AT&T V341U Motivate Smartphone
Product's Documents
Below are documents related to this product, you can read online or download:
- User Manual - (English) Read Online | Download pdf
USER MANUAL
The topics in this section will introduce you to your phone, help you get set up with service, provide an overview of the phone screen, and get you started with basic phone operations.
The following topics describe the basics of using this guide and your new phone.
Thank you for purchasing your new AT&T MotivateTM Smartphone. The following topics explain how best to use this guide to get the most out of your .phone
Before using your phone
Read the Safety Information Guide that came with your device thoroughly for proper usage.
Accessible services may be limited by subscription contract conditions.
Descriptions in the user guide
Note that most descriptions in this guide are based on your phone’s setup at the time of purchase. Unless otherwise noted, instructions begin from the phone’s Home screen, which is displayed by pressing the Home button  .
.
Screenshots and key labels
Screenshots and other illustrations in this user guide may appear differently on your phone. from your phone’s display.
Other notations
In the user guide, the phone may be referred to either as “phone,” “device,” or “handset.” A microSDTM or microSDHCTM card is referred to as an “SD card” or a “memory card.”
The following topics give you all the information you need to set up your
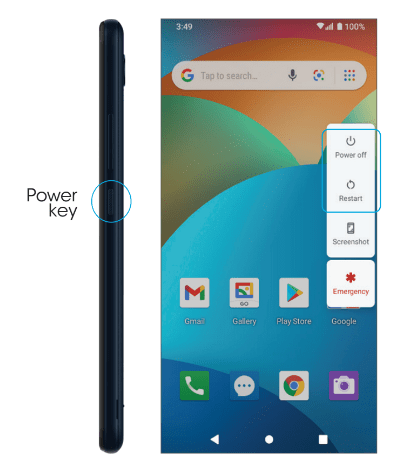
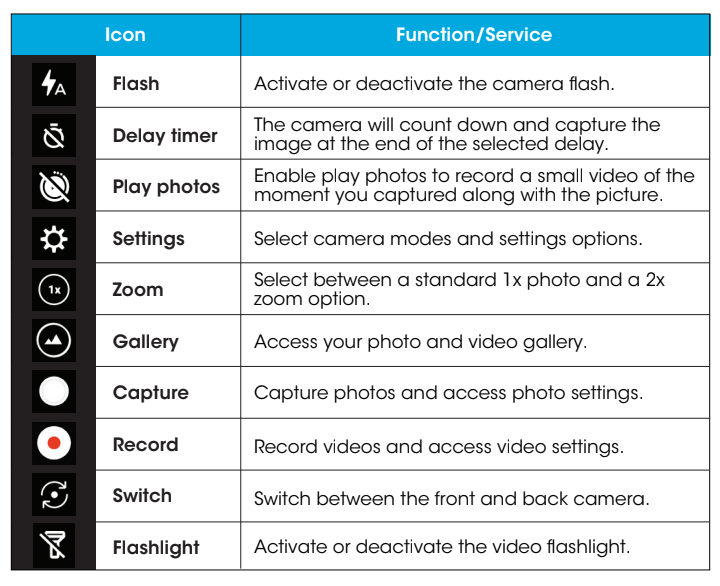
Parts and functions
These topics illustrate your phone’s primary parts and key functions.
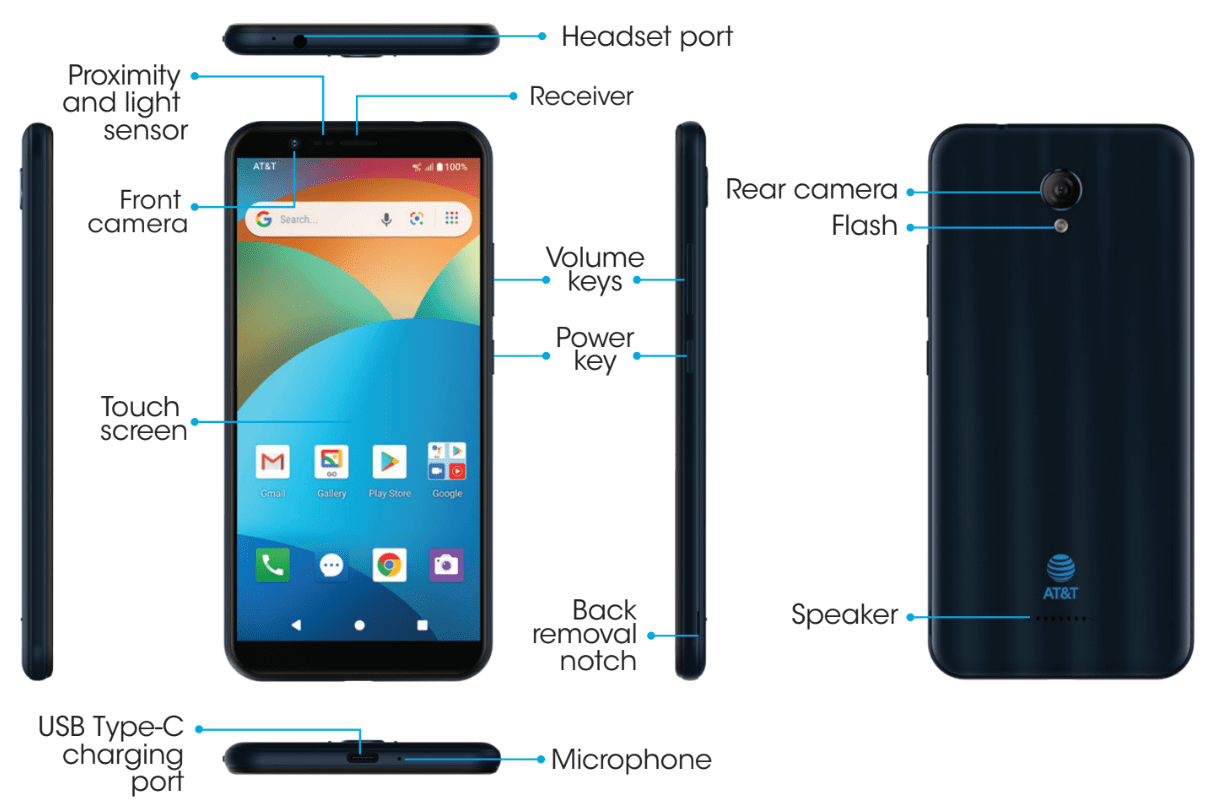
| Part | Description |
| Flash |
|
| Front camera |
|
| Headset port |
|
| Power key |
|
| Proximity and light sensor |
|
| Rear camera |
|
| Receiver |
|
| Speaker |
|
| Touch screen |
|
| USB charging port |
|
| Volume keys |
|
The following topics explain how to care for your phone’s battery.
Charge the battery
Follow these instructions to charge your phone using either the included AC adapter or via USB connection on your computer.
Charge using the AC adapter
1. Connect one end of the data cable to the USB Type-C port located on the bottom of you.r phone
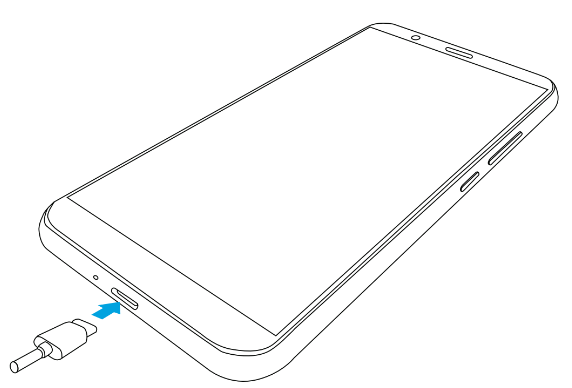
2. Connect the other end to the power adapter.
3. Connect the power adapter to an electrical outlet to fully charge your phone.
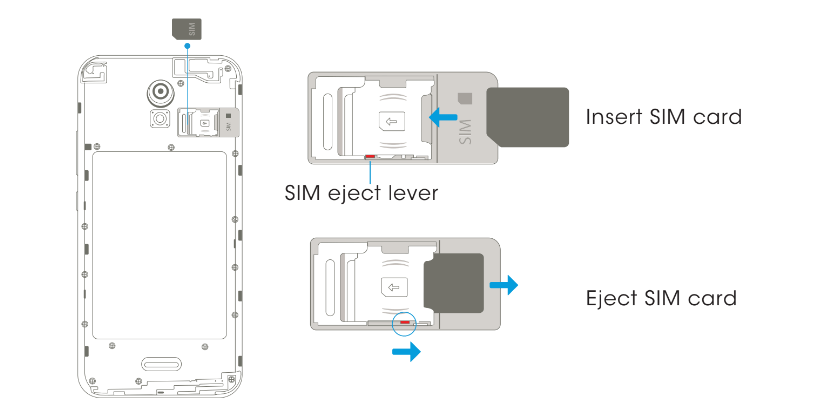
Your device uses a nano SIM card. A SIM card is pre-installed, but you may be able to use your previous SIM card. Contact your service provider for more details.
Insert a Nano SIM card
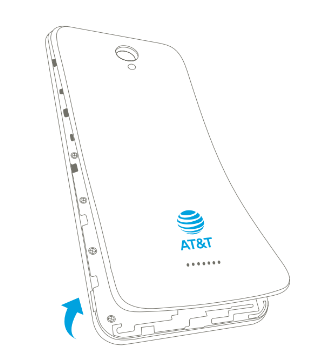
1. Insert a fingernail into the small slot at the bottom right corner of the device and firmly peel back the flexible cover to remove it.
2. On the back of the phone, slide the Nano SIM card into the SIM card slot at the top left with the gold contacts facing down.
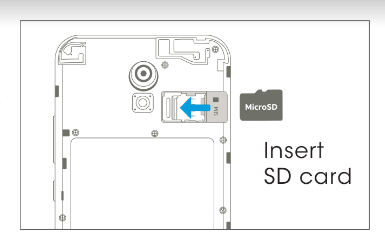
Insert a microSD card
With the back cover of the phone removed, slide the SD memory card into the SD slot with the gold contacts facing down to.
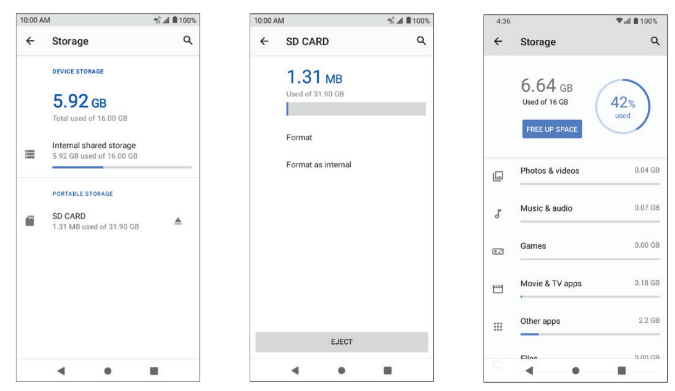
Mount an SD card
 .
. > SD CARD.
Unmount an SD card
Always unmount an SD card before removing it from your phone to avoid corrupting or damaging the files on the SD card
. >  .
.Your SD card is now safely unmounted. To use this SD card again, you will need to remove (see below) and mount it again.
Remove an SD card
Format an SD card
When you insert ab optional SD card for the first time , it is recommended that you format it on your phone
.> SD CARD. > Storage settings.
All data on the SD card will be erased, and the card will be formatted for use on your phone.
The instructions below explain how to turn your phone on and off.
Turn your phone on
Turn your phone off
Restart your phone
Once your service has been activated, you will need to run Setup.The Setup Wizard will appear to guide you through the basic settings on your device.You will be prompted to select the language you want to use, set up your Wi-Fi connection, enter your name, set a screen lock method, sign in to your GoogleTM account, select location services, and more.
Follow the remaining instructions to finish your phone setup.
Use the touch screen
Your phone’s touch screen lets you control actions through a variety of touch gestures.
Tap or touch
Tap or touch with your finger to type characters into the on-screen keyboard, select and open applications and settings, or press on-screen buttons.
Touch and hold
Touch and hold an item to view available options (for example, a contact or link in a Web page) or to move icons or widgets.
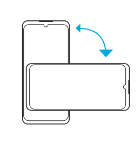
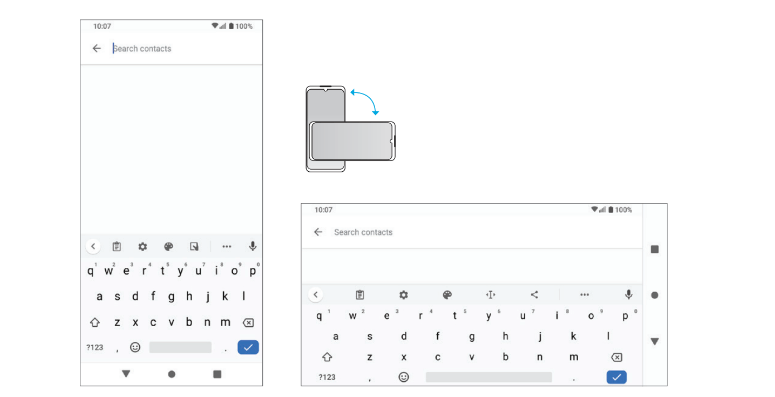
Rotate*
Rotate the phone sideways to automatically change the screen orientation from portrait to landscape. When entering text, you can turn the phone sideways to bring up a bigger keyboard. See “Touch screen keyboards” on page 36 for more details.
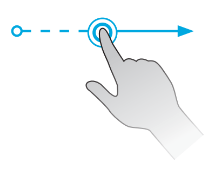
Swipe or slide
Quickly drag your finger vertically or horizontally across the screen to swipe or slide.
Drag
Touch and hold your finger with slight pressure, then move your fingers slowly across the screen to drag. While dragging, do not release your finger until you have reached the target position.
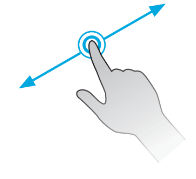
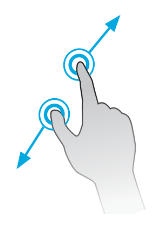
Pinch and spread
Use your thumb and forefinger in a pinching motion on your screen to zoom out, or spread them to zoom in when viewing a picture or a web page. (Move fingers inward to zoom out and outward to zoom in).
The following topics outline basic features and operations of your phone.
Most of your phone’s operations originate from the Home screen or the Apps applications) list.
to display the Home screen.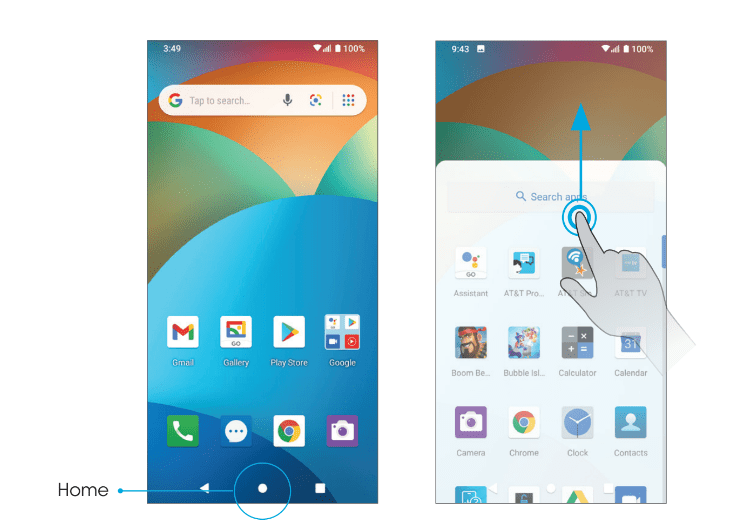
For information about using the Home screen, see “Home screen basics” on page 43.
Select options and navigate screens
Tap icons, on-screen buttons, and other items to open or activate the assigned function.
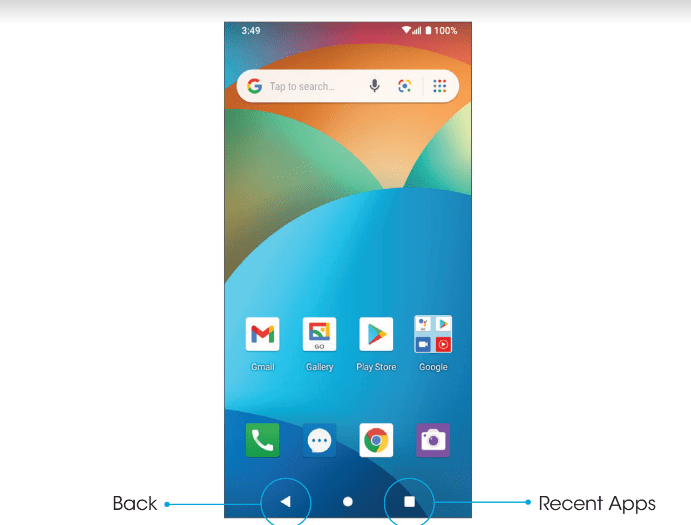
 to return to the previous screen.
Recent applications
View your recently used applications by tapping the Recent Apps button 
Switch between recently opened apps
You can easily switch between the apps you’ve recently opened.
 to see your recently-opened apps.
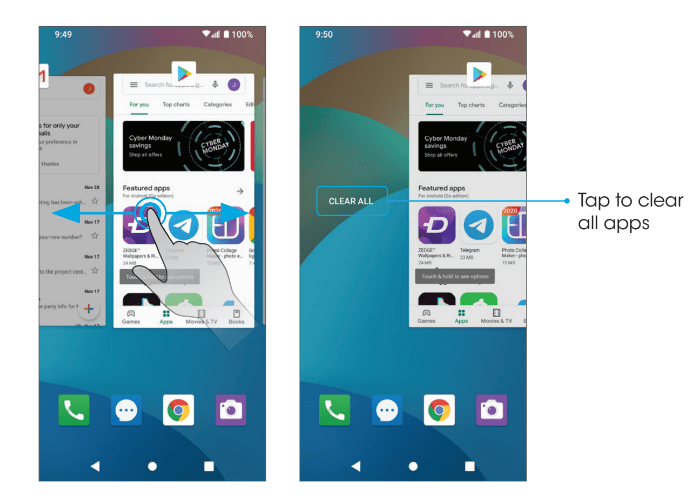
You can tap the Recent Apps button  twice to quickly switch between the two most recently used apps.
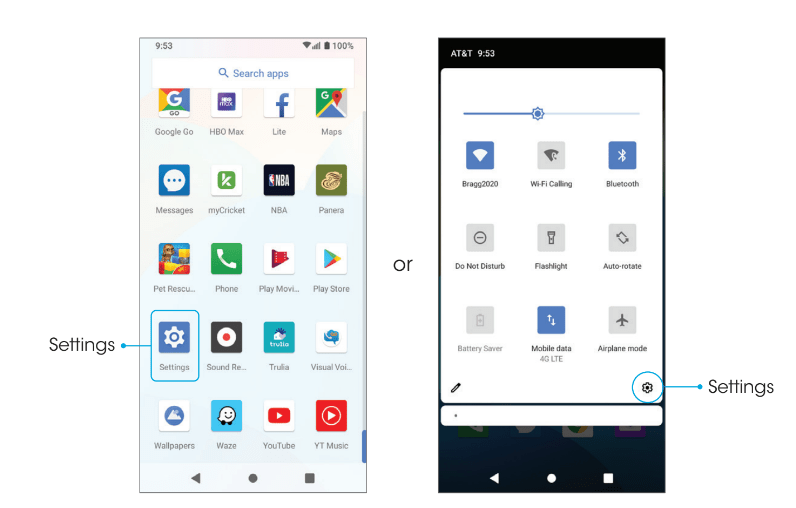
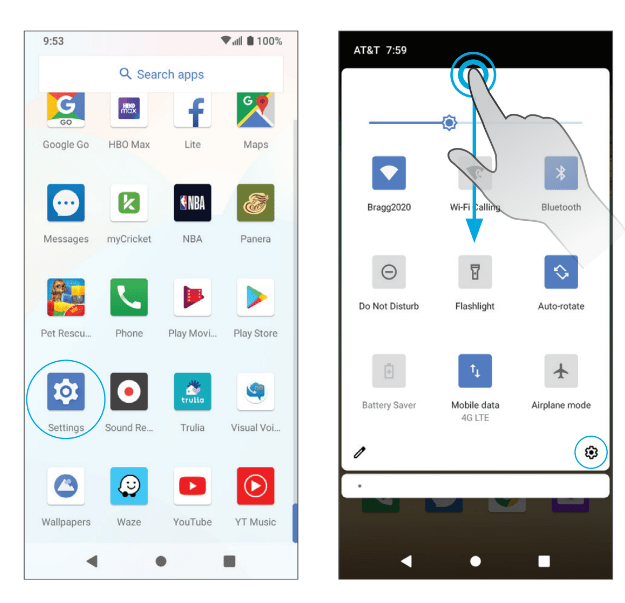
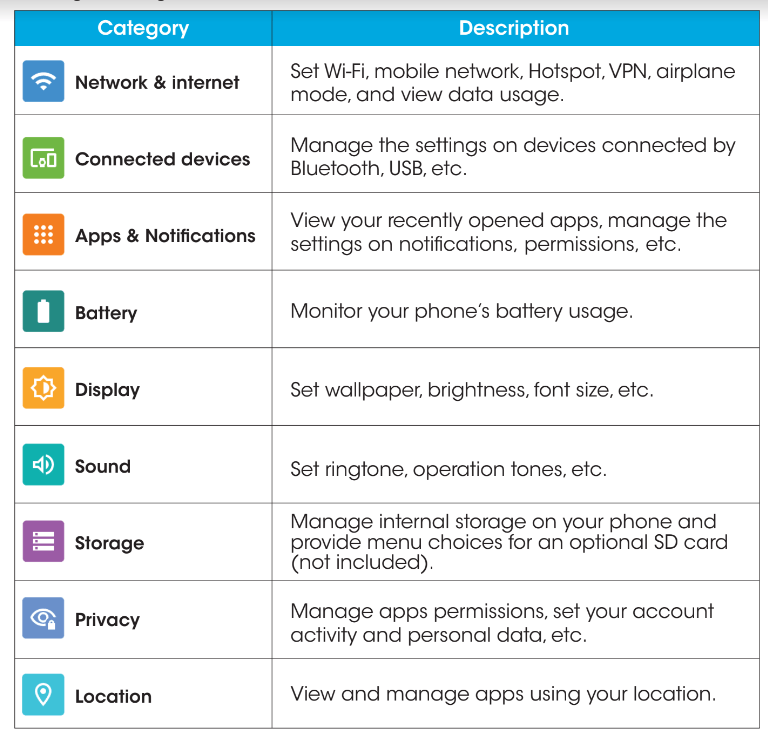
You can customize your phone’s settings and options in the Settings menu.
There are two ways to access the Settings menu:
. .
.For more information, see “Basic settings” on page 123.
The default orientation for your phone’s screen is portrait (vertical), but many apps will change to landscape orientation (horizontal or widescreen) when the phone is rotated sideways.
Turn screen rotation on or off
 to turn it on or off. . Tap Display
  > Advanced > Auto-rotate screen and slide the switch to the On
  or Off
  position to activate or deactivate screen rotation.
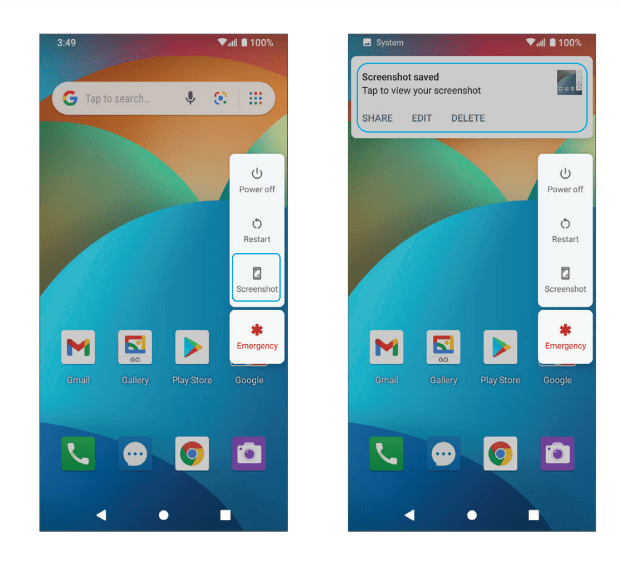
There are two ways to capture a screenshot:
Your screenshots will be stored in the Screenshot folder of the Gallery app.
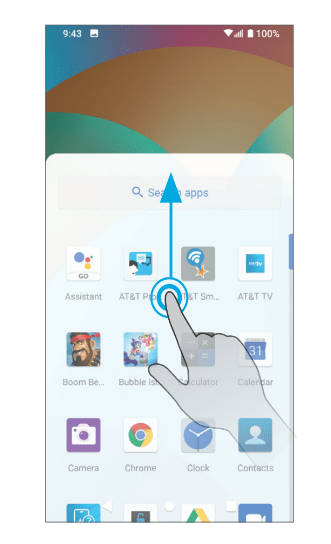
The following topics describe how to access the Apps list and launch applications on your phone.
Launch apps
All installed apps can be accessed and launched from the Apps list.
Work with apps
Group app folders
Control app permissions
The first time you open an app , you'll be asked to grant permissions to access certain data or features. This ensures that you have full control of which apps have authorized access.
If you don’t want to grant access for an app, choose DENY. If you choose DENY in a trusted app, you may not be able to use the app or access all the functions. To modify permission settings, follow the steps below:
. > Advanced > Permission manager.
 or Deny
  to adjust the permission settings.
Set default apps
You can choose default apps for web browsing, text messaging, and more.
. > Default apps.Choose default apps
Some actions can be performed with more than one app. When performing
You can choose to use an app only this time by tapping JUST ONCE, or tap ALWAYS to set that app as the default.
You can change the default app at any time in the Settings menu.
.> Default apps.To change the default app for opening links, continue with the steps below:
> Default apps > Opening links.Disable an app
You can disable some default apps which can’t be uninstalled to avoid them running in the background and downloading . data.
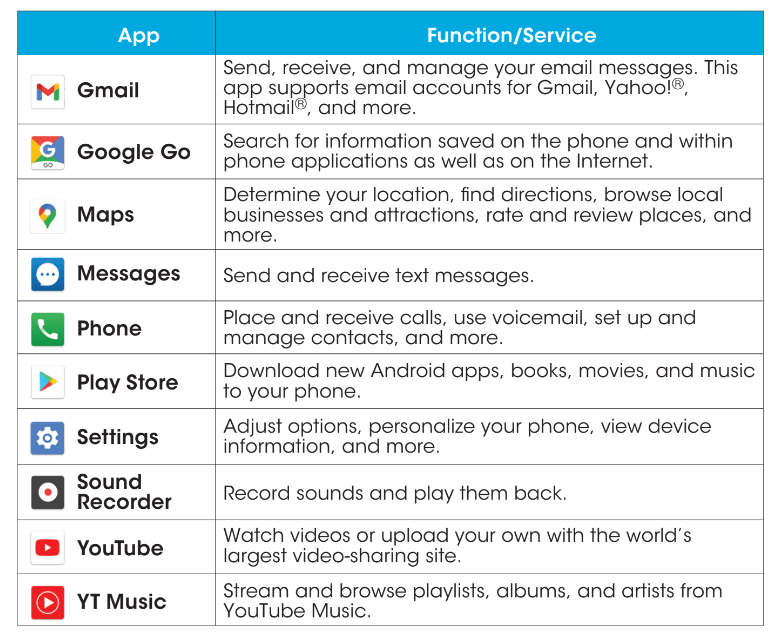
.> SEE ALL APPS.Apps list
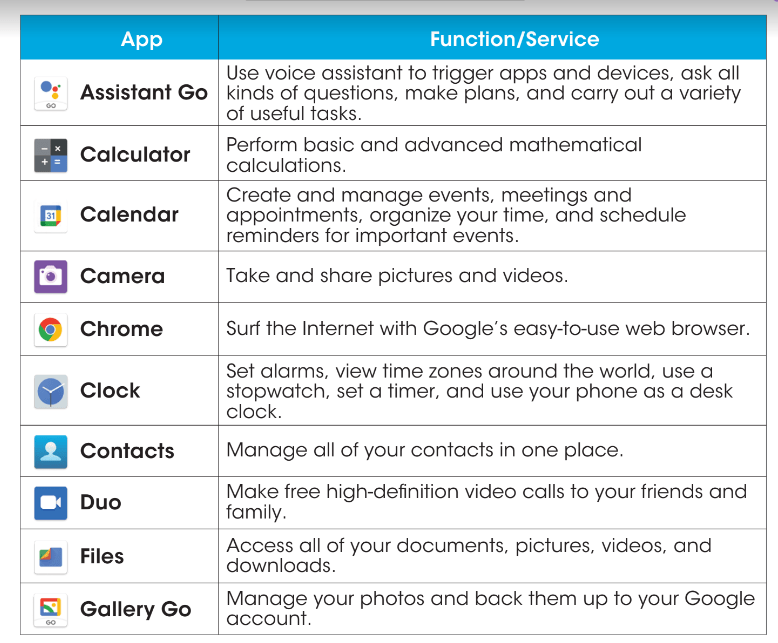
The Apps list expands to include any apps you download and install on your phone. The following table outlines the primary apps that have been preinstalled on your phone.
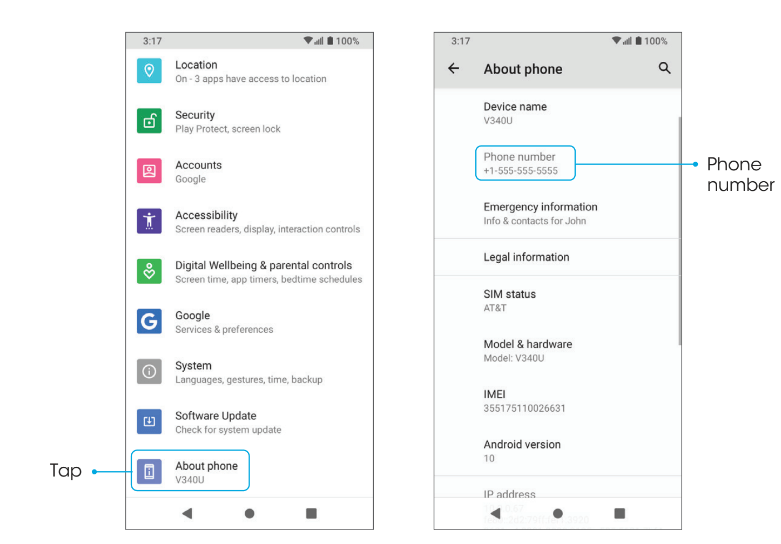
Follow the instructions below to view your phone number.
. .
.
Airplane mode
Airplane mode turns off all functions that emit or receive signals while leaving your phone on so you can use apps that don’t require a signal or data.
To turn on Airplane mode
. > Advanced > Airplane mode.position to activate Airplane mode.
You will see the Airplane mode icon  in the Status bar.
To turn off Airplane mode
.> Advanced > Airplane mode. position to deactivate Airplane mode.Your phone’s wireless connection feature will be restored.
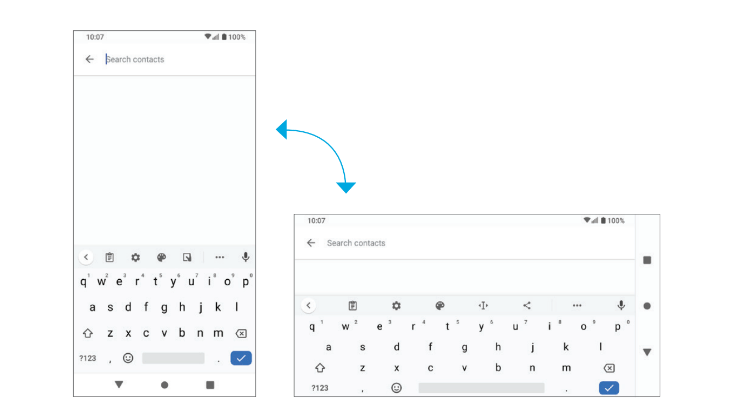
You can type on your phone using one of the available touch screen keyboards or Google Voice Typing.
Touch screen keyboards
Your phone offers Google touch screen keyboards for entering text. The keyboard appears automatically on-screen when you tap a text entry field, and can be used in either portrait or landscape mode. You can also use Google Voice Typing to enter text using your voice. See “Google Voice Typing” on page 37 for details.
Google keyboard
The Google keyboard offers a traditional QWERTY keyboard setup for entering text by tapping keys (like on a computer), along with options that allow you to enter text faster and more accurately, such as continuous key input, personalized usage dictionaries, and more.
Access Google keyboard settings
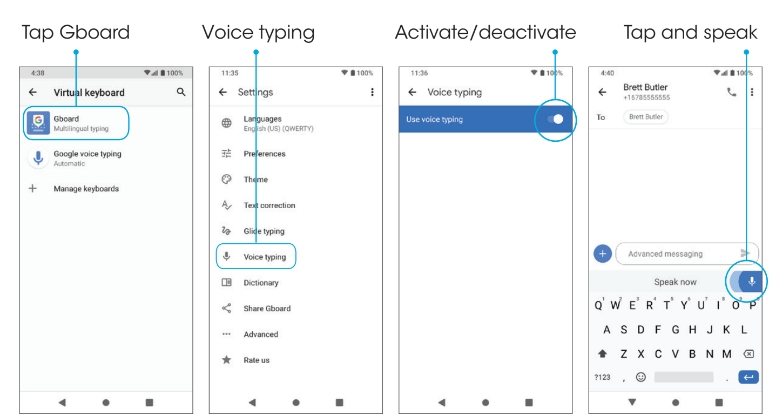
.Google Voice Typing
Google Voice Typing uses Google Voice recognition to convert speech to text.
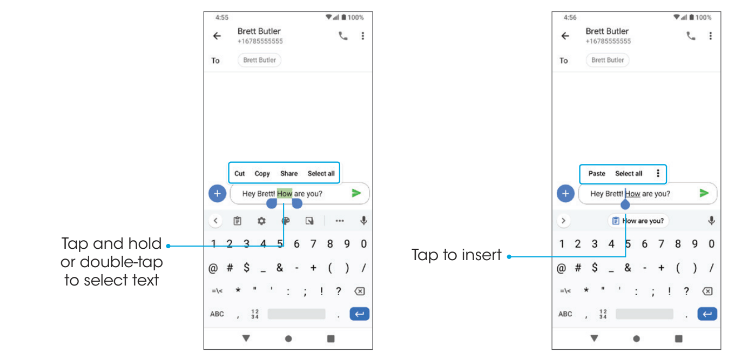
Tips for editing text
Your phone has many options to make entering text easier, including copying, cutting, and pasting text, using voice-to-text input, customizing the user dictionary, using predictive text, and more.
To edit text you have already entered
To insert new text
You will need a Google account to access several phone features, such as Gmail, Duo, and Google Play Store. Enter your Google account information to access Google apps. These apps sync between your phone and your online Google account.
Create a Google account
If you do not already have a Google account, you can create one online or using your phone.
Create a Google account online
1. Using a computer, visit google.com.
2. On the main page, click Sign in > Create account > For myself.
3. Follow the prompts to set up your account:
a. Enter your first and last name, a desired username/Gmail address, and create and confirm a password.
b. Add a phone number or secondary email for security (optional).
c. Enter basic personal information.
4. Tap I agree to accept Google’s Privacy and Terms and finish your Google account setup.
Create a Google account using your phone
. > Add account.
4. Follow the prompts to set up your account. Tap Next to proceed between steps, which may include:
a. Enter your basic information such as first and last name.
b. Enter a desired username/Gmail address.
c. Create and confirm a password.
d. Add a phone number for security, or tap Skip.
e. Review your account info. Tap Next to confirm.
5. Tap I agree to accept Google’s Privacy and Terms and finish your Google account setup.
Sign in to your Google account
If you have a Google account but have not yet signed in with your phone, follow these instructions to sign in to your Google account.
. > Add account > Google.> Sync now.
Lock and unlock your screen
You can quickly turn your phone screen off when not in use, and unlock it when you need it.
Turn the screen off when not in use
To quickly turn the screen off, press the Power key. Pressing the Power key again or receiving an incoming call will turn on your phone screen and display the lock screen.
To save battery power, your phone screen will automatically turn off after being idle for a period of time.You will still be able to receive messages and calls while the phone’s screen is off.
Turn the screen on and unlock it
If you have set up a screen lock, you will be prompted to unlock your phone.
See “Lock screen” on page 156 for details.
The following topics describe how to use and customize your phone’s home screen understand the Status bar, and use the Notification panel.
The Home screen is the starting point for your phone’s applications, functions, and menus.You can customize your Home screen by adding application icons, shortcuts, folders, widgets, and more.
Home screen layout
Your Home screen extends beyond the initial screen. Swipe left or right to display additional screens.

Extended home screens
In addition to the main Home screen, your phone features extended Home screens to provide more space for adding icons, widgets, and more. Press the Home button to display the main Home screen, then swipe to the right to move from the main screen to an extended screen.
To add a new Home screen, drag an app icon or a widget to the right edge of the main screen and release the icon.A new extended screen will be added.

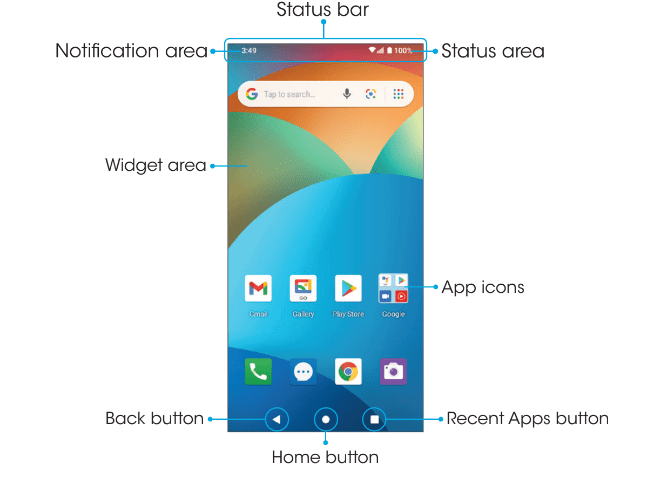
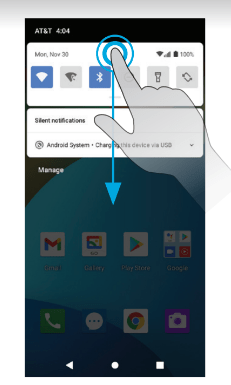
Quickly view your phone’s status and notifications at the top of the screen.
Status bar
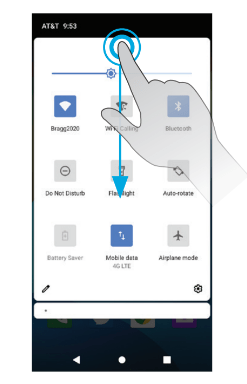
The Status bar at the top of the Home screen provides phone and service status information on the right side and notification alerts on the left. To view the Notification panel or access the Quick Settings menu, drag the Status bar down from the top of the screen.
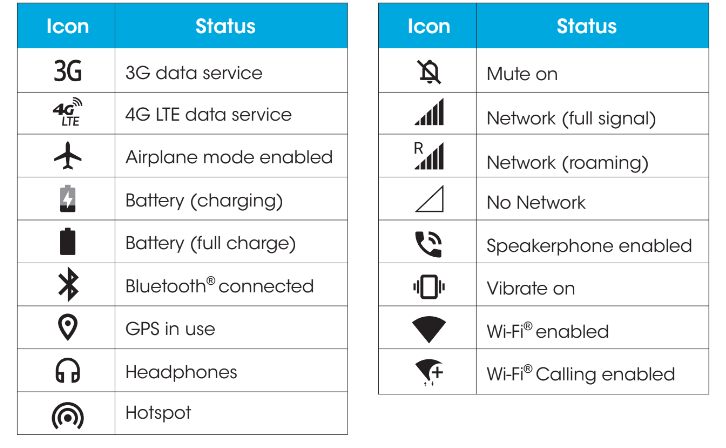
Main status icons (Right side)
Main notification icons (Left side)
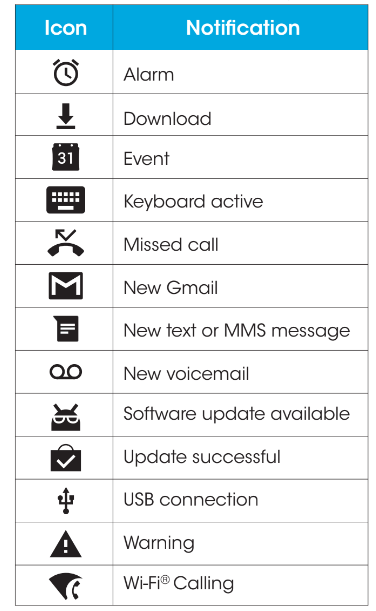
Your phone’s notifications appear at the left side of the Status bar. Access the full Notification panel by dragging down the Status bar to check notifications, download updates, open messaging apps, access the Quick Settings menu, and more.
Open the Notification panel
Close the Notification panel
Swipe up to close the Notification panel, or tap the Back button .
Notification panel layout
The Notification panel gives you access to both notifications and the Quick Settings menu.
To access the Quick Settings menu:
Learn how to set the wallpaper and add, move, or remove shortcuts, widgets, and folders from the Home screen.
Operations for rearranging the Home screen
To move widgets and app shortcuts icons
From the Home screen, touch and hold an app shortcut or widget, and drag it to the desired location.
To delete widgets and app shortcuts icons
From the Home screen, touch and hold an app or widget and drag it to 
Remove at the top of the screen to delete it from the Home screen.
To display the Home screen menu
From the Home screen, touch and hold an empty space to display the Home screen menu. Change wallpapers, add widgets, and adjust other Home screen settings from the Home screen menu.
Add shortcuts to the Home screen
Add shortcuts for quick access to favorite apps from the Home screen.
Add widgets to the Home screen
Widgets are self-contained apps on the Home screen.Unlike a shortcut,which will open an app, widgets can perform certain functions without navigating away from the Home screen. You can create widgets for a specific contact, for bookmarks to web pages, your calendar, email, and more.
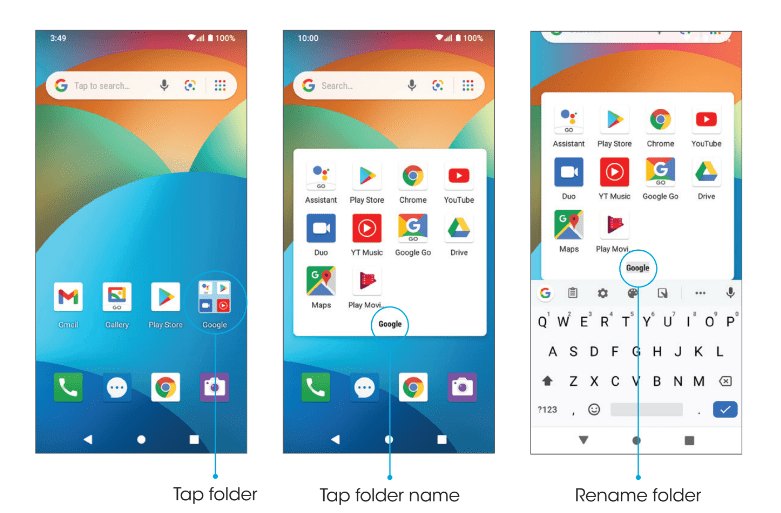
Add folders to the Home screen
You can group Home screen shortcuts into folders for convenient access.
 .
.Change folder names
Once you have added folders, you can change the name easily from the folder display.
 .
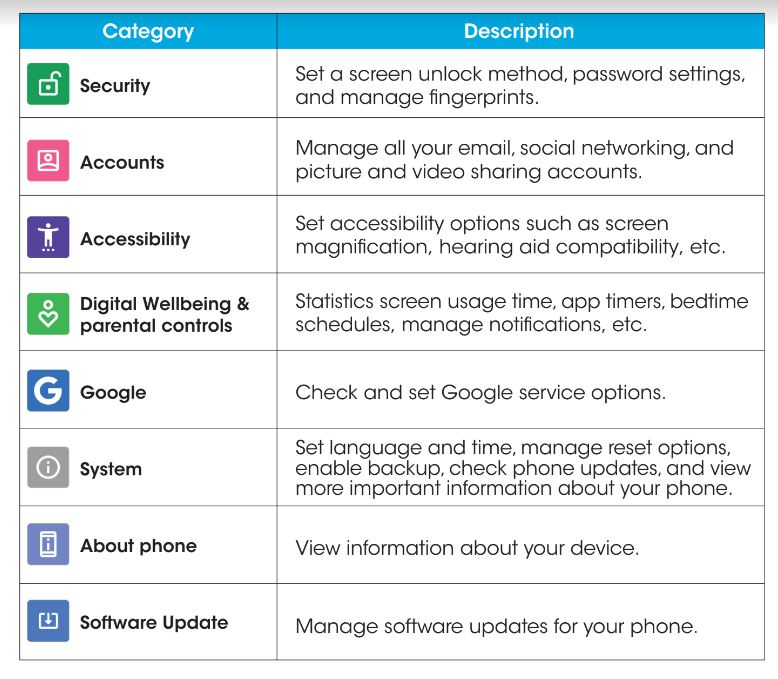
.The topics in this section will cover your phone’s settings and options.
From the Home screen, swipe up to access Apps and tap Settings to access your phone’s Settings menu.You can also access the Settings menu from the Status bar. Swipe the Status bar down twice and tap Settings .
The topics in this section will cover troubleshooting tips and phone specifications.
Check below for solutions to common problems you may experience.
Problem: The phone freezes or operations are unstable.
Solution: Restart the device. Press and hold the Power key, then tap Restart.
Problem: The device starts freezing after installing a new app.
Solution: The newly-installed app may be causing the device to freeze. Uninstall the app in Safe mode.To enable Safe mode:
Problem: The phone will not make calls, send messages, check email, or connect to the Internet.
> Network & internet > Airplane mode and ensure the switch is in the Off position.> Network & internet > Mobile network and ensure the switch is in the On position.Problem: The battery drains too quickly.
Solution: Making calls or connecting to a mobile network outside of your service area will drain the battery. Certain apps and functions can also drain the battery.
Problem: An app will not download or install.
Problem: The phone will not unlock.
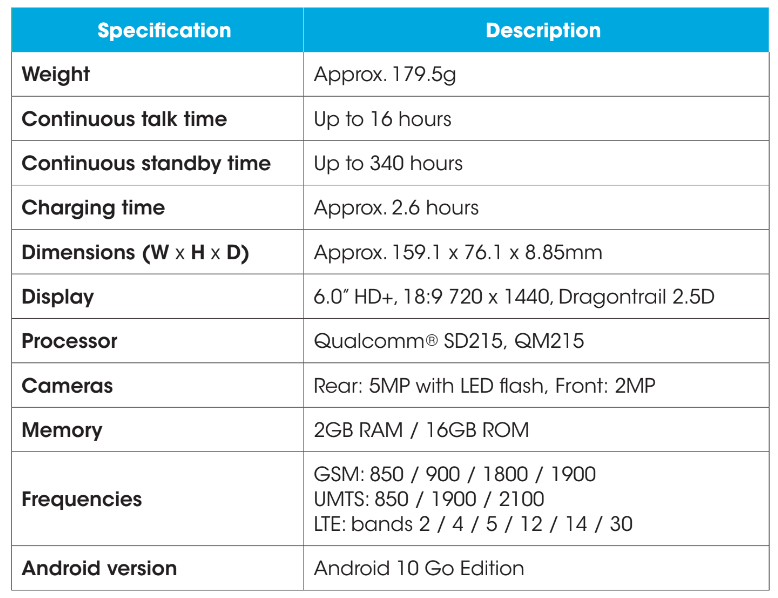
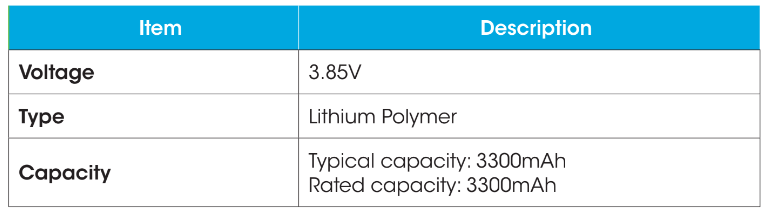
The following tables list your phone's and battery's specifications
Phone specifications
Battery specifications
The topics in this section will explore the features that make your phone so much more than a phone, from the camera and productivity apps to music, entertainment, and more.
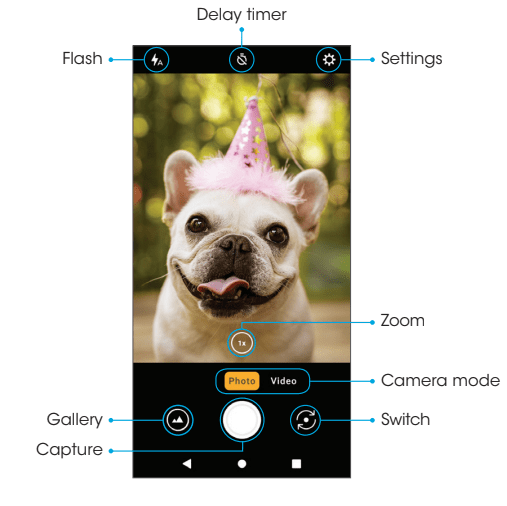
The camera’s viewfinder screen lets you view your subject and access camera controls and options.
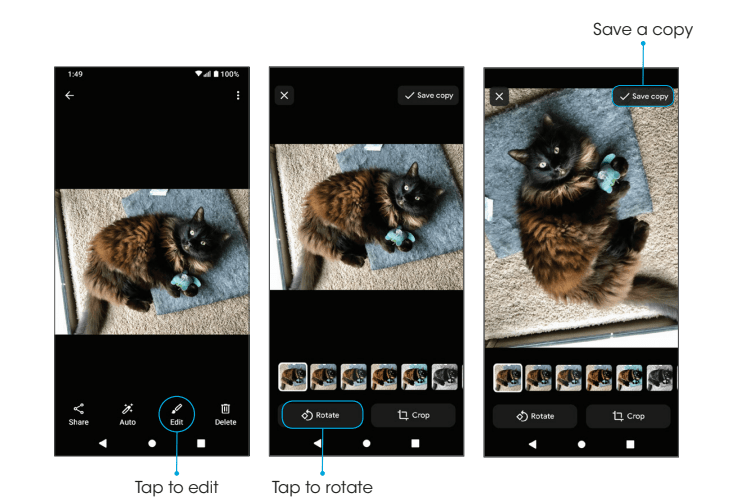
1.From the Home screen, tap Gallery Go  .
.
2.Tap the picture you want to crop.
3.Tap Edit to access the Edit screen.
4.Tap Crop to crop the photo.
5.To adjust the crop box size, drag the corners inward or outward to resize the crop box.

6.Tap Save copy to apply the changes to the photo and save.
The cropped picture is saved in the album as a copy. The original picture will remain unedited.
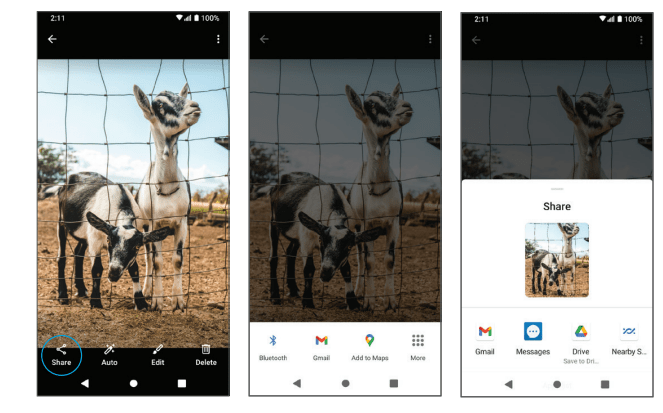
The Gallery Go app allows you to send photos and videos using email or MMS messages.You can share photos and videos on your social networks, or send them to another phone or your computer via Bluetooth.
. , then select to share using Gallery Go or another app.
Follow the on-screen prompts to send the photos or videos.