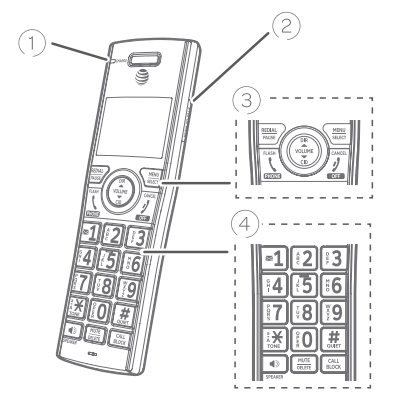
On when the handset is charging in the telephone base or charger.
2. PUSH TO TALK
Press to initiate a one-to-one or one-to-group broadcast.
Press and hold to broadcast to a group of system devices.
3. REDIAL/PAUSE
Press repeatedly to view the last ten numbers dialed (page 31).
While entering numbers, press and hold to insert a dialing pause (page 49).
4. MENU/SELECT
When the handset is not in use, press to show the menu.
While in the menu, press to select an item or save an entry or setting.
PHONE/FLASH
Press to make or answer a call (page 30).
During a call, press to answer an incoming call when you receive a call waiting alert (page 104).
During message playback, press to call back the caller if the caller’s number is available (page 119).
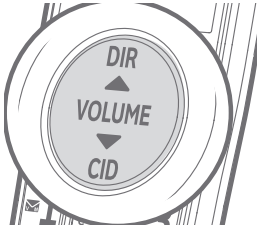
DIR/VOLUME
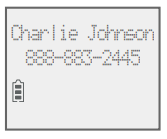
Press DIR to show directory entries when the handset is not in use (page 51).
Press to scroll up while in menus. f While entering names or numbers, press to move the cursor to the right.
Press to increase the listening volume when on a call (page 33), or to increase the message playback volume (page 119).
3. CID/VOLUME
Press CID to show caller ID log when the handset is not in use (page 62).
Press to scroll down while in menus.
While entering names or numbers, press to move the cursor to the left.
Press to decrease the listening volume when on a call (page 33), or to decrease the message playback volume (page 119).
OFF/CANCEL
During a call, press to hang up (page 30).
While in a menu, press to cancel an operation, back up to the previous menu, or exit the menu display; or press and hold this button to exit to idle mode.
When the handset is ringing, press to mute the ringer temporarily (page 31).
Press and hold while the telephone is not in use to erase the missed call indicator (page 60).
4. 1
While reviewing a caller ID log entry, press repeatedly to add or remove 1 in front of the telephone number before dialing or saving it in the directory (page 63).
Press and hold to set (page 23) or to dial your voicemail number (page 58).
TONE
Press to switch to tone dialing temporarily during a call if you have pulse service (page 36).
While entering names, press to change the next letter to upper or lower case (page 49).
QUIET# (pound key)
Press repeatedly to display other dialing options when reviewing a caller ID log entry (page 63).
Press and hold to enter the QUIET mode setting screen, or to deactivate QUIET mode (page 29).
/SPEAKER
Press to make or answer a call using the speakerphone (page 30).
Press to switch between the speakerphone and the handset (page 31).
MUTE/DELETE
During a call, press to mute the microphone (page 34).
When the handset is ringing, press to mute the ringer temporarily (page 31).
While reviewing the caller ID log, directory, redial memory, block list, allow list, or star name list, press to delete an individual entry.
While predialing, press to delete digits.
During message or announcement playback, press to delete the playing message or the recorded announcement.
CALL BLOCK
Press to block the incoming call when the telephone is ringing (page 69) or during the call (page 103).
When the handset is not in use, press to show the Smart call blocker menu (page 73).
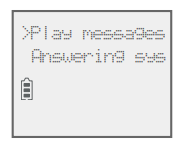
Main menu
Play messages (page 118)
Answering sys (page 104)
Smart call blk (page 69)
Directory (page 48)
Caller ID log (page 59)
Intercom (page 39)
Ringers (page 17)
Set date/time (page 19)
Settings (page 20)
Web address (page 28)
The > symbol highlights a menu item.
Using menus:
Press MENU/SELECT to show the menu.
Press CID or DIR to scroll through menu items.
Press MENU/SELECT to confirm or save changes to a highlighted menu item.
Press OFF/ CANCEL to cancel an operation, back up to the previous menu, or exit the menu display.
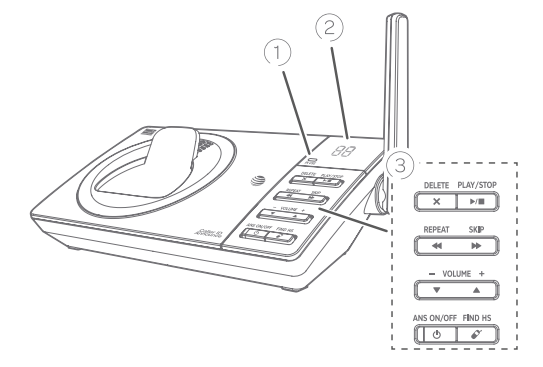
1. IN USE indicator
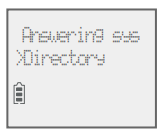
On when the handset is in use, or when the answering system is answering an incoming call.
Flashes when another telephone is in use on the same line.
Flashes when there is an incoming call.
2. Message counter
Shows the number of messages or other answering system information.
3. X/DELETE
Press to delete the message currently playing (page 119).
Press twice to delete all old messages when the phone is not in use (page 120).
/PLAY/STOP
Press to start or stop message playback (page 118).
/REPEAT
Press to repeat a message.
Press twice to play the previous message (page 119).
/SKIP
Press to skip a message (page 119).
/ -VOLUME+/
During message playback, press to adjust the listening volume (page 119).
While in idle mode, press to adjust the base ringer volume.
/ANS ON/OFF
Press to turn the built-in answering system on or off (page 106).
FIND HS
While the phone is idle, press to page all handsets (page 38).
Telephone base and charger installation
Install the telephone base and charger, as shown below.
The telephone base is ready for tabletop use. If you want to change to wall-mounting, see Installation options on page 14 for
details.
Telephone base installation
Charger installation
Telephone settings
Handset settings
Ringer volume
You can set the ringer volume level to one of six levels or turn the ringer off. When the ringer is off, appears on the screen.
1. Press MENU/SELECT in idle mode to enter the main menu.
2. Use to scroll to Ringers, then press MENU/SELECT.
3. Press MENU/SELECT again to select Ringer volume.
4. Press to sample each volume level.
5. Press MENU/SELECT to save your preference. There is a confirmation tone and the screen returns to the previous menu.
Notes:
The handset ringer volume also determines the ringer volume for intercom calls.
If the ringer volume is set to off, that handset is silenced for all incoming calls except paging tone.
If the ringer volume is set to off, the caller ID will not be announced and the screen will briefly display Caller ID won’t be announced.
Ringer tone
You can choose one of ten ringer tones.
1. Press MENU/SELECT in idle mode to enter the main menu.
2. Use to scroll to Ringers, then press MENU/SELECT.
3. Press to scroll to Ringer tone, then press MENU/SELECT.
4. Press to sample each ringer tone.
5. Press MENU/SELECT to save your preference. There is a confirmation tone and the screen returns to the previous menu.
Note: If you turn off the ringer volume, you will not hear ringer tone sample
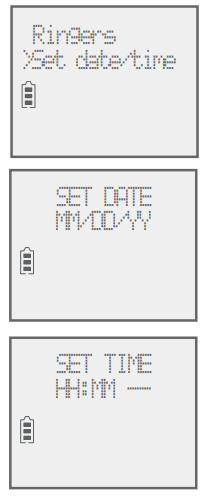
Set date/time
The answering system announces the day and time of each message prior to playing it. Before using the answering system, set the date and time as follows. If you subscribe to caller ID service, the day, month and time are set automatically with each incoming call. The year must be set so that the day of the week can be calculated from the caller ID information. You can turn off the date and time settings of the caller ID service and set the date and time manually (see Use caller ID to automatically set date and time on page 26).
After a power failure or handset registration, the system prompts you to set the date and time.
To set the date and time manually:
1. When the handset is in idle mode, press MENU/SELECT to enter the main menu.
2. Press to scroll to Set date/time and then press MENU/SELECT.
3. Press to select the month, then press MENU/SELECT, or enter the number using the dialing keys.
4. Press to select the day, then press MENU/SELECT, or enter the number using the dialing keys.
5. Press to select the year, or enter the number using the dialing keys, then press MENU/SELECT to move on to set the time.
6. Press to select the hour, then press MENU/SELECT, or enter the number using the dialing keys.
7. Press to select the minute, then press MENU/SELECT, or enter the number using the dialing keys.
8. Press to highlight AM or PM, or press 2 for AM or 7 for PM. Press MENU/SELECT to confirm. There is a confirmation tone and the screen returns to the previous menu.
Note: If the clock is not set when a message is recorded, the system announces, “Time and day not set,” before it plays the message.
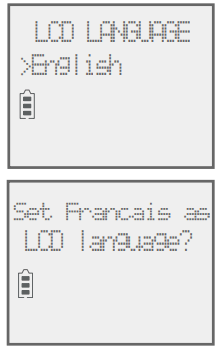
LCD language
You can select the language used for all screen displays.
1. Press MENU/SELECT in idle mode to enter the main menu.
2. Use to scroll to Settings, then press MENU/SELECT.
3. Press MENU/SELECT to choose LCD language.
4. Press to highlight English, Français or Español, then press MENU/SELECT. The screen prompts Set English/Français/ Español as LCD language?.
5. Press MENU/SELECT to save your preference. There is a confirmation tone and the screen returns to the previous menu.
Note: If you accidentally change the LCD language to French or Spanish, you can reset it back to English without going through the French or Spanish menus. Press MENU/SELECT on the handset in idle mode, then enter 364#. There is a confirmation tone.
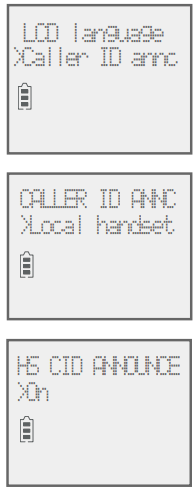
Caller ID announce
The caller ID announce feature lets you know who’s calling without having to look at the display. When you have an incoming call, the handset and/or base speaks “Call from...” and the name of the caller based on the directory or caller ID information. If the caller’s name is private or unknown, the phone number up to the last 11 digits will be announced. If the caller’s phone number is also private or unknown, no information will be announced. The default setting is On.
To turn on or off the caller ID announce feature:
1. Press MENU/SELECT in idle mode to enter the main menu.
2. Use to scroll to Settings, then press MENU/SELECT.
3. Use to scroll to Caller ID annc, then press MENU/SELECT.
4. Use to highlight the desired option, then press MENU/SELECT. f Set all On/Off - Change the setting for the base and all handsets. f Local handset - Change the setting for that handset only. f Base - Change the setting for the telephone base only.
5. Use to highlight On or Off, then press MENU/SELECT. There is a confirmation tone and the screen returns to the previous menu. If you change the setting to Set all On/Off, the screen shows CID Annc ON/OFF on all HS & BS. The caller ID announce feature has been turned on or off on all handsets and on the telephone base.
Notes:
To use the caller ID announce feature, you must subscribe to caller ID service from your telephone service provider.
When there are up to five handsets registered, the telephone system supports caller ID announce for all handsets. If six or more devices are registered, the system supports caller ID announce for the first four registered handsets only.
This feature does not announce information for call waiting calls.
It takes at least two rings for the phone to receive caller ID information and announce it. If the phone is answered before the end of the second ring, the phone won’t have time to announce the caller’s information.
Pronunciation of names may vary with this feature. Not all names may be pronounced correctly.
Caller ID announce is available in English only.
If you have paired an AT&T TL80133 DECT 6.0 cordless speakerphone to the telephone base, the caller ID announce setting for all devices also applies to the cordless speakerphone. When the setting is On, the cordless speakerphone speaks “Call from...” and the name of the caller based on the directory or caller ID information during an incoming call. If the caller’s name is unavailable, the phone number up to the last 11 digits will be announced.
Set speed dial voicemail number
This feature lets you save your voicemail number for easy access when you press and hold the 1 key
To save your voicemail number:
1. Press MENU/SELECT in idle mode to enter the main menu.
2. Use to scroll to Settings, then press MENU/SELECT.
3. Use to scroll to Voicemail #, then press MENU/SELECT.
4. Use the dialing keys to enter the voicemail access number provided by your telephone service provider (up to 30 digits) when prompted.
Press to move the cursor to the left or right.
Press MUTE/DELETE on the handset to erase a digit.
Press and hold MUTE/DELETE on the handset to erase all digits.
Press REDIAL/PAUSE to enter a three-second dialing pause (a p appears).
5. Press MENU/SELECT to save. There is a confirmation tone and the screen displays Voicemail # saved, then returns to the previous menu.
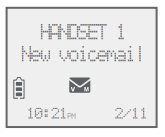
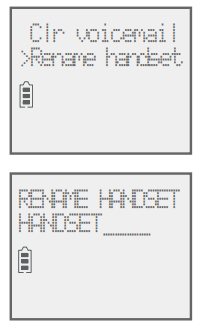
Voicemail (visual message waiting) indicator
If you subscribe to a voicemail service offered by your telephone service provider, this feature provides a visual indication when you have new voicemail messages.
New voicemail and the icon appear on the handset screen.
Notes:
This feature does not indicate new messages recorded on your phone’s built-in answering system.
For more information about the difference between your answering system and voicemail, see page 113.
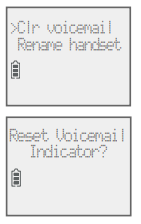
Clear voicemail indication
Use this feature when the telephone indicates that you have new voicemail but there is none. For example, when you have accessed your voicemail while away from home. This feature only turns off the displayed New voicemail and the icon; it does not delete your voicemail messages. As long as you have new voicemail messages, your telephone service provider continues to send the signal to turn on the indicators.
To manually turn off the new voicemail indicators:
1. Press MENU/SELECT when in idle mode to enter the main menu.
2. Use to scroll to Settings, then press MENU/SELECT.
3. Use to scroll to Clr voicemail, then press MENU/SELECT. The screen shows Reset Voicemail Indicator?.
4. Press MENU/SELECT again to turn the voicemail indication off. There is a confirmation tone and the screen returns to the previous menu.
Notes:
Your telephone service provider voicemail may alert you to new messages with a stutter (broken) dial tone. Contact your telephone service provider for more details.
For information about using your voicemail service, contact your telephone service provider.
Rename handset
You can edit the handset name for each system handset.
1. When the handset is idle, press MENU/SELECT.
2. Use to scroll to Settings, then press MENU/SELECT.
3. Use to scroll to Rename handset, then press MENU/SELECT.
4. Change the handset name when prompted.
Press to move the cursor to the left or right.
Use the dialing keys to enter a name (up to 11 characters). Each time you press a key, a character on that key appears. Additional key presses produce other characters on that key. See the chart on page 50.
Press MUTE/DELETE to backspace and delete a character.
Press and hold MUTE/DELETE to delete all characters.
5. Press MENU/SELECT to save the setting and return to the previous menu. There is a confirmation tone.
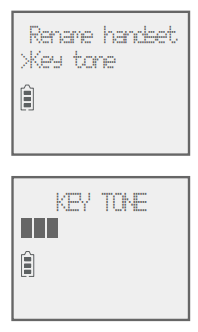
Key tone
The handset is set to beep with each key press. You can adjust the key tone volume or turn it off. If you turn off the key tone, there are no beeps when you press keys.
1. Press MENU/SELECT in idle mode to enter the main menu.
2. Use to scroll to Settings, then press MENU/SELECT.
3. Use to scroll to Key tone, then press MENU/SELECT.
4. Use to select the desired volume or Off.
5. Press MENU/SELECT to save your preference. There is a confirmation tone and the screen returns to the previous menu.
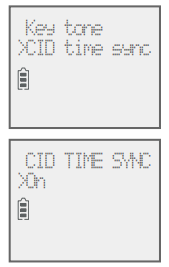
Use caller ID to automatically set date and time
If you subscribe to caller ID service, the day, month and time are set automatically with each incoming call. Follow the steps to turn the CID time sync feature on or off. The default setting is On.
1. When the handset is in idle mode, press MENU/SELECT to enter the main menu.
2. Press to scroll to Settings, then press MENU/SELECT.
3. Press to scroll to CID time sync, then press MENU/SELECT.
4. Press to highlight On or Off, then press MENU/SELECT to save. There is a confirmation tone and the screen returns to the previous menu.
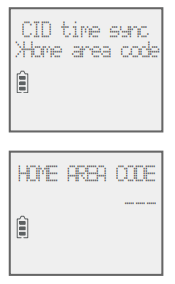
Home area code
If you dial seven digits to make a local call (no area code required), enter your area code into the telephone as the home area code. When you receive a call from within your home area code, the caller ID log only displays the seven digits of the telephone number. This feature makes it easy for you to place a call from the caller ID log. If you dial ten digits to make a local phone call, do not use this home area code feature. If you do, you cannot place local calls from your caller ID log, as they will have only seven digits.
To set the home area code:
1. Press MENU/SELECT in idle mode to enter the main menu.
2. Use to scroll to Settings, then press MENU/SELECT.
3. Use to scroll to Home area code, then press MENU/SELECT. The screen briefly shows Only for 7digit dial from CID.
4. Use the dialing keys to enter a three-digit home area code.
Press MUTE/DELETE to delete a digit.
Press and hold MUTE/DELETE to delete all digits.
5. Press MENU/SELECT to save. There is a confirmation tone and the screen shows Area code will not show in CID briefly before returning to the previous menu.
Note: If in the future, your telephone service provider requires you to dial ten digits to make a local call (area code plus telephone number), you need to delete your home area code and dial out locally from the call ID log. With the home area code displayed, press and hold MUTE/DELETE until the digits are deleted, and then press MENU/SELECT. The home area code is now restored to its default setting of _ _ _ (empty).
Dial mode
The dial mode is preset to tone dialing. If you have pulse (rotary) service, you must change the dial mode to pulse dialing before using the telephone.
To set the dial mode:
1. Press MENU/SELECT in idle mode to enter the main menu.
2. Use to scroll to Settings, then press MENU/SELECT.
3. Use to scroll to Dial mode, then press MENU/SELECT.
4. Use to highlight Touch-tone or Pulse, then press MENU/SELECT. There is a confirmation tone and the screen returns to the previous menu.
Web address
Use this feature to view the AT&T website address.
1. Press MENU/SELECT in idle mode to enter the main menu.
2. Use to scroll to Web address, then press MENU/SELECT.
QUIET mode
When QUIET mode is turned on, the telephone silences all sounds during the set period of time (1-12 hours). However, the handset locator paging tone and any sound-generating operations initiated by users, such as making calls using the speakerphone or setting ringer volume, will sound as normal. After you turn on QUIET mode, this feature activates immediately and the answering system turns on automatically. When QUIET mode is on, the answering system takes calls and records messages without broadcasting them
To turn QUIET mode on:
1. Press and hold QUIET # in idle mode to enter the QUIET mode setting screen. The screen shows Quiet: _ _ hours (1-12 hours).
2. Use the dialing keys to enter the desired number of hours (1-12) you would like to turn on QUIET mode, then press MENU/SELECT. Your screen briefly shows Answering sys is ON and then Quiet mode on.
To turn QUIET mode off:
While QUIET mode is on, press and hold QUIET #. The screen then shows Quiet mode is off and you hear a confirmation tone.
Notes:
If you change the base ringer, handset ringer, ringer volume, key tone, or caller ID announce features when QUIET mode is on, the sample plays but the feature is still muted after saving the setting.
After QUIET mode is turned off or the set period of time has expired, all muted features will be activated again.
The PTT function is not available when QUIET mode is on.
Intercom is available during QUIET mode, but the handset will not ring.
When QUIET mode is on, and Smart call blocker is on and in screening mode, all screened calls will be sent to the answering system after screening. For more information on Smart call blocker, see page 69.
Telephone operation
Making a call
Press or , then enter the telephone number.
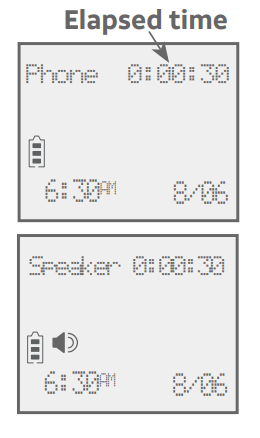
The screen displays the elapsed time as you talk (in hours, minutes and seconds).
Note: Pressing or to access services from your telephone service provider does not affect the elapsed time. to access services from your telephone service provider does not affect the elapsed time.
On hook dialing (predialing)
1. Enter the telephone number. Press MUTE/DELETE to make corrections when entering the phone number.
2. Press or to dial.
Answering a call
Press or -OR
Press any dialing key (0-9, TONE * or #).
Ending a call
Press or return the handset to the telephone base or charger.
Auto off
A call ends automatically when you put the handset in the telephone base or charger.
Temporary ringer silencing
Press or MUTE/DELETE while the telephone is ringing to silence the ringer temporarily on that handset only. This turns off the ringer without disconnecting the call. The next incoming call rings normally at the preset volume.
Handset speakerphone
During a call, press to switch between handsfree speakerphone and normal handset use. Press or return the handset to the telephone base or charger to hang up.
Notes:
When you use the speakerphone, the key pad and the button on the handset are lit.
The speakerphone uses more power than the normal handset. If the handset battery becomes very low while you are using the speakerphone, the call remains in speakerphone mode until you hang up or the battery becomes depleted.
After installing a battery into the handset, the screen may show Low battery. If you use the speakerphone at this time, the battery may become depleted. Follow the instructions in the Battery installation and charging section on pages 9-11.
Last number redial
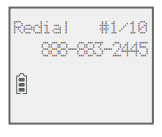
Each handset stores the last ten telephone numbers dialed (up to 30 digits).
To view the ten most recently dialed numbers:
To display the most recently called number, press REDIAL/PAUSE.
To view up to ten recently called numbers, press REDIAL/PAUSE, then or REDIAL/PAUSE repeatedly.
The handset beeps twice at the end of the list. Press to exit.
To redial a number:
To dial the displayed number, press or -OR
Press or /SPEAKER, then press REDIAL/PAUSE repeatedly to view the redial memory. Press MENU/SELECT to dial the displayed number.
To delete a redial entry:
While the screen displays the desired number, press MUTE/DELETE to delete the number from the redial memory.
Equalizer
The handset equalizer enables you to change the quality of the audio to best suit your hearing.
While on a call or intercom call, press MENU/SELECT to select the equalizer setting Treble 1, Treble 2, Bass or Natural (the default setting). The current setting is shown on the handset screen for two seconds.
Notes:
If you switch the call between the handset and the speakerphone by pressing , the audio setting remains unchanged.
The current equalizer setting remains unchanged until a new setting is selected.
Options while on calls
Volume control
You can set the listening volume to one of six levels. While on a call, press to decrease or press to increase the listening volume.
Notes:
Handset and speakerphone volume settings are independent.
When the volume reaches the minimum or maximum setting, you hear two beeps
Call waiting
If you subscribe to call waiting service from your telephone service provider, and someone calls while you are already on a call, you hear two beeps.
Press on the handset to put your current call on hold and take the new call.
Press on your handset at any time to switch back and forth between calls.
Note:
If the Smart call blocker feature is on and in screening mode, and you receive a call waiting call: - If you have already picked up a screened call, the telephone checks whether the call waiting call’s number can be found in the directory, block list or allow list. It also checks whether the caller name is in the star name list. After that, the telephone displays the caller ID information or Blocked call accordingly. You can press or /SPEAKER to take the new call, or press CALL BLOCK on the handset to block it. - If the telephone is screening a call, the call waiting call will be ignored and logged as missed call in the caller ID log.
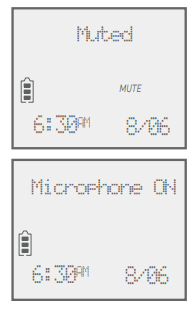
Mute
Use the mute function to turn off the microphone. You can hear the caller, but the caller cannot hear you.
To mute a call:
While on a call, press MUTE/DELETE. When mute is on, the handset shows Muted for a few seconds and MUTE icon displays until you turn off mute.
To end mute a call:
Press MUTE/DELETE again. When mute is off, Microphone ON appears temporarily on the handset.
Chain dialing
Use this feature to initiate a dialing sequence from the numbers in the directory, caller ID log or redial memory while you are on a call. Chain dialing is useful when you wish to access other numbers (such as bank account numbers or access codes) from the directory, caller ID log or redial list.
To access the directory while on a call:
1. Press MENU/SELECT.
2. Press to scroll to Directory and then press MENU/SELECT.
3. Press to scroll to the desired number.
4. Press MENU/SELECT to dial the number shown.
To access the caller ID log while on a call:
1. Press MENU/SELECT.
2. Press to scroll to Caller ID log, then press MENU/SELECT.
3. Press to scroll to the desired number.
4. Press MENU/SELECT to dial the number shown.
To access the redial list while on a call:
1. Press REDIAL/PAUSE to show the most recently dialed number.
2. Press to scroll to the desired number, or press REDIAL/PAUSE repeatedly to find the desired number. Press MENU/SELECT to dial the number shown.
Notes:
You cannot edit a directory entry while on a call. For more details about the directory, see pages 48-58.
You cannot copy a caller ID entry into the directory while on a call. For more details about the caller ID log, see pages 59-68.
If you press REDIAL/PAUSE while on a call, you can only view the ten most recently dialed numbers but you cannot erase the entries. For more details about the redial memory, see page 31.
Press on the handset to exit redial, directory or caller ID log when on a call.
Temporary tone dialing
If you have pulse (rotary) service only, you can switch from pulse to touch-tone dialing temporarily during a call. This is useful if you need to send touch-tone signals to access your telephone banking or long distance services.
1. During a call, press TONE*.
2. Use the dialing keys to enter the desired number. The telephone sends touch-tone signals.
3. The telephone automatically returns to pulse dialing after you end the call.
Options while on calls
Blind transfer
While on an outside call, you can transfer the call to a specific device or any device without notifying them.
To transfer an outside call directly without notifying the desired device:
1. During the call, press MENU/SELECT.
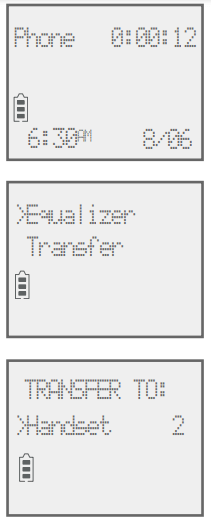
2. Press qCID or pDIR to scroll to Transfer and then press MENU/SELECT.
If you have a two-handset system and no other registered devices, the outside call is put onhold and your handset shows Transferring call.... The other handset rings and shows Transfer from other handset.
If you have other registered device(s) or more than two handsets, your screen shows TRANSFER TO:. Use the dialing keys to enter a specific device number (1-9 for handsets 1-9, TONE* followed by 0-2 for handsets 10-12, or TONE* followed by # for all devices), or press to scroll to the desired device and press MENU/SELECT. The outside call is put on hold and your handset screen shows Transferring call... or Transferring call to all.... The other device rings and shows Transfer from HANDSET X (HANDSET represents the handset name, X represents the handset number).
3. To answer the call on the destination handset, press , , or any dialing key (0-9, TONE or #). The initiating handset shows Call transferred and goes to idle mode.
Notes:
To cancel the transfer and return to the external call before the blind transfer call is answered, press , or on your handset.
If the other device does not answer the transfer within 30 seconds, the transfer ends and the initiating device rings while showing No response to transfer. If it does not pick up within 30 seconds, the device returns to idle mode and the outside call ends.
Troubleshooting
My telephone doesn’t work at all.
Make sure the power cord is securely plugged in.
Make sure you plug the battery connector securely into the cordless handset.
Make sure you plug the telephone line cord securely and firmly into the telephone base and the telephone wall jack.
Charge the battery in the cordless handset for at least ten hours. For optimum daily performance, return the cordless handset to the telephone base or charger when not in use.
If the battery is depleted, it may take approximately 30 minutes to charge the handset before it shows Low battery. See page 9 for details.
Reset the telephone base. Unplug the electrical power. Wait for approximately 15 seconds, then plug it back in. Allow up to one minute for the cordless handset and telephone base to reset.
You may need to purchase a new battery. Please refer to Battery installation and charging in this user’s manual on pages 9-11.
The display shows No line. I cannot get a dial tone.
Try all the suggestions, as mentioned above.
If the previous suggestions do not work, disconnect the telephone line cord from your telephone and connect the telephone line cord to another telephone.
If there is no dial tone on that other telephone either, your telephone line cord may be defective. Install a new telephone line cord.
If changing the telephone line cord does not help, the wall jack (or the wiring to this wall jack) may be defective. Try using a different wall jack in your home to connect your CL82107/ CL82207/CL82257/CL82307/CL82357/CL82407/CL82507/ CL82547/CL82557 telephone, or contact your telephone service provider (charges may apply).
I cannot dial out.
Try all the suggestions, as mentioned above.
Make sure you have a dial tone before dialing. The cordless handset may take a second or two to find the telephone base and produce a dial tone. This is normal. Wait an extra second before dialing.
Eliminate any background noise. Noise from a television, radio or other appliances may cause the phone to not dial out properly. If you cannot eliminate the background noise, first try muting the cordless handset before dialing, or dialing from another room with less background noise.
If other phones in your home are having the same problem, contact your telephone service provider (charges may apply).
My cordless handset isn’t performing normally.
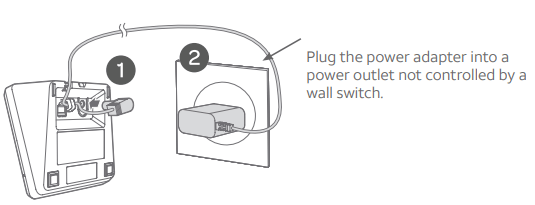
Make sure you plug the power cord securely into the telephone base. Plug the power adapter into a different working electrical outlet without a wall switch.
Move the cordless handset closer to the telephone base. You may have moved out of range.
Reset the telephone base. Unplug the electrical power. Wait for 15 seconds, then plug it back in. Allow up to one minute for the cordless handset and telephone base to reset.
Other electronic products such as HAM radios and other DECT phones, can cause interference with your cordless phone. Try installing your phone as far away as possible from these types of electronic devices.
Out of range OR No pwr at base appears on my cordless handset.
Ensure you plug the telephone base in properly and the power is on.
Place the cordless handset in the telephone base for one minute to allow the cordless handset and base to synchronize.
Move the cordless handset closer to the telephone base. You may have moved out of range.
Reset the telephone base. Unplug the electrical power. Wait for 15 seconds, then plug it back in. Allow up to one minute for the cordless handset and telephone base to reset.
Other electronic products such as HAM radios and other DECT phones, can cause interference with your cordless phone. Try installing your phone as far away as possible from these types of electronic devices.
The batteries do not hold a charge.
If the cordless handset is in the telephone base or charger and the charge light is not on, refer to The charge light is off (page 141).
Charge the battery in the cordless handset for at least ten hours. For optimum daily performance, return the cordless handset to the telephone base or charger when not in use.
If the battery is depleted, it may take approximately 30 minutes to charge the handset before it shows Low battery. Refer to the table on page 9 for details.
You may need to purchase a new battery. Please refer to Battery installation and charging in this user’s manual on pages 9-11.
I get noise, static, or weak signals even when I’m near the telephone base.
If you subscribe to high-speed Internet service (DSL - digital subscriber line) through your telephone line, you must install a DSL filter between the telephone line cord and the telephone wall jack (page 7). The filter prevents noise and caller ID problems as a result of DSL interference. Please contact your DSL service provider for more information about DSL filters.
You may be able to improve the performance of your cordless phone by installing your new telephone base as far as possible from any other existing cordless telephone system that may already be installed.
Other electronic products such as HAM radios and other DECT phones, can cause interference with your cordless phone. Try installing your phone as far away as possible from these types of electronic devices.
Do not install this phone near a microwave oven or on the same electrical outlet. You may experience decreased performance while the microwave oven is operating.
If you plug your phone in with a modem or a surge protector, plug the phone (or modem/surge protector) into a different location. If this does not solve the problem, relocate your phone or modem farther apart from one another, or use a different surge protector.
Move your phone to a higher location. The phone may have better reception in a high area.
If other phones in your home are having the same problem, contact your telephone service provider (charges may apply).
I experience poor sound quality when using the handset speakerphone.
For increased sound quality while using the handset speakerphone, place the handset on a flat surface with the dial pad facing up.
I hear other calls while using my phone.
Disconnect the telephone base from the telephone jack, and plug in a different telephone. If you still hear other calls, call your telephone service provider.
My cordless handset does not ring when I receive a call.
Make sure that the ringer is not off. Refer to Ringer volume on page 17 in this user’s manual.
Make sure you plug in the telephone line cord securely into the telephone base and the telephone jack. Make sure you plug in the power cord securely.
The cordless handset may be too far from the telephone base.
Charge the battery in the cordless handset for at least ten hours. For optimum daily performance, return the cordless handset to the telephone base or charger when not in use.
You may have too many extension phones on your telephone line to allow all of them to ring simultaneously. Try unplugging some of the other phones.
The layout of your home or office may be limiting the operating range. Try moving the telephone base to another location, preferably to a higher location.
If other phones in your home are having the same problem, contact your telephone service provider (charges may apply).
Test a working phone at the phone jack. If another phone has the same problem, contact your telephone service provider (charges may apply).
Other electronic products can cause interference with your cordless phone. Try installing your phone as far away as possible from electronic devices such as television sets, VCRs, or other cordless telephones.
Remove the battery. Install the battery again and place the cordless handset into the telephone base. Wait for the cordless handset to reestablish its connection with the telephone base. Allow up to one minute for this to take place.
Your line cord may be defective. Try installing a new line cord.
My calls cut in and out while I’m using my cordless handset.
Other electronic products such as HAM radios and other DECT phones, can cause interference with your cordless phone. Try installing your phone as far away as possible from these types of electronic devices.
Do not install this phone near a microwave oven or on the same electrical outlet. You may experience decreased performance while the microwave oven is operating.
If you plug your phone in with a modem or surge protector, plug the phone (or modem/surge protector) into a different location. If this does not solve the problem, relocate your phone or modem farther apart from one another, or use a different surge protector.
Move your telephone base to a higher location. The phone may have better reception when installed in a high area.
If other phones in your home are having the same problem, contact your telephone service provider (charges may apply).
The charge light is off.
Make sure you plug the power and line cords in correctly and securely.
Unplug the electrical power. Wait for 15 seconds, then plug it back in. Allow up to one minute for the cordless handset and telephone base to reset.
Clean the cordless handset, charger and telephone base charging contacts each month with a pencil eraser or cloth.
The battery may not be connected to the handset or is missing completely. Ensure that the battery is installed properly.
My caller ID isn’t working.
Caller ID is a subscription service. You must subscribe to this service from your telephone service provider for this feature to work on your phone.
The caller may not be calling from an area that supports caller ID.
Both your and your caller’s telephone service providers must use caller ID compatible equipment.
If you subscribe to high-speed Internet service (DSL - digital subscriber line) through your telephone line, you must install a DSL filter between the telephone line cord and the telephone wall jack (page 7). The filter prevents noise and caller ID problems resulting from DSL interference. Please contact your DSL service provider for more information about DSL filters.
System does not receive caller ID when on a call.
Make sure you subscribe to caller ID with call waiting features from your telephone service provider. Caller ID features works only if both you and the caller are in areas offering caller ID service, and if both telephone service providers use compatible equipment.
System screens all my incoming calls.
You may have set Smart call blocker to screen calls without numbers and uncategorized calls. The telephone asks callers to announce their names or press the pound key (#). We recommend that you add the phone numbers of your family members and friends, and desired businesses to your Directory (see page 48) or Allow list (see page 80), or add their names to the Star name list (see page 85). This will avoid Smart call blocker to screen their calls.
To turn Smart call blocker off, see Set Smart call blocker on/off on page 73.
While screening a call, the telephone suddenly stops screening and connects to the call.
Another handset may have picked up the screening call.
If you have other telephone system sharing the same telephone line, and someone picks up the call on the other telephone system while the screening is in progress, the screening process will be terminated and connect you to the caller.
My telephone blocks calls from someone I know.
You may have saved the caller’s number in your block list. To remove the number from the block list, see Delete a block entry on page 80.
Blocking calls with numbers saved in my block list only.
If you want to block calls with numbers saved in your block list only, and allow all other calls to get through to you, change the settings to accept calls without numbers and uncategorized calls. See Control calls without numbers on page 73 and Control uncategorized calls on page 74.
Blocking all unknown calls.
If you want to block all unknown calls with numbers or names that are not in your directory, allow list or star name list, change the settings to block calls without numbers and uncategorized calls. See Control calls without numbers on page 73 and Control uncategorized calls on page 74.
Forwarding all unknown calls to the answering system.
If you want to forward all unknown calls with numbers or names that are not in your directory, allow list or star name list to the answering system, see Control calls without numbers on page 73 and Control uncategorized calls on page 74 to change the settings.
Incomplete messages.
If a caller leaves a very long message, part of it may be lost when the system disconnects the call after the maximum recording time you have set.
If the caller pauses for longer than seven seconds, the system stops recording and disconnects the call.
If the system’s memory becomes full during a message, the system stops recording and disconnects the call.
If the caller’s voice is very soft, the system may stop recording and disconnect the call.
Difficulty hearing messages.
Press VOLUME+ to increase the telephone base speaker volume.
Press DIR/VOLUME to adjust the message playback volume on a handset.
System does not answer after the correct number of rings.
•Make sure that the answering system is on. ANS ON should show on the handset and the /ANS ON/OFF light on the telephone base should be on.
•If toll saver is activated, the number of rings changes to two when you have new messages stored (page 109).
•If the memory is full or the system is off, the system will answer after ten rings.
In some cases, the answering system is affected by the ringing system used by your telephone service provider.
If you subscribe to voicemail service, change the number of rings so that your answering system answers before your voicemail (page 109). To determine how many rings activate your voicemail, contact your telephone service provider.
If there is a fax machine connected to the same telephone line, try disconnecting the fax machine. If that solves the problem, consult your fax machine documentation for information on compatibility with answering systems.
System does not respond to remote commands.
Make sure to enter your remote access code correctly (page 110).
Make sure you are calling from a touch-tone phone. When you dial a number, you should hear tones. If you hear clicks, the phone is not a touch-tone telephone and cannot activate the answering system.
The answering system may not detect the remote access code while your announcement or message is playing. Try waiting until the announcement or message is over, or press command code 5 to stop the operation before entering other codes.
There may be interference on the phone line you are using. Press dialing keys firmly.
System does not record messages.
Make sure the answering system is on. ANS ON should show on the handset and the /ANS ON/OFF light on the telephone base should be on.
Make sure the memory of the answering system is not full.
If you subscribe to voicemail service, change the number of rings so that your answering system answers before your voicemail (page 109). To determine how many rings activate your voicemail, contact your telephone service provider.
If there is a fax machine connected to the same telephone line, try disconnecting the fax machine. If that solves the problem, consult your fax machine documentation for information on compatibility with answering systems.
System announces, “Time and day not set.”
You need to reset the system clock (page 19).
Outgoing announcement is not clear.
When you record your announcement, make sure you speak in a normal tone of voice, about nine inches from the handset.
Make sure there is no background noise (TV, music, etc.) while recording.
New voicemail and show on the screens, and I don’t know why.
Your telephone has both a built-in answering system and voicemail indication. If New voicemail and appear on the screens, then your telephone has received a signal from your telephone service provider that you have a voicemail message waiting for you to retrieve from them. Contact your telephone service provider for more information on how to access your voicemail.
I cannot retrieve voicemail messages.
Your telephone has both a built-in answering system and voicemail indication. They are independent features and each alerts you to new messages differently (page 113). If you subscribe to voicemail service from your telephone service provider, contact your telephone service provider for more information on how to access your voicemail.
I’ve set my LCD language to Spanish or French and I don’t know how to change it back to English.
Press MENU/SELECT on your handset in idle mode, then enter 364#. You hear a confirmation tone.
I subscribe to a nontraditional telephone service that uses my computer to establish connections, and my telephone doesn’t work.
Make sure your computer is powered on.
Make sure your Internet connection is working properly.
Make sure that the software is installed and running for your nontraditional telephone service.
Make sure to plug your USB telephone adapter into a dedicated USB port on your computer. Do not plug it into a multiple port USB hub (USB splitter) that is not powered.
In a few rare instances, the USB port on your computer may not have enough power. Try using a USB hub with its own external power supply.
If you are using a firewall, it may prevent access to your nontraditional telephone service provider. Contact your service provider for more information.
Common cure for electronic equipment.
If the telephone does not seem to be responding normally, try putting the cordless handset in the telephone base or charger. If it does not fix the problem, do the following (in the order listed):
1.Disconnect the power to the telephone base.
2.Disconnect the cordless handset battery.
3.Wait a few minutes.
4.Connect power to the telephone base.
5.Remove the battery. Replace the battery and place the cordless handset into the telephone base or charger.
6.Wait for the cordless handset to reestablish its connection with the telephone base. Allow up to one minute for this to take place.
Maintenance
Taking care of your telephone
Your cordless telephone contains sophisticated electronic parts, so you must treat it with care.
Avoid rough treatment.
Place the handset down gently.
Save the original packing materials to protect your telephone if you ever need to ship it.
Avoid water
You can damage your telephone if it gets wet. Do not use the handset in the rain, or handle it with wet hands. Do not install the telephone base near a sink, bathtub or shower.
Electrical storms
Electrical storms can sometimes cause power surges harmful to electronic equipment. For your own safety, take caution when using electric appliances during storms.
Cleaning your telephone
Your telephone has a durable plastic casing that should retain its luster for many years. Clean it only with a soft cloth slightly dampened with water or mild soap.
Do not use excess water or cleaning solvents of any kind.
Not sure how you mean “sound”. The ring is certainly not objectionable. What I don’t like is the voice that announces who is calling. Most words are garbled….at least to me they are.
#2 Does each phone fit easily and security in the docking system?
I bought these phones for the Smart Call Block feature and it works. I have not received a robo call in 2 weeks since I have had these phones. Just make sure your smart call block feature is on.
#5 Does the smart call blocker work if you have phone service provided by a provider other than at&t (but do have caller id)?
I had RCN and now have Spectrum and it works great with both services. Love how quiet our home has become since getting this phone set.
#6 When talking on the phone & another call comes in how do receive the new call coming in?
Call waiting still works with this phone, however, if you decide to take the call whoever is calling in will come through because the phone system did not have time to deal with the call.
#7 May I leave this handset in the cradle when not in use? I don’t want to harm the battery.
Yes, you can leave the handsets sitting on the charging base when not in use. The batteries are rechargeable and does not overcharge.
 PHONE/FLASH
 DIR/VOLUME
 CID/VOLUME
 OFF/CANCEL
 1
1
 /SPEAKER
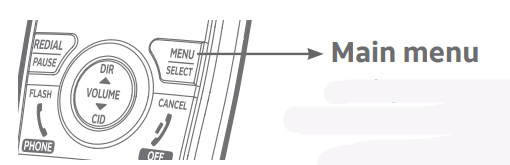
 /PLAY/STOP
 /REPEAT
 /SKIP
/SKIP /ANS ON/OFF
 FIND HS
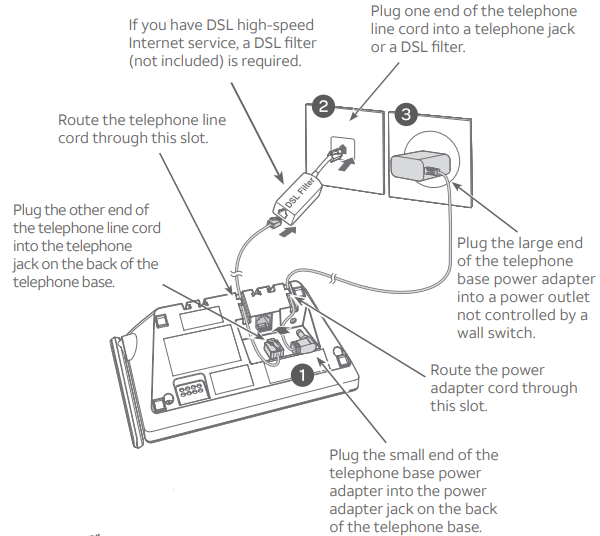
 appears on the screen.
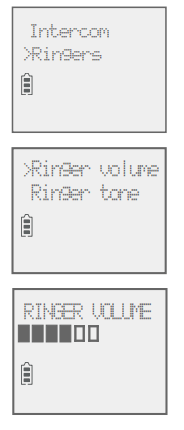
 to scroll to Ringers, then press MENU/SELECT.
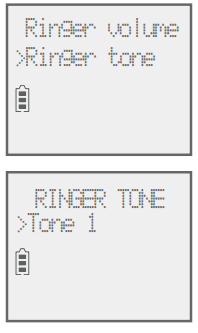
 1 key
1 key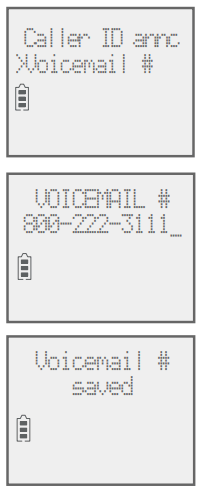
 , then enter the telephone number.
 or
or  or return the handset to the telephone base or charger.
 to decrease or press
  to increase the listening volume.
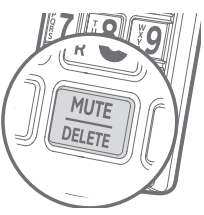
 show on the screens, and I don’t know why.