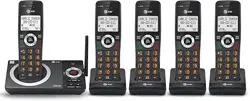
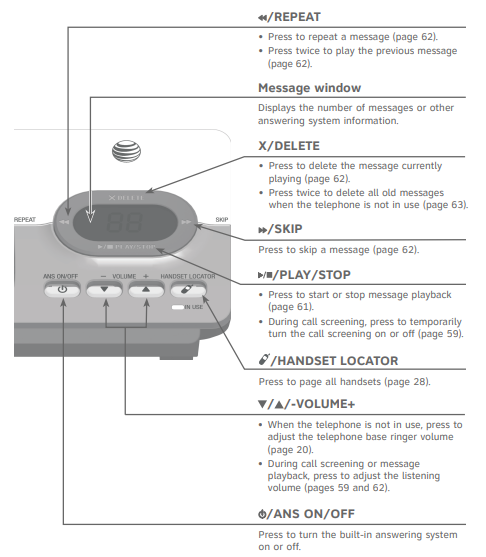
Owners' Guide Printer- Copier- Fax- Scanner
Getting started
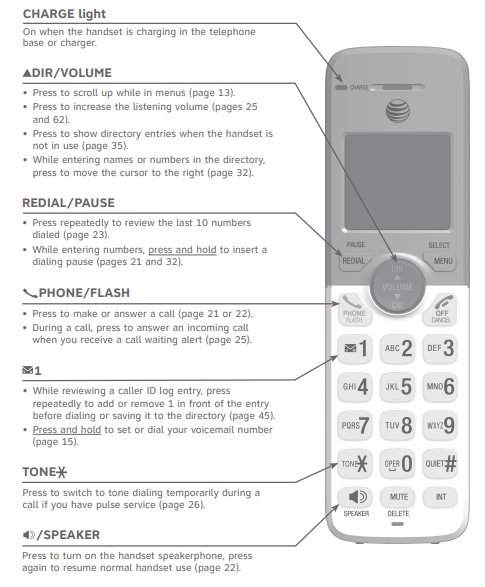
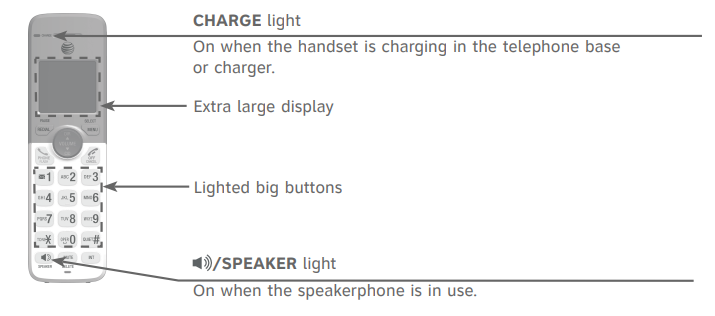
Quick reference guide - handset

Quick reference guide - telephone base
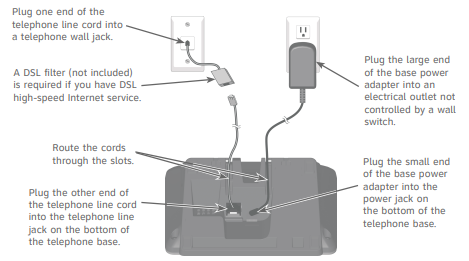
Telephone base and charger installation
Install the telephone base and charger, as shown below. If you subscribe to high-speed Internet service (DSL - digital subscriber line) through your telephone line, you must install a DSL filter between the telephone line cord and the telephone wall jack. The filter prevents noise and caller ID problems caused by DSL interference. Please contact your DSL service provider for more information about DSL filters.
The telephone base comes ready for tabletop use. If you want to mount your telephone on a wall, refer to Wall-mount installation on pages 10-12 for details.
Battery installation and charging
Battery installation
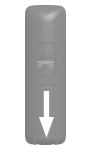
Install the battery, as shown below.
- Plug the battery connector securely into the socket inside the handset battery compartment, matching the orientation of the engraved label. Insert the supplied battery with the label this side up facing up, as indicated.

- Align the cover flat against the battery compartment, then slide it upwards until it clicks into place.
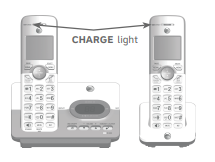
- Charge the handset by placing it face up in the telephone base or charger. The charge light is on when charging.
To replace the battery, press the tab and slide the battery compartment cover downwards. Lift out the old battery and disconnect it from the handset. Follow the instructions to install and charge the new battery.
Battery charging
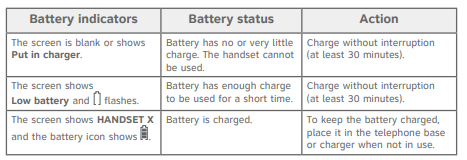
Once you have installed the battery, the screen indicates the battery status (see the following table). If necessary, place the handset in the telephone base or charger to charge the battery. For best performance, keep the handset in the telephone base or charger when not in use. The battery is fully charged after 16 hours of continuous charging. See Technical specifications on page 94 for battery operating times.
If the screen is blank, you need to charge the handset without interruption for at least 30 minutes to give the handset enough charge to use the telephone for a short time. The screen shows Low battery until you have charged the battery without interruption for at least 30 minutes. The following table summarizes the battery charge indicators and actions to take.
Notes:
- If you are on a call in low battery mode, you hear 4 short beeps every 50 seconds.
- If no battery is installed in the handset when you place it in the telephone base or charger, the screen shows No battery. Follow the instructions in Battery installation on page 7 to install the battery.
After you install your telephone or power returns following a power outage, the handset will prompt you to set the date and time (see page 17). To skip setting the date and time, press  off/cancel.

Telephone settings
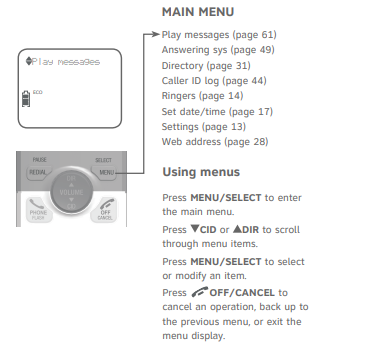
Menu overview
Use the menu to change the telephone settings.
- Press menu/select in idle mode (when handset is not in use) to enter the main menu.
- Press
 CID or
  DIR to scroll through menu items.
- Press menu/select to select or save the indicated item.
-or-
Press  off/cancel to cancel an operation, back up to the previous menu or exit the menu display. Press and hold
  off/cancel to cancel an operation and return to idle mode.
Handset settings
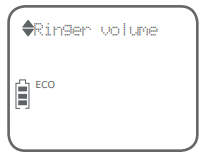
Ringer volume
You can set the handset ringer volume level (1-6), or turn the ringer off. When the ringer is off,  and Ringer off appears on the handset screen.
- Press menu/select in idle mode to enter the main menu.
- Press
 CID or
  DIR to scroll to Ringers, then press menu/select.
- Press menu/select to select Ringer volume.
- Press
 CID or
  DIR to sample each volume level.
- Press menu/select to save your preference.

Notes:
- Changing the handset ringer volume does not affect the base ringer volume. For more information on the base ringer volume, see Telephone base ringer volume on page 20.
- The handset ringer volume also determines the ringer volume of intercom calls and paging tones.
- If the handset ringer volume is off, that handset ringer is silenced for all incoming calls. However, that handset still plays the paging tone when responding to the handset locator feature (see Handset locator on page 28).
- While the telephone is ringing, press
 off/cancel or mute/delete to silence the ringer temporarily on that handset only (see Temporary ringer silencing on page 21).
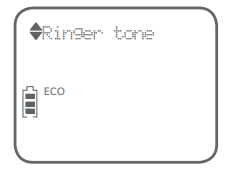
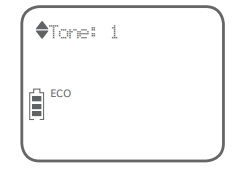
Ringer tone
You can choose one of 10 ringer tones for the handset.
- Press menu/select in idle mode to enter the main menu.
- Press
 CID or
  DIR to scroll to Ringers, then press menu/select.
- Press
 CID or
  DIR to scroll to Ringer tone, then press menu/select.
- Press
 CID or
  DIR to sample each tone.
- Press menu/select to save your preference.
Note: if you turn off the handset ringer volume, you will not hear ringer tone samples.
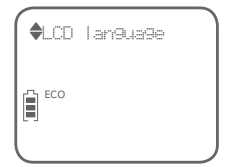
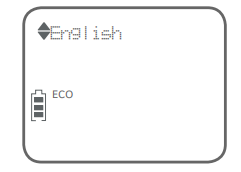
LCD language
You can select the language used for all screen displays.
- Press menu/select in the idle mode to enter the main menu.
- Press
 CID or
  DIR to scroll to Settings, then press menu/select.
- Press menu/select to select LCD language.
- Press
 CID or
  DIR to select English, Français or Español.
- Press menu/select twice to save your preference.
Note: If you accidentally change the LCD language to French or Spanish, you can reset it back to English without going through the French or Spanish menus. Press MENU/SELECT in idle mode, then enter 364# using the dialing keys. You hear a confirmation tone.
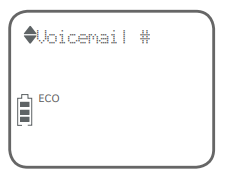
Set speed dial voicemail number
If you subscribe to a voicemail service offered by your telephone service provider, you can save the voicemail number to  1 on each handset for easy access. When you want to retrieve voicemail messages, press and hold
  1. Contact your telephone service provider for more information and assistance about your voicemail service.
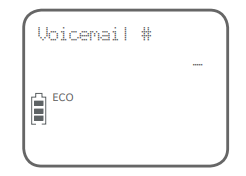
To set your voicemail number:
- Press menu/select in idle mode to enter the main menu.
- Press
 CID or
  DIR to scroll to Settings, then press menu/select.
- Press
 CID or
  DIR to scroll to Voicemail #, then press menu/select.
- Use the dialing keys to enter the voicemail number (up to 30 digits).
- Press menu/select to save. The handset shows VM # saved and the stored number.
OR
If it is your first time to set the voicemail number:
- Press and hold
 1 in idle mode.
- Use the dialing keys to enter the voicemail number (up to 30 digits).
- Press menu/select to save. The handset dials the saved voicemail number.
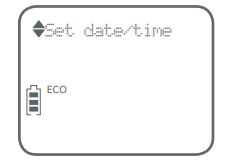
Set date/time
The answering system announces the day of the week and time of each message received prior to playing it. If you subscribe to caller ID service, the day, month and time are set automatically with each incoming call (see About caller ID on page 42). However, the year must be set so that the day of the week can be calculated from the caller ID information.
Follow the steps, as mentioned below, to set the month, date, year and time.
- Press menu/select in idle mode to enter the main menu.
- Press
 CID or
  DIR to scroll to Set date/time, and then press menu/select.
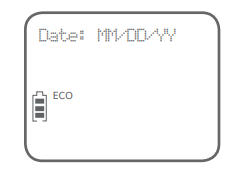
- Press
 CID or
  DIR to select the month, then press menu/select, or enter the 2-digit number (01-12) using the dialing keys (0-9).
- Press
 CID or
  DIR to select the day, then press menu/select, or enter the 2-digit number (01-31) using the dialing keys (0-9).
- Press
 CID or
  DIR to select the year, or enter the 2-digit number (00-99) using the dialing keys (0-9), then press menu/select.
- Press
 CID or
  DIR to select the hour, then press menu/select, or enter the 2-digit number (00-23) using the dialing keys (0-9).
- Press
 CID or
  DIR to select the minute, then press menu/select, or enter the 2-digit number (00-59) using the dialing keys (0-9).
- Press
 CID or
  DIR to choose AM or PM. Press menu/select to save.

Note: If the date and time is not set when the message is recorded, the system announces “Time and date not set” before it plays the message.
Appendix
Adding and registering handsets
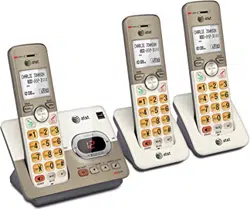
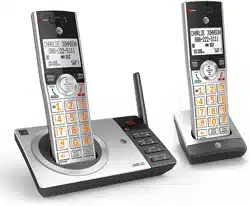
Your telephone system can support up to five handsets. The handsets provided within your product package are already registered as HANDSET 1, and so forth. You can purchase additional handset AT&T EL50003 or AT&T EL50013 to expand your telephone system. EL50003 (silver) is for use with EL52103/EL52203/EL52253/EL52303/EL52353/EL52403/EL52503. EL50013 (champagne) is for use with EL52113/EL52213/EL52313/ EL52333. Additional handsets are assigned numbers in the sequential order they are registered (up to HANDSET 5). Each handset must be registered to the telephone base before use.
Register a handset to the telephone base
- Before you begin registration, make sure the handset is out of the telephone base or charger and shows To register HS... and ...see manual, alternately.
- Put the handset you wish to register on the telephone base cradle.
- The IN USE light on the telephone base turns on. After about 10 seconds, the handset shows Registering.... The handset shows Registered and you hear a confirmation tone if the registration was successful. The IN USE light turns off. The handset is now registered with the telephone base.

If the registration fails, the handset displays Failed and then To register HS... and ...see manual, alternately. Try the registration again by removing the handset from the telephone base and then placing it back in.
Notes:
- You cannot register a handset if any other system handset is in use.
- You can only register one handset to the telephone base at a time.
Deregistering handsets
If you want to replace a handset, or reassign the designated handset number of a registered handset, you must deregister all handsets that are registered to the telephone base, and then register each handset individually.
To make deregistration easier, read all of the instructions on this page before you begin.
Deregister all handsets from the telephone base
- Press and hold
 /HANDSET LOCATOR on the telephone base for about 10 seconds until the IN USE light on the telephone base turns on and starts to flash. Then, release
  /HANDSET LOCATOR.
- Immediately press
 /HANDSET LOCATOR again. You must press
  /HANDSET LOCATOR while the IN USE light is still flashing. The IN USE light flashes for approximately five seconds.
- The deregistration takes about 10 seconds to complete. If the deregistration was successful, all handsets display To register HS... and ...see manual, alternately.
To register the handset(s) to the telephone base again, follow the registration instructions on the previous page.
NOTES:
- If the deregistration fails, you may need to reset the system and try again. To reset, unplug the power from the telephone base and plug it back in.
- You cannot deregister the handsets if any other system handset is in use.
- Even if the battery is depleted, you can still deregister the handsets by following the steps mentioned above. After the handset is charged for at least ten minutes, the screen shows To register HS... and ...see manual, alternately.
Screen icons, indicator lights and alert tones
Screen icons

Handset indicator lights
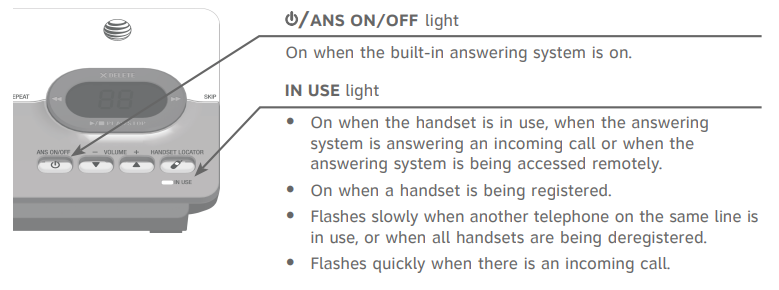
Telephone base indicator lights
Handset alert tones

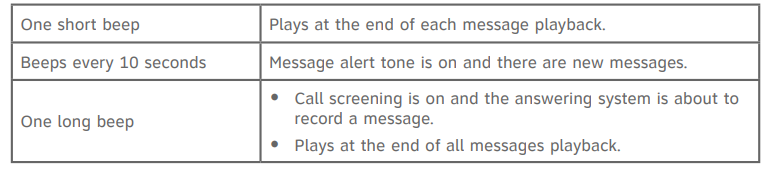
Telephone base alert tones
Handset display screen messages


Troubleshooting
My telephone doesn’t work at all.
- Make sure the power cord is securely plugged in.
- Make sure that the battery connector is securely plugged into the cordless handset.
- Make sure the telephone line cord is securely and firmly plugged into the telephone base and the telephone wall jack.
- Charge the battery in the cordless handset for at least 16 hours. For optimum daily performance, return the cordless handset to the telephone base or charger when not in use.
- If the battery is depleted, charge the handset for at least 30 minutes before you use it. Refer to Battery charging on page 9 for details.
- Reset the telephone base. Unplug the electrical power. Wait for approximately 15 seconds, then plug it back in. Allow up to one minute for the cordless handset and telephone base to reset.
- You may need to purchase a new battery. Please refer to Battery installation on page 7.
The display shows No line. I cannot get a dial tone.
- First try all of the suggestions mentioned above.
- If the previous suggestions do not work, disconnect the telephone line cord from your telephone and connect the telephone line cord to another telephone.
- If there is no dial tone on that other telephone either, your telephone line cord may be defective. Install a new telephone line cord.
- If changing the telephone line cord does not help, the wall jack (or the wiring to this wall jack) may be defective. Try using a different wall jack in your home to connect your EL52103/EL52113/EL52203/EL52213/ EL52253/EL52303/EL52313/EL52333/EL52353/EL52403/EL52503 telephone, or contact your telephone service provider (charges may contact your telephone service provider (charges may apply).
I cannot dial out.
- First try all the suggestions in the item The display shows No line. I cannot get a dial tone.
- Make sure you have a dial tone before dialing. The cordless handset may take a second or two to find the telephone base and produce a dial tone. This is normal. Wait an extra second before dialing.
- Check that all the telephones connected to the same telephone line are hung up.
- Make sure to set the dial mode to the correct setting (pulse dialing or tone dialing) for the service in your area.
- Eliminate any background noise. Noise from a television, radio or other appliances may cause the telephone not to dial out properly. If you cannot eliminate the background noise, first try muting the cordless handset before dialing, or dialing from another room with less background noise.
- If other telephones in your home are having the same problem, the problem is in your wiring or telephone service. Contact your telephone service provider (charges may apply).
My cordless handset isn’t performing normally.
- Make sure the power cord is securely plugged into the telephone base. Plug the power adapter into a different, working electrical outlet not controlled by a wall switch.
- Move the cordless handset closer to the telephone base. You might have moved out of range.
- Reset the telephone base. Unplug the electrical power. Wait for 15 seconds, then plug it back in. Allow up to one minute for the cordless handset and telephone base to reset.
- Other electronic products such as HAM radios and other DECT phones, can cause interference to your cordless telephone. Try installing your telephone as far away as possible from these types of electronic devices.
Out of range or no pwr at base appears on my cordless handset.
- Ensure that the telephone base is powered on.
- Place the cordless handset in the telephone base for one minute to allow the cordless handset and base to synchronize.
- Move the cordless handset closer to the telephone base. You might have moved out of range.
- Reset the telephone base. Unplug the electrical power. Wait for 15 seconds, then plug it back in. Allow up to one minute for the cordless handset and telephone base to reset.
- Other electronic products such as HAM radios and other DECT phones, can cause interference to your cordless telephone. Try installing your telephone as far away as possible from these types of electronic devices.
The batteries do not hold a charge.
- If the cordless handset is in the telephone base or charger and the charge light does not come on, refer to the item The charge light is off on this page.
- Charge the battery in the cordless handset for at least 16 hours. For optimum daily performance, return the cordless handset to the telephone base or charger when not in use.
- If the battery is depleted, it may take approximately 30 minutes to charge the handset before it shows low battery. Refer to Battery charging on page 9 for details.
- You may need to purchase a new battery. Please refer to Battery installation on page 7.
The charge light is off.
- Make sure the power cord is plugged in correctly and securely.
- Make sure the battery is installed correctly in the handset. Follow the instruction in Battery installation on page 7 to install the battery.
- Unplug the electrical power. Wait for 15 seconds, then plug it back in. Allow up to one minute for the cordless handset and telephone base to reset.
- Clean the cordless handset and telephone base charging contacts each month using a pencil eraser or cloth.
I get noise, static, or weak signals even when I’m near the telephone base.
- If you subscribe to high-speed Internet service (DSL - digital subscriber line) through your telephone line, you must install a DSL filter between the telephone line cord and the telephone wall jack (see Telephone base and charger installation on page 6). The filter prevents noise and caller ID problems caused by DSL interference. Please contact your DSL service provider for more information about DSL filters.
- Other electronic products such as HAM radios and other DECT phones, can cause interference to your cordless telephone. Try installing your telephone as far away as possible from these types of electronic devices.
- Do not install this telephone near a microwave oven or on the same electrical outlet. You may experience decreased performance while the microwave oven is operating.
- If your telephone is plugged in with a modem or a surge protector, plug the telephone (or modem/surge protector) into a different location. If this doesn’t solve the problem, relocate your telephone or modem farther apart from one another, or use a different surge protector.
- Relocate your telephone to a higher location. The telephone will likely have better reception when installed in a high area.
- If the other telephones in your home are having the same problem, the problem is in your wiring or telephone service. Contact your telephone service provider (charges may apply).
I experience poor sound quality when using the speakerphone.
- For increased sound quality while using the speakerphone, place the handset on a flat surface with the dial pad facing up.
- When using a speakerphone, controlling background noise in your environment is essential. While you are listening to your party, press mute/delete to temporarily turn your microphone off. When it is your turn to speak, remember to press mute/delete again to turn the microphone on.
- Excessive background noise will cause a speakerphone to fade in and out. Try controlling the background noise by turning off any audio devices near the speakerphone. Also, try to avoid interrupting the person at the other end of the conversation while they are speaking. If background noise cannot be controlled, you should terminate speakerphone operation and return to normal handset mode.
I hear other calls while using my telephone.
- Disconnect the telephone base from the telephone wall jack, and plug in a different telephone. If you still hear other calls, the problem is probably in your wiring or telephone service. Call your telephone service provider (charges may apply).
My calls cut in and out while I’m using my cordless handset.
- Other electronic products such as HAM radios and other DECT phones, can cause interference to your cordless telephone. Try installing your telephone as far away as possible from these types of electronic devices.
- Move the handset closer to the base. The operating range may vary with environmental conditions and time of use. There may be places within your environment that a cordless telephone will not work well. If the problem only occurs in certain areas of your environment, you can conclude that there is nothing wrong with the telephone.
- Do not install this telephone near a microwave oven or on the same electrical outlet. You may experience decreased performance while the microwave oven is operating.
- If your telephone is plugged in with a modem or surge protector, plug the telephone (or modem/surge protector) into a different location. If this doesn’t solve the problem, relocate your telephone or modem farther apart from one another, or use a different surge protector.
- Relocate your telephone base to a higher location. The telephone will have better reception when installed in a high area.
- If the other telephones in your home are having the same problem, the problem is in your wiring or telephone service. Contact your telephone service provider (charges may apply).
- If you subscribe to high-speed Internet service (DSL - digital subscriber line) through your telephone line, you must install a DSL filter between the telephone line cord and the telephone wall jack (see Telephone base and charger installation on page 6). The filter prevents noise and caller ID problems caused by DSL interference. Please contact your DSL service provider for more information about DSL filters.
My cordless handset does not ring when I receive a call.
- Make sure that the ringer is not turned off. Refer to Ringer volume on page 14.
- Make sure the telephone line cord is plugged securely into the telephone base and the telephone wall jack. Make sure the power cord is securely plugged in.
- The cordless handset may be too far from the telephone base.
- Charge the battery in the cordless handset for at least 16 hours. For optimum daily performance, return the cordless handset to the telephone base or charger when not in use.
- You may have too many extension telephones on your telephone line to allow all of them to ring simultaneously. Try unplugging one telephone at a time until the telephone start ringing.
- The layout of your home or office might be limiting the operating range. Try moving the telephone base to another location, preferably on an upper floor.
- If the other telephones in your home are having the same problem, the problem is in your wiring or telephone service. Contact your telephone service provider (charges may apply).
- Test a working telephone at the telephone wall jack. If another telephone has the same problem, the problem is the telephone wall jack. Contact your telephone service provider (charges may apply).
- Other electronic products such as HAM radios and other DECT phones, can cause interference to your cordless telephone. Try installing your telephone as far away as possible from these types of electronic devices.
- Completely remove and then replace the battery. Place the cordless handset in the telephone base. Wait for the cordless handset to reestablish its connection with the telephone base. Allow up to one minute for this to take place.
- Your telephone line cord might be defective. Try installing a new telephone line cord.
My caller ID isn’t working.
- Caller ID is a subscription service. You must subscribe to this service from your telephone service provider for this feature to work on your telephone.
- Your caller must be calling from an area that supports caller ID.
- Both your and your caller’s telephone service providers must use caller ID compatible equipment.
- Make sure the home area code is set correctly in the telephone (see Home area code on page 18).
- If you subscribe to high-speed Internet service (DSL - digital subscriber line) through your telephone line, you must install a DSL filter between the telephone line and the telephone wall jack (see Telephone base and charger installation on page 6). The filter prevents noise and caller ID problems caused by DSL interference. Please contact your DSL service provider for more information about DSL filters.
My telephone does not receive caller ID when on a call.
- Make sure you subscribe to caller ID with call waiting features provided by your telephone service provider. Caller ID features work only if both you and the caller are in areas offering caller ID service, and if both telephone service providers use compatible equipment.
A  icon shows on the display and I don’t know why.
- Your telephone has voicemail indication that is separate from the built-in answering system. If
 appears on the display, then your telephone has received a signal from your telephone service provider that you have a voicemmail message waiting for you to retrieve from your telephone service provider. Contact your telephone service provider for more information on how to access your voicemail.
I cannot retrieve voicemail messages.
- Your telephone has both a built-in answering system and voicemail indication. They are independent features and each alerts you to new messages differently (see Answering system and voicemail indicators on page 57). If you subscribe to voicemail service from your telephone service provider (charges may apply), contact your telephone service provider for more information on how to access your voicemail.
Incomplete messages.
- If a caller leaves a very long message, part of it may be lost when the system disconnects the call after the maximum recording time you have set (see Message alert tone on page 55).
- If the caller pauses for longer than 7 seconds, the answering system stops recording and disconnects the call.
- If the answering system’s memory becomes full during a message, the answering system stops recording and disconnects the call.
- If the caller’s voice is very soft, the answering system may stop recording and disconnects the call.
- If someone picks up the call at a telephone on the same line during a message, the answering system stops recording and disconnects the call. Part of the message may be lost.
Difficulty hearing messages.
- Press
 /-volume+ to adjust the speaker volume on the telephone base.
- Press
 dir/volume to increase the message playback volume on a handset.
The answering system does not answer after correct number of rings.
- Make sure the answering system is on. When the answering system is on, ans on should show on the handset and the
 /ans. On/off light is lit on the telephone base (see Answer on/off on page 51).
- If toll saver is selected, the number of rings changes to 2 when there are new messages (see Number of rings on page 53).
- If the memory is full or the answering system is off, the answering system answers after 10 rings.
- In some cases, the answering system is affected by the ringing system used by the telephone service provider.
- If you subscribe to voicemail service, change the number of rings so that your answering system answers before your voicemail (see Answering system and voicemail indicators on page 57). To determine how many rings activate your voicemail, contact your telephone service provider.
- If there is a fax machine connected to the same telephone line, try disconnecting the fax machine. If that solves the problem, consult your fax machine documentation for information on compatibility with answering systems.
The answering system announces “Time and date not set.”
- You need to reset the date and time (see Set date/time on page 17).
The answering system does not respond to the remote commands.
- Make sure to enter your remote access code correctly (see Remote access code on page 54).
- Make sure you are calling from a touch-tone telephone. When you dial a number, you should hear tones. If you hear clicks, the telephone is not a touch-tone telephone and cannot activate the answering system.
- The answering system may not detect the remote access code while your announcement is playing. Try waiting until the announcement is over before entering the code.
- There may be interference on the telephone line you are using. Press dialing keys firmly.
The answering system does not record messages.
- Make sure the answering system is on (see Answer on/off on page 51).
- Make sure the memory of the answering system is not full. When the answering machine memory is full, it does not record new messages until some old messages are deleted.
- If you subscribe to voicemail service, change the number of rings so that your answering system answers before your voicemail (see Answering system and voicemail indicators on page 57). To determine how many rings activate your voicemail, contact your telephone service provider.
- If there is a fax machine connected to the same telephone line, try disconnecting the fax machine. If that solves the problem, consult your fax machine documentation for information on compatibility with answering systems.
Announcement is not clear.
- When you record your announcement, make sure you speak in a normal tone of voice, toward the microphone on the handset.
- Make sure there is no background noise (TV, music, etc.) while recording.
I subscribe to a nontraditional telephone service that uses my computer to establish connections, and my telephone doesn’t work.
- Make sure your computer is powered on.
- Make sure your Internet connection is working properly.
- Make sure that the software is installed and running for your nontraditional telephone service.
- Make sure to plug your USB port adapter into a dedicated USB port on your computer. Do not plug into a multiple port USB hub (USB splitter) that is not powered.
- In a few rare instances, the USB port on your computer may not have enough power. In these instances, try using a USB hub with its own external power supply.
- If you are using a firewall, it may prevent access to your nontraditional telephone service. Contact your service provider for more information.
I’ve set my LCD language to Spanish or French and I don’t know how to change it back to English.
- Press MENU/SELECT in idle mode. Enter 364# using the dialing keys. You hear a confirmation tone.
Common cure for electronic equipment:
If the telephone is not responding normally, try resetting the telephone. Do the following in the order listed.
- Disconnect the power to the telephone base.
- Disconnect the cordless handset battery, and spare battery, if applicable.
- Wait a few minutes.
- Connect power to the telephone base.
- Completely remove and then replace the battery. Place the cordless handset into the telephone base.
- Wait for the cordless handset to reestablish its connection with the telephone base. Allow up to one minute for this to take place.
Maintenance
Taking care of your telephone
- Your cordless telephone contains sophisticated electronic parts, so it must be treated with care.
- Avoid rough treatment.
- Place the handset down gently.
- Save the original packing materials to protect your telephone if you ever need to ship it.
Avoid water
- Your telephone can be damaged if it gets wet. Do not use the handset in the rain, or handle it with wet hands. Do not install the telephone base near a sink, bathtub or shower.
Electrical storms
- Electrical storms can sometimes cause power surges harmful to electronic equipment. For your own safety, take caution when using electric appliances during storms.
Cleaning your telephone
- Your telephone has durable plastic casing that should retain its luster for many years. Clean it only with a soft cloth slightly dampened with water or mild soap.
- Do not use excess water or cleaning solvents of any kind.