To prevent possible SERIOUS INJURY or DEATH from a moving gate or door:
• ALWAYS keep remote controls out of reach of children. NEVER permit children to operate, or play with remote control
transmitters.
• Activate gate or door ONLY when it can be seen clearly, is properly adjusted and there are no obstructions to door travel.
• ALWAYS keep gate or door in sight until completely closed. NEVER permit anyone to cross path of moving gate or door.
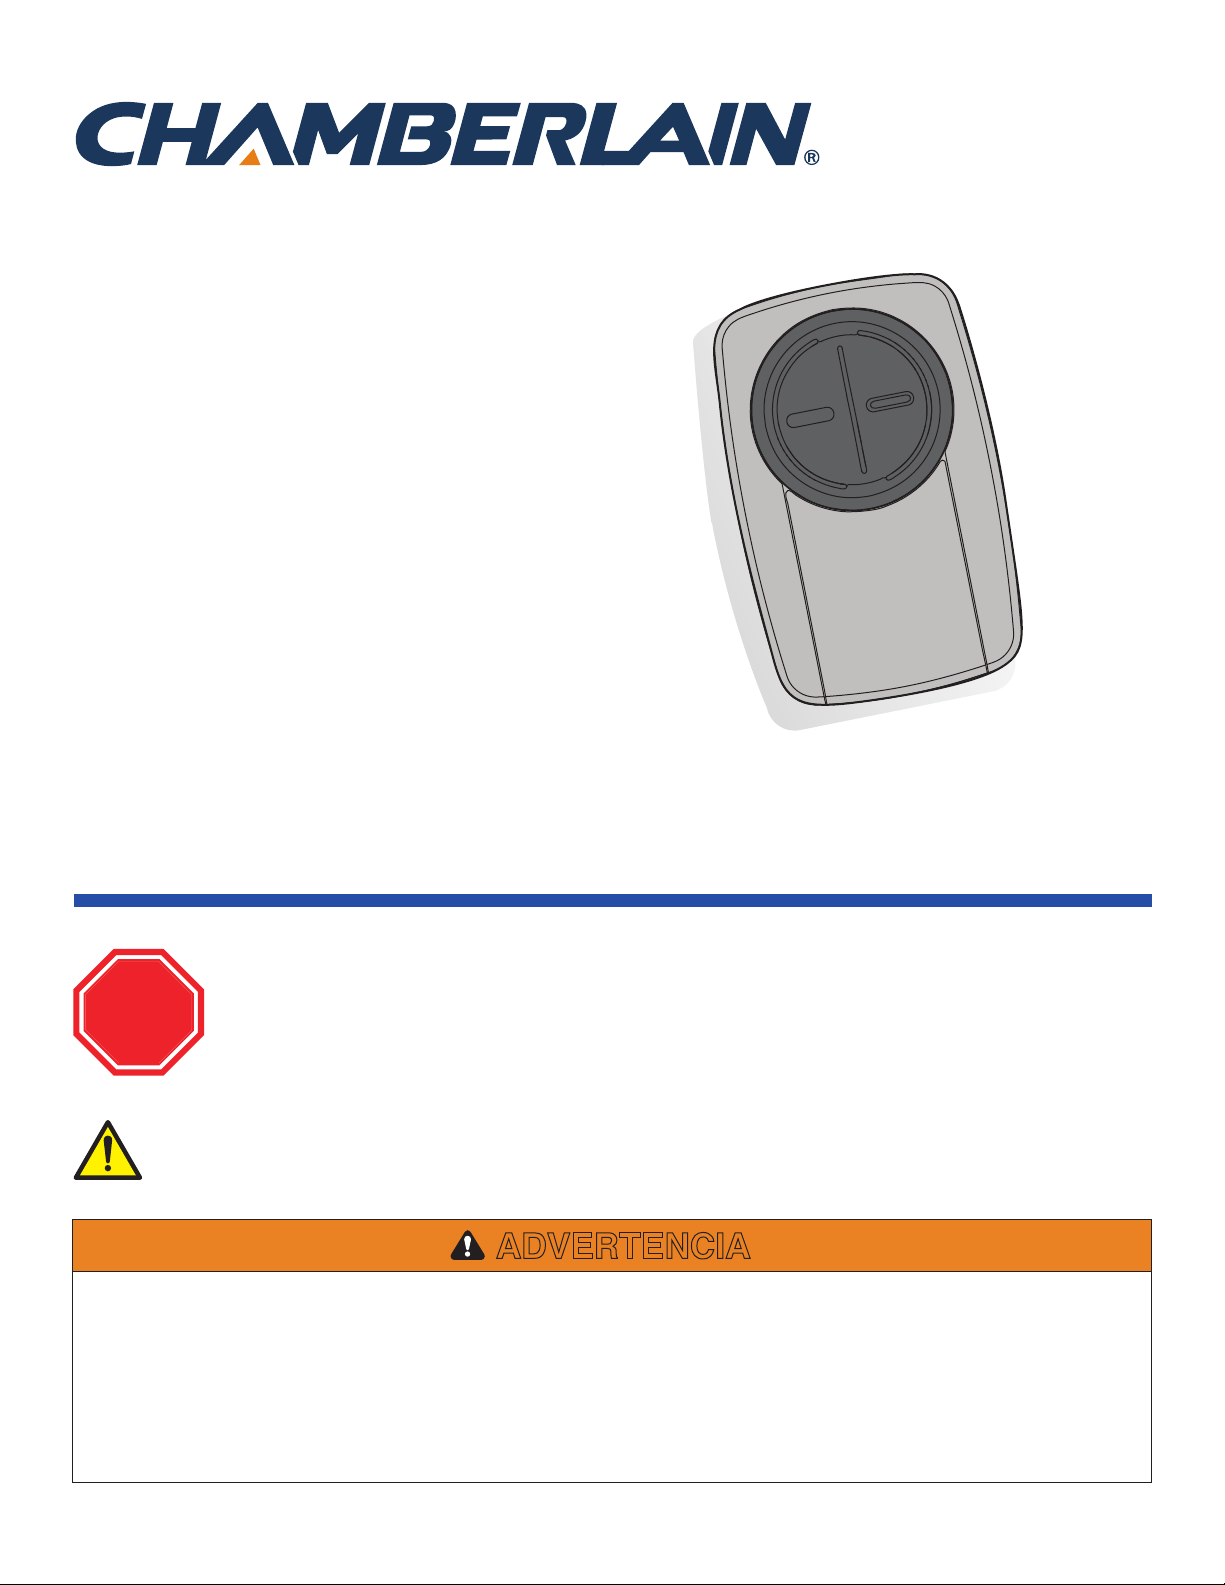
Models KLIK3U, KLIK3U-BK,
KLIK3U-BL, KLIK3U-BK2, KLIK3U-BL2,
KLIK3U-SS, KLIK3C, KLIK3C-BK,
KLIK3C-BL, KLIK3C-SS, KLIK3C-BK2,
KLIK3C-BL2
Read instructions thoroughly BEFORE beginning.
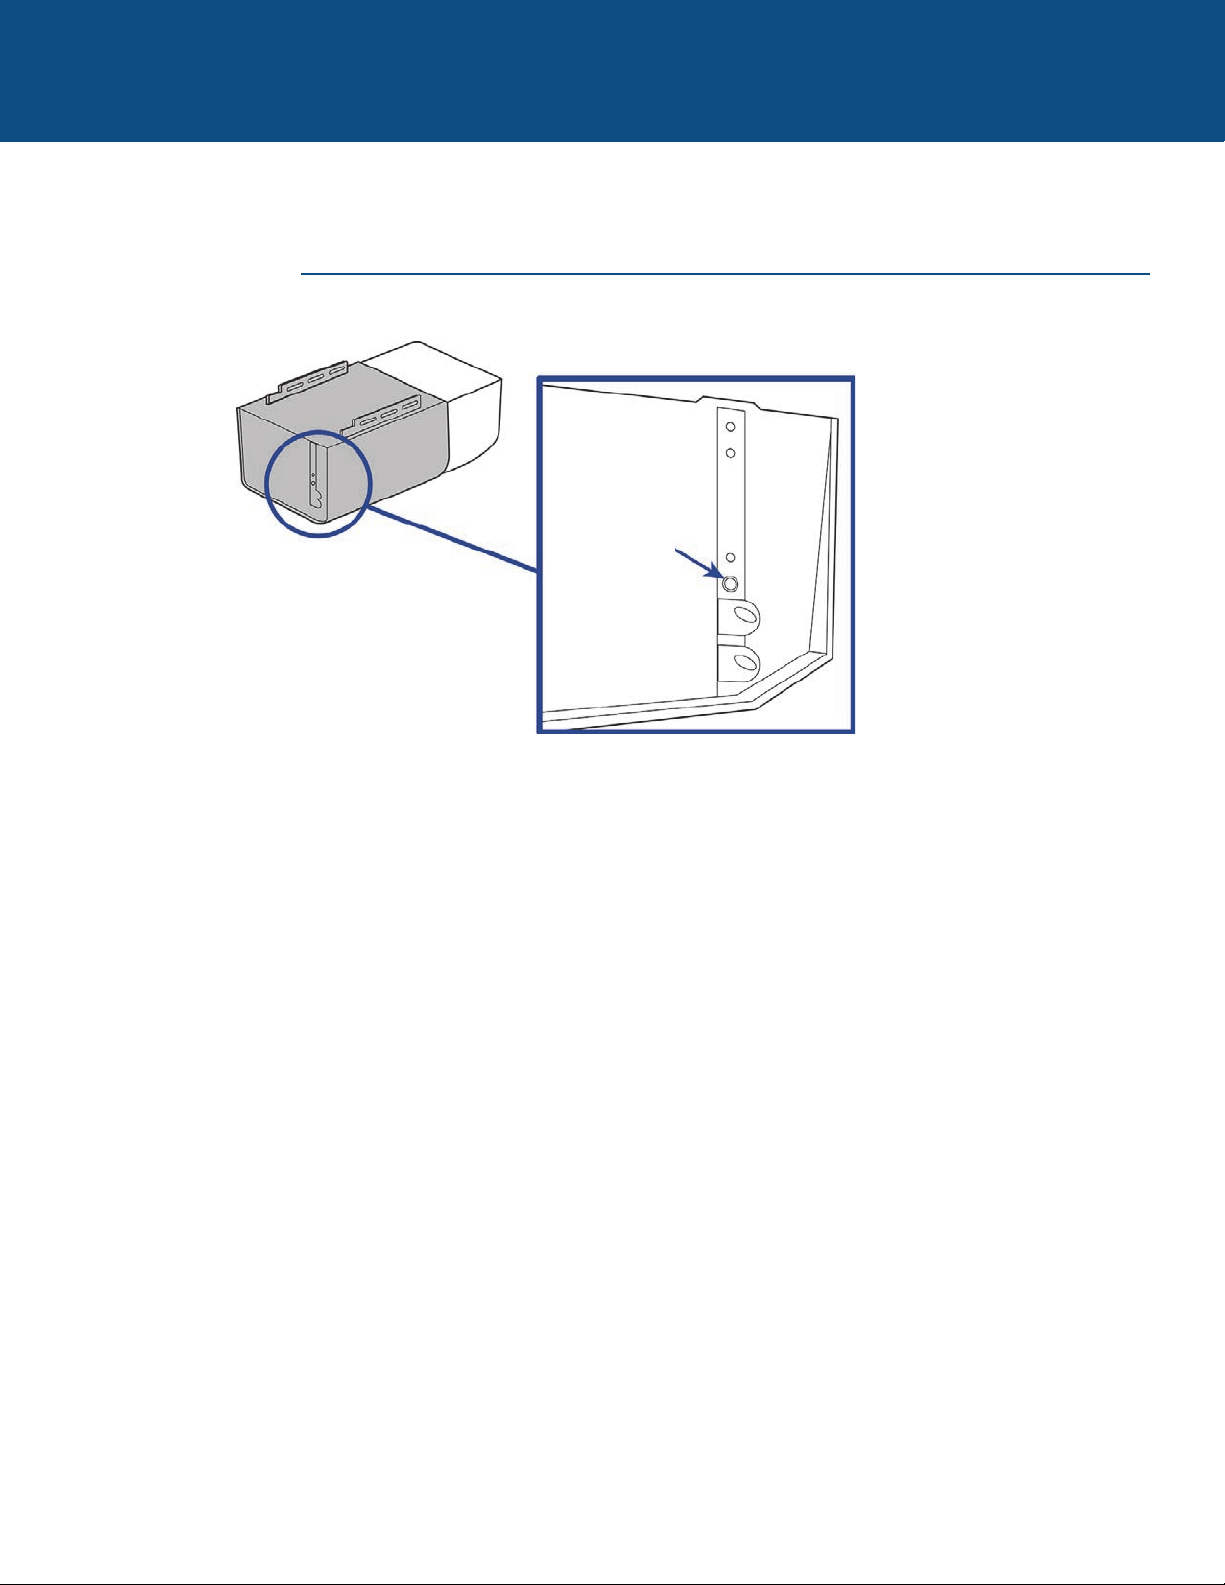
If using the Universal Remote Control with residential door openers, the remote control must be used only with
door openers manufactured after 1993 that utilize photoelectric sensors. The photoelectric sensors are always
located on or near the bottom of the door track.
STOP
UNIVERSAL REMOTE
CONTROL
WARNING: This product can expose you to chemicals including lead, which are known to the State of California to cause
cancer or birth defects or other reproductive harm. For more information go to www.P65Warnings.ca.gov
2
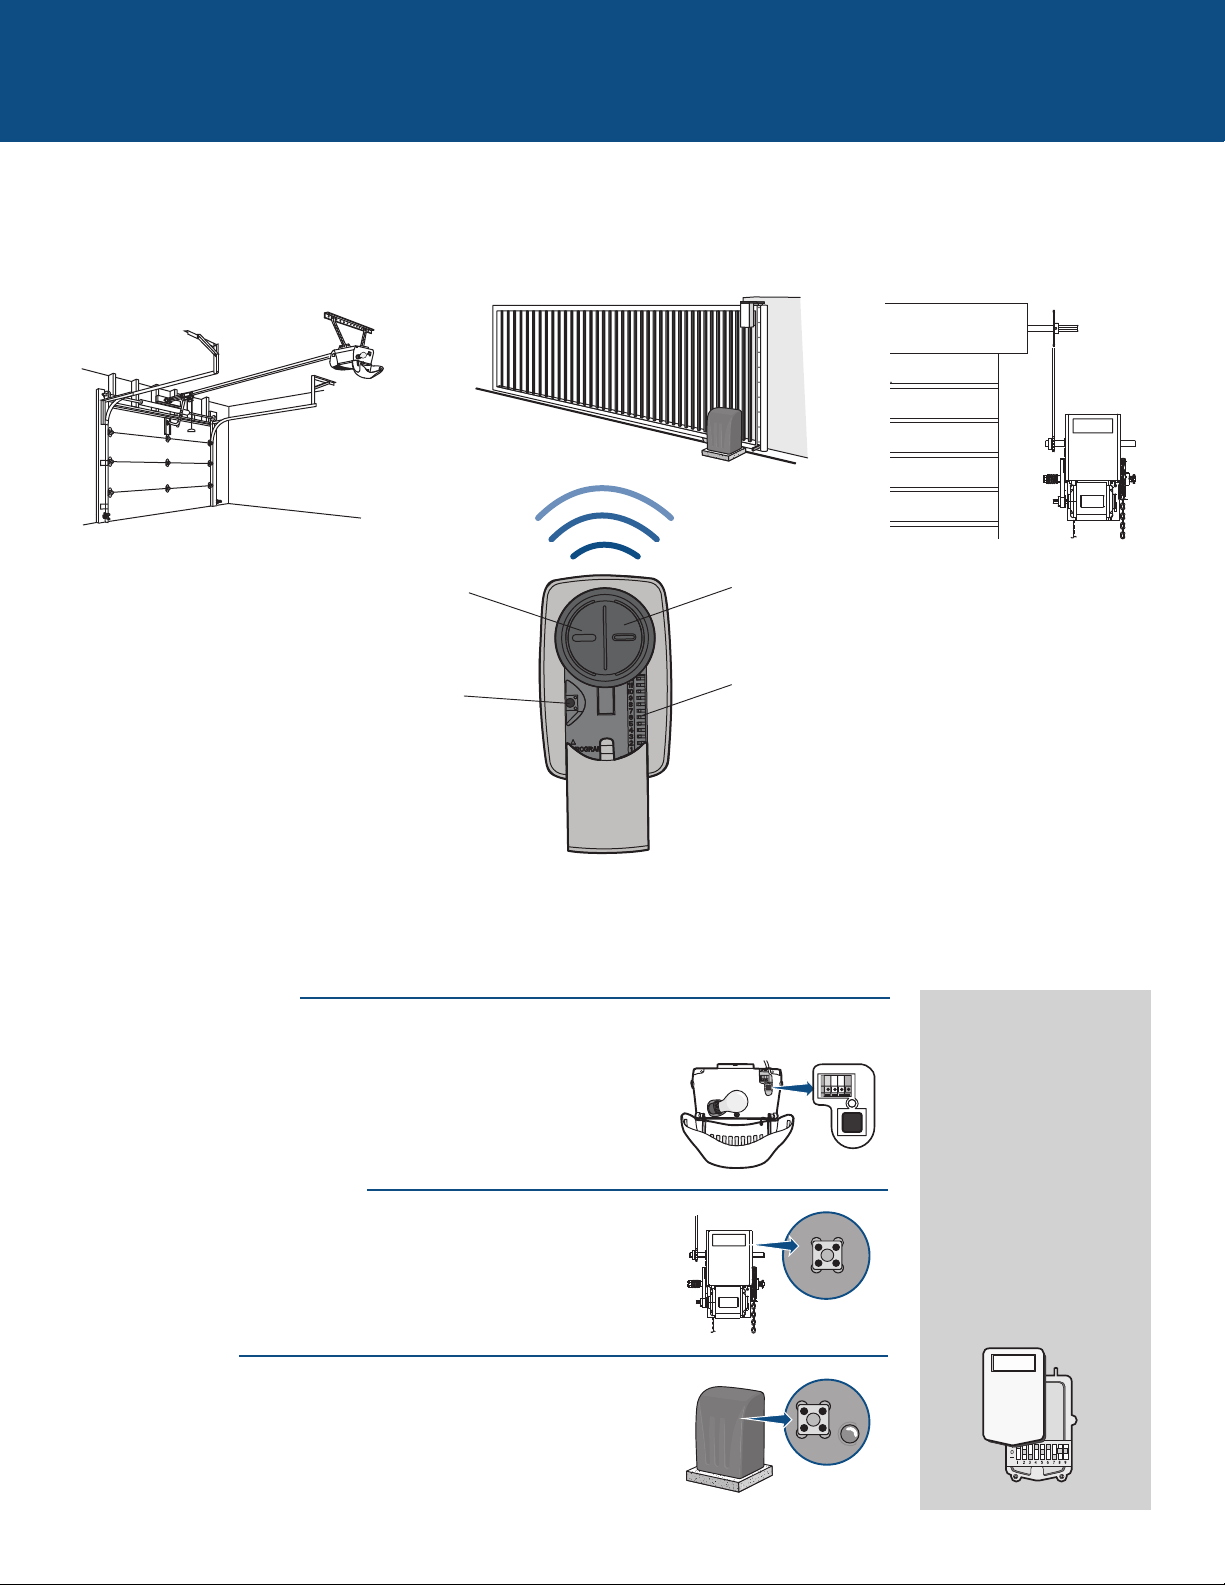
GETTING STARTED
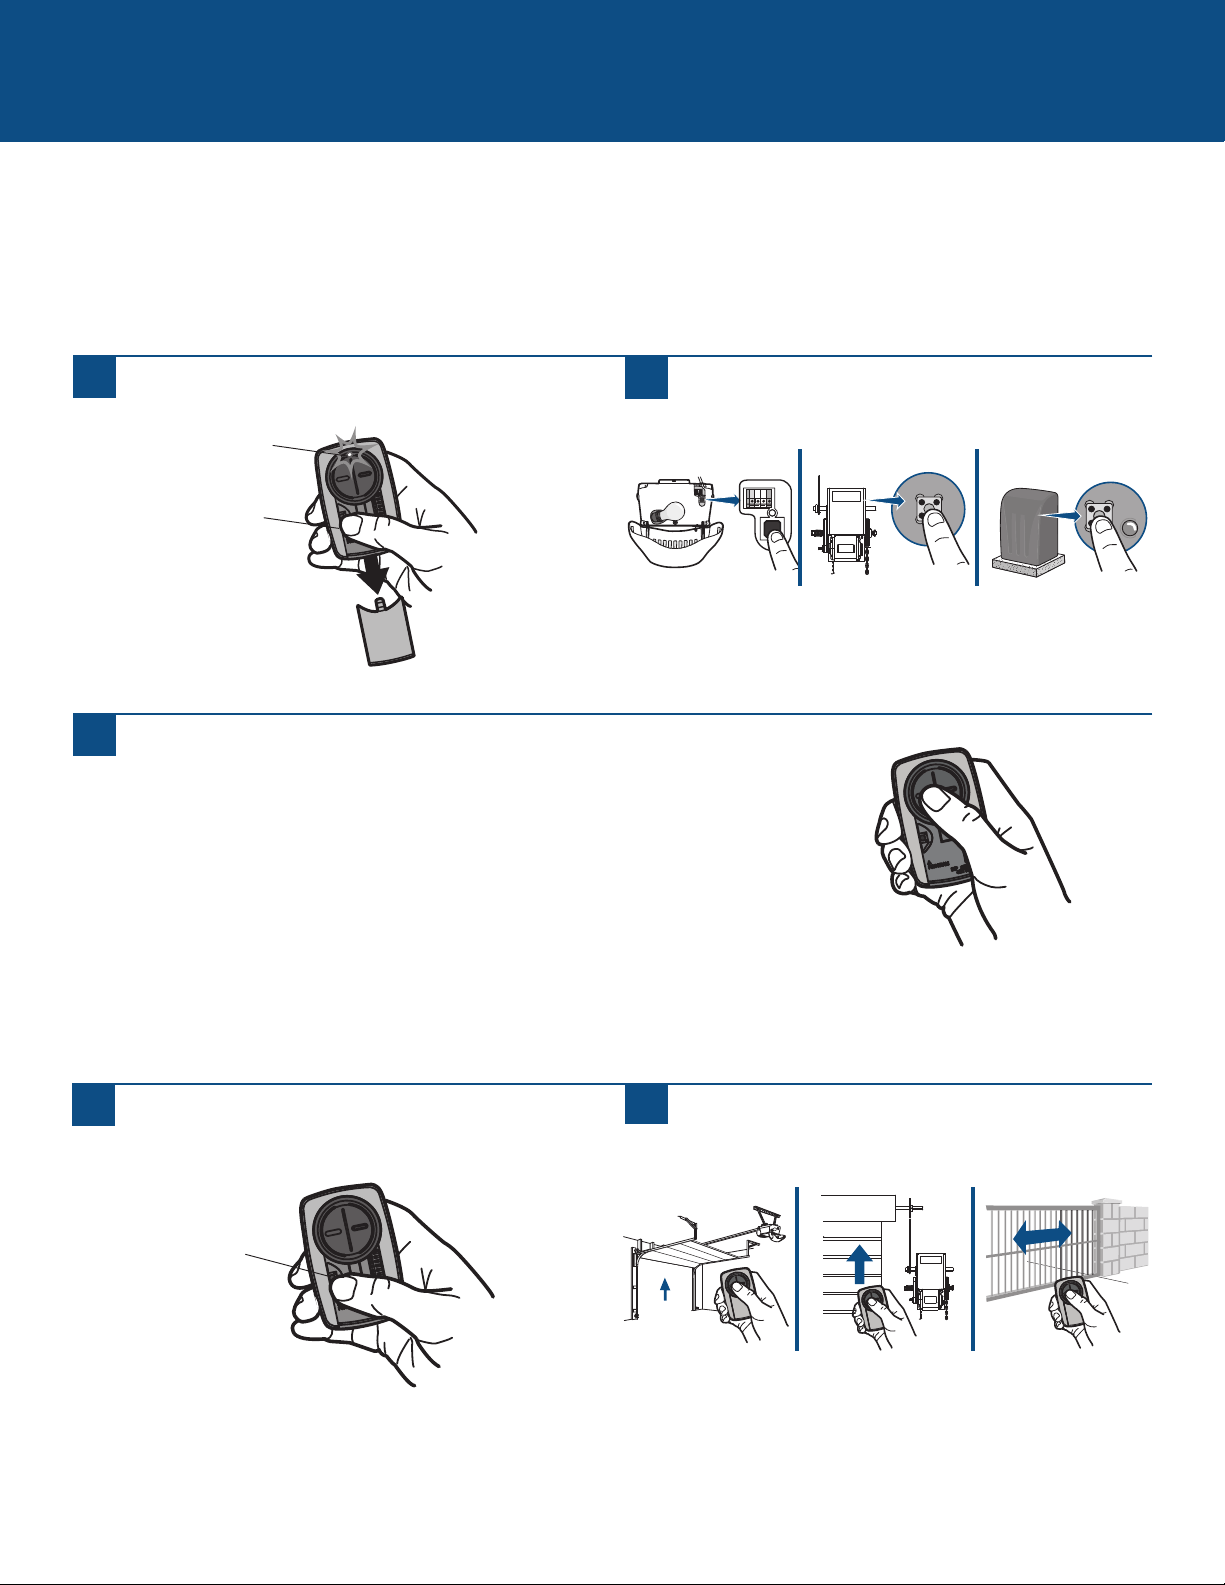
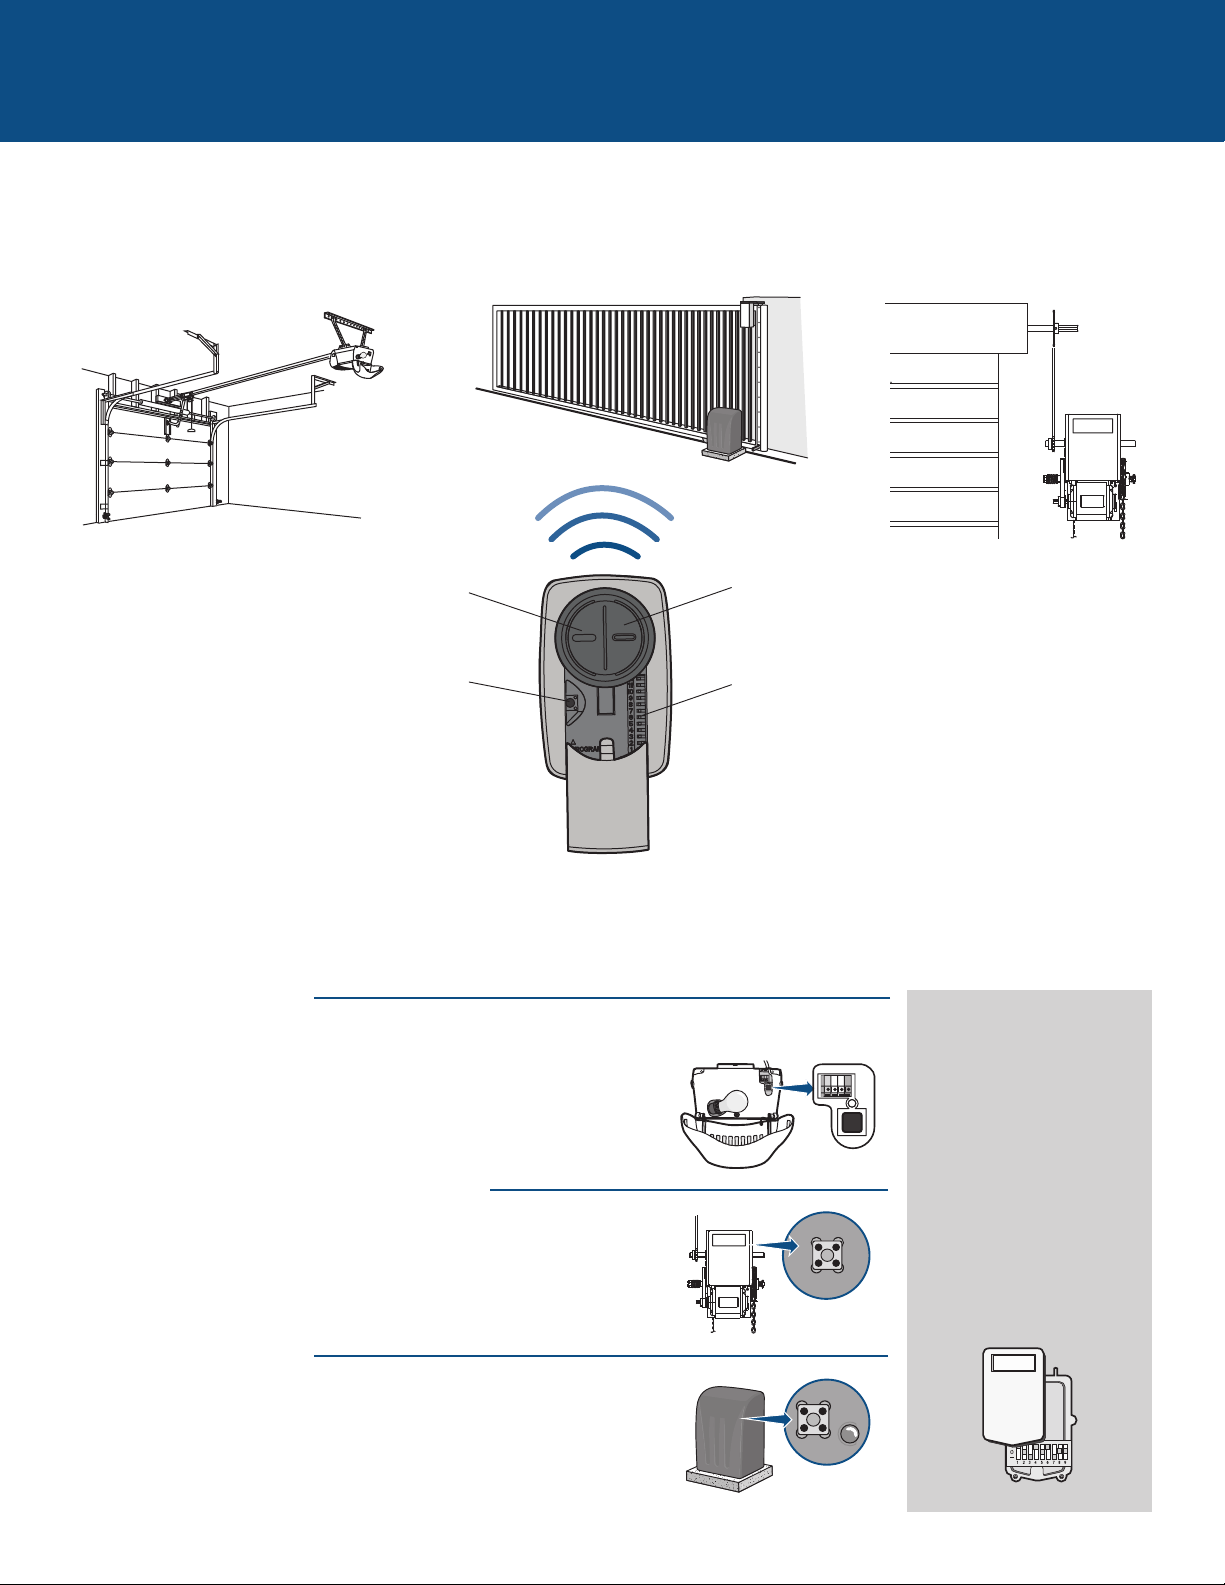
The remote control can be programmed to activate up to two products, such as a garage door opener, gate operator, or
commercial door operator. The images throughout this manual are for reference only and your product may look different.
Button 2
Programmed separately from Button 1.
Garage Door Opener
Commercial Door OperatorGate Operator
Button 1
Programmed separately from Button 2.
Program Button
Used for programming products with LEARN buttons.
Depending on your product, there is a button (LEARN button) or DIP switches used for programming. You will need to locate the
LEARN button or DIP switches on your product before you start programming.
DIP Switches
Used for programming products with DIP switches.
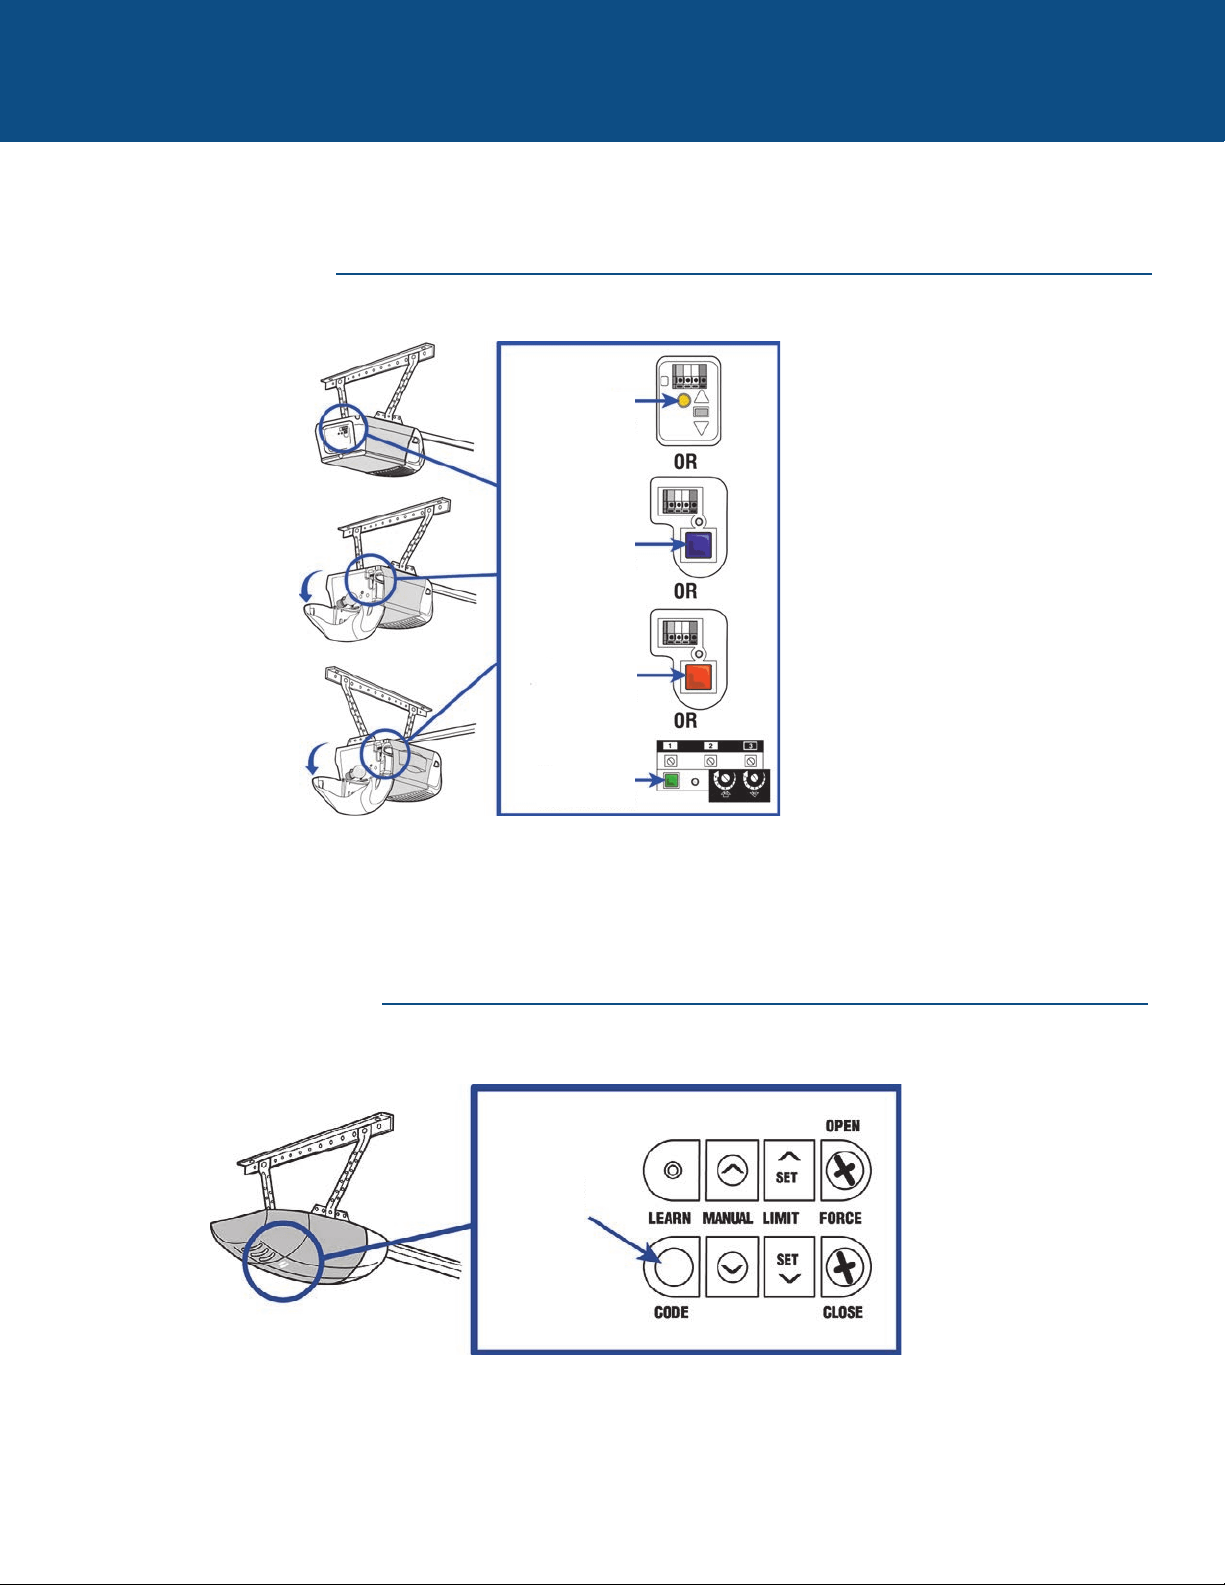
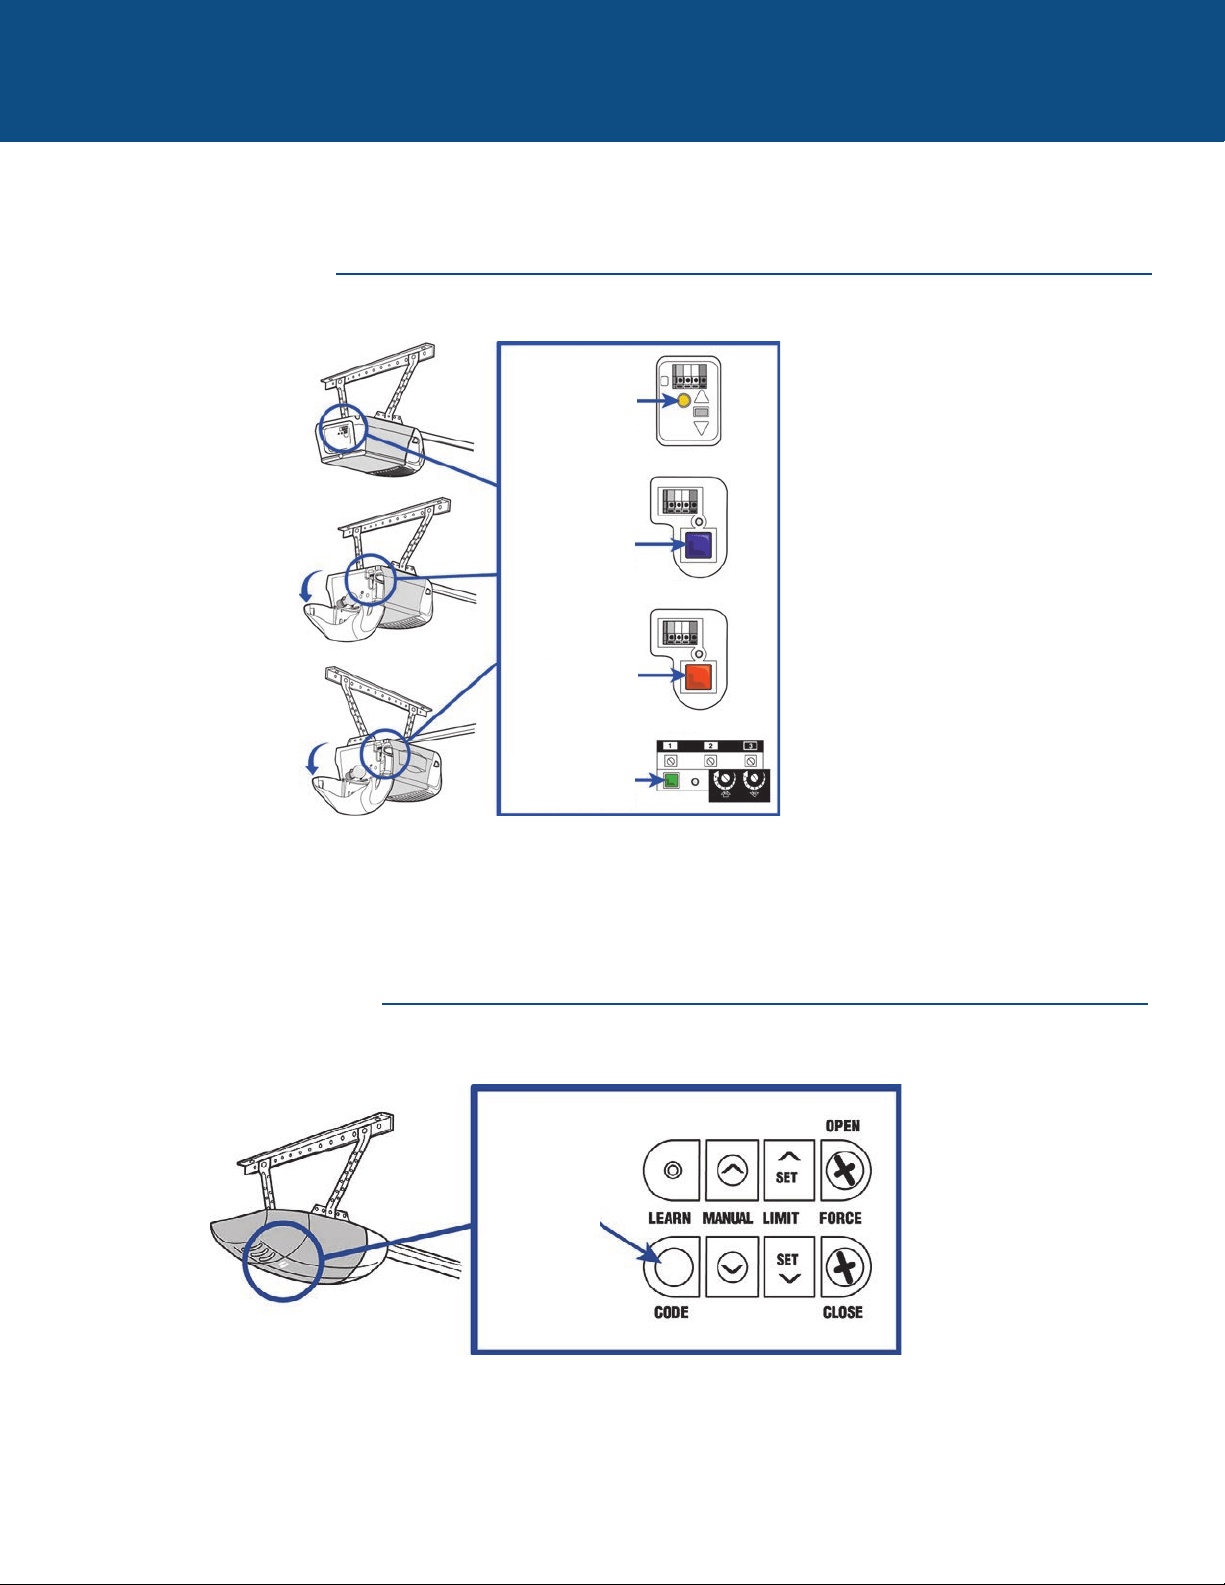
GARAGE DOOR OPENERS
The LEARN button or DIP switches are typically located on the back or
side panel of your garage door opener. Your LEARN button may have a
different name (SMART button, PROGRAM button, SET button, etc.). For
help locating your LEARN button or DIP switches refer to the Help
section in this manual or contact your garage door opener manufacturer.
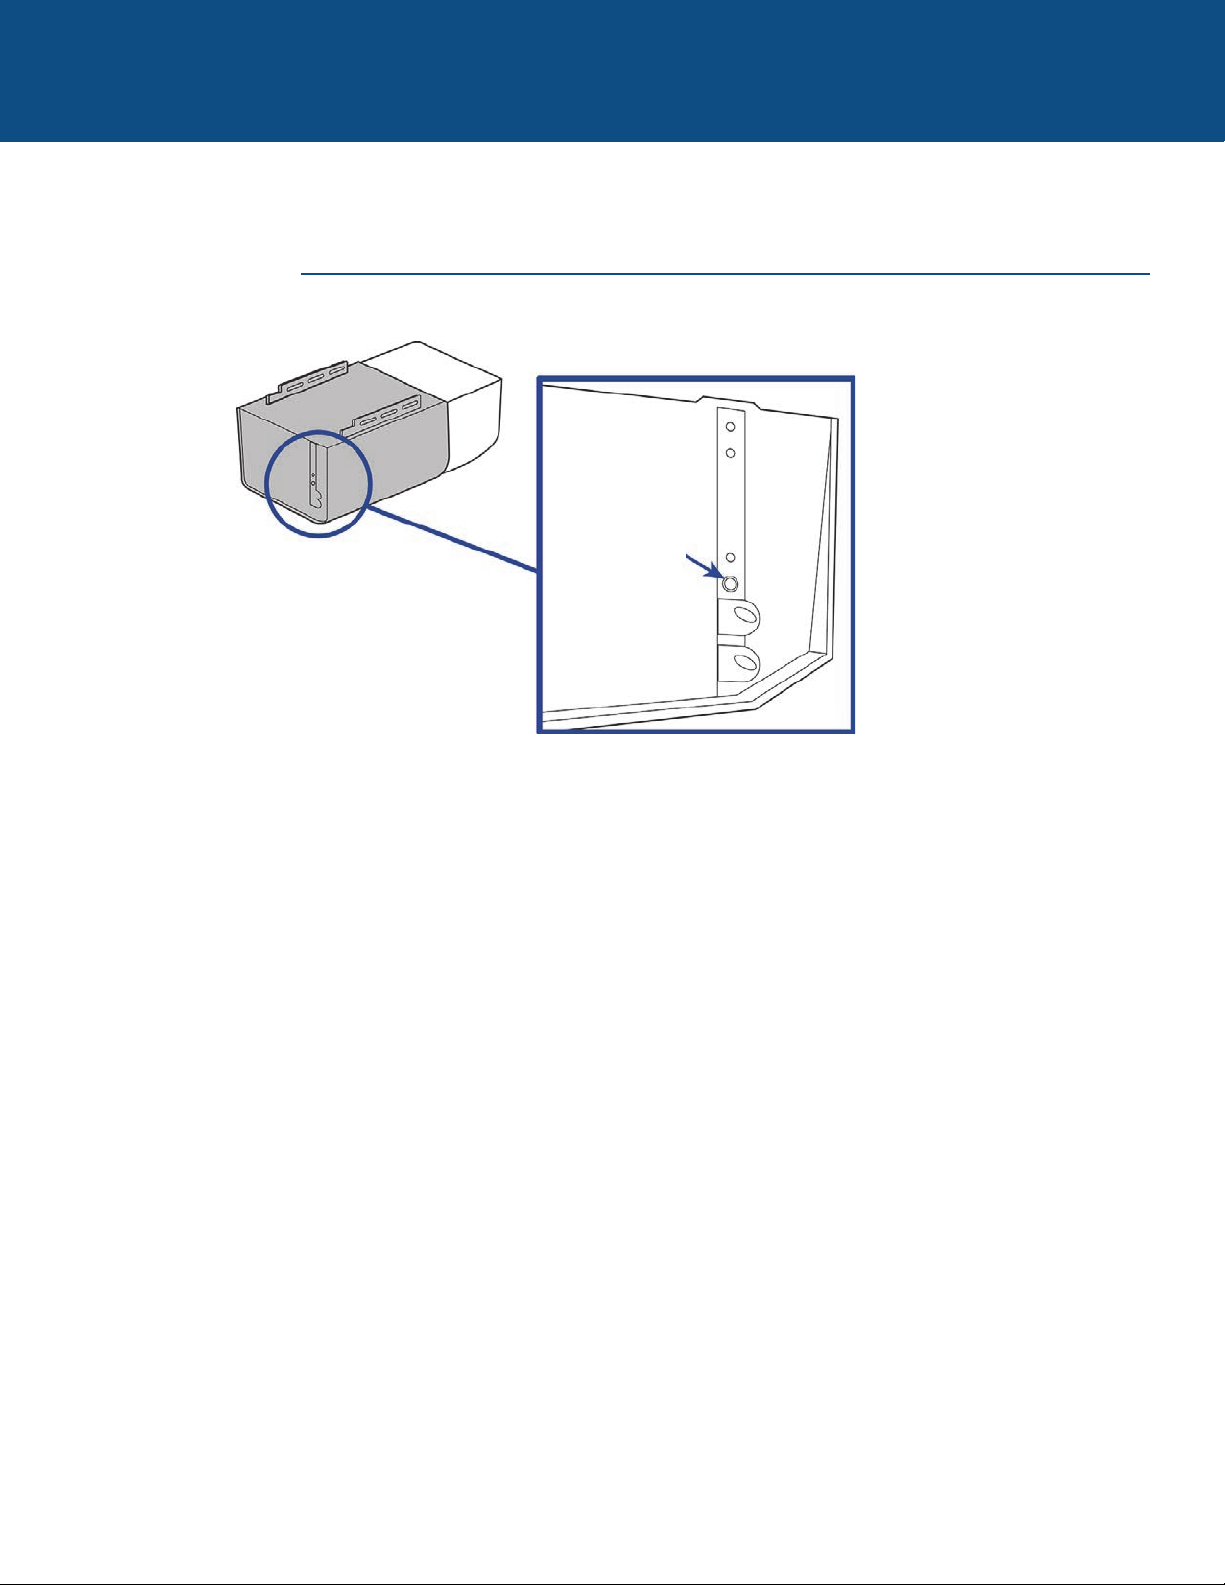
COMMERCIAL DOOR OPERATORS
The LEARN button or DIP switches are typically located on the logic
board of your operator. Your LEARN button may have a different name
(RADIO button, XMITTER button, etc.). For help locating your LEARN
button or DIP switches contact your door operator manufacturer.
GATE OPERATORS
The LEARN button or DIP switches are typically located on the control
board of your operator. Your LEARN button may have a different name
(RADIO button, XMITTER button, etc.). For help locating your LEARN
button or DIP switches contact your gate operator manufacturer.
EXTERNAL RECEIVER
Some products do not
have a LEARN button or
DIP switches. In this
case, the LEARN button
or DIP switches will be
located in an external
receiver. The receiver will
be located on the product
or mounted nearby.
Follow the programming
instructions for an
external receiver.
3
GARAGE DOOR OPENERS
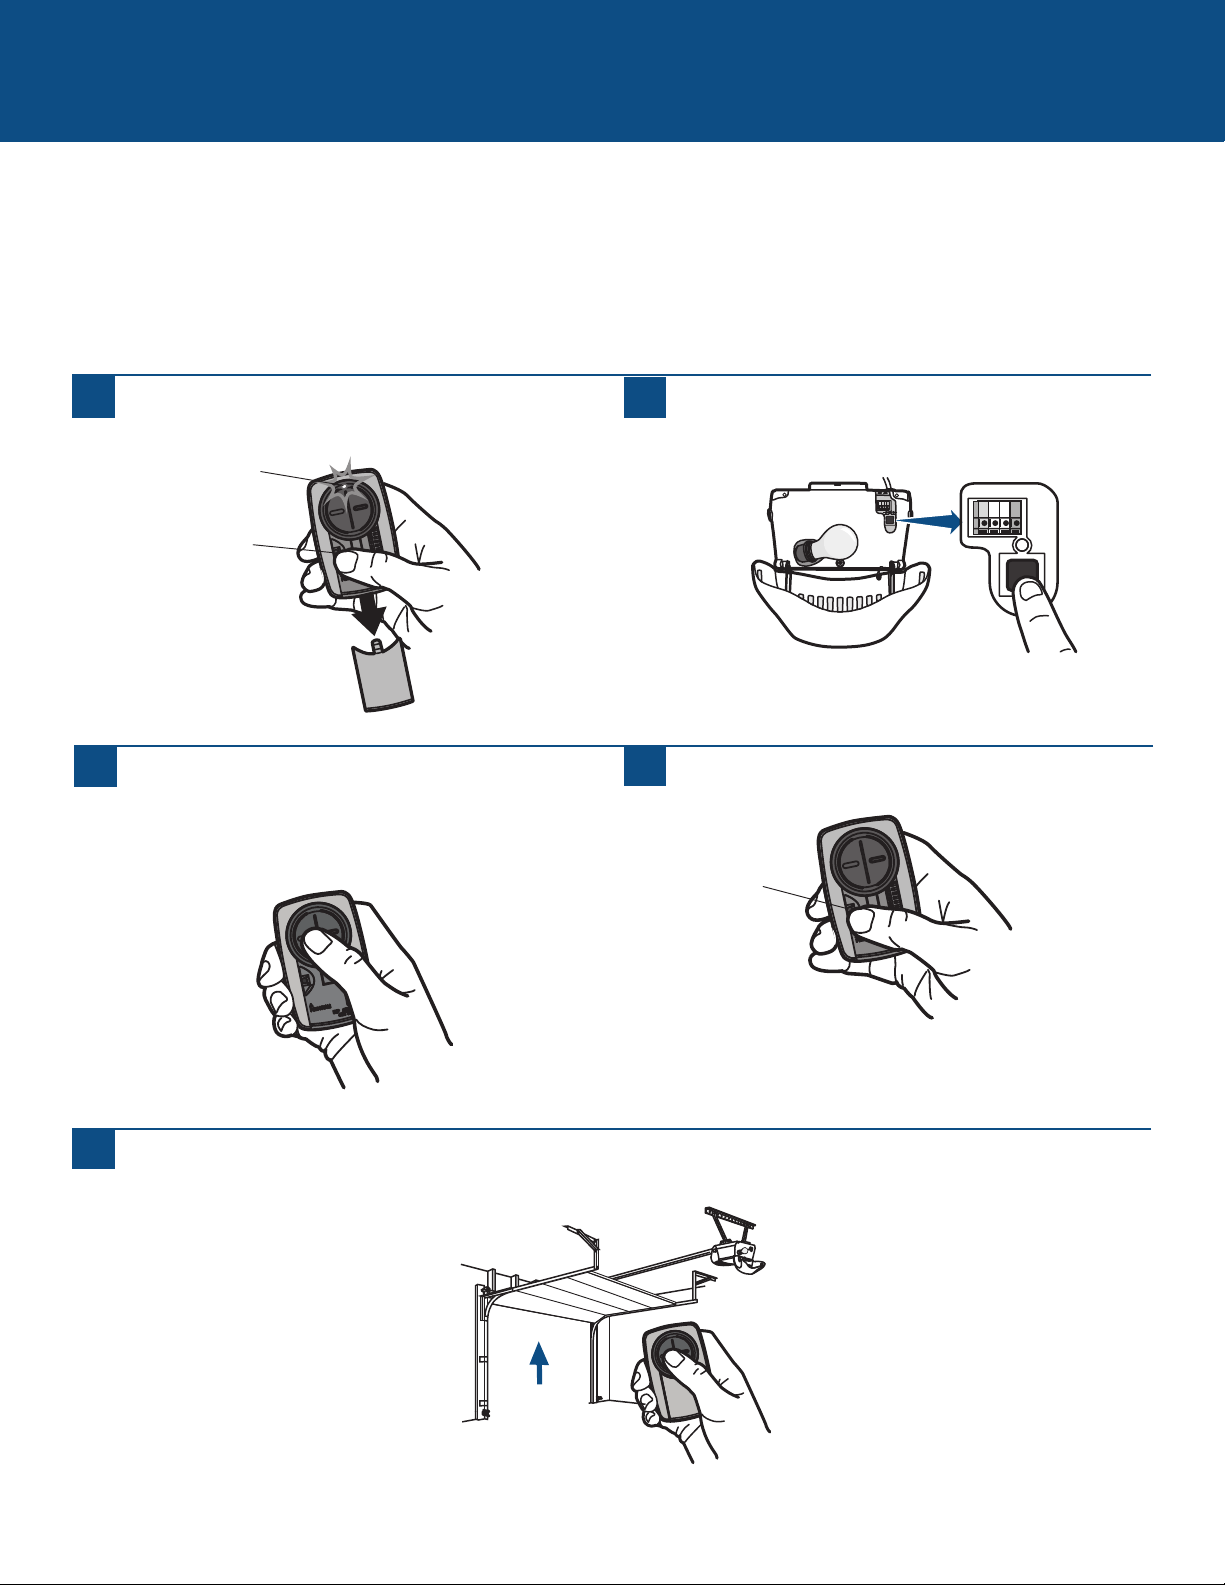
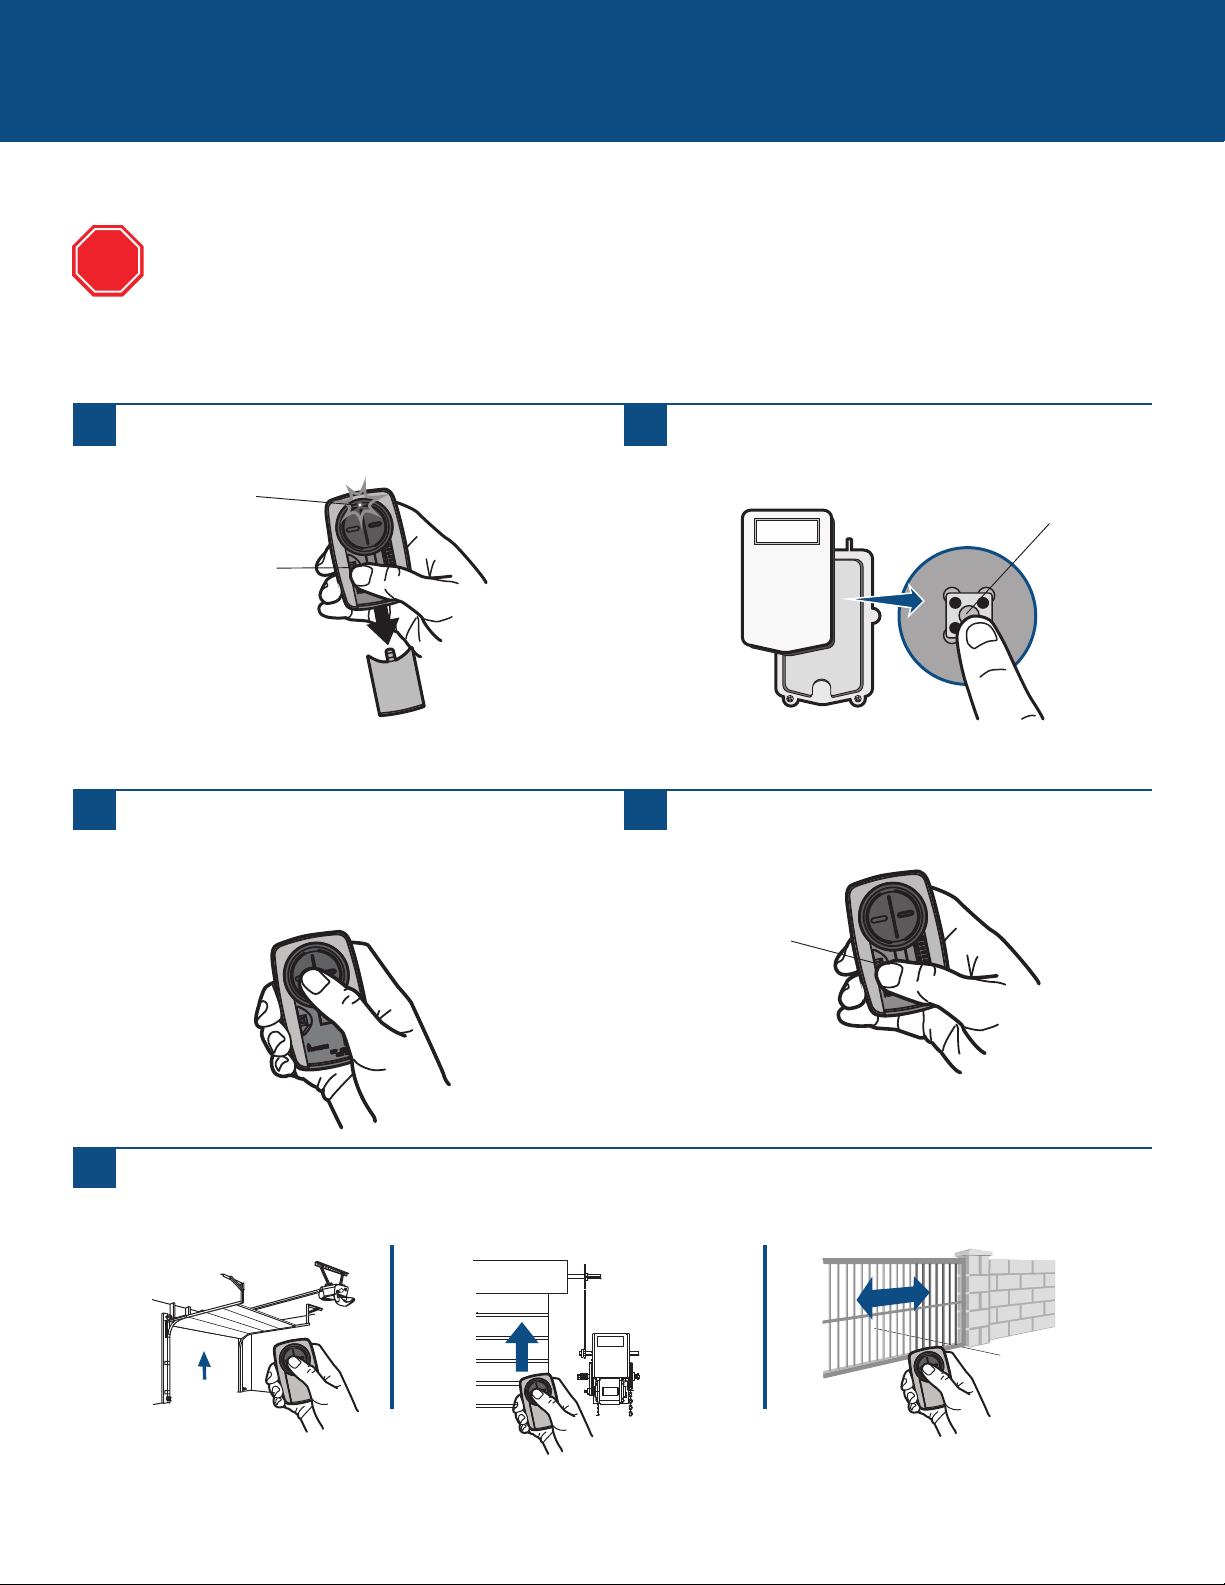
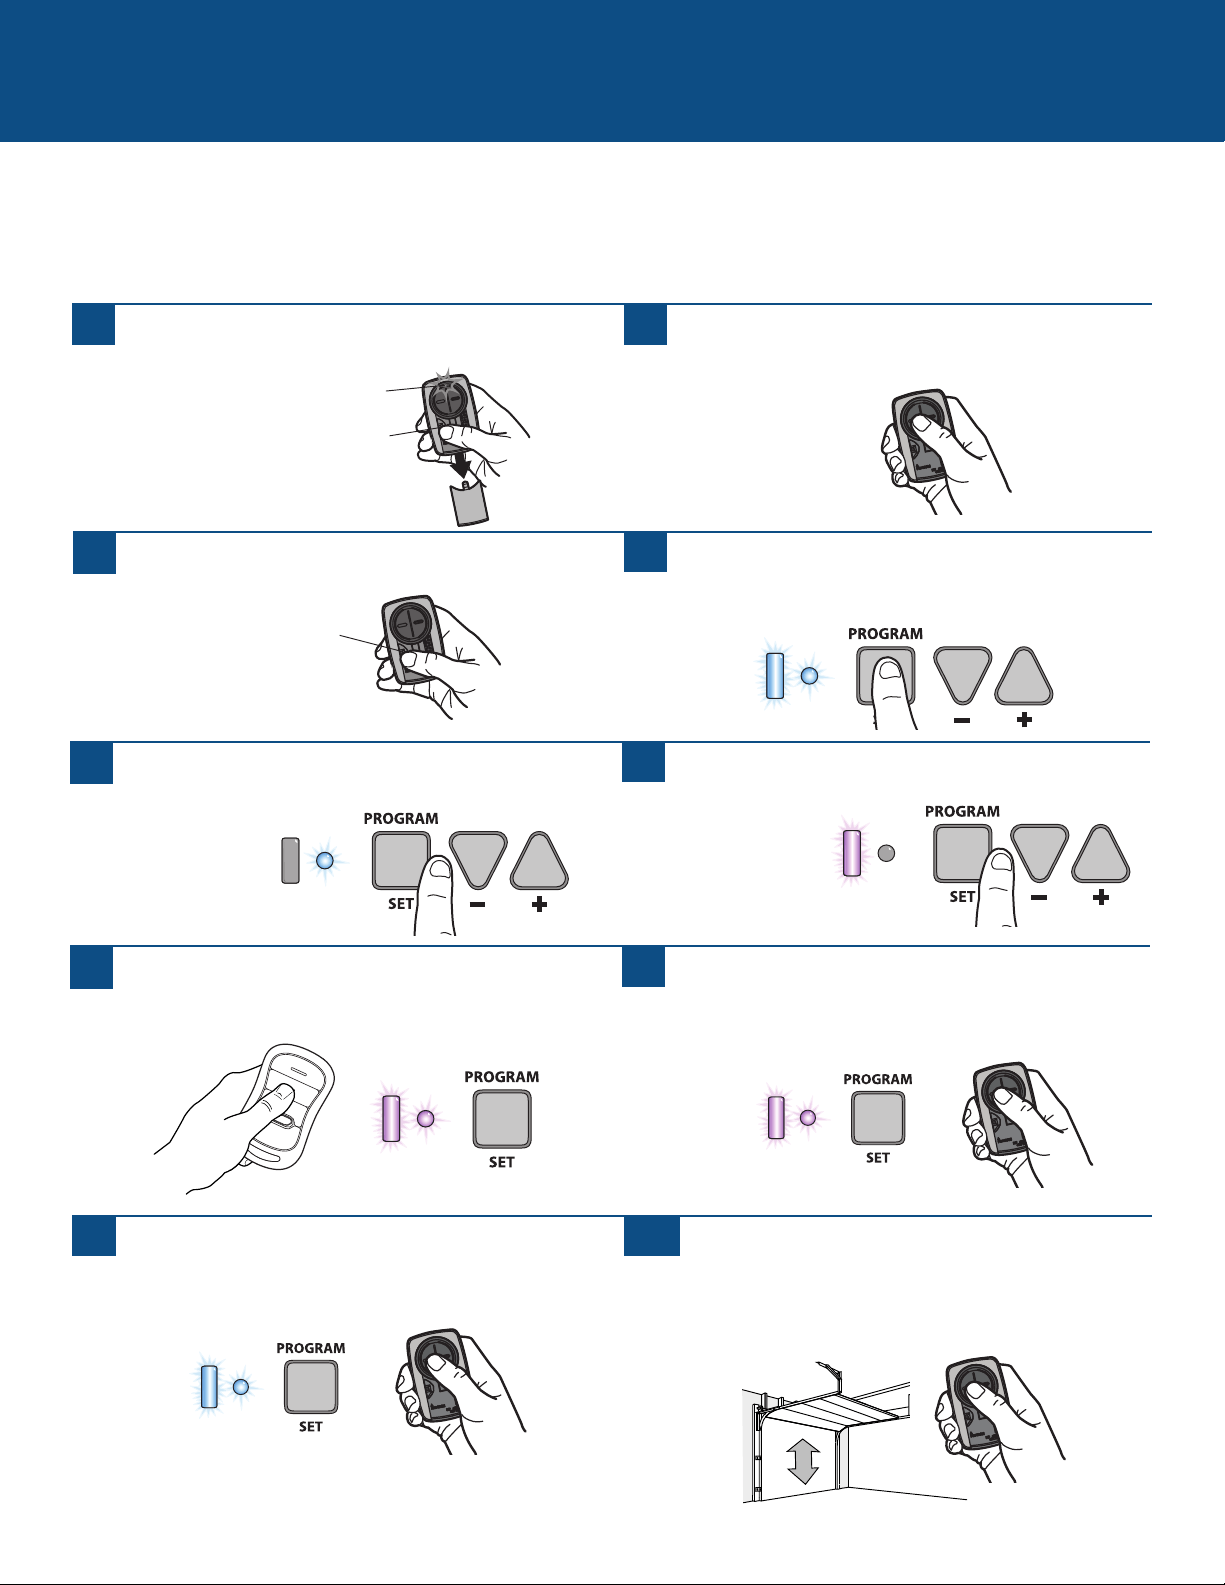
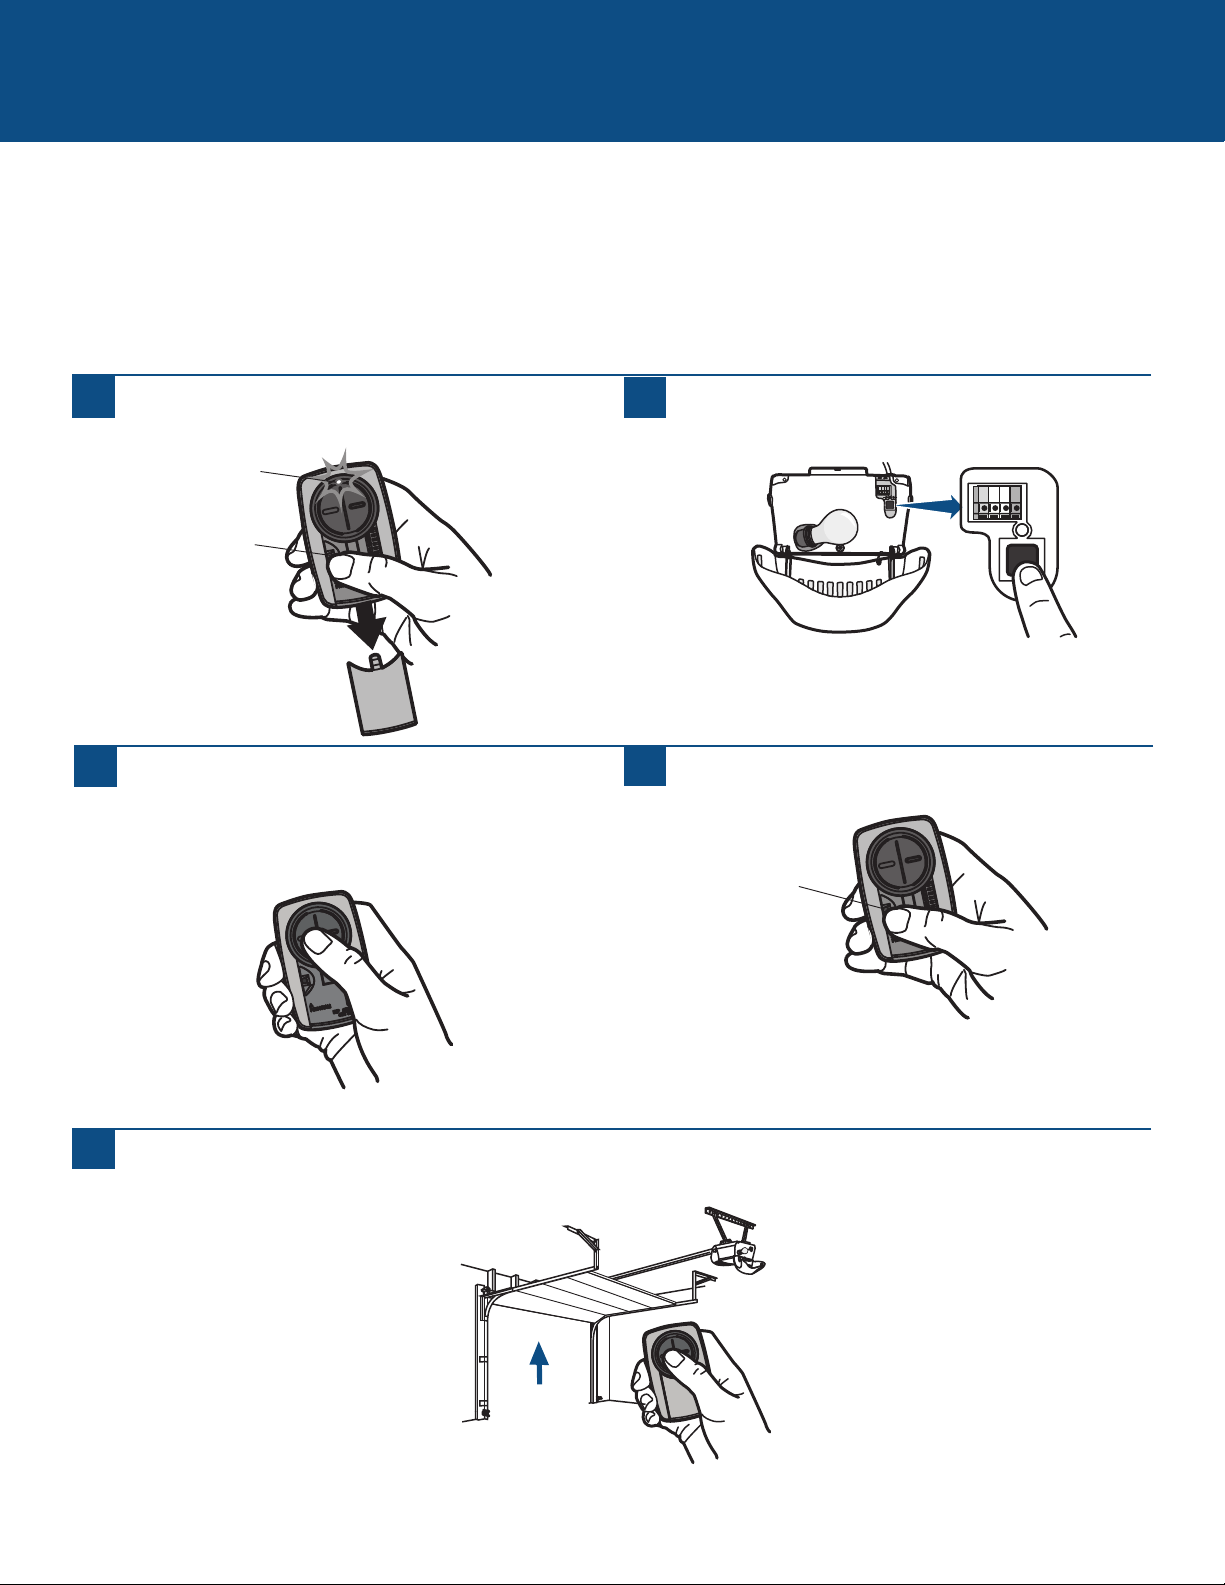
Programming to a Garage Door Opener with a LEARN Button
The LEARN button is typically located on the back or side panel of the garage door opener or an external receiver. For help
locating your LEARN button refer to the Help section in this manual or contact your garage door opener manufacturer.
If you have a Genie
®
Intellicode
®
2 garage door opener go to the next page.
The images throughout this manual are for reference only and your product may look different.
Program Button
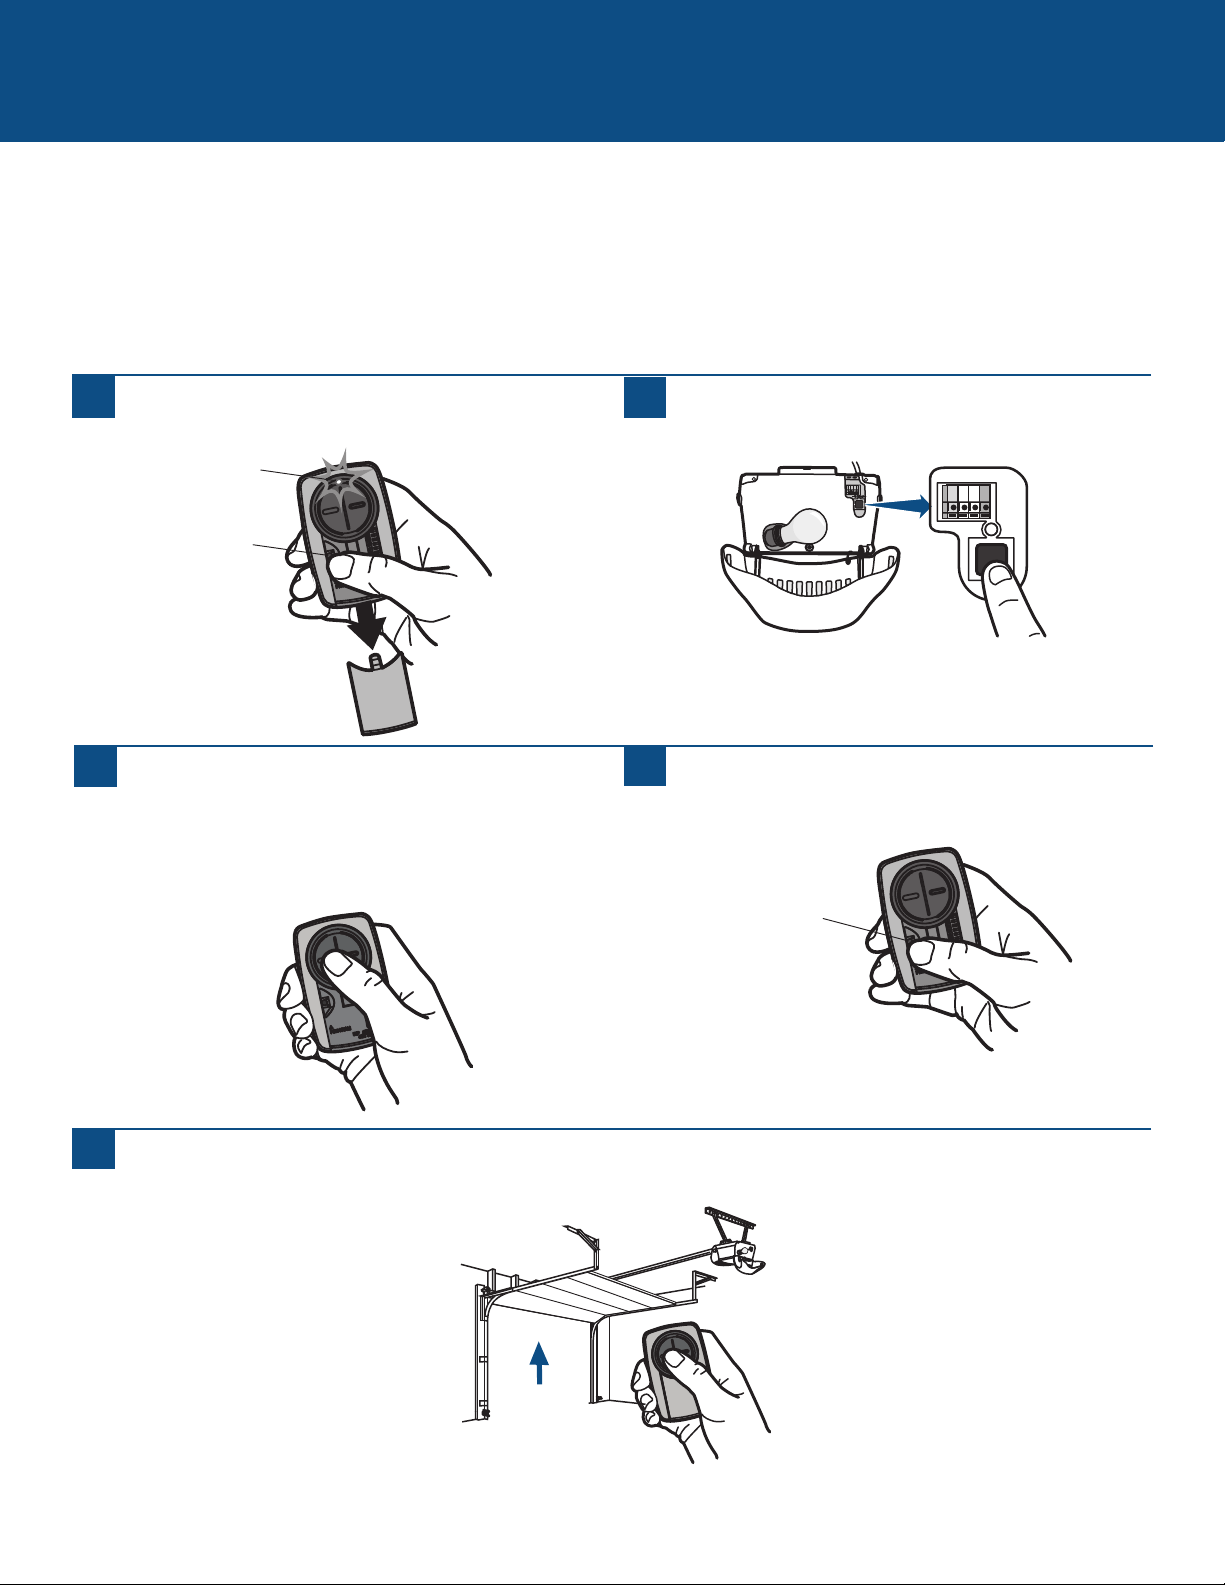
1
Press the program button on the remote control until
the LED turns on.
2
Press and release the LEARN button* on your garage door
opener.
3
Press and release the remote control button, the LED will
flash. When the LED stops flashing, continue to press and
release the button (maximum of 9 times) until your
garage door opener responds by clicking, blinking, or
activating.
4
Press the program button on the remote control to save.
5
Test the remote control by pressing the button. If the garage door opener does not activate, repeat the programming steps or
follow the alternative programming option.
Program Button
* Depending on your product, the LEARN button may have a different name (use
the button for programming remote controls).
LED

4
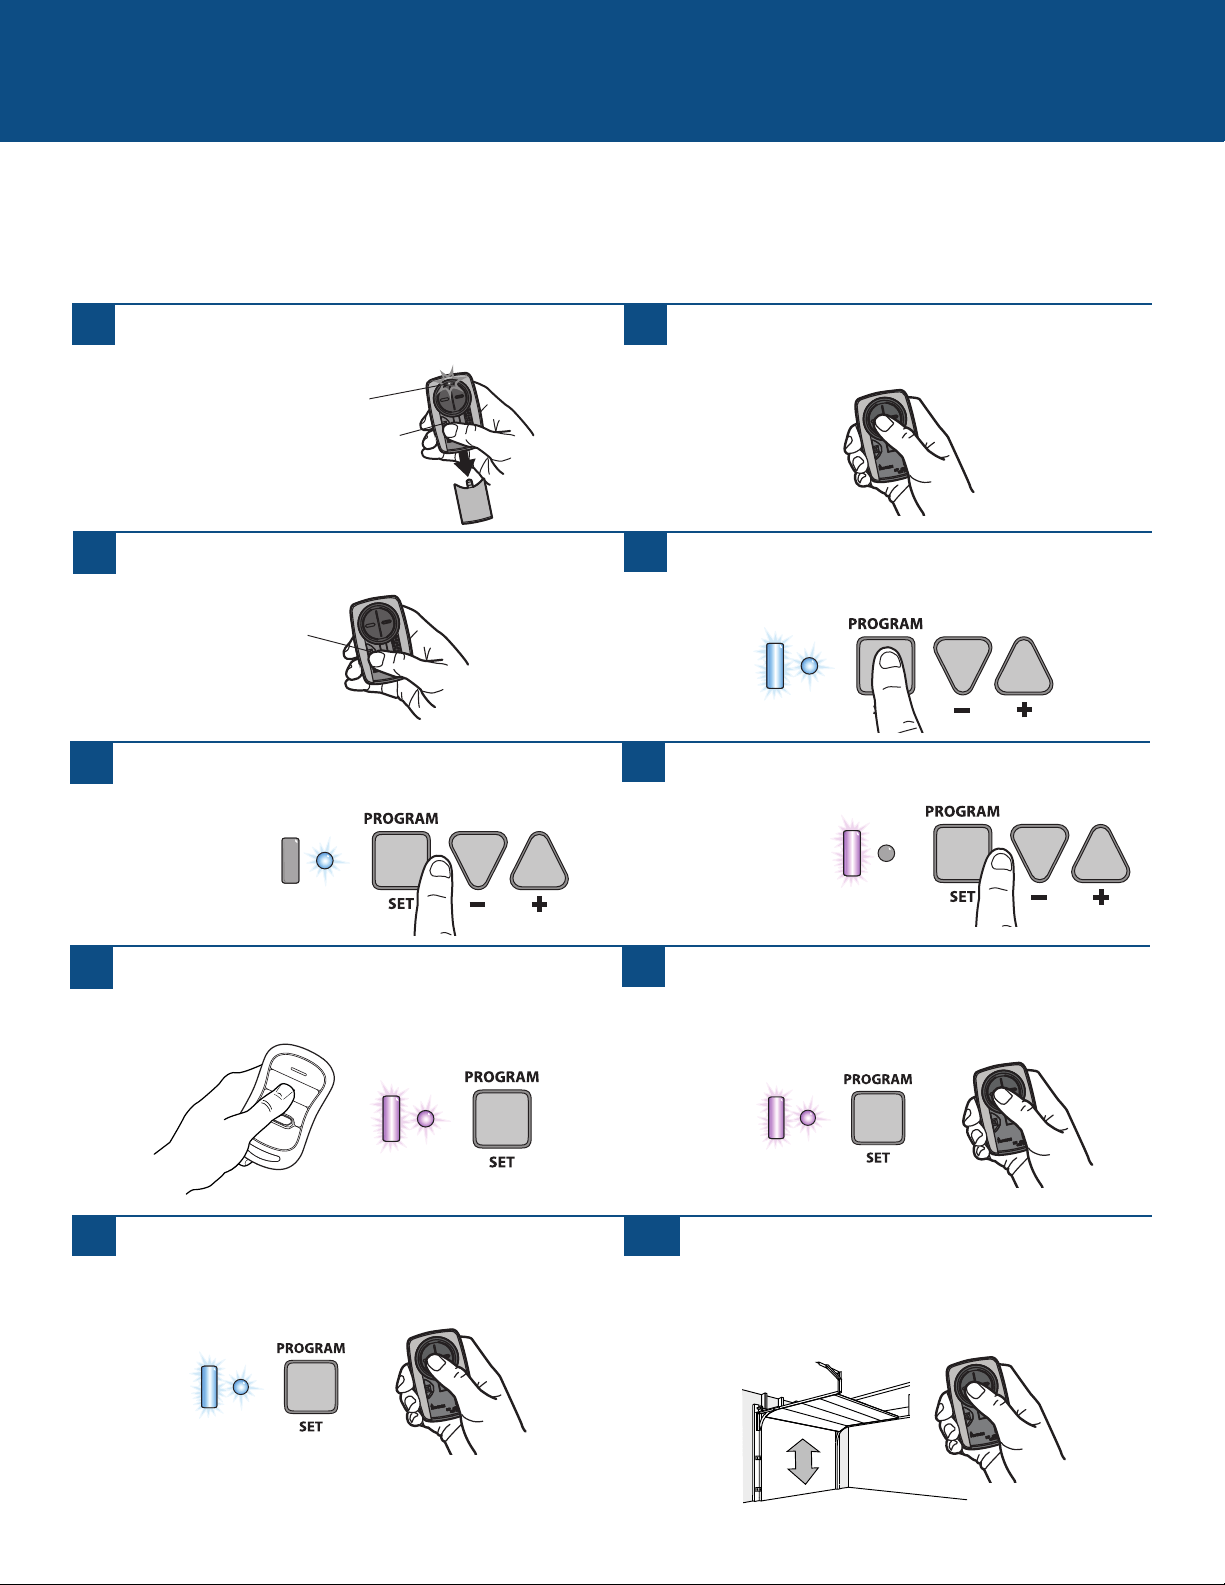
Programming to a Genie
®
Intellicode
®
2 Garage Door Opener
Before starting, you MUST have a Genie
®
Intellicode
®
2 remote control with at least one button already programmed to the garage
door opener.
The images throughout this manual are for reference only and your product may look different.
GARAGE DOOR OPENERS (continued)
1
Press the program button on the Universal Remote
Control until the LED turns on.
2
Select a button to program and press that button 5 times,
ensuring the LED stops flashing after each press.
3
Press the program button on the Universal Remote
Control.
4
On the garage door opener, press and hold the
Program/Set button until both the long and short LED
light up BLUE.
5
Release the Program/Set button and only the round LED
will be lit in BLUE.
6
Press and release the Program/Set button and the long
LED will flash PURPLE.
7
On the Universal Remote Control, press and release the
same button you have already selected in step 2. Both
LEDs on the garage door opener will light up PURPLE.
8
On the Universal Remote Control, press and release the
same button again. Both LED’s on the garage door opener
will light up BLUE.
On the Genie
®
remote control, press and release the
button that is already programmed to the garage door
opener. Both LED’s will flash PURPLE.
9
On the Universal Remote Control, press and release the
same button again. This will activate the garage door
opener and programming is complete.
If the door does not activate, repeat the steps.
10
Program Button
Program Button
LED
5
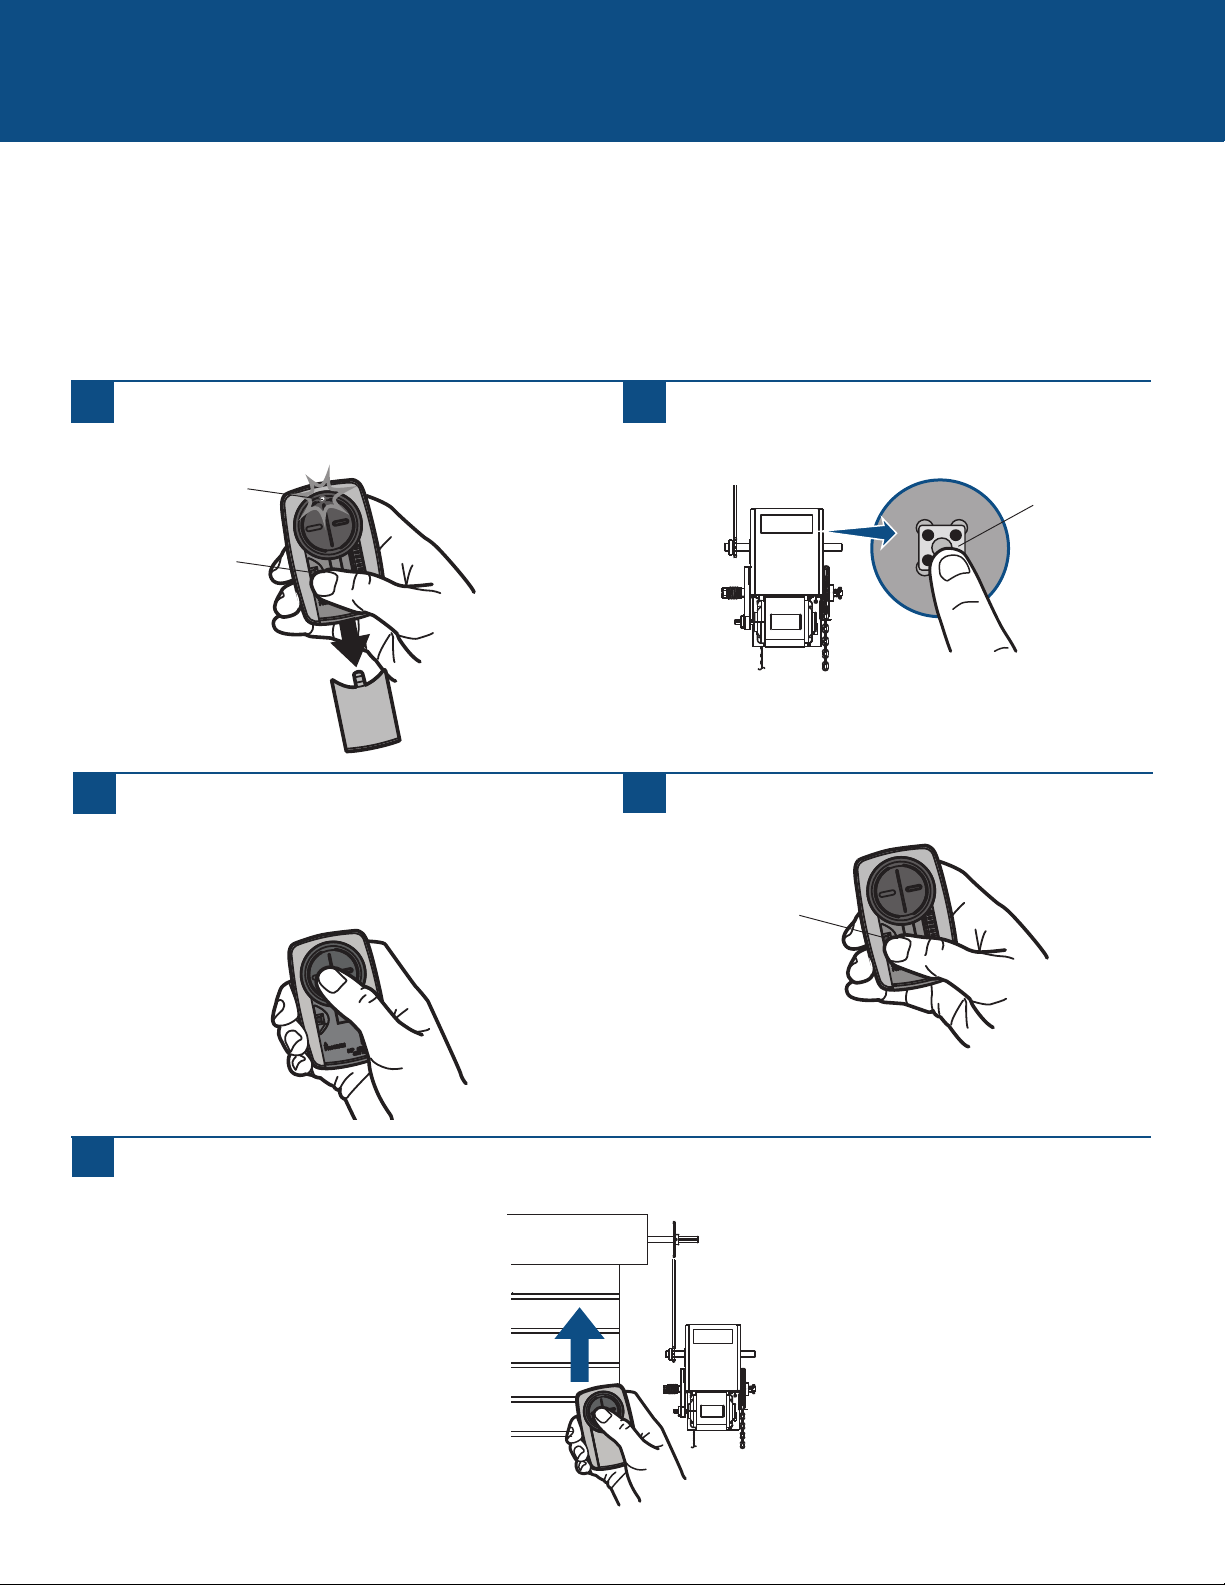
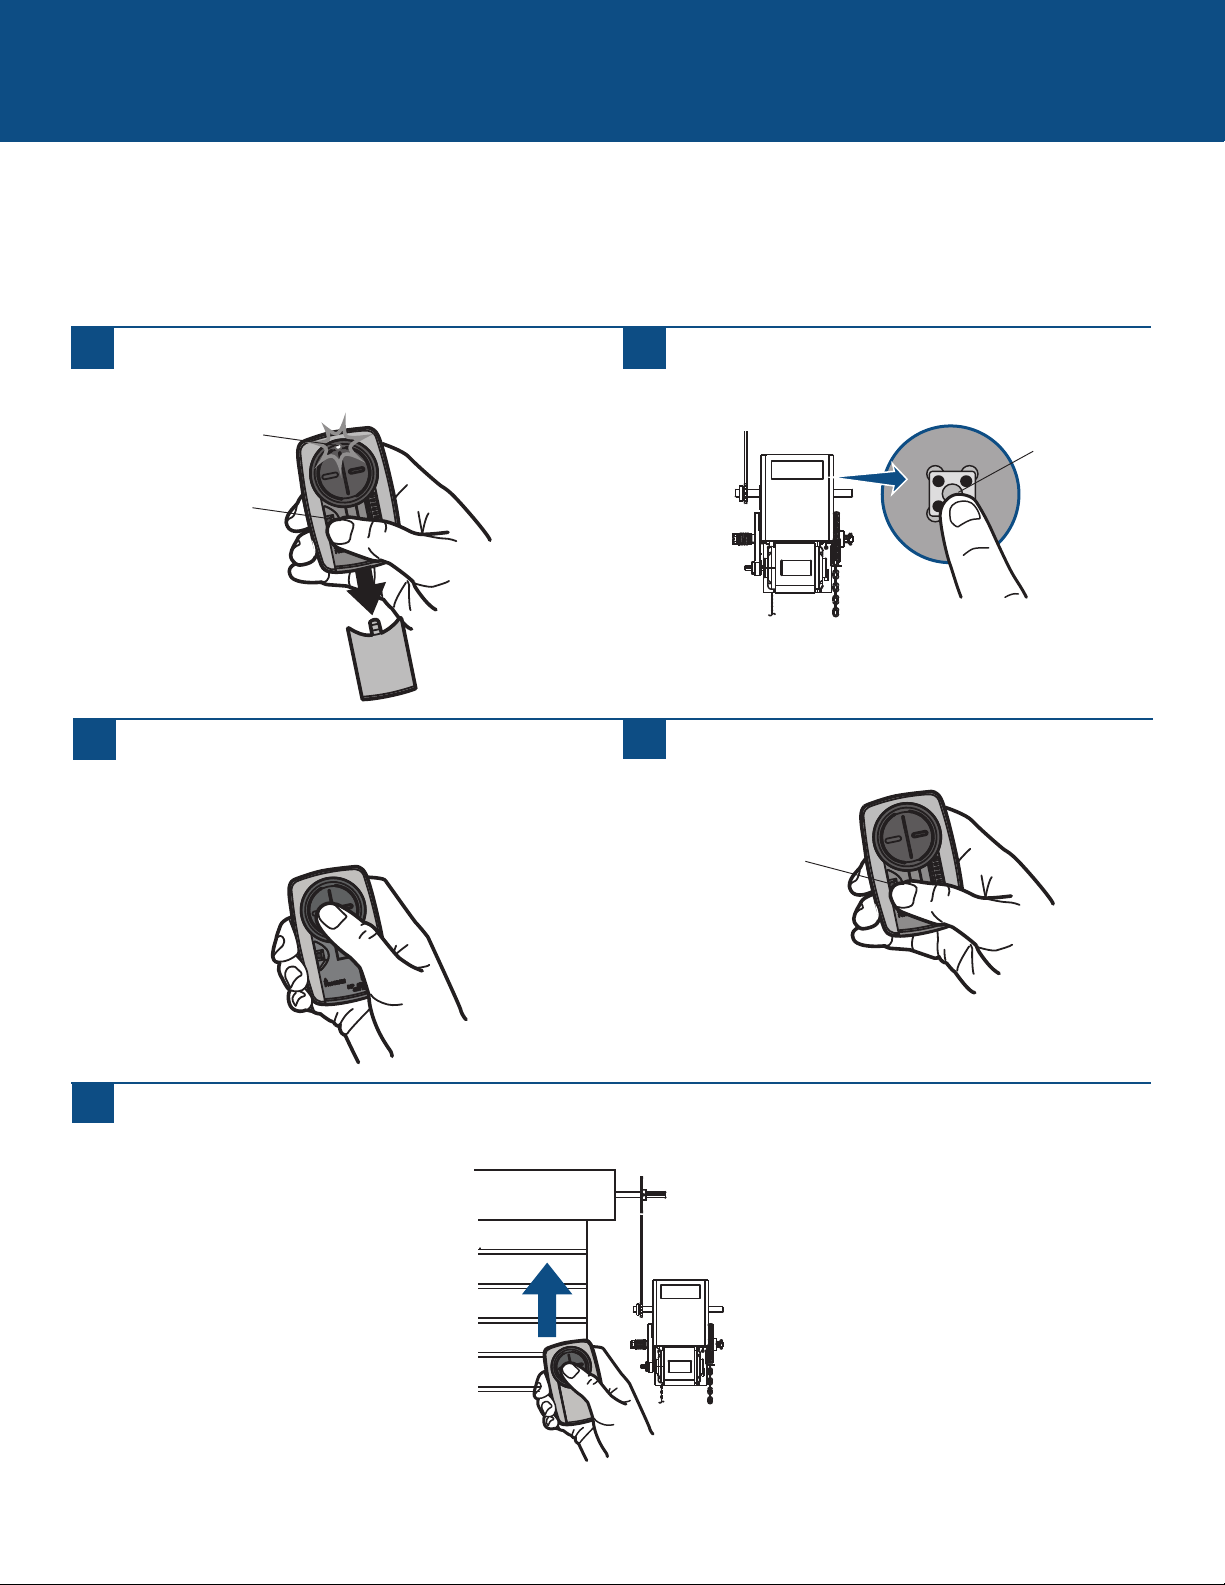
COMMERCIAL DOOR OPERATORS
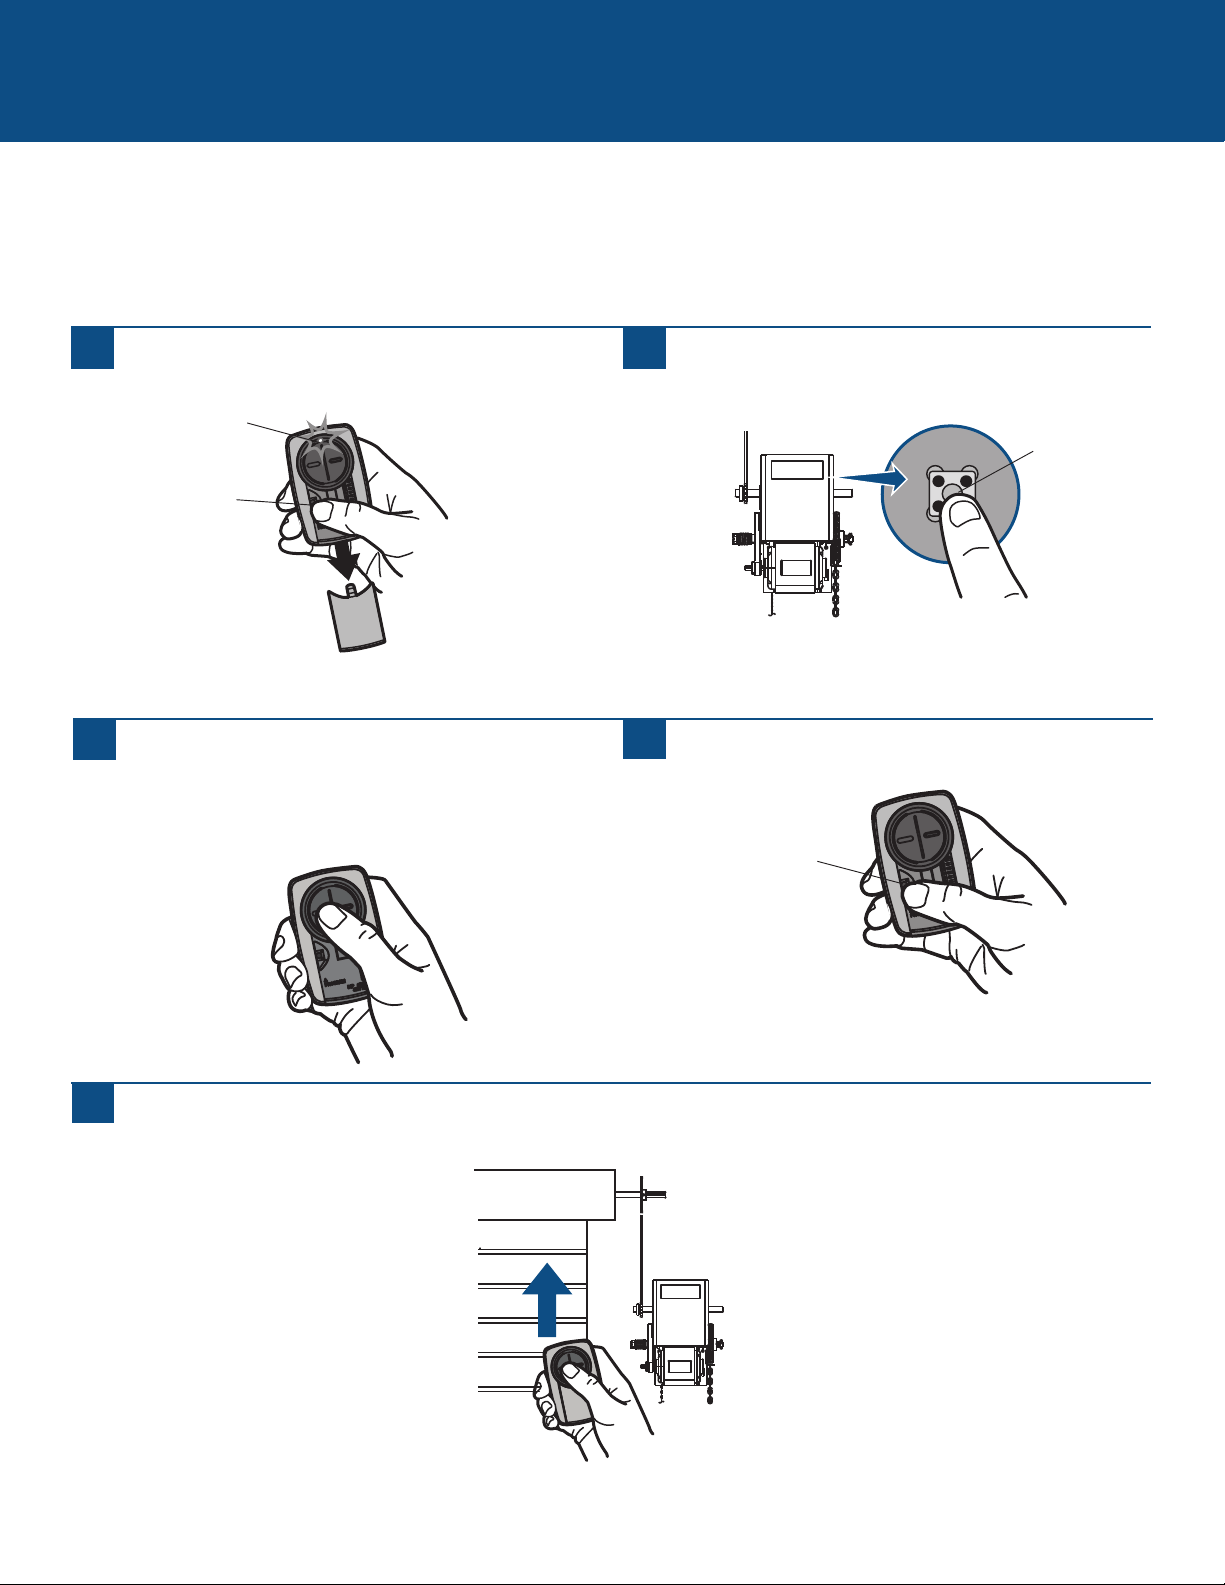
Programming to a Commercial Door Operator with a LEARN Button
The LEARN button is typically located on the logic board of the operator or an external receiver. For help locating your LEARN
button contact your commercial door operator manufacturer.
The images throughout this manual are for reference only and your product may look different.
1
Press the program button on the remote control until
the LED turns on.
2
Press and release the LEARN button* on your commercial
door operator.
3
Press and release the remote control button, the LED will
flash. When the LED stops flashing, continue to press
and release the button until your commercial door
operator responds by clicking, blinking, or activating.
4
Press the program button on the remote control to save.
5
Test the remote control by pressing the button. If the commercial door operator does not activate, repeat the programming
steps or follow the alternative programming option.
LEARN Button*
* Depending on your product, the LEARN button may have a different name (use
the button for programming remote controls).
Program Button
Program Button
LED
6
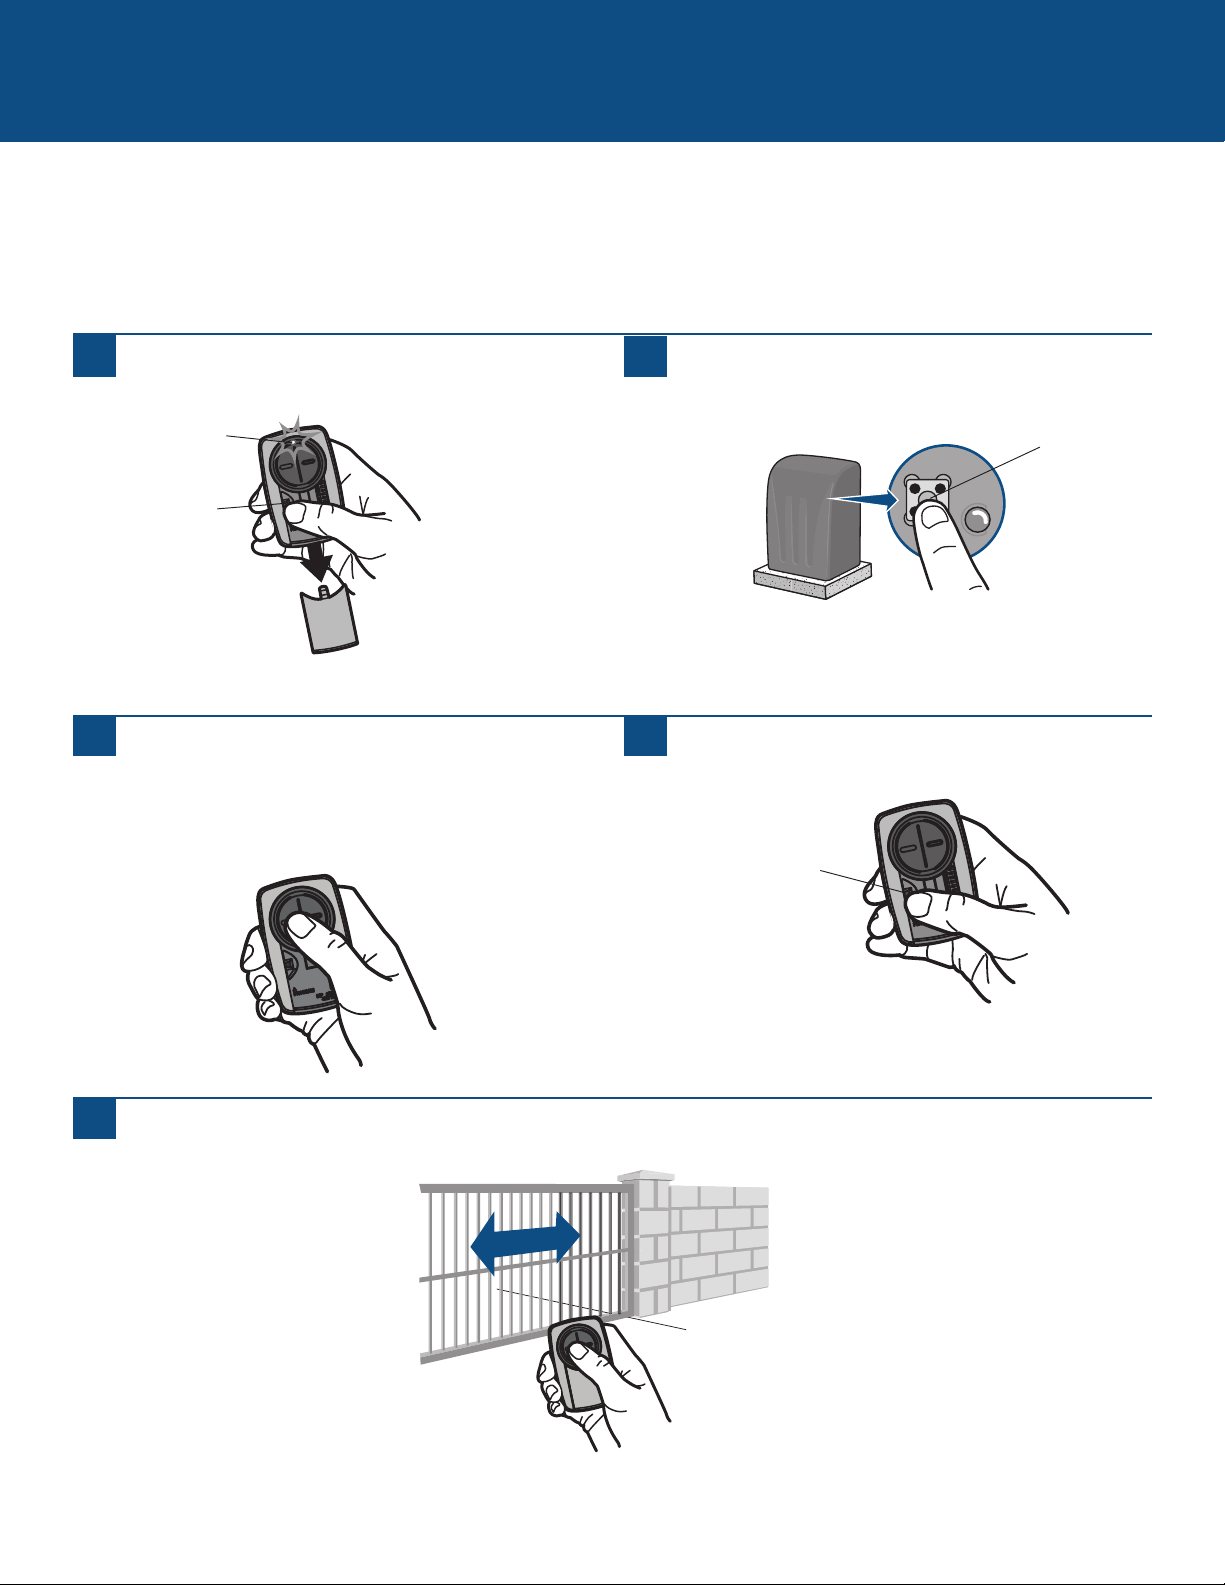
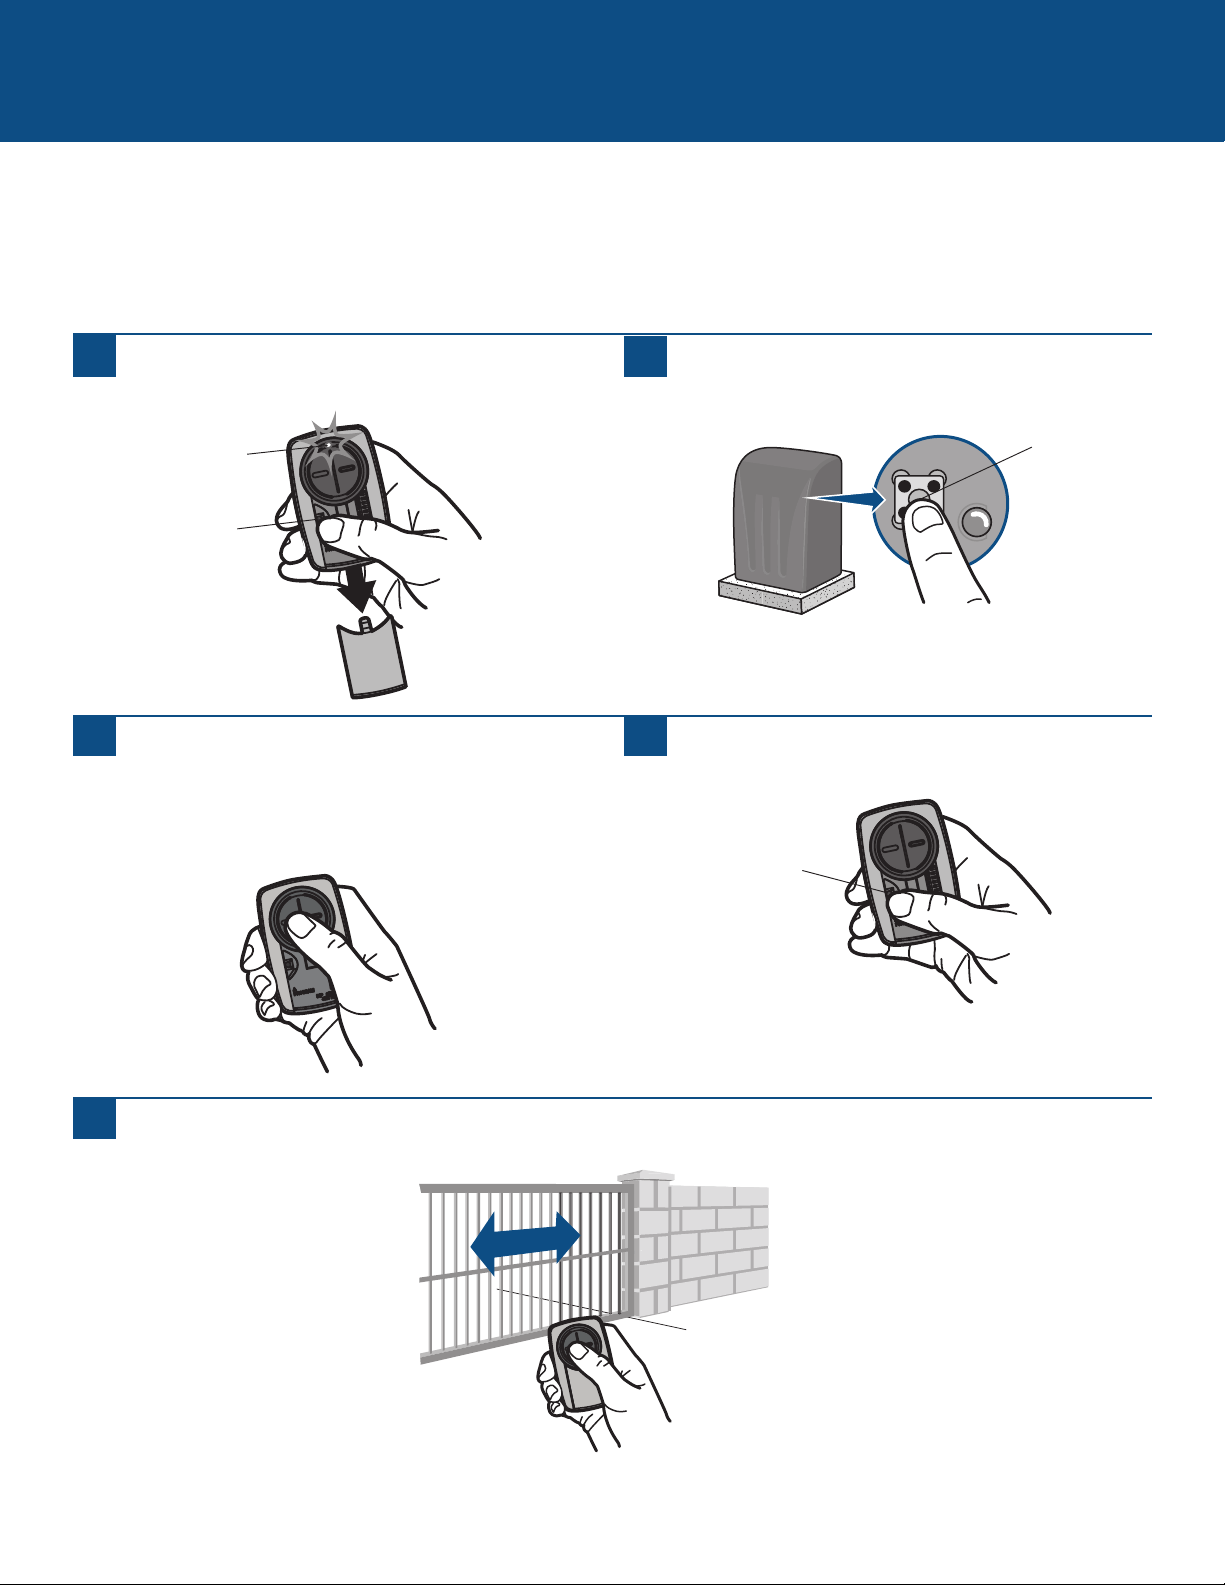
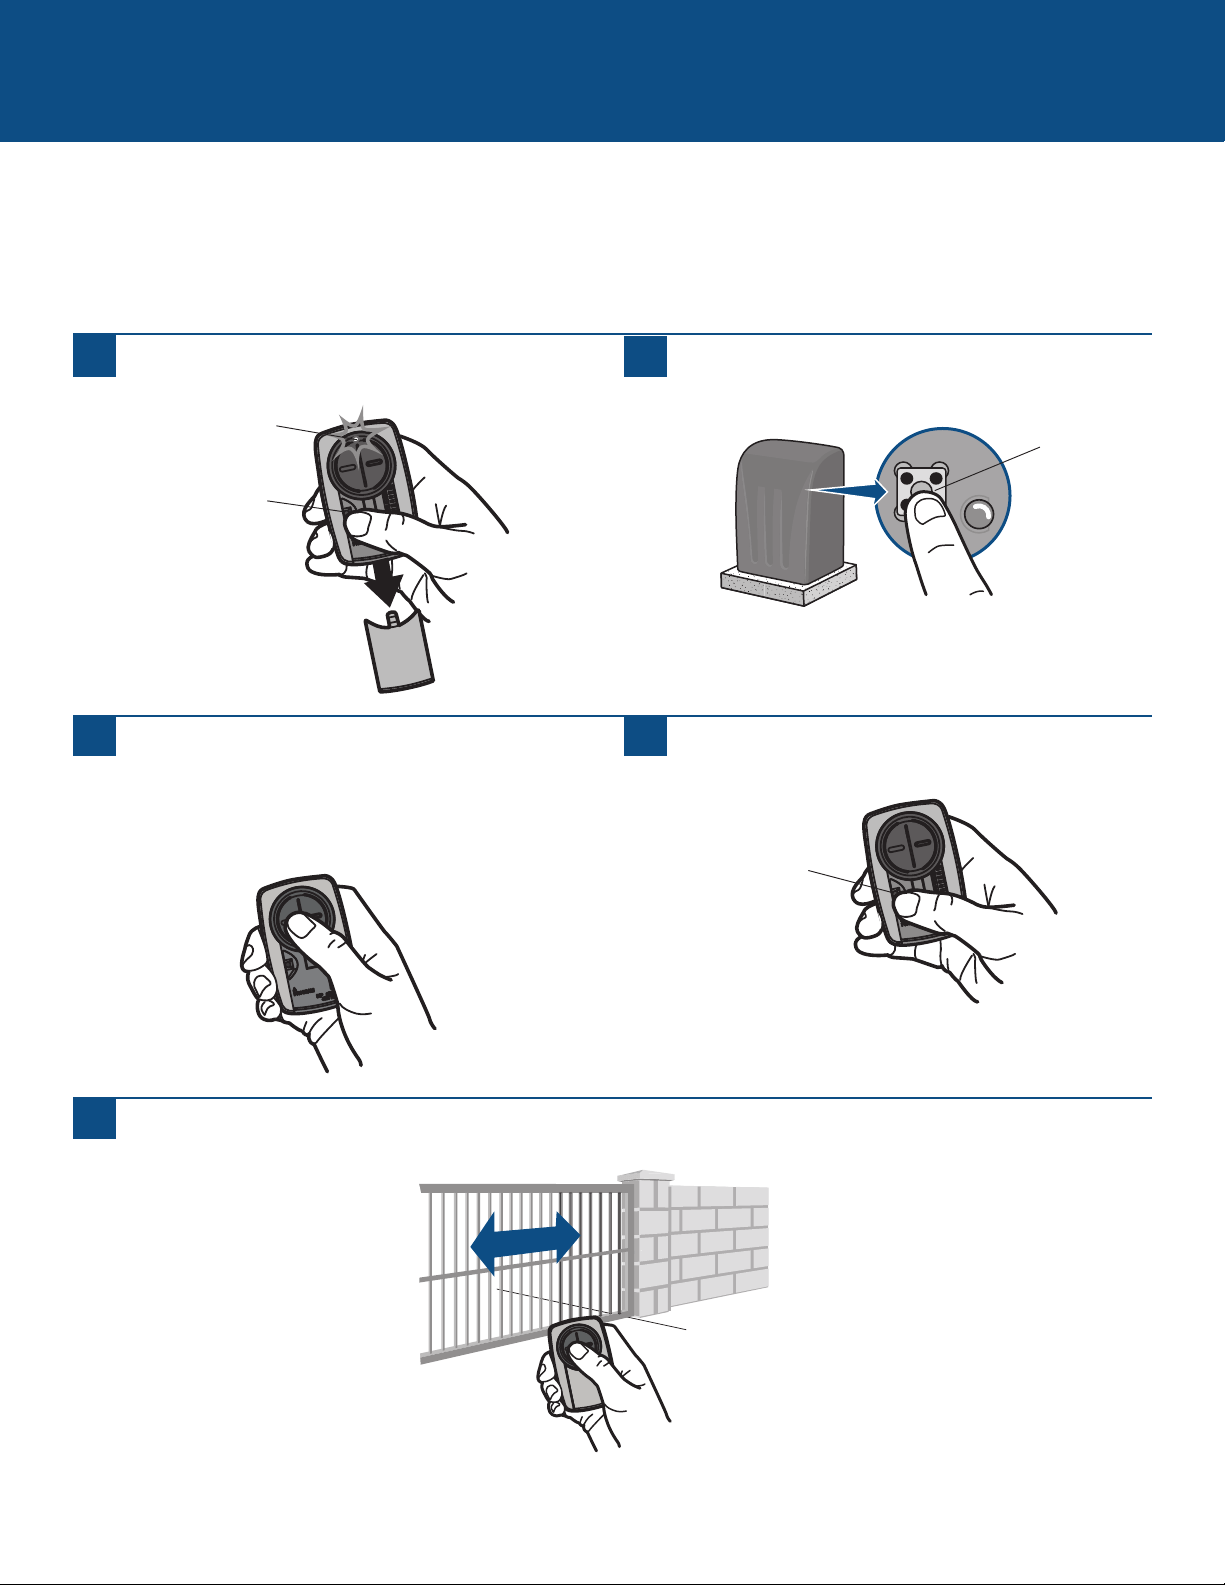
Programming to a Gate Operator with a LEARN Button
The LEARN button is typically located on the control board of the operator or an external receiver. For help locating your LEARN
button contact your gate operator manufacturer.
The images throughout this manual are for reference only and your product may look different.
GATE OPERATORS
1
Press the program button on the remote control until
the LED turns on.
2
Press and release the LEARN button* on your gate
operator.
3
Press and release the remote control button, the LED will
flash. When the LED stops flashing, continue to press
and release the button until your gate operator responds
by clicking, blinking, or activating.
4
Press the program button on the remote control to save.
5
Test the remote control by pressing the button. If the gate operator does not activate, repeat the programming steps or follow
the alternative programming option.
Learn Button*
* Depending on your product, the LEARN button may have a different name (use
the button for programming remote controls).
Program Button
Program Button
LED
7
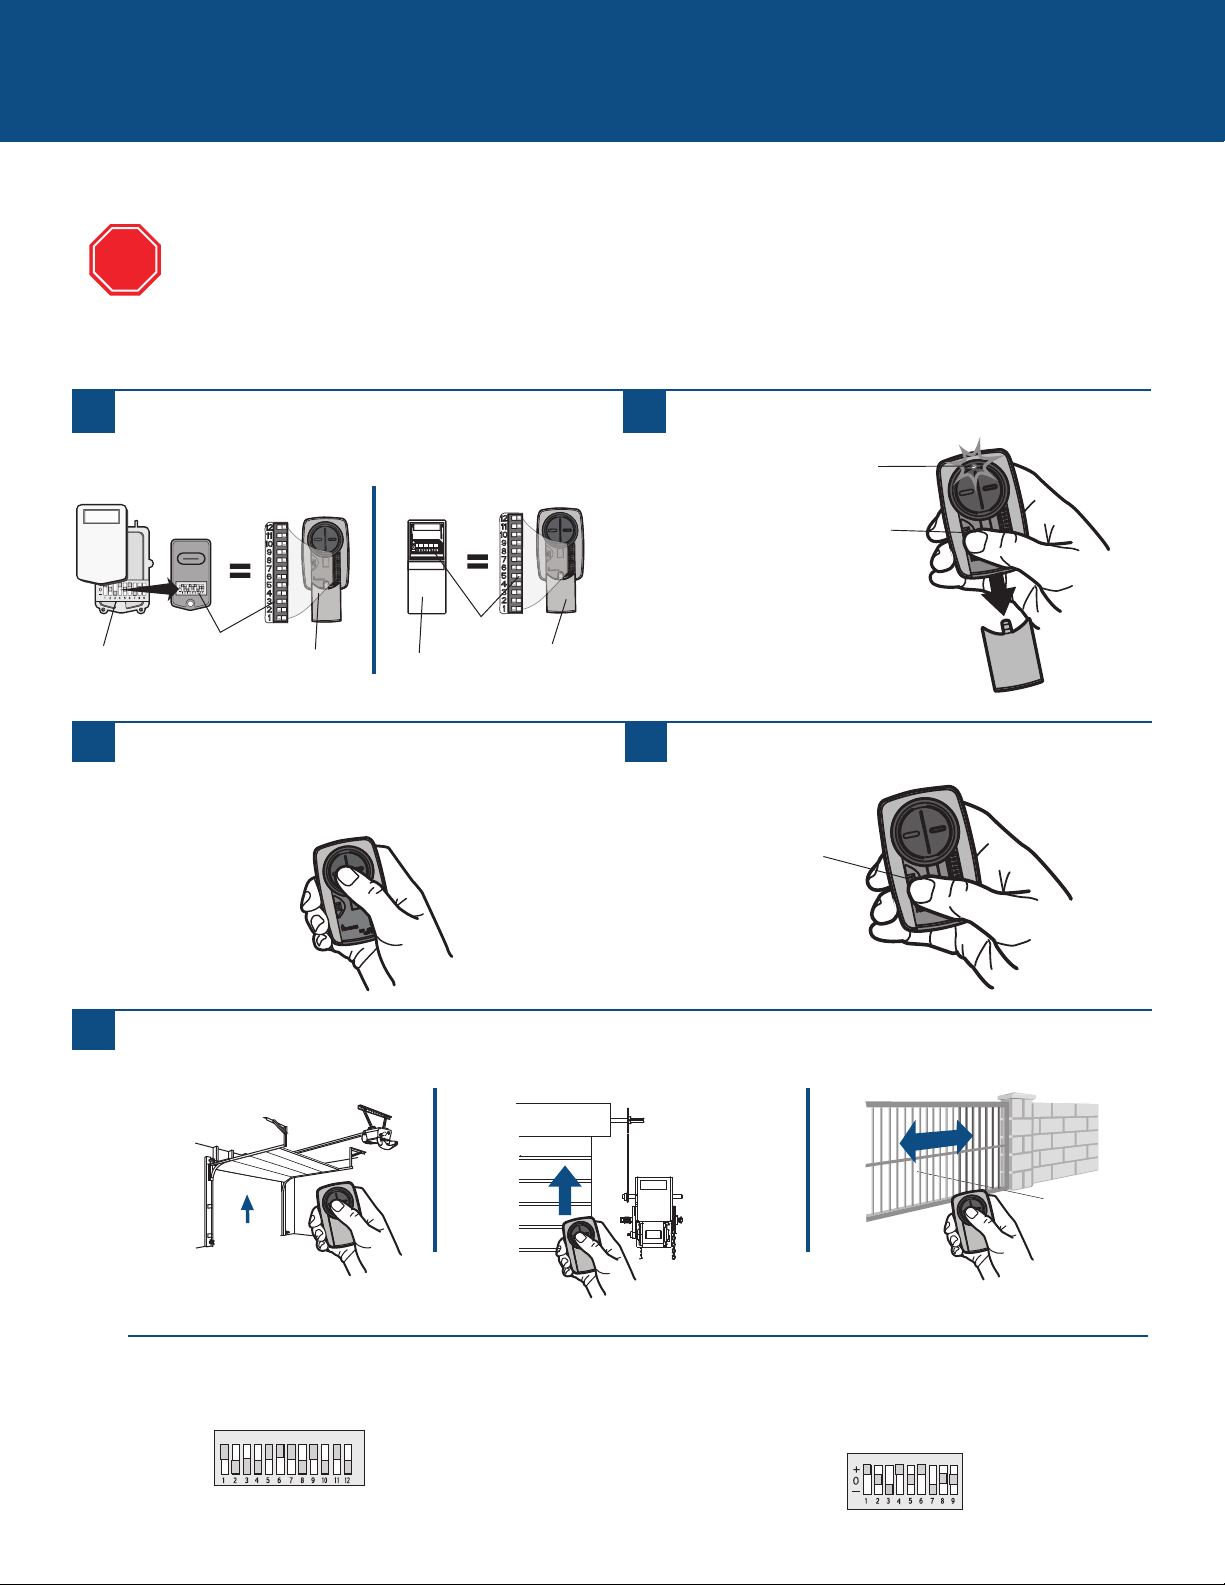
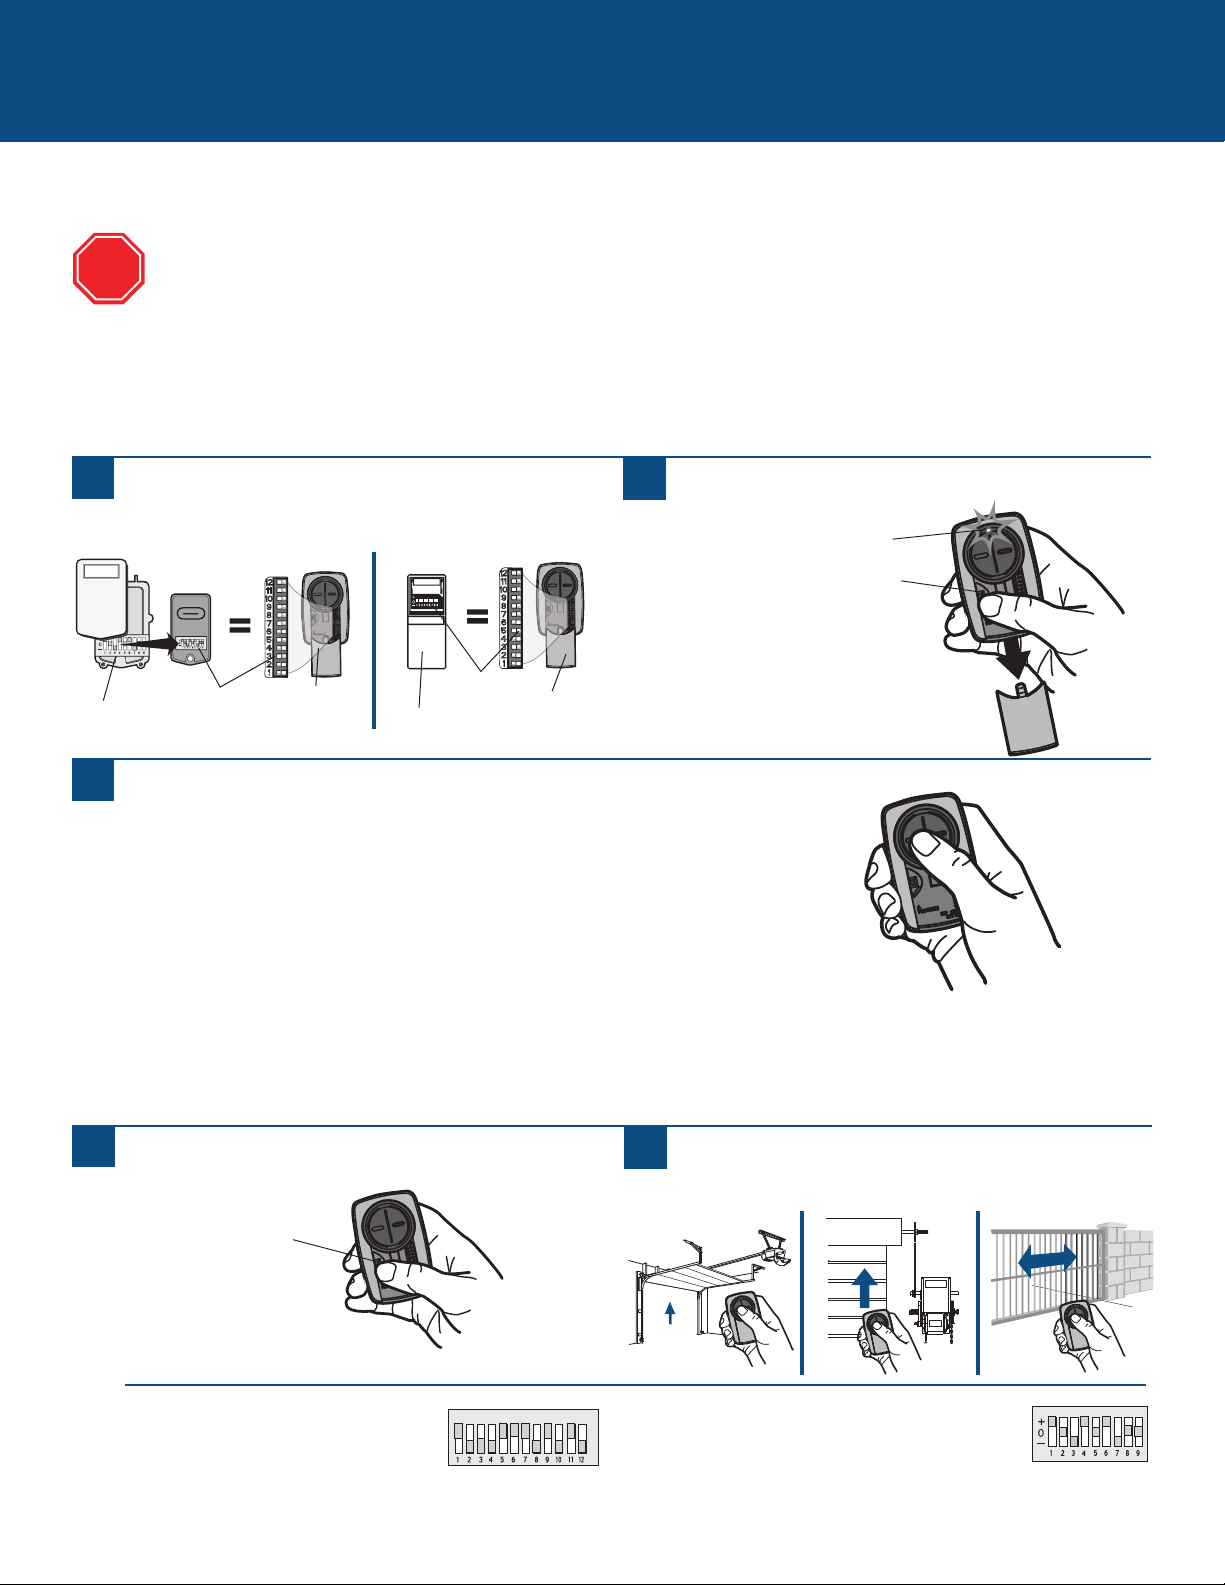
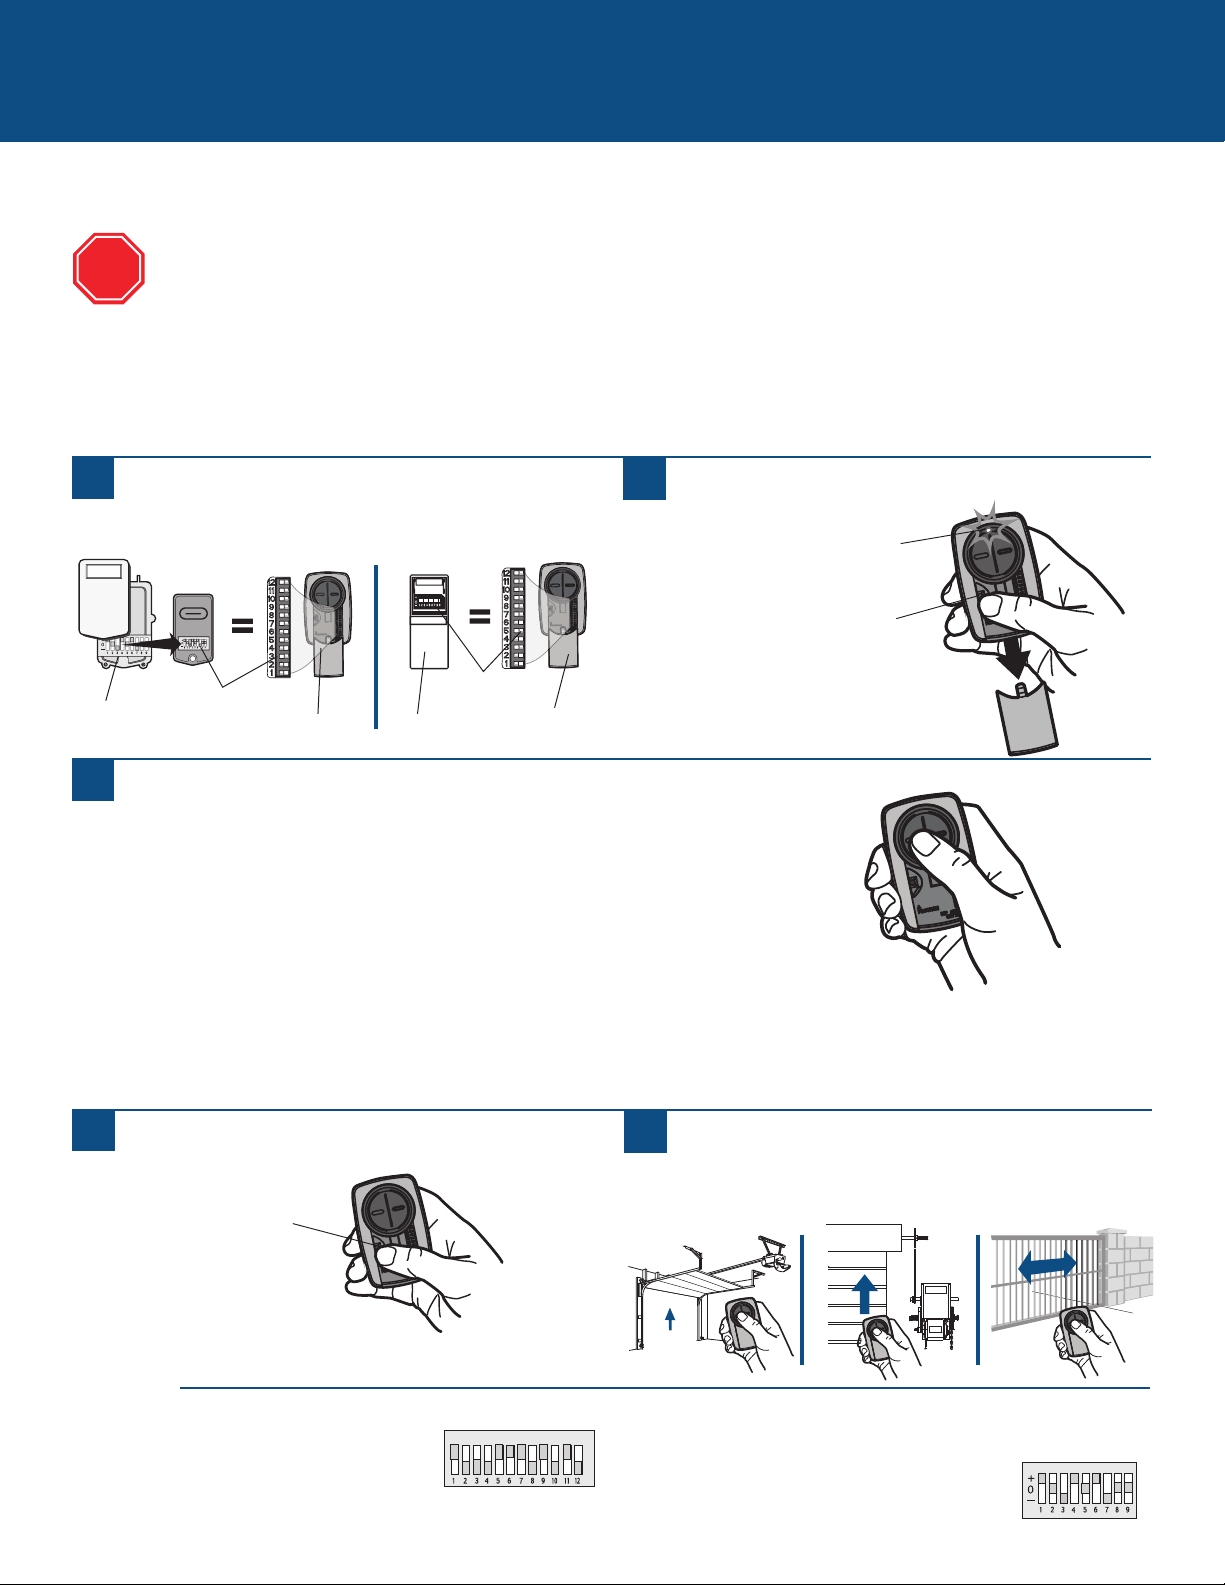
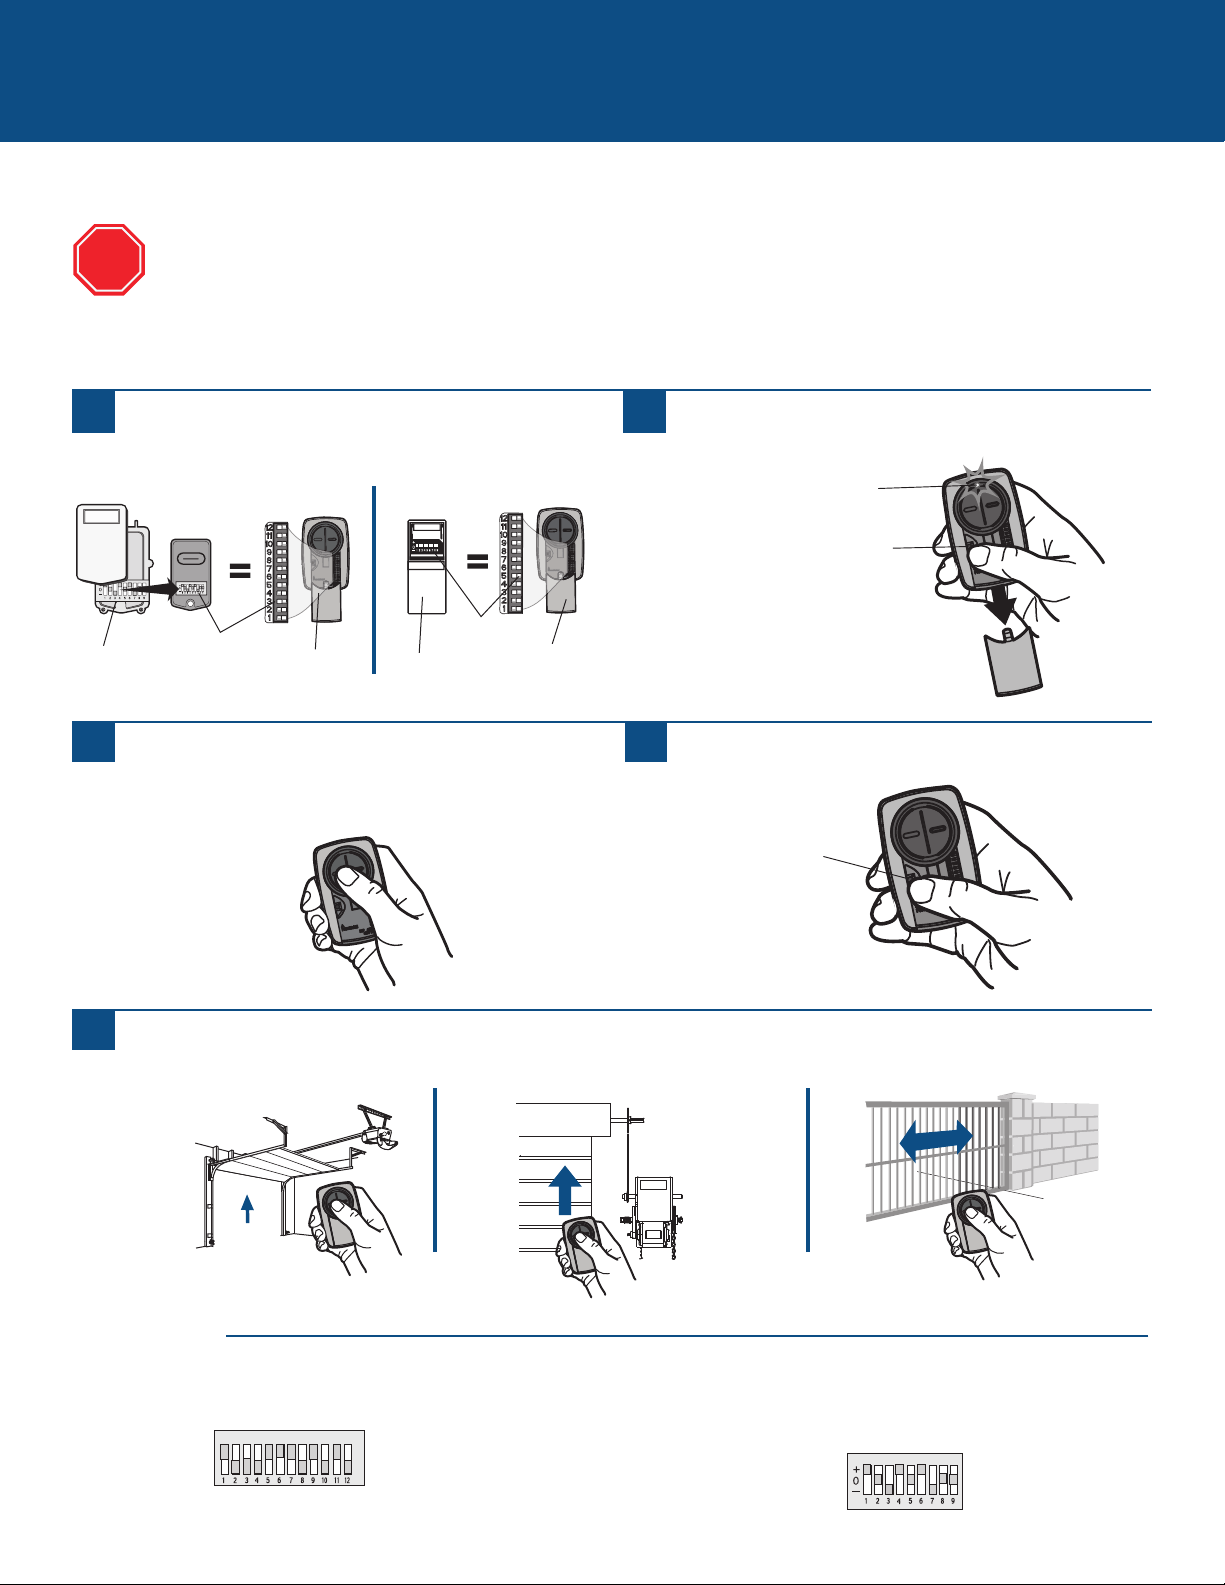
Programming to an External Receiver with DIP Switches
3 Position DIP Switch:
For Chamberlain remotes DO NOT use the “0” position, use “+” or “-”.
If you already have a 3-button remote, DIP switch #1 must be set to “-” if the
large button is to open the door. It may be necessary to reprogram original
remote controls.
EXTERNAL RECEIVERS
1
Press the program button on the Universal Remote
Control until the LED turns on.
2
Match the DIP switches between the existing remote
control or external receiver and the Universal Remote
Control. Turn extra switches OFF.
3
2 Position DIP Switch:
If programming fails reverse DIP switches (OFF to ON and ON to OFF).
External
Receiver
DIP Switches
DIP Switches
Existing Remote
Universal
Remote
Control
Universal
Remote
Control
If using the Universal Remote Control with residential door openers, the remote control must be used only with door
openers manufactured after 1993 that utilize photoelectric sensors. The photoelectric sensors are always located on
or near the bottom of the door track.
The external receiver is typically located on the product or mounted near the product.
The images throughout this manual are for reference only and your product may look different.
Press and release the Universal Remote Control button,
the LED will flash. When the LED stops flashing,
continue to press and release the button until your
product responds by clicking, blinking, or activating.
4
Press the program button on the Universal Remote
Control to save.
5
Test the Universal Remote Control by pressing the button. If the product does not activate, repeat the programming steps or
follow the alternative programming option.
TIPS
STOP
Program Button
Program Button
LED
8
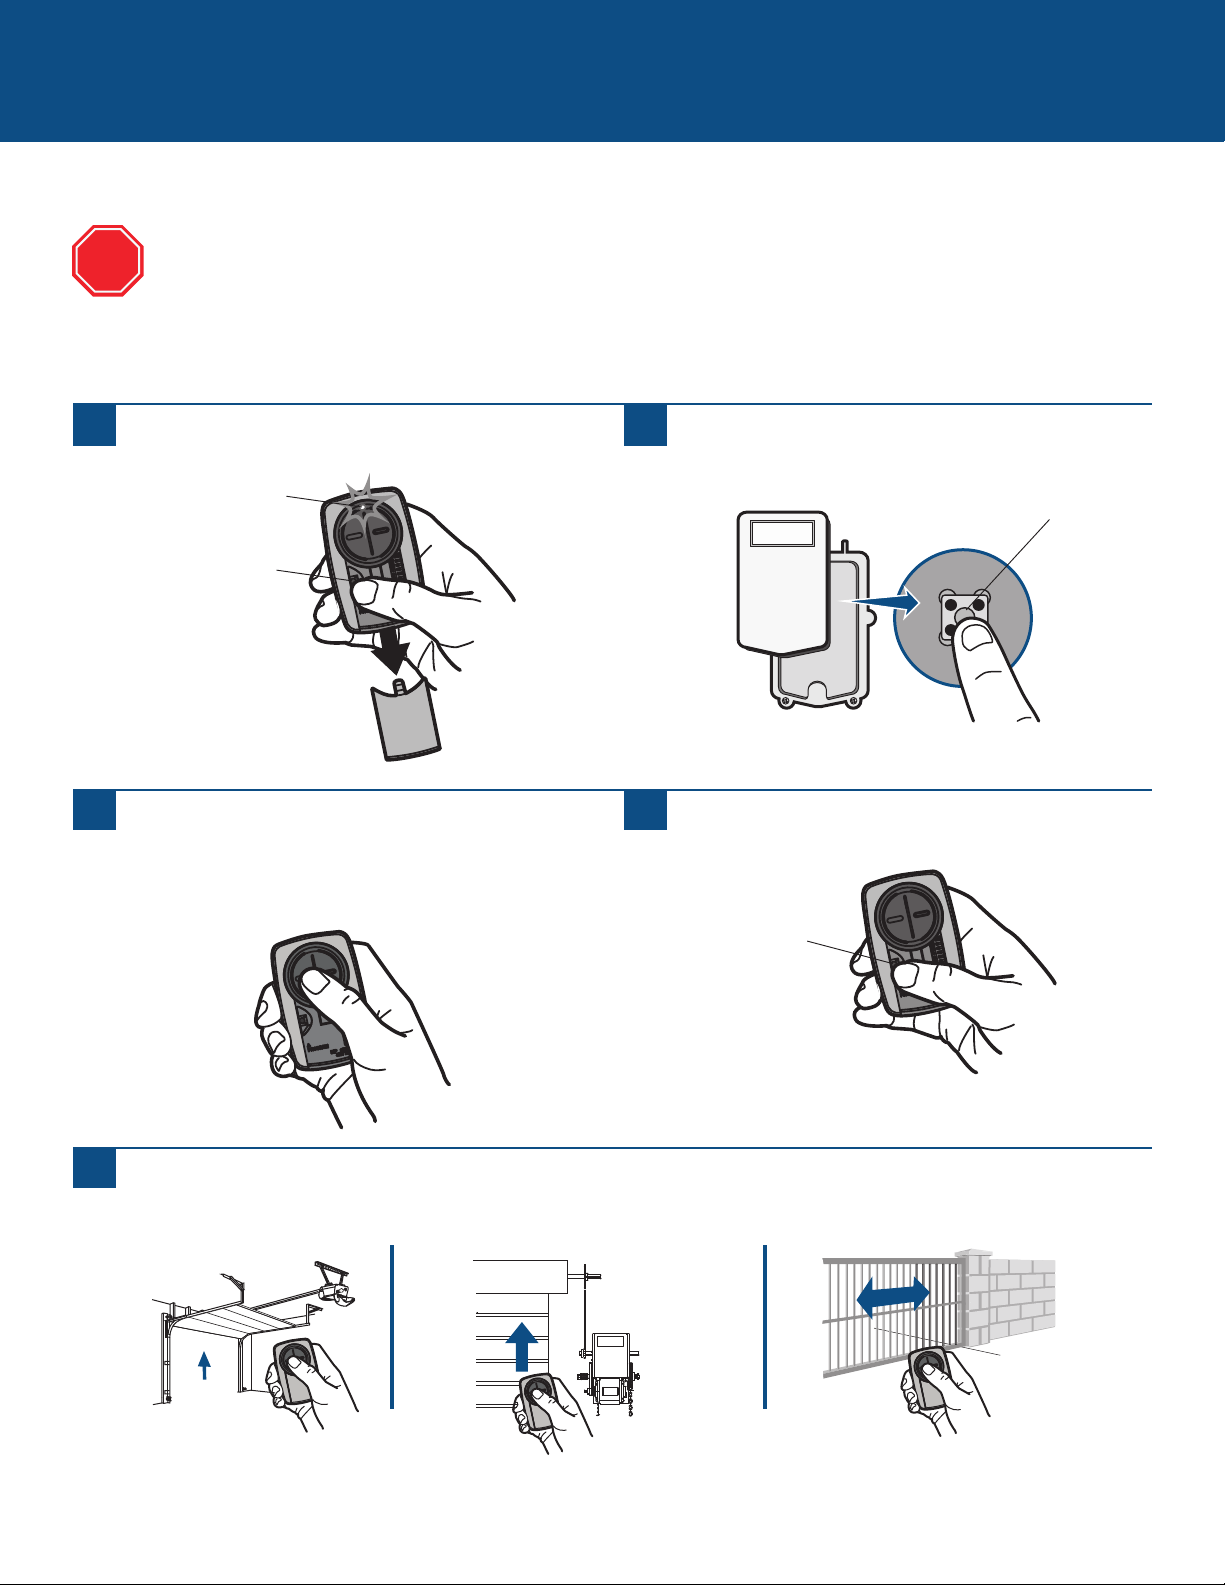
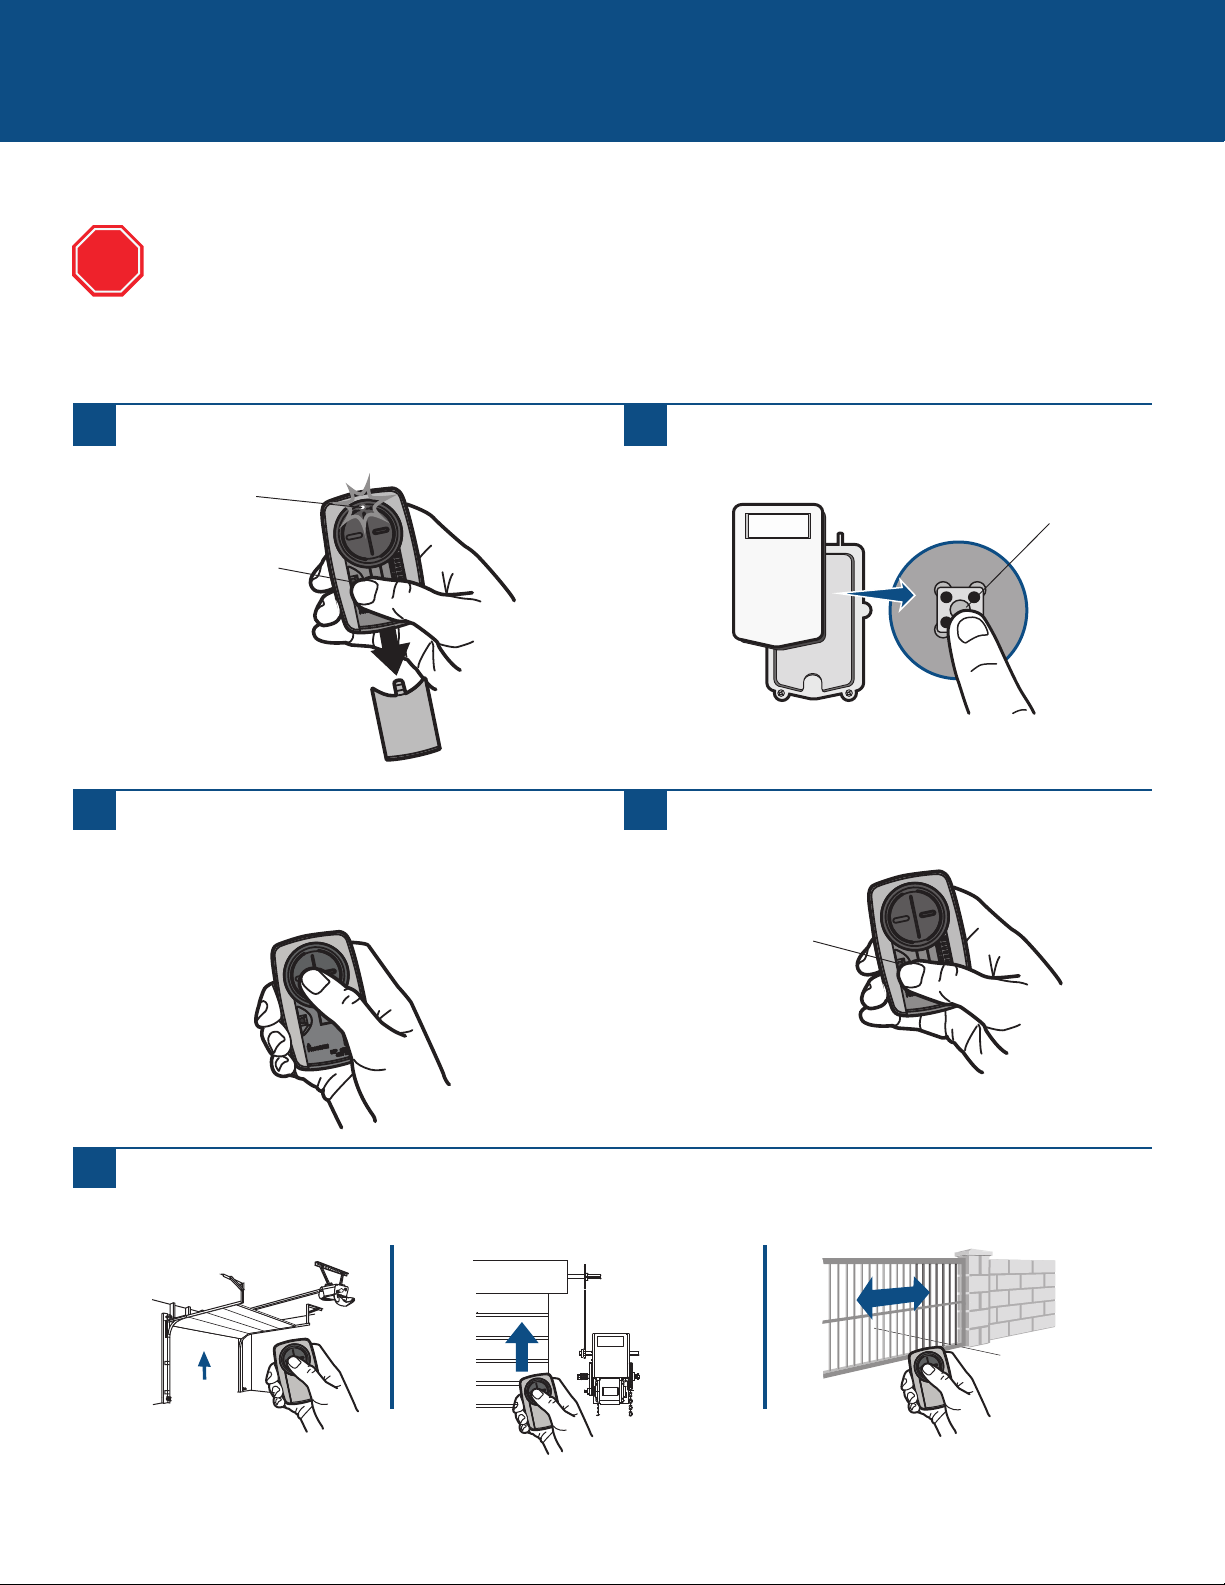
Programming to an External Receiver with a LEARN Button
EXTERNAL RECEIVERS (continued)
1
Press the program button on the remote control until
the LED turns on.
2
Press and release the LEARN button* on the external
receiver.
3
Press and release the remote control button, the LED will
flash. When the LED stops flashing, continue to press
and release the button until your product responds by
clicking, blinking, or activating.
4
Press the program button on the remote control to save.
5
Test the remote control by pressing the button. If the product does not activate, repeat the programming steps or follow the
alternative programming option.
Learn Button*
If using the Universal Remote Control with residential door openers, the remote control must be used only with door
openers manufactured after 1993 that utilize photoelectric sensors. The photoelectric sensors are always located on or
near the bottom of the door track.
The external receiver is typically located on the product or mounted near the product.
The images throughout this manual are for reference only and your product may look different.
* Depending on your product, the SMART/LEARN button may have a different
name (use the button for programming remote controls).
STOP
Program Button
Program Button
LED

9
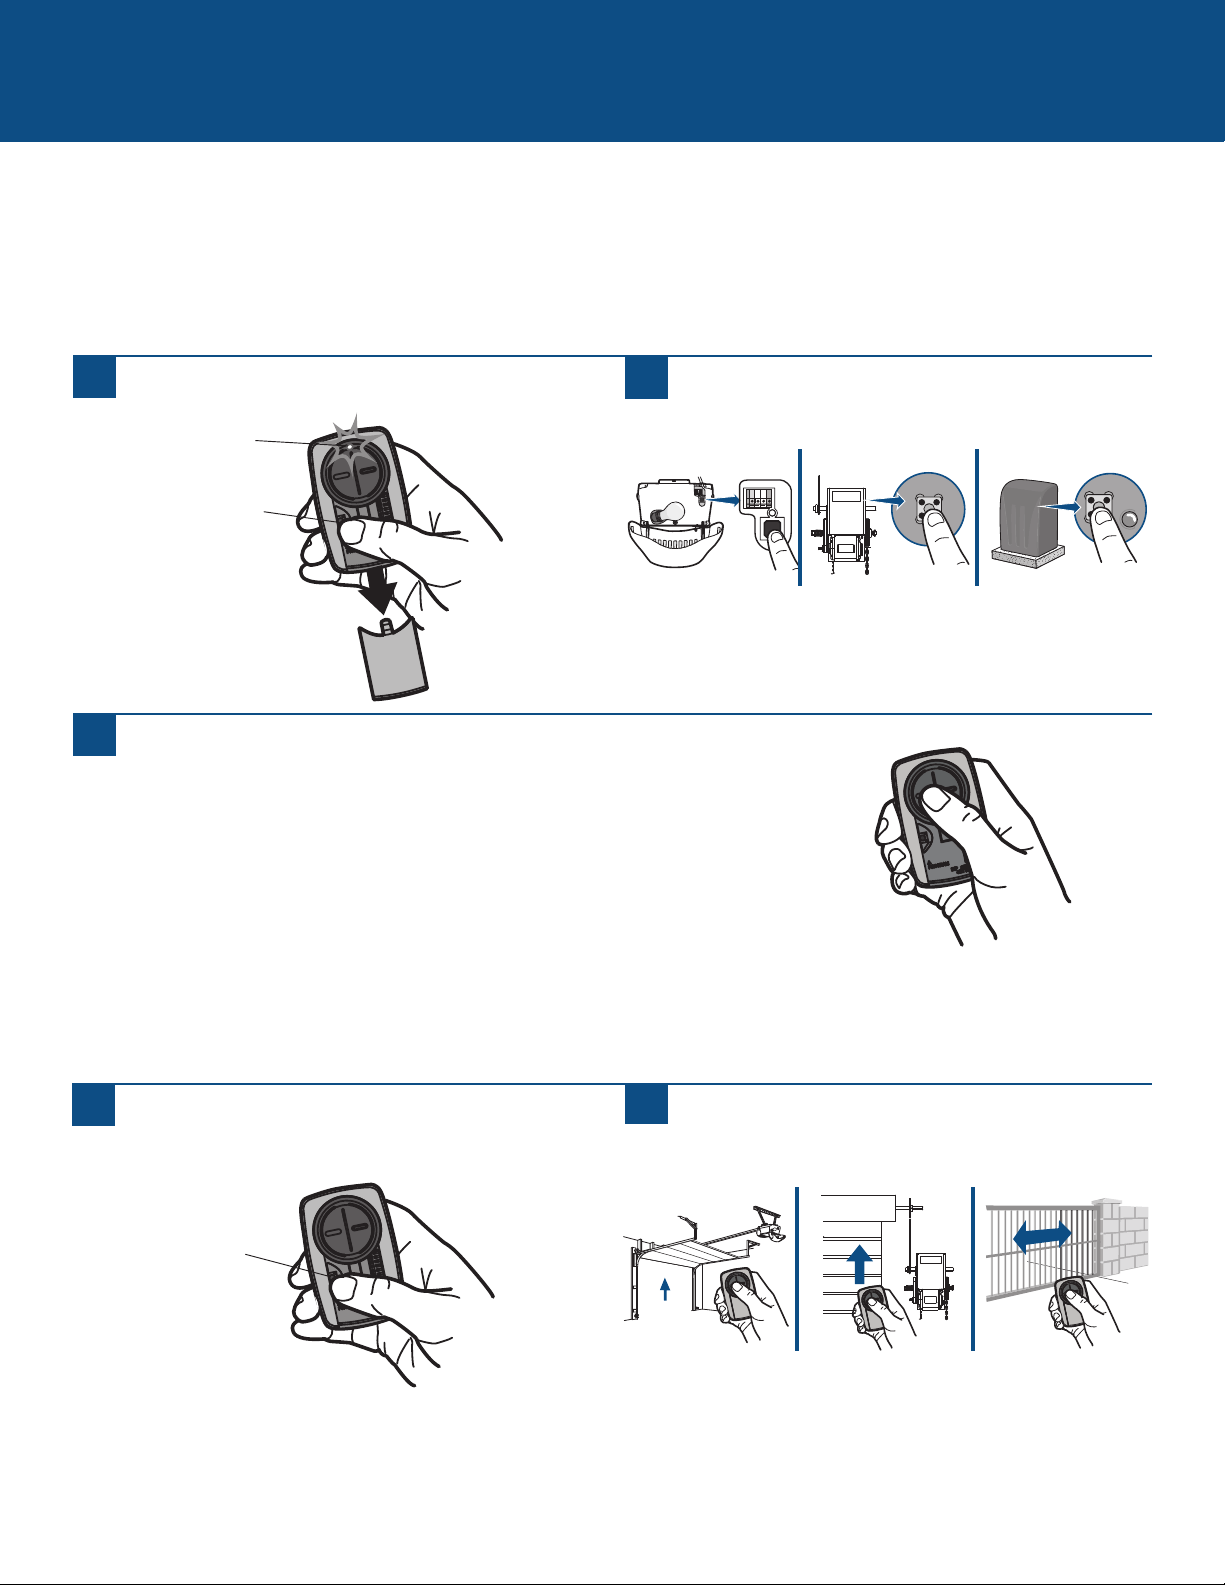
Alternative programming option for products with a LEARN Button
The LEARN button is typically located on the product or an external receiver. For help locating your LEARN button refer to the Help
section in this manual or contact your product manufacturer.
The images throughout this manual are for reference only and your product may look different.
** LiftMaster, Do-It, Master Mechanic, Raynor, True Value and Sears Craftsman are compatible with Chamberlain technology.
ALTERNATIVE PROGRAMMING OPTIONS
1
Press the program button on the remote control until
the LED turns on.
2
Press and release the LEARN button* on your product.
3
Press and release the remote control button...
...8 times (Chamberlain
®
** product with yellow LEARN button).
...3 times (Chamberlain
®
** product with purple LEARN button).
...2 times (Chamberlain
®
** product with orange LEARN button).
...4 times (Chamberlain
®
** product with green LEARN button).
... 5 or 6 times (Overhead Door
®
Genie
®
Intellicode product).
...1 time (Linear
®
Mega-Code product).
...7 times (Stanley
®
Secure Code product).
...9 times (Wayne Dalton
®
Rolling Code product).
The LED on the remote control must stop blinking between each press of the button. The code is accepted when the product
responds by clicking, blinking, or activating.
4
Press the program button on the remote control to
save.
5
Test the remote control by pressing the button. If the
product does not activate, repeat the programming steps.
* Depending on your product, the LEARN button may have a different name (use
the button for programming remote controls).
Program Button
Program Button
LED
10
Alternative programming option for products with DIP Switches
ALTERNATIVE PROGRAMMING OPTIONS (continued)
Press and release the Universal Remote Control button...
...11 times (Chamberlain
®
** product with 9 DIP switches).
...12 times (Chamberlain
®
** Canada product with 9 DIP switches).
...13 times (Genie
®
product with 12 DIP switches).
...14 times (Linear Multicode
®
with 10 DIP switches).
...15 times (Chamberlain
®
* product with 8 DIP switches).
...16 times (Stanley/Multicode
®
product with 10 DIP switches).
...17 times (Genie
®
product with 9 DIP switches).
...18 times (Linear
®
, Moore-O-Matic
®
product with 8 DIP switches).
...19 times (Chamberlain
®
** product with 7 DIP switches).
The LED on the Universal Remote Control must stop blinking between each press of the button. The code is accepted when the
garage door opener responds by clicking, blinking, or activating.
3 Position DIP Switch:
For Chamberlain remote controls DO NOT use the “0” position,
use “+” or “-”. If you already have a 3-button remote, DIP
switch #1 must be set to “-” if the large button is to open the
door. It may be necessary to reprogram original remote controls.
1
Press the program button on the Universal Remote
Control until the LED turns on.
2
Match the DIP switches between the existing remote
control or external receiver and the Universal Remote
Control. Turn extra switches OFF.
3
5
Press the program button on the Universal Remote
Control to save.
6
Test the Universal Remote Control by pressing the button.
If the product does not activate, repeat the programming
steps.
2 Position DIP Switch:
If programming fails reverse DIP switches (OFF to ON
and ON to OFF).
External
Receiver
DIP Switches
DIP Switches
Existing Remote
Universal
Remote
Control
If using the Universal Remote Control with residential door openers, the remote control must be used only with door
openers manufactured after 1993 that utilize photoelectric sensors. The photoelectric sensors are always located on or
near the bottom of the door track.
The DIP switches are typically located on the product or an external receiver. For help locating your DIP switches
contact your product manufacturer.
The images throughout this manual are for reference only and your product may look different.
** LiftMaster, Do-It, Master Mechanic, Raynor, True Value and Sears Craftsman are compatible with Chamberlain technology.
TIPS
STOP
Universal
Remote
Control
Program Button
Program Button
LED

11
NEED HELP?
The remote control will not program to a product with DIP switches.
• Check the battery in the remote control. The LED should light when you press a button. Replace the battery if necessary.
• If programming with 2 position DIP switches, reverse the DIP switches (OFF to ON and ON to OFF), then repeat the programming
steps.
• For Chamberlain remote controls DO NOT use the “0” position, use “+” or “-”. If you already have a 3-button remote, DIP switch #1
must be set to “-” if the large button is to open the door. It may be necessary to reprogram original remote controls.
• Repeat the programming steps but make sure the LED stops flashing between each press of the remote control button.
• Try programming using the Alternative Programming Option for products with a LEARN button.
The remote control will not program to a product with a LEARN button.
• Check the battery in the remote control. The LED should light when you press a button. Replace the battery if necessary.
• Repeat the programming steps but make sure the LED stops flashing between each press of the remote control button.
• Try programming using the Alternative Programming Option for products with DIP switches.
The remote control LED will not light or it is dim.
• Replace the battery.
The remote control LED does not activate the product until it is close to the product.
• Replace the battery.
12
NEED HELP?
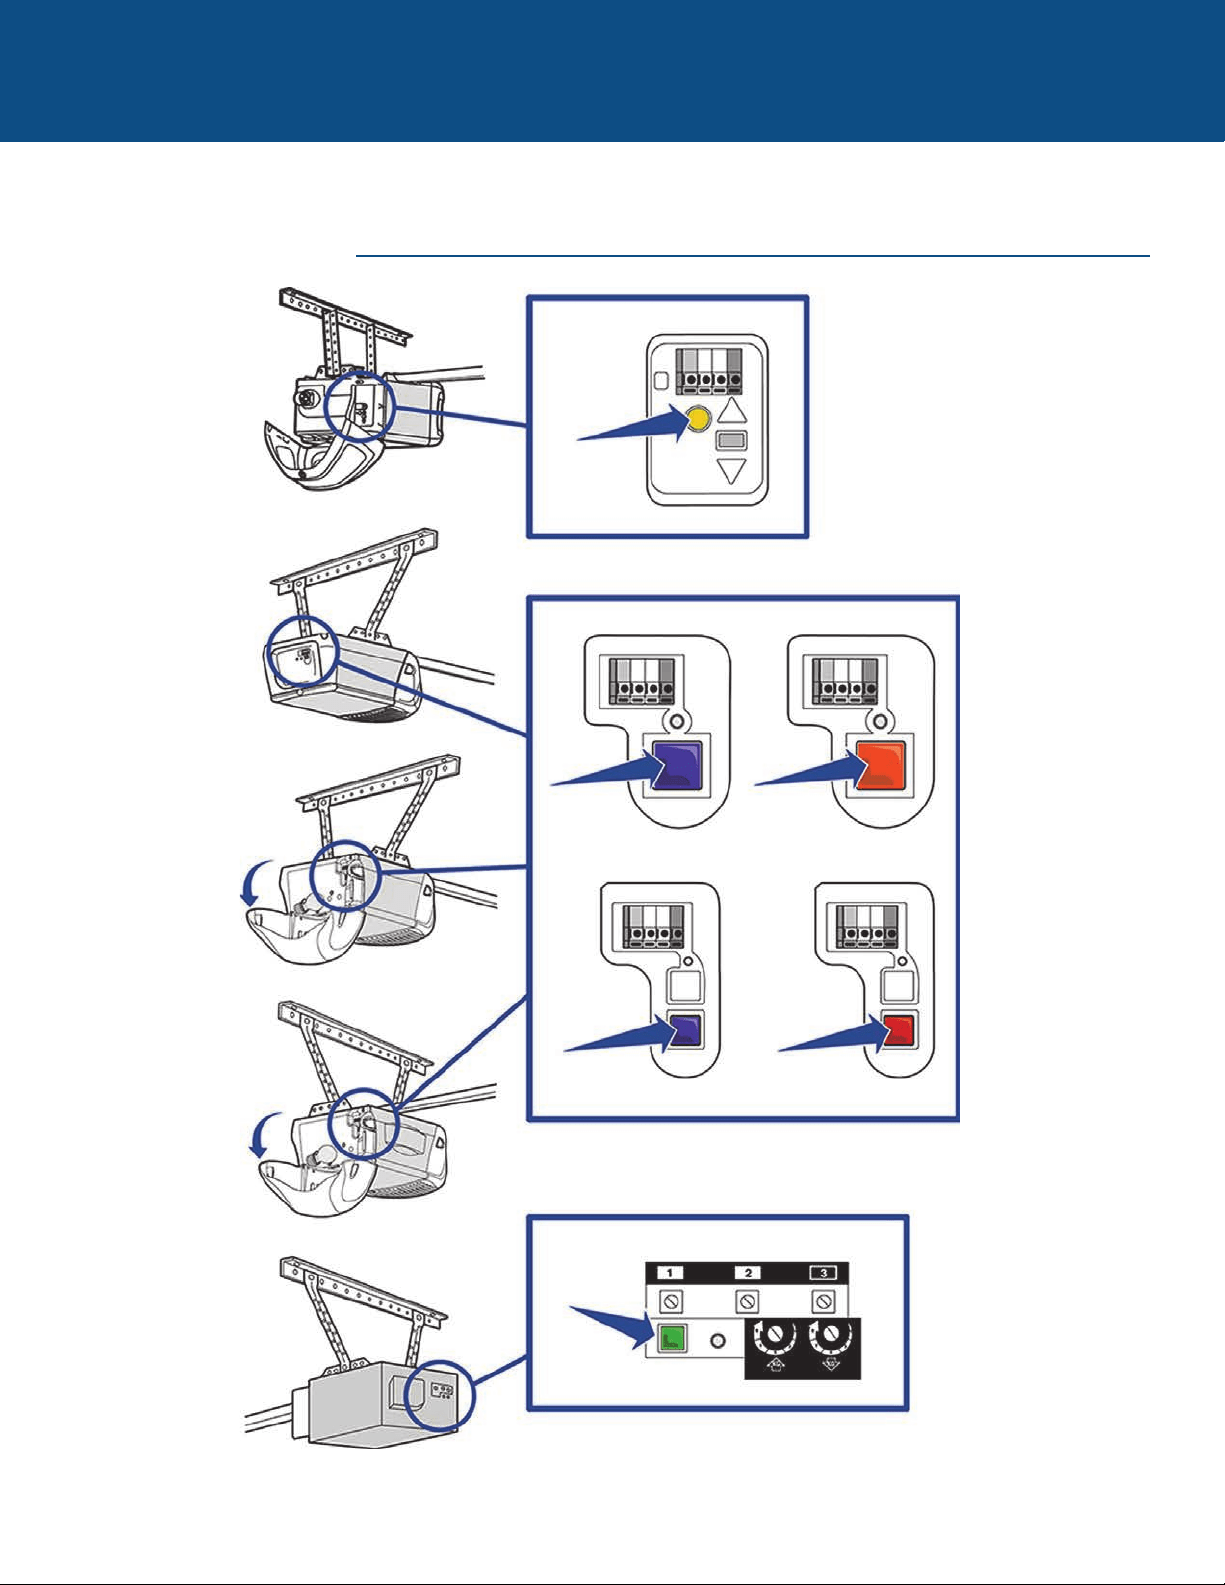
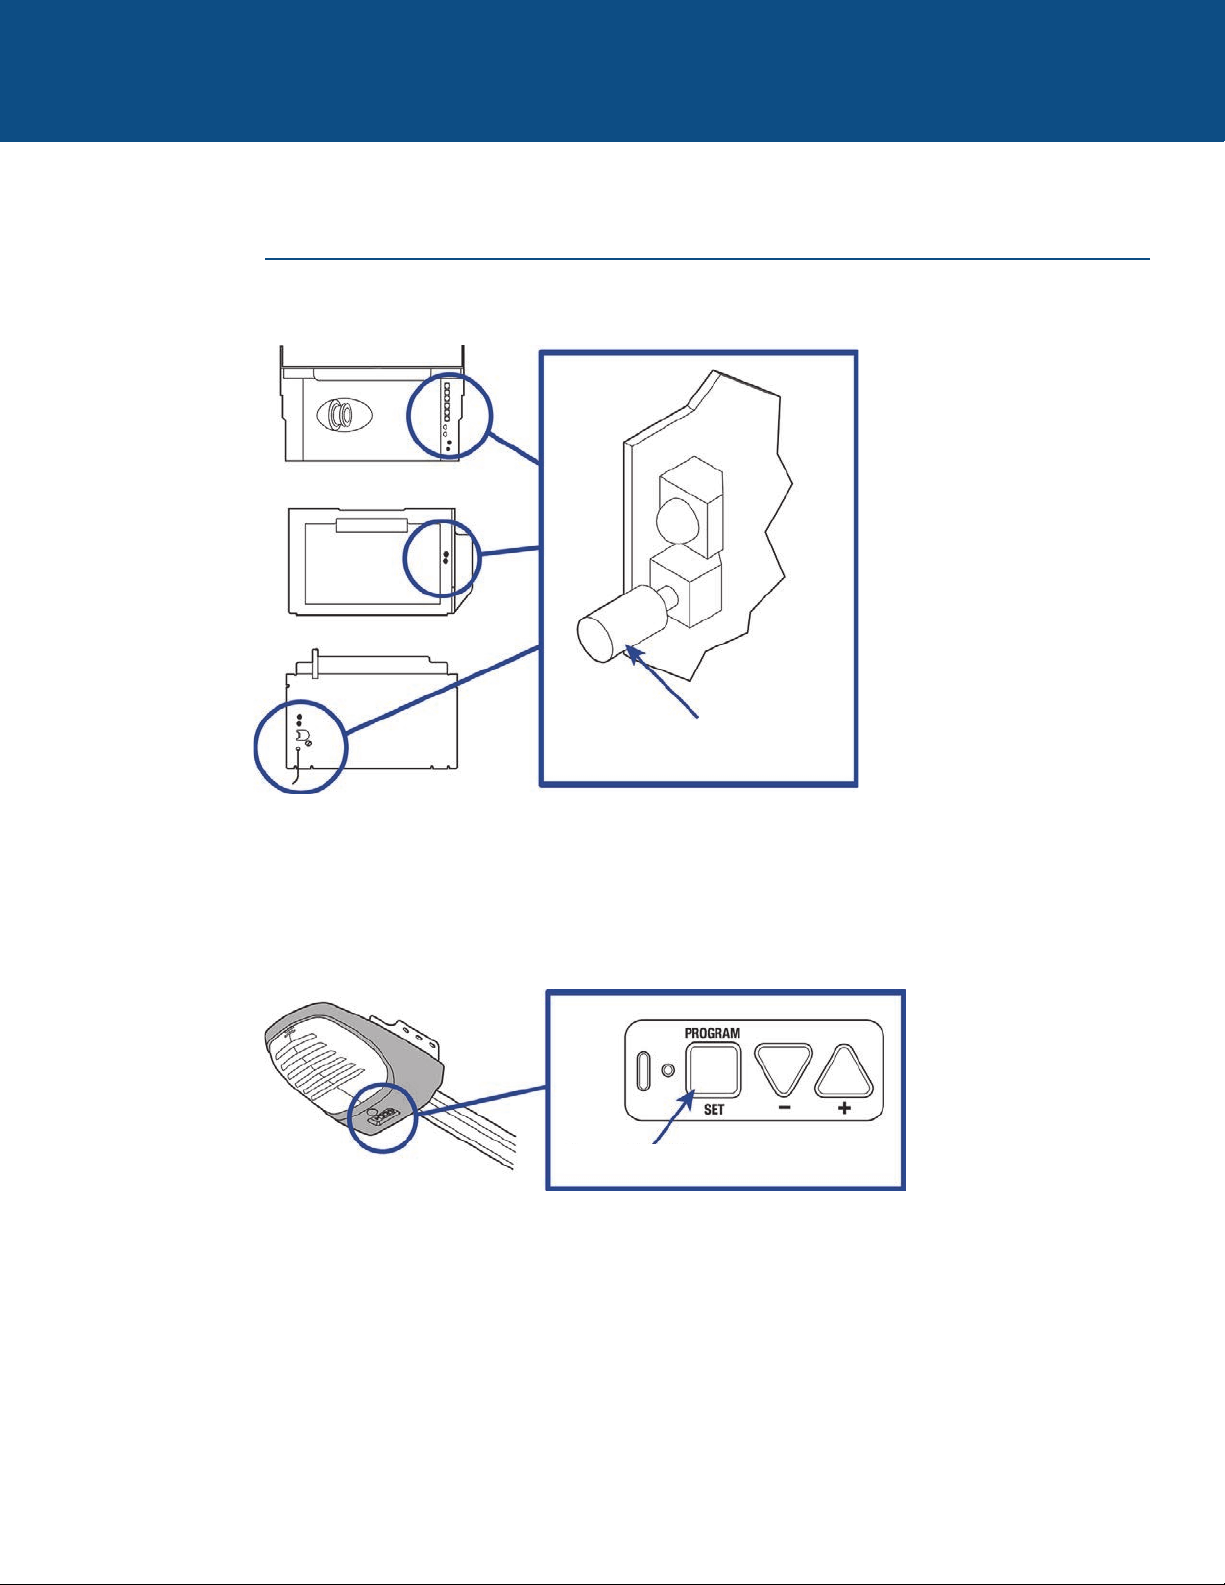
CHAMBERLAIN PRODUCTS
Locate the LEARN button

13
NEED HELP?
GENIE PRODUCTS
Locate the LEARN button
Learn Code
Button
Program Set Button
14
NEED HELP?
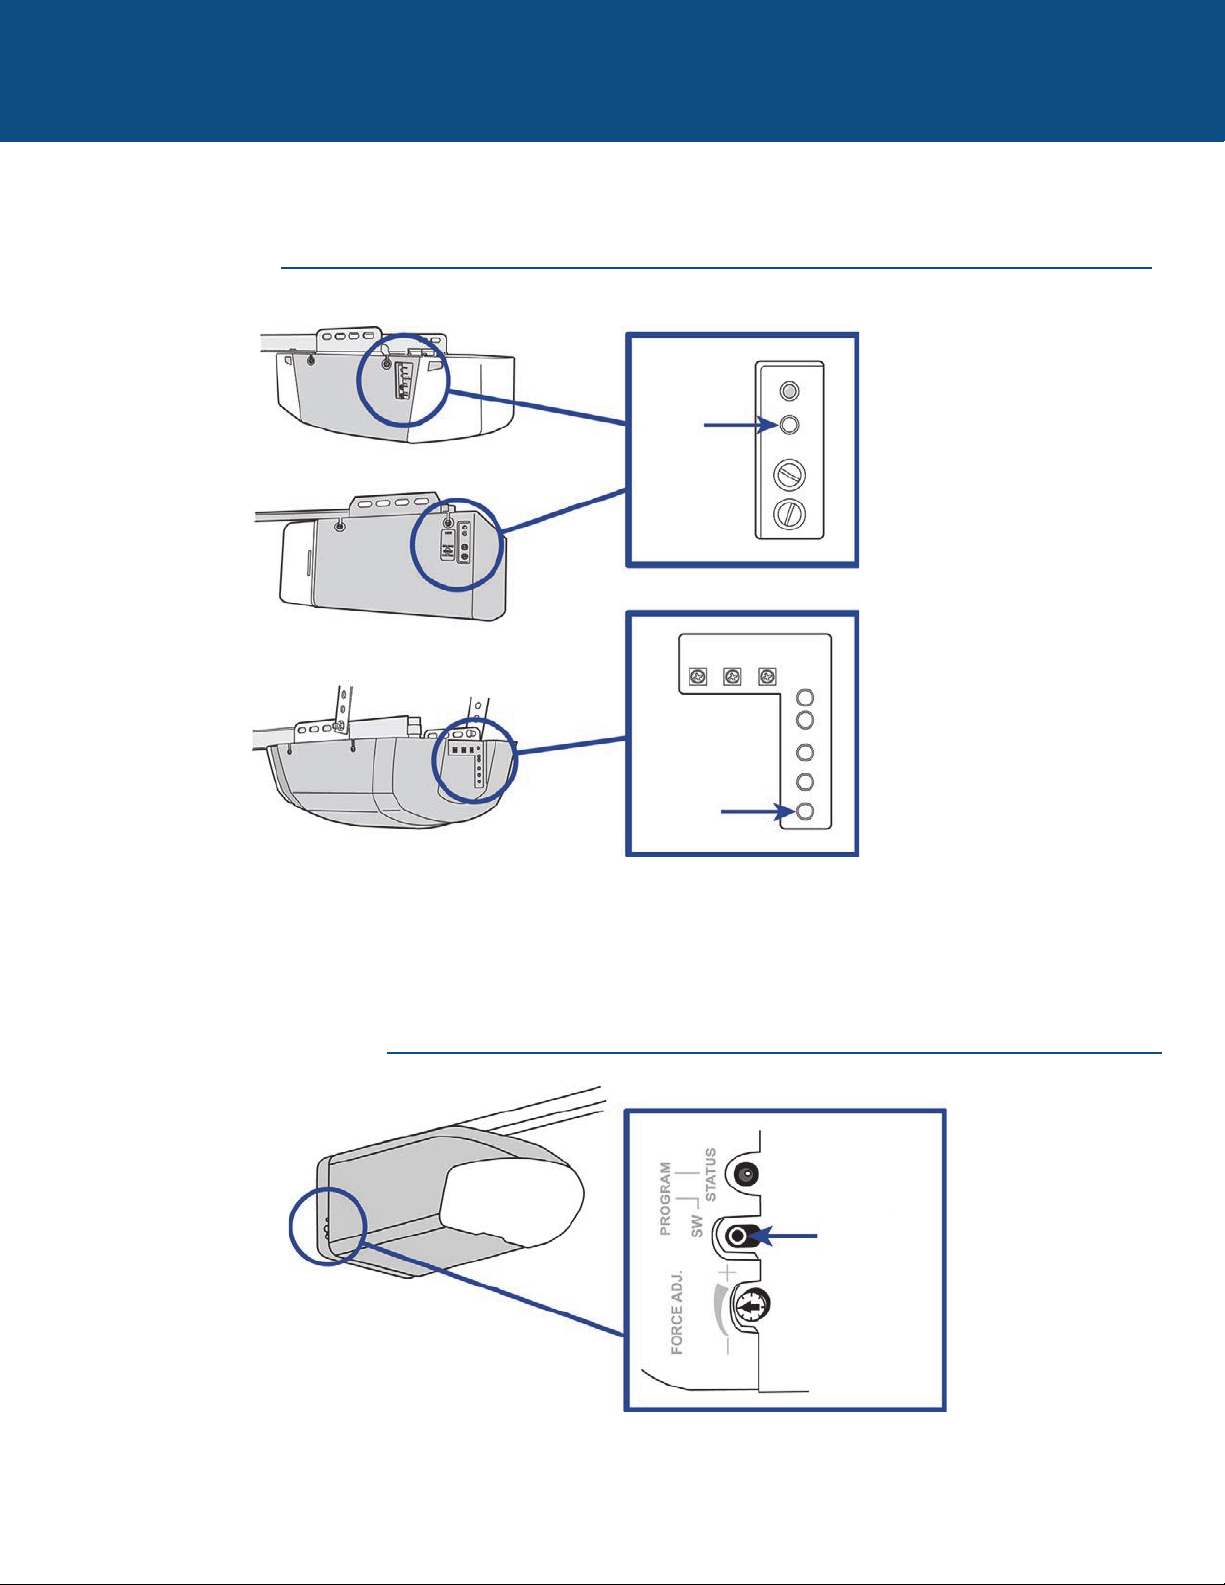
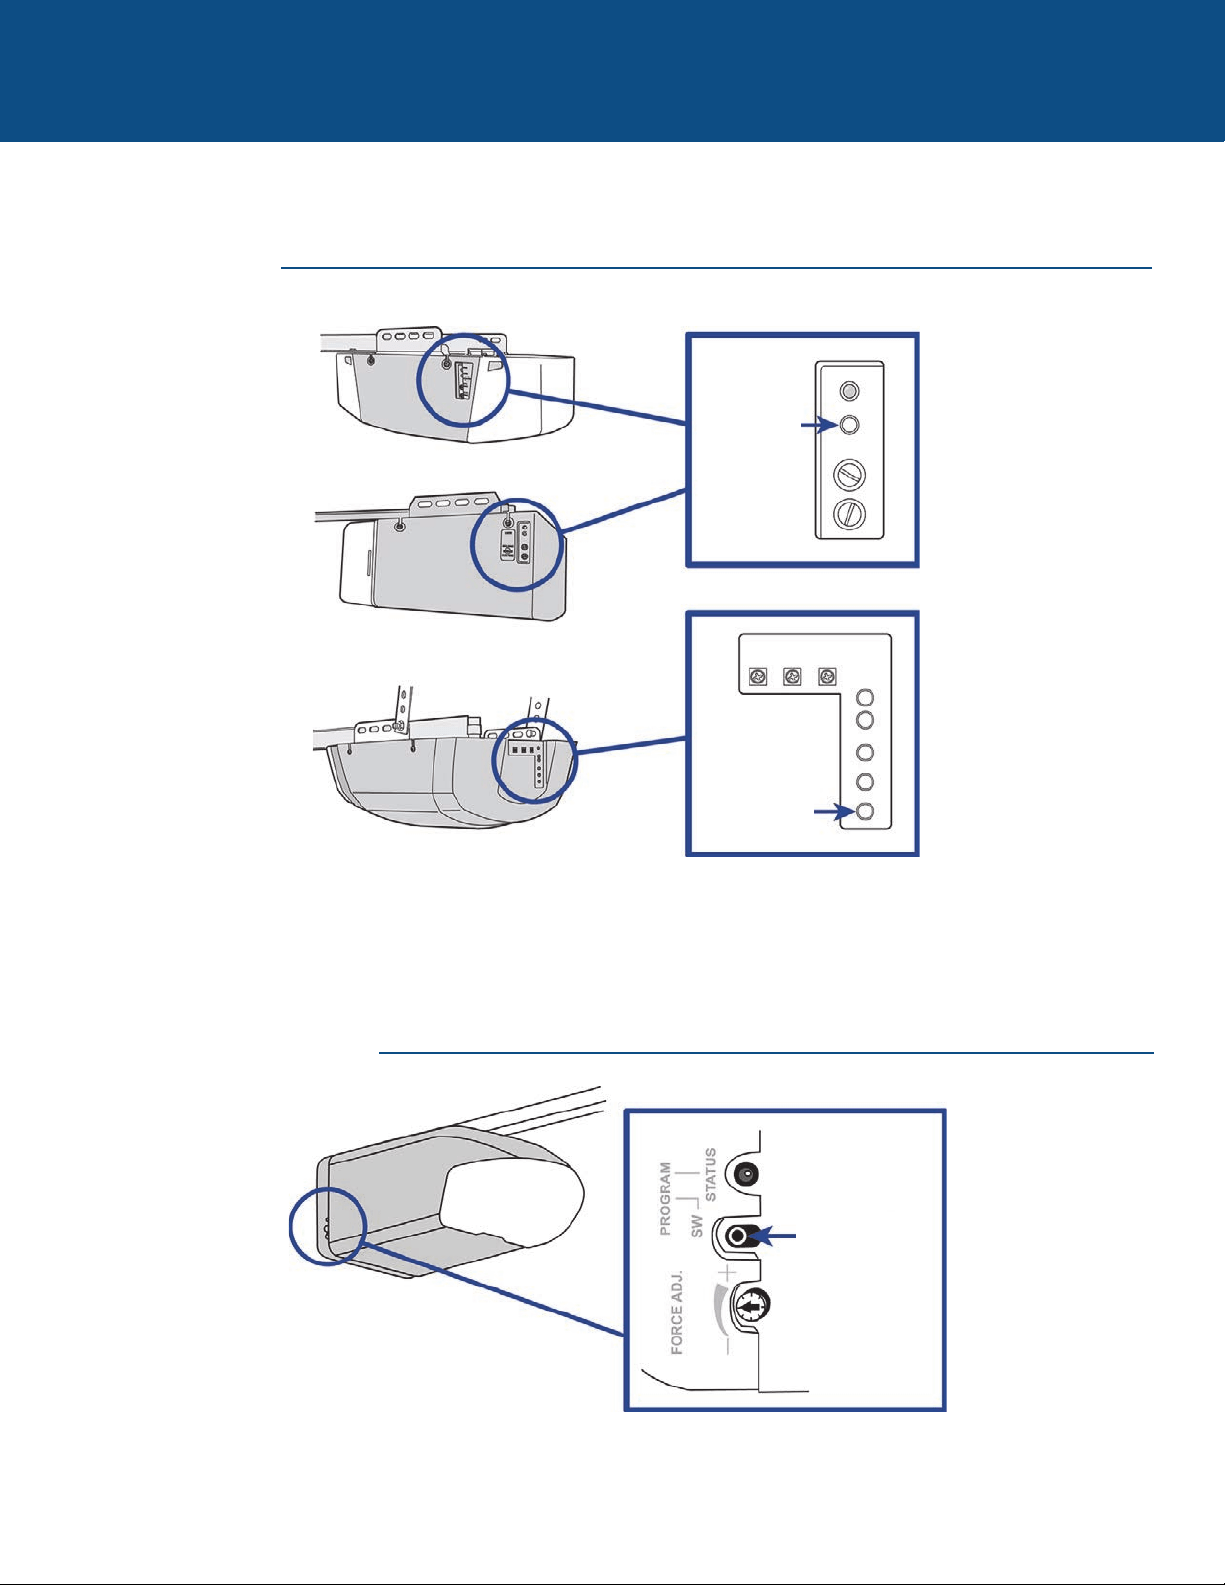
LINEAR PRODUCTS
WAYNE DALTON PRODUCTS
Locate the LEARN button
Learn
Button
Learn
Button
Program SW
Button
15
NEED HELP?
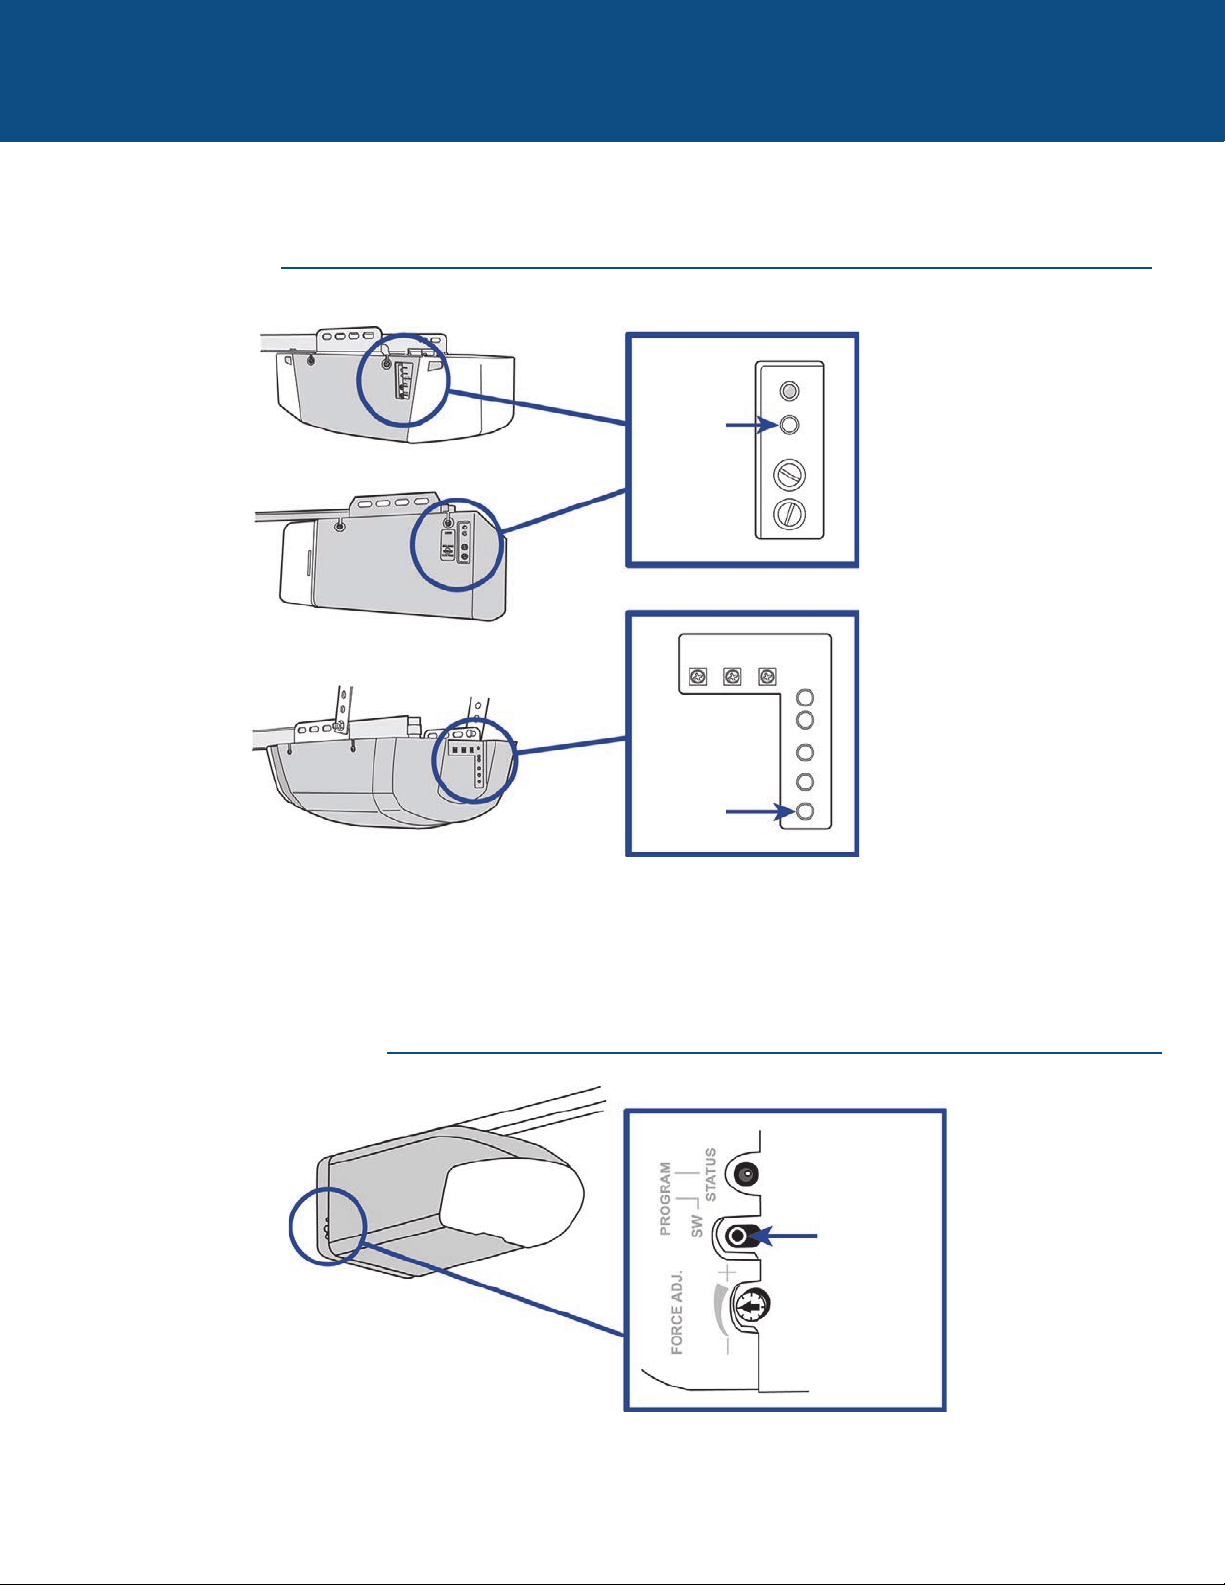
LIFTMASTER PRODUCTS
OVERHEAD DOOR PRODUCTS
Locate the LEARN button
Yellow Learn
Button
Purple Learn
Button
Orange Learn
Button
Green Learn
Button
Learn Code
Button

16
NEED HELP?
STANLEY PRODUCTS
Locate the LEARN button
Learn Button
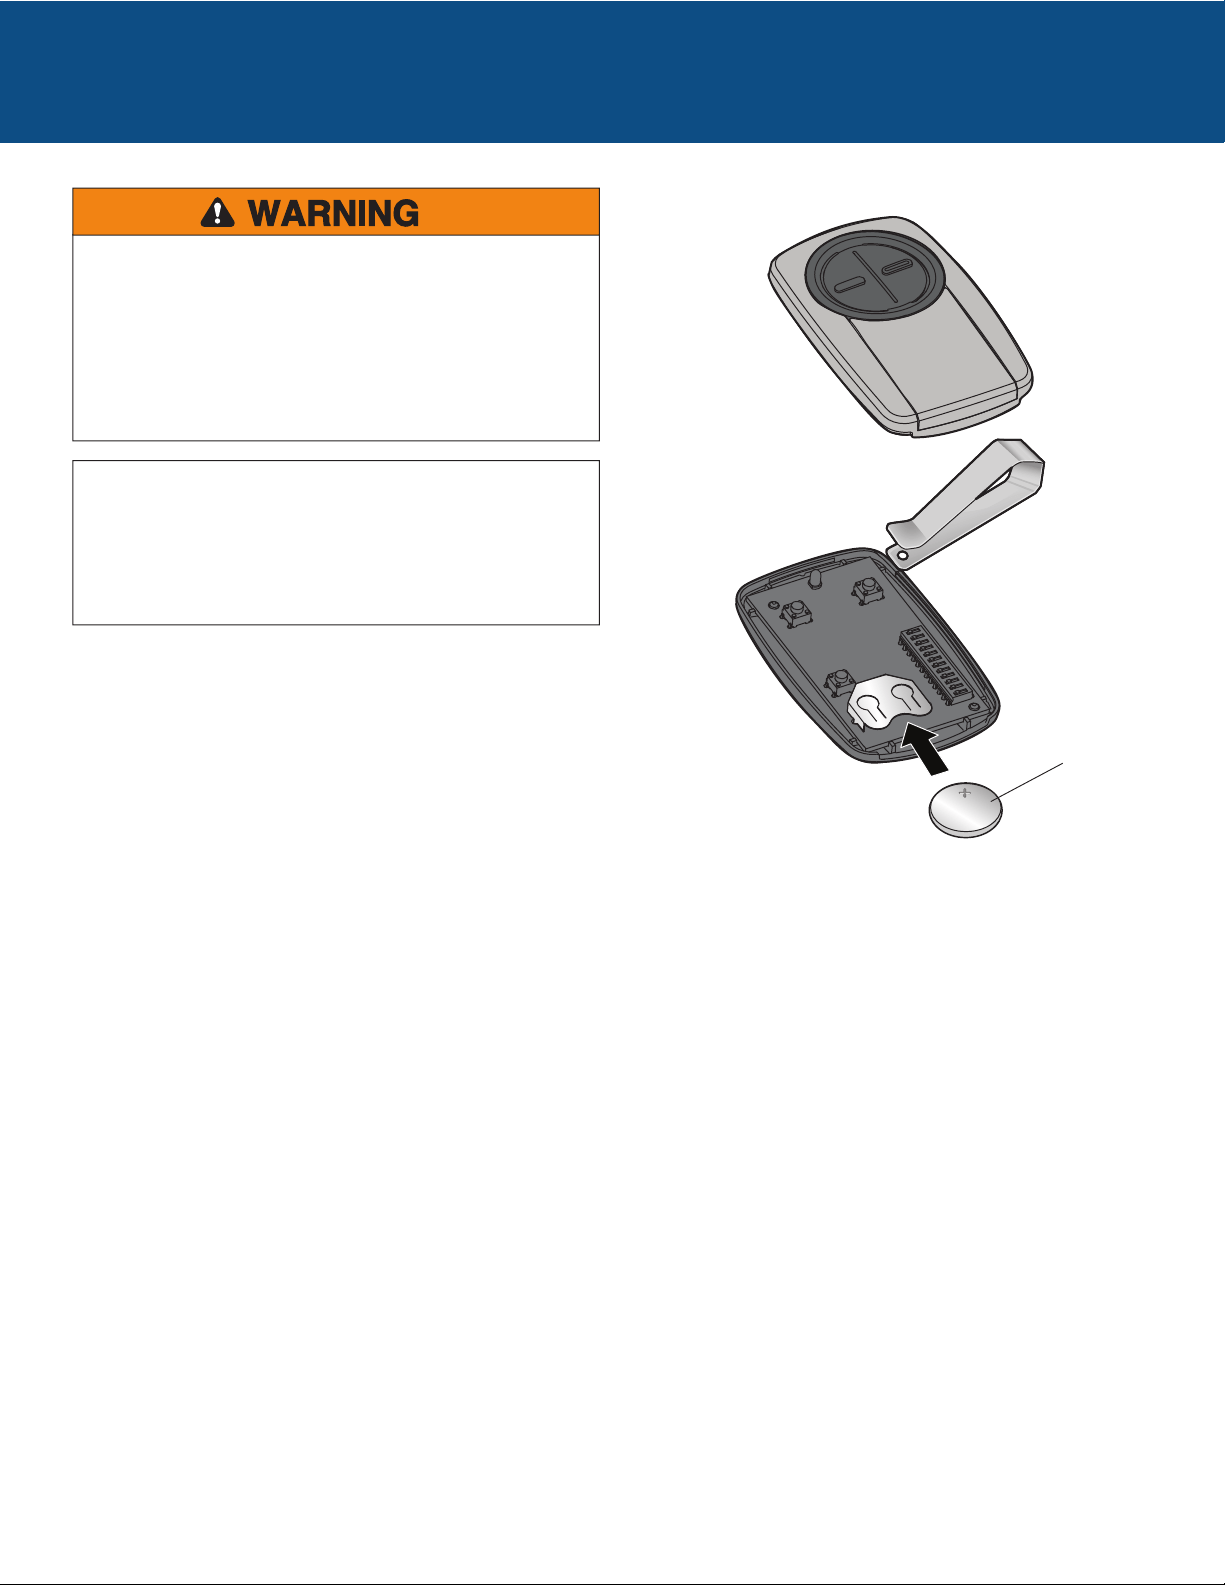
To prevent possible SERIOUS INJURY or DEATH:
• NEVER allow small children near batteries.
• If battery is swallowed, immediately notify doctor.
To reduce risk of fire, explosion or chemical burn:
• Replace ONLY with 3V CR2032 coin batteries.
• DO NOT recharge, disassemble, heat above 212°F (100°C)
or incinerate.
NOTICE: To comply with FCC and or Industry Canada (IC) rules, adjustment or
modifications of this receiver and/or transmitter are prohibited, except for
changing the code setting or replacing the battery. THERE ARE NO OTHER USER
SERVICEABLE PARTS.
Tested to Comply with FCC Standards FOR HOME OR OFFICE USE. Operation is
subject to the following two conditions: (1) this device may not cause harmful
interference, and (2)this device must accept any interference received, including
interference that may cause undesired operation.
Dispose of batteries properly. Replace ONLY with 3V CR2032 coin
batteries.
Battery
BATTERY
Pour prévenir d’éventuelles BLESSURES GRAVES ou LA MORT dues à un portail ou une porte de garage en mouvement :
• Garder EN TOUT TEMPS la télécommande hors de portée des enfants. Ne JAMAIS permettre à un enfant de faire fonctionner ou
de jouer avec une télécommande.
• Actionner le portail ou la porte UNIQUEMENT lorsqu’il ou elle est clairement visible, correctement réglé(e) et libre de toute
entrave lorsqu’il ou elle est en mouvement.
• Garder TOUJOURS le portail ou la porte en vue jusqu’à la fermeture complète. Ne JAMAIS permettre à quiconque de passer
lorsqu’un portail ou une porte est en mouvement.
Bien lire les instructions AVANT de commencer.
Si la télécommande universelle est utilisée avec un ouvre-porte de garage résidentiel, celle-ci ne doit l’être
qu’avec des ouvre-portes de garage fabriqués après 1993 et qui fonctionnent avec des capteurs
photoélectriques. Les capteurs photoélectriques sont toujours situés sur la partie inférieure du guide de la
porte ou à proximité de cette partie.
ARRÊT
AVERTISSEMENT : Ce produit peut vous exposer à des produits chimiques comme le plomb, reconnu par l’État de la
Californie comme cause de cancers, d’anomalies congénitales et d’autres problèmes liés à la reproduction. Pour plus
d’informations, visitez www.P65Warnings.ca.gov
Modèles KLIK3U, KLIK3U-BK,
KLIK3U-BL, KLIK3U-BK2, KLIK3U-BL2,
KLIK3U-SS, KLIK3C, KLIK3C-BK,
KLIK3C-BL, KLIK3C-SS, KLIK3C-BK2,
KLIK3C-BL2
TÉLÉCOMMANDE
UNIVERSELLE

2
POUR COMMENCER
La télécommande universelle peut être programmée pour activer jusqu’à deux produits, comme un ouvre-porte de garage, un
actionneur de portail ou de porte commerciale. Les illustrations de ce manuel ne sont fournies qu’à titre de référence; votre
produit peut avoir une apparence différente.
Bouton 2
Programmé séparément du bouton 1.
Ouvre-porte de garage
Actionneur de porte industrielleActionneur de portail
Bouton 1
Programmé séparément du bouton 2.
Bouton de programmation
Utilisé pour la programmation de produits à l’aide de
boutons d’apprentissage.
Selon votre produit, un bouton d’apprentissage ou des commutateurs DIP sont utilisés pour la programmation. Vous devrez
localiser le bouton d’apprentissage ou les commutateurs DIP sur votre produit avant de procéder à la programmation.
Commutateurs DIP
Utilisé pour la programmation de produits à l’aide de
commutateurs DIP.
OUVRE-PORTES DE GARAGE
Le bouton d’apprentissage ou les commutateurs DIP sont généralement
situés sur le panneau arrière ou latéral de votre ouvre-porte de garage. Le
bouton d’apprentissage « LEARN » peut avoir un autre nom (bouton
« SMART », bouton « PROGRAM », bouton « SET », etc.). Pour vous
aider à localiser le bouton d’apprentissage ou les commutateurs DIP,
consulter la section Aide de ce manuel ou contacter le fabricant de votre
ouvre-porte de garage.
ACTIONNEURS DE PORTE COMMERCIALE
Le bouton d’apprentissage ou les commutateurs DIP sont généralement
situés sur la carte logique de votre actionneur. Votre bouton
d’apprentissage peut porter un autre nom (bouton radio, bouton
d’émetteur, etc.) Pour vous aider à localiser le bouton d’apprentissage ou
les commutateurs DIP, consulter le fabricant de votre actionneur de
porte.
ACTIONNEURS DE PORTAIL
Le bouton d’apprentissage ou les commutateurs DIP sont généralement
situés sur le tableau de commande de votre actionneur. Votre bouton
d’apprentissage peut porter un autre nom (bouton radio, bouton
d’émetteur, etc.) Pour vous aider à localiser le bouton d’apprentissage ou
les commutateurs DIP, consulter le fabricant de votre actionneur de
portail.
RÉCEPTEUR EXTERNE
Certains produits ne sont
pas dotés d’un bouton
d’apprentissage ou de
commutateurs DIP. Dans
ce cas, le bouton
d’apprentissage ou les
commutateurs DIP seront
situés sur un récepteur
externe. Le récepteur
sera situé sur le produit
ou monté à proximité.
Suivre les instructions de
programmation pour un
récepteur externe.
3
OUVRE-PORTES DE GARAGE
Programmation de l’ouvre-porte de garage à l’aide du bouton d’apprentissage
Le bouton d’apprentissage est généralement situé sur le panneau arrière ou latéral de l’ouvre-porte de garage ou d’un récepteur
externe. Pour vous aider à localiser le bouton d’apprentissage, consulter la section Aide de ce manuel ou contacter le fabricant de
votre ouvre-porte de garage.
Si vous possédez un ouvre-porte de garage Genie
®
Intellicode
®
2 , passer à la page suivante.
Les illustrations de ce manuel ne sont fournies qu’à titre de référence; votre produit peut avoir une apparence différente.
Bouton de
programmation
1
Appuyer sur le bouton de programmation sur la
télécommande jusqu’à ce que la DEL s’allume.
2
Enfoncer et relâcher le bouton d’apprentissage* sur votre
ouvre-porte de garage.
3
Enfoncer et relâcher le bouton de la télécommande, la
DEL se mettra à clignoter. Lorsque la DEL s’arrête de
clignoter, continuer à enfoncer et relâcher le bouton (au
maximum 9 fois) jusqu’à ce que l’ouvre-porte de garage
réagisse à la commande en émettant un clic, en clignotant
ou en s’activant.
4
Enfoncer le bouton de programmation sur la
télécommande pour mettre en mémoire.
5
Tester la télécommande en enfonçant le bouton. Si l’ouvre-porte de garage ne s’active pas, répéter les étapes de
programmation ou adopter l’autre méthode de programmation.
Bouton de
programmation
* Selon votre produit, le bouton d’apprentissage peut avoir un autre nom (utiliser
le bouton servant à programmer les télécommandes).
DEL
4
Programmation à un ouvre-porte de garage Genie
®
Intellicode
®
2
Avant de commencer, vous DEVEZ avoir une télécommande Genie
®
Intellicode
®
2 dont au moins un bouton a déjà été programmé
à l’ouvre-porte de garage.
Les illustrations de ce manuel ne sont fournies qu’à titre de référence; votre produit peut avoir une apparence différente.
OUVRE-PORTES DE GARAGE « suite »
1
Appuyer sur le bouton de programmation de la
télécommande universelle jusqu’à ce que la DEL s’allume.
2
Sélectionner un bouton à programmer et l’enfoncer 5 fois
en vous assurant que la DEL cesse de clignoter après
chaque pression.
3
Enfoncer le bouton de programmation sur la
télécommande universelle.
4
Sur l’ouvre-porte de garage, enfoncer et tenir le bouton de
programmation/réglage « PROGRAM/SET » jusqu’à ce que
la DEL courte et la DEL longue s’allument en BLEU.
5
Relâcher le bouton de programmation/réglage
« PROGRAM/SET »; seule la DEL ronde s’allumera en
BLEU.
6
Enfoncer et relâcher le bouton de programmation/réglage
« PROGRAM/SET » et la DEL longue clignotera en MAUVE.
7
Sur la télécommande universelle, enfoncer et relâcher le
même bouton que vous aviez déjà sélectionné à l’étape 2.
Les deux DEL sur l’ouvre-porte de garage s’allumeront en
MAUVE.
8
Sur la télécommande universelle, enfoncer et relâcher le
même bouton une autre fois. Les deux DEL sur l’ouvre-
porte de garage s’allumeront en BLEU.
Sur la télécommande Genie
®
, enfoncer et relâcher le
bouton déjà programmé à l’ouvre-porte
de garage. Les deux DEL clignoteront en MAUVE.
9
Sur la télécommande universelle, enfoncer et relâcher le
même bouton une autre fois. Cela activera l’ouvre-porte
de garage et la programmation sera terminée.
Si la porte ne s’active pas, répéter les étapes de
programmation.
10
Bouton de programmation
Bouton de programmation
DEL
5
ACTIONNEURS DE PORTE COMMERCIALE
Programmation d’un actionneur de porte commerciale à l’aide d’un bouton
d’apprentissage
Le bouton d’apprentissage se situe généralement sur la carte logique de l’actionneur ou sur un récepteur externe. Pour vous aider
à localiser le bouton d’apprentissage sur votre actionneur de porte commerciale, consulter le fabricant de votre actionneur de
porte.
Les illustrations de ce manuel ne sont fournies qu’à titre de référence; votre produit peut avoir une apparence différente.
1
Appuyer sur le bouton de programmation de la
télécommande universelle jusqu’à ce que la DEL s’allume.
2
Enfoncer et relâcher le bouton d’apprentissage* sur votre
actionneur de porte commerciale.
3
Enfoncer et relâcher le bouton de la télécommande, la
DEL se mettra à clignoter. Lorsque la DEL s’arrête de
clignoter, continuer à enfoncer et relâcher le bouton
jusqu’à ce que l’actionneur de porte commerciale
réagisse à la commande en émettant un clic, en
clignotant ou en s’activant.
4
Enfoncer le bouton de programmation sur la
télécommande pour mettre en mémoire.
5
Tester la télécommande en enfonçant le bouton. Si l’actionneur de porte commerciale ne s’active pas, répéter les étapes de
programmation ou adopter l’autre méthode de programmation.
Bouton
d’apprentissage*
* Selon votre produit, le bouton d’apprentissage peut avoir un autre nom (utiliser
le bouton servant à programmer les télécommandes).
DEL
Bouton de
programmation
Bouton de
programmation
6
Programmation d’un actionneur de portail à l’aide d’un bouton d’apprentissage
Le bouton d’apprentissage est généralement situé sur la carte logique de l’actionneur ou sur un récepteur externe. Pour vous aider
à localiser le bouton d’apprentissage sur votre actionneur de portail, consulter le fabricant de l’actionneur.
Les illustrations de ce manuel ne sont fournies qu’à titre de référence; votre produit peut avoir une apparence différente.
ACTIONNEURS DE PORTAIL
1
Appuyer sur le bouton de programmation de la
télécommande universelle jusqu’à ce que la DEL s’allume.
2
Enfoncer et relâcher le bouton d’apprentissage* sur
l’actionneur de votre portail.
3
Enfoncer et relâcher le bouton de la télécommande, la
DEL se mettra à clignoter. Lorsque la DEL s’arrête de
clignoter, continuer à enfoncer et relâcher le bouton
jusqu’à ce que l’actionneur du portail réagisse à la
commande en émettant un clic, en clignotant ou en
s’activant.
4
Enfoncer le bouton de programmation sur la
télécommande pour mettre en mémoire.
5
Tester la télécommande en enfonçant le bouton. Si l’actionneur de portail ne s’active pas, répéter les étapes de programmation
ou adopter l’autre méthode de programmation.
Bouton
d’apprentissage*
* Selon votre produit, le bouton d’apprentissage peut avoir un autre nom (utiliser
le bouton servant à programmer les télécommandes).
DEL
Bouton de
programmation
Bouton de
programmation

7
Programmation à un récepteur externe à l’aide des commutateurs DIP
Commutateur DIP à trois positions :
En ce qui concerne les télécommandes Chamberlain, NE PAS utiliser la position
« 0 », se servir des positions « + » ou « - ». Si vous avez déjà une télécommande
à trois boutons, régler le commutateur DIP no 1 à « - » si le gros bouton est
celui qui activera la porte. Il peut s’avérer nécessaire de
reprogrammes les télécommandes originales.
RÉCEPTEURS EXTERNES
1
Enfoncer le bouton de programmation sur la
télécommande universelle.
2
Faire correspondre des commutateurs DIP entre la
télécommande existante ou le récepteur externe et la
télécommande universelle. Mettre les commutateurs
supplémentaires à la position arrêt « OFF ».
3
Commutateur DIP à deux positions :
Si la programmation échoue, inverser les positions des commutateurs DIP
(ARRÊT à MARCH et MARCH à ARRÊT).
Récepteur
externe
Commutateurs DIP
Commutateurs
DIP
Télécommande
existante
Télécommande
universelle
Télécommande
universelle
Si la télécommande universelle est utilisée avec un ouvre-porte de garage résidentiel, celle-ci ne doit l’être qu’avec
des ouvre-portes de garage fabriqués après 1993 et qui fonctionnent avec des capteurs photoélectriques. Les
capteurs photoélectriques sont toujours situés sur la partie inférieure du guide de la porte ou à proximité de cette
partie.
Le récepteur externe est généralement situé sur le produit ou monté à proximité de celui-ci.
Les illustrations de ce manuel ne sont fournies qu’à titre de référence; votre produit peut avoir une apparence différente.
Enfoncer et relâcher le bouton de la télécommande
universelle, la DEL se mettra à clignoter. Lorsque la DEL
continue de clignoter, continuer d’enfoncer et de relâcher
le bouton jusqu’à ce que votre produit réagisse en
émettant un clic, en
clignotant ou en s’activant.
4
Enfoncer le bouton de programmation sur la
télécommande universelle pour mettre en mémoire.
5
Tester la télécommande universelle en enfonçant le bouton. Si le produit ne s’active pas, répéter les étapes de programmation
ou adopter l’autre méthode de programmation.
CONSEILS
ARRÊT
DEL
Bouton de
programmation
Bouton de
programmation
8
Programmation à un récepteur externe à l’aide d’un bouton d’apprentissage
RÉCEPTEURS EXTERNES (suite)
1
Appuyer sur le bouton de programmation sur la
télécommande jusqu’à ce que la DEL s’allume.
2
Enfoncer et relâcher le bouton d’apprentissage* sur le
récepteur.
3
Enfoncer et relâcher le bouton de la télécommande, la
DEL se mettra à clignoter. Lorsque la DEL s’arrête de
clignoter, continuer à enfoncer et relâcher le bouton
jusqu’à ce que votre produit réagisse à la commande en
émettant un clic, en clignotant ou en s’activant.
4
Enfoncer le bouton de programmation sur la
télécommande pour mettre en mémoire.
5
Tester la télécommande en enfonçant le bouton. Si le produit ne s’active pas, répéter les étapes de programmation ou adopter
l’autre méthode de programmation.
Bouton
d’apprentissage*
Si la télécommande universelle est utilisée avec un ouvre-porte de garage résidentiel, celle-ci ne doit l’être qu’avec
des ouvre-portes de garage fabriqués après 1993 et qui fonctionnent avec des capteurs photoélectriques. Les capteurs
photoélectriques sont toujours situés sur la partie inférieure du guide de la porte ou à proximité de cette partie.
Le récepteur externe est généralement situé sur le produit ou monté à proximité de celui-ci.
Les illustrations de ce manuel ne sont fournies qu’à titre de référence; votre produit peut avoir une apparence différente.
* Selon votre produit, le bouton intelligent/apprentissage peut avoir un autre
nom (utiliser le bouton servant à programmer les télécommandes).
ARRÊT
DEL
Bouton de
programmation
Bouton de
programmation
9
Autre options de programmation de produits à l’aide d’un bouton d’apprentissage
Le bouton d’apprentissage est généralement situé sur le produit ou sur un récepteur externe. Pour vous aider à localiser le bouton
d’apprentissage, consulter la section Aide de ce manuel ou contacter le fabricant du produit.
Les illustrations de ce manuel ne sont fournies qu’à titre de référence; votre produit peut avoir une apparence différente.
** LiftMaster, Do-It, Master Mechanic, Raynor, True Value et Sears Craftsman sont compatibles avec la technologie Chamberlain.
AUTRE OPTIONS DE PROGRAMMATION
1
Appuyer sur le bouton de programmation sur la
télécommande jusqu’à ce que la DEL s’allume.
2
Enfoncer et relâcher le bouton d’apprentissage* de votre
produit.
3
Enfoncer et relâcher le bouton de la télécommande…
...8 fois (produit Chamberlain
®
** avec bouton d’apprentissage jaune).
...3 fois (produit Chamberlain
®
** avec bouton d’apprentissage mauve).
...2 fois (produit Chamberlain
®
** avec bouton d’apprentissage orange).
...4 fois (produit Chamberlain
®
** avec bouton d’apprentissage vert).
... 5 ou 6 fois (produit à code intelligent Overhead Door
®
Genie
®
).
...1 fois (produit Linear
®
Mega-Code).
...7 fois (produit à code sécurisé Stanley
®
).
...9 fois (produit sans code fixe Wayne Dalton
®
).
La DEL de la télécommande DOIT cesser de clignoter entre chaque pression exercée sur le bouton. Le code a été accepté
lorsque le produit réagit en émettant un clic, en clignotant ou en s’activant.
4
Enfoncer le bouton de programmation sur la
télécommande pour mettre en mémoire.
5
Tester la télécommande en enfonçant le bouton. Si le
produit ne s’active pas, répéter les étapes de
programmation ou adopter l’autre méthode de
programmation.
* Selon votre produit, le bouton d’apprentissage peut avoir un autre nom (utiliser
le bouton servant à programmer les télécommandes).
DEL
Bouton de
programmation
Bouton de
programmation
10
Autre option de programmation pour les produits avec commutateurs DIP
AUTRES OPTIONS DE PROGRAMMATION (suite)
Enfoncer et relâcher le bouton de la télécommande universelle…
...11 fois (produit Chamberlain
®
** avec 9 commutateurs DIP).
...12 fois (produit Chamberlain
®
** canadien avec 9 commutateurs DIP).
...13 fois (produit Genie
®
avec 12 commutateurs DIP).
...14 fois (produit Linear Multicode
®
avec 10 commutateurs DIP).
...15 fois (produit Chamberlain
®
* avec 8 commutateurs DIP).
...16 fois (produit Stanley/Multicode
®
avec 10 commutateurs DIP).
...17 fois (produit Genie
®
avec 9 commutateurs DIP).
...18 fois (produit Linear
®
, Moore-O-Matic
®
avec 8 commutateurs DIP).
...19 fois (produit Chamberlain
®
** avec 7 commutateurs DIP).
La DEL de la télécommande universelle DOIT cesser de clignoter entre chaque pression exercée sur le bouton. Le code a été
accepté lorsque l’ouvre-porte de garage réagit en émettant un clic, en clignotant ou en s’activant.
1
Enfoncer le bouton de programmation sur la
télécommande universelle.
2
Faire correspondre des commutateurs DIP entre la
télécommande existante ou le récepteur externe et la
télécommande universelle. Mettre les commutateurs
supplémentaires à la position arrêt « OFF ».
3
5
Enfoncer le bouton de programmation sur la
télécommande universelle pour mettre en mémoire.
6
Tester la télécommande universelle en enfonçant le
bouton. Si le produit ne s’active pas, répéter les étapes de
programmation ou adopter l’autre méthode de
programmation.
Si la télécommande universelle est utilisée avec un ouvre-porte de garage résidentiel, celle-ci ne doit l’être qu’avec
des ouvre-portes de garage fabriqués après 1993 et qui fonctionnent avec des capteurs photoélectriques. Les capteurs
photoélectriques sont toujours situés sur la partie inférieure du guide de la porte ou à proximité de cette partie.
Les commutateurs DIP se trouvent généralement sur le produit ou un récepteur externe. Pour toute assistance dans
l’identification des commutateurs DIP, s’adresser au fabricant du produit.
Les illustrations de ce manuel ne sont fournies qu’à titre de référence; votre produit peut avoir une apparence différente.
** LiftMaster, Do-It, Master Mechanic, Raynor, True Value et Sears Craftsman sont compatibles avec la technologie Chamberlain.
ARRÊT
DEL
Bouton de
programmation
Bouton de
programmation
Commutateurs DIP
Commutateurs
DIP
Télécommande
existante
Télécommande
universelle
Télécommande
universelle
Commutateur DIP à trois positions :
En ce qui concerne les télécommandes Chamberlain, NE PAS utiliser la position
« 0 », se servir des positions « + » ou « - ». Si vous avez déjà une télécommande
à trois boutons, régler le commutateur DIP no 1 à « - » si le
gros bouton est celui qui activera la porte. Il peut s’avérer
nécessaire de reprogrammes les télécommandes originales.
Commutateur DIP à deux positions :
Si la programmation échoue, inverser les positions des
commutateurs DIP (ARRÊT à MARCH et MARCH à
ARRÊT).
CONSEILS

11
BESOIN D’AIDE?
La télécommande ne se programme pas à un produit avec commutateurs DIP.
• Vérifier la pile de la télécommande. La DEL devrait s’allumer en appuyant sur un bouton. Remplacer la pile au besoin.
• Si la programmation a été réalisée à l’aide de commutateurs DIP à deux positions, inverser celles-ci (ARRÊT à MARCH et MARCH à
ARRÊT) puis, répéter les étapes de programmation.
• En ce qui concerne les télécommandes Chamberlain, NE PAS utiliser la position « 0 », se servir des positions « + » ou « - ». Si
vous avez déjà une télécommande à trois boutons, régler le commutateur DIP no 1 à « - » si le gros bouton est celui qui activera la
porte. Il peut s’avérer nécessaire de reprogrammes les télécommandes originales.
• Répéter les étapes de programmation en vous assurer que la DEL cesse de clignoter entre chaque pression sur le bouton de la
télécommande.
• Essayer de programmer à l’aide de l’autre option de programmation pour les produits avec bouton d’apprentissage.
La télécommande ne se programme pas à un produit avec bouton d’apprentissage.
• Vérifier la pile de la télécommande. La DEL devrait s’allumer en appuyant sur un bouton. Remplacer la pile au besoin.
• Répéter les étapes de programmation en vous assurer que la DEL cesse de clignoter entre chaque pression sur le bouton de la
télécommande.
• Essayer de programmer à l’aide de l’autre option de programmation pour les produits avec commutateurs DIP.
La DEL de la télécommande ne s’allume pas ou s’allume faiblement.
• Remplacer la pile.
La DEL de la télécommande n’active pas le produit à moins d’être à grande proximité de ce dernier.
• Remplacer la pile.

12
BESOIN D’AIDE?
PRODUITS CHAMBERLAIN
Repérer le bouton d’apprentissage
13
BESOIN D’AIDE?
PRODUITS GENIE
Repérer le bouton d’apprentissage
Bouton de code
d’apprentissage
Bouton de réglage de programmation
14
BESOIN D’AIDE?
PRODUITS LINEAR
PRODUITS WAYNE DALTON
Repérer le bouton d’apprentissage
Bouton
d’apprentissage
Bouton
d’apprentissage
Bouton de
programmation
« SW »
15
BESOIN D’AIDE?
PRODUITS LIFTMASTER
PRODUITS OVERHEAD DOOR
Repérer le bouton d’apprentissage
Bouton
d’apprentissage
jaune
Bouton
d’apprentissage
mauve
OU
OU
OU
Bouton
d’apprentissage
orange
Bouton
d’apprentissage
vert
Bouton de code
d’apprentissage
« LEARN CODE »
16
BESOIN D’AIDE?
PRODUITS STANLEY
Repérer le bouton d’apprentissage
Bouton
d’apprentissage

Pour éviter des BLESSURES GRAVES, VOIRE MORTELLES :
• Ne JAMAIS laisser des enfants s’approcher des piles.
• Si une pile est avalée, aviser un médecin immédiatement.
Pour réduire le risque d’incendie, d’explosion ou de brûlure
chimique :
• Remplacer la pile UNIQUEMENT par une pile bouton 3V
CR2032.
• NE PAS la recharger, la démonter, la chauffer à plus de
100 °C (212 °F) ou l’incinérer.
AVIS : Les règles de la FCC ou d’Industrie Canada (IC), ou les deux, interdisent
tout ajustement ou toute modification de ce récepteur et/ou de cet émetteur,
sauf pour modifier le code ou pour remplacer la pile. IL N’EXISTE AUCUNE
AUTRE PIÈCE SUSCEPTIBLE D’ÊTRE ENTRETENUE PAR L’UTILISATEUR.
Vérifié pour conformité avec les normes FCC POUR UTILISATION À LA MAISON
OU AU BUREAU. L’utilisation est assujettie aux deux conditions ci-après : (1) ce
dispositif ne doit pas causer d’interférences nuisibles, et (2) ce dispositif doit
accepter toute interférence reçue, y compris une interférence pouvant causer un
fonctionnement indésirable.
Mettre les piles au rebut de manière appropriée. Remplacer les
piles UNIQUEMENT par des piles bouton 3V CR2032.
Pile
PILE
Para evitar la posibilidad de una LESIÓN GRAVE O INCLUSO LA MUERTE causada por la puerta en movimiento:
• SIEMPRE conserve los controles remotos alejados del alcance de los niños. NUNCA permita que los niños usen o jueguen con
un control remoto.
• Active la puerta ÚNICAMENTE cuando pueda verla claramente, cuando esté correctamente ajustada y no hubiera obstrucciones
en su recorrido.
• Tenga SIEMPRE la puerta del garaje a la vista hasta que esté completamente cerrada. NUNCA permita que alguien cruce la
trayectoria de un portón o una puerta en movimiento.
ADVERTENCIA
Leer las instrucciones ANTES de comenzar.
Si se usa el control remoto universal con abre-puertas residenciales, se debe usar solo con abre-puertas
fabricados después de 1993 que utilicen sensores fotoeléctricos. Los sensores fotoeléctricos se encuentran
siempre en la parte inferior de la guía de la puerta o en sus proximidades.
ALTO
ADVERTENCIA: Este producto puede exponerle a productos químicos (incluido el plomo), que a consideración del
estado de California causan cáncer, defectos congénitos u otros daños reproductivos. Para más información, visite
www.P65Warnings.ca.gov
Modelos KLIK3U, KLIK3U-BK,
KLIK3U-BL, KLIK3U-BK2, KLIK3U-BL2,
KLIK3U-SS, KLIK3C, KLIK3C-BK,
KLIK3C-BL, KLIK3C-SS, KLIK3C-BK2,
KLIK3C-BL2
CONTROL REMOTO
UNIVERSAL
2
PASOS INICIALES
El control remoto puede programarse para activar hasta dos productos, tales como abre-puertas de garaje, operador de la
portones u operador de puerta comercial. Las imágenes en este manual se usan solamente como referencia. El producto
comprado podría tener un aspecto diferente.
Botón 2
Programado independientemente del Botón 1.
Abre-puertas de garaje
Operador de puertas de uso comercialOperador de portón
Botón 1
Programado independientemente del Botón 2
Botón de Programar
Usado para la programación de productos con
botones aprendizaje.
Según el tipo de producto, la programación se realiza con un botón aprendizaje o con microselectores. Localice el botón
aprendizaje o los microselectores antes de iniciar la programación.
Microselectores
Usados para la programación de productos con
microselectores.
ABRE-PUERTAS DE GARAJE
El botón aprendizaje o los microselectores generalmente están en la parte
posterior o el panel lateral del abre-puerta de garaje. Su botón aprendizaje
(LEARN) puede tener un nombre distinto (botón SMART, botón
PROGRAM, botón SET, etc.). Si necesitara ayuda para localizar el botón
aprendizaje o los microselectores consulte la sección de Ayuda de este
manual o al fabricante del abre-puerta de garaje.
OPERADORES DE PUERTAS DE USO COMERCIAL
El botón aprendizaje o los microselectores generalmente están en la
tarjeta lógica del operador. El botón aprendizaje podría tener un nombre
diferente tal como radio, transmisor, etc. Si necesitara ayuda para
localizar el botón aprendizaje o los microselectores comuníquese con el
fabricante del operador de puerta.
OPERADORES DE PORTÓN
El botón aprendizaje o los microselectores generalmente están en la
tarjeta de control del operador. El botón aprendizaje podría tener un
nombre diferente tal como radio, transmisor, etc. Si necesitara ayuda
para localizar el botón aprendizaje o los microselectores comuníquese
con el fabricante del operador del portón.
RECEPTOR EXTERNO
Ciertos productos no tienen
un botón aprendizaje ni
microselectores. En tal
caso, el botón aprendizaje o
los microselectores estarán
en un receptor externo. El
receptor se encontrará en
el producto o montado en
las cercanías. Siga las
instrucciones de
programación para receptor
externo.
3
ABRE-PUERTAS DE GARAJE
Programación con el botón aprendizaje de un abre-puerta de garaje
El botón aprendizaje generalmente está en la parte posterior o el panel lateral del abre-puerta o en un receptor externo. Si
necesitara ayuda para localizar el botón aprendizaje consulte la sección de Ayuda de este manual o al fabricante del abre-puerta
de garaje.
Si tuviera un abre-puerta Genie
®
Intellicode
®
2 continúe en la siguiente página.
Las imágenes en este manual se usan solamente como referencia. El producto comprado podría tener un aspecto diferente.
Botón de
programación
1
Oprima el botón de programación en el control remoto
hasta que se encienda el LED.
2
Oprima y suelte el botón aprendizaje* en el abre-puerta de
garaje.
3
Oprima y suelte el botón del control remoto y el LED
comenzará a parpadear. Cuando el LED deje de
parpadear, continúe pulsando y soltando el botón (hasta
un máximo de 9 veces) hasta que el abre-puerta responda
haciendo clic, parpadeando o activándose.
4
Pulse el botón de programación del control remoto para
guardar en memoria la programación.
5
Pruebe el control remoto pulsando el botón. Si no se activara el abre-puerta repita los pasos de programación o siga los pasos
de programación de alternativa.
* Según el tipo de producto, el botón aprendizaje podría tener un nombre diferente
(usar dicho botón para la programación del control remoto).
LED
Botón de
programación
4
Programación de un abre-puerta de garaje Genie
®
Intellicode
®
2
Antes de comenzar, DEBE tener un control remoto de Genie
®
Intellicode
®
2 con al menos un botón programado para el
abre-puerta.
Las imágenes en este manual se usan solamente como referencia. El producto comprado podría tener un aspecto diferente.
ABRE-PUERTAS DE GARAJE (continuación)
1
Oprima el botón de programación en el control remoto
universal hasta que se encienda el LED.
2
Elija un botón para programar y pulse dicho botón 5
veces. El LED debe dejar de parpadear cada vez que se
pulsa el botón.
3
Pulse el botón de programación del control remoto
universal.
4
En el abre-puerta pulse y mantenga oprimido el botón de
programación (PROGRAM/SET) hasta que el LED largo y
corto se enciendan de color AZUL.
5
Al soltar el botón de programación (PROGRAM/SET)
quedará encendido de AZUL solamente el LED redondo.
6
Pulse y suelte el botón de programación (PROGRAM/SET)
y el LED largo parpadeará de color VIOLETA.
7
En el control remoto universal pulse y suelte el mismo
botón elegido en el paso 2. Ambos LED del abre-puerta se
encenderán de color VIOLETA.
8
En el control remoto universal pulse y suelte nuevamente
el mismo botón. Ambos LED del abre-puerta se
encenderán de color AZUL.
En control remoto Genie
®
pulse y suelte el botón que está
programado para el abre-puerta de garaje. Ambos LED
parpadearán de color VIOLETA.
9
En el control remoto universal pulse y suelte nuevamente
el mismo botón. Esto activará el abre-puerta y habrá
finalizado la programación.
Si la puerta no se activara, repita los pasos de
programación.
10
LED
Botón de programación
Botón de programación
5
OPERADORES DE PUERTA DE USO COMERCIAL
Programación con el botón aprendizaje de operador de puertas de uso comercial
El botón aprendizaje está normalmente ubicado en la tarjeta de lógica de la unidad operadora o en el receptor externo. Si
necesitara ayuda para localizar el botón aprendizaje comuníquese con el fabricante del operador de puerta.
Las imágenes en este manual se usan solamente como referencia. El producto comprado podría tener un aspecto diferente.
1
Oprima el botón de programación en el control remoto
hasta que se encienda el LED.
2
Pulse y suelte el botón aprendizaje* del operador.
3
Oprima y suelte el botón del control remoto y el LED
comenzará a parpadear. Cuando el LED deje de
parpadear, continúe pulsando y soltando el botón hasta
que el operador responda haciendo clic, parpadeando o
activándose.
4
Pulse el botón de programación del control remoto para
guardar en memoria la programación.
5
Pruebe el control remoto pulsando el botón. Si no se activara el operador, repita los pasos de programación o siga los pasos
de programación de alternativa.
Botón
aprendizaje*
* Según el tipo de producto, el botón aprendizaje podría tener un nombre diferente
(usar dicho botón para la programación del control remoto).
LED
Botón de
programación
Botón de
programación
6
Programación con el botón aprendizaje del operador de portones
El botón aprendizaje está normalmente ubicado en la tarjeta de lógica de la unidad operadora o en el receptor externo. Si
necesitara ayuda para localizar el botón aprendizaje comuníquese con el fabricante del operador de portones.
Las imágenes en este manual se usan solamente como referencia. El producto comprado podría tener un aspecto diferente.
OPERADORES DE PORTÓN
1
Oprima el botón de programación en el control remoto
hasta que se encienda el LED.
2
Pulse y suelte el botón aprendizaje* del operador.
3
Pulse y suelte el botón del control remoto y el LED
comenzará a parpadear. Cuando el LED deje de
parpadear, continúe pulsando y soltando el botón hasta
que el operador responda haciendo clic, parpadeando o
activándose.
4
Pulse el botón de programación del control remoto para
guardar en memoria la programación.
5
Pruebe el control remoto pulsando el botón. Si no se activara el operador, repita los pasos de programación o siga los pasos de
programación de alternativa.
Botón
aprendizaje*
* Según el tipo de producto, el botón aprendizaje podría tener un nombre diferente
(usar dicho botón para la programación del control remoto).
LED
Botón de
programación
Botón de
programación
7
Programación con un receptor externo y microselectores
Microselector de 3 posiciones:
En controles de Chamberlain NO usar la posición “0”, usar “+” o “-”. Si tuviera
un control remoto de 3 botones, el microselector 1 debe estar en “-” si usara el
botón grande para abrir la puerta. Podría ser necesario volver a programar el
control remoto original.
RECEPTORES EXTERNOS
1
Oprima el botón de programación en el control remoto
universal hasta que se encienda el LED.
2
Debe coincidir la posición de los microselectores del
control remoto o receptor externo, con los del control
remoto universal. El resto de los microselectores debe
estar en desactivado (OFF).
3
Microselector de 2 posiciones:
Si la programación fallara, invertir la posición de los microselectores (desactivado
[OFF] a activado [ON] y activado [ON] a desactivado [OFF]).
Receptor
externo
Microselectores
Microselectores
Control Remoto
Control
remoto
universal
Control
remoto
universal
Si se usa el control remoto universal con abre-puertas residenciales, se debe usar solo con abre-puertas fabricados
después de 1993 que utilicen sensores fotoeléctricos. Los sensores fotoeléctricos se encuentran siempre en la parte
inferior de la guía de la puerta o en sus proximidades.
El receptor externo generalmente está en el producto o montado en las cercanías del mismo.
Las imágenes en este manual se usan solamente como referencia. El producto comprado podría tener un aspecto diferente.
Pulse y suelte el botón del control remoto universal y el
LED comenzará a parpadear. Cuando el LED deje de
parpadear, continúe pulsando y soltando el botón hasta
que el producto responda con un clic, parpadeando o
activándose.
4
Pulse el botón de programación del control remoto
universal para guardar en memoria la programación.
5
Pruebe el control remoto universal pulsando el botón. Si no se activara el producto, repita los pasos de programación o siga
los pasos de programación de alternativa.
SUGERENCIAS
ALTO
LED
Botón de
programación
Botón de
programación
8
Programación de un receptor externo con el botón aprendizaje
RECEPTORES EXTERNOS (continuación)
1
Oprima el botón de programación en el control remoto
hasta que se encienda el LED.
2
Pulse y suelte el botón aprendizaje* del receptor externo.
3
Pulse y suelte el botón del control remoto y el LED
comenzará a parpadear. Cuando el LED deje de
parpadear, continúe pulsando y soltando el botón hasta
que el producto responda haciendo clic, parpadeando o
activándose.
4
Pulse el botón de programación del control remoto para
guardar en memoria la programación.
5
Pruebe el control remoto pulsando el botón. Si no se activara el producto, repita los pasos de programación o siga los pasos
de programación de alternativa.
Botón
aprendizaje*
Si se usa el control remoto universal con abre-puertas residenciales, se debe usar solo con abre-puertas fabricados
después de 1993 que utilicen sensores fotoeléctricos. Los sensores fotoeléctricos se encuentran siempre en la parte
inferior de la guía de la puerta o en sus proximidades.
El receptor externo generalmente está en el producto o montado en las cercanías del mismo.
Las imágenes en este manual se usan solamente como referencia. El producto comprado podría tener un aspecto diferente.
* Según el tipo de producto, el botón aprendizaje podría tener un nombre diferente
(usar dicho botón para la programación del control remoto).
ALTO
LED
Botón de
programación
Botón de
programación
9
Programación de alternativa para productos con botón aprendizaje
El botón aprendizaje generalmente está en el producto o en el receptor externo. Si necesitara ayuda para localizar el botón
aprendizaje consulte la sección de Ayuda de este manual o al fabricante del producto.
Las imágenes en este manual se usan solamente como referencia. El producto comprado podría tener un aspecto diferente.
** LiftMaster, Do-It, Master Mechanic, Raynor, True Value y Sears Craftsman son compatibles con la tecnología de Chamberlain.
OPCIONES DE PROGRAMACIÓN DE ALTERNATIVA
1
Oprima el botón de programación en el control remoto
hasta que se encienda el LED.
2
Oprima y suelte el botón aprendizaje*.
3
Pulse y suelte el botón del control remoto...
...8 veces (producto Chamberlain
®
** con botón LEARN amarillo).
...3 veces (producto Chamberlain
®
** con botón LEARN violeta).
...2 veces (producto Chamberlain
®
** con botón LEARN anaranjado).
...4 veces (producto Chamberlain
®
** con botón LEARN verde).
... 5 o 6 veces (producto Overhead Door
®
Genie
®
Intellicode).
...1 vez (producto Linear
®
Mega-Code).
...7 veces (producto Stanley
®
Secure Code).
...9 veces (producto Wayne Dalton
®
Rolling Code).
El LED del control remoto DEBE dejar de destellar entre cada pulsación del botón. Si el producto responde con un clic,
parpadeando o activándose, significa que el código fue aceptado.
4
Pulse el botón de programación del control remoto
para guardar en memoria la programación.
5
Pruebe el control remoto pulsando el botón. Si no se
activara el producto, repita los pasos de programación o
siga los pasos de programación de alternativa.
* Según el tipo de producto, el botón aprendizaje podría tener un nombre diferente
(usar dicho botón para la programación del control remoto).
LED
Botón de
programación
Botón de
programación

10
Programación de alternativa para productos con microselectores
OPCIONES DE PROGRAMACIÓN DE ALTERNATIVA (continuación)
Pulse y suelte el botón del control remoto universal...
...11 veces (producto Chamberlain
®
** con 9 microselectores).
...12 veces (producto Chamberlain
®
** Canadá con 9 microselectores).
...13 veces (producto Genie
®
con 12 microselectores).
...14 veces (Linear Multicode
®
con 10 microselectores).
...15 veces (producto Chamberlain
®
** con 8 microselectores).
...16 veces (producto Stanley/Multicode
®
con 10 microselectores).
...17 veces (producto Genie
®
** con 9 microselectores).
...18 veces (producto Linear
®
, Moore-O-Matic
®
con 8 microselectores).
...19 veces (producto Chamberlain
®
** con 7 microselectores).
El LED del control remoto universal DEBE dejar de destellar entre cada pulsación del botón. Si el abre-puerta responde con un
clic, parpadeando o activándose, significa que el código fue aceptado.
1
Oprima el botón de programación en el control remoto
universal hasta que se encienda el LED.
2
Debe coincidir la posición de los microselectores del
control remoto o receptor externo, con los del control
remoto universal. El resto de los microselectores debe
estar en desactivado (OFF).
3
5
Pulse el botón de programación del control remoto
universal para guardar en memoria la programación.
6
Pruebe el control remoto universal pulsando el botón. Si
no se activara el producto, repita los pasos de
programación o siga los pasos de programación de
alternativa.
Si se usa el control remoto universal con abre-puertas residenciales, se debe usar solo con abre-puertas fabricados
después de 1993 que utilicen sensores fotoeléctricos. Los sensores fotoeléctricos se encuentran siempre en la parte
inferior de la guía de la puerta o en sus proximidades.
Los interruptores DIP generalmente están ubicados en el producto o en un receptor externo. Para ayudar a localizar sus
interruptores DIP comuníquese con el fabricante del producto.
Las imágenes en este manual se usan solamente como referencia. El producto comprado podría tener un aspecto diferente.
** LiftMaster, Do-It, Master Mechanic, Raynor, True Value y Sears Craftsman son compatibles con la tecnología de Chamberlain.
ALTO
LED
Botón de
programación
Botón de
programación
Microselector de 3 posiciones:
En controles de Chamberlain NO usar la posición “0”, usar “+” o “-”. Si tuviera
un control remoto de 3 botones, el microselector 1 debe estar
en “-” si usara el botón grande para abrir la puerta. Podría ser
necesario volver a programar el control remoto original.
Microselector de 2 posiciones:
Si la programación fallara, invertir la posición de los
microselectores (desactivado [OFF] a activado [ON] y
activado [ON] a desactivado [OFF]).
SUGERENCIAS
Receptor
externo
Microselectores
Microselectores
Control Remoto
Control
remoto
universal
Control
remoto
universal

11
¿NECESITA AYUDA?
El control remoto no se programará para un producto con microselectores.
• Verificar la batería del control remoto. El LED debe encenderse al pulsar un botón. Cambie la batería en caso de ser necesario.
• Al programar con microselectores de 2 posiciones, invertir la posición (de desactivado [OFF] a activado [ON] y activado [ON] a
desactivado [OFF]) y luego repetir los pasos de programación.
• En controles de Chamberlain NO usar la posición “0”, usar “+” o “-”. Si tuviera un control remoto de 3 botones, el microselector 1
debe estar en “-” si usara el botón grande para abrir la puerta. Podría ser necesario volver a programar el control remoto original.
• Repita los pasos de programación y verifique que el LED deje de parpadear inmediatamente después de pulsar el botón del control
remoto.
• Intente programar con una opción de alternativa para productos con botón aprendizaje.
El control remoto no se programará para un producto con botón aprendizaje.
• Verificar la batería del control remoto. El LED debe encenderse al pulsar un botón. Cambie la batería en caso de ser necesario.
• Repita los pasos de programación y verifique que el LED deje de parpadear inmediatamente después de pulsar el botón del control
remoto.
• Intente programar con una opción de alternativa para productos con microselectores.
El LED del control remoto no se enciende o tiene menos intensidad.
• Cambiar la batería.
El LED del control remoto no se enciende para activar al producto hasta que está cerca del mismo.
• Cambiar la batería.

12
¿NECESITA AYUDA?
PRODUCTOS CHAMBERLAIN
Localice el botón aprendizaje

13
¿NECESITA AYUDA?
PRODUCTOS GENIE
Localice el botón aprendizaje
Botón de aprendizaje
de código
Botón de programación
14
¿NECESITA AYUDA?
PRODUCTOS LINEAR
PRODUCTOS WAYNE DALTON
Localice el botón aprendizaje
Botón
aprendizaje
Botón
aprendizaje
Botón SW de
programación

15
¿NECESITA AYUDA?
PRODUCTOS LIFTMASTER
PRODUCTOS OVERHEAD DOOR
Localice el botón aprendizaje
Botón amarillo
aprendizaje
O
O
O
Botón violeta
aprendizaje
Botón
anaranjado
aprendizaje
Botón verde
aprendizaje
Botón de
aprendizaje
de código
16
¿NECESITA AYUDA?
PRODUCTOS STANLEY
Localice el botón aprendizaje
Botón
aprendizaje

Para evitar una LESIÓN GRAVE O INCLUSO LA MUERTE:
• NUNCA permita la presencia de niños cerca de baterías.
• Si alguien tragara una pila/batería llamar inmediatamente a
un médico. Para reducir el riesgo de incendio, explosión o
quemadura:
• Usar ÚNICAMENTE pilas modelo 3V CR2032.
• NO recargar, desarmar, calentar por sobre 212 °F (100 °C)
ni incinerar.
ADVERTENCIA
AVISO: Para cumplir con las reglas de la FCC y/o Canadá (IC), se prohíben los
ajustes o modificaciones de este receptor y/o transmisor, excepto para cambiar
el código establecido o para cambiar la batería. NO HAY OTROS COMPONENTES
QUE NECESITEN INTERVENCIÓN DEL USUARIO.
Se ha probado para cumplir con las normas de la FCC para USO EN EL HOGAR
O LA OFICINA. El uso está sujeto a las siguientes condiciones: (1) Este
dispositivo no debe causar interferencia perjudicial, y (2) este dispositivo debe
poder recibir interferencia, incluso interferencia que pueda afectar su
funcionamiento.
Chamberlain y LiftMaster son marcas registradas de Chamberlain Group. Genie es una marca registrada de Overhead Door Corporation.
Overhead Door es una marca registrada de Overhead Door Corporation. Linear es una marca registrada de Linear Corporation. Master
Mechanic es una marca registrada de TruServ. Sears es una marca registrada de Sears & Roebuck Stanley es una marca registrada de The
Stanley Works. Wayne Dalton es una marca registrada de Wayne Dalton Corporation. Do It es una marca registrada de Do It Best Corporation.
Deseche las baterías usadas de acuerdo con las normas. Usar
ÚNICAMENTE baterías modelo 3V CR2032.
© 2017, The Chamberlain Group, Inc.
All Rights Reserved
Tous droits réservés
Todos los derechos reservados
GDORetail104B
www.chamberlain.com
1-800-442-1255
Batería
BATERÍA
Chamberlain and LiftMaster are Trademarks of Chamberlain Group. Genie is a Trademark of Overhead Door Corporation. Overhead Door is
a Trademark of Overhead Door Corporation. Linear is a Trademark of Linear Corporation. Master Mechanic is a Trademark of TruServ. Sears
is a Trademark of Sears & Roebuck. Stanley is a Trademark of The Stanley Works. Wayne Dalton is a trademark of Wayne Dalton Corporation.
Do It is a trademark of Do It Best Corporation.
Chamberlain et LiftMaster sont des marques de commerce du groupe Chamberlain. Genie est une marque de commerce d’Overhead Door
Corporation. Overhead Door est une marque de commerce d’Overhead Door Corporation. Linear est une marque de commerce de Linear
Corporation. Master Mechanic est une marque de commerce de TruServ. Sears est une marque de commerce de Sears & Roebuck. Stanley
est une marque de commerce de The Stanley Works. Wayne Dalton est une marque de commerce de Wayne Dalton Corporation. Do It est
une marque de commerce de Do It Best Corporation.