T2132 51005002647 V01
Owner’s Manual
RoboVac
For FAQs and more information, please visit:
www.eufylife.com
01
English
Thank you for purchasing RoboVac. Read all instructions before
using this product, and keep it properly for future reference.
02 Important Safety Instructions
15 AboutYourRoboVac
What's In the Box
RoboVac Anatomy
LED Indication
19 UsingYourRoboVac
Important Tips Before Use
Preparation
Charge Your RoboVac
Use Your RoboVac with the EufyHome App
Start / Stop Cleaning
Select a Cleaning Mode
Use Your RoboVac with Amazon Alexa /
the Google Assistant
28 CleaningandMaintenance
Clean the Dust Collector and Filter
Clean the Rolling Brush
Clean the Side Brushes
Replace the Side Brushes
Clean the Sensors and Charging Pins
Clean the Swivel Wheel
35 Troubleshooting
40 Speci�cations
41 CustomerService
TableofContents
English
01
Español
42
Türk
78

01
English
Thank you for purchasing RoboVac. Read all instructions before
using this product, and keep it properly for future reference.
02 Important Safety Instructions
15 AboutYourRoboVac
What's In the Box
RoboVac Anatomy
LED Indication
19 UsingYourRoboVac
Important Tips Before Use
Preparation
Charge Your RoboVac
Use Your RoboVac with the EufyHome App
Start / Stop Cleaning
Select a Cleaning Mode
Use Your RoboVac with Amazon Alexa /
the Google Assistant
28 CleaningandMaintenance
Clean the Dust Collector and Filter
Clean the Rolling Brush
Clean the Side Brushes
Replace the Side Brushes
Clean the Sensors and Charging Pins
Clean the Swivel Wheel
35 Troubleshooting
40 Speci�cations
41 CustomerService
TableofContents
English
01
Español
42
Türk
78
02 03
English English
Important Safety Instructions
To reduce the risk of injury or damage, read these safety
instructions carefully and keep them at hand when setting up,
using, and maintaining this device.
WARNING SYMBOLS USED
This is the safety alert symbol. This symbol alerts you to
potential hazards that could result in property damage
and/or serious bodily harm or death.
• For household and indoor use only.
• Use only as described in this manual. Only use attachments
recommended by the manufacturer.
• Do not use this device with damaged cord or plug. If this
device is not working as it should, has been dropped,
damaged, left outdoors, or dropped into water, return it to a
service center.
• Do not pull or carry by cord, use cord as a handle, close a
door on cord, or pull cord around sharp edges or corners. Do
not run this device over the cord. Keep the cord away from
any heated surfaces.
• Do not unplug the device by pulling on cord. To unplug,
grasp the plug, not the cord.
• Do not handle the plug or the device with wet hands.
• Do not put any object into openings. Do not use this device
with any opening blocked.
• Keep hair, loose clothing, fingers, and all parts of your body
away from open and moving parts.
• Turn off all controls before unplugging.
• Use extra care when cleaning on stairs.
• Do not use to pick up flammable or combustible liquids,
such as gasoline, or use in areas where they may be present.
• Place the cords from other appliances out of the area to be
cleaned.
• Do not operate this device in a room where an infant or child
is sleeping.
• Do not operate this device in an area where there are fragile
objects on the floor to be cleaned.
• Do not operate this device in a room that has lit candles on
furniture that the vacuum may accidentally hit or bump into.
• Do not use this device on a wet surface.
• Do not use this device without a dust collector and/or filters
in place.
• Prevent unintentional starting by ensuring the switch is in
the off-position before picking up or carrying the device.
• Under extreme conditions, liquid may eject from the
battery; if this occurs, avoid all contact. If contact
accidentally occurs, thoroughly wash with water and
soap. If the liquid makes contact with your eyes, seek
medical help immediately. Liquid from the battery may
cause irritation or burns.
• Do not expose this device to fire or excessive temperature.
Exposure to fire or temperature above 130°C / 265°F may
cause an explosion.
• Follow all charging instructions and do not charge the
battery pack or appliance outside of the temperature
range specified in the instructions. Charging improperly
or at temperatures outside of the specified range may
damage the battery and increase the risk of fire.
• Have servicing performed by a qualified repair person
using only identical replacement parts. This will ensure
that the safety of the product is maintained.
• Do not modify or attempt to repair this device except as
indicated in the instructions for use and care.
• This device can be used by children aged from 8
years and above and persons with reduced physical,
sensory or mental capabilities or lack of experience
and knowledge if they have been given supervision or
instruction concerning use of this device in a safe way
and understand the hazards involved.
• Children should be supervised to ensure they do not play
with this device.
• Cleaning and maintenance shall not be performed by
children without adult supervision.
• The plug must be removed from the socket-outlet before
cleaning or maintaining this device.
• This device contains the battery that is only replaceable by
skilled persons.
• This device must be disconnected from the supply mains
when removing the battery.
04 05
English English
• Do Not Mix Old And New Batteries.
• Do Not Mix Alkaline Standard (Carbon-Zinc), Or
Rechargeable (Nickel-Cadmium) Batteries.
• For the purposes of recharging the battery, only use the
detachable power adapter (US: GSCU0600S019V12E
EU: GSCV0600S019V12E UK: GSCB0600S019V12E AU:
GSCS0600S019V12E) provided with this device.
• The battery must be removed from this device before
this device is disposed of. To remove the battery from
this device, first remove the screws on the bottom, then
remove the main PCB and unscrew the battery cover using a
screwdriver. Remove the battery by disconnecting the quick
connector.
• The used battery should be placed in a sealed plastic bag
and disposed of safely according to local environmental
regulations.
• The external flexible cable or cord of the power adapter
cannot be replaced; if the cord is damaged, the power
adapter shall be disposed of.
• This device is not a toy. Do not sit or stand on this device.
Small children and pets should be supervised when this
device is operating.
• Store and operate this device in room temperature
environments only.
• Clean with a cloth dampened with water only.
• Do not use this device to pick up anything that is burning or
smoking, such as cigarettes, matches, or hot things.
• Do not use this device to pick up spills of bleach, paint,
chemicals, or anything wet.
• Before using this device, pick up objects like clothing and
loose paper. Lift up cords for blinds or curtains, and move
power cords and fragile objects out of the way. If this device
passes over a power cord and drags it, an object could be
pulled off a table or shelf.
• If the room to be cleaned has a balcony, a physical barrier
should be used to prevent access to the balcony and to
ensure safe operation.
• Do not place anything on top of this device.
• Be aware that this device moves around on its own. Take
care when walking in the area where this device is operating
to avoid stepping on it.
• Do not operate this device in areas with exposed electrical
outlets on the floor.
• Do not expose the electronics of this device, its battery, or
the integrated Charging Base. There are no user-serviceable
parts inside.
• Do not use this device on an unfinished, unsealed, waxed
or rough floor. It may result in damage to the floor and this
device. Use only on hard floor surfaces or low-pile carpet.
• This device has been designed to be used on floors without
scratching them. We still recommend that you test this
device on a small area of the room to be cleaned to ensure
no scratches are made before cleaning the whole room.
SAVE THESE INSTRUCTIONS
Notice
This symbol on the device or its packaging indicates:
Do not dispose of electrical appliances as unsorted
municipal waste; use separate collection facilities.
Contact your local authority for information
regarding the collection systems available. If
electrical appliances are disposed of in landfills or
dumps, hazardous substances can leak into the
groundwater and get into the food chain, damaging
your health and well-being. When replacing old
appliances with new ones, the retailer is legally
obliged to take back your old appliance for disposal
at least free of charge.
FCC Statement
This device complies with Part 15 of the FCC Rules. Operation
is subject to the following two conditions: (1) This device
may not cause harmful interference, and (2) this device must
accept any interference received, including interference that
may cause undesired operation.
06 07
English English
Warning: Changes or modifications not expressly approved
by the party responsible for compliance could void the user's
authority to operate the equipment.
Note:This equipment has been tested and found to comply
with the limits for a Class B digital device, pursuant to Part
15 of the FCC Rules. These limits are designed to provide
reasonable protection against harmful interference in a
residential installation.
This equipment generates, uses, and can radiate radio
frequency energy and, if not installed and used in accordance
with the instructions, may cause harmful interference to
radio communications. However, there is no guarantee
that interference will not occur in a particular installation. If
this equipment does cause harmful interference to radio or
television reception, which can be determined by turning the
equipment off and on, the user is encouraged to try to correct
the interference by one or more of the following measures: (1)
Reorient or relocate the receiving antenna. (2) Increase the
separation between the equipment and receiver. (3) Connect
the equipment into an outlet on a circuit different from that to
which the receiver is connected. (4) Consult the dealer or an
experienced radio / TV technician for help.
The following importer is the responsible party (for FCC
matters only).
Company Name: POWER MOBILE LIFE, LLC
Address: 400 108th Ave NE Ste 400, Bellevue, WA 98004-5541
Telephone: +1 (800) 988 7973
FCC Radiation Exposure Statement
This equipment complies with FCC radiation exposure limits
set forth for an uncontrolled environment. This equipment
should be installed and operated with minimum distance
20cm between the radiator & your body.
ISED Compliance Statement
This device contains licence-exempt transmitter(s)/
receiver(s) that comply with Innovation, Science and
Economic Development Canada's licence-exempt RSS(s).
Operation is subject to the following two conditions:
1. This device may not cause interference.
2. This device must accept any interference, including
interference that may cause undesired operation of the
device.
Declaration of Conformity
Hereby, Anker Innovations Limited declares that the product
type T2132 is in compliance with Directives Directive
2014/53/EU.
The full text of the EU declaration of conformity is available at
the following internet address:
https://www.eufylife.com/
Anker Innovations Limited
Room 1318-19, Hollywood Plaza, 610 Nathan Road, Mongkok,
Kowloon, Hong Kong
Maximum output power: 14 dBm
Frequency band: 2.4G band (2.4000GHz - 2.4835GHz)
Trademark Notice
• Amazon, Echo, Alexa and all related logos are trademarks of
Amazon.com, Inc. or its affiliates.
• Apple and the Apple logo are trademarks of Apple Inc.,
registered in the U.S. and other countries. App Store is a
service mark of Apple Inc., registered in the U.S. and other
countries.
• Google Play and the Google Play logo are trademarks of
Google Inc.
• Google Home is a trademark of Google Inc.
08 09
Français Français
Consignes de sécurité importantes
Pour réduire le risque de blessure ou de dommage, lisez
attentivement les consignes de sécurité et gardez-les à portée
de main lors de la configuration, l'utilisation et l'entretien de
cet appareil.
SYMBOLES D'AVERTISSEMENT UTILISÉS
Il s'agit du symbole d'avertissement de sécurité. Ce
symbole vous alerte sur les dangers potentiels qui
peuvent entraîner des dommages matériels et/ou des
lésions corporelles graves ou la mort.
• Uniquement destiné à un usage domestique en intérieur.
• Utiliser uniquement tel que décrit dans le présent manuel.
Utiliser uniquement des pièces de rechange recommandées
par le fabricant.
• Ne pas utiliser cet appareil avec un cordon ou une fiche
endommagée. Si cet appareil ne fonctionne pas comme il le
devrait, est tombé, est endommagé, a été laissé à l'extérieur
ou est tombé dans l'eau, retournez-le à un centre de service.
• Pas tirer ou transporter par le cordon, ne pas utiliser le
cordon comme poignée, ne pas fermer de porte sur le
cordon ou tirer le cordon autour de bords ou de coins
tranchants. Ne pas faire passer l'appareil par-dessus le
cordon. Garder le cordon à l'écart des surfaces chaudes.
• Ne pas débrancher l'appareil en tirant sur le cordon. • Pour
débrancher, tirer sur la fiche, pas sur le cordon.
• Ne pas manipuler l'appareil ou la fiche avec les mains
mouillées.
• Ne placer aucun objet dans les ouvertures. Ne pas utiliser
cet appareil avec des ouvertures obstruées.
• Veiller à ce que les cheveux, vêtements amples, doigts
et toute autre partie du corps soient tenus à l'écart des
ouvertures et des pièces mobiles.
• Éteindre l'appareil avant de le débrancher.
• Faire très attention lors du nettoyage d'escaliers.
• Ne pas utiliser pour aspirer des liquides inflammables ou
combustibles tels que de l'essence, et ne pas utiliser dans
des zones où de tels liquides pourraient être présents.
• Placer les cordons des autres appareils hors de la zone à
nettoyer.
• Ne pas utiliser cet appareil dans une pièce où dort un bébé
ou un enfant.
• Ne pas utiliser cet appareil dans une zone où se trouvent des
objets fragiles sur le sol à nettoyer.
• Ne pas utiliser cet appareil dans une pièce où des bougies
sont allumées sur des meubles que l'aspirateur pourrait
accidentellement heurter.
• Ne pas utiliser l'appareil sur des surfaces humides.
• Ne pas utiliser cet appareil sans que le collecteur de
poussière et/ou les filtres ne soient en place.
• Éviter tout démarrage non intentionnel en vous assurant que
l'interrupteur est sur la position arrêt avant de saisir ou de
porter l'appareil.
• Dans des conditions d'utilisation extrêmes, du liquide
peut s'échapper de la batterie ; si cela se produit,
éviter tout contact. En cas de contact accidentel, rincer
abondamment avec de l'eau et du savon. Si le liquide
entre en contact avec vos yeux, consultez immédiatement
un médecin. Le liquide de la batterie peut provoquer une
irritation ou des brûlures.
• Ne pas exposer l'appareil au feu ou à des températures
excessives. L'exposition au feu ou à une température
supérieure à 130 °C peut provoquer une explosion.
• Suivez toutes les instructions de charge et ne chargez
pas la batterie ou l'appareil en dehors de la plage de
température indiquée dans les instructions. Une charge
incorrecte ou à des températures hors de la plage
spécifiée peut endommager la batterie et augmenter le
risque d'incendie.
• Confiez les réparations à un technicien qualifié en
utilisant uniquement des pièces de rechange identiques.
Cela permettra de préserver la sûreté d'utilisation du
produit.
• Ne pas modifier ni essayer de réparer cet appareil, sauf
si cela est indiqué dans les instructions d'utilisation et
d'entretien.
• Cet appareil peut être utilisé par des enfants âgés de
8 ans et plus, ainsi que des personnes présentant des
capacités physiques, sensorielles ou mentales réduites,
10 11
Français Français
ou un manque d'expérience et de connaissances,
si celles-ci sont sous surveillance ou ont reçu les
instructions d'utilisation de cet appareil et comprennent
les risques encourus, et l'utilisent dans un endroit sûr.
• Les enfants doivent être surveillés afin de s'assurer qu'ils ne
jouent pas avec cet appareil.
• Le nettoyage et l'entretien ne doivent pas être effectués par
des enfants sans la supervision des adultes.
• La fiche doit être retirée de la prise de courant avant de
nettoyer ou d'entretenir cet appareil.
• Cet appareil contient une batterie qui ne peut être remplacée
que par des personnes qualifiées.
• Cet appareil doit être débranché du secteur lors du retrait de
la batterie.
• Ne pas mélanger les piles neuves et usagées.
• Ne pas mélanger des piles alcalines standard (carbone-zinc)
ou rechargeables (nickel-cadmium).
• Pour recharger la batterie, utiliser uniquement le
cordon amovible du bloc d'alimentation (USA :
GSCU0600S019V12E UE : GSCV0600S019V12E R-U :
GSCB0600S019V12E AUS : GSCS0600S019V12E) fourni
avec cet appareil.
• La batterie doit être retirée de cet appareil avant de le mettre
au rebut. Pour retirer la batterie à partir de cet appareil,
retirez d'abord les vis de la partie inférieure, puis retirez
le circuit principal et dévissez le couvercle de la batterie à
l'aide d'un tournevis. Retirez la batterie en débranchant le
connecteur rapide.
• La batterie usagée doit être placée dans un sac en plastique
hermétique et éliminée en toute sécurité, conformément aux
réglementations environnementales locales.
• Le câble flexible externe ou le cordon de l'adaptateur
secteur ne peuvent pas être remplacés ; si le cordon est
endommagé, l'adaptateur secteur doit être mis au rebut.
• Cet appareil n'est pas un jouet. Veillez à ne pas vous tenir
debout ou assis sur cet appareil. Les jeunes enfants et
les animaux de compagnie doivent être surveillés lors du
fonctionnement de cet appareil.
• Entreposez et utilisez cet appareil dans des environnements
à température ambiante.
• Nettoyez avec un chiffon imbibé d'eau uniquement.
• Ne pas utiliser cet appareil pour ramasser des objets qui
brûlent ou qui fument, comme des cigarettes, des allumettes
ou des objets chauds.
• N'utilisez pas cet appareil pour ramasser des déversements
d'eau de javel, de peinture, de produits chimiques ou quoi
que ce soit de mouillé.
• Avant d'utiliser cet appareil, ramassez les objets tels que
les vêtements et les feuilles de papier. Mettez en hauteur
les cordons de stores ou de rideaux au sol et déplacez les
objets fragiles et les cordons d'alimentation hors du passage
de l'appareil. Si cet appareil passe au-dessus d'un cordon
d'alimentation et le traîne avec lui, un objet peut tomber
d'une table ou d'une étagère.
• Si la pièce à nettoyer possède un balcon, une barrière
physique doit être utilisée pour empêcher l'accès au balcon
et garantir un fonctionnement sécurisé.
• Veuillez ne rien placer sur le dessus de cet appareil.
• Gardez à l'esprit que cet appareil se déplace par ses propres
moyens. Faites attention en marchant dans la zone où cet
appareil fonctionne, afin d'éviter de marcher dessus.
• N'utilisez pas cet appareil dans des zones avec prises
électriques exposées sur le plancher.
• N'exposez pas l'électronique de cet appareil, de sa batterie
ou de la base de chargement intégrée. L'appareil ne contient
aucune pièce réparable par l'utilisateur.
• N'utilisez pas cet appareil sur un sol inachevé, non vitrifié,
ciré ou rugueux. Cela peut entraîner des dommages sur le
sol et cet appareil. Utilisez-le uniquement sur des surfaces
dures ou des moquettes à poils ras.
• Cet appareil a été conçu pour être utilisé sur des planchers
sans le rayer. Nous vous recommandons de toujours tester
l'appareil sur une petite zone de la pièce à nettoyer, avant
de nettoyer la salle entière, pour s'assurer qu'aucune rayure
n'apparaisse.
12 13
Français Français
CONSERVEZ CES INSTRUCTIONS
Avis
Ce symbole sur le produit ou son emballage
indique :
Ne jetez pas les appareils électriques de la même
manière que les déchets municipaux non triés ;
utilisez une infrastructure de collecte séparée.
Contactez directement votre commune pour
plus d'informations concernant les systèmes de
collecte disponibles. Si des appareils électriques
sont jetés dans des décharges ou des dépotoirs,
des substances dangereuses peuvent s'infiltrer
dans les eaux souterraines et entrer dans la chaîne
alimentaire, nuire à votre santé et votre bien-être.
Quand vous remplacez vos anciens appareils par
de nouveaux, le détaillant est légalement obligé
de reprendre votre ancien appareil pour son
élimination, au minimum gratuitement.
Déclaration FCC
Cet appareil est conforme à la partie 15 du règlement
de la FCC. Le fonctionnement est soumis aux deux
conditions suivantes : (1) cet appareil ne doit pas produire
d'interférences nuisibles, et (2) cet appareil doit accepter
toutes les interférences subies, même celles susceptibles d'en
compromettre le fonctionnement.
Avertissement : les changements ou les modifications
non expressément approuvés par la partie responsable
de la conformité pourraient entraîner une annulation de
l'autorisation d'utilisation de l'équipement.
Remarque : cet équipement a été testé et déclaré
conforme aux limites d'un appareil numérique de classe B,
conformément à la partie 15 des règles FCC. Ces restrictions
sont désignées afin de fournir une protection raisonnable
contre des interférences nuisibles dans une installation
résidentielle.
Cet appareil génère, utilise et peut émettre des fréquences
radio qui peuvent causer des interférences nuisibles aux
radiocommunications si l’appareil n’est pas installé et
utilisé conformément aux instructions. Cependant, il n'est
nullement garanti que ces interférences se produiront dans
une installation particulière.Si cet appareil provoque des
interférences nuisibles à la réception de la radio ou de la
télévision, ce qui peut être déterminé en mettant en route
l'appareil et en l'arrêtant, il est recommandé d'essayer de
corriger les interférences en prenant l'une ou plusieurs des
mesures suivantes : (1) réorienter ou déplacer l'antenne de
réception , (2) éloigner davantage l'appareil du récepteur ; (3)
brancher l'appareil à une prise sur un circuit différent de celui
auquel le récepteur est connecté ; (4) consulter le revendeur
ou un technicien expérimenté en radio/télévision pour obtenir
une assistance.
L'importateur suivant est la partie responsable (pour les
questions relatives au règlement FCC uniquement).
Nom de la société : POWER MOBILE LIFE, LLC
Adresse : 400 108th Ave NE Ste 400, Bellevue, WA 98004-5541
Téléphone : +1 (800) 988 7973
L'émetteur/récepteur exempt de licence contenu dans
le présent appareil est conforme aux CNR d'Innovation,
Sciences et Développement économique Canada applicables
aux appareils radio exempts de licence. L'exploitation est
autorisée aux deux conditions suivantes :
1. L'appareil ne doit pas produire de brouillage;
2. L'appareil doit accepter tout brouillage radioélectrique subi,
même si le brouillage est susceptible d’en compromettre le
fonctionnement.

15
English
14
Français
Déclaration de conformité avec les normes d'exposition aux
RF
Cet équipement est conforme aux limites d'exposition aux
radiations FCC/IC établies pour un environnement non
contrôlé. Cet équipement doit être installé et utilisé avec
une distance minimum de 20 cm entre le radiateur et votre
corps.
Déclaration de conformité
Ce produit est conforme aux exigences en matière
d'interférences radio de la Communauté européenne.
Par les présentes, Anker Innovations Limited déclare
que l'équipement radio de type T2132 est conforme à la
directive 2014/53/UE. Le texte complet de la déclaration de
conformité à la réglementation européenne est disponible à
l'adresse Internet suivante : https://www.eufylife.com/.
Puissance de sortie maximale : 14 dBm (pour l'UE)
Bande de fréquence : Bande 2,4 G (2,4000 GHz - 2,4835 GHz)
Avis de marque commerciale
• Amazon, Echo, Alexa et tous les logos associés sont des
marques commerciales d'Amazon.com, Inc. ou de ses
filiales.
• Apple et le logo Apple sont des marques déposées d'Apple
Inc., enregistrées aux États-Unis et dans d'autres pays. App
Store est une marque de service d'Apple Inc., enregistrée
aux États-Unis et dans d'autres pays.
• Google Play et le logo Google Play sont des marques de
Google Inc.
• Google Home est une marque de Google Inc.
About Your RoboVac
What's In the Box
RoboVac
Power Adapter
Additional Filter Cable Ties (x5) Owner’s Manual &
Other Documents
Cleaning Tool Side Brushes
(×4)
Charging Base Remote Control
(AAA Battery ×2)

16 17
English English
RoboVac Anatomy
A. Top & Side
B. Bottom
Wi-Fi status light
Auto cleaning Start/Stop button
Spot cleaning button
Recharge button
Bumper
Infrared sensor
Dust collector
Dust collector release button
Charging contact pins
Battery compartment
Brush guard
Rolling brush
Main power switch
(On/Off)
Drop sensors
Swivel wheel
Side brushes
Wheels
Dust collector
C. Dust Collector
D. Suction Inlet
E. Charging Base
Filter
Dust collector
Suction inlet
Status light
Charging
contact pins
Power socket
Power cord storage
compartment
18 19
English English
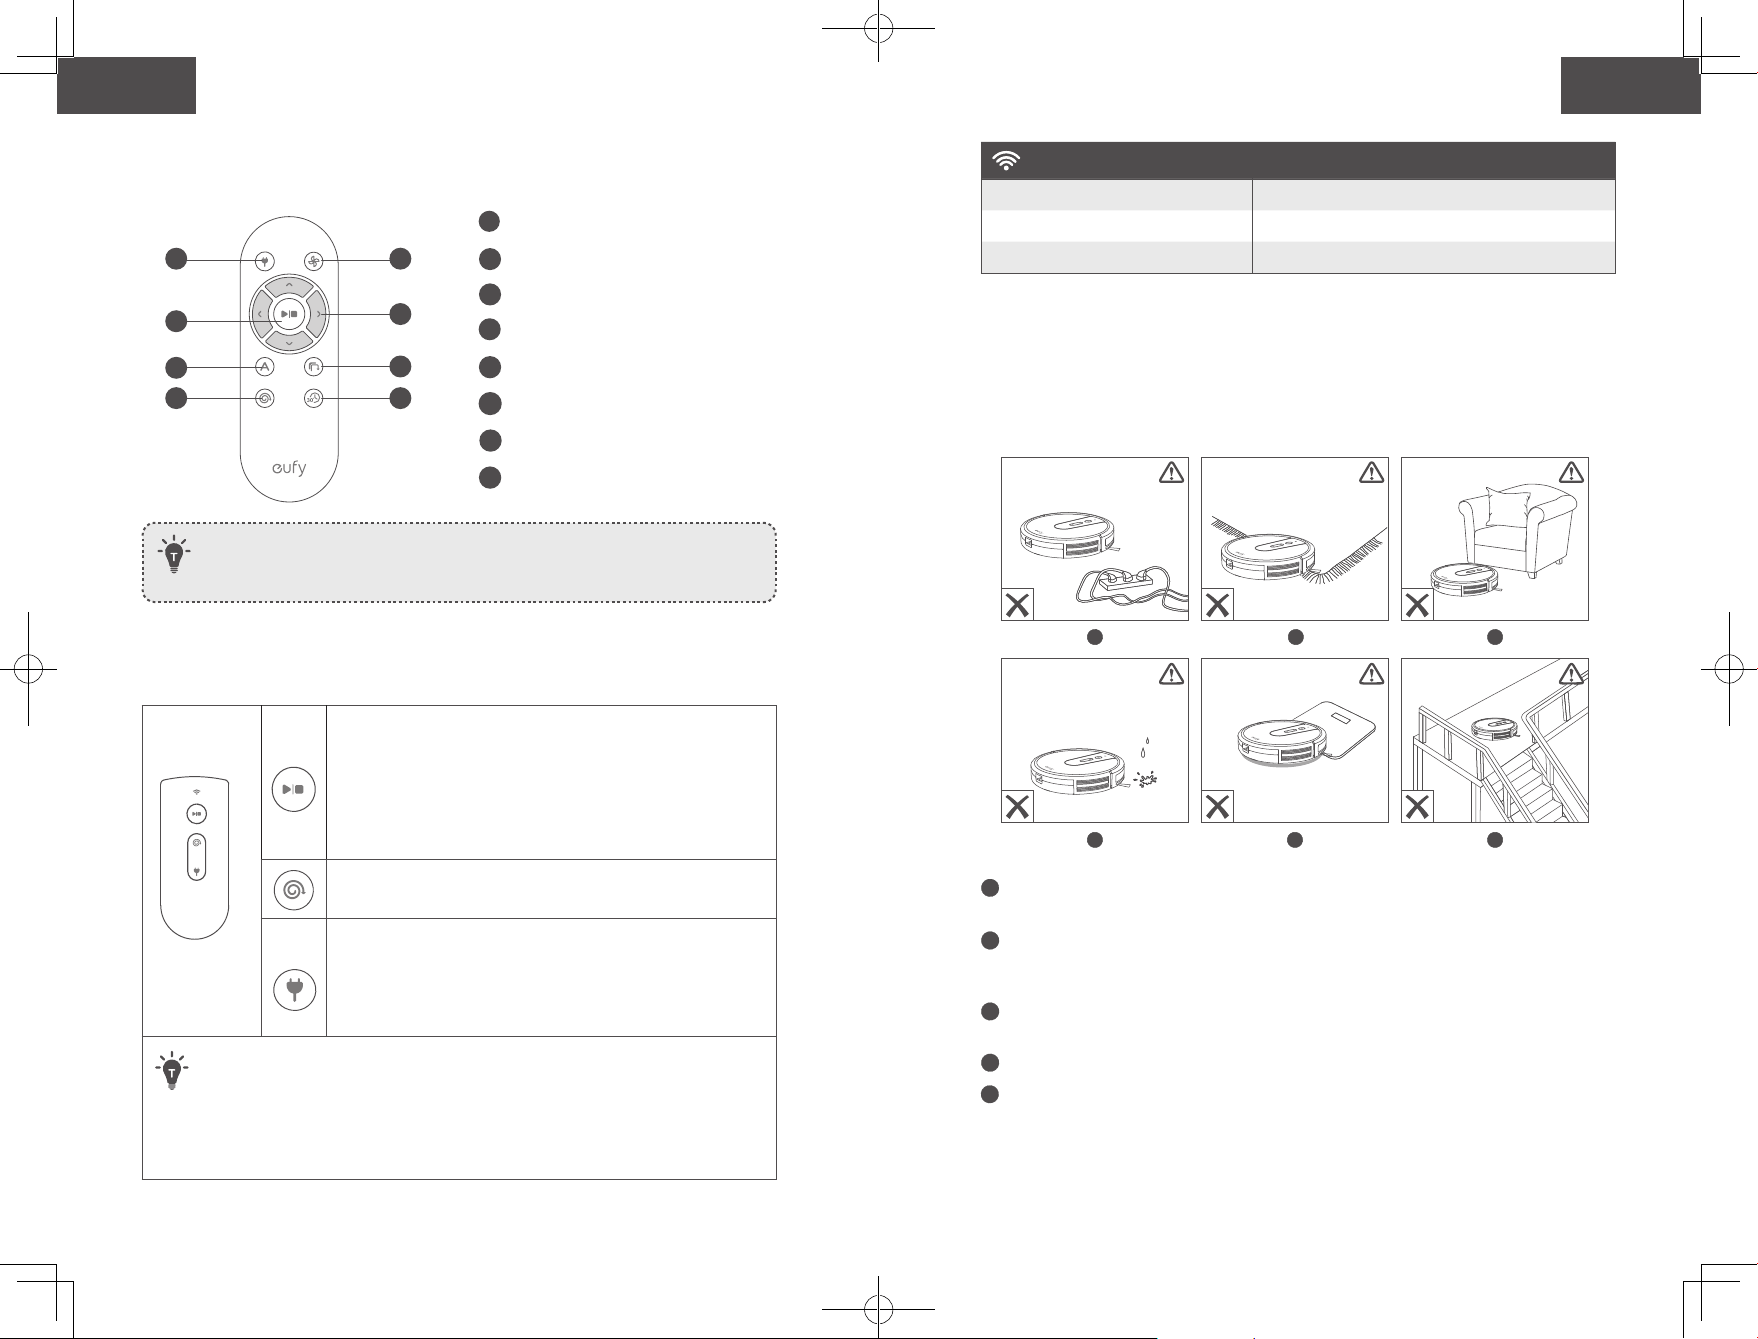
Remote Control
1
3
5
7
2
4
6
8
Install 2 AAA batteries before using the remote control for the first time. Make
sure the positive and negative ends are facing the correct polarity direction as
marked in the battery compartment.
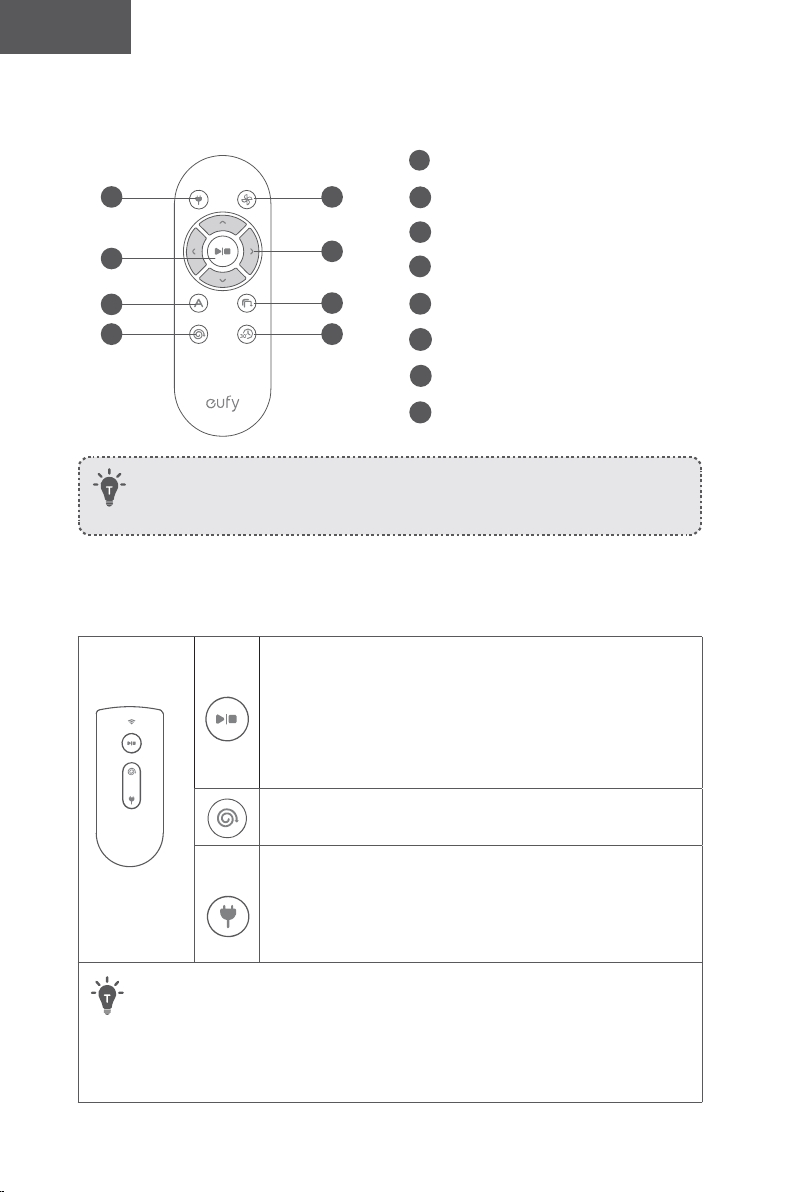
Buttons & Indicators
Start/Stop Cleaning
Reset the Wi-Fi Connection (Press and hold for 10 seconds
until RoboVac beeps)
• Solid Blue: standby or cleaning
• Flashing/Solid red: error
*Refer to the “Troubleshooting>Error Tone” section in this
manual for solutions.
Spot Cleaning
• Flashing blue: Spot Mode
Return to Charging Base
• Flashing blue: returning to charging base
• Flashing orange: low power and returning to charging base
• Breathing orange (when docked to charging base): charging
• Solid blue (when docked to charging base): fully charged
• When you use the Find My Robot function via the EufyHome app, all three LED
indicators flash blue and RoboVac beeps once.
• To conserve power, all LED indicators automatically turn off when:
• RoboVac is not docked to the Charging Base and has been inactive for 10
minutes;
• RoboVac is fully charged for 10 minutes.
1
Return RoboVac to Charging Base
2
Adjust suction power level
3
Start Auto cleaning / Stop cleaning
4
Control cleaning direction manually
5
Start Auto cleaning
6
Start Edge cleaning
7
Start Spot cleaning
8
Start Quick cleaning
(Wi-Fi Status Light)
Status
Slowly flashing blue Waiting for connection
Rapidly flashing blue Connecting with your wireless router
Solid blue Connected to your wireless router
Using Your RoboVac
Important Tips Before Use
a
b
c
d
e
f
a
Remove power cords and small objects from the floor that may entangle RoboVac. You
can use the supplied cable ties to organize your wires and power cords.
b
Fold tasseled edges of area rugs underneath to prevent tangling RoboVac. Avoid
cleaning very dark-colored rugs or high-pile rugs thicker than 1.02 in/26 mm as they
may cause RoboVac to malfunction.
c
Keep RoboVac away from spaces lower than 2.87 in/73 mm to prevent RoboVac from
getting stuck. If necessary, place a physical barrier to block off the problem areas.
d
Keep RoboVac away from wet areas during cleaning. .
e
RoboVac may climb on top of objects less than 0.63 in/16 mm in height. Remove these
objects if possible.
18 19
English English
Remote Control
1
3
5
7
2
4
6
8
Install 2 AAA batteries before using the remote control for the first time. Make
sure the positive and negative ends are facing the correct polarity direction as
marked in the battery compartment.
Buttons & Indicators
Start/Stop Cleaning
Reset the Wi-Fi Connection (Press and hold for 10 seconds
until RoboVac beeps)
• Solid Blue: standby or cleaning
• Flashing/Solid red: error
*Refer to the “Troubleshooting>Error Tone” section in this
manual for solutions.
Spot Cleaning
• Flashing blue: Spot Mode
Return to Charging Base
• Flashing blue: returning to charging base
• Flashing orange: low power and returning to charging base
• Breathing orange (when docked to charging base): charging
• Solid blue (when docked to charging base): fully charged
• When you use the Find My Robot function via the EufyHome app, all three LED
indicators flash blue and RoboVac beeps once.
• To conserve power, all LED indicators automatically turn off when:
• RoboVac is not docked to the Charging Base and has been inactive for 10
minutes;
• RoboVac is fully charged for 10 minutes.
1
Return RoboVac to Charging Base
2
Adjust suction power level
3
Start Auto cleaning / Stop cleaning
4
Control cleaning direction manually
5
Start Auto cleaning
6
Start Edge cleaning
7
Start Spot cleaning
8
Start Quick cleaning
(Wi-Fi Status Light)
Status
Slowly flashing blue Waiting for connection
Rapidly flashing blue Connecting with your wireless router
Solid blue Connected to your wireless router
Using Your RoboVac
Important Tips Before Use
a
b
c
d
e
f
a
Remove power cords and small objects from the floor that may entangle RoboVac. You
can use the supplied cable ties to organize your wires and power cords.
b
Fold tasseled edges of area rugs underneath to prevent tangling RoboVac. Avoid
cleaning very dark-colored rugs or high-pile rugs thicker than 1.02 in/26 mm as they
may cause RoboVac to malfunction.
c
Keep RoboVac away from spaces lower than 2.87 in/73 mm to prevent RoboVac from
getting stuck. If necessary, place a physical barrier to block off the problem areas.
d
Keep RoboVac away from wet areas during cleaning. .
e
RoboVac may climb on top of objects less than 0.63 in/16 mm in height. Remove these
objects if possible.

20 21
English English
f
Anti-drop sensors can prevent RoboVac from tumbling down stairs and steep drops
in most cases. They may work less effectively if dirty or used on reflective/very dark-
colored floors. It is recommended to place physical barriers to block off areas where
RoboVac may fall, such as stairs covered by carpets or the rounded edges of wood floors.
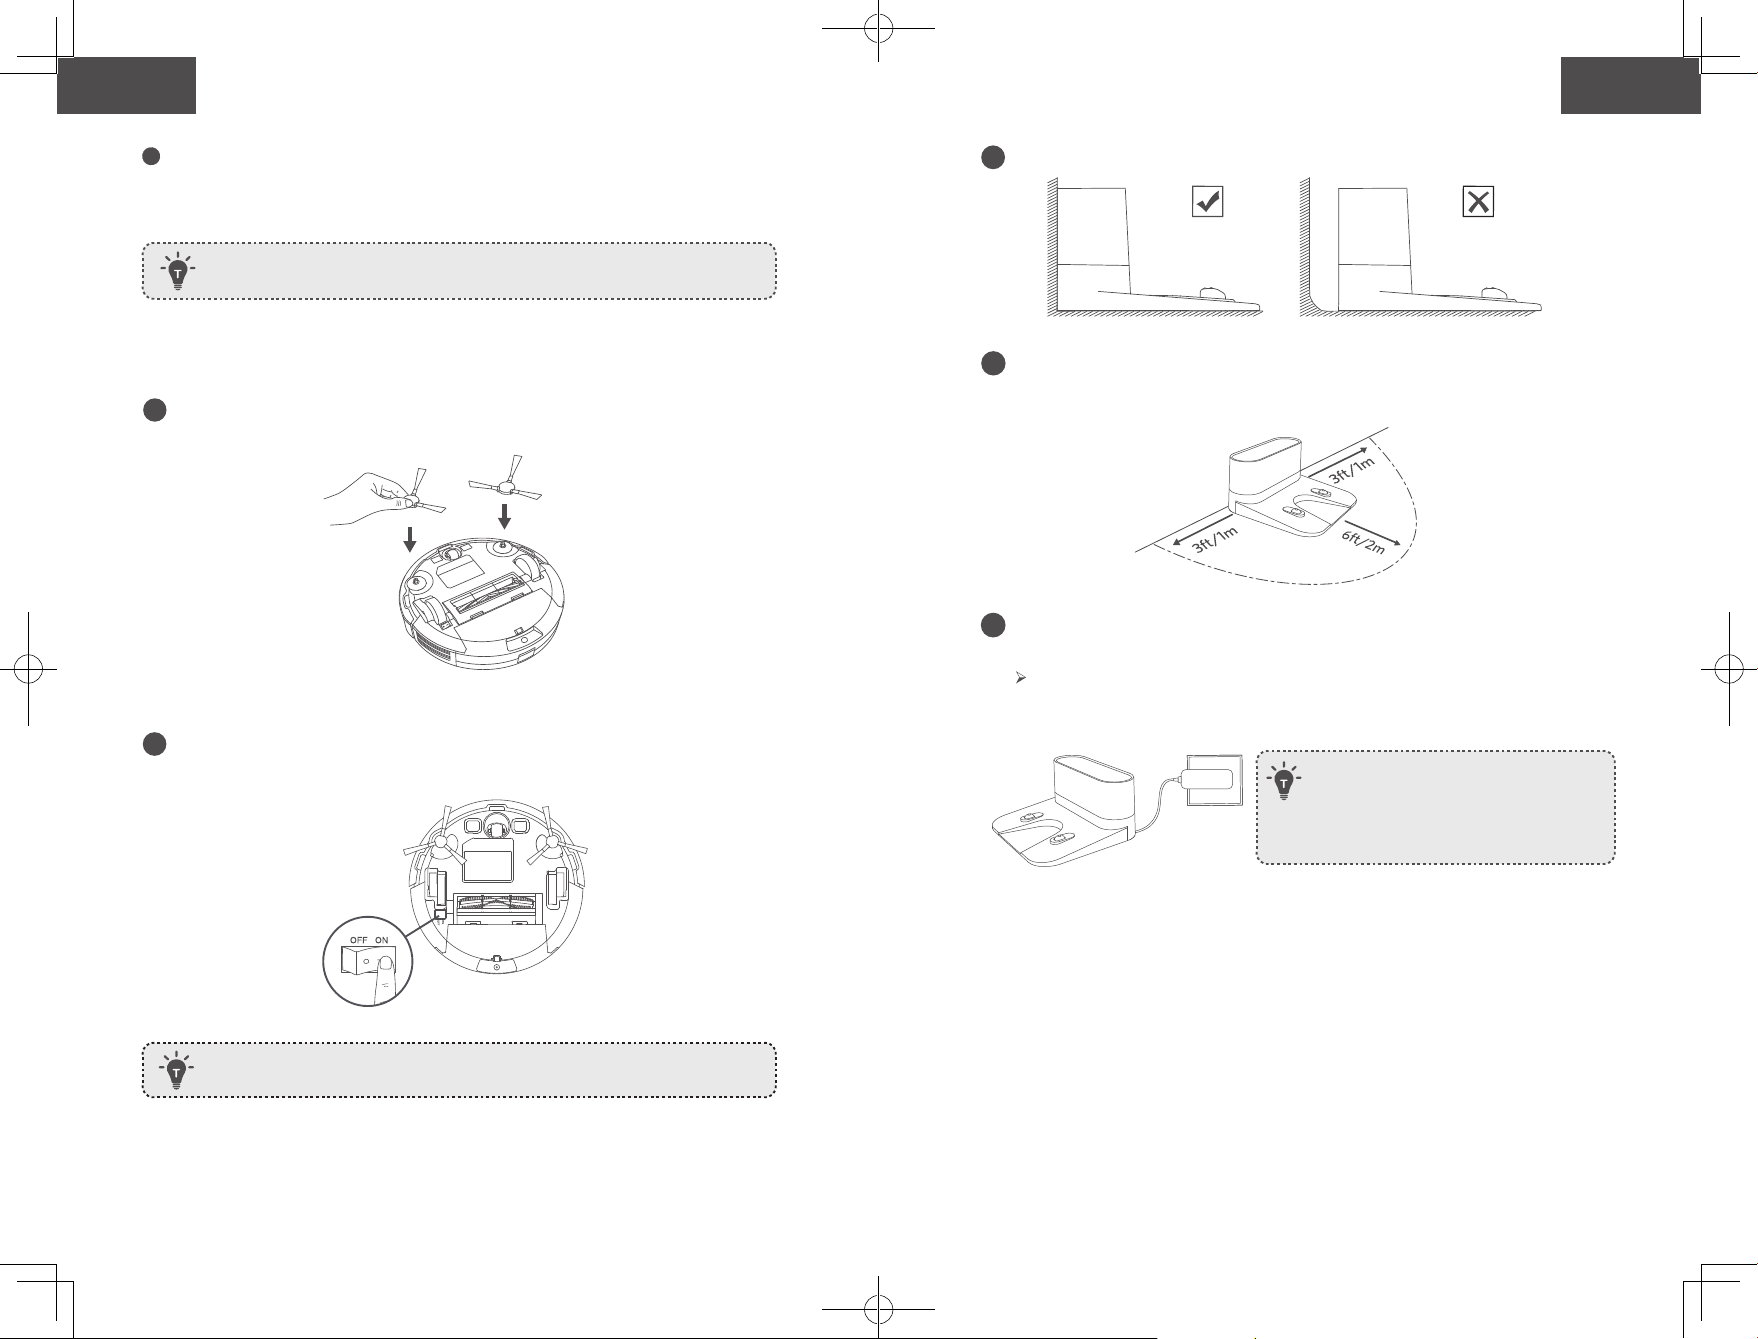
Preparation
1
Install the side brushes before use.
2
Turn on the main power switch on the bottom of RoboVac.
Remove the sticker next to the power switch, and the foam blocks beside the
bumper before use.
Place physical barriers in front of fireplaces and areas that may cause damage to
RoboVac if entered.
3
Place the Charging Base on a hard, level surface and against a wall.
4
Remove objects within 3 ft/1 m of the left and right side and within 6 ft/2 m of the front of
the Charging Base. If you cannot remove the objects, check whether RoboVac can return
to the Charging Base normally; if not, contact eufy customer service for help.
5
Connect the round connector of the adapter into the power socket on the Charging
Base and the other end into a wall outlet.
When the Charging Base connects to AC power, the LED indicator on the
Charging Base is SOLID WHITE.
- Install the Charging Base in a location that RoboVac
can easily access. It is recommended to place the
Charging Base against a wall, and on a hard-level
surface rather than on rugs or carpets.
- Always keep the Charging Base plugged in, otherwise
RoboVac will not automatically return to it.
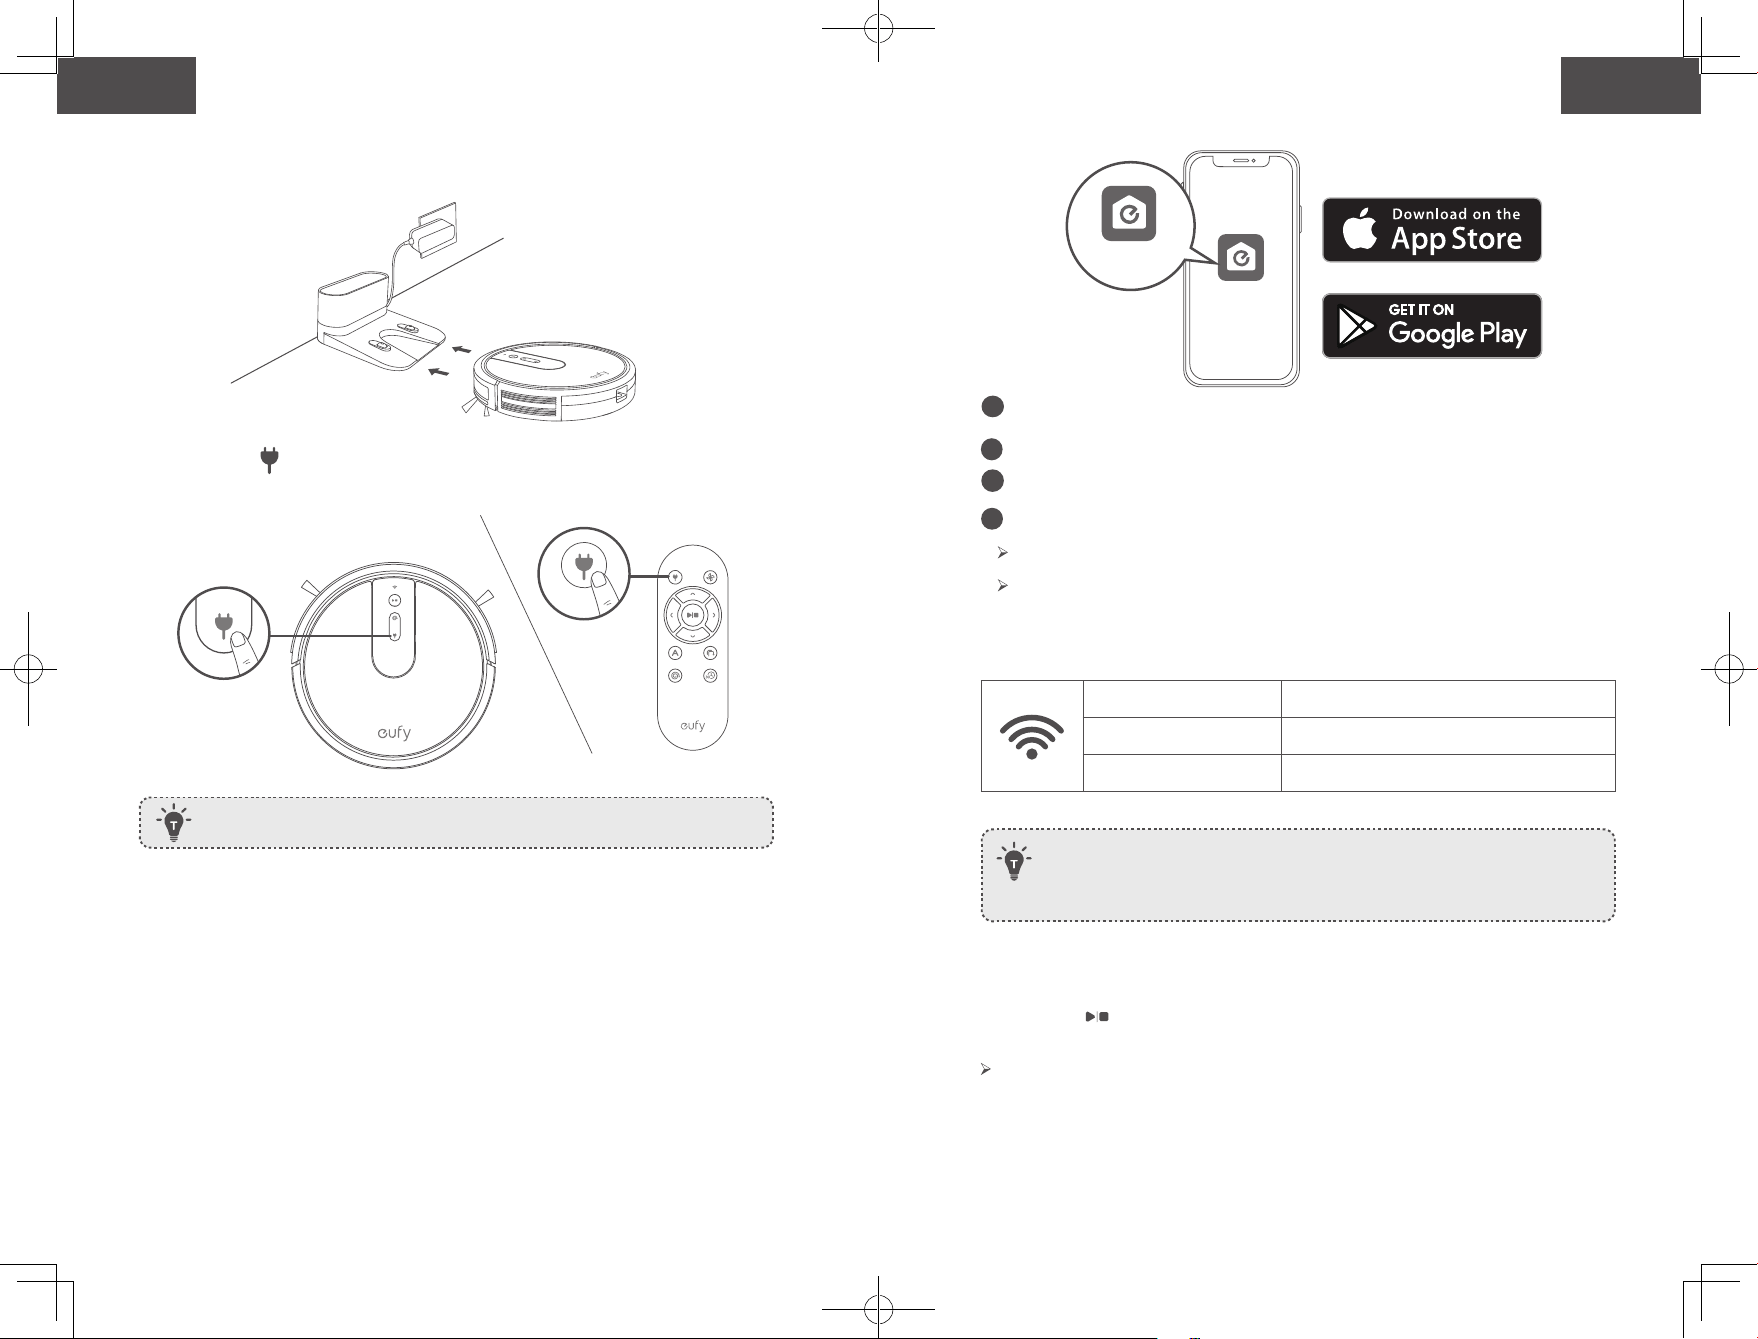
Charge Your RoboVac
• RoboVac has a pre-installed rechargeable battery that has to be fully charged before
use.
• RoboVac returns to the Charging Base at the end of a cleaning cycle or when its
battery is running low.
20 21
English English
f
Anti-drop sensors can prevent RoboVac from tumbling down stairs and steep drops
in most cases. They may work less effectively if dirty or used on reflective/very dark-
colored floors. It is recommended to place physical barriers to block off areas where
RoboVac may fall, such as stairs covered by carpets or the rounded edges of wood floors.
Preparation
1
Install the side brushes before use.
2
Turn on the main power switch on the bottom of RoboVac.
Remove the sticker next to the power switch, and the foam blocks beside the
bumper before use.
Place physical barriers in front of fireplaces and areas that may cause damage to
RoboVac if entered.
3
Place the Charging Base on a hard, level surface and against a wall.
4
Remove objects within 3 ft/1 m of the left and right side and within 6 ft/2 m of the front of
the Charging Base. If you cannot remove the objects, check whether RoboVac can return
to the Charging Base normally; if not, contact eufy customer service for help.
5
Connect the round connector of the adapter into the power socket on the Charging
Base and the other end into a wall outlet.
When the Charging Base connects to AC power, the LED indicator on the
Charging Base is SOLID WHITE.
- Install the Charging Base in a location that RoboVac
can easily access. It is recommended to place the
Charging Base against a wall, and on a hard-level
surface rather than on rugs or carpets.
- Always keep the Charging Base plugged in, otherwise
RoboVac will not automatically return to it.
Charge Your RoboVac
• RoboVac has a pre-installed rechargeable battery that has to be fully charged before
use.
• RoboVac returns to the Charging Base at the end of a cleaning cycle or when its
battery is running low.
22 23
English English
Method 1: Attach RoboVac to the Charging Base by aligning its charging pins with the
charging pins on the base.
Method 2: Press on RoboVac or on the remote control to return RoboVac to the
Charging Base.
Use Your RoboVac with the EufyHome App
To enjoy all available features, it is recommended to control your RoboVac via the
EufyHome app.
Before you start, make sure that:
• Your smartphone or tablet is connected to a Wi-Fi network.
• Your smartphone or tablet is running iOS 9.0 (or above) or Android 5.0 (or above).
• The 2.4GHz band wireless signal is enabled on your wireless router.
• The Wi-Fi status light on RoboVac is slowly flashing blue.
• The main power switch on the bottom is turned on and RoboVac is attached to the
Charging Base to ensure it has enough power during setup.
Turn off the main power switch if RoboVac will not be used for a long period of
time. To preserve the battery’s lifespan, recharge at least once every 6 months.
EufyHome
EufyHome
1
Download the EufyHome app from the App Store (iOS devices) or Google Play
(Android devices).
2
Open the app and create a user account.
3
Tap the “+” icon to add RoboVac to your EufyHome account.
4
Follow the instructions in the app to set up the Wi-Fi connection.
After connecting successfully, you can control RoboVac via the app.
With the app, you can select a cleaning mode, set the time, schedule a cleaning, view
the system status, receive notifications and access additional features.
Wi-Fi Status Light
Slowly flashing blue Waiting for connection
Rapidly flashing blue Connecting with your wireless router
Solid blue Connected to your wireless router
- If you have any problems during the Wi-Fi setup process, refer to the “Troubleshooting
> Wi-Fi connection” section in this Manual.
- If RoboVac gets stuck in any space, tap Find My Robot in the app to find the machine.
This function is available in the app only.
Reset the Wi-Fi Connection
Press and hold on RoboVac for 10 seconds until RoboVac beeps to reset the Wi-Fi
connection if necessary.
You will hear a beep when the Wi-Fi connection has been reset and the Wi-Fi status light
will slowly flash blue. Now you can follow the Wi-Fi instructions in the EufyHome app to
set up the Wi-Fi connection.

24 25
English English
Schedule Cleaning
With the EufyHome app, you can schedule RoboVac to start cleaning at a particular time.
You can set the time and customize the cleaning schedules from Sunday to Saturday on
the EufyHome app. This function is available in the app only.
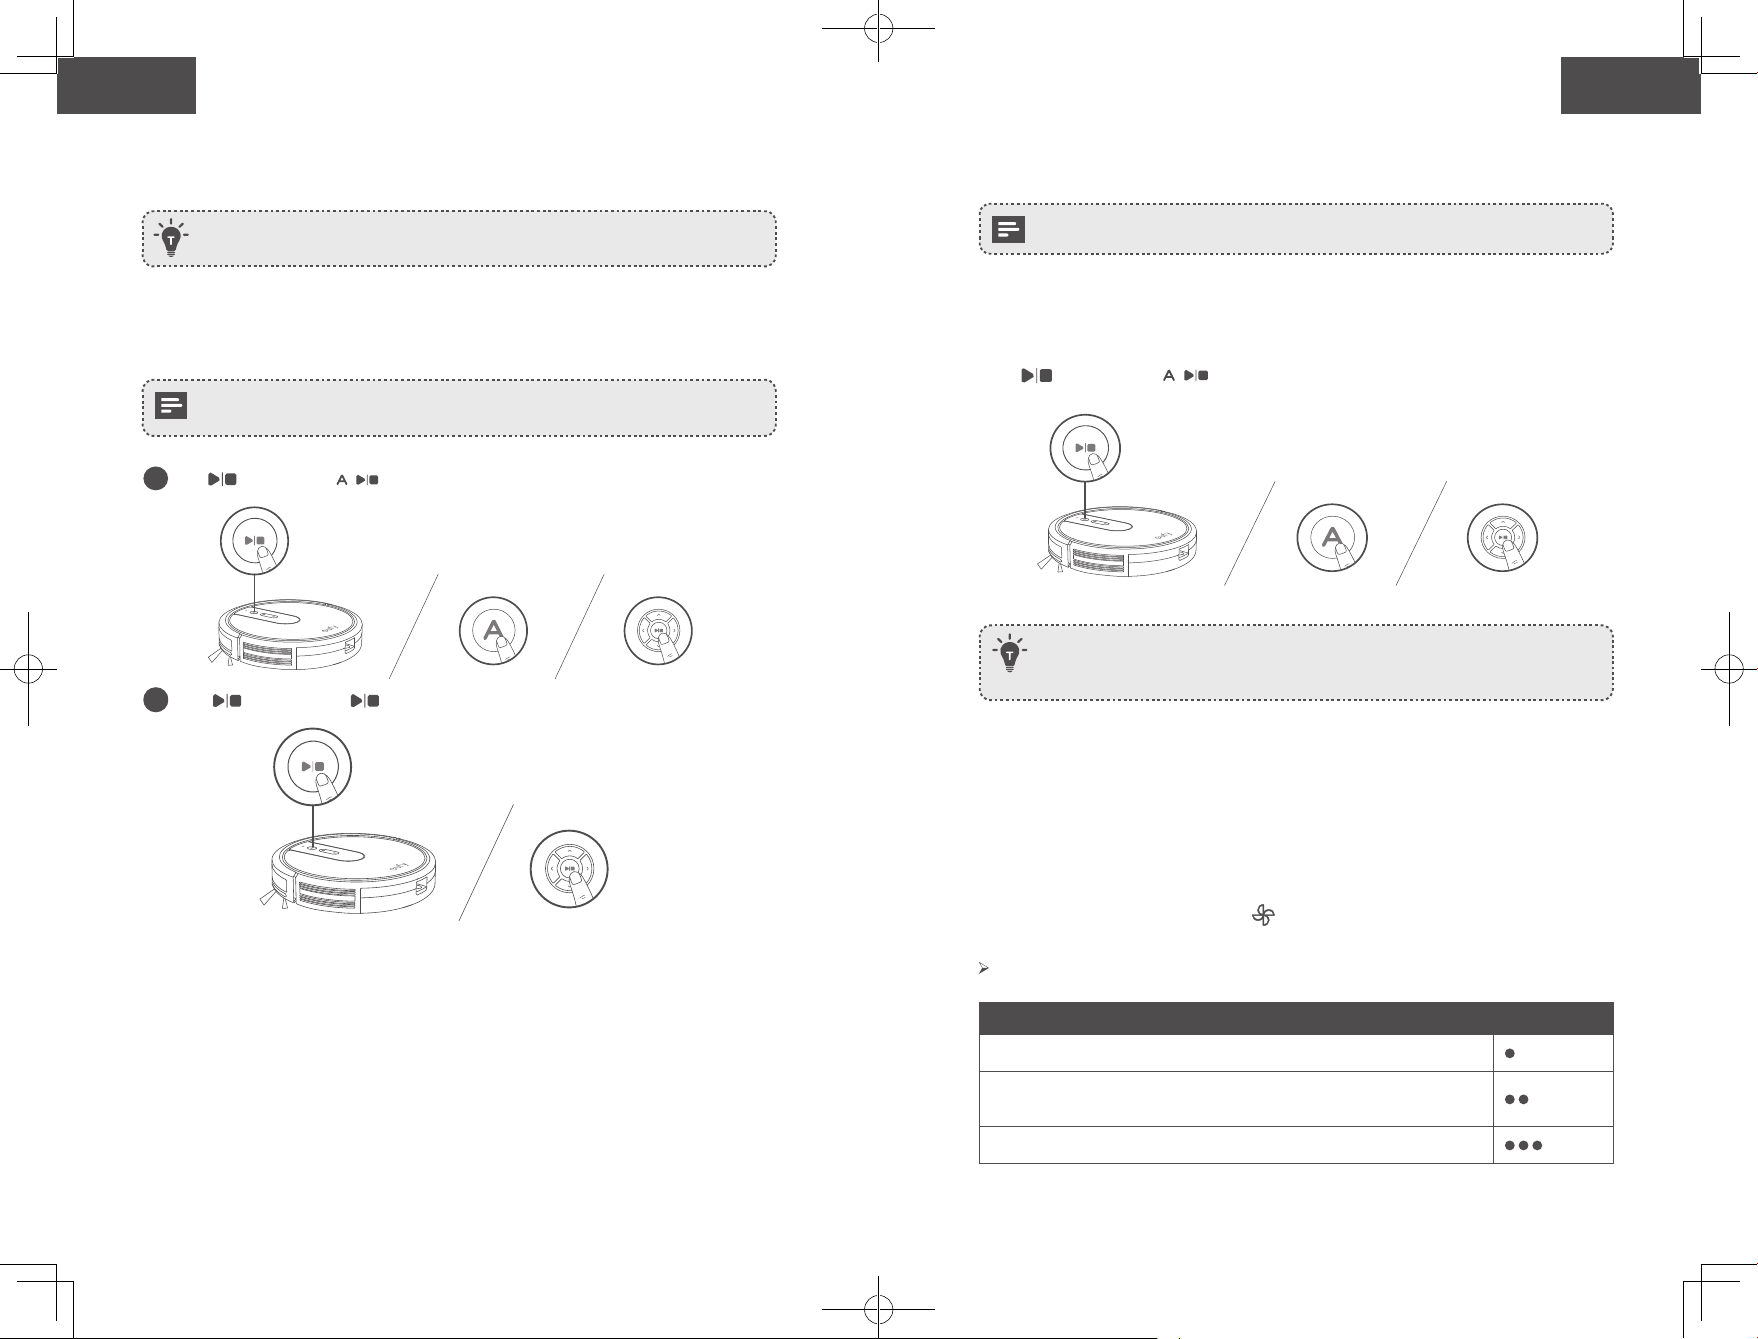
Start / Stop Cleaning
- Make sure the main power switch on the bottom of RoboVac is turned on before use.
- You can also start or stop cleaning via the EufyHome app.
1
Press on RoboVac or on the remote control to start cleaning in Auto Mode.
2
Press on RoboVac or on the remote control to stop cleaning.
Select a Cleaning Mode
You can also select a cleaning mode via the EufyHome app.
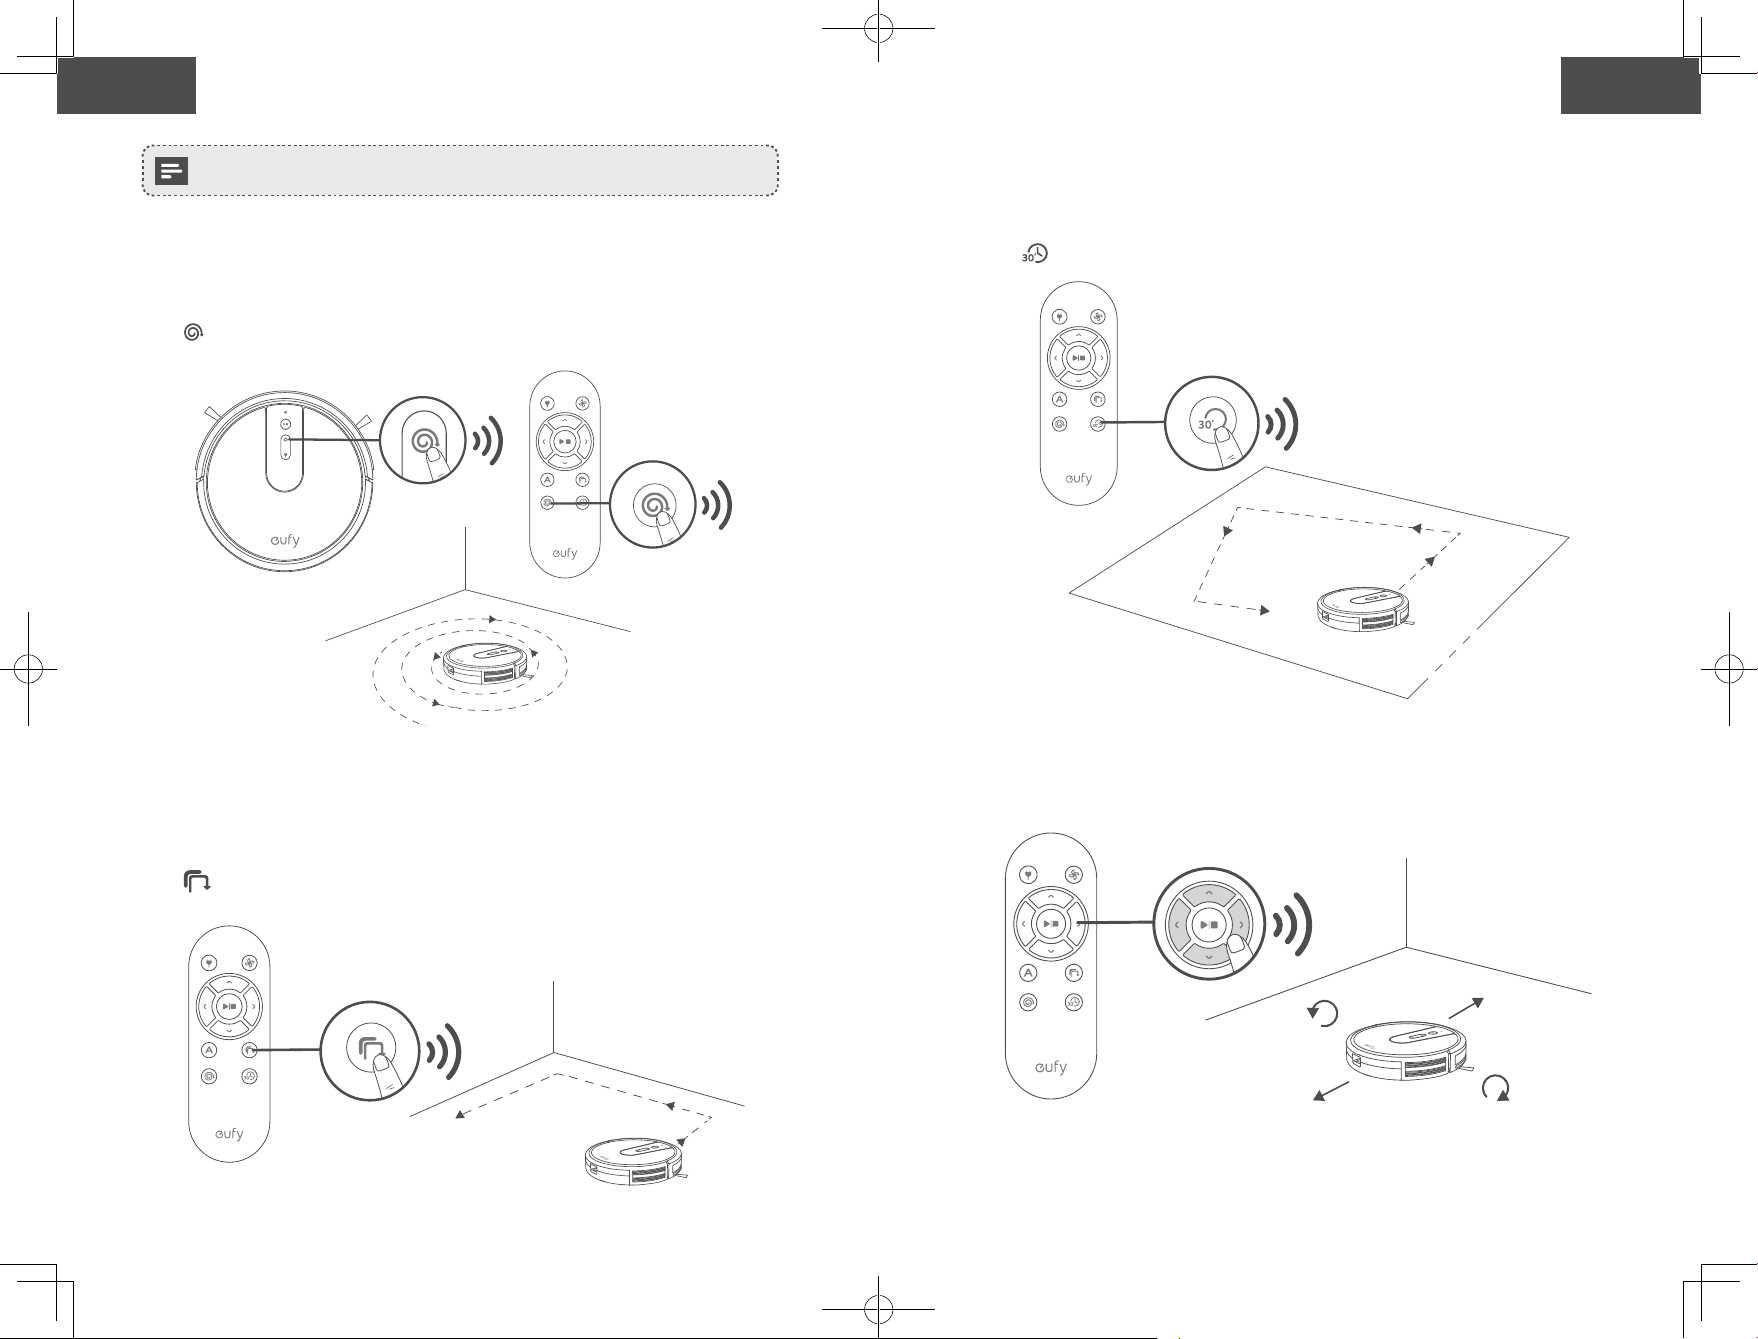
1. Auto cleaning
RoboVac optimizes its cleaning path by selecting different cleaning modes automatically
until cleaning is complete. This is the most commonly used cleaning mode.
Press on RoboVac or on the remote control to start cleaning in Auto Mode.
- RoboVac will return to the Charging Base automatically when the battery level becomes
low or when RoboVac finishes cleaning.
- By default, RoboVac starts in Auto cleaning mode when it is turned on.
BoostIQ™ Feature
When the BoostIQ™ feature is enabled, RoboVac will automatically increase the suction
power if it detects stronger power is needed to ensure the best clean. BoostIQ™ is ideal for
cleaning thicker carpets and hard-to-sweep messes, which will reduce the total cleaning
time, but increase the noise level. If the vacuuming noise caused by BoostIQ™ disturbs you,
you can disable this feature. This feature only works in Auto and Quick cleaning modes.
In Auto or Quick cleaning mode, press on the remote control repeatedly to adjust the
suction power level.
The corresponding icon is displayed on the remote control.
Suction Power Level Beeps
Standard power
BoostIQ™
(Default, automatically switches between Standard and Enhanced power)
Maximum power

24 25
English English
Schedule Cleaning
With the EufyHome app, you can schedule RoboVac to start cleaning at a particular time.
You can set the time and customize the cleaning schedules from Sunday to Saturday on
the EufyHome app. This function is available in the app only.
Start / Stop Cleaning
- Make sure the main power switch on the bottom of RoboVac is turned on before use.
- You can also start or stop cleaning via the EufyHome app.
1
Press on RoboVac or on the remote control to start cleaning in Auto Mode.
2
Press on RoboVac or on the remote control to stop cleaning.
Select a Cleaning Mode
You can also select a cleaning mode via the EufyHome app.
1. Auto cleaning
RoboVac optimizes its cleaning path by selecting different cleaning modes automatically
until cleaning is complete. This is the most commonly used cleaning mode.
Press on RoboVac or on the remote control to start cleaning in Auto Mode.
- RoboVac will return to the Charging Base automatically when the battery level becomes
low or when RoboVac finishes cleaning.
- By default, RoboVac starts in Auto cleaning mode when it is turned on.
BoostIQ™ Feature
When the BoostIQ™ feature is enabled, RoboVac will automatically increase the suction
power if it detects stronger power is needed to ensure the best clean. BoostIQ™ is ideal for
cleaning thicker carpets and hard-to-sweep messes, which will reduce the total cleaning
time, but increase the noise level. If the vacuuming noise caused by BoostIQ™ disturbs you,
you can disable this feature. This feature only works in Auto and Quick cleaning modes.
In Auto or Quick cleaning mode, press on the remote control repeatedly to adjust the
suction power level.
The corresponding icon is displayed on the remote control.
Suction Power Level Beeps
Standard power
BoostIQ™
(Default, automatically switches between Standard and Enhanced power)
Maximum power
26 27
English English
When RoboVac starts cleaning in Auto or Quick mode the next time, it will clean
according to the suction power level you previously selected.
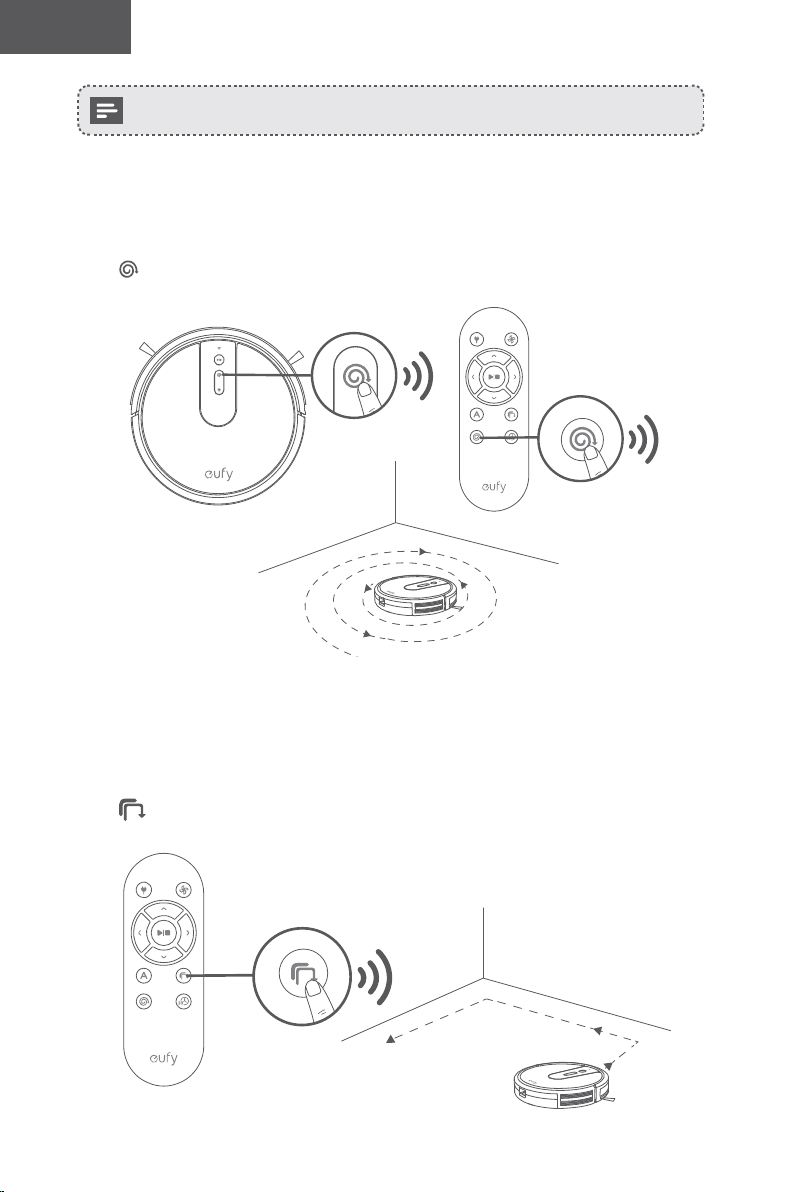
2. Spot cleaning
RoboVac intensively cleans a specific area in a spiral pattern, useful if there is a
concentrated area of dust or debris. In Spot mode, RoboVac will stop cleaning after 2
minutes.
Press on RoboVac or on the remote control to start cleaning in Spot Mode.
3. Edge cleaning
RoboVac reduces its speed when it detects a wall and then follows the wall to ensure the
edge is cleaned thoroughly. In Edge mode, RoboVac will clean for 20 minutes and return to
the Charging Base.
Press on the remote control to start cleaning in Edge Mode.
4. Quick cleaning
RoboVac will automatically stop cleaning after 30 minutes and return to the Charging Base
in this mode. If any small room or area needs to be cleaned, it is recommended to select
this mode to save time and power.
Press on the remote control to start quick cleaning mode.
5. Manual cleaning
You can direct RoboVac to clean a particular area by using the directional buttons on the
remote control.
Turn left
Move backward Turn right
Move forward

26 27
English English
When RoboVac starts cleaning in Auto or Quick mode the next time, it will clean
according to the suction power level you previously selected.
2. Spot cleaning
RoboVac intensively cleans a specific area in a spiral pattern, useful if there is a
concentrated area of dust or debris. In Spot mode, RoboVac will stop cleaning after 2
minutes.
Press on RoboVac or on the remote control to start cleaning in Spot Mode.
3. Edge cleaning
RoboVac reduces its speed when it detects a wall and then follows the wall to ensure the
edge is cleaned thoroughly. In Edge mode, RoboVac will clean for 20 minutes and return to
the Charging Base.
Press on the remote control to start cleaning in Edge Mode.
4. Quick cleaning
RoboVac will automatically stop cleaning after 30 minutes and return to the Charging Base
in this mode. If any small room or area needs to be cleaned, it is recommended to select
this mode to save time and power.
Press on the remote control to start quick cleaning mode.
5. Manual cleaning
You can direct RoboVac to clean a particular area by using the directional buttons on the
remote control.
Turn left
Move backward Turn right
Move forward
28 29
English English
Use Your RoboVac with Amazon Alexa / the Google
Assistant
Currently this feature only supports English, German, French, and Spanish. You
could check regularly if more languages are supported at
https://www.eufylife.com/support/.
Amazon Alexa and the Google Assistant are smart voice assistants that enable you to
control RoboVac with your voice.
Before you start, make sure that:
• RoboVac is attached to the Charging Base to ensure there is enough power.
• RoboVac is connected with the EufyHome app.
• You have an Alexa-enabled device (i.e. Amazon Echo, Echo Dot and Amazon Tap,
Echo Show, Echo Spot) or a device enabled with the Google Assistant (i.e. Google
Home, Google Home Mini). These devices are sold separately.
• The Amazon Alexa app or Google Home app is already installed on your smart
device, and you have created an account.
To control RoboVac with Amazon Alexa or the Google Assistant
1
Open the EufyHome app and tap “Smart Integrations” in the top left.
2
Follow the on-screen instructions to complete the setup.
For more information about how RoboVac works with Amazon Alexa / the
Google Assistant, visit https://www.eufylife.com/support/ for details.
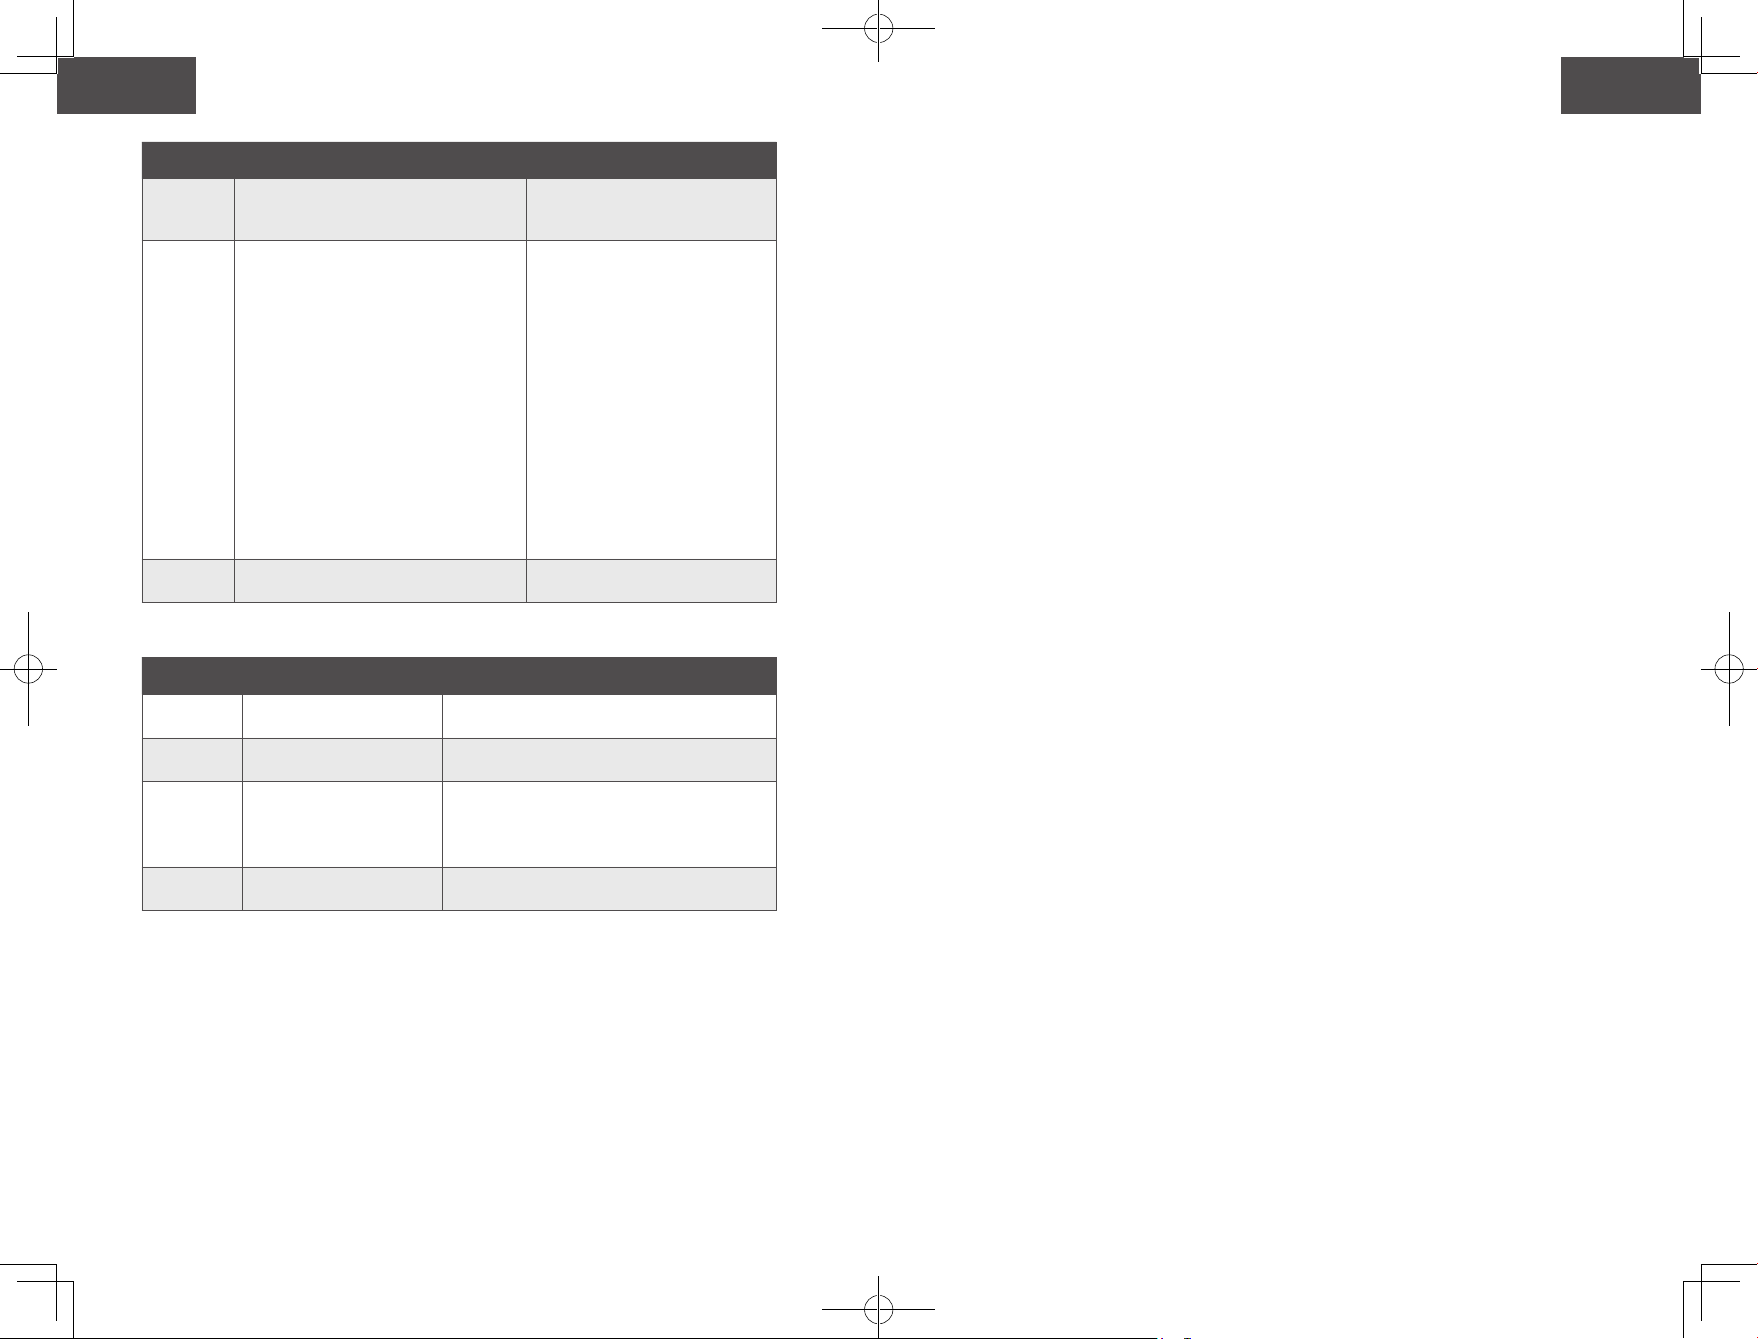
Cleaning and Maintenance
For optimal performance, follow the instructions below to clean and maintain RoboVac
regularly. The cleaning/replacement frequency will depend on your usage habits of
RoboVac.
Recommended cleaning/replacement frequency
RoboVac Part Cleaning Frequency Replacement Frequency
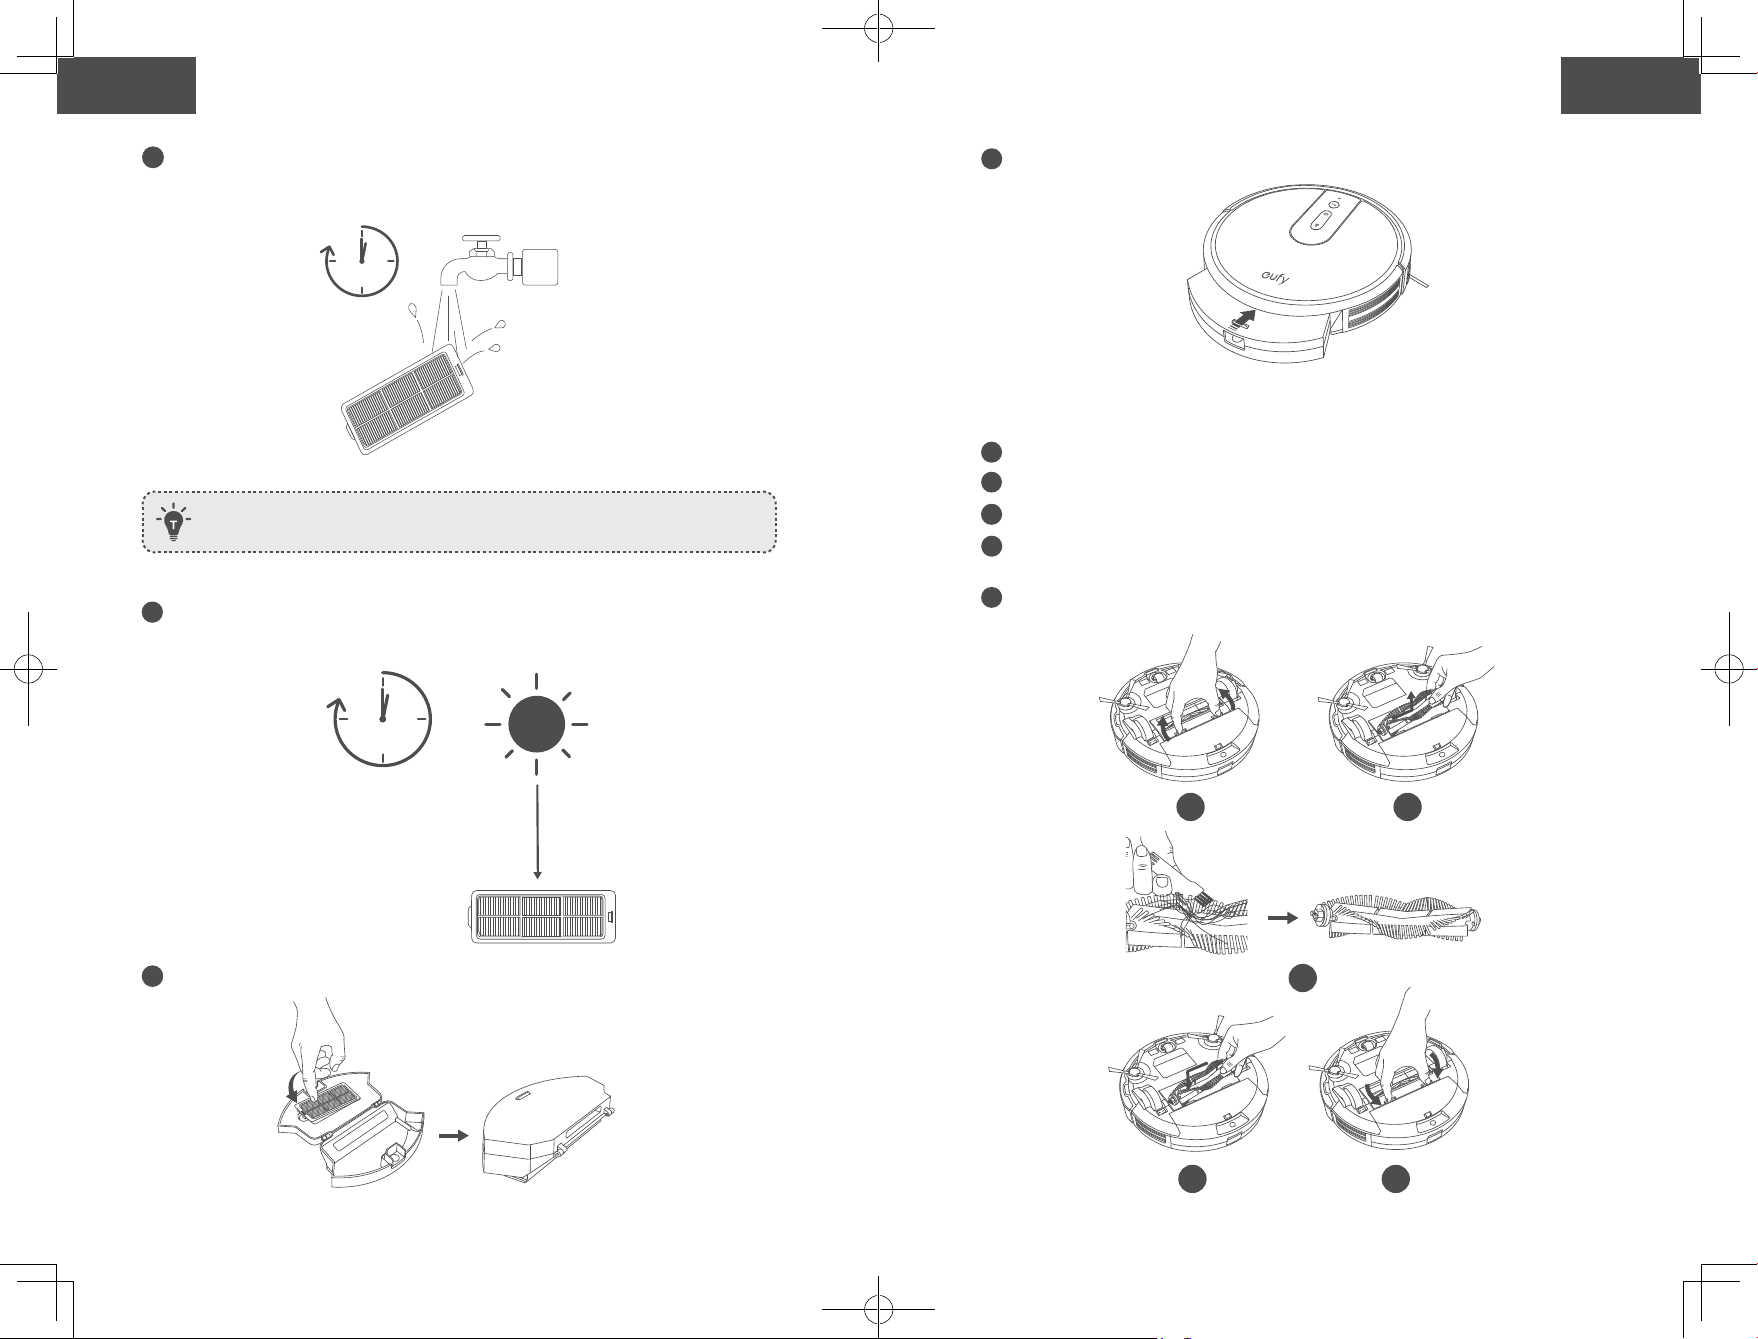
Dust Collector After each use -
Filter
Once every week
(Twice a week if you
have a pet)
Every 2 months
Rolling Brush Once every month Every 6-12 months
Side Brushes Once every month Every 3-6 months (or when visibly worn)
Brush Guard Once every month
Every 3-6 months (or when the silicone rubber
strip on the brush guard becomes visibly worn)
Sensors Once every month -
Charging Pins Once every month -
Swivel Wheel Once every month -
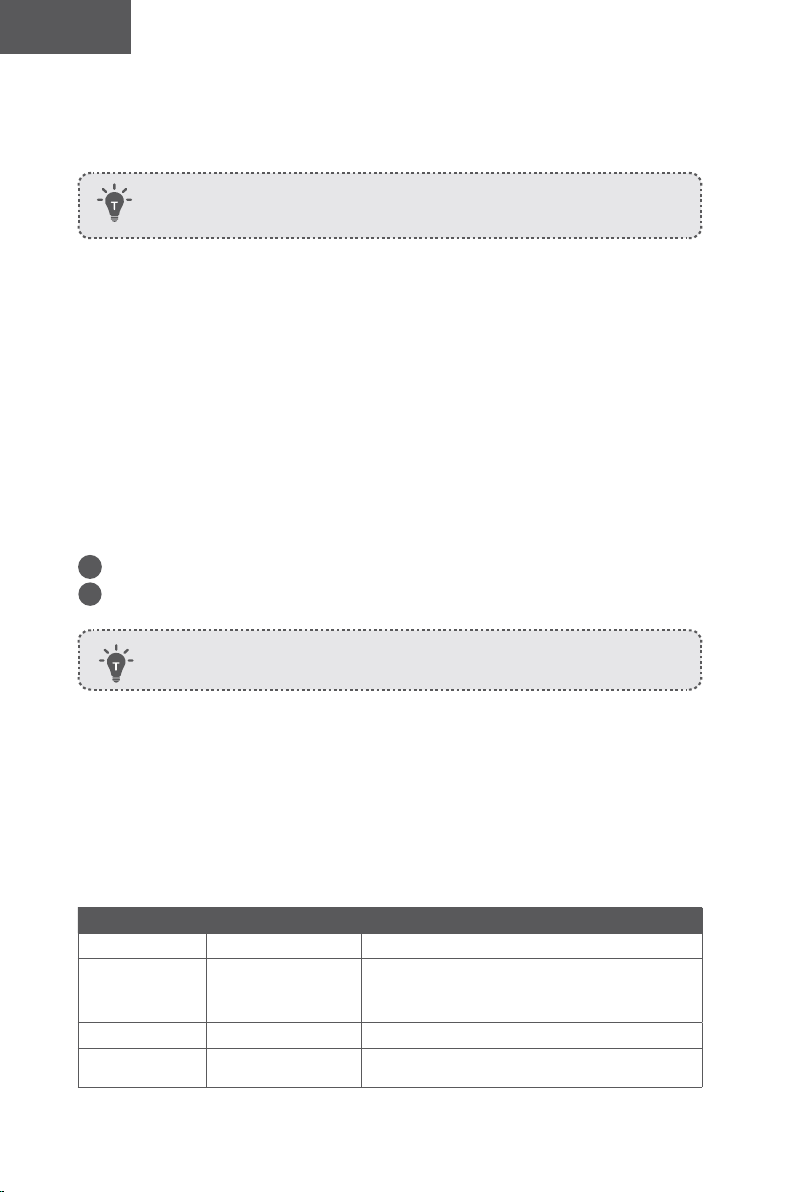
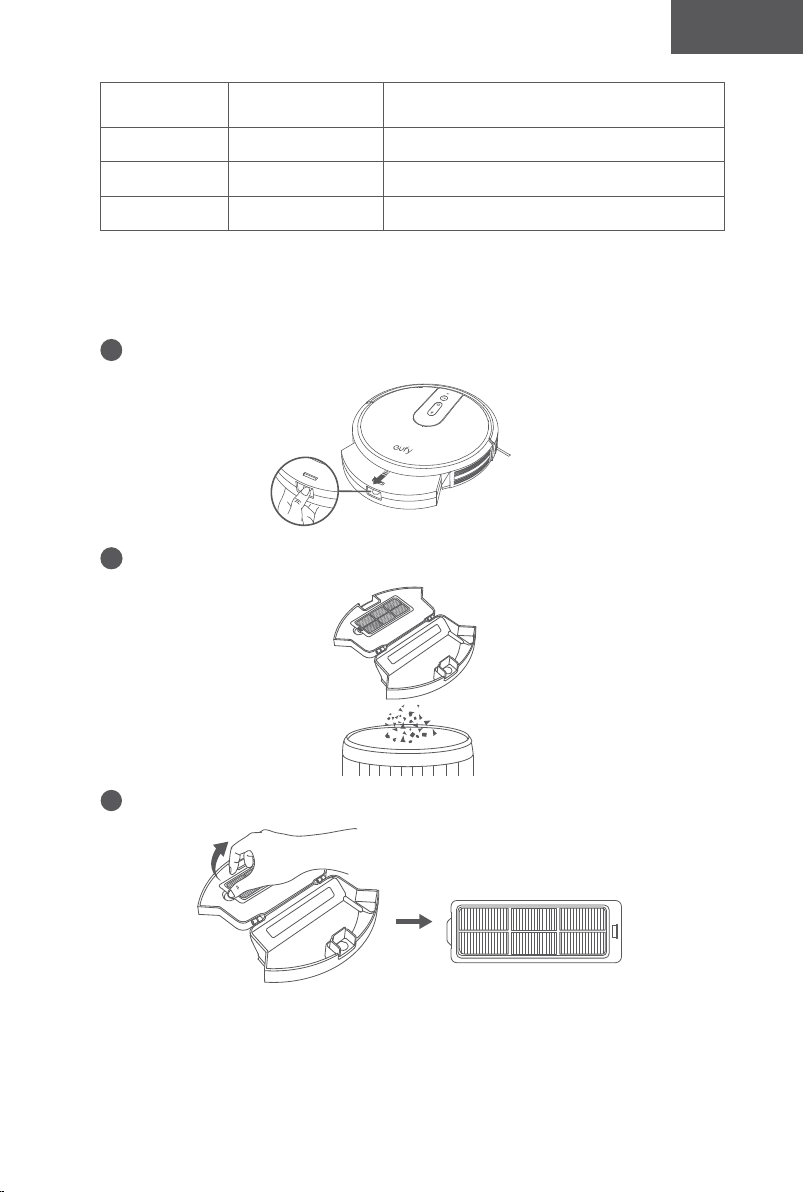
Clean the Dust Collector and Filter
1
Press the dust collector release button to pull the dust collector out.
2
Open and empty the dust collector.
3
Take out the filter.
28 29
English English
Use Your RoboVac with Amazon Alexa / the Google
Assistant
Currently this feature only supports English, German, French, and Spanish. You
could check regularly if more languages are supported at
https://www.eufylife.com/support/.
Amazon Alexa and the Google Assistant are smart voice assistants that enable you to
control RoboVac with your voice.
Before you start, make sure that:
• RoboVac is attached to the Charging Base to ensure there is enough power.
• RoboVac is connected with the EufyHome app.
• You have an Alexa-enabled device (i.e. Amazon Echo, Echo Dot and Amazon Tap,
Echo Show, Echo Spot) or a device enabled with the Google Assistant (i.e. Google
Home, Google Home Mini). These devices are sold separately.
• The Amazon Alexa app or Google Home app is already installed on your smart
device, and you have created an account.
To control RoboVac with Amazon Alexa or the Google Assistant
1
Open the EufyHome app and tap “Smart Integrations” in the top left.
2
Follow the on-screen instructions to complete the setup.
For more information about how RoboVac works with Amazon Alexa / the
Google Assistant, visit https://www.eufylife.com/support/ for details.
Cleaning and Maintenance
For optimal performance, follow the instructions below to clean and maintain RoboVac
regularly. The cleaning/replacement frequency will depend on your usage habits of
RoboVac.
Recommended cleaning/replacement frequency
RoboVac Part Cleaning Frequency Replacement Frequency
Dust Collector After each use -
Filter
Once every week
(Twice a week if you
have a pet)
Every 2 months
Rolling Brush Once every month Every 6-12 months
Side Brushes Once every month Every 3-6 months (or when visibly worn)
Brush Guard Once every month
Every 3-6 months (or when the silicone rubber
strip on the brush guard becomes visibly worn)
Sensors Once every month -
Charging Pins Once every month -
Swivel Wheel Once every month -
Clean the Dust Collector and Filter
1
Press the dust collector release button to pull the dust collector out.
2
Open and empty the dust collector.
3
Take out the filter.

30 31
English English
4
Rinse the filter thoroughly with water.
1
min
Do not use a brush, hot water, or any detergent to clean the filter.
5
Air-dry the filter completely before next use. You may change to use the other
filter if the original one is not completely dry.
24h
6
Put the filter back into the dust collector.
7
Push the dust collector back into the main unit.
Clean the Rolling Brush
1
Pull on the release tabs to unlock the brush guard as shown.
2
Lift the rolling brush to remove.
3
Clean the rolling brush with the provided cleaning tool or a vacuum cleaner.
4
Reinstall the rolling brush by inserting the fixed protruding end first and then clicking
into place.
5
Press down to snap the brush guard into place.
1 2
3
54
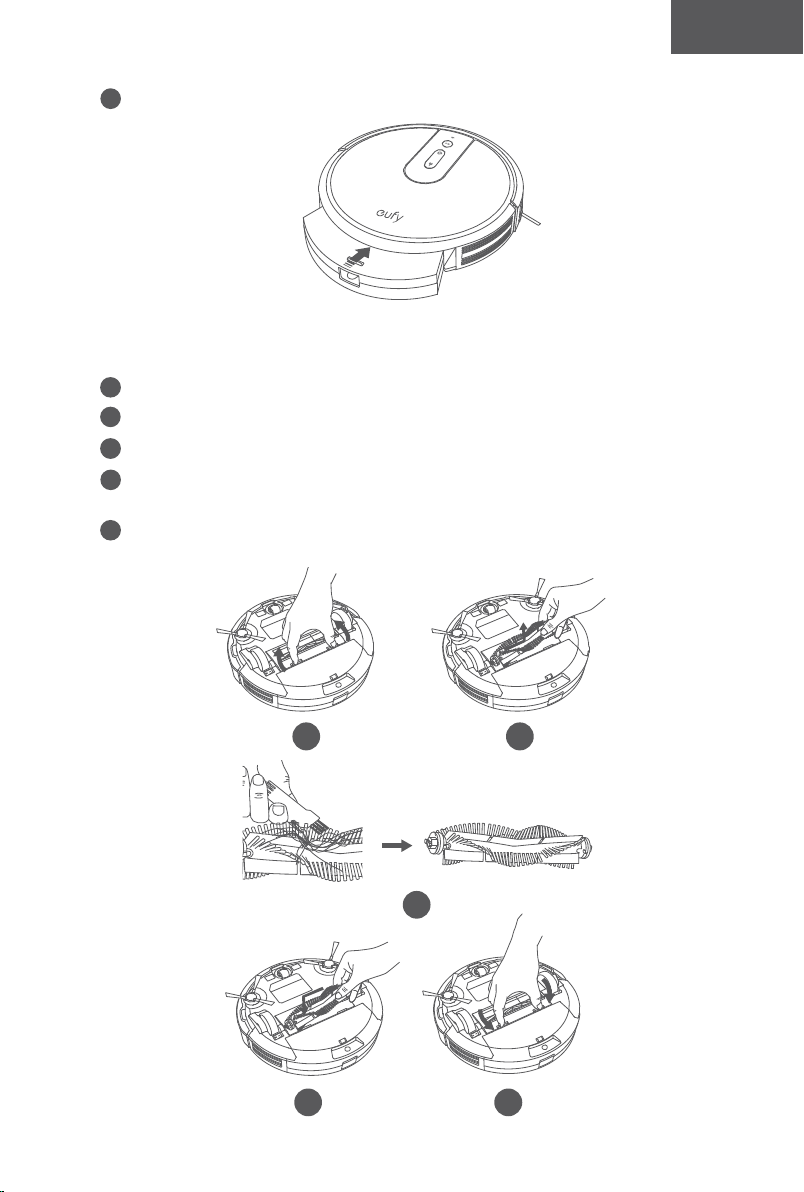

32 33
English English
Clean the Side Brushes
Foreign substances, such as hair, can easily get tangled in the side brushes, and dirt may
adhere to them. Be sure to clean them regularly.
1
Remove the side brushes.
2
Carefully unwind and pull off any hair or string that is wrapped between the main unit
and the side brushes.
3
Use a cloth dampened with warm water to remove dust from the brushes or to gently
reshape them.
- Only use the side brushes when they are completely dry.
- To protect your wooden or carpeted floor, our side brushes are made of soft materials
and may become curled after use for some time, but it will not aect the cleaning
eect.
Replace the Side Brushes
The side brushes may become bent or damaged after being used for a period of time.
Follow the instructions below to replace them.
•
Pull off the old side brushes and snap the new ones into place.
Clean the Sensors and Charging Pins
To maintain the best performance, clean the bumper, sensors and charging pins regularly.
• Dust off the bumper, sensors and charging contact pins using a dry cloth or cleaning
brush
.
Clean the Swivel Wheel
• Hair or dust particles can easily get entangled in the swivel wheel. Be sure to clean the
swivel wheel periodically and as needed.
Wheel
Axle
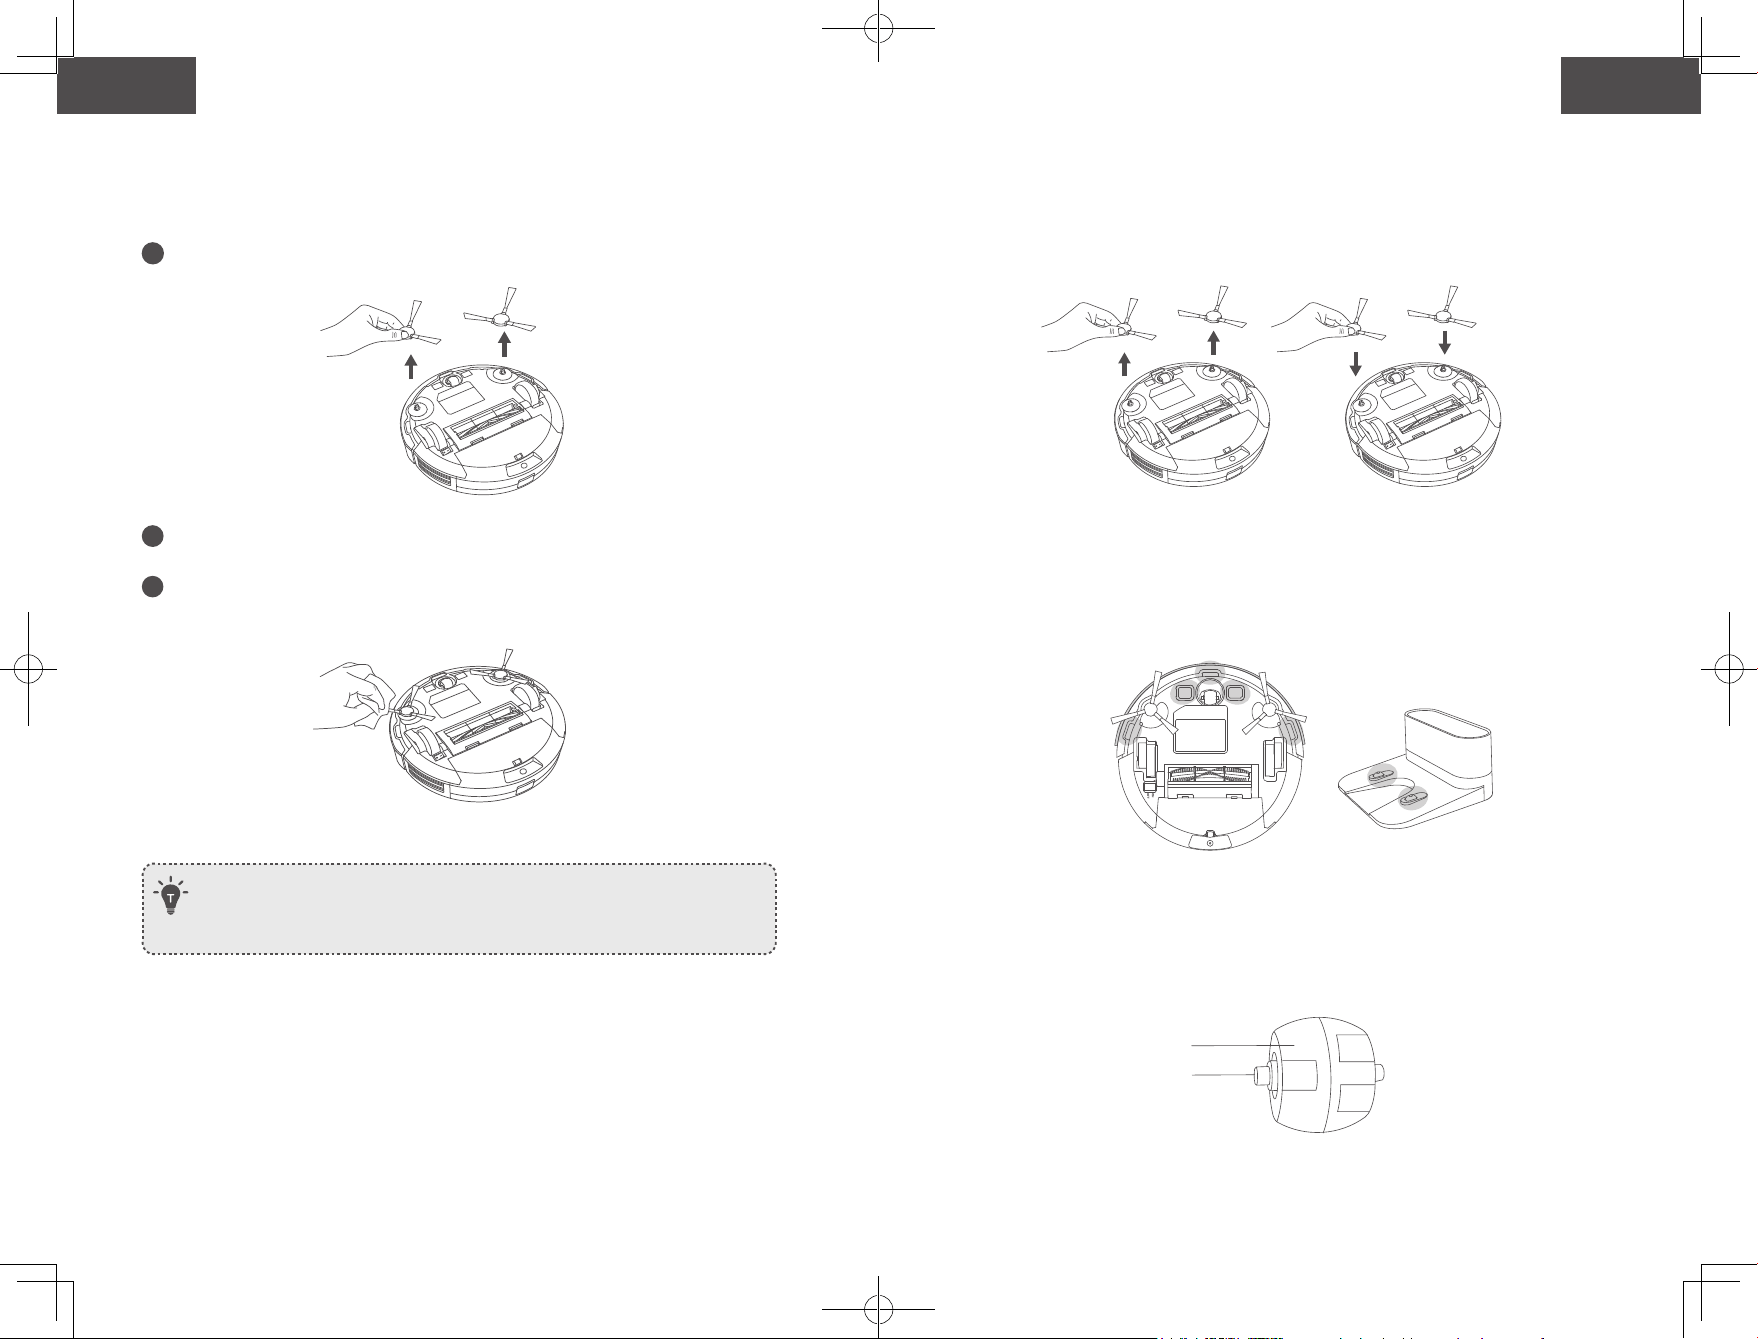
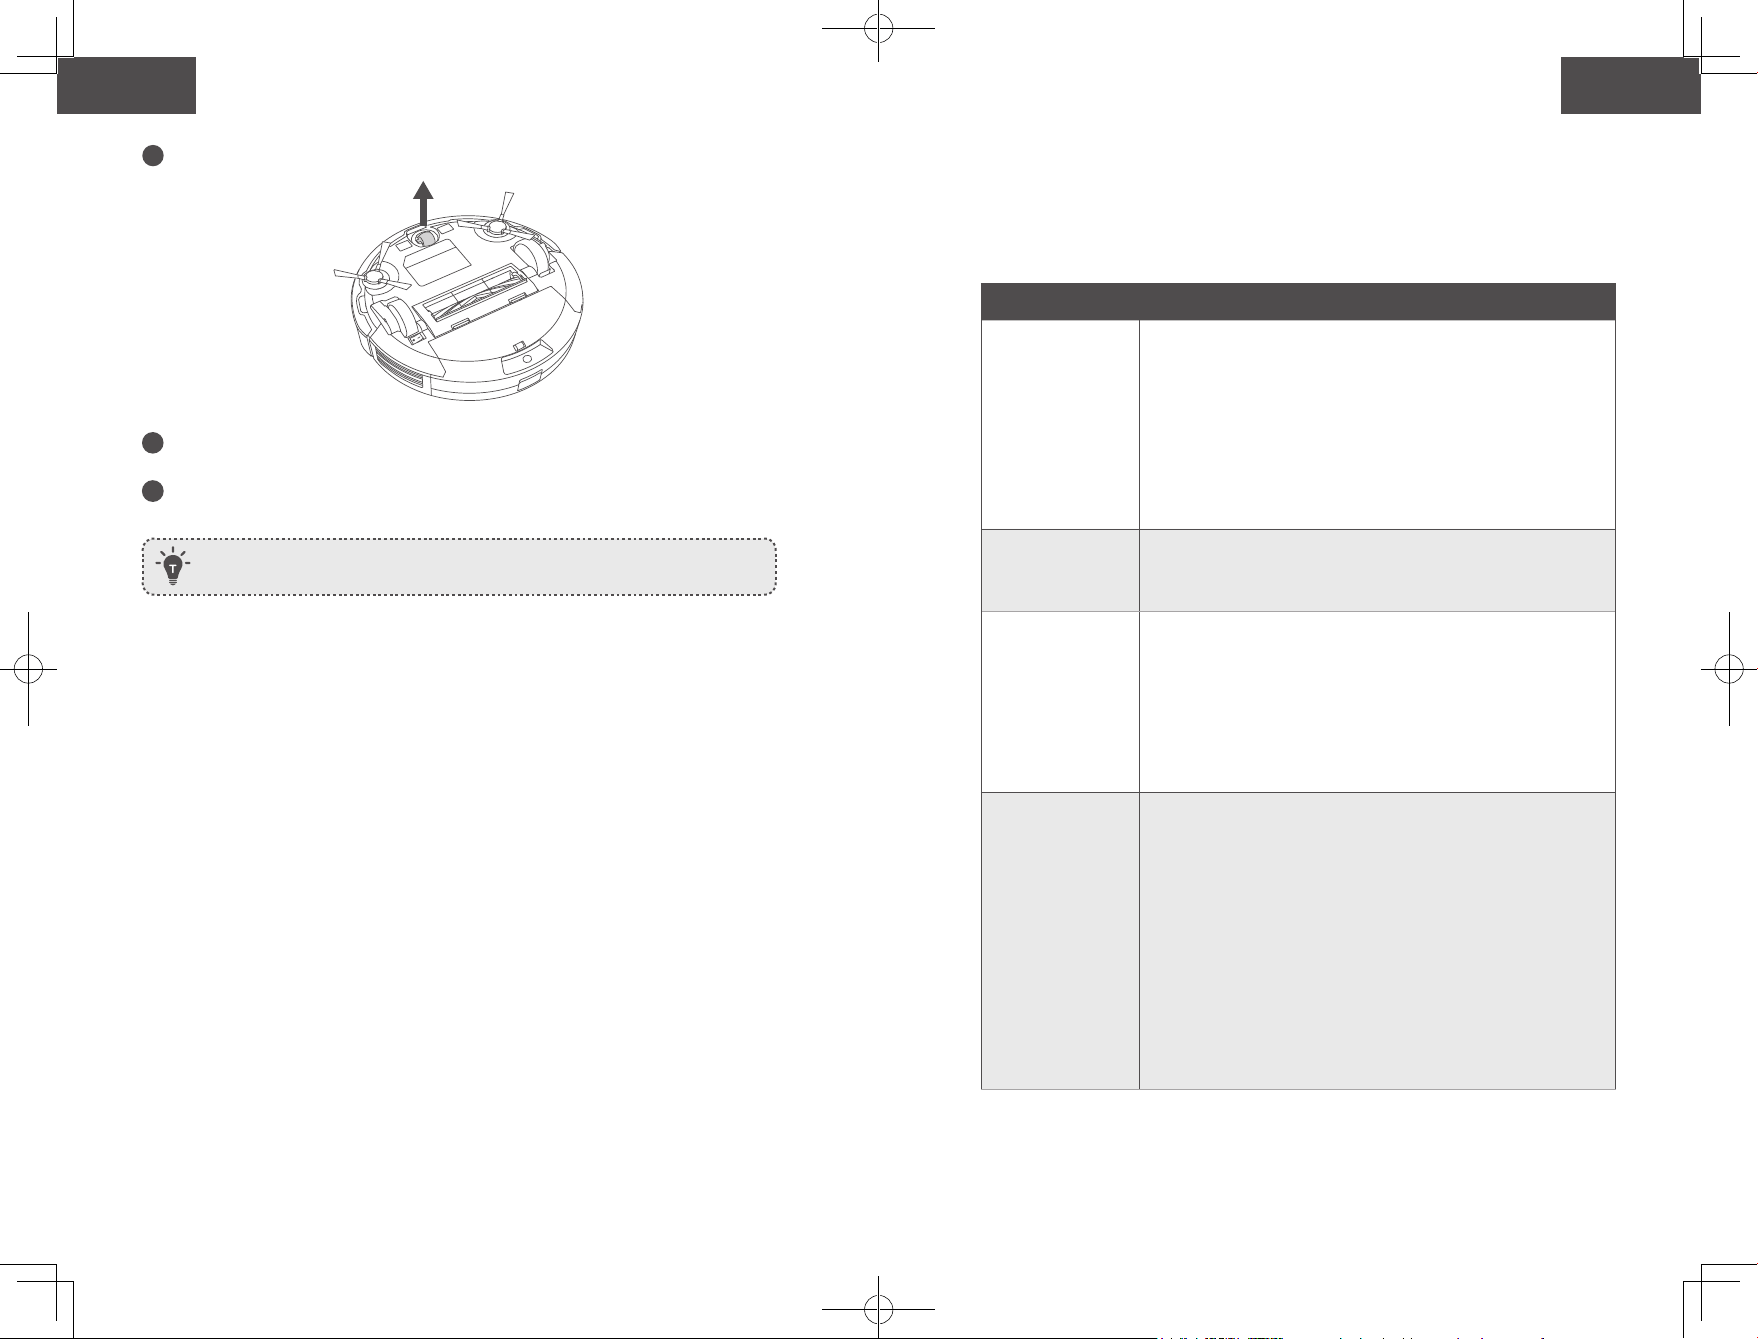
34 35
English English
1
Pull out the swivel wheel.
2
Clean any hair or debris wrapped around the wheel or entangled inside the wheel
cavity.
3
Reinstall the wheel and push in until it clicks into place.
- You can clean the swivel wheel with water.
- Use the swivel wheel only when it is completely dry.
Troubleshooting
Frequently asked questions:
The solutions below are for general questions. If your problem persists, visit
www.eufylife.com or contact support@eufylife.com for help.
Problems Solutions
RoboVac cannot be
activated.
• Make sure the main power switch is in the ON position.
• Make sure the battery is fully charged.
• Replace the batteries (2 AAA) in the remote control.
• Make sure the remote control is within range (16 ft/5 m) of
RoboVac.
• If you still have trouble, turn off the main power switch and
then turn it back on.
The remote control
does not work.
• Replace the batteries in the remote control.
• Make sure RoboVac is turned on and fully charged.
RoboVac stops
working suddenly.
• Check if RoboVac is trapped or stuck on an obstacle.
• Check if the battery level is too low.
• Check the “Error Tones” section to find the solution.
• If you still have trouble, turn off the main power switch,
wait for 2 seconds, and then turn it back on.
You cannot
schedule cleanings.
• Make sure the main power switch on the bottom of
RoboVac is turned on.
• You can set the time of day and scheduled cleaning time
via the EufyHome app.
• Make sure the scheduled time has been set correctly.
• Check if RoboVac’s power is too low to start cleaning.
• Cleaning schedules are erased when RoboVac is powered
off. If RoboVac is powered on without Internet access,
cleaning schedules will not synchronize and must be reset
via the app.
Suction power is
weak.
• Check if any obstructions are blocking the suction inlet.
• Empty the dust collector.
• Check if the filters are wet due to water or other liquid on
the floor. Air-dry the filters completely before use.
34 35
English English
1
Pull out the swivel wheel.
2
Clean any hair or debris wrapped around the wheel or entangled inside the wheel
cavity.
3
Reinstall the wheel and push in until it clicks into place.
- You can clean the swivel wheel with water.
- Use the swivel wheel only when it is completely dry.
Troubleshooting
Frequently asked questions:
The solutions below are for general questions. If your problem persists, visit
www.eufylife.com or contact [email protected]om for help.
Problems Solutions
RoboVac cannot be
activated.
• Make sure the main power switch is in the ON position.
• Make sure the battery is fully charged.
• Replace the batteries (2 AAA) in the remote control.
• Make sure the remote control is within range (16 ft/5 m) of
RoboVac.
• If you still have trouble, turn off the main power switch and
then turn it back on.
The remote control
does not work.
• Replace the batteries in the remote control.
• Make sure RoboVac is turned on and fully charged.
RoboVac stops
working suddenly.
• Check if RoboVac is trapped or stuck on an obstacle.
• Check if the battery level is too low.
• Check the “Error Tones” section to find the solution.
• If you still have trouble, turn off the main power switch,
wait for 2 seconds, and then turn it back on.
You cannot
schedule cleanings.
• Make sure the main power switch on the bottom of
RoboVac is turned on.
• You can set the time of day and scheduled cleaning time
via the EufyHome app.
• Make sure the scheduled time has been set correctly.
• Check if RoboVac’s power is too low to start cleaning.
• Cleaning schedules are erased when RoboVac is powered
off. If RoboVac is powered on without Internet access,
cleaning schedules will not synchronize and must be reset
via the app.
Suction power is
weak.
• Check if any obstructions are blocking the suction inlet.
• Empty the dust collector.
• Check if the filters are wet due to water or other liquid on
the floor. Air-dry the filters completely before use.
36 37
English English
Problems Solutions
RoboVac cannot be
charged.
• Check if the indicator on the Charging Base lights up. If
not, contact the eufy service center to repair or replace the
Charging Base.
• Check if the indicator on RoboVac is solid red and there is
no beep during charging. If yes, it indicates the battery has
failed. Reinstall the battery, then turn RoboVac on and off.
If the problem persists, contact the eufy service center to
repair or replace the battery.
• Dust off the charging contact pins with a dry cloth.
• Check if you can hear a beep when RoboVac is docked onto
the Charging Base. If not, contact the eufy service center to
repair or replace the Charging Base.
RoboVac cannot
return to the
Charging Base.
• Remove objects within 3 ft/1 m to the left and right side
and within 6 ft/2 m of the front of the Charging Base.
• When RoboVac is in the vicinity of the Charging Base, it
will return more quickly. However, if the Charging Base is
located far away, RoboVac will need more time to return.
Please be patient as it works its way back.
• Clean the charging contact pins.
The rolling brush
does not rotate.
• Clean the rolling brush.
• Check if the rolling brush and brush guard have been
installed properly.
RoboVac’s
movements or travel
path are abnormal.
• Clean the sensors carefully with a dry cloth.
• Restart RoboVac by turning the power switch off and on.
RoboVac's cleaning
time becomes
shorter or is less
than 100 minutes.
• Make sure RoboVac is fully charged (indicated by a solid
blue LED light) before cleaning.
• The cleaning time will be affected by the suction mode and
floors/carpets to be cleaned:
• Standard suction mode (on hardwood floors): approx.
100 minutes of cleaning
• BoostIQTM mode (on carpeting): approx. 60 minutes of
cleaning
• Max suction mode (on medium-pile carpets): approx. 40
minutes of cleaning
• If your cleaning time is much less than the time mentioned
above, contact eufy customer service for help.
Problems Solutions
RoboVac cannot
connect to a Wi-Fi
network.
• Make sure you entered the Wi-Fi password correctly.
• Make sure your RoboVac, router, and mobile phone are
close enough to ensure a strong signal strength.
• Make sure your Wi-Fi router supports the 2.4GHz and
802.11b/g/n bands; the 5GHz band is not supported. For
details, refer to the “Troubleshooting > Wi-Fi connection”
section in this manual.
You cannot control
RoboVac with
Amazon Alexa.
• Check if there are any Internet connection problems.
• Check whether you have installed the Amazon Alexa
app onto your smart device and enabled “EufyHome -
RoboVac” Skill in the Amazon Alexa app. For details, refer
to the “Smart Integrations” page in the EufyHome App.
• Make sure you have an EufyHome account and have
connected to RoboVac.
• Make sure you are using correct Alexa voice-commands.
You cannot control
RoboVac with the
Google Assistant.
• Check if there are any Internet connection problems.
• Check if you have installed the Google Home app onto
your smart device and initiated the “EufyHome” action
in the Google Home app. For details, refer to the “Smart
Integrations” page in the EufyHome App.
• Check if you are using the proper commands when talking
to the Google Assistant. When making your request, first
say the wake words “Ok Google”.
• Repeat your question. Speak clearly to the Google
Assistant.
Error Tones
When RoboVac is in trouble, it will emit a series of short or long beeps and the red indicator
on the button will be solid or flashing.
Flashing red indicator light
Error Tone Cause Solution
One beep
• RoboVac is stuck and one of the
wheels is not making contact with
the floor (hanging in mid-air).
• RoboVac may be in an extremely
large room and the bumper is not
registering obstacles.
Restart cleaning in a new location.
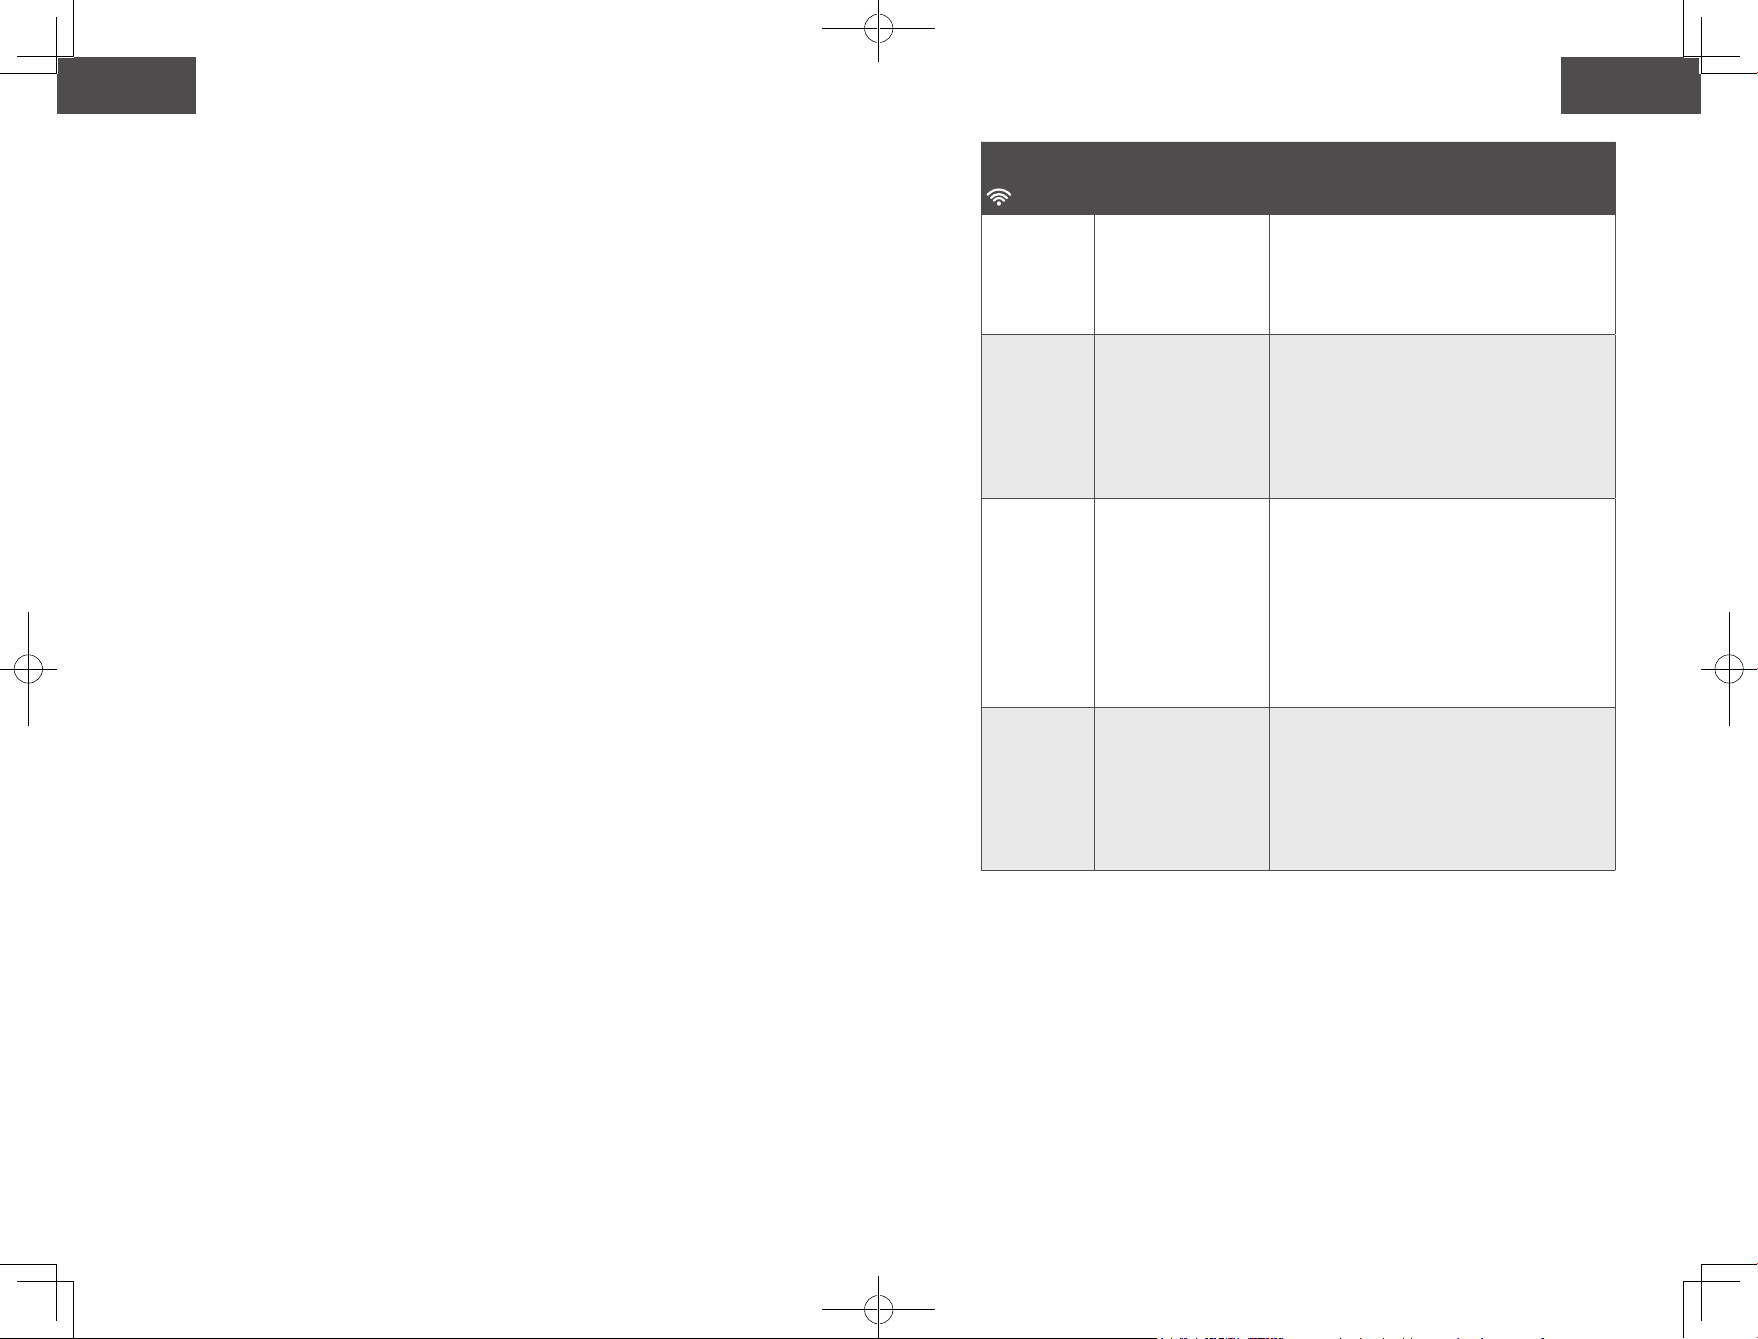
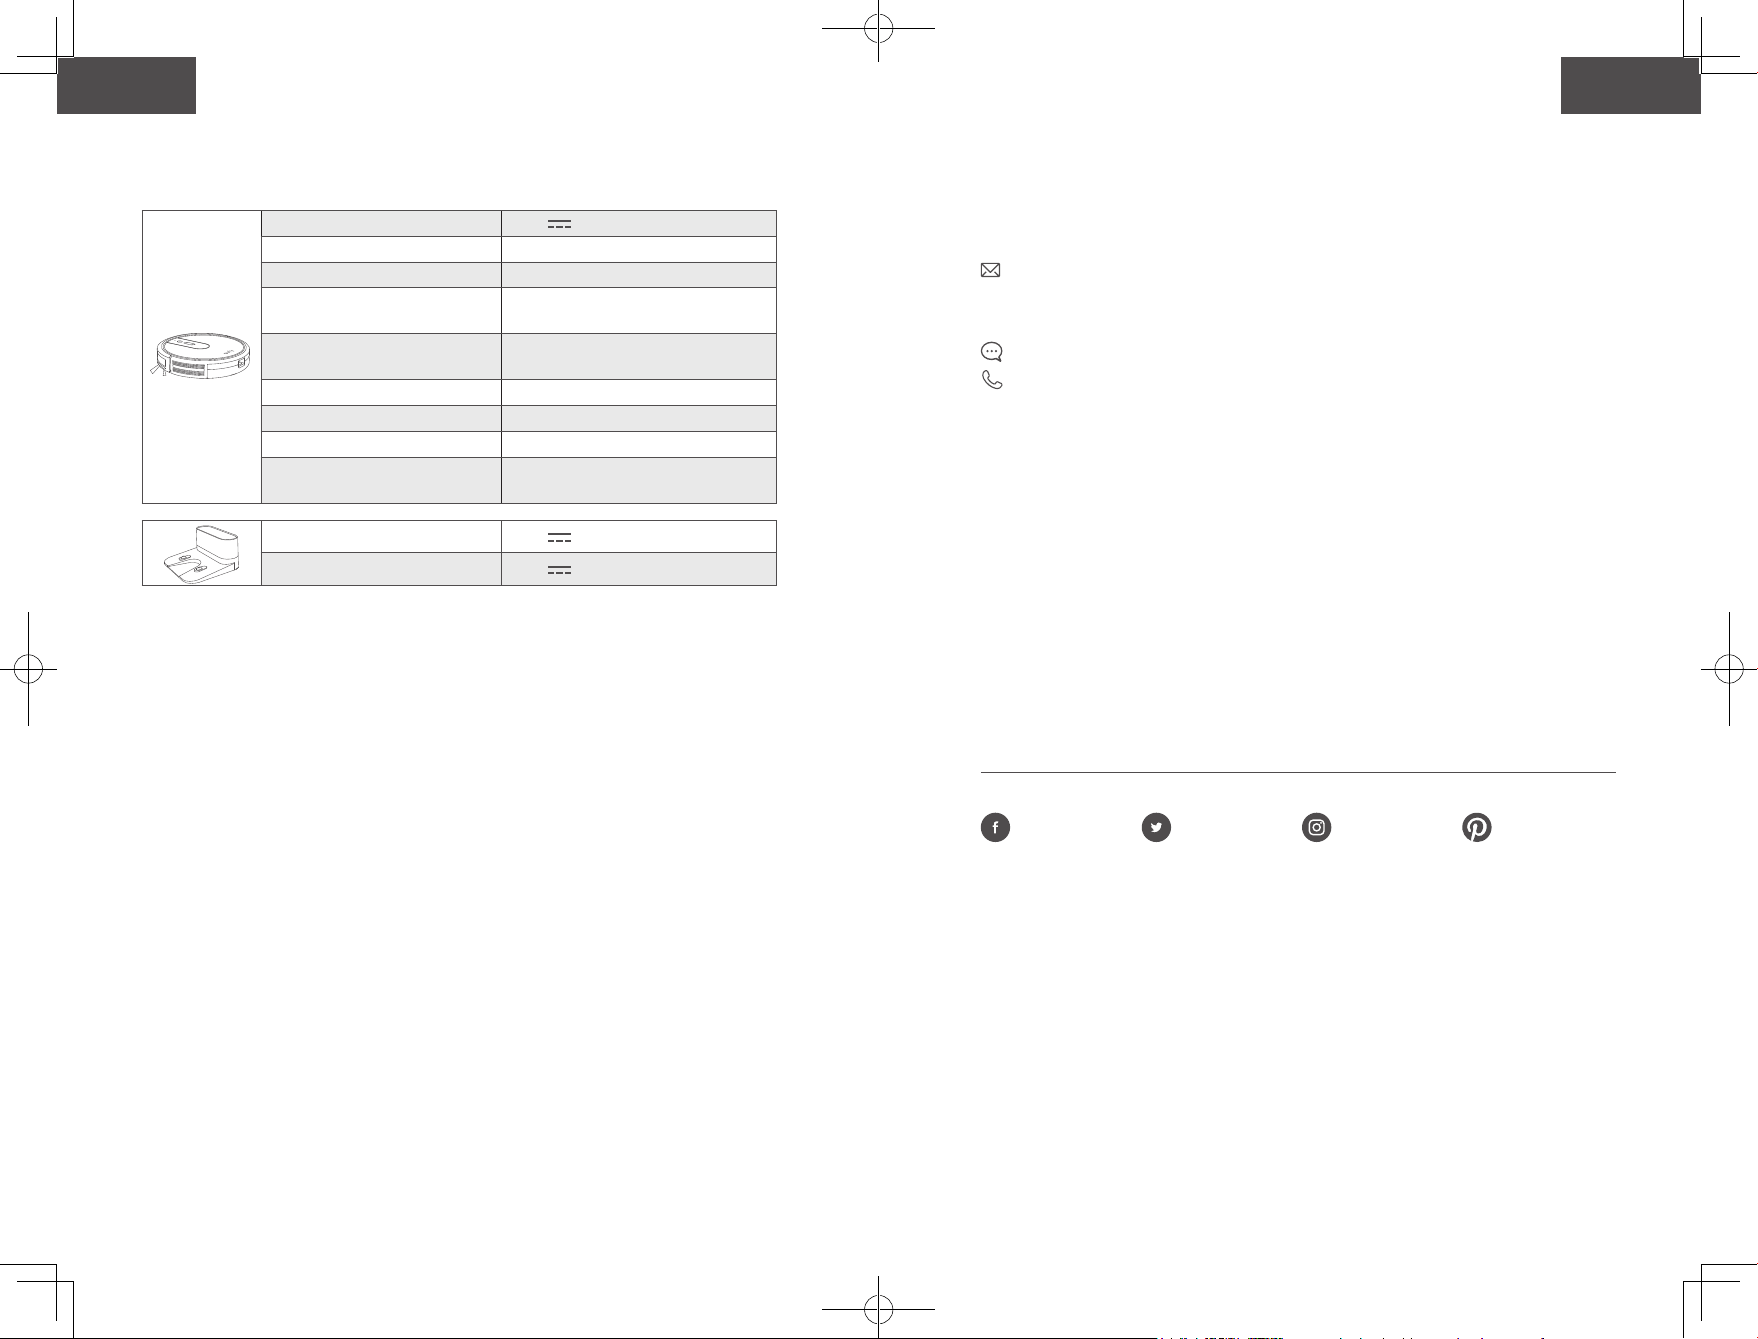
38 39
English English
Error Tone Cause Solution
Two beeps RoboVac’s bumper is stuck.
Tap RoboVac’s bumper several
times to dislodge any debris that
may be trapped underneath.
Three beeps
RoboVac can get stuck in the following
scenarios:
• When RoboVac does not have
enough power to reverse when
on the edge of a staircase that is
covered by a rug.
• When RoboVac tries to reverse due
to exposure to strong sunshine,
but cannot reverse due to physical
barriers in the way.
• When RoboVac reverses due to
exposure to strong sunshine, but
continues to be exposed to strong
sunshine after reversing for 3
seconds.
• Restart cleaning in a new
location.
• Use a physical barrier to
block off the problem area.
Four beeps RoboVac’s power level is too low.
Manually charge RoboVac for at
least 5 hours.
Solid red indicator light
Error Tone Cause Solution
One beep
RoboVac’s left/right wheel
is stuck.
Turn o RoboVac and remove any hair or debris
from the left/right wheel.
Two beeps
RoboVac’s side brush is
stuck.
Turn o RoboVac and remove any hair or debris
from the side brush.
Three beeps
RoboVac’s suction fan is
stuck.
• Turn off RoboVac, then remove and
empty the dust collector.
• Make sure the suction inlet is not blocked
by any hair or debris.
Four beeps
RoboVac’s rolling brush is
stuck.
Turn o RoboVac and remove any hair or debris
from the rolling brush.
Wi-Fi Connection
Before Wi-Fi setup, make sure RoboVac and your Wi-Fi network meet the following
requirements.
Wi-Fi Setup Requirements
• RoboVac:
- RoboVac is fully charged and the main power switch on the bottom of RoboVac is
turned on.
- Wi-Fi status light slowly flashes blue.
• Wi-Fi Network:
- Use the correct password for your network.
- Do not use a VPN (Virtual Private Network) or Proxy Server.
- Your Wi-Fi router supports 802.11b/g/n and IPv4 protocol.
- You are using a 2.4GHz router or a dual-band router that is configured to support a
2.4GHz frequency band. RoboVac does not support 5GHz frequency band.
- If RoboVac cannot connect to the Wi-Fi network and you are using a 2.4/5GHz
mixed network, switch to a 2.4GHz network for Wi-Fi setup. You can switch back
once your setup is complete.
- When connecting to a hidden network, make sure you enter the correct network
name, SSID (case sensitive), and connecting to a 2.4GHz wireless network.
- When using a network extender/repeater, make sure the network name (SSID) and
password are the same as your primary network.
- The firewall and port settings of your Wi-Fi router allow RoboVac to connect with
the Eufy servers.
Network Security Requirement
- WPA and WPA2 using TKIP, PSK, AES/CCMP encryption.
Wi-Fi Channels
- The FCC requires that all wireless devices in the United States operate on the 1-11
wireless spectrum channels.
- Some countries outside North America can use spectrum channels higher than
channel 11. Refer to your local regulatory agency to determine which channels are
accessible.
- A future software release will support access to channels above 11 for users outside
North America. Until then, use channels 1-11.
If you cannot control RoboVac with your smartphone, try the solutions below to solve the
problem. If the problem persists, contact the eufy service center for help.
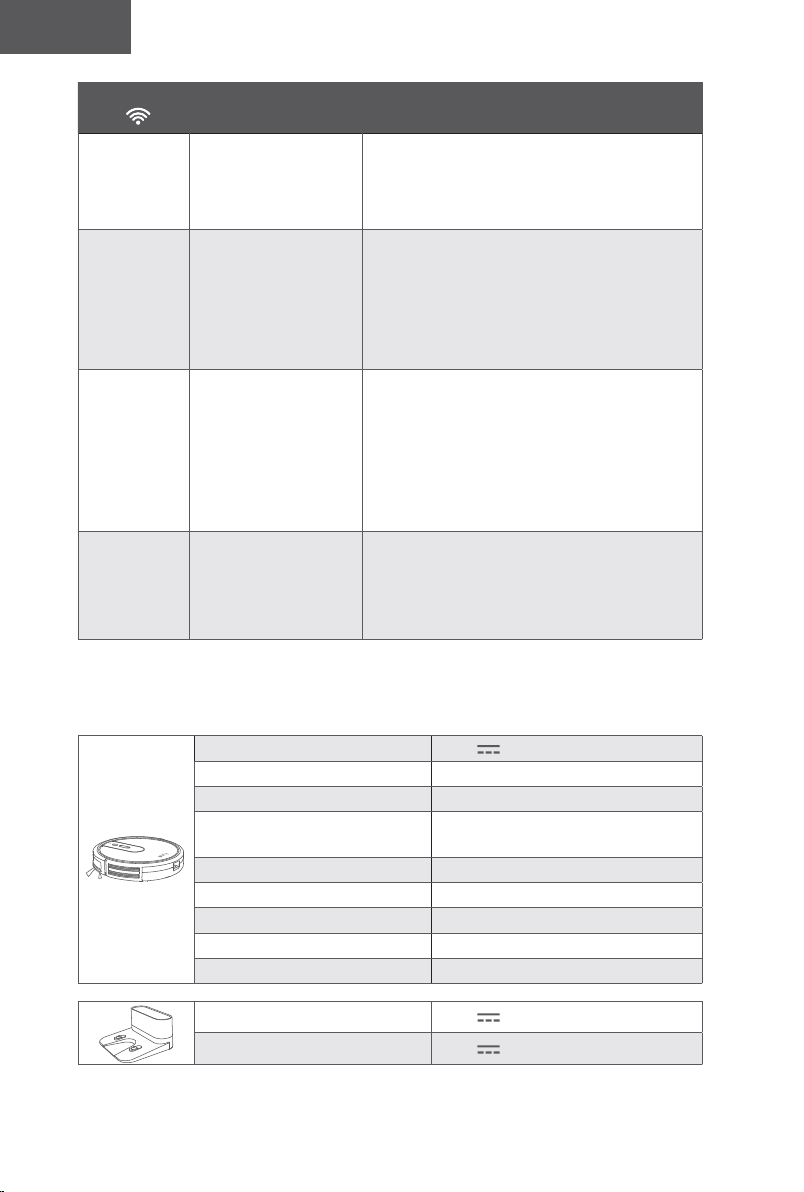
40 41
English English
Wi-Fi Status
Light
Cause Solutions
Solid blue
RoboVac has
connected to your
router, but cannot
access the Internet.
• Check if your router is connected to the
Internet.
• Check with your Internet provider to see if
there is any Internet connection problem.
Rapidly
flashing blue
RoboVac cannot
connect to your
wireless router.
• Check if you have modified your network
name and password.
• Reset Wi-Fi connection if necessary.
Refer to the “Use Your RoboVac with
the EufyHome App > Reset the Wi-Fi
Connection” section in this manual.
Slowly
flashing blue
Wi-Fi connection is
reset or has not been
set up before.
• Set up Wi-Fi connection with RoboVac.
Refer to the “Use Your RoboVac with the
EufyHome App” section in this manual.
• Reset Wi-Fi connection if necessary.
Refer to the “Use Your RoboVac with
the EufyHome App > Reset the Wi-Fi
Connection” section in this manual.
Off
• RoboVac is turned off.
• RoboVac’s power
level is low.
• RoboVac is in Sleep
mode.
• Charge RoboVac by attaching it to the
Charging Base. Make sure the main power
switch on the bottom of RoboVac is turned
on.
Specifications
Input 19 V 0.6 A
Battery Voltage DC 14.4 V
Power Consumption 40 W
Battery Type
DC 14.4 V
Li-ion 2600 mAh
Dust Collector Capacity
0.6 L
Cleaning Time Max. 100 mins
Charging Time 300 - 360 mins
Charging Temperature 5°C - 40°C
Storage Temperature -20°C - 60°C
Input 19 V 0.6 A
Output 19 V 0.6 A
Customer Service
For FAQs and more information, please visit www.eufylife.com.
support@eufylife.com
support.mea@anker.com (For Middle East and Africa Only)
service@myeufy.com.au
www.eufylife.com
(US) +1 (800) 988 7973 Mon-Fri 9:00am - 5:00pm (PT)
(UK) +44 (0) 1604 936200 Mon-Fri 6:00 - 11:00 (GMT)
(DE) +49 (0) 69 9579 7960 Mo-Fr 6:00 - 11:00
(Middle East & Africa) +971 42463266 Sun-Thu 9:00 - 17:30 (GMT+4)
(UAE) +971 8000320817 Sun-Thu 9:00 - 17:30 (GMT+4)
(KSA) +966 8008500030 Sun-Thu 8:00 - 16:30 (GMT+3)
(Kuwait) +965 22069086 Sun-Thu 8:00 - 16:30 (GMT+3)
(Egypt) +20 8000000826 Sun-Thu 7:00 - 15:30 (GMT+2)
(KR) +82 02-1670-7098 Mon-Fri 10:00 - 17: 00 (GMT+1
(AU) +61 3 8331 4800 Mon-Fri 8:30 - 17:00 (AEST)
@EufyOcial @EufyOcial@EufyOcial @EufyOcial
Anker Innovations Limited
Room 1318-19, Hollywood Plaza, 610 Nathan Road, Mongkok, Kowloon, Hong Kong
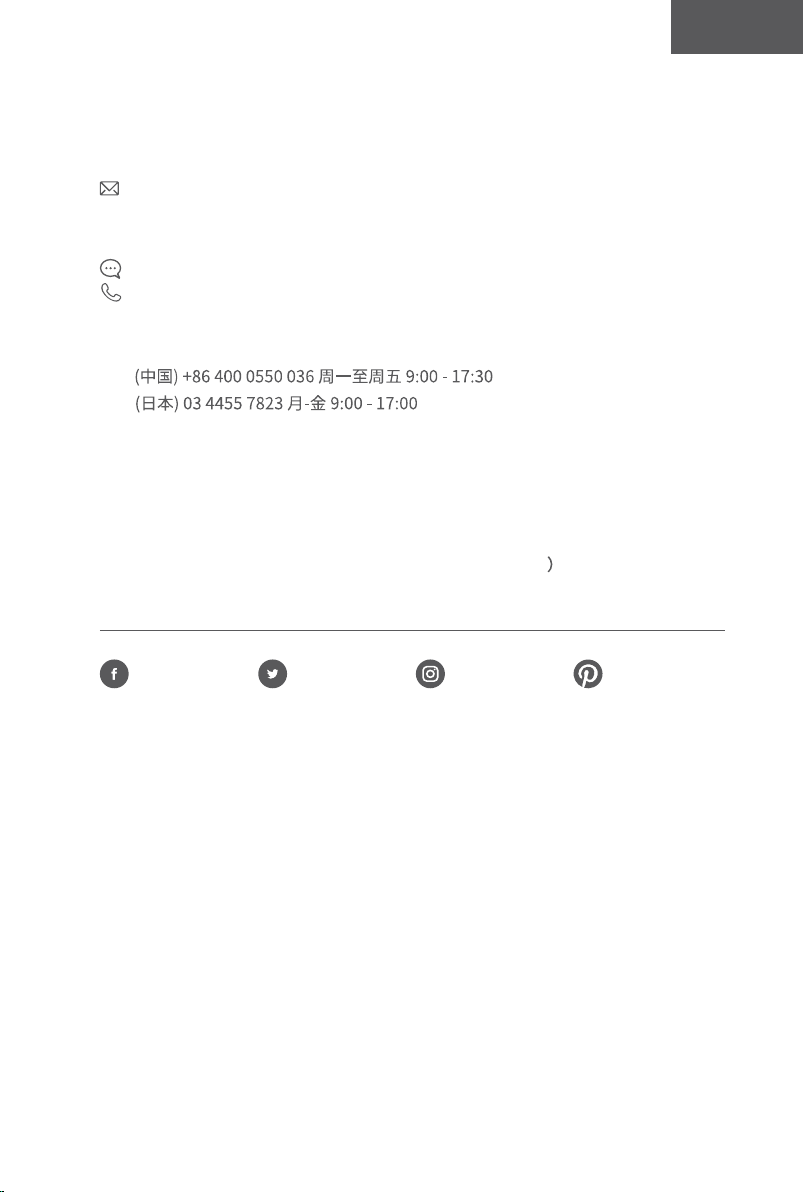
40 41
English English
Wi-Fi Status
Light
Cause Solutions
Solid blue
RoboVac has
connected to your
router, but cannot
access the Internet.
• Check if your router is connected to the
Internet.
• Check with your Internet provider to see if
there is any Internet connection problem.
Rapidly
flashing blue
RoboVac cannot
connect to your
wireless router.
• Check if you have modified your network
name and password.
• Reset Wi-Fi connection if necessary.
Refer to the “Use Your RoboVac with
the EufyHome App > Reset the Wi-Fi
Connection” section in this manual.
Slowly
flashing blue
Wi-Fi connection is
reset or has not been
set up before.
• Set up Wi-Fi connection with RoboVac.
Refer to the “Use Your RoboVac with the
EufyHome App” section in this manual.
• Reset Wi-Fi connection if necessary.
Refer to the “Use Your RoboVac with
the EufyHome App > Reset the Wi-Fi
Connection” section in this manual.
Off
• RoboVac is turned off.
• RoboVac’s power
level is low.
• RoboVac is in Sleep
mode.
• Charge RoboVac by attaching it to the
Charging Base. Make sure the main power
switch on the bottom of RoboVac is turned
on.
Specifications
Input 19 V 0.6 A
Battery Voltage DC 14.4 V
Power Consumption 40 W
Battery Type
DC 14.4 V
Li-ion 2600 mAh
Dust Collector Capacity
0.6 L
Cleaning Time Max. 100 mins
Charging Time 300 - 360 mins
Charging Temperature 5°C - 40°C
Storage Temperature -20°C - 60°C
Input 19 V 0.6 A
Output 19 V 0.6 A
Customer Service
For FAQs and more information, please visit www.eufylife.com.
[email protected] (For Middle East and Africa Only)
www.eufylife.com
(US) +1 (800) 988 7973 Mon-Fri 9:00am - 5:00pm (PT)
(UK) +44 (0) 1604 936200 Mon-Fri 6:00 - 11:00 (GMT)
(DE) +49 (0) 69 9579 7960 Mo-Fr 6:00 - 11:00
(Middle East & Africa) +971 42463266 Sun-Thu 9:00 - 17:30 (GMT+4)
(UAE) +971 8000320817 Sun-Thu 9:00 - 17:30 (GMT+4)
(KSA) +966 8008500030 Sun-Thu 8:00 - 16:30 (GMT+3)
(Kuwait) +965 22069086 Sun-Thu 8:00 - 16:30 (GMT+3)
(Egypt) +20 8000000826 Sun-Thu 7:00 - 15:30 (GMT+2)
(KR) +82 02-1670-7098 Mon-Fri 10:00 - 17: 00 (GMT+1
(AU) +61 3 8331 4800 Mon-Fri 8:30 - 17:00 (AEST)
@EufyOcial @EufyOcial@EufyOcial @EufyOcial
Anker Innovations Limited
Room 1318-19, Hollywood Plaza, 610 Nathan Road, Mongkok, Kowloon, Hong Kong
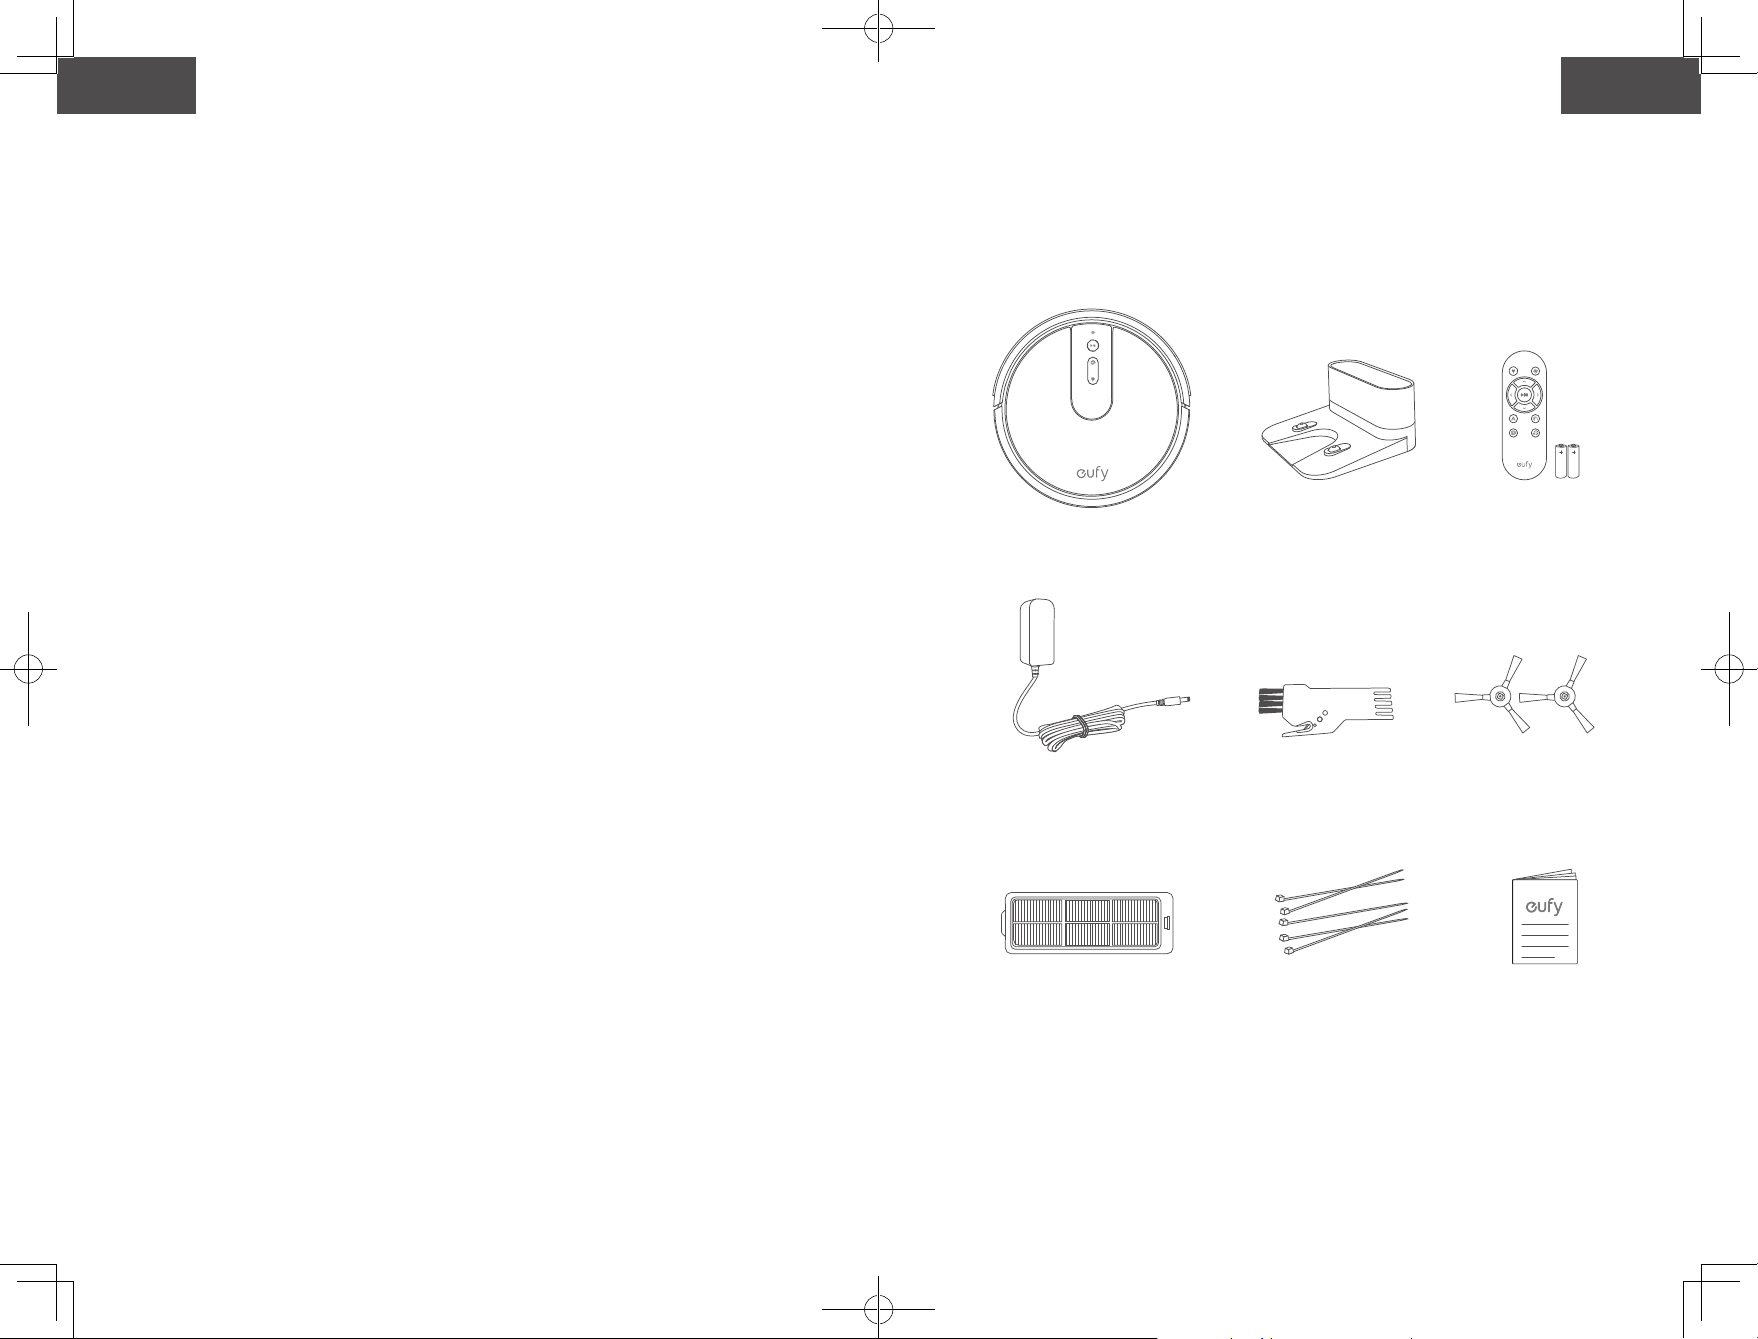
42 43
Español Español
Gracias por adquirir el RoboVac. Lea todas las instrucciones antes
de usar este producto y consérvelas para referencia futura.
43 Instruccionesdeseguridadimportantes
49 Información sobre el RoboVac
Contenido de la caja
Anatomía del RoboVac
Indicación LED
53UsodelRoboVac
Consejos importantes antes del uso
Preparación
Carga del RoboVac
Uso del RoboVac con la aplicación EufyHome
Inicio/detención de la limpieza
Selección de un modo de limpieza
Use su RoboVac con Amazon Alexa/Google
Assistant
62 Limpieza y mantenimiento
Limpiezadelos�ltrosyelrecolectordepolvo
Limpieza del cepillo giratorio
Limpie los cepillos laterales
Reemplace los cepillos laterales
Limpieza de los sensores y los contactos de
carga
Limpieza de la rueda giratoria
69Solucióndeproblemas
76Especi�caciones
77Serviciodeatenciónalcliente
Tabladecontenidos
Instrucciones de seguridad importantes
A fin de reducir el riesgo de lesiones o daños, lea
detenidamente estas instrucciones de seguridad y
consérvelas a mano durante la configuración, el uso y el
mantenimiento de este dispositivo.
SÍMBOLOS DE ADVERTENCIA UTILIZADOS
Este es el símbolo de alerta de seguridad. Este símbolo le
advierte de posibles riesgos que podrían provocar daños
materiales o personales, e incluso la muerte.
• Solo para uso doméstico en interiores.
• Use solo según lo descrito en este manual. Use solo los
accesorios recomendados por el fabricante.
• No use este dispositivo si el cable o el enchufe están
dañados. Si este dispositivo no está funcionando como
debería, se ha caído o dañado, ha quedado a la intemperie o
ha caído al agua, envíelo a un centro de reparación.
• No arrastre el dispositivo, no lo traslade tomándolo por
el cable ni use el cable como manija. Evite cerrar puertas
sobre el cable o tirar de este alrededor de esquinas o bordes
pronunciados. No use el dispositivo con el cable debajo de
este. Mantenga el cable alejado de superficies calientes.
• No desenchufe el dispositivo tirando del cable. Para
desenchufarla, tire del enchufe, no del cable.
• No manipule el enchufe o el dispositivo con las manos
mojadas.
• No ponga objetos en los orificios. No utilice este dispositivo
si hay orificios bloqueados.
• Mantenga el cabello, las prendas de vestir holgadas, los
dedos y todas las partes del cuerpo alejados de los orificios
y las piezas móviles.
• Apague todos los controles antes de desenchufar el
dispositivo.
• Tenga especial precaución al limpiar escaleras.
• No use el dispositivo para recoger líquidos combustibles o
inflamables, como gasolina, ni lo use en áreas donde dichas
sustancias podrían estar presentes.
• Aleje los cables de otros dispositivos del área por limpiar.
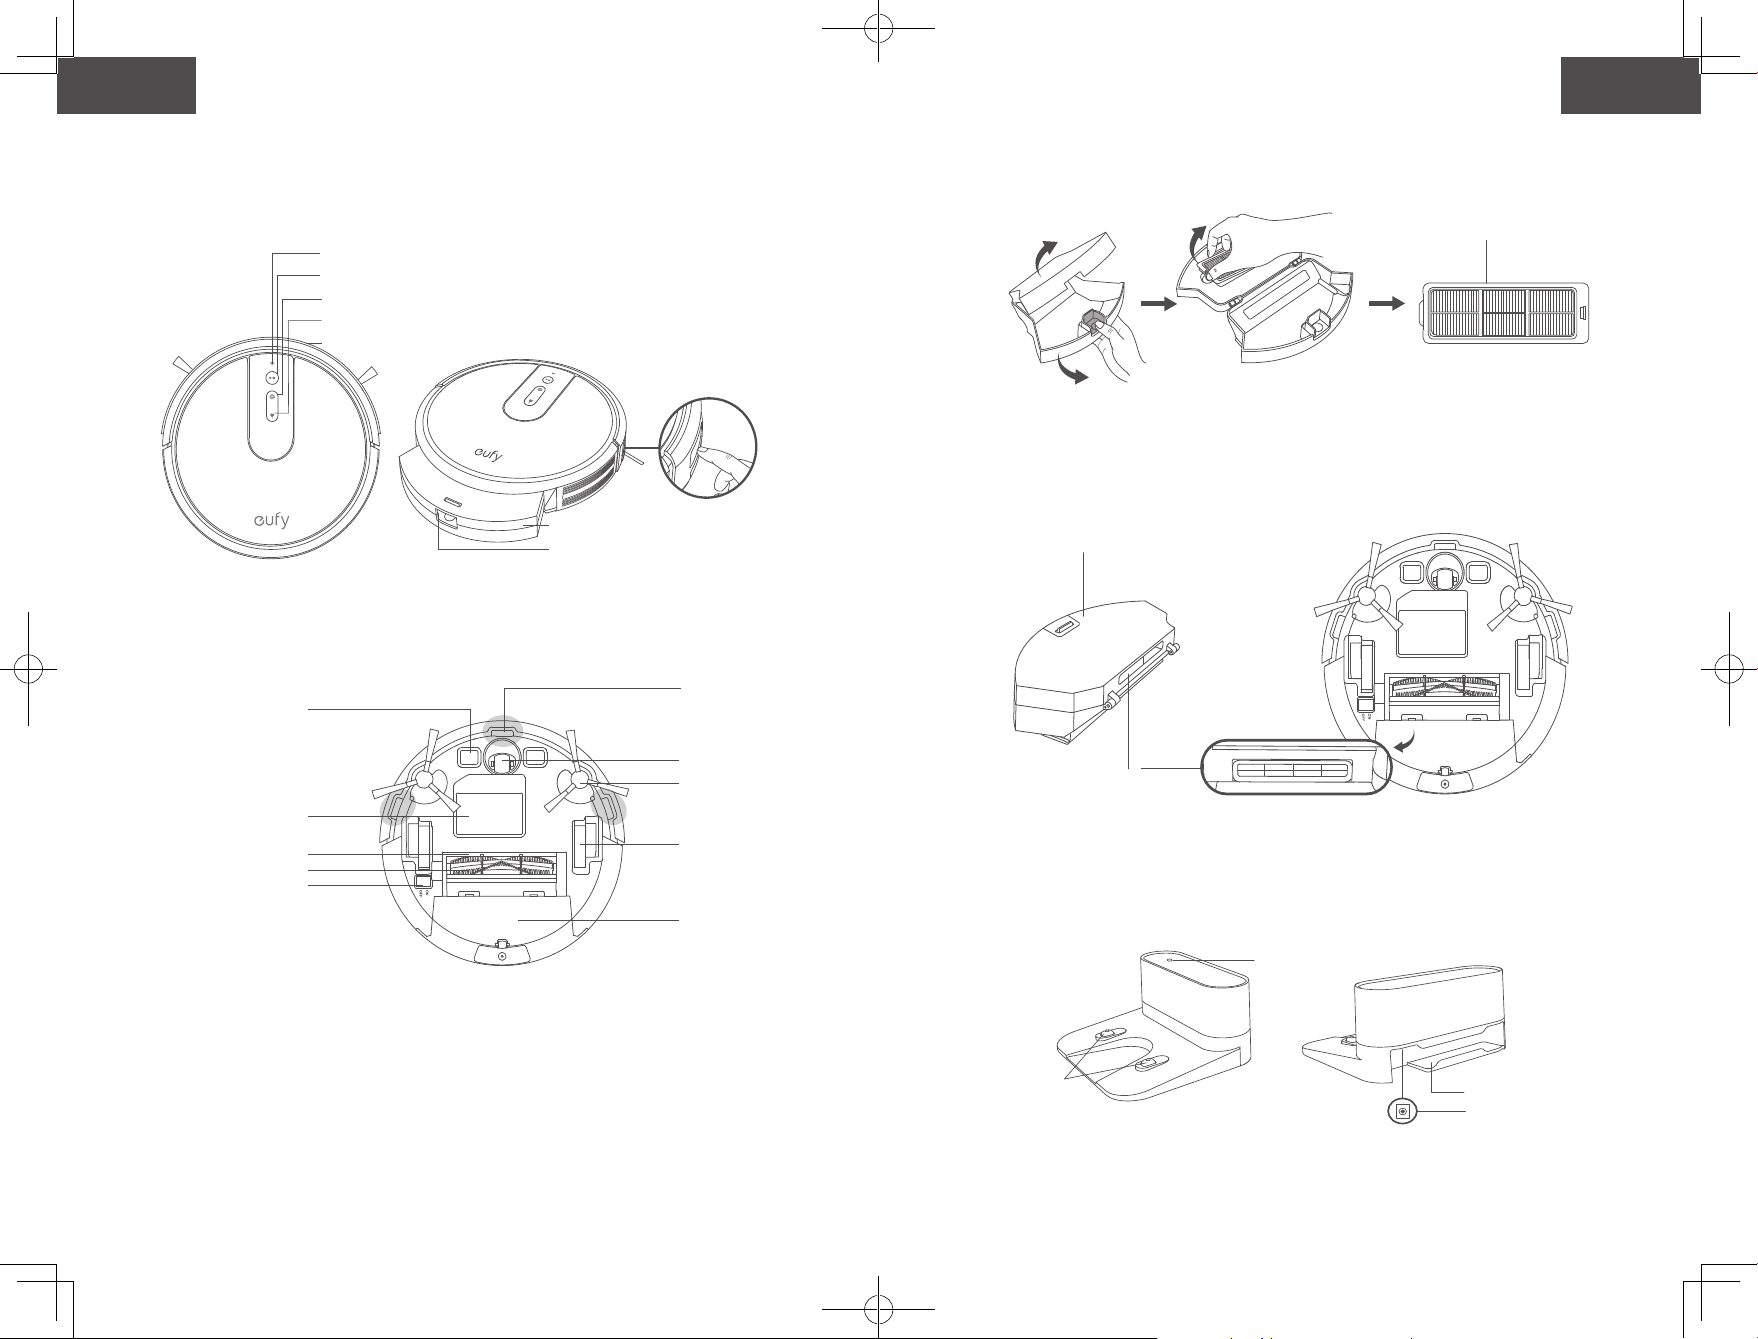

44 45
Español Español
• No utilice este dispositivo en una habitación donde haya un
bebé o un niño durmiendo.
• No lo use en áreas donde haya objetos frágiles sobre el piso
por limpiar.
• No use el dispositivo en habitaciones donde haya velas
encendidas o muebles que la aspiradora pueda chocar de
forma accidental.
• No utilice este dispositivo sobre superficies mojadas.
• No use este dispositivo sin un colector o filtro de polvo
instalado.
• Impida el arranque accidental asegurándose de que el
interruptor esté en la posición de apagado antes de recoger
o trasladar el dispositivo.
• En condiciones extremas, puede salir líquido de la batería;
si esto ocurre, evite todo contacto. En caso de contacto
accidental, lávese bien con agua y jabón. Si el líquido
entra en contacto con sus ojos, obtenga atención médica
de inmediato. El líquido de la batería puede causar
irritación o quemaduras.
• No exponga este dispositivo al fuego o a temperaturas
excesivas. La exposición al fuego o a temperaturas que
exceden los 130 °C/265 °F puede provocar una explosión.
• Siga todas las instrucciones de carga y no cargue la
batería ni el dispositivo fuera del intervalo de temperatura
especificado en las instrucciones. La carga incorrecta o
a temperaturas fuera del intervalo especificado puede
provocar daños en la batería y aumentar el riesgo de incendio.
• El mantenimiento debe ser realizado por una persona
calificada en reparación que utilice únicamente piezas de
repuesto idénticas a las originales. De esta manera, se
asegurará de mantener la seguridad del producto.
• No modifique ni intente reparar este dispositivo, excepto de
la forma indicada en las instrucciones de uso y cuidado.
• Este dispositivo lo pueden utilizar niños a partir de
8 años y personas con facultades físicas, sensoriales o
mentales reducidas, así como con falta de experiencia y
conocimientos, si se les ha proporcionado supervisión
o instrucciones acerca del uso del dispositivo de forma
segura y entienden los riesgos involucrados.
• Supervise a los niños para garantizar que no jueguen con el
dispositivo.
• No permita que los niños realicen la limpieza y el
mantenimiento sin la supervisión de un adulto.
• Retire el enchufe del tomacorriente antes de realizar tareas
de limpieza o mantenimiento del dispositivo.
• Este dispositivo contiene una batería que solo puede ser
reemplazada por personas capacitadas.
• Desconecte el dispositivo de la fuente de alimentación para
retirar la batería.
• No mezcle baterías viejas y nuevas.
• No mezcle baterías alcalinas estándares (zinc-carbono) y
baterías recargables (níquel-cadmio).
• Para cargar la batería, use solo el adaptador
desmontable (EE. UU.: GSCU0600S019V12E, UE:
GSCV0600S019V12E, Reino Unido: GSCB0600S019V12E,
AU: GSCS0600S019V12E) provisto con este dispositivo.
• Antes de desechar el dispositivo, se debe extraer la batería.
Para retirar la batería del dispositivo, primero deberá retirar
los tornillos de la parte inferior y, a continuación, extraer la
placa principal de circuito impreso y desatornillar la tapa
de la batería con un destornillador. Para extraer la batería,
desconecte el conector rápido.
• La batería usada se debe colocar en una bolsa de
plástico sellada y se debe desechar de forma segura y de
conformidad con las normativas ambientales locales.
• El cable flexible externo o el cable del adaptador de
alimentación no se pueden reemplazar; si el cable está
dañado, se debe desechar el adaptador.
• Este dispositivo no es un juguete. No se siente sobre el
dispositivo ni se suba a él. Supervise a los niños pequeños y
las mascotas mientras el dispositivo esté en funcionamiento.
• Almacene y utilice el dispositivo únicamente en entornos a
temperatura ambiente.
• Limpie el dispositivo con un paño humedecido solo con
agua.
• No use este dispositivo para recoger elementos ardiendo
o que emitan humo, como cigarrillos, fósforos u objetos
calientes.
• No utilice el dispositivo para limpiar derrames de lejía,
pintura, productos químicos o cualquier objeto mojado.
• Antes de utilizar el dispositivo, recoja los objetos del suelo,
como ropa o papeles. Levante los cordones de persianas o
cortinas, y retire los cables de alimentación y los objetos
frágiles. Si el dispositivo pasa por encima de un cable y lo
arrastra, podría tirar un objeto de una mesa o estantería.
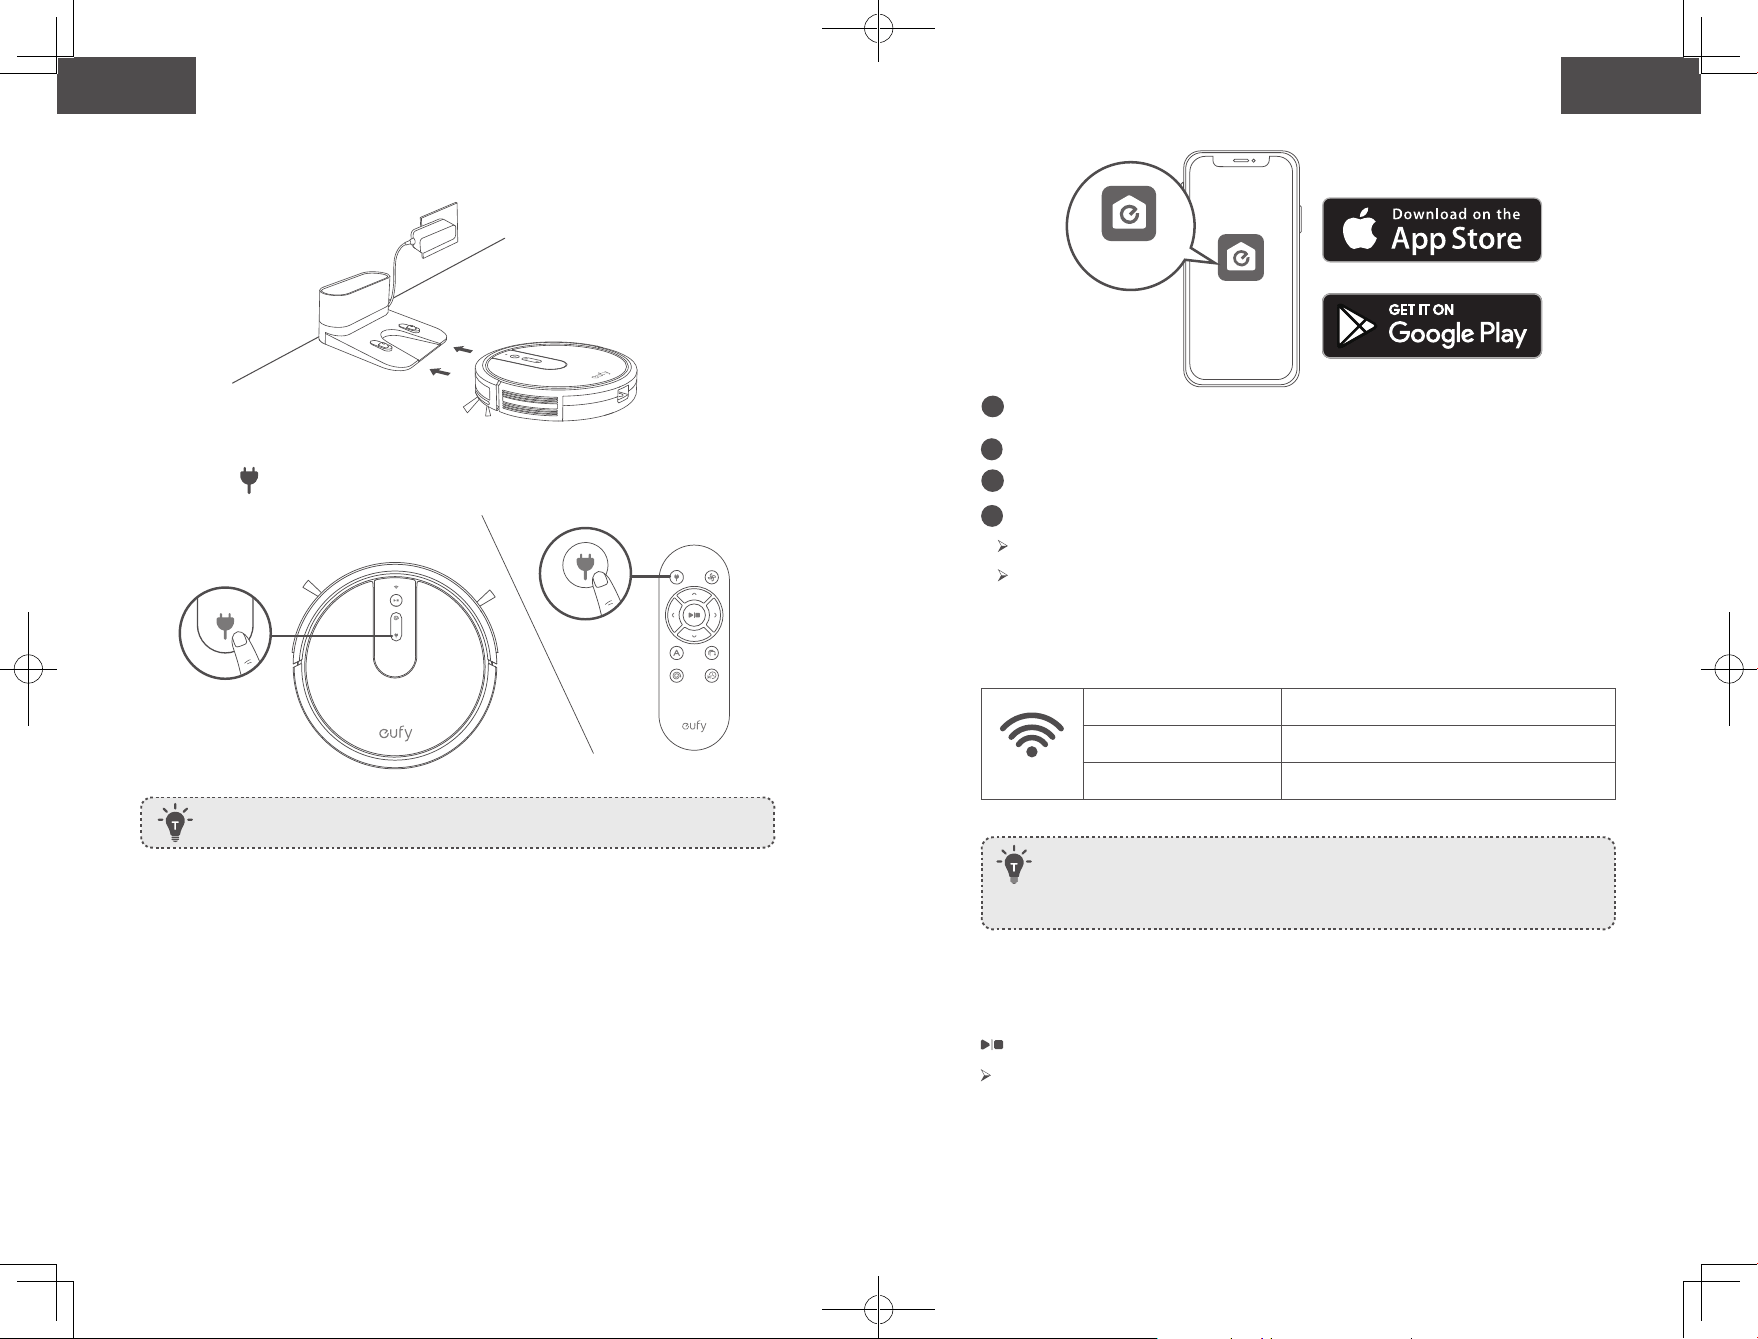
46 47
Español Español
• Si hay un balcón en la habitación que se va a limpiar, se debe
utilizar una barrera física para evitar el acceso al balcón y
garantizar el funcionamiento seguro.
• No coloque ningún objeto sobre el dispositivo.
• Tenga en cuenta que el dispositivo se mueve por cuenta
propia. Tenga cuidado al caminar por la zona donde se
encuentre para evitar pisarlo.
• No utilice el dispositivo en zonas en las que haya tomas de
corriente en el suelo.
• No exponga el sistema electrónico del dispositivo, su batería
ni la base de carga integrada. No contiene piezas que el
usuario pueda reparar.
• No utilice el dispositivo sobre suelos en bruto, sin sellar,
encerados o ásperos. De lo contrario, podría provocar daños
en el suelo y el dispositivo. Utilícelo únicamente sobre
suelos duros o alfombras de pelo corto.
• Este dispositivo se ha diseñado para su uso en suelos sin
rayarlos. Antes de limpiar una habitación completa, le
recomendamos que realice una prueba del dispositivo en
una pequeña zona de la habitación que se va a limpiar para
garantizar que no provoque arañazos.
CONSERVE ESTAS INSTRUCCIONES
Aviso
Este símbolo en el dispositivo o en su embalaje
indica lo siguiente:
No deseche los aparatos eléctricos como residuos
urbanos sin clasificar; utilice instalaciones de
recogida independientes. Póngase en contacto con
las autoridades locales para obtener información
acerca de los sistemas de recogida disponibles. Si
se desechan dispositivos eléctricos en vertederos
o basureros, pueden filtrarse sustancias peligrosas
hasta las aguas subterráneas y llegar a la cadena
alimenticia, lo que supondría un daño para su salud
y bienestar. Al cambiar dispositivos antiguos por
nuevos, el minorista tiene la obligación legal de
recuperar el dispositivo antiguo para su eliminación,
sin cargo alguno.
Declaración de la FCC
Este dispositivo cumple con la sección 15 de la normativa de
la FCC. El uso del producto está sujeto a las dos condiciones
siguientes: (1) este dispositivo no puede causar interferencias
perjudiciales y (2) este dispositivo debe aceptar cualquier
interferencia recibida, incluidas aquellas que puedan provocar
un funcionamiento no deseado.
Advertencia: Cualquier cambio o modificación no aprobado
expresamente por la parte responsable del cumplimiento
podría anular la autorización del usuario para utilizar el
equipo.
Nota: este equipo se probó y se demostró que cumple con
los límites de un dispositivo digital Clase B, conforme a la
Sección 15 de las Normas de la FCC. Estos límites se han
diseñado para proporcionar una protección razonable contra
interferencias perjudiciales en instalaciones residenciales.
Este equipo genera, utiliza y puede irradiar energía de
radiofrecuencia y, si no se instala y utiliza de acuerdo con las
instrucciones, podría ocasionar interferencias perjudiciales
para las comunicaciones por radio. Sin embargo, no es posible
garantizar que no se vayan a producir interferencias en una
instalación en concreto.Si este equipo causa interferencias
perjudiciales para la recepción de radio o televisión, lo cual
puede determinarse apagando y encendiendo el equipo, se
recomienda al usuario que intente corregir la interferencia
mediante una o varias de las siguientes medidas: (1)
Reorientar o reubicar la antena receptora. (2) Aumente la
distancia entre el equipo y el receptor. (3) Conecte el equipo
a una toma de corriente de un circuito distinto al que esté
conectado el receptor. (4) Para obtener asistencia, consulte al
distribuidor o a un técnico especializado en radio y TV.
El siguiente importador es la parte responsable (solo para
asuntos relacionados con la FCC).
Nombre de la empresa: POWER MOBILE LIFE, LLC.
Dirección: 400 108th Ave NE Ste 400, Bellevue, WA 98004-5541
Teléfono: +1 (800) 988 7973

48 49
Español Español
Declaración de cumplimiento de ISED
Este dispositivo contiene transmisores/receptores exentos
de licencia que cumplen con los RSS exentos de licencia de
Innovación, Ciencia y Desarrollo Económico de Canadá. El uso
está sujeto a las dos condiciones siguientes:
1. Este dispositivo no puede provocar interferencias.
2. Este dispositivo debe aceptar cualquier interferencia
recibida, incluidas interferencias que puedan causar un
funcionamiento no deseado.
Declaración de conformidad
Por el presente, Anker Innovations Limited declara que el tipo
de producto T2132 cumple con la Directiva 2014/53/EU.
El texto completo de la declaración de conformidad de la UE
está disponible en la siguiente dirección de Internet:
https://www.eufylife.com/
Anker Innovations Limited
Room 1318-19, Hollywood Plaza, 610 Nathan Road, Mongkok,
Kowloon, Hong Kong
Potencia máxima de salida: 14 dBm
Banda de frecuencia: banda de 2,4 G (2,4000 GHz-
2,4835 GHz)
Aviso de marcas registradas
• Amazon, Echo, Alexa y todos los logotipos relacionados son
marcas comerciales de Amazon.com, Inc. o sus filiales.
• Apple y su logotipo son marcas comerciales de Apple Inc.,
registradas en los EE. UU. y en otros países. App Store
es una marca de servicio de Apple Inc., registrada en los
EE. UU. y en otros países.
• Google Play y su logotipo son marcas comerciales de
Google Inc.
• Google Home es una marca comercial de Google Inc.
Información sobre el RoboVac
Contenido de la caja
RoboVac
Adaptador de
alimentación
Filtro adicional Sujetacables (5) Manual del
propietario y otros
documentos
Herramienta de
limpieza
Cepillos
laterales (4)
Base de carga Control remoto
(2 baterías AAA)
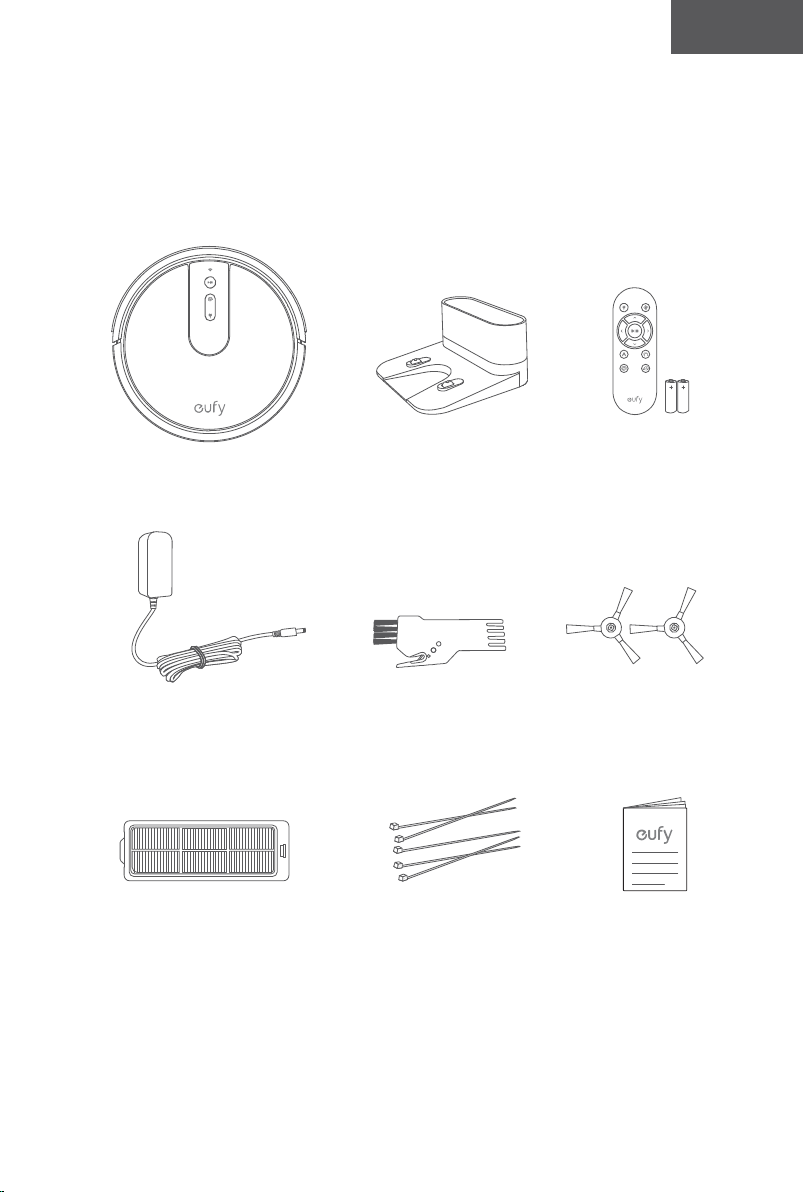
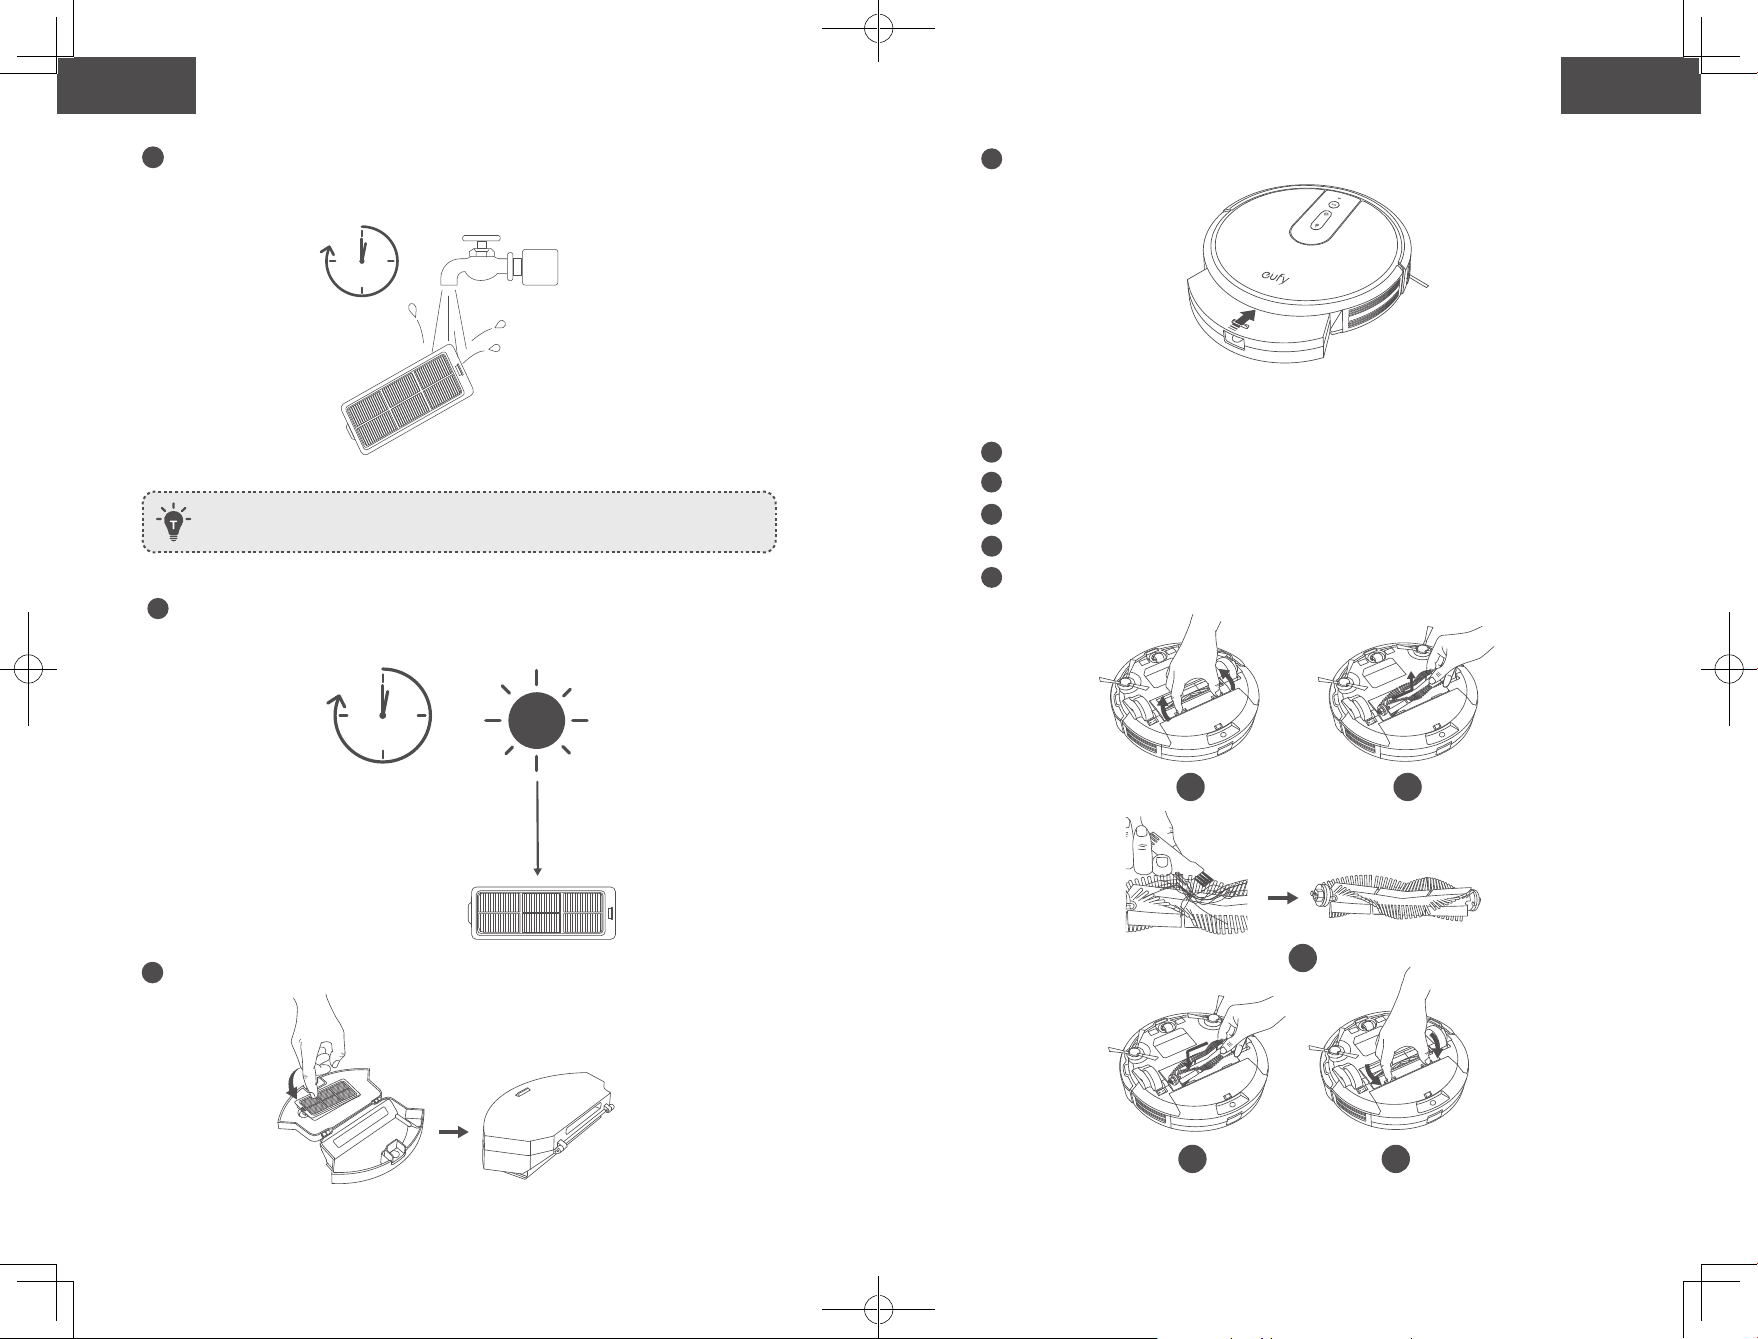
50 51
Español Español
Anatomía del RoboVac
A. Parte superior y lateral
B. Parte inferior
Luz de estado de Wi-Fi
Botón de inicio/detención de limpieza automática
Botón para la limpieza localizada
Botón para recargar
Paragolpes
Sensor infrarrojo
Recolector de polvo
Botón de liberación del
recolector de polvo
Contactos de carga
Compartimento de la pila
Protección para los cepillos
Cepillo giratorio
Interruptor principal de
alimentación (encendido/
apagado)
Sensores de
desnivel
Rueda giratoria
Cepillos
laterales
Ruedas
Recolector
de polvo
C. Recolector de polvo
D. Entrada de aspiración
E. Base de carga
Filtro
Recolector de polvo
Entrada de aspiración
Luz de estado
Contactos
de carga
Toma de
alimentación
Compartimento para
guardar el cable de
alimentación
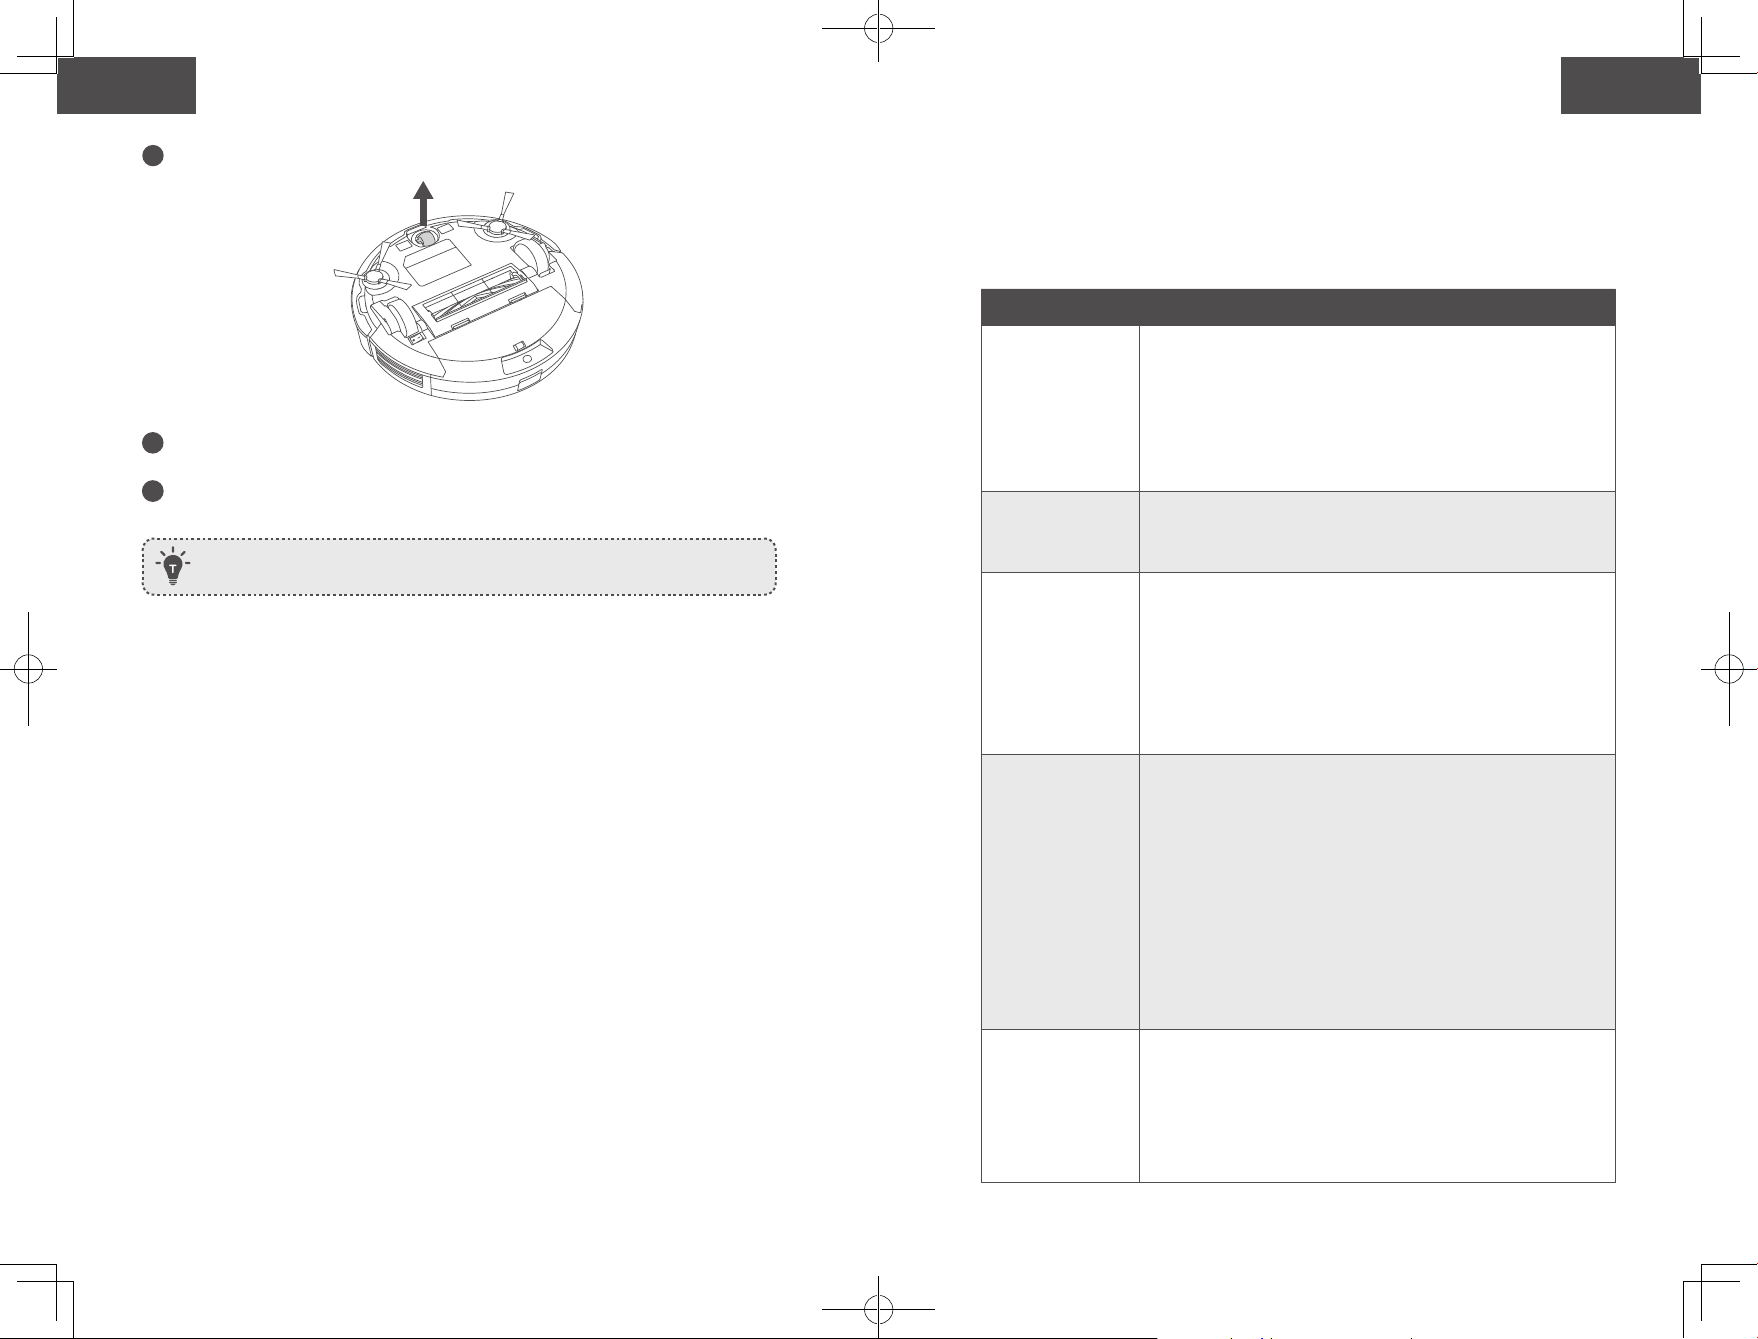
52 53
Español Español
Mando a distancia
1
3
5
7
2
4
6
8
Instale 2 baterías AAA antes de utilizar el control remoto por primera vez.
Asegúrese de que los polos positivo y negativo se encuentren en la dirección
correcta de polaridad, según se indica en el compartimiento para las pilas.
Botones e indicadores
Inicio/detención de la limpieza
Reinicie la conexión de Wi-Fi (mantenga presionado durante
10 segundos hasta que el RoboVac emita un tono)
• Azul permanente: en espera o limpiando
• Rojo destellante/permanente: error
*Consulte la sección "Resolución de problemas>Tono de error"
de este manual para obtener soluciones.
Limpieza de manchas
• Azul destellante: Modo de limpieza
Regreso a la base de carga
• Azul destellante: regreso a la base de carga
• Naranja destellante: baja energía y regreso a la base de
carga
• Naranja intermitente (cuando está acoplado a la base de
carga): carga en curso
• Azul permanente (cuando se conecta a la base de carga):
totalmente cargado
• Cuando usa la función Find My Robot (Buscar mi robot) en la aplicación
EufyHome, los tres indicadores LED destellan en azul y el RoboVac emite un tono.
• Para ahorrar energía, todos los indicadores LED se apagan automáticamente
cuando:
• El RoboVac no se encuentre acoplado a la base de carga y haya estado inactivo
durante 10 minutos.
• El RoboVac lleve 10 minutos completamente cargado.
1
Regrese el RoboVac a la base de carga
2
Ajuste el nivel de potencia de succión
3
Inicie la limpieza automática/Detener la
limpieza
4
Controle manualmente la dirección de
limpieza
5
Inicie la limpieza automática
6
Inicie la limpieza de bordes
7
Inicie la limpieza de manchas
8
Inicie la limpieza rápida
(Luz de estado de Wi-Fi)
Estado
Azul intermitente lento Esperando conexión
Azul intermitente rápido Conectando con el router inalámbrico
Azul fijo Conectado al router inalámbrico
Uso del RoboVac
Consejos importantes antes del uso
a
b
c
d
e
f
a
Retire del suelo los cables de alimentación y los objetos pequeños que se puedan
enredar con el RoboVac. Puede usar los sujetacables suministrados para organizar los
distintos cables.
b
Pliegue los bordes con flecos de las alfombras para evitar que el RoboVac se enrede.
Evite limpiar alfombras de colores muy oscuros o alfombras de pelo alto de más de
1,02 pulgadas/26 mm, ya que pueden provocar un funcionamiento incorrecto del
RoboVac.
c
No limpie espacios de menos de 73 mm de altura para evitar que el RoboVac se
quede atascado. Si es necesario, coloque una barrera física para bloquear las zonas
problemáticas.
d
No permita que el RoboVac acceda a áreas mojadas durante la limpieza. .
e
El RoboVac podría subirse a objetos de hasta 16 mm de altura. Retire estos objetos, de
ser posible.
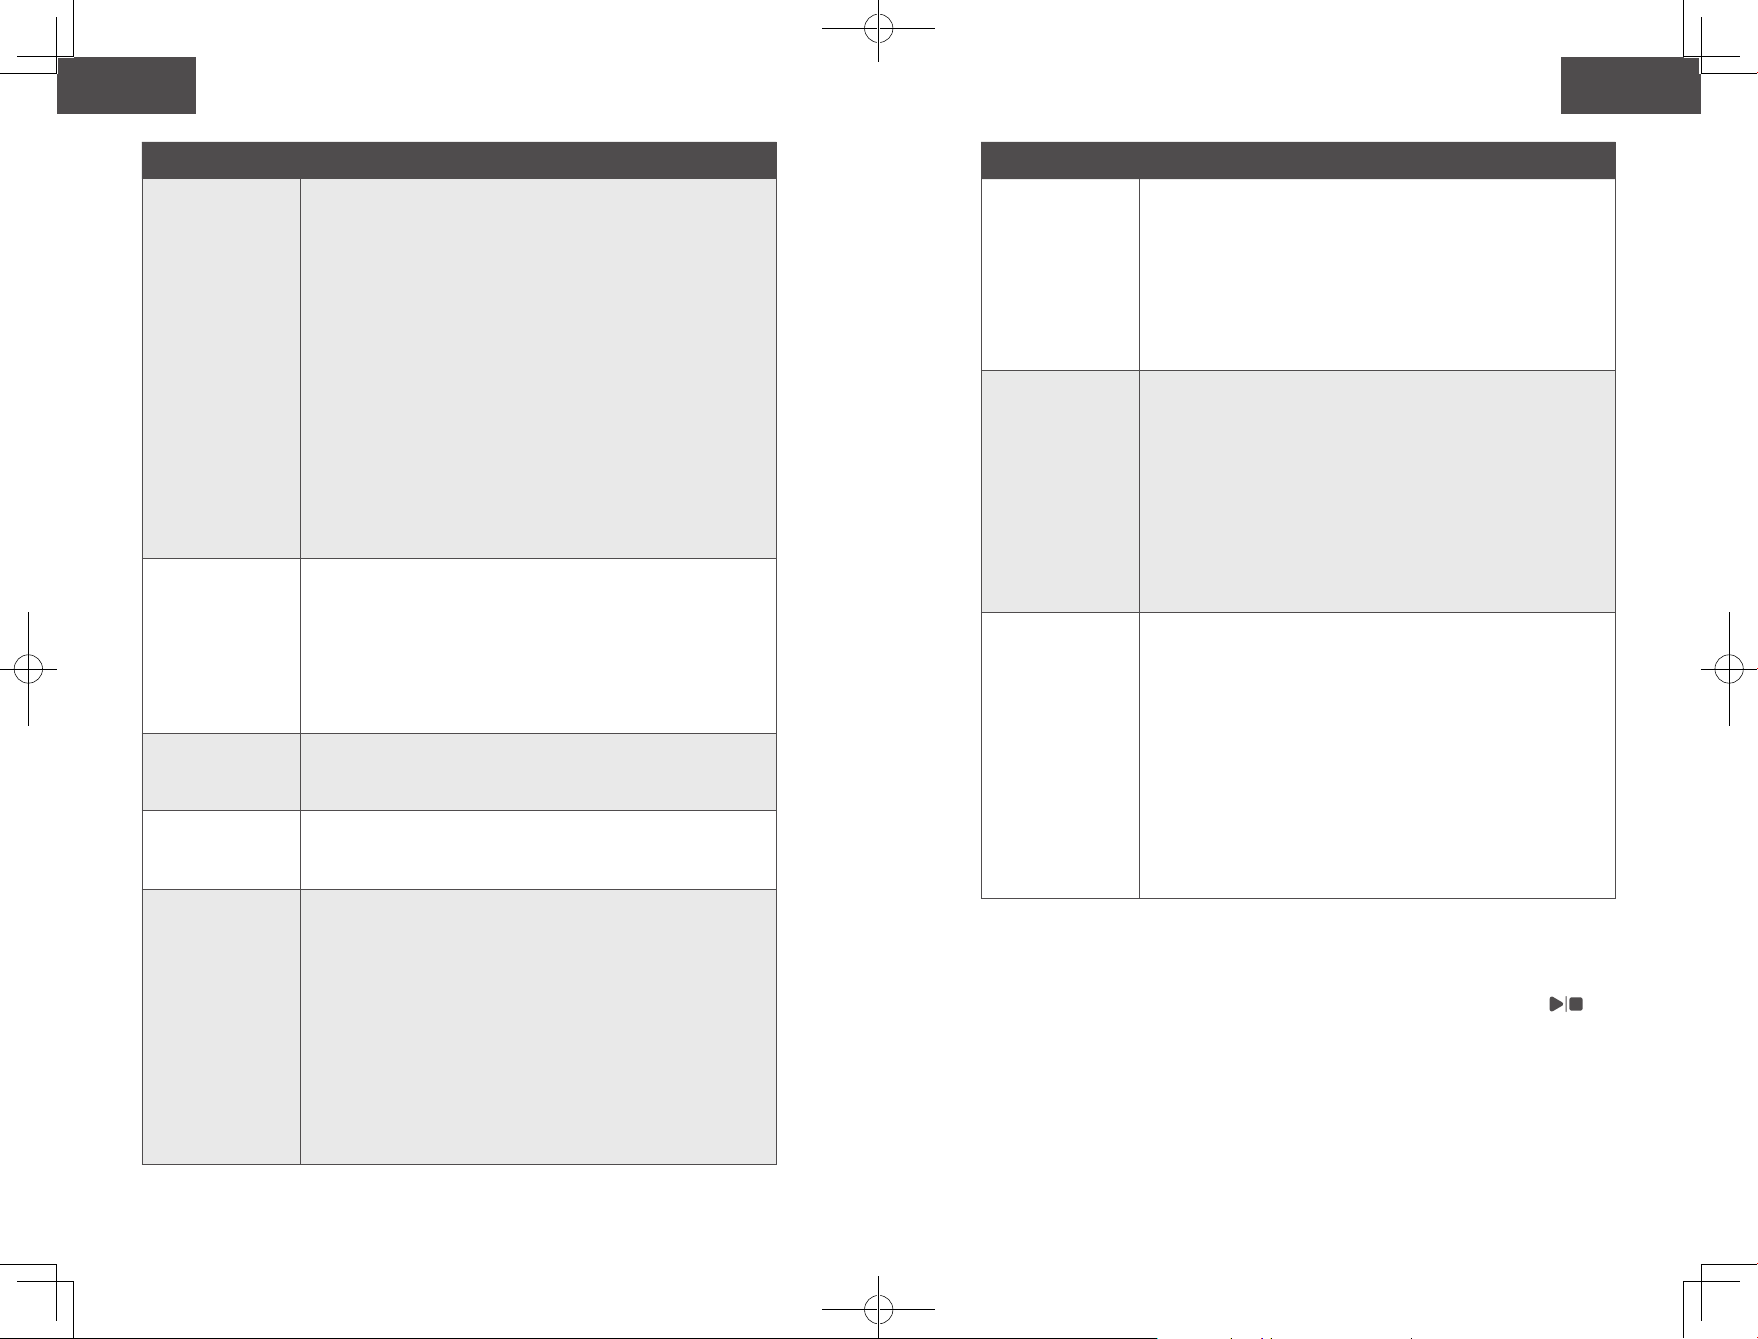
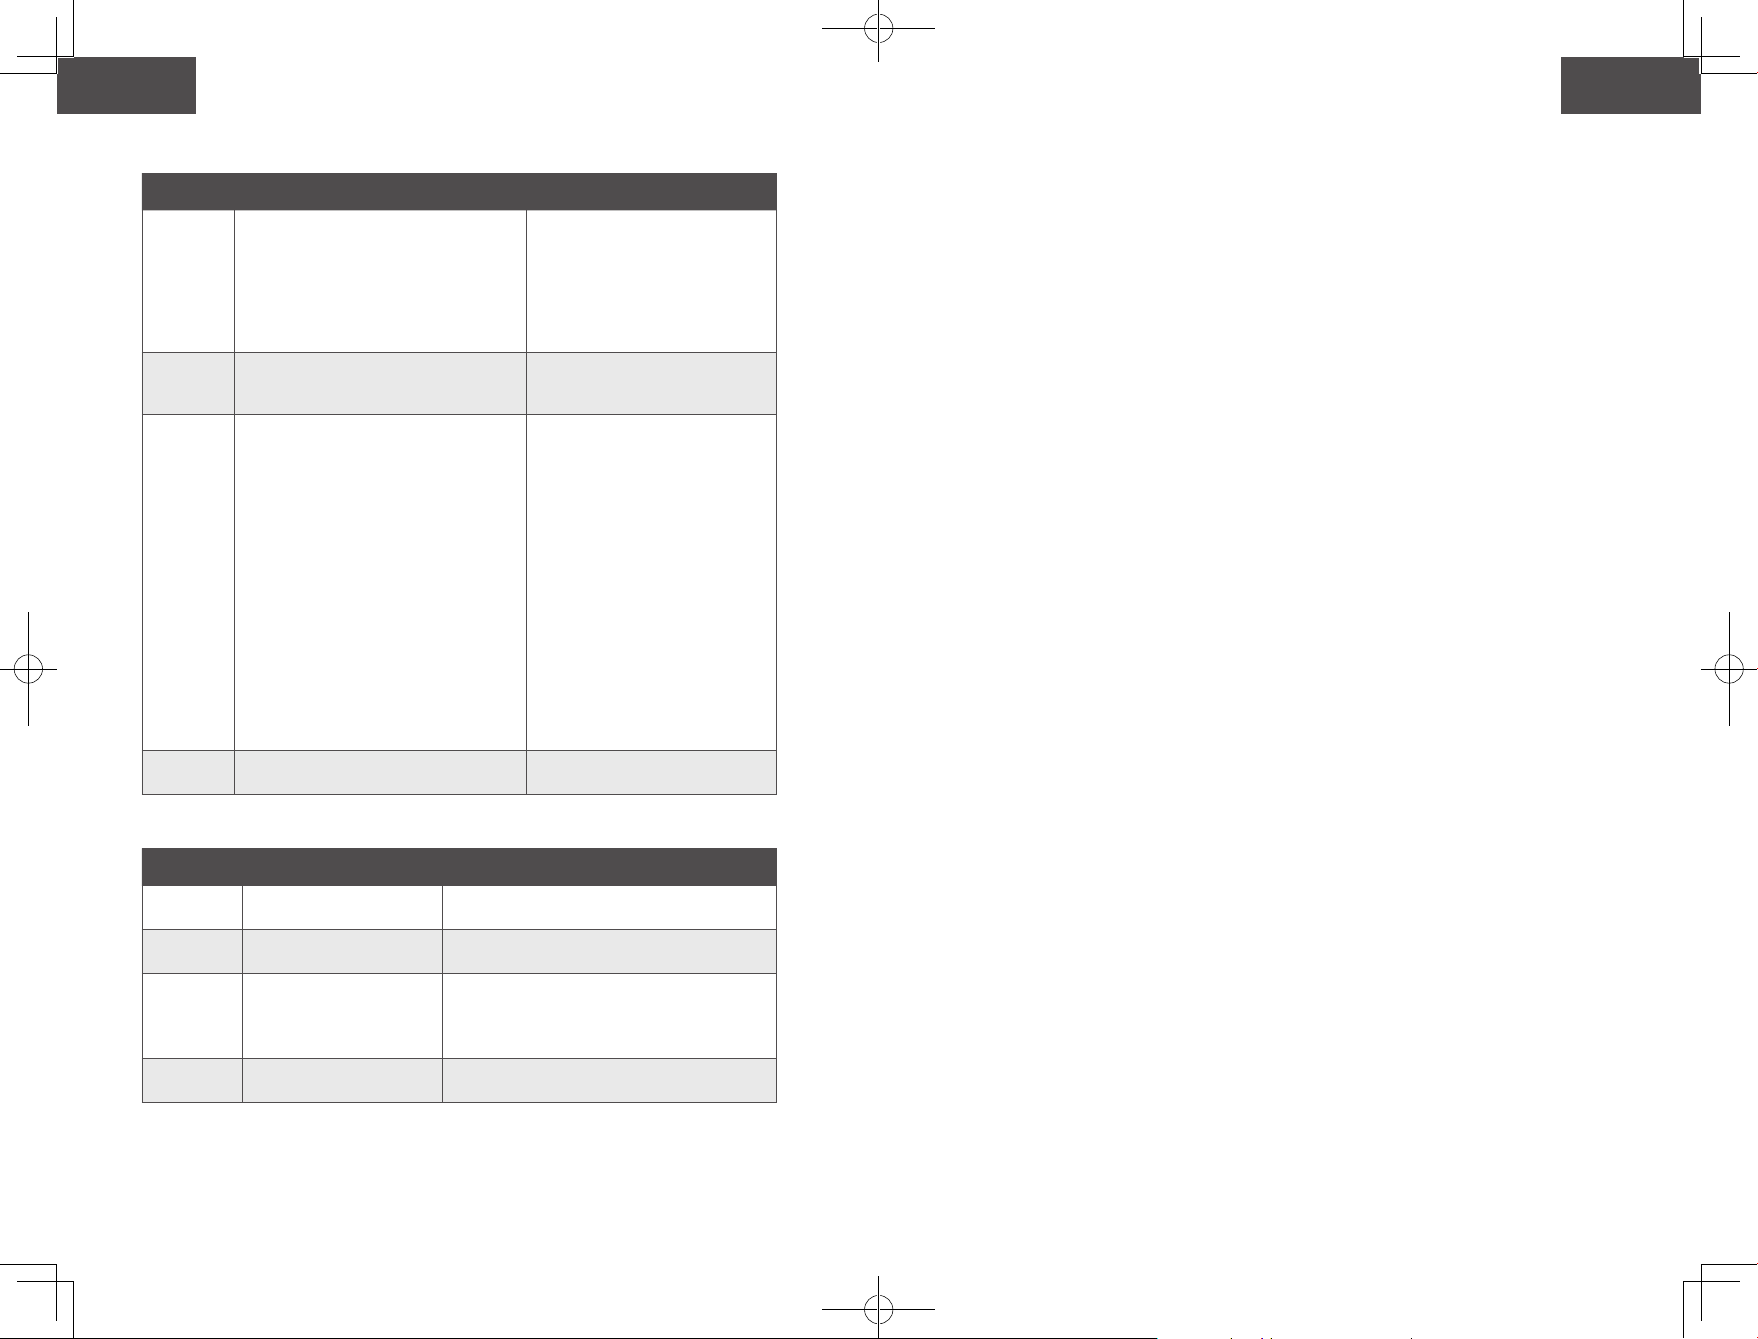
54 55
Español Español
f
Los sensores contra las caídas pueden evitar que el RoboVac caiga por las escaleras y las
pendientes pronunciadas en la mayoría de los casos. Es posible que funcione con menos
eficacia si está sucio o si se utiliza en suelos reflectantes o de colores muy oscuros. Se
recomienda colocar barreras físicas para bloquear las áreas donde el RoboVac pueda
caer, como escaleras alfombradas o los bordes redondeados de pisos de madera.
Preparación
1
Instale los cepillos laterales antes de usar.
2
Encienda el interruptor de alimentación principal en la parte inferior del RoboVac.
Retire el adhesivo junto al interruptor de encendido y los bloques de espuma
junto al tope antes del uso.
Coloque barreras físicas delante de las chimeneas y las áreas que puedan dañar el
RoboVac si ingresa a ellas.
3
Coloque la base de carga sobre una superficie dura y nivelada y contra una pared.
4
Retire los objetos que se encuentren a una distancia de 1 m de los laterales de la base
de carga y de 2 m de la parte frontal. Si no puede retirar los objetos, compruebe que el
RoboVac puede volver a la base de carga con normalidad; de lo contrario, póngase en
contacto con el servicio de atención al cliente de eufy para obtener asistencia.
5
Conecte el conector redondo del adaptador al enchufe de la base de carga y el otro
extremo a un tomacorriente.
Cuando la base de carga se conecta a la alimentación de CA, el indicador LED
de la base de carga es BLANCO PERMANENTE..
- Instale la base de carga en una ubicación donde el
RoboVac pueda acceder fácilmente. Es recomendable
colocar la base de carga apoyada contra la pared y
sobre una superficie plana y resistente, en lugar de
sobre alfombras o moquetas.
- Siempre mantenga la base de carga enchufada, de lo
contrario, el RoboVac no regresará automáticamente.
Carga del RoboVac
• El RoboVac dispone de una batería recargable preinstalada que se debe cargar por
completo antes del uso.
• El RoboVac volverá a la base de carga al terminar un ciclo de limpieza o cuando la
batería se esté agotando.
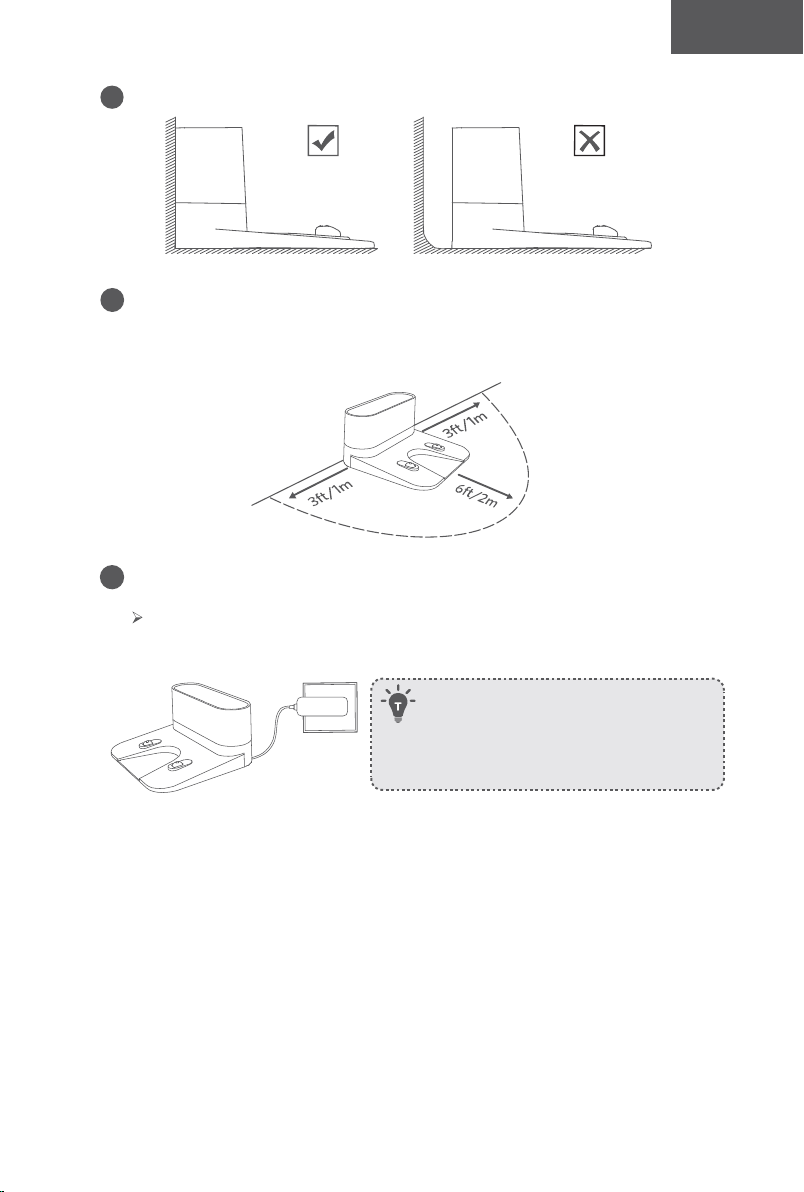
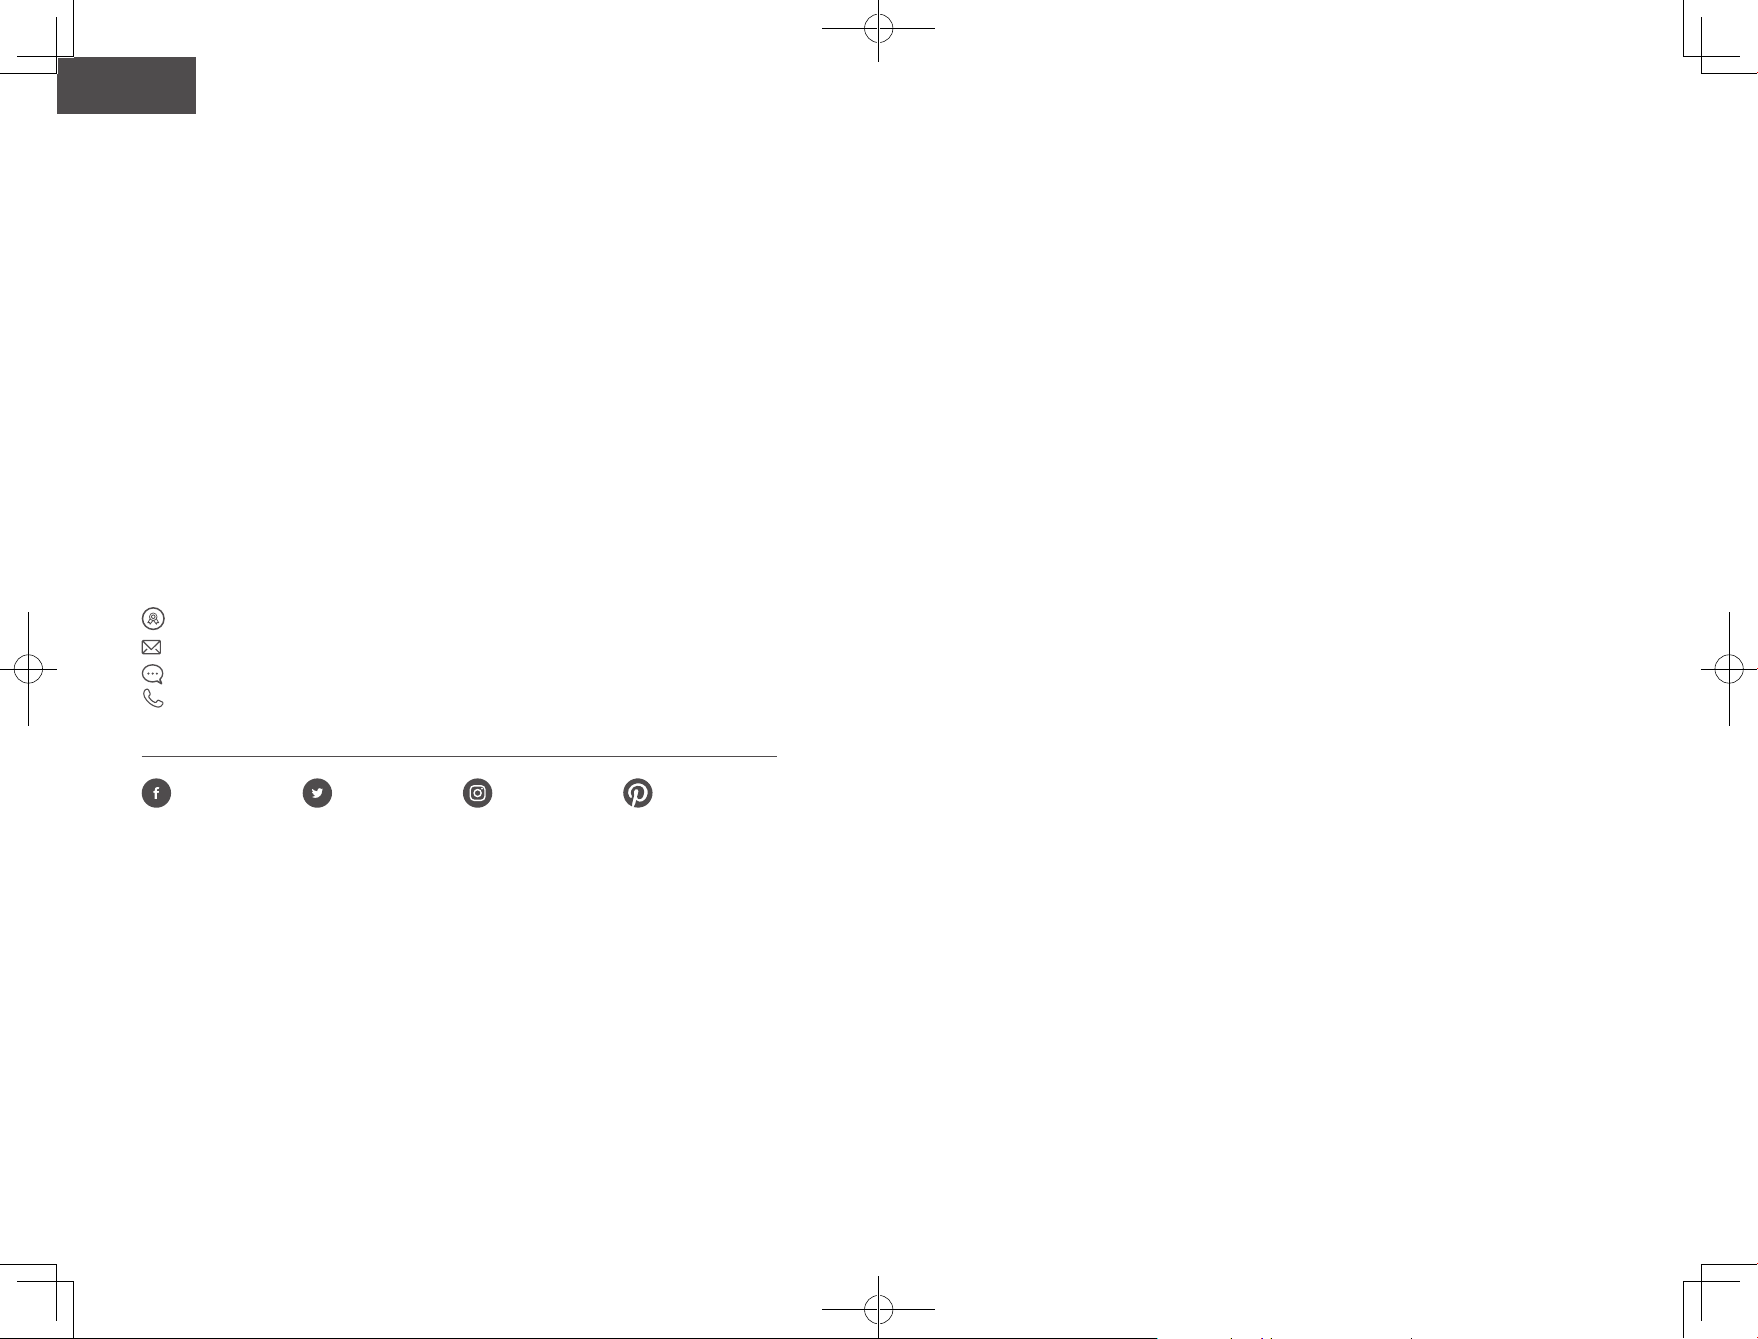
56 57
Español Español
Método 1: Para conectar el RoboVac a la base de carga, alinee los contactos de carga del
robot con los de la base.
Método 2: Presione en el RoboVac o en el control remoto para que el RoboVac regrese a
la base de carga.
Uso del RoboVac con la aplicación EufyHome
Para disfrutar de todas las funciones disponibles, le recomendamos que controle el
RoboVac con la aplicación EufyHome.
Antes de empezar, asegúrese de que:
• Su smartphone o tableta esté conectado a una red Wi-Fi.
• Su smartphone o tableta ejecute iOS 9.0 (o superior) o Android 5.0 (o superior).
• La señal inalámbrica de la banda de 2,4 GHz esté activada en el router inalámbrico.
• La luz de estado de Wi-Fi del RoboVac parpadee lentamente en azul.
• El interruptor de alimentación principal en la parte inferior está encendido y el
RoboVac está conectado a la base de carga para garantizar que tenga suficiente
energía durante la configuración.
Apague el interruptor principal si no planea utilizar el RoboVac durante un
largo periodo de tiempo. Para conservar la vida útil de la batería, vuelva a
cargarla al menos una vez cada 6 meses.
EufyHome
EufyHome
1
Descargue la aplicación EufyHome de App Store (dispositivos iOS) o Google Play
(dispositivos Android).
2
Abra la aplicación y cree una cuenta de usuario.
3
Toque el icono "+" para agregar el RoboVac a su cuenta de EufyHome.
4
Siga las instrucciones de la aplicación para configurar la conexión de Wi-Fi.
Después de conectarse correctamente, puede controlar el RoboVac a través de la
aplicación.
Con la aplicación, puede seleccionar un modo de limpieza, establecer la hora,
programar una limpieza, ver el estado del sistema, recibir notificaciones y acceder a
funciones adicionales.
Luz de estado de Wi-Fi
Azul intermitente lento Esperando conexión
Azul intermitente rápido Conectando con el router inalámbrico
Azul fijo Conectado al router inalámbrico
- Si tiene algún problema durante el proceso de configuración de Wi-Fi, consulte la
sección "Resolución de problemas> Conexión Wi-Fi" en este manual.
- Si el RoboVac se atasca en cualquier espacio, toque Find My Robot (Buscar mi robot)
en la aplicación para encontrar la máquina. Esta función solo está disponible en la aplicación.
Restablecimiento de la conexión Wi-Fi
Mantenga presionado en el RoboVac durante 10 segundos hasta que el RoboVac emita
un tono para restablecer la conexión de Wi-Fi si es necesario.
Escuchará un tono cuando la conexión de Wi-Fi se haya restablecido y la luz de estado
de Wi-Fi destellará lentamente en azul. Siga las instrucciones de Wi-Fi de la aplicación
EufyHome para configurar la conexión Wi-Fi.
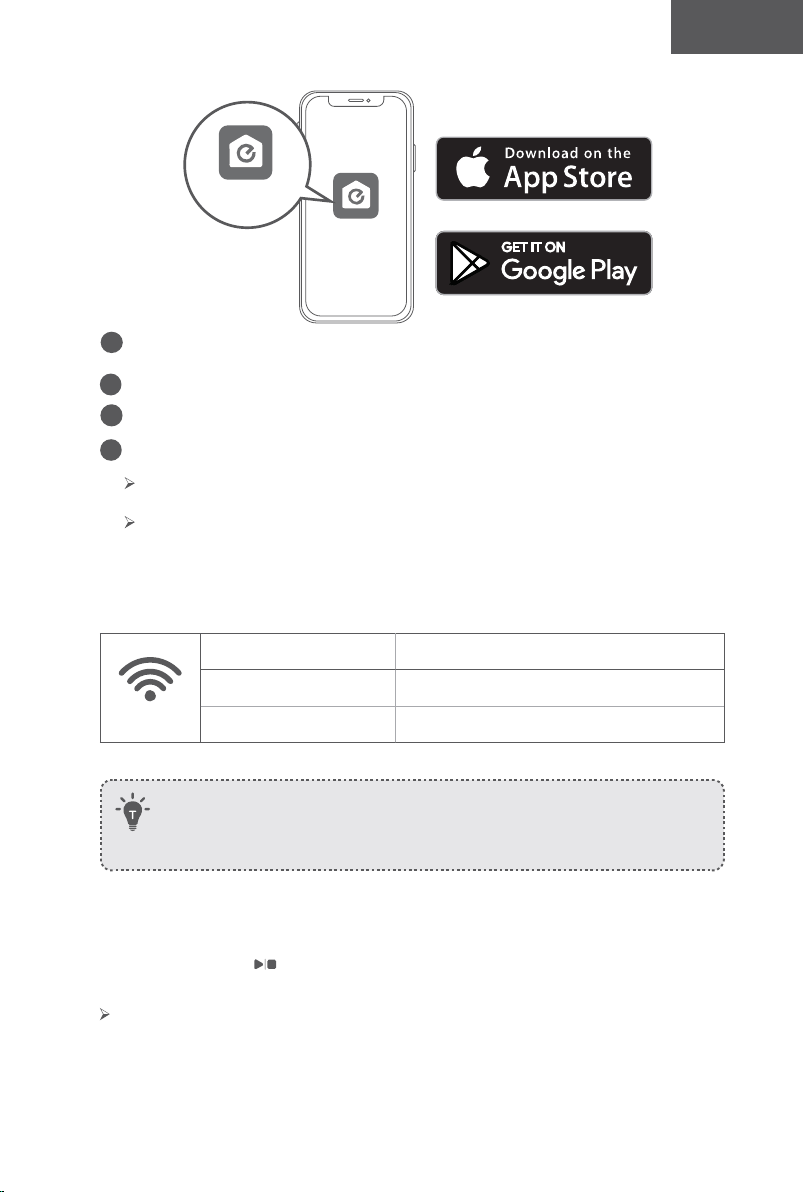
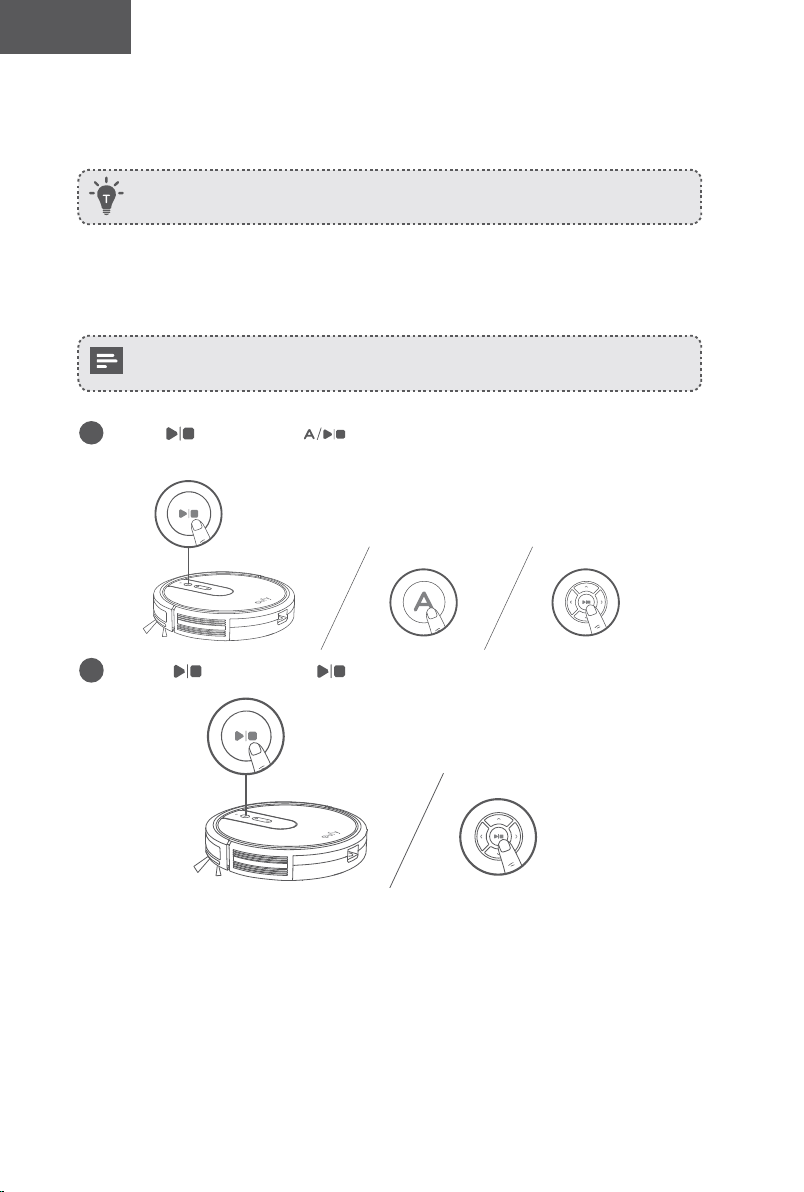
58 59
Español Español
Programación de la limpieza
En la aplicación EufyHome, puede programar el RoboVac para que inicie la limpieza a una
hora específica.
Puede configurar la hora y personalizar la programación de la limpieza de domingo a
sábado en la aplicación EufyHome. Esta función solo está disponible en la aplicación.
Inicio/detención de la limpieza
- Asegúrese de que el interruptor de alimentación principal en la parte inferior del
RoboVac esté encendido antes de usar.
- También puede iniciar o detener la limpieza desde la aplicación EufyHome.
1
Presione en el RoboVac o en el control remoto para comenzar a limpiar en modo
automático.
2
Presione en el RoboVac o en el control remoto para detener la limpieza.
Selección de un modo de limpieza
También puede seleccionar un modo de limpieza desde la aplicación EufyHome.
1. Limpieza automática
El RoboVac optimiza su ruta de limpieza seleccionando diferentes modos de limpieza
automáticamente hasta que se completa la limpieza. Es el modo de limpieza más utilizado.
Presione en el RoboVac o en el control remoto para comenzar a limpiar en
modo automático.
- El RoboVac volverá a la base de carga automáticamente cuando el nivel de la batería sea
bajo o cuando termine de limpiar.
- Por configuración predeterminada, el RoboVac se inicia en el modo de limpieza automática
cuando se enciende.
Función BoostIQ™
Cuando se habilita la función BoostIQ™, el RoboVac aumentará automáticamente la
potencia de succión si detecta que se necesita una potencia más fuerte para garantizar
una mejor limpieza. La función BoostIQ™ es ideal para la limpieza de alfombras gruesas
y elementos difíciles de aspirar, ya que reducirá el tiempo de limpieza total, aunque
aumentará el nivel de ruido. Si el ruido de la aspiración provocado por la función BoostIQ™
le resulta molesto, puede desactivarla. Esta función solo se activa en los modos de limpieza
automática y rápida.
En el modo de limpieza automática o rápida, presione en el control remoto
repetidamente para ajustar el nivel de potencia de succión.
El icono correspondiente se muestra en el control remoto.
Nivel de potencia de succión Tonos
Potencia estándar
BoostIQ™
(Predeterminado, cambia automáticamente entre potencia estándar y
aumentada)
Potencia máxima
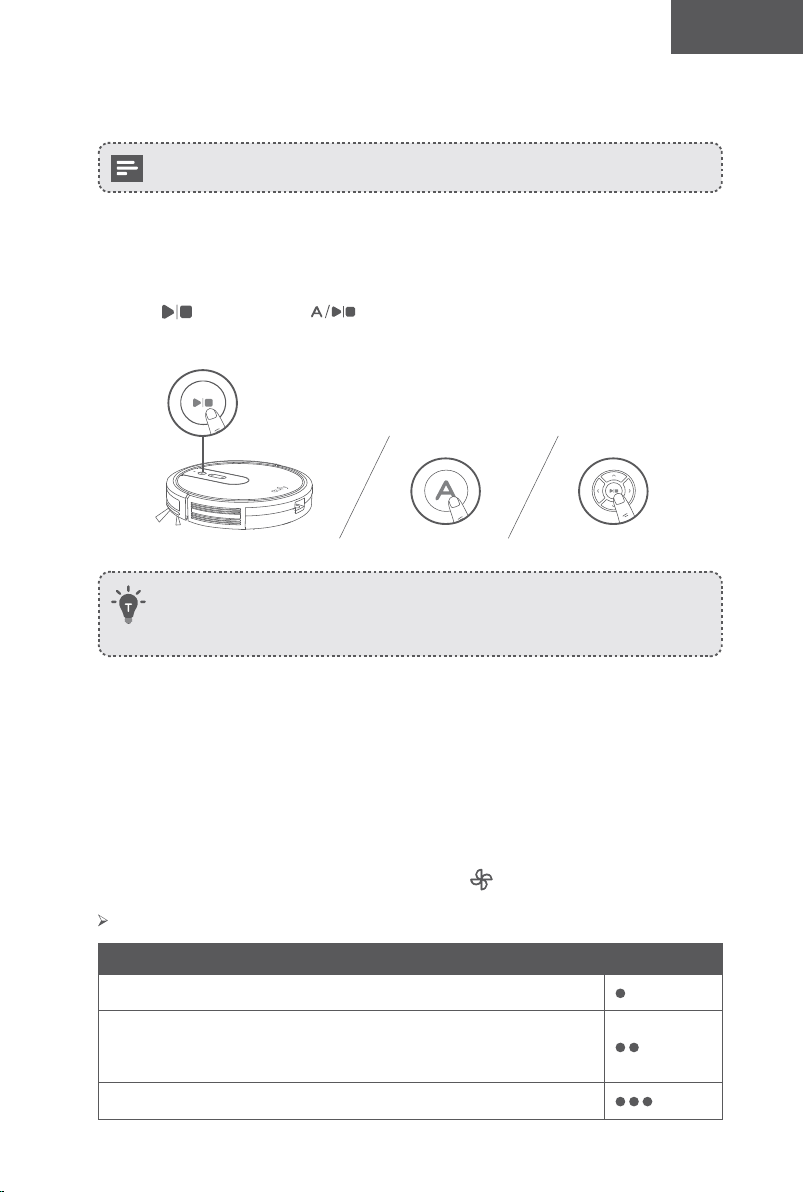
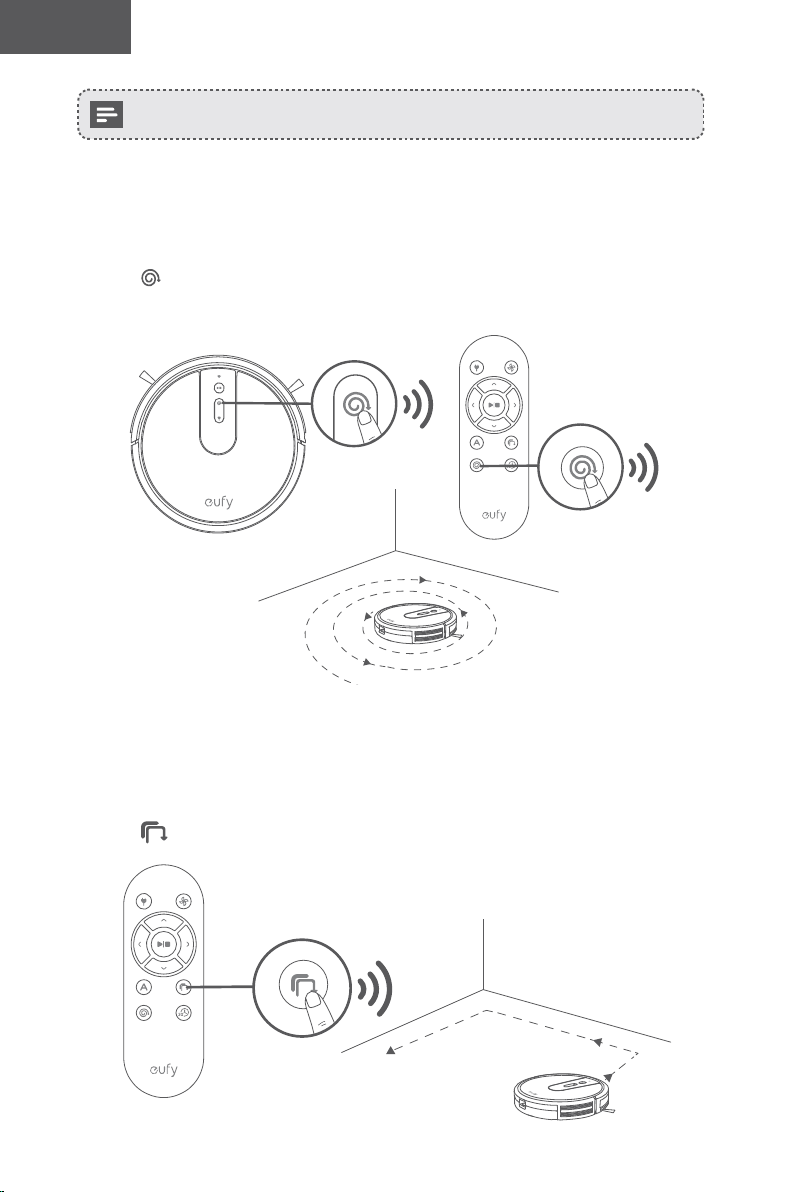
60 61
Español Español
Cuando el RoboVac comience a limpiar en modo automático o rápido la próxima vez,
limpiará de acuerdo con el nivel de potencia de succión que seleccionó anteriormente.
2. Limpieza de manchas
El RoboVac limpia a fondo una zona determinada siguiendo un patrón en espiral, lo que
resulta útil si hay una zona con polvo o suciedad concentrada. En el modo de limpieza
localizada, el RoboVac detendrá el proceso de limpieza tras 2 minutos.
Presione en el RoboVac o en el control remoto para comenzar a limpiar en modo de
limpieza de manchas.
3. Limpieza de bordes
El RoboVac reduce su velocidad cuando detecta una pared y luego sigue la pared para
asegurarse de que el borde se limpie a fondo. En el modo de borde, el RoboVac limpiará
durante 20 minutos y volverá a la base de carga.
Presione en el control remoto para comenzar a limpiar en modo de borde.
4. Limpieza rápida
El RoboVac dejará de limpiar automáticamente después de 30 minutos y volverá a la
base de carga en este modo. Si necesita limpiar alguna habitación o área pequeña, se
recomienda seleccionar este modo para ahorrar tiempo y energía.
Presione en el control remoto para comenzar el modo de limpieza rápida.
5. Limpieza manual
Puede indicarle a RoboVac que limpie un área en particular utilizando los botones de
dirección del control remoto.
Gire a la
izquierda
Mueva hacia
atrás
Gire a la derecha
Mueva hacia
adelante
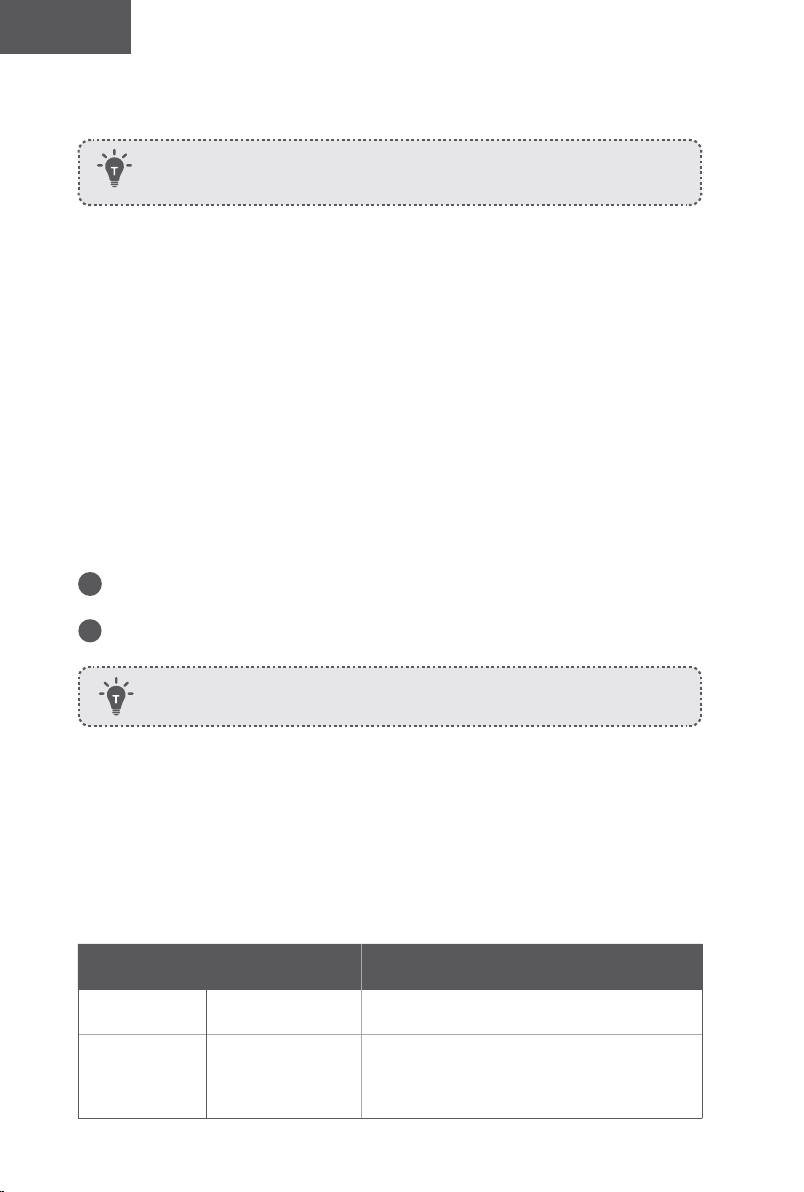
62 63
Español Español
Use su RoboVac con Amazon Alexa/Google Assistant
Actualmente, esta función está disponible únicamente en inglés, alemán,
francés y español. Puede comprobar periódicamente si se admiten más idiomas en
https://www.eufylife.com/support/.
Tanto Alexa de Amazon como el Asistente de Google son asistentes de voz inteligentes
basados en IA que le permiten controlar el RoboVac con la voz.
Antes de empezar, asegúrese de que:
• El RoboVac esté conectado a la base de carga para garantizar que dispone de
energía suficiente.
• El RoboVac esté conectado a la aplicación EufyHome.
• Dispone de un dispositivo compatible con Alexa (p. ej., Amazon Echo, Echo Dot
y Amazon Tap, Echo Show, Echo Spot) o con el Asistente de Google (p. ej.,
Google Home, Google Home Mini). Estos dispositivos se venden por separado.
• La aplicación Alexa de Amazon o Google Home ya esté instalada en el dispositivo
inteligente y de que haya creado una cuenta.
Para controlar el RoboVac con Alexa de Amazon o el Asistente de
Google
1
Abra la aplicación EufyHome y toque “Smart Integrations” (Integraciones
inteligentes) en la esquina superior izquierda.
2
Siga las instrucciones en pantalla para completar la configuración.
Para obtener más información sobre cómo funciona con Amazon Alexa/
Google Assistant, visite https://www.eufylife.com/support/.
Limpieza y mantenimiento
Para obtener un rendimiento óptimo, siga las siguientes instrucciones para realizar la
limpieza y el mantenimiento regulares del RoboVac. La frecuencia de limpieza/sustitución
dependerá de sus hábitos de uso del RoboVac.
Frecuencia de limpieza/sustitución recomendada
Pieza del
RoboVac
Frecuencia de
limpieza
Frecuencia de sustitución
Recolector de
polvo
Después de cada
uso
-
Filtro
Una vez por semana
(dos veces por
semana si tienes una
mascota)
Cada 2 meses
Cepillo giratorio Una vez al mes Cada 6-12 meses
Cepillos laterales Una vez al mes
Cada 3-6 meses (o cuando se vean
deteriorados)
Protección para
los cepillos
Una vez al mes
Cada 3-6 meses (o cuando la tira de goma de
silicona en la protección del cepillo se desgasta
visiblemente)
Sensores Una vez al mes -
Contactos de
carga
Una vez al mes -
Rueda giratoria Una vez al mes -
Limpieza de los filtros y el recolector de polvo
1
Presione el botón de liberación del colector de polvo para sacar el colector de
polvo.
2
Abra y vacíe el colector de polvo.
3
Saque el filtro.
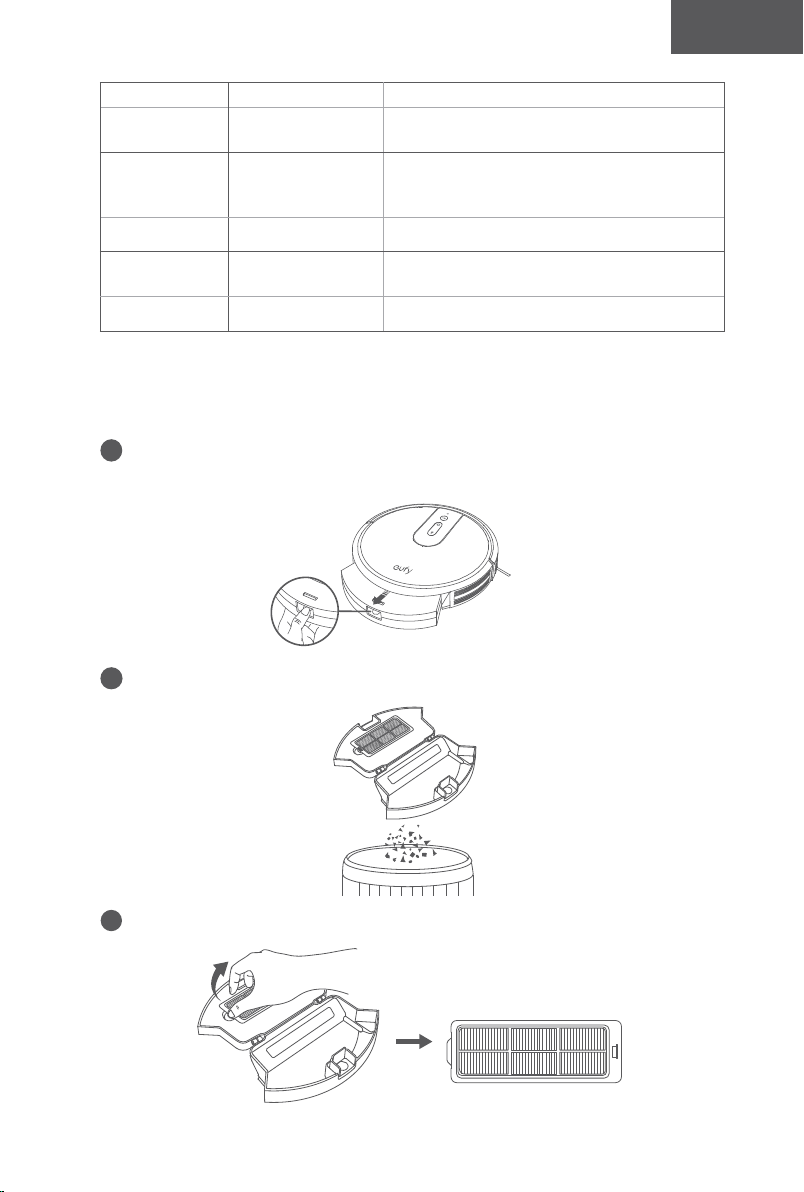
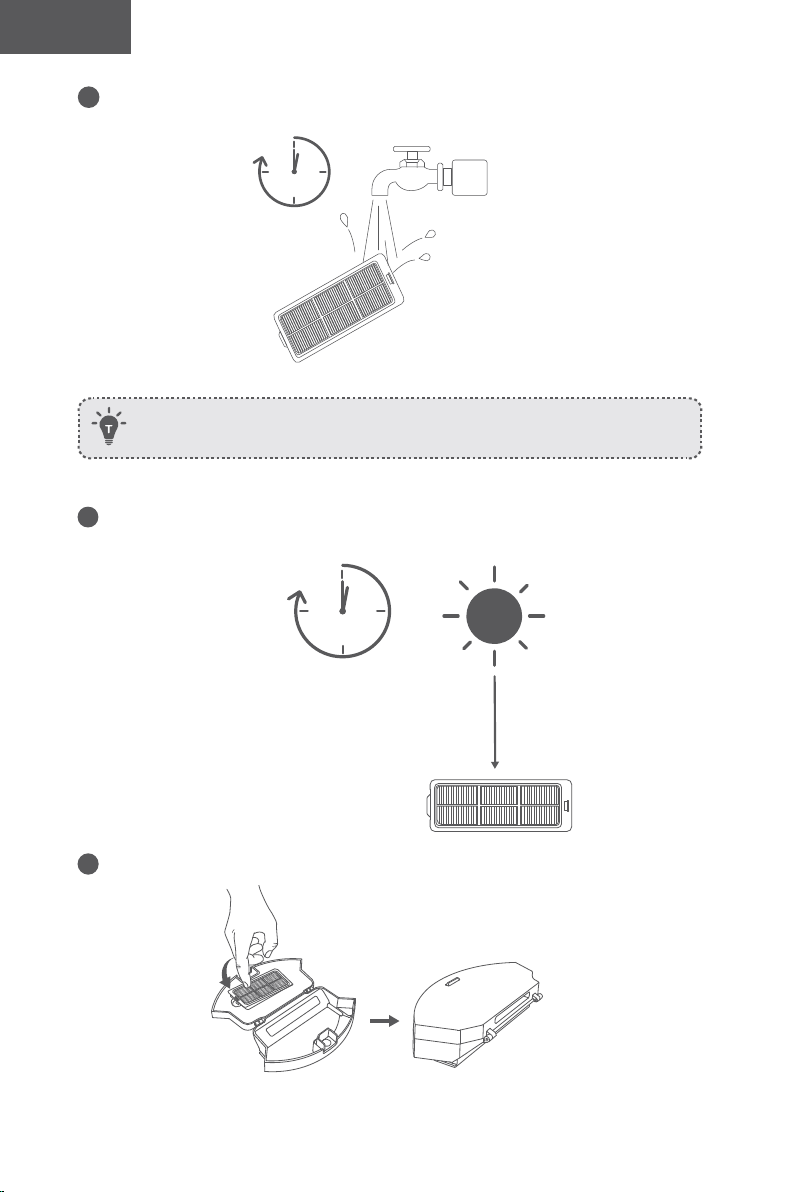
64 65
Español Español
4
Enjuague bien el filtro con agua.
1
min
No utilice cepillos, agua caliente ni detergentes para limpiar el filtro.
5
Seque el filtro al aire completamente antes del próximo uso. Si el filtro original no
está completamente seco, utilice el filtro adicional.
24h
6
Vuelva a colocar el filtro en el colector de polvo.
7
Coloque el recolector de polvo en la unidad principal.
Limpieza del cepillo giratorio
1
Tire de las pestañas de liberación para desbloquear la protección del cepillo como se muestra.
2
Levante el cepillo giratorio para extraerlo.
3
Limpie el cepillo giratorio con la herramienta de limpieza suministrada o un aspirador.
4
Vuelva a instalar el cepillo giratorio; para ello, introduzca primero el extremo saliente
fijo y, a continuación, encájelo en su sitio.
5
Presione la protección del cepillo para encajarla en su sitio.
1 2
3
54
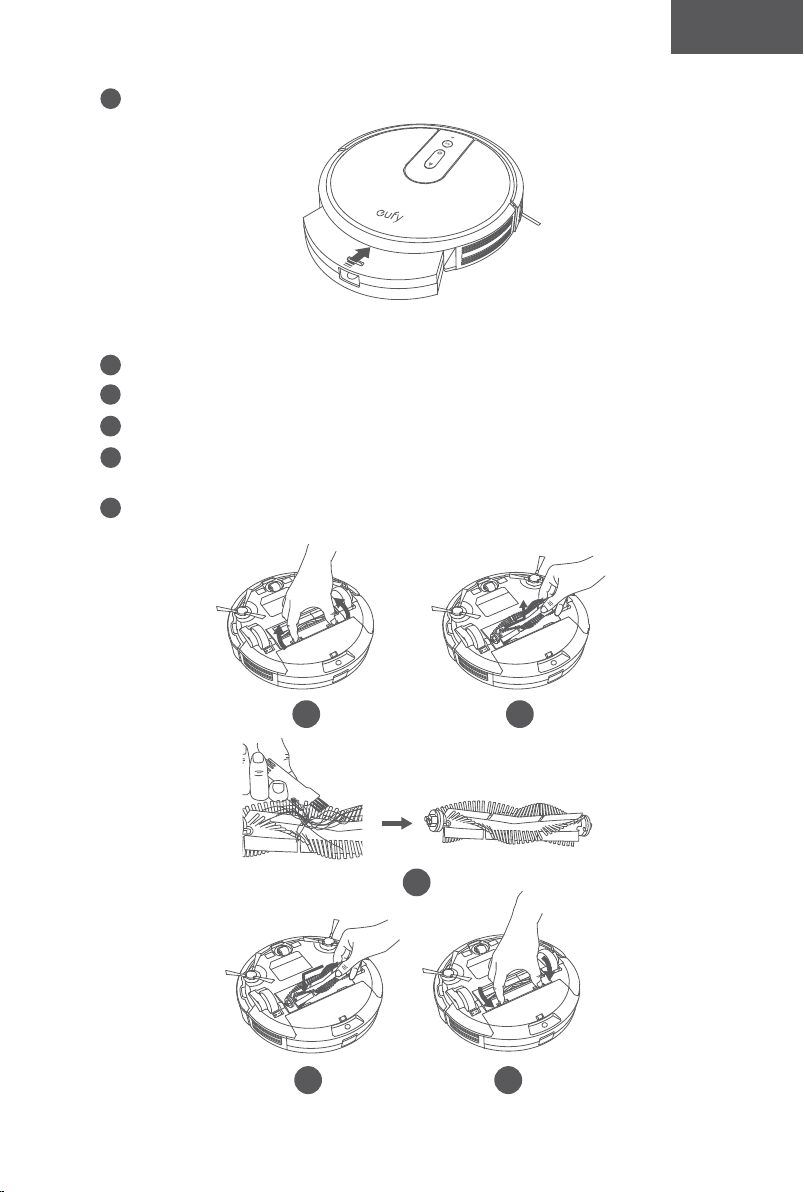

66 67
Español Español
Limpie los cepillos laterales
Las sustancias extrañas, como el cabello, pueden enredarse fácilmente en los cepillos
laterales y la suciedad puede adherirse a ellos. Asegúrese de limpiarlos periódicamente.
1
Retire los cepillos laterales.
2
Desenrolle con cuidado y tire de cualquier cabello o cuerda que esté enrollada entre la
unidad principal y los cepillos laterales.
3
Utilice un paño humedecido con agua tibia para quitar el polvo de los cepillos o ajustar
su forma suavemente.
- Utilice los cepillos laterales solo cuando estén completamente secos.
- Para proteger su piso de madera o alfombrado, nuestros cepillos laterales están hechos
de materiales suaves y pueden enroscarse después de su uso durante algún tiempo,
pero no afectarán el efecto de limpieza.
Reemplace los cepillos laterales
Es posible que los cepillos laterales se doblen o dañen después de su uso durante cierto
tiempo. Siga las instrucciones a continuación para reemplazarlos.
• Retire los cepillos laterales usados y coloque los nuevos en su lugar.
Limpieza de los sensores y los contactos de carga
Para mantener el mejor rendimiento, limpie el tope, los sensores y las clavijas de carga
periódicamente.
• Quite el polvo del tope, los sensores y los contactos de carga con un paño seco o un
cepillo de limpieza
.
Limpieza de la rueda giratoria
• El pelo y las partículas de polvo pueden quedarse atrapados fácilmente en la rueda
giratoria. Asegúrese de limpiar la rueda giratoria con regularidad, según sea necesario.
Rueda
Eje
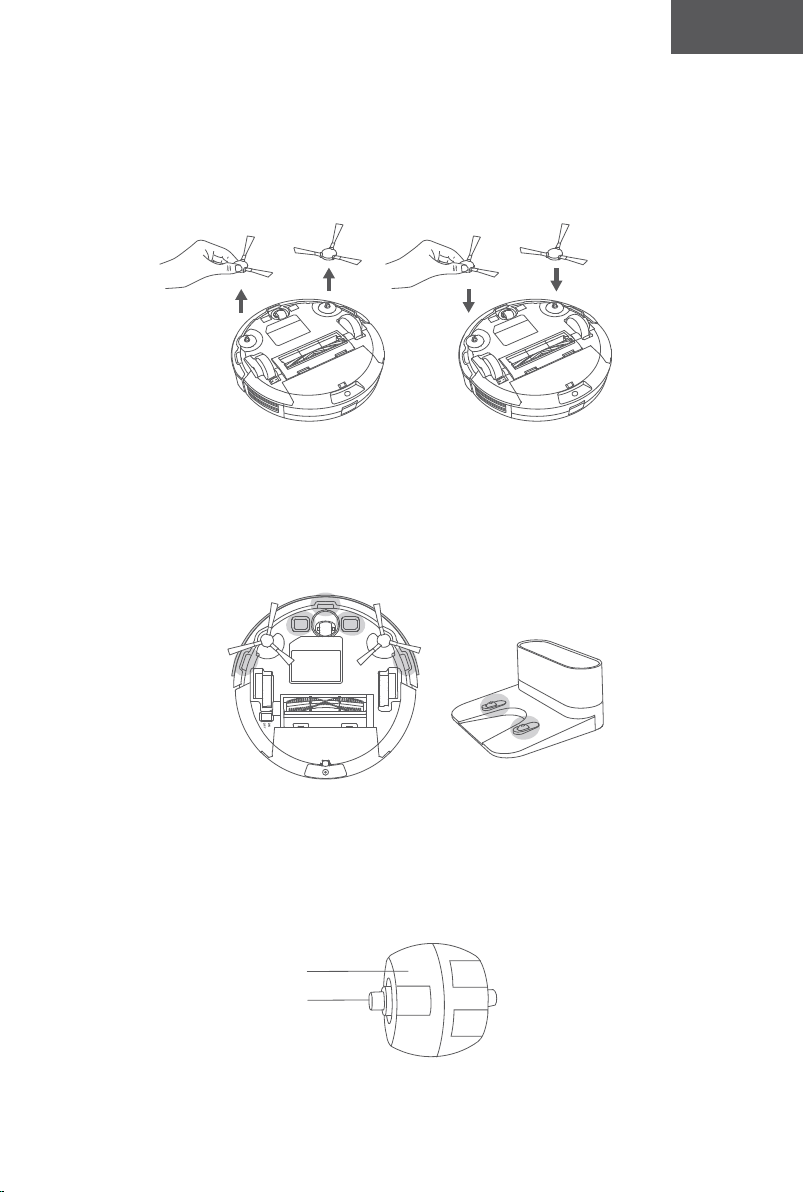
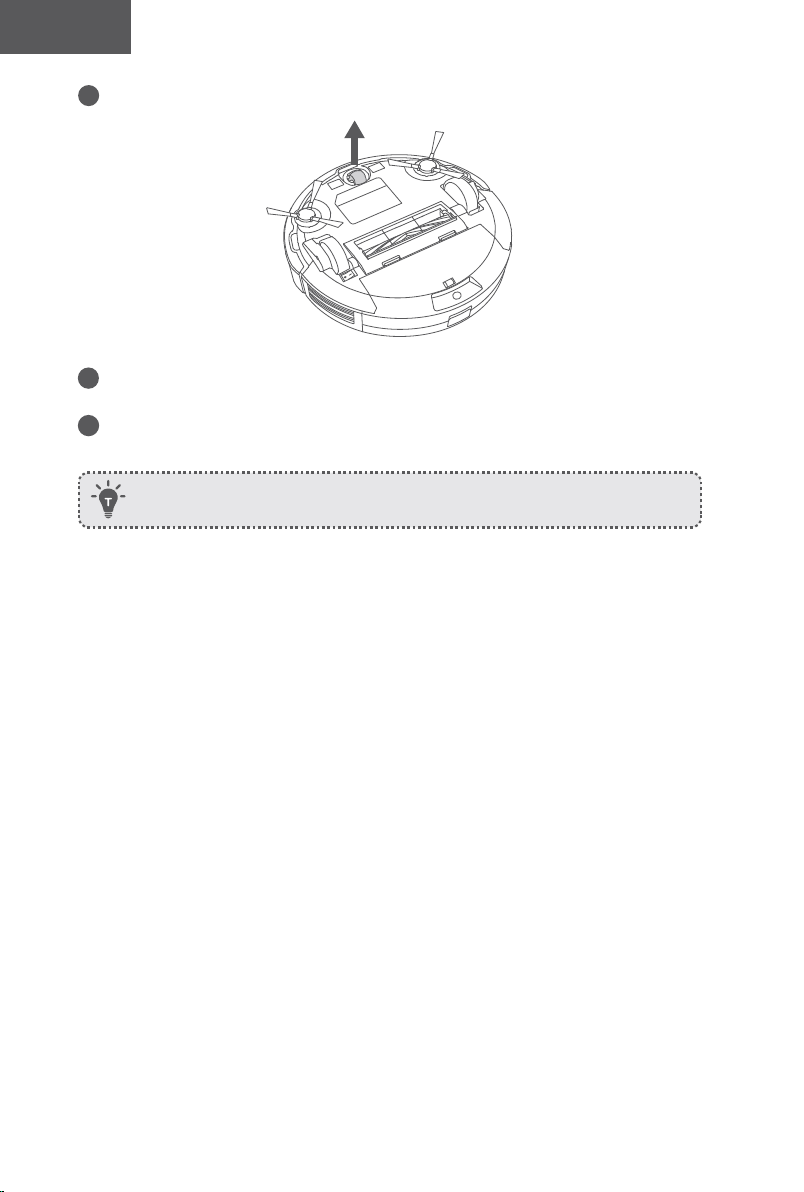
68 69
Español Español
1
Extraiga la rueda giratoria.
2
Retire el pelo y la suciedad que haya podido enredarse en la rueda o atascarse en la
cavidad de la rueda.
3
Vuelva a instalar la rueda y empújela hasta que encaje en su sitio.
- Puede limpiar la rueda giratoria con agua.
- Utilice la rueda giratoria solo cuando esté completamente seca.
Solución de problemas
Preguntas frecuentes:
A continuación, se proporcionan soluciones para preguntas generales. Si su problema continúa,
visite www.eufylife.com o contacte a support@eufylife.com para obtener asistencia.
Problemas Soluciones
El RoboVac no se
puede activar.
• Asegúrese de que el interruptor principal esté en la
posición de encendido.
• Asegúrese de que la batería esté totalmente cargada.
• Reemplace las baterías (2 AAA) en el control remoto.
• Asegúrese de que el control remoto esté dentro del alcance
(16 pies/5 m) del RoboVac.
• Si el problema persiste, apague el interruptor principal y
vuelva a encenderlo.
El control remoto no
funciona.
• Reemplace las baterías en el control remoto.
• Asegúrese de que el RoboVac esté encendido y
completamente cargado.
El RoboVac deja
de funcionar
repentinamente.
• Compruebe que el RoboVac no se haya atascado en un
obstáculo.
• Compruebe que el nivel de batería no sea demasiado bajo.
• Consulte la sección "Tonos de error" para encontrar la
solución.
• Si el problema persiste, apague el interruptor principal,
espere 2 segundos y vuelva a encenderlo.
No se pueden
programar
limpiezas.
• Asegúrese de que el interruptor de alimentación principal
en la parte inferior del RoboVac esté encendido.
• Puede establecer la hora del día y la hora de la limpieza
programada a través de la aplicación EufyHome.
• Asegúrese de haber establecido correctamente la hora
programada.
• Compruebe si el nivel de la batería del RoboVac es
suficiente para iniciar la limpieza.
• Los programas de limpieza se borran cuando el RoboVac
está apagado. Si el RoboVac está encendido, pero no
puede acceder a Internet, los programas de limpieza no se
sincronizarán y deberá restablecerlos desde la aplicación.
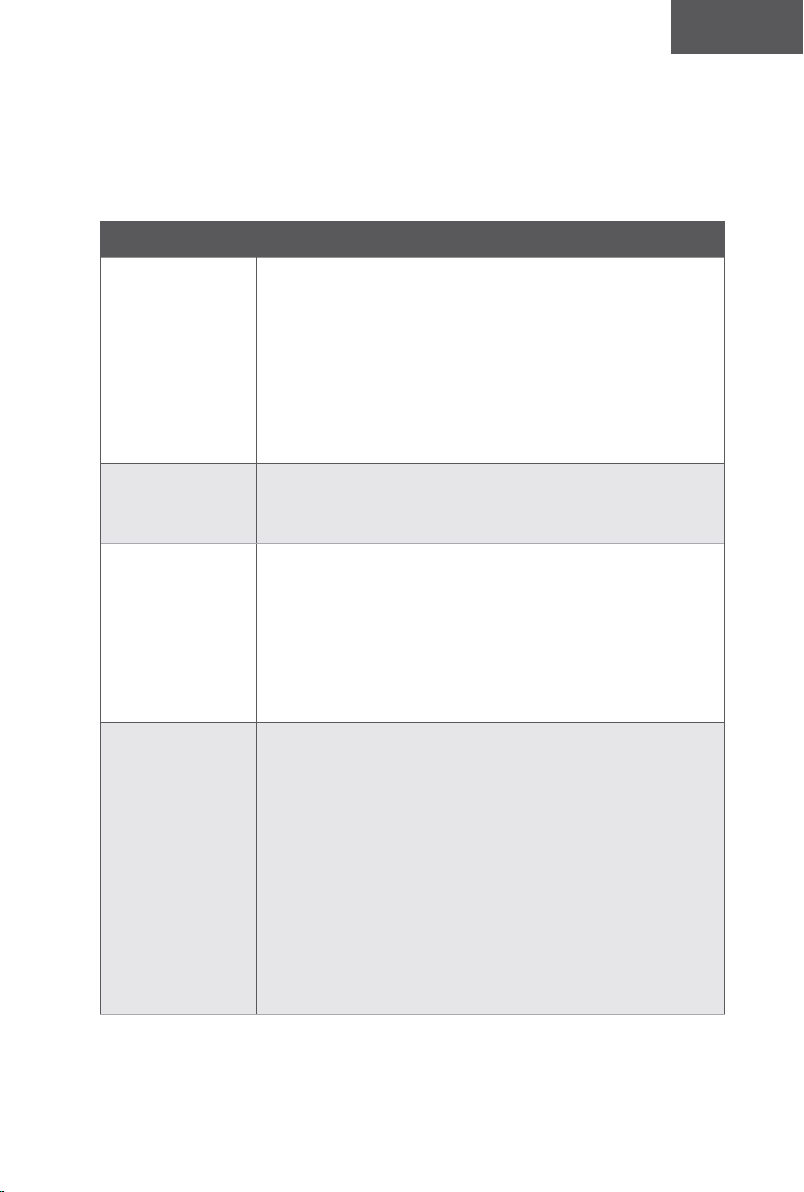
68 69
Español Español
1
Extraiga la rueda giratoria.
2
Retire el pelo y la suciedad que haya podido enredarse en la rueda o atascarse en la
cavidad de la rueda.
3
Vuelva a instalar la rueda y empújela hasta que encaje en su sitio.
- Puede limpiar la rueda giratoria con agua.
- Utilice la rueda giratoria solo cuando esté completamente seca.
Solución de problemas
Preguntas frecuentes:
A continuación, se proporcionan soluciones para preguntas generales. Si su problema continúa,
visite www.eufylife.com o contacte a [email protected] para obtener asistencia.
Problemas Soluciones
El RoboVac no se
puede activar.
• Asegúrese de que el interruptor principal esté en la
posición de encendido.
• Asegúrese de que la batería esté totalmente cargada.
• Reemplace las baterías (2 AAA) en el control remoto.
• Asegúrese de que el control remoto esté dentro del alcance
(16 pies/5 m) del RoboVac.
• Si el problema persiste, apague el interruptor principal y
vuelva a encenderlo.
El control remoto no
funciona.
• Reemplace las baterías en el control remoto.
• Asegúrese de que el RoboVac esté encendido y
completamente cargado.
El RoboVac deja
de funcionar
repentinamente.
• Compruebe que el RoboVac no se haya atascado en un
obstáculo.
• Compruebe que el nivel de batería no sea demasiado bajo.
• Consulte la sección "Tonos de error" para encontrar la
solución.
• Si el problema persiste, apague el interruptor principal,
espere 2 segundos y vuelva a encenderlo.
No se pueden
programar
limpiezas.
• Asegúrese de que el interruptor de alimentación principal
en la parte inferior del RoboVac esté encendido.
• Puede establecer la hora del día y la hora de la limpieza
programada a través de la aplicación EufyHome.
• Asegúrese de haber establecido correctamente la hora
programada.
• Compruebe si el nivel de la batería del RoboVac es
suficiente para iniciar la limpieza.
• Los programas de limpieza se borran cuando el RoboVac
está apagado. Si el RoboVac está encendido, pero no
puede acceder a Internet, los programas de limpieza no se
sincronizarán y deberá restablecerlos desde la aplicación.
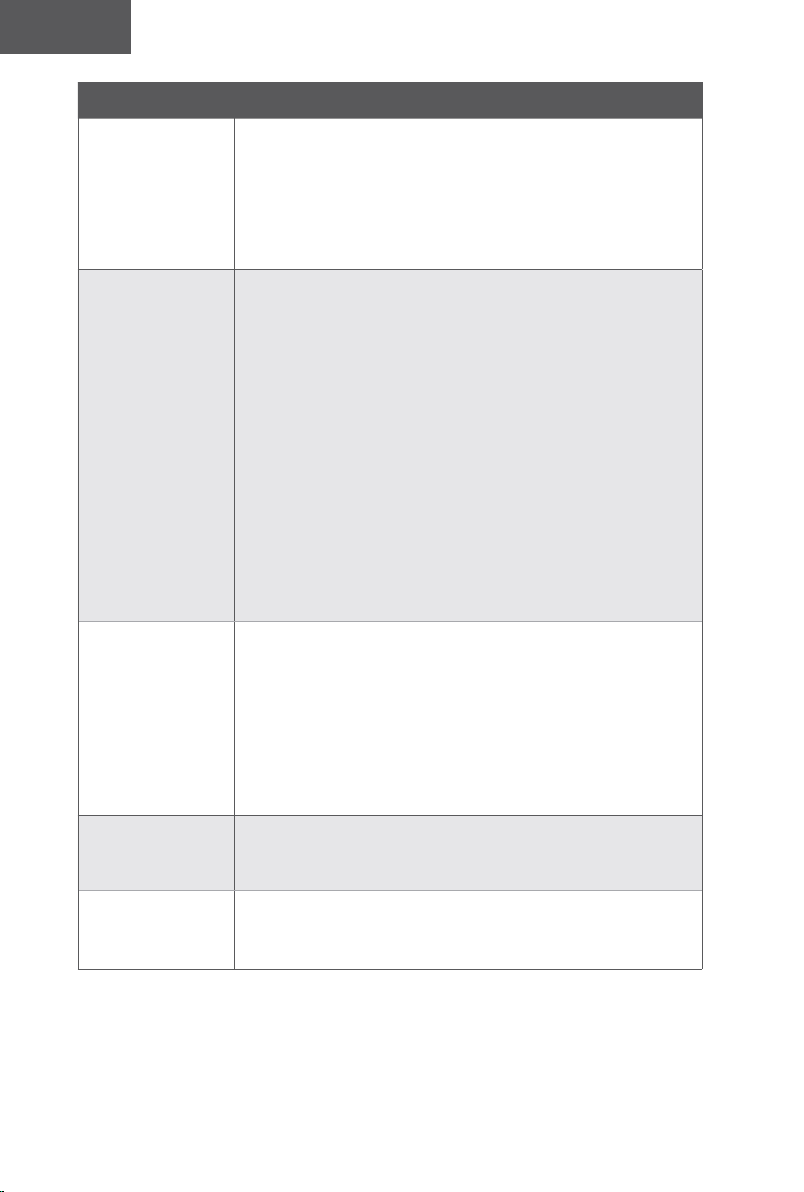
70 71
Español Español
Problemas Soluciones
La potencia de
aspiración es débil.
• Compruebe si la entrada de aspiración está bloqueada por
alguna obstrucción.
• Vacíe el recolector de polvo.
• Compruebe si los filtros están mojados debido al
agua u otro líquido en el suelo. Seque los filtros al aire
completamente antes de usar.
El RoboVac no se
carga.
• Compruebe si se ilumina el indicador de la base de carga. Si
no es así, póngase en contacto con el centro de servicio de
eufy para reparar o sustituir la base de carga.
• Compruebe si el indicador del RoboVac está en rojo
permanente y no hay ningún tono durante la carga. En
caso afirmativo, indica que la batería ha fallado. Vuelva a
instalar la batería, luego encienda y apague el RoboVac. Si
el problema persiste, comuníquese con el centro de servicio
de eufy para reparar o reemplazar la batería.
• Utilice un paño seco para quitar el polvo de los contactos
de carga.
• Compruebe si puede oír un pitido cuando el RoboVac
se conecta a la base de carga. Si no es así, póngase en
contacto con el centro de servicio de eufy para reparar o
sustituir la base de carga.
El RoboVac no
puede volver a la
base de carga.
• Retire los objetos que se encuentren a una distancia de 1 m
de los laterales de la base de carga y de 2 m de la parte
frontal.
• El RoboVac volverá más rápido si se encuentra cerca de
la base de carga. Por el contrario, si la base de carga se
encuentra lejos, el RoboVac necesitará más tiempo para
volver. Tenga paciencia mientras busca el camino de vuelta.
• Limpie los contactos de carga.
El cepillo giratorio
no gira.
• Limpie el cepillo giratorio.
• Compruebe que el cepillo giratorio y la protección del
cepillo se hayan instalado correctamente.
Los movimientos
o el recorrido
del RoboVac son
inusuales.
• Utilice un paño seco para limpiar los sensores con cuidado.
• Apague el interruptor principal y vuelva a encenderlo para
reiniciar el RoboVac.
Problemas Soluciones
El tiempo de
limpieza del
RoboVac es más
corto o inferior a
100 minutos.
• Antes de la limpieza, asegúrese de que el RoboVac esté
completamente cargado (esto se indica con la luz LED de
color azul fijo).
• El tiempo de limpieza se verá afectado por el modo de
aspiración y el tipo de suelo o alfombra que se vaya a
limpiar:
• Modo de aspiración estándar (en suelos duros):
aproximadamente 100 minutos de limpieza
• Modo BoostIQTM (en alfombras): aprox. 60 minutos de
limpieza
• Modo de aspiración máxima (en alfombras de pelo
medio): aproximadamente 40 minutos de limpieza
• Si el tiempo de limpieza del RoboVac es considerablemente
inferior a los tiempos indicados anteriormente, póngase en
contacto con el servicio de atención al cliente de eufy para
obtener asistencia.
El RoboVac no
puede conectarse a
una red Wi-Fi.
• Asegúrese de que ha introducido la contraseña de Wi-Fi
correctamente.
• Asegúrese de que el RoboVac, el router y el teléfono móvil
estén cerca, de modo que la intensidad de señal sea fuerte.
• Asegúrese de que el router inalámbrico sea compatible
con las bandas de 2,4 GHz y 802.11b/g/n (no se admite la
banda de 5 GHz). Para obtener más información, consulte
la sección “Solución de problemas > Conexión Wi-Fi” de
este manual.
No se puede
controlar el
RoboVac con Alexa
de Amazon.
• Compruebe si existe algún problema de conexión a
Internet.
• Compruebe si ha instalado la aplicación Alexa de Amazon
en el dispositivo inteligente y ha activado la habilidad
“EufyHome - RoboVac” en ella. Para obtener más
información, consulte la página “Smart Integrations”
(Integraciones inteligentes) de la aplicación EufyHome.
• Asegúrese de tener una cuenta de EufyHome y de que ha
establecido conexión con el RoboVac.
• Asegúrese de que está utilizando los comandos de voz
correctos cuando le habla a Alexa.
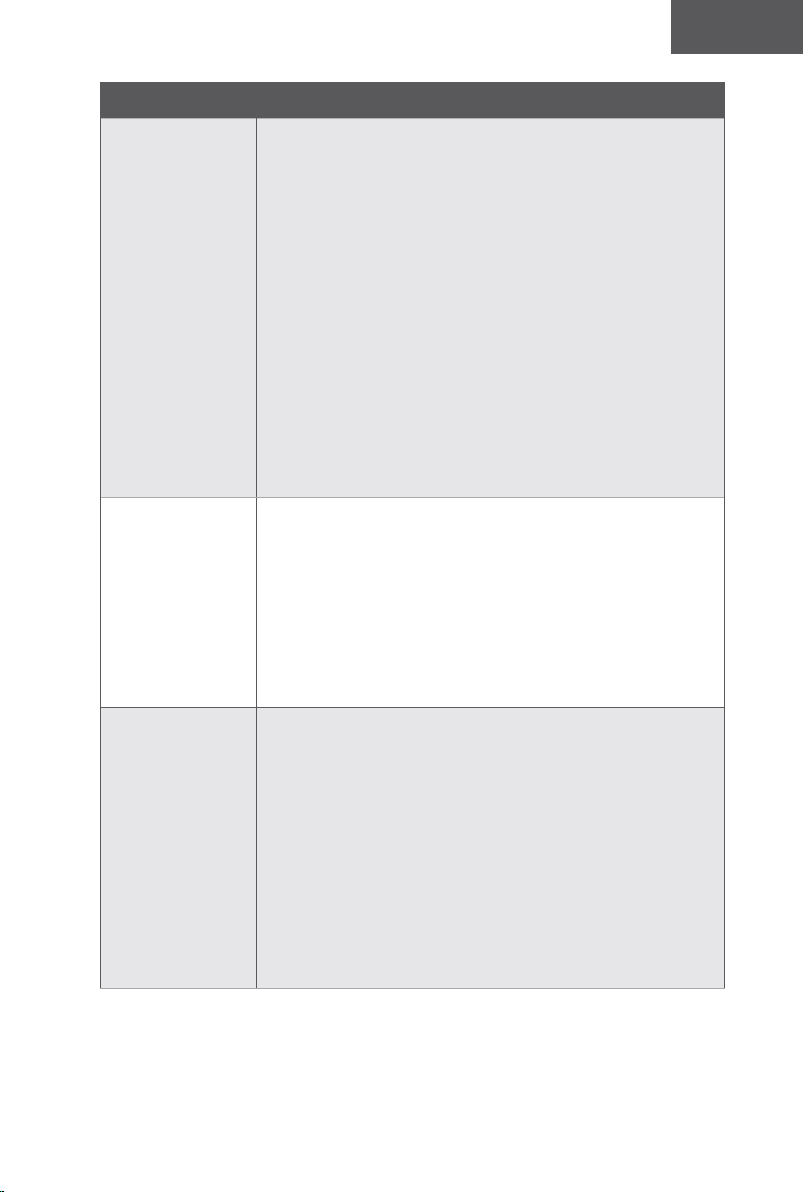
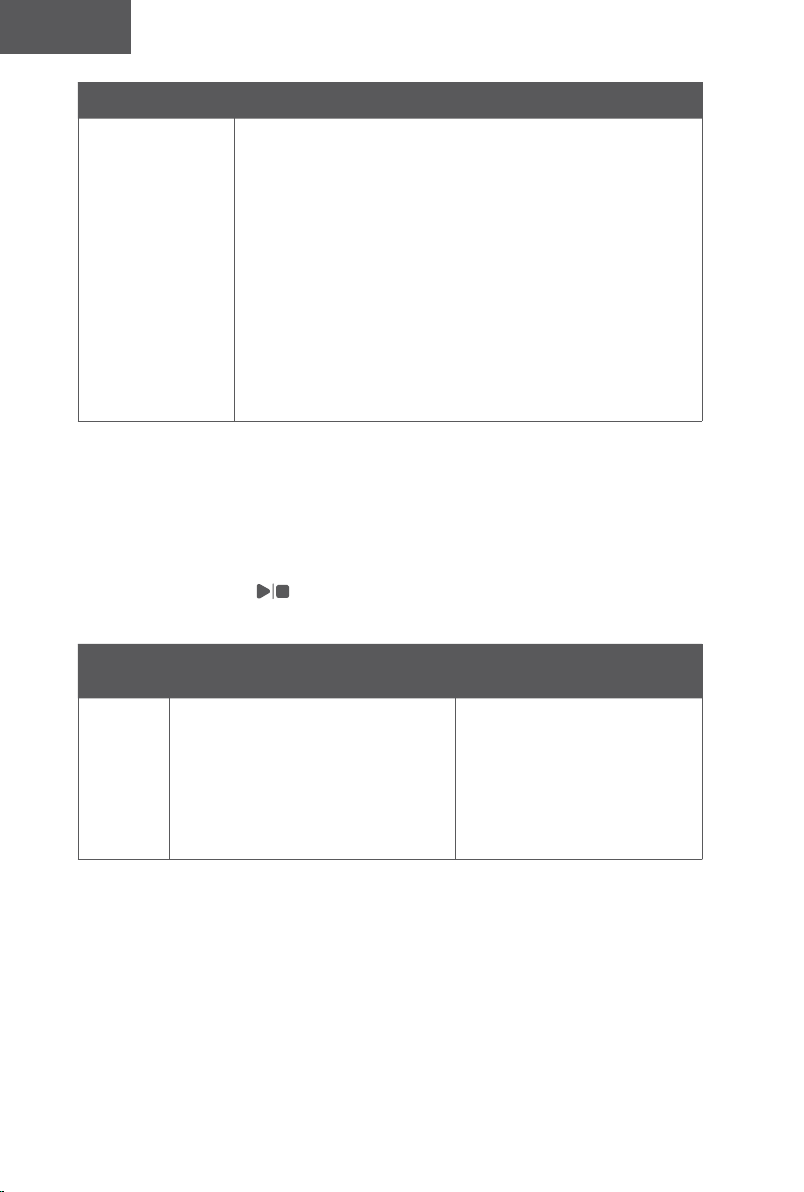
72 73
Español Español
Problemas Soluciones
No se puede
controlar el
RoboVac con
el Asistente de
Google.
• Compruebe si existe algún problema de conexión a
Internet.
• Compruebe si ha instalado la aplicación Google Home en el
dispositivo inteligente y ha iniciado la acción “EufyHome”
en ella. Para obtener más información, consulte la página
“Smart Integrations” (Integraciones inteligentes) de la
aplicación EufyHome.
• Compruebe si está utilizando los comandos correctos
cuando le habla al Asistente de Google. Cuando realice
su solicitud, diga primero las palabras de activación “Ok
Google”.
• Repita la solicitud. Hable de forma clara al Asistente de
Google.
Tonos de error
Cuando el RoboVac tenga problemas, emitirá una serie de tonos cortos o largos y el
indicador rojo en el botón estará fijo o destellando.
Luz indicadora roja intermitente
Tono de
error
Causas Solución
Un tono
• El RoboVac está atascado y una de
las ruedas no está tocando el piso
(está colgando).
• Es posible que el RoboVac esté en
una habitación extremadamente
grande y que el tope no esté
registrando obstáculos.
Reinicie la limpieza en una nueva
ubicación.
Tono de
error
Causas Solución
Dos tonos El tope del RoboVac está atascado.
Dé un golpecito en el tope del
RoboVac unas cuantas veces para
quitar cualquier suciedad que pueda
estar atrapada debajo.
Tres tonos
El RoboVac puede atascarse en los
siguientes casos:
• Cuando el RoboVac no tiene
suficiente potencia para retroceder
cuando está en el borde de una
escalera cubierta por un tapete.
• Cuando el RoboVac intenta ir hacia
atrás debido a la exposición a una
fuerte luz solar, pero no puede
hacerlo debido a barreras físicas en
el camino.
• Cuando el RoboVac va hacia atrás
debido a la exposición a un sol
fuerte, pero continúa expuesto a
un sol fuerte después de ir marcha
atrás durante 3 segundos.
• Reinicie la limpieza en una
nueva ubicación.
• Use una barrera física para
bloquear el área que pueda
presentar problemas.
Cuatro
tonos
El nivel de potencia del RoboVac es
demasiado bajo.
Cargue manualmente el RoboVac
durante al menos 5 horas.
Luz indicadora roja permanente
Tono de
error
Causas Solución
Un tono
La rueda izquierda/derecha
del RoboVac está atascada.
Apague el RoboVac y quite cualquier cabello
o suciedad que se encuentre en la rueda
izquierda/derecha.
Dos tonos
El cepillo lateral del
RoboVac está atascado.
Apague el RoboVac y quite cualquier cabello o
suciedad que se encuentre en el cepillo lateral.
Tres tonos
El ventilador de succión del
RoboVac está atascado.
• Apague el RoboVac, luego retire y vacíe
el colector de polvo.
• Asegúrese de que la entrada de succión
no esté bloqueada por cabellos o
suciedad.
Cuatro tonos
El cepillo giratorio del
RoboVac está atascado.
Apague el RoboVac y quite cualquier cabello o
suciedad que se encuentre en el cepillo giratorio.
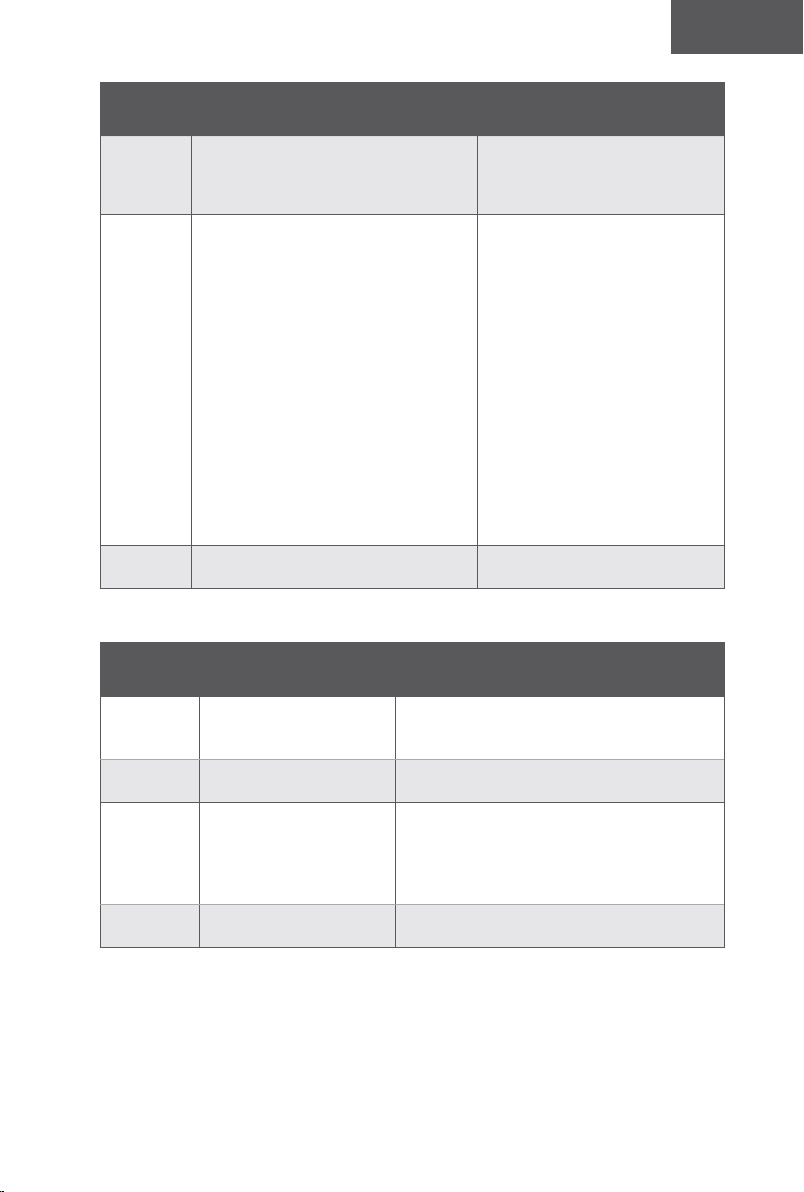

74 75
Español Español
Conexión Wi-Fi
Antes de configurar la conexión Wi-Fi, asegúrese de que el RoboVac y la red Wi-Fi
cumplan los siguientes requisitos.
Requisitos de configuración Wi-Fi
• RoboVac:
- El RoboVac está totalmente cargado y el interruptor de alimentación principal en la
parte inferior del RoboVac está encendido.
- La luz de estado de Wi-Fi parpadea lentamente en azul.
• Red Wi-Fi:
- Utilice la contraseña correcta de la red.
- No utilice una red privada virtual (VPN) ni un servidor proxy.
- El router Wi-Fi es compatible con 802.11b/g/n y el protocolo IPv4.
- Utilice un router de 2,4 GHz o un router de doble banda configurado para admitir
la banda de frecuencia de 2,4 GHz. El RoboVac no es compatible con la banda de
frecuencia de 5 GHz.
- Si el RoboVac no se puede conectar a la red Wi-Fi y está utilizando una red mixta de
2,4/5 GHz, cambie a una red de 2,4 GHz para la configuración de la conexión Wi-Fi.
Puede volver a cambiar una vez que la instalación se haya completado.
- Cuando realice una conexión a una red oculta, asegúrese de escribir el nombre de
red y el SSID (distingue entre mayúsculas y minúsculas) correctos, así como de
conectarse a una red inalámbrica de 2,4 GHz.
- Si utiliza un repetidor o amplificador de red, asegúrese de que el nombre de red
(SSID) y la contraseña sean los mismos que en la red principal.
- Los ajustes de firewall y de los puertos del router Wi-Fi permiten que el RoboVac se
conecte con los servidores de eufy.
Requisitos de seguridad de la red
- WPA y WPA2 con cifrado TKIP, PSK, AES/CCMP.
Canales Wi-Fi
- La Comisión Federal de Comunicaciones (FCC) exige que todos los dispositivos
inalámbricos en los Estados Unidos operen en los canales de espectro inalámbrico
de 1 a 11.
- Algunos países fuera de los EE. UU. pueden utilizar canales de espectro superiores
al canal 11. Consulte la normativa local para determinar los canales accesibles.
- En el futuro, una actualización de software permitirá que los usuarios fuera de
Norteamérica puedan acceder a los canales superiores al 11. Hasta entonces, utilice
los canales del 1 a 11.
Si no puede controlar el RoboVac con su smartphone, pruebe las siguientes soluciones para
solventar el problema. Si el problema persiste, comuníquese con el centro de servicio de
eufy para obtener asistencia.
Luz de estado
de Wi-Fi Causas Soluciones
Azul fijo
El RoboVac se ha
conectado al router,
pero no puede acceder
a Internet.
• Compruebe si el router está conectado a
Internet.
• Consulte a su proveedor de Internet para
ver si existe algún problema en la conexión
a Internet.
Azul
intermitente
rápido
El RoboVac no se
puede conectar al
router inalámbrico.
• Compruebe si ha modificado el nombre de
la red y la contraseña.
• Restablezca la conexión Wi-Fi, si es
necesario. Consulte la sección “Uso del
RoboVac con la aplicación EufyHome >
Restablecimiento de la conexión Wi-Fi” de
este manual.
Azul
intermitente
lento
La conexión Wi-Fi
se ha restablecido o
no se ha configurado
anteriormente.
• Configure la conexión Wi-Fi con el
RoboVac. Consulte la sección “Uso del
RoboVac con la aplicación EufyHome” de
este manual.
• Restablezca la conexión Wi-Fi, si es
necesario. Consulte la sección “Uso del
RoboVac con la aplicación EufyHome >
Restablecimiento de la conexión Wi-Fi” de
este manual.
Apagada
• El RoboVac está
apagado.
• El nivel de batería
del RoboVac es
bajo.
• El RoboVac se
encuentra en modo
de suspensión.
• Cargue el RoboVac acoplándolo a la base
de carga. Asegúrese de que el interruptor
de alimentación principal en la parte
inferior del RoboVac esté encendido.
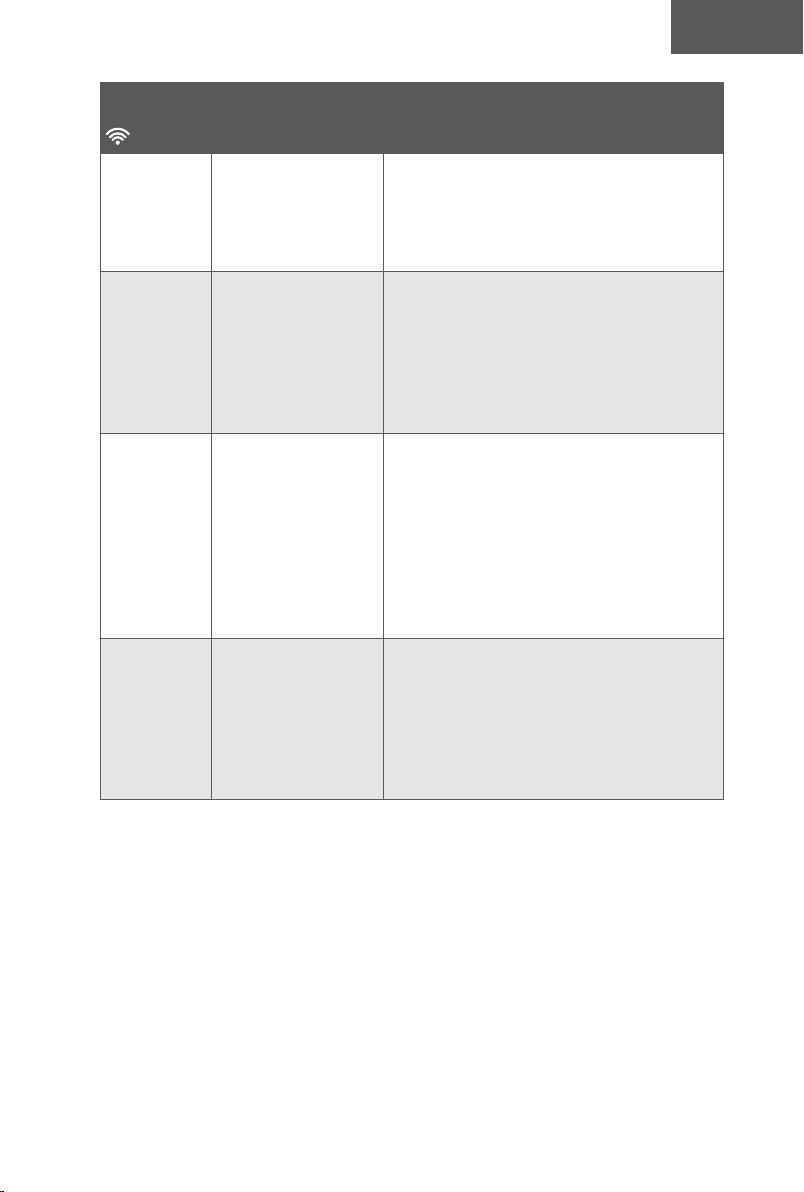
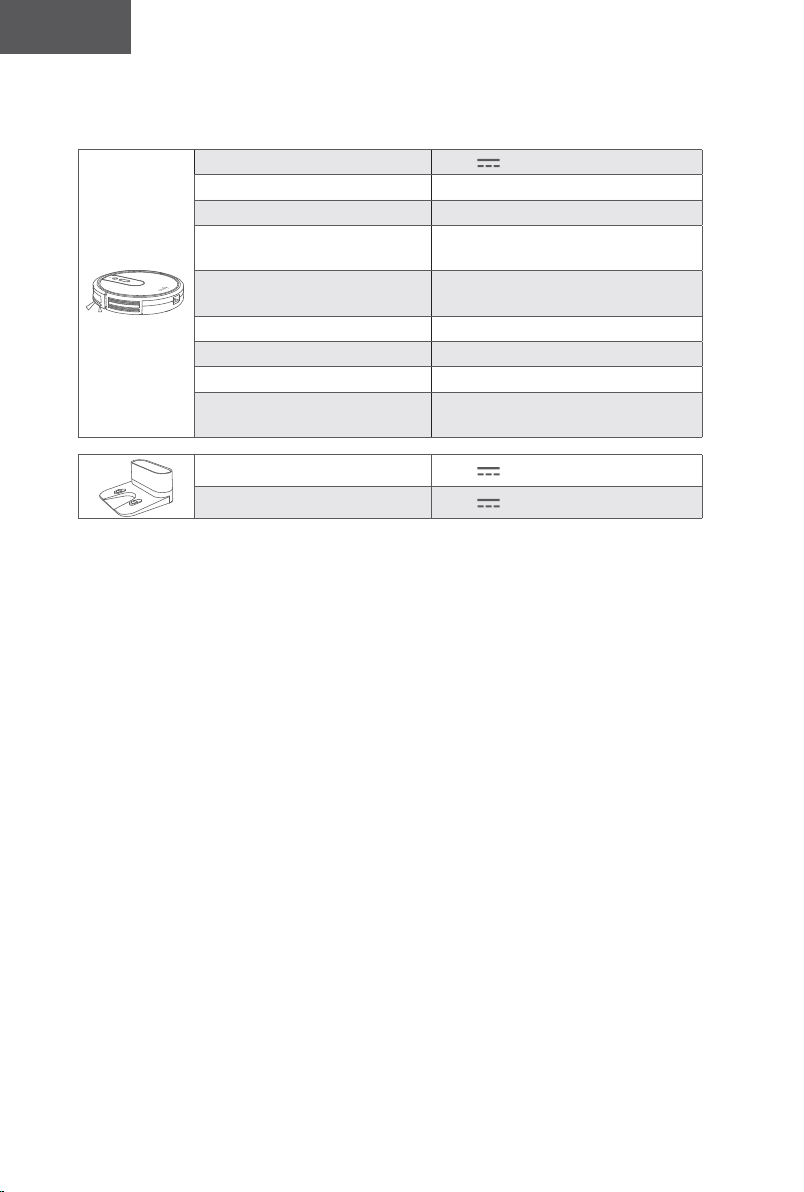
76 77
Español Español
Especificaciones
Entrada 19 V 0,6 A
Tensión de la batería CC 14,4 V
Consumo de energía 40 W
Tipo de batería
CC 14,4 V
Iones de litio de 2600 mAh
Capacidad del recolector de
polvo
0,6 l
Tiempo de limpieza 100 minutos máx.
Tiempo de carga 300-360 minutos
Temperatura de carga 5 a 40 °C
Temperatura de
almacenamiento
-20 a 60 °C
Entrada 19 V 0,6 A
Salida 19 V 0,6 A
Servicio de atención al cliente
Para acceder a las preguntas frecuentes y obtener más información, visite www.
eufylife.com.
support@eufylife.com
support.mea@anker.com (solo para Oriente Medio y África)
service@myeufy.com.au
www.eufylife.com
(US) +1 (800) 988 7973 de lunes a viernes, de 9:00 a. m. a 5:00 p. m. (hora
del Pacífico)
Reino Unido: +44 (0) 1604 936200 de lunes a viernes, de 6:00 a 11:00 (GMT)
Alemania: +49 (0) 69 9579 7960 de lunes a viernes, de 6:00 a 11:00
Oriente Medio y África: +971 42463266 de domingo a jueves, de 9:00 a
17:30 (GMT+4)
Emiratos Árabes Unidos: +971 8000320817 de domingo a jueves, de 9:00 a
17:30 (GMT+4)
Arabia Saudí: +966 8008500030 de domingo a jueves, de 8:00 a 16:30 (GMT+3)
Kuwáit: +965 22069086 de domingo a jueves, de 8:00 a 16:30 (GMT+3)
Egipto: +20 8000000826 de domingo a jueves, de 7:00 a 15:30 (GMT+2)
Corea: +82 02-1670-7098 de lunes a viernes, de 10:00 a 17:00 (GMT+1
Australia: +61 3 8331 4800 de lunes a viernes, de 8:30 a 17:00 (AEST)
@EufyOcial @EufyOcial@EufyOcial @EufyOcial

76 77
Español Español
Especificaciones
Entrada 19 V 0,6 A
Tensión de la batería CC 14,4 V
Consumo de energía 40 W
Tipo de batería
CC 14,4 V
Iones de litio de 2600 mAh
Capacidad del recolector de
polvo
0,6 l
Tiempo de limpieza 100 minutos máx.
Tiempo de carga 300-360 minutos
Temperatura de carga 5 a 40 °C
Temperatura de
almacenamiento
-20 a 60 °C
Entrada 19 V 0,6 A
Salida 19 V 0,6 A
Servicio de atención al cliente
Para acceder a las preguntas frecuentes y obtener más información, visite www.
eufylife.com.
[email protected] (solo para Oriente Medio y África)
www.eufylife.com
(US) +1 (800) 988 7973 de lunes a viernes, de 9:00 a. m. a 5:00 p. m. (hora
del Pacífico)
Reino Unido: +44 (0) 1604 936200 de lunes a viernes, de 6:00 a 11:00 (GMT)
Alemania: +49 (0) 69 9579 7960 de lunes a viernes, de 6:00 a 11:00
Oriente Medio y África: +971 42463266 de domingo a jueves, de 9:00 a
17:30 (GMT+4)
Emiratos Árabes Unidos: +971 8000320817 de domingo a jueves, de 9:00 a
17:30 (GMT+4)
Arabia Saudí: +966 8008500030 de domingo a jueves, de 8:00 a 16:30 (GMT+3)
Kuwáit: +965 22069086 de domingo a jueves, de 8:00 a 16:30 (GMT+3)
Egipto: +20 8000000826 de domingo a jueves, de 7:00 a 15:30 (GMT+2)
Corea: +82 02-1670-7098 de lunes a viernes, de 10:00 a 17:00 (GMT+1
Australia: +61 3 8331 4800 de lunes a viernes, de 8:30 a 17:00 (AEST)
@EufyOcial @EufyOcial@EufyOcial @EufyOcial

78 79
Türk Türk
RoboVac’ısatınaldığınıziçinteşekkürederiz.Buürünükullanmadan
öncetümtalimatlarıokuyunvedahasonrabaşvurmaküzerekılavuzu
uygunbirşekildesaklayın.
79 ÖnemliGüvenlikTalimatları
85 RoboVac’ınızhakkında
Kutuİçeriği
RoboVac Anatomisi
LED Göstergesi
89 RoboVac’ınızıKullanma
KullanımÖncesiÖnemliİpuçları
Hazırlık
RoboVac’ınızıŞarjEtme
RoboVac’ınızıEufyHomeUygulamasıile
Kullanma
TemizliğiBaşlatma/Durdurma
TemizlemeModuSeçme
RoboVac'ınızıAmazonAlexa/Google
Asistan ile Kullanma
95 TemizlikveBakım
TozHaznesiveFiltreTemizliği
DönerFırçaTemizliği
YanFırçalarıTemizleme
YanFırçalarıDeğiştirme
SensörlerveŞarjPimlerininTemizliği
DönerTekerlekTemizliği
105 Sorungiderme
110 TeknikÖzellikler
112 MüşteriHizmetleri
İçindekiler
Önemli Güvenlik Talimatları
Bu cihazı kurarken, kullanırken ve bakımını yaparken
yaralanma veya hasar riskini azaltmak için bu güvenlik
talimatlarını dikkatlice okuyun ve elinizin altında bulundurun.
KULLANILAN UYARI SEMBOLLERİ
Bu, güvenlik uyarısı sembolüdür. Bu sembol, sizi maddi
hasar ve/veya ciddi fiziksel yaralanmalar veya ölümle
sonuçlanabilecek olası tehlikeler konusunda uyarır.
• Yalnızca ev içi ve kapalı alanda kullanım içindir.
• Yalnızca bu kılavuzda açıklanan şekilde kullanın. Yalnızca
üreticinin önerdiği aksesuarları kullanın.
• Kablonun veya fişin hasarlı olması durumunda cihazı
kullanmayın. Cihaz gerektiği gibi çalışmıyorsa, düştüyse,
hasar gördüyse, dışarıda bırakıldıysa ya da suya düştüyse
cihazı servis merkezine götürün.
• Cihazı kablosundan tutup çekmeyin veya taşımayın, kabloyu
tutma yeri olarak kullanmayın, kablonun üzerine kapı
kapatmayın ya da kabloyu sivri köşelerden veya kenarlardan
geçirmeyin. Cihazı kablosunun üzerinde çalıştırmayın.
Kabloyu sıcak yüzeylerden uzak tutun.
• Cihazı kablosundan çekerek prizden çıkarmayın. Prizden
çıkarmak için kabloyu değil fişi tutun.
• Elleriniz ıslakken fişi veya cihazı tutmayın.
• Deliklere herhangi bir nesne sokmayın. Delikleri tıkalı
olduğunda cihazı kullanmayın.
• Saçlarınızı, bol kıyafetlerinizi, parmaklarınızı ve vücudunuzun
geri kalanını açık ve hareketli parçalardan uzak tutun.
• Fişi çekmeden önce tüm kontrolleri kapatın.
• Merdivenleri temizlerken ekstra özen gösterin.
• Benzin gibi yanıcı veya patlayıcı sıvıları temizlemek için ya da
bu tür sıvıların bulunduğu yerlerde kullanmayın.
• Diğer cihazların kablolarını temizlenecek yerden uzaklaştırın.
• Bu cihazı bebeğin veya çocuğun uyuduğu odalarda
kullanmayın.
• Bu cihazı temizlenecek zeminde narin nesnelerin olduğu
yerlerde kullanmayın.
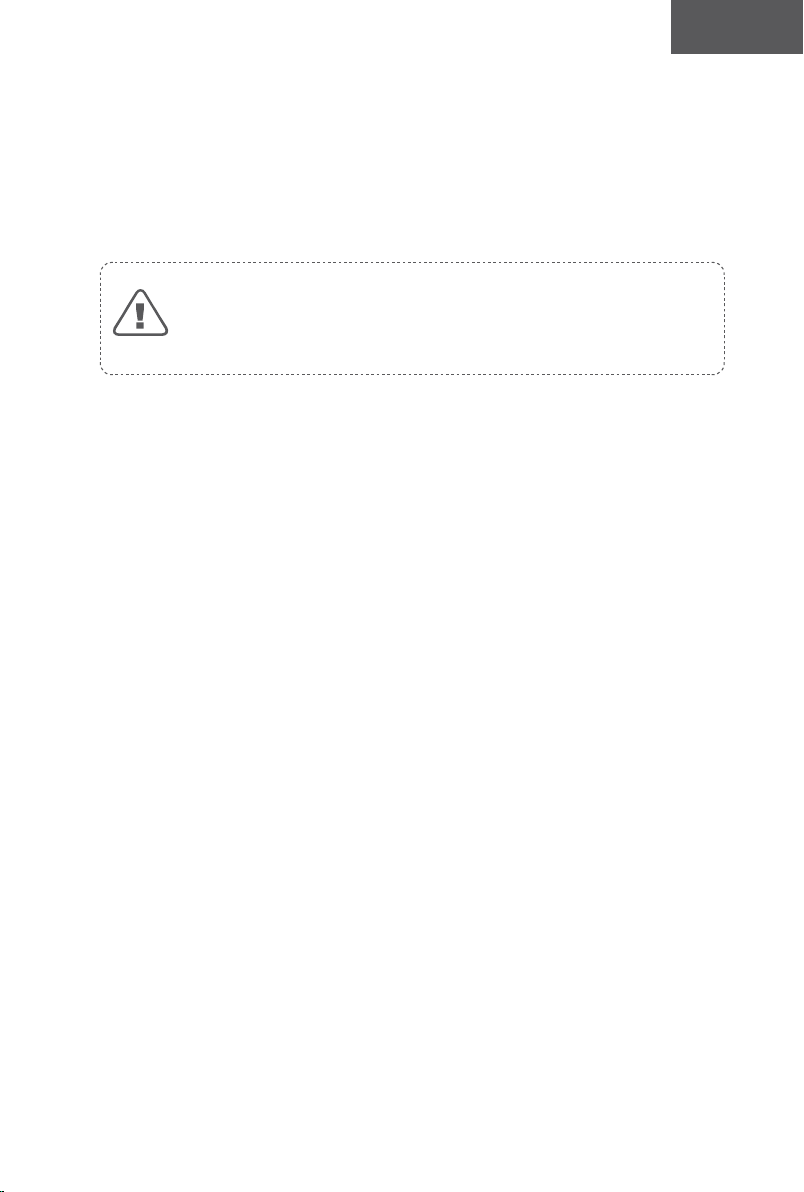

80 81
Türk Türk
• Bu cihazı, üzerinde yanan mum bulunan mobilyaların olduğu
ve süpürgenin kazara çarparak bunları düşürebileceği
odalarda kullanmayın.
• Bu cihazı ıslak yüzeylerde kullanmayın.
• Bu cihazı toz haznesi ve/veya filtreleri takılı olmadan
kullanmayın.
• Cihazı elinize almadan veya taşımadan önce beklenmedik
şekilde çalışmasını önlemek için güç düğmesinin kapalı
olduğundan emin olun.
• Ekstrem koşullar altında pilden sıvı sızabilir; bu durum
ortaya çıkarsa pile temas etmekten kaçının. Kazara pile
temas ederseniz temas bölgesini su ve sabunla iyice
yıkayın. Sıvının gözünüze temas etmesi durumunda derhal
tıbbi yardım alın. Pilden sızan sıvı tahrişe veya yanıklara
sebep olabilir.
• Bu cihazı ateşe veya aşırı sıcaklıklara maruz bırakmayın.
Ateşe veya 130°C / 265°F üzeri sıcaklıklara maruz kalması
patlamaya sebep olabilir.
• Tüm şarj etme talimatlarına uyun ve pil takımını veya
cihazı talimatlarda belirtilen sıcaklık aralığı dışında
şarj etmeyin. Uygunsuz şekilde veya belirtilen aralığın
dışındaki sıcaklıklarda şarj edilmesi pile zarar verebilir ve
yangın riskini artırabilir.
• Yalnızca eşdeğer yedek parçalar kullanan nitelikli bir tamir
personelinden servis hizmeti alın. Bu sayede ürünün
güvenli olduğundan emin olunabilir.
• Kullanım ve bakım talimatlarında belirtilenler haricinde
cihazda değişiklik yapmayın veya cihazı onarmayı
denemeyin.
• 8 yaş ve üzeri çocuklar ile fiziksel, duyusal veya zihinsel
engeli olan ya da deneyim ve bilgi sahibi olmayan
kişiler bu cihazı yalnızca gözetim altında olmaları veya
kendilerine bu cihazın güvenli bir şekilde kullanımıyla
ilgili bilgi verilmesi ve ilgili tehlikeleri anlamaları kaydıyla
kullanabilir.
• Çocukların bu cihazla oynamamasına dikkat edilmelidir.
• Temizlik ve bakım, bir yetişkin gözetiminde olmayan çocuklar
tarafından yapılmamalıdır.
• Bu cihaz temizlenmeden veya bakımı yapılmadan önce
prizden çıkarılmalıdır.
• Cihazda yalnızca uzman kişiler tarafından değiştirilebilen pil
bulunmaktadır.
• Pili çıkarılırken cihazın ana şebeke bağlantısı kesilmelidir.
• Eski ve Yeni Pilleri Karıştırmayın.
• Standart Alkali (Karbon Çinko) Pilleri Şarj Edilebilir (Nikel
Kadmiyum) Pillerle Karıştırmayın.
• Pili şarj etmek için yalnızca bu cihazla birlikte gelen takılıp
çıkarılabilir güç adaptörünü (ABD: GSCU0600S019V12E
AB: GSCV0600S019V12E BK: GSCB0600S019V12E AU:
GSCS0600S019V12E) kullanın.
• Bu cihaz bertaraf edilmeden önce pil cihazdan çıkarılmalıdır.
Pili cihazdan çıkarmak için önce alt kısımdaki vidaları sökün,
ardından ana PCB parçasını çıkarın ve tornavida kullanarak
pil kapağının vidalarını sökün. Hızlı konektörün bağlantısını
keserek pili çıkarın.
• Kullanılmış pil, kapalı bir plastik torbaya konulmalı ve yerel
çevre yönetmeliklerine uygun olarak güvenli bir şekilde imha
edilmelidir.
• Güç adaptörünün harici esnek kablosu veya kordonu
değiştirilemez. Kablonun hasar görmesi durumunda güç
adaptörü atılmalıdır.
• Bu cihaz bir oyuncak değildir. Bu cihazın üzerine oturmayın
veya basmayın. Bu cihazın çalışması sırasında küçük
çocuklar ve evcil hayvanlar gözetim altında olmalıdır.
• Bu cihazı yalnızca oda sıcaklığında saklayın ve çalıştırın.
• Yalnızca suyla nemlendirilmiş bir bezle temizleyin.
• Bu cihazı sigara, kibrit ya da sıcak nesneler gibi yanan ya da
tüten herhangi bir şeyi almak için kullanmayın.
• Çamaşır suyu, boya, kimyasal birikintilerini veya ıslak
herhangi bir şeyi temizlemek için bu cihazı kullanmayın.
• Bu cihazı kullanmadan önce giysi ve dağılmış kağıtlar gibi
nesneleri toplayın. Panjur veya perdelerin kordonlarını yerden
kaldırın, kabloları ve kırılgan nesneleri yoldan çekin. Bu cihaz
bir güç kablosunun üzerinden geçip onu sürüklerse, masada
veya rafta duran eşyalar düşebilir.
• Temizlenecek odanın balkonu varsa, balkona erişimi
engellemek ve güvenli çalışmayı sağlamak için bir bariyer
kullanılmalıdır.
• Bu cihazın üstüne hiçbir şey koymayın.
• Bu cihazın kendi kendine hareket ettiğini unutmayın. Bu
cihazın çalıştığı alanda yürürken üzerine basmamak için
dikkatli olun.
82 83
Türk Türk
• Bu cihazı yerde açıkta elektrik prizleri olan alanlarda
çalıştırmayın.
• Bu cihazın elektronik parçalarını, pilini veya entegre Şarj
İstasyonunu açıkta bırakmayın. İçerisinde bakımı kullanıcı
tarafından yapılabilecek parçalar bulunmamaktadır.
• Bu cihazı bitmemiş, kaplamasız, cilalı veya pürüzlü zeminler
üzerinde kullanmayın. Bu durum zemine ve bu cihaza zarar
verebilir. Yalnızca sert zemin yüzeylerde veya az tüylü
halılarda kullanın.
• Bu cihaz, zeminlerde, zemini çizmeden kullanılacak şekilde
tasarlanmıştır. Yine de, tüm odayı temizlemeden önce çiziğe
sebep olmadığından emin olmak için bu cihazı temizlenecek
odanın küçük bir alanında test etmenizi öneririz.
BU TALİMATLARI GÖZ ÖNÜNDE
BULUNDURUN
Bilgi Notu
Cihazın veya ambalajının üzerindeki bu sembol
aşağıdaki anlamları taşır:
Elektrikli aletleri sınıflandırılmamış kentsel atık
olarak atmayın; ayrı toplama tesislerini kullanın.
Mevcut toplama sistemleriyle ilgili bilgi almak için
bölgenizdeki yetkili kuruma başvurun. Elektrikli
cihazlar katı atık sahalarına veya çöplüklere atılırsa,
tehlikeli maddeler yeraltı suyuna sızabilir ve besin
zincirine girerek sağlığınıza zarar verebilir. Eski
cihazları yenileriyle değiştirirken, perakendeci yasal
olarak en azından eski cihazınızı ücretsiz olarak
bertaraf etmek üzere geri almakla yükümlüdür.
FCC Beyanı
Bu cihaz, FCC Kuralları Bölüm 15'e uygundur. Kullanım
aşağıdaki iki şarta tabidir: (1) Bu cihaz zararlı parazite neden
olmamalıdır ve (2) bu cihaz, istenmeyen kullanıma neden
olabilecek parazit dahil, alınan her tür paraziti kabul etmelidir.
Uyarı: Uyumluluktan sorumlu tarafın açıkça onaylamadığı
değişiklikler veya modifikasyonlar, kullanıcının ekipmanı
çalıştırma yetkisini geçersiz kılabilir.
Not: Bu ekipman, FCC Kuralları Bölüm 15 uyarınca test
edilmiş ve B Sınıfı dijital cihaz sınırlarına uygun olduğu tespit
edilmiştir. Bu kısıtlamalar, yerleşim alanlarındaki kurulumlarda,
zararlı girişimlere karşı makul koruma sağlamak üzere
tasarlanmıştır.
Bu ekipman radyo frekansı enerjisi oluşturur, kullanır
ve yayabilir; talimatlara uygun biçimde kurulmaması
ve kullanılmaması durumunda, radyo iletişimine zararlı
girişimlere neden olabilir. Ancak, belli bir kurulumda girişim
oluşmayacağına dair bir garanti verilmez. Bu ekipman radyo
ve televizyon alıcılarında, cihazın kapatılması ve açılmasıyla
anlaşılacak zararlı girişimler oluşmasına neden olursa,
kullanıcı aşağıdaki önlemleri uygulayarak girişimleri gidermeyi
deneyebilir: (1) Alıcı anteninin yönünü veya yerini değiştirmek.
(2) Ekipman ile alıcı arasındaki mesafeyi artırmak. (3)
Ekipmanı, alıcının bağlı olduğu devreden farklı bir devredeki
çıkış noktasına bağlamak. (4) Yardım için satıcıya veya
deneyimli bir radyo/TV teknisyenine danışmak.
Aşağıdaki ithalatçı sorumlu taraftır (yalnızca FCC konuları
için).
Şirket Adı: POWER MOBILE LIFE, LLC
Adres: 400 108th Ave NE Ste 400, Bellevue, WA 98004-5541
Telefon: +1 (800) 988 7973
ISED Uygunluk Beyanı
Bu cihaz, Innovation, Science and Economic Development
Canada lisansından muaf RSS'ler ile uyumlu olan lisanstan
muaf vericilere/alıcılara sahiptir. Kullanım aşağıdaki iki şarta
tabidir:

84 85
Türk Türk
1. Bu cihaz girişime neden olamaz.
2. Bu cihaz, cihazın istenmeyen şekilde çalışmasına neden
olacak girişimler dahil her türlü girişimi kabul etmelidir.
Uygunluk Beyanı
Anker Innovations Limited, bu belge ile T2132 ürün tipinin
2014/53/EU Direktifi ile uyumlu olduğunu beyan eder.
AB Uygunluk beyanının tam metni aşağıdaki internet
adresinde mevcuttur:
https://www.eufylife.com/
Anker Innovations Limited
Room 1318-19, Hollywood Plaza, 610 Nathan Road, Mongkok,
Kowloon, Hong Kong
Maksimum çıkış gücü: 14 dBm
Frekans bandı: 2,4 G bandı (2,4000 GHz - 2,4835 GHz)
Ticari Marka Bildirimi
• Amazon, Echo, Alexa ve tüm ilgili logolar, Amazon.com, Inc.
veya iştiraklerinin ticari markalarıdır.
• Apple ve Apple logosu, Apple Inc.'in ABD ve diğer ülkelerde
tescilli ticari markalarıdır. App Store, Apple Inc.'in ABD ve
diğer ülkelerde tescilli hizmet markasıdır.
• Google Play ve Google Play logosu, Google Inc. şirketinin
ticari markalarıdır.
• Google Home, Google Inc.'in ticari markasıdır.
RoboVac’ınız hakkında
Kutu İçeriği
RoboVac
Güç Adaptörü
Yedek Filtre Kablo Bağları (5 adet) Kullanım Kılavuzu
ve Diğer Belgeler
Temizleme
Aleti
Yan Fırçalar
(×4)
Şarj İstasyonu Uzaktan Kumanda
(AAA Pil x2)
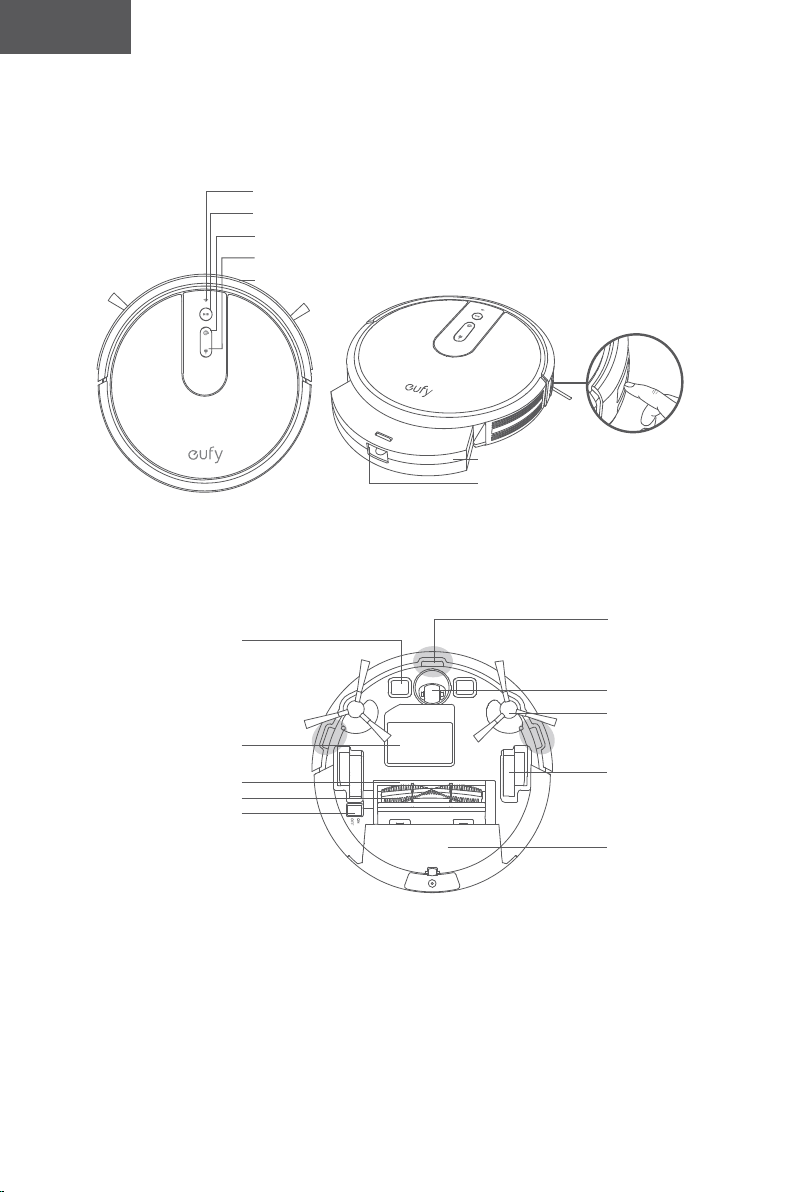
86 87
Türk Türk
RoboVac Anatomisi
A. Üst & Yan
B. Alt
Wi-Fi Durum Işığı
Otomatik temizlik Başlat/Duraklat düğmesi
Spot temizlik düğmesi
Yeniden şarj düğmesi
Tampon
Kızılötesi sensör
Toz haznesi
Toz haznesini serbest bırakma
düğmesi
Şarj temas pimleri
Pil bölmesi
Fırça Koruyucu
Döner Fırça
Ana güç düğmesi
(Açık/Kapalı)
Düşme sensörleri
Döner Tekerlek
Yan Fırçalar
Tekerlekler
Toz Haznesi
C. Toz Haznesi
D. Emme Girişi
E. Şarj İstasyonu
Filtre
Toz Haznesi
Emme Girişi
Durum ışığı
Şarj temas
pimleri
Güç Girişi
Güç kablosu saklama
bölmesi
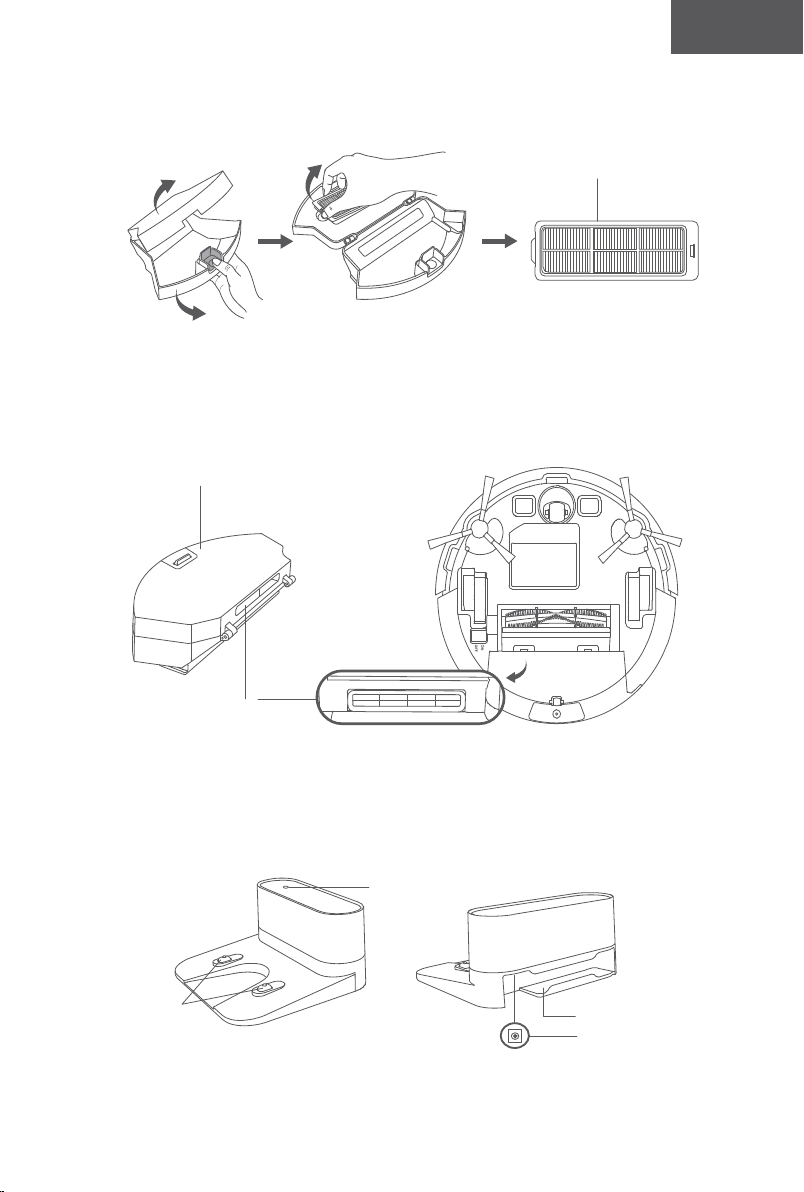

88 89
Türk Türk
Uzaktan Kumanda
1
3
5
7
2
4
6
8
Uzaktan kumandayı ilk kez kullanmadan önce 2 adet AAA pil takın. Artı ve eksi
uçların pil bölmesinde işaretlendiği gibi doğru kutup yönüne baktığından emin
olun.
Düğmeler ve Göstergeler
Temizliği Başlat/Durdur
Wi-Fi Bağlantısını sıfırla (RoboVac bip sesi çıkarana kadar 10
saniye basılı tutun)
• Sabit Mavi: beklemede veya temizliyor
• Yanıp Sönen/Sabit kırmızı: hata
*Çözüm için bu kılavuzdaki "Sorun Giderme > Hata Sesi"
bölümüne bakın.
Spot Temizlik
• Yanıp sönen mavi: Spot Modu
Şarj İstasyonuna Dön
• Yanıp sönen mavi: şarj istasyonuna dönüyor
• Yanıp sönen turuncu: düşük güç ve şarj istasyonuna dönüyor
• Soluk turuncu (şarj istasyonuna yanaştığında): şarj oluyor
• Sabit mavi (şarj istasyonunda takılıyken): tamamen şarj oldu
• EufyHome uygulaması üzerinden Robotumu Bul işlevini kullandığınızda, üç LED
göstergesi birden mavi renkte yanıp söner ve RoboVac bir defa bip sesi çıkarır.
• Güç tasarrufu için, aşağıdaki durumlarda tüm LED göstergeleri otomatik olarak
sönecektir:
• RoboVac, Şarj İstasyonuna takılı değilse ve 10 dakikadır çalışır durumda
değilse;
• RoboVac, tam olarak şarj olduktan sonra 10 dakika geçtiğinde.
1
RoboVac'ı Şarj İstasyonuna döndür
2
Emme gücü seviyesini ayarlama
3
Otomatik temizlik başlat/Temizliği duraklat
4
Temizlik yönünü manuel olarak ayarla
5
Otomatik temizliği başlat
6
Kenar temizliğini başlat
7
Spot temizliği başlat
8
Hızlı temizlik başlat
(Wi-Fi Durum Işığı)
Durum
Yavaş yanıp sönen mavi: Bağlantı için bekleniyor
Hızlı yanıp sönen mavi Kablosuz yönlendiricinize bağlanıyor
Sabit mavi Kablosuz yönlendiricinize bağlandı
RoboVac’ınızı Kullanma
Kullanım Öncesi Önemli İpuçları
a
b
c
d
e
f
a
RoboVac'a engel olabilecek güç kablolarını ve küçük nesneleri yerden kaldırın.
Kablolarınızı ve güç kablolarınızı düzenlemek için ürünle birlikte verilen kablo bağlarını
kullanabilirsiniz.
b
RoboVac'ın dolanmasını önlemek için parça halıların püsküllü kenarlarını altına katlayın.
RoboVac'ın arızalanmasına sebep olabileceği için çok koyu renkli halıları veya tüyleri
1,02 inç/26 mm'den kalın olan uzun tüylü halıları temizlemekten kaçının.
c
RoboVac'ın sıkışmasını önlemek için 73 mm/2,87 inç'ten daha alçak boşluklu
alanlardan uzak tutun. Gerekirse, sorunlu alanları kapatmak için fiziksel bir bariyer
yerleştirin.
d
Temizlik sırasında RoboVac'ı ıslak alanlardan uzak tutun. .
e
RoboVac, yüksekliği 16 mm/0,63 inç'ten az olan nesnelerin üzerine çıkabilir. Mümkünse
bu nesneleri kaldırın.
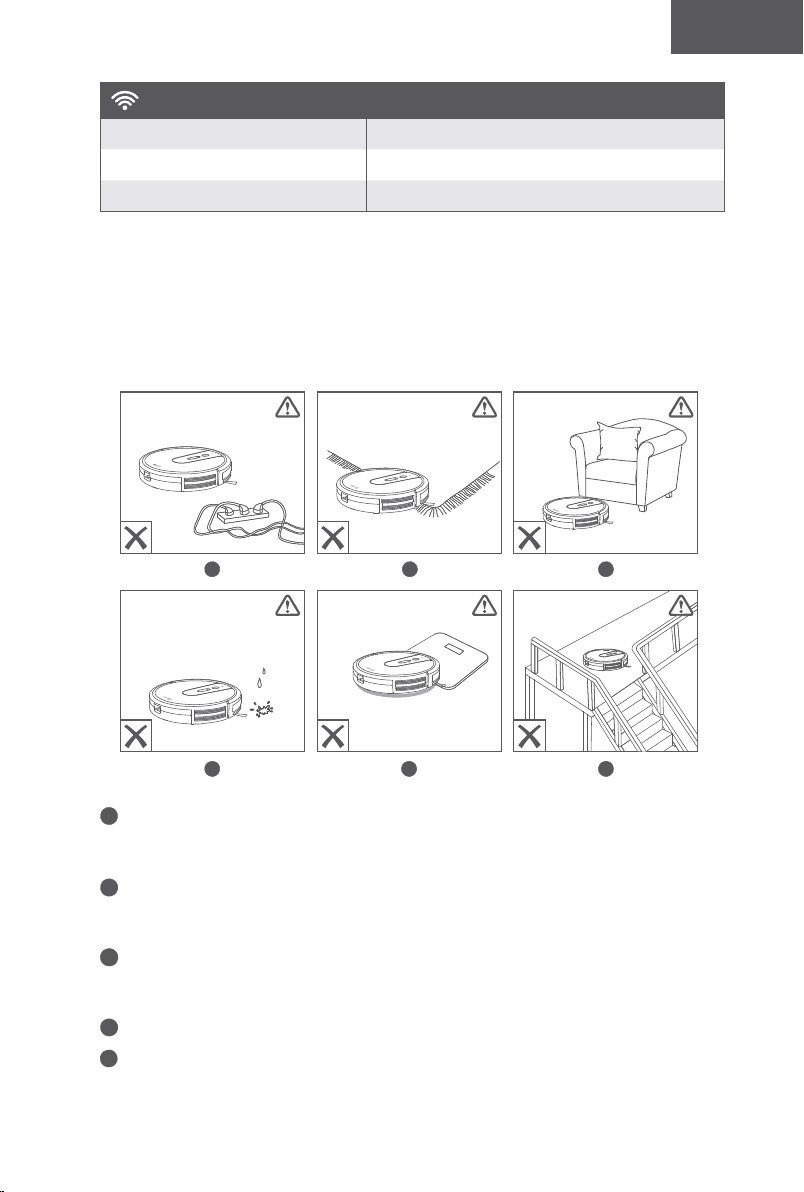
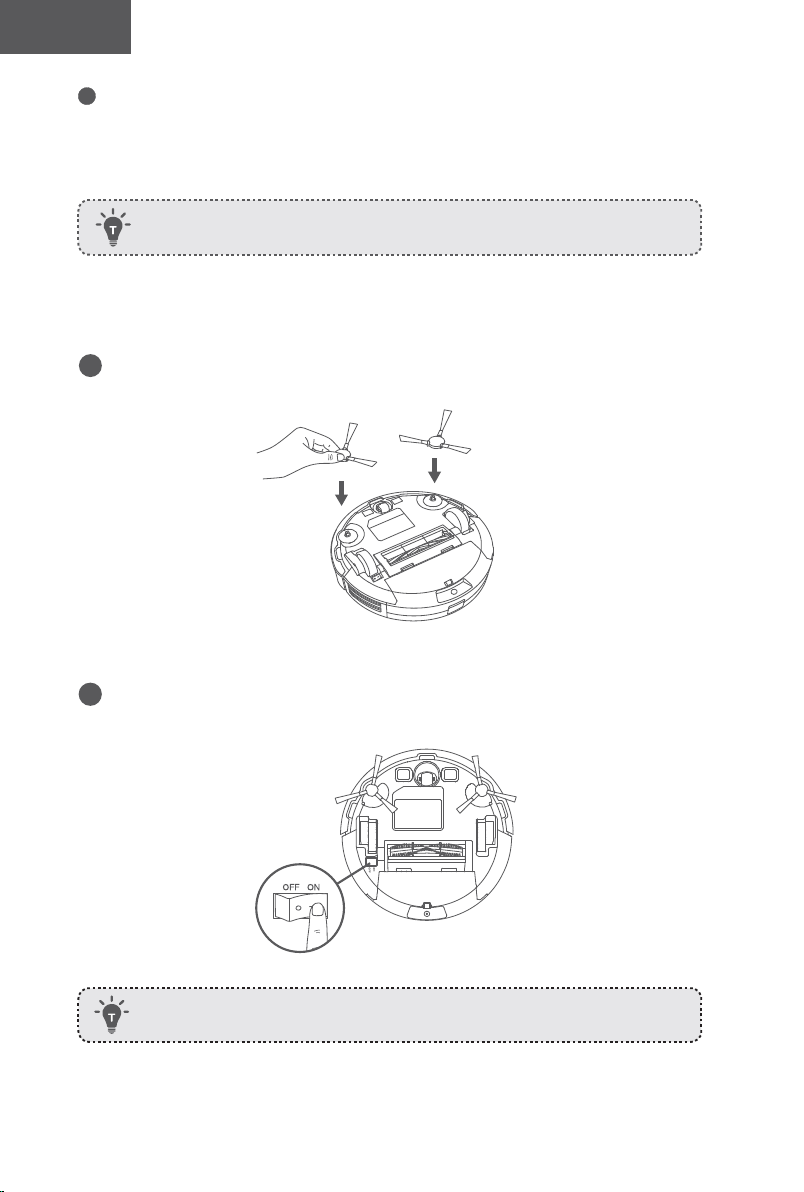
90 91
Türk Türk
f
Düşme önleyici sensörler, RoboVac'ın merdivenlerden yuvarlanmasını ve sert düşüşleri
çoğunlukla önleyebilir. Sensörler kirlenmişse veya ürün yansıma yapan/çok koyu renkli
zeminlerde kullanılıyorsa sensörlerin etkisi azalabilir. Halı kaplı merdivenler veya yuvarlak
ahşap zemin kenarları gibi RoboVac'ın düşebileceği alanları kapatmak için fiziksel engeller
yerleştirilmesi önerilir.
Hazırlık
1
Kullanım öncesi yan fırçaları takın.
2
RoboVac'ın alt kısmındaki ana güç anahtarını açın.
Kullanmadan önce güç anahtarının yanındaki etiketi ve tamponun yanındaki
köpük blokları çıkarın.
Şömine önlerine ve girildiğinde RoboVac'a zarar verebilecek alanlara fiziksel
bariyerler yerleştirin.
3
Şarj İstasyonunu duvara yaslayarak sert ve düz bir zemine yerleştirin.
4
Şarj İstasyonunun solunda ve sağında 3 ft/1 m ve ön tarafından 6 ft/2 m mesafede
bulunan nesneleri kaldırın. Nesneleri yolundan kaldıramıyorsanız RoboVac'ın Şarj
İstasyonuna normal şekilde dönüp dönemediğini kontrol edin; dönemiyorsa yardım almak
için eufy müşteri hizmetlerine başvurun.
5
Adaptörün yuvarlak konektörünü Şarj İstasyonundaki güç soketine, diğer ucunu ise
duvardaki elektrik prizine takın.
Şarj İstasyonu AC güce bağlandığında Şarj İstasyonunun üzerindeki LED
gösterge SABİT BEYAZ renkte yanar.
- Şarj İstasyonunu RoboVac'ın kolay erişebileceği bir
yere yerleştirin. Şarj İstasyonunun duvara yaslanarak
ve kilim veya halı yerine sert bir düz yüzeye
yerleştirilmesi önerilir.
- Şarj İstasyonunu her zaman prize takılı tutun, aksi takdirde
RoboVac istasyona otomatik olarak geri dönmeyecektir.
RoboVac’ınızı Şarj Etme
• RoboVac'ta önceden takılmış yeniden şarj edilebilir bir pil bulunur ve kullanım öncesi
tamamen şarj edilmelidir.
• RoboVac bir temizlik döngüsünü tamamladığında veya pili azaldığında Şarj
İstasyonuna geri dönecektir.
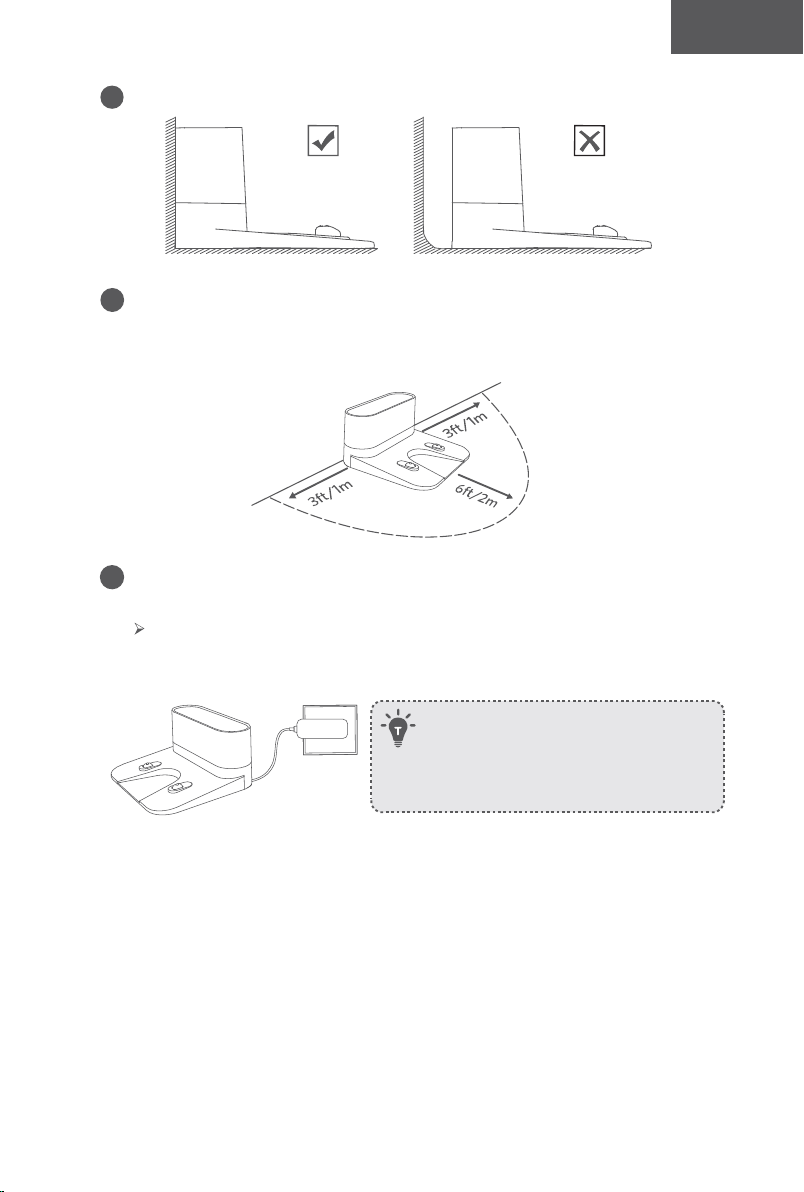
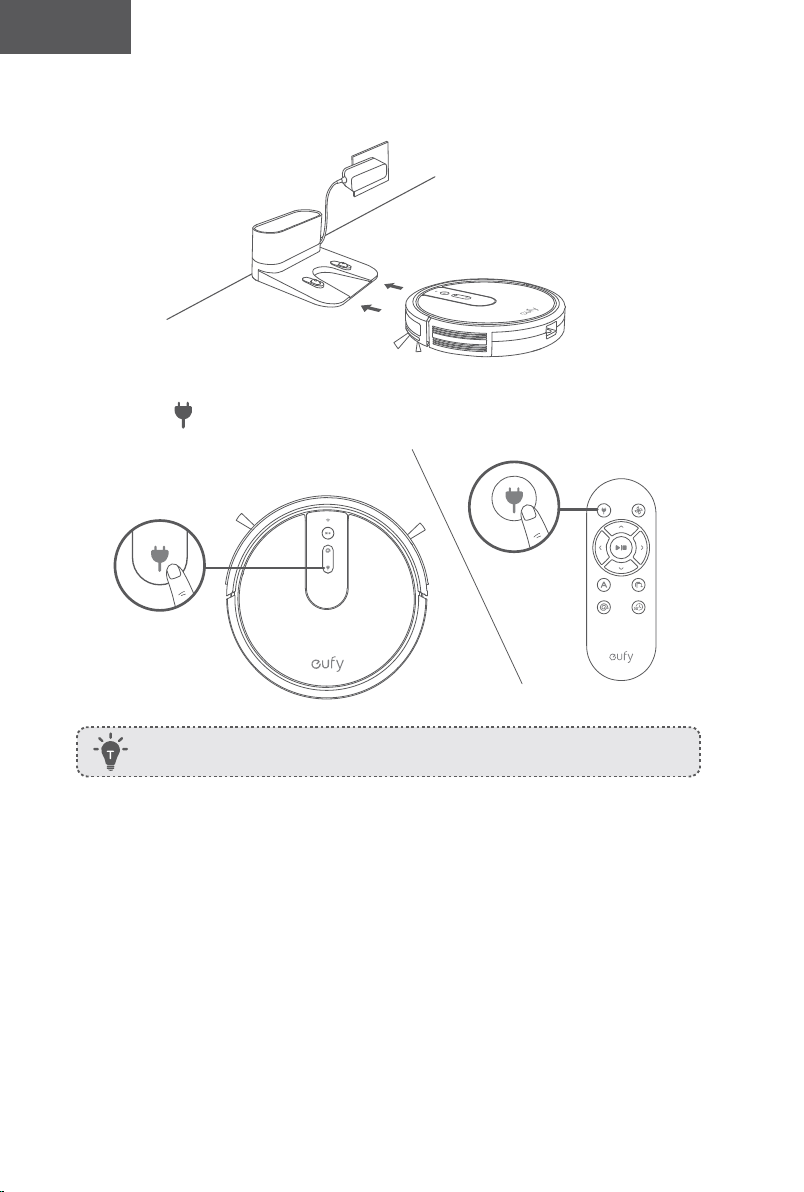
92 93
Türk Türk
1. Yöntem: Şarj pimlerini kaidedeki şarj pimleriyle hizalayarak RoboVac'ı Şarj İstasyonuna
yerleştirin.
2. Yöntem: RoboVac'ın Şarj İstasyonuna dönmesi için RoboVac üzerindeki veya uzaktan
kumandadaki tuşuna basın.
RoboVac’ınızı EufyHome Uygulaması ile Kullanma
Mevcut tüm özelliklerden yararlanmak için RoboVac'ınızı EufyHome uygulaması üzerinden
kontrol etmeniz önerilir.
Başlamadan önce aşağıdakilerden emin olun:
• Akıllı telefonunuz veya tabletiniz Wi-Fi ağına bağlı olmalıdır.
• Akıllı telefonunuz veya tabletinizde iOS 9.0 (veya üstü) veya Android 5.0 (veya
üstü) çalışıyor.
• Kablosuz yönlendiricinizde 2,4 GHz bant kablosuz sinyali etkin.
• RoboVac üzerindeki Wi-Fi durum ışığı yavaşça mavi renkte yanıp sönüyor.
• Kurulum esnasında yeterli güç olduğundan emin olmak için alt kısımdaki ana güç
düğmesinin açık ve RoboVac'ın Şarj İstasyonuna takılı olduğundan.
RoboVac uzun bir süre kullanılmayacaksa ana güç anahtarını kapatın. Pilin
ömrünü korumak için en az 6 ayda bir şarj edin.
EufyHome
EufyHome
1
App Store'dan (iOS cihazlar için) veya Google Play'den (Android cihazlar için)
EufyHome uygulamasını indirin.
2
Uygulamayı açın ve bir kullanıcı hesabı oluşturun.
3
RoboVac'ı EufyHome hesabınıza eklemek için "+" simgesine dokunun.
4
Wi-Fi bağlantısını kurmak için uygulamadaki talimatları uygulayın.
Başarıyla bağlandıktan sonra RoboVac'ı uygulama üzerinden kontrol edebilirsiniz.
Uygulamayı kullanarak temizlik modu seçebilir, saati ayarlayabilir, temizlik
programlayabilir, sistem durumunu görüntüleyebilir, bildirim alabilir ve ek özelliklere
erişebilirsiniz.
Wi-Fi Durum Işığı
Yavaş yanıp sönen mavi: Bağlantı için bekleniyor
Hızlı yanıp sönen mavi Kablosuz yönlendiricinize bağlanıyor
Sabit mavi Kablosuz yönlendiricinize bağlandı
- Wi-Fi kurulum işlemi sırasında herhangi bir sorunla karşılaşırsanız bu Kılavuzdaki "Sorun
Giderme> Wi-Fi bağlantısı" bölümüne bakın.
- RoboVac herhangi bir yerde sıkışırsa makineyi bulmak için uygulamada Robotumu Bul
öğesine dokunun. Bu işlev yalnızca uygulamada kullanılabilir.
Wi-Fi bağlantısını sıfırlama
Gerekirse Wi-Fi bağlantısını sıfırlamak için bir sesi duyulana kadar RoboVac'ın üzerindeki
düğmesini 10 saniye basılı tutun.
Wi-Fi bağlantısı sıfırlandığında bip sesi duyulacaktır ve Wi-Fi durum ışığı yavaşça
mavi renkte yanıp sönecektir. Artık Wi-Fi bağlantısını ayarlamak için EufyHome
uygulamasındaki Wi-Fi talimatlarını izleyebilirsiniz.
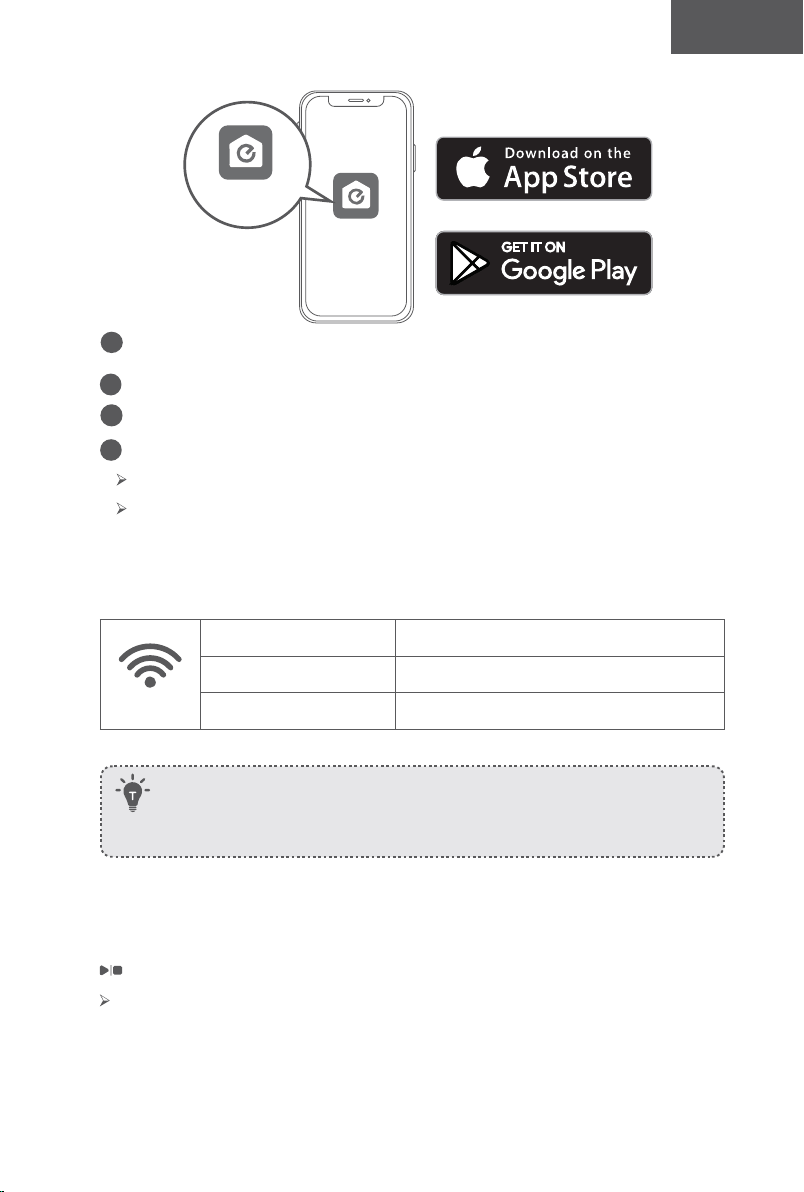
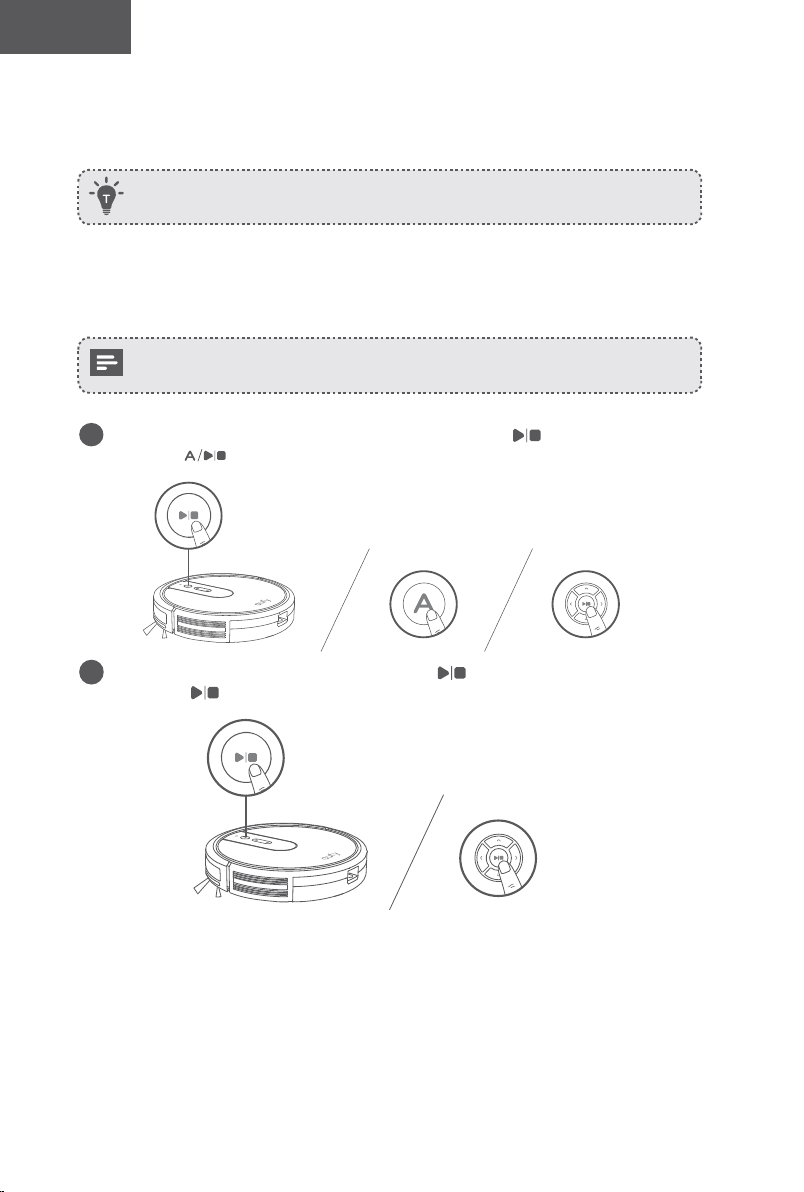
94 95
Türk Türk
Temizliği Programlama
EufyHome uygulamasıyla, RoboVac'ı belirli bir zamanda temizliğe başlayacak şekilde
programlayabilirsiniz.
EufyHome uygulamasında saati ayarlayabilir ve Pazardan Cumartesiye temizlik
programlarını özelleştirebilirsiniz. Bu işlev yalnızca uygulamada kullanılabilir.
Temizliği Başlatma / Durdurma
- Kullanmadan önce RoboVac'ın alt kısmındaki ana güç düğmesinin açık olduğundan
emin olun.
- EufyHome uygulaması üzerinden de temizliği başlatabilir veya durdurabilirsiniz.
1
Temizliği Otomatik Modda başlatmak için RoboVac'ın üzerindeki düğmesine veya uzaktan
kumandaki düğmesine basın.
2
Temizliği durdurmak için RoboVac'ın üzerindeki düğmesine veya uzaktan
kumandaki düğmesine basın.
Temizleme Modu Seçme
Ayrıca EufyHome uygulaması üzerinden bir temizlik modu da seçebilirsiniz.
1. Otomatik temizlik
RoboVac, temizlik tamamlanana kadar farklı temizleme modlarını otomatik olarak seçerek
en iyi temizlik yolunu belirler. Bu mod en yaygın kullanılan temizlik modudur.
Temizliği Otomatik Modda başlatmak için RoboVac'ın üzerindeki düğmesine veya
uzaktan kumandaki düğmesine basın.
- RoboVac, pil seviyesi azaldığında veya temizliği bitirdiğinde otomatik olarak Şarj
İstasyonuna geri dönecektir.
- RoboVac varsayılan olarak Otomatik temizlik modunda açılmaktadır.
BoostIQ™ Özelliği
BoostIQ özelliği etkinken RoboVac en iyi temizlik için daha fazla güç gerektiğini tespit
ederse emiş gücünü otomatik olarak artıracaktır. BoostIQ™, daha kalın halıları ve
süpürmesi zor kirleri temizlemek için ideal olup, toplam temizlik süresini azaltacak ancak
gürültü seviyesini artıracaktır. BoostIQ™'nun neden olduğu vakumlama sesi sizi rahatsız
ediyorsa bu özelliği devre dışı bırakabilirsiniz. Bu özellik yalnızca Otomatik ve Hızlı temizlik
modlarında çalışır.
Otomatik veya Hızlı temizlik modunda emiş gücü seviyesini ayarlamak için uzaktan
kumandadaki tuşuna tekrar tekrar basın.
Uzaktan kumandada ilgili simge görüntülenecektir.
Emiş Gücü Seviyesi Bip sesleri
Standart güç
BoostIQ™
(Varsayılan seçimi, Standart ve Gelişmiş güç arasında otomatik olarak geçiş
yapar)
Maksimum güç
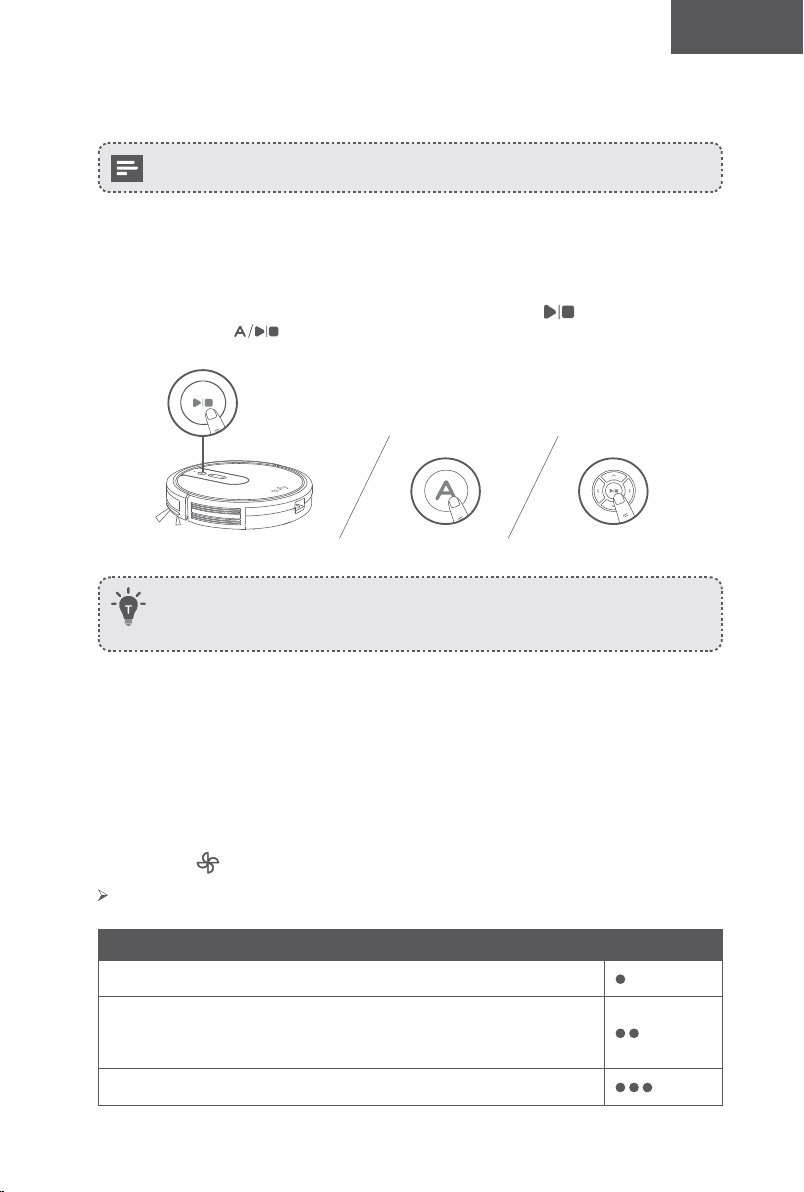
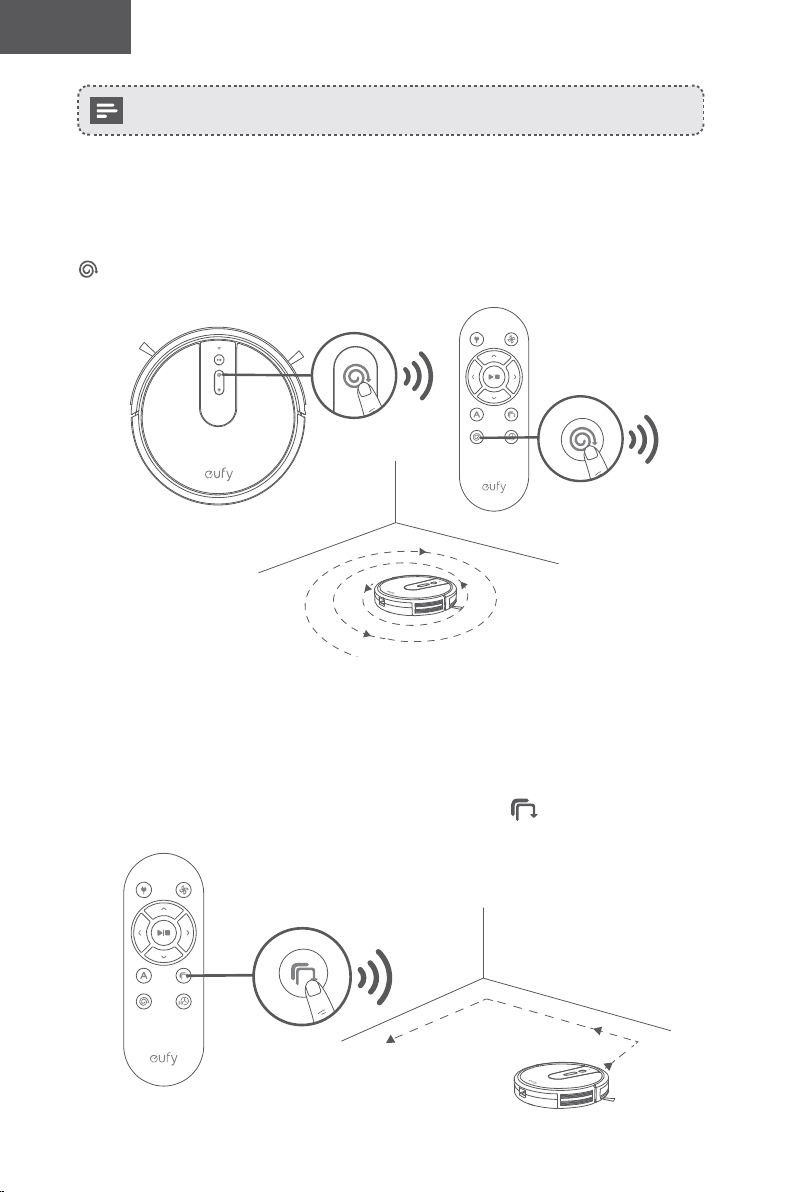
96 97
Türk Türk
RoboVac, Otomatik veya Hızlı modunda çalıştırıldığı bir sonraki temizlikte daha
önce seçtiğiniz emiş gücü seviyesini kullanacaktır.
2. Spot Temizlik
RoboVac, belirli bir alanı spiral hareketlerle yoğun bir şekilde temizler, aşırı tozlu ve kirli
alanlarda kullanışlıdır. RoboVac Spot modundayken temizliği 2 dakika sonra durduracaktır.
Otomatik Modda temizliği başlatmak için RoboVac üzerindeki veya uzaktan kumandadaki
tuşuna basın.
3. Kenar temizliği
RoboVac bir duvar algıladığında hızını azaltır ve duvarın kenarını iyice temizlemek için
duvarı takip eder. RoboVac Kenar modundayken 20 dakika boyunca temizlik yapacak ve
ardından Şarj İstasyonuna dönecektir.
Kenar Modunda temizliği başlatmak için uzaktan kumandadaki tuşuna basın.
4. Hızlı temizlik
RoboVac bu modda çalışırken temizliği 30 dakika sonra otomatik olarak durduracak ve Şarj
İstasyonuna dönecektir. Küçük bir odanın veya alanın temizlenmesi gerekiyorsa zamandan
ve enerjiden tasarruf etmek için bu modu seçmeniz önerilir.
Hızlı temizlik modunu başlatmak için uzaktan kumandadaki tuşuna basın.
5. Manuel temizlik
Uzaktan kumanda üzerindeki yön düğmelerini kullanarak RoboVac'ı belirli bir alanı
temizlemesi için yönlendirebilirsiniz.
Sola dönüş
Geri hareket Sağa dönüş
İleri hareket
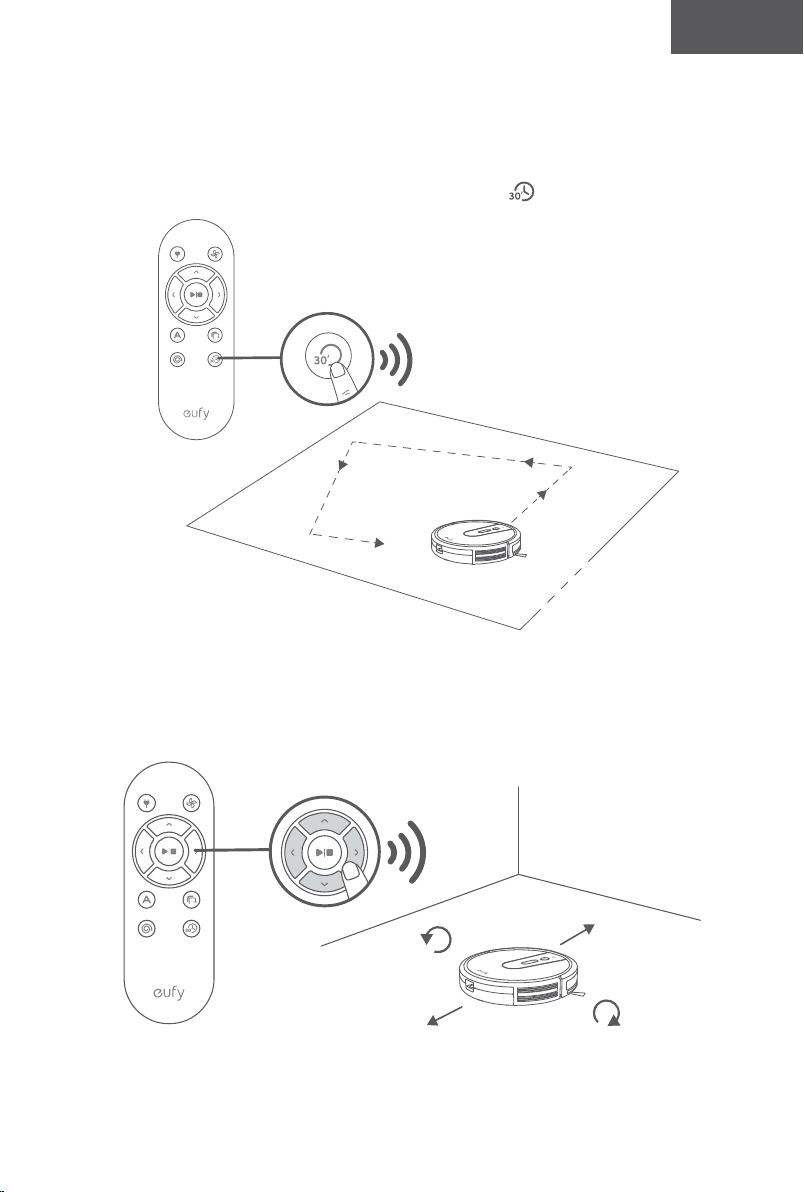

98 99
Türk Türk
RoboVac'ınızı Amazon Alexa / Google Asistan ile
Kullanma
Şu anda bu özellik yalnızca İngilizce, Almanca, Fransızca ve İspanyolca'yı
desteklemektedir. Başka dillerin desteklenip desteklenmediğini
https://www.eufylife.com/support/ adresinden düzenli olarak kontrol edebilirsiniz.
Amazon Alexa ve Google Assistant, RoboVac'ı sesinizle kontrol etmenizi sağlayan akıllı
sesli asistanlardır.
Başlamadan önce aşağıdakilerden emin olun:
• RoboVac, yeterli gücünün olması için Şarj İstasyonuna takılır.
• RoboVac, EufyHome uygulamasıyla bağlantılıdır.
• Alexa uyumlu bir cihazınız (ör. Amazon Echo, Echo Dot ve Amazon Tap, Echo Show,
Echo Spot) veya Google Assistant ile etkinleştirilmiş bir cihazınız (ör. Google Home,
Google Home Mini) var. Bu cihazlar ayrıca satılmaktadır.
• Amazon Alexa uygulaması veya Google Home uygulaması akıllı cihazınızda zaten
yüklü ve bir hesap oluşturdunuz.
RoboVac’ı Amazon Alexa veya Google Assistant ile kontrol etmek
için
1
EufyHome uygulamasını açın ve sol üstteki "Akıllı entegrasyonlar" seçeneğine
dokunun.
2
Kurulumu tamamlamak için ekrandaki talimatları uygulayın.
RoboVac'ın Amazon Alexa / Google Asistan ile nasıl çalıştığı hakkında daha
fazla bilgi almak için https://www.eufylife.com/support/ adresini ziyaret edin.
Temizlik ve Bakım
En iyi performansı almak için, RoboVac’ı düzenli olarak temizlemek ve bakımını
yapmak üzere aşağıdaki talimatları izleyin. Temizlik/değişim sıklığı RoboVac'ı kullanım
alışkanlıklarınıza bağlı olacaktır.
Önerilen temizik/değişim sıklığı
RoboVac Parçası Temizlik Sıklığı Değişim Sıklığı
Toz Haznesi
Her kullanımdan
sonra
-
Filtre
Haftada bir kez
(Evcil hayvanınız
varsa haftada iki
kez)
Her 2 ayda bir
Döner Fırça Ayda bir Her 6-12 ayda bir
Yan Fırçalar Ayda bir
Her 3-6 ayda bir (veya belirgin şekilde
yıprandığında)
Fırça Koruyucu Ayda bir
3 ila 6 ayda bir kez (veya fırça koruyucusundaki
silikon kauçuk şerit belirgin şekilde aşındığında)
Sensörler Ayda bir -
Şarj Pimleri Ayda bir -
Döner Tekerlek Ayda bir -
Toz Haznesi ve Filtre Temizliği
1
Toz haznesini çıkarmak için toz haznesini açma düğmesine basın.
2
Toz haznesini açın ve boşaltın.
3
Filtreyi çıkarın.
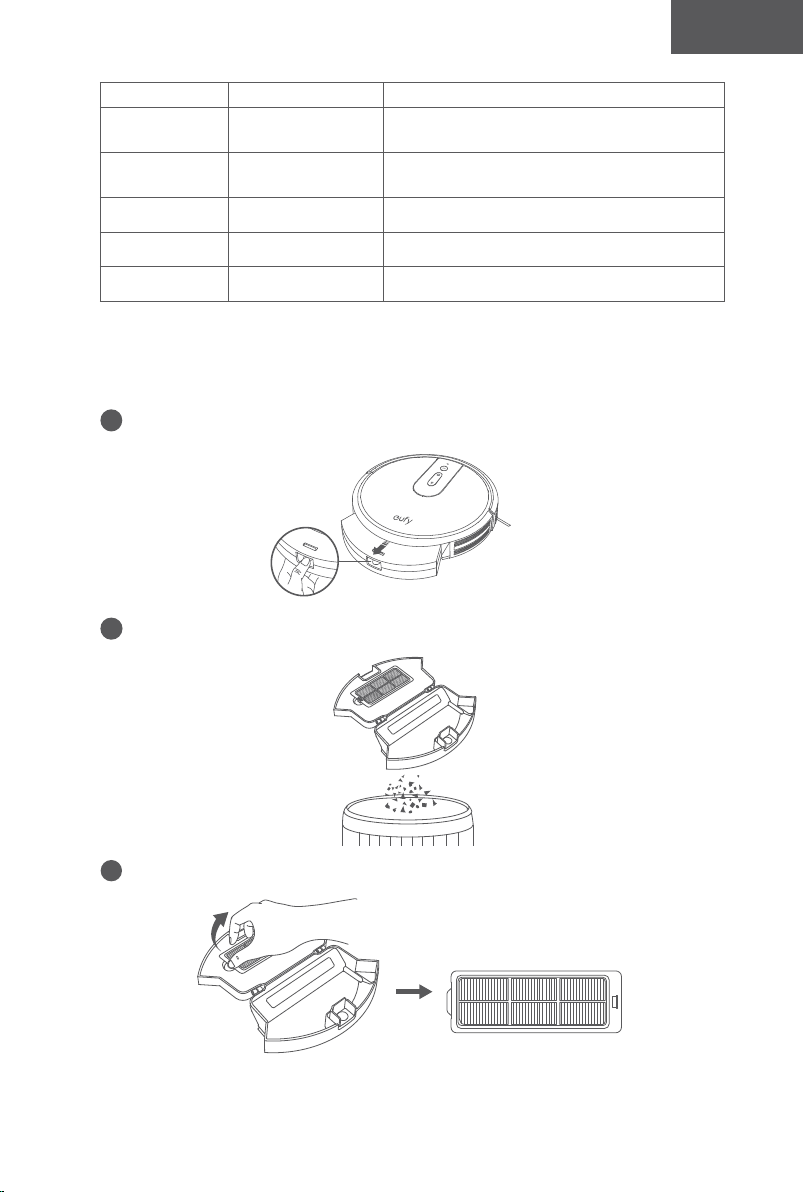
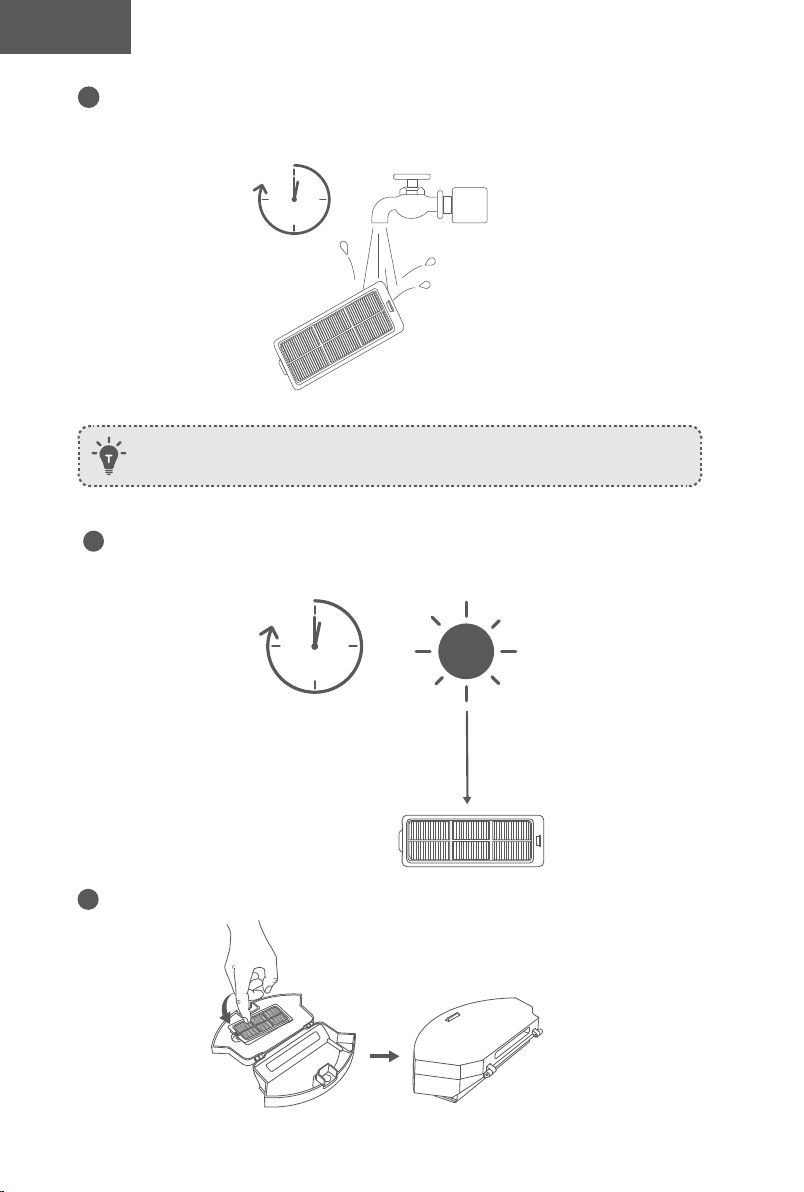
100 101
Türk Türk
4
Filtreyi suyla iyice yıkayın.
1
min
Filtreyi temizlemek için fırça, sıcak su veya deterjan kullanmayın.
5
Kullanmadan önce filtreyi havayla tamamen kurutun. Orijinal filtre tamamen
kurumamışsa diğer filtreyi kullanabilirsiniz.
24h
6
Filtreyi tekrar toz haznesine yerleştirin.
7
Toz haznesini ana ünitedeki yerine itin.
Döner Fırça Temizliği
1
Serbest bırakma tırnaklarını gösterildiği gibi çekerek fırça koruyucunun kilidini açın.
2
Çıkarmak için döner fırçayı kaldırın.
3
Döner fırçayı ürünle birlikte verilen temizleme aletiyle veya elektrikli süpürgeyle temizleyin.
4
Döner fırçayı, önce sabit çıkıntılı ucu takıp ardından yerine oturtarak takın.
5
Fırça koruyucuyu yerine oturtmak için aşağı doğru bastırın.
1 2
3
54
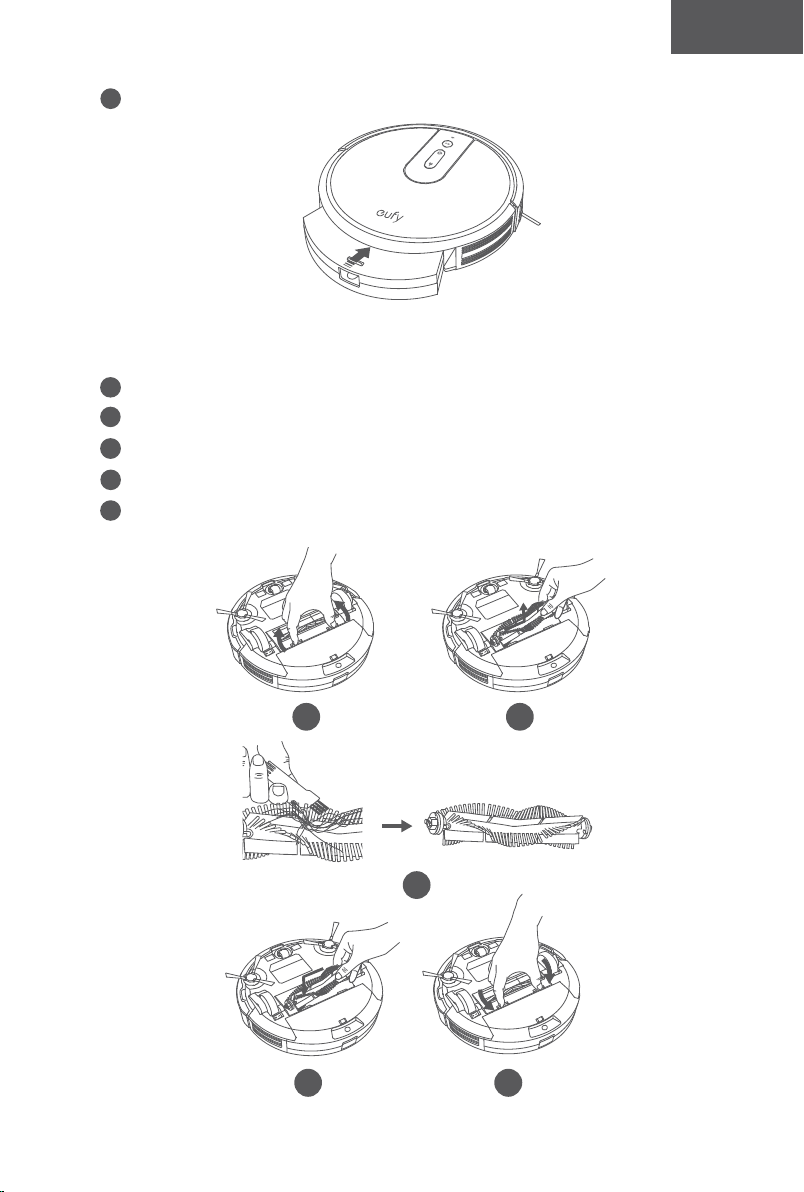
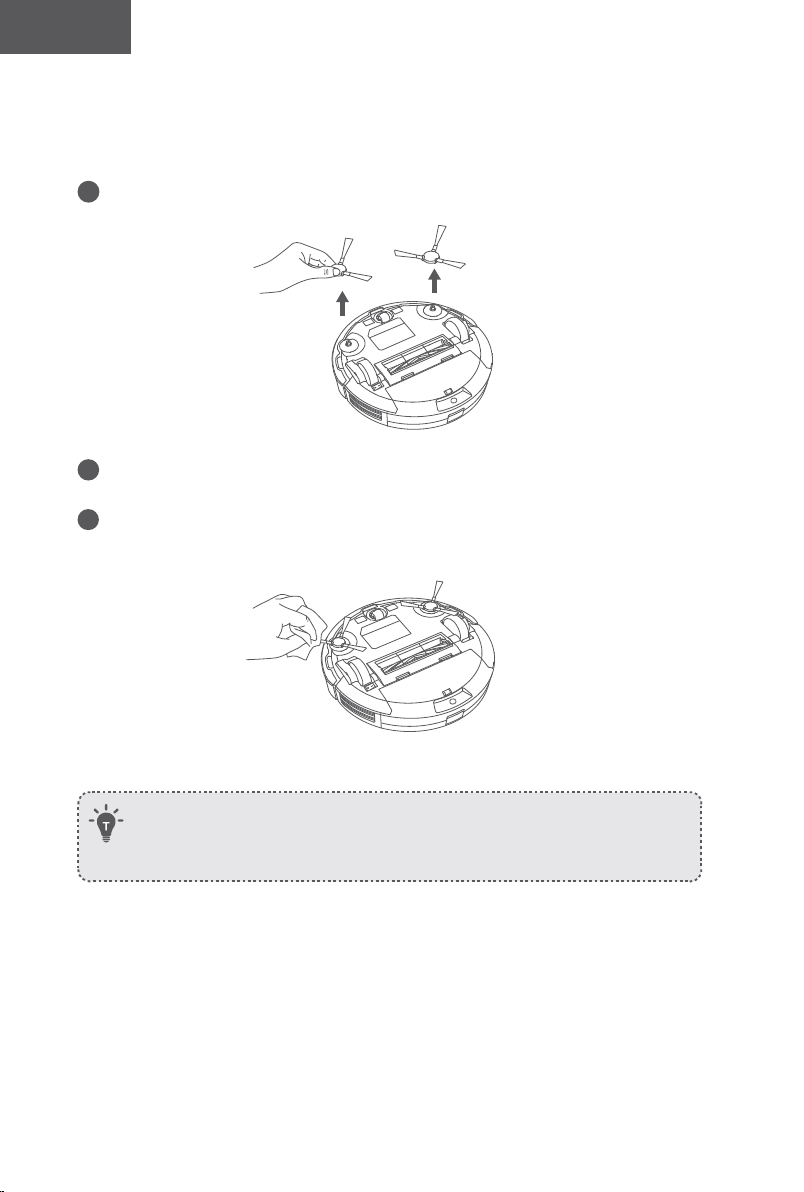
102 103
Türk Türk
Yan Fırçaları Temizleme
Saç gibi yabancı maddeler yan fırçalara kolayca dolaşabilir ve üzerlerine kir yapışabilir.
Bunları düzenli olarak temizlediğinizden emin olun.
1
Yan fırçaları çıkarın.
2
Ana ünite ile yan fırçalar arasına dolanmış saçları veya iplikleri dikkatlice gevşetin ve
çekin.
3
Fırçalardaki tozu temizlemek veya hafifçe yeniden şekillendirmek için ılık suyla
nemlendirilmiş bir bez kullanın.
- Yan fırçaları yalnızca tamamen kuru olduklarında kullanın.
- Ahşap veya halı zemininizi korumak için yan fırçalar yumuşak malzemelerden üretilmiştir
ve bir süre kullanılmalarının ardından kıvrımlı hale gelebilir, fakat bu durum temizliği
etkilemeyecektir.
Yan Fırçaları Değiştirme
Yan fırçalar bir süre kullanıldıktan sonra eğilebilir veya zarar görebilir. Bunları değiştirmek
için aşağıdaki talimatları uygulayın.
• Eski yan fırçaları çıkarın ve yenilerini yerine takın.
Sensörler ve Şarj Pimlerinin Temizliği
En iyi performansı almaya devam etmek için tamponu, sensörleri ve şarj pimlerini düzenli
olarak temizleyin.
• Kuru bez veya temizlik fırçası kullanarak tamponun, sensörlerin ve şarj temas pimlerinin
tozunu alın
.
Döner Tekerlek Temizliği
• Saç veya toz parçacıkları, döner tekerleğe kolayca sıkışabilir. Döner tekerleği periyodik
olarak ve gerektiği gibi temizlediğinizden emin olun.
Tekerlek
Aks
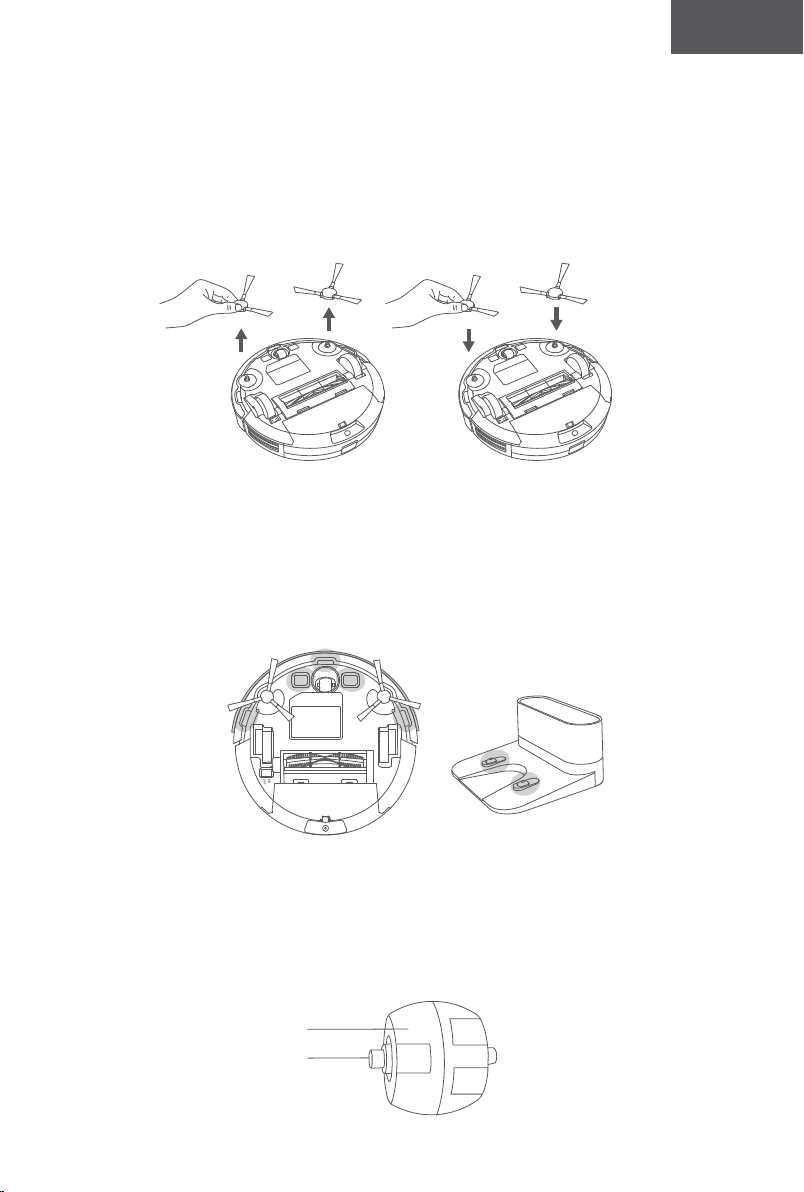

104 105
Türk Türk
1
Döner tekerleği dışarı çekin.
2
Tekerleğin etrafına dolanmış veya tekerlek boşluğunun içine sıkışmış saçları veya
kalıntıları temizleyin.
3
Tekerleği yerine takın ve yerine oturana kadar itin.
- Döner tekerleği suyla temizleyebilirsiniz.
- Döner tekerleği yalnızca tamamen kuruduğunda kullanın.
Sorun giderme
Sıkça sorulan sorular:
Aşağıdaki çözümler genel sorulara yöneliktir. Sorununuz devam ederse yardım almak için
www.eufylife.com adresini ziyaret edin veya support@eufylife.com adresiyle iletişime geçin.
Sorunlar Çözümler
RoboVac
etkinleştirilemiyor.
• Ana güç anahtarının AÇIK konumda olduğundan emin olun.
• Pilin tamamen dolu olduğundan emin olun.
• Uzaktan kumandanın pillerini (2 AAA) değiştirin.
• Uzaktan kumandanın RoboVac'ın kapsamında (5 m/16 ft)
olduğundan emin olun.
• Sorun devam ediyorsa ana güç anahtarını kapatın ve tekrar açın.
Uzaktan kumanda
çalışmıyor.
• Uzaktan kumandanın pillerini değiştirin.
• RoboVac'ın açık olduğundan ve şarjının dolu olduğundan
emin olun.
RoboVac aniden
çalışmayı
durduruyor.
• RoboVac'ın bir engele takılmış ya da sıkışmış olup
olmadığını kontrol edin.
• Pil seviyesinin çok düşük olup olmadığını kontrol edin.
• Sorunların çözümlerini görmek için "Hata Tonları"
bölümünü kontrol edin.
• Sorun devam ediyorsa ana güç anahtarını kapatın, 2 saniye
bekleyin ve ardından tekrar açın.
Temizlik
programlaması
yapamıyorsunuz.
• RoboVac'ın alt kısmındaki ana güç anahtarının açık
olduğundan emin olun.
• EufyHome uygulamasıyla günün saatini ve programlanan
temizliğin zamanını ayarlayabilirsiniz.
• Programlanan saatin doğru ayarlandığından emin olun.
• RoboVac’ın gücünün temizliğe başlamak için çok düşük
olup olmadığını kontrol edin.
• RoboVac kapatıldığında temizlik programları silinir.
RoboVac, internet erişimi olmadan açılırsa temizlik
programları senkronize edilmez ve uygulama aracılığıyla
sıfırlanmaları gerekir.
Emiş gücü zayıf.
• Emme girişini engelleyen herhangi bir tıkanıklık olup
olmadığını kontrol edin.
• Toz haznesini boşaltın.
• Zeminde bulunan su veya diğer sıvılar nedeniyle filtrelerin
ıslanıp ıslanmadığını kontrol edin. Kullanmadan önce
filtreleri havayla tamamen kurutun.
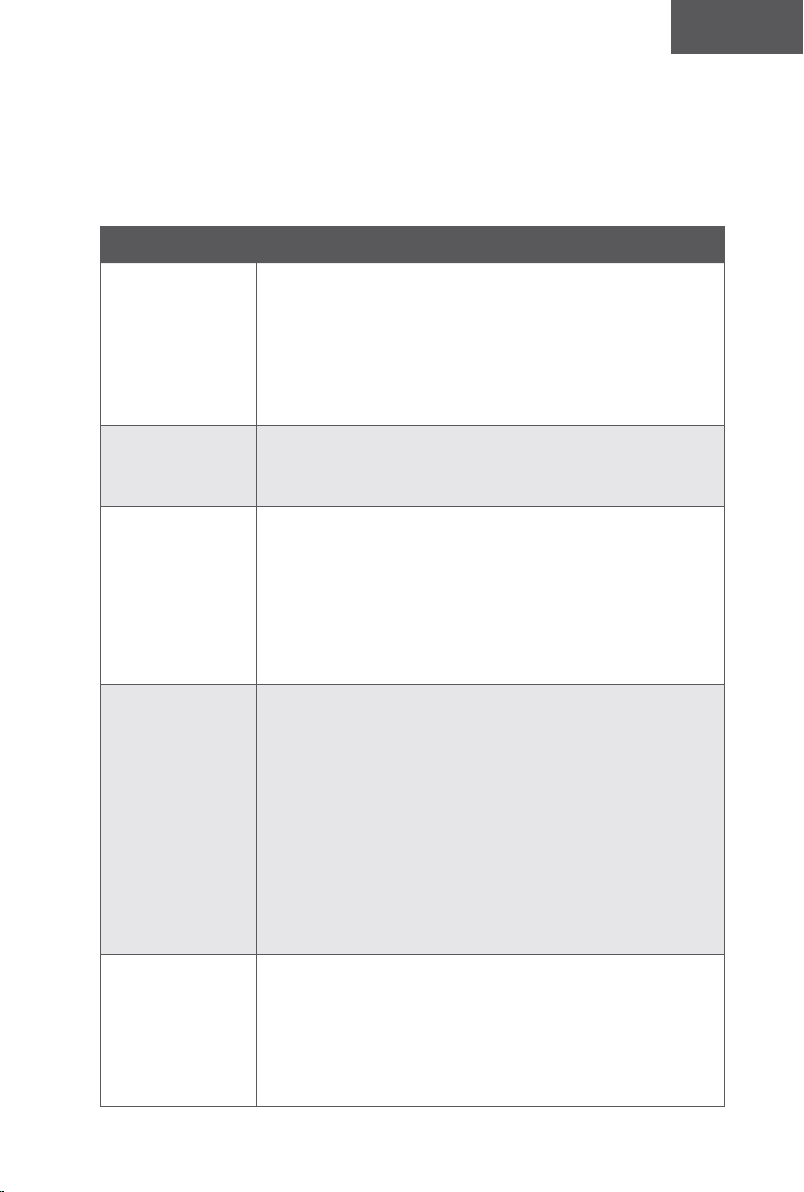
104 105
Türk Türk
1
Döner tekerleği dışarı çekin.
2
Tekerleğin etrafına dolanmış veya tekerlek boşluğunun içine sıkışmış saçları veya
kalıntıları temizleyin.
3
Tekerleği yerine takın ve yerine oturana kadar itin.
- Döner tekerleği suyla temizleyebilirsiniz.
- Döner tekerleği yalnızca tamamen kuruduğunda kullanın.
Sorun giderme
Sıkça sorulan sorular:
Aşağıdaki çözümler genel sorulara yöneliktir. Sorununuz devam ederse yardım almak için
www.eufylife.com adresini ziyaret edin veya suppor[email protected]m adresiyle iletişime geçin.
Sorunlar Çözümler
RoboVac
etkinleştirilemiyor.
• Ana güç anahtarının AÇIK konumda olduğundan emin olun.
• Pilin tamamen dolu olduğundan emin olun.
• Uzaktan kumandanın pillerini (2 AAA) değiştirin.
• Uzaktan kumandanın RoboVac'ın kapsamında (5 m/16 ft)
olduğundan emin olun.
• Sorun devam ediyorsa ana güç anahtarını kapatın ve tekrar açın.
Uzaktan kumanda
çalışmıyor.
• Uzaktan kumandanın pillerini değiştirin.
• RoboVac'ın açık olduğundan ve şarjının dolu olduğundan
emin olun.
RoboVac aniden
çalışmayı
durduruyor.
• RoboVac'ın bir engele takılmış ya da sıkışmış olup
olmadığını kontrol edin.
• Pil seviyesinin çok düşük olup olmadığını kontrol edin.
• Sorunların çözümlerini görmek için "Hata Tonları"
bölümünü kontrol edin.
• Sorun devam ediyorsa ana güç anahtarını kapatın, 2 saniye
bekleyin ve ardından tekrar açın.
Temizlik
programlaması
yapamıyorsunuz.
• RoboVac'ın alt kısmındaki ana güç anahtarının açık
olduğundan emin olun.
• EufyHome uygulamasıyla günün saatini ve programlanan
temizliğin zamanını ayarlayabilirsiniz.
• Programlanan saatin doğru ayarlandığından emin olun.
• RoboVac’ın gücünün temizliğe başlamak için çok düşük
olup olmadığını kontrol edin.
• RoboVac kapatıldığında temizlik programları silinir.
RoboVac, internet erişimi olmadan açılırsa temizlik
programları senkronize edilmez ve uygulama aracılığıyla
sıfırlanmaları gerekir.
Emiş gücü zayıf.
• Emme girişini engelleyen herhangi bir tıkanıklık olup
olmadığını kontrol edin.
• Toz haznesini boşaltın.
• Zeminde bulunan su veya diğer sıvılar nedeniyle filtrelerin
ıslanıp ıslanmadığını kontrol edin. Kullanmadan önce
filtreleri havayla tamamen kurutun.
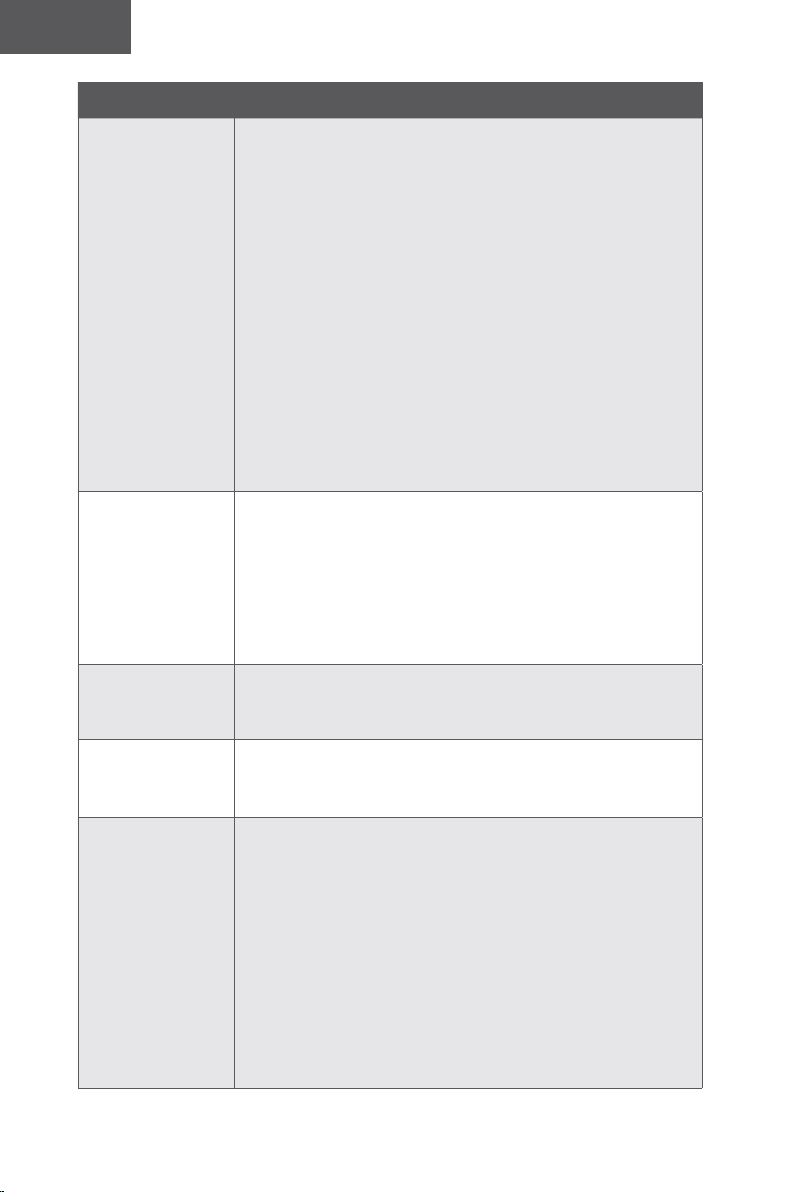
106 107
Türk Türk
Sorunlar Çözümler
RoboVac şarj
olmuyor.
• Şarj İstasyonundaki göstergenin yanıp yanmadığını kontrol
edin. Gösterge yanmıyorsa Şarj İstasyonunun onarılması
veya değiştirilmesi için eufy servis merkeziyle iletişime
geçin.
• RoboVac'ın üzerindeki göstergenin kırmızı renkte sabit
olarak yanıp yanmadığını ve şarj esnasında bip sesi duyulup
duyulmadığını kontrol edin. Bunların mevcut olması pilin
arızalı olduğu anlamına gelmektedir. Pili çıkarıp tekrar takın,
ardından RoboVac'ı açıp kapatın. Sorun devam ederse pilin
onarılması veya değiştirilmesi için eufy servis merkeziyle
iletişime geçin.
• Kuru bir bezle şarj temas pimlerinin tozunu alın.
• RoboVac cihazınız Şarj İstasyonuna yerleştirildiğinde bip
sesi çıkıp çıkmadığını kontrol edin. Gösterge yanmıyorsa
Şarj İstasyonunun onarılması veya değiştirilmesi için eufy
servis merkeziyle iletişime geçin.
RoboVac, Şarj
İstasyonuna geri
dönemiyor.
• Şarj İstasyonunun solunda ve sağında 3 ft/1 m ve ön
tarafından 6 ft/2 m mesafede bulunan nesneleri kaldırın.
• RoboVac, Şarj İstasyonunun yakınındayken daha hızlı geri
dönecektir. Bununla birlikte, Şarj İstasyonu çok uzaktaysa,
RoboVac’ın geri dönmesi için daha fazla zamana ihtiyacı
olacaktır. Geri dönmeye çalıştığı sırada lütfen sabırlı olun.
• Şarj temas pimlerini temizleyin.
Döner fırça
dönmüyor.
• Döner fırçayı temizleyin.
• Döner fırça ve fırça koruyucunun düzgün takılıp
takılmadığını kontrol edin.
RoboVac’ın
hareketleri veya
izlediği yol normal
değil.
• Sensörleri kuru bir bezle dikkatlice temizleyin.
• Güç anahtarını kapatıp açarak RoboVac'ı yeniden başlatın.
RoboVac'ın
temizleme süresi
kısalıyor veya
temizlik 100
dakikadan kısa
sürede bitiyor.
• Temizlik öncesinde RoboVac'ın tamamen şarj olduğundan
(sabit mavi LED ışıkla gösterilir) emin olun.
• Emiş modu seviyesi ve temizlenecek zeminin/halının
durumu temizleme süresini etkileyecektir:
• Standart emiş modu (parke zeminlerde): yaklaşık 100
dakika temizlik
• BoostIQTM modu (halı üzerinde): Yaklaşık 60 dakika temizlik
• Maksimum emiş modu (orta tüylü halılarda): yaklaşık 40
dakika temizlik
• Temizlik işlemi yukarıda belirtilenlerden çok daha kısa sürüyorsa
yardım için eufy müşteri hizmetleri ile iletişime geçin.
Sorunlar Çözümler
RoboVac bir Wi-Fi
ağına bağlanamıyor.
• Wi-Fi şifresini doğru girdiğinizden emin olun.
• RoboVac'ın, yönlendiricinizin ve cep telefonunuzun
birbirlerine güçlü bir sinyal sağlayacak kadar yakın
olduğundan emin olun.
• Wi-Fi yönlendiricinizin 2,4 GHz ve 802.11b/g/n
bantlarını desteklediğinden emin olun; 5GHz bandı
desteklenmemektedir.Ayrıntılar için bu kılavuzdaki "Sorun
Giderme > Wi-Fi bağlantısı" bölümüne bakın.
RoboVac Amazon
Alexa üzerinden
kontrol edilemiyor.
• Herhangi bir İnternet bağlantısı sorunu olup olmadığını
kontrol edin.
• Amazon Alexa uygulamasını akıllı cihazınıza kurup
kurmadığınızı ve Amazon Alexa uygulamasında “EufyHome
- RoboVac” Özelliğini etkinleştirip etkinleştirmediğinizi
kontrol edin.Ayrıntılar için EufyHome uygulamasındaki
"Akıllı Entegrasyonlar" sayfasına bakın.
• EufyHome hesabınız olduğundan ve RoboVac'a bağlı
olduğundan emin olun.
• Doğru Alexa sesli komutlarını kullandığınızdan emin olun.
RoboVac Google
Asistan ile kontrol
edilemiyor.
• Herhangi bir İnternet bağlantısı sorunu olup olmadığını
kontrol edin.
• Google Home uygulamasını akıllı cihazınıza yükleyip
yüklemediğinizi ve Google Home uygulamasında
"EufyHome" işlemini başlatıp başlatmadığınızı kontrol
edin.Ayrıntılar için EufyHome uygulamasındaki "Akıllı
Entegrasyonlar" sayfasına bakın.
• Google Asistan ile konuşurken doğru komutları kullanıp
kullanmadığınızı kontrol edin. İstekte bulunurken önce "Ok
Google" uyandırma kelimelerini söyleyin.
• Sorunuzu tekrarlayın. Google Asistan ile anlaşılır bir şekilde
konuşun.
Hata Sesleri
RoboVac bir sorunla karşılaştığında bir dizi kısa veya uzun bip sesi duyulacaktır ve
düğmesinin üzerindeki kırmızı gösterge ışığı sabit şekilde yanacak veya yanıp sönecektir.
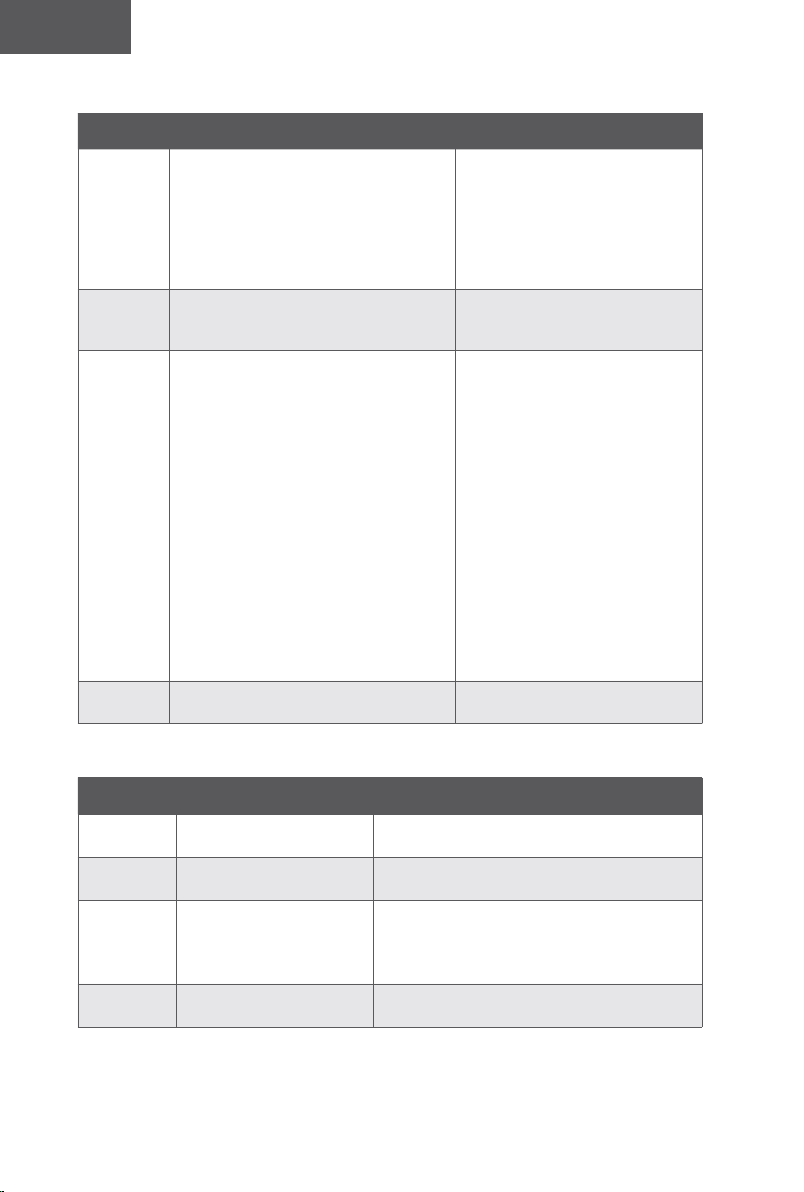
108 109
Türk Türk
Yanıp sönen kırmızı gösterge ışığı
Hata Sesi Neden Çözüm
Bir defa bip
• RoboVac sıkışmış ve tekerleklerden
biri zeminle temas etmiyor (havada
asılı).
• RoboVac çok geniş bir odada
çalışırken tamponu engelleri
tanıyamıyor olabilir.
Temizliği yeni bir konumda tekrar
başlatın.
İki defa bip RoboVac'ın tamponu sıkışmıştır.
Altına sıkışmış olabilecek
kalıntıları çıkarmak için RoboVac'ın
tamponuna birkaç kez hafifçe vurun.
Üç defa bip
RoboVac aşağıdaki senaryolarda takılabilir:
• RoboVac, halıyla kaplı bir
merdivenin kenarındayken geri
dönmek için yeterli güce sahip
olmadığında.
• RoboVac, güçlü güneş ışığına
maruz kaldığı için geri dönmeye
çalıştığında fakat yolundaki
fiziksel engeller nedeniyle geri
dönemediğinde.
• RoboVac güçlü güneş ışığına
maruz kaldığı için geri dönmeye
çalıştığında fakat 3 saniye boyunca
geri gittikten sonra güçlü güneş
ışığına maruz kalmaya devam
ettiğinde.
• Temizliği yeni bir konumda
tekrar başlatın.
• Sorunlu alanı kapatmak için
fiziksel bir bariyer kullanın.
Dört defa
bip
RoboVac'ın güç seviyesi çok düşüktür.
RoboVac'ı en az 5 saat süreyle
manuel olarak şarj edin.
Sabit kırmızı gösterge ışığı
Hata Sesi Neden Çözüm
Bir defa bip
RoboVac'ın sol/sağ tekerleği
sıkışmıştır.
RoboVac'ı kapatın ve sol/sağ tekerlekteki saç
veya kalıntıları çıkarın.
İki defa bip
RoboVac'ın yan fırçası
sıkışmıştır.
RoboVac'ı kapatın ve yan fırçadaki saç veya
kalıntıları çıkarın.
Üç defa bip
RoboVac'ın emiş fanı
sıkışmıştır.
• RoboVac'ı kapatın, ardından toz haznesini
çıkarıp boşaltın.
• Emme girişinin saç veya kalıntılarla
tıkanmadığından emin olun.
Dört defa bip
RoboVac'ın döner fırçası
sıkışmıştır.
RoboVac'ı kapatın ve döner fırçadaki saç veya
kalıntıları çıkarın.
Wi-Fi Bağlantısı
Wi-Fi kurulumundan önce RoboVac ve Wi-Fi ağınızın aşağıdaki gereksinimleri
karşıladığından emin olun.
Wi-Fi Kurulumu Gereksinimleri
• RoboVac:
- RoboVac tamamen şarj edilmiş ve RoboVac'ın alt kısmındaki ana güç anahtarı açılmış
olmalıdır.
- Wi-Fi durum ışığı yavaşça mavi renkte yanıp sönüyor olmalıdır.
• Wi-Fi Ağı:
- Ağınız için doğru şifreyi girmiş olmalısınız.
- VPN (Sanal Gizli Ağ) veya Proxy Sunucu kullanmamalısınız.
- Wi-Fi yönlendiriciniz 802.11b/g/n ve IPv4 protokolünü desteklemelidir.
- 2,4 GHz frekans bandını desteklemek üzere yapılandırılmış bir 2,4 GHz yönlendirici
veya çift bantlı bir yönlendirici kullanıyor olmalısınız. RoboVac 5GHz frekans bantlarını
desteklememektedir.
- RoboVac Wi-Fi ağına bağlanamıyorsa ve 2,4/5 GHz karma ağ kullanıyorsanız Wi-Fi
kurulumu için 2,4 GHz ağa geçiş yapın. Kurulumunuz tamamlandığında diğer ağa
dönebilirsiniz.
- Gizli bir ağa bağlanırken doğru ağ adını, SSID'yi (büyük/küçük harfe duyarlı)
girdiğinizden ve 2,4 GHz kablosuz ağa bağlandığınızdan emin olun.
- Bir ağ genişletici/tekrarlayıcı kullanırken, ağ adının (SSID) ve şifrenin birincil ağınızla
aynı olduğundan emin olun.
- Wi-Fi yönlendiricinizin güvenlik duvarı ve bağlantı noktası ayarları RoboVac'ın Eufy
sunucularına bağlanmasına izin vermelidir.
Ağ Güvenliği Gereksinimleri
- TKIP, PSK, AES/CCMP şifrelemesi kullanan WPA ve WPA2.
Wi-Fi Kanalları
- FCC, Amerika Birleşik Devletleri'ndeki tüm kablosuz cihazların 1-11 arası kablosuz
spektrumlu kanallarda çalışmasını gerektirir.
- Kuzey Amerika dışındaki bazı ülkelerde kanal 11'den daha yüksek spektrumlu
kanallar kullanılabilir. Hangi kanalların erişilebilir olduğunu belirlemek için yerel
düzenleyici kurumunuza başvurun.
- İleride yayınlanacak bir yazılım sürümünde Kuzey Amerika dışındaki kullanıcılar için
11'in üzerindeki kanallara erişim desteklenecektir. O zamana kadar 1-11 arası kanalları
kullanın.
RoboVac'ı akıllı telefonunuzla kontrol edemiyorsanız sorunu çözmek için aşağıdakileri
deneyin. Sorun devam ederse yardım için eufy servis merkeziyle iletişime geçin.
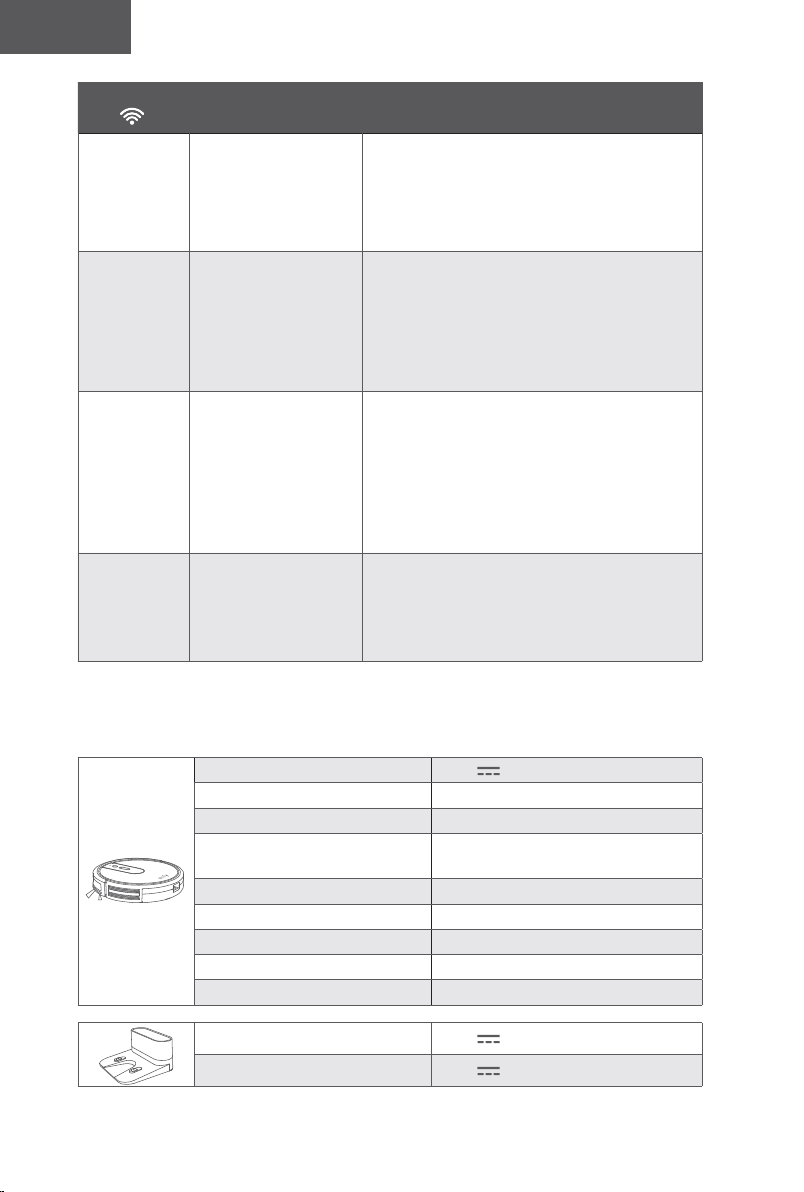
110 111
Türk Türk
Wi-Fi Durum
Işığı
Neden Çözümler
Sabit mavi
RoboVac
yönlendiricinize
bağlandı fakat internete
erişemiyor.
• Yönlendiricinizin internete bağlı olup
olmadığını kontrol edin.
• İnternet bağlantısında sorunu olup
olmadığını öğrenmek için internet
sağlayıcınıza danışın.
Hızlı yanıp
sönen mavi
RoboVac kablosuz
yönlendiricinize
bağlanamıyor.
• Ağ adınızı ve şifrenizi değiştirip
değiştirmediğinizi kontrol edin.
• Gerekirse Wi-Fi bağlantısını sıfırlayın.
Bu kılavuzdaki "RoboVac'ınızı EufyHome
Uygulaması ile Kullanma > Wi-Fi
bağlantısını sıfırlama" bölümüne bakın.
Yavaş yanıp
sönen mavi:
Wi-Fi bağlantısı
sıfırlanmış veya hiç
ayarlanmamış.
• RoboVac ile Wi-Fi bağlantısı kurun.Bu
kılavuzdaki "RoboVac'ınızı EufyHome
Uygulaması ile Kullanma" bölümüne bakın.
• Gerekirse Wi-Fi bağlantısını sıfırlayın.
Bu kılavuzdaki "RoboVac'ınızı EufyHome
Uygulaması ile Kullanma > Wi-Fi
bağlantısını sıfırlama" bölümüne bakın.
Kapalı
• RoboVac kapalıdır.
• RoboVac'ın güç
seviyesi düşüktür.
• RoboVac Uyku
modundadır.
• RoboVac'ı Şarj İstasyonuna yerleştirerek
şarj edin. RoboVac'ın alt kısmındaki ana
güç anahtarının açık olduğundan emin olun.
Teknik Özellikler
GİRİŞ 19 V 0,6 A
Pil Voltajı DC 14,4 V
Güç Tüketimi 40 W
Pil Tipi
DC 14,4 V
Li-ion 2600 mAh
Toz Haznesi Kapasitesi
0,6 L
Temizlik Süresi Maks. 100 dk.
Şarj Süresi 300 - 360 dk.
Şarj Sıcaklığı 5°C ila 40°C
Saklama Sıcaklığı -20°C ila 60°C
GİRİŞ 19 V 0,6 A
Çıkış 19 V 0,6 A
İTHALATÇIFİRMA
İthalatçıFirma
Kayhan Telefon ve
ElektronikİTH.İHR.
LTD.ŞTİ.
Adres:
Maslak Mah. Maslak
Meydan Sok. Beybi
Giz Plaza No:1/55
Sarıyer/İstanbul
Telefon: 0850 460 14 14
Teknik Servis
Adresi:
Seyrantepe mah.
Çekimsersok.
No:12/BKağıthane/
İstanbul
GARANTİŞARTLARI
1-Garantisüresimalınteslimtarihindenitibarenbaşlarve2yıldır.
2-Malınbütünparçalarıdahilolmaküzeretamamıgarantikapsamındadır.
3-Malınayıplıolduğununanlaşılmasıdurumundatüketici,6502sayılıTüketicinin
KorunmasıHakkındaKanunun11incimaddesindeyeralan;Sözleşmedendönme,
·Satışbedelindenindirimisteme,
·Ücretsizonarılmasınıisteme,
·Satılanınayıpsızbirmisliiledeğiştirilmesiniisteme,haklarındanbirinikullanabilir.
4-Tüketicininbuhaklardanücretsizonarımhakkınıseçmesidurumundasatıcı;işcilik
masrafıdeğiştirilenparçabedeliyadabaskaherhangibiradıaltındahiçbirücrettalep
etmeksizinmalınonarımıyapmakveyayaptırmaklayükümlüdür.Tüketiciücretsizonarım
hakkınıüreticiveyaithalatçıyakarşıdakullanabilir.Satıcıüreticiveithalatçıtüketicininbu
hakkınıkullanmasındanmüteselsilensorumludur
5-Tüketicininücretsizonarımhakkınıkullanmasıhalindemalın;
·Garantisüresiiçindetekrararızalanması,
·Tamiriiçingerekenazamisüreninaşılması.
·Tamirininmümkünolmadığının,yetkiliservisistasyonu,satıcı,üreticiveyaithalatçı
tarafındanbirraporlabelirlenmesidurumlarında;tüketicimalınbedeliadesini,ayıp
oranındabedelindiriminiveyaimkanvarsamalınayıpsızmisliiledeğiştirilmesini
satıcıdantalepedebilir.Satıcıtüketicinintalebinireddedemez.Butalebinyerine
getirilmemesidurumundasatıcı,üreticiveithalatçımüteselsilensorumludur.
6)Malıntamirsüresi20işgününügeçemez.Busüre,garantisüresiiçeirsindemala
ilişkinarızanınyetkiliservisistasyonunaveyasatıcıyabildirimitarihinde,garantisisüresi
dışındaisemalınyetkiliservisistasyonunateslimtarihindenitibarenbaşlar.Malın
arızasının10işgünüiçerisindegiderilememesihalindeüreticiveyaithalatçı;malıntamiri
tamamlanıncayakadarbenzerözellikleresahipbaşkabirmalıtüketicininkullanımına
tahsisetmekzorundadır.Malıngarantisüresiiçerisindearızalanmasıdurumundatamirde
qeçensüregarantisüresineeklenir.
7)Malınkullanmakılavuzundayeralanhususlaraaykırıkullanılmasındankaynaklanan
arızalargarantikapsamıdışındadır.
8)Tüketici,garantidendoğanhaklarınınkullanılmasıileilgiliolarakçıkabilecek
uyuşmazlıklardayerleşimyerininbulunduğuveyatüketiciişlemininyapıldığıyerdeki
TüketiciHakemHeyetineveyaTüketiciMahkemesinebaşvurabilir.
9)SatıcıtarafındanbuGarantiBelgesininverilmemesidurumundatüketiciGümrük
veTicaretBakanlığıTüketicininKorunmasıvePiyasaGözetimiGenelMüdürlüğüne
başvurabilir.
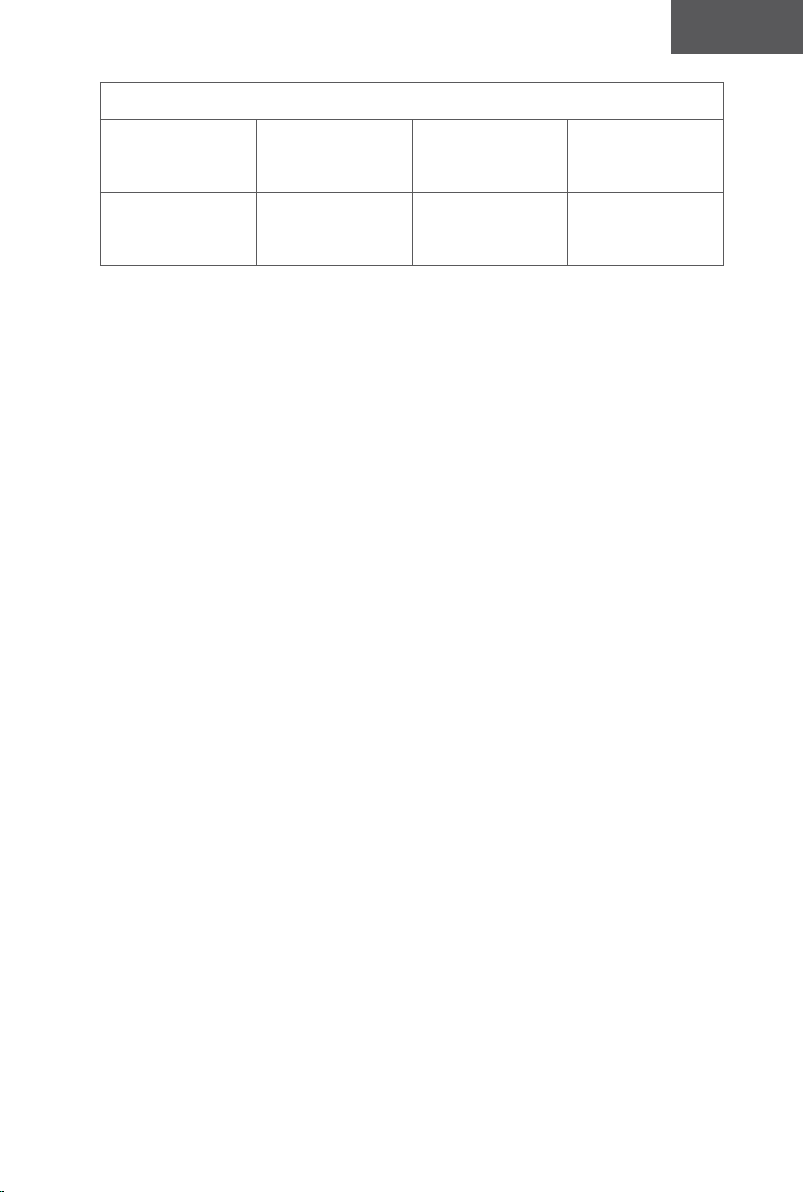
112
Türk
Müşteri Hizmetleri
Sıksorulansorularvedahafazlabilgiiçinlütfenwww.eufylife.comadresiniziyaret
edin.
24 ay garant
www.eufylife.com
(ABD) +1 (800) 988 7973 Pzt - Cum 9:00 - 17:00 (PT)
(TR) +90 0850 460 14 14 Mon-Fri 9:00 - 18:00
@EufyOcial @EufyOcial@EufyOcial @EufyOcial
GARANTİGEÇERLİLİKKOŞULLARI
1-Cihazınmontajve/veyaonarımlarınınfirmamızyetkiliservislerininharicindeyapıldığının
yadacihazınaçıldığınıntesbitihalindegarantigeçersizolacaktır.
2-FirmamıztarafındanverilenGARANTİsözkonusucihazınamaçlarıdışındaveya
anormalşartlardakullanılmasındandoğacakarızalarınıngiderilmesinikapsamadığıgibi
aşağıdabelirtilenarızalardagarantidışıdır.
*Cihazınkullanmakılavuzundaveyamontajkılavuzundayeralanhususlaraaykırı
kullanımhatalarından,kazadanmeydanagelenhasarvearızalar,
*Voltajuyumsuzluğu,hatalıelektrikdonanımıilecihazetiketindeyazılıvoltajdanfarklı
voltajilekullanımnedeniylemeydanagelecekhasarvearızalar,
*Yangın,selbasmasıveyıldırımdüşmesigibiafetlersonucumeydanagelecekhasar
vearızalar,tüketiciyeteslimindensonracihazınnakli,yükleme,boşaltmavetaşınma
sırasındameydanagelecekhasarvearızalar.

112
Türk
Müşteri Hizmetleri
Sıksorulansorularvedahafazlabilgiiçinlütfenwww.eufylife.comadresiniziyaret
edin.
24 ay garant
support@eufylife.com
www.eufylife.com
(ABD) +1 (800) 988 7973 Pzt - Cum 9:00 - 17:00 (PT)
(TR) +90 0850 460 14 14 Mon-Fri 9:00 - 18:00
@EufyOcial @EufyOcial@EufyOcial @EufyOcial
GARANTİGEÇERLİLİKKOŞULLARI
1-Cihazınmontajve/veyaonarımlarınınfirmamızyetkiliservislerininharicindeyapıldığının
yadacihazınaçıldığınıntesbitihalindegarantigeçersizolacaktır.
2-FirmamıztarafındanverilenGARANTİsözkonusucihazınamaçlarıdışındaveya
anormalşartlardakullanılmasındandoğacakarızalarınıngiderilmesinikapsamadığıgibi
aşağıdabelirtilenarızalardagarantidışıdır.
*Cihazınkullanmakılavuzundaveyamontajkılavuzundayeralanhususlaraaykırı
kullanımhatalarından,kazadanmeydanagelenhasarvearızalar,
*Voltajuyumsuzluğu,hatalıelektrikdonanımıilecihazetiketindeyazılıvoltajdanfarklı
voltajilekullanımnedeniylemeydanagelecekhasarvearızalar,
*Yangın,selbasmasıveyıldırımdüşmesigibiafetlersonucumeydanagelecekhasar
vearızalar,tüketiciyeteslimindensonracihazınnakli,yükleme,boşaltmavetaşınma
sırasındameydanagelecekhasarvearızalar.

T2132 51005002647 V01
Owner’s Manual
RoboVac
For FAQs and more information, please visit:
www.eufylife.com