
1. About Your Robot Vacuum 3-in-1 E20
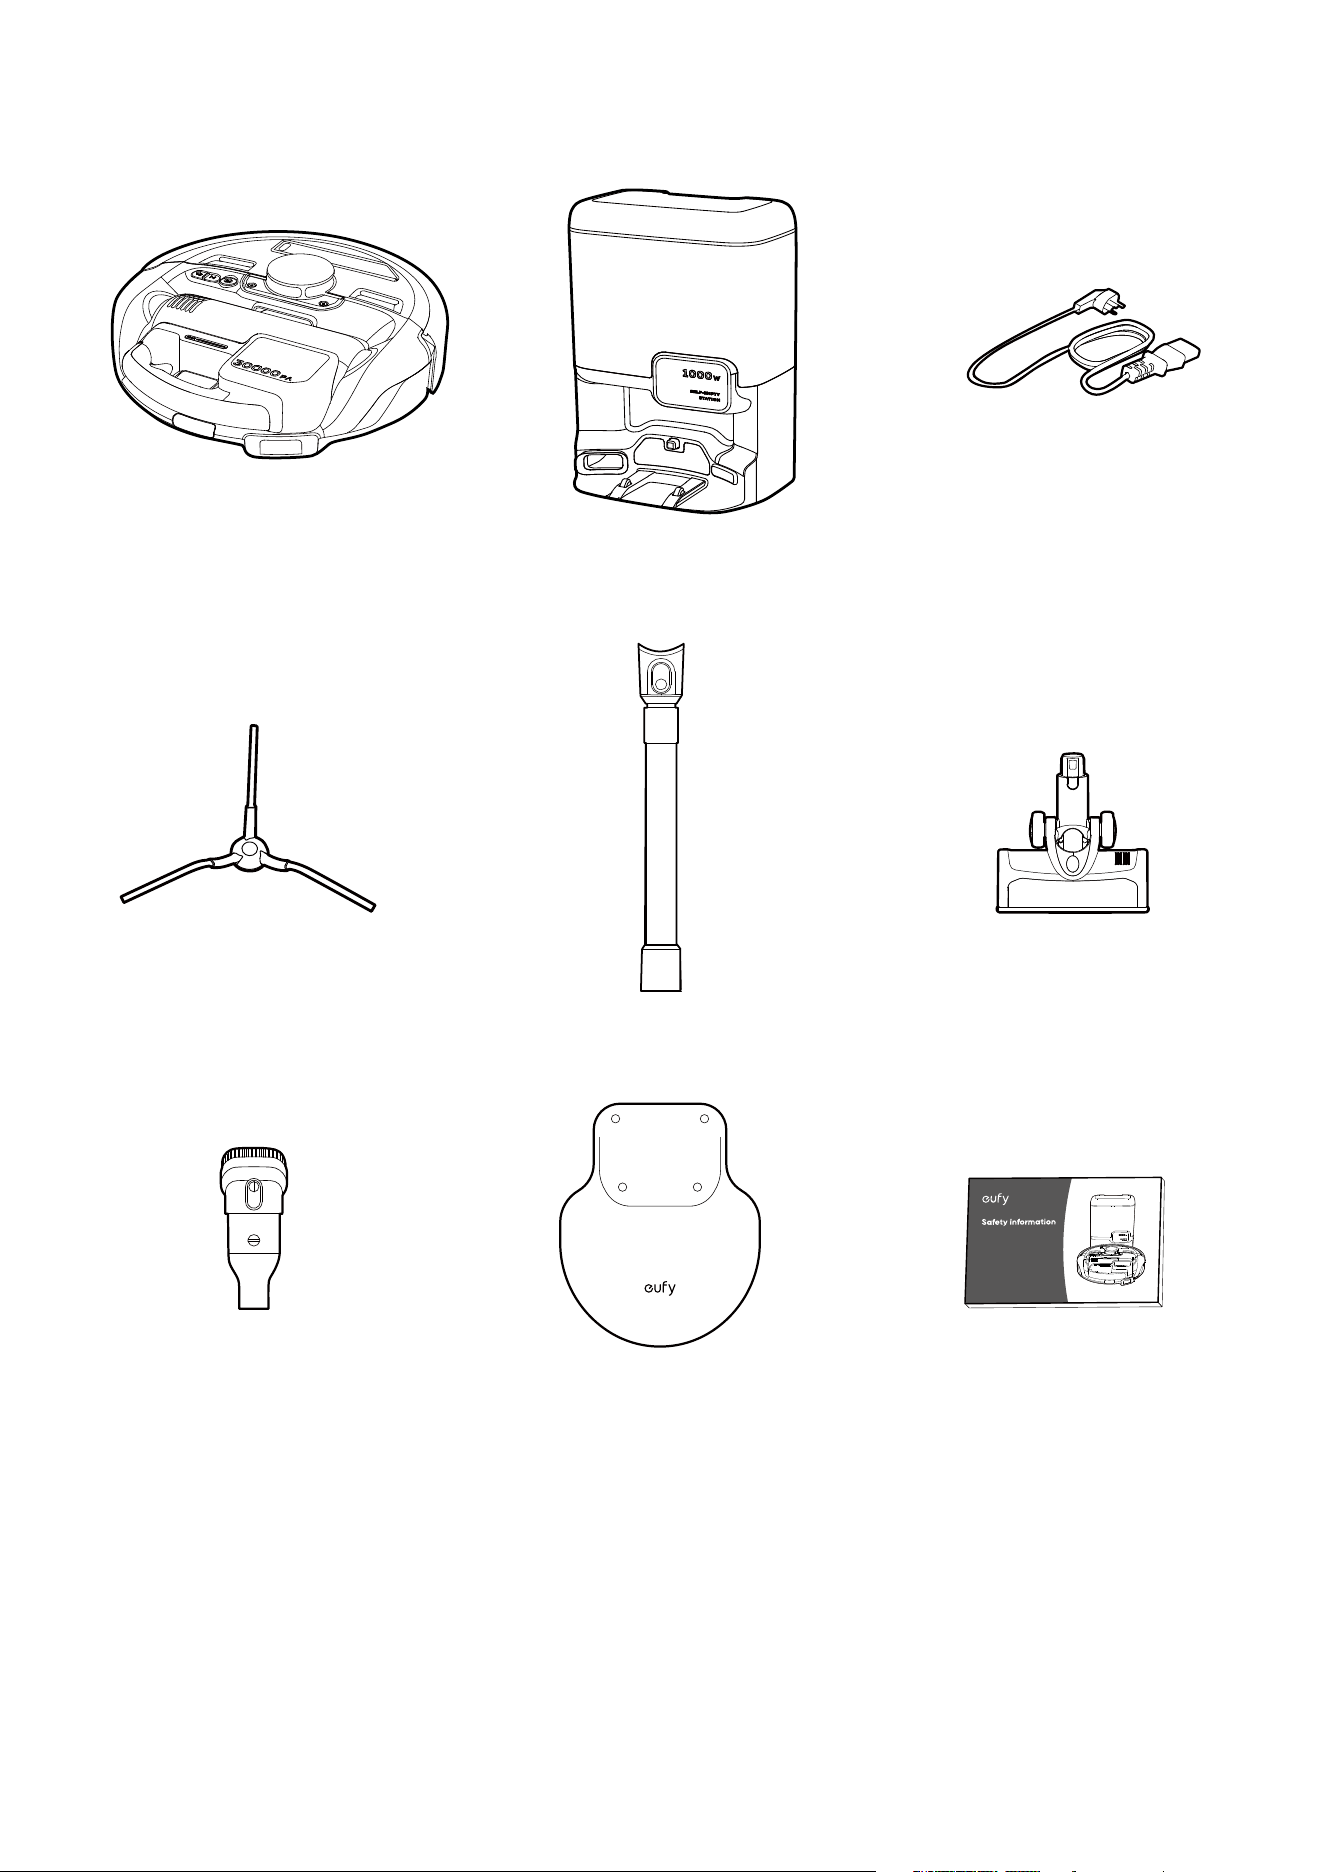
1.1 What's in the Box
1.2 Overview
1.3 Button Controls
1.4 LED Indication
2. Preparing Your Robot Vacuum 3-in-1 E20
2.1 Important Tips Before Use
2.2 Prepare the Robot
2.3 Connect to Power Supply
2.4 Place the Self-Empty Station
2.5 Charge the Robot
3. Using Your Robot with the eufy Clean App
3.1 Download the App
3.2 Quick Mapping before First Use
3.3 Set Up No-Go Zone
3.4 Editing Carpets
3.5 Schedule Cleaning
3.6 Select a Cleaning Mode
3.7 Selecting a Suction Power Level
4. Using Your Robot with Apple Siri / Amazon Alexa / The Google
Assistant
5. Using Your Cordless Stick Vacuum
5.1 Detach the Cordless Stick Vacuum
5.2 Install a Vacuum Cleaner Head
5.3 Start / Pause Cleaning
5.4 Charge the Cordless Stick Vacuum
6. Auto Dust Collection
7. Enabling / Disabling Child Safety Lock
8. Cleaning and Maintenance
8.1 Recommended Cleaning and Replacement Frequency
8.2 Clean the Dust Bin, Filter and Jet Cyclone
8.3 Clean the Rolling Brush
8.4 Clean the Side Brush
8.5 Clean the Floor Brush
8.6 Clean the Sensors and Charging Contact Pins
8.7 Clean the Swivel Wheel
8.8 Replace the Dust Bag

1. About Your Robot Vacuum 3-in-1 E20
1.1 What's in the Box
Power Cord
*The Power Cord varies by region.
Self-Empty Station
(with Dust Bag Included)
Robot with Cordless Stick Vacuum
Floor Brush Cleaner HeadAdjustable Extension TubeSide Brush
DocumentsDock Assist Mat2 in 1 Combination Tool
Note: Should you encounter any issues such as damaged packaging, missing accessories, or signs of use, please
contact eufy support immediately. We are committed to resolving your concerns promptly and ensuring your
satisfaction.
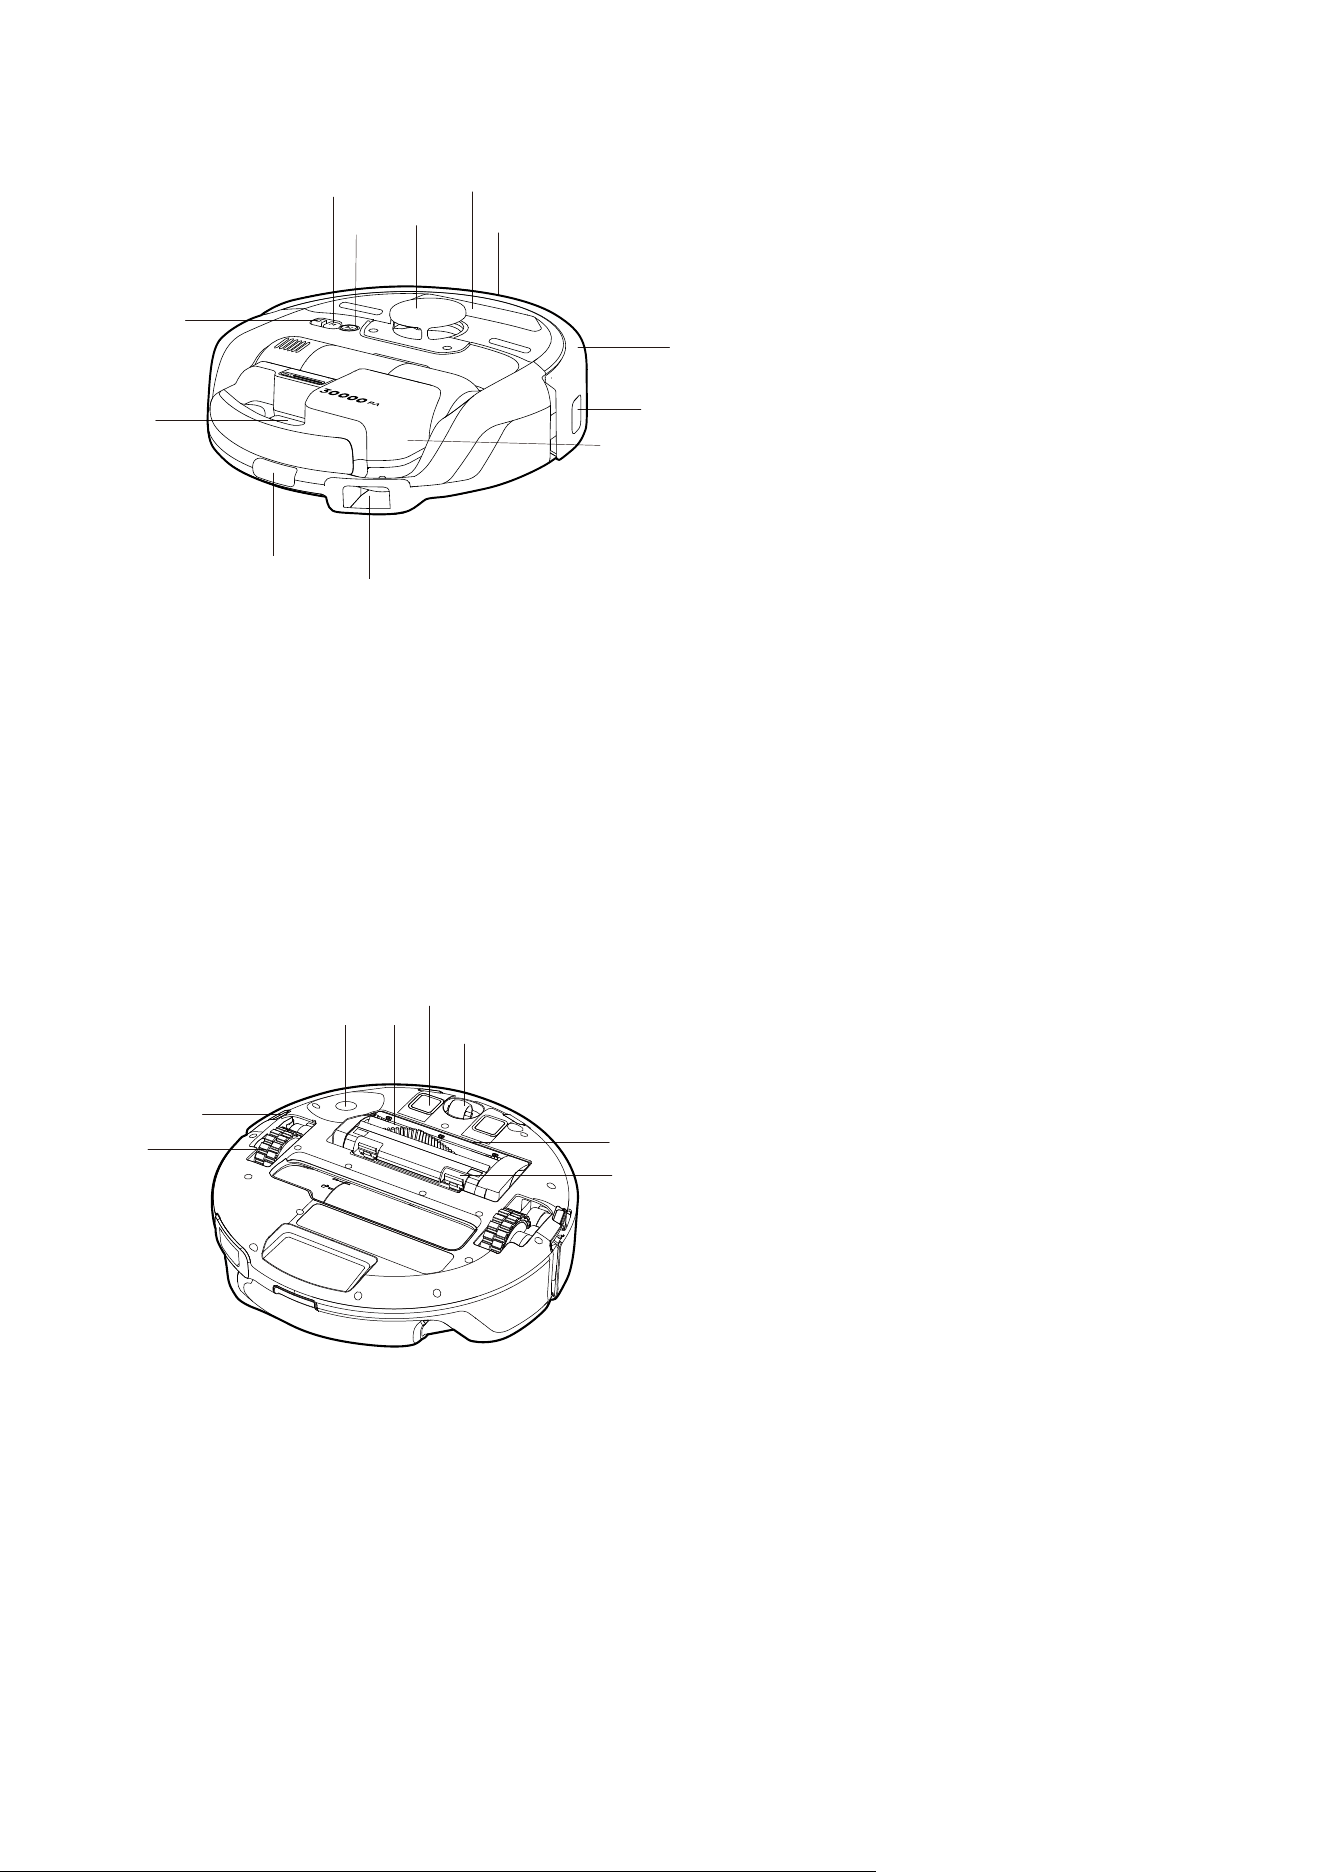
1.2 Overview
❶
❻
❷
❸
❺
❹
❼
❾
❽
❿
⓫
⓬
❶
Navigation LiDAR
❼
Dust Outlet
❷
Start / Pause Button
❽
Cordless Stick Vacuum
❸
Suction Mode Button
❾
Line Laser Sensor
❹
Recharge Button
❿
Bumper
❺
Quick Release Button
⓫
Line Laser Sensor
❻
Recharge Sensor
⓬
Dusting and Crevice Tool
❶
❽
❸ ❷
❹
❺
❻
❼
❶
Charging Contact Pins × 2
❺
Wheels × 2
❷
Rolling Brush
❻
Brush Guard Release Buttons × 2
❸
Side Brush Installation Port
❼
Brush Guard
❹
Anti-Drop Sensors × 4
❽
Swivel Wheel
❻
❺
❶
❷
❸
❹
❼
❽
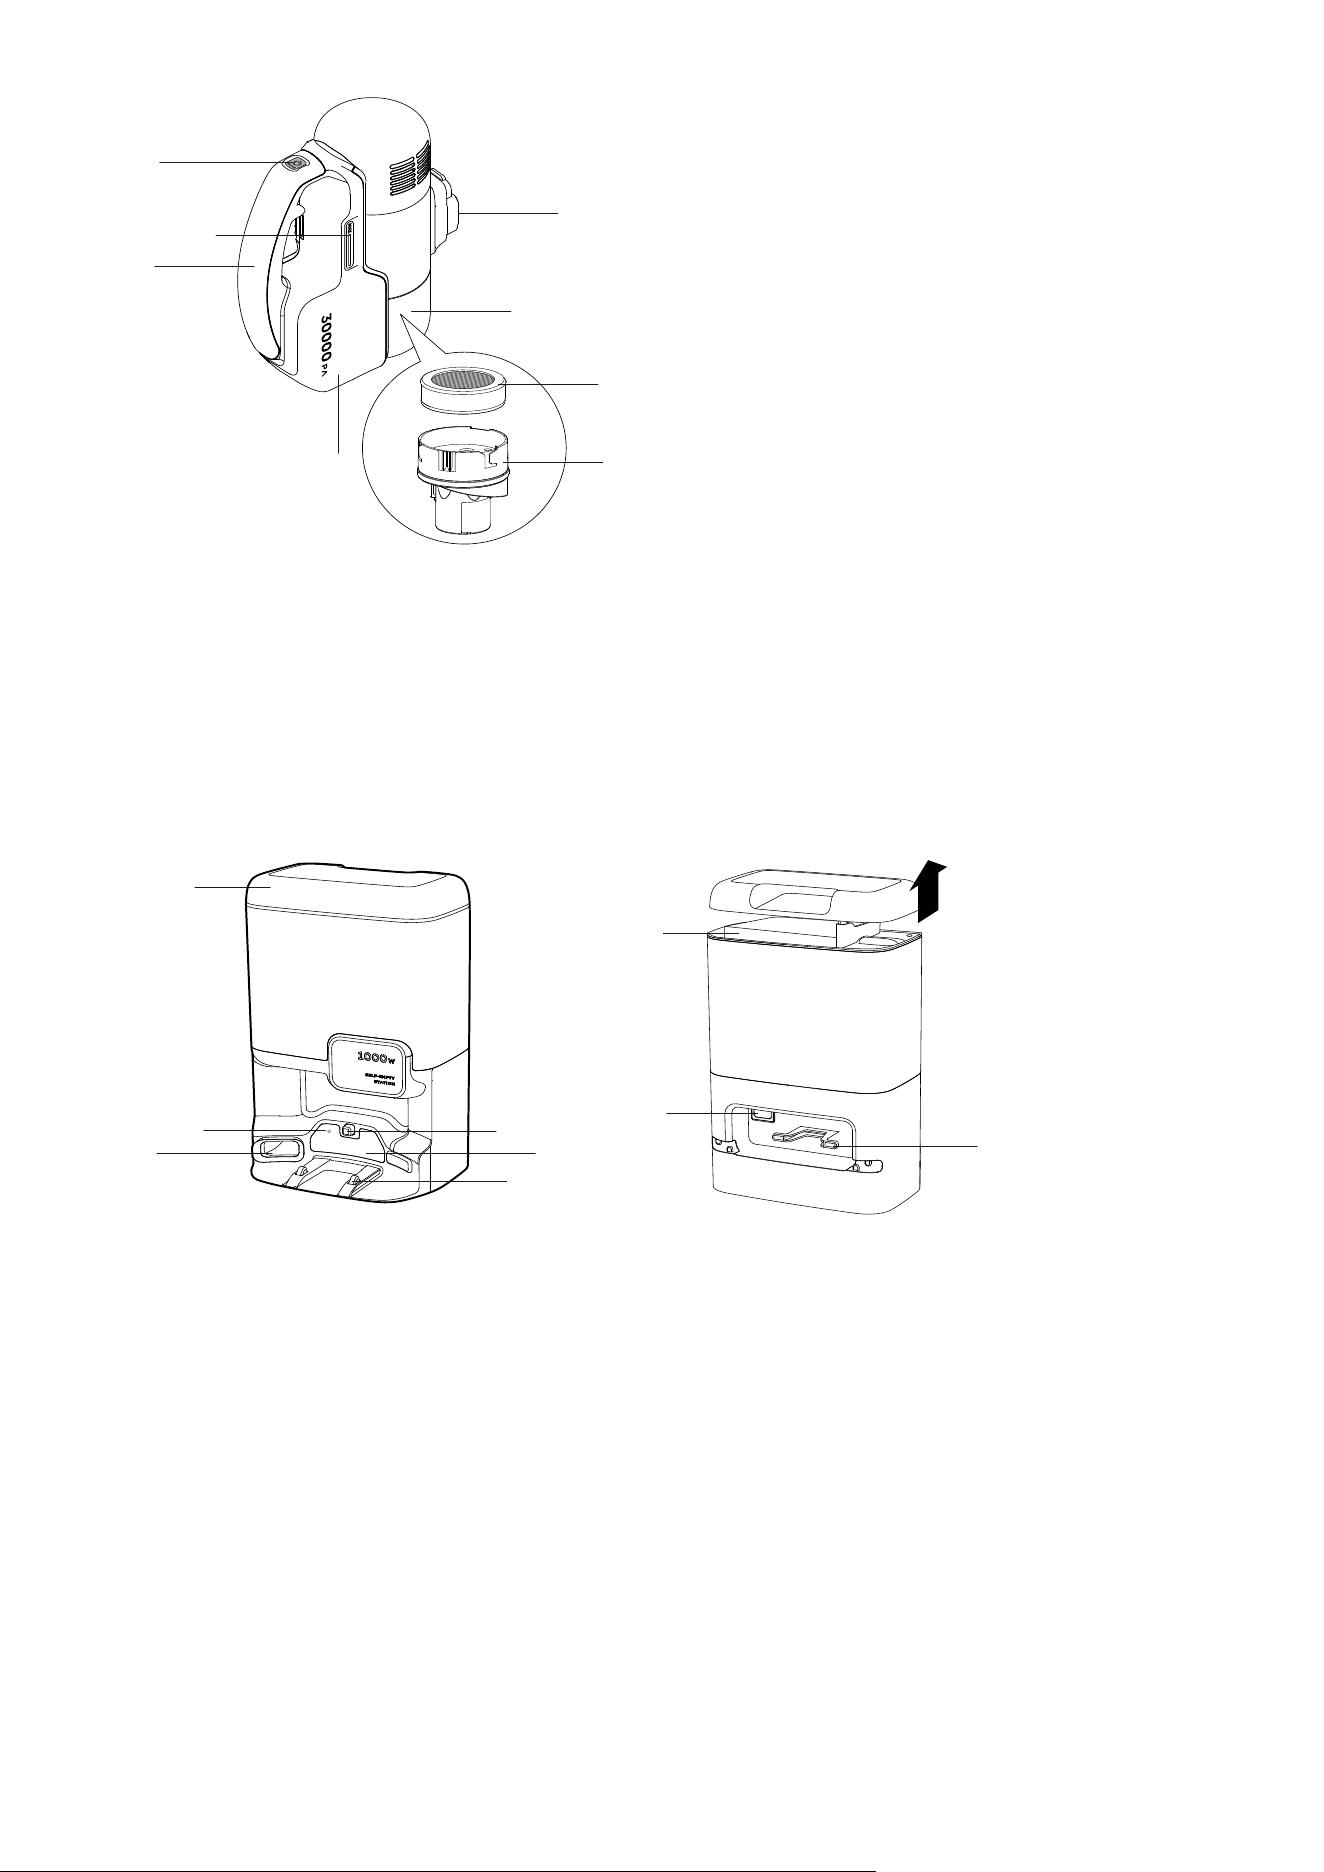
❶
Power / Mode Button
❺
Dust Inlet
❷
Power / Mode Indicator
❻
Dust Bin
❸
Handle
❼
High-Performance Filter
❹
Battery
❽
Jet Cyclone
❶
❺
❹
❸
❻
❷
❼
❽
❾
❶
Dust Cover
❻
Charging Contact Pins × 2
❷
LED Indicator
❼
Dust Bag
❸
Dust Collection Interface
❽
Power Socket
❹
Docking Switch
❾
Cord Winding Groove
❺
Recharge Sensor
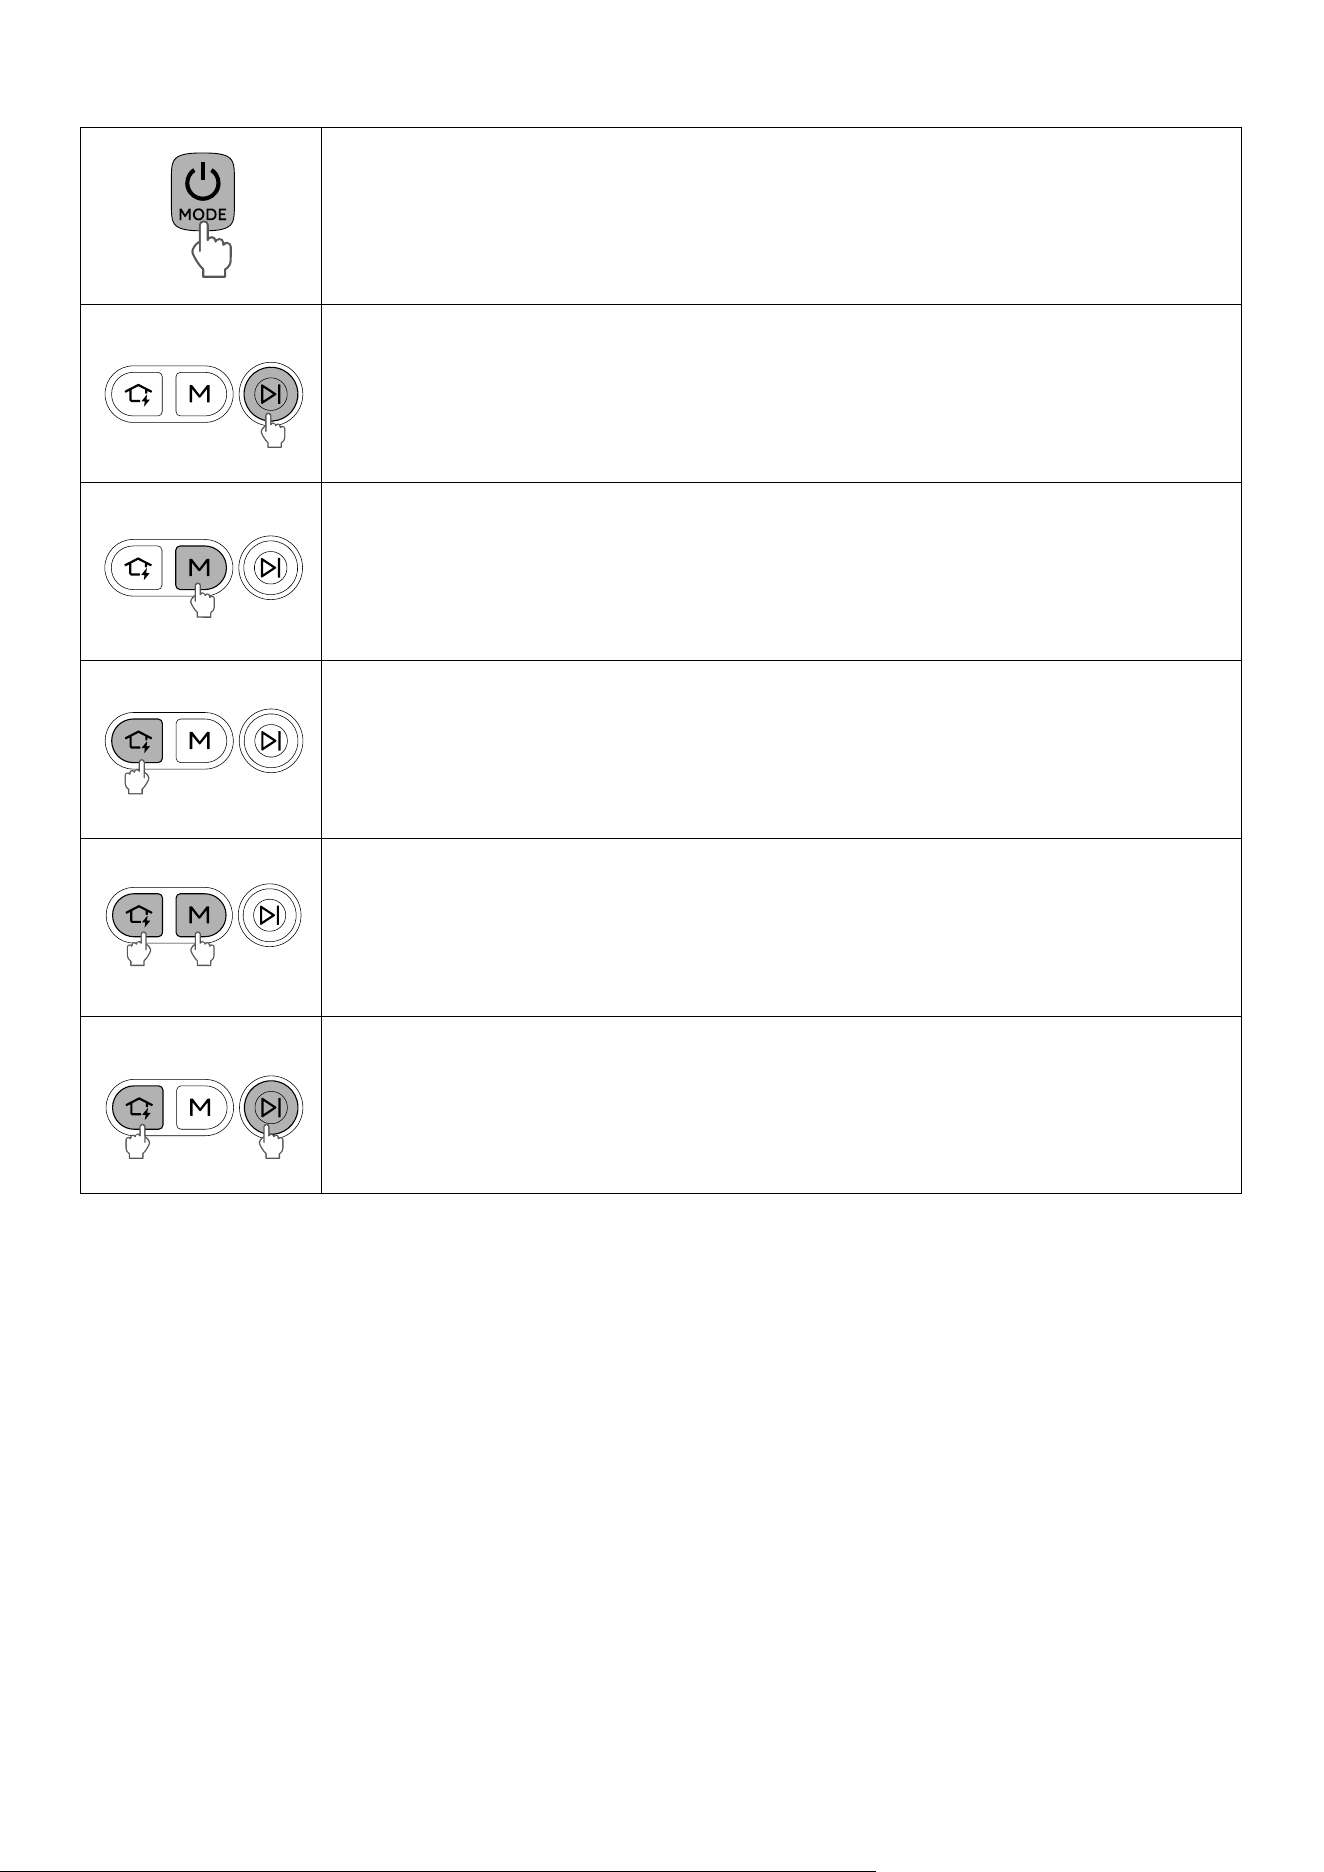
1.3 Button Controls
• Press to power on
• Press for 10 seconds to power o
• Press to start / pause cleaning
• Press to switch suction modes: ECO, Standard, Turbo, and Maximum
• Press for 3 seconds to indicate the battery level on the Cordless Stick Vacuum
• Press to return the Robot to the Self-Empty Station
• Press for 3 seconds to start emptying the dust bin and cleaning the rolling brush
• Simultaneously press for 3 seconds to start Wi-Fi connection
• Simultaneously press for 10 seconds to restore factory settings
• Simultaneously press for 3 seconds to enable or disable the child safety lock
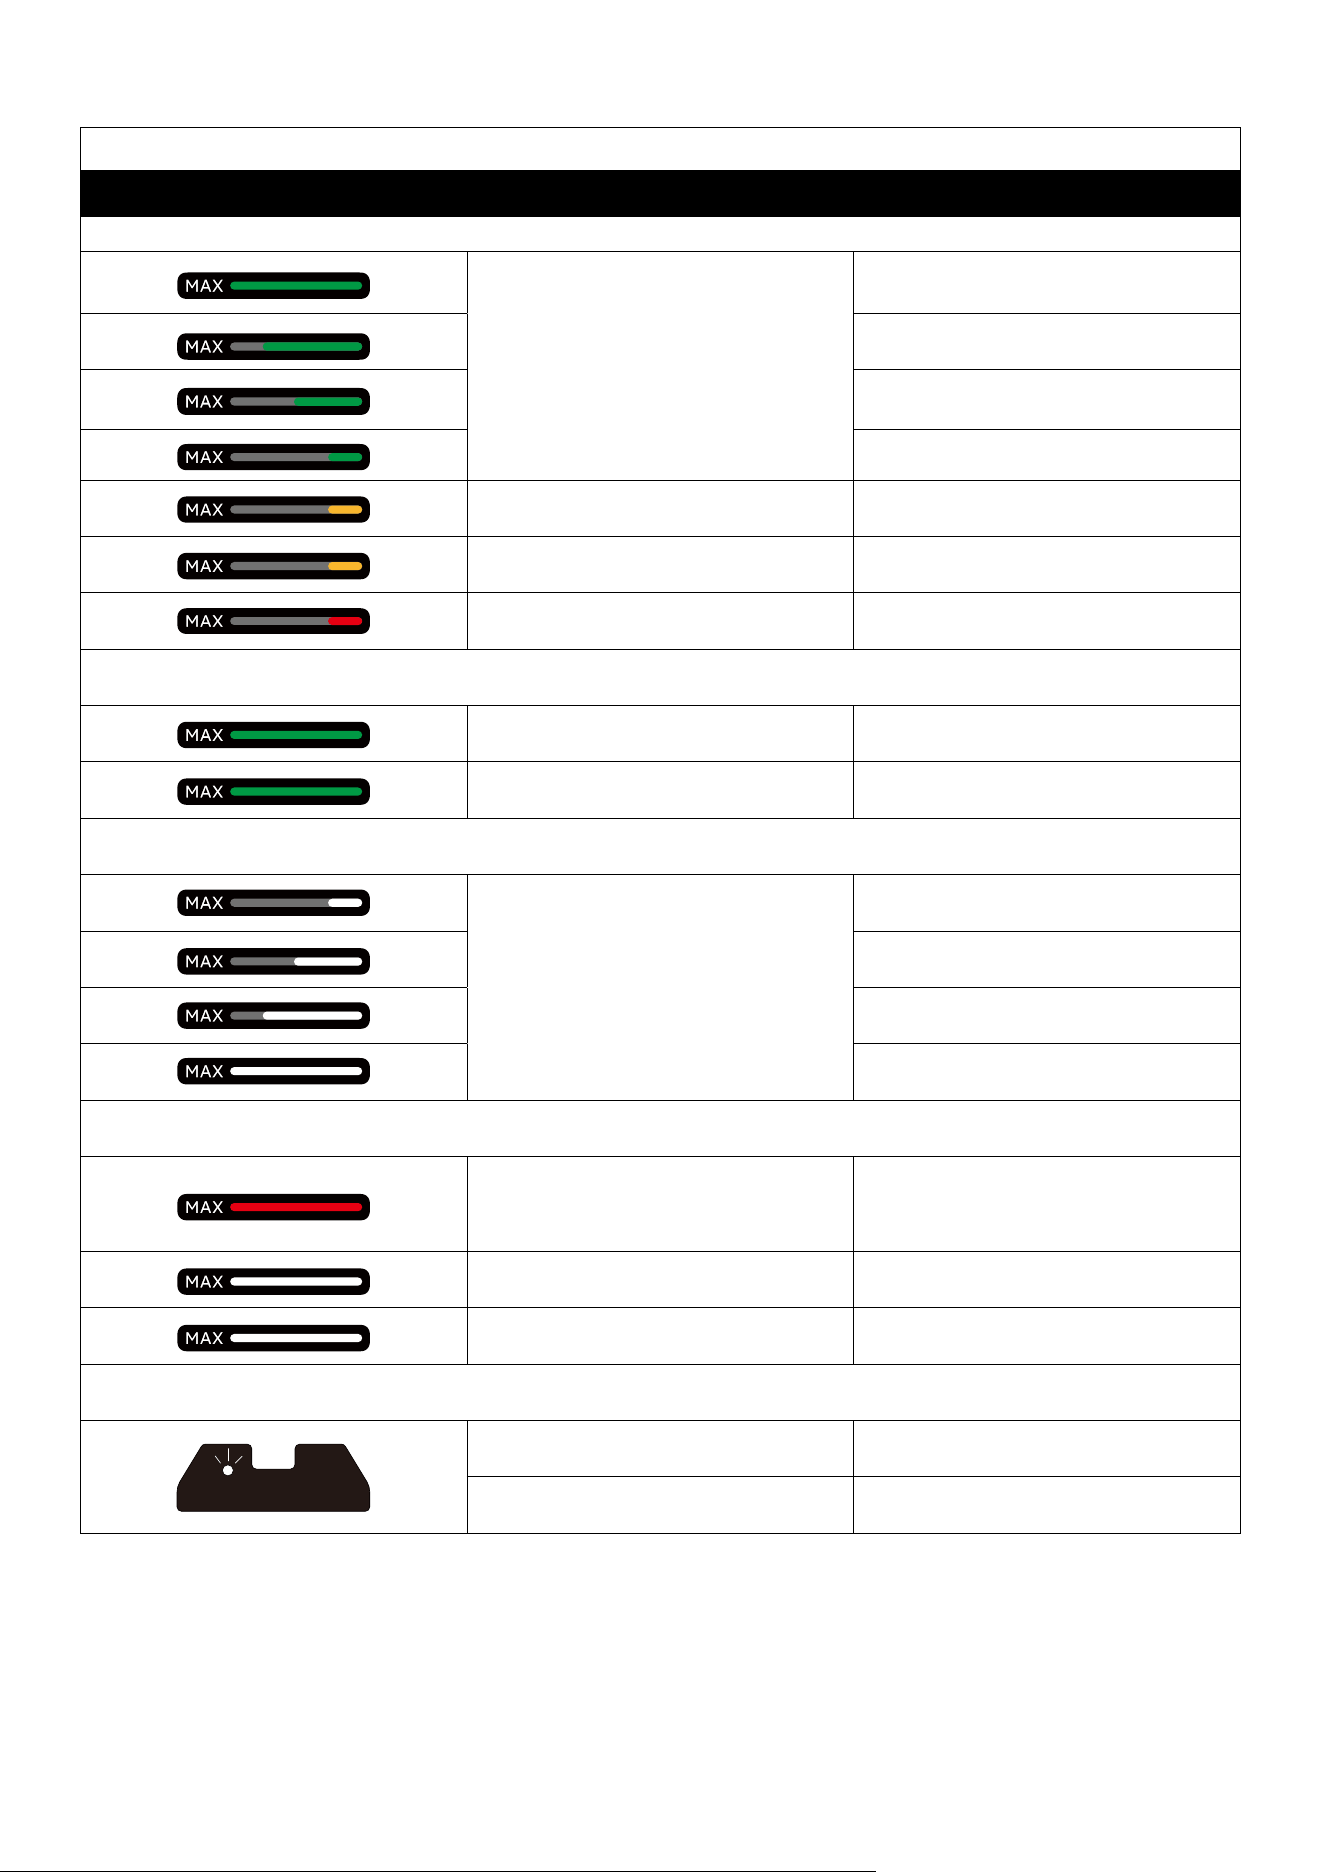
1.4 LED Indication
Robot & Cordless Stick Vacuum
LED Indicators LED Indication Status / Battery Level
When in use
Steady green
75% to 100%
50% to 75%
25% to 50%
15% to 25%
Steady yellow 13% to 15%
Flashing yellow 5% to 13%
Flashing red <5%
When charging
Flashing green Charging
Steady green Fully charged
When switching modes
Steady white
ECO suction
Standard suction
Turbo suction
Maximum suction
When indicating robot status
Steady red
Error
(Please refer to voice alerts or the
in-app instructions for solutions)
Breathing white
Enters pairing mode or resetting
mode.
Flashing white Pairing or resetting the network.
Self-Empty Station
The LED lights up in white Self-Empty Station powered on
Steady white
Working normally / Collecting
Dust
2. Preparing Your Robot Vacuum 3-in-1 E20
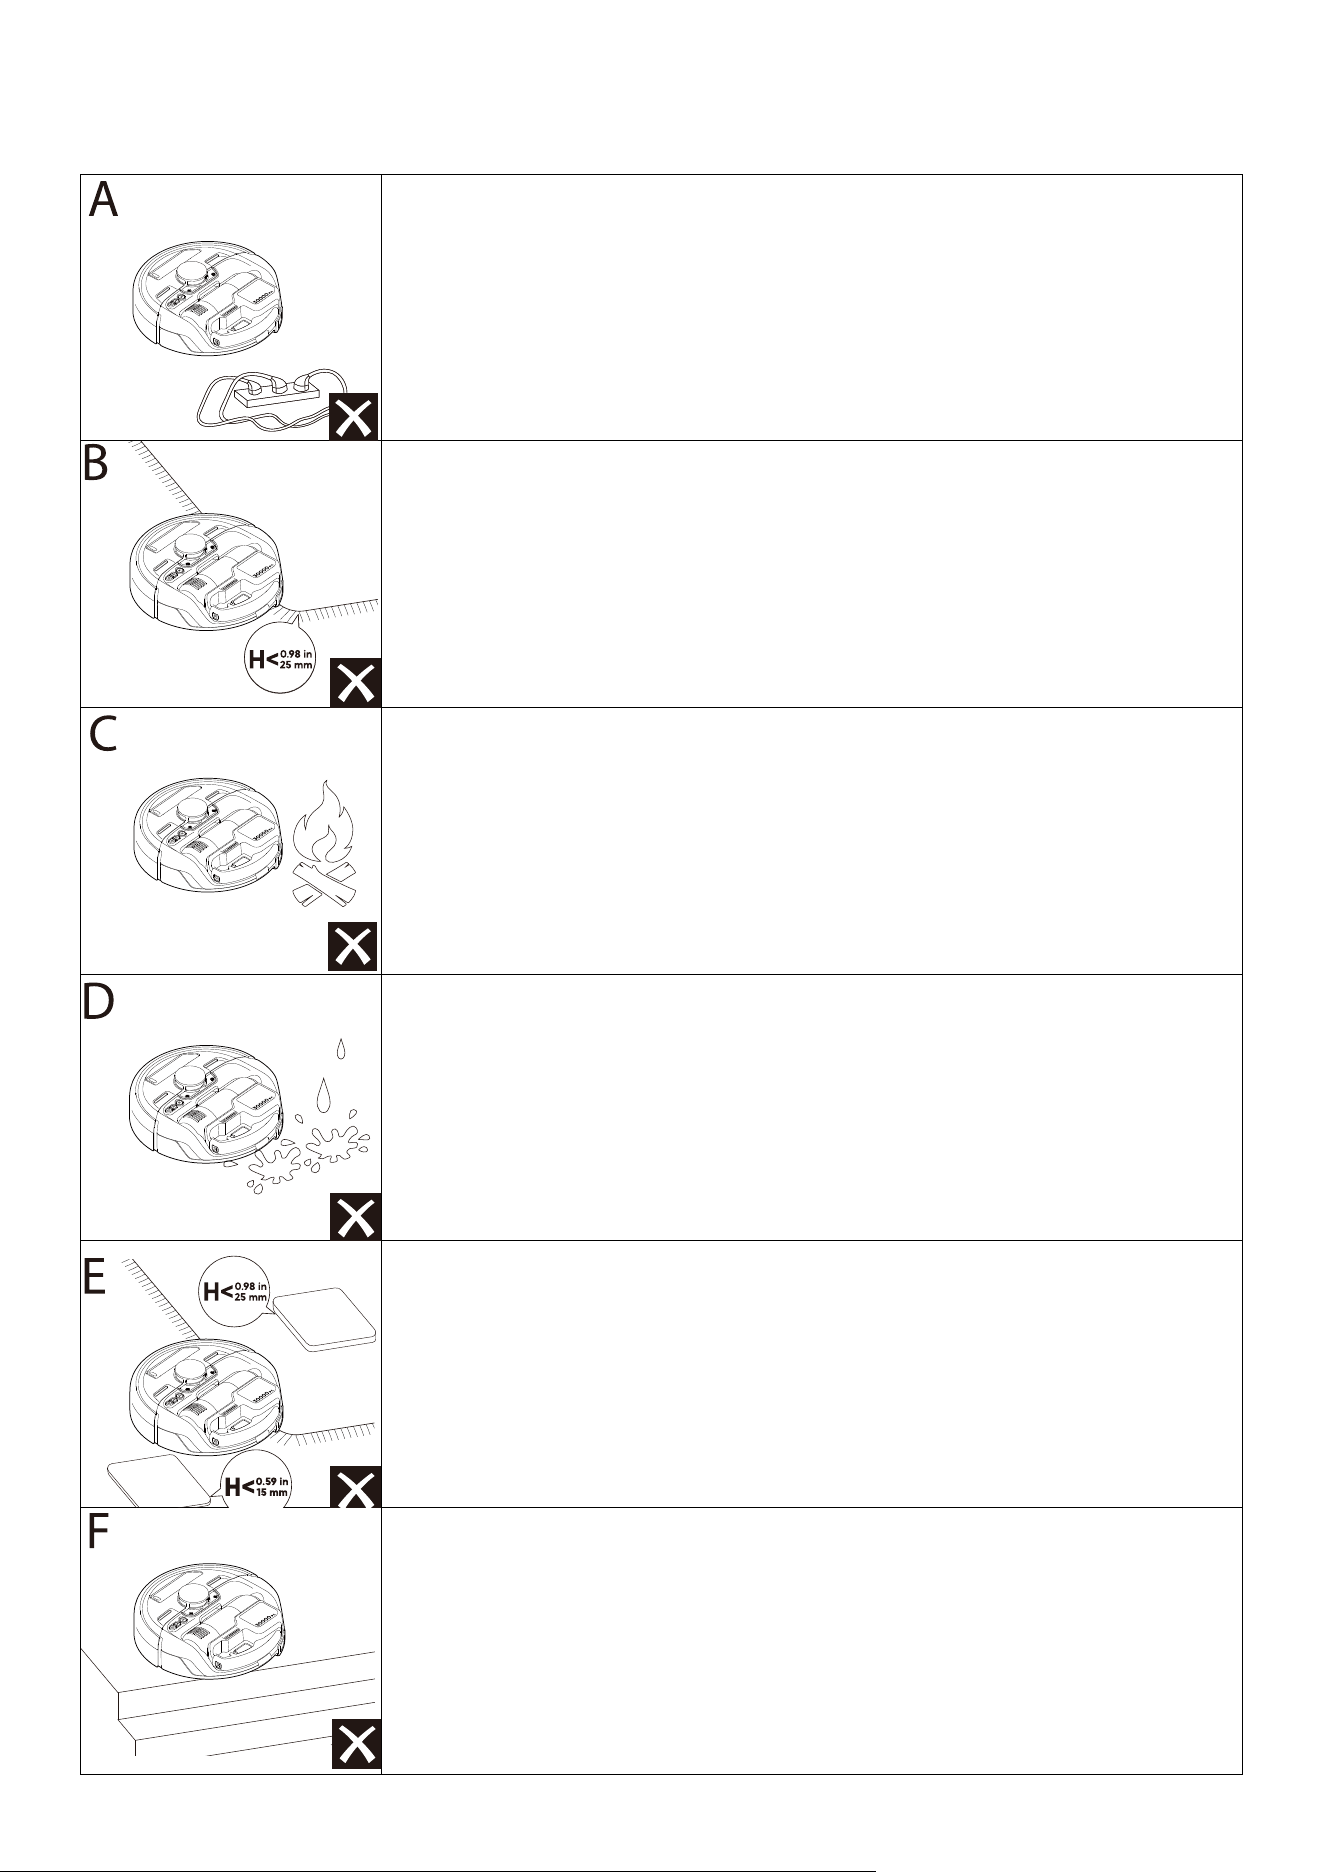
2.1 Important Tips Before Use
A. Remove power cords and small objects from the floor that may entangle the
robot.
B. Fold tasseled edges of rugs underneath to prevent tangling the robot. Avoid
cleaning high-pile rugs or rugs thicker than 0.98 in (25 mm) as they may cause
the robot to malfunction. Set a “No-Go” zone to block o areas where the rugs
are thicker than 0.98 in (25 mm).
C. It is strongly recommended to place physical barriers or set a “No-Go” zone
via the eufy clean app in front of fireplaces and certain areas (i.e. air vents) that
may cause damage to the robot if entered.
D. Avoid vacuuming large amounts of water or burning objects or it will potentially
cause safety hazards or damage the robot.
E. Remove objects less than 0.59 in (15 mm) in height on the floor, and objects less
than 0.98 in (25 mm) in height on the carpets, which the Robot cannot recognize
as obstacle and avoid them.
F. Anti-drop sensors will prevent the robot from tumbling down stairs and steep
drops in most cases, but sensors are less eective if dirty or used on carpeted /
reflective / dark floors. Place physical barriers or set a “No-Go” zone to block o
areas where the robot may fall.
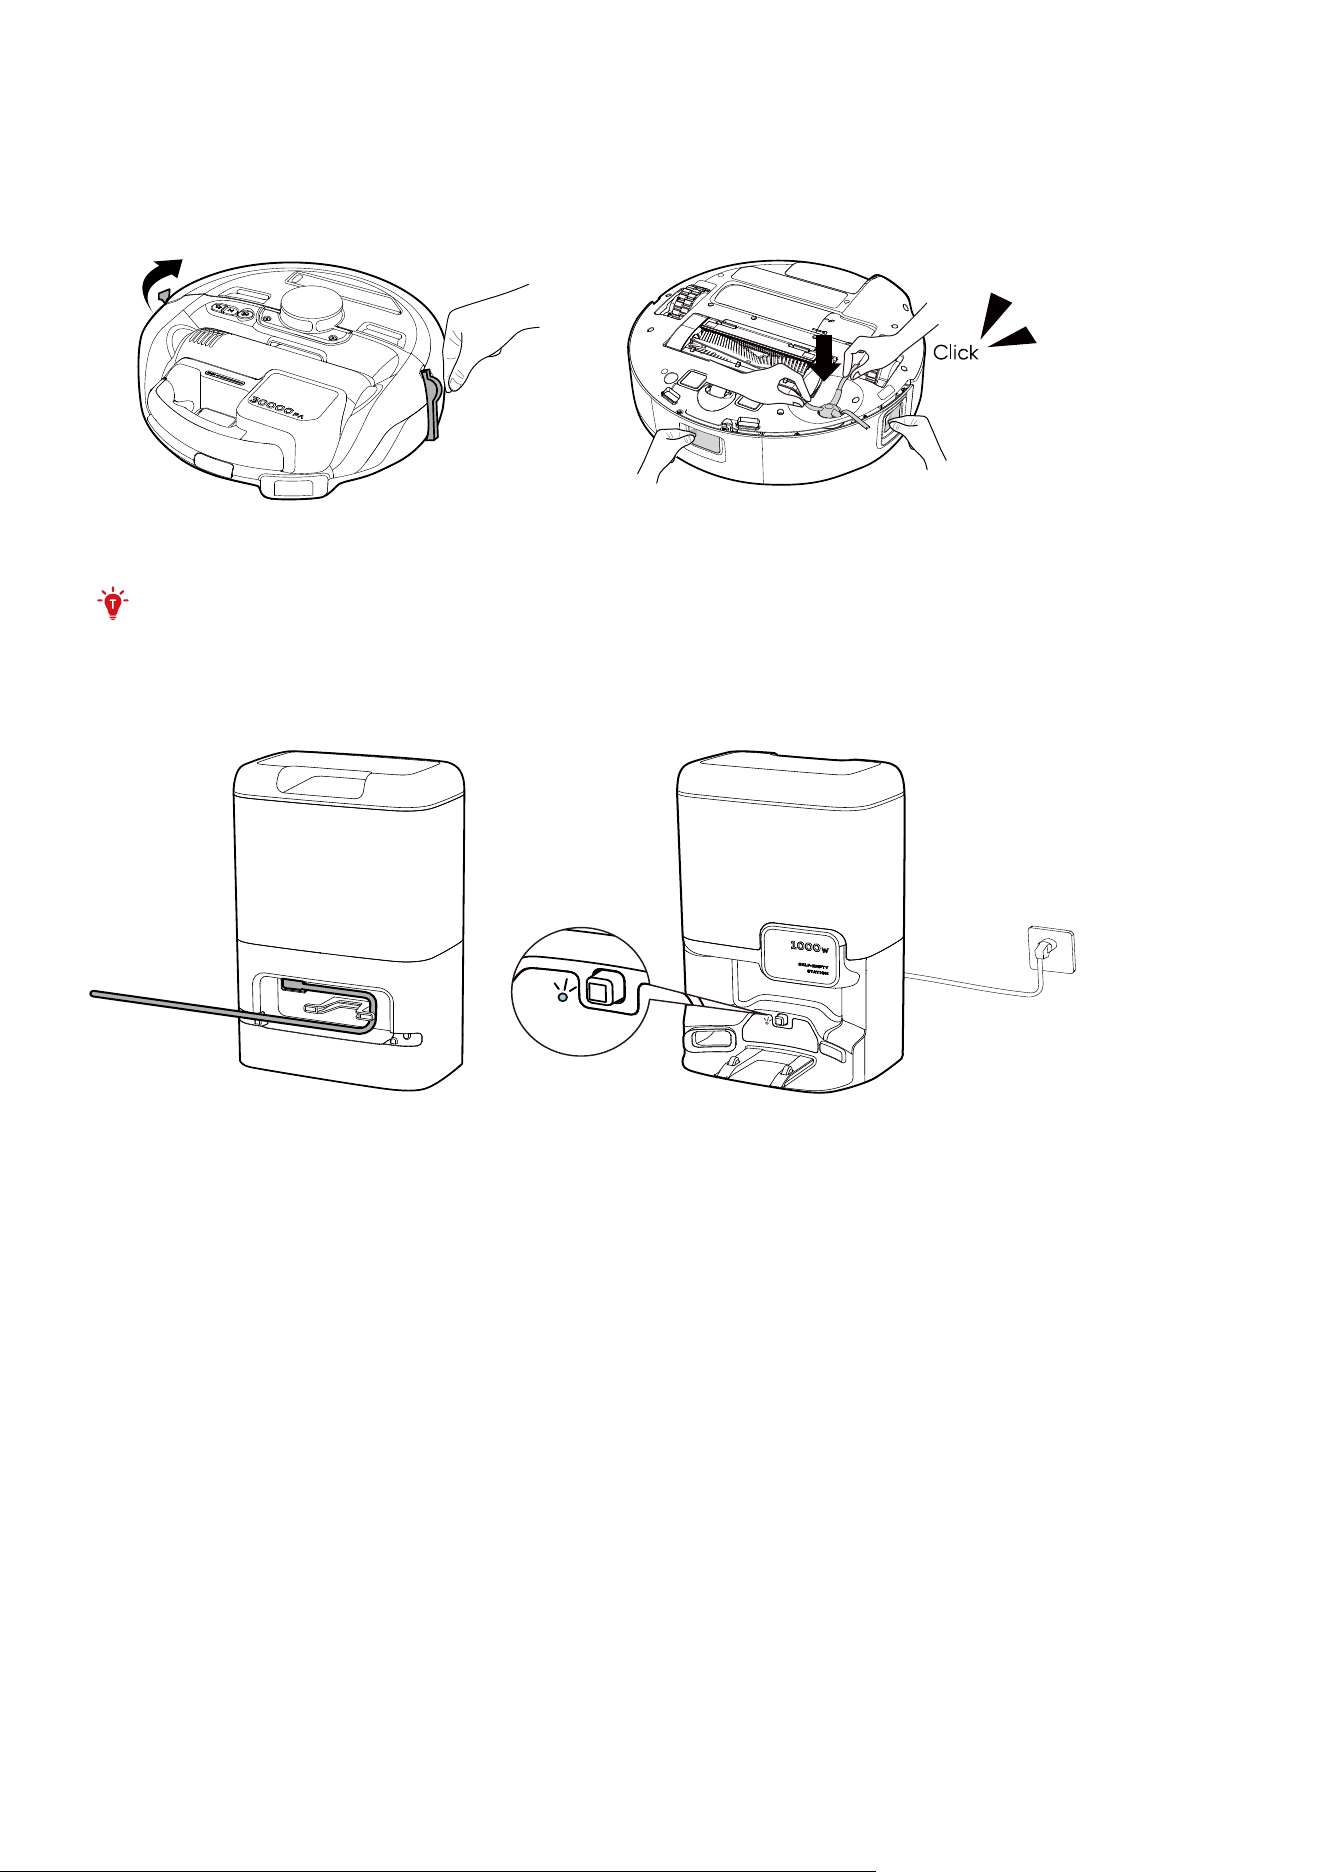
2.2 Prepare the Robot
1. Before using, remove stickers, laser protection film, and foam packaging from the Robot.
2. Make sure the brush is correctly installed based on the diagram below. You will hear a "click" when the side
brushes are in place.
➀
➁
• If you need to return or repair the product, do not remove the protective film.
2.3 Connect to Power Supply
Connect the power cord to the Self-Empty Station and a wall outlet.
➀ ➁
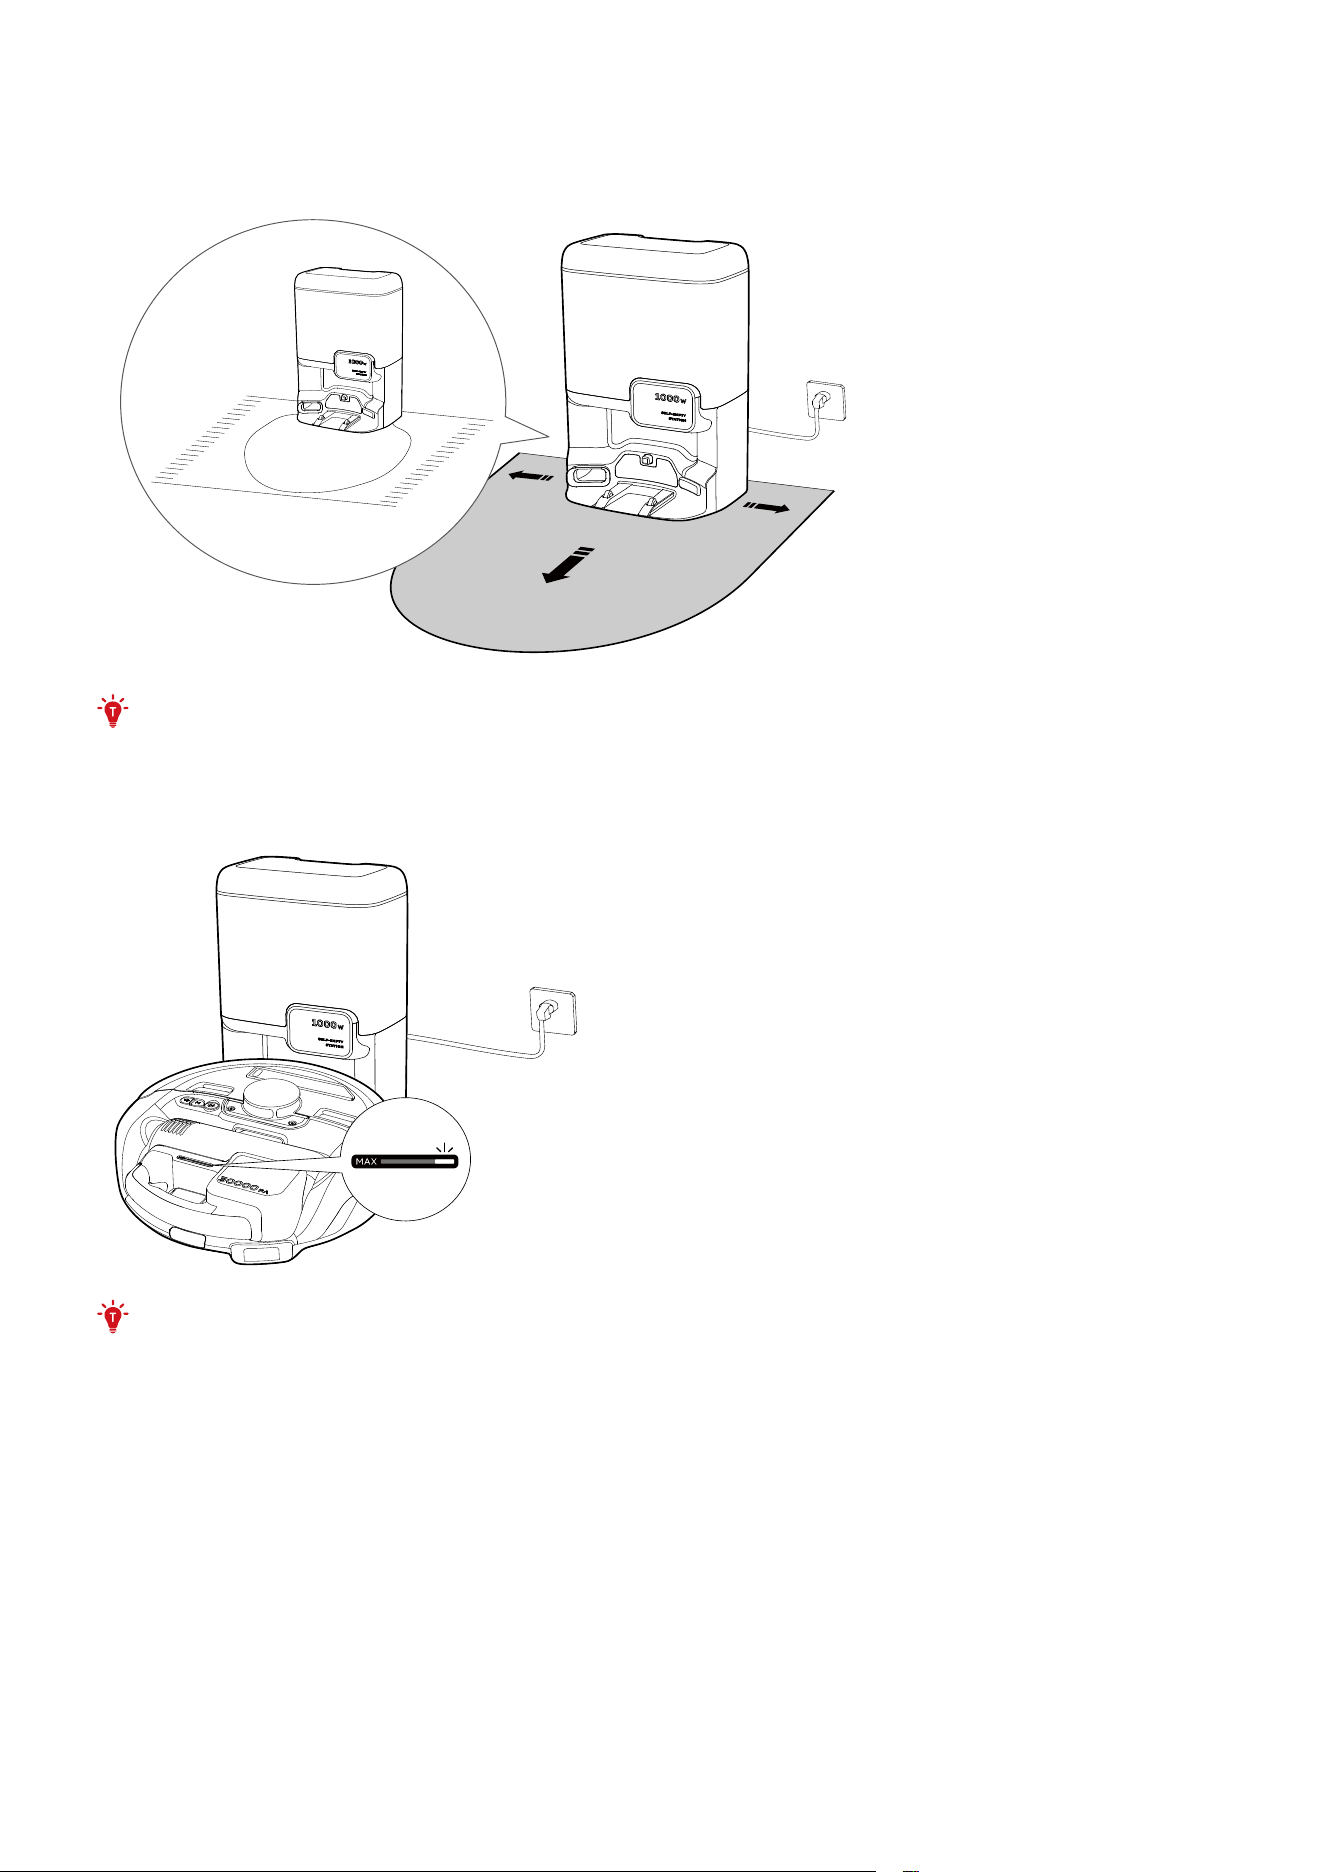
2.4 Place the Self-Empty Station
Place the Self-Empty Station against a wall and on a hard, level surface, and install the dock assist mat under
the Self-Empty Station. Place the Self-Empty Station in a location that has strong Wi-Fi signal and the Robot can
easily access. Ensure a clearance of at least 4.9 ft (1.5 m) in front and 1.6 ft (0.5 m) at the sides.
4.9 ft / 1.5 m
1.6 ft / 0.5 m
1.6 ft / 0.5 m
• Always keep the Self-Empty Station plugged in, otherwise the Robot will not automatically return.
2.5 Charge the Robot
Attach the Robot to the Self-Empty Station and it will start charging automatically.
• For the first-time use, you must activate the battery by charging it. Once activation is complete, the
power indicator on the Cordless Stick Vacuum will light up green.
3. Using Your Robot with the eufy Clean App
To enjoy all the available features, it is recommended to control your robot via the eufy Clean app.
Before you start, make sure:
• Your smartphone is running iOS 11.0 (or above) or Android 8.0 (or above).
• The 2.4GHz band wireless signal is enabled on your wireless router.
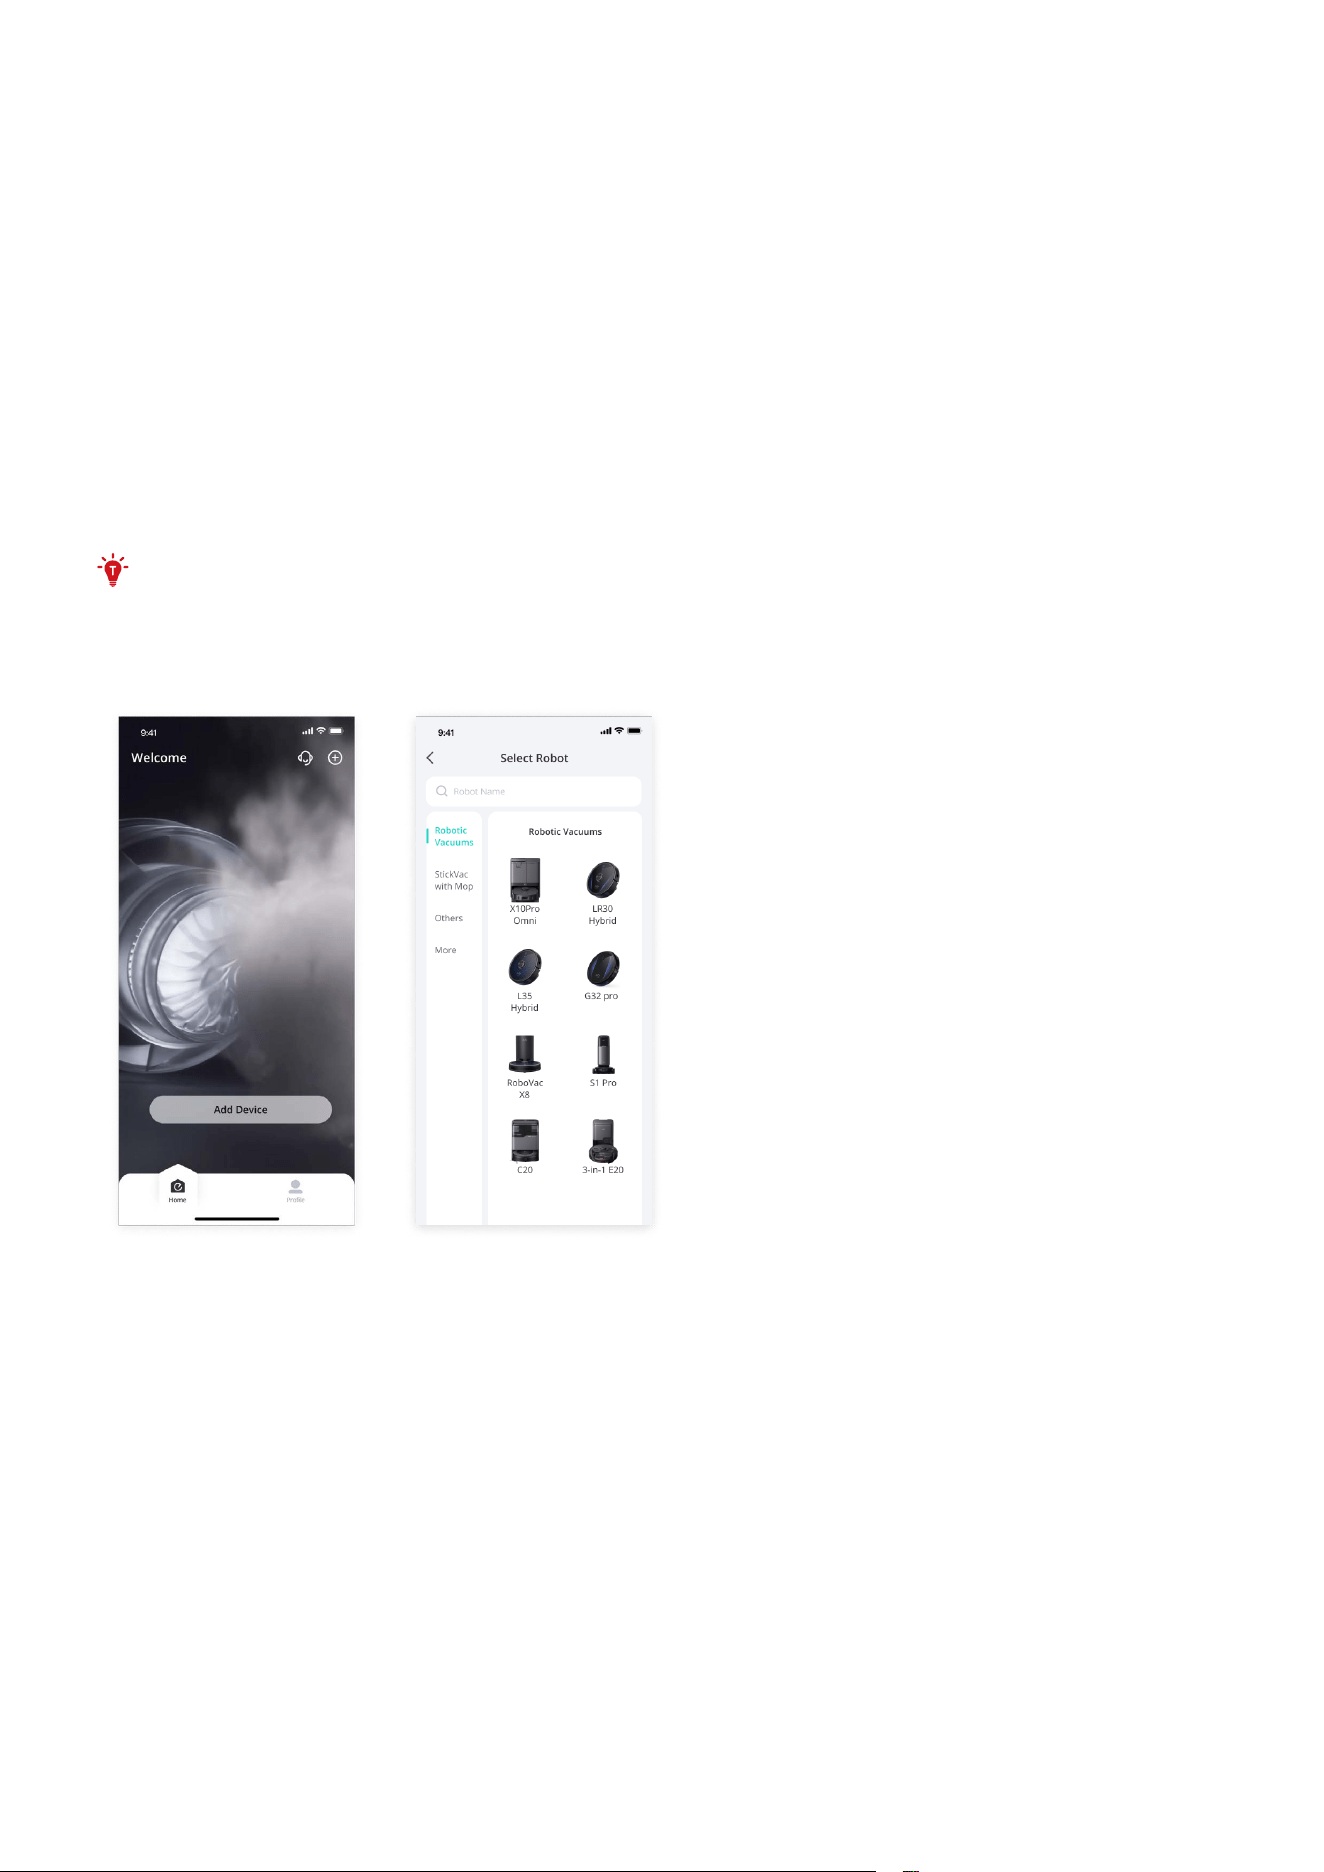
3.1 Download the App
1. Download the eufy Clean app from the App Store (iOS devices) or Google Play (Android devices), or by clicking
this link: https://dl-eufy.eufylife.com/qcdl/index.html?flow=eufy.
2. Open the app and create a user account.
3. Tap Add Device on the main screen of the app, and select 3-in-1 E20 to connect the robot.
4. Follow the instructions in the app to set up the Wi-Fi connection.
• After connecting successfully, you can control the robot via the app.
• With the app, you can select dierent cleaning modes, schedule cleaning, adjust the suction level, view the
operation status, receive notifications, set up “No-Go” zones, and access additional features.
• The Robot does not support 5GHz Wi-Fi.
• If the robot gets stuck in any space, tap Find My Robot in the app to find the device.
• Due to ongoing development and upgrades of the eufy Clean App, there may be minor adjustments to
features. Please refer to the latest version for the most accurate information.
3.2 Quick Mapping before First Use
After your robot is connected, tap Enter and then Start on the screen to start quick mapping followed by a whole
house cleaning. Once the mapping is completed, you are ready to start cleaning.
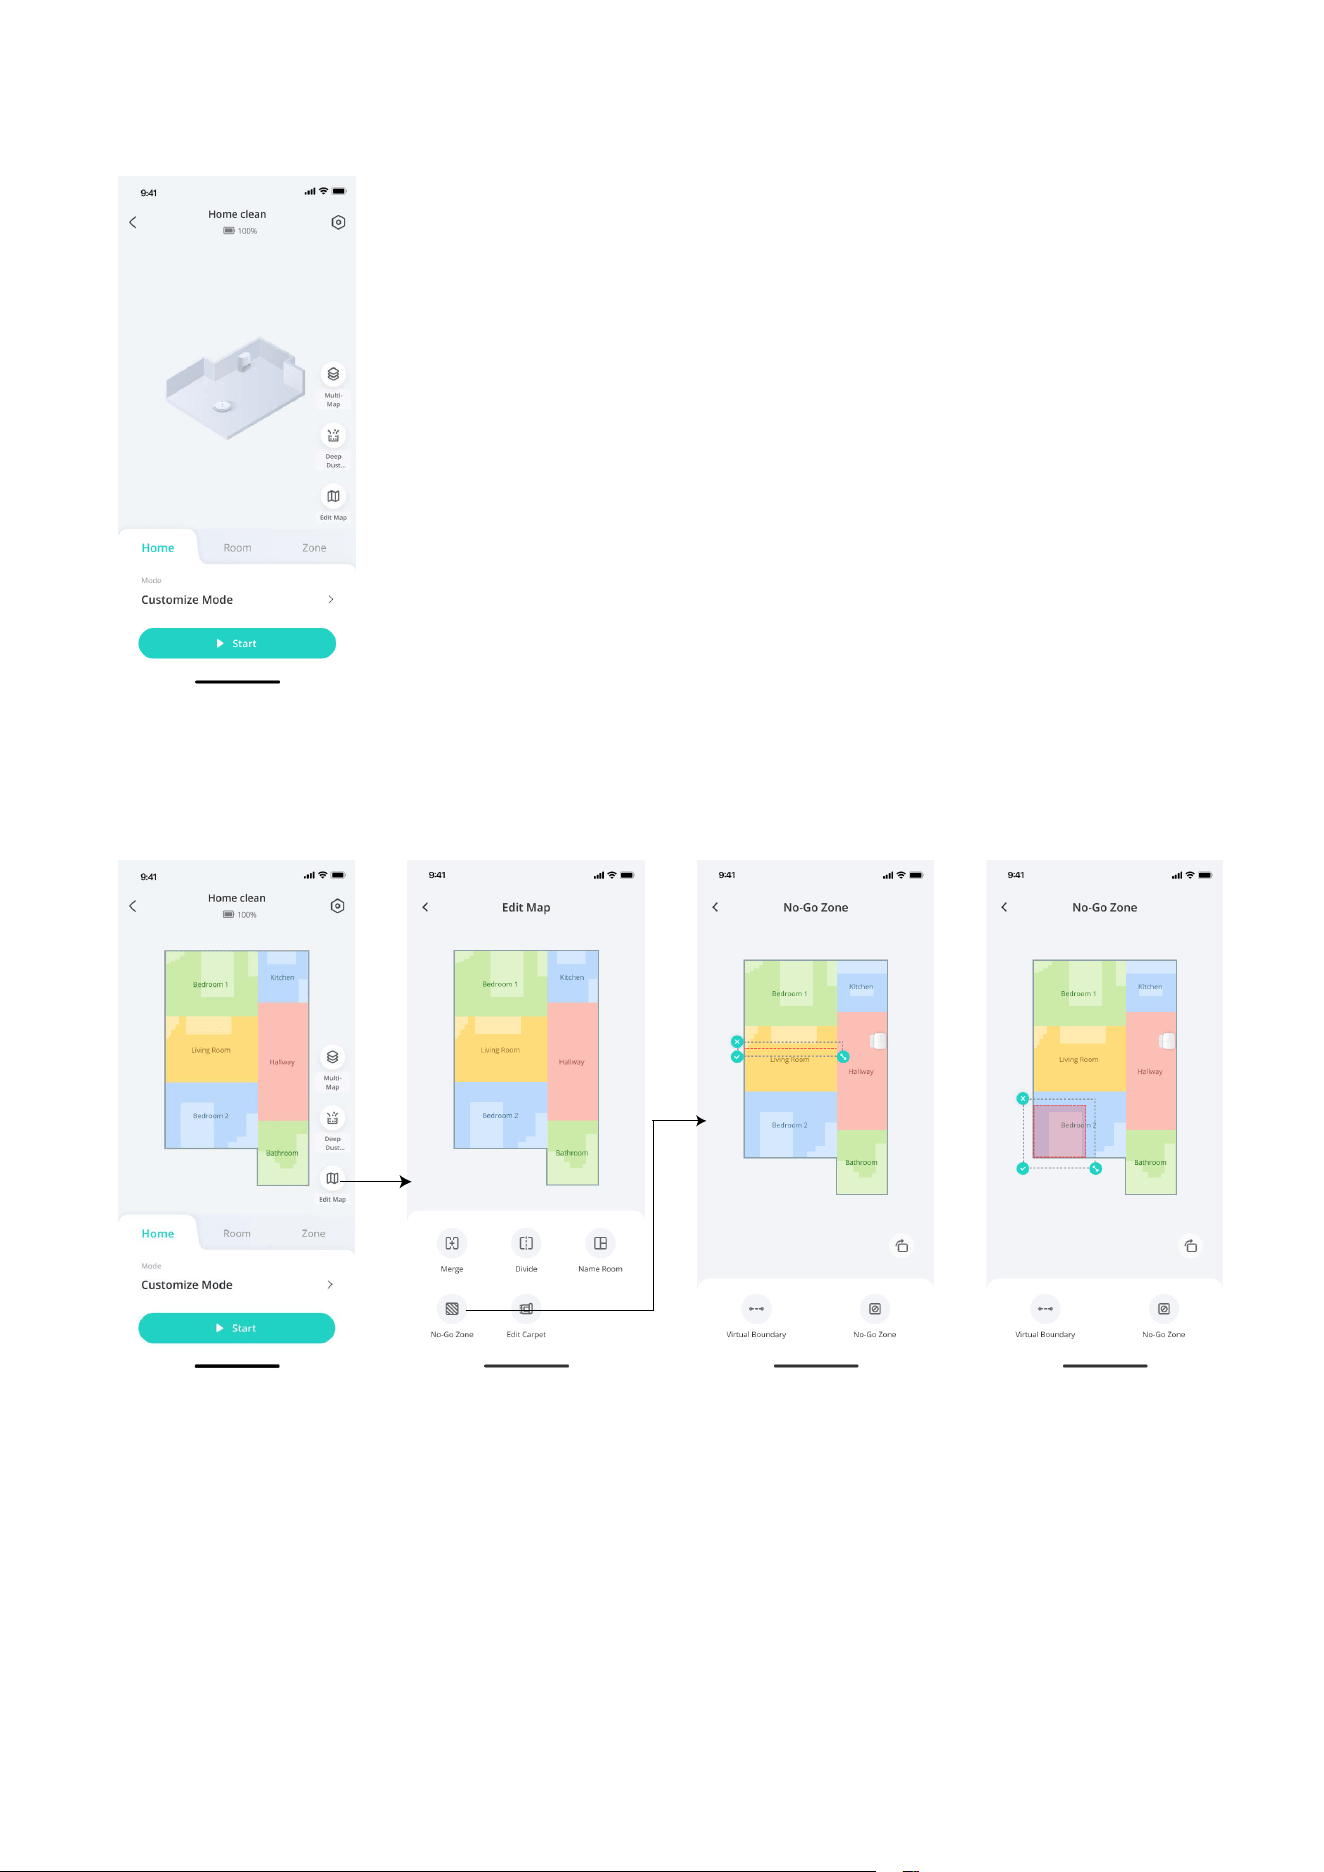
3.3 Set Up No-Go Zone
With the eufy Clean app, you can set up a “No-Go Zone” as a restricted area, which the robot will not enter the
zone to vacuum. This eliminates the need to use physical barriers, including boundary strips. This feature is only
designed for dividing the cleaning zones, not for isolating hazardous areas.
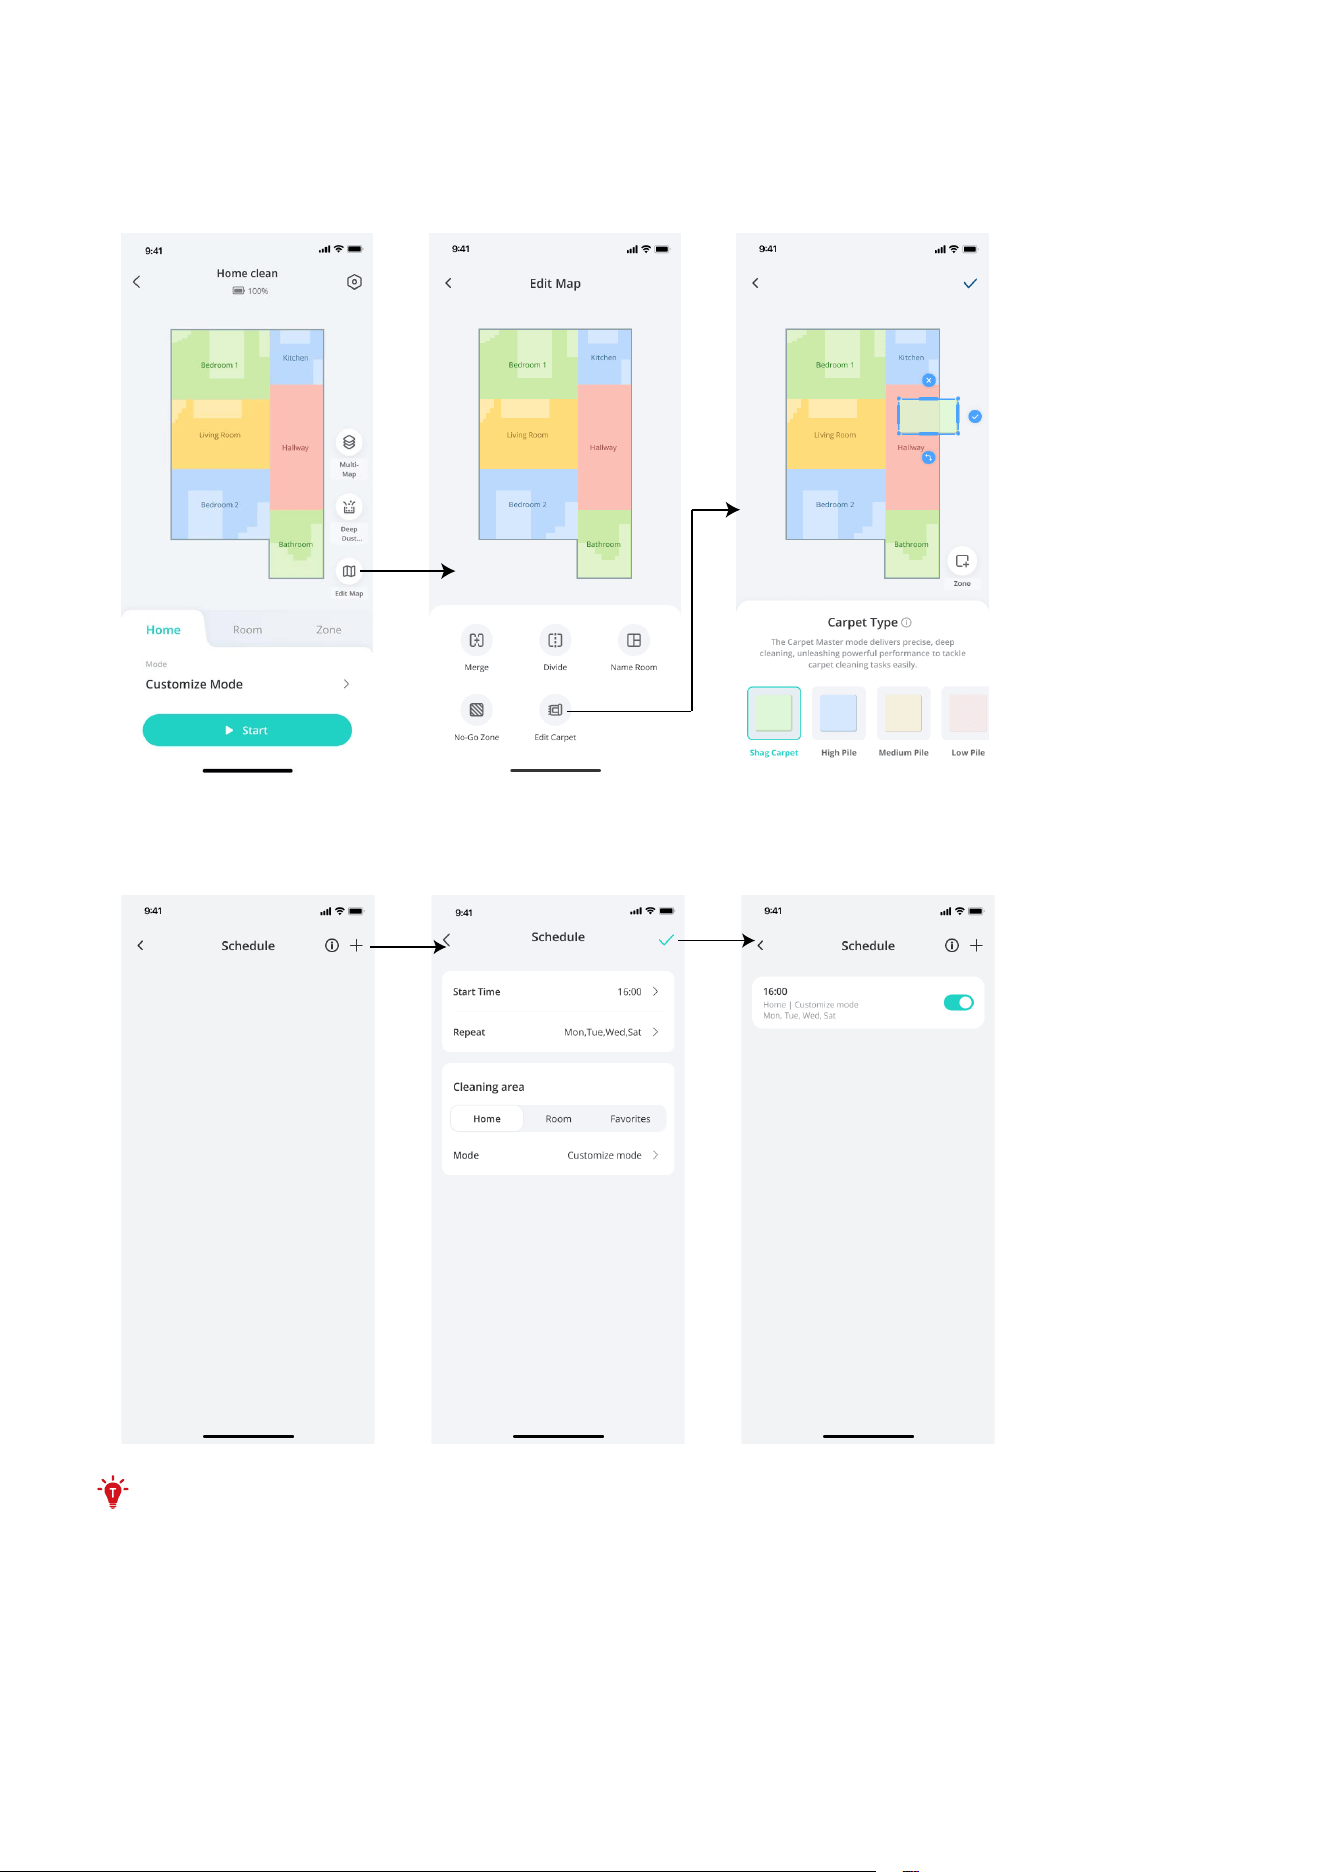
3.4 Editing Carpets
To protect your carpets and ensure ecient cleaning, please customize the settings for dierent types of carpets
in the eufy Clean app. The Robot will not enter the zone with carpets thicker than 0.98 in (25 mm).
• Tap Edit Map > Edit Carpet to complete the setup.
3.5 Schedule Cleaning
With the eufy Clean app, you can schedule the robot to start cleaning at a particular time.
• You can set the time and customize cleaning schedules from Sunday to Saturday on the eufy Clean app.
This function is only available on the app.
3.6 Select a Cleaning Mode
You can start / pause cleaning or select a cleaning mode via the eufy Clean app.
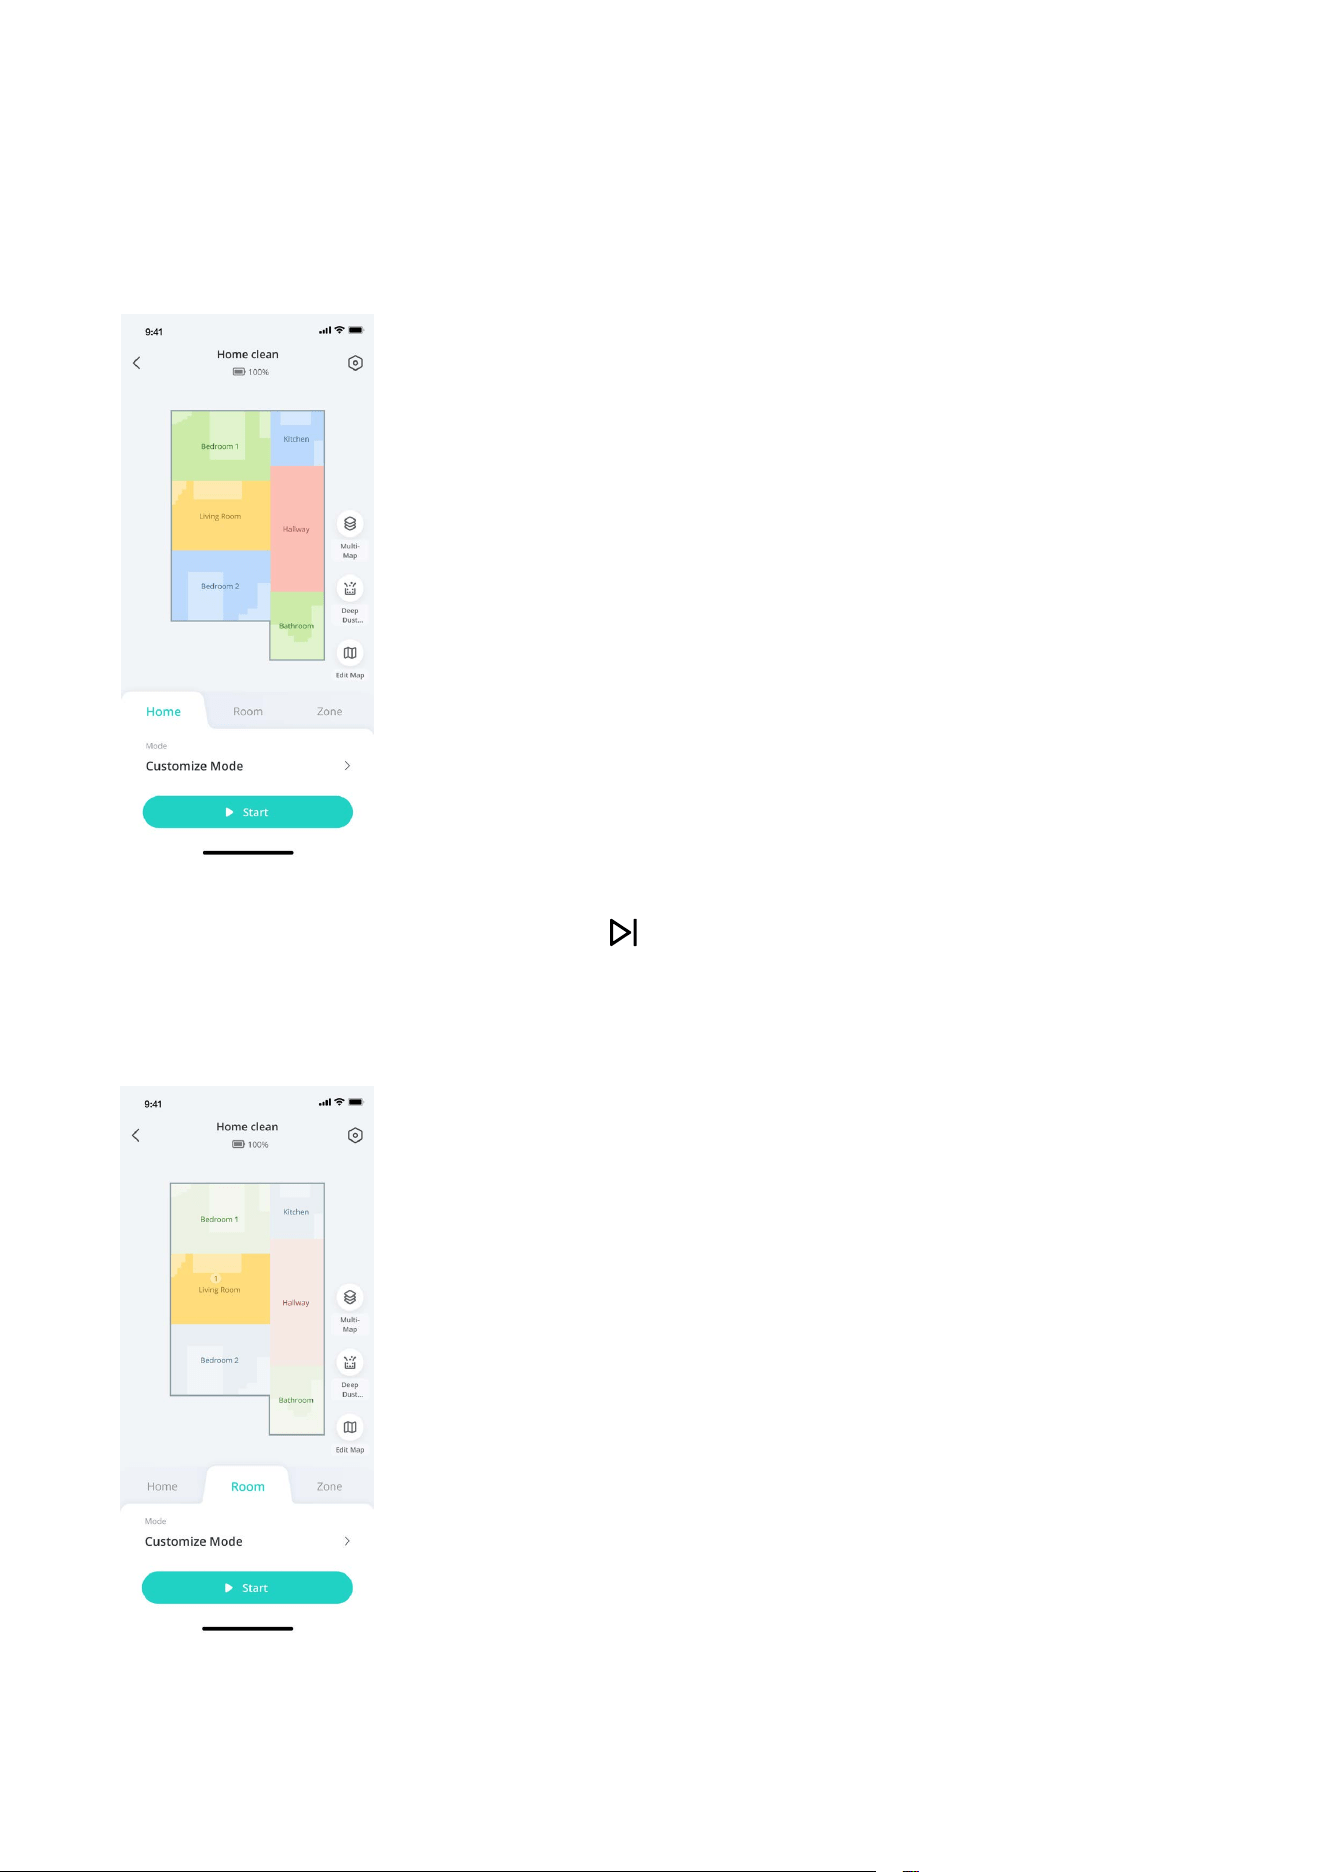
3.6.1 Home Cleaning Mode
Tap Start in the eufy Clean app to enable Home Cleaning mode.
After startup, the robot moves from the Self-Empty Station and automatically determines its cleaning route,
cleaning the edges first and following a Z-shaped cleaning path. When cleaning is finished, the robot
automatically returns to the Self-Empty Station.
• To pause cleaning, tap Pause in the app or press on the robot.
3.6.2 Room Cleaning
In this mode, you can select the specific room that requires cleaning in the eufy Clean app. You can set the suction
power and cleaning times of each room. The robot will clean the selected rooms only and return to the Self-Empty
Station after cleaning.
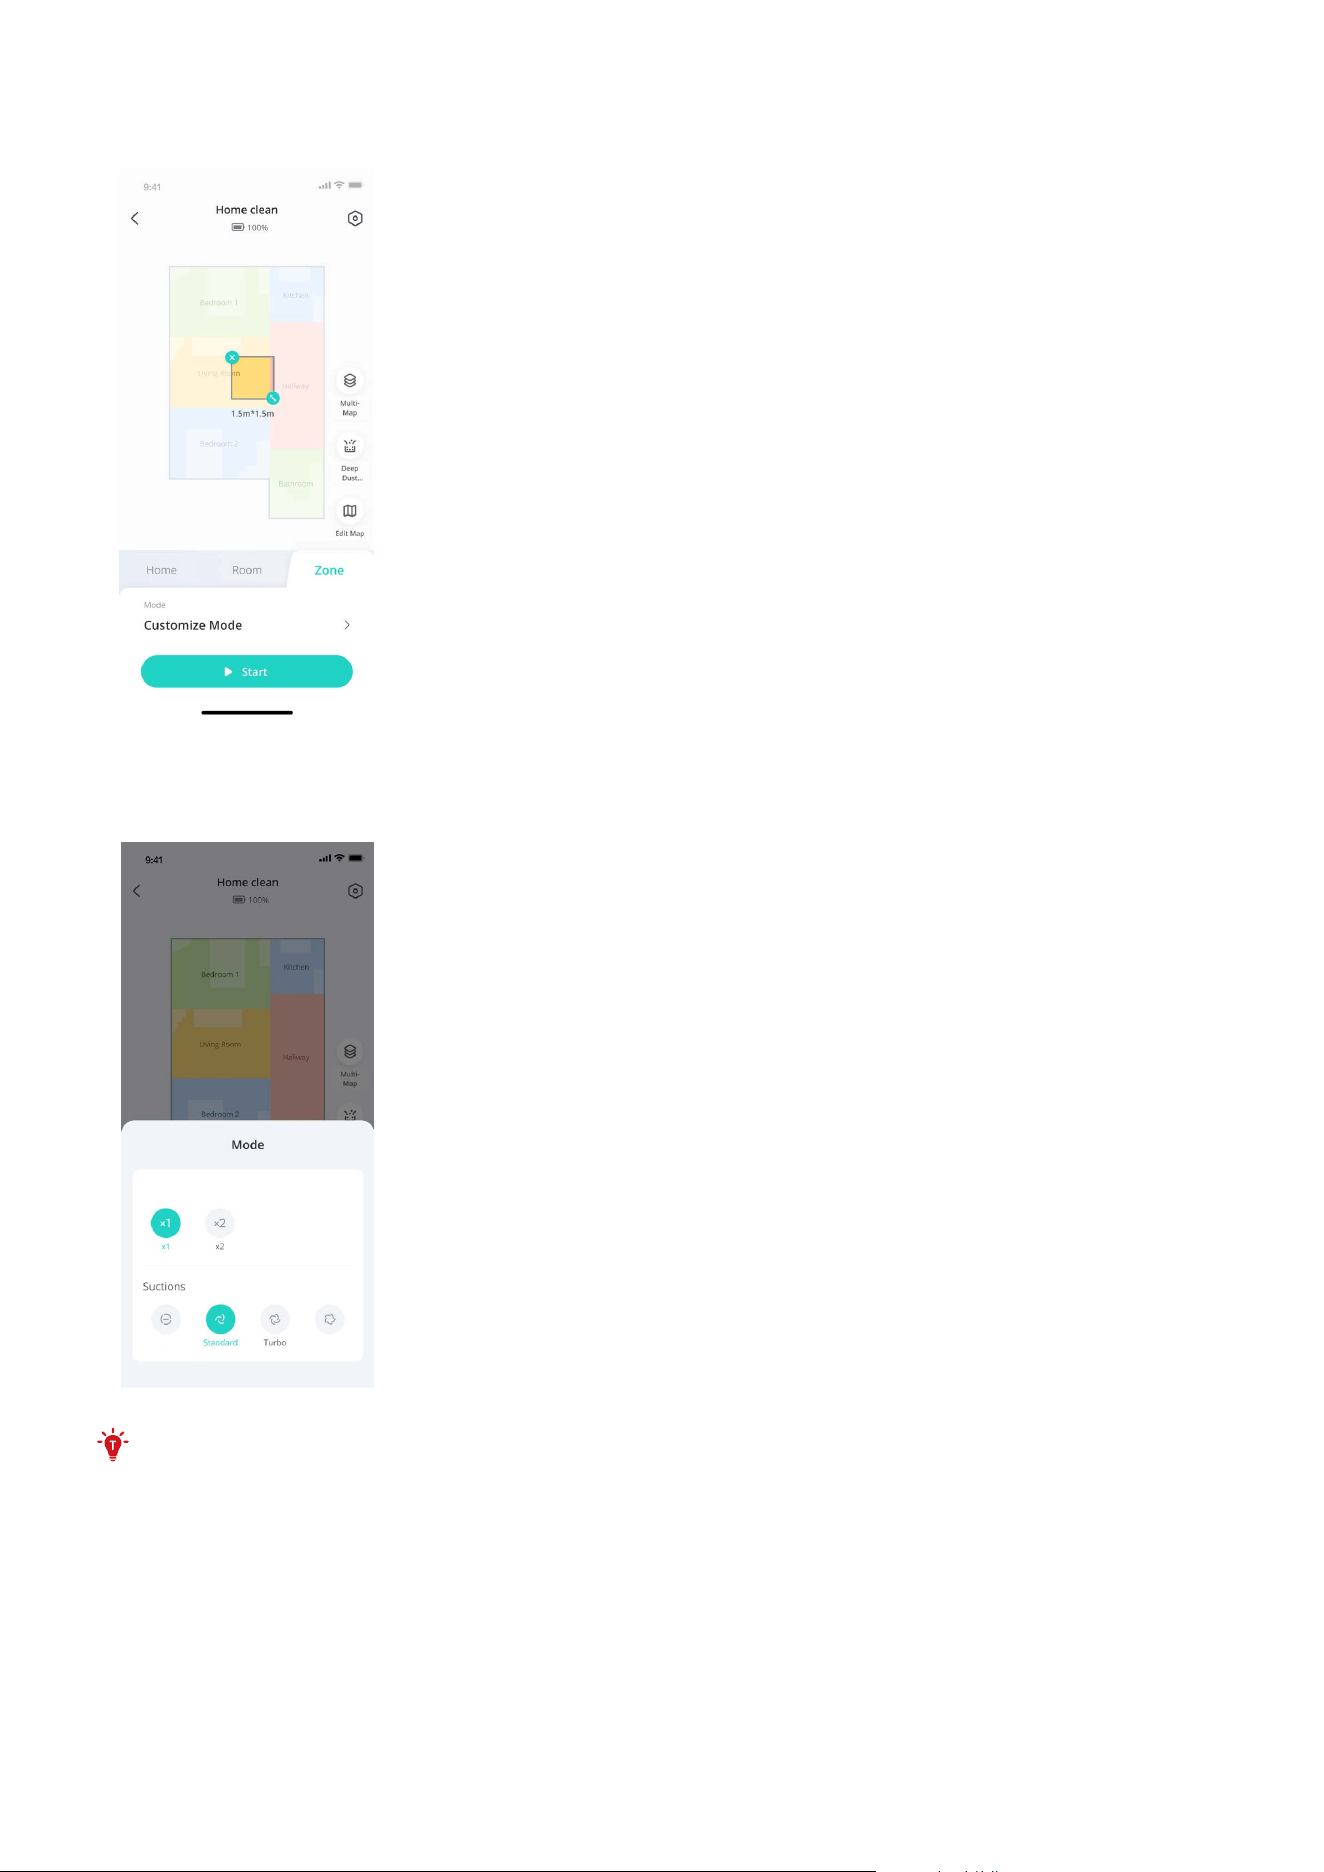
3.6.3 Zone Cleaning
In this mode, you can set up a cleaning zone and customize its size in the eufy Clean app, and the robot will clean
the selected zone only.
3.7 Selecting a Suction Power Level
In the eufy Clean app, select a suction power level according to your needs: ECO, Standard (Default), Turbo, and
Maximum.
Cleaning Times
ECO
Maximum
• When the robot starts cleaning next time, it will clean according to the suction power level you previously
selected.
4. Using Your Robot with Apple Siri / Amazon Alexa / The Google
Assistant
Apple Siri, Amazon Alexa and the Google Assistant are smart voice control devices that enable you to control the
robot with your voice.
Before you start, make sure:
• The robot is attached to the Self-Empty Station to ensure there is enough power.
• The robot is connected with the eufy Clean app.
• You have an Apple Siri-enabled device (i.e. HomePod, HomePod mini, Apple TV, or iPad) an Amazon Alexa-
enabled device (i.e. Amazon Echo, Echo Dot, Amazon Tap, Echo Show, or Echo Spot) or a device enabled with
the Google Assistant (i.e. Google Home, Google Home Mini). These devices are sold separately.
• The Apple Home app, Amazon Alexa app or Google Home app is already installed on your smart device, and
you have created an account.
To control the robot with Apple Siri, Amazon Alexa or the Google Assistant:
1. Open the eufy Clean app and find “Smart Integrations” in the top left.
2. Follow the on-screen instructions to complete the setup.
5. Using Your Cordless Stick Vacuum
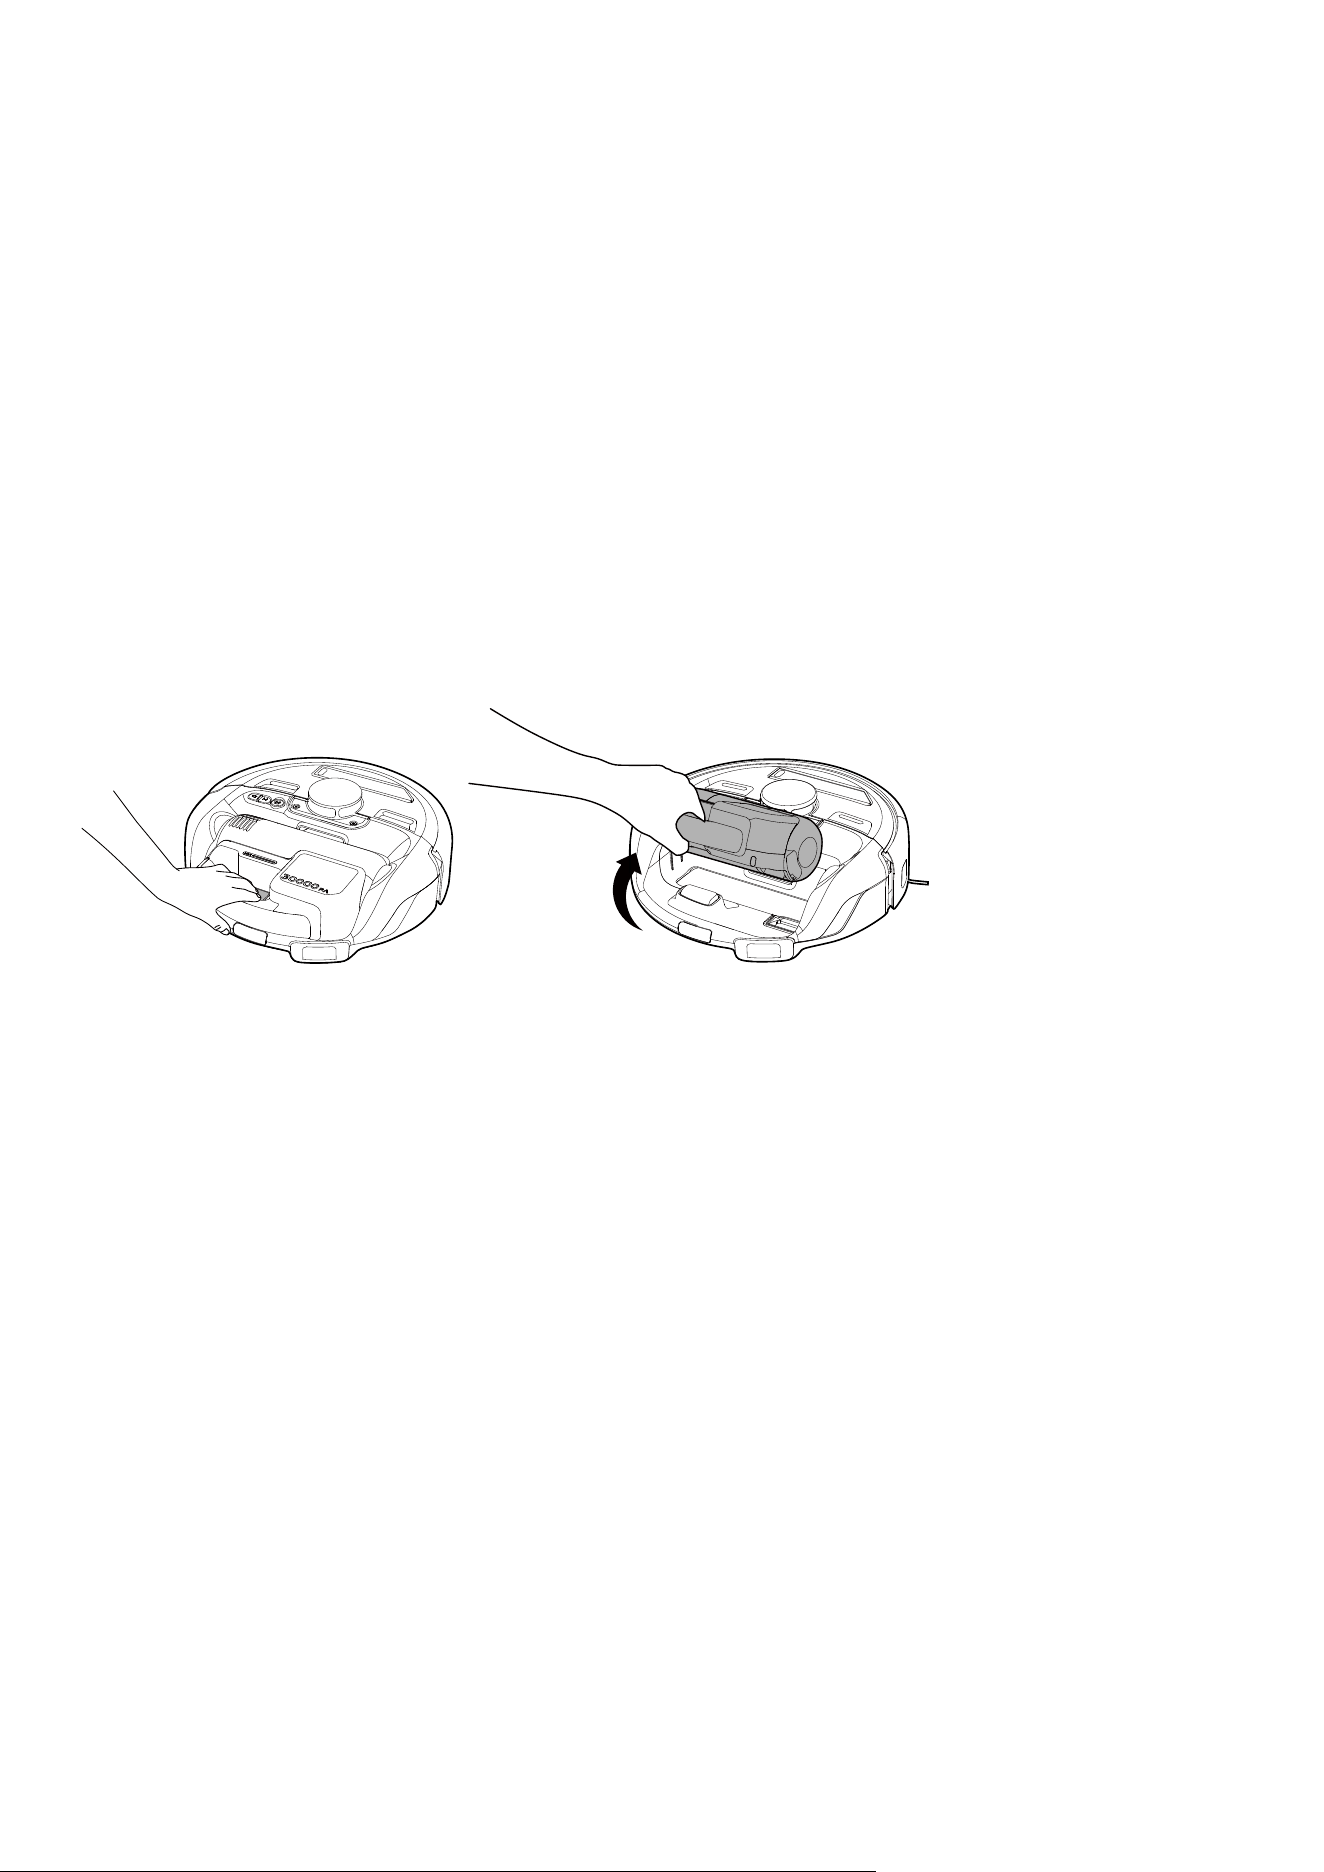
5.1 Detach the Cordless Stick Vacuum
Press the quick release button and then lift up to detach the Cordless Stick Vacuum.
➁➀
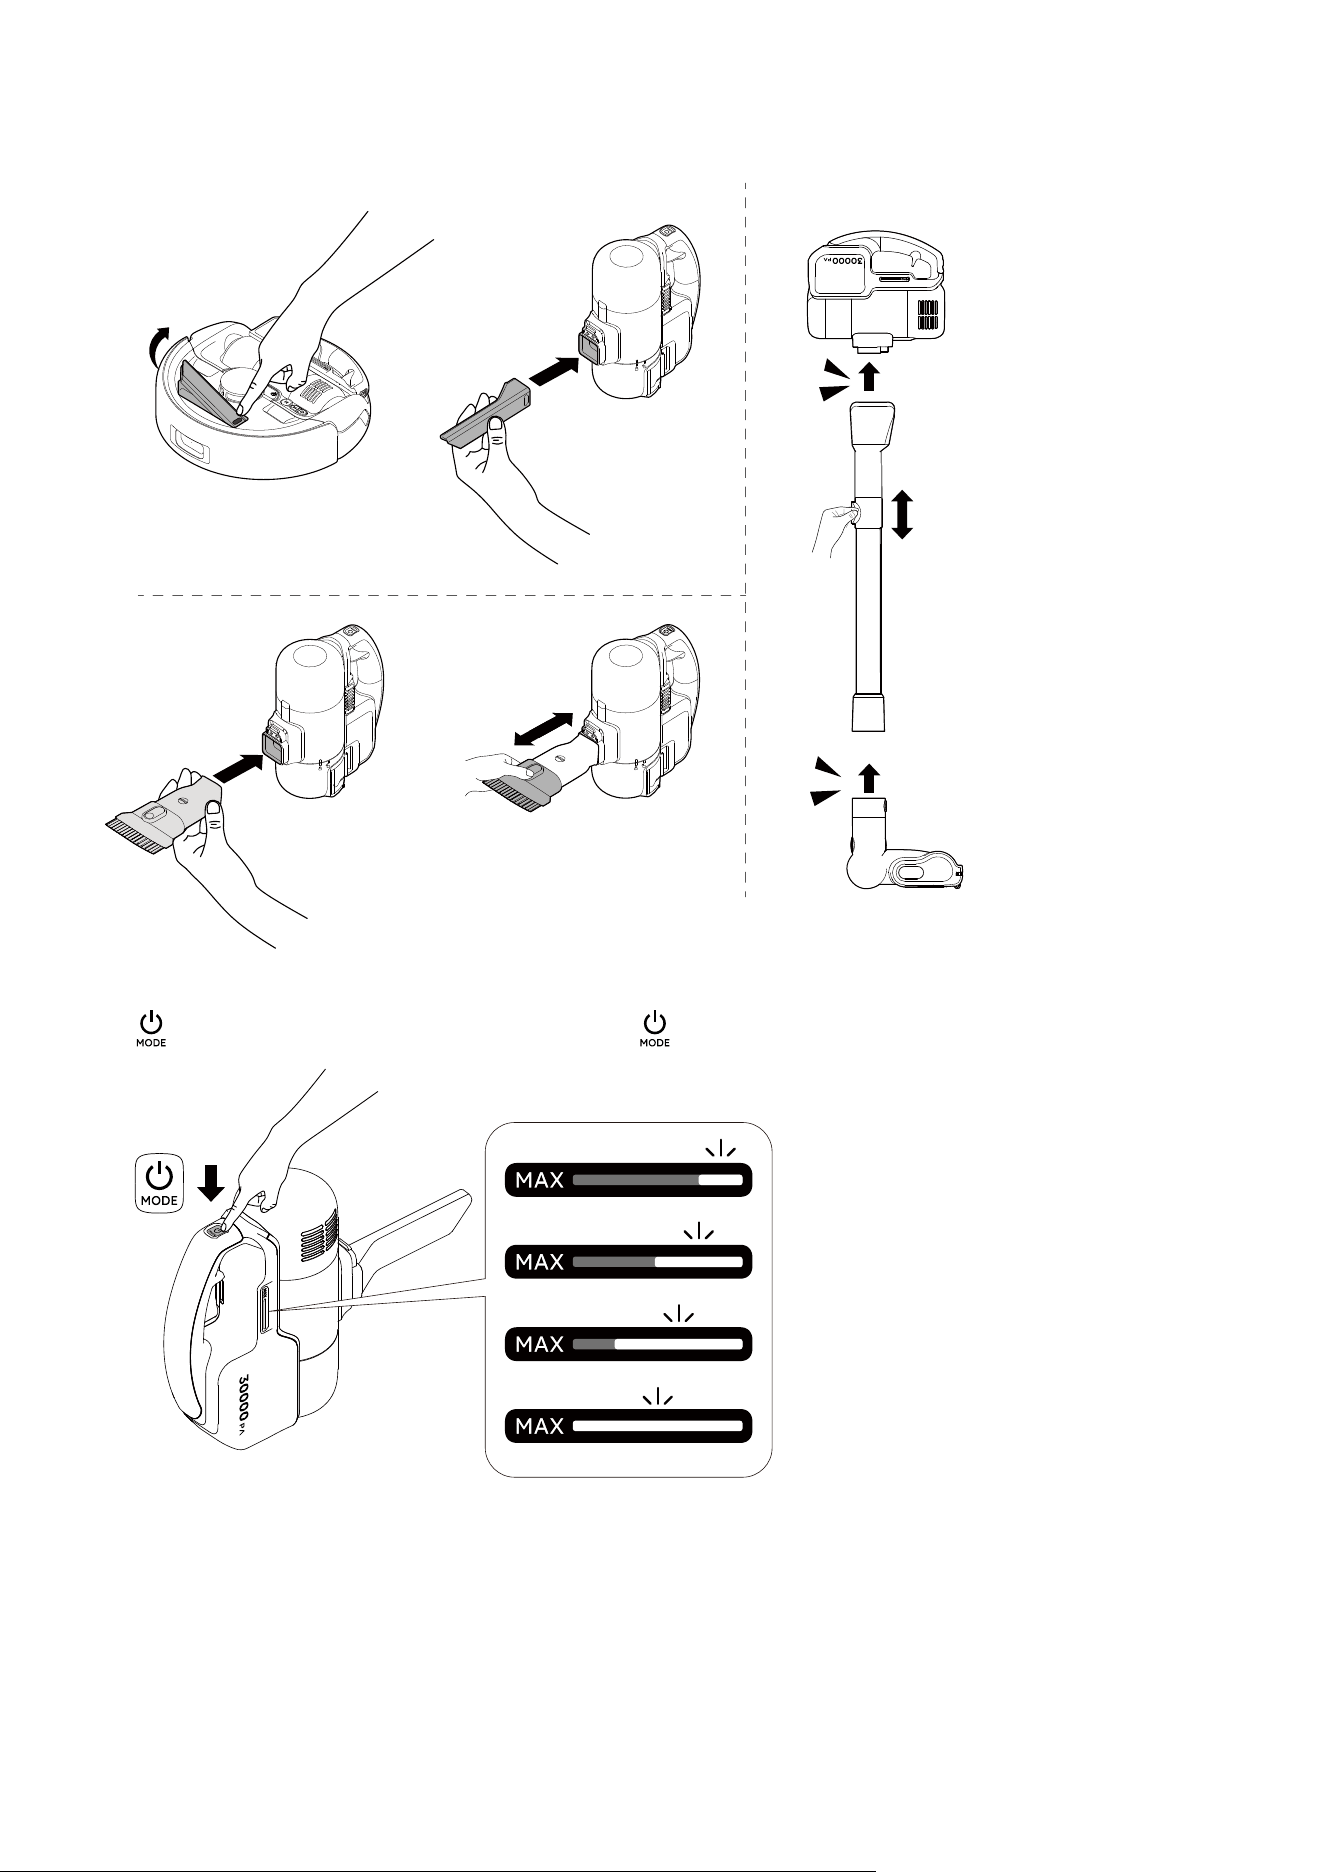
5.2 Install a Vacuum Cleaner Head
Select and install a vacuum cleaner head to the Cordless Stick Vacuum.
Adjust the length carefully to avoid pinching your hand.
Click
Click
➀
➀
➁
➂
➁
➀ ➁
5.3 Start / Pause Cleaning
Press for 2 seconds to start or pause cleaning. Press to switch suction modes.
ECO suction
Standard suction
Turbo suction
Maximum suction
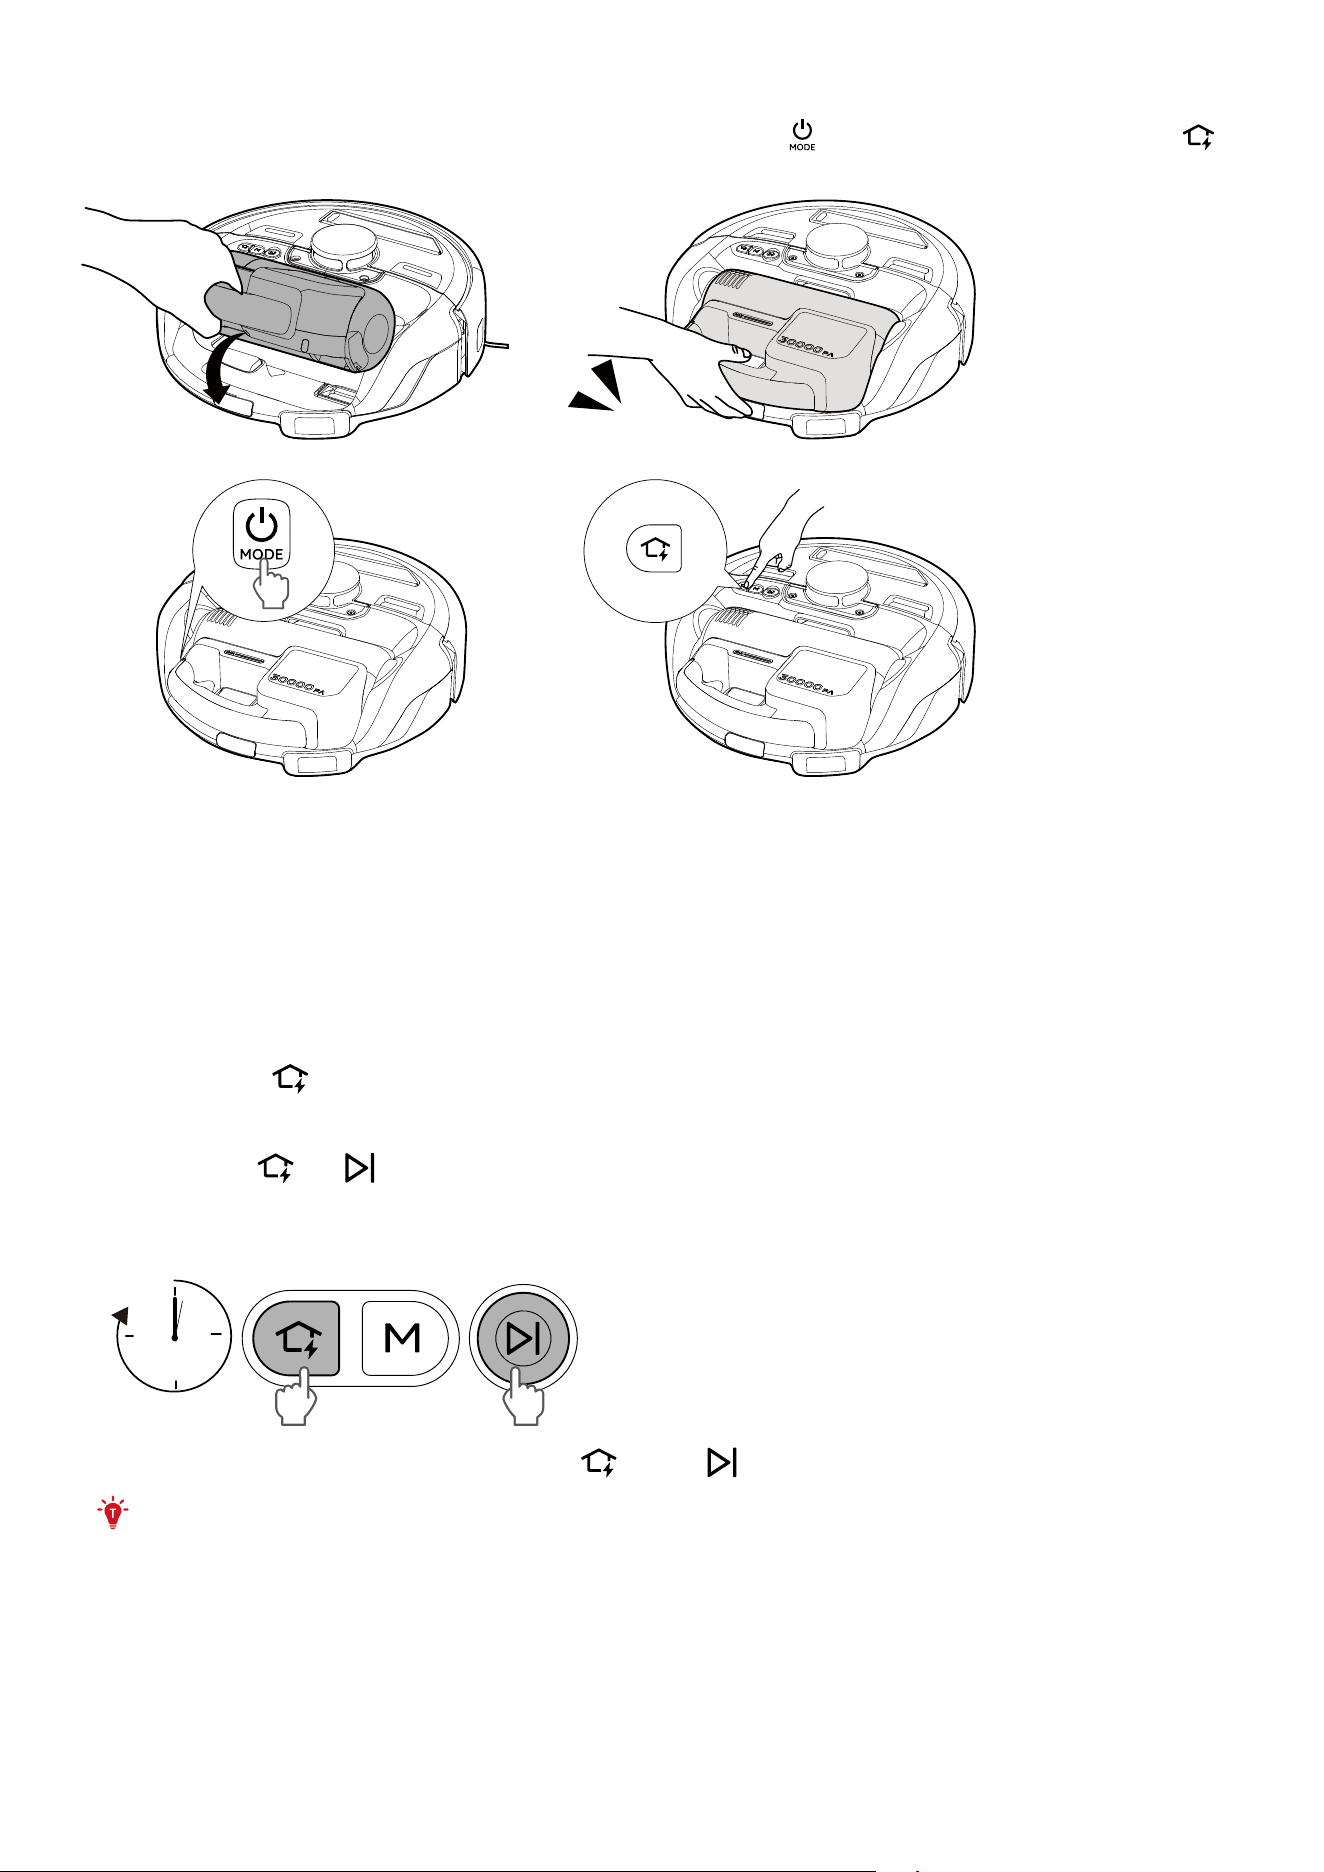
5.4 Charge the Cordless Stick Vacuum
Insert the Cordless Stick Vacuum and push down until it clicks. Press to power on the robot. Then press to
return the robot to the Self-Empty Station.
Click
➀ ➁
➃➂
6. Auto Dust Collection
The dust bin can be automatically emptied when Auto Dust Collection is triggered. Auto Dust Collection will be
triggered in any of the following scenarios:
• The preset dust collection time is reached during cleaning process.
• The Robot finishes the cleaning task and returns to the Self-Empty Station.
• The Robot automatically returns to the Self-Empty Station after cleaning for more than 3 minutes.
• After more than 10 minutes of cleaning with the cordless stick vacuum, reinsert the vacuum back to the Robot.
You can also press
for 3 seconds or tap Deep Dust Collection in the app to empty the dust bin as necessary.
7. Enabling / Disabling Child Safety Lock
• Press and hold and simultaneously for 3 seconds to activate the child safety lock. Once the child safety
lock is enabled, all buttons will be locked to prevent children from damaging the device or accidentally getting
hurt.
3s
• To disable the child safety lock, press and hold and the button simultaneously for 3 seconds again.
• This function is also available in the eufy Clean app.
8. Cleaning and Maintenance
Prior to cleaning and maintaining, turn o the device and unplug the power cord.
For optimal performance, follow the instructions below to clean and maintain the product regularly. The cleaning
and replacement frequency will depend on your home environment and usage habits.
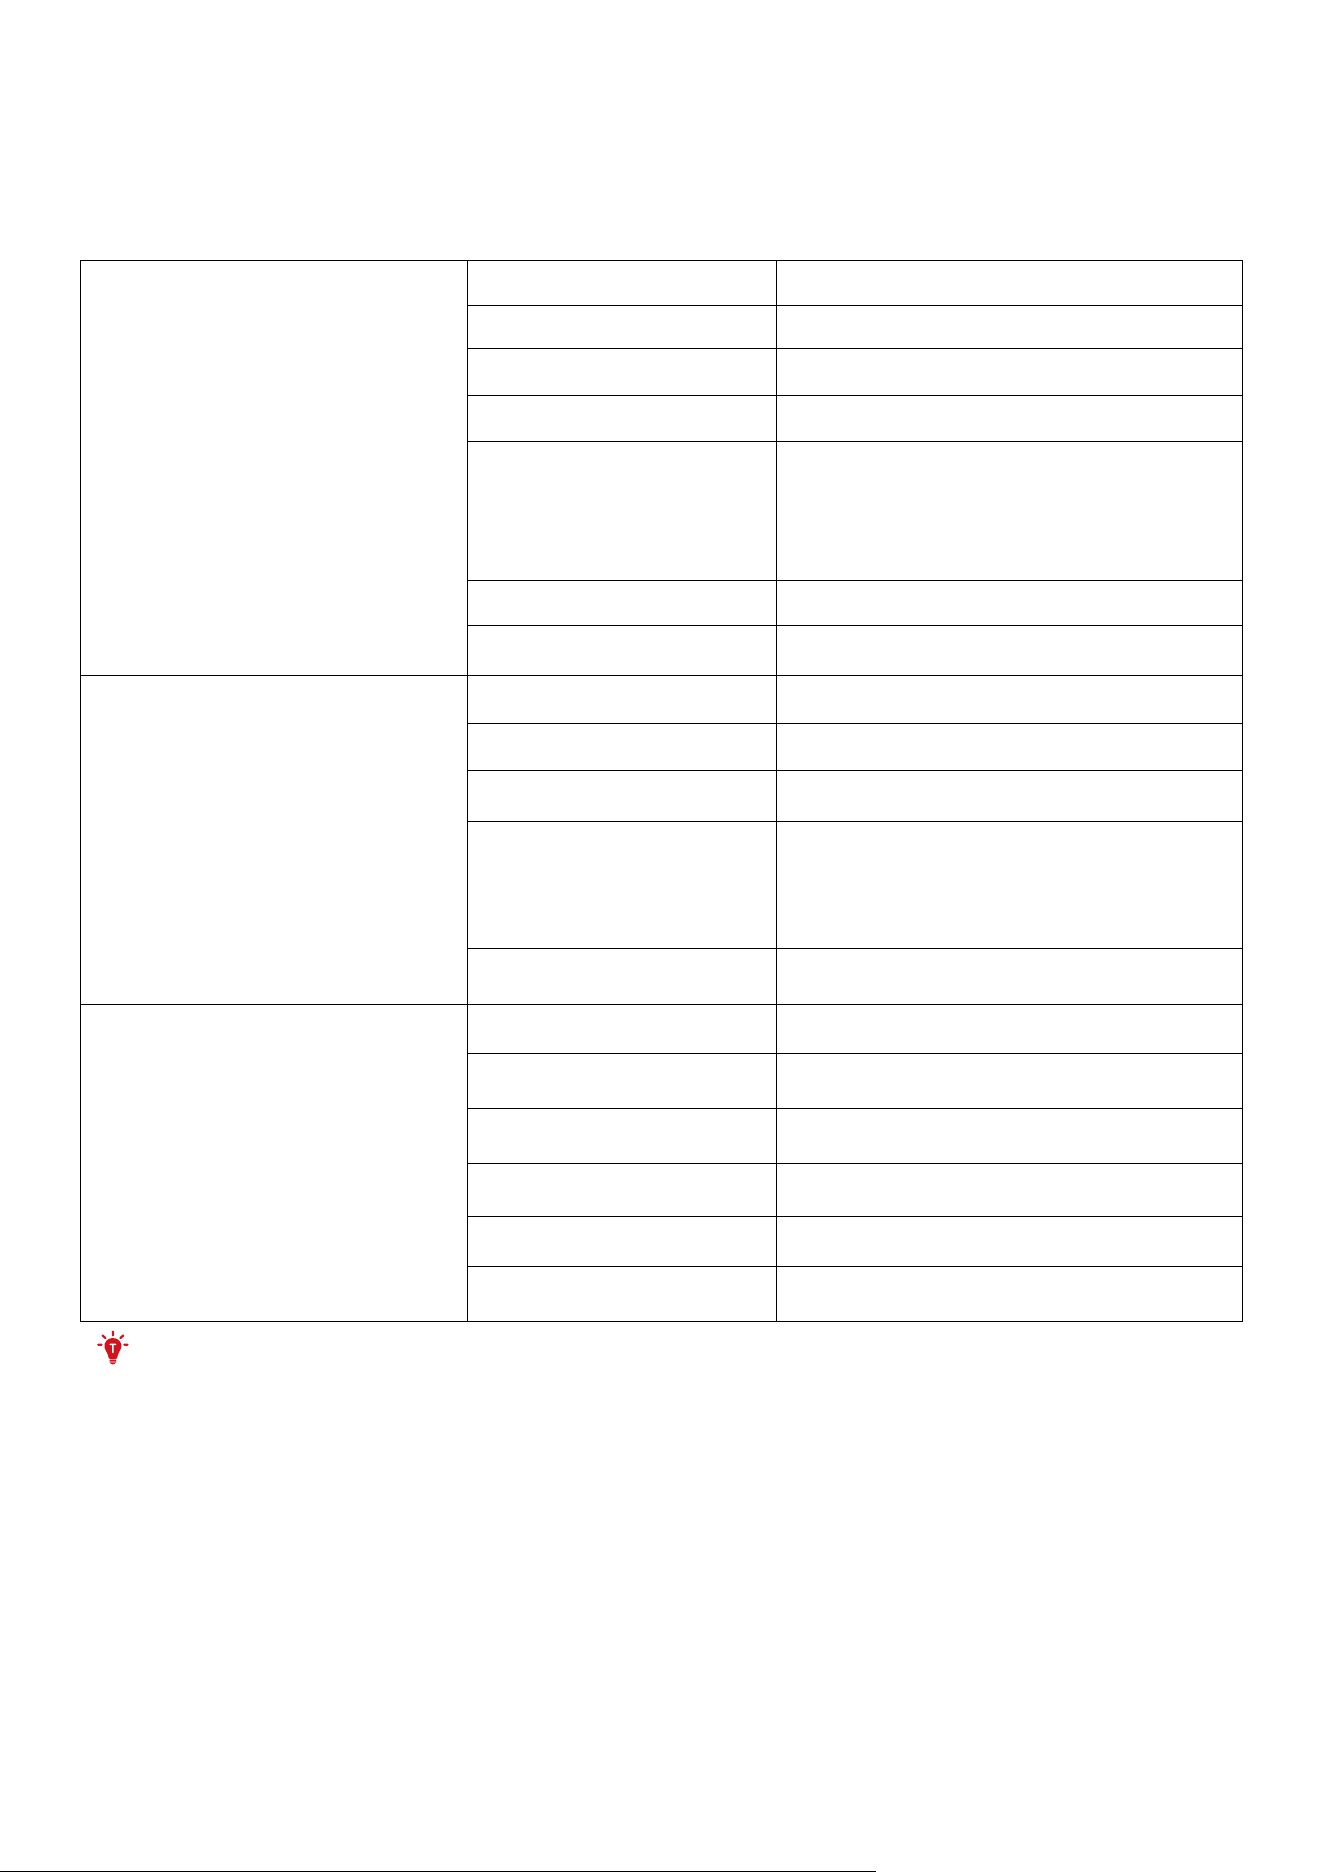
8.1 Recommended Cleaning and Replacement Frequency
Part Cleaning Frequency RReplacement Frequency
Dust Bin Every 2 months -
High-Performance Filter Every 1.5 months
Every 6 months
(or when visibly worn)
Jet Cyclone Every 1.5 months -
Side Brush Every 1.5 months
Every 3 months
(or when visibly worn)
Brush Guard Every 1.5 months
Every 6 months
(or when visibly worn)
Rolling Brush Every 1.5 months
Every 6 months
(or when visibly worn)
Sensors Every 2 months -
Charging Contact Pins Every 2 months -
Swivel Wheel Every 2 months -
Disposable dust bag -
Every 2 months (Or when the dust
bag is full)
Recharge sensors Every 2 months
8.2 Clean the Dust Bin, Filter and Jet Cyclone
1. Rotate the dust bin to the unlock position.
2. Remove the dust bin and empty it.
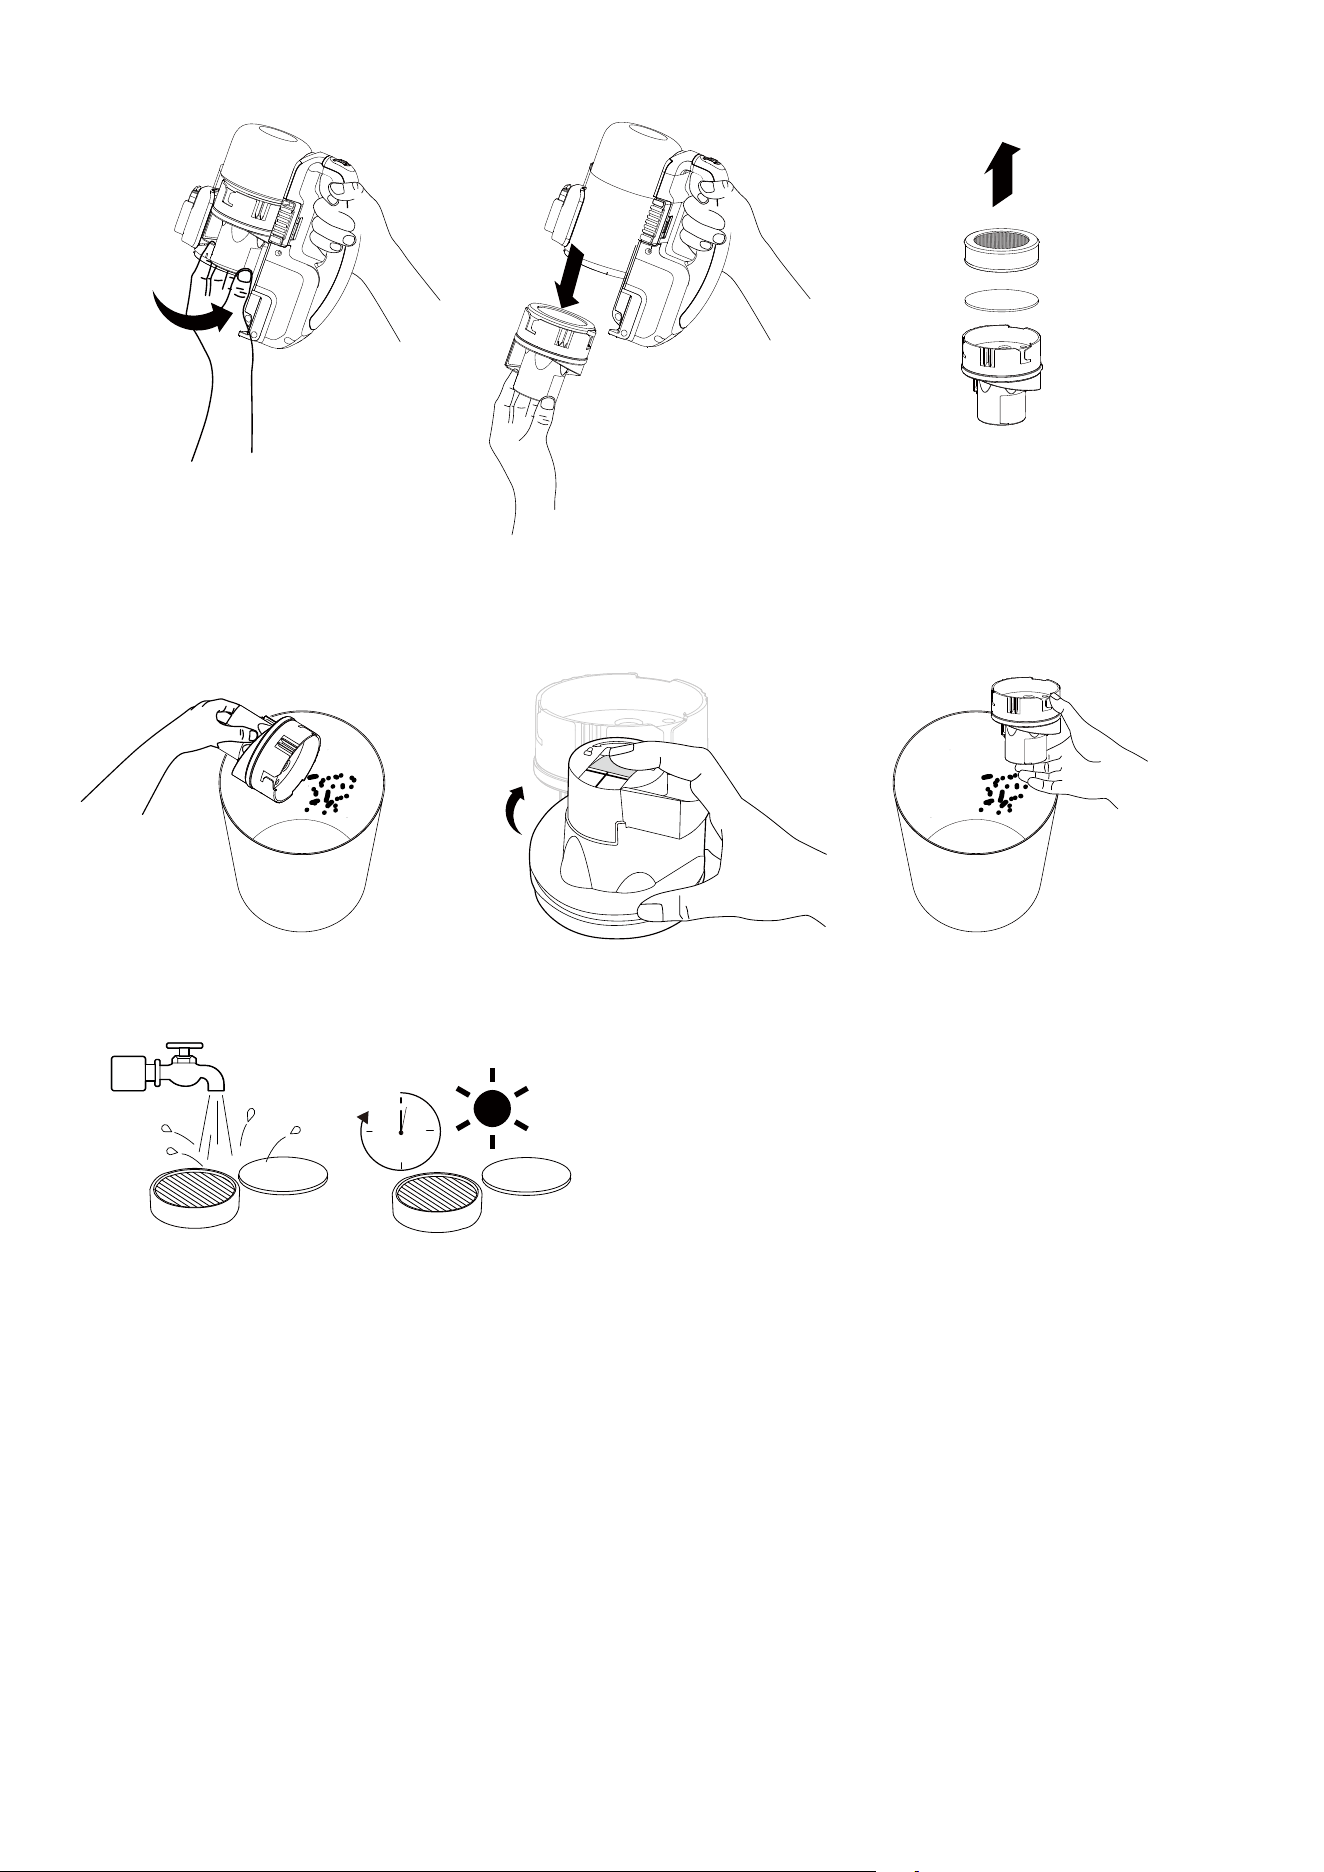
3. Rotate the filter and the sponge to the unlock position and remove it.
➀ ➁ ➂
4. Remove the debris from the jet cyclone. Open the silicone lid on the bottom of the jet cyclone, and knock the
debris inside the cyclone out.
➀ ➁ ➂
5. Rinse the dust bin, the sponge and the high-performance filter thoroughly with water. Air-dry the sponge and
the filter completely, and make sure the interior of dust bin is dry before next use.
24h
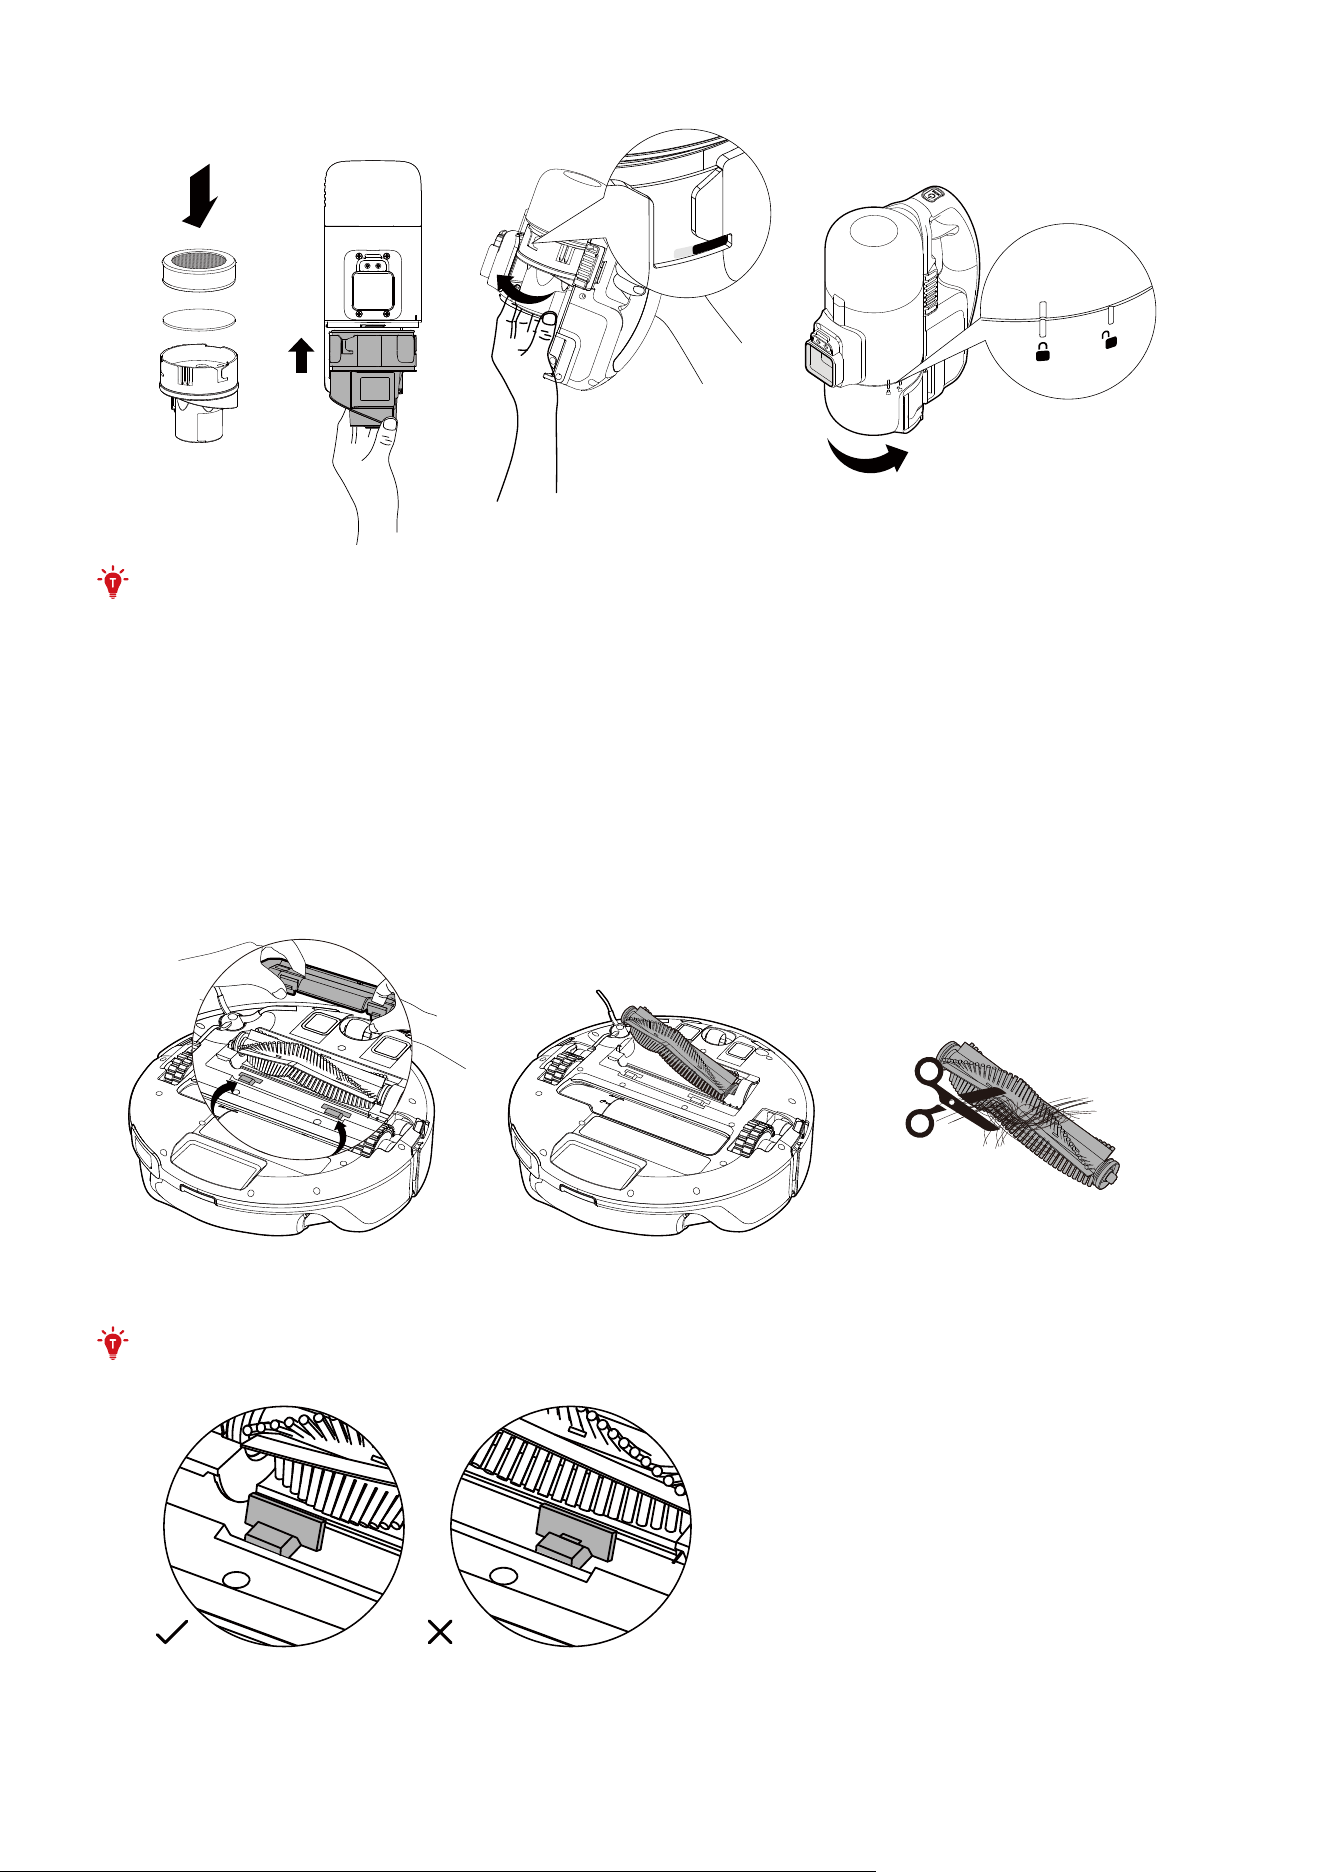
6. Reinstall the filter, the sponge and the dust bin.
➀
➁
➂
➃
• Do not use a brush, hot water, or any detergent to clean the filter.
• Do not use the filter if it is not completely dry, otherwise it may aect the cleaning performance.
• Once you have used the products for 6 months, you can reach out to our customer service team to
purchase new filter elements.
• Please keep the used filter elements away from children.
8.3 Clean the Rolling Brush
1. Push up on the release buttons to unlock the brush guard, then lift o the brush guard.
2. Lift up the rolling brush to remove, and remove any debris. If there is hair entangled at both ends of the rolling
brush, remove the hair manually or with scissors.
3. Reinstall the rolling brush and brush guard.
➀ ➁ ➂
• When installing the rolling brush, make sure the two release buttons are clicked into place.
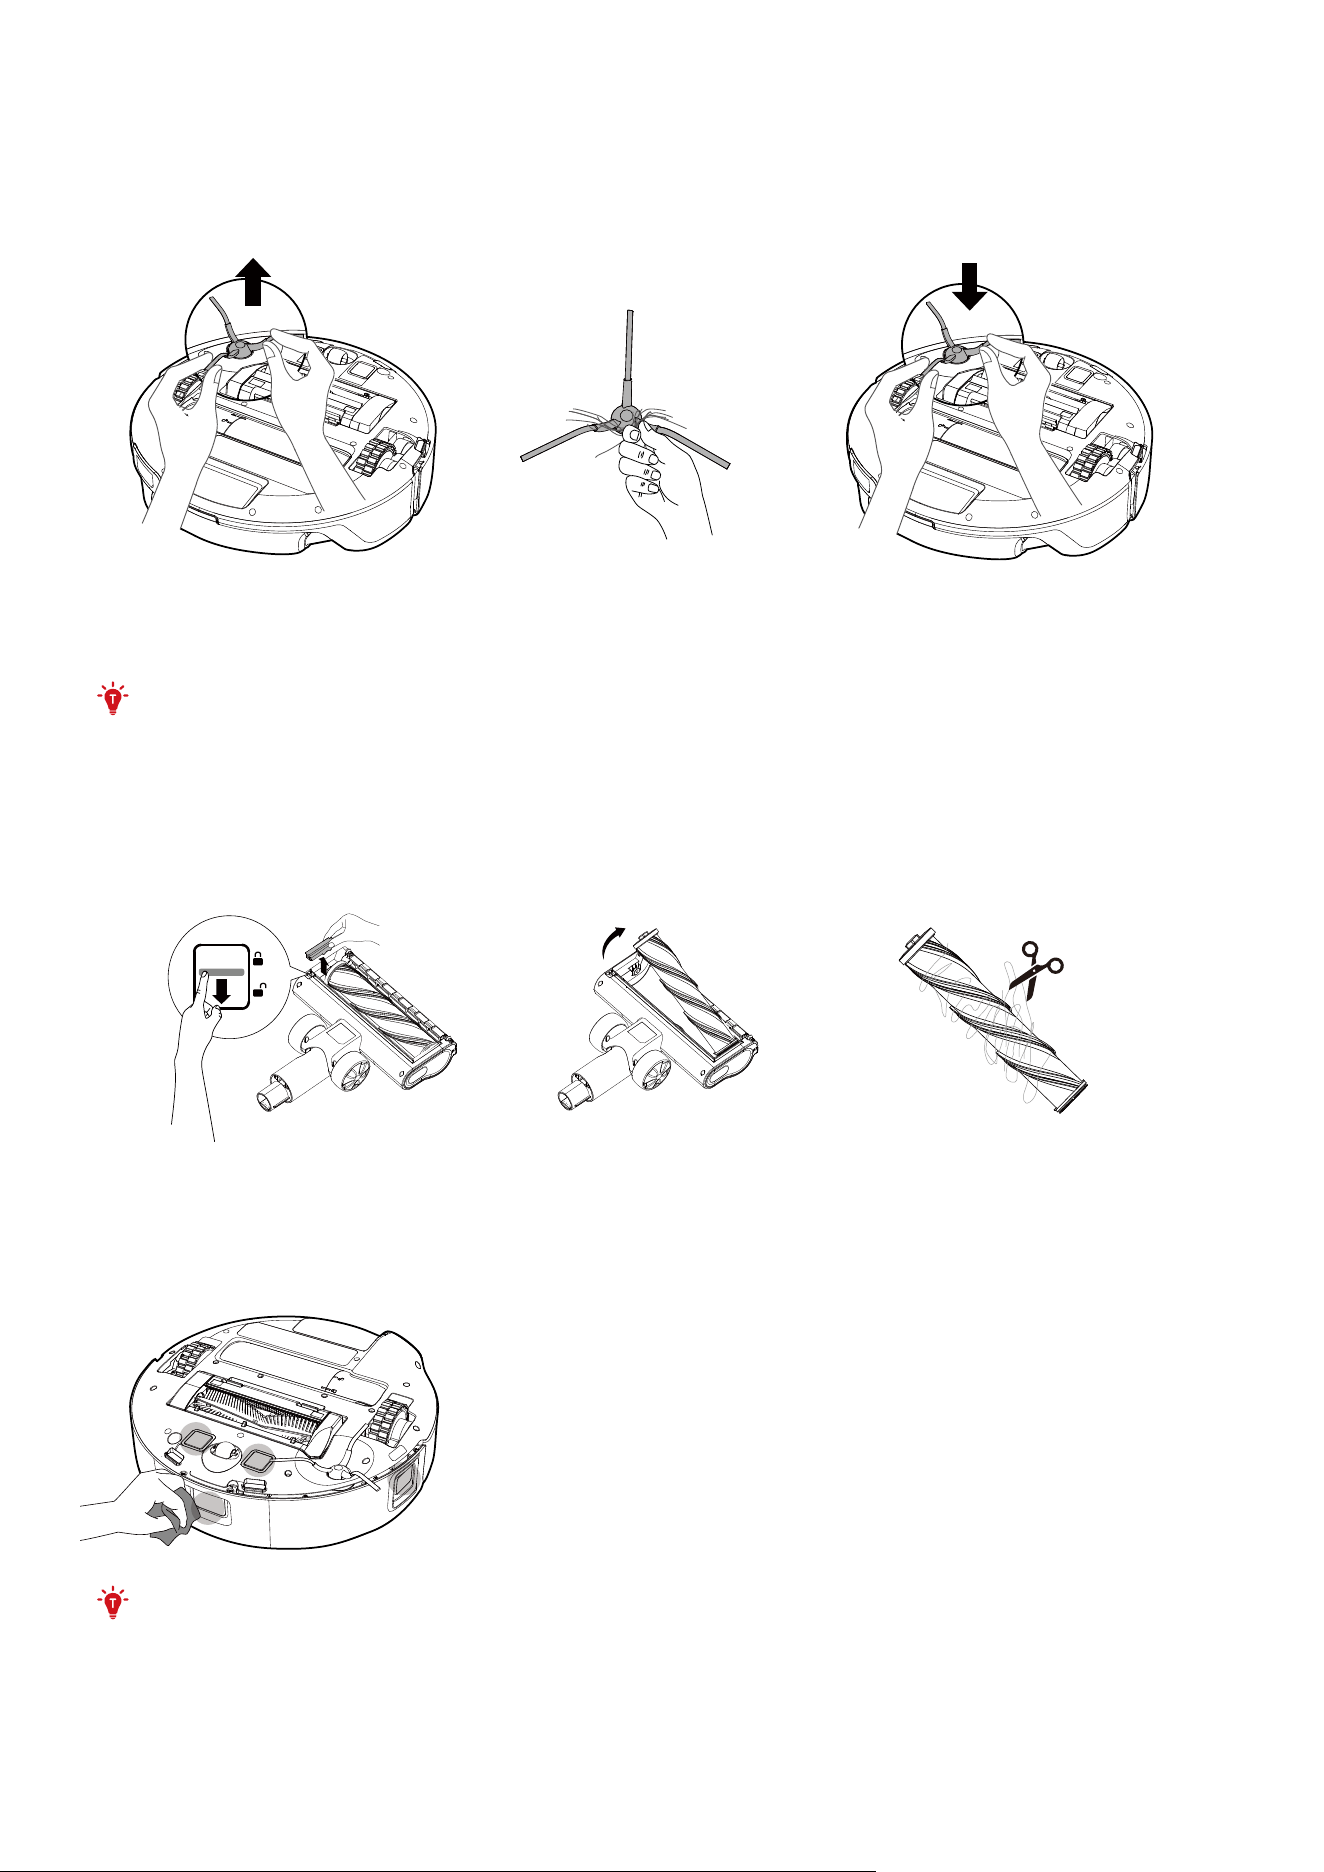
8.4 Clean the Side Brush
Foreign substances, such as hair, can easily get tangled in the side brush, so it is best to clean it regularly.
1. Remove the side brush.
2. Carefully unwind and pull o any hair or substances that are wrapped between the robot and the side brushes.
3. Reinstall the side brush. You will hear a click when the side brush has been properlly installed.
➀ ➁ ➂
• Only use the side brush when it is completely dry.
8.5 Clean the Floor Brush
1. Push the release tab to the unlock position, remove the brush guard.
2. Lift to take out the brush. Clean the brush with scissors.
➀ ➁ ➂
8.6 Clean the Sensors and Charging Contact Pins
To maintain the best performance, clean the sensors and charging contact pins regularly.
• Dust o the sensors and charging contact pins with a clean cloth.
• Do not use detergents, water or other liquids to clean the sensors and charging contact pins. Avoid
excessive force when wiping.
• Do not use hard materials to scrape the charging contact pins.
8.7 Clean the Swivel Wheel
Hair or dust particles can easily get entangled in the swivel wheel. Be sure to clean the wheel periodically and as
needed.
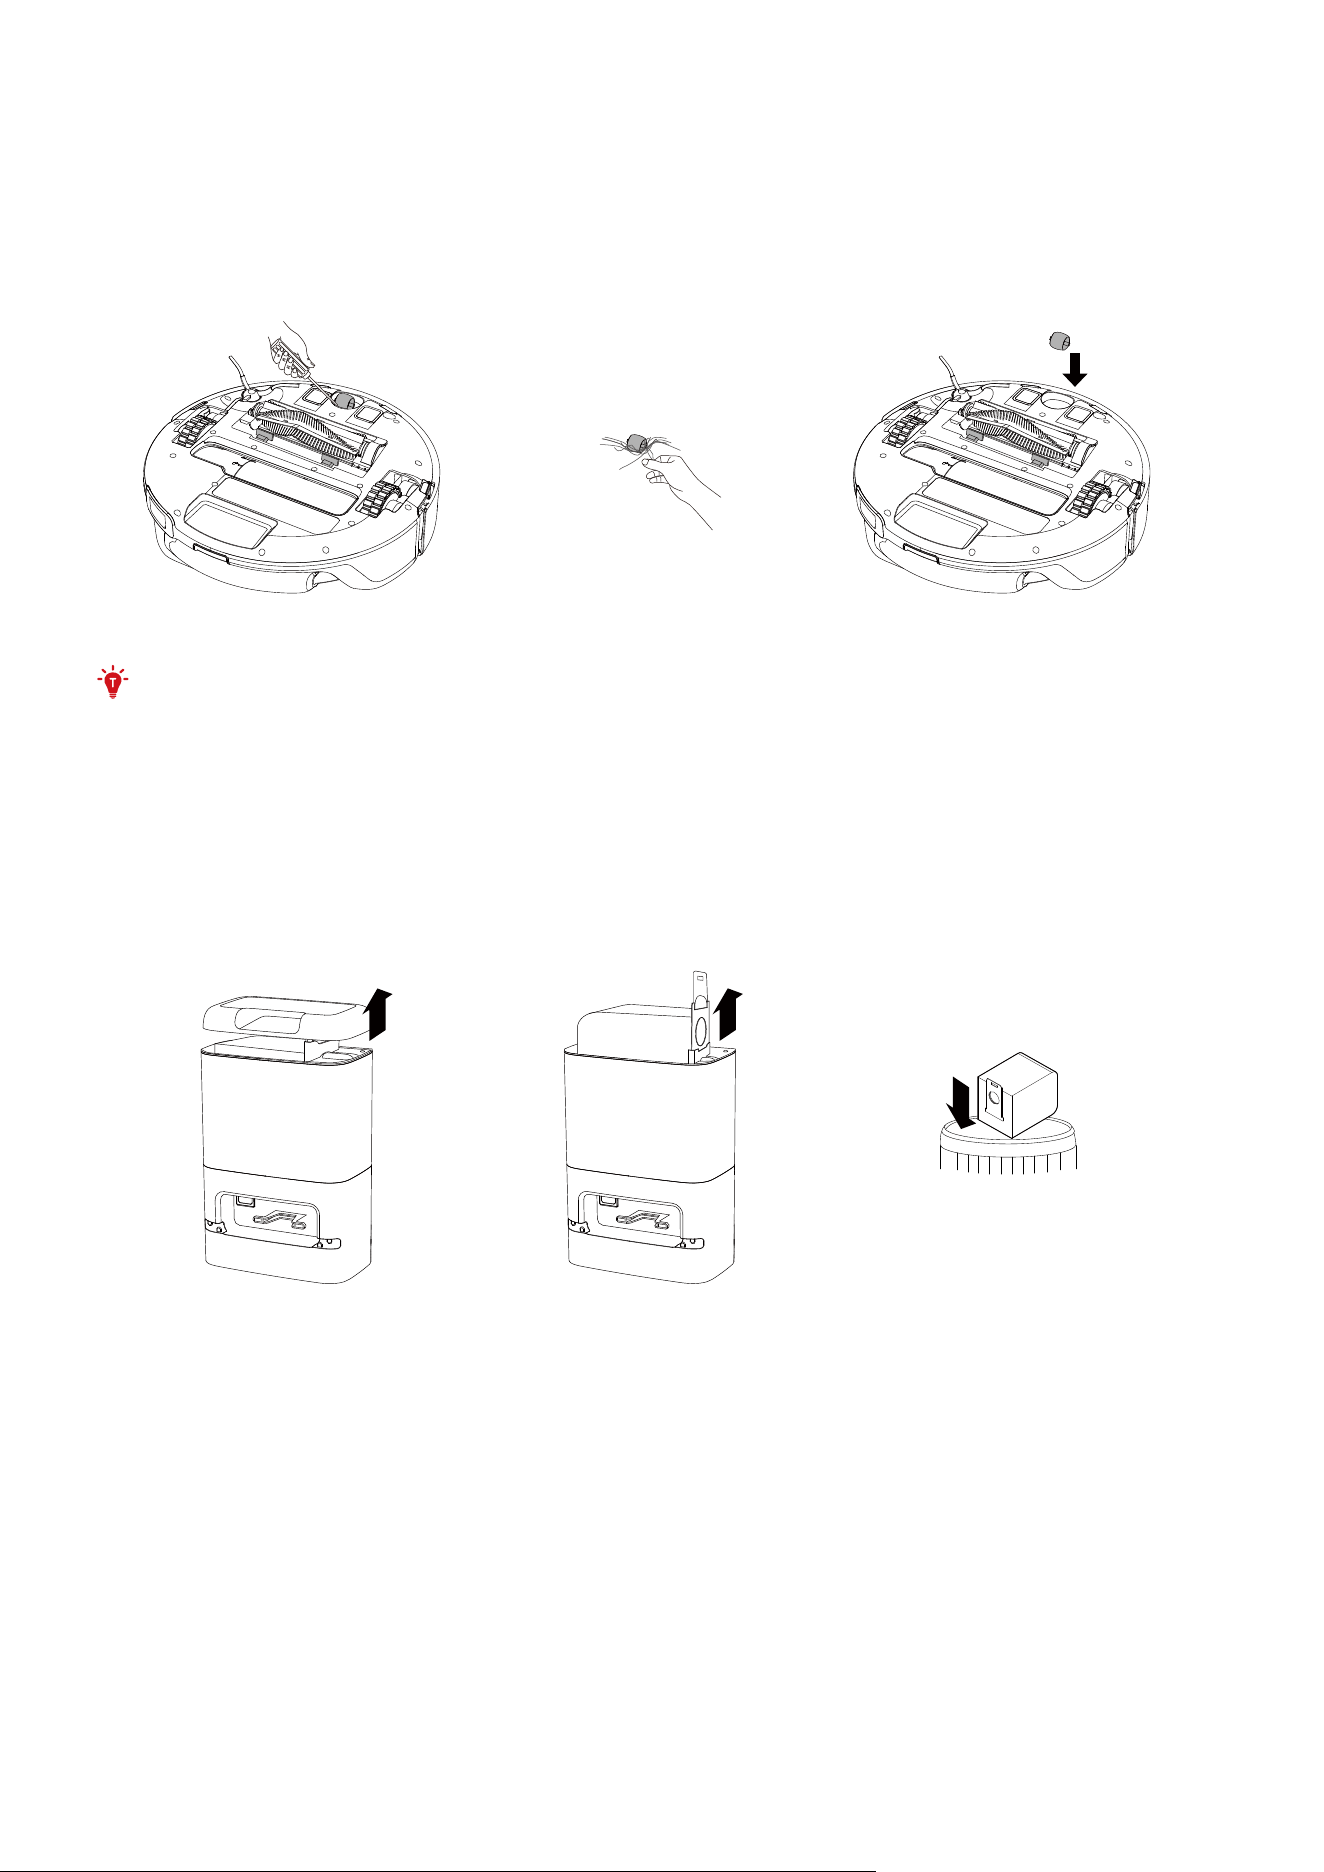
1. Pull out the swivel wheel with a tool (such as a screwdriver).
2. Clean any hair or debris wrapped around the wheel or entangled inside the wheel cavity.
3. Reinstall the wheel and push it in until it clicks into place.
➀ ➁ ➂
• Do not clean the swivel wheel with water.
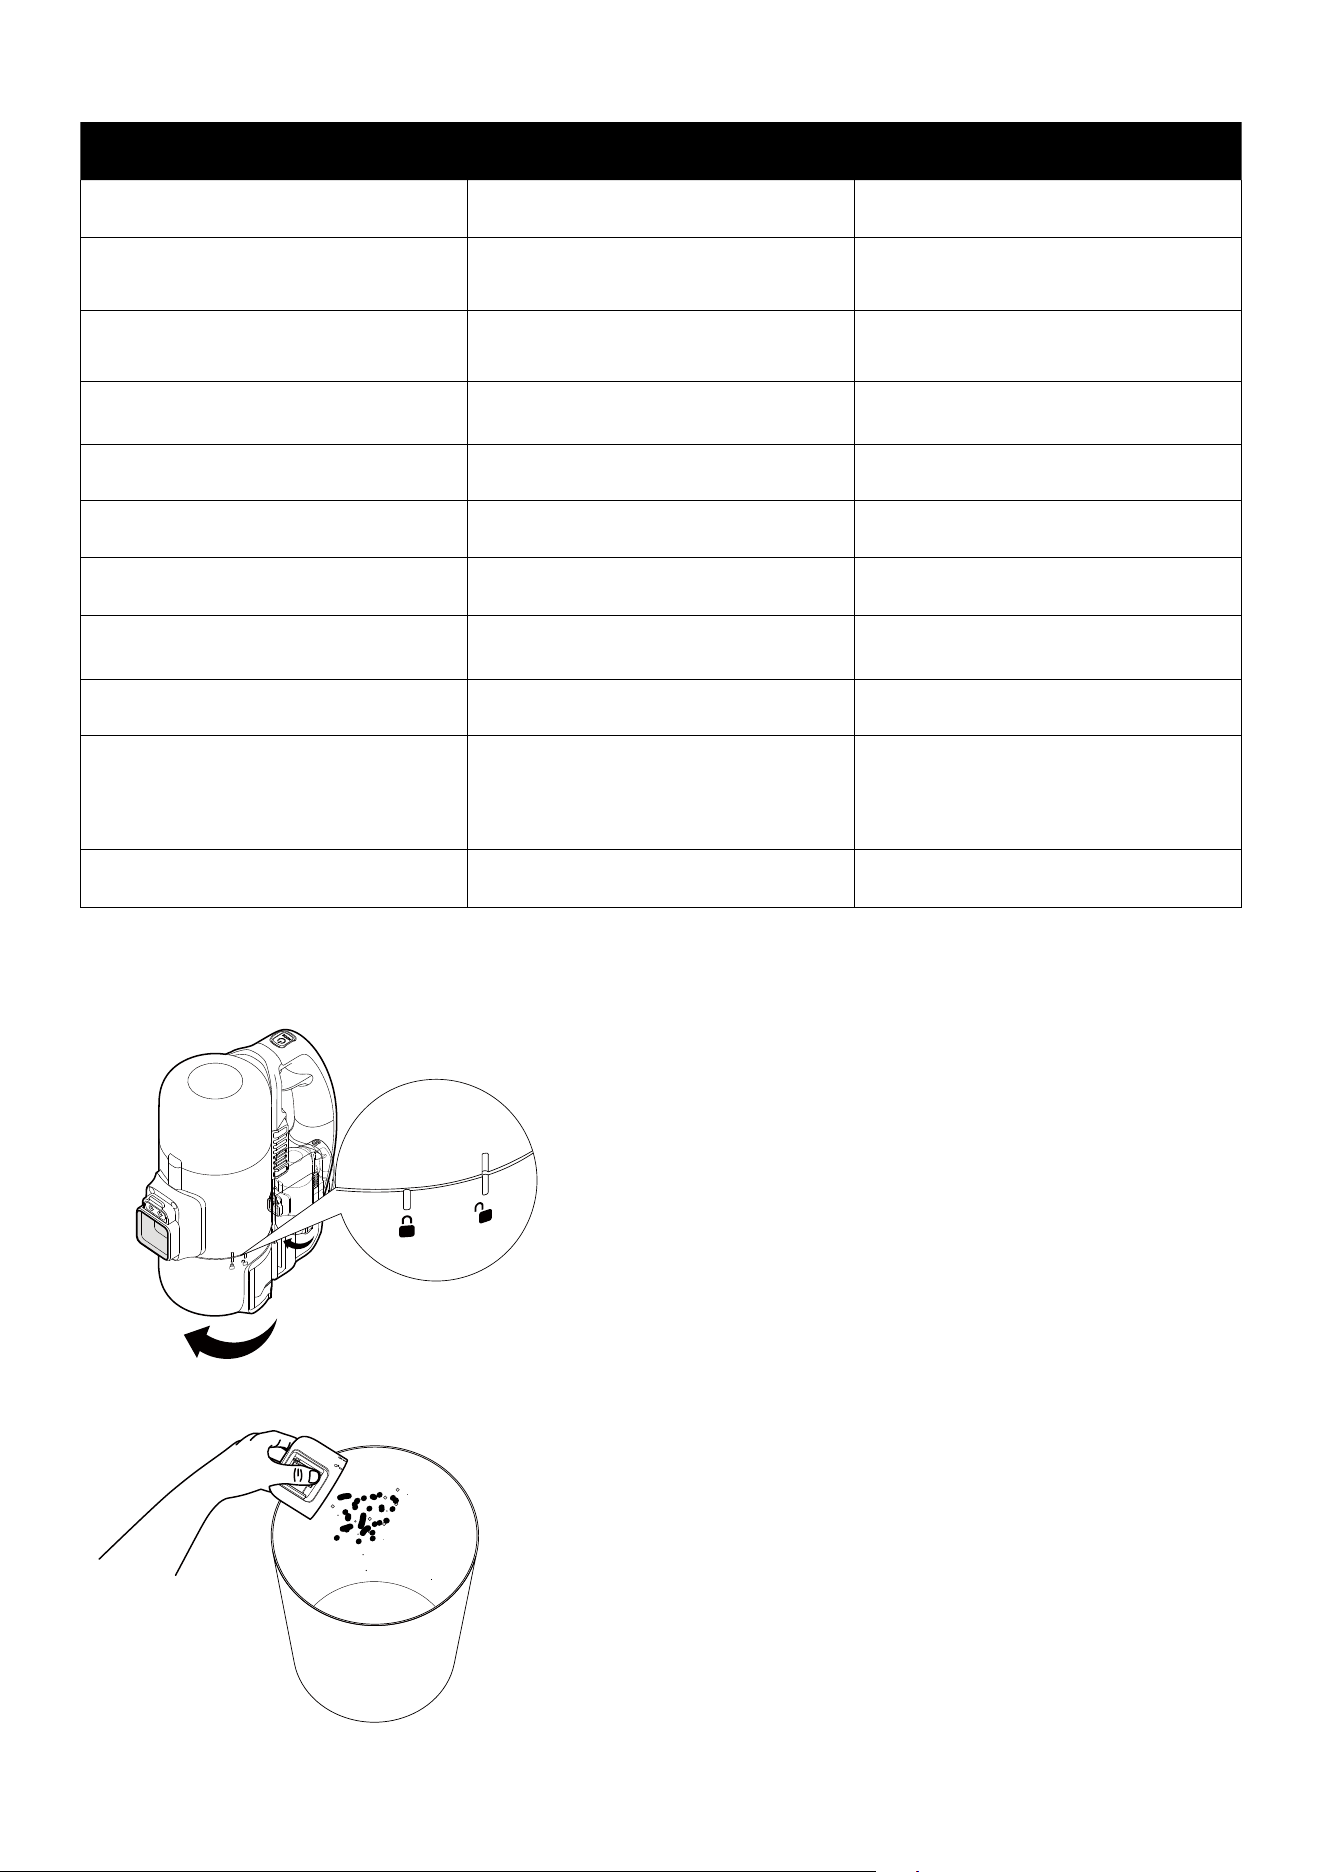
8.8 Replace the Dust Bag
Follow the in-app prompts to check if the dust bag is full, and follow the steps below to replace it if needed.
1. Open the dust cover.
2. Pull up to remove the dust bag.
3. Dispose of the used dust bag.
4. Install a new dust bag.
5. Close the dust cover.
➀ ➁ ➂
9. Troubleshooting
When an error occurs, please refer to the in-app instructions for solutions. If the problem persists, please contact
support@eufy.com for help.
10. Specifications
Robot
Dimensions 350*350*118mm
Weight 2.25kg
Battery 4200mAh, 14.8V
Input Power 16V
⎓
2A, 32W
Cleaning Time
ECO suction: Up to 180 minutes
Standard suction: Up to 120 minutes
Turbo suction: Up to 90 minutes
Maximum suction: Up to 60 minutes
Charging Time 2.5h
Charging Temperature 5-40
℃
Cordless Stick Vacuum
Dimensions 220*199*90mm
Weight 1.3kg
Input Power 16V
⎓
2A, 32W
Cleaning Time
ECO suction: Up to 50 minutes
Standard suction: Up to 30 minutes
Turbo suction: Up to 20 minutes
Maximum suction: Up to 13 minutes
Charging Temperature 5-40
℃
Self-Empty Station
Dimensions 250*150*386.5mm
Weight 3.35kg
Rated Input 100-120V, 50-60Hz
Power (Dust Collection) 1000W
Power (Charge) 38W
Rated Output 16V
⎓
2A, 32W
• As voltages vary across dierent countries and regions, we recommend purchasing the machine version
specific to your location to avoid potential safety hazards and equipment damage.
11. Warranty
The product's warranty period is determined by the seller and may vary according to dierent sales channels and
local legal requirements, but the minimum warranty period shall not be less than 12 months.
Note: The 12-month warranty covers the main unit (including the battery) and the Self-Empty Station, not
applicable to consumables like rolling brush, side brush, etc.
This limited warranty provided by the manufacturer does in no way aect a potential statutory warranty
provided by law.