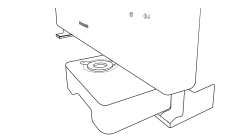
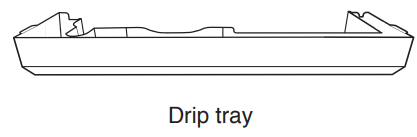
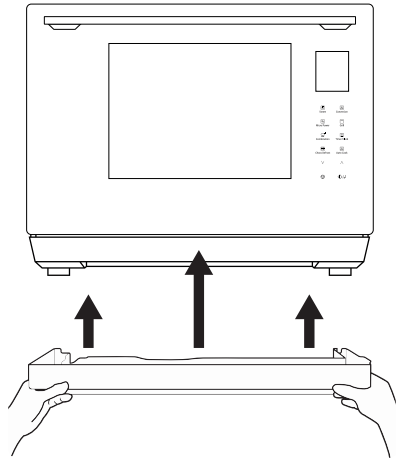
Before using the oven, the drip tray must be fitted as it collects excess water during cooking. The drip tray should be removed and cleaned on a regular basis.
Fit the drip tray by holding with both hands and clicking onto the front legs of the oven.
To remove the drip tray, hold with both hands and gently ease forward. Wash in warm soapy water. Reposition the drip tray by clicking back onto the legs.
Do not use a dishwasher to clean the drip tray.
Reposition the drip tray by clicking back onto the legs.
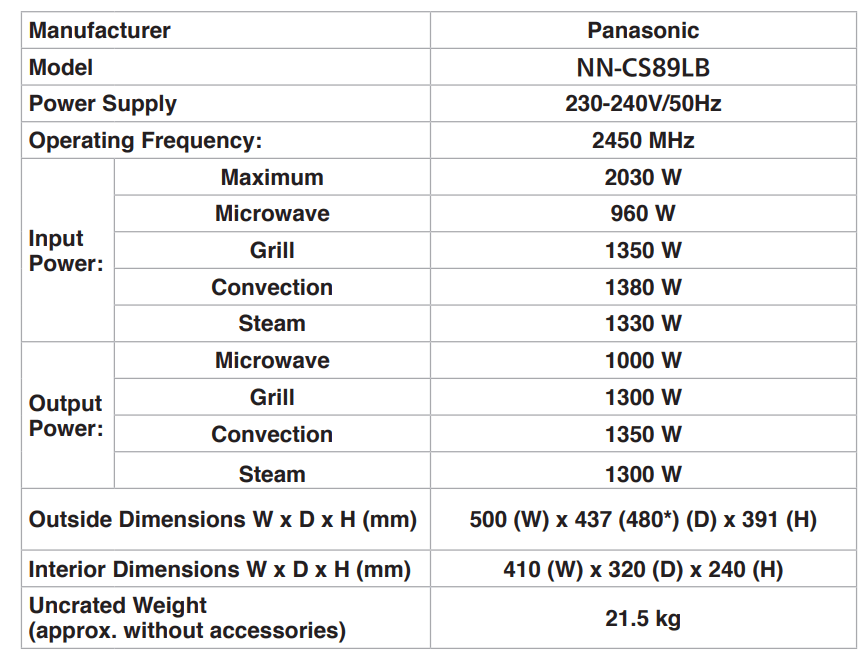
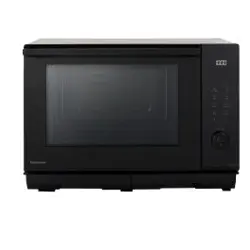
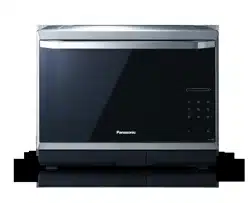
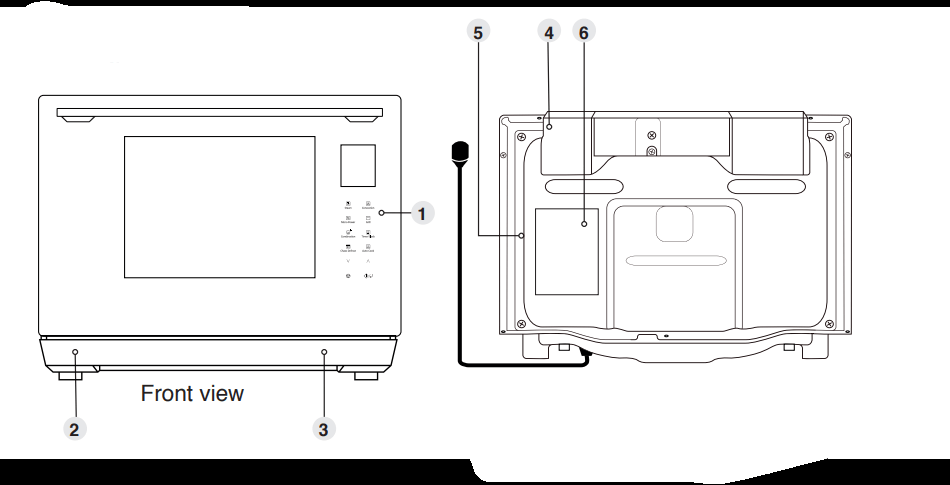
Outline Diagram
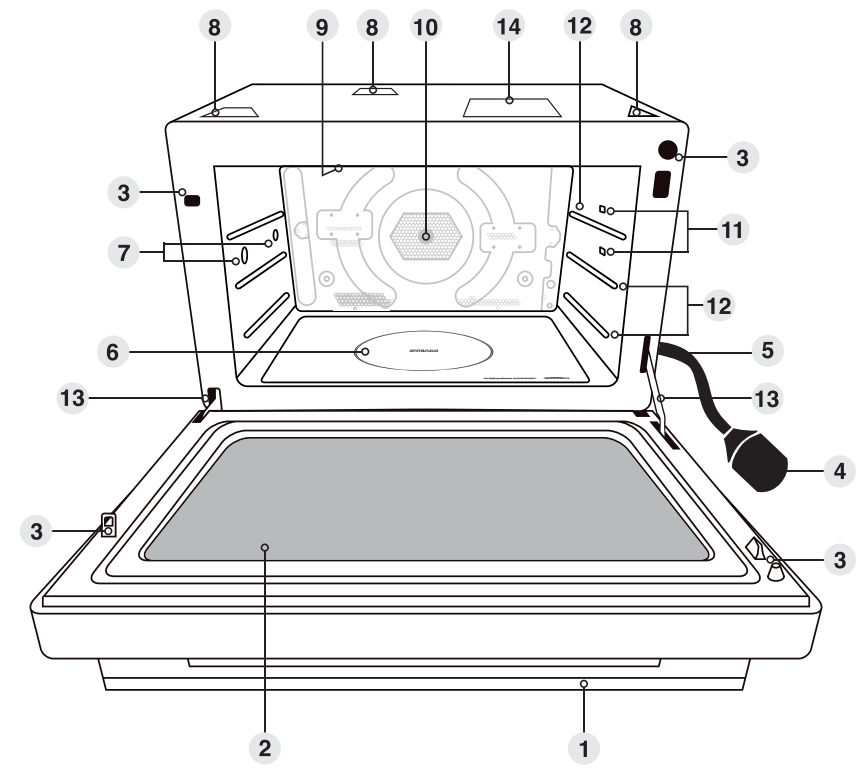
1. Door handle
Pull the door handle downwards to open. When you open the oven door during cooking, the cooking is stopped temporarily without clearing the programmed settings. The cooking is resumed as soon as the door is closed and Start/ Confirmation is touched.
2. Oven window
3. Door safety lock system
To prevent injury, do not insert finger, knife, spoon or other object into the latch hole.
4. Power supply plug
5. Power supply cord
6. Bottom microwave feeding
7. Steam outlets
8. Warning label
9. Grill elements
10. Convection heater
11. LED lights
The oven lamp lights as soon as the oven door is opened.
12. Shelf positions
13. Door hinges
To prevent injury when opening or closing the door, keep fingers away from the door hinges.
14. Menu label
Position your supplied menu label.
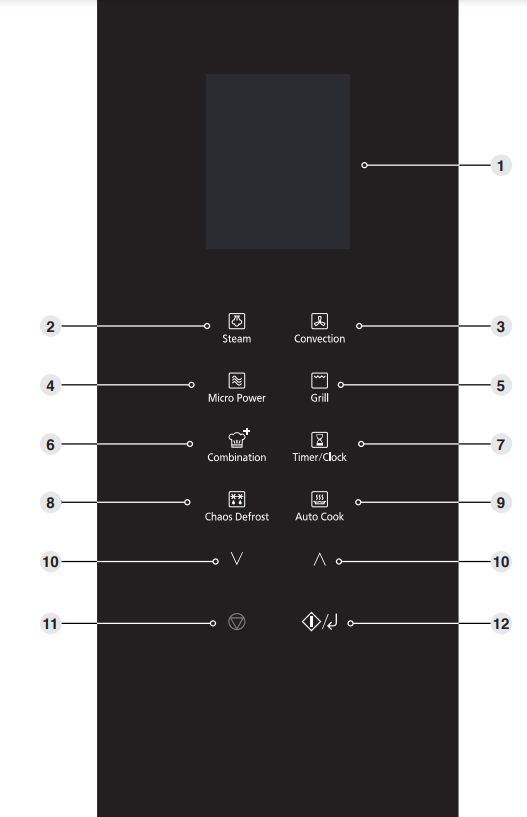
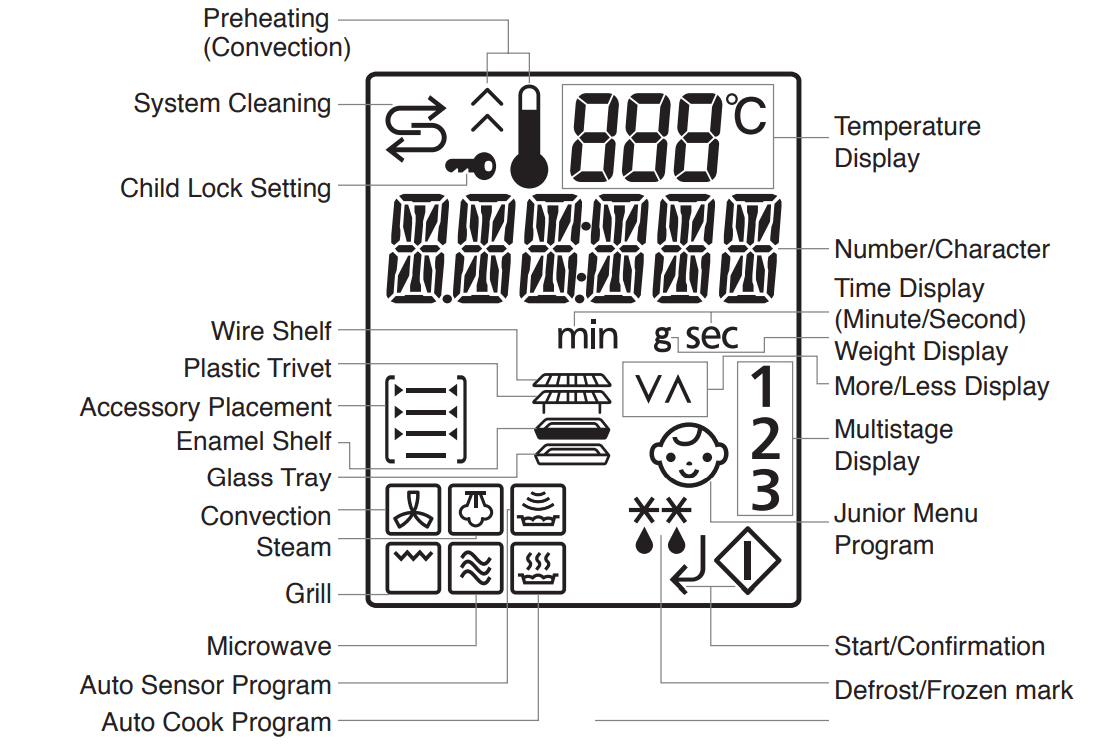
Control Panel
1. Display Window
2. Steam
3. Convection
4. Micro Power
5. Grill
6. Combination
7. Timer/Clock
8. Chaos Defrost
9. Auto Cook
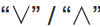
10. Up/Down Selection
Select the time, weight or auto menu by tapping .
11. Stop/Cancel:
Before cooking: One touch clears your instructions.
During cooking: One touch temporarily stops the cooking program. Another touch cancels all your instructions and a colon or the clock will appear in the display.
12. Start/Confirmation
Touch to start operating the oven or confirm the setting. If during cooking the door is opened or Stop/Cancel is touched once, Start/ Confirmation has to be touched again to continue cooking.
Microwave Display Window
Let's Start to Use Your Oven
1. Plug In
Plug into a 13 amp fused electrical socket. You will be reminded to read your operating instructions.
2. Tap Timer/Clock Twice to
Set Clock Set clock as a 24 hr clock. (See page 36 for details).
3. Tap Convection
( will appear in the display window with the oven temperature) (this procedure is to burn off the oil used for rust protection in the oven.) Tap the Convection until 230 °C is in the display window. Remove all accessories from the oven.
4. Enter Time
Tap “∧ ” until 5 minutes is displayed in the window.
5. Touch Start/Confirmation
The time will be displayed in the window and count down. The oven will beep at the end of the program. The oven is now ready to use.
Setting the Clock
When the oven is first plugged in “REFER TO OPERATING INSTRUCTIONS BEFORE USE” appears in display window.
Tap Timer/Clock twice.
"SET TIME" will appear in the display window and the colon starts to blink.
Enter the time by tapping .
Touch Timer/Clock.
The colon stops blinking. Time of day is now locked into the display.
Operation Guide Setting
To assist you in programming your oven, the following operation will appear in the display window. When you become familiar with your oven, the operation guide can be turned off.
To turn off:
To turn on:
Using the Timer
This feature allows you to program the oven as a kitchen timer. It can be also used to program a standing time after cooking is completed or to program a delay start.
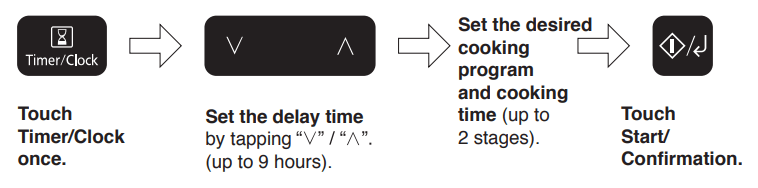
1. Delay Start Cooking
By using the timer, you are able to program delay start cooking.
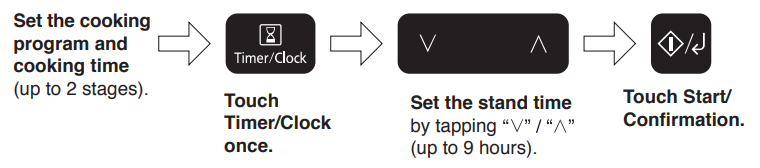
2. To Set a Standing Time
By using the timer, you can program standing time after cooking is completed or use to program the oven as a minute timer.
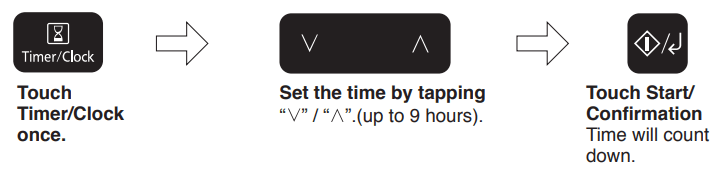
3. Kitchen Timer
Note
Three stage cooking can be programmed including stand time.
If the oven door is opened during the stand time or Delay Start or Kitchen Timer, the time in the display window will continue to count down.
If the programmed stand time exceeds one hour, the time will count down in units of minutes. If less than one hour, the time will count down in units of seconds.
Standing time cannot be used after an auto program.
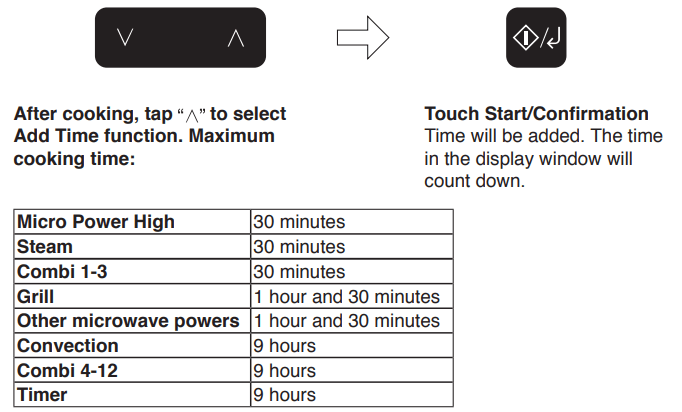
Using the Add Time Function
This feature allows you to add cooking time at the end of previous cooking.
Note
This function is only available for Micro Power, Grill, Convection, Steam, Combination and Timer functions and it is not available for Auto programs.
The Add Time function will not operate after 2 minutes cooking.
The Add Time function can be used after the multi-stage cooking. The power level is the same as the last stage.
Cleaning Programs
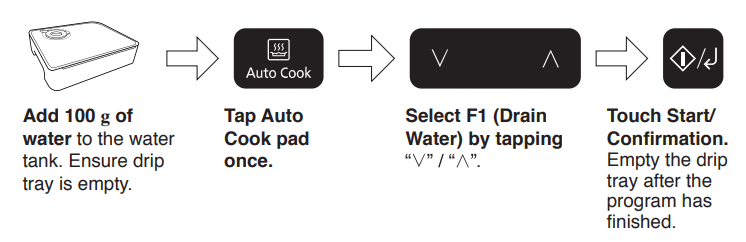
F1. Drain Water
Water is pumped through the system to clean the pipes. The water is drained into the drip tray
Note
Only run this program with 100 g of water in the tank.
Do not remove the drip tray during the drain water program.
Empty the drip tray and rinse with running water after the program has finished.
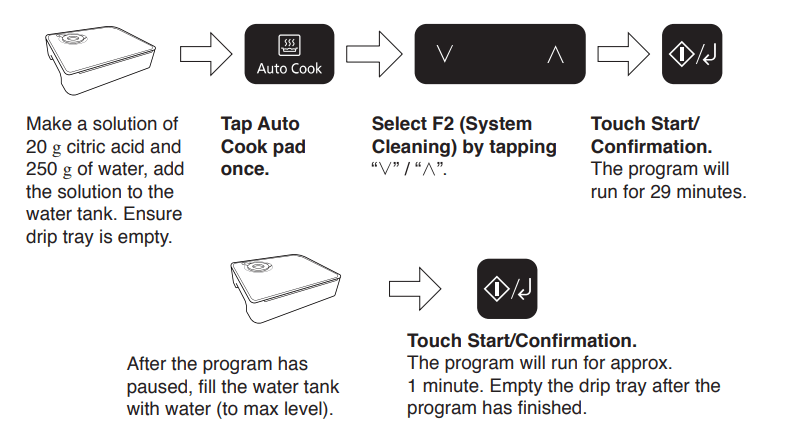
F2. System Cleaning
The first stage of this program cleans the system with a citric acid solution. The second stage runs water through the system to rinse the pipes.
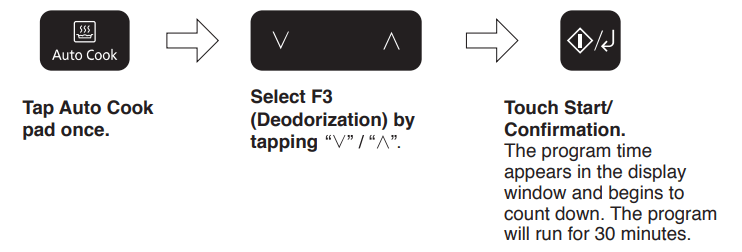
F3. Deodorization
This feature is recommended for eliminating any odours from the oven.
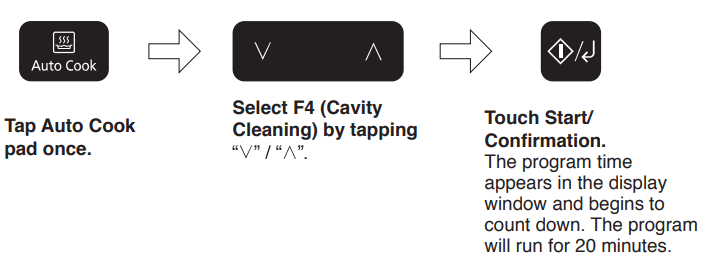
F4. Cavity Cleaning
This feature is suitable for removing the build up of fat or grease in the cavity
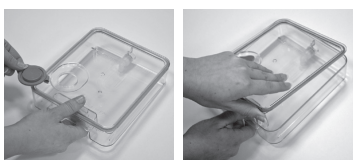
Cleaning the Water Tank
Clean with a soft sponge in water.
Remove the water tank and clean the compartment where the water tank is inserted.
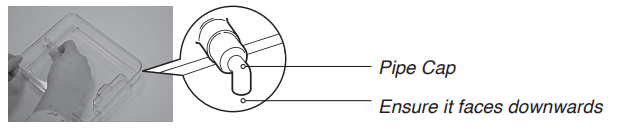
Open the water supply cap, remove the lid and pipe cap and clean.
If the pipe cap is difficlult to remove, wiggle from side to side. When re-fitting, make sure that the pipe faces down (see diagram).
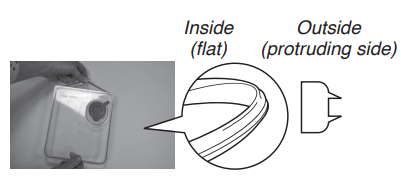
The rubber seal of the tank can also be removed for cleaning.
Removing the Rubber Seal
Ensure that the rubber seal is not inside out when re-fitting. If the seal is not fitted correctly the lid will not close securely and it will leak.
Note
Clean the water tank at least once a week to prevent build up of limescale
Do not use a dishwasher to clean the water tank or parts of the water tank.
Care & Cleaning of Your Oven
Switch the oven off before cleaning and unplug at the socket if possible.
Keep the inside of the oven, door seals and door seal areas clean. When food splatters or spilled liquids adhere to oven walls, door seals and door seal areas wipe off with a damp cloth. Mild detergent may be used if they get very dirty. The use of harsh detergent or abrasives is not recommended.
After using grill, convection, steam and combination cooking the walls of the oven should be cleaned with a soft cloth squeezed in soapy water. Particular care should be taken to keep the window area clean especially after cooking by grill, convection, steam and combination. Stubborn spots inside the oven can be removed by using a small amount of branded conventional oven-cleaner sprayed onto a soft damp cloth. Wipe onto problem spots, leave for recommended time and then wipe off. Do not spray directly inside the oven
After cooking with a steam function, check and wipe away any excess water which may have condensed within the oven cavity. Empty the drip tray (refer to page 19).
Do not use harsh abrasive cleaners or sharp metal scrapers to clean the oven door glass since they may scratch the surface, which may result in shattering of the glass.
The outside oven surface should be cleaned with a damp cloth. To prevent damage to the operating parts inside the oven, water should not be allowed to seep into the ventilation openings.
If the control panel becomes dirty, clean with a soft, dry cloth. Do not use harsh detergents or abrasives on control panel. When cleaning the control panel, unplug the socket. Leave the oven door closed.
If steam accumulates inside or around the outside of the oven door, wipe with a soft cloth. This may occur when the microwave oven is operated under high humidity conditions and in no way indicates a malfunction of the unit or microwave leakage.
The oven cavity floor should be cleaned regularly. Simply wipe the bottom surface of the oven with mild detergent and warm water then dry with a clean cloth. Cooking vapours collect during repeated use but in no way affect the bottom surface.
When grilling or cooking by convection, steam or combination some foods may splatter grease onto the oven walls. If the oven is not cleaned to eliminate this grease, it can accumulate and cause the oven to ‘smoke’ during use. These marks will be more difficult to clean later.
A steam cleaner is not to be used for cleaning.
Ensure all accessories are kept clean, especially when using microwave or combination programs.
Keep air vents clear at all times. Check that no dust or other material is blocking any of the air vents on the top of the oven. If vents become blocked this could cause overheating which would affect the operation of the oven and possibly result in a hazardous situation.
Run the system cleaning program when the symbol shows in the display. See pages 87. Clean the water tank at least once a week to prevent build up of limescale. See page 89.
Maintenance of Your Oven
Service
When your oven requires a service call your local Panasonic engineer (Customer Communications Centre on 0344 844 3899 can recommend an engineer).
Door Seals
2. Do not attempt to tamper with or make any adjustments or repairs to door, control panel housing, safety interlock switches or any other part of the oven. Do not remove outer panel from oven. The door seals and door seal areas should always be kept clean – use a damp cloth.
Water Tank
3. Do not use the water tank if it is cracked or broken, as leaking water could result in electrical failure and danger of electric shock. If the water tank becomes damaged, please contact your dealer.
Oven Light
4. The oven lamp must be replaced by a service technician trained by the manufacturer. Do not attempt to remove the outer casing from the oven.
Selected Spares and Accessories
5. These may be ordered directly on line at www.panasonic.co.uk or by telephoning the Customer Communication Centre on 0344 844 3899. Most major credit and debit cards accepted. Ensure you quote the correct model number.
Questions & Answers
Q: Why won’t my oven turn on?
A: When the oven does not turn on, check the following:
Is the oven plugged in securely? Remove the plug from the outlet, wait 10 seconds and reinsert.
Check the circuit breaker and the fuse. Reset the circuit breaker or replace the fuse if it is tripped or blown.
If the circuit breaker or fuse is all right, plug another appliance into the outlet. If the other appliance works, there probably is a problem with the oven. If the other appliance does not work, there probably is a problem with the outlet.
If it seems that there is a problem with the oven, contact an authorized Service Centre.
Q: My oven causes interference with my TV. Is this normal?
A: Some radio and TV interference might occur when you cook with the oven. This interference is similar to the interference caused by small appliances such as mixers, vacuums, blow dryers, etc. It does not indicate a problem with your oven.
Q: The oven won’t accept my program. Why?
A: The oven is designed not to accept an incorrect program. For example, the oven will not accept a fourth stage.
Q: Sometimes warm air comes from the oven vents. Why?
A: The heat given off from the cooking food warms the air in the oven cavity. This warmed air is carried out of the oven by the air flow pattern in the oven. There are no microwaves in the air. The oven vents should never be blocked during cooking.
Q: I can’t set an auto cook program and ‘HOT’ appears in the display. Why?
A: If ‘HOT’ appears in the display window, the oven temperature is too high from previous use and an auto program can not be set. Cooking mode and time may still be set manually.
Q: Can I use a conventional oven thermometer in the oven?
A: Only when you are using Grill/Convection cooking mode. The metal in some thermometers may cause arcing in your oven and should not be used on Microwave and Combination with Microwave cooking modes.
Q: There are humming and clicking noises from my oven when I cook by Combination. What is causing these noises?
A: The noises occur as the oven automatically switches from one power to another to create the combination setting. This is normal.
Q: My oven has an odour and generates smoke when using the Combination and Grill function. Why?
A: After repeated use, it is recommended to clean the oven and then run the oven without food. This will burn off any food, residue or oil which may cause an odour and/or smoking.
Q: The oven stops cooking by microwave and ‘H97’ or ‘H98’ appears in the display. Why?
A: This display indicates a problem with the microwave generation system. Please contact an authorised Service Centre.
Q: The fan continues to rotate after cooking. Why?
A: After using the oven, the fan motor may rotate to cool the electrical components. This is normal and you can continue using the oven at this time.
Q: “DEMO MODE PRESS ANY KEY” appears in the display and the oven does not cook. Why?
A: The oven has been programmed in DEMO MODE. This mode is designed for retail store display. Deactivate this mode by touching Microwave once and Stop/Cancel 4 times.
Q: The operation guide has disappeared on my display, I can only see numbers?
A: The operation guide was turned off by tapping Timer/Clock 4 times. When colon or time of day is displayed, touch Timer/Clock 4 times to turn the operation guide back on.
Q: The oven stops cooking by steam or combination with steam and U14 appears in the display.
A: The water tank is empty and the operation guide has been turned off. Re-fill the water tank, position back in the oven and touch Start/ Confirmation to resume cooking.
Q: The control panel keys do not respond when tapped. Why?
A: Ensure the oven is plugged in. The oven may be in stand-by mode. Open and close the door to activate.
#1 Can I turn off the beeping sound of the microwave?
- The beeping sound cannot be turned off on any of our microwave ovens. - It is a safety feature to inform of cooking progress and to help prevent accidental misoperation when pressing buttons. - Full details of beeping sounds are given in the operating instructions for each model.
#2 My microwave seems to run after the cooking has finished.
The unit has a cooling fan, which will continue to run after cooking to cool down the elements inside, the fan will stop automaticaly when it is finished. This does not indicate a fault and no microwaves will be released during this operation. You can also continue to use the oven normally during this time if you wish to cook another item.
- Chaos defrost is a system that improves the auto weight defrosting process. - Chaos defrost uses random pulses of power to achieve a quicker and more even defrost within the food. This would only be used for Bread, Meat Items or Meat Joints.
#4 Is the light supposed to be on in the microwave? Is there any way in which I can turn it off?
- All the microwaves have a bulb inside and they are supposed to be on while the microwave is in use and the door is open. - If your microwave light no longer operates then the bulb may need to be exchanged, we recommend this to be carried out by an authorised service agent, those in your area can be found on our Website. - There is no way to turn the light off while using the microwave.
#5 Is it normal for the outside casing to get hot on my microwave oven?
- Exterior oven surfaces, including the air vents on the rear and bottom of the cabinet, and the oven door will get hot during GRILL, CONVECTION and COMBINATION. Additionally using microwave power for long time settings can produce excess steam leading to the cabinet becoming hot so please take care when opening or closing the door and when inserting or removing food and accessories. Always follow the operating instructions and ensure the unit is installed with adequate ventilation space to prevent overheating. - Setting the power and time too high for your food load can also lead to overheating and could eventually cause malfunction, or reduce the life of the product.
#6 Why does my microwave have condensation in-between the glass doors?
The door is designed to stop microwave energy for escaping, however does not need to be airtight in order to do this. There are small holes around the door seals because the temperatures on either side of the door differ (i.e. the air in the interior cavity is hotter than that on the outside of the microwave). This causes air expansion in the door cavity, so there are air release holes in the seal of the door to accommodate this so the pressure does not build.
#7 My microwave displays "Demo Mode", how can I deactivate this?
Please see the operating instructions for your model as it can be different from model to model.

 .
.
 will appear in the display window with the oven temperature) (this procedure is to burn off the oil used for rust protection in the oven.) Tap the Convection until 230 °C is in the display window. Remove all accessories from the oven.
 .
.