1. Unpack oven, remove all packing material, and examine the oven for any damage such as dents, broken door latches or cracks in the door. Notify dealer immediately if unit is damaged. Do not install if unit is damaged.
Guarantee
2. Your receipt is your guarantee, please keep safely
Cord
3. If the supply cord of this appliance is damaged, it must be replaced by the manufacturer or it’s service agent or a similarly qualified person in order to avoid a hazard.
Note The appliance should be inspected for damage to the door seals and door seal areas. If these areas are damaged the appliance should not be operated until it has been repaired by a service technician trained by the manufacturer.
4. Before using grill, convection or combination function for the first time operate the oven without food and accessories (including glass turntable and roller ring) on Convection 220 °C for 5 minutes. This will allow the oil that is used for rust protection to be burned off. This is the only time that the oven is operated empty (except when preheating).
Placement of your Oven
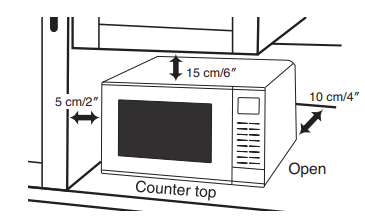
This oven is intended for countertop use only. It is not intended for built-in use or for use inside a cupboard. The microwave oven shall not be placed in a cabinet.
1. Oven must be placed on a flat, stable surface 85 cm / 33 ½ inch above floor level, with rear of oven placed against a back wall. For proper operation, the oven must have sufficient air flow, i.e. 5 cm / 2 inch at one side, the other being open; 15 cm / 6 inch clear over the top; 10 cm / 4 inch at the rear.
2. Do not place the microwave oven on a shelf directly above a gas or electric hob. This may be a safety hazard and the oven may be damaged.
3. Do not block the air vents on the sides and back of the oven. If these openings are blocked during operation the oven may overheat. In this case the oven is protected by a thermal safety device and resumes operation only after cooling down. The oven will remain inoperable with a blank display until it has cooled.
4. This appliance is intended to be used in household applications only
Care & Cleaning of your Oven
Important It is essential for the safe operation of the oven that it is kept clean and wiped out after each use. Failure to maintain the oven in a clean condition could lead to deterioration of a surface that could adversely affect the life of the appliance and possibly result in a hazardous situation.
1. Switch the oven off before cleaning and unplug at socket if possible.
2. Keep the inside of the oven, door seals and door seal areas clean. When food splatters or spilled liquids adhere to oven walls, door seals and door seal areas wipe off with a damp cloth. Mild detergent may be used if they get very dirty. The use of harsh detergent or abrasives is not recommended. Take care when cleaning around the waveguide cover.
3. After using grill, convection or combination cooking, the walls of the oven should be cleaned with a soft cloth and soapy water. Particular care should be taken to keep the window area clean especially after cooking by grill, convection or combination. Stubborn spots inside the oven can be removed by using a small amount of conventional ovencleaner sprayed onto a soft damp cloth. Wipe onto problem spots, leave for recommended time and then wipe off. Do not spray directly inside the oven.
4. After use, the oven interior should be wiped out to remove any remaining water in order to reduce the risk of corrosion to the cavity and door. The cavity and door can be damaged by abrasive cleaners and sharp objects so care must be taken to avoid damage caused in this way. If the cavity or door become damaged the lining may begin to corrode. Providing the above precautions are taken regarding the cleaning and care of your oven the life of the cavity and door may be extended.
5. The outside oven surface should be cleaned with a damp cloth. To prevent damage to the operating parts inside the oven, water should not be allowed to seep into the ventilation openings.
6. If the control panel becomes dirty, clean with a soft, dry cloth. Do not use harsh detergents or abrasives on the control panel. When cleaning the control panel, leave the oven door open to prevent the oven from accidentally turning on. After cleaning press Stop/Cancel pad to clear display window.
7. Do not use harsh abrasive cleaners or sharp metal scrapers to clean the oven door glass since they can scratch the surface, which may result in shattering of the glass.
8. Keep air vents clear at all times Check that no dust or other material is blocking any of the air vents on the top, bottom or rear of the oven. If air vents become blocked this could cause overheating which would affect the operation of the oven and possibly result in a hazardous situation.
9. If steam accumulates inside or around the outside of the oven door, wipe with a soft cloth. This may occur when the microwave oven is operated under high humidity conditions and in no way indicates a malfunction of the unit or microwave leakage.
10. It is occasionally necessary to remove the glass turntable for cleaning. Wash the turntable in warm soapy water. Do not place in the dishwasher.
11. The roller ring and oven cavity floor should be cleaned regularly to avoid excessive noise. Simply wipe the bottom surface of the oven, particularly the turntable spindle and the area surrounding this, with mild detergent and hot water then dry with a clean cloth. The roller ring may be washed in mild soapy water.
After removing the roller ring from cavity floor for cleaning, be sure to replace it in the proper position.
12. When grilling or cooking by convection or combination, some foods may splatter grease onto the oven walls. If the oven is not cleaned to eliminate this grease, it can accumulate and cause the oven to ‘smoke’ during use. These marks will be more difficult to clean later.
13. A steam cleaner is not to be used for cleaning.
14. Users are advised to avoid any downward pressure on the microwave door when in the open position. There is a safety risk that the oven will tilt forward.
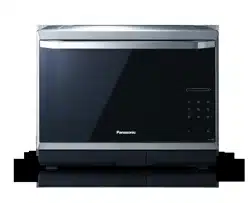
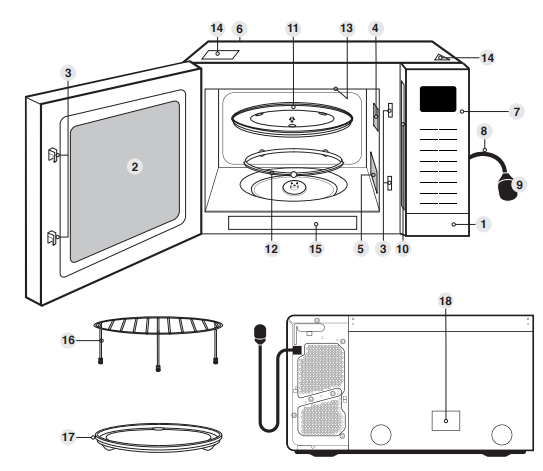
Parts of your Oven
Door release. Press to open the door. When you open the oven door during cooking, the cooking is stopped temporarily without clearing earlier made settings. The cooking is resumed as soon as the door is closed and Start pad pressed.
See-through oven window
Door safety lock system
Oven lamp
Waveguide cover (do not remove)
External oven air vents
Control panel
Power supply cord
Plug
Identification plate
Glass turntable. The glass turntable and roller ring are the only accessories used for microwave cooking.
Roller ring. (i).The roller ring and oven floor should be cleaned frequently to prevent excessive noise. (ii).The roller ring must always be used together with the glass turntable for cooking.
Heating elements
Caution label (hot surfaces)
Menu label
Wire rack
Enamel tray
Warning label
Note
The illustration is for reference only.
The glass turntable, wire rack and enamel tray are the only accessories with this oven. All other cooking utensils mentioned in this manual must be purchased separately.
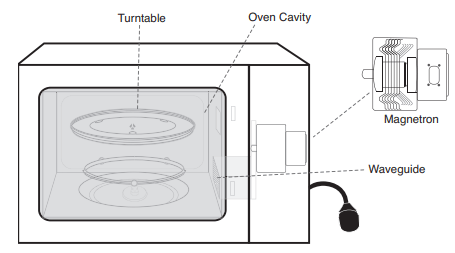
Microwaving Principles
Microwave energy has been used in this country to cook and reheat food since early experiments with radar in World War II. Microwaves are present in the atmosphere all the time, both naturally and from manmade sources.
Manmade sources include radar, radio, television, telecommunication links and mobile phones.
How Microwaves Cook Food
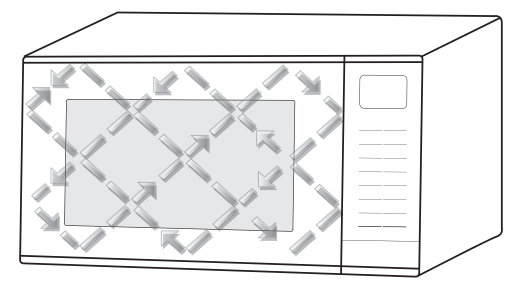
Reflection
The microwaves bounce off the metal walls and the metal door screen.
In a microwave oven, electricity is converted into microwaves by the magnetron.
Transmission
Then they pass through the cooking containers to be absorbed by the water molecules in the food, all foods contain water to a more or lesser extent.
The microwaves cause the water molecules to vibrate which causes friction, i.e. heat. This heat then cooks the food. Microwaves are also attracted to fat and sugar particles, and foods high in these will cook more quickly. Microwaves can only penetrate to a depth of 4-5 cm (1½-2 inch) and as heat spreads through the food by conduction, just as in a traditional oven, the food cooks from the outside inwards.
Note
The dish used to cook or reheat the food will get warm during cooking, as the heat conducts from the food. Even in microwaving, oven gloves are required!
Microwaves cannot pass through metal and therefore metal cooking utensils can never be used in a microwave, for cooking on microwave only.
Foods Not Suitable for Cooking by Microwave Only
Yorkshire puddings, souffles, double crust pastry pies. This is because these foods rely on dry external heat to cook correctly, do not attempt to cook by microwave. Foods that require deep fat frying cannot be cooked either.
Standing Time
When a microwave oven is switched off, the food will continue to cook by conduction – not by microwave energy. Hence standing time is very important in microwaving, particularly for dense foods i.e. meat, cakes and reheated meals (Refer to page 21).
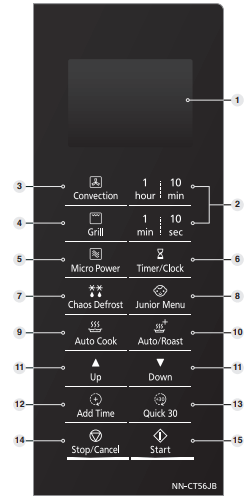
Control Panels
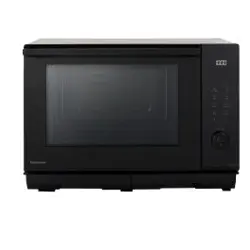
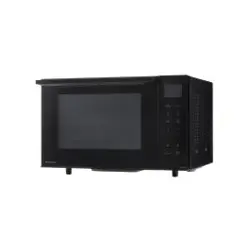
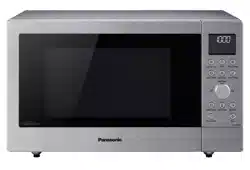
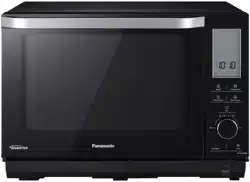
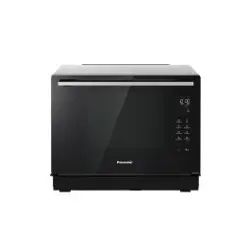
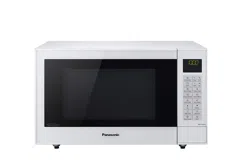
NN-CT54JW, NN-CT55JW, NN-CT56JB, NN-CT57JM *
* The design of your control panel may vary from the panel displayed, but the words on the pads will be the same.
1. Display window 2. Time pads 3. Convection pad (pages 40-41) 4. Grill pad (pages 38-39) 5. Micro Power pad (pages 31-32) 6. Timer/Clock pad (pages 30, 49-50) 7. Auto weight defrost-Chaos Defrost programs (pages 33-34) 8. Junior Menu programs (pages 55-57) 9. Auto Cook programs (pages 58-59) 10. Auto/Roast programs (pages 60-62) 11. Up and Down pads 12. Add Time pad (page 37) 13. Quick 30 pad (page 37) 14. Stop/Cancel pad:
Before cooking: One press clears your instructions
During cooking: one press temporarily stops the cooking program. Another press cancels all your instructions and the time of day will appear in the display.
15. Start pad
Press to start operating the oven. If during cooking the door is opened or Stop/Cancel is pressed once, Start has to be pressed again to continue cooking.
Let's Start to Use Your Oven
NN-CT54JW, NN-CT55JW, NN-CT56JB, NN-CT57JM *
* The design of your control panel may vary from the panel displayed, but the words on the pads will be the same.
1. Plug in
Plug into a 13 amp fused electrical socket. You will be reminded to read your operating instructions.
2. Lb/oz Conversion
Default weight is grams. To select weight in pounds and ounces, after first plug in, press Start pad once. Press again to change to grams.
3. Press Timer/Clock pad Twice to Set Clock
Set clock as a 24 hr clock. (See page 30).
4. Press Convection pad
will appear in the display window with the oven temperature. This procedure is to burn off the oil used for rust protection in the oven. Press Convection pad until 220 °C appears in the display window. Remove all accessories from the oven.
5. Press Time pads
Press 1 min pad until 5 minutes is displayed in the window.
6. Press Start
The time will be displayed in the window and count down. The oven will beep at the end of the program. The oven is now ready to use. Caution: heating elements and oven will be hot.
7. Demonstration Mode
This is to enable you to experiment setting various programs. (The letter D will always appear in the display window. This is to confirm that there is no microwave power produced and it is safe to use the oven without any food). To select this mode press the Micro Power pad once and then Stop/Cancel 4 times. “DEMO MODE PRESS ANY KEY” will appear. To cancel press the Micro Power pad once and then Stop/Cancel 4 times.
8. Child Lock
To operate the child lock facility press the Start pad three times, this will make the oven controls inoperable, however, the door can be opened. will appear in the display and none of the controls will operate. To clear child lock facility press Stop/Cancel three times. To activate or cancel child lock, Start or Stop/Cancel must be pressed 3 times within a 10 second period. Child Lock can be set when a colon or the time of day is displayed.
Setting the Clock
Example of how to set 11:25am.
Note
To reset time of day, repeat step 1 through to step 3, as above.
The clock will keep the time of day as long as the oven is plugged in and electricity is supplied.
This is a 24 hour clock, i.e. 2pm = 14:00 not 2:00.
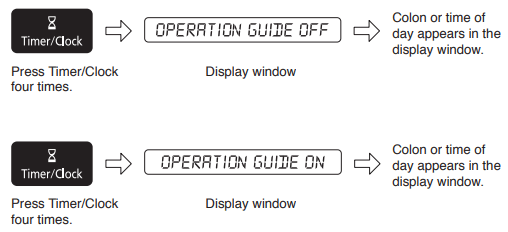
Operation Guide Setting
To assist you in programming your oven, the following operation will appear in the display window. When you become familiar with your oven, the operation guide can be turned off.
To turn off:
Microwave Cooking and Defrosting
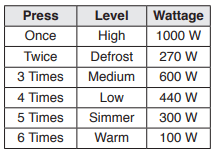
There are six different microwave power levels available.
Note
Maximum time that can be set on High microwave is 30 minutes.
On all power levels, except High microwave, the maximum time that can be set is 99 minutes, 50 seconds. The 1 hour pad is inoperable.
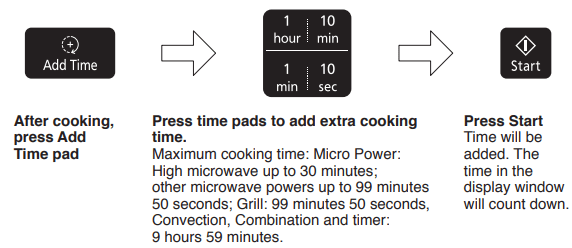
You can increase the cooking time during cooking if required. Time can be increased in 1 minute increments, up to 10 minutes. Press ‘Add time’ pad once, then press ‘1 min’ pad to a maximum of 10 minutes. After selecting ‘Add Time’ function, time should be added within a 5 second period. Cooking time can not be decreased during cooking.
For manual defrosting times, please refer to defrost chart on page 36.
For multi-stage cooking refer to page 48.
Stand time can be programmed after microwave power and time setting. Refer to using the timer on pages 49-50.
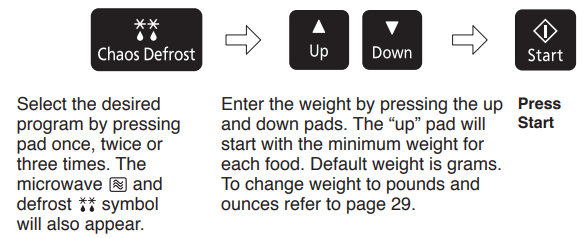
Auto Weight Defrost - Chaos Defrost
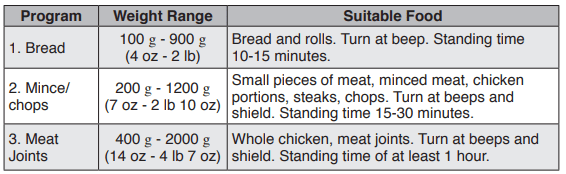
With this feature you can defrost frozen foods according to the weight. Select the category and set the weight of the food. The weight can be programmed in grams or pounds and ounces. The weight starts from the minimum weight for each category.
This feature allows you to defrost minced meat, chops, chicken portions, meat joints and bread.
The Chaos Defrost pad should be pressed to select the correct category and then enter in the weight of the food in grams or pounds and ounces using the up and down pads.
Foods should be placed in a suitable dish, whole chickens and joints of meat should be on an upturned saucer or on a micro-safe rack. Chops, chicken portions and slices of bread should be placed in a single layer. It is not necessary to cover the foods. The Chaos Theory principle is used in Auto Weight defrost programs to give you a quick and more even defrost. The Chaos system uses a random sequence of pulsing microwave energy which speeds up the defrosting process. During the program the oven will beep to remind you to check the food. It is essential that you turn and stir the food frequently and shield if necessary (See pages 34-35). On hearing the first beep you should turn and shield (if possible). On the second beep you should turn the food or break it up.
Using the Quick 30 Function
This function allows you to quickly set cooking time in 30 second increments.
Note
This function is only available for Micro Power. If desired, you can use other microwave power levels. Select desired power level before pressing Quick 30.
After setting the time by Quick 30, you can not use the time pads.
This function will not operate for 1 minute after manual cooking because of 'Add Time' function.
If you wish to operate within 1 minute, pressing Stop/Cancel will allow the operation.
Using the Add Time Function
This feature allows you to add cooking time at the end of previous cooking.
Note
This function is only available for Micro Power, Grill, Convection, Combination and Timer functions and it is not available for Auto programs.
The Add Time function will not operate after 1 minute cooking.
The Add Time function can be used after the multi-stage cooking and during cooking.
The power level is the same as the last stage.
Grilling
The Quartz Grill system on the oven gives fast efficient cooking for a wide variety of foods e.g. chops, sausages, steak, toast, oven chips etc.
Do not preheat the grill before use.
The enamel tray must be on the glass turntable when using.
Note
The Grill will only operate with the oven door closed, and there is no microwave power on the grill only program.
You can increase the cooking time during cooking if required. Time can be increased in 1 minute increments, up to 10 minutes. Press ‘Add time’ pad once, then press ‘1 min’ pad to a maximum of 10 minutes. After selecting ‘Add Time’ function, time should be added within a 5 second period. Cooking time can not be decreased during cooking.
Convection Cooking
Your microwave oven can be used in convection mode which incorporates a heating element with a fan. For best results always place food in a preheated oven. The enamel tray must be on the glass turntable when preheating.
Note
1. * Open the door using the door release pad, because if the Stop/Cancel pad is pressed the program may be cancelled.
2. The oven will maintain the selected temperature for approximately 30 minutes. If no food has been placed inside the oven, then it will automatically cancel the cooking program “OPEN DOOR” will appear in the display window. If no cooking time is set, oven will revert to time of day after 6 minutes.
3. You can increase the cooking time during cooking if required. Time can be increased in 1 minute increments, up to 10 minutes. Press ‘Add time’ pad once, then press ‘1 min’ pad to a maximum of 10 minutes. After selecting ‘Add Time’ function, time should be added within a 5 second period. Cooking time can not be decreased during cooking.
4. After pressing Start, the selected temperature can be recalled and changed. Press convection pad once to indicate the temperature in the display window. While the temperature is recalled in the display window, you can change the temperature by pressing Convection pad.
5. The oven cannot preheat to 40 °C.
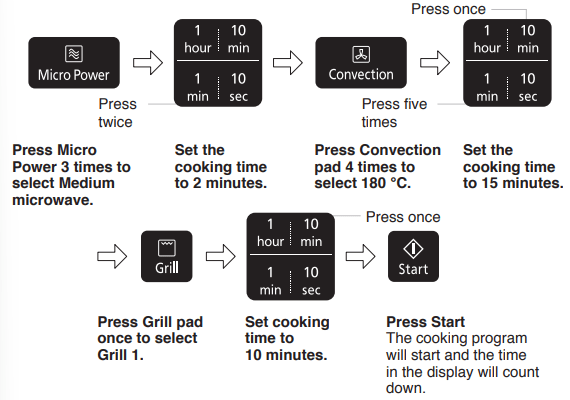
Multi-stage Cooking
2 or 3 Stage Cooking
Example: To cook on Medium microwave for 2 minutes, cook on 180 °C for 15 minutes and cook on Grill 1 for 10 minutes.
Note
For 3 stage cooking, enter another cooking program before pressing Start.
During cooking, one press on Stop/Cancel stops the operation. You can re-start it by pressing Start. A second press of Stop/Cancel will cancel the selected program.
Whilst not operating, one press of Stop/Cancel cancels the selected program.
Auto programs and preheating cannot be used with multi-stage cooking.
Delay/stand feature can be used with multi-stage cooking.
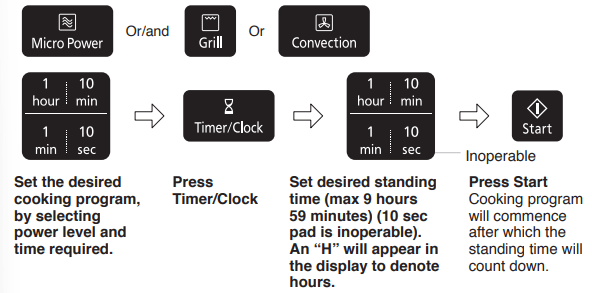
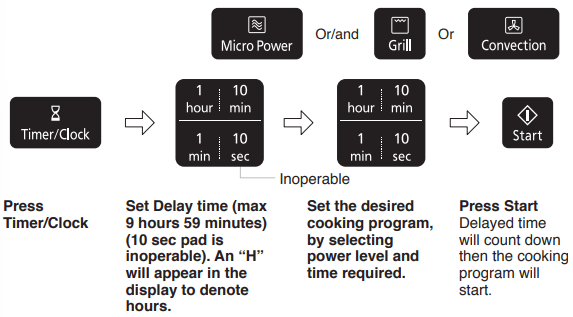
Using the Timer
The timer can be used either before or after a cooking program. This feature can be used to set a standing time after cooking or to delay the start of your cooking.
1. To Set a Standing Time:
Note
Three stage cooking can be programmed including standing time.
If the oven door is opened during the standing time or minute timer, the time in the display window will continue to count down.
This feature may also be used as a minute timer. In this case press Timer/Clock, set time and press Start.
Standing time cannot be programmed after an auto program and preheating.
If the programmed stand time exceeds one hour, the time will count down in units of minutes. If less than one hour, the time will count down in units of seconds.
2. To Set a Kitchen Timer
3. To Set a Delay Start:
Note
Three stage cooking can be programmed including delay start cooking.
If the programmed delay time exceeds one hour, the time will count down in units of minutes. If less than one hour, the time will count down in units of seconds.
Delay start cannot be programmed before an auto program and preheating.
If the oven door is opened during the delay time, the time in the display window will continue to count down.
Cooking and Reheating Guidelines
Most foods reheat very quickly in your oven by High microwave. Meals can be brought back to serving temperature in just minutes and will taste freshly cooked. Always check food is piping hot and return to oven if necessary.
As a general rule, always cover wet foods, e.g. soups, casseroles and plated meals.
Do not cover dry foods e.g. bread rolls, mince pies, sausage rolls etc.
The charts on pages 65-81 show you the best way to cook or reheat your favourite foods. The best method depends on the type of food you are cooking or reheating.
Remember to stir or turn food wherever possible during cooking or reheating. This ensures even cooking or reheating on the outside and in the centre.
When is Food Reheated?
Food that has been reheated or cooked should be served piping hot i.e. steam should be visibly emitted from all parts. As long as good hygiene practices have been followed during the preparation and storage of the food, then cooking or reheating presents no safety risks.
Foods that cannot be stirred should be cut with a knife to test that they are adequately heated throughout. Even if a manufacturer’s instructions or the times in the cookbook have been followed, it is still important to check the food is heated thoroughly. If in doubt, always return to the oven for further reheating. If you cannot find the equivalent food in the chart then choose a similar type and size listed and adjust the cooking time if necessary.
Plated Meals
Everyone’s appetite varies and reheat times depend on meal contents. Dense items e.g. mashed potato, should be spread out well. If a lot of gravy is added, extra time may be required. Place denser items to the outside of the plate. An average plated meal will take 4-5 minutes on High microwave to reheat. Do not stack meals.
Canned Foods
Remove foods from can and place in a suitable dish before heating.
Soups
Place soup in a bowl. Stir before heating and at least once during reheat time and again at the end.
Casseroles
Stir halfway through and again at the end of heating.
Questions and Answers
Q: Why won’t my oven turn on?
A: When the oven does not turn on, check the following:
Is the oven plugged in securely? Remove the plug from the outlet, wait 10 seconds and reinsert.
Check the circuit breaker and the fuse. Reset the circuit breaker or replace the fuse if it is tripped or blown.
If the circuit breaker or fuse is all right, plug another appliance into the outlet. If the other appliance works, there probably is a problem with the oven. If the other appliance does not work, there probably is a problem with the outlet.
If it seems that there is a problem with the oven, contact an authorised Service Center.
Q: My microwave oven causes interference with my TV. Is this normal?
A: Some radio, TV, Wi-Fi, cordless telephone, baby monitor, bluetooth or other wireless equipment interference might occur when you cook with the microwave oven. This interference is similar to the interference caused by small appliances such as mixers, vacuums, blow dryers, etc. It does not indicate a problem with your oven.
Q: The oven won’t accept my program. Why?
A: The oven is designed not to accept an incorrect program. For example, the oven will not accept a fourth stage of cooking.
Q: Sometimes warm air comes from the oven vents. Why?
A: The heat given off from the food whilst cooking warms the air in the oven cavity. This warmed air is carried out of the oven by the air flow pattern in the oven. There are no microwaves in the air. The oven vents should never be blocked during cooking.
Q: Can I use a conventional oven thermometer in the oven?
A: Only when you are using Grill and Convection cooking mode. The metal in some thermometers may cause arcing in your oven and should not be used on microwave and Combination cooking functions.
Q: There are humming and clicking noises from my oven when I cook by Combination. What is causing these noises?
A: The noises occur as the oven automatically switches from microwave power to Convection/ Grill to create the combination setting. This is normal.
Q: My oven has an odour and generates smoke when using the Convection, Combination and Grill function. Why?
A: After repeated use, it is recommended to clean the oven and then run the oven without food, glass turntable, and roller ring on grill for 5 minutes. This will burn off any food, residue or oil which may cause an odour and/or smoking.
Q: The oven stops cooking by microwave and ‘H97’ or ‘H98’ appears in the display. Why?
A: This display indicates a problem with the microwave generation system. Please contact an authorised Service Centre.
Q: The fan continues to rotate after cooking. Why?
A: After using the oven, the fan motor may rotate to cool the electrical components. This is normal and you can continue using the oven at this time.
Q: “DEMO MODE PRESS ANY KEY” or “D” appears in the display and the oven does not cook. Why?
A: The oven has been programmed in demo mode. This mode is designed for retail store display. Deactivate this mode by pressing Micro Power once and Stop/Cancel 4 times.
Q: Can I check the pre-set oven temperature while cooking or preheating by Convection?
A: Yes. Press Convection pad and the oven temperature will appear in the display window for 2 seconds.
Q: The operation guide has disappeared on my display, I can only see numbers. Why?
A: The operation guide was turned off by pressing Timer/Clock 4 times. When colon or time of day is displayed, press Timer/Clock 4 times to turn the operation guide back on.

 will appear in the display window with the oven temperature. This procedure is to burn off the oil used for rust protection in the oven. Press Convection pad until 220 °C appears in the display window. Remove all accessories from the oven.
 will appear in the display and none of the controls will operate. To clear child lock facility press Stop/Cancel three times. To activate or cancel child lock, Start or Stop/Cancel must be pressed 3 times within a 10 second period. Child Lock can be set when a colon or the time of day is displayed.