It is hazardous for anyone other than a competent person to carry out any service or repair operation that involves the removal of a cover which gives protection against exposure to electrical parts.
If the supply cord is damaged, it must be replaced by the manufacturer, its service agent or similarly qualified persons in order to avoid a hazard.
This product is intended for household use only. Do not use outdoors.
Children shall not play with the appliance. Cleaning and user maintenance shall not be made by children unless they are older than 8 and supervised. Keep the appliance and its' cord out of reach of children.
Do not operate this appliance for anything other than its intended use.
To protect against electrical shock do not immerse cord, plug, or appliance in water or other liquid.
Do not direct steam at people, animals, electrical outlets, or equipment containing electrical components.
Unplug from power outlet when not in use. Do not leave steam mop unattended while plugged in.
Do not use with damaged cord or plug.
Do not use steam mop if it has been dropped, damaged, left outdoors or drops into water.
Keep the steam mop away from water; do not allow it to get wet. If unit is wet, do not plug unit into wall socket or turn unit on.
Do not handle steam mop with wet hands.
Do not pull or carry by cord, use cord as a handle, close door on cord, hang cord over the edge of the worktop, pull cord around sharp corners or edges, or expose cord to heated surfaces.
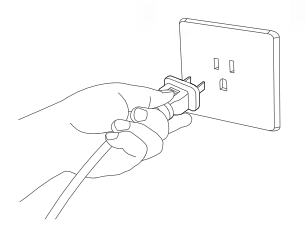
Do not unplug by pulling on cord.
Do unplug the mop after use.
The use of accessory attachments not recommended by the appliance manufacturer may cause fire, electric shock or injury. Only use the accessories supplied by the manufacturer.
Never remove parts from the appliance such as the screws and so on.
The filling aperture must not be opened during use.
Do not use appliance in an enclosed space filled with vapor given off by oil-based paint, paint thinner, some moth proofing substances, flammable dust, or other explosive or toxic vapors.
Do not use on leather, wax polished furniture or floors, synthetic fabrics, velvet or other delicate, steam-sensitive materials.
Never put descaling, aromatic or alcoholic products into the steam mop, as this may damage the unit. Descale the product regularly with a mixture of 50% natural white vinegar & 50% water to maintain its performance and allow the mixture to steam through the product.
Do not store with a wet mop pad still attaced.
Using distilled or demineralized water will maximize the performance of your steam mop.
Use extra care when cleaning on stairs.
Do not use steam for space heating purposes; household use only.
Use on waxed or some unwaxed floors may diminish glossiness. Do not use on unsealed wood floors. Test in an inconspicuous area or check the care instructions from your flooring manufacturer.
Quality testing during the manufacturing process may result in water droplets remaining within the water tank.
If you shake this product the water cut-off valve will make a rattling noise. This is normal and is not a defect.
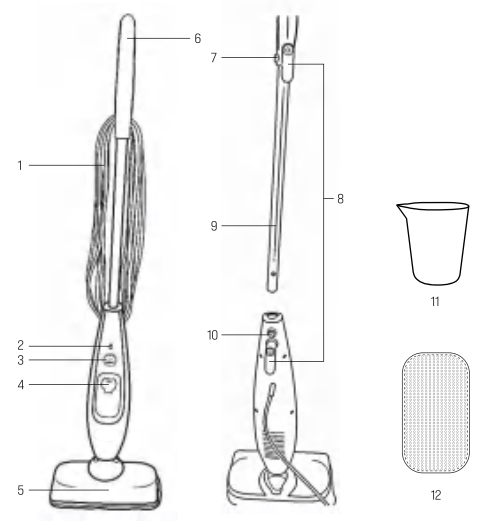
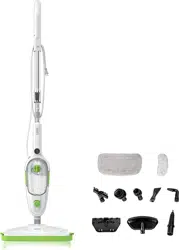
PRODUCT DIAGRAM
Power Cord
Power Indicator Light
Power Dial
Water Cap and Tank
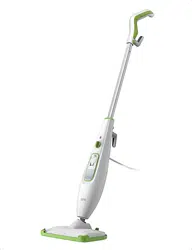
Mop Head
Handle Top
Handle Top Release Button
Cord Hook
Handle Tube
Handle tube Release Button
Measuring Cup
Mop Pad
Carpet Glider (for carpet cleaning only)
ASSEMBLY AND OPERATIONS
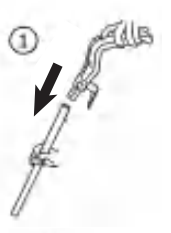
1. How to Assemble
Important! Do not use the steam mop if there is any visible damage on the product.
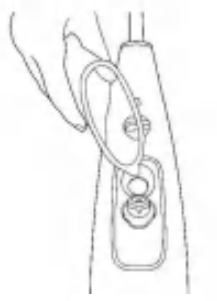
1) Fit the handle top onto the handle tube, apply a small amount of pressure until you hear it ‘click’ into place.
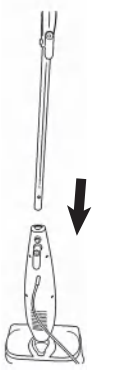
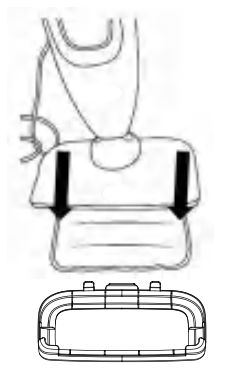
2) Once this is secure, put the assembly into the top of the main unit with the cord hook parallel to the back of the unit. Push the tab on the base to allow the handle to fully insert and secure. This should ‘click’ into place.
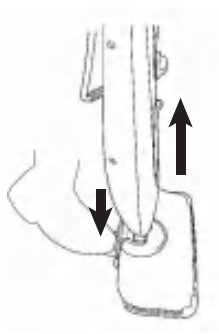
3) If you wish to remove the handle, simply push the release button on the back of the unit and lift the assembly upwards. The release button on the handle top allows you to disassemble the handle parts if required.
Note: Before assembling/disassembling any parts of the product, make sure the unit is unplugged and has cooled sufficiently.
2. How to Use
- Attach mop pad
To attach the pad, place it on the floor with the velcro facing upwards. Lift the mop above the pad and align the head with the mop pad. Lower the pad and rest the mop on it to secure the velcro to the head. Put the Carpet Glider on for carpet cleaning purpose.
To remove the pad, secure your foot on the protruding part of glider and lift the mop away.
Note:
The steam mop should never be operated without the mop pad attached.
It is recommended to use the original mop pad from Topping for better performance.
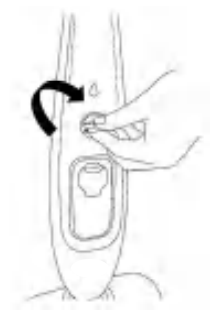
- Filling the tank
1) Do not lay the steam mop horizontally instead of tilting the steam mop backwards, approximately 45° - 60°.
2) Pull open the cap on the water tank. Fill the provider measuring cup with cool water, being careful not to spill any liquid.
3) Use the cup to add water.
4) Close the cap on the tank so that it is secure. Lift the mop upright.
Note:
Before filling/re-filling the water tank, unplug the steam mop. Do not touch any hot parts before allowing them to cool sufficiently.
Never use boiling water, gas, oil, detergent, and chemical liquids such as disinfectant in your steam appliance which is harmful for the device.
A full tank should provide approximately 15 minutes steam time. The mop will not steam if you do not turn on the power and wait sufficient time for the water to heat.
- Start to use
After all required parts are assembled, make sure your floors are vacuumed/swept before using the steam mop.
1) Fill the water tank.
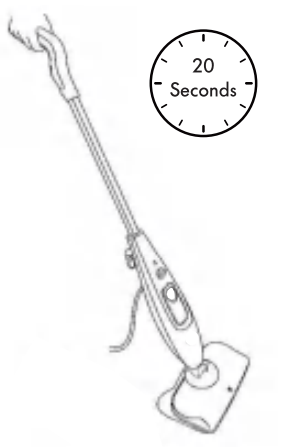
2) Power on the mop.
3) Turn the Power Dial clockwise to choose steam level (3 steam levels).
4) Wait about 20 seconds for heating and ready to use as the mop steams.
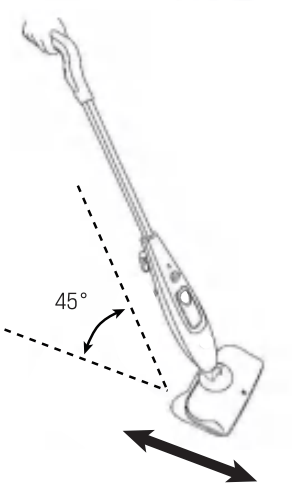
5) Tilt the steam mop backwards, approximately 45°, and get started.
Note:
When using the steam mop, do not leave it over a particular area for more than 30 seconds. This could cause damage.
If the steam flow slows down or stops the unit may need refilling with water.
3. How to Store
Turn the power dial to the ‘off’ position and allow the unit to cool.
Switch the power off at the plug socket and remove the plug.
Allow the mop pad to fully cool and then carefully remove from the mop head.
Empty any remaining water from the water tank before storing.
Wrap the power cord around the upper and lower cord hooks.
Store upright in a protected, dry area.
Note: Do not install or remove the mop pad while steam is emitting.
CLEANING AND CARE
Important! Never immerse the steam mop in water.
Before you clean the appliance, disconnect the mains plug from the wall socket. To clean the exterior of the device, use a damp, soft cloth and mild detergent. When wiping off the main body, do not allow moisture in the area around the indicator light.
Care of your microfibre cleaning pads
Wash the pads in the water and allow to dry thoroughly before next use.
Note:
Do not use water over 40 degrees.
Do not use fabric softener and do not tumble dry. Dry on a line.
Should there be any loose threads on pad, do not to try to pull any threads or cut any threads, carefully cut the threads with scissors.
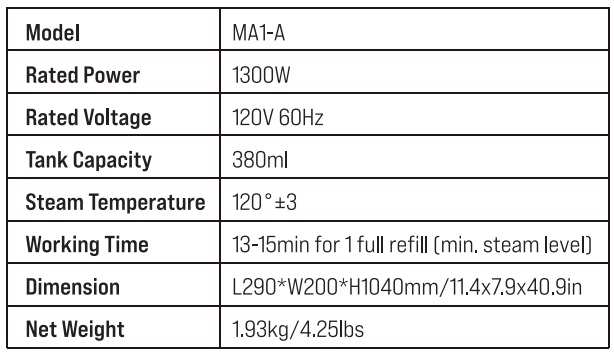
SPECIFICATION
FAQ/TROUBLE SHOOTING
1. Reduced steam/no steam is coming out
Water tank may not be filled. Make sure the water tank is filled.
The unit may not be plugged in properly/the fuse or breaker may not be working. Verify the unit is plugged into an approved electrical outlet and that the fuse or breaker is functioning properly. Ensure you have waited at least 20 seconds for the water to heat up.
2. The indicator light is not working
The unit may not be plugged in properly/the fuse or breaker may not be working. Verify the unit is plugged into an approved electrical outlet and that the fuse or breaker is functioning properly. Ensure the power dial is switched to ‘ON’. There is a peculiar smell coming from the unit.
3. There is a peculiar smell coming from the unit
First time using product. If this is the first time you are using the mop, the smell may be due to new parts being heated up for the first time.
This is not the first time the product has been used. Discontinue use if problem persists and contact Customer Services.
4. There is a ‘clicking/bubbling/rattle’ noise coming from the steam mop when in use
This is normal occurrence due to the construction of the product and its operational functionality.
5. There is a puddle of water/the mop pad is not picking up dirt
The mop pad is saturated and needs changing. Wash the mop pad, following Cleaning and Care of the manual.
6. Parts have broken/need replacing
Either the mop pad, carpet glider, measuring cup or handle have broken or been lost. Call Customer Services.
None of the above have broken but another part has. Discontionue use and contact customer services.
7. I have lost the instruction manual provided
The instruction manual has been lost or misplaced. It is important to have a copy of the instruction manual.