SSC 6010WH
EN
MULTIFUNCTIONAL STEAM MOP 2-IN-1
Translation of the original manual
SSC 6010WH
A
1
2
3
4
5
14
15
16
17
6
7
8
9
10
11
12
13
18
19
20
22
23
24
21
25 26
B
1
2
3
4
5
12
13
6 7 8
9 10
11
C
C5
C3
C4
C1
C2
D
D1 D2
D3 D4
D5
D
D6
E
E1
E2
E3 E4
E5
E6
F

– 1 –
10/2024
2024, .
EN Multifunctional Steam Mop 2-in-1
Important Safety Instructions
READ CAREFULLY AND STORE FOR FUTURE USE.
• This appliance is not to be used by children.
• This appliance may be only used by persons with
physical, sensory or mental impairments or by
inexperienced persons provided they are properly
supervised or have been informed about how to use of
the product in asafe manner and understand the potential
dangers.
• Children must not play with the appliance.
• Cleaning and maintenance must not be carried out by
children. Keep the power cable out of reach of children.
• If the power cable is damaged, have it replaced in
aprofessional service centre in order to prevent
adangerous situation. It is forbidden to use the appliance
with the power cable damaged.
• Only use clean water in the appliance. Do not use any
other liquids or add any detergents to the water.
• Pull the plug out of the socket before cleaning or
maintaining the appliance.
WARNING: Danger of scalding.

– 2 –
10/2024
2024, .
• Liquid or steam must not flow towards equipment
containing electrical components, such as the interior of
the oven.
• The filling hole must not be opened during use. Follow the
instructions for safe water container refilling inthis manual.
• The appliance must not be left unattended while
connected to thepower supply.
• The appliance must not be used if it has fallen, there are
visible signs of damage or leaks.
• Do not allow access to children if the appliance is live or
cooling.
• This appliance is designed for use in households, offices and similar types of areas. Do not use in industrial surroundings.
• Do not expose the appliance to direct sunlight and do not place it near open fire or appliances that are a source of heat.
• Before connecting the plug of the power cord to apower socket, make sure that the nominal voltage listed on the mop'srating plate matches the
electrical voltage of the power outlet.
• Make sure that the power cable does not touch hot surfaces or sharp objects. Position the cable so that it is not tripped over.
• Do not immerse the appliance, power cord or plug in water or other liquids or rinse them under running water.
• Before switching on the appliance, make sure it is correctly assembled.
• Make sure that the air outlet or suction opening is not blocked when the appliance is in operation.
• Do not point the steam dispenser at people, animals, other appliances, etc.
• Do not expose the appliance to dripping or spraying water.
• Always store indoors.
• Do not touch the appliance with wet hands.
• Do not use the appliance inan enclosed area filled with fumes released by oil paints, paint thinners, certain anti-moth substances, flammable dust or
other explosive or toxic fumes.
• Do not use the appliance on leather, wax-polished furniture or floors, synthetic fabrics, velvet or other delicate steam-sensitive materials.
• Do not use the appliance to heat the room.
• Only use the accessories supplied with the appliance or recommended by the manufacturer. Use of other accessories may cause fire, electric shock
or injury.
• Never fill the water tank with descaling, aromatic, alcohol or detergent as this may damage it.
• Do not use the appliance toremove:
– smouldering cigarettes, burning objects, matches or hot ashes;
– flammable or volatile substances;
– sharp objects such as shards, needles, pins, etc;
– flour, plaster, cement and other building materials;
• Always switch off the appliance andunplug the power cord from the mains socket after use, before cleaning or maintenance.
• Disconnect the power cord from the socket by pulling the plug, not the cord. Otherwise, damage to the power cord or the socket may occur.
• Do not use the appliance if it is not working correctly, if it has been damaged or has been submerged in water. Do not repair or modify the appliance
yourself. All repairs should be carried out by an authorised service centre. Tampering with the appliance may result in the loss of your legal rights
regarding faulty performance or warranty for quality.
– 3 –
10/2024
2024, .
• Thank you for purchasing our SENCOR product; we hope it will serve
to your satisfaction.
• Before using this appliance, please familiarise yourself with the user
manual, even if you are already familiar with using similar types of
appliances. Use the appliance only as described in this user manual.
Keep the manual for future reference.
• It is recommended to keep the original packaging, packing material,
receipt and confirmation of the extent of the seller'sliability or warranty
certificate at least for the duration of the legal right of defective
performance or quality guarantee. When transporting the appliance,
we recommend packaging it again in the original box provided by the
manufacturer.
. . . . . . . . . . . . . . . . . . . . . . . . . . . . . . . . . . . . . . . . . . . . . . . . . . . . . . . . . . . . . . . . . . . .
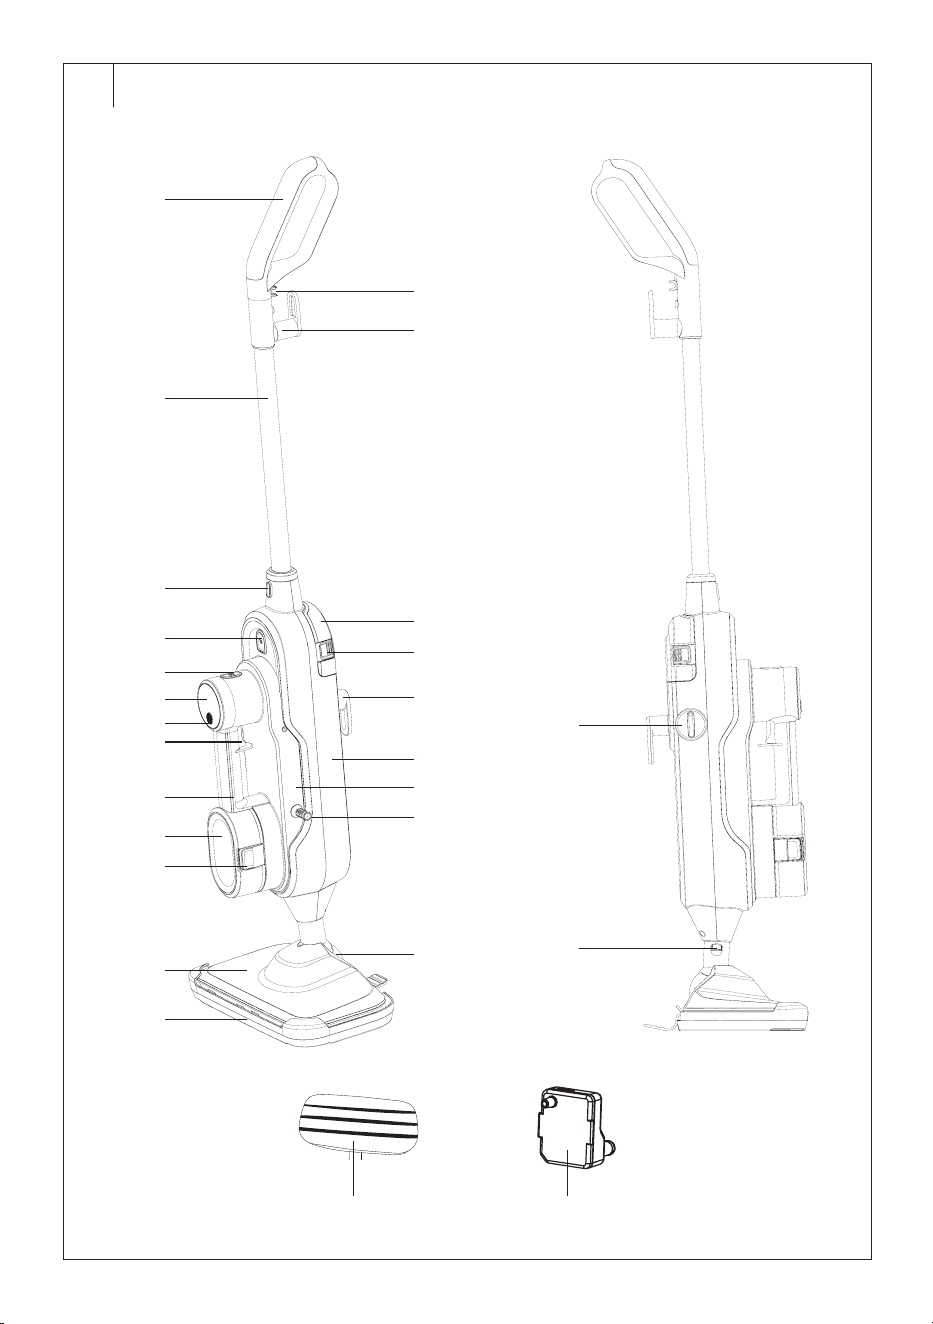
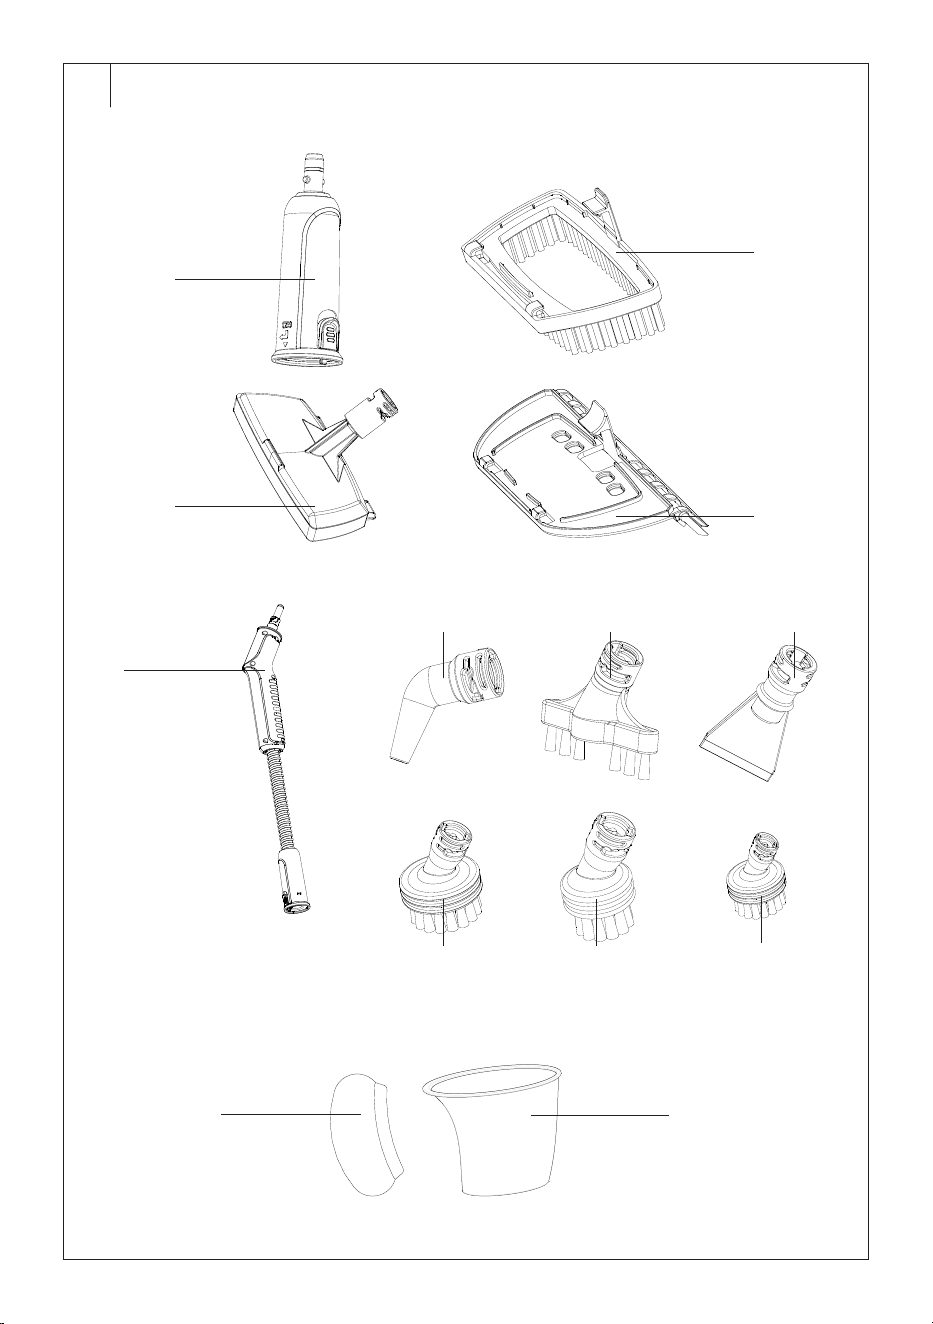
DESCRIPTION OF THE MOP
A1 Handle
A2 Mop bar
A3 Bar release button
A4 Hand-held unit release button
A5 Power on/off button
A6 Steam intensity indicator
lights
A7 Button to adjust steam
intensity
A8 Power switch
A9 Hand-held unit handle
A10 Clean water tank
A11 Buttons torelease the clean
water tank (located on both
sides)
A12 Mop nozzle
A13 Carpet attachment
A14 Plug attachment holder
A15 Upper cablewinding hook
A16 Detergent tank
A17 Detergent tank release
buttons (located on both
sides)
A18 Lower cablewinding hook
A19 Mop body
A20 Hand-held unit
A21 Power cord
A22 Flexible joint
A23 Detergent dosing regulator
A24 Button to release the mop
nozzle
A25 Mop sleeve
A26 Lime scale filter
. . . . . . . . . . . . . . . . . . . . . . . . . . . . . . . . . . . . . . . . . . . . . . . . . . . . . . . . . . . . . . . . . . . .
DESCRIPTION OF ACCESSORIES
B1 Tailpiece for attachments
B2 Small flat attachment
B3 Brush attachment
B4 Window attachment
B5 Hose with tailpiece for
connecting attachments
B6 Narrow nozzle
B7 Joint brush
B8 Squeegee
B9 Round brush withplastic
bristles
B10 Round brush withmetallic
bristles
B11 Round brush withplastic
bristles (small)
B12 Small mop sleeve
B13 Measuring cup
. . . . . . . . . . . . . . . . . . . . . . . . . . . . . . . . . . . . . . . . . . . . . . . . . . . . . . . . . . . . . . . . . . . .
BEFORE FIRST USE
• Before first use, remove the mop and its accessories form the
packaging and discard all promotional labels and tags. Check that
neither the mop nor any of its components is damaged.
. . . . . . . . . . . . . . . . . . . . . . . . . . . . . . . . . . . . . . . . . . . . . . . . . . . . . . . . . . . . . . . . . . . .
PURPOSE OF USE
• The steam mop is designed to clean smooth floor coverings, low-
pile carpets, mats with steam. The hand-held unit withextensions
andaccessories is designed toclean tiles, joints in the bathroom or in
the kitchen, toclean oven grates, windows anddoors, etc.
• Folded steam mop with amop sleeve – suitable forcleaning smooth
floor coverings, tiles, etc.
• Folded steam mop with amop sleeve andacarpet attachment –
suitable forcleaning carpets with alow pile, mats, runners, etc.
• Hand-held unit withasmall flat attachment and abrush attachment
– suitable for cleaning curtains, drapes, hanging clothes, etc. Before
use, always check the symbols on the fabric label to ensure that
steam steaming is suitable for the fabric type.
• Hand-held unit withasmall flat attachment and awindow adapter –
suitable forcleaning windows, glass door panels, mirrors, etc.
• Hand-held unit withasmall flat attachment andasmall mop sleeve
– suitable forcleaning smooth surfaces, e.g. kitchen units, table tops,
etc., which can be cleaned with steam.
• Hand-held unit withnarrow nozzle – suitable for cleaning hard to
reach places andcorners.
• Hand-held unit withajoint brush – suitable forcleaning tile joints.
• Hand-held unit with squeegee – suitable forremoving dirt
andcleaning smooth surfaces, dishes, etc.
• Hand-held unit withround brush withplastic bristles – suitable
forcleaning tiles, washbasin, sink, bathtub, toilet, etc.
• Hand-held unit withround brush withmetal bristles – suitable
forremoving dirt andcleaning oven grates, pans, etc. Before use,
always check that steam steaming and using metal bristles are
suitable for the type of surface, so as not to scratch it.
• Hose – allows you to extend the range when cleaning.
. . . . . . . . . . . . . . . . . . . . . . . . . . . . . . . . . . . . . . . . . . . . . . . . . . . . . . . . . . . . . . . . . . . .
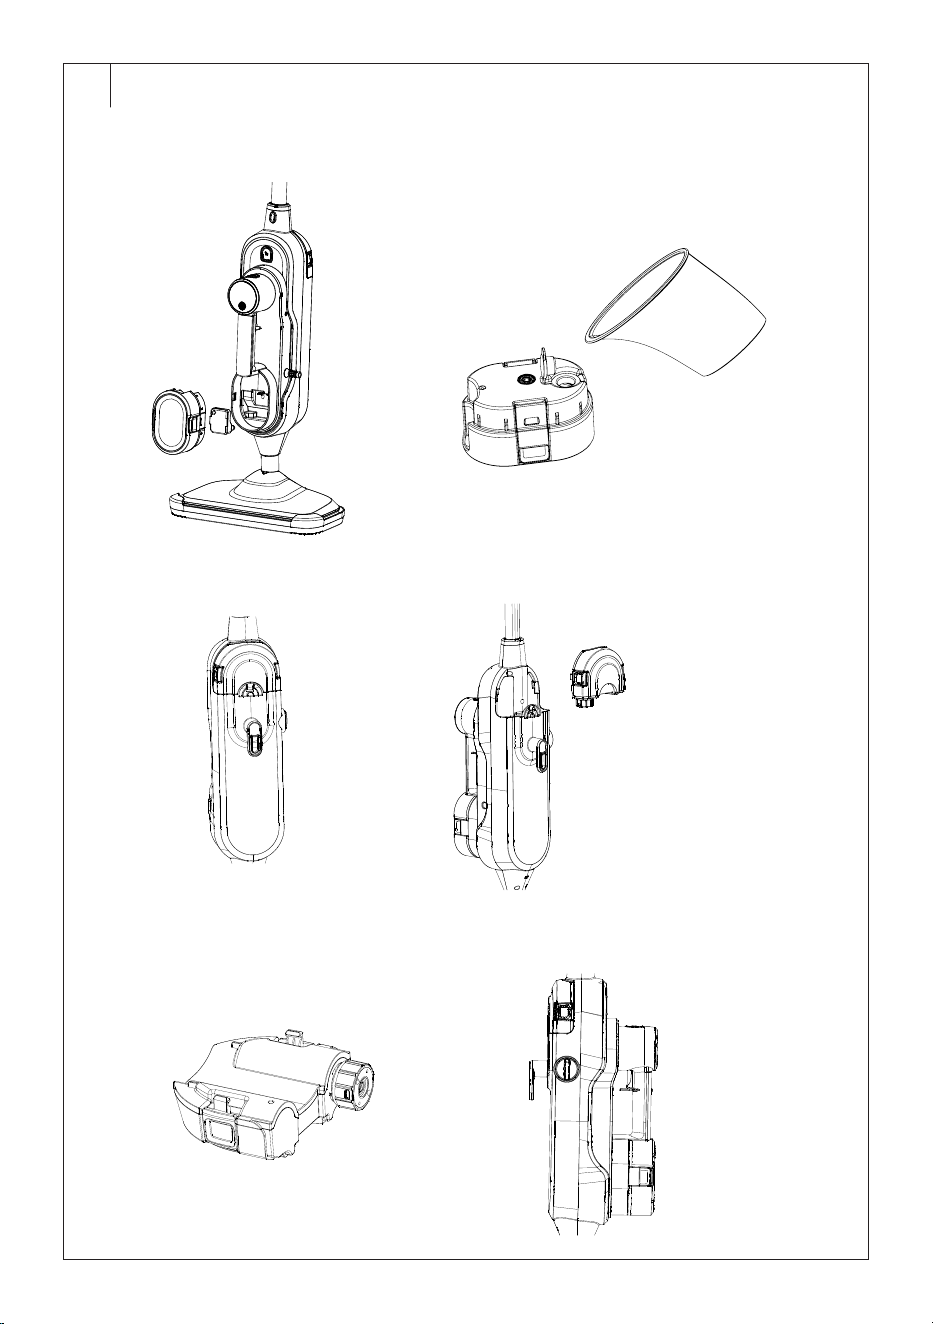
ASSEMBLY AND LAYOUT OF THE MOP
Warning:
Before assembling or disassembling the mop, always
make sure that it is switched off and the power plug is
disconnected from the mains socket.
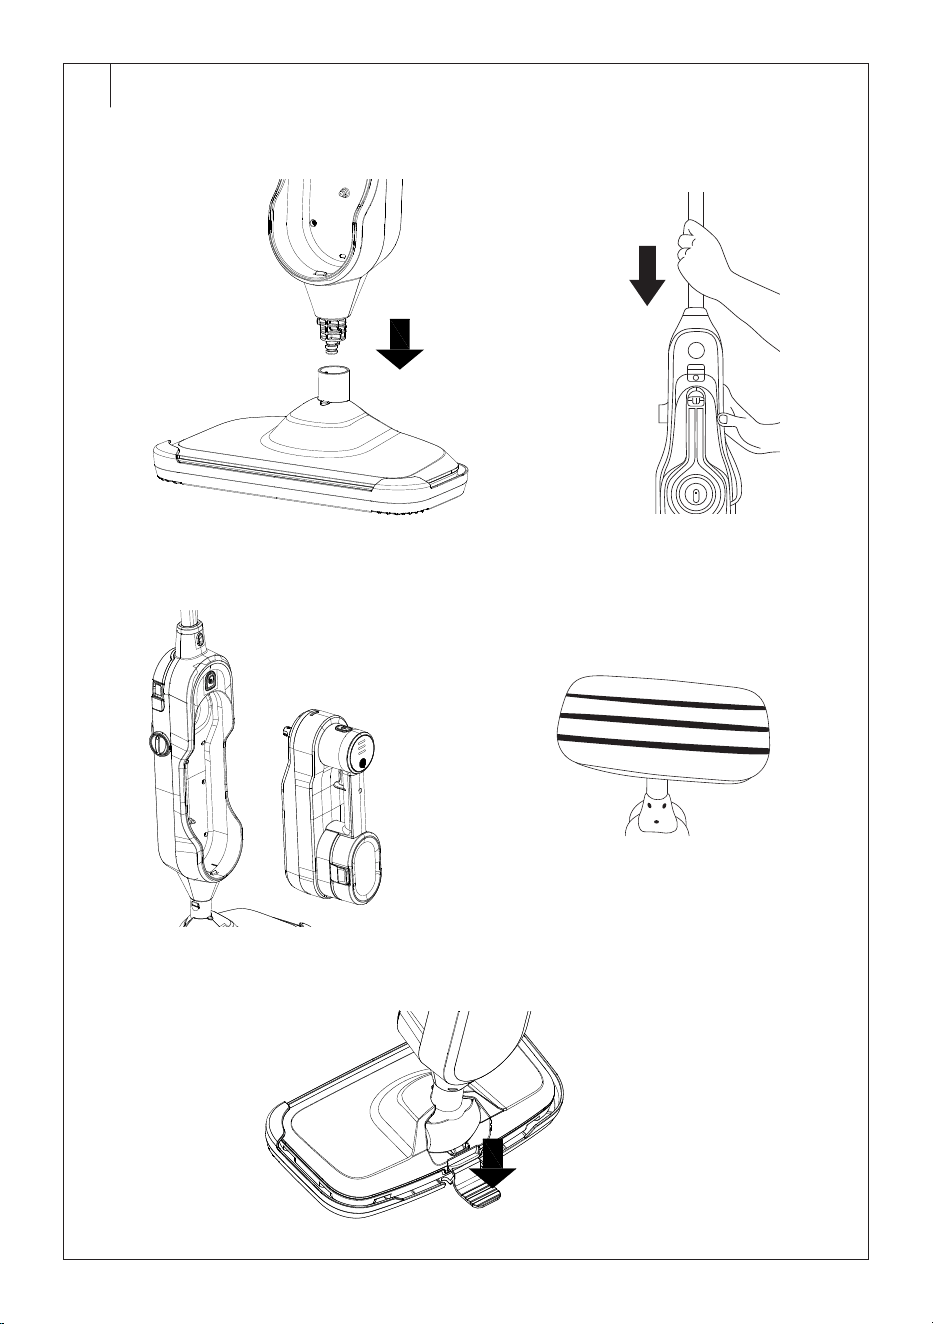
Assembling the Mop
1. Insert the end of the mop body into the hole inthe upper part of the
flexible joint of the mop nozzle (see Figure C1). Press gently until you
hear aclick. This indicates proper securing.
2. Insert the handle bar into the hole atthe top of the motor unit (see
Figure C2). Press gently until you hear aclick. This indicates proper
securing.
3. Place the hand unit, if removed, against thebody of the mop and
push the hand unit slightly into the body of the mop until you hear
aclick (see Figure C3). This indicates proper securing.
4. Put the mop sleeve on the bottom of the mop nozzle (see figure C4).
The mop sleeve is easily attached using aVelcro fastener.
5. If you are going to use asteam mop toclean the carpet, put the
attachment on the carpets. Insert the front of the mop nozzle from
above into the holder andthen push down on the back of the mop
nozzle until you hear aclick.
Disassembling the Mop
1. If the carpet attachment is fitted, remove it by stepping lightly on the
tab at the back of the attachment (see Figure C5) and lifting the mop
upwards.
2. Remove the mop sleeve from themop head.
3. Grasp the hand unit by the handle with one hand and press the hand
unit release button with the other. Carefully pull the hand unit out of
the mop body.
4. Grasp the handle bar with one hand and press the handle bar
release button with the other hand. Pull out the handle bar from the
mop body in the upward direction.
5. Press the button torelease the mop nozzle with one hand and pull
the mop body out of the flexible joint with the other.
. . . . . . . . . . . . . . . . . . . . . . . . . . . . . . . . . . . . . . . . . . . . . . . . . . . . . . . . . . . . . . . . . . . .
EN
Multifunctional Steam Mop 2-in-1
User Manual
– 4 –
10/2024
2024, .
ASSEMBLING ANDDISASSEMBLING THE HAND-HELD UNIT
WITHACCESSORIES
Warning:
Before assembling or disassembling the mop and
accessories, always make sure the mop is switched
off and the power cord plug is disconnected from the
mains socket.
• The supplied accessories are connected to thehand-held unit.
In order to use the hand-held unit withaccessories andattachments, it is
always necessary to attach the tailpiece (B1). This should also be
used when connecting the hose to thehand-held unit.
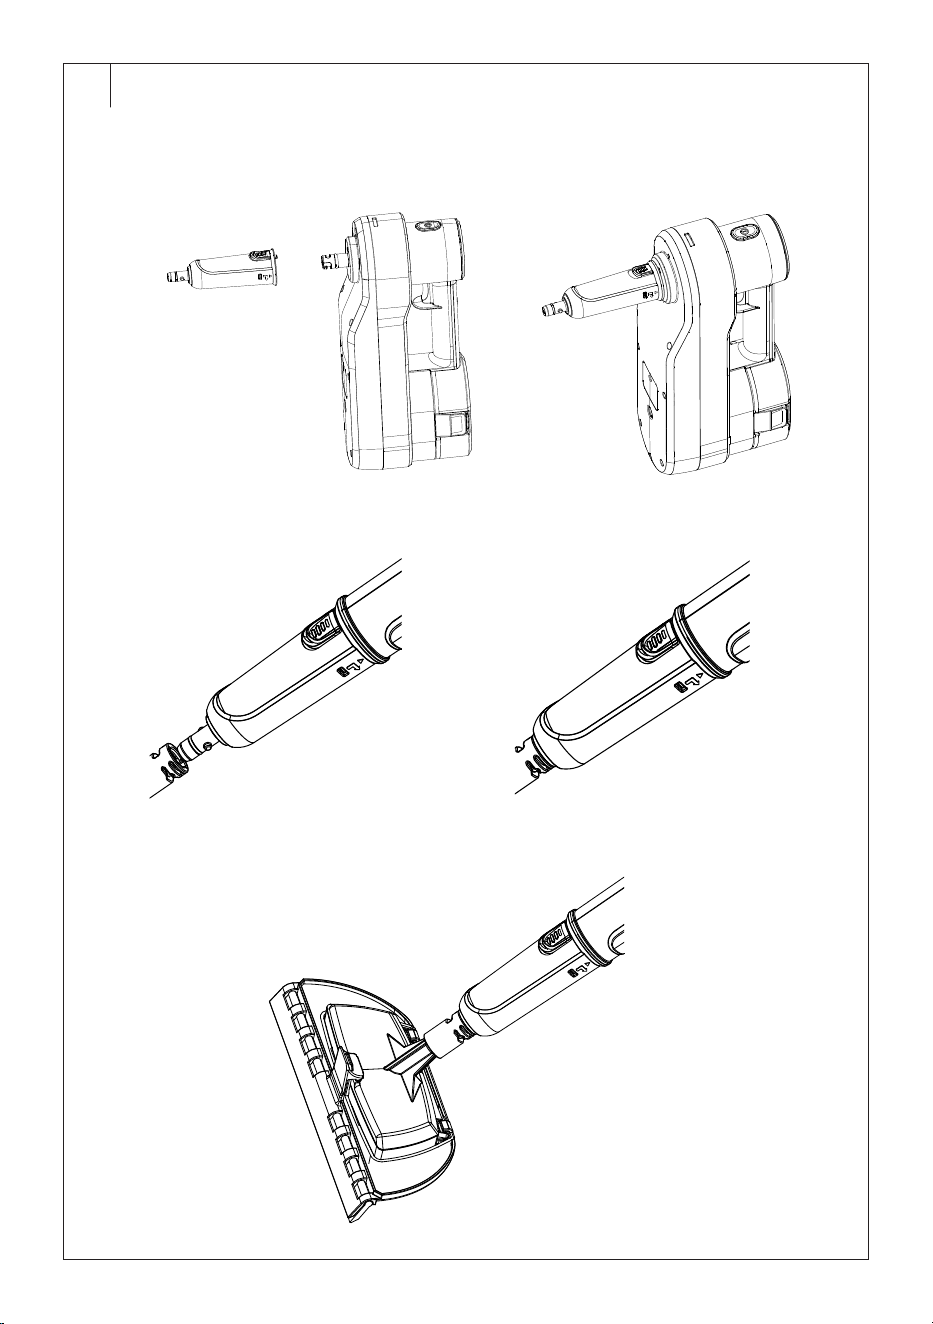
Assembling the Hand-held Unit withAccessories
1. Remove the hand-held unit from thebody ofthe mop. Grasp the
hand unit by the handle with one hand and press the hand unit
release button with the other. Carefully pull the hand unit out of the
mop body.
2. Attach the tailpiece to the output connector at the back of the hand-
held unit so that the arrow on the tailpiece aligns with the arrow on
the hand-held unit (see Figure D1).
3. Turn the tailpiece clockwise until you hear aclick and the lock
toremove the tailpiece is aligned with the arrow on the hand-held
unit (see Figure D2).
4. Fit the selected attachment or accessory onto the tailpiece end so
that the tabs at the tailpiece end are aligned with the cut-outs in the
attachment or accessory attachment (see Figures D3).
5. Turn the attachment or accessory clockwise until you feel resistance
(see Figure D4).
• When assembling ahand-held unit with ahose, first attach the hose
end to the outlet connector. The attaching procedure is the same
as in point 2 above. Then attach the tailpiece and the accessory or
attachment as described above to the free end of the hose.
Layout of the Hand-held Unit withAccessories
1. Turn the attachment or accessory counterclockwise until you feel
resistance andremove the attachment or accessory from the end
ofthe tailpiece.
2. Pull the lock on the tailpiece away from the hand-held unit andturn
the tailpiece counterclockwise until the arrow on the tailpiece is
aligned with the arrow on the hand-held unit.
3. Pull the tailpiece away from the output connector.
Note:
When connecting or disconnecting the hose, follow the
same procedure.
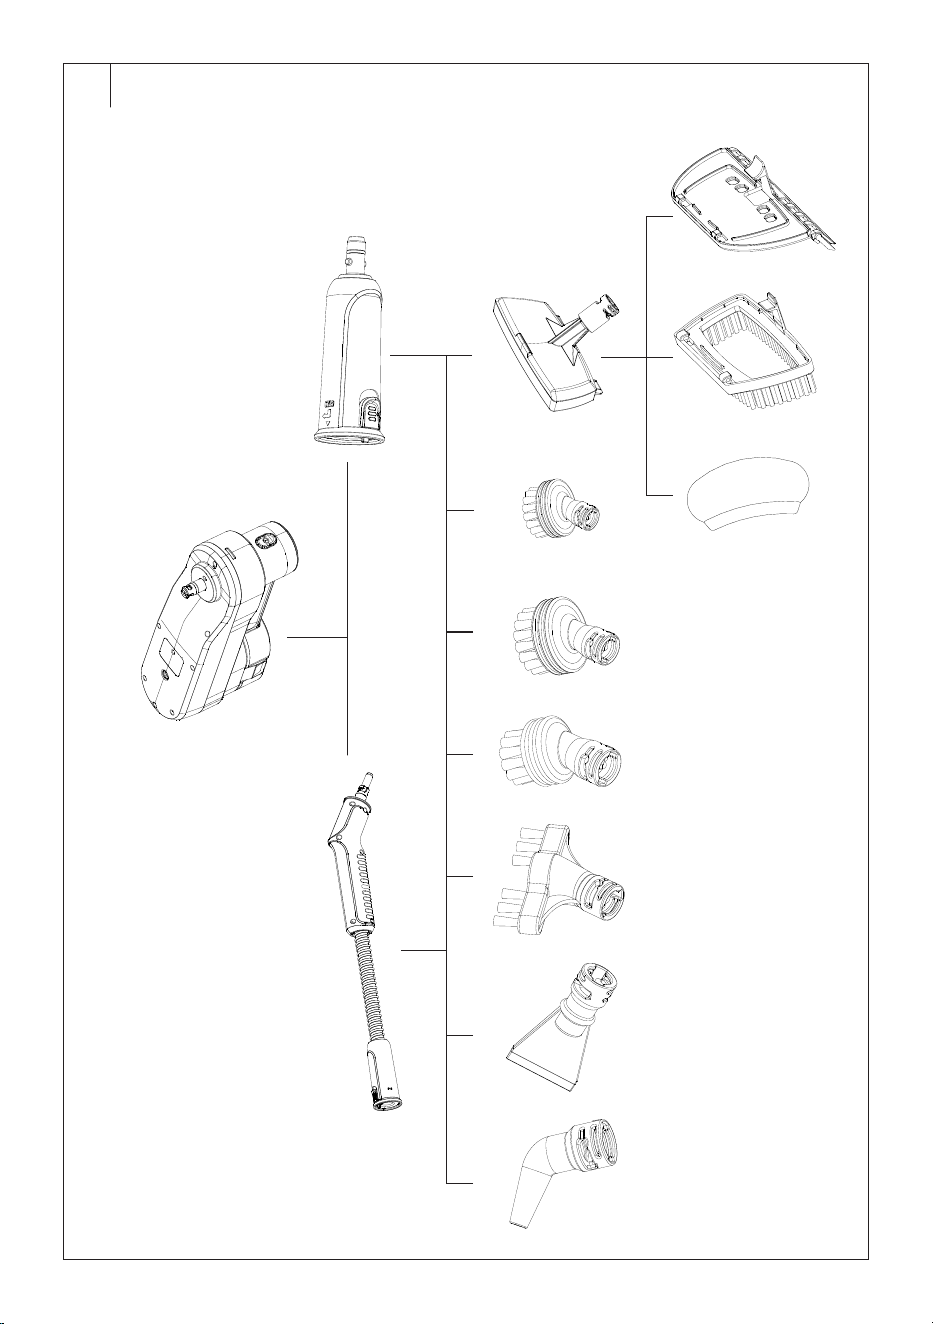
• FOR OPTIONS ON HOW TO COMBINE THE
ACCESSORIES WITH EACH OTHER, SEE FIGURE D6.
. . . . . . . . . . . . . . . . . . . . . . . . . . . . . . . . . . . . . . . . . . . . . . . . . . . . . . . . . . . . . . . . . . . .
PREPARATION FOR USE
Filling the Water Tank
1. Press the clean water tank release buttons torelease it andpull it out
of the hand-held unit body (see figure E1).
2. Release the stopper and pour clean water into the tank (see Figure
E2).
3. Close the stopper properly andinsert the tank back into the hand-
held unit.
• It is possible to use tap water. However, we recommend replacing the
anti-scale filter after approximately 160 hours of use or when the filter
turns yellow.
Filling the Detergent Tank
1. Press the detergent tank release buttons (see Figure E3) to release it
andremove it from the mop body (see Figure E4).
2. Turn the tank lid to release it andremove it (see Figure E5).
3. Pour detergent into the tank andadd water.
4. Replace the lid andtwist the cap to secure it. Insert the tank back
into the mop body.
5. Set the intensity of detergent release with the detergent dosing
regulator (see Figure E6).
• Use cleaning agents withalow foaming effect, without bleaching
agents and without chlorine.
. . . . . . . . . . . . . . . . . . . . . . . . . . . . . . . . . . . . . . . . . . . . . . . . . . . . . . . . . . . . . . . . . . . .
USE OF STEAM MOP
• Check that the steam mop is folded according to its intended use; that
the water tank and detergent tank are full.
• We recommend slightly moistening the mop sleeve inclean water
and wringing it thoroughly before putting it on the mop head.
• The area you will be cleaning with asteam mop should first be
properly vacuumed or swept with abroom to remove coarse dirt that
could damage the floor covering or carpet.
• The use of asteam mop on waxed or some non-waxed floors may
lead to adecrease in gloss.
• We recommend checking with themanufacturer of the floor covering,
carpet, etc. whether it is possible to clean it with asteam mop.
Connecting the Mop to the Mains
• Fully unwind the power cord. Insert the plug into aproperly grounded
power outlet.
Using the Steam Mop
1. Press the on/off button to switch the steam mop on.
2. One steam intensity indicator will start to flash.
3. When the light comes on, use the steam intensity button toset the
steam intensity level:
Low intensity (the upper indicator light is on)
Medium intensity (the middle indicator light is on)
High intensity (the bottom indicator light on)
4. After adjusting the steam intensity, you will hear aclicking sound
andafter awhile the steam dispensing will start.
5. Move the mop slowly back and forth to clean the floor covering.
6. When you have finished cleaning, press the on/off button to switch
the steam mop off. Disconnect the power cord from the power
socket.
7. Put the steam mop in the parking position andwait until it has
cooled down before cleaning it.
Using the hand-held unit
1. Press the on/off button to switch the hand-held unit on.
2. One steam intensity indicator will start to flash.
3. When the light comes on, use the steam intensity button toset the
steam intensity level:
Low intensity (the upper indicator light is on)
Medium intensity (the middle indicator light is on)
High intensity (the bottom indicator light on)
4. After setting the steam intensity, you will hear aclick sound.
5. Press the switch on the hand-held unit and steam will be dispensed.
6. When you have finished cleaning, press the on/off button to switch
the hand-held unit off. Disconnect the power cord from the power
socket.
7. Place the hand-held unit on asolid surface andwait for it to cool
before cleaning it.
Warning:
HOT STEAM! Take extra care not to scald yourself
with hot steam or hot parts of the steam mop,
especially if you are using ahand-held unit
withaccessories.
Refilling the Water Tank
• If the water in the tank runs out during use, the steam intensity
indicators will gradually turn on and the steam release will stop.
• Turn off the steam mop (hand-held unit) with the on/off button, wait
for it to cool down alittle, andadd water to the tank following the
instructions “Filling the Water Tank”.
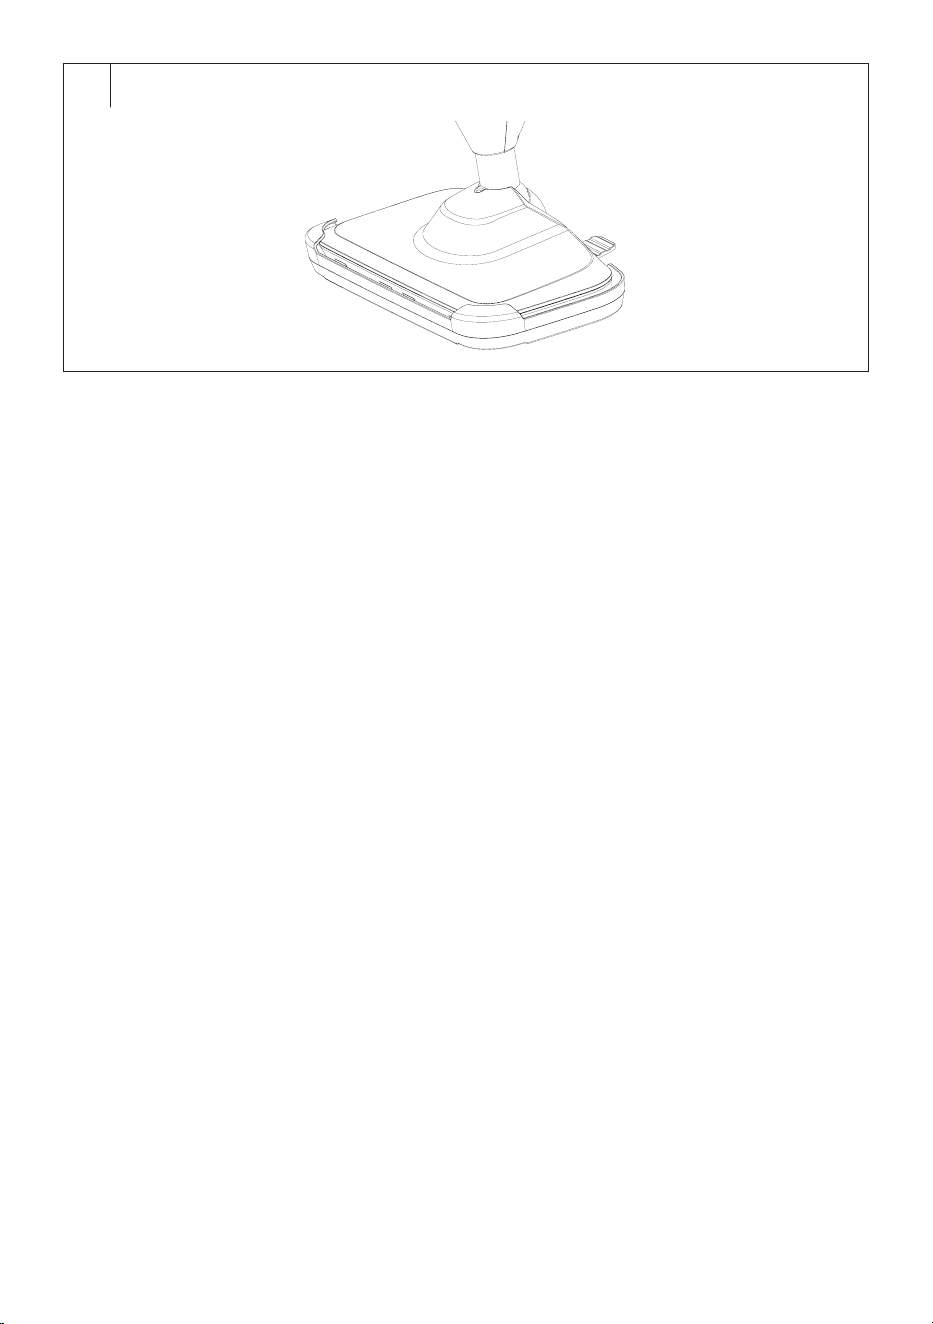
Parking Position
• Place the handle of the steam mop in an upright position so that the
protrusion on the flexible joint fits into the notch in the mop head – see
Figure F.
• The parking position serves tofix the steam mop in an upright position.
The steam mop can thus stand alone without falling down.
– 5 –
10/2024
2024, .
. . . . . . . . . . . . . . . . . . . . . . . . . . . . . . . . . . . . . . . . . . . . . . . . . . . . . . . . . . . . . . . . . . . .
CLEANING AND MAINTENANCE
• Before cleaning, switch off the steam mop (hand-held unit) using the
on/off button, unplug the power cord from the mains socket and allow
the appliance to cool down completely.
Warning:
HOT STEAM! Take extra care not to scald yourself
with hot steam or hot parts of the steam mop.
Warning:
To prevent the risk of electric shock, do not immerse
the appliance, power cable, or plug into water or any
other liquid.
Warning:
Do not use abrasive cleaning agents, solvents, etc. to
clean any parts of the appliance that could damage
the surface of the appliance. None of the components
of this appliance is dishwasher safe.
Cleaning the Mop Sleeve
1. Remove the mop sleeve from themop head.
2. Wash byhand inwarm water withalittle hand washing detergent.
3. Rinse inclean water andwring inhand. Allow to dry freely.
• The mop sleeve is not intended to be washed in awashing machine or
to bedried in aclothes dryer.
Cleaning the Water Tank
1. Remove the water tank from the hand-held unit.
2. Loosen the stopper and pour off the remaining water.
3. Rinse the tank with clean water andleave the stopper open to allow
the inside of the tank to dry out.
4. Then insert it back into the hand-held unit.
Cleaning the Detergent Tank
1. Remove the detergent tank from thesteam mop.
2. Release the lid and pour out the remaining water.
3. Rinse the tank with clean water andleave the lid open to allow the
inside of the tank to dry.
4. Then, reinsert it into the steam mop.
External Surface of the Steam Mop andAccessories
• Wipe the outer surface of the steam mop and accessories with
aslightly damp cloth and wipe with adry cloth.
Storage of the Steam Mop
• Put the steam mop in the parking position and wrap the power cord
around the upper andlower hooks. Store the clean steam mop
andaccessories in adry andwell-ventilated place.
. . . . . . . . . . . . . . . . . . . . . . . . . . . . . . . . . . . . . . . . . . . . . . . . . . . . . . . . . . . . . . . . . . . .
TECHNICAL SPECIFICATIONS
Rated voltage..........................................................................................220–240 V~
Rated frequency .........................................................................................50−60 Hz
Rated power input ...........................................................................................1,500 W
Length of the power cord ....................................................................................... 5 m
Water tank capacity ......................................................................................... 300 ml
Detergent tank capacity ....................................................................................150 ml
Heating time ................................................................................approximately 30 s
Operating time......................................................................................approx. 15 min.
Water resistance ......................................................................................................IPX4
Text and technical specifications are subject to change.
. . . . . . . . . . . . . . . . . . . . . . . . . . . . . . . . . . . . . . . . . . . . . . . . . . . . . . . . . . . . . . . . . . . .
INSTRUCTIONS AND INFORMATION ON DISPOSAL OF USED
PACKAGING MATERIAL
Dispose of used packaging material at the location designated by the
municipality for waste disposal.
DISPOSAL OF USED ELECTRICAL AND ELECTRONIC EQUIPMENT
This symbol on the products or accompanying documents
indicates that used electrical and electronic products
should not be disposed of with regular municipal waste.
For proper disposal and recycling of these products, deliver
them to designated collection points. Alternatively, in some
European Union states or other European countries the
products can be returned to the local retailer when buying
an equivalent new product. By properly disposing of this
product, you help preserve valuable natural resources and contribute to
preventing potential negative impacts on the environment and human
health resulting from improper waste disposal. For further details, contact
your local authorities or the nearest collection point. Fines may be
imposed for improper disposal of this type of waste in accordance with
national regulations.
For Business Entities in European Union States
To dispose of electric or electronic equipment, request necessary
information from your retailer or supplier.
Disposal in Other Countries Outside the European Union
This symbol is valid in the European Union. To dispose of this product
elsewhere, request necessary information on the correct disposal method
from local authorities or your retailer.
This product complies with all the essential requirements of
the applicable EU directives.