1
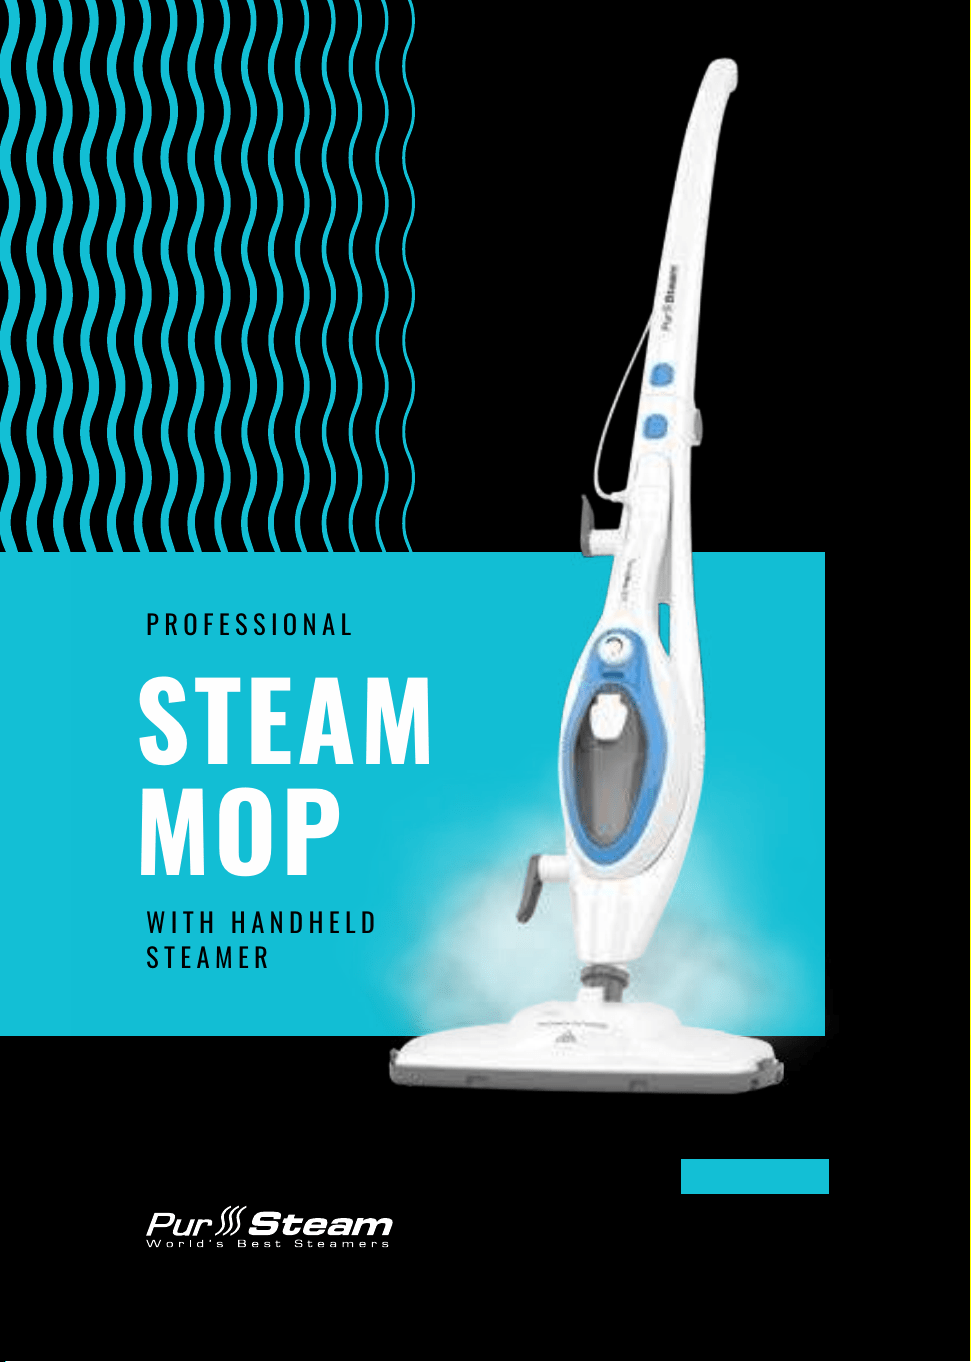
STEAM
MOP
MODEL: THERMA PRO 211
PROFESSIONAL
MANUAL
WITH HANDHELD
STEAMER

2 3
At PurSteam, we set out to revolutionize the way
people clean. We harnessed the power of steam
to make everyday home cleaning tasks easier,
without the use of harmful chemicals.
We believe in a more natural approach. Our
steamers use the convenience of heated water
to clean and sterilize surfaces without the use
of harmful chemicals – a must for homes with
children and pets.
We are more than just a brand specializing in
steam cleaning. We take pride in an unwavering
commitment to customer satisfaction. We’re
dedicated to simplifying your daily routines. We
also include comprehensive warranties to back
up the brands we love to cra for you.
Get ready to redefine clean,
one steam at a time!
IMPORTANT SAFETY INSTRUCTIONS 4
DESCRIPTION OF PARTS 6
INSTRUCTIONS FOR USE 7
HOW TO ASSEMBLE AND USE 7
ACCESSORIES 10
CLEANING AND MAINTENANCE 12
TROUBLESHOOTING 14
SPECIFICATION 15
WARRANTY 15
CONTACT US 15
TABLE OF CONTENTS
MANUAL
CLEAN WITH THE POWER OF STEAM
STEAM
MOP
CONGRATULATIONS

4 5
•
Danger of scalding. Please use
caution when using the Steam
Cleaner.
• The steam emied from the open-
ings is very hot.
•
Do not immerse the appliance
in water.
•
Do not leave the appliance unat-
tended while connected to the
main power supply.
•
Do not leave the appliance con-
nected to an electrical outlet when
not in use.
•
Never pull the power cord to dis-
connect the appliance from the
socket but gently unplug it.
•
Keep the appliance cord away from
heat sources and sharp edges.
•
Do not use the appliance with
wet hands.
•
Do not pull or carry the appliance
by the cord, pull the cord around
sharp corners, or expose the cable
to heated surfaces.
Please ensure that you read the full
safety and operational instructions
within the manual included with your
steam mop.
•
When using electrical appliances,
necessary safety precautions should
always be followed.
•
This appliance is not intended for
use by persons (including children)
who are not mentally able, physically
capable, experienced, or do not un-
derstand the product. They should be
given instructions and they should
be under supervision by a person
responsible for their safety.
•
Do not direct steam at people, ani-
mals, electrical appliances, or electri-
cal outlets.
•
Keep this appliance and cord out of
reach of children.
•
This appliance must not be used by
children.
SAVE THESE INSTRUCTIONS
WARNING!
IMPORTANT SAFETY INSTRUCTIONS
•
Do not use this appliance on
leather, wax polished furni-
ture or floors, synthetic fab-
rics, velvet or other delicate,
steam sensitive materials.
•
Do not use the appliance on any
unsealed hard floor surfaces.
•
Never add de-scaling, aromatic,
alcoholic or detergent products
into the steam mop as this may
cause damage to the unit. Doing
so will void your warranty.
•
This appliance gets very hot during
use, exercise extreme caution.
•
The microfiber cleaning pad must
be installed correctly before use.
•
All repairs should be carried out by
a qualified engineer. Improper re-
pairs may place the us er at serious
risk of harm.
•
This appliance is intended for
household use only.
• It should not be used for commer-
cial purposes.
• Never leave the steam mop stand-
ing in an upright position, on a
floor area while the unit is on for
longer than 5 sec. Leaving the mop
in this position may cause a build-
up of a pale residue on the surface.
•
Distilled or demineralized water
is recommended in place of tap
water. Do not use chemicals in the
water tank.
•
When cleaning hobs and ovens,
you must not direct the steam to-
wards any electrical connections.
Please ensure hobs and ovens are
fully cooled before aempting to
clean.
• Ensure the device is disconnected
from the outlet before cleaning.
•
Do not use this appliance for any
purpose other than that for which
it is designed.
• Do not use the appliance if it has
been dropped or damaged in any
way.
•
If the supply cord or plug is dam-
aged please contact PurSteam
Customer Service.
WARNING!
WARNING!
NOTE: Always wear suitable
shoes when using this appli-
ance and when changing the
accessories; do not wear slip-
pers or open-toed footwear.
NOTE: Surfaces treated with
wax and some non-wax floors
may lose their shine due to the
heat and steam action. It is rec-
ommended to test an isolated
surface area before proceeding
with cleaning the larger surface.
6 7
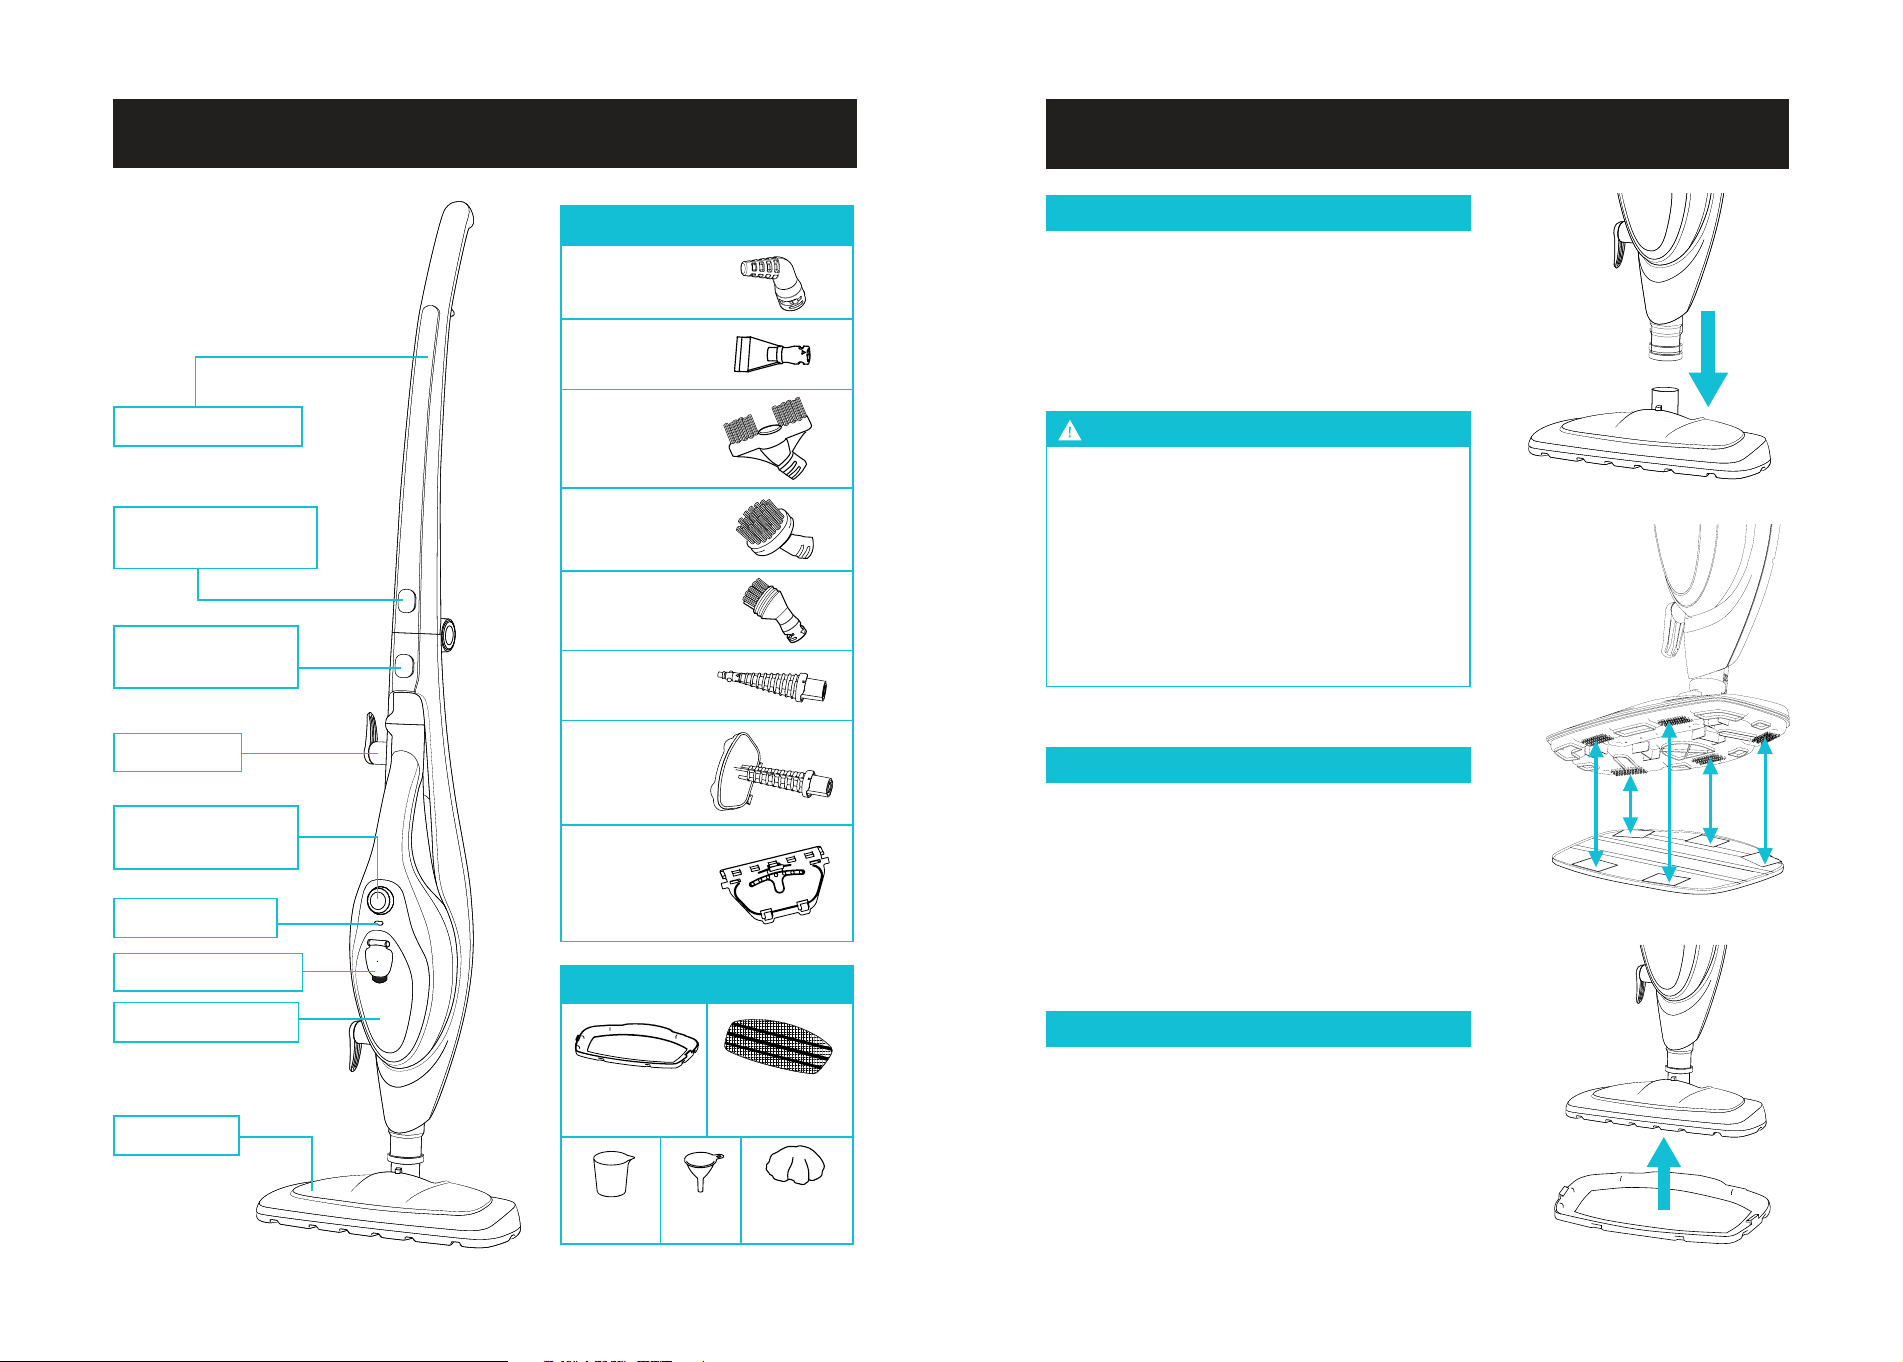
DESCRIPTION OF PARTS
Steam Mop Body
Angled Nozzle
Scrape Tool
Double
Brush Tool
Big Brush
Tool
Small Brush
Tool
Steamer Jet
Steamer
Aachment
Squeegee
Aachment
Carpet
Glider
Microfiber
Cloth
Funnel
Cup
Steamer
Cloth
Collapsible Handle
Release Buon
Steam Mop Base
Release Buon
Cord Hook
Switch and
Steam Regulator
Light Indicator
Water Tank Cover
Steam Mop Base
Mop Head
DETACHABLE ACCESSORIES
ADDITIONAL ACCESSORIES
ATTACHING THE MOP HEAD
Slide the boom end of the Steam Mop
Base onto the Mop Head until the Mop Head
spindle locks into place. Hold both parts of
the unit and gently push the clip into the
handle to lock it.
INSTRUCTIONS FOR USE
Never force the Steam Mop Base onto
the Mop Head, as this could potentially
damage the Steam Mop. Always aach
the Mop Head using both hands, ensuring
it locks into place correctly. The Steam
Head can be removed from the main body
by pressing the Steam Mop Base Release
buon, located on the Steam Head spindle.
WARNING!
ATTACHING A MICROFIBRE CLOTH
Position the Microfibre Cloth onto the Mop
Head and secure it. Make sure to match
each Velcro piece on the Cloth to the
corresponding spike on the Mop Head and
press firmly to stick them together.
ATTACHING THE CARPET GLIDER
Position the Microfibre Cloth onto the Mop
Head and place the Carpet Glider over and
around the Microfibre Cloth. To remove,
simply push the Carpet Glider with your foot.
8 9
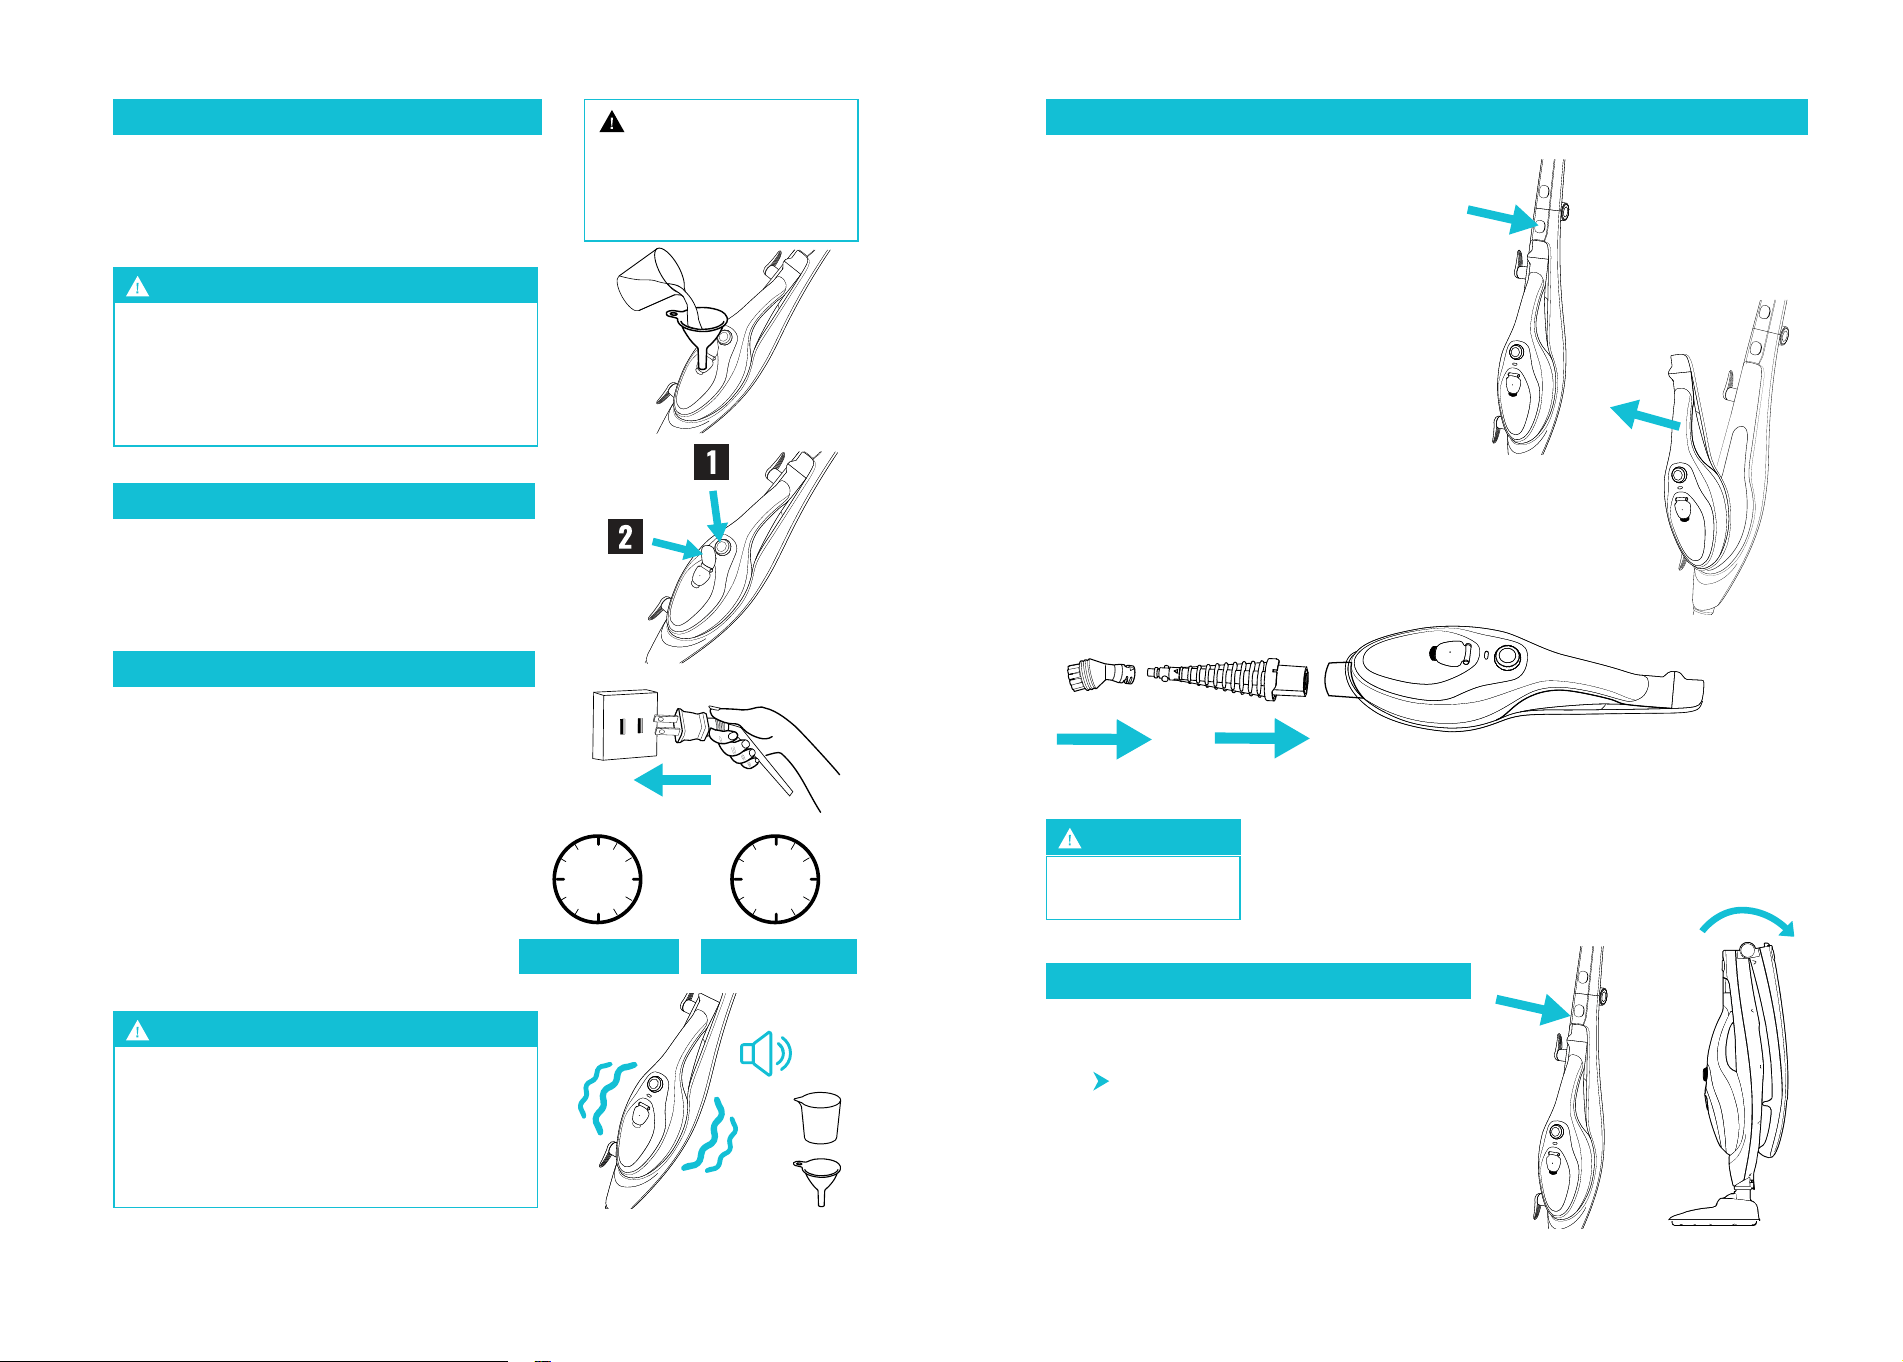
FILLING THE WATER TANK
Open the Water Tank Cover and fill the tank
with 12 oz (~380 ml) of water using the Funnel
and the Measuring Cup.
When the tank runs out of the water,
the pump inside will make a sound and
vibrate at which time you need to turn
off the Steam Mop immediately and re-
fill the Water Tank before using it again.
Never place de-scaling, aromatic,
alcoholic or detergent products in the
steam mop tank, this will cause damage
to the appliance and void your warranty.
WARNING!
WARNING!
USING THE STEAM MOP
Plug in the Steam Mop into an electrical
outlet and switch it on. It will take
approximately 30 seconds for the Steam
Mop to preheat aer which it is ready for use.
The steam will run continuously until
theunit is turned off or the water runs
out. A full tank of water will produce
approximately 12minutes of steam at
the maximum seing and approximately
25 minutes at the lowest seing.
FILLING THE TANK DURING USE
Turn off the switch (1) then open the tank to
pour in the water (2). Seal the tank and turn
on to activate the steam.
USING THE MOP AS A HAND HELD STEAMER / STEAM CLEANER
Press the Handheld Steamer Release buon
to remove the base from the main boy.
Install the Steamer Jet or the Steamer
aachment at the top of the Handheld
Steamer by pushing it in.
Before aaching any accessories onto the
Steamer Jet or the Steamer aachment,
make sure it is locked in the position. Choose
the aachment you would like to use on the
Steamer Jet, and install it by aligning with the
arrow indicator on Steamer Jet, then turn it
clockwise.
Take off the accessories aer use and
re-aach the Handheld Steamer into the
Steam Mop Base.
Extremely Hot!
WARNING!
FOLDING HANDLE
Press the Collapsible Handle Release buon
to fold the handle and store the unit.
(See
page 13).
~12
minutes
~25
minutes
MAX SETTING LOW SETTING
TIP: Use of distilled or
demineralized water is
recommended to prolong
the life of your hard
floor cleaner.
10 11
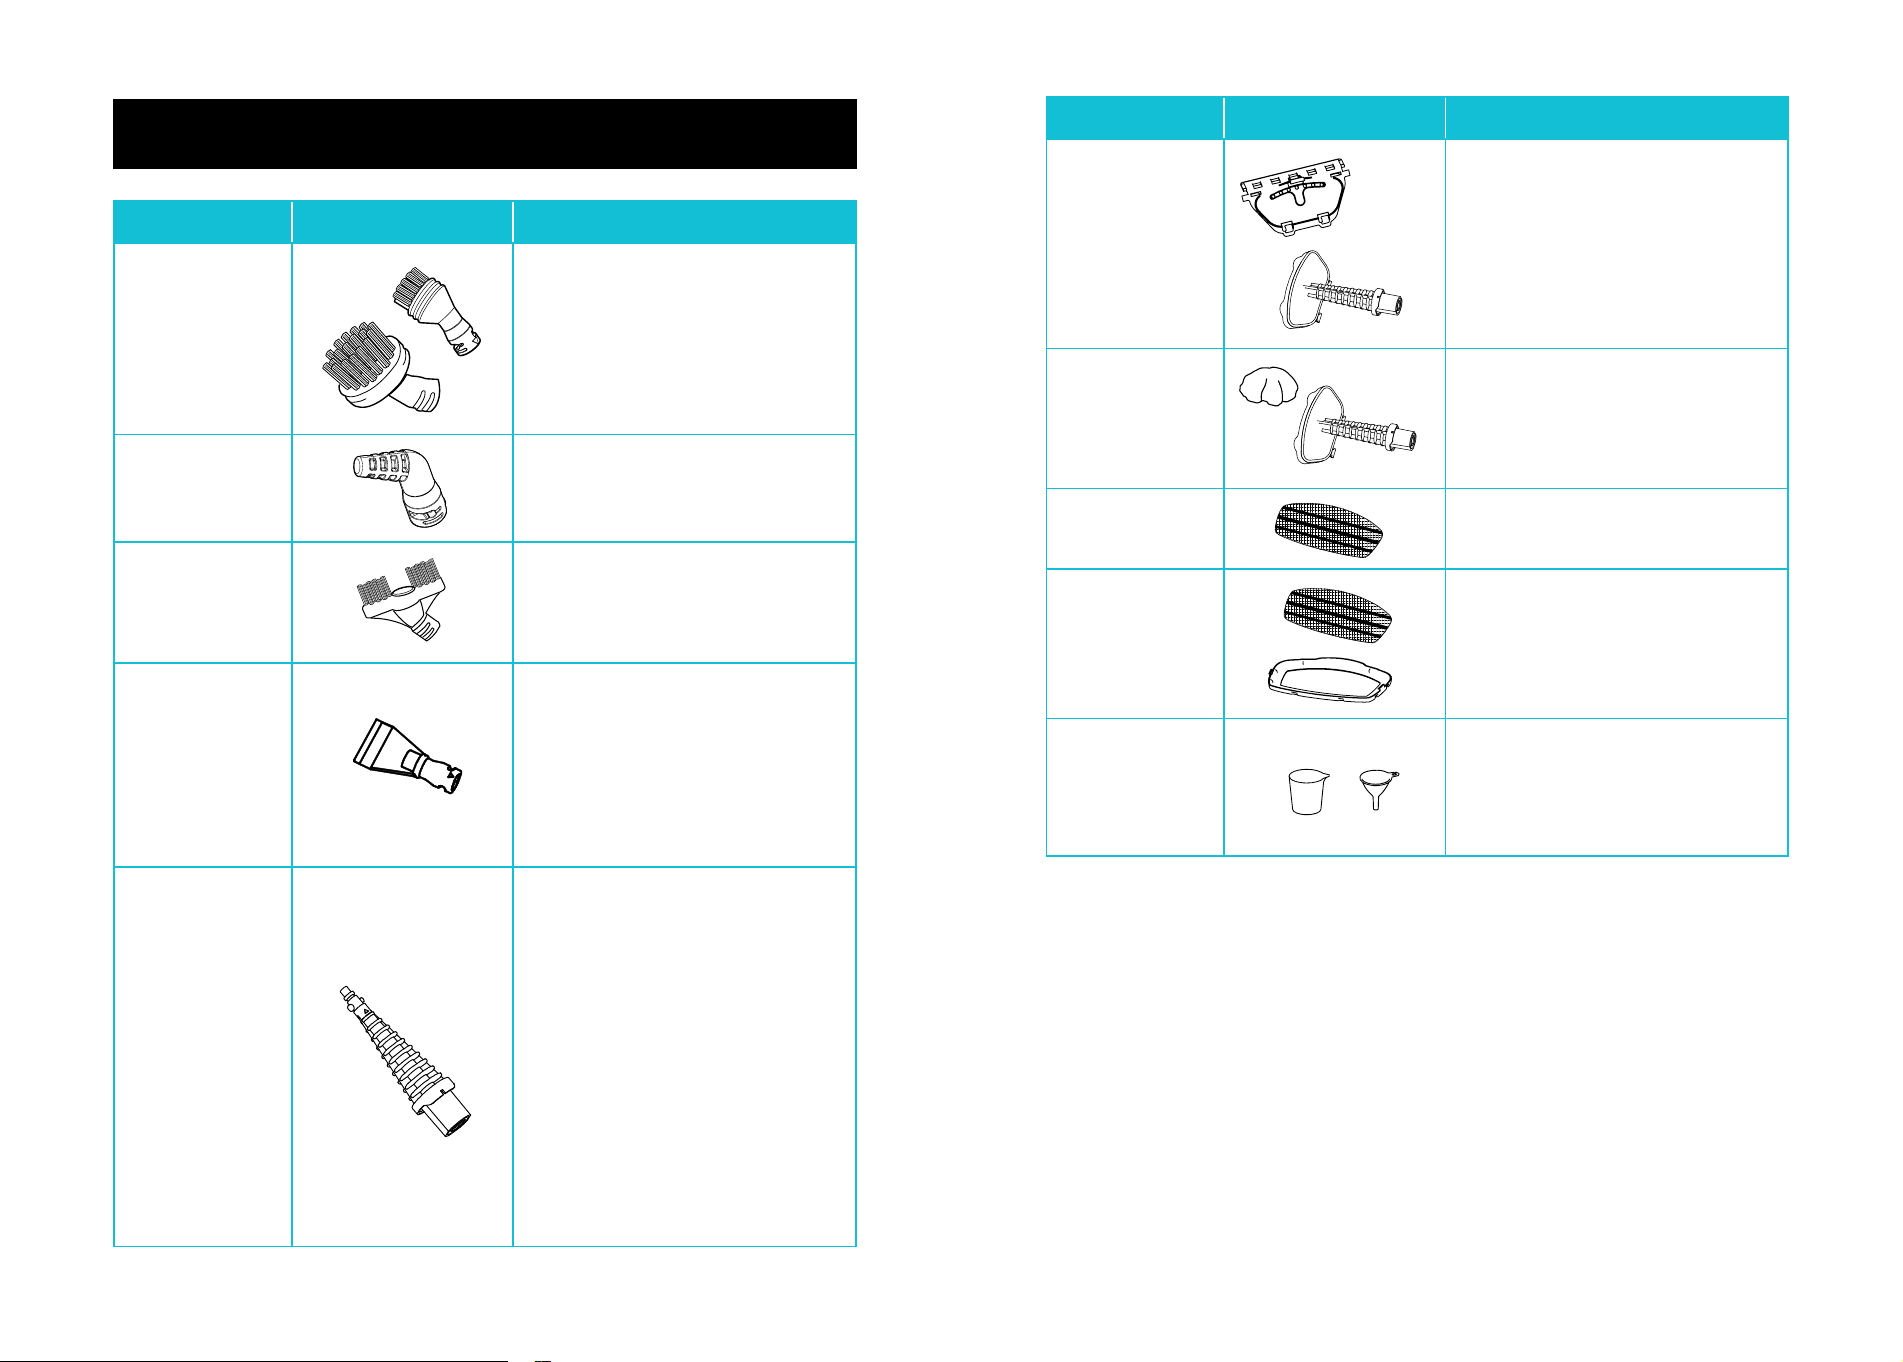
NAME PICTURE SUGGESTED USE
Big and Small
Brush Tool
Ovens, hobs, showers, bath tubs,
tiles, toys, refrigerators, etc.
WARNING: Brush Tools may
scratch some surfaces.
Angled Nozzle
Stove tops, taps, sinks, hard to
reach areas, etc.
Double Brush
Tool
Cleaning grout lines, sanded or
non-sanded.
Scrape Tool
Scraping baked on food, grime
and grease. Removing residue or
other substances from surfaces
such as hobs/cooktops and
ovens.
Steamer Jet
Sink, gas stove, faucet grout,
microwaves oven, range hood,
hard to reach area, etc.
It also serves as an accessory
adapter to aach one of the
small tools: Double Brush Tool,
Scrape Tool, Angled nozzle, Big
Brush Tool or the Small Brush
Tool.
ACCESSORIES
NAME PICTURE SUGGESTED USE
Squeegee
Aachment
Shower screens, mirrors and
glass. Remove creases from sofa,
tablecloths, etc. Also serves as an
accessory adapter for steaming
garments and fabrics.
Garment
Steamer and
Garment Cloth
Steaming sofa, tablecloths
and garment, etc. Use with the
Squeegee Aachment.
Microfibre
Cloth
Cleaning hard floors.
Carpet Glider Cleaning carpets.
Funnel and
Measuring Cup
Measure the water and pour it in
the Steam Mop Base.

12 13
CLEANING AND MAINTENANCE
Before cleaning, ensure the appliance is unplugged and has cooled
down. Drain any remaining water from the base every time you finish
with steaming. Clean the accessories in warm, soapy water and leave
them to air dry.
WARNING!
STORAGE
Remove the Water Tank and empty out any residual water, then clean the outer
surface with a dry cloth. Remove the cleaning pad and wash it, so it is ready for
future use. Store the appliance in a dry area out of reach of children.
When storing or carrying the mop, always wrap the cord around the cord hooks.
CLEANING THE MICROFIBER CLOTHS
The Microfiber Cloths are machine washable. You may wash them in warm water.
Always use a mild detergent and avoid fabric soeners. Air dry only.
NOTE: Never use bleach or fabric soener when cleaning the Microfi-
ber Cloths.
Never put descaling, alcoholic, or detergent products into the steam cleaner,
as this may damage it or make it unsafe for use.
WARNING!
WARNING!
If you live in an area with hard water (high dissolved minerals), it will produce
lime scale and impact product performance. We recommend the use of
distilled or demineralized water to improve the Steam Mop’s longevity.

14 15
TROUBLESHOOTING
PROBLEM POSSIBLE CAUSE SOLUTION
Reduced
steam or
No steam
Water Tank is empty. Fill Water Tank.
Steam nozzle is
blocked.
Remove Mop Head and clean
the nozzle.
The Steam buon is
not pressed.
Press the Steam buon.
Steam Control Knob is
set to MIN.
Turn the Steam Control Knob
clockwise to MAX.
There is no power to
the unit.
Ensure the appliance is plugged
in and turned ON.
Unit will not
turn ON
The unit is not
plugged in.
Make sure that the unit is
plugged into a proper outlet and
that the switch is ON.
Blown fuse or breaker. Check your fuse or breaker.
Steam Mop Base not
properly aached.
Make sure that the Steam Mop
Base is securely aached onto
the Steam Mop Head.
SPECIFICATION
This product is warranted to be free from defects in material and workmanship
under normal use and service for one year from the date of the original purchase
with the receipt. The manufacturer’s obligation shall be limited to repairing or
replacing any part of the product that is defective. Such warranty shall not apply
to damages resulting from accidents, abuse, or misuse.
WARRANTY
CONTACT US
WWW.PURSTEAM.COM
MODEL
Therma Pro 211
RATED VOLTAGE
120 V
RATED FREQUENCY
60 Hz
OUTPUT POWER
1550 W
CAPACITY
12.8 fl oz / 380 ml
STEAM TEMPERATURE
212°F
CORD LENGTH
28 (853 cm)
STEAM MOPMODEL: THERMA PRO 211