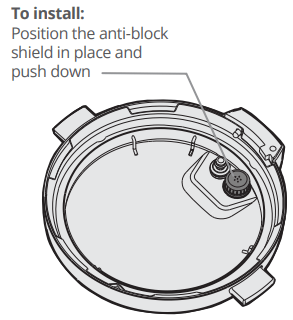
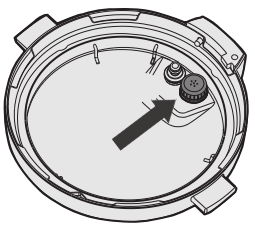
Using your thumb, push the side of the anti-block shield towards the lid rim and lift up with some effort. The anti-block shield should pop out
Control and Features
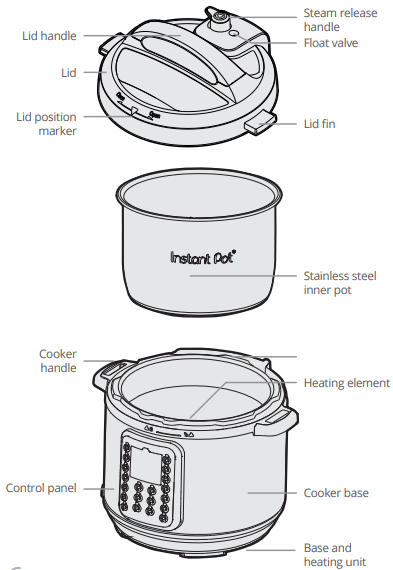
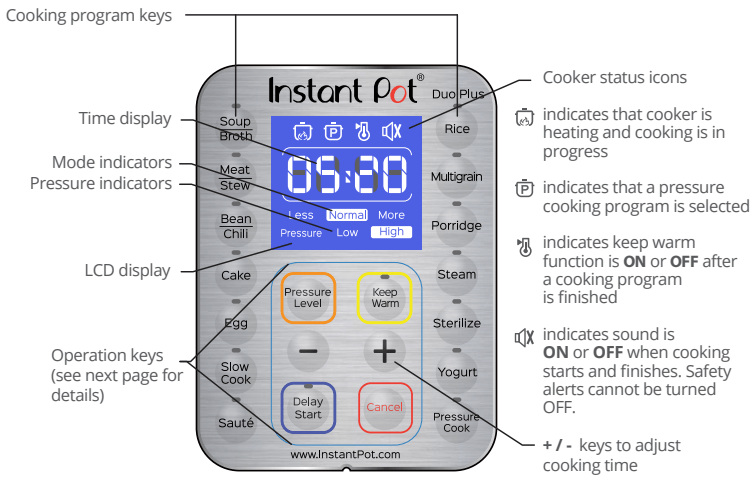
Control Panel
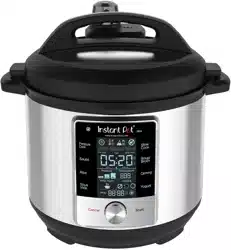
The control panel of your Instant Pot® Duo Plus 60/80 consists of a large LCD display, cooking program keys, operations keys to control pressure level, + / - to adjust cooking time and a Cancel button.
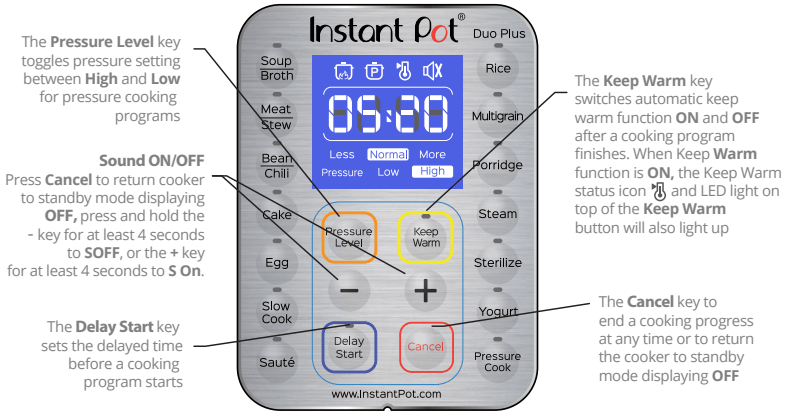
Instant Pot® is a programmed smart cooker that has preset cooking instructions for different food ingredients and cooking methods. It also remembers your most recent setting per cooking program for a more personalized cooking experience. To return to factory default setting for a specific cooking program: press and hold the cooking program key until the cooker beeps and displays OFF. For a full reset of all cooking programs, return cooker to standby mode displaying OFF, then press and hold the Cancel key until the cooker beeps.
The Pressure Level key has no effect on non-pressure cooking programs: Slow Cook, Sauté and Yogurt.
Cooking Program Options
Programs
Modes
Cooking Options
Notes for Users
Less
Soup without meat.
The soup/broth remains clear due to lack of boiling motion under pressure cooking.
Normal
Soup with meat.
More
Rich bone broth.
Less
Soft texture.
Choose different modes based on the meat texture desired.
Normal
Very soft texture.
More
Fall-off-the bone meat texture.
Less
Less soft texture.
Choose different modes based on the bean texture desired.
Normal
Soft texture.
More
Very soft texture.
Less
Lighter moist cakes.
Adjust cooking time for different recipes.
Normal
Denser moist cakes.
More
New York style cheesecakes.
Less
Soft boiled eggs.
Pre-set times are intended for extra large eggs. Adjust cooking time to account for different egg sizes.
Normal
Medium boiled eggs.
More
Hard boiled eggs.
Less
Simmering, thickening and reducing liquids.
NEVER have the lid on when sautéing. Maximum time is 30 minutes as a safety Pan searing. precaution.
Normal
Pan searing.
More
Stir-frying or browning meat.
Less
Corresponds to LOW setting in some temperature controlled slow cookers.
Non-pressure cooking program. You may also use the Instant Pot® glass lid as an option.
Normal
Corresponds to MEDIUM setting in some temperature controlled slow cookers.
More
Corresponds to HIGH setting in some temperature controlled slow cookers.
Less
Al dente white rice.
Automated cooking program. LCD displays ‘Auto’ until cooking count down time starts.
Normal
Normal texture white rice.
More
Softer texture white rice.
Less
Wild rice, brown rice, mung beans, etc.
Choose different modes based on the type of grains and the desired texture.
Normal
Wild rice, brown rice, mung beans, etc.
More
Tough grains or a mixture of grains and beans.
Program includes 45 minutes of warm water soaking time prior to 60 minutes of pressure cooking.
Less
Oatmeal
DO NOT use Quick Release as thick liquid will spatter out and block the pressure release valve. See page 17.
Normal
White rice porridge/congee.
More
Rice porridge/congee with a mixture of various grains.
Programs
Modes
Cooking Options
Notes for Users
Less
Vegetables.
Use the trivet provided to elevate food above the water and use Quick Release method to prevent food from overcooking.
Normal
Fish and Seafood.
More
Meat.
Less
Pasteurization of dairy products.
No pressure hot water bath canning at ~83°C/181.4°F. **see note below**
Normal
Sterilization of utensils and canning of acidic fruits and vegetables. **
Low pressure hot water bath canning at ~110°C/230°F. **see note below**
More
Sterilization of utensils and canning of acidic fruits and vegetables. **
High pressure hot water bath canning at ~115°C/239°F. **see note below**
Less
Jiu Niang, a sweet fermented glutinous rice dessert.
Default fermentation time is 24:00 hours. You can adjust time based on your recipe.
Normal
Fermenting milk when making yogurt.
‘Yogt’ will be displayed on the screen when completed.
More
Pasteurizing milk when making yogurt.
‘boiL’ will be displayed on the screen.
Less
Manual programming of pressure level and cooking time according to your favourite recipes or cooking habits.
Press the Pressure Level key to adjust pressure levels and the + / - keys to change cooking time.
Normal
More
Getting Started
1. Read warning cards and warning labels. Remove all packaging materials and removable warning cards from the cooker and accessories.
2. Clean the inner pot, lid and accessories with water and detergent before the first use.
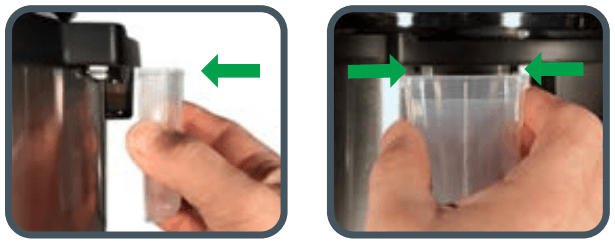
3. Install the condensation collector at the rear of the cooker by aligning the top of the collector with the guides on the cooker and press in.
4. Place the steam release handle on the lid.
The steam release handle does not lock tight into the lid but will fit loosely.
Before using your Instant Pot®:
1. To remove the lid, hold the handle, turn the lid counterclockwise and lift.
2. Remove the inner pot from the pressure cooker. Add food and liquid into the inner pot as the recipe directs. If steaming, place the steam rack on the bottom of the inner pot first. Always add at least 2 cups (~18 fl oz / 500 mL) of liquid for minimum liquid requirement. See “Cooking and Safety Tips” on page 22.
3. Wipe the outside of the inner pot dry. Make sure there is no food debris on the heating element.
4. Put the inner pot back into the cooker. Rotate slightly to ensure that it is seated correctly.
5. Make sure the sealing ring rack is completely set in the groove on the inside of the sealing ring. Ensure there is no deformation on the sealing ring rack. Do not attempt to repair a deformed ring rack. Please contact the customer care team.
6. To place lid, reverse Step 1. Place the lid on the cooker, align the mark on the lid with the (unlock) mark and turn clockwise to the (lock) mark.
• Make sure the steam release valve, float valve and anti-block shield are clean and free from debris.
• After putting the lid on, make sure the float valve on lid top drops down.
• Do not put lid on for the Sauté program.
Initial Test Run
To familiarize yourself with the Instant Pot® and check if the cooker is working properly:
Add 3 measuring cups of water into the inner pot (~25 fl oz / 750 mL).
Close the lid. Turn steam release handle to Sealing position.
Press the Steam button and press the + / - keys to adjust time to 2 minutes.
The preheating cycle will start after 10 seconds and the cooker with display On. Traces of steam will release until the float valve pops up. The Steam program will begin after a few minutes when working pressure is reached. The cooker will beep and automatically switch to Keep Warm mode if the Keep Warm function is ON.
*If you have any questions or concerns, please refer to the troubleshooting guide on pages 24 - 26, or call the customer care team. Contact information on page 24.*
Pressure Cooking
The following are all pressure cooking programs: Pressure Cook, Rice, Soup/Broth, Meat/Stew, Bean/Chili, Multigrain, Porridge, Cake, Egg, Sterilize and Steam.
• Do not fill the inner pot more than 2/3 full. For food that expands during cooking such as rice or dried vegetables, do not fill the inner pot more than 1/2 full.
• After the cooking process has started, you can press Cancel at any time to end the program. The cooker then goes to standby mode.
1. Follow the steps in “Getting Started” pages 12 - 14.
2. Position the steam release handle to Sealing.
3. Connect the power cord. The LCD displays OFF, indicating that the cooker is in standby mode.
4. Select a pressure cooking program: Pressure Cook, Rice, Soup/Broth, Meat/Stew, Bean/Chili, Multigrain, Porridge, Cake, Egg, Sterilize or Steam.
5. Optionally, personalize pressure cooking programs as follows:
To do this ....
Press this button
Followed by these steps...
Change the cooking time
Cooking Program Key of Your Choice
Select between three preset cooking times, Normal, Less and More by repeatedly pressing the cooking program you wish to adjust.
+ / -
Add/subtract time; press and hold for faster changes.
Change the cooking pressure
Pressure Level
Select either High or Low
Set the delayed cooking time
Delay Start
1. Use the + / - buttons to set the hours.
2. Press Delay Start again.
3. Use the + / - buttons to set the minutes.
6. 10 seconds after choosing the settings, the cooker beeps 3 times and displays On to indicate that the cooker has entered preheating cycle. If using Delay Start, the Delay Start light indicator will light up and 10 seconds later, the delay timer will start to count down. When count down is finished, the LED will display On for the preheating cycle. Depending on the amount of food and its temperature, the preheating cycle can last from a few minutes to 40 minutes or more . As the cooker heats up and pressure builds, the float valve rises. When working pressure is reached, the cooker enters the pressure cooking cycle and displays the remaining cooking time.
When the cooking cycle has finished, the cooker beeps and enters the Keep Warm mode if the Auto Keep Warm function is turned ON. The LED displays the elapsed time (such as L0:02). If Cancel is not pressed, the cooker will turn OFF after 10 hours.
**Users can switch Auto Keep Warm ON/OFF, adjust pressure level and cooking time at any time during the cooking process.
7. Release the pressure using one of the following methods (refer to recipe):
Natural Release: Allow the cooker to cool down naturally until the float valve drops down. This may take 10 to 40 minutes, or even more, depending on the amount of food in the cooker. Place a wet towel on the metal part of the lid to speed up cooling (do not cover the steam release).
Quick Release: Turn the steam release handle to the Venting position to let steam out until the float valve drops down. Never pull out the steam release handle while releasing steam as escaping steam is extremely hot and can cause scalding. When cooking food with large liquid volume or starch content, immediately turn the steam release handle back to the Sealing position at the first sign of spattering. Quick Release should ALWAYS be closely attended.
8. Press Cancel. The LCD displays OFF, indicating that the cooker is in standby mode. Open the lid. Make sure the float valve is down before opening the lid.
Non-Pressure Cooking
The following are non-pressure cooking programs: Sauté, Slow Cook, Yogurt and Keep Warm.
Sauté
1. Connect the power cord. The LCD displays OFF, indicating that the cooker is on standby.
2. Select the Sauté program.
3. To change the cooking temperature, press Sauté repeatedly to select between Less (for simmering or thickening sauce) Normal (for regular browning), and More (for stir-frying or blackening meat).
10 seconds after pressing the settings, the cooking process will start. The cooker beeps 3 times and the LCD displays On to indicate that the cooker has entered the preheating cycle. When the working temperature is reached, the LCD displays Hot.
4. Add food to the inner pot and sauté.
5. When you have finished sautéing the food, press Cancel. The LCD displays OFF, indicating that the cooker is in standby mode.
• Do not put the lid on for Sauté program. There will be warning alerts and the display will flash.
• As a safety precaution, the cooker automatically enters standby mode after 30 minutes if you have not pressed Cancel.
Slow Cook
1. You may use the Instant Pot glass lid as an option. If using the pressure cooking lid, make sure the steam release handle is turned to Venting.
2. Connect the power cord. The LCD displays OFF, indicating that the cooker is on standby.
3. Select the Slow Cook program.
4. Optionally, modify the slow cooking program as follows:
To do this ....
Press this button
Followed by these steps...
Change the cooking time
+ / -
Add / subtract time.
Change the cooking temperature
Cooking Program Key of Your Choice
Select between three preset cooking temperatures, Normal, Less and More by repeatedly pressing the cooking program you wish to adjust.
Set the delayed cooking time
Delay Start
1. Use the + / - buttons to set the hours.
2. Press Delay Start again.
3. Use the + / - buttons to set the minutes.
10 seconds after choosing the settings, the cooking program will start. The cooker will beep 3 times and the cooker will enter the cooking cycle. The LED will display the remaining cooking time. If using Delay Start, the Delay Start light indicator will light up and 10 seconds later, the delay timer will start to count down. When count down is finished.
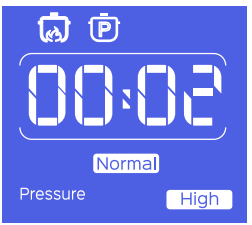
5. When the cooking cycle has finished, the cooker beeps and enters the Keep Warm mode if the Keep Warm program is turned ON. The LCD displays the elapsed time (such as 00:02). After 24 hours, the cooker turns off.
6. If the lid is on, remove it by turning counterclockwise and lifting.
7. Press Cancel. The LCD displays OFF, indicating that the cooker is in standby mode.
Yogurt
1. Pasteurize Milk
a) Add milk to the inner pot.
b) Select the Yogurt program.
c) Press the Yogurt key repeatedly to select the More mode. 10 seconds after pressing the settings, the heating process starts. The cooker beeps 3 times and the LCD displays boiL.
d) When finished, the cooker beeps and the LCD displays Yogt.
If making yogurt in smaller containers: add 1 cup/250 ml of water to the inner pot, place the steam rack in the inner pot and put the containers on top of the steam rack, close the lid, select the Steam program and use the + / - buttons to set time to 2 minutes. Make sure the steam release handle is in Sealing position when running the Steam program as this is a pressure cooking program. When complete, use the natural release method (page 17) and continue with steps 2 to 4.
*The advantages of pasteurizing milk are to 1) kill pathogens and harmful bacteria, and 2) denature milk proteins for easier absorption by the body.
2. Cool Milk
a) Remove the inner pot and place it on a wire rack.
b) Allow the milk to cool to 115°F/46°C. Test the milk temperature with a thermometer.
3. Add Starter Culture
a) Add starter culture to the warm milk in the inner pot.
b) Replace the inner pot and close the lid.
The steam release handle can be left in Venting or Sealing position.
4. Ferment Yogurt
a) Select the Yogurt program.
b) Press + / - to set fermentation time.
c) When finished, the cooker beeps and the LCD displays Yogt.
Safety and Cooking Tips
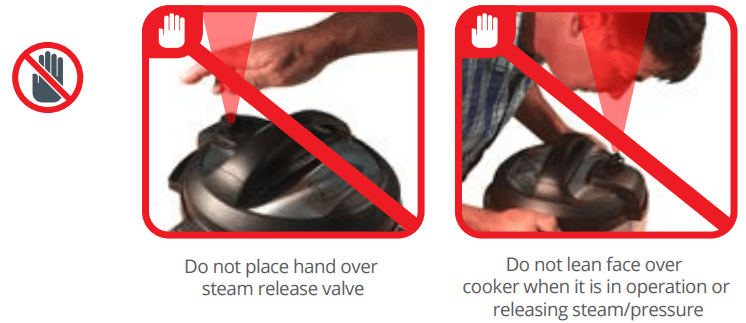
Extreme caution should be taken when moving the steam release handle to Venting position. Keep hands and face away from the steam release openings. Failure to comply may result in scalding or serious injury.
Do not attempt to open the lid until pressure inside the cooker is completely released. As a safety feature, until the float valve drops down the lid is locked and cannot be opened. Do not force lid open.
When opening the lid, the inner pot may adhere to the lid. This is caused by vacuum due to cooling. To release the vacuum, move the steam release handle to the Venting position.
If the float valve is stuck, move the steam release valve to the Venting position. Once all the steam is released, push the float valve down with a pen or long utensil.
Always add at least 18 fl oz. / 500 ml of water or other liquids so enough steam can be generated to cook under pressure. These include cooking sauces, wine, beer, stocks, juices of fruits and vegetables. Oils, oil-based sauces and thick cooking sauces do not have enough water content and will not account for the required liquid volume.
Time to pressure and cooking time will vary according to the temperature and quantity of the ingredients. Food that is cold or frozen will take longer to cook than food that is at room temperature.
When using the Delay Start program, allow sufficient cooling down time before serving.
The Delay Start program is not recommended for porridge, oatmeal or other foamy and thick liquids. Cooking progresses should be monitored when cooking these foods.
Care and Cleaning
Unplug your Instant Pot® and let it cool to room temperature before cleaning.
All Instant Pot® inner pots, pressure cooker lids, glass lids, and accessories are dishwasher safe.
Remove the inner pot and lid and wash with detergent. Rinse with clear water and wipe dry with a soft cloth.
Wipe the inner cooker base rim and slot dry with cloth to prevent rusting of the exterior cooker rim.
Remove the sealing ring and anti-block shield from the underside of the lid. Wash with warm, soapy water, rinse with clear water and wipe dry with a soft cloth.
The sealing ring must always be properly positioned on the underside of the lid.
Clean the outer body with a damp soft cloth or sponge.
Never use harsh chemical detergents, scouring pads or powders on any of the parts or components.
Periodically check that the steam release valve and float valve are in good working order and free of debris.
Troubleshooting
The issues in the following tables do not always indicate a faulty cooker. Please examine the cooker carefully before contacting the support team.
Problem
Possible reason
Solution
Difficulty with closing the lid
Sealing ring not installed properly.
Position the sealing ring well.
Float valve in the popped-up position.
Slightly press the float valve downward.
Difficulty with opening the lid
Pressure exists inside the cooker.
Position the steam release valve to the venting position to reduce the internal pressure. Open the lid after the pressure is completely released.
Float valve stuck at the popped-up position.
Ensure steam is completely released by turning steam release handle to Venting position, Press the float valve lightly with a long utensil. Open the lid cautiously and clean the float valve and lid before the next use.
Steam leaks from the side of the lid
No sealing ring
Install the sealing ring
Sealing ring damaged
Replace the sealing ring
Food debris attached to the sealing ring
Clean the sealing ring
Lid not closed properly
Open then close the lid again
Steam leaks from float valve for over 2 minutes
Food debris on the float valve silicone seal
Clean the float valve silicone seal
Float valve silicone ring worn- out
Replace the float valve silicone ring
Float valve unable to rise
Too little food or water in inner pot
Add water according to the recipe
Float valve obstructed by the lid locking pin
Close the lid completely, see “Getting Started” section
Steam comes out from the steam release valve non-stop
Steam release valve not in sealing position
Turn the steam release handle to the sealing position
Pressure control fails
Contact support online
Display flashes “Lid”
Lid is not in the correct position for the selected program
Close the lid for pressure cooking or open the lid for sautéing
Display remains blank after connecting the power cord
Bad power connection or no power
Inspect the power cord to ensure a good connection, check if the power outlet is active
Cooker’s electrical fuse has blown
Contact support online
All LCDs flash with a code appearing on screen and the warning beep is ON
C1
Faulty temperature sensor
Contact support online
C2
Faulty temperature sensor
Contact support online
C5
Temperature is too high because inner pot is not placed into the cooker base
Insert the inner pot properly
Temperature is too high because there is no water in inner pot
Put food and water in the inner pot
C6
Faulty pressure sensor
Contact support online
C6H
Faulty HIGH pressure sensor
C6L
Faulty LOW pressure sensor
Rice is half cooked or too hard
Too little water
Adjust dry rice and water ratio according to recipe
Lid opened too early
After cooking cycle completes, leave the lid on for 5 more minutes
Rice is too soft
Too much water
Adjust dry rice and water ratio according to recipe
The cooker beeps 5 times and displays ‘burn’ message after the cooking program started.
Indication of overheating. The cooker has reduced the heating temperature, and may not reach cooking pressure
Starch deposits at the bottom of the inner pot might have clogged heat dissipation. Stop the cooker and inspect the bottom of the inner pot
Occasional ticking or light cracking sound
The sound of power switching and expanding pressure board when changing temperature
Q: That picture doesn't resemble the Instant pot duo plus 3 qt pressure cooker. Where are pictures that correspond with mine? .ine is new. Presumably the newest model. Reply


 The steam release handle does not lock tight into the lid but will fit loosely.
 mark on the lid with the
  (unlock) mark and turn clockwise to the
  (lock) mark.


 The steam release handle can be left in Venting or Sealing position.