DUO NOVA
TM
3 QUART, 6 QUART, AND 8 QUART
Multi-Use Pressure Cooker
User Manual
Welcome
Important Safeguards
Getting Started
Pressure Cooking Basics
Cooking With the Duo Nova
Care & Cleaning
Troubleshooting
Warranty
Contact/Support Information

2
Table of Contents
Welcome . ..................................................................................................................3
IMPORTANT SAFEGUARDS ...............................................................................4–9
Specications .........................................................................................................9
Getting Started ............................................................................................... 10–20
InitialSetup ........................................................................................................... 10
Product,PartsandAccessories ................................................................... 11–12
ControlPanel .................................................................................................. 13–14
StatusMessages ..................................................................................................15
StatusIcons ...........................................................................................................16
Settings ........................................................................................................... 17–19
CleaningBeforeFirstUse ..................................................................................20
Pressure Cooking Basics ............................................................................... 20–29
PressureControlFeatures .................................................................................. 21
DepressurizingtheCooker .......................................................................... 27–28
InitialTestRun ......................................................................................................29
Cooking with the Duo Nova ................................................................................ 30
PressureCookingWiththeDuoNova ...................................................... 30–36
Non-PressureCookingWiththeDuoNova ..............................................37–44
Care & Cleaning ..............................................................................................45–46
Troubleshooting .............................................................................................. 47–49
Warranty ........................................................................................................... 50 –51
Contact and Support Information ...................................................................... 52

3
Welcome to the world of Instant cooking.
Thankyouforwelcomingusintoyourkitchen.
Havingfamiliesourselves,wedevelopedtheInstantPot
®
Duo
™
Nova
Multi-UsePressureCookerstoallowbusyfamiliesandprofessionalsalike
tocookhealthy,deliciousmealsmoreeasilyandinlesstime.
Wehavepartneredwithchefs,authorsandbloggerstocompilea
collectionofrecipesthatwehopeyouenjoy!
Happycooking,
RobertJ.Wang
Founder&ChiefInnovationOfcer
Findhelpfulhow-to videos,download the app,orvisitourrecipesite.
Download the Instant Pot App
•1000+OriginalRecipes
•NewUserTips
•GettingStartedVideos

4
IMPORTANT SAFEGUARDS
Whenusingelectricalappliances,basicsafetyprecautionsshouldalwaysbe
followed:
1. READTHEGETTINGSTARTEDGUIDEANDALLINSTRUCTIONS,
SAFEGUARDS,ANDWARNINGSBEFOREOPERATINGTHEAPPLIANCE.
FAILURETOFOLLOWTHESESAFEGUARDSANDINSTRUCTIONSMAY
RESULTININJURYAND/ORPROPERTYDAMAGE.
2. UseonlytheInstantPot®DuoNovalidwiththeInstantPot®DuoNova
pressurecooker.Usinganyotherpressurecookerlidsmaycauseinjury
and/ordamage.
3. Alwaysoperatetheapplianceonastable,non-combustible,levelsurface.
4. Donotusetheapplianceforanythingotherthanitsintendeduse.Failure
tofollowtheseinstructionsmayresultininjuryorpropertydamage.
5. Forhouseholduseonly.Donotuseoutdoors.Notforcommercialuse.
6.
CAUTION
Donotplacetheapplianceonorincloseproximitytoa
hotgasorelectricburner,oraheatedoven.Heatfromanexternalsource
willdamagetheappliance.Failuretofollowtheseinstructionsmayresult
ininjuryorpropertydamage.
7.
CAUTION
Donotusetheappliancenearwaterorame.Keepoutof
directsunlight.Failuretofollowtheseinstructionsmayresultininjuryor
propertydamage.
8.
CAUTION
Donottouchhotsurfaces.Onlyusesidehandlesfor
carryingormoving.Extremecautionmustbeusedwhenmovingthe
appliancecontaininghotliquids.Donotmovetheappliancewhenitis
underpressure.
9.
CAUTION
Thecookerbasecontainselectricalcomponents.Toavoid
electricalshock,donotputliquidofanykindintocookerbase,anddo
notimmersepowercord,plug,ortheapplianceinwaterorotherliquid.
Donotrinsetheapplianceundertap.
10.
CAUTION
Donotllover“PCMAX–2/3”asindicatedontheinner
pot.Whencookingfoodsthatexpandduringcookingsuchasriceor
driedvegetables,donotlltheinnerpotover“–1/2”line.Overllingmay
causeariskofcloggingthesteamreleasepipeanddevelopingexcess
pressure.Refertothe“GettingStartedGuide."
Read this manual carefully and completely, and retain for future reference.
Failure to adhere to safety instructions may result in serious injury.
WARNING

5
IMPORTANT SAFEGUARDS
11.
WARNING
Thisappliancecooksunderpressure.Failuretofollow
theseinstructionsmayresultinburns,injuryand/orpropertydamage.
Makecertaintheapplianceisproperlyclosedbeforeoperating.
12. Whencookingmeatwithskin(e.g.sausagewithcasing),theskincan
swellwhenheated.Donotpiercetheskinwhileitisswollen;thiscould
resultinscaldinginjury.
13.
CAUTION
Whenpressurecookingfoodwithadoughyorthicktexture,
orahighfat/oilcontent,contentsmaysplatterwhenopeningthelid.
Pleasefollowrecipeinstructionsforpressurereleasemethod.Referto
DepressuringtheCookerinthismanual.
14.
CAUTION
Beforeeachuse,checkthesteamreleasevalve/handle,
steamreleasepipe,anti-blockshieldandoatvalveforclogging.Referto
the“GettingStartedGuide."Failuretodosomayresultininjuryor
propertydamage.
15.
WARNING
Donotopentheapplianceuntilithasdepressurizedand
allinternalpressurehasbeenreleased.Iftheoatvalveisstillupand/or
thelidisdifculttoopen,thisindicatesthattheapplianceisstillpressurized–
donotforceitopen.Anypressureintheappliancecanbehazardous.Refer
tothe"DepressurizingtheCooker"inthismanualforinformationon
releasingpressure.Openingappliancewhileitisstillpressurizedmaylead
tosuddenreleaseofhotcontentsandmaycauseburnsorotherinjuries.
16. Donotusethisappliancefordeepfryingorpressurefryingwithoil.
17. Donotleanoverorplaceyourhandsorfaceoverthesteamrelease
valve/handleoroatvalvewhentheapplianceisinoperationorhas
residualpressure.Donottouchthemetalportionofthelidwhenthe
applianceisinoperation;thiscouldresultininjury.
18. Donotcoverorobstructthesteamreleasevalve/handleand/oroat
valvewithclothorotherobjects.Obstructingthesteamreleasevalve/
handleand/oroatvalvecancreateasafetyissueandmaycauseinjury.
19. Turntheapplianceoffifsteamescapesfromthesteamreleasevalve/
handleand/oroatvalveinasteadystreamforlongerthan3minutes.
Theremayberesidualpressureintheappliance.Allowtheapplianceto
depressurizenaturallyorreleaseallexcesspressurebeforeopening.For
moreinformationonhowtoreleasepressure,referto“Troubleshooting”on
page47ofthisguide.
Read this manual carefully and completely, and retain for future reference.
Failure to adhere to safety instructions may result in serious injury.
WARNING

6
IMPORTANT SAFEGUARDS
20. Turntheapplianceoffifsteamescapesfromthesidesofthelidand
ensuresealingringisproperlyinstalled.Refertopage22inthis
manualonhowtocheckthesealingring.
21. Todisconnect,selectCancel,thenremoveplugfrompowersource.
22. Unplugfromtheoutletwhennotinuse,aswellasbeforeaddingor
removingpartsoraccessories,andbeforecleaning.Tounplug,grasp
theplugandpullfromtheoutlet.Neverpullfromthepowercord.
23. Regularlyinspecttheapplianceandpowercord.Donotoperatethe
applianceifthepowercordorplugisdamaged,oraftertheappliance
malfunctionsorisdroppedordamagedinanymanner.Forassistance,
contactCustomerCareat[email protected]or1-800-828-7280.
24.
CAUTION
Donotletthepowercordhangoveredgesoftablesor
counters,ortouchhotsurfacesoropename,includingthestovetop.
25.
CAUTION
Spilledfoodcancauseseriousburns.Ashortpower-
supplycordisprovidedtoreducethehazardsresultingfromgrabbing,
entanglementandtripping.
•Keeptheapplianceandcordawayfromchildren.
•Neverdrapethepowercordoveredgesoftablesorcounters.
•Neverusebelow-counterpoweroutlets,andneverusewithan
extensioncord.
26. Intendedforcountertopuseonly.Keeptheapplianceonastable,heat-
resistantplatform.Donotplaceonanythingthatmayblocktheventson
thebottomoftheappliance.Donotplaceonahotstove.
27.
CAUTION
Donotuseanyaccessoriesorattachmentsnotauthorized
byInstantBrands™Inc.Theuseofattachmentsnotrecommendedby
themanufacturer,maycauseariskofinjury,reorelectricshock.
28.
CAUTION
Beforeinsertingtheinnerpotintotheappliance,clean
theoutersurfaceoftheinnerpotandtheheatingelementlocatedonthe
innersurfaceoftheouterpotwithacleandrycloth.Ensuretheyaredry
andfreeoffooddebris.Referto“Care&Cleaning."Failuretodosomay
resultininjuryorpropertydamage.
29. Donotattempttorepair,replace,ormodifycomponentsofthe
Read this manual carefully and completely, and retain for future reference.
Failure to adhere to safety instructions may result in serious injury.
WARNING

7
IMPORTANT SAFEGUARDS
appliance,asthismaycauseelectricshock,reorinjury,andwill
voidthewarranty.
30. Donottamperwithanyofthesafetymechanisms.Failuretofollowthese
instructionsmayresultininjuryorpropertydamage.
31. Donotusetheapplianceinelectricalsystemsotherthan120V/60Hzfor
NorthAmerica.Donotusewithpowerconvertersoradapters.
32. ThisapplianceisNOTtobeusedbychildrenorbypersonswithreduced
physical,sensory,ormentalcapabilities.Closesupervisionisnecessary
whenanyapplianceisusednearchildrenandtheseindividuals.Children
shouldnotplaywiththisappliance.
33. Toreducetheriskofpressureleakage,cookonlyinanauthorized
stainlesssteelInstantPot®Innerpot.DONOTusetheappliancewithout
theremovableinnerpotinstalled.
34. Topreventpersonalinjuryanddamagetotheappliance,onlyreplace
thesealingringwithanauthorizedInstantPot®sealingring.Referto
the“GettingStartedGuide."
35. Theuseofaccessoryattachmentsnotrecommendedbytheappliance
manufacturermaycauseinjuries.
36. Propermaintenanceisrecommendedaftereachuse.Referto“Care&
Cleaning."Lettheappliancecooltoroomtemperaturebeforecleaning
orstorage.
37. Neverconnectthisappliancetoanexternaltimerswitchorseparate
remote-controlsystem.
38.
CAUTION
DONOTtouchaccessoriesduringorimmediatelyafter
cooking.Toavoidpersonalinjury,
•Alwaysuseovenmittswhenremovingaccessories,andtohandle
theinnerpot.
•Alwaysplacehotaccessoriesonaheatresistantsurfaceorcookingplate.
•Useextremecautionwhendisposingofhotgrease.
Failuretofollowtheseinstructionsmayresultininjuryorpropertydamage
39. Donotleavetheapplianceunattendedwhileinuse.
Read this manual carefully and completely, and retain for future reference.
Failure to adhere to safety instructions may result in serious injury.
WARNING

8
IMPORTANT SAFEGUARDS
40.
CAUTION
Extremecautionmustbeusedwhentheinnerpot
containshotoil,hotfood,orhotliquids.Improperuse,includingmoving
thecookerbase,mayresultinpersonalinjury.Donotmovetheappliance
whileitisinuse.
41. Oversizedfoodsand/ormetalutensilsmustnotbeinsertedintothe
innerpotastheymaycauseriskofreand/orpersonalinjury.
42. Donotstoreanymaterialsinthecookerbaseorinnerpotwhennotinuse.
43. Donotplaceanycombustiblematerialsinthecookerbaseorinnerpot,
suchaspaper,cardboard,plastic,Styrofoamorwood.
44. Donotusetheincludedaccessoriesinamicrowave,toasteroven,
convectionorconventionaloven,oronaceramiccooktop,electriccoil,
gasrange,oroutdoorgrill.
45. Theremovableinnerpotcanbeextremelyheavywhenfullofingredients.
Careshouldbetakenwhenliftingtheinnerpotfromthecookerbaseto
avoidburninjury.
46.
CAUTION
Usecautionwhenremovingthelid.Heatandsteam
escapesassoonasthelidisremoved.Neverplaceyourface,handsor
exposedskinovertheapplianceopeningwhereheatandsteamescapes
whenremovingthelid.
SAVETHESEINSTRUCTIONS.
Read this manual carefully and completely, and retain for future reference.
Failure to adhere to safety instructions may result in serious injury.
WARNING
9
IMPORTANT SAFEGUARDS
Special Cord Set Instructions
AsperULsafetyrequirements,ashortpowersupplycord(0.6mto0.9m/
24"to35")isprovidedtoreducethehazardsresultingfromgrabbing,
entanglementandtripping.
Thisappliancehasa3-pronggroundingplug.Toreducetheriskofelectric
shock,plugthepowercordintoagrounded(earthed)electricaloutletthat
iseasilyaccessible.
Product Specications
DuoNovaMini 3Quarts/2.8Litres 120V~60Hz 700W 8.8lb/3.99kg
11.5"×10.2"×11"
29.2cm×25.9cm×27.9cm
DuoNova60 6Quarts/5.7Litres 120V~60Hz 1000W 11.8lb/5.37kg
13.2"×12.2"×12.5"
33.5cm×31cm×31.7cm
DuoNova80 8Quarts/7.6Litres 120V~60Hz 1200W 15.6lb/7.08kg
14.8"×13.6"×14"
37.6cm×34.3cm×36.8cm
WARNING
THE FAILURE TO FOLLOW ANY OF THE IMPORTANT SAFEGUARDS AND THE IMPORTANT
INSTRUCTIONS FOR SAFE USE IS A MISUSE OF YOUR APPLIANCE THAT CAN VOID YOUR
WARRANTY AND CREATE THE RISK OF SERIOUS INJURY.
WARNING
Electrical shock hazard. Use grounded outlet only. DO NOT remove ground. DO NOT use an adapter. DO
NOT use an extension cord. Failure to follow instructions can cause electric shock or death.
WARNING
To avoid injury, read and understand instruction manual before using this appliance. Failure to do so may
result in injury.
Read this manual carefully and completely, and retain for future reference.
Failure to adhere to safety instructions may result in serious injury.
WARNING

10
Initial Setup
• ReadalloftheImportantSafeguardsinthisUserManualbeforeusing
theappliance.FailuretoreadandfollowImportantSafeguardsmay
resultindamagetotheappliance,propertydamageorpersonalinjury.
• UseonlytheInstantPot®DuoNovalidwiththeInstantPot®DuoNova
pressurecooker.Usinganyotherpressurecookerlidsmaycauseinjury
and/ordamage.
• Removeallpackagingmaterialandaccessoriesfromwithinandaround
theappliance.
• FollowCare&Cleaninginstructionsinthismanualtocleantheappliance
beforerstuse.
• Placetheapplianceonastable,levelsurface,awayfromcombustible
materialandexternalheatsources.Donotplacetheapplianceonastovetop.
• Donotplaceanythingontopoftheappliance.
• Donotblockthepressurecontrolmechanismslocatedontheappliancelid.
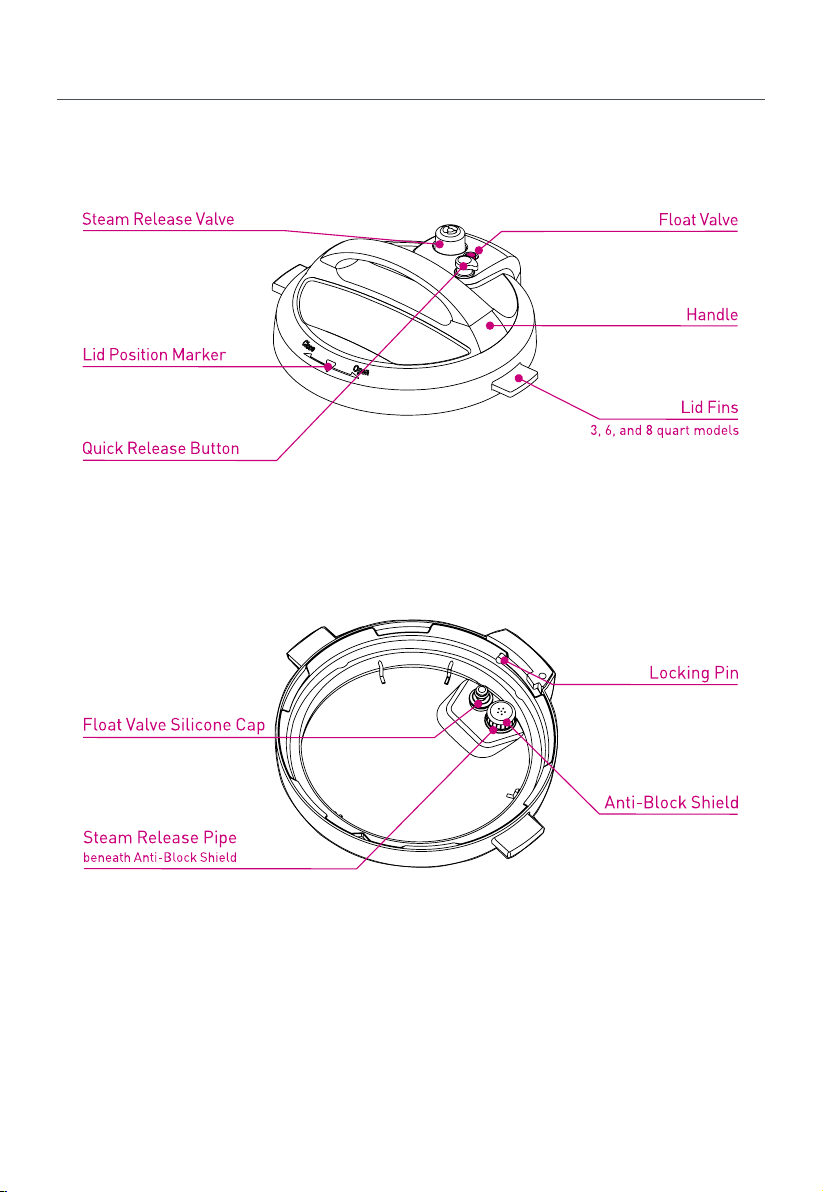
Product, Parts & Accessories
Top of Lid
Underside of Lid
Note: Illustrations are for reference only and may differ from the actual appliance.
12
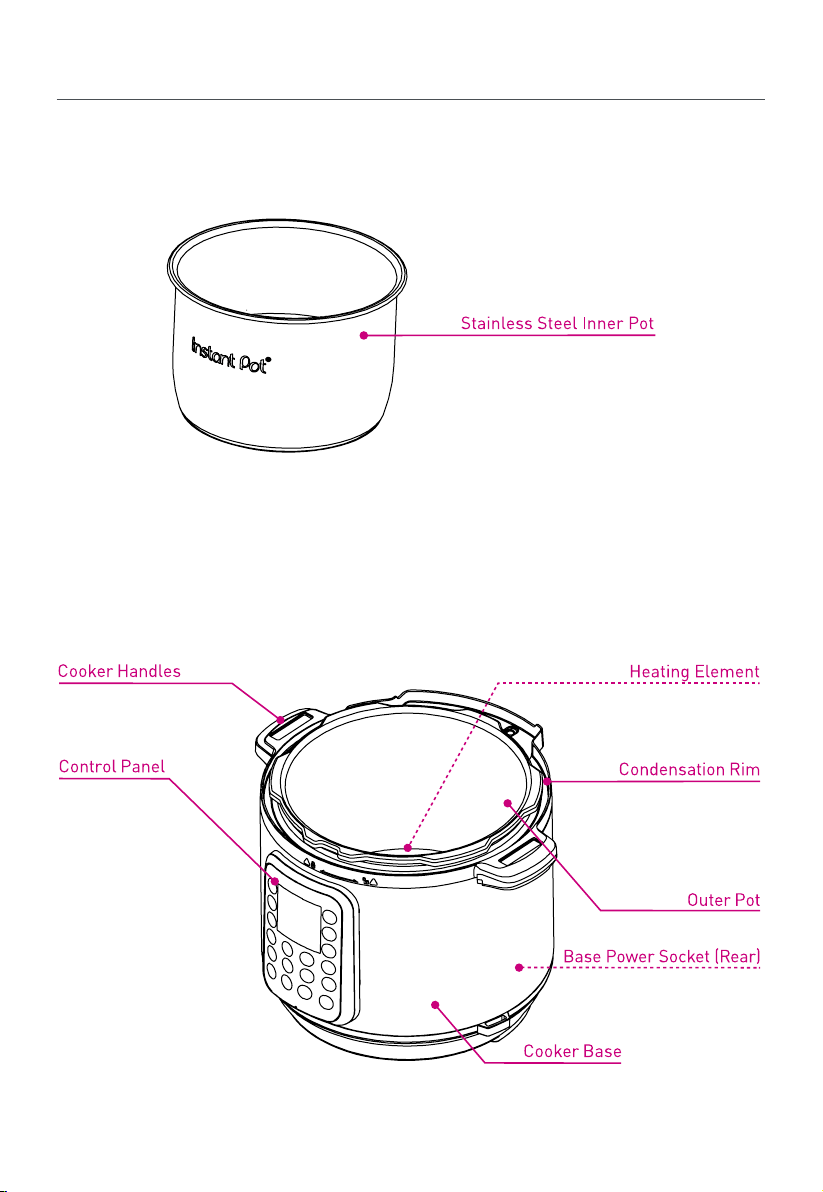
Product, Parts & Accessories
Inner Pot
Cooker Base
Note: Illustrations are for reference only and may differ from the actual appliance.
13
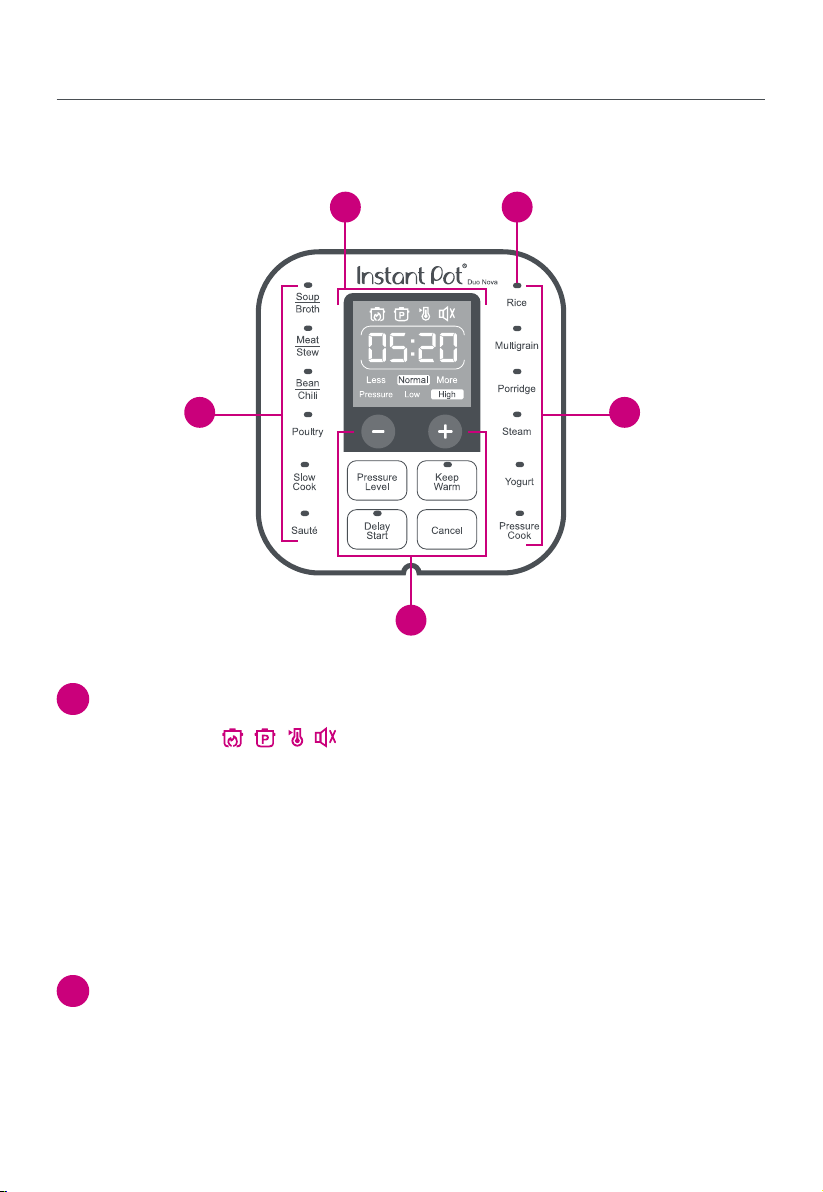
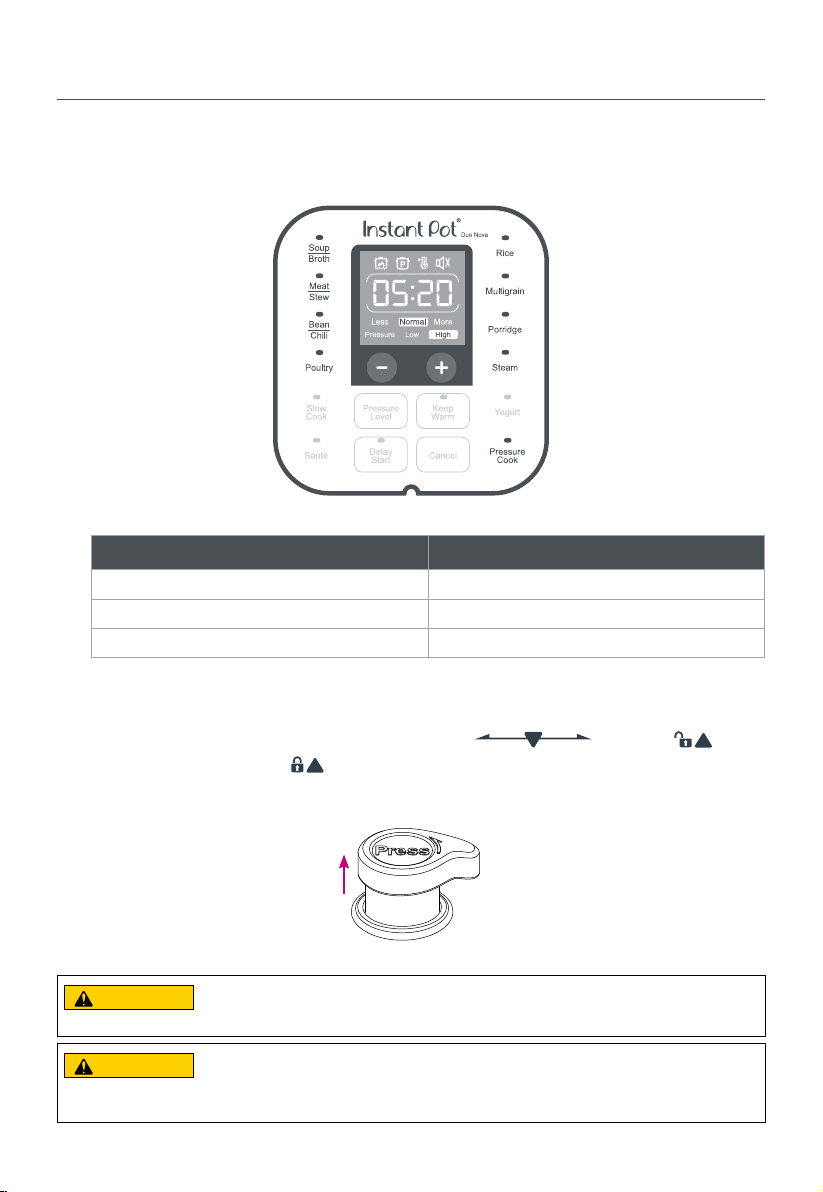
Control Panel
DuoNovaMulti-UsePressureCookersfeatureanintuitivecontrolpanelwith
LEDdisplaytohelpmakecookingfastandeasy.
1 Display
Status Icons showcookerstatusasdescribedin
“StatusIndicators,”below.
Timer/ReadoutshowscountdowntoDelay Start,cookingtime
remaining,andKeep Warmtimepassedinhoursandminutes.Also
showscertain“StatusMessages”asdescribedbelow.
Less – Normal – MoreindicatetheselectedSmartProgramcooking
timeortemperature.
Pressure Level IndicatorshowstheselectedSmartProgrampressurelevel.
2 Smart Program Settings Keys
−/+ keys–adjustDelay Start,cookingandKeep Warmtimes.
Pressure Level–togglesbetweenLowandHighpressurelevels.
Keep Warm–turnstheKeep Warmoptiononoroff.
1
3 3
2
2

14
Control Panel
Delay Start–enablesthedelayedstartoption.
LED IndicatorsshowtheselectedoractiveSmartProgramincluding
anyoptionsselected.
Cancel–PresscancelatanytimetoreturnthecookertoStandbymode.
See “Settings," below for more information.
3 Smart Programs
Pressure Cooking
Soup/Broth
Meat/Stew
Bean/Chili
Poultry(notavailableonDuoNova3Quartmodels)
Rice
Multigrain(notavailableonDuoNova3Quartmodels)
Porridge
Steam
PressureCook
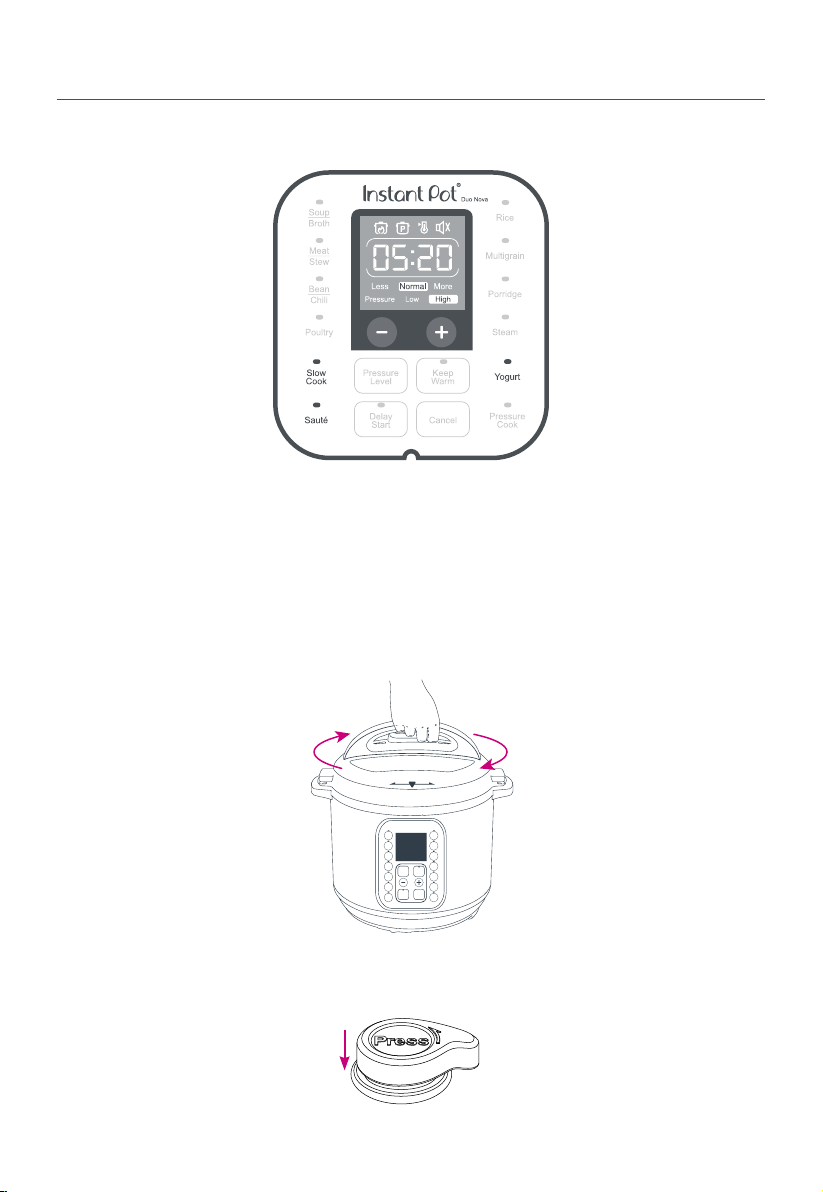
Non-Pressure Cooking
SlowCook
Sauté
Yogur t
KeepWarm

15
Status Messages
[OFF]indicatesthatthecookerisinStandbymode.
[Lid]indicatesthatthecookerlidisnotproperlysecured.
[On]indicatesthatthecookerispreheating.
[Auto]indicatesthattheRiceSmartProgramisrunning.
[boiL]indicatesthattheYogurtSmartProgramisinthe
processofpasteurizingmilk(i.e.,theYogurtSmartProgram
issettoMore).
[Hot]indicatesthattheSautéSmartProgramhasreached
cookingtemperatureandfoodmaybeaddedtothe
innerpot.
[HH:MM]displaysoneofthefollowing:
• WhenDelayStartisselected,displaysacountdown
untiltheSmartProgrambegins;
• WhenaSmartProgramisrunning,displaysthecooking
timeremaininginthatSmartProgram;
• WhenKeepWarmisselected,displaysthelengthof
timethatfoodhasbeenwarming.
[End]indicatesthataSmartProgramhasended.
[Food Burn]indicatesthatthecookerisoverheatingdueto
insufcientliquid.See“Troubleshooting”formoreinformation.
[C*]indicatesthatanerrorhasoccurred.See
“Troubleshooting”formoreinformationonerrorcodes.

16
Status Icons
Illuminatedwhentheheatingelementisactive,e.g.,duringpreheating
modeandwhenheatisbeingappliedduringcooking.
Illuminatedwhenthecookerisusingapressurecookingprogram.
IlluminatedwhenKeepWarmisinprogress.
Illuminatedwhencookersoundsareturnedoff.
Note: Audible safety alerts (beeps) cannot be turned off.
IlluminatedtoindicatetheSmartProgramselectedorrunning.

17
Settings
Pressure Cooking Smart Programs
Adjusting and Saving Pressure Levels
SelectapressurecookingSmartProgramandpressPressure Leveltotoggle
between“Low”and“High”pressuresettings.
Whencookingbegins,thesettingwillbesavedandrememberedthenext
timetheSmartProgramisselected.
Tip: Higher pressures create higher cooking temperatures.
Adjust and Save Pressure Cooking Smart Program Cooking Time
SelectapressurecookingSmartProgramandpresstheSmartProgram
keyagaintotogglethroughthe“Less,"“Normal”and“More”cookingtime
settings.Viewthecookingprogramsoptionsonpage36.
Whencookingbegins,thesettingwillbesavedandrememberedthenext
timetheSmartProgramisselected.
Delay Start
WithaSmartProgramselected,pressDelay Starttoactivatethedelayhours.
Press“−/+”toadjust.
PressDelay Startagaintoactivatethedelayminutes.Press“−/+”toadjust.
Delay startwillactivateafter10secondsandstartcountingdown.
Delay startcanbesettoaminimumof10minutesormaximumof24hours.
Keep Warm
WithaSmartProgramselected,pressKeep WarmtotoggleONorOFF.
TheKeep WarmlightwillbeilluminatedwhensettoON.Keep Warmwill
startautomaticallyaftertheSmartProgramendsandcontinueuntilCancel
ispressedorthecookerlidisremoved.

18
Settings
Non-Pressure Cooking Smart Programs
Adjust and Save Non-Pressure Cooking Temperatures
Selectanon-pressurecookingSmartProgramandpresstheSmart
Programagaintotogglethroughthe“Less,"“Normal”and“More”cooking
temperaturesettings.
Whencookingbegins,thesettingwillbesavedandrememberedthenext
timetheSmartProgramisselected.
Adjust and Save Non-Pressure Cooking Time
Selectanon-pressurecookingSmartProgramandpress“−/+”toadjust
cookingtime.Cookingtimeadjustmentsmadewhilecookingisinprogress
willapplytothecurrentcookingsessiononlyandwillnotbesaved.
Delay Start
WithaSmartProgramselected,pressDelay Starttoactivatethedelayhours.
Press“−/+”toadjust.
PressDelay Startagaintoactivatethedelayminutes.Press“−/+”toadjust.
Note: Delay Start is not available with the Sauté or Yogurt Smart Programs.
Keep Warm
WithaSmartProgramselected,pressKeep WarmtotoggleONandOFF.
Note: Keep Warm is not available with the Sauté or Yogurt Smart Programs.

19
Settings
Resetting Smart Programs to Factory Default Settings
Resetting Individual Smart Programs
WiththecookerinStandbymode(Displayreads“Off”),pressandholdthe
SmartProgramcontrolyouwishtoresettofactorydefaultfor10seconds.The
SmartProgrampressurelevel,cookingtimeandtemperaturesettingswillbe
restoredtothefactorydefaults.
Reset All Time and Temperature Settings
WiththecookerinStandbymode(Displayreads“Off”),pressandhold
Cancelfor10seconds.AllSmartProgrampressurelevels,cookingtimes
andtemperatureswillberestoredtothefactorydefaults.
Turn Sounds On and Off
CookersoundsareONbydefault.WiththeapplianceinStandbymode
(Displayreads“Off”),pressandholdthe“−“for5secondstoturnallsounds
excepterroralertsOFF.The
statusindicatorwillbeilluminated.Pressand
holdthe“+“for5secondstoturnallsoundsON.The statusindicatorwill
beextinguished.
20
Cleaning Before First Use
1. Removetheinnerpotfromthecookerandwashwithhotwateranddish
soap.
Note: the inner pot is dishwasher safe.
2. Inspectinnerpotfordeformationsordamage.
Note: To avoid personal injury or damage to the appliance, replace a deformed or
damaged inner pot. Use only authorized Instant Pot inner pots in your cooker.
3. Rinseanddrytheinnerpotbeforereturningittothecooker.
4. Wipetheheatingelementwithadryclothtoensurethatitisdryandfree
offoodparticles.Failuretodosomayresultinpersonalinjuryordamage
totheappliance.
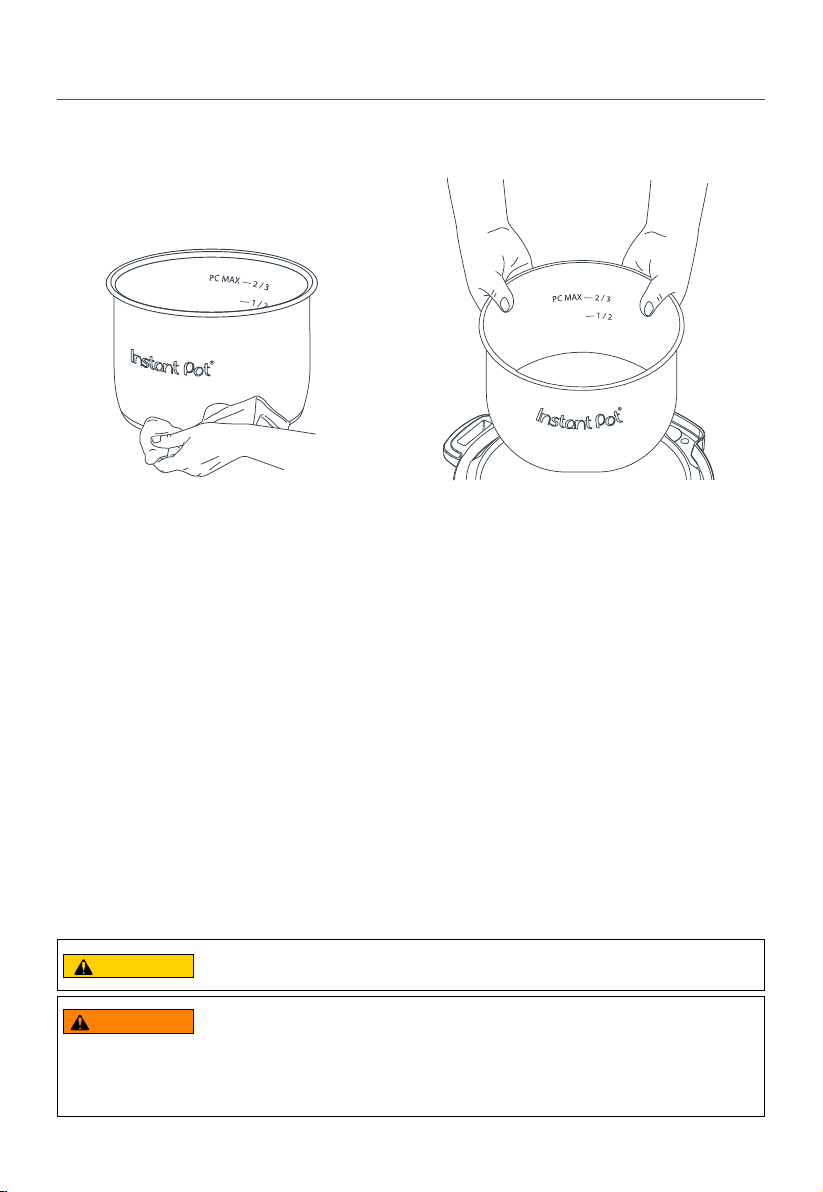
CAUTION
To avoid risk of personal injury and/or property damage, do not pour food or liquid into
cooker base.
WARNING
Do not ll the inner pot higher than the PC MAX — 2/3 line (Pressure Cooking
Maximum), as indicated on the inner pot.
Exercise extreme caution when cooking and venting food such as applesauce,
cranberries, pearl barley, oatmeal, split peas, noodles, etc., as these foods may foam,
froth, or spatter, and may clog the steam release pipe and/or steam release valve. Do
not ll the inner pot higher than the —1/2 line when cooking these foods.
21
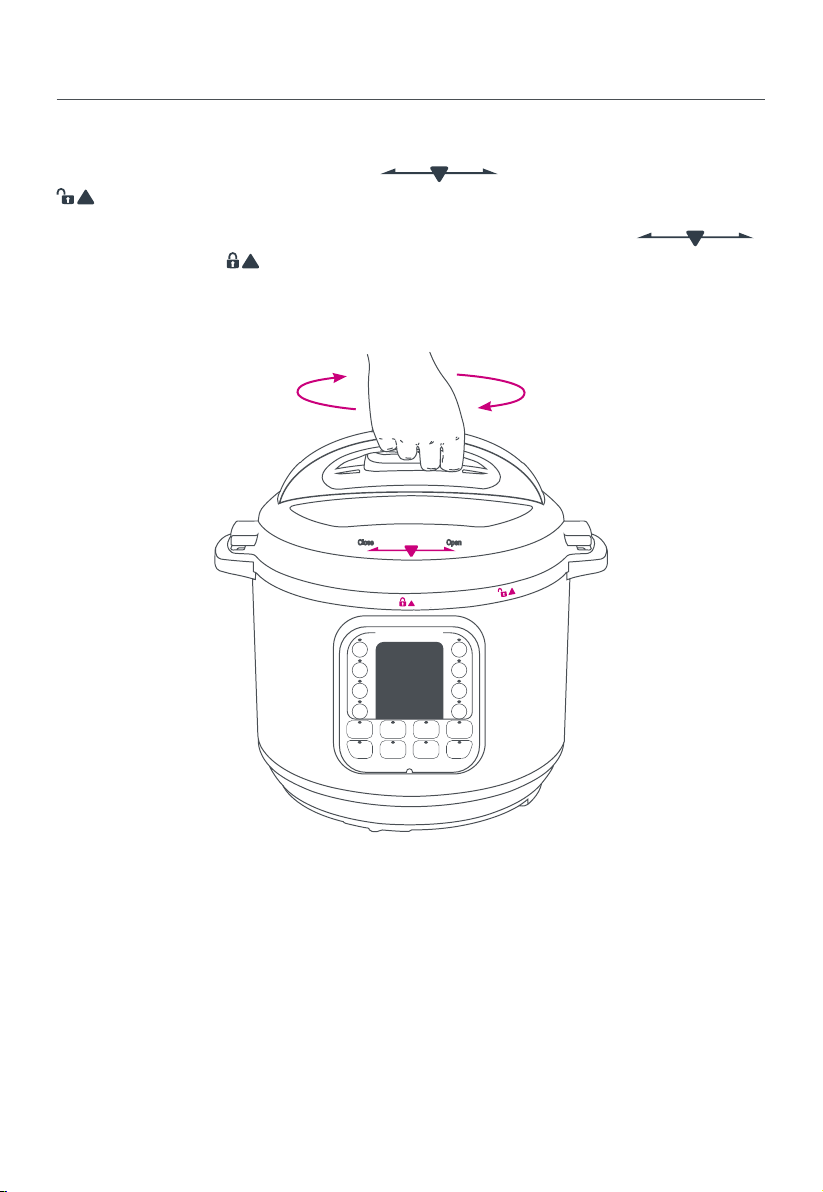
Pressure Control Features
Locking Lid
Placethelidonthecookerwiththe onthelidalignedwiththe
onthecookerbase.
Tolockthelidandsealthecooker,turnthelidclockwiseuntilthe
isalignedwiththe onthecookerbase.
22
Pressure Control Features
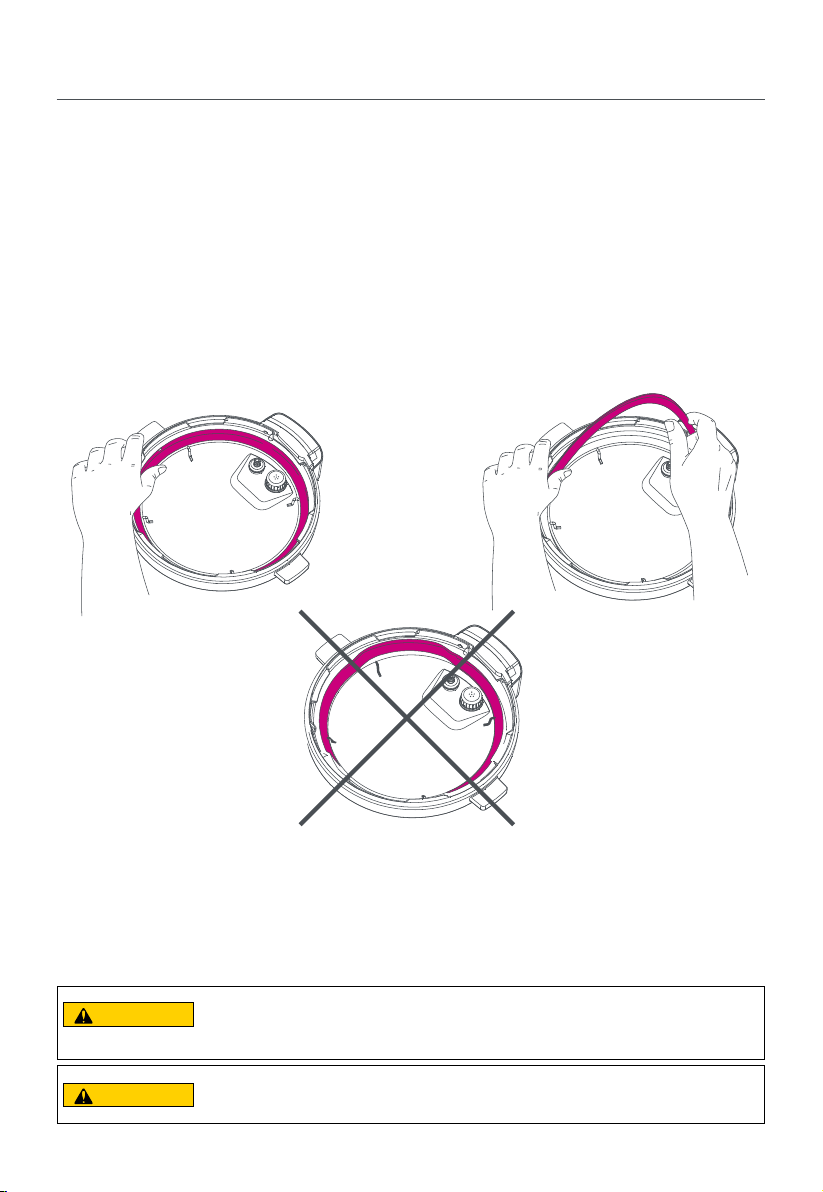
Sealing Ring
Thesealingringinstalledontheundersideofthelidcreatesanair-tightseal
betweenthelidandthecooker.
Removethesealingringbypullingitgentlyoffofthecircular,stainlesssteel
sealingrackattachedtotheundersideofthecookerlid.
Cleanandinspectthesealingringfordeformationordamageaftereachuse.
Reinstallbygentlypressingthesealingringoverthesealingringrack.Ensure
thatthesealingringracksitssnuglywithinthegrooveinthesealingring.
Notes: Two sealing rings are included with the cooker. Use one for sweet dishes
and one for savory dishes.
Only one sealing ring should be installed in the lid when using the cooker.
Replace the sealing ring(s) every 12 months or when the sealing ring
becomes deformed or damaged.
CAUTION
Always check for cuts or deformations in sealing ring prior to cooking. Only use
authorized Instant Pot® sealing rings. Failure to follow these instructions may cause
food to discharge, which may lead to personal injury or property damage.
CAUTION
Sealing rings may stretch over time. Do not use a stretched or damaged sealing ring.
If puckering occurs, replace sealing ring.
23
Pressure Control Features
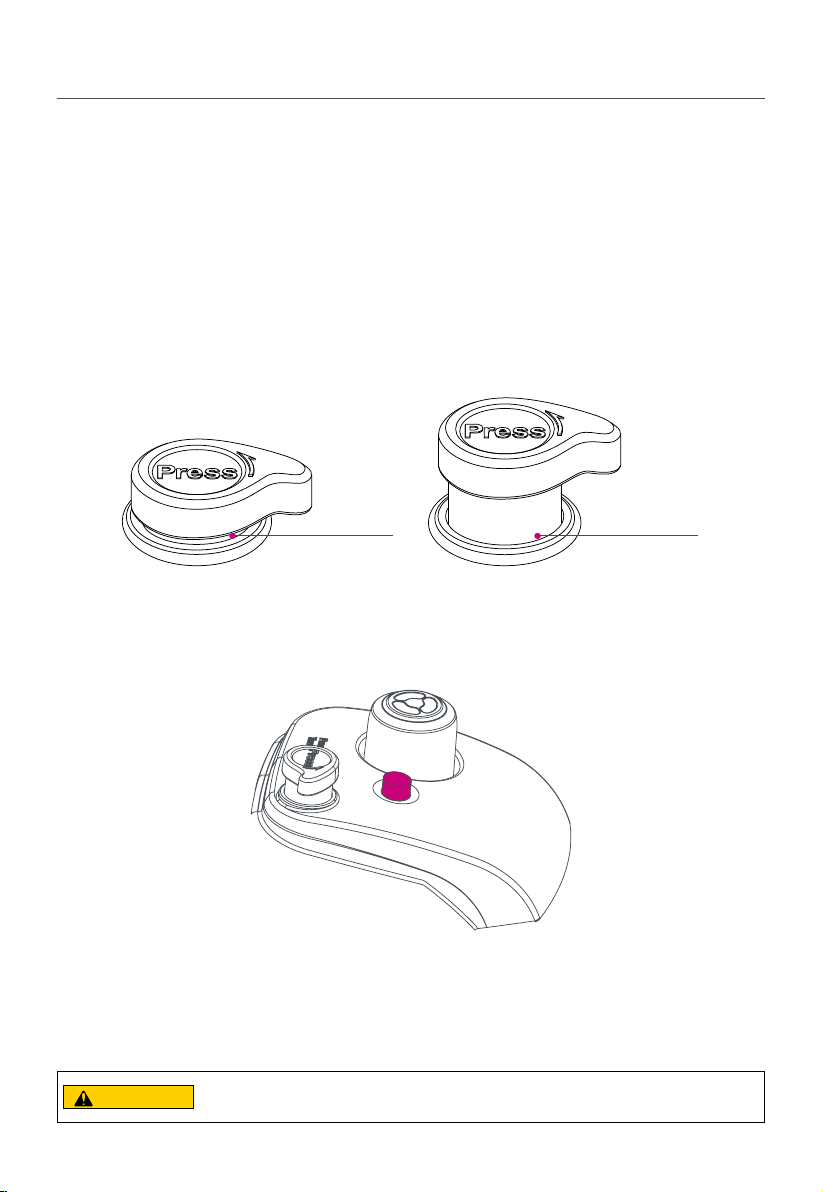
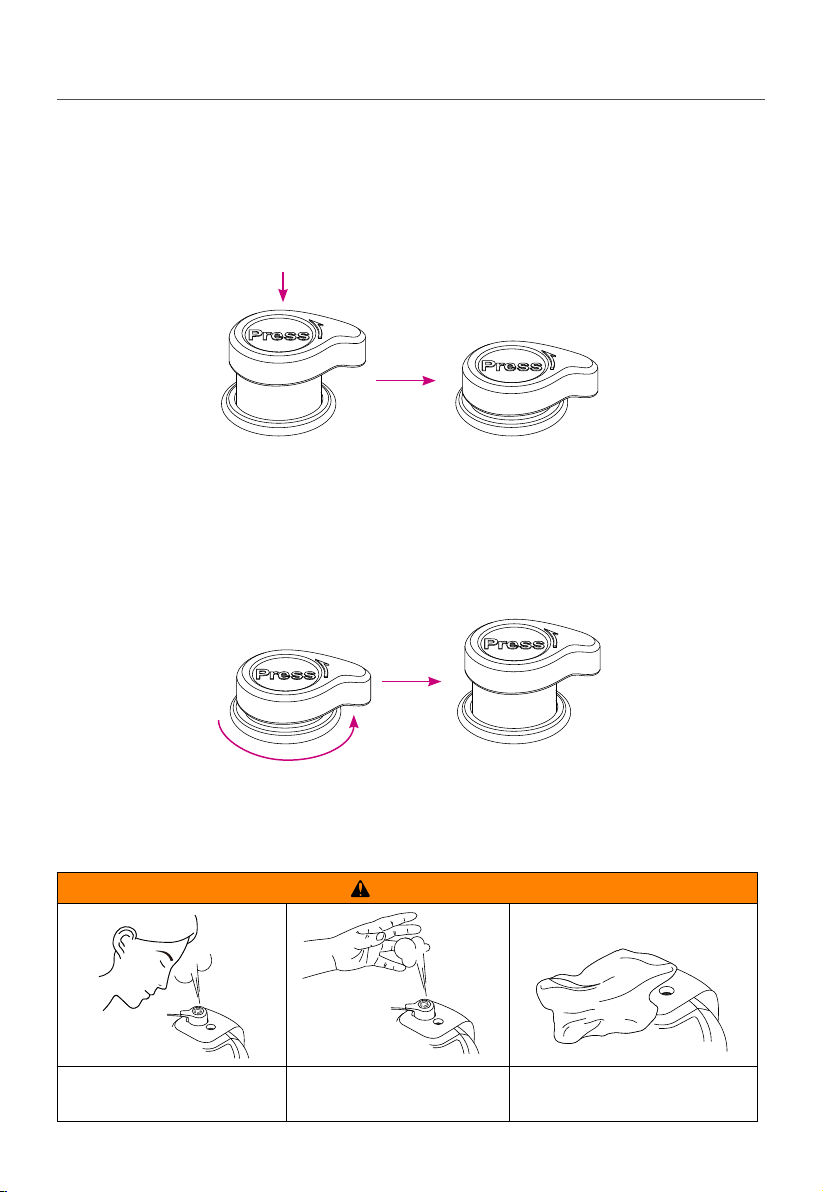
Quick Release Button
Whenthecookerlidislocked,theQuickReleaseButtonisautomaticallyset
tothesealed(up)position,sealingthecookerandallowingpressuretobuild.
(TheFloatValvewillpopupwhenthecookerispressurized.)
ReleasepressurebypressingdownontheQuickReleaseButtontoopen
theSteamReleaseValve.
ClosetheSteamReleaseValvebyturningtheQuickReleaseButton
counter-clockwiseuntilitpopsupintothesealedposition.
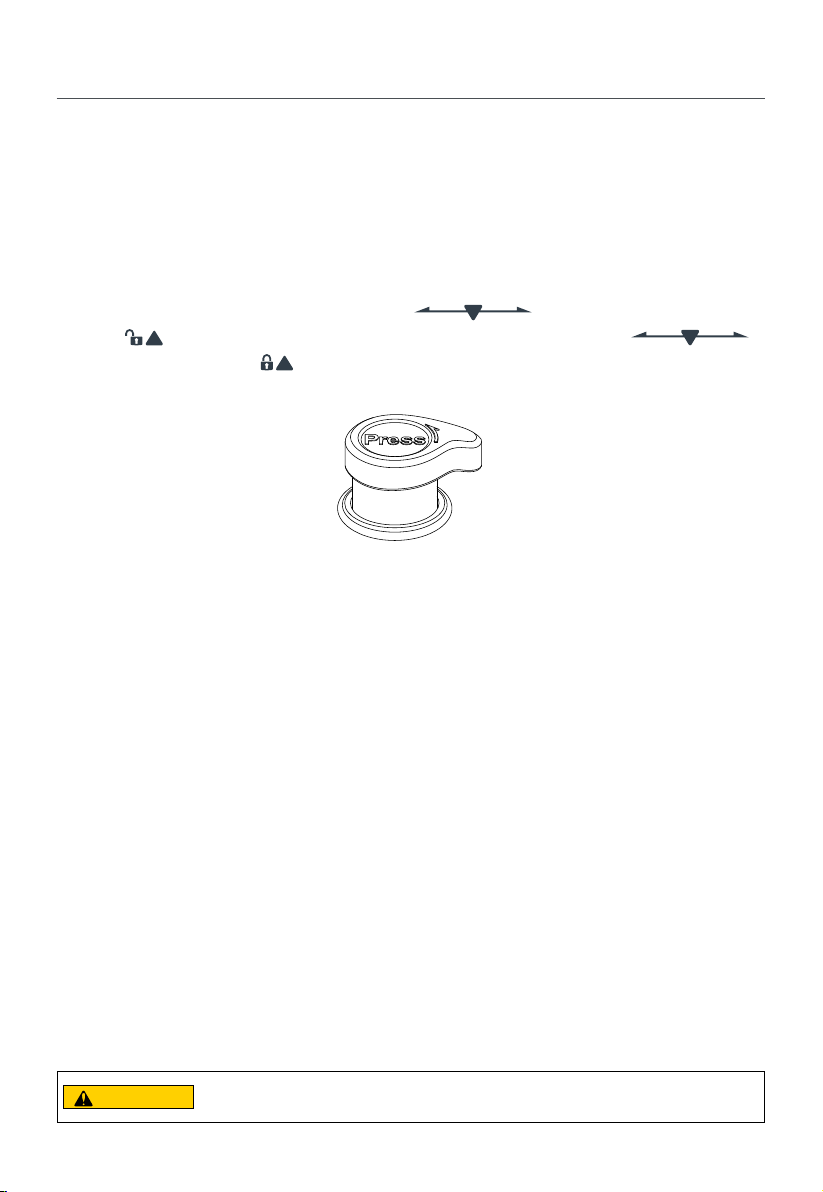
Float Valve
TheFloatValveprovidesavisualindicationofthepressurewithinthecooker.
WhentheFloatValveisup,thecookerispressurized.
CleanandinspecttheFloatValveaftereachuse.
Vent(down) Seal(up)
CAUTION
All pressure must be released and oat value must be down. Failure to follow these
instructions could result in property damage and/or personal injury.

24
Pressure Control Features
RemovetheFloatValvebypullingtheFloatValveSiliconeCapofftheFloatValve
pipe(ontheundersideofthelid)andremovingtheoatvalvefromtopoflid.
ReinstalltheFloatValvebyinsertingitpipe-rstintooatvalveholeinthetop
ofthelid.Holditinthatpositionwhilermlypressingthesiliconecaponto
thevalvepipeprotrudingfromtheundersideofthelid.
Donotattempttooperatethepressurecookerwithouttheoatvalveor
siliconecapproperlyinstalledinthecookerlid.
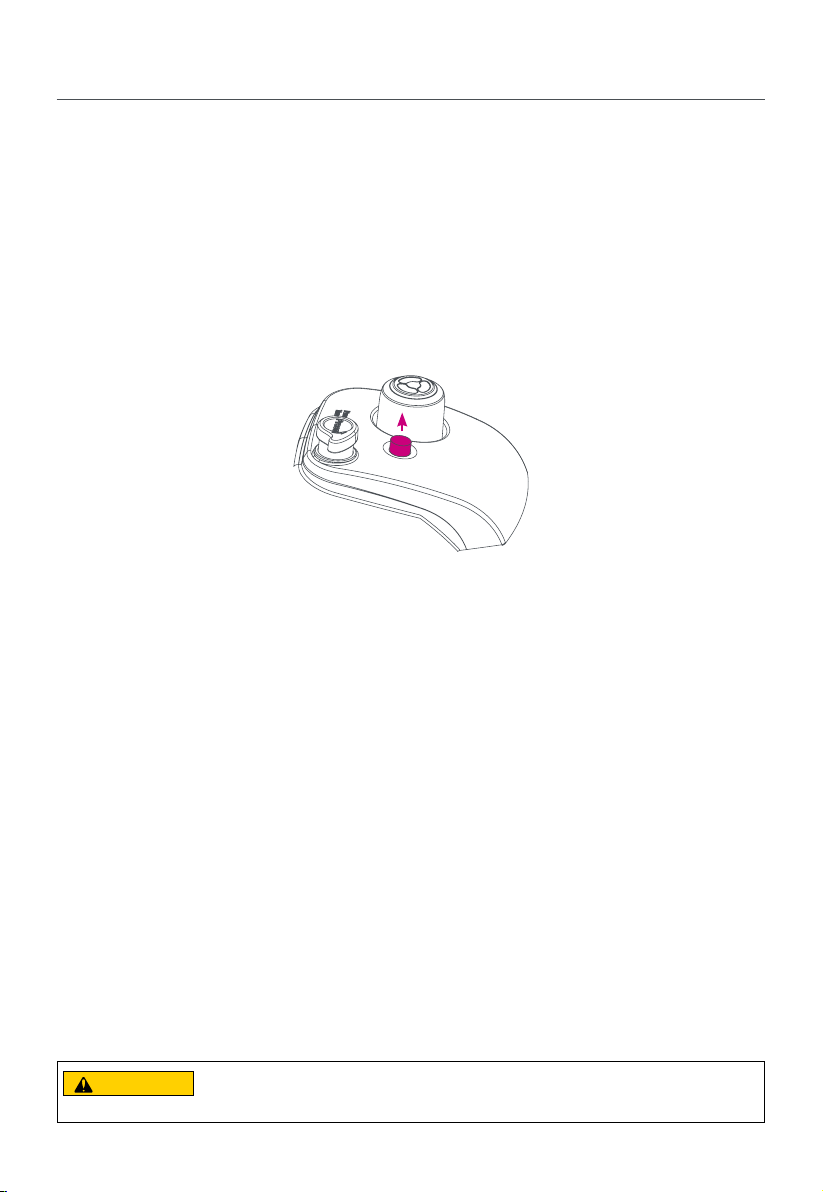
Steam Release Valve
TheSteamReleaseValve(locatedinthetopofthelid)openstoallowtherelease
ofpressurewithinthecookerwhentheQuickReleaseButtonispressed.
TheSteamReleaseValvewillalsoopenautomaticallytoregulateandmaintain
optimalpressurewhilecooking.
RemovetheSteamReleaseValvecoverbypullingitupandofftheSteam
ReleaseValvestem.
CleanandinspecttheSteamReleaseValvecoveraftereachcookeruse.
ReinstallthecoverbypressingitrmlydownwardontotheSteamRelease
Valvestemuntilitsnapsintoplace.
DonotattempttooperatethepressurecookerwithouttheSteamRelease
Valvecoverinstalled.

25
Pressure Control Features
Anti-Block Shield
TheSteamReleaseValveincludesanAnti-BlockShieldlocatedonthe
undersideofthelid.
TheAnti-BlockShieldpreventsfoodparticlesfromenteringtheSteam
ReleaseValveandaffectingtheperformanceofthecooker.
RemovebypressingrmlyagainstthesideoftheAnti-BlockShield
(pressingtowardsoutsideedgeoflid)untilitpopsoffofthespringtabs.
CleanandinspecttheAnti-BlockShieldaftereachuse.
ReinstalltheAnti-BlockShieldbycenteringitoverthespringtabsand
pressingdownrmlyuntilitsnapsintoplace.
DonotattempttooperatethepressurecookerwithouttheAnti-Block
Shieldinstalled.
26
Pressure Control Features
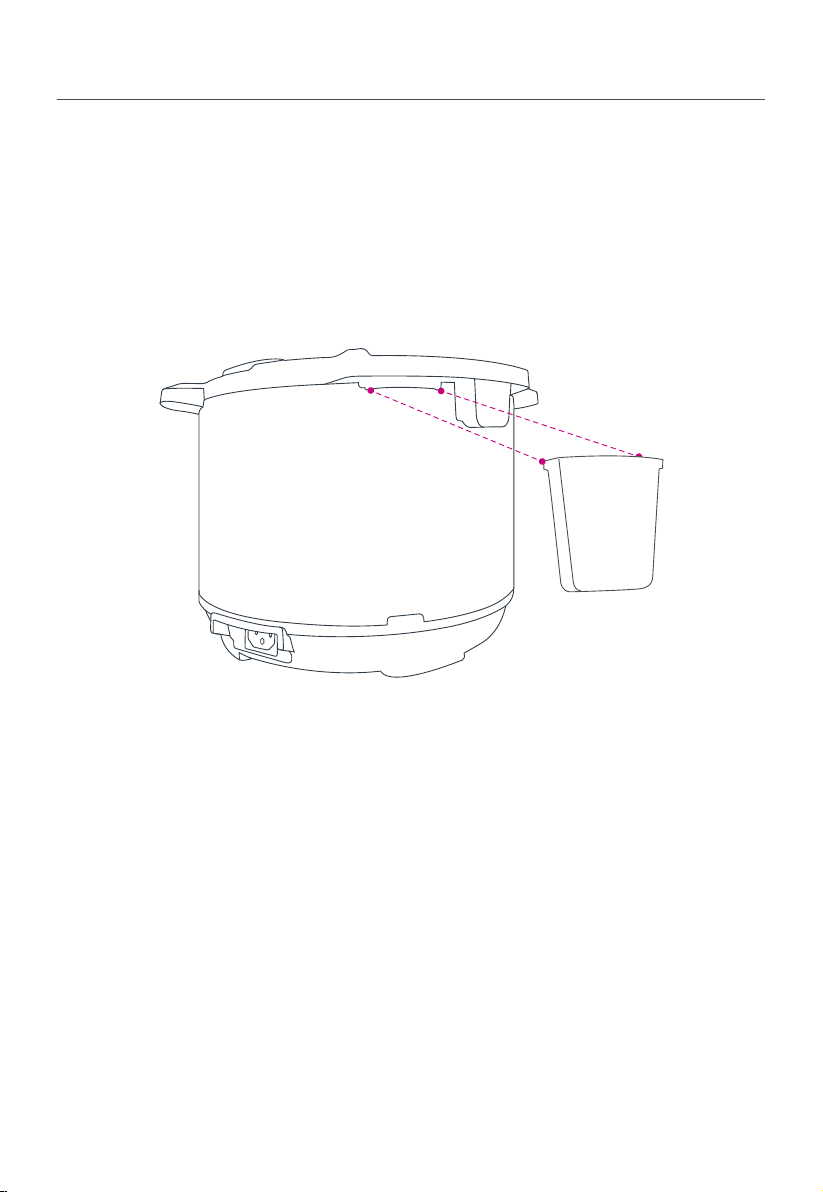
Condensation Collector
TheCondensationCollectorholdsthecondensatethatcollectsnaturallyin
theCondensationRimwhilecooking.
ToinstalltheCondensationCollector,alignandslidethegroovesoneither
sideofthetopofthereservoiroverthetabsinthereservoirholderatthe
backofthecooker.
DonotoperatethepressurecookerwithouttheCondensation
Collectorinstalled.

27
Depressurizing the Cooker (Venting Methods)
AlwaysfollowtheInstantPotpressurecookingrecipeinstructionsfor
depressurizingthecooker.Therearetwowaystoreleasepressure.Natural
Release(NR)andQuickRelase(QR).
Natural Release
Important:UseNaturalReleasetodepressurizethecookeraftercookinghigh
starchfoods(e.g.,soups,stews,chilis,pasta,oatmealandcongee)orwhen
cookingfoodsthatexpandwhencooked(e.g.,beansandgrains).
LeavetheQuickReleaseButtonintheclosedposition.Asthetemperature
withinthecookerdrops,thecookerwilldepressurizenaturallyovertime.
Depressurizationtimevarieswithvolumeoffoodandliquidinthecookerand
cantake10–40minutesorlonger.Whenthecookerissafelydepressurized,
theFloatValvedropsintothelid.
28
Depressurizing the Cooker (Venting Methods)
Quick Release
Important:Donotusequickreleasewhencookinghighstarchfoods(e.g.,
soups,stews,chilis,pasta,oatmealandcongee)orwhencookingfoodsthat
expandwhencooked(e.g.,beansandgrains).Toreleasepressurequickly,
presstheQuickReleaseButtondownuntilitlocksintoplace.
PressurewillbereleasedthroughtheSteamReleaseValve.Whenthecooker
issafelydepressurized,theFloatValvewilllowerintothelid.
Ifquickventingcreatesundesirablesteamspatter,closetheQuickRelease
Buttonbyturningitcounter-clockwiseuntilitpopsup,andtryagainafter
afewminutes.Ifspattercontinues,usetheNaturalReleaseprocedureto
releaseremainingpressure.
WARNING
Do NOT lean over steam release
valve.
Do NOT place unprotected skin
over steam release valve.
Do NOT cover steam release valve.
29
Initial Test Run
Followthesestepstoensurethatyourcookerbuildsandreleases
pressureproperly.
1. Removetheinnerpotfromthecooker
2. Add3cups(750ml)ofwatertotheinnerpot
3. Placeinnerpotincooker.
4. Placethelidonthecookerwiththe
onthelidalignedwith
the onthecookerbase.Turnthelidclockwiseuntilthe
isalignedwiththe onthecookerbase.TheQuickReleaseButtonwill
popupintothesealedposition.
5. Plugthepowercordintoa120Voutlet.(TheDisplaywillread“OFF.")
6. PressPressure CooktoselectthePressureCookSmartProgram.
7. PressKeep WarmtodeactivatetheKeepWarmoption.
8. Press“−/+”toadjustcookingtimeto“00:05."
9. After10seconds,theDisplaywillread“On”toindicatethatpre-heating
hasbegun.
10. TheFloatValvewillpopupwhenthecookerhasreachedtherequired
pressurelevel.TheDisplaywillcountdowntheremainingcookingtime.
11. TheDisplaywillread“End”whentheSmartProgramiscomplete.Press
theQuickReleaseButtondownuntilitlocksintoplace.Steamwillbe
releasedthroughtheSteamReleaseValve.TheFloatValvewilldropinto
thelidwhenthecookerisfullydepressurized.
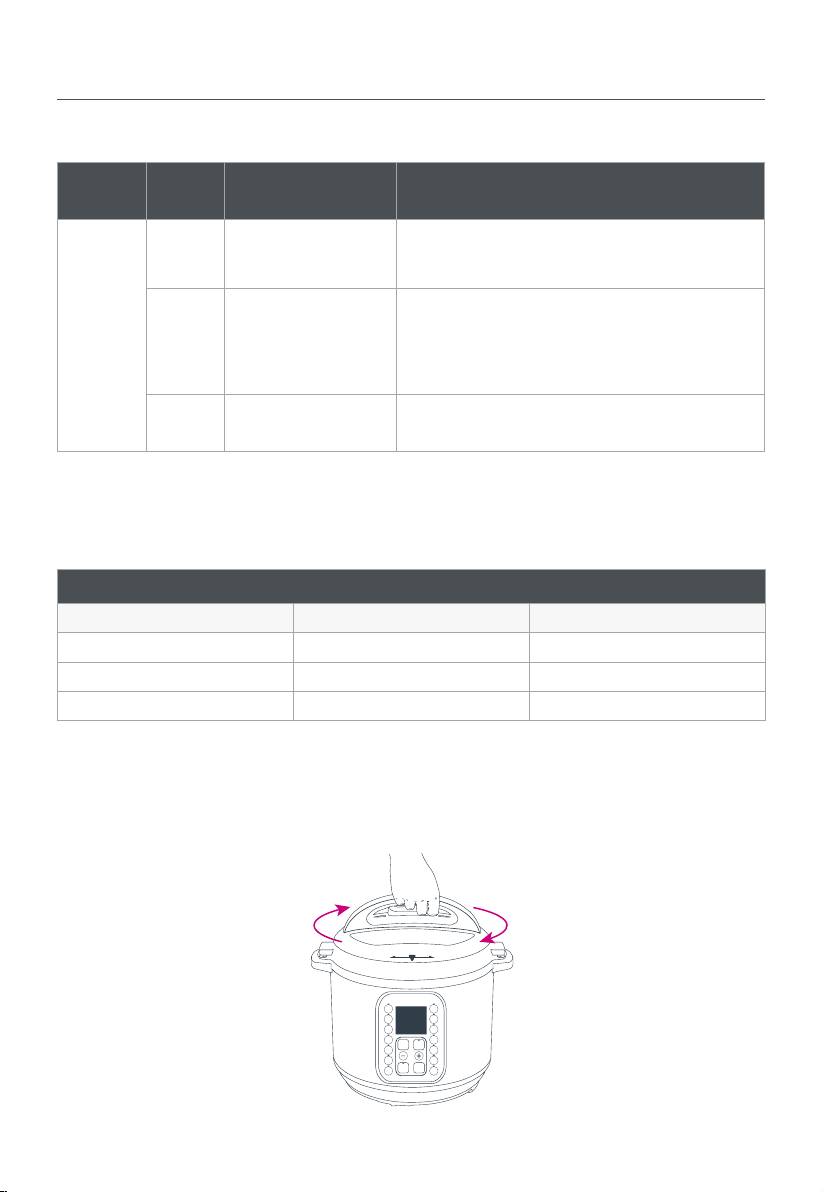
12. Turnthelidcounter-clockwisetounlock.Liftthelid,removetheinnerpot,
discardtheremainingwateranddrytheinnerpot.
CAUTION
Inner pot will be hot after cooking. Always use oven mitts or Instant Pot Mini Mitts when
handling a hot inner pot.
30
Cooking With the Duo Nova
Pressure Cooking with the Duo Nova
Pre-heating and Pressurization
Pressurecookingisafast,thoroughandenergy-efcientwaytocooka
varietyoffoods.
Heatvaporizestheliquidinsidethecookerandactivatestheoatvalve,which
popsupautomaticallytosealandallowthecookertobecomepressurized.
Itisnormaltoseesomesteamescapingthroughtheoatvalveduringthis
process.Pressurizationtimevarieswiththevolumeofliquidandfoodin
thecooker.
Cooking
Whentherequiredpressurelevelisreached,cookingbegins.TheDisplay
willcountdowntheSmartProgramcookingtimeinhoursandminutes.
Cookingtime,temperatureandpressurelevelcanbeadjustedwhilethe
SmartProgramisrunning.
TheDisplaywillread“00:00”whentheSmartProgramiscomplete.
IfKeep Warmisactivated,theDisplayshowstheelapsedtimeafterSmart
Programcookinghasended.
Depressurizing
AlwaysfollowtheInstantPotpressurecookingrecipeforthecorrectpressure
ventingprocedure.
CAUTION
Do not attempt to remove lid while cooker is pressurized. See "Depressurizing the
Cooker" for more information on releasing pressure. Failure to follow the instructions
may result in property damage and/or personal injury.
31
Cooking With the Duo Nova
Using the Pressure Cooking Smart Programs
FollowthesestepswhenusingpressurecookingSmartPrograms.
1. Addliquidandfoodtotheinnerpotasdirectedbytherecipe.
Size Minimum Liquid*
3Quarts/2.8Litres 1cup(8oz/250ml)
6Quarts/5.7Litres 11/2cups(12oz/375ml)
8Quarts/7.6Litres 2cups(16oz/500ml)
2. Placetheinnerpotinthecooker.
3. Placethecookerlidonthebase,alignthe
withthe and
turnclockwisetolock inplace.Thelidwillautomaticallybeinthe
sealedpositionandthequickreleasebuttonwillbeup.
CAUTION
Liquids must be water-based. To avoid scorching or scalding injury, be cautious when
cooking with more than 1/4 cup (2 oz / 60 mL) oil, oil-based sauces, condensed
cream-based soups, and thick sauces. Add suitable liquid to thin sauces. Avoid recipes
that call for more than 1/4 cup (2 oz / 60 mL) of oil or fat content.
CAUTION
Do not ll inner pot higher than "PC MAX—2/3" line indicated on inner pot. When
cooking foods that expand such as rice or beans, do not ll the appliance over
"—1/2" line indicated on inner pot.

32
Cooking With the Duo Nova
4. PressapressurecookingSmartProgramkey.
5.
PresstheSmartProgramkeyrepeatedlytocyclethrough
andselectaSmartProgramcookingtime/temperaturesetting.
6.
PressPressure LeveltotogglebetweentheLowandHigh
pressureoptions.
7. Press
toadjustcookingtime.
Note: When cooking begins, pressure cooking settings adjustments will be saved
and remembered the next time the Smart Program is selected.
8. PressKeep WarmtoturntheKeepWarmoptiononoroff.
9. PressDelay Startandthe“−/+”controlstosetthehoursandminutes
beforetheSmartProgrambegins.
DelayStartcountdownwillbeginautomaticallyafter10seconds.
IfDelayStartisactive,theDisplaywillshowthetimeremaininguntil
theSmartProgramcookingbegins.
WhentheSmartProgrambegins,theDisplaywillread“On”toindicate
thatpreheatingisinprogress.
Whenthecookerreachesthetargetcookingtemperature,cooking
beginsandtheDisplaywillcountdowntheremainingcookingtime.
TheDisplaywillread“End”whentheSmartProgramiscomplete.
FollowtheInstantPotrecipedirectionsforcookerdepressurization
beforeattemptingtoremovethelid.
ToendtheSmartProgramatanytime,pressCancel.
WARNING
Until cooker pressurizes and oat valve has popped up, lid will be removable. Once
pressurized, lid will lock. To avoid scalding injury, do not attempt to force lid open
while cooker is pressurized. Failure to follow these instruction may result in property
damage and/or personal injury.

33
Pressure Cooking Default Settings
Smart
Program
Settings and Default
Soup/Broth
Pressure Low(35–55kPa/5–8psi) High(65–85kPa/9.4–12.3psi)
Setting Less Normal More Less Normal More
DefaultCooking
Time(adjustable)
00:20 00:30 04:00 00:20 00:30 04:00
Meat/Stew
Pressure Low(35–55kPa/5–8psi) High(65–85kPa/9.4–12.3psi)
Setting Less Normal More Less Normal More
DefaultCooking
Time(adjustable)
00:20 00:35 00:45 00:20 00:35 00:45
Bean/Chili
Pressure Low(35–55kPa/5–8psi) High(65–85kPa/9.4–12.3psi)
Setting Less Normal More Less Normal More
DefaultCooking
Time(adjustable)
00:25 00:30 00:40 00:25 00:30 00:40
Poultry*
Pressure Low(35–55kPa/5–8psi) High(65–85kPa/9.4–12.3psi)
Setting Less Normal More Less Normal More
DefaultCooking
Time(adjustable)
00:05 00:15 00:30 00:05 00:15 00:30
Rice
Pressure Low(35–55kPa/5–8psi) High(65–85kPa/9.4–12.3psi)
Setting Less Normal More Less Normal More
DefaultCooking
Time(adjustable)
00:08 00:12 00:15 00:08 00:12 00:15
Multigrain*
Pressure Low(35–55kPa/5–8psi) High(65–85kPa/9.4–12.3psi)
Setting Less Normal More Less Normal More
DefaultCooking
Time(adjustable)
00:20 00:40
01:00
(+00:45
soaking
time)
00:20 00:40
01:00
(+00:45
soaking
time)
Porridge or
Oatmeal
Pressure Low(35–55kPa/5–8psi) High(65–85kPa/9.4–12.3psi)
Setting Less Normal More Less Normal More
DefaultCooking
Time(adjustable)
00:05 00:20 00:30 00:05 00:20 00:30

34
Pressure Cooking Default Settings
Smart
Program
Settings and Default
Steam
Pressure Low(35–55kPa/5–8psi) High(65–85kPa/9.4–12.3psi)
Setting Less Normal More Less Normal More
DefaultCooking
Time(adjustable)
00:03 00:10 00:15 00:03 00:10 00:15
Pressure
Cook
Pressure Low(35–55kPa/5–8psi) High(65–85kPa/9.4–12.3psi)
Setting Less Normal More Less Normal More
DefaultCooking
Time(adjustable)
00:20 00:35 00:45 00:20 00:35 00:45
* Not available on Duo Nova 3 Quart models.
CAUTION
Always use a meat thermometer to ensure the internal temperature of meats reaches a
safe minimum internal temperature.

35
Pressure Cooking Tips
Smart
Program
Setting Suggested Use Note
Soup/
Broth
Less Soupwithoutmeat
Liquidremainsclearduetolackof
boilingmotion.
AlwaysuseNRtoreleasepressure
whencookingsoupwithahigh
starchcontent.
Normal Soupwithmeat
More Richbonebroth
Meat/
Stew
Less Softtexture
Choosesettingbasedonmeat
texturedesired,oradjustcooktime
manually.
Allowmeatto“rest”for5–30minutes,
dependingonsize.Itwillretaincook-
ingjuicesfortender,succulentmeat.
Normal Verysofttexture
More Fall-off-the-bonetexture
Bean/
Chili
Less Firmertexture
Choosesettingbasedonbean
texturedesired,oradjustcooktime
manually.
Whencookingbeansorlegumes,
alwaysuseNRtoreleasepressure.
Ensuredrybeansarecompletely
submergedinwater.
Normal Softtexture
More Verysofttexture
Poultry*
Less Softtexture
Choosesettingbasedonpoultry
texturedesiredoradjustcooktime
manually.
Allowmeatto“rest”for5–30minutes,
dependingonsize.Itwillretaincook-
ingjuicesfortender,succulentmeat.
*6 & 8 Quart only – Mini use Pressure
Cook.
Normal Verysofttexture
More Fall-off-the-bonetexture
Rice
Less Tenderbutrmtobite
Forcookingmediumandlong-grain
whiterice.
Dependingonthevolumeofrice,
cooktimemayrangefrom8–15
minutes.
Use10-MinuteNaturalReleaseafter
cookingforperfectresults.
Normal Normaltexturewhiterice
More Softertexturewhiterice

36
Pressure Cooking Tips
Smart
Program
Setting Suggested Use Note
Multi-
grain*
Less
Brownrice,wildrice,black
beans,chickpeas,etc.
Select“Less”or“Normal”basedon
typeofgrainanddesiredtexture.
“More”beginswith45minutesof
warmwatersoakingtimepriorto60
minutesofpressurecooking.
*6 & 8 Quart only – Mini use Pressure
Cook.
Normal
Brownrice,wildrice,mung
beans,etc.
More
Toughgrainsora
mixtureofgrainsandbeans
Porridge
Less Oatmeal—steelcutorrolled
Adjusttimeasdirectedinrecipe.
AlwaysuseNRtoreleasepressure
whencookingfoodsthatexpand.
Normal Whiterice,porridge/congee
More
Riceporridge/congeewitha
mixtureofvariousgrains
Steam
Less Vegetables
Usesteamrackprovidedtoelevate
foodabovethecookingliquid.
UseQRtoreleasepressuretopre-
ventfoodfromovercooking.
Normal FishandSeafood
More Meat
Pressure
Cook
NA Manualprogramming
PressPressure Leveltotogglebe-
tweenHighandLowpressure.
Use+ / - keystoadjustcooktime.
Adjustaccordingtorecipeforde-
siredresults.
37
Non-Pressure Cooking With the Duo Nova
Followthesestepswhenusingnon-pressurecookingSmartPrograms.
Slow Cook
1. Addliquidandfoodtotheinnerpot.
2. Placetheinnerpotinthecooker.
3. Lockthecookerlidinplace,oralternativelyyoucancoverthecooker
withanInstantPotGlassLid(purchasedseparately).
4. PresstheQuickReleaseButtondowntoensurethattheSteamRelease
Valveisopen.

38
Non-Pressure Cooking With the Duo Nova
5. PressSlow Cook.
6.
PressSlow Cookagaintoadjustthecookingtemperature.
Setting Suggested Use
Less 4.5hoursto97–100°C/207–212°F
Normal 3.5hoursto97–100°C/207–212°F
More 2.5hoursto97–100°C/207–212°F
Time to reach target temperature can be +/− 30 minutes from set time.
7. Press toadjustcookingtime.
Note: When cooking begins, the setting will be saved and remembered the
next time the Smart Program is selected.
Optionally,pressKeep Warmtoturnthefoodwarmingoptiononoroff.
Optionally,pressDelay Startandusethe“−/+”controlstoadjustthe
durationofthedelay.
TheSlow CookSmartProgramwillbeginautomaticallyafter10seconds.
IfDelayStartisactive,Displaywillcountdownthetimeremaininguntilthe
SmartProgrambegins.
WhentheSmartProgrambegins,theDisplaywillread“On”toindicate
thatpreheatingisinprogress.
Whencookingbegins,theDisplaywillcountdowntheremaining
cookingtime.
TheDisplaywillread“End”whentheSmartProgramiscomplete.
ToendtheSmartProgramatanytime,pressCancel.

39
Non-Pressure Cooking With the Duo Nova
Smart Program – Sauté
1. Placetheinnerpotinthecooker.
2. PressSauté.
3.
PressSautéagaintoadjustthecookingtemperature.
Setting Suggested Use
Less Simmering,thickeningandreducingliquids
Normal Pansearingorsautéing
More Stir-fryingorbrowningmeat
Note: Cooking temperature adjustments will be saved to the Smart Program when
cooking begins.
TheSautéSmartProgramwillbeginautomaticallyafter10secondsand
theDisplaywillread“On”toindicatethatheatingisinprogress.
Whenthecookerhasreachedthetargetcookingtemperature,the
Displaywillread“Hot”toindicatethatfoodmaybeaddedtotheinnerpot.
Note: The Display may alternate between “On” and “Hot” during cooking to
indicate that the cooker is maintaining the target cooking temperature.
TheDisplaywillread“End”whentheSmartProgramiscomplete.
ToendtheSmartProgramatanytime,pressCancel.Youcannotuse
theKeep WarmfunctionwithSauté.
WhenusingSautémodewithpressurecooking,alwaysensureyou
deglazethepotafteryouarenishedsautéingandbeforeyou
pressurecookasfoodcangetstuckonthebottomoftheinnerpot.
Deglazinginvolvesaddingathinliquidlikewaterorbrothtothehot
surfaceandscrapingthebottomwithasiliconescraperorwooden
spatulatoremoveanythingthatmaybestucktothebottom.
Deglazingalsoaddsavortoyourdishandcanpreventgettinga
"burn"notice.
WARNING
When sautéing, food may burn if unmonitored. To avoid burning, do not leave cooker
unattended and do not use a lid.
40
Non-Pressure Cooking With the Duo Nova
Smart Program – Yogurt
Smart
Program
Setting Suggested Use Note
Yogurt
Less
ForJiuNiang,asweet
fermentedglutinous
ricedessert
Defaultfermentationtimeis"24:00"hours.
Adjusttimebasedonrecipe.
Normal
Fermentingmilkafter
curlturehasbeen
added
Defaultfermentationtimeis"08:00"hours.
Adjustasdesiredupto"99:30"hours.
"yogt"willbedisplayedon-screenwhen
completed.
More Pasteurizingmilk
"boiL"willbedisplayedwhileProgramisrunning.
"yogt"willbedisplayedwhencompleted.
Step 1 – Pasteurize Milk
1. Addmilktotheinnerpot.
Minimum and Maximum Milk Volumes
Duo Nova Model Minimum Maximum
3Quart/2.8Litres 2cups(6.7oz/473.2mL) 2quarts(80oz/2.3L)
6Quart/5.7Litres 4cups(32oz/946.4mL) 4quarts(128oz/4.5L)
8Quart/7.6Litres 6cups(50oz/1419.5mL) 6quarts(240oz/6.8L)
2. Placetheinnerpotinthecooker.
3. Lockthecookerlidinplace.

41
Non-Pressure Cooking With the Duo Nova
4. PresstheQuickVentControldowntoensurethattheSteamRelease
Valveisopen.
5. PressYogur t.
6. PressYogur tagaintoadjustthecookingtemperaturetoMore.
TheDisplaywillread“boiL."
TheYogurtSmartProgramwillbeginautomaticallyafter10seconds.
WhenthecookerhasreachedthetargetcookingtemperatureforStep1,
theDisplaywillread“End”andreturntoStandbymode.
Note: Use a thermometer to ensure that the milk has reached the pasteurization
temperature of 161°F / 72°C.
Step 2 – Add Starter Culture
1. Removetheinnerpotfromthecookerandallowthemilktocool.
2. Addstarterculturetothemilkinaccordancewiththeinstructions
includedwithstartercultureproduct.
Note: Plain yogurt with active cultures can also be used as a starter. Follow a
trusted Instant Pot yogurt recipe when using yogurt as a starter culture.
3. Placetheinnerpotinthecooker.
4. Lockthecookerlidinplace.
5. PresstheQuickReleaseButtondowntoensurethattheSteamRelease
Valveisopen.

42
Non-Pressure Cooking With the Duo Nova
Step 3 - Ferment
6. PressYogur t.
7. PressYogurtagaintoadjustthecookingtemperaturetoNormal.
TheDisplaywillread“08:00”(i.e.,thedefaultfermentationtime).
Optionally,press“−/+”toadjustfermentationtime.
TheYogur tSmartProgramwillbeginautomaticallyafter10seconds
andtheDisplaywillshowtheelapsedcookingtime.
TheDisplaywillread“End”whentheSmartProgramiscomplete.
ToendtheSmartProgramatanytime,pressCancel.
Using Pre-measured Yogurt Cups
Pre-measuredyogurtcupscanbeusedwiththeYogurtSmartProgram.
1. Transferthemilktothepre-measuredyogurtcups.
2. Sealthepre-measuredyogurtcups.
3. Cleantheinnerpotthoroughly.
4. PlacetheSteamRackinthebottomoftheInnerPot.
5. PlacethesealedyogurtcupsontheSteamRackandaddwatertothe
InnerPotuntilthecupsaresubmergedhalfway.

43
Non-Pressure Cooking With the Duo Nova
Smart Program - Keep Warm (Manual)
1. WiththecookerinStandbymode,pressKeep Warm.
2.
PressKeep Warmagaintotogglethroughthe
Less/Normal/Moretemperaturesettings.SeeDefaultSettings
onnextpage.
3.
Press“−/+”toadjustthewarmingtimetoamaximumof99:50hours.
Note: Keep Warm function will count up.

44
Non-Pressure Cooking Default Settings
Smart Program Settings and Defaults
Slow Cook
Setting Less Normal More
DefaultCooking
Time(adjustable)
08:00 06:00 04:00
Cooking
Temperature
(notadjustable)
97–100°C/207–212°F
Sauté
Setting Less Normal More
DefaultCooking
Time(not
adjustable)
00:30
Cooking
Temperature
(notadjustable)
105°C/221°F 169°C/156°F 174°C/345°F
Yogurt
Setting Less Normal More
DefaultCooking
Time
24:00(adjustable) 08:00(adjustable)
boiL(not
adjustable)
Cooking
Temperature
(notadjustable)
33°C/91.5°F 42°C/108°F
83–88°C/
181.4–190.4°F
Keep Warm
Setting Less Normal More
Cooking
Temperature
(notadjustable)
56°C/133°F 63°C/145°F 74°C/165°F

45
Care & Cleaning
Cleanthepressurecookeraftereachuse.Alwaysensuretheinnerpotisdry
ontheoutsidebeforeinsertingintothecookerbaseandthatthecookerbase
isfreeoffoodordebris.
Alwaysunplugthecookerandletitcooltoroomtemperaturebeforecleaning.
Neveruseharshchemicaldetergents,scouringpads,orpowderstoclean
anypartofthecooker.
Cleaning Method Part Cleaning Tip
Dishwasher Safe
or Hand Wash
Accessories
•SteamRack
•CondensationCollector
Neveruseharshchemical
detergents,powdersorscouring
padsonaccessories
Placeontoprackofdishwasher
Washaftereachuse
Lid
SmallParts
•Anti-BlockShield
•SealingRing
•SteamReleaseHandle
•FloatValve
•FloatValveSiliconeCap
Removesmallpartsfromlidbefore
washing
Inspectandcleansteamreleasepipe
regularly
Washaftereachusewithhotwater
andmilddishsoap
Allsmallpartsshouldberemoved
onceeveryfewcookingcyclesfor
routinecleaning,andanytimethere
isvisiblefoodparticles
InnerPot
Donotuseabrasivecleanersor
scouringpadsoninnerpot
Acutehardwaterstainingmay
requirescrubbingwithavinegar
dampenedsponge
Washaftereachuse
Ensureallsurfacesaredrybefore
placingincookerbase
Damp Wash Only
DetachablePowerCord
(3&6QuartOnly)
Useabarelydampclothtowipeany
particlesoffpowercord.
CookerBase
Wipetheinsideoftheouterpotas
wellasthecondensationrimwitha
barelydampcloth,andallowtoair
dry
Cleancookerbaseandcontrolpanel
withasoft,barelydampclothor
sponge
46
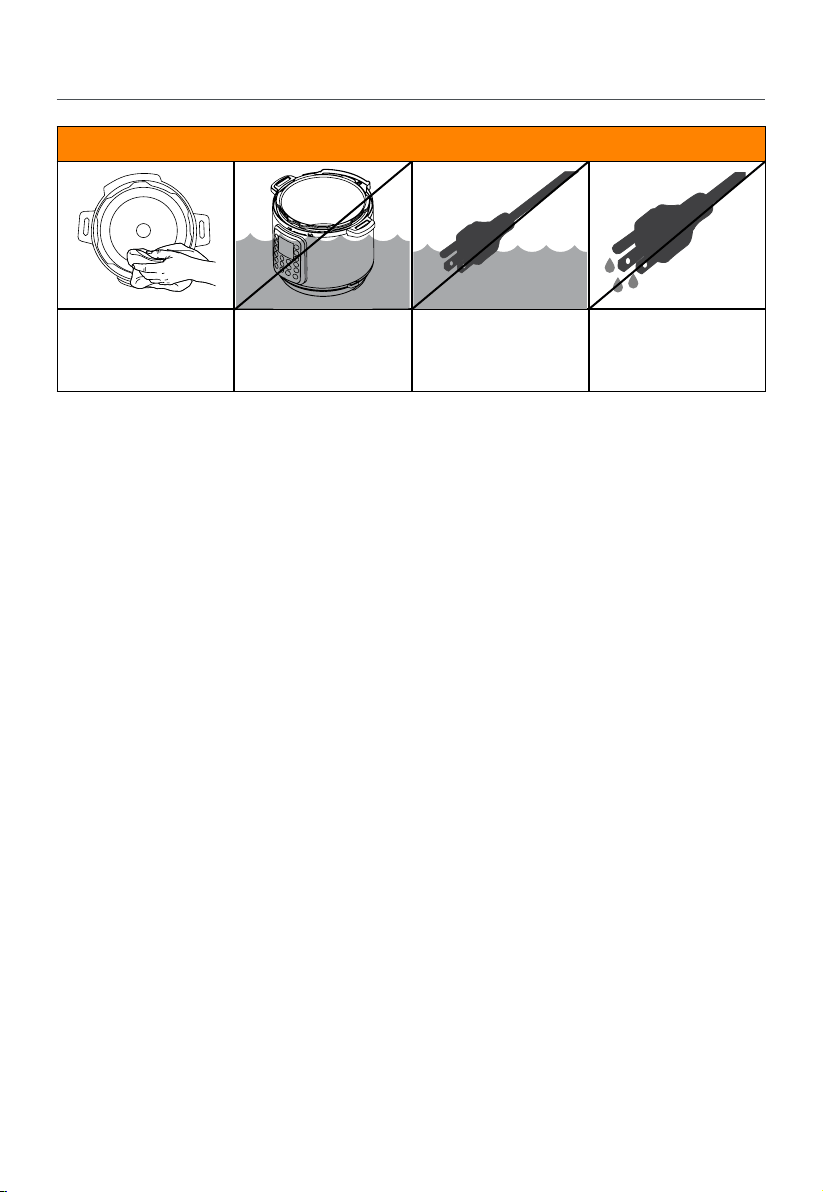
Care & Cleaning
Ensure heating element
remains dry at all times.
Do not immerse
cooker base in water
or attempt to cycle
through dishwasher.
Do not submerge
power cord at any time.
Do not wet prongs
of power cord.

47
Troubleshooting
Registeryourproducttodayatinstantpot.com/support/register.Tocontact
CustomerCare,call1 800 828 7280,emailsupport@instantpot.comor
chatinstantpot.com/#Chat.
Problem Possible Reason Solution
Difculty
closing lid
Sealingringnotproperly
installed
Repositionsealingring,ensureitissnugbehind
sealingringrack
Floatvalveinthe
popped-upposition
Gentlypresstheoatvalvedownwardwithalong
utensil
Contentsincookerare
stillhot
Turnsteamreleasehandletowards"Venting"
position,thenlowerlidontocookerbaseslowly,
allowingheattodissipate
Difculty
opening lid
Pressureinsidethe
cooker
Releasepressureaccordingtorecipe;onlyopen
lidafteroatvalvehasdroppeddown
Floatvalvestuckatthe
popped-uppositiondue
tofooddebrisorresidue
Ensuresteamiscompletelyreleasedbyquick
releasingpressure,thenpressoatvalve
gentlywithalongutensil.Openlidcautiously.
Thoroughlycleanoatvalve,surroundingarea,
andlidbeforenextuse.
CAUTION
Contents may be under pressure. To avoid scalding injury, do
not attempt to force lid open.
Inner pot is
stuck to lid when
cooker is opened
Coolingofinnerpot
maycreatesuction,
causinginnerpotto
adheretothelid
Toreleasethevacuum,turnsteamreleasehandle
towards"Venting"position
Steam leaks from
side of lid
Sealingringdamagedor
notinstalledproperly
Replacesealingring
Lidnotclosedproperly Openthencloselid
Sealingringrackis
warpedoroff-centre
Removesealingringfromlid,checksealingring
rackforbendsorwarps,contactCustomerCare
Fooddebrisattached
tosealingring
Removesealingringandcleanthoroughly
Innerpotrimmaybe
misshapen
CheckfordeformationandcontactCustomer
Care

48
Troubleshooting
Problem Possible Reason Solution
Float valve
does not rise
Fooddebrisonoat
valveoroatvalve
siliconecap
Removeoatvalvefromlidandcleanthoroughly;
perform"Initial Test Run"tocheckforfunction;
contactCustomerCare
Toolittleliquidinthe
innerpot
Checkforscorchingonbottomofinnerpot;add
11/2cups(12oz/325mL)liquidtoinnerpot
Floatvalvesiliconecap
worn,damagedormissing
Installorreplaceoatvalve
Floatvalveobstructedby
lid-lockingmechanism
Tapoatvalvewithalongutensil.Ifnotresolved,
turncookeroffandremovesmallpartsfromlid;
cleanthoroughlyandre-install,thenperform
"Initial Test Run"tocheckforfunction;contact
CustomerCare
Noheatintheinnerpot
Perform"Initial Test Run"tocheckforfunction;
contactCustomerCare
Innerpotbasemaybe
damaged
Perform"Initial Test Run"tocheckforfunction;
contactCustomerCare
Minor steam
leaking/hissing
from steam
release handle
during cook cycle
Steamreleasehandle
notin"Sealing"position
Turnsteamreleasehandleto"Sealing"position
Cookerisregulating
excesspressure
Thisisnormal;noactionrequired
Steam gushes
from steam
release handle
when in "Sealing"
position
Notenoughliquidinthe
innerpot
Add11/2cups(12oz/325mL)ofathincooking
liquidtoinnerpot
Pressuresensorcontrol
failure
ContactCustomerCare
Steamreleasehandle
notseatedproperly
Turnsteamreleasehandleto"Sealing"position
Display remains
blank after
connecting the
power cord
Badpowerconnection
ornopower
Inspectpowercord;ensuredetachablepower
cordispluggedtightlyintobasepowersocket;
checkoutlettoensureitispowered
Cooker'selectricalfuse
hasblown
ContactCustomerCare
Occasional
clicking or light
cracking sound
Thesoundofpower
switchingandexpanding
pressureboardwhen
changingtemperatures
Thisisnormal;noactionrequired
Bottomoftheinnerpot
iswet
Wipebottomofinnerpot,andensureheating
elementisdrybeforecooking

49
Error Codes
Problem Possible Reason Solution
Error code
appears on
display and
cooker beeps
continuously
C1
C2
C6
C6H
C6L
Faultysensor ContactCustomerCare.
C5
Temperatureistoohigh
becauseinnerpotisnot
placedinthecooker
base
PressCancelandwaitforheatingelementto
cool;ensuretherearenoforeignobjectsin
cookerbase;insertorrepositioninnerpotin
cookerbaseandre-entercommands.
Temperatureistoohigh
becausethereisno
waterininnerpot
Checkforscorchingonbottomofinnerpot;
removeifnecessary.
Addthin,water-basedliquidtoinnerpot
basedonsize:
3Qt-1cup|6Qt-11/2cups
8Qt-2cups
C7
or
NoPr
Heatelementhasfailed ContactCustomerCare
Notenoughliquid
Addthin,water-basedliquidtoinnerpot
basedonsize:
3Qt-1cup|6Qt-11/2cups
8Qt-2cups
Steamreleasehandleis
inthe“Venting”position
Turnsteamreleasehandleto“Sealing”
position.
Lid
Lidisnotinthecorrect
positionfortheselected
program
Openandclosethelid.
DonotusealidwhenusingSauté.
OvHt/
Burn/
Foodburn
Hightemperature
detectedatbottom
ofinnerpot;cooker
automaticallyreduces
temperaturetoavoid
overheating
Starchdepositsatthebottomoftheinnerpot
mayhaveblockedheatdissipation.
Turnthecookeroff,releasepressure
accordingtotherecipe,andinspectthe
bottomoftheinnerpot.
PrSE
Pressurehas
accumulatedduringa
non-pressurecooking
program
Turnsteamreleasehandleto“Venting”
position.
Iftheproblemspersistorforanyserviceissue,contactanauthorizedservicerepresentative
at[email protected]orbycreatingasupportticketinstantpot.com/support.
DONOTATTEMPTTOSERVICETHEAPPLIANCEYOURSELF.

50
Warranty
Limited Warranty
This Limited Warranty is effective for one year from the date of original consumer purchase. Proof of original
purchase date and, if requested by an authorized representative of Instant Brands Inc. (“Instant Brands”), return of
your appliance, is required to obtain service under this Limited Warranty. Provided that this appliance is operated
and maintained in accordance with written instructions attached to or furnished with the appliance, Instant Brands
will, in its sole and exclusive discretion, either: (i) repair defects in materials or workmanship; or (ii) replace the
appliance. In the event that your appliance is replaced, the Limited Warranty on the replacement appliance will
expire 12 months from the date of original consumer purchase.
This Limited Warranty extends only to the original purchaser and use of the appliance
in the United States of America and Canada. This warranty does not cover units that are
used outside of the United States of America and Canada.
Any modication or attempted modication to your appliance may interfere with the safe operation of the
appliance and will void this Limited Warranty. This Limited Warranty does not apply in respect of any appliance
or any part thereof that has been altered or modied unless such alterations or modications were expressly
authorized by an Instant Brands representative.
Limitation and Exclusions
The liability of Instant Brands, if any, for any allegedly defective appliance or part shall in no circumstances exceed
the purchase price of a comparable replacement appliance.
This Limited Warranty does not cover:
1. Damage resulting from accident, alteration, misuse, abuse, neglect, unreasonable use, use contrary to the
operating instructions, normal wear and tear, commercial use, improper assembly, disassembly, failure to
provide reasonable and necessary maintenance, re, ood, acts of God or repair by anyone unless directed by
an Instant Brands Representative;
2. Repairs where your appliance is used for other than normal, personal use or when it is used in a manner that is
contrary to published user or operator instructions; or
3. Use of unauthorized parts and accessories, or repairs to parts and systems resulting from unauthorized repairs
or modications made to this appliance.
The cost of repair or replacement under these excluded circumstances shall be paid by you.

51
Warranty
Disclaimer of Implied Warranties
EXCEPT AS EXPRESSLY PROVIDED HEREIN AND TO THE EXTENT PERMITTED BY LAW, INSTANT BRANDS MAKES
NO WARRANTIES, CONDITIONS OR REPRESENTATIONS, EXPRESS OR IMPLIED, BY STATUTE, USAGE, CUSTOM OF
TRADE OR OTHERWISE WITH RESPECT TO THE APPLIANCES OR PARTS COVERED BY THIS WARRANTY, INCLUDING
BUT NOT LIMITED TO, WARRANTIES, CONDITIONS, OR REPRESENTATIONS OF WORKMANSHIP, MERCHANTABILITY,
MERCHANTABLE QUALITY, FITNESS FOR A PARTICULAR PURPOSE OR DURABILITY.
Some states or provinces do not allow for the exclusion of implied warranties of merchantability or tness, so
this limitation may not apply to you. In these states and provinces, you have only the implied warranties that are
expressly required to be provided in accordance with applicable law.
Limitation of Remedies; Exclusion of Incidental and Consequential Damage
YOUR SOLE AND EXCLUSIVE REMEDY UNDER THIS LIMITED WARRANTY SHALL BE APPLIANCE REPAIR OR
REPLACEMENT AS PROVIDED HEREIN. INSTANT BRANDS SHALL NOT BE LIABLE FOR INDIRECT, INCIDENTAL OR
CONSEQUENTIAL DAMAGES ARISING OUT OF OR IN CONNECTION WITH THE USE OR PERFORMANCE OF THE
APPLIANCE OR DAMAGES WITH RESPECT TO ANY ECONOMIC LOSS, PERSONAL INJURY, LOSS OF PROPERTY,
LOSS OF REVENUES OR PROFITS, LOSS OF ENJOYMENT OR USE, COSTS OF REMOVAL, INSTALLATION OR OTHER
INDIRECT, INCIDENTAL OR CONSEQUENTIAL DAMAGES OF ANY NATURE OR KIND.
Warranty Registration
Please visit www.instantpot.com/support/register to register your new Instant Brands™ appliance
and validate your warranty within thirty (30) days of purchase. You will be asked to provide the store name, date
of purchase, model number (found on the back of your appliance) and serial number (found on the bottom of
your appliance) along with your name and email address. The registration will enable us to keep you up to date
with product developments, recipes and contact you in the unlikely event of a product safety notication. By
registering, you acknowledge that you have read and understand the instructions for use, and warnings set forth in
the accompanying instructions.
Warranty Service
To obtain service under this warranty, please contact our Customer Service Department
by phone at 1-800-828-7280 or by email to support@instantpot.com. You can also create
a support ticket online at www.instantpot.com/support. If we are unable to resolve
the problem, you may be asked to send your appliance to the Service Department for
quality inspection. Instant Brands is not responsible for shipping costs related to warranty
service, save and except for shipping costs associated with the return of your appliance
from Canada or within the 48 contiguous states and the District of Columbia of the United
States of America, as provided herein. When returning your appliance, please include your
name, mailing address, email address, phone number, and proof of the original purchase
date as well as a description of the problem you are encountering with the appliance.

Copyright © 2019 Instant Brands™ Inc
686-0101-51
Registeryourproducttodayat:
instantpot.com/support/register
ContactCustomerCare:
1-800-828-7280
support@instantpot.com
instantpot.com/#Chat
instantpot.com
store.instantpot.com
InstantBrandsInc.
11–300EarlGreyDr.,Suite383
Ottawa,Ontario
K2T1C1
Canada