Documents: Go to download!
User Manual
- Owner's manual - (English)
- Installing Your New Appliance
- Description of the Appliance
- Display Controls
- Using your Appliance
- Cleaning and Care
- Helpful Hints and Tips
- Troubleshooting
- Disposal of the Appliance
Table of contents
User Manual refrigerator
Installing Your New Appliance
Ventilation of appliance
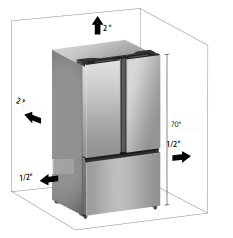
In order to improve efficiency of the cooling system and save energy, it is necessary to maintain good ventilation around the appliance for the dissipation of heat. For this reason, sufficient clear space should be available around the refrigerator.
- Suggestion: It is advisable for there to be at least 3"(75mm) of clearance from the back of the fridge to the wall, at least 4"(100mm) of clearance from its top, at least 4"(100mm ) from its side to the wall and a clear space in front to allow the doors to open 125°. As shown in the following diagrams.
Note:
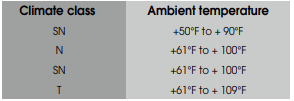
- This appliance performs well within the climate class from N to T shown in the table below. It may not work properly if left at a temperature above or below the indicated range for a long period.
- Stand your appliance in a dry place to avoid high moisture.
- Keep the appliance out of direct sunlight, rain or frost. Stand the appliance away from heat sources such as stoves, fires or heaters.
Leveling of appliance
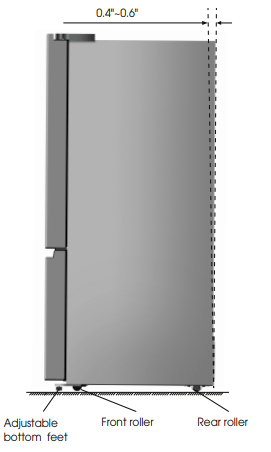
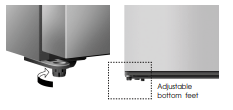
- For sufficient leveling and air circulating in the lower rear section of the appliance, the bottom feet may need to be adjusted. You can adjust them manually by hand or by using a suitable tool.
- To allow the doors to self-close, tilt the top backwards by 0.4" - 0.6".
Door Removal
- In case your home access door is too narrow for the refrigerator to pass through, remove the refrigerator doors and drawers. If you do not need to remove the appliance doors, proceed to ‘Installing Water Lines’ on page 8. If you need to remove the doors, continue below.
Tools you will need(Not provided):
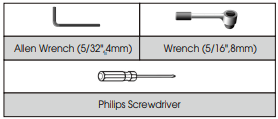
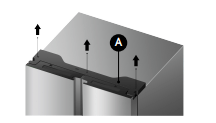
1. With the door closed, remove the 3 screws holding the top cover (A) with Philips (+) screwdriver, and then remove the top cover with the entireharness attached.
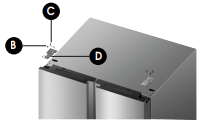
2. Remove the screws (B) fixed on the hinges with a wrench (5/16",8mm) and 1 ground screw (C) attached to the hinge with Philips (+) screwdriver. Remove the upper left and right door hinges (D).
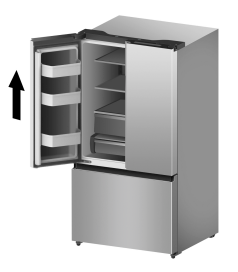
3. Use both hands to open the door more Disassembling the freezer door than 90°. Lift it up and take it off.
4. Remove the 4 hex head bolts hinges (E) with an Allen wrench (5/32",4mm). Remove the lower left and right door hinges (F)
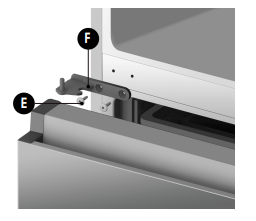
Disassembling the freezer door
1. Pull out the freezer door and the upper freezer drawer (G) to the final position.
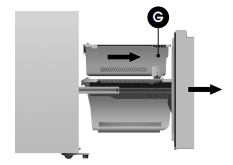
2. Take out the ice storage box (H) by lifting it up in the direction of the arrow.
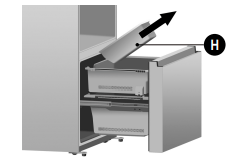
3. Take out the upper freezer drawer (G) by lifting it up from the rail system.
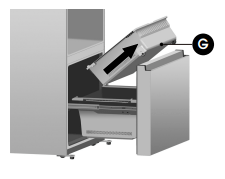
4. Remove the lower freezer drawer (C) Installing the water lines by lifting it up.
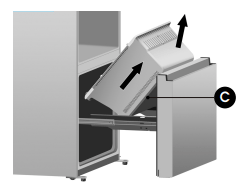
5. Remove the 4 screws attached to the supporting frame (D).
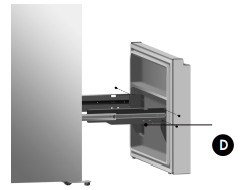
6. Pull out the freezer door and lift it upin the direction of the arrow.
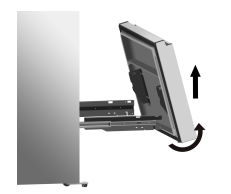
Re-assembling the freezer door
To reattach the drawer after you moved the appliance to its final location, assemble the parts in reverse order.
Installing the water lines
A water dispenser with a filter is one of the helpful features on your new appliance. To help promote better health, the water filter removes unwanted particles from your water. However, it does not sterilize or destroy microorganisms. You may need to purchase a water purifying system to do that.
In order for the ice maker to operate properly, a water line is required.
- the maximum inlet water pressure is 700kPa;
- the minimum inlet water pressure is 207kPa.
What you need to have before you star
1. Power drill and 1/4’’ drill bit
2. 1/2’’ or adjustable wrench.
3. Flatblade and Philips head screwdrivers.
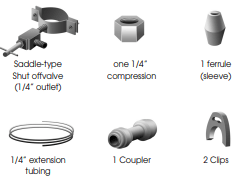
4. You need to purchase several item to compalet this connection.You may find these items sold as a kit at local hardware store.
Connecting to the water supply line
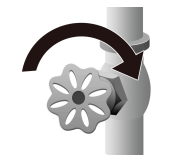
1. First, shut off the main water supply
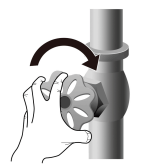
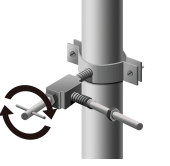
2. Using a power drill and a 1/4’’ drill bit drill into the cold-water line and connect the saddle-type shutoff valve.
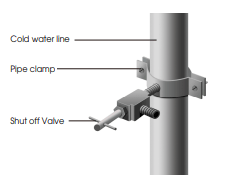
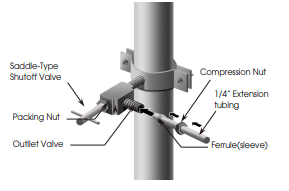
3. Connect 1/4’’ extension tubing to shutoff valve outlet.
4. Flush the tubing. Turn the main water supply on and flush out the tubing until the water is clear. Then, shut the water off at the water valve after about a quart of water has flushed through the tubing.
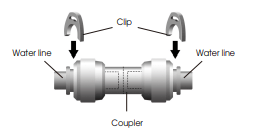
5. Connect the extension tubing line with the line on the back of the fridge via the coupler. Fully insert the extension tubing into the coupler, and then insert the clip onto the coupler to lockup the tubing. Do the same with the other end. After both clips are inserted, check the line to make sure it is held firmly by the clip.
6. Turn the water on and check for leakage.
Description of the Appliance
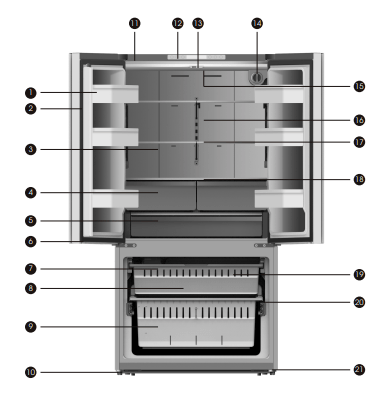
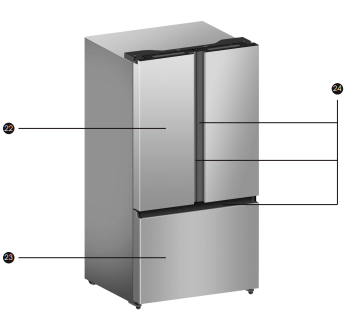
- Door bins
- Vertical baffle part
- Water dispenser (inside)
- Fruit and vegetables crisper
- Full width pantry
- Freezer LED light
- Ice maker (inside)
- Ice bucket (inside)
- Lower freezer drawer
- Adjustable bottom feet
- Top cover
- Control panel
- Vertical baffle guide block
- Water filter
- Refrigerator LED light (inside)
- Air channel
- Glass shelf
- Criper Cover
- Upper freezer drawer
- Lower drawer partition (inside)
- Roll wheel
- Refrigerator door
- Freezer door
- Handles
Display Controls
Your product has one control panel which is installed on the top cover. Use your appliance according to the following control guidelines.

When the appliance is powered on for the first time, the backlighting of the icons on the display panel start working. If no buttons have been touched or the doors are closed, the backlighting will turn off after 60 seconds. The control panel consists of two areas about temperature, and one area about different modes.
 Ice Control
This button controls the ice maker. You can touch the “Ice On/Off” button to control the ice maker. When the “Ice On/Off” function light is on, the ice maker is working. If you want to lock the ice maker, please touch the “Ice On/Off” button again until the button light is off
 Fridge Temperature Control
You can touch the “Fridge” icon to activate the mode to control the fridge temperature. When you touch the button continuously, the temperature will be set in the following sequence.

 Super Cool
If you want to decrease the time needed to cool products in the Fridge, please touch this button. The Super Cool icon “  ” will be illuminated, and the fridge temperature setting displays at 35°F. Super cool automatically switches off after 3 hours, and the refrigerator temperature setting will revert back to the previous setting. When Super Cool function is on, you can touch the “Super Cool” button again to switch it off. The fridge will not retain the Super Cool function when powered off.
 Freezer Temperature Control
You can touch the “Freezer” button to activate the mode to control the freezer temperature. When you press the button continuously, the temperature will be set in the following sequence.

 Super Freeze
If you want to decrease the time needed to freeze products in the freezer, please touch this button, the Super Freeze icon “  ” will be illuminated, the freezer temperature setting displays -12°F. Super Freeze can quickly lower the temperature and freeze your food faster than usual. This can retain more of the vitamins and nutrients in fresh food and keep your food longer. The Super Freeze mode allows you to freeze items inside with maximum speed. We recommend that you let the appliance operate for 6 hours first. Super Freeze automatically switches off after 26 hours, and the freezer temperature setting will revert back to the previous setting. When the Super Freeze function is on, you can touch the “Super Freeze” button again to switch off. If power cutoff happens while Super Freeze is activated, the Super Freeze will not remain active after power is resupplied
 Water Filter
In general, you should change the water filter every 6 months to ensure the highest possible water quality. After the refrigerator has dispensed about 300 gallons of water, the filter icon “  ” will blink, reminding you to replace the water filter. First of all, you need to purchase a new water filer. You can purchase the new filter from the retailer where you purchased your refrigerator or the Hisense after-sales service system.
Before that, please check that the new filter is the same filter type that came with your fridge and can be correctly used in your refrigerator. After you change the water filter, push and hold the “Ice On/Off” buttons for 3 seconds to make the blinking stop. When you replace the water filter, some water may leak from the filter and lines. Please let the water flow into a pan and wipe up any leakage that may have occurred.
 Energy Saving
You can touch this button to turn Energy Saver mode on and off. When you turn Energy Saver on, the Energy Saver icon "  " lights up.
The temperature of the fridge is automatically switched to 42oF and the freezer to 2oF. If Energy Saver is off,the icon "  " will go off and the temperature setting will revert back to the previous setting.

Demo mode (Freezer/ Fridge Temperature Indicator moving)
Demo mode is for store display, and it prevents the refrigerator from generating cool air. In this of Cooling off Mode, the refrigerator may seem like it is working but it will not make cool air. The indicators on the control panel will show double “0F”. To cancel this mode, press and hold “Ice On/Off” and “Energy Saving” keys at the same time for 3 seconds until the buzzer beep three times and the display panel will light for 3 second.
Using your Appliance
This section tells you how to use most of the useful features. We recommend that you read through them carefully before using the appliance.
Getting Cold Water
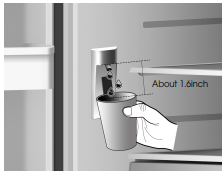
The water dispenser is located in the left side of the fridge. Open the refrigerator doors, and push the water dispenser button to get water. Then move your glass down the dispenser lever in the suggested position and press it. Hold the glass underneath the dispenser for 2~3 seconds after releasing the dispenser button as water may continue to dispense after the button is released.
1. Changing the water filter
To drink the freshest and cleanest water from your refrigerator, change the filter on time. To change the water filter, follow these steps:
1. Shut off the water supply. Then turn the water filter (K) about a 1/4 turn, counter-clockwise.
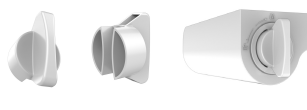
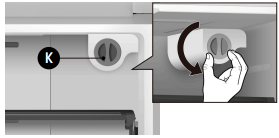
2. Pull the water filter (K) from the filter holder (L).
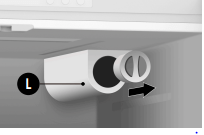
Note:
- To change the water filter easily, shut off the water supply valve.
- Sometimes, it is hard to disassemble the water filter because impurities in the water cause it to stick. If you are having difficulties, grip the water filter firmly and pull it out.
- When you pull the water filter, a little water can leak from the opening. This is normal. To minimize the water leaks, keep the filter cartridge horizontal when pulling it.
- To prevent overflow, empty the water filter tray (M) and dry around the filter case.
- To insert the new water filter, follow the directions below
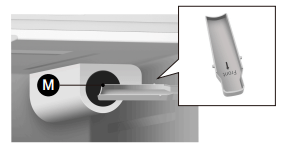
3. Insert the new filter into the filter holder.
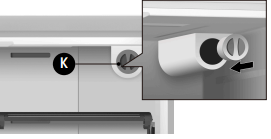
4. Push the filter, and then turn it clockwise until it locks
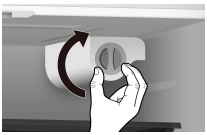
- If you have trouble inserting the water filter because of high water pressure, shut off the water supply valve.
5. If you turned off the water supply, turn it back on.
Removing any residual matter inside the water supply line after installing the water filter
- After the water filter is replaced, dispense 2.5 gallons of water (flush for approximately 5 minutes) to remove trapped air and contaminants from the system.
- Additional flushing may be required in some households.
- Open the refrigerator door and make sure there are no water leaks coming from the water filter.
Reverse osmosis water supply:
The pressure of the water supply coming out of a reverse osmosis system going to the water inlet valve of the refrigerator needs to be between 30 and 100psi (207 and 700kPa). If a reverse osmosis water system is connected to your cold water supply, the water pressure to the reverse osmosis system needs to be a minimum of 40 to 60 psi (276 to 414 kPa).If the water pressure to the reverse osmosis system is less than 40 to 60 psi (276 to 414 kPa):
- Check to see whether the sediment filter in the reverse osmosis system is blocked. Replace the filter if necessary.
- Allow the storage tank on the reverse osmosis system to refill after heavy usage.
- If your refrigerator has a water filter, it may further reduce the water pressure when used in conjunction with a reverse osmosis system. To resolve it, remove the water filter.
2. Using your fridge compartment
The refrigerator compartment is suitable for storage of vegetables and fruit. Food inside should be sealed for storage in order to avoid losing moisture or flavor permeating into other foods.
Door baskets :
The refrigerator compartment is provided with six door baskets, which are suitable for the storage of canned liquid, bottled drinks and packaged food. To remove the door baskets, simply lift the racks up and pull straight out. To relocate the door baskets, slide it in above the desired location and push down until it stops.
Glass shelves:
To remove the glass shelves, tilt up the front of the shelf in the direction shown (1) and lift it up vertically (2).Pull the shelf out.
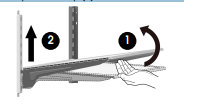
To re-install the glass shelves, tilt the front of the shelf up and guide the shelf hooks into the slots at a desired height (1). Then lower the front of the shelf so that the hooks can drop into the slots (2).

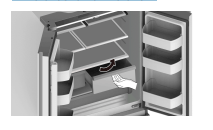
The refrigerator compartment is also provided with a foldable shelf. It can be folded as required. To fold the shelf, hold the removable glass(N) and lift it up slightly, then push it slightly in the direction of the arrow.

To unfold the shelf, hold the removable glass(N) and pull it out slightly in the direction of the arrow until it can’t move

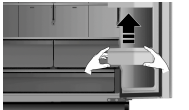
Vegetable and fruit crispers:
The crispers are suitable for storage of vegetables and fruit. To take them out, open the door to the final location first. Then pull out the drawer and tilt up the front of the crisper after moving slightly in the direction of the arrow.
Using the freezer compartment:
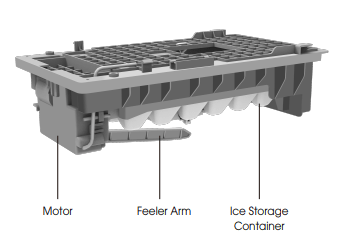
The freezer compartment is provided with an upper drawer, a lower drawer and an ice box. To remove all of them, refer to page 8 for disassembly instruction.
Press ICE On/Off to turn the ice maker On and Off. The Ice Maker icon is “ ” illuminated when the ice maker is functioning.

- Following installation, allow 24 hours to produce the first batch of ice. Discard the first three batches of ice produced. Allow 2 to 3 days to fill the ice storage container.
- If the ice in the ice container clumps, break up ice using a plastic utensil and discard. Do not use a sharp tool to break up the ice. This can cause damage to the ice container.
- Do not store any items other than ice in the ice storage container.
Cleaning and Care
Exterior cleaning
To maintain good appearance of your appliance, you should clean it regularly
- Spray water onto a cleaning cloth instead of spraying directly on the surface of the appliance. This helps ensure an even distribution of moisture to the surface
- Clean the doors, handles and cabinet surfaces with a mild detergent and then wipe dry with a soft cloth.
Interior cleaning
You should clean the appliance interior regularly. It will be easier to clean when food stocks are low. Wipe the inside of the fridge and freezer with a weak solution of backing soda and water, and then rinse with warm water using a wrung-out sponge or cloth. Wipe completely dry before replacing the shelves and baskets. Thoroughly dry all surfaces and removable parts before putting them back into place.
Although this appliance automatically defrosts, a layer of frost may occur on the freezer compartment’s interior walls if the freezer door is opened frequently or kept open too long. If the frost is too thick, choose a time when the freezer is nearly empty and proceed as follows:
- Remove existing food and accessory baskets, unplug the appliance from the main power and leave the doors open. Ventilate the room thoroughly to accelerate the process.
- When defrosting is completed, clean your freezer as described above.
Door seals cleaning
Take care to keep door seals clean. Sticky food and drinks can cause seals to stick to the cabinet and tear when you open the door. Wash seal with a mild detergent and warm water. Rinse and dry it thoroughly after cleaning.
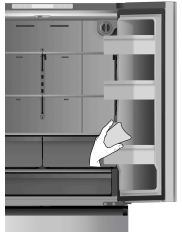
Replacing the LED light
WARNING
The LED light must be replaced by a competent person. If the LED light is damaged, follow the steps below
- . Unplug your appliance.
- Remove the light cover by lifting up and pulling out.
- Hold the LED light with one hand and pull it while pressing the connector latch with the other hand.
- Replace the LED light and snap it correctly in place and replace the light cover.
Helpful Hints and Tips
Energy Saving Tips
We recommend that you follow the tips below to save energy.
- Try to avoid keeping the door open for long periods in order to conserve energy. Ensure the appliance is away from any sources of heat (direct sunlight, electric oven or cooker etc.)
- Don’t set the temperature colder than necessary.
- Don’t store warm food or evaporating liquid in the appliance.
- Place the appliance in a well ventilated, humidity freeroom. Please refer to Installing your New Appliance chapter.
- If the diagram shows the correct combination for the drawers, crisper and shelves, do not adjust the combination as this is designed to be the most energy efficient configuration.
Hints for fresh food refrigeration
- Do not place hot food directly into the refrigerator or freezer, the internal temperature will increase resulting in the compressor having to work harder and consume more energy
- Do cover or wrap the food, particularly if it has a strong flavor.
- Place food properly so that air can circulate freely around it.
Hints for refrigeration
- For Meat: (all types) wrap in cling wrap and place on the glass shelf above the vegetable drawer. Always follow food storage times and use by dates suggested by manufacturers.
- Cooked food, cold dishes, etc.: They should be covered and placed on any shelf.
- Fruit and vegetables: They should be stored in the special drawer provided.
- Butter and cheese: Should be wrapped in airtight foil or plastic film wrap.
- Milk bottles: Should have a lid and be stored in the door racks
Hints for freezing
- When first starting-up or after a period out of use, let the appliance run at least 2 hours on the higher settings before putting food in the compartment.
- Prepare food in small portions to enable it to be rapidly and completely frozen and to make it possible to subsequently thaw only the quantity required.
- Wrap up the food in aluminum foil or cling wraps which are airtight.
- Do not allow unfrozen food to touch the food which is already frozen to avoid temperature rise of the latter.
- Iced products (ice cubes, popsicles): if consumed immediately after removal from the freezer compartment, will probably cause frost burns to the skin.
- It is recommended to label and date each frozen package in order to keep track of the storage time.
Hints for the storage of frozen food
- Ensure that frozen food has been stored correctly by the food retailer
- Once defrosted, food will deteriorate rapidly and should not be re-frozen. Do not exceed the storage period indicated by the food manufacturer.
Switching off your appliance
If the appliance needs to be switched off for an extended period, the following steps should be taken to prevent mold on the appliance.
- Remove all food.
- Remove the power plug from the main socket.
- Clean and dry the interior thoroughly.
- Ensure that all the doors are wedged open slightly to allow air to circulate.
Troubleshooting
Appliance is not working correctly
- Check whether the power cord is plugged into the power outlet properly.
- Check the fuse or circuit of your power supply, replace if necessary
- The room temperature may be too low. Try setting the refrigerator or freezer temperature to a colder level to solve this problem.
- It is normal that the freezer is not operating during the defrost cycle, or for a short time after the appliance is switched on to protect the compressor.
Odors from the compartment
- The interior may need to be cleaned
- Some food, containers or wrapping may cause odors.
Noise from the appliance
- The sounds below are quite normal:
- Compressor running noises.
- Air movement noise from the small fan motor in the freezer compartment or other compartments.
- Gurgling sound similar to water boiling.
- Popping noise during automatic defrosting.
- Clicking noise before the compressor starts.
- Clicking noise when you get the water.
- The motor running noises when you get ice.
- Other unusual noises are due to the reasons below and may need you to check and take action: The cabinet is not level. The back of appliance is touching the wall. Bottles or containers have fallen or are rolling.
The motor runs continuously
- It is normal to frequently hear the sound of the motor, it will need to run more when in following circumstances:
- Temperature setting is set colder than necessary.
- Large quantity of warm food has recently been stored within the appliance.
- The temperature outside the appliance is high.
- Doors are kept open too long or too often.
- After first installing the appliance or if it has been switched off for a long time.
A layer of frost occurs in the compartment
- Check that the air outlets are not blocked by food and ensure food is placed within the appliance to allow sufficient ventilation. Ensure that door is fully closed. To remove the frost, please refer to the Cleaning and Care chapter.
Temperature inside is too warm
- You may have left the doors open too long or too frequently; or the doors are kept open by some obstacle; or the appliance is located with insufficient clearance at the sides, back and top.
Temperature inside is too cold
- Increase the temperature by following the “Display Controls” chapter.
Doors can’t be closed easily
- Check whether the top of the refrigerator is tilted back by 0.4"-0.6"(10-15mm) to allow the doors to self-close, or if something inside is preventing the doors from closing.
The light is not working
- The LED light may be damaged. Refer to replace LED lights in“ Cleaning and Care” chapter.
- The control system has disabled the lights due to the door being kept open too long. Close and reopen the door to reactivate the lights.
Hear water bubbling in the refrigerator
- This is normal. The bubbling comes from the refrigerant coolant liquid circulating through the refrigerator.
Ice is not making
- Did you wait for 12 hours after installation of the water supply line before making ice? If it is not sufficiently cool, it may take longer to make ice, such as when first installed.
- Is the water line connected and the water valve open?
- Did you manually stop the ice making function? Make sure you do not set the “Ice Off” mode.
- Is there any ice blocked within the ice maker bucket?
- Is the water pressure less than 30psi? Install a booster pump to compensate for the low pressure. Is the freezer temperature too warm? Try setting the freezer temperature lower.
- Ice maker is not making the ice fast enough. Please wait for at least 90 minutes.
Water dispenser is not functioning
- Is the water line connected and the water valve open?
- Has the water line been crushed or kinked? Make sure the waterline is free and clear of any obstruction.
- Is the water tank frozen because the refrigerator temperature is too low? Try selecting a warmer setting on the display panel.
- Check if the filter is properly installed. If it is not properly installed, the water dispenser may not work.
Disposal of the Appliance
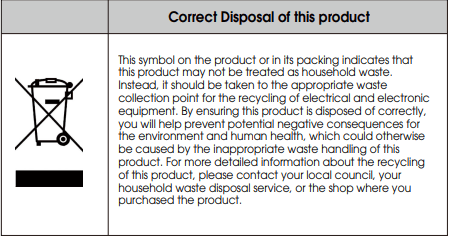
DANGER : It is prohibited to dispose of this appliance as household waste.
- Packaging materials
- Packaging materials with the recycle symbol are recyclable. Dispose of the packaging into a suitable waste collection container to recycle it.
- Before disposal of the appliance
- Pull out the main plug from the main socket.
- Cut off the power cord and discard with the main plug.
WARNING: Refrigerators contain refrigerant and gases in the insulation. Refrigerant and gases must be disposed of professionally as they may cause eye injuries or ignition. Ensure that tubing of the refrigerant circuit is not damaged prior to proper disposal.
See other models: RB327N4WW1 43A6G 60A6G 75A6G RS694N4TC1
