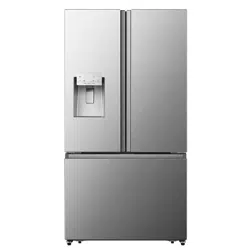
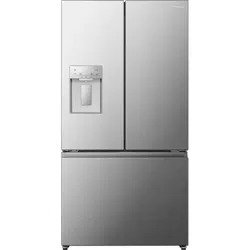
Installing Your New Appliance
Leveling of appliance
- For sufficient leveling and air circulating in the lower rear section of the appliance, the bottom feet may need to be adjusted. You can adjust them manually by hand or by using a suitable tool.
- To allow the doors to self-close, tilt the top backwards by 0.4" - 0.6".
-618766.png)
Door Removal
- In case your home access door is too narrow for the refrigerator to pass through, remove the refrigerator doors and drawers. If you do not need to remove the appliance doors, proceed to ‘Installing Water Lines’ on page 8. If you need to remove the doors, continue below.
Tools you will need(Not provided):
-814711.png)
- With the door closed, remove the 3 screws holding the top cover (1) with Philips (+) screwdriver, and then remove the top cover with the entire harness attached.
-946487.png)
- Separate the two connectors on the left side door. To remove the wire connector, press the top of the connector (2) and separate it from the other one. To remove the water coupler from the hinge, twist and 2. 5 pull the clips from the coupler. Remove the water line (3) while pressing the movable part (4) of the water line coupler
-171388.png)
2. Remove the screws (5) fixed on the hinges with a wrench (5/16",8mm) and 1 ground screw (6) attached to the hinge with Philips (+) screwdriver. Remove the upper left and right door hinges (7)
-983785.png)
3. Use both hands to open the door more than 90°. Lift it up and take it off.
-751694.png)
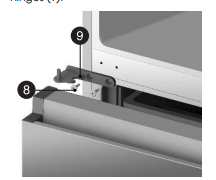
4. Remove the 4 hex head bolts hinges (8 ) with an Allen wrench (5/32",4mm). Remove the lower left and right door hinges (9).
Disassembling the freezer door
1. Remove the 4 hex head bolts hinges (8 ) with an Allen wrench (5/32",4mm). Remove the lower left and right door hinges (9). Pull out the freezer door and the upper freezer drawer (10) to the final position.
-52384.png)
2. Take out the upper freezer drawer (11) by lifting it up from the rail system.
-156564.png)
3. Remove the lower freezer drawer (12) by lifting it up.
-205800.png)
4. Remove the 4 screws attached to the supporting frame (13).
-250024.png)
5. Pull out the freezer door and lift it up in the direction of the arrow.
-282270.png)
What you need to have before you begin
1. Power drill and 1/4’’ drill bit.
2. 1/2’’ or adjustable wrench.
3. Flatblade and Philips head screwdrivers
-501055.png)
4. You may need to purchase several items to complete this connection. You may find these items sold as a kit at local hardware store.
Connecting to the water supply line
1. First, shut off the main water supply
-901451.png)
2. Using a power drill and a 1/4’’ drill bit drill into the cold-water line and connect the saddle-type shutoff valve.
-641503.png)
3. Connect 1/4’’ extension tubing to shutoff valve outlet.
-428883.png)
4. Flush the tubing. Turn the main water supply on and flush out the tubing until the water is clear. Then, shut the water off at the water valve after about a quart of water has flushed through the tubing
-638129.png)
5. Connect the extension tubing line with the line on the back of the fridge via the coupler. Fully insert the extension tubing into the coupler, and then insert the clip onto the coupler to lock in the tubing. Do the same with the other end. After both clips are inserted, check the line to make sure it is held firmly by the clips.
-95420.png)
Note: Ensure that the water line does not get pinched or bent when installing. This can result in improper water flow through the line and will affect the functionality of the fridge.
6. Turn the water on and check for leakage.
-512653.png)
Description of Appliance
-655581.png)
Display Controls
Your product has one control panel which is installed on the fridge door. Use your appliance according to the following control guidelines.
-89114.png)
When the appliance is powered on for the first time, the backlighting of the icons on the display panel start working. If no buttons have been touched or the doors are closed, the backlighting will turn off after 60 seconds. The control panel consists of two areas about temperature, and one area about different modes.
-372815.png) Ice Control
Ice Control
This button controls the ice maker. You can touch the “Ice Off” button to control the ice maker. When the “Ice Off” function light is off, the ice maker is working. If you want to turn off the ice maker, please touch the “Ice Off” button again until the icon light is on
-516208.png) Freezer Temperature Control
Freezer Temperature Control
Press the “Freezer” button to change the freezer temperature. When you press the button continuously, the temperature will be set in the following sequence
If you want to decrease the time needed to freeze products in the freezer, press and hold the “Freezer” button for 3 seconds. The Super Freeze icon will illuminate and the freezer temperature setting will display -11°F. Super Freeze can quickly lower the temperature and freeze your food faster than usual. This can retain more of the vitamins and nutrients in fresh food and keep your food longer.
The Super Freeze mode allows you to freeze items inside with maximum speed. We recommend that you let the appliance operate for 6 hours first. Super Freeze automatically switches off after 52 hours, and the freezer temperature setting will revert back to the previous setting.
When the Super Freeze function is on, press and hold the “Freezer” button more than 3 seconds to turn it off. “Super Freezer" will be off and the temperature will revert back to the previous setting.
Using your Appliance
Getting Cold Water and Ice
The water dispenser is located in the fridge door.
Getting Cold Water
To get water, push the water button. Then move your cup down the dispenser lever (A) to the suggested position and press it.
-846481.png)
Getting Cubed Ice
To get cubed ice, push the cubed ice button as required. Then move your cup down the dispenser lever to the suggested position and press it.
Getting Crushed Ice
To get crushed ice, push the crushed ice button as required. Then move your cup down the dispenser lever to the suggested position and press it.
Water clouding phenomenon
All water provided to the refrigerator flows through an alkaline water filter. In the filtering process, the pressure of the water that has flowed out of the filter is increased, and the water becomes saturated with oxygen and nitrogen. When water flows out into the air, the pressure plummets and the oxygen and nitrogen get supersaturated, which results in gas bubbles. The water may temporarily look misty or cloudy due to these oxygen bubbles. After a few seconds, the water will look clear.
Using the freezer compartment
The freezer compartment is provided with an upper drawer and a lower drawer. To remove all of them, refer to page 8 for disassembly instruction.
Ice Maker
Press “Ice Off” Button to turn the ice maker On and Off. The Ice Off icon “ ” is off when the ice maker is functioning.
- Following installation, allow 24 hours to produce the first batch of ice. Discard the first three batches of ice produced. Allow 2 to 3 days to fill the ice storage container.
- If the ice in the ice container clumps, break up ice using a plastic utensil and discard. Do not use a sharp tool to break up the ice. This can cause damage to the ice container.
- Do not store any items other than ice in the ice storage container.
-551099.png)
To turn off the ice maker:
Press the “Ice Off” button to turn off the ice maker. The “ ” icon lights up when ice is turned off. Press again to turn the ice maker back on.
To remove the ice bucket,
1. Gently lift it up, and then pull it out slowly while holding the bottom of the bucket with one hand and the side with the other hand.
-986053.png)
2. Empty the bucket
Note If you leave the ice cubes in the bucket, the ice cubes may clump together making it difficult to remove them
3. When done, put the bucket back into position, If the bucket does not fit in, turn the knob 90 degrees, and then try again.
-198870.png)
Cleaning and Care
Interior cleaning
Clean the appliance interior regularly. It will be easier to clean when food stocks are low. Wipe the inside of the fridge and freezer with a weak solution of baking soda and water, and then rinse with warm water using a wrung-out sponge or cloth. Wipe completely dry before replacing the shelves and baskets. Thoroughly dry all surfaces and removable parts before putting them back into place.
-99952.png)
Although this appliance automatically defrosts, a layer of frost may occur on the freezer compartment’s interior walls if the freezer door is opened frequently or kept open too long. If the frost is too thick, choose a time when the freezer is nearly empty and proceed as follows:
- Remove existing food and accessory baskets, unplug the appliance from the main power and leave the doors open. Ventilate the room thoroughly to accelerate the process.
- When defrosting is completed, clean your freezer as described above.
Exterior cleaning
To maintain good appearance of your appliance, you should clean it regularly
- Spray water onto a cleaning cloth instead of spraying directly onto the surface of the appliance. This helps ensure an even distribution of moisture to the surface.
- Clean the doors, handles and cabinet surfaces with a mild detergent and then wipe dry with a soft cloth.
Door seal cleaning
Take care to keep the door seals clean. Sticky food and drinks can cause seals to stick to the cabinet and tear when you open the door. Wash seal with a mild detergent and warm water. Rinse and dry it thoroughly after cleaning.
-426414.png)
Troubleshooting
Appliance is not working correctly
- Check whether the power cord is plugged into the power outlet properly.
- Check the fuse or circuit of your power supply, replace if necessary.
- The room temperature may be too low. Try setting the refrigerator or freezer temperature to a colder level to solve this problem.
- It is normal that the freezer is not operating during the defrost cycle, or for a short time after the appliance is switched on to protect the compressor.
Odors from the compartments
- The interior may need to be cleaned
- Some food, containers or wrapping may cause odors.
Noise from the appliance
- The sounds below are quite normal:
- Compressor running noises.
- Air movement noise from the small fan motor in the freezer compartment or other compartments.
- Gurgling sound similar to water boiling.
- Popping noise during automatic defrosting.
- Clicking noise before the compressor starts.
- Clicking noise when dispensing water.
- The motor running noises when dispensing ice
- Other unusual noises may be due to the reasons below and may need you to check and take action:
- The cabinet is not level.
- The back of appliance is touching the wall.
- Bottles or containers have fallen or are rolling
The motor runs continuously
- It is normal to frequently hear the sound of the motor. It will need to run more in the following circumstances:
- The temperature outside the appliance is high.
- Doors are kept open too long or too often.
- After first installing the appliance or if it has been switched off for a long time.
A layer of frost occurs in the compartment
- Check that the air outlets are not blocked by food and ensure food is placed within the appliance to allow sufficient ventilation. Ensure that the door is closing fully. To remove the frost, please refer to the Cleaning and Care chapter
Temperature inside is too warm
- You may have left the doors open too long or too frequently; or the doors are kept open by some obstacle; or the appliance is located with insufficient clearance at the sides, back and top.
Temperature inside is too cold
- Increase the temperature by following the “Display Controls” chapter.
Doors can’t be closed easily
- Check whether the top of the refrigerator is tilted back by 0.4"-0.6"(10-15mm) to allow the doors to self-close, or if something inside is preventing the doors from closing
The light is not working The LED light may be damaged.
- Refer to replace LED lights in“ Cleaning and Care” chapter.
- The control system has disabled the lights due to the door being kept open too long. Close and reopen the door to reactivate the lights.
Hear water bubbling in the refrigerator
- This is normal. The bubbling comes from the refrigerant coolant liquid circulating through the refrigerator.
Ice maker is not working
- Did you wait for 12 hours after installation of the water supply line before making ice? If it is not sufficiently cool, it may take longer to make ice, such as when first installed.
- Is the water line connected and the water valve open?
- Did you manually stop the ice making function? Make sure you did not set the “Ice Off” mode.
- Is there any ice stuck within the ice maker bucket?
- Is the water pressure less than 30psi? Install a booster pump to compensate for the low pressure.
- Is the freezer temperature too warm? Try setting the freezer temperature lower.
- Ice maker is not making ice fast enough. Please wait for at least 90 minutes.
Water dispenser is not functioning
- Has the water line been crushed or kinked? Make sure the waterline is free and clear of any obstruction.
- Is the water tank frozen because the refrigerator temperature is too low? Try selecting a warmer setting on the display panel.
- Check if the filter is properly installed. If it is not properly installed, the water dispenser may not work.