
For questions about features, operation/performance, parts or service, call:
1-877-465-3566
Model:
HQD20*****
Refrigerator Use & Care Guide

2
Thank you for choosing Hisense. We are sure you will find your new refrigerator a
pleasure to use. However, before you use the appliance, we recommend that you
carefully read the instructions, which provide details about installing and using the
product. Please keep this manual for future reference.
Table of Contents
REFRIGERATOR SAFETY ........................................................................................................................................3
PARTS AND FEATURES ..........................................................................................................................................4
INSTALLATION REQUIREMENTS ...........................................................................................................................5
Location Requirements ............................................................................................................................................................... 5
Electrical Requirements .............................................................................................................................................................. 5
Water Supply Requirements ..................................................................................................................................................... 5
INSTALLATION INSTRUCTIONS ............................................................................................................................6
Unpack the Refrigerator .............................................................................................................................................................6
Move Near Water Supply............................................................................................................................................................6
Connect the Water Supply ........................................................................................................................................................ 7
Complete the Installation ...........................................................................................................................................................8
Level Refrigerator ..........................................................................................................................................................................8
Align Doors ...................................................................................................................................................................................... 8
REFRIGERATOR USE ...............................................................................................................................................9
Opening and Closing Doors ......................................................................................................................................................9
Using the Controls ........................................................................................................................................................................9
Features ............................................................................................................................................................................................11
General Use Information ............................................................................................................................................................12
REFRIGERATOR CARE .......................................................................................................................................... 12
Cleaning ...........................................................................................................................................................................................12
Lights ................................................................................................................................................................................................13
Vacation and Moving Care ........................................................................................................................................................13
Reinstalling/Using Refrigerator Again .................................................................................................................................13
TROUBLESHOOTING ............................................................................................................................................ 14
3
Refrigerator Safety
Your safety and the safety of others are very important.
We have provided many important safety messages in this manual and on your appliance. Always read and obey
all safety messages.
DANGER
WARNING
CAUTION
This is the safety alert symbol.
This symbol alerts you to potential hazards that can kill or hurt you and others. All safety
messages will follow the safety alert symbol and either the word “DANGER,” “WARNING” or
“CAUTION.”
These words mean:
An imminently hazardous situation. You could be killed or seriously injured if you
don’t immediately follow instructions.
A potentially hazardous situation which, if not avoided, could result in death or
serious bodily injury.
A potentially hazardous situation which, if not avoided, may result in moderate or
minor injury.
All safety messages will tell you what the potential hazard is, tell you how to reduce the chance of injury, and tell
you what can happen if the instructions are not followed.
Important Safety Instructions
WARNING: To reduce the risk of fire, electrical shock, injury to persons, or damage when using the
refrigerator, follow basic precautions, including the following:
• Ensure everyone using this appliance is familiar
with its operations and safety features.
• This appliance is not intended for use by
persons (including children) with reduced
physical, sensory or mental capabilities, unless
supervised or properly instructed.
• Plug into a grounded 3 prong outlet.
• Do not remove ground prong.
• Do not use an adapter.
• Do not use an extension cord.
• If the power supply cord is damaged, it must
be replaced by the manufacturer, its service
agent or a similarly qualified person to avoid a
hazard.
• Disconnect power before servicing.
• Do not use electrical appliances inside the food
storage compartments of the refrigerator,
unless they are of the type recommended by
the manufacturer.
• Replace all parts and panels before operating.
• Flammable refrigerant used. To be repaired
only by trained service personnel. Do not
puncture refrigerant tubing.
• Flammable refrigerant used. Dispose of
properly in accordance with federal or local
regulations.
•
Flammable refrigerant used. Follow
handling instructions carefully. Risk of fire
or explosion due to puncture of refrigerant
tubing.
•
Use nonflammable cleaner.
•
Do not use mechanical devices or other
means to accelerate the defrosting process,
other than those recommended by the
manufacturer.
•
Keep flammable materials and vapors, such
as gasoline, away from refrigerator.
•
CAUTION: Do not store products which
contain flammable propellants (e.g. spray
cans) or explosive substances in the
refrigerator.
•
Keep ventilation openings in the appliance
enclosure or in the built-in structure clear of
obstruction.
•
Connect to potable water supply only.
•
Use two or more people to move and install
refrigerator.
•
To avoid the risk of children becoming
trapped and suffocating, do not allow them
to play or hide inside the refrigerator.
Read and Save These Instructions
4
Proper Disposal of Your Old Refrigerator
WARNING
Suffocation Hazard
Remove doors from your old refrigerator.
Failure to do so can result in death or brain damage.
IMPORTANT: Child entrapment and suffocation are
not problems of the past. Junked or abandoned
refrigerators are still dangerous– even if they will sit
for “just a few days.” If you are getting rid of your old
refrigerator, please follow these instructions to help
prevent accidents.
Before You Throw Away Your Old Refrigerator or
Freezer:
•
Take off the doors.
•
Leave the shelves in place so that children may
not easily climb inside.
Important information to know about disposal
of refrigerants:
Dispose of refrigerator in accordance with
Federal and Local regulations. Refrigerants
must be evacuated by a licensed, EPA certified
refrigerant technician in accordance with
established procedures.
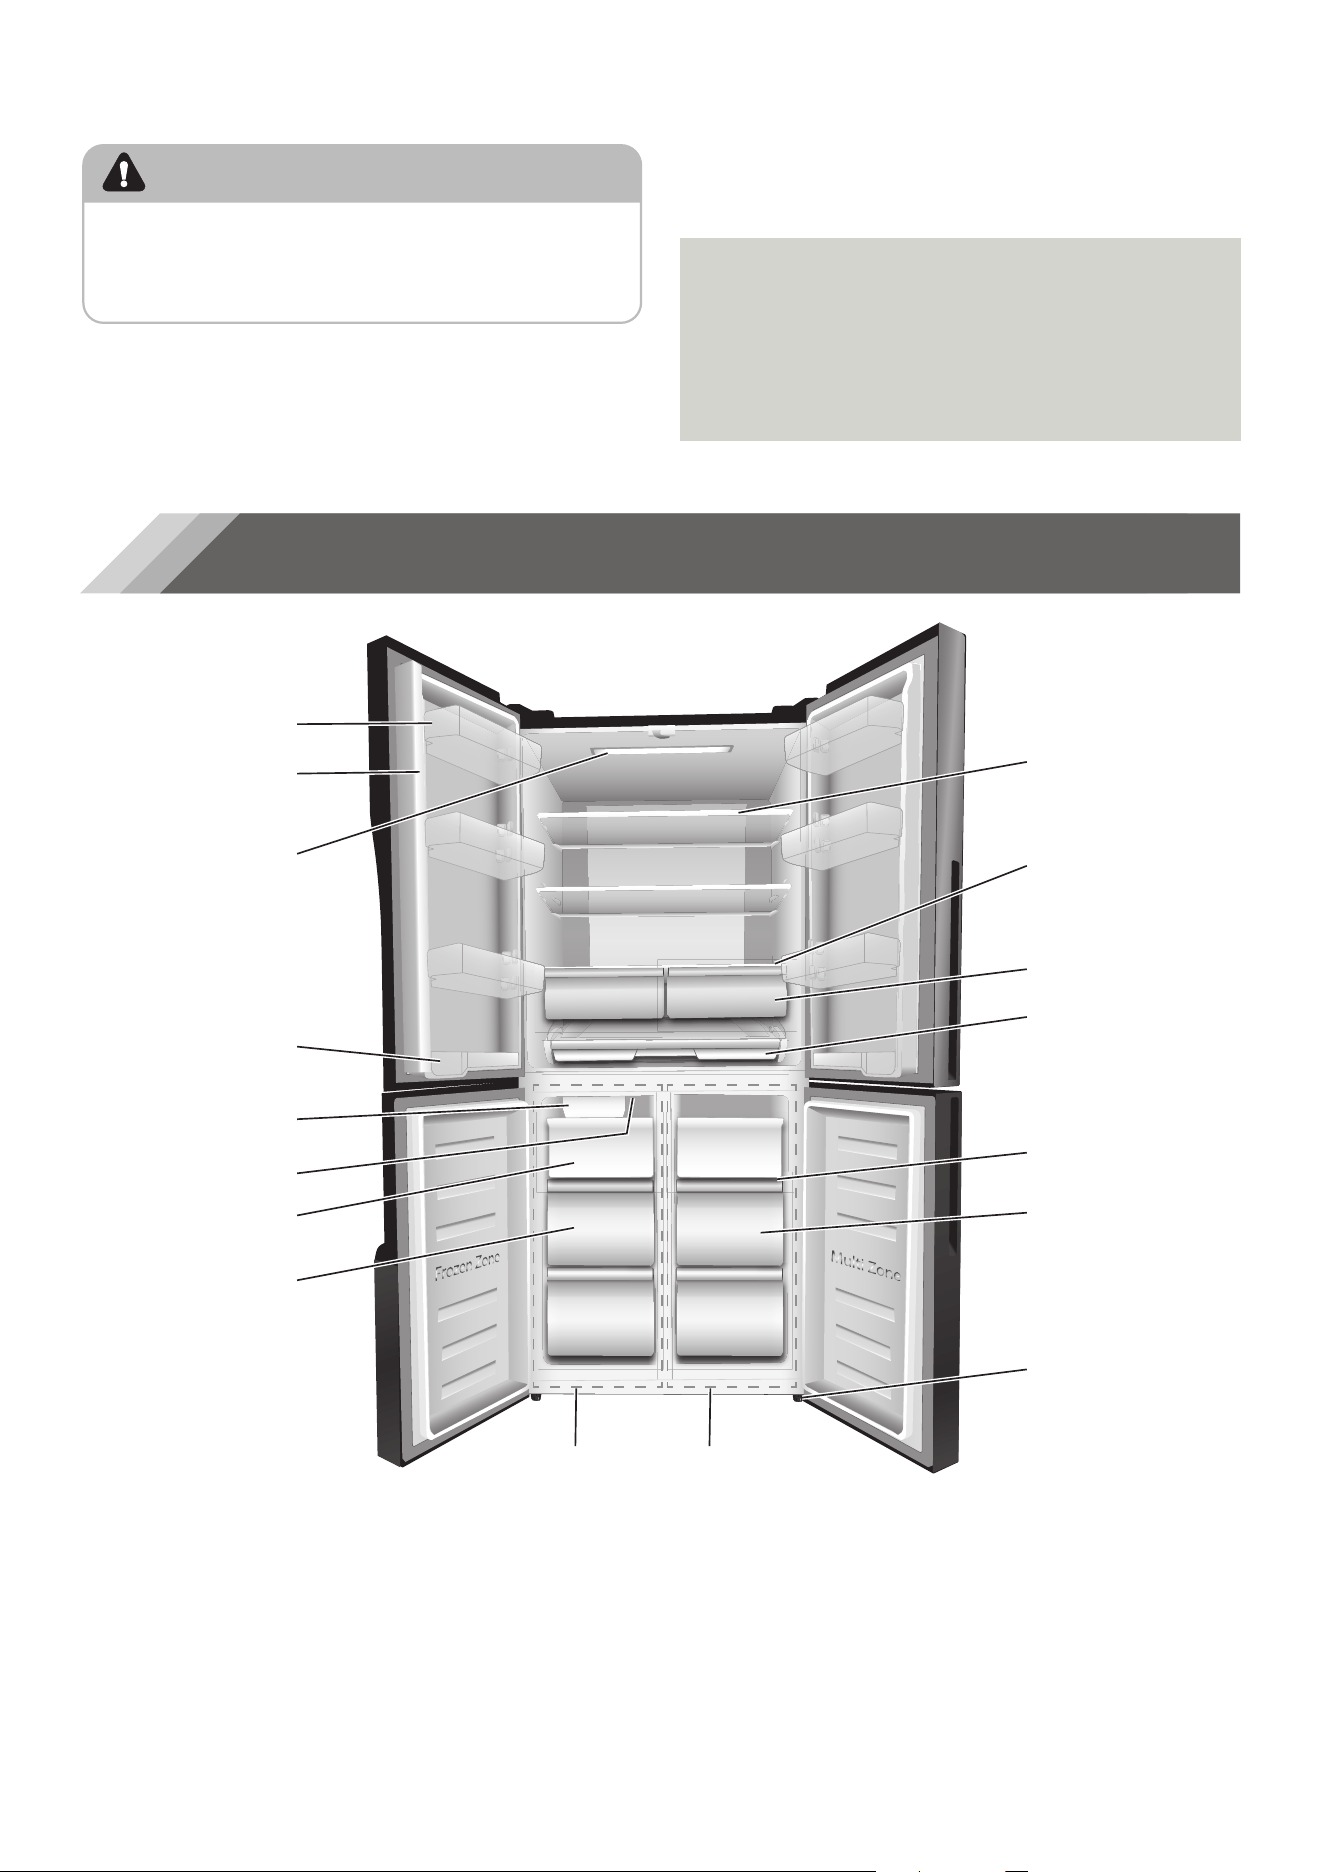
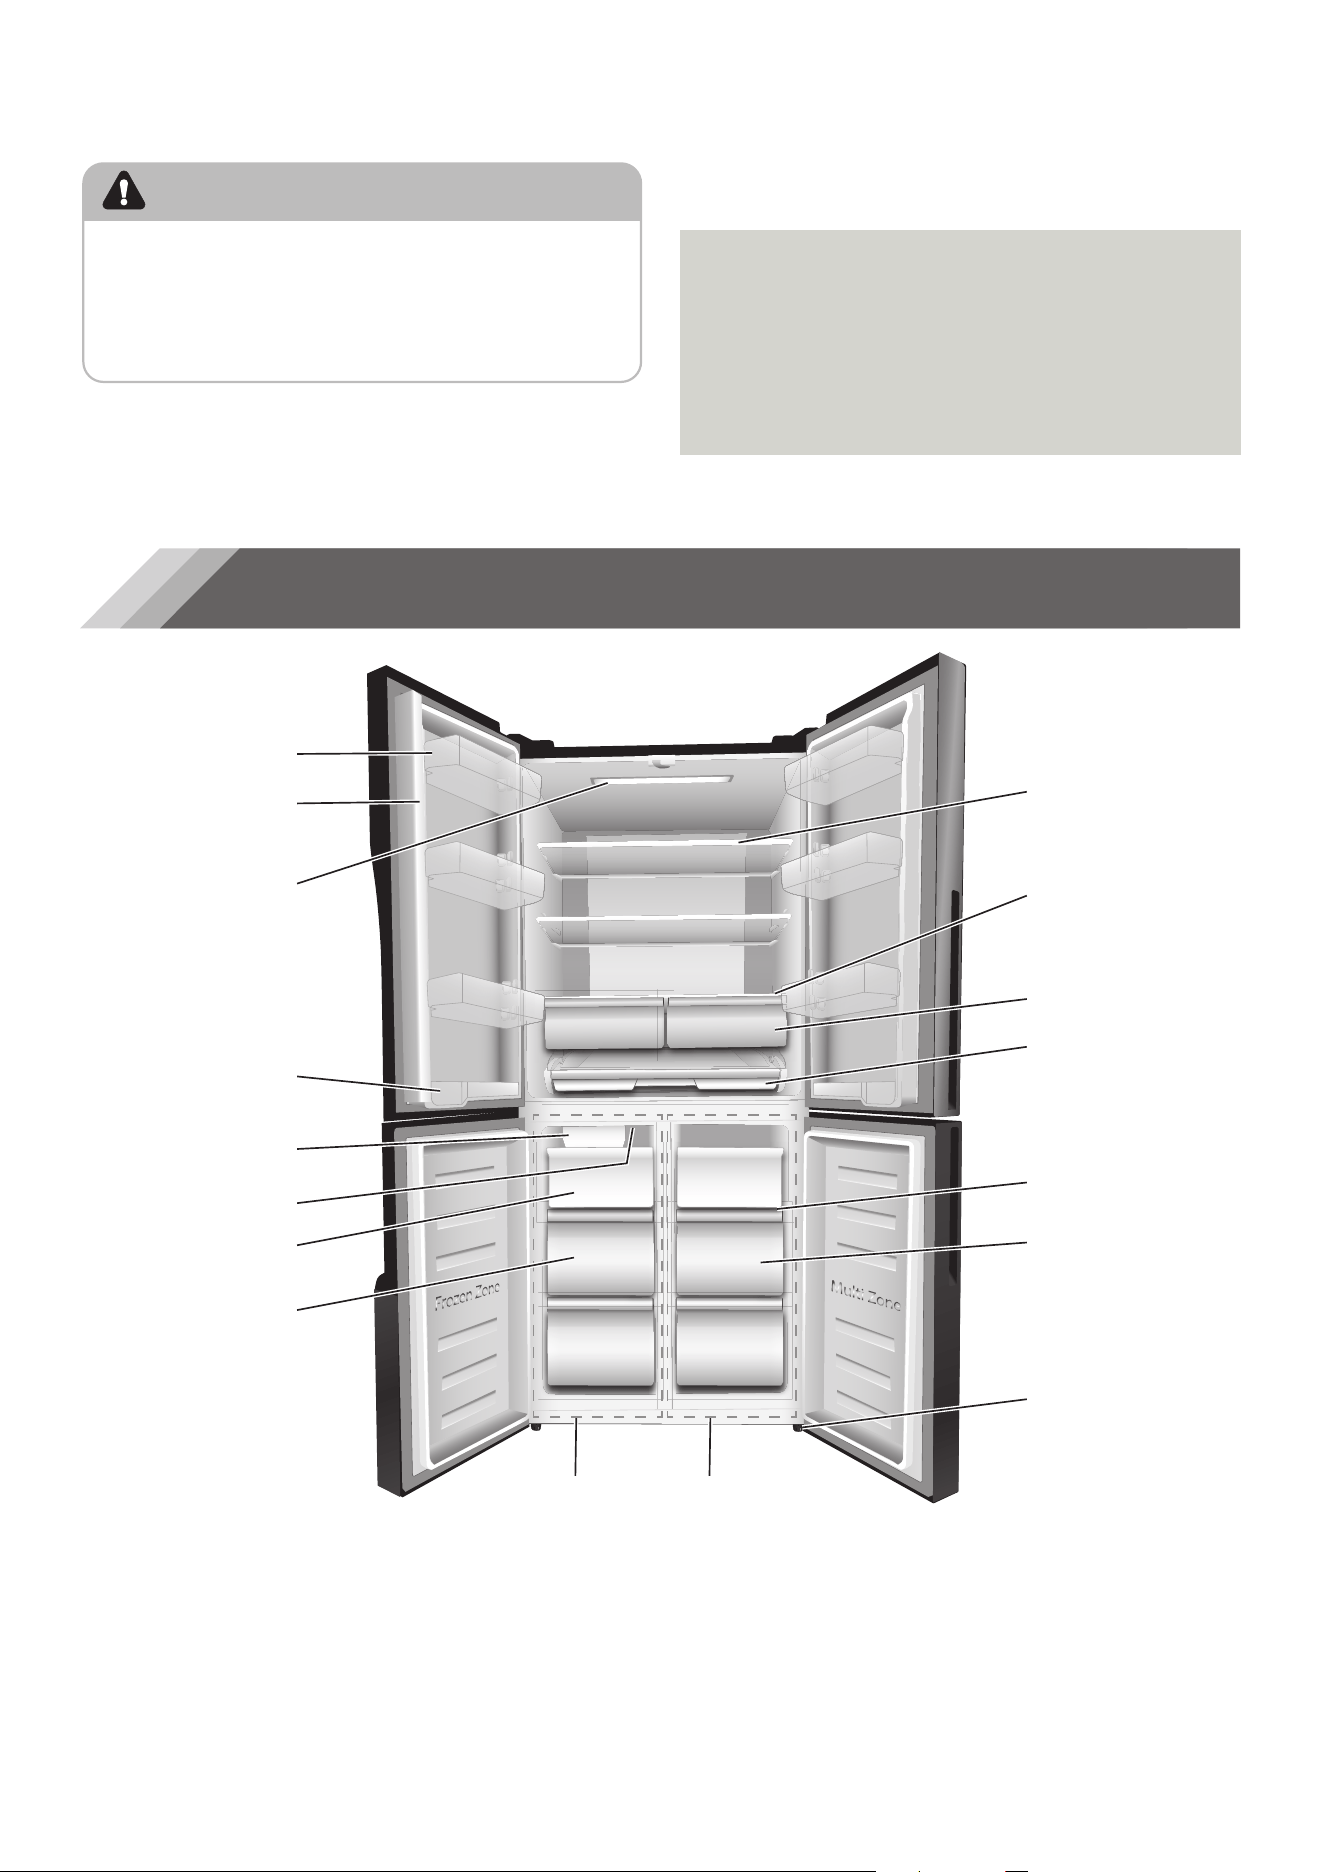
Parts and Features
a
d
b
c
e
g
h
f
i j
k
m
l
n
o
p
q
a Door Bin
b Mullion
c Refrigerator LED Light
d Door Tray
e Ice Maker
f Freezer LED Light
g Ice Storage Container
h Freezer Drawer
i Freezer Compartment
j Convertible Compartment
k Glass Shelf
l Cover
m Storage Drawer
n Full-width Drawer
o Glass Shelf
p Convertible Drawer
q Leveling Leg
NOTE: Your model may look different from this and other images in this manual, depending on your
model’s features.
5
Installation Requirements
Location Requirements
WARNING
Explosion and Fire Hazard
Keep flammable materials and vapors, such as
gasoline, away from appliance.
Failure to do so can result in death, explosion or fire.
IMPORTANT: This refrigerator is designed for
indoor, household use only.
Temperature
This refrigerator is intended for use in a location
where the temperature ranges from a minimum
of 55°F (13°C) to a maximum of 110°F (43°C). The
preferred room temperature range for optimum
performance, which reduces electricity usage and
provides superior cooling, is between 60°F (15°C)
and 90°F (32°C). It is recommended that you do
not install the refrigerator near a heat source, such
as an oven or radiator.
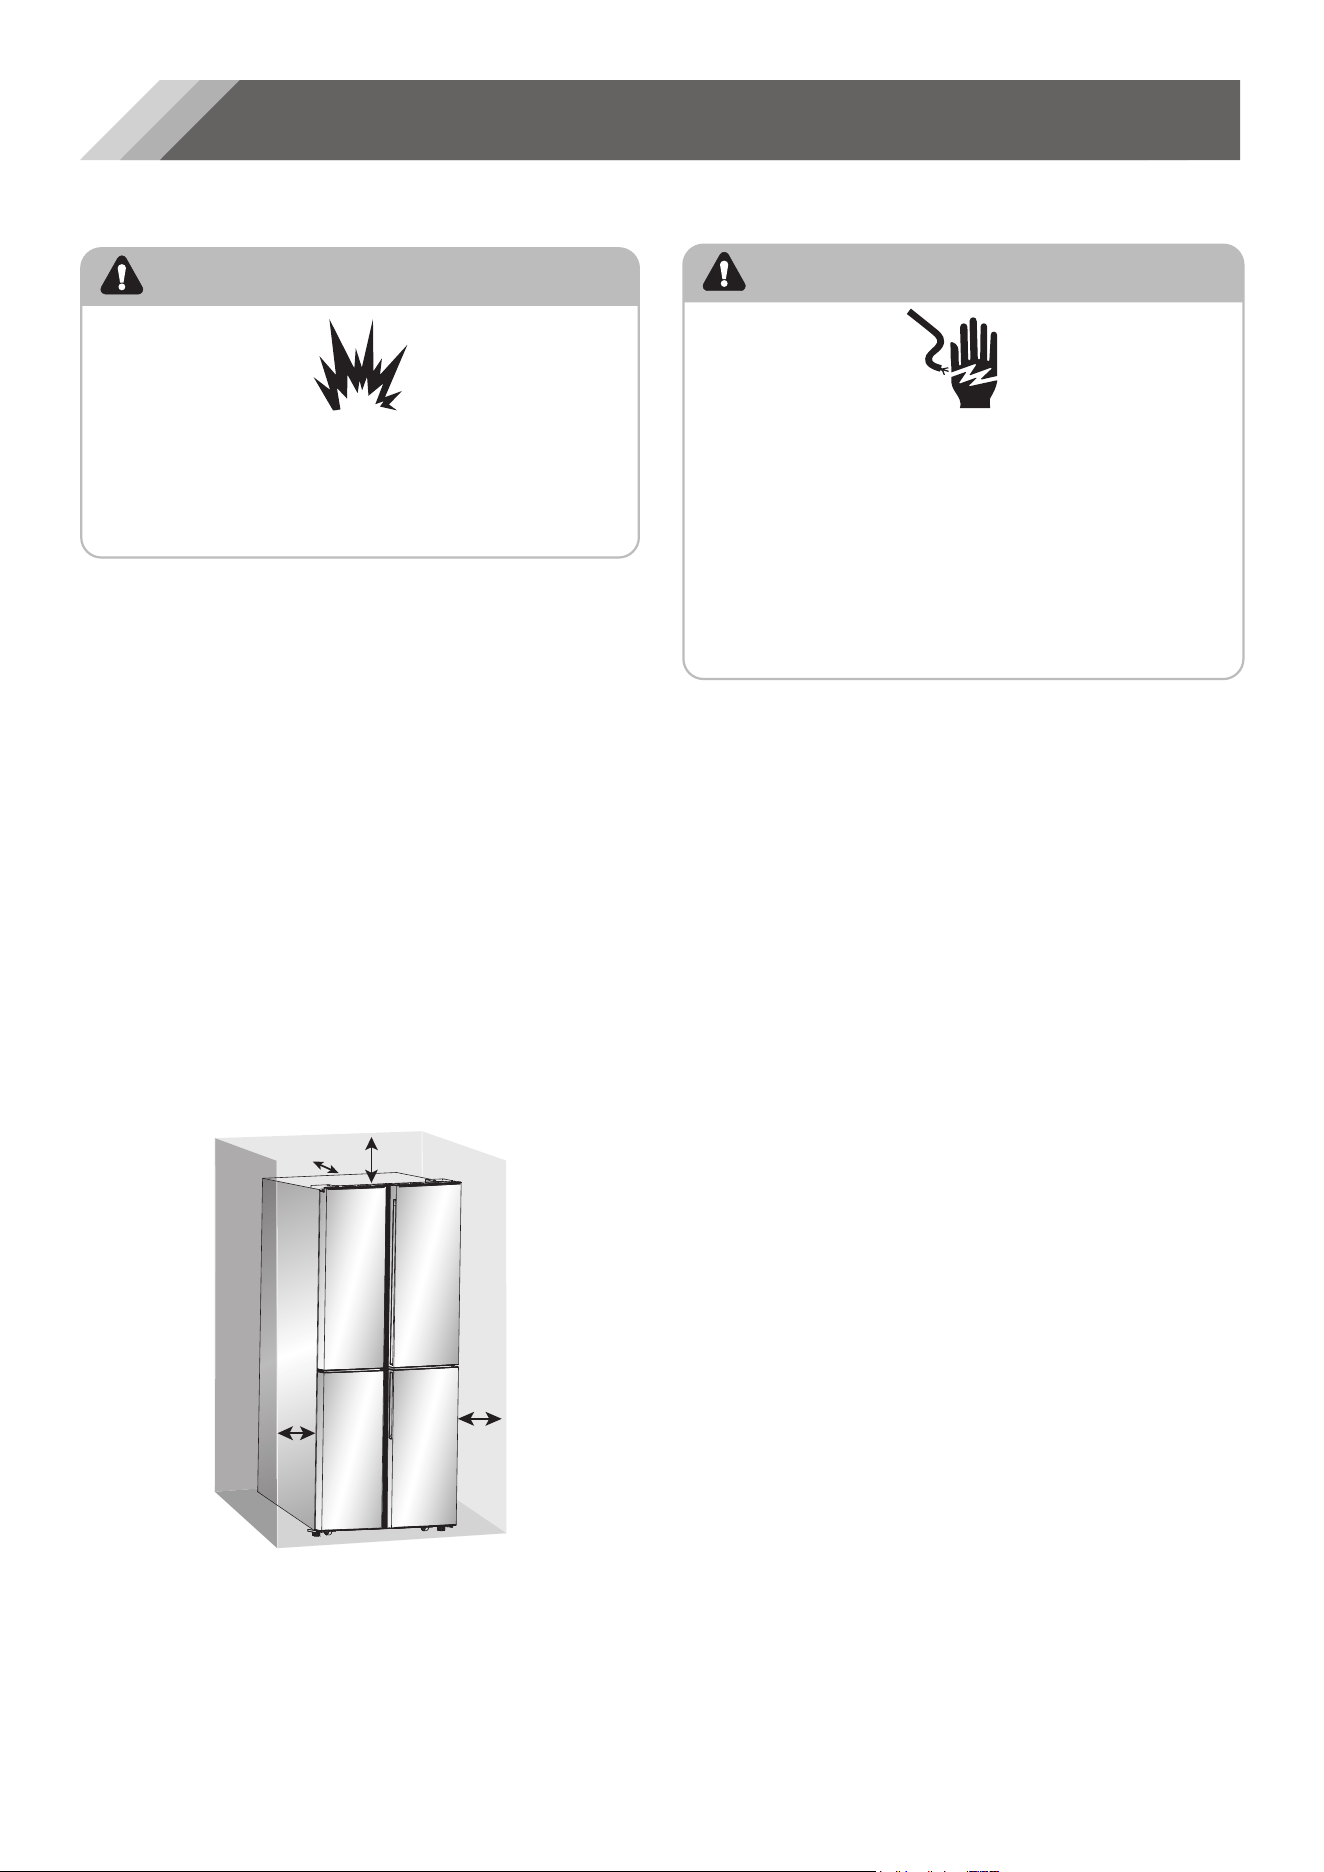
Ventilation
Adequate air circulation around the refrigerator is
required for efficient operation.
To ensure proper ventilation, maintain the
recommended clearances.
Recommended Clearances
a
b
c
c
a 4" Above
b 2" Behind
c 1/2 " Each Side
NOTE: If you place the refrigerator next to a fixed
wall, leave 4" (10 cm) minimum space to allow the
door to swing open.
Electrical Requirements
WARNING
Electrical Shock Hazard
Plug into a grounded 3 prong outlet.
Do not remove the ground prong from the power
cord plug.
Do not use an adapter.
Do not use an extension cord.
Failure to do so can result in death, fire or
electrical shock.
Before you move your refrigerator into its final
location, it is important to make sure you have the
proper electrical connection.
Recommended Grounding Method
A 115 volt, 60 Hz, AC only 15- or 20-amp fused,
grounded electrical supply is required. It is
recommended that a separate circuit serving only
your refrigerator be provided. Use an outlet that
cannot be turned off by a switch. Do not use an
extension cord.
NOTE: Before performing any type of installation
or cleaning, disconnect the refrigerator from the
electrical source. When you are finished, reconnect
the refrigerator to the electrical source and reset
the temperature controls to the desired setting.
Water Supply Requirements
A cold water supply with water pressure between
30 and 125 psi (207 and 862 kPa) is required to
operate the ice maker. If you have questions about
your water pressure, call a licensed, qualified
plumber.
IMPORTANT: Operation outside the water
pressure range may cause malfunction and severe,
damaging water leaks.
NOTE: If the water pressure is less than what is
required, ice cubes could be hollow or irregularly
shaped.
6
Reverse Osmosis Water Supply
(if applicable)
IMPORTANT: The pressure of the water supply
coming out of a reverse osmosis system going to
the water inlet valve of the refrigerator needs to
be between 30 and 125 psi (207 and 862 kPa).
If water pressure is too low:
Check to see whether the sediment filter in the
reverse osmosis system is blocked. Replace the
filter if necessary.
Allow the storage tank on the reverse osmosis
system to refill after heavy use. The tank
capacity could be too small to keep up with the
requirements of the refrigerator.
If you have questions about your water pressure,
call a licensed, qualified plumber.
Installation Instructions
Unpack the Refrigerator
WARNING
Fire or Explosion Hazard
Do not puncture refrigerant tubing.
Follow handling instructions carefully.
Flammable refrigerant used.
Failure to do so can result in death, explosion or fire.
IMPORTANT: Handle with care when moving
refrigerator to avoid either damaging the
refrigerant tubing or increasing the risk of a leak.
WARNING
Excessive Weight Hazard
Use two or more people to move and install
refrigerator.
Failure to do so can result in back or other injury.
Remove the Packaging
•
Remove tape and glue residue from surfaces
before turning on the refrigerator. Rub a small
amount of liquid dish soap over the adhesive
with your fingers. Wipe with warm water and
dry.
NOTE: Do not use sharp instruments, rubbing
alcohol, flammable fluids, or abrasive cleaners
to remove tape or glue. These products can
damage the surface of your refrigerator. For
more information, see “Refrigerator Safety.”
•
Dispose of/recycle all packaging materials.
•
If the refrigerator has been placed in a
horizontal or tilted position for any period of
time wait 4 hours before plugging it in to allow
the oil to settle into the compressor.
When Moving Your Refrigerator:
Your refrigerator is heavy. When moving
the refrigerator for cleaning or service, be
sure to cover the floor with cardboard or
hardboard to avoid floor damage. Always pull
the refrigerator straight out when moving it.
Do not wiggle or “walk” the refrigerator when
trying to move it, as floor damage could occur.
Clean Before Using
After you remove all of the packaging materials,
clean the inside of the refrigerator before using
it. See the cleaning instructions in “Refrigerator
Care.”
Important information to know about glass
shelves and covers:
Do not clean glass shelves or covers with
warm water when they are cold. Shelves
and covers may break if exposed to sudden
temperature changes or impact, such as
bumping. Tempered glass is designed to
shatter into many small, pebble-size pieces.
This is normal. Glass shelves and covers are
heavy. Use both hands when removing them to
avoid dropping.
7
Move Near Water Supply
WARNING
Fire or Explosion Hazard
Do not puncture refrigerant tubing.
Follow handling instructions carefully.
Flammable refrigerant used.
Failure to do so can result in death, explosion or fire.
IMPORTANT: The refrigerator must be located
on a solid, level surface that is strong enough to
support the refrigerator fully loaded.
•
Before moving, retract the leveling legs to
avoid scraping the floor.
•
The refrigerator has wheels, which should
be used for only forward and backward
movement.
NOTE: Trying to move the refrigerator sideways
may damage your floor.
Connect the Water Supply
Read all directions before you begin.
IMPORTANT:
•
The water connection must be made by a
qualified plumber.
•
Plumbing must be installed in accordance with
the International Plumbing Code and any local
codes and ordinances.
•
Use ONLY NEW Copper or PEX tubing.
•
Install tubing only in areas where temperatures
will remain above freezing.
Connect Water Line to Household Water
Supply
Following are two methods of connecting to your
household water supply. Use the instructions
specific to your installation.
IMPORTANT: Turn off main water supply. Turn on
nearest faucet long enough to clear the line of
water.
Method 1: Quarter-turn Shutoff Valve
Gather the required tools and parts before starting
installation.
•
1/2 " Wrench or 2 Adjustable Wrenches
•
Quarter-turn Shutoff Valve
•
1/4 " Compression Nut
•
Ferrule (sleeve)
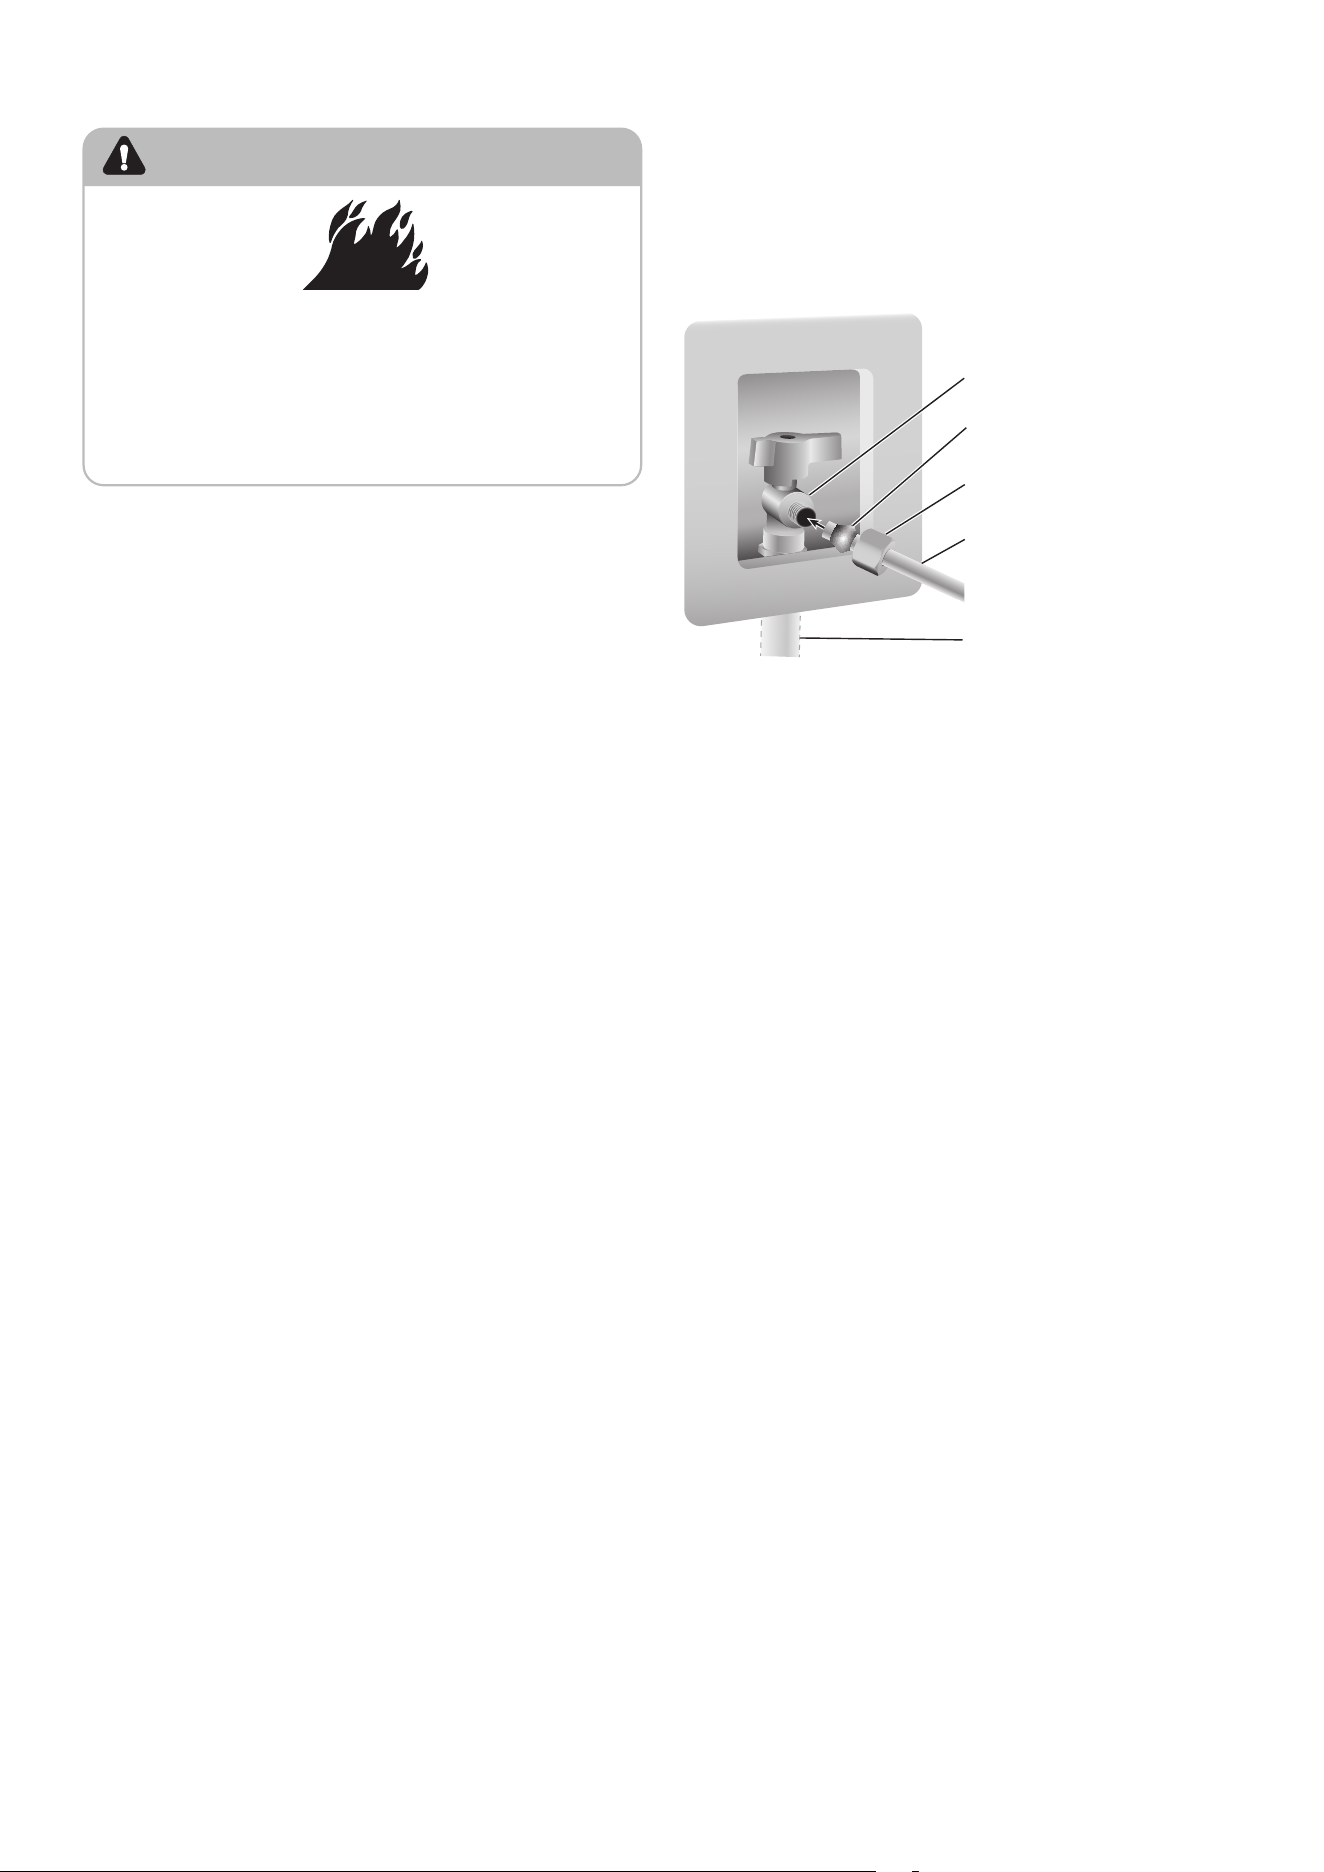
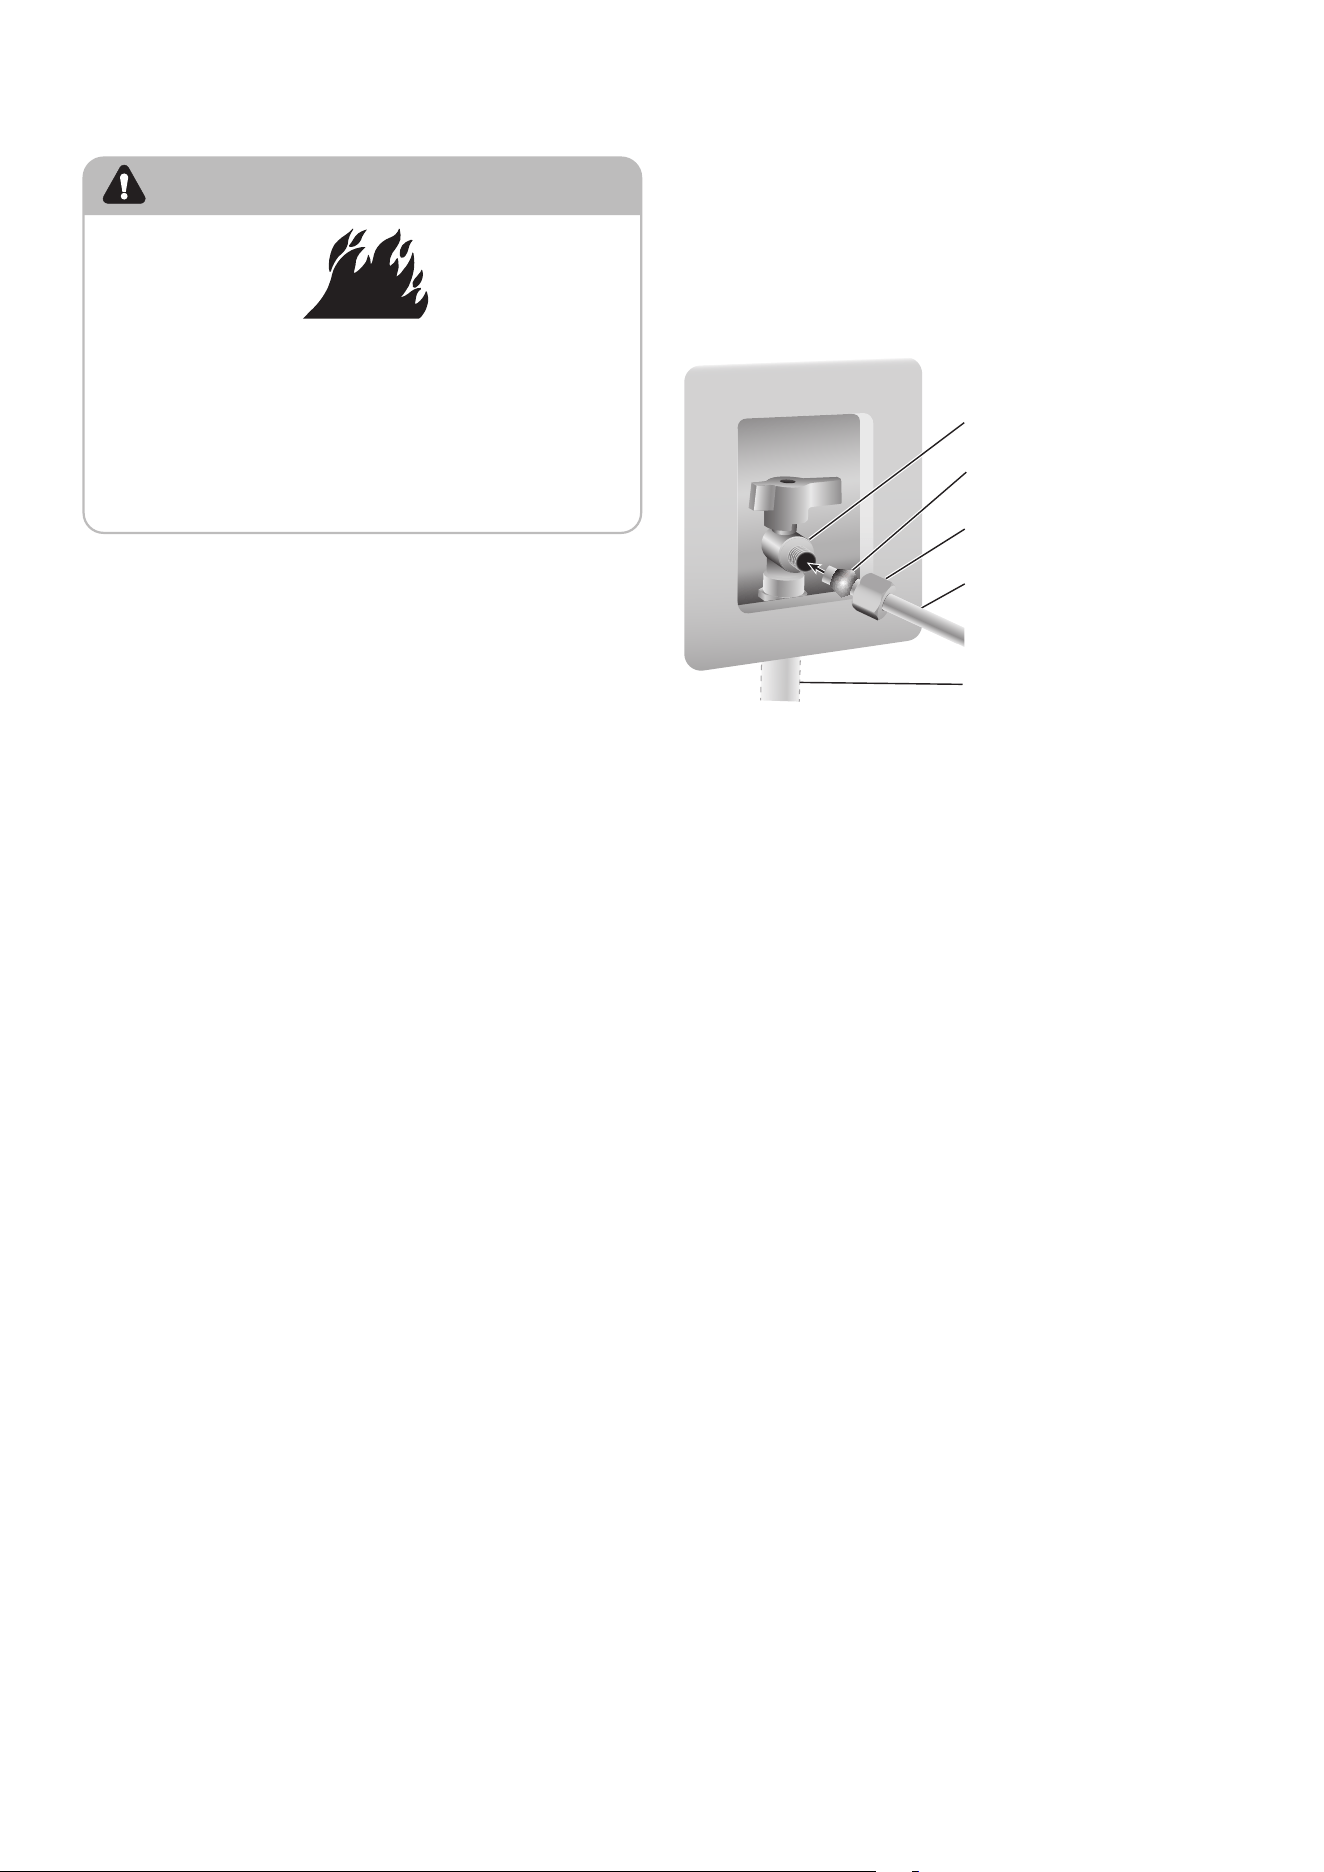
1. Use a quarter-turn shutoff valve or the
equivalent served by a household supply line.
NOTE: To allow sufficient water flow to the
refrigerator, a minimum 1/2 " household supply
line is recommended.
2. Using the ferrule (sleeve) and compression nut,
connect the 1/4 " water line to the shutoff valve.
NOTE: Do not overtighten.
c
b
a
e
d
a Quarter-turn
Shutoff Valve
b Ferrule
(Sleeve)
c Compression
Nut
d 1/4 " Water Line
e Household
Supply Line
3. Place the free end of the water line into an
empty container or sink.
4. Turn on main water supply and open
shutoff valve to flush the water line of any
contaminants. Run water until it is clear.
Method 2: Saddle Valve
NOTE: Do not use a piercing-type or 3/1 6 " (4.76 mm)
saddle valve which reduces water flow and clogs
easier.
Gather the required tools and parts before starting
installation.
•
Flat-blade Screwdriver
•
1/2 " Wrench or 2 Adjustable Wrenches
•
Cordless Drill
•
1/4 " Drill Bit
•
1/4 " Compression Nut
•
Ferrule (sleeve)
1. Find a 1/2 " to 11/4 " (12.7 mm to 31.8 mm) vertical
cold water pipe near the refrigerator.
IMPORTANT:
•
Make sure it is a cold water pipe.
•
Horizontal pipe will work, but the following
procedure must be followed: Drill on the top
side of the pipe, not the bottom. This will
help keep water away from the drill. This also
keeps normal sediment from collecting in
the valve.
2. Determine the length of water line you need.
Measure from the connection on the rear of the
refrigerator to the water pipe. Add 7 ft (2.1 m)
to allow for cleaning. Use 1/4 " (6.35 mm) O.D.
(outside diameter) water line.
3. Using a cordless drill, drill a 1/4 " hole in the cold
water pipe you have selected.
8
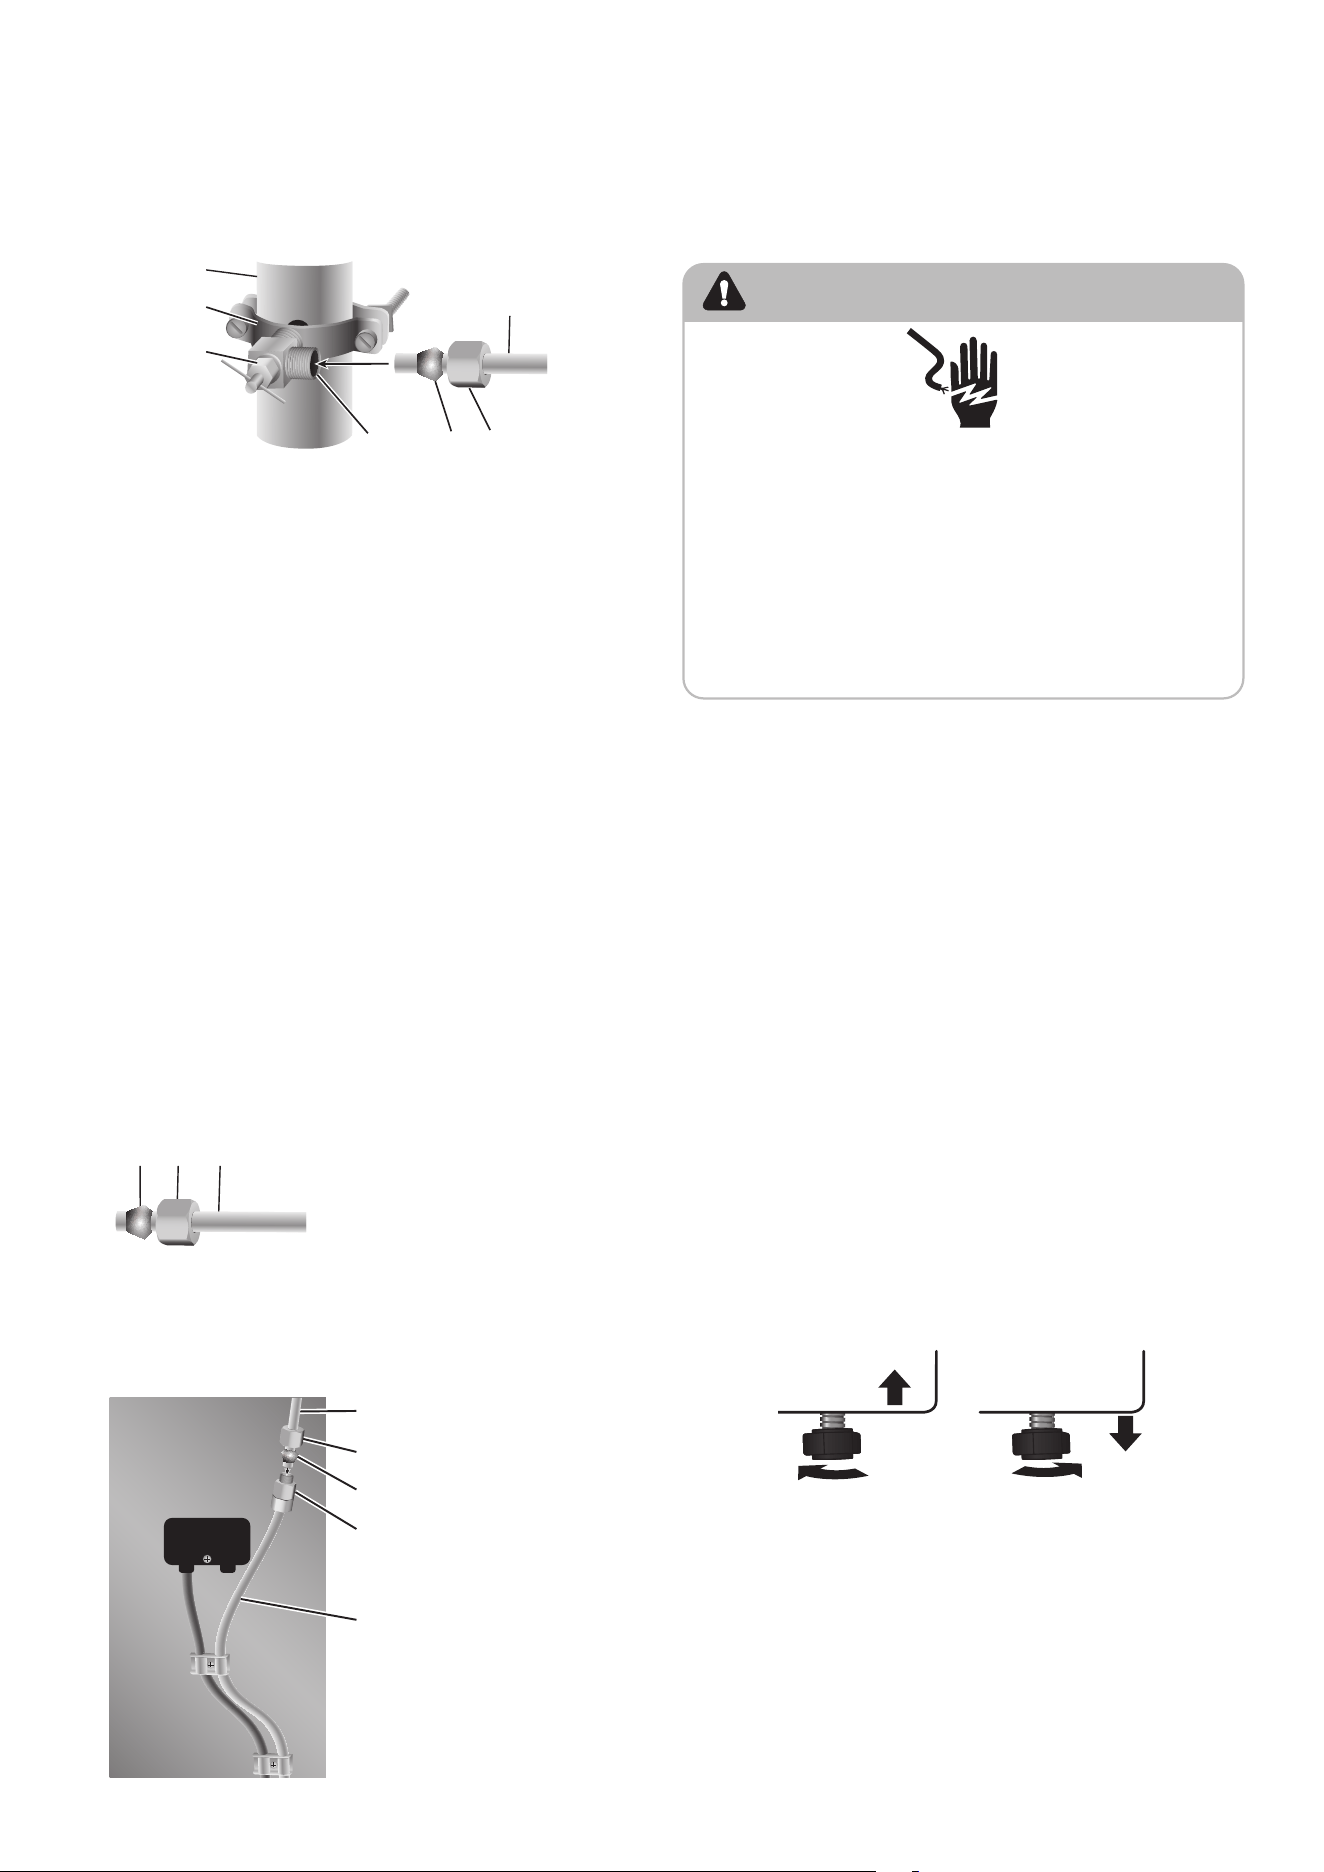
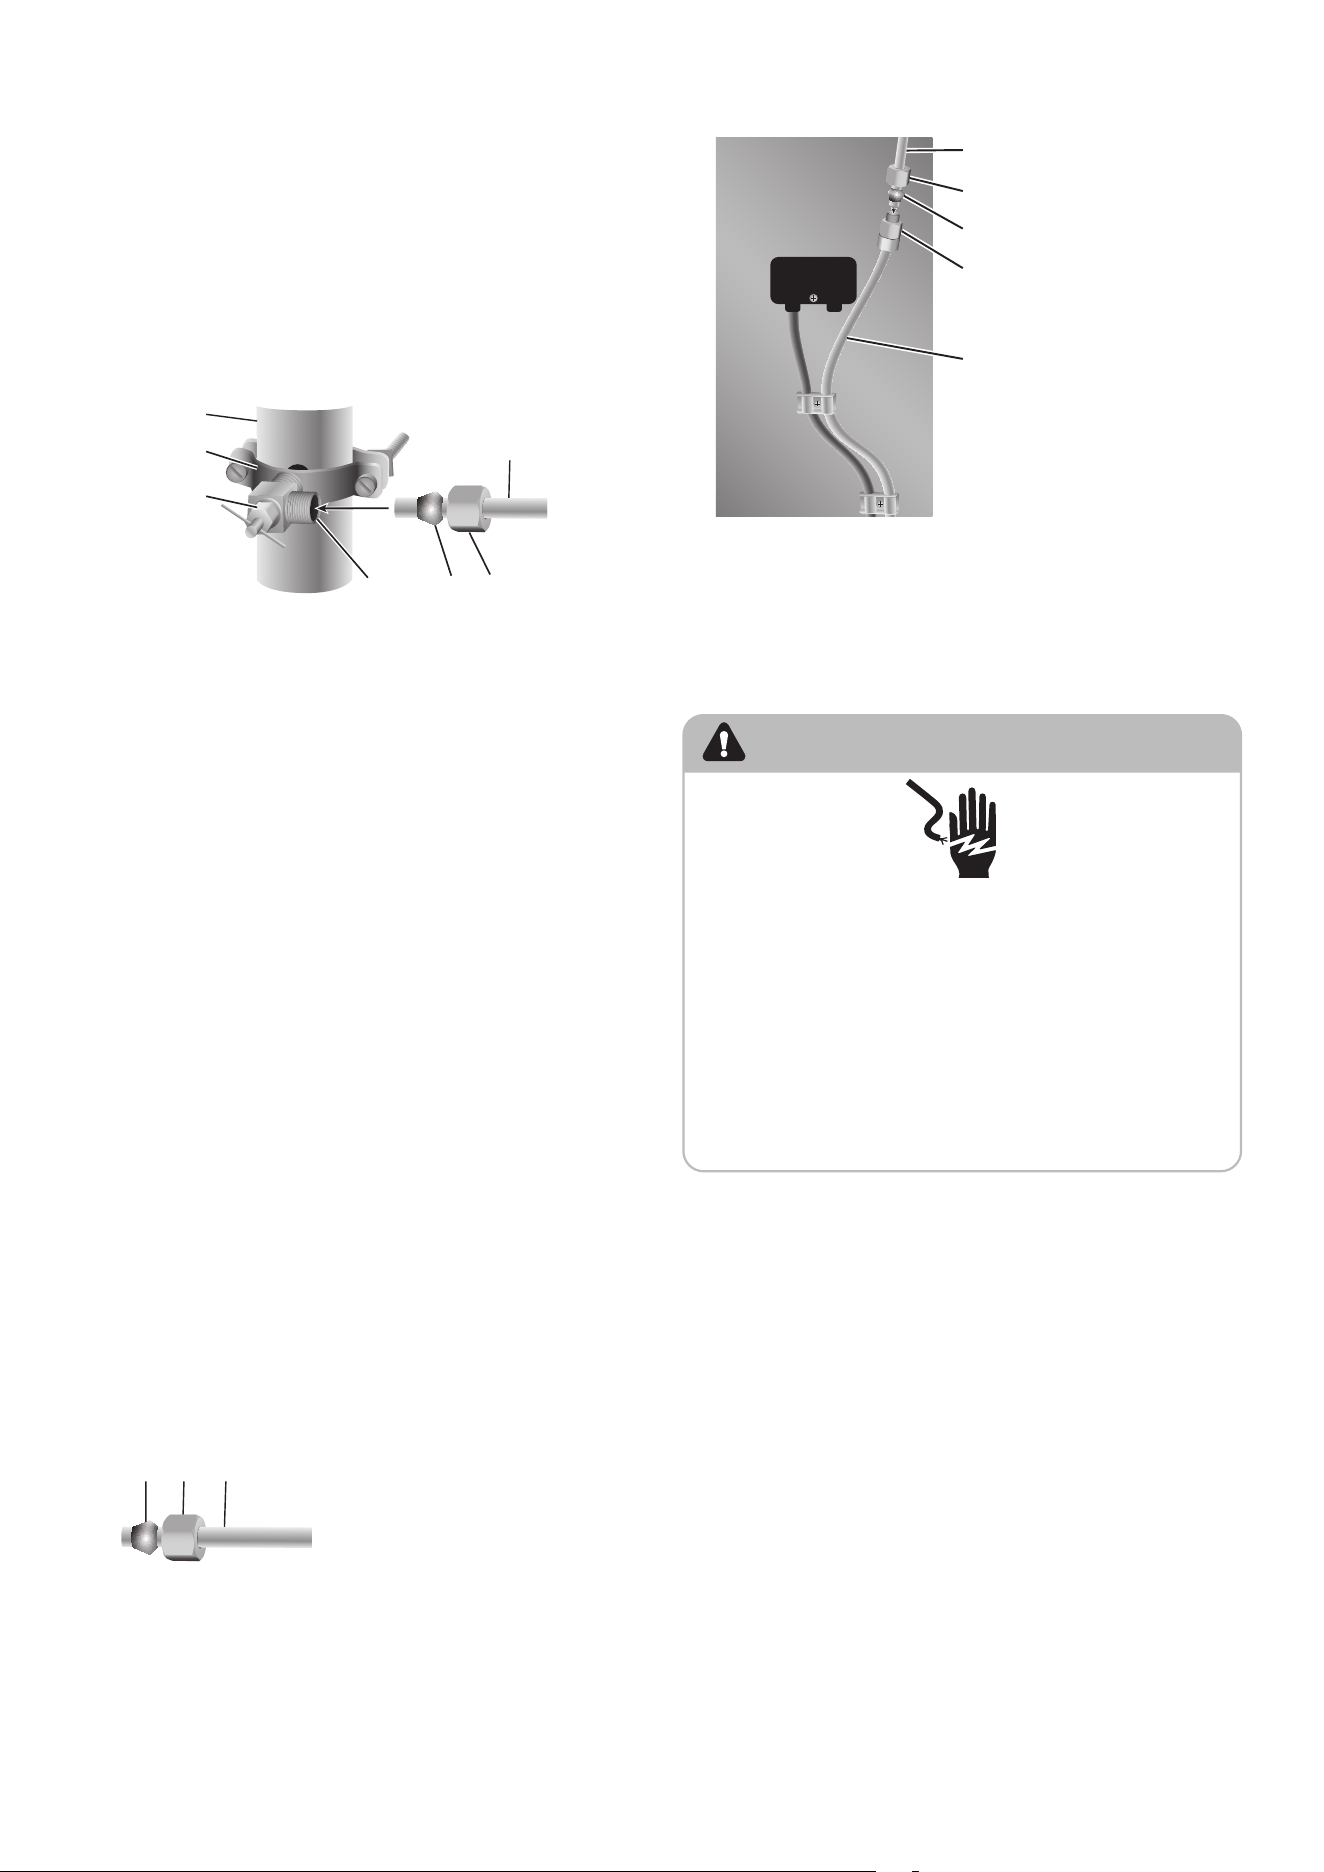
4. Fasten the shutoff valve to the cold water pipe
with the pipe clamp. Be sure the outlet end is
solidly in the 1/4 " drilled hole in the water pipe
and that the washer is under the pipe clamp.
Tighten the packing nut. Tighten the pipe
clamp screws slowly and evenly so the washer
makes a watertight seal. Do not overtighten.
a
g
b
c
d e f
a Household Supply
Line
b Saddle Valve
c Packing Nut
d Shutoff Valve
e Ferrule (Sleeve)
f Compression Nut
g 1/4 " Water Line
5. Slip the compression sleeve and compression
nut on the water line as shown. Insert the end
of the tubing into the outlet end squarely as far
as it will go. Screw compression nut onto outlet
end with adjustable wrench. Do not overtighten
or you may crush the water line.
6. Place the free end of the water line into an
empty container or sink.
7. Turn on main water supply and open
shutoff valve to flush the water line of any
contaminants. Run water until it is clear.
Connect Water Line to Refrigerator
IMPORTANT: If you turn the refrigerator on before
the water is connected, turn off the ice maker.
1. Unplug refrigerator or disconnect power.
2. Close shut-off valve.
3. Thread a brass compression nut and ferrule
(sleeve) onto the free end of the water line.
a b c
a Ferrule (Sleeve)
b Brass Compression
Nut
c Water Line
4. Insert the free end of the water line into the
brass fitting attached to the water inlet on the
back of the refrigerator.
5. Slide the compression nut over the ferrule and
screw the nut onto the brass fitting.
a
b
c
d
e
a Water Line
b Brass
Compression
Nut
c Ferrule
(Sleeve)
d Brass Fitting
e Water Inlet
6. Confirm water line is secure by gently pulling
on it.
7. Turn on water supply and check for leaks.
Correct any leaks.
Complete the Installation
WARNING
Electrical Shock Hazard
Plug into a grounded 3 prong outlet.
Do not remove the ground prong from the power
cord plug.
Do not use an adapter.
Do not use an extension cord.
Failure to do so can result in death, fire or
electrical shock.
1. Plug into a grounded 3 prong outlet.
NOTE: This refrigerator begins operating as
soon as it is connected to the power supply.
2. Move the refrigerator into its final location,
making sure to maintain the recommended
clearance.
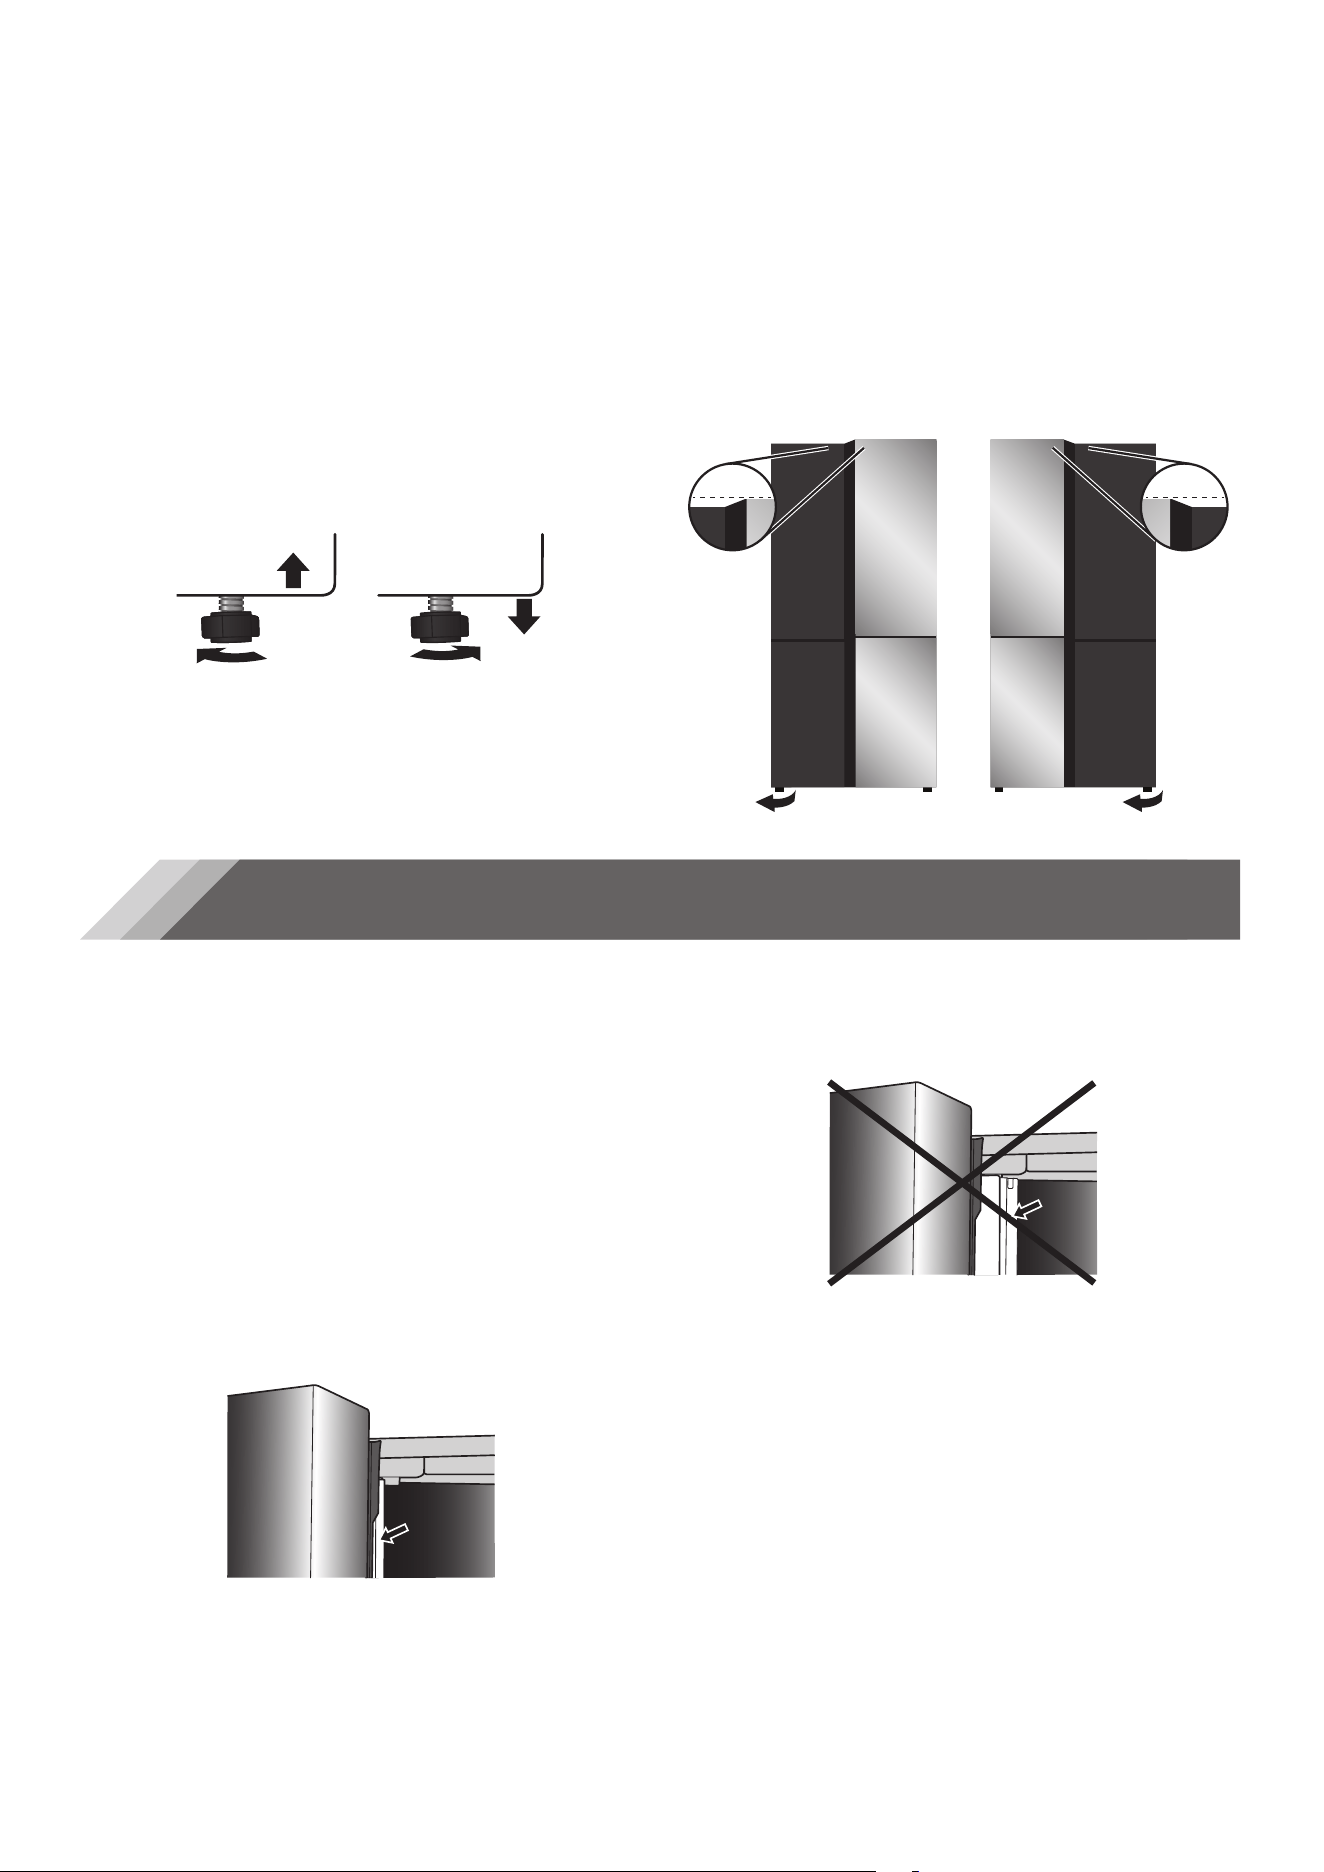
Level Refrigerator
(if needed)
The refrigerator must be level to maintain optimal
performance and appearance.
1. Turn the leveling feet on the bottom, front of
the cabinet to raise or lower that side of the
refrigerator until the refrigerator is level side-
to-side.
2. Turn both feet, by the same amount, to slightly
raise the front of the refrigerator. This will make
it easier for the doors to close.
NOTE: Having someone push against the top
of the refrigerator takes some weight off the
leveling feet. This makes it easier to turn the
feet.
9
Align Doors
(if needed)
If the edges of the refrigerator doors do not align
with each other, you can make adjustments.
Using Adjustable Foot
•
Turn the adjustable foot to raise or lower that
side of the refrigerator.
•
Clockwise - to raise
•
Counterclockwise - to lower
Refrigerator Use
Opening and Closing Doors
The four doors can be opened and closed either
separately or together.
•
There is a mullion on the left-hand side
refrigerator compartment door.
•
When closing the left-hand door, the mullion
folds behind the right-hand door joining the
two doors.
•
The temperature of the door frame is controlled
to help prevent moisture from developing on
the mullion. The temperature of the surface
may be warm, which is normal, and will not
affect the performance of the refrigerator.
NOTE: Before closing the left-hand door, make
sure the mullion is folded inward. If the mullion
is pulled outward it may become damaged
when you try to close the door.
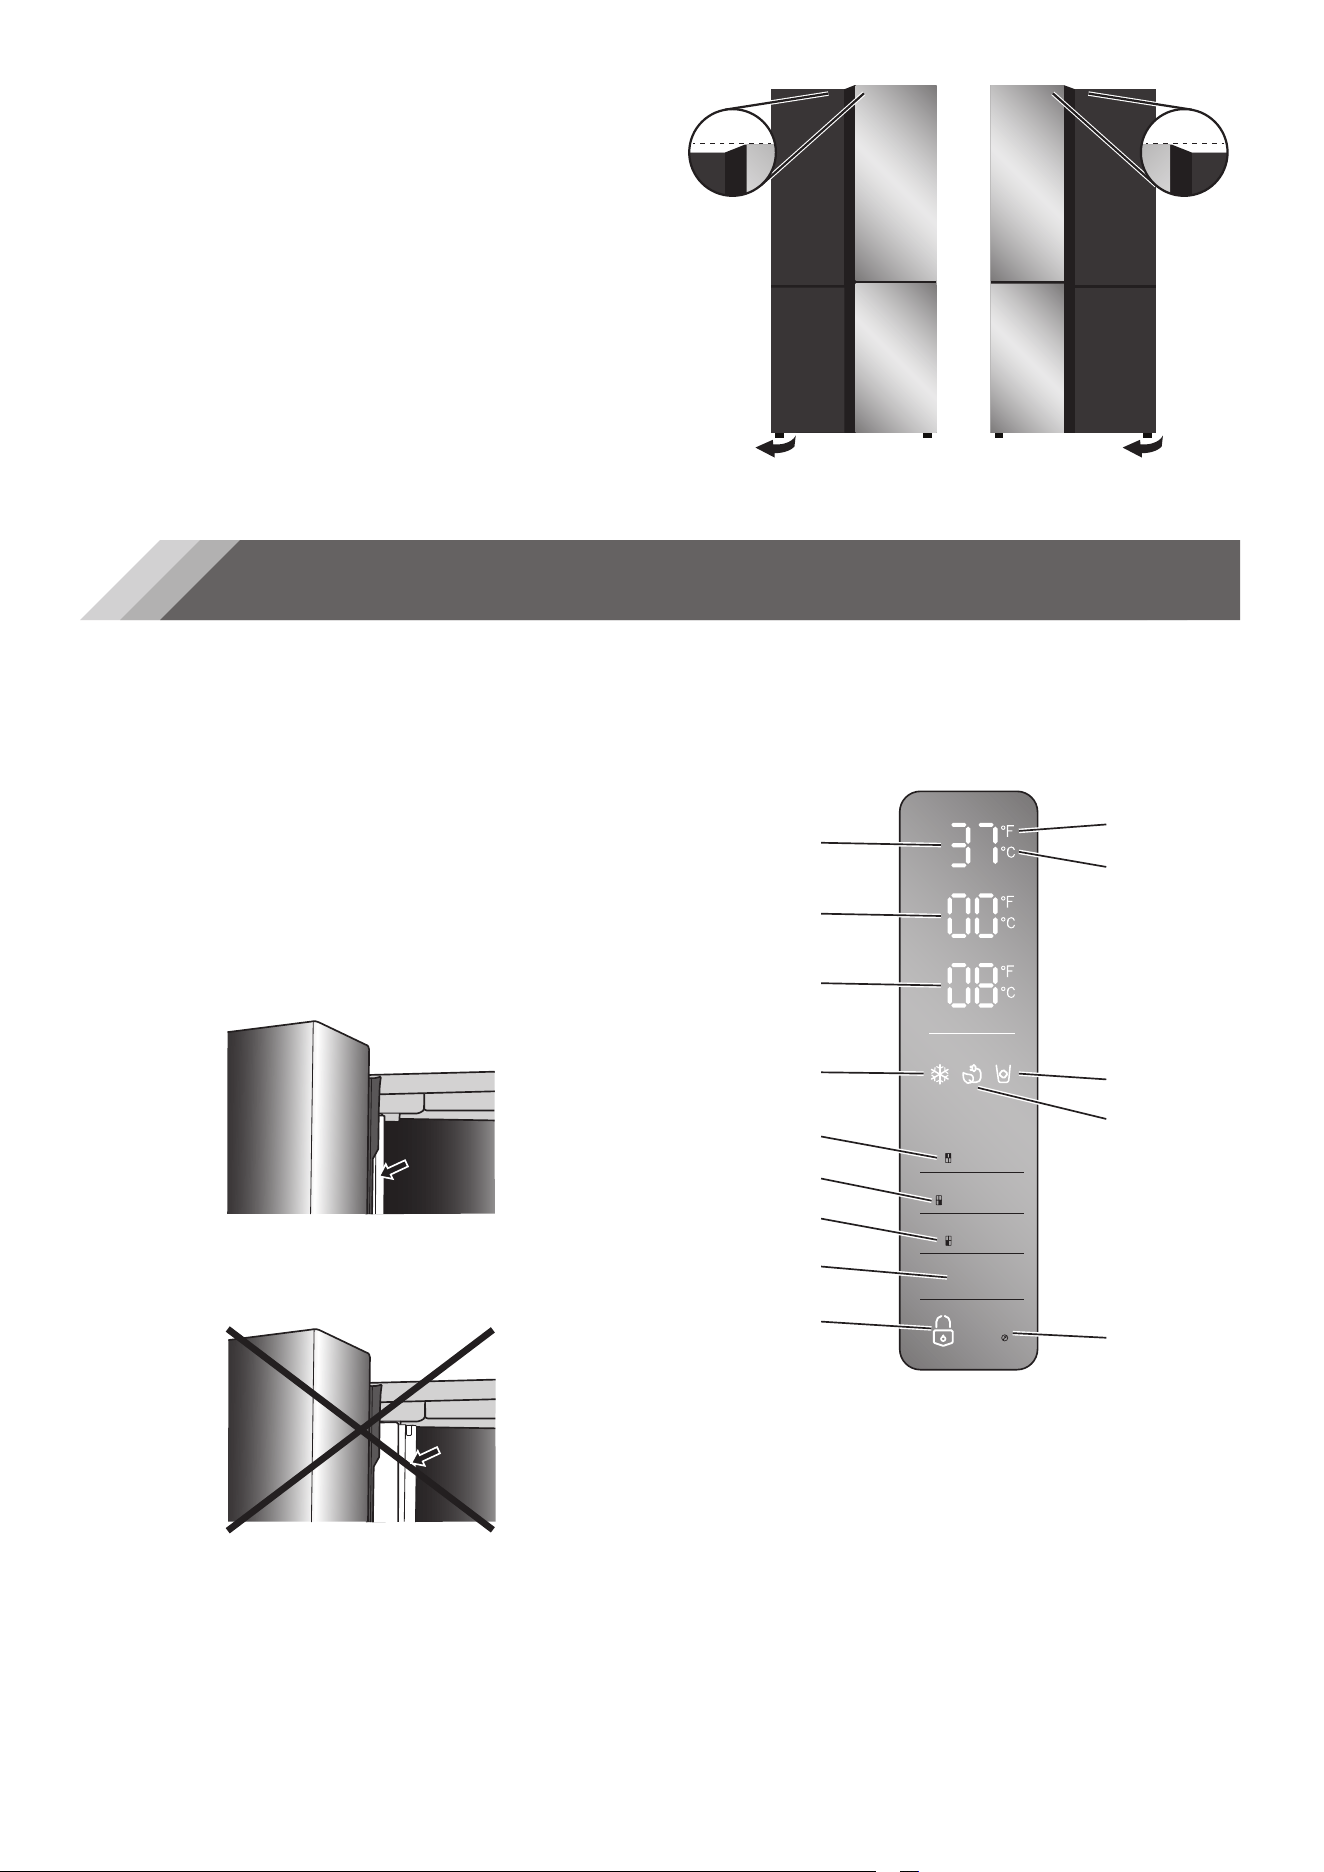
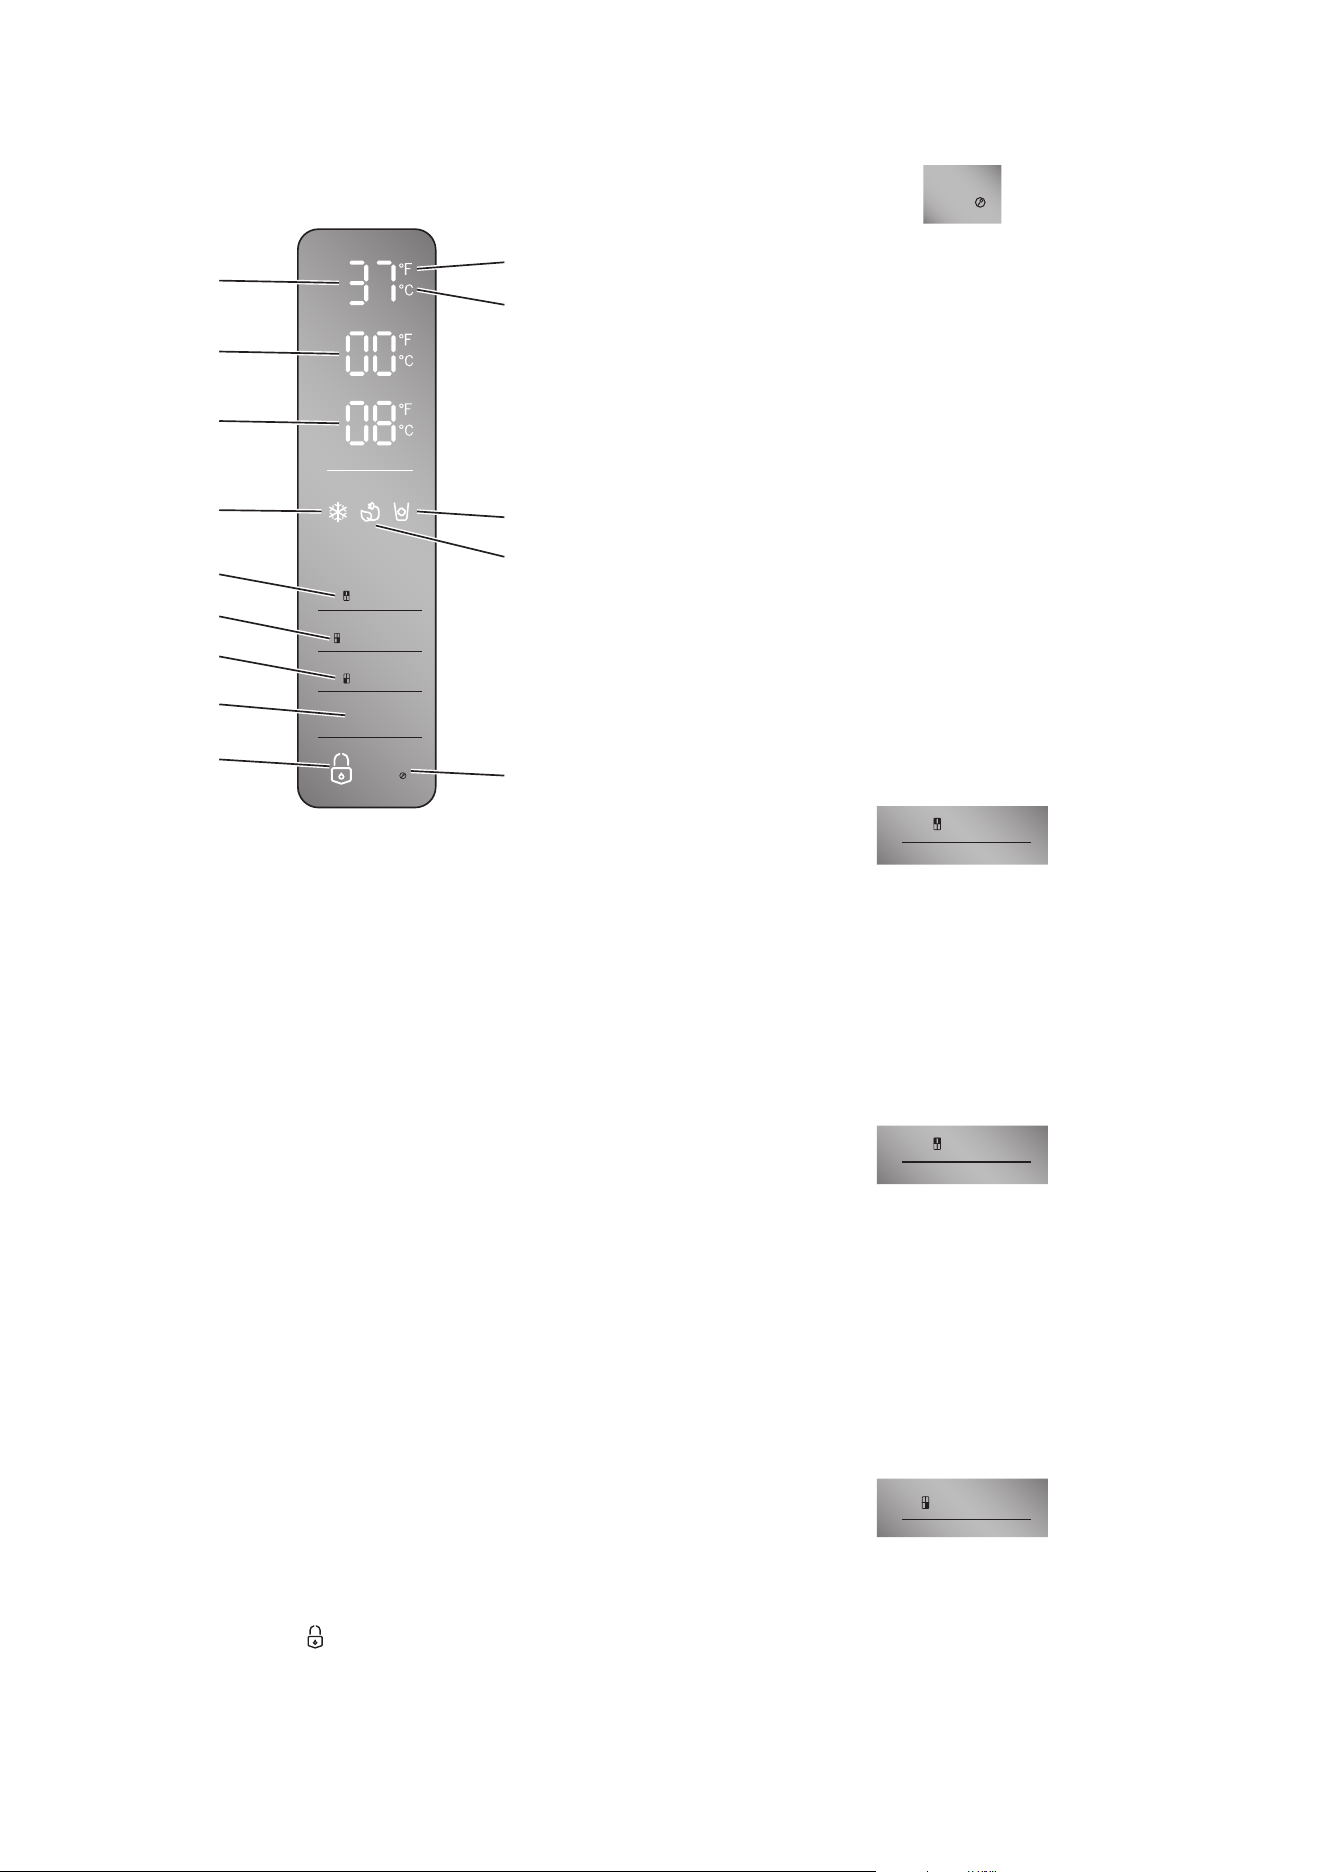
Using the Controls
NOTE: The controls on your model may look
different from this and other images in this
manual, depending on your model’s features.
Fridge
Hold 3 sec for °C/°F
Hold 3 sec for Ice On/Off
Mode
Convertible
Freezer
Mode
Unlock
3sec
e
a
b
c
d
f
g
h
i
j
k
l
n
m
a Refrigerator
Compartment
Temperature
b Convertible
Compartment
Temperature
c Freezer Compartment
Temperature
d Super Freeze Icon
e Refrigerator Temp
Control
f Convertible Temp
Control
g Freezer Temp
Control
h Mode Control
i Lock/Unlock Icon
j Fahrenheit Indicator
k Celsius Indicator
l Ice Maker Icon
m Energy Saver Icon
n Unlock Control
10
Control Panel
The display will illuminate when the refrigerator is
first plugged in, a control is pressed, or a door is
opened. However the lights will automatically turn
off after 60 seconds.
The Control Panel is locked, unless manually
unlocked.
NOTE: When the control panel is locked, the Lock
icon is illuminated.
To Unlock the Control Panel:
•
Press and hold UNLOCK for 3 seconds.
Unlock
3sec
NOTE: When the control panel is unlocked, the
Unlock icon is illuminated.
Setting Compartment Temperatures
When you set a temperature, you are setting an
average temperature for the entire compartment.
The actual compartment temperatures may vary
from the temperatures displayed depending on
the amount and placement of stored food, and the
surrounding room temperature.
Recommended Temperature Settings
•
Refrigerator Compartment: 37°F (3°C)
•
Convertible Compartment: 8°F (-13°C)
•
Freezer Compartment: 0°F (-18°C)
Display Temperatures in Degrees Fahrenheit or
Celsius
•
Press and hold FRIDGE for 3 seconds.
Fridge
Hold 3 sec for °C/°F
NOTE: Either the °F or °C icon will illuminate to
indicate in which scale (Fahrenheit or Celsius)
the temperature is being displayed.
•
Press FRIDGE again, to change the temperature
scale.
Refrigerator (Fridge) Compartment Temperature
1. Press FRIDGE once to turn on the temperature
control.
Fridge
Hold 3 sec for °C/°F
2. Press FRIDGE repeatedly to cycle through the
available temperature settings, from 45°F to
34°F or from 7°C to 1°C.
NOTE: Each press advances the setting by one
degree.
3. Release FRIDGE when the desired temperature
setting appears.
Convertible Compartment Temperature
1. Press CONVERTIBLE once to turn on the
temperature control.
Convertible
2. Press CONVERTIBLE repeatedly to cycle
through the available temperature settings,
from 45°F to -4°F or from 7°C to -20°C.
NOTE: Each press of the button advances the
setting by three degrees.
3. Release CONVERTIBLE to select the desired
temperature setting.
Freezer Compartment Temperature
1. Press FREEZER once to turn on the
temperature control.
Hold 3 sec for Ice On/Off
Freezer
2. Press FREEZER repeatedly to cycle through
the available temperature settings, from 5°F to
-13°F or from -14°C to -24°C.
NOTE: Each press of the button advances the
setting by one degree.
3. Release FREEZER to select the desired
temperature setting.
Ice Maker Control
•
Press and hold FREEZER for 3 seconds to turn
On/Off the ice maker.
Hold 3 sec for Ice On/Off
Freezer
NOTE: When the ice maker is on, the Ice Maker
icon is illuminated.
Additional Features
IMPORTANT: Press and hold UNLOCK for
3 seconds to unlock the control panel.
Unlock
3sec
Press MODE to toggle between the Super Freeze
and Energy Saver features.
Super Freeze
The Super Freeze feature rapidly lowers the
freezer compartment temperature to freeze
fresh food faster and maintain the temperature
of the frozen food during periods of high usage,
full grocery loads, or temporarily warm room
temperatures.
The Super Freeze feature lowers the temperature
in the freezer compartment to -13°F (-25°C).
•
Press MODE until the Super Freeze icon
appears.
Mode
•
Press either the MODE or FREEZER control to
manually turn off Super Freeze.
NOTE: When Super Freeze is on, is
illuminated and -13°F or -25°C appears in the
temperature display.
11
•
Press FREEZER to manually turn off Super
Freeze and return to the previously set
temperature.
NOTE: Super Freeze will automatically turn off
after several hours, and the freezer will revert
to its previous temperature setting.
Energy Saver
The Energy Saver feature reduces energy use by
raising the Refrigerator Compartment temperature
to 43 °F (6 °C) and the Freezer Compartment
temperature to 1 °F (-17 °C).
IMPORTANT: The compartment temperatures
in Energy Saving mode are not suitable for the
storage of certain food items.
•
Press MODE until the Energy Saver icon
appears.
NOTE: When the refrigerator is in Energy Saver
mode, is illuminated.
•
Press FREEZER or FRIDGE to manually turn off
the Energy Saver feature.
Door Open Alarm
If a door is open for longer than 2 minutes, an
alarm will sound to alert you. The alarm will sound
3 times every minute for 8 minutes.
•
To turn off the alarm, close all doors
completely.
Features
Important information to know about glass
shelves and covers:
Do not clean glass shelves or covers with
warm water when they are cold. Shelves
and covers may break if exposed to sudden
temperature changes or impact, such as
bumping. Tempered glass is designed to
shatter into many small, pebble-size pieces.
This is normal. Glass shelves and covers are
heavy. Use both hands when removing them to
avoid dropping.
Refrigerator
IMPORTANT: To avoid damage to the doors, make
sure all shelves and drawers are pushed fully into
the cabinet before closing a door.
Adjustable Shelves
The height of the shelves can be adjusted to fi t
your storage needs.
1. To remove a shelf, gently lift upward and then
pull the shelf forward until the end of the shelf
is past the shelf guides.
a
a Shelf
Guides
2. To reinstall a shelf, gently slide the shelf back
into the refrigerator compartment, and then
lower the shelf onto the shelf guides so that the
hooks fi t behind the rear guides.
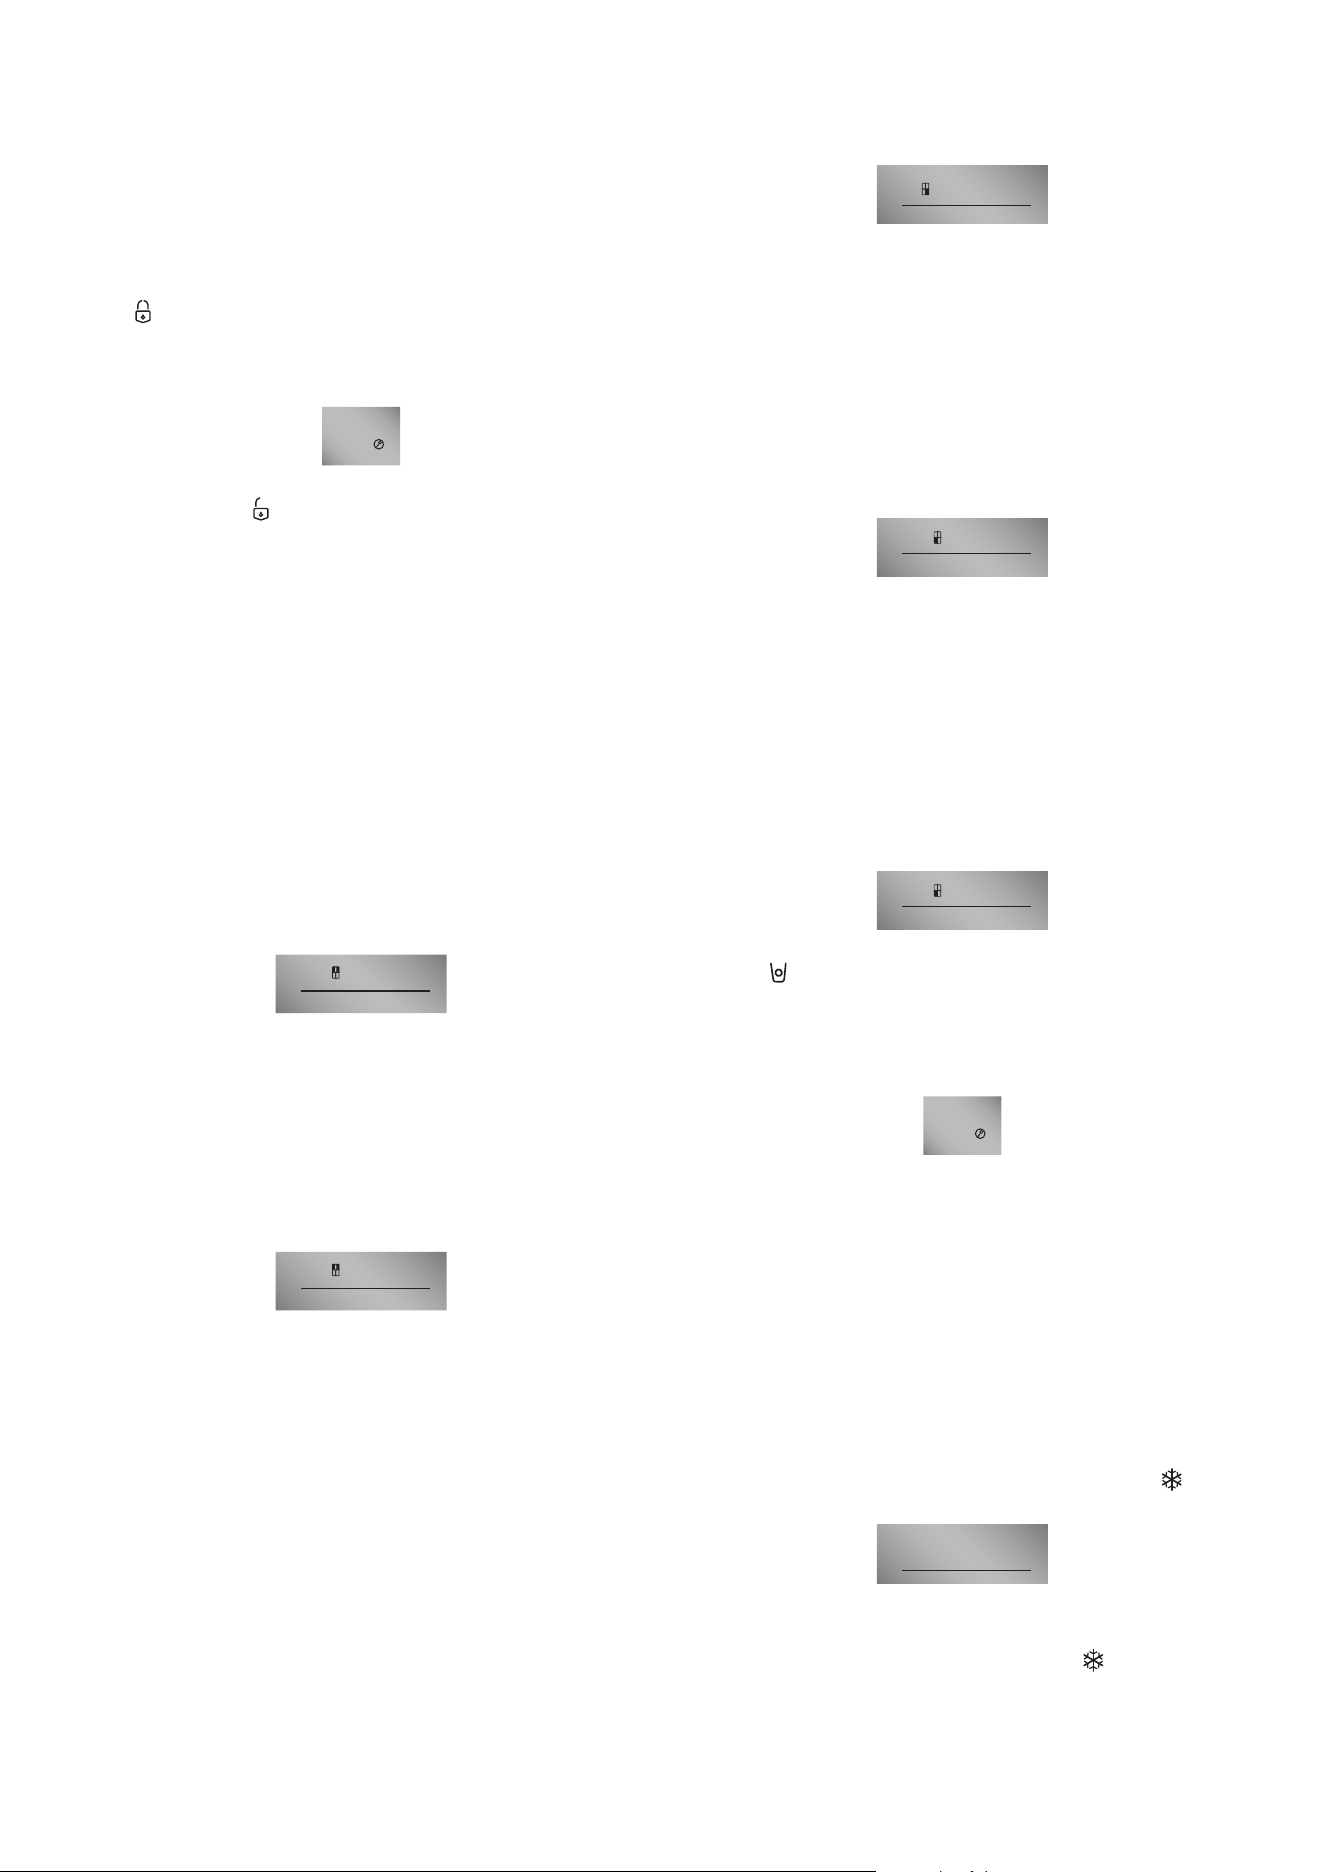
Removable Door Bins
The bins located in the middle of the door are
adjustable.
To Remove and Replace a Door Bin:
1. Place hands on both sides of the bin and lift
upward.
2. Pull the door bin out.
3. Replace the door bin by inserting it above the
support and pressing down to snap into place.
Crisper Drawers
The two crisper drawers mounted on telescopic
extension slides can be used to store fruits and
vegetables.
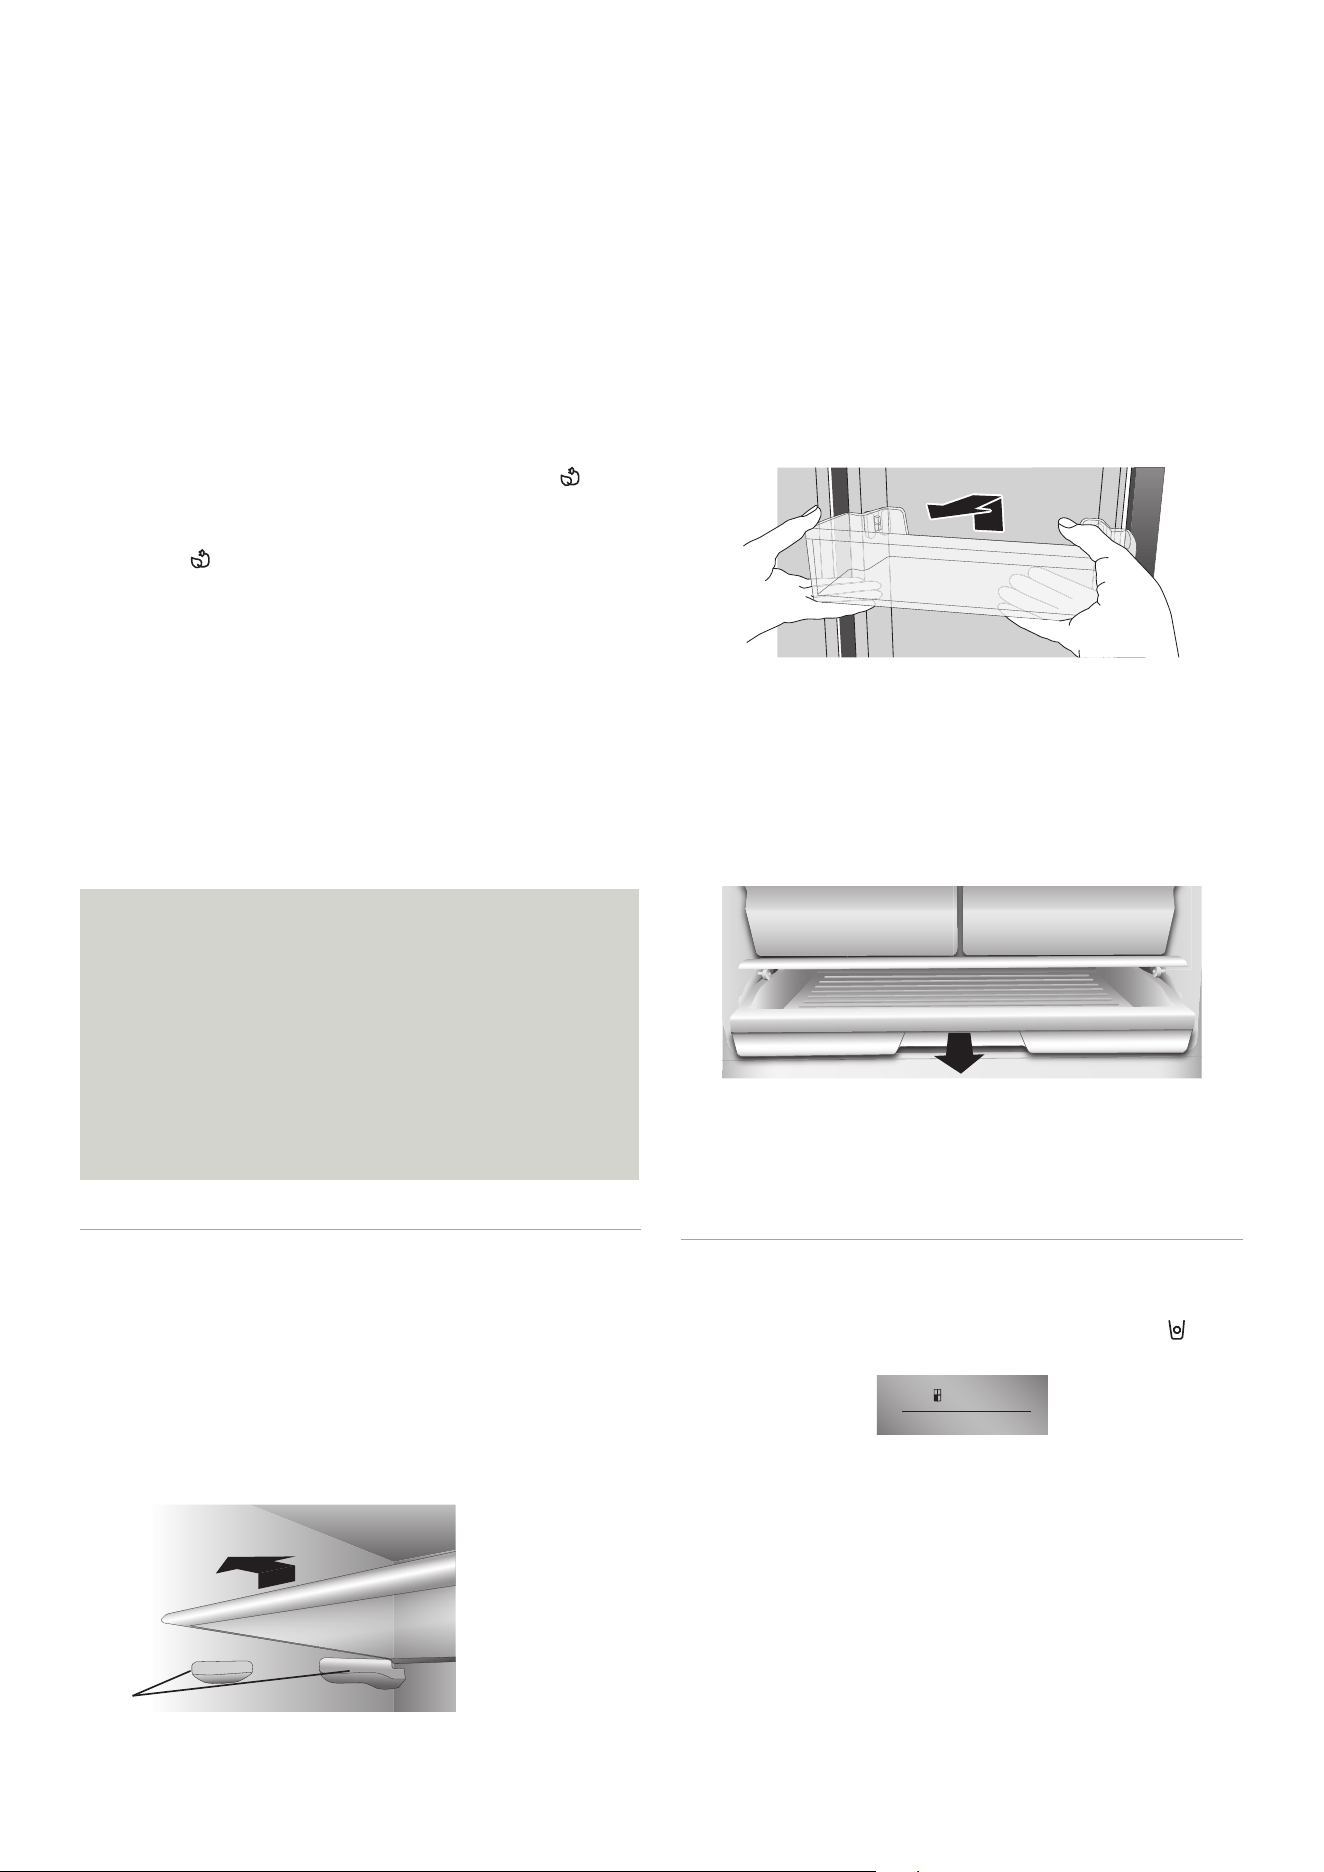
Full-width Drawer
The full-width drawer is an ideal space to store
large deli platters.
•
Open - The cover automatically opens as the
drawer is pulled out from the cabinet.
•
Close - The cover automatically closes as the
drawer is pushed into the cabinet.
Freezer
Ice Maker
Turn On/Off the ice maker by pressing and holding
FREEZER for 3 seconds. The Ice Maker icon will
illuminate.
Hold 3 sec for Ice On/Off
Freezer
•
Following installation, allow 24 hours to
produce the fi rst batch of ice. Discard the
fi rst three batches of ice produced. Allow 2 to
3 days to fi ll the ice storage container.
•
If the ice in the ice container clumps, break up
ice using a plastic utensil and discard. Do not
use a sharp tool to break up the ice. This can
cause damage to the ice container.
•
Do not store any items other than ice in the ice
storage container.
•
If you will be away for an extended period
of time, close the main water valve to avoid
possible leaks.
12
NOTE: The quality of your ice will be only as
good as the quality of the water supplied to
your ice maker. Avoid connecting the ice maker
to a softened water supply. Water softener
chemicals (such as salt) can damage parts of
the ice maker and lead to poor quality ice. If
a softened water supply cannot be avoided,
make sure the water softener is operating
properly and is well-maintained.
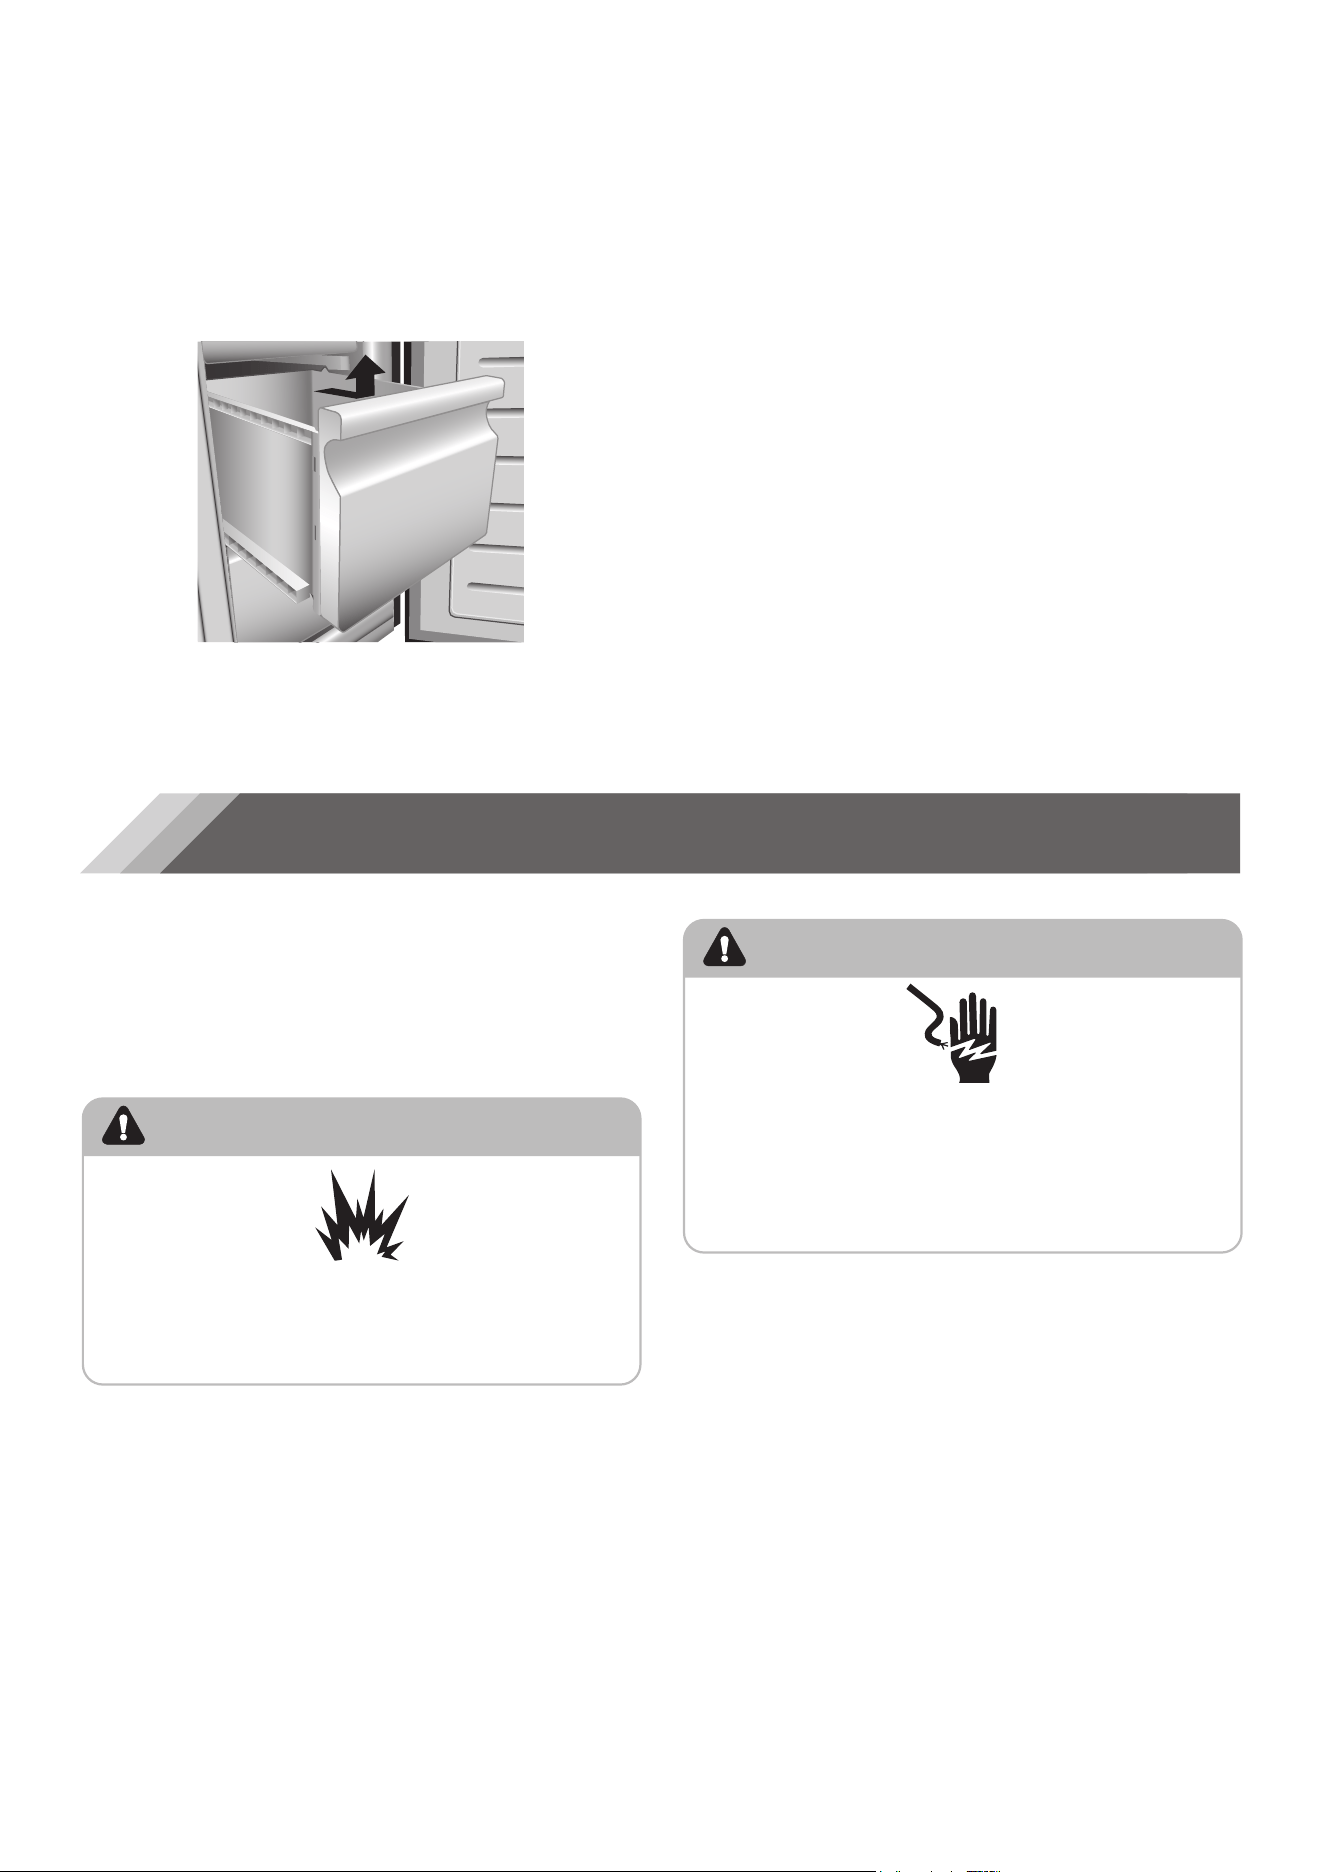
Freezer Drawers
To Remove/Replace Freezer Drawer:
1. Pull out drawer to maximum extension.
2. Lift up to remove the drawer.
3. Reverse steps 1 and 2 to replace the drawer.
General Use Information
•
When first turning on refrigerator after a period
of non-use, allow the refrigerator to cool at
least 2 hours before adding food.
•
Do not block air circulation vents with stored
items.
•
Store items so that the air can circulate freely
around them.
•
Cover or wrap stored food well to avoid
transfer of odors.
•
Once defrosted, food quality will deteriorate
rapidly. Defrosted food should not be refrozen.
•
Neither bottled nor canned drinks should be
stored in the freezer compartment. Bottles and
cans may explode.
Refrigerator Care
Cleaning
Both the refrigerator and freezer sections defrost
automatically. However, clean both sections about
once a month to avoid buildup of odors. Wipe
up spills immediately. To avoid odor transfer and
drying out of food, wrap or cover foods tightly.
WARNING
Explosion Hazard
Use nonflammable cleaner.
Failure to do so can result in death, explosion or fire.
IMPORTANT:
•
Do not use harsh chemicals, ammonia, chlorine
bleach, concentrated detergent, solvents,
abrasives or metal scouring pads to clean your
refrigerator inside or out. They can damage
and/or discolor the refrigerator finish.
•
Do not use warm water to clean glass shelves
while they are still cold. Glass may break when
exposed to sudden temperature changes or
impact.
WARNING
Electrical Shock Hazard
Unplug your appliance or disconnect power before
cleaning.
Failure to do so can result in death, electric shock or
personal injury.
1. Unplug refrigerator or disconnect power.
2. Clean the interior.
Hand wash, rinse, and dry removable parts
and interior surfaces thoroughly. Use a clean
sponge or soft cloth and a mild detergent in
warm water.
3. Clean the door seals (gaskets). A dirty or sticky
door seal may adhere to the cabinet and tear
when you open the door.
Using a soft cloth and a solution of mild
detergent and warm water, hand wash the
door seals. Rinse with clear water and dry
thoroughly.
4. Clean the exterior surfaces.
Wash exterior surfaces with a clean, soft cloth
or sponge and a mild detergent in warm water.
Rinse surfaces with clean, warm water and dry
immediately to avoid water spots.
5. Plug in refrigerator or reconnect power.
13
Lights
IMPORTANT: Your refrigerator is equipped with
LED lighting. These lights are designed to last
for the life of your refrigerator. However, if the
lights stop operating, please contact a qualified
technician for replacement.
Vacation and Moving Care
Vacation
If You Choose to Leave the Refrigerator On While
You’re Away:
1. Use up any perishables and freeze other items.
If You Choose to Turn Off the Refrigerator Before
You Leave:
1. Remove all food from the refrigerator and
freezer.
2. Unplug refrigerator or disconnect power.
3. Clean refrigerator, wipe it, and dry well.
4. Tape rubber or wood blocks to the tops of both
doors to prop them open far enough for air to
get in. This stops odor and mold from building
up.
Moving
WARNING
Fire or Explosion Hazard
Do not puncture refrigerant tubing.
Follow handling instructions carefully.
Flammable refrigerant used.
Failure to do so can result in death, explosion or fire.
IMPORTANT: Handle with care when moving
refrigerator to avoid either damaging the
refrigerant tubing or increasing the risk of a leak.
WARNING
Excessive Weight Hazard
Use two or more people to move and install
refrigerator.
Failure to do so can result in back or other injury.
When you are moving your refrigerator to a new
home, follow these steps to prepare it for the
move.
1. Remove all food from the refrigerator and pack
all frozen food in dry ice.
2. Unplug refrigerator.
3. Clean, wipe, and dry thoroughly.
4. Take out all removable parts, wrap them well,
and tape them together so they don’t shift and
rattle during the move.
5. Raise the leveling legs so they don’t scrape the
floor. See “Level Refrigerator.”
6. Tape the doors closed and tape the power cord
to the back of the refrigerator. When you get to
your new home, put everything back and refer
to the “Installation Instructions” section for
preparation instructions.
Reinstalling/Using Refrigerator
Again
If the refrigerator has been placed in a horizontal
or tilted position for any period of time wait
4 hours before plugging it in to allow the oil to
settle into the compressor.
1. Clean refrigerator. See “Cleaning.”
2. Place refrigerator in desired location and level.
See “Installation Instructions.”
WARNING
Electrical Shock Hazard
Plug into a grounded 3 prong outlet.
Do not remove the ground prong from the power
cord plug.
Do not use an adapter.
Do not use an extension cord.
Failure to do so can result in death, fire or
electrical shock.
3. Plug into grounded 3 prong outlet.

14
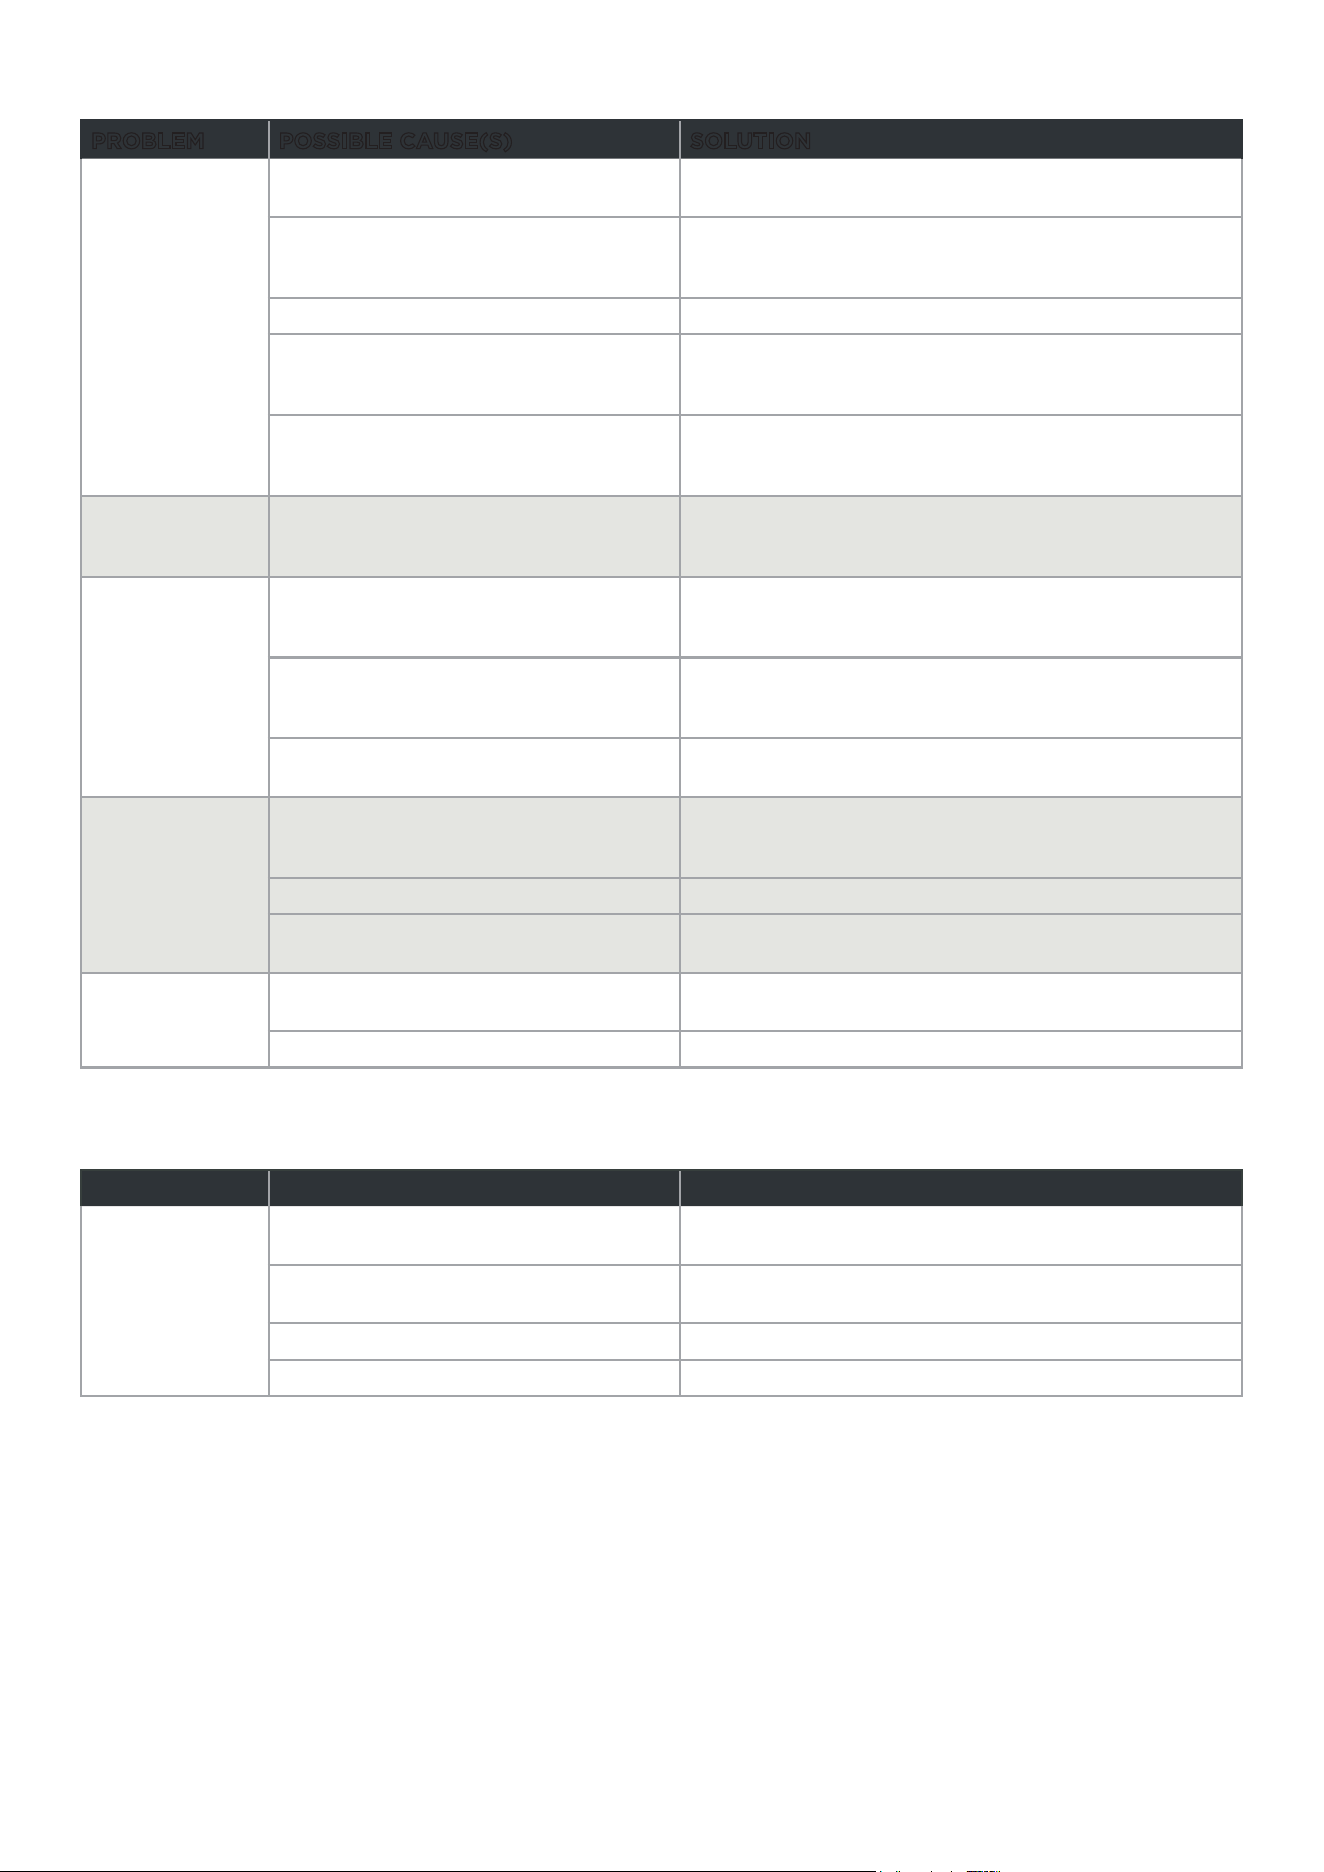
Troubleshooting
Try the solutions suggested here first in order to avoid the cost of an unnecessary service call.
Refrigerator is Not Operating
PROBLEM POSSIBLE CAUSE(S) SOLUTION
Refrigerator does not
run
Refrigerator is unplugged. Plug refrigerator into a grounded 3 prong
outlet.
Breaker is tripped or turned off,
or fuse is blown.
Reset/Turn on breaker or replace fuse.
Refrigerator is in defrost mode. Wait for defrost cycle to end and cooling
system to restart.
Refrigerator
compressor runs
frequently or for long
periods of time
NOTE: This
refrigerator is
designed to run for
longer periods of time
at a lower energy
usage.
Refrigerator is first plugged in. This is normal. Allow 24 hours for the
refrigerator to cool down.
Warm or large amounts of food
added.
This is normal.
Door is left open, or refrigerator
is not level.
Check that an item is not preventing door
from closing. Level the refrigerator. See
“Level Refrigerator.”
Hot weather or frequent
openings
This is normal.
Temperature control set to
coldest setting.
Adjust temperature to a warmer setting.
Refrigerator has an
odor
Food is not sealed or packaged
properly.
Reseal packaging. Place an opened box of
baking soda in the refrigerator, replace every
3 months.
Interior needs to be cleaned. Clean the interior. See “Cleaning.”
Food stored too long. Dispose of spoiled food.
Light does not come
on
Refrigerator is unplugged. Plug refrigerator into a grounded 3 prong
outlet.
LED light is burned out. Contact a qualified technician to replace the
burned out LED.
Doors do not close
properly
Refrigerator is not level. See “Level Refrigerator.”
Something is obstructing door
closure.
Check for and remove obstructions.
Vibration or rattling Refrigerator is not resting firmly
on floor.
See “Level Refrigerator.”
Normal Sounds It sounds like water is flowing
from the refrigerator.
Refrigerant flowing in the lines will make this
sound when the compressor starts and stops.
The refrigerator has an automatic defrosting
system. The defrosted water will make this
sound.
Humming or buzzing sounds The compressor and fans used for cold
air circulation can make this sound. If the
refrigerator is not level, the sound will be
louder.
Cracking or clicking sounds The interior parts will make this sound as
they contract and expand in response to
temperature changes.
Popping noise May occur during automatic defrosting.
15
Temperature and Moisture
PROBLEM POSSIBLE CAUSE(S) SOLUTION
Refrigerator or
freezer is too
warm
Temperature control is not set cold
enough.
Adjust the compartment to a colder setting;
allow 24 hours for the temperature to adjust.
Doors opened frequently or left
open.
Limit door openings to maintain the internal
temperature. Check that an item is not
preventing door from closing.
Warm food added recently. Allow time for food and refrigerator to cool.
The space between the back of
the refrigerator and the wall is too
close.
Allow 2" (5 cm) space between the back of the
refrigerator and the wall.
Items against back of
compartments are blocking proper
airflow.
Store items only inside the trim of the glass
shelves; don’t place items against sides of the
compartments or directly in front of any vents.
Refrigerator or
freezer is too
cold
Temperature control is set too cold. Adjust temperature in the compartment to
the next warmer setting; allow 24 hours for
temperature to adjust.
Moisture on
exterior/
interior of
refrigerator
High humidity This is normal during times of high humidity.
Dry surface and adjust temperature to a slightly
colder setting.
Doors opened frequently or left
open.
Keep door closed. Check that an item is not
preventing the door from closing. Level the
refrigerator. See “Level Refrigerator.”
Open container of water in
refrigerator
Cover or seal container
Frost or ice
crystals on
frozen food
Freezer door left open or opened
frequently.
Limit door openings to maintain the internal
temperature. Check that an item is not
preventing door from closing.
Refrigerator is not level. Level the refrigerator. See “Level Refrigerator.”
Items blocking freezer air vents and
preventing proper air flow.
Move items away from rear wall.
Food freezing
in refrigerator
Food placed too close to the air
vent.
Move items away from back and top of the
refrigerator.
Temperature control set too cold. Adjust the temperature to a less cold setting.
Ice
PROBLEM POSSIBLE CAUSE(S) SOLUTION
The ice
maker is not
producing ice,
enough ice,
or cubes are
hollow.
Ice maker is not turned on Press and hold FREEZER for 3 seconds to turn
On/Off the ice maker. See “Using the Controls.”
New installation Wait 24 hours after installation for ice production
to begin.
Kink in the water line Straighten the water supply line.
Inadequate water pressure Contact a licensed, qualified plumber.
For more help, visit www.hisense-usa.com or call the consumer help line at
1-877-465-3566.

16
Copyright Statement
© 2019 Hisense Company Ltd. All Rights Reserved.
All material in this User Manual is the property of Hisense Company Ltd. and its subsidiaries, and is
protected under US, CANADA, MEXICO and International copyright and/or other intellectual property
laws. Reproduction or transmission of the materials, in whole or in part, in any manner, electronic, print, or
otherwise, without the prior written consent of Hisense Company Ltd. is a violation of Hisense Company
Ltd. rights under the aforementioned laws.
No part of this publication may be stored, reproduced, transmitted or distributed, in whole or in part, in
any manner, electronic or otherwise, whether or not for a charge or other or no consideration, without
the prior written permission of Hisense Company Ltd.
Requests for permission to store, reproduce, transmit or distribute materials may be made to one of the
following addresses:
USA: Hisense USA Corporation
7310 McGinnis Ferry Road
Suwanee, GA 30024
CANADA: Hisense Canada Co., Ltd
2283 Argentia Road, Unit 16
Mississauga, ON, Canada
LSN 5Z2
MEXICO: Hisense Mexico S. de R.L. de C.V.
Blvd. Miguel de Cervantes Saavedra No 301
Torre Norte Piso 2, Col. Ampliación Granada
Miguel Hidalgo, Ciudad de México, C.P. 11520
Hisense, and any and all other Hisense product names, logo’s, slogans or marks are registered trademarks
of Hisense Company Ltd. and its subsidiaries. All other trademarks are the property of their respective
holders.
©2019. All rights reserved. Hisense and the Hisense logo are registered trademarks of Hisense. Other
brand and product names are registered trademarks of their respective owners.
Disclaimer:
Images throughout this document are for illustrative purposes only and may differ from the actual
product.

Para preguntas sobre características, operación, desempeño, partes o
servicio, llame a: 1-877-465-3566
Modelo:
HQD20*****
Guía de uso y cuidado del refrigerador

2
Gracias por elegir Hisense. Estamos seguros de le encantará utilizar su nuevo
refrigerador. Sin embargo, antes de utilizar el electrodoméstico, le recomendamos que
lea atentamente las instrucciones, las cuales brindan detalles sobre la instalación y el uso
del producto. Por favor, guarde este manual para futuras referencias.
Índice
SEGURIDAD DEL REFRIGERADOR .......................................................................................................................3
PIEZAS Y CARACTERÍSTICAS ...............................................................................................................................4
REQUISITOS PARA LA INSTALACIÓN ..................................................................................................................5
Requisitos de Ubicación ............................................................................................................................................................. 5
Requisitos Eléctricos .................................................................................................................................................................... 5
Requisitos del Suministro de Agua .......................................................................................................................................5
INSTRUCCIONES DE INSTALACIÓN .....................................................................................................................6
Desempaque el Refrigerador ....................................................................................................................................................6
Para Mover Cerca del Suministro de Agua .......................................................................................................................... 7
Para Conectar el Suministro de Agua ................................................................................................................................... 7
Finalización de la Instalación ....................................................................................................................................................8
Para Nivelar el Refrigerador ......................................................................................................................................................9
Para Alinear las Puertas ..............................................................................................................................................................9
USO DE SU REFRIGERADOR .................................................................................................................................9
Cómo Abrir y Cerrar las Puertas .............................................................................................................................................9
Uso de los Controles .................................................................................................................................................................. 10
Características ............................................................................................................................................................................... 11
Información de Uso General ..................................................................................................................................................12
CUIDADO DEL REFRIGERADOR ......................................................................................................................... 13
Limpieza ...........................................................................................................................................................................................13
Luces .................................................................................................................................................................................................13
Cuidado Durante las Vacaciones y Mudanzas ...................................................................................................................13
Cómo Volver a Instalar o Usar el Refrigerador Nuevamente...................................................................................... 14
SOLUCIÓN DE PROBLEMAS ................................................................................................................................ 15
3
Seguridad del Refrigerador
Su seguridad y la seguridad de los demás es muy importante.
Hemos incluido muchos mensajes importantes de seguridad en este manual y en su electrodoméstico. Lea y
obedezca siempre todos los mensajes de seguridad.
PELIGRO
ADVERTENCIA
PRECAUCIÓN
Este es el símbolo de advertencia de seguridad.
Este símbolo le llama la atención sobre peligros potenciales que pueden ocasionar la muerte o
una lesión a usted y a los demás. Todos los mensajes de seguridad irán a continuación del
símbolo de advertencia de seguridad y de la palabra “PELIGRO”, “ADVERTENCIA” o
“PRECAUCIÓN”.
Estas palabras significan:
Se trata de una situación de peligro inminente. Si no sigue las
instrucciones de inmediato, usted puede morir o sufrir una lesión grave.
Se trata de una situación posiblemente peligrosa que, de no evitarse,
podría causar la muerte o una lesión grave.
Se trata de una situación posiblemente peligrosa que, de no evitarse,
podría causar lesiones moderadas o leves.
Todos los mensajes de seguridad le dirán el peligro potencial, le dirán cómo reducir las posibilidades de sufrir
una lesión y lo que puede suceder si no se siguen las instrucciones.
Instrucciones Importantes de Seguridad
ADVERTENCIA: Para reducir el riesgo de incendio, choque eléctrico, lesiones a personas o daños al
utilizar el refrigerador, siga precauciones básicas, incluyendo las siguientes:
•
Asegúrese que todos los que usan este aparato
estén familiarizados con sus operaciones y
características de seguridad.
•
Este aparato no está diseñado para ser
utilizado por personas (incluidos niños) con
capacidades físicas, sensoriales o mentales
reducidas, a menos que estén supervisadas o
debidamente instruidas.
•
Conecte el aparato a un tomacorriente de
3 terminales con conexión a tierra.
•
No quite el terminal de conexión a tierra.
•
No use un adaptador.
•
No use un cable eléctrico de extensión.
•
Si el cable de alimentación está dañado,
debe ser reemplazado por el fabricante, su
agente de servicio o una persona igualmente
calificada, para evitar un peligro.
•
Desconecte el suministro de energía antes de
darle servicio técnico.
•
No utilice aparatos eléctricos dentro de los
compartimentos de almacenamiento de
alimentos del refrigerador, a menos que sean
del tipo recomendado por el fabricante.
•
Vuelva a colocar todas las piezas y paneles
antes de ponerlo en funcionamiento.
•
El refrigerante usado es inflamable. La
reparación debe ser efectuada solamente por
personal capacitado para dar servicio. No
perfore el tubo refrigerante.
•
El refrigerante usado es inflamable.
Deshágase del refrigerador correctamente
siguiendo las normas federales y locales.
•
El refrigerante usado es inflamable. Siga
con cuidado todas las instrucciones
de manipulación. Riesgo de incendio o
explosión debido a una perforación en el
tubo refrigerante.
•
Use un limpiador no inflamable.
•
No utilice dispositivos mecánicos u
otros medios para acelerar el proceso
de descongelación, que no sean los
recomendados por el fabricante.
•
Mantenga los materiales y vapores
inflamables, tales como la gasolina, alejados
del refrigerador.
•
PRECAUCIÓN: No almacene en el
refrigerador productos que contengan
propulsores inflamables (por ejemplo, latas
de aerosol) o sustancias explosivas.
•
Mantenga las aberturas de ventilación en
el gabinete del aparato o en la estructura
incorporada, sin obstrucciones.
•
Conecte únicamente a un suministro de
agua potable.
•
Con la ayuda de dos o más personas,
mueva e instale el refrigerador.
•
Para evitar el riesgo de que los niños
queden atrapados y se asfixien, no permita
que jueguen ni se escondan dentro del
refrigerador.
Lea y Guarde Estas Instrucciones
4
Cómo Deshacerse Adecuadamente de Su
Aparato Refrigerador Viejo
ADVERTENCIA
Peligro de asfixia
Quite la puerta o el(los) cajón(cajones) de su
aparato refrigerador viejo.
No seguir esta instrucción puede ocasionar la
muerte o daño al cerebro.
IMPORTANTE: El atrapamiento y asfixia de niños no
es un problema del pasado. Un aparato refrigerador
desechado y abandonado es un peligro, aun si va a
quedar ahí “por unos pocos días”. Si usted está por
deshacerse de su aparato refrigerador viejo, siga las
instrucciones a continuación para evitar accidentes.
Antes de descartar su aparato refrigerador o
congelador viejo:
•
Quite las puertas.
•
Deje los estantes en su lugar así los niños no
pueden meterse adentro con facilidad.
Información importante para saber acerca del
desecho de refrigerantes:
Deshágase del refrigerador siguiendo
los reglamentos federales y locales. Los
refrigerantes deberán ser evacuados por un
técnico certificado en refrigeración por EPA
(Agencia de protección del medioambiente)
según los procedimientos establecidos.
Piezas y Características
a
d
b
c
e
g
h
f
i j
k
m
l
n
o
p
q
a Depósito de la puerta
b Parteluz
c Luz LED del refrigerador
d Bandeja de la puerta
e Fábrica de hielo
f Luz LED del congelador
g Recipiente de
almacenamiento para hielo
h Cajón del congelador
i Compartimiento del
congelador
j Compartimiento convertible
k Estante de vidrio
l Cubierta
m Cajón de almacenamiento
n Cajón de ancho completo
o Estante de vidrio
p Cajón de convertible
q Pata de nivelación
NOTA: Su modelo puede verse diferente de esta y otras imágenes en este manual, dependiendo de las
características del mismo.

5
Requisitos para la Instalación
Requisitos de Ubicación
ADVERTENCIA
Peligro de Explosión
Mantenga los materiales y vapores inflamables,
tales como gasolina, alejados del aparato.
No seguir esta instrucción puede ocasionar la
muerte, explosión, o incendio.
IMPORTANTE: Este refrigerador ha sido diseñado
únicamente para usarse dentro del hogar.
Temperatura
Este refrigerador está diseñado para ser utilizado
en un lugar donde la temperatura oscile entre
un mínimo de 55°F (13°C) y un máximo de
110°F (43°C). El rango de temperatura ideal de
la habitación para un rendimiento óptimo, que
reduce el consumo de electricidad y proporciona
una refrigeración superior, es entre 60°F (15°C)
y 90°F (32°C). Se recomienda que no instale el
refrigerador cerca de una fuente de calor, como un
horno o un radiador.
Ventilación
Se requiere una circulación de aire adecuada
alrededor del refrigerador para una operación
eficiente.
Para asegurar una ventilación adecuada, mantenga
los espacios recomendados.
Espacios recomendados
a
b
c
c
a 4" arriba
b 2" por detrás
c 1/2 " a cada lado
NOTA: Si coloca el refrigerador cerca de una pared
fija, deje un espacio mínimo de 4" (10 cm) para
permitir que la puerta se abra.
Requisitos Eléctricos
ADVERTENCIA
Peligro de Choque Eléctrico
Conecte a un contacto de pared de conexión a tierra
de 3 terminales.
No quite el terminal de conexión a tierra del cable
de alimentación.
No use un adaptador.
No use un cable eléctrico de extensión.
No seguir estas instrucciones puede ocasionar la
muerte, incendio o choque eléctrico.
Antes de mover el refrigerador a su ubicación final,
es importante asegurarse de que tiene la conexión
eléctrica adecuada.
Método de conexión a tierra recomendado
Se requiere un suministro eléctrico de 115 voltios,
60 hertzios, CA solamente, de 15 o 20 amperios
y protegido con fusibles, conectado a tierra. Se
recomienda utilizar un circuito separado solo para
su refrigerador. Use un tomacorriente que no se
pueda apagar con un interruptor. No use un cable
eléctrico de extensión.
NOTA: Antes de realizar cualquier tipo de
instalación o limpieza, desconecte el refrigerador
de la fuente de suministro eléctrico. Cuando haya
terminado, vuelva a conectar el refrigerador a la
fuente de energía eléctrica y reajuste los controles
de temperatura en la posición deseada.
Requisitos del Suministro de Agua
Se requiere un suministro de agua fría con una
presión de agua entre 30 y 125 psi (207 y 862 kPa)
para operar la fábrica de hielo. Si tiene preguntas
sobre la presión de agua, llame a un plomero
calificado y con licencia.
IMPORTANTE: La operación fuera del rango de
presión del agua puede causar un funcionamiento
defectuoso y fugas de agua graves y perjudiciales.
NOTA: Si la presión del agua es menor que la
requerida, los cubitos de hielo podrían tener forma
hueca o irregular.
6
Abastecimiento de agua por ósmosis
inversa (si es aplicable)
IMPORTANTE: La presión del suministro de agua
que sale de un sistema de ósmosis inversa que va
a la válvula de entrada de agua del refrigerador
debe estar entre 30 y 125 psi (207 y 862 kPa).
Si la presión del agua es demasiado baja:
Compruebe si el filtro de sedimentos en el sistema
de ósmosis inversa está bloqueado. Reemplace el
filtro si es necesario.
Permita que el tanque de almacenamiento en el
sistema de ósmosis inversa se llene después de
un uso intenso. La capacidad del tanque podría
ser demasiado pequeña para cumplir con los
requisitos del refrigerador.
Si tiene preguntas sobre la presión de agua,
llame a un plomero calificado y con licencia.
Instrucciones de Instalación
Desempaque el Refrigerador
ADVERTENCIA
Peligro de Explosión o Incendio
No perfore el tubo refrigerante.
Siga con cuidado las instrucciones de manipulación.
El refrigerante usado es inflamable.
No seguir esta instrucción puede ocasionar la
muerte, explosión, o incendio.
IMPORTANTE: Al mover el refrigerador, manipúlelo
con cuidado para evitar daños en el tubo
refrigerante o incrementar los riesgos de fugas.
ADVERTENCIA
Peligro de Peso Excesivo
Use dos o más personas para mover e instalar el
refrigerador.
No seguir esta instrucción puede ocasionar una
lesión en la espalda u otro tipo de lesiones.
Cómo Quitar el Empaque
•
Quite los restos de cinta y goma de las
superficies de su refrigerador antes de
encenderlo. Frote un poco de detergente
líquido para vajilla sobre el adhesivo con los
dedos. Limpie con agua tibia y seque.
NOTA: No use instrumentos filosos, alcohol
isopropílico, líquidos inflamables o productos
de limpieza abrasivos para eliminar los restos
de cinta o goma. Estos productos pueden
dañar la superficie de su refrigerador. Para
obtener más información, vea “Seguridad del
refrigerador”.
•
Deshágase de todos los materiales de empaque
o recíclelos.
•
If the refrigerator has been in a horizontal
or tilted position for any period of time wait
4 hours before plugging it in to allow the oil to
settle into the compressor.
Cuando mueva su refrigerador:
Su refrigerador es pesado. Cuando mueva
el refrigerador para la limpieza o para darle
servicio, cerciórese de cubrir el piso con cartón
o madera para evitar daños en este. Al mover
el refrigerador, siempre tire directamente
hacia afuera. No menee el refrigerador de lado
a lado ni lo haga “caminar” cuando trate de
moverlo, ya que podría dañar el suelo.
Limpieza Antes del Uso
Una vez que usted haya quitado todos los
materiales de empaque, limpie el interior del
refrigerador antes de usarlo. Vea las instrucciones
de limpieza en “Cuidado del refrigerador”.
Información importante acerca de los
estantes y tapas de vidrio:
No limpie los estantes y tapas de vidrio con
agua caliente mientras estén fríos. Los estantes
y tapas pueden romperse si se exponen a
cambios bruscos de temperatura o a impactos
como golpes bruscos. El vidrio templado
se ha diseñado para hacerse añicos. Esto es
normal. Los estantes y tapas de vidrio son muy
pesados. Use ambas manos al quitarlos para
evitar que se caigan.
7
Para Mover Cerca del Suministro
de Agua
ADVERTENCIA
Peligro de Explosión o Incendio
No perfore el tubo refrigerante.
Siga con cuidado las instrucciones de manipulación.
El refrigerante usado es inflamable.
No seguir esta instrucción puede ocasionar la
muerte, explosión, o incendio.
IMPORTANTE: El refrigerador debe ubicarse
en una superficie sólida y nivelada que sea lo
suficientemente fuerte como para sostener el
refrigerador completamente cargado.
•
Antes de moverlo, retraiga las patas niveladoras
para evitar raspar el piso.
•
El refrigerador tiene ruedas, que deben usarse
solo para movimientos hacia adelante y hacia
atrás.
NOTA: Tratar de mover el refrigerador hacia los
lados puede dañar el piso.
Para Conectar el Suministro
de Agua
Lea todas las instrucciones antes de comenzar.
IMPORTANTE:
•
La conexión de agua debe ser realizada por un
plomero calificado.
•
La plomería debe instalarse de acuerdo con el
Código Internacional de Plomería y todos los
códigos y ordenanzas locales.
•
Use SOLAMENTE una NUEVA tubería de cobre
o PEX.
•
Instale la tubería solo en áreas donde las
temperaturas permanecerán por encima de la
congelación.
Para conectar la línea de agua al
suministro de agua del hogar
A continuación se explican dos métodos de
conexión al suministro de agua del hogar. Utilice
las instrucciones específicas para su instalación.
IMPORTANTE: Cierre el suministro de agua
principal. Abra el grifo más cercano el tiempo
suficiente para limpiar la línea de agua.
Método 1: Válvula de cierre de un cuarto de
vuelta
Reúna las herramientas y piezas necesarias antes
de comenzar la instalación.
•
Llave de ½" o 2 llaves ajustables
•
Válvula de cierre de un cuarto de vuelta
•
Tuerca de compresión de ¼"
•
Férula (manguito)
1. Use una válvula de cierre de un cuarto de
vuelta o el equivalente que sirva para la línea
de suministro del hogar.
NOTA: Para permitir un flujo de agua suficiente
al refrigerador, se recomienda una línea de
suministro del hogar de 1/2 " como mínimo.
2. Usando la férula (manguito) y la tuerca de
compresión, conecte la línea de agua de 1/4 " a la
válvula de cierre.
NOTA: No apriete demasiado.
c
b
a
e
d
a Válvula de
cierre de un
cuarto de
vuelta
b Férula
(manguito)
c Tuerca de
compresión
d Línea de agua
de 1/4 "
e Línea de
suministro del
hogar
3. Coloque el extremo libre de la línea de agua en
un recipiente vacío o fregadero.
4. Abra el suministro de agua principal y la
válvula de cierre para limpiar la línea de agua
de cualquier contaminante. Deje correr el agua
hasta que quede limpia.
Método 2: Válvula tipo silleta
NOTA: No utilice una válvula de asiento de
3/1 6 " (4,76 mm) ni una válvula perforadora, ya
que reducen el flujo de agua y facilitan las
obstrucciones.
Reúna las herramientas y piezas necesarias antes
de comenzar la instalación.
•
Destornillador de punta plana
•
Llave de ½" o 2 llaves ajustables
•
Taladro inalámbrico
•
Broca de ¼"
•
Tuerca de compresión de ¼"
•
Férula (manguito)
1. Busque una tubería vertical de agua fría de 1/2 " a
11/4 " (12,7 mm a 31,8 mm) cerca del refrigerador.
IMPORTANTE:
•
Asegúrese que sea una tubería de agua fría.
•
Una tubería horizontal funcionará, pero se
debe seguir el siguiente procedimiento:
Perfore en la parte superior de la tubería, no
en la parte inferior. Esto ayudará a mantener
el agua alejada del taladro. Esto también
evita que los sedimentos normales se
acumulen en la válvula.
2. Determine la longitud de la línea de agua que
necesita. Mida desde la conexión en la parte
posterior del refrigerador hasta la tubería de
agua. Agregue 7 pies (2,1 m) para permitir
la limpieza. Utilice una línea de agua de 1/4 "
(6,35 mm) de diámetro exterior.
8
3. Con un taladro inalámbrico, taladre un orificio
de 1/4 " en la tubería de agua fría que ha
seleccionado.
4. Sujete la válvula de cierre a la tubería de agua
fría con la abrazadera para tubería. Asegúrese
que el extremo de la salida esté sólidamente
en el orificio de 1/4 " taladrado en la tubería de
agua y que la arandela esté por debajo de la
abrazadera para tubería. Apriete la tuerca de
empaque. Apriete los tornillos de la abrazadera
de la tubería lenta y uniformemente para que
la arandela haga un sello hermético. No apriete
demasiado.
a
g
b
c
d e f
a Línea de suministro
del hogar
b Válvula tipo silleta
c Tuerca de empaque
d Válvula de cierre
e Férula (manguito)
f Tuerca de
compresión
g Línea de agua
de 1/4 "
5. Deslice el manguito de compresión y la tuerca
de compresión en la línea de agua como se
muestra. Inserte el extremo de la tubería en el
extremo de la salida en ángulo recto, hasta el
tope. Atornille la tuerca de compresión en el
extremo de salida con una llave ajustable. No
apriete demasiado o puede aplastar la línea de
agua.
6. Coloque el extremo libre de la línea de agua en
un recipiente vacío o fregadero.
7. Abra el suministro de agua principal y la
válvula de cierre para limpiar la línea de agua
de cualquier contaminante. Deje correr el agua
hasta que quede limpia.
Para conectar la línea de agua al
refrigerador
IMPORTANTE: Si enciende el refrigerador antes de
conectar el agua, apague la fábrica de hielo.
1. Desenchufe el refrigerador o desconecte la
corriente.
2. Cierre la válvula de cierre.
3. Enrosque una tuerca de compresión de cobre y
una férula (manguito) en el extremo libre de la
línea de agua.
a b c
a Férula (manguito)
b Tuerca de compresión
de cobre
a Línea de agua
4. Inserte el extremo libre de la línea de agua en el
conector de cobre unido a la entrada de agua
en la parte posterior del refrigerador.
5. Deslice la tuerca de compresión sobre la férula
y atornille la tuerca en el conector de cobre.
a
b
c
d
e
a Línea de
agua
b Tuerca de
compresión
de cobre
c Férula
(manguito)
d Conector
de cobre
e Entrada de
agua
6. Confirme que la línea de agua esté segura
tirando suavemente de ella.
7. Abra el suministro de agua al refrigerador y
revise si hay fugas. Corrija cualquier fuga.
Finalización de la Instalación
ADVERTENCIA
Peligro de Choque Eléctrico
Conecte a un contacto de pared de conexión a tierra
de 3 terminales.
No quite el terminal de conexión a tierra del cable
de alimentación.
No use un adaptador.
No use un cable eléctrico de extensión.
No seguir estas instrucciones puede ocasionar la
muerte, incendio o choque eléctrico.
1. Enchufe en un tomacorriente de 3 clavijas con
conexión a tierra.
NOTA: Este refrigerador comienza a funcionar
tan pronto como se conecta a la fuente de
alimentación.
2. Mueva el refrigerador a su ubicación final,
asegurándose de mantener el espacio
recomendado.
9
Para Nivelar el Refrigerador
(si es necesario)
El refrigerador debe estar nivelado para mantener
un rendimiento y apariencia óptimos.
1. Gire las patas niveladoras en la parte inferior y
frontal de la carcasa, para subir o bajar ese lado
del refrigerador hasta que el refrigerador esté
nivelado de lado a lado.
2. Gire ambas patas, en la misma medida, para
levantar ligeramente la parte frontal del
refrigerador. Esto facilitará el cierre de las
puertas.
NOTA: Hacer que alguien empuje contra la
parte superior del refrigerador quita algo de
peso a las patas niveladoras. Esto hace que sea
más fácil girar las patas.
Para Alinear las Puertas
(si es necesario)
Si los bordes de las puertas del refrigerador no
están alineados, puede regularlos:
Uso de la pata regulable
•
Gire la pata regulable para subir o bajar ese
lado del refrigerador.
•
En el sentido de las ajugas del reloj - para
subir
•
En sentido contrario a las agujas del reloj -
para bajar
Uso de su Refrigerador
Cómo Abrir y Cerrar las Puertas
Las cuatro puertas se pueden abrir y cerrar por
separado o juntas.
•
Hay un parteluz en la puerta del
compartimiento del refrigerador del lado
izquierdo.
•
Al cerrar la puerta de la izquierda, el parteluz
se pliega detrás de la puerta de la derecha
uniendo las dos puertas.
•
La temperatura del marco de la puerta
se controla para ayudar a prevenir que la
humedad se desarrolle en el parteluz. La
temperatura de la superficie puede ser cálida,
lo que es normal, y no afectará el rendimiento
del refrigerador.
NOTA: Antes de cerrar la puerta de la izquierda,
asegúrese de que el parteluz esté doblado
hacia adentro. Si el parteluz se tira hacia afuera,
puede dañarse al intentar cerrar la puerta.
10
Uso de los Controles
NOTA: Los controles de su modelo pueden verse
diferentes de esta y otras imágenes en este
manual, dependiendo de las características del
mismo.
Fridge
Hold 3 sec for °C/°F
Hold 3 sec for Ice On/Off
Mode
Convertible
Freezer
Mode
Unlock
3sec
e
a
b
c
d
f
g
h
i
j
k
l
n
m
a Temperatura del
compartimiento del
refrigerador
b Temperatura del
compartimento
convertible
c Temperatura del
compartimiento del
congelador
d Ícono de Super Freeze
(Súper congelador)
e Control de temperatura
del compartimiento del
refrigerador
f Control de temperatura
del compartimiento del
convertible
g Control de temperatura
del compartimento
congelador
h Control de modo
i Ícono de
bloqueo/
desbloqueo
j Indicador de
Fahrenheit
k Indicador de
Celsius
l Ícono de Ice
Maker (Fábrica
de hielo)
m Ícono de Energy
Saver (Ahorro de
energía)
n Control de
desbloqueo
Panel de control
La pantalla se iluminará cuando se conecte el
refrigerador por primera vez, se presione un
control o se abra una puerta. Sin embargo, las
luces se apagarán automáticamente después de
60 segundos.
El panel de control está bloqueado, a menos que
se desbloquee manualmente.
NOTA: Cuando el panel de control está bloqueado,
el ícono de bloqueo se ilumina.
Para desbloquear el panel de control:
•
Mantenga presionado UNLOCK
(DESBLOQUEO) durante 3 segundos.
Unlock
3sec
NOTA: Cuando el panel de control está
desbloqueado, el ícono de desbloqueo se
ilumina.
Ajuste de las temperaturas del
compartimiento
Cuando ajusta una temperatura, está configurando
una temperatura promedio para todo el
compartimiento. Las temperaturas reales del
compartimiento pueden variar de las temperaturas
mostradas, dependiendo de la cantidad y la
ubicación de los alimentos almacenados, y la
temperatura ambiente circundante.
Ajustes de temperatura recomendados
•
Compartimiento del refrigerador: 37°F (3°C)
•
Compartimiento del convertible: 8°F (-13°C)
•
Compartimiento del congelador: 0°F (-18°C)
Para mostrar las temperaturas en grados
Fahrenheit o Celsius
•
Mantenga presionado FRIDGE
(REFRIGERADOR) durante 3 segundos.
Fridge
Hold 3 sec for °C/°F
NOTA: El ícono de °F o °C se iluminará para
indicar en qué escala (Fahrenheit o Celsius) se
muestra la temperatura.
•
Presione FRIDGE nuevamente, para cambiar la
escala de temperatura.
Temperatura del compartimiento del refrigerador
(Fridge)
1. Presione FRIDGE una vez para encender el
control de temperatura.
Fridge
Hold 3 sec for °C/°F
2. Presione FRIDGE repetidamente para recorrer
los ajustes de temperatura disponibles, de 45°F
a 34°F o de 7°C a 1°C.
NOTA: Cada pulsación avanza el ajuste en un
grado.
3. Suelte FRIDGE cuando aparezca el ajuste de
temperatura deseado.
Temperatura del compartimiento convertible
1. Presione CONVERTIBLE una vez para encender
el control de temperatura.
Convertible
2. Presione CONVERTIBLE repetidamente para
recorrer los ajustes de temperatura disponibles,
de 45°F a -4°F o de 7°C a -20°C.
NOTA: Cada vez que se presiona el botón, el
ajuste avanza en tres grados.
3. Suelte CONVERTIBLE para seleccionar el ajuste
de temperatura deseado.
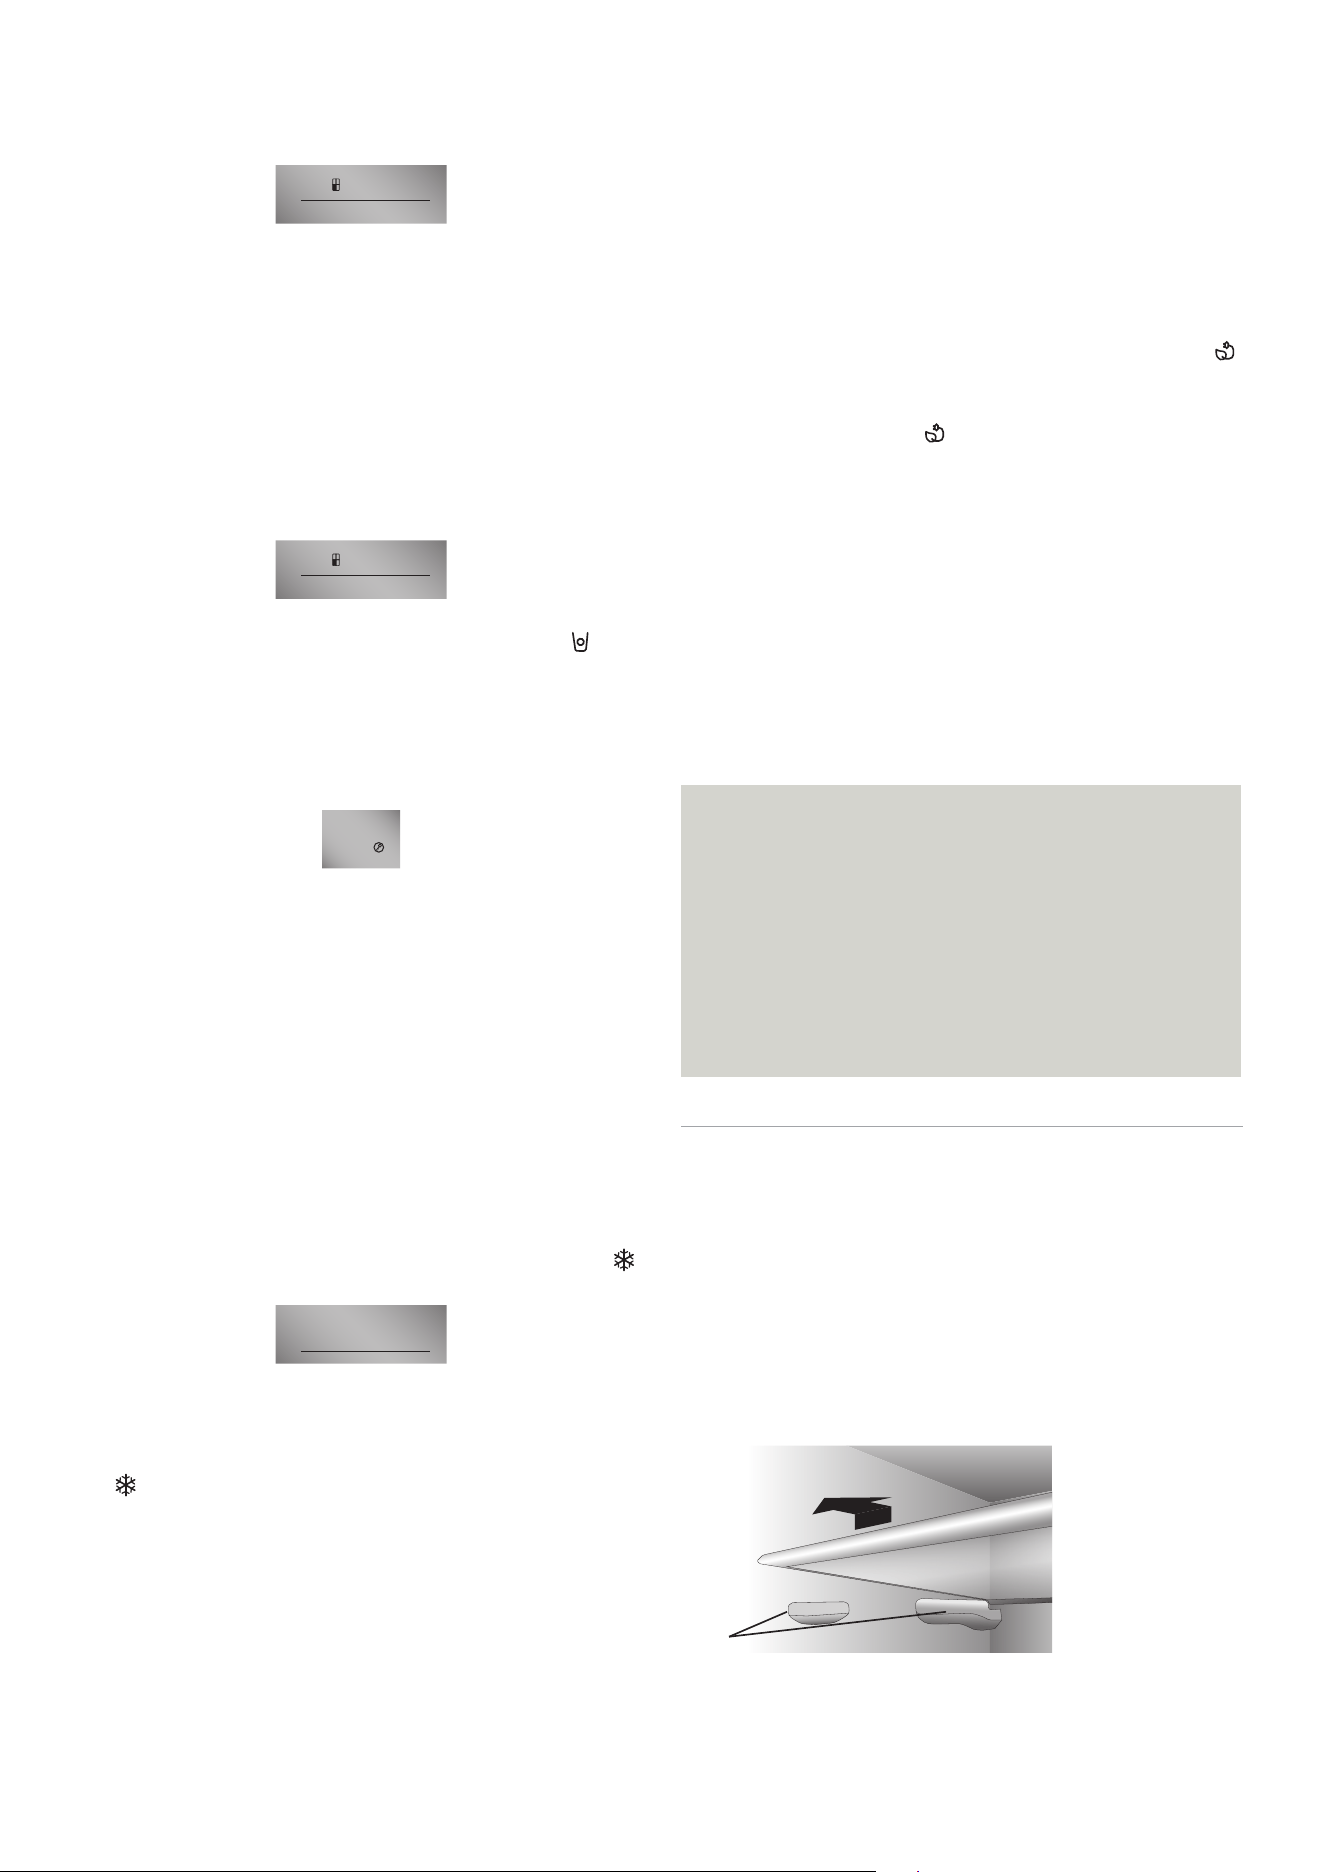
11
Temperatura del compartimento del congelador
1. Presione FREEZER (CONGELADOR) una vez
para encender el control de temperatura.
Hold 3 sec for Ice On/Off
Freezer
2. Presione FREEZER repetidamente para recorrer
los ajustes de temperatura disponibles, de 5°F
a -13°F o de -14°C a -24°C.
NOTA: Cada vez que se presiona el botón, el
ajuste avanza en un grado.
3. Suelte FREEZER para seleccionar el ajuste de
temperatura deseado.
Control de Ice Maker (Fábrica de hielo)
•
Mantenga presionado FREEZER
(CONGELADOR) durante 3 segundos para
encender/apagar la fábrica de hielo.
Hold 3 sec for Ice On/Off
Freezer
NOTA: Cuando la fábrica de hielo está
encendida, el ícono de la fábrica de hielo se
ilumina.
Características adicionales
IMPORTANTE: Mantenga presionado UNLOCK
(DESBLOQUEO) durante 3 segundos para
desbloquear el panel de control.
Unlock
3sec
Presione MODE (MODO) para alternar entre las
funciones Super Freeze (Súper congelador) y
Energy Saver (Ahorro de energía).
Super Freeze (Súper congelador)
La función Super Freeze disminuye rápidamente
la temperatura del compartimiento del congelador
para congelar los alimentos frescos más
rápidamente y mantener la temperatura de los
alimentos congelados durante los períodos de alto
consumo, las cargas completas de comestibles o
temperatura ambiente temporalmente cálida de la
habitación.
La función Super Freeze reduce la temperatura en
el compartimiento del congelador a -13°F (-25°C).
•
Presione MODE (MODO) hasta que aparezca
el ícono de Super Freeze.
Mode
•
Presione el control de MODE (MODO) o
FREEZER (CONGELADOR) para apagar
manualmente Super Freeze.
NOTA: Cuando Super Freeze está activada,
se ilumina y aparece -13°F o -25°C en la
pantalla de temperatura.
•
Presione FREEZER para desactivar
manualmente Super Freeze y volver a la
temperatura establecida previamente.
NOTA: Super Freeze se apagará
automáticamente después de varias horas, y el
congelador volverá a su ajuste de temperatura
anterior.
Energy Saving (Ahorro de energía)
La función de ahorro de energía reduce el
uso de energía al elevar la temperatura del
compartimiento del refrigerador a 43°F (6°C) y la
temperatura del compartimiento del congelador a
1°F (-17°C).
IMPORTANTE: Las temperaturas del
compartimiento en el modo Energy Saving
(Ahorro de energía) no son adecuadas para el
almacenamiento de ciertos alimentos.
•
Presione MODE (MODO) hasta que aparezca
el ícono de Energy Saving (Ahorro de energía).
NOTA: Cuando el refrigerador está en modo de
ahorro de energía, se ilumina.
•
Presione FREEZER (CONGELADOR) o FRIDGE
(REFRIGERADOR) para apagar manualmente
la función de ahorro de energía.
Alarma de puerta abierta
Si una puerta está abierta por más de 2 minutos,
sonará una alarma para avisarle. La alarma sonará
3 veces por minuto durante 8 minutos.
•
Para apagar la alarma, cierre todas las puertas
y el cajón por completo.
Características
Información importante acerca de los
estantes y tapas de vidrio:
No limpie los estantes y tapas de vidrio con
agua caliente mientras estén fríos. Los estantes
y tapas pueden romperse si se exponen a
cambios bruscos de temperatura o a impactos
como golpes bruscos. El vidrio templado
se ha diseñado para hacerse añicos. Esto es
normal. Los estantes y tapas de vidrio son muy
pesados. Use ambas manos al quitarlos para
evitar que se caigan.
Refrigerador
IMPORTANTE: Para evitar daños en las puertas,
asegúrese que todos los estantes y cajones estén
completamente introducidos en la carcasa antes
de cerrar una puerta.
Estantes ajustables
La altura de los estantes se puede ajustar para
adaptarla a las necesidades de almacenamiento.
1. Para quitar un estante, levante suavemente
hacia arriba y luego jale el estante hacia
adelante hasta que el extremo del estante haya
pasado las guías del mismo.
a
a Guías del
estante
2. Para volver a instalar un estante, deslice con
suavidad el estante nuevamente dentro del
compartimiento del refrigerador y luego baje el
estante sobre las guías del mismo para que los
ganchos encajen detrás de las guías traseras.
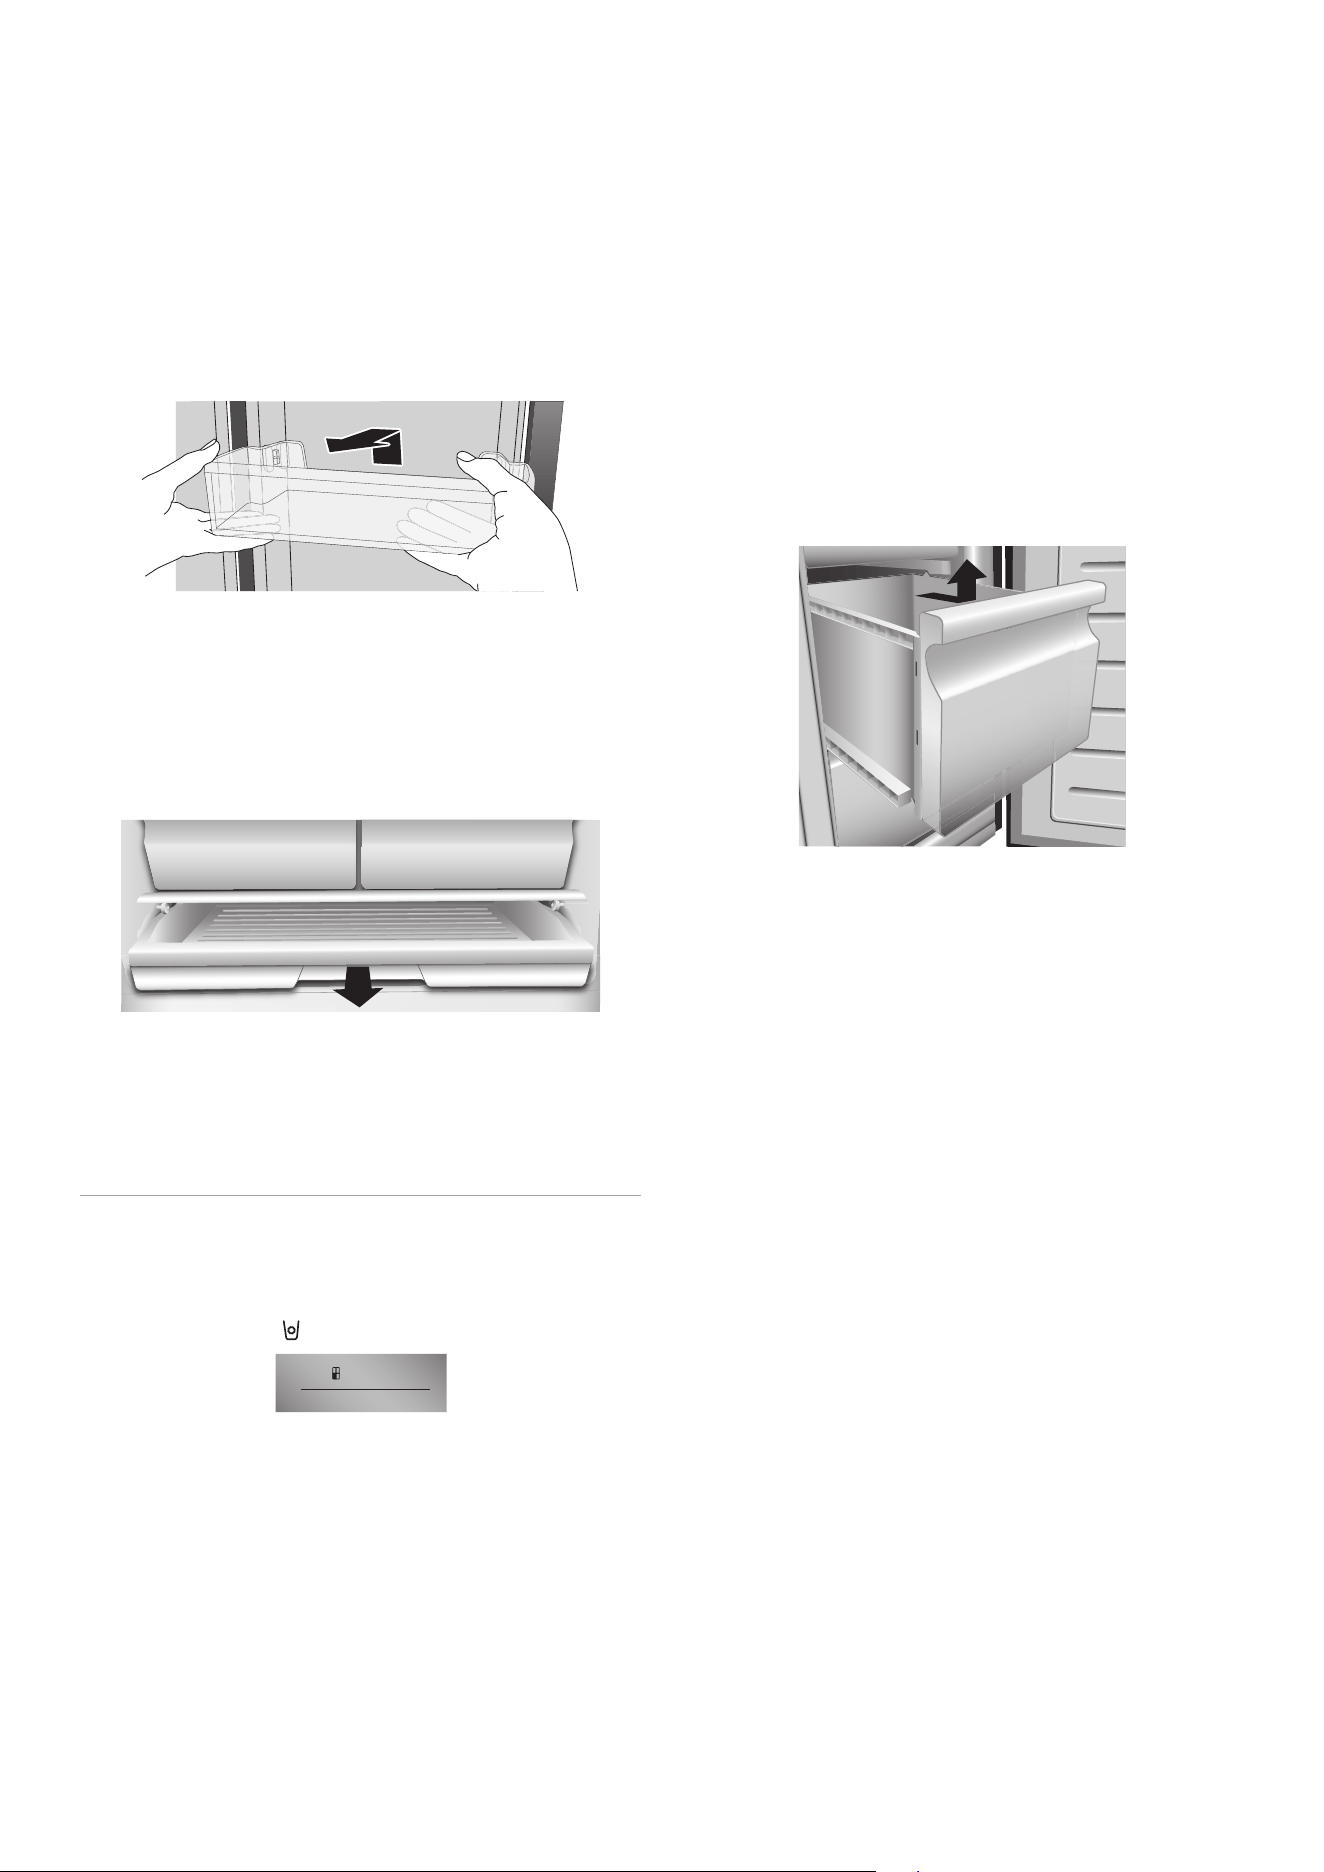
12
Depósitos desmontables de la puerta
Los depósitos situados en el centro de la puerta
son ajustables.
Para quitar y reemplazar un depósito de la
puerta:
1. Coloque las manos en ambos lados del
depósito y levántelo hacia arriba.
2. Tire del depósito de la puerta hacia afuera.
3. Vuelva a colocar el depósito de la puerta
insertándolo sobre el soporte y presionando
hacia abajo para que encaje en su lugar.
Cajones de almacenamiento
Los dos cajones para verduras, montados en guías
de extensión telescópicas, pueden usarse para
almacenar frutas y verduras.
Cajón de ancho completo
El cajón de ancho completo es un espacio ideal
para almacenar platos de charcutería grandes.
•
Abierto: la tapa se abre automáticamente
cuando se saca el cajón de la carcasa.
•
Cerrado: la tapa se cierra automáticamente
cuando el cajón se empuja dentro de la
carcasa.
Congelador
Fábrica de hielo
Encienda/apague la fábrica de hielo presionando
y manteniendo presionado FREEZER
(CONGELADOR) durante 3 segundos. El ícono de
la fábrica de hielo se iluminará.
Hold 3 sec for Ice On/Off
Freezer
•
Luego de la instalación, espere 24 horas para
producir el primer lote de hielo. Deseche
los tres primeros lotes de hielo producidos.
Espere de 2 a 3 días para llenar el recipiente de
almacenamiento de hielo.
•
Si el hielo se agrupa en el recipiente, rompa el
hielo con un utensilio de plástico y deséchelo.
No utilice una herramienta afi lada para romper
el hielo. Esto puede causar daños al recipiente
para hielo.
•
No almacene ningún otro elemento que no sea
hielo en el recipiente de almacenamiento de
hielo.
•
Si va a estar fuera por un período prolongado
de tiempo, cierre la válvula de agua principal
para evitar posibles fugas.
NOTA: La calidad del hielo será tan buena
como la calidad del agua suministrada a la
fábrica de hielo. Evite conectar la fábrica de
hielo a un suministro de agua ablandada. Los
productos químicos para ablandar el agua
(como la sal) pueden dañar partes de la fábrica
de hielo y causar hielo de mala calidad. Si no se
puede evitar un suministro de agua ablandada,
asegúrese de que el ablandador de agua
esté funcionando correctamente y esté bien
mantenido.
Cajones del congelador
Para quitar / reemplazar el cajón del congelador:
1. Saque el cajón a la extensión máxima.
2. Levante para sacar el cajón.
3. Invierta los pasos 1 y 2 para reemplazar el
cajón.
Información de Uso General
•
Cuando encienda el refrigerador por primera
vez después de un período de inactividad,
deje que se enfríe al menos 2 horas antes de
agregar alimentos.
•
No bloquee las salidas de aire con artículos
almacenados.
•
Almacene los artículos para que el aire pueda
circular libremente alrededor de ellos.
•
Cubra o envuelva bien los alimentos
almacenados para evitar la transferencia de
olores.
•
Una vez descongelados, la calidad de los
alimentos se deteriorará rápidamente y no
deben volver a congelarse.
•
Ni las bebidas embotelladas ni enlatadas deben
almacenarse en el congelador. Las botellas y las
latas pueden explotar.
13
Cuidado del Refrigerador
Limpieza
Tanto las secciones del refrigerador como la del
congelador se descongelan automáticamente. No
obstante, limpie ambas secciones más o menos
una vez al mes para evitar la acumulación de
olores. Limpie los derrames de inmediato. Para
evitar la transferencia de olores y el secado de los
alimentos, envuélvalos o cúbralos bien.
ADVERTENCIA
Peligro de Explosión
Use un limpiador no inflamable.
No seguir esta instrucción puede ocasionar la
muerte, explosión o incendio.
IMPORTANTE:
•
No use productos químicos fuertes,
amoníaco, blanqueador con cloro, detergente
concentrado, solventes o estropajos de metal
o abrasivos para limpiar su refrigerador por
dentro o por fuera. Estos pueden dañar o
decolorar el acabado del refrigerador.
•
No utilice agua tibia para limpiar los estantes
de vidrio mientras aún están fríos. El vidrio
se podría romper si se lo expone a cambios
bruscos de temperatura o a impactos.
ADVERTENCIA
Peligro de choque eléctrico
Desenchufe el aparato o desconecte el suministro
de energía antes de limpiarlo.
No seguir esta instrucción puede ocasionar la
muerte, choque eléctrico o daños personales.
1. Desenchufe el refrigerador o desconecte el
suministro de energía.
2. Limpie el interior.
Lave a mano, enjuague y seque las partes
desmontables y las superficies interiores a
fondo. Use una esponja limpia o un paño suave
y detergente suave en agua tibia.
3. Limpie los sellos de la puerta y del cajón (las
juntas). Una junta sucia o pegajosa puede
adherirse a la carcasa y rasgarse al abrir la
puerta.
Con un paño suave y una solución de
detergente suave y agua tibia, lave a mano las
juntas de la puerta. Enjuague con agua limpia y
seque bien.
4. Limpie las superficies exteriores.
Lave las superficies exteriores con un paño o
esponja limpia y suave y un detergente suave
en agua tibia. Enjuague las superficies con agua
limpia y tibia y séquelas inmediatamente para
evitar las manchas de agua.
5. Enchufe el refrigerador o vuelva a conectar la
corriente.
Luces
IMPORTANTE: El refrigerador está equipado con
iluminación LED. Estas luces están diseñadas para
durar toda la vida del refrigerador. Sin embargo, si
las luces dejan de funcionar, comuníquese con un
técnico calificado para que las reemplace.
Cuidado Durante las Vacaciones y
Mudanzas
Vacaciones
Si usted decide dejar el refrigerador funcionando
mientras está ausente:
1. Use todos los artículos perecederos y congele
el resto.
Si decide apagar el refrigerador antes de irse:
1. Quite toda la comida del refrigerador y del
congelador.
2. Desenchufe el refrigerador o desconecte el
suministro de energía.
3. Limpie el refrigerador, pásele un trapo y
séquelo bien.
4. Fije bloques de goma o de madera con cinta
adhesiva en la parte superior de ambas puertas
para que queden abiertas y el aire circule. Esto
evita que se formen olores y se desarrollen
hongos.
14
Mudanza
ADVERTENCIA
Peligro de Explosión o Incendio
No perfore el tubo refrigerante.
Siga con cuidado las instrucciones de manipulación.
El refrigerante usado es inflamable.
No seguir esta instrucción puede ocasionar la
muerte, explosión, o incendio.
IMPORTANTE: Al mover el refrigerador, manipúlelo
con cuidado para evitar daños en el tubo
refrigerante o incrementar los riesgos de fugas.
ADVERTENCIA
Peligro de Peso Excesivo
Use dos o más personas para mover e instalar el
refrigerador.
No seguir esta instrucción puede ocasionar una
lesión en la espalda u otro tipo de lesiones.
Si Ud. muda su refrigerador a una casa nueva, siga
estos pasos para prepararse para la mudanza.
1. Saque todos los alimentos del refrigerador y
empaque todos los alimentos congelados en
hielo seco.
2. Desenchufe el refrigerador.
3. Limpie, enjuague y seque bien.
4. Saque todas las piezas removibles, envuélvalas
bien y asegúrelas con cinta adhesiva para
que no se muevan ni se sacudan durante la
mudanza.
5. Levante las patas niveladoras para que
no raspen el piso. Consulte “Nivelar el
refrigerador”.
6. Sostenga las puertas para que queden cerradas
y el cable pegado a la parte posterior del
refrigerador con cinta adhesiva. Cuando
llegue a la casa nueva, coloque todo de nuevo
en su sitio y lea la sección “Instrucciones de
instalación” para obtener instrucciones de
preparación.
Cómo Volver a Instalar o Usar el
Refrigerador Nuevamente
Si el refrigerador se ha colocado en posición
horizontal o inclinada por un período de tiempo,
espere 4 horas antes de enchufarlo para permitir
que el aceite se asiente en el compresor.
1. Limpie el refrigerador. Vea “Limpieza”.
2. Coloque el refrigerador en la ubicación
deseada y nivélelo. Vea “Instrucciones de
instalación”.
ADVERTENCIA
Peligro de Choque Eléctrico
Conecte a un contacto de pared de conexión a tierra
de 3 terminales.
No quite el terminal de conexión a tierra del cable
de alimentación.
No use un adaptador.
No use un cable eléctrico de extensión.
No seguir estas instrucciones puede ocasionar la
muerte, incendio o choque eléctrico.
3. Enchufe el aparato a un tomacorriente de
3 terminales con conexión a tierra.
15
Solución de Problemas
Pruebe primero las soluciones recomendadas en esta sección para evitarse el costo de una visita
innecesaria del servicio técnico.
El Refrigerador No Funciona
PROBLEMA CAUSA(S) POSIBLE(S) SOLUCIÓN
El refrigerador no
funciona
El refrigerador está
desenchufado.
Enchufe el refrigerador en un tomacorriente
de 3 clavijas con conexión a tierra.
El interruptor se disparó o se
apagó, o el fusible se quemó.
Reinicie / Encienda el interruptor o
reemplace el fusible.
El refrigerador está en modo de
descongelación.
Espere a que finalice el ciclo de
descongelación y se reinicie el sistema de
enfriamiento.
El compresor del
refrigerador funciona
con frecuencia o por
largos períodos de
tiempo
NOTA: Este
refrigerador está
diseñado para
funcionar durante
períodos de tiempo
más largos con un
menor consumo de
energía.
El refrigerador se conecta
primero.
Esto es normal. Espere 24 horas para que el
refrigerador se enfríe.
Se añadieron alimentos tibios o
en grandes cantidades.
Esto es normal.
La puerta se deja abierta o el
refrigerador no está nivelado.
Compruebe que un artículo no esté
impidiendo que la puerta se cierre. Nivele
el refrigerador. Consulte “Nivelar el
refrigerador”.
Clima caluroso o aperturas
frecuentes.
Esto es normal.
Control de temperatura
configurado en el ajuste más
frío.
Ajuste la temperatura a un ajuste más cálido.
El refrigerador tiene
un olor
La comida no está sellada o
empacada adecuadamente.
Vuelva a sellar los empaques. Coloque una
caja abierta de bicarbonato de sodio en el
refrigerador y reemplace cada 3 meses.
El interior necesita ser limpiado. Limpie el interior. Consulte “Limpieza”.
Alimentos almacenados por
demasiado tiempo.
Deseche los alimentos en mal estado.
La luz no se enciende El refrigerador está
desenchufado.
Enchufe el refrigerador en un tomacorriente
de 3 clavijas con conexión a tierra.
La luz LED está quemada. Póngase en contacto con un técnico
calificado para reemplazar la luz LED
quemada.
Las puertas no cierran
correctamente
El refrigerador no está nivelado. Consulte “Nivelar el refrigerador”.
Algo está obstruyendo el cierre
de la puerta.
Compruebe y elimine las obstrucciones.
Vibración o golpeteo El refrigerador no descansa
firmemente sobre el piso.
Consulte “Nivelar el refrigerador”.
Sonidos normales Suena como si el agua fluyera
del refrigerador.
El refrigerante que fluye en las líneas emitirá
este sonido cuando el compresor arranque y
se detenga.
El refrigerador dispone de un sistema
automático de descongelación. El agua
descongelada hará este sonido.
Sonidos como zumbidos o
pitidos
El compresor y los ventiladores utilizados
para la circulación de aire frío pueden
hacer este sonido. Si el refrigerador no está
nivelado, el sonido será más alto.
Sonidos como agrietamientos o
chasquidos
Las partes interiores harán este sonido a
medida que se contraigan y se expandan en
respuesta a los cambios de temperatura.
Sonido de estallido Puede ocurrir durante la descongelación
automática.
16
Temperatura y humedad
PROBLEMA CAUSA(S) POSIBLE(S) SOLUCIÓN
El refrigerador
o el congelador
están demasiado
calientes.
El control de temperatura no está
ajustado lo suficientemente frío.
Ajuste el compartimiento a una configuración
más fría; espere 24 horas para que la
temperatura se ajuste.
Las puertas se abren con
frecuencia o se dejan abiertas.
Limite las aperturas de las puertas para
mantener la temperatura interna. Compruebe
que un artículo no esté impidiendo que la
puerta se cierre.
Comida caliente agregada
recientemente.
Deje que se enfríe la comida y el refrigerador.
El espacio entre la parte posterior
del refrigerador y la pared está
demasiado cerca.
Deje un espacio de 2" (5 cm) entre la parte
posterior del refrigerador y la pared.
Los artículos contra la parte
posterior de los compartimientos
están bloqueando el flujo de aire
adecuado.
Almacene los artículos solo dentro del borde
de los estantes de vidrio; no coloque objetos
contra los costados de los compartimientos o
directamente frente a las rejillas de ventilación.
El refrigerador
o el congelador
están demasiado
fríos.
El control de temperatura está
demasiado frío.
Ajuste la temperatura en el compartimiento a
la siguiente configuración más caliente; espere
24 horas para que la temperatura se ajuste.
Humedad en el
exterior / interior
del refrigerador.
Alta humedad Esto es normal en tiempos de alta humedad.
Seque la superficie y ajuste la temperatura a un
ajuste ligeramente más frío.
Las puertas se abren con
frecuencia o se dejan abiertas.
Mantenga la puerta cerrada. Compruebe que
un artículo no esté impidiendo que la puerta se
cierre. Nivele el refrigerador. Consulte “Nivelar
el refrigerador”.
Recipiente de agua abierto en el
refrigerador.
Cubra o selle el recipiente.
Cristales de
escarcha o
de hielo en
alimentos
congelados.
La puerta del congelador se deja
abierta o se abre con frecuencia.
Limite las aperturas de las puertas para
mantener la temperatura interna. Compruebe
que un artículo no esté impidiendo que la
puerta se cierre.
El refrigerador no está nivelado. Nivele el refrigerador. Consulte “Nivelar el
refrigerador”.
Artículos que bloquean las salidas
de aire del congelador y evitan el
flujo de aire adecuado.
Aleje los artículos de la pared trasera.
Congelación de
alimentos en el
refrigerador.
Alimentos colocados demasiado
cerca de la salida de aire.
Aleje los artículos de la parte posterior y
superior del refrigerador.
El control de temperatura está
demasiado frío.
Ajuste la temperatura a un ajuste menos frío.
Hielo
PROBLEMA CAUSA(S) POSIBLE(S) SOLUCIÓN
La fábrica
de hielo no
produce hielo,
suficiente hielo
o los cubos
están huecos.
La fábrica de hielo no está
encendida
Mantenga presionado FREEZER
(CONGELADOR) durante 3 segundos para
encender/apagar la fábrica de hielo. Consulte
“Uso de los controles”.
Nueva instalación Espere 24 horas después de la instalación para
que comience la producción de hielo.
Torcedura en la línea de agua Enderece la línea de suministro de agua.
Presión de agua inadecuada Póngase en contacto con un plomero calificado
y con licencia.
Para obtener más ayuda, visite www.hisense-usa.com o llame a la línea de ayuda al
consumidor al 1-877-465-3566.

17
Derechos de autor
© 2019 Hisense Company Ltd. Todos los derechos reservados.
Todo el material en este Manual del usuario es propiedad de Hisense Company Ltd. y sus subsidiarias, y
está protegido por las leyes de derechos de autor de los EE. UU., CANADÁ, MÉXICO e internacionales,
y/u otras leyes de propiedad intelectual. La reproducción o transmisión de los materiales, total o
parcialmente, de cualquier manera, electrónica, impresa o de otro tipo, sin el consentimiento previo por
escrito de Hisense Company Ltd. es una violación de los derechos de Hisense Company Ltd. conforme a
las leyes mencionadas anteriormente.
Ninguna parte de esta publicación puede ser almacenada, reproducida, transmitida o distribuida, en su
totalidad o en parte, de ninguna manera, ya sea electrónica o de otro modo, independientemente de que
sea o no por algún cargo u otro motivo o por ninguna retribución, sin el permiso previo por escrito de
Hisense Company Ltd.
Las solicitudes de permiso para almacenar, reproducir, transmitir o distribuir materiales pueden realizarse
a una de las siguientes direcciones:
EE. UU.: Hisense USA Corporation
7310 McGinnis Ferry Road
Suwanee, GA 30024
CANADÁ: Hisense Canada Co., Ltd
2283 Argentia Road, Unit 16
Mississauga, ON, Canada
LSN 5Z2
MÉXICO: Hisense Mexico S. de R.L. de C.V.
Blvd. Miguel de Cervantes Saavedra No 301
Torre Norte Piso 2, Col. Ampliación Granada
Miguel Hidalgo, Ciudad de México, C.P. 11520
Hisense y cualquiera y todos los demás nombres de productos, logotipos, lemas o marcas de Hisense son
marcas registradas de Hisense Company Ltd. y sus subsidiarias. Todas las demás marcas registradas son
propiedad de sus respectivos titulares.
©2019. Todos los derechos reservados. Hisense y el logotipo de Hisense son marcas registradas de
Hisense. Otras marcas y nombres de productos son marcas registradas de sus respectivos propietarios.
Exclusión de responsabilidad:
Las imágenes a lo largo de este documento son solo para fines ilustrativos y pueden diferir del
producto real.