User Manual for Treadmill
ASSEMBLY
UNPACKING
Unpack the equipment where you will be using it. Place the carton on a level flat surface. It is recommended that you place a protective covering on your floor. Never open box when it is on its side.
IMPORTANT NOTES
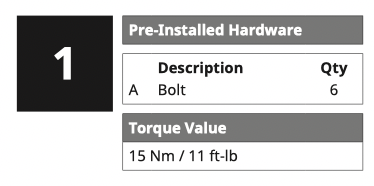
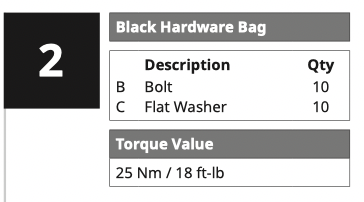
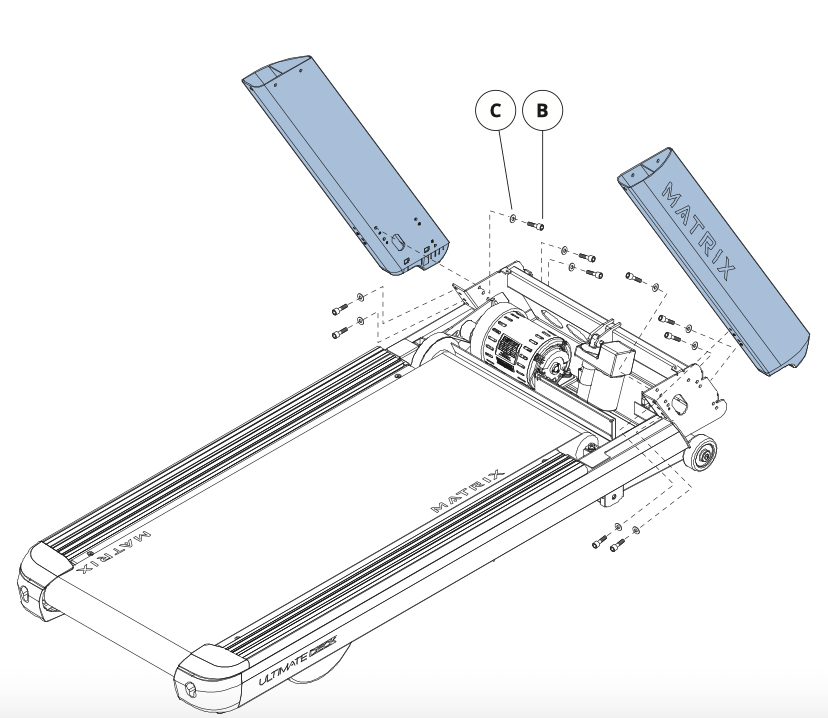
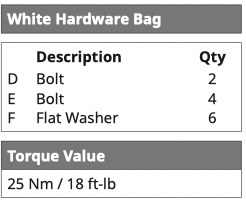
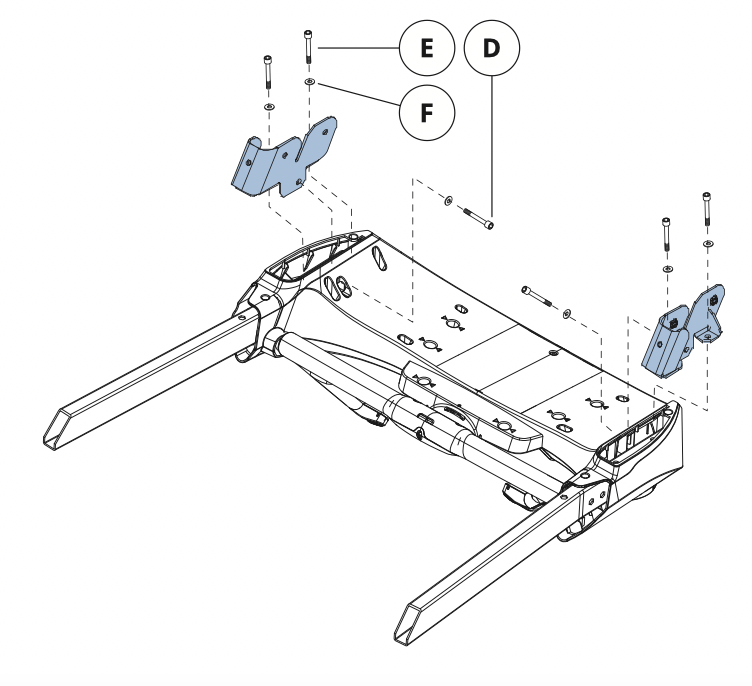
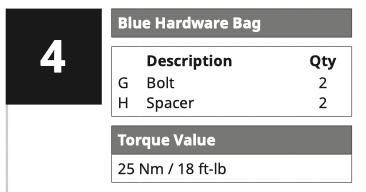
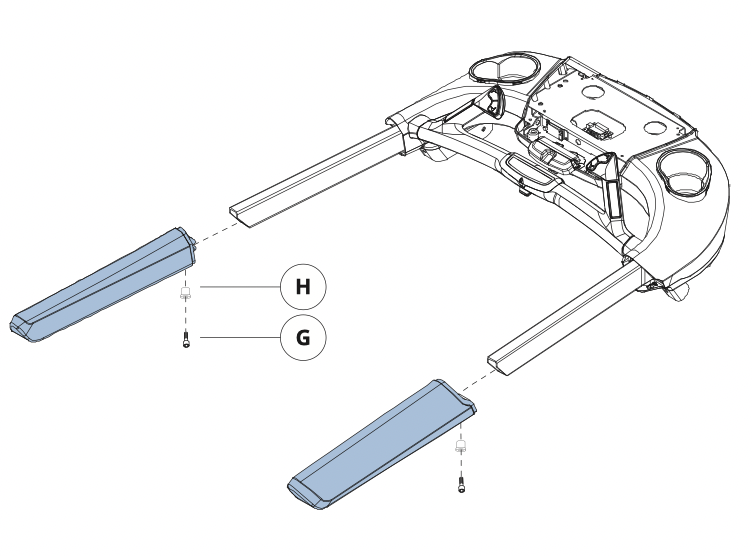
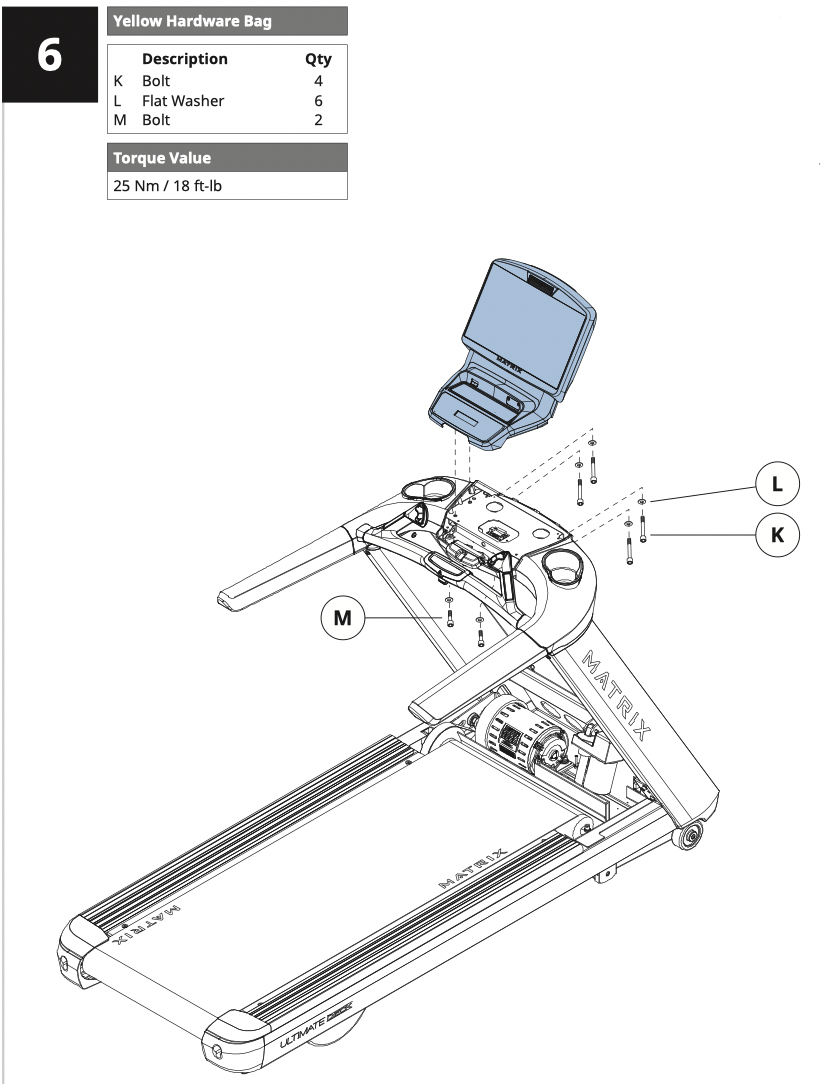
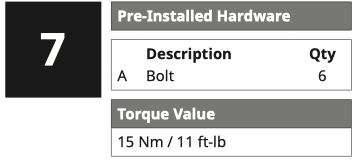
During each assembly step, ensure that ALL nuts and bolts are in place and partially threaded.
Several parts have been pre-lubricated to aid in assembly and usage. Please do not wipe this off. If you have difficulty, a light application of lithium grease is recommended.
SERIAL NUMBER LOCATIONS
Before proceeding, find the serial numbers located on barcode stickers and enter them in the spaces provided below.


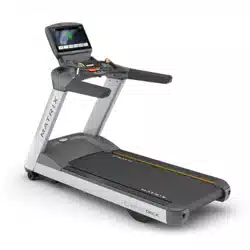
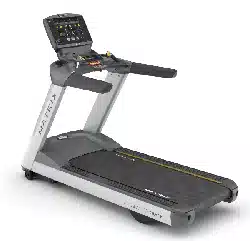
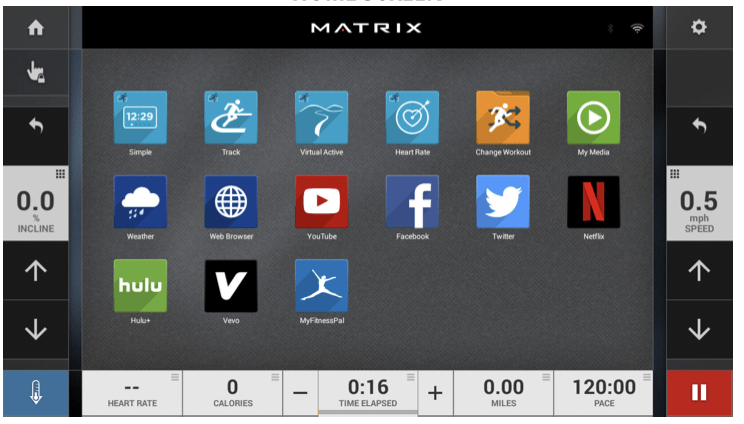
T130 XI CONSOLE DESCRIPTION
The Matrix machine is inspected before it is packaged. It is shipped in two pieces: the base and the console. Carefully unpack the unit and dispose of the box material. Note: There is a thin protective sheet of clear plastic on the overlay of the console that should be removed before use.
The T130 XI has a fully integrated touch screen display. All information required for workouts is explained on-screen. Exploration of the interface is highly encouraged. The information explaining how to program for various workouts will give an explanation about the contents of each screen on the T130 XI.
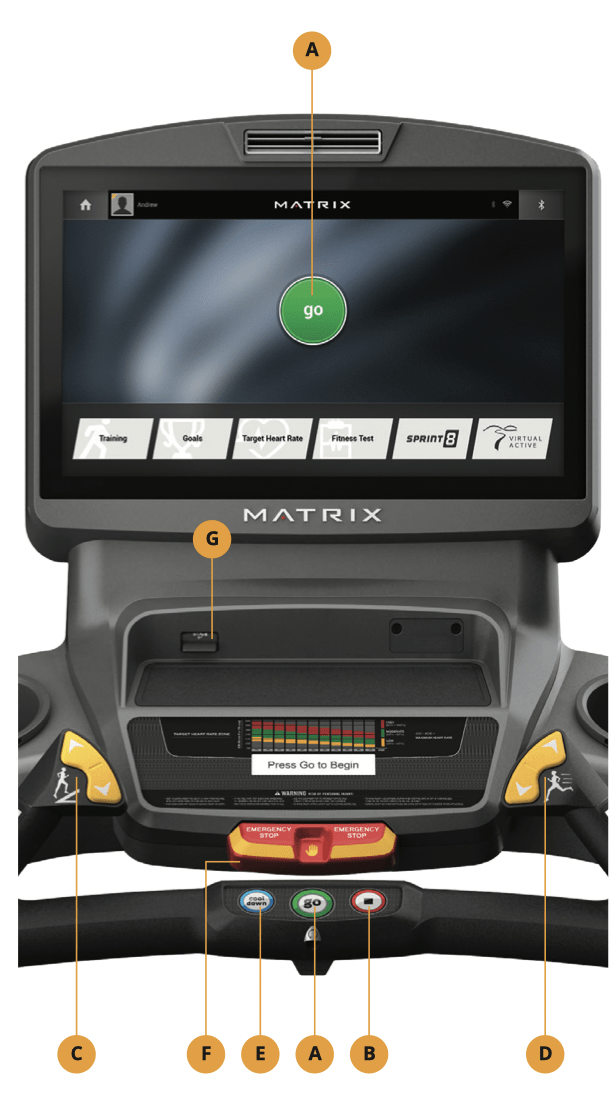
A) GO: One Touch Start.
B) STOP: Ends workout and shows workout summary data.
C) INCLINE TOGGLES: Adjust incline during workout.
D) SPEED TOGGLES: Adjust speed during workout.
E) COOL DOWN: Puts treadmill into Cool Down mode. Cool Down time is dependent on the length of the workout. Workouts 19 minutes and shorter will have a cool down length of 2 minutes. Workouts 20 minutes and longer will have a cool down length of 5 minutes.
F) EMERGENCY STOP / IMMOBILIZATION: To stop all functions and immobilize the unit. The emergency stop on this treadmill must be returned to its original position in order to allow normal operation of the unit.
G) USB PORT: Used for software updates only.
CONSOLE SETUP
1) Choose your language. Touch  to continue.
2) Select the RETAIL MODE button. Touchto continue.
3) Select your home Wi-Fi network. If your network is password protected, enter your network password and press enter. Touch to continue.
4) Select TREADMILL. Touch to continue.
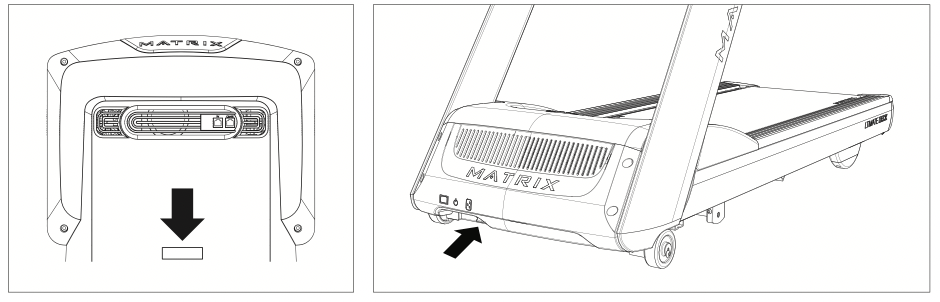
5) Input your frame and console serial numbers. The serial numbers can be found on the back of your console and on the elevation platform beneath the power switch on your treadmill. They can also be found on the outside of your console and frame boxes. Touch to continue after entering your serial information.
6) Verify your serial information is correct. Touch to continue.
7) Input the date and time. Touch to continue to your home screen.
CONSOLE OPERATION
GETTING STARTED
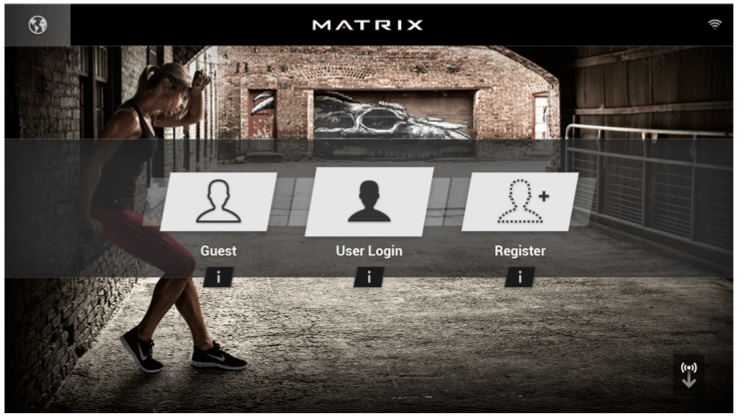
• Touch the USER button to sign-in with your XID.
• Touch the GUEST button to workout anonymously.
• Touch the REGISTER button to create a new XID.
• For help or more information, touch .
.
• To change language, touch  .
.
USER SIGN-IN
1) Enter your XID and touch .
.
2) Enter your PASSCODE and touch
 Consoles equipped with RFID will have this symbol in the lowerright corner of the display. To log in, touch your RFID tag to the symbol
 located on the bottom right of the console. *
REGISTER A NEW USER
1) Don’t have an xID account? Registration is easy.
2) Follow the on-screen prompts to create your free account.
3) Review your information and select the I ACCEPT THE TERMS AND CONDITIONS box to review the Terms and Conditions.
4) Touch to complete registration. Your account is now active and you are signed-in.
LOGIN SCREEN
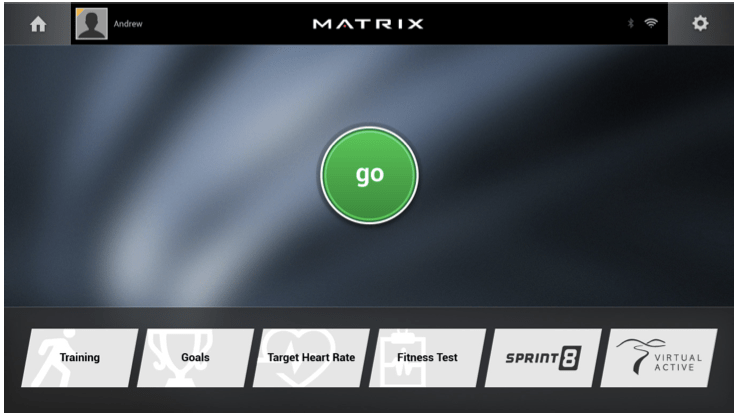
GO SCREEN
• Touch GO to begin working out immediately. Or...
• Touch the WORKOUT CATEGORY button of your choice to customize your workout.
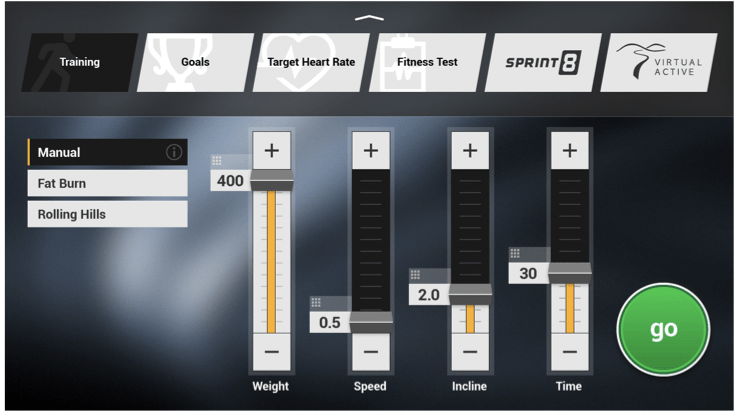
PROGRAM SETUP
1) After selecting a WORKOUT CATEGORY button, select one of the PROGRAMS listed to the left.
For more information on a selected program, touch  .
.
2) Use the SLIDER CONTROLS to adjust your program settings.
3) Press GO to begin your workout.
Note: Workouts and features vary based on model type, console configurations, software versions and options purchased.
GO SCREEN
PROGRAM SETUP
Note: Workouts and features vary based on model type, console configurations, software versions and options purchased.
HOME SCREEN
• The USERNAME or GUEST is shown in the upper left corner.
• Touch to change WORKOUT STATISTICS displayed at the bottom of the screen.
• Touch to go back to the home screen whenever you’re using an app.
• Touch to adjust VOLUME, pair a BLUETOOTH device or to change AUDIO SOURCE (My Media, Virtual Active, etc.).
• Touch to increase or decrease the intensity level, speed or incline.
• Touch  to use the keypad to set intensity level, speed or incline. Press
 to confirm change.
• Touch to change intensity level, speed or incline back to previous setting.
• Touch  to temporarily pause your workout and touch
 to resume. NOTE: After resuming, speed, incline and intensity levels will be reset.
• While paused, touch  to end workout.
• Touch to increase or decrease the duration of your workout.
• Touch to enter cool down mode. Cool down lasts for a few minutes while reducing the workout intensity, allowing your body to recover from your workout.
• Touch to lock the screen in order to prevent accidental screen touches from being implemented. Touch it again to unlock the screen and allow screen touches.
• Touch to turn the fan on. There are three fan speeds (low, medium, high).
APPS AND ENTERTAINMENT

Note: Workouts and features vary based on model type, console configurations, software versions and options purchased.
NOTE:
This equipment has been tested and found to comply with the limits for a Class B digital device, pursuant to part 15 of the FCC rules. These limits are designed to provide reasonable protection against harmful interference in a residential installation. This equipment generates, uses and can radiate radio frequency energy and, if not installed and used in accordance with the instructions, may cause harmful interference to radio communications. However, there is no guarantee that interference will not occur in a particular installation. If this equipment does cause harmful interference to radio or television reception, which can be determined by turning the equipment off and on, the user is encouraged to try to correct the interference by one or more of the following measures:
• Reorient or relocate the receiving antenna.
• Increase the separation between the equipment and receiver.
• Connect the equipment into an outlet on a circuit different from that to which the receiver is connected.
• Consult the dealer or an experienced radio/TV technician for help.
Any changes or modifications not expressly approved by the party responsible for compliance could void the user’s authority to operate this equipment. FCC RF Radiation Exposure Statement:
1. This Transmitter must not be co-located or operating in conjunction with any other antenna or transmitter.
2. This equipment complies with FCC RF radiation exposure limits set forth for an uncontrolled environment. This equipment should be installed and operated with a minimum distance of 20 centimeters between the radiator and your body
BEFORE YOU BEGIN
LOCATION OF THE TREADMILL
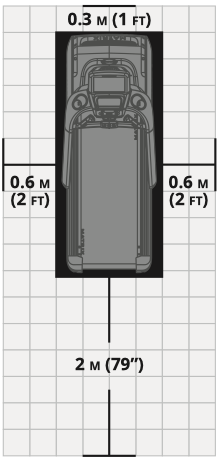
Place the equipment on a level and stable surface away from direct sunlight. The intense UV light can cause discoloration on the plastics. Locate the equipment in an area with cool temperatures and low humidity. Please leave a clear zone behind the treadmill that is at least the width of the treadmill and at least 79” (2 meters) long. This zone must be clear of any obstruction and provide the user a clear exit path from the machine. For ease of access, there should be an accessible space on both sides of the treadmill of at least 24” (0.6 meters) to allow a user access to the treadmill from either side. Do not place the treadmill in any area that will block any vent or air openings.
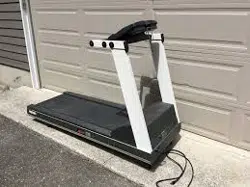
The treadmill should not be located in a garage, covered patio, near water or outdoors.
LEVELING THE TREADMILL
Use of shim or adding leveling foot.
NOTE: It is extremely important that the levelers are correctly adjusted for proper operation. An unbalanced unit may cause belt misalignment or other issues. Use of a level is recommended.
Remove the leveling shim provided on the underside of the treadmill. The shim can be found mounted on the underside of the right hand side rail. Remove the rear foot on the side of the treadmill that is resting low. Install the shim as shown above and return the rear foot.
When installing the optional rear leveling foot accessory, remove the existing rear foot. Replace with new leveling foot and fasten to the frame using the existing fasteners that held in the half-moon foot.
WARNING!
Our equipment is heavy, use care and additional help if necessary when moving. Failure to follow these instructions could result in injury.
POWER
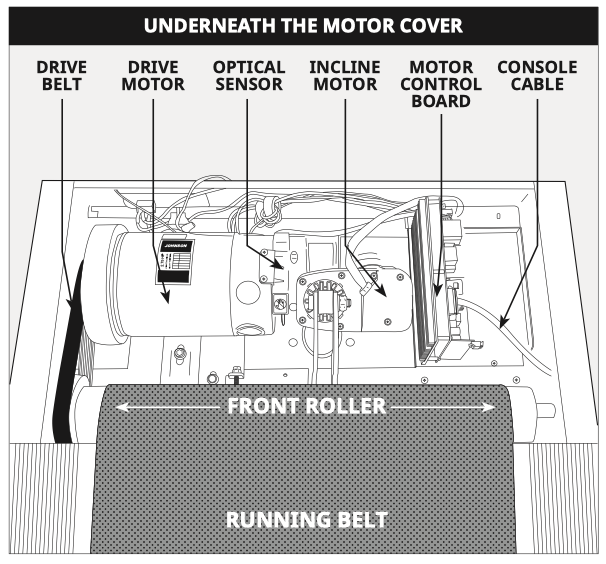
This treadmill is powered by a power supply and must be plugged into a power jack. The power jack is located at the front of the treadmill underneath the motor cover. Make sure the power switch is in the ON position. Unplug power chord when not in use.
WARNING!
Never operate equipment if it has a damaged cord or plug, if it is not working properly, if it has been damaged, or immersed in water. Contact Customer Tech Support for examination and repair.

TENSIONING THE RUNNING BELT
After placing the treadmill in the position it will be used, the belt must be checked for proper tension and centering. The belt might need to be adjusted after the first two hours of use. Temperature, humidity, and use cause the belt to stretch at different rates. If the belt starts to slip when a user is on it, be sure to follow the directions below.
1) Locate the two hex head bolts on the rear of the treadmill. The bolts are located at each end of the frame at the back of the treadmill. These bolts adjust the rear belt roller. Do not adjust until the treadmill is on. This will prevent over tightening of one side.
2) The belt should have equal distance on either side between the frame. If the belt is touching one side, do not start the treadmill. Turn the bolts counter clockwise approximately one full turn on each side. Manually center the belt by pushing the belt from side to side until it is parallel with the side rails. Tighten the bolts the same amount as when the user loosened them, approximately one full turn. Inspect the belt for damage.
3) Start the treadmill running belt by pressing the GO buttion. Increase speed to 3 mph (~4.8 kph) and observe the belt position. If it is moving to the right, tighten the right bolt by turning it clockwise ¼ turn, and loosen the left bolt ¼ turn. If it is moving to the left, tighten the left bolt by turning it clockwise ¼ turn and loosen the right ¼ turn. Repeat Step 3 until the belt remains centered for several minutes.
4) Check the tension of the belt. The belt should be very snug. When a person walks or runs on the belt, it should not hesitate or slip. If this occurs, tighten the belt by turning both bolts clockwise ¼ turn. Repeat if necessary.
NOTE: Use the orange strip in the lateral position of the side rails as criteria to confirm the belt is properly centered. It is necessary to adjust the belt until the edge of the belt is parallel to the orange or white strip.
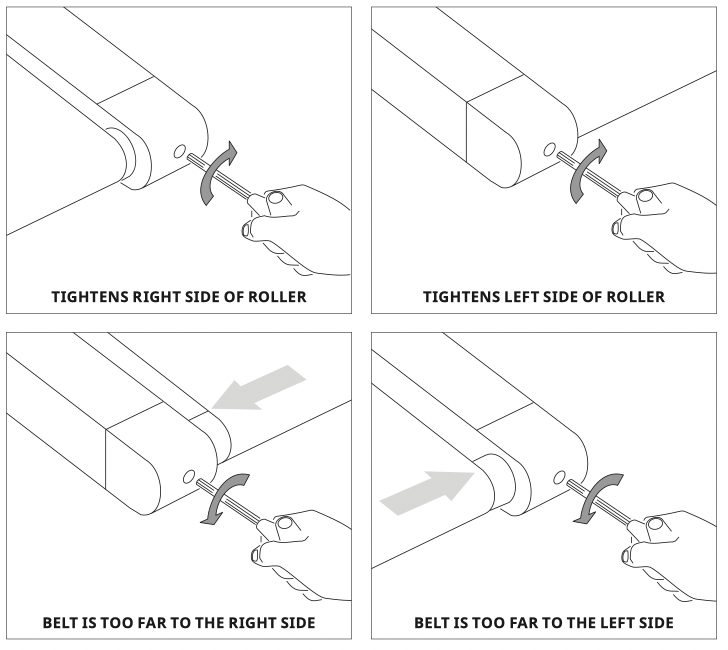
WARNING!
Do not run belt faster than 3 mph (~4.8 kph) while centering. Keep fingers, hair and clothing away from belt at all times.
Treadmills equipped with side handrails and front handlebar for user support and emergency dismount, press emergency button to stop the machine for emergency dismount.
BEFORE USING THE TREADMILL
Perform initial setup and calibrate the treadmill using the auto-calibration feature found in ‘Manager Mode’ or ‘Engineering Mode’.
NOTES:
• DO NOT stand on the belt while the auto-calibration sequence is in progress.
• DO NOT adjust incline until the initial setup and auto-calibration are completed.
• DO NOT start the treadmill running belt or press any speed buttons until directed to while tensioning the running belt.
CAUTION!
RISK OF INJURY TO PERSONS
While you are preparing to use the treadmill, do not stand on the belt. Place your feet on the side rails before starting the treadmill. Start walking on the belt only after the belt has begun to move. Never start the treadmill at a fast running speed and attempt to jump on! In case of an emergency, place both hands on the side arm rests to hold yourself up and place your feet onto the side rails.
USING THE SAFETY KEY
Your treadmill will not start unless the emergency stop button is reset. Attach the clip end securely to your clothing. This safety key is designed to cut the power to the treadmill if you should fall. Check the operation of the safety key every 2 weeks.
WARNING!
Never use the treadmill without securing the safety key clip to your clothing. Pull on the safety key clip first to make sure it will not come off your clothing.
USING THE HEART RATE FUNCTION
The heart rate function on this product is not a medical device. While heart rate grips can provide a relative estimation of your actual heart rate, they should not be relied on when accurate readings are necessary. Some people, including those in a cardiac rehab program, may benefit from using an alternate heart rate monitoring system like a chest or wrist strap. Various factors, including movement of the user, may affect the accuracy of your heart rate reading. The heart rate reading is intended only as an exercise aid in determining heart rate trends in general. Please consult your physician.
PULSE GRIPS
Place the palm of your hands directly on the grip pulse handlebars. Both hands must grip the bars for your heart rate to register. It takes 5 consecutive heart beats (15-20 seconds) for your heart rate to register. When gripping the pulse handlebars, do not grip tightly. Holding the grips tightly may elevate your blood pressure. Keep a loose, cupping hold. You may experience an erratic readout if consistently holding the grip pulse handlebars. Make sure to clean the pulse sensors to ensure proper contact can be maintained.
When used in conjunction with a wireless chest transmitter, your heart rate can be transmitted wirelessly to the unit and displayed on the console.
WARNING!
Heart rate monitoring systems may be inaccurate. Over exercising may result in serious injury or death. If you feel faint, stop exercising immediately.
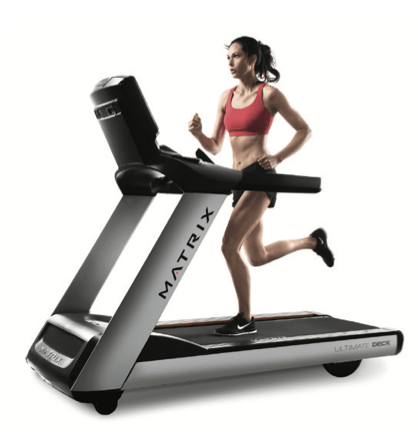
PROPER USAGE
Position your feet on the belt, bend your arms slightly and grasp the heart rate sensors (as shown). While running, your feet should be located in the center of the belt so that your hands can swing naturally and without contacting the front handlebars.
Your treadmill is capable of reaching high speeds. Always start off using a slower speed and adjust the speed in small increments to reach a higher speed level. Never leave the treadmill unattended while it is running. When not in use turn the on/off switch to off and unplug the power cord. Make sure to follow the MAINTENANCE schedule in this guide to maintain optimal performance and prevent premature electronic failure. Keep your body and head facing forward. Do not attempt to turn around or look backwards while the treadmill is running. Stop your workout immediately if you feel pain, faint, dizzy or are short of breath.
MAINTENANCE
Preventative maintenance is the key to smooth operating equipment, as well as keeping the users’ liability to a minimum. Equipment needs to be inspected at regular intervals. Defective components must be replaced immediately. Improperly working equipment must be kept out of use until it is repaired. Ensure that any person(s) making adjustments or performing maintenance or repair of any kind is qualified to do so.
WARNING
To remove power from the treadmill, the power cord must be disconnected from the wall outlet.
|
MAINTENANCE SCHEDULE
|
|
ACTION
|
FREQUENCY
|
|
Clean and inspect the treadmill:
• Turn off the treadmill with the ON/OFF switch, then unplug the power cord at the wall outlet.
• Wipe down the running belt, deck, motor cover and console casing with a damp cloth. Never use solvents, as they can cause damage to the treadmill.
• Inspect the power cord. If the power cord is damaged, please reference contact information on the back cover of the INFORMATION CARD for assistance.
• Make sure the power cord is not underneath the treadmill or in any other area where it can become pinched or cut during storage or use.
• Check the tension and alignment of the running belt. Make sure that the treadmill belt will not damage any other components on the treadmill by being misaligned.
• If any labels are damaged or illegible, please reference contact information on the back cover of the INFORMATION CARD for assistance.
|
DAILY
|
|
Clean underneath the treadmill:
• Turn off the treadmill with the ON/OFF switch, then unplug the power cord at the wall outlet.
• Fold the treadmill into the upright position, making sure that the lock latch is secure.
• Move the treadmill.
• Wipe or vacuum any dust particles or other objects that may have accumulated underneath the treadmill.
• Return the treadmill to its previous position.
|
WEEKLY
|
|
IMPORTANT!
• Turn off the treadmill with the ON/OFF switch, then unplug the power cord at the wall outlet. Wait 60 seconds.
• Inspect all assembly bolts of the machine for proper tightness.
• Remove the motor cover. Wait until ALL display screens turn off.
• Clean the motor and lower board area to eliminate any lint or dust particles that may have accumulated. Failure to do so may result in premature failure of key electrical components.
• Wipe down the belt with a damp cloth. Vacuum any black/ white particles that may accumulate around the unit. These particles may accumulate from normal treadmill use.
• If your treadmill has air shocks under the deck for lift assistance, lubricate the silver air shock tube with Teflon-based spray found at your local hardware or bike store.
|
MONTHLY
|
| LUBRICATING THE RUNNING BELT |
|
EVERY 3 MONTHS OR 500 Miles
It is necessary to lubricate your treadmill running deck every three months or 500 Miles to maintain optimal performance. Once the treadmill records 500 Miles it will display the message “LUBE” or “LUBE BELT.” The treadmill will not operate while the message is showing. Your treadmill came with a bottle of 100% silicone lubricant, which can be used for two applications.
Go to this website to purchase additional Silicone Lubricant: www.johnsonfit.com/lubricant
Tools Needed:
• Blue-handled T-wrench or Allen wrench
• 100% silicone oil

PROCEDURE:
1. Turn off the treadmill with the on/off switch and unplug the power cord at the wall outlet.
2. Using the T-wrench or Allen wrench, loosen the rear roller bolts 10-15 counter-clockwise turns. This should give the belt enough slack for you to lift it.
3. Lift the belt as far as you can and squirt the silicone oil in a zigzag pattern across the entire running deck surface. Use slightly less than 1/2 bottle or 40 ml. Do not apply the silicone oil on top of the running belt. Lay the running belt down and then tighten both rear roller bolts clockwise the same number of turns loosened.
4. After you have applied lubricant, plug in the power cord. Press and hold STOP for three seconds to remove message for one workout. Press and hold STOP and SPEED UP for 5 seconds to reset for the next 500 miles.
5. Stay off of the machine and press START. Allow the belt to run at 3 mph for 3 minutes to begin spreading the silicone. Then walk on the machine at a comfortable speed for 3 minutes to complete spreading the silicone and to check the running belt for proper tension and alignment.
6. Once the belt is centered and tensioned, stop the belt. Wipe any excess oil from the sides with a damp cloth.
|
TROUBLESHOOTING
COMMON PRODUCT QUESTIONS
ARE THE SOUNDS MY TREADMILL MAKES NORMAL?
All treadmills make a certain type of thumping noise due to the belt riding over the rollers, especially new treadmills. This noise will diminish over time, although it may not totally go away. Over time, the belt will stretch, causing the belt to ride smoother over the rollers.
WHY IS THE TREADMILL I PURCHASED LOUDER THAN THE ONE AT THE STORE?
All fitness products seem quieter in a large store showroom because there is generally more background noise than in your home. Also, there will be less reverberation on a carpeted concrete floor than on a wood overlay floor. Sometimes a heavy rubber mat will help reduce reverberation through the floor. If a fitness product is placed close to a wall, there will be more reflected noise.
WHEN SHOULD I BE WORRIED ABOUT A NOISE?
As long as the sounds your treadmill makes are no louder than a normal conversational tone of voice, it is considered normal noise.
BASIC TROUBLESHOOTING
PROBLEM: The console does not light up.
SOLUTION: Verify the following:
Does the light on the ON/OFF switch light up?
NOTE: Some treadmill models do not have a switch that lights up. If this is the case, please proceed with the yes and no solutions below.
If yes:
• Turn the power off, unplug the power cable and wait 60 seconds. Remove motor cover.
Wait until all LED lights have gone off on the motor control board before proceeding. Next verify that none of the wires connecting to the lower board are loose or disconnected.
• Double-check that all connections are secure, especially the console cable. Unplug and reconnect the console cable to verify.
• Make sure the console cable is not pinched or damaged in any way.
• Plug the treadmill in, turn the power switch on and look for any lit LEDs on the motor control board.
If no:
• Verify that the outlet the machine is plugged into is functional. Double-check that the breaker has not tripped, it is on a dedicated 15-amp circuit, it is not on a GFCI-equipped outlet, and it is not plugged into a power strip/surge protector or extension cord.
• Verify that the power cord is not pinched or damaged and is properly plugged into the outlet AND the machine.
• Verify that the power switch is turned to the ON position.
PROBLEM: The belt does not move or moves briefly, but the console works.
SOLUTION: Verify the following:
• Make sure you are following the recommendations and power guidelines. The unit should be on a dedicated 15-amp circuit and not on a GFCI-equipped outlet. Do not plug the machine into a power strip/surge protector or extension cord.
• Check for any belt movement. If so, make note of how far or how long it moves before stopping.
• Try to move the belt by hand. If not, the drive belt may have come off or the motor bearings may have seized.
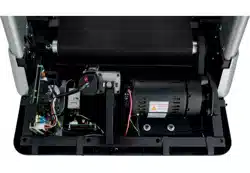
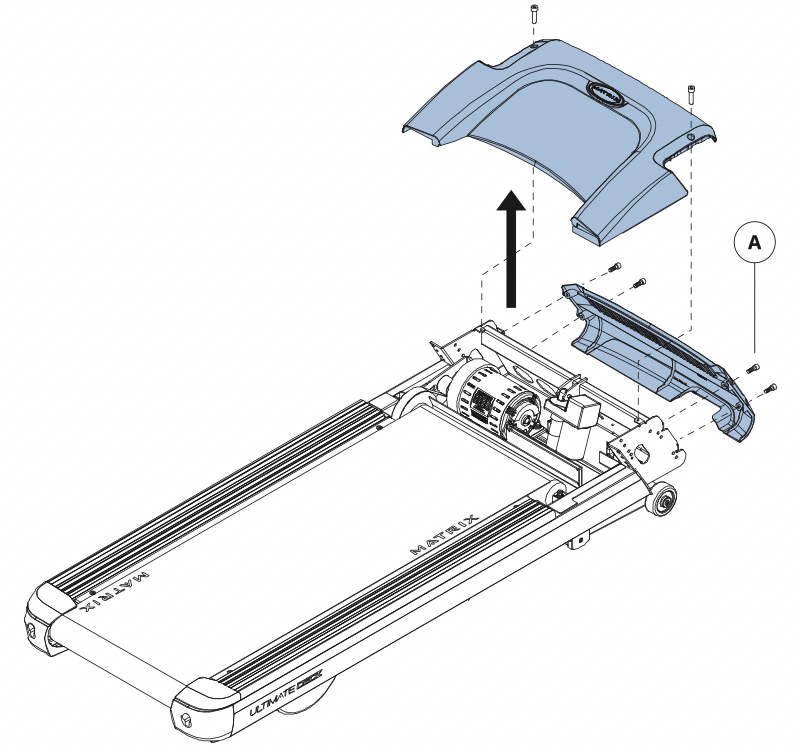
• Turn the treadmill off and unplug it from the outlet. Remove the plastic motor cover located in front of the machine by taking out the Phillips screws. Check the drive belt for proper alignment.
• With the cover still off, check over the wire and cable connections, as they may have become loose or disconnected during shipping or assembly. Make sure connections are secure and no wires are crimped, damaged, disconnected or burnt.
PROBLEM: The incline does not move, won’t go down or does not seem to be at the right level.
SOLUTION: Verify the following:
• Make sure you are following the recommendations and power guidelines. The unit should be on a dedicated 15-amp circuit and not on a GFCI-equipped outlet. Do not plug the machine into a power strip/surge protector or extension cord.
• Make sure the console shows a change on the display when the elevation buttons are pressed.
• Turn the treadmill off and unplug it from the outlet. Verify the console cable connections at the top of the mast are connected securely. Make sure all of the multicolored wires are fully inserted into the cable harness.
• Remove the plastic motor cover located in front of the machine by taking out the Phillips screws. Check over the wire and cable connections, as they may have become loose or disconnected during shipping or assembly. Make sure connections are secure and no wires are crimped, damaged, disconnected or burnt.
PROBLEM: The treadmill circuit breaker trips during a workout.
SOLUTION: Verify the following:
• Make sure the treadmill is plugged into a dedicated 15-amp circuit.
• Verify that you do not have the machine on an extension cord or surge protector.
• Confirm that the machine is not plugged into a GFCI-equipped outlet or on a circuit that has a GFCI-equipped outlet on it.
PROBLEM: The running belt does not stay centered during a workout.
SOLUTION: Verify the following:
• Make sure the treadmill is on a level surface.
• Verify that the belt is properly tightened and centered (Refer to the TENSIONING and CENTERING THE RUNNING BELT sections for detailed directions).
TROUBLESHOOTING HEART RATE (GRIP-PULSE ONLY)
Check your exercise environment for sources of interference such as fluorescent lights, computers, underground fencing, home security systems or appliances containing large motors. These items may cause erratic heart rate readouts.
You may experience an erratic readout under the following conditions:
• Gripping the heart rate handlebars too tight. Try to maintain moderate pressure while holding onto the heart rate handlebars.
• Constant movement and vibration due to constantly holding the heart rate handlebars while exercising. If you are receiving erratic heart rate readouts, try to only hold the grips long enough to monitor your heart rate.
• When you are breathing heavily during a workout.
• When your hands are constricted by wearing a ring.
• When your hands are dry or cold. Try to moisten your palms by rubbing them together to warm.
• Anyone with heavy arrhythmia.
• Anyone with arteriosclerosis or peripheral circulation disorder.
• Anyone whose skin on the measuring palm is especially thick.