Owner's Guide Health & Household
OPERATION GUIDE
XR CONSOLE DESCRIPTION
Note: There is a thin protective sheet of clear plastic on the overlay of the console that should be removed before use.
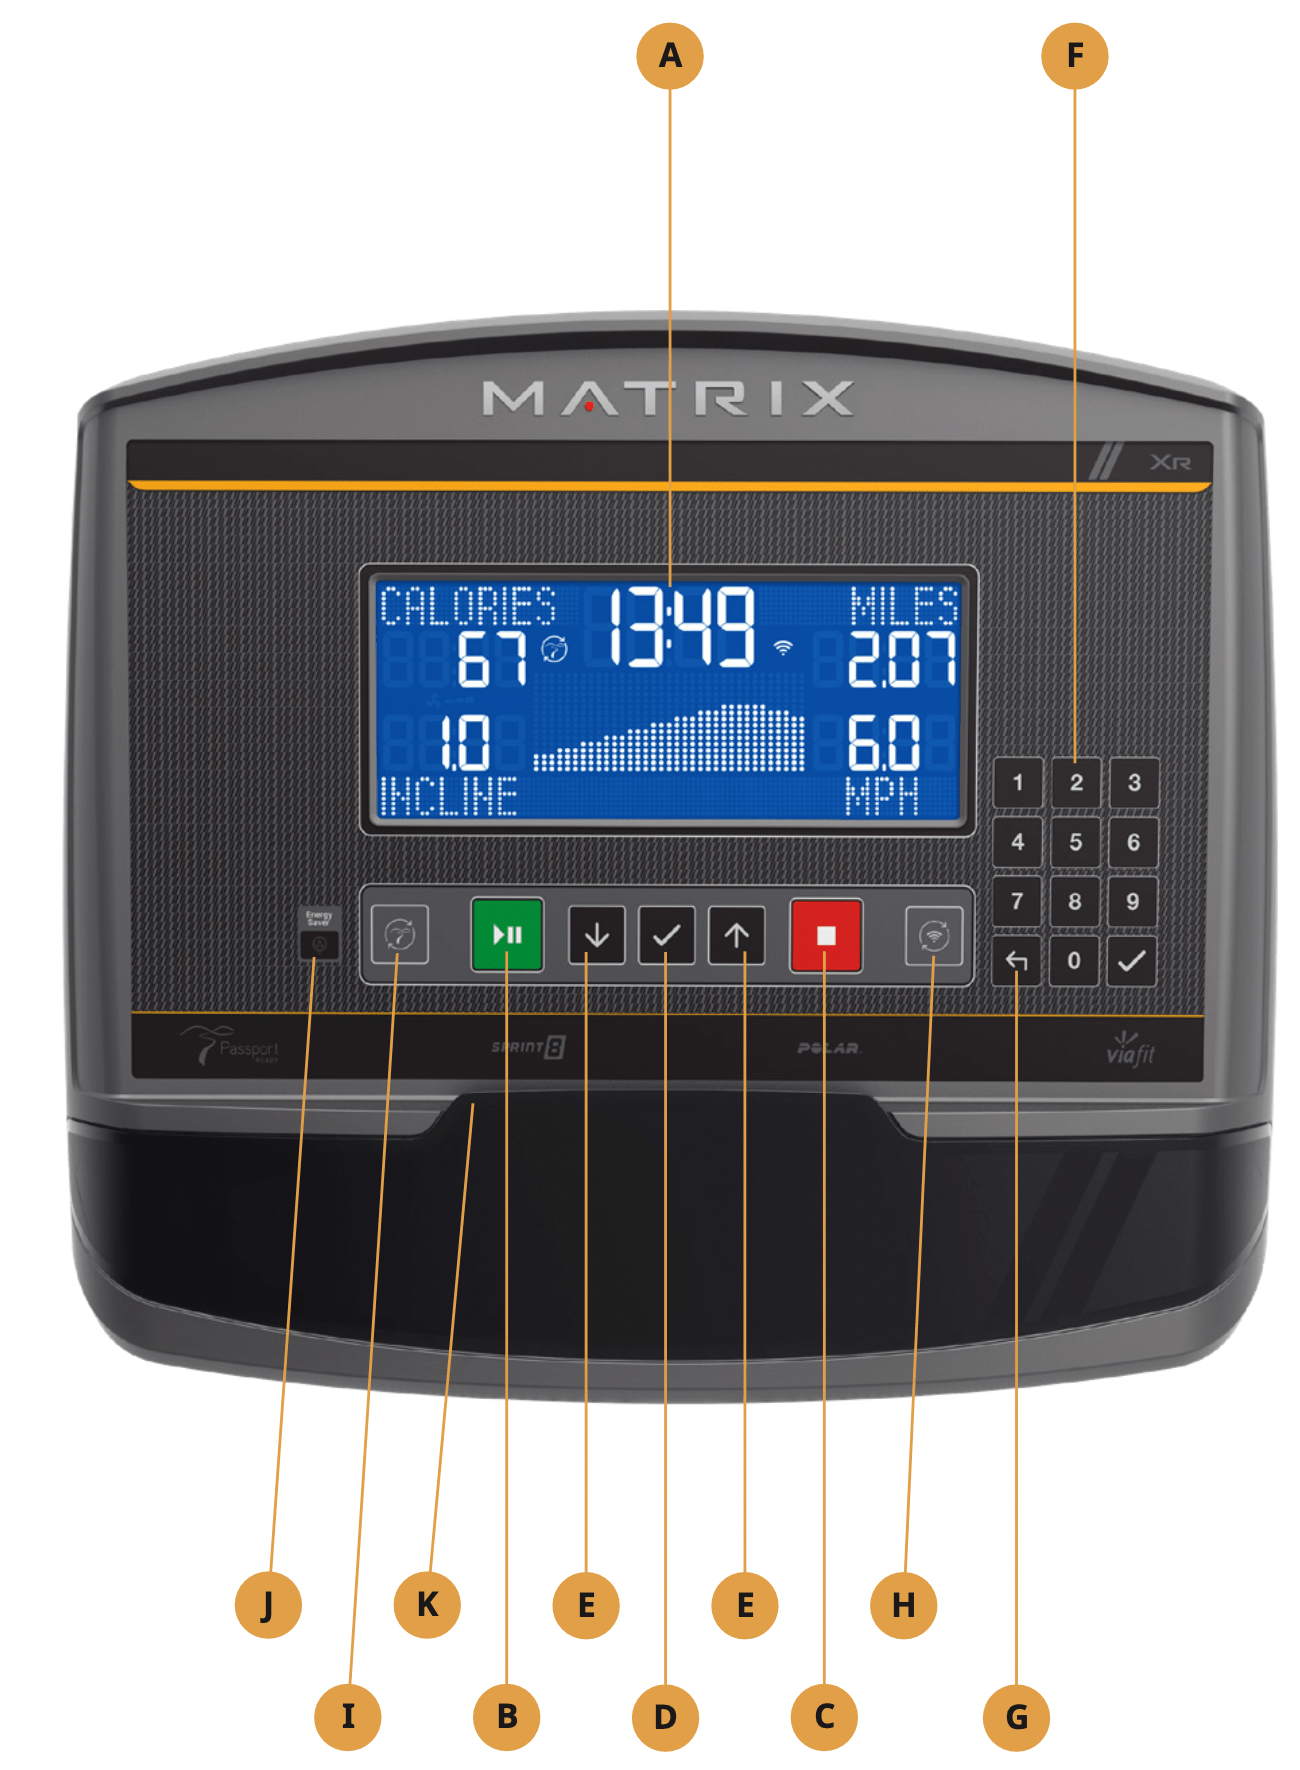
A) LCD DISPLAY WINDOW: Displays workout feedback, program profile and more.
B) GO/PAUSE  : Press to start, pause or resume your workout.
C) STOP  : Press to stop your workout. Press and hold for 3 seconds to reset console.
D) ENTER  : Confirm each program setting. Press to change display feedback during workout. Press and hold to scan.
E) ARROWS  : used to adjust program settings.
F) NUMBER KEYPAD: Used to enter xID login, to enter program data during program setup and to adjust speed / resistance level during workout. Press to confirm setting.
G) BACK  : Go to previous program setting.
H) WI-FI CONNECT & SYNC: Press to connect your wireless internet connection. See BEFORE YOU BEGIN section for more info.
I) PASSPORT CONNECT & SYNC: Press to connect your Passport box for Virtual Active programming. Passport Player is sold at your Retailer or at www.passportplayer.com
J) ENERGY SAVER LIGHT: Indicates if machine is in energy saver mode. Press any key to wake up the machine.
K) READING RACK: Holds reading material or electronic device.
XR DISPLAY DESCRIPTION
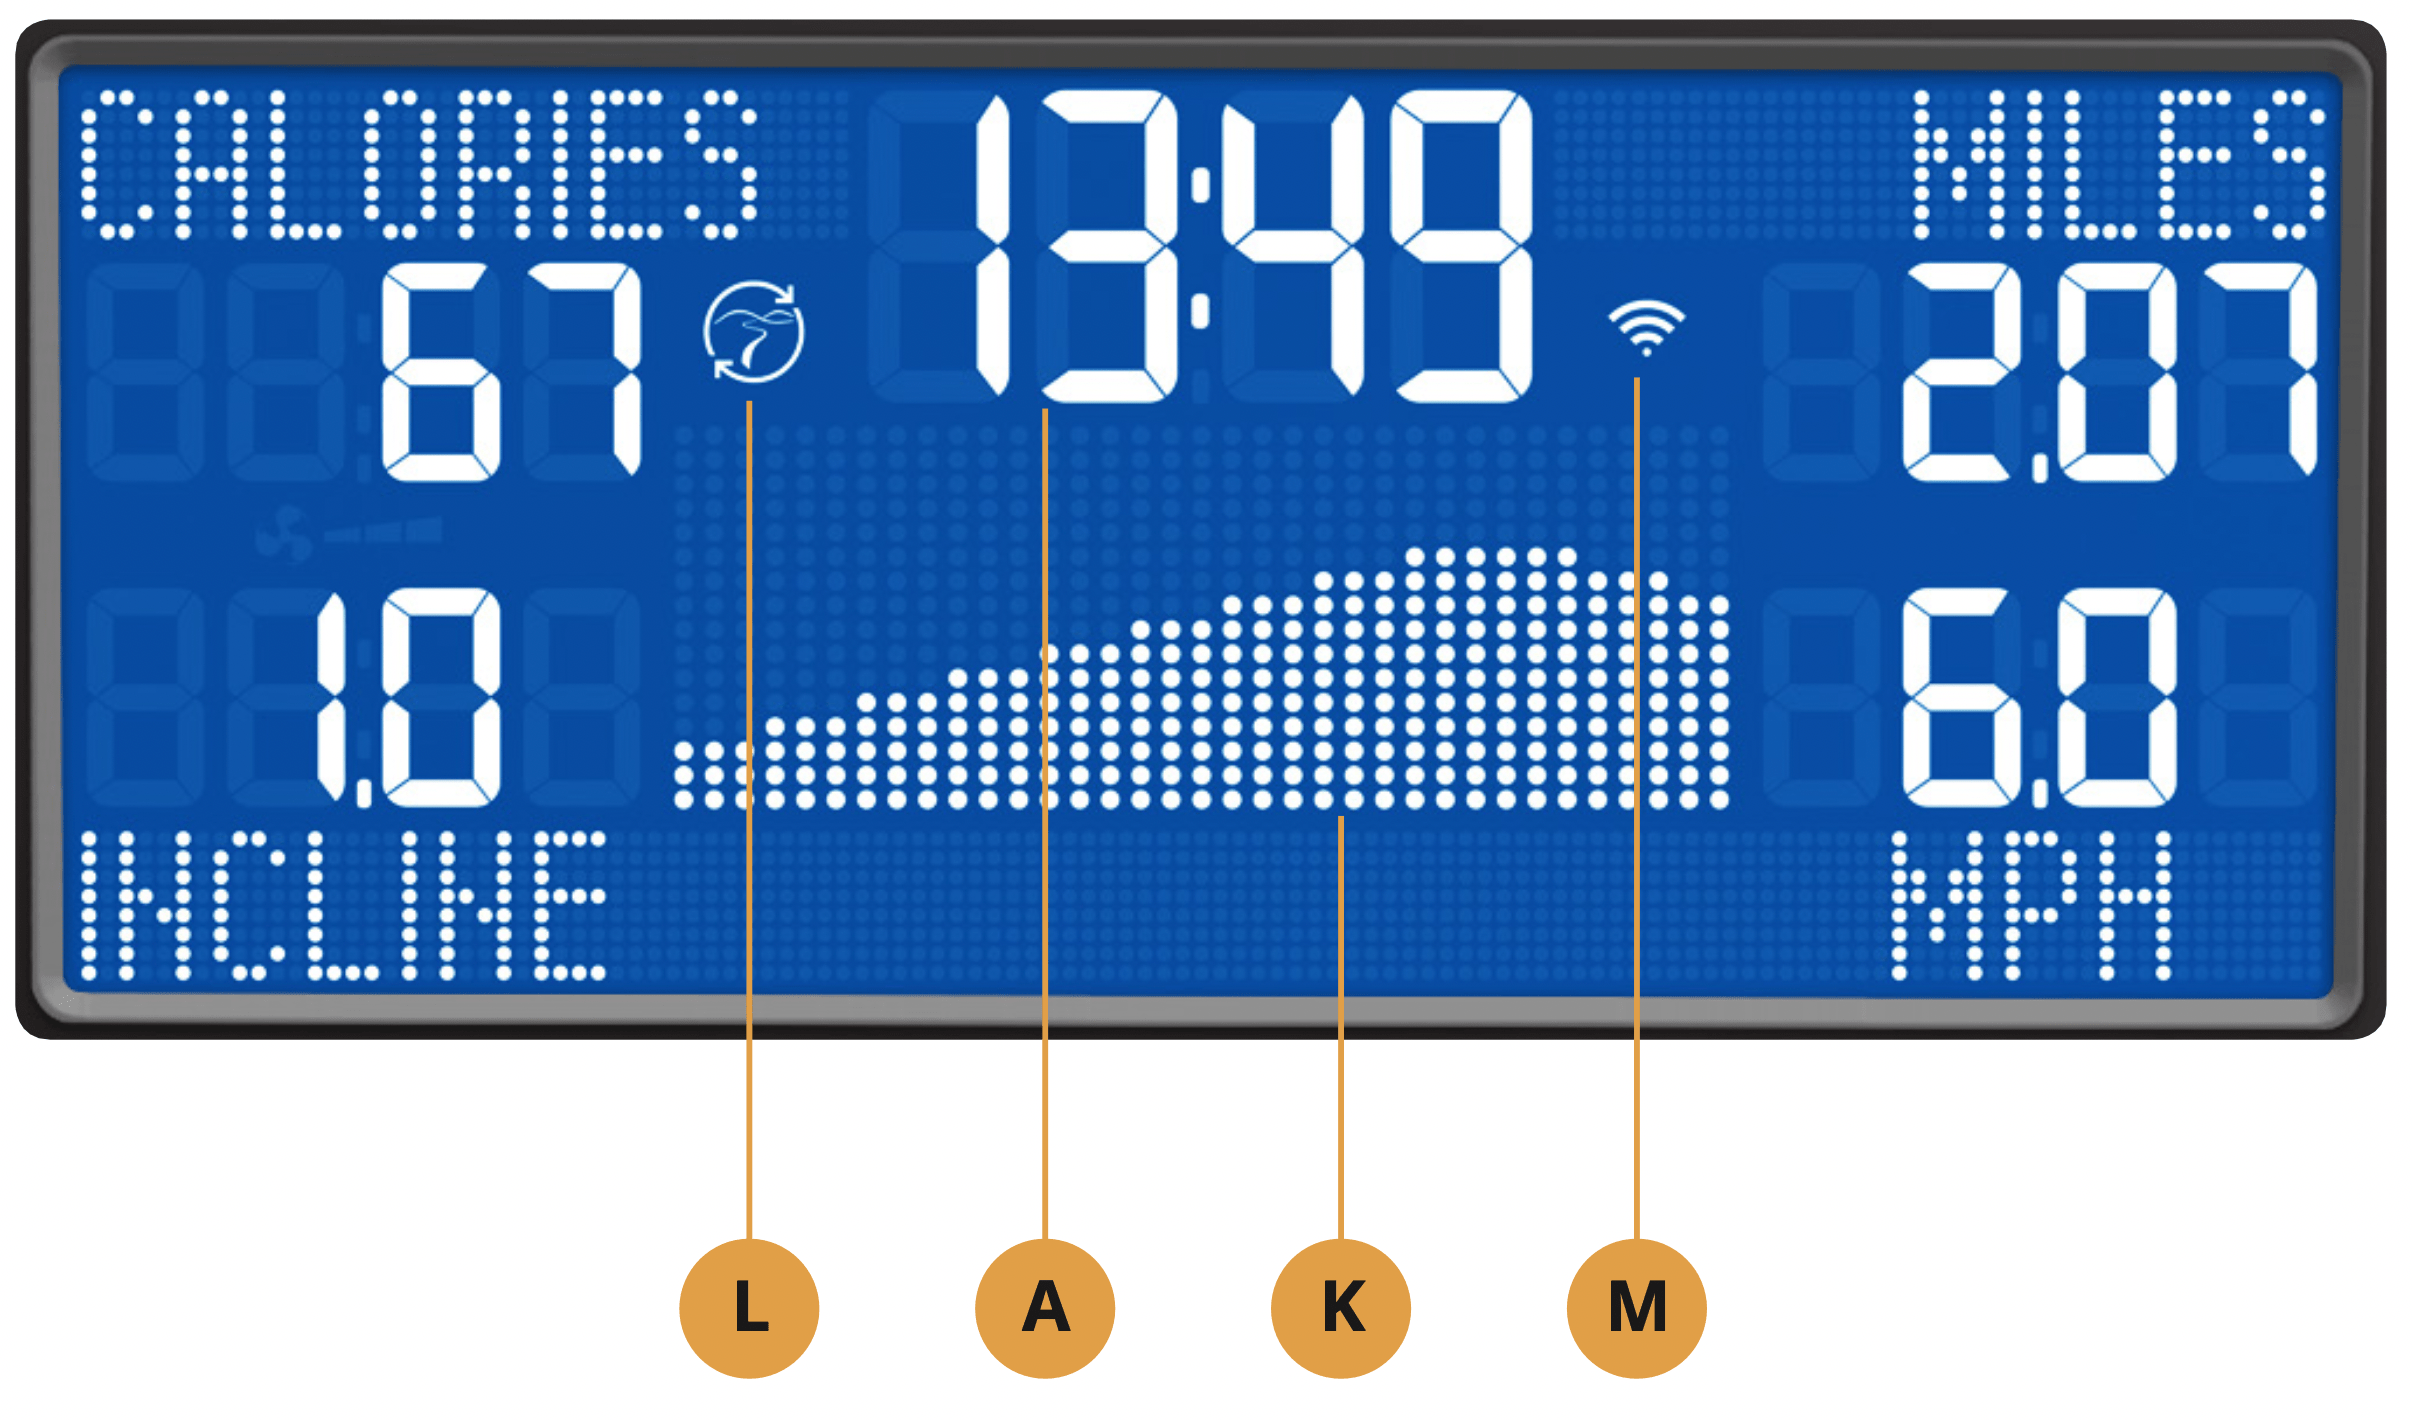
A) TIME: Is always shown in the larger central portion of the display. Shown as minutes : seconds. View the time remaining or the time elapsed in your workout.
B) INCLINE: Shown as percent. Indicates the incline of your walking or running surface (Treadmills and Ascents only).
C) DISTANCE: Shown as Miles or Kilometers* based on your default setting. Indicates distance traveled or distance remaining during your workout.
D) SPEED: Shown as MPH or KPH* based on your default setting. Indicates how fast the footpads/pedals are moving.
E) CALORIES: Total calories burned or calories remaining to burn during your workout.
F) HEART RATE: Shown as BPM (beats per minute). Used to monitor your heart rate (when wearing a wireless heart rate strap or when contact is made with both pulse grips).
G) RESISTANCE (RES): Shows the current resistance level (Bikes, Ellipticals, Ascents only).
H) RPM: Revolutions Per Minute (Bikes, Ellipticals, Ascents only).
I) WATTS: Displays current user power output (Bikes, Ellipticals, Ascents only).
J) PACE: Indicates how many minutes it takes to complete a mile based on your current speed (Treadmills only).
K) PROGRAM PROFILE: The dot matrix will show the program profile as you progress through wour workout. Profile represents incline, resistance or speed (depending on model type and workout type).
L) PASSPORT: Indicates Passport box connection is present.
M) WI-FI: Indicates wireless connection is present and the strength (low, medium, high). Flashes when Wi-Fi is trying to connect.
* Default is set during console install. If logged in with xID, the default is set by user profile.
BEFORE YOU BEGIN
INITIAL SETUP
When you power on the console for the first time you will be prompted to perform initial setup.
Plug in the power cord and turn the equipment ON (Note: Some equipment does not have a power switch). TREADMILLS ONLY: Insert the safety key into the safety keyhole.
- Select your language and touch to confirm.
- Select your frame model number and touch to confirm.
- Select metric / standard and touch to confirm.
SET UP XID ACCOUNT FOR VIAFIT CONNECTIVITY
Connect to ViaFit and discover a powerful new way to get more results from your workouts, your tracking and your social networking.
Up to four users can be saved on a machine. This process is the first step in connecting your equipment. It must be done from a computer, tablet, or mobile device that is connected to the internet.
- Visit the web site to create an account and connect your console to home wireless network.
- Click on Connect Your Equipment.
- Sign In if you already have an xID account or Create an Account by entering in your information.
- Continue to follow the online instructions to complete the process of connecting your console to your home wireless network.
- Manage the console user accounts from your Account Profile
Congratulations! You are now connected and ready to get started.
SYNCING CONSOLE WITH PASSPORT
- Use the arrow keys on the Passport remote to scroll to the setup icon and press select.
- Follow the on-screen prompts to press
 on the equipment console.
- The icon (L) will flash while connecting and remain steady once it has synced successfully.
NOTE: See PASSPORT OWNER’S MANUAL for more information.
GETTING STARTED
- Check to make sure no objects are nearby that will hinder the movement of the equipment.
- Plug in the power cord and turn the equipment ON
Note: Some equipment does not have a power switch.
TREADMILLS ONLY:
- Stand on the side rails of the treadmill.
- Attach the safety key clip to part of your clothing making sure that it is secure and will not become detached during operation.
- Insert the safety key into the safety keyhole.
ALL MODELS:
- Select User 1-4 that you linked your xID to in your user profile.
- If prompted, enter your Passcode using the keypad then press .
- You are now logged into your xID.
A. QUICK START UP
Simply press to begin working out.
Time, distance, and calories will all count up from zero. OR...
B. SELECT A PROGRAM
- Select a PROGRAM using and press .
- Set workout program information using and press after each selection. Press to go back a step in the setup.
- Press to begin workout.
FINISHING YOUR WORKOUT
When your workout is complete, the display will flash “WORKOUT COMPLETE” and beep. Your workout information will stay displayed on the console for 30 seconds and then reset.
TO RESET THE CONSOLE
Hold for 3 seconds.
XER/XIR CONSOLE DESCRIPTION
Note: There is a thin protective sheet of clear plastic on the overlay of the console that should be removed before use.
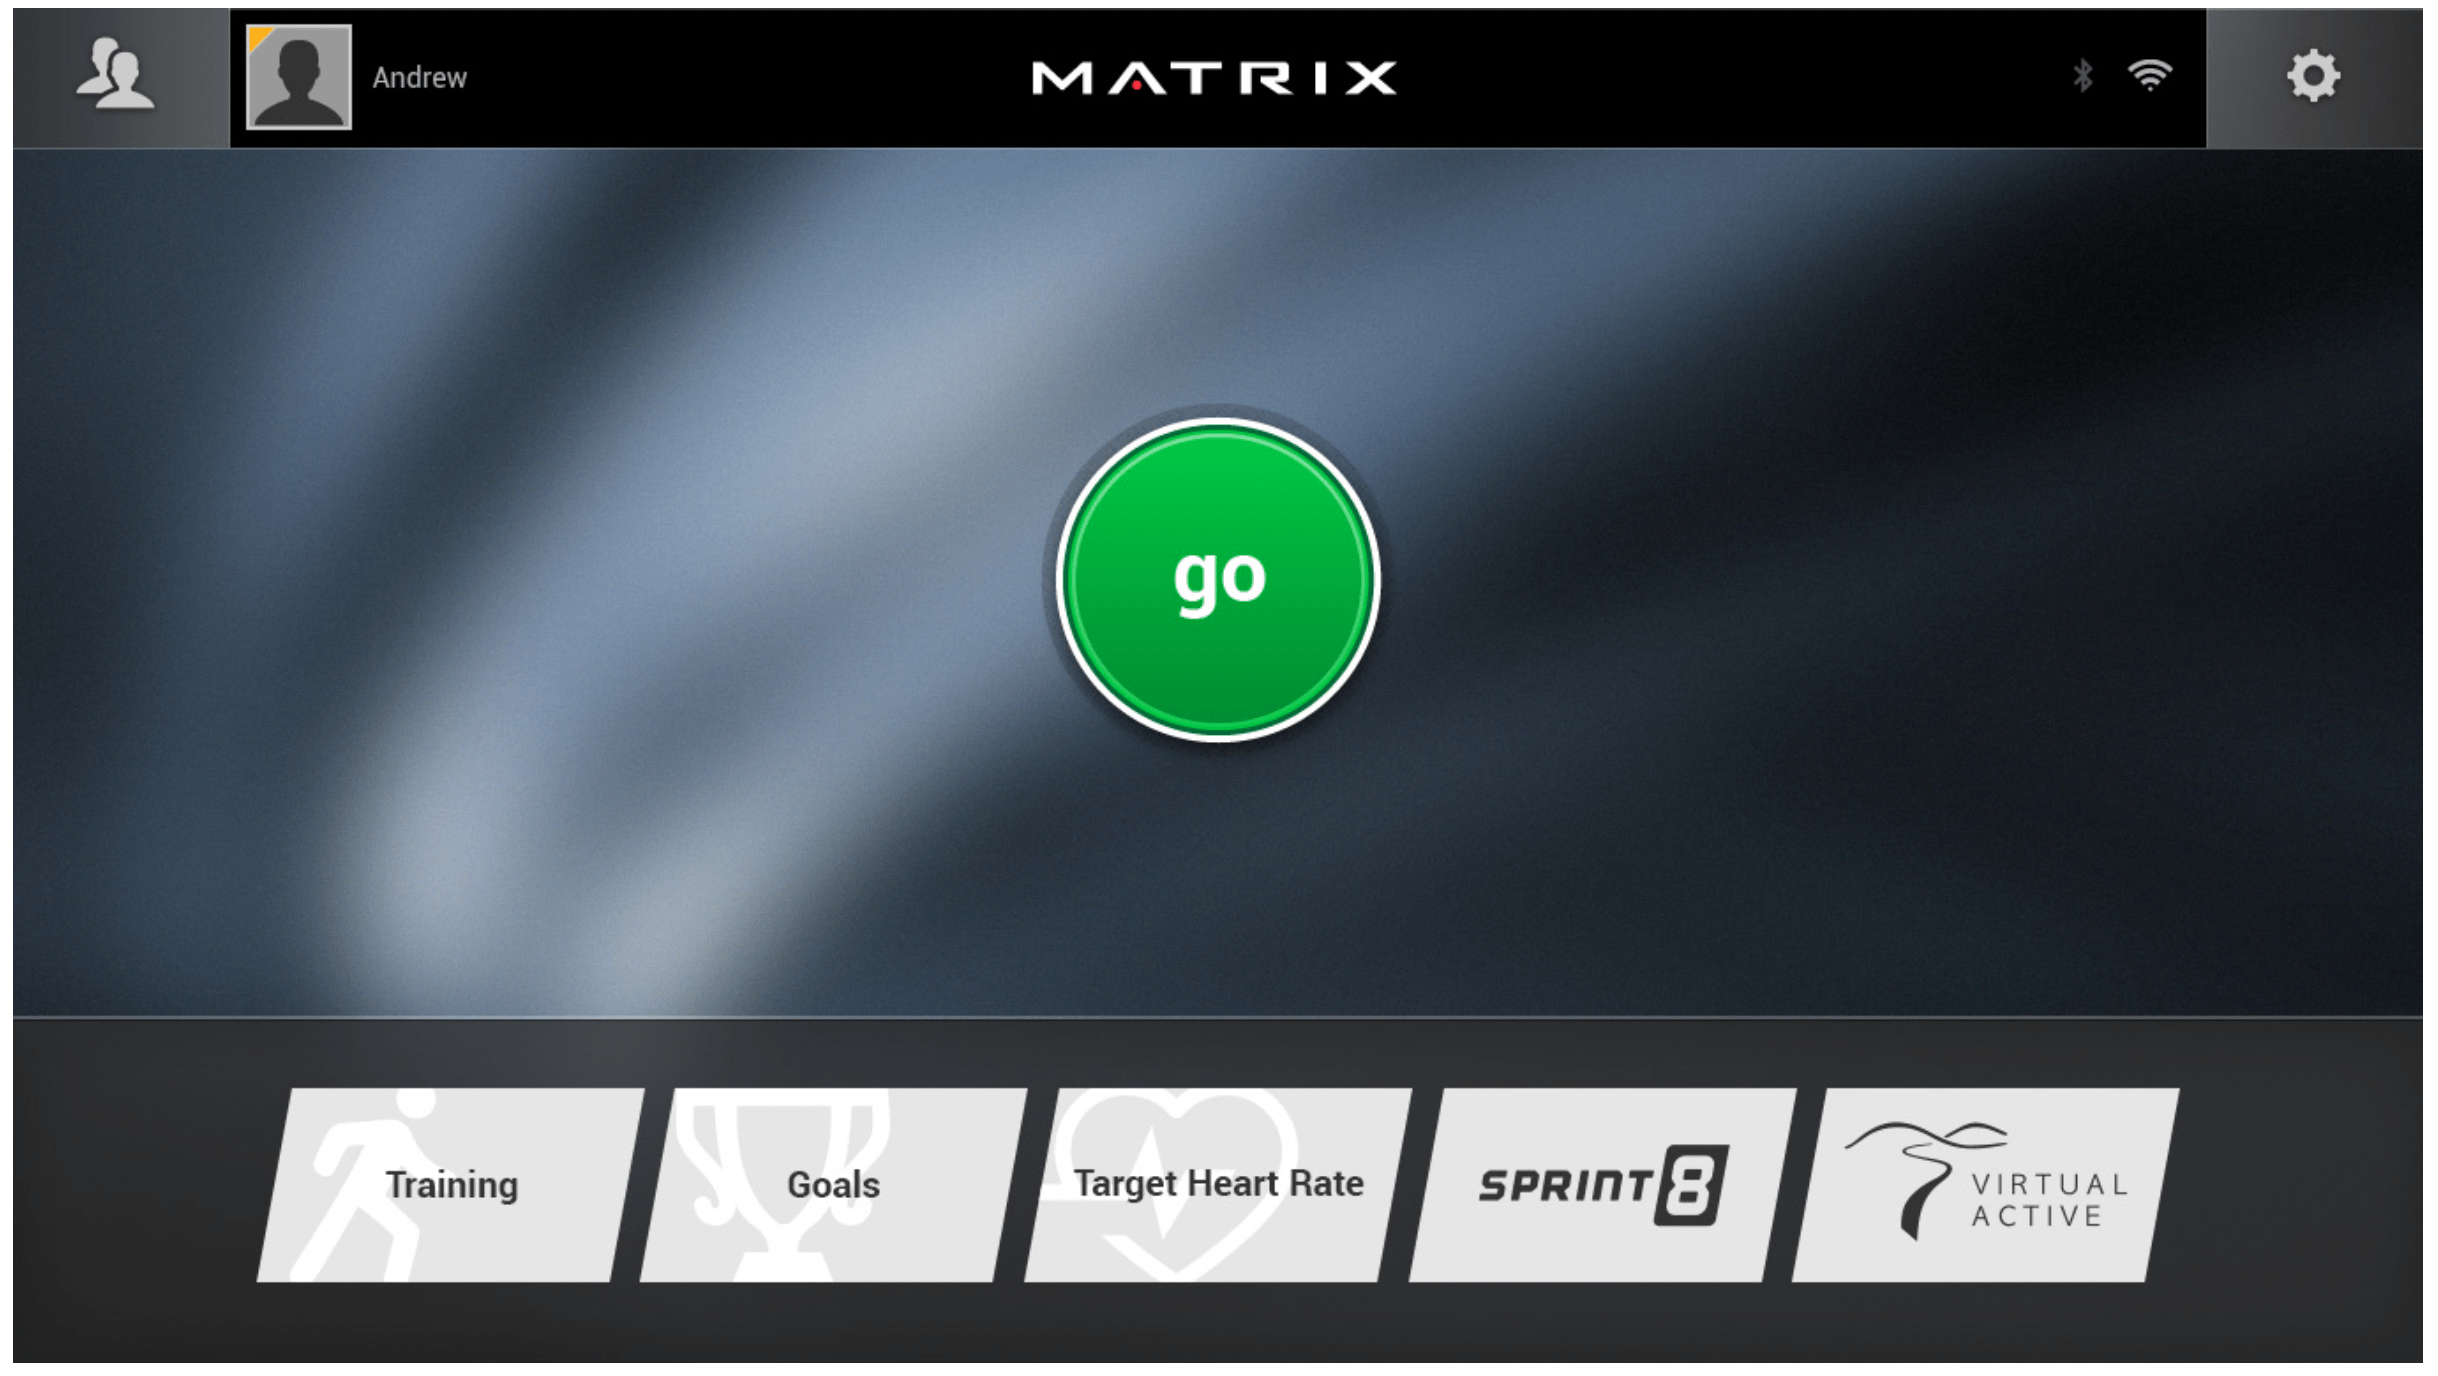
The XER and XIR has a fully integrated touch screen display. All information required for workouts is explained on screen. Exploration of the interface is highly encouraged.
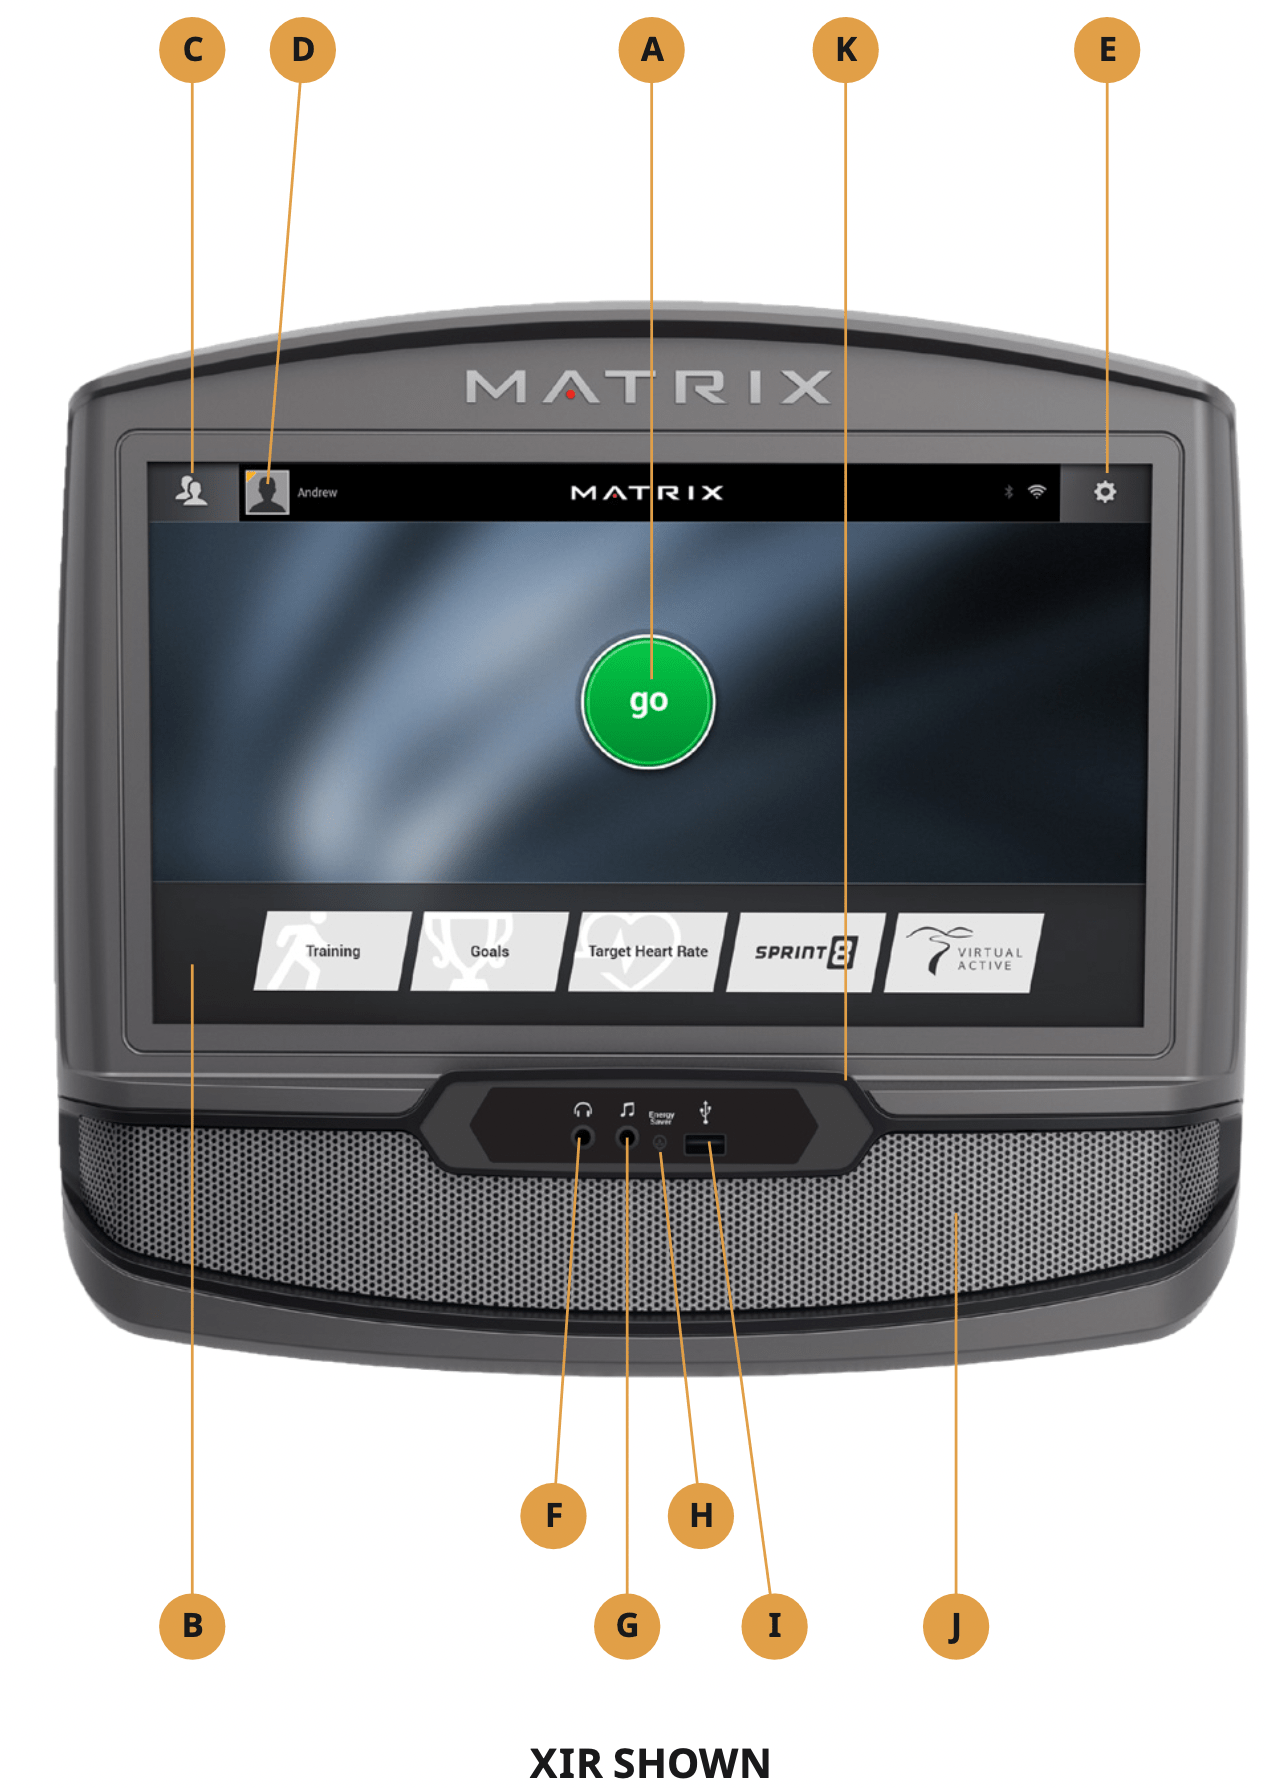
A) GO: Press to begin a quick start program.
B) PROGRAM BUTTONS: Press to select from a number of preset programs.
C) USER MENU: Select an existing User, Guest or Add User.
D) USER SETUP: Allows you to edit User Information.
E) SETTINGS MENU: Access to Volume Controls, Bluetooth Pairing, Wi-Fi Setup, Sync Passport, Machine defaults and more.
F) HEADPHONE JACK: Plug your headphones into the console to use them instead of the console speakers.
G) AUDIO IN: Plug your media player into the console using the included audio adaptor cable.
H) ENERGY SAVER LIGHT: Indicates if machine is in energy saver mode. Press a button to wake up the machine.
I) USB PORT: Access media from compatible devices (XIR only), charging devices* and for software updates.
J) SPEAKERS: Audio plays through the speakers.
K) READING RACK: Holds reading material or electronic device.
* Will not charge USB devices that draw more than 1 amp.
BEFORE YOU BEGIN
INITIAL SETUP
When you power on the console for the first time you will be prompted to perform initial setup.
- Select your language and touch
 to confirm.
CONNECT WI-FI *
- Choose from the available wireless networks detected and shown on screen. If you do not see your network, you can add it manually via the OTHER option. If you do not want to set up Wi-Fi at this time, touch .
- Use the keyboard to enter your Wi-Fi network password. Touch to confirm.
- Wi-Fi connection status and signal strength will be indicated by the
 symbol in the upper right corner of the display.
MODEL SETUP
- Select your frame model number and touch to confirm.
DATE AND TIME SETUP
- If the console has been connected to Wi-Fi, it will detect your location and fill in time and date info automatically.
- Change any time and date settings as desired and touch to confirm.
SET UP XID ACCOUNT FOR VIAFIT CONNECTIVITY
Creating an xID account will allow you to save and share workout data online. Create and save up to four xID accounts directly from the console.
- If you already have an xID, touch Log In. To continue without creating an xID touch Skip xID.
- Enter your phone number or another easy-to-remember 10-14 digit number. This will be your xID. Touch to confirm.
- Create an easy to remember 4-digit passcode. Touch to confirm.
- Enter your email address. This must be a unique email address. Touch to confirm.
- Fill in your profile information to finish the xID account set up process. Touch to confirm.
- Confirm your information and select the I accept the terms and conditions box to review the Terms and Conditions. Touch to complete xID setup.
- Check the Share Information box to share your workouts to the ViaFit community.
GETTING STARTED
- Touch GO to begin working out immediately. Or...
- Touch the WORKOUT CATEGORY button of your choice.
TREADMILLS ONLY:
- Stand on the side rails of the treadmill.
- Attach the safety key clip to part of your clothing making sure that it is secure and will not become detached during operation.
- Insert the safety key into the safety keyhole.
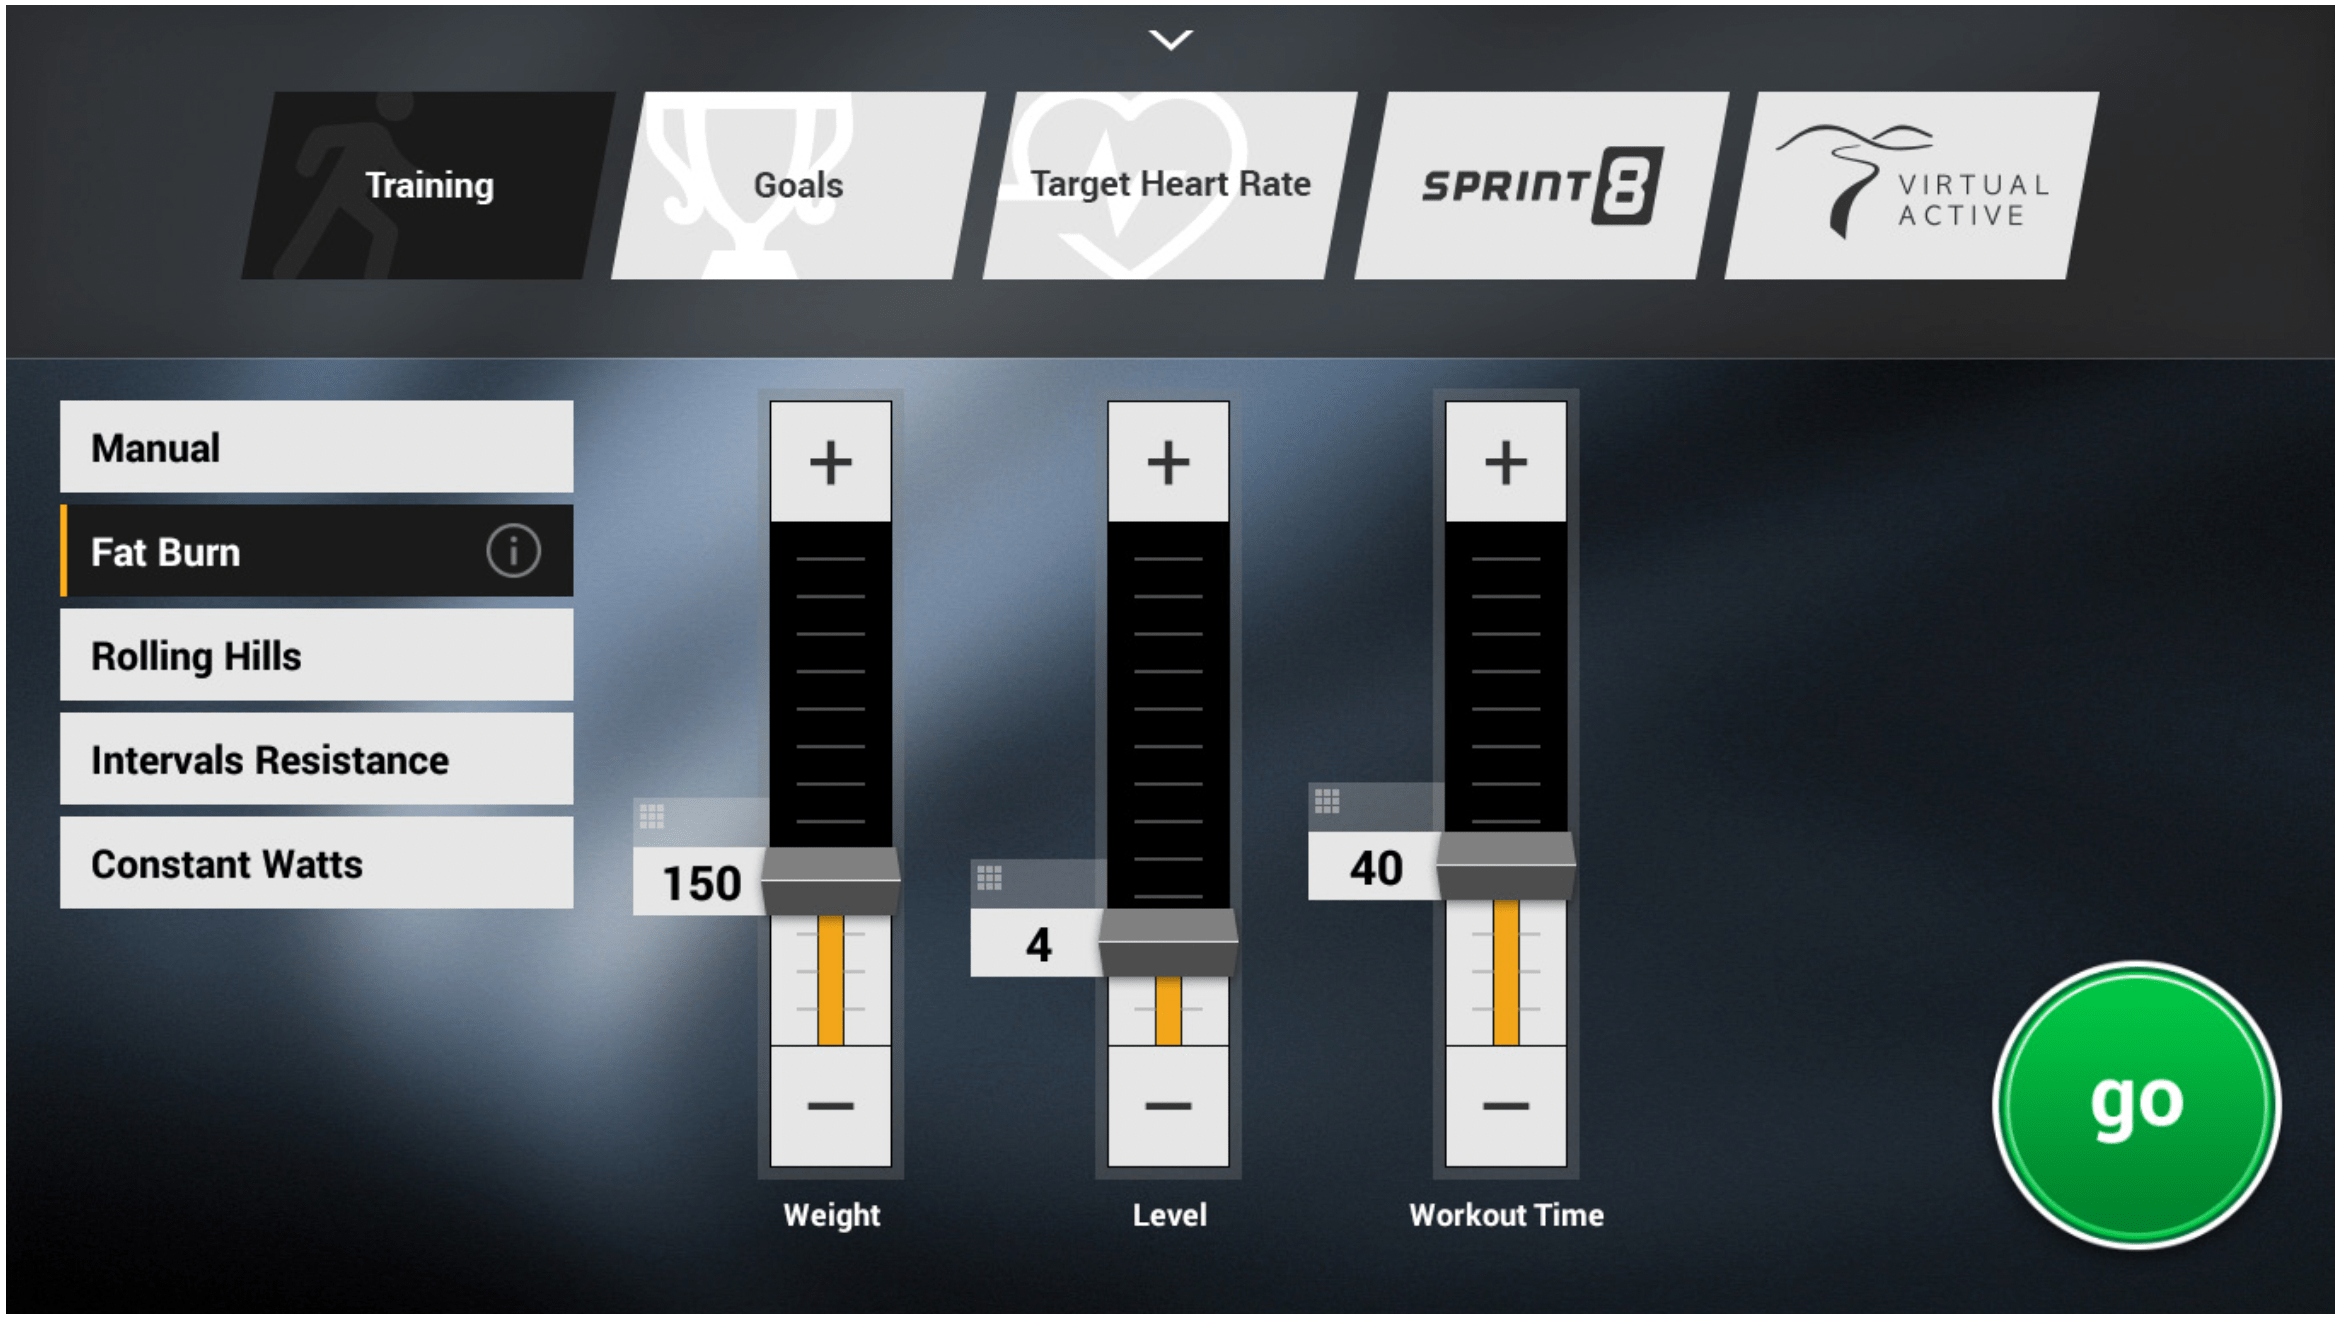
PROGRAM SETUP
- After selecting a WORKOUT CATEGORY button, select one of the PROGRAMS listed to the left.
For more information on a selected program, touch  .
.
Use the SLIDER CONTROLS to adjust your program settings.
Touch  to open a keypad to enter numbers.
Touch  to return to the GO SCREEN.
- Touch GO to begin your workout.
FINISHING YOUR WORKOUT
When your workout is complete, your workout information will continue to display on the console for 2 minutes and then is automatically saved to ViaFit if xID Terms and Conditions were accepted and you are logged in.
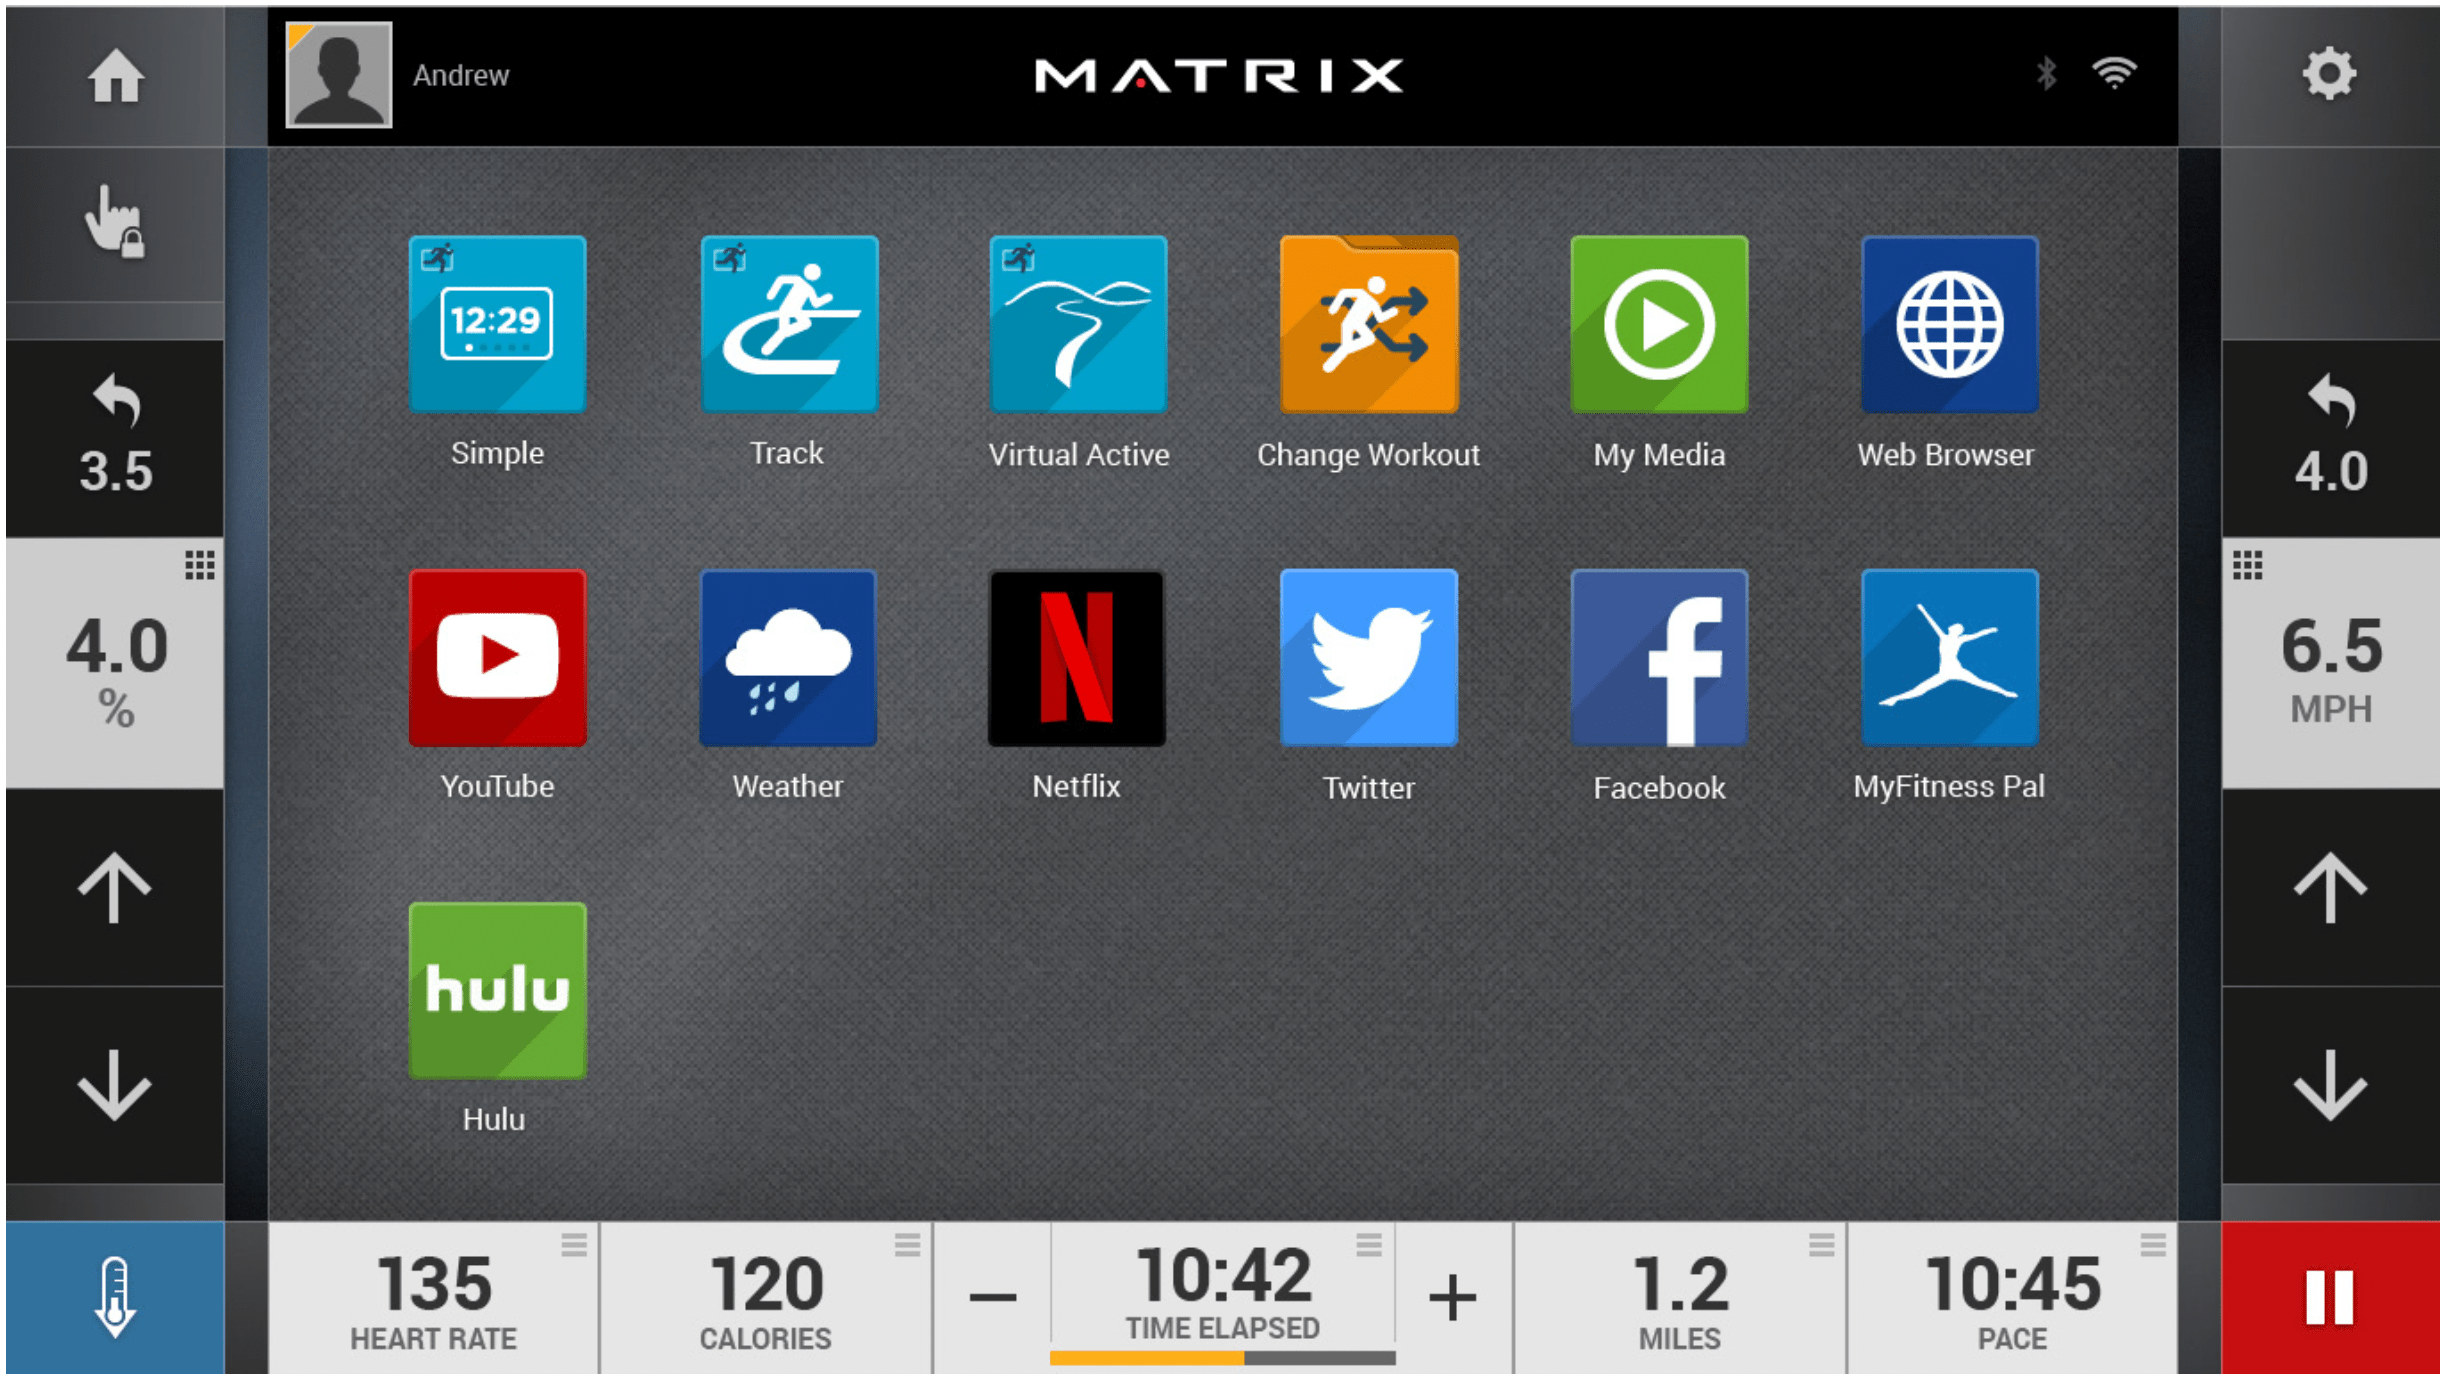
HOME SCREEN
- Touch
 to change WORKOUT FEEDBACK displays at the bottom of the screen.
- While using an app, touch
 to go back to the home screen.
- Touch
 to adjust VOLUME, pair a BLUETOOTH device or to change AUDIO SOURCE (Netflix, My Media, Virtual Active, etc.).
- Touch to increase or decrease the resistance level, speed or incline.
- Touch to use the keypad to set resistance level, speed or incline. Press
 to confirm change.
- Touch
 to change resistance level, speed or incline back to previous setting.
- Touch
 to temporarily pause your workout and touch
  to resume. While paused, touch to end workout.
- Touch
 to increase or decrease the duration of your workout or workout goal.
- Touch
 to enter cool down mode. Cool down lasts for five minutes while reducing the workout intensity, allowing your body to recover from your workout.
- Touch
 to lock the screen. Touch it again to unlock the screen and allow screen touches.
BLUETOOTH (XER AND XIR ONLY)*
The XIR console can connect via Bluetooth to one device per category:
- Media Players (XIR only, includes Phones, Tablet and MP3 players)
- Speakers / Headphones
- Heart Rate Monitors
TO CONNECT YOUR COMPATIBLE DEVICE:
- BLUETOOTH PAIRING
 can be accessed from the SETTINGS MENU
- Enable Bluetooth on your device and make sure it is discoverable.
- Touch the appropriate category from the list. The Bluetooth device should appear to the right after a few seconds.
- Touch the device name and follow the onscreen prompts to pair the device. Once paired, the Bluetooth icon will be highlighted and appear in the top right corner of the menu bar.
- Connected Phone/Tablet/MP3 players can stream audio in the MY MEDIA APP.
USB AUDIO/VIDEO (XIR ONLY)
The XIR console can stream media in the MY MEDIA APP via USB. Supported devices include USB flash drives, Windows phones/tablets, and Android phones/tablets.
The media types supported are:
Audio
- AAC (.3GP, .MP4, .M4A, .AAC)
- MP3 (.MP3)
- Wave (.WAV)
Video
- H.263 (.3GP, .MP4)
- H.264 (.MP4, .MOV)
TO PLAY MEDIA DURING YOUR WORKOUT:
- Unlock and connect your device to the USB port
 located beneath the display.
- Open the MY MEDIA APP and select the USB device name from the Media Source list.
- Select the Audio or Video tab at the top to access your files and play your media.
* Not all Bluetooth protocols are compatible.
SYNCING CONSOLE WITH PASSPORT
- Use the arrow keys on the Passport remote to scroll to the setup icon and press select.
- Follow the on-screen prompts and when prompted, return to the console and open the SETTINGS MENU and touch PASSPORT SYNC
 .
.
- When the passport sync is complete, the passport icon will appear in the top right corner of the menu bar.
NOTE: See PASSPORT OWNER’S MANUAL for more information.
AUDIO IN/OUT
You can play audio through the console speakers by connecting a device to the audio in jack  located beneath the display. Plug your headphones into the audio out jack
  to use them instead of the console speakers.
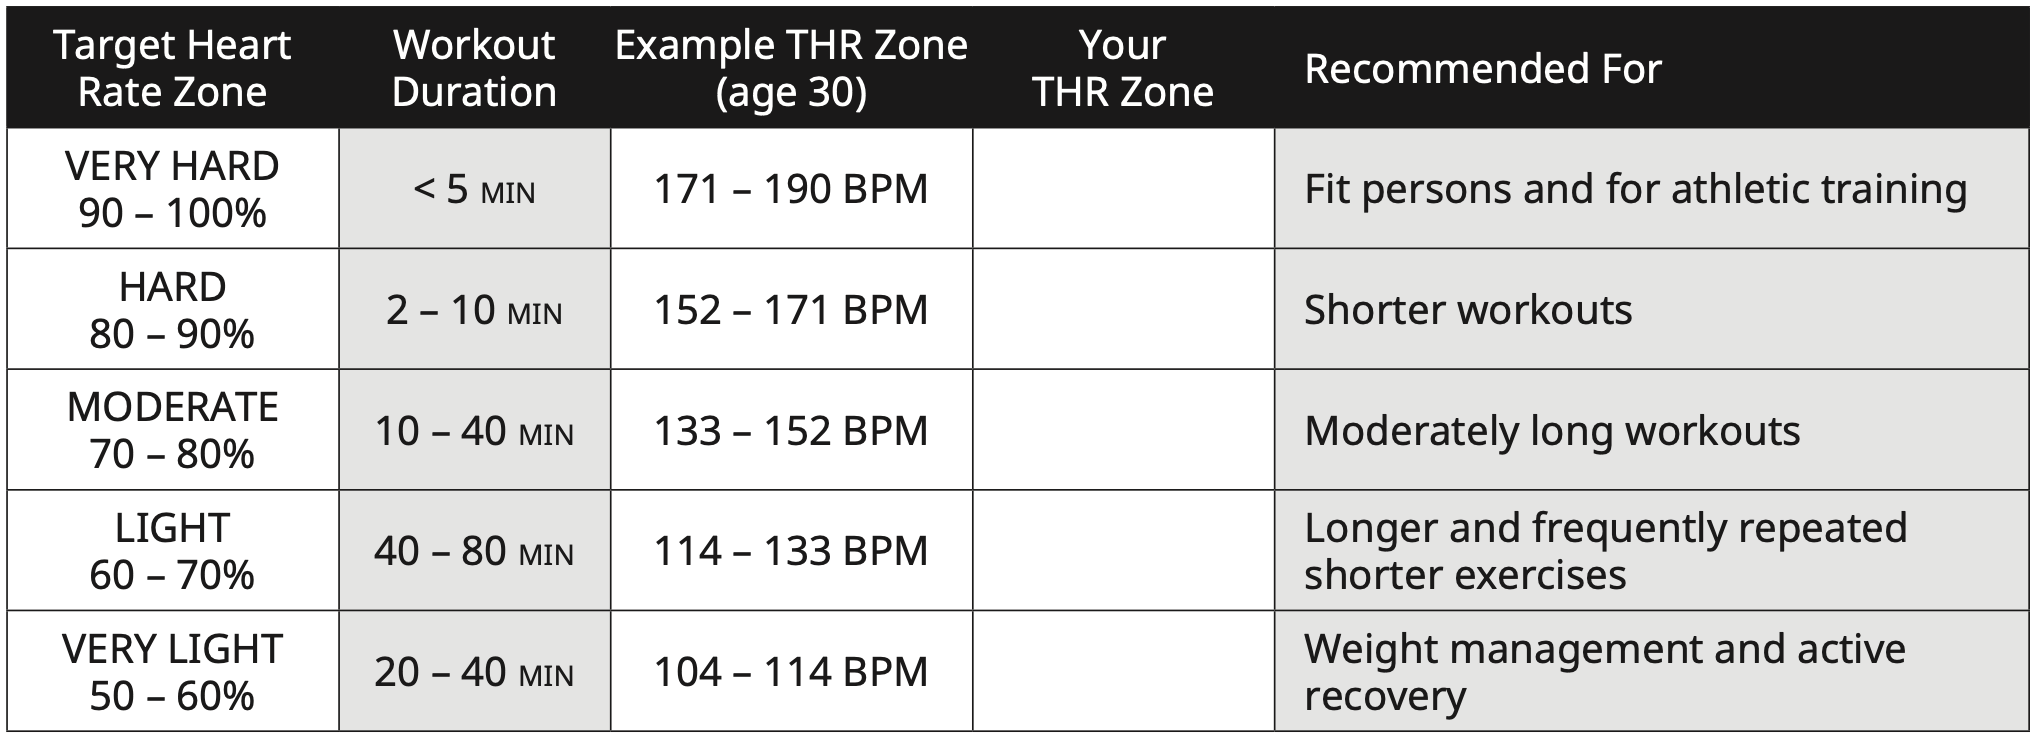
TARGET HEART RATE
The first step in knowing the right intensity for your training is to find out your maximum heart rate (max HR = 220 – your age). The age-based method provides an average statistical prediction of your max HR and is a good method for the majority of people, especially those new to heart rate training. The most precise and accurate way of determining your individual max HR is to have it clinically tested by a cardiologist or exercise physiologist through the use of a maximal stress test. If you are over the age of 40, overweight, have been sedentary for several years or have a history of heart disease in your family, clinical testing is recommended.
This chart gives examples of the heart rate range for a 30-year-old exercising at 5 different heart rate zones. For example, a 30-year-old’s max HR is 220 – 30 = 190 BPM and 90% max HR is 190 × 0.9 = 171 BPM.
USING THE HEART RATE FUNCTION
The heart rate function on this product is not a medical device. While heart rate grips can provide a relative estimation of your actual heart rate, they should not be relied on when accurate readings are necessary. Some people, including those in a cardiac rehab program, may benefit from using an alternate heart rate monitoring system like a chest or wrist strap. Various factors, including movement of the user, may affect the accuracy of your heart rate reading. The heart rate reading is intended only as an exercise aid in determining heart rate trends in general. Please consult your physician. For best results, a wireless heart rate transmitter should be used.
PULSE GRIPS
Place the palm of your hands directly on the grip pulse handlebars. Both hands must grip the bars for your heart rate to register. It takes 5 consecutive heart beats (15-20 seconds) for your heart rate to register. When gripping the pulse handlebars, do not grip tightly. Holding the grips tightly may elevate your blood pressure. Keep a loose, cupping hold. You may experience an erratic readout if consistently holding the grip pulse handlebars. Make sure to clean the pulse sensors to ensure proper contact can be maintained.
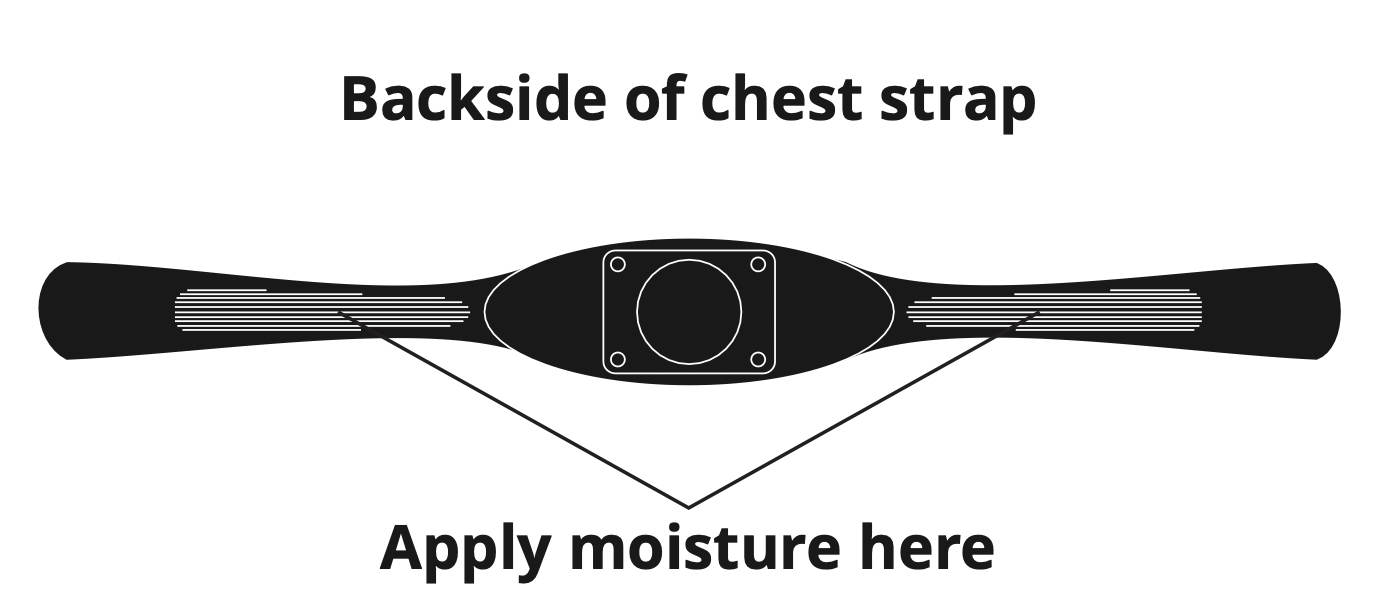
WIRELESS HEART RATE RECEIVER
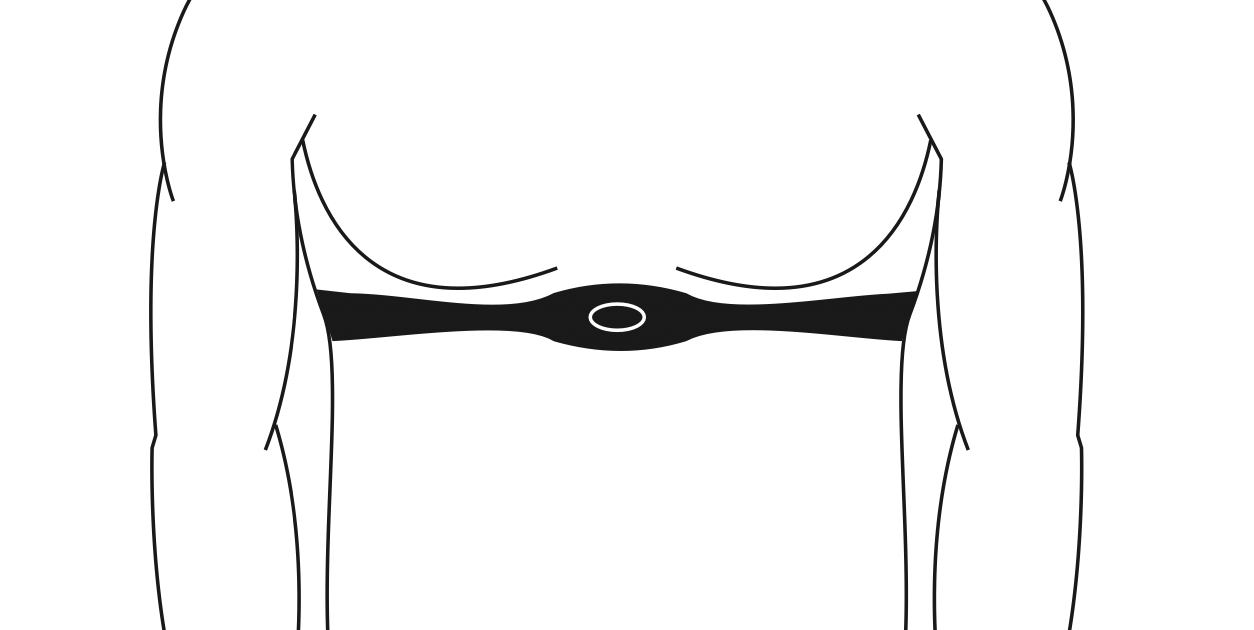
When used in conjunction with a wireless chest transmitter, your heart rate can be transmitted wirelessly to the unit and displayed on the console.
Prior to wearing the wireless chest transmitter on your chest, moisten the two rubber electrodes with water. Center the chest strap just below the breast or pectoral muscles, directly over your sternum, with the logo facing out. NOTE: The chest strap must be tight and properly placed to receive an accurate and inconsistent readout. If the chest strap is too loose, or positioned improperly, you may receive an erratic or inconsistent heart rate readout.
WARNING! Heart rate monitoring systems may be inaccurate. Over exercising may result in serious injury or death. If you feel faint, stop exercising immediately.
XR CONSOLE
TREADMILLS
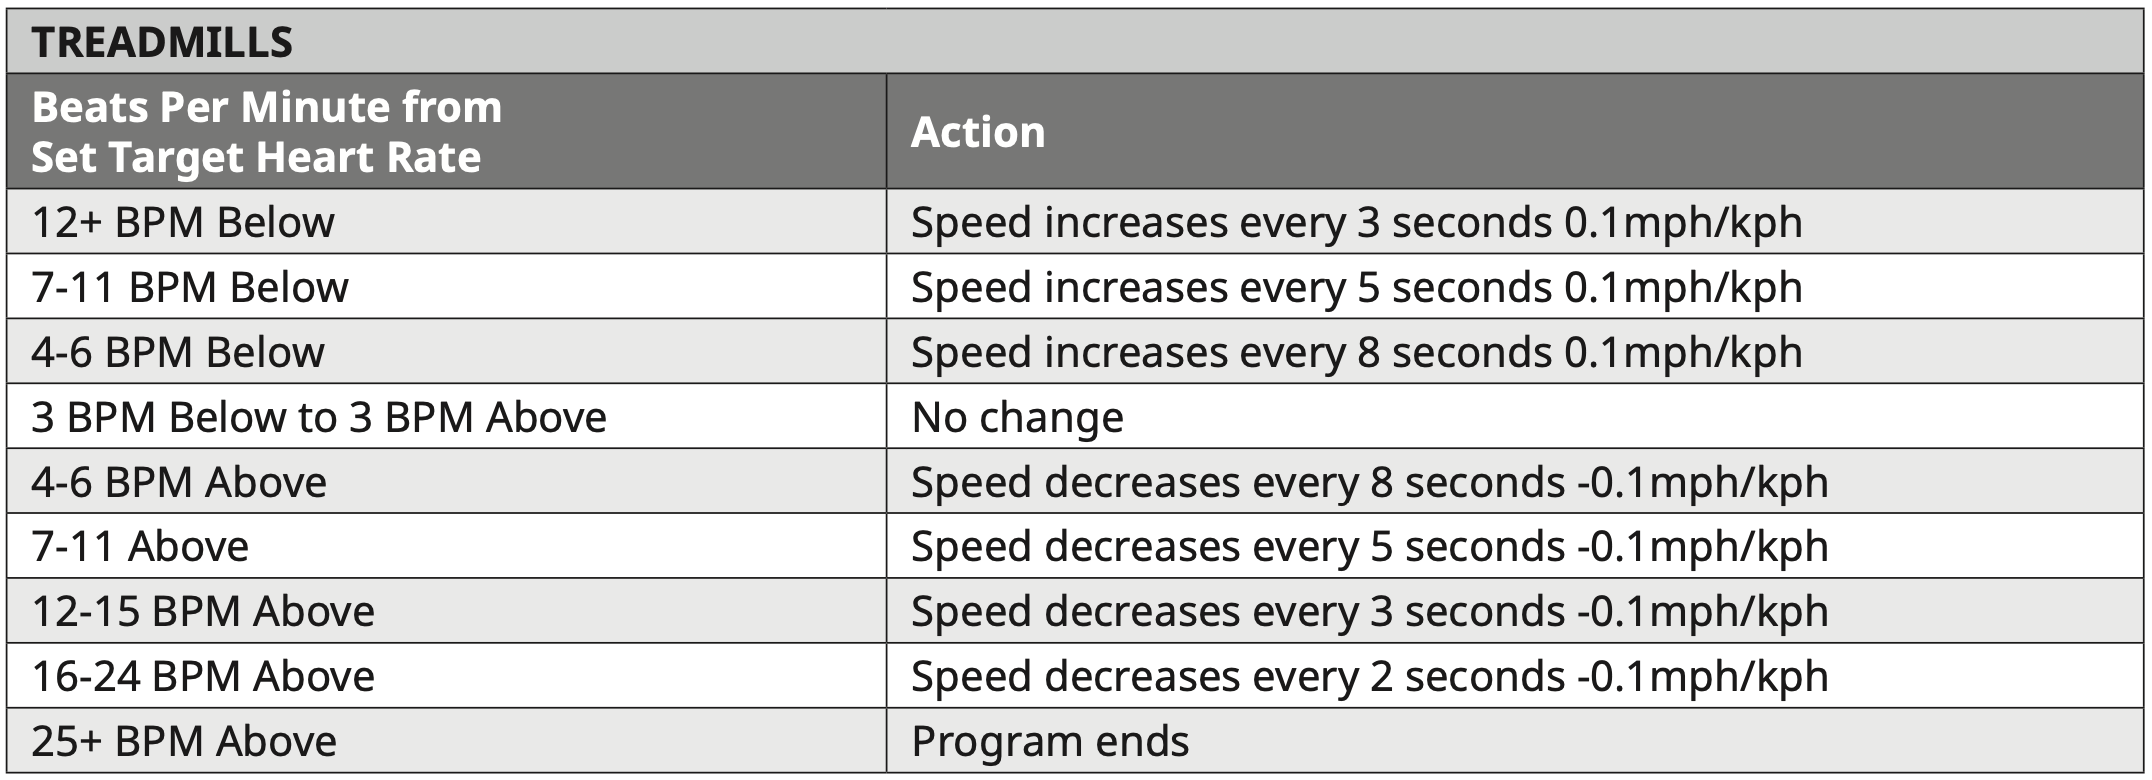
Target Heart Rate - Speed
- The incline and speed can be adjusted at any time by the user including during warm up and cool down.
- The speed range for the workout is from 0.5 MPH – 12.5 MPH / 0.8 KPH – 20 KPH.
- During the 4 minute Cool Down, the speed will be reduced by half of the current speed for the first 2 minutes and then reduced to 0.5 mph / 0.8 kph the remaining 2 minutes.
- If no heart rate is detected or signal is lost, the speed will remain at the same level for 60 seconds and then begin decreasing 0.6 MPH / 1.0 KPH every 10 seconds until the minimum speed is reached while incline will remain unchanged.
ASCENT/ELLIPTICAL/BIKE/CLIMBMILL
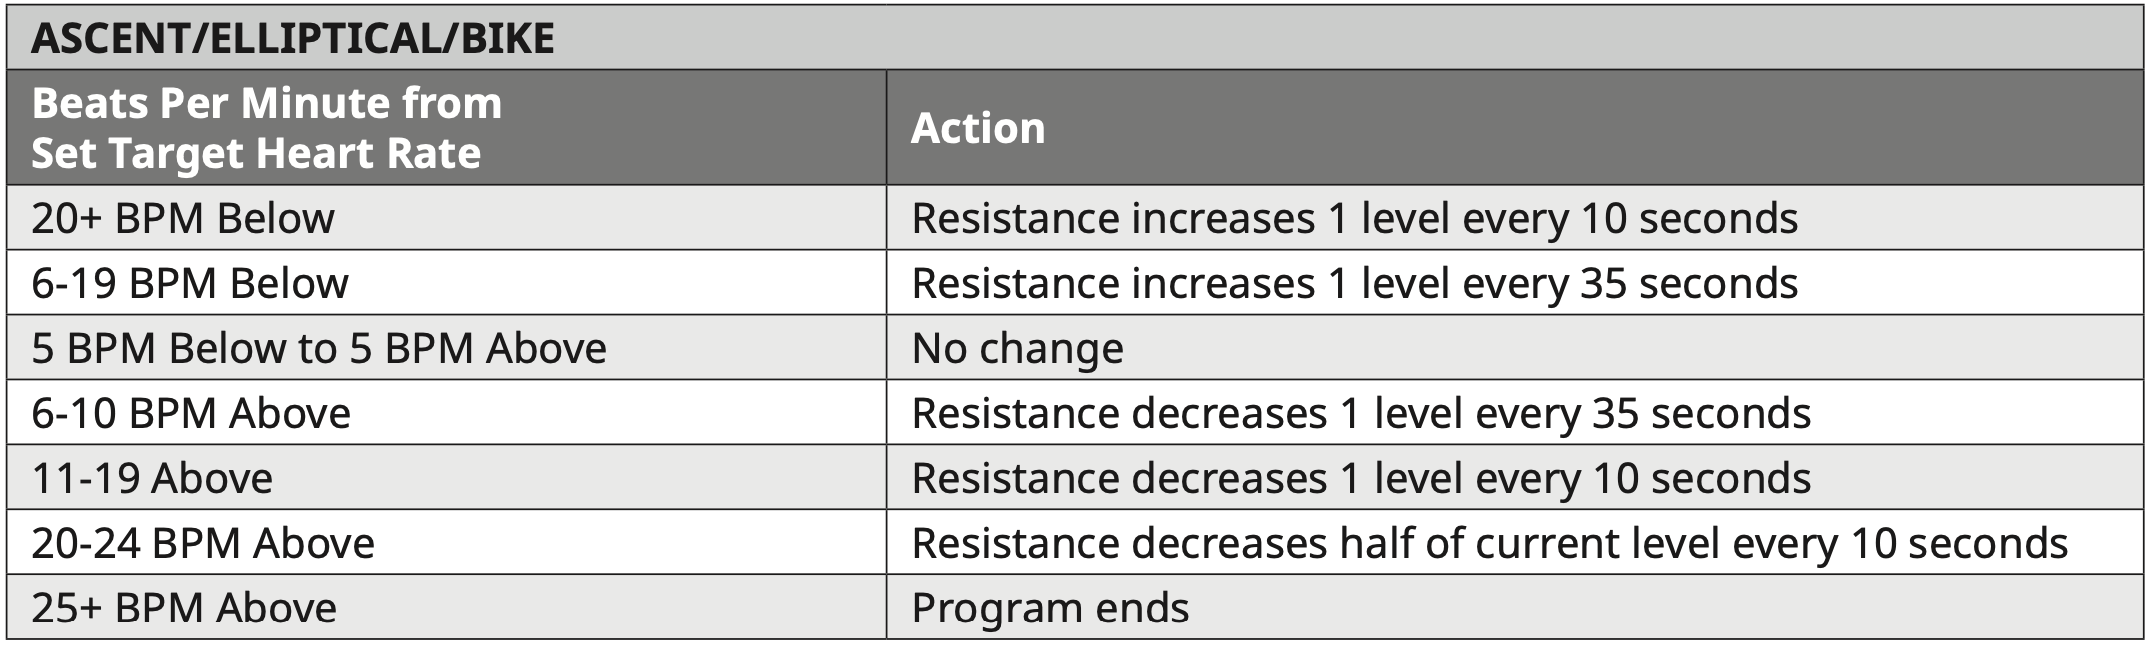
Target Heart Rate - Resistance
- The resistance and incline (A30 & A50 only) can be adjusted at any time by the user including during warm up and cool down.
- The resistance range for the workout is 1 – 20 (A30, E30, U30 & R30) or 1 – 30 (A50, E50, U50 & R50)
- During the 4 minute Cool Down, the resistance will be reduced by half of the current resistance for the first 2 minutes and then reduced to 1 for the remaining 2 minutes.
- If no heart rate is detected or signal is lost, the resistance will remain at the same level for 60 seconds and then begin decreasing 1 resistance level every 10 seconds until the minimum resistance is reached. The incline (A30 & A50 only) will remain unchanged.
XER AND XIR CONSOLES
TREADMILLS
Target Heart Rate - Speed
- The incline and speed can be adjusted at any time by the user including during warm up and cool down.
- The speed range for the workout is from 0.5 MPH / 0.8 KPH to the maximum set by the user during workout setup.
- After warm up the speed automatically adjusts 0.3 MPH / 0.5 KPH every 20 seconds to bring you within 5 beats of your THR.
- Speed will not exceed the max speed set during program setup.
- During Cool Down the speed will be reduced by 60% of the current speed or to 4 MPH / 6.4KPH, whichever is slower and the incline will be reduced to 0.
- If no heart rate is detected or signal is lost, the speed will remain at the same level for 60 seconds and then begin decreasing 0.6 MPH / 1.0 KPH every 10 seconds until the minimum speed is reached while incline will remain unchanged.
- The program ends if the user’s heart rate exceeds the max heart rate for 20 seconds.
Target Heart Rate - Incline (XIR console only)
- The incline and speed can be adjusted at any time by the user including during warm up and cool down.
- The incline range for the workout is from 0% to the maximum set by the user during workout setup.
- After warm up the incline automatically adjusts 0.5% every 5 seconds to bring you within 5 beats of your % max heart rate.
- Incline will not exceed the max incline set during program setup.
- During Cool Down the speed will be reduced by 60% of the current speed or to 4 MPH / 6.4KPH, whichever is slower and the incline will be reduced to 0.
- If no heart rate is detected or signal is lost, the speed will remain at the same level for 60 seconds and then begin decreasing 0.6 MPH / 1.0 KPH every 10 seconds until the minimum speed is reached while incline will remain unchanged.
- The program ends if the user’s heart rate exceeds the max heart rate for 5 seconds.
ASCENT/ELLIPTICAL/BIKE/CLIMBMILL
Target Heart Rate - Resistance
- The resistance and incline (A30 & A50 only) can be adjusted at any time by the user including during warm up and cool down.
- The resistance range for the workout is from 1 to the maximum set by the user during workout setup.
- After warm up the resistance automatically adjusts 1 resistance level every 10 seconds to bring you within 5 beats of your % max heart rate.
- Resistance will not exceed the max resistance set during program setup.
- During Cool Down the resistance will be reduced to 1 and the incline will be reduced to 0.
- If no heart rate is detected or signal is lost, the resistance will remain at the same level for 60 seconds and then begin decreasing 1 resistance level every 10 seconds until the minimum resistance is reached. The incline (A30 & A50 only) will remain unchanged.
- The program ends if the user’s heart rate exceeds the max heart rate for 10 seconds.