Owner's Manual Air Conditioner
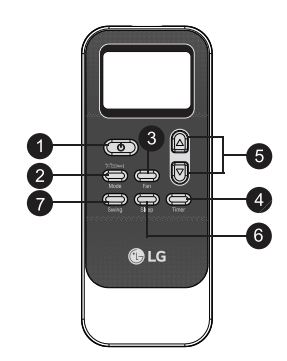
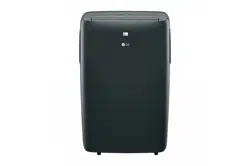
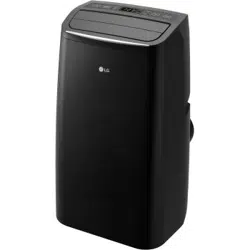
Parts and Features
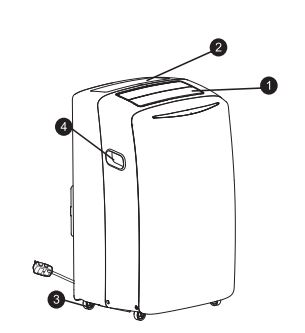
Key parts and components
1. Air discharge
The adjustable louvered air discharge opens automatically when the air conditioner is turned on, and closes when it is turned off. It can also be set to oscillate to distribute air more evently through the room.
2. Control panel and display
Easy to read digital display shows the set temperature and indicator lights show the operating mode. Simple push buttons make changing settings quick and easy.
3. Swiveling casters
Swiveling casters allow you to move the air conditioner easily on mots floor surfaces.
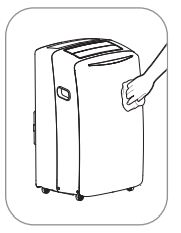
4. Intergrated handles
Intergrated handles provide a convinient grip when listing the air conditioner.
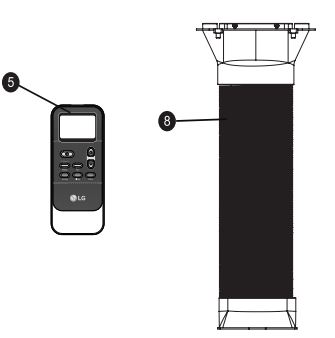
5. Infrared remote controller
The remote controller allows you to adjust the temperature and operate most functions of the air conditioner from across the room.
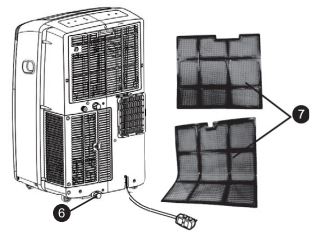
6. Bottom drain port
Before moving the air conditioner, drain the internal water in the collection tank completely using the bottom drain port.
7. Air filter
8. Hose and diffuser
How to use
BEFORE USING THE AIR CONDITIONER
Preparing for operation
- Plug the power cord into its own delicated properly grounđe. Do not plug other appliances into the same outlet. Doing so could overload the outlet and create a fire hazard.
- Make sure the air conditioner and cord are positioned where they do not create a tripping hazard and will receive adequate ventilation.
- Make sure that any items that could be blown over or damaged by the airflow from the fan are out of the airflow path.
Important:
- Do not remain in the direct airflow from the air conditioner for extended periods of time.
- When used at the same time as stoves, fireplaces, and other combustion devices, make sure there is a sufficient flow of fresh air into the room. Do not use in tightly enclose spaces with these types of devices.
- This air conditoner is tended for household use as a consumer comfort appliance. Do not use it as a precision climate control system, or for purpose such as cooling precision equipment, food, pets, plants, artwork,... Such items could be damaged.
- Do not bend the hose downward when window installation kit is not applied. It may cause failure of air conditioner or performance deterionration.
Unpacking the air conditioner
- Remove and store packing materials for reuse.
- Remove any shipping tape before using.
- DO NOT use sharp instruments, alcohol, thinners, or abrasive cleaners to remove adhesive.
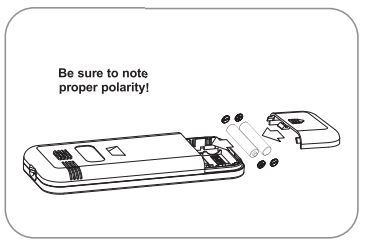
Inserting batteries in the remote
Before using the remote, install the provided AAA batteries.
- Press and slide to remove the battery cover on the back of the remote.
- Insert two new alkaline AAA batteries into the battery compartment, being sure to note the proper polarity.
- Reattach the battery cover.
NOTE:
- Use only alkaline batteries. Do not use rechargeable batteries.
- When replacing batteries, always replace both batteries with now batteries. Do not mix old and new batteries. Do not mix alkaline, standard, or rechargeable batteries.
- If the air conditioner will not be used for an extended period of time, remove the betteries from the remote.
WARNING!
- If the batteries leak onto your clothes or skin, remove contaminated clothing and rinse skin thoroughly with soap and water. Do not use the remote if the battery has leaked.
- If the battery or the liquid inside it are ingested, do not induce vomiting or give food or drink. Contact a physician immediately
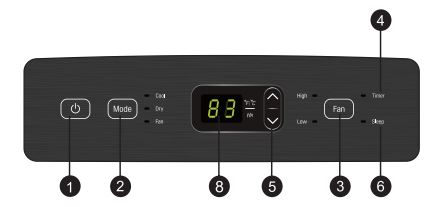
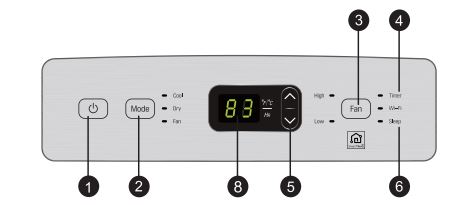
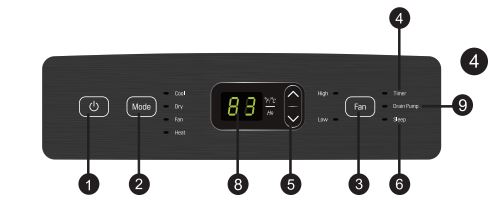
CONTROL PANEL AND REMOTE
Operation of functions is the same when using the remote or the control panel, unless otherwise stated. The remote and the control panel are not in sync. For best results when using the remote, remember to check that all desired settings are correct on the remote as well as on the control panel.
NOTE: The remote sensor is located on the front panel of the air conditioner. Point the remote from anywhere at the sensor. The remote may not work if the sensor is in bright light or if there is not a clear path between the remote and the sensor. Some functions may not be supported, depending on the model.
1. Power
Turns the air conditioner on and off.
A chime sounds to confirm you have turned it on or off.
2. Mode
Press this button repeatedly to toggle through and select the operating mode. Modes include Cool, Dry (dehumidify), Fan, and Heat. An LED illuminates to indicate the selected mode. The default mode is Cool. See the Operation section for more information.
NOTE: Press and hold the Mode button on the remote for 3 seconds to switch the temperature display from degrees Celsius (°C) to degrees Fahrenheit (°F).
3. Fan
Press repeatedly to toggle the fan speed between High and Low settings. An LED illuminates to indicate the selected fan speed. The fan speed can be changed in the Cool, Fan, and Heat modes. The fan speed is preset in the Dry mode. After pressing the button, there is a brief delay before the fan motor changes speed.
4. Timer
Use the timer function to set the air conditioner to turn on or off at a desired time. The timer function can only be set using the remote. See the Operation section for more information.
5. Temp/Timer
6. Sleep
SLEEP mode can be used with any of the four modes. This function gives you a more comfortable environment for sleep.
The appliance will stop operation automatically after operating for 8 hours.
The fan speed is automatically set to Low.
This function can only be activated from the remote.
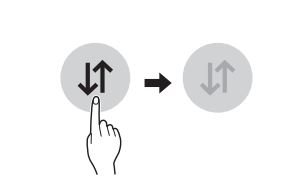
7. Swing
Sets the air discharge louvers to open and shut, circulating the air more effectively through the room.
This function can only be set from the remote.
If the louvers do not move properly, unplug and plug in the power cord.
8. Led display
LED display shows the set temperature, fan speed, or the selected TIMER delay.
LEDs illuminate to indicate the active Mode, fan speed, and other settings. An E5 error code displays when the water drain tank needs to be emptied.
9. Drain pump (Optional)
If you use the Heat mode, you must install the drain hose. If only the Cool mode is used, the drain hose is not needed.
OPERATION
MODES
Cool
Compressor runs and cools the room. Use the ▲/▼ and FAN buttons to set the desired temperature and fan speed. The desired temperature can be set from 60°F to 86°F (16°C to 30°C) in one-degree increments.
FAN
Fan circulates air but compressor does not run. Use the FAN button to set the desired fan speed to either High or Low.
DRY
Use the Dry mode to remove humidity from the room without additional cooling. The fan speed is preset and cannot be adjusted.
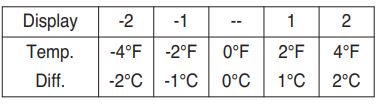
NOTE: After 3 minutes in Dry mode, the target temperature is automatically set to 4°F (2°C) below the current room temperature. If desired, the temperature differential can be manually set by using the ▲/▼ buttons, within a range of -4°F (-2°C) less to 4°F (2°C) more than the room temperature.
HEAT(Optional)
Compressor runs and heats the room. Use the ƞ.Ơ and FAN buttons to set the desired temperature and fan speed. The desired temperature can be set from 60°F to 86°F (16°C to 30°C) in one-degree increments.
TIMER
Use the Timer function to turn the air conditioner ON/OFF automatically.
Setting the Air Conditioner to Turn ON
- Plug in the air conditioner and use the remote to power it ON.
- Use the remote to set the desired mode, temperature, fan speed, etc.
- Use the remote to power OFF the air conditioner.
- Press TIMER on the remote and use the ▲/▼ buttons to set the desired delay time until the air conditioner turns ON. The delay time can be set from 0 to 24 hours in one-hour increments.
- Press TIMER again to enter the delay time. The TIMER LED on the air conditioner illuminates, and the delay time appears on the remote and in the control panel.
- To cancel the Timer function, press TIMER on the remote.
Setting the Air Conditioner to Turn OFF
- Plug in the air conditioner and use the remote to power it ON.
- Use the remote to set the desired mode, temperature, fan speed, etc.
- Press TIMER on the remote and use the ▲/▼ buttons to set the desired delay time until the air conditioner turns OFF. The delay time can be set from 0 to 24 hours in one-hour increments.
- Press TIMER again to enter the delay time. The TIMER LED on the air conditioner illuminates, and the delay time appears on the remote. The delay time appears briefly in the control panel and is then replaced by the set temperature.
- To cancel the Timer function, press TIMER on the remote.
Smart Functions
Using Smart ThinQ Application (on some models)
Things to check before using LG SmartThinQ
- Check the distance between the appliance and wireless router.
- Turn of the Mobile data or Cellular data on your smartphone.
- Connect your smartphone to the wireless router.
Installing LG SmartThinQ
Search for the LG SmartThinQ application from the Google Play Store or Apple App Store on a smartphone. Follow instructions to download and install the application.
NOTE: If you choose the simple login to access the LG SmartThinQ application, you must go through the appliance registration process each time you change your smartphone or reinstall the application.
Product Registration
- Run the LG SmartThinQ application on a smart phone.
- Create an account and sign in.
- Select Register.
- Select Air conditioner.
- Follow the instruction on the smart phone.
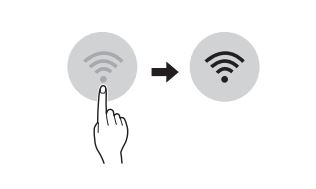
Wi-Fi Function
Communicate with the appliance from a smart phone using the convenient smart features.
Using the Application
- Select the appliance in the application and connect it to a Wi-Fi network.
- Select the menu on the upper right side to access settings and features.
Firmware Update
Keep the appliance performance updated.
Settings
Allows you to set various options on the appliance and in the application.
NOTE:
- If you change your wireless router, your Internet service provider or your password after registering the appliance, please delete it from the LG SmartThinQ Settings → Edit Product and register again.
- The application is subject to change for appliance improvement purposes without notice to users.
- Functions may vary by model.
Insallation Instructions
Preparing for installation
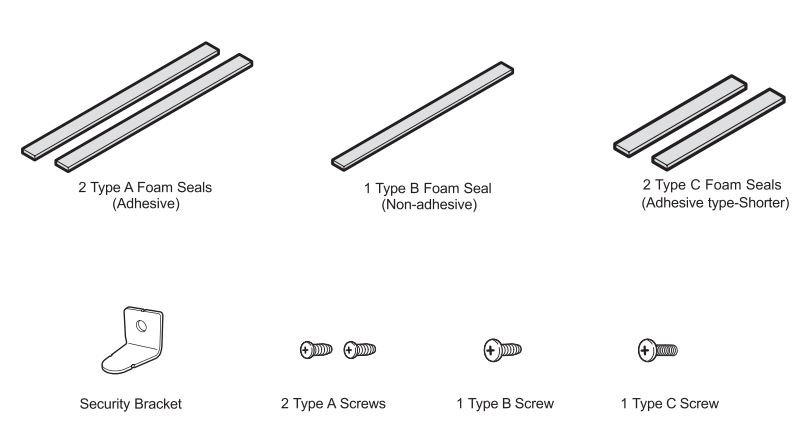
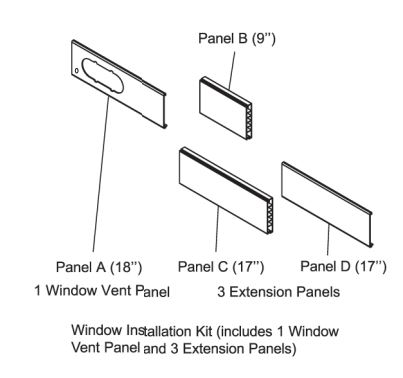
Exhaust components
The following components are used for window venting. Not all components are used for every installation.
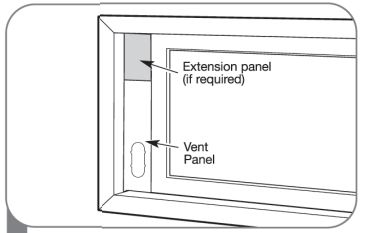
Window Installation Kit (includes 1 Window Vent Panel and 3 Extension Panels
Selection of installation location
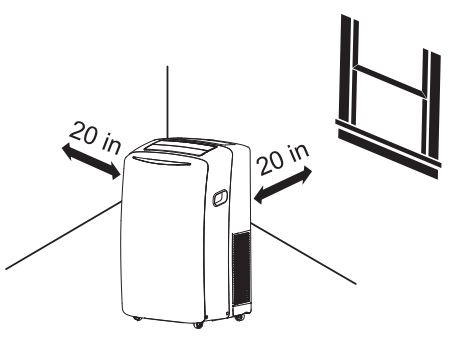
- Place the unit on a level floor.
- For best performance, allow at least 20 in of air space on all sides of the unit for good air circulation.
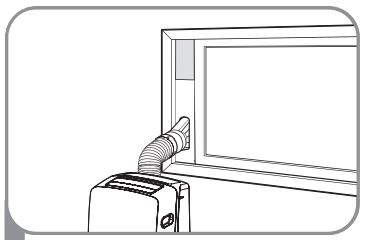
- Place the unit near a window. The hose and diffuser will be used to connect the air conditioner to the window installation kit to vent exhaust air outside.
Warning!
- The length of the exhaust hose is specially designed according to the specification of this product.
- Do not replace or extend with your own private hose as this could cause malfunction.
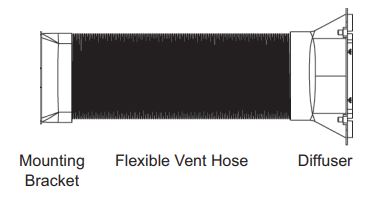
Attaching the hose and diffuser
Assembling the Mounting Bracket, Diffuser, and Vent Hose
- Use a pliers to extend the first four or five accordioned folds at both ends of the vent hose.
- To attach the mounting bracket to one end of the vent hose, insert the extended folds on one side of the vent hose between the ridges inside one side of the mounting bracket.
- Use a pliers to pull the folds on the opposite side of the vent hose up and between the ridges inside the opposite side of the mounting bracket.
- Tug the mounting bracket to make sure it is securely attached to the vent hose.
- To attach the diffuser to the other end of the vent hose, use a Phillips screwdriver to remove the four screws holding the grill on the end of the diffuser. Set the grill and screws aside.
- Insert the vent hose in the round end of the diffuser in the same manner as assembling the hose to the mounting bracket. (See steps 2 and 3.)
- Tug the diffuser to make sure it is securely attached to the vent hose. 8. Reattach the grill on the diffuser, using the four screws removed in step 5.
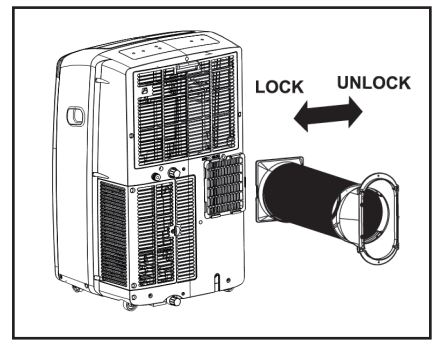
Attach the hose assembly onto the back of the air conditioner by inserting the edges of the mounting bracket behind the tabs at the top and bottom and sliding the mounting bracket to the left until it snaps into place.
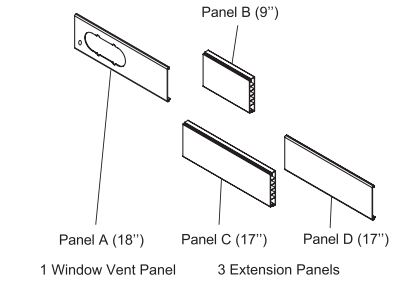
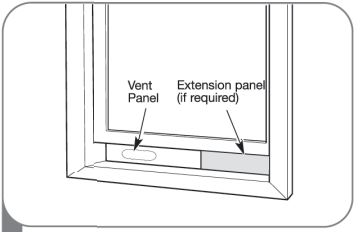
WINDOW VENT PANEL AND EXTENSIONS
The window installation kit allows you to install the air conditioner in most vertical-sliding windows 18” to 50” wide, or horizontal-sliding windows from 18” to 50” high.
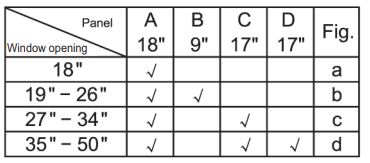
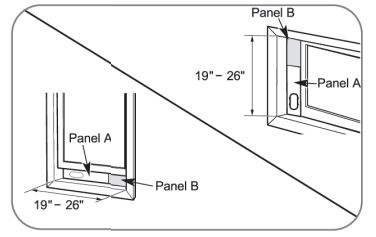
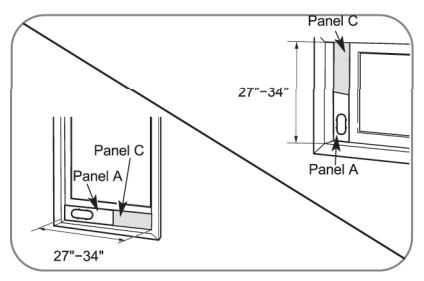
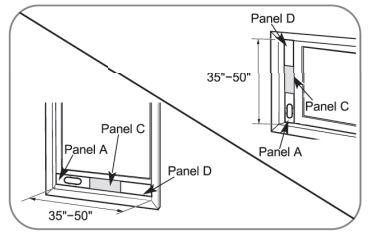
- Select the panels required based on the window opening, as shown above.
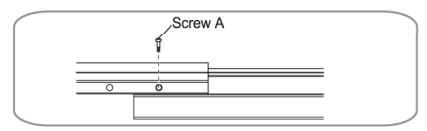
- If the installation requires 2 or 3 panels, assemble the panels to the proper length and fix them in place with 1 type A screw.
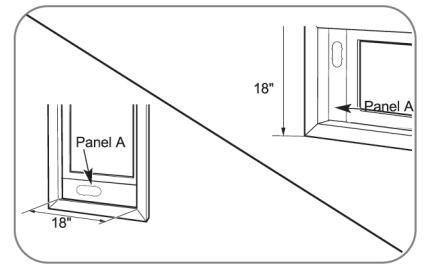
For an 18'' window opening, use the window vent panel by itself.
For window openings from 19” to 26”, use the window vent panel (Panel A) and an extension panel (Panel B).
For widow openings from 27'' to 34'', use the window vent panel (Panel A) and an extension panel (Panel C).
For window openings from 35” to 50”, use the window vent panel and two extension panels (Panel C and Panel D)
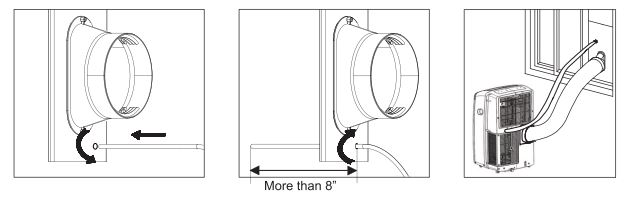
INSTALLATION IN VERTICAL-SLIDING WINDOWS
NOTE: The window installation kit can be used with vertical-sliding windows between 18” and 50” wide.
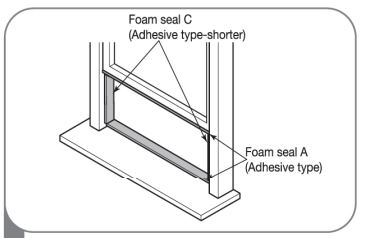
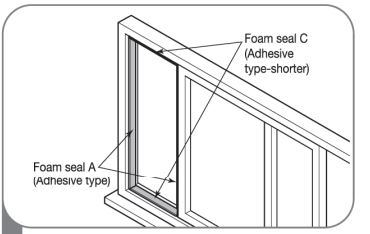
- Cut the foam seal A (adhesive type) & C (adhesive type-shorter) to the proper length, and attach them to the window sash and frame.
- Insert the vent panel assembly, including extension panels, if needed into the window opening. Extend the extension panels, if used.
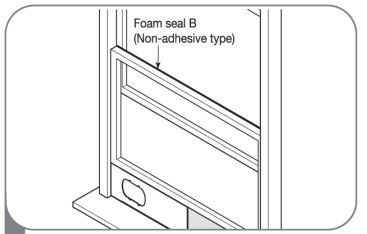
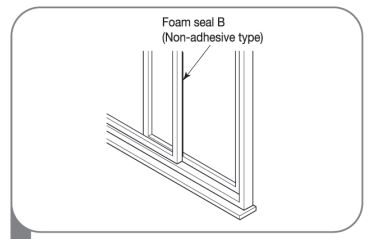
- Cut the foam seal B (non-adhesive type) to the window width. Stuff the foam seal B between the glass and the window to prevent air insects from getting into the room.
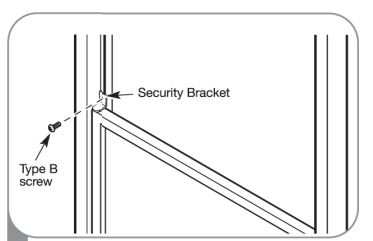
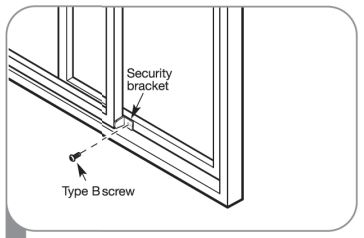
- Install the security bracket with a type B screw as shown, it desired.
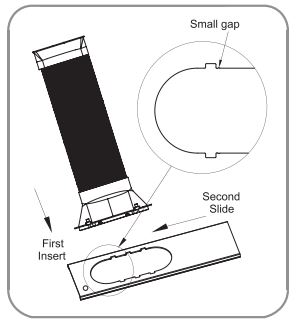
- Insert the diffuser into the opening in the vent panel and slide it to lock it into place.

Align the tabs on the diffuser with the slots in the vent panel. Insert the diffuser into the opening in the vent panel and slide the diffuser to lock the tabs in place.
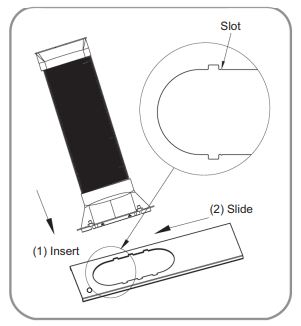
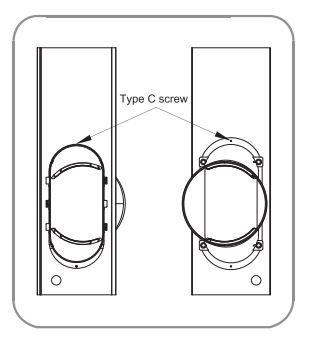
Insert the type C screw in the hole in the diffuser to prevent the diffuser from sliding out of the vent opening.

INSTALLATION IN HORIZONTAL-SLIDING WINDOWS
NOTE: The window installation kit can be used with horizontal-sliding windows between 18” and 50” tall.
- Cut the foam seal A (adhesive type) & C (adhesive type-shorter) to the proper length, and attach them to the window sash and frame.
- Insert the vent panel assembly, including extension panels, if needed, into the window opening. Extend the extension panels, if used.
- Cut the foam seal B (non-adhesive type) to the window height. Stuff the foam seal B between the glass and the window to prevent air insects from getting into the room.
- Install the window security bracket with a type B screw as shown.
- Insert the diffuser into the opening in the vent panel and slide it to lock it into place.
Align the tabs on the diffuser with the slots in the vent panel. Insert the diffuser into the opening in the vent panel and slide the diffuser to lock the tabs in place.
Insert the type C screw in the hole in the diffuser to prevent the diffuser from sliding out of the vent opening.
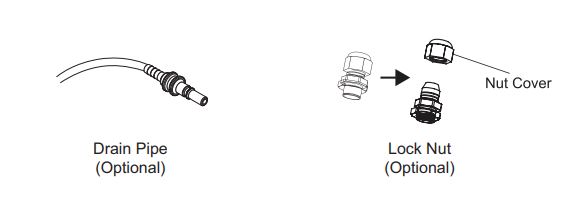
HEATING DRAINAGE (Optional)
CAUTION!
- If you use the Heat mode, you must install the drain hose. If only the Cool mode is used, the drain hose is not needed.
- If the outside temperature is at or near freezing (32°F/0°C) follow the indoor drainage instructions.
- If using the outdoor drainage method, make sure the outlet of the hose is aimed away from nearby surfaces that could be stained or damaged by the draining water.
INDOOR DRAINAGE
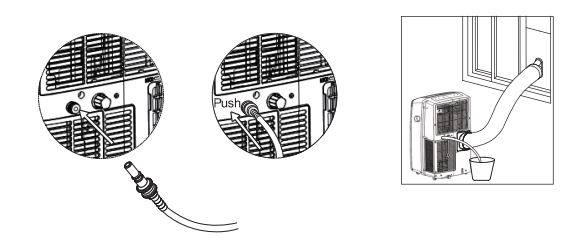
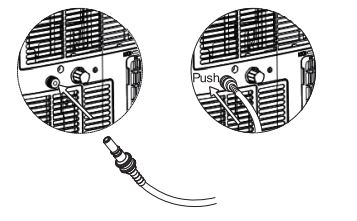
- To attach the drain hose, insert the connector into the upper drain port at the back of the unit until it snaps into place.
- Place the other end of the drain hose in a bucket that holds at least 28 ounces. Remember to check and empty the bucket frequently to avoid overflows.
- Set the unit to automatic drain by pressing the Fan and Down buttons at the same time.
- To detach the drain hose, push the outer ring of the upper drain port in and pull the connector out.
OUTDOOR DRAINAGE
When the weather is above freezing, the unit can be set up to drain to the outside. Make sure the outlet of the hose is aimed away from nearby surfaces that could be stained or damaged by the draining water.
- To attach the drain hose, insert the connector into the upper drain port at the back of the unit until it snaps into place.
- Rotate the nut cover on the window vent panel and insert the other end of the drain hose through the hole in the window vent panel.
- Make sure to insert the drain hose at least 8 inches.
- Rotate the nut cover back to secure the drain hose in place.
- Set the unit to automatic drain by pressing the Fan and Down buttons at the same time.
- To detach the drain hose from the product, push the outer ring of the upper drain port in and pull the connector out.
CAUTION!
Inserting the drain hose in the unit will automatically activate the drain function. To activate the drain manually, press the Fan and Down buttons at the same time.
Care and Cleaning
EMPTYING THE WATER COLLECTION TANK
Using the Upper Drain Port (Dry Mode Only)
- This can be used when you need dehumidification in high humidity.
- The upper drain port is not used in the Cool or Fan mode.
- Remove the drain plug when using the Dry (dehumidifying) mode.
- Install a drain hose (16mm [5/8”] inside diameter) and place the open end of the hose over a drain or bucket or out the window.
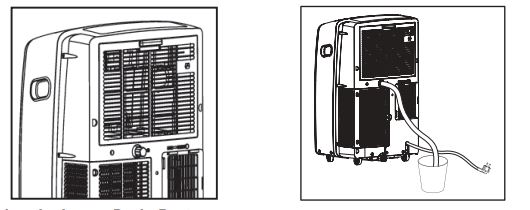
Using the Lower Drain Port
When the internal water collection tank is full, the LED display will show E5 and the air conditioner will turn off until the tank is emptied.
- Unplug the air conditioner, disconnect the exhaust hose from the back, and move the air conditioner to a suitable drain location or outdoors. You may also place a pan under the drain that will hold up to 2 pints of water.
- Remove the drain cap from the drain outlet.
- Once the water collection tank is drained, reinstall the drain cap, making sure it is on securely.
- Place the air conditioner in the desired location, reconnect the exhaust hose, and plug in the air conditioner.
Notice: If the E5 error appears in the display:
The water collection tank is full. Unplug the air conditioner, drain the tank, then plug the air conditioner back in and restart it.
NOTE: After the air conditioner is unplugged, it defaults to the Cool mode with a temperature setting of 75°F (24°C) once restarted.
CLEANING THE CASE
Wipe the case with a slightly damp cloth, then wipe dry with a dry cloth or towel.
- To prevent damage to the finish, do not use gasoline, benzene, thinner, etc..., or any abrasive cleansers to clean the air conditioner; they may damage the finish.
- Never pour water onto or into the air conditioner. It could damage internal components and create a shock and fire hazard.
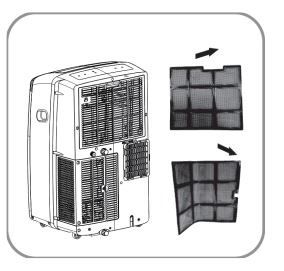
CLEANING THE AIR FILTER
Do not operate the air conditioner without the air filters in place.
- Pull out each air filter by the handle.
- Use a vacuum cleaner to clean the filters. If the filters are heavily soiled, they can be washed in warm water using a mild detergent.
Do not use harsh cleaners to every hot water. Do not wash in a dishwasher.
- Allow the filters to dry completely before reinstalling.
- Reinsert the filters.
STORING THE AIR CONDITIONER
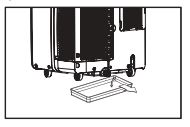
If the air conditioner will not be used for an extended period of time:
- To drain the water collection tank completely, leave the bottom drain cap off long enough to allow any residual water to drain out. Once the tank is completely and no more water flows out, reinstall the cap.
- Remove and clean the filters, allow them to dry completely, then reinstall them.
- Remove the batteries from the remote.
- Store the air conditioner in a cool, dry location, away from direct sunlight, extreme temperatures and excessive dust.
Before using the air conditioner again:
- Make sure the filters and drain cap are in place
- Check the power cord to make sure is in good condition, with no cracks or damage.
- Place new batteries in the remote.
- Install the air conditioners as described in the Installation Instructions.
Troubleshooting
BEFORE CALLING FOR SERVICE
| Problem |
Possible causes |
Corrective Action |
| Air conditioner does not start |
The air conditioner is unplugged. |
Make sure the air conditioner plug is pushed completely into the outlet. |
| The fuse is blown/circuit breaker is tripped. |
Check the house fuse/circuit breaker box and replace the fuse or reset the breaker. |
| Power failure. |
If power failure occurs, unplug the unit. When power is restored, wait 3 minutes to restart the air conditioner to prevent tripping of the compressor overload. |
| The current interrupter device is tripped. |
Press the RESET button located on the power cord plug. If the RESET button will not stay engaged, discontinue use of the air conditoner and contact a qualified service techician. |
| E5 appears in the display. |
The water collection tank is full. Drain the tank and reset your settings. |
| Room temperature is less than the set temperature. |
This is normal. The air conditioner automatically shuts off when the room temperature equals or is less than the set temperature. Adjust the temperature setting, if needed. |
| Air conditioner does not cool as it should |
Airflow is restricted. |
Make sure there are no curtains, blinds or furniture blocking the front of the air conditiner. |
| The temp control may not be set |
In COOL mode, press the DECREASE button. |
| The air filters are dirty |
Clean the filters at least every 2 weeks. |
| The room may have been hot. |
When the air conditioners is first turned on, you need to allow time for the room to cool down.
|
| Air conditioner freezing up |
The cooling coils are iced over.
|
Ice may bock the air flow and obstruct the air conditioner from properly cooling the room.
Set the mode control at High Fan or High Cool.
|
| Air conditioner runs too often or too long |
Area to be cooled is too large for the air conditioner. |
Consult your dealer for the air conditioner capacity necessary to cool the desired area. |
| Doors or windows are open. |
Make sure doors and windows are closed. |
| Your home appliance and smartphone is not connected to the Wi-Fi network. |
The password for the Wi-Fi that you are trying to connect to is incorrect. |
Find the Wi-Fi network connected to your smartphone and remove it, then register your appliance on LG SmartThinQ. |
| |
Mobile data for your smartphone is turned on. |
Find the Wi-Fi network connected to your smartphone and remove it, then register your appliance on LG SmartThinQ. |
| |
The wireless network name (SSID) is set incorrectly. |
The wireless network name (SSID) should be a combination of English letters and numbers. (Do not use special characters.) |
| |
The router frequency is not 2.4 GHz. |
Only a 2.4 GHz router frequency is supported. Set the wireless router to 2.4 GHz and connect the appliance to the wireless router. To check the router frequency, check with your Internet service provider or the router manufacturer. |
| |
The distance between the appliance and the router is too far. |
If the distance between the appliance and the router is too far, the signal may be weak and the connection may not be configured correctly. Move the location of the router so that it is closer to the appliance. |
Note: Some functions may not be supported, depending on the model.
| Error Code |
Possible causes |
Corrective Action |
| Code appears in the display |
| E5 |
The water collection tank is full. |
Empty the water collection bank. See Care and Cleaning section. |
| E1 |
Short or open circuit in the indoor air thermistor. |
Unplug the air conditioner and contact your authorized LG service center. |
| E2 |
Short or open circuit in the indoor pipe thermistor. |
Unplug the air conditioner and contact your authorized LG service center. |
| E3 |
Short or open circuit in the outdoor pipe thermistor. |
Unplug the air conditioner and contact your authorized LG service center. |
| EA |
Software problem. |
Unplug the air conditioner and contact your authorized LG service center. |