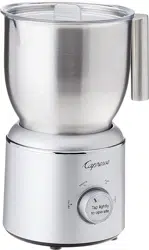
Left: Heat/Froth (heat and stir) | Center: Off | Right: Froth (stir)
Cord Location
Cord can be wrapped and stored inside of the bottom of Base when not in use.
Please see Important Safeguards section for instructions about the cord & plug.
HOW TO OPERATE
1. Before first use, wipe down the HOT CHOCOLATE MAKER exterior with a clean, non-abrasive cloth or sponge. Thoroughly wash the interior of the Mixing Container with warm, sudsy water and a non-abrasive cloth or sponge. DO NOT immerse Mixing Container in water. Wash Dispensing Valve and Lid in warm, sudsy water and thoroughly dry. DO NOT put the Base in water.
2. Find a stable, waterproof surface near an electrical outlet before starting. Make sure the cord is away from any water source.
3. DO NOT place the HOT CHOCOLATE MAKER near the edge of a table or countertop.
4. Remove the Lid from the Mixing Container.
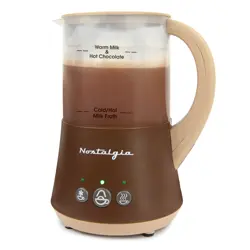
5. Pour 32 ounces of water or milk into the Mixing Container.
NOTE: Do not fill the Mixing Container past the "Max" fill line.
6. Add 8 to 14 tablespoons of your favorite instant drink mix, depending on whether using milk or water. (See SERVING GUIDE table below.)
7. Replace the Lid on the Mixing Container. Make sure the lid covers the pour spout. DO NOT operate without lid securely in place.
8. Plug the HOT CHOCOLATE MAKER into an outlet.
9. Turn the switch to the "HEAT/FROTH" position. The HOT CHOCOLATE MAKER will begin to mix and heat.
NOTE: You may move the switch to the "OFF" position to turn the appliance off at any time. A full 32 ounces takes approximately 6-8 minutes to heat. DO NOT run on "HEAT/FROTH" for more than 15 minutes. This will cause milk to scald.
10. Once the beverage reaches your ideal temperature, turn the switch to the "FROTH" position. Place a cup under the Dispensing Valve press down on the valve. The beverage will mix while it dispenses so that a rich layer of froth is released into your cup along with the hot drink.
11. When the container has less than 1 cup of liquid remaining or is empty, press the "OFF" switch. Dispense any remaining liquid into a cup by pressing down on the Dispensing Valve. You may also pour the beverage out of the top of the Mixing Container by turning the lid clockwise so the "POUR" indicator is aligned with the spout.
The appliance will remain on until you switch it off.
NOTE: Pre-packaged instant cocoa, coffee and tea mixes may vary from the quantities indicated in this guide. Use the quantities specified on the packaging for exact measurements.
HELPFUL TIPS
SMOKING
A small amount of smoke and/or odor may occur upon heating due to the release of manufacturing oils. This is normal.
NOISE
Some minor expansion/contraction sounds may occur during heating and cooling. This is normal.
HEATING BEVERAGES
DO NOT run the HOT CHOCOLATE MAKER on the "HEAT/FROTH" setting for more than 15 minutes. This will cause milk to scald.
CLEANING & MAINTENANCE
1. After using your HOT CHOCOLATE MAKER, disconnect from electrical outlet. Remove plug by gripping the plug body and pulling out of the outlet. Never yank or twist cord to unplug the unit. Allow the appliance to cool completely before cleaning.
2. Remove the Mixing Container from the Base. Pour out any unused beverage.
3. Wash the interior of the Mixing Container with a combination of mild detergent and water. DO NOT submerge the Mixing Container in water. Rinse and dry thoroughly.
4. Unscrew the Dispensing Valve from the Mixing Container by turning counterclockwise. Open the Dispensing Valve and flush with clean water.
5. Wash the lid in warm, soapy water. Rinse and dry thoroughly.
6. Wipe the exterior of the Base and Mixing container with a soft, damp cloth.
7. NEVER immerse Base in water or put any parts in the dishwasher.
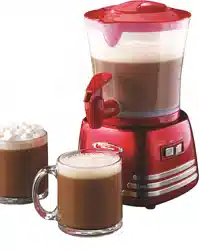
Add ingredients to the HOT CHOCOLATE MAKER and turn switch to "HEAT/FROTH".
Run for 4 to 8 minutes, or until beverage reaches ideal temperature. Switch to "FROTH" setting.
Dispense the drink into a mug. Top with whipped cream and sweetened chocolate powder or chocolate shavings, if desired.
Serves 2.
MINTY HOT COCOA
• 2 Heaping Tbsp. Unsweetened Cocoa Powder
• 4 Tsp. Sugar
• 2 Cups Milk
• 3 Tbsp. Mint Syrup or Crème de Menthe
Add ingredients to the HOT CHOCOLATE MAKER and turn switch to "HEAT/FROTH".
Run for 4 to 8 minutes, or until beverage reaches ideal temperature. Switch to "FROTH" setting.
Dispense the drink into a mug. Top with whipping cream.
Serves 2.
SPICY MEXICAN HOT CHOCOLATE
• 3 Tbsp. Instant Hot Chocolate Mix
• 1 Tbsp. Chocolate Syrup
• ½ Tsp. Ground Cinnamon
• 1 Pinch Chili Powder
• ¼ Cup Milk
• ¾ Cup Water
Add ingredients to the HOT CHOCOLATE MAKER and turn switch to "HEAT/FROTH".
Run for 4 to 8 minutes, or until beverage reaches ideal temperature. Switch to "FROTH" setting.
Dispense the drink into a mug. Top with whipped cream, if desired.
Serves 1.
CREAMY CARAMEL APPLE CIDER
• 2 Cups Apple Cider or Apple Juice
• ¼ Tsp. Cinnamon
• 4 Tbsp. Caramel Syrup
• Whipping Cream
Add apple cider or juice and cinnamon to the HOT CHOCOLATE MAKER and turn switch to "HEAT/FROTH".
Run for 4 to 8 minutes, or until beverage reaches ideal temperature. Switch to "FROTH" setting. Dispense the drink into the mug.
Top with whipping cream and drizzle 2 tbsp. of caramel syrup over the top of each mug.
Serves 2.
SAFETY
IMPORTANT SAFEGUARDS
A person who has not read and understood all operating and safety instructions is not qualified to operate this appliance. All users of this appliance must read and understand this Instruction Manual before operating or cleaning this appliance.
When using electrical appliances, basic safety precautions should always be followed, including:
1. Read all instructions before operating this appliance.
2. DO NOT TOUCH the hot surfaces. Use handles or knobs.
3. This appliance is NOT A TOY.
4. Unsupervised young children and cognitively challenged individuals should never operate this appliance.
5. Close supervision is necessary when any appliance is used by or near children.
6. To protect against electrical shock do not immerse cord, plug or any part of this unit in water or other liquids.
7. Unplug from outlet when not in use, before removing parts and before cleaning. Allow to cool before putting on or taking off any parts, and before cleaning.
8. DO NOT operate any appliance with a damaged cord or plug, or after the appliance malfunctions, or if the appliance has been damaged in any manner. Return the appliance to the nearest repair shop for examination, repair or adjustment.
9. The manufacturer does not recommend the use of accessory attachments other than what is provided by the manufacturer. Use of attachments may cause injuries.
10. DO NOT use the appliance for other than its intended use.
11. DO NOT use outdoors. FOR HOUSEHOLD USE ONLY.
12. DO NOT place on or near a hot gas or electric burner, or in a heated oven.
13. DO NOT put in dishwasher.
14. DO NOT let cord hang over edge of table or counter, or touch not surfaces.
15. NEVER leave unit unattended while in use or when plugged into an outlet.
16. Extreme caution must be used when moving an appliance containing hot food or liquid.
17. Always attach plug to appliance first, then plug cord in the wall outlet. To disconnect, turn any control to "off," then remove plug from wall outlet.
ADDITIONAL IMPORTANT SAFEGUARDS
Operating Safety Precautions
1. NEVER put fingers or utensils into feed or discharge areas.
2. Keep hands and utensils out of container while unit is in operation to reduce the risk of severe personal injury or damage to the appliance.
3. DO NOT remove lid while in use. Always operate appliance with lid in place.
4. DO NOT add anything to the container while the appliance is operating
5. This unit must be on a level surface to operate properly.
6. Make sure the container is properly attached to the base before turning on unit.
Instructions for the Electrical Cord and Plug
1. This appliance has a polarized plug (one blade is wider than the other). To reduce the risk of electrical shock, this plug is intended to fit into a polarized outlet only one way. If the plug does not fit fully into the outlet, reverse the plug. If it still does not fit, contact a qualified electrician. Do not attempt to modify the plug in any way.
2. A short power supply cord is provided to reduce the risk resulting from becoming entangled or tripping over a long cord.
3. If a long detachable power-supply cord or extension cord is used:
• Extension cords can be used if care is exercised in their use.
• The marked electrical rating of the cord or extension cord should be at least as great as the electrical rating of the appliance.
• When using a longer cord or extension cord, make sure that the cord does not drape over a countertop or tabletop where it can be pulled on or tripped over unintentionally.
4. The manufacturer does not recommend using this machine in countries that do not support 120V AC even if a voltage adapter, transformer, or converter is in use.


 IMPORTANT SAFEGUARDS