
HOUSEHOLD USE ONLY
Please read all instructions carefully before using the product
INSTRUCTION MANUAL
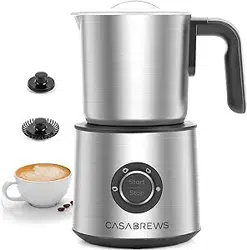
Milk Frother
Model:MK-UL

CONTENTS
IMPORTANT SAFEGUARDS .....................................................................................................
KNOW YOUR COFFEE MAKER ................................................................................................
BEFORE FIRST USE ....................................................................................................................
MAKING DRINKS ....................................................................................................................
TIPS .................................................................................................................................................
CLEANING AND MAINTENANCE ..............................................................................................
TROUBLESHOOTING ................................................................................................................
WARRANTY INFORMATION ....................................................................................................
CUSTOMER SUPPORT ................................................................................................................

Before using this appliance, please follow these basic precautions:
01.
Carefully read all instructions before operating the appliance for the first time and save for future reference.
02. Remove and safely discard any packaging materials and promotional labels before using the appliance for the first
time.
03. To eliminate a choking hazard for young children, remove and safely discard the protective cover fitted to the
power plug of this appliance.
04. To protect against electrical shock, do not immerse the power cord , power plug or motor base in water or any other
liquid, or allow moisture to come into contact with.
05. Do not place the appliance near the edge or a bench or table during operation.
06. Do not place the appliance on or near a hot gas or electric burner, or where it could touch any other source of heat.
07. Do not use on a sink drain board.
08. Always use the appliance on a dry, level surface.
09. Keep the appliance clear of walls, curtains and other heat or steam sensitive materials.
10. Provide adequate space above and on all sides for air circulation around the appliance.
11. Unwind the power cord fully before use.
12. Do not allow the power cord to hang over the edge of a table or counter, touch hot surfaces or become knotted.
13. The appliance is not intended to be operated by means of an external timer or separate remote control system.
14. Do not touch hot surfaces, Use handles or knobs.
IMPORTANT SAFEGUARDS
1

2
15. The appliance has been designed specifically for the purpose of foaming milk and other dairy milk alternatives
and is not intended to whip, thicken or heat other food substances eg. oil,eggs, butter, heavy whipping cream,
soups, gravies etc.
16. The appliance is not designed to mix a large quantity of dry ingredients or melt large food pieces eg. cubed
chocolate, ground nuts, whole spices, fresh herbs, Ice cubes etc.
17. The underside of the jug must always be clean and dry before placing onto the power base.
18. Attach the jug lid securely to the jug before operation.
19. Do not remove the jug lid during operation.
20. Use caution when pouring foamed milk from the jug as the jug and hot milk may scald.
21. Do not operate the appliance without liquid . Always fill to at least the ”MIN” marking and no more than the
“MAX” marking inside the jug.
22. The jug must only be used with the power base provided. Do not use attachments other than those provided with
the appliance as it may result in fire, electric shock or injury to persons.
23. Do not put metal or similar items into the jug as this may damage or aect the operation of the appliance.
24. To disconnect, press the STARTISTOP button ( the button surround should stop flashing ), then remove the plug
from power outlet.
25. Always remove the plug from the power outlet and allow to cool if the appliance is not in use, before attempting to
move the appliance, before cleaning, disassembling, assembling and when storing the appliance.
26. Keep the appliance and accessories clean. Strictly follow the care and cleaning instructions described in this book.
27. Do not use harsh abrasive caustic cleaners or oven cleaners when cleaning the appliance.
28. This appliance is for household use only . Do not use the appliance for anything other than its intended purpose as
described in this book. Do not use outdoors . Do not use in moving vehicles or boats.

WARNING
Always ensure the frothing disc is securely attached to the milk jug before use.
WARNING
Frothing disc is a choking hazard .Children must always be supervised and never left unattended
with appliance.
WARNING
Never immerse the power base , power cord or power plug in water or allow moisture to come into
contact with these parts.
29. Do not leave the appliance unattended when In use.
30. This appliance is not intended for use by young children or infirm persons without supervision. Young children
should be supervised to ensure that they do not play with the appliance.
31. Regularly inspect the power cord , power plug and actual appliance for any damage. Do not operate if damaged in
any way or after the appliance malfunctions.
32. For any maintenance other than cleaning, visit www.casabrews.com or contact Customer Service by email:
3
FOR HOUSEHOLD USE ONLY
SAVE THESE INSTRUCTIONS
4
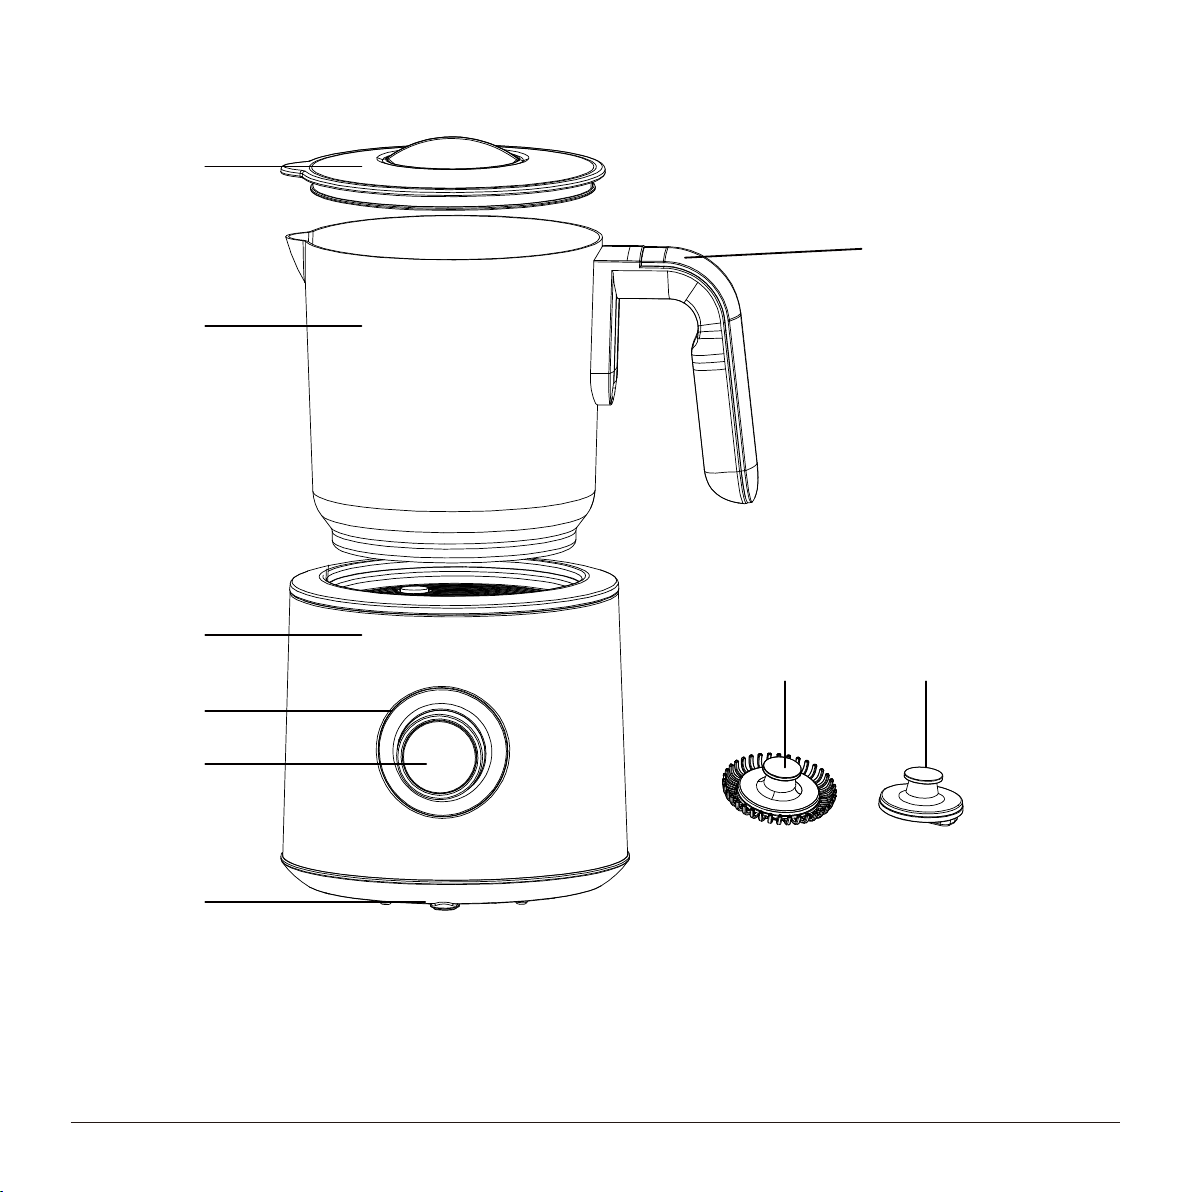
1. Jug Lid
2. Milk Jug
3. Power Base
4. LED Indicators
5. Start/Stop Push-Dial
6. Cord Wrap
7. Jug Handle
8. Frothing Disc
9. Stirring Disc
KNOW YOUR MILK FROTHER
1
2
3
4
5
6
7
8
9
5
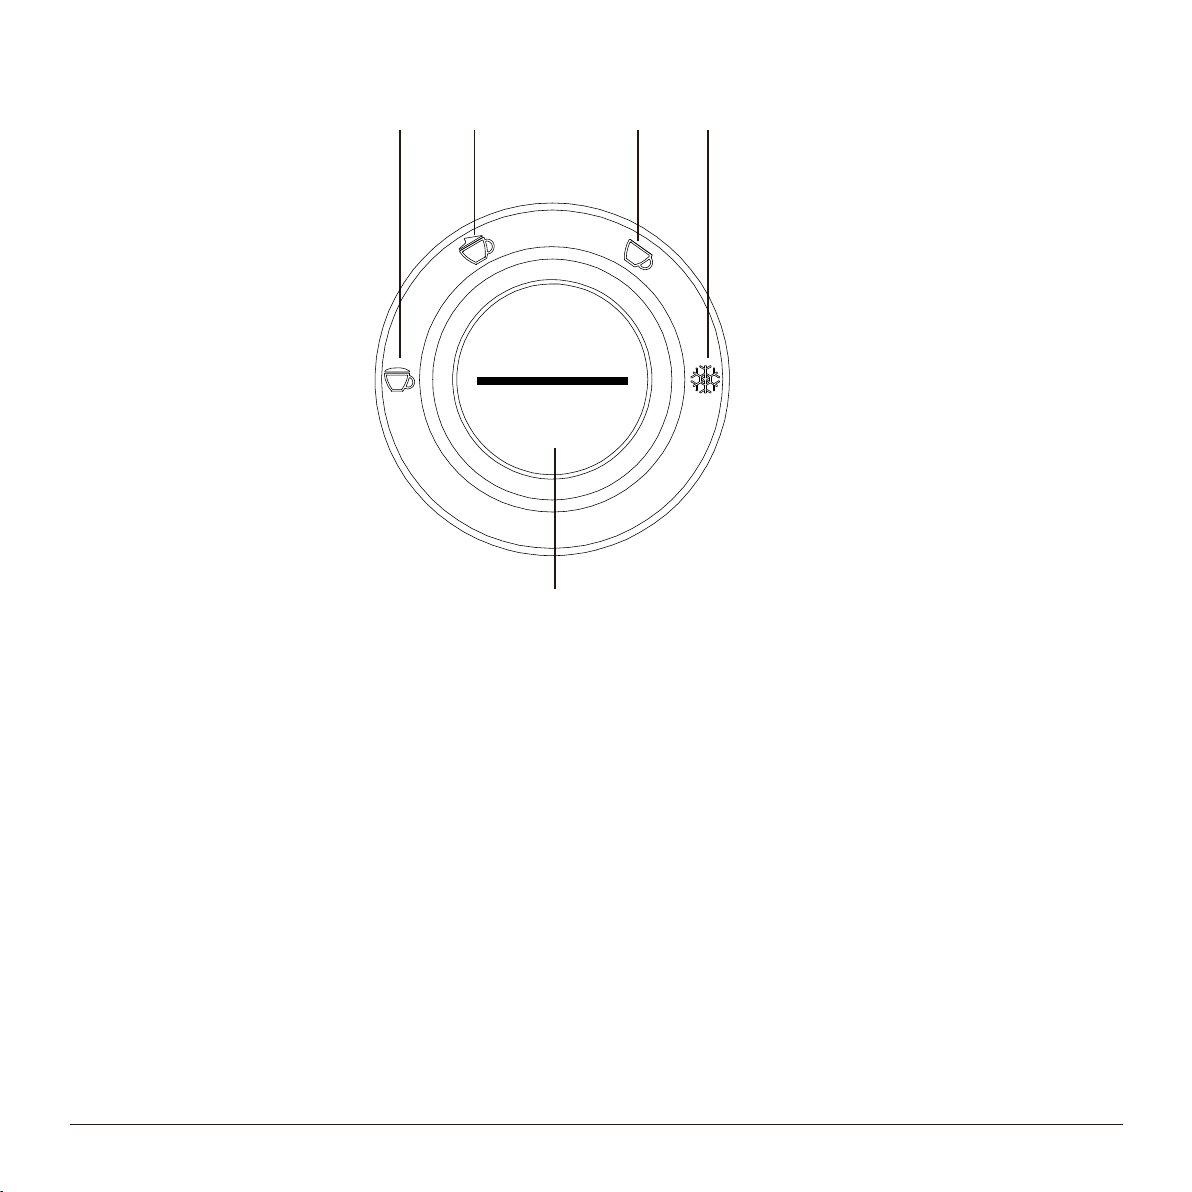
A. Warm Thick Foam Indicator
The warm, thick foam setting heats and froths your liquid to create a rich, dense style of warm microfoam.
The crowning touch for your cappuccino.
B. Warm Foam Indicator
The warm foam setting heats and froths, and with a gentle swirl of the pitcher at the end, creates a loose style of
warm microfoam-like a cloud floating on your café au lait and lattes.
C. Heating Indicator
The Heating setting heats your drink without generating any foam. This setting automatically slow-stirs your
drink to keep it from scorching, for amazing steamed milk, hot chocolate and more!
D. Cold Foam Indicator
The cold foam setting creates a luscious, silky microfoam filled with millions of tiny bubbles. Use milk and coconut
milk for the perfect cold brew topper.
E. Start/Stop Push-Dial
Press the center of the dial to start or stop operation. Turn the dial to choose the setting you want.
A B C D
E
Start
Stop
6
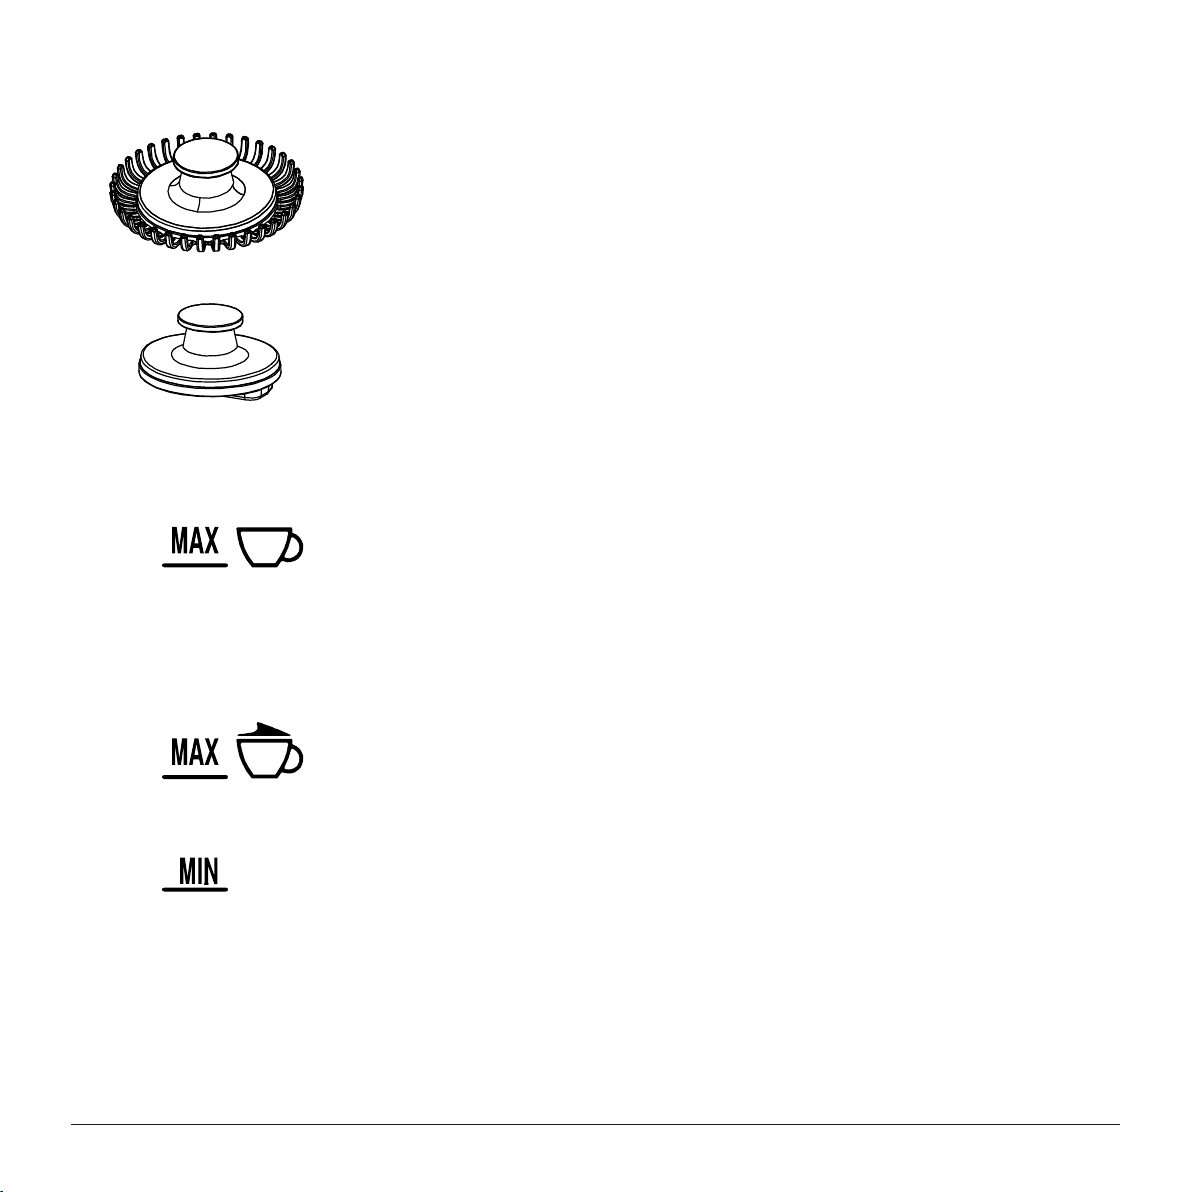
Frothing Disc
For Warm Thick Foam, Warm Foam and Cold Foam.
MAX Fill Line 2
For Heating. 500ml
MAX Fill Line 1
For Warm Thick Foam, Warm Foam and Cold Foam.250ml
MIN Fill Line
120ml
Stirring Disc
For Heating.

7
Before first use, ensure you have all parts and accessories-power base, milk jug, frothing disc, stirring disc and jug lid.
Remove and safely discard all promotional labels and packing materials attached to the milk frother.
Wash the milk jug, discs and lid in warm soapy water then rinse and dry thoroughly. Wipe the exterior of the power base
with a soft damp cloth then dry thoroughly.
BEFORE FIRST USE
01. Place the milk frother on a fat level surface and plug the power cord into a 110V-120V power outlet. The indicators
will all light up once, then only the Warm Thick Foam indicator will light up and other indicators will o.
02. Select the frothing or stirring disc.
Choose the frothing disc for warm thick foam, warm foam and cold foam froth.
Choose the stirring disc for heating milk.
03. Insert the disc onto the shaft at the base of the milk jug. Ensure the disc is inserted the
correct way with the wider part of the disc at the bottom of the jug.
The disc should click' securely onto the shaft.
04. Pour the required amount of cold, fresh milk into the milk jug then cover with the jug lid. Always use cold milk and
fill the milk jug between the MIN and MAX level marking. Overfilling may result in spillage, while under filling
prevents the disc from working optimally.
MAKING DRINKS
After 30 seconds of non-use, the milk frother will enter sleep mode. All the indicators will o.
To reactivate, turn or press the Start/Stop push-dial.
NOTE:
For optimum froth, do not exceed the MAX measurement markings inside the milk jug.NOTE:
If the disc is not inserted correctly it may dislodge during operation, a grinding noise may be heard,
or milk will not swirl. Do not operate the milk frother without a frothing disc inserted into the milk jug
as this can cause uneven heating and burning.
NOTE:

8
05. Ensure the jug lid is securely attached and the outside of the milk jug is clean. Place the milk jug onto the power
base, ensuring the jug is sitting flat.
06. Turn the Start/Stop push-dial to the desired setting. The indicator that corresponds to the selected setting will
light up.
07. Only press the Start/Stop push-dial once, firmly. The milk frother will start to work and the indicator will slowly
blink.
If the milk frother does not do this, try pushing the Start/Stop push-dial again to ensure it has been properly
activated.
08. To stop the process at any time, press Start/Stop push-dial again.
09. When the process ends, the milk frother will automatically stop. This will take anywhere between 2-7 minutes.
10. Carefully remove the milk jug from the power base as the milk jug and contents will be hot . Be careful not to place
the milk jug on a table cloth, plastic surface or heat sensitive surface which may scorch or melt.
11. Remove the jug lid, pour and/or spoon out the frothed milk.
12. Clean the milk jug and disc immediately after use. Both will be hot so allow them to cool completely
(or filling the milk jug with water for quick cooling) before disassembling.
01. Always use cold, fresh ( or fresh opened ) milk. The colder the liquid the better. Warm milk will not foam up
properly.
02. Not all milk alternatives produce foam. Experiment with dierent milk options and frothing discs to achieve the
desired result.
03. When frothing big batches, allow the milk frother to rest for about 3 minutes after every 2 frothing cycles.
04. Ensure the milk jug and frothing disc are clean before use.
TIPS

9
Both the jug lid, milk jug and disc should be cleaned immediately after each use to prevent build-up of milk residue.
01. Unplug the power cord from the power outlet before cleaning.
02. The milk jug and disc will be hot immediately after use, so carefully remove the milk jug from the power base and
fill with tap water. Once the milk jug and frothing disc have cooled completely, remove the frothing disc and rinse
o any milk in warm water.
03. Wash the milk jug , jug lid and disc in warm soapy water, rinse and dry thoroughly.The seal from the lid can be
removed and washed separately.
04. Wipe the exterior of the power base with a soft damp cloth . Dry thoroughly.
CLEANING AND MAINTENANCE
Never immerse the power base in water or any other liquid. The outside of the milk jug must always
be clean and dry before placing on the power base prior to use.
NOTE:
The milk jug, jug lid and discs can be washed in the dishwasher (top shelf only). However to extend the
life of the discs, we recommend these are washed by hand.
NOTE:

10
TROUBLESHOOTING
Milk Jug has not been cleaned properly
and milk residue from previous use is
burning.
Ensure the milk jug is thoroughly cleaned after each
use and between consecutive uses.
Milk is not swirling correctly. Ensure the frothing disc is securely and correctly
attached.
Ingredients have been added too quickly
or too much.
Add ingredients (if desired) slowly and in small
quantities after the milk has already started swirling.
Burnt milk?
Nothing happened after pressing
the Start/Stop button?
Frothing disc is not moving or is
dislodged?
Milk is not heating?
Frothing disc has dislodged during
operation.
Frothing disc is not inserted correctly.
Ensure the frothing disc is securely and correctly
attached.
The milk frother failed to activate.
Ensure that the milk frother has been properly
activated and repush the Start/Stop push-dial again.
The milk jug is not positioned onto the
power base.
Ensure the milk jug is Correctly positioned onto the
power base.
The indicators are all o?
After 30 seconds of non-use, the milk
frother will enter sleep mode.
Turn or press the Start/Stop push-dial to reactivate
the milk frother.
The milk frother failed to activate.
Ensure that the milk frother has been properly
activated and repush the Start/Stop push-dial again.
Frothing disc is not inserted correctly. Ensure the frothing disc is securely and correctly
attached.
PROBLEM POSSIBLE CAUSE SOLUTION
Milk is not foaming?
Milk is warm or too hot to foam.
Do not re-foam already heated milk.
Use cold , fresh ( or freshly opened ) milk .
If your problem is not listed, please contact Customer Support.
NOTE:

WARRANTY INFORMATION
We provides warranty in accordance with the legislation of the customer's own country of residence, with a minimum of 12
months, starting from the date on which the appliance is sold to the end user.
The warranty only covers defects in material or workmanship.
The warranty will not apply in cases of:
- Normal wear and tear.
- Incorrect use, e.g. overloading of the appliance, use of non-approved accessories.
- Use of force, damage caused by external influences.
- Damage caused by non-observance of the user manual, e.g. connection to an unsuitable mains supply or non-compliance
with the installation instructions.
- Partially or completely dismantled appliances.
11