INSTRUCTION MANUAL
Espresso Coee Machine
Model: NEUTRON PRO
HOUSEHOLD USE ONLY
Please read all instructions carefully before using the product

CONTENTS
IMPORTANT SAFEGUARDS ...................................................................................................... 1-3
KNOW YOUR ESPRESSO COFFEE MACHINE ........................................................................ 4
CONTROL PANEL ....................................................................................................................... 5
SPECIFICATIONS ....................................................................................................................... 6
BEFORE FIRST USE ..................................................................................................................... 7-8
HOW TO TAMP THE GROUND COFFEE .................................................................................. 9
HOW TO MAKE AN ESPRESSO ................................................................................................. 10-11
INSERTING THE PORTAFILTER ....................................................................................... 10
MAKING ESPRESSO ................................................................................................................ 10
IDEAL EXTRACTION .............................................................................................................. 11
UNDER EXTRACTION ........................................................................................................... 11
OVER EXTRACTION ............................................................................................................... 11
HOW TO PROGRAM THE VOLUME OF SINGLE/DOUBLE ESPRESSO ................................ 12
HOW TO SET THE ESPRESSO TEMPERATURE ...................................................................... 13
HOW TO FROTH THE MILK ...................................................................................................... 14-16
HOW TO SET THE STEAM TEMPERATURE ............................................................................ 16-17
MAKING AN AMERICANO ........................................................................................................ 17-18
HOW TO SET THE AMERICANO TEMPERATURE .................................................................. 18-19
HOW TO MAKE HOT WATER ................................................................................................... 19
HOW TO SET THE HOT WATER TEMPERATURE ................................................................... 20
CLEANING AND MAINTENANCE ............................................................................................ 21-25
FLUSH CLEANING CYCLE ................................................................................................... 21-22
DESCALING ................................................................................................................................. 22-24
CLEANING THE BREW HEAD ........................................................................................... 24
CLEANING THE FILTERS AND PORTAFILTER ........................................................ 25
CLEANING THE STEAM WAND ...................................................................................... 25
CLEANING THE DRIP TRAY ............................................................................................... 25
RESETTING TO DEFAULTS ....................................................................................................... 26
AUTO SHUT OFF ........................................................................................................................ 26
ERROR MODE .............................................................................................................................. 27-29
TROUBLESHOOTING ................................................................................................................. 30-32
CA 65 ............................................................................................................................................ 32
WARRANTY INFORMATION ..................................................................................................... 33
CUSTOMER SUPPORT ................................................................................................................ 33

1
IMPORTANT SAFEGUARDS
Before using the appliance, the following basic precautions should always be followed:
01. Read all instructions.
02. Before using check that the voltage of wall outlet corresponds to rated voltage marked on the rating plate.
03. This appliance has been incorporated with a grounded plug. Please ensure the wall outlet in your house is
well earthed.
04. To protect against fire, electric shock and injury to persons, do not immerse main parts of the product, cord,
or plug, in water or other liquid.
05. The appliance must not be immersed.
06. Remove plug from wall outlet before cleaning and when not in use. Allow appliance to cool down
completely before taking o or attaching components or before cleaning.
07. Do not operate any appliance with a damaged cord or plug or after the appliance malfunctions, or is
dropped or damaged in any manner. Contact the manufacturer by email ([email protected]) how to
deal with returning the appliance.
08. The use of accessory attachments not recommended by the appliance manufacturer may result in fire,
electric shock or injury to persons.
09. Place appliance on flat surface or table, do not hang power cord over the edge of table or counter.
10. Ensure the power cord does not touch the hot surface of the appliance.
11. Do not place the appliance on hot surface or beside on open flame.
12. To disconnect, remove plug from wall outlet. Always hold the plug, but never pull the cord.
13. Do not use appliance for other than intended use and place it in a dry environment.
14. Be careful not to get burned by the steam.
15. Do not touch any hot surface of the appliance, such as steam wand, and the steel mesh . Use handle or
knobs.

2
16. Do not let the appliance operate without water.
17. DO NOT remove the metal portafilter while brewing coee. Metal parts will be hot. Please make sure to
hold it by the handle and use caution when moving unit with hot liquids.
18. Connect plug to wall outlet before using and turn o all switches for plug is removed from the wall
outlet. To unplug, grasp the plug and pull from the outlet. Never pull from the power cord.
19. This appliance can be used by children aged 8 years and above if they have been given supervision or
instruction concerning use of the appliance in a safe way and if they understand the hazards involved.
Cleaning and user maintenance shall not be made by children unless they are older than 8 and supervised.
Keep the appliance and its cord out of reach of children under the age of 8. Close supervision is necessary
when any appliance is used by or near children. Children should be supervised to ensure that they do not
play with the appliance.
20. Appliance can be used by persons with reduced physical, sensory or mental capabilities or lack of
experience and knowledge, if they have been given supervision or instruction concerning use of the
appliance in a safe way and understand the hazards involved.
21. Children shall not play with the appliance.
22. This appliance is intended for household use.
23. Do not use outdoors.
24. Avoid contact with moving parts.
25. Note the high temperature at the top of the machine.
26 a) A short power-supply cord (or detachable power-supply cord) is provided to prevent becoming
entangled in or tripping over a longer cord.
b) Longer detachable power-supply cords or extension cords are available and maybe used if care is
exercised in their use.
c) If a long detachable power-supply cord or extension cord is used:
1) The marked electrical rating of the detachable power-supply cord or extension cord should be at least
as great as the electrical rating of the appliance.

3
WARNING
To prevent hot steam and hot water from scalding the body or causing other personal injury,
and also to prevent damage to the product, do not remove the water tank or portafilter when
you use this appliance to brew coee or froth milk. Before removing portafilter to brew another cup of coee,
make sure the appliance is in standby mode. If you want to add more water to the water tank, press the power
button until the appliance powers o.
WARNING
Do not touch the top cover of the machine after the machine has been working for a long time
so as to prevent burns.
2) If the appliance is of the grounded type, the extension cord should be a grounding type 3-wire cord.
3) The longer cord should be arranged so that it will not drape over the counter top or table top where it
can be pulled on by children or tripped over.
SAVE THESE INSTRUCTIONS
FOR HOUSEHOLD USE ONLY
4
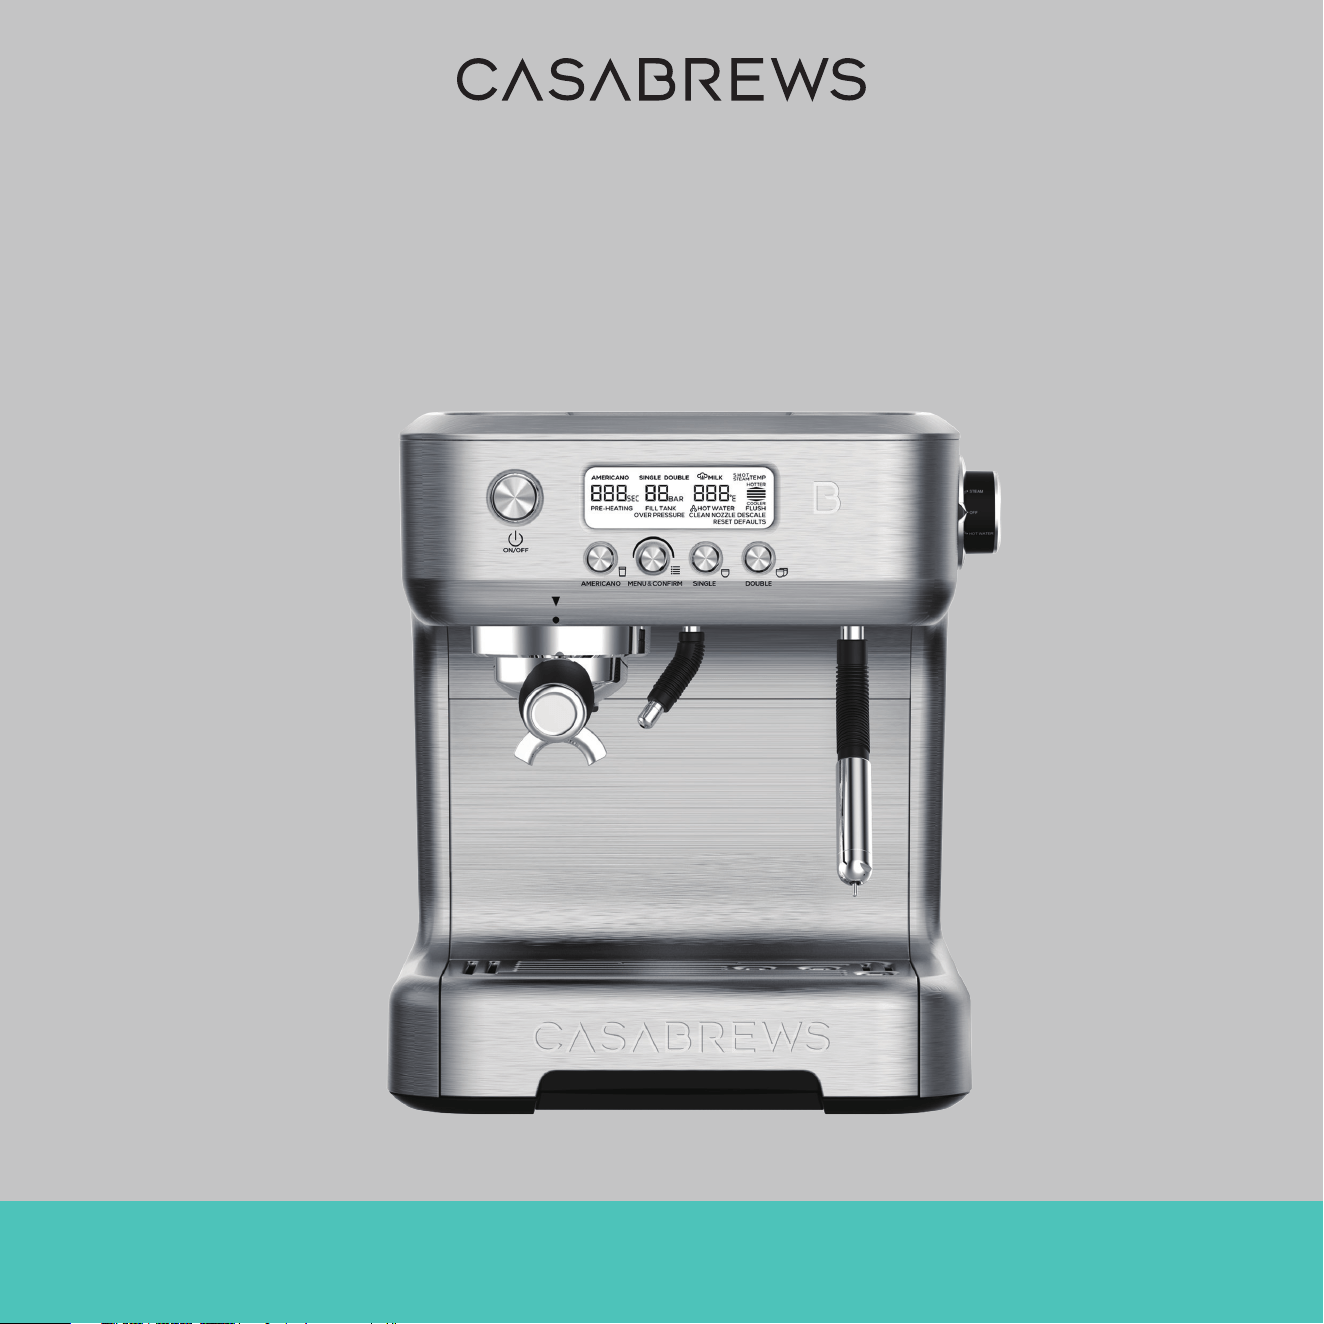
KNOW YOUR ESPRESSO COFFEE MACHINE
9
10
11
12
13
16
17
18
1
2
3
6
5
7
8
4
14
15
19
20
21
22 23 24
1. Stainless Steel Cup Warmer Plate
2. Panel Control
3. Anti-scalding Sleeve Hot Water Wand
4. Hot Water Wand
5. Drip Tray Grid
6. Main Body
7. Water Level Indicator
8. Drip Tray
9. Water Tank Lid
10. Water Tank
11. Spring Loaded Tamper D.58
12. Milk Pitcher
13. Steam Knob
14. Dual Wall ONE CUP Filter D.58
15. Dual Wall TWO CUP Filter D.58
16. Anti-scalding Sleeve Steam Wand
17. Steam Wand
18. NTC Milk Sensor
19. Single Wall ONE CUP Filter D.58
20. Single Wall TWO CUP Filter D.58
21. Stainless Steel Portafilter D.58
22. Coee Measuring Spoon
23. Cleaning Brush
24. Cleaning Needle
5
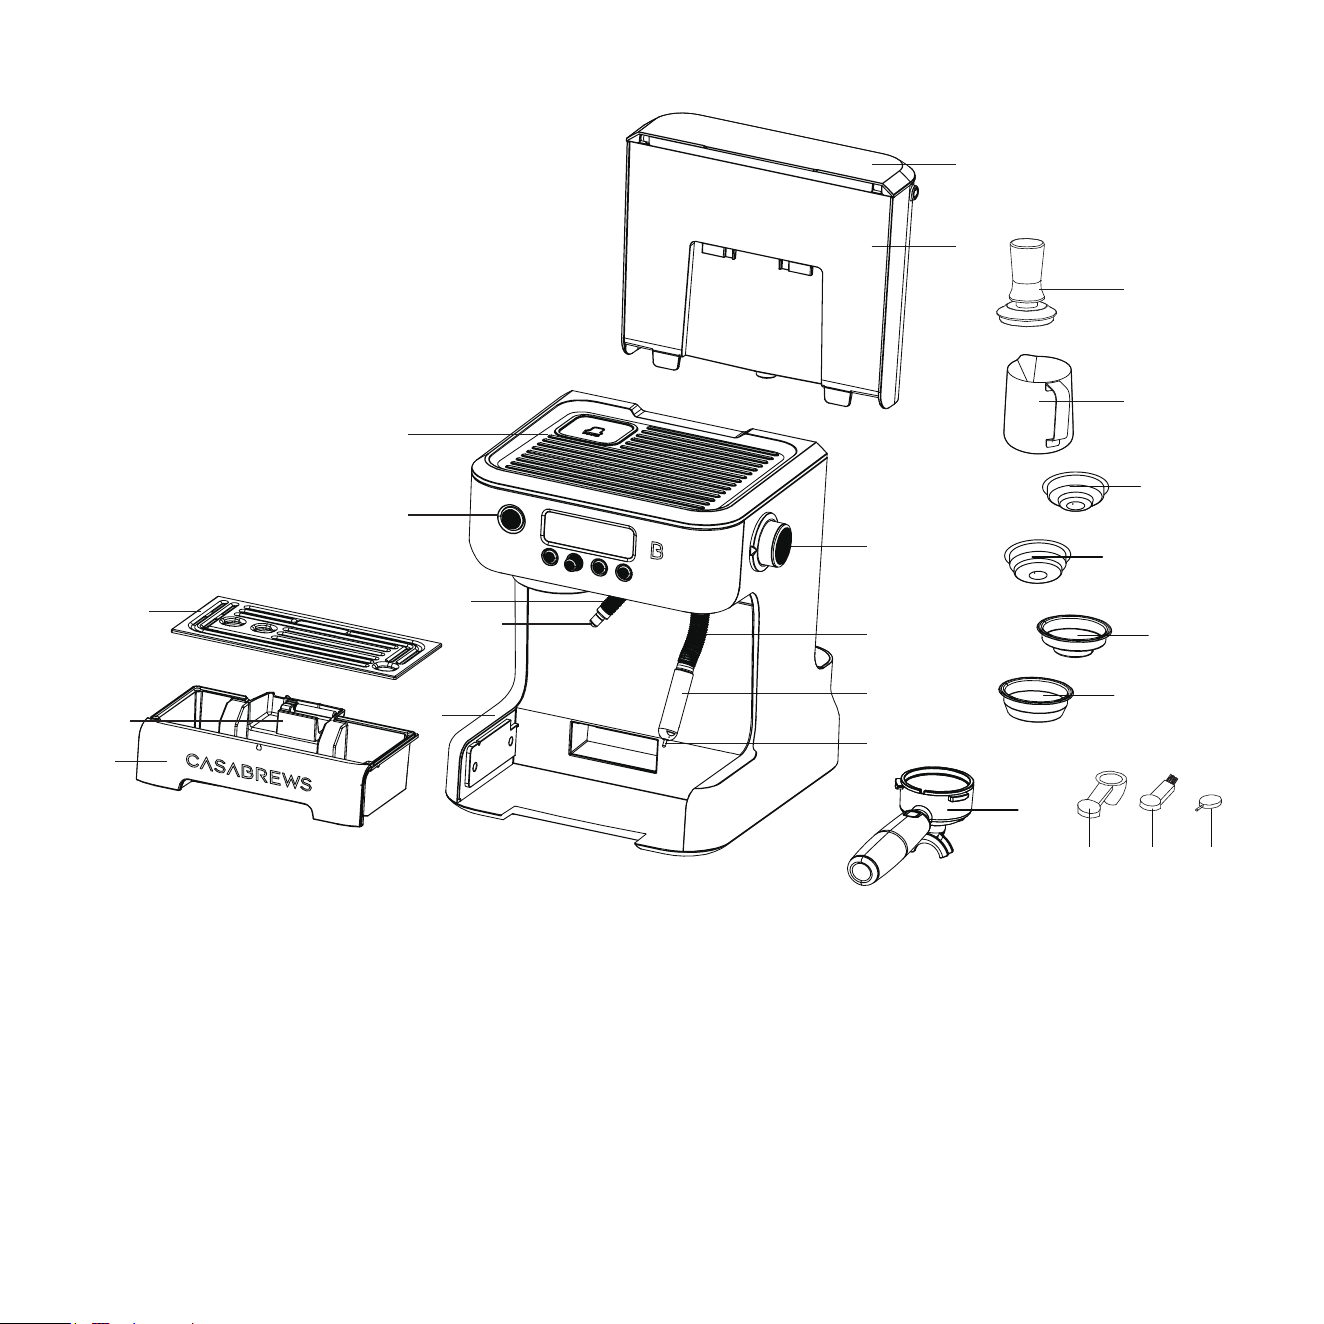
A. Power Button: Press to power ON/OFF.
B. AMERICANO Button: Press to brew an americano.
C. MENU & CONFIRM Button: Press to enter and press and hold more than 3 seconds to exit the main menu,
turn to navigate in the menu.
D. SINGLE Button: Press to brew a single espresso.
E. DOUBLE Button: Press to brew a double espresso.
F. LCD Display Screen: Comprehensive info with extracting progress animations.
CONTROL PANEL
F
EDCBA
ON/OFF
AMERICANO MENU & CONFIRM SINGLE DOUBLE

6
Model: NEUTRON PRO
Voltage: 120V~ 60Hz
Power: 1500W
Pump: Italian 20 Bar
Capacity of water tank: 2.7 L/91 OZ
Product size: 11.3x13.1x13.5 INCHES
Net weight: 20.46 LBS
SPECIFICATIONS
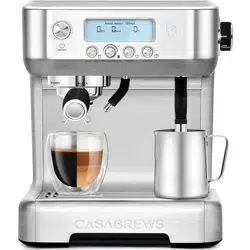
Dear customer,
Thank you for your purchase of the CASABREWS Espresso Coee Machine. To ensure
you get the best use of this machine, please take the time to read this manual and learn
how to use this espresso coee machine, even if you are an experienced home
barista – this machine may be dierent to ones you have operated before. The operating
instructions will show you how to use the product optimally and safely, and with a little
experimenting you will soon find your preferred settings. We hope that you enjoy your
purchase!

7
INITIAL USE
The initial use is necessary before using the machine. It will help to rinse the machine and prime the heating
system before the first use.
01. Fill the water tank with cold potable tap water.
02. Insert the plug into a wall outlet with suitable voltage (120V~, 60Hz), then one beep is emitted.
03. Press the Power button, then one beep is emitted.
LCD shows FLUSH and SINGLE button turns illuminated.
Place a cup underneath brew head.
Replace the water daily. The water tank should be filled with fresh, cold tap water before each use.
NOTE:
Remove and discard all labels and packaging materials attached to your espresso coee machine.
Ensure you have removed all parts and accessories before discarding the packaging.
Remove the packaging and the plastics bags containing the accessories.
Clean the water tank, portafilter, filter baskets, milk jug and drip tray using warm water and a gentle dishwashing
liquid. Rinse well, then dry thoroughly before reassembling.
FILLING THE WATER TANK
Fill the water tank with cold potable tap water to below the MAX marking indicated on the side of the water tank.
BEFORE FIRST USE
After machine turns on first use mode
TWO CUP
TWO CUP
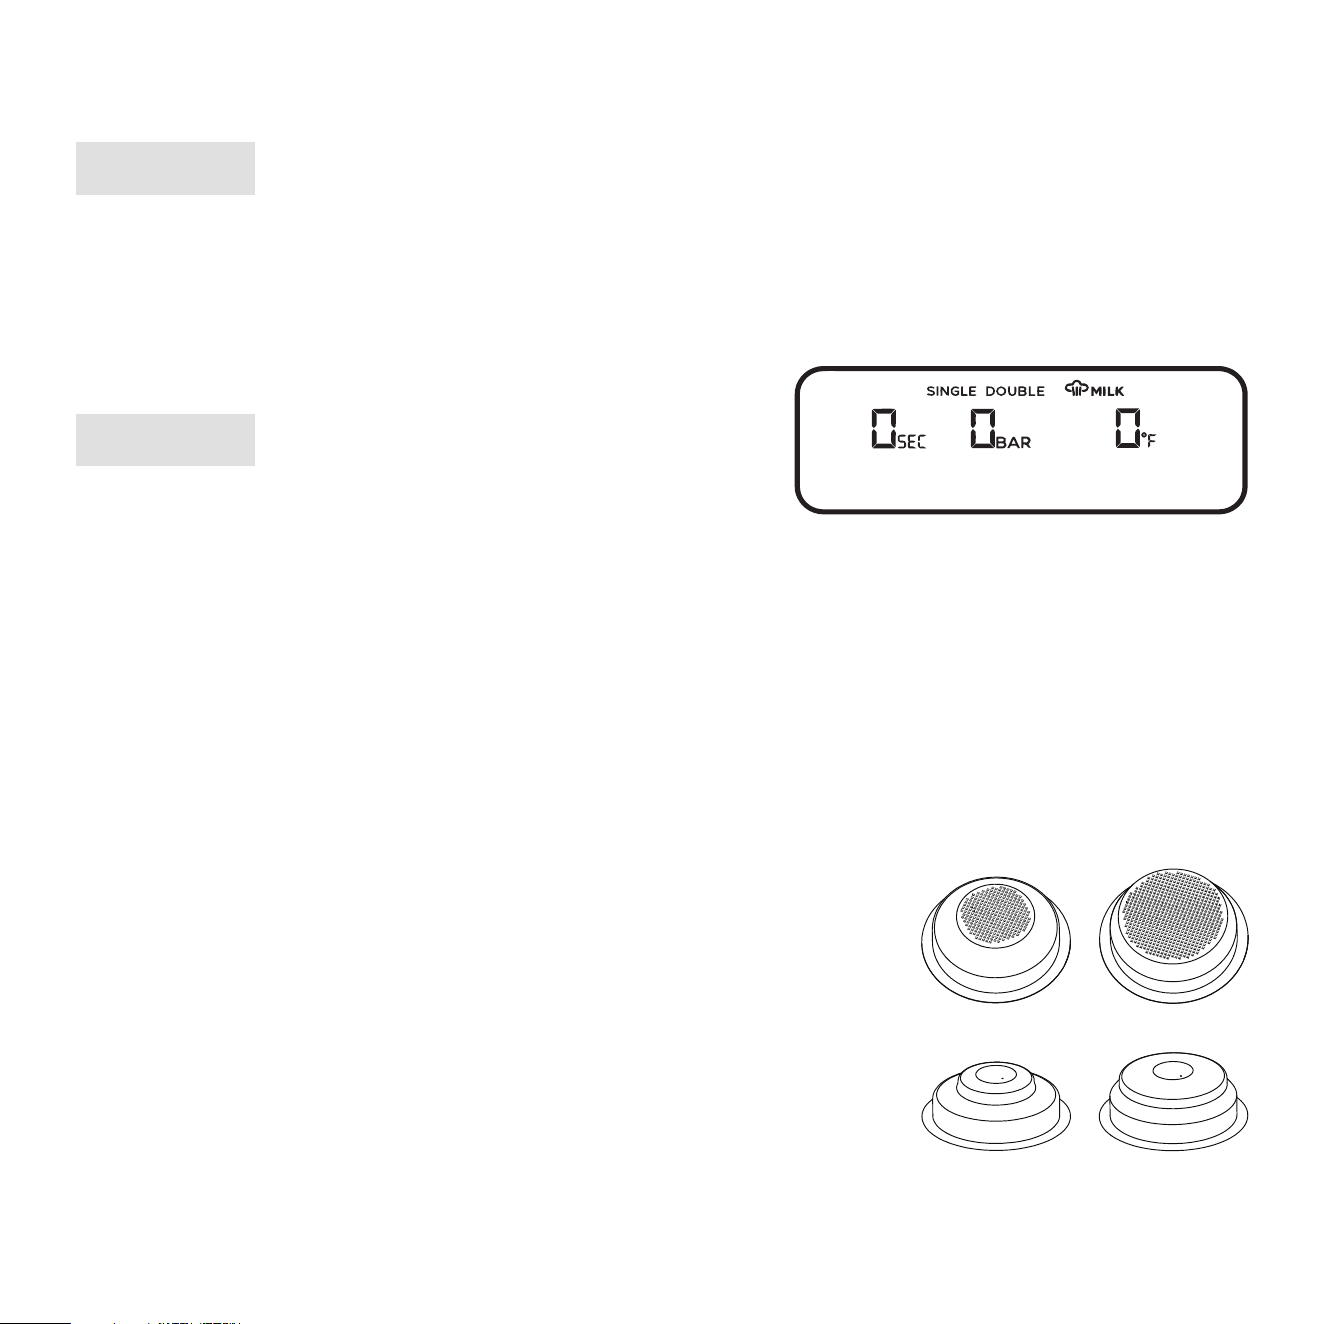
SELECTING THE FILTER SIZE
This machine includes 4 filters: 2 single wall filters and 2 dual wall filters.
Single wall filters:
Use single wall filters if grinding fresh whole coee beans. Single wall filters allow you
to experiment with grind and dose to create a more balanced espresso.
Dual wall filters:
Use dual wall filters if using pre-ground coee. Dual wall filters regulate the pressure
and help to optimize the extraction regardless of the grind, dose or freshness.
ONE CUP
ONE CUP
8
04. To go ahead SINGLE button must be pressed and machine starts flushing from brew head for 30 seconds,
afterwards automatically stop brewing.
05. Machine is heating-up, accordingly all buttons excepted Power button are flashing simultaneously.
06. Upon heating up has finished all button are illuminated.
07. Machine is in READY mode.
08. Now your espresso coee machine is ready to use.
Heating up process takes about 2 minutes.
NOTE:
You cannot stop dispensing water during 30 seconds of flushing.
This FLUSH process run for the first time only or when you resetting defaults and you turn
machine o and on.
NOTE:
"READY" mode
The provided filters are designed for:
ONE CUP filter = approx. 13-15g
TWO CUP filter = approx. 19-21g
Insert either the ONE CUP or TWO CUP filter into the portafilter.
9
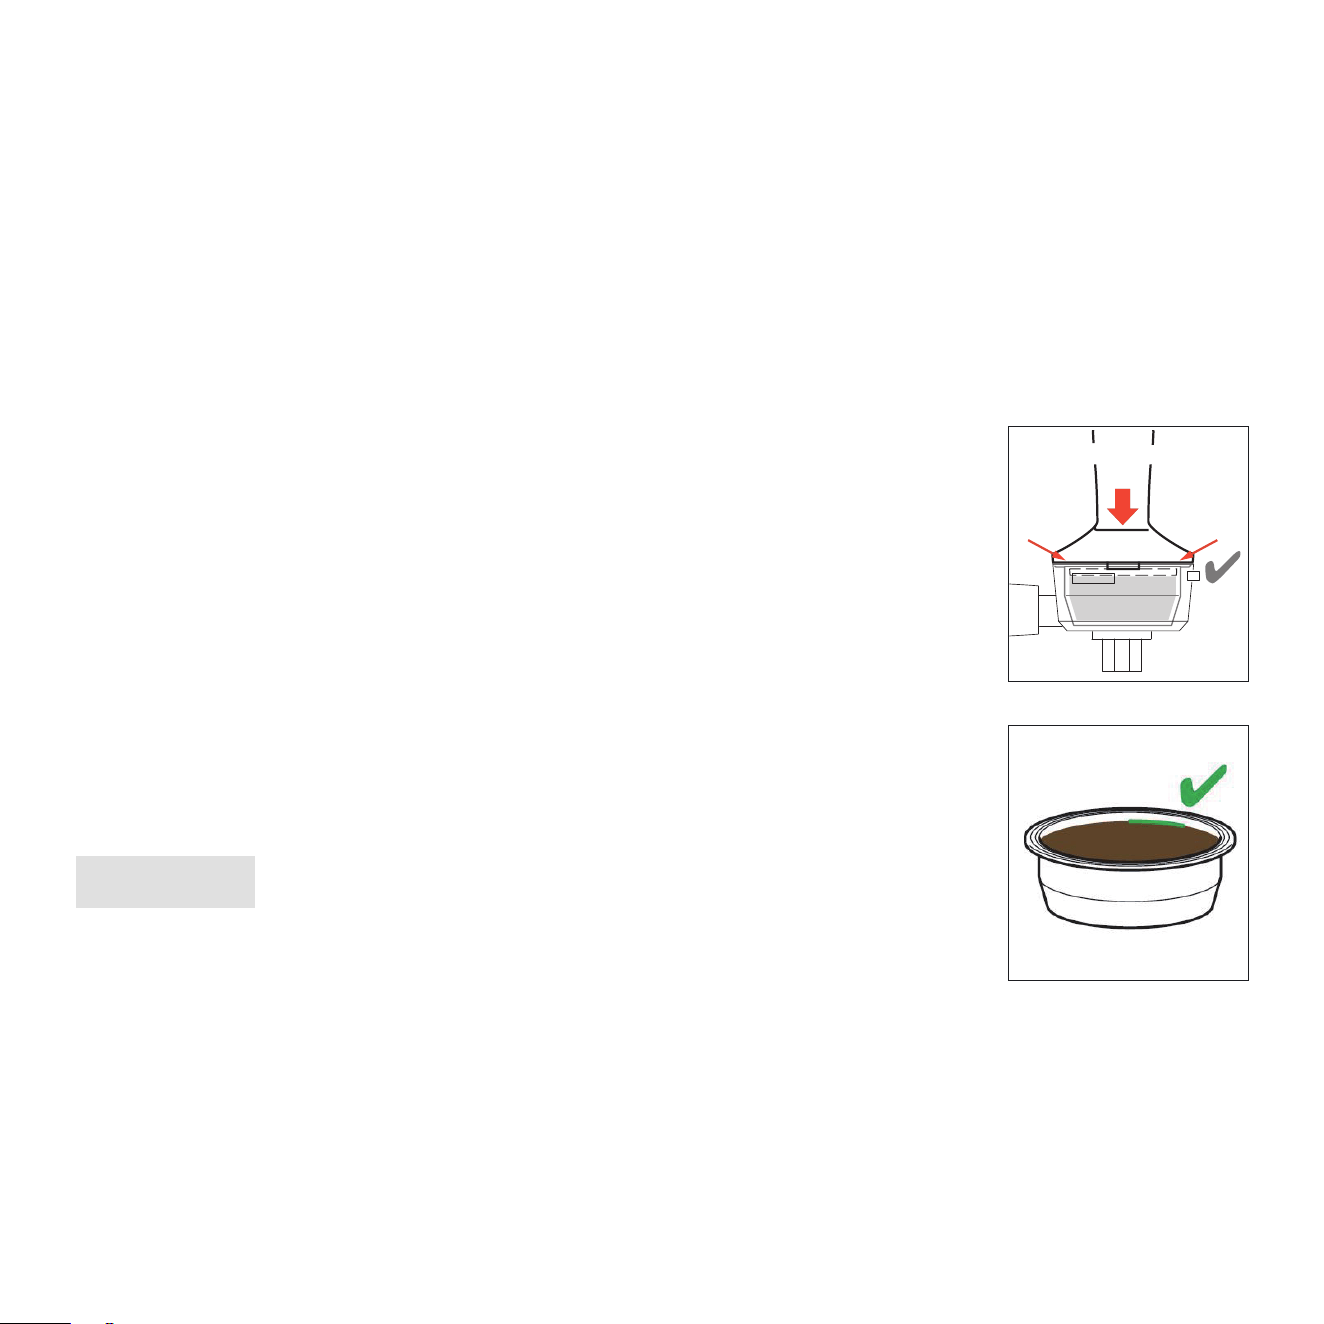
The surface of ground coee should not be beyond the MAX mark after
tamping, otherwise the portafilter might not be able to be locked into the
brew head.
NOTE:
01.
Using the spring loaded tamper, tamp down firmly using approx. 11-22lbs (5-10kg)
of pressure.
02. Wipe excess coee from the rim of the filter to ensure a proper seal is achieved in
the brew head.
As a guide to using the right amount of ground coee, the levelling guide of the tamper
should be in touch with the top of the filter after the ground coee has been tamped.
Also, the MAX marks in both of the filters are intended to assist in identifying the correct
quantity of ground coee more easily.
HOW TO TAMP THE GROUND COFFEE
You are able to stop brewing by pressing SINGLE
or DOUBLE button before preset volume is
reached.
NOTE:
If you feel an excessive resistance while you rotate towards the centre
the portafilter, we recommend to spread some edible oil on the rim of
the filter.
NOTE:
Before inserting the portafilter, move the hot water wand to avoid interference.
NOTE:
10
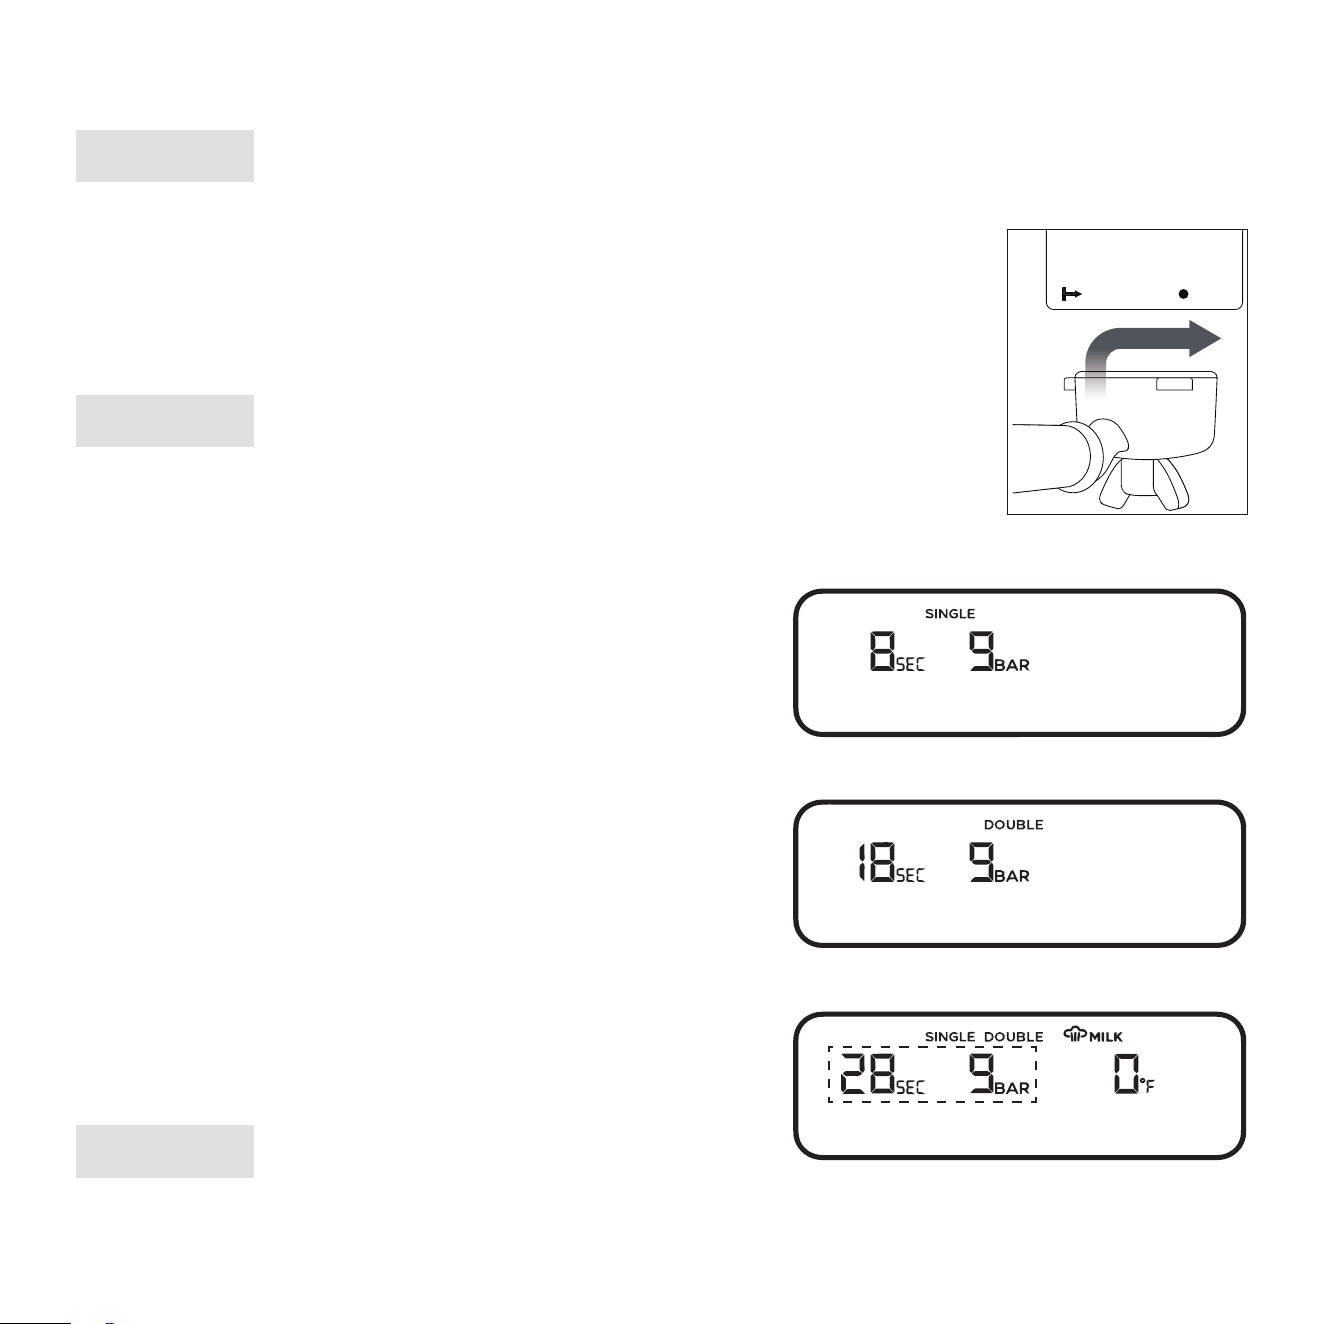
INSERTING THE PORTAFILTER
Place the portafilter underneath the brew head so that the handle is aligned with the
INSERT position. Insert the portafilter into the brew head and rotate the handle towards
the centre until firm resistance is felt.
MAKING ESPRESSO
01. Place a pre-warmed cup beneath the portafilter.
02. Press the SINGLE or DOUBLE button, machine will beep,
to brew for pre-set volume. The machine starts brewing.
03. The LCD will show the pressure of extraction, and the timer
will start to count up.
04. The pre-programmed volume of a single espresso is approx.
35ml/1.18oz, and the double espresso is approx. 75ml/2.54oz.
05. The machine will automatically stop, machine will beep,
once the pre-set volume has been extracted, and the LCD
will go back to READY mode, but brewing time and maximum
pressure will flash for 10 seconds, then they will disappear.
You are able to press SINGLE, DOUBLE or AMERICANO
button for the next brewing immediately.
HOW TO MAKE AN ESPRESSO
INSERT LOCK
Brewing a double espresso
Brewing a single espresso
After finishing to brew the icons dashed
rectangle are flashing for 10 seconds.

IDEAL EXTRACTION
If the pressure shown on the LCD is between 6-12 bar, it means the espresso has been extracted at the ideal
pressure.
Features:
* Slow flow like warm honey.
* Crema is golden brown with a fine mousse texture.
* Espresso is dark brown.
11
OVER EXTRACTION
If the pressure shown on the LCD is over 12 bar, you have either too much ground coee in the filter and /or the
grind is too fine. This is an OVER EXTRACTED shot.
UNDER EXTRACTION
If the pressure shown on the LCD is under 6 bar, you do not have enough ground coee in the filter and /or the
grind is too coarse. This is an UNDER EXTRACTED shot.
Solutions:
* Select a finer pre ground coee or grind settings in your
CASABREWS grinder.
* Increase the amount of ground coee and retry.
* Increase the tamping pressure and retry.
Features:
* Fast flow like water.
* Crema is thin and pale.
* Espresso is pale brown.
* Tastes bitter/sharp, weak and watery.
Features:
* Flow drips very slowly or not at all.
* Crema is dark and spotty.
* Espresso is very dark brown.
* Tastes bitter and burnt.
Solutions:
* Select a coarser pre ground coee or grind settings in your
CASABREWS grinder.
* Decrease the amount of ground coee and retry.
* Decrease the tamping pressure and retry.
12
The adjustable volume for a single espresso ranges between 30ml/1.01oz and 60ml/2.03oz,
and a double espresso ranges between 70ml/2.37oz and 105ml/3.55oz. The machine will fail
to program volumes outside of this range.
NOTE:
PROGRAMMING ESPRESSO VOLUME
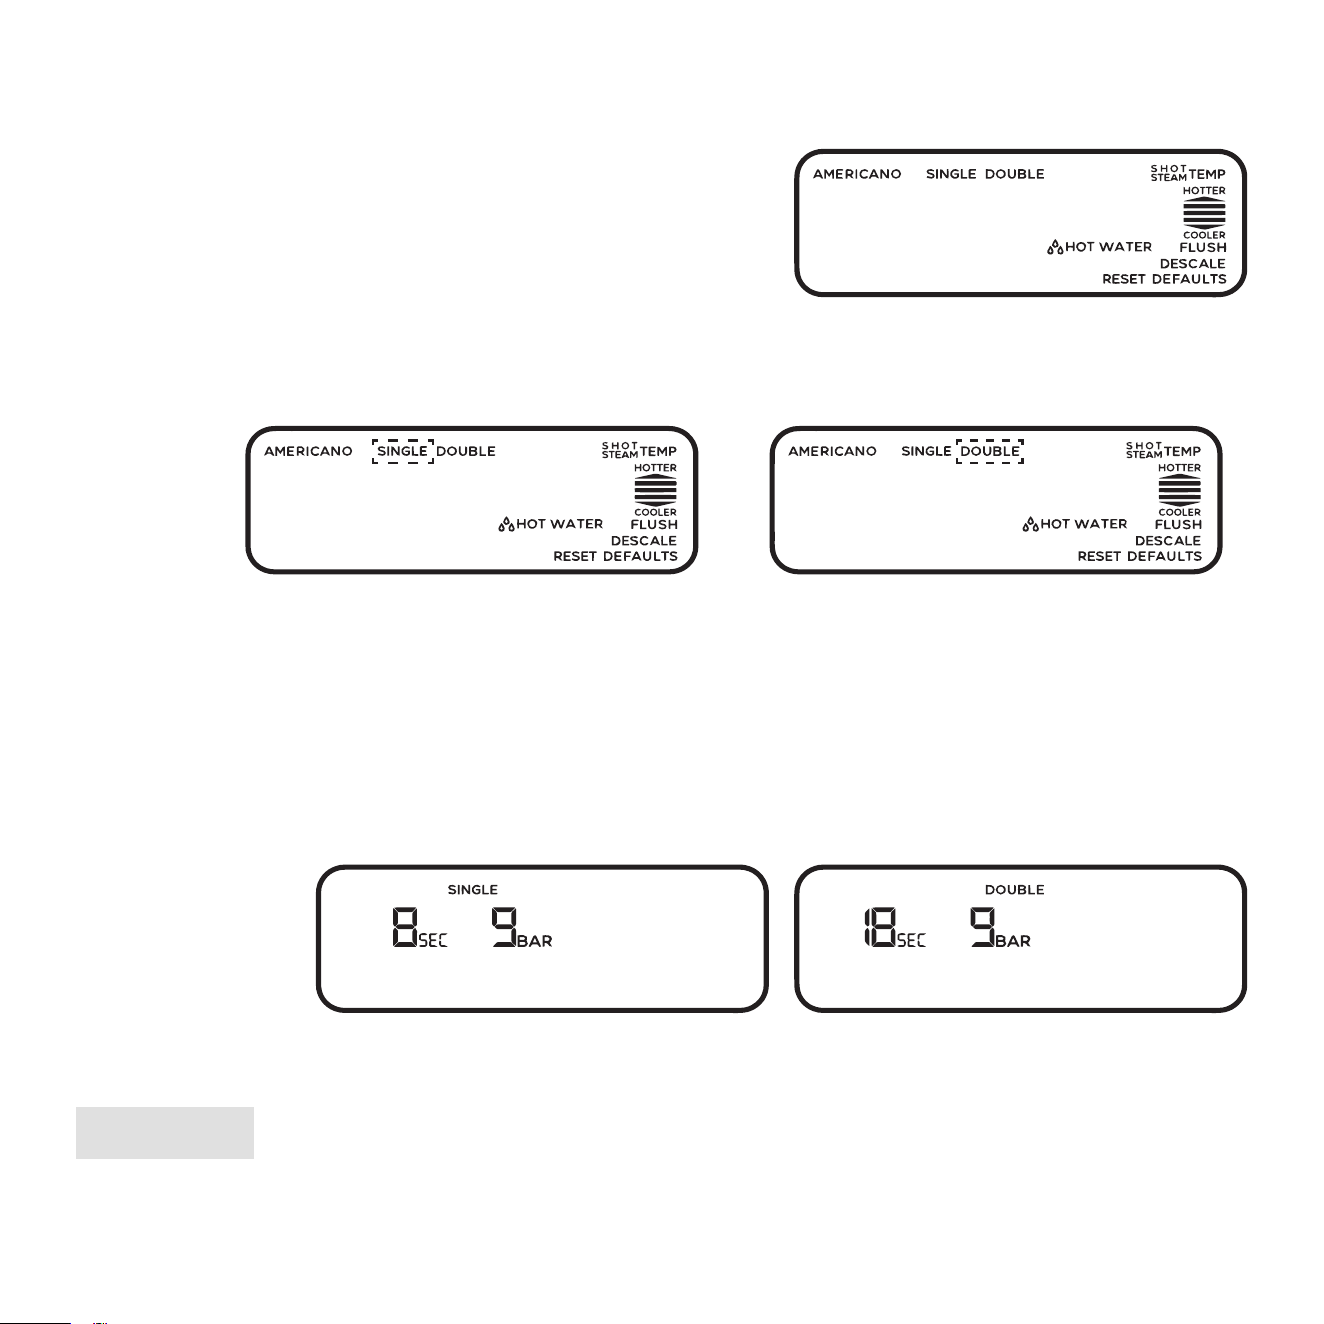
01. Press the MENU button to enter the main menu, machine
will beep.
HOW TO PROGRAM THE VOLUME OF SINGLE/DOUBLE ESPRESSO
02. Use the MENU dial to navigate through the menu until LCD shows SINGLE or DOUBLE SHOT are
flashing. To select, press theMENU dial.
03. The machine starts to brew. The single or double button is illuminated when brewing.
04. To stop the extraction at the desired volume, press the SINGLE or DOUBLE button again. The LCD shows
brewing time and pressure and the machine will beep to indicate that the custom setting has been
programmed. The machine will then return to READY mode. The custom setting can now be activated by
pressing the SINGLE or DOUBLE button.
Main menu
When selecting to program the volume of single
espresso icon in the dashed rectangle is flashing
When selecting to program the volume of double
espresso icon in the dashed rectangle is flashing
During programming the
volume of single espresso
During programming the
volume of double espresso
01. Press MENU button to enter to the main menu, then
machine will beep.
Main menu
02. Use the MENU dial to navigate through the main menu, until LCD shows such flashing icons, then press
MENU dial machine will beep.
Selecting single and double espresso shot
temperature icons in the dashed rectangle
are flashing
13
04. The machine will beep to indicate that the custom setting has been programmed. Then machine will
return to READY mode.
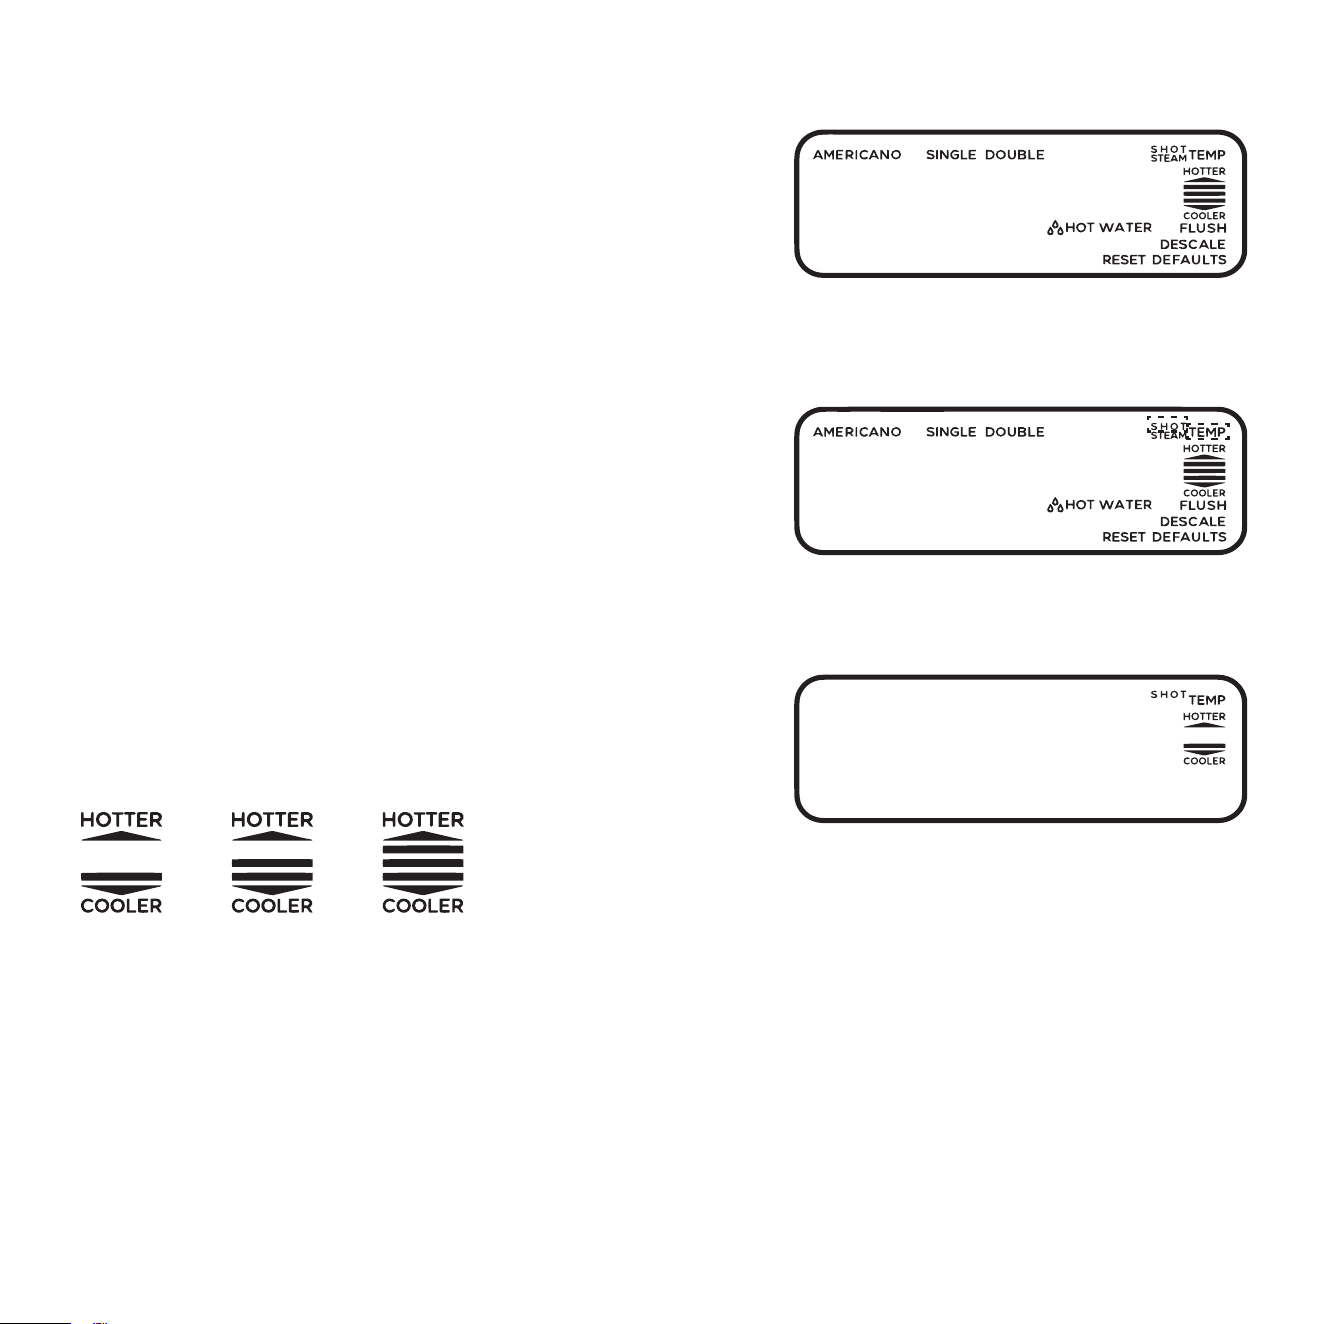
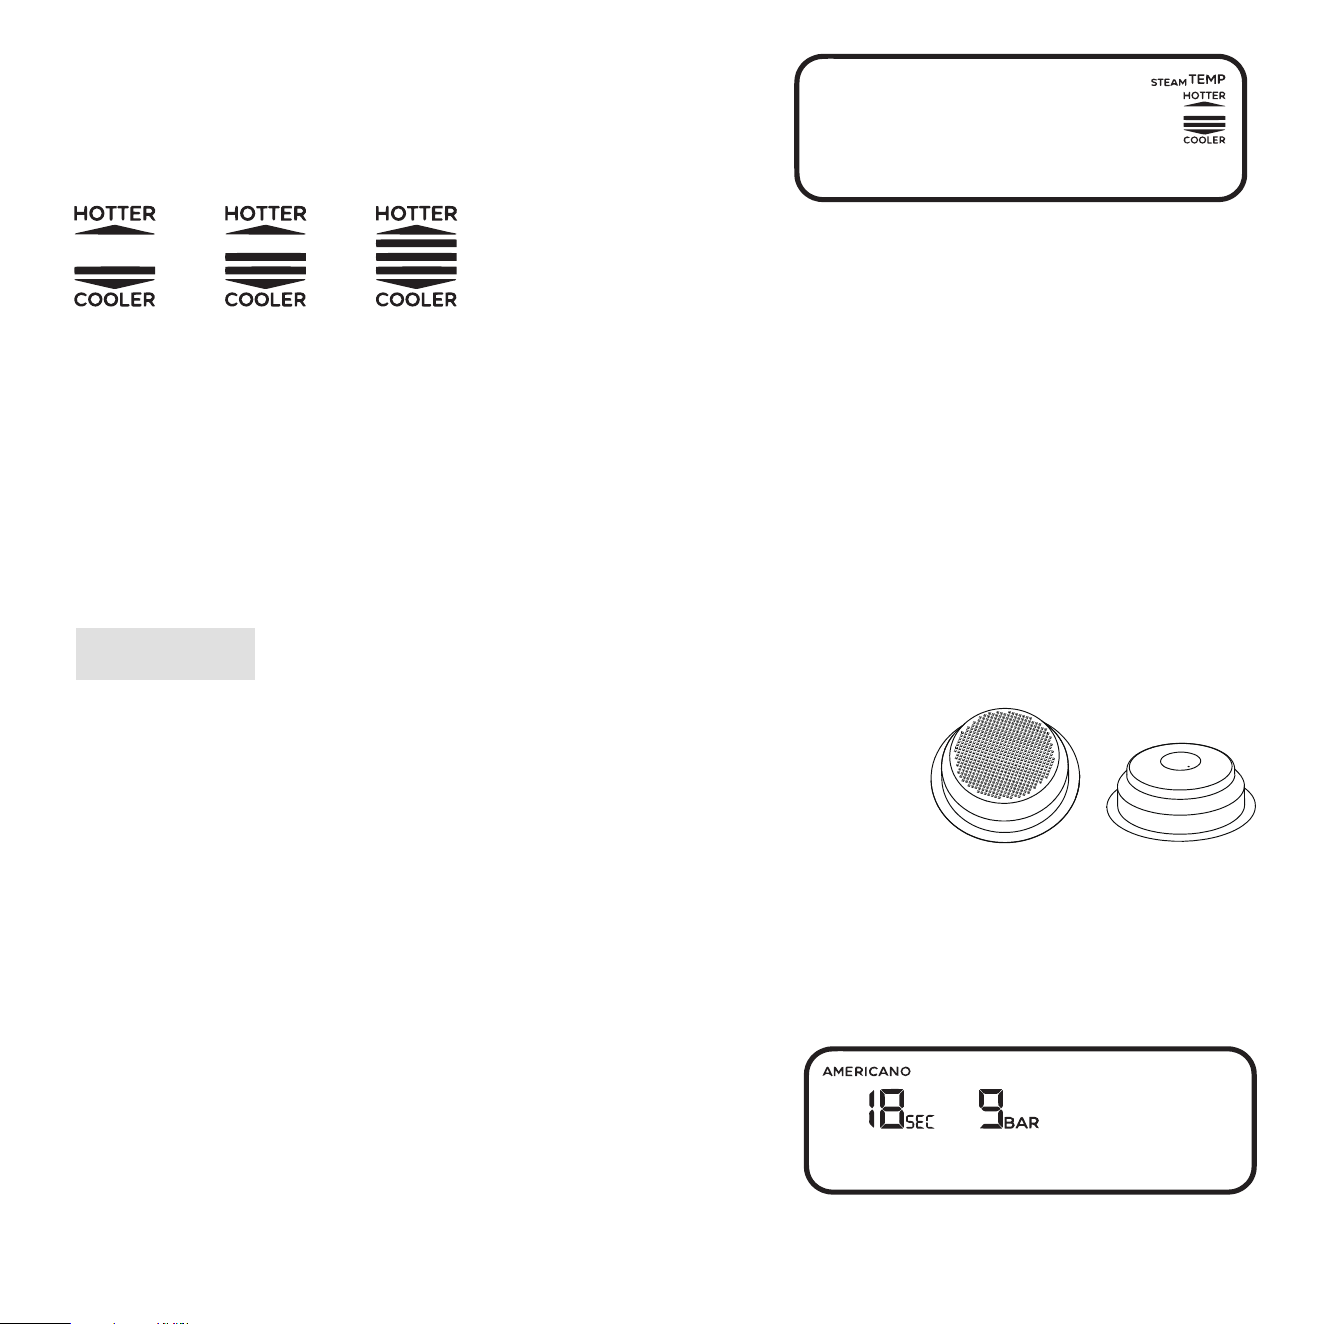
03. Turn MENU dial to select the shot temperature you want, then
press the MENU dial.
You are able to choose three preset temperatures:
Default parameter is middle for single and double espresso.
Selecting single, double espresso shot
temperature
Cool Middle Hot
HOW TO SET THE ESPRESSO TEMPERATURE
Before frothing the milk, release steam for 5-10 seconds.
This process is to purge out the residual water inside the steam wand.
We recommend using cold(39°F-41°F), fresh whole milk. The density of the frothed milk will depend on the milk
fat content.
x
AUTOMATIC FROTHING
01. Fill the milk pitcher with 150ml/5.07oz cold fresh whole milk.
02. Lift the steam wand and insert it into the milk
with the steam wand tip just below the surface
of the milk, close to the right-hand side of the
jug at a 3 o’clock position.
03. Lean the milk pitcher on the drip tray grid.
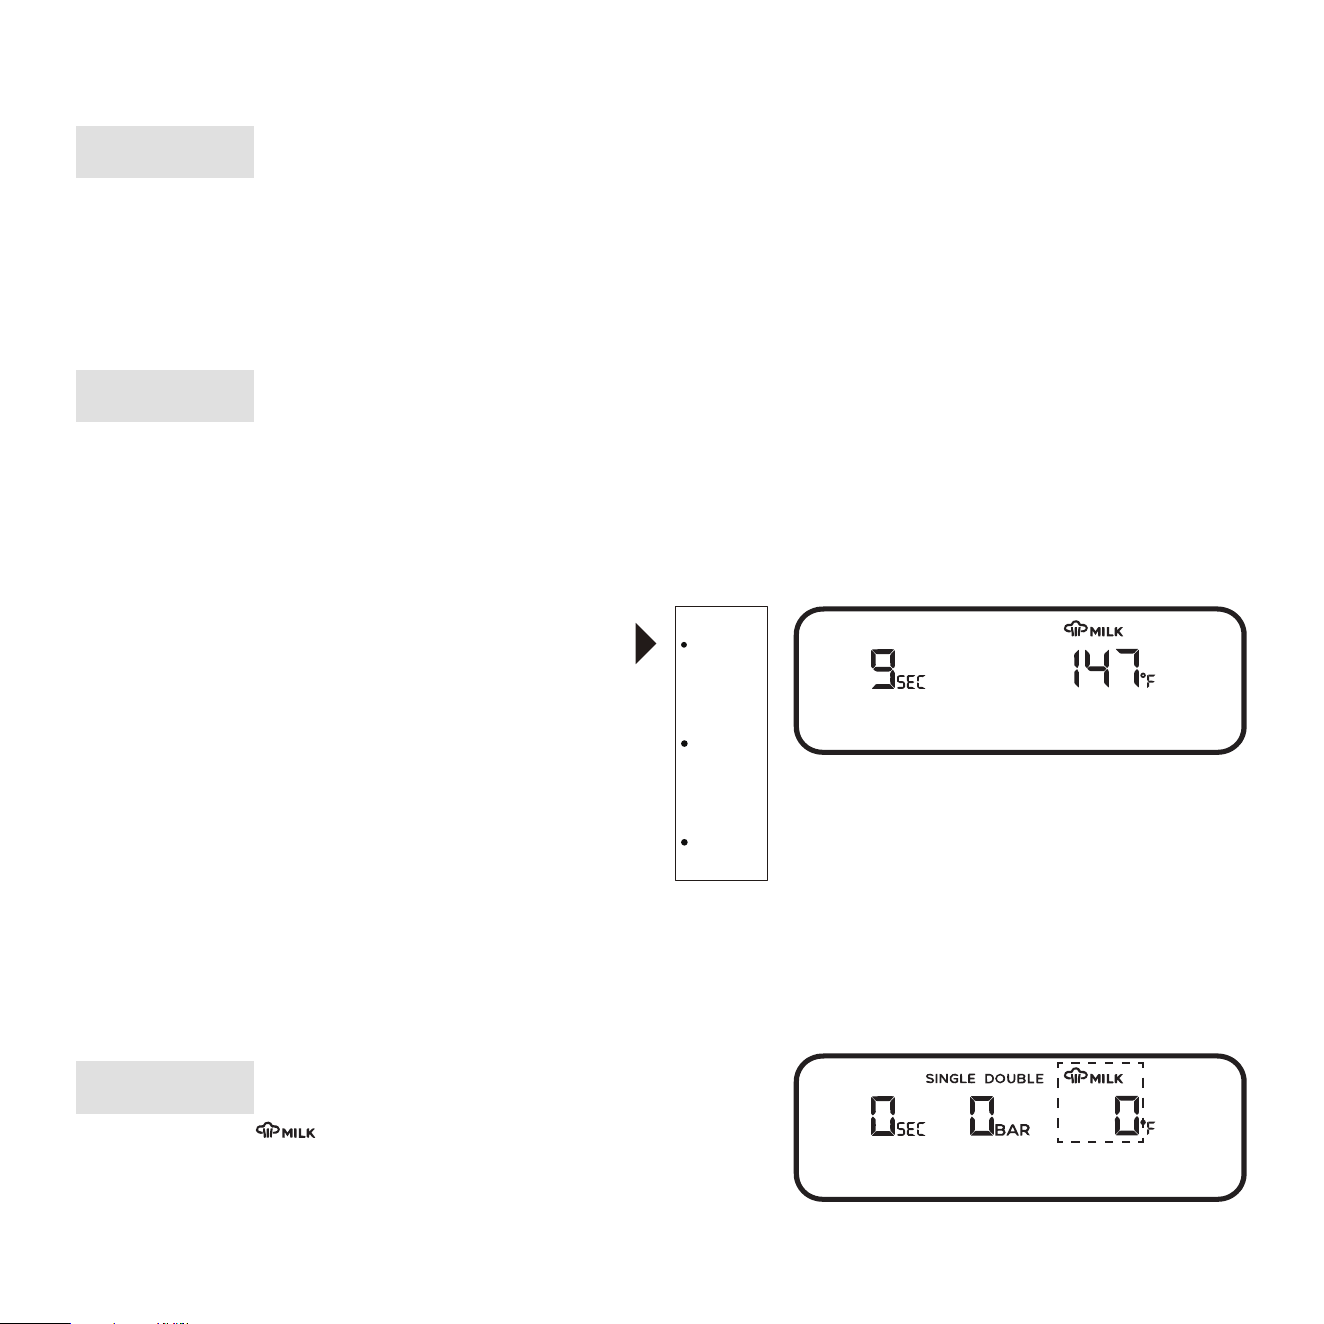
04. Turn the STEAM knob to the
STEAM position, and LCD shows
temperature.
05. Keep the steam wand tip just under the surface of the milk until the milk is spinning clockwise, producing a
vortex.
06. Machine will stop steaming when preset temperature is reached. (Default setting is hot).
HOW TO FROTH THE MILK
This machine is installed with a dedicated heater to make steam. When lateral white LED turns
to be illuminated, then steam is ready to use.
NOTE:
Automatic frothing works upon 150ml/5.07oz only has been poured in the milk pitcher.
Instead of, you like frothing more than 150ml/5.07oz to 200ml/6.76oz of cold fresh whole
milk, you must use manual frothing.
NOTE:
Upon machine reached preset temperature of
milk, and steam knob is still in STEAM position,
then LCD blinks icon and temperature icon for three times
then one beep is emitted and repeat it again. Until steam knob is
back in OFF position.
NOTE:
STEAM
OFF
HOT WATER
Making steam
14
MANUAL FROTHING
01. Fill the milk pitcher with more than 150ml/5.07oz cold fresh whole milk
02. Lift the steam wand and insert it into the milk with the steam wand tip just below the surface of the milk,
close to the right-hand side of the jug at a 3 o’clock position.
03. Turn the STEAM knob to the STEAM
position, and LCD shows temperature.
04. Keep the steam wand tip just under the
surface of the milk until the milk is spinning
clockwise, producing a vortex. Accordingly
move downwards the pitcher while milk
during frothing increases its volume to keep
the steam wand nozzle just below the surface
of the milk.
You are able to brew single/double espresso and americano, during making steam.
Be aware of scalding.
KINDLY REMINDER:
STEAM
OFF
HOT WATER
07. Turn STEAM knob in OFF position.
08. Remove the steam wand from milk pitcher.
09. Wipe the steam wand with a clean damp cloth. Then return to lowered position
over the drip tray, point it out toward into the slot of the drip dray grid.
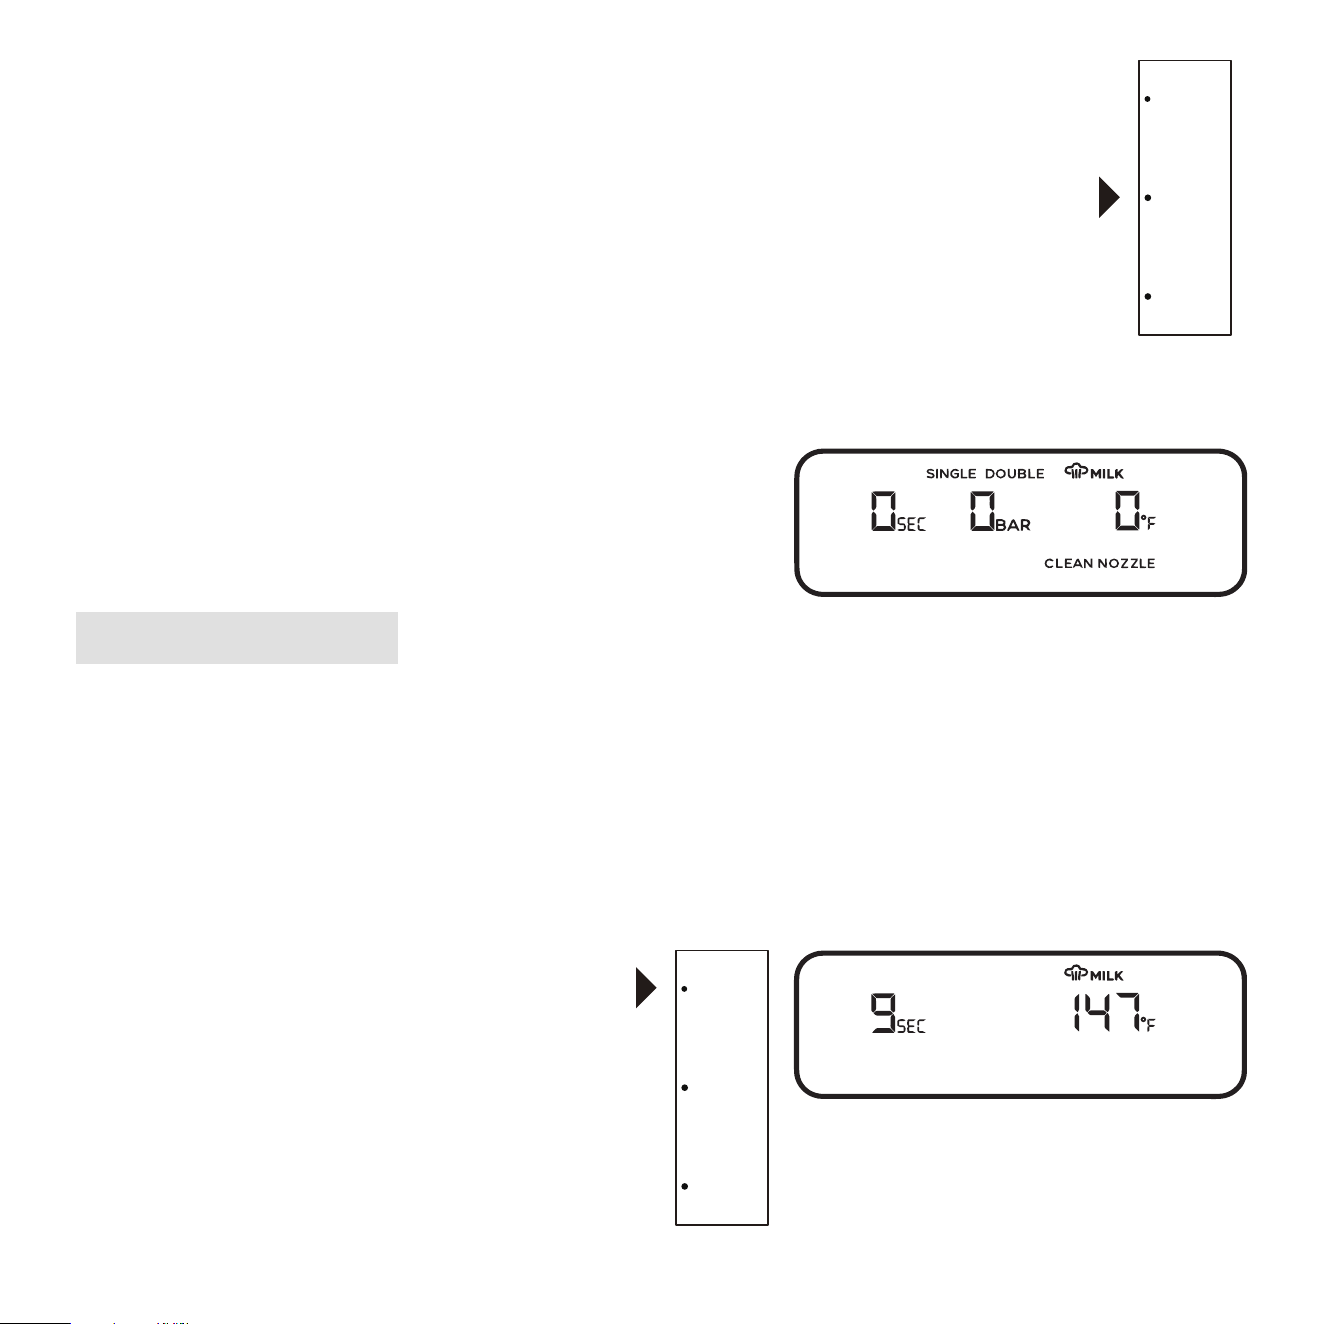
10. After frothing milk, it is recommended to flush the residual milk from the steam wand.
11. The LCD will display CLEAN NOZZLE to remind you to
clean steam wand. To remove it, make steam.
15
STEAM
OFF
HOT WATER
Making steam
You are able to brew single/double espresso and americano, during making steam.
Be aware of scalding.
KINDLY REMINDER:
HOW TO SET STEAM TEMPERATURE
05. Machine will stop steaming when preset temperature is reached. (Default setting is hot).
Main menu
Selecting steam temp
icons in the dashed rectangle are flashing
01. Press MENU button to enter to the main menu, then machine
will beep.
02. Use the MENU dial to navigate through the main menu,
until LCD shows such flashing icons, then press MENU dial.
16
06. Turn STEAM knob in OFF position.
07. Remove the steam wand from milk pitcher.
08. Wipe the steam wand with a clean damp cloth. Then return to lowered position over the drip tray, point it
out toward into the slot of the drip dray grid.
09. After frothing milk, it is recommended to flush the residual
milk from the steam wand.
10. The LCD will display CLEAN NOZZLE to remind you to
clean steam wand. To remove it, make steam.
Upon machine reached preset temperature of
milk, and steam knob is still in STEAM position,
then LCD blinks icon and temperature icon for three times
then one beep is emitted and repeat it again. Until steam knob is
back in OFF position.
NOTE:
17
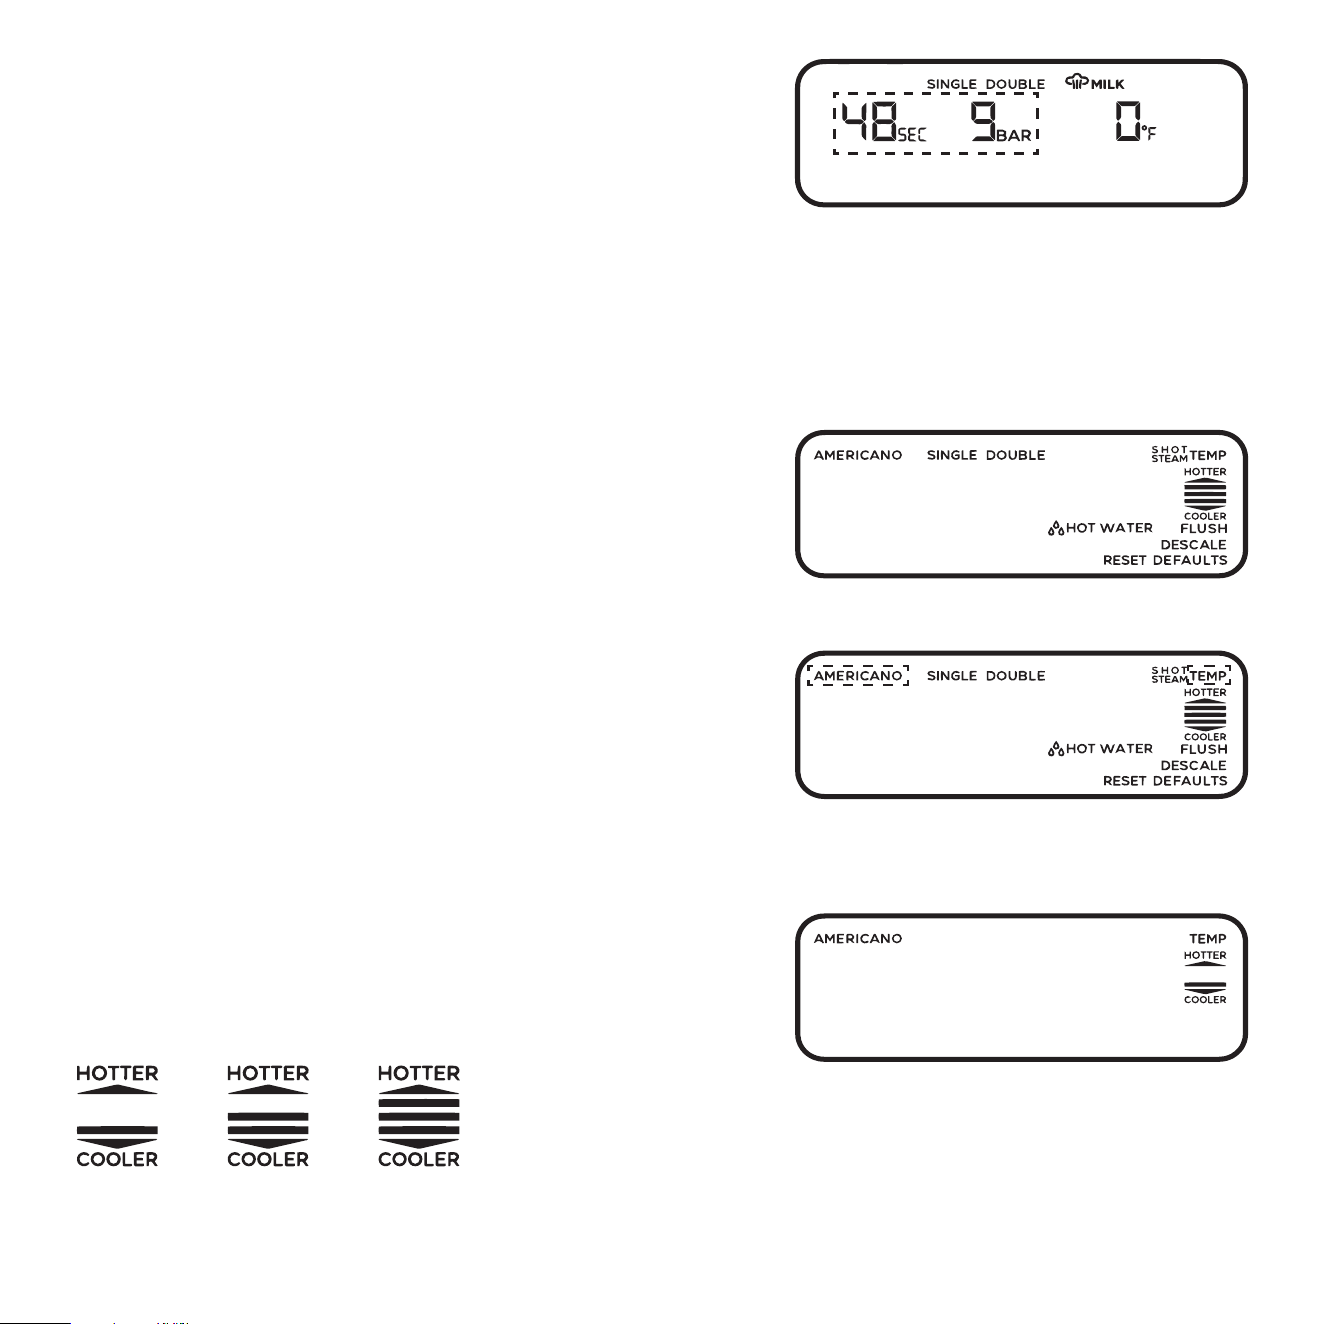
03. Turn MENU dial to select the steam temperature you want,
then press the MENU dial.
You are able to choose three preset temperatures:
Default parameter is hot.
04. The machine will beep to indicate that the custom setting has been programmed. Then machine will return
to READY mode.
During selecting the temperature
of steam
Cool Middle Hot
01. Insert TWO CUP filter into the portafilter to brew americano.
(ground coee approx. 19-21g)
02. Place a cup, with a capacity of at least 8oz, beneath the portafilter.
03. Point hot water wand toward the cup.
04. Press americano button, machine will beep, then the machine starts brewing, firstly a coee
(approx. 70ml/2.37oz), automatically stop brewing. Secondly hot water starts automatically dispensing,
approx. 100ml/3.38oz, total americano volume approx. 170ml/5.75oz.
05. The LCD will show the pressure of extraction, and the timer
will start to count up.
MAKING AN AMERICANO
Brewing an americano
during brewing coee
TWO CUP
TWO CUP
Before inserting the portafilter, move the hot water wand to avoid interference.
NOTE:
After finishing to brew the icons dashed
rectangle are flashing for 10 seconds.
06. The machine automatically stop, machine will beep, once the
pre-set volume has been extracted, then LCD will go back to
READY mode, but brewing time and maximum pressure will
flash for 10 seconds, then they will disappear.
You are able to press SINGLE, DOUBLE or AMERICANO
button for the next brewing immediately.
HOW TO SET THE AMERICANO TEMPERATURE
01. Press MENU button to enter to the main menu,
then machine will beep.
Main menu
Selecting americano shot temperature
icons in the dashed rectangle are flashing
02. Use the MENU dial to navigate through the main menu,
until LCD shows such flashing icons, then press MENU dial.
03. Turn MENU dial to select the americano temperature you
want, then press the MENU dial.
You are able to choose three preset temperatures:
Default parameter is hot.
During programming the temperature
of americano
Cool Middle Hot
18
04. The machine will beep to indicate that the custom setting has been programmed. Then machine will return
to READY mode.
19
The hot water will stop after brewing approx.
215ml/7.27oz automatically.
Steam knob is in HOT WATER position and LCD goes back to
READY mode, but icon will flash for three times and
one beep is emitted and repeat again, until steam knob turns back
in OFF position.
NOTE:
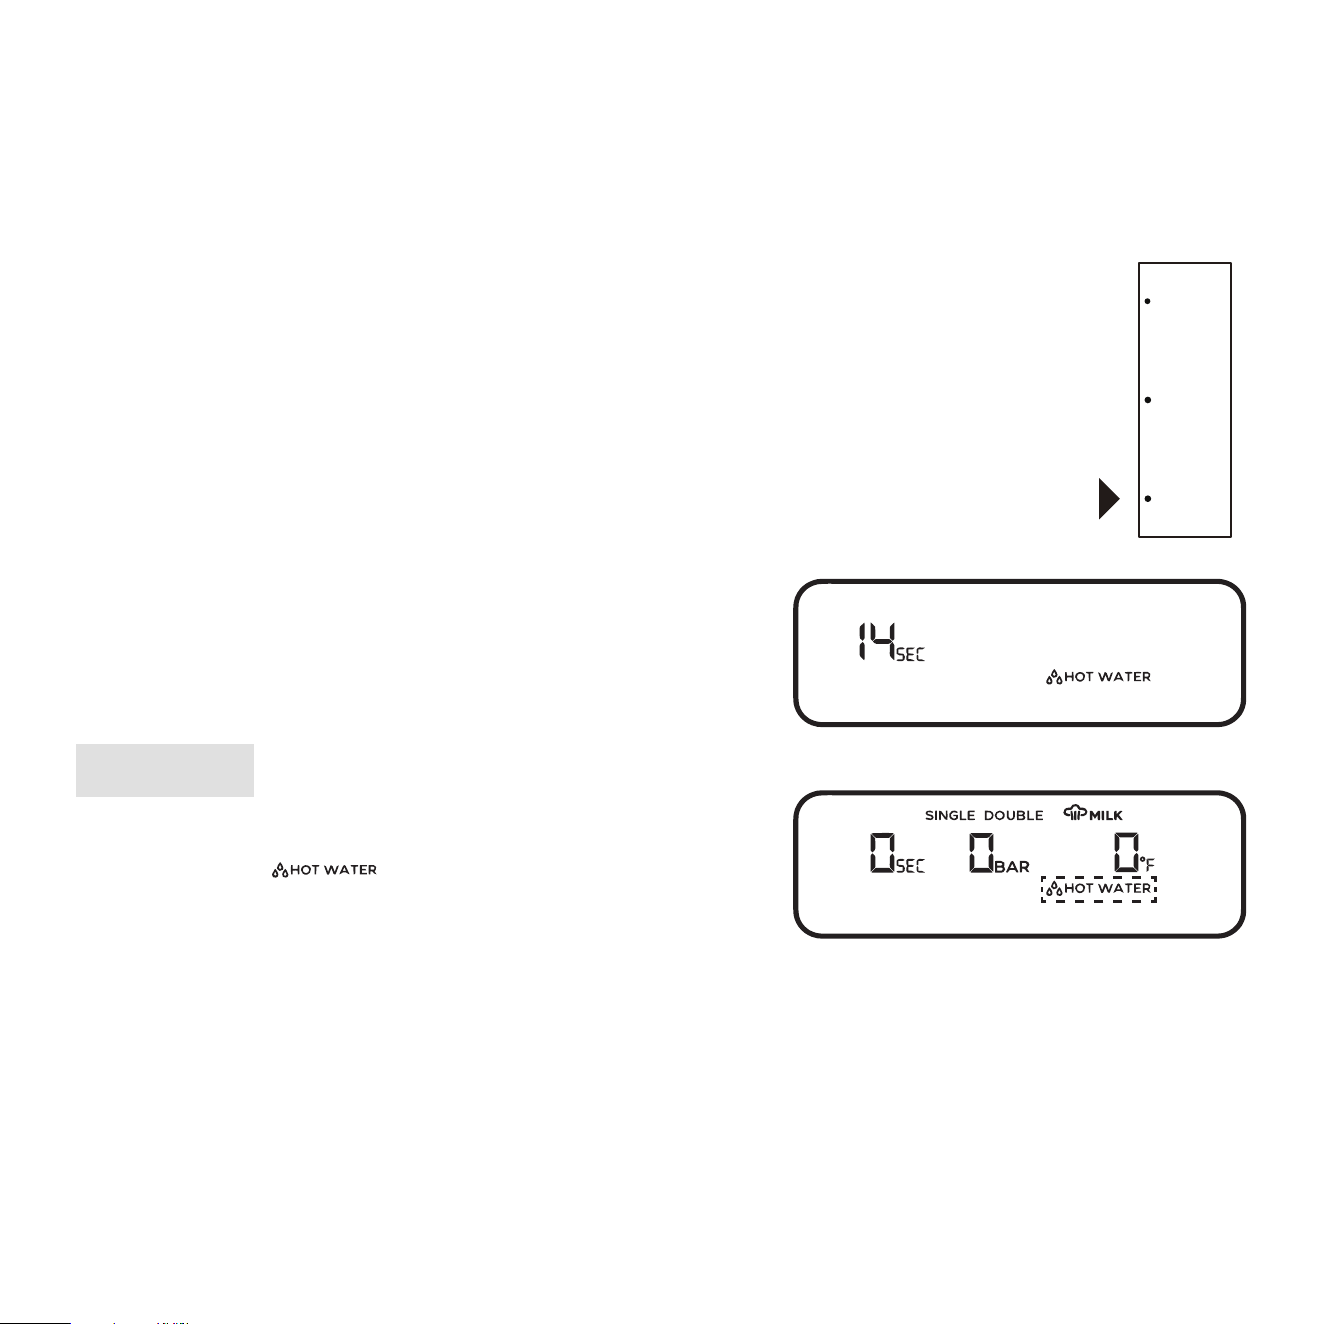
01.
Point hot water wand toward the cup.
02. The hot water function can be used to clean and preheat cups, or to add
hot water manually. To activate the hot water, turn the STEAM knob to
HOT WATER, then machine will beep.
03. The LCD will show that HOT WATER has been activated,
and the timer starts to count up.
04. To stop the hot water, turn the knob back to the OFF position,
then machine will beep.
HOW TO MAKE HOT WATER
STEAM
OFF
HOT WATER
Making hot water
01. Press MENU button to enter to the main menu, then machine
will beep.
02. Use the MENU dial to navigate through the main menu, until LCD shows such flashing icons, then press
MENU dial.
HOW TO SET THE HOT WATER TEMPERATURE
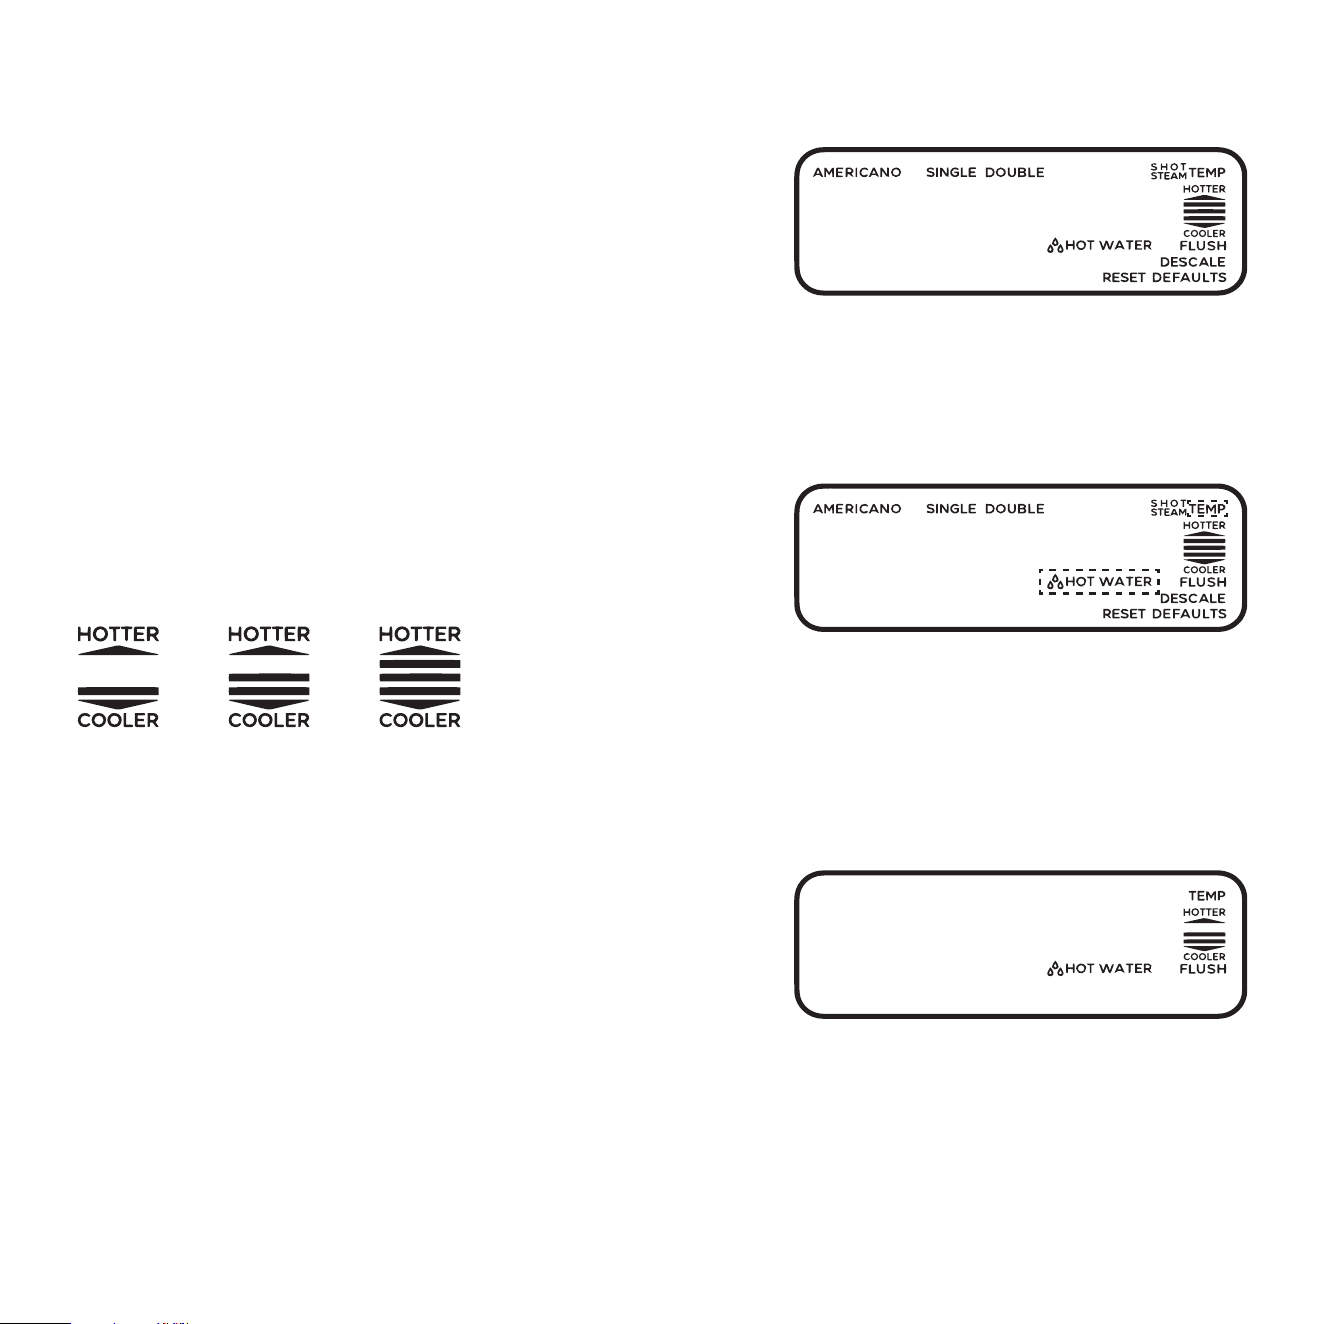
03. Turn MENU dial to select the hot water temperature you want,
then press the MENU dial.
You are able to choose three preset temperatures:
Default parameter is hot.
04. The machine will beep to indicate that the custom setting
has been programmed. Then machine will return to READY
mode.
Main menu
Selecting hot water temperature
icons in the dashed rectangle are flashing
During selecting the temperature
of hot water
Cool Middle Hot
20
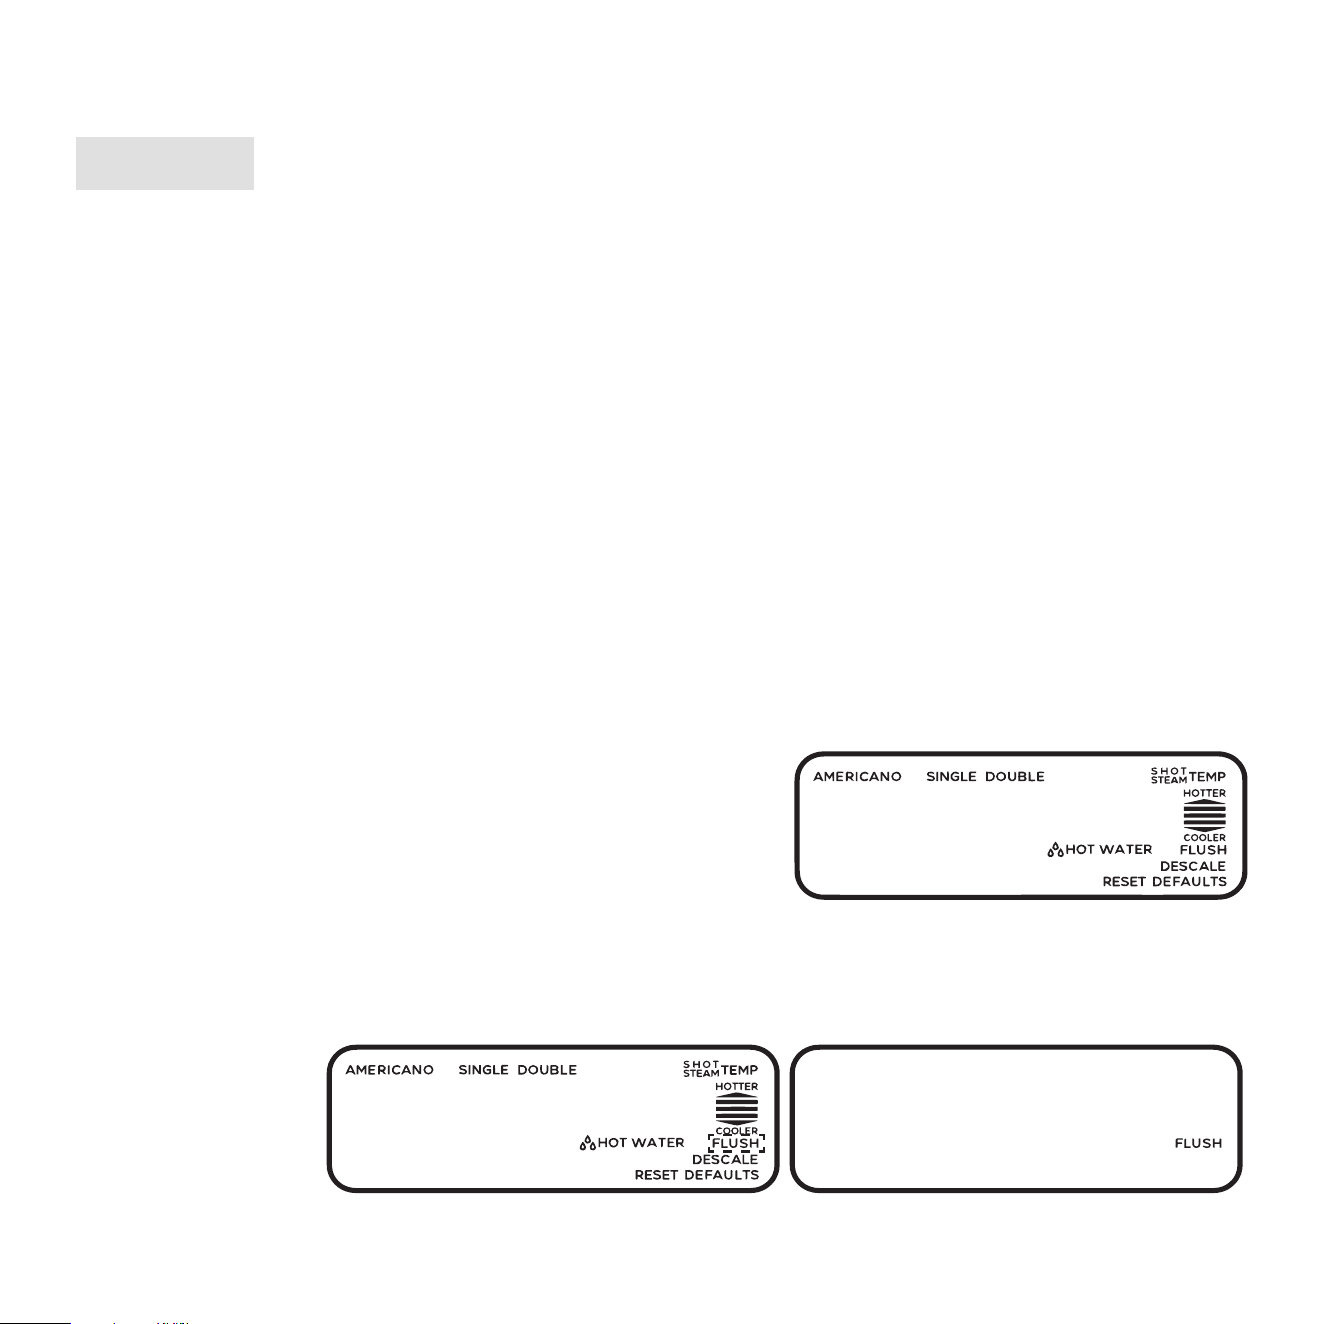
Running FLUSHSelecting FLUSH
icon in the dashed rectangle is flashing
07. Use the MENU dial to navigate through the menu , until LCD shows FLUSH is flashing, then press MENU
dial to start the cleaning cycle.
To prevent damage to the appliance, do not use alkaline cleaning agents when cleaning, use a soft
cloth and mild detergent.
Caution:
FLUSH CLEANING CYCLE
FLUSH cycle can keep the machine in working order and ensure perfect coee flavor, a constant coee flow, and
excellent milk froth for a long period of time.
We recommend doing a FLUSH cycle at least once a week.
01. Insert an empty filter into the portafilter.
02. Lock the portafilter into the brew head.
03. Empty the drip tray and replace onto the machine.
04. Fill the water tank to the MAX line then reattach to the machine.
05. Put a empty cup beneath the portafilter and position the steam wand in the direction of the drip tray.
06. Press the MENU button to enter the main menu, then machine will beep.
CLEANING AND MAINTENANCE
Main menu
21

You cannot stop dispensing water from brew head during 30 seconds of flushing.
NOTE:
DESCALING
Use this function to access descaling cycle, upon DESCALE is appeared into LCD.
After regular use, hard water can cause limescale build up in and on many of the inner functioning components,
reducing the brewing flow, brewing temperature, power of the machine, and the taste of the espresso.
We recommend doing a DESCALE cycle at least once a month.
Please ensure you allow approximately 30 minutes to complete the entire descale process and follow the
step-by-step instructions. If you’ve just finished using your machine, please ensure to turn the machine o and
allow to cool down for at least 1 hour before starting your descale process.
01. Prepare for Descaling
a) Empty the drip tray and reattach to the machine. Remove the water tank from the machine.
b) Fill the water tank with cold water and a descaler (4 parts of water and 1 part of descaler) to MAX level.
Please also refer to the instructions on the descaler. Please use a household descaler. Put water tank back into
position at the back of the machine.
c) Put an empty cup beneath the portafilter, and put another empty cup beneath the steam wand.
d) Hot water wand must be pointed out toward the cup.
08. Once the FLUSH cleaning cycle is complete, the machine will beep and return to READY mode.
09. Empty and rinse the cup and portafilter, and clean the drip tray.
We recommend to refrain from using citric or acetic acid and baking soda to run descaling cycle.
NOTE:
22
23
Running DESCALE cycle
Upon descaling cycle has begun, you can abort it to unplug the machine while it is
running descaling cycle.
If you turn machine o and on again you are not able to abort the descaling cycle.
KINDLY REMINDER:
Descaling cycle ended
After descaling is started, steam knob must be turn in STEAM position, to allow descaler solution
to remove limescale from steam circuit.
NOTE:
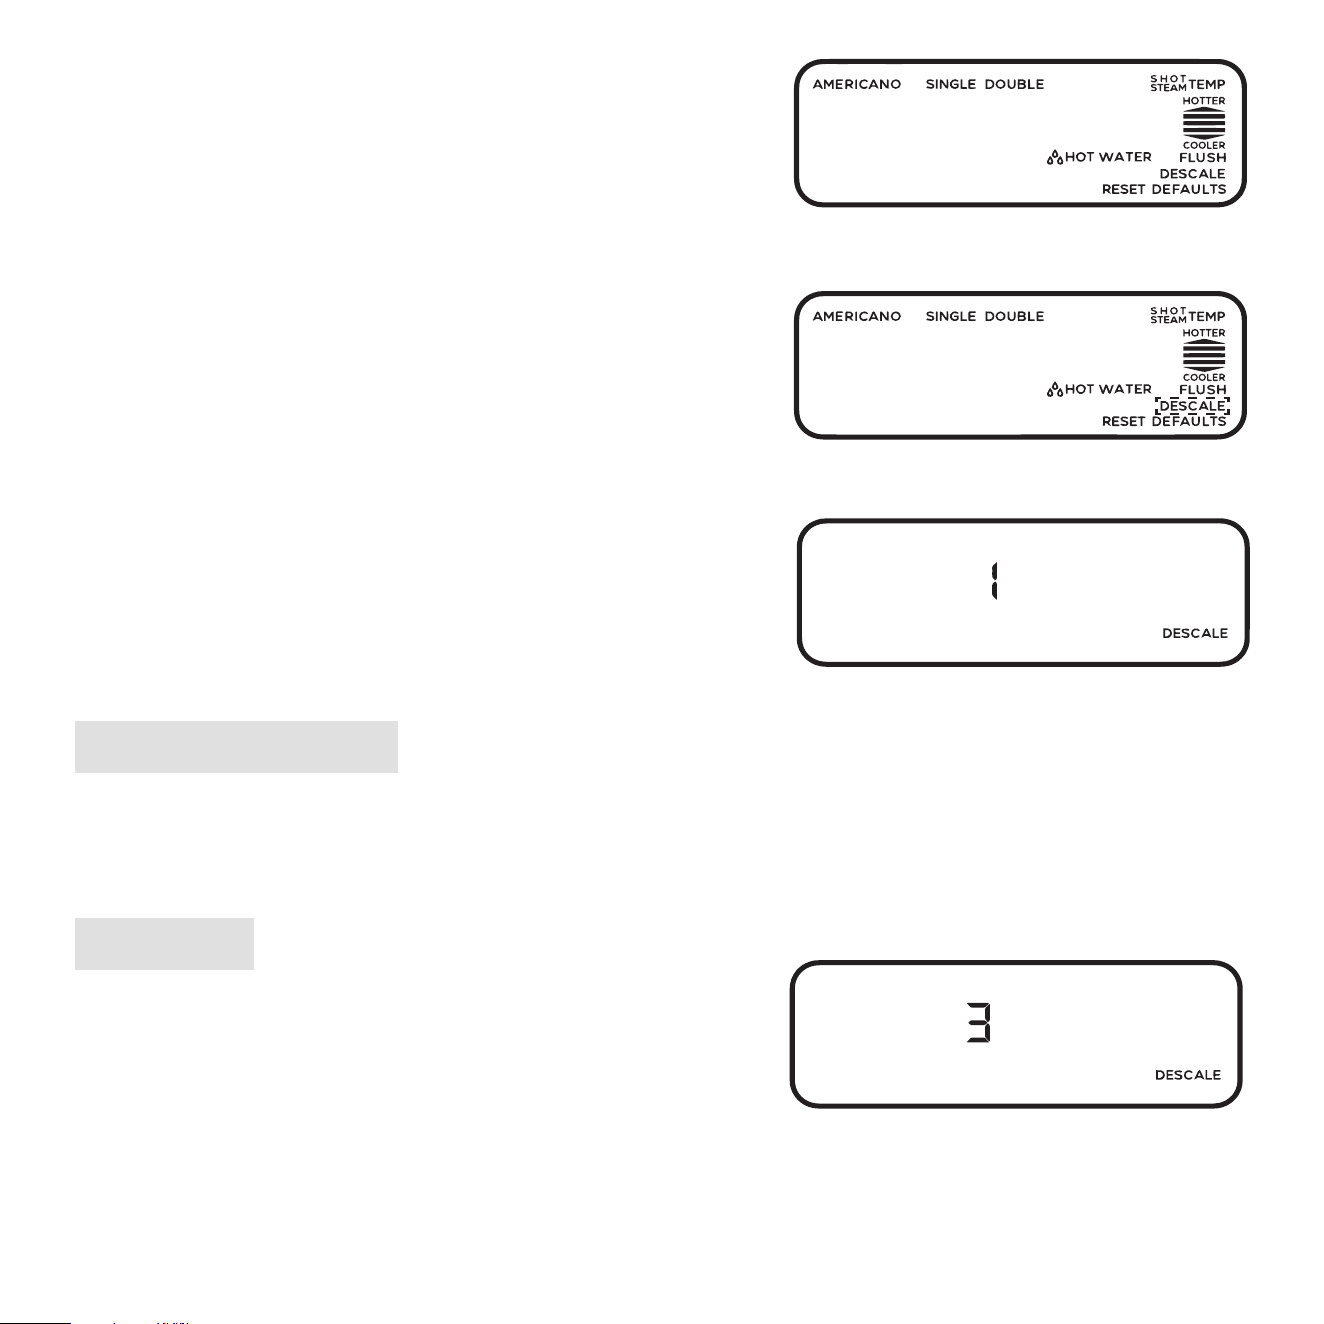
b) Use the MENU dial to navigate through the menu, until LCD shows DESCALE is flashing.
c) Press MENU dial then MENU dial and DOUBLE button are
illuminated.
d) To run descaling cycle press DOUBLE button, then it starts.
Press MENU dial to abort the descaling cycle, then machine goes
back to main menu.
02. Begin Descaling
a) Press the MENU button to enter the main menu.
Main menu
During this time, water will flow through the group head, hot water and steam wand alternately. SINGLE and
DOUBLE buttons will flash alternately, and the LCD will count from 1 to 3.
e) Upon descaling cycle is ended, then SINGLE button will be
illuminated and LCD will show such message, and DESCALE is
flashing into LCD.
f) Empty the cups and drip tray then put back into position. Empty any remaining descale solution from the water
tank, then fill the water tank with fresh tap water to the MAX line and reattach it to the machine.
Selecting descale
icon in the dashed rectangle is flashing

e) Empty the cups and drip tray then put back into position. Empty any remaining water from the water tank and
put back into position.
f) Rinse the water tank and drip tray. Dry thoroughly before reattaching it to the machine.
g) Fill the water tank with fresh tap water to the MAX level and reattach it to the machine.
24
03. Flush
a) Put an empty cup beneath the portafilter and steam wand.
b) Hot water wand must be pointed out toward the cup.
c) Press SINGLE button, machine will start flushing. During flushing,
water will flow through the group head, hot water and steam wand
alternately SINGLE and DOUBLE buttons will flash alternatively
and the LCD will count from 4 to 6.
d) Once the flush is complete, then machine turns o.
Running FLUSH
Turn steam knob in OFF position, otherwise while you turn machine on LCD shows E03.
Accordingly turns steam knob in OFF position machine goes in heating-up mode or READY mode.
NOTE:
CLEANING THE BREW HEAD
The brew head interior and shower screen should be wiped with a damp cloth after use to remove any ground
coee particles.
Periodically purge the machine. Place an empty filter basket and portafilter into the brew head. Press the SINGLE
button and run a short flow of water to rinse out any residual coee. Remove the portafilter and rinse thoroughly.

CLEANING THE STEAM WAND
The steam wand should always be cleaned after frothing milk. Wipe the steam wand with a damp cloth.
After use, it is recommended to purge the steam wand for a couple of seconds, to clear any remaining milk. With
the steam wand positioned down over the drip tray, turn and keep the steam knob in STEAM position for a couple
of seconds to allow the machine to create steam before turning it back to OFF position.
If the steam tip hole becomes blocked, it will reduce frothing performance. Use the provided steam wand cleaning
needle to clear the opening.
If the steam wand is still blocked, unscrew the tip and soak the tip in hot water before using the cleaning needle to
unblock again. Replace the tip back on the steam wand.
CLEANING THE FILTERS AND PORTAFILTER
The filters and portafilter should be rinsed under hot water immediately after use to remove all residual coee
oils.
If any of the holes in the filter become blocked, use the cleaning needle provided to unblock the holes.
If the holes remain blocked, soak filter and portafilter in hot water for approx. 20 minutes. Rinse thoroughly.
All parts should be cleaned by hand using warm water and a gentle dishwashing liquid.
DO NOT clean any of the parts or accessories in the dishwasher.
NOTE:
25
If you make steam within 10 minutes upon last dispensing, NTC sensor is disable and you are able
to make steam without frothing milk, or to clean steam wand up. Be aware of scalding.
NOTE:
CLEANING THE DRIP TRAY
The drip tray should be removed, emptied and cleaned at regular intervals, particularly when the drip tray full
indicator is showing PLEASE EMPTY TRAY.
Remove the drip tray from the machine and separate the parts. Wash all parts in warm soapy water with a soft
cloth. Rinse and dry thoroughly before reassembling and attaching to the machine.
The machine will shut o automatically after no operation for 15 minutes.
AUTO SHUT OFF
RESETTING TO DEFAULTS
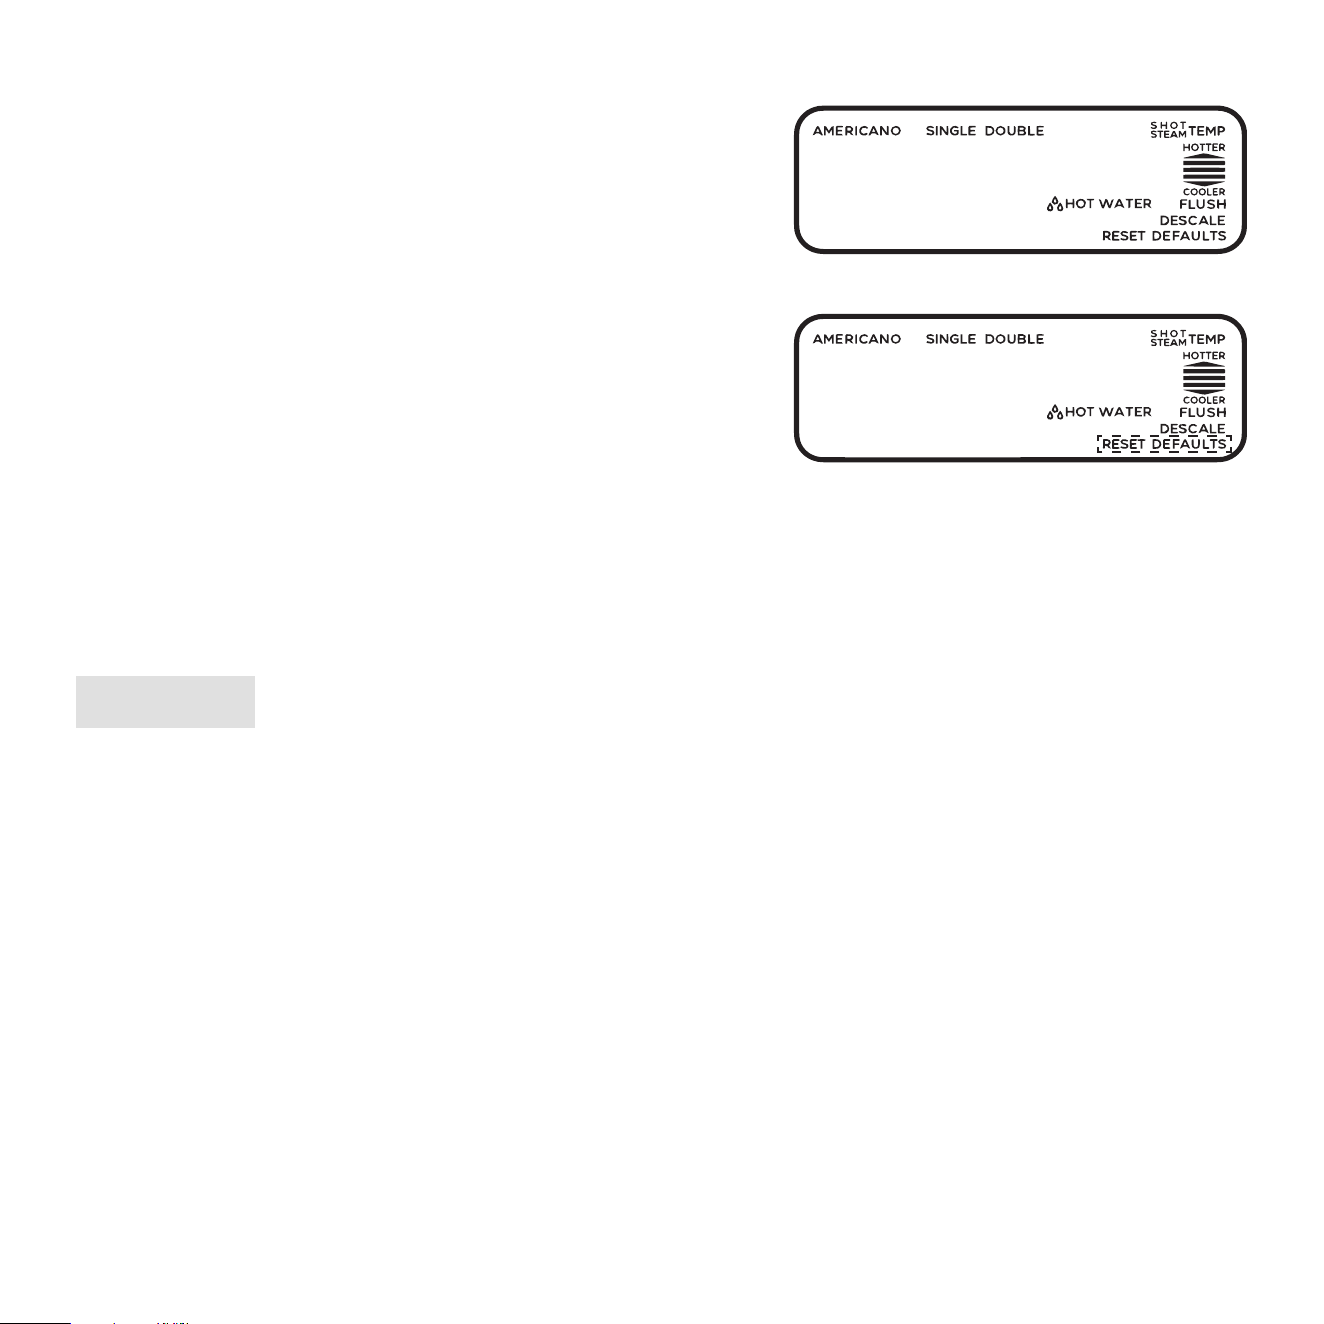
01. Press the MENU button to enter the main menu.
02. Use the MENU dial to navigate through the menu, until
LCD shows RESET DEFAULTS is flashing, then press
the MENU dial.
03. The machine will beep.
04. The single and double espresso, americano, hot water and steam temperature, single and double espresso
volume settings will all return to the default settings.
The machine will return to READY mode.
Main menu
When selecting to reset default settings
icon in the dashed rectangle is flashing
After resetting to defaults and you turn machine o and on, the machine goes back to status
mentioned at bullet point 03 in INITIAL USE part.
NOTE:
26
27
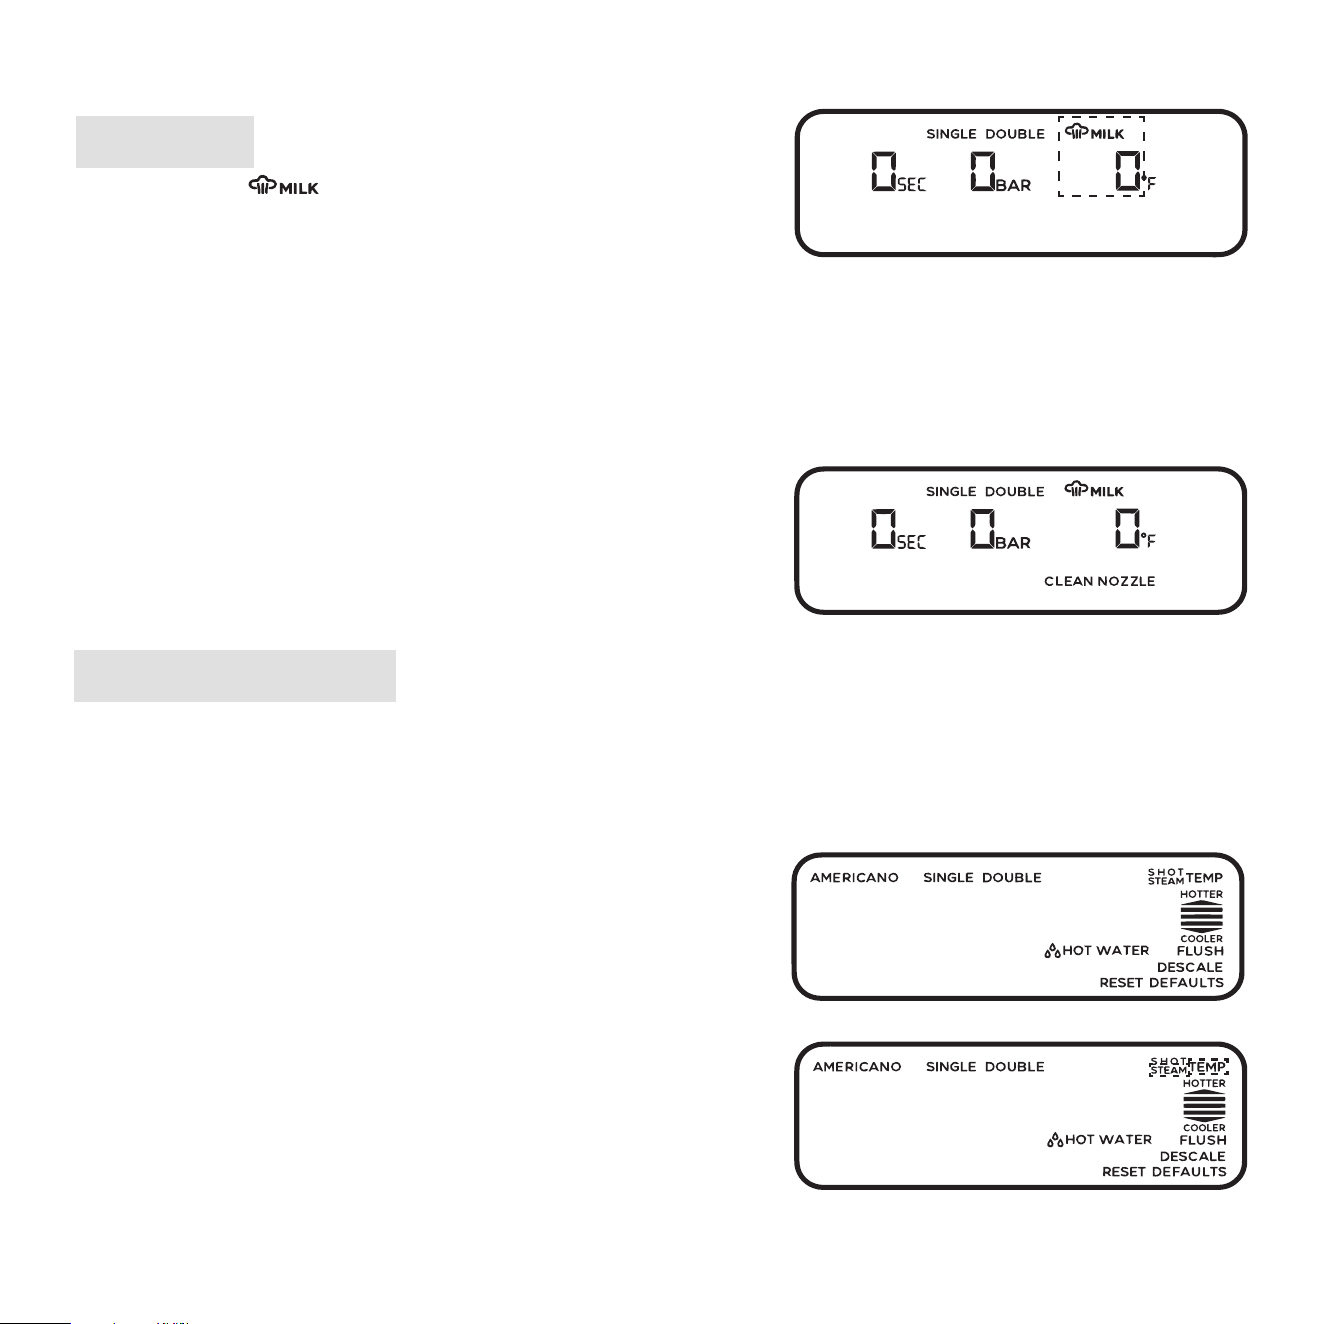
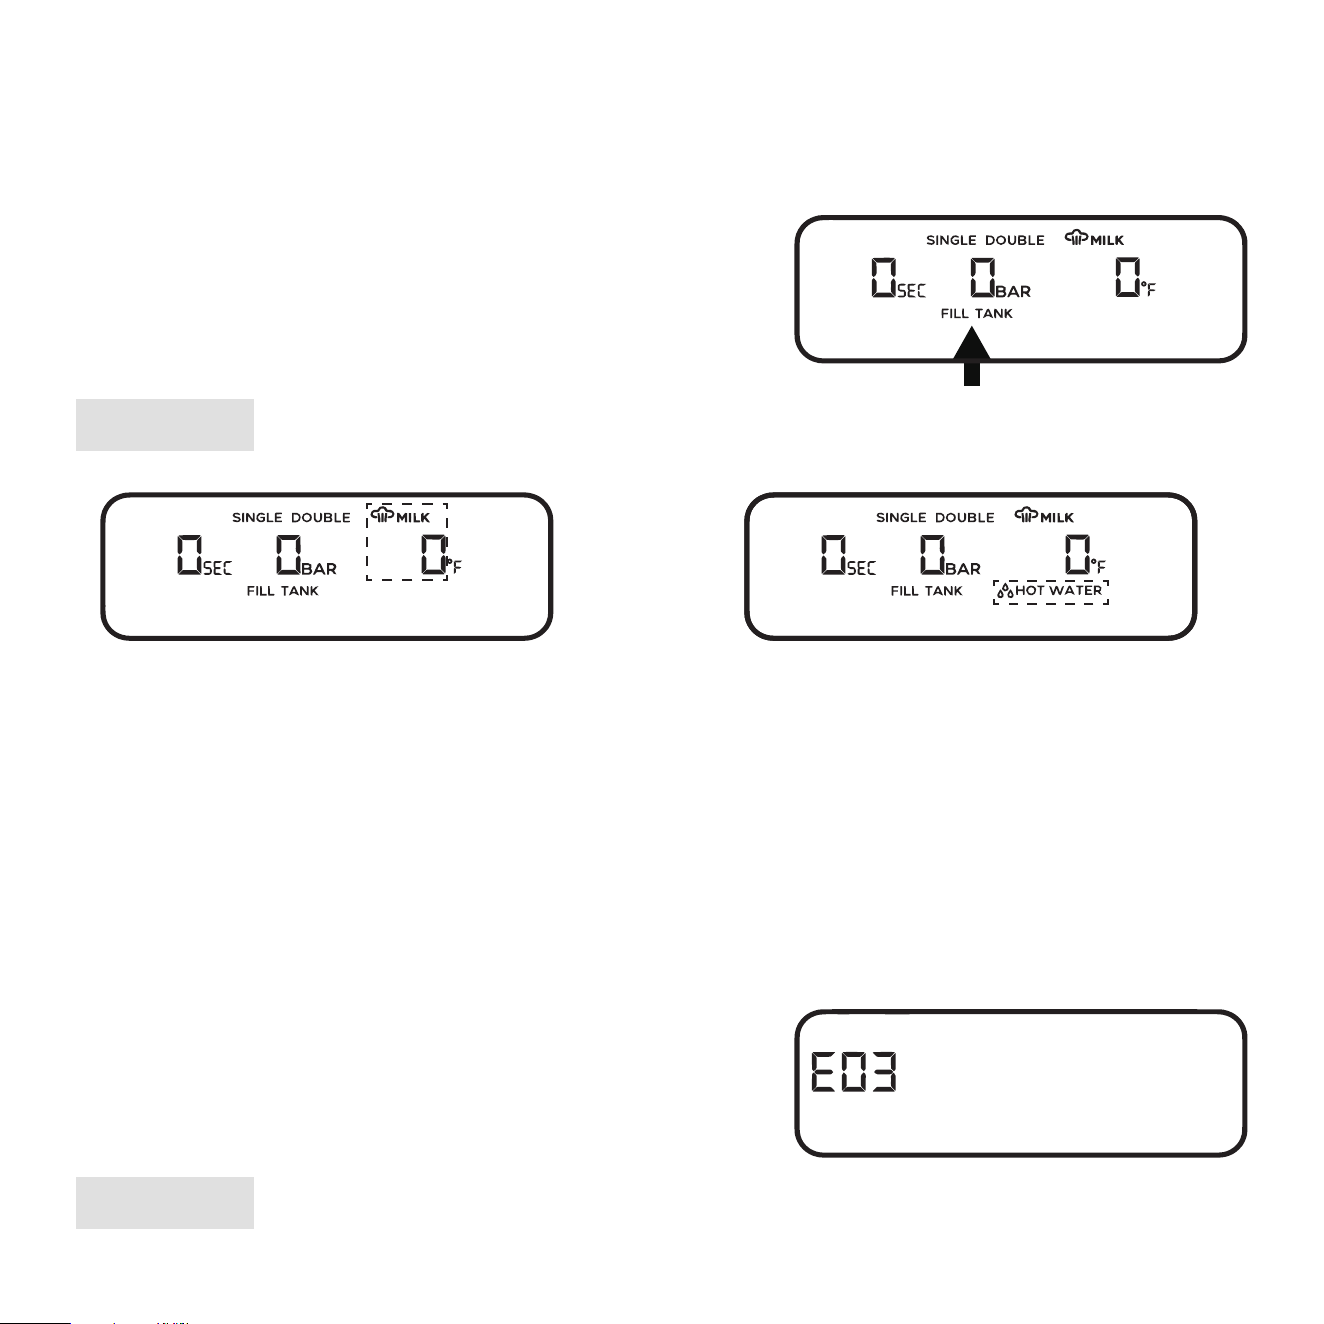
FILL TANK
All brewing will be aborted upon the water is used up or the water tank is not attached in place, then the machine
will show "FILL TANK" is flashing on the LCD.
Once the water is filled or the water tank is reattached,
"FILL TANK" will disappear.
If steam knob is in STEAM position, while water
is filled or water tank is reattached, icons in
dashed rectangle are flashing three times and
one beep is emitted then repeat it again.
Until steam knob is back to OFF position
If steam knob is in HOT WATER position, while
water is filled or water tank is reattached, icons
in dashed rectangle are flashing three times and
one beep is emitted then repeat it again.
Until steam knob is back to OFF position
ERROR MODE
E03
If the machine shows “E03” on the LCD, check and return the
STEAM knob to the “OFF” position.
If you are making steam or dispensing hot water, and steam knob is not in OFF position, while
water is filled or water tank is reattached, LCD will show as below images.
NOTE:
If the machine still shows “E03” after returning the steam knob to “OFF” position, please contact
CASABREWS customer support.
NOTE:
E10
If the machine shows “E10”, “E11”, “E12”, “E13” on the LCD,
please contact our customer support team.
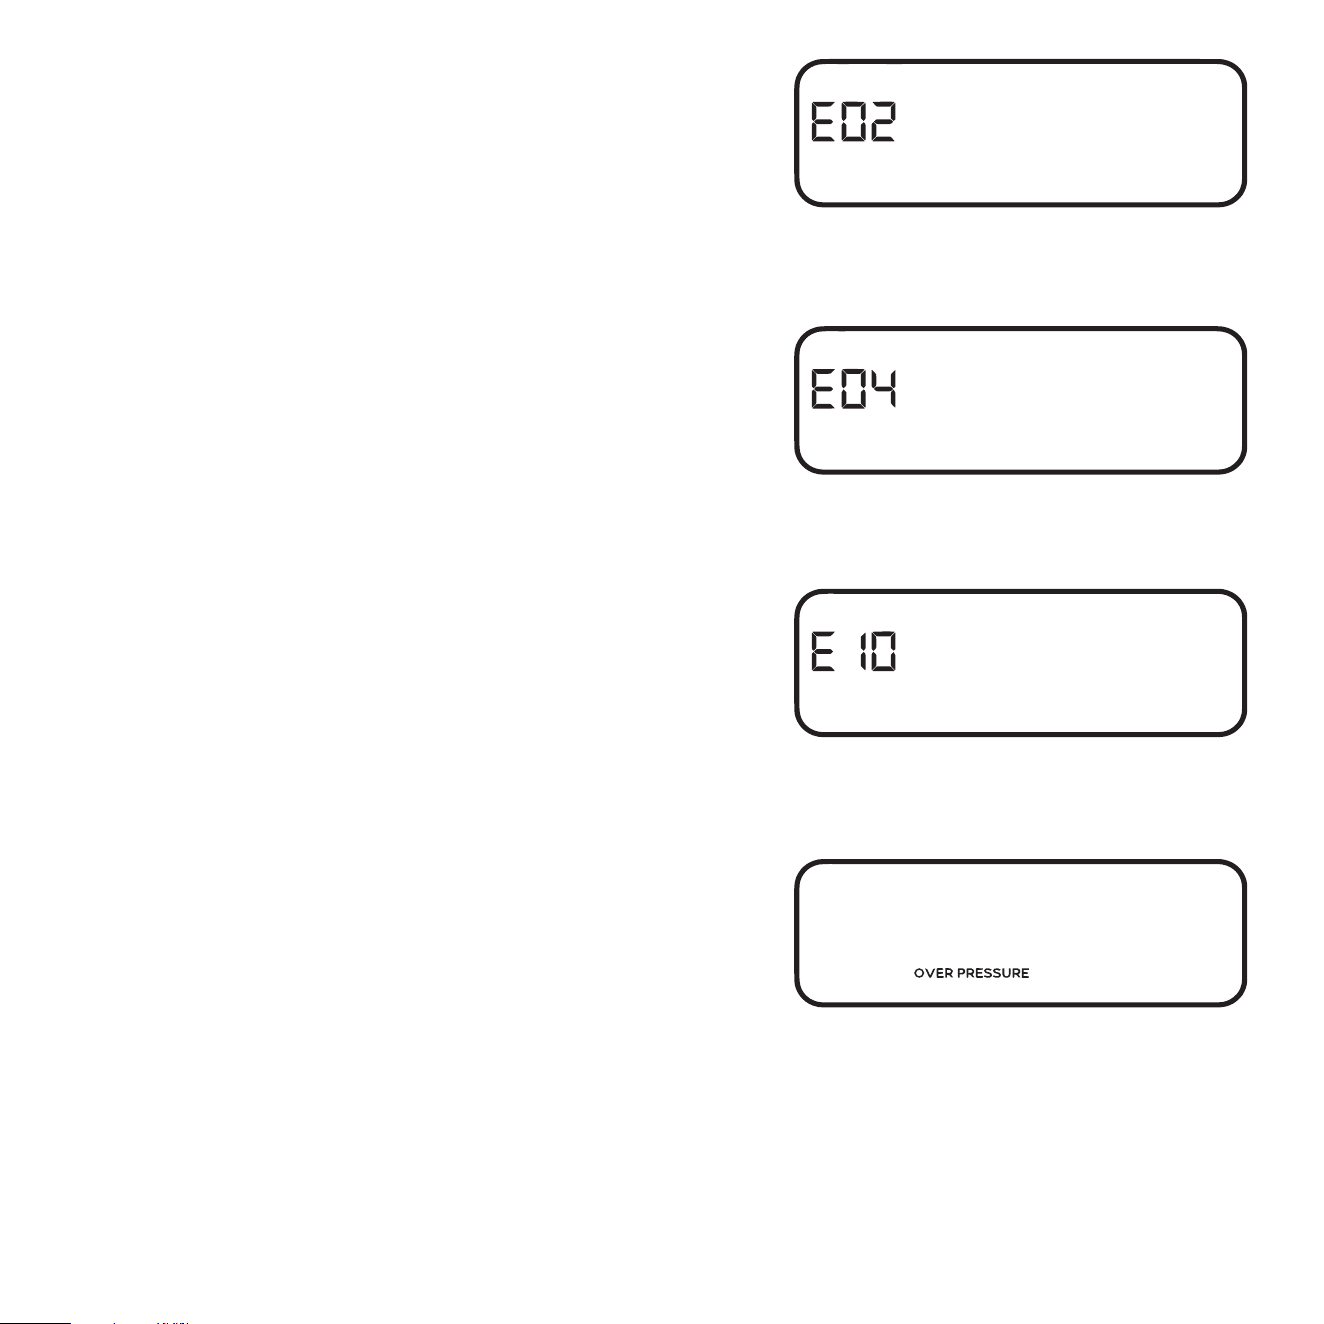
OVERPRESSURE
If the machine shows “OVERPRESSURE” on the LCD, machine
automatically releases the pressure and go back to READY mode.
E04
If the machine shows “E04” on the LCD, please contact our customer
support team.
E02
If the machine shows “E02” on the LCD, press any buttons except
Power button to cancel this error.
28

OVERHEATING PROTECTION
If LCD screen shows , it means machine is in overheating
protection.
1) Put an empty cup beneath the portafilter.
2) Hot water wand must be pointed out toward the cup.
3) To cancel this error, turn steam knob in HOT WATER position for 10-15 seconds, and then turn steam knob
back to OFF position.
4) Machine returns to READY mode.
5) Empty the cup.
29

Coee is ground too finely. Use a coarser grind setting and retry.
Too much ground coee in the filter. Decrease the amount of ground coee.
Coee tamped too firmly.
Tamp using between 11-22 lbs of pressure.
The coee bean is deep roasted and
contains too much oil.
Use a Medium Espresso Roast Coee Bean.
Coee tamped too lightly.
The filter may be blocked.
Tamp using between 11-22 lbs of pressure.
Clean the filter.
Machine needs to be descaled.
Run descale cycle.
Coee is ground too coarsely. Use a finer grind setting and retry.
Not enough ground coee in the filter. Increase the amount of ground coee.
The coee bean is lightly roasted and
does not contain enough oil.
Use a fresh Medium Espresso Roast Coee
Bean.
Water tank is not properly attached. Push water tank down completely to lock into
place.
Water tank is empty. Fill tank.
The filter may be blocked. Clean the filter.
Machine needs to be descaled. Run descale cycle.
Water tank is not properly attached. Push water tank down completely to lock into
place.
The machine is faulty. Contact our customer support team.
Water tank is empty. Fill tank.
The machine is not plugged in. Plug the machine in.
POSSIBLE CAUSE SOLUTION
The machine does not turn
on.
Water does not flow from
the brew head.
Very little espresso pours
out or none comes out at
all.
The pressure is over 12 bar
(OVER EXTRACTION).
Coee
pours out too
quickly.
The pressure is under 5 bar
(UNDER EXTRACTION).
PROBLEM
There are coee grounds around
the filter basket rim.
Remove any residual ground coee from the
rim of the filter to ensure a proper seal in brew
head.
Portafilter not inserted in the brew
head correctly.
Ensure portafilter is completely inserted and
rotated until resistance is felt.
Coee or water leaks
out around the edge of the
portafilter.
TROUBLESHOOTING
30

Coee or water leaks
out around the edge of the
portafilter.
Too much ground coee in the filter
basket.
Decrease the amount of ground coee.
There are ground coee on the
surface of the brew head.
Clean any residual ground coee from the
surface of the brew head.
Water tank is empty. Fill tank.
Not enough steam.
Let the steam come out for 5 seconds then
start to froth the milk.
The steam wand is inserted too far in
the milk.
Add some milk to allow the steam wand tip
reach just below the surface of the milk.
The milk used is not cold or not whole
milk.
Use cold, fresh whole milk.
Machine needs to be descaled. Run descale cycle.
Steam wand is blocked. Clean the steam wand.
Water tank is not properly attached. Push water tank down completely to lock into
place.
No steam.
Cannot froth the milk.
Cups not pre-heated.
Rinse cups under hot water.
Portafilter not pre-heated. Rinse portafilter under hot water.
Water tank is not properly attached. Push water tank down completely to lock into
place.
Brew head not pre-heated. Run a single shot without ground coee.
Coee is ground too coarsely
(UNDER EXTRACTION).
Use a finer grind setting and retry.
Not enough ground coee in the filter
(UNDER EXTRACTION).
Increase the amount of ground coee.
Coee is not hot enough.
Coee is ground too coarsely
(UNDER EXTRACTION).
Use a finer grind setting and retry.
Not enough ground coee in the filter
(UNDER EXTRACTION).
Increase the amount of ground coee.
Water tank or the silicon tube inside
the machine is broken.
Contact our customer support team.
Coee is watery.
The drip tray is full. Empty the drip tray.
Water leaks from the
bottom.
31

If your problem is not listed here, please contact Customer Support.
NOTE:
The machine is faulty.
Contact our customer support team.
Machine does not heat up.
The machine is faulty. Contact our customer support team.
All buttons won't stop
flashing in white when the
machine is turned on.
The machine is faulty. Contact our customer support team.
Water leaks from the
steam wand when brewing
or frothing.
Out of range of the allowable volume.
The adjustable volume for a single espresso
ranges between 30 ml/1.01 oz and
60 ml/2.03 oz, and a double espresso ranges
between 70 ml/2.37 oz and 105 ml/3.55 oz.
Machine fails to program
the volume of single or
double espresso.
CA 65
32
WARNING: This product can expose you to chemicals including Styrene, which known to the State of
California to cause cancer, and Bisphenol-A, which is known to the State of California to cause birth defects
or other reproductive harm. For more information go to www.p
65
warnings.ca.gov.
ADVERTENCIA: Este producto puede exponerle a químicos incluyendo Estireno, que el Estado de
Califomia reconoce como causante de c¡ncer, y Bisfenol-A, que el Estado de California reconoce como
causante de defectos de nacimiento u otros daños reproductivos. Para más infomación visite
www.p
65
warnings.ca.gov
(Applicable to California residents only)

33
WARRANTY INFORMATION
The manufacturer provides warranty in accordance with the legislation of the customer's own country of residence,
with a minimum of 12 months, starting from the date on which the appliance is sold to the end user.
The warranty only covers defects in material or workmanship.
The warranty will not apply in cases of:
- Normal wear and tear.
- Incorrect use, e.g. overloading of the appliance, use of non-approved accessories.
- Use of force, damage caused by external influences.
- Damage caused by non-observance of the user manual, e.g. connection to an unsuitable mains supply or
non-compliance with the installation instructions.
- Partially or completely dismantled appliances.