HOUSEHOLD USE ONLY
Please read all instructions carefully before using the product
INSTRUCTION MANUAL
Espresso Coee Machine
Model: ULTRA

CONTENTS
IMPORTANT SAFEGUARDS ..................................................................................................... 1-2
KNOW YOUR COFFEE MACHINE ........................................................................................... 3-4
SPECIFICATIONS .......................................................................................................................... 5
BEFORE FIRST USE ........................................................................................................................ 5
FIRST USE ...................................................................................................................................... 6
FLUSHING THE MACHINE ........................................................................................................... 7
HOW TO MAKE ESPRESSO ...................................................................................................... 7-8
HOW TO SET SHOT TEMPERATURE .......................................................................................... 9
HOW TO PROGRAM THE VOLUME OF ESPRESSO ............................................................. 9-10
RESETTING TO DEFAULTS ........................................................................................................ 10
HOW TO MAKE HOT WATER ..................................................................................................... 11
HOW TO MAKE STEAM ......................................................................................................... 11-12
WATER SHORTAGE ALARM ...................................................................................................... 12
AUTO SHUT OFF ......................................................................................................................... 13
CLEANING AND MAINTENANCE ....................................................................................... 13-15
CLEANING THE BREW HEAD ........................................................................ 13
CLEANING THE FILTERS AND PORTAFILTER ...................................... 13
CLEANING THE STEAM WAND .................................................................... 13-14
CLEANING THE DRIP TRAY ............................................................................ 14
DESCALING .............................................................................................................. 14-15
TROUBLESHOOTING ................................................................................................................. 16
CA 65 ............................................................................................................................................ 17
WARRANTY INFORMATION ..................................................................................................... 17
CUSTOMER SUPPORT ................................................................................................................ 18

READ ALL INSTRUCTIONS BEFORE USE AND SAVE FOR FUTURE REFERENCE.
01.
Carefully read all instructions before operating and save for future reference.
02. Do not touch hot surfaces. Use handles or knobs as advised in this instruction book.
03. To protect against fire, electric shock and injury to persons, do not immerse the power cord, plug or appliance itself
in water or other liquids.
04. Close supervision is necessary when any appliance is used by or near children or person with reduced physical,
sensory or mental capabilities.
05. Before using the appliance, check that the voltage of the wall outlet corresponds to the voltage marked on the
rating plate.
06. If the appliance is to be left unattended, cleaned, moved, assembled or stored, always switch o the appliance by
pressing the POWER button to o and unplug from the power outlet.
07. Unplug from outlet when not in use and before cleaning. Allow to cool before putting on or taking o parts and
before cleaning the appliance.
08. It is recommended to regularly inspect the appliance and power cord. Do not use the appliance if there is damage
to the power cord or plug, or after the appliance malfunctions or has been damaged in any way. Immediately stop
use and contact CASABREWS Customer Support.
09. The use of accessory attachments not recommended by CASABREWS may result in fire, electric shock or injury to
persons.
10. Do not let the power cord hang over the edge of a table or counter-top or touch hot surfaces.
11. Do not place the appliance near the edge of a table or countertop. Ensure the surface is hard, flat and free of water
and other substances. Avoid interruption of airflow underneath the appliance.
12. Do not place the appliance on or near a hot gas or electric burner. Do not place it in, or allow it to come in contact
with a heated oven.
IMPORTANT SAFEGUARDS
1

2
13. This appliance is recommended for household use only. Do not use this appliance for anything other than its
intended use. Do not use outdoors. Do not use in moving vehicles or boats.
14. It is recommended to plug the espresso machine into a properly grounded and dedicated circuit, separate from
other electrical appliances.
15. Use only cold water in the water tank. Do not use any other liquids. Do not use highly filtered, demineralized or
distilled water as this may aect the taste of the coee and how the espresso machine operates.
16. Ensure the portafilter is firmly inserted and secured into the group head before starting an extraction. Never
remove the portafilter during the extraction process.
17. Caution must be used during descaling as hot steam may be released. Before descaling, turn o the machine, allow
to cool for at least 1 hour and ensure the drip tray is empty and fully inserted.
18. Do not attempt to open or service the espresso machine.
19. For any maintenance other than cleaning and descaling, contact CASABREWS Customer Support.
20. To avoid the risk of injury, do not open the brew chamber during the brew process.
Do not use outdoors.
Do not place on or near a hot gas or electric burner, or in a heated oven.
HOUSEHOLD USE ONLY
SAVE THESE INSTRUCTIONS
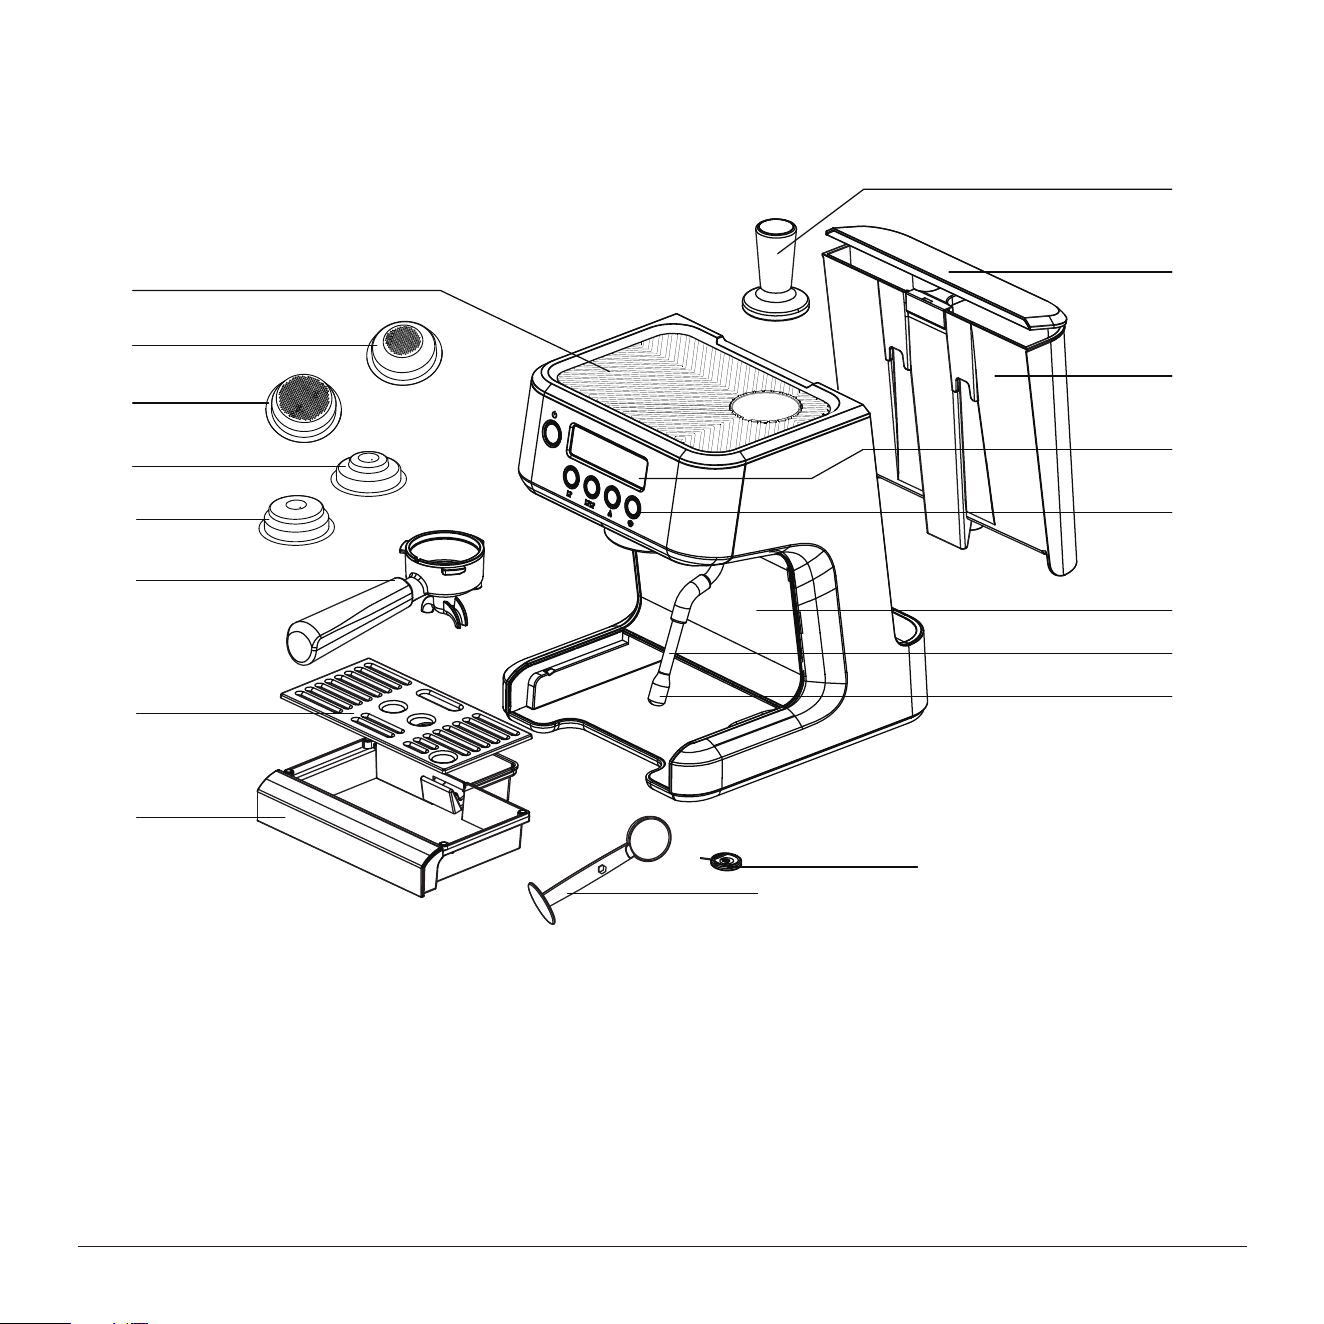
1. Cup warmer;
2. ONE CUP single wall filter;
3. TWO CUP single wall filter;
4. ONE CUP dual wall filter;
5. TWO CUP dual wall filter;
6. Filter holder/Portafilter;
7. Drip tray grid;
8. Removable drip tray;
9. Tamper;
10. Water tank lid;
11. Water tank;
12. LCD display screen;
13. Control panel;
14. Main body;
15. Steam wand;
16. Steam nozzle;
17. Cleaning needle;
18. Coee spoon;
KNOW YOUR COFFEE MACHINE
3
1
9
10
11
12
13
15
14
16
17
18
2
3
4
5
6
7
8
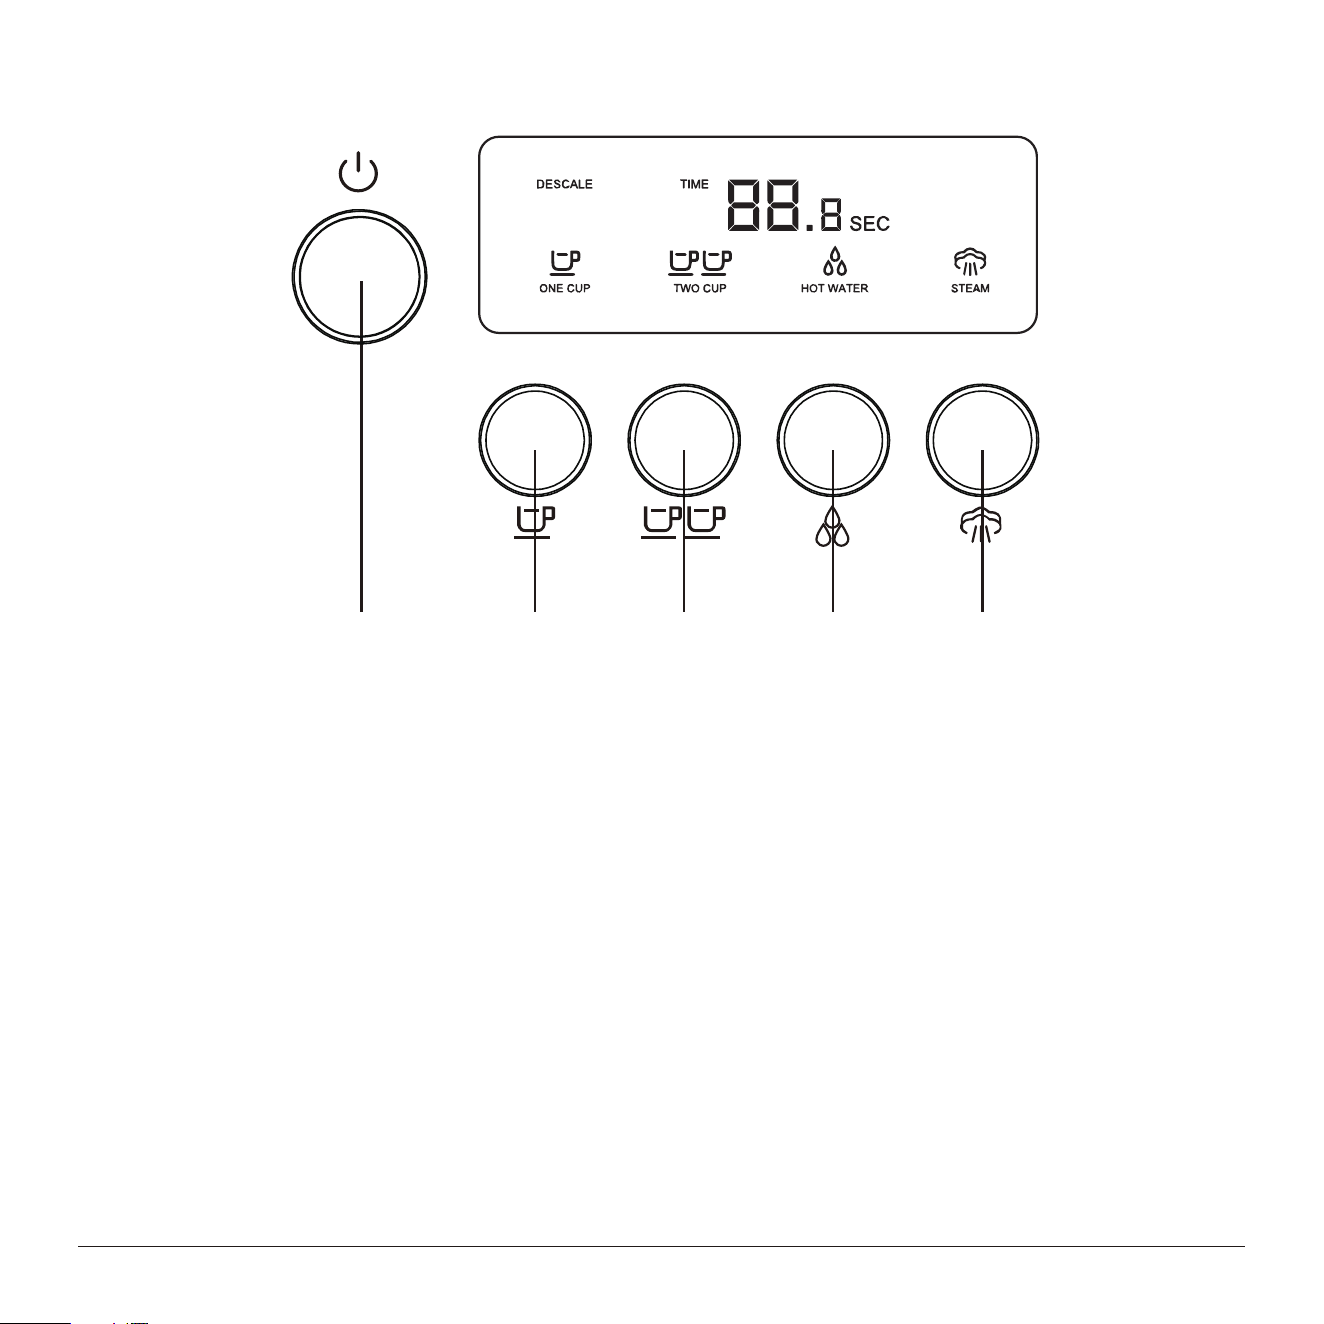
A: Power Button: Press to turn on/o the machine;
Press and hold for 5 seconds to check the SW revision;
B: ONE CUP Button: Press to start/stop brewing a ONE CUP espresso;
Press and hold for 5 seconds to enter the volume program mode;
C: TWO CUP Button: Press to start/stop brewing a TWO CUP espresso or two cups of espresso;
Press and hold for 5 seconds to enter the volume program mode;
D: Hot Water Button: Press to start/stop brewing hot water;
Press and hold for 5 seconds to enter the temperature setting mode;
Press to exit the steam mode when the machine is in steam mode;
E: Steam Button: Press to enter steam mode when the machine is standby;
Press to start/stop making steam when the machine is in steam mode;
Press and hold for 5 seconds to exit the steam mode when the machine is in steam mode;
4
A B C D E

01. Remove the plug at the bottom of the water tank.
02. Remove and discard all labels and packaging materials attached to your espresso machine. Ensure you have
removed all parts and accessories before discarding the packaging.
03. Detach the water tank located at the back of the machine and remove the red rubber plug under the water tank
before first use.
04. Remove the plastic bag containing the portafilter and filters.
05. Clean the water tank, portafilter and filters by using warm water and a gentle dish washing liquid. Rinse well then
dry thoroughly.
BEFORE FIRST USE
Model: ULTRA
Voltage: 120V~ 60Hz
Power: 1350W
Pump: Italian 20 Bar
Capacity of water tank: 2.2 L/ 73 OZ
Product size: 12.2*10.31*12.99 INCHES
Net weight: 13.64 LBS
Dear customer,
Thank you for your purchase of the CASABREWS Espresso Coee Machine. To ensure you get the best use of this
machine, please take the time to read this manual and learn how to use this espresso machine, even if you are an
experienced home barista-this machine may be dierent to ones you have operated before. In these operating
instructions, you will learn how to use the product optimally and safely, and with a little experimenting you will
soon find your preferred settings.
We hope that you enjoy it!
SPECIFICATIONS
5
01. Ensure tank is filled with cold water. You can do this by either opening the top-fill water tank lid, or by removing
the water tank at the back of the machine.
02. Insert the plug into a wall outlet with suitable voltage (120V~, 60Hz).
03. Press power button to turn machine on.
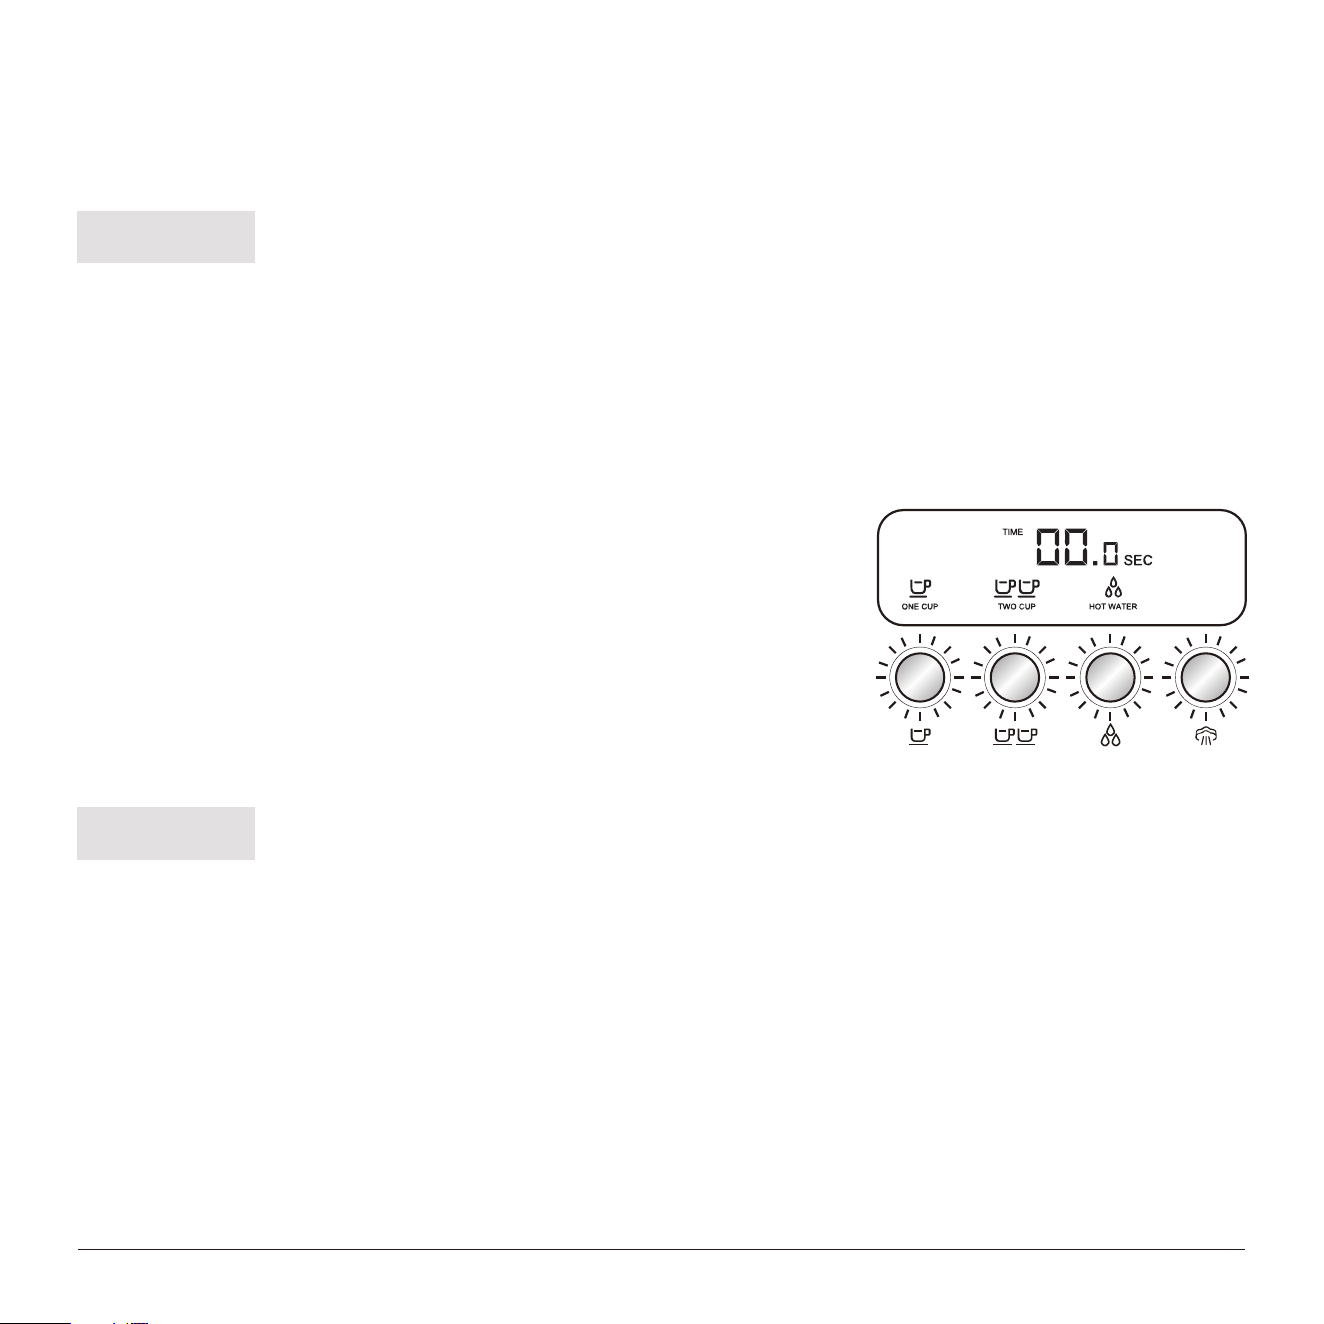
04. The LCD screen will display all icons once then go back to standby mode. The ONE CUP button, TWO CUP
button, hot water button and steam button will start flashing simultaneously, indicating the machine is preheating.
05. After approximately 1 minute, the machine will reach the default operating
temperature and all 4 buttons will illuminate. The machine is now in
STANDBY mode, ready for the next step. (image. 1)
FIRST USE
6
Replace the water daily. The water tank should be filled with fresh, cold tap water before each use.
NOTE:
You will not be able to select the ONE CUP, TWO CUP , hot water or steam functions until the
machine has reached STANDBY mode.
NOTE:
image. 1
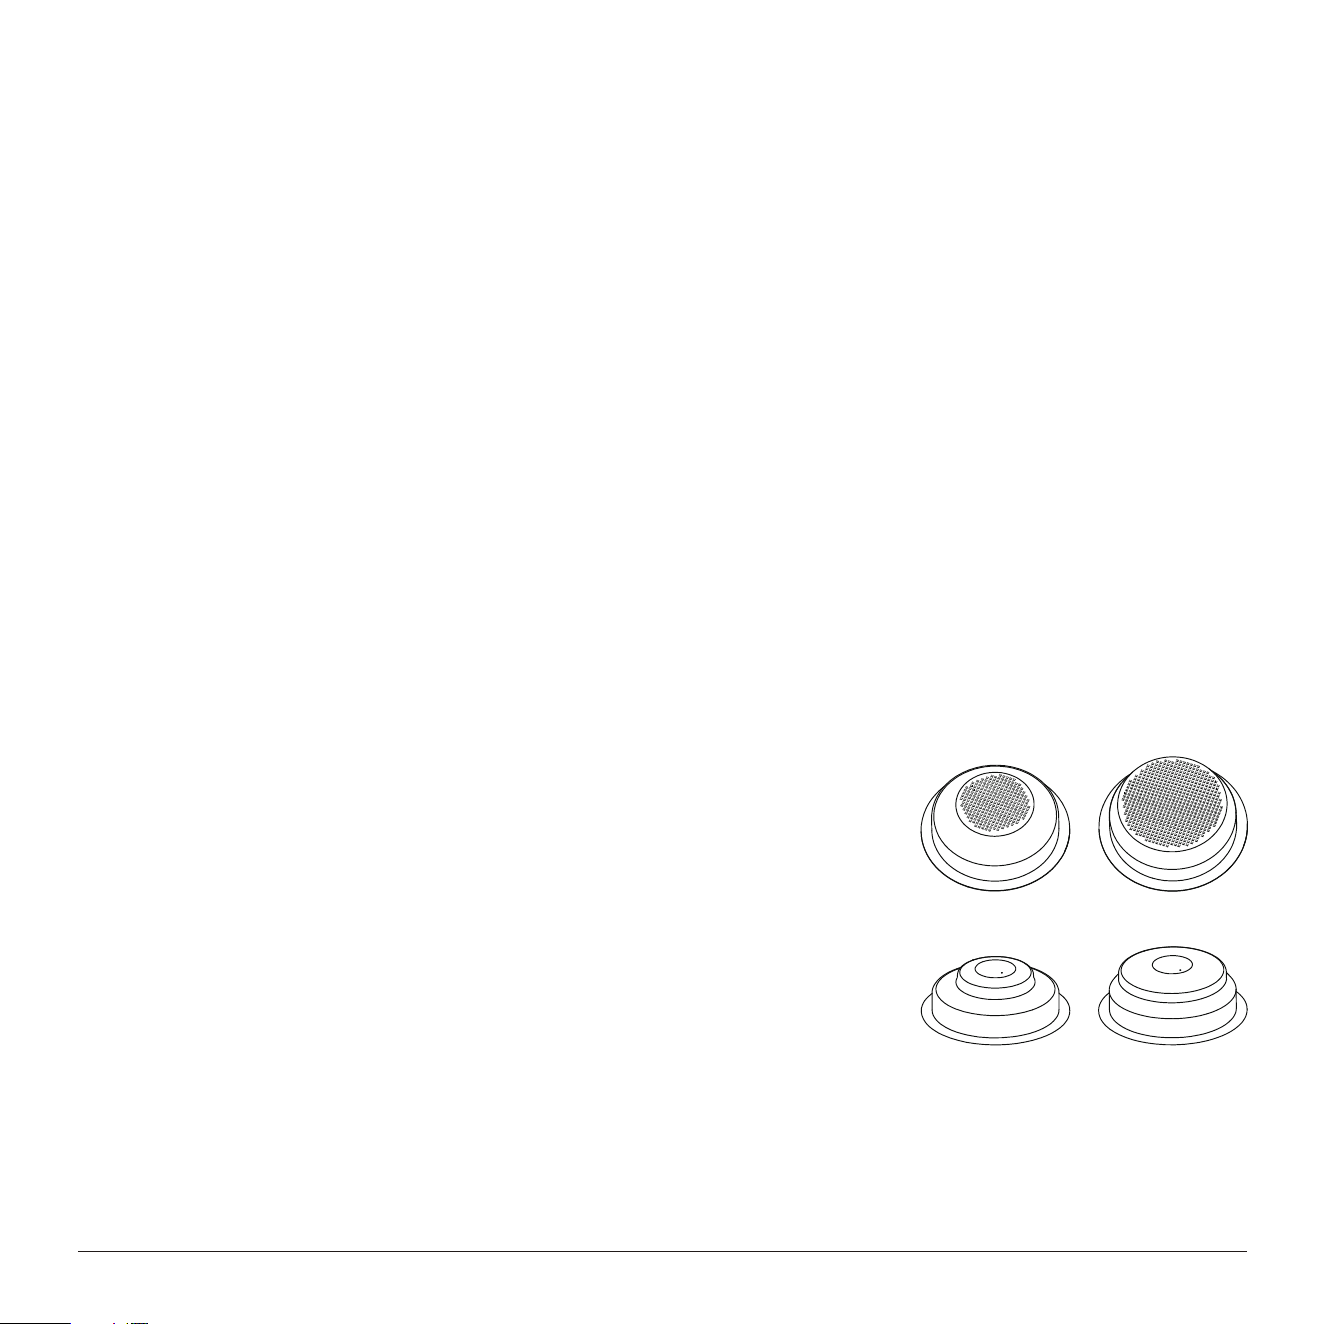
SELECTING THE FILTER SIZE
This machine includes 4 filters: 2 single wall filters and 2 dual wall filters.
Single wall filters:
Use single wall filters if grinding fresh whole coee beans. Single wall filters allow you
to experiment with grind and dose to create a more balanced espresso.
Dual wall filters:
Use dual wall filters if using pre-ground coee. Dual wall filters regulate the pressure
and help to optimize the extraction regardless of the grind, dose or freshness.
HOW TO MAKE ESPRESSO
When the machine has reached STANDBY mode.
01. Press hot water button once to run water through the steam wand. After 30 seconds, press the hot water button
once again.
02. Press two cup button to run water through the group head. The machine will stop automatically once the process
finished.
03. Repeat step 1-2 twice.
04. Refill water tank and empty drip tray, if required.
Now your espresso machine is ready to use.
FLUSHING THE MACHINE
7
The provided filters are designed for:
ONE CUP filter = approx. 13-15g
TWO CUP filter = approx. 19-21g
Insert either the ONE CUP or TWO CUP filter into the portafilter.
ONE CUP TWO CUP
ONE CUP TWO CUP
TAMPING THE GROUND COFFEE
01.
Using the tamper, tamp down firmly using approx. 11-22 lbs (5-10kg) of pressure.
02. Wipe excess coee from the rim of the filter to ensure a proper seal is achieved in the brew head.
INSERTING THE PORTAFILTER
Place the portafilter underneath the brew head so that the handle is aligned with the INSERT position.
Insert the portafilter into the brew head and rotate the handle counterclockwise towards the center until firm resistance is felt.
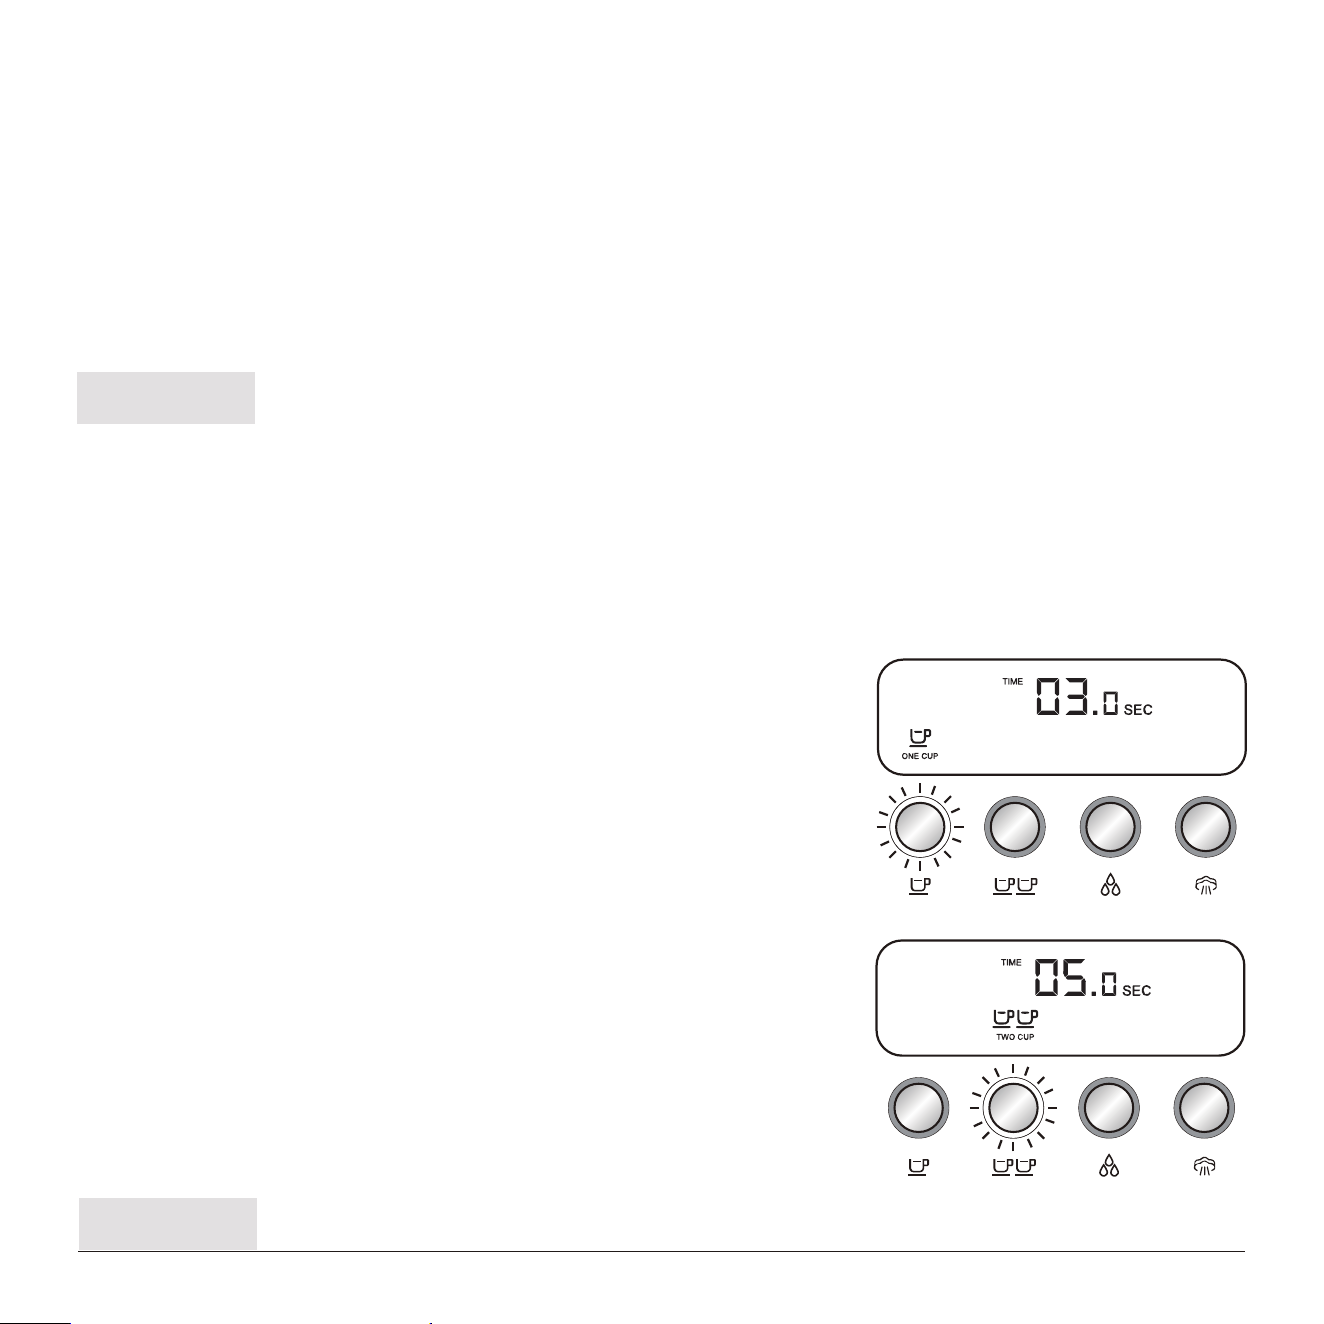
ONE CUP ESPRESSO
Press ONE CUP button once to extract a ONE CUP espresso at the preset volume
(approx. 35ml). The LCD screen will display the brewing time.(image. 2)
The machine will stop once the volume reached preset and return to
STANDBY mode.
As a guide to using the right amount of ground coee, the top edge of the metal cap on the tamper should be level with
the top of the filter after the ground coee has been tamped.
Also, the MAX marks on both of the filters are intended to assist in identifying the right amount of ground coee more
easily.
8
The surface of the ground coee should not be beyond the MAX mark after tamping, otherwise
the portafilter might not be able to be locked into the brew head.
NOTE:
image. 2
To stop the process, just press the ONE CUP button or TWO CUP button once again.
NOTE:
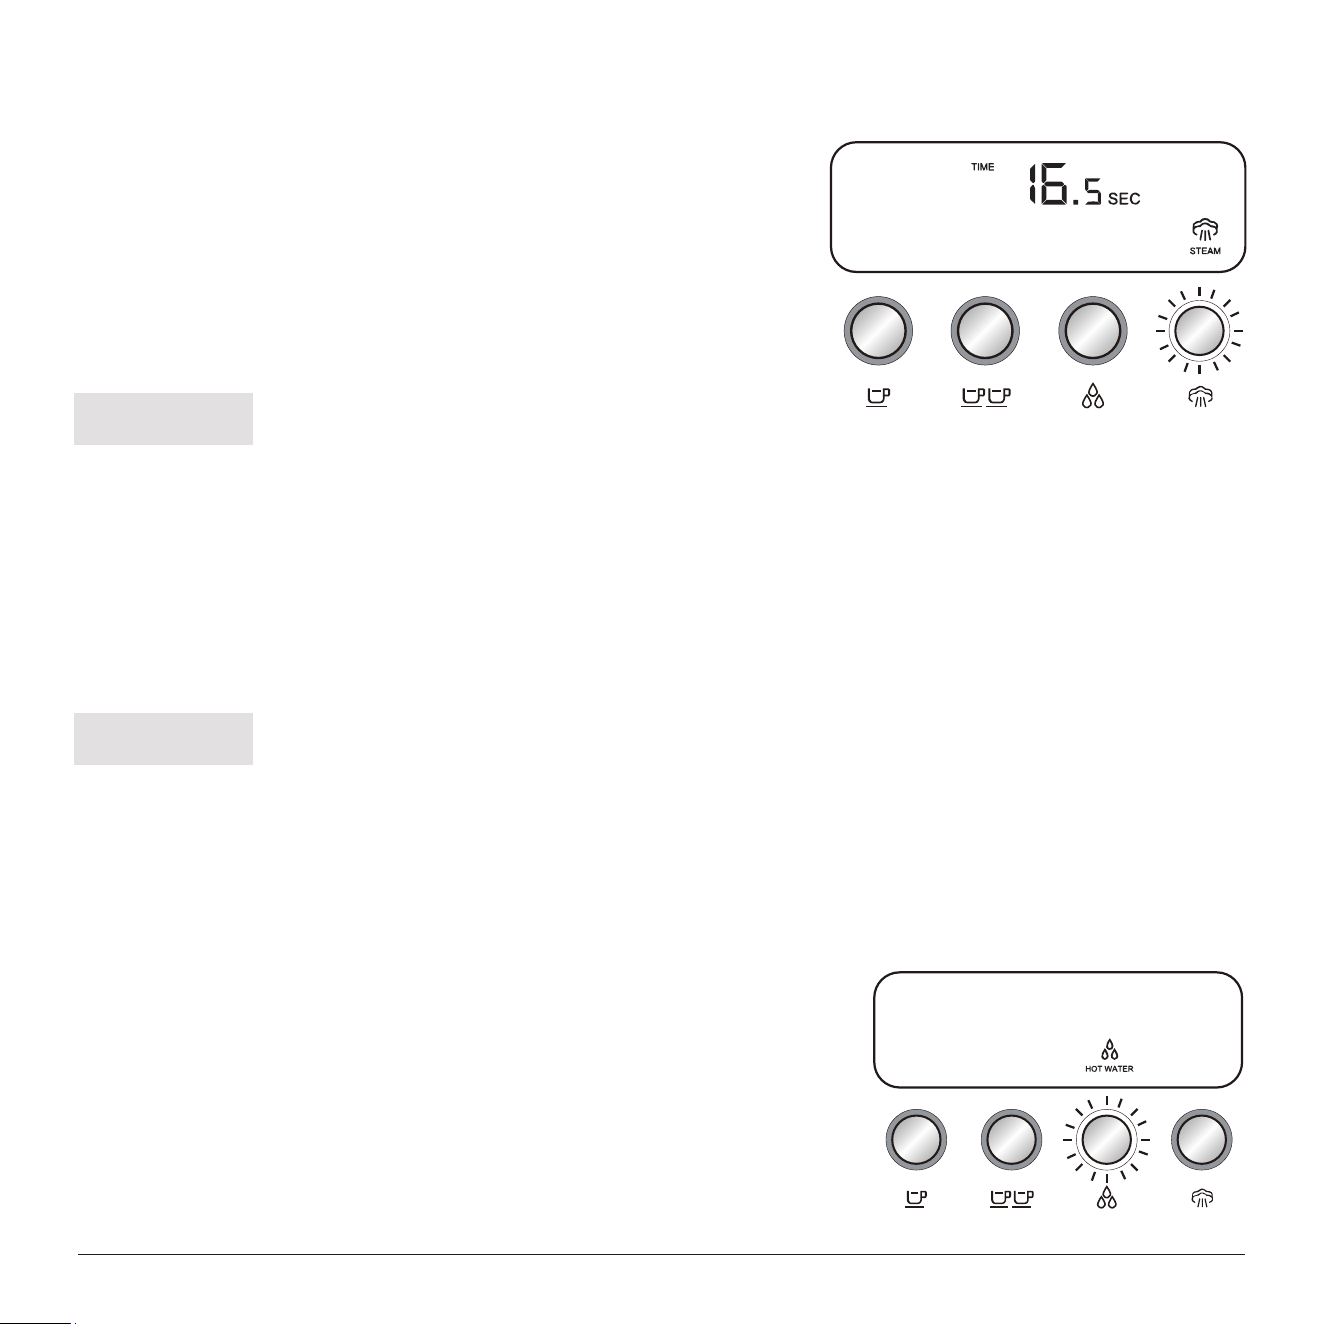
TWO CUP ESPRESSO
Press TWO CUP button once to extract a TWO CUP espresso or two cups of
espresso at the preset volume (approx. 70ml). The LCD screen will display
the brewing time.(image. 3)
The machine will stop once the volume reached preset and return to
STANDBY mode.
image. 3
HOW TO PROGRAM THE VOLUME OF ESPRESSO
The adjustable volume for ONE CUP espresso range ranges between 20 ml/0.68 oz
and 125 ml/4.23 oz. The machine will fail to program if the volume is out of the range.
NOTE:
HOW TO SET SHOT TEMPERATURE
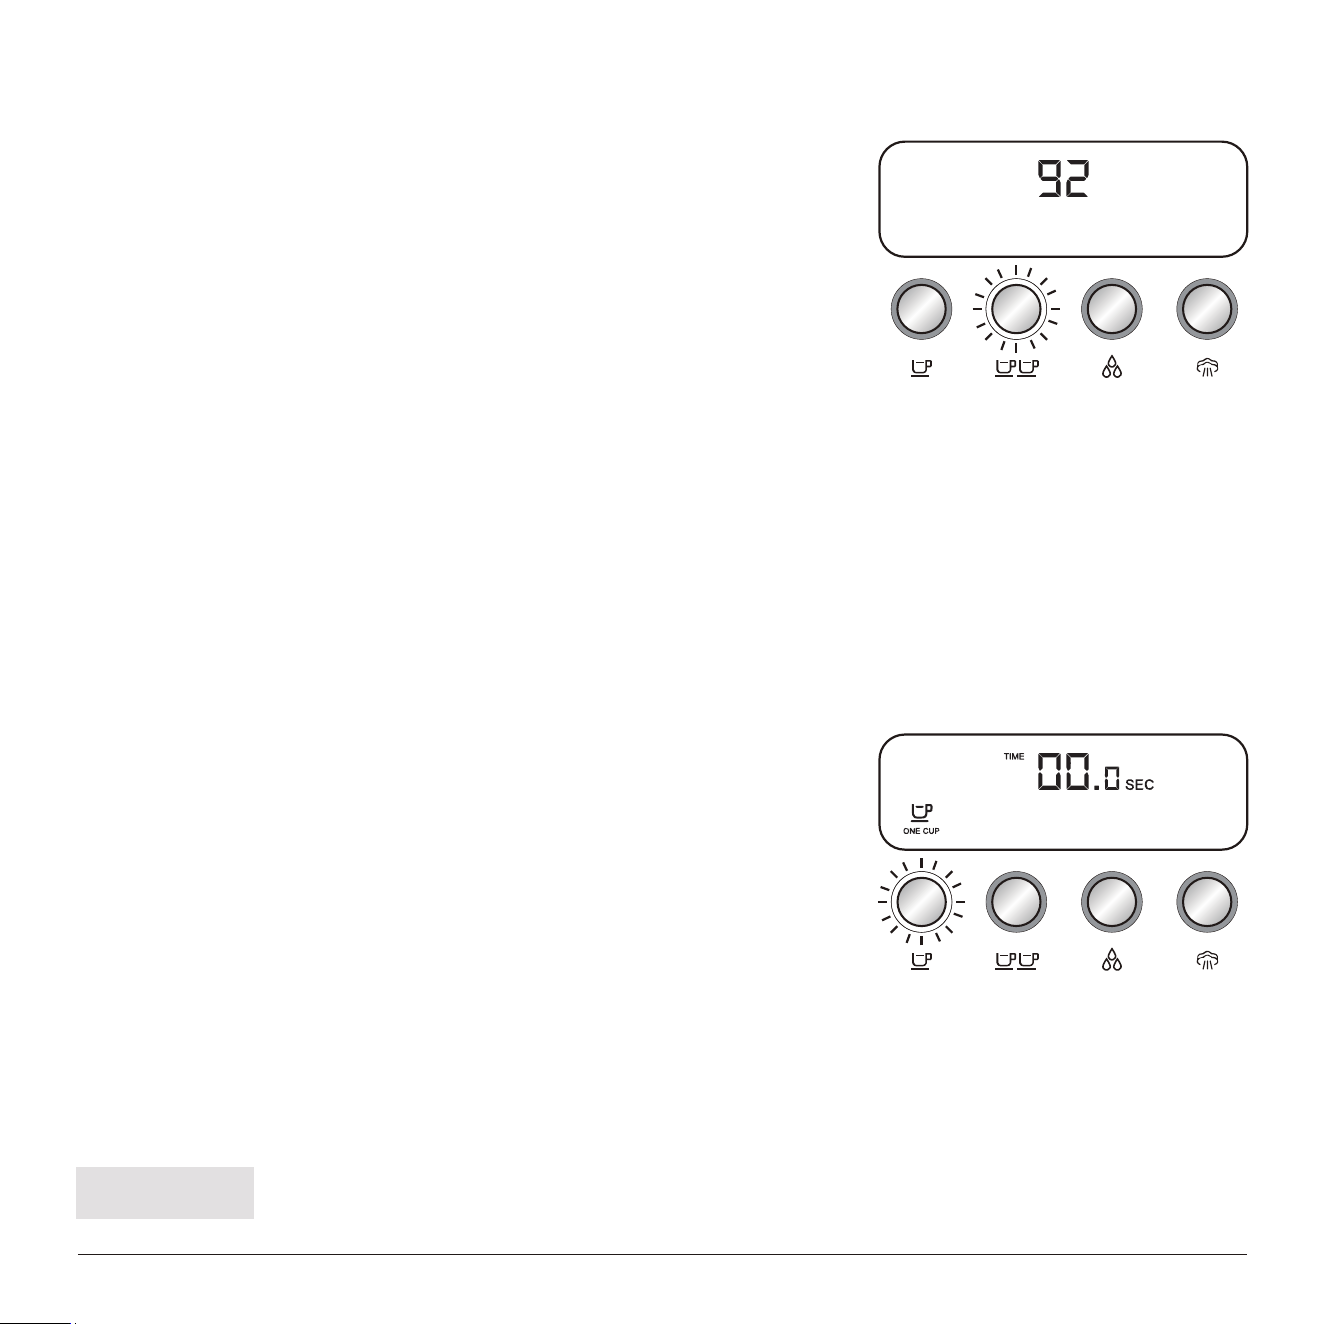
01. Press and hold hot water button for 5 seconds, the machine will enter
the temperature program mode. The power button will illuminate and
the LCD will display the current shot temperature.(image. 4)
02. Press either ONE CUP button, TWO CUP button, hot water button or
steam button to choose the desired shot temperature.
ONE CUP button = 90 ℃ / 194 ℉
TWO CUP button = 92 ℃ / 197 ℉
hot water button = 94 ℃ / 201 ℉
steam button = 96 ℃ / 204 ℉
The new temperature will be displayed on the LCD. Press the power button to set. The machine will beep once and
go back to STANDBY mode.
9
PROGRAM THE VOLUME OF ONE CUP ESPRESSO
01.
Press and hold the ONE CUP button for 5 seconds. The machine will
enter volume program mode. Only power button and ONE CUP button
are illuminated, other buttons are o. (image. 5)
02. Press ONE CUP button, the machine starts to brew. The ONE CUP
button will flash while brewing.
image. 4
image. 5
03. To stop the extraction at the desired level, press ONE CUP button again.
The machine will beep once, indicating that the new volume has been set.
The new volume can now be activated by pressing the ONE CUP button.
RESETTING TO DEFAULTS
To reset the machine to the default volume of ONE CUP or TWO CUP espresso, press and hold the ONE CUP
button and TWO CUP button for 5 seconds.
All the buttons will flash 3 times and the machine will beep 3 times, indicating the default volume of ONE CUP
and TWO CUP espresso has been reset to defaults.
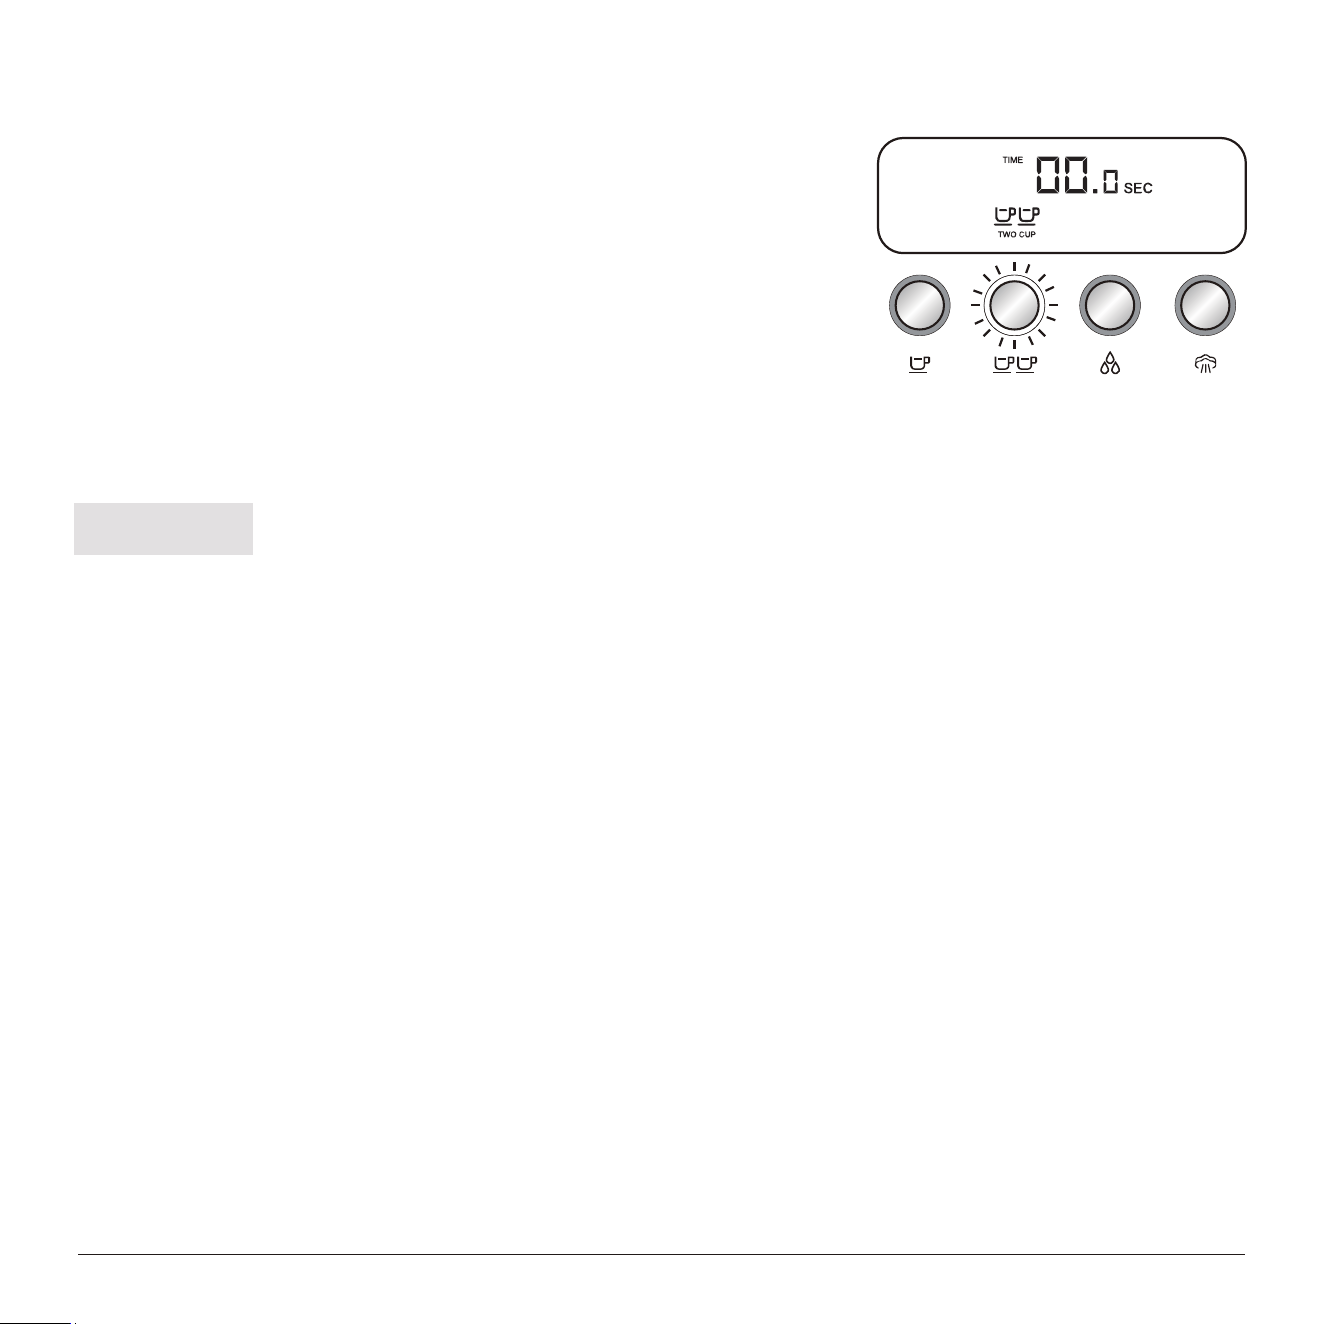
PROGRAM THE VOLUME OF TWO CUP ESPRESSO
01.
Press and hold the TWO CUP button for 5 seconds. The machine will
enter volume program mode. Only power button and TWO CUP button
are illuminated, other buttons are o. (image. 6)
02. Press TWO CUP button, the machine starts to brew. The TWO CUP
button will flash while brewing.
03. To stop the extraction at the desired volume, press TWO CUP button again.
The machine will beep once, indicating that the new volume has been set.
The new volume can now be activated by pressing the TWO CUP button.
The adjustable volume for TWO CUP espresso range ranges between 20 ml/0.68 oz
and 250 ml/8.45 oz. The machine will fail to program if the volume is out of the range.
NOTE:
10
image. 6
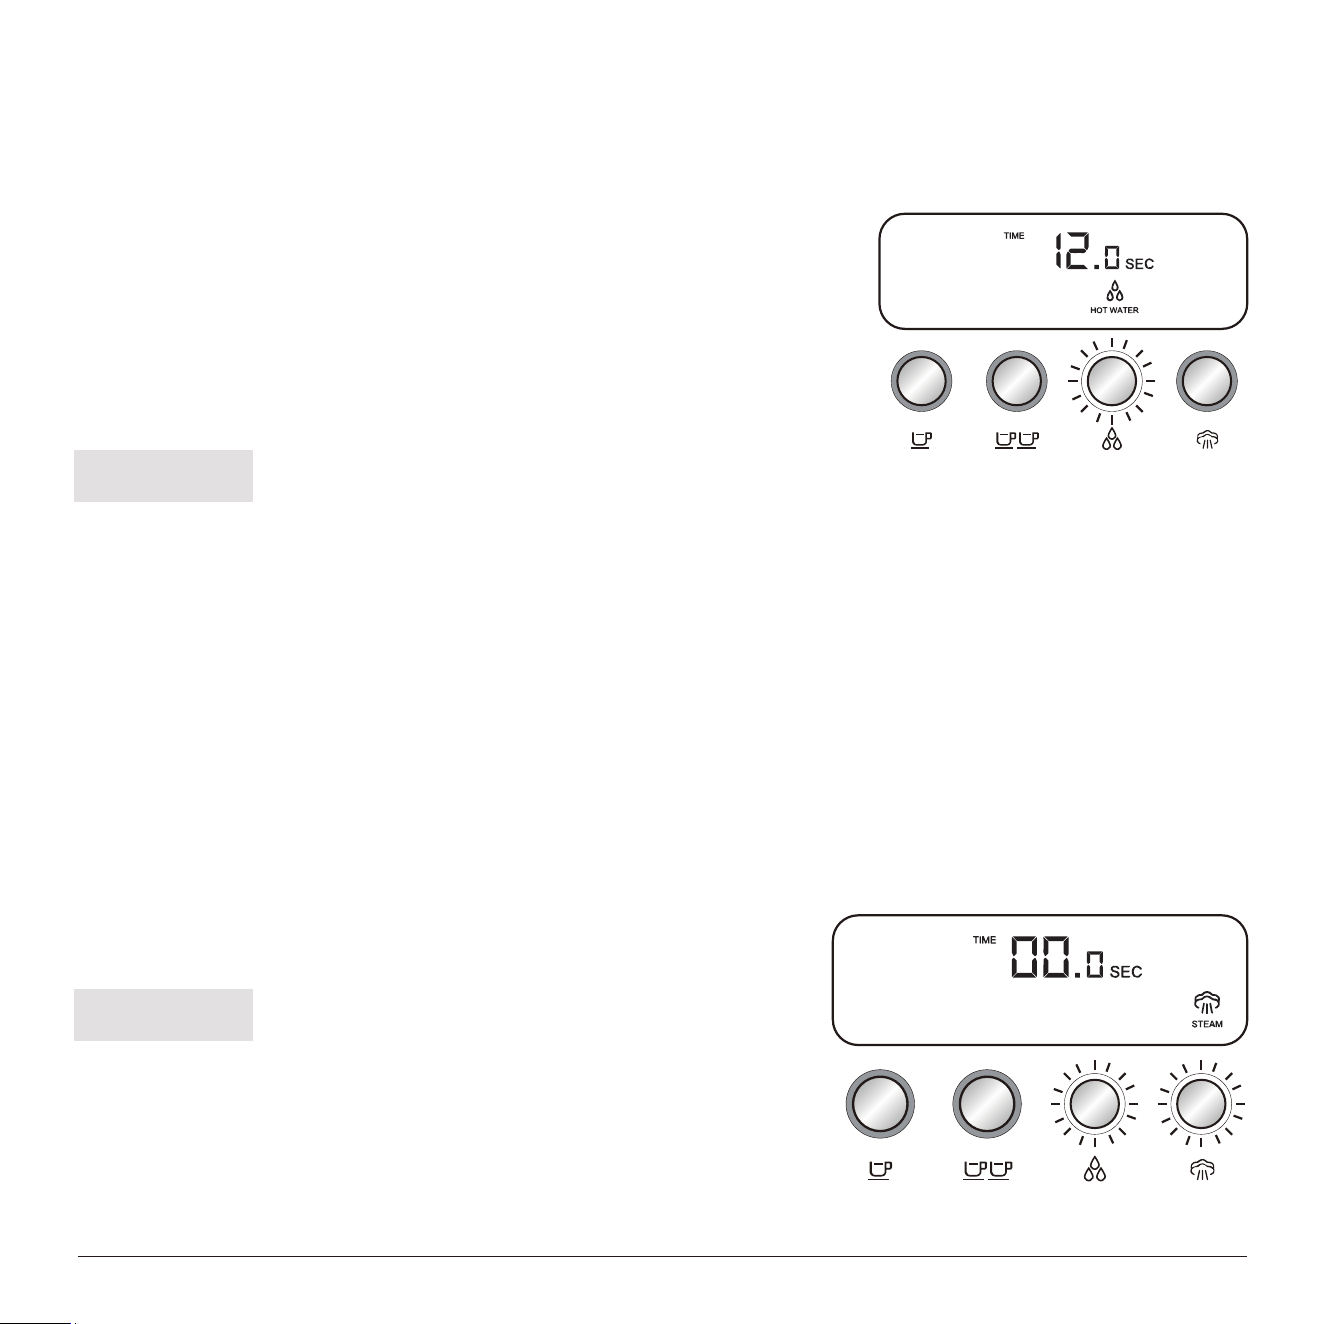
ENTER STEAM MODE
01.
Press steam button once, the machine will enter steam mode and start heating up to reach steam temperature.
The hot water button will illuminate and the steam button will flash.
02. Once the temperature reached, the hot water button and steam button will illuminate.
Now the machine is ready to make steam. (image. 8)
HOW TO MAKE STEAM
The hot water will stop automatically after approx.
60 seconds.
NOTE:
The machine will exit steam mode automatically
if no operation for 1 minute.
NOTE:
HOW TO MAKE HOT WATER
The hot water function can be used to clean and preheat cups, or to add hot water manually.
To activate the hot water, press the hot water button. The machine will start to
dispense hot water from the steam wand. The hot water button and icon will
illuminate. The LCD screen will display the dispensing time.(image. 7)
To stop the hot water, press the hot water button again. The machine will go
back to STANDBY mode.
11
image. 7
image. 8
WATER SHORTAGE ALARM
The machine will detect the shortage of water while making espresso,
hot water and steam. The hot water button and hot water icon in LCD will
flash simultaneously.(image. 10)
Fill tank with cold fresh water and press hot water button. The machine
will go back to STANDBY mode.
MAKE STEAM
01.
Press the steam button. The machine will start to dispense steam
from steam wand. The hot water button will be o and the steam
button keep flashing, and the LCD will display the steaming time.
(image. 9)
02. To stop the steam, press the steam button again. The machine
will go back to steam mode.
EXIT STEAM MODE
To exit the steam mode, press the hot water once or press and hold the steam button for 5 seconds. The machine
will exit steam mode and start to cool down to espresso temperature.
The steam will stop automatically after 5 minutes.
The machine will cool down and go back to
STANDBY mode.
NOTE:
The machine will pump water and release a lot of steam from the drip tray when cooling down.
It’s normal. The machine will stop automatically and go back to STANDBY mode once cooled
down.
NOTE:
12
image. 9
image. 10

CLEANING THE BREW HEAD
The brew head interior and shower screen should be wiped with a damp cloth after use to remove any coee ground
particles.
Periodically purge the machine. Place an empty filter and portafilter into the brew head. Press the two cup button
and run a short flow of water to rinse out any residual coee. Remove the portafilter and rinse thoroughly.
CLEANING THE FILTERS AND PORTAFILTER
The filters and portafilter should be rinsed under hot water immediately after use to remove all residual coee oils.
If any of the holes in the filter become blocked, use the cleaning needle provided to unblock the holes.
If the holes remain blocked, soak filter and portafilter in hot water for approx. 20 minutes.
Rinse thoroughly.
CLEANING AND MAINTENANCE
AUTO SHUT OFF
The machine will shut o automatically after no operation for 20 minutes.
All parts should be cleaned by hand using warm water and a gentle dishwashing liquid.
Do not clean any of the parts or accessories in the dishwasher.
NOTE:
CLEANING THE STEAM WAND
The steam wand should always be cleaned after frothing milk. Wipe the steam wand with a damp cloth.
13
DESCALING
Use this function to access descale procedures when a descale alert is flashed on the LCD.
Please ensure you allow approximately 20 minutes to complete the
entire descale process and follow the step by step instructions. If you’ve
just finished using your machine, please ensure to turn the machine
o and allow to cool for at least 1 hour before starting your descale
process. (image. 11)
01. Prepare for Descaling
a) Empty the drip tray and insert into position.
b) Fill cold water with descaler into water tank to MAX line. Put water tank back into position at the back of
the machine.
CLEANING THE DRIP TRAY
A red floating is installed into the drip tray to indicate water level, empty when floating start being visible over the
grid.
Remove the drip tray from the machine and separate the parts. Wash all parts in warm soapy water with a soft cloth.
Rinse and dry thoroughly before reassembling and reattaching to the machine.
After use, it is recommended to purge the steam wand for a couple of seconds, to clear any remaining milk. With
the steam wand positioned down over the drip tray, press hot water button to allow the machine to dispense water
for a couple of seconds then press hot water button again.
If the steam nozzle hole becomes blocked, it will reduce steam or result in no steam. Use the provided cleaning
needle to clear the hole.
If the steam wand is still blocked, unscrew the nozzle and soak the nozzle in hot water before using the cleaning
needle to unblock again. Replace the nozzle back on the steam wand.
14
image. 11
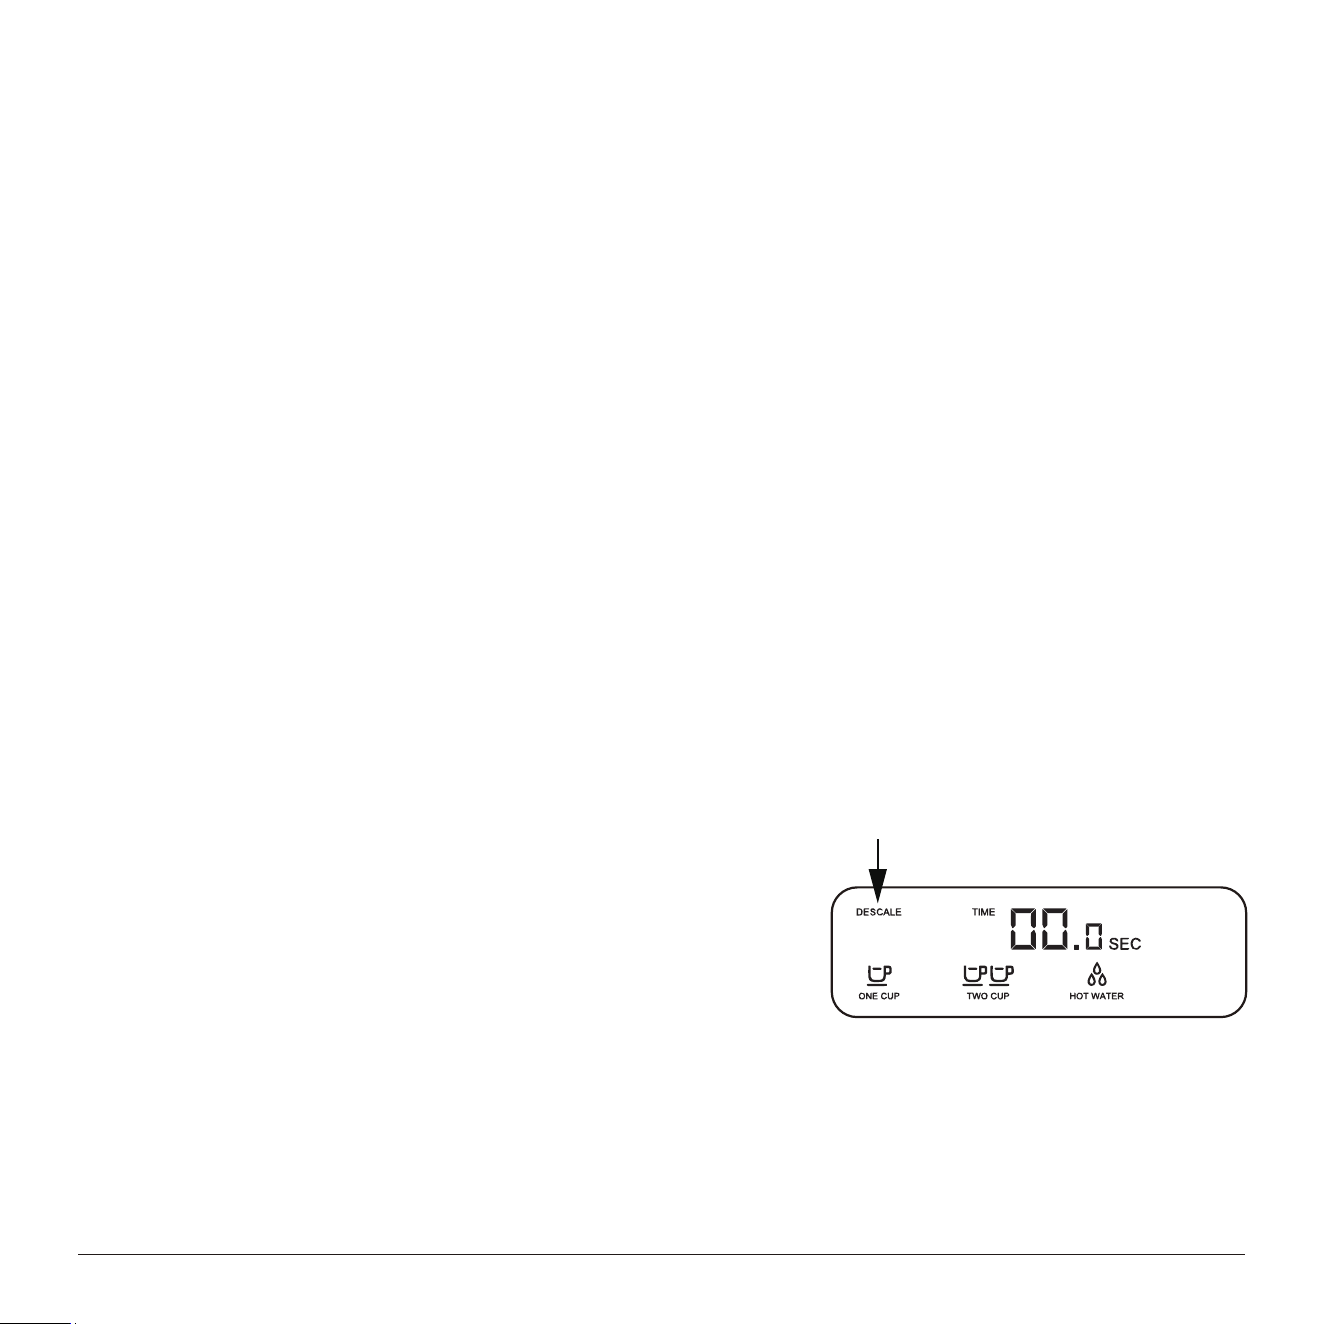
02. Begin Descaling
a) Press hot water button to proceed. Machine will fill boilers with
descale solution and heat to temperature. During this time,
water will flow through the group head and steam wand
alternately. The One Cup button and hot water button will
flash alternately, and the LCD will count from 01 to 05.
b) Wait for counter to reach 05. This allows solution to dissolve
limescale build-up.
c) Once the counter reaches to 05, the machine is ready to flush.(image. 13)
d) When Descale phase is ended, One Cup and hot water buttons, icons are will flash 3 times and pause for
3 seconds.
03. Flush
a) Press hot water button to proceed. During this procedure, the LCD will count from 06 to 08.
b) During this time, the machine will fill boiler brew with fresh clean water and heat to temperature.
c) Wait for counter to reach 08. Then the machine will stop automatically and go back to STANDBY mode.
d) Empty drip tray and insert back to place.
e) Empty water tank, then rinse and fill with clean water to the MAX line. Put water tank back into position.
Now the descale process is completed, and the machine is ready to use.
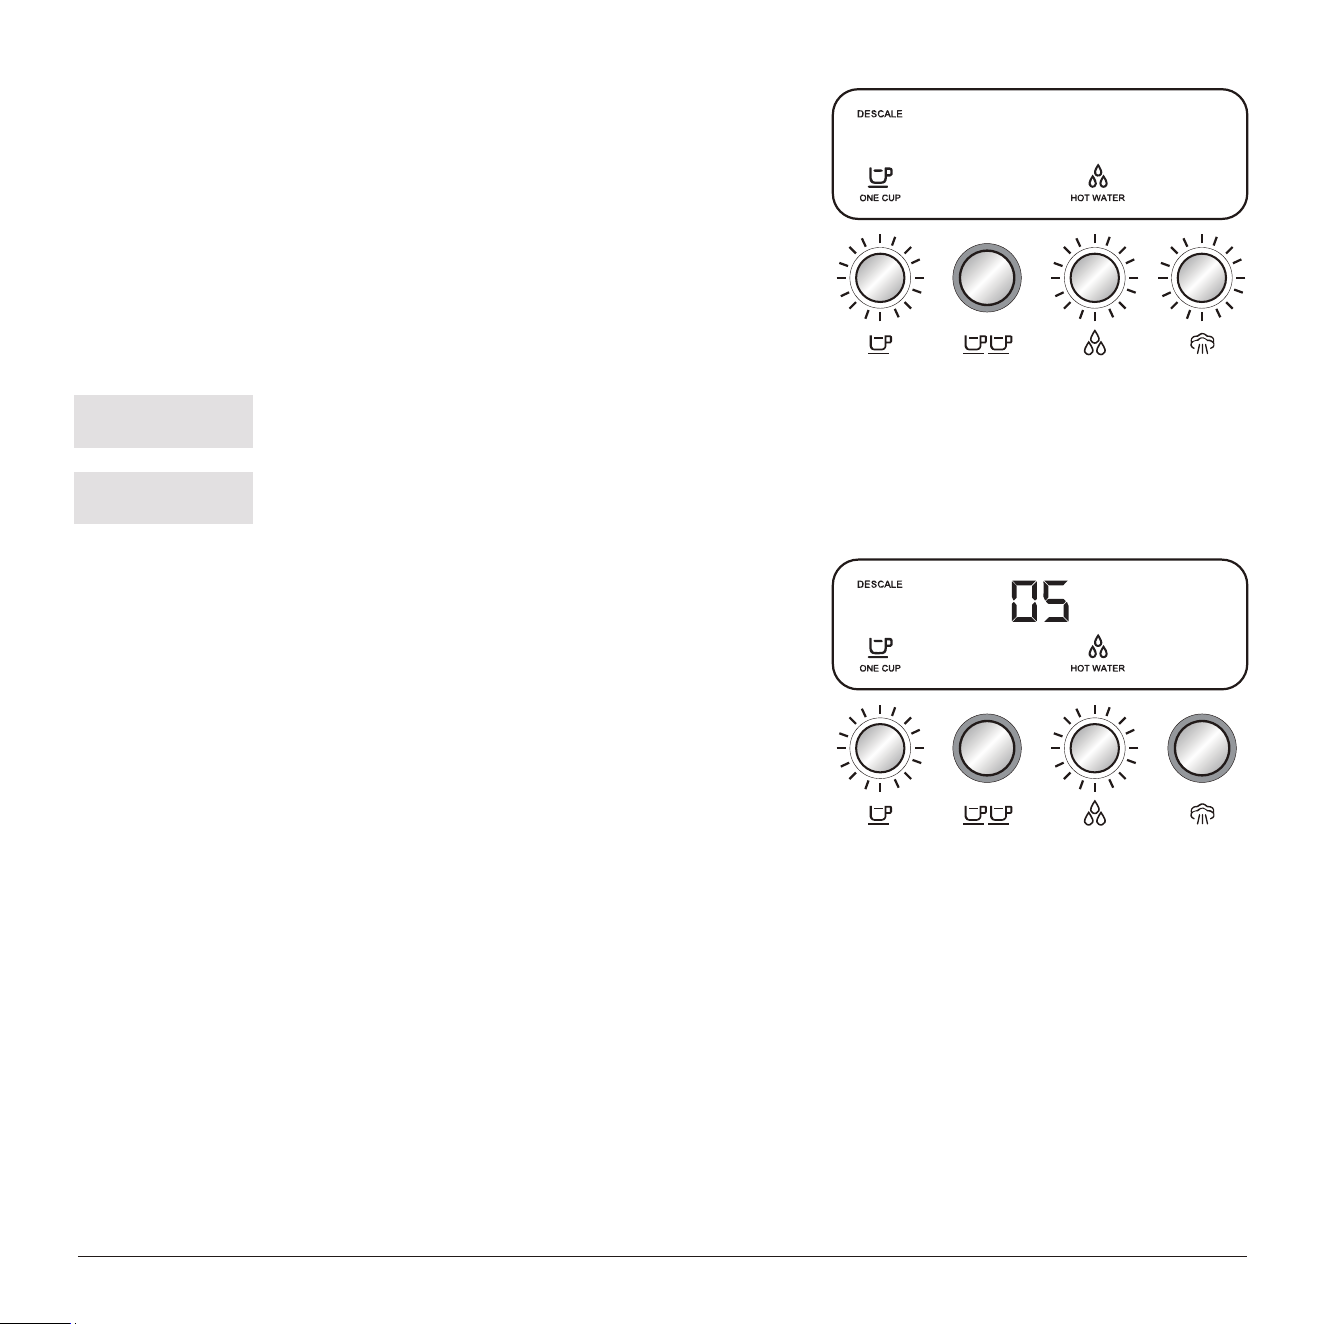
c) Put a large cup or mug under the brew head and steam wand.
d) Press and hold One Cup button and hot water button
simultaneously for 5 seconds to enter Descale mode. The
One Cup icon and hot water icon in the LCD will light up,
and the One Cup button, hot water button and steam button
will illuminate.(image. 12)
To exit Descale mode, press the steam button once. The machine will go back to STANDBY
mode.
NOTE:
Once the descale process begins, there is no way to exit the process until the whole process
completed, even turn o or unplug the machine.
NOTE:
15
image. 12
image. 13
If your problem is not listed, please contact Customer Support.
NOTE:
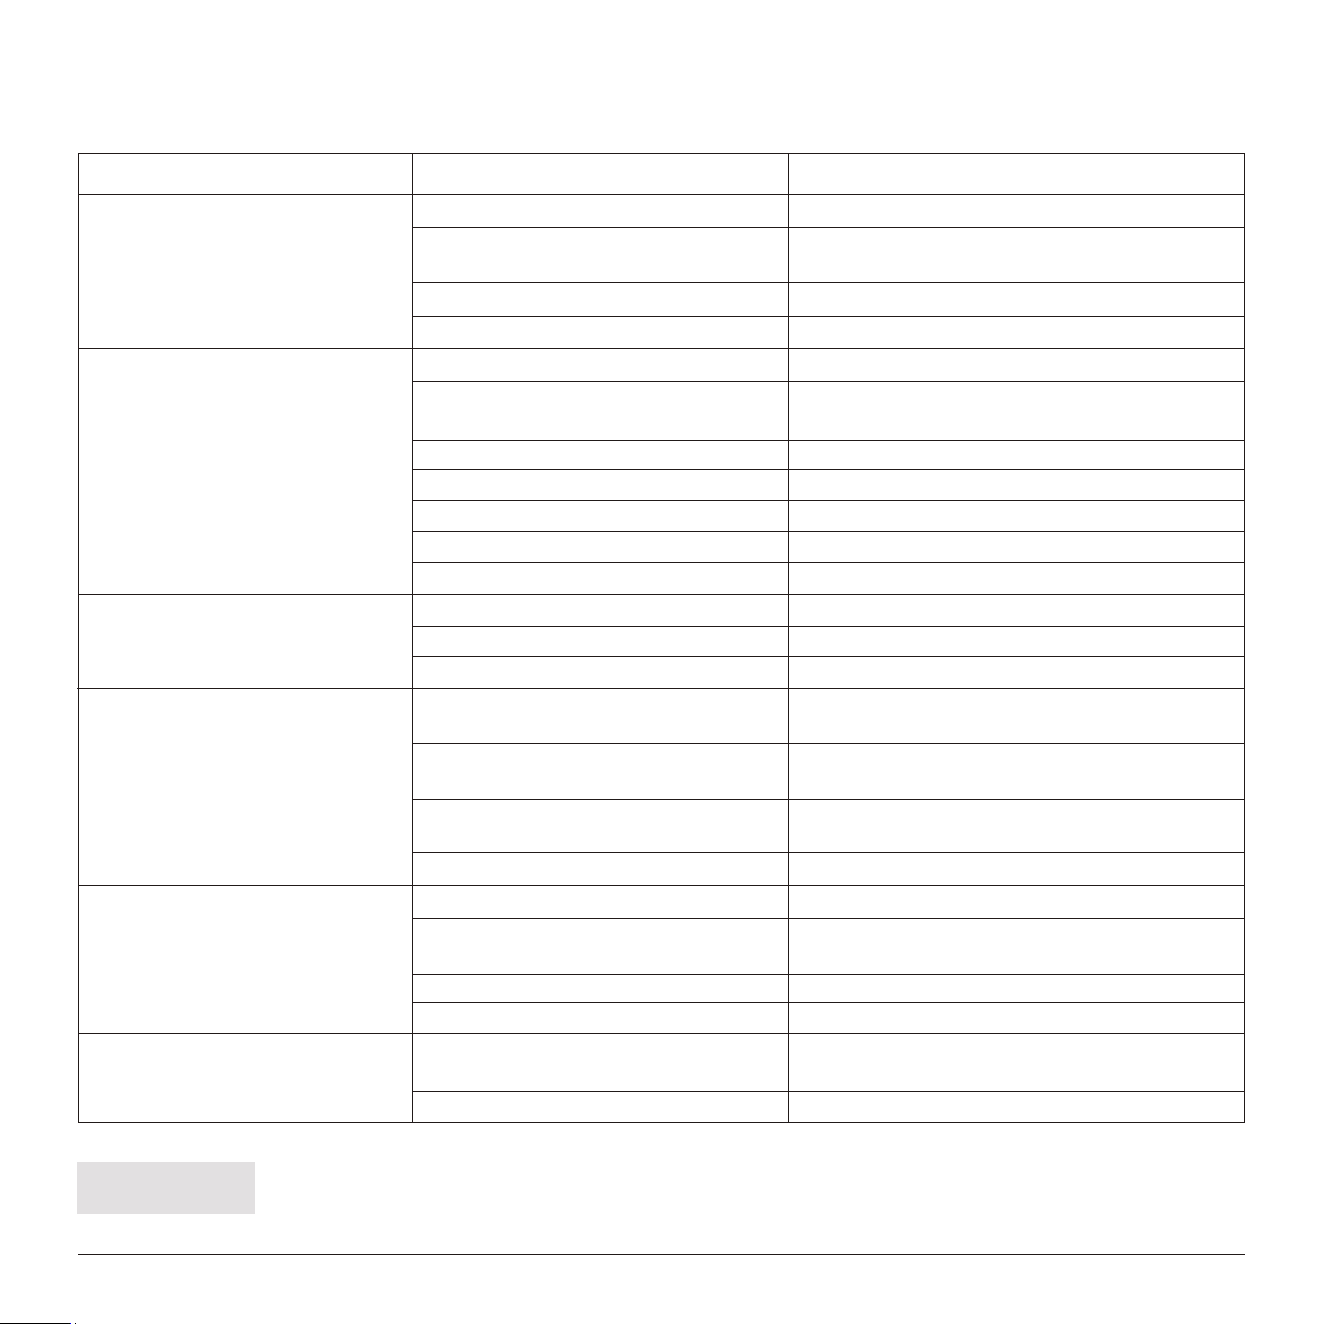
TROUBLESHOOTING
The filter may be blocked. Clean the filter.
Espresso runs out too quickly.
Espresso drips out of the rim of the
filter holder.
Espresso only drips from the
portafilter spouts or not at all.
Machine needs to be descaled.
Water tank is empty. Fill tank.
Run descale cycle.
Coee is ground too finely. Use a coarser grind.
The filter may be blocked. Clean the filter.
PROBLEM POSSIBLE CAUSE SOLUTION
Water does not flow from the brew
head.
Water tank is empty.
Water tank is not fully inserted and locked
into position.
Push water tank down completely to lock into place.
Fill tank.
Portafilter not inserted in the brew head
correctly.
Ensure portafilter is completely inserted and rotated
until resistance is felt.
Not enough ground coee in the filter. Increase the amount of ground coee.
Coee is ground too coarsely. Use a finer grind.
Coee tamped too lightly. Tamp between or 11-22 lb of pressure.
Machine needs to be descaled. Run descale cycle.
Water tank is empty. Fill tank.
Machine needs to be descaled. Run descale cycle.
Water tank is not fully inserted and locked
into position.
Push water tank down completely to lock into place.
Steam nozzle is blocked. Clean the steam nozzle.
There are coee grounds around the filter
basket rim.
Remove any residual ground coee from the rim of
the filter to ensure a proper seal in group head.
There are coee grounds on the surface of
the brew head.
Clean any residual ground coee from the surface of
the brew head.
No steam.
Too much ground coee in the filter basket. Decrease the amount of ground coee.
Water tank is not fully inserted and locked
into position.
Push water tank down completely to lock into place.
Too much coee ground in the filter. Decrease the amount of coee ground.
Coee tamped too firmly. Tamp between or 11-22 lb of pressure.
Water tank is broken. Contact our customer support team.
Water leaks from bottom.
Water tank is not fully inserted and locked
into position.
Push water tank down completely to lock into place.
16
CA 65
WARNING: This product can expose you to chemicals including Styrene, which known to the State of
California to cause cancer, and Bisphenol-A, which is known to the State of California to cause birth defects
or other reproductive harm. For more information go to www.P65Warnings.ca.gov.
ADVERTENCIA: Este producto lo puede exponer a sustancias químicas incluyendo el estireno, el cual
es conocido en el estado de California como responsable de causar cancer, y bisfenol A, el cual es conocido
en el estado de California
WARRANTY INFORMATION
The manufacturer provides warranty in accordance with the legislation of the customer's own country of residence, with a
minimum of 12 months, starting from the date on which the appliance is sold to the end user.
The warranty only covers defects in material or workmanship.
The warranty will not apply in cases of:
- Normal wear and tear.
- Incorrect use, e.g. overloading of the appliance, use of non-approved accessories.
- Use of force, damage caused by external influences.
- Damage caused by non-observance of the user manual, e.g. connection to an unsuitable mains supply or non-compliance
with the installation instructions.
- Partially or completely dismantled appliances.
17