Your RETRO MICROWAVE OVEN is fully assembled. Before using, remove all packing materials from inside the oven. Check the oven for any damage, such as misaligned or bent door, damaged door seals and sealing surfaces, broken or loose door hinges/latches and dents inside the oven or on the door. If there is any damage, DO NOT operate the oven. Return damaged items to the store where it was purchased.
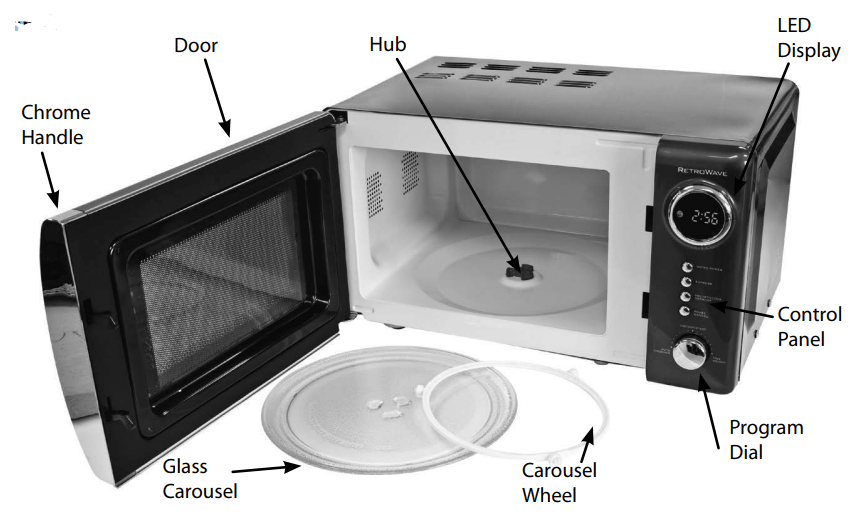
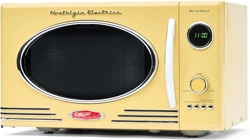
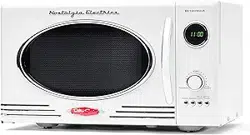
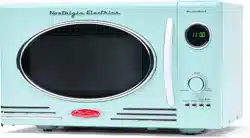
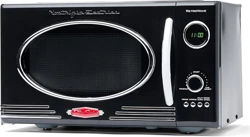
PARTS
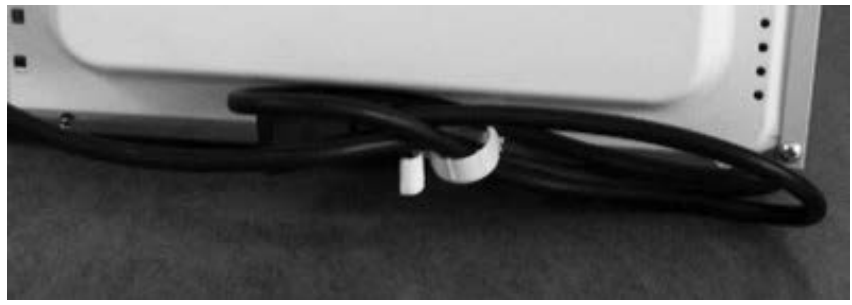
CORD LOCATION
To save energy and for easy storage, cord can be unplugged and easily wrapped around plastic bracket behind the unit.
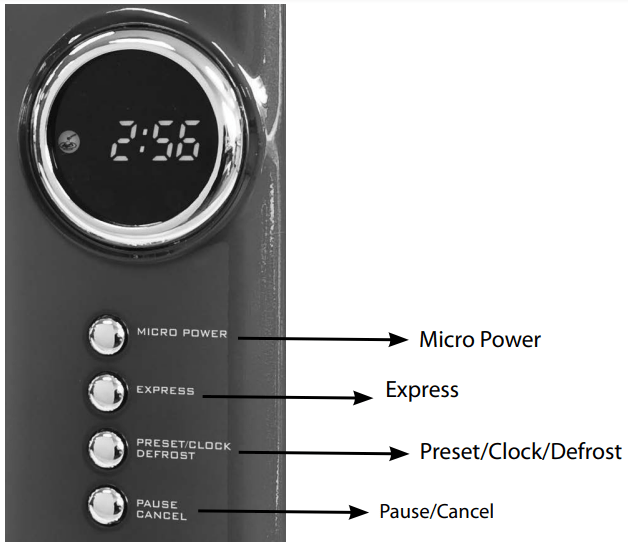
Control Panel
HOW TO OPERATE
CHOOSING A LOCATION
You will use the oven frequently, so plan its location for ease of use. Allow at least 2 inches on the sides, top and at the rear of the oven for air circulation. Do not place or install the oven in any area where heat and steam are generated; for example, next to or above a conventional gas or electric range or above a conventional wall oven. Heat and steam may damage the electronics or the mechanical parts of the oven.
AFTER PLUGGING IN
As soon as the microwave is plugged into the outlet, the LED Display will flash three times. Then the LED Display will flash ":", which prompts you to enter the time.
SETTING THE CLOCK
• While the LED Display reads ":", press the PRESET/CLOCK/DEFROST button for three seconds. The LED Display will then read 1:00 and the 1: on the left will flash.
• Turn the PROGRAM DIAL to set the hour.
• Once you have set the hour, press the PRESET/CLOCK/DEFROST button again and turn the PROGRAM DIAL to set the minutes.
• Once you have set the correct time, press the PRESET/CLOCK/DEFROST button again or wait 5 seconds. When the numbers no longer flash, the time is set.
CONTROL PANEL
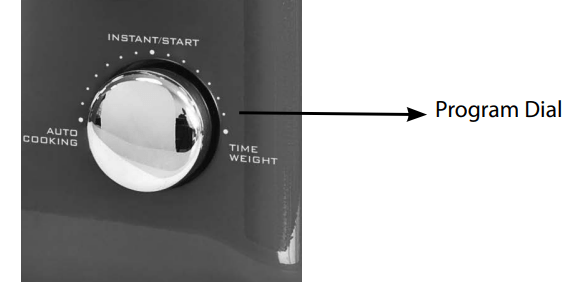
PROGRAM DIAL
The PROGRAM DIAL is a multi-functioning controller. It can be used to set the time on the clock, adjust cooking time and to select a pre-defined cooking program.
• Quick Start: Pressing the PROGRAM DIAL once will immediately start a cooking cycle for one minute at maximum power.
• Adjusting Time: You can adjust the cooking time by either pressing the PROGRAM DIAL additional times to add 10-second increments, or turning the PROGRAM DIAL clockwise to increase time by seconds and counter-clockwise to decrease time by seconds.
• Selecting a Cooking Program: Turning the PROGRAM DIAL counter-clockwise prior to starting a cooking cycle allows you to select a cooking program. The LED Display will light up an icon to show which program is selected. If you do not understand what each icon means, refer to the chart on the following page. Once you have selected your desired program, press the PROGRAM DIAL. The LED Display will then prompt you to select the weight or number of food items. Turn the PROGRAM DIAL again to select the weight or number of food items and press the PROGRAM DIAL to begin the cooking cycle.
• Note: If the microwave oven is in LOCK mode, the PROGRAM DIAL will not work when pressed.
POWER
Press the MICRO POWER button to change the cooking power.
• 100 P: High Power; 100% microwave power. Applicable for quick and thorough cooking. Use for cooking foods such as meats and vegetables.
• 80 P: Medium-High Power; 80% microwave power. Applicable for medium express cooking. Use for cooking foods such as eggs, fish, rice and soup.
• 60 P : Medium Power; 60% microwave power. Applicable for steaming food.
Pressing the EXPRESS button once and then pressing the PROGRAM DIAL will start a 30 second cooking cycle. You may add time in 30-second increments up to 1.5 minutes by pressing the EXPRESS button again.
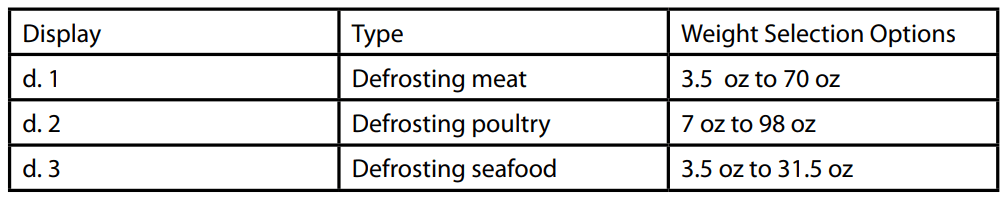
DEFROST
Press the PRESET/CLOCK/DEFROST button to select the cycle type. After selecting the cycle, press INSTANT/START to confirm and then use the PROGRAM DIAL to set the weight. Press INSTANT/START again to start cooking.
NOTE: Halfway through defrosting, you will be prompted by three beeps to turn the food over.
PAUSE/CANCEL/LOCK
Press the PAUSE/CANCEL button once during the cooking program to pause the cooking process.
• Press the PAUSE/CANCEL button twice to cancel the current cooking program.
• Use the LOCK feature to lock the control panel when you are cleaning or so that children cannot use the oven unsupervised. All the buttons are rendered inoperable in this mode.
• To set the child lock, press and hold the PAUSE/CANCEL button for about 3 seconds. The LED Display will show the word "OFF" and a padlock icon.
• To cancel child lock, press and hold the PAUSE/CANCEL button for about 3 seconds until the LED Display shows the time again.
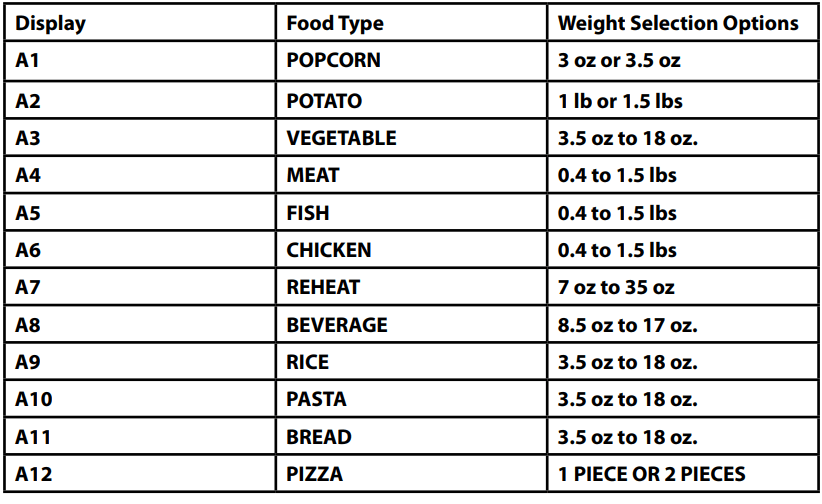
Automatic Cooking
To use the default cooking options programmed into the microwave, turn the PROGRAM DIAL to select the appropriate setting based on the food type and the amount of food.
COOKING
MULTI-SEQUENCE COOKING
You can program up to four separate cooking sequences for each cooking program. This is useful if you need to cook something at different power and time settings (ex. 10 minutes at 100 P, 10 minutes at 80 P, 5 minutes at 20 P).
The maximum time for each cooking sequence is 60 minutes.
1. First, select the power level by pressing the MICRO POWER button. Then use the PROGRAM DIAL to set the desired cooking time for that sequence. You must select the time or you cannot go on to the next step.
2. Press the MICRO POWER button again to add another sequence and use the PROGRAM DIAL to set time.
3. After you have set the desired number of sequences, press the INSTANT/START button to begin cooking.
DELAYED START
1. To preset your microwave to begin cooking at a later time, you must first set the current time (see above).
2. Once the time has been set, select the cooking program by pressing the MICRO POWER button.
3. Turn the PROGRAM DIAL to set your desired cooking time.
4. Press and hold the PRESET/CLOCK/DEFROST button to return to the current time, then set the desired start time by turning the PROGRAM DIAL to the hour, pressing the PRESET/CLOCK/DEFROST button to confirm the hour, and setting the minutes by turning the PROGRAM DIAL.
5. Press the PRESET/CLOCK/DEFROST button to confirm the now activated delayed start time; microwave will beep and the clock icon will flash. You may check your delayed start time by pressing the PRESET/CLOCK/DEFROST button again at any time.
NOTE: The clock must be set in order for the Delayed Start feature to work.
HELPFUL TIPS
CAROUSEL ROTATION
If the Glass Carousel inside of your microwave oven makes noise during cooking or does not seem to be rotating properly, stop the cooking process immediately by pressing the PAUSE/CANCEL button and make sure that:
A) The Glass Carousel is properly aligned on the Carousel Wheel and Hub.
B) There is no excess food or debris lodged underneath the Glass Carousel.
SPLATTERING
Some foods may splatter inside of the microwave when cooked in the microwave oven. It is recommended that you use a paper towel, wax paper or microwavesafe lid to loosely cover open dishes that may splatter. It is not recommended that you use plastic wrap to cover foods while cooking in the microwave oven.
FOODS
• Eggs: Cooking eggs with yolk intact can cause eggs to explode. It's best to puncture yolks before cooking. Never cook eggs inside of shell, or reheat whole, hardboiled eggs.
• Nuts: Do not cook dry nuts or seeds inside of the shell.
• Potatoes, apples, squash, hot dogs and sausages: Puncture the skin to allow steam to escape, or these foods could explode during cooking
• Popcorn: Only use microwave popcorn that is especially packaged for microwave oven cooking. Follow the directions on the packaging exactly. Never exceed the maximum cooking time on packaging.
• Baby Food: Never heat baby food in its container. Transfer the baby food to a microwave-safe container before cooking. Check temperature before serving.
• General: NEVER use the microwave oven for deep fat frying or for drying wood, gourds, herbs or wet paper.
MICROWAVE SAFE COOKWARE
The following cookware is safe for microwave oven cooking:
• Glass ceramics
• Heat-resistant glass
• Microwave-safe plastics
• Paper plates
• Microwave-safe pottery, stoneware and porcelain
NEVER use the following in your microwave oven
• Metal pans and dishes, including those with metallic trim
• Glass that is not heat-resistant
• Plastic containers that are not microwave-safe
• Paper products
• Plastic bags used for storing food or oven baking
• Objects with metal twist ties or staples attached
CLEANING & MAINTENANCE
To prolong the life of your RETRO MICROWAVE OVEN, please follow these simple instructions for maintenance.
• Unplug microwave oven or set to LOCK mode. Never place the microwave oven in a dishwasher.
• Remove Glass Carousel and Carousel Wheel.
• Wash Glass Carousel in warm, soapy water using a nonabrasive cloth or sponge. Dry thoroughly.
• Wipe down inside and outside of microwave oven using warm, soapy water and a non-abrasive cloth or sponge. Dry thoroughly.
• Never use harsh or abrasive cleaners on the microwave oven and never use an abrasive sponge, cloth or scouring pad.
NO! You can't set your own time!! Just to reheat Joe, it wants 4 min.!!! Piece of crap. I don't DARE defrost anything - I'm afraid the meat/fish would be ruined! Too late for me to send back. I just try to deal w/it.
#2 I think my microwave needs a new switch or fuse. when i open it the plate spins when i close it the microwave does not work. what switch do i need?
You need to push the button again to use up the rest of your time you set on your timer. Best of luck!
This is not an NSF microwave. It should not be used in a food service or restaurant setting. It could be used in a hotel room. I do not believe any NSF Microwaves are .7 cu ft.