Loading ...
Loading ...
Loading ...
51
l
Dette apparat overholder EF-forordning 1935/2004
om materialer og genstande, der kommer i kontakt
med levnedsmidler.
Dette tilbehør har vridetilslutningssystem
og
er designet til direkte montering på den seneste
generation af Kenwood Chef-modeller (TYPE KVC,
KVL, og KCC, KWL,-KCL).
Dette tilbehør passer også til KMix-
køkkenmaskinee med lavhastighedsudtag (TYPE
KMX).
For at tjekke, at dette tilbehør er kompatibelt
med din køkkenmaskine, skal du sikre, at begge
komponenter har vridetilslutningssystem
.
Hvis din køkkenmaskine har
stangtilslutningssystem , skal du også
bruge et mellemstykke, før betjening er mulig.
Referencekoden for mellemstykket er KAT001ME.
Flere oplysninger og bestilling af mellemstykket på
www.kenwoodworld.com/twist.
før første brug
Vask delene: Se "pleje og rengøring".
forklaring
1
nedstopper
2
låg med tragt
3
snegl
4
filterkurv
5
drejelig viskerholder
6
saftskål
7
tud til rester
8
safttud
9
drypstop
bk
drivaksel
bl
drivenhed
bm
saftkande
bn
rengøringsbørste
bo
skruenøgle
samling af din saftpresser (AèH)
A+B
Sæt reststopperen ind i åbningen på undersiden af
saftskålen
6
, og tryk den ind, til den sidder fast.
C+D
Sæt saftskålen
6
på drivenheden ved at rette
with the (graphic) on the power unit
(graphic) on the bottom of the bowl
unlock graphic
lock graphic / Fit the lid onto the unit and click into place (x)
lter holder assembly into the juicing bowl and align the (graphic)
(graphic) on the juicing bowl
switch graphic, on, o & reverse
på siden af skålen ind med
with the (graphic) on the power unit
(graphic) on the bottom of the bowl
unlock graphic
lock graphic / Fit the lid onto the unit and click into place (x)
lter holder assembly into the juicing bowl and align the (graphic)
(graphic) on the juicing bowl
switch graphic, on, o & reverse
på drivenheden.
For at låse skålen på skal den drejes med uret,
indtil
with the (graphic) on the power unit
(graphic) on the bottom of the bowl
unlock graphic
lock graphic / Fit the lid onto the unit and click into place (x)
lter holder assembly into the juicing bowl and align the (graphic)
(graphic) on the juicing bowl
switch graphic, on, o & reverse
er rettet ind med
with the (graphic) on the power unit
(graphic) on the bottom of the bowl
unlock graphic
lock graphic / Fit the lid onto the unit and click into place (x)
lter holder assembly into the juicing bowl and align the (graphic)
(graphic) on the juicing bowl
switch graphic, on, o & reverse
på motorenheden.
E
Anbring filterkurven
4
i viskerholderen
5
.
F
Sænk viskerholderen ned i saftskålen, og ret
with the (graphic) on the power unit
(graphic) on the bottom of the bowl
unlock graphic
lock graphic / Fit the lid onto the unit and click into place (x)
lter holder assembly into the juicing bowl and align the (graphic)
(graphic) on the juicing bowl
switch graphic, on, o & reverse
ind med
with the (graphic) on the power unit
(graphic) on the bottom of the bowl
unlock graphic
lock graphic / Fit the lid onto the unit and click into place (x)
lter holder assembly into the juicing bowl and align the (graphic)
(graphic) on the juicing bowl
switch graphic, on, o & reverse
på toppen af drivenheden. Sørg for, at
filterkurven er låst på plads.
G
Anbring sneglen
3
i filterkurven, og tryk ned for
at fastgøre den. Bemærk: Låget kan ikke
sættes på, hvis ikke sneglen er trykket
helt ned.
H
Sæt låget
2
på enheden, og sørg for, at
with the (graphic) on the power unit
(graphic) on the bottom of the bowl
unlock graphic
lock graphic / Fit the lid onto the unit and click into place (x)
lter holder assembly into the juicing bowl and align the (graphic)
(graphic) on the juicing bowl
switch graphic, on, o & reverse
er
rettet ind med
with the (graphic) on the power unit
(graphic) on the bottom of the bowl
unlock graphic
lock graphic / Fit the lid onto the unit and click into place (x)
lter holder assembly into the juicing bowl and align the (graphic)
(graphic) on the juicing bowl
switch graphic, on, o & reverse
på toppen af drivenheden. Drej
derpå låget med uret, til det klikker på plads, og
with the (graphic) on the power unit
(graphic) on the bottom of the bowl
unlock graphic
lock graphic / Fit the lid onto the unit and click into place (x)
lter holder assembly into the juicing bowl and align the (graphic)
(graphic) on the juicing bowl
switch graphic, on, o & reverse
er rettet ind med
with the (graphic) on the power unit
(graphic) on the bottom of the bowl
unlock graphic
lock graphic / Fit the lid onto the unit and click into place (x)
lter holder assembly into the juicing bowl and align the (graphic)
(graphic) on the juicing bowl
switch graphic, on, o & reverse
på toppen af drivenheden.
Anbring nedskubberen
1
i tilførselsrøret.
8-10cm
l
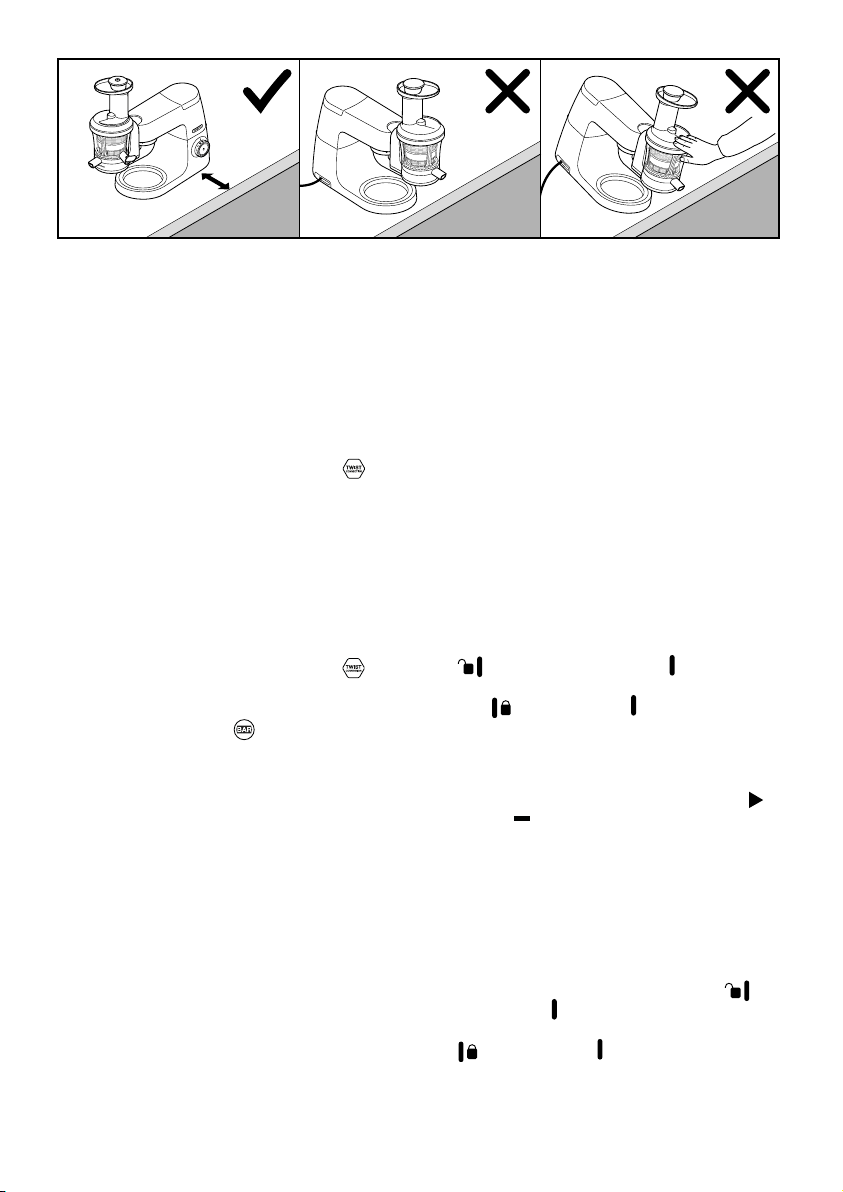
Flyt eller hæv ikke mixerhovedet med tilbehør påsat, da
køkkenmaskinen kan blive ustabil.
l
Se yderligere sikkerhedsadvarsler i instruktionsbogen til din
køkkenmaskine.
Loading ...
Loading ...
Loading ...