User Guide
Wi-Fi Baby Camera
Day / Night HD Cloud Camera
Version 1.1 | 8/28/14
DCS-825L
2D-Link DCS-825L User Manual
D-Link reserves the right to revise this publication and to make changes in the content hereof without obligation to notify any person or organization
of such revisions or changes. Information in this document may become obsolete as our services and websites develop and change. Please refer to
the www.mydlink.com website for the most current information.
Manual Revisions
Revision Date Description
1.0 February 5, 2014 • Initial release
1.1 August 28, 2014 • Minor changes
Trademarks
© 2014 D-Link. All Rights Reserved. D-Link and the D-Link logo are trademarks or registered trademarks of D-Link Corporation or its subsidiaries. All
other third-party marks mentioned herein may be trademarks of their respective owners. This publication may not be reproduced, in whole or in part,
without prior express written permission from D-Link Systems, Inc.
Preface

3D-Link DCS-825L User Manual
Table of Contents
Preface .............................................................................................. 2
Manual Revisions .................................................................. 2
Trademarks.............................................................................. 2
Product Overview ......................................................................... 4
Package Contents ................................................................. 4
Minimum Requirements .................................................... 5
Introduction ............................................................................ 6
Important Safety Information .......................................... 7
Hardware Overview ............................................................. 9
Front View ............................................................................ 9
Rear View ...........................................................................10
Bottom View .....................................................................11
Options ...............................................................................12
Installation ....................................................................................13
Wireless Installation Considerations ............................13
Camera Setup ....................................................................... 14
Mounting the Camera .......................................................15
Download the mydlink Baby App .................................17
Set Up a New Camera with the mydlink Baby App 21
Monitoring ....................................................................................22
mydlink Baby App Home Screen ..................................22
mydlink Baby App Live View ........................................... 23
Conguration ...............................................................................24
mydlink Baby App Conguration .................................24
mydlink Baby App Settings .............................................27
Video Recording and Playback ..............................................28
Taking Snapshots or Recording Videos ......................28
Play Back Event-Triggered Videos .................................29
Creating a mydlink Account ...................................................30
Advanced Features ...................................................................31
Enabling Direct Connect ..................................................31
Troubleshooting .........................................................................33
Technical Specications ...........................................................36
Contacting Technical Support ...............................................38
Warranty ........................................................................................39
Registration ..................................................................................46

4D-Link DCS-825L User Manual
Section 1: Product Overview
Product Overview
Package Contents
If any of the above items are missing, please contact your reseller.
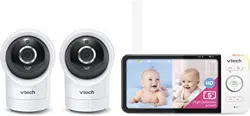
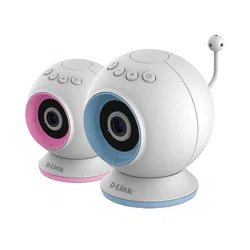
DCS-825L Wi-Fi Baby Camera
Wall Mount Kit
Power adapter
Desktop Base
Quick Install Guide
Blue and Pink Accent Rings
5D-Link DCS-825L User Manual
Section 1: Product Overview
Minimum Requirements
Mobile Requirements
• For mobile requirements refer to Compatibility List on mydlink Baby app page:
App Store and Google Play
Computer Requirements
• Computer with 1.3GHz processor or above and at least 128 MB RAM
• Microsoft Windows® 8, 7, Vista®, or Mac OS® X (10.6 or higher)
• Internet Explorer®7, Firefox®12, Safari®6, or Chrome™20 or higher with Java installed and enabled
Network Requirements
• 802.11g/n Wi-Fi network
(Wireless N network recommended for optimal performance)
Remote Viewing Requirements* • Internet access required for remote viewing
mydlink Requirements
• For mydlink requirements refer to:
http://www.mydlink.com
*Note: Direct Connection requires no Internet connection and no router. Refer to "Advanced Features" on page 31.

6D-Link DCS-825L User Manual
Section 1: Product Overview
Introduction
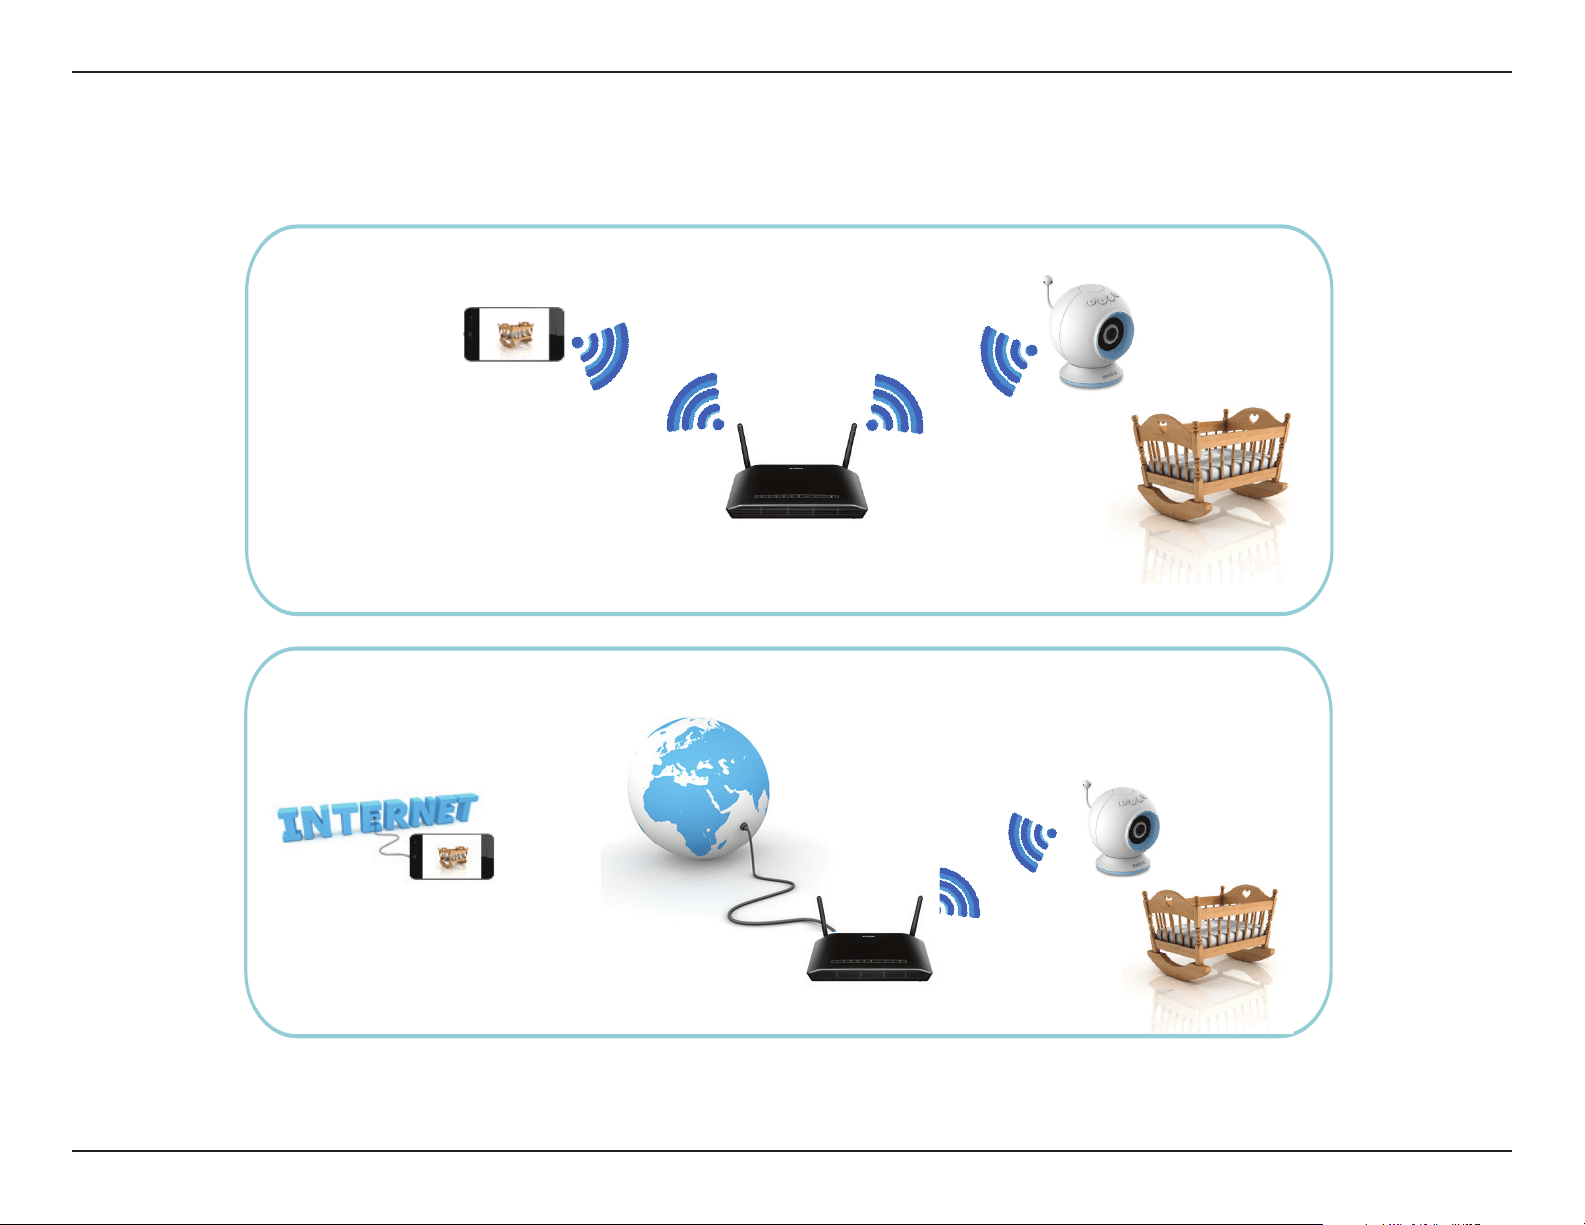
Keep an eye on your little one with the DCS-825L Wi-Fi Baby Camera. This portable camera transforms your mobile device into a versatile, yet easy-to-use baby
monitor. Connect to the camera wirelessly at home, or through the Internet when you are at work, so you can check on your infant no matter where you are. You
can even take the DCS-825L with you when you travel with your baby. All you need is a mobile device to connect directly to the Wi-Fi Baby Camera.
The DCS-825L is packed with features including motion, sound, and temperature monitoring, as well as night vision. It will take snapshots, record videos, and can
even play gentle lullabies to help ease your baby to sleep!
7D-Link DCS-825L User Manual
Section 1: Product Overview
Important Safety Information
The DCS-825L is designed to meet the highest safety standards. Please make sure that it is set up and used correctly. It is very important that you follow the
safety guidelines below:
Make sure the DCS-825L and cord are out of baby’s reach. In general,
this means the Wi-Fi Baby Camera and cord should be placed at least
three feet away from baby’s crib.
Use caution if you wall-mount the DCS-825L. Be careful not to allow the
Wi-Fi Baby Camera cord to dangle between the crib and a wall. You should
use the three foot minimum spacing between baby and the cord in this
case, too.
Watch out for other cord hazards. While you’re securing the Wi-Fi Baby
Camera cord, take a moment to look around for any other strangulation
hazards as well. One common culprit is window blind cords that are within
baby’s reach. Cords for other electronics and nursery decor with ribbons
or decorative cords may also be a risk.
Don’t place the DCS-825L on the crib rail. Even if you think your baby
would not touch the Wi-Fi Baby Camera, it’s too risky to leave it within
easy reach of your baby. Even baby camera cords that are secured to the
rail could be yanked or twisted by a curious child.
Mounting the DCS-825L on tabletops. Place the Wi-Fi Baby Camera on
a table top no less than three feet away from your baby’s crib. Feed the
power cord down the back of the table or use wall clips to secure the cord
away so your baby cannot reach the cord. Plug in the power cord, check
your smartphone or tablet to ensure that you are getting a good view of
your child and that there are no obstructions.
As your baby reaches toddlerhood, you should re-evaluate placement
of the DCS-825L. When little arms get longer and toddlers learn to climb
and reach for things, you may need to move the Wi-Fi Baby Camera to
prevent access to the cord.
You can use the DCS-825L in other places besides the nursery, if it's
indoors. When considering alternative locations, avoid placement where
the camera may come in contact with water. Don’t forget to also check
those locations to make sure you can place the Wi-Fi Baby Camera out of
baby’s reach.
Do not place the DCS-825L close to water or heat. Do not use the Wi-
Fi Baby Camera near bathtubs or sinks, and keep the baby camera away
from heat sources such as stoves, radiators, etc.
Strangulation Hazard: Keep the DCS-825L and any attached cords at least three feet out of reach of any children or babies.
Make sure you keep any attached cords out of your baby’s crib or child's sleeping area.
8D-Link DCS-825L User Manual
Section 1: Product Overview
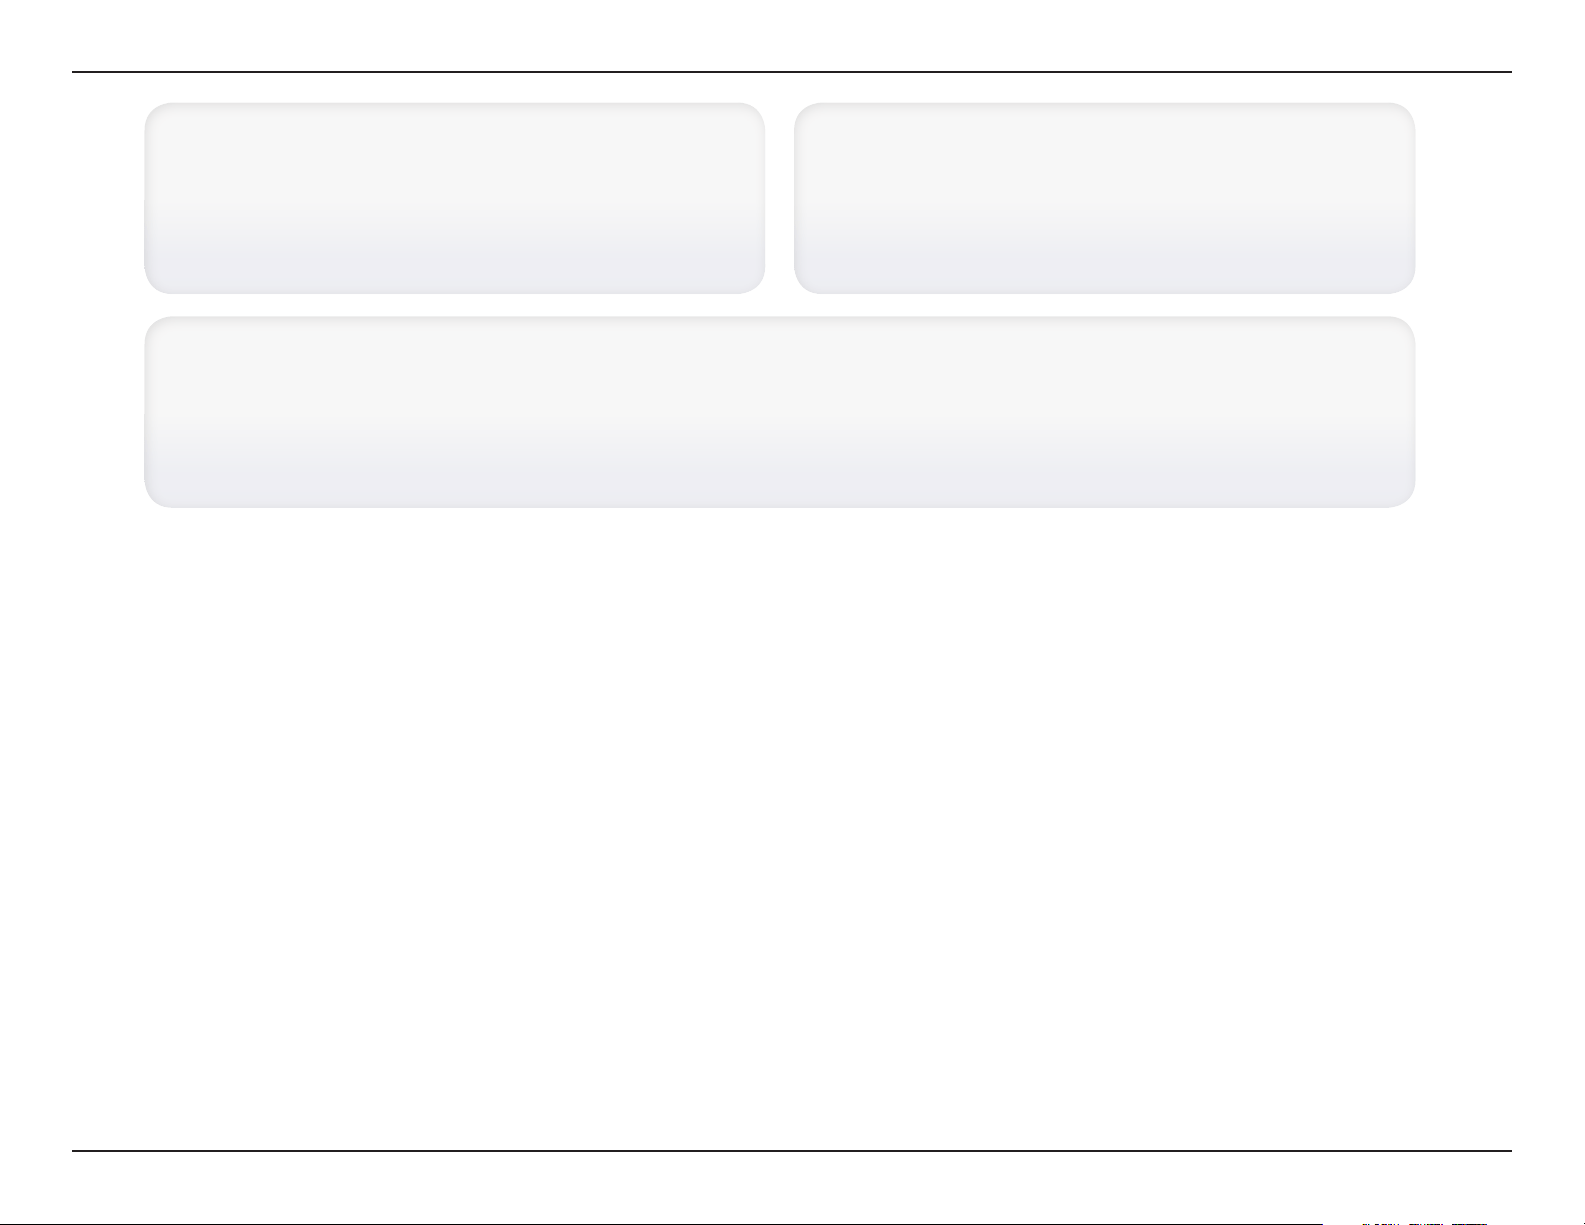
Make sure there is proper ventilation around the DCS-825L. Make sure
you do not place the Wi-Fi Baby Camera on sofas, cushions, beds, etc. in a
way that may block ventilation. DO NOT cover the camera with a blanket.
Remember the DCS-825L is not a toy. Do not allow babies or children
to play with the Wi-Fi Baby Camera. You should never attempt to open or
disassemble the camera.
Most Important: Remember that the DCS-825L is not a babysitter. The Wi-Fi Baby Camera should only be used as a parenting aid for monitoring your
baby or child. While it does give you the ability to remotely view your baby or child, there should always be an adult in the same house. The Wi-Fi Baby
Camera should not be considered a replacement for responsible adult supervision. In addition to monitoring your baby or child with the Wi-Fi Baby
Camera, make sure you check on your child or baby regularly.
How to Ensure your DCS-825L is Secure
The rst step is to make sure you turn on security features during the installation process. Follow the instructions, and make sure you set up
a strong password at least eight characters long, with a mix of symbols and upper and lower case letters. Make sure you keep the Wi-Fi Baby
Camera software and mydlink Baby app up-to-date.
How to Clean Your DCS-825L
Clean the camera with a dry cloth only; never allow the camera to get wet. The sticky pad on the desktop base may be cleaned with water and
air dried (do not use a cloth to dry it). Make sure the base is completely dry before reattaching it to the camera.
9D-Link DCS-825L User Manual
Section 1: Product Overview
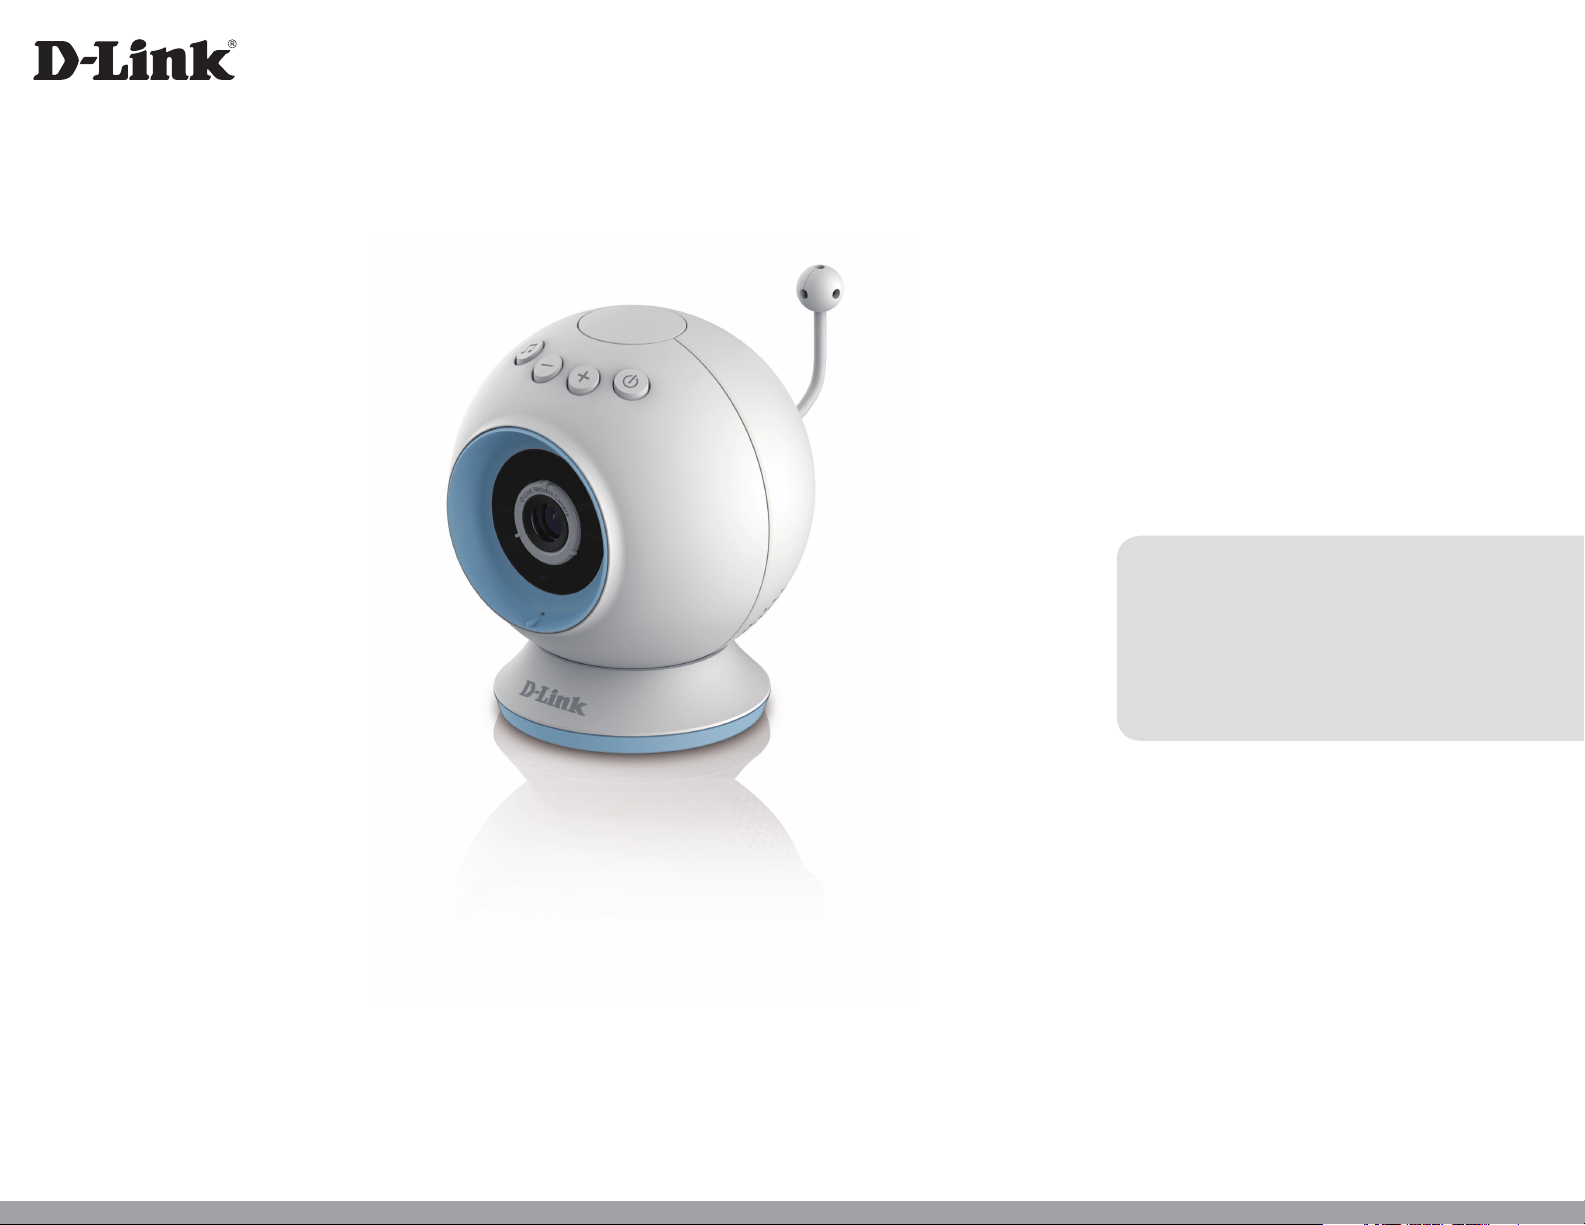
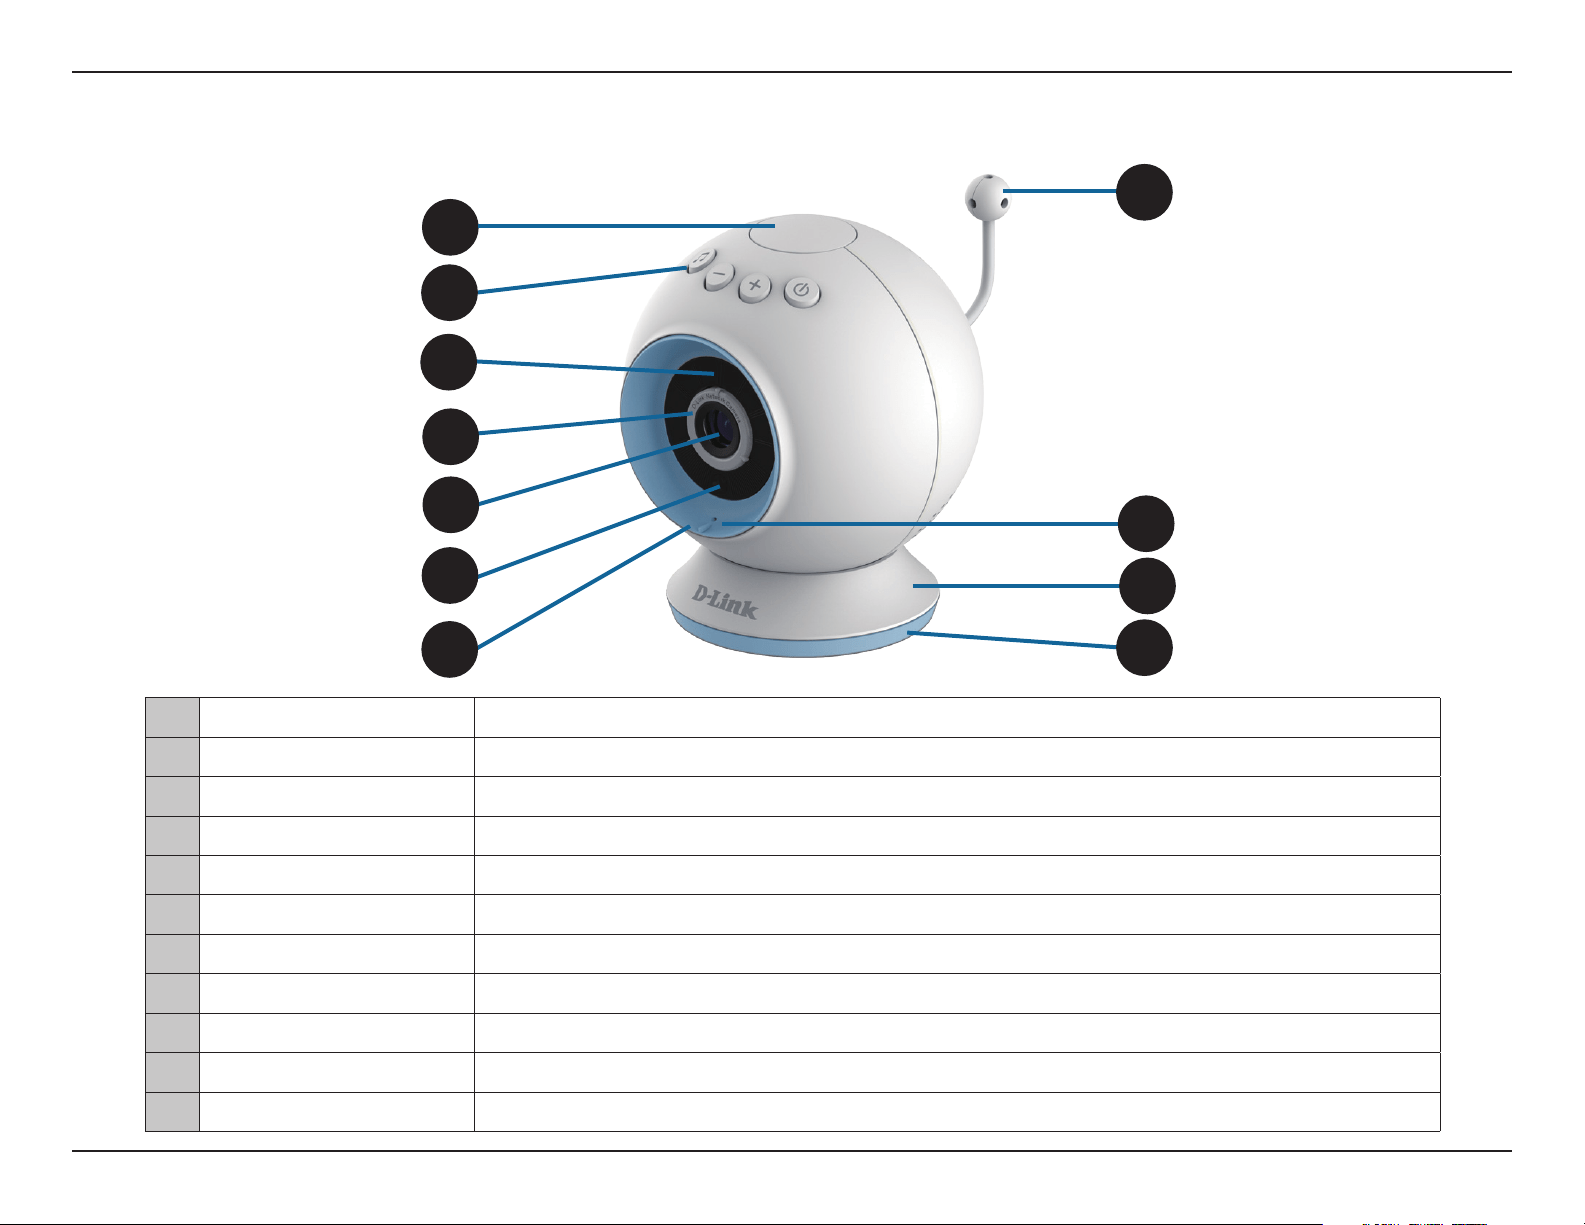
Front View
Hardware Overview
1 Temperature Indicator Indicates the current temperature level. (Red is too hot, green is within the dened range, and blue is too cold.)
2 Lullaby/Volume/Power Controls the music, volume, and the power.
3 Night Vision (IR) LEDs Infrared LEDs illuminate the camera's eld of view at night.
4 Focus Ring Used to adjust the focus.
5 Camera Lens Allows you to record or view video of the surrounding area.
6 Ambient Light Sensor Sensor for ambient (surrounding) light.
7 Accent Ring Decorative switchable front accent ring (in blue or pink).
8 Temperature Sensor Sensor for the temperature.
9 Microphone Allows you to record or listen to audio from the surrounding area.
10 Camera Base Switchable base for desktop use. (Can be exchanged for wall mount.)
11 Base Accent Ring Decorative switchable base accent ring.
2
3
5
1
4
7
8
9
10
11
6
10D-Link DCS-825L User Manual
Section 1: Product Overview
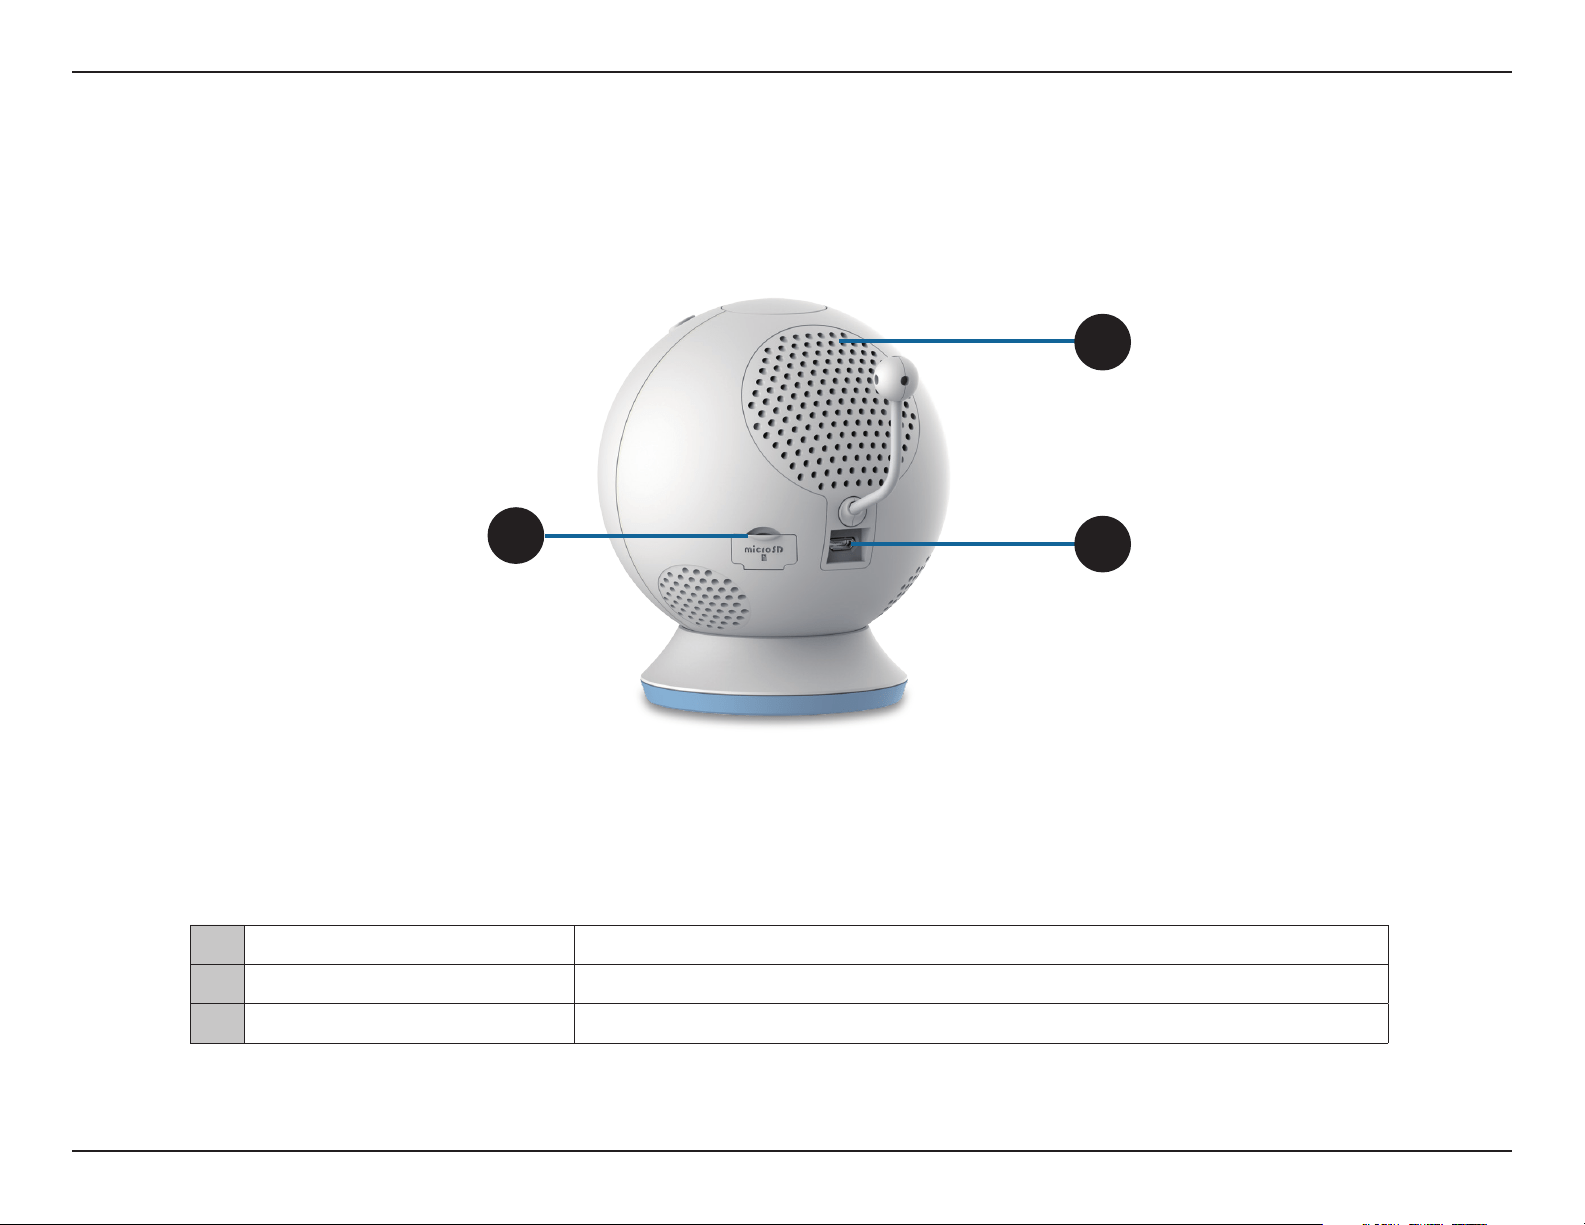
Rear View
1 microSD Card Slot Slot for inserting the microSD card for storage of event-triggered video and images.
2 Speaker Allows you to talk to your baby and to play lullabies.
3 Micro-USB Power Port Micro-USB connector for the supplied power adapter or USB battery pack*.
1
2
3
*Note: USB battery not included. Only 5V /2A battery pack is supported.
11D-Link DCS-825L User Manual
Section 1: Product Overview
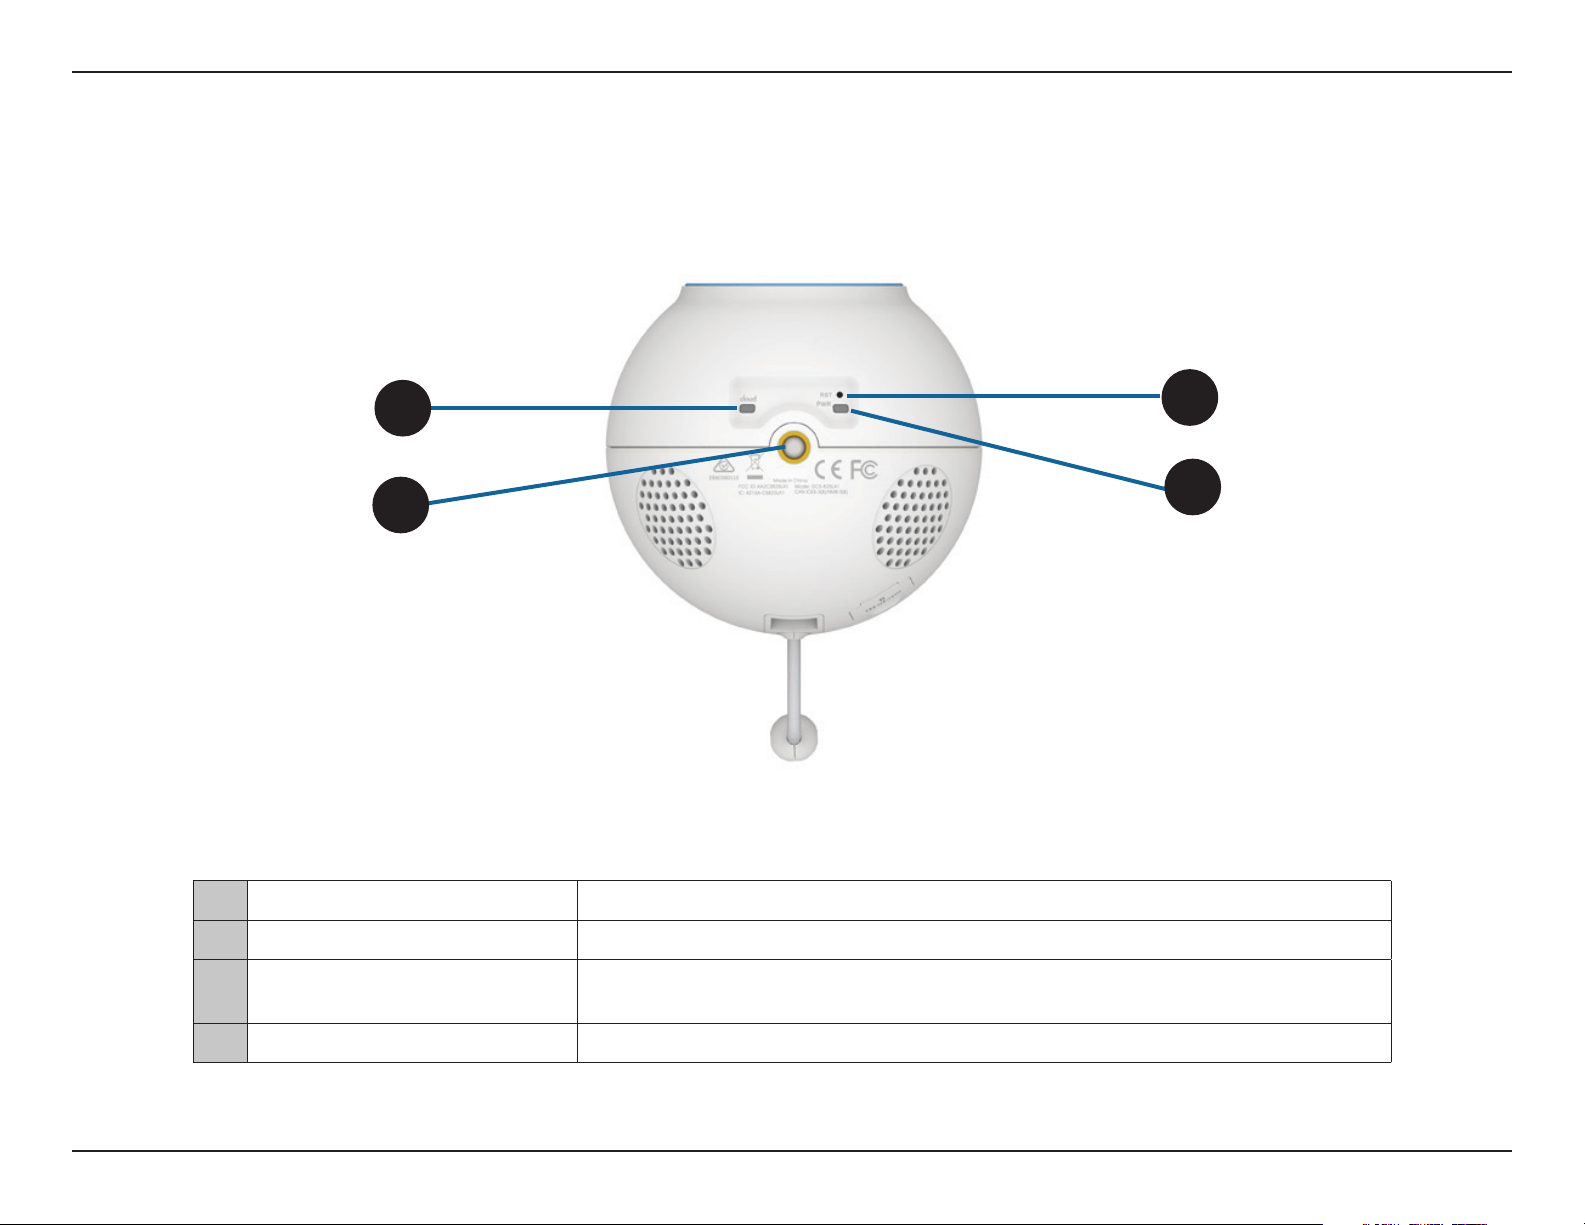
Bottom View
1 Cloud LED A solid blue light indicates a connection to the mydlink server.
2 Mounting Point Used for wall mount.
3 Reset Button
Press and hold the recessed button for a minimum of 10 seconds to reset the camera to the
factory default settings.
4 Power LED A solid red light indicates the camera is powered on.
3
4
1
2
12D-Link DCS-825L User Manual
Section 1: Product Overview
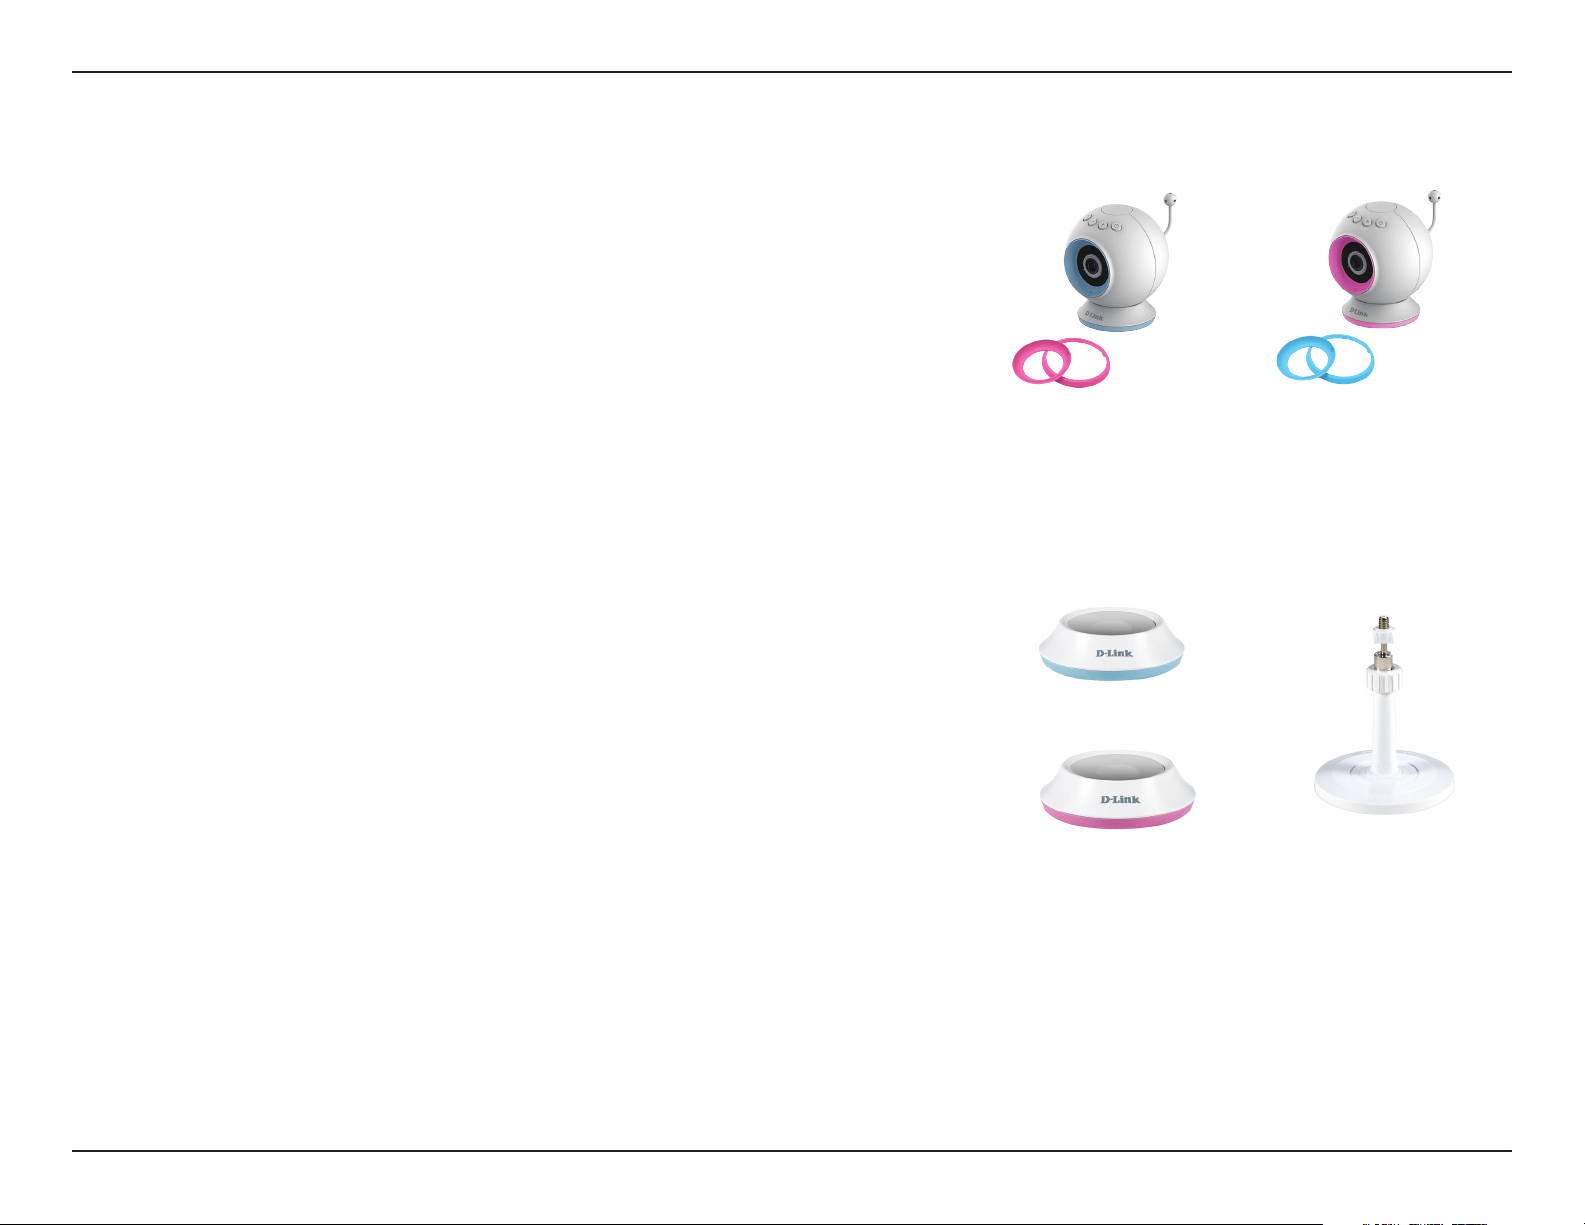
Options
Choice of Accent Rings:
First, choose the color of the accent ring. To remove the accent ring, simply turn
it counter clockwise, then lift it o. Place the new accent ring on, and rotate it
clockwise until it clicks into place.
Choice of Camera Mounts:
Depending on where you would like to place the camera, you can use either a wall
mount or a desktop base.
Note: If you choose to use the desktop base, you also get a choice of blue or pink base
accent rings.

13D-Link DCS-825L User Manual
Section 2: Installation
This D-Link camera can connect to your wireless network from anywhere within the operating range of your wireless network. However, the
number, thickness, and location of walls, ceilings, or other objects that the wireless signals must pass through may limit the range. Typical ranges
vary depending on the types of materials and background RF (radio frequency) noise in your home or business. The key to maximizing wireless
range is to follow these basic guidelines:
1. Minimize the number of walls and ceilings between your camera and other network devices - each wall or ceiling can reduce your camera’s
range from 3-90 feet (1-30 meters).
2. Be aware of the direct line between network devices. A wall that is 1.5 feet thick (.5 meters), at a 45-degree angle appears to be almost 3 feet
(1 meter) thick. At a 2-degree angle, it looks over 42 feet (14 meters) thick. Position your devices so that the signal will travel straight through
a wall or ceiling (instead of at an angle) for better reception.
3. Building Materials make a dierence. A solid metal door or aluminum studs may weaken the wireless signal. Try to position your access points,
wireless routers, and other networking devices where the signal passes through drywall or open doorways. Materials and objects such as
glass, steel, metal, walls with insulation, water (sh tanks), mirrors, le cabinets, brick, and concrete will degrade your wireless signal.
4. Keep your camera at least 3-6 feet or 1-2 meters away from electrical devices or appliances that generate RF noise.
5. If you are using 2.4GHz cordless phones or other radio frequency sources (such as microwave ovens), your wireless connection may degrade
dramatically or drop completely. Make sure your 2.4GHz phone base is as far away from your wireless devices as possible. The base transmits
a signal even if the phone is not in use.
Installation
Wireless Installation Considerations
14D-Link DCS-825L User Manual
Section 2: Installation
There are several ways to set up your DCS-825L:
Camera Setup
2. Remotely...
Connect to your DCS-825L using the Internet.
Connect to your DCS-825L through your home wireless network.
1. At Home...
Note: You can also connect directly to your DCS-825L wirelessly, so there is no need for an Internet connection or a
router. Refer to "Advanced Features" on page 31 for details.
15D-Link DCS-825L User Manual
Section 2: Installation
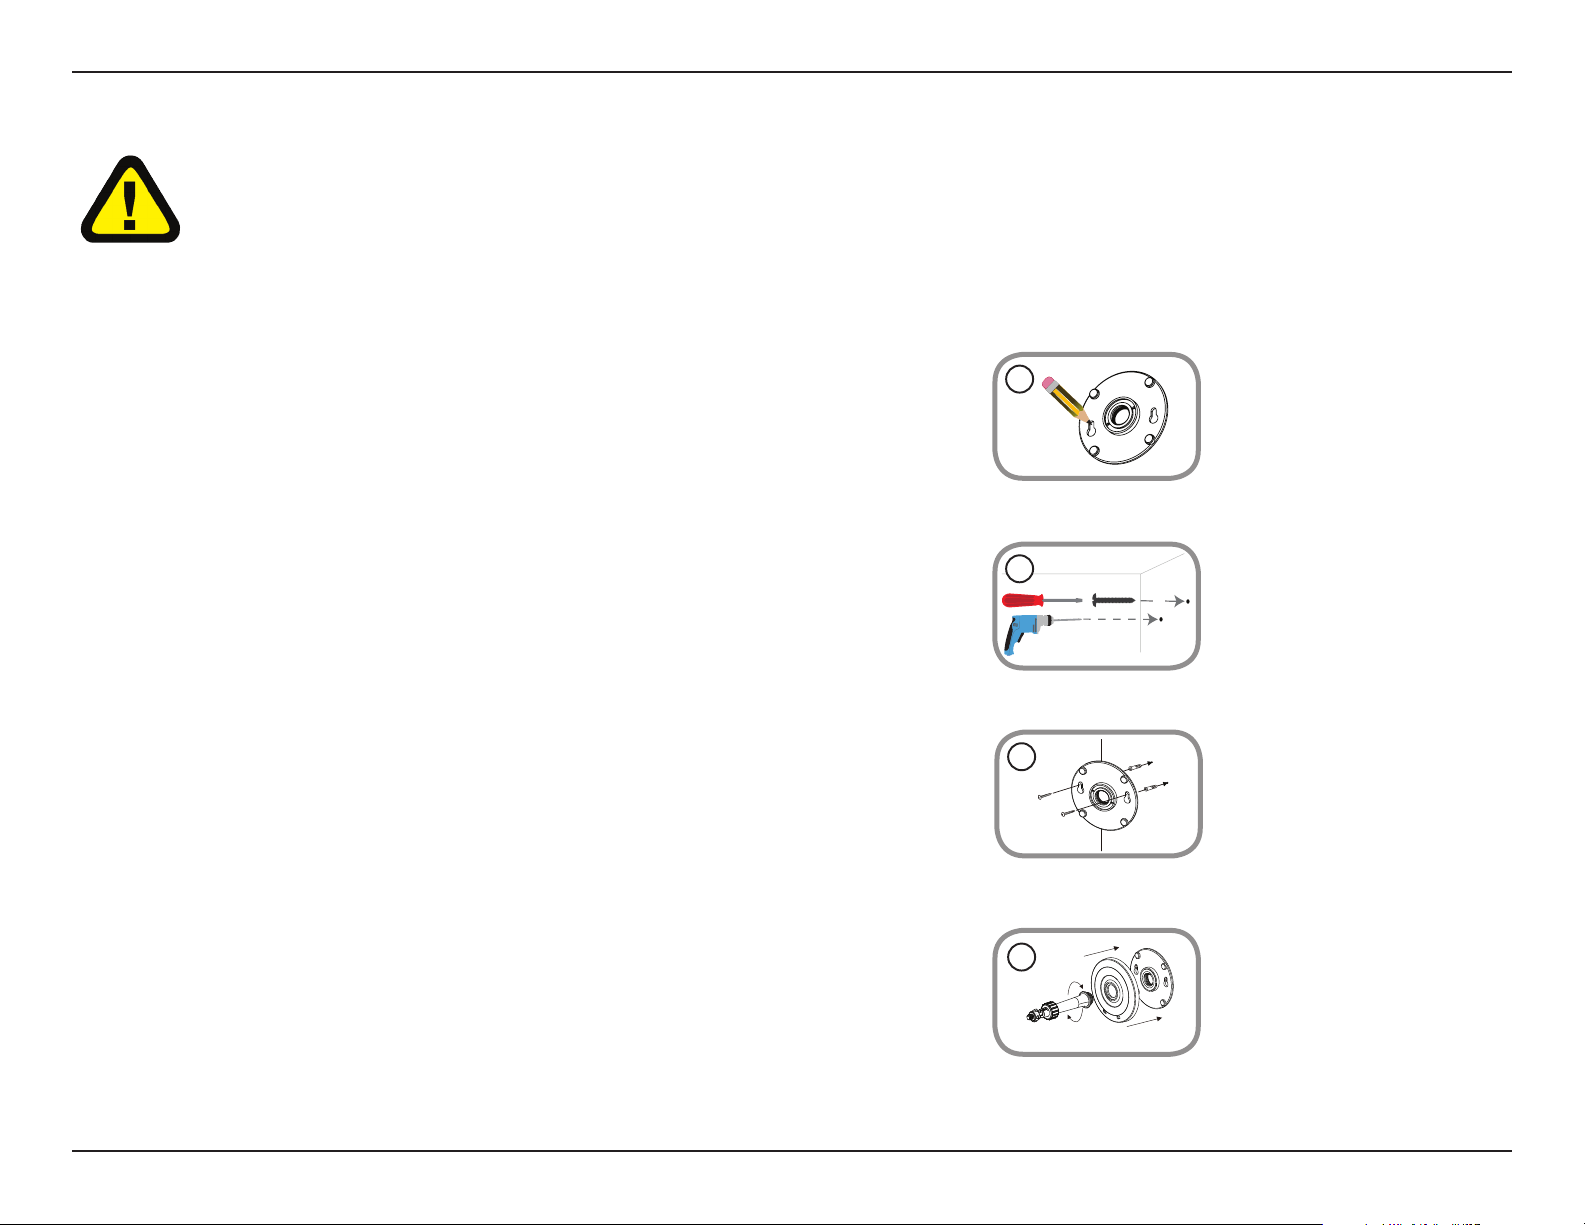
Mounting the Camera
1.
Place the mounting base where you want to position the camera and use a pencil to
mark the holes.
4. Place the base cover over the mounting base and screw the camera stem clockwise into
the mounting base.
2. Use a 6mm drill bit to drill two holes that are at least 30mm deep. Use a mallet to insert
the wall anchors into the holes.
3. Place the mounting base over the holes that you drilled in the wall. Use the supplied
screws to attach the mounting base to the surface of the wall.
Note: Do not overtighten the screws as this may damage the mounting base.
Refer to the steps below for mounting the camera. The DCS-825L is for indoor use only. We suggest you congure the camera before mounting it.
1
2
3
WARNING - STRANGULATION HAZARD
Children have STRANGLED in cords. Keep adapter cord out of reach of children (minimum of three feet away). NEVER place the camera or adapter cord inside
the crib or child's sleeping area. Do not use extension cords. This product is NOT intended to replace proper adult supervision of children.
4
16D-Link DCS-825L User Manual
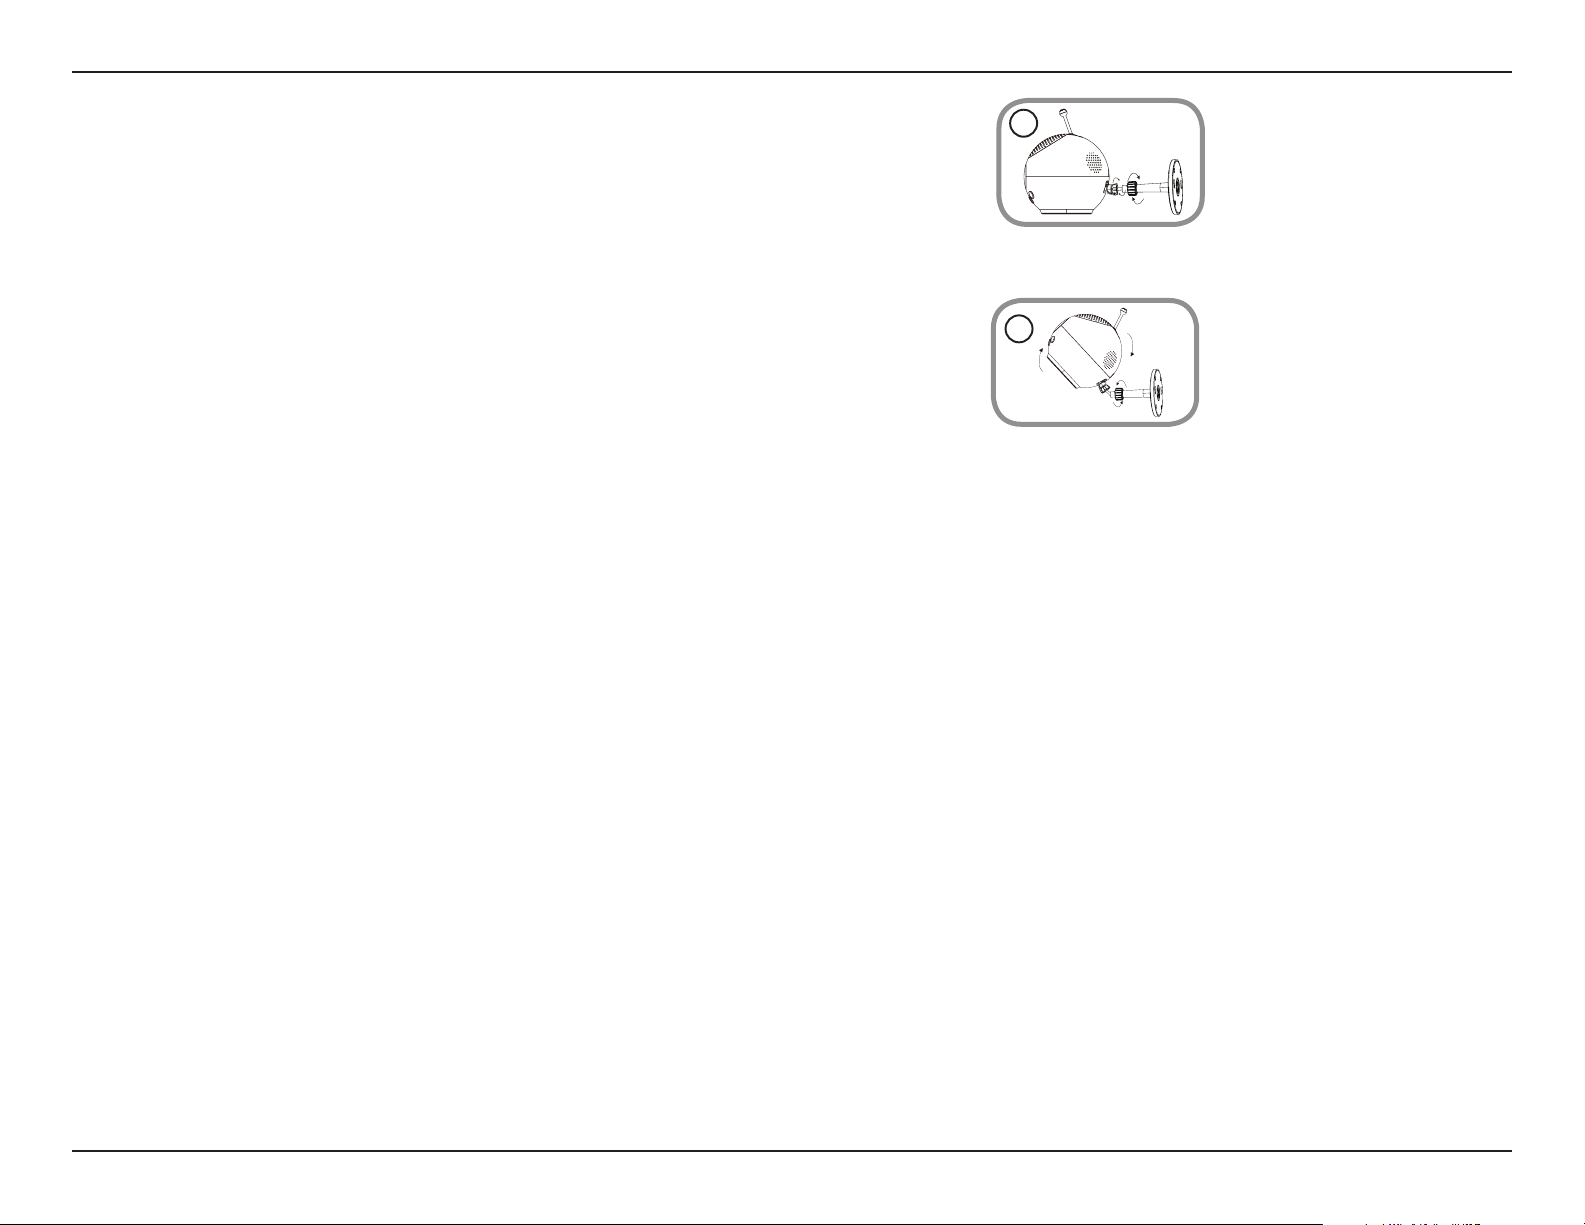
Section 2: Installation
6. Adjust the angle of the camera as desired and tighten the collar on the camera stem to
lock it into place.
6
5. Remove the desktop base from the camera by simply pulling it o. Loosen the collar on
the camera stem and then screw the camera stem into the bottom of the camera. Turn
the securing wheel to ensure the camera is snugly attached.
5
17D-Link DCS-825L User Manual
Section 2: Installation
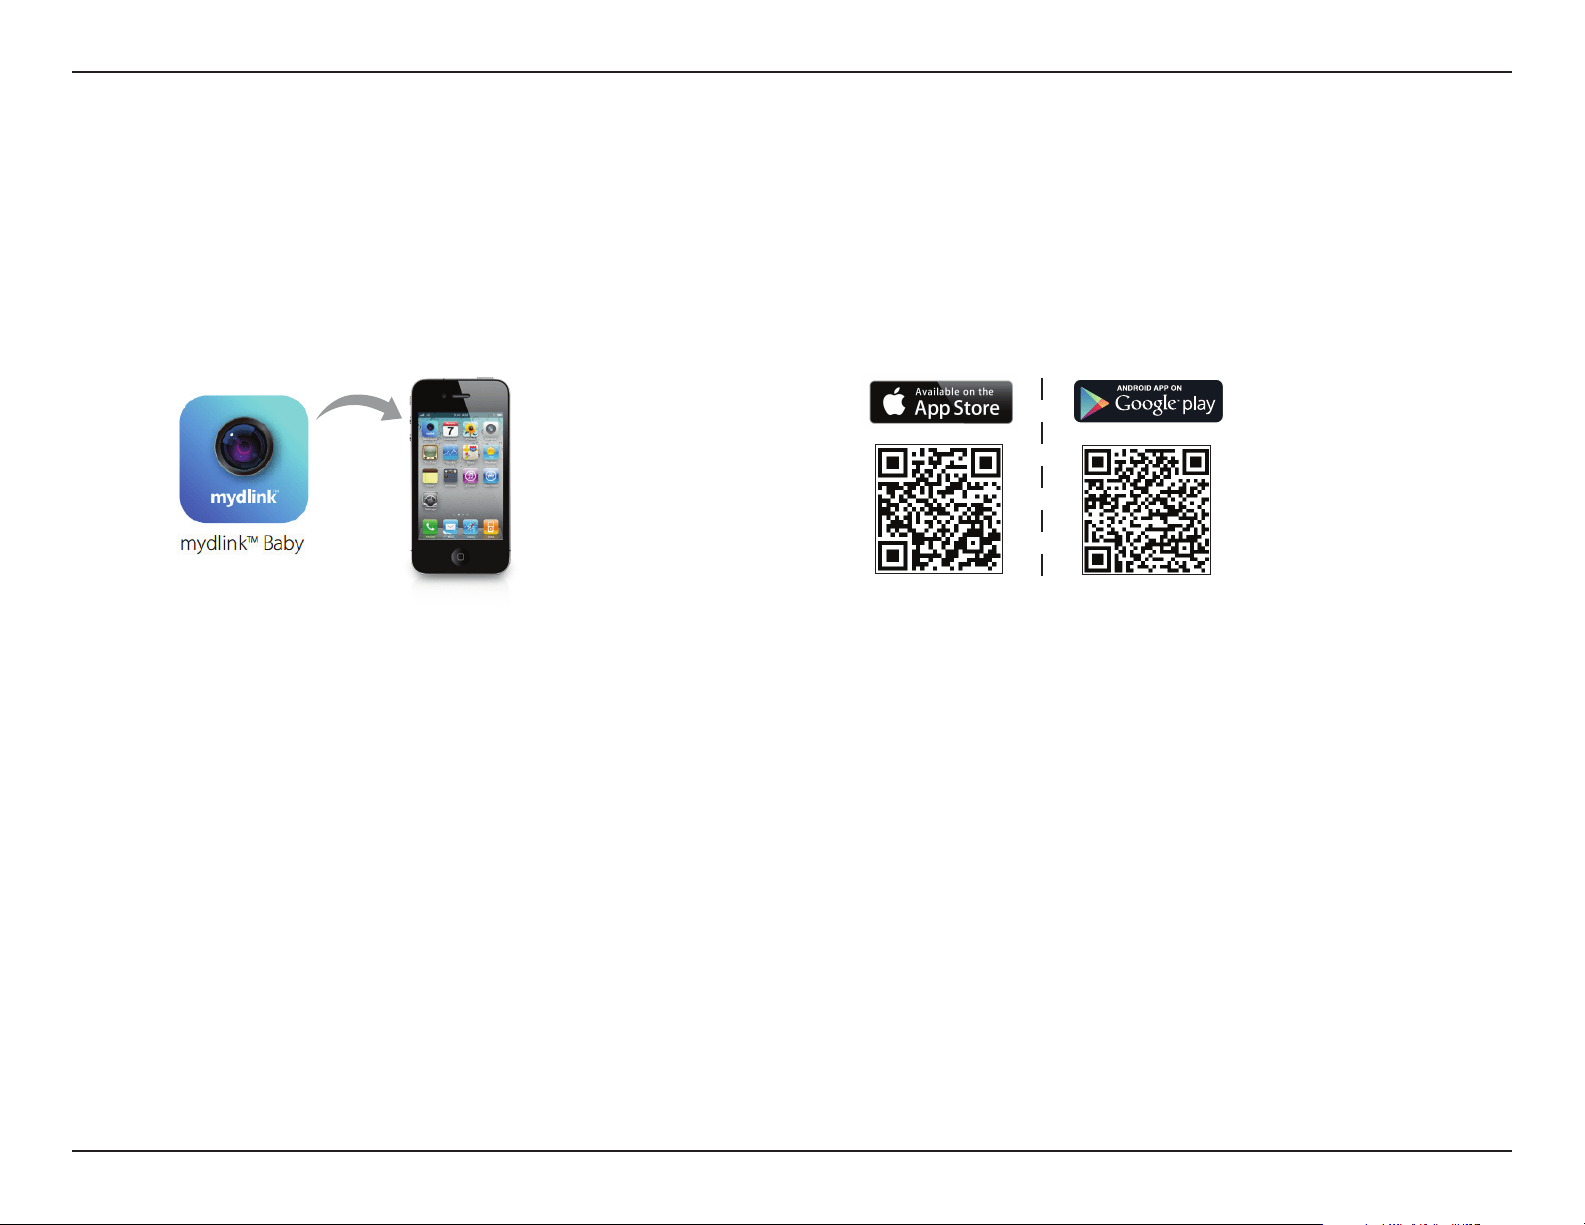
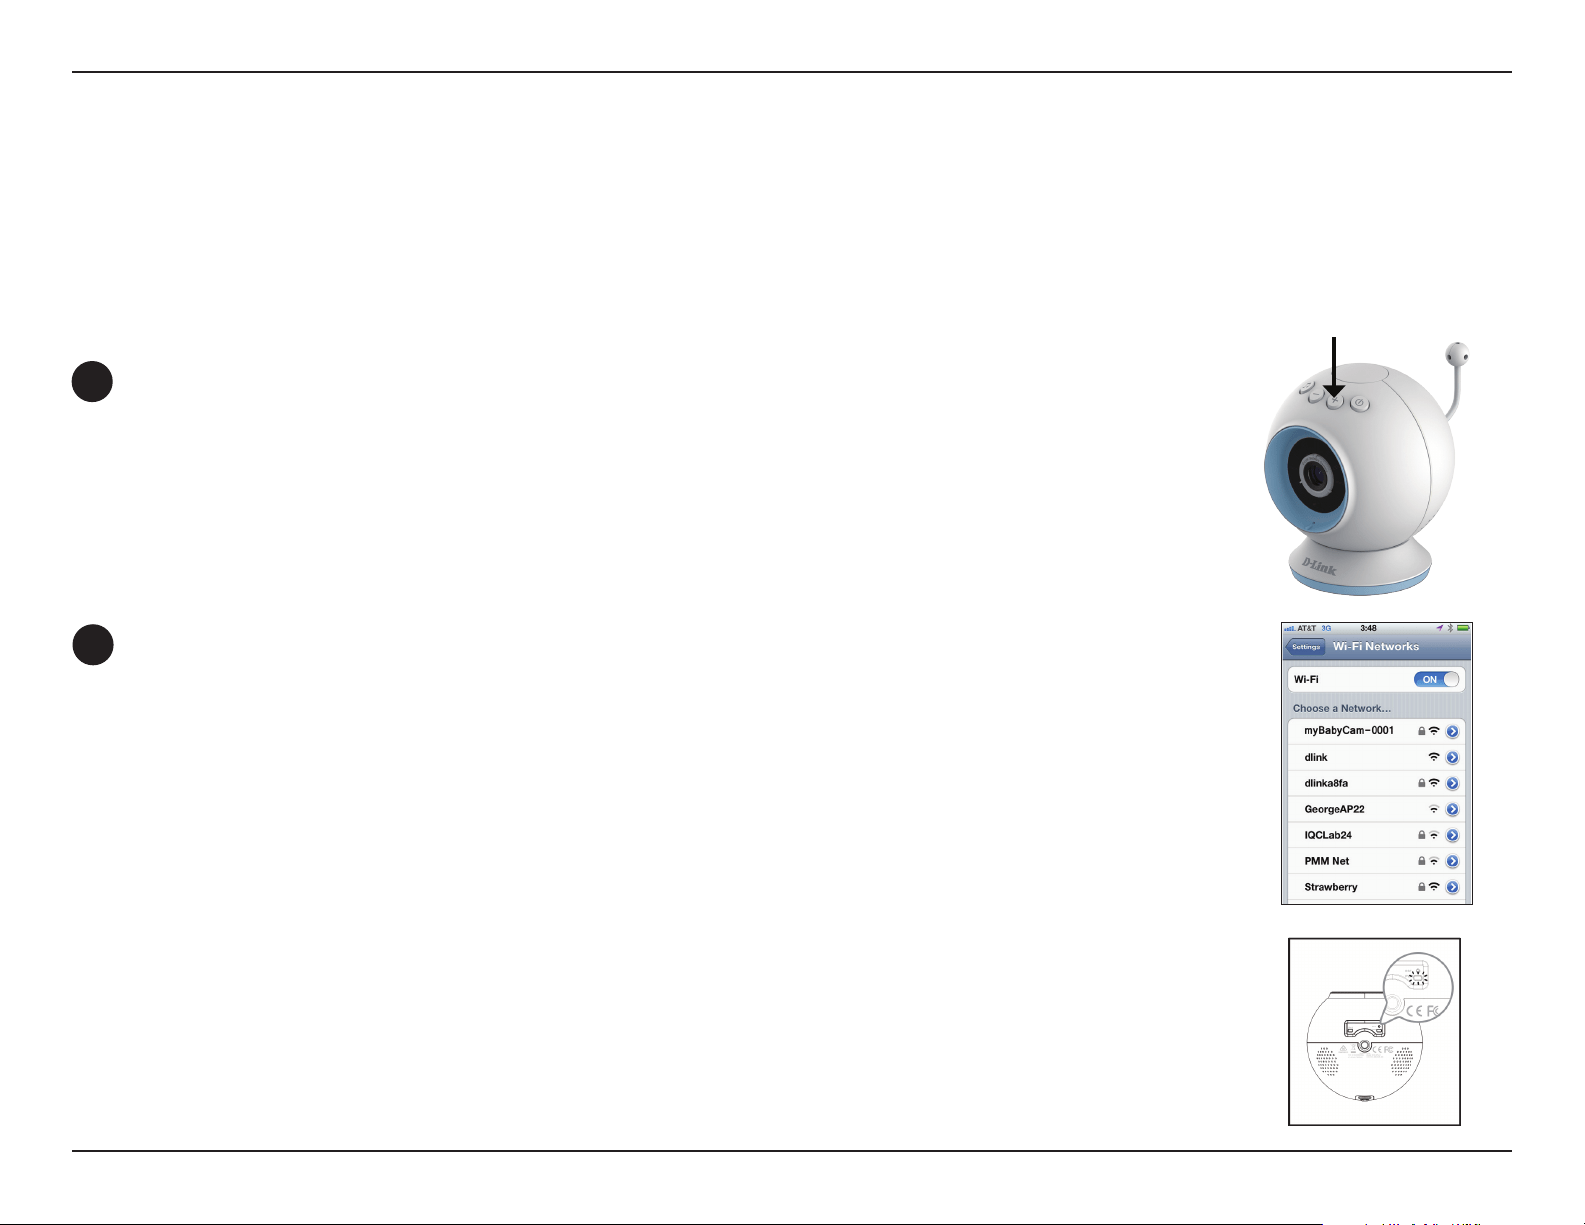
Download the mydlink Baby App
mydlink Baby Camera Monitor (Free)
Search for mydlink Baby in the App Store or Google Play. You can download and install the app on your smartphone or tablet
when connected to the Internet. Instructions for installing the app begin on the next page.
System Requirements: Refer to mydlink Baby app page on the App Store
SM
and Google Play™.
You can also nd the mydlink Baby app by scanning the QR code above with a QR code reader. Install the app and skip to
"Set Up a New Camera with the mydlink Baby App" on page 21.

18D-Link DCS-825L User Manual
Section 2: Installation
For an iOS device, tap on the App Store icon.
1
For an Android device, tap on Play Store.
19D-Link DCS-825L User Manual
Section 2: Installation
2
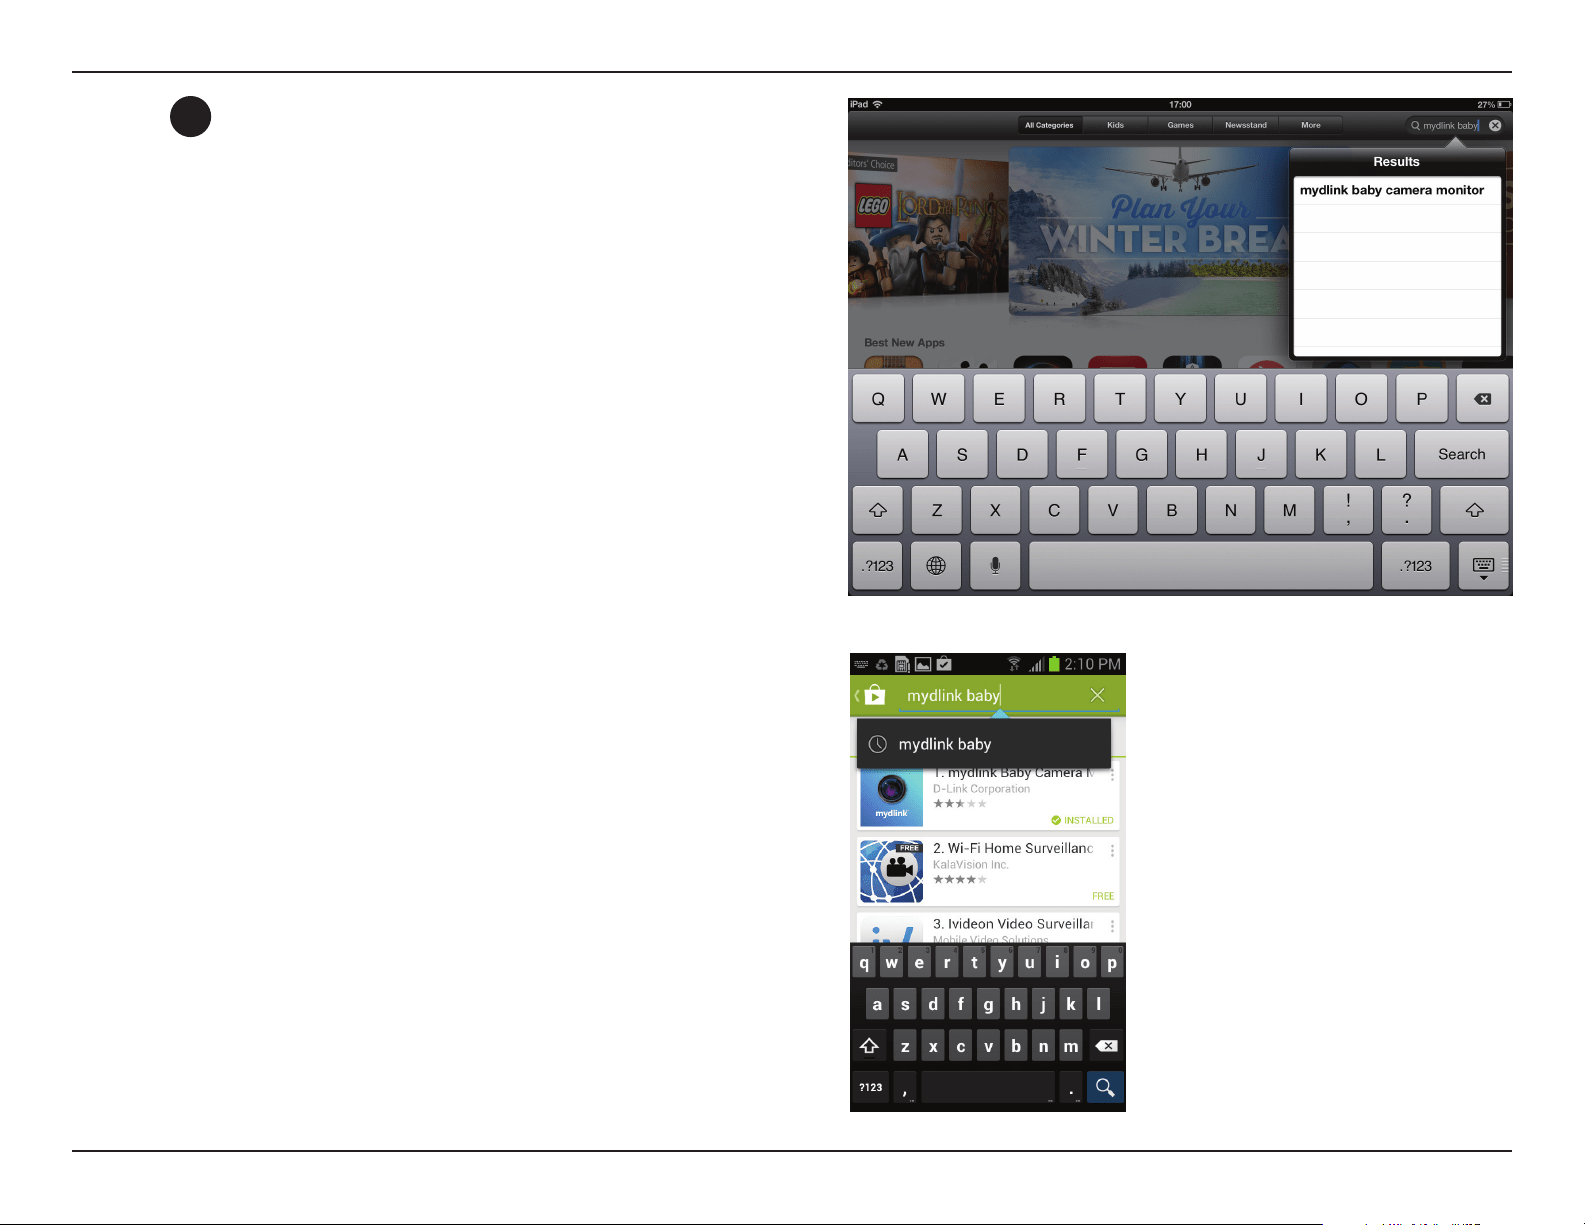
Search for mydlink baby within the search eld.
Similar search for mydlink baby for Android.
20D-Link DCS-825L User Manual
Section 2: Installation
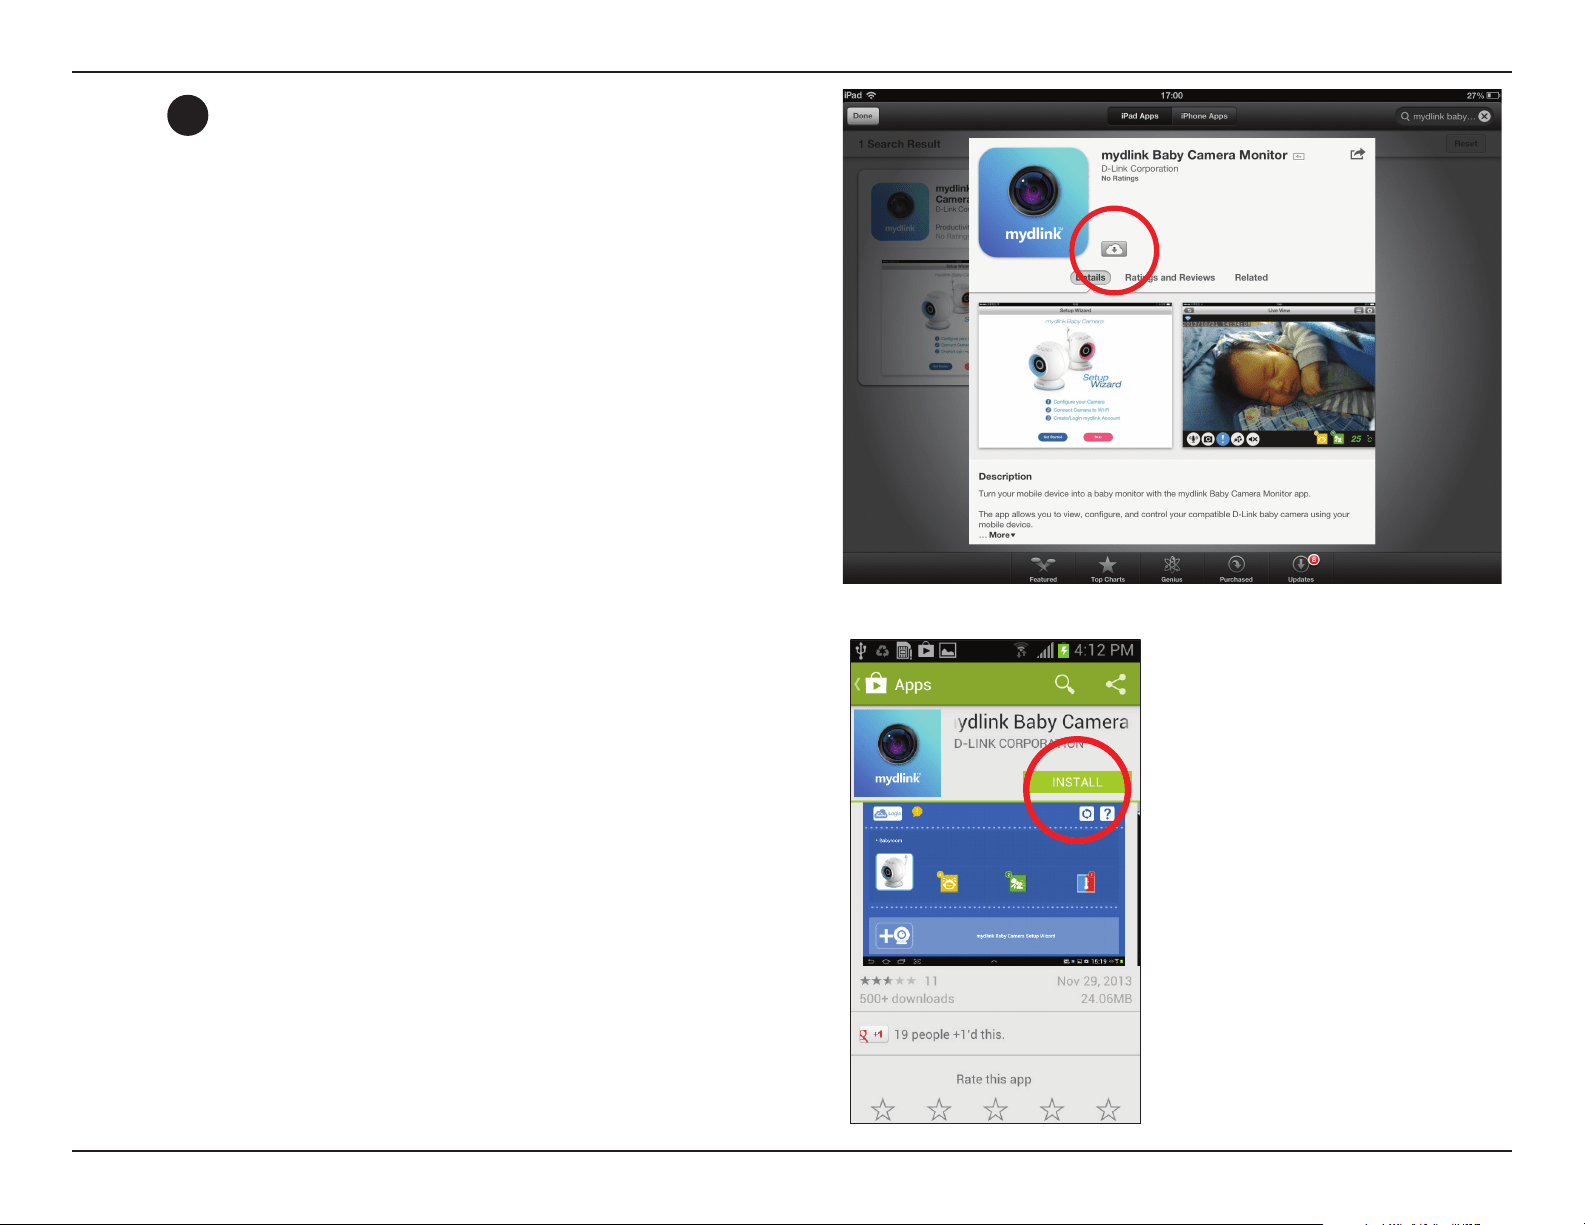
For Android, tap on Install to install the app.
For an iOS device, tap on the (+) icon to install the mydlink
Baby app.
3
21D-Link DCS-825L User Manual
Section 2: Installation
Set Up a New Camera with the mydlink Baby App
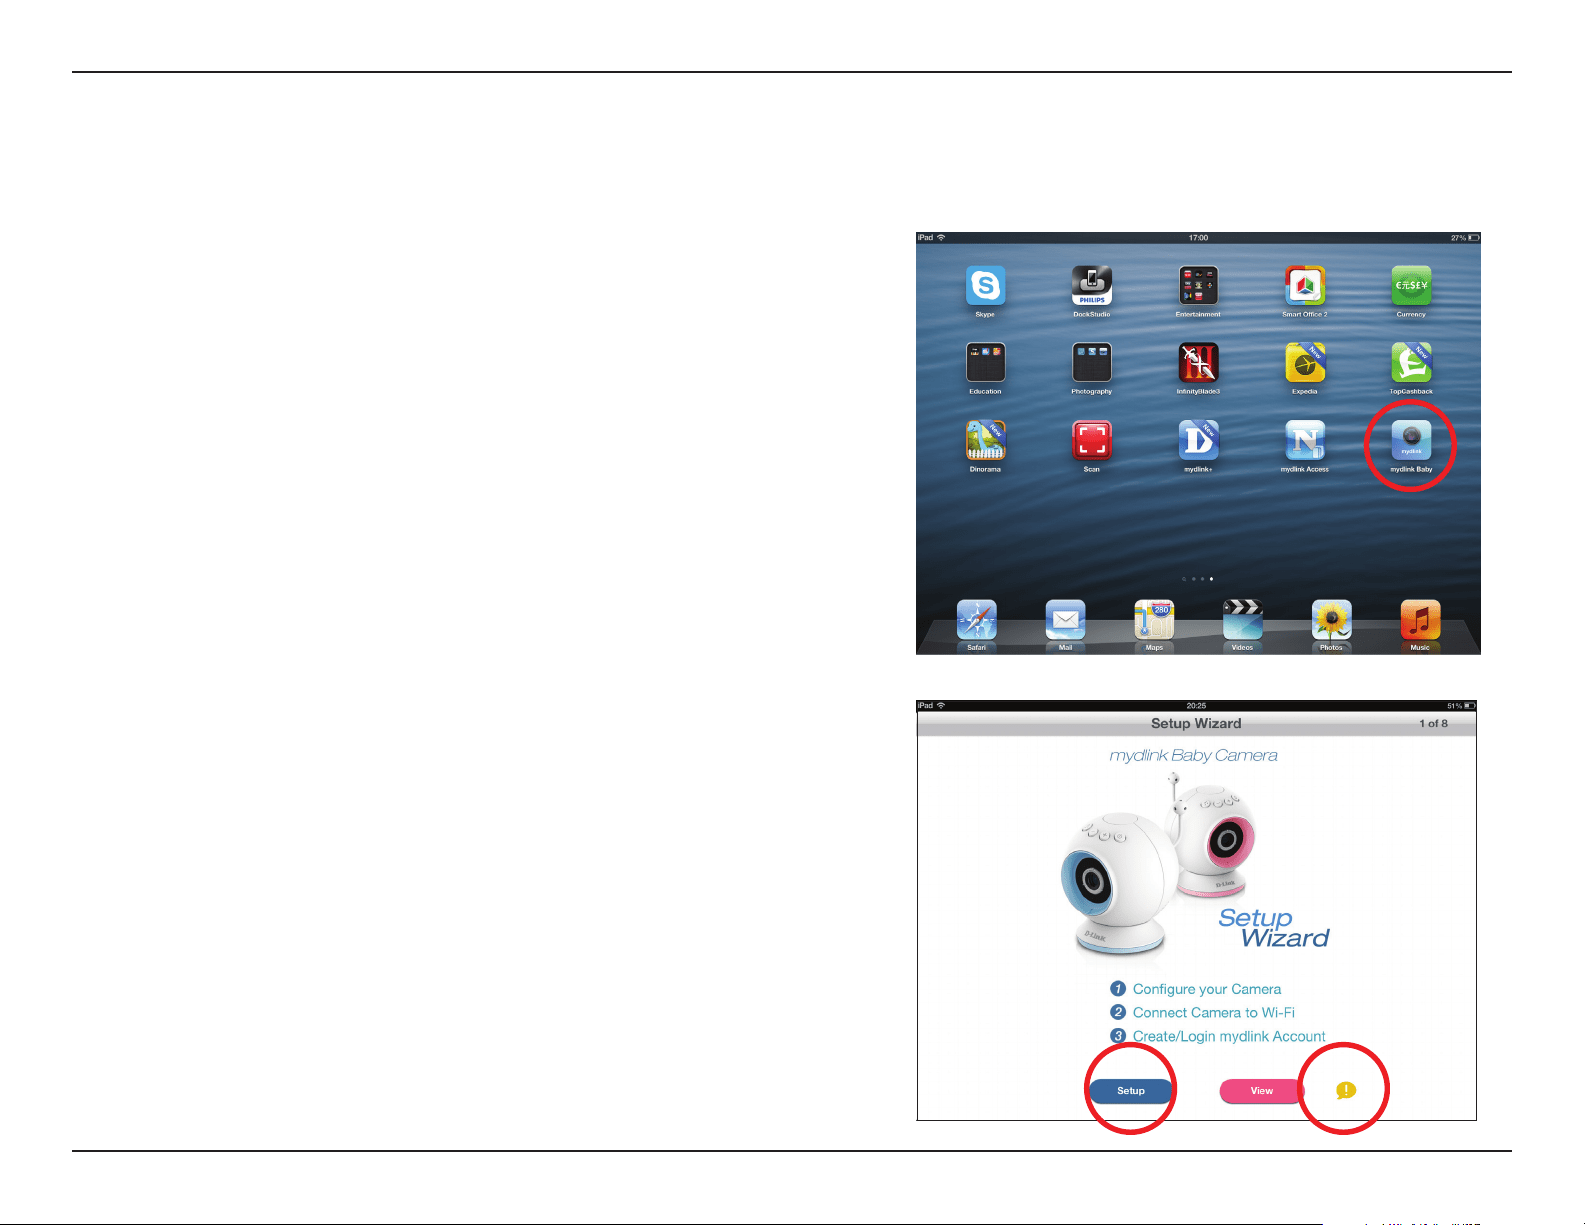
Once the mydlink Baby app is installed, simply tap on the icon
to open the app. The next screen you see is the Setup Wizard.
Tap Setup to launch the Setup Wizard and congure your camera.
The wizard will guide you through the process of connecting
your camera to your home Wi-Fi network and creating your
mydlink account.
If you need help during the setup process, tap on the yellow (!)
symbol. Helpful hints will appear on the screen.
Note: Although the main screens that follow are for an iOS device, instructions for an Android device are very similar.
22D-Link DCS-825L User Manual
Section 3: Monitoring
Monitoring
mydlink Baby App Home Screen
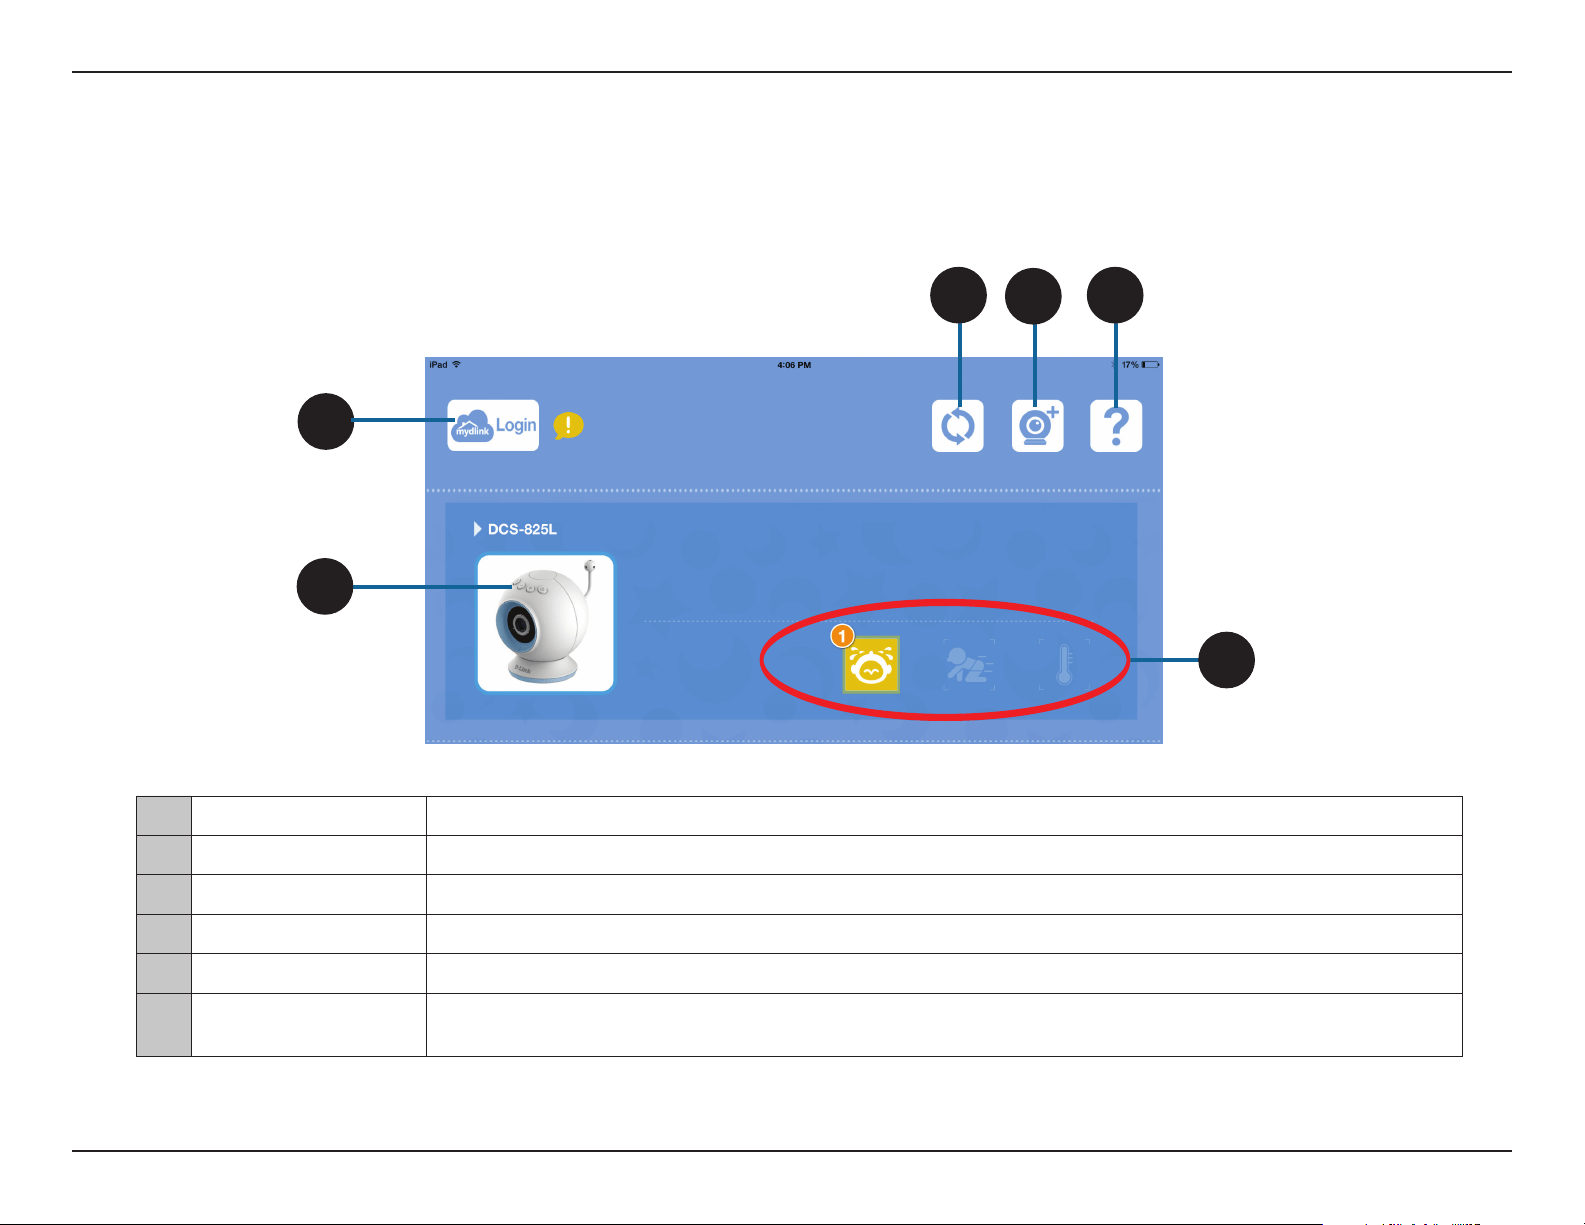
Once the setup process is complete, you will see the mydlink Baby app Home Screen.
1
2
3 5
6
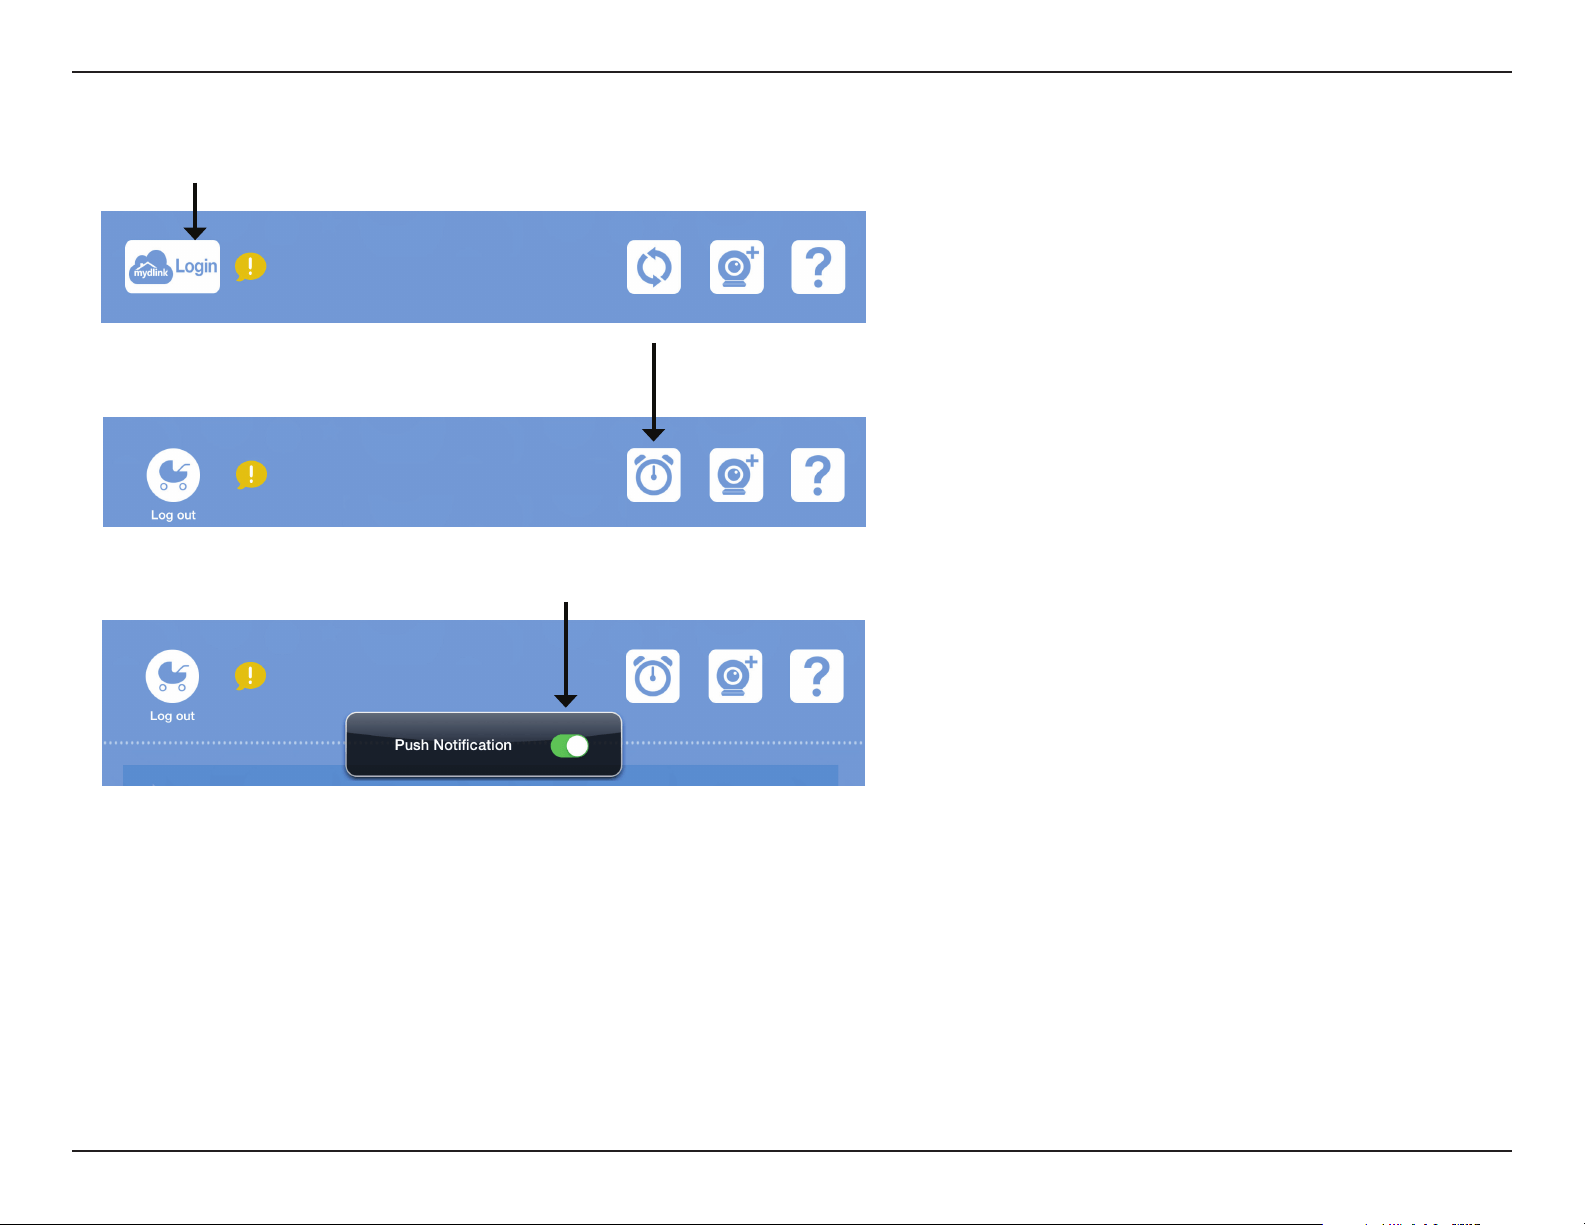
1 Login Tap on the mydlink Login icon to remotely access your DCS-825L.
2 DCS-825L Tap on the Wi-Fi Baby Camera image to access Live View. Refer to "mydlink Baby App Live View" on page 23.
3 Refresh Tap on the Refresh icon to scan for Wi-Fi Baby Cameras on your network that have not yet been added to the app.*
4 Camera Setup Wizard Tap on Camera + icon to set up an additional DCS-825L.
5 ? Tap on the Question Mark icon for FAQs (frequently asked questions).
6 Alert Icons
A number will appear by an alert icon for notication, signifying when sound or motion is detected, or when the temperature
becomes too warm or too cold. (To reset alerts, tap on the alert icon.)
*Note: When you log in, the refresh icon will change, allowing you to access the control for push notication. Refer to question 12 of "Troubleshooting" on page 33.
4
23D-Link DCS-825L User Manual
Section 3: Monitoring
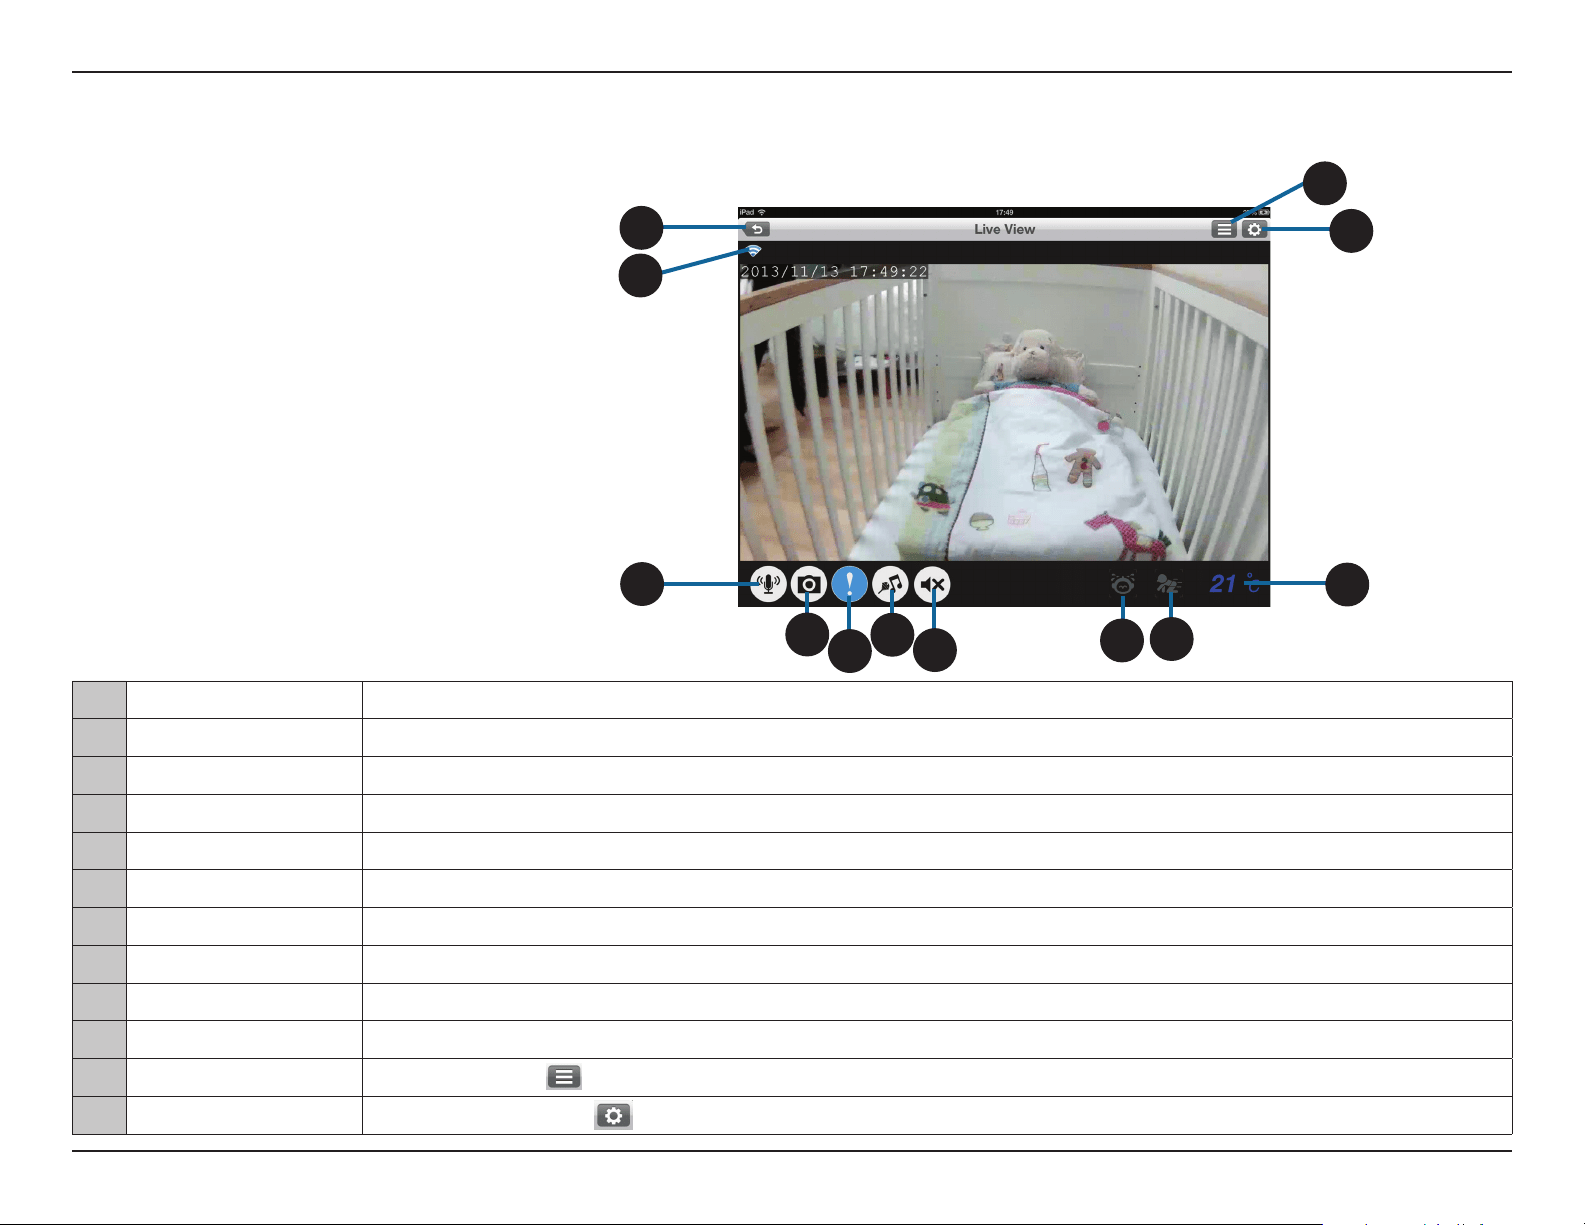
mydlink Baby App Live View
1 Return Tap on the Return icon to return to the Home screen .
2 Wi-Fi Status Indicates the type of connection to the Wi-Fi Baby Camera. (Blue = local, pink = mydlink remote, green = direct connect, and grey = disconnected.)
3 Microphone Tap on the Microphone icon to enable or disable two-way audio.
4 Camera Tap on the Camera icon to access snapshot, video recording, and playback mode.
5 Alerts Tap on the Alerts icon (!) to enable or disable alert notication.
6 Music Tap on the Music icon to select from the ve available lullabies to play on your camera's speaker. Also is used to enable or disable the music.
7 Speaker Tap on the Speaker icon to enable or disable Live View audio. Volume can be controlled by using the volume buttons on the mobile device.
8 Sound Alert Indicates when a loud sound is detected, like the sound of a baby crying.
9 Motion Alert Indicates when motion is detected, such as when the baby is moving.
10 Current Temperature Displays the current temperature.
11 Settings Tap the Settings icon ( ) to access settings, such as the camera's video resolution or brightness.
12 Conguration Tap the Conguration icon ( ) to access the conguration menu.
1
12
11
4
5
6
7
8
9
10
3
Note: The rst time you access your DCS-825L Live View,
you will get a reminder to adjust the focus on the camera.
This will ensure you get the best possible image. You only
need to do this once, and then you can turn o the reminder.
2
At any time, tap on the Live View screen to return to
the Home screen, and to access both the Settings and
Conguration menus.
24D-Link DCS-825L User Manual
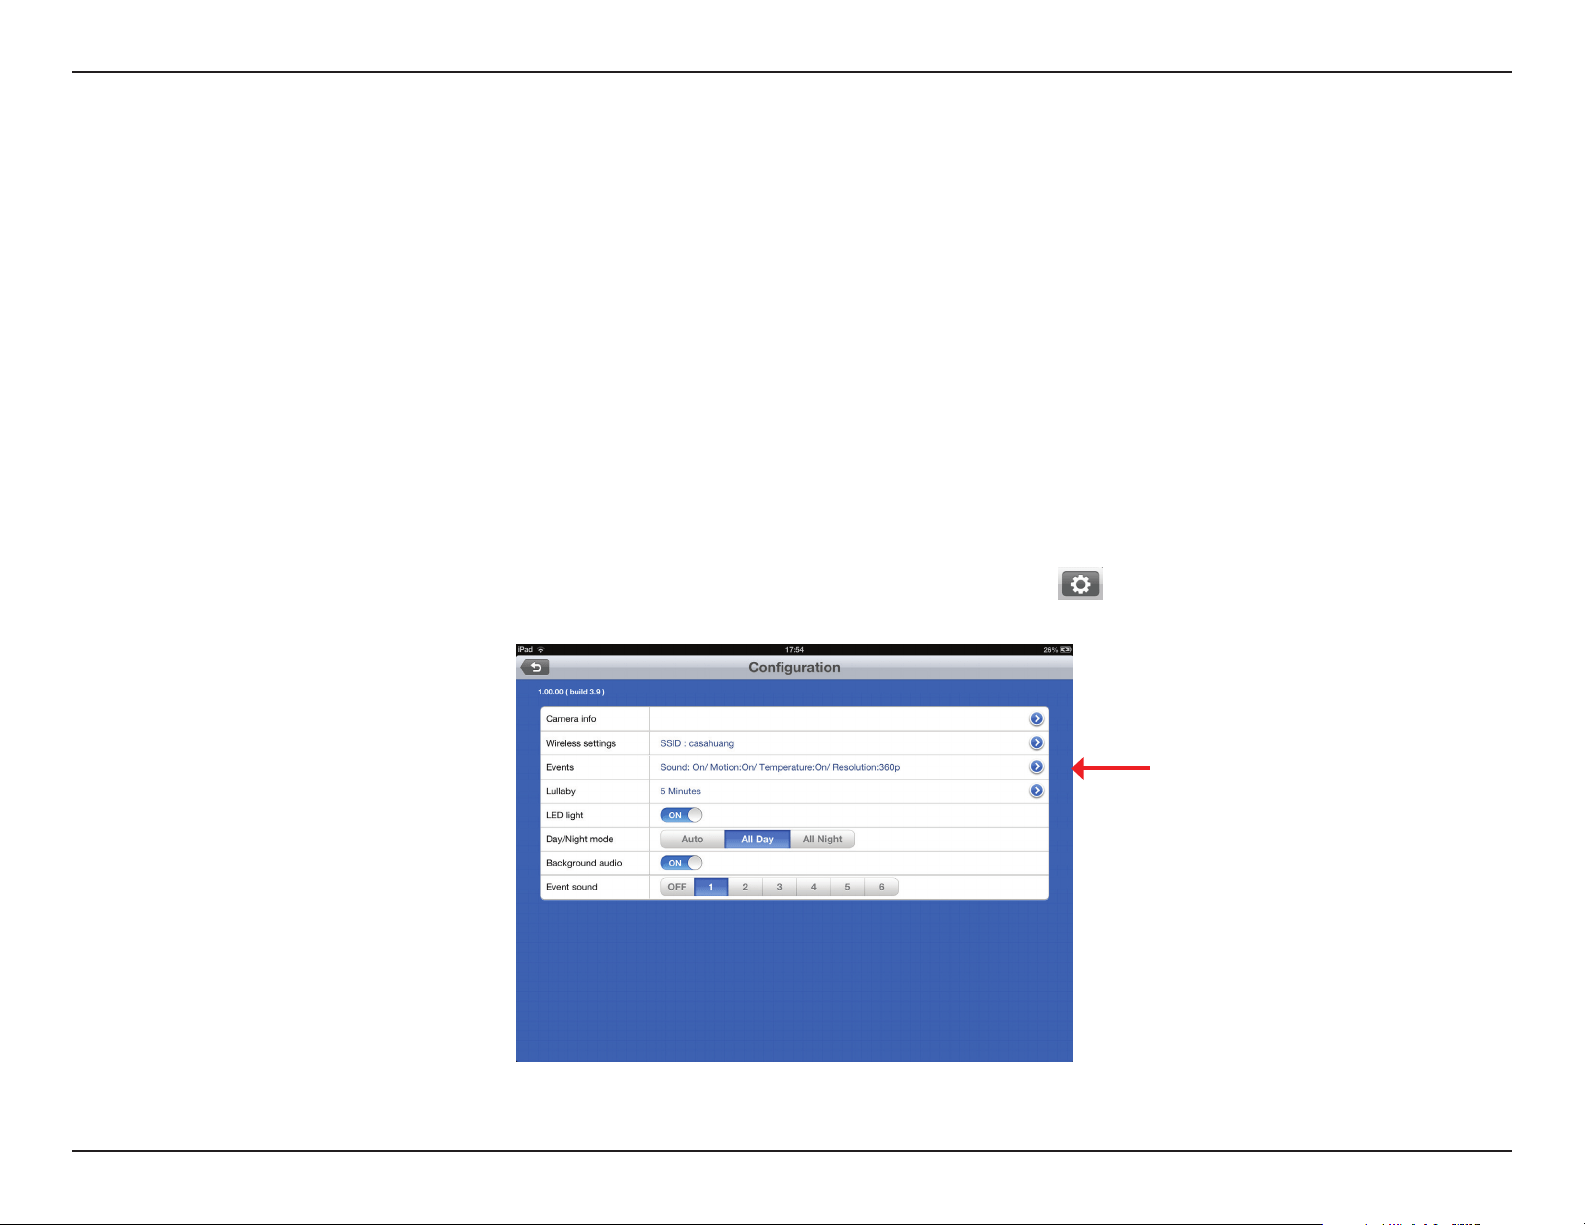
Section 4: Conguration
At any time after you complete the Setup Wizard, you may tap on the Live View screen to access the Conguration menu. The conguration icon is in the upper
right corner of the screen.
Tap to access Camera Information
Tap to access Wireless screen
Tap to access Events screen
Tap to access Lullaby screen
Turn on/o the temperature indicator light
Change the camera’s day/night mode to Auto, All
Day, or All Night
Enable background audio to play live sound when
mydlink Baby app is minimized, or when your
mobile device is in standby mode
Change or turn o alert sound
Conguration
mydlink Baby App Conguration
25D-Link DCS-825L User Manual
Section 4: Conguration
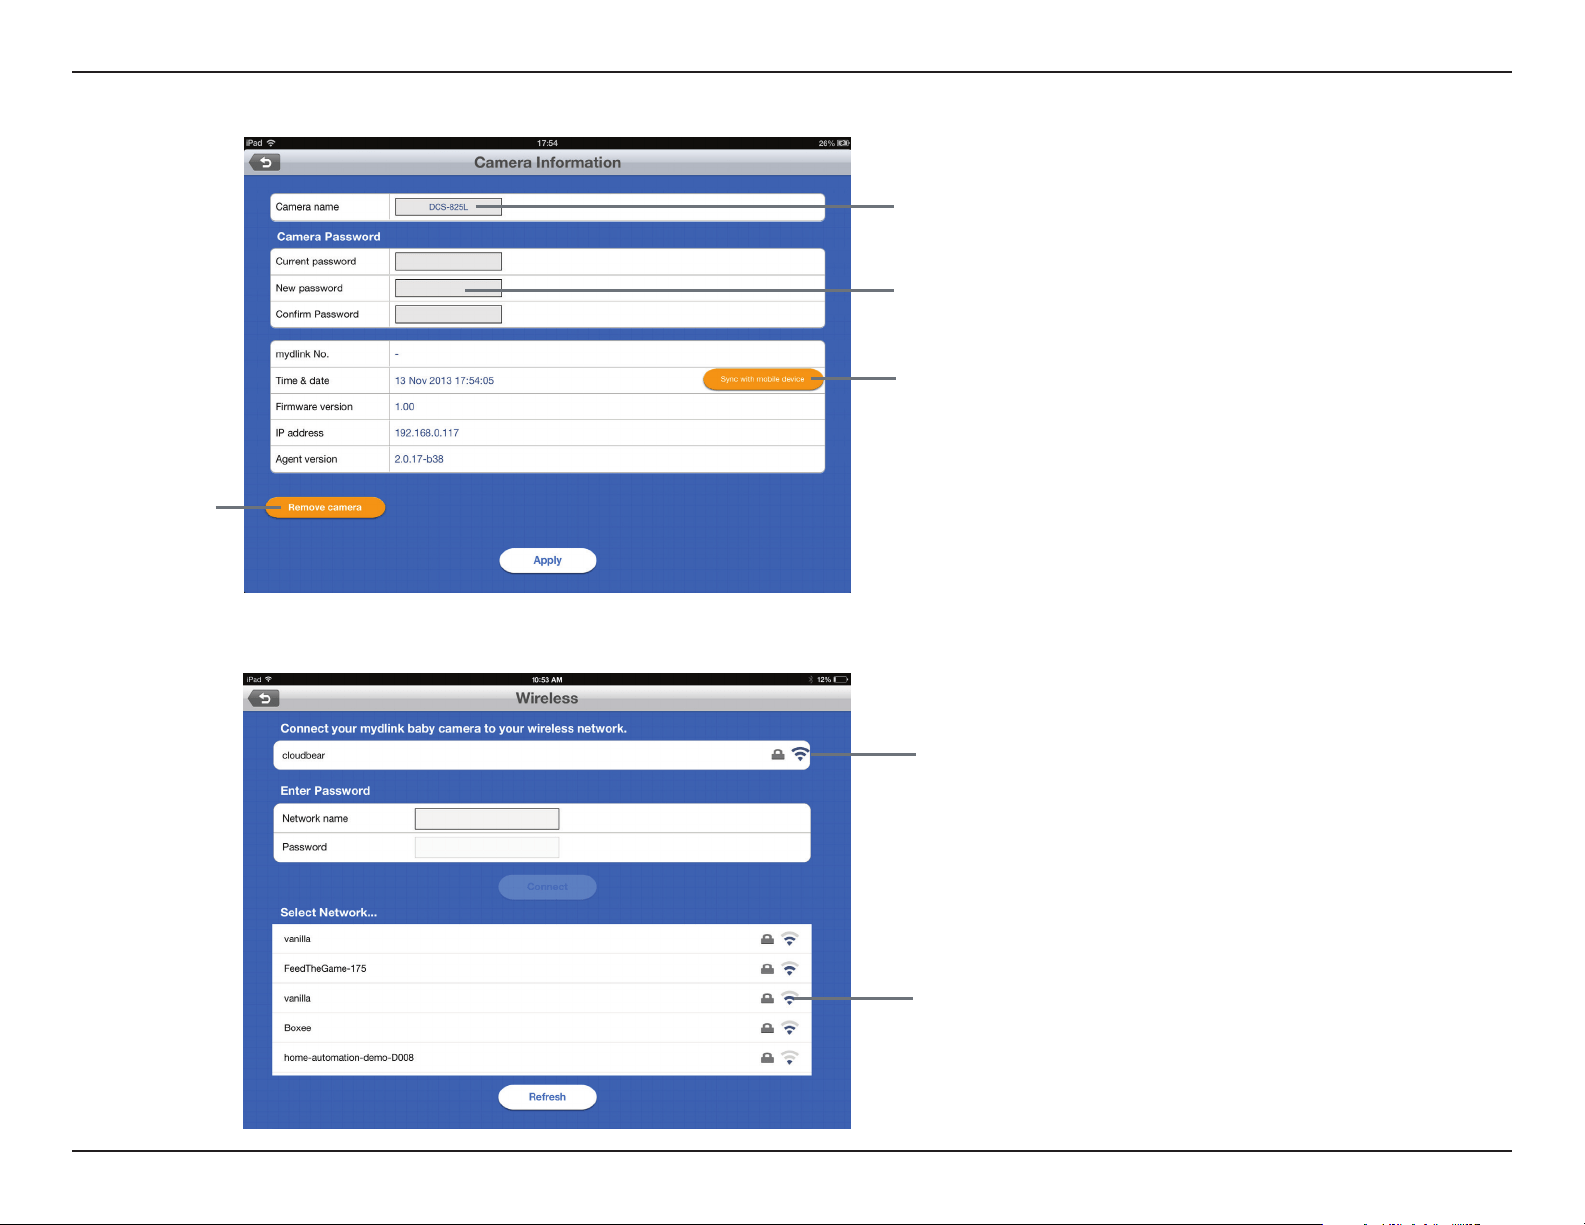
• Under Wireless…
See which wireless network your
camera is currently connected to
Change the wireless network you
want your camera to connect to
• Under Camera Information…
Change your Camera Password
Sync your camera’s time and date to
your mobile device
Remove your camera
from the app's
local access list
Change your Camera Name
26D-Link DCS-825L User Manual
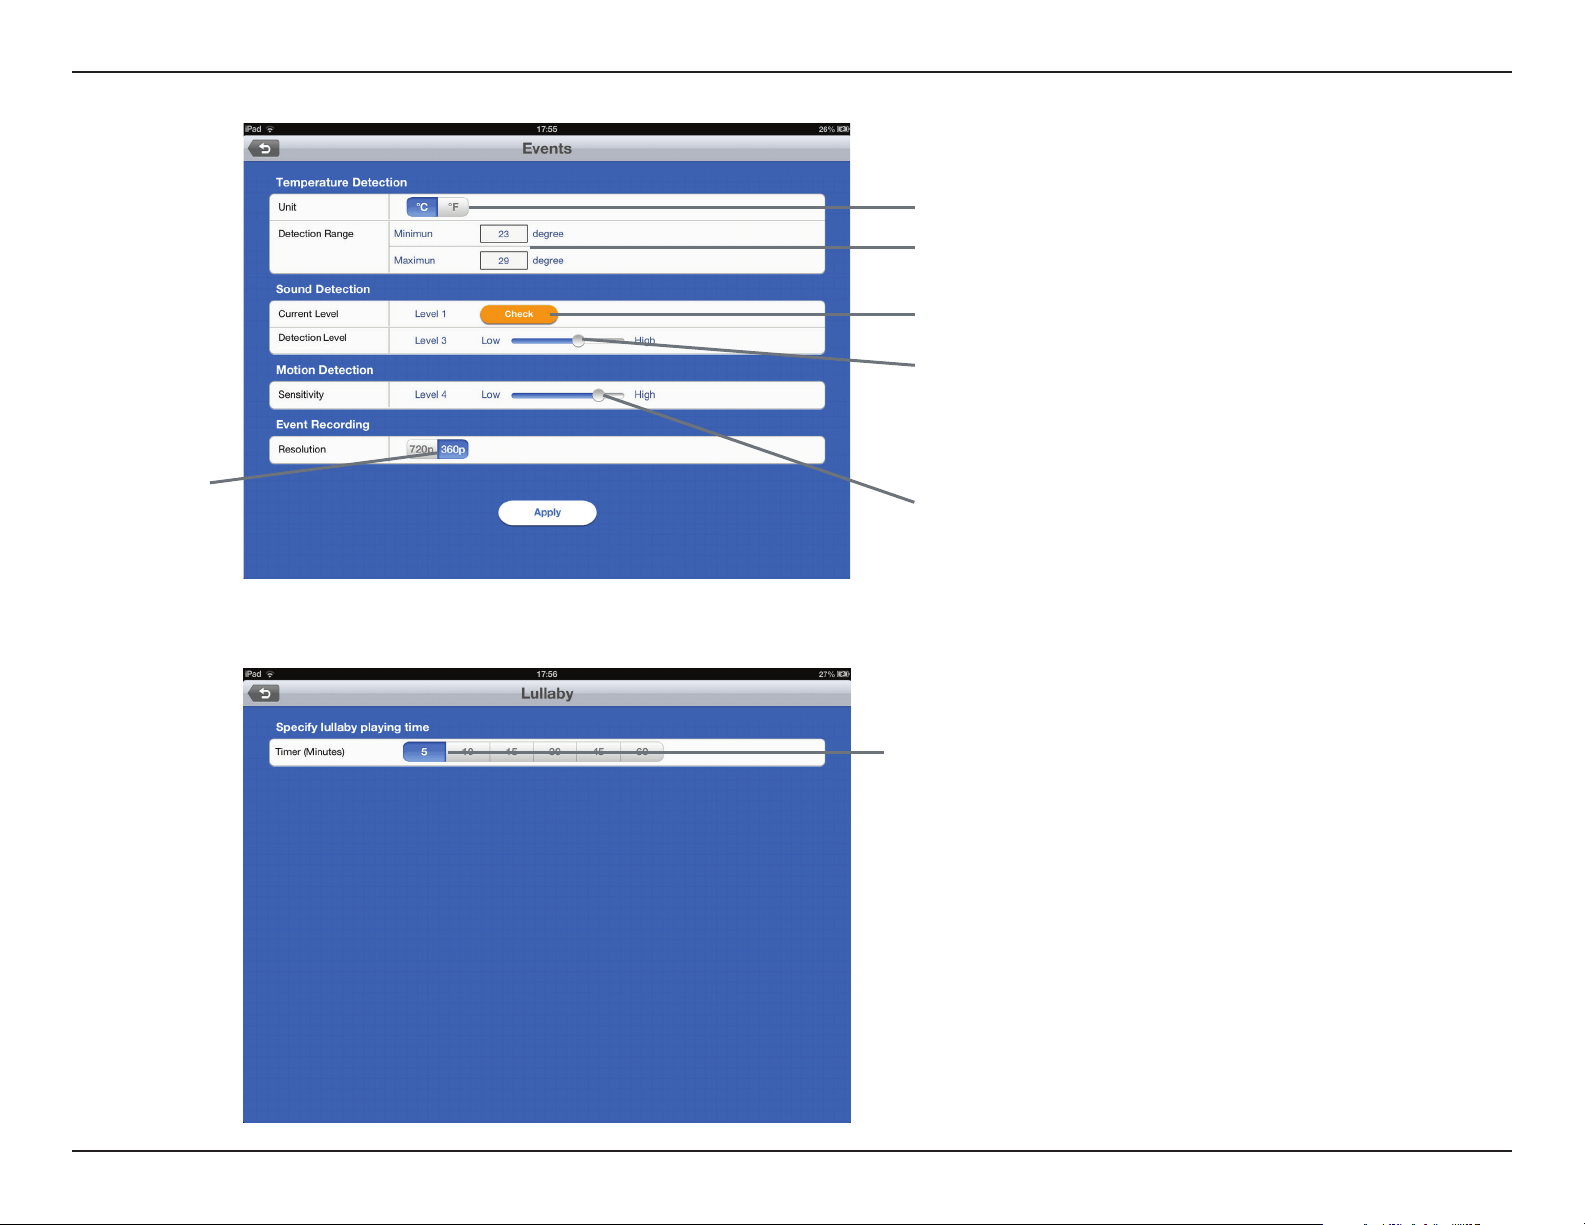
Section 4: Conguration
• Under Lullaby…
Select how long the lullaby will play (in minutes)
when activated
• Under Events…
Change the temperature unit of measure
(Centigrade or Farenheit)
Change the temperature alert range
Check ambient sound level. The level number
will change depending how noisy the
background is
Change Sound Detection level. Set the Sound
Detection Level higher than the Current Level
to receive alerts when noise exceeds the
current level. You can put the Detection Level
at the highest setting to disable sound alerts
- a higher detection level means less noise is
required to trigger an event
Change motion detection sensitivity. You can
also put sensitivity at the lowest setting in
order to disable motion alerts
Select the resolution
for recording video
to the microSD card
when an event is
triggered
27D-Link DCS-825L User Manual
Section 4: Conguration
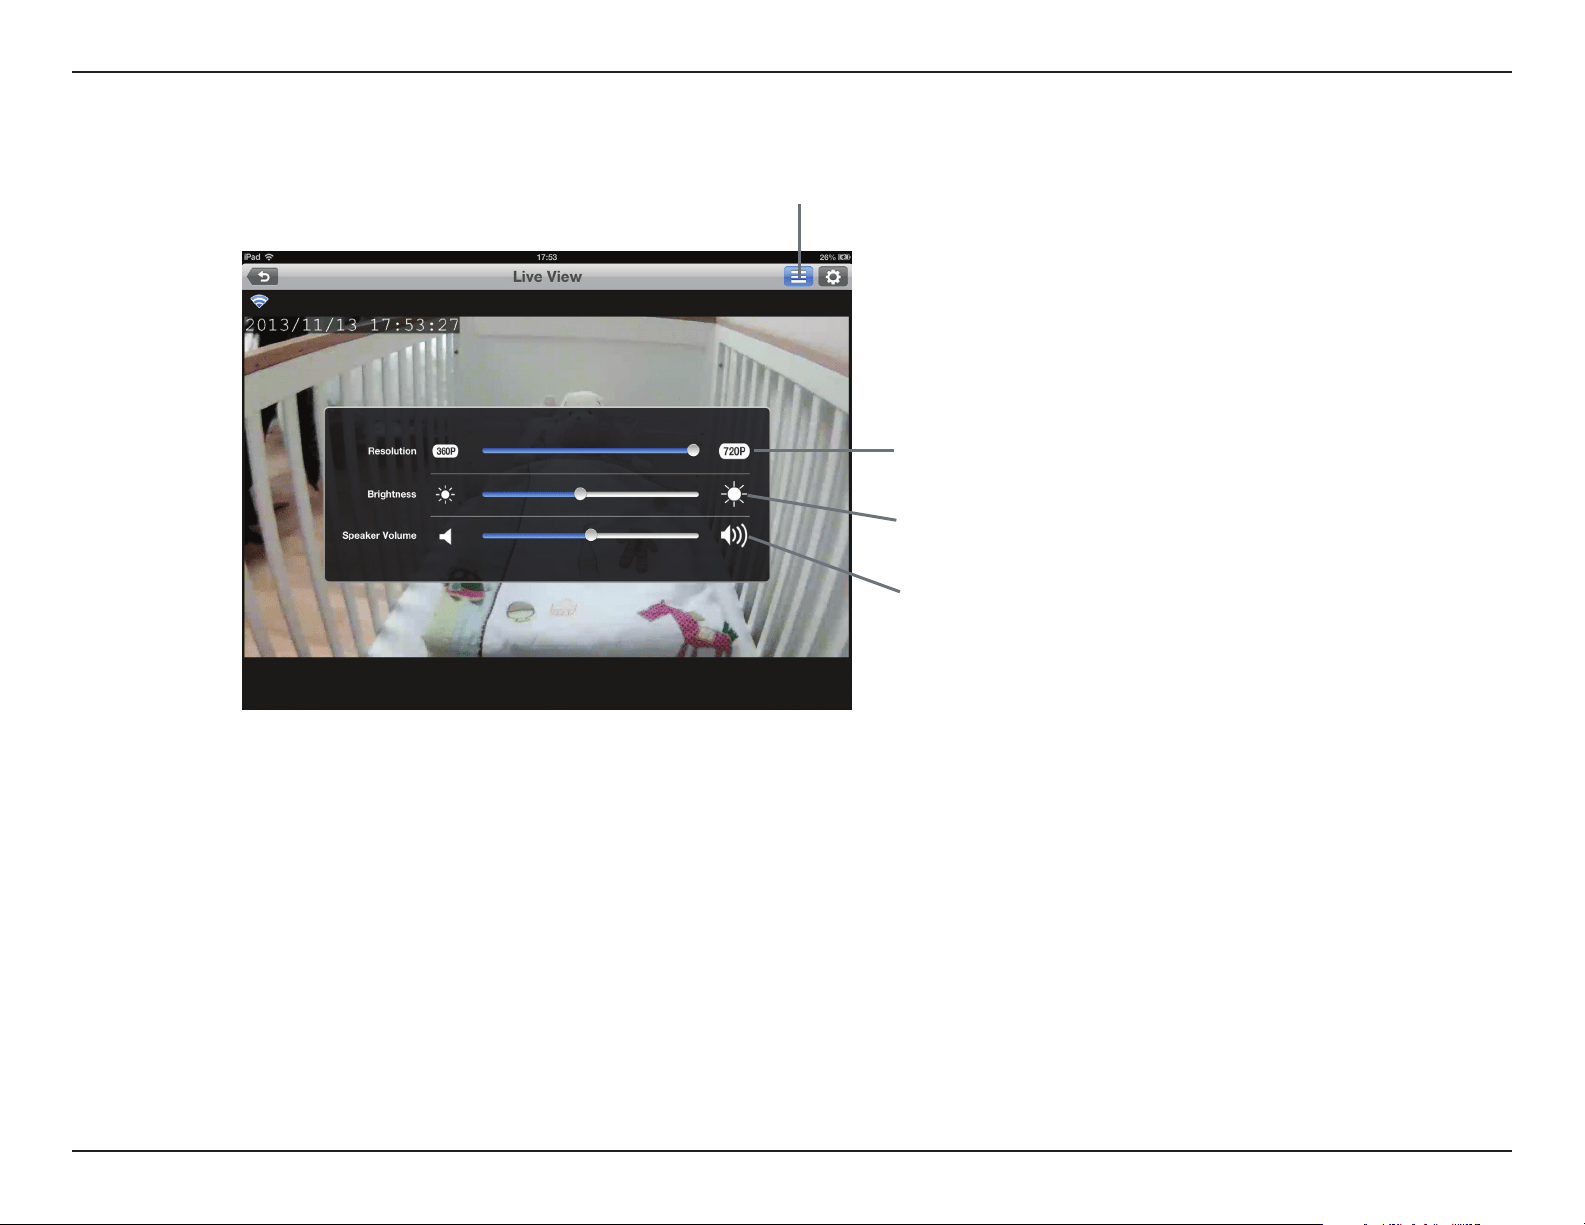
mydlink Baby App Settings
Adjust your camera's Resolution from 360P to 720P.
Although 360P resolution will give you a faster response,
selecting 720P will give you a higher resolution image
Change the Speaker Volume on the camera for two-way
audio communication and lullabies
Adjust the Brightness of the Live View image
Tap this icon to open the settings menu
28D-Link DCS-825L User Manual
Section 5: Video Recording and Playback
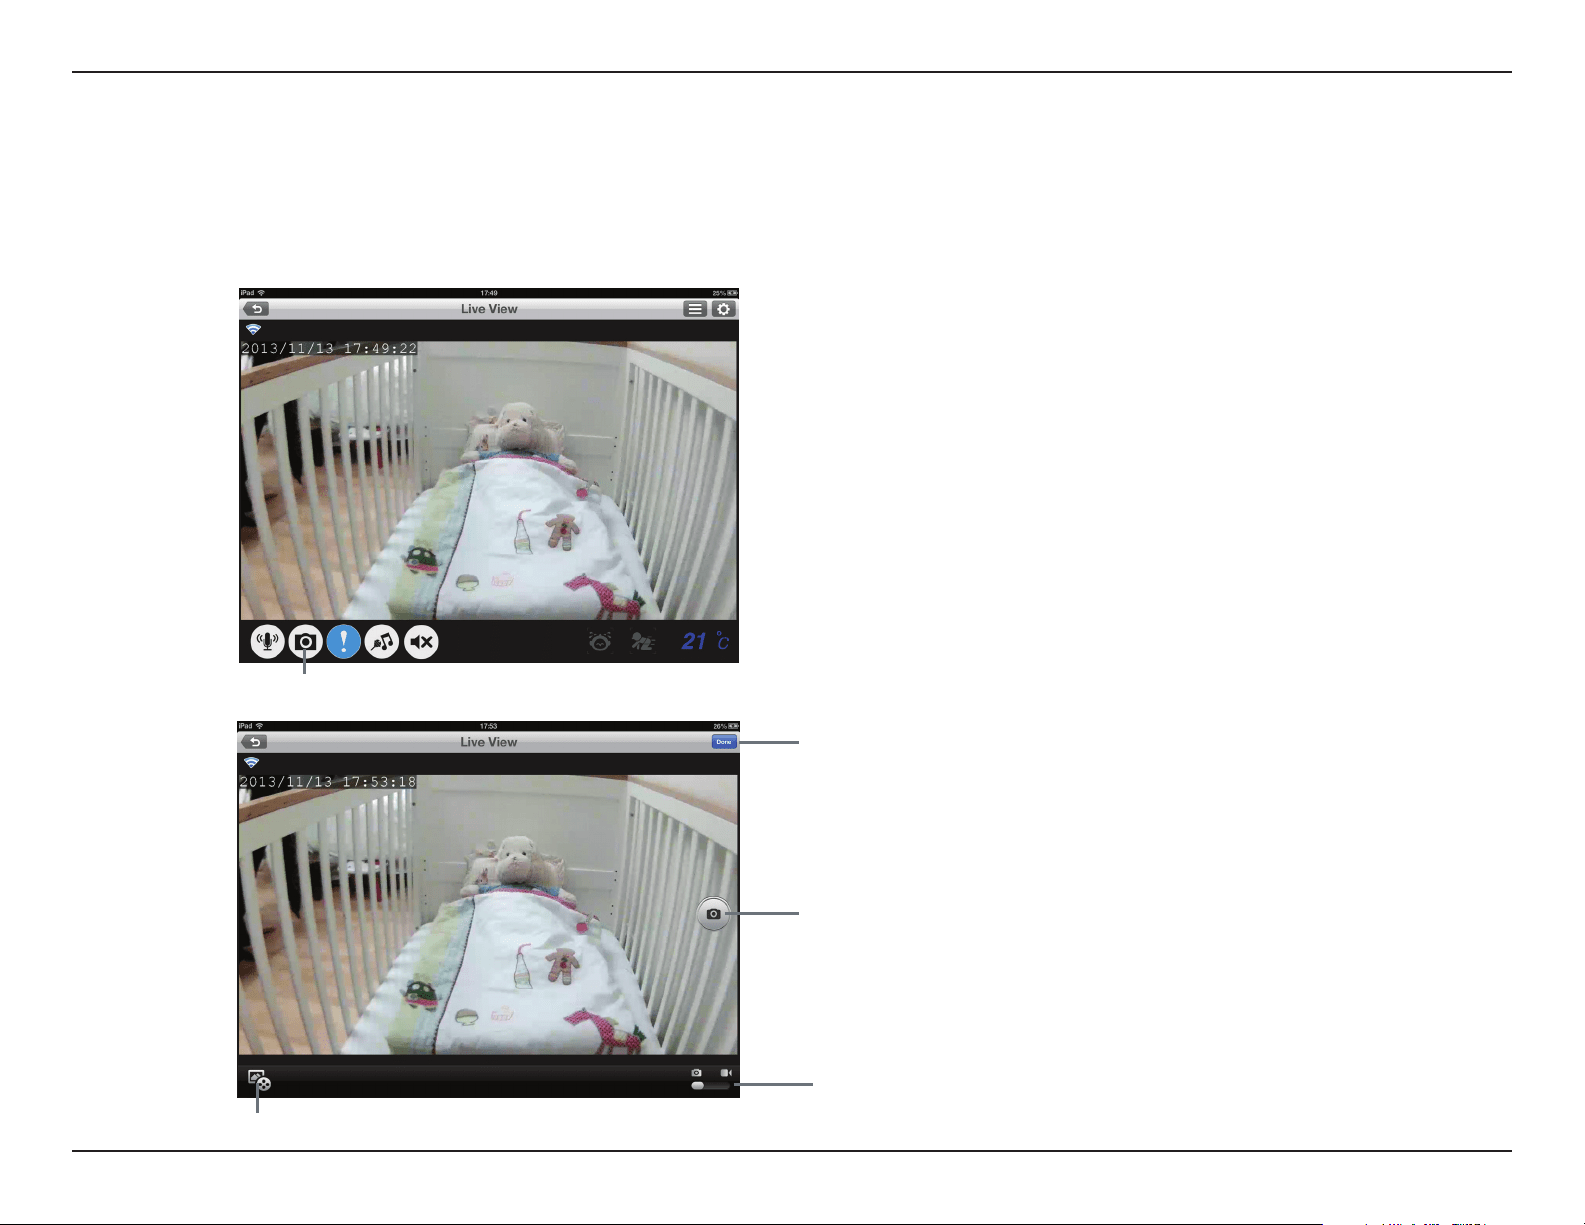
Tap Done to return to Live View
Tap the Playback icon to play event-triggered videos from the microSD card in the Wi-Fi Baby Camera. (A microSD card is not included.)
Slide to toggle between Snapshot and Video recording mode
Video Recording and Playback
Taking Snapshots or Recording Videos
When you take snapshots or record videos, the images and videos are stored directly to your smartphone or tablet. You can access snapshots or recorded videos in the
mobile device's photo library.
Tap the Camera icon to take a snapshot in snapshot mode. The
camera button changes to a round button when the DCS-825L
is in recording mode. (A red button will replace the black button
when the camera is recording video.)
Tapping on the Camera icon will allow you to access the recording mode. (See toggle description below right.)
29D-Link DCS-825L User Manual
Section 5: Video Recording and Playback
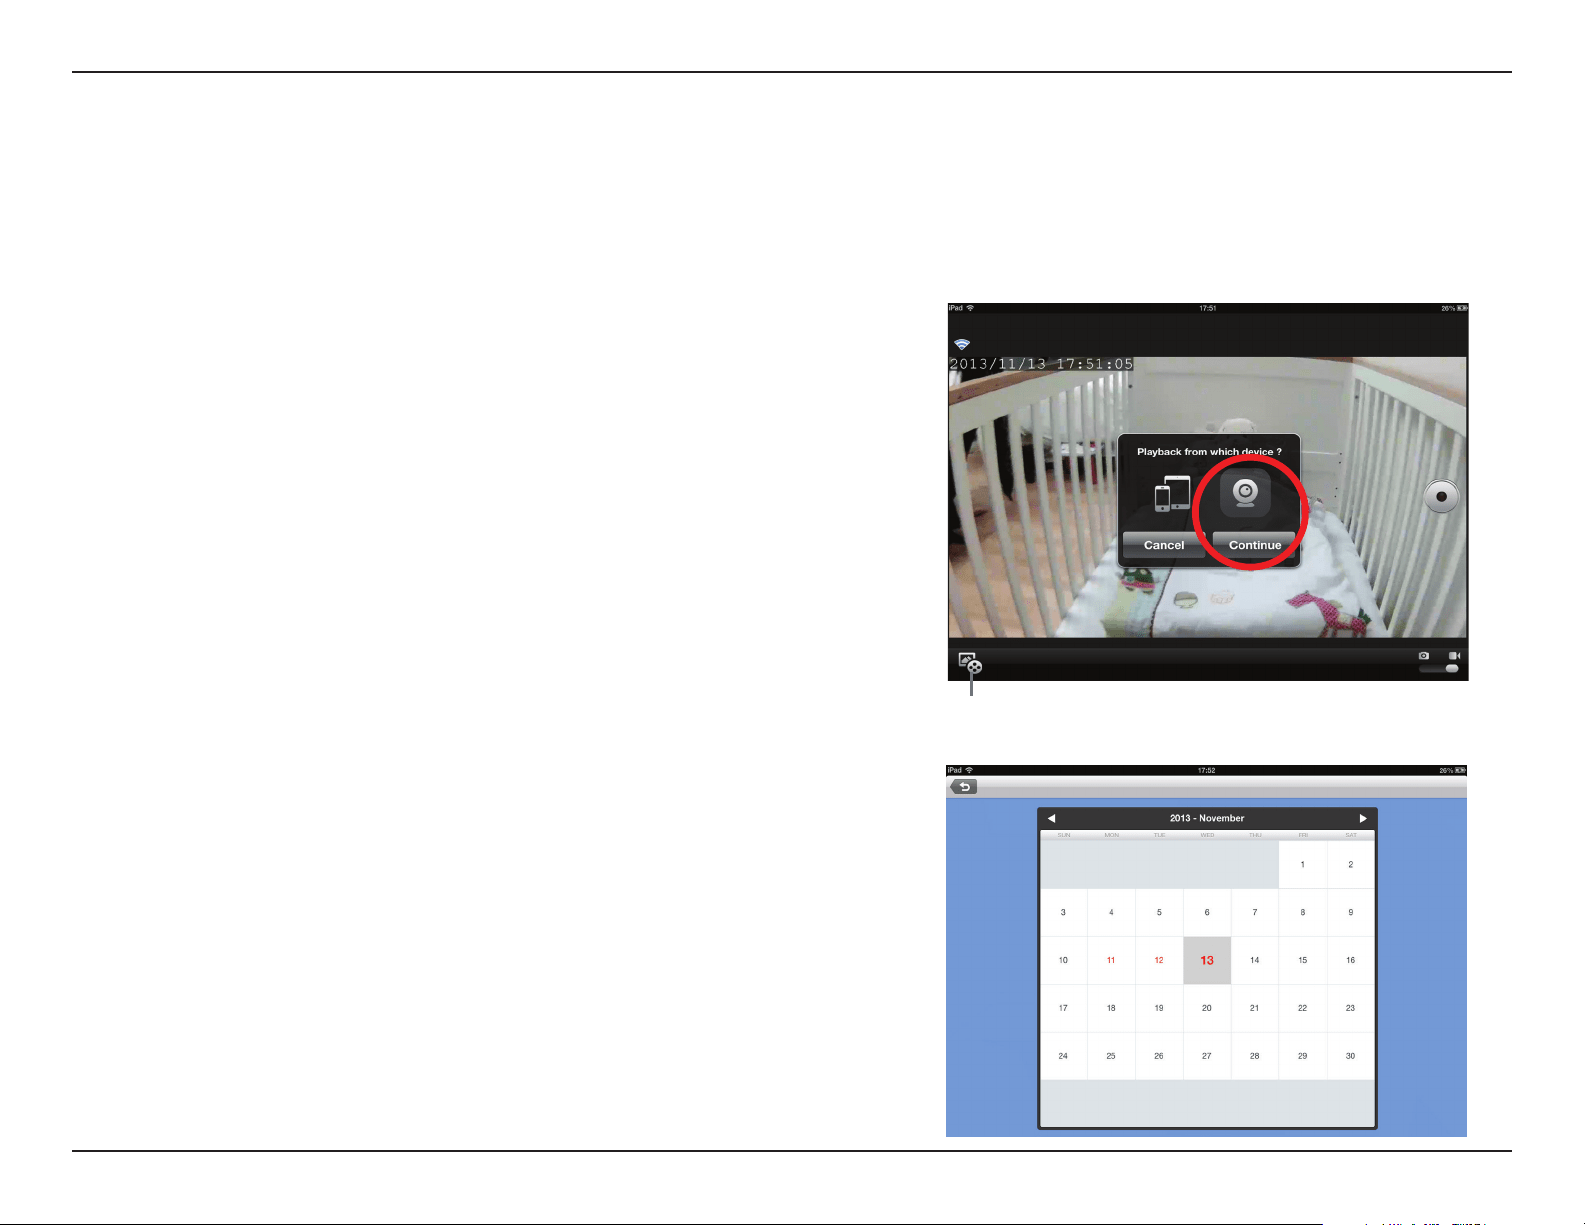
Play Back Event-Triggered Videos
If you need additional memory for video recording, the DCS-825L has an integrated microSD card slot. Simply insert a microSD card and the DCS-825L will
automatically record videos whenever sound or movement is detected. What’s more, you can see snapshots or watch videos from anywhere*. Never miss a
precious moment again!
* Requires iPhone, iPad, iPod Touch, or Android device with Internet access.
The highlighted dates on the calendar indicate that you have video stored. Tap the date to
view the video.
Tap the Playback icon in the lower left corner of the screen, select the Camera icon,
and tap Continue to play videos from the camera's microSD card.
Playback event-triggered videos from the microSD card in the Wi-Fi Baby Camera.
(A microSD card is not included.)
30D-Link DCS-825L User Manual
Section 6: mydlink
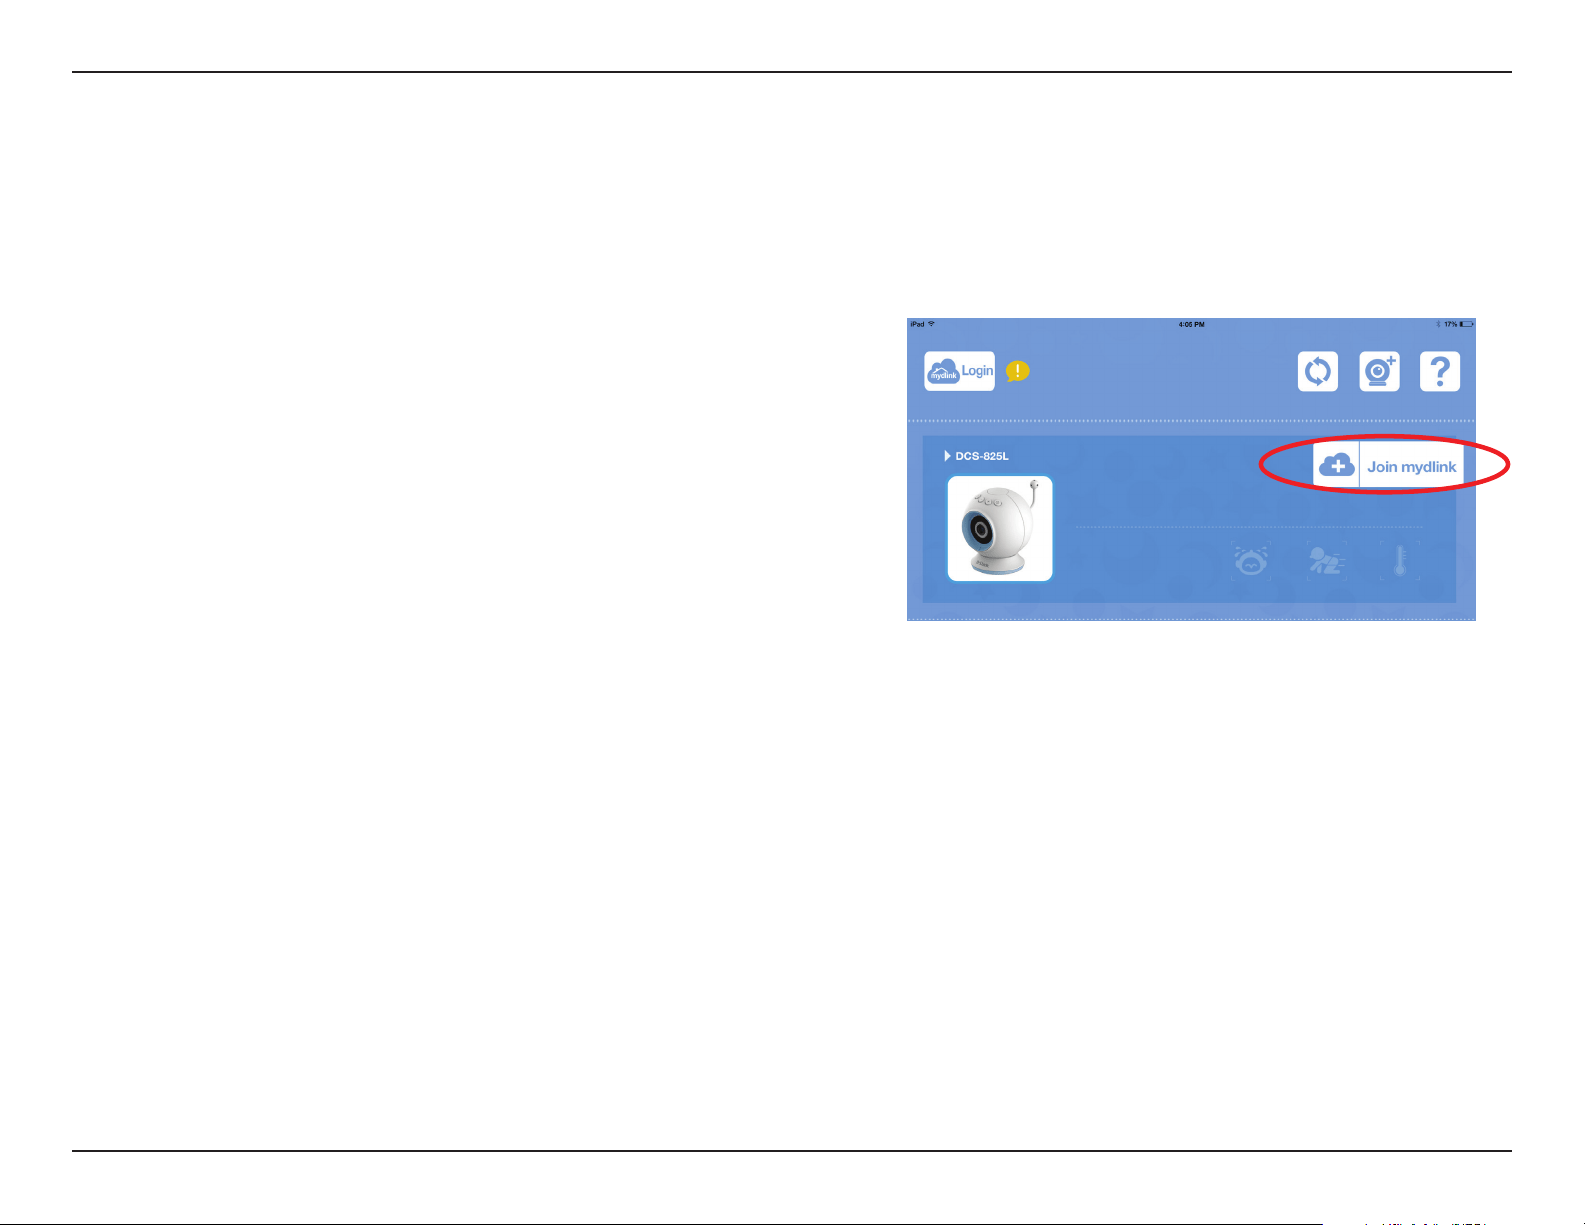
During the setup process, the Setup Wizard gives you an opportunity to create a mydlink account. When you set up an account with mydlink, it gives you the
ability to securely monitor your baby or child when you are away from home, absolutely free and without a monthly subscription fee.
If you initially decide not to take advantage of this free service and change your
mind later, you can create your mydlink account by tapping Join mydlink from the
mydlink Baby app Home Screen.
For more information, go to http://mydlink.com
Creating a mydlink Account
Section 7: Advanced Features
31D-Link DCS-825L User Manual
Advanced Features
Enabling Direct Connect
1
Press and hold the (+) button on the camera for at least ve seconds. The temperature
indicator LED on the top of the camera will ash three times.
2
Connect your mobile device to the myBabyCam-xxxx Wi-Fi network. (XXXX is a 4-digit
code, the last 4 digits of your camera’s MAC address.) Use the Wi-Fi password you created
during the Setup Wizard installation process.
Note: Once you are connected to the camera, you will no longer have Internet access.
During the initial steps with the Setup Wizard, you congured the camera to connect to your home Wi-Fi network. If you want to take your camera
with you, it's not a problem with the DCS-825L.* You can connect directly to your camera, which means there is no need for an Internet connection
or a router. Follow the steps below to enable Direct Connect.
*You have the option of using a portable USB battery pack (not included) that supplies 5V/2A of power when you take
the camera with you. Plug the USB battery pack into the Micro-USB power port. The Power LED on the bottom of the
camera will turn red when the camera is powered on.
(+)
Section 7: Advanced Features
32D-Link DCS-825L User Manual
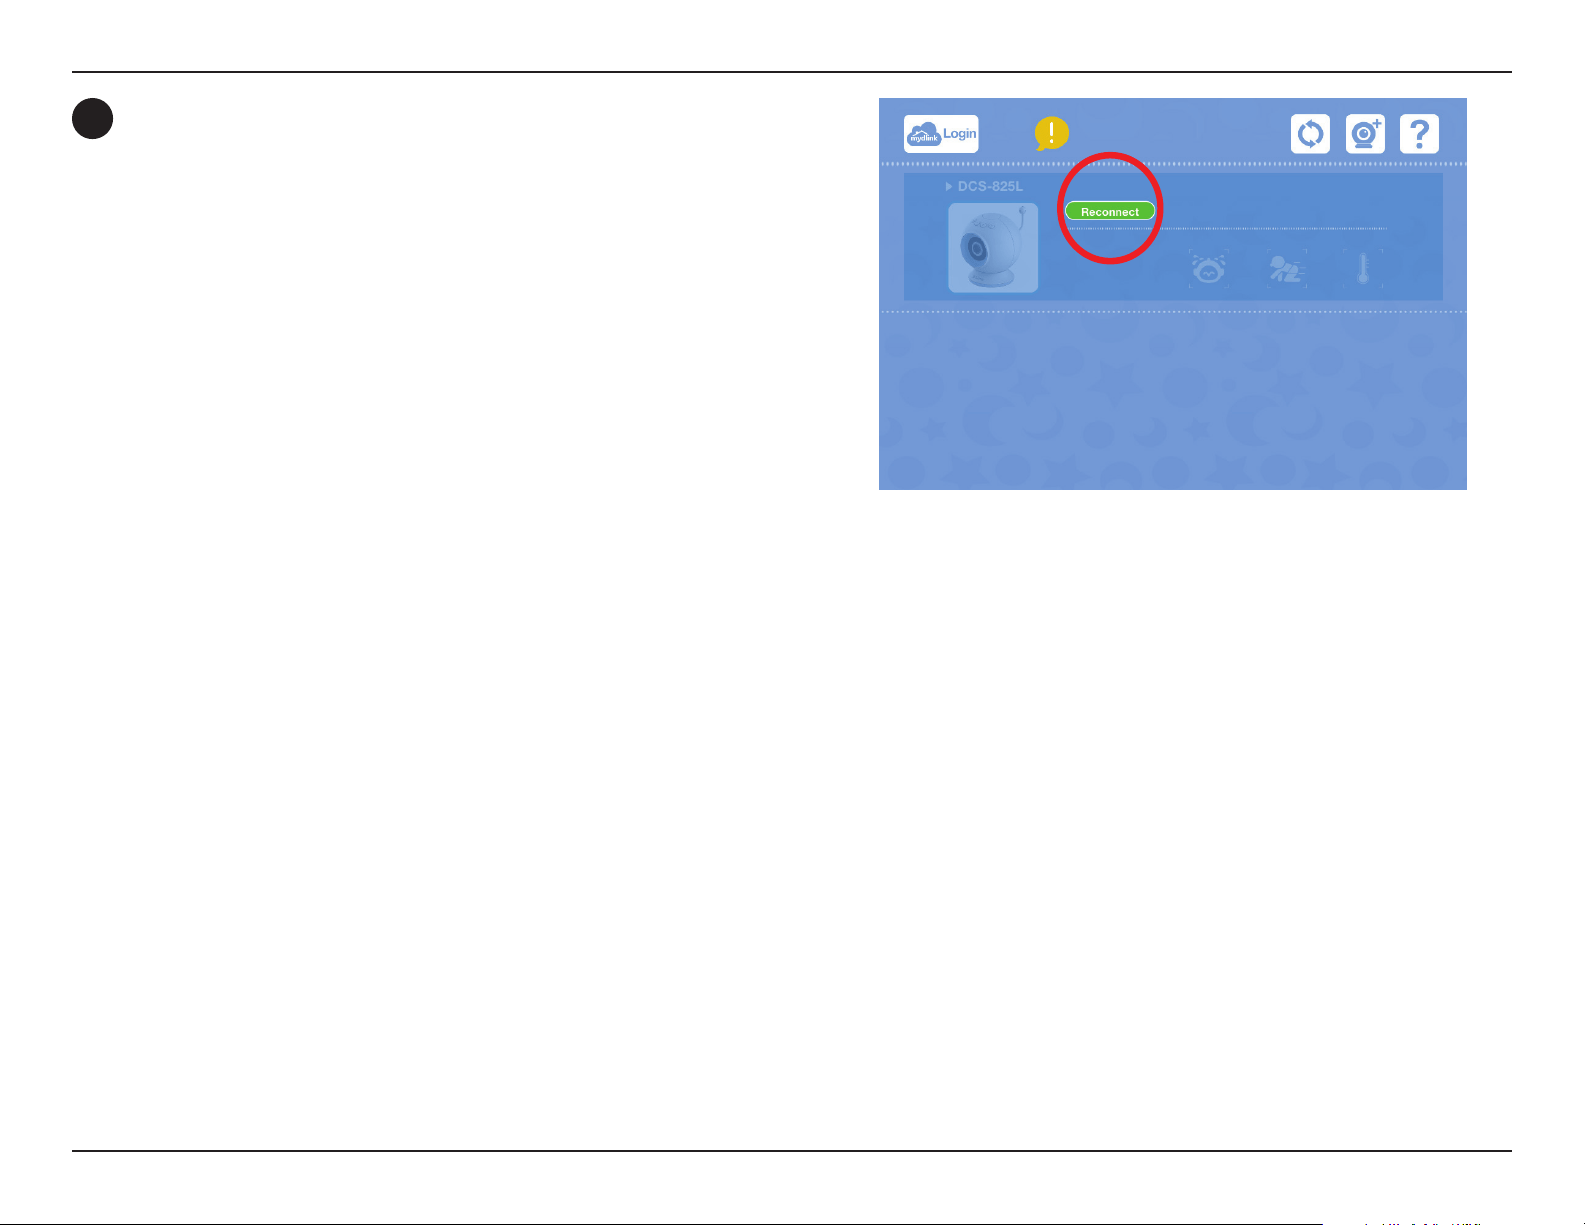
3
Open the mydlink Baby app. To connect, tap the Reconnect button for
the camera.
Note: When you nish using Direct Connect, press and hold the (-) button on the top of the camera for about ve seconds to turn o Direct Connect
mode. This will ensure that your mobile device will return to normal operation with Internet access, and you should have no problem connecting
the DCS-825L to your Wi-Fi network when you return home.

33D-Link DCS-825L User Manual
Section 8: Troubleshooting
Troubleshooting
2. What should I do if the image is out of focus?
You can turn the white focus ring on the front of the camera to adjust the focus.
3. How do I change the accent rings?
Rotate the accent ring counter clockwise, then lift it o. Place the new ring on and rotate it clockwise until it clicks into place.
4. How do I select a dierent lullaby?
Use the mydlink Baby app to change the lullaby. Tap on the music icon on the camera’s Live View screen. Select a lullaby from the list or select Play
All. (Refer to "mydlink Baby App Conguration" on page 24.)
5. I started the mydlink Baby app, but I can’t nd my camera.
• Make sure your camera is turned on and receiving power.
• If you are setting up a new camera, make sure your smartphone or tablet is connected to the camera’s Wi-Fi signal (not your wireless router). This
also applies when you enable Direct Connect to use the camera away from home. (Refer to "Advanced Features" on page 31.)
• The Wi-Fi network name should be [myBabyCam-XXXX], where XXXX is a 4-digit code (the last 4 digits of your camera’s MAC address).
• The Wi-Fi network name and password is printed on a label on the bottom of your camera and on the back of the Quick Install Guide.
• If you still can’t nd your camera, reset your camera by pressing its reset button for 10 seconds (while it is powered on).
6. Why is there a white haze when viewing Live Video in night vision mode?
The night vision lights on the camera may be reecting o a nearby surface. Try repositioning and aiming the camera.
7. What does it mean when the Power LED is red?
When you power on the camera, the Power LED will be solid red. When you reset the camera, the Power LED will be ashing red.
Reset
1. What can I do if I forget my password?
If you forget your password, you must reset your camera. Unfortunately, this will change your settings back to the
factory default settings. To reset your camera, use an unfolded paper clip to press and hold the RESET button for
about10 seconds while your camera is powered on.
34D-Link DCS-825L User Manual
Section 8: Troubleshooting
8. How can you power the camera?
The camera can be powered with the provided power adapter. You can also use an external USB battery for total portability. (USB battery is not
included. Requires 5V/2A output.)
9. How do I access the camera remotely?
You can set up a new mydlink account and register the camera with mydlink during the initial setup. Once the process is complete, log in to your
mydlink account by tapping the mydlink Login button on the Home screen. With mydlink, you can monitor your baby from anywhere as long as
your smartphone or tablet is connected to the Internet (over Wi-Fi or over a cellular network).
Note: If you don't enable mydlink, you will only be able to view the camera within your home's wireless coverage area.
10. Should the app be running constantly on my device?
The app can run in the background, allowing you to hear your baby continuously, even when the phone is locked. The smartphone or tablet
can still be used normally while the app is running. If you do not want to hear audio from the camera when the app is open, you can turn o the
Background audio on the Conguration menu. If you close the app, the camera audio will be turned o.
11. How do I adjust the sensitivity of motion and audio detection?
From the Live View page, tap on the screen to reveal the icons, and tap the Conguration icon (
) to go to the Conguration menu. Tap the
Events arrow to access the motion and audio detection settings.
35D-Link DCS-825L User Manual
Section 8: Troubleshooting
12. How do I activate push notications?
A. Go to the Home page and log in.
B. After logging in, you will notice that the refresh icon
on the top right has changed to an alarm clock icon.
C. Tap on the alarm clock icon, and you will see the Push Notication setting. Tap on the switch icon to activate push notications. The switch icon
will turn green, and you should begin to receive alerts as specied.
Note: If you do not receive alerts, go to the Conguration menu and adjust the sensitivity level of sound and motion detection as described on the previous
page, question 11.

36D-Link DCS-825L User Manual
Appendix A: Technical Specications
Technical Specications
CAMERA HARDWARE PROFILE
• 1/4" Megapixel Progressive CMOS Sensor
• 16 ft. IR Illumination Distance
• Minimum Illumination: 0 lux with IR LEDs On
• ICR Filter
• Built-in Microphone and Speaker
• Digital Zoom
• Tripod Screw Mount
• Focal Length: 3.3 mm
• Aperture: F2.2
• Angle of View:
• (H) 66.2°
• (V) 35.9°
• (D) 76.2°
• Power Button
• Volume Control Buttons
• Lullaby Button
IMAGE FEATURES
• Adjustable Image Size
• Time Stamp
NETWORK PROTOCOLS
• IPv4
• ARP
• TCP/IP
• UDP
• ICMP
• DHCP Client
• NTP Client (D-Link)
• DNS Client
• DDNS Client (D-Link)
• HTTP
• HTTPS (for Conguration)
• UPnP Port Forwarding
• RTP/RTSP/RTCP
EXTERNAL DEVICE INTERFACES
• IEEE 802.11n Wireless
• microSD Card Slot
• Reset Button
• Power Port (Micro-USB
1
)
REMOTE MANAGEMENT
• Take Snapshots and Video Clips and Save Directly to Your Smartphone or Tablet
• Connect to Your DCS-825L via Web Browser
• Connect Directly to the DCS-825L with Your Mobile Device
EVENT MANAGEMENT
• Motion Detection
• Sound Detection
• Temperature Alert
• Event-Triggered Snapshots and Video Recording to microSD Card
2
MOBILE SUPPORT
• mydlink Baby App for iOS and Android Mobile Devices is Available on the App
Store and Google Play
VIDEO COMPRESSION
• H.264 Format Video Compression
• H.264 Streaming Over UDP, TCP, HTTP
• JPEG for Still Images
VIDEO RESOLUTION
• 1280 x 720, 640 x 360
WEIGHT
• 14.08 oz (400 g)
OPERATING TEMPERATURE
• 32° to 104°F (0° to 40°C)
1 USB battery not included. Requires at least 2 A output.
2 A microSDHC Class 6 card or above is recommended. Supports card capacities up to 32 GB.

37D-Link DCS-825L User Manual
Appendix A: Technical Specications
STORAGE TEMPERATURE
• - 4° to 158°F (-20° to 70°C)
DIMENSIONS
• 3.6 in x 4.1 in (92 mm x 105.5 mm)
EXTERNAL POWER ADAPTER
• Input 100-240VAC, 50/60Hz (Micro USB Type)
• Output 5 VDC, 1.5A
POWER CONSUMPTION
• Max. 7.5 W
CERTIFICATIONS
• CE
• CE LVD
• FCC
• ICES
• C-Tick

38D-Link DCS-825L User Manual
Appendix B: Contacting Technical Support
Contacting Technical Support
U.S. and Canadian customers can contact D-Link technical support through our web site or by phone.
Before you contact technical support, please have the following ready:
• Model number of the product (e.g. DCS-825L)
• Hardware Revision (located on the camera (e.g. rev A1))
• Serial Number (s/n number located on the camera).
You can nd software updates and user documentation on the D-Link website as well as frequently asked questions and
answers to technical issues.
For customers within the United States:
Phone Support:
(877) 453-5465
Internet Support:
http://support.dlink.com
For customers within the Canada:
Phone Support:
(866) 354-6599
Internet Support:
http://support.dlink.ca

39D-Link DCS-825L User Manual
Appendix C: Warranty
Warranty
Subject to the terms and conditions set forth herein, D-Link Systems, Inc. (“D-Link”) provides this Limited Warranty:
• Only to the person or entity that originally purchased the product from D-Link or its authorized reseller or distributor, and
• Only for products purchased and delivered within the fty states of the United States, the District of Columbia, U.S. Possessions
or Protectorates, U.S. Military Installations, or addresses with an APO or FPO.
Limited Warranty:
D-Link warrants that the hardware portion of the D-Link product described below (“Hardware”) will be free from material defects in workmanship
and materials under normal use from the date of original retail purchase of the product, for the period set forth below (“Warranty Period”), except
as otherwise stated herein.
• Hardware (excluding power supplies and fans): One (1) year
• Power supplies and fans: One (1) year
• Spare parts and spare kits: Ninety (90) days
The customer’s sole and exclusive remedy and the entire liability of D-Link and its suppliers under this Limited Warranty will be, at
D-Link’s option, to repair or replace the defective Hardware during the Warranty Period at no charge to the original owner or to refund the actual
purchase price paid. Any repair or replacement will be rendered by D-Link at an Authorized D-Link Service Oce. The replacement hardware
need not be new or have an identical make, model or part. D-Link may, at its option, replace the defective Hardware or any part thereof with any
reconditioned product that D-Link reasonably determines is substantially equivalent (or superior) in all material respects to the defective Hardware.
Repaired or replacement hardware will be warranted for the remainder of the original Warranty Period or ninety (90) days, whichever is longer,
and is subject to the same limitations and exclusions. If a material defect is incapable of correction, or if D-Link determines that it is not practical
to repair or replace the defective Hardware, the actual price paid by the original purchaser for the defective Hardware will be refunded by D-Link
upon return to D-Link of the defective Hardware. All Hardware or part thereof that is replaced by D-Link, or for which the purchase price is refunded,
shall become the property of D-Link upon replacement or refund.

40D-Link DCS-825L User Manual
Appendix C: Warranty
Limited Software Warranty:
D-Link warrants that the software portion of the product (“Software”) will substantially conform to D-Link’s then current functional specications
for the Software, as set forth in the applicable documentation, from the date of original retail purchase of the Software for a period of ninety (90)
days (“Software Warranty Period”), provided that the Software is properly installed on approved hardware and operated as contemplated in its
documentation. D-Link further warrants that, during the Software Warranty Period, the magnetic media on which D-Link delivers the Software will be
free of physical defects. The customer’s sole and exclusive remedy and the entire liability of D-Link and its suppliers under this Limited Warranty will
be, at D-Link’s option, to replace the non-conforming Software (or defective media) with software that substantially conforms to D-Link’s functional
specications for the Software or to refund the portion of the actual purchase price paid that is attributable to the Software. Except as otherwise
agreed by D-Link in writing, the replacement Software is provided only to the original licensee, and is subject to the terms and conditions of the
license granted by D-Link for the Software. Replacement Software will be warranted for the remainder of the original Warranty Period and is subject
to the same limitations and exclusions. If a material non-conformance is incapable of correction, or if D-Link determines in its sole discretion that it
is not practical to replace the non-conforming Software, the price paid by the original licensee for the non-conforming Software will be refunded by
D-Link; provided that the non-conforming Software (and all copies thereof) is rst returned to D-Link. The license granted respecting any Software
for which a refund is given automatically terminates.
Non-Applicability of Warranty:
The Limited Warranty provided hereunder for Hardware and Software portions of D-Link’s products will not be applied to and does not cover any
refurbished product and any product purchased through the inventory clearance or liquidation sale or other sales in which D-Link, the sellers, or
the liquidators expressly disclaim their warranty obligation pertaining to the product and in that case, the product is being sold “As-Is” without any
warranty whatsoever including, without limitation, the Limited Warranty as described herein, notwithstanding anything stated herein to the contrary.
Submitting A Claim (USA):
The customer shall return the product to the original purchase point based on its return policy. In case the return policy period has expired and
the product is within warranty, the customer shall submit a claim to D-Link as outlined below:
• The customer must submit with the product as part of the claim a written description of the Hardware defect or Software
nonconformance in sucient detail to allow D-Link to conrm the same, along with proof of purchase of the product (such as a
copy of the dated purchase invoice for the product) if the product is not registered.
• The customer must obtain a Case ID Number from D-Link Technical Support at https://support.dlink.com, who will attempt to
assist the customer in resolving any suspected defects with the product. If the product is considered defective, the customer must
obtain a Return Material Authorization (“RMA”) number by completing the RMA form and entering the assigned Case ID Number
at https://rma.dlink.com/.
• After an RMA number is issued, the defective product must be packaged securely in the original or other suitable shipping package
to ensure that it will not be damaged in transit, and the RMA number must be prominently marked on the outside of the package.
Please refer to shipping and packaging instructions located online at http://rma.dlink.com.

41D-Link DCS-825L User Manual
Appendix C: Warranty
• The customer is responsible for all in-bound shipping charges to D-Link. No Cash on Delivery (“COD”) is allowed. Products sent COD
will either be rejected by D-Link or become the property of D-Link. Products shall be fully insured by the customer and shipped
to D-Link Systems, Inc., 17595 Mt. Herrmann, Fountain Valley, CA 92708. D-Link will not be held responsible for any packages
that are lost in transit to D-Link. The repaired or replaced packages will be shipped to the customer via UPS Ground or any common
carrier selected by D-Link. Return shipping charges shall be prepaid by D-Link if you use an address in the United States, otherwise
we will ship the product to you freight collect. Expedited shipping is available upon request and provided shipping charges are
prepaid by the customer.
D-Link may reject or return any product that is not packaged and shipped in strict compliance with the foregoing requirements, or for which an
RMA number is not visible from the outside of the package. The product owner agrees to pay D-Link’s reasonable handling and return shipping
charges for any product that is not packaged and shipped in accordance with the foregoing requirements, or that is determined by D-Link not to
be defective or non-conforming.
Submitting A Claim (Canada):
The customer shall return the product to the original purchase point based on its return policy. In case the return policy period has expired and
the product is within warranty, the customer shall submit a claim to D-Link as outlined below:
• Customers need to provide their receipt (proof of purchase) even if the product is registered. Without a receipt, no warranty service will
be done. The registration is not considered a proof of purchase.
• The customer must submit with the product as part of the claim a written description of the Hardware defect or Software nonconformance
in sucient detail to allow D-Link to conrm the same, along with proof of purchase of the product (such as a copy of the dated purchase
invoice for the product) if the product is not registered.
• The customer must obtain a Case ID Number from D-Link Technical Support at 1-800-361-5265, who will attempt to assist the customer
in resolving any suspected defects with the product. If the product is considered defective, the customer must obtain a Return Material
Authorization (“RMA”) number by completing the RMA form and entering the assigned Case ID Number at https://rma.dlink.ca/.
• After an RMA number is issued, the defective product must be packaged securely in the original or other suitable shipping package to
ensure that it will not be damaged in transit, and the RMA number must be prominently marked on the outside of the package. Do not
include any manuals or accessories in the shipping package. D-Link will only replace the defective portion of the product and will not ship
back any accessories.
• The customer is responsible for all in-bound shipping charges to D-Link. No Cash on Delivery (“COD”) is allowed. Products sent COD will
be rejected by D-Link. Products shall be fully insured by the customer and shipped to D-Link Networks, Inc., 2525 Meadowvale Boulevard
Mississauga, Ontario, L5N 5S2 Canada. D-Link will not be held responsible for any packages that are lost in transit to D-Link. The repaired

42D-Link DCS-825L User Manual
Appendix C: Warranty
or replaced packages will be shipped to the customer via Purolator Canada or any common carrier selected by D-Link. Return shipping
charges shall be prepaid by D-Link if you use an address in Canada, otherwise we will ship the product to you freight collect. Expedited
shipping is available upon request and provided shipping charges are prepaid by the customer. D-Link may reject or return any product
that is not packaged and shipped in strict compliance with the foregoing requirements, or for which an RMA number is not visible from
the outside of the package. The product owner agrees to pay D-Link’s reasonable handling and return shipping charges for any product
that is not packaged and shipped in accordance with the foregoing requirements, or that is determined by D-Link not to be defective or
non-conforming.
• RMA phone number: 1-800-361-5265 Hours of Operation: Monday-Friday, 9:00AM – 9:00PM EST
What Is Not Covered:
The Limited Warranty provided herein by D-Link does not cover:
Products that, in D-Link’s judgment, have been subjected to abuse, accident, alteration, modication, tampering, negligence, misuse, faulty installation,
lack of reasonable care, repair or service in any way that is not contemplated in the documentation for the product, or if the model or serial number
has been altered, tampered with, defaced or removed; Initial installation, installation and removal of the product for repair, and shipping costs;
Operational adjustments covered in the operating manual for the product, and normal maintenance; Damage that occurs in shipment, due to act
of God, failures due to power surge, and cosmetic damage; Any hardware, software, rmware or other products or services provided by anyone
other than D-Link; and Products that have been purchased from inventory clearance or liquidation sales or other sales in which D-Link, the sellers,
or the liquidators expressly disclaim their warranty obligation pertaining to the product.
While necessary maintenance or repairs on your Product can be performed by any company, we recommend that you use only an Authorized D-Link
Service Oce. Improper or incorrectly performed maintenance or repair voids this Limited Warranty.
Disclaimer of Other Warranties:
EXCEPT FOR THE LIMITED WARRANTY SPECIFIED HEREIN, THE PRODUCT IS PROVIDED “AS-IS” WITHOUT ANY WARRANTY OF ANY KIND WHATSOEVER
INCLUDING, WITHOUT LIMITATION, ANY WARRANTY OF MERCHANTABILITY, FITNESS FOR A PARTICULAR PURPOSE AND NONINFRINGEMENT.
IF ANY IMPLIED WARRANTY CANNOT BE DISCLAIMED IN ANY TERRITORY WHERE A PRODUCT IS SOLD, THE DURATION OF SUCH IMPLIED WARRANTY
SHALL BE LIMITED TO THE DURATION OF THE APPLICABLE WARRANTY PERIOD SET FORTH ABOVE. EXCEPT AS EXPRESSLY COVERED UNDER THE
LIMITED WARRANTY PROVIDED HEREIN, THE ENTIRE RISK AS TO THE QUALITY, SELECTION AND PERFORMANCE OF THE PRODUCT IS WITH THE
PURCHASER OF THE PRODUCT.
Limitation of Liability:
TO THE MAXIMUM EXTENT PERMITTED BY LAW, D-LINK IS NOT LIABLE UNDER ANY CONTRACT, NEGLIGENCE, STRICT LIABILITY OR OTHER LEGAL
OR EQUITABLE THEORY FOR ANY LOSS OF USE OF THE PRODUCT, INCONVENIENCE OR DAMAGES OF ANY CHARACTER, WHETHER DIRECT, SPECIAL,

43D-Link DCS-825L User Manual
Appendix C: Warranty
INCIDENTAL OR CONSEQUENTIAL (INCLUDING, BUT NOT LIMITED TO, DAMAGES FOR LOSS OF GOODWILL, LOSS OF REVENUE OR PROFIT, WORK
STOPPAGE, COMPUTER FAILURE OR MALFUNCTION, FAILURE OF OTHER EQUIPMENT OR COMPUTER PROGRAMS TO WHICH D-LINK’S PRODUCT
IS CONNECTED WITH, LOSS OF INFORMATION OR DATA CONTAINED IN, STORED ON, OR INTEGRATED WITH ANY PRODUCT RETURNED TO D-LINK
FOR WARRANTY SERVICE) RESULTING FROM THE USE OF THE PRODUCT, RELATING TO WARRANTY SERVICE, OR ARISING OUT OF ANY BREACH OF
THIS LIMITED WARRANTY, EVEN IF D-LINK HAS BEEN ADVISED OF THE POSSIBILITY OF SUCH DAMAGES. THE SOLE REMEDY FOR A BREACH OF
THE FOREGOING LIMITED WARRANTY IS REPAIR, REPLACEMENT OR REFUND OF THE DEFECTIVE OR NONCONFORMING PRODUCT. THE MAXIMUM
LIABILITY OF D-LINK UNDER THIS WARRANTY IS LIMITED TO THE PURCHASE PRICE OF THE PRODUCT COVERED BY THE WARRANTY. THE FOREGOING
EXPRESS WRITTEN WARRANTIES AND REMEDIES ARE EXCLUSIVE AND ARE IN LIEU OF ANY OTHER WARRANTIES OR REMEDIES, EXPRESS, IMPLIED
OR STATUTORY.
Governing Law:
This Limited Warranty shall be governed by the laws of the State of California. Some states do not allow exclusion or limitation of incidental or
consequential damages, or limitations on how long an implied warranty lasts, so the foregoing limitations and exclusions may not apply. This
Limited Warranty provides specic legal rights and you may also have other rights which vary from state to state.
Trademarks:
D-Link is a registered trademark of D-Link Corporation/D-Link Systems, Inc. Other trademarks or registered trademarks are the property of their
respective owners.
Copyright Statement:
No part of this publication or documentation accompanying this product may be reproduced in any form or by any means or used to make any
derivative such as translation, transformation, or adaptation without permission from D-Link Corporation/D-Link Systems, Inc., as stipulated by the
United States Copyright Act of 1976 and any amendments thereto. Contents are subject to change without prior notice.
©2014 by D-Link. All rights reserved.
CE Mark Warning:
This is a Class B product. In a domestic environment, this product may cause radio interference, in which case the user may be required to take
adequate measures.
FCC Statement:
This equipment has been tested and found to comply with the limits for a Class B digital device, pursuant to Part 15 of the FCC Rules. These limits are
designed to provide reasonable protection against harmful interference in a residential installation. This equipment generates, uses and can radiate
radio frequency energy and, if not installed and used in accordance with the instructions, may cause harmful interference to radio communications.

44D-Link DCS-825L User Manual
Appendix C: Warranty
However, there is no guarantee that interference will not occur in a particular installation. If this equipment does cause harmful interference to radio
or television reception, which can be determined by turning the equipment o and on, the user is encouraged to try to correct the interference by
one of the following measures:
• Reorient or relocate the receiving antenna.
• Increase the separation between the equipment and receiver.
• Connect the equipment into an outlet on a circuit dierent from that to which the receiver is connected.
• Consult the dealer or an experienced radio/TV technician for help.
This device complies with Part 15 of the FCC Rules. Operation is subject to the following two conditions: (1) This device may not cause harmful
interference, and (2) this device must accept any interference received, including interference that may cause undesired operation.
FCC Caution:
Any changes or modications not expressly approved by the party responsible for compliance could void the user’s authority to operate this
equipment.
Operations in the 5.15-5.25GHz / 5.470 ~ 5.725GHz band are restricted to indoor usage only.
IMPORTANT NOTICE:
FCC Radiation Exposure Statement:
This equipment complies with FCC radiation exposure limits set forth for an uncontrolled environment. This equipment should be installed and
operated with minimum distance 20cm between the radiator & your body. To maintain compliance with FCC RF exposure compliance requirements,
please avoid direct contact to the transmitting antenna during transmitting.
If this device is going to be operated in 5.15 ~ 5.25GHz frequency range, then it is restricted in indoor environment only. This transmitter must not
be co-located or operating in conjunction with any other antenna or transmitter.
The availability of some specic channels and/or operational frequency bands are country dependent and are rmware programmed at the factory
to match the intended destination. The rmware setting is not accessible by the end user.

45D-Link DCS-825L User Manual
Appendix C: Warranty
ICC Notice:
Operation is subject to the following two conditions:
1) This device may not cause interference and
2) This device must accept any interference, including interference that may cause undesired operation of the device.
IMPORTANT NOTE:
IC Radiation Exposure Statement:
This equipment complies with IC radiation exposure limits set forth for an uncontrolled environment. End users must follow the specic operating
instructions for satisfying RF exposure compliance. This equipment should be installed and operated with minimum distance 20cm between the
radiator & your body.
This transmitter must not be co-located or operating in conjunction with any other antenna or transmitter.
(i) The device for the band 5150-5250 MHz is only for indoor usage to reduce potential for harmful interference to
co-channel mobile satellite systems;
(ii) The maximum antenna gain (2dBi) permitted (for devices in the band 5725-5825 MHz) to comply with the e.i.r.p. limits specied
for point-to-point and non point-to-point operation as appropriate, as stated in section A9.2(3).
In addition, users should also be cautioned to take note that high-power radars are allocated as primary users (meaning they have priority) of the
bands 5250-5350 MHz and 5650-5850 MHz and these radars could cause interference and/or damage to LE-LAN devices.
Règlement d’Industry Canada
Les conditions de fonctionnement sont sujettes à deux conditions:
(1) Ce périphérique ne doit pas causer d’interférence et.
(2) Ce périphérique doit accepter toute interférence, y compris les interférences pouvant perturber le bon fonctionnement de
ce périphérique.