

ASSEMBLY / OWNER’S MANUAL
™
™
™

Assembly / Owner’s Manual
2
Important Safety Instructions .................................3
Safety Warning Labels and Serial Number.............5
6SHFL¿FDWLRQV%HIRUH$VVHPEO\ ........................... 6
Parts ...................................................................... 7
+DUGZDUH7RROV .................................................... 8
Unboxing Your Machine .......................................... 9
$VVHPEO\ ..............................................................11
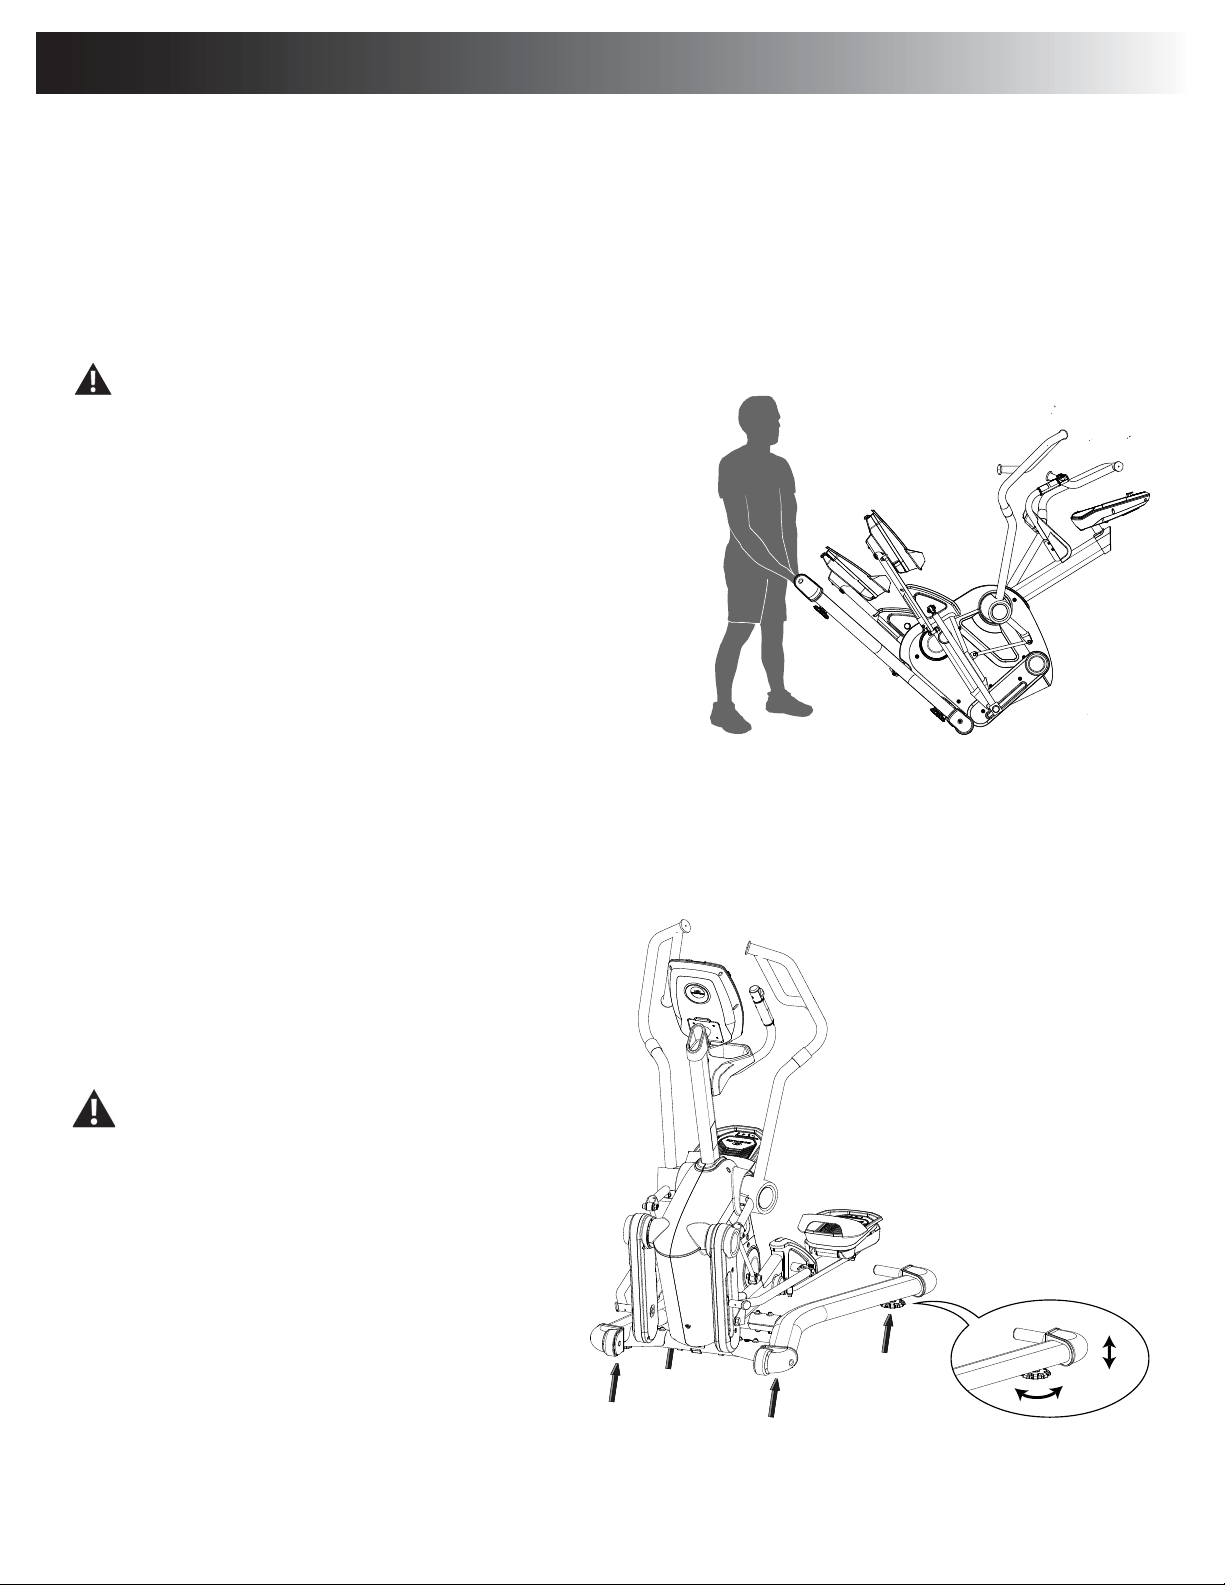
Moving Your Machine ........................................... 22
Leveling Your Machine ......................................... 22
Features ............................................................... 23
&RQQHFWLYLW\ZLWKWKH)LWQHVV$SS ........................27
Operations ............................................................30
$GMXVWLQJWKH3HGDOV ............................................30
Mounting and Dismounting ..................................30
3RZHU8S,GOH0RGH ..........................................31
8VHU3UR¿OHV ........................................................31
Workout Programs ...............................................32
Pausing or Stopping ............................................ 35
:RUNRXW&RPSOHWH5HVXOWV ................................36
Celebrations ........................................................36
Machine Settings Mode .......................................37
Maintenance .........................................................38
Maintenance Parts ................................................40
7URXEOHVKRRWLQJ ....................................................41
%RG\:HLJKW/RVV*XLGH ......................................43
:DUUDQW\86&DQDGDRQO\..................................51
You’re about to experience an incredible workout that can help you lose weight and reshape your entire body so you’ll look and feel better than ever
EHIRUH:HWKDQN\RXIRUWUXVWLQJLQWKH%RZÀH[EUDQG
8VHWKLV0DQXDODVDJXLGHWRJHWWLQJVWDUWHGRQ\RXU%RZÀH[
™
workouts and for tips to keep your machine well maintained.
Yours in Health,
7KH%RZÀH[)DPLO\
Table of Contents
To validate warranty support, keep the original proof of purchase and record the following information:
Serial Number __________________________ Date of Purchase ____________________
If purchased in US/Canada:7RUHJLVWHU\RXUSURGXFWZDUUDQW\JRWRZZZERZÁH[FRPUHJLVWHU
2UFDOO±
,I\RXKDYHTXHVWLRQVRUSUREOHPVZLWK\RXUSURGXFWSOHDVHFDOO±
If purchased outside US/Canada:7RUHJLVWHU\RXUSURGXFWZDUUDQW\FRQWDFW\RXUORFDOGLVWULEXWRU
)RUGHWDLOVUHJDUGLQJSURGXFWZDUUDQW\RULI\RXKDYHTXHVWLRQVRUSUREOHPVZLWK\RXUSURGXFWSOHDVHFRQWDFW\RXUORFDOGLVWULEXWRU7R¿QG\RXUORFDO
GLVWULEXWRUJRWRZZZQDXWLOXVLQWHUQDWLRQDOFRP
1DXWLOXV,QF&HQWHUSRLQW3DUNZD\*URYHSRUW2+86$ZZZ1DXWLOXV,QFFRP&XVWRPHU6HUYLFH1RUWK$PHULFDFVQOV#QDXWLOXV
FRP_RXWVLGH86ZZZQDXWLOXVLQWHUQDWLRQDOFRP_3ULQWHGLQ&KLQD_1DXWLOXV,QF_%RZÀH[WKH%ORJR/DWHUDO;%RZÀH[/DWHUDO;;PRGH1DXWLOXVDQG
Schwinn are trademarks owned or licensed by Nautilus, Inc., which are registered or otherwise protected by common law in the United States and other countries.
Polar
®
, OwnCode
®
*RRJOH3OD\DQG1XW7KLQV
®
DUHWUDGHPDUNVRIWKHLUUHVSHFWLYHRZQHUV$SS6WRUHLVDVHUYLFHPDUNRI$SSOH,QF7KH%OXHWRRWK
®
word mark
DQGORJRVDUHUHJLVWHUHGWUDGHPDUNVRZQHGE\%OXHWRRWK6,*,QFDQGDQ\XVHRIVXFKPDUNVE\1DXWLOXV,QFLVXQGHUOLFHQVH
25,*,1$/0$18$/(1*/,6+9(56,2121/<
Welcome to the Bowflex
™
LateralX
™
LX5
fitness machine!

Assembly / Owner’s Manual
3
Important Safety Instructions
When using an electrical appliance, basic precautions should always be followed, including the following:
This icon means a potentially hazardous situation which, if not avoided, could result in death or serious injury.
Obey the following warnings:
Read and understand all Warnings on this machine.
Carefully read and understand the Assembly/Owner’s Manual.
• Keep bystanders and children away from the product you are assembling at all times.
• Do not connect power supply to the machine until instructed to do so.
• 7KHPDFKLQHVKRXOGQHYHUEHOHIWXQDWWHQGHGZKHQSOXJJHGLQ8QSOXJIURPRXWOHWZKHQQRWLQXVHDQGEHIRUHSXWWLQJRQRUWDNLQJRIISDUWV
• %HIRUHHDFKXVHH[DPLQHWKHPDFKLQHIRUGDPDJHWRSRZHUFRUGORRVHSDUWVRUVLJQVRIZHDU'RQRWXVHLIIRXQGLQWKLVFRQGLWLRQ,ISXUFKDVHG
LQ86&DQDGDFRQWDFW&XVWRPHU6HUYLFHIRUUHSDLULQIRUPDWLRQ,ISXUFKDVHGRXWVLGH86&DQDGDFRQWDFW\RXUORFDOGLVWULEXWRUIRUUHSDLU
information.
• 'RQRWGURSRUSXWREMHFWVLQWRDQ\RSHQLQJRIWKHPDFKLQH
• Do not assemble this machine outdoors or in a wet or moist location.
• Make sure assembly is done in an appropriate work space away from foot traffic and exposure to bystanders.
• Some components of the machine can be heavy or awkward. Use a second person when doing the assembly steps involving these parts. Do not
do steps that involve heavy lifting or awkward movements on your own.
• Set up this machine on a solid, level, horizontal surface.
• 'RQRWWU\WRFKDQJHWKHGHVLJQRUIXQFWLRQDOLW\RIWKLVPDFKLQH7KLVFRXOGFRPSURPLVHWKHVDIHW\RIWKLVPDFKLQHDQGZLOOYRLGWKHZDUUDQW\
• If replacement parts are necessary, use only genuine Nautilus replacement parts and hardware. Failure to use genuine replacement parts can
cause a risk to users, keep the machine from operating correctly and void the warranty.
• Do not use until the machine has been fully assembled and inspected for correct performance in accordance with the Manual.
• Use this machine only for its intended use as described in this manual. Do not use attachments not recommended by the manufacturer.
• 'RDOODVVHPEO\VWHSVLQWKHVHTXHQFHJLYHQ,QFRUUHFWDVVHPEO\FDQOHDGWRLQMXU\RULQFRUUHFWIXQFWLRQ
• Connect this machine to a properly grounded outlet only.
• Keep the power cord away from heat sources and hot surfaces.
• Do not operate where aerosol products are being used.
• 6$9(7+(6(,16758&7,216

Assembly / Owner’s Manual
4
Before using this equipment, obey the following warnings:
Read and understand the complete Manual. Keep the Manual for future reference.
Read and understand all Warnings on this machine. If at any time the Warning stickers become loose, unreadable or dislodged,
replace the labels. If purchased in US/Canada, contact Customer Service for replacement labels. If purchased outside US/Canada,
contact your local distributor for them.
• Children must not be let on or near to this machine. Moving parts and other features of the machine can be dangerous to children.
• Not intended for use by anyone under 14 years of age.
• Consult a physician before you start an exercise program. Stop exercising if you feel pain or tightness in your chest, become short of breath, or
feel faint. Contact your doctor before you use the machine again. Use the values calculated or measured by the machine’s computer for reference
purposes only.
• %HIRUHHDFKXVHH[DPLQHWKLVPDFKLQHIRUGDPDJHWRSRZHUFRUGSRZHUUHFHSWDFOHORRVHSDUWVRUVLJQVRIZHDU'RQRWXVHLIIRXQGLQWKLV
FRQGLWLRQ0RQLWRUWKH+DQGOHEDUV3HGDOVDQG&UDQN$UPVFORVHO\,ISXUFKDVHGLQ86&DQDGDFRQWDFW&XVWRPHU6HUYLFHIRUUHSDLULQIRUPDWLRQ
,ISXUFKDVHGRXWVLGH86&DQDGDFRQWDFW\RXUORFDOGLVWULEXWRUIRUUHSDLULQIRUPDWLRQ
• 7KLVDSSOLDQFHVKRXOGRQO\EHXVHGZLWKWKHSRZHUVXSSO\XQLWSURYLGHGRUDUHSODFHPHQWSRZHUVXSSO\XQLWVXSSOLHGIURP1DXWLOXV,QF
• 0D[LPXPXVHUZHLJKWOLPLWNJOEV'RQRWXVHLI\RXDUHRYHUWKLVZHLJKW
• 7KLVPDFKLQHLVIRUKRPHXVHRQO\'RQRWSODFHRUXVHWKHPDFKLQHLQDFRPPHUFLDORULQVWLWXWLRQDOVHWWLQJ7KLVLQFOXGHVJ\PVFRUSRUDWLRQV
work places, clubs, fitness centers and any public or private entity that has a machine for use by its members, customers, employees or affiliates.
• 'RQRWZHDUORRVHFORWKLQJRUMHZHOU\7KLVPDFKLQHFRQWDLQVPRYLQJSDUWV'RQRWSXWILQJHUVIHHWRURWKHUREMHFWVLQWRPRYLQJSDUWVRIWKH
exercise equipment.
• $OZD\VZHDUUXEEHUVROHGDWKOHWLFVKRHVZKHQ\RXXVHWKLVPDFKLQH'RQRWXVHWKHPDFKLQHZLWKEDUHIHHWRURQO\ZHDULQJVRFNV
• Set up and operate this machine on a solid, level, horizontal surface.
• Make the Foot Pedals stable before you step on them. Use caution when you step on and off the machine.
• Do not operate this machine outdoors or in moist or wet locations.
• .HHSDWOHDVWP´RQHDFKVLGHRIWKHPDFKLQHFOHDU7KLVLVWKHUHFRPPHQGHGVDIHGLVWDQFHIRUDFFHVVDQGSDVVDJHDURXQGDQG
emergency dismounts from the machine. Keep third parties out of this space when machine is in use.
• Do not over exert yourself during exercise. Operate the machine in the manner described in this manual.
• &RUUHFWO\DGMXVWDQGVDIHO\HQJDJHDOO3RVLWLRQDO$GMXVWPHQW'HYLFHV0DNHVXUHWKDWWKH$GMXVWPHQW'HYLFHVGRQRWKLWWKHXVHU
• Keep the Foot Pedals and Handlebars clean and dry.
• Perform all regular and periodic maintenance procedures recommended in the Owner’s Manual.
• 'RQRWGURSRUSXWREMHFWVLQWRDQ\RSHQLQJRIWKHPDFKLQH
• Keep power cord away from heat source and hot surfaces.
• Do not operate where aerosol products are being used.
• ([HUFLVHRQWKLVPDFKLQHUHTXLUHVFRRUGLQDWLRQDQGEDODQFH%HVXUHWRDQWLFLSDWHWKDWFKDQJHVLQVSHHGLQFOLQHDQJOHDQGUHVLVWDQFHOHYHOFDQ
RFFXUGXULQJZRUNRXWVDQGEHDWWHQWLYHLQRUGHUWRDYRLGORVVRIEDODQFHDQGSRVVLEOHLQMXU\
• Use this machine only for its intended use as described in this manual. Do not use attachments not recommended by the manufacturer.
• 7KLVDSSOLDQFHLVQRWLQWHQGHGIRUXVHE\SHUVRQVZLWKUHGXFHGSK\VLFDOVHQVRU\RUPHQWDOFDSDELOLWLHVRUODFNRINQRZOHGJHXQOHVVWKH\KDYH
been given supervision or instruction concerning use of the appliance by a person responsible for their safety. Keep children under the age of 14
away from this machine.
• Children should be supervised to ensure that they do not play with the appliance.
Assembly / Owner’s Manual
5
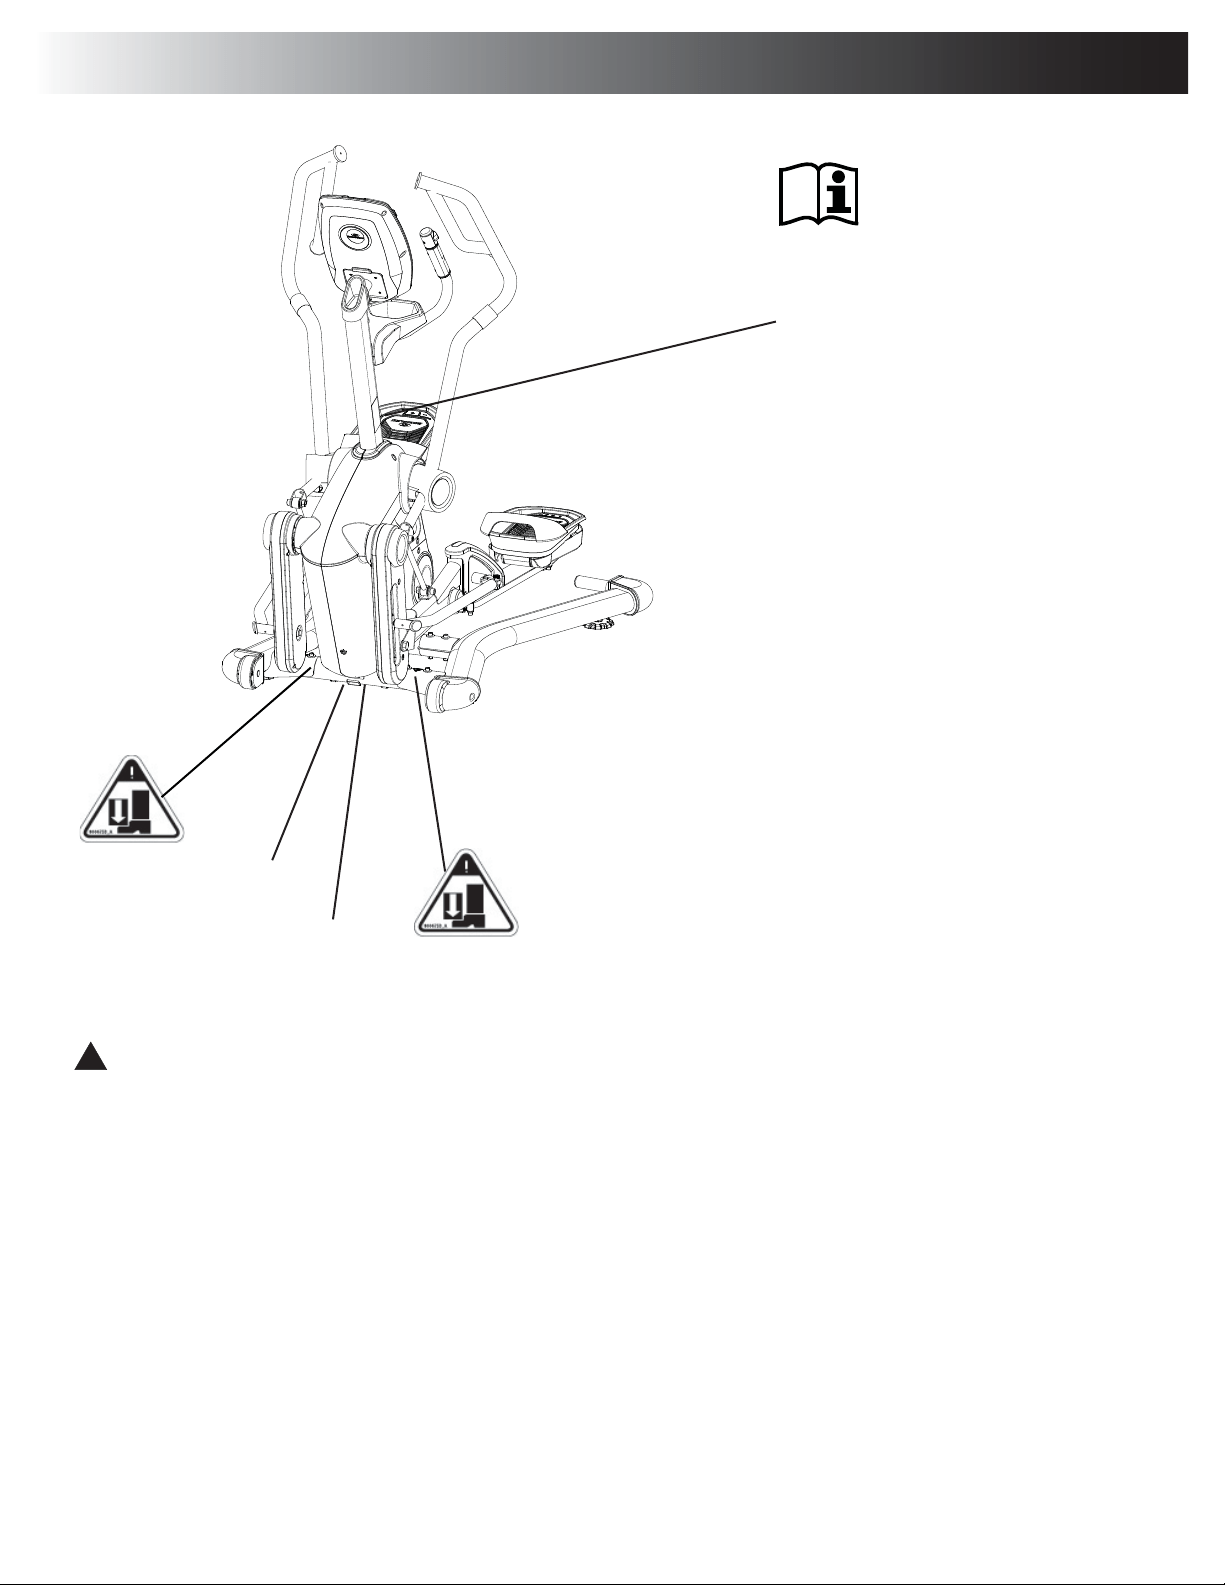
Safety Warning Labels and Serial Number
Serial Number
3URGXFW6SHFL¿FDWLRQ
WARNING!
,QMXU\RUGHDWKLVSRVVLEOHLIFDXWLRQLVQRW
used while using this machine.
• Not intended for children under 14 yrs. of age.
• Keep children & pets away.
5HDGDQGIROORZDOOZDUQLQJVRQWKLVPDFKLQH
7KLVSURGXFWLVIRU+RPHXVHRQO\
5HIHUWRWKHRZQHU¶VPDQXDOIRUDGGLWLRQDO
warnings and safety information.
• Heart rate displayed, if applicable, is an
approximation and should be used for
reference only.
• Consult a physician prior to using any
exercise equipment.
7KHPD[LPXPXVHUZHLJKWIRUWKLVPDFKLQHLV
NJOEV
• Care should be used when mounting or
GLVPRXQWLQJWKHHTXLSPHQW%HIRUHPRXQWLQJRU
dismounting, move the pedal on the mounting
or dismounting side to its lowest position and
bring the machine to a complete stop.
7KLVXQLWLVQRWHTXLSSHGZLWKDIUHHZKHHO
Pedal speed should be reduced in a controlled
manner.
WARNING!
.HHSIHHWDQGKDQGVDZD\
FCC Compliance
!
&KDQJHVRUPRGLÀFDWLRQVWRWKLVXQLWQRWH[SUHVVO\DSSURYHGE\WKHSDUW\UHVSRQVLEOHIRUFRPSOLDQFHFRXOGYRLGWKHXVHU·V
authority to operate the equipment.
7KHPDFKLQHDQGSRZHUVXSSO\FRPSO\ZLWK3DUWRIWKH)&&UXOHV2SHUDWLRQLVVXEMHFWWRWKHIROORZLQJWZRFRQGLWLRQV7KLVGHYLFHPD\QRW
FDXVHKDUPIXOLQWHUIHUHQFHDQGWKLVGHYLFHPXVWDFFHSWDQ\LQWHUIHUHQFHUHFHLYHGLQFOXGLQJLQWHUIHUHQFHWKDWPD\FDXVHXQGHVLUHGRSHUDWLRQ
Note:7KLVPDFKLQHDQGSRZHUVXSSO\KDYHEHHQWHVWHGDQGIRXQGWRFRPSO\ZLWKWKHOLPLWVIRUD&ODVV%GLJLWDOGHYLFHSXUVXDQWWR3DUWRI
WKH)&&5XOHV7KHVHOLPLWVDUHGHVLJQHGWRSURYLGHUHDVRQDEOHSURWHFWLRQDJDLQVWKDUPIXOLQWHUIHUHQFHLQDUHVLGHQWLDOLQVWDOODWLRQ7KLV
equipment generates, uses and can radiate radio frequency energy and, if not installed and used in accordance with the instructions, may
cause harmful interference to radio communications.
However, there is no guarantee that interference will not occur in a particular installation. If this equipment does cause harmful interference to radio
or television reception, which can be determined by turning the equipment off and on, the user is encouraged to try to correct the interference by one
RUPRUHRIWKHIROORZLQJPHDVXUHV
5HRULHQWRUUHORFDWHWKHUHFHLYLQJDQWHQQD
• Increase the separation between the equipment and receiver.
• Connect the equipment into an outlet on a circuit different from that to which the receiver is connected.
&RQVXOWWKHGHDOHURUDQH[SHULHQFHGUDGLR79WHFKQLFLDQIRUKHOS
7KHODEHORQWKHSURGXFWLVDYDLODEOHLQ(QJOLVKDQG
)UHQFK&DQDGLDQRQO\
Assembly / Owner’s Manual
6
Before Assembly
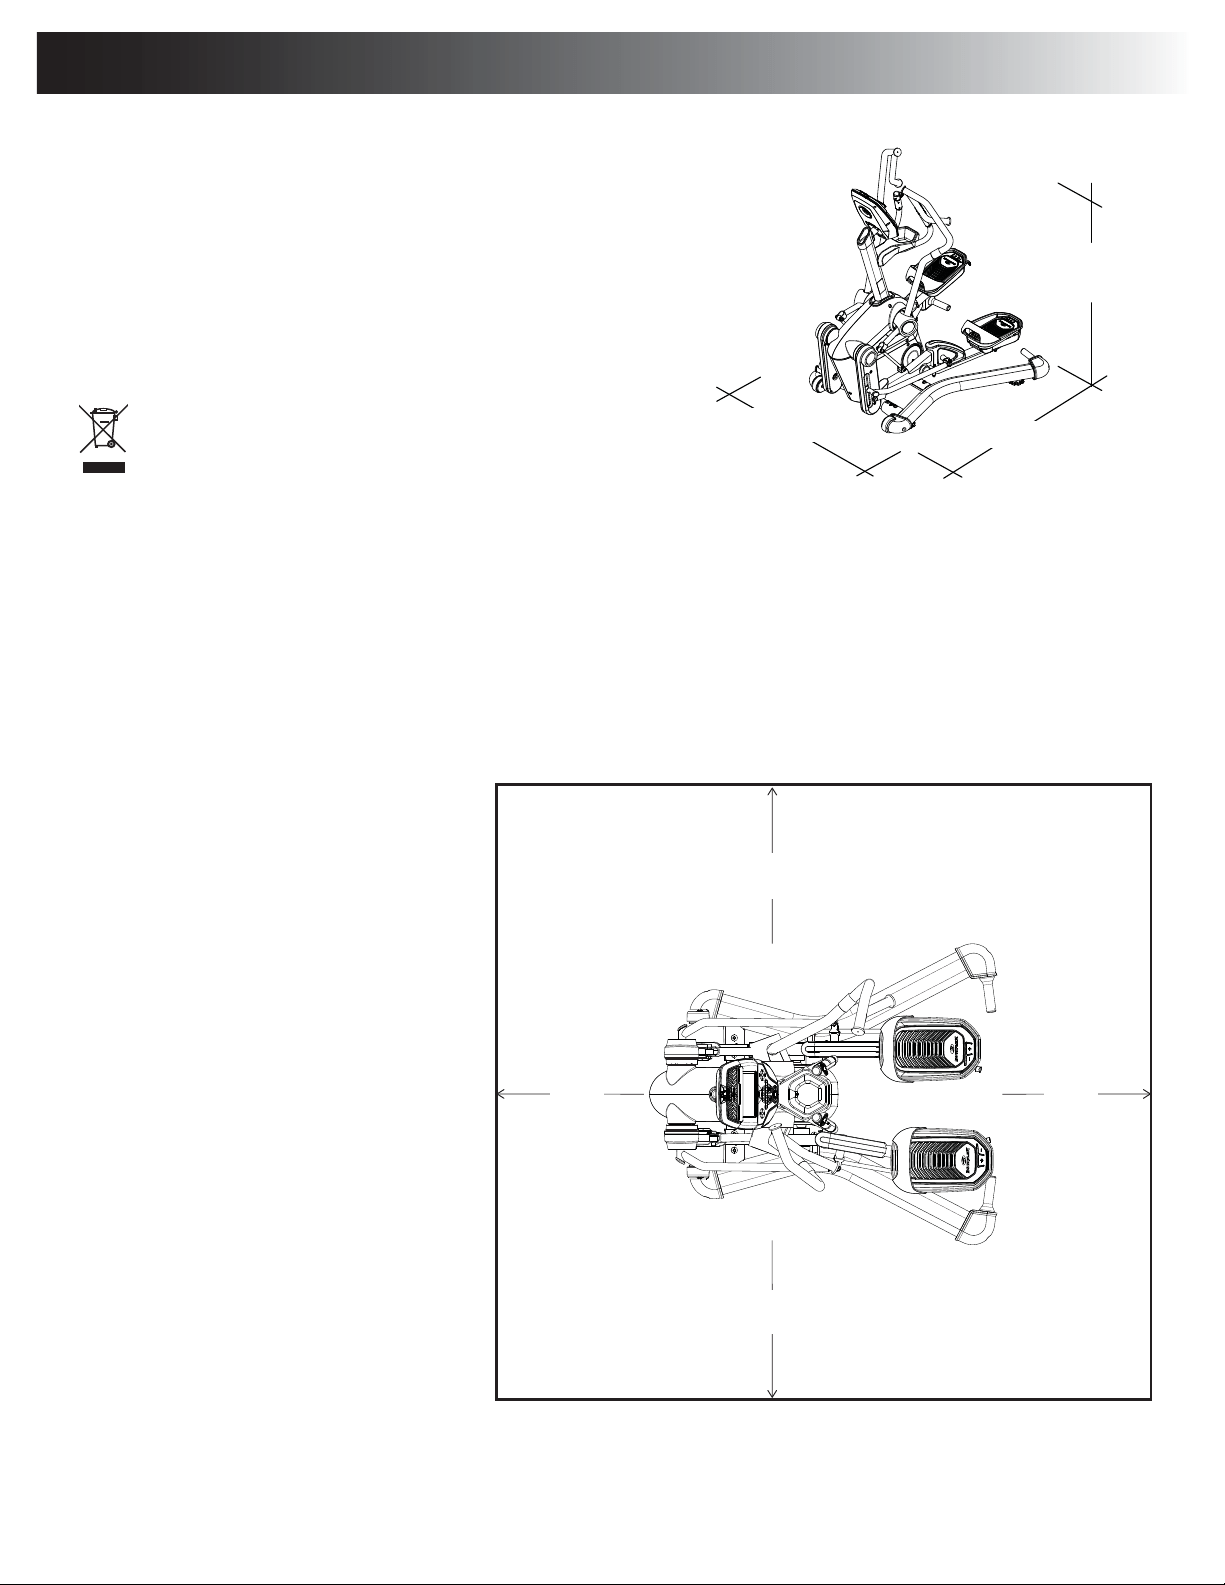
6HOHFWWKHDUHDZKHUH\RXDUHJRLQJWRRSHUDWH\RXUPDFKLQHDQGFRPSOHWHWKHDVVHPEO\WKHUH7KHZLGWKRIWKHPDFKLQHLVZLGHUWKDQDVWDQGDUG
room door frame. Disassembly may be required if transporting to a different area. For safe operation, the location must be on a hard, level surface.
$OORZDPLQLPXPZRUNRXWDUHDRIFP[FP´[´%HVXUHWKDWWKHZRUNRXWVSDFH\RXDUHXWLOL]LQJKDVDGHTXDWHKHLJKWFOHDUDQFH
taking into consideration the height of the user and the maximum incline of the elliptical machine.
Basic Assembly
)ROORZWKHVHEDVLFSRLQWVZKHQ\RXDVVHPEOH\RXUPDFKLQH
• 5HDGDQGXQGHUVWDQGWKH³,PSRUWDQW6DIHW\
Instructions” before assembly.
• Collect all the pieces necessary for each
assembly step.
• Using the recommended wrenches, turn
WKHEROWVDQGQXWVWRWKHULJKWFORFNZLVHWR
WLJKWHQDQGWKHOHIWFRXQWHUFORFNZLVHWR
loosen, unless instructed otherwise.
• When attaching 2 pieces, lightly lift and look
through the bolt holes to help insert the bolt
through the holes.
• 7KHDVVHPEO\UHTXLUHVSHRSOH
• Do not use any power tools for assembly.
Machine Mat
7KH%RZÀH[0DFKLQH0DWLVDQRSWLRQDO
accessory that helps keep your workout area
clear and adds a layer of protection to your
ÀRRU7KHUXEEHUPDFKLQHPDWSURYLGHVDQRQ
slip, rubber surface which limits static discharge
and reduces the possibility of display errors. If
SRVVLEOHSXW\RXU%RZÀH[0DFKLQH0DWLQ
your selected workout area before you begin
assembly.
7RRUGHUWKHRSWLRQDOPDFKLQHPDWJRWRZZZERZÀH[FRPRUFDOO±
Specifications / Before Assembly
Maximum User Weight: NJOEV
Maximum Pedal Height: FP´
Machine Weight: DSSUR[NJOEV
Total Surface Area (footprint) of equipment: 16,007 cm
2
Power Requirements:
,QSXW9ROWDJH 9$&+]
2XWSXW9ROWDJH 9'&$
+HDUW5DWH&KHVW6WUDS &5EDWWHU\
'2127GLVSRVHRIWKLVSURGXFWDVUHIXVH7KLVSURGXFWLVWREH
recycled. For proper disposal of this product, please follow the pre
scribed methods at an approved waste center.
159.8 cm
(62.9”)
117.7 cm (46.3”)
136 cm (53.5”)
0.6m
24”
2.4m
96”
2.6m
102”
0.6m
24”
0.6m
24”
0.6m
24”
Assembly / Owner’s Manual
7
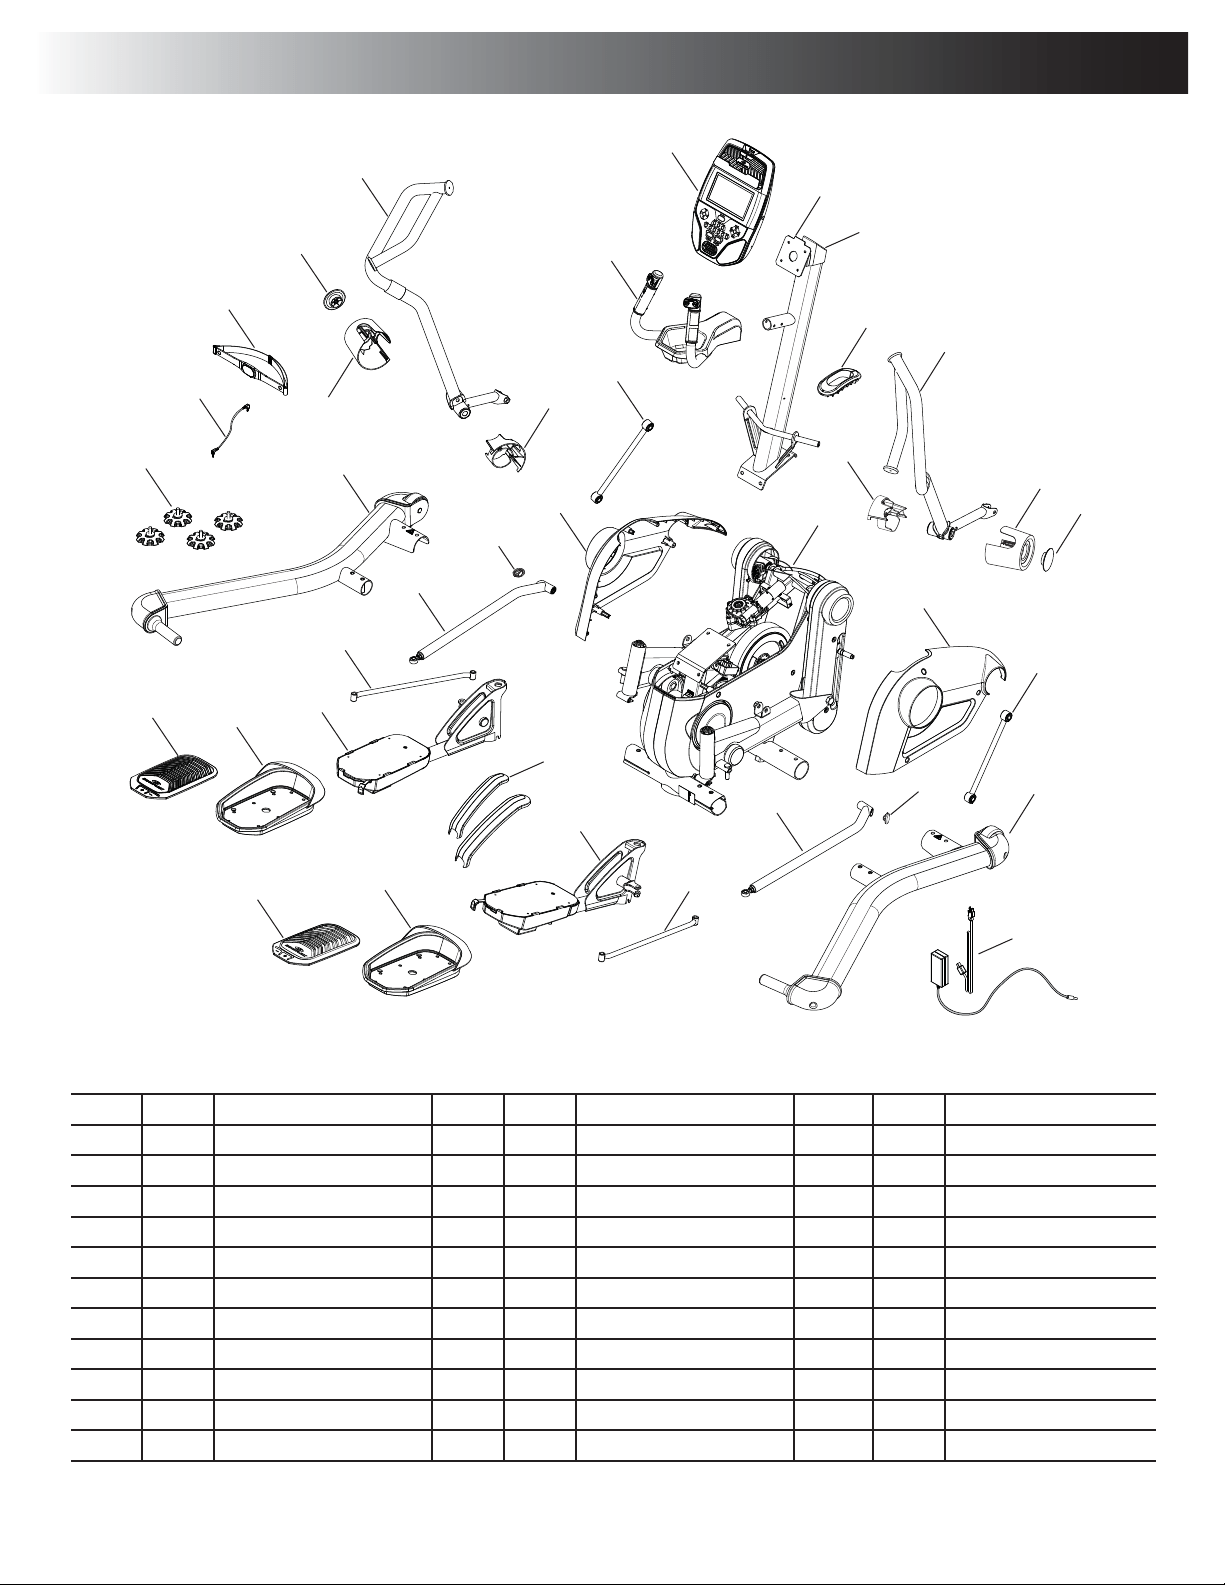
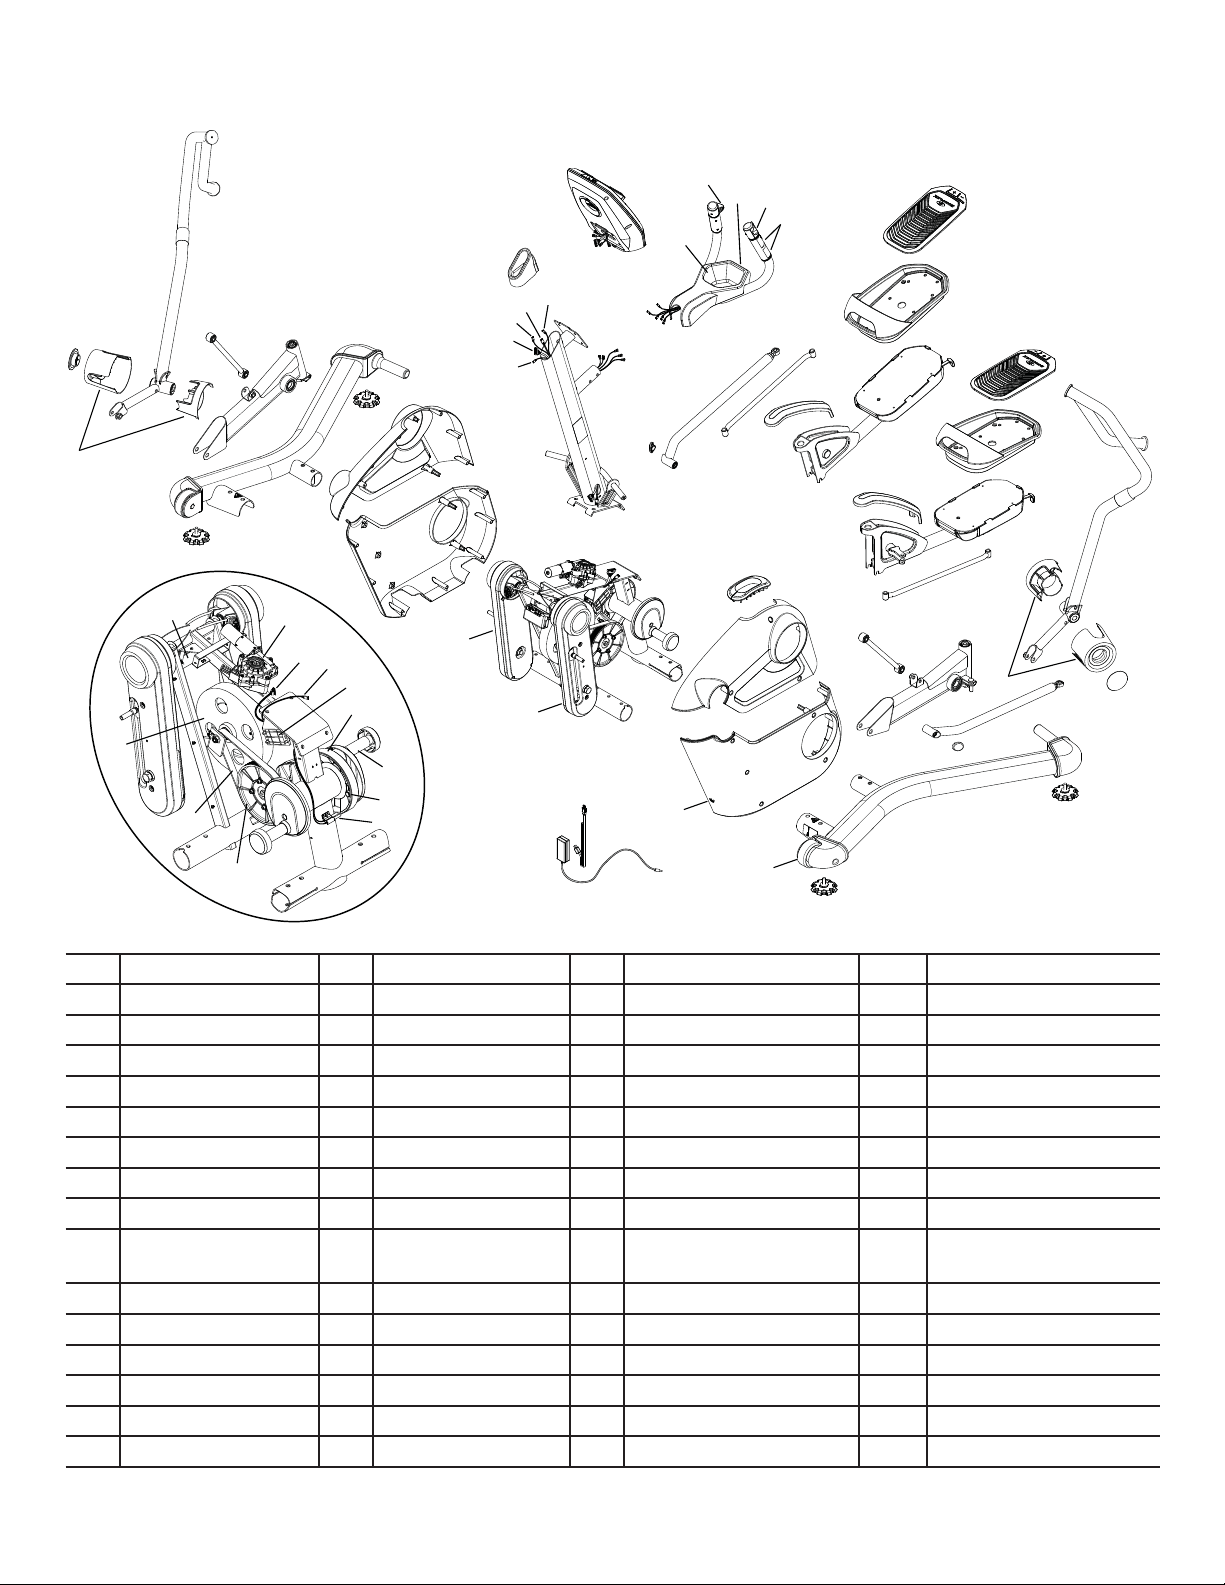
$ULJKW³R ´DQGOHIW³L ´GHFDOKDVEHHQDSSOLHGWRVRPHSDUWVWRDVVLVWZLWKDVVHPEO\
Item Qty Description Item Qty Description Item Qty Description
11(QJLQH$VVHPEO\ 12 1 3LYRW&RYHU,QVLGH5LJKW 23 1 Foot Pad, Left
21%DVH$VVHPEO\5LJKW 13 1 +DQGOHEDU$UP/HIW 24 2 Lateral Link
31%DVH$VVHPEO\/HIW 14 1 Pivot Cover, Left 25 2 /DWHUDO/LQN(QGFDS
4 4 Leveler Foot 15 1 Pivot Cover, Inside, Left 26 1 Static Handlebar
5 1 Console Mast 16 2 3LYRW%ROW&RYHU 27 1 Console
618SSHU6KURXG5LJKW 17 1 3HGDO$UP5LJKW 28 1 0DVW(QG&DS
7 1 Upper Shroud, Left 18 1 3HGDO$UP/HIW 29 2 3HGDO$UP7RSFDS
810DVW*DVNHW 19 2 Parallel Link 30 1 3RZHU$GDSWHUZ&RUG
9 2 Handlebar Link 20 1 3HGDO6KURXG5LJKW 31 1 Chest Strap
10 1 +DQGOHEDU$UP5LJKW 21 1 )RRW3DG5LJKW 32 1 Media Cable
11 1 3LYRW&RYHU5LJKW 22 1 Pedal Shroud, Left
Parts
30
27
13
1
2
3
4
5
28
6
7
8
9
9
10
11
12
14
15
16
16
17
18
19
19
20
21
22
23
24
24
25
25
26
31
32
29
Assembly / Owner’s Manual
8
Hardware / Tools
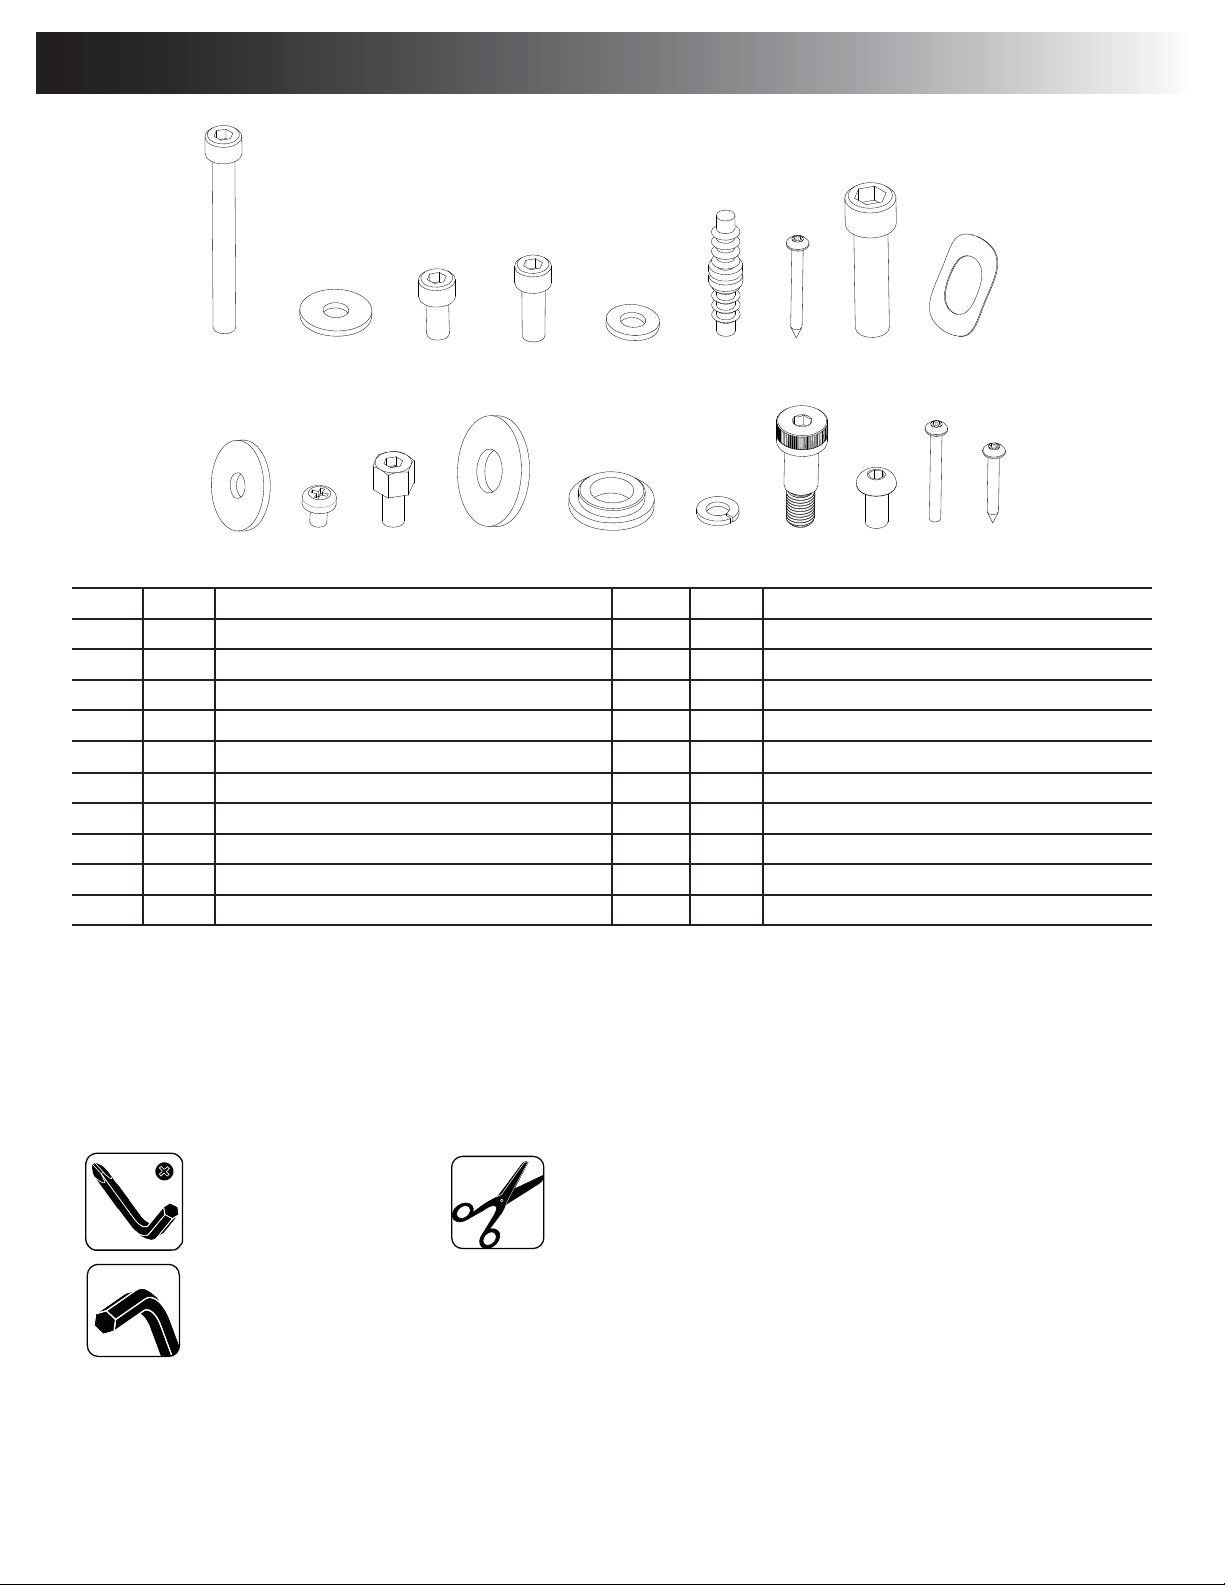
+DUGZDUH
Item Qty Description Item Qty Description
$ 4 6RFNHW+HDG&DS6FUHZ0[Z7KUHDG/RFN K 8 Screw, Pan Head Phillips M6x8
% 8 )ODW:DVKHU05HJXODU L23LYRW%ROW0[
C106RFNHW+HDG&DS6FUHZ0[Z7KUHDG/RFN M2)ODW:DVKHU05HJXODU
D106RFNHW+HDG&DS6FUHZ0[Z7KUHDG/RFN N2&ROODU8SSHU6KDIW3HGDO$UP
( 12 Flat Washer, M8 Narrow O 16 Spring Washer, M8
F 6 Push Fastener, 10mm x 50mm P 2 6RFNHW+HDG&DS6FUHZ6KRXOGHU07KUHDG
* 4 6FUHZ0[6HOI7KUHDGLQJ Q46RFNHW%XWWRQ+HDG&DS6FUHZ0[
H46RFNHW+HDG&DS6FUHZ0[Z7KUHDG/RFN 5 2 Screw, M4x40
I 2 Wave Washer, M20 S 4 6FUHZ0[6HOI7KUHDGLQJ
J 4 Flat Washer, M8 Wide
Note:6HOHFWSLHFHVRI+DUGZDUHKDYHEHHQSURYLGHGDVVSDUHVRQWKH+DUGZDUH&DUG%HDZDUHWKDWWKHUHPD\EHUHPDLQLQJ+DUGZDUH
after the proper assembly of your machine.
Tools
Included Not Included
UHFRPPHQGHG
6mm
#2
10mm
AB CDE FGHI
J
K
LM N OPQ
R
S
Assembly / Owner’s Manual
9
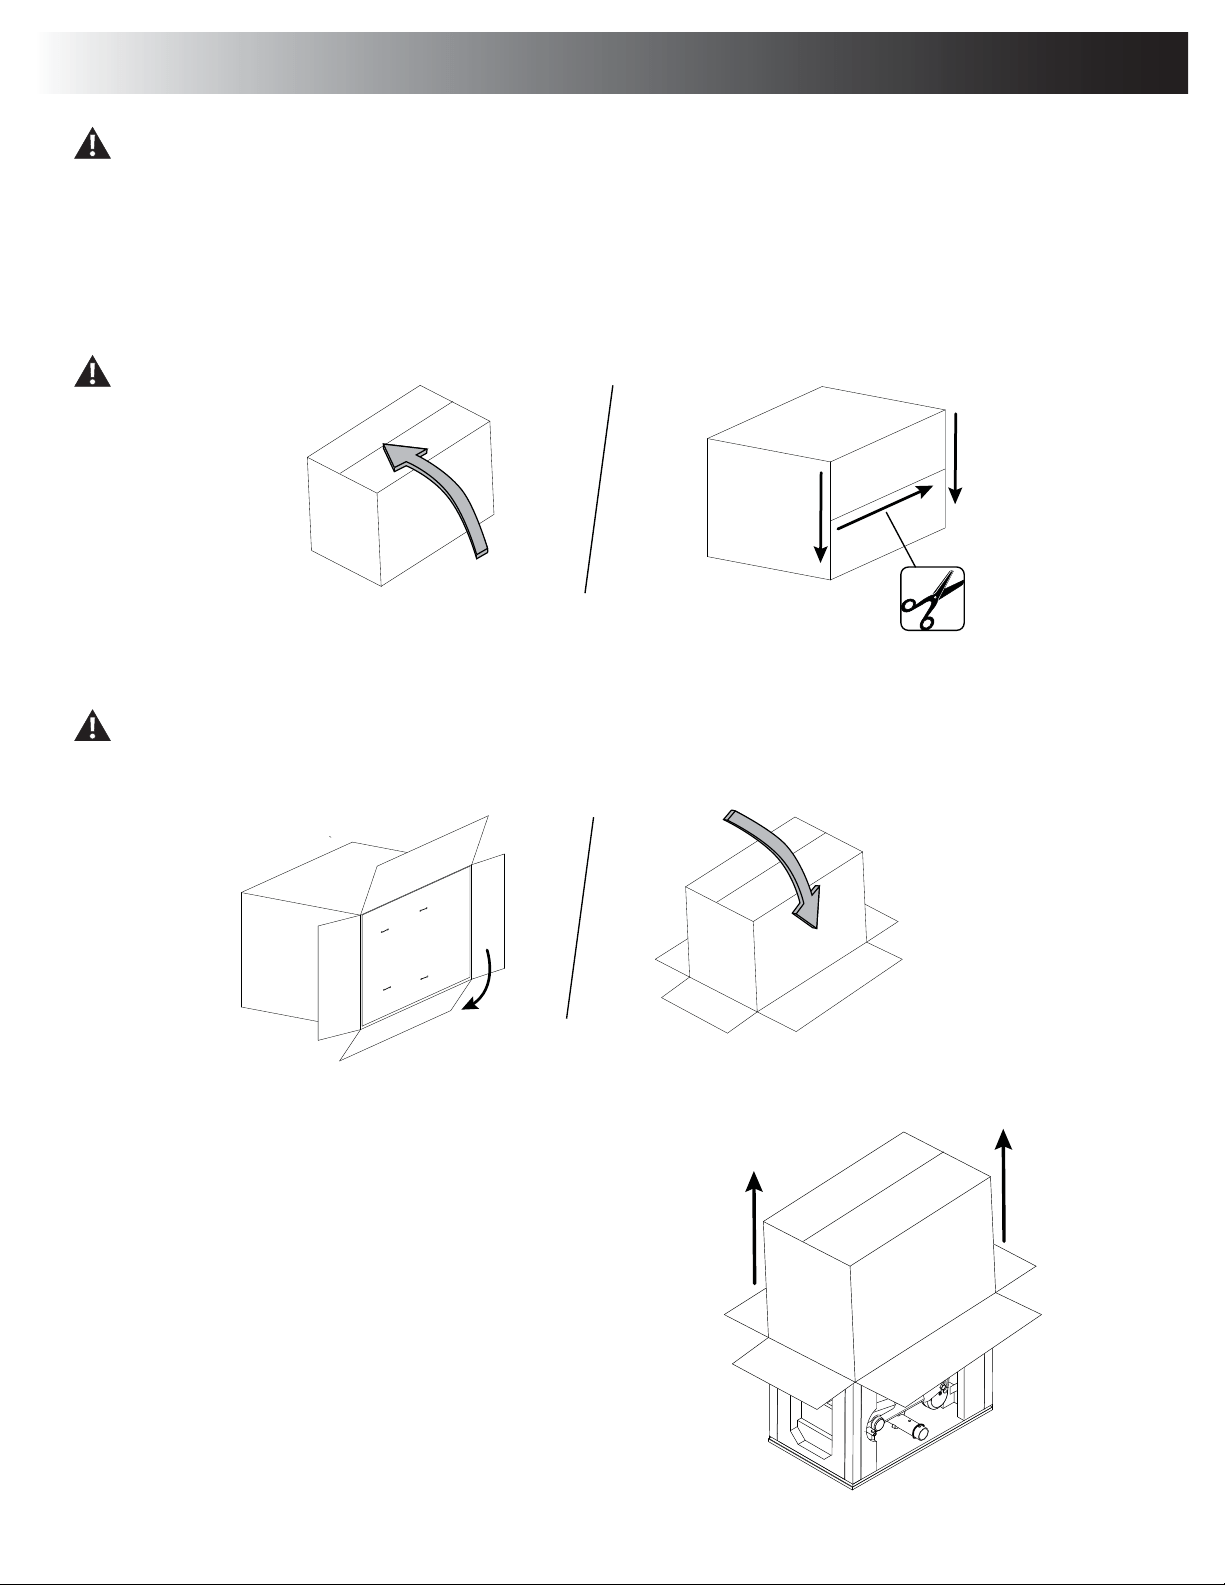
Unboxing Your Machine
6RPHFRPSRQHQWVRIWKHPDFKLQHFDQEHKHDY\RUDZNZDUG8VHDVHFRQGSHUVRQZKHQXQER[LQJWKHPDFKLQH'RQRWGRVWHSV
that involve heavy lifting or awkward movements on your own.
Note:7KH8QER[LQJLQVWUXFWLRQVDUHLQWKH4XLFN6WDUW0DQXDO5HPRYHWKH0DQXDOIURP%R[%R[FRQWDLQVWKH(QJLQH$VVHPEO\DQGDIHZ
smaller parts.
1. Carefully Turn Box 2 on Long Side and Cut the Packing Tape on the Bottom of the Box
This step requires two people.
2. Fold the Flaps Out to Expose the Shipping Platform and Tip the Box Upright
This step requires two people.
Note:%HVXUHWRIROGWKHERWWRPÀDSXQGHUWKH%R[VRWKDWWKHVKLSSLQJSODWIRUPZLOOUHVWRQWKHÀRRU
3. Lift the Box off the Contents
Assembly / Owner’s Manual
10
4. Remove the Packaging Material Around the Parts
Note:5HPRYHWKHFDUGERDUGWXEHVEHIRUHUHPRYLQJWKHSODVWLFIRDP%HDZDUHWKDW
parts are embedded in the foam packaging.
5. Cut the Zipties that Attach the Engine Assembly to the
Shipping Platform
NOTICE:'RQRWUHPRYHWKHSODWIRUPXQWLOWKH%DVH$VVHPEOLHVDUHDWWDFKHGLQRUGHU
WRSUHYHQWGDPDJHWRWKHÀRRU
Ziptie
Assembly / Owner’s Manual
11
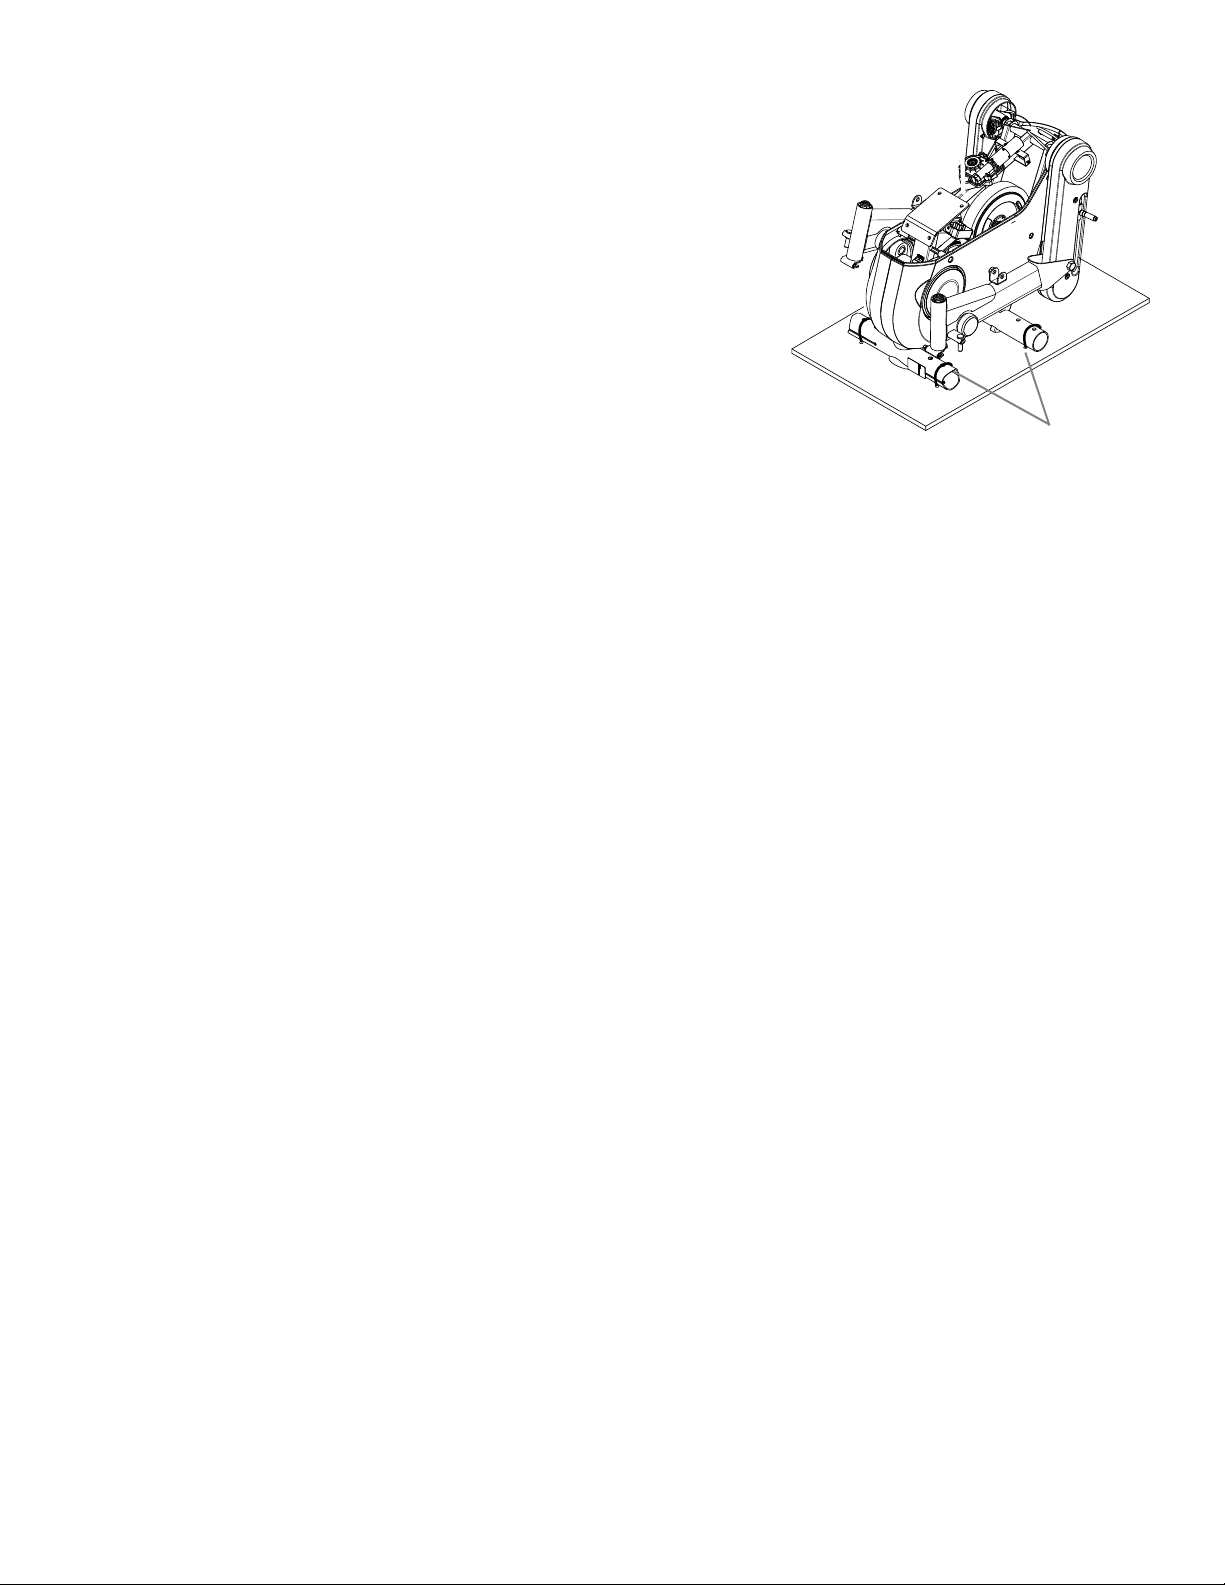
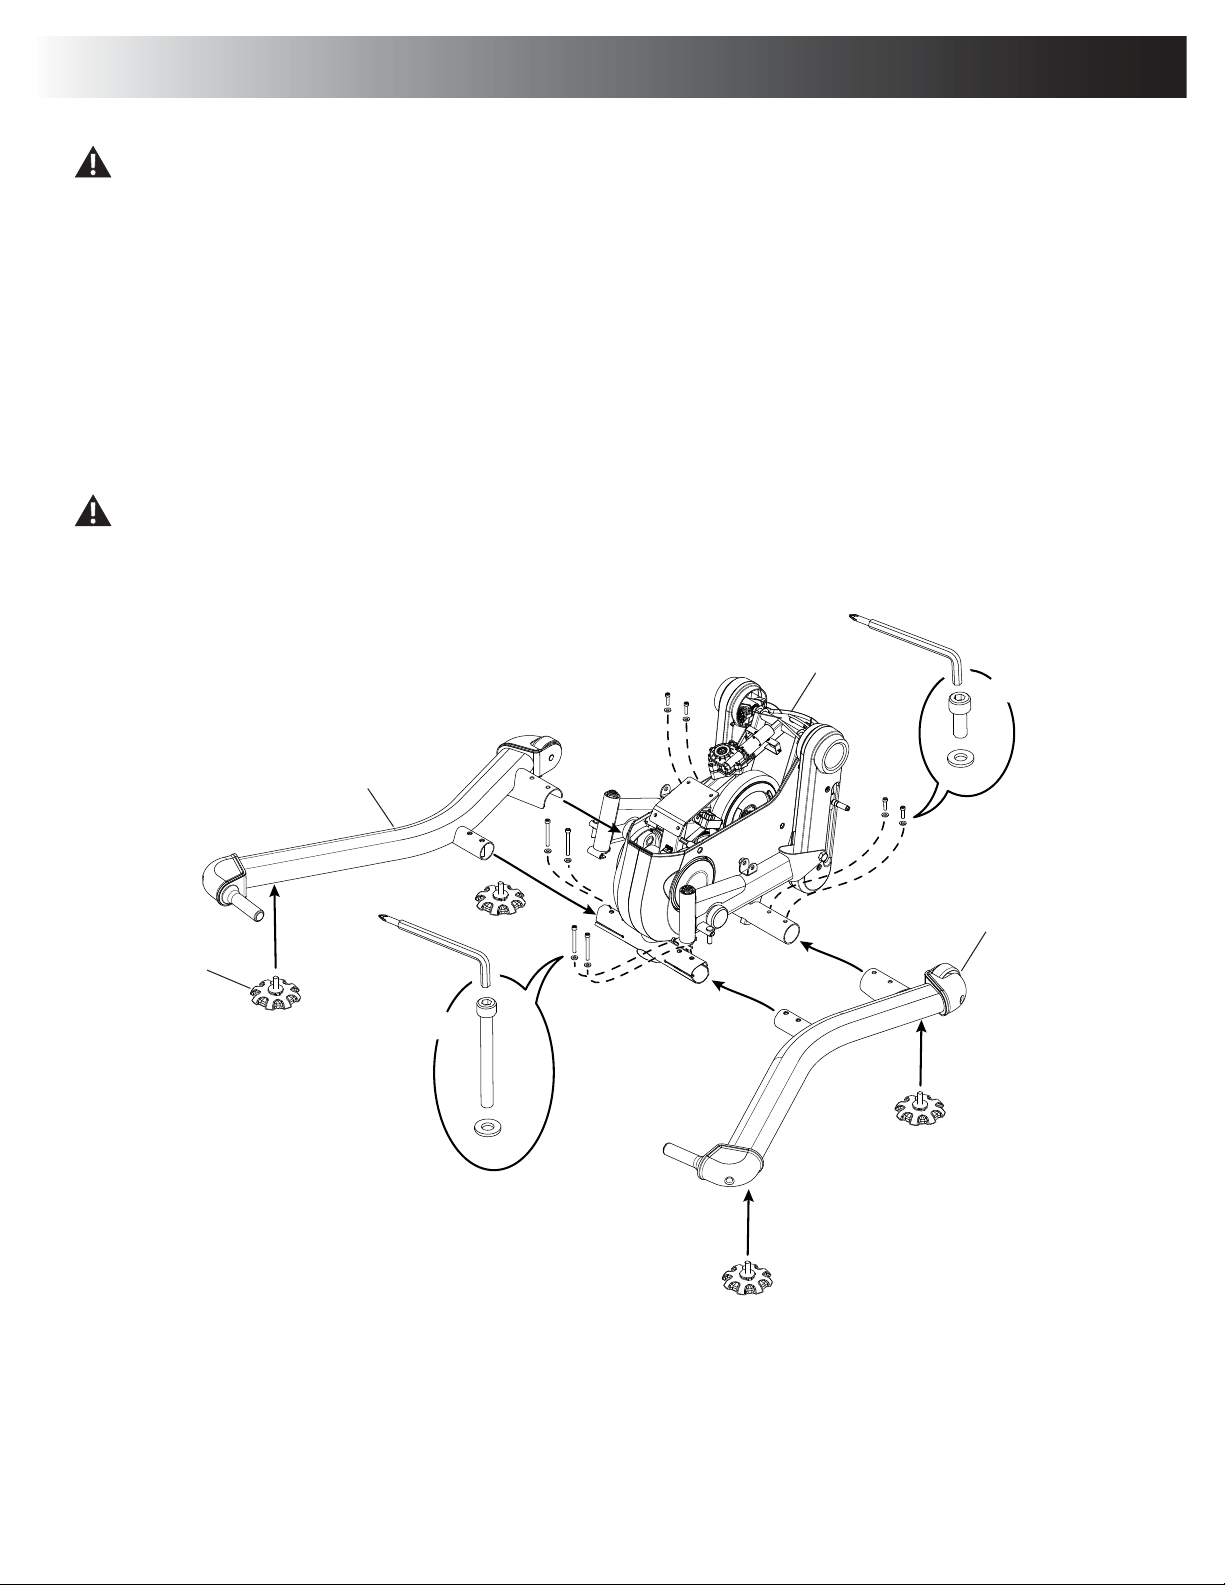
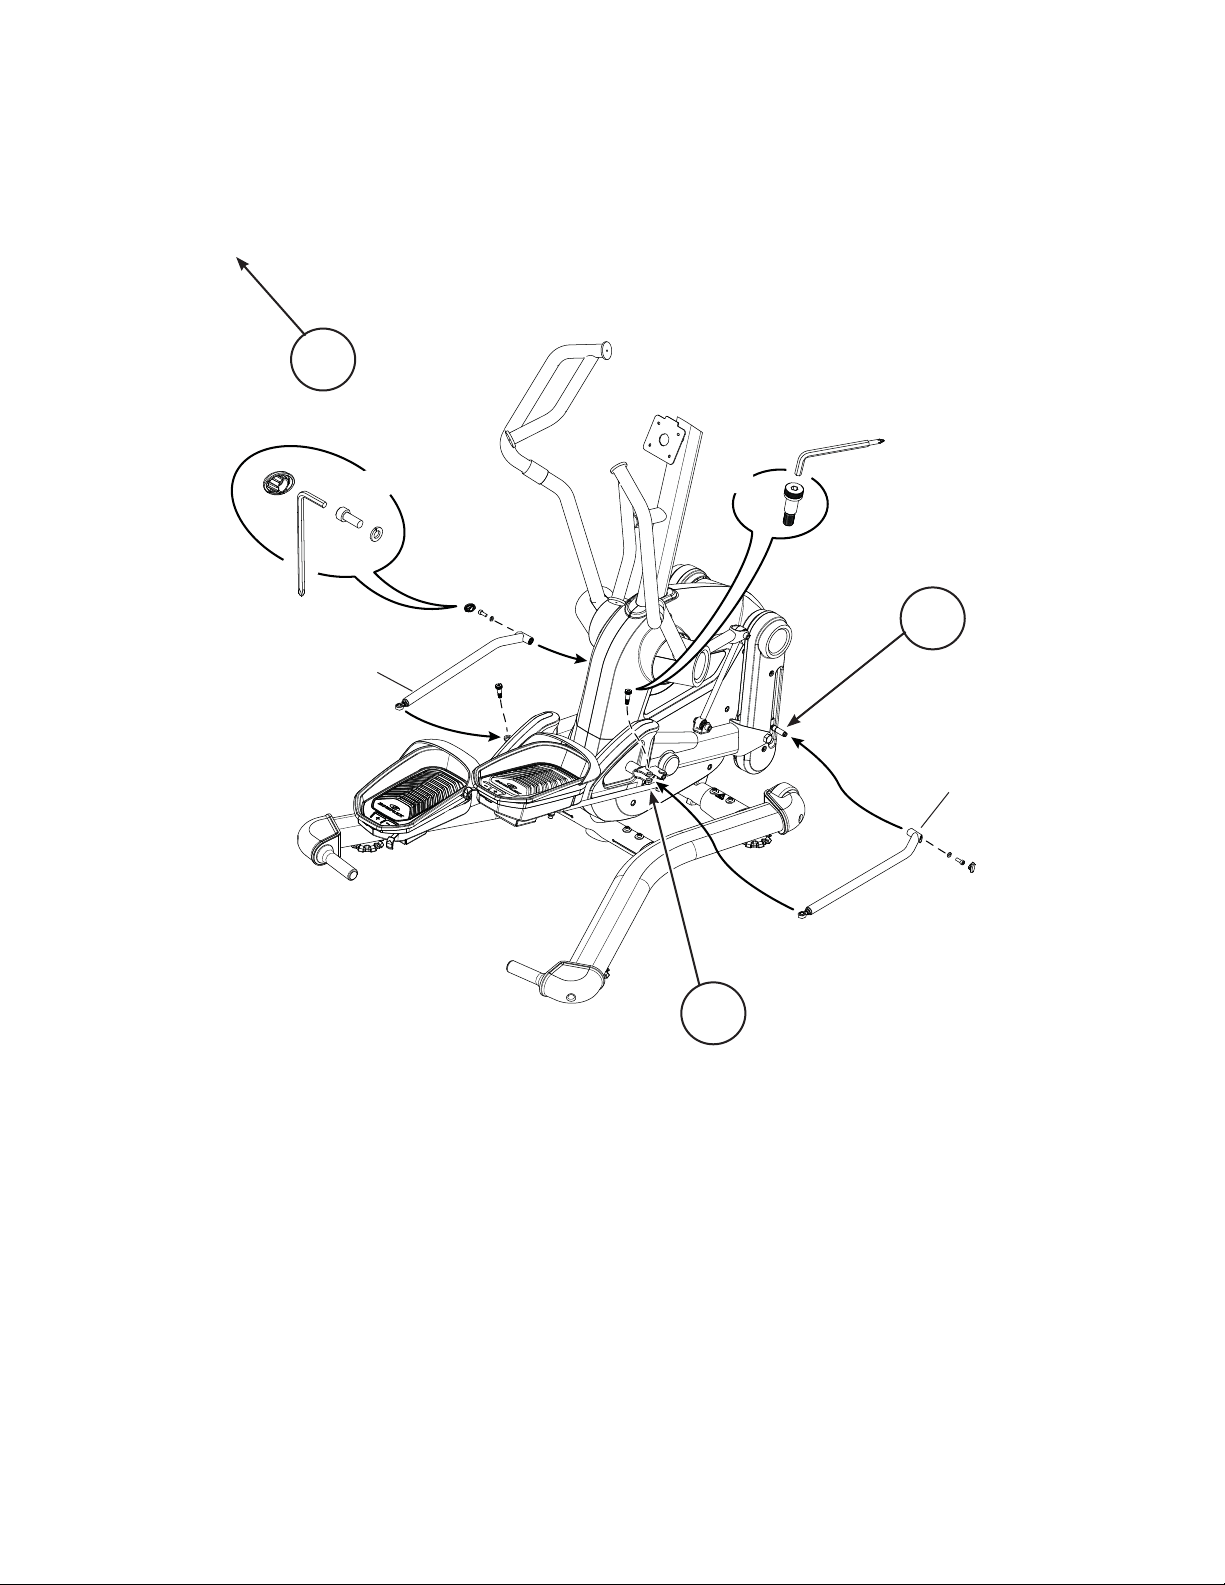
Assembly
Some components of the machine can be heavy or awkward. Use a second person when doing the assembly steps involving
these parts. Do not do steps that involve heavy lifting or awkward movements on your own.
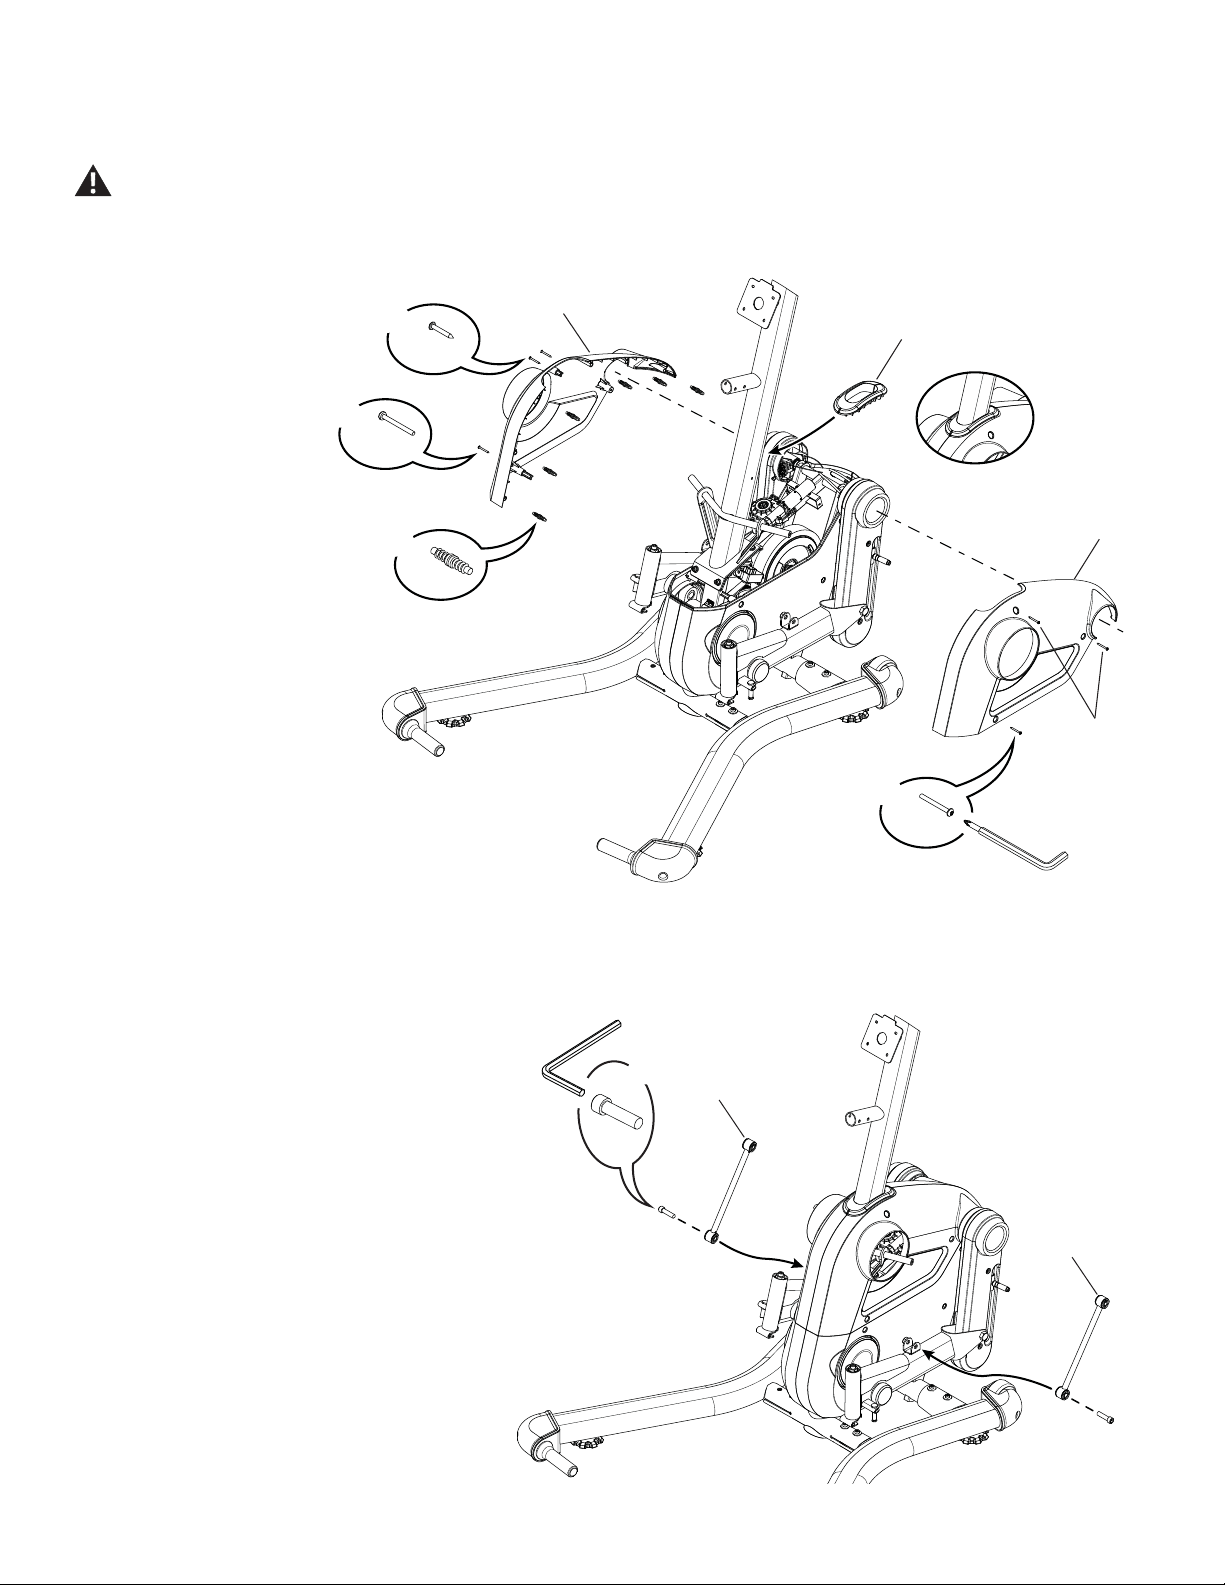
1. Install Levelers on the Base Assemblies and Install Base Assemblies to the Engine Assembly
,QVWDOOWKH/HYHOHUVRQWKH%DVH$VVHPEOLHVEHIRUHLQVWDOOLQJWKH%DVH$VVHPEOLHVWRWKH(QJLQH$VVHPEO\
Note:$ULJKW³5´DQGOHIW³/´GHFDOKDVEHHQDSSOLHGWRVRPHSDUWVWRDVVLVWZLWKDVVHPEO\
,QVWDOOWKH%DVH$VVHPEOLHVRQHDWDWLPH7LOWWKH(QJLQH$VVHPEO\WRWKHVLGHDQGVOLGHWKHFRUUHFW%DVH$VVHPEO\LQWRSRVLWLRQDQGLQVWDOOWKH
KDUGZDUH,WPD\EHKHOSIXOWRSXWDVWDWLFVROLGREMHFWOLNHDERRNRUER[XQGHUWKHIURQWWXEHWRDOLJQWKHVFUHZVDQGKROHV
Be sure to FULLYWLJKWHQKDUGZDUHZLWKKH[ZUHQFKZKHQDOOKDUGZDUHKDVEHHQÀQJHUWLJKWHQHG5HPRYHWKHVKLSSLQJSODWIRUP
and set it safely aside.
In order to avoid possible serious injury, when installing the Base Assemblies to the Engine AssemblyEHFDUHIXOWRDYRLGÀQJHUV
or hands being caught or pinched.
1
2
3
D
B
X4
4
(X4)
A
B
X4
6mm
6mm
Assembly / Owner’s Manual
12
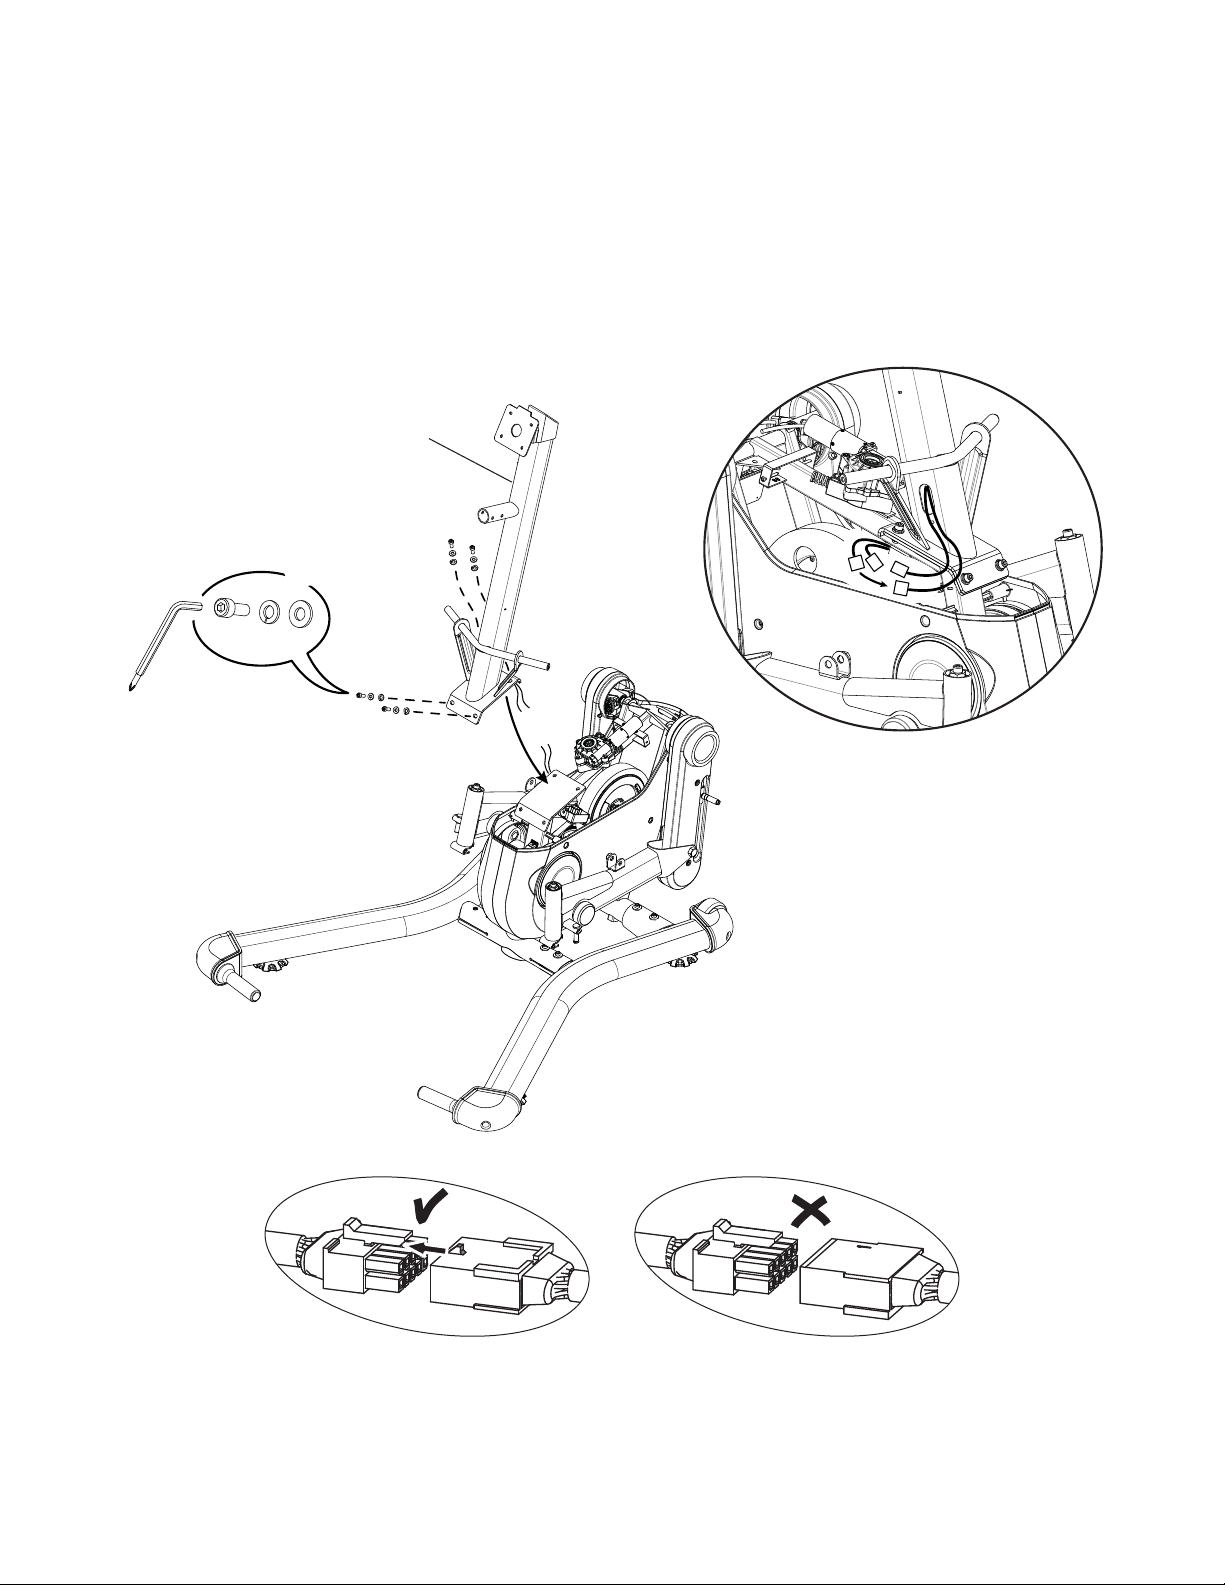
2. Install Console Mast to Frame Assembly
Note: $WWDFKWKH&RQVROH0DVWWRWKHEDVHPRXQWDQGFRQQHFWWKHEDVHFDEOHVWRWKHPDVWFDEOHV Do not fully tighten until all hardware
has been installed.
NOTICE:9HULI\WKHFDEOHFRQQHFWLRQVWREHVXUHWKDWWKH\DUHFRQQHFWHGFRUUHFWO\VRWKDWWKHORFNLQJWDEVDUHDOLJQHGDQGHQJDJHG,I
the cable connections are reversed, the Console will not turn on or the Static Handlebar buttons will not work. Do not crimp the
Cables.
D
E
X4
6mm
O
5
Assembly / Owner’s Manual
13
3. Attach the Shrouds and Mast Gasket to Frame Assembly
Insert the Push Fasteners (F) in the mount holes in the Left Shroud. Put the Left Shroud in position. Align the Right Shroud with
the Push Fasteners and move the Right Shroud into position. Push the Shrouds together so that the Push Fasteners are fully
seated. Install the Shrouds to the Frame Assembly with the screws (R, S).
NOTICE: Do not crimp the Cables.
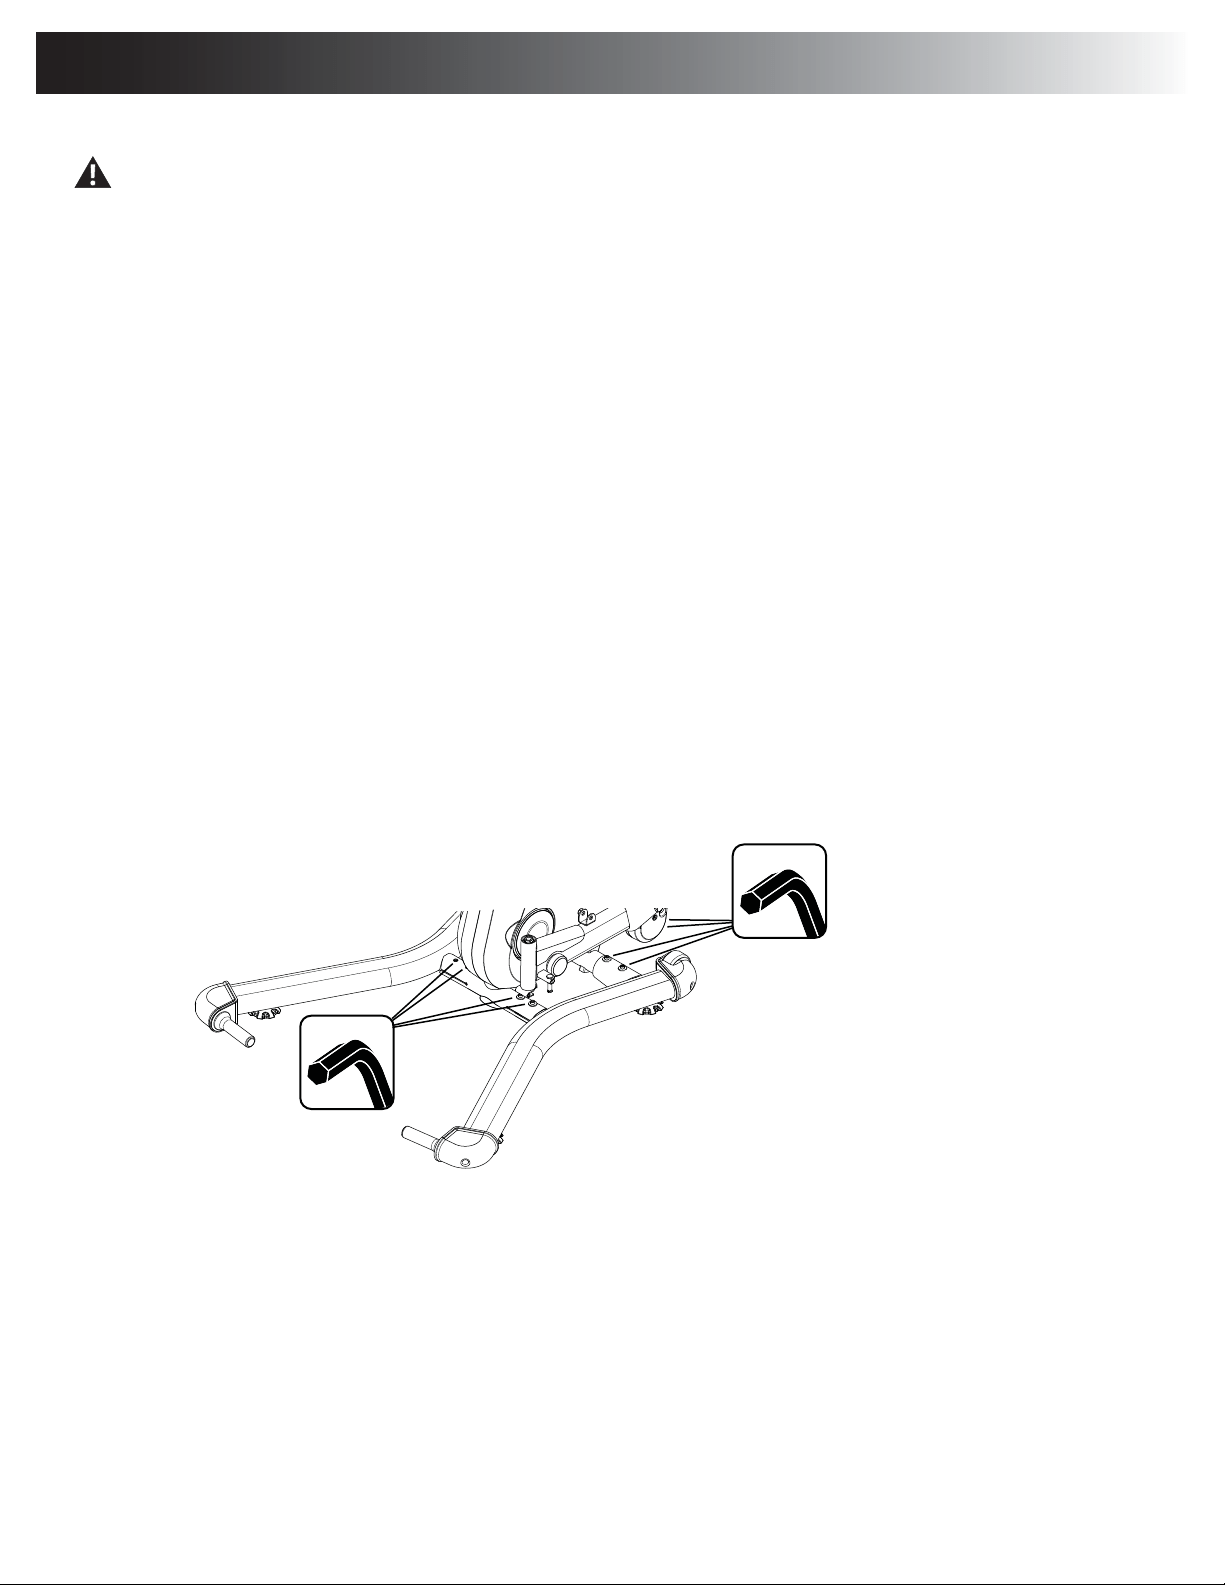
4. Attach Handlebar Links to Crank Arms
Note: Finger tighten the screws at this time.
6
7
8
R
F
X6
X1
R
X1
S
X2
S
#2
9
9
H
X2
10mm

Assembly / Owner’s Manual
14
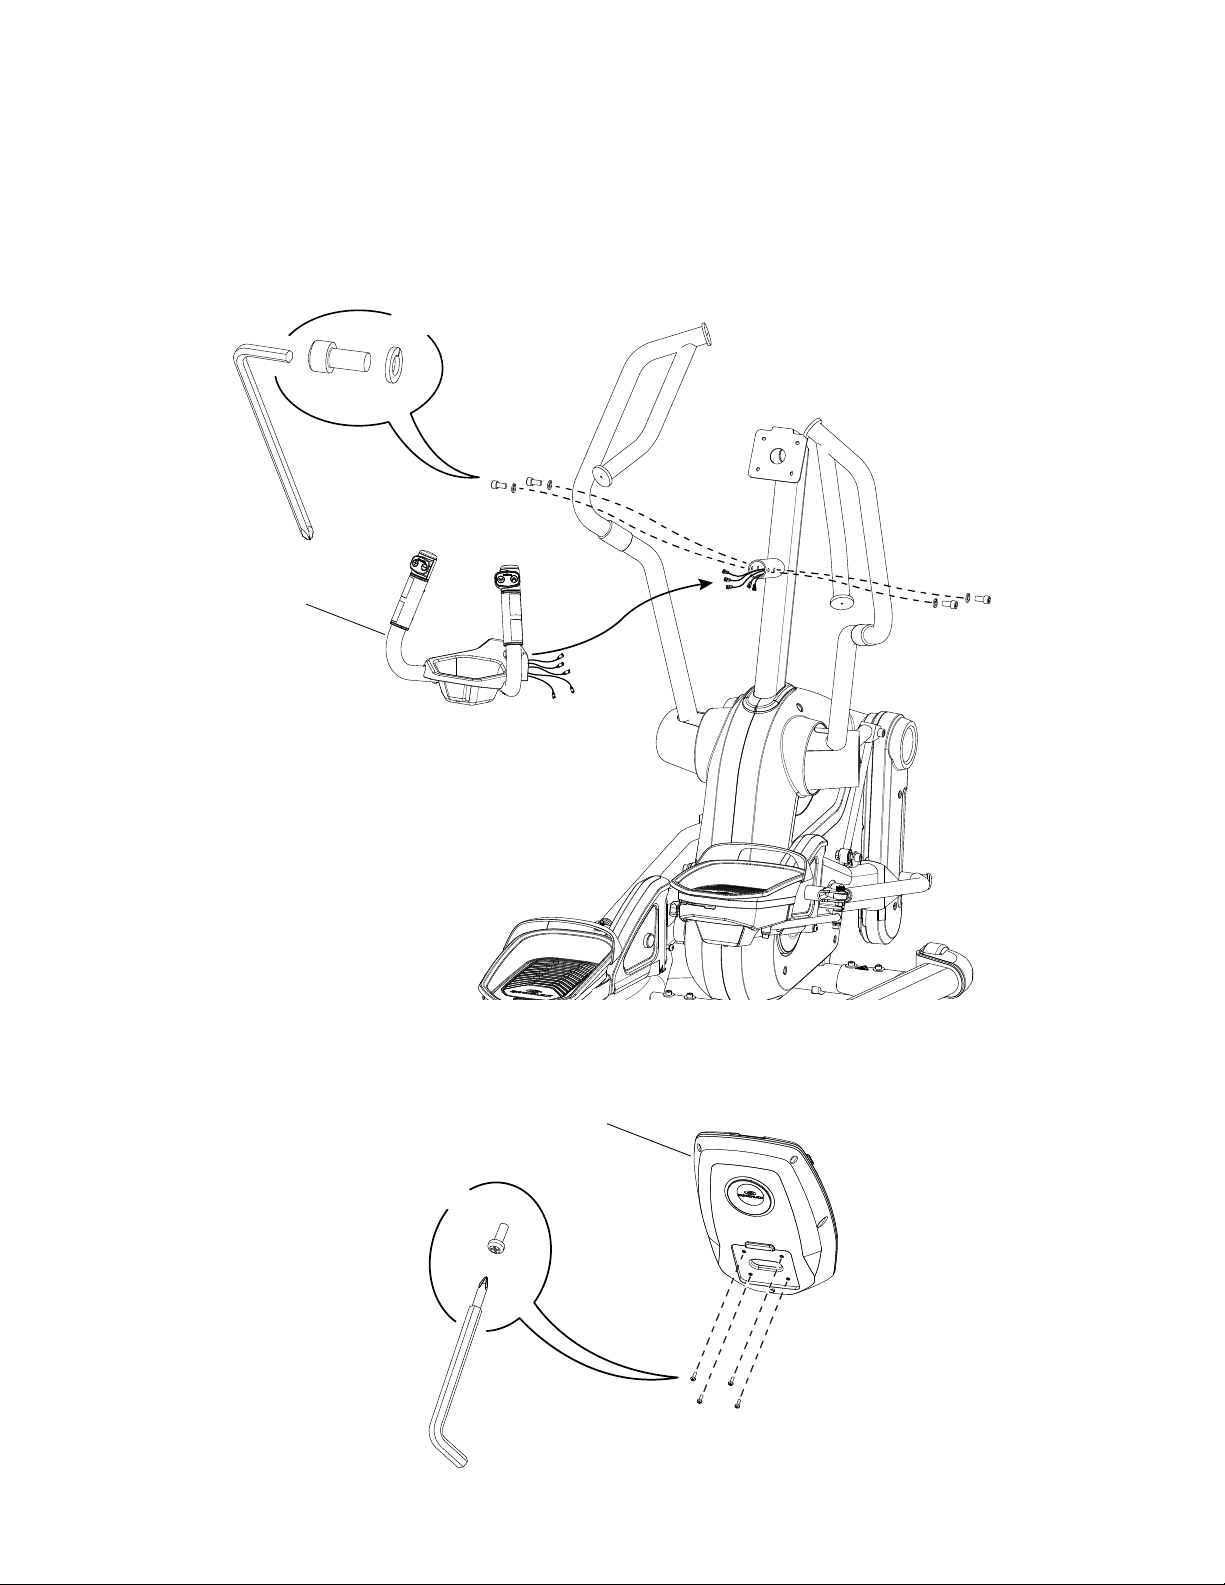
5. Attach Pivot Covers to Handlebar Arms, and Install Handlebar Arms
NOTICE:$ULJKW³5´DQGOHIW³/´GHFDOKDYHEHHQDSSOLHGWRVRPHSDUWVWRDVVLVWZLWKDVVHPEO\:KHQDWWDFKLQJWKH+DQGOHEDU3LYRW
6KURXGVWRWKH+DQGOHEDU$UPVGRQRWRYHUWLJKWHQWKHVFUHZVDVWKLVFDQGDPDJHWKH6KURXGV
1.:KLOHKROGLQJWKH3LYRW&RYHURQWKH+DQGOHEDU$UPMXQFWLRQSODFHWKH,QVLGH3LYRW&RYHURQWKHRSSRVLWHVLGHRIWKHKDQGOHEDUDQGDWWDFKZLWK
VFUHZV*,QVWDOODWLRQRIWKH/HIW3LYRW&RYHURQWKH/HIW+DQGOHEDU$UPLVVKRZQLQdetail 5a.
7KHSURFHGXUHLVWKHVDPHIRUWKH5LJKW+DQGOHEDU$UP
H1 (X2)
16
10
16
11
12
I
X2
15
L
O
J
X2
14
13
H
X2
10mm
6mm
9
5a
2.%HVXUHWKH+DQGOHEDU/LQNLVWLOWHGIRUZDUG3XWWKHZDYHZDVKHU,RQWKHSLYRWURG$OLJQWKH+DQGOHEDU$UPDVVHPEO\ZLWKWKHSLYRWURGDQG
DWWDFKWKHORZHU+DQGOHEDU$UPWRWKH+DQGOHEDU/LQN6OLGHWKH+DQGOHEDU$UPDVVHPEO\IXOO\RQWRWKHSLYRWURGDQGLQVWDOOWKHKDUGZDUH
Be aware that the Handlebars are top heavy, and will want to pivot when attached onto
the Pivot Rod. Be sure to stay out of the path of the Handlebar and to gently allow it to pivot to a rest.
FULLY tighten the screws (H1) from Step 4.
14
13
15
G (X2)
#2
14
13
15
14
15
13
Assembly / Owner’s Manual
15
N
X2
N
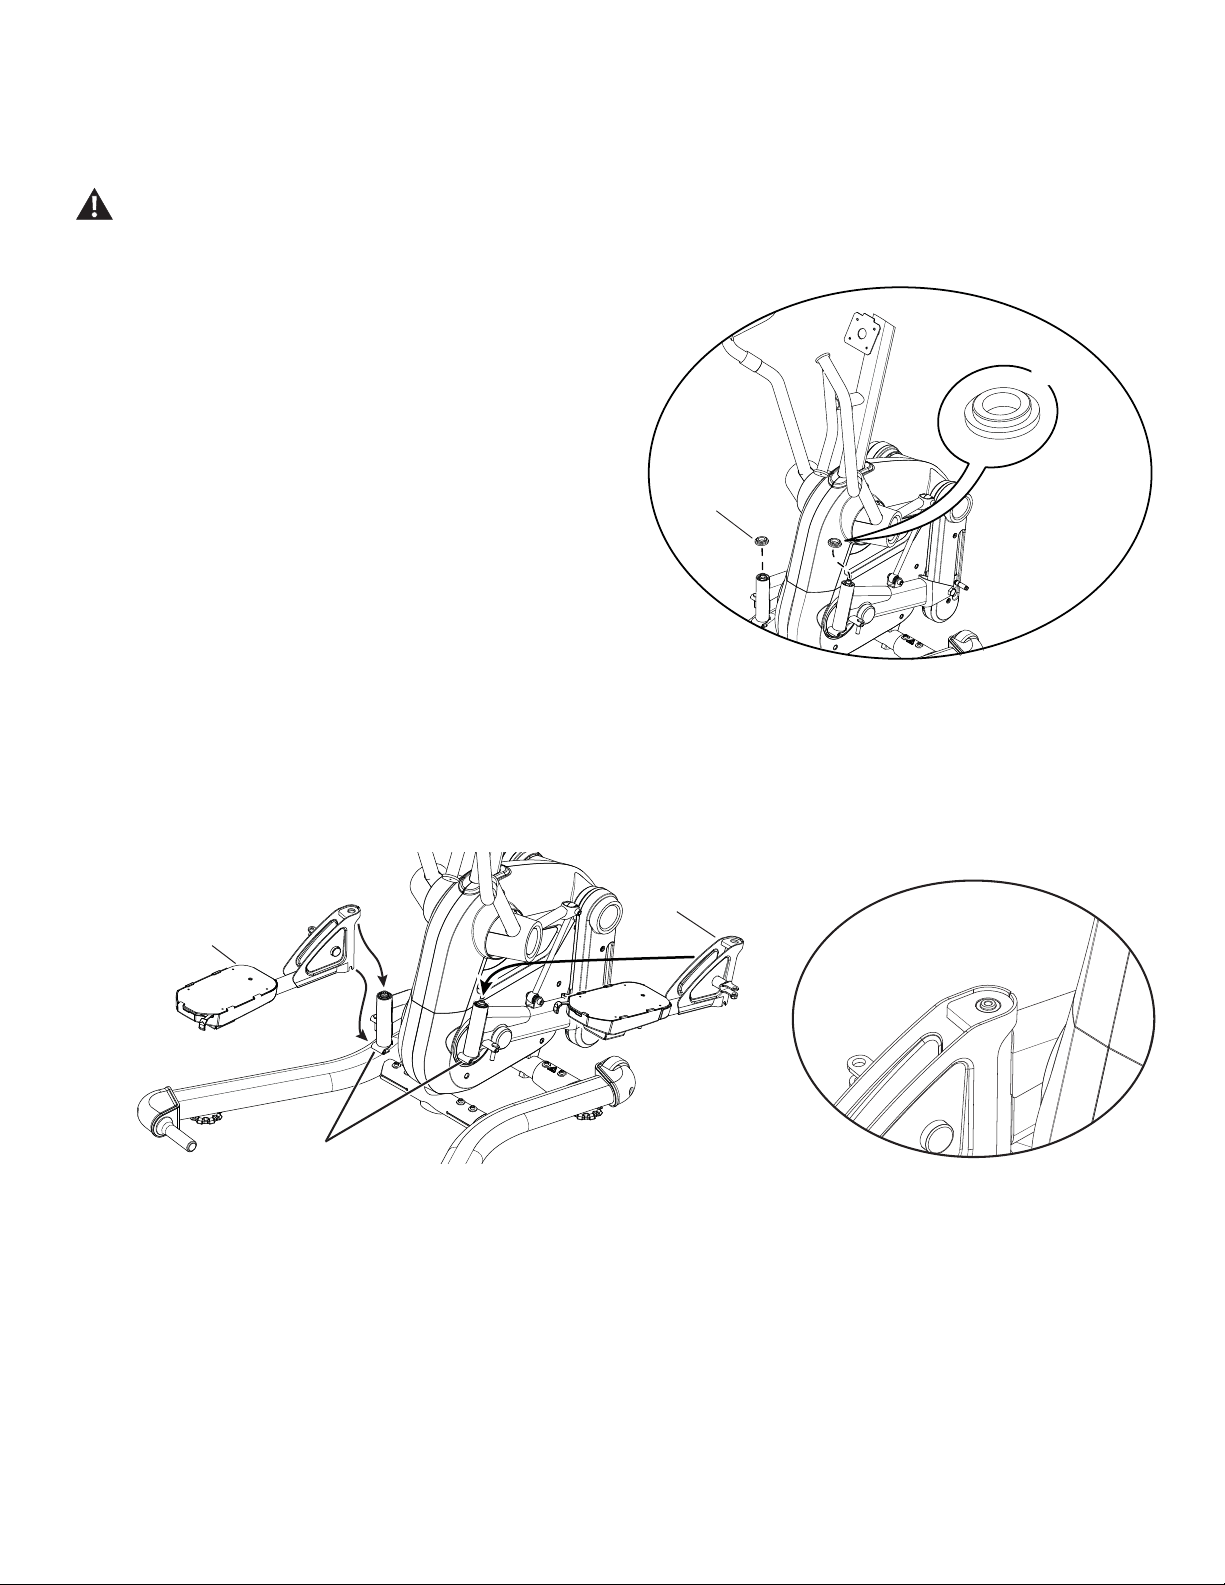
6. Attach Pedal Arms to Crank Arms
Note:$ULJKW³5´DQGOHIW³/´GHFDOKDYHEHHQDSSOLHGWRVRPHSDUWVWRDVVLVWZLWKDVVHPEO\
,QRUGHUWRDYRLGSRVVLEOHVHULRXVLQMXU\ZKHQSXWWLQJWKH3HGDO$UPRQWKH&UDQN$UPVEHFDUHIXOWRDYRLGÀQJHUVRUKDQGV
being caught or pinched.
Be sure to install hardware and parts in the correct order to ensure smooth, quiet operation of the machine.
1.3XWWKH&ROODU1RQWKHKDUGZDUHLQVHUWRQWKH&UDQN$UP'R127LQVWDOO
other washers at this time.
18
17
1a
2./RZHUWKH3HGDO$UPRQWRWKH&ROODUDQGVOLGHWKH3HGDO$UPLQWRWKHXQGHUEUDFNHWD
3XVKGRZQDQGKROGWKH3HGDO$UPLQRUGHUWRIXOO\VHDWWKH3HGDO$UPRQWKH&ROODU
Note:0DNHVXUHWKH3HGDO$UPLVVHDWHGRYHUWKH&ROODU7RSRI&ROODUVKRXOGEHYLVLEOH
LQWKHKROHRQWKH3HGDO$UPÀXVKZLWKWKHKROH
Assembly / Owner’s Manual
16
3.$)7(5WKH3HGDO$UPLVLQSRVLWLRQSODFHWKHODUJHZDVKHU0ODUJHKROHRQWRSRI
WKHKROHLQWKH3HGDO$UP7KHQSODFHWKHZLGHZDVKHU-VPDOOKROHRQWRSRIWKHODUJH
ZDVKHU0
4.,QVWDOOWKHVFUHZ&WKURXJKWKHZDVKHUV-0DQG3HGDO$UP¿QJHUWLJKWRQO\
X2
C
M
6mm
J
5.,QVWDOOWKHVFUHZV4DQGZDVKHUV(LQWRWKH3HGDO$UPDQG
XQGHUEUDFNHWD¿QJHUWLJKWRQO\
6. Fully tighten screw C.
7. Fully tighten screws Q.
8.$WWDFKWKH7RSFDSWRWKH3HGDO$UP
Q
X4
6mm
E
C (X2)
29
Assembly / Owner’s Manual
17
7. Attach the Parallel Links to Pedal Arms and Crank Arms
Note:$WWDFK3DUDOOHO/LQNWRERWWRPRI3HGDODQGWKHVLGHEUDFNHWRQWKH&UDQN$UP)XOO\WLJKWHQWKHKDUGZDUH
19
19
C
O
E
X4
6mm
8. Attach the Pedal Shrouds and Footpads to Pedal Arms
Note: Fully tighten the hardware.
K
23 22
18
K
21
17
20
X8
Assembly / Owner’s Manual
18
9. Attach Lateral Links to Crank Arms and then Pedal Arms
NOTICE: 1.$WWDFK/DWHUDO/LQNVWR&UDQN$UPV)LQJHUWLJKWHQWKHVFUHZV
2.$WWDFK/DWHUDO/LQNVWR3HGDO$UPV
3. Fully tighten the hardware.
D
O
X2
25
24
24
6mm
P
X2
6mm
1
2
3
Assembly / Owner’s Manual
19
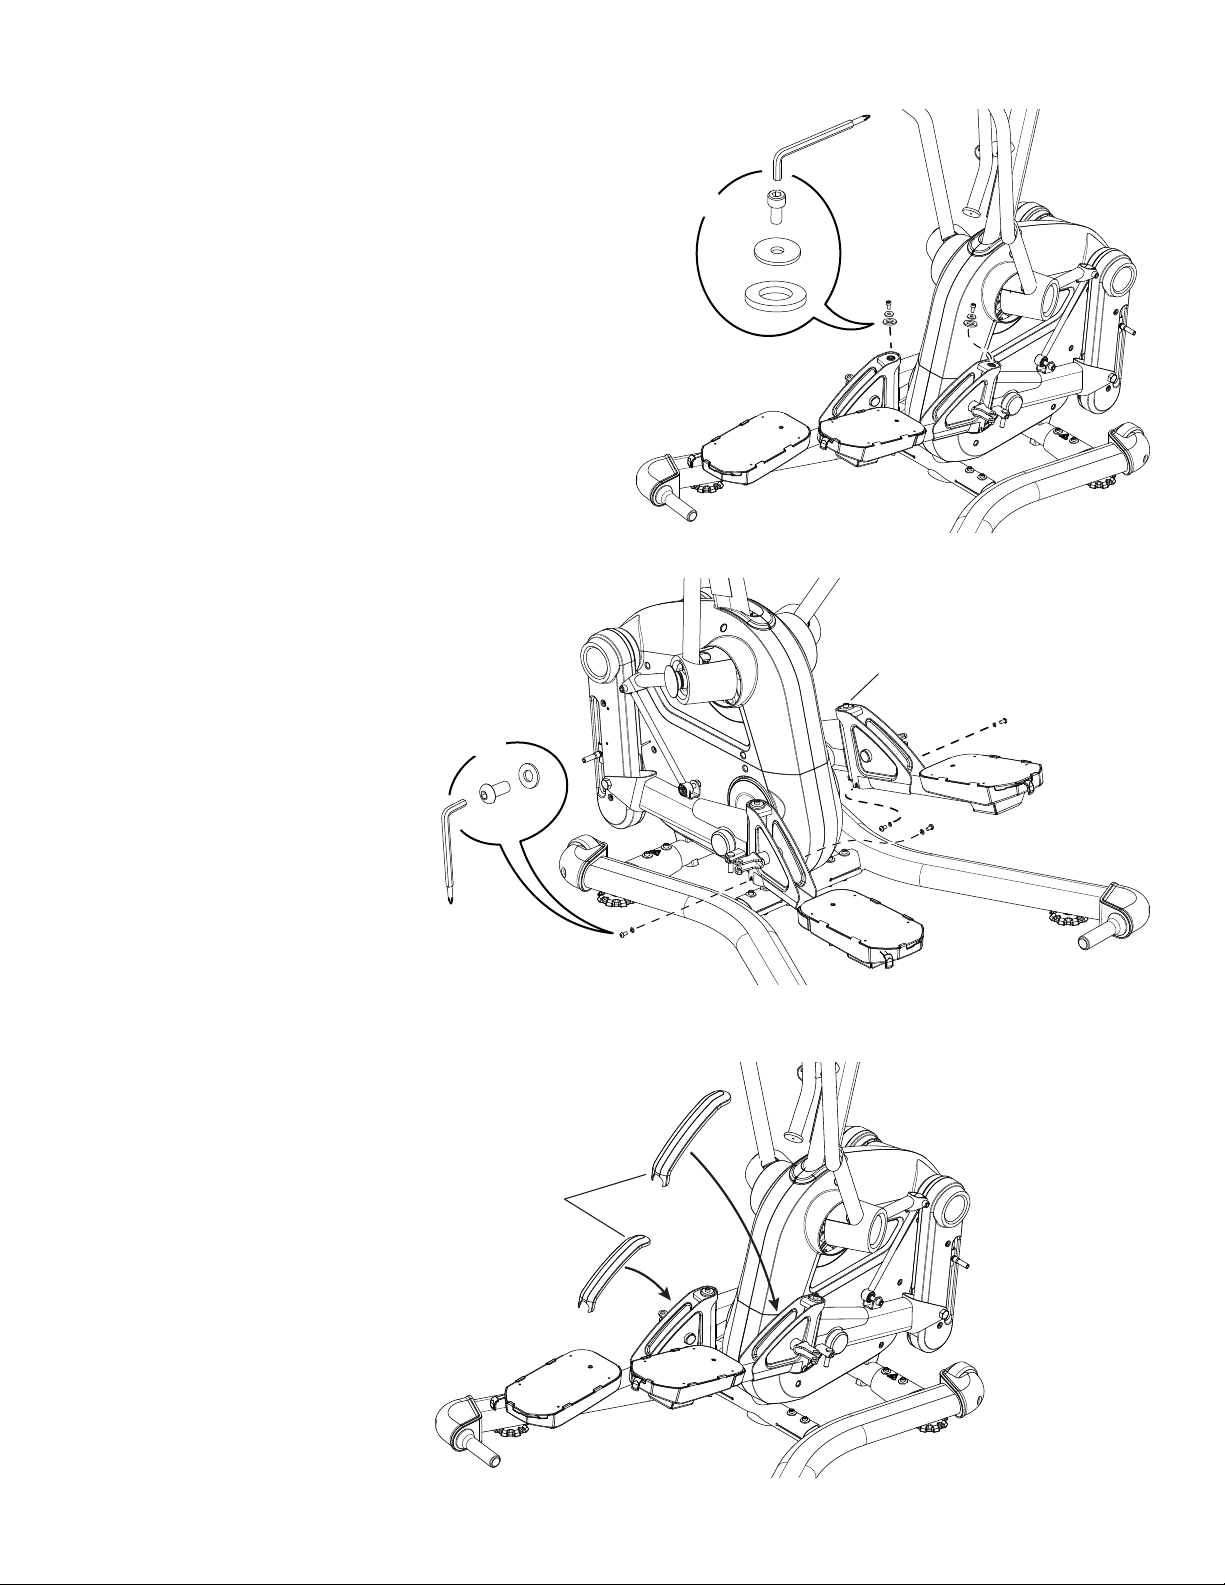
10. Install Static Handlebar to Console Mast
NOTICE: Do not crimp the Cables.
Note:5HPRYHUXEEHUEDQGVIURPWKHFDEOHV&RQQHFWWKHFDEOHVIURPWKH6WDWLF+DQGOHEDUWRWKHFDEOHVIURPWKHPRXQWWXEHRQWKHEDFN
RIWKH&RQVROH0DVW7KHVPDOOHVWFDEOHFRQQHFWLRQVDUHLQWHUFKDQJHDEOH²HDFK+DQGOHEDUFDEOHFRQQHFWRUFDQFRQQHFWWRHLWKHURQHRI
the Mast cable connectors. Slide the Static Handlebar onto the mount tube and install the hardware.
11. Remove the Hardware from the Console
NOTICE: Do not crimp the Cables.
X4
27
C
O
6mm
X4
26
Assembly / Owner’s Manual
20
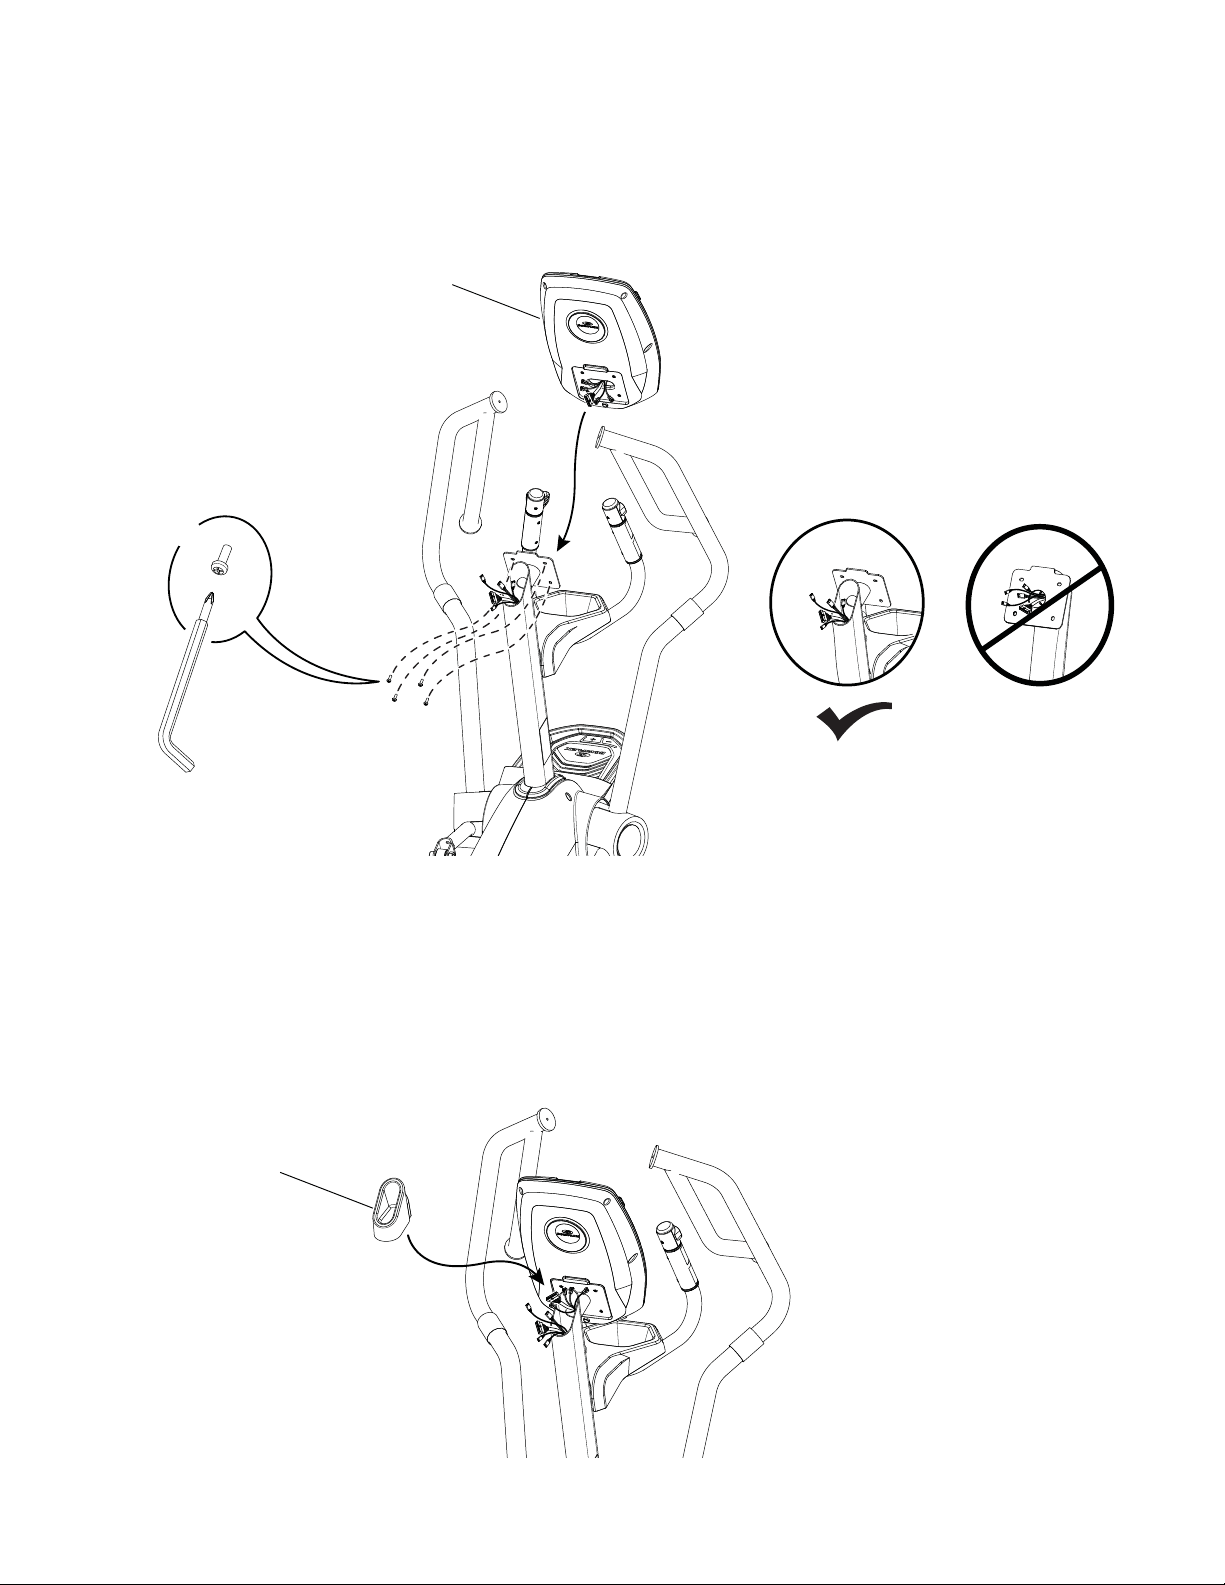
12. Route Console Cables through Mounting Plate and Attach the Console
NOTICE: Do not crimp the Cables. If the Mast Cables are routed through the Mounting Plate on the Console Mast, pull them back through
the opening. Make sure the Mast Cable connectors do not fall into the Console Mast.
27
X4
13. Connect the Console Cables to Mast Cables and Attach the Mast End Cap
NOTICE:'RQRWFULPSWKH&DEOHV0DNHVXUHWRFRQQHFWDOOFDEOHV(DFKFRQQHFWRUHQGFDQRQO\EHFRQQQHFWHGWRWKHPDWFKLQJ
connector. Push the excess cable length down into the Console Mast.
28
Assembly / Owner’s Manual
21
15. Final Inspection
,QVSHFW\RXUPDFKLQHWRHQVXUHWKDWDOOIDVWHQHUVDUHWLJKWDQGFRPSRQHQWVDUHSURSHUO\DVVHPEOHG,QVSHFW3HGDOVWRFRQ¿UPWKDWWKH3HGDO
Suspension option is set to the same position for both Pedals.
Note:5HPRYHDQ\SURWHFWLYHFRYHUVIURPWKHIDFHRIWKH&RQVROH,IWKHUHLVSURWHFWLYHSODVWLF¿OPRQWKH&RQWDFW+HDUW5DWH6HQVRUVRQ
WKH6WDWLF+DQGOHEDUUHPRYHWKHSODVWLF¿OP
%HVXUHWRUHFRUGWKHVHULDOQXPEHULQWKH¿HOGSURYLGHGDWWKHIURQWRIWKLVPDQXDO
Do not use until the machine has been fully assembled and inspected for correct performance in accordance with the Owner’s
Manual.
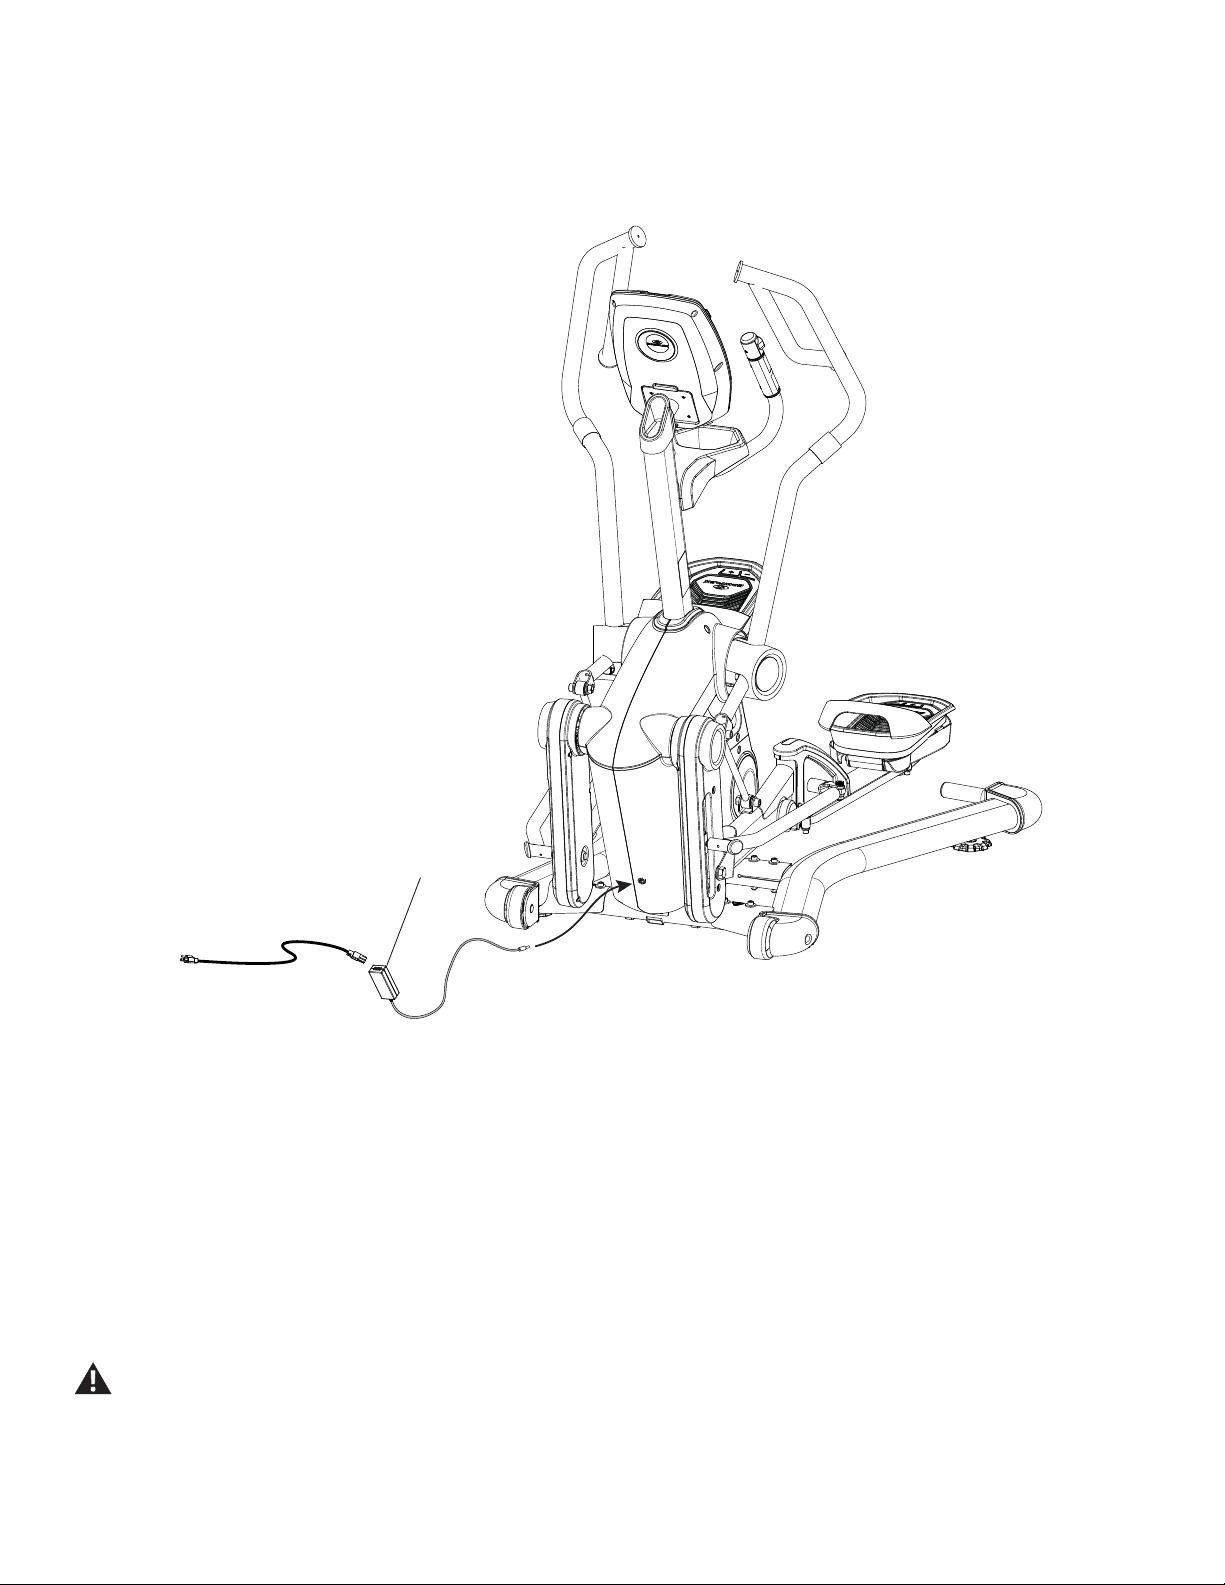
14. Connect the Power Adapter to the Power Cord, and Connect to Frame Assembly
NOTICE:0DNHVXUHWKDWWKH3RZHU$GDSWHUZLUHDQG3RZHU&RUGVWD\FOHDURIDOOPRYLQJSDUWV
30
Assembly / Owner’s Manual
22
Moving Your Machine
7KH¿WQHVVPDFKLQHZHLJKVDSSUR[LPDWHO\OEVNJZKHQIXOO\DVVHPEOHGDQGUHTXLUHVFDXWLRQZKHQEHLQJPRYHG
NOTICE: Always disconnect the power cord and power adapter from the wall outlet and the machine before attempting to move the
machine.
8VHWKH7UDQVSRUW+DQGOHVDWWKHUHDURIWKHPDFKLQHWROLIWDQGPRYHWKHPDFKLQH<RXUPDFKLQHFDQEHUROOHGRQWKHWUDQVSRUWZKHHOVWRDQHZ
ORFDWLRQ/RZHU\RXUPDFKLQHVORZO\LQWRLWVQHZORFDWLRQZLWKRXWLQMXU\WR\RXUKHDGRU¿QJHUV
Do not use the handlebars, Console Mast, or the Console to lift or
move the machine. Injury to you or damage to the machine can occur.
The machine may be moved by one or more persons depending on
their physical abilities and capacities. Make sure that you and others
DUHDOOSK\VLFDOO\ÀWDQGDEOHWRPRYHWKHPDFKLQHVDIHO\
Place the machine on a clean, hard, level surface, free from unwanted
material or other objects that may hamper your ability to move freely.
A rubber mat should be used below the machine to prevent the
UHOHDVHRIVWDWLFHOHFWULFLW\DQGSURWHFW\RXUÁRRULQJ
To prevent unsupervised operation of the machine always disconnect
the power cord from the wall outlet and machine power input. Place
the power cord in a secure location.
Adjustments
Leveling the Machine
7KHPDFKLQHQHHGVWREHOHYHOHGLI\RXUZRUNRXWDUHDLVXQHYHQRULIWKH
%DVH$VVHPEO\LVVOLJKWO\RIIWKHÀRRU7RDGMXVW
1. Place the machine in your workout area.
/RRVHQWKHORFNLQJQXWVDQGDGMXVWWKHOHYHOHUVXQWLOWKH\DOOFRQWDFW
WKHÀRRU
Do not adjust the levelers to such a height that they detach or
unscrew from the machine. Injury to you or damage to the
machine can occur.
$GMXVWXQWLOWKHPDFKLQHLVOHYHO7LJKWHQWKHORFNLQJQXWV
Make sure the machine is level and stable before you exercise.
Assembly / Owner’s Manual
23
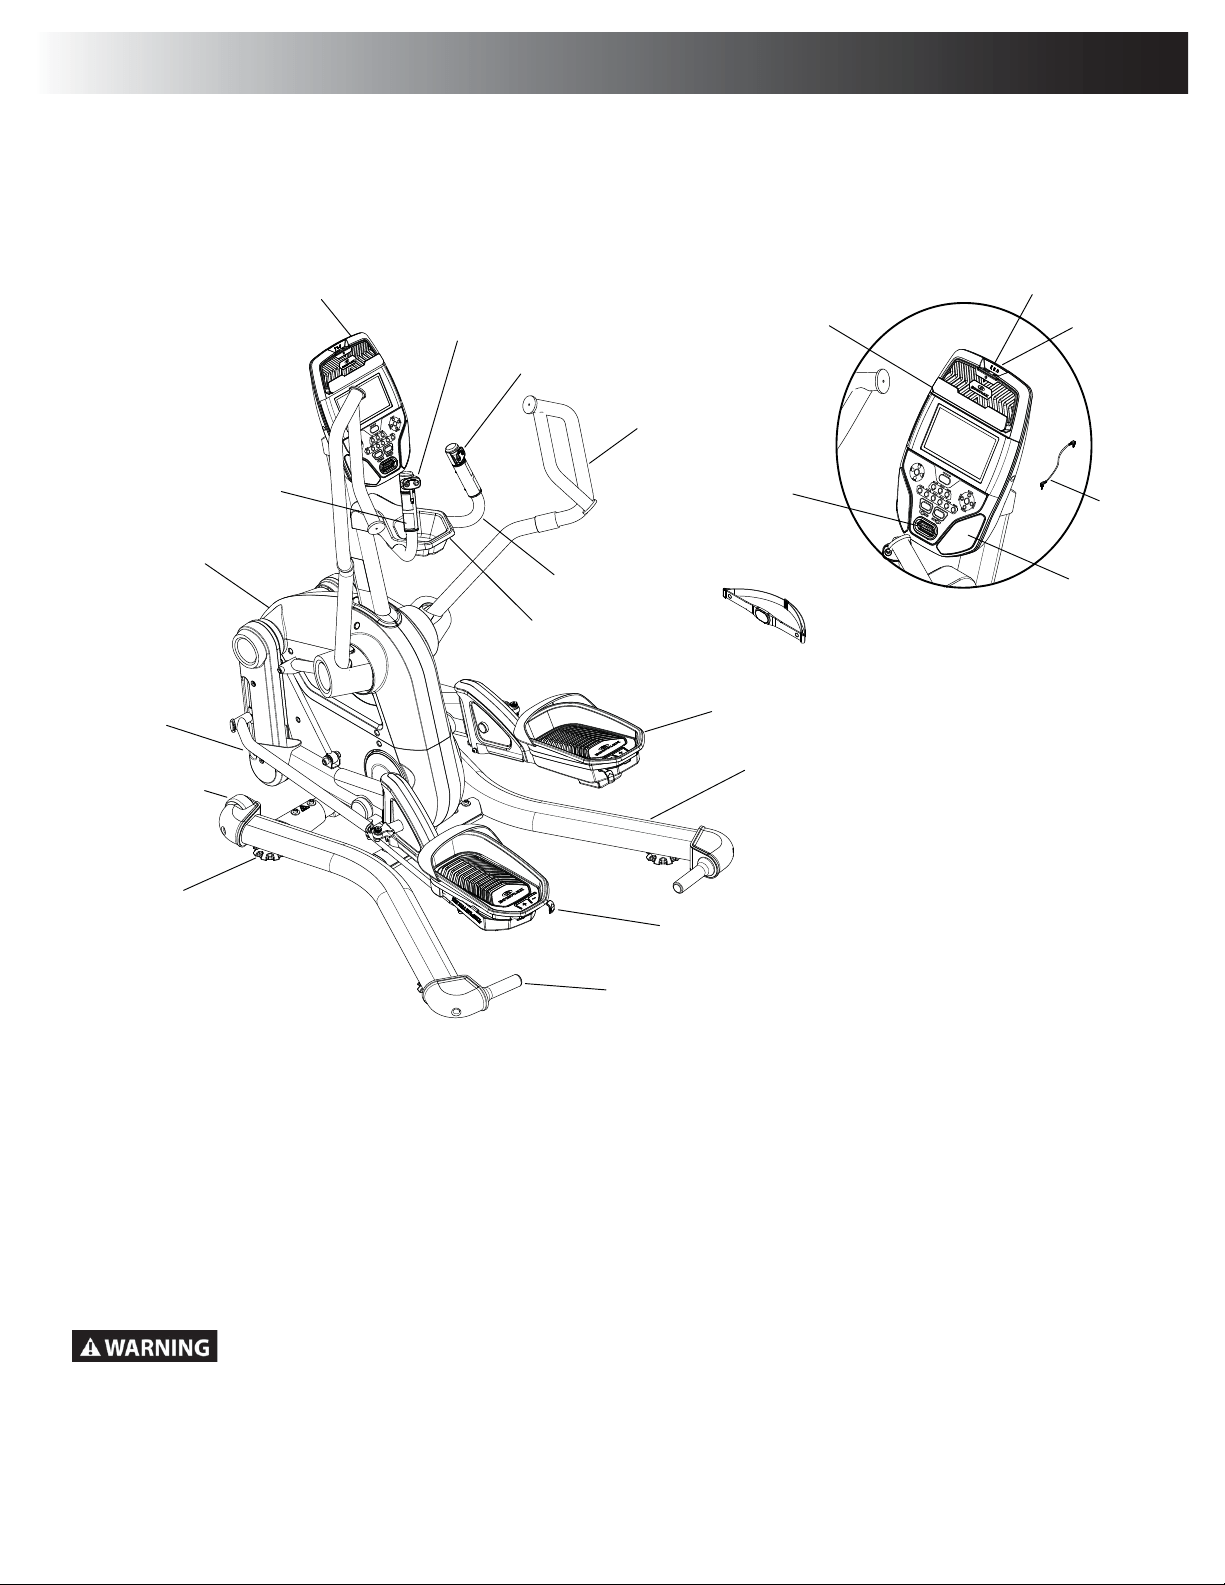
Features
Pedal
7UDQVSRUW+DQGOH
Leveler
%DVH$VVHPEO\
0HGLD7UD\
Upper Handlebar
Speaker
Power Inlet
Contact Heart
5DWH6HQVRUV
86%3RUW
Use the values calculated or measured by the machine’s computer for reference purposes only. The heart rate
GLVSOD\HGLVDQDSSUR[LPDWLRQDQGVKRXOGEHXVHGIRUUHIHUHQFHRQO\2YHUH[HUFLVLQJPD\UHVXOWLQVHULRXVLQMXU\RU
GHDWK,I\RXIHHOIDLQWVWRSH[HUFLVLQJLPPHGLDWHO\
Switch Select™ Pedal Suspension Lever
Fan
Lateral Stride Controls
5HVLVWDQFe Controls
Console
Static Handlebar
Fully Shrouded
Flywheel
7UDQVSRUW:KHHO
MP3 Input
Media
Cable
Cupholder
+HDUW5DWH6WUDS
Assembly / Owner’s Manual
24
Bluetooth
®
App Connected display
'LVSOD\VKRZVZKHQWKHPDFKLQHLVSDLUHGZLWKWKH$SS
Active User display
7KH$FWLYH8VHUGLVSOD\VKRZVWKHVHOHFWHGXVHUSUR¿OH$XVHUSUR¿OHLVDOZD\VVHOHFWHG)URPDSRZHUXSWKHODVW8VHUZLOOEHWKHGHIDXOW8VHU
User button
3XVKWRVHOHFWWKHGHVLUHG8VHU3UR¿OHSXVKDQGKROGIRUVHFRQGVWRHGLWWKHVHOHFWHG8VHU3UR¿OH
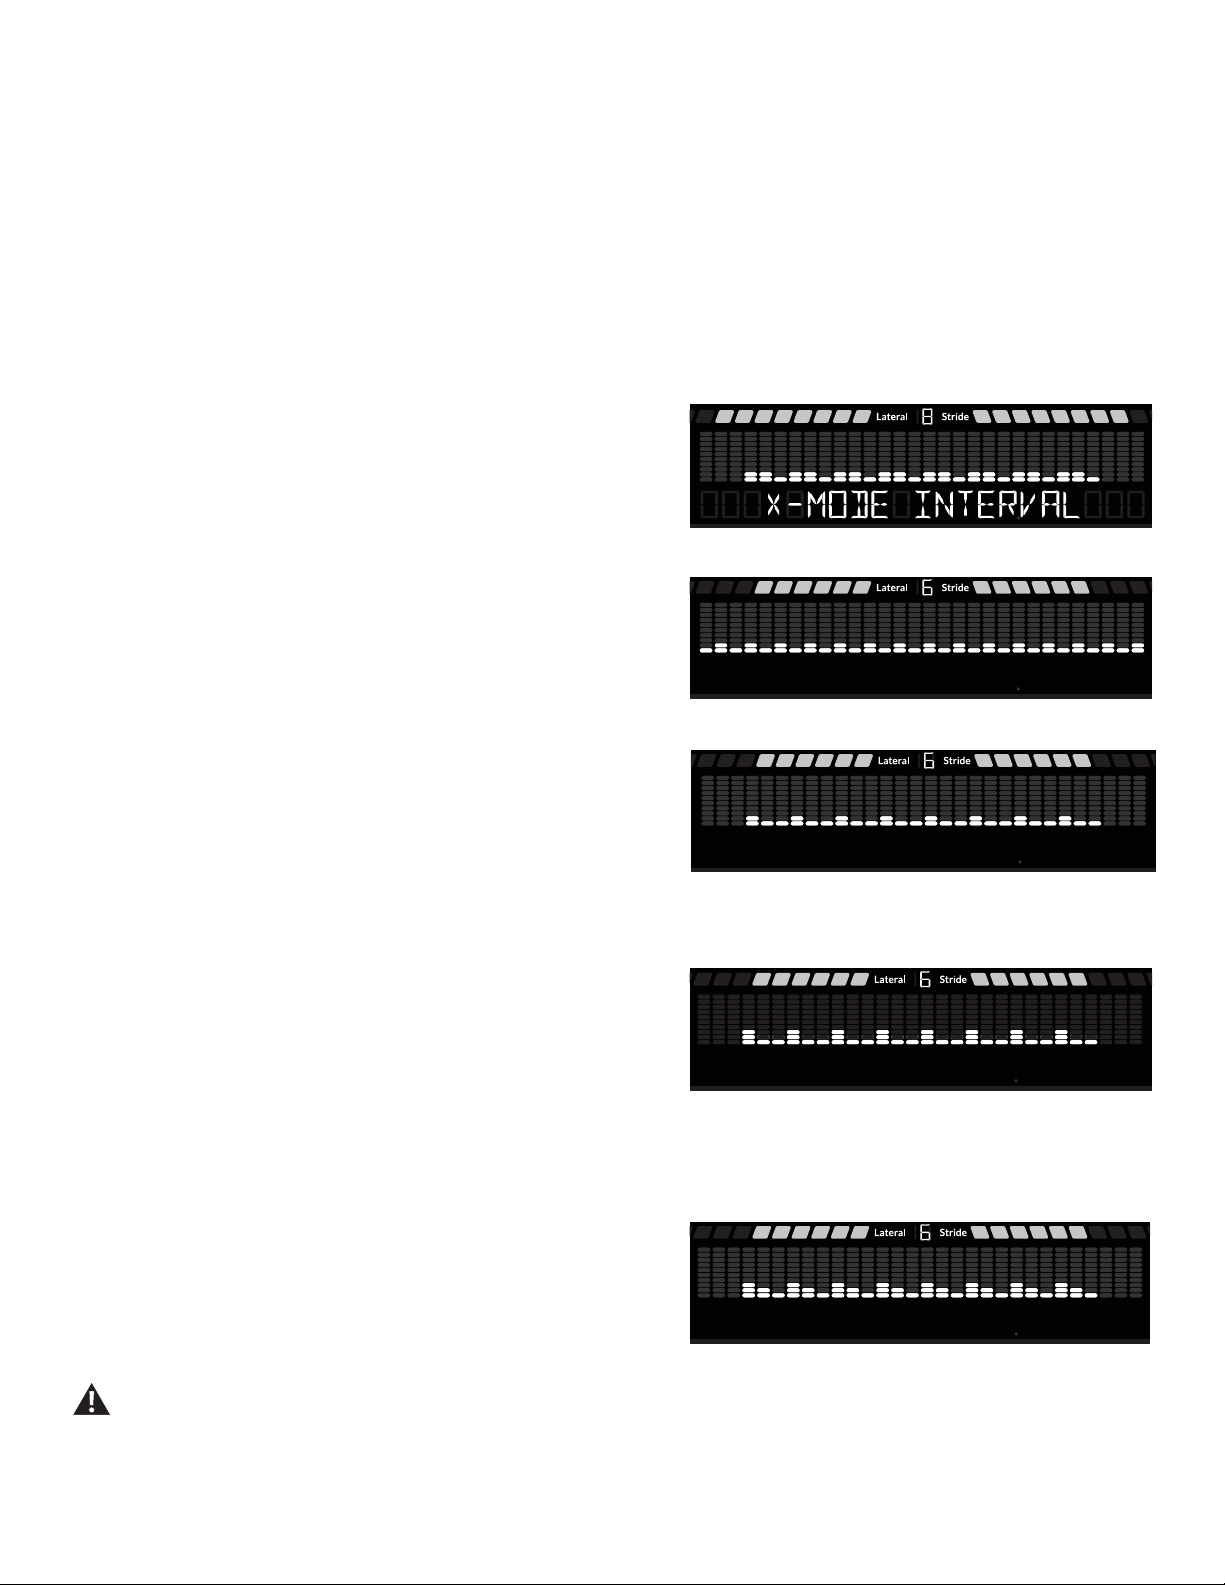
X-mode
™
button
3XVKWRVHOHFWWKH;PRGH
™
16 minute interval program.
Increase (c) / Decrease (d) buttons
7KH,QFUHDVH'HFUHDVHEXWWRQVFKDQJHDYDOXHRUPRYHWKURXJKRSWLRQV$EXWWRQZLOOOLJKWXSWRLQGLFDWHLWLVDQDYDLODEOHRSWLRQ
Console
$FWLYH8VHUGLVSOD\
Program buttons
Fan button
%OXHWRRWK
®
$SS&RQQHFWHG
display
9ROXPHDXGLR
button
;PRGH
™
program
Assembly / Owner’s Manual
25
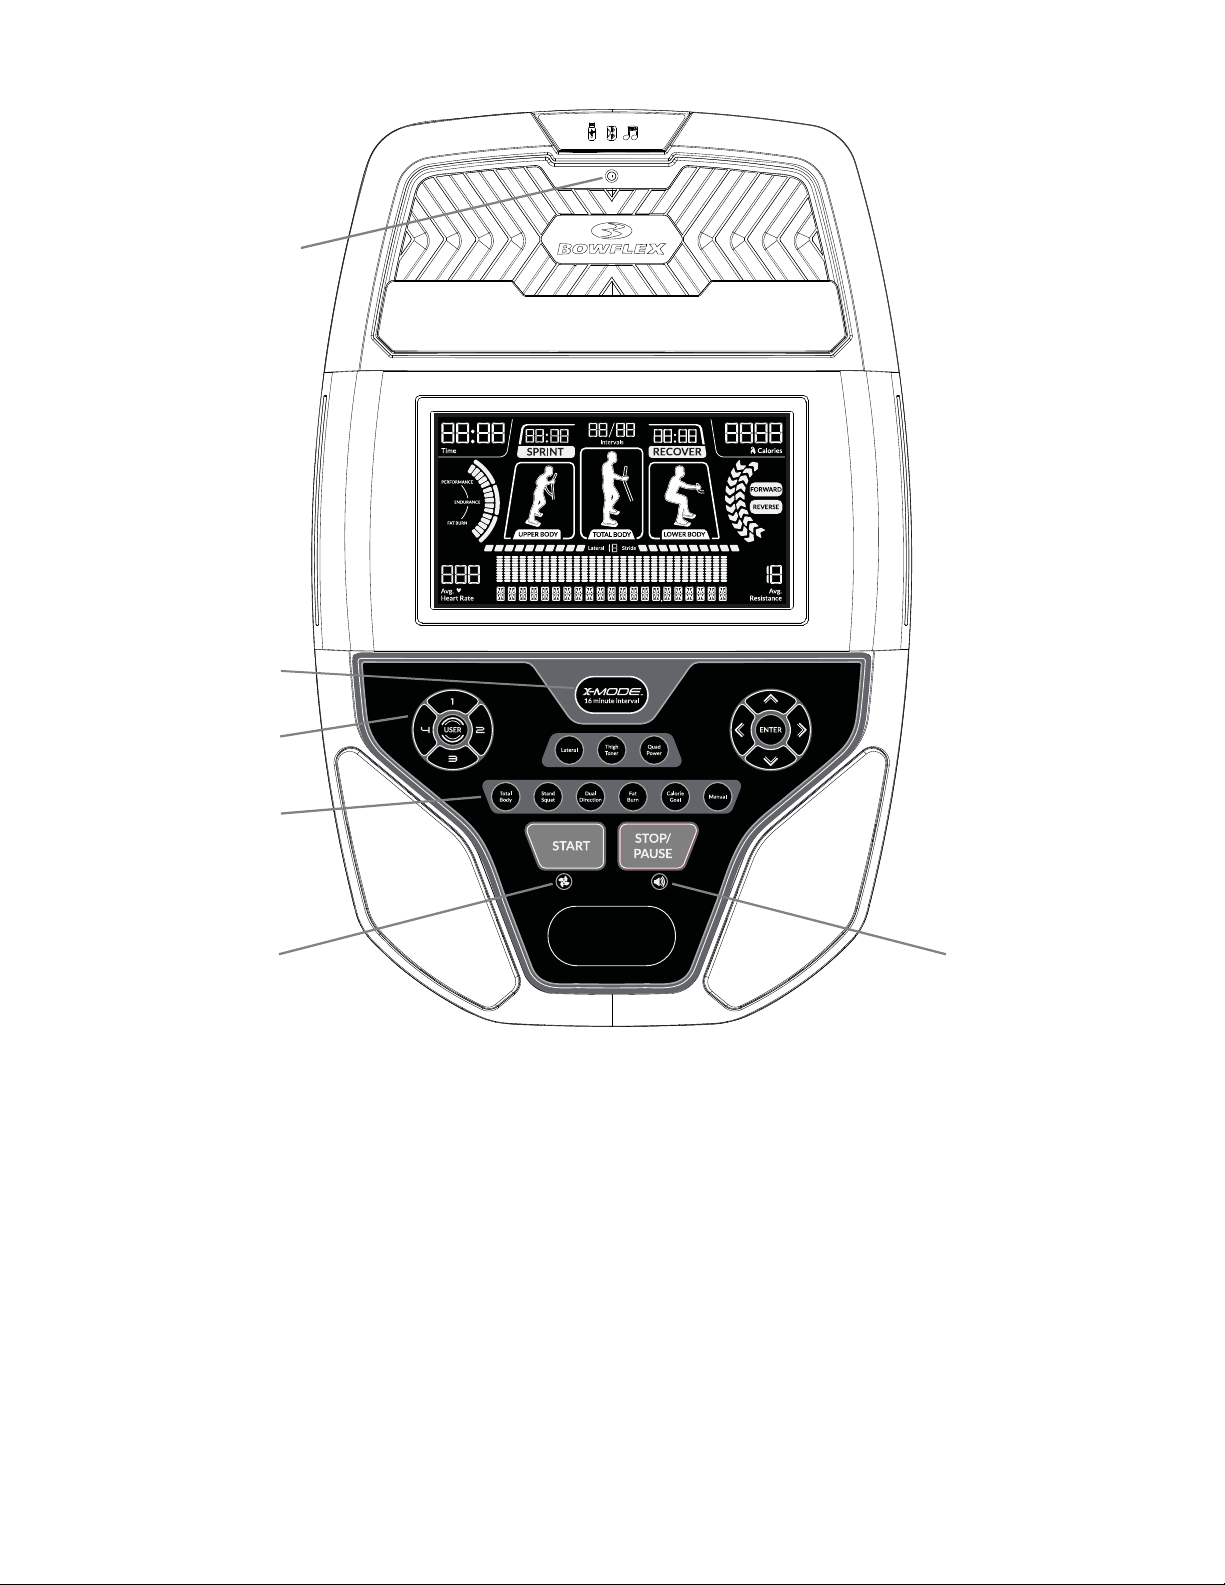
ENTER button
&RQ¿UPVLQIRUPDWLRQRUDVHOHFWLRQ
Left (e) / Right (f) buttons
3XVKWRVKLIWWKHFXUUHQWO\DFWLYHVHJPHQW$EXWWRQZLOOOLJKWXSWRLQGLFDWHLWLVDQDYDLODEOHRSWLRQ
Program buttons
3XVKWRVHOHFWRQHRIWKHZRUNRXW3URJUDPV7KHLOOXPLQDWHGOLJKWDURXQGWKHEXWWRQVKRZVWKHFXUUHQWO\VHOHFWHGSURJUDP$:RUNRXW3URJUDPLV
always selected.
START button
Push to start the currently selected workout Program, or resume a paused workout.
STOP/PAUSE button
3XVKWRSDXVHDZRUNRXWH[LWWKH8VHU3UR¿OHRU0DFKLQH6HWWLQJVPRGHRUHQGDSDXVHGZRUNRXW
Volume button
7KH9ROXPHEXWWRQVHWVWKHVRXQGOHYHORIWKH&RQVROHDQGWKHLQGLFDWRUOLJKWVVKRZWKHFXUUHQWVHWWLQJORZ/('PHGLXP/('VKLJK
/('VRURIIQR/('VIt does not affect the output from the headphone jack.
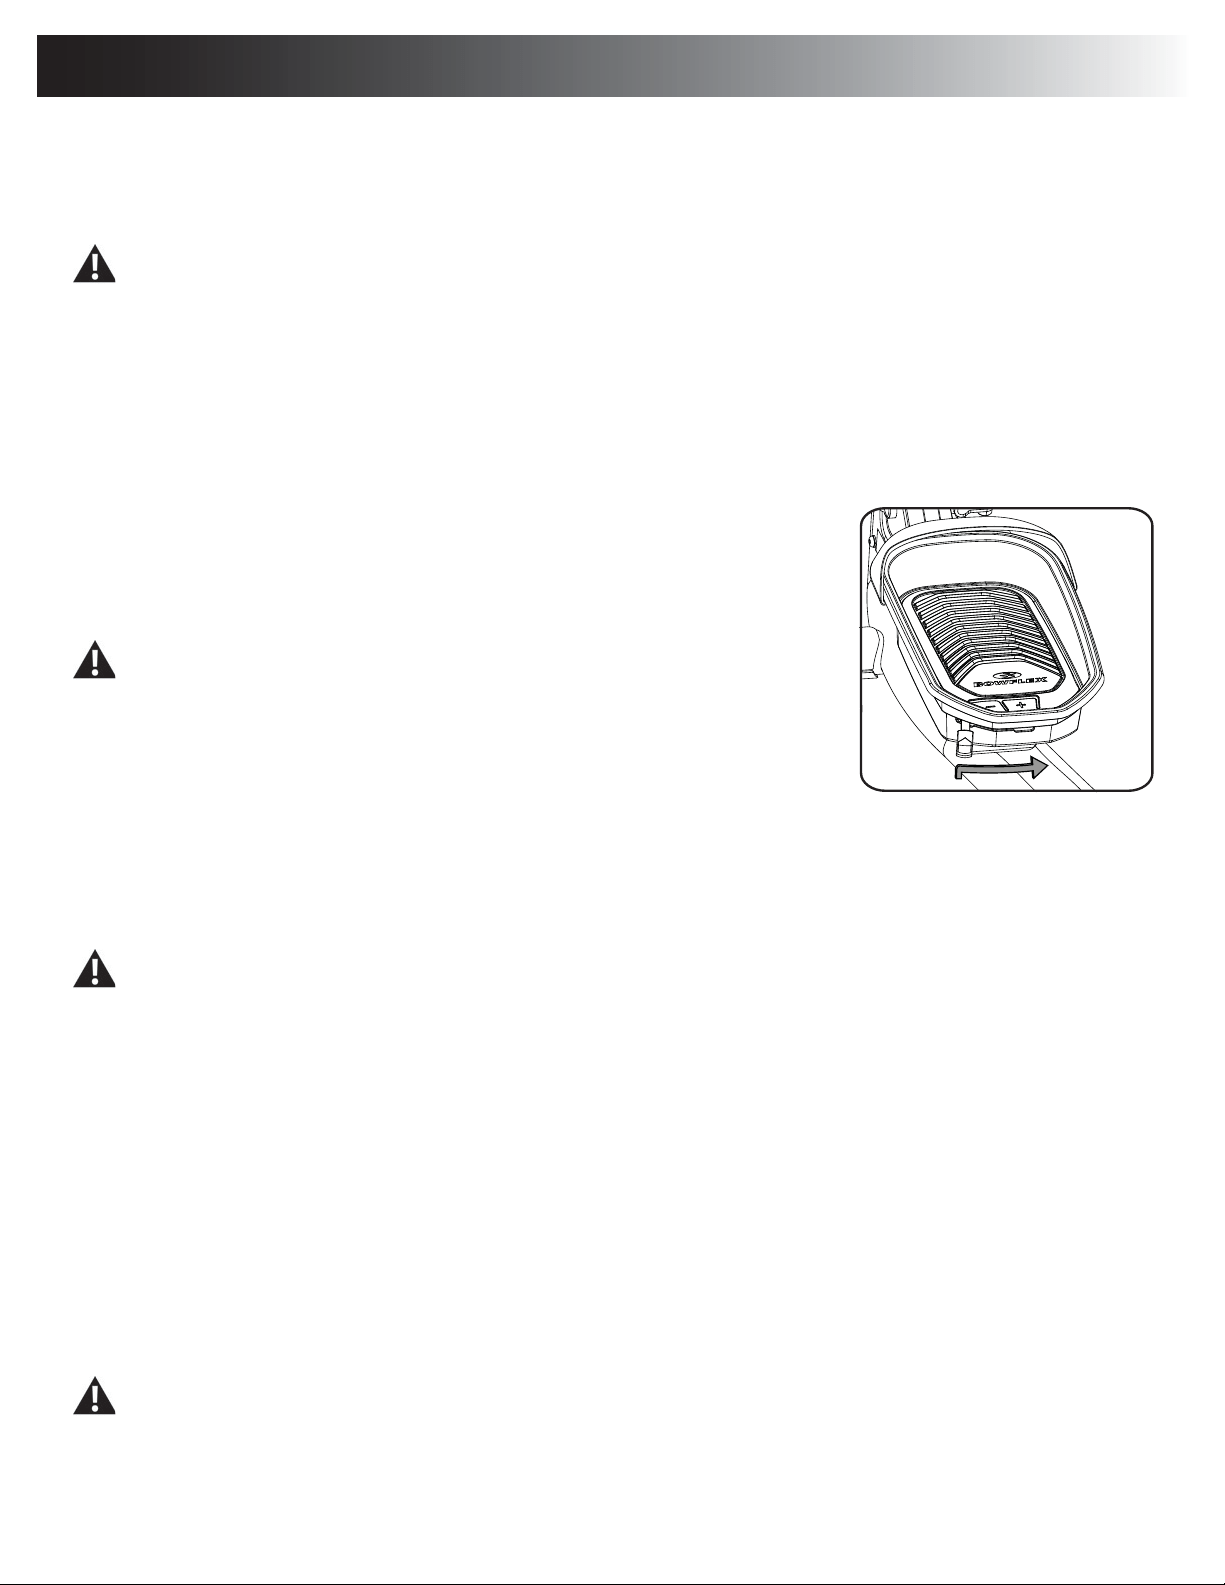
Fan button
&RQWUROVVSHHGIDQRIIKLJKPHGLXPORZ
Console Display
Time display
)RUSURJUDPVZLWKDVHWWLPHGXUDWLRQWKH7LPHGLVSOD\FRXQWVGRZQLQPLQXWHVDQGVHFRQGVWR]HUR
)RUSURJUDPVZLWKQRVHWWLPHGXUDWLRQHJ0DQXDO&DORULHVWKHGLSOD\FRXQWVWKHWRWDOWLPHRI\RXUZRUNRXWHJPLQXWHV7KHPD[LPXP
WLPHIRUDZRUNRXWLV
Workout Segment
display
%HQH¿W=RQH
display
Lateral Stride
display
Interval time 2Interval time 1
Interval progress
Coaching Card
display

Assembly / Owner’s Manual
26
Interval Time displays
'XULQJDQ,QWHUYDOZRUNRXWWKH,QWHUYDOWLPHGLVSOD\VKRZVWKHUHPDLQLQJWLPHRIWKHFXUUHQW,QWHUYDO$Q,QWHUYDOFRQVLVWVRIKLJKDQGORZLQWHQVLW\
VHJPHQWV7KH,QWHUYDOWLPHFRXQWVGRZQWKH¿UVWLQWHUYDO,QWHUYDOWLPHFRXQWVGRZQWKHVHFRQGLQWHUYDODQGWKHGLVSOD\VFRQWLQXHWRDOWHUQDWH
during the workout.
Intervals Progress display
'XULQJDQ,QWHUYDOZRUNRXWWKH,QWHUYDOVSURJUHVVGLVSOD\VKRZVWKHFXUUHQWO\DFWLYH,QWHUYDODQGWKHWRWDOQXPEHURI,QWHUYDOVIRUWKHZRUNRXW²IRU
H[DPSOHLVWKH¿UVW,QWHUYDORIDWRWDORIHLJKW,QWHUYDOV
Calories display
7KH&DORULHVGLVSOD\FRXQWV\RXUWRWDOFDORULHV7KHPD[LPXPYDOXHIRUFDORULHVGXULQJDZRUNRXWLV
Sprint display
'XULQJFHUWDLQ,QWHUYDOZRUNRXWV³6SULQW´LVLOOXPLQDWHGGXULQJDQ8SSHU%RG\VHJPHQWRIWKHZRUNRXWWRHQFRXUDJHWKHXVHUWRLQFUHDVHHIIRUW
Recover display
'XULQJFHUWDLQ,QWHUYDOZRUNRXWV³5HFRYHU´LVLOOXPLQDWHGGXULQJWKHUHGXFHGUHVLVWDQFHVHJPHQWRIWKHZRUNRXW
Benefit Zone display
'XULQJDZRUNRXWWKH%HQH¿W=RQHGLVSOD\VKRZVWKHUDWHRIFDORULHEXUQVHJPHQW FDORULHVPLQXWH
)DW%XUQJUHHQ(QGXUDQFHEOXH3HUIRUPDQFHUHG
Coa ching Card display
Upper Body display
7KHLOOXPLQDWHG8SSHU%RG\LPDJHLQGLFDWHVH[HUFLVHWKDWFRQFHQWUDWHVRQXVHRIWKHG\QDPLFKDQGOHEDUDUPVLQWKHFXUUHQWLQWHUYDOVHJPHQWLQWHUYDOSURJUDPV
Total Body display
7KHLOOXPLQDWHG7RWDO%RG\LPDJHLQGLFDWHVH[HUFLVHIRUWKHZKROHERG\LQWKHFXUUHQWLQWHUYDOVHJPHQWLQWHUYDOSURJUDPVRUZRUNRXWVWHDG\VWDWHSURJUDPV
Lower Body display
7KHLOOXPLQDWHG/RZHU%RG\LPDJHLQGLFDWHVH[HUFLVHLQDEHQWNQHHVSRVLWWLRQ³VTXDW´LQWKHFXUUHQWLQWHUYDOVHJPHQWLQWHUYDOSURJUDPV
Forward/Reverse display
$UURZVPRYHWRVKRZ\RXUUHDOWLPHGLUHFWLRQIRUZDUGXSDUURZVUHYHUVHGRZQDUURZV
)RUZDUG5HYHUVHGLUHFWLRQDOFRDFKLQJODEHOVDSSHDUGXULQJWKHDSSURSULDWHLQWHUYDO,IPDFKLQHGHWHFWVWKDW\RXDUHQRWPRYLQJLQWKHFRUUHFW
GLUHFWLRQWKHDSSURSULDWHODEHOÀDVKHVDPHVVDJHWRFKDQJHGLUHFWLRQ
Lateral Stride display
7KH/DWHUDO6WULGHGLVSOD\VKRZVWKHZLGWKIURPFHQWHURIWKHODWHUDOVWULGH7KHUDQJHLVDQGLVV\PPHWULFDOWRERWKVLGHVIURPWKHFHQWHU
Heart Rate display
7KH+HDUW5DWHGLVSOD\VKRZV\RXUKHDUWEHDWVSHUPLQXWH7KHKHDUWLFRQZLOOÀDVKZKHQDFTXLULQJWKHUDWH:LWKDVWDEOHUHDGLQJWKHLFRQZLOOEH
shown as solid.
7KHKHDUWUDWHGLVSOD\HGLVDQDSSUR[LPDWLRQDQGVKRXOGEHXVHGIRUUHIHUHQFHRQO\
$WWKHHQGRIWKHZRUNRXWWKHGLVSOD\VKRZVWKH$YHUDJH+HDUW5DWH
Workout Segment (Brickyard) display
7KH:RUNRXW6HJPHQWGLVSOD\VKRZVWKHFRXUVHSUR¿OHRIWKHZRUNRXWSURJUDP$FRXUVHSUR¿OHKDVXSWRFROXPQV7KHVHJPHQWVVKRZFKDQJHV
RIUHVLVWDQFHRYHUWKHZRUNRXW7KHPRUHLQWHQVHWKHUHVLVWDQFHVHWWLQJWKHKLJKHUWKHQXPEHURIVHJPHQWV7KHÀDVKLQJFROXPQVKRZV\RXU
location in the workout.

Assembly / Owner’s Manual
27
Resistance display
7KH5HVLVWDQFHGLVSOD\VKRZVWKHFXUUHQWUHVLVWDQFHOHYHOLQWKHZRUNRXW0D[LPXPUHVLVWDQFHOHYHOLV
$WWKHHQGRIWKHZRUNRXWWKHGLVSOD\VKRZVWKH$YHUDJH5HVLVWDQFHOHYHO
Remote Resistance and Lateral Stride Controls
7KHUHPRWH5HVLVWDQFHDQG/DWHUDO6WULGHFRQWUROVDUHORFDWHGRQWKH6WDWLF+DQGOHEDUDUPV7KHUHVLVWDQFHDQGODWHUDOVWULGHZLGWKFDQEHFRQ
WUROOHGIURPWKHVHNH\SDGV7KHNH\SDGRQWKHOHIWKDQGOHEDUDUPLQFOXGHVD/DWHUDO6WULGH,QFUHDVHNH\DQGD/DWHUDO6WULGH'HFUHDVH–NH\
7KHNH\SDGRQWKHULJKWKDQGOHEDUDUPLQFOXGHVDQ5HVLVWDQFH,QFUHDVHNH\cDQGD5HVLVWDQFH'HFUHDVHdNH\
Do not push these buttons when grabbing onto the Static Handlebar.
Bluetooth
®
Connectivity with the “Bowflex LateralX™” Fitness App
7KLV¿WQHVVPDFKLQHLVHTXLSSHGZLWK%OXHWRRWK
®
FRQQHFWLYLW\DQGFDQZLUHOHVVO\V\QFZLWKWKH³%RZÀH[/DWHUDO;´)LWQHVV$SSRQVXSSRUWHGGH
YLFHV7KH6RIWZDUH$SSV\QFVZLWK\RXU¿WQHVVPDFKLQHWRWUDFNWRWDOFDORULHVEXUQHGWLPHGLVWDQFHDQGPRUH5HFRUGVDQGVWRUHVHYHU\ZRUNRXW
IRUTXLFNUHIHUHQFH7UDFN\RXUUHVXOWVDQGVKDUHZLWKIULHQGVDQGIDPLO\
'RZQORDGWKHIUHH6RIWZDUH$SSQDPHGWKH³%RZÀH[/DWHUDO;´)LWQHVV$SS7KHVRIWZDUHDSSLVDYDLODEOHRQ$SS6WRUHDQG*RRJOH3OD\
Note:)RUDFRPSOHWHOLVWRIVXSSRUWHGGHYLFHVUHYLHZWKHVRIWZDUHDSSRQ$SS6WRUHRU*RRJOH3OD\
)ROORZWKHLQVWUXFWLRQVRQWKH6RIWZDUH$SSWRV\QF\RXUGHYLFHWR\RXUH[HUFLVHPDFKLQH
Workout with Other Fitness Apps
7KLV¿WQHVVPDFKLQHKDVLQWHJUDWHG%OXHWRRWK
®
connectivity which allows it to work with a number of digital partners. For our latest list of supported
SDUWQHUVSOHDVHYLVLWZZZERZÀH[FRPDSSV
USB Charging
,ID86%'HYLFHLVDWWDFKHGWRWKH86%3RUWWKH3RUWZLOODWWHPSWWRFKDUJHWKH'HYLFH7KHSRZHUVXSSOLHGIURPWKH86%3RUWPD\QRWEHHQRXJK
to operate the Device and charge it at the same time.
Switch Select™ Pedal Suspension Technology
7KHSHGDOVDUHHTXLSSHGZLWKWKH6ZLWFK6HOHFW3HGDO6XVSHQVLRQ7HFKQRORJ\ZKLFKDGMXVWVWKHDQJOHDQGLPSDFWUHVLVWDQFHRIWKHSHGDOV
$GMXVWPHQWRIWKHSHGDOVPD\DGDSWWKHVDPHZRUNRXWWRDIIHFWGLIIHUHQWPXVFOHJURXSV7KHKHHODUHDVRIWKHSHGDOVKDYHDGHJUHHUDQJHRI
YHUWLFDOPRWLRQ7KHDGMXVWPHQWOHYHUFDQVHWWKH¿UPQHVVRIWKHDFWLRQDFFRUGLQJWRWKHZHLJKWRIWKHXVHU
Assembly / Owner’s Manual
28
Remote Heart Rate Monitor
0RQLWRULQJ\RXU+HDUW5DWHLVRQHRIWKHEHVWSURFHGXUHVWRFRQWUROWKHLQWHQVLW\RI\RXUH[HUFLVH7KH&RQVROHUHDGVWKHWHOHPHWU\+5VLJQDOVIURP
WKH+HDUW5DWH&KHVW6WUDS7UDQVPLWWHUWKDWRSHUDWHVLQWKHN+]N+]UDQJH
Note: 7KHKHDUWUDWHFKHVWVWUDSPXVWEHDQXQFRGHGKHDUWUDWHVWUDSIURP3RODU(OHFWURRUDQXQFRGHG32/$5
®
compatible model.
&RGHG32/$5
®
KHDUWUDWHVWUDSVVXFKDV32/$5
®
OwnCode
®
FKHVWVWUDSVZLOOQRWZRUNZLWKWKLVHTXLSPHQW.
If you have a pacemaker or other implanted electronic device, consult your doctor before using a wireless chest strap or other
telemetric heart rate monitor.
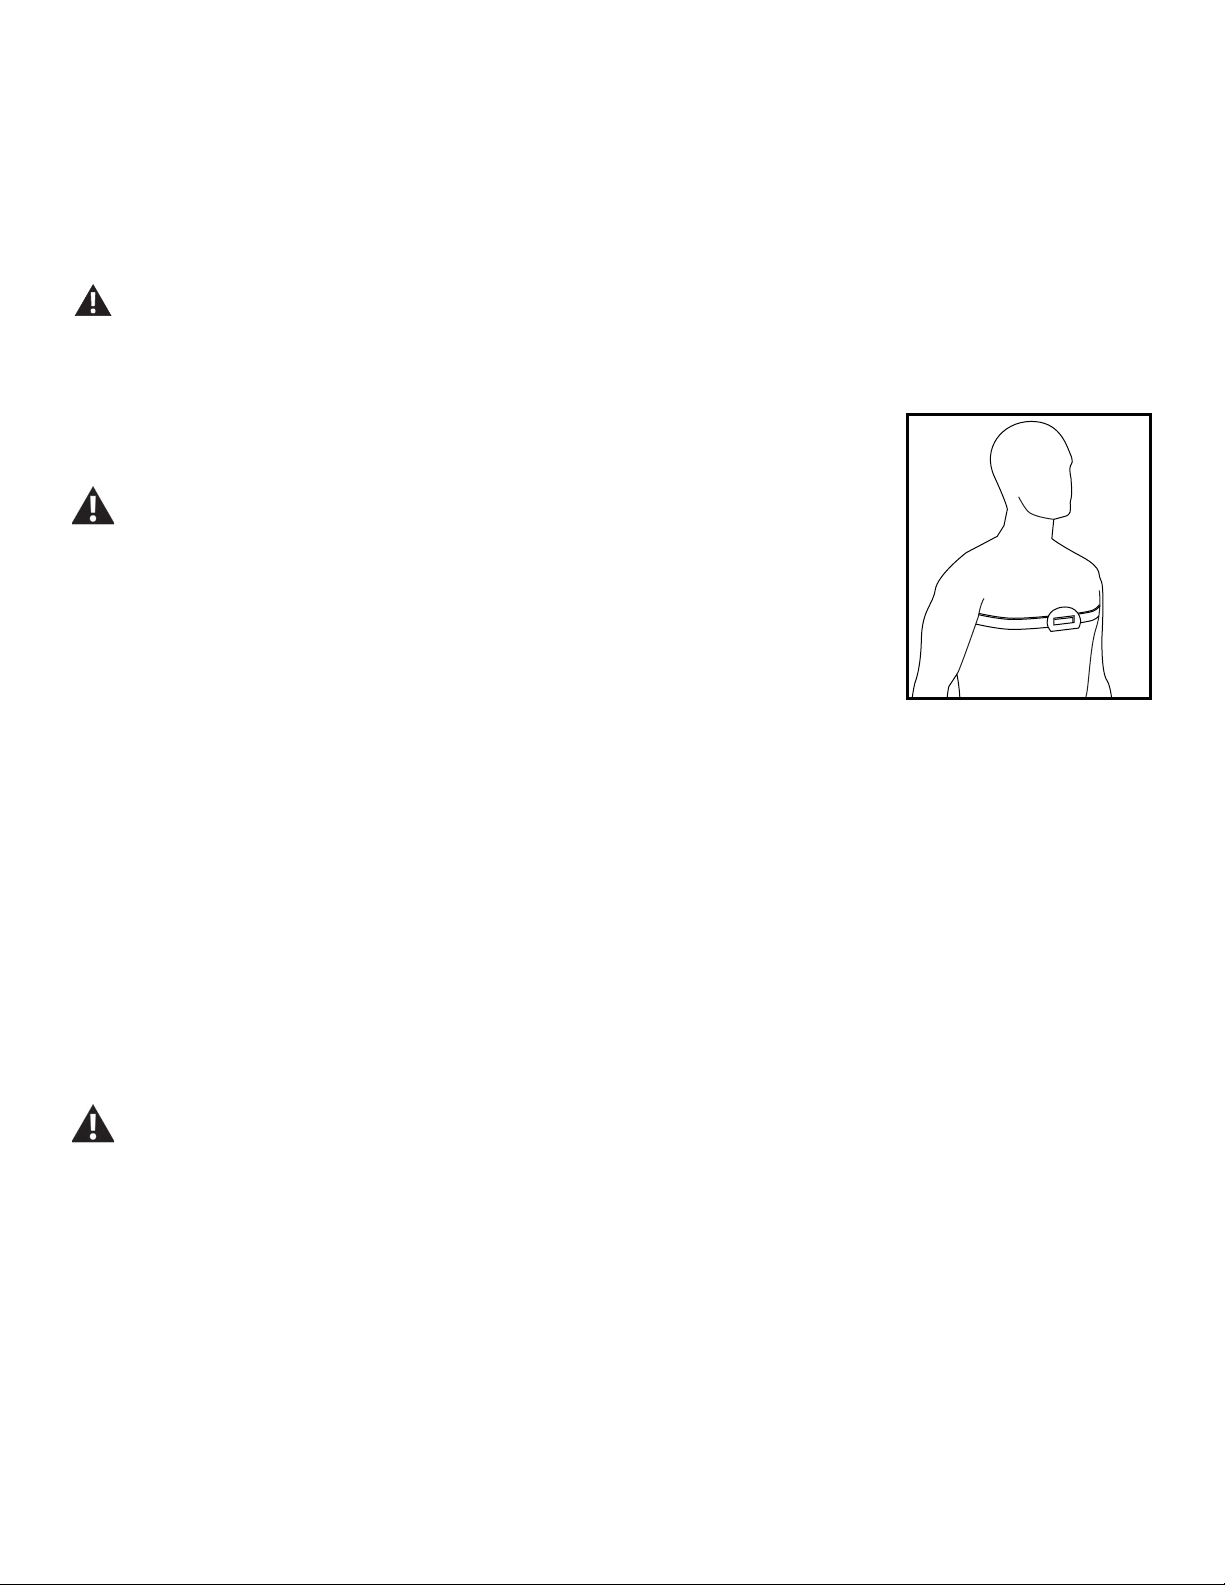
Chest Strap
Using the provided heart rate transmitter chest strap lets you monitor your heart rate at any time during your
workout.
&RQVXOWDSK\VLFLDQEHIRUH\RXVWDUWDQH[HUFLVHSURJUDP6WRSH[HUFLVLQJLI\RXIHHOSDLQRU
tightness in your chest, become short of breath, or feel faint. Contact your doctor before you use
WKHPDFKLQHDJDLQ7KHKHDUWUDWHGLVSOD\HGLVDQDSSUR[LPDWLRQDQGVKRXOGEHXVHGIRUUHIHUHQFH
only.
7RSXWRQ\RXUFKHVWVWUDS
6HFXUHWKHVWUDSDURXQG\RXUFKHVWMXVWEHORZWKHFKHVWPXVFOHV
/LIWWKHWUDQVPLWWHURII\RXUFKHVWDQGPRLVWHQWKHWZR*URRYHG(OHFWURGH$UHDVRQWKHEDFN
&KHFNWKDWWKHZHWHOHFWURGHDUHDVDUH¿UPO\DJDLQVW\RXUVNLQ
7KHWUDQVPLWWHUZLOOVHQG\RXUKHDUWUDWHWRWKHPDFKLQH¶VUHFHLYHUDQGGLVSOD\\RXUHVWLPDWHG%HDWV3HU0LQXWH%30
$OZD\VUHPRYHWKHWUDQVPLWWHUEHIRUH\RXFOHDQWKHFKHVWVWUDS&OHDQWKHFKHVWVWUDSUHJXODUO\ZLWKPLOGVRDSDQGZDWHUDQGWKRURXJKO\GU\LW5H
sidual sweat and moisture may keep the transmitter active and drain the battery in the transmitter. Dry and wipe clean the transmitter after each use.
Note: Do not use abrasives or chemicals such as steel wool or alcohol when you clean the chest strap, as they can damage the electrodes
permanently.
If the Console does not display a heart rate value, the transmitter may be at fault. Check that the textured contact areas on the chest strap are
making contact with your skin. You may need to lightly wet the contact areas. Check that the curve of the transmitter is oriented upward. If no signal
appears or you need further assistance, contact Customer Care.
Before discarding a chest strap, remove the battery. Dispose of in accordance with local regulations and/or at approved recycling
centers.
Contact Heart Rate Sensors
&RQWDFW+HDUW5DWH&+5VHQVRUVVHQG\RXUKHDUWUDWHVLJQDOVWRWKH&RQVROH7KH&+5VHQVRUVDUHWKHVWDLQOHVVVWHHOSDUWVRIWKH+DQGOHEDUV
7RXVHSXW\RXUKDQGVFRPIRUWDEO\DURXQGWKHVHQVRUV%HVXUHWKDW\RXUKDQGVWRXFKERWKWKHWRSDQGWKHERWWRPRIWKHVHQVRUV+ROG¿UPEXW
QRWWRRWLJKWRUORRVH%RWKKDQGVPXVWPDNHFRQWDFWZLWKWKHVHQVRUVIRUWKH&RQVROHWRGHWHFWDSXOVH$IWHUWKH&RQVROHGHWHFWVIRXUVWDEOHSXOVH
signals, your initial pulse rate will be shown.
2QFHWKH&RQVROHKDV\RXULQLWLDOKHDUWUDWHGRQRWPRYHRUVKLIW\RXUKDQGVIRUWRVHFRQGV7KH&RQVROHZLOOQRZYDOLGDWHWKHKHDUWUDWH
0DQ\IDFWRUVLQÀXHQFHWKHDELOLW\RIWKHVHQVRUVWRGHWHFW\RXUKHDUWUDWHVLJQDO
• 0RYHPHQWRIWKHXSSHUERG\PXVFOHVLQFOXGLQJDUPVSURGXFHVDQHOHFWULFDOVLJQDOPXVFOHDUWLIDFWWKDWFDQLQWHUIHUHZLWKSXOVHGHWHFWLRQ6OLJKW
hand movement while in contact with the sensors can also produce interference.

Assembly / Owner’s Manual
29
• Calluses and hand lotion may act as an insulating layer to reduce the signal strength.
• 6RPH(OHFWURFDUGLRJUDP(.*VLJQDOVJHQHUDWHGE\LQGLYLGXDOVDUHQRWVWURQJHQRXJKWREHGHWHFWHGE\WKHVHQVRUV
• 7KHSUR[LPLW\RIRWKHUHOHFWURQLFPDFKLQHVFDQJHQHUDWHLQWHUIHUHQFH
If your heart rate signal ever seems erratic after validation, wipe off your hands and the sensors and try again.
7KHKHDUWUDWHGLVSOD\HGLVDQDSSUR[LPDWLRQDQGVKRXOGEHXVHGIRUUHIHUHQFHRQO\
Assembly / Owner’s Manual
30
Operations
What to Wear
:HDUUXEEHUVROHGDWKOHWLFVKRHV<RXZLOOQHHGWKHDSSURSULDWHFORWKHVIRUH[HUFLVHWKDWDOORZ\RXWRPRYHIUHHO\
How Often Should You Exercise
&RQVXOWDSK\VLFLDQEHIRUH\RXVWDUWDQH[HUFLVHSURJUDP6WRSH[HUFLVLQJLI\RXIHHOSDLQRUWLJKWQHVVLQ\RXUFKHVWEHFRPHVKRUW
of breath, or feel faint. Contact your doctor before you use the machine again. Use the values calculated or measured by the
PDFKLQH·VFRPSXWHUIRUUHIHUHQFHSXUSRVHVRQO\7KHKHDUWUDWHGLVSOD\HGRQWKHFRQVROHLVDQDSSUR[LPDWLRQDQGVKRXOGEHXVHG
for reference only.
• 3 times a week for 30 minutes each day.
• Schedule workouts in advance and try to follow the schedule.
• &RQVLGHUGRLQJVRPHZDUPXSVWUHWFKHVZKLFKZLOOKHOSSUHSDUH\RXUERG\EHIRUH\RXUZRUNRXWV
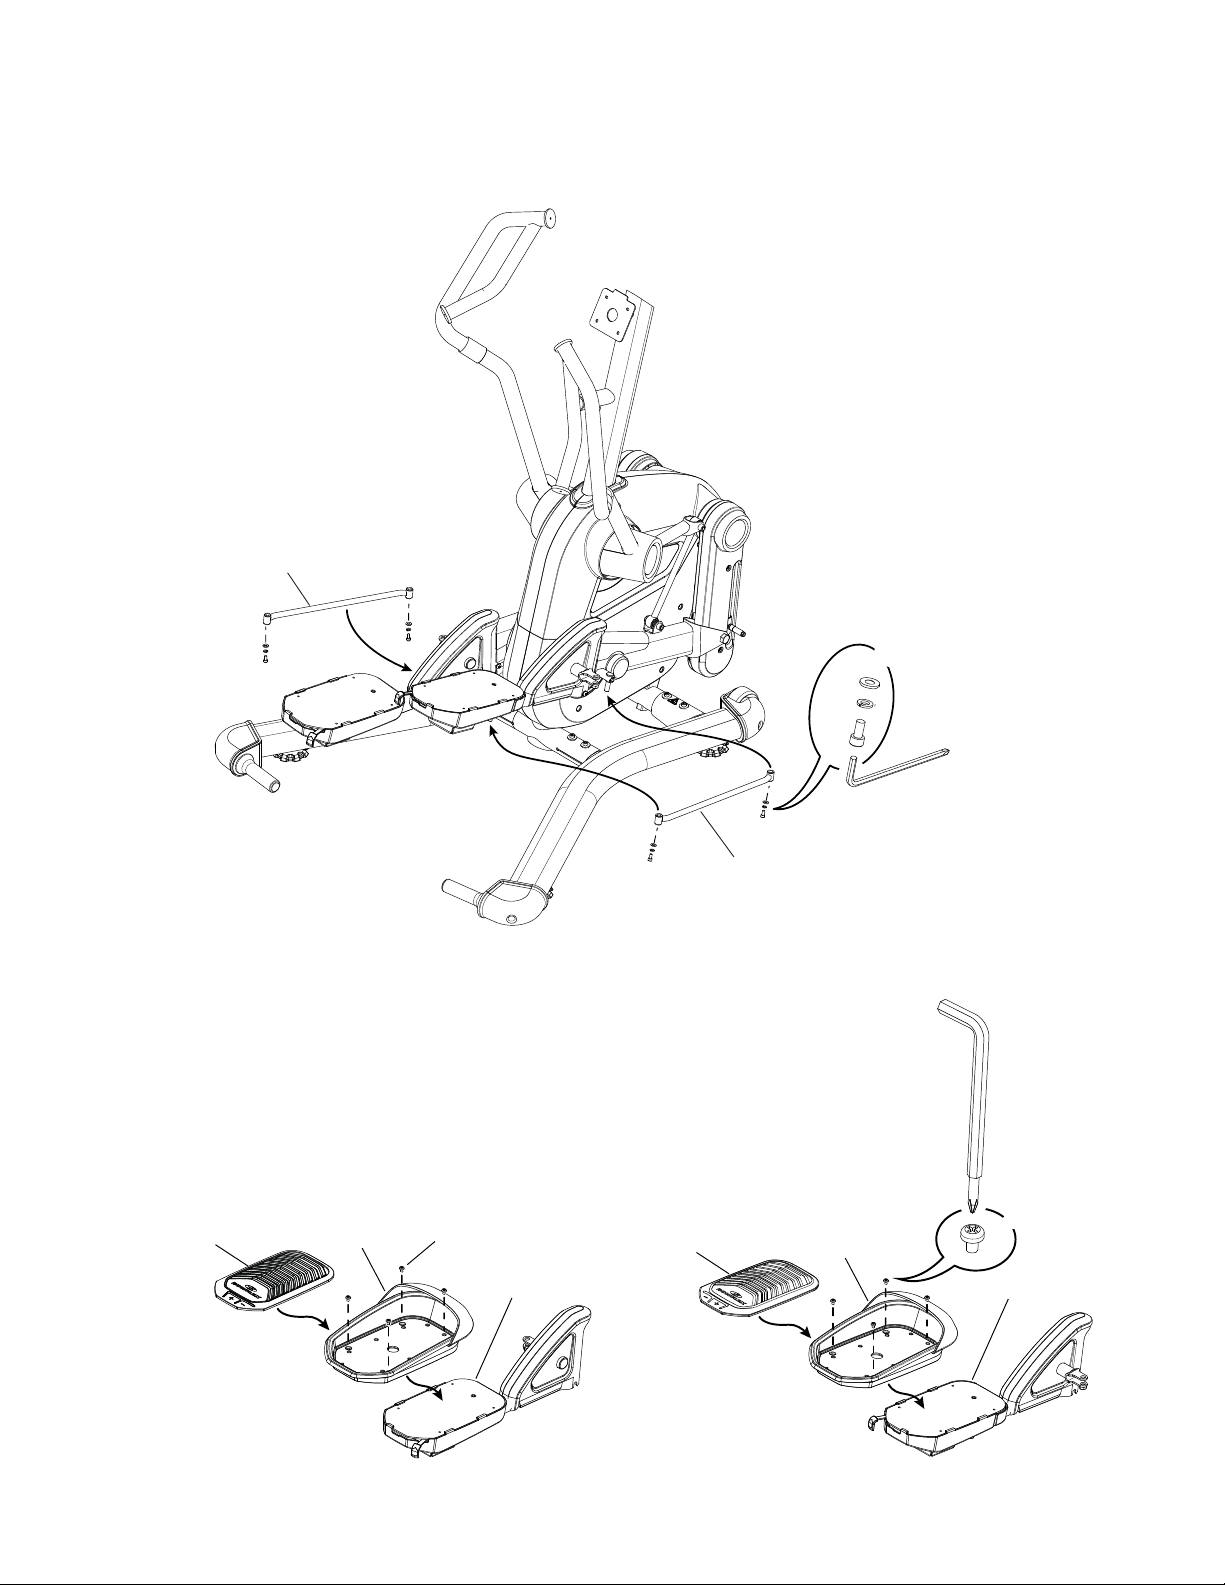
Adjusting the Pedals
7KH3HGDOVDUHHTXLSSHGZLWKWKH6ZLWFK6HOHFW3HGDO6XVSHQVLRQ7HFKQRORJ\ZKLFKDGMXVWVWKHDQJOH
RIWKH3HGDOV$GMXVWPHQWRIWKH3HGDOVPD\DGDSWWKHVDPHZRUNRXWWRDIIHFWGLIIHUHQWPXVFOHJURXSV
Note:,WLVUHFRPPHQGHGWRDGMXVWERWK3HGDOVWRWKHVDPHVHWWLQJ
Do not adjust the Pedals when on the machine.
7RDGMXVWWKH3HGDO
7LOWWKHEDFNRIWKH3HGDOXS
/LIWWKHDGMXVWPHQWOHYHURXWRIWKHQRWFKIRUWKHFXUUHQWVHWWLQJDQGPRYHLWWRWKHGHVLUHGVHWWLQJ%H
sure the lever is engaged in the notch at the new setting.
Mounting and Dismounting the Machine
Care should be used when mounting or dismounting the machine.
Be aware that the Pedals and the Upper Handlebars are connected and when either of these parts move the other does as well. In
order to avoid possible serious injury, only grasp the Static Handlebars to steady yourself.
7RPRXQWWKH¿WQHVVPDFKLQH
1. Move the Pedals until the one nearest you is in the lowest position.
*UDVSWKH6WDWLF+DQGOHEDUVXQGHUWKH&RQVROH
3. Steadying yourself with the Static Handlebars, step up onto the lowest Pedal and place your other foot onto the opposite Pedal.
7RGLVPRXQWWKH¿WQHVVPDFKLQH
1. Move the Pedal you want to dismount from to the highest position, and bring the machine to a complete stop.
This machine is not equipped with a free-wheel. Pedal speed should be reduced in a controlled manner.

Assembly / Owner’s Manual
31
*UDVSWKH6WDWLF+DQGOHEDUVXQGHUWKH&RQVROHWRVWHDG\\RXUVHOI
:LWK\RXUZHLJKWRQWKHORZHVWIRRWVZLQJWKHXSSHUIRRWRIIWKHPDFKLQHDQGGRZQRQWRWKHÀRRU
4. Step off of the machine and release your grip from the Static Handlebars.
Power Up / Idle Mode
7KH&RQVROHZLOOHQWHU3RZHU8SPRGHZKHQLQLWLDOO\SOXJJHGLQWRDSRZHUVRXUFHDQ\EXWWRQLVSXVKHGRULILWUHFHLYHVDVLJQDOIURPWKH530VHQ
VRUDVDUHVXOWRISHGDOLQJWKHPDFKLQH7KHVFUHHQGLVSOD\VWKH;PRGH
™
program.
Shut Off (Sleep Mode)
,IWKH&RQVROHGRHVQRWUHFHLYHDQ\LQSXWIRU¿YHPLQXWHVLWZLOODXWRPDWLFDOO\VKXWRII
3XVKDQ\EXWWRQWRVWDUWZDNHXSWKH&RQVROH
Note:7KH&RQVROHGRHVQRWKDYHDQ2Q2IIVZLWFK
8VHU3URĆOHV
7KH&RQVROHLVHTXLSSHGZLWK8VHU3UR¿OHV(DFK8VHU3UR¿OHKDVYDOXHVDQGRSWLRQVVSHFL¿FWRLW
6FUHHQ%ULJKWQHVV
5HVHW8VHU
7KHODVWSURJUDPWKDWD8VHUFRPSOHWHGZLOOEHWKHGHIDXOWSURJUDPIRUWKDW8VHU$ZRUNRXWRIPLQXWHRUORQJHUZLOOEHVDYHGWRWKH8VHUSUR¿OH
7KHODVW9ROXPHOHYHOWKDWD8VHUVHWZLOOEHWKHGHIDXOWYROXPHIRUWKDW8VHU
6HOHFWD8VHU3URĆOH
(YHU\ZRUNRXWLVVDYHGWRWKH8VHU3UR¿OHDQGFDQEHUHYLHZHGZLWKWKH%RZÀH[/DWHUDO;$SS%HVXUHWRVHOHFWWKHSURSHU8VHU3UR¿OHEHIRUH
VWDUWLQJDZRUNRXW7KHODVW8VHUWKDWFRPSOHWHGDZRUNRXWZLOOEHWKHGHIDXOW8VHU
8VHU3UR¿OHVDUHDVVLJQHGWKHGHIDXOWYDOXHVXQWLOWKH\DUHFXVWRPL]HGE\HGLWLQJ
(GLW8VHU3URĆOH
1. From the 3RZHU8S0RGHVFUHHQSXVKWKH86(5EXWWRQWRVHOHFWRQHRIWKH8VHU3UR¿OHV
3XVKDQGKROGGRZQIRUVHFRQGVWKH86(5EXWWRQWRHGLWWKH8VHU3UR¿OH
7KH&RQVROHGLVSOD\VKRZVWKH6FUHHQ%ULJKWQHVVSURPSWDQGWKHFXUUHQWYDOXH
3XVKWKH,QFUHDVHRU'HFUHDVHEXWWRQVWRFKDQJHWKHGLVSOD\HG6FUHHQ%ULJKWQHVVYDOXHDQGSXVKWKH(17(5EXWWRQWRDFFHSWWKHGLVSOD\HG
value.
Note: 7RH[LWWKH8VHU3URILOHRSWLRQVSXVKWKH67233$86(EXWWRQDQGWKHFRQVROHZLOOJREDFNWRWKH3RZHU8S0RGHVFUHHQ
7RUHWXUQWRWKHSUHYLRXVSURPSWSXVKWKH/HIWRU%DFNDUURZEXWWRQ
7KH&RQVROHGLVSOD\VKRZVWKH5HVHW8VHUSURPSWDQGWKHFXUUHQWYDOXH³12´7RHUDVHDOOZRUNRXWVIRUWKHVHOHFWHG8VHUSXVKWKH,QFUHDVH
(cRU'HFUHDVHdEXWWRQWRFKDQJHWKHYDOXHWR³<(6´DQGSXVK(QWHU7KH&RQVROHZLOOQRZFRQ¿UPLIWKH8VHUZDQWVWRHUDVHWKHZRUNRXWV
Use the Increase (cRU'HFUHDVHdEXWWRQWRFKDQJHWKHYDOXHWR³<(6´DQGSXVK(QWHU7KHZRUNRXWVIRUWKLV8VHUKDYHEHHQHUDVHG
7KH&RQVROHGLVSOD\VKRZVWKHFRQ¿UPDWLRQVFUHHQIRUWZRVHFRQGVDQGWKHQZLOOJRWRWKH3RZHU8S0RGHVFUHHQ

Assembly / Owner’s Manual
32
Getting Started
,I\RXDUHMXVWVWDUWLQJD¿WQHVVSURJUDPRUUHWXUQLQJWRRQHDIWHUDORQJWLPHRIIFKDQFHVDUH\RXPLJKWQRWEHDEOHWRGRPLQXWHVRQLWULJKWDZD\
7KDW¶VRND\2QHRIWKHSULPDU\UHDVRQVWKH%RZÀH[/DWHUDO;
™
7UDLQHULVVRHIIHFWLYHLVWKDWLWLVFKDOOHQJLQJDQGLWLVGLIIHUHQWVR\RXQHHGWLPHWR
get used to it.
%HJLQE\VLPSO\WXUQLQJLWRQDQGH[SHULHQFLQJWKHXQLTXHPRWLRQWKH/DWHUDO;
™
7UDLQHUSURYLGHV&KDQJH\RXUKDQGSRVLWLRQVDURXQGRQWKHKDQGOHV
3ODFHWKHPKLJKLQWKHPLGGOHORZDQGRQWKHVWDWLRQDU\JULSVLQWKHFHQWHURIWKH/DWHUDO;7UDLQHU
5HDOL]HWKDW\RXU¿UVWVHVVLRQPLJKWMXVWEHDIHZPLQXWHV2QFHDJDLQWKDW¶VFRPSOHWHO\QRUPDO<RXQHHGWREXLOGXSVORZO\RQWKH/DWHUDO;
™
7UDLQHU²7KHUHDVRQ\RXFDQWRUFKVRPDQ\FDORULHVLQMXVWPLQXWHVLVWKDWLWLVDFKDOOHQJLQJZRUNRXW<RXUIRFXVVKRXOGEHRQXVLQJWKH/DWHU
DO;
™
7UDLQHUFRQVLVWHQWO\QRWWKHRYHUDOOOHQJWKRIWKHVHVVLRQV
6RJLYH\RXUVHOIWLPHWREXLOGXSWRPLQXWHV,WPD\WDNHVHYHUDOZHHNV5HDOL]HWKDWHYHU\VHVVLRQFRXQWVHYHQMXVWDIHZPLQXWHV(YHU\ZRUNRXW
ZLOOPDNH\RXDOLWWOHVWURQJHUJHW\RXDOLWWOHFORVHUWR\RXUJRDODQGEHIRUH\RXNQRZLW\RX¶OOEHGRLQJWKHIXOOPLQXWH;PRGHZRUNRXW
X-mode
™
16 Minute Interval Program (initial default program)
6WUHQJWKHQ\RXUHYHU\GD\PXVFOHV²7RKHOS\RXJHWWKHPD[LPXPUHVXOWVLQWKHVKRUWHVWDPRXQWRIWLPHZHKDYHDGGHGDEXLOWLQPLQXWH;
mode™ workout that you can start with the simple touch of the button.
7KH0LQXWH;PRGH:RUNRXWEUHDNVGRZQLQWRWKHVHLQWHUYDOV
VHFRQGVRI7RWDO%RG\
VHFRQGVRI/RZHU%RG\
5HSHDWWKHLQWHUYDOVPRUHWLPHV
5HPHPEHUWRZRUNRXWDWDSDFHWKDWLVFRPIRUWDEOHIRU\RX
7KH&RQVROHVFUHHQGLVSOD\VWKH;PRGH
™
SURJUDPDW3RZHU8S7RVWDUWWKHSURJUDPSXVKWKH67$57EXWWRQ7KHSURJUDPKDVLQWHUYDOV
minutes for each interval.
5HYLHZWKHFXUUHQWO\VHOHFWHG8VHU3UR¿OH3XVKWKH86(5EXWWRQWRFKDQJHWKHDFWLYH8VHU3UR¿OH
2. Mount the machine.
3XVKWKH;PRGH
™
EXWWRQDQGSXVK67$57
Your workout will begin after the three second, audible beep countdown.
$VHDFKFROXPQLVGRQHWKH&RQVROHKLGHVLWVRWKDWRQO\WKHUHPDLQLQJFROXPQVDUHYLVLEOH7KHXVHUFDQDOVRPDQXDOO\DGMXVWWKHUHVLVWDQFHYDOXHV
at any time during a workout.
([HUFLVHRQWKLVPDFKLQHUHTXLUHVFRRUGLQDWLRQDQGEDODQFH%HVXUHWRDQWLFLSDWHWKDWFKDQJHVLQUHVLVWDQFHOHYHOVDQGODWHUDO
stride width can occur during workouts, and be attentive in order to avoid loss of balance and possible injury.
'XULQJD3URÀOH3URJUDPZRUNRXWWKH&RQVROHZLOOPDNHDQDXGLEOHEHHSZKHQWKHQH[WVHJPHQWRIWKHZRUNRXWRFFXUV%HSUH-
pared for changes in Resistance with each segment change.
If the Sound has been muted, the Console will display the “AUDIO OFF” prompt for a few seconds.
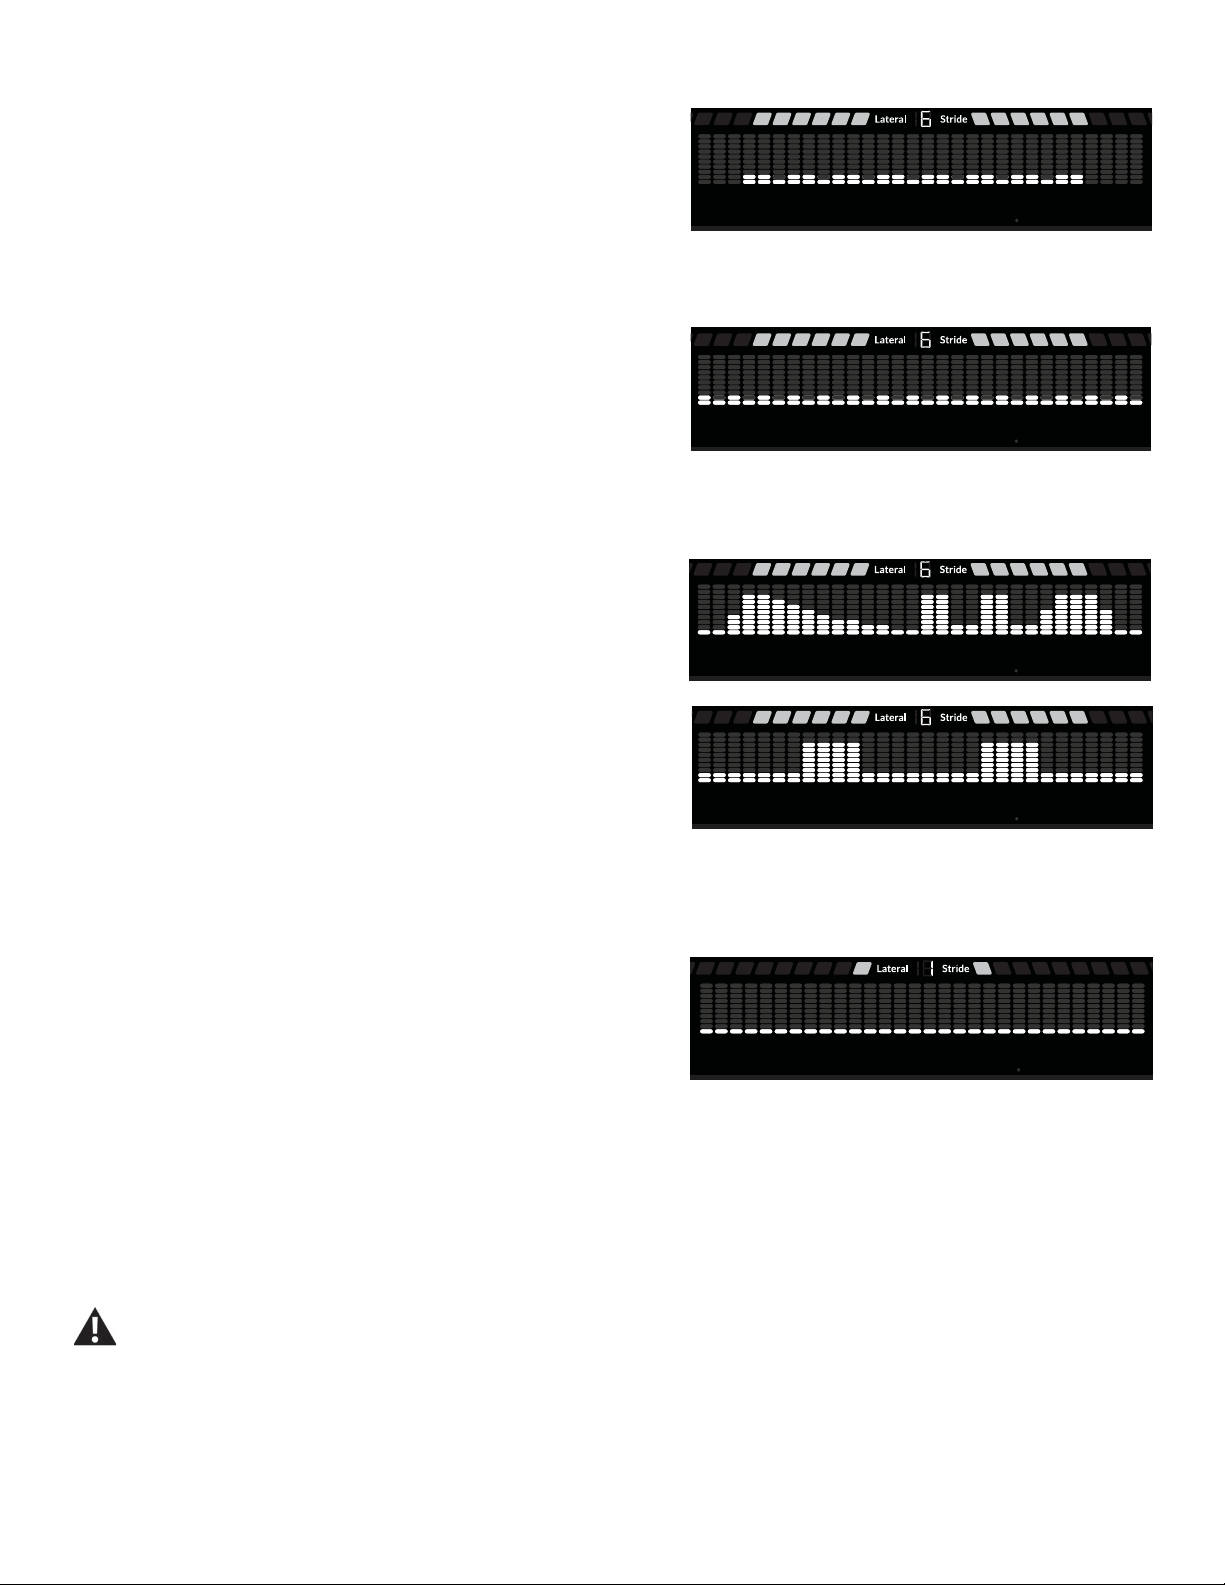
Workout Programs
7KH:RUNRXW3URJUDPVKDYHXSWRFROXPQVDOORZLQJIRUDYDULHW\RIUHVLVWDQFHEDVHGZRUNRXWV$VWKHZRUNRXWSURJUHVVHVWKHFXUUHQWVHJPHQW
FROXPQÀDVKHV7KHXVHUFDQDOVRPDQXDOO\DGMXVWWKHUHVLVWDQFHYDOXHVDWDQ\WLPHGXULQJDZRUNRXW
'XULQJD3URÀOH3URJUDPZRUNRXWWKH&RQVROHZLOOPDNHDQDXGLEOHEHHSZKHQWKHQH[WVHJPHQWRIWKHZRUNRXWRFFXUV%H
prepared for changes in Resistance with each segment change.
If the Sound has been muted, the Console will display the “AUDIO OFF” prompt for a few seconds.
Programs
Assembly / Owner’s Manual
33
:RUNRXWVRIPLQXWHRUORQJHUDUHDXWRPDWLFDOO\VDYHGWRWKH&RQVROH$PD[LPXPRIZRUNRXWVFDQEHVDYHGWRWKH&RQVROH2QFHWKHPDL
mum number of workouts is reached, the oldest workout will be erased.
Interval Workout Programs
'XULQJDQ,QWHUYDO:RUNRXWWKHZRUNRXWZLOOVZLWFKEHWZHHQDQLQFUHDVHGDFWLYLW\SHULRGDQGDORZHUDFWLYLW\SHULRG7KLVVKLIWZLOOEHUHSHDWHGIRUWKH
WRWDOQXPEHURILQWHUYDOV7KH&RQVROHZLOOVKRZWKHFXUUHQW,QWHUYDODQGKRZPDQ\,QWHUYDOVQHHGWREHFRPSOHWHG³´LVWKH¿UVW,QWHUYDORIDWRWDO
RIHLJKW,QWHUYDOV7KH&RQVROHZLOOFRXQWGRZQWKHWLPHUHPDLQLQJRIWKHDFWLYHSDUWRIWKH,QWHUYDO'XULQJFHUWDLQ,QWHUYDO:RUNRXWVWKH&RQVROH
GLVSOD\ZLOOVKRZ6SULQWGXULQJLQFUHDVHGDFWLYLW\SHULRGRU5HFRYHUVORZHUSDFHGµFDWFK\RXUEUHDWK¶WLPHSHULRG
X-mode
™
16 Minute Interval
LQWHUYDOVPLQXWHVIRUHDFKLQWHUYDO
7RWDOERG\GHIDXOWODWHUDOUHVLVWDQFHWZRFROXPQV VHFRQGV
/RZHUERG\GHIDXOWODWHUDOUHVLVWDQFHRQHFROXPQ VHFRQGV
Lateral Stride Interval
PLQXWHSURJUDPLQWHUYDOVPLQXWHVIRUHDFKLQWHUYDO
1DUURZGHIDXOWODWHUDOUHVLVWDQFHRQHFROXPQ VHFV
:LGHGHIDXOWODWHUDOUHVLVWDQFHRQHFROXPQ VHFV
Thigh Toner Interval
PLQXWHSURJUDPLQWHUYDOVPLQXWHVIRUHDFKLQWHUYDO
$GMXVWVODWHUDOZLGWKDFFRUGLQJWRXVHU¶VVSHHG
0RUHHIIRUWJHWVZLGHUGHIDXOWUHVLVWDQFHRQHFROXPQ VHFV
/HVVHIIRUWJHWVQDUURZHUGHIDXOWUHVLVWDQFHWZRFROXPQV VHFV
'HIDXOWODWHUDO
• Lateral Stride buttons disabled
Quad Power Interval
PLQXWHSURJUDPLQWHUYDOVPLQXWHVIRUHDFKLQWHUYDO
$GMXVWVUHVLVWDQFHDQGODWHUDOZLGWKDFFRUGLQJWRXVHU¶VVSHHG
0RUHHIIRUWJHWVZLGHUUHVLVWDQFHJHWVKLJKHUGHIDXOWUHVLVWDQFHRQHFROXPQ
30 secs
/HVVHIIRUWJHWVQDUURZHUUHVLVWDQFHJHWVORZHUGHIDXOWUHVLVWDQFHWZR
FROXPQV VHFV
'HIDXOWODWHUDO
5HVLVWDQFHDQG/DWHUDO6WULGHEXWWRQVGLVDEOHG
Total Body
PLQXWHSURJUDPLQWHUYDOVPLQXWHVIRUHDFKLQWHUYDO
7RWDOERG\GHIDXOWUHVLVWDQFHRQHFROXPQ VHFRQGV
8SSHUERG\GHIDXOWUHVLVWDQFHRQHFROXPQ VHFRQGV
/RZHUERG\GHIDXOWUHVLVWDQFHRQHFROXPQ VHFRQGV
'HIDXOWODWHUDO
The ”Sprint” period of an Interval Workout is a suggested workout level increase, and should only be followed if your physical
ÀWQHVVOHYHODOORZV
00Walking0interval000
000000TOTAL0BODY00o00
00Walking0interval000
0THIGH0TONER0interval
00Walking0interval000
0QUAD0POWER0interval0
00Walking0interval000
00LATERAL0STRIDE0int0
Assembly / Owner’s Manual
34
00Walking0interval000
00000STAND0SQUAT
00000
00Walking0interval000
0
00
DUAL0DIRECTION
0000
Stand Squat
PLQXWHSURJUDPLQWHUYDOVPLQXWHVIRUHDFKLQWHUYDO
7RWDOERG\GHIDXOWUHVLVWDQFHWZRFROXPQV VHFRQGV
/RZHUERG\GHIDXOWUHVLVWDQFHRQHFROXPQ VHFRQGV
5HYHUVHGLUHFWLRQ7RWDOERG\GHIDXOWUHVLVWDQFHWZRFROXPQV VHFRQGV
5HYHUVHGLUHFWLRQ/RZHUERG\GHIDXOWUHVLVWDQFHRQHFROXPQ VHFRQGV
'HIDXOWODWHUDO
Dual Direction
PLQXWHSURJUDPLQWHUYDOVPLQXWHVIRUHDFKLQWHUYDO
)RUZDUGGHIDXOWUHVLVWDQFHRQHFROXPQ VHFRQGV
5HYHUVHGHIDXOWUHVLVWDQFHRQHFROXPQ VHFRQGV
'HIDXOWODWHUDO
Steady State Programs
Fat Burn
PLQXWHSURJUDPPLQXWHHDFKFROXPQ
'HIDXOWODWHUDO
Calorie Goal
FDORULHVGHIDXOWJRDO
%HIRUHDZRUNRXWSXVKWKH,QFUHDVHcRU'HFUHDVHdEXWWRQVWRDGMXVWWKH
*RDOE\FDORULHLQFUHPHQWV
Note: 50 calories is the minimum, 9950 calories is the maximum.
0RYHPHQWRIWKHÀDVKLQJLQGLFDWRUDFURVVWKHFROXPQVVKRZVSURJUHVVWRZDUGWKH
FDORULHJRDO7KHWZRSHDNVUHSUHVHQWUHVLVWDQFHDGMXVWPHQWVGHIDXOWUHVLVWDQFHWKHQ
'HIDXOWODWHUDO
Manual
2SHQHQGHGZRUNRXWPLQXWHHDFKFROXPQ
Note:PD[LPXPWLPHLV
'HIDXOWODWHUDO
Starting a Workout
7REHJLQDZRUNRXW
5HYLHZWKHFXUUHQWO\VHOHFWHG8VHU3UR¿OH3XVKWKH86(5EXWWRQWRFKDQJHWKHDFWLYH8VHU3UR¿OH
2. Mount the machine.
Be sure that the workout space you are utilizing has adequate height clearance, taking into consideration the height of the user and
WKHPD[LPXPKHLJKWRIWKH3HGDOV
3XVKWKHEXWWRQIRUWKHGHVLUHG3URJUDP:RUNRXW7KH&RQVROHZLOOVKRZWKHVHOHFWHGZRUNRXW
3XVKWKH67$57EXWWRQ
00Walking0interval000
000000FAT0
BURN
0000000
00Walking0interval000
0000000MANUAL00000000
00Walking0interval000
00o00CALORIE0
GOAL
0000

Assembly / Owner’s Manual
35
Your workout will begin after the three second, audible beep countdown.
([HUFLVHRQWKLVPDFKLQHUHTXLUHVFRRUGLQDWLRQDQGEDODQFH%HVXUHWRDQWLFLSDWHWKDWFKDQJHVLQUHVLVWDQFHOHYHOVDQGODWHUDO
stride width can occur during workouts, and be attentive in order to avoid loss of balance and possible injury.
'XULQJD3URÀOH3URJUDPZRUNRXWWKH&RQVROHZLOOPDNHDQDXGLEOHEHHSZKHQWKHQH[WVHJPHQWRIWKHZRUNRXWRFFXUV%HSUH
pared for changes in Resistance and Lateral Stride width with each segment change.
If the Sound has been muted, the Console will display the “AUDIO OFF” prompt for a few seconds.
,IGXULQJDZRUNRXWWKH8VHUSXVKHVRQHRIWKH3URJUDPEXWWRQVWKH&RQVROHZLOODVNLIWKH\ZRXOGOLNHWRVZLWFKZRUNRXWV,IWKH8VHUFRQ¿UPV
WKHVZLWFKE\SUHVVLQJWKH(17(5EXWWRQWKHFXUUHQWZRUNRXWZLOOEHHQGHG7KHQHZZRUNRXWSURJUDPZLOOEHGLVSOD\HGDQGZLOOEHJLQZKHQWKH
67$57EXWWRQLVSXVKHG
Changing Lateral Stride Width
Push the Lateral Stride Increase(+RU'HFUHDVH–EXWWRQVWRFKDQJHWKHZLGWKRIWKHODWHUDOVWULGHPRWLRQEHIRUHRUGXULQJDZRUNRXWSURJUDP
Note:7KH/DWHUDO6WULGHEXWWRQVDUHGLVDEOHGGXULQJWKH7KLJK7RQHU,QWHUYDODQG4XDG3RZHU,QWHUYDOSURJUDPV.
Changing Resistance Levels
3XVKWKH5HVLVWDQFH/HYHO,QFUHDVHcRU'HFUHDVHdEXWWRQVWRFKDQJHWKHUHVLVWDQFHOHYHOEHIRUHRUGXULQJDZRUNRXWSURJUDP
Note:7KH5HVLVWDQFHEXWWRQVDUHGLVDEOHGGXULQJ4XDG3RZHU,QWHUYDOSURJUDPV.
Changing a Workout Program During a Workout
7KH&RQVROHDOORZVDGLIIHUHQW:RUNRXW3URJUDPWREHVWDUWHGIURPDQDFWLYHZRUNRXW
1. From an active workout, push the button for the desired Program Workout. .
7KH&RQVROHZLOOVKRZDSURPSWWRFRQ¿UPWKHZRUNRXWVHOHFWLRQ3XVK(17(5
7RFRQWLQXHLQWKHFXUUHQWSURJUDPXVHWKH,QFUHDVHcRU'HFUHDVHdEXWWRQVWRVHOHFW12DQGSXVK(17(5
Note:7KHZRUNRXWPHWULFVZLOOQRWFDUU\RYHUIURPWKHSUHYLRXVZRUNRXWWRWKHQHZZRUNRXW,IWKHSUHYLRXVZRUNRXWZDVDWOHDVWRQH
PLQXWHORQJWKHUHVXOWVZLOOEHVDYHGWRWKH8VHUSUR¿OH
7KH&RQVROHZLOOVKRZWKHVHOHFWHGZRUNRXW3XVKWKH67$57EXWWRQ
Your workout will begin after the three second, audible beep countdown.
Pausing or Stopping a Workout
6WRSSHGDOLQJDQGSXVKWKH67233$86(EXWWRQWRSDXVHWKHZRUNRXW
Note:7KHZRUNRXWDXWRPDWLFDOO\SDXVHVLIWKHUHLVQRLQSXWIRUVHFRQGV,IDSDXVHGZRUNRXWLVQRWUHVWDUWHGLQPLQXWHVWKHPDFKLQHZLOO
end the workout and display the workout results.
7RUHVXPH\RXUZRUNRXWSXVKWKH67$57EXWWRQRUEHJLQSHGDOLQJ7RHQG\RXUZRUNRXWSXVK67233$86(DJDLQ7KH&RQVROHZLOOGLVSOD\
your workout results.

Assembly / Owner’s Manual
36
Workout Complete / Results
:KHQWKHJRDORIDZRUNRXWLVDFKLHYHGWKH&RQVROHZLOOGLVSOD\³:RUNRXW&RPSOHWH´IRUWZRVHFRQGV7KH&RQVROHZLOOGLVSOD\WKHZRUNRXW
UHVXOWV²7LPH&DORULHV,QWHUYDOURXQGV,QWHUYDOSURJUDPVRQO\EULFN\DUGGLVSOD\RIWKHXVHU¶VRXWSXW/DWHUDO6WULGHODVWODWHUDOQXPEHU$YHUDJH
+HDUW5DWHDQG$YHUDJH5HVLVWDQFHOHYHO7KHQWKH&RQVROHZLOOGLVSOD\³6DYLQJ:RUNRXW´IRUWZRVHFRQGV
7DSWKH6\QFLFRQRQWKHDSSVFUHHQRQ\RXUGHYLFHWRGRZQORDGWKHZRUNRXWGDWD7KHQJRWRWKH-RXUQDOVFUHHQWRVHH\RXU
workout results.
If the Console does not receive any further input after 5 minutes, the Console will shut off.
Customize the Goal for the Calorie Goal Program
7KHZRUNRXWJRDOIRUWKH&DORULH*RDOSURJUDPFDQEHDGMXVWHG2QFHFKDQJHGWKHQHZYDOXHZLOOEHWKHGHIDXOWIRUIXWXUH&DORULH*RDOZRUNRXWV
3XVKWKH&DORULH*RDOEXWWRQ
3XVKWKH,QFUHDVHRU'HFUHDVHEXWWRQVWRDGMXVWWKHGLVSOD\HGFDORULHJRDOYDOXH
7KHGHIDXOW&DORULH*RDOYDOXHLVFDORULHVDQGLVDGMXVWHGLQFDORULHLQFUHPHQWVFDORULHVLVWKHPLQLPXPYDOXHIRUDZRUNRXW
calories the maximum value.
3XVK67$57WRVHWWKHYDOXHDQGEHJLQD&DORULH*RDO3URJUDPZRUNRXW
Celebrations
When a Celebration is earned the Console will make an audible sound, display the name of the achievement, and animate the lights in a certain
sequence.
• For every 100 calories burned
/RQJHVWWLPHG:RUNRXW
7RUHYLHZDFKLHYHG&HOHEUDWLRQVJRWRWKH-RXUQDOSDJHLQWKH%RZÀH[/DWHUDO;$SS&HOHEUDWLRQVZLOOEHSURYLGHGZLWKWKHZRUNRXWUHVXOWV

Assembly / Owner’s Manual
37
Machine Settings Mode
7KH0DFKLQH6HWWLQJV0RGHOHWV\RXYLHZWKHWRWDOUXQKRXUVIRUWKHPDFKLQHDQGWKHFXUUHQWYHUVLRQVRIWKHPDLQV\VWHPV
+ROGGRZQWKH67233$86(EXWWRQDQG5LJKWDUURZEXWWRQWRJHWKHUIRUVHFRQGVZKLOHLQWKH3RZHU8S0RGHWRDFFHVVWKH0DFKLQH6HWWLQJV
Mode.
Note:3XVK67233$86(WRH[LWWKH0DFKLQH6HWWLQJV0RGHDQGUHWXUQWRWKH3RZHU8S0RGHVFUHHQ
7KH&RQVROHGLVSOD\VWKH727$/+2856IRUWKHPDFKLQH
3XVKWKH5LJKWEXWWRQWRJRWRWKHQH[WRSWLRQ
7KH&RQVROHGLVSOD\VKRZVWKHFXUUHQW&RQVROH)LUPZDUH9HUVLRQ
3XVKWKH5LJKWEXWWRQWRJRWRWKHQH[WRSWLRQ
7KH&RQVROHGLVSOD\VKRZVWKHFXUUHQW0RWRU&RQWURO%RDUG)LUPZDUH9HUVLRQ
3XVKWKH5LJKWEXWWRQWRJRWRWKHQH[WRSWLRQ
7KH&RQVROHGLVSOD\VKRZVWKHFXUUHQW%/(9HUVLRQ
3XVKWKH5LJKWEXWWRQWRJRWRWKHQH[WRSWLRQ
7KH&RQVROHGLVSOD\VWKH',6&211(&7%/(12SURPSW
Note:,I\RXZDQWWRGLVFRQQHFWWKH%OXHWRRWK
®
WUDQVPLWWHUSXVKWKH,QFUHDVH'HFUHDVHEXWWRQVWRVHOHFWWKH³',6&211(&7%/(<(6´
RSWLRQDQGSXVK(QWHU7KH&RQVROHZLOOH[LWWKH0DFKLQH6HWWLQJV0RGHDQGUHWXUQWRWKH3RZHU8S0RGHVFUHHQ
3XVKWKH5LJKWEXWWRQWRJRWRWKHQH[WRSWLRQ
7KH&RQVROHGLVSOD\VWKH9,(:(552506*12RSWLRQ7KLVRSWLRQLVIRU6HUYLFH7HFKQLFLDQVXVHRQO\
3XVKWKH5LJKWEXWWRQWRJRWRWKHQH[WRSWLRQ
7KH&RQVROHGLVSOD\VWKH5(6(7&2162/(12SURPSW
Note:,I\RXZDQWWRUHVHWWKH&RQVROHWRIDFWRU\VHWWLQJVSXVKWKH,QFUHDVH'HFUHDVHEXWWRQVWRVHOHFWWKH³5(6(7&2162/(<(6´
RSWLRQDQGSXVK(17(57XUQWKHPDFKLQHRIIZKHQWKH&RQVROHGLVSOD\VWKH³32:(5&<&/(12:´SURPSW
3XVKWKH67233$86(EXWWRQWRH[LWWKH0DFKLQH6HWWLQJV0RGHDQGUHWXUQWRWKH3RZHU8S0RGHVFUHHQ
Assembly / Owner’s Manual
38
5HDGDOOPDLQWHQDQFHLQVWUXFWLRQVIXOO\EHIRUH\RXVWDUWDQ\UHSDLUZRUN,QVRPHFRQGLWLRQVDQDVVLVWDQWLVUHTXLUHGWRGRWKHQHFHVVDU\WDVNV
(TXLSPHQWPXVWEHUHJXODUO\H[DPLQHGIRUGDPDJHDQGUHSDLUV7KHRZQHULVUHVSRQVLEOHWRPDNHVXUHWKDWUHJXODUPDLQWHQDQFHLV
done. Worn or damaged components must be repaired or replaced immediately. Only manufacturer supplied components can be
used to maintain and repair the equipment.
If at any time the Warning labels become loose, unreadable or dislodged, replace the labels. If purchased in US/Canada, contact
Customer Service for replacement labels. If purchased outside US/Canada, contact your local distributor for them.
Disconnect all power to the machine before you service it.
Daily: %HIRUHHDFKXVHH[DPLQHWKHH[HUFLVHPDFKLQHIRUORRVHEURNHQGDPDJHGRUZRUQSDUWV'RQRWXVHLIIRXQGLQWKLVFRQGLWLRQ
5HSDLURUUHSODFHDOOSDUWVDWWKH¿UVWVLJQRIZHDURUGDPDJH$IWHUHDFKZRUNRXWXVHDGDPSFORWKWRZLSH\RXUPDFKLQHDQG
Console free of moisture.
NOTICE: If necessary, only use a mild dish soap with a soft cloth to clean the Console. Do not clean with a petroleum based
solvent, automotive cleaner, or any product that contains ammonia. Do not clean the Console in direct sunlight or at high
WHPSHUDWXUHV%HVXUHWRNHHSWKH&RQVROHIUHHRIPRLVWXUH
Weekly: Check for smooth crank and pedal arm operation. Wipe the machine to remove dust, dirt, or grime.
NOTICE:'RQRWXVHSHWUROHXPEDVHGSURGXFWV'RQRWDSSO\SHWUROHXPEDVHGSURGXFWVOXEULFDQWRUFKHPLFDOVWRWKHFKURPHSODWHG
VKDIWVLQWKH$GMXVWDEOH$UPV
Monthly or after 20 hours: 0DNHVXUHDOOEROWVDQGVFUHZVDUHWLJKW7LJKWHQLIQHFHVVDU\
NOTICE:/RRVHVFUHZVDWWKHLQGLFDWHGORFDWLRQVPD\FDXVHVTXHDNLQJFOLFNLQJRUNQRFNLQJQRLVHV%HVXUHWRWLJKWHQFULLY.
Maintenance
6mm
6mm
Pedal arms not shown
Assembly / Owner’s Manual
39
CR2032
+
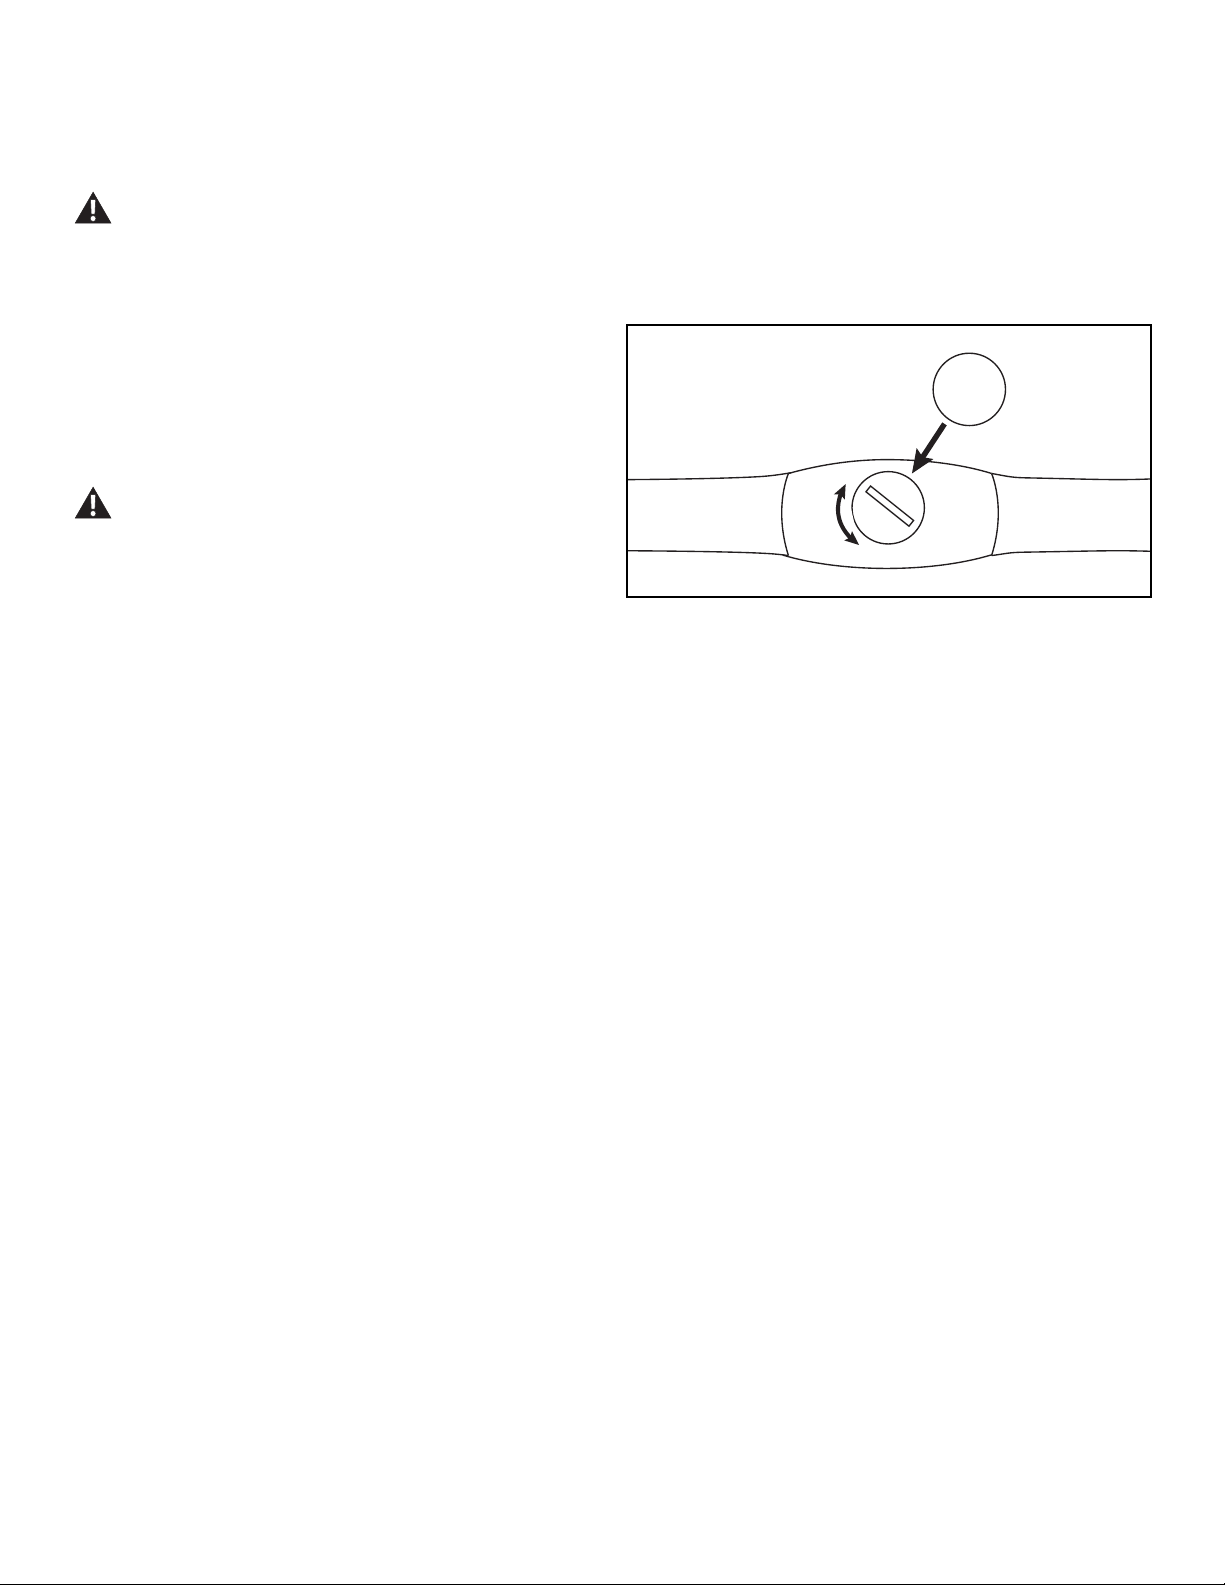
Replace Batteries in Chest Strap
7KHKHDUWUDWH+5FKHVWVWUDSXVHVD&5EDWWHU\
Do not perform this procedure outdoors or in moist or wet locations.
8VLQJDFRLQORRVHQWKHVORWWHGFRYHURQWKHEDWWHU\ED\5HPRYHWKHFRYHUDQGEDWWHU\
:KHQUHSODFLQJWKHEDWWHU\LQVHUWLWLQWKHEDWWHU\ED\ZLWKWKHV\PEROIDFLQJXS
Note: 7KHFKHVWVWUDSXVHV&5VL]HEDWWHULHV
5HLQVWDOOWKHFRYHURQWKHVWUDS
4. Discard the old battery. Dispose of in accordance with local
UHJXODWLRQVDQGRUDWDSSURYHGUHF\FOLQJFHQWHUV
5. Inspect your chest strap to ensure function.
Do not use until the equipment has been fully assembled and
inspected for correct performance in accordance with the
Owner’s Manual.
Assembly / Owner’s Manual
40
Maintenance Parts
Item Description Item Description Item Description Item Description
$ Console P 3LYRW%ROW&RYHU (( Static Handlebar 77 Data Cable, Lower Lateral
% Console Mast Q 3HGDO$UP5LJKW FF Cupholder UU 6HUYR0RWRU5HVLVWDQFH
C (QJLQH$VVHPEO\ 5 3HGDO$UP/HIW ** &RQWDFW+56HQVRU 99 5HVLVWDQFH)O\ZKHHO
D %DVH$VVHPEO\5LJKW S 3HGDO$UP7RSFDS HH 7HOHPHWULF+55HFHLYHU WW Crank
( %DVH$VVHPEO\/HIW 7 3HGDO6KURXG5LJKW II 5HPRWH5HVLVWDQFH&RQWURO ;; Pulley, Second Stage Crank
F Leveler Foot U Pedal Shroud, Left JJ 5HPRWH/DWHUDO&RQWURO YY 'ULYH%HOW5LJKW-
* 7UDQVSRUW:KHHO 9 )RRW3DG5LJKW KK 'DWD&DEOH8SSHU5HVLVWDQFH ZZ 'ULYH%HOW/HIWW-
H 8SSHU6KURXG5LJKW W Foot Pad, Left LL Data Cable, Upper Lateral $$$ 'XDO6SHHG'LUHFWLRQ6HQVRU
I Upper Shroud, Left ; Parallel Link MM 5HPRWH5HVLVWDQFH&RQWURO
Wire
%%% Speed Sensor Magnet
J 0DVW*DVNHW Y Lateral Link NN 5HPRWH/DWHUDO&RQWURO:LUH CCC &DEOH$FWXDWRU
K Handlebar Link Z /DWHUDO/LQN(QGFDS OO +5&DEOH&RQVROH0DVW DDD 3&%$6OLP&RQWURO%RDUG
L +DQGOHEDU$UP5LJKW $$ 0LG3HGDO$UP5LJKW PP 0DVW(QG&DS ((( Power Inlet
M 3LYRW&RYHU5LJKW %% 0LG3HGDO$UP/HIW QQ /RZHU6KURXG5LJKW FFF 3RZHU$GDSWHUZ&RUG
N +DQGOHEDU$UP/HIW CC $GMXVWDEOH$UP5LJKW 55 Lower Shroud, Left
O Pivot Cover, Left DD $GMXVWDEOH$UP/HIW SS 'DWD&DEOH/RZHU5HVLVWDQFH
A
CC
M
O
EE
HH
GG
B
C
D
E
F
G
F
H
I
J
K
K
L
N
P
P
Q
R
S
S
T
U
V
W
X
X
Y
Y
Z
Z
AA
BB
DD
FF
II
JJ
PP
QQ
RR
EEE
UU
VV
WW
XX
YY
DD
ZZ
AAA
BBB
CCC
DDD
F
F
SS
FFF
TT
KK
LL
OO
NN
MM

Assembly / Owner’s Manual
41
Condition/Problem Things to Check Solution
1RGLVSOD\SDUWLDOGLVSOD\XQLW
will not turn on
&KHFNHOHFWULFDOZDOORXWOHW Make sure unit is plugged into a functioning wall outlet.
Check connection at front of unit &RQQHFWLRQVKRXOGEHVHFXUHDQGXQGDPDJHG5HSODFHDGDSWHURUFRQQHF
tion at unit if either are damaged.
Check data cable integrity $OOZLUHVLQFDEOHVKRXOGEHLQWDFW,IDQ\DUHYLVLEO\FULPSHGRUFXWUHSODFH
cable.
&KHFNGDWDFDEOHFRQQHFWLRQV
orientation
%HVXUHFDEOHLVFRQQHFWHGVHFXUHO\DQGRULHQWHGSURSHUO\6PDOOODWFKRQ
connector should line up and snap into place.
Check console display for
damage
Check for visual sign that console display is cracked or otherwise damaged.
5HSODFH&RQVROHLIGDPDJHG
Console Display ,I&RQVROHRQO\KDVSDUWLDOGLVSOD\DQGDOOFRQQHFWLRQVDUH¿QHUHSODFHWKH
Console.
If the above steps do not resolve the problem, contact Customer Service (if
LQVLGH86&DQDGDRU\RXUORFDOGLVWULEXWRULIRXWVLGH86&DQDGD
8QLWRSHUDWHVEXW&RQWDFW+5
not displayed
+5FDEOHFRQQHFWLRQ %HVXUHFDEOHLVFRQQHFWHGVHFXUHO\DWWRSRI&RQVROH0DVW
Sensor grip %HVXUHKDQGVDUHFHQWHUHGRQ+5VHQVRUV+DQGVPXVWEHNHSWVWLOOZLWK
UHODWLYHO\HTXDOSUHVVXUHDSSOLHGWRHDFKVLGH,IWKHUHLVSODVWLF¿OPRQWKH
+5VHQVRUFDUHIXOO\SHHORIIWKH¿OP
Dry or calloused hands 6HQVRUVPD\KDYHGLI¿FXOW\ZLWKGULHGRXWRUFDOORXVHGKDQGV$FRQGXFWLYH
HOHFWURGHFUHDPKHDUWUDWHFUHDPFDQKHOSPDNHEHWWHUFRQGXFW7KHVHDUH
DYDLODEOHRQWKHZHERUDWPHGLFDORUVRPHODUJHU¿WQHVVVWRUHV
Static Handlebar If tests reveal no other issues, Static Handlebar should be replaced.
8QLWRSHUDWHVEXW7HOHPHWULF+5
not displayed
&KHVW6WUDSRSWLRQDO 6WUDSVKRXOGEH³32/$5
®
” compatible and uncoded. Make sure strap is
directly against skin and contact area is wet.
&KHVW6WUDS%DWWHU\ If strap has replaceable batteries, install new batteries.
Interference 7U\PRYLQJXQLWDZD\IURPVRXUFHVRILQWHUIHUHQFH790LFURZDYHHWF
5HSODFH&KHVW6WUDS ,ILQWHUIHUHQFHLVHOLPLQDWHGDQG+5GRHVQRWIXQFWLRQUHSODFHVWUDS
5HSODFH&RQVROH ,I+5VWLOOGRHVQRWIXQFWLRQUHSODFH&RQVROH
8QLWRSHUDWHVEXW7HOHPHWULF+5
displayed incorrectly
Interference 0DNHVXUHWKDWWKH+5UHFHLYHULVQRWEORFNHGE\DSHUVRQDOHOHFWURQLF
device in the cupholder.
5HVLVWDQFHGRHVQRWFKDQJH
(machine turns on and oper
DWHV
Check Console &KHFNIRUYLVXDOVLJQWKDW&RQVROHLVGDPDJHG5HSODFH&RQVROHLIGDPDJHG
&KHFNGDWDFDEOHFRQQHFWLRQV
orientation
%HVXUHFDEOHFRQQHFWLRQVDWWRSDQGERWWRPRI&RQVROH0DVWDUHFRQQHFWHG
VHFXUHO\DQGRULHQWHGSURSHUO\5HVHDWDOOFRQQHFWLRQV6PDOOODWFKRQFRQ
nector should line up and snap into place.
5HVLVWDQFHKDQGOHEDU
connection
%HVXUHFDEOHIURP6WDWLF+DQGOHEDUDQGFDEOHVWR&RQVROHDUHVHFXUHDQG
undamaged.
If the above steps do not resolve the problem, contact Customer Service (if
LQVLGH86&DQDGDRU\RXUORFDOGLVWULEXWRULIRXWVLGH86&DQDGD
Console shuts off (enters sleep
PRGHZKLOHLQXVH
&KHFNHOHFWULFDOZDOORXWOHW Make sure unit is plugged into a functioning wall outlet.
Check connection at front of unit &RQQHFWLRQVKRXOGEHVHFXUHDQGXQGDPDJHG5HSODFHDGDSWHURUFRQQHF
tion at unit if either are damaged.
&KHFNGDWDFDEOHFRQQHFWLRQV
orientation
%HVXUHFDEOHFRQQHFWLRQVDWWRSDQGERWWRPRI&RQVROH0DVWDUHconnected
securely and oriented properly. Small latch on connector should line up and
snap into place.
Troubleshooting

Assembly / Owner’s Manual
42
Condition/Problem Things to Check Solution
5HVHWPDFKLQH 8QSOXJXQLWIURPHOHFWULFDORXWOHWIRUPLQXWHV5HFRQQHFWWRRXWOHW
Check Speed Sensor (requires
VKURXGUHPRYDO
Speed sensors should be aligned with magnet and connected to data cable.
5HDOLJQVHQVRULIQHFHVVDU\5HSODFHLIWKHUHLVDQ\GDPDJHWRWKHVHQVRURU
the connecting wire.
Fan will not turn on or will not
turn off
Check data cable integrity $OOZLUHVLQFDEOHVKRXOGEHLQWDFW,IDQ\DUHFXWRUFULPSHGUHSODFHFDEOH
&KHFNGDWDFDEOHFRQQHFWLRQV
orientation
%HVXUHFDEOHLVFRQQHFWHGVHFXUHO\DQGRULHQWHGSURSHUO\6PDOOODWFKRQ
connector should line up and snap into place.
5HVHWPDFKLQH 8QSOXJXQLWIURPHOHFWULFDORXWOHWIRUPLQXWHV5HFRQQHFWWRRXWOHW
Fan will not turn on, but Console
operates
Check for blockage of fan 8QSOXJXQLWIURPHOHFWULFDORXWOHWIRUPLQXWHV5HPRYHPDWHULDOIURPIDQ,I
QHFHVVDU\GHWDFKWKH&RQVROHWRKHOSZLWKUHPRYDO5HSODFHWKH&RQVROHLI
unable to remove blockage.
8QLWURFNVGRHVQRWVLWOHYHO &KHFNOHYHOHUDGMXVWPHQW $GMXVWOHYHOHUVXQWLOPDFKLQHLVOHYHO
Check surface under unit $GMXVWPHQWPD\QRWEHDEOHWRFRPSHQVDWHIRUH[WUHPHO\XQHYHQVXUIDFHV
Move machine to level area.
Machine slides from side to side
during operation
Floor surface 7KHPDFKLQHPD\VOLGHRQDKDUGVXUIDFH3XWWKHPDFKLQHRQDUXEEHU
PDFKLQHPDWZKLFKZLOOSURYLGHDQRQVOLSVXUIDFH
)RRWSHGDOVORRVHXQLWGLI¿FXOW
to operate
Hardware 7LJKWO\VHFXUHDOOKDUGZDUHRQWKH3HGDO$UPVDQG+DQGOHEDU$UPV
Click, tick or knocking sound Check for loose hardware 7LJKWO\VHFXUHDOOKDUGZDUH
Check foot assemblies, leg as
semblies, handlebar assemblies
Manually move foot, leg, and handlebar assemblies to isolate sound. Contact
&XVWRPHU6HUYLFHLILQVLGH86&DQDGDRU\RXUORFDOGLVWULEXWRULIRXWVLGH
86&DQDGD
Workout results will not sync
ZLWK%OXHWRRWK
®
enabled device
Current console mode 0DFKLQHPXVWEHLQ,GOH0RGHWRV\QF3XVKWKH67233$86(EXWWRQXQWLO
WKH3RZHU8S0RGHVFUHHQLVGLVSOD\HG
7RWDOWLPHRIZRUNRXW $ZRUNRXWPXVWEHORQJHUWKDQPLQXWHWREHVDYHGDQGSRVWHGE\WKH
Console.
Fitness machine 8QSOXJXQLWIURPHOHFWULFDORXWOHWIRUPLQXWHV5HFRQQHFWWRRXWOHW
%OXHWRRWK
®
enabled device &RQVXOW\RXUGHYLFHWREHVXUHWKDWWKH%OXHWRRWK
®
wireless feature has been
enabled on it.
)LWQHVV$SS 5HYLHZ6SHFL¿FDWLRQVRI)LWQHVV$SSDQGFRQ¿UP\RXUGHYLFHLVFRPSDWLEOH
&RQWDFWDSSVXSSRUW#QDXWLOXVFRPLILQVLGH86&DQDGDRU\RXUORFDO
GLVWULEXWRULIRXWVLGH86&DQDGDIRUIXUWKHUDVVLVWDQFH

Assembly / Owner’s Manual
43
Introduction and Overview
:HOFRPHWRWKH%RZÀH[%RG\:HLJKW/RVV*XLGH7KLVJXLGHLVGHVLJQHGWREHXVHGZLWK\RXU%RZÀH[
™
HTXLSPHQWDQGZLOOKHOS\RX
• Lose weight and get lean
• Improve your health and wellness
• Increase your energy and vitality
&RQVXOWDSK\VLFLDQEHIRUH\RXVWDUWDQH[HUFLVHSURJUDPRUDQHZKHDOWKDQGGLHWSODQ6WRSH[HUFLVLQJLI\RXIHHOSDLQRUWLJKWQHVV
in your chest, become short of breath, or feel faint. Contact your doctor before you use the machine again. Use the values calcu-
ODWHGRUPHDVXUHGE\WKHPDFKLQH·VFRPSXWHUIRUUHIHUHQFHSXUSRVHVRQO\7KHKHDUWUDWHGLVSOD\HGRQWKHFRQVROHLVDQDSSUR[L-
mation and should be used for reference only.
%\IRFXVLQJRQWKHPDLQWKUHHHOHPHQWVRIWKH%RZÀH[%RG\:HLJKW/RVV*XLGHTXDOLW\EDODQFHDQGFRQVLVWHQF\\RX¶OOEHDEOHWRUHDFKDQG
PDLQWDLQ\RXUZHLJKWORVVDQG¿WQHVVJRDOVIRUWKHQH[WVL[ZHHNVDQGEH\RQG
• Quality±7KHHPSKDVLVRIWKLVSODQLVRQHDWLQJPRUHZKROHIRRGVDQGJHWWLQJWKHPRVWQXWULHQWVIURP\RXUFDORULHVDVSRVVLEOH0DNLQJWKH
PDMRULW\RI\RXUGLHWIURPIRRGVWKDWKDYHDVLQJOHLQJUHGLHQWIRUH[DPSOHIUXLWVYHJHWDEOHV¿VKOHDQSURWHLQHJJVEHDQVQXWVDQGZKROH
JUDLQVSURYLGHVWKHYLWDPLQVPLQHUDOV¿EHUSURWHLQDQGKHDOWK\IDWV\RXUERG\QHHGV
• Balance±(DFKRIWKHPHDOVDQGVQDFNVLQWKLVJXLGHKDYHDVRXUFHRI¿EHURUVPDUWFDUERK\GUDWHSURWHLQDQGKHDOWK\IDWWRNHHS\RXU
HQHUJ\OHYHOVFRQVLVWHQWWKURXJKRXWWKHGD\WRIXHO\RXUZRUNRXWV%\KDYLQJWKLVEDODQFH\RX¶OOIHHOIXOOHUORQJHUZKLFKLVFULWLFDOWRZHLJKWORVV
success.
• Consistency±*HWWLQJDERXWWKHVDPHQXPEHURIFDORULHVHDFKGD\LVLPSRUWDQWIRU\RXUPHWDEROLVPDQG\RXUPLQGVHW,I\RXRYHUGRLWRQH
GD\GRQ¶WWU\WRPDNHXSIRULWWKHQH[WGD\E\QRWHDWLQJRUFXWWLQJ\RXUFDORULHVGUDVWLFDOO\*HWULJKWEDFNRQWUDFNE\IROORZLQJWKLVJXLGH
Results & Expectations
5HVXOWVZLOOYDU\GHSHQGLQJRQ\RXUDJHVWDUWLQJZHLJKWDQGH[HUFLVHOHYHOEXWRQDYHUDJH\RXPD\ORVHOEVSHUZHHNDQGH[SHULHQFHLQFUHDVHG
energy levels.
5 Tips for Long-Term Success
1. Keep a food logLQFOXGLQJKXQJHUOHYHOVDQGZDWHULQWDNH)UHHRQOLQHIRRGORJVDQGPRELOHDSSVDUHDYDLODEOHDWZZZP\¿WQHVVSDOFRPDQG
www.loseit.com
2. Weigh and/or take measurements weekly±QRPRUHDQGQROHVV:HLJKLQJZHHNO\UDWKHUWKDQGDLO\RUHYHU\RWKHUGD\LVEHVW<RX¶OOWUDFN
\RXUSURJUHVVDQGNHHS\RXUVHOILQFKHFNZLWKRXWJHWWLQJGLVFRXUDJHGLIWKHVFDOHGRHVQ¶WPRYHIRUDIHZGD\V$QGUHPHPEHUZHLJKWLVMXVW
DQXPEHUDQGLW¶VLQÀXHQFHGE\PXVFOHJDLQDVZHOODVIDWORVV)HHOLQJKRZ\RXUFORWKHV¿WFDQRIWHQEHDEHWWHULQGLFDWRURISURJUHVVDV\RXU
body adapts to exercise and nutrition changes.
3. Measure portions±7RDYRLGSRUWLRQFUHHSXVHPHDVXULQJFXSVDQGVSRRQVIRUJUDLQVULFHSDVWDFHUHDOEHDQVQXWVRLOVDQGGDLU\8VH
WKH3RUWLRQ6L]HV*XLGHIRURWKHUIRRGV
4. Plan ahead±0DNHDPHDOSODQIRUWKHZHHNRUORJ\RXUIRRGDGD\LQDGYDQFH3ODQQLQJVHWV\RXXSIRUVXFFHVVHVSHFLDOO\IRUVRFLDOHYHQWV
and eating out.
5. Practice your desired long-term habits±,W¶VHDV\WRMXVWLI\SRRUHDWLQJFKRLFHVZKHQ\RX¶UHRQO\IRFXVHGRQWKHVKRUWWHUP)RFXVRQWKH
ORQJWHUPVDWLVIDFWLRQRIDVOLPPHUKHDOWKLHU\RXUDWKHUWKDQWKHWHPSRUDU\JUDWL¿FDWLRQ\RX¶OOJHWIURPVSOXUJLQJ
How to Use this Guide
• Eat breakfast within 90 minutes of waking up and balance your meals and snacks throughout the day
±'RQ¶WJRORQJHUWKDQKRXUVZLWKRXWHDWLQJ
±,I\RX¶UHQRWXVHGWRHDWLQJEUHDNIDVWVWDUWRXWVPDOOZLWKDSLHFHRIIUXLWDQGKDYHVRPHWKLQJHOVHKRXUVODWHU<RXUERG\DGDSWVWR
not eating breakfast, but as soon as you start eating early in the day and cutting back on dinner portions you’ll notice your hunger will
LQFUHDVH7KLVLVDJRRGVLJQ\RXUPHWDEROLVPLVZRUNLQJ
• 0L[DQGPDWFKPHDORSWLRQV
±6HOHFWRSWLRQIURPWKHDSSURSULDWHPHDOSODQPDOHRUIHPDOHIRUEUHDNIDVWOXQFKDQGGLQQHUSD\LQJFORVHDWWHQWLRQWRSRUWLRQVL]HV
±6HOHFWVQDFNRSWLRQVSHUGD\
±<RXKDYHWKHRSWLRQWRVXEVWLWXWHRQHVQDFNIRURQHWUHDWXQGHUFDORULHV
±8VHWKHPHDOSODQVDPSOHRSWLRQVDQGJURFHU\OLVWWRFUHDWH\RXURZQPHDOVIRUPRUHYDULHW\
Bowflex™ Body Weight Loss Guide

Assembly / Owner’s Manual
44
±<RXFDQVZDSRXWDQ\W\SHRISURWHLQYHJHWDEOHVRUVPDUWFDUEVIRUWKHVXJJHVWHGPHDORSWLRQV)RUH[DPSOH
• 7XUNH\IRUWXQD
• $Q\¿VKRUVHDIRRGIRUFKLFNHQ
• Cooked vegetables instead of salad
• Eat your calories
±&XWRXWKLJKFDORULHEHYHUDJHVOLNHVRGDMXLFHVFRIIHHGULQNVDQGDOFRKRO
±6WLFNZLWKZDWHUXQVZHHWHQHGWHDDQGFRIIHH$LPIRUDPLQLPXPRIR]OLWHUVRIZDWHUSHUGD\WRVWD\ZHOOK\GUDWHG
• If you’re still hungry after or in between meals:
±+DYHDJODVVRIZDWHUDQGZDLWPLQXWHV0DQ\WLPHVZHPLVWDNHWKLUVWRUHYHQERUHGRPIRUKXQJHU:DLWRXWWKHLQLWLDOXUJHWRHDW
and sometimes it will pass.
±,I\RX¶UHVWLOOKXQJU\DIWHUZDLWLQJPLQXWHVKDYHDVQDFNRUPLQLPHDOZLWKIUXLWYHJHWDEOHVDQGSURWHLQ
If your goal is muscle gain or strength:
• Use the same meal plan but increase portion sizes in the same ratios to increase the total number of calories you eat every day. For example,
LQFUHDVHSRUWLRQVL]HVRISURWHLQDQGVPDUWFDUEVDWPHDOVE\$GGLQJDVQDFNLVDQRWKHURSWLRQWRPHHW\RXUERG\¶VLQFUHDVHGFDORULH
needs in order to gain muscle and strength.
• )RFXVRQSRVWZRUNRXWQXWULWLRQE\KDYLQJRQHRI\RXUVQDFNVZLWKLQPLQXWHVDIWHU\RXFRPSOHWH\RXUZRUNRXW0DNHVXUHWRKDYHDFRP
ELQDWLRQRIFDUERK\GUDWHVVXFKDVIUXLWZLWKSURWHLQ\RJXUWPLONRUSURWHLQSRZGHUWRSURPRWHPXVFOHJURZWKDQGUHFRYHU\&KRFRODWHPLONLV
also a great option.
Meal Plan Overview
7KHIHPDOHPHDOSODQSURYLGHVDERXWFDORULHVDQGWKHPDOHSODQSURYLGHVDERXWFDORULHVRIKLJKTXDOLW\QXWULWLRQWRQRWRQO\KHOS\RX
ORVHZHLJKWDQGIHHOJUHDWEXWJHWWKHPRVWRXWRI\RXUFDORULHV7KHYLWDPLQVPLQHUDOVDQGDQWLR[LGDQWVIURPHDWLQJPRVWO\ZKROHIRRGVKHOSVXS
SRUWRSWLPDOKHDOWK7KHVHFDORULHOHYHOVZLOOUHVXOWLQKHDOWK\ZHLJKWORVVIRUWKHPDMRULW\RISHRSOH.HHSLQPLQGWKDWHYHU\RQH¶VPHWDEROLVPLVYHU\
GLIIHUHQWGHSHQGLQJRQDJHKHLJKWZHLJKWDFWLYLW\OHYHODQGJHQHWLFV3D\FORVHDWWHQWLRQWR\RXUZHLJKWKXQJHUOHYHOVDQGHQHUJ\DQGDGMXVW\RXU
calories if needed.
Follow these guidelines if you’re over 55:
• If you’re over 55, you need fewer calories because your metabolism slows as you age. Stick with three meals with one optional snack per day.
Follow these guidelines if you’re under 25:
• ,I\RX¶UHXQGHU\RXPD\QHHGPRUHFDORULHV$GGDQRWKHUVQDFNLI\RXIHHOORZRQHQHUJ\RUDUHH[WUHPHO\KXQJU\
Breakfast
%UHDNIDVWLQFOXGHVDVPDUWFDUEIUXLWDQGDVRXUFHRISURWHLQZKLFKZLOODOVRKDYHIDW:LWKDEDODQFHRIFDUERK\GUDWHVDQG¿EHUIURPWKHVPDUWFDUE
and fruit combined with protein and fat, you’ll energize your day and help control hunger levels throughout the day.
Snacks
(DFKVQDFNLVDEDODQFHRIFDUERK\GUDWHVDQGSURWHLQWRNHHS\RXUEORRGVXJDUPRUHFRQVLVWHQWZKLFKPHDQV\RXZRQ¶WH[SHULHQFHKXQJHUDQG
energy level spikes and drops.
7KLVKDSSHQVZKHQ\RXKDYHDKLJKFDUERQO\VQDFNOLNHFKLSVFDQG\VRGDFUDFNHUVRUSUHW]HOV
Lunch and Dinner
/XQFKFRPELQHV¿OOLQJ¿EHUIURPYHJHWDEOHVDQGVPDUWFDUEVZLWKDOHDQRUORZIDWSURWHLQ7KHKHDOWK\IDWFDQFRPHHLWKHUIURPWKHSURWHLQDGGHG
GXULQJFRRNLQJQXWVRQDVDODGRUDVDGUHVVLQJRUVDXFHVXFKDVRLODQGYLQHJDUVDODGGUHVVLQJ

Assembly / Owner’s Manual
45
protein
veggies
rich
carbs
+HUH¶VDQRYHUYLHZRIZKDWDQLGHDOGD\ORRNVOLNH
6HH3RUWLRQ6L]H*XLGHIRUSURSHUVHUYLQJVL]HV
smart
carb
protein/fat
Breakfast
Lunch
Dinner
Snack #1
Snack #2
fruit
smart
carb
protein
healthy
fat
smart
carb
protein
veggies
smart
carb
protein
healthy
fat
smart
carb
protein
veggies

Assembly / Owner’s Manual
46
Breakfast Options Fruit Smart Carb Protein/Fat
Fruit and Nut Oatmeal Cook
SODLQRDWVLQZDWHU7RSZLWKIUXLW
nuts, milk, cinnamon, and honey.
%HUULHVRUEDQDQD Plain oats
5HJXODURUTXLFNFRRN
Nuts and milk
(JJ0XIÀQ&RRNHJJV7RDVW
bread and top with 1 slice of
cheese, 1 slice of ham, and
tomato.
7RPDWR (QJOLVKPXI¿QRUVDQGZLFKWKLQ (JJKDPDQGFKHHVH
Yogurt Power Parfait7RS\RJXUW
with fruit. Sprinkle with 1 serving
RIQXWVWEVSZKHDWJHUPRU
JURXQGÀD[VHHGWEVSRDWVDQG
cinnamon.
Chopped fruit of your choice Oats, wheat germ, and ground
ÀD[VHHG
3ODLQQRQIDW*UHHN\RJXUWDQG
nuts
On the Go PB & Apple Sand-
wich7RDVWEUHDG6SUHDGRQ
peanut butter, thin slices of ½ an
apple, and 1 teaspoon of honey.
Sliced apple Sandwich thin, bread, or bagel
thin
Peanut butter
Lunch & Dinner Options Lean Protein Smart Carb Veggies
Pork Loin, Sweet Potato &
Green Beans
*ULOOHGRUEDNHGSRUNORLQ %DNHG6ZHHW3RWDWR *UHHQ%HDQV
Chicken Stir Fry
Flavor with 2 tablespoon teriyaki
sauce
Chicken breast or boneless skin
less thigh
%URZQRUZLOGULFH Mixed stir fry vegetables
IUHVKRUIUR]HQ
Steak Tacos with Side Salad (3
IRUPDOHVIRUIHPDOHV7RSZLWK
salsa, cilantro, and sprinkle of
shredded cheese
Flank or sirloin steak Corn tortillas Salad
Whole Wheat Pasta with
Shrimp or Cannellini Beans &
Marinara Sauce
6KULPSIUR]HQRUIUHVKRUFDQ
nellini beans
Whole wheat pasta Steamed broccoli
Bunless Burgers with Oven
Fries, Corn, & Salad
*ULOOEXUJHUV%DNHVOLFHGSRWD
toes on sprayed cookie sheet for
PLQXWHV#)
93% lean ground beef or turkey Oven baked fries &RUQRQWKHFREVLGHVDODG
Tuna & Avocado Wrap with
Vegetable Soup
8VHR]RIWXQDFDQ7RSZLWK
lettuce, tomato, avocado, and
mustard.
7XQD +LJK¿EHUZUDS 9HJHWDEOHVRXS
KRPHPDGHRUORZVRGLXP
FDQQHG

Assembly / Owner’s Manual
47
Snack Options
Smart Carb Protein
1 medium apple DOPRQGV
%DE\FDUURWV 2 tbsp hummus
1 serving of crackers* 1 string cheese
(QHUJ\RUSURWHLQEDUZLWKFDORULHV
6HHZZZ%RZÀH[FRP5HVRXUFHVIRUEUDQGUHFRPPHQGDWLRQV
Optional Treats
<RXKDYHWKHFKRLFHRIUHSODFLQJ6QDFNZLWKDFDORULHWUHDW<RXFDQKDYHDQRSWLRQDOWUHDWHYHU\GD\EXWIRURSWLPDOKHDOWKLWLVUHFRP
PHQGHGWROLPLWVPDOOVSOXUJHVWRWLPHVSHUZHHN8VHWKHDSSURDFKWKDWZRUNVEHVWIRU\RX+HUHDUHDIHZH[DPSOHV
• ½ cup lowfat ice cream
• 1 small bag of baked potato chips
• 4oz of wine or 12oz light beer
• FXSVRIDLUSRSSHGRUOLJKWSRSFRUQ
Sample 3 Day Plan
%DVHGRQHDFKRIWKHPHDORSWLRQVOLVWHGDERYHDW\SLFDOGD\SODQFRXOGORRNOLNHWKLV
Day 1 Day 2 Day 3
Breakfast (JJPXI¿Q Power yogurt parfait )UXLWQXWRDWPHDO
Snack 1 $SSOHZLWKDOPRQGV 1XW7KLQV
®
VWULQJFKHHVH %DE\FDUURWVDQGKXPPXV
Lunch 7XQDDYRFDGRZUDSZLWKVRXS /HIWRYHUVIURPGLQQHUGD\ /HIWRYHUVIURPGLQQHUGD\
Optional Snack 2 or Treat ½ cup ice cream bar (QHUJ\EDU 100 calorie bag of light popcorn
Dinner Shrimp pasta Chicken stir fry %XQOHVVEXUJHUV
Assembly / Owner’s Manual
48
FXS EDVHEDOO
FXS OLJKWEXOE
R]RUWEVS
= golf ball
FXSQXWV
$OWRLGVWLQ
R]FKLFNHQRUPHDW
GHFNRIFDUGV
1 medium potato
FRPSXWHUPRXVH
1 medium piece of
IUXLW WHQQLVEDOO
R]FKHHVH
= 3 dice
Portion Size Guide
(DFKRIWKHLWHPVOLVWHGDUHIRURQHVHUYLQJ
MALE FEMALE
PROTEIN
2 eggs
R]FKLFNHQ¿VKOHDQPHDWRUWRIX
FXSEHDQVRUOHQWLOV
1 cup greek yogurt*
1.5oz cheese*
1 egg
R]FKLFNHQ¿VKRUOHDQPHDW
FXSEHDQVRUOHQWLOV
FXSJUHHN\RJXUW
1.5oz cheese*
HEALTHY FAT
7EOVSQSHDQXWRUQXWEXWWHU
WVSQROLYHÀD[RUZDOQXWRLO
FXSRIQXWV
PHGLXPDYRFDGR
1 tblspn peanut or nut butter*
WVSQROLYHÀD[RUZDOQXWRLO
FXSRUWDEOHVSRRQVRIQXWVDSSUR[DOPRQGV
PHGLXPDYRFDGR
SMART CARB
FXSFRRNHGJUDLQVFXSUDZRDWVEURZQULFH
quinoa, pasta
1 medium sweet or regular potato
2 corn tortillas
1 slice of bread (or 2 light slices equaling 120 calories
RUOHVV
HQJOLVKPXI¿QVDQGZLFKWKLQRUKLJK¿EHUZUDS
FXSFRRNHGFXSUDZJUDLQV
PHGLXPVZHHWSRWDWRRU
regular potato
2 corn tortillas
1 slice of bread (or 2 light slices equaling 120 calories or
OHVV
HQJOLVKPXI¿QVDQGZLFKWKLQRUKLJK¿EHUZUDS
FRUIT
1 medium apple, orange, or pear
VPDOOEDQDQDOHQJWKRI\RXUKDQG
1 cup berries or chopped fruit
FXSGULHGIUXLWIUHVKRUIUR]HQLVRSWLPDO
9HJHWDEOHV<RXFDQKDYHXQOLPLWHGYHJHWDEOHVH[FHSWIRUSHDVDQGFRUQVWLFNZLWKFXSVHUYLQJ
FXSVVSLQDFKRUOHWWXFH FXSSHGKDQGV
1 cup raw vegetables
FXSFRRNHGYHJHWDEOHV
R]ORZVRGLXPYHJHWDEOHMXLFH
OPTIONAL TREATS
FXSORZIDWLFHFUHDP
1 small bag of baked potato chips
1oz dark chocolate
4oz of wine or 12oz light beer
FXSVDLUSRSSHGRUOLJKWSRSFRUQ
VRPHIRRGVDUHDFRPELQDWLRQRISURWHLQDQGFDUEVRUSURWHLQDQGIDW

Assembly / Owner’s Manual
49
Grocery List
BREAD & GRAINS
100% whole wheat bread
Sprouted grain breads
/LJKWRUZKROHZKHDWHQJOLVKPXI¿QV
Sandwich or bagel thins
&RUQRUORZFDUEZKROHZKHDWWRUWLOODV
+LJK¿EHUZUDSV
3ODLQRDWVPLQXWHRUROGIDVKLRQHG
:KROHJUDLQVEURZQULFHEXOJDUEDUOH\TXLQRDFRXVFRXV
7LSV/RRNIRUZKROHZKHDWDVWKH¿UVWLQJUHGLHQW/RRNIRUJRI
¿EHUSHUVOLFHRUJSHUVOLFHVRIOLJKWRUGLHWEUHDG$LPIRUEUHDGZLWK
less than 100 calories per slice.
DAIRY & DAIRY ALTERNATIVES
3ODLQQRQIDWJUHHN\RJXUW
.H¿U\RJXUWOLNHGULQN
2UJDQLFORZIDWPLON
(QULFKHGDOPRQGRUVR\PLON
&KHHVHIHWDSDUPHVDQPR]]DUHOODOLJKWKDYDUWLSURYRORQHVZLVV
string cheese, or single serving packages
MEAT, FISH, POULTRY & PROTEIN
Wild game
Salmon, halibut, tuna, tilapia, shrimp,
FDW¿VKVFDOORSVRUFUDE
Pork loin, pork chops, or pork roast
&KLFNHQRUWXUNH\EUHDVWRUWKLJKVQRVNLQ
(JJVDQGHJJZKLWHV
/HDQEHHIVLUORLQFKXFNURXQGWHQGHUORLQOHDQRUJDQLFDQG
JUDVVIHGLVEHVW
&DQQHGVDOPRQRUWXQDLQZDWHU
1LWUDWHIUHHUHGXFHGVRGLXPKDPWXUNH\FKLFNHQRUURDVWEHHIOXQFK
meat
$Q\W\SHRIEHDQGU\RUFDQQHGORZVRGLXPYDULHWLHV
7RIXDQGWHPSHK
7LSV/RRNIRU³&KRLFH´RU³6HOHFW´FXWVRIPHDWUDWKHUWKDQ³3ULPH´
Prime cuts are fattier. Limit intake of highly processed meat and
imitation meat products like sausage, bacon, pepperoni, and hot dogs to
once a week or less.
FROZEN FOODS
$OOYHJHWDEOHVZLWKRXWVDXFH
$OOIUXLW
*UDLQVDQGJUDLQPHGOH\V
CRACKERS, SNACKS & ENERGY BARS
$Q\XQVDOWHGQXWVRUVHHGV
$LUSRSSHGRUOLJKWSRSFRUQ
(GDPDPHLQWKHSRG
(QHUJ\EDUV
Crackers
Hummus
7LSV/LPLWFUDFNHUVSUHW]HOVDQGFKLSVWRVHUYLQJVSHUZHHN
$OZD\VSDLUZLWKSURWHLQVXFKDVKXPPXVFKHHVHRUQXWV/RRNIRU
energy bars with less than 200 calories and 20g of sugar and at least 3g
RISURWHLQDQGJRI¿EHU/RRNIRUFUDFNHUVZLWKOHVVWKDQFDORULHV
and 4g or less of fat per serving.
FATS & OILS
$YRFDGR
2OLYHJUDSHVHHGZDOQXWVHVDPHRUÀD[VHHGRLO
%XWWHUVSUHDGVORRNIRUSURGXFWVIUHHRIWUDQVIDWVDQGSDUWLDOO\
hydrogenated oils on the ingredient list.
7LSV/LJKWROLYHRLOUHIHUVWRWKHÀDYRUQRWWKHFDORULHFRQWHQW$OZD\V
PHDVXUHRLODQGEXWWHU(YHQLIDIDWLVFRQVLGHUHGKHDOWK\LW¶VVWLOOYHU\
high in calories and portions need to be controlled.
DRESSINGS, CONDIMENTS & SAUCES
9LQHJDUVULFHZLQHEDOVDPLF
$OOIUHVKRUGULHGKHUEVDQGVSLFHV
Mustard
Salsa and chili sauce
0DULQDUDVDXFHZLWKQRKLJKIUXFWRVHFRUQV\UXS
/HPRQDQGOLPHMXLFH
%RWWOHGPLQFHGJDUOLFDQGJLQJHU
/RZVRGLXPVR\VDXFH
7LSV/RRNIRUSURGXFWVIUHHRI06*DGGHGFRORUVDQGKLJKIUXFWRVH
FRUQV\UXS/RRNIRUVDXFHVXQGHUFDORULHVSHUVHUYLQJ$YRLGFUHDP
based sauces and dressings like ranch, bleu cheese, and alfredo.
$OOIUXLWVDQGYHJHWDEOHVIUHVKDQGIUR]HQDUHJUHDWFKRLFHV6LQFHHYHU\PHDOKDVRQHRUERWK\RXUVKRSSLQJFDUWVKRXOGUHÀHFWWKLV

Assembly / Owner’s Manual
50
Keep It Going
Tips for continued weight loss and maintaining changes
• Keep weighing yourself weekly, even after you’ve reached your goal weight
• Continue keeping a food log.,I\RXKDYH\RXUPHDOSODQZHOOHVWDEOLVKHGORJ\RXUIRRGHYHU\RWKHUZHHNWRNHHS\RXUVHOIRQWUDFN'RQ¶W
feel like you have to do it every day.
• Prepare for plateaus.7KHVFDOHPLJKWQRWEXGJHIRUDIHZZHHNVRUHYHQPRQWKVDIWHUVRPHLQLWLDOZHLJKWORVV7KLVLVQRUPDODQGWREHH[
SHFWHG,W¶VWKHERG\¶VQDWXUDOSURFHVVIRUDGMXVWLQJWR\RXUQHZORZHUZHLJKW6WD\IRFXVHGRQ\RXUORQJWHUPJRDOFHOHEUDWH\RXUVXFFHVVHV
and changes, and mix up your workouts to help overcome the plateau.
• Calorie adjustments for maintaining weight loss.2QFH\RX¶YHUHDFKHG\RXUJRDOZHLJKW\RXFDQLQFUHDVH\RXUFDORULHVSHUGD\
as long as your activity level stays the same
• Treat yourself.+DYHDQRQIRRGUHZDUGIRUHDFKJRDO\RXKLWVXFKDVDPDVVDJHDQHZRXW¿WRUDQRXWLQJZLWKIULHQGVDQGIDPLO\
• Use the resources belowWR¿QGQHZUHFLSHVJHWH[SHUWDGYLFHDQGVXSSRUWWRVWD\PRWLYDWHG
Resources
'RZQORDGDEOH5HVRXUFHVIURP%RZÁH[:HEVLWHZZZ%RZÀH[FRP5HVRXUFHV
• *URFHU\6KRSSLQJ/LVWIRU)ULGJH%ODQN)RUP
• 7 Day Meal Planning Form
• $GGLWLRQDO'LQQHU2SWLRQV
• 3UHDQG3RVW:RUNRXW)XHOLQJ*XLGH
Questions & Support
• $VNTXHVWLRQVSRVWVXJJHVWLRQVDQGFRQQHFWZLWKRXURQOLQH%RZÀH['LHWLWLDQRQWKH%RZÀH[)DFHERRNSDJH
Recipes
• www.wholeliving.com
• www.eatingwell.com
• www.whfoods.org
• www.livebetteramerica.org
Online food logs
• ZZZP\¿WQHVVSDOFRP
• www.loseit.com

Assembly / Owner’s Manual
51
Who Is Covered
This warranty is valid only to the original purchaser and is not transferable or applicable to any other person(s).
What Is Covered
Nautilus, Inc. warrants that this product is free from defects in materials and workmanship, when used for the purpose intended, under normal conditions, and provided it receives
proper care and maintenance as described in the Product’s Assembly and Owner’s manual. This warranty is good only for authentic, original, legitimate machines manufactured by
Nautilus, Inc. and sold through an authorized agent and used in the United States or Canada.
Terms
Warranty terms for products purchased in US/Canada are as stated below
• Frame 3 years
• Parts 3 years
• Electronics (Console) 1 year
• Labor 90 days
(Labor support does not include the installation of replacement parts involved in the initial product assembly and preventative maintenance services. All repairs covered
under the labor portion of the warranty must be preauthorized by Nautilus.)
For warranty & service of products purchased outside US/Canada, please contact your local distributor. To find your local international distributor, go to: www.nautilusinternational.
com
How Nautilus Will Support the Warranty
Throughout the terms of the warranty coverage, Nautilus, Inc. will repair any machine that proves to be defective in materials or workmanship. Nautilus reserves the right to replace
the product in the event a repair is not possible. When Nautilus determines replacement is the correct remedy, Nautilus may apply a limited credit reimbursement toward another
Nautilus, Inc. brand Product, at our discretion. This reimbursement may be prorated based on length of ownership. Nautilus, Inc. provides repair service within major metropolitan
areas. Nautilus, Inc. reserves the right to charge the consumer for travel outside these areas. Nautilus, Inc. is not responsible for dealer labor or maintenance charges beyond the
applicable warranty period(s) stated herein. Nautilus, Inc. reserves the right to substitute material, parts or products of equal or better quality if identical materials or products are
not available at the time of service under this warranty. Any replacement of the product under the terms of the Warranty in no way extends the original Warranty period. Any limited
credit reimbursement may be prorated based on length of ownership. THESE REMEDIES ARE THE EXCLUSIVE AND SOLE REMEDIES FOR ANY BREACH OF WARRANTY.
What You Must Do
• Retain appropriate and acceptable Proof of Purchase.
• Operate, maintain, and inspect the Product as specified in the Product Documentation (Assembly, Owner’s Manuals, etc.).
• Product must be used exclusively for the purpose intended.
• Notify Nautilus within 30 days after detecting an issue with the Product.
• Install replacement parts or components in accordance with any Nautilus instructions.
• Perform diagnostic procedures with a trained Nautilus, Inc representative if requested.
What Is Not Covered
• Damage due to abuse, tampering or modification of the Product, failure to properly follow assembly instructions, maintenance instructions, or safety warnings as stated in the
Product Documentation (Assembly, Owner’s Manuals, etc), damage due to improper storage or the effect of environmental conditions such as moisture or weather, misuse,
mishandling, accident, natural disasters, power surges.
• A machine placed or used in a commercial or institutional setting. This includes gyms, corporations, work places, clubs, fitness centers and any public or private entity that
has a machine for use by its members, customers, employees or affiliates.
• Damage caused by exceeding maximum user weights as defined in the Product’s Owner’s manual or warning label.
• Damage due to normal usage and wear and tear.
• This warranty does not extend to any territories or countries outside the United States and Canada.
How to Obtain Service
For Products purchased directly from Nautilus, Inc. contact the Nautilus office listed on the Contacts page of the products Owner’s manual. You may be required to return the
defective component to a specified address for repair or inspection, at your expense. Standard ground shipping of any warranty replacement parts will be paid by Nautilus, Inc. For
products purchased from a retailer, you may be asked to contact your retailer for warranty support.
Exclusions
The preceding warranties are the sole and exclusive express warranties made by Nautilus, Inc. They supersede any prior, contrary or additional representations, whether oral or
written. No agent, representative, dealer, person or employee has the authority to alter or increase the obligations or limitations of this warranty. Any implied warranties, including
the WARRANTY OF MERCHANTABILITY and any WARRANTY OF FITNESS FOR A PARTICULAR PURPOSE, are limited in duration to the term of the applicable express warranty
provided above, whichever is longer. Some states do not allow limitations on how long an implied warranty lasts, so the above limitation may not apply to you.
Limitation of Remedies
EXCEPT AS OTHERWISE REQUIRED BY APPLICABLE LAW, THE PURCHASER’S EXCLUSIVE REMEDY IS LIMITED TO REPAIR OR REPLACEMENT OF ANY COMPONENT DEEMED BY
NAUTILUS, INC. TO BE DEFECTIVE UNDER THE TERMS AND CONDITIONS STATED HEREIN. IN NO EVENT WILL NAUTILUS, INC. BE LIABLE FOR ANY SPECIAL, CONSEQUENTIAL,
INCIDENTAL, INDIRECT OR ECONOMIC DAMAGES, REGARDLESS OF THE THEORY OF LIABILITY (INCLUDING, WITHOUT LIMITATION, PRODUCT LIABILITY, NEGLIGENCE OR OTHER
TORT) OR FOR ANY LOST REVENUE, PROFIT, DATA, PRIVACY OR FOR ANY PUNITIVE DAMAGES ARISING OUT OF OR RELATED TO THE USE OF THE FITNESS MACHINE EVEN IF
NAUTILUS, INC. HAS BEEN ADVISED OF THE POSSIBILITY OF SUCH DAMAGES. THIS EXCLUSION AND LIMITATION SHALL APPLY EVEN IF ANY REMEDY FAILS OF ITS ESSENTIAL
PURPOSE. SOME STATES DO NOT ALLOW THE EXCLUSION OR LIMITATION OF CONSEQUENTIAL OR INCIDENTAL TYPE DAMAGES SO THE ABOVE LIMITATION MAY NOT APPLY TO
YOU.
State Laws
This warranty gives you specific legal rights. You may also have other rights, which vary from state to state.
Expirations
If the warranty has expired, Nautilus, Inc. may assist with replacements or repairs to parts and labor, but there will be a charge for these services. Contact a Nautilus office for
information on post-warranty parts and services. Nautilus does not guarantee availability of spare parts after expiration of warranty period.
International Purchases
If you purchased your machine outside of the United States consult your local distributor or dealer for warranty coverage.
( If purchased in US/Canada ) Warranty
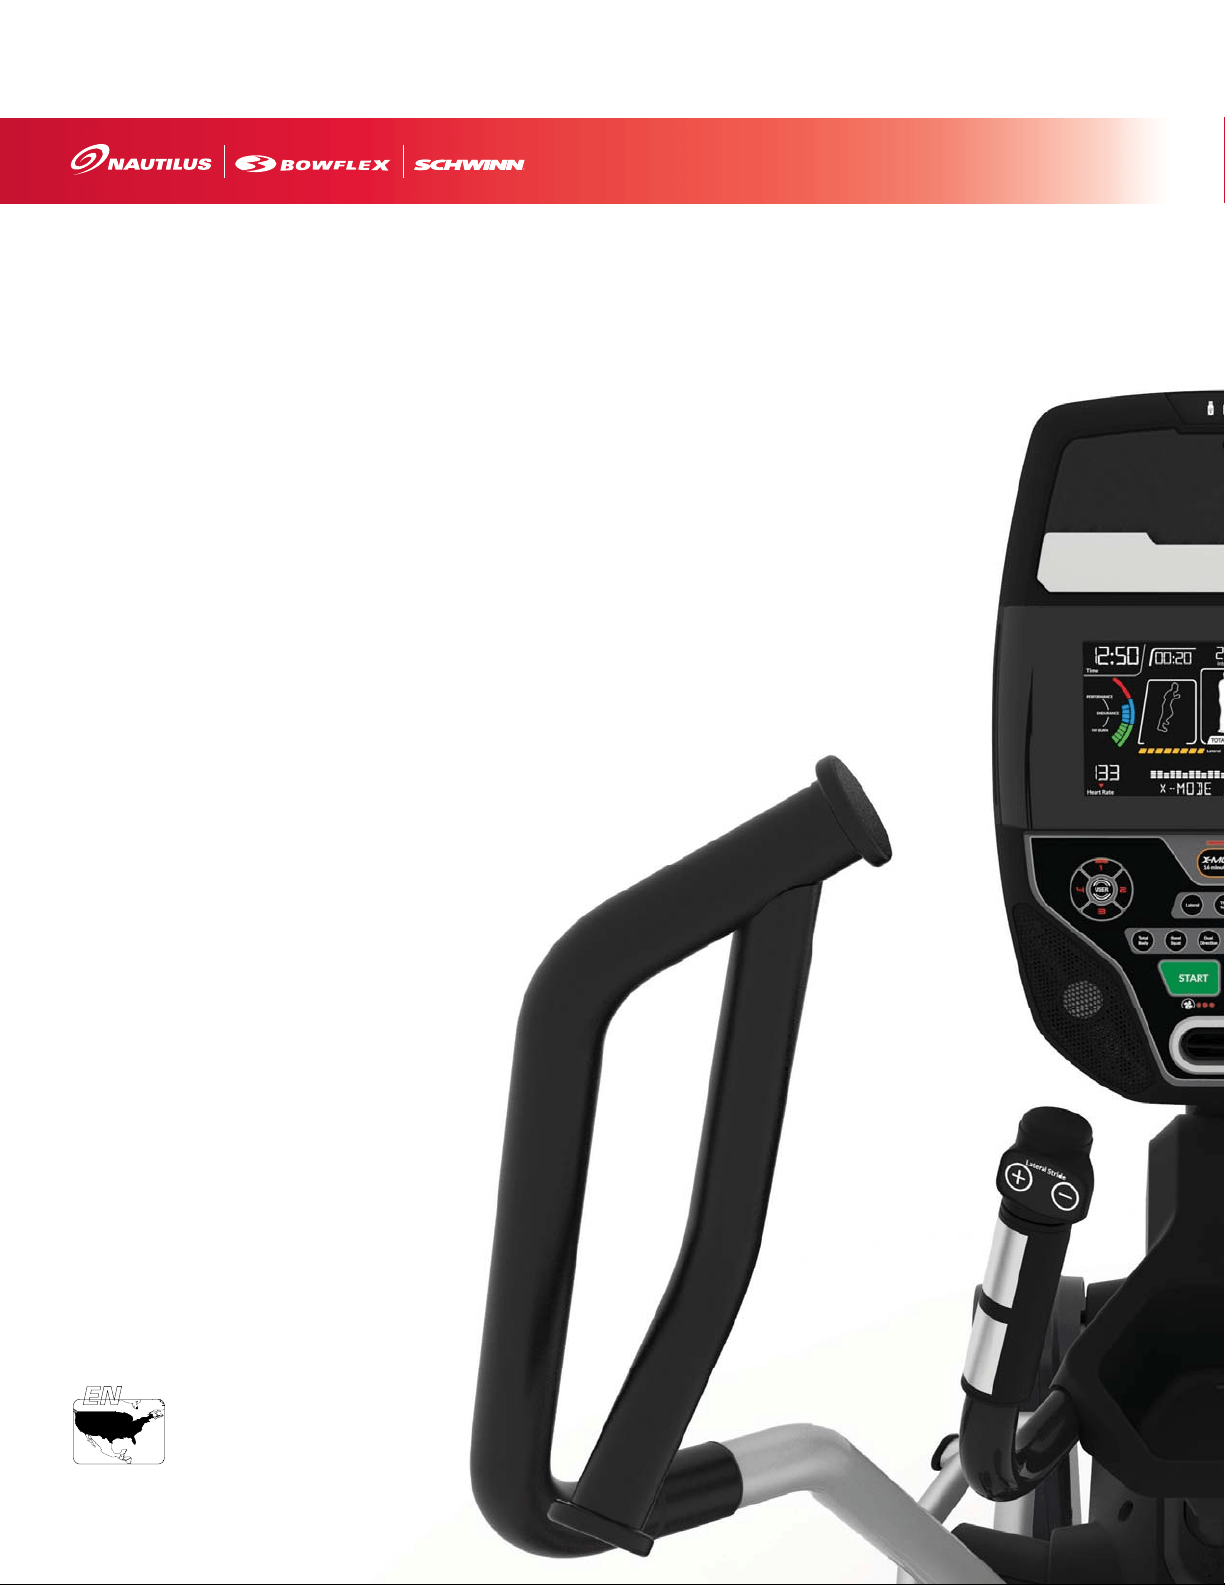
8020250.070119.B
EN
™
™
™
™
™