T8.5J Treadmill
OWNER’S MANUAL
BENUTZERHANDBUCH
GEBRUIKERSHANDLEIDING
MANUALE DEL PROPRIETARI
MANUEL DU PROPRIÉTAIRE
MANUAL DE USUARIO
使用手冊


3
Contents
ENGLISH ........................................4
DEUTSCH ....................................49
NEDERLANDS .............................95
FRANÇAIS .................................140
ITALIANO ..................................185
ESPAÑOL...................................230
繁體中文.....................................275

4
ENGLISH

5
Important
Safety
Instructions
ENGLISH
6
Thanks for choosing BowFlex T8.5J Treadmill as your fitness equipment. We are sincerely encourage you to read through this
Owner’s manual carefully before the assembling of your equipment started, especially of below WARNINGS! WARNINGS WILL
REDUCE THE RISK OF BURNS, FIRE, ELECTRICAL SHOCK OR INJURY TO PERSONS.
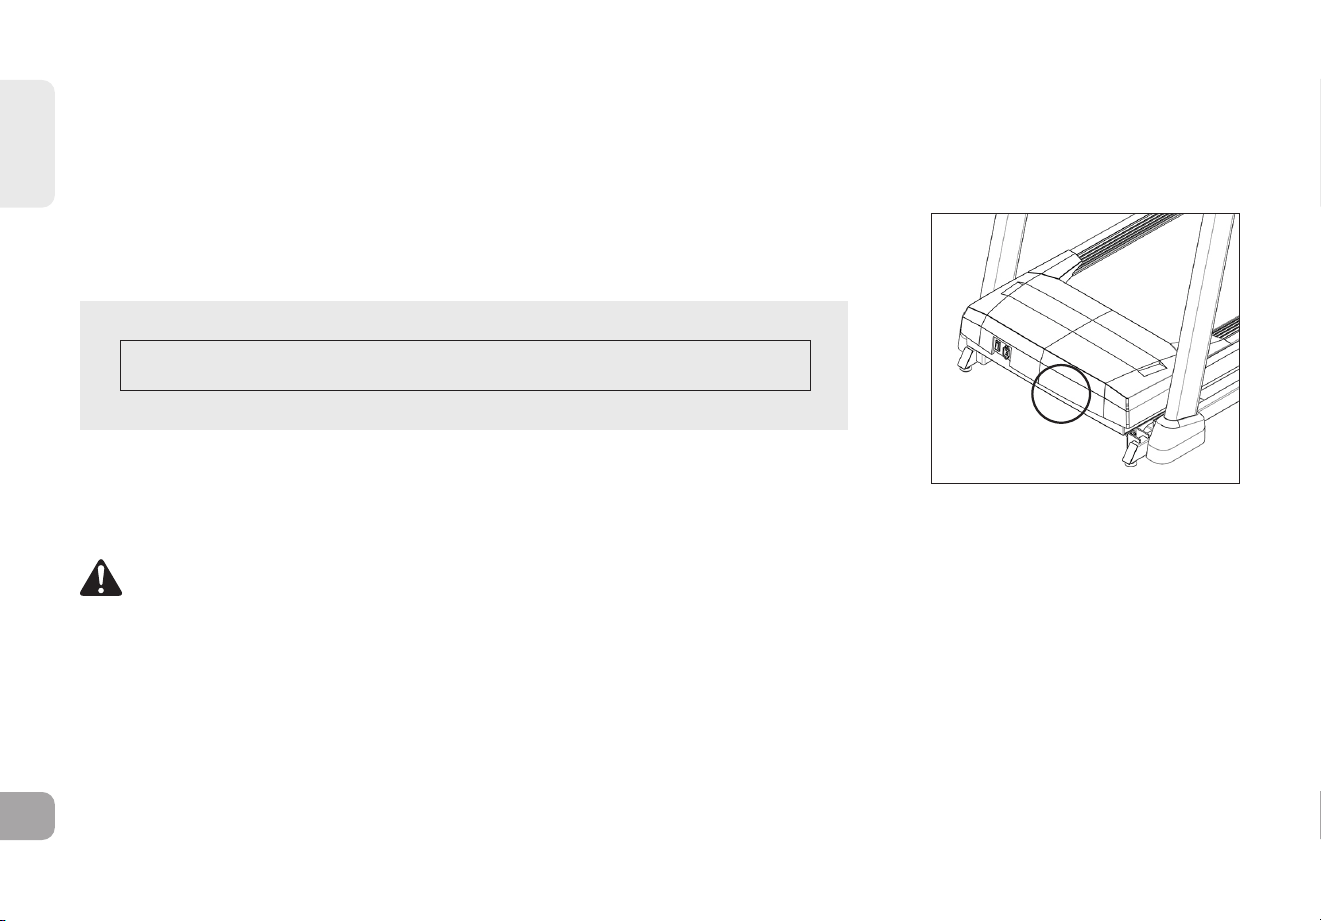
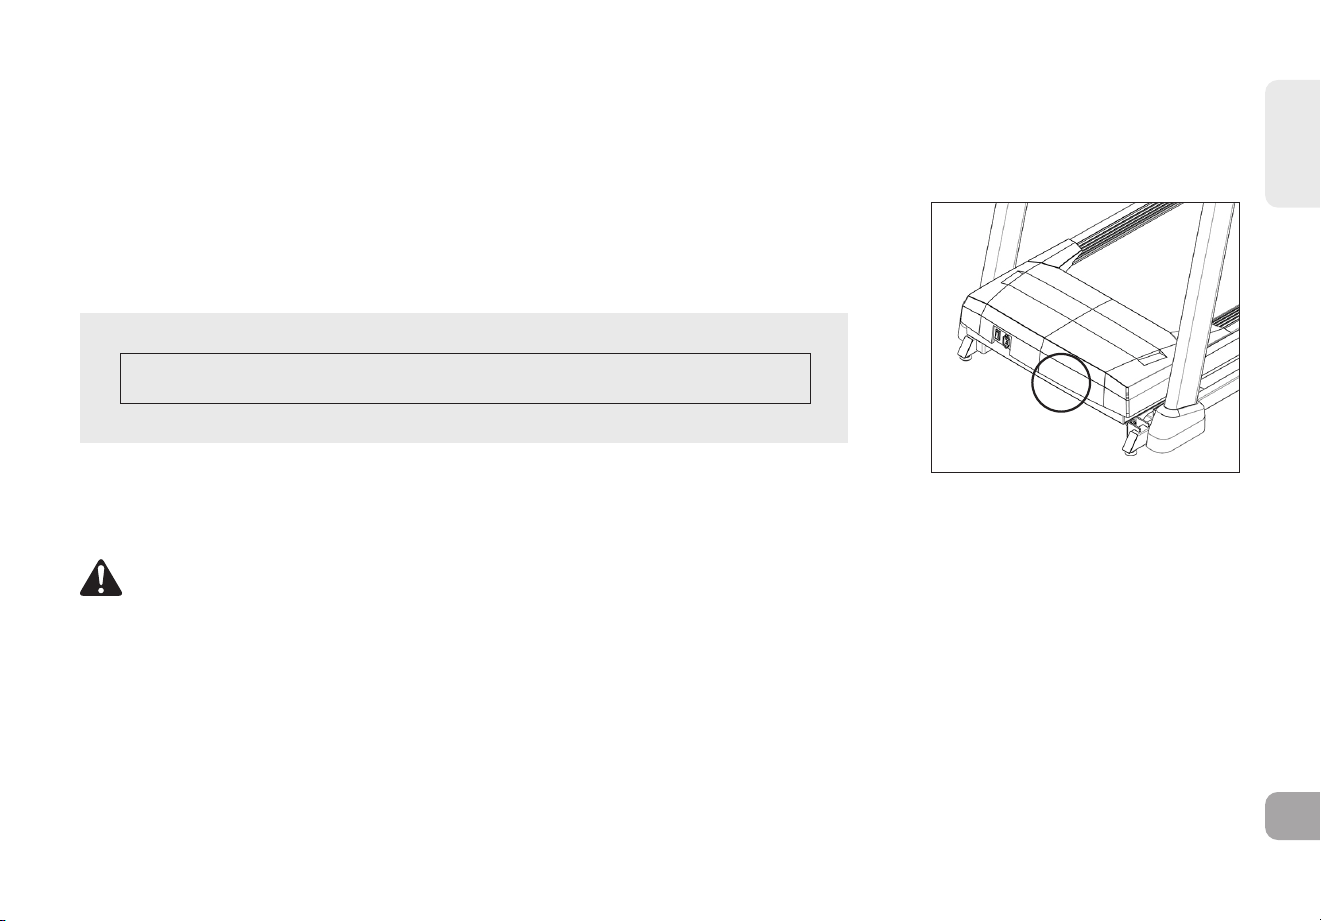
Before proceeding, find your treadmill’s serial number located on a white barcode sticker
near the on/off power switch and power cord and enter it in the space provided below.
ENTER YOUR SERIAL NUMBER AND MODEL NAME IN THE BOXES BELOW:
SERIAL NUMBER:
MODEL NAME: BOWFLEX T8.5J
» Refer to the SERIAL NUMBER and MODEL NAME when calling for service.
• FAILURE TO FOLLOW THESE INSTRUCTIONS COULD RESULT IN INJURY!
• Heart rate monitoring systems may be inaccurate. Over exercising may result in serious injury or death. If you feel paint stop
exercising immediately.
• When exercising, always maintain a comfortable pace.
• If you experience any kind of pain, including but not limited to chest pains, nausea, dizziness, or shortness of breath, stop
exercising immediately and consult your physician before continuing. Incorrect or excessive exercise may damage your health.
• Do not wear clothes that might catch on any part of the treadmill
• Always wear athletic shoes while using this equipment.
• Do not jump on the treadmill.
• While exercising, do not run near the edge of the belt to avoid the risk of injury.
WARNING
SERIAL NUMBER LOCATION

ENGLISH
7
• At no time should more than one person be on treadmill while in operation.
• This treadmill should not be used by persons weighing more than the weight showing in TECH SPEC section. Failure to comply
will void the warranty.
• When lowering the treadmill deck, wait until rear feet are firmly on the floor before stepping on the deck.
• Do not operate under blanket or pillow. Excessive heating can occur and cause fire, electric shock, or injury to persons.
• Connect this exercise product to a properly grounded outlet only.
• To disconnect, turn all controls to the off position, then remove plug from outlet.
• Disconnect all power before moving the equipment.
• Never operate product with a damaged cord or plug even if it is working properly. Never operate any product if it appears
damaged, or has been immersed in water. Contact Customer Tech Support for replacement or repair in order to avoid a hazard.
• The treadmill should never be left unattended when plugged in. Unplug from outlet when not in use, and before putting on or
taking off parts.
• At NO time should pets or children under the age of 13 be closer to the treadmill than 3 meter.
• At NO time should children under the age of 13 use the treadmill.
• Children over the age of 13 or the persons with reduced physical, sensory or mental capabilities, or lack of experience and
knowledge should not use the treadmill, unless supervised or unless they have been given instruction concerning use of the
treadmill by a person responsible for their safety.
• Do not remove the protected covers unless instructed by professional and your local dealer. Service should only be done by and
authorized service technician.
• Disconnect the safety key to prevent uncontrolled usage of third parties.
• Treadmill equipped with side handrails and front handlebar for user support and emergency dismount, press emergency button
to stop the machine for emergency dismount.
• The noise level of the treadmill is less than 70 dB when there is no user on it and more than 70 dB when it is in use. If the noise of
treadmill bothers you, stop exercising and take a break. Noise emission under load is higher than without load.
• Make sure the treadmill comes to complete stop before folding. Do not operate the treadmill when it is folded.
• Please note that the plastic parts, such as end caps, are susceptible to wear.
• The treadmill’s safety level can only be maintained if it is checked regularly for damage and wear.
• Make sure the edge of the belt is parallel with the lateral position of the side rail and does not move under the side rail. If the
belt is not centered it must be adjusted before use.
• Use the treadmill only for its intended use as described in the treadmill guide and owner’s manual.
• Do not use other attachments that are not recommended by the manufacturer. Attachments may cause injury.
• Return the unit to a service center for examination and repair.
• Keep power cord away from heated surfaces. Do not carry this unit by its supply cord or use the cord as a handle.
• Never operate the treadmill with the air opening blocked. Keep the air opening clean, free of lint, hair, and the like.

ENGLISH
8
• To prevent electrical shock, never drop or insert any object into any opening.
• Do not operate where aerosol (spray) products are being used or when oxygen is being administered.
• This treadmill is intended for in-home use only. Failure to comply will void the warranty.
• Do not use treadmill in any location that is not temperature controlled, such as but not limited to garages, porches, pool rooms,
bathrooms, car ports or outdoors. If your treadmill has been exposed to colder temperatures or high moisture climates, it is
strongly recommended that the treadmill is warmed up to room temperature before first time use. Failure to comply will void
the warranty.
• Treadmill is heavy; use care and additional help if necessary when moving. Do not attempt to move or transport treadmill unless
it is in the upright, folded position with the lock latch secured. Failure to follow these instructions could result in injury.
• Do not move or lift treadmill from packaging until specified to do so in the assembly instructions. You may remove the plastic
wrap from console masts.
• Never open box when it is positioned upside-down or on its side.
• Unpack and assemble the unit where it will be used.
• The enclosed treadmill is equipped with high-pressure springs which can cause the lower base frame to spring open if
mishandled.
• Do not remove the console covers unless instructed by Customer Tech Support. Service should only be done by an authorized
service a technician.
• Have 2 people available for assembly, this will make the assembly process easier.

ENGLISH
9
TECH SPECS
Assembled Dimensions
(L x W x H)
193 x 86.4 x 144.8 cm /
76" x 34" x 57"
Product Weight 85 kg / 187 lbs.
Max User Weight 147 kg / 325 lbs.
For assembly video, please visit:
https://global.bowflex.com/en/assembly-videos.html
From now on, you can assemble your equipment
at your convenience. For detailed instructions on
assembly, operation, programs, troubleshooting, and
maintenance, please scan the QR code on the left
side to access the complete manual.
If scanning the QR code fails, you can visit the
website provided here:
https://global.bowflex.com/en/manuals.html
If you have any questions, need assistance with missing parts, or require technical support or
maintenance for your equipment, please contact Customer Tech Support.
NEED HELP?
WARRANTY
If your equipment requires warranty service, please contact local Customer Tech Support.
Manufacturer: Johnson Health Industry (Vietnam) Co., Ltd. | Manufacturer address: Lot CN-24, Thuan Thanh II Industrial Park,
Mao Dien Ward, Bac Ninh Province, Vietnam
ENGLISH
10
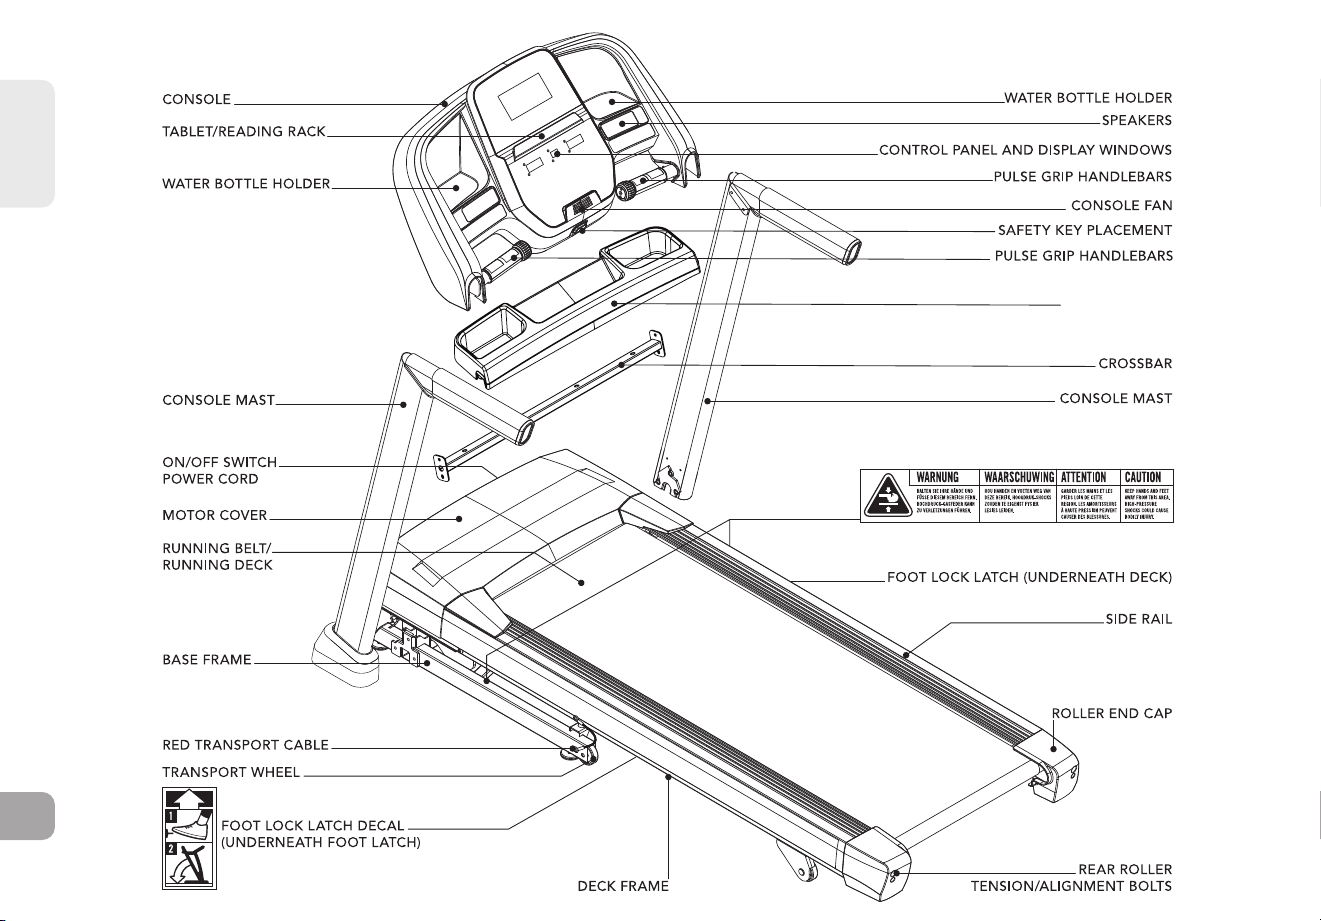
STORAGE TRAY
ENGLISH
11
TOOLS INCLUDED:
F 6 mm T-Wrench
F 6 mm L-Wrench
F 5 mm L-Wrench
PARTS INCLUDED:
F 1 Console Assembly
F 2 Console Masts
F 1 Crossbar
F 1 Hardware Kit
F 1 Safety Key
F 1 Audio Adapter Cable
F 1 Bottle of Silicone Lubricant
(for 2 applications)
DO NOT ATTEMPT TO LIFT THE TREADMILL! Do not move or lift treadmill from
packaging until specified to do so in the assembly instructions. You may remove the
plastic wrap from console masts.
NOTE: During each assembly step, ensure that ALL nuts and bolts are in place and partially
threaded in before completely tightening any ONE bolt.
NOTE: A light application of grease may aid in the installation of hardware. Any grease, such
as lithium bike grease is recommended.
FAILURE TO FOLLOW THESE INSTRUCTIONS COULD RESULT IN INJURY!
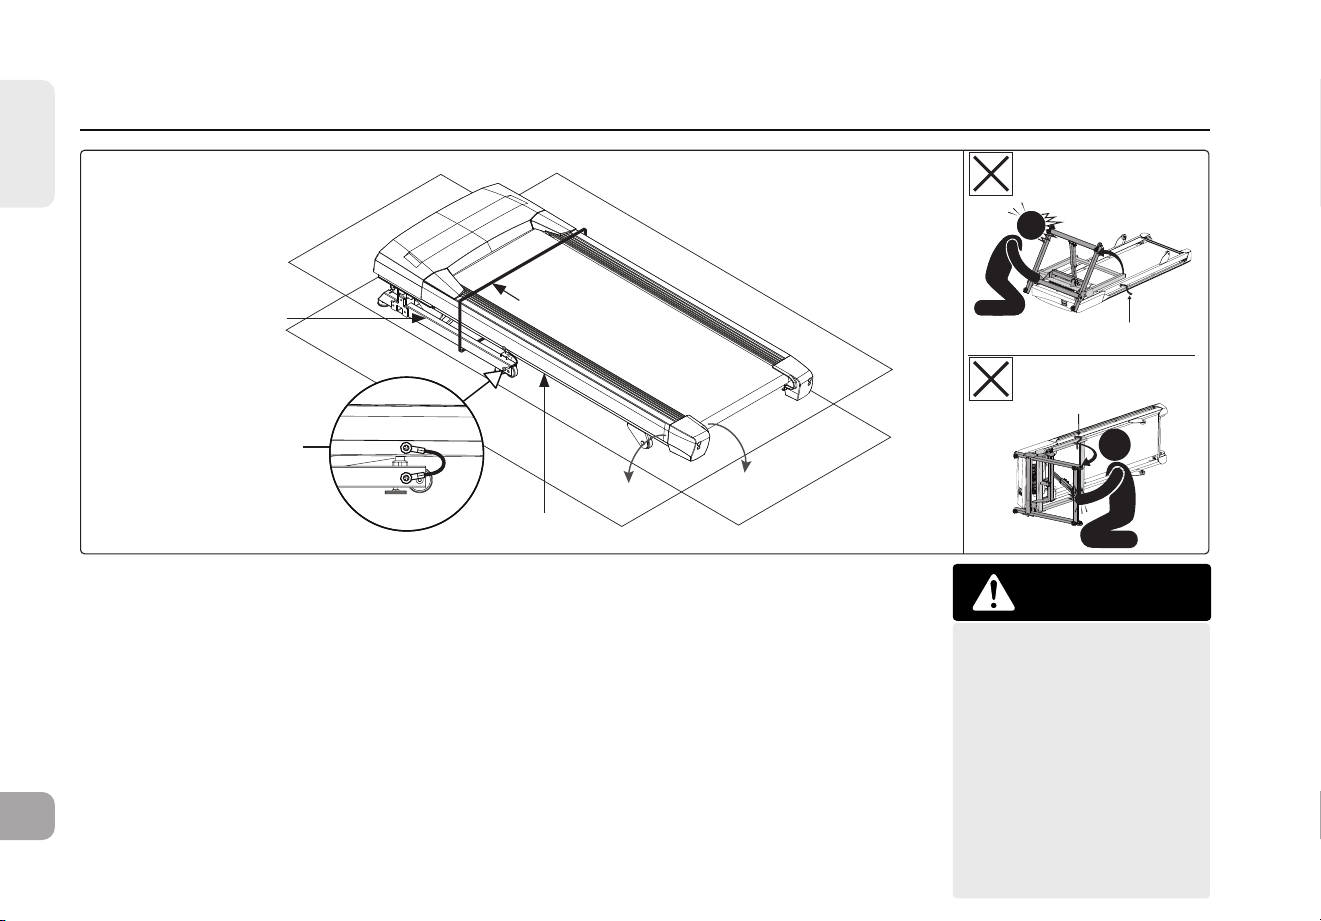
Never open box when it is positioned upside-down or on its side.
Unpack and assemble the unit where it will be used.
The enclosed treadmill is equipped with high-pressure springs which can cause the
lower base frame to spring open if mishandled.
The red transport cables are installed between the upper deck frame and the lower
base frame to prevent the movement of the lower base frame. DO NOT remove red
transport cables until instructed to do so.
WARNING
WARNING
WARNING
ENGLISH
12
RED TRANSPORT
CABLE
RED TRANSPORT
CABLE
ASSEMBLY STEP- UNPACKING
BANDING STRAP
DECK FRAME
RED TRANSPORT CABLE
(LEFT & RIGHT SIDES)
BASE FRAME
A Place the treadmill carton on a level flat surface with the bottom of the box on the ground.
B Cut banding straps on outside of box and remove box lid.
C DO NOT lift treadmill out of the box. Instead, tear down corners of bottom of treadmill
box as shown. Treadmill should be assembled on flattened treadmill box as shown to
protect floor surface.
D Cut the banding straps inside the box and remove everything but the treadmill frame.
E Partially lift the running deck upward from the rear to remove all contents from
underneath the running deck. Red transport cables on either side of treadmill will prevent
the treadmill deck from fully lifting.
NEVER tip treadmill
upside-down or on
its side. DO NOT use
tools to remove the red
transport cables until
instructed to do so. If
a component requires
tools to remove, wait
until the Assembly
Instructions instructs
you how to safely
remove the component.
WARNING

ENGLISH
13
A
2
1
NOTE: Do not fully tighten bolts until the end of
STEP 4.
A - QTY: 3
Bolt (M8)
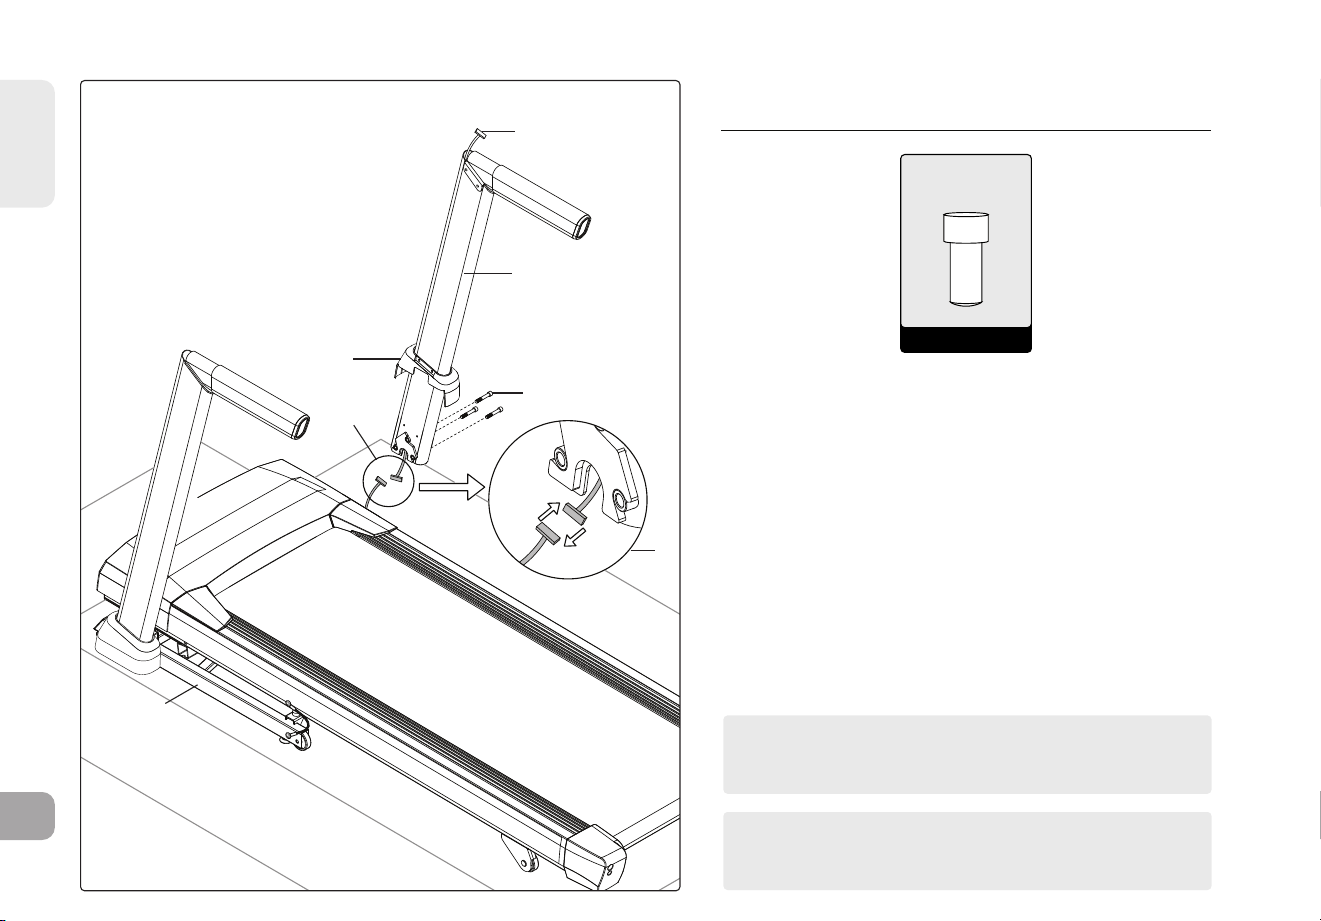
1.1 Open HARDWARE FOR STEP 1.
1.2 Slide LEFT CONSOLE MAST BOOT (8) on to
LEFT CONSOLE MAST (1).
1.3 Attach the LEFT CONSOLE MAST (1) to the BASE
FRAME (2) using 3 BOLTS (A).
8
ASSEMBLY STEP 1
ENGLISH
14
NOTE: Do not fully tighten bolts until the
end of STEP 4.
4
9
3
3
A
2
3
NOTE: Be careful not to pinch any wires while
assembling the console.
A - QTY: 3
Bolt (M8)
A SSEMB LY STEP 2
2.1 Open HARDWARE FOR STEP 2.
2.2 Slide RIGHT CONSOLE MAST BOOT (9) on to
RIGHT CONSOLE MAST (4).
2.3 Pull the CONSOLE CABLE (3) away from the
treadmill base frame. Connect the CONSOLE
CABLE (3) from the MAIN FRAME (2) to the
CONSOLE CABLE (3) in the bottom of the
RIGHT CONSOLE MAST (4). The other end of the
CONSOLE CABLE (3) should be located at the top
of the mast.
2.4 Attach RIGHT CONSOLE MAST (4) to MAIN
FRAME (2) using 3 BOLTS (A).
ENGLISH
15
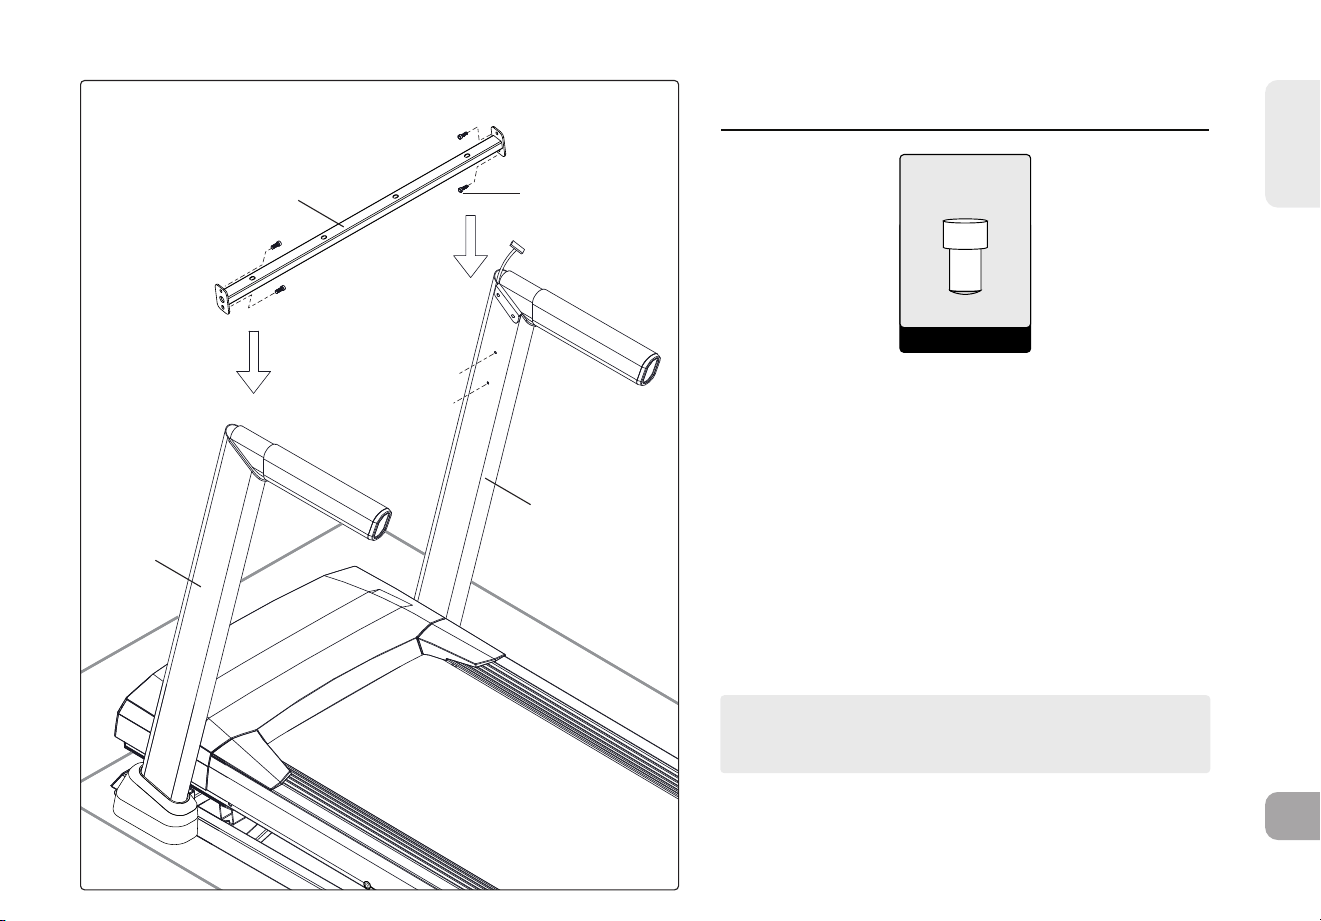
NOTE: Do not fully tighten bolts until the end of
STEP 4.
D
1
6
4
D - QTY: 4
Bolt (M6)
ASSEMBLY STEP 3
3.1 Open HARDWARE FOR STEP 3.
3.2 Attach LEFT SIDE of the CROSSBAR (6) to the
UPRIGHT MAST (1) loosely using
2 BOLTS (A).
3.3 Attach RIGHT SIDE of the CROSSBAR (6) to the
UPRIGHT MAST (4) loosely using
2 BOLTS (D).
ENGLISH
16
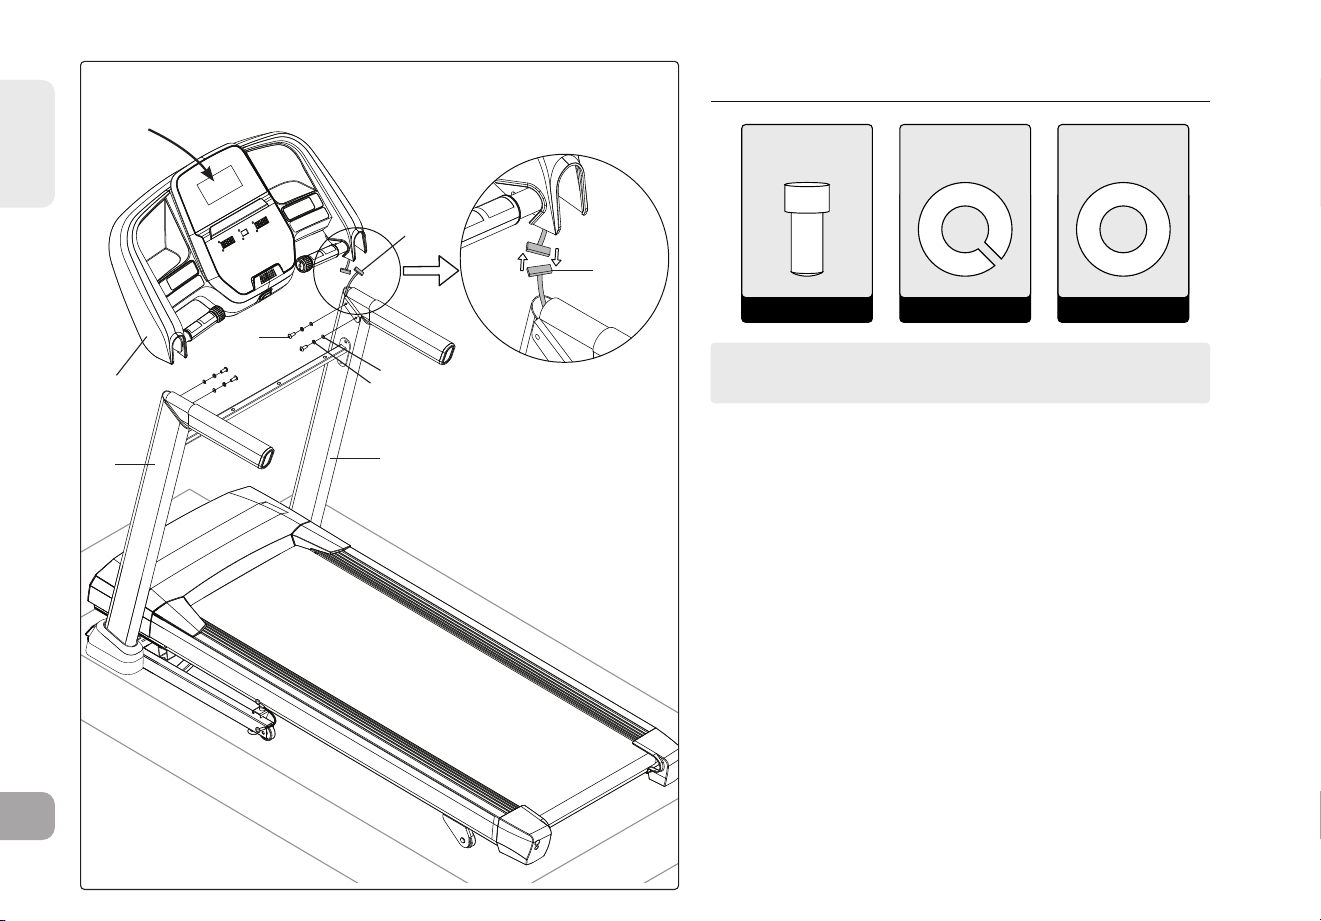
NOTE: Be careful not to pinch any wires while
assembling the console.
B
C
A
(STEP 4.5)
4
3
3
1
5
B - QTY: 4 C - QTY: 4A - QTY: 4
Bolt (M8)
Spring
Washer
Flat
Washer
A SSEMB LY STEP 4
4.1 Open HARDWARE FOR STEP 4.
4.2 Gently place the CONSOLE (5) on top of the
CONSOLE MASTS (1&4). Attach the LEFT SIDE first
using 2 BOLTS (A), 2 SPRING WASHERS (B) and 2 FLAT
WASHERS (C).
4.3 The CONSOLE CABLES (3) are tucked into the RIGHT
CONSOLE MAST (4). Using the lead wire carefully pull
the CONSOLE CABLE (3) out of the RIGHT CONSOLE
MAST (4). Detach and and discard the LEAD WIRE.
Connect the CONSOLE CABLES (3) and carefully tuck
wires in masts to avoid damage.
4.4 Attach the RIGHT SIDE of the CONSOLE (5) using
2 BOLTS (A), 2 SPRING WASHERS (B) and 2 FLAT
WASHERS (C).
4.5 Pull the top of the CONSOLE (5) towards the back of
the treadmill and HOLD while TIGHTENING THE LEFT
AND RIGHT SIDE BOLTS (A).
4.6 REMEMBER to tighten ALL BOLTS & SCREWS
completely now that assembly is finished.

ENGLISH
17
E - QTY: 4
Screw
A SSEMB LY STEP 5
5.1 Open HARDWARE FOR STEP 5.
5.2 Attach the ACCESSORY TRAY (7) to the
CROSSBAR (6) using 4 SCREWS (E).
6
E
7

ENGLISH
18
FAILURE TO FOLLOW THESE INSTRUCTIONS COULD RESULT IN
INJURY!
Once the red transport cables have been detached from the
treadmill, high pressure springs can cause the lower base frame to
spring open. NEVER tip treadmill upside-down or on its side, and
NEVER lift this unit if red transport cables are not connecting the
upper deck frame to the lower base frame.
RED TRANSPORT CABLE
RED TRANSPORT CABLE
WARNING
A SSEMBLY STEP 6 - REMOVAL OF RED TRANSPORT CABLES
6.1 Ensure that treadmill is resting with all wheels supported by the floor.
6.2 On left side of treadmill, use the 5mm L-wrench (provided in box)
to remove the two bolts connecting the red transport cable to the
upper deck frame and the lower base frame.
6.3 Replace both bolts (one in the upper deck frame and one in the
lower base frame) and fully tighten to lock in place. Note that to
prevent the lower base frame from springing open during transport
or disassembly of the treadmill in the future, the red transport cable
can be reattached to the treadmill using these same bolts.
6.4 Perform same operation on right side of treadmill to remove the two
bolts connecting the red transport cable to the upper deck frame
and the lower base frame.
6.5 Replace both bolts and fully tighten to lock in place.
6.6 Save both red transport cables for future use by placing cables into
clear poly bag alongside the owner’s manual.
6.7 When red transport cables are not installed, transport unit ONLY on
the ground, and ONLY after it is fully assembled and in the upright
folded position with the lock latch secured.

ENGLISH
19
A SSEMB LY STEP 7
7.1 Open HARDWARE FOR STEP 7.
7.2 REMEMBER to tighten CROSSBAR BOLTS
into the CONSOLE MASTS(3&4) completely
now that assembly is finished. Lift DECK
(10) to upright and locked position.
7.3 Slide LEFT CONSOLE BOOT (8) to the
bottom of the LEFT CONSOLE MAST (3).
Attach with 2 BOLTS (F) through the holes
in LEFT CONSOLE BOOT (8) into LEFT
UPRIGHT MAST (3).
7.4 Slide RIGHT CONSOLE BOOT (9) to the
bottom of the RIGHT CONSOLE MAST (4).
Attach with 2 BOLTS (F) through the holes
in RIGHT CONSOLE BOOT (9) into RIGHT
UPRIGHT MAST (4).
F - QTY: 4
Screw
Z06x4
F
4
10
1
8
9
9
ENGLISH
20
ASSEMBLY COMPLETE!
Before the first use, lubricate the treadmill
deck by following the instructions in the
MAINTENANCE section in the TREADMILL GUIDE.
NOTE: If treadmill must be disassembled or lifted in
the future, use the 5mm L-wrench to re-attach red
transport cables to the upper deck frame and lower
base frame on both the left side and right side of the
treadmill. Check to ensure that the lower base frame
cannot spring open before lifting or disassembling
treadmill.
1
2
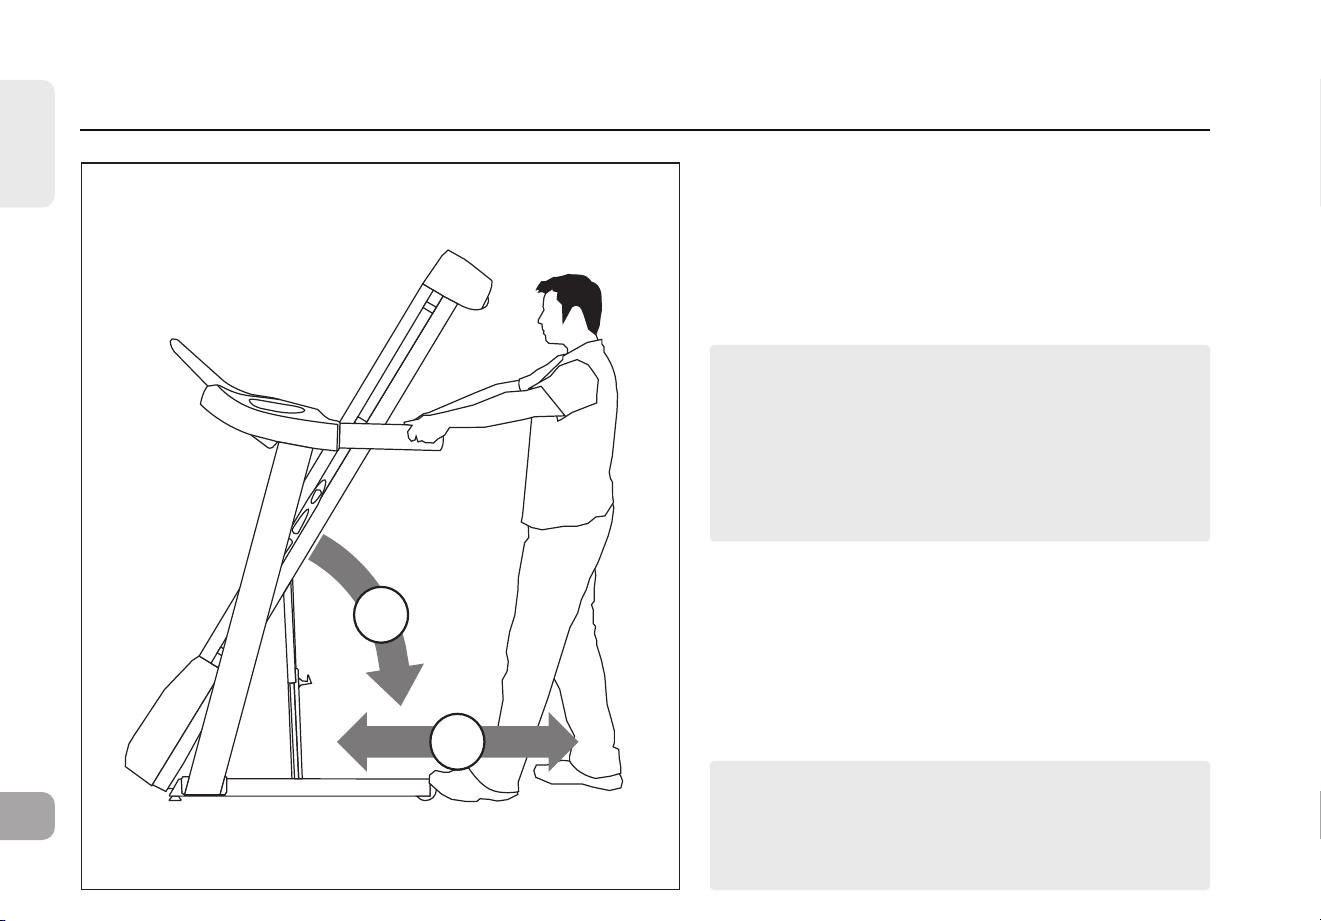
A SSEMB LY STEP 8 - MOVING TREADMILL
8.1 To move, make sure the treadmill is folded and
securely latched. Then firmly grasp the handlebars,
tilt the treadmill back (1) and roll (2).
8.2 Move treadmill off flattened box and into its final
position, ready for use. Dispose of cardboard box.

21
Treadmill
Setup
and Use

ENGLISH
22
LOCATION OF THE TREADMILL
Place the treadmill on a level and stable surface. There should be 30cm of clearance in front of
the treadmill for the power cord. Please leave a clear zone behind the treadmill that is at least the
width of the treadmill and at least 2 meters long. This zone must be clear of any obstruction and
provide the user a clear exit path from the machine. In case of an emergency, place both hands on
the side arm rests to hold yourself up and place your feet onto the side rails.
For ease of access, there should be an accessible space preferentially on both sides of the
treadmill equal to 0.6 meter to allow a user access to the treadmill from either side.
Do not place the treadmill in any area that will block any vent or air openings. The treadmill should
not be located in a garage, covered patio, near water or outdoors.
GROUNDING INSTRUCTIONS
This product must be grounded. If a treadmill should malfunction or breakdown, grounding
provides a path of least resistance for electrical current to reduce the risk of electrical shock.
This product is equipped with a cord having an equipment-grounding conductor and a grounding
plug. The plug must be plugged into an appropriate outlet that is properly installed and grounded in
accordance with local codes and ordinances.
DANGER!
• Improper connection of the equipment-grounding conductor can result in a risk of electric
shock. Check with a qualified electrician or service provider if you are in doubt as to whether
the product is properly grounded. Do not modify the plug provided with the product. If it does
not fit the outlet, have a proper outlet installed by a qualified electrician.
• This product is for use on a nominal local voltage circuit and has a grounding plug. No adapter
should be used with this product.
• This product must be used on a dedicated circuit. To determine if you are on a dedicated
circuit, shut off the power to that circuit and observe if any other devices lose power. If so,
move devices to a different circuit.
Note: There are usually multiple outlets on one circuit.
60 cm
(2 ft)
60 cm
(2 ft)
2 m (79”)
30 cm (1 ft)
FREE
AREA
T8.5J
ENGLISH
23
FOLDING TREADMILLS
To fold, firmly grasp the back end of the treadmill. Carefully lift the end of the treadmill
deck into the upright position until the lock latch engages and securely locks the deck
into position. Make sure the deck is securely latched before letting go.
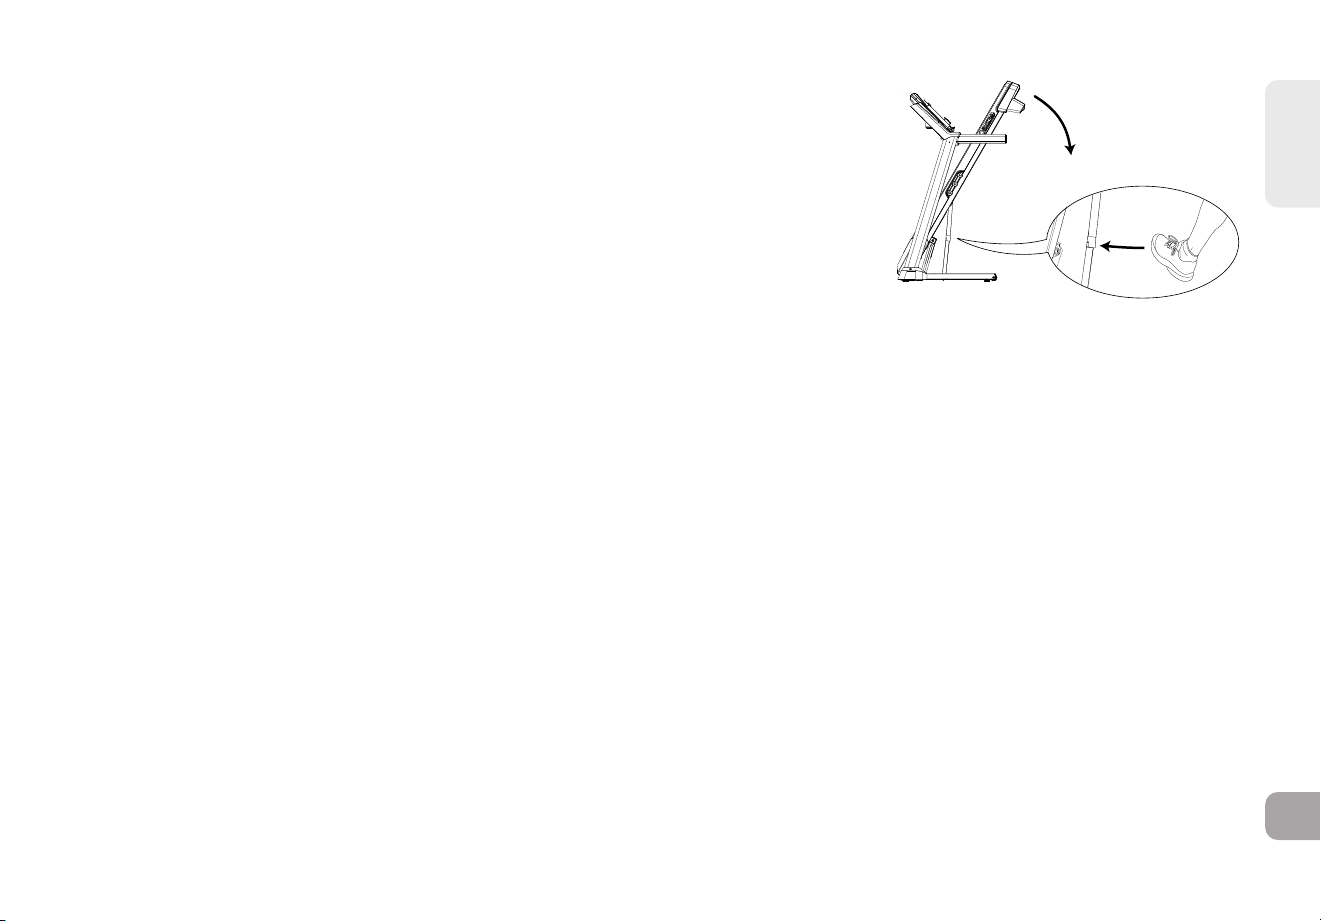
UNFOLDING
Firmly grasp the back end of the treadmill. To unfold, gently press down on the foot
lock latch with your foot until the lock latch disengages. Carefully lower the deck to
the ground.
USING THE SAFETY KEY
Your treadmill will not start unless the safety key is placed in position. Attach the clip end securely to your clothing. This safety key
is designed to cut the power to the treadmill if you should fall. Check the operation of the safety key every 2 weeks.
WARNING: Never use the treadmill without securing the safety key clip to your clothing. Pull on the safety key clip first to make
sure it will not come off your clothing.
POWER
Your treadmill is powered by a power supply. Some treadmills have a power switch, located next to the power jack. Make sure it is
in the on position. Unplug cord when not in use.
WARNING: Never operate product if it has a damaged cord or plug, if it is not working properly, if it has been damaged, or
immersed in water. Please contact Customer Tech Support at the number listed on the back panel of the OWNER’S MANUAL.

ENGLISH
24
LEVELING THE TREADMILL
Your treadmill should be level for optimum use. Once you have placed your treadmill where you intend to use it, raise or lower
one or both of the adjustable levelers located on the bottom of the treadmill frame. A carpenter’s level is recommended. If your
treadmill is not level, the running belt may not track properly. Once you have leveled your treadmill, lock the levelers in place by
tightening the nuts against the frame.
ADJUST HEIGHT LOCK ADJUSTMENT

ENGLISH
25
2
4
6
8
10
12
16
20
Q
M M
P
N
IH
B
R
F G
A
J
C
O
Q
DS T U SEL K

ENGLISH
26
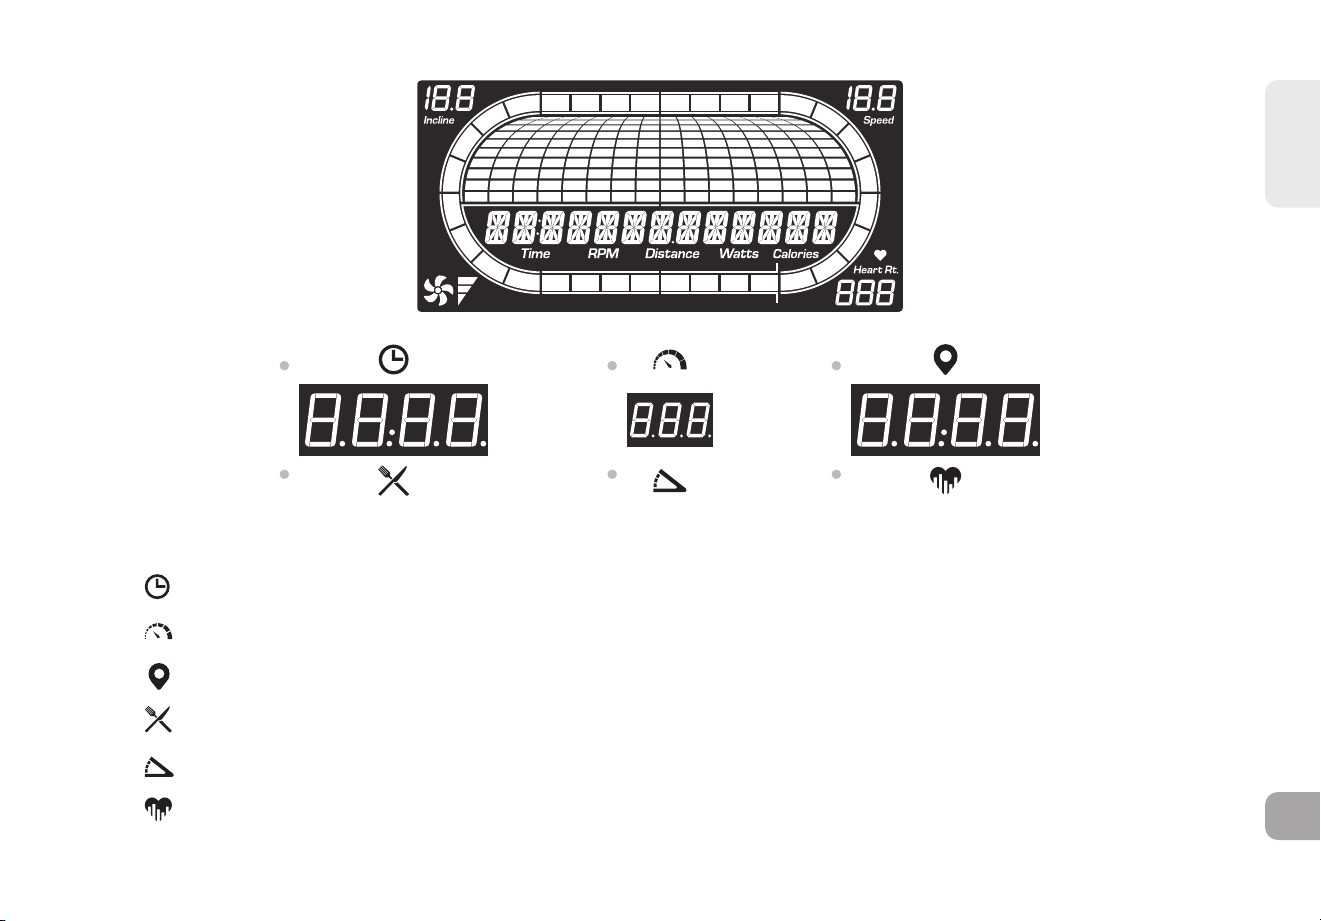
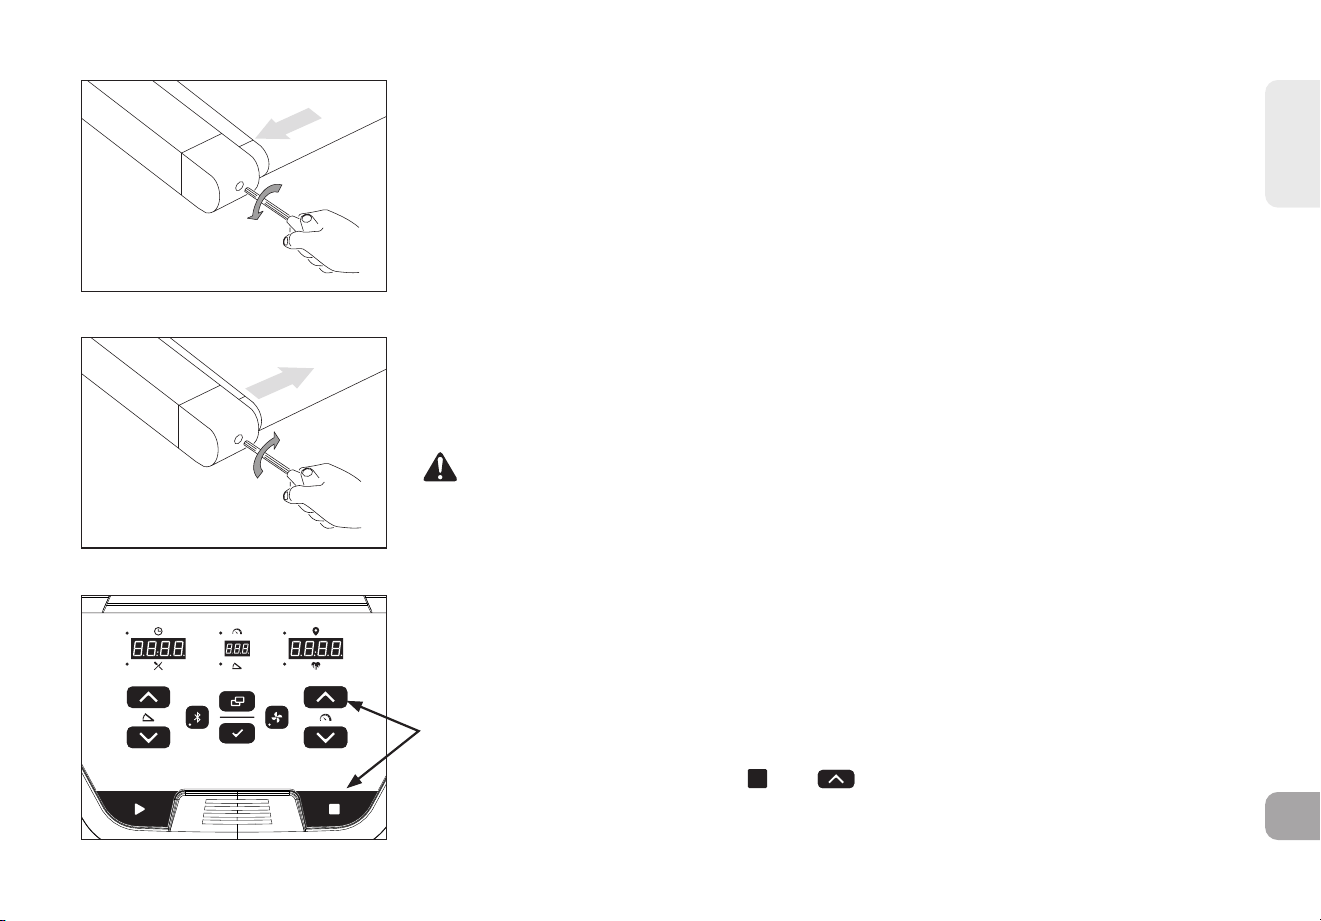
CONSOLE OPERATION
Note: There is a thin protective sheet of clear plastic on the overlay of the console that should be removed before use.
A) LCD DISPLAY: Time, RPM, Distance, Watts, Calories, Incline, Speed, Heart Rate, Fan Speed.
B) LED DISPLAY: Time, Speed, Distance, Calories, Incline, Heart Rate.
C) WORKOUT PROGRAMS: Lists each program available during your workout.
D) START: press to begin exercising, start your workout, or resume exercising after pause.
E) STOP: press to pause/end your workout. Hold for 3 seconds to reset the console.
F) INCLINE +/- KEYS: used to adjust incline in small increments (0.5% increments).
G) SPEED +/- KEYS: used to adjust speed in small increments (0.1 mph increments).
H) INCLINE QUICK KEYS: used to reach desired incline more quickly.
I) SPEED QUICK KEYS: used to reach desired speed more quickly.
J) CHANGE DISPLAY: press to change display feedback during workout.
K) FAN KEY: pressing fan button will change level 1,2,3 then off
L) FAN: personal workout fan.
M) SPEAKERS: music plays through speakers when your CD / MP3 player is connected to the console.
N) AUDIO IN JACK: plug your CD / MP3 player into the console using the included audio adaptor cable.
O) AUDIO OUT / HEADPHONE JACK: plug your headphones into this jack to listen to your music through the headphones.
Note: when headphones are plugged into the headphone jack the sound will no longer come out through the speakers.
P) USB INPUT: 1A/5V USB output power.
Q) WATER BOTTLE POCKETS: holds personal workout equipment.
R) TABLET/READING RACK: holds tablet or reading material.
S) HEART RATE PULSE GRIPS: used to measure heart rate.
T) INCLINE SCROLL WHEEL: used to adjust incline in small increments (.5%).
U) SPEED SCROLL WHEEL: used to adjust speed in small increments (.1 MPH).
ENGLISH
27
DISPLAY WINDOWS
• TIME: Shown as minutes : seconds. View the time remaining or the time elapsed in your workout.
• SPEED: Shown as MPH. Indicates how fast your walking or running surface is moving.
• DISTANCE: Shown as miles. Indicates distance traveled or distance remaining during your workout.
• CALORIES: Total calories burned or calories remaining left to burn during your workout.
• INCLINE: Shown as percent. Indicates the incline of your walking or running surface.
• HEART RATE: Shown as BPM (beats per minute). Used to monitor your heart rate (displayed when contact is made with both
pulse grips).

ENGLISH
28
GETTING STARTED
1) Check to make sure no objects are placed on the belt that will hinder the movement of the treadmill.
2) Plug in the power cord and turn the treadmill ON. (The ON/OFF switch is next to the power cord.)
3) Stand on the side rails of the treadmill.
4) Attach the safety key clip to part of your clothing making sure that it is secure and will not become detached during operation.
5) Insert the safety key into the safety keyhole in the console.
6) You have two options to start your workout:
A) QUICK START UP
Simply press the START key to begin working out.
Time, distance, and calories will all count up from zero. OR...
B) SELECT A WORKOUT OR TARGET
1) Select your PROGRAM with the +/- buttons and press ENTER when your desired PROGRAM is displayed.
2) Adjust the SETTING with the +/- buttons and press ENTER when your desired SETTING is displayed.
3) Press START to begin.
SPECIFICATION FOR PROGRAMS WITH MULTIPLE SEGMENTS
1) The user can increase speed and incline in a certain segment and it ONLY INCREASES FOR THAT SEGMENT.
For the following segments, the machine will follow the values in the provided table.
2) The user can decrease the speed and incline in any segment and it will decrease the same amount for the following segments.
BOWFLEX CONNECTED FITNESS SYSTEM
Your BowFlex machine is Bluetooth ready, allowing you to use Bluetooth 4.0 technology to wirelessly connect your device and other apps to
your BowFlex treadmill.

ENGLISH
29
P1) MANUAL: Adjust your speed and incline manually during your workout.
WORKOUT PROFILES
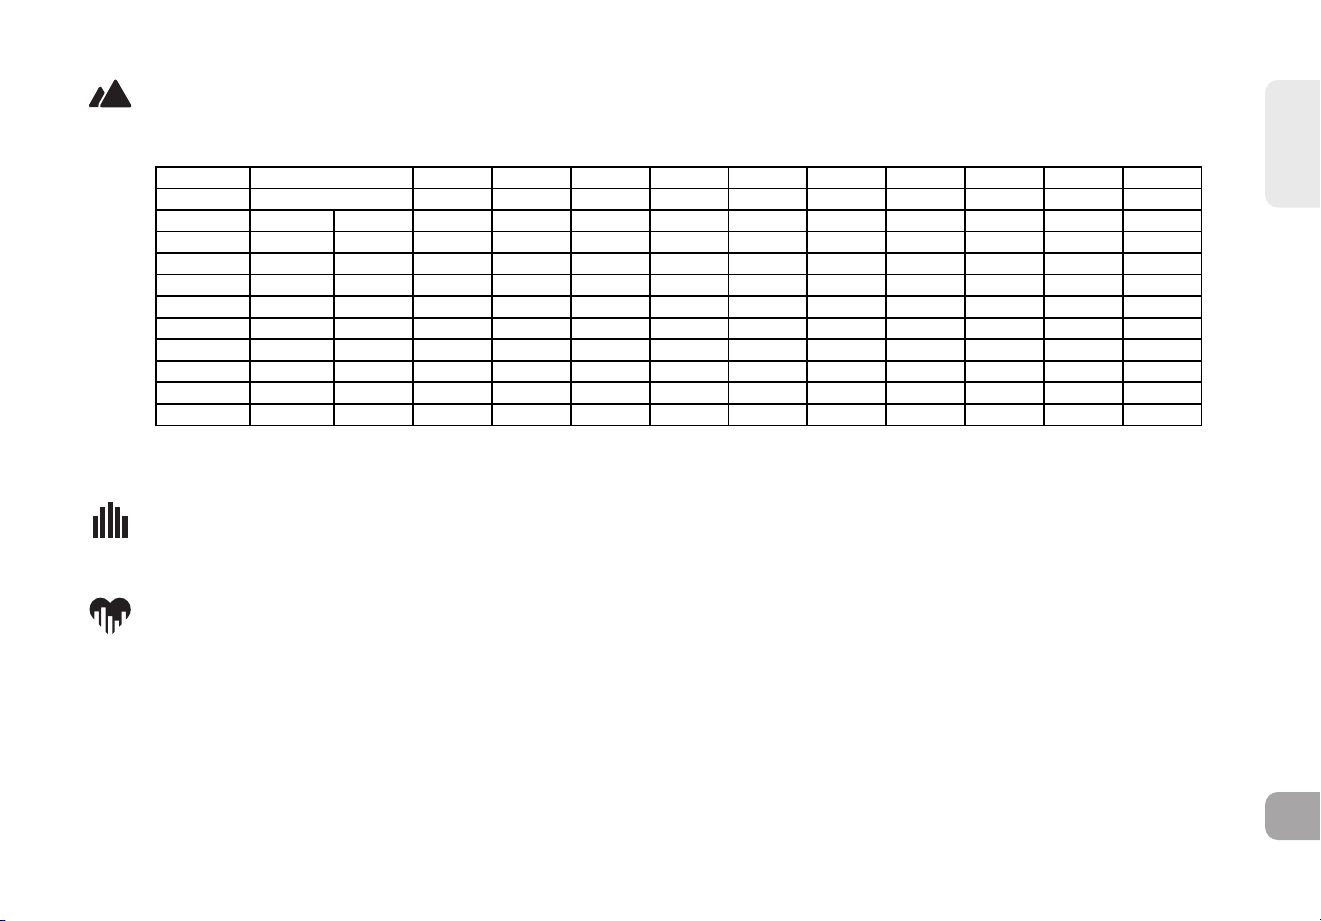
P2) WEIGHT LOSS: A workout designed specifically to target weight. Promotes weight loss by increasing and decreasing incline,
while keeping you in your fat burning zone. Includes 20 levels.
WEIGHT LOSS
Segment = workout time / 16
Level 1 2 3 4 5 6 7 8 9 10 11 12 13 14 15 16 17 18 19 20
Segment
1 0 0 0 0 0 0 1 2 2 2.5 2.5 2.5 2.5 2.5 3.5 5 5 5 5 5
2 0 0 1 2 2.5 3.5 3.5 3.5 4.5 5.5 6 7 7.5 8.5 9.5 11 11 11 11.5 12
3 1 2 2 2 2 2 2 2 2 2.5 3.5 4.5 4.5 4.5 5.5 7 7.5 8.5 9 10
4 1.5 3.5 4 5 5 5 5 5 6 7 7.5 8.5 9 10 11 12 12.5 13.5 14 15
5 1 2 2 2 2 2 2.5 3.5 4 4.5 4.5 4.5 5.5 7 7.5 8.5 8.5 8.5 9.5 11
6 1.5 3.5 3.5 3.5 5 6.5 7.5 8.5 9 10 10 10 10.5 11.5 12.5 13.5 13.5 13.5 13.5 13.5
7 1 2 2 2 2 2 2.5 3.5 4 4.5 5 5.5 5.5 5.5 7 8.5 8.5 8.5 9 10
8 1.5 3.5 4 5 5 5 5.5 6.5 7.5 8.5 9 10 10.5 11.5 11.5 12 13.5 15 15 15
9 1.5 3.5 3.5 3.5 3.5 3.5 4 5 5 5.5 6 7 7 7 8.5 10 10.5 11 11.5 12
10 1 2 2 2 2 2 2.5 3.5 4 4.5 4.5 4.5 4.5 4.5 6.5 8.5 8.5 8.5 9 10
11 1.5 3.5 3.5 3.5 4 5 5 5 6 7 8.5 10 10.5 11.5 12.5 13.5 13.5 13.5 14 15
12 1 2 2 2 2 2 2 2 3 4.5 5.5 7 7 7 7.5 8.5 9 10 10 10
13 1.5 3.5 4 5 5.5 6.5 7.5 8.5 8.5 8.5 9 10 10 10 11 12 12 12 12.5 13.5
14 1 2 2 2 2.5 3.5 4 5 5 5.5 5.5 5.5 7 8.5 9 10 10.5 11 11.5 12
15 0 0 0 0 1 2 2.5 3.5 4 4.5 4.5 4.5 5 5.5 7 8.5 9 10 10 10
16 0 0 0 0 0 0 1 2 2 2.5 2.5 2.5 2.5 2.5 3.5 5 5 5 5 5
WEIGHT LOSS (10%incline Max)
Segment = workout time / 16
Level 1 2 3 4 5 6 7 8 9 10 11 12 13 14 15 16 17 18 19 20
Segment
1 0 0 0 0 0 0 1 2 2 2.5 2.5 2.5 2.5 2.5 3.5
5 5 5 5 5
2 0 0 1 2 2.5 3.5 3.5 3.5 4.5 5.5 6 7 7.5 8.5 9.5 10 10 10 10 10
3 1 2 2 2 2 2 2 2 2 2.5 3.5 4.5 4.5 4.5 5.5 7 7.5 8.5 9 10
4 1.5 3.5 4 5 5 5 5 5 6 7 7.5 8.5 9 10 10 10 10 10 10 10
5 1 2 2 2 2 2 2.5 3.5 4 4.5 4.5 4.5 5.5 7 7.5 8.5 8.5 8.5 9.5 10
6 1.5 3.5 3.5 3.5 5 6.5 7.5 8.5 9 10 10 10 10 10 10 10 10 10 10 10
7 1 2 2 2 2 2 2.5 3.5 4 4.5 5 5.5 5.5 5.5 7 8.5 8.5 8.5 9 10
8 1.5 3.5 4 5 5 5 5.5 6.5 7.5 8.5 9 10 10 10 10 10 10 10 10 10
9 1.5 3.5 3.5 3.5 3.5 3.5 4 5 5 5.5 6 7 7 7 8.5 10 10 10 10 10
10 1 2 2 2 2 2 2.5 3.5 4 4.5 4.5 4.5 4.5 4.5 6.5 8.5 8.5 8.5 9 10
11 1.5 3.5 3.5 3.5 4 5 5 5 6 7 8.5 10 10 10 10 10 10 10 10 10
12 1 2 2 2 2 2 2 2 3 4.5 5.5 7 7 7 7.5 8.5 9 10 10 10
13 1.5 3.5 4 5 5.5 6.5 7.5 8.5 8.5 8.5 9 10 10 10 10 10 10 10 10 10
14 1 2 2 2 2.5 3.5 4 5 5 5.5 5.5 5.5 7 8.5 9 10 10 10 10 10
15 0 0 0 0 1 2 2.5 3.5 4 4.5 4.5 4.5 5 5.5 7 8.5 9 10 10 10
16 0 0 0 0 0 0 1 2 2 2.5 2.5 2.5 2.5 2.5 3.5 5 5 5 5 5
WEIGHT LOSS (12%incline Max)
Segment = workout time / 16
Level 1 2 3 4 5 6 7 8 9 10 11 12 13 14 15 16 17 18 19 20
Segment
1 0 0 0 0 0 0 1 2 2 2.5 2.5 2.5 2.5 2.5 3.5 5 5 5 5 5
2 0 0 1 2 2.5 3.5 3.5 3.5 4.5 5.5 6 7 7.5 8.5 9.5 11 11 11 11.5 12
3 1 2 2 2 2 2 2 2 2 2.5 3.5 4.5 4.5
4.5 5.5 7 7.5 8.5 9 10
4 1.5 3.5 4 5 5 5 5 5 6 7 7.5 8.5 9 10 11 12 12 12 12 12
5 1 2 2 2 2 2 2.5 3.5 4 4.5 4.5 4.5 5.5 7 7.5 8.5 8.5 8.5 9.5 11
6 1.5 3.5 3.5 3.5 5 6.5 7.5 8.5 9 10 10 10 10.5 11.5 12 12 12 12 12 12
7 1 2 2 2 2 2 2.5 3.5 4 4.5 5 5.5 5.5 5.5 7 8.5 8.5 8.5 9 10
8 1.5 3.5 4 5 5 5 5.5 6.5 7.5 8.5 9 10 10.5 11.5 11.5 12 12 12 12 12
9 1.5 3.5 3.5 3.5 3.5 3.5 4 5 5 5.5 6 7 7 7 8.5 10 10.5 11 11.5 12
10 1 2 2 2 2 2 2.5 3.5 4 4.5 4.5 4.5 4.5 4.5 6.5 8.5 8.5 8.5 9 10
11 1.5 3.5 3.5 3.5 4 5 5 5 6 7 8.5 10 10.5 11.5 12 12 12 12 12 12
12 1 2 2 2 2 2 2 2 3 4.5 5.5 7 7 7 7.5 8.5 9 10 10 10
13 1.5 3.5 4 5 5.5 6.5 7.5 8.5 8.5 8.5 9 10 10 10 11 12 12 12 12 12
14 1 2 2 2 2.5 3.5 4 5 5 5.5 5.5 5.5 7 8.5 9 10 10.5 11 11.5 12
15 0 0 0 0 1 2 2.5 3.5 4 4.5 4.5 4.5 5 5.5 7 8.5 9 10 10 10
16 0 0 0 0 0 0 1 2 2 2.5 2.5 2.5 2.5 2.5 3.5 5 5 5 5 5
INCLINE
INCLINE
INCLINE

ENGLISH
30
P3) INTERVALS: Improves your strength, speed and endurance by increasing and decreasing the incline throughout your workout to
involve your heart and other muscles. Includes 20 levels.
P4) DISTANCE: Push yourself and go further during your workout with 13 distance workouts. Choose from
1 mile, 2 miles, 5k, 5 miles, 10k, 8 miles, 15k, 10 miles, 20k, half marathon, 15 miles, 20 miles and marathon goals.
User sets starting speed levels.
P5) CALORIES: Set goals for burning calories. Calories burned are calculated using distance and speed.
Intervals (15%Incline)
Segment =workout time/16
Level 1 2 3 4 5 6 7 8 9 10 11 12 13 14 15 16 17 18 19 20
Segment
1 0 0 0 0 0 0 0 0 0 0 0 0 0 0 0 0 0 0 0 0
2 0.5 0.5 0.5 0.5 0.5 0.5 0.5 0.5 1 1 1 1 1 1 1 1.5 1.5 1.5 1.5 1.5
3 0 0 0 0 0 0 0 0 0 0 0 0 0 0 0 0 0 0 0 0
4 1.5 2 2 2.5 3 3 3.5 3.5 4 4.5 5 5.5 5.5 6 6 6.5 7 7 8 8.5
5 0 0 0 0 0 0 0 0 0 0 0 0 0 0 0 0 0 0 0 0
6 2.5 2.5 3 3.5 4 4.5 4.5 5 5.5 6 7 7.5 8 8 8.5 9.5 9.5 10 11 11.5
7 0 0 0 0 0 0 0 0 0 0 0 0 0 0 0 0 0 0 0 0
8 3 3.5 4 4.5 5 5.5 6 6.5 7 8 9 9.5 10 10.5 11 12 12.5 13 14 15
9 0 0 0 0 0 0 0 0 0 0 0 0 0 0 0 0 0 0 0 0
10 3 3.5 4 4.5 5 5.5 6 6.5 7 8 9 9.5 10 10.5 11 12 12.5 13 14 15
11 0 0 0 0 0 0 0 0 0 0 0 0 0 0 0 0 0 0 0 0
12 3 3.5 4 4.5 5 5.5 6 6.5 7 8 9 9.5 10 10.5 11 12 12.5 13 14 15
13 0 0 0 0 0 0 0 0 0 0 0 0 0 0 0 0 0 0 0 0
14 3 3.5 4 4.5 5 5.5 6 6.5 7 8 9 9.5 10 10.5 11 12 12.5 13 14 15
15 0 0 0 0 0 0 0 0 0 0 0 0 0 0 0 0 0 0 0 0
16 3 3.5 4 4.5 5 5.5 6 6.5 7 8 9 9.5 10 10.5 11 12 12.5 13 14 15
Intervals (10%Incline)
Segment =workout time/16
Level 1 2 3 4 5 6 7 8 9 10 11 12 13 14 15 16 17 18 19 20
Segment
1 0 0 0 0 0 0 0 0 0 0 0 0 0 0 0 0 0 0 0 0
2 0.5 0.5 0.5 0.5 0.5 0.5 0.5 0.5 1 1 1 1 1 1 1 1.5 1.5 1.5 1.5 1.5
3 0 0 0 0 0 0 0 0 0 0 0 0 0 0 0 0 0 0 0 0
4 1.5 2 2 2.5 3 3 3.5 3.5 4 4.5 5 5.5 5.5 6 6 6.5 7 7 8 8.5
5 0 0 0 0 0 0 0 0 0 0 0 0 0 0 0 0 0 0 0 0
6 2.5 2.5 3 3.5 4 4.5 4.5 5 5.5 6 7 7.5 8 8 8.5 9.5 9.5 10 10 10
7 0 0 0 0 0 0 0 0 0 0 0 0 0 0 0 0 0 0 0 0
8 3 3.5 4 4.5 5 5.5 6 6.5 7 8 9 9.5 10 10 10 10 10 10 10 10
9 0 0 0 0 0 0 0 0 0 0 0 0 0 0 0 0 0 0 0 0
10 3 3.5 4 4.5 5 5.5 6 6.5 7 8 9 9.5 10 10 10 10 10 10 10 10
11 0 0 0 0 0 0 0 0 0 0 0 0 0 0 0 0 0 0 0 0
12 3 3.5 4 4.5 5 5.5 6 6.5 7 8 9 9.5 10 10 10 10 10 10 10 10
13 0 0 0 0 0 0 0 0 0 0 0 0 0 0 0 0 0 0 0 0
14 3 3.5 4 4.5 5 5.5 6 6.5 7 8 9 9.5 10 10 10 10 10 10 10 10
15 0 0 0 0 0 0 0 0 0 0 0 0 0 0 0 0 0 0 0 0
16 3 3.5 4 4.5 5 5.5 6 6.5 7 8 9 9.5 10 10 10 10 10 10 10 10
Segment =workout time/16
Intervals (12%Incline)
Level 1 2 3 4 5 6 7 8 9 10 11 12 13 14 15 16 17 18 19 20
Segment
1 0 0 0 0 0 0 0 0 0 0 0 0 0 0 0 0 0 0 0 0
2 0.5 0.5 0.5 0.5 0.5 0.5 0.5 0.5 1 1 1 1 1 1 1 1.5 1.5 1.5 1.5 1.5
3 0 0 0 0 0 0 0 0 0 0 0 0 0 0 0 0 0 0 0 0
4 1.5 2 2 2.5 3 3 3.5 3.5 4 4.5 5 5.5 5.5 6 6 6.5 7 7 8 8.5
5 0 0 0 0 0 0 0 0 0 0 0 0 0 0 0 0 0 0 0 0
6 2.5 2.5 3 3.5 4 4.5 4.5 5 5.5 6 7 7.5 8 8 8.5 9.5 9.5 10 11 11.5
7 0 0 0 0 0 0 0 0 0 0 0 0 0 0 0 0 0 0 0 0
8 3 3.5 4 4.5 5 5.5 6 6.5 7 8 9 9.5 10 10.5 11 12 12 12 12 12
9 0 0 0 0 0 0 0 0 0 0 0 0 0 0 0 0 0 0 0 0
10 3 3.5 4 4.5 5 5.5 6 6.5 7 8 9 9.5 10 10.5 11 12 12 12 12 12
11 0 0 0 0 0 0 0 0 0 0 0 0 0 0 0 0 0 0 0 0
12 3 3.5 4 4.5 5 5.5 6 6.5 7 8 9 9.5 10 10.5 11 12 12 12 12 12
13 0 0 0 0 0 0 0 0 0 0 0 0 0 0 0 0 0 0 0 0
14 3 3.5 4 4.5 5 5.5 6 6.5 7 8 9 9.5 10 10.5 11 12 12 12 12 12
15 0 0 0 0 0 0 0 0 0 0 0 0 0 0 0 0 0 0 0 0
16 3 3.5 4 4.5 5 5.5 6 6.5 7 8 9 9.5 10 10.5 11 12 12 12 12 12
INCLINE
INCLINE
INCLINE
ENGLISH
31
P6) HILL CLIMB: Simulates a hill ascent and descent. This program helps tone muscle and improve cardiovascular ability. Incline
changes and segments repeat every 30 seconds.
Segment 1 2 3 4 5 6 7 8 9 10
Time 30 sec 30 sec 30 sec 30 sec 30 sec 30 sec 30 sec 30 sec 30 sec 30 sec
Level 1 0 0 1 1.5 2 2.5 3 3 2.5 2 1.5 1
Level 2 0 0 1.5 2 2.5 3 3.5 3.5 3 2.5 2 1.5
Level 3 0 1 2 2.5 3 3.5 4 4 3.5 3 2.5 2
Level 4 0 1.5 2.5 3 3.5 4 4.5 4.5 4 3.5 3 2.5
Level 5 0 1.5 3 3.5 4 4.5 5 5 4.5 4 3.5 3
Level 6 0 1.5 3.5 4 4.5 5 5.5 5.5 5 4.5 4 3.5
Level 7 0 1.5 4 4.5 5 5.5 6 6 5.5 5 4.5 4
Level 8 0 2 4.5 5 5.5 6 6.5 6.5 6 5.5 5 4.5
Level 9 0 2 5 5.5 6 6.5 7 7 6.5 6 5.5 5
Level 10 0 2 5.5 6 6.5 7 7.5 7.5 7 6.5 6 5.5
Warm Up
4:00 Mins
P7) CUSTOM: Allows you to create and reuse your perfect workout with a combination of a specific speed, incline and time or
distance. The ultimate in personal programming. This is a time or distance based goal program.
P8) TARGET HEART RATE: This program is designed for you to improve your overall cardiovascular fitness levels. You
simply set your target heart rate. The program will then monitor and adjust the intensity level to maintain your heart
rate within your targeted range while you exercise – a proven method to maximize your weight loss and fitness goals.
A chest strap is required and must be worn during the duration of this program. See below for calculating your target heart
rate.
ENGLISH
32
Calculating Your Target Heart Rate:
The first step in knowing the right intensity for your training is to find out your maximum heart rate (max HR = 220 – your age).
The age-based method provides an average statistical prediction of your max HR and is a good method for the majority of people,
especially those new to heart rate training.
The most precise and accurate way of determining your individual max HR is to have it clinically tested by a cardiologist or exercise
physiologist through the use of a maximal stress test. If you are over the age of 40, overweight, have been sedentary for several
years, orhave a history of heart disease in your family, clinical testing is recommended.
This chart gives examples of the heart rate range for a 30 year old exercising at 5 different heart rate zones. For example, a 30-year-
old’s max HR is 220 – 30 = 190 bpm and 90% max HR is 190 × 0.9 = 171 bpm.
Target Heart
Rate Zone
Workout
Duration
Example THR
(age 30)
Your THR Recommend For
Target Heart
Rate Zone
< 5 min
171-190 BPM
Fit persons for
athletic training
VERY HARD
90 - 100%
2-10 min 152-171 BPM Shorter Workouts
HARD
80 - 90%
10-40 min
133-152 BPM
Moderately long
Workouts
MODERATE
70 - 80%
40-80 min
114-133 BPM
Longer and
frequently repeated
shorter exercises
LIGHT
60 - 70%
20-40 min
104-114BPM
Weight management
and active recovery
VERY LIGHT
50 - 60%
Additional target heart rate notes:
1). The treadmill incline will automatically adjust to bring you near your specified heart rate.
2). If there is no heart rate detected, the unit will not change the incline.
3). If your heart rate is 25 beats over your target zone the program will shut down.

ENGLISH
33
TO RESET THE CONSOLE
Hold STOP key for 3 seconds.
FINISHING YOUR WORKOUT
When your workout is complete, the unit will beep. Your workout information will stay displayed on the console for 30 seconds and then
reset.
CONNECTING VIA BLUETOOTH 4.0LE
1) Check to ensure that your music device is Bluetooth 4.0 compatible
2) Go into your device’s Bluetooth settings and scan for devices.
3) On your music device, locate the Bluetooth device list. Select your treadmill or elliptical unit that appears on this list.
Wait for your music device to finish pairing with the unit.
4) You will know when pairing is successful when your music device shows the treadmill or elliptical unit as now being a paired device.
USING MULTIPLE MUSIC DEVICES
If multiple devices are being paired with the unit (i.e.: multiple users are using the treadmill or elliptical unit and pairing their music devices
with it) then you will need to un-pair the current paired device and then re-pair your device through the pairing procedure noted above.
CONNECTING VIA AN AUDIO CABLE
1) Connect the included AUDIO ADAPTOR CABLE to the AUDIO IN JACK on the right side of the console and the headphone jack on your
media device.
2) Use your media device buttons to adjust song settings.
3) Remove the AUDIO ADAPTOR CABLE when not in use.
4) If you don’t want to use the SPEAKERS, you can plug your headphones into the AUDIO OUT JACK at the right side of the console.
This ensures that if you accidentally catch the headphone line while running, you won’t drop your device to the ground.

ENGLISH
34
CONNECT YOUR DEVICE WITH THE JRNY APP FOR MORE DYNAMIC WORKOUTS
If you have a JRNY membership*, it can be accessed through your device when synced to the console of this machine.
With that JRNY membership, you receive guided workouts adapted.
* A JRNY membership is required for the JRNY experience – see global.bowflex.com/en/jrny.html for details. Where available
(including the United States), you can obtain a JRNY membership by downloading the JRNY app onto your phone or tablet and
signing up within the downloaded app. JRNY memberships may not be available in all countries.

35
Maintenance &
Troubleshooting

ENGLISH
36
MAINTENANCE
Preventative maintenance is the key to smooth operating equipment, as well as keeping the users’ liability to a minimum. Equipment
needs to be inspected at regular intervals. Defective components must be replaced immediately. Improperly working equipment
must be kept out of use until it is repaired. Ensure that any person(s) making adjustments or performing maintenance or repair
ofany kind is qualified to do so.
WARNING
To remove power from the treadmill, the power cord must be disconnected from the wall outlet.

ENGLISH
37
MAINTENANCE SCHEDULE
ACTION FREQUENCY
Clean and inspect the treadmill:
• Turn off the treadmill with the ON/OFF switch, then unplug the power cord at the wall outlet.
• Wipe down the running belt, deck, motor cover and console casing with a damp
cloth. Never use solvents, as they can cause damage to the treadmill.
• Inspect the power cord. If the power cord is damaged, please reference contact
information on the back cover ofthe INFORMATION CARD for assistance.
• Make sure the power cord is not underneath the treadmill or in any other
area where it can become pinched or cut during storage or use.
• Check the tension and alignment of the running belt. Make sure that the treadmill belt
will not damage any other components on the treadmill by being misaligned.
• If any labels are damaged or illegible, please reference contact information
on the back cover of the INFORMATION CARD forassistance.
DAILY
Clean underneath the treadmill:
• Turn off the treadmill with the ON/OFF switch, then unplug the power cord at the wall outlet.
• Fold the treadmill into the upright position, making sure that the lock latch is secure.
• Move the treadmill.
• Wipe or vacuum any dust particles or other objects that may
have accumulated underneath the treadmill.
• Return the treadmill to its previous position.
WEEKLY
IMPORTANT!
• Turn off the treadmill with the ON/OFF switch, then unplug the
power cord at the wall outlet. Wait 60 seconds.
• Inspect all assembly bolts of the machine for proper tightness.
• Remove the motor cover. Wait until ALL display screens turn off.
• Clean the motor and lower board area to eliminate any lint or dust particles that may have
accumulated. Failure to do so may result in premature failure of key electrical components.
• Wipe down the belt with a damp cloth. Vacuum any black/white particles that may
accumulate around the unit. These particles may accumulate from normal treadmill use.
• If your treadmill has air shocks under the deck for lift assistance, lubricate the silver
air shock tube with Teflon-based spray found at your local hardware or bike store.
MONTHLY

ENGLISH
38
MAINTENANCE SCHEDULE
LUBRICATING THE RUNNING BELT
EVERY 3 MONTHS OR 480 KM
It is necessary to lubricate your treadmill running deck every
three months or 480 km to maintain optimal performance.
Once the treadmill records 480 km it will display the message
“LUBE” or “LUBE BELT.” The treadmill will not operate while the
message is showing. Your treadmill came with a bottle of 100%
silicone lubricant, which can be used for two applications.
To purchase additional Silicone Lubricant:
Please contact Customer Tech Support.
Tools Needed:
• T-wrench or Allen wrench
• 100% silicone oil
RUNNING
BELT
RUNNING
DECK

ENGLISH
39
PROCEDURE:
1. Turn off the treadmill with the on/off switch and unplug the power cord at the wall outlet.
2. Using the T-wrench or Allen wrench, loosen the rear roller bolts
10-15 counter-clockwise turns. This should give the belt enough slack for you to lift it.
3. Lift the belt as far as you can and squirt the silicone oil in a zigzag pattern across the entire running deck
surface. Use 1/2 bottle of silicone lubricant. Do not apply the silicone oil on top of the running belt. Lay the
running belt down and then tighten both rear roller bolts clockwise the same number of turns loosened.
4. After you have applied lubricant, plug in the power cord, and insert the safety key. Reset the Lube Belt message by
first pressing and holding the SPEED UP button, then STOP button and hold BOTH buttons for 5-7seconds.
5. Stay off of the machine and press START. Allow the belt to run at3 mph for 3 minutes to begin
spreading the silicone. Then walk on the machine at a comfortable speed for 3 minutes to complete
spreading the silicone and to check the running belt for proper tension and alignment.
6. Once the belt is centered and tensioned, stop the belt. Wipe any excess oil from the sides with a damp cloth.
Press any key to suspend the lubrication warning message until after your next workout.
Note: Some older models may require you to hold stop for 5 seconds to suspend message for 8 km of use.
If your treadmill has air shocks under the deck for lift assistance, lubricate the silver air
shock tube with Teflon-based spray found at your local hardware or bike store.
Visit the Customer Support section of our website to view “how-to” maintenance videos. Please
contact Customer Tech Support with questions about applying lubricant to your treadmill.
ENGLISH
40
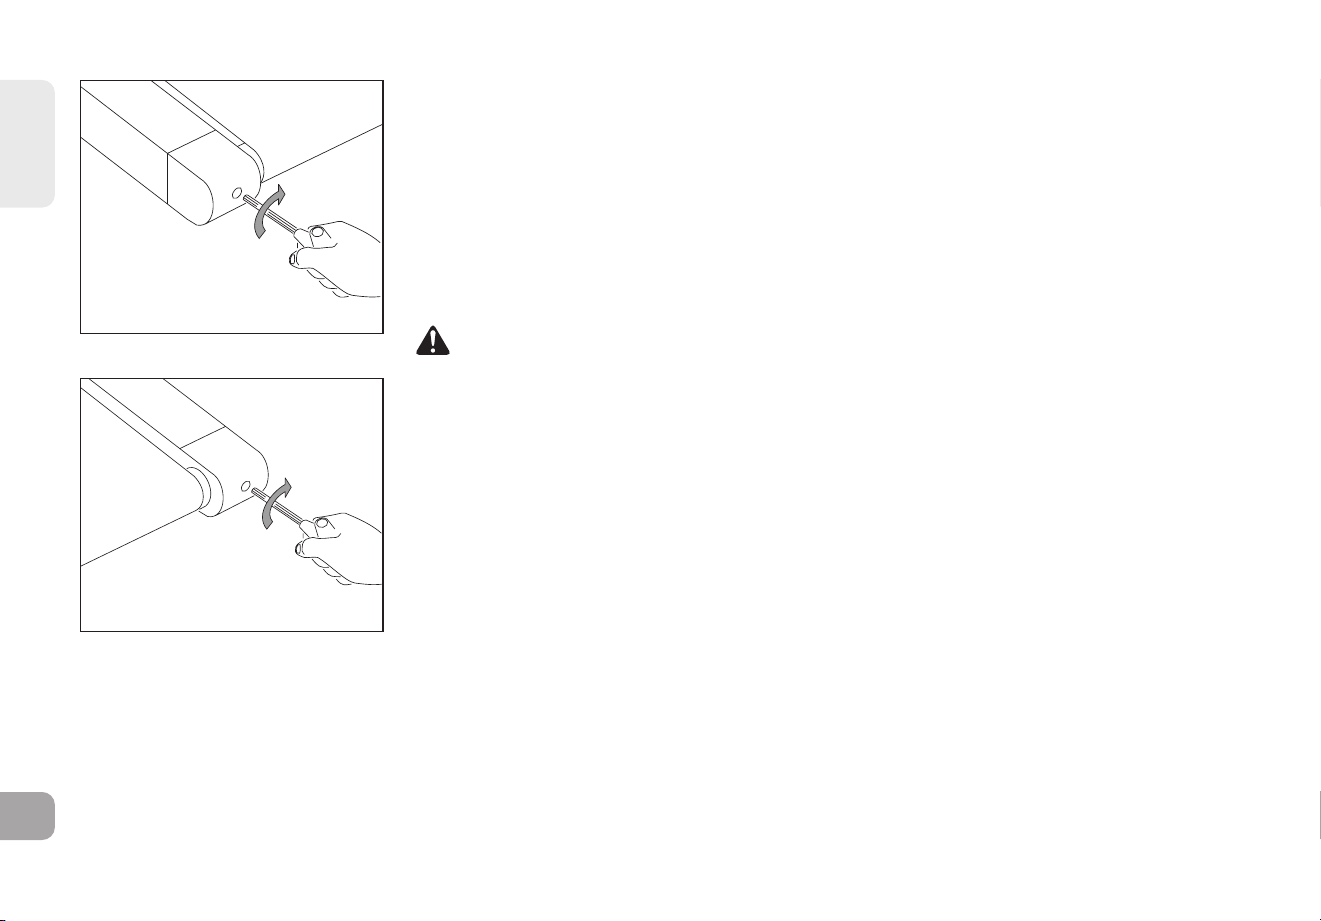
TENSIONING THE RUNNING BELT
If you can feel a slipping sensation when running on the treadmill, the running belt
must be tightened. In most cases, the belt has stretched from use, causing the belt
to slip. This is a normal and common adjustment. To eliminate this slipping, turn the
treadmill off and tension both the rear roller bolts using the supplied Allen wrench,
turning them ¼ turn to the right (clockwise) as shown. Turn the treadmill on and
check for slipping. Repeat if necessary, but never turn the roller bolts more than ¼
turn at a time. Belt is properly tensioned when the slipping sensation is gone.
WARNING
Running belt should NOT be moving during tensioning. Over-tightening the running belt can
cause excessive wear on the treadmill as well as its components. Never over-tighten the belt.
TIGHTENS LEFT SIDE OF ROLLER
TIGHTENS RIGHT SIDE OF ROLLER
ENGLISH
41
CENTERING THE RUNNING BELT
If the running belt is too far to the right side: Using the supplied Allen wrenchand with
the treadmill running at 1 km/h turn the LEFT adjustment bolt counter-clockwise a ¼
turn and wait for the belt to adjust itself. Use the motor cover marking or part line as a
reference for alignment. Repeat if necessary, untilthebelt remains centered during use.
If the running belt is too far to the left side: Using the supplied Allen wrench andwith
the treadmill running at 1 km/h turn the LEFT adjustment bolt clockwise a¼turn and
wait for the belt to adjust itself. Use the motor cover marking or part line as a reference
for alignment. Repeat if necessary, until the belt remains centered during use.
• If you find the belt is slipping because it is too loose, center it then tension asneeded.
• For easier adjustment bolt access, remove the end caps.
CAUTION
Do not run belt faster than 1 km/h while centering. Keep fingers,
hair and clothing away from belt at all times.
BELT IS TOO FAR TO THE RIGHT SIDE
BELT IS TOO FAR TO THE LEFT SIDE
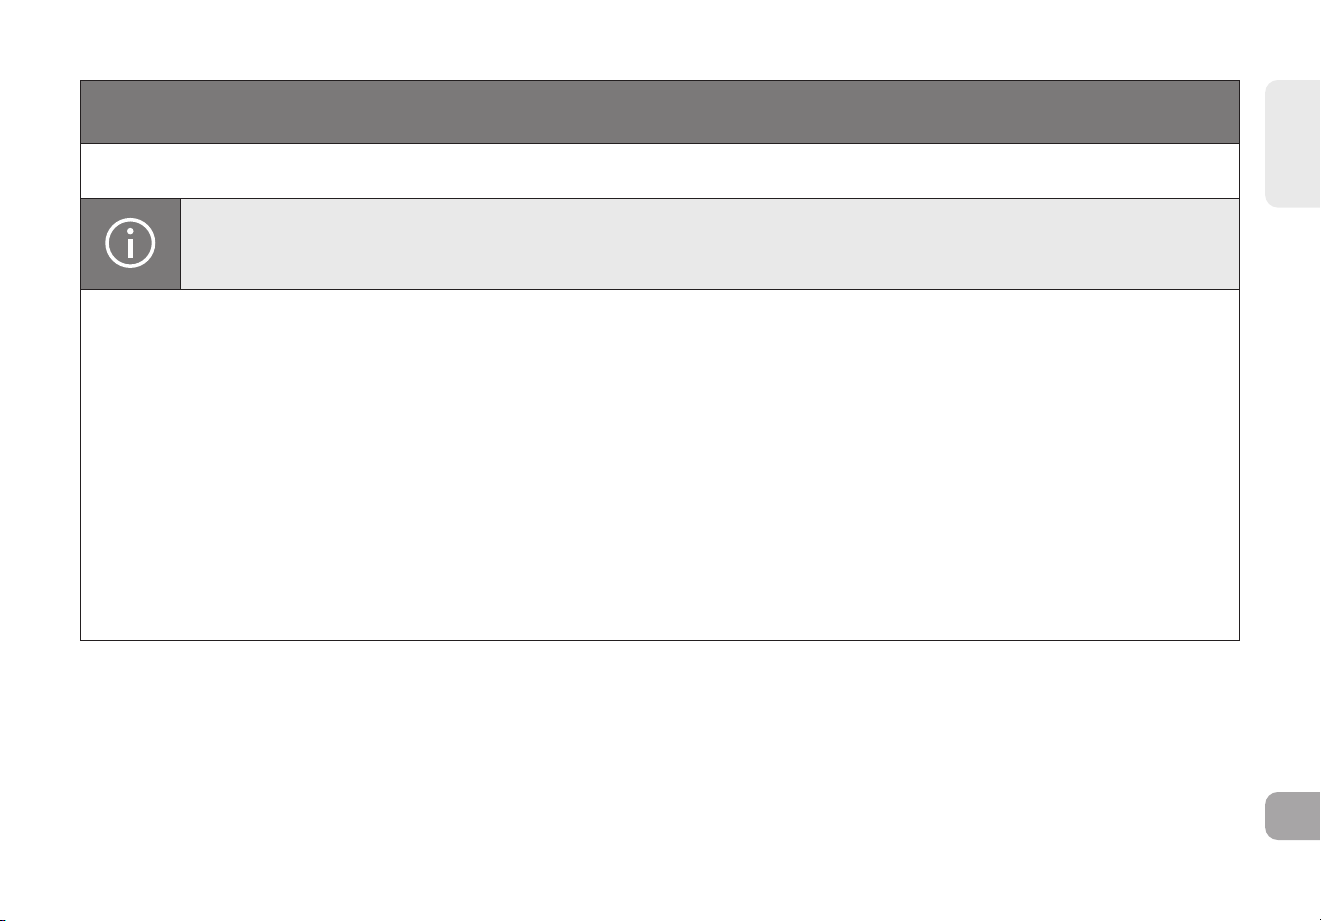
To reset the Lube belt warning
The treadmill will flash “LUBE BELT” reminder every 150 mi. After lubricating
belt, reset warning by holding down and buttons for 3-5 seconds.
2
4
6
8
10
12
16
20

ENGLISH
42
TROUBLESHOOTING
COMMON PRODUCT QUESTIONS
ARE THE SOUNDS MY TREADMILL MAKES NORMAL?
All treadmills make a certain type of thumping noise due to the belt riding over the rollers, especially new treadmills. This noise
willdiminish over time, although it may not totally go away. Over time, the belt will stretch, causing the belt to ride smoother over
the rollers.
WHY IS THE TREADMILL I PURCHASED LOUDER THAN THE ONE AT THE STORE?
All fitness products seem quieter in a large store showroom because there is generally more background noise than in your home.
Also, there will be less reverberation on a carpeted concrete floor than on a wood overlay floor. Sometimes a heavy rubber mat will
help reduce reverberation through the floor. Ifa fitness product is placed close to a wall, there will be more reflected noise.
WHEN SHOULD I BE WORRIED ABOUT A NOISE?
As long as the sounds your treadmill makes are no louder than a normal conversational tone of voice, it is considered normal noise.
BASIC TROUBLESHOOTING
PROBLEM: The console does not light up.
SOLUTION: Verify the following:
Does the red light on the ON/OFF switch light up?
NOTE: Some treadmill models do not have a switch that lights up. If this is the
case, please proceed with the yes and no solutions below.
If yes:
• Turn the power off, unplug the power cable and wait 60 seconds. Remove motor cover. Wait
until all red LED lights have gone off on the motor control board before proceeding. Next verify
that none of the wires connecting to the lower board are loose or disconnected.
• Double-check that all connections are secure, especially the console cable. Unplug and reconnect the console cable to verify.

ENGLISH
43
JOHNSON
UNDERNEATH THE MOTOR COVER
DRIVE
BELT
DRIVE
MOTOR
OPTICAL
SENSOR
INCLINE
MOTOR
MOTOR
CONTROL
BOARD
CONSOLE
CABLE
FRONT ROLLER
RUNNING BELT
• Make sure the console cable is not
pinched ordamaged in any way.
• Plug the treadmill in, turn the power switch on and
look for any lit LEDs on the motor control board.
If no:
• Verify that the outlet the machine is plugged into is
functional. Double-check that the breaker has not
tripped, it is on a dedicated 15-amp circuit, it is not
on a GFCI-equipped outlet, and it is not plugged into
a power strip/surge protector or extension cord.
• Verify that the power cord is not pinched or damaged
and isproperly plugged into the outlet AND the machine.
• Verify that the power switch is
turned to the ON position.
PROBLEM: The console reads SAFETY
KEY OFF or only displaysdashes.
SOLUTION: Verify the following:
• Verify the safety key is securely in place.
• If using a magnetic key, make sure the key is magnetized.

ENGLISH
44
TROUBLESHOOTING
JOHNSON
UNDERNEATH THE MOTOR COVER
DRIVE
BELT
DRIVE
MOTOR
OPTICAL
SENSOR
INCLINE
MOTOR
MOTOR
CONTROL
BOARD
CONSOLE
CABLE
FRONT ROLLER
RUNNING BELT
BASIC TROUBLESHOOTING
PROBLEM: The belt does not move or moves briefly,
but the console works.
SOLUTION: Verify the following:
• Make sure you are following the recommendations
and power guidelines of GROUNDING INSTRUCTIONS
& BASIC OPERATION in this owner’s manual. The unit
should be on a dedicated 15-amp circuit and not on a
GFCI-equipped outlet. Do not plug themachine into
a power strip/surge protector orextensioncord.
• Check for any belt movement. If so, make note of
how farorhow long it moves before stopping.
• Try to move the belt by hand. If not, the drive belt may
havecome off or the motor bearings may have seized.
• Turn the treadmill off and unplug it from the outlet.
Remove the plastic motor cover located in front
of the machine by taking out the Phillips screws.
Check the drive belt forproper alignment.
• With the cover still off, check over the wire and
cable connections, as they may have become loose or
disconnected during shipping or assembly. Make sure
connections are secure and no wires are crimped,
damaged, disconnected or burnt.
PROBLEM: The incline does not move, won’t go
down or does not seem to be at the right level.
SOLUTION: Verify the following:
• Make sure you are following the recommendations and power guidelines on pages 4 and 5 of this

ENGLISH
45
TREADMILL GUIDE. The unit should be on a dedicated 15-amp circuit and not on a GFCI-equipped
outlet. Do not plug the machine into a power strip/surge protector or extension cord.
• Make sure the console shows a change on the display when the elevation buttons are pressed.
• Turn the treadmill off and unplug it from the outlet. Verify the console cable connections at the top of the mast
areconnected securely. Make sure all of the multicolored wires are fully inserted into the cable harness.
• Remove the plastic motor cover located in front of the machine by taking out the Phillips screws. Check over
thewire and cable connections, as they may have become loose or disconnected during shipping or assembly.
Make sure connections are secure and no wires are crimped, damaged, disconnected or burnt.
PROBLEM: No audio comes out of the speakers, but the headphones work.
SOLUTION: Verify the following:
• Turn the treadmill off and unplug it from the outlet. Removethe plastic motor cover
located in front ofthemachine by taking out the Phillips screws.
• Check the wire and cable connections to the speaker board, near the motor control board.
PROBLEM: The treadmill circuit breaker trips during aworkout.
SOLUTION: Verify the following:
• Make sure the treadmill is plugged into a dedicated
15-amp circuit.
• Verify that you do not have the machine onanextension cord or surge protector.
• Confirm that the machine is not plugged into aGFCI-equipped outlet or on a circuit that has aGFCI-equipped outlet on it.
PROBLEM: The running belt does not stay centered during a workout.
SOLUTION: Verify the following:
• Make sure the treadmill is on a level surface.
• Verify that the belt is properly tightened and centered (Refer to the TENSIONING and
CENTERING THE RUNNING BELT sections fordetailed directions).
PROBLEM: Operating speed appears inaccurate.
SOLUTION:

ENGLISH
46
• Turn the treadmill off and unplug it from the wall.
• Remove the screws from the motor cover screws using a Phillips screwdriver.
• Verify that the optical sensor is plugged into the motor control board.
• Inspect the speed sensor cable/connection for any visible damage.
BASIC TROUBLESHOOTING
PROBLEM: At higher incline levels, a message reading “Speed Range Error – Ending Workout” appears.
SOLUTION:
• This is a safety feature that automatically cuts power to the drive motor when the speed is out
of range due to the combination of the load on the belt and high degree of incline
• To prevent an automatic end to your workout, reduce the incline level percentage.
TROUBLESHOOTING HEART RATE (GRIP-PULSE ONLY)
Check your exercise environment for sources of interference such as fluorescent lights, computers, underground fencing, home
security systems or appliances containing large motors. These items maycause erratic heart rate readouts.
You may experience an erratic readout under the following conditions:
• Gripping the heart rate handlebars too tight. Try to maintain moderate pressure while holding onto the heart rate handlebars.
• Constant movement and vibration due to constantly holding the heart rate handlebars while exercising. If you
are receiving erratic heart rate readouts, try to only hold the grips long enough to monitor your heart rate.
• When you are breathing heavily during a workout.
• When your hands are constricted by wearing a ring.
• When your hands are dry or cold. Try to moisten your palms by rubbing them together to warm.
• Anyone with heavy arrhythmia.
• Anyone with arteriosclerosis or peripheral circulation disorder.
• Anyone whose skin on the measuring palm isespecially thick.
ENGLISH
47
NEED ASSISTANCE?
If this troubleshooting section does not remedy the problem, discontinue use and turn the power off.
Please contact Customer Tech Support.
The following information may be asked of you when you call. Pleasehave these items readily available:
• Model Name
• Serial Number
• Proof of Purchase
Some common troubleshooting questions that may be asked are:
• How long has this problem been occurring?
• Does this problem occur with every use? With every user?
• If you are hearing a noise, does it come from the front or the back? What kind
of noise is it (thumping, grinding, squeaking, chirping etc.)?
• Has the machine been maintained per the MAINTENANCE schedule?
Answering these and other questions will give the technicians the ability to send proper replacement parts and the service
necessary to get you and your treadmill running again!

ENGLISH
48
THE FOLLOWING INFORMATION ONLY CONCERNS CUSTOMERSIN GERMANY
1. Disposal of electrical and electronic equipment
The symbol of the “crossed-out dustbin” means that you are required by law to dispose of this equipment separately from
unsorted municipal waste. Disposal via household waste, such as the residual waste garbage can or the yellow garbage
can, is prohibited. Avoid misdirected waste by disposing of it correctly at special collection and return points.
2. Removal of batteries and lamps
If the products contain batteries and accumulators or lamps that can be removed from the old device without destroying
it, these must be removed before disposal and disposed of separately as batteries or lamps. The following batteries or
accumulators are contained in this electrical device: Lithium-ion accumulator.
3. Possibilities of the return of old devices
Owners of old appliances can return them free of charge within the framework of the possibilities for the return or collection of old appliances
set up and available by public waste management authorities, so that the proper disposal of the old appliances is ensured. In addition, the
return is also possible with distributors under certain conditions. The following link provides an online directory of collection and take-back
points: https://www.ear-system.de/ear-verzeichnis/sammel-und- ruecknahmestellen
For distributors:
The return has to be free of charge with the purchase of a similar new device (1:1 return). Independently of this, there is the
possibility to return the old equipment to the distributor free of charge. The prerequisite for this is that the external dimensions do not exceed
25 centimeters and the return is limited to three old devices per type of device (0:1 take-back).
Retail:
Distributors with a sales area for electrical and electronic equipment of at least 400 square meters are obligated to take back WEEE.
Also obliged to take back are food retailers who have a total sales area of at least 800 square meters and who also offer and make available
on the market electrical and electronic equipment several times a calendar year or on a permanent basis.
Distance selling market:
distributors who sell their products using distance communication means (e.g. online store) are obliged to take back
WEEE if the storage and shipping areas for electrical and electronic equipment are at least 400 square meters.
4. Data protection
We would like to point out to all end users of WEEE that you are responsible for deleting personal data on the WEEE to be disposed of.
5. WEEE registration number
Under the registration number DE-49229072 we are registered with the stiftung elektro-altgeräte register, Nordostpark 72, 90411 Nuremberg,
Germany, as a producer of electrical and/or electronic equipment.
Manufacturer/EU-importer:
Johnson Health Tech. GmbH
|
Europaallee 51, 50226 Frechen, Germany

49
DEUTSCH

50
Wichtige
Sicherheitsan-
weisungen
DEUTSCH
51
Vielen Dank, dass Sie sich für das BowFlex T8.5J Laufband als Ihr Fitnessgerät entschieden haben. Wir möchten Sie bitten, diese
Bedienungsanleitung vor der Montage Ihres Geräts sorgfältig zu lesen, insbesondere die folgenden WARNUNGEN! WARNUNGEN
VERRINGERN DAS RISIKO VON VERBRENNUNGEN, BRAND, ELEKTRISCHEN SCHLÄGEN ODER VERLETZUNGEN VON PERSONEN.
Bevor Sie fortfahren, suchen Sie die Seriennummer des Laufbands auf einem weißen Aufkleber
mit Strichcode neben dem Ein-/Ausschalter, und tragen Sie diese im nachfolgenden freien
Feld ein.
GEBEN SIE DIE SERIENNUMMER UND DIE MODELLBEZEICHNUNG IN DEN
NACHSTEHENDEN FELDERN EIN:
SERIENNUMMER:
MODELLBEZEICHNUNG: BOWFLEX T8.5J
» Wenn Sie sich an den Kundendienst wenden, halten Sie die SERIENNUMMER und die
MODELLBEZEICHNUNG bereit.
• BEI NICHTBEACHTUNG DIESER ANWEISUNGEN KANN ES ZU VERLETZUNGEN KOMMEN!
• Herzfrequenzüberwachungssysteme können ungenau sein. Exzessives Training kann zu ernsthaften Verletzungen oder Tod führen.
Brechen Sie das Training sofort ab, wenn Sie Schwindel oder Benommenheit fühlen.
• Trainieren Sie stets in einem für Sie angenehmen Tempo.
• Sollten während des Trainings Schmerzen jeglicher Art, etwa Brustschmerzen, Übelkeit, Schwindel oder Atemlosigkeit, auftreten,
beenden Sie sofort dasTraining und suchen Sie einen Arzt auf, bevor Sie das Training fortsetzen. Falsches oder übermäßiges Training
kann die Gesundheit beeinträchtigen.
• Tragen Sie keine Kleidung, die sich am Laufband verfangen könnte.
• Tragen Sie stets Sportschuhe bei der Verwendung des Geräts.
• Springen Sie nicht auf das Laufband.
WARNUNG
POSITION DER SERIENNUMMER

DEUTSCH
52
• Laufen Sie während des Trainings nicht auf der Kante der Laufmatte, um das Risiko von Verletzungen zu vermeiden.
• Das Laufband darf immer nur von jeweils einer Person verwendet werden.
• Das Laufband darf nicht von Personen verwendet werden, die mehr als im Abschnitt „TECHNISCHE SPEZIFIKATIONEN“ gezeigt
wiegen. BeiZuwiderhandlung verfällt die Garantie.
• Wenn Sie das Laufband herunterklappen, warten Sie, bis die hinteren Standfüße fest auf dem Boden stehen, bevor Sie auf das
Laufband steigen.
• Nicht unter einer Decke oder einem Kissen benutzen. Übermäßige Erwärmung kann zu Bränden, Stromschlägen oder
Personenschäden führen.
• Schließen Sie das Trainingsgerät nur an eine ordnungsgemäß geerdete Steckdose an.
• Zum Abschalten drehen Sie alle Bedienelemente in die ausgeschaltete Position und trennen Sie dann den Stecker von der
Steckdose.
• Trennen Sie das Gerät von der Stromversorgung, bevor Sie es umstellen.
• Betreiben Sie das Gerät niemals mit einem beschädigten Kabel oder Stecker, auch wenn es normal funktioniert. Betreiben Sie
niemals ein Gerät, das beschädigt zu sein scheint oder in Wasser getaucht worden ist. Wenden Sie sich an den technischen
Kundendienst, um Ersatz oder eine Reparatur zu beantragen, um eine Gefährdung zu vermeiden.
• Das Laufband darf nie unbeaufsichtigt bleiben, solange es an das Stromnetz angeschlossen ist. Ziehen Sie den Stecker aus der
Steckdose, wennSie das Gerät nicht benutzen oder bevor Sie Teile anbringen oder abnehmen.
• Kinder unter 13 Jahren sowie Haustiere sollten UNBEDINGT einen Abstand von mindestens 3 Metern zum Laufband einhalten.
• Kinder unter 13 Jahren sollten das Laufband NICHT verwenden.
• Kinder über 13 Jahre oder Personen mit eingeschränkten körperlichen, sensorischen oder geistigen Fähigkeiten oder mangelnder
Erfahrung und Kenntnis sollten das Laufband nicht benutzen, es sei denn, sie werden beaufsichtigt oder haben eine Einweisung
in die Benutzung des Laufbandes durch eine für ihre Sicherheit verantwortliche Person erhalten.
• Entfernen Sie die Schutzabdeckungen nur nach Aufforderung durch Fachpersonal oder Ihren örtlichen Händler. Die Wartung
sollte nur durch autorisiertes Service-Personal durchgeführt werden.
• Bewahren Sie den Sicherheitsschlüssel getrennt auf, um eine unerwünschte Benutzung durch nicht berechtigte Personen zu
vermeiden.
• Bei Laufbändern mit seitlichen Handläufen und einer Haltestange zur Unterstützung drücken Sie im Falle eines Notausstiegs den
Notknopf, um das Gerät für den Notausstieg zu stoppen.
• Der Geräuschpegel des Laufbands liegt unter 70 dB, solange es nicht benutzt wird, und über 70 dB, wenn es in Betrieb ist.
Wenn das Geräusch desLaufbands Sie zu sehr stört, unterbrechen Sie das Training für eine Pause. Die Geräuschemission unter
Belastung ist höher als ohne Belastung.
• Vergewissern Sie sich, dass das Laufband vollständig zum Stillstand gekommen ist, bevor Sie es einklappen. Betreiben Sie das
Laufband nicht, wenn es zusammengeklappt ist.
• Bitte beachten Sie, dass die Kunststoffteile am Gerät, etwa die Abschlusskappen, verschleißanfällig sind.

DEUTSCH
53
• Die Sicherheit des Laufbands ist nur gewährleistet, wenn es regelmäßig auf Beschädigungen und Verschleiß überprüft wird.
• Stellen Sie sicher dass die Kante der Laufmatte parallel zu den seitlichen Trittflächen und nicht darunter verläuft. Wurde die
Laufmatte nochnichtzentriert, muss sie vor dem Gebrauch eingestellt werden.
• Verwenden Sie das Gerät nur gemäß Laufband- und Benutzerhandbuch.
• Verwenden Sie keine Anbauteile oder -geräte, die nicht vom Hersteller empfohlen sind. Anbauteile können zu Verletzungen führen.
• Senden Sie das Gerät zur Überprüfung und Reparatur an ein Service-Zentrum.
• Halten Sie das Netzkabel von aufgeheizten Oberflächen fern. Tragen Sie das Gerät nicht am Netzkabel bzw. verwenden Sie das Kabel
nicht als Griff.
• Betreiben Sie das Laufband niemals, wenn die Belüftungsöffnung blockiert ist. Halten Sie die Belüftungsöffnung sauber und frei
von Staub, Haaren und dergleichen.
• Zur Vermeidung von Stromschlägen dürfen keine Gegenstände in Öffnungen am Gerät eingeworfen oder eingeführt werden.
• Nehmen Sie das Gerät nicht an Orten in Betrieb, an denen Aerosolprodukte (Spray) verwendet werden oder Sauerstoff
verabreicht wird.
• Dieses Laufband ist nur für den Heimgebrauch gedacht. Bei Zuwiderhandlung verfällt die Garantie.
• Verwenden Sie das Laufband in keiner Umgebung ohne Temperaturregulierung, etwa in Garagen, Vorbauten, Pool-Anlagen,
Badezimmern, Autostellplätzen oder im Freien. Ist das Laufband niedrigen Temperaturen oder hoher Luftfeuchtigkeit ausgesetzt
gewesen, sollte es vor dem ersten Gebrauch unbedingt auf Raumtemperatur erwärmt werden. Bei Zuwiderhandlung verfällt die
Garantie.
• Schweres Laufband: Gehen Sie umsichtig vor und holen Sie sich bei Bedarf Unterstützung, wenn Sie das Gerät umstellen
möchten. Versuchen Sie nicht, das Laufband umzustellen oder zu transportieren, wenn es nicht aufrecht steht,
zusammengeklappt ist und mittels Verriegelung gesichert ist. Befolgen Sie diese Anweisungen, um Verletzungen zu vermeiden.
• Bewegen oder heben Sie das Laufband nicht aus der Verpackung, bis Sie in der Anleitung hierzu angewiesen werden. Entfernen
Sie die Plastikfolie von den Konsolenmasten.
• Öffnen Sie den Karton nicht, wenn er auf dem Kopf steht oder auf der Seite liegt.
• Packen Sie das Gerät an dem Ort aus, an dem es verwendet werden soll, und montieren Sie es dort.
• Das geschlossene Laufband ist mit Hochdruckfedern ausgestattet, die bei unsachgemäßer Handhabung ein plötzliches
Aufklappen des unteren Grundrahmens verursachen können.
• Entfernen Sie die Konsolenabdeckungen nur nach Aufforderung durch den technischen Kundendienst. Die Wartung sollte nur
durch autorisiertes Service-Personal erfolgen.
• Planen Sie für die Montage Unterstützung durch eine zweite Person ein, das erleichtert den Aufbau.

DEUTSCH
54
GMBH SERVICE CONTACT: Johnson Health Tech. GmbH
Europaallee 51, 50226 Frechen. +49 2234 9997 400
BENÖTIGEN SIE
UNTERSTÜTZUNG?
GEWÄHRLEISTUNG
Wenn Ihr Gerät einen Garantieservice benötigt, wenden Sie sich bitte an den technischen Kundendienst vor Ort.
Hersteller: Johnson Health Industry (Vietnam) Co., Ltd. | Herstelleradresse: Lot CN-24, Thuan Thanh II Industrial Park,
Mao Dien Ward, Bac Ninh Province, Vietnam
TECHNISCHE SPEZIFIKATIONEN
Maße, aufgebaut
(L x B x H)
193 x 86,4 x 144,8 cm
Produktgewicht 85 kg
Max. Benutzergewicht 147 kg
Ein Montagevideo finden Sie unter
https://global.bowflex.com/en/assembly-videos.html
Von nun an können Sie Ihr Gerät nach Belieben
montieren. Fürausführliche Anleitungen zu Montage,
Betrieb, Programmen, Fehlerbehebung und Wartung
scannen Sie bitte den QR-Code auf der linken Seite,
um die vollständige Anleitung aufzurufen.
Wenn das Scannen des QR-Codes fehlschlägt,
können Sie die hier angegebene Website besuchen:
https://global.bowflex.com/en/manuals.html
DEUTSCH
55
STORAGE TRAY
KONSOLE
TABLET-/LESEABLAGE
FLASCHENHALTER
KONSOLENSÄULE
MOTORABDECKUNG
GRUNDRAHMEN
LAUFDECK-RAHMENL
ROTES TRANSPORTKABEL
TRANSPORTROLLEN
FUSSVERRIEGELUNG
(UNTER DEM LAUFDECK)
ON/ OFF Ausschalter
und Netzkabel
LAUFGURT /
LAUFFLÄCHE
FLASCHENHALTER
HANDGRIFFE MIT PULSSENSORENL
POSITIONIERUNG DES SICHERHEITSSCHLÜSSELS
HANDGRIFFE MIT PULSSENSORENL
BEDIENFELD UND ANZEIGEFENSTER
LAUTSPRECHER
KONSOLE TAN
ABLAGEFACH
QUERSTREBE
SEITENSCHIENE
ENDEKAPPE DER
LAUFROLLE
SPANN-/JUSTIERSCHRAUBEN
DER HINTEREN WALZE
KONSOLENSÄULE
FUSSVERRIEGELUNG (UNTER DEM DECK)
DEUTSCH
56
BEILIEGENDE WERKZEUGE:
F 6 mm T-Griff-Schlüssel
F 6 mm L-Schlüssel
F 5 mm L-Schlüssel
LIEFERUMFANG:
F 1 Konsolenbaugruppe
F 2 Konsolenstütze
F 1 Querstrebe
F 1 Schraubenset
F 1 Sicherheitsschlüssel
F 1 Audio-Adapterkabel
F 1 Flasche Silikonschmiermittel
(für 2 Anwendungen)
DO NOT ATTEMPT TO LIFT THE TREADMILL! Bewegen oder heben Sie das
Laufband erst aus der Verpackung, wenn dies in der Montageanleitung ausdrücklich
vorgesehen ist. Sie dürfen die Schutzfolie von den Konsolenstützen entfernen.
HINWEIS: Achten Sie bei jedem Montageschritt darauf, dass alle Schrauben und Muttern
eingesetzt und zunächst nur handfest angezogen werden, bevor eine Schraube vollständig
festgezogen wird.
HINWEIS: Eine leichte Fettung kann die Montage der Verbindungselemente erleichtern.
Eswird ein beliebiges Fett, z. B. Lithiumfett für Fahrräder, empfohlen.
DIE NICHTBEFOLGUNG DIESER ANWEISUNGEN KANN ZU VERLETZUNGEN FÜHREN!
Öffnen Sie den Karton niemals, wenn er auf dem Kopf steht oder seitlich liegt.
Packen Sie das Gerät an dem Ort aus und montieren Sie es dort, wo es verwendet
werden soll.
Das beiliegende Laufband ist mit Hochdruckfedern ausgestattet, die den unteren
Basisrahmen plötzlich aufklappen lassen können, wenn unsachgemäß gehandhabt.
Die roten Transportsicherungskabel sind zwischen oberem Rahmen und unterem
Basisrahmen installiert, um unbeabsichtigte Bewegungen zu verhindern. Entfernen
Sie die roten Transportsicherungskabel nicht, bevor Sie dazu aufgefordert werden.
WARNUNG
WARNUNG
WARNUNG

DEUTSCH
57
RED TRANSPORT
CABLE
RED TRANSPORT
CABLE
MONTAGE SCHRITT – AUSPACKEN
UMREIFUNGSBAND
LAUFDECK-RAHMEN
ROTES TRANSPORTKABEL
(LINKE UND RECHTE SEITE)
GRUNDRAHMEN
A Stellen Sie den Karton des Laufbands auf eine ebene, flache Oberfläche, sodass die Unterseite
des Kartons den Boden berührt.
B Schneiden Sie die Umreifungsbänder außen am Karton durch und entfernen Sie den Deckel.
C Heben Sie das Laufband NICHT aus dem Karton. Reißen Sie stattdessen die unteren Ecken des
Laufbandkartons wie abgebildet auf. Das Laufband sollte wie gezeigt auf dem flachgelegten
Karton montiert werden, um den Bodenbelag zu schützen.
D Schneiden Sie die Spannbänder im Inneren des Kartons durch und entfernen Sie alle Teile mit
Ausnahme des Laufbandrahmens.
E Heben Sie das Laufdeck von hinten leicht an, um alle Teile zu entfernen, die sich unter dem
Laufdeck befinden. Die roten Transportsicherungen an beiden Seiten des Laufbands verhindern,
dass das Laufdeck vollständig angehoben werden kann.
Kippen Sie das Laufband
NIEMALS auf den Kopf oder
auf die Seite. Verwenden
Sie KEIN Werkzeug, um die
roten Transportsicherungen
zu entfernen, bevor dies in
der Anleitung ausdrücklich
angegeben wird. Wenn
für das Entfernen eines
Bauteils Werkzeug
erforderlich ist, warten Sie,
bis die Montageanleitung
eine sichere Demontage
beschreibt.
ROTES
TRANSPORTKABEL
ROTES
TRANSPORTKABEL
WARNUNG

DEUTSCH
58
A
2
1
HINWEIS: Ziehen Sie die Schrauben erst am Ende von
SCHRITT 4 vollständig fest.
A - ANZAHL: 3
Schraube (M8)
8.3 Öffnen Sie das MONTAGEMATERIAL FÜR SCHRITT 1.
8.4 Schieben Sie die LINKEN KONSOLENTRÄGER (8)
aufdie LINKEN KONSOLENTRÄGER (1).
8.5
Befestigen Sie die LINKE KONSOLENSÄULE (1) mit
3SCHRAUBEN (A) am BASISRAHMENBASISRAHMEN
(2).
8
MONTAGE SCHRITT 1

DEUTSCH
59
HINWEIS: Ziehen Sie die Schrauben erst am Ende von
SCHRITT 4 vollständig fest.
4
9
3
3
A
2
3
HINWEIS: Achten Sie darauf, keine Kabel beim
Zusammenbauen der Konsole zu quetschen.
A - ANZAHL: 3
Schraube (M8)
MONTAGE SCHRITT 2
10.1
Öffnen Sie das MONTAGEMATERIAL FÜR SCHRITT 2.
10.2
Schieben Sie die RECHTE KONSOLENTRÄGER (9) auf die
RECHTE KONSOLENSÄULE (4).
10.3
Ziehen Sie das KONSOLENKABEL (3) vom Basisrahmen
des Laufbands weg. Verbinden Sie das KONSOLENKABEL
(3) vom HAUPTRAHMEN (2) mit dem KONSOLENKABEL
(3) im unteren Bereich der rechten KONSOLENSÄULE (4).
Das andere Ende des KONSOLENKABELS (3) sollte sich
oben an der Säule befinden.
10.4
Befestigen Sie DIE RECHTE KONSOLENSÄULE (4) mit
3SCHRAUBEN (A) AM HAUPTRAHMEN (2)

DEUTSCH
60
HINWEIS: Ziehen Sie die Schrauben erst am Ende von
SCHRITT 4 vollständig fest.
D
1
6
4
D - ANZAHL: 4
Schraube (M6)
MONTAGE SCHRITT 3
3.1 Öffnen Sie das MONTAGEMATERIAL FÜR SCHRITT 3.
3.2 Befestigen Sie die linke Seite der Querstrebe (6) mit
2Schrauben (A) locker an der linken Konsolensäule (1).
3.3
Befestigen Sie die rechte Seite der Querstrebe (6) mit
2Schrauben (D) locker an der lrechten Konsolensäule (4).

DEUTSCH
61
HINWEIS: Achten Sie darauf, keine Kabel beim
Zusammenbauen der Konsole zu quetschen.
B
C
A
(SCHRITT 4.5)
4
3
3
1
5
B - ANZAHL: 4 C - ANZAHL: 4
A - ANZAHL: 4
Schraube (M8)
Federringen
Flache
Unterlegscheibe
MONTAGE SCHRITT 4
4.1 Öffnen Sie das MONTAGEMATERIAL FÜR SCHRITT 4.
4.2 Setzen Sie das KONSOLENBASIS (5) sanft auf die
KONSOLENSÄULE (1&4). Befestigen Sie zunächst die LINKE
SEITE mit 2 SCHRAUBEN (A), 2FEDERRINGEN (B) und
2UNTERLEGSCHEIBEN (C).
4.3 Die KONSOLEKABEL (3) sind in der RECHTEN
KONSOLENSÄULE (4) verstaut. Ziehen Sie das
KONSOLEKABEL (3) mithilfe des Einzugsdrahts vorsichtig
aus der KONSOLENSÄULE (4) heraus.. Trennen und entsorgen
Sie den EINZUGSDRAHT. Verbinden Sie die CONSOLE CABLES
(3) und verstauen Sie die Kabel vorsichtig in den MASTS,
umBeschädigungen zu vermeiden.
4.4
Befestigen Sie die RECHTE SEITE der KONSOLE (5) mit 2BOLZEN
(A), 2 FEDERRINGEN (B) und 2UNTERLEGSCHEIBEN (C).
4.5 Ziehen Sie die Oberseite der KONSOLE (5) nach hinten in
Richtung Laufband und halten Sie sie während Sie die auf der
linken und rechten Seite festziehenSCHRAUBEN (A).
4.6 DENKEN SIE DARAN nun nach Abschluss der Montage ALLE
SCHRAUBEN UND BOLZEN vollständig FESTZUZIEHEN.
DEUTSCH
62
E - ANZAHL: 4
Schraube
MONTAGE SCHRITT 5
13.1 Öffnen Sie das MONTAGEMATERIAL FÜR SCHRITT 5.
13.2 Befestigen Sie dasZUBEHÖRFACH (7) mit
4SCHRAUBEN (E) an der QUERSTANGE (6).
6
E
7

DEUTSCH
63
DIE NICHTBEFOLGUNG DIESER ANWEISUNGEN KANN ZU
VERLETZUNGEN FÜHREN!
Sobald die roten Transportsicherungen vom Laufband entfernt
wurden, können Hochdruckfedern dazu führen, dass sich der untere
Grundrahmen plötzlich öffnet. Kippen Sie das Laufband NIEMALS
auf den Kopf oder auf die Seite, und heben Sie das Gerät NIEMALS an,
wenn die roten Transportsicherungen den oberen Laufdeckrahmen
nicht mit dem unteren Grundrahmen verbinden.
ROTES TRANSPORTKABEL
ROTES TRANSPORTKABEL
WARNUNG
SCHRITT 6 - ENTFERNUNG DER ROTEN TRANSPORTKABEL
14.1 Stellen Sie sicher, dass das Laufband mit allen Rädern auf dem Boden ruht.
14.2 Auf der linken Seite des Laufbands verwenden Sie den 5-mm-
Innensechskantschlüssel (im Karton enthalten), um die beiden Schrauben zu
entfernen, die das rote Transportkabel mit dem oberen Deckrahmen und dem
unteren Grundrahmen verbinden.
14.3 Ersetzen Sie beide Schrauben (eine im oberen Deckrahmen und eine im unteren
Grundrahmen) und ziehen Sie sie vollständig fest, um sie zu fixieren. Beachten Sie,
dass zur Vermeidung eines plötzlichen Aufspringens des unteren Grundrahmens
beim zukünftigen Transport oder bei der Demontage das rote Transportkabel mit
denselben Schrauben wieder am Laufband befestigt werden kann.
14.4 Führen Sie die gleiche Operation auf der rechten Seite des Laufbands durch, um
die beiden Schrauben zu entfernen, die das rote Transportkabel mit dem oberen
Deckrahmen und dem unteren Grundrahmen verbinden.
14.5 Ersetzen Sie beide Schrauben und ziehen Sie sie vollständig fest, um sie zu fixieren.
14.6 Bewahren Sie beide roten Transportkabel für zukünftige Verwendung auf, indem Sie
die Kabel in einen klaren Polybeutel zusammen mit dem Benutzerhandbuch legen.
14.7 Wenn die roten Transportsicherungen nicht installiert sind, darf das Gerät NUR am
Boden bewegt werden – und NUR, wenn es vollständig montiert, hochgeklappt und
mit der Verriegelung gesichert ist.

DEUTSCH
64
MONTAGE SCHRITT 7
15.1 Offnen SIE DAS MONTAGEMATERIAL FÜR
SCHRITT 7.
15.2 Denken Sie daran, die Schrauben der Querstange
vollständig in die Konsolensäulen (3 & 4)
einzudrehen, jetzt, da die Montage abgeschlossen
ist. Heben Sie die Laufdeckeinheit (10) in die
aufrechte und verriegelte Position an.
15.3 Schieben Sie die LINKE KONSOLENABDECKUNG
(8) an das untere Ende der LINKEN
KONSOLENSÄULE (3). Attach with 2 BOLZENS
(F) through the holes in LEFT CONSOLE BOOT (8)
into LEFT UPRIGHT MAST (3).
15.4
Schieben Sie die RECHTE KONSOLENABDECKUNG
(9) an das untere Ende der RECHTE KONSOLENSÄULE
(4). Befestigen Sie sie mit 2 SCHRAUBEN (F) durch
die Öffnungen der KONSOLENABDECKUNG (9) in die
rechte senkrechte Säule (4).
F - ANZAHL: 4
Schraube
Z06x4
F
4
10
1
8
9
9

DEUTSCH
65
MONTAGE ABGESCHLOSSEN!
Vor der ersten Benutzung,schmieren Sie die
Laufdeckfläche gemäß den Anweisungen im
WARTUNGSABSCHNITTDES LAUFBAND-
HANDBUCHS.
HINWEIS: Wenn das Laufband zukünftig demontiert
oder angehoben werden muss, verwenden Sie den
5 mm L-Schlüssel, um die roten Transportsicherungen
wieder am oberen Laufdeckrahmen und am unteren
Grundrahmen auf beiden Seiten (links und rechts) zu
befestigen. Vergewissern Sie sich vor dem Anheben
oder der Demontage des Laufbands, dass sich der
untere Grundrahmen nicht plötzlich öffnen kann.
1
2
MONTAGE SCHRITT 8 – LAUFBAND VERSCHIEBEN
16.1 Stellen Sie sicher, dass das Laufband hochgeklappt
und sicher verriegelt ist, bevor Sie es bewegen.
Fassen Sie die Handläufe fest an, kippen Sie das
Laufband nach hinten (1) und rollen Sie es (2).
16.2 Bewegen Sie das Laufband von der flachgelegten
Verpackung an seinen endgültigen Aufstellort, an
dem es einsatzbereit ist. Entsorgen Sie den Karton
ordnungsgemäß.

66
Laufband
Aufbau und
Verwendung

DEUTSCH
67
STANDORT DES LAUFBANDS
Platzieren Sie das Laufband auf einer ebenen und stabilen Fläche. Es sollten rund 30cm Freiraum
vor dem Laufband für das Netzkabel vorhanden sein. Lassen Sie hinter dem Laufband einen Bereich
frei, der mindestens so breit wie das Laufband und zwei Meter lang ist. In diesem Bereich dürfen
sich keine Hindernisse befinden und Nutzer müssen einen freien Zu- und Abstieg vom Gerät haben.
Halten Sie sich im Notfall mit beiden Händen an den seitlichen Haltestangen fest und stellen Sie
sich auf die seitlichen Trittflächen.
Für einen leichteren Zugang sollte auf beiden Seiten des Laufbands ein freier Bereich von 60 cm
vorhanden sein, sodass man von beiden Seiten bequem auf das Laufband steigen kann.
Platzieren Sie das Laufband so, dass keine Öffnungen am Gerät blockiert werden. Das Laufband
sollte nicht in einer Garage, auf einer überdachten Terrasse, in der Nähe von Wasser oder im Freien
aufgestellt werden.
HINWEISE ZUR ERDUNG
Dieses Produkt muss über eine Erdung verfügen. Im Falle einer Fehlfunktion oder eines Ausfalls des
Laufbands bietet die Erdung dem elektrischen Strom den Weg des geringsten Widerstands, was
das Risiko eines Stromschlags verringert. Dieses Produkt ist mit einem Kabel ausgestattet, das über
einen Geräteschutzleiter und einen Erdungsstecker verfügt. Der Netzstecker muss in eine geeignete
Steckdose gesteckt werden, die entsprechend den örtlichen Vorschriften und Verordnungen
installiert und geerdet ist.
GEFAHR!
• Ein unsachgemäßer Anschluss des Geräteschutzleiters kann zu einem Stromschlag führen.
Wenden Sie sich an einen qualifizierten Elektriker oder Dienstleister, wenn Sie Zweifel haben,
ob das Gerät ordnungsgemäß geerdet ist. Nehmen Sie keine Änderungen am mitgelieferten
Netzstecker vor. Passt dieser nicht in Ihre Steckdose, lassen Sie eine geeignete Steckdose von
einem qualifizierten Elektriker installieren.
• Dieses Produkt ist für die Verwendung an einem lokalen Stromkreis mit Nennspannung gedacht.
Für dieses Produkt sollte kein Adapter verwendet werden.
• Dieses Produkt muss über einen separaten Stromkreis betrieben werden. Um festzustellen, ob
es sich um einen separaten Stromkreis handelt, schalten Sie den Strom für diesen Stromkreis
ab und prüfen Sie, ob auch die Stromzufuhr anderer Geräte getrennt wurde. Verwenden Sie in
diesem Fall für diese Geräte einen anderen Stromkreis.
Hinweis: Normalerweise gibt es pro Stromkreis mehrere Steckdosen.
60 cm
(2 ft)
60 cm
(2 ft)
2 m
30 cm
FREIER
BEREICH
T8.5J

DEUTSCH
68
ZUSAMMENKLAPPEN DES LAUFBANDS
Zum Zusammenklappen nehmen Sie das hintere Ende des Laufbands fest in die Hand.
Heben Sie das Ende des Laufbanddecks vorsichtig in die aufrechte Position, bis der
Verriegelungsstift einrastet und das Deck sicher in seiner Position verriegelt. Stellen Sie
sicher, dass das Deck sicher verriegelt ist, bevor Sie es loslassen.
AUFKLAPPEN
Nehmen Sie das hintere Ende des Laufbands fest in die Hand. Drücken Sie zum
Aufklappen die Fußverriegelung mit dem Fuß vorsichtig nach unten, bis sich die
Verriegelung löst. Senken Sie das Deck vorsichtig auf den Boden ab.
VERWENDUNG DES SICHERHEITSSCHLÜSSELS
Das Laufband kann erst gestartet werden, nachdem der Sicherheitsschlüssel eingesteckt wurde. Befestigen Sie die Klammer sicher
an Ihrer Kleidung. Der Sicherheitsschlüssel soll die Stromversorgung zum Laufband unterbrechen, falls Sie stürzen. Überprüfen Sie
die Funktionsfähigkeit des Sicherheitsschlüssels alle 2Wochen.
WARNUNG: Benutzen Sie das Laufband niemals ohne die Klammer des Sicherheitsschlüssels an Ihrer Kleidung zu befestigen.
Ziehen Sie zunächst an der Klammer des Sicherheitsschlüssels, umsicherzustellen, dass sich dieser nicht von Ihrer Kleidung löst.
STROMVERSORGUNG
Ihr Laufband wird über ein Netzteil mit Strom versorgt. Die Stromversorgung muss mit der Buchse am vorderen Ende des Geräts
in der Nähe des Stabilisatorrohres verbunden werden. Einige Laufbänder verfügen über einen Stromschalter neben der Buchse.
Vergewissern Siesich, dass dieser auf EIN steht. Trennen Sie das Gerät vom Netz, wenn es nicht genutzt wird. HINWEIS: Einige
Laufbänder verfügen über einen Ein-/Ausschalter hinter der Konsole.
WARNUNG: Das Gerät darf nicht verwendet werden, wenn das Kabel oder der Stecker beschädigt sind, es nicht ordnungsgemäß
funktioniert oder wenn es beschädigt wurde oder in Wasser steht.

DEUTSCH
69
NIVELLIEREN DES LAUFBANDS
Ihr Laufband muss für einen optimalen Betrieb eben stehen. Sobald Sie das Gerät am gewünschten Aufstellungsort aufgestellt
haben, heben oder senken Sie einen oder beide Höhenversteller an der Unterseite des Laufbandrahmens. Hierfür wird eine
Wasserwaage empfohlen. Wenn das Gerät nicht nivelliert ist, läuft das Laufband ggf. nicht einwandfrei. Sobald Sie das Gerät
nivelliert haben, arretieren Sie die Höhenversteller, indem Sie die Muttern am Rahmen festziehen.
HÖHE EINSTELLEN VERRIEGELN
DER EINSTELLUNG

DEUTSCH
70
2
4
6
8
10
12
16
20
Q
M M
P
N
IH
B
R
F G
A
J
C
O
Q
DS T U SEL K

DEUTSCH
71
KONSOLENBEDIENUNG
Hinweis: Auf der Oberfläche der Konsole befindet sich ein dünnes, schützendes Plastikblatt, das vor der Verwendung entfernt werden sollte.
A) LCD DISPLAY: Zeit, Umdrehungen pro Minute, Distanz, Watt, Kalorien, Steigung, Geschwindigkeit, Herzfrequenz, Lüftergeschwindigkeit
B) LED DISPLAY: Zeit, Geschwindigkeit, Distanz, Kalorien, Steigung, Herzfrequenz
C) TRAININGSPROGRAMME: Listet alle während des Trainings verfügbaren Programme auf.
D) START: Drücken Sie, um mit dem Training zu beginnen, ein pausiertes Training fortzusetzen oder ein neues Training zu starten.
E) STOP: Drücken Sie, um das Training zu pausieren oder zu beenden. Halten Sie die Taste 3 Sekunden lang gedrückt, um die Konsole
zurückzusetzen.
F) STEIGUNG +/-: Dient zur schrittweisen Einstellung der Steigung in 0,5 %-Schritten.
G) SPEED+/-: Wird verwendet, um die Geschwindigkeit in kleinen Schritten (0,1 MPH) anzupassen.
H) SCHNELLTASTEN STEIGUNG: Ermöglichen eine schnellere Auswahl der gewünschten Steigung.
I) SCHNELLTASTEN GESCHWINDIGKEIT: Ermöglichen eine schnellere Auswahl der gewünschten Geschwindigkeit.
J) ANZEIGE WECHSELN: Drücken Sie die Taste, um während des Trainings die Anzeige zu ändern.
K) LÜFTERTASTE: Durch wiederholtes Drücken wird die Lüfterstufe auf 1,2,3 und anschließend AUS geschaltet.
L) LÜFTER:Persönlicher Trainingslüfter.
M) LAUTSPRECHER:Musik wird über die Lautsprecher wiedergegeben, wenn Ihr CD-/MP3-player mit der Konsole verbunden ist.
N) AUDIOEINGANG: Schließen Sie Ihren CD-/MP3-Player mit dem mitgelieferten Audiokabel an die Konsole an.
O) AUDIOAUSGANG / KOPFHÖRERANSCHLUSS: Schließen Sie Ihre Kopfhörer an, um Musik über Kopfhörer zu hören.
Hinweis: Bei angeschlossenen Kopfhörern erfolgt die Wiedergabe nicht mehr über die Lautsprecher.
P) USB-EINGANG: 1A/5V USB-Ausgang.
Q) FLASCHENHALTER: Zur Aufbewahrung persönlicher Trainingsgegenstände.
R) TABLET-/LESESTÜTZE: Zur Ablage eines Tablets oder Lesematerials.
S) PULSSENSOREN: Dienen zur Messung der Herzfrequenz.
T) STEIGUNGS-DREHREGEL: Wird verwendet, um die Steigung in kleinen Schritten (5%) anzupassen.
U) GESCHWINDIGKEITS-DREHREGEL: Wird verwendet, um die Geschwindigkeit in kleinen Schritten (1 MPH) anzupassen.

DEUTSCH
72
DISPLAY WINDOWS
• TIME: Wird als Minuten : Sekunden angezeigt. Zeigt die verbleibende oder bereits verstrichene Trainingszeit an.
• SPEED: Wird in MPH angezeigt. Zeigt an, wie schnell sich die Geh- oder Lauffläche bewegt.
• DISTANCE: Wird in Meilen angezeigt. Zeigt die während des Trainings zurückgelegte Strecke an.
• CALORIES: Gesamtverbrauchte Kalorien oder verbleibende Kalorien, die während des Trainings zu verbrennen sind.
• INCLINE: Wird in Prozent angezeigt. Zeigt die Steigung der Geh- oder Lauffläche an.
• HEART RATE: Wird in BPM (Schläge pro Minute) angezeigt. Dient zur Überwachung der Herzfrequenz (wird angezeigt, wenn
beide Pulssensoren berührt werden).

DEUTSCH
73
ERSTE SCHRITTE
1) Vergewissern Sie sich, dass keine Gegenstände auf dem Band liegen, die Bewegung des Laufbands behindern könnten.
2) Stecken Sie das Netzkabel ein und schalten Sie das Laufband ON. (Der ON/OFF-Schalter befindet sich neben dem Netzkabel.)
3) Stellen Sie sich auf die seitlichen Handläufe des Laufbands.
4) Befestigen Sie den Sicherheitsschlüsselclip an Ihrer Kleidung und stellen Sie sicher, dass er sicher sitzt und sich während des Betriebs
nicht lösen kann.
5) Setzen Sie den Sicherheitsschlüssel in das Sicherheitsschloss an der Konsole ein.
6) Sie haben zwei Optionen, um mit Ihrem Training zu beginnen:
A) SCHNELLER START
Drücken Sie einfach die START-TASTE, um mit dem Training zu beginnen.
Zeit, Entfernung und Kalorien werden von null an hochgezählt. ODER...
B) WÄHLEN SIE EIN TRAINING ODER EIN ZIEL
1) Wählen Sie Ihr PROGRAMM mit den +/- Tasten und drücken Sie ENTER, wenn das gewünschte PROGRAMM angezeigt wird.
2) Passen Sie die EINSTELLUNG mit den +/- Tasten an und drücken Sie ENTER, wenn die gewünschte EINSTELLUNG angezeigt wird.
3) Drücken Sie START, um zu beginnen.
SPEZIFIKATION FÜR PROGRAMME MIT MEHREREN SEGMENTEN
1) Der Benutzer kann Geschwindigkeit und Steigung in einem bestimmten Segment erhöhen, und sie werden NUR für dieses Segment
erhöht. In den folgenden Segmenten folgt das Gerät den Werten in der bereitgestellten Tabelle.
2) Der Benutzer kann die Geschwindigkeit und Steigung in jedem Segment verringern, und die Verringerung wird in den folgenden
Segmenten um denselben Betrag erfolgen.
BOWFLEX CONNECTED FITNESS SYSTEM
Ihr BowFlex-Gerät ist Bluetooth-fähig und ermöglicht die drahtlose Verbindung Ihres Geräts und anderer Apps mit dem BowFlex-Laufband
über die Bluetooth-4.0-Technologie.

DEUTSCH
74
P1) MANUELL: Passen Sie während des Trainings Geschwindigkeit und Steigung manuell an.
TRAININGSPROFIL
P2) GEWICHTSREDUKTION: Ein Trainingsprogramm, das speziell zur Gewichtsreduktion entwickelt wurde. Fördert die
Fettverbrennung durch wechselnde Steigungsgrade, wobei Sie in Ihrer Fettverbrennungszone bleiben. Enthält 20 Widerstandsstufen.
WEIGHT LOSS
Segment = workout time � 16
Level 1 2 3 4 5 6 7 8 9 10 11 12 13 14 15 16 17 18 19 20
Segment
1 0 0 0 0 0 0 1 2 2 2,5 2,5 2,5 2,5 2,5 3,5 5 5 5 5 5
2 0 0 1 2 2,5 3,5 3,5 3,5 4,5 5,5 6 7 7,5 8,5 9,5 11 11 11 11,5 12
3 1 2 2 2 2 2 2 2 2 2,5 3,5 4,5 4,5 4,5 5,5 7 7,5 8,5 9 10
4 1,5 3,5 4 5 5 5 5 5 6 7 7,5 8,5 9 10 11 12 12,5 13,5 14 15
5 1 2 2 2 2 2 2,5 3,5 4 4,5 4,5 4,5 5,5 7 7,5 8,5 8,5 8,5 9,5 11
6 1,5 3,5 3,5 3,5 5 6,5 7,5 8,5 9 10 10 10 10,5 11,5 12,5 13,5 13,5 13,5 13,5 13,5
7 1 2 2 2 2 2 2,5 3,5 4 4,5 5 5,5 5,5 5,5 7 8,5 8,5 8,5 9 10
8 1,5 3,5 4 5 5 5 5,5 6,5 7,5 8,5 9 10 10,5 11,5 11,5 12 13,5 15 15 15
9 1,5 3,5 3,5 3,5 3,5 3,5 4 5 5 5,5 6 7 7 7 8,5 10 10,5 11 11,5 12
10 1 2 2 2 2 2 2,5 3,5 4 4,5 4,5 4,5 4,5 4,5 6,5 8,5 8,5 8,5 9 10
11 1,5 3,5 3,5 3,5 4 5 5 5 6 7 8,5 10 10,5 11,5 12,5 13,5 13,5 13,5 14 15
12 1 2 2 2 2 2 2 2 3 4,5 5,5 7 7 7 7,5 8,5 9 10 10 10
13 1,5 3,5 4 5 5,5 6,5 7,5 8,5 8,5 8,5 9 10 10 10 11 12 12 12 12,5 13,5
14 1 2 2 2 2,5 3,5 4 5 5 5,5 5,5 5,5 7 8,5 9 10 10,5 11 11,5 12
15 0 0 0 0 1 2 2,5 3,5 4 4,5 4,5 4,5 5 5,5 7 8,5 9 10 10 10
16 0 0 0 0 0 0 1 2 2 2,5 2,5 2,5 2,5 2,5 3,5 5 5 5 5 5
WEIGHT LOSS (10%incline Max)
Segment = workout time � 16
Level 1 2 3 4 5 6 7 8 9 10 11 12 13 14 15 16 17 18 19 20
Segment
1 0 0 0 0 0 0 1 2 2 2,5 2,5 2,5 2,5 2,5 3,5 5 5 5 5 5
2 0 0 1 2 2,5 3,5 3,5 3,5 4,5 5,5 6 7 7,5 8,5 9,5 10 10 10 10 10
3 1 2 2 2 2 2 2 2 2 2,5 3,5 4,5 4,5 4,5 5,5 7 7,5 8,5 9 10
4 1,5 3,5 4 5 5 5 5 5 6 7 7,5 8,5
9 10 10 10 10 10 10 10
5 1 2 2 2 2 2 2,5 3,5 4 4,5 4,5 4,5 5,5 7 7,5 8,5 8,5 8,5 9,5 10
6 1,5 3,5 3,5 3,5 5 6,5 7,5 8,5 9 10 10 10 10 10 10 10 10 10 10 10
7 1 2 2 2 2 2 2,5 3,5 4 4,5 5 5,5 5,5 5,5 7 8,5 8,5 8,5 9 10
8 1,5 3,5 4 5 5 5 5,5 6,5 7,5 8,5 9 10 10 10 10 10 10 10 10 10
9 1,5 3,5 3,5 3,5 3,5 3,5 4 5 5 5,5 6 7 7 7 8,5 10 10 10 10 10
10 1 2 2 2 2 2 2,5 3,5 4 4,5 4,5 4,5 4,5 4,5 6,5 8,5 8,5 8,5 9 10
11 1,5 3,5 3,5 3,5 4 5 5 5 6 7 8,5 10 10 10 10 10 10 10 10 10
12 1 2 2 2 2 2 2 2 3 4,5 5,5 7 7 7 7,5 8,5 9 10 10 10
13 1,5 3,5 4 5 5,5 6,5 7,5 8,5 8,5 8,5 9 10 10 10 10 10 10 10 10 10
14 1 2 2 2 2,5 3,5 4 5 5 5,5 5,5 5,5 7 8,5 9 10 10 10 10 10
15 0 0 0 0 1 2 2,5 3,5 4 4,5 4,5 4,5 5 5,5 7 8,5 9 10 10 10
16 0 0 0 0 0 0 1
2 2 2,5 2,5 2,5 2,5 2,5 3,5 5 5 5 5 5
WEIGHT LOSS (12%incline Max)
Segment = workout time � 16
Level 1 2 3 4 5 6 7 8 9 10 11 12 13 14 15 16 17 18 19 20
Segment
1 0 0 0 0 0 0 1 2 2 2,5 2,5 2,5 2,5 2,5 3,5 5 5 5 5 5
2 0 0 1 2 2,5 3,5 3,5 3,5 4,5 5,5 6 7 7,5 8,5 9,5 11 11 11 11,5 12
3 1 2 2 2 2 2 2 2 2 2,5 3,5 4,5 4,5 4,5 5,5 7 7,5 8,5 9 10
4 1,5 3,5 4 5 5 5 5 5 6 7 7,5 8,5 9 10 11 12 12 12 12 12
5 1 2 2 2 2 2 2,5 3,5 4 4,5 4,5 4,5 5,5 7 7,5 8,5 8,5 8,5 9,5 11
6 1,5 3,5 3,5 3,5 5 6,5 7,5 8,5 9 10 10 10 10,5 11,5 12 12 12 12 12 12
7 1 2 2 2 2 2 2,5 3,5 4 4,5 5 5,5 5,5 5,5 7 8,5 8,5 8,5 9 10
8 1,5 3,5 4 5 5 5 5,5 6,5 7,5 8,5 9 10 10,5 11,5 11,5 12 12 12 12 12
9 1,5 3,5 3,5 3,5 3,5 3,5 4 5 5 5,5 6 7 7 7 8,5
10 10,5 11 11,5 12
10 1 2 2 2 2 2 2,5 3,5 4 4,5 4,5 4,5 4,5 4,5 6,5 8,5 8,5 8,5 9 10
11 1,5 3,5 3,5 3,5 4 5 5 5 6 7 8,5 10 10,5 11,5 12 12 12 12 12 12
12 1 2 2 2 2 2 2 2 3 4,5 5,5 7 7 7 7,5 8,5 9 10 10 10
13 1,5 3,5 4 5 5,5 6,5 7,5 8,5 8,5 8,5 9 10 10 10 11 12 12 12 12 12
14 1 2 2 2 2,5 3,5 4 5 5 5,5 5,5 5,5 7 8,5 9 10 10,5 11 11,5 12
15 0 0 0 0 1 2 2,5 3,5 4 4,5 4,5 4,5 5 5,5 7 8,5 9 10 10 10
16
0 0 0 0 0 0 1 2 2 2,5 2,5 2,5 2,5 2,5 3,5 5 5 5 5 5
INCLINE
INCLINE
INCLINE
GEWICHTSREDUKTION (max. 12 % Steigung)
Segmentstufe = Trainingszeit / 16
Stufe
Abschnitt
STEIGUNG

DEUTSCH
75
P3) INTERVALLE: Verbessert Kraft, Geschwindigkeit und Ausdauer, indem während des gesamten Trainings die Steigung erhöht und
verringert wird – so wird das Herz sowie weitere Muskelgruppen aktiviert. Enthält 20 Widerstandsstufen.
P4) DISTANZ: Fordern Sie sich heraus und gehen Sie beim Training weiter – mit 13 voreingestellten Distanzprogrammen. Wählen
Sie zwischen 1 Meile, 2 Meilen, 5 km, 5 Meilen, 10 km, 8 Meilen, 15 km, 10 Meilen, 20 km, Halbmarathon, 15 Meilen, 20 Meilen und
Marathon-Zielen. Benutzer legt die Startgeschwindigkeit fest.
P5) KALORIEN: Setzen Sie Ziele für den Kalorienverbrauch. Der Kalorienverbrauch wird basierend auf Distanz und Geschwindigkeit
berechnet.
Intervals (15%Incline)
Segment =workout time�16
Level 1 2 3 4 5 6 7 8 9 10 11 12 13 14 15 16 17 18 19 20
Segment
1 0 0 0 0 0 0 0 0 0 0 0 0 0 0 0 0 0 0 0 0
2 0,5 0,5 0,5 0,5 0,5 0,5 0,5 0,5 1 1 1 1 1 1 1 1,5 1,5 1,5 1,5 1,5
3 0 0 0 0 0 0 0 0 0 0 0 0 0 0 0 0 0 0 0 0
4 1,5 2 2 2,5 3 3 3,5 3,5 4 4,5 5 5,5 5,5 6 6 6,5 7 7 8 8,5
5 0 0 0 0 0 0 0 0 0 0 0 0 0 0 0 0 0 0 0 0
6 2,5 2,5 3 3,5 4 4,5 4,5 5 5,5 6 7 7,5 8 8 8,5 9,5 9,5 10 11 11,5
7 0 0 0 0 0 0 0 0 0 0 0 0 0 0 0 0 0 0 0 0
8 3 3,5 4 4,5 5 5,5 6 6,5 7 8 9 9,5 10 10,5 11 12 12,5 13 14 15
9 0 0 0 0 0 0 0 0 0 0 0 0 0 0 0 0 0 0 0 0
10 3 3,5 4 4,5 5 5,5 6 6,5 7 8 9 9,5 10 10,5 11 12 12,5 13 14 15
11 0 0 0 0 0 0 0 0 0 0 0 0 0 0 0 0 0 0 0 0
12 3 3,5 4 4,5 5 5,5 6 6,5 7 8 9 9,5 10 10,5 11 12 12,5 13 14 15
13 0 0 0 0 0 0 0 0 0 0 0 0 0 0 0 0 0 0 0 0
14 3 3,5 4 4,5 5 5,5 6 6,5 7 8 9 9,5 10 10,5 11 12 12,5 13 14 15
15 0 0 0 0 0 0 0 0 0 0 0 0 0 0 0 0 0 0 0 0
16 3 3,5 4 4,5 5 5,5 6 6,5 7 8 9 9,5 10 10,5 11 12 12,5 13 14 15
Intervals (10%Incline)
Segment =workout time�16
Level 1 2 3 4 5 6 7 8 9 10 11 12 13 14 15 16 17 18 19 20
Segment
1 0 0 0 0 0 0 0 0 0 0 0 0 0 0 0 0 0 0 0 0
2 0,5 0,5 0,5 0,5 0,5 0,5 0,5 0,5 1 1 1 1 1 1 1 1,5 1,5 1,5 1,5 1,5
3 0 0 0 0 0 0 0 0 0 0 0 0 0 0 0 0 0 0 0 0
4 1,5 2 2 2,5 3 3 3,5 3,5 4 4,5 5 5,5 5,5 6 6 6,5 7 7 8 8,5
5 0 0 0 0 0 0 0 0 0 0 0 0 0 0 0 0 0 0 0 0
6 2,5 2,5 3 3,5 4 4,5 4,5 5 5,5 6 7 7,5 8 8 8,5 9,5 9,5 10 10 10
7 0 0 0 0 0 0 0 0 0 0 0 0 0 0 0 0 0 0 0 0
8 3 3,5 4 4,5 5 5,5 6 6,5 7 8 9 9,5 10 10 10 10 10 10 10 10
9 0 0 0 0 0 0 0 0 0 0 0 0 0 0 0 0 0 0 0 0
10 3 3,5 4 4,5 5 5,5 6 6,5 7 8 9 9,5 10 10 10 10 10 10 10 10
11 0 0 0 0 0 0 0 0 0 0 0 0 0 0 0 0 0 0 0 0
12 3 3,5 4 4,5 5 5,5 6 6,5 7 8 9 9,5 10 10 10 10 10 10 10 10
13 0 0 0 0 0 0 0 0 0 0 0 0 0 0 0 0 0 0 0 0
14 3 3,5 4 4,5 5 5,5 6 6,5 7 8 9 9,5 10 10 10 10 10 10 10 10
15 0 0 0 0 0 0 0 0 0 0 0 0 0 0 0 0 0 0 0 0
16 3 3,5 4 4,5 5 5,5 6 6,5 7 8 9 9,5 10 10 10 10 10 10 10 10
Segment =workout time�16
Intervals (12%Incline)
Level 1 2 3 4 5 6 7 8 9 10 11 12 13 14 15 16 17 18 19 20
Segment
1 0 0 0 0 0 0 0 0 0 0 0 0 0 0 0 0 0 0 0 0
2 0,5 0,5 0,5 0,5 0,5 0,5 0,5 0,5 1 1 1 1 1 1 1 1,5 1,5 1,5 1,5 1,5
3 0 0 0 0 0 0 0 0 0 0 0 0 0 0 0 0 0 0 0 0
4 1,5 2 2 2,5 3 3 3,5 3,5 4 4,5 5 5,5 5,5 6 6 6,5 7 7 8 8,5
5 0 0 0 0 0 0 0 0 0 0 0 0 0 0 0 0 0 0 0 0
6 2,5 2,5 3 3,5 4 4,5 4,5 5 5,5 6 7 7,5 8 8 8,5 9,5 9,5 10 11 11,5
7 0 0 0 0 0 0 0 0 0 0 0 0 0 0 0 0 0 0 0 0
8 3 3,5 4 4,5 5 5,5 6 6,5 7 8 9 9,5 10 10,5 11 12 12 12 12 12
9 0 0 0 0 0 0 0 0 0 0 0 0 0 0 0 0 0 0 0 0
10 3 3,5 4 4,5 5 5,5 6 6,5 7 8 9 9,5 10 10,5 11 12 12 12 12 12
11 0 0 0 0 0 0 0 0 0 0 0 0 0 0 0 0 0 0 0 0
12 3 3,5 4 4,5 5 5,5 6 6,5 7 8 9 9,5 10 10,5 11 12 12 12 12 12
13 0 0 0 0 0 0 0 0 0 0 0 0 0 0 0 0 0 0 0 0
14 3 3,5 4 4,5 5 5,5 6 6,5 7 8 9 9,5 10 10,5 11 12 12 12 12 12
15 0 0 0 0 0 0 0 0 0 0 0 0 0 0 0 0 0 0 0 0
16 3 3,5 4 4,5 5 5,5 6 6,5 7 8 9 9,5 10 10,5 11 12 12 12 12 12
INCLINE
INCLINE
INCLINE
Segmentstufe = Trainingszeit/16
Intervalle (12% Steigung)
Stufe
Abschnitt
STEIGUNG

DEUTSCH
76
P6) HÜGELTRAINING: Simuliert einen Anstieg und Abstieg. Dieses Programm hilft beim Muskelaufbau und verbessert die
kardiovaskuläre Leistungsfähigkeit. Die Steigung ändert sich alle 30 Sekunden, und die Segmente wiederholen sich.
P7) BENUTZERDEFINIERT: Ermöglicht es Ihnen, Ihr individuelles Training mit einer Kombination aus spezifischer Geschwindigkeit,
Steigung und Zeit oder Distanz zu erstellen und wiederzuverwenden. Das ultimative personalisierte Trainingsprogramm. Dies ist ein
zielorientiertes Programm basierend auf Zeit oder Distanz.
P8) Ziel-Herzfrequenz: Dieses Programm wurde entwickelt, um Ihre allgemeine kardiovaskuläre Fitness zu verbessern.
Sie legen einfach Ihre Zielherzfrequenz fest. Das Programm überwacht und passt dann die Intensitätsstufe an, um
Ihre Herzfrequenz während des Trainings im Zielbereich zu halten – eine bewährte Methode zur Maximierung von
Gewichtsverlust und Fitnesszielen. Ein Brustgurt ist erforderlich und muss während der gesamten Programmdauer
getragen werden. Siehe unten zur Berechnung Ihrer Zielherzfrequenz.
Segment 1 2 3 4 5 6 7 8 9 10
Time 30 sec 30 sec 30 sec 30 sec 30 sec 30 sec 30 sec 30 sec 30 sec 30 sec
Level 1 0 0 1 1,5 2 2,5 3 3 2,5 2 1,5 1
Level 2 0 0 1,5 2 2,5 3 3,5 3,5 3 2,5 2 1,5
Level 3 0 1 2 2,5 3 3,5 4 4 3,5 3 2,5 2
Level 4 0 1,5 2,5 3 3,5 4 4,5 4,5 4 3,5 3 2,5
Level 5 0 1,5 3 3,5 4 4,5 5 5 4,5 4 3,5 3
Level 6 0 1,5 3,5 4 4,5 5 5,5 5,5 5 4,5 4 3,5
Level 7 0 1,5 4 4,5 5 5,5 6 6 5,5 5 4,5 4
Level 8 0 2 4,5 5 5,5 6 6,5 6,5 6 5,5 5 4,5
Level 9 0 2 5 5,5 6 6,5 7 7 6,5 6 5,5 5
Level 10 0 2 5,5 6 6,5 7 7,5 7,5 7 6,5 6 5,5
Warm Up
4:00 Mins
Abschnitt
Zeit
Stufe 1
Stufe 2
Stufe 3
Stufe 4
Stufe 5
Stufe 6
Stufe 7
Stufe 8
Stufe 9
Stufe 10
Aufwärmen
4:00 Min
30 Sek30 Sek30 Sek30 Sek30 Sek30 Sek30 Sek30 Sek30 Sek
30 Sek

DEUTSCH
77
Berechnung Ihrer Zielherzfrequenz:
Der erste Schritt, um die richtige Trainingsintensität zu bestimmen, besteht darin, Ihre maximale Herzfrequenz zu ermitteln (max. HF =
220 – Lebensalter). Die altersbasierte Methode liefert eine statistisch durchschnittliche Schätzung der maximalen Herzfrequenz und ist
für die meisten Menschen – insbesondere Einsteiger im Herzfrequenztraining – gut geeignet.
Die präziseste und genaueste Methode zur Bestimmung der individuellen maximalen Herzfrequenz ist ein klinischer Belastungstest
durch einen Kardiologen oder Sportmediziner. Wenn Sie über 40 Jahre alt sind, übergewichtig sind, seit mehreren Jahren keinen Sport
getrieben haben oder familiär vorbelastet sind, wird ein klinischer Test empfohlen.
Diese Tabelle zeigt Beispiele für den Herzfrequenzbereich einer 30-jährigen Person beim Training in 5 verschiedenen Herzfrequenzzonen.
Zum Beispiel beträgt die maximale Herzfrequenz einer 30-jährigen Person 220 – 30 = 190 bpm, und 90 % der max. Herzfrequenz
entsprechen 190 × 0,9 = 171 bpm.
Zusätzliche Hinweise zur Zielherzfrequenz:
1). Die Steigung des Laufbands wird automatisch angepasst, um Sie an Ihre angegebene Zielherzfrequenz heranzuführen.
2). Wird keine Herzfrequenz erkannt, ändert das Gerät die Steigung nicht.
3). Wenn Ihre Herzfrequenz 25 Schläge über der Zielzone liegt, wird das Programm automatisch beendet.
Target Heart
Rate Zone
Workout
Duration
Example THR
(age 30)
Your THR Recommend For
Target Heart
Rate Zone
< 5 min
171-190 BPM
Fit persons for
athletic training
VERY HARD
90 - 100%
2-10 min 152-171 BPM Shorter Workouts
HARD
80 - 90%
10-40 min
133-152 BPM
Moderately long
Workouts
MODERATE
70 - 80%
40-80 min
114-133 BPM
Longer and
frequently repeated
shorter exercises
LIGHT
60 - 70%
20-40 min
104-114BPM
Weight management
and active recovery
VERY LIGHT
50 - 60%
Ziel-
Herzfrequenzzone
Trainingsdauer
Beispielhafte
Zielherzfrequenz
(Alter 30)
Ihre ZHF Empfohlen für
Sehr anstrengend
90-100%
< 5 min 171-190 BPM
Trainierte Personen für
sportliches Leistungstraining
Anstrengend
80 - 90%
2-10 min 152-171 BPM Kürzere Trainingseinheiten
Mäßig
70 - 80%
10-40 min 133-152 BPM
Mittel lange
Trainingseinheiten
Leicht
60 - 70%
40-80 min 114-133 BPM
Längere und häufig
wiederholte kurze
Trainingseinheiten
Sehr leicht
50 - 60%
20-40 min 104-114 BPM
Gewichtsmanagement und
aktive Erholung

DEUTSCH
78
ZUM ZURÜCKSETZEN DER KONSOLE
Halten Sie die STOPPTASTE 3 Sekunden lang gedrückt.
BEENDEN IHRES TRAININGS
Wenn Ihr Training abgeschlossen ist, gibt das Gerät einen Signalton ab. Ihre Trainingsdaten bleiben 30 Sekunden lang auf der Konsole
sichtbar und werden dann zurückgesetzt.
VERBINDUNG ÜBER BLUETOOTH 4.0LE
1) Stellen Sie sicher, dass Ihr Musikgerät Bluetooth 4.0-kompatibel ist.
2) Gehen Sie in die Bluetooth-Einstellungen Ihres Geräts und suchen Sie nach verfügbaren Geräten.
3) Wählen Sie in der Liste der Bluetooth-Geräte den Namen des Laufbands aus. Warten Sie, bis die Kopplung abgeschlossen ist. Wählen
SieIhr Laufband- oder Ellipsentrainer-Gerät aus der angezeigten Liste aus. Warten Sie, bis Ihr Musikgerät die Kopplung mit dem Gerät
abgeschlossen hat.
4) Sie erkennen eine erfolgreiche Kopplung daran, dass Ihr Musikgerät das Laufband- oder Ellipsentrainer-Gerät als verbundenes Gerät
anzeigt.
VERWENDUNG MEHRERER MUSIKGERÄTE
Wenn mehrere Geräte mit dem Gerät gekoppelt werden sollen (z. B. mehrere Benutzer koppeln ihre Musikgeräte mit dem Laufband oder
Ellipsentrainer), muss das aktuell gekoppelte Gerät zuerst entkoppelt und anschließend Ihr eigenes Gerät gemäß obiger Kopplungsanleitung
erneut gekoppelt werden.
VERBINDUNG ÜBER EIN AUDIOKABEL
1) Schließen Sie das mitgelieferte AUDIO-ADAPTERKABEL an die AUDIO-IN-BUCHSE an der rechten Seite der Konsole und an die
Kopfhörerbuchse Ihres Mediengeräts an.
2) Verwenden Sie die Tasten Ihres Mediengeräts, um die Musikeinstellungen zu steuern.
3) Entfernen Sie das AUDIO-ADAPTERKABEL, wenn es nicht verwendet wird.
4) Wenn Sie die LAUTSPRECHER nicht verwenden möchten, können Sie Ihre Kopfhörer an die AUDIO-OUT-BUCHSE an der rechten Seite der
Konsole anschließen. So stellen Sie sicher, dass Ihr Gerät nicht auf den Boden fällt, falls Sie während des Laufens versehentlich am
Kopfhörerkabel ziehen.

DEUTSCH
79
VERBINDEN SIE IHR GERÄT MIT DER JRNY-APP FÜR DYNAMISCHERE WORKOUTS
Wenn Sie eine JRNY-Mitgliedschaft* haben, können Sie über Ihr Gerät darauf zugreifen, sobald es mit der Konsole dieses Geräts
synchronisiert ist. Mit der JRNY-Mitgliedschaft erhalten Sie angeleitete Workouts, die auf Sie abgestimmt sind.
* Für das JRNY-Erlebnis ist eine JRNY-Mitgliedschaft erforderlich – Details finden Sie unter global.bowflex.com/en/jrny.html
In verfügbaren Regionen (einschließlich der USA) können Sie die JRNY-Mitgliedschaft erhalten, indem Sie die JRNY-App auf Ihr
Smartphone oder Tablet herunterladen und sich in der App registrieren. JRNY-Mitgliedschaften sind möglicherweise nicht in allen
Ländern verfügbar.

80
Wartung &
Problem-
behandlung

DEUTSCH
81
WARTUNG
Die vorbeugende Wartung ist für den störungsfreien Betrieb der Geräte sowie die Beschränkung der Haftung des Benutzers auf ein
Minimum äußerst wichtig. Die Geräte müssen in regelmäßigen Abständen überprüft werden. Defekte Komponenten müssen sofort
ausgetauscht werden. Nicht ordnungsgemäß funktionsfähige Geräte müssen außer Betrieb genommen werden, bis sie repariert
wurden. Stellen Sie sicher, dass alle Personen, die Einstellungen, Wartungs- oder Reparaturarbeiten jeglicher Art am Gerät
vornehmen, hierfür qualifiziert sind.
WARNUNG
Um das Laufband vom Strom zu trennen, muss das Netzkabel aus der Steckdose in der Wand gezogen werden.

DEUTSCH
82
WARTUNGSPLAN
TÄTIGKEIT HÄUFIGKEIT
Laufband reinigen und kontrollieren:
• Schalten Sie das Laufband mit dem EIN/AUS-Schalter aus und ziehen Sie das Netzkabel aus der
Steckdose.
• Wischen Sie Laufband, Laufbandfläche, Motorabdeckung und Konsolengehäuse mit einem
feuchten Tuch ab. Verwenden Sie keine Lösemittel, da diese zu Beschädigungen am Laufband
führen.
• Überprüfen Sie das Netzkabel. Wenn das Stromkabel beschädigt ist, finden Sie für weitere
Unterstützung unsere Kontaktdaten auf der Rückseite der INFORMATIONSKARTE.
• Stellen Sie sicher, dass sich das Netzkabel nicht unter dem Laufband oder in einem anderen
Bereich befindet, in dem es während der Lagerung oder des Gebrauchs eingeklemmt oder
durchgeschnitten werden kann.
• Überprüfen Sie die Spannung und Ausrichtung des Laufbands. Stellen Sie sicher, dass das
Laufband aufgrund einer falschen Ausrichtung keine anderen Komponenten des Geräts
beschädigt.
• Wenn Etiketten beschädigt oder unleserlich sind, finden Sie für weitere Unterstützung unsere
Kontaktdaten auf der Rückseite der INFORMATIONSKARTE.
TÄGLICH
Reinigung unter dem Laufband:
• Schalten Sie das Laufband mit dem EIN/AUS-Schalter aus und ziehen Sie das Netzkabel aus der
Steckdose.
• Klappen Sie das Laufband in die aufrechte Position und stellen Sie sicher, dass die Verriegelung
eingerastet ist.
• Bewegen Sie das Laufband.
• Wischen oder saugen Sie alle Staubpartikel oder anderen Objekte ab, die sich unter dem
Laufband ggf. angesammelt haben.
• Bringen Sie das Laufband zurück an seinen ursprünglichen Aufstellungsort.
WÖCHENTLICH

DEUTSCH
83
WICHTIG!
• Schalten Sie das Laufband mit dem EIN/AUS-Schalter aus und ziehen Sie das Netzkabel aus der
Steckdose. Warten Sie 60Sekunden.
• Überprüfen Sie alle Montageschrauben des Geräts auf einen festen Sitz.
• Entfernen Sie die Motorabdeckung. Warten Sie, bis ALLE Anzeigebildschirme ausgeschaltet
wurden.
• Reinigen Sie den Motor und den unteren Bereich der Platine, um alle Fussel oder Staubpartikel
zu beseitigen, die sich ggf. angesammelt haben. Wird dies nicht getan, kann es zu frühzeitigen
Defekten von wichtigen elektrischen Komponenten kommen.
• Wischen Sie das Band mit einem feuchten Tuch ab. Saugen Sie alle schwarzen/weißen Partikel
auf, die sich um das Gerät herum ansammeln. Diese Partikel können sich durch die normale
Nutzung des Laufbands ansammeln.
• Wenn Ihr Laufband unter der Lauffläche über Stoßdämpfer zur Hubunterstützung verfügt,
schmieren Sie diese silbernen Stoßdämpferröhren mit einem teflonbasierten Spray, das Sie im
Baumarkt oder Fahrradladen erhalten.
MONATLICH

DEUTSCH
84
WARTUNGSPLAN
ÖLUNG
ALLE 3 MONATE ODER 480 KILOMETER
Ihre Laufmatte muss für einen optimalen Betrieb alle drei Monate
bzw. 480 Kilometer geschmiert werden. Sobald Ihr Laufband eine
Strecke von 480 Kilometern erreicht hat, wird die Nachricht
„LUBE“ (SCHMIEREN) oder „LUBE BELT“ (LAUFMATTE SCHMIEREN)
angezeigt. Während dieser Anzeigen kann das Laufband nicht
betrieben werden. Im Lieferumfang Ihres Laufbands ist eine
Flasche mit einem Silikonschmiermittel mit 100% Silikongehalt
enthalten, die für zwei Schmierintervalle ausreichend ist.
Zusätzliches Silikonschmiermittel kaufen:
Wenden Sie sich bitte an den technischen Kundendienst.
Benötigte Werkzeuge:
• T-Schlüssel oder Inbus-Schlüssel
• 100% Silikonöl
LAUFMATTE
LAUFDECK

DEUTSCH
85
VERFAHREN:
1. Schalten Sie das Laufband mit dem Ein/Aus-Schalter aus und ziehen Sie das Netzkabel aus der Steckdose.
2. Lösen Sie die hinteren Rollenschrauben mit dem Sechskant-Steckschlüssel mit dem T-Griff
oder dem Inbusschlüssel Führen Sie 10 bis 15 Umdrehungen gegen den Uhrzeigersinn
durch. Dadurch ist die Matte lose genug, dass Sie sie anheben können.
3. Heben Sie die Laufmatte so weit wie möglich an und verteilen Sie das Silikonöl in einem Zickzackmuster auf der
gesamten Lauffläche. Verwenden Sie eine halbe Flasche des mitgelieferten Silikonschmiermittels. Tragen Sie das
Silikonöl nicht auf die Oberseite der Laufmatte auf. Lassen Sie die Laufmatte wieder herunter und ziehen Sie beide
hinteren Rollenschrauben im Uhrzeigersinn um die Anzahl an Umdrehungen an, die sie zuvor gelöst wurden.
4. Tragen Sie das Schmiermittel auf, schließen Sie das Gerät an die Stromversorgung an und stecken Sie den
Sicherheitsschlüssel ein. Setzen Sie die „Lube Belt“-Meldung zurück, indem Sie zuerst die Taste SPEED UP drücken und
gedrückt halten, drücken Sie danach die Taste STOP und halten Sie dann BEIDE Tasten 5 bis 7 Sekunden lang gedrückt.
5. Halten Sie einen Sicherheitsabstand zur Maschine ein, wenn Sie dann auf START drücken. Die Matte muss
bei einer Geschwindigkeit von 5km/h 3Minuten lang laufen, damit das Silikon beginnt, sich zu verteilen.
Laufen Sie dann 3Minuten lang in einem angenehmen Tempo auf der Maschine, um das Silikon gleichmäßig
zu verteilen und die Laufmatte auf ordnungsgemäße Spannung und Ausrichtung zu prüfen.
6. Stoppen Sie die Matte, sobald sie mittig ausgerichtet und gespannt ist. Wischen
Sie überschüssiges Öl mit einem feuchten Tuch an den Seiten ab.
Betätigen Sie eine beliebige Taste, um die Warnmeldung für die Schmierung bis nach Ihrem nächsten Training zu unterdrücken.
Hinweis: Bei einigen älteren Modellen müssen Sie möglicherweise 5 Sekunden lang die Stopptaste gedrückt halten, um die
Meldung für 8 km zu unterbrechen.
Wenn Ihr Laufband unter der Lauffläche über Stoßdämpfer zur Klapp-Unterstützung verfügt, schmieren Sie diese
silbernen Stoßdämpferröhren mit einem PTFE Spray, das Sie im Baumarkt oder Fahrradladen erhalten.
Besuchen Sie den Abschnitt für den Kunden-Support auf unserer Website. Dort können Sie
praktische Videos zur Wartung ansehen. Bitte kontaktieren Sie bei Fragen zur Anwendung
des Schmiermittels bei Ihrem Laufband unseren technischen Kunden-Support.

DEUTSCH
86
SPANNEN DES LAUFBANDS
Wenn Sie fühlen, dass es auf dem Laufband rutschig ist, muss das Band gespannt werden.
In den meisten Fällen hat sich das Band durch die Benutzung ausgedehnt, wodurch es zu
Schlupf kommt. Dies ist eine normale und gängige Einstellung. Schalten Sie das Gerät zur
Beseitigung dieses Schlupfes aus und ziehen Sie die beiden hinteren Rollenschrauben mit
einem Inbusschlüssel fest und drehen Siesie wie abgebildet ¼-Drehung nach rechts (im
Uhrzeigersinn). Schalten Sie das Gerät ein und überprüfen Sie, ob Schlupf vorhanden ist.
Wiederholen Sie diesen Vorgang bei Bedarf, drehen Sie die Rollenschrauben jedoch niemals
mehr als um ¼-Drehung. Das Band ist ausreichend gespannt, wenn das Rutschgefühl nicht
mehr auftritt.
WARNUNG
Das Laufband darf während des Spannens NICHT bewegt werden. Ein Überspannen des
Laufbands kann zu übermäßigem Verschleiß am Gerät und dessen Komponenten führen.
Überspannen Sie niemals das Laufband.
ANZIEHEN DER LINKEN SEITE
DER ROLLE
ANZIEHEN DER RECHTEN SEITE
DER ROLLE
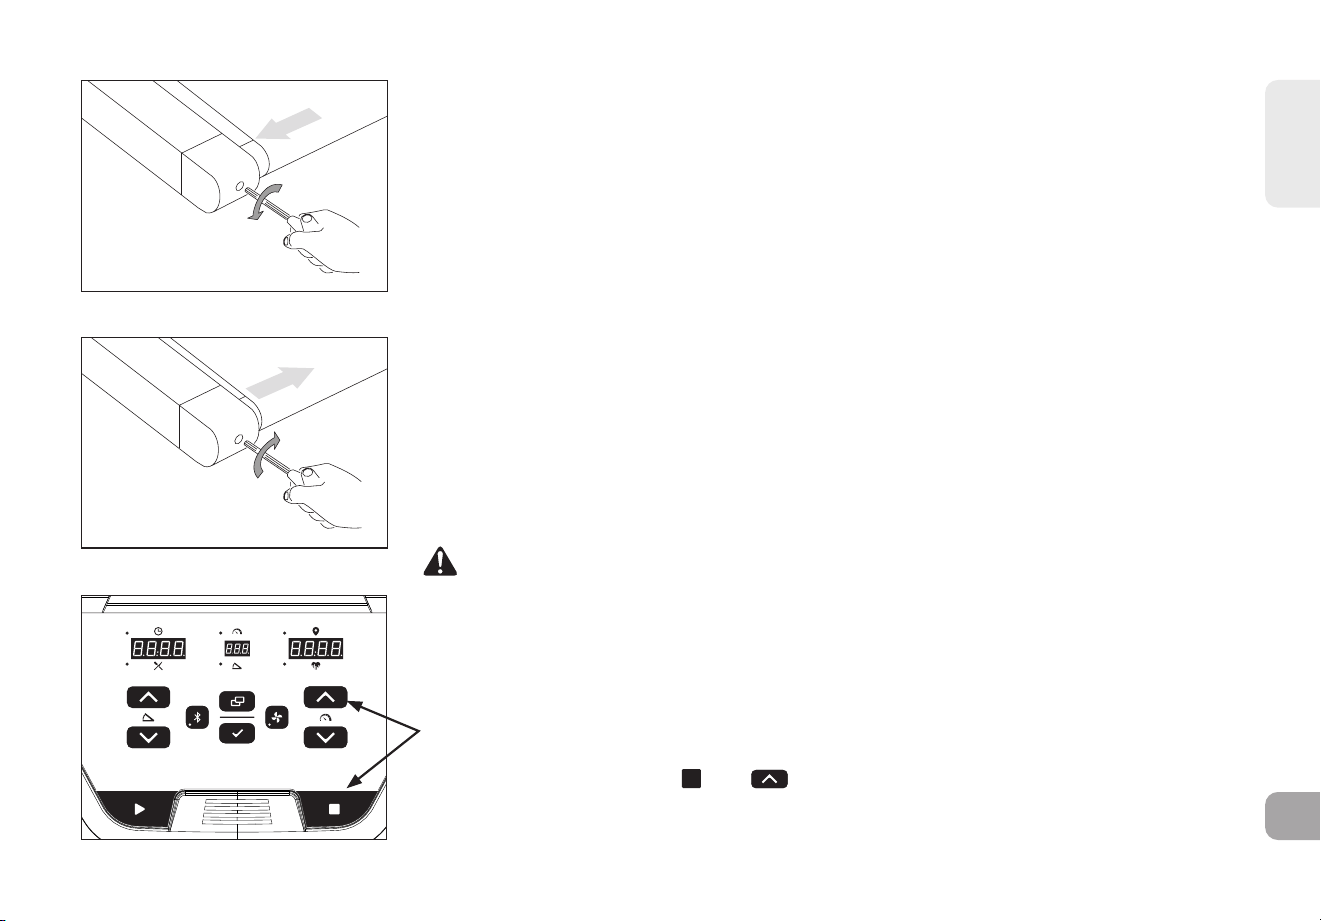
DEUTSCH
87
2
4
6
8
10
12
16
20
ZENTRIEREN DES LAUFBANDS
Wenn sich das Band zu weit rechts befindet: Mithilfe des mitgelieferten Inbusschlüssels
und bei einer Laufgeschwindigkeit von 1 km/h, drehen Sie die LINKE Einstellschraube gegen
den Uhrzeigersinn um eine ¼-Drehung und warten Sie, bis sich das Band selbst eingestellt
hat. Verwenden Sie die Markierung der Motorabdeckung oder die Teillinie als Referenz für
die Einstellung. Wiederholen Sie den Vorgang bei Bedarf, bis das Laufband während des
Betriebs zentriert bleibt.
Wenn sich das Band zu weit links befindet: Mithilfe des mitgelieferten Inbusschlüssels
und bei einer Laufgeschwindigkeit von 1 km/h, drehen Sie die LINKE Einstellschraube im
Uhrzeigersinn um eine ¼-Drehung und warten Sie, bis sich das Band selbst eingestellt hat.
Verwenden Sie die Markierung der Motorabdeckung oder die Teillinie als Referenz für
die Einstellung. Wiederholen Sieden Vorgang bei Bedarf, bis das Laufband während des
Betriebs zentriert bleibt.
• Wenn Sie am Band einen Schlupf bemerken, weil es zu locker sitzt, zentrieren und
spannen Sie es nach Bedarf.
• Entfernen Sie die Endkappen für einfacheren Zugang zu den Schrauben.
VORSICHT
Lassen Sie das Band während der Zentrierung nicht schneller als 1km/h laufen.
Halten Sie Ihre Finger, Haare und Kleidung jederzeit vom Band fern.
BAND ZU WEIT RECHTS
BAND ZU WEIT LINKS
So setzen Sie die Schmierband-Warnung zurück
Alle 150 Meilen blinkt die Anzeige „LUBE BELT“ auf dem Laufband. Nach dem Schmieren des
Bandes halten Sie die Tasten und 3–5 Sekunden lang gedrückt, um die Warnung
zurückzusetzen.

DEUTSCH
88
PROBLEMBEHANDLUNG
HÄUFIGE FRAGEN ZUM PRODUKT
SIND DIE GERÄUSCHE NORMAL, DIE MEIN LAUFBAND ERZEUGT?
Alle Laufbänder (insbesondere neue Laufbänder) erzeugen ein klopfendes Geräusch, da das Band über die Rollen läuft. Diese
Geräusche werden im Laufe der Zeit geringer, verschwinden jedoch nicht völlig. Das Band dehnt sich im Laufe der Zeit aus, wodurch
es sanfter über die Rollen läuft.
WIESO IST DAS LAUFBAND, DAS ICH GEKAUFT HABE, LAUTER ALS DAS LAUFBAND IM GESCHÄFT?
Alle Fitnessgeräte wirken in einem großen Vorführraum eines Geschäfts leiser, da in der Regel mehr Hintergrundgeräusche
vorhanden sind als bei Ihnen zu Hause. Zudem ist der Nachhall auf einem Betonboden mit Teppichbelag geringer als auf hölzernem
Bodenbelag. In bestimmten Fällen ermöglicht eine schwere Gummimatte die Reduzierung von Nachhall über den Boden. Wird ein
Fitnessgerät nahe aneiner Wand aufgestellt, werden mehr Geräusche reflektiert.
WANN MUSS ICH MIR ÜBER EIN GERÄUSCH SORGEN MACHEN?
So lange die Geräusche, die von Ihrem Laufband erzeugt werden, nicht lauter als eine normale Unterhaltung
zwischen zwei Personen sind, wird die Geräuschentwicklung als normal eingestuft.
GRUNDLEGENDE PROBLEMBEHANDLUNG
PROBLEM: Die Konsole wird nicht beleuchtet.
LÖSUNG: Überprüfen Sie Folgendes:
Leuchtet die rote Lampe am ON/OFF-Schalter auf? HINWEIS: Einige Laufbandmodelle verfügen nicht über einen aufleuchtenden
Schalter. Ist dies der Fall, fahren Sie mit den Lösungen ja und nein unten fort.
Falls ja:
• Trennen Sie die Netzversorgung, ziehen Sie das Netzkabel und warten Sie 60Sekunden. Entfernen Sie die Motorabdeckung.
Warten Sie, bis alle roten LED-Lampen an der Motorsteuerungsplatine erloschen sind, bevor Sie fortfahren. Überprüfen Sie als
nächstes, dass keines der an die untere Platine angeschlossenen Kabel lose oder getrennt ist.

DEUTSCH
89
• Überprüfen Sie, dass alle Anschlüsse fest sitzen,
insbesondere das Konsolenkabel. Ziehen Sie das
Konsolenkabel zum Überprüfen und schließen Sie es
anschließend wieder an.
• Vergewissern Sie sich, dass das Konsolenkabel nicht
eingeklemmt oder beschädigt ist.
• Schließen Sie das Laufband an den Strom an, betätigen
Sie den Stromschalter und achten Sie auf leuchtende
LEDs auf der Motorsteuerungsplatine.
Falls nein:
• Überprüfen Sie, dass die Steckdose, in die die Maschine
eingesteckt ist, funktionsfähig ist. Überprüfen Sie
nochmals, ob der Trennschalter ausgelöst wurde,
es sich um einen dedizierten 15 Ampere-Stromkreis
handelt, keine Steckdose mit Fehlerstromschutzschalter
verwendet wird und das Gerät nicht in eine
Steckerleiste mit Überspannungsschutz oder
Verlängerungskabel eingesteckt ist.
• Überprüfen Sie, dass das Netzkabel ist nicht
eingeklemmt oder beschädigt ist und ordnungsgemäß in
die Steckdose UND das Gerät eingesteckt wurde.
• Überprüfen Sie, dass der Netzschalter sich in der
Stellung ON befindet.
PROBLEM: Die Konsole zeigt SICHERHEITSSCHLÜSSEL AB
oder nur Balken an.
LÖSUNG: Überprüfen Sie Folgendes:
• Überprüfen Sie, ob der Sicherheitsschlüssel fest sitzt.
• Wenn Sie einen magnetischen Schlüssel verwenden,
stellen Sie sicher, dass der Schlüssel magnetisiert ist.
JOHNSON
UNTER DER MOTORABDECKUNG
ZAHNRIE-
MEN
ANTRIEBS-
MOTOR
OPTISCHER
SENSOR
NEIGUNGS-
MOTOR
MOTORSTEUE-
RUNGSPLA-
TINE
KONSOLEN-
KABEL
VORDERE ROLLE
LAUFBAND
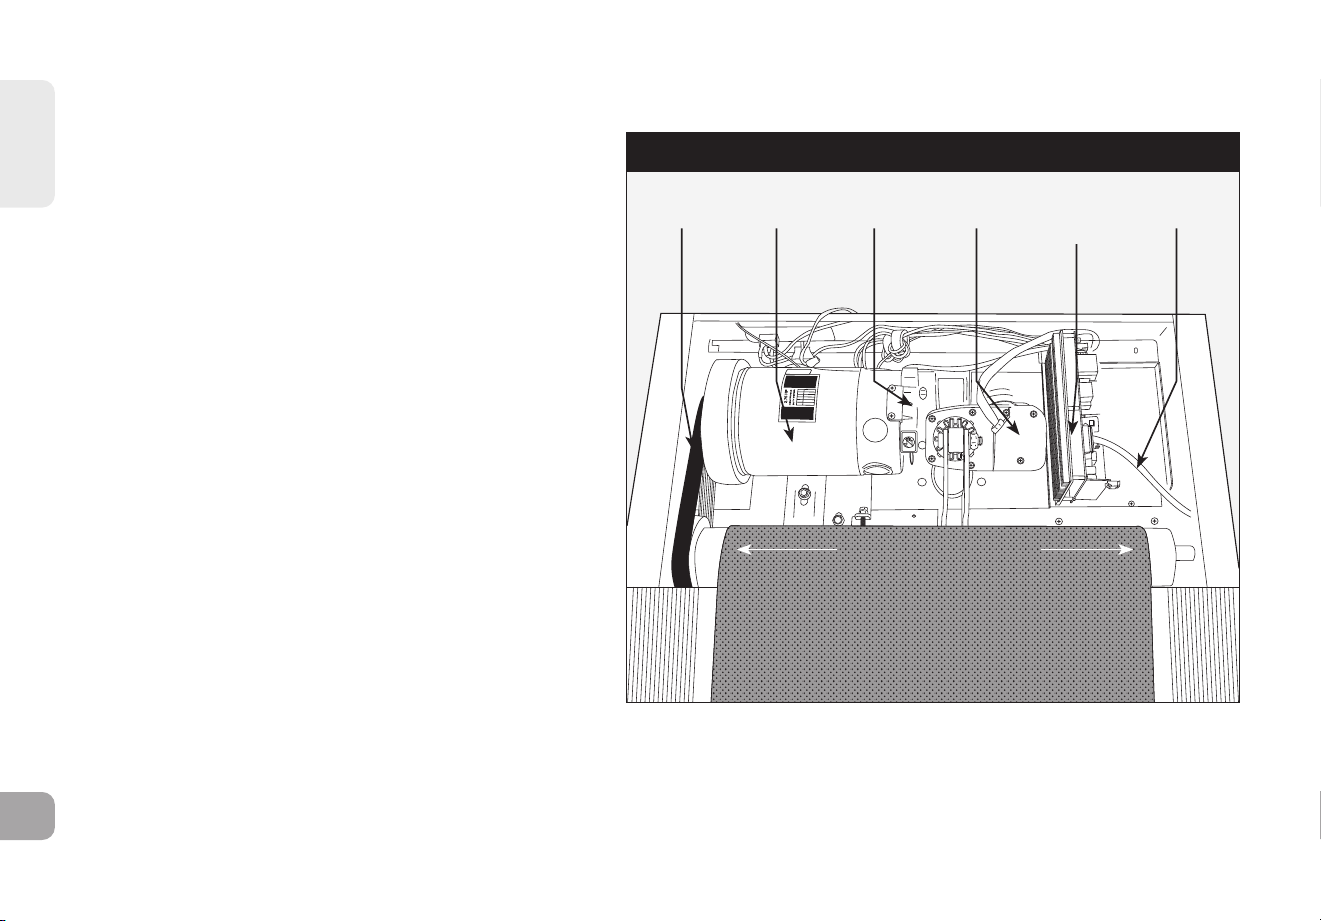
DEUTSCH
90
PROBLEMBEHANDLUNG
GRUNDLEGENDE PROBLEMBEHANDLUNG
PROBLEM: Das Laufband bewegt sich nicht oder nur kurz,
aber die Konsole funktioniert.
LÖSUNG: Überprüfen Sie Folgendes:
• Vergewissern Sie sich, dass Sie die Empfehlungen
und Stromrichtlinien unter ERDUNGSANLEITUNG
& GRUNDBETRIEB in dieser Bedienungsanleitung
befolgen. Die Einheit sollte über einen dedizierten 15
Ampere-Stromkreis versorgt werden und nicht über
eine Steckdose mit Fehlerstromschutzschalter. Stecken
Sie die Maschine nicht in eine Stromleiste, einen
Überspannungsschutz oderin ein Verlängerungskabel.
• Überprüfen Sie, ob sich das Band bewegt. Wenn ja,
notieren Sie wie weit oder wie lange es sich bewegt, ehe
es stoppt.
• Versuchen Sie das Band von Hand zu bewegen. Wenn
das nicht funktioniert, ist vielleicht das Band von der
Führung gerutscht oder die Motorlager sitzen fest.
• Stellen Sie das Laufband aus und trennen Sie es vom
Stromkreis. Lösen Sie Kreuzschlitzschrauben und
entfernen die Plastikabdeckung des Motors an der
vorderen Seiten des Geräts. Überprüfen Sie, ob der
Zahnriemen richtig sitzt.
• Überprüfen Sie bei dieser Gelegenheit auch die Leitungs-
und Kabelverbindungen, da sich diese beim Transport
oder Aufbau möglicherweise gelöst haben oder getrennt wurden. Überprüfen Sie, dass alle Verbindungen fest sitzen und keine
Leitungen geknickt, beschädigt, getrennt oder durchgebrannt sind.
PROBLEM: Die Steigung lässt sich nicht erhöhen oder verringern, oder befindet sich nicht auf der richtigen Stufe.
JOHNSON
UNTER DER MOTORABDECKUNG
ZAHNRIE-
MEN
ANTRIEBS-
MOTOR
OPTISCHER
SENSOR
NEIGUNGS-
MOTOR
MOTORSTEUE-
RUNGSPLA-
TINE
KONSOLEN-
KABEL
VORDERE ROLLE
LAUFBAND

DEUTSCH
91
LÖSUNG: Überprüfen Sie Folgendes:
• Stellen Sie sicher, dass Sie den Empfehlungen und Energierichtlinien auf den Seiten 4 und 5 dieser LAUFBANDANLEITUNG
folgen. Die Einheit sollte über einen dedizierten 15 Ampere-Stromkreis versorgt werden und nicht über eine Steckdose mit
Fehlerstromschutzschalter. Stecken Sie die Maschine nicht in eine Stromleiste, einen Überspannungsschutz oder in ein
Verlängerungskabel.
• Überprüfen Sie, ob die Konsole eine Veränderung anzeigt, nachdem Sie die Steigungsknöpfe betätigt haben.
• Stellen Sie das Laufband aus und trennen Sie es vom Stromkreis. Überprüfen Sie, dass die Kabelverbindungen an der Spitze des
Konsolenmastes fest verbunden sind. Stellen Sie sicher, dass alle bunten Leitungen vollständig im Kabelbaum eingefügt sind.
• Lösen Sie Kreuzschlitzschrauben und entfernen die Plastikabdeckung des Motors an der vorderen Seiten des Geräts. Überprüfen
Sie die Leitungs- und Kabelverbindungen, da sich diese möglicherweise beim Transport oder Aufbau gelöst haben oder
getrennt wurden. Überprüfen Sie, dass alle Verbindungen fest sitzen und keine Leitungen geknickt, beschädigt, getrennt oder
durchgebrannt sind.
PROBLEM: Die Lautsprecher geben keinen Klang wieder, aber die Kopfhörer funktionieren.
LÖSUNG: Überprüfen Sie Folgendes:
• Stellen Sie das Laufband aus und trennen Sie es vom Stromkreis. Lösen Sie Kreuzschlitzschrauben und entfernen die
Plastikabdeckung des Motors an der vorderen Seiten des Geräts.
• Überprüfen Sie die Leitungs- und Kabelverbindungen zur Lautsprecherplatine (bei der Motorsteuerungsplatine).
PROBLEM: Die Sicherung des Laufbands löst während des Trainings aus.
LÖSUNG: Überprüfen Sie Folgendes:
• Stellen Sie sicher, dass das Laufband an einen dedizierten 15 Ampere-Stromkreis angeschlossen ist.
• Überprüfen Sie, dass das Gerät nicht an ein Verlängerungskabel oder einen Überspannungsschutz angeschlossen ist.
• Überprüfen Sie, dass das Gerät nicht an eine Steckdose oder an einen Stromkreis mit Fehlerstromschutzschalter
angeschlossen ist.
PROBLEM: Das Laufband bleibt während des Trainings nicht zentriert.
LÖSUNG: Überprüfen Sie Folgendes:
• Stellen Sie sicher, dass das Laufband auf ebenem Untergrund aufgestellt wird.
• Stellen Sie sicher, dass das Band ordnungsgemäß gespannt und zentriert ist (weitere Anweisungen finden Siein den Kapiteln
SPANNEN und ZENTRIEREN DES LAUFBANDS).

DEUTSCH
92
PROBLEM: Die Betriebsgeschwindigkeit ist scheinbar ungenau.
LÖSUNG:
• Stellen Sie das Laufband aus und trennen Sie es vom Stromkreis.
• Entfernen Sie die Schrauben an der Motorabdeckung mithilfe eines Kreuzschlitzschraubenziehers.
• Überprüfen Sie, dass der optische Sensor in die Motorsteuerungsplatine eingesteckt ist.
• Untersuchen Sie das Kabel / die Verbindung des Geschwindigkeitssensors auf sichtbare Schäden.
GRUNDLEGENDE PROBLEMBEHANDLUNG
PROBLEM: Bei höheren Steigungen wird die Meldung „Geschwindigkeitsbereich-Fehler – Training wird beendet“ angezeigt.
LÖSUNG:
• Dies ist eine Sicherheitsfunktion, die die Stromzufuhr zum Antriebsmotor automatisch unterbricht, wenn die Geschwindigkeit
aufgrund der Last auf dem Band in Verbindung mit einem hohen Steigungsgrad außerhalb des zulässigen Bereichs liegt.
• Damit Ihr Trainings nicht automatisch beendet wird, verringern Sie den Steigungswinkel.
PROBLEMBEHANDLUNG HERZFREQUENZ (NURPULSGRIFF)
Kontrollieren Sie Ihre Trainingsumgebung auf Störquellen wie Leuchtstofflampen, Computer, Zäune im Boden, Heim-
Sicherheitssysteme oder Geräte mit großen Motoren. Diese Elemente verursachen fehlerhafte Herzfrequenzanzeigewerte.
Unter den folgenden Bedingungen kann es zu falsch angezeigten Messwerten kommen:
• Zu festes Umfassen der Herzfrequenz-Handgriffe. Versuchen Sie, die Herzfrequenz-Handgriffe mit mittlerem Druck zu
umfassen.
• Konstante Bewegung und Vibration aufgrund eines dauerhaften Umfassens der Herzfrequenz-Handgriffe während
des Trainings. Wenn Sie falsche Herzfrequenz-Messwerte erhalten, halten Sie die Griffe nur so lange umfasst, bis eine
Überwachung Ihrer Herzfrequenz möglich ist.
• Wenn Sie während des Trainings schwer atmen.
• Wenn Ihre Hände durch das Tragen von Ringen eingeschränkt sind.
• Wenn Ihre Hände trocken oder kalt sind. Versuchen Sie, Ihre Handflächen durch Aneinanderreiben zum Aufwärmen
anzufeuchten.
DEUTSCH
93
BRAUCHEN SIE UNTERSTÜTZUNG?
Wenn das Kapitel Problembehandlung nicht zur Lösung des Problems beitragen kann, beenden Sie die Verwendung und
schalten Sie das
Gerät aus.
Wenden Sie sich bitte an den technischen Kundendienst.
Sie werden bei einem Anruf beim Händler möglicherweise nach den folgenden Informationen gefragt. Bitte halten Sie diese
Informationen sofort bereit:
• Modellname
• Seriennummer
• Kaufnachweis
Nachfolgend sind einige der häufigsten Fragen aufgeführt, die im Rahmen der Problembehandlung gestellt werden können:
• Wie lange tritt dieses Problem bereits auf?
• Tritt das Problem bei jeder Benutzung auf? Bei jedem Benutzer?
• Wenn Sie Geräusche wahrnehmen, kommen diese von der Vorder- oder Rückseite? Was für eine Art von Geräusch ist es
(Klopfen, Schleifen, Quietschen, Zirpenusw.)?
• Wurde das Gerät gemäß WARTUNGSPLAN gewartet?
Durch die Beantwortung dieser und anderer Fragen haben die Techniker die Möglichkeit, die richtigen Ersatzteile
bereitzustellen und die erforderlichen Wartungsarbeiten durchzuführen, damit Sie und Ihr Laufband wieder ansLaufen
kommen!
• Personen mit starken Herzrhythmusstörungen.
• Personen mit Arterienverkalkung oder peripheren Durchblutungsstörungen.
• Personen, deren Haut an den Handflächen, an denen gemessen wird, besonders dick ist.

DEUTSCH
94
DIE NACHFOLGENDEN INFORMATIONEN BETREFFEN NUR KU DEN IN DEUTSCHLAND
1. Entsorgung von Elektro- und Elektronikgeräten
Das Symbol der „durchgestrichenen Mülltonne“ bedeutet, dass Sie gesetzlich verpichtet sind, diese Geräte einer
vom unsortierten Siedlungsabfall getrennten Erfassung zuzuführen. Die Entsorgung über den Hausmüll, wie bspw. die
Restmülltonne oder die Gelbe Tonne ist untersagt. Vermeiden Sie Fehlwürfe durch die korrekte Entsorgung in speziellen
Sammel- und Rückgabestellen.
2. Entnahme von Batterien und Lampen
Enthalten die Produkte Batterien und Akkus oder Lampen, die aus dem Altgerät zerstörungsfrei entnommen werden
können, müssen die vor der Entsorgung entnommen werden und getrennt als Batterie bzw. Lampe entsorgt werden.
Folgende Batterien bzw. Akkumulatoren sind in diesem Elektrogerät enthalten: Lithium-Ionen Knopfzelle.
3. Möglichkeiten der Rückgabe von Altgeräten
Besitzer von Altgeräten können diese im Rahmen der durch öffentlich-rechtlichen Entsorgungsträger eingerichteten und zur Verfügung
stehenden Möglichkeiten der Rückgabe oder Sammlung von Altgeräten unentgeltlich abgeben, damit eine ordnungsgemäße Entsorgung der
Altgeräte sichergestellt ist. Außerdem ist die Rückgabe unter bestimmten Voraussetzungen auch bei Vertreibern möglich. Unter folgendem
Link besteht die Möglichkeit, sich ein Onlineverzeichnis der Sammel- und Rücknahmestellen anzeigen zu lassen:
https://www.ear-system.de/ear- verzeichnis/sammel-und-ruecknahmestellen
Für Vertreiber:
DieRücknahmehatkostenlosbeimKaufeinesgleichartigenNeugerätszuerfolgen (1:1Rücknahme).Unabhängigdavon,gibtesdieMö
glichkeit,dieAltgeräte kostenlosanden Vertreiber zurückzugeben.Voraussetzungdafürist,dassdieäußerenAbmessungennichtgrößerals 25Zentim
etersindundsichdieRückgabeaufdreiAltgeräteproGeräteartbeschränkt(0:1 Rücknahme).
Einzelhandel:
Vertreiber, die über eine Verkaufsäche für Elektro- und Elektronikgeräte von mindestens 400 Quadratmetern verfügen,
sind zur Rücknahme von Elektro-Altgeräten verpichtet. Außerdem zur Rücknahme verpichtet sind Lebensmitteleinzelhändler, die über
eine Gesamtverkaufsäche von mindestens 800 Quadratmetern verfügen und mehrmals im Kalenderjahr oder dauerhaft auch Elektro- und
Elektronikgeräte anbieten und auf dem Markt bereitstellen.
Fernabsatzmarkt:
Vertreiber, die unter Verwendung von Fernkommunikationsmitteln (z.B. Onlineshop) ihre Produkte verkaufen, sind zur
Rücknahme von Altgeräten verpichtet, wenn die Lager- und Versandächen für Elektro- und Elektronikgeräte mindestens 400 m² betra gen.
4. Datenschutz
Wir weisen alle Endnutzer von Elektro- und Elektronikaltgeräten darauf hin, dass Sie für das Löschen personenbezogener Daten auf den zu
entsorgenden Altgeräten selbst verantwortlich sind.
5. WEEE-Registrierungsnummer
UUnter der Registrierungsnummer DE-49229072 sind wir bei der stiftung elektro-altgeräte register, Nordostpark 72, 90411 Nürnberg, als
Hersteller von Elektro- und/ oder Elektronikgeräten registriert.
Manufacturer/EU-importer:
Johnson Health Tech. GmbH
|
Europaallee 51, 50226 Frechen, Germany
Rev. 1.1 - Stand vom 01.03.2023

95
NEDERLANDS

96
Belangrijke
Veiligheidsin-
structies
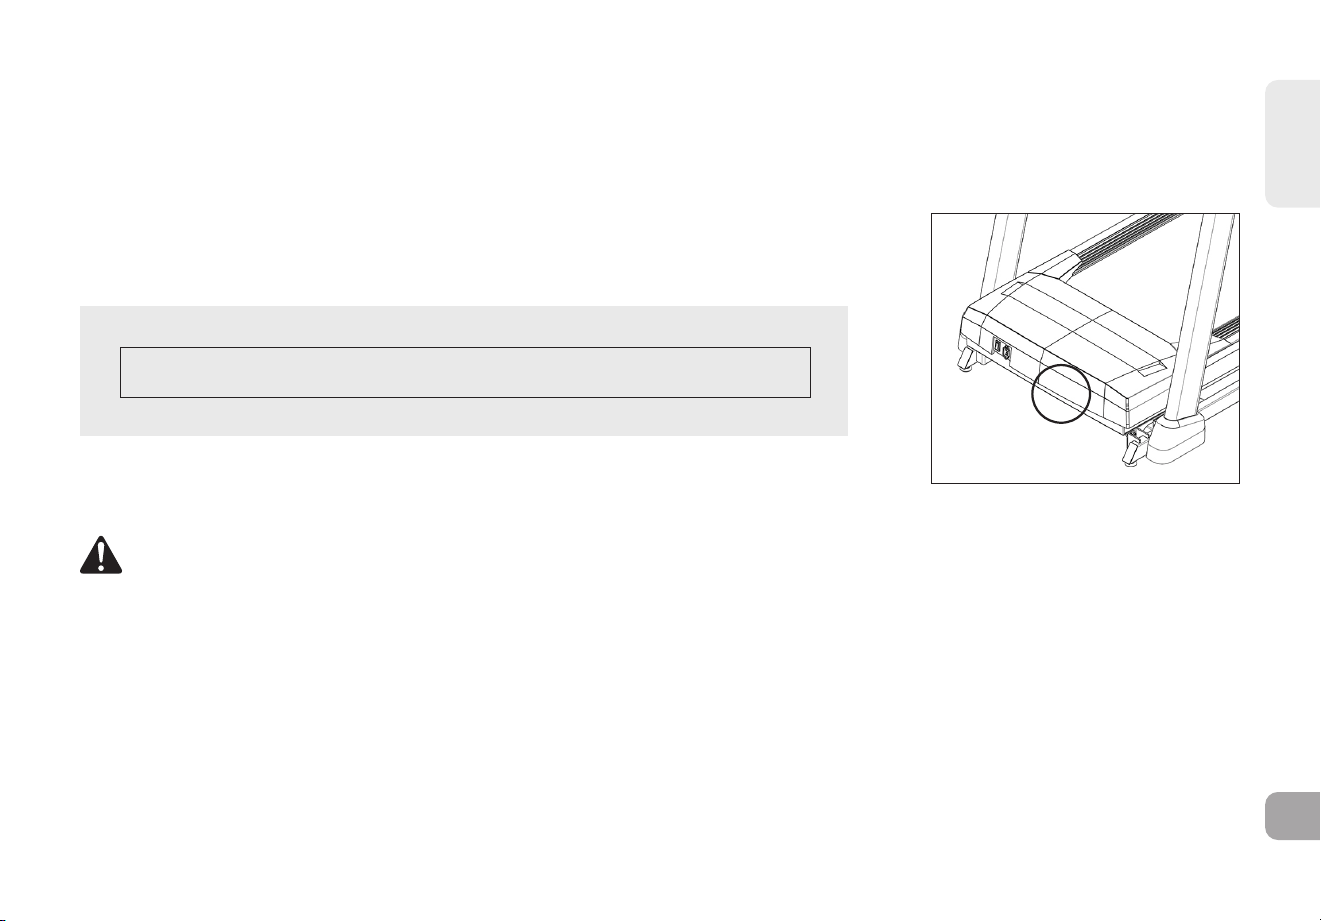
NEDERLANDS
97
Bedankt dat u de BowFlex T8.5J Loopband hebt gekozen als fitnessapparaat. We raden u met klem aan deze gebruikershandleiding
zorgvuldig door te lezen voordat u met de montage van uw apparatuur begint, vooral de onderstaande WAARSCHUWINGEN!
WAARSCHUWINGEN VERMINDEREN HET RISICO VAN VERBRANDING, BRAND, ELEKTRISCHE SCHOKKEN OF LICHAMELIJK
LETSEL.
Zoek voor u verder gaat het serienummer van de loopband, dat zich bevindt op een witte
barcode-sticker in de buurt van de aan-/uitschakelaar, en voer het hieronder in.
VUL UW SERIENUMMER EN MODELNAAM IN DE ONDERSTAANDE VAKKEN IN:
SERIENUMMER:
MODELNAAM: BOWFLEX T8.5J
» Geef het SERIENUMMER en de MODELNAAM op als u belt voor een serviceafspraak.
• HET NIET OPVOLGEN VAN DEZE INSTRUCTIES KAN TOT LETSEL LEIDEN!
• Hartslagmonitorsystemen kunnen onnauwkeurig zijn. Overmatig trainen kan ernstig letsel of de dood tot gevolg hebben. Stop uw
training direct als uzich duizelig begint te voelen.
• Houd altijd een comfortabel tempo aan tijdens de training.
• Als u pijn ervaart, met inbegrip van - maar niet beperkt tot - pijn op de borst, misselijkheid, duizeligheid of kortademigheid,
stop dan direct uw training en raadpleeg uw arts voordat u verder gaat. Onjuiste of overmatige lichaamsbeweging kan letsel
veroorzaken.
• Draag geen kleding die aan een onderdeel van de loopband kan blijven haken.
• Draag altijd sportschoenen tijdens het gebruik van deze apparatuur.
• Spring niet op de loopband.
• Loop tijdens het trainen niet in de buurt van de rand van de band om het risico op letsel te voorkomen.
WAARSCHUWING
LOCATIE SERIENUMMER

NEDERLANDS
98
• Er mag zich nooit meer dan een persoon tegelijk op de loopband bevinden terwijl deze gebruikt wordt.
• Deze loopband mag niet worden gebruikt door personen die meer wegen dan gespecificeerd in het gedeelt TECHNISCHE
SPECIFICATIES. Als u zich hier niet aan houdt, zal de garantie komen te vervallen.
• Wacht tot de achterzijde stevig op de vloer staat voor u op het loopvlak stapt als u dit omlaag zet.
• Gebruik het apparaat niet onder een deken of kussen. Overmatige verhitting kan brand, een elektrische schok of persoonlijk
letsel veroorzaken.
• Sluit dit trainingsapparaat alleen aan op een geaard stopcontact.
• Om het apparaat uit te schakelen zet u alle bedieningselementen in de uit-stand en trekt u de stekker uit het stopcontact.
• Sluit de stroomtoevoer af voordat u het apparaat verplaatst.
• Gebruik het product nooit met een beschadigd netsnoer of een beschadigde stekker, zelfs niet als het nog correct werkt. Gebruik
het product nooit als het beschadigd lijkt of in water is ondergedompeld. Neem contact op met de technische klantenservice voor
vervanging of reparatie om gevaar te voorkomen.
• Laat de loopband nooit onbeheerd achter wanneer het is aangesloten. Trek de stekker uit het stopcontact wanneer u het niet
gebruikt en voordat uonderdelen aan- of afbouwt.
• Huisdieren of kinderen jonger dan 13 jaar mogen NOOIT dichter dan 3 meter bij de loopband komen.
• Kinderen jonger dan 13 jaar mogen de loopband NOOIT gebruiken.
• Kinderen ouder dan 13 jaar of personen met verminderde fysieke, zintuiglijke of mentale capaciteiten of met gebrek aan ervaring
en kennis mogen de loopband niet gebruiken, tenzij onder toezicht of tenzij ze instructies hebben gekregen over het gebruik van
de loopband van een persoon die verantwoordelijk is voor hun veiligheid.
• Verwijder de beschermde deksels alleen als dit is voorgeschreven door een professional en uw lokale dealer. Onderhoud mag
alleen worden uitgevoerd door een bevoegde servicemonteur.
• Verwijder de veiligheidssleutel om ongecontroleerd gebruik door derden te voorkomen.
• Bij loopbanden uitgerust met handrails aan de zijkant en een handlebar aan de voorkant voor ondersteuning van de gebruiker en
voor afstappen bij noodgevallen: druk op de noodknop om de machine te stoppen om af te stappen bij noodgevallen.
• Het geluidsniveau van de loopband is minder dan 70 dB wanneer er geen gebruiker op de loopband staat en meer dan 70 dB
wanneer deze in gebruik is. Als het geluid van de loopband u stoort, stop dan met trainen en neem een pauze. De geluidsemissie
onder belasting is hoger dan zonder belasting.
• Zorg ervoor dat de loopband volledig tot stilstand is gekomen voordat u het apparaat inklapt. Gebruik de loopband niet wanneer
deze ingeklapt is.
• Houd er rekening mee dat de kunststof onderdelen, zoals eindkappen, onderhevig zijn aan slijtage.
• Het veiligheidsniveau van de loopband kan alleen worden gehandhaafd als deze regelmatig wordt gecontroleerd op schade en slijtage.
• Zorg dat de rand van de band parallel loopt met de laterale positie van de zijrail en deze niet onder de zijrail schuift. Als de band
niet gecentreerd is, moet deze voor gebruik worden afgesteld.
• Gebruik de loopband uitsluitend zoals beoogd, en zoals omschreven in de trainingsgids en gebruikshandleiding.

NEDERLANDS
99
• Gebruik geen toebehoren die niet zijn aanbevolen door de fabrikant. Toebehoren kunnen letsel veroorzaken.
• Breng het apparaat terug naar een servicecentrum voor onderzoek en reparatie.
• Houd het netsnoer uit de buurt van warmtebronnen. Draag dit apparaat niet aan het netsnoer en gebruik het netsnoer niet als
handvat.
• Gebruik de loopband nooit als de luchtopening geblokkeerd is. Houd de luchtopening schoon en vrij van stof, haren en dergelijke.
• Laat nooit voorwerpen in een opening vallen en steek nooit voorwerpen in openingen om elektrische schokken te voorkomen.
• Niet gebruiken waar aerosols (spuitbussen) worden gebruikt of als zuurstof wordt toegediend.
• Deze loopband is uitsluitend bedoeld voor gebruik binnenshuis. Als u zich hier niet aan houdt, zal de garantie komen te vervallen.
• Gebruik de loopband niet op een locatie zonder temperatuurcontrole, zoals - maar niet beperkt tot - garages, veranda’s,
zwembadruimtes, badkamers, carports of buiten. Als uw loopband is blootgesteld aan koudere temperaturen of een vochtige
omgeving wordt het ten zeerste aangeraden om de loopband voor het eerste gebruik op kamertemperatuur te brengen. Als u
zich hier niet aan houdt, zal de garantie komen te vervallen.
• De loopband is zwaar, wees voorzichtig en vraag indien nodig om hulp bij het verplaatsen. Probeer de loopband niet te
verplaatsen of te transporteren, tenzij deze rechtop staat, is ingeklapt en met de vergrendeling is vastgezet. Het niet opvolgen
van deze instructies kan tot letsel leiden.
• Verplaats of til de loopband niet uit de verpakking tot dit in de montage-instructies wordt gespecificeerd. U mag de plastic
verpakking van de consolemasten verwijderen.
• Open de doos nooit als deze op zijn kop of op zijn kant ligt.
• Pak deze unit uit en monteer deze waar hij gebruikt gaat worden.
• De gesloten loopband is uitgerust met hogedrukveren waardoor het onderste basisframe open kan springen bij verkeerd gebruik.
• Verwijder afdekkingen van de console alleen als u hiervoor instructies hebt gekregen van de technische klantenservice.
Onderhoud mag alleen worden uitgevoerd door een bevoegde servicemonteur.
• Zorg dat er 2 mensen beschikbaar zijn voor de montage, dit zal het montageproces vergemakkelijken.
NEDERLANDS
100
Als u vragen hebt, hulp nodig hebt bij ontbrekende onderdelen of technische ondersteuning
of onderhoud nodig hebt voor uw apparatuur, neem dan contact op met de technische
klantenservice.
HULP NODIG?
GARANTIE
Als uw apparatuur garantieservice nodig hebt, neem dan contact op met de plaatselijke technische klantenservice.
Fabrikant: Johnson Health Industry (Vietnam) Co., Ltd. | Adres fabrikant: Lot CN-24, Thuan Thanh II Industrial Park,
Mao Dien Ward, Bac Ninh Province, Vietnam
TECHNISCHE SPECIFICATIES
Gemonteerde afmetingen
(L x B x H):
193 x 86,4 x 144,8 cm /
76″ x 34″ x 57″
Productgewicht 85 kg / 187 lbs.
Max. gewicht gebruiker 147 kg / 325 lbs.
Voor een montagevideo, bezoek:
https://global.bowflex.com/en/assembly-videos.html
Vanaf nu kunt u uw apparatuur monteren wanneer
het u uitkomt. Voor gedetailleerde instructies over
montage, bediening, programma’s, probleemoplossing
en onderhoud kunt u de QR-code aan de linkerkant
scannen om toegang te krijgen tot de volledige
handleiding.
Als het scannen van de QR-code mislukt, kunt u de
website hier bezoeken:
https://global.bowflex.com/en/manuals.html

NEDERLANDS
101
STORAGE TRAY
CONSOLE
TABLET/LEESTRACK
FLESSENHOLDER
CONSOLEPAAL
MOTORBESCHERMING
BASISFRAME
DEKFRAME
RODE TRANSPORTKABEL
TRANSPORTWIEL
FOETSLUIF STICKER
(ONDER DE VOETSLUIF)
AAN/UIT SCHAKELAAR
STROOMKABEL
LOOPBAND/ LOOPDEK
FLESSENHOLDER
HARTSLAGBEUGELS
PLAATSING VAN VEILIGHEIDSKEY
HARTSLAGBEUGELS
BEDIENINGSPANEEL EN WEERGAVEVENSTERS
LUIDSPREKERS
CONSOLE TAN
OPBERGBAK
HORIZONBAK
ZIJKANTRAIL
ROLLER EINDEKAP
ACHTERROLLER SPANNING/
UITLIJN BOUTEN
CONSOLEPAAL
VOETSLUIF (ONDER DECK)

NEDERLANDS
102
INBEGREPEN GEREEDSCHAP:
F 6 mm T-sleutel
F 6 mm L-sleutel
F 5 mm L-sleutel
ONDERDELEN INBEGREPEN:
F 1 Console Montage
F 2 Console Stangen
F 1 Dwarsbalk
F 1 Gereedschapskit
F 1 Veiligheids Sleutel
F 1 Audio Adapter Kabel
F 1 Fles Siliconesmeermiddel
(voor 2 toepassingen)
PROBEER DE LOOPBAND NIET OP TE HEFFEN! Verplaats of til de loopband niet
uit de verpakking totdat dit in de assemblage-instructies wordt aangegeven. U mag
de plastic folie van de consolemasten verwijderen.
OPMERKING: Tijdens elke montagestap moet u ervoor zorgen dat ALLE moeren en
bouten op hun plaats zitten en gedeeltelijk zijn vastgedraaid voordat u ÉÉN bout volledig
aandraait.
OPMERKING: Een lichte toepassing van vet kan helpen bij het installeren van de
onderdelen. Elk soort vet, zoals lithium-vet voor fietsen, wordt aanbevolen.
Het niet volgen van deze instructies kan leiden tot letsel!
Open de doos nooit wanneer deze ondersteboven of op zijn zij ligt.
Pak de eenheid uit en monteer deze op de plaats waar hij zal worden gebruikt.
De meegeleverde loopband is uitgerust met hogedrukveren die ervoor kunnen
zorgen dat het onderste basisframe openveert bij onjuiste behandeling.
De rode transportkabels zijn tussen het bovenste deckframe en het onderste
basisframe geïnstalleerd om de beweging van het onderste basisframe te
voorkomen. Verwijder de rode transportkabels niet totdat dit wordt aangegeven.
WAARSCHUWING
WAARSCHUWING
WAARSCHUWING
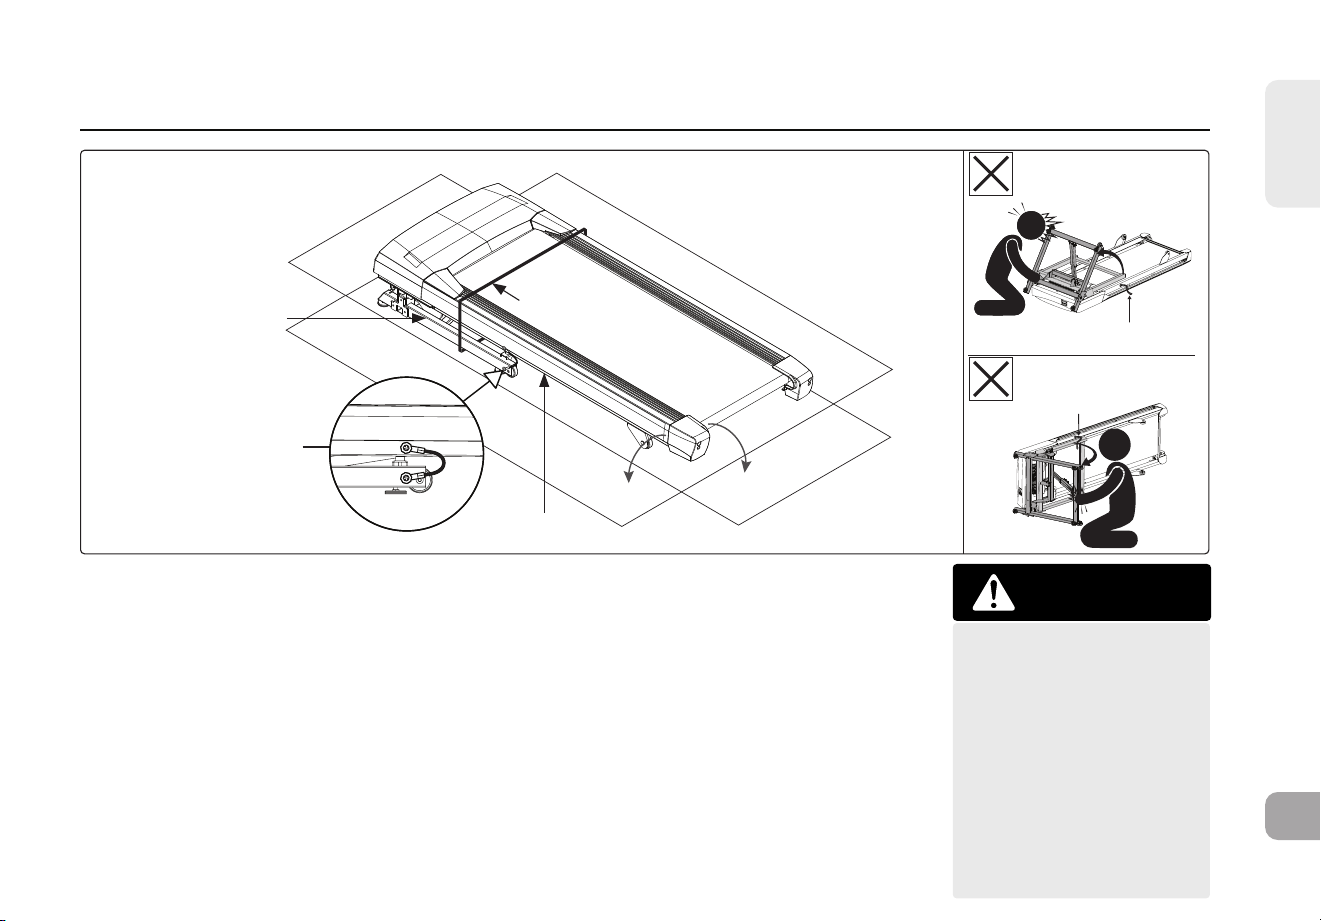
NEDERLANDS
103
RED TRANSPORT
CABLE
RED TRANSPORT
CABLE
MONTAGE STAP UITPAKKEN
VERPAKKINGSBAND
DEKFRAME
RODE TRANSPORTKABEL
(LINKER- EN RECHTERZIJDE)
BASISFRAME
A Plaats de loopbanddoos op een vlakke, stabiele ondergrond met de bodem van de doos op de
grond.
B Snijd de verpakkingsband aan de buitenkant van de doos door en verwijder het deksel van de
doos.
C Til de loopband niet uit de doos. Trek in plaats daarvan de hoeken van de onderkant van de
loopbanddoos af zoals weergegeven. De loopband moet op de afgeplatte loopbanddoos worden
gemonteerd, zoals weergegeven, om de vloer te beschermen.
D Snijd de verpakkingsband binnenin de doos door en verwijder alles behalve het loopbandframe.
E Til het loopdeck gedeeltelijk omhoog vanaf de achterzijde om alle inhoud onder het loopdeck te
verwijderen. De rode transportkabels aan beide zijden van de loopband zullen verhinderen dat
het loopdeck volledig omhoog komt.
Draai de loopband nooit
om of op zijn zij. Gebruik
geen gereedschap om
de rode transportkabels
te verwijderen, tenzij
dit wordt aangegeven in
de montage-instructies.
Als een onderdeel
gereedschap nodig heeft
om te verwijderen, wacht
dan tot de montage-
instructies u uitleggen hoe
u het onderdeel veilig kunt
verwijderen.
RODE
TRANSPORTKABEL
RODE
TRANSPORTKABEL
WAARSCHUWING
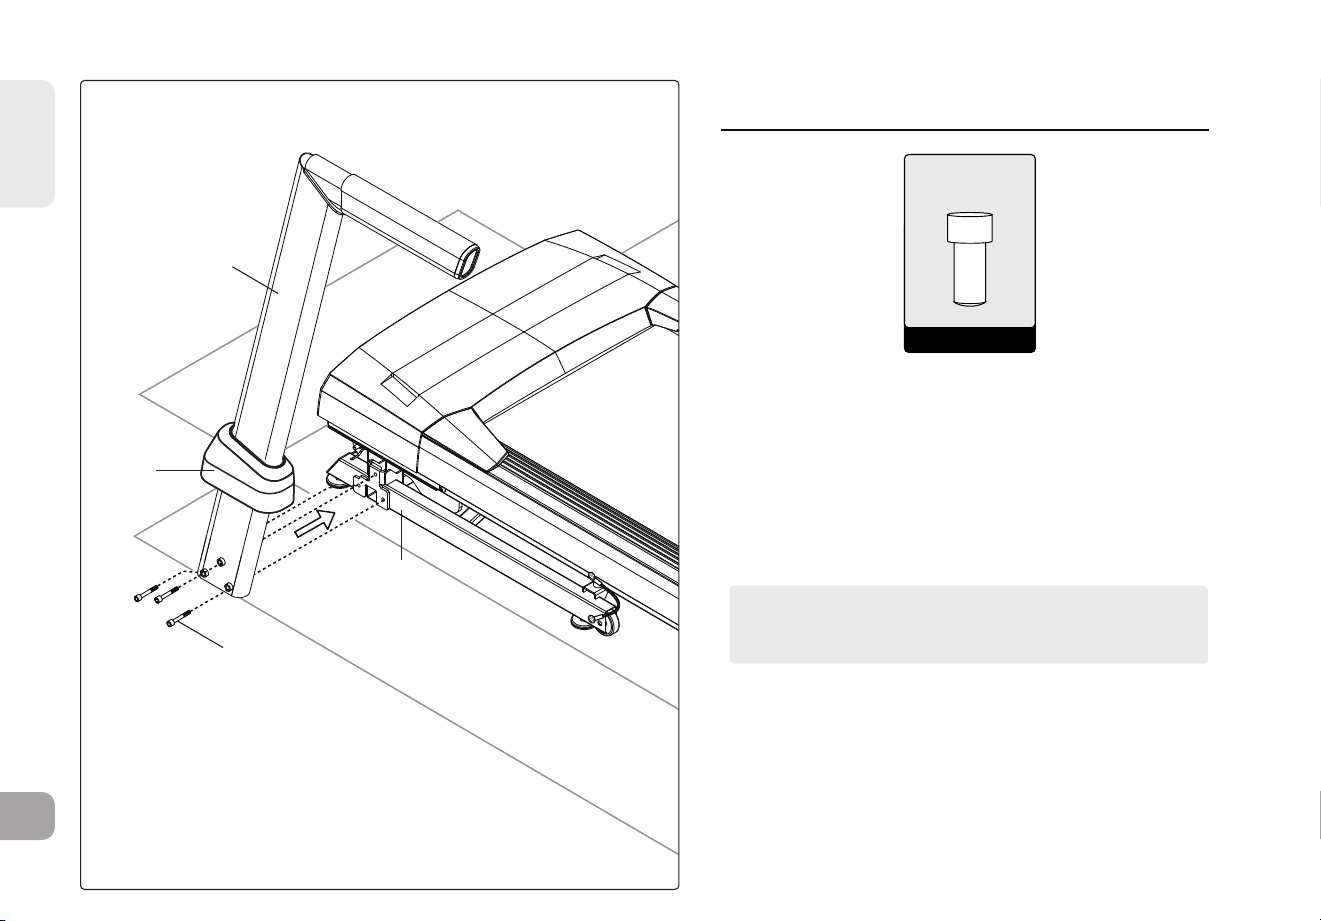
NEDERLANDS
104
A
2
1
OPMERKING: Draai de bouten pas volledig vast aan
het einde van STAP 4.
A - AANTAL: 3
Bout (M8)
16.3 Open de MONTAGEMATERIALEN VOOR STAP 1.
16.4 Schuif de LINKER CONSOLEMANTEL (8) over de
LINKER CONSOLEMAST (1).
16.5 Bevestig de LINKER CONSOLEMAST (1) aan het
ONDERSTEL (2) met 3 BOUTEN (A).
8
MONTAGE STAP 1

NEDERLANDS
105
OPMERKING: Draai de bouten pas volledig vast aan
het einde van STAP 4.
4
9
3
3
A
2
3
OPMERKING: Wees voorzichtig bij het monteren van
de console, zodat er geen draden bekneld raken.
A - AANTAL: 3
Bout (M8)
MONTAGE STAP 2
18.1 Open de MONTAGEMATERIALEN VOOR STAP 2.
18.2 Schuif de RECHTER CONSOLEMANTEL (9) over de
RECHTER CONSOLEMAST (4).
18.3 Trek de CONSOLEKABEL (3) los van het onderstel
van de loopband. Sluit de CONSOLEKABEL (3) van
het HOOFDFRAME (2) aan op de CONSOLEKABEL
(3) onderaan de RECHTER CONSOLEMAST (4). Het
andere uiteinde van de CONSOLEKABEL (3) moet
zich bovenaan de mast bevinden.
18.4 Bevestig de RECHTER CONSOLEMAST (4) aan het
HOOFDFRAME (2) met 3 BOUTEN (A).
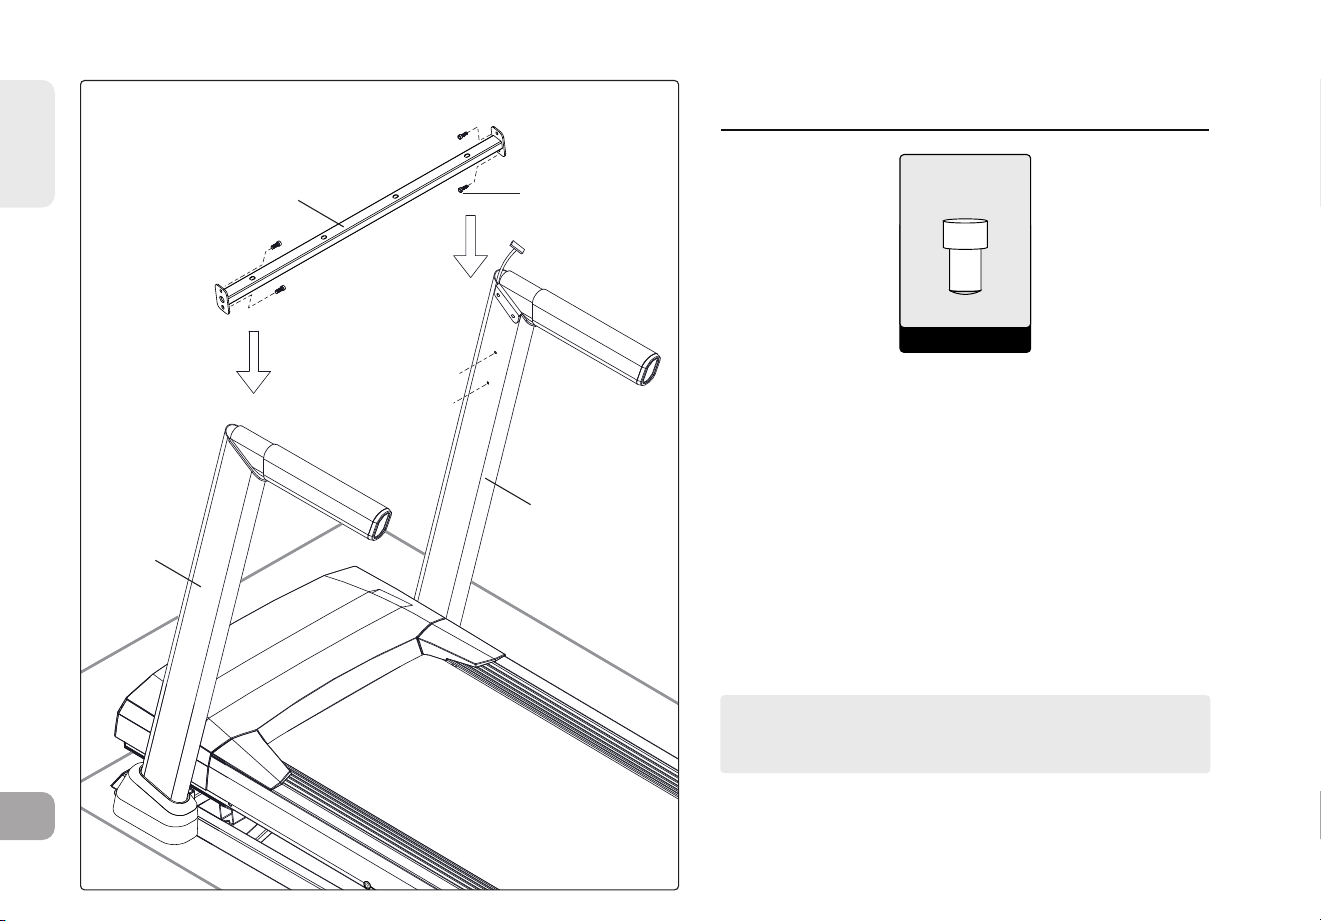
NEDERLANDS
106
OPMERKING: Draai de bouten pas volledig vast aan het
einde van STAP 4.
D
1
6
4
D - AANTAL: 4
Bout (M6)
MONTAGE STAP 3
3.1 Open de MONTAGEMATERIALEN VOOR STAP 3.
3.2 Bevestig de LINKERZIJDE van de DWARSBALK (6) losjes
aan de OPSTAANDE MAST (1) met 2 BOUTEN (A).
3.3 Bevestig de RECHTERZIJDE van de DWARSBALK (6)
losjes met 2 BOUTEN (D) aan de OPSTAANDE MAST (4).

NEDERLANDS
107
OPMERKING: Wees voorzichtig bij het monteren van
de console, zodat er geen draden bekneld raken.
B
C
A
(STAP 4.5)
4
3
3
1
5
B - AANTAL: 4 C - AANTAL: 4A - AANTAL: 4
Bout (M8)
Veerring Platte Ring
MONTAGE STAP 4
4.1
Open de MONTAGEMATERIALEN VOOR STAP 4.
4.2
Plaats de CONSOLE (5) voorzichtig boven op de
CONSOLEMASTEN (1 EN 4). Bevestig eerst de
LINKERKANT met 2 BOUTEN (A), 2 VEERRINGEN (B) en
2PLATTE RINGEN (C).
4.3
De CONSOLE CABLES (3) zijn in de RIGHT CONSOLE
MAST (4) gestopt. Trek met behulp van de lead wire
voorzichtig de CONSOLE CABLE (3) uit de RIGHT
CONSOLE MAST (4). Verwijder en gooi de LEAD
WIREweg. Sluit de CONSOLE CABLES (3) aan en stop
de kabels voorzichtig in de masten om beschadiging te
voorkomen.
4.4
Bevestig de RECHTERZIJDE van de CONSOLE (5) met 2
BOUTEN (A), 2 VEERRINGEN (B) en 2 PLATTE RINGEN (C).
4.5
Trek de bovenkant van de CONSOLE (5) naar de
achterkant van de loopband en HOUD deze vast terwijl
u de LEFT AND RIGHT SIDE aandraait met BOUTEN (A).
4.6
DENK ERAAN om nu ALLE BOUTEN EN SCHROEVEN
volledig aan te draaien, aangezien de montage is
voltooid.

NEDERLANDS
108
E - AANTAL: 4
Schroef
MONTAGE STAP 5
21.1 Open de BEVESTIGINGSONDERDELEN VOOR
STAP 5.
21.2 Bevestig de ACCESSOIRESCHAAL (7) aan de
DWARSBALK (6) met 4 SCHROEVEN (E).
6
E
7

NEDERLANDS
109
Het niet volgen van deze instructies kan leiden tot letsel!
Zodra de rode transportkabels zijn losgekoppeld van de loopband,
kunnen de hoge drukveren ervoor zorgen dat het onderste
basisframe zich opent. Draai de loopband NOOIT om of op zijn
kant, en til dit apparaat NOOIT op als de rode transportkabels de
bovenste dekframe niet verbinden met het onderste basisframe.
RODE TRANSPORTKABEL
RODE TRANSPORTKABEL
WAARSCHUWING
MONTAGE STAP 6 - VERWIJDEREN VAN DE RODE TRANSPORTKABELS
22.1 Zorg ervoor dat de loopband rust op de vloer met alle wielen ondersteund.
22.2 Aan de linkerzijde van de loopband, gebruik de 5 mm L-sleutel (meegeleverd
in de doos) om de twee bouten los te draaien die de rode transportkabel
verbinden met het bovenste dekframe en het onderste basisframe.
22.3 Vervang beide bouten (één in het bovenste dekframe en één in het onderste
basisframe) en draai ze volledig aan om ze vast te zetten. Let op dat om te
voorkomen dat het onderste basisframe zich opent tijdens transport of
demontage van de loopband in de toekomst, de rode transportkabel opnieuw
aan de loopband kan worden bevestigd met dezezelfde bouten.
22.4 Voer dezelfde handeling uit aan de rechterzijde van de loopband om de
twee bouten los te draaien die de rode transportkabel verbinden met het
bovenste dekframe en het onderste basisframe.
22.5 Vervang beide bouten en draai ze volledig aan om ze op hun plaats te
vergrendelen.
22.6 Bewaar beide rode transportkabels voor toekomstig gebruik door de kabels
in een doorzichtige polybag naast de handleiding te plaatsen.
22.7 Wanneer de rode transportkabels niet zijn geïnstalleerd, transporteert u de
eenheid ALLEEN op de grond, en ALLEEN nadat deze volledig is gemonteerd
en in de rechtopstaande gevouwen positie staat met de vergrendelsluiting
vastgezet.
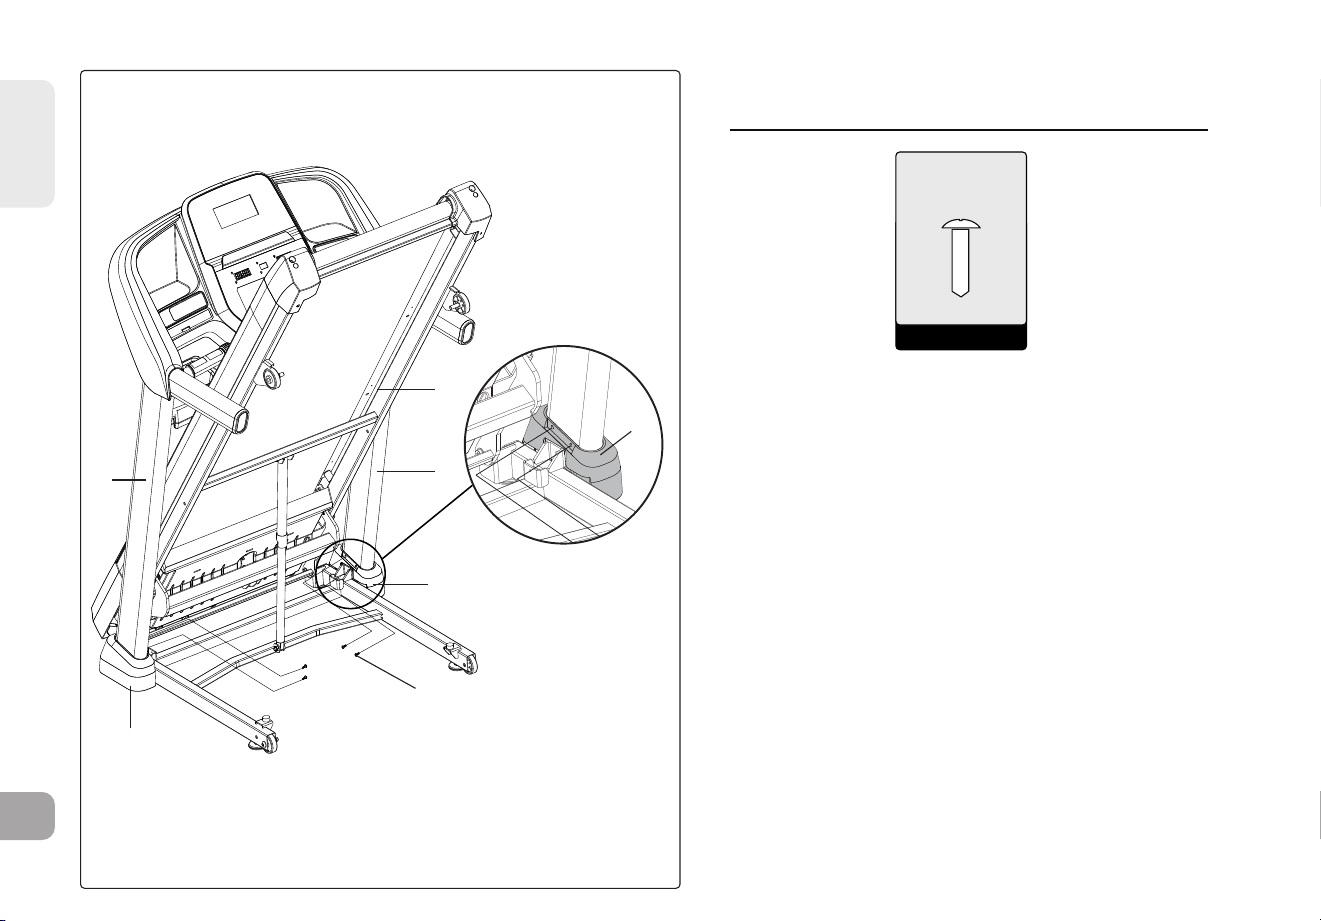
NEDERLANDS
110
MONTAGE STAP 7
23.1 Open DE BEVESTIGINGSONDERDELEN VOOR
STAP 7.
23.2 DENK ERAAN om de DWARSBALKBOUTEN
volledig vast te draaien in de
CONSOLEMASTEN (3 & 4), nu de montage
is voltooid. Til het DECK (10) op naar de
rechtopstaande en vergrendelde positie.
23.3 Schuif de LINKER CONSOLEKAP (8) naar de
onderzijde van de LINKER CONSOLEPAAL (3).
Bevestig met 2 BOUTEN (F) door de openingen
in de LINKER CONSOLEKAP (8) in de LINKER
STAANDE PAAL (3).
23.4 Schuif de RECHTER CONSOLEKAP (9) naar de
onderzijde van de RECHTER CONSOLEPAAL
(4). Bevestig met 2 BOUTEN (F) door de
openingen in de RECHTER CONSOLEKAP (9) in
de RECHTER STAANDE PAAL (4).
F - AANTAL: 4
Schroef
Z06x4
F
4
10
1
8
9
9
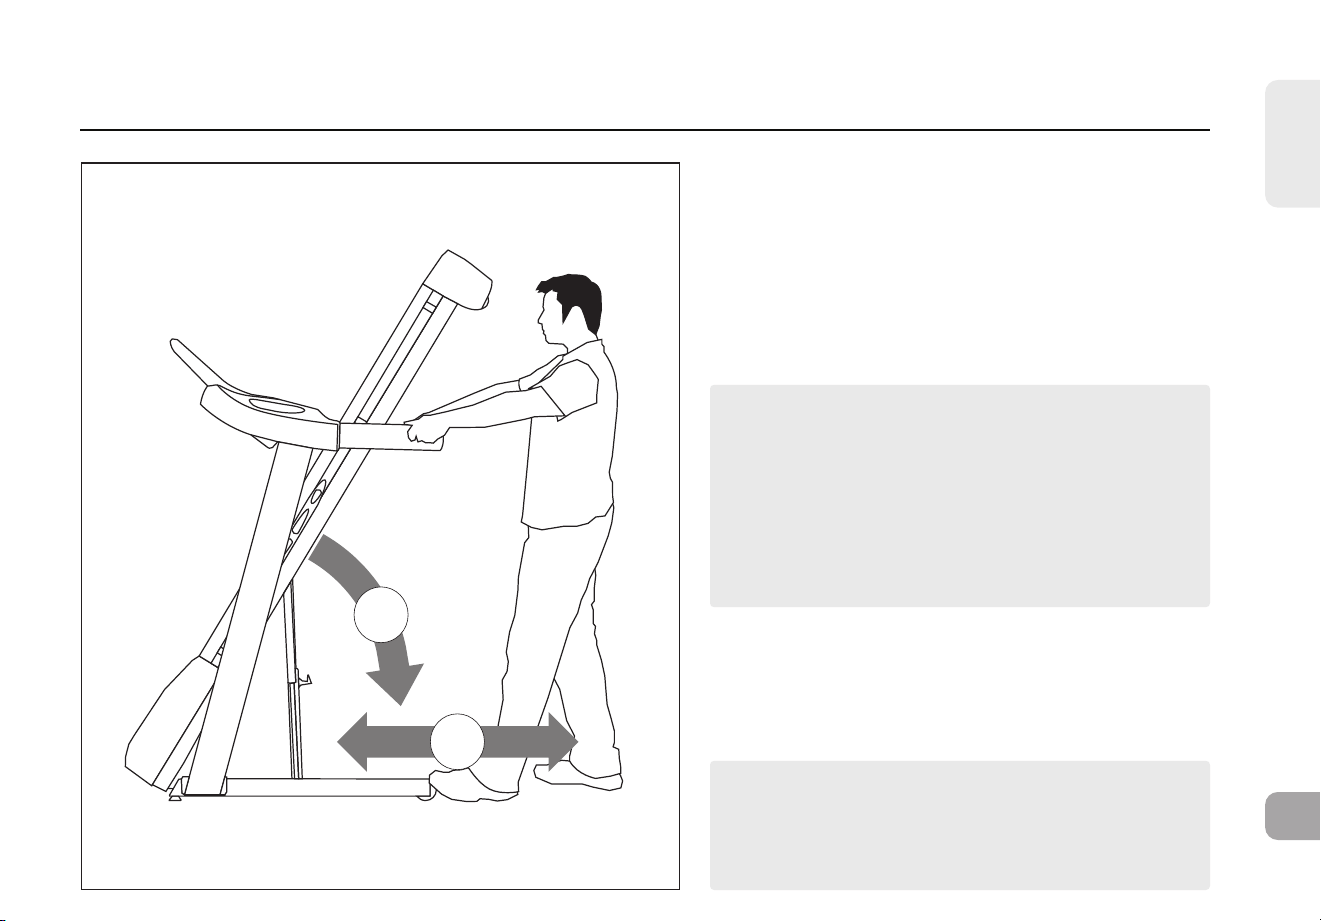
NEDERLANDS
111
MONTAGE VOLTOOID!
Smeer het loopvlak van de loopband vóór het
eerste gebruik, volgens de instructies in het
ONDERHOUDSGEDEELTE van de HANDLEIDING.
OPMERKING: Als de loopband in de toekomst
gedemonteerd of opgeheven moet worden, gebruik
dan de 5 mm L-sleutel om de rode transportkabels
opnieuw aan zowel het bovenste dekframe als het
onderste basisframe van de loopband aan beide
zijden te bevestigen. Controleer of het onderste
basisframe niet kan openveren voordat u de
loopband optilt of demonteert.
1
2
MONTAGE STAP 8 - VERPLAATSEN VAN DE LOOPBAND
24.1 Om de loopband te verplaatsen, zorg ervoor dat
deze is ingeklapt en goed vergrendeld is. Grijp
daarna stevig de handgrepen vast, kantel de
loopband achterover (1) en rol deze (2).
24.2 Verplaats de loopband van de afgeplatte doos naar
de uiteindelijke positie, klaar voor gebruik. Gooi de
kartonnen doos weg.

112
Loopband
installatie en
gebruik
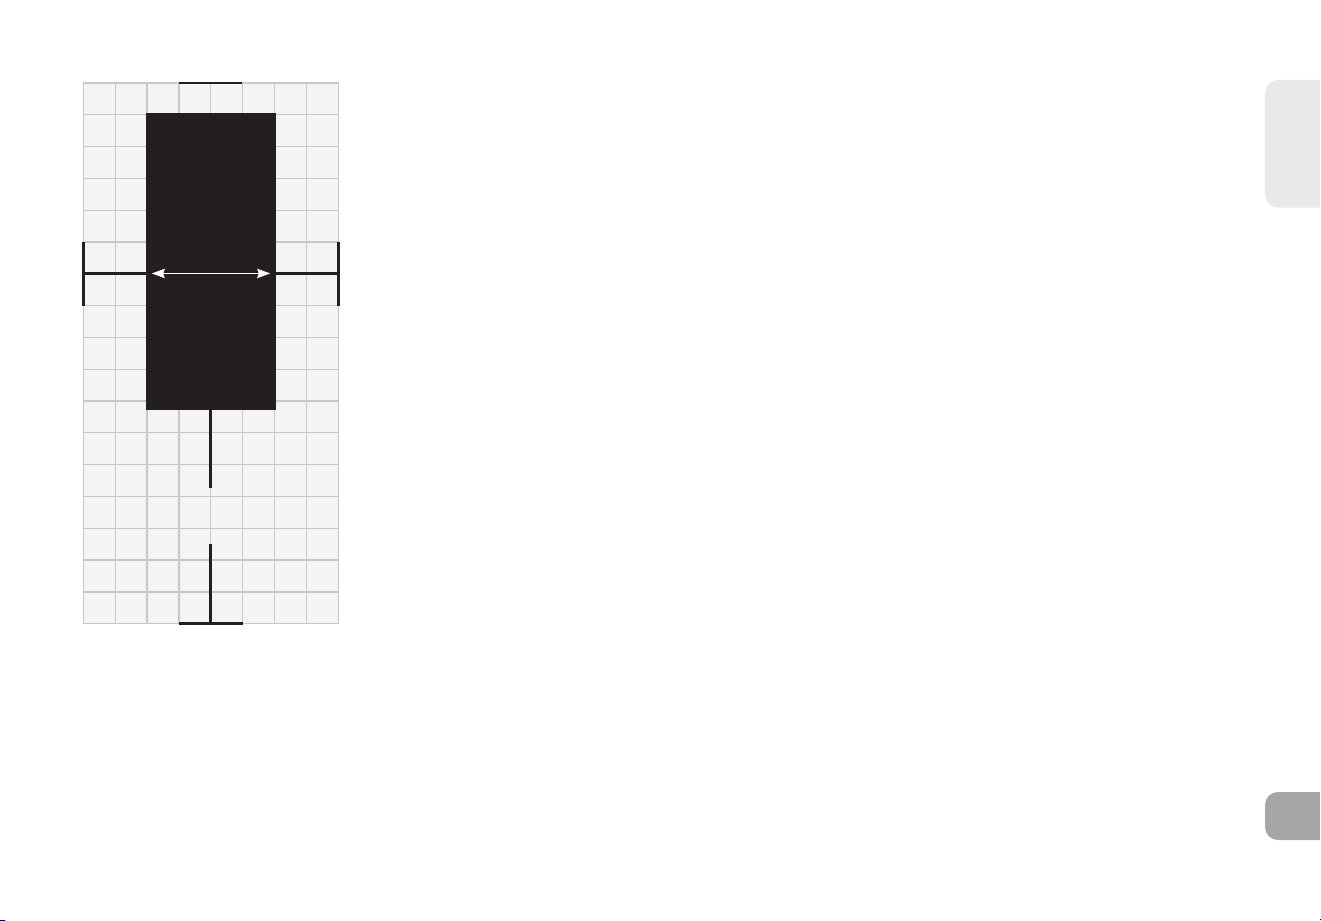
NEDERLANDS
113
PLAATSING VAN DE LOOPBAND
Plaats de loopband op een vlakke ondergrond. Aan de voorkant van het apparaat moet er 30 cm
vrije ruimte zijn voor het netsnoer. Houd een vrije zone aan achter het apparaat van ten minste
de breedte van de loopband, en ten minste 2 meter lang. Deze zone dient vrij van obstakels te zijn
zodat de gebruiker vrije toegang heeft tot de machine. In geval van nood plaatst u beide handen op
de zijarmsteunen om uzelf staande te houden en plaatst u uw voeten op de zijrails.
Voor gemakkelijke toegang is het aanbevolen om aan beide zijden van de loopband een vrij
toegankelijke ruimte van ten minste 60 cm aan te houden zodat gebruikers van beide zijden toegang
tot de loopband hebben.
Plaats de loopband niet zodanig dat ventilatie- of luchttoevoeropeningen geblokkeerd worden.
De loopband mag niet in een garage, op een overdekt terras, dicht bij water of buiten worden
opgesteld.
AARDINGSINSTRUCTIES
Dit product moet geaard zijn. Als de loopband niet goed werkt of defect raakt, biedt de aarding
de minste weerstand voor elektrische stroom om het risico van elektrische schokken te beperken.
Dit product is uitgerust met een netsnoer met een aardekabel en een geaarde stekker. De stekker
moet worden aangesloten op een geschikt stopcontact dat correct is geïnstalleerd en geaard in
overeenstemming met alle plaatselijke voorschriften.
GEVA AR!
• Een ondeskundige aansluiting van de aardleiding van de apparatuur kan elektrische schokken tot
gevolg hebben. Neem contact op met een gekwalificeerde elektricien of servicemonteur als u
twijfelt of het product correct is geaard. Pas de stekker die bij het product is geleverd niet aan.
Als de stekker niet in het stopcontact past, dient u een geschikt stopcontact te laten installeren
door een gekwalificeerde elektricien.
• Dit product is bedoeld voor gebruik met een nominaal lokaal spanningscircuit en heeft een
geaarde stekker. Ermag geen adapter worden gebruikt met dit product.
• Dit product dient gebruikt te worden op een eigen circuit. Om vast te stellen of er sprake is van
een eigen circuit haalt u de stroom van dat circuit af en kijkt u of er andere toestellen uitvallen.
Als dit het geval is dient u die toestellen op een ander circuit aan te sluiten.
Opmerking: Er zijn meestal meerdere stopcontacten aangesloten op één circuit.
60 cm
(2 ft)
60 cm
(2 ft)
2 m (79”)
30 cm (1 ft)
VRIJE
RUIMTE
T8.5J

NEDERLANDS
114
INKLAPBARE LOOPBANDEN
Neem het uiteinde van de loopband stevig vast om in te klappen. Zet het uiteinde van het
loopvlak voorzichtig rechtop totdat de vergrendeling vastklikt en het loopvlak stevig op
zijn plaats is vergrendeld. Zorg ervoor dat het loopvlak stevig is vergrendeld voordat u
het loslaat.
UITKLAPPEN
Neem het uiteinde van de loopband stevig vast. Druk voorzichtig met uw voet op de
voetvergrendeling totdat de vergrendeling loskomt. Laat het loopvlak voorzichtig op de
grond zakken.
VERWENDUNG DES SICHERHEITSSCHLÜSSELS
Das Laufband kann erst gestartet werden, nachdem der Sicherheitsschlüssel eingesteckt wurde. Befestigen Sie die Klammer sicher
an Ihrer Kleidung. Der Sicherheitsschlüssel soll die Stromversorgung zum Laufband unterbrechen, falls Sie stürzen. Überprüfen Sie
die Funktionsfähigkeit des Sicherheitsschlüssels alle 2Wochen.
WARNUNG: Benutzen Sie das Laufband niemals ohne die Klammer des Sicherheitsschlüssels an Ihrer Kleidung zu befestigen.
Ziehen Sie zunächst an der Klammer des Sicherheitsschlüssels, umsicherzustellen, dass sich dieser nicht von Ihrer Kleidung löst.
STROMVERSORGUNG
Ihr Laufband wird über ein Netzteil mit Strom versorgt. Die Stromversorgung muss mit der Buchse am vorderen Ende des Geräts
in der Nähe des Stabilisatorrohres verbunden werden. Einige Laufbänder verfügen über einen Stromschalter neben der Buchse.
Vergewissern Siesich, dass dieser auf EIN steht. Trennen Sie das Gerät vom Netz, wenn es nicht genutzt wird. HINWEIS: Einige
Laufbänder verfügen über einen Ein-/Ausschalter hinter der Konsole.
WAARSCHUWING: Gebruik het product nooit als het snoer of de stekker beschadigd is, als het niet juist werkt, als het product
beschadigd is of ondergedompeld werd in water.
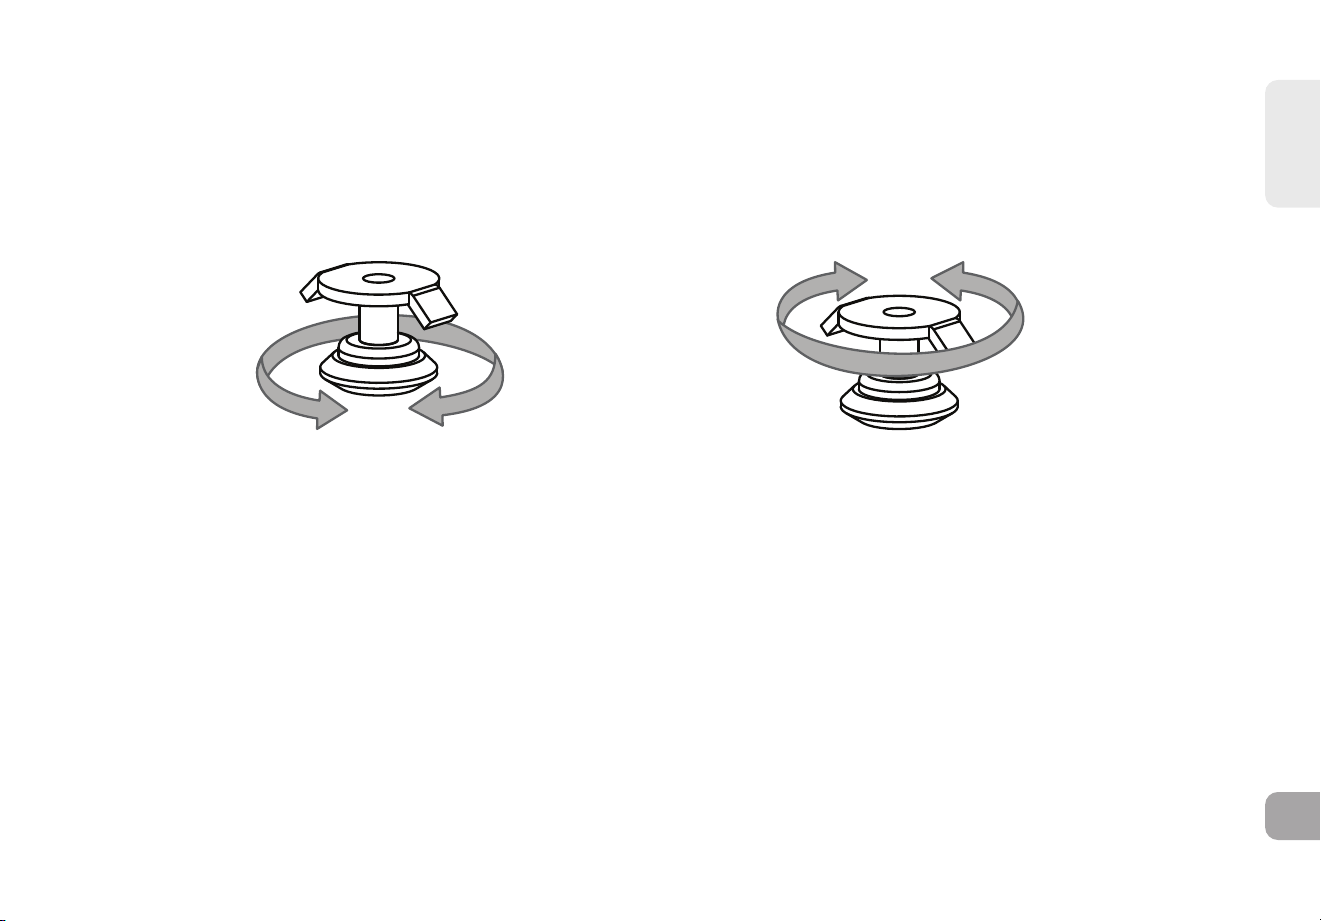
NEDERLANDS
115
DE LOOPBAND WATERPAS ZETTEN
Uw loopband moet waterpas staan voor optimaal gebruik. Als u de loopband heeft neergezet waar u hem wilt gebruiken, verhoog
of verlaag dan één of beide verstelbare nivelleerders die zich aan de onderkant van het frame van de loopband bevinden. We
raden u aan om een waterpas te gebruiken. Als uw loopband niet waterpas staat, kan het zijn dat de band niet goed loopt. Wanneer
uw loopband waterpas staat, vergrendelt u de nivelleerders in die positie door de moeren tegen het frame aan te draaien.
HOOGTE
VERSTELLEN
VERGRENDELING
AFSTELLING

NEDERLANDS
116
2
4
6
8
10
12
16
20
Q
M M
P
N
IH
B
R
F G
A
J
C
O
Q
DS T U SEL K

NEDERLANDS
117
CONSOLEBEDIENING
Opmerking: Er zit een dunne beschermfolie van doorzichtig plastic op de overlay van de console die verwijderd moet worden voor gebruik.
A) LCD-SCHERM: Tijd, RPM, Afstand, Watt, Calorieën, Helling, Snelheid, Hartslag, Ventilatorsnelheid.
B) LED SCHERM: Tijd, Snelheid, Afstand, Calorieën, Helling, Hartslag.
C) TRAININGSPROGRAMMA’S: Toont een overzicht van alle programma’s die tijdens uw training beschikbaar zijn.
D) STARTEN: druk om te beginnen met trainen, uw training te starten of te hervatten na een pauze.
E) STOPPEN: druk om uw training te pauzeren of te beëindigen. Houd 3 seconden ingedrukt om de console te resetten.
F) HELLING +/- TOETSEN: worden gebruikt om de helling in kleine stappen aan te passen (stappen van 0,5%).
G) SNELHEID +/- TOETSEN: worden gebruikt om de snelheid in kleine stappen aan te passen (stappen van 0,1 mph).
H) SNELLE HELLINGTOETSEN: worden gebruikt om sneller de gewenste helling te bereiken.
I) SNELLE SNELHEIDENTOETSEN: worden gebruikt om sneller de gewenste snelheid te bereiken.
J) WEERGAVE WISSELEN: druk om de scherminformatie tijdens de training te wijzigen.
K) VENTILATORKNOP: druk op de knop om te schakelen tussen niveau 1,2,3 en uit.
L) VENTILATOR: persoonlijke trainingsventilator.
M) LUIDSPREKERS: muziek wordt afgespeeld via de luidsprekers wanneer uw CD / MP3 speler is aangesloten op de console.
N) AUDIO-IN-AANSLUITING: sluit uw CD / MP3 speler aan op de console met de meegeleverde audiokabel.
O) AUDIO-UITGANG / HOOFDTELEFOONAANSLUITING: sluit uw hoofdtelefoon aan om via de hoofdtelefoon naar muziek te luisteren.
Opmerking: wanneer een hoofdtelefoon is aangesloten, wordt het geluid niet langer via de luidsprekers afgespeeld.
P) USB-INGANG: 1A/5V USB-uitgangsvermogen.
Q) FLESSENHOUDERS: biedt ruimte voor persoonlijke trainingsaccessoires.
R) TABLETHOUDER / LEESREK: voor het plaatsen van een tablet of leesmateriaal.
S) POLSSENSOREN VOOR HARTSLAG: worden gebruikt om de hartslag te meten.
T) SCROLLWIEL HELLING: wordt gebruikt om de helling in kleine stappen aan te passen (0,5%).
U) SNELHEIDSREGELWIEL: wordt gebruikt om de snelheid in kleine stappen aan te passen (0,1 MPH).

NEDERLANDS
118
WEERGAVEVENSTERS
• TIME: Weergegeven als minuten : seconden. Bekijk de resterende of verstreken tijd van uw training.
• SPEED: Getoond in MPH. Geeft aan hoe snel je loop- of hardloopoppervlak beweegt.
• DISTANCE: Getoond in mijlen. Geeft de afgelegde afstand of de resterende afstand tijdens uw training aan.
• CALORIES: Totale verbruikte calorieën of resterende calorieën die nog verbrand moeten worden tijdens uw training.
• INCLINE: Getoond als percentage. Geeft de helling van je loop- of hardloopoppervlak aan.
• HEART RATE: Weergegeven als BPM (slagen per minuut). Wordt gebruikt om uw hartslag te meten (weergave verschijnt
wanneer beide handsensoren worden vastgehouden).

NEDERLANDS
119
AAN DE SLAG
1) Controleer of er geen voorwerpen op de band zijn geplaatst die de beweging van de loopband belemmeren.
2) Steek de voedingskabel in het stopcontact en zet de loopband AAN. (De AAN/UIT-schakelaar bevindt zich naast de voedingskabel.)
3) Sta op de zijrails van de loopband.
4) Bevestig de veiligheidssleutelclip aan een deel van uw kleding en zorg ervoor dat deze stevig vastzit en niet losraakt tijdens het
gebruik.
5) Steek de veiligheidsleutel in het sleutelgat van de console.
6) Je hebt twee opties om je training te starten:
A) SNELLE OPSTART
Druk eenvoudig op de START-TOETS om te beginnen met trainen.
Tijd, afstand en calorieën worden vanaf nul geteld. OF...
B) SELECTEER EEN TRAINING OF TARGET
1) Selecteer uw PROGRAMMA met de +/- toetsen en druk op ENTER wanneer het gewenste PROGRAMMA wordt weergegeven.
2) Pas de SETTING aan met de +/- toetsen en druk op ENTER wanneer de gewenste SETTING wordt weergegeven.
3) Druk op START om te beginnen.
SPECIFICATIES VOOR PROGRAMMA'S MET MEERDERE SEGMENTEN
1) De gebruiker kan de snelheid en helling in een bepaald segment verhogen en het verhoogt ALLEEN VOOR DAT SEGMENT.
Voor de volgende segmenten volgt de machine de waarden in de opgegeven tabel.
2) De gebruiker kan de snelheid en helling in elk segment verlagen en het zal met hetzelfde aantal afnemen voor de volgende
segmenten.
BOWFLEX CONNECTED FITNESS SYSTEM
Uw BowFlex-apparaat is voorzien van Bluetooth-functionaliteit, waarmee u via Bluetooth 4.0 draadloos uw toestel en andere apps kunt
verbinden met uw BowFlex-loopband.

NEDERLANDS
120
P1) HANDMATIG: Pas tijdens uw training handmatig de snelheid en helling aan.
TRAININGSPROFIELEN
P2) GEWICHTSVERLIES: Een trainingsprogramma dat speciaal is ontworpen om gewichtsverlies te bevorderen. De helling wordt
verhoogd en verlaagd om vetverbranding te stimuleren terwijl u in uw vetverbrandingszone blijft. Bevat 20 niveaus.
WEIGHT LOSS
Segment = workout time � 16
Level 1 2 3 4 5 6 7 8 9 10 11 12 13 14 15 16 17 18 19 20
Segment
1 0 0 0 0 0 0 1 2 2 2,5 2,5 2,5 2,5 2,5 3,5 5 5 5 5 5
2 0 0 1 2 2,5 3,5 3,5 3,5 4,5 5,5 6 7 7,5 8,5 9,5 11 11 11 11,5 12
3 1 2 2 2 2 2 2 2 2 2,5 3,5 4,5 4,5 4,5 5,5 7 7,5 8,5 9 10
4 1,5 3,5 4 5 5 5 5 5 6 7 7,5 8,5 9 10 11 12 12,5 13,5 14 15
5 1 2 2 2 2 2 2,5 3,5 4 4,5 4,5 4,5 5,5 7 7,5 8,5 8,5 8,5 9,5 11
6 1,5 3,5 3,5 3,5 5 6,5 7,5 8,5 9 10 10 10 10,5 11,5 12,5 13,5 13,5 13,5 13,5 13,5
7 1 2 2 2 2 2 2,5 3,5 4 4,5 5 5,5 5,5 5,5 7 8,5 8,5 8,5 9 10
8 1,5 3,5 4 5 5 5 5,5 6,5 7,5 8,5 9 10 10,5 11,5 11,5 12 13,5 15 15 15
9 1,5 3,5 3,5 3,5 3,5 3,5 4 5 5 5,5 6 7 7 7 8,5 10 10,5 11 11,5 12
10 1 2 2 2 2 2 2,5 3,5 4 4,5 4,5 4,5 4,5 4,5 6,5 8,5 8,5 8,5 9 10
11 1,5 3,5 3,5 3,5 4 5 5 5 6 7 8,5 10 10,5 11,5 12,5 13,5 13,5 13,5 14 15
12 1 2 2 2 2 2 2 2 3 4,5 5,5 7 7 7 7,5 8,5 9 10 10 10
13 1,5 3,5 4 5 5,5 6,5 7,5 8,5 8,5 8,5 9 10 10 10 11 12 12 12 12,5 13,5
14 1 2 2 2 2,5 3,5 4 5 5 5,5 5,5 5,5 7 8,5 9 10 10,5 11 11,5 12
15 0 0 0 0 1 2 2,5 3,5 4 4,5 4,5 4,5 5 5,5 7 8,5 9 10 10 10
16 0 0 0 0 0 0 1 2 2 2,5 2,5 2,5 2,5 2,5 3,5 5 5 5 5 5
WEIGHT LOSS (10%incline Max)
Segment = workout time � 16
Level 1 2 3 4 5 6 7 8 9 10 11 12 13 14 15 16 17 18 19 20
Segment
1 0 0 0 0 0 0 1 2 2 2,5 2,5 2,5 2,5 2,5 3,5 5 5 5 5 5
2 0 0 1 2 2,5 3,5 3,5 3,5 4,5 5,5 6 7 7,5 8,5 9,5 10 10 10 10 10
3 1 2 2 2 2 2 2 2 2 2,5 3,5 4,5 4,5 4,5 5,5 7 7,5 8,5 9 10
4 1,5 3,5 4 5 5 5 5 5 6 7 7,5 8,5
9 10 10 10 10 10 10 10
5 1 2 2 2 2 2 2,5 3,5 4 4,5 4,5 4,5 5,5 7 7,5 8,5 8,5 8,5 9,5 10
6 1,5 3,5 3,5 3,5 5 6,5 7,5 8,5 9 10 10 10 10 10 10 10 10 10 10 10
7 1 2 2 2 2 2 2,5 3,5 4 4,5 5 5,5 5,5 5,5 7 8,5 8,5 8,5 9 10
8 1,5 3,5 4 5 5 5 5,5 6,5 7,5 8,5 9 10 10 10 10 10 10 10 10 10
9 1,5 3,5 3,5 3,5 3,5 3,5 4 5 5 5,5 6 7 7 7 8,5 10 10 10 10 10
10 1 2 2 2 2 2 2,5 3,5 4 4,5 4,5 4,5 4,5 4,5 6,5 8,5 8,5 8,5 9 10
11 1,5 3,5 3,5 3,5 4 5 5 5 6 7 8,5 10 10 10 10 10 10 10 10 10
12 1 2 2 2 2 2 2 2 3 4,5 5,5 7 7 7 7,5 8,5 9 10 10 10
13 1,5 3,5 4 5 5,5 6,5 7,5 8,5 8,5 8,5 9 10 10 10 10 10 10 10 10 10
14 1 2 2 2 2,5 3,5 4 5 5 5,5 5,5 5,5 7 8,5 9 10 10 10 10 10
15 0 0 0 0 1 2 2,5 3,5 4 4,5 4,5 4,5 5 5,5 7 8,5 9 10 10 10
16 0 0 0 0 0 0 1
2 2 2,5 2,5 2,5 2,5 2,5 3,5 5 5 5 5 5
WEIGHT LOSS (12%incline Max)
Segment = workout time � 16
Level 1 2 3 4 5 6 7 8 9 10 11 12 13 14 15 16 17 18 19 20
Segment
1 0 0 0 0 0 0 1 2 2 2,5 2,5 2,5 2,5 2,5 3,5 5 5 5 5 5
2 0 0 1 2 2,5 3,5 3,5 3,5 4,5 5,5 6 7 7,5 8,5 9,5 11 11 11 11,5 12
3 1 2 2 2 2 2 2 2 2 2,5 3,5 4,5 4,5 4,5 5,5 7 7,5 8,5 9 10
4 1,5 3,5 4 5 5 5 5 5 6 7 7,5 8,5 9 10 11 12 12 12 12 12
5 1 2 2 2 2 2 2,5 3,5 4 4,5 4,5 4,5 5,5 7 7,5 8,5 8,5 8,5 9,5 11
6 1,5 3,5 3,5 3,5 5 6,5 7,5 8,5 9 10 10 10 10,5 11,5 12 12 12 12 12 12
7 1 2 2 2 2 2 2,5 3,5 4 4,5 5 5,5 5,5 5,5 7 8,5 8,5 8,5 9 10
8 1,5 3,5 4 5 5 5 5,5 6,5 7,5 8,5 9 10 10,5 11,5 11,5 12 12 12 12 12
9 1,5 3,5 3,5 3,5 3,5 3,5 4 5 5 5,5 6 7 7 7 8,5
10 10,5 11 11,5 12
10 1 2 2 2 2 2 2,5 3,5 4 4,5 4,5 4,5 4,5 4,5 6,5 8,5 8,5 8,5 9 10
11 1,5 3,5 3,5 3,5 4 5 5 5 6 7 8,5 10 10,5 11,5 12 12 12 12 12 12
12 1 2 2 2 2 2 2 2 3 4,5 5,5 7 7 7 7,5 8,5 9 10 10 10
13 1,5 3,5 4 5 5,5 6,5 7,5 8,5 8,5 8,5 9 10 10 10 11 12 12 12 12 12
14 1 2 2 2 2,5 3,5 4 5 5 5,5 5,5 5,5 7 8,5 9 10 10,5 11 11,5 12
15 0 0 0 0 1 2 2,5 3,5 4 4,5 4,5 4,5 5 5,5 7 8,5 9 10 10 10
16
0 0 0 0 0 0 1 2 2 2,5 2,5 2,5 2,5 2,5 3,5 5 5 5 5 5
INCLINE
INCLINE
INCLINE
GEWICHTSVERLIES (maximale helling 12%)
Segment = trainingstijd/16
Niveau
Segment
HELLING
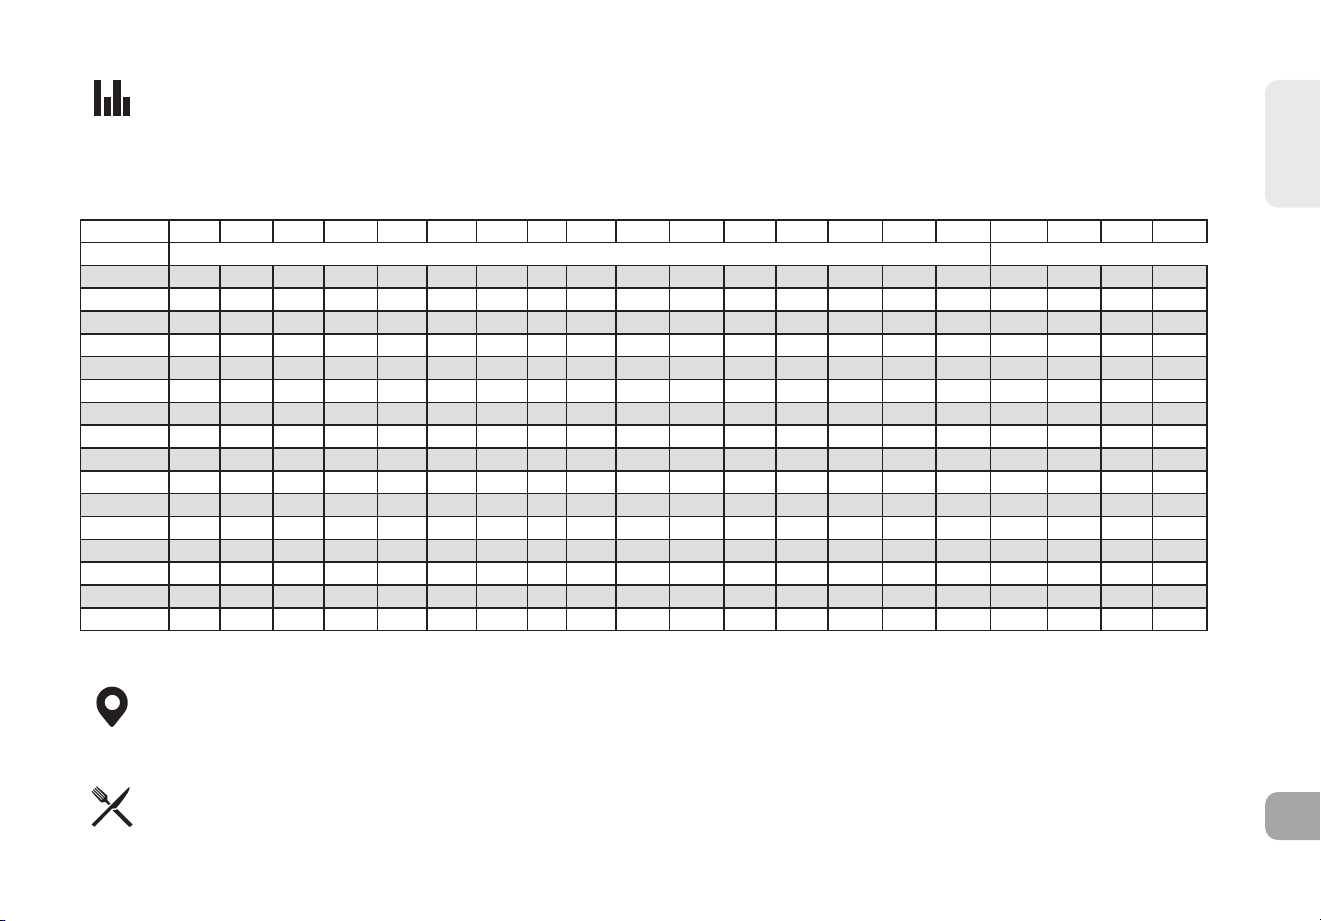
NEDERLANDS
121
P3) INTERVALLEN: Verbetert uw kracht, snelheid en uithoudingsvermogen door de helling tijdens uw training afwisselend te
verhogen en te verlagen, zodat uw hart en andere spiergroepen worden geactiveerd. Bevat 20 niveaus.
P4) AFSTAND: Daag jezelf uit en ga verder tijdens je training met 13 afstandstrainingen. Kies uit 1 mijl, 2 mijl, 5k, 5 mijl, 10k, 8 mijl,
15k, 10 mijl, 20k, halve marathon, 15 mijl, 20 mijl en marathon doelen.
De gebruiker stelt het startsnelheidsniveau zelf in.
P5) CALORIEËN: Stel doelen in voor het verbranden van calorieën. Het aantal verbrande calorieën wordt berekend op basis van
afstand en snelheid.
Intervals (15%Incline)
Segment =workout time�16
Level 1 2 3 4 5 6 7 8 9 10 11 12 13 14 15 16 17 18 19 20
Segment
1 0 0 0 0 0 0 0 0 0 0 0 0 0 0 0 0 0 0 0 0
2 0,5 0,5 0,5 0,5 0,5 0,5 0,5 0,5 1 1 1 1 1 1 1 1,5 1,5 1,5 1,5 1,5
3 0 0 0 0 0 0 0 0 0 0 0 0 0 0 0 0 0 0 0 0
4 1,5 2 2 2,5 3 3 3,5 3,5 4 4,5 5 5,5 5,5 6 6 6,5 7 7 8 8,5
5 0 0 0 0 0 0 0 0 0 0 0 0 0 0 0 0 0 0 0 0
6 2,5 2,5 3 3,5 4 4,5 4,5 5 5,5 6 7 7,5 8 8 8,5 9,5 9,5 10 11 11,5
7 0 0 0 0 0 0 0 0 0 0 0 0 0 0 0 0 0 0 0 0
8 3 3,5 4 4,5 5 5,5 6 6,5 7 8 9 9,5 10 10,5 11 12 12,5 13 14 15
9 0 0 0 0 0 0 0 0 0 0 0 0 0 0 0 0 0 0 0 0
10 3 3,5 4 4,5 5 5,5 6 6,5 7 8 9 9,5 10 10,5 11 12 12,5 13 14 15
11 0 0 0 0 0 0 0 0 0 0 0 0 0 0 0 0 0 0 0 0
12 3 3,5 4 4,5 5 5,5 6 6,5 7 8 9 9,5 10 10,5 11 12 12,5 13 14 15
13 0 0 0 0 0 0 0 0 0 0 0 0 0 0 0 0 0 0 0 0
14 3 3,5 4 4,5 5 5,5 6 6,5 7 8 9 9,5 10 10,5 11 12 12,5 13 14 15
15 0 0 0 0 0 0 0 0 0 0 0 0 0 0 0 0 0 0 0 0
16 3 3,5 4 4,5 5 5,5 6 6,5 7 8 9 9,5 10 10,5 11 12 12,5 13 14 15
Intervals (10%Incline)
Segment =workout time�16
Level 1 2 3 4 5 6 7 8 9 10 11 12 13 14 15 16 17 18 19 20
Segment
1 0 0 0 0 0 0 0 0 0 0 0 0 0 0 0 0 0 0 0 0
2 0,5 0,5 0,5 0,5 0,5 0,5 0,5 0,5 1 1 1 1 1 1 1 1,5 1,5 1,5 1,5 1,5
3 0 0 0 0 0 0 0 0 0 0 0 0 0 0 0 0 0 0 0 0
4 1,5 2 2 2,5 3 3 3,5 3,5 4 4,5 5 5,5 5,5 6 6 6,5 7 7 8 8,5
5 0 0 0 0 0 0 0 0 0 0 0 0 0 0 0 0 0 0 0 0
6 2,5 2,5 3 3,5 4 4,5 4,5 5 5,5 6 7 7,5 8 8 8,5 9,5 9,5 10 10 10
7 0 0 0 0 0 0 0 0 0 0 0 0 0 0 0 0 0 0 0 0
8 3 3,5 4 4,5 5 5,5 6 6,5 7 8 9 9,5 10 10 10 10 10 10 10 10
9 0 0 0 0 0 0 0 0 0 0 0 0 0 0 0 0 0 0 0 0
10 3 3,5 4 4,5 5 5,5 6 6,5 7 8 9 9,5 10 10 10 10 10 10 10 10
11 0 0 0 0 0 0 0 0 0 0 0 0 0 0 0 0 0 0 0 0
12 3 3,5 4 4,5 5 5,5 6 6,5 7 8 9 9,5 10 10 10 10 10 10 10 10
13 0 0 0 0 0 0 0 0 0 0 0 0 0 0 0 0 0 0 0 0
14 3 3,5 4 4,5 5 5,5 6 6,5 7 8 9 9,5 10 10 10 10 10 10 10 10
15 0 0 0 0 0 0 0 0 0 0 0 0 0 0 0 0 0 0 0 0
16 3 3,5 4 4,5 5 5,5 6 6,5 7 8 9 9,5 10 10 10 10 10 10 10 10
Segment =workout time�16
Intervals (12%Incline)
Level 1 2 3 4 5 6 7 8 9 10 11 12 13 14 15 16 17 18 19 20
Segment
1 0 0 0 0 0 0 0 0 0 0 0 0 0 0 0 0 0 0 0 0
2 0,5 0,5 0,5 0,5 0,5 0,5 0,5 0,5 1 1 1 1 1 1 1 1,5 1,5 1,5 1,5 1,5
3 0 0 0 0 0 0 0 0 0 0 0 0 0 0 0 0 0 0 0 0
4 1,5 2 2 2,5 3 3 3,5 3,5 4 4,5 5 5,5 5,5 6 6 6,5 7 7 8 8,5
5 0 0 0 0 0 0 0 0 0 0 0 0 0 0 0 0 0 0 0 0
6 2,5 2,5 3 3,5 4 4,5 4,5 5 5,5 6 7 7,5 8 8 8,5 9,5 9,5 10 11 11,5
7 0 0 0 0 0 0 0 0 0 0 0 0 0 0 0 0 0 0 0 0
8 3 3,5 4 4,5 5 5,5 6 6,5 7 8 9 9,5 10 10,5 11 12 12 12 12 12
9 0 0 0 0 0 0 0 0 0 0 0 0 0 0 0 0 0 0 0 0
10 3 3,5 4 4,5 5 5,5 6 6,5 7 8 9 9,5 10 10,5 11 12 12 12 12 12
11 0 0 0 0 0 0 0 0 0 0 0 0 0 0 0 0 0 0 0 0
12 3 3,5 4 4,5 5 5,5 6 6,5 7 8 9 9,5 10 10,5 11 12 12 12 12 12
13 0 0 0 0 0 0 0 0 0 0 0 0 0 0 0 0 0 0 0 0
14 3 3,5 4 4,5 5 5,5 6 6,5 7 8 9 9,5 10 10,5 11 12 12 12 12 12
15 0 0 0 0 0 0 0 0 0 0 0 0 0 0 0 0 0 0 0 0
16 3 3,5 4 4,5 5 5,5 6 6,5 7 8 9 9,5 10 10,5 11 12 12 12 12 12
INCLINE
INCLINE
INCLINE
Segment = trainingstijd/16
Intervallen (12% Helling)
Niveau
Segment
HELLING
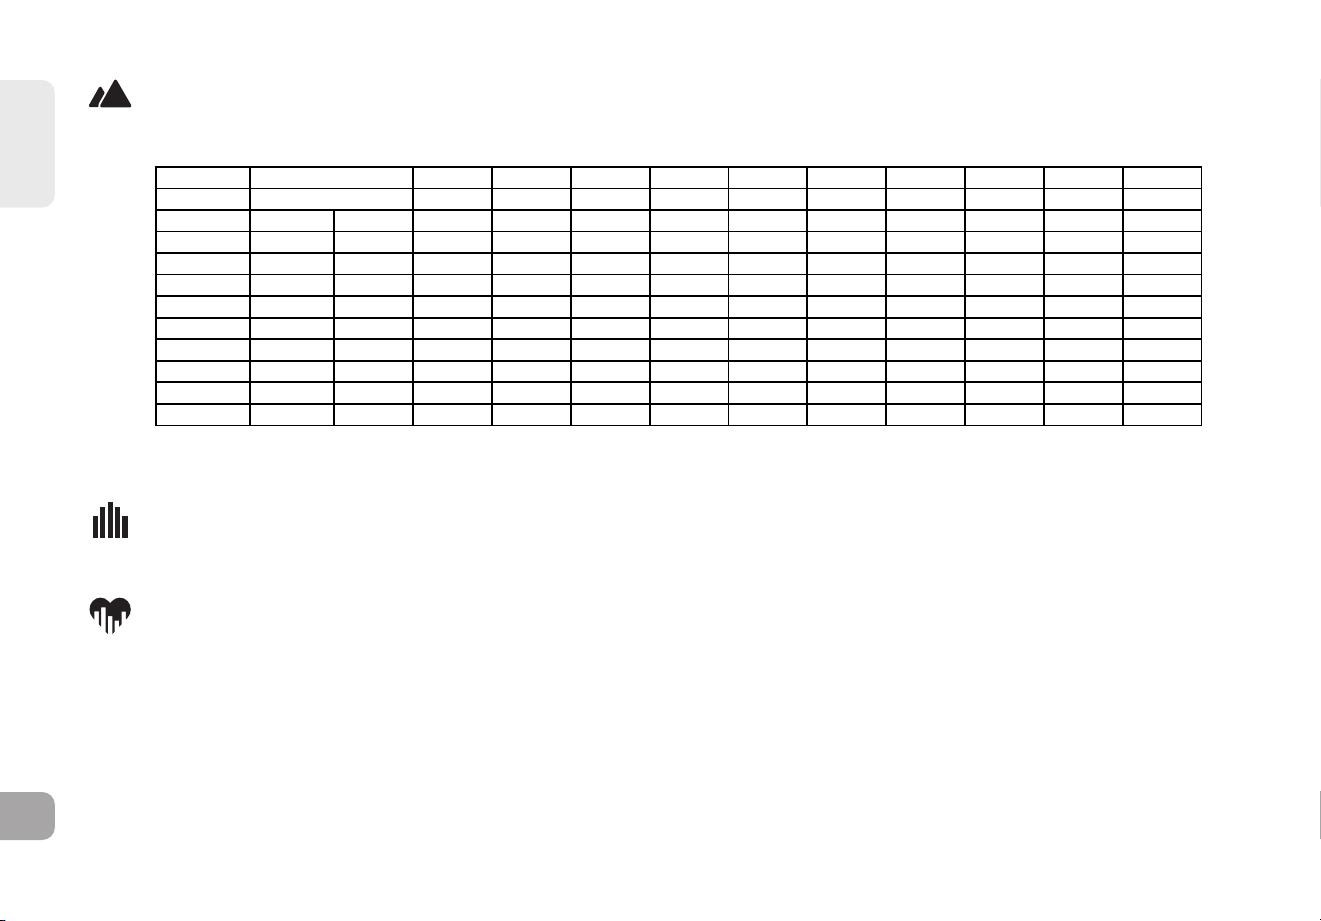
NEDERLANDS
122
P6) HEUVELOPLOOP: Simuleert het op- en aflopen van een heuvel. Dit programma helpt bij het versterken van spieren en het
verbeteren van de cardiovasculaire conditie. Hellingniveaus en segmenten herhalen zich elke 30 seconden.
P7) AANGEPAST: Hiermee kunt u uw ideale training samenstellen en hergebruiken met een combinatie van een specifieke snelheid,
helling en tijd of afstand. De ultieme vorm van persoonlijke programmering. Dit programma is gebaseerd op tijd- of afstandsdoelen.
P8) DOELHARTSLAG: Dit programma is ontworpen om je algehele cardiovasculaire fitheid te verbeteren. Je stelt
eenvoudig je doelhartslag in. Het programma zal vervolgens het intensiteitsniveau monitoren en aanpassen om
je hartslag binnen je doelbereik te houden tijdens het trainen – een bewezen methode om je gewichtsverlies en
fitheidsdoelen te maximaliseren. Een borstband is vereist en moet tijdens dit programma worden gedragen. Zie
hieronder voor het berekenen van je doelhartslag.
Segment 1 2 3 4 5 6 7 8 9 10
Time 30 sec 30 sec 30 sec 30 sec 30 sec 30 sec 30 sec 30 sec 30 sec 30 sec
Level 1 0 0 1 1,5 2 2,5 3 3 2,5 2 1,5 1
Level 2 0 0 1,5 2 2,5 3 3,5 3,5 3 2,5 2 1,5
Level 3 0 1 2 2,5 3 3,5 4 4 3,5 3 2,5 2
Level 4 0 1,5 2,5 3 3,5 4 4,5 4,5 4 3,5 3 2,5
Level 5 0 1,5 3 3,5 4 4,5 5 5 4,5 4 3,5 3
Level 6 0 1,5 3,5 4 4,5 5 5,5 5,5 5 4,5 4 3,5
Level 7 0 1,5 4 4,5 5 5,5 6 6 5,5 5 4,5 4
Level 8 0 2 4,5 5 5,5 6 6,5 6,5 6 5,5 5 4,5
Level 9 0 2 5 5,5 6 6,5 7 7 6,5 6 5,5 5
Level 10 0 2 5,5 6 6,5 7 7,5 7,5 7 6,5 6 5,5
Warm Up
4:00 Mins
Segment
Tijd
Niveau 1
Niveau 2
Niveau 3
Niveau 4
Niveau 5
Niveau 6
Niveau 7
Niveau 8
Niveau 9
Niveau 10
Warming-up
4:00 min
30 sec30 sec30 sec30 sec30 sec30 sec30 sec30 sec30 sec30 sec
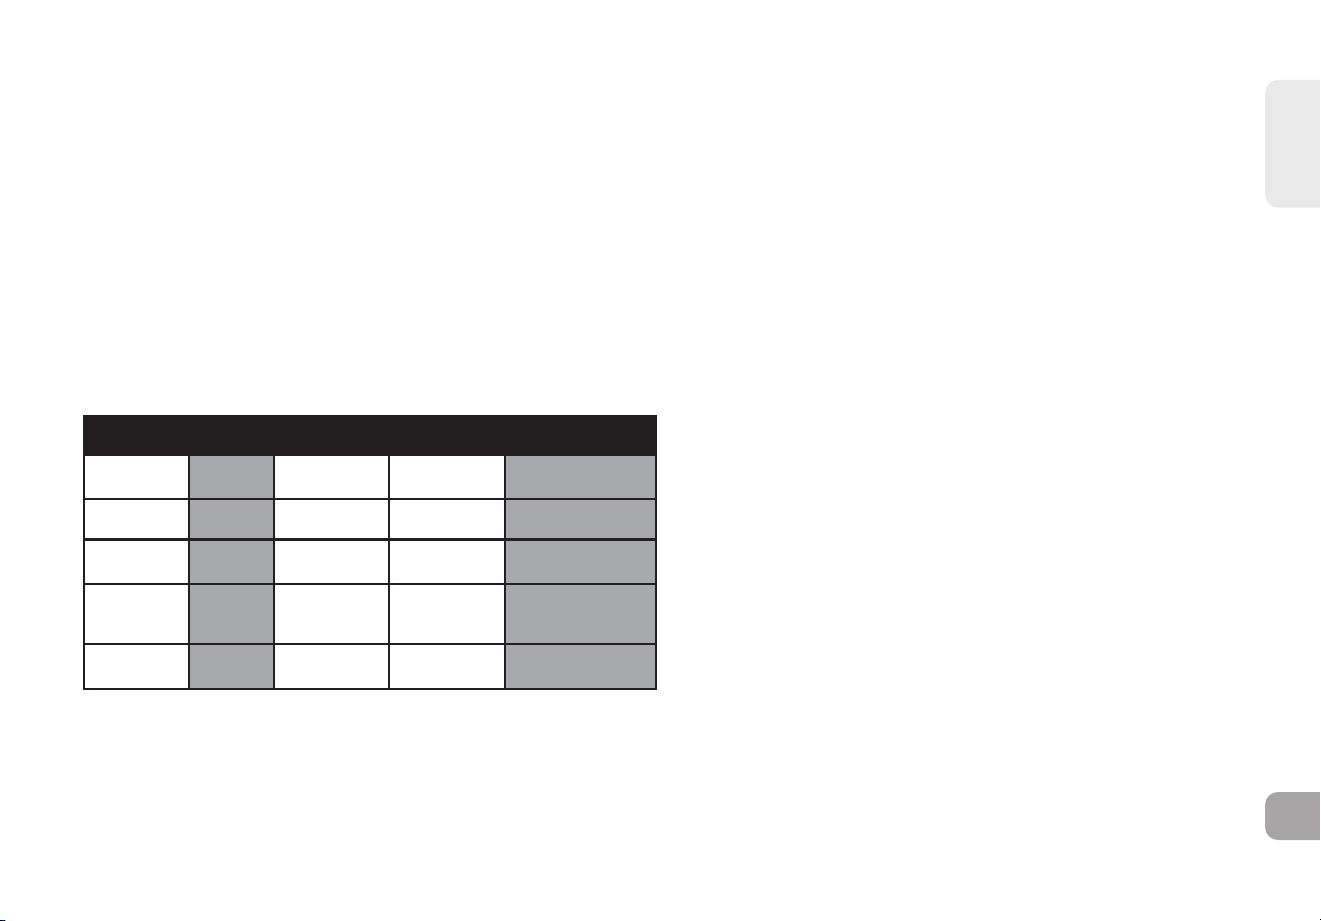
NEDERLANDS
123
Uw doelhartslag berekenen:
De eerste stap om de juiste trainingsintensiteit te bepalen is het vaststellen van uw maximale hartslag (maximale HR = 220 – uw
leeftijd). De leeftijdsgebonden methode geeft een gemiddelde statistische schatting van uw maximale HR en is geschikt voor de
meeste mensen, vooral voor beginners met hartslagtraining.
De meest nauwkeurige manier om uw persoonlijke maximale HR te bepalen is via een klinische test door een cardioloog of
inspanningsfysioloog, met behulp van een maximale inspanningstest. Als u ouder bent dan 40 jaar, overgewicht hebt, al jaren
lichamelijk inactief bent of een familiegeschiedenis van hartziekten hebt, wordt klinisch onderzoek aanbevolen.
Deze grafiek geeft voorbeelden van het hartslagbereik voor een 30-jarige die oefent in 5 verschillende hartslagzones. Bijvoorbeeld:
de maximale HR van een 30-jarige is 220 – 30 = 190 bpm en 90% van de maximale HR is 190 × 0,9 = 171 bpm.
Aanvullende opmerkingen over de doelhartslag:
1). De helling van de loopband wordt automatisch aangepast om u dichter bij uw ingestelde hartslag te brengen.
2). Als er geen hartslag wordt gedetecteerd, wordt de helling niet aangepast.
3). Als uw hartslag 25 slagen boven uw doelzone komt, wordt het programma beëindigd.
Target Heart
Rate Zone
Workout
Duration
Example THR
(age 30)
Your THR Recommend For
Target Heart
Rate Zone
< 5 min
171-190 BPM
Fit persons for
athletic training
VERY HARD
90 - 100%
2-10 min 152-171 BPM Shorter Workouts
HARD
80 - 90%
10-40 min
133-152 BPM
Moderately long
Workouts
MODERATE
70 - 80%
40-80 min
114-133 BPM
Longer and
frequently repeated
shorter exercises
LIGHT
60 - 70%
20-40 min
104-114BPM
Weight management
and active recovery
VERY LIGHT
50 - 60%
Doelhartslagzone Trainingsduur
Voorbeeld-THR
(leeftijd 30)
Uw THR Aanbevolen voor
ZEER INTENSIEF
90-100%
< 5 min 171–190 BPM
Getrainde personen voor
atletische training
INTENSIEF
80 - 90%
2-10 min 152-171 BPM Korte trainingssessies
MATIG
70 - 80%
10-40 min 133-152 BPM Gemiddeld lange trainingen
LICHT
60 - 70%
40-80 min 114-133 BPM
Langere en vaak herhaalde
korte oefeningen
ZEER LICHT
50 - 60%
20-40 min 104-114 BPM
Gewichtsbeheersing en
actief herstel

NEDERLANDS
124
OM DE CONSOLE TE RESETTEN
Houd de STOPTOETS 3 seconden ingedrukt.
HET BEËINDIGEN VAN JE TRAINING
Wanneer je training voltooid is, zal het apparaat piepen. Je trainingsinformatie blijft 30 seconden op de console weergegeven en wordt
daarna gereset.
VERBINDEN VIA BLUETOOTH 4.0LE
1) Controleer of je muziekapparaat Bluetooth 4.0-compatibel is
2) Ga naar de Bluetooth-instellingen van uw apparaat en zoek naar beschikbare apparaten.
3) Zoek op uw muziekapparaat de lijst met Bluetooth-apparaten. Selecteer de loopband of crosstrainer die in de lijst wordt weergegeven.
Wacht totdat je muziekapparaat klaar is met koppelen met het apparaat.
4) U weet dat de koppeling is gelukt wanneer uw muziekapparaat de loopband of crosstrainer als gekoppeld apparaat weergeeft.
HET GEBRUIK VAN MEERDERE MUZIEKAPPARATEN
Als meerdere apparaten met het toestel worden gekoppeld (bijv. meerdere gebruikers koppelen hun muziekapparaten met de loopband of
crosstrainer), moet u het huidige gekoppelde apparaat ontkoppelen en uw apparaat opnieuw koppelen volgens de hierboven beschreven
procedure.
VERBINDEN VIA EEN AUDIOKABEL
1) Sluit de meegeleverde AUDIO-ADAPTERKABEL aan op de AUDIO IN-AANSLUITING aan de rechterzijde van de console en op de
hoofdtelefoonaansluiting van uw mediaspeler.
2) Gebruik de knoppen van uw mediaspeler om de nummers te bedienen.
3) Verwijder de AUDIO-ADAPTERKABEL wanneer deze niet in gebruik is.
4) Als u de LUIDSPREKERS niet wilt gebruiken, kunt u uw hoofdtelefoon aansluiten op de AUDIO OUT-AANSLUITING aan de rechterzijde
van de console. Dit voorkomt dat u uw apparaat laat vallen als u per ongeluk tijdens het lopen aan het snoer van de hoofdtelefoon blijft
haken.

NEDERLANDS
125
VERBIND JE APPARAAT MET DE JRNY-APP VOOR DYNAMISCHERE WORKOUTS
Als je een JRNY-lidmaatschap* hebt, kun je hier via je apparaat toegang toe krijgen wanneer het gesynchroniseerd is met de console
van dit toestel. Met dat lidmaatschap ontvang je begeleide trainingen die op jou zijn afgestemd.
* Voor de JRNY-ervaring is een JRNY-lidmaatschap vereist – zie global.bowflex.com/en/jrny.html voor meer informatie. Waar
beschikbaar (inclusief de Verenigde Staten) kunt u een JRNY-lidmaatschap verkrijgen door de JRNY-app op uw telefoon of tablet te
downloaden en u in de app aan te melden. JRNY-lidmaatschappen zijn mogelijk niet in alle landen beschikbaar.

126
Onderhoud &
Probleem-
oplossing

NEDERLANDS
127
ONDERHOUD
Preventief onderhoud is cruciaal voor soepel werkende apparatuur, evenals om de aansprakelijkheid van de gebruiker tot een
minimum te beperken. Apparaten moeten regelmatig worden geïnspecteerd. Kapotte onderdelen moeten onmiddellijk vervangen
worden. Wanneer een apparaat niet goed werkt, mag het niet worden gebruikt totdat het gerepareerd is. Zorg dat degene(n) die
aanpassingen, onderhoud of reparaties uitvoert/uitvoeren, hiervoor gekwalificeerd is/zijn.
WAARSCHUWING
Om de stroom van de loopband af te halen, moet de stekker uit het stopcontact worden gehaald.

NEDERLANDS
128
ONDERHOUDSSCHEMA
ACTIE FREQUENTIE
De loopband schoonmaken en inspecteren:
• Zet de loopband uit met de AAN/UIT-schakelaar en haal de stekker uit het stopcontact.
• Veeg de loopband, het dek, de afdekplaat van de motor en de consolebehuizing af met een
vochtige doek. Gebruik nooit oplosmiddelen, omdat die de loopband beschadigen.
• Inspecteer de stroomkabel. Als de stroomkabel beschadigd is, raadpleeg dan voor hulp de
contactgegevens op de achterzijde van de INFOKAART.
• Zorg dat de stroomkabel zich niet onder de loopband bevindt of op een andere plek waar het
bekneld kan raken of doorgesneden kan worden tijdens opslag of gebruik.
• Controleer de spanning van de loopband en of hij goed gecentreerd is. Zorg dat de band geen
andere onderdelen van het apparaat kan beschadigen, doordat hij niet juistgecentreerd is.
• Als een label beschadigd of onleesbaar is, raadpleeg dan voor hulp de contactgegevens op de
achterzijde van de INFOKAART.
DAGELIJKS
Onder de loopband schoonmaken:
• Zet de loopband uit met de AAN/UIT-schakelaar en haal de stekker uit het stopcontact.
• Klap de loopband verticaal in en zorg dat hij goed vergrendeld is.
• Verplaats de loopband.
• Veeg het stof of andere objecten op die zich hebben opgehoopt onder de loopband ofverwijder
ze met een stofzuiger.
• Zet de loopband terug op zijn plek.
WEKELIJKS

NEDERLANDS
129
BELANGRIJK!
• Zet de loopband uit met de AAN/UIT-schakelaar en haal de stekker uit het stopcontact. Wacht
60 seconden.
• Controleer of alle verbindingsbouten van de machine goed vastzitten.
• Verwijder de afdekplaat van de motor. Wacht tot ALLE displayschermen uitgeschakeld zijn.
• Maak de motor en het gedeelte met het onderliggende paneel schoon door pluisjes en stof die
daar zijn opgehoopt te verwijderen. Het niet opvolgen van deze instructies kan tot voortijdige
gebreken aan de elektronische onderdelen leiden.
• Veeg de band schoon met een vochtige doek. Stofzuig alle zwarte/witte deeltjes die zich rond
het apparaat hebben opgehoopt. Deze deeltjes kunnen zich ophopen bij normaal gebruik van de
loopband.
• Als uw loopband luchtvering voor hulp bij het optillen onder het dek heeft, smeer de zilveren
buis van de luchtvering dan met een spray op basis van Teflon, verkrijgbaar bijuw lokale
ijzerhandel of fietsenzaak.
MAANDELIJKS
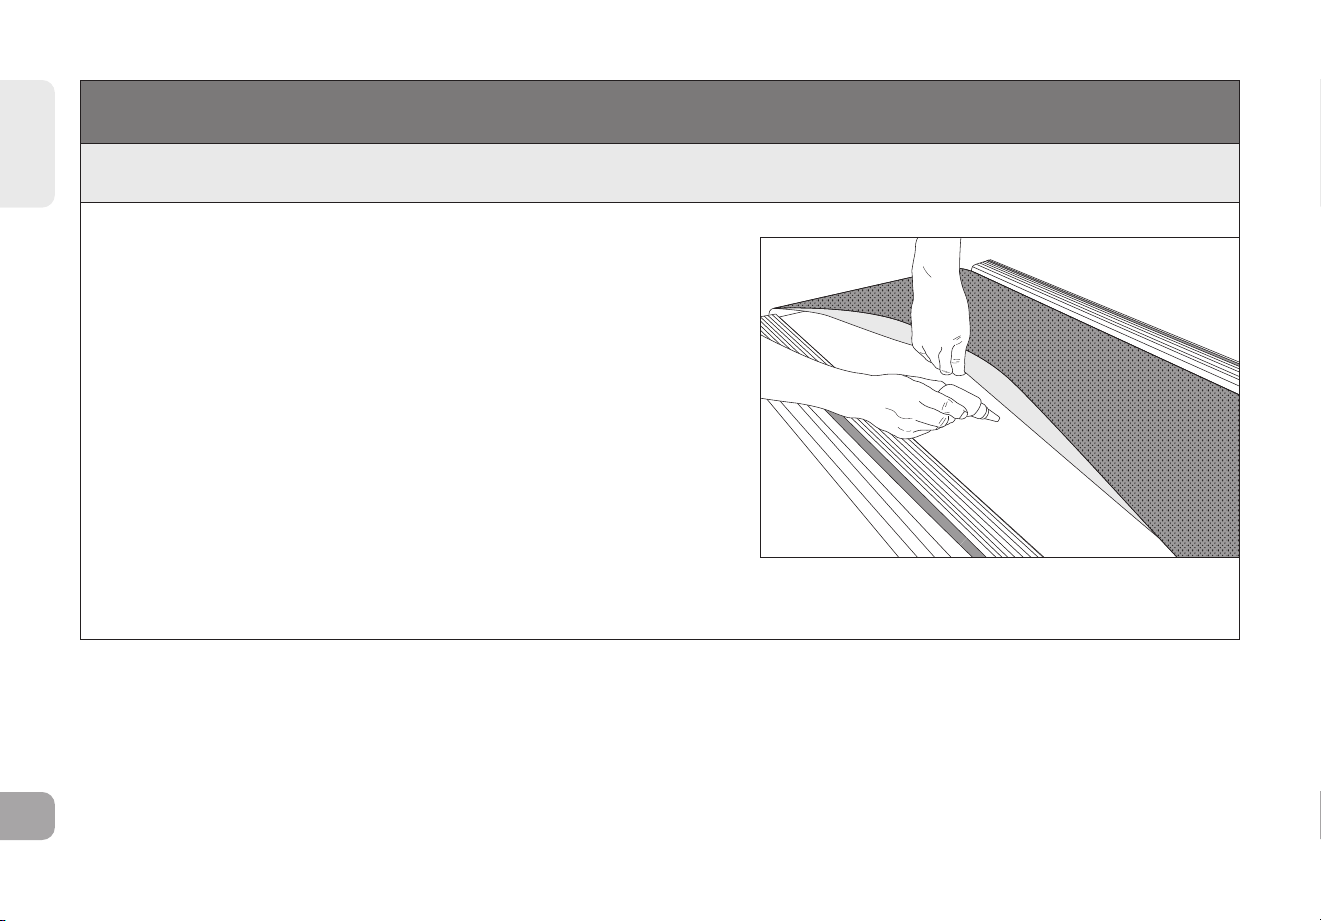
NEDERLANDS
130
ONDERHOUDSSCHEMA
HET OLIËN
ELKE 3 MAANDEN OF 480 KILOMETER
Het is nodig om het loopdek van uw loopband elke drie maanden of
480 kilometer te smeren om optimale prestaties te handhaven. Zodra
de loopband 480 kilometer registreert, wordt de melding ‘LUBE’
(smeren) of ‘LUBE BELT’ (band smeren) op het scherm weergegeven.
De loopband werkt niet wanneer de melding wordt weergegeven.
Uw loopband komt met een flesje 100% silicone smeermiddel,
dat voor twee onderhoudsbeurten kan worden gebruikt.
Om extra siliconengel te kopen:
Neem dan contact op met de technische klantenservice.
Benodigd gereedschap:
• T-sleutel of inbussleutel
• 100% siliconenolie
LOOPBAND
LOOPDEK

NEDERLANDS
131
PROCEDURE:
1. Zet de loopband uit met de aan-/uitschakelaar en haal de stekker uit het stopcontact.
2. Draai de rollerbouten aan de achterzijde los met behulp van de T-sleutel of inbussleutel. Draai 10-15
omwentelingen naar links. De band zou aldus voldoende los moeten hangen zodat u hem kunt optillen.
3. Til de band zo hoog mogelijk op en spuit de siliconenolie in een zigzagpatroon over het volledige
oppervlak van het loopdek. Gebruik een ½ flesje silicone smeermiddel. Breng geen siliconenolie
aan op de bovenzijde van de loopband. Leg de loopband neer en draai beide rollerbouten aan
de achterzijde evenveel omwentelingen naar rechts als dat u ze hebt losgedraaid.
4. Nadat u smeermiddel hebt aangebracht, steekt u de stekker in het stopcontact en brengt u de
veiligheidssleutel in. Stel de melding voor Band smeren terug door de knop SNELHEID OMHOOG,
vervolgens de STOP-knop en dan BEIDE knoppen 5-7 seconden ingedrukt te houden.
5. Sta niet op de loopband en druk op START. Laat de band 3 minuten op 4,5 km/u ingeschakeld om de siliconenolie
te beginnen verspreiden. Wandel vervolgens 3 minuten lang tegen een comfortabel tempo op het apparaat om
de siliconenolie te verspreiden en te controleren of de loopband correct is aangespannen en uitgelijnd.
6. Zodra de loopband gecentreerd en aangespannen is, stopt de loopband. Veeg
overtollige olie aan de zijkant schoon met een vochtige doek.
Druk op een willekeurige toets om de waarschuwingsmelding voor het smeren tot na uw volgende training uit te stellen.
Opmerking: Bij sommige oudere modellen moet u stop 5 seconden ingedrukt
houden om het bericht voor 8 km gebruik op te schorten.
Als uw loopband luchtvering voor hulp bij het optillen onder het dek heeft, smeer de zilveren buis van de
luchtvering dan met een spray op basis van Teflon, verkrijgbaar bij uw lokale ijzerhandel of fietsenzaak.
Ga naar de rubriek Klantenondersteuning van onze website om de ‘Hoe’-onderhoudsvideo’s te bekijken. Neem contact
op met onze technische klantenservice voor vragen over het aanbrengen van smeermiddel op uw loopband.
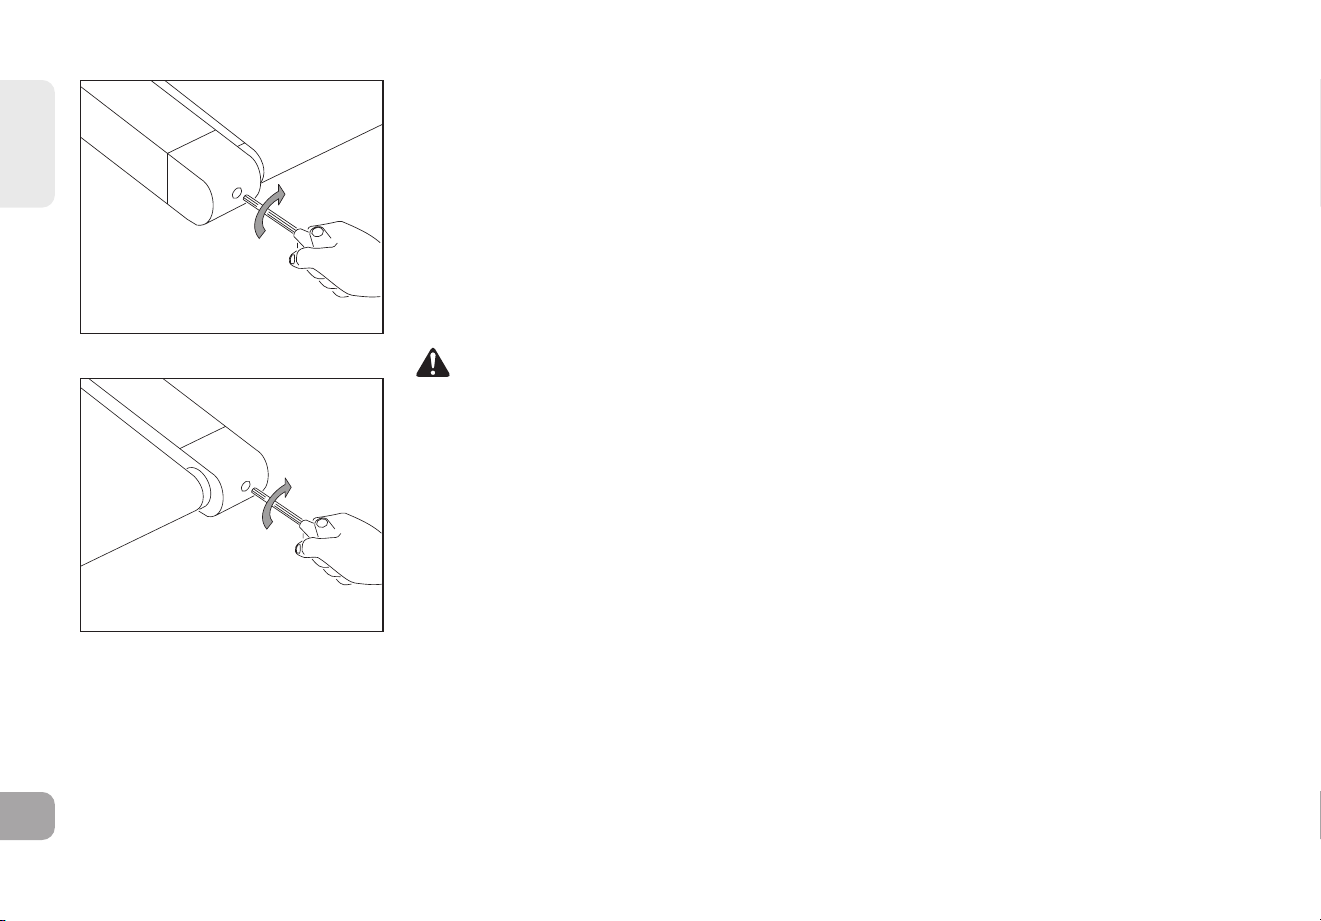
NEDERLANDS
132
DE LOOPBAND AANSPANNEN
Als u tijdens het hardlopen het gevoel krijgt weg te glijden op de loopband, dan moet de band
worden aangespannen. In de meeste gevallen is de band uitgerekt door gebruik, waardoor hij
wegglijdt. Deze aanpassing is normaal en gebruikelijk. Om wegglijden te voorkomen, schakelt
u de loopband uit en draait u de beide bouten van de roller aan de achterkant aan met behulp
van de meegeleverde inbussleutel, waarmee u ze een kwartslag naar rechts draait (met de
klok mee), zoals hier wordt getoond. Zet de loopband weer aan en controleer op wegglijden.
Herhaal indien nodig, maar draai de bouten van de roller nooit meer dan een kwartslag
per keer. De band is goed aangespannen als het gevoel van wegglijden verdwenen is.
WAARSCHUWING
De loopband mag NIET bewegen tijdens het aanspannen. De loopband te strak aanspannen
kan tot overmatige slijtage leiden voor zowel de band als voor andere onderdelen. Span de
band nooit te strak aan.
SPANT DE LINKERKANT
VAN DE ROLLER AAN
SPANT DE RECHTERKANT
VAN DE ROLLER AAN
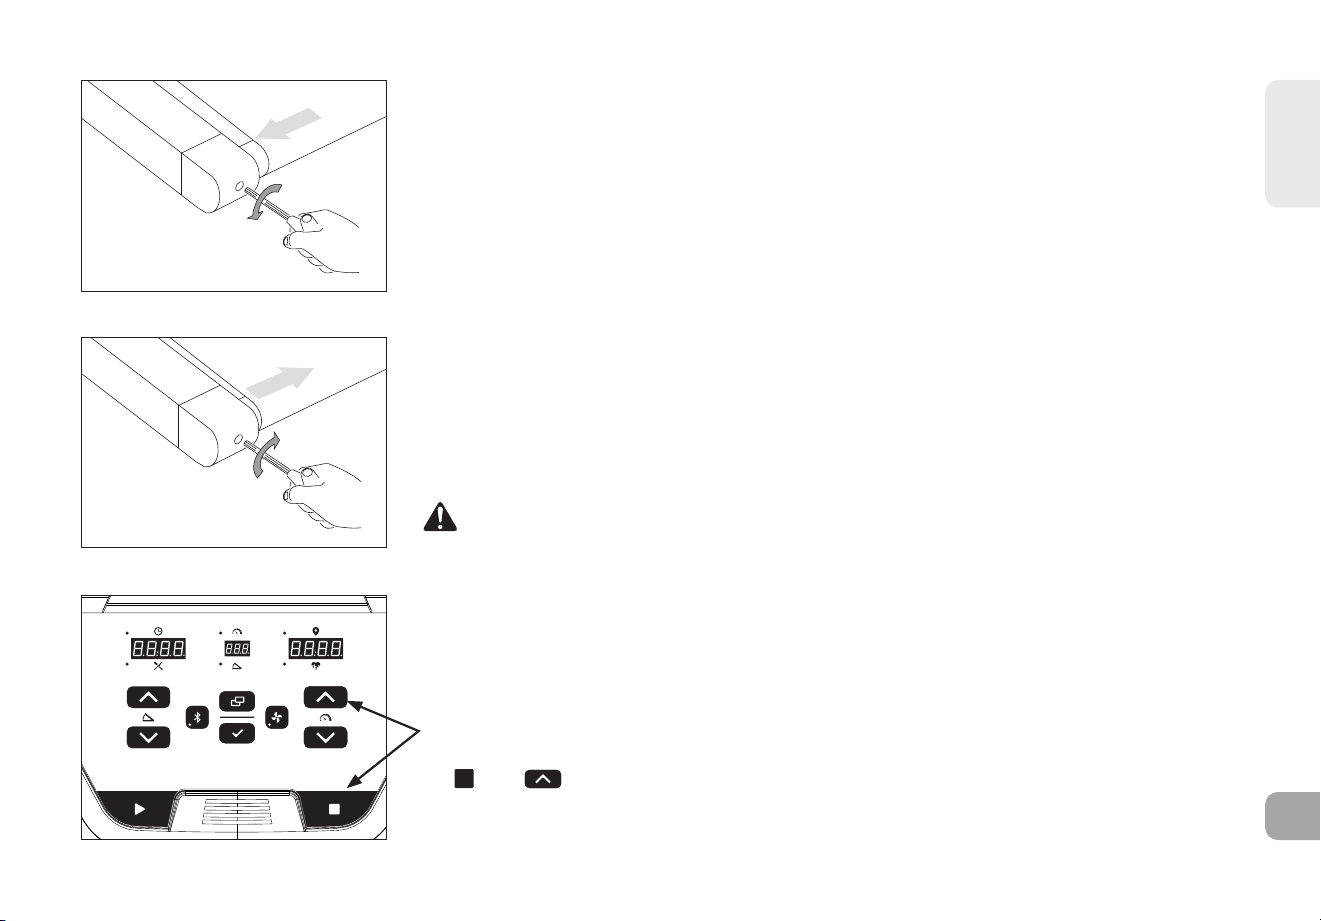
NEDERLANDS
133
DE LOOPBAND CENTREREN
Als de loopband te ver naar rechts gecentreerd is: draai de loopband op een snelheid van
1 km/h, gebruik de meegeleverde inbussleutel om de verstelbare LINKERAFSTELBOUT een
kwartslag tegen de klok in te draaien en wacht totdat de band zichzelf aanpast. Gebruik
de markering of scheidingslijn op de afdekplaat van de motor als referentiepunt bij het
centreren. Herhaal indien nodig, totdat de band tijdens gebruik in het midden blijft lopen.
Als de loopband te ver naar links gecentreerd is: draai de loopband op een snelheid van 1
km/h, gebruik de meegeleverde inbussleutel om de verstelbare LINKERAFSTELBOUT een
kwartslag met de klok mee te draaien en wacht totdat de band zichzelf aanpast. Gebruik
de markering of scheidingslijn op de afdekplaat van de motor als referentiepunt bij het
centreren. Herhaal indien nodig, totdat de band tijdens gebruik in het midden blijft lopen.
• Als u voelt dat de band wegglijdt omdat hij te los is, centreer
de band dan en span hem naar wens aan.
• Verwijder de einddoppen, zodat u beter bij de afstelbouten kunt.
VOORZICHTIG
Draai de band niet sneller dan 1 km/h tijdens het centreren.
Houd altijd uw vingers, haren en kleding bij de band weg.
BAND LIGT TE VER NAAR RECHTS
BAND LIGT TE VER NAAR LINKS
De waarschuwing voor het smeren van de band resetten
De loopband toont elke 150 mijl de melding “LUBE BELT”. Na het smeren van de band, houd
de - en -knoppen 3–5 seconden ingedrukt om de waarschuwing te resetten.
2
4
6
8
10
12
16
20

NEDERLANDS
134
PROBLEEMOPLOSSING
VEEL GESTELDE VRAGEN OVER HET PRODUCT
ZIJN DE GELUIDEN DIE MIJN LOOPBAND MAAKT NORMAAL?
Alle loopbanden maken een bepaald bonzend geluid, doordat de band over de rollers glijdt, zeker bij nieuwe loopbanden. Het
geluid zal na verloop van tijd afnemen, maar het kan zijn dat het niet helemaal verdwijnt. Na verloop van tijd rekt de band uit en zal
daardoor soepeler over de rollers gaan lopen.
WAAROM MAAKT DE LOOPBAND DIE IK HEB GEKOCHT MEER GELUID DAN DIE IN DE WINKEL?
Alle fitnessproducten lijken stiller in een grote winkel, omdat daar over het algemeen meer achtergrondgeluiden zijn dan in uw eigen
huis. Er zal tevens minder weerkaatsing zijn op een betonnenondervloer met tapijt dan op een houten vloer. Soms kan een zware
rubberen mat helpen omde weerkaatsing via de vloer te verminderen. Als een fitnessproduct dicht bij een muur wordt geplaatst,
zullen de geluiden sterker weerkaatsen.
WANNEER MOET IK ME ZORGEN MAKEN OM EEN GELUID?
Zolang de geluiden die uw loopband maakt niet luider zijn dan het volume van een stem tijdens eennormaal gesprek, worden ze als
normale
geluiden beschouwd.
EENVOUDIGE PROBLEEMOPLOSSING
PROBLEEM: De console is niet verlicht.
OPLOSSING: Controleer het volgende:
Brandt het rode lampje op de AAN-/UIT-schakelaar?
OPMERKING: sommige loopbandmodellen hebben geen verlichte schakelaar. Als dat het geval is, ga dan verder naar de
onderstaande ja- en nee-oplossingen.
Zo ja:
• Schakel de stroom uit, trek de stekker uit het stopcontact en wacht 60 seconden. Verwijder de afdekplaat van de motor. Wacht
tot alle rode ledlampjes op het motorbedieningspaneel uit zijn voordat u verder gaat. Controleer dan of er geen draden los zitten
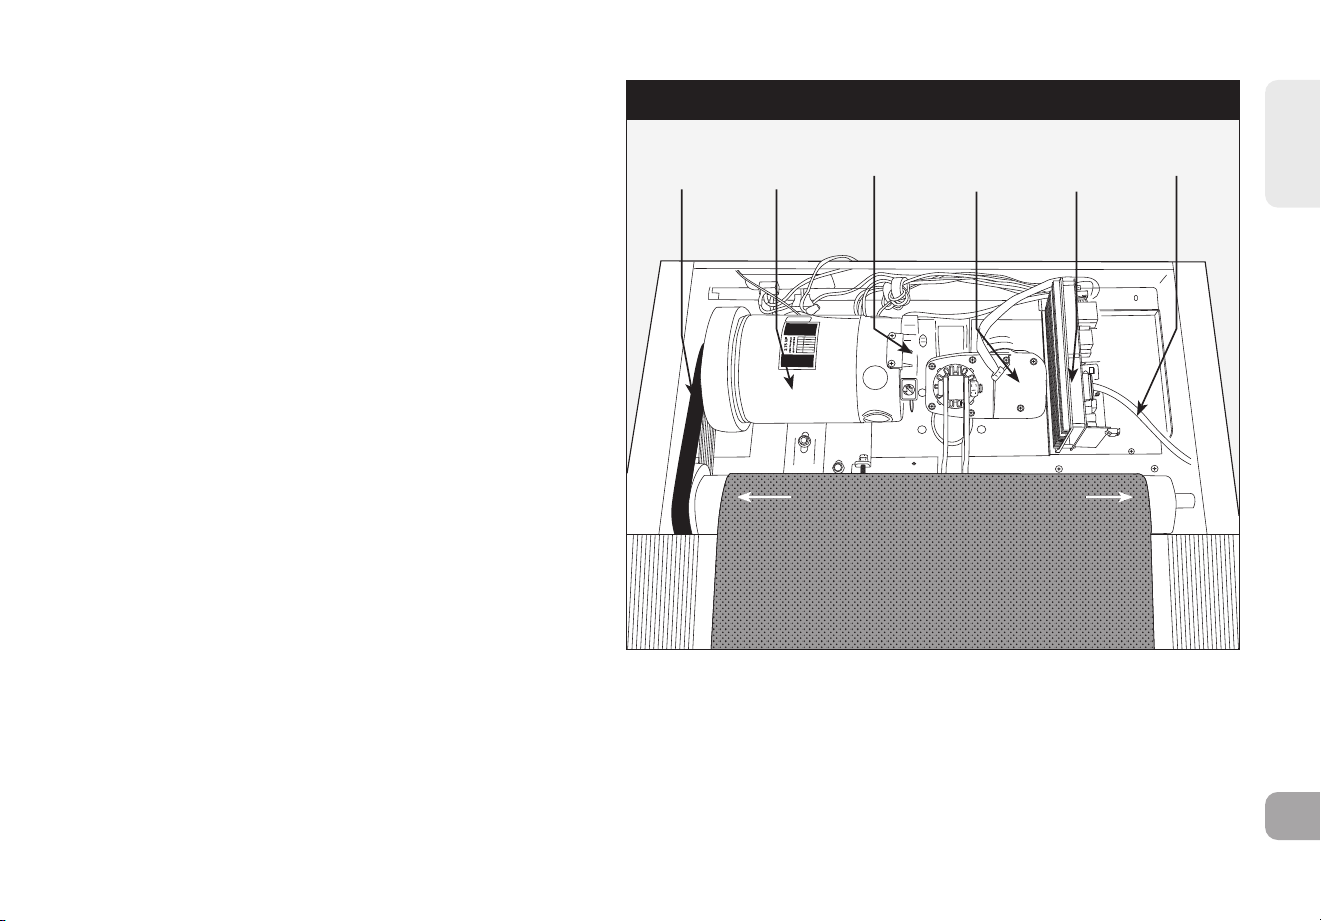
NEDERLANDS
135
die verbinding met het onderliggende paneel moeten
maken.
• Controleer nog eens of alle aansluitingen goed zitten, in
het bijzonder de consolekabel.
Trek de kabel er voor de zekerheid uit en steek hem
opnieuw in de console.
• Controleer of de consolekabel niet bekneld zit of
enigszins beschadigd is.
• Steek de stekker van de loopband weer in het
stopcontact, zet de stroomschakelaar aan en
kijk of er ledlampjes gaan branden op het
motorbedieningspaneel.
Zo niet:
• Controleer of het stopcontact werkt waar de loopband
op aangesloten is. Controleer nog eens of de zekeringen
niet zijn doorgeslagen en dat het is aangesloten op
een eigen 15-A-voedingscircuit en dus niet op een
uitgang met een aardlekschakelaar, een stekkerdoos/
overspanningsbeveiliging of een verlengsnoer.
• Controleer of de stroomkabel niet bekneld is of
beschadigd is en dat die zowel goedin het stopcontact
ALS op de machine is aangesloten.
• Controleer of de stroomschakelaar AAN staat.
PROBLEEM: De console zegt VEILIGHEIDSSLEUTEL UIT of
laat alleen streepjes zien.
OPLOSSING: Controleer het volgende:
• Controleer of de veiligheidssleutel goed in het slot zit.
• Als u een magneetsleutel gebruikt, zorg er dan voor dat
de sleutel gemagnetiseerdis.
JOHNSON
ONDER DE AFDEKPLAAT VAN DE MOTOR
AAN-
DRIJF-
RIEM
AAN-
DRIJF-
MOTOR
OPTISCHE
SENSOR
MOTOR
VOOR
HELLING
MOTORBE-
DIENINGS-
PANEEL
CON-
SOLEKA-
BEL
ROLLER AAN VOORZIJDE
LOOPBAND

NEDERLANDS
136
PROBLEEMOPLOSSING
EENVOUDIGE PROBLEEMOPLOSSING
PROBLEEM: De band beweegt niet of beweegt heel even,
maar de console werkt.
OPLOSSING: Controleer het volgende:
• Zorg ervoor dat u de aanbevelingen en stroomrichtlijnen
volgt bij AARDINGINSTRUCTIES EN BASISBEDIENING
in deze gebruikershandleiding. Het apparaat moet zijn
aangesloten op een eigen 15-A-voedingscircuit en niet op
een uitgang met een aardlekschakelaar. Sluit de machine
niet aan op eenstekkerdoos/overspanningsbeveiliging of
een verlengsnoer.
• Controleer of de band beweegt. Zo ja, noteer hoe ver of
hoe lang de band beweegt voordat hij stopt.
• Probeer de band met de hand te bewegen. Lukt dat niet,
dan kan het zijn datde aandrijfriem is losgekomen of dat
de motorlagers zijn vastgelopen.
• Zet de loopband uit en haal de stekker uit het
stopcontact. Verwijder aan de voorkant van de
machine de plastic afdekplaat van de motor door de
kruiskopschroeven los te draaien. Controleer of de
aandrijfriem goed gecentreerd is.
• Controleer nu de afdekplaat er nog af is of de bedrading
en kabelaansluitingen in orde zijn, aangezien die mogelijk
los zijn gekomen tijdens verzending of montage. Zorg
dat de draden goed aangesloten zijnenniet opgekruld,
beschadigd, losgetrokken of verbrand zijn.
PROBLEEM: De helling beweegt niet, wil niet naar beneden
of lijkt niet op de juiste positie te zitten.
OPLOSSING: Controleer het volgende:
JOHNSON
ONDER DE AFDEKPLAAT VAN DE MOTOR
AAN-
DRIJF-
RIEM
AAN-
DRIJF-
MOTOR
OPTISCHE
SENSOR
MOTOR
VOOR
HELLING
MOTORBE-
DIENINGS-
PANEEL
CON-
SOLEKA-
BEL
ROLLER AAN VOORZIJDE
LOOPBAND

NEDERLANDS
137
• Zorg dat u de aanbevelingen en richtlijnen voor stroomvoorziening op pagina 4 en 5 van deze HANDLEIDING VOOR DE
LOOPBAND opvolgt. Het apparaat moet zijn aangesloten op een eigen 15-A-voedingscircuit en niet op een uitgang met een
aardlekschakelaar. Sluit de machine niet aan op een stekkerdoos/overspanningsbeveiliging of een verlengsnoer.
• Controleer of het display van de console verandert wanneer de knoppen voor verhoging ingedrukt worden.
• Zet de loopband uit en haal de stekker uit het stopcontact. Controleer of de kabels aan de bovenkant van de mast goed
aangesloten zitten. Zorg dat de meerkleurige draden zich volledig inde kabelboom bevinden.
• Verwijder aan de voorkant van de machine de plastic afdekplaat van de motor door de kruiskopschroeven los te draaien.
Controleer alle bedrading en kabelaansluitingen nog eens, aangezien die mogelijk los zijn gekomen tijdens verzending of montage.
Zorg dat de draden goedaangesloten zijn en niet opgekruld, beschadigd, losgetrokken of verbrand zijn.
PROBLEEM: Er komt geen geluid uit de speakers, maar de koptelefoon doet het wel.
OPLOSSING: Controleer het volgende:
• Zet de loopband uit en haal de stekker uit het stopcontact. Verwijder aan de voorkant van de machine de plastic afdekplaat van
de motor door de kruiskopschroeven los te draaien.
• Controleer de bedrading en kabelaansluitingen naar de speakerbehuizing, vlak bij het motorbedieningspaneel.
PROBLEEM: De stroomonderbreker van de loopband slaat door tijdens de training.
OPLOSSING: Controleer het volgende:
• Zorg dat de loopband is aangesloten op een eigen 15-A-voedingscircuit.
• Zorg dat u de machine niet heeft aangesloten op een verlengsnoer of overspanningsbeveiliging.
• Controleer of de machine niet is aangesloten op een uitgang met een aardlekschakelaar of een circuit waar een uitgang met
een aardlekschakelaar op zit.
PROBLEEM: De loopband blijft niet in het midden liggen tijdens het trainen.
OPLOSSING: Controleer het volgende:
• Zorg dat de loopband zich op een effen oppervlak bevindt.
• Controleer of de band stevig aangespannen en gecentreerd is (raadpleeg de onderdelen DELOOPBAND AANSPANNEN en
CENTREREN voor uitgebreide aanwijzingen).
PROBLEEM: De snelheid klopt niet.
OPLOSSING:

NEDERLANDS
138
• Zet de loopband uit en haal de stekker uit het stopcontact.
• Verwijder de schroeven uit de afdekplaat van de motor met een kruiskopschroevendraaier.
• Controleer of de optische sensor in het motorbedieningspaneel ingeplugd is.
• Controleer de kabel/aansluiting van de snelheidssensor op zichtbare beschadiging.
EENVOUDIGE PROBLEEMOPLOSSING
PROBLEEM: Bij hogere hellingniveaus verschijnt er een bericht met de tekst “Fout snelheidsbereik - training wordt beëindigd”.
OPLOSSING:
• Dit is een veiligheidsfunctie die automatisch de stroomtoevoer naar de aandrijfmotor onderbreekt wanneer de
snelheid buiten het bereik valt vanwege de combinatie van de belasting op de band en een hoge hellingsgraad.
• Verlaag het hellingspercentage om te voorkomen dat uw training automatisch wordt beëindigd.
PROBLEEMOPLOSSING HARTSLAGMETERS (ALLEENVOOR HARTSLAGSENSOREN)
Controleer uw trainingsomgeving op bronnen die storing kunnen veroorzaken, zoals fluorescerende lampen, computers,
ondergrondse omheining, inbraakbeveiligingssystemen of apparaten met zware motoren. Deze items kunnen voor een
onregelmatige meting van dehartslag zorgen.
U kunt een onregelmatige meting krijgen bij de volgende omstandigheden:
• De handgrepen met hartslagsensoren worden te hard vastgegrepen. Probeer de druk op de handgrepen wat te verlichten,
terwijl u ze wel blijft vasthouden.
• Voortdurende beweging en trilling doordat de handgrepen constantworden vastgehouden tijdens het trainen. Als u
onregelmatige metingen van de hartslag krijgt, probeer dan de handgrepen alleen vast te houden tijdens het meten van
uwhartslag.
• Als u zwaar ademt tijdens een training.
• Als uw handen beklemd raken omdat u een ring draagt.
• Als uw handen droog of koud zijn. Probeer uw handen vochtig temaken door ze tegen elkaar warm te wrijven.
• Bij personen met zware aritmie.
• Bij personen met aderverkalking of perifere circulatieproblemen.
• Bij personen van wie de huid op de handpalm waar de meting plaatsvindt erg dik is.
NEDERLANDS
139
HULP NODIG?
Als dit probleemoplossingsgedeelte het probleem niet verhelpt, stop dan met het gebruik van het apparaat en schakel de
stroom uit.
Neem dan contact op met de technische klantenservice.
De volgende gegevens kunnen worden gevraagd wanneer ubelt. Zorg dat u deze items bij de hand hebt:
• Naam van model
• Serienummer
• Aankoopbewijs
Enkele gebruikelijke vragen die gesteld kunnen worden omhet probleem op te sporen:
• Hoe lang duurt dit probleem al?
• Vindt dit probleem plaats bij elk gebruik? Bij elke gebruiker?
• Als u een geluid hoort, komt dit dan van de voor- of achterkant? Wat voor geluid is het (bonzen, schuren, kraken, piepen,
enz.)?
• Is de machine onderhouden volgens het ONDERHOUDSSCHEMA?
Door deze en andere vragen te beantwoorden, kunnen de technici de juiste vervangende onderdelen naar u sturen en de nodige
service bieden, zodat zowel u als uw loopband weer aan het werk kunnen!

140
FRANÇAIS

141
Consignes
de sécurité
importantes
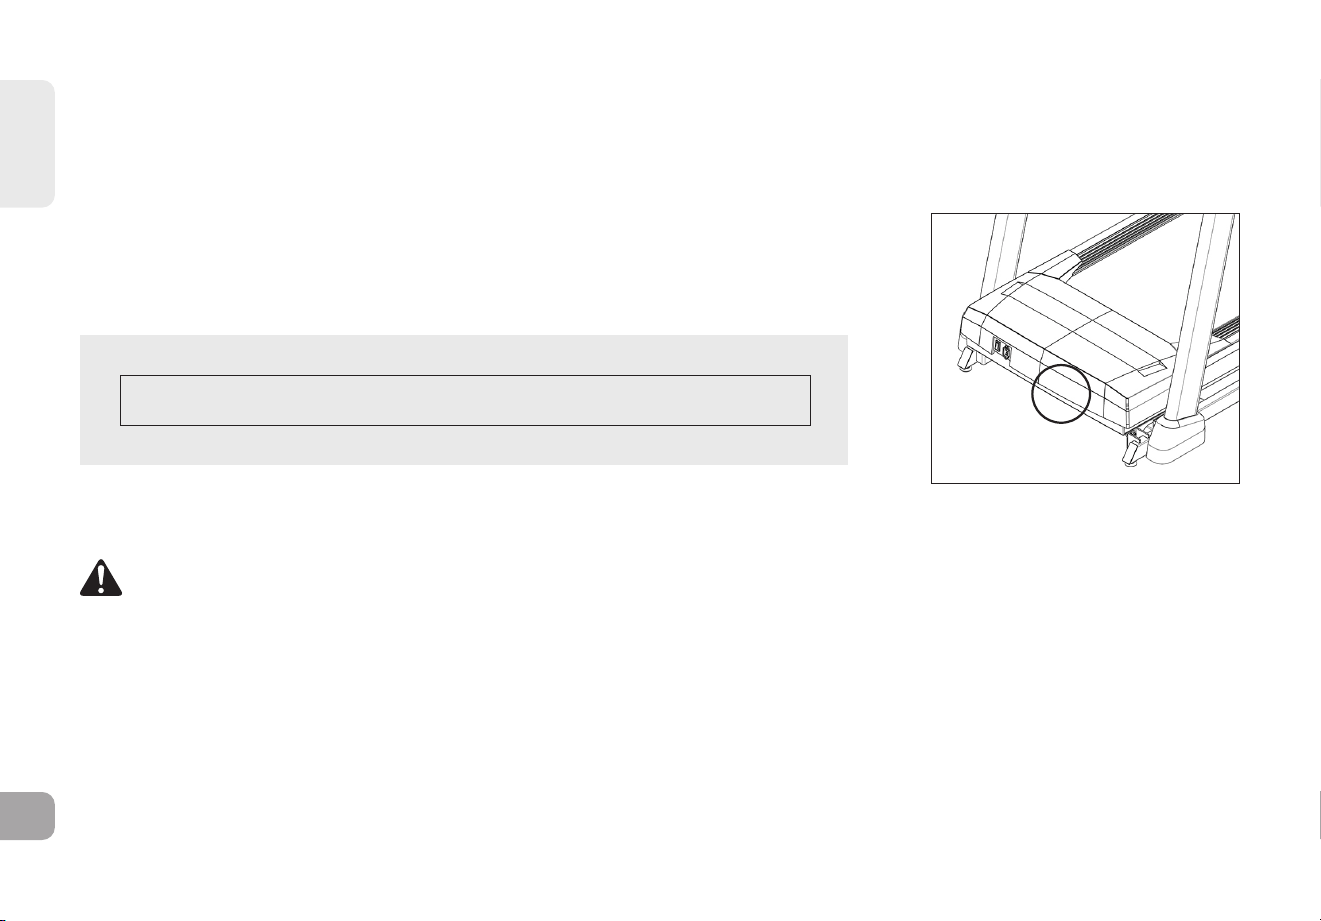
FRANÇAIS
142
Nous vous remercions d'avoir choisi le tapis de course BowFlex T8.5J comme équipement de fitness. Nous vous encourageons
sincèrement à lire attentivement ce manuel du propriétaire avant de commencer le montage de votre équipement, et en
particulier les AVERTISSEMENTS ci-dessous ! LES AVERTISSEMENTS RÉDUIRONT LE RISQUE DE BRÛLURE, D’INCENDIE, DE CHOC
ÉLECTRIQUE OU DE BLESSURE DES PERSONNES.
Avant de commencer, trouvez le numéro de série du tapis de course sur l'autocollant blanc à
codes-barres près de l'interrupteur marche/arrêt et du cordon d'alimentation, puis entrez-le
dans l'espace prévu à cet effet.
NOTEZ VOTRE NUMÉRO DE SÉRIE ET NOM DE MODÈLE DANS LES CASES CI-DESSOUS:
NUMÉRO DE SÉRIE:
NOM DU MODÈLE: BOWFLEX T8.5J
» Référez-vous au NUMÉRO DE SÉRIE et au NOM DE MODÈLE lorsque vous appelez le
service.
• LE NON-RESPECT DE CES INSTRUCTIONS PEUT ENTRAÎNER DES BLESSURES!
• Les systèmes de surveillance de la fréquence cardiaque peuvent être inexacts. S’exercer de manière excessive peut entraîner
des blessures graves ou la mort. Si vous vous sentez mal, arrêtez immédiatement de vous entraîner.
• Lors de l’exécution de tout exercice, maintenez toujours un rythme confortable.
• Si vous ressentez une douleur quelconque, notamment des douleurs à la poitrine, des nausées, des étourdissements ou un
essoufflement, arrêtez immédiatement de faire l’exercice et consultez votre médecin avant de continuer. Un exercice incorrect ou
excessif peut nuire à votre santé.
• Ne portez pas de vêtements susceptibles de se coincer sur une partie quelconque du tapis de course.
• Portez toujours des chaussures de sport lorsque vous utilisez cet équipement.
• Ne sautez pas sur le tapis de course.
AVERTISSEMENT
EMPLACEMENT
DU NUMÉRO DE SÉRIE

FRANÇAIS
143
• Pendant que vous vous entrainez, ne courez pas près du bord du tapis pour éviter tout risque de blessure.
• À aucun moment, plus d’une personne ne doit être sur le tapis de course pendant son fonctionnement.
• Ce tapis de course ne doit pas être utilisé par des personnes pesant plus que le poids indiqué dans la section TECH SPEC. En
cas de non-respect de ces instructions, la garantie sera annulée.
• Lorsque vous abaissez la plateforme du tapis de course, attendez que les pieds arrière soient posés fermement sur le sol avant
de monter sur la plateforme.
• Ne l’utilisez pas sous une couverture ou un oreiller. Une surchauffe peut se produire et provoquer un incendie, une électrocution
ou des blessures.
• Connectez ce produit d’exercice uniquement à une prise correctement mise à la terre.
• Pour la déconnecter, mettez toutes les commandes en position d’arrêt, puis retirez la fiche de la prise.
• Débranchez toutes les sources d’alimentation avant de déplacer l’équipement.
• N’utilisez jamais le produit avec un cordon ou une prise endommagé(e), même s’il fonctionne correctement. N’utilisez jamais le
produit s’il semble endommagé ou s’il a été immergé dans l’eau. Contactez le service d’assistance technique à la clientèle pour
tout remplacement ou réparation afin d’éviter tout danger.
• Le tapis de course ne doit jamais être laissé sans surveillance lorsqu’il est branché. Débranchez-le de la prise de courant
lorsqu’il n’est pas utilisé, et avant de mettre ou de retirer des pièces.
• À aucun moment, les animaux de compagnie et les enfants de moins de 13ans ne doivent s’approcher du tapis de course à moins
de 3mètres.
• Les enfants de moins de 13ans ne doivent à AUCUN moment utiliser le tapis de course.
• Les enfants de plus de 13 ans ou les personnes dont les capacités physiques, sensorielles ou mentales sont réduites ou qui
manquent d’expérience et de connaissances ne doivent pas utiliser le tapis de cours s’ils ne sont pas surveillés ou n’ont pas reçu
d’instructions concernant l’utilisation du tapis de course de la part d’une personne responsable de leur sécurité.
• Ne retirez pas les couvercles protégés, à moins qu’un professionnel et votre revendeur local vous y autorisent. L’entretien ne
doit être effectué que par un technicien de service autorisé.
• Déconnectez la clé de sécurité pour empêcher toute utilisation incontrôlée de tiers.
• Tapis roulants équipés de mains courantes latérales et d’un guidon avant pour le soutien de l’utilisateur et le démontage
d’urgence; appuyez sur le bouton d’urgence pour arrêter la machine en cas de démontage d’urgence.
• Le niveau de bruit du tapis de course est inférieur à 70 dB en l’absence d’utilisateur et supérieur à 70 dB en utilisation. Si le bruit
du tapis roulant vous dérange, arrêtez-vous et faites une pause. L’émission de bruit sous charge est plus élevée que sans charge.
• Assurez-vous que le tapis de course est à l’arrêt complet avant de le plier. Ne faites pas fonctionner le tapis de course quand il
est plié.
• Veuillez noter que les pièces en plastique, telles que les capuchons d’extrémité, sont susceptibles de s’user.
• Le niveau de sécurité du tapis roulant ne peut être maintenu que s’il fait l’objet d’un contrôle régulier pour détecter les traces
de détérioration et d’usure.

FRANÇAIS
144
• Assurez-vous que le bord de la bande de course est parallèle à la position latérale du rail latéral et ne bougez pas sous le rail
latéral. Si la courroie n’est pas centrée elle doit être ajustée avant utilisation.
• Utilisez le tapis de course uniquement pour l’usage prévu, tel que décrit dans le guide du tapis de course et le manuel du
propriétaire.
• N’utilisez pas d’autres accessoires non recommandés par le fabricant. Les accessoires peuvent causer des blessures.
• Renvoyez l’unité à un centre de service pour examen et réparation.
• Tenez le cordon d’alimentation à l’écart des surfaces chauffées. Ne transportez pas cet appareil en le tenant par son cordon
d’alimentation et n’utilisez pas le cordon comme poignée.
• N’utilisez jamais le tapis de course avec l’ouverture d’air bloquée. Gardez l’ouverture d’air propre et exempte de peluches, de
cheveux et autres crasses.
• Pour éviter les chocs électriques, ne laissez jamais tomber ou n’insérez aucun objet dans une ouverture.
• Ne l’utilisez pas lorsque des aérosols (sprays) sont utilisés ou lorsque de l’oxygène est administré.
• Ce tapis de course est destiné à un usage domestique uniquement. En cas de non-respect de ces instructions, la garantie sera
annulée.
• N’utilisez pas le tapis de course dans un endroit où la température n’est pas contrôlée, comme par exemple, les garages, les
vérandas, les salles de billard, les salles de bain, les abris de voiture ou à l’extérieur. Si votre tapis de course a été exposé à des
températures plus froides ou à des climats très humides, il est fortement recommandé de réchauffer le tapis de course jusqu’à
la température ambiante avant la première utilisation. En cas de non-respect de ces instructions, la garantie sera annulée.
• Le tapis de course est lourd; prenez des précautions et demandez de l’aide supplémentaire si nécessaire quand vous le
déplacez. N’essayez pas de déplacer ou de transporter le tapis de course à moins qu’il ne soit en position verticale pliée avec le
loquet de verrouillage bien en place. Le non-respect de ces instructions peut entraîner des blessures.
• Ne déplacez pas et ne sortez pas le tapis de course de son emballage avant que cela ne soit spécifié dans les instructions de
montage. Vous pouvez retirer la pellicule de plastique des montants de la console.
• N’ouvrez jamais l’emballage lorsqu’il est renversé ou placé sur le côté.
• Déballez et assemblez l’appareil à l’endroit où il sera utilisé.
• Le tapis roulant qui se trouve dans l’emballage est équipé de ressorts à haute pression qui peuvent provoquer l’ouverture du
cadre inférieur de la base en cas de mauvaise manipulation.
• Ne retirez pas les caches de la console, sauf si l’assistance technique client vous l’a demandé. L’entretien ne doit être effectué
que par un technicien de service autorisé.
• Prévoir 2 personnes pour le montage afin de faciliter le processus.

FRANÇAIS
145
Si vous avez des question ou besoin d'aide pour des pièces manquantes ou d'une assistance
technique ou d'un entretien pour votre équipement, veuillez contacter le service d'assistance
technique à la clientèle.
VOUS AVEZ
BESOIN D’AIDE?
GARANTIE
Si votre équipement nécessite un service de garantie, veuillez contacter le service d'assistance technique à la clientèle local.
Fabricant: Johnson Health Industry (Vietnam) Co., Ltd. | Adresse du fabricant: Lot CN-24, Thuan Thanh II Industrial Park,
Mao Dien Ward, Bac Ninh Province, Vietnam
SPÉCIFICATIONS TECHNIQUES
Dimensions une fois
assemblé (L x l x h)
193 x 86,4 x 144,8 cm /
76" x 34" x 57"
Poids du produit 85 kg / 187 lbs.
Poids utilisateur max. 147 kg / 325 lbs.
Pour la vidéo d’assemblage, veuillez visiter
https://global.bowflex.com/en/assembly-videos.html
Vous pouvez désormais assembler votre matériel à
votre convenance. Veuillez scanner le code QR sur le
côté gauche pour accéder au manuel complet et à des
instructions sur l’assemblage, le fonctionnement, les
programmes, le dépannage et l’entretien.
Si le scan du code QR échoue, vous pouvez visiter le
site web fourni ici:
https://global.bowflex.com/en/manuals.html
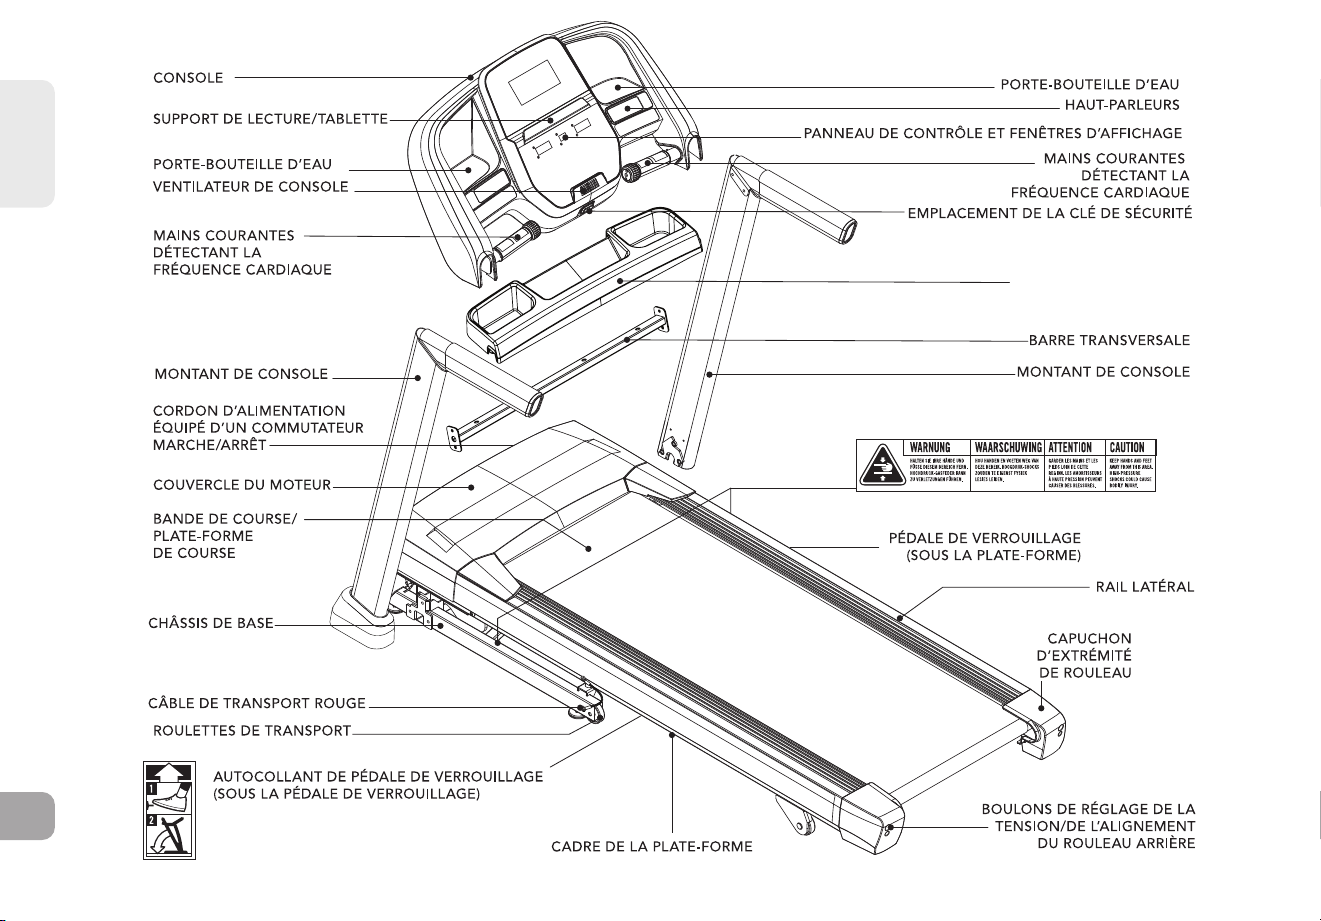
FRANÇAIS
146
PLATEAU DE RANGEMENT

FRANÇAIS
147
OUTILS INCLUS:
F Clé en T de 6mm
F Clé en L de 6mm
F Clé en L de 5mm
PIÈCES INCLUSES:
F 1 console
F 2 montants de console
F 1 barre transversale
F 1 ensemble de pièces dequincaillerie
F 1 clé de sécurité
F 1 câble d’adaptateur audio
F 1 bouteille de lubrifiant àlasilicone
(suffisante pour2applications)
N’ESSAYEZ PAS DE SOULEVER LE TAPIS ROULANT! Ne déplacez pas et ne
soulevez pas le tapis roulant de l’emballage avant que cela ne soit demandé dans
les instructions de montage. Vous pouvez retirer le film plastique des montants de
la console.
AVERTISSEMENT
REMARQUE: Lors de chaque étape de l’assemblage, assurez-vous que TOUS les écrous et
boulons sont en place et partiellement filetés avant de serrer complètement UN seul boulon.
REMARQUE: Une légère application de graisse peut faciliter l’installation du matériel. Toute
graisse, telle que la graisse pour vélo au lithium, est recommandée.
LE NON-RESPECT DE CES CONSIGNES POURRAIT ENTRAÎNER DES BLESSURES!
AVERTISSEMENT
AVERTISSEMENT
N’ouvrez jamais la boîte d’emballage lorsqu’elle est tournée à l’envers ou sur le côté.
Déballez et assemblez l’appareil là où il sera utilisé.
Le tapis roulant ci-joint est équipé de ressorts à haute pression qui pourraient
provoquer l’ouverture soudaine de la partie inférieure du socle si le tapis roulant est
mal manipulé.
Des câbles de transport rouges sont installés entre le cadre supérieur de la plate-
forme et le cadre inférieur de la plate-forme pour empêcher tout mouvement du
cadre inférieur de la plate-forme. Ne retirez PAS les câbles de transport rouges avant
d’y être invité.
AVERTISSEMENT
AVERTISSEMENT
AVERTISSEMENT
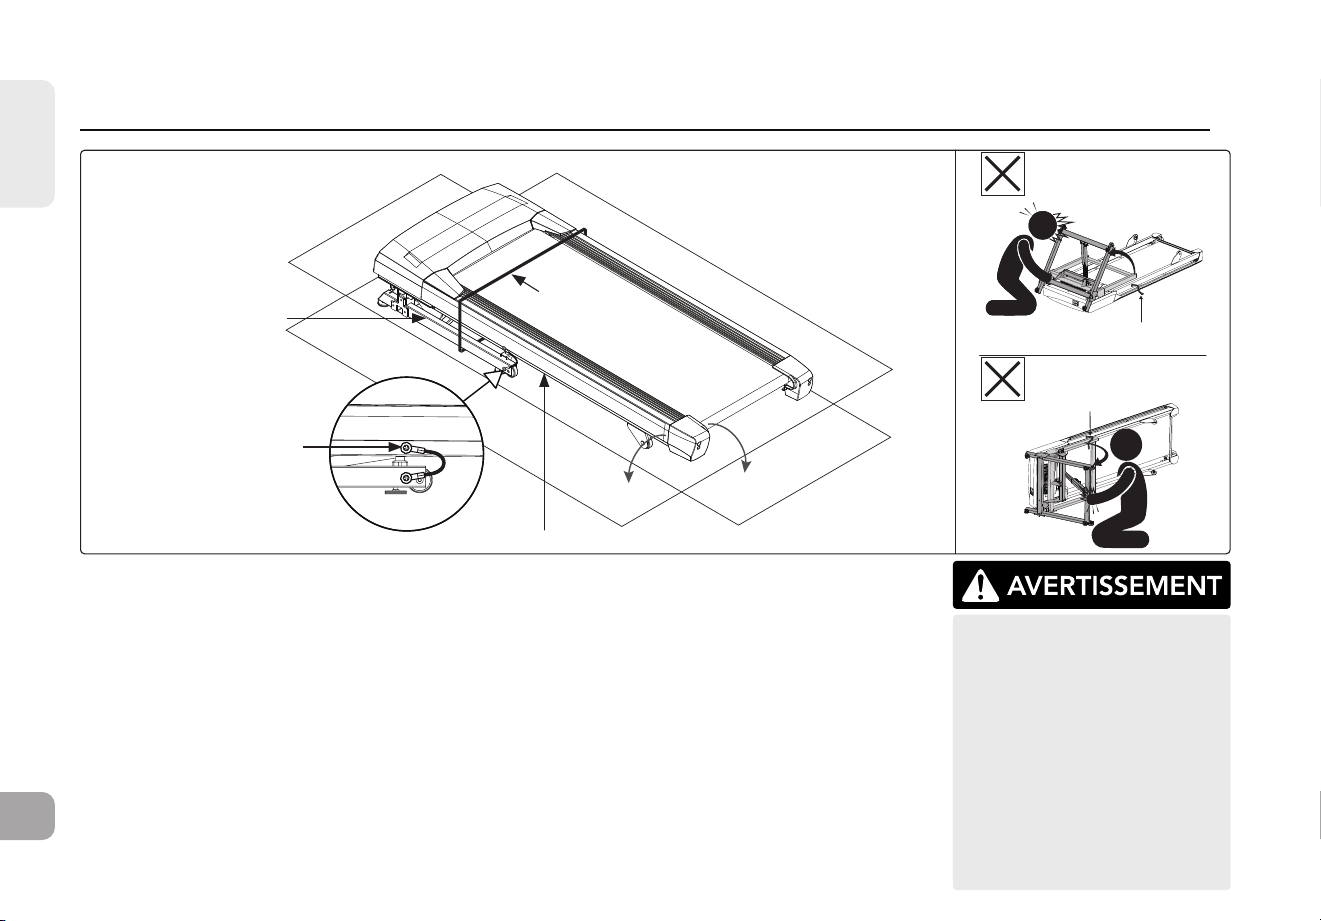
FRANÇAIS
148
CÂBLE DE
TRANSPORT ROUGE
CÂBLE DE
TRANSPORT ROUGE
ÉTAPE D’ASSEMBLAGE - DÉBALLAGE
A Placez le carton du tapis roulant sur une surface plane avec le fond de la boîte reposant sur le sol.
B Coupez les sangles de cerclage à l’extérieur de la boîte, puis retirez le couvercle de la boîte.
C Ne soulevez PAS le tapis roulant hors de la boîte. Au lieu de cela, abattez les coins de la
boîte du tapis roulant comme illustré. Le tapis roulant doit être assemblé sur sa boîte
aplatie, comme illustré, afin de ne pas abîmer la surface du sol.
D Coupez les sangles de cerclage à l’intérieur de la boîte, puis retirez tout sauf le cadre du
tapis roulant.
E Soulevez partiellement la plate-forme du tapis roulant vers le haut, par l’arrière, pour retirer
tout le contenu du dessous de la plate-forme du tapis roulant. Des câbles de transport
rouges de chaque côté du tapis roulant empêchent la plate-forme du tapis roulant de se
soulever complètement.
Ne tournez JAMAIS le
tapis roulant à l’envers
ou sur le côté. N’utilisez
PAS d’outils pour retirer
les câbles de transport
rouges avant d’y être
invité. Si un composant
nécessite des outils pour
être retiré, attendez que
les instructions de montage
vous indiquent comment
retirer ce composant de
manière sécuritaire.
BANDE DE
CERCLAGE
CADRE DE LA PLATE-FORME
CÂBLE DE
TRANSPORT ROUGE
(CÔTÉS GAUCHE ET DROIT)
SOCLE DE BASE
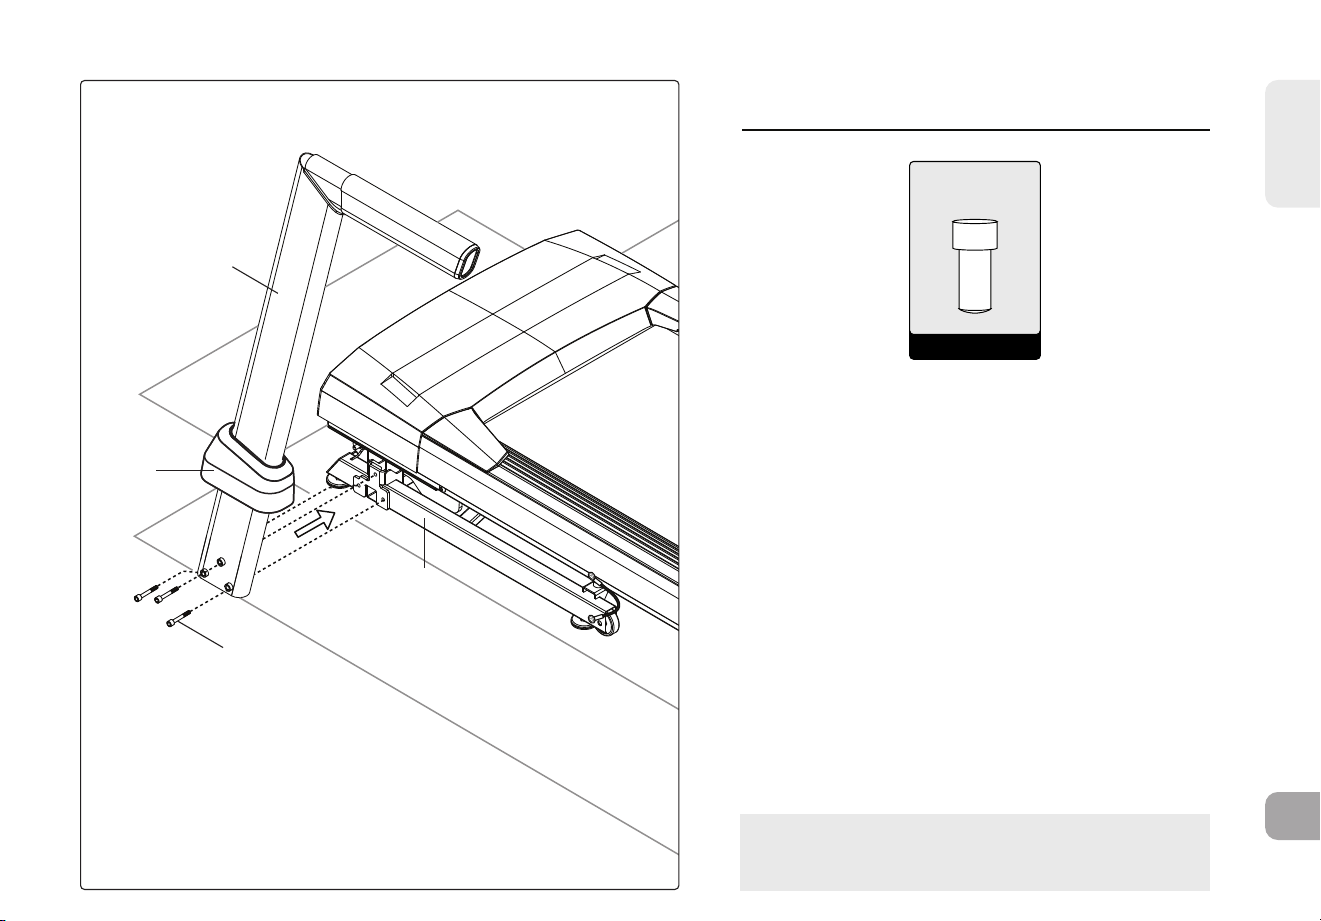
FRANÇAIS
149
A
8
2
1
REMARQUE: ne serrez complètement les boulons
qu’après ASSEMBLAGE ÉTAPE4.
A - QTÉ: 3
Boulon (M8)
ASSEMBLAGE ÉTAPE 1
1.1
Ouvrez LE SACHET CONTENANT LA QUINCAILLERIE
À UTILISER LORS DEL’ÉTAPE1
1.2 Glissez la BOTTE DE MÂT DE CONSOLE GAUCHE
(8) sur le MÂT DE CONSOLE GAUCHE(1).
1.3
Attachez le MONTANT DE CONSOLE GAUCHE (1) au
CADRE DE LA BASE (2) avec 3BOULONS (A).

FRANÇAIS
150
4
9
3
3
A
2
3
REMARQUE: Veillez à ne pincer aucun des fils
pendant l’assemblage de la console.
REMARQUE: ne serrez complètement les boulons
qu’après ASSEMBLAGE ÉTAPE4.
A - QTÉ: 3
Boulon (M8)
ASSEMBLAGE ÉTAPE 2
2.1
Ouvrez LE SACHET CONTENANT LA QUINCAILLERIE À
UTILISER LORS DEL’ÉTAPE2.
2.2 Faites glisser le BOTTE DU MÂT DE LA CONSOLE
DROITE (9) sur le MÂT DROITE DE LA CONSOLE (4).
2.3
Tirez le
CÂBLE DE LA CONSOLE (3)
à l’écart du cadre
de la base du tapis roulant. Branchez le
CÂBLE DE LA
CONSOLE (3)
du
CADRE PRINCIPAL (2)
au
CÂBLE DE
LA CONSOLE (3)
dans le bas du
MONTANT DROIT DE
LA CONSOLE (4)
. L’autre extrémité du
CÂBLE DE LA
CONSOLE (3)
doit être située sur le dessus du montant.
2.4
Fixez le MONTANT DROIT DE LA CONSOLE (4) au CADRE
PRINCIPAL (2) à l’aide de 3BOULONS(A).
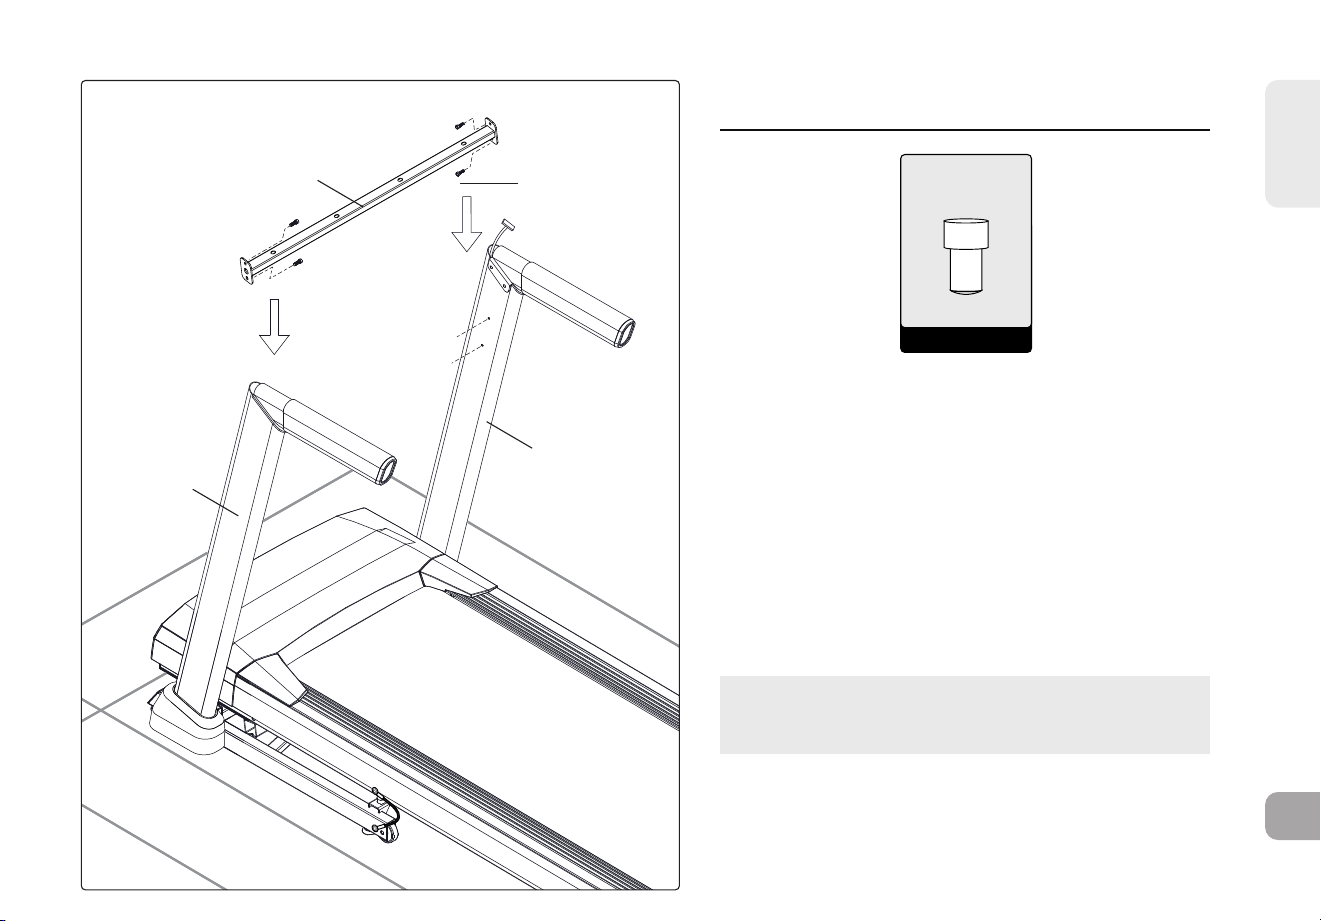
FRANÇAIS
151
REMARQUE: ne serrez complètement les boulons
qu’après ASSEMBLAGE ÉTAPE4.
D
1
6
4
D - QTÉ: 4
Boulon (M6)
ASSEMBLAGE ÉTAPE 3
3.1
Ouvrez LE SACHET CONTENANT LA
QUINCAILLERIE À UTILISER LORS DE L’ÉTAPE3.
3.2 Fixez le CÔTÉ GAUCHE de la BARRE TRAVERSALE
(6) au MONTANT VERTICAL (1) à l’aide de 2
BOULONS (A) sans les serrer.
3.3 Fixez le CÔTÉ GAUCHE de la BARRE TRAVERSALE
(6) au MONTANT VERTICAL (4) à l’aide de 2
BOULONS (D) sans les serrer.

FRANÇAIS
152
B
C
A
(STEP 4.5)
4
3
3
1
5
REMARQUE: Veillez à ne pincer aucun des fils
pendant l’assemblage de la console.
B - QTÉ: 4 C - QTÉ: 4A - QTÉ: 4
Boulon (M8)
Rondelle
Élastique
Rondelle
Plate
ASSEMBLAGE ÉTAPE 4
4.1
Ouvrez LE SACHET CONTENANT LA QUINCAILLERIE À
UTILISER LORS DE L’ÉTAPE4.
4.2
Déposez délicatement la CONSOLE (5) sur les MONTANTS
DE LA CONSOLE (1 ET 4). Fixez d’abord le CÔTÉ GAUCHE à
l’aide de 2BOULONS(A), 2RONDELLES ÉLASTIQUES (B) et
2RONDELLES PLATES (C).
4.3
Les CÂBLES DE LA CONSOLE (3) doivent être glissés dans
le MONTANT DE LA CONSOLE (4). À l’aide du fil de guidage,
tirez soigneusement sur le CÂBLE DE LA CONSOLE (3) pour
l’extraire du MONTANT DE LA CONSOLE (4). Détachez le
FILDE GUIDAGE et jetez-le. Branchez les CÂBLES DE LA
CONSOLE (3) et mettez soigneusement les fils dans les
montants pour éviter les dommages.
4.4
Fixez ensuite le CÔTÉ DROIT de la CONSOLE (5) à l’aide
de 2BOULONS (A), 2RONDELLES ÉLASTIQUES (B) et
2RONDELLES PLATES (C).
4.5
Tirez le haut de la CONSOLE (5) vers l’arrière du tapis
roulant et MAINTENEZ tout en SERRANT LES VIS
LATÉRALES GAUCHE ET DROITE (A).
4.6 N’OUBLIEZ PAS de serrer complètement TOUS LES
BOULONS ET VIS maintenant quel’assemblage est
terminé.

FRANÇAIS
153
6
E
7
E - QTY: 4
Vis
ASSEMBLAGE ÉTAPE 5
5.1 Ouverture du MATÉRIEL POUR L’ÉTAPE 5.
5.2 Attachez le PLATEAU D’ACCESSOIRES (7) à la
BARRE TRANSVERSALE (6) à l’aide de 4 VIS (E).

FRANÇAIS
154
CÂBLE DE TRANSPORT ROUGE
CÂBLE DE TRANSPORT ROUGE
LE NON-RESPECT DE CES CONSIGNES POURRAIT ENTRAÎNER
DES BLESSURES!
Une fois que les câbles de transport rouges ont été détachés
du tapis roulant, des ressorts à haute pression pourraient
provoquer l’ouverture soudaine de la partie inférieure du socle.
Ne tournez JAMAIS le tapis roulant à l’envers ou sur le côté et ne
soulevez JAMAIS cet appareil si les câbles de transport rouges
ne relient pas le cadre supérieur de la plate-forme à la partie
inférieure du socle.
AVERTISSEMENT
ASSEMBLAGE ÉTAPE 6 - RETRAIT DES CÂBLES DE TRANSPORT ROUGES
6.1 Assurez-vous que toutes les roues du tapis roulant reposent sur le sol.
6.2 Sur le côté gauche du tapis roulant, utilisez la clé enL de 5mm
(fournie dans la boîte) pour retirer les deux boulons reliant le câble
de transport rouge au cadre supérieur de la plate-forme et à la
partie inférieure du socle.
6.3 Replacez les deux boulons (un dans le cadre supérieur de la
plate-forme et un dans la partie inférieure du socle) et serrez-
les complètement en place. Notez que pour éviter que la partie
inférieure du socle ne s’ouvre lors du transport ou du démontage
du tapis roulant à l’avenir, le câble de transport rouge peut être
rattaché au tapis roulant à l’aide des mêmes boulons.
6.4 Effectuez la même opération sur le côté droit du tapis roulant pour
retirer les deux boulons reliant le câble de transport rouge au cadre
supérieur de la plate-forme et à la partie inférieure du socle.
6.5 Remettez les deux boulons en place et serrez-les complètement en place.
6.6 Conservez les deux câbles de transport rouges pour une utilisation
future en plaçant les câbles dans un sac en polyéthylène
transparent avec le Manuel du propriétaire.
6.7 Lorsque les câbles de transport rouges ne sont pas installés,
transportez l’appareil UNIQUEMENT sur le sol et UNIQUEMENT
après qu’il soit complètement assemblé et replié en position
verticale avec le loquet de verrouillage sécurisé.

FRANÇAIS
155
F - QTY: 4
Screw
ASSEMBLAGE ÉTAPE 7
7.1 Ouverture du MATÉRIEL POUR L’ÉTAPE 6.
7.2 N’OUBLIEZ PAS de serrer les BOULONS
DE LA BARRE TRANSVERSALE dans les
MÂTS DE CONSOLE (3&4) complètement
maintenant que l’assemblage est terminé.
Soulevez la PLATEFORME (10) en position
verticale et verrouillée.
7.3 Faites glisser LA BOTTE DE CONSOLE
GAUCHE (8) au BAS DU MÂT DE CONSOLE
GAUCHE (1). Fixez avec 2 BOULONS (A) à
travers les trous de LA BOTTE DE CONSOLE
GAUCHE (8) dans LE MÂT VERTICAL
GAUCHE (1).
7.4 Faites glisser LA BOTTE DE CONSOLE
DROIT (9) au BAS DU MÂT DE CONSOLE
DROIT (4). Fixez avec 2 BOULONS (A) à
travers les trous de la BOTTE DE CONSOLE
DROIT (9) dans le MÂT VERTICAL DROIT (4).
Z06x4
F
4
10
1
8
9
9
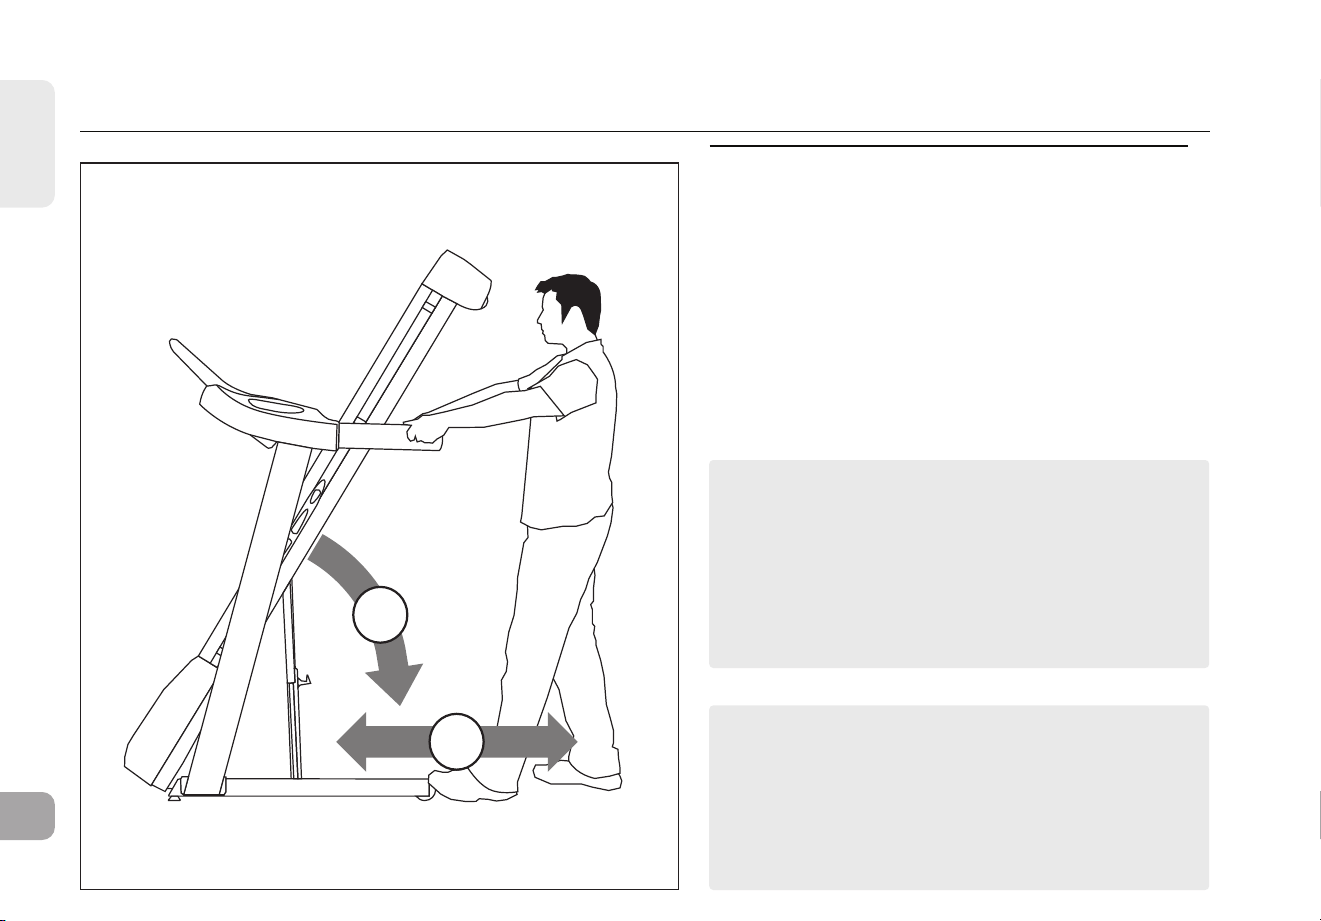
FRANÇAIS
156
1
2
L’ASSEMBLAGE EST TERMINÉ!
Avant la première utilisation, lubrifiez la plate-forme
du tapis roulant en suivant les instructions de la
section d’entretien du guide du tapis roulant.
REMARQUE: Si le tapis roulant doit être démonté
ou levé à l’avenir, utilisez la clé enL de 5mm pour
rattacher les câbles de transport rouges au cadre
supérieur de la plate-forme et à la partie inférieure du
socle sur les côtés gauche et droit du tapis roulant.
Assurez-vous que la partie inférieure du socle ne peut
pas s’ouvrir avant de soulever ou de démonter le tapis
roulant.
ASSEMBLAGE ÉTAPE 8 - TAPIS ROULANT MOBILE
8.1 Pour déplacer l’appareil, assurez-vous que le tapis
roulant est replié et bien verrouillé. Saisissez ensuite
fermement le guidon, inclinez le tapis roulant vers
l’arrière (1) et roulez (2).
8.2 Déplacez le tapis roulant de la boîte aplatie dans sa
position finale, prêt à l’emploi. Jetez la boîte en carton.

157
Installation et
utilisation du
tapis de course
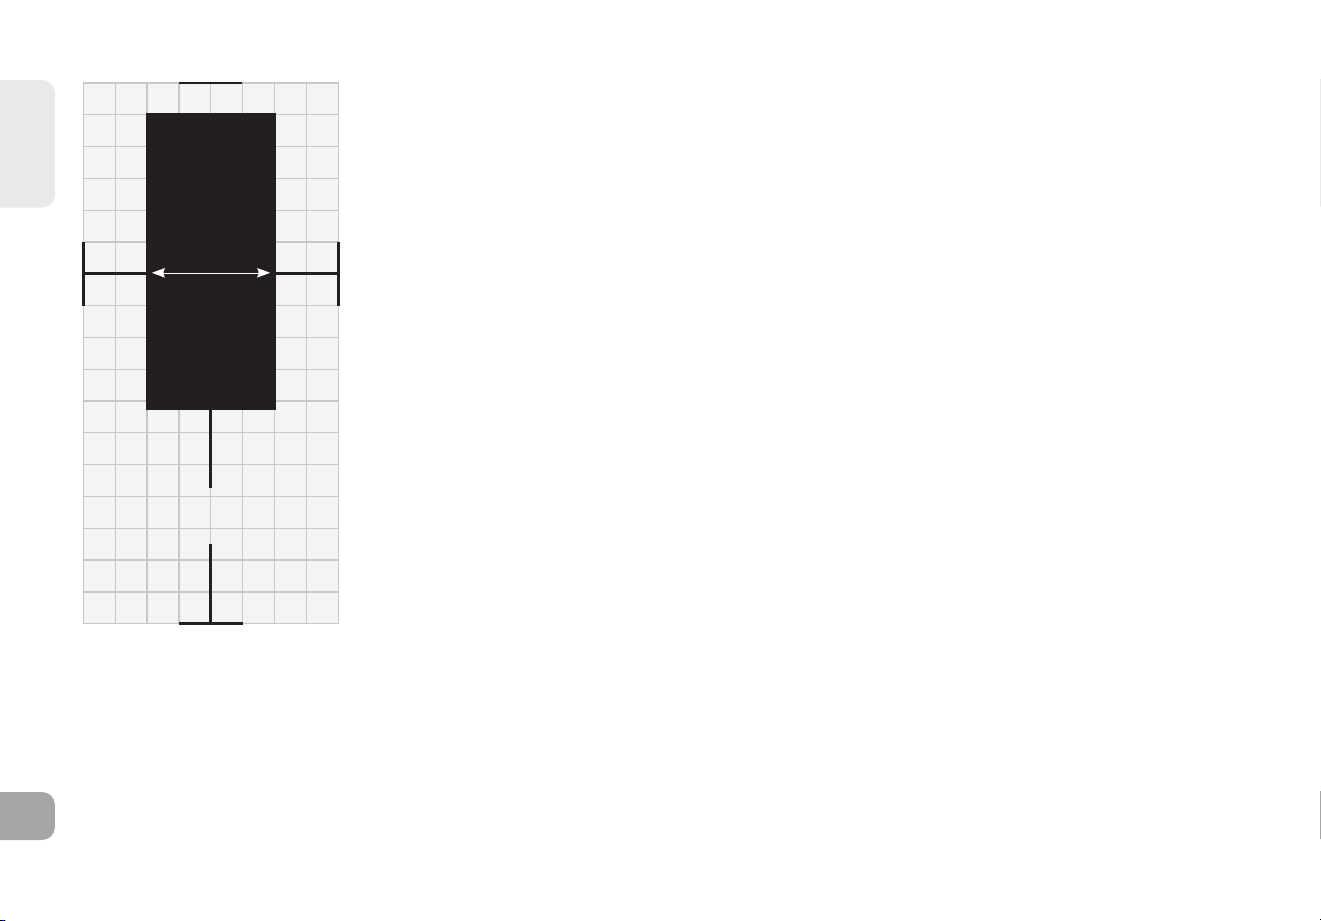
FRANÇAIS
158
EMPLACEMENT DU TAPIS DE COURSE
Placez le tapis de course sur une surface stable et de niveau. Il doit y avoir trente centimètres
d'espace libre devant le tapis de course pour le cordon d'alimentation. Laissez une zone dégagée
derrière le tapis de course d'une longueur minimale de la largeur du tapis de course et d'au moins
2mètres. Cette zone doit être exempte de toute obstruction et fournir à l'utilisateur une voie de
sortie dégagée de la machine. En cas d'urgence, placez vos deux mains sur les accoudoirs pour
vous tenir debout et placez vos pieds sur les rails latéraux.
Pour faciliter l'accès, vous devez disposer d'un espace accessible de préférence des deux côtés du
tapis de course d'au moins 60cm afin de permettre à un utilisateur d'avoir accès au tapis de course
d'un côté ou de l'autre.
Ne placez pas le tapis de course dans un endroit où il serait susceptible de bloquer les ouvertures
d'aération ou de ventilation. Le tapis de course ne doit pas être situé dans un garage, sur une
terrasse couverte, près de l'eau ou à l'extérieur.
INSTRUCTIONS DE LA MISE À LA TERRE
Ce produit doit être mis à la terre. En cas de dysfonctionnement ou de panne, la mise à la terre
fournit un chemin de moindre résistance au courant électrique afin de réduire le risque de
choc électrique. Ce produit est équipé d'un cordon muni d'un conducteur de mise à la terre de
l'équipement et d'une prise de terre. La fiche doit être branchée dans une prise appropriée qui est
correctement installée et mise à la terre conformément à tous les codes et règlements locaux.
DANGER!
• Une mauvaise connexion du conducteur de mise à la terre de l'équipement peut entraîner un risque
de choc électrique. Consultez un électricien qualifié ou un réparateur si vous avez des doutes
quant à la mise à la terre du produit. Ne modifiez pas la fiche fournie avec le produit. Si elle ne
correspond pas à la prise, faites installer une prise adéquate par un électricien qualifié.
• Ce produit est destiné à être utilisé sur un circuit à tension nominale et possède une fiche de
mise à la terre. Aucun adaptateur ne doit être utilisé avec ce produit.
• Ce produit doit être utilisé sur un circuit dédié. Pour déterminer si vous êtes sur un circuit
dédié, mettez ce circuit hors tension et observez si un autre appareil manque de courant. Si tel
est le cas, déplacez les périphériques sur un autre circuit.
Remarque: Il y a généralement plusieurs prises sur un circuit.
60 cm
(2 pi)
60 cm
(2 pi)
2 m (79”)
30 cm (1 pied)
SUPERFICIE
LIBRE
T8.5J

FRANÇAIS
159
UTILISATION DE LA CLÉ DE SÛRETÉ
Votre tapis de course ne démarrera pas si la clé de sécurité n’est pas insérée dans l’emplacement réservé à cet effet. Fixez
solidement le clip de sécurité à l’un de vos vêtements. Cette clé de sécurité est conçue pour couper l’alimentation du tapis de
course en cas de chute. Assurez-vous du bon fonctionnement de la clé de sécurité tous les quinze jours.
AVERTISSEMENT: N’utilisez jamais le tapis de course sans avoir d’abord fixé le clip de sécurité à l’un de vos vêtements. Tirez sur
le clip de sécurité pour vérifier qu’il est fixé solidement à vos vêtements.
ALIMENTATION
Votre tapis de course fonctionne avec une alimentation électrique. Le câble d’alimentation doit être branché au connecteur
d’alimentation situé à l’avant de l’appareil, près de la barre stabilisatrice. Certains tapis de course sont équipés d’un interrupteur
marche/arrêt situé près du connecteur d’alimentation. Assurez-vous que celui-ci est en position «Marche». Débranchez le
câble lorsque l’appareil n’est pas utilisé. REMARQUE: certains tapis de course sont équipés d’un interrupteur marche/arrêt situé
derrière la console.
AVERTISSEMENT: N‘utilisez jamais l‘appareil si le câble d‘alimentation ou la prise est endommagé(e), s‘il ne fonctionne pas
correctement, s‘il a été endommagé ou s‘il a été immergé.
TAPIS DE COURSE PLIANTS
Pour le plier, saisissez fermement l’extrémité arrière du tapis de course. Soulever avec
précaution l’extrémité du plateau du tapis à la verticale jusqu’à ce que le loquet de
verrouillage s’enclenche et verrouille solidement le plateau. Assurez-vous que le plateau
est bien verrouillée avant de la lâcher.
DÉPLIAGE
Saisissez fermement l’extrémité arrière du tapis de course. Pour déplier, appuyez
doucement sur le loquet de verrouillage avec votre pied jusqu’à ce qu’il se relâche.
Abaissez avec soin le plateau sur le sol.
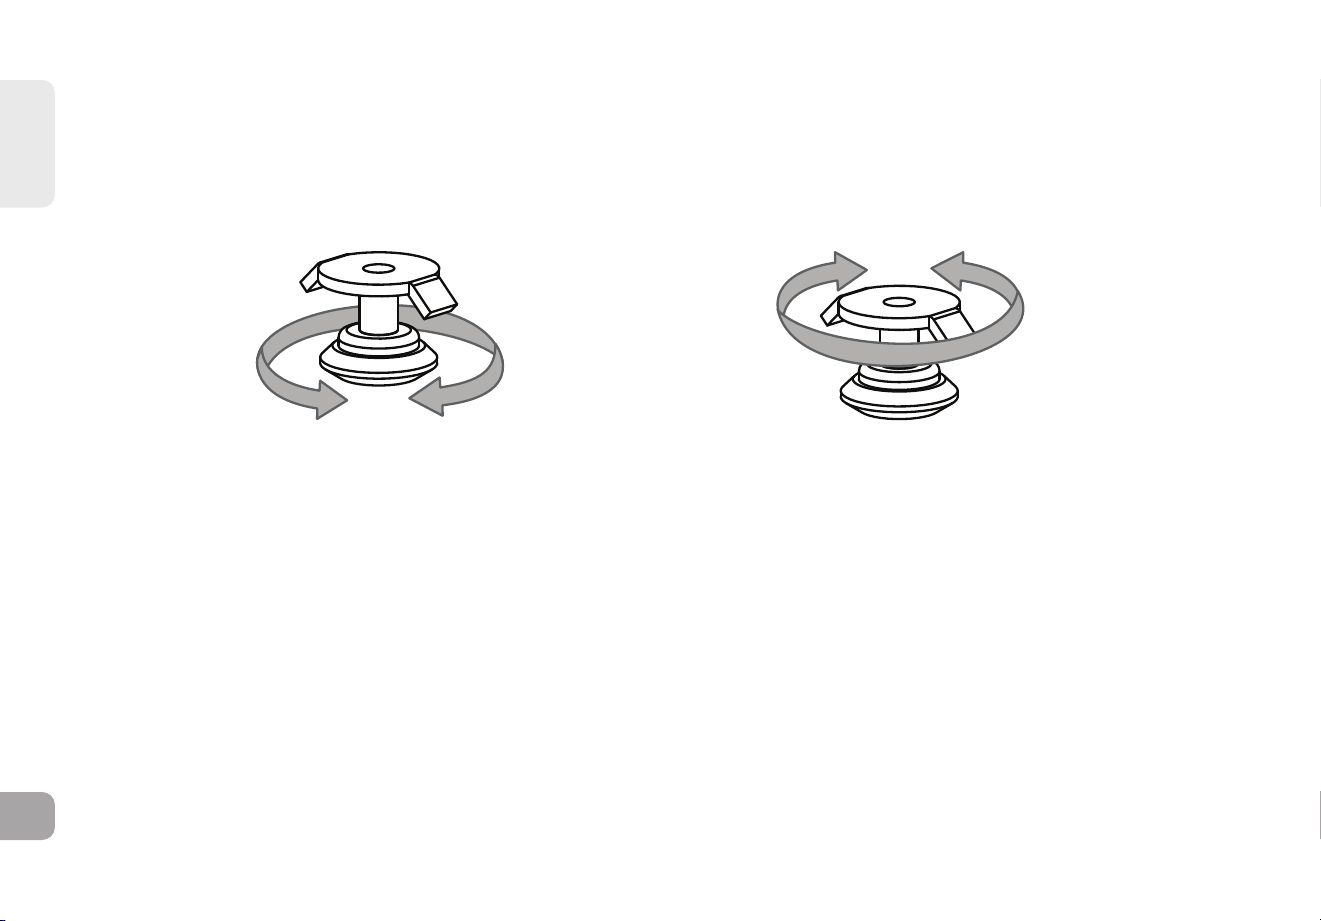
FRANÇAIS
160
MISE DE NIVEAU DU TAPIS DE COURSE
Pour une utilisation optimale, votre appareil doit être mis de niveau. Lorsque le tapis de course est installé à l’emplacement
souhaité, remontez ou descendez l’un des pieds réglables, ou les deux, qui sont situés au bas du châssis du tapis de course.
L’utilisation d’un niveau à bulle est recommandée. La bande de course ne fonctionnera pas correctement si le tapis de course n’est
pas de niveau. Une fois votre tapis de course de niveau, verrouillez la position des pieds réglables en serrant lesécrous contre le
châssis.
RÉGLAGE DE
LA HAUTEUR
RÉGLAGE DU VERROU

FRANÇAIS
161
2
4
6
8
10
12
16
20
Q
M M
P
N
IH
B
R
F G
A
J
O
Q
DS T U SEL K
C

FRANÇAIS
162
FONCTIONNEMENT DE LA CONSOLE
Remarque: Avant d’utiliser la console, enlevez la fine pellicule protectrice en plastique transparent qui la recouvre.
A) FENÊTRES D’AFFICHAGE LCD: Temps, régime, distance, watts, calories, inclinaison, vitesse, fréquence cardiaque, vitesse du ventilateur.
B) ÉCRAN DEL: Temps, Vitesse, Distance, Calories, Inclinaison, Fréquence cardiaque.
C) INDICATEURS D’ENTRAÎNEMENT: indique quel entraînement est réglé pour le programme en cours.
D) DÉMARRAGE: appuyez sur ce bouton pour commencer une séance d’exercice, commencer un entraînement
ou poursuivre l’exercice après une pause.
E) ARRÊT: appuyez sur ce bouton pour mettre sur pause ou arrêter votre entraînement. Maintenez-le enfoncé pendant 3secondes pour
réinitialiser la console.
F) TOUCHES D’INCLINAISON +/-: servent à régler l’inclinaison par petits incréments (incréments de 0,5%).
G) TOUCHES DE VITESSE +/-: servent à régler la vitesse par petits incréments (incréments de 0,16km/h ou 0,1mi/h).
H) TOUCHES DE RÉGLAGE RAPIDE DE L’INCLINAISON: servent à atteindre l’inclinaison désirée plus rapidement.
I) TOUCHES DE RÉGLAGE RAPIDE DE LA VITESSE: servent à atteindre la vitesse désirée plus rapidement.
J) CHANGEMENT DE L’AFFICHAGE: appuyez sur cette touche pour changer l’affichage des résultats pendant une séance
d’entraînement.
K) TOUCHE VENTILATEUR: appuyer sur le bouton du ventilateur changera le niveau 1,2,3 puis s’éteindra
L) VENTILATEUR: ventilateur de conditionnement physique personnel.
M) HAUT-PARLEURS: diffusent la musique par les haut-parleurs lorsque votre lecteur de CD/MP3 est branché à la console.
N) PRISE D’ENTRÉE AUDIO: branchez votre lecteur de CD OU MP3 dans la console à l’aide du câble adaptateur audio inclus.
O) PRISE DE SORTIE AUDIO/PRISE POUR ÉCOUTEURS: branchez vos écouteurs dans cette prise pour écouter votre musique par
l’entremise des écouteurs. Remarque: lorsque les écouteurs sont branchés dans la prise correspondante,
le son n’est plus diffusé par les haut-parleurs.
P) PORT USB: puissance de sortie USB de 1A/5V.
Q) COMPARTIMENTS POUR BOUTEILLE D’EAU: permettent à l’utilisateur de ranger son matériel d’entraînement.
R) SUPPORT DE LECTURE/TABLETTE: sert à poser une tablette ou un livre/périodique.
S) POIGNÉES DÉTECTANT LA FRÉQUENCE CARDIAQUE: utilisées pour mesurer la fréquence cardiaque.
T) MOLETTE D’INCLINAISON : utilisé pour régler l’inclinaison par petits incréments ( .5% ).
U) MOLETTE DE VITESSE : utilisé pour régler la vitesse par petits incréments ( .1 MPH ).

FRANÇAIS
163
FENÊTRES D’AFFICHAGE
•
TEMPS: indiqué selon le format minutes:secondes. Affichage de la durée restante ou écoulée de votre séance d’entraînement.
•
VITESSE: indiquée en mi/h. Affichage de la vitesse de déplacement de la surface de marche ou de course.
•
DISTANCE: indiquée en miles. Affichage de la distance parcourue ou de la distance restante à parcourir durant votre séance
d’entraînement.
•
CALORIES: nombre total de calories brûlées ou de calories restant à brûler au cours de votre séance d’entraînement.
•
INCLINAISON: indiquée en pourcentage. Indique le degré d’inclinaison de la surface de course ou de marche.
•
FRÉQUENCE CARDIAQUE: indique les BPM (battements par minute). Permet à l’utilisateur de surveiller sa fréquence
cardiaque (s’affiche lorsqu’un contact est établi avec les deux poignées détectant la fréquence cardiaque).

FRANÇAIS
164
POUR COMMENCER
1) Assurez-vous qu’il n’y a aucun objet placé sur la courroie qui risquerait de gêner les mouvements du tapis roulant.
2) Branchez le cordon d’alimentation et mettez le tapis roulant sous tension. (L’interrupteur MARCHE/ARRÊT est situé près ducordon
d’alimentation.)
3) Tenez-vous sur les glissières latérales du tapis roulant.
4) Attachez la pince de sécurité sur l’un de vos vêtements et assurez-vous qu’elle est bien fixée et qu’elle ne se détachera paspendant
la séance.
5) Insérez la clé de sûreté dans la serrure de la console.
6) Vous avez deux options pour commencer votre entraînement:
A) MISE EN MARCHE RAPIDE
Appuyez simplement sur la touche DÉMARRAGE pour commencer une séance d’entraînement.
Le temps écoulé, la distance parcourue et les calories brûlées seront calculés à partir de zéro. OU...
B) SÉLECTIONNEZ UN ENTRAÎNEMENT OU UN OBJECTIF
1) Sélectionnez le PROGRAMME avec les boutons +/- et appuyez sur ENTRÉE lorsque le PROGRAMME souhaité est affiché.
2) Ajustez le RÉGLAGE avec les boutons +/- et appuyez sur ENTRÉE lorsque le RÉGLAGE souhaité est affiché.
3) Appuyez sur DÉMARRAGE pour commencer.
SPÉCIFICATIONS POUR LES PROGRAMMES AVEC PLUSIEURS SEGMENTS
1) L’utilisateur peut augmenter la vitesse et l’inclinaison dans un certain segment et cela augmente UNIQUEMENT POUR
CE SEGMENT. Pour les segments suivants, la machine suivra les valeurs du tableau fourni.
2) L’utilisateur peut diminuer la vitesse et l’inclinaison dans n’importe quel segment et cela diminuera du même montant
pour les segments suivants.
SYSTÈME DE CONDITIONNEMENT PHYSIQUE CONNECTÉ BOWFLEX
Votre machine BowFlex est compatible Bluetooth, ce qui vous permet d’utiliser la technologie Bluetooth4.0 pour connecter sans fil votre
appareil et d’autres applications à votre tapis roulant BowFlex.
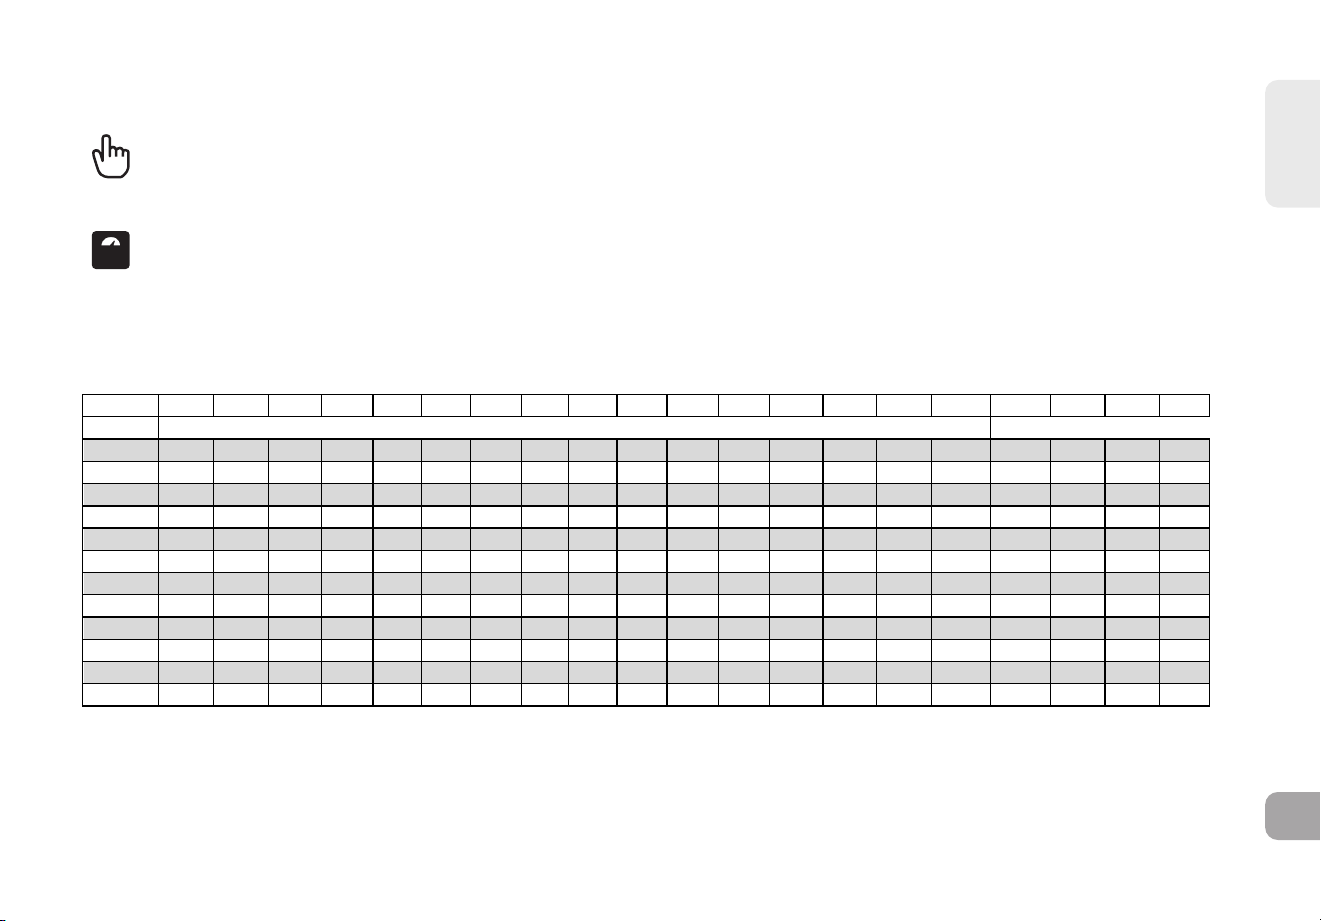
FRANÇAIS
165
P1) MANUEL: ajustez la vitesse et l’inclinaison manuellement pendant votre entraînement.
P2) PERTE DE POIDS: Un entraînement conçu spécifiquement pour cibler le poids. Favorise la perte de poids en augmentant et en
diminuant l’inclinaison, tout en vous maintenant dans votre zone de combustion des graisses. Comprend 20 niveaux.
PROFILS D’ENTRAÎNEMENT
t/',d>K^^
^ĞŐŵĞŶƚсǁŽƌŬŽƵƚƚŝŵĞϭϲ
>ĞǀĞů ϭ Ϯ ϯ ϰ ϱ ϲ ϳ ϴ ϵ ϭϬ ϭϭ ϭϮ ϭϯ ϭϰ ϭϱ ϭϲ ϭϳ ϭϴ ϭϵ ϮϬ
^ĞŐŵĞŶƚ
ϭ Ϭ Ϭ Ϭ Ϭ Ϭ Ϭ ϭ Ϯ Ϯ Ϯϱ Ϯϱ Ϯϱ Ϯϱ Ϯϱ ϯϱ ϱ ϱ ϱ ϱ ϱ
Ϯ Ϭ Ϭ ϭ Ϯ Ϯϱ ϯϱ ϯϱ ϯϱ ϰϱ ϱϱ ϲ ϳ ϳϱ ϴϱ ϵϱ ϭϭ ϭϭ ϭϭ ϭϭϱ ϭϮ
ϯ ϭ Ϯ Ϯ Ϯ Ϯ Ϯ Ϯ Ϯ Ϯ Ϯϱ ϯϱ ϰϱ ϰϱ ϰϱ ϱϱ ϳ ϳϱ ϴϱ ϵ ϭϬ
ϰ ϭϱ ϯϱ ϰ ϱ ϱ ϱ ϱ ϱ ϲ ϳ ϳϱ ϴϱ ϵ ϭϬ ϭϭ ϭϮ ϭϮϱ ϭϯϱ ϭϰ ϭϱ
ϱ ϭ Ϯ Ϯ Ϯ Ϯ Ϯ Ϯϱ ϯϱ ϰ ϰϱ ϰϱ ϰϱ ϱϱ ϳ ϳϱ ϴϱ ϴϱ ϴϱ ϵϱ ϭϭ
ϲ ϭϱ ϯϱ ϯϱ ϯϱ ϱ ϲϱ ϳϱ ϴϱ ϵ ϭϬ ϭϬ ϭϬ ϭϬϱ ϭϭϱ ϭϮϱ ϭϯϱ ϭϯϱ ϭϯϱ ϭϯϱ ϭϯϱ
ϳ ϭ Ϯ Ϯ Ϯ Ϯ Ϯ Ϯϱ ϯϱ ϰ ϰϱ ϱ ϱϱ ϱϱ ϱϱ ϳ ϴϱ ϴϱ ϴϱ ϵ ϭϬ
ϴ ϭϱ ϯϱ ϰ ϱ ϱ ϱ ϱϱ ϲϱ ϳϱ ϴϱ ϵ ϭϬ ϭϬϱ ϭϭϱ ϭϭϱ ϭϮ ϭϯϱ ϭϱ ϭϱ ϭϱ
ϵ ϭϱ ϯϱ ϯϱ ϯϱ ϯϱ ϯϱ ϰ ϱ ϱ ϱϱ ϲ ϳ ϳ ϳ ϴϱ ϭϬ ϭϬϱ ϭϭ ϭϭϱ ϭϮ
ϭϬ ϭ Ϯ Ϯ Ϯ Ϯ Ϯ Ϯϱ ϯϱ ϰ ϰϱ ϰϱ ϰϱ ϰϱ ϰϱ ϲϱ ϴϱ ϴϱ ϴϱ ϵ ϭϬ
ϭϭ ϭϱ ϯϱ ϯϱ ϯϱ ϰ ϱ ϱ ϱ ϲ ϳ ϴϱ ϭϬ ϭϬϱ ϭϭϱ ϭϮϱ ϭϯϱ ϭϯϱ ϭϯϱ ϭϰ ϭϱ
ϭϮ ϭ Ϯ Ϯ Ϯ Ϯ Ϯ Ϯ Ϯ ϯ ϰϱ ϱϱ ϳ ϳ ϳ ϳϱ ϴϱ ϵ ϭϬ ϭϬ ϭϬ
ϭϯ ϭϱ ϯϱ ϰ ϱ ϱϱ ϲϱ ϳϱ ϴϱ ϴϱ ϴϱ ϵ ϭϬ ϭϬ ϭϬ ϭϭ ϭϮ ϭϮ ϭϮ ϭϮϱ ϭϯϱ
ϭϰ ϭ Ϯ Ϯ Ϯ Ϯϱ ϯϱ ϰ ϱ ϱ ϱϱ ϱϱ ϱϱ ϳ ϴϱ ϵ ϭϬ ϭϬϱ ϭϭ ϭϭϱ ϭϮ
ϭϱ Ϭ Ϭ Ϭ Ϭ ϭ Ϯ Ϯϱ ϯϱ ϰ ϰϱ ϰϱ ϰϱ ϱ ϱϱ ϳ ϴϱ ϵ ϭϬ ϭϬ ϭϬ
ϭϲ Ϭ Ϭ Ϭ Ϭ Ϭ Ϭ ϭ Ϯ Ϯ Ϯϱ Ϯϱ Ϯϱ Ϯϱ Ϯϱ ϯϱ ϱ ϱ ϱ ϱ ϱ
t/',d>K^^;ϭϬйŝŶĐůŝŶĞDĂdžͿ
^ĞŐŵĞŶƚсǁŽƌŬŽƵƚƚŝŵĞϭϲ
>ĞǀĞů ϭ Ϯ ϯ ϰ ϱ ϲ ϳ ϴ ϵ ϭϬ ϭϭ ϭϮ ϭϯ ϭϰ ϭϱ ϭϲ ϭϳ ϭϴ ϭϵ ϮϬ
^ĞŐŵĞŶƚ
ϭ Ϭ Ϭ Ϭ Ϭ Ϭ Ϭ ϭ Ϯ Ϯ Ϯϱ Ϯϱ Ϯϱ Ϯϱ Ϯϱ ϯϱ
ϱ ϱ ϱ ϱ ϱ
Ϯ Ϭ Ϭ ϭ Ϯ Ϯϱ ϯϱ ϯϱ ϯϱ ϰϱ ϱϱ ϲ ϳ ϳϱ ϴϱ ϵϱ ϭϬ ϭϬ ϭϬ ϭϬ ϭϬ
ϯ ϭ Ϯ Ϯ Ϯ Ϯ Ϯ Ϯ Ϯ Ϯ Ϯϱ ϯϱ ϰϱ ϰϱ ϰϱ ϱϱ ϳ ϳϱ ϴϱ ϵ ϭϬ
ϰ ϭϱ ϯϱ ϰ ϱ ϱ ϱ ϱ ϱ ϲ ϳ ϳϱ ϴϱ ϵ ϭϬ ϭϬ ϭϬ ϭϬ ϭϬ ϭϬ ϭϬ
ϱ ϭ Ϯ Ϯ Ϯ Ϯ Ϯ Ϯϱ ϯϱ ϰ ϰϱ ϰϱ ϰϱ ϱϱ ϳ ϳϱ ϴϱ ϴϱ ϴϱ ϵϱ ϭϬ
ϲ ϭϱ ϯϱ ϯϱ ϯϱ ϱ ϲϱ ϳϱ ϴϱ ϵ ϭϬ ϭϬ ϭϬ ϭϬ ϭϬ ϭϬ ϭϬ ϭϬ ϭϬ ϭϬ ϭϬ
ϳ ϭ Ϯ Ϯ Ϯ Ϯ Ϯ Ϯϱ ϯϱ ϰ ϰϱ ϱ ϱϱ ϱϱ ϱϱ ϳ ϴϱ ϴϱ ϴϱ ϵ ϭϬ
ϴ ϭϱ ϯϱ ϰ ϱ ϱ ϱ ϱϱ ϲϱ ϳϱ ϴϱ ϵ ϭϬ ϭϬ ϭϬ ϭϬ ϭϬ ϭϬ ϭϬ ϭϬ ϭϬ
ϵ ϭϱ ϯϱ ϯϱ ϯϱ ϯϱ ϯϱ ϰ ϱ ϱ ϱϱ ϲ ϳ ϳ ϳ ϴϱ ϭϬ ϭϬ ϭϬ ϭϬ ϭϬ
ϭϬ ϭ Ϯ Ϯ Ϯ Ϯ Ϯ Ϯϱ ϯϱ ϰ ϰϱ ϰϱ ϰϱ ϰϱ ϰϱ ϲϱ ϴϱ ϴϱ ϴϱ ϵ ϭϬ
ϭϭ ϭϱ ϯϱ ϯϱ ϯϱ ϰ ϱ ϱ ϱ ϲ ϳ ϴϱ ϭϬ ϭϬ ϭϬ ϭϬ ϭϬ ϭϬ ϭϬ ϭϬ ϭϬ
ϭϮ ϭ Ϯ Ϯ Ϯ Ϯ Ϯ Ϯ Ϯ ϯ ϰϱ ϱϱ ϳ ϳ ϳ ϳϱ ϴϱ ϵ ϭϬ ϭϬ ϭϬ
ϭϯ ϭϱ ϯϱ ϰ ϱ ϱϱ ϲϱ ϳϱ ϴϱ ϴϱ ϴϱ ϵ ϭϬ ϭϬ ϭϬ ϭϬ ϭϬ ϭϬ ϭϬ ϭϬ ϭϬ
ϭϰ ϭ Ϯ Ϯ Ϯ Ϯϱ ϯϱ ϰ ϱ ϱ ϱϱ ϱϱ ϱϱ ϳ ϴϱ ϵ ϭϬ ϭϬ ϭϬ ϭϬ ϭϬ
ϭϱ Ϭ Ϭ Ϭ Ϭ ϭ Ϯ Ϯϱ ϯϱ ϰ ϰϱ ϰϱ ϰϱ ϱ ϱϱ ϳ ϴϱ ϵ ϭϬ ϭϬ ϭϬ
ϭϲ Ϭ Ϭ Ϭ Ϭ Ϭ Ϭ ϭ Ϯ Ϯ Ϯϱ Ϯϱ Ϯϱ Ϯϱ Ϯϱ ϯϱ ϱ ϱ ϱ ϱ ϱ
t/',d>K^^;ϭϮйŝŶĐůŝŶĞDĂdžͿ
^ĞŐŵĞŶƚсǁŽƌŬŽƵƚƚŝŵĞϭϲ
>ĞǀĞů ϭ Ϯ ϯ ϰ ϱ ϲ ϳ ϴ ϵ ϭϬ ϭϭ ϭϮ ϭϯ ϭϰ ϭϱ ϭϲ ϭϳ ϭϴ ϭϵ ϮϬ
^ĞŐŵĞŶƚ
ϭ Ϭ Ϭ Ϭ Ϭ Ϭ Ϭ ϭ Ϯ Ϯ Ϯϱ Ϯϱ Ϯϱ Ϯϱ Ϯϱ ϯϱ ϱ ϱ ϱ ϱ ϱ
Ϯ Ϭ Ϭ ϭ Ϯ Ϯϱ ϯϱ ϯϱ ϯϱ ϰϱ ϱϱ ϲ ϳ ϳϱ ϴϱ ϵϱ ϭϭ ϭϭ ϭϭ ϭϭϱ ϭϮ
ϯ ϭ Ϯ Ϯ Ϯ Ϯ Ϯ Ϯ Ϯ Ϯ Ϯϱ ϯϱ ϰϱ ϰϱ
ϰϱ ϱϱ ϳ ϳϱ ϴϱ ϵ ϭϬ
ϰ ϭϱ ϯϱ ϰ ϱ ϱ ϱ ϱ ϱ ϲ ϳ ϳϱ ϴϱ ϵ ϭϬ ϭϭ ϭϮ ϭϮ ϭϮ ϭϮ ϭϮ
ϱ ϭ Ϯ Ϯ Ϯ Ϯ Ϯ Ϯϱ ϯϱ ϰ ϰϱ ϰϱ ϰϱ ϱϱ ϳ ϳϱ ϴϱ ϴϱ ϴϱ ϵϱ ϭϭ
ϲ ϭϱ ϯϱ ϯϱ ϯϱ ϱ ϲϱ ϳϱ ϴϱ ϵ ϭϬ ϭϬ ϭϬ ϭϬϱ ϭϭϱ ϭϮ ϭϮ ϭϮ ϭϮ ϭϮ ϭϮ
ϳ ϭ Ϯ Ϯ Ϯ Ϯ Ϯ Ϯϱ ϯϱ ϰ ϰϱ ϱ ϱϱ ϱϱ ϱϱ ϳ ϴϱ ϴϱ ϴϱ ϵ ϭϬ
ϴ ϭϱ ϯϱ ϰ ϱ ϱ ϱ ϱϱ ϲϱ ϳϱ ϴϱ ϵ ϭϬ ϭϬϱ ϭϭϱ ϭϭϱ ϭϮ ϭϮ ϭϮ ϭϮ ϭϮ
ϵ ϭϱ ϯϱ ϯϱ ϯϱ ϯϱ ϯϱ ϰ ϱ ϱ ϱϱ ϲ ϳ ϳ ϳ ϴϱ ϭϬ ϭϬϱ ϭϭ ϭϭϱ ϭϮ
ϭϬ ϭ Ϯ Ϯ Ϯ Ϯ Ϯ Ϯϱ ϯϱ ϰ ϰϱ ϰϱ ϰϱ ϰϱ ϰϱ ϲϱ ϴϱ ϴϱ ϴϱ ϵ ϭϬ
ϭϭ ϭϱ ϯϱ ϯϱ ϯϱ ϰ ϱ ϱ ϱ ϲ ϳ ϴϱ ϭϬ ϭϬϱ ϭϭϱ ϭϮ ϭϮ ϭϮ ϭϮ ϭϮ ϭϮ
ϭϮ ϭ Ϯ Ϯ Ϯ Ϯ Ϯ Ϯ Ϯ ϯ ϰϱ ϱϱ ϳ ϳ ϳ ϳϱ ϴϱ ϵ ϭϬ ϭϬ ϭϬ
/E>/E
/E>/E
/E>/E

FRANÇAIS
166
P3) INTERVALLES: augmentent votre force, votre vitesse et votre endurance en augmentant et en diminuant la vitesse tout au long
de votre séance d’entraînement pour faire travailler votre coeur et vos autres muscles. Comprend 10 niveaux
La vitesse et l’inclinaison varient et les segments se répètent toutes les 30secondes.
P4) DISTANCE: allez toujours plus loin lors de l’entraînement avec 13entraînements basés sur la distance. Choisissez parmi un
entraînement de 1mile, 2miles, 5km, 5miles, 10km, 8miles, 15km, 10miles, 20km, un semi-marathon, 15miles, 20miles ou un
entraînement basé sur des objectifs de marathon. L’utilisateur règle la vitesse de départ.
P5) CALORIES: fixez des objectifs pour brûler des calories. Les calories brûlées sont calculées en fonction de la distance et de la vitesse.
Intervals (15%Incline)
Segment =workout time/16
Level 1 2 3 4 5 6 7 8 9 10 11 12 13 14 15 16 17 18 19 20
Segment
1 0 0 0 0 0 0 0 0 0 0 0 0 0 0 0 0 0 0 0 0
2 0.5 0.5 0.5 0.5 0.5 0.5 0.5 0.5 1 1 1 1 1 1 1 1.5 1.5 1.5 1.5 1.5
3 0 0 0 0 0 0 0 0 0 0 0 0 0 0 0 0 0 0 0 0
4 1.5 2 2 2.5 3 3 3.5 3.5 4 4.5 5 5.5 5.5 6 6 6.5 7 7 8 8.5
5 0 0 0 0 0 0 0 0 0 0 0 0 0 0 0 0 0 0 0 0
6 2.5 2.5 3 3.5 4 4.5 4.5 5 5.5 6 7 7.5 8 8 8.5 9.5 9.5 10 11 11.5
7 0 0 0 0 0 0 0 0 0 0 0 0 0 0 0 0 0 0 0 0
8 3 3.5 4 4.5 5 5.5 6 6.5 7 8 9 9.5 10 10.5 11 12 12.5 13 14 15
9 0 0 0 0 0 0 0 0 0 0 0 0 0 0 0 0 0 0 0 0
10 3 3.5 4 4.5 5 5.5 6 6.5 7 8 9 9.5 10 10.5 11 12 12.5 13 14 15
11 0 0 0 0 0 0 0 0 0 0 0 0 0 0 0 0 0 0 0 0
12 3 3.5 4 4.5 5 5.5 6 6.5 7 8 9 9.5 10 10.5 11 12 12.5 13 14 15
13 0 0 0 0 0 0 0 0 0 0 0 0 0 0 0 0 0 0 0 0
14 3 3.5 4 4.5 5 5.5 6 6.5 7 8 9 9.5 10 10.5 11 12 12.5 13 14 15
15 0 0 0 0 0 0 0 0 0 0 0 0 0 0 0 0 0 0 0 0
16 3 3.5 4 4.5 5 5.5 6 6.5 7 8 9 9.5 10 10.5 11 12 12.5 13 14 15
Intervals (10%Incline)
Segment =workout time/16
Level 1 2 3 4 5 6 7 8 9 10 11 12 13 14 15 16 17 18 19 20
Segment
1 0 0 0 0 0 0 0 0 0 0 0 0 0 0 0 0 0 0 0 0
2 0.5 0.5 0.5 0.5 0.5 0.5 0.5 0.5 1 1 1 1 1 1 1 1.5 1.5 1.5 1.5 1.5
3 0 0 0 0 0 0 0 0 0 0 0 0 0 0 0 0 0 0 0 0
4 1.5 2 2 2.5 3 3 3.5 3.5 4 4.5 5 5.5 5.5 6 6 6.5 7 7 8 8.5
5 0 0 0 0 0 0 0 0 0 0 0 0 0 0 0 0 0 0 0 0
6 2.5 2.5 3 3.5 4 4.5 4.5 5 5.5 6 7 7.5 8 8 8.5 9.5 9.5 10 10 10
7 0 0 0 0 0 0 0 0 0 0 0 0 0 0 0 0 0 0 0 0
8 3 3.5 4 4.5 5 5.5 6 6.5 7 8 9 9.5 10 10 10 10 10 10 10 10
9 0 0 0 0 0 0 0 0 0 0 0 0 0 0 0 0 0 0 0 0
10 3 3.5 4 4.5 5 5.5 6 6.5 7 8 9 9.5 10 10 10 10 10 10 10 10
11 0 0 0 0 0 0 0 0 0 0 0 0 0 0 0 0 0 0 0 0
12 3 3.5 4 4.5 5 5.5 6 6.5 7 8 9 9.5 10 10 10 10 10 10 10 10
13 0 0 0 0 0 0 0 0 0 0 0 0 0 0 0 0 0 0 0 0
14 3 3.5 4 4.5 5 5.5 6 6.5 7 8 9 9.5 10 10 10 10 10 10 10 10
15 0 0 0 0 0 0 0 0 0 0 0 0 0 0 0 0 0 0 0 0
16 3 3.5 4 4.5 5 5.5 6 6.5 7 8 9 9.5 10 10 10 10 10 10 10 10
Segment =workout time/16
Intervals (12%Incline)
Level 1 2 3 4 5 6 7 8 9 10 11 12 13 14 15 16 17 18 19 20
Segment
INCLINE
INCLINE
INCLINE
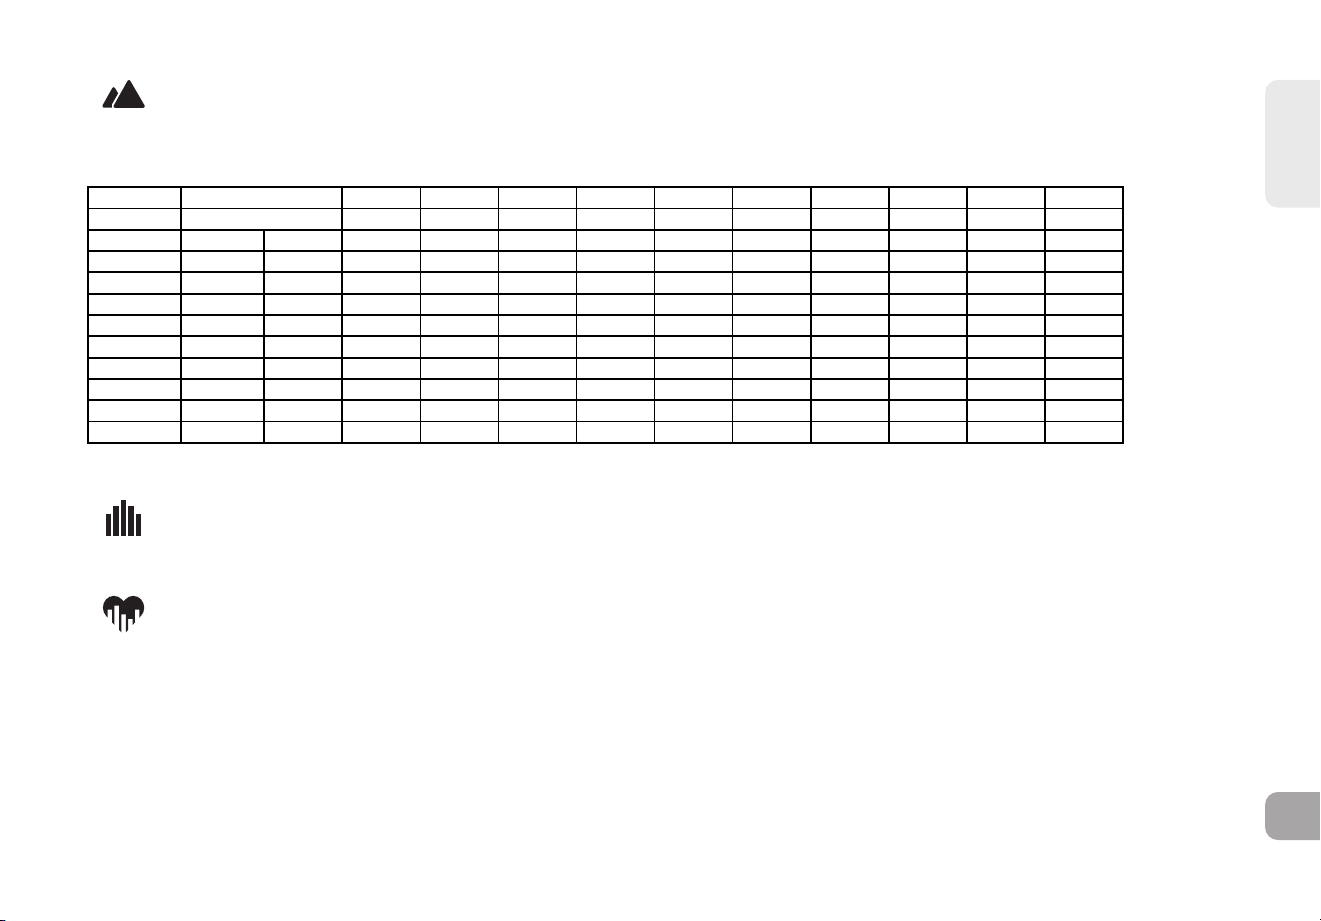
FRANÇAIS
167
Segment 1 2 3 4 5 6 7 8 9 10
Temps 30 s 30 s 30 s 30 s 30 s 30 s 30 s 30 s 30 s 30 s
Niveau 1 0 0 1 1,5 2 2,5 3 3 2,5 2 1,5 1
Niveau 2 0 0 1,5 2 2,5 3 3,5 3,5 3 2,5 2 1,5
Niveau 3 0 1 2 2,5 3 3,5 4 4 3,5 3 2,5 2
Niveau 4 0 1,5 2,5 3 3,5 4 4,5 4,5 4 3,5 3 2,5
Niveau 5 0 1,5 3 3,5 4 4,5 5 5 4,5 4 3,5 3
Niveau 6 0 1,5 3,5 4 4,5 5 5,5 5,5 5 4,5 4 3,5
Niveau 7 0 1,5 4 4,5 5 5,5 6 6 5,5 5 4,5 4
Niveau 8 0 2 4,5 5 5,5 6 6,5 6,5 6 5,5 5 4,5
Niveau 9 0 2 5 5,5 6 6,5 7 7 6,5 6 5,5 5
Niveau 10 0 2 5,5 6 6,5 7 7,5 7,5 7 6,5 6 5,5
Échauffement
4:00 min
P6) MONTÉE: simule la montée et la descente d’une colline. Ce programme aide à tonifier les muscles et à améliorer la capacité
cardiovasculaire.
La vitesse et l’inclinaison varient et les segments se répètent toutes les 30secondes.
P7) PERSONNALISÉ: vous permet de créer et de refaire la séance d’entraînement idéale pour vous avec une vitesse, une inclinaison
et unedurée ou une distance spécifiques. Ce qu’il y a de mieux en matière de programmation personnalisée. Ce programme est
basé surun objectif de temps ou de distance.
P8) FRÉQUENCE CARDIAQUE CIBLE: ce programme est conçu pour vous aider à améliorer votre santé cardiovasculaire globale.
Vous réglez simplement votre fréquence cardiaque cible. Le programme surveille et ajuste ensuite le niveau d’intensité afin de maintenir
votre fréquence cardiaque dans votre plage cible pendant votre exercice, une méthode éprouvée pour maximiser vos objectifs de perte
de poids et de conditionnement physique. Une ceinture cardio-fréquencemètre doit être portée pendant toute la durée du programme.
Voirci-dessous pour calculer votre fréquence cardiaque cible.
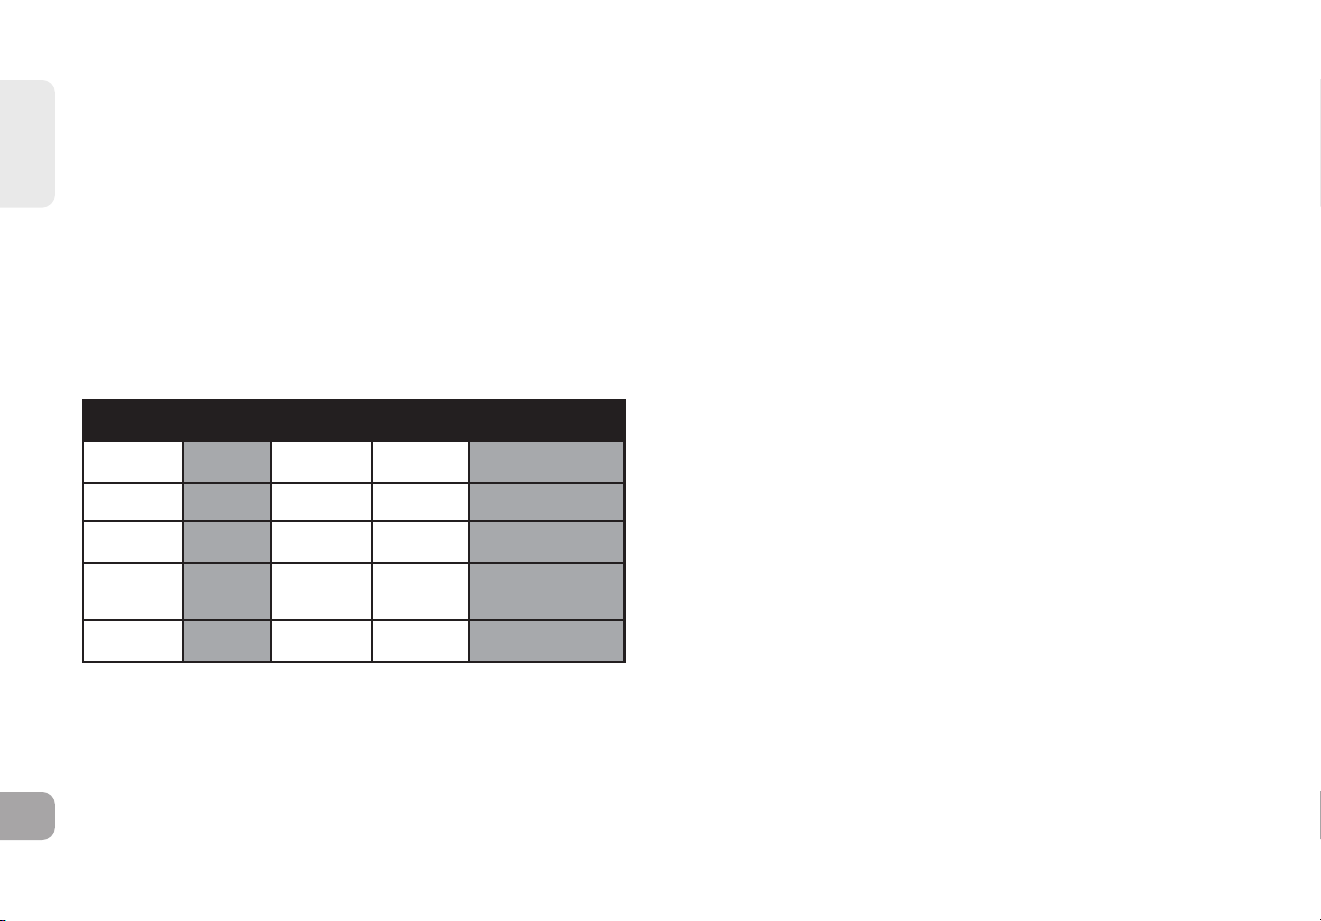
FRANÇAIS
168
Calcul de votre fréquence cardiaque cible
La première étape pour connaître la bonne intensité pour votre entraînement est de trouver la fréquence cardiaque maximale de l’utilisateur
(FC max. = 220 – âge de l’utilisateur). La méthode basée sur l’âge offre une prévision statistique moyenne de votre FC maximale et convient àla
majorité des gens, particulièrement à ceux qui sont nouvellement initiés à l’entraînement en fonction de la fréquence cardiaque.
La façon la plus précise et juste de déterminer la FC maximale d’un individu est de la faire tester en clinique par un cardiologue ou un
physiologiste de l’exercice qui lui fera passer un test à l’effort maximal. Si l’utilisateur a plus de 40 ans, présente un surpoids, a été sédentaire
pendant plusieurs années ou a des antécédents de maladies cardiaques dans sa famille, il est recommandé d’effectuer un test clinique.
Ce tableau contient des exemples de plages de fréquence cardiaque pour une personne de 30 ans qui fait de l’exercice selon 5 zones de
fréquence cardiaque différentes. Par exemple, la FC maximale d’un homme de 30 ans est de 220 – 30 = 190 bpm, et 90% de la FC maximale
équivaut à 190 x 0,9 = 171 bpm.
Durée de
la séance
d’entraînement
Exemple
de FCC
(30 ans)
Votre FCC Recommandé pour
< 5 min 171 - 190 BPM
Personnes en bonne
forme physique pour un
entraînement athlétique
TRÈS DIFFICILE
90 – 100%
2 - 10 min 152 - 171 BPM
Séances d’entraînement
plus courtes
DIFFICILE
80 – 90 %
10 - 40 min 133 - 152 BPM
Séances d’entraînement
modérément longues
MODÉRÉE
70 – 80 %
40 - 80 min
114 - 133 BPM
Séances d’entraînement
plus longues et avec des
exercices de routine plus
courts
LÉGÈRE
60 – 70 %
20 - 40 min 104 - 114 BPM
Gestion du poids et
récupération active
TRÈS LÉGÈRE
50 – 60 %
Zone de
fréquence
cardiaque cible
Autres remarques sur la fréquence cardiaque cible:
1). L’inclinaison du tapis roulant s’ajustera automatiquement pour vous rapprocher de votre fréquence cardiaque spécifiée.
2). Si aucune fréquence cardiaque n’est détectée, l’appareil ne changera pas d’inclinaison.
3). Si votre fréquence cardiaque est à 25 battements au-dessus de la zone cible, le programme s’arrêtera.

FRANÇAIS
169
POUR RÉINITIALISER LA CONSOLE:
Maintenez la touche ARRÊT enfoncée pendant 3secondes.
FIN D’UNE SÉANCE D’ENTRAÎNEMENT
Une fois votre séance terminée, l’appareil émet un bip. Les informations concernant la séance d’entraînement restent affichées sur la
console pendant 30secondes avant d’être réinitialisées.
CONNEXION VIA LA TECHNOLOGIE BLUETOOTH 4.0LE
1) Vérifiez que votre appareil de musique est compatible avec la technologie Bluetooth 4.0
2) Rendez-vous dans les paramètres Bluetooth de votre appareil et recherchez les appareils à proximité.
3) Sur votre appareil de musique, localisez la liste des appareils Bluetooth à proximité. Sur cette liste, sélectionnez votre tapis roulant ou
votre exerciseur elliptique. Attendez que votre appareil de musique finisse de se jumeler avec la machine.
4) Une fois que votre appareil de musique affiche le tapis roulant ou l’exerciseur elliptique en tant qu’appareil jumelé, cela signifie que la
connexion est établie.
UTILISATION DE PLUSIEURS APPAREILS DE MUSIQUE
Si plusieurs appareils sont jumelés avec la machine (par exemple si plusieurs personnes utilisent le tapis roulant ou l’exerciseur elliptique et y
connectent leur appareil de musique) vous devrez déconnecter le jumelage de musique avec lequel elle est actuellement jumelée et la
jumeler à nouveau avec votre appareil en suivant les instructions ci-dessus.
CONNEXION À L’AIDE D’UN CÂBLE AUDIO
1) Branchez le CÂBLE D’ADAPTATEUR AUDIO inclus dans la PRISE D’ENTRÉE AUDIO sur le côté droit de la cosole et la prise pour écouteurs
devotre appareil de musique.
2) Utilisez les boutons sur le appareil multimédia pour ajuster les paramètres des chansons.
3) Débranchez le CÂBLE D’ADAPTATEUR AUDIO lorsqu’il n’est pas utilisé.
4) Si vous ne voulez pas utiliser les HAUT-PARLEURS, vous pouvez brancher vos écouteurs dans la PRISE DE SORTIE AUDIO sur le côté droit
de la cosole. Ainsi, sivousdébranchez accidentellement le fil des écouteurs en courant, votre appareil ne tombera pas au sol.

FRANÇAIS
170
CONNECTEZ VOTRE APPAREIL À L’APPLICATION JRNY POUR DES ENTRAÎNEMENTS PLUS
DYNAMIQUES
Si vous avez un abonnement JRNY*, vous pouvez y accéder via votre appareil lorsqu’il est synchronisé avec la console de cette
machine. Grâce à cet abonnement, vous bénéficiez d’entraînements guidés adaptés à vos besoins.
* Un abonnement JRNY est requis pour profiter de l’expérience JRNY – voir global.bowflex.com/en/jrny.html pour plus de détails.
Là où disponible (y compris aux États-Unis), vous pouvez obtenir un abonnement JRNY en téléchargeant l’application JRNY sur
votre téléphone ou tablette, puis en vous inscrivant via l’application. L’abonnement JRNY peut ne pas être disponible dans tous les
pays.

171
Entretien Et
Dépannage

FRANÇAIS
172
ENTRETIEN
Réaliser un entretien préventif est essentiel au bon fonctionnement de l’appareil tout en limitant la responsabilité des utilisateurs
en cas d’incident. L’appareil doit être vérifié régulièrement. Faites remplacer les pièces défectueuses immédiatement. Cessez
d’utiliser l’appareil défectueux jusqu’à ce qu’il soit réparé. Assurez-vous que l’entretien, les réglages ou les réparations sont
effectués par un personnel qualifié.
AVERTISSEMENT
Pour que le tapis de course ne soit plus alimenté en électricité, le câble d’alimentation doit être débranché de la prise murale.

FRANÇAIS
173
PROGRAMME D’ENTRETIEN
ACTION FRÉQUENCE
Nettoyez et inspectez le tapis de course:
• Mettez le tapis de course hors tension à l’aide de l’interrupteur MARCHE/
ARRÊT puis débranchez le câble d’alimentation de la prise murale.
• Nettoyez la bande de course, la plateforme, le couvercle du moteur et
le boîtier de la console à l’aide d’un chiffon humide. N’utilisez jamais de
solvants car ceux-ci pourraient détériorer le tapis de course.
• Contrôlez le câble d’alimentation. Si le câble d'alimentation est
endommagé, contactez l'assistance technique en vous référant aux
coordonnées présentes au dos de la CARTE D'INFORMATION.
• Assurez-vous que le câble d’alimentation ne se trouve pas sous le tapis de course ou à un
endroit où il risquerait d’être pincé ou coupé au cours du stockage ou de l'utilisation.
• Vérifiez que la bande de course est tendue et centrée correctement. Si la bande est
décalée, elle risque d'endommager d'autres composants du tapis de course.
• Si une étiquette est endommagée ou illisible, contactez l'assistance technique en
vous référant aux coordonnées présentes au dos de la CARTE D'INFORMATION.
QUOTIDIEN

FRANÇAIS
174
Nettoyez le dessous du tapis de course:
• Mettez le tapis de course hors tension à l’aide de l’interrupteur MARCHE/
ARRÊT puis débranchez le câble d’alimentation de la prise murale.
• Repliez la plateforme en position verticale et assurez-vous
que le loquet de verrouillage est enclenché.
• Déplacez le tapis de course.
• Nettoyez ou aspirez les particules de poussière et autres corps
étrangers ayant pu s’accumuler sous le tapis de course.
• Replacez le tapis de course à son emplacement initial.
HEBDOMADAIRE
IMPORTANT!
• Mettez le tapis de course hors tension à l’aide de l’interrupteur MARCHE/ARRÊT puis
débranchez le câble d’alimentation de la prise murale. Attendez 60secondes.
• Contrôlez tous les boulons d’assemblage de l'appareil et vérifiez qu’ils sont bien serrés.
• Ôtez le couvercle du moteur. Attendez l’extinction de TOUS les écrans d’affichage.
• Nettoyez le moteur et le panneau inférieur pour enlever toutes les peluches ou les
particules de poussière ayant pu s’accumuler. Le manquement à cette obligation peut
entraîner une défaillance prématurée des composants électroniques essentiels.
• Nettoyez la bande de course avec un chiffon humide. Aspirez toutes les
particules blanches/noires ayant pu s’accumuler autour de l’appareil. Ces
particules peuvent s’amasser suite à un usage normal du tapis de course.
• Si votre tapis de course est équipé d'amortisseurs pneumatiques sous
la plateforme pour faciliter le levage de celle-ci, lubrifiez le tube gris
métallisé des amortisseurs à l'aide d'un lubrifiant en spray à base de Teflon
que vous trouvez en quincaillerie ou dans un magasin de cycles.
MENSUEL
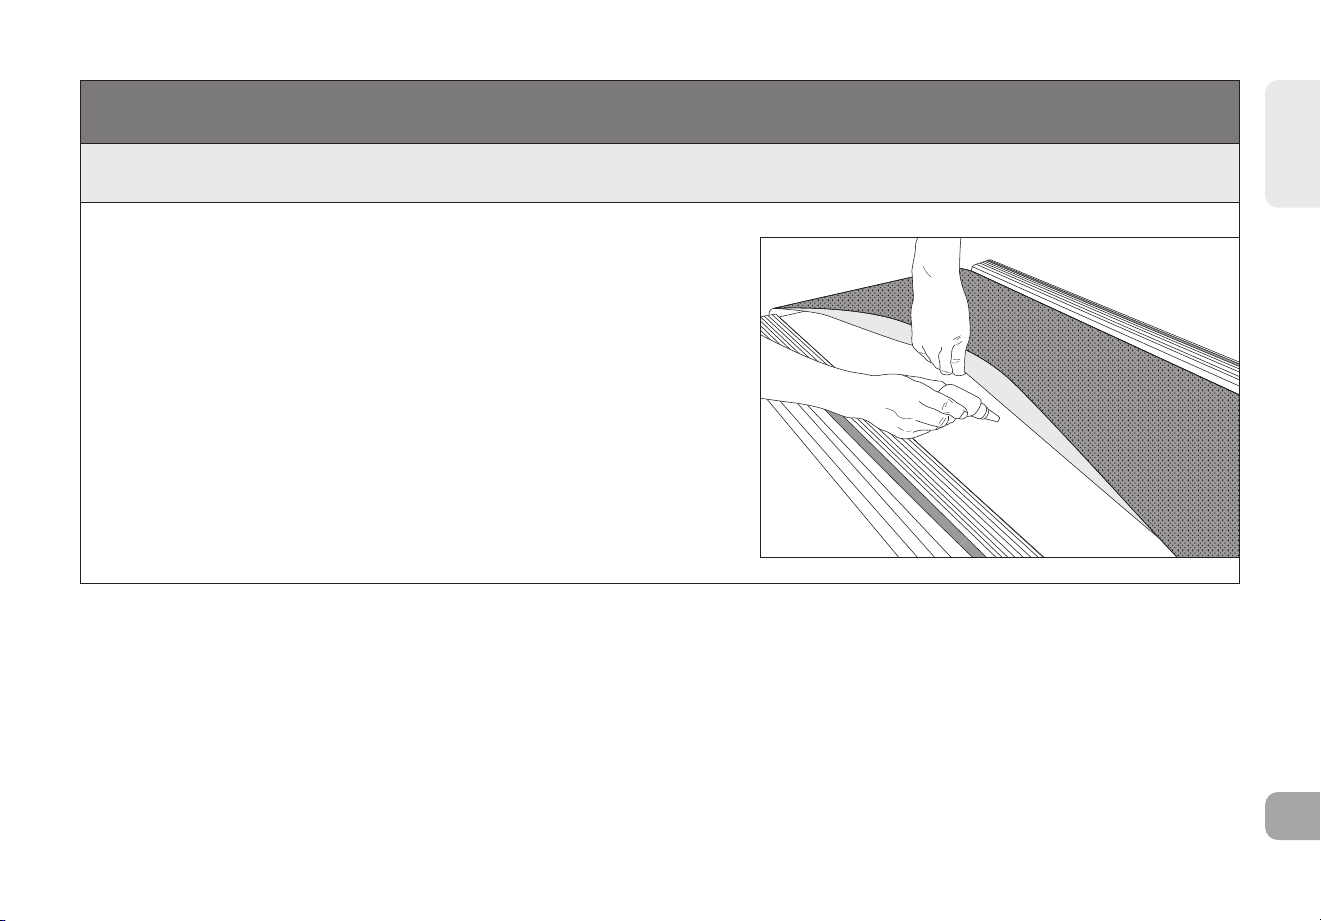
FRANÇAIS
175
PROGRAMME D’ENTRETIEN
LUBRIFICATION DE LA BANDE
TOUS LES 3 MOIS OU TOUS LES 480 KM
Il est nécessaire de lubrifier la plate-forme du tapis roulant tous
les trois mois ou tous les 480km pour lui conserver son rendement
optimal. Lorsque le tapis roulant atteint 480 km, ilaffiche le
message « LUBE » (lubrifier) ou «LUBEBELT» (lubrifier la
bande). Le tapis roulant ne fonctionnera pas tant que ce message
est affiché. Votretapis roulant est livré avec une bouteille de
lubrifiant à la silicone 100 %, suffisante pour deux applications.
Pour acheter du lubrifiant à base de silicone supplémentaire :
Veuillez contacter le service d’assistance technique à la clientèle.
Outils nécessaires:
• clé en T ou clé Allen
• Huile silicone 100 %
BANDE
PLATE-FORME
DE COURSE

FRANÇAIS
176
MARCHE À SUIVRE :
1. Placez le tapis roulant hors tension à l’aide du bouton de
«ON/OFF» (marche/arrêt), et débranchez le cordon d’alimentation delaprise murale.
2. À l’aide de la clé à manche en T ou de la clé hexagonale, desserrez les boulons des rouleaux arrière en les tournant de
10 à 15 tours dans le sens antihoraire. Cela devrait donner assez de jeu à la bande pour permettre de la soulever.
3. Soulevez la bande autant que possible et versez l’huile silicone en zigzags sur toute la surface de la plate-forme. Utilisez
1/2 bouteille de lubrifiant au silicone. N’appliquez pas d’huile sur la bande. Reposez la bande, puis serrez les deux
boulons du rouleau arrière en les tournant dans le sens horaire du même nombre de tours que vous les avez desserrés.
4. Après avoir fait la lubrification du tapis, connecter la machine à la prise murale et insérrer
la clé magnétique. Effacer le message “Lube Belt” en appuyant sur la touche SPEED (+) et
ensuite sur la touche STOP. Garder les doigts dessus pour 5 à 7 secondes.
5. Descendez de la machine et appuyez sur la touche «START» (démarrer). Laissez la bande fonctionner à 5 k/h (3 mi/h)
pendant 3minutes pour faire répandre le silicone. Puis marchez sur l’appareil à une vitesse confortable pendant 3
minutes pour achever la distribution du silicone et vérifiez que la tension et l’alignement delabande sont satisfaisants.
6. Une fois la bande centrée et tendue, arrêtez l’appareil. Essuyez l’excès d’huile sur les côtés avec un chiffon humide.
Appuyer sur n’importe quelle touche pour suspendre qu’après votre exercice subséquent le message d’avertissement de la
lubrification.
Remarque : Sur certains modèles plus anciens, il peut être nécessaire de maintenir la touche stop enfoncée pendant 5
secondes pour suspendre le message pendant 8 km d’utilisation.
Si le tapis roulant comporte des amortisseurs pneumatiques sous laplateforme pour en faciliter le
levage, lubrifiez le tube d’amortisseur pneumatique argenté par vaporisation d’un produit à base
de Téflon, envente dans les quincailleries ou les magasins d’articles pour cyclistes.
Visitez la section de soutien à la clientèle de notre site Web pour visualiser les vidéos pratiques d’entretien. Pour toute
question relative àla lubrification du tapis roulant, communiquer avec le service de soutien technique à la clientèle.
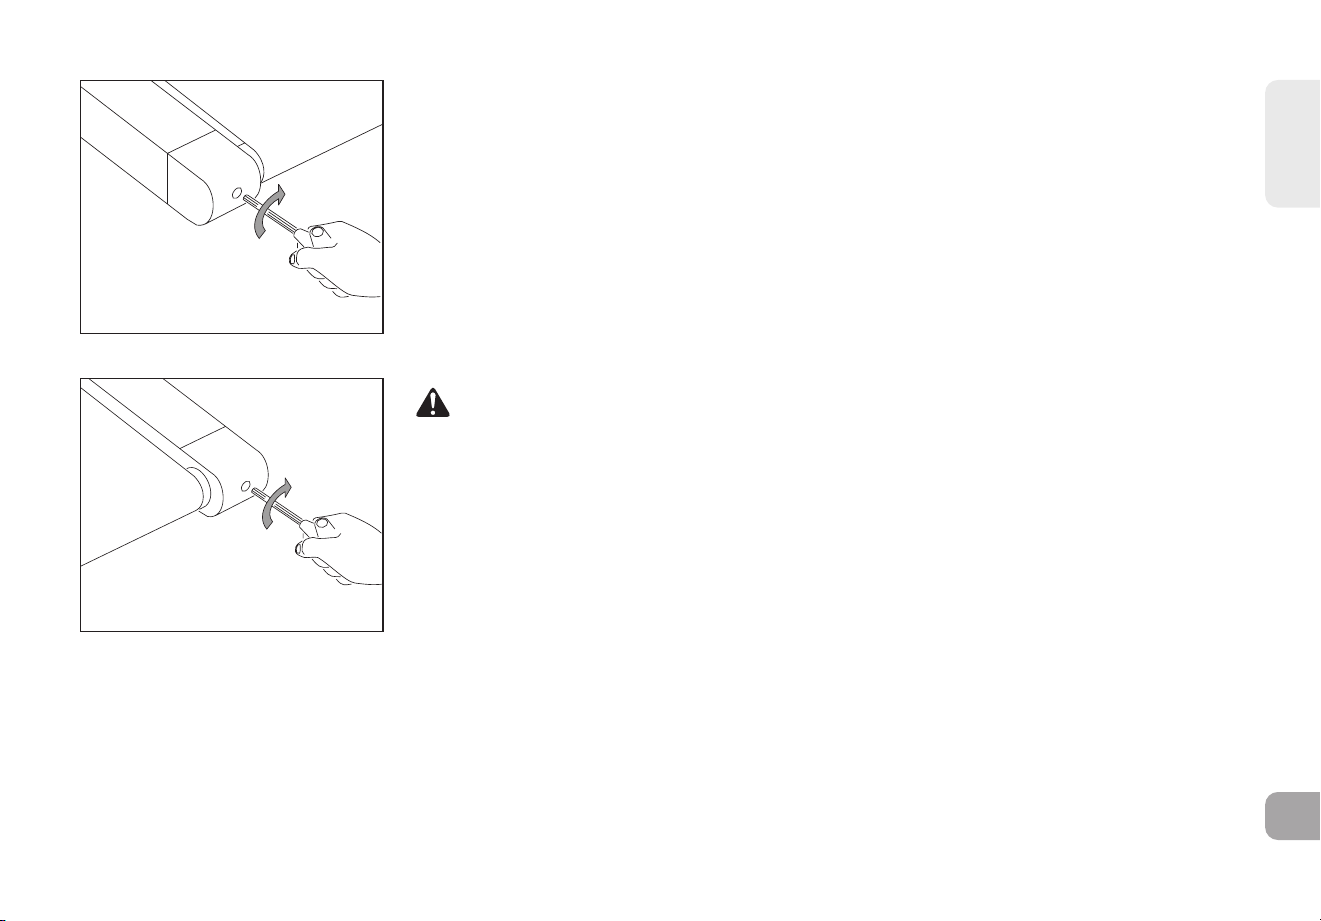
FRANÇAIS
177
RÉGLAGE DE LA TENSION DE
LA BANDE DE COURSE
Si vous remarquez que la bande glisse lors d’un exercice sur le tapis, c’est le signe qu’elle doit
être retendue. Avec l’usage, la bande de course s’est étirée en longueur et s’est relâchée. Il
s’agit d’un réglage normal et courant. Pour éviter que la bande ne glisse, mettez le tapis de
course hors tension et resserrez les boulons du rouleau arrière à l’aide de la clé Allen fournie,
en tournant les vis de ¼ de tour vers la droite (dans le sens des aiguilles d’une montre) comme
illustré. Mettez l’appareil en marche afin de vérifier si la bande glisse de nouveau. Répétez
l’opération si nécessaire mais ne tournez jamais les boulons du rouleau de plus de ¼ de tour à
la fois. La bande de course est correctement tendue lorsqu’elle ne glisse plus.
AVERTISSEMENT
Ne faites JAMAIS défiler la bande de course pendant le réglage de la tension. Une tension
excessive de la bande de course peut entraîner une usure prématurée du tapis de course et
de ses composants. Ne tendez pas excessivement la bande de course.
RESSERRAGE DU CÔTÉ
GAUCHE DU ROULEAU
RESSERRAGE DU CÔTÉ
DROIT DU ROULEAU
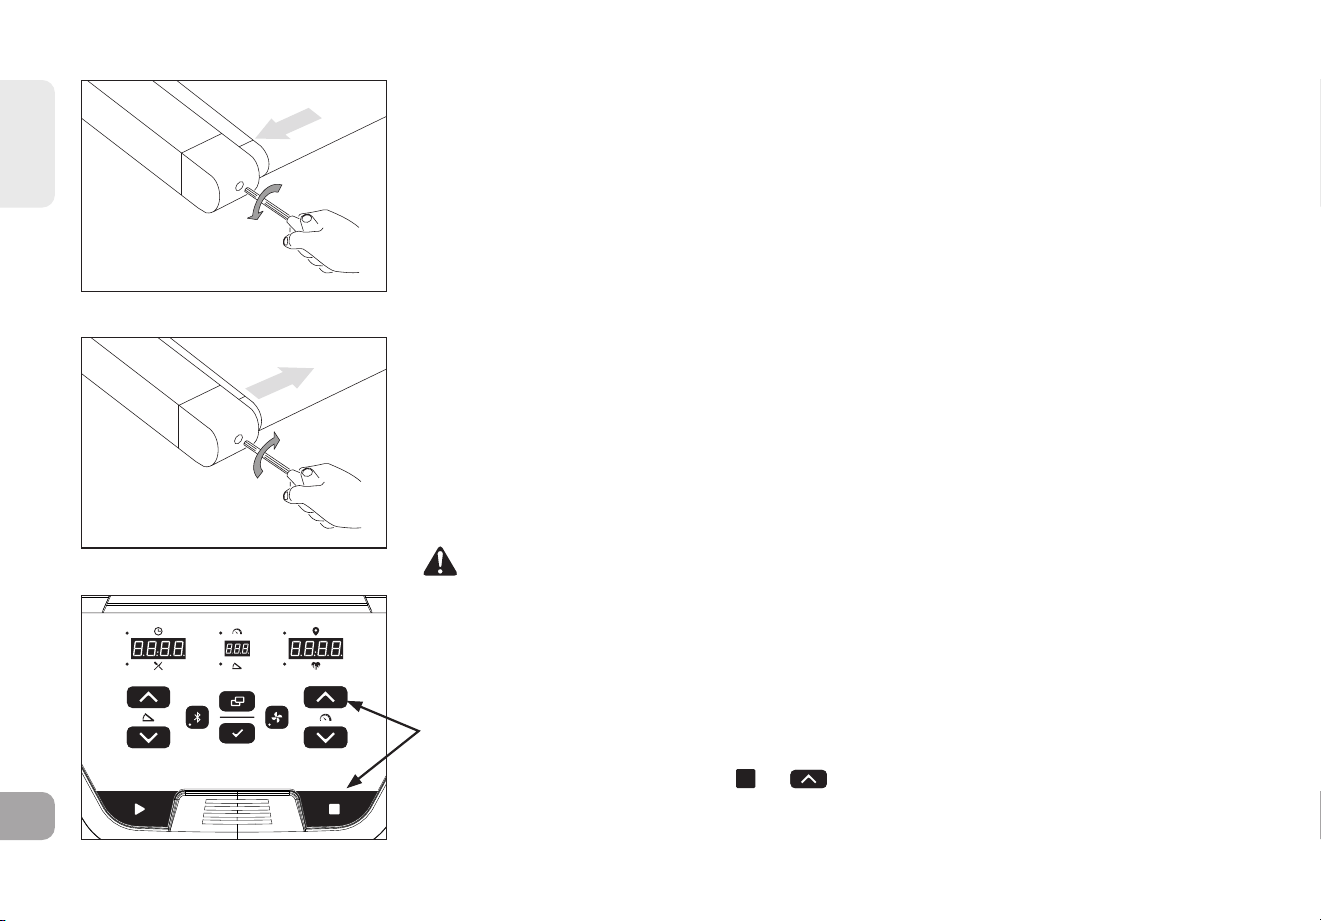
FRANÇAIS
178
CENTRAGE DE LA BANDE DE COURSE
Lorsque la bande est trop décalée à droite, effectuez les réglages suivants: faites
fonctionner le tapis de course à 1 km/h et, à l’aide de la clé Allen fournie, tournez la vis de
réglage de GAUCHE d’¼ tour dans le sens inverse des aiguilles d’une montre et attendez
que la bande se mette en place. Utilisez la ligne centrale ou le marquage du couvercle
du moteur comme repère pour le centrage. Répétez l’opération si nécessaire, jusqu’à
ce que labande reste centrée correctement lors de l’utilisation du tapis de course.
Lorsque la bande est trop décalée à gauche, effectuez les réglages suivants: faites
fonctionner le tapis de course à 1 km/h et, à l’aide de la clé Allen fournie, tournez la vis
de réglage de GAUCHE d’¼ tour dans le sens des aiguilles d’une montre et attendez
que la bande se mette en place. Utilisez la ligne centrale ou le marquage du couvercle
du moteur comme repère pour le centrage. Répétez l’opération si nécessaire, jusqu’à
ce que labande reste centrée correctement lors de l’utilisation du tapis de course.
• Si vous trouvez que la bande de course glisse car elle est trop
lâche, centrez-la puis réglez la tension correctement.
• Pour accéder plus facilement aux vis de réglage, retirez les embouts.
ATTENTION
Ne faites pas tourner la bande à plus de 1 km/h lors du centrage. Tenez toujours les mains,
les cheveux et les vêtements éloignés de la bande de course.
LA BANDE DE COURSE EST
TROP DÉCALÉE À DROITE
LA BANDE DE COURSE EST
TROP DÉCALÉE À GAUCHE
Pour réinitialiser l’alerte de lubrification de la courroie
Le tapis de course affichera le rappel “LUBE BELT” tous les 150 miles. Après avoir lubrifié
la courroie, maintenez les boutons et enfoncés pendant 3 à 5 secondes pour
réinitialiser l’alerte.
2
4
6
8
10
12
16
20

FRANÇAIS
179
DÉPANNAGE
QUESTIONS FRÉQUENTES RELATIVES AU PRODUIT
LES SONS QU’ÉMET MON TAPIS DE COURSE SONT-ILS NORMAUX?
Tous les tapis de course, surtout neufs, émettent un bruit sourd dû au passage de la bande sur les rouleaux. Ce bruit diminuera au fil
du temps mais ne disparaîtra jamais complètement. Labande aura tendance à s’étirer avec le temps et glissera plus facilement sur
les rouleaux.
POURQUOI LE TAPIS DE COURSE QUE J’AI ACHETÉ EST-IL PLUS BRUYANT QUE CELUI PRÉSENTÉ EN MAGASIN?
Tous les produits de remise en forme exposés dans un grand magasin semblent toujours être plus silencieux car le bruit de fond y
est plus élevé que chez vous. La réverbération acoustique est également moindre sur un sol en béton recouvert de moquette que
sur un parquet. L’installation d’un tapis épais en caoutchouc sous l’appareil peut aider à réduire la réverbération sur le sol. Si un
appareil de remise en forme est placé près d’un mur, cela risque d’amplifier les bruits par un effet tambour.
À QUEL MOMENT DOIS-JE M’INQUIÉTER DU BRUIT?
Tant que le niveau sonore de votre tapis de course n’est pas plus élevé que celui d’une conversation normale, le bruit émis par
l’appareil est considéré comme normal.
PROCÉDURES DE DÉPANNAGE DE BASE
PROBLÈME: la console ne s’allume pas.
SOLUTION: effectuez les vérifications suivantes:
Le voyant rouge sur l’interrupteur MARCHE/ARRÊT est-il allumé? REMARQUE: certains modèles de tapis de course ne possèdent
pas d’interrupteur avec voyant lumineux. Si c’est le cas de votre modèle, veuillez suivre les étapes «oui» et «non» indiquées ci-
après pour trouver des solutions à votre problème.
Si «oui»:
• Mettez l’appareil hors tension, débranchez la prise de courant et attendez 60secondes. Ôtez le couvercle du moteur. Attendez
que tous les voyants lumineux DEL rouges sur la carte électronique moteur soient éteints avant de procéder à l’étape suivante.
Vérifiez ensuite qu’aucun fil connecté au panneau inférieur n’est mal raccordé ou débranché.
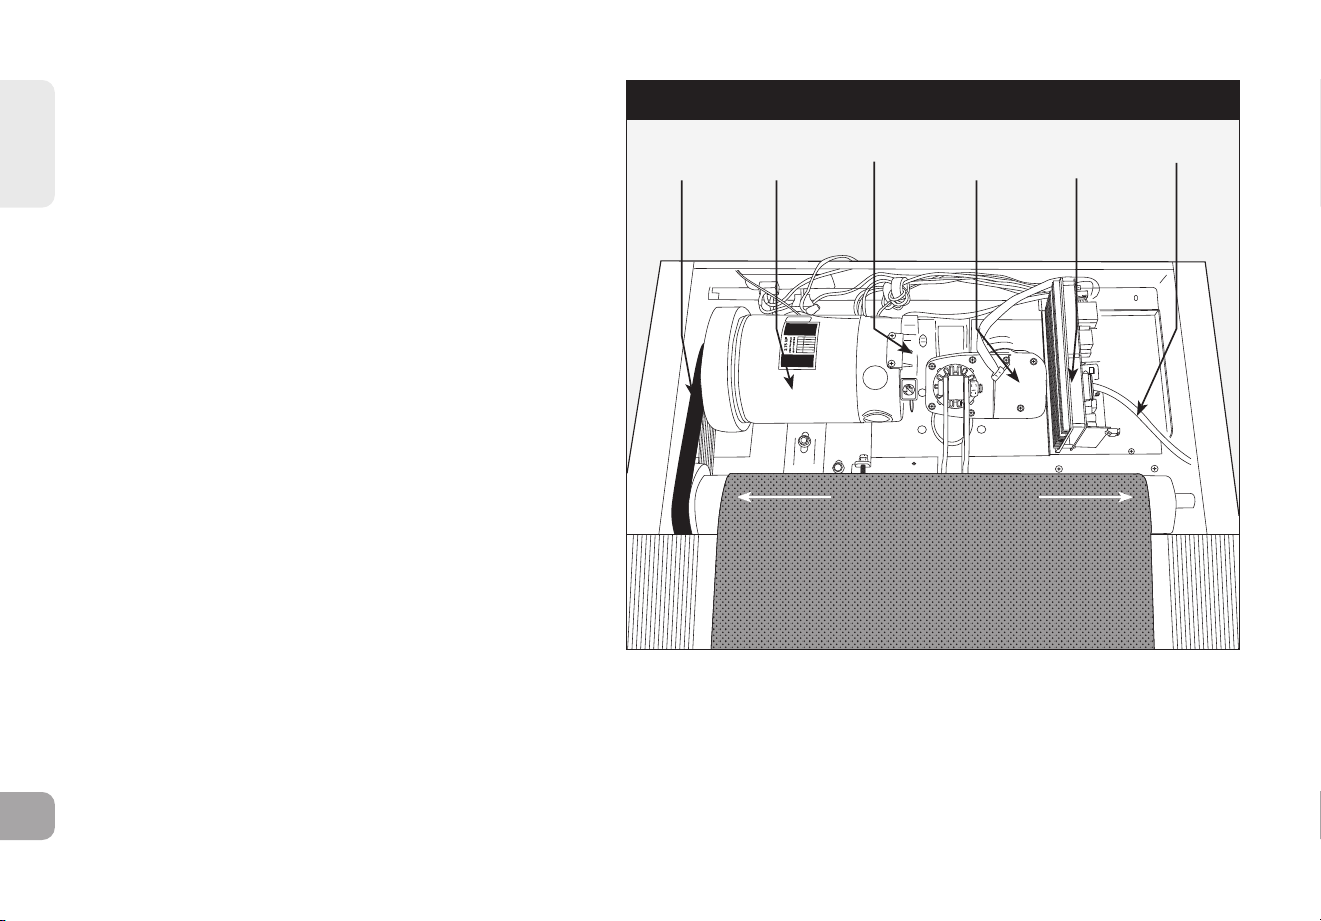
FRANÇAIS
180
• Vérifiez toutes les connexions, en particulier le câble de
la console. Pour ce faire, débranchez et rebranchez le
câble de la console.
• Assurez-vous que le câble de la console n’est pas pincé
ou endommagé.
• Branchez le tapis de course, mettez l’interrupteur est
position MARCHE et observez sidesvoyants lumineux
DEL s’allument sur la carte électronique moteur.
Si «non»:
• Vérifiez que la prise de courant sur laquelle est branché
l’appareil fonctionne correctement. Assurez-vous que
le disjoncteur ne s’est pas déclenché, que l’appareil
est branché sur un circuit de 15 ampères distinct, qu’il
n’est pas branché sur une prise équipée d’un disjoncteur
différentiel de fuite à la terre et qu’il n’est pas branché
sur une multiprise/ un parasurtenseur ou une rallonge
électrique.
• Vérifiez que le câble d’alimentation n’est pas pincé ou
endommagé
et qu’il est correctement raccordé à la prise de courant
ET à l’appareil.
• Vérifiez que l’interrupteur est position MARCHE.
PROBLÈME: la console indique SAFETY KEY OFF (CLÉ DE
SÉCURITÉ NON CONNECTÉE) ou n’affiche que des tirets.
SOLUTION: effectuez les vérifications suivantes:
• Vérifiez que la clé de sécurité est fermement en place.
• Si vous utilisez une clé magnétique, assurez-vous que la
clé est magnétisée.
JOHNSON
SOUS LE COUVERCLE DU MOTEUR
COURROIE
D'ENTRAÎNE-
MENT
MOTEUR
D'ENTRAÎNE-
MENT
CAPTEUR
OPTIQUE
MOTEUR
D'INCLINAI-
SON
CARTE
ÉLECTRO-
NIQUE
MOTEUR
CÂBLE DE
CONSOLE
ROULEAU AVANT
BANDE DE COURSE
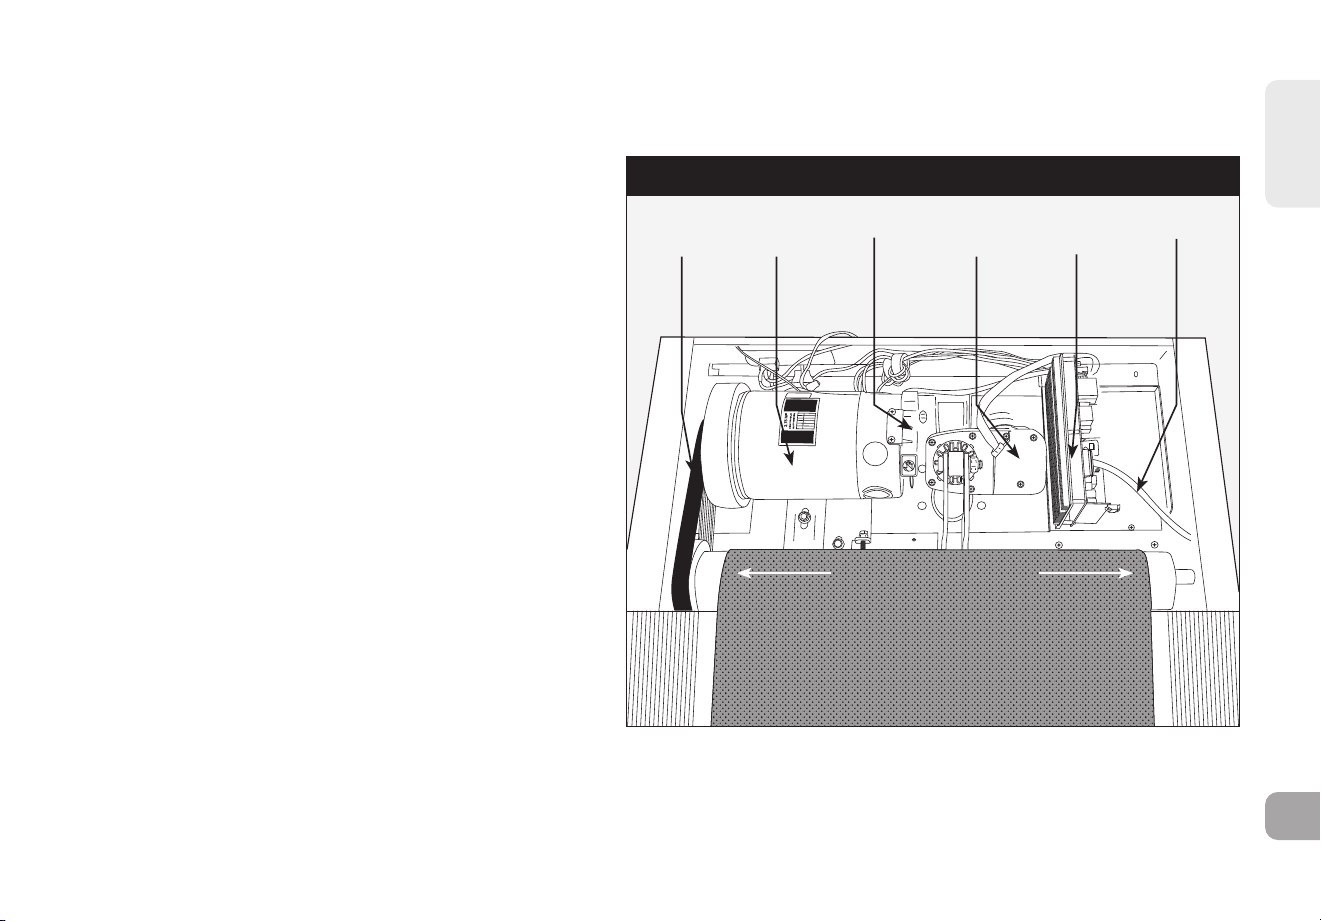
FRANÇAIS
181
DÉPANNAGE
PROCÉDURES DE DÉPANNAGE DE BASE
PROBLÈME: la console fonctionne mais la bande de
course reste immobile ou défile un bref instant.
SOLUTION: effectuez les vérifications suivantes:
• Assurez-vous que vous suivez les recommandations et les
directives relatives à l’alimentation des INSTRUCTIONS
DE MISE A LA TERRE et du FONCTIONNEMENT DE
BASE de ce manuel d’utilisation. L’unité doit être
branchée sur un circuit de 15 ampères distinct et ne pas
être raccordée à une prise équipée d’un disjoncteur
différentiel de fuite à la terre. Ne branchez pas l’appareil
sur une multiprise/ un parasurtenseur ou une rallonge
électrique.
• Vérifiez si la bande de course défile. Si oui, notez la
distance sur laquelle elle a défilé ou le temps pendant
lequel elle a défilé avant de s’arrêter.
• Essayez de faire défiler la bande de course à la main.
Si cela est impossible, la courroie d’entraînement peut
être sortie de son logement ou les roulements du moteur
peuvent être grippés.
• Mettez le tapis de course hors tension et débranchez la
prise. Retirez le couvercle en plastique du moteur, situé
à l’avant de l’appareil, en retirant les vis à l’aide d’un
tournevis cruciforme. Vérifiez le bonalignement de la
courroie d’entraînement.
• Avant de remettre le couvercle, vérifiez
les connexions des fils et des câbles car
ceux-ci pourraient être mal raccordés
ou avoir été débranchés au cours du transport ou du montage. Assurez-vous queles fils et câbles sont
connectés correctement et qu’aucun câblen’est enroulé, endommagé, déconnecté ou brulé.
PROBLÈME: l’inclinaison ne fonctionne pas, ne descend pas ou ne semble pas être à la bonne hauteur.
JOHNSON
SOUS LE COUVERCLE DU MOTEUR
COURROIE
D'ENTRAÎNE-
MENT
MOTEUR
D'ENTRAÎNE-
MENT
CAPTEUR
OPTIQUE
MOTEUR
D'INCLINAI-
SON
CARTE
ÉLECTRO-
NIQUE
MOTEUR
CÂBLE DE
CONSOLE
ROULEAU AVANT
BANDE DE COURSE

FRANÇAIS
182
SOLUTION: effectuez les vérifications suivantes:
• Vérifiez que les recommandations et les directives relatives à l’alimentation, qui sont présentées en pages 4 et 5 du présent
GUIDE D’UTILISATION DU TAPIS DE COURSE sont bien respectées. L’unité doit être branchée sur un circuit de 15 ampères
distinct et ne pas être raccordée à une prise équipée d’un disjoncteur différentiel de fuite à la terre. Ne branchez pas l’appareil
sur une multiprise/ un parasurtenseur ou une rallonge électrique.
• Assurez-vous que la console indique un changement sur l’écran lorsque l’on appuie sur les boutons commandant l’élévation.
• Mettez le tapis de course hors tension et débranchez la prise. Vérifiez que les câbles de la console sont connectés correctement
sur le dessus du montant. Assurez-vous que tous les fils multicolores sont entièrement insérés dans le faisceau de câblage.
• Retirez le couvercle en plastique du moteur, situé à l’avant de l’appareil, en retirant les vis à l’aide d’un tournevis cruciforme.
Vérifiez les connexions des fils et des câbles car ceux-ci pourraient être mal enclenchés ou avoir été débranchés au cours du
transport ou du montage. Assurez-vous que les fils et câbles sont connectés correctement et qu’aucun câble n’est enroulé,
endommagé, déconnecté ou brulé.
PROBLÈME: aucun son ne sort des haut-parleurs mais le casque fonctionne.
SOLUTION: effectuez les vérifications suivantes:
• Mettez le tapis de course hors tension et débranchez la prise. Retirez le couvercle en plastique dumoteur, situé à l’avant de
l’appareil, en retirant les vis à l’aide d’un tournevis cruciforme.
• Vérifiez que les fils et les câbles sont connectés correctement sur la carte des haut-parleurs située près de la carte électronique
moteur.
PROBLÈME: le disjoncteur du tapis roulant se déclenche lors d’un exercice.
SOLUTION: effectuez les vérifications suivantes:
• Vérifiez que l’appareil est branché sur un circuit de 15 ampères distinct.
• Assurez-vous que l’appareil n’est pas branché sur une rallonge électrique ou un parasurtenseur.
• Assurez-vous que l’appareil n’est pas branché sur une prise équipée d’un disjoncteur différentiel de fuite à la terre ou sur un
circuit qui intègre une prise équipée d’un disjoncteur différentiel de fuite à la terre.
PROBLÈME: la bande de course ne reste pas centrée durant un exercice.
SOLUTION: effectuez les vérifications suivantes:
• Assurez-vous que votre tapis de course est installé sur une surface plane.
• Vérifiez que la bande est correctement tendue et centrée (reportez-vous aux sections RÉGLAGE DE LA TENSION et
CENTRAGE DE LA BANDE DE COURSE pour des indications plus détaillées).

FRANÇAIS
183
PROBLÈME: la vitesse de fonctionnement semble incorrecte.
SOLUTION:
• Mettez le tapis de course hors tension et débranchez la fiche de la prise murale.
• Retirez les vis du couvercle du moteur à l’aide d’un tournevis cruciforme.
• Vérifiez que le capteur optique est raccordé à la carte électronique moteur.
• Vérifiez que le câble du capteur de vitesse est en bon état et qu’il est connecté correctement.
PROCÉDURES DE DÉPANNAGE DE BASE
PROBLÈME: A des niveaux plus élevés d’inclinaison, un message apparaît qui dit, “Speed Range Error – Ending Workout”.
SOLUTION:
• Ceci est un dispositif de sécurité qui coupe automatiquement l’alimentation du moteur lorsque la vitesse est hors de portée
par suite de la combinaison de la charge sur la courrie et un haut degré d’inclinaison.
• Pour éviter une fin automatique pour votre séance d’entraînement, réduisez le pourcentage de niveau d’inclinaison.
DÉPANNAGE DU MONITEUR DE FRÉQUENCE CARDIAQUE
(POIGNÉES À CAPTEURS TACTILES CARDIAQUES UNIQUEMENT)
Contrôlez l’endroit où vous vous entraînez et recherchez des sources possibles d’interférence, telles que des lumières
fluorescentes, des ordinateurs, des clôtures électriques, des systèmes d’alarme ou des installations équipées de gros moteurs. Ces
appareils peuvent causer des lectures erronées de la fréquence cardiaque.
Des mesures incohérentes de la fréquence cardiaque peuvent également se produire dans les cas suivants:
• Une pression excessive sur les poignées équipées de capteurs tactiles. Essayez d’exercer une pression modérée sur ces
poignées.
• Des vibrations et un mouvement constants lorsque vous tenez les poignées pendant les exercices. Si l’écran affiche des
mesures incohérentes, saisissez les poignées le temps nécessaire afin que votre rythme cardiaque soit enregistré.
• Lorsque vous êtes essoufflé durant un entraînement.
• Lorsque vos doigts sont comprimés par des bagues.
• Lorsque vos mains sont sèches ou froides. Frottez-vous les mainsafin de les hydrater et de les réchauffer.

FRANÇAIS
184
BESOIN D’UNE ASSISTANCE TECHNIQUE ?
Si le problème subsiste, arrêtez d’utiliser le tapis et mettez-le hors tension.
Veuillez contacter le service d’assistance technique à la clientèle.
Lors de votre appel, vous devrez probablement fournir les renseignements ci-après. Veuillez préparer les informations
suivantes:
• Nom du modèle
• Numéro de série
• Preuve d’achat
Les questions fréquemment posées sont les suivantes:
• Depuis combien de temps rencontrez-vous ce problème?
• Le problème se répète-t-il à chaque utilisation?
Avec tous les utilisateurs?
• Si vous entendez un bruit gênant, provient-il de l’avant ou de l’arrière de l’appareil? De quel
type de bruit s’agit-il (bruit sourd, grincement, son aigu, sifflement, etc.)?
• L’appareil a-t-il été entretenu conformément au programme D’ENTRETIEN?
Les réponses à ces questions et à d’autres questions permettront aux techniciens d’envoyer
les pièces de rechange adéquates et d’effectuer la révision nécessaire au bon fonctionnement
de votre tapis decourse et vous faire reprendre votre entraînement!
• Lorsque vous souffrez d’arythmie grave.
• Lorsque vous êtes atteint d’artériosclérose ou de troubles de lacirculation périphérique.
• Lorsque la peau des paumes de vos mains est particulièrement épaisse.

185
ITALIANO

186
Importanti
istruzioni di
sicurezza
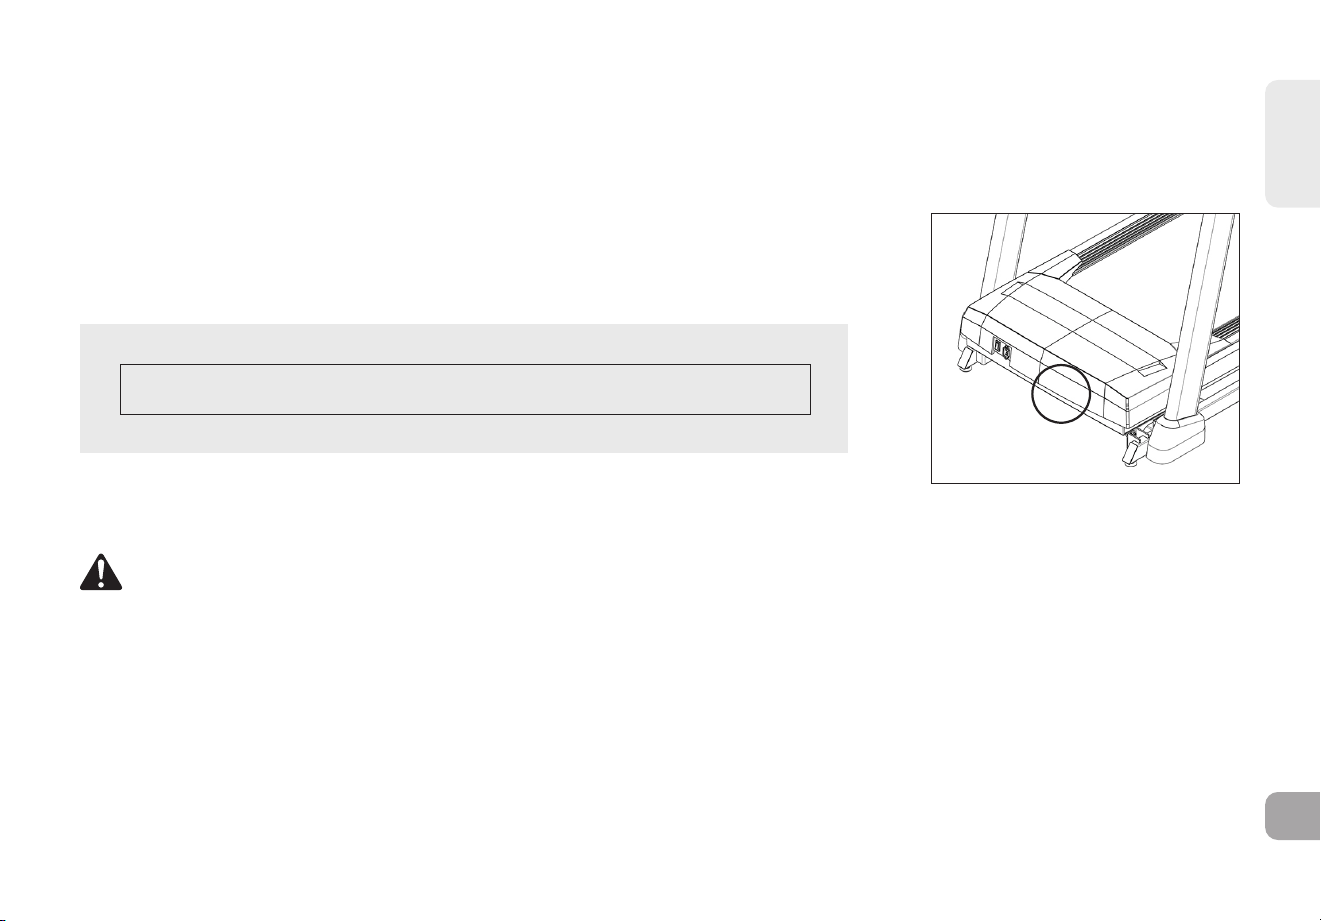
ITALIANO
187
Grazie per aver scelto il tapis roulant BowFlex T8.5J come attrezzo da fitness. Invitiamo a leggere attentamente questo manuale
del proprietario prima di iniziare il montaggio dell'attrezzo, in particolare le AVVERTENZE riportate di seguito! LE AVVERTENZE
PERMETTONO DI RIDURRE IL RISCHIO DI USTIONI, INCENDIO, ELETTROSHOCK O LESIONI A PERSONE:
Prima di procedere, cercare il numero di serie del tapis roulant collocato sopra un codice a
barre bianco vicino all’interruttore di accensione/spegnimento e al cavo di alimentazione e
inserirlo nello spazio sottostante.
INSERIRE IL NUMERO DI SERIE E IL NOME EL MODELLO NEGLI SPAZI SOTTOSTANTI:
NUMERO DI SERIE:
NOME MODELLO: BOWFLEX T8.5J
» Fare riferimento al NUMERO DI SERIE e al NOME MODELLO quando si richiede assistenza.
• LA MANCATA OSSERVANZA DI QUESTE ISTRUZIONI PUÒ PROVOCARE LESIONI!
• I sistemi di monitoraggio della frequenza cardiaca possono essere inaccurati. L’eccesso di esercizio può causare lesioni gravi o
morte. Se ci si sente svenire, interrompere immediatamente l’esercizio.
• Durante l’attività fisica mantenere sempre un ritmo confortevole.
• Se si avverte qualsiasi tipo di dolore, ad esempio dolore al torace, nausea, capogiro o respiro affannoso, interrompere
immediatamente l’esercizio
e consultare un medico prima di continuare. L’esercizio non corretto o eccessivo può danneggiare la salute.
• Non indossare indumenti che possano incastrarsi in qualsiasi parte del tapis roulant.
• Indossare sempre scarpe da ginnastica quando si utilizza questo attrezzo.
• Non saltare sul tapis roulant.
ATTENZIONE
COLLOCAZIONE NUMERO DI SERIE

ITALIANO
188
• Durante l'allenamento, non correre vicino al bordo della cinghia per evitare il rischio di lesioni.
• Quando il tapis roulant è in funzione, non dovrebbe essere mai utilizzato da più di una persona.
• Questo tapis roulant non deve essere usato da persone di peso superiore a quello specificato nella sezione SPECIFICHE
TECNICHE. Il mancato rispetto di questa indicazione annulla la garanzia.
• Abbassando la pedana del tapis roulant, attendere che i piedini posteriori siano saldamente a terra prima di salirvi.
• Non utilizzare sotto una coperta o un cuscino. Si può generare un calore eccessivo che può causare incendi, elettroshock o
lesioni a persone.
• Collegare questo prodotto soltanto a prese con un'adeguata messa a terra.
• Per scollegare, portare tutti i controlli in posizione di off e scollegare la spina dalla presa.
• Scollegare tutti i collegamenti prima di spostare l’apparecchio.
• Non utilizzare il prodotto con il cavo o la spina danneggiata anche se funziona correttamente. Non utilizzare il prodotto se appare
danneggiato o è stato immerso in acqua. Per evitare pericoli, contattare l'assistenza tecnica clienti per la sostituzione o la
riparazione.
• Non lasciare mai il tapis roulant incustodito quando è collegato alla corrente. Staccarlo dalla corrente quando non è in uso e
prima di aggiungere o rimuovere parti.
• Non consentire MAI ad animali o bambini al di sotto dei 13 anni di avvicinarsi a meno di 3 metri dal tapis roulant.
• Non consentire MAI a bambini al di sotto dei 13 anni di utilizzare il tapis roulant.
• I bambini di età superiore a 13 anni o le persone con capacità fisiche, sensoriali o mentali ridotte, o prive di esperienza e
competenze, non devono utilizzare il tapis roulant, a meno che non siano supervisionati o abbiano ricevuto istruzioni relative
all'uso del tapis roulant da una persona responsabile della loro sicurezza.
• Non rimuovere le coperture protettive se non su istruzioni di uno specialista o del rivenditore locale. Le operazioni di assistenza
devono essere eseguite solo da un tecnico di assistenza autorizzato.
• Scollegare la chiave di sicurezza per prevenire l’uso di terzi senza supervisione.
• Il tapis roulant è dotato di corrimano laterali e maniglione frontale per sostenere l’utente e scendere in caso di emergenza;
premere il pulsante d’emergenza per arrestare l’attrezzo in caso di emergenza.
• Il livello di rumore del tapis roulant è inferiore a 70 dB quando non vi è alcun utente sulla cinghia, oltre 70 dB durante l’uso. Se il
rumore del tapis roulant è di disturbo, interrompere l’esercizio e fare una pausa. L'emissione dei rumori sotto carico è superiore
rispetto a quando è senza carico.
• Assicurarsi che il tapis roulant si arresti completamente prima di piegare. Non utilizzare il tapis roulant quando è ripiegato.
• Si prega di notare che le parti in plastica, come i tappi terminali, sono soggette a usura.
• Il tapis roulant conserva il suo livello di sicurezza solo se controllato regolarmente per verificare l’eventuale presenza di danni e
usura.
• Assicurarsi che il bordo della cinghia sia parallelo alla corsia laterale, e non spostarlo sotto la corsia laterale. Se la cinghia non è
centrata, deve essere regolata prima dell’uso.

ITALIANO
189
• Utilizzare il tapis roulant soltanto per l’uso descritto nella relativa guida e nel manuale del proprietario.
• Non utilizzare altri collegamenti non raccomandati dal produttore. Gli ancoraggi possono causare lesioni.
• Restituire l’unità a un centro di assistenza per controllo e riparazione.
• Tenere il cavo di alimentazione lontano dalle superfici riscaldate. Non sollevare l’unità tramite il cavo di alimentazione o
utilizzarlo come maniglia.
• Non utilizzare mai il tapis roulant se la presa d’aria è ostruita. Tenere la presa d’aria pulita, priva di pelucchi, capelli e simili.
• Per prevenire lo shock elettrico, non fare cadere o inserire mai oggetti nelle aperture.
• Non utilizzare dopo l’impiego di prodotti spray o la somministrazione di ossigeno.
• Questo tapis roulant è inteso esclusivamente per l’uso domestico. Il mancato rispetto di questa indicazione annulla la garanzia.
• Non utilizzare il tapis roulant in luoghi in cui la temperatura non è controllata, quali garage, verande, piscine, bagni, parcheggi o
aree esterne. Se il tapis roulant è stato esposto a temperature fredde o climi ad umidità elevata, si raccomanda fortemente si
riscaldare il tapis roulant a temperatura ambiente prima del primo utilizzo. Il mancato rispetto di questa indicazione annulla la
garanzia.
• I nostri tapis roulant sono pesanti: spostare con cautela e, se necessario, farsi aiutare. Non cercare di spostare o trasportare il
tapis roulant se non in posizione verticale, ripiegata con il chiavistello bloccato. La mancata osservanza di queste istruzioni può
provocare lesioni.
• Non spostare o sollevare il tapis roulant finché non è specificato nelle istruzioni di assemblaggio. È consentito rimuovere
l’imballaggio di plastica dalle aste della console.
• Non aprire la scatola quando è ribaltata o appoggiata lateralmente.
• Estrarre l’unità dalla scatola e assemblarla laddove sarà utilizzata.
• Il tapis roulant incluso è dotato di molle ad alta pressione che possono causare l’apertura del telaio della base inferiore se
maneggiato in modo improprio.
• Non rimuovere le coperture della console se non indicato dal Assistenza Tecnica Clienti. Le operazioni di assistenza devono
essere eseguite solo da un tecnico di assistenza autorizzato.
• Per il montaggio è necessario essere in due: ciò renderà la procedura più semplice.

ITALIANO
190
SPECIFICHE TECNICHE
Dimensioni assemblato
(L x L x A)
193 x 86,4 x 144,8 cm /
76" x 34" x 57"
Peso del prodotto 85 kg / 187 lbs.
Massimo peso dell'utente 147 kg / 325 lbs.
Per il video di montaggio, visitare
https://global.bowflex.com/en/assembly-videos.html
Da questo momento è possibile assemblare
l’attrezzatura quando è più conveniente. Per
istruzioni dettagliate su montaggio, funzionamento,
programmi, risoluzione dei problemi e manutenzione,
scansionare il codice QR sul lato sinistro per
accedere al manuale completo.
Se la scansione del codice QR non riesce, visitare il
sito web indicato qui:
https://global.bowflex.com/en/manuals.html
In caso di domande, se si necessita di assistenza per parti mancanti o se si necessita di assistenza tecnica
o manutenzione per l'attrezzo, contattare l'assistenza tecnica clienti.
BISOGNO
DI AIUTO?
GARANZIA
Se l'attrezzo necessita di assistenza durante la garanzia, contattare l'assistenza tecnica clienti locale.
Fabbricante: Johnson Health Industry (Vietnam) Co., Ltd. | Indirizzo del fabbricante: Lot CN-24, Thuan Thanh II Industrial Park,
Mao Dien Ward, Bac Ninh Province, Vietnam

ITALIANO
191
STORAGE TRAY
CONSOLE
SUPPORTO PER
TABLET/LETTURA
PORTABORRACCIA
MASTICE DELLA CONSOLE
COPERTURA DEL MOTORE
TELAIO DI BASE
TELAIO DEL PIANO
CAVO DI TRASPORTO ROSSO
RUOTE DI TRASPORTO
DECALCOMANIA DEL
BLOCCO DEL PIEDE (SOTTO
IL BLOCCO DEL PIEDE)
INTERRUTTORE ON/OFF
CAVO DI ALIMENTAZIONE
NASTRO DA CORSA/
PIATTAFORMA DA CORSA
PORTABORRACCIA
MANUBRI CON IMPUGNATURE PER BATTITO CARDIACO
POSIZIONAMENTO DELLA CHIAVE DI SICUREZZA
MANUBRI CON IMPUGNATURE PER BATTITO CARDIACO
PANNELLO DI CONTROLLO E FINESTRE DI VISUALIZZAZIONE
ALTOPARLANTI
CONSOLE TAN
VASSOIO DI STOCCAGGIO
BARRA TRASVERSALE
BINARIO LATERALE
TAPPO FINALE DEL
RULLO
BOLTS DI REGOLAZIONE/
ALLINEAMENTO DEL RULLI
POSTERIORI
MASTICE DELLA CONSOLE
CHIUSURA DI BLOCCO DEL PIEDE
(SOTTO IL PIANO DI CORSA)

ITALIANO
192
ATTREZZI INCLUSI:
F Chiave a T da 6 mm
F Chiave a L da 6 mm
F Chiave a L da 5 mm
PARTI INCLUSE:
F 1 Assemblaggio della console
F 2 Paletti della console
F 1 Barra trasversale
F 1 Kit di attrezzi
F 1 Chiave di sicurezza
F 1 Cavo adattatore audio
F 1 Bottiglia di lubrificante al silicone
(per 2 applicazioni)
NON TENTARE DI SOLLEVARE IL TAPIS ROULANT! Non spostare o sollevare
il tapis roulant dalla confezione fino a quando non indicato nelle istruzioni di
montaggio. È possibile rimuovere la pellicola di plastica dai pali della console.
NOTA: Durante ogni fase di montaggio, assicurarsi che TUTTI i dadi e i bulloni siano inseriti
e parzialmente avvitati prima di serrare completamente CIASCUN bullone.
NOTA: L'applicazione di un leggero strato di grasso può agevolare l'installazione della
viteria. Si consiglia l'uso di qualsiasi tipo di grasso, ad esempio grasso al litio per biciclette.
IL NON RISPETTO DI QUESTE ISTRUZIONI POTREBBE COMPORTARE LESIONI!
Non aprire mai la scatola quando è posizionata capovolta o su un lato.
Sballare e assemblare l'unità nel luogo in cui verrà utilizzata.
Il tapis roulant incluso è dotato di molle ad alta pressione che, se maneggiate in modo
improprio, potrebbero causare l'apertura improvvisa del telaio inferiore.
I cavi di trasporto rossi sono installati tra il telaio superiore e il telaio inferiore per
impedire il movimento del telaio inferiore. NON rimuovere i cavi di trasporto rossi
fino a quando non indicato nelle istruzioni.
AVVERTENZA
AVVERTENZA
AVVERTENZA
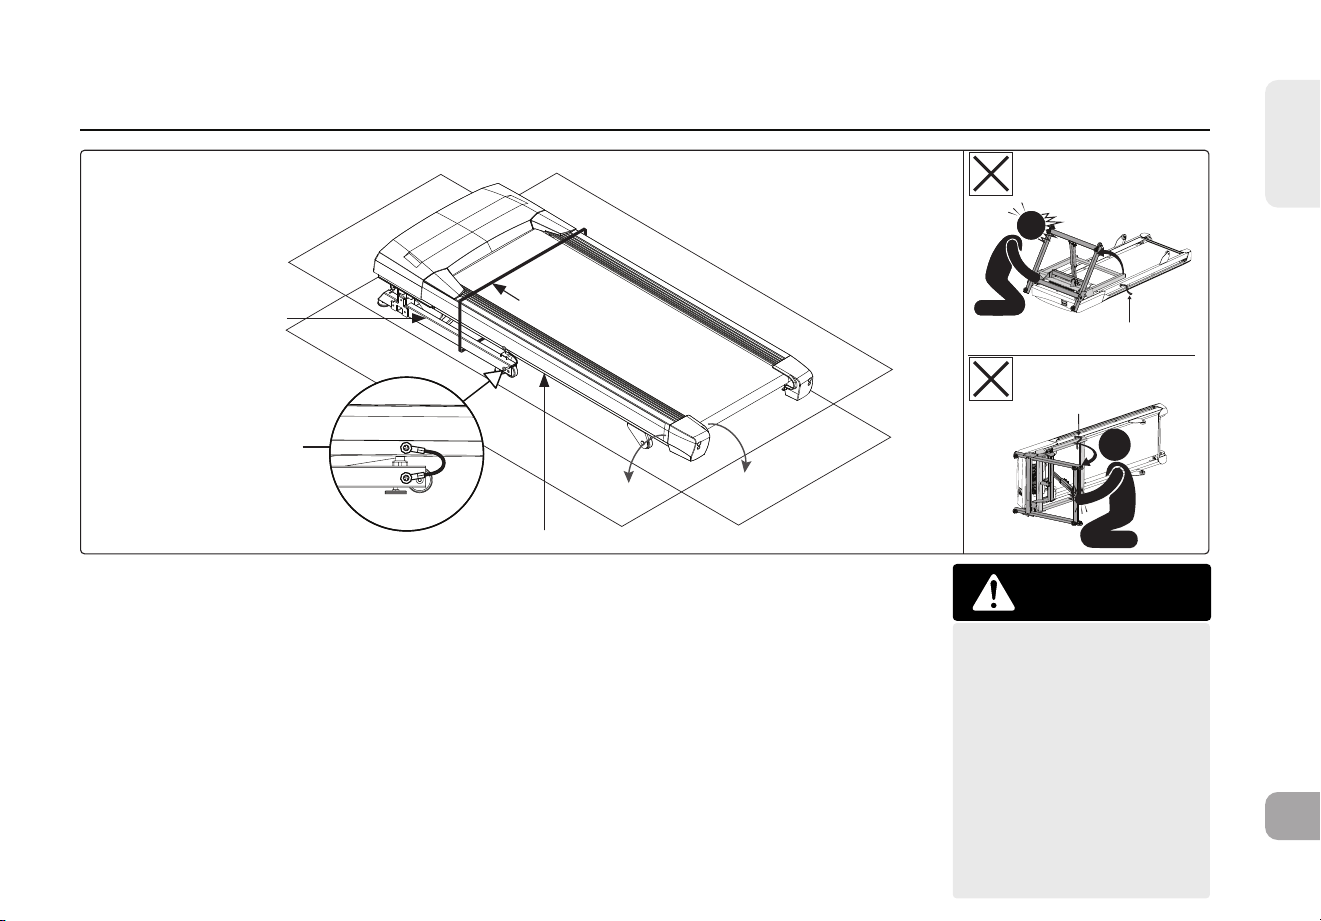
ITALIANO
193
RED TRANSPORT
CABLE
RED TRANSPORT
CABLE
PASSO DI MONTAGGIO PASSO - SBALLAGGIO
CINGHIA DI
IMBALLAGGIO
TELAIO DEL PIANO
CAVO DI
TRASPORTO
ROSSO
(LATI SINISTRO E
DESTRO)
TELAIO DI BASE
A Posizionare la scatola del tapis roulant su una superficie piana e stabile con il fondo della
scatola a contatto con il suolo.
B Tagliare le cinghie di imballaggio all'esterno della scatola e rimuovere il coperchio.
C NON sollevare il tapis roulant dalla scatola. Invece, strappare gli angoli della parte inferiore
della scatola del tapis roulant come mostrato. Il tapis roulant deve essere assemblato sulla
scatola appiattita come mostrato, per proteggere la superficie del pavimento.
D Tagliare le cinghie di imballaggio all'interno della scatola e rimuovere tutto tranne il telaio del
tapis roulant.
E Sollevare parzialmente il piano di corsa dalla parte posteriore per rimuovere tutti gli oggetti
sotto il piano di corsa. I cavi di trasporto rossi su entrambi i lati del tapis roulant impediranno
al piano di corsa di sollevarsi completamente.
NON rovesciare mai il
tapis roulant o metterlo
su un lato. NON utilizzare
strumenti per rimuovere
i cavi di trasporto rossi
fino a quando non indicato
nelle istruzioni. Se un
componente richiede
strumenti per essere
rimosso, attendere
che le istruzioni di
montaggio spieghino come
rimuoverlo in sicurezza.
CAVO DI TRASPORTO
ROSSO
CAVO DI
TRASPORTO ROSSO
AVVERTENZA

ITALIANO
194
A
2
1
NOTA: Non stringere completamente i bulloni fino alla
fine del PASSO 4.
A - QUANTITÀ: 3
Bullone (M8)
8.3 Aprire IL KIT DI FERRAMENTA PER IL PASSAGGIO1.
8.4 Far scivolare GOMMINO DEL PALLETTO DELLA
CONSOLE SINISTRO (8) sul PALLETTO DELLA
CONSOLE SINISTRO (1).
8.5 Fissare il PALLETTO DELLA CONSOLE SINISTRO (1) al
TELAIO DI BASE (2) utilizzando 3 BULLONI (A).
8
PASSO DI MONTAGGIO PASSO 1

ITALIANO
195
NOTA: Non stringere completamente i bulloni fino alla
fine del PASSO 4.
4
9
3
3
A
2
3
NOTA: Fai attenzione a non pizzicare i cavi durante il
montaggio della console.
A - QUANTITÀ: 3
Bullone (M8)
PASSO DI MONTAGGIO PASSO 2
10.1 Aprire IL KIT DI FERRAMENTA PER IL PASSAGGIO 2.
10.2 Far scivolare GOMMINO DEL PALLETTO DELLA
CONSOLE DESTRO (9) sul PALLETTO DELLA CONSOLE
DESTRO (4).
10.3 Separare il CAVO DELLA CONSOLE (3) dal telaio di base
del tapis roulant. Collegare il CAVO DELLA CONSOLE (3)
dal TELAIO PRINCIPALE (2) al CAVO DELLA CONSOLE
(3) nella parte inferiore del PALLETTO DELLA CONSOLE
DESTRO (4). L'altro estremo del CAVO DELLA CONSOLE
(3) dovrebbe trovarsi in cima al paletto.
10.4
Fissare il PALLETTO DELLA CONSOLE DESTRO PALLETTO (4)
al MAIN TELAIO PRINCIPALE (2) utilizzando 3 BULLONI (A).

ITALIANO
196
NOTA: Non stringere completamente i bulloni fino alla
fine del
PASSO 4.
D
1
6
4
D - QUANTITÀ: 4
Bullone (M6)
PASSO DI MONTAGGIO PASSO 3
3.1 Aprire IL KIT DI FERRAMENTA PER IL PASSAGGIO 3.
3.2 Fissare il LATO SINISTRO della BARRELLA
TRASVERSALE (6) al PALLETTO VERTICALE (1) in modo
lasco utilizzando 2 BULLONI (A).
3.3 Fissare il LATO DESTRO della BARRELLA
TRASVERSALE (6) al PALLETTO VERTICALE (4) in modo
lasco utilizzando 2 BULLONI (D).

ITALIANO
197
NOTA: Fai attenzione a non pizzicare i cavi durante il
montaggio della console.
B
C
A
(PASSO 4.5)
4
3
3
1
5
B - QUANTITÀ: 4 C - QUANTITÀ: 4
A - QUANTITÀ: 4
Bullone (M8)
Rondella
amolla
Rondella
piatta
PASSO DI MONTAGGIO PASSO 4
4.1 Aprire IL KIT DI FERRAMENTA PER IL PASSAGGIO 4.
4.2 Posizionare delicatamente la CONSOLE (5) sopra i
PALETTI DELLA CONSOLE (1&4). Fissare prima il LATO
SINISTRO utilizzando 2 BULLONI (A), 2 RONDELLE A
MOLLA (B) e 2 RONDELLE PIATTE (C).
4.3 I CAVI DELLA CONSOLE (3) sono riposti nel PALLETTO
DELLA CONSOLE DESTRO (4). Utilizzare il cavo di
guida per estrarre con attenzione il CAVO DELLA
CONSOLE (3) dal PALLETTO DELLA CONSOLE DESTRO
(4). Staccare e smaltire il CAVO DI GUIDA. Collegare
i CAVI DELLA CONSOLE (3) e riporre con attenzione i
cavi nei paletti per evitare danni.
4.4
Fissare il LATO DESTRO della CONSOLE (5) utilizzando
2BULLONI (A), 2 RONDELLE A MOLLA (B) e 2 RONDELLE
PIATTE (C).
4.5 Sollevare la parte superiore della CONSOLE (5) verso
la parte posteriore del tapis roulant e tenere mentre
si stringono i bulloni (A) dei lati sinistro e destro .
4.6 RICORDA di stringere TUTTI I BULLONI E LE VITI
completamente ora che l'assemblaggio è terminato.

ITALIANO
198
E - QUANTITÀ: 4
vite
PASSO DI MONTAGGIO PASSO 5
13.1 Aprire IL KIT DI FERRAMENTA PER IL PASSAGGIO 5.
13.2 Fissare il VASSOIO ACCESSORI (7) al TRAVERSO (6)
utilizzando 4 VITI (E).
6
E
7

ITALIANO
199
IL NON RISPETTO DI QUESTE ISTRUZIONI POTREBBE COMPORTARE
LESIONI!
Una volta staccati i cavi di trasporto rossi dal tapis roulant, le
molle ad alta pressione potrebbero causare l'apertura improvvisa
del telaio inferiore. NON rovesciare mai il tapis roulant o metterlo
su un lato, e NON sollevare questa unità se i cavi di trasporto rossi
non collegano il telaio superiore al telaio inferiore.
CAVO DI TRASPORTO ROSSO
CAVO DI TRASPORTO ROSSO
AVVERTENZA
PASSO DI MONTAGGIO PASSO 6 - RIMOZIONE DEI CAVI DI TRASPORTO ROSSI
14.1 Assicurarsi che il tapis roulant sia appoggiato con tutte le ruote a contatto
con il pavimento.
14.2 Sul lato sinistro del tapis roulant, utilizzare la chiave a L da 5 mm (fornita
nella scatola) per rimuovere i due bulloni che collegano il cavo di trasporto
rosso al telaio superiore e al telaio inferiore.
14.3 Sostituire entrambi i bulloni (uno nel telaio superiore e uno nel telaio
inferiore) e stringerli completamente per bloccarli in posizione. Si noti
che, per evitare che il telaio inferiore si apra durante il trasporto o il
disassemblaggio del tapis roulant in futuro, il cavo di trasporto rosso può
essere riattaccato al tapis roulant utilizzando gli stessi bulloni.
14.4 Eseguire la stessa operazione sul lato destro del tapis roulant per rimuovere
i due bulloni che collegano il cavo di trasporto rosso al telaio superiore e al
telaio inferiore.
14.5 Sostituire entrambi i bulloni e stringerli completamente per bloccarli in
posizione.
14.6 Conservare entrambi i cavi di trasporto rossi per un uso futuro, mettendoli
in un sacchetto di plastica trasparente insieme al manuale dell'utente.
14.7 Quando i cavi di trasporto rossi non sono installati, trasportare l'unità
SOLO a terra, e SOLO dopo che è completamente assemblata e in posizione
verticale piegata con il blocco di sicurezza fissato.

ITALIANO
200
PASSO DI MONTAGGIO PASSO 7
15.1 Aprire IL KIT DI FERRAMENTA PER IL
PASSAGGIO7.
15.2 RICORDA di serrare completamente i bulloni
del CROSSBAR nei CONSOLE MASTS (3 e 4)
ora che il montaggio è terminato. Sollevare
il DECK (10) fino alla posizione verticale e
bloccata.
15.3
Far scorrere il LEFT CONSOLE BOOT (8) fino
alla base del CONSOLE MAST SINISTRO (3).
Fissare con 2 BULLONI (F) attraverso i fori del
LEFT CONSOLE BOOT (8) al CONSOLE MAST
sinistro (3).
15.4 Far scorrere il RIGHT CONSOLE BOOT (9) fino
alla base del CONSOLE MAST DESTRO (4).
Fissare con 2 BULLONI (F) attraverso i fori del
RIGHT CONSOLE BOOT (9) al CONSOLE MAST
destro (4).
F - QUANTITÀ: 4
vite
Z06x4
F
4
10
1
8
9
9
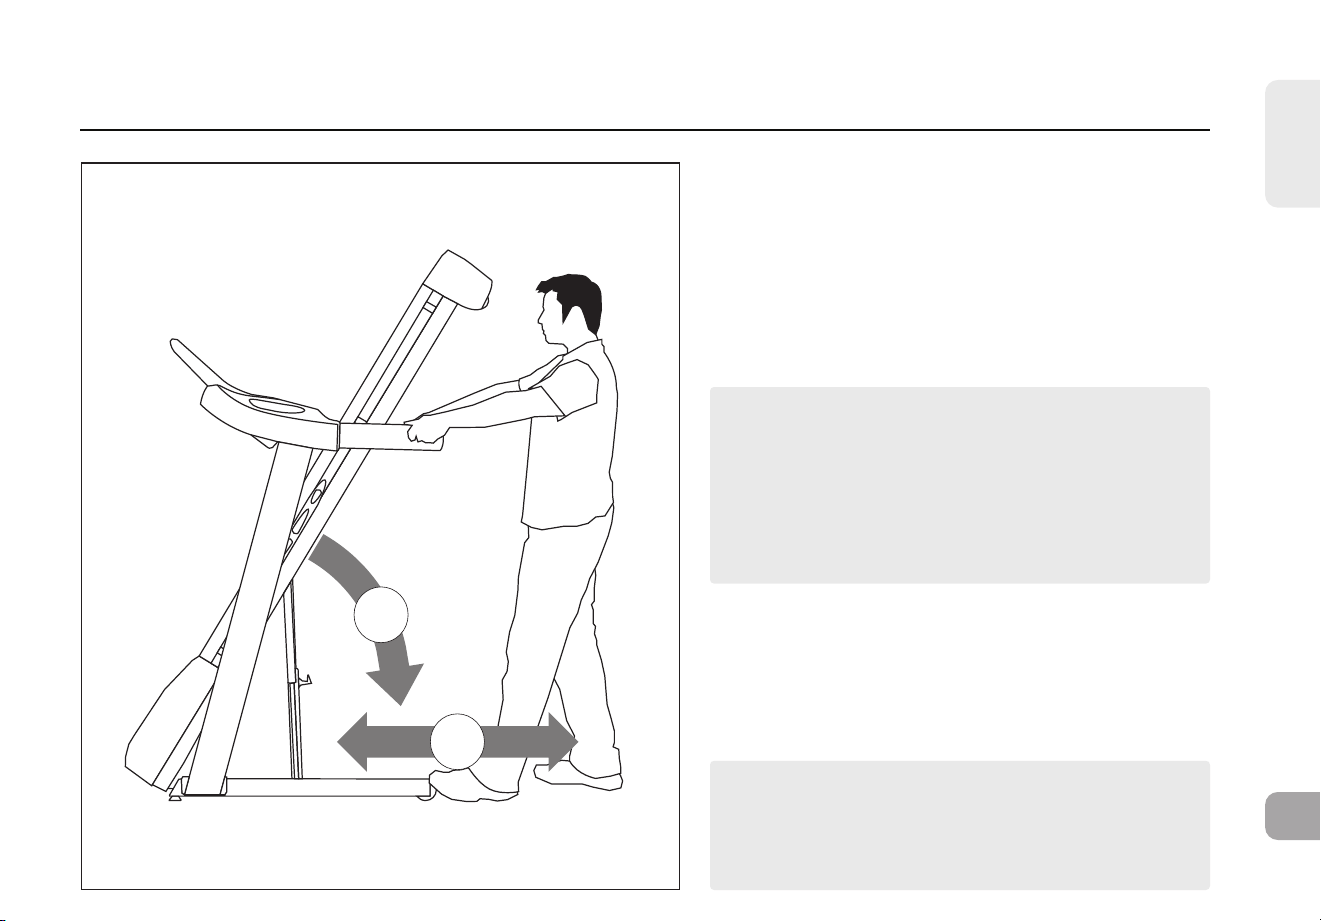
ITALIANO
201
MONTAGGIO COMPLETATO!
Prima del primo utilizzo, lubrificare il piano del
tapis roulant seguendo le istruzioni nella sezione
MANUTENZIONE del MANUALE DEL TAPIS
ROULANT.
NOTA: Se il tapis roulant deve essere smontato o
sollevato in futuro, utilizzare la chiave a L da 5 mm
per riattaccare i cavi di trasporto rossi al telaio
superiore e al telaio inferiore sia sul lato sinistro che
sul lato destro del tapis roulant. Verificare che il
telaio inferiore non possa aprirsi improvvisamente
prima di sollevare o smontare il tapis roulant.
1
2
PASSO DI MONTAGGIO PASSO 8 - SPOSTAMENTO DEL TAPIS ROULANT
16.1 Per spostarlo, assicurarsi che il tapis roulant sia
piegato e bloccato saldamente. Quindi afferrare
saldamente le maniglie, inclinare il tapis roulant
all'indietro (1) e farlo rotolare (2).
16.2 Spostare il tapis roulant dalla scatola appiattita e
posizionarlo nella sua posizione finale, pronto per
l'uso. Smaltire la scatola di cartone.

202
Installazione
e utilizzo del
tapis roulant

ITALIANO
203
POSIZIONAMENTO DEL TAPIS ROULANT
Colloca il tapis roulant su una superficie stabile. Lasciare almeno 30 cm di spazio davanti al tapis
roulant per il cavo di alimentazione. Lasciare una zona libera dietro il tapis roulant pari ad almeno la
larghezza del tapis roulant e ad almeno 2 metri. Questo spazio deve essere privo di ostacoli e fornire
all’utente una chiara via di uscita dalla macchina. In caso di emergenza, poni le mani sui braccioli
laterali per reggerti e i piedi sulle corsie laterali.
Per agevolare l’accesso, lascia uno spazio, preferibilmente su entrambi i lati del tapis roulant, pari
a 0,6 metri per consentire all’utente di accedere da entrambi i lati.
Non collocare il tapis roulant in un punto che blocchi un’apertura di ventilazione o una presa d’aria.
Non collocare il tapis roulant in un garage, un cortile coperto, a contatto con l’acqua o all’esterno.
ISTRUZIONI DI MESSA A TERRA
Il prodotto deve essere provvisto di messa a terra. In caso di malfunzionamenti o guasti, la messa
a terra fornisce una via di minore resistenza per la corrente elettrica in modo da ridurre il rischio
di elettroshock. Il prodotto è dotato di un cavo con un connettore di messa a terra e una spina di
messa a terra. La spina deve essere collegata a una presa adeguata appropriatamente installata e
messa a terra in conformità con i codici e le normative locali.
PERICOLO!
• Un collegamento inadeguato del conduttore di messa a terra dell’attrezzo può comportare il
rischio di elettroshock. In caso di dubbio, verificare con un elettricista o un addetto qualificato
se il prodotto dispone di un’appropriata messa a terra. Non modificare la spina fornita con
il prodotto. Se non entra nella presa, farsi installare una presa adeguata da un elettricista
qualificato.
• Questo prodotto va utilizzato su un circuito di tensione locale nominale munito di spina di
messa a terra. Per questo prodotto non vanno utilizzati adattatori.
• Questo prodotto deve avere un circuito dedicato. Per determinare se si è su un circuito
dedicato, staccare la corrente del circuito e osservare se altri dispositivi rimangono senza
corrente. In tal caso, spostare i dispositivi su un altro circuito.
Nota: di norma un circuito ha più uscite.
60 cm
(2 ft)
60 cm
(2 ft)
2 m (79”)
30 cm (1 ft)
SPAZIO
LIBERO
T8.5J
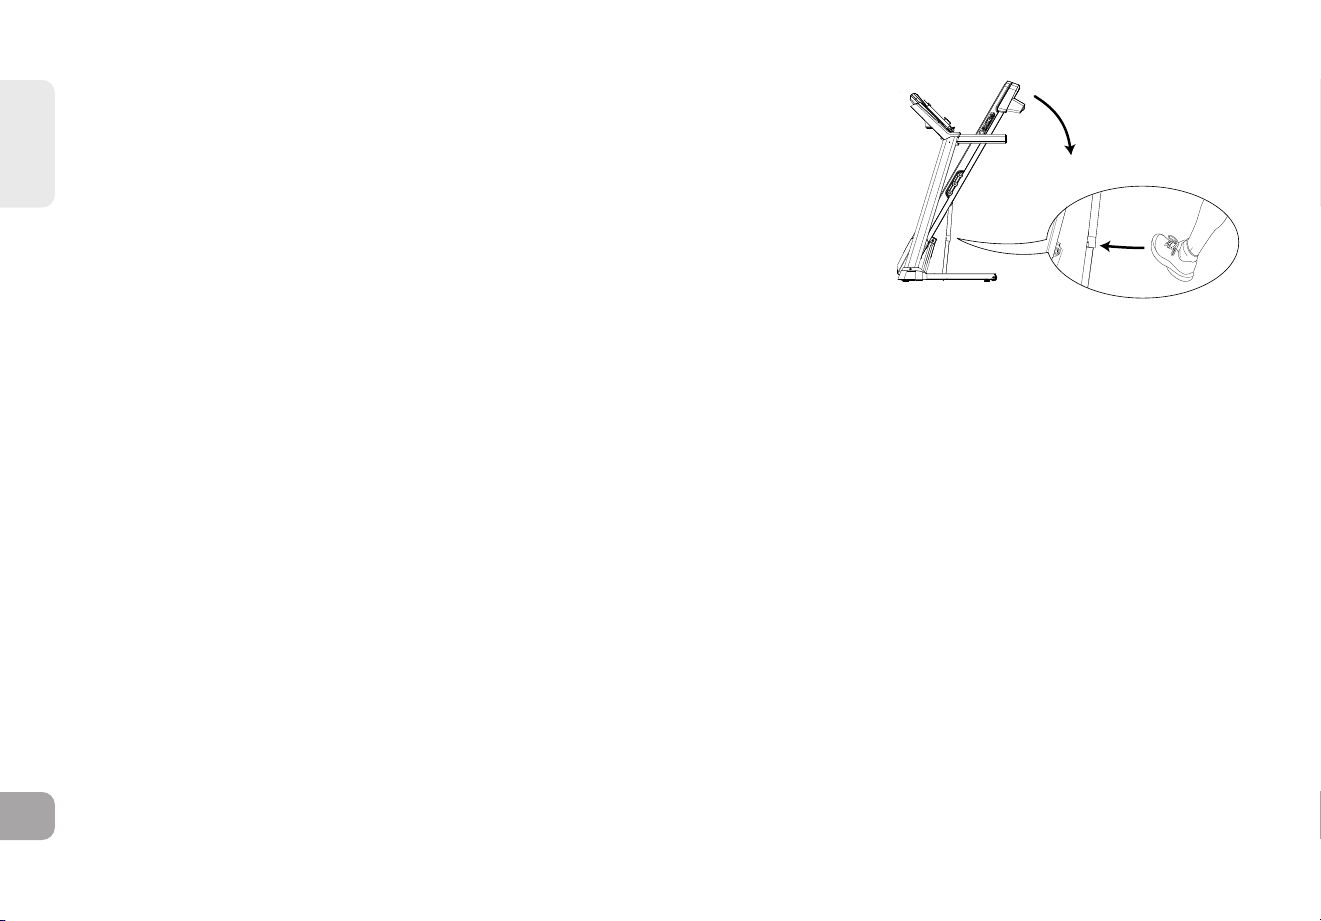
ITALIANO
204
TAPIS ROULANT PIEGHEVOLI
Per ripiegarlo, afferrare saldamente l’estremità posteriore del tapis roulant. Sollevare
con cautela l’estremità della pedana del tapis roulant in posizione verticale fino a
quando il fermo si innesta e blocca saldamente la pedana in posizione. Accertarsi che la
pedana sia bloccata in modo sicuro prima di lasciarla andare.
APERTURA
Afferrare saldamente la parte posteriore del tapis roulant. Se il tapis roulant è dotato di
una chiusura a pedale (A), per aprirlo premere delicatamente.
UTILIZZO DELLA CHIAVE DI SICUREZZA
Il tapis roulant non si avvia a meno che la chiave di sicurezza non sia in posizione. Attaccare bene l’estremità della clip ai propri
abiti. La chiave di sicurezza è stata ideata per togliere l’alimentazione al tapis roulant in caso di caduta dell’utente. Controllare il
funzionamento della chiave di sicurezza ogni 2 settimane.
AVVERTENZA: Non utilizzare mai il tapis roulant senza aver prima fissato la clip della chiave di sicurezza ai propri indumenti.
Tirare la clip della chiave di sicurezza per accertarsi che non si stacchi dagli indumenti.
ALIMENTAZIONE
Il tapis roulant è alimentato per mezzo di un alimentatore. Quest’ultimo va inserito nell’attacco ubicato nella parte anteriore
dell’unità, vicino al tubo dello stabilizzatore. Alcuni tapis roulant hanno un interruttore on/off, posto accanto all’attacco
dell’alimentatore. Accertarsi che sia nella posizione di accensione. Scollegare il cavo quando l’attrezzo non èin uso. NOTA: alcuni
tapis roulant hanno un interruttore on/offdietro la console.
AVVERTENZA: Non utilizzare il prodotto se il cavo o la spina sono danneggiati oppure se l’attrezzo non funziona correttamente,
ha subito dei danni o è stato immerso in acqua.
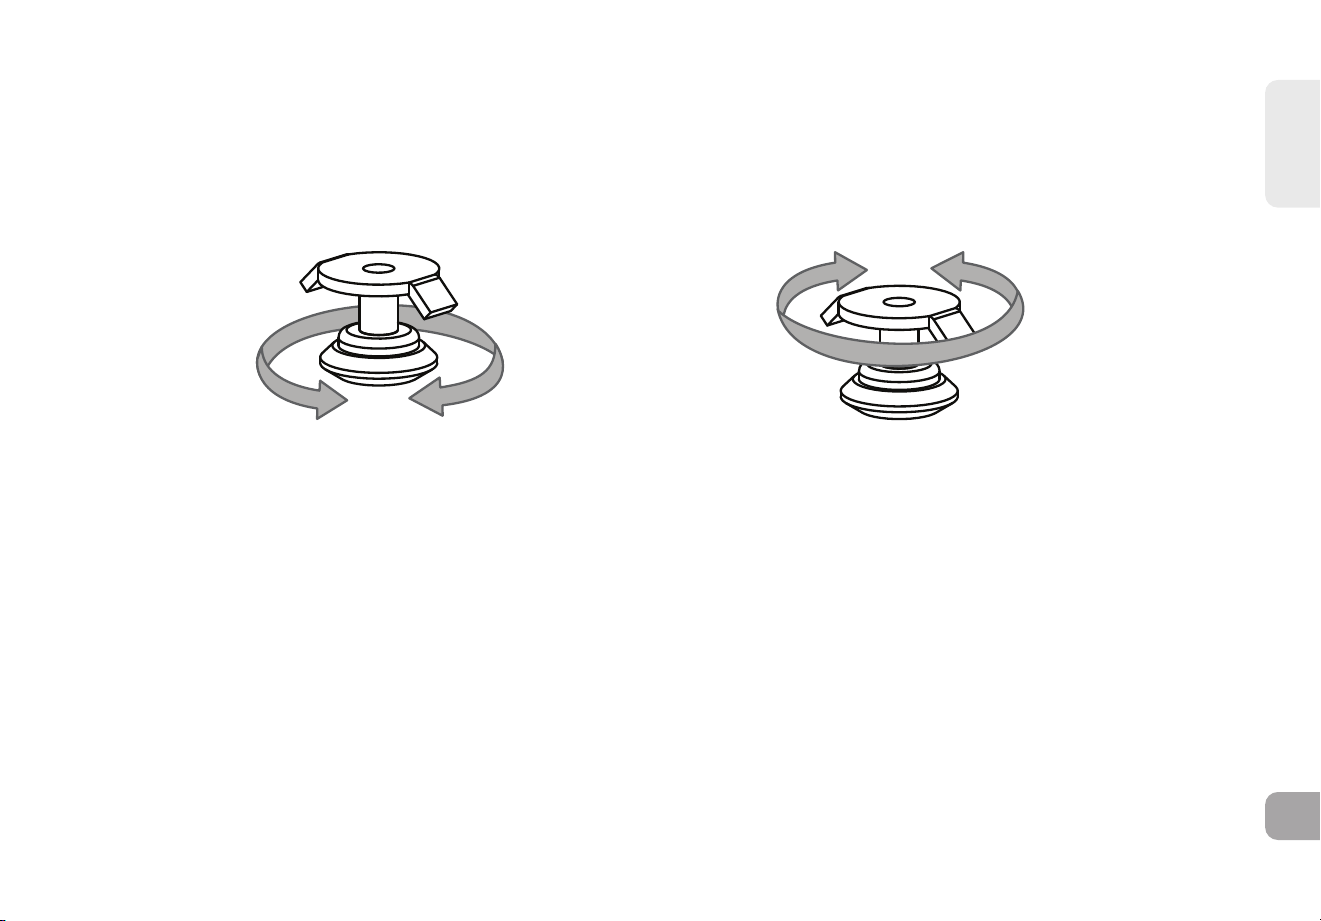
ITALIANO
205
LIVELLAMENTO DEL TAPIS ROULANT
Il tapis roulant deve essere in piano affinché l’uso sia ottimale. Una volta posizionato il tapis roulant nel luogo in cui si desidera
utilizzarlo, alzare o abbassare uno o entrambi i livellatori regolabili situati nella parte inferiore del telaio. Si consiglia una livella da
carpentiere. Se il tapis roulant non è in piano, il nastro da corsa potrebbe non essere allineato correttamente. Una volta livellato il
tapis roulant, bloccare i livellatori in posizione serrando i dadi contro il telaio.
REGOLAZIONE
DELL’ALTEZZA
REGOLAZIONE
DEL BLOCCO
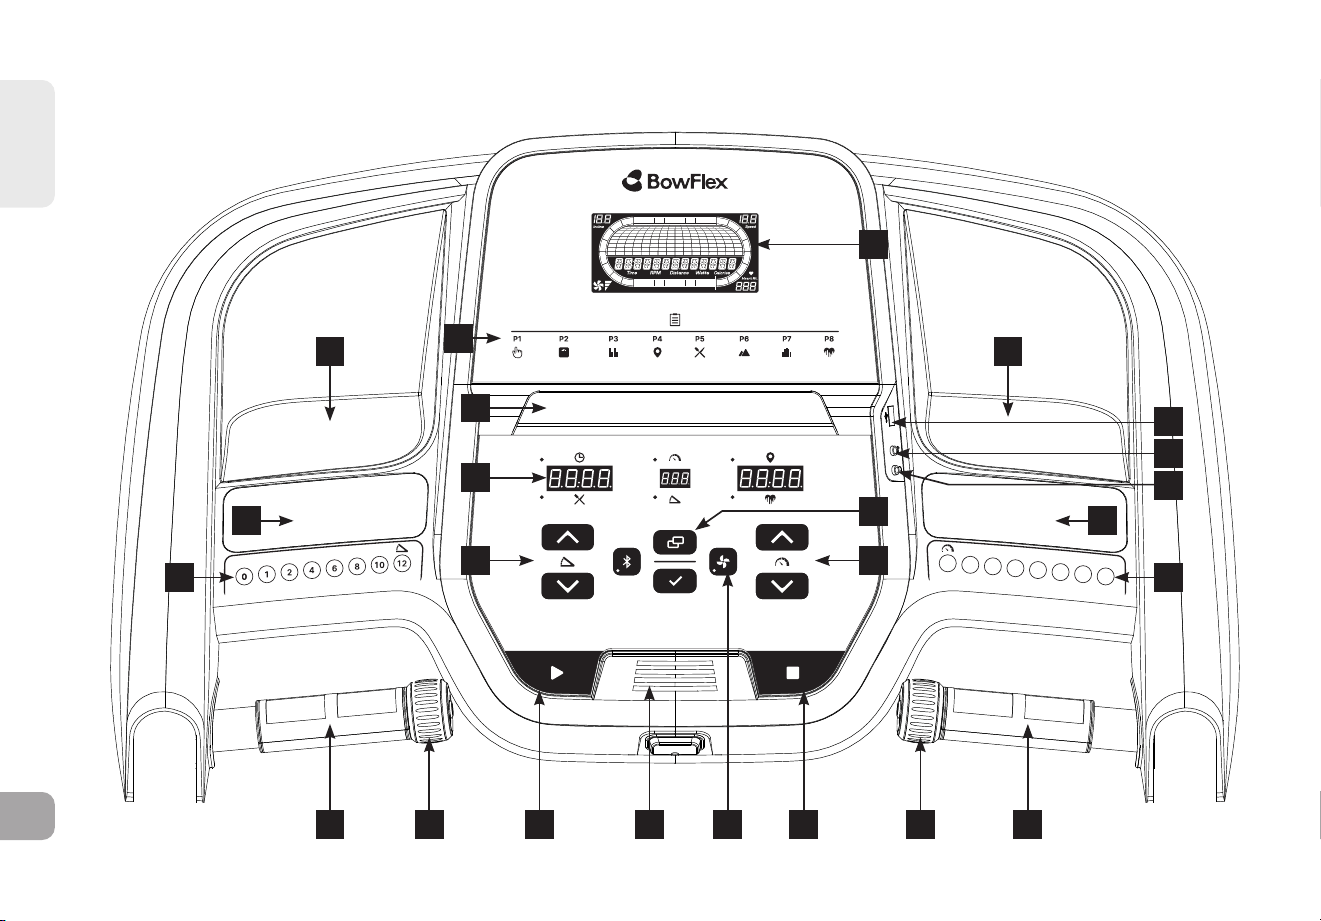
ITALIANO
206
2
4
6
8
10
12
16
20
Q
M M
P
N
IH
B
R
F G
A
J
C
O
Q
DS T U SEL K

ITALIANO
207
PERAZIONE DELLA CONSOLE
Nota: C'è un sottile foglio protettivo di plastica trasparente sul rivestimento della console che deve essere rimosso prima dell'uso.
A) DISPLAY LCD: Time, RPM, Distance, Watts, Calories, Incline, Speed, Heart Rate, Fan Speed.
B) DISPLAY LED: Time, Speed, Distance, Calories, Incline, Heart Rate.
C) PROGRAMMI DI ALLENAMENTO: Elenca ciascun programma disponibile durante l'allenamento.
D) START: premere per iniziare l'esercizio, avviare l'allenamento o riprendere l'esercizio dopo una pausa.
E) STOP: premere per mettere in pausa/terminare l'allenamento. Tenere premuto per 3 secondi per ripristinare la console.
F) TASTI INCLINAZIONE +/-: utilizzati per regolare l'inclinazione in piccoli incrementi (incrementi dello 0,5%).
G) TASTI VELOCITÀ +/-: utilizzati per regolare la velocità in piccoli incrementi (incrementi di 0,1 mph).
H) TASTI RAPIDI INCLINE: utilizzati per raggiungere rapidamente l'inclinazione desiderata.
I) TASTI RAPIDI SPEED: utilizzati per raggiungere rapidamente la velocità desiderata.
J) CHANGE DISPLAY: premere per modificare le informazioni visualizzate durante l'allenamento.
K) TASTO FAN: premendo il tasto fan si passa dal livello 1 al 2, al 3, poi si spegne.
L) VENTILATORE: ventilatore personale per l'allenamento.
M) ALTOPARLANTI: la musica viene riprodotta dagli altoparlanti quando il tuo lettore CD / MP3 è collegato alla console.
N) INGRESSO AUDIO: collegare il lettore CD / MP3 alla console utilizzando il cavo adattatore audio in dotazione.
O) USCITA AUDIO / JACK CUFFIE: collegare le cuffie a questo jack per ascoltare la musica tramite le cuffie.
Nota: quando le cuffie sono collegate al jack delle cuffie, il suono non uscirà più dagli altoparlanti.
P) INGRESSO USB: uscita USB 1A/5V.
Q) TASCHE PORTABORRACCIA: per contenere accessori personali da allenamento.
R) SUPPORTO PER TABLET/LETTURA: per sostenere un tablet o materiale di lettura.
S) SENSORI DI FREQUENZA CARDIACA: utilizzati per misurare la frequenza cardiaca.
T) ROTELLA DI SCORRIMENTO INCLINE: utilizzata per regolare l'inclinazione a piccoli incrementi (0,5%).
U) ROTELLA DI SCORRIMENTO SPEED: utilizzata per regolare la velocità a piccoli incrementi (0,1 MPH).

ITALIANO
208
FINESTRE DEL DISPLAY
• TIME: Visualizzato in minuti: secondi. Visualizza il tempo rimanente o il tempo trascorso durante l'allenamento.
• SPEED: Visualizzato in MPH. Indica la velocità della superficie su cui stai camminando o correndo.
• DISTANCE: Visualizzato in miglia. Indica la distanza percorsa o la distanza rimanente durante l'allenamento.
• CALORIES: Totale delle calorie bruciate o delle calorie rimanenti da bruciare durante l'allenamento.
• INCLINE: Visualizzato in percentuale. Indica l'inclinazione della superficie su cui stai camminando o correndo.
• HEART RATE: Visualizzato in BPM (battiti per minuto). Utilizzato per monitorare la frequenza cardiaca (visualizzato quando si
entra in contatto con entrambe le impugnature per il battito).

ITALIANO
209
INIZIARE
1) Verificare che non ci siano oggetti sulla superficie del nastro che possano ostacolare il movimento del tapis roulant.
2) Collegare il cavo di alimentazione e accendere il tapis roulant. (L'interruttore ON/OFF si trova accanto al cavo di alimentazione.)
3) Stare sulle barre laterali del tapis roulant.
4) Attacca la clip della chiave di sicurezza a una parte dei tuoi vestiti, assicurandoti che sia sicura e che non si stacchi durante il
funzionamento.
5) Inserisci la chiave di sicurezza nella serratura della chiave di sicurezza nella console.
6) Hai due opzioni per iniziare il tuo allenamento:
A) AVVIO RAPIDO
Basta premere il tasto START per iniziare l'allenamento.
Tempo, distanza e calorie verranno conteggiati a partire da zero. O...
B) SELEZIONA UN ALLENAMENTO O UN OBIETTIVO
1) Seleziona il tuo PROGRAMMA con i tasti +/- e premi ENTER quando il PROGRAMMA desiderato viene visualizzato.
2) Regola l'IMPOSTAZIONE con i tasti +/- e premi ENTER quando l'IMPOSTAZIONE desiderata viene visualizzata.
3) Premi START per iniziare.
SPECIFICHE PER PROGRAMMI CON PIÙ SEGMENTI
1) L'utente può aumentare la velocità e l'inclinazione in un determinato segmento e l'aumento AVRÀ EFFETTO SOLO SU QUEL
SEGMENTO. Per i segmenti successivi, la macchina seguirà i valori indicati nella tabella fornita.
2) L'utente può diminuire la velocità e l'inclinazione in qualsiasi segmento, e la diminuzione si applicherà nella stessa misura anche ai
segmenti successivi.
BOWFLEX CONNECTED FITNESS SYSTEM
Il tuo dispositivo BowFlex è compatibile con Bluetooth e ti consente di utilizzare la tecnologia Bluetooth 4.0 per connettere in modalità
wireless il tuo dispositivo e altre app al tapis roulant BowFlex.
ITALIANO
210
P1) MANUALE: Regola manualmente la velocità e l'inclinazione durante l'allenamento.
PROFILI DI ALLENAMENTO
P2) WEIGHT LOSS: Un allenamento progettato specificamente per mirare alla perdita di peso. Favorisce la perdita di peso
aumentando e diminuendo l'inclinazione, mantenendoti nella zona di bruciagrassi. Comprende 20 livelli.
WEIGHT LOSS
Segment = workout time � 16
Level 1 2 3 4 5 6 7 8 9 10 11 12 13 14 15 16 17 18 19 20
Segment
1 0 0 0 0 0 0 1 2 2 2,5 2,5 2,5 2,5 2,5 3,5 5 5 5 5 5
2 0 0 1 2 2,5 3,5 3,5 3,5 4,5 5,5 6 7 7,5 8,5 9,5 11 11 11 11,5 12
3 1 2 2 2 2 2 2 2 2 2,5 3,5 4,5 4,5 4,5 5,5 7 7,5 8,5 9 10
4 1,5 3,5 4 5 5 5 5 5 6 7 7,5 8,5 9 10 11 12 12,5 13,5 14 15
5 1 2 2 2 2 2 2,5 3,5 4 4,5 4,5 4,5 5,5 7 7,5 8,5 8,5 8,5 9,5 11
6 1,5 3,5 3,5 3,5 5 6,5 7,5 8,5 9 10 10 10 10,5 11,5 12,5 13,5 13,5 13,5 13,5 13,5
7 1 2 2 2 2 2 2,5 3,5 4 4,5 5 5,5 5,5 5,5 7 8,5 8,5 8,5 9 10
8 1,5 3,5 4 5 5 5 5,5 6,5 7,5 8,5 9 10 10,5 11,5 11,5 12 13,5 15 15 15
9 1,5 3,5 3,5 3,5 3,5 3,5 4 5 5 5,5 6 7 7 7 8,5 10 10,5 11 11,5 12
10 1 2 2 2 2 2 2,5 3,5 4 4,5 4,5 4,5 4,5 4,5 6,5 8,5 8,5 8,5 9 10
11 1,5 3,5 3,5 3,5 4 5 5 5 6 7 8,5 10 10,5 11,5 12,5 13,5 13,5 13,5 14 15
12 1 2 2 2 2 2 2 2 3 4,5 5,5 7 7 7 7,5 8,5 9 10 10 10
13 1,5 3,5 4 5 5,5 6,5 7,5 8,5 8,5 8,5 9 10 10 10 11 12 12 12 12,5 13,5
14 1 2 2 2 2,5 3,5 4 5 5 5,5 5,5 5,5 7 8,5 9 10 10,5 11 11,5 12
15 0 0 0 0 1 2 2,5 3,5 4 4,5 4,5 4,5 5 5,5 7 8,5 9 10 10 10
16 0 0 0 0 0 0 1 2 2 2,5 2,5 2,5 2,5 2,5 3,5 5 5 5 5 5
WEIGHT LOSS (10%incline Max)
Segment = workout time � 16
Level 1 2 3 4 5 6 7 8 9 10 11 12 13 14 15 16 17 18 19 20
Segment
1 0 0 0 0 0 0 1 2 2 2,5 2,5 2,5 2,5 2,5 3,5 5 5 5 5 5
2 0 0 1 2 2,5 3,5 3,5 3,5 4,5 5,5 6 7 7,5 8,5 9,5 10 10 10 10 10
3 1 2 2 2 2 2 2 2 2 2,5 3,5 4,5 4,5 4,5 5,5 7 7,5 8,5 9 10
4 1,5 3,5 4 5 5 5 5 5 6 7 7,5 8,5
9 10 10 10 10 10 10 10
5 1 2 2 2 2 2 2,5 3,5 4 4,5 4,5 4,5 5,5 7 7,5 8,5 8,5 8,5 9,5 10
6 1,5 3,5 3,5 3,5 5 6,5 7,5 8,5 9 10 10 10 10 10 10 10 10 10 10 10
7 1 2 2 2 2 2 2,5 3,5 4 4,5 5 5,5 5,5 5,5 7 8,5 8,5 8,5 9 10
8 1,5 3,5 4 5 5 5 5,5 6,5 7,5 8,5 9 10 10 10 10 10 10 10 10 10
9 1,5 3,5 3,5 3,5 3,5 3,5 4 5 5 5,5 6 7 7 7 8,5 10 10 10 10 10
10 1 2 2 2 2 2 2,5 3,5 4 4,5 4,5 4,5 4,5 4,5 6,5 8,5 8,5 8,5 9 10
11 1,5 3,5 3,5 3,5 4 5 5 5 6 7 8,5 10 10 10 10 10 10 10 10 10
12 1 2 2 2 2 2 2 2 3 4,5 5,5 7 7 7 7,5 8,5 9 10 10 10
13 1,5 3,5 4 5 5,5 6,5 7,5 8,5 8,5 8,5 9 10 10 10 10 10 10 10 10 10
14 1 2 2 2 2,5 3,5 4 5 5 5,5 5,5 5,5 7 8,5 9 10 10 10 10 10
15 0 0 0 0 1 2 2,5 3,5 4 4,5 4,5 4,5 5 5,5 7 8,5 9 10 10 10
16 0 0 0 0 0 0 1
2 2 2,5 2,5 2,5 2,5 2,5 3,5 5 5 5 5 5
WEIGHT LOSS (12%incline Max)
Segment = workout time � 16
Level 1 2 3 4 5 6 7 8 9 10 11 12 13 14 15 16 17 18 19 20
Segment
1 0 0 0 0 0 0 1 2 2 2,5 2,5 2,5 2,5 2,5 3,5 5 5 5 5 5
2 0 0 1 2 2,5 3,5 3,5 3,5 4,5 5,5 6 7 7,5 8,5 9,5 11 11 11 11,5 12
3 1 2 2 2 2 2 2 2 2 2,5 3,5 4,5 4,5 4,5 5,5 7 7,5 8,5 9 10
4 1,5 3,5 4 5 5 5 5 5 6 7 7,5 8,5 9 10 11 12 12 12 12 12
5 1 2 2 2 2 2 2,5 3,5 4 4,5 4,5 4,5 5,5 7 7,5 8,5 8,5 8,5 9,5 11
6 1,5 3,5 3,5 3,5 5 6,5 7,5 8,5 9 10 10 10 10,5 11,5 12 12 12 12 12 12
7 1 2 2 2 2 2 2,5 3,5 4 4,5 5 5,5 5,5 5,5 7 8,5 8,5 8,5 9 10
8 1,5 3,5 4 5 5 5 5,5 6,5 7,5 8,5 9 10 10,5 11,5 11,5 12 12 12 12 12
9 1,5 3,5 3,5 3,5 3,5 3,5 4 5 5 5,5 6 7 7 7 8,5
10 10,5 11 11,5 12
10 1 2 2 2 2 2 2,5 3,5 4 4,5 4,5 4,5 4,5 4,5 6,5 8,5 8,5 8,5 9 10
11 1,5 3,5 3,5 3,5 4 5 5 5 6 7 8,5 10 10,5 11,5 12 12 12 12 12 12
12 1 2 2 2 2 2 2 2 3 4,5 5,5 7 7 7 7,5 8,5 9 10 10 10
13 1,5 3,5 4 5 5,5 6,5 7,5 8,5 8,5 8,5 9 10 10 10 11 12 12 12 12 12
14 1 2 2 2 2,5 3,5 4 5 5 5,5 5,5 5,5 7 8,5 9 10 10,5 11 11,5 12
15 0 0 0 0 1 2 2,5 3,5 4 4,5 4,5 4,5 5 5,5 7 8,5 9 10 10 10
16
0 0 0 0 0 0 1 2 2 2,5 2,5 2,5 2,5 2,5 3,5 5 5 5 5 5
INCLINE
INCLINE
INCLINE
PERDITA DI PESO (Inclinazione massima 12%)
Segmento = tempo dell'allenamento/16
Livello
Segmento
INCLINAZIONE

ITALIANO
211
P3) INTERVALS: Migliora la tua forza, velocità e resistenza aumentando e diminuendo l'inclinazione durante l'allenamento per
coinvolgere il cuore e altri muscoli. Comprende 20 livelli.
P4) DISTANZA: Sfida te stesso e supera i tuoi limiti durante l'allenamento con 13 allenamenti basati sulla distanza. Scegli tra
1 miglio, 2 miglia, 5k, 5 miglia, 10k, 8 miglia, 15k, 10 miglia, 20k, mezza maratona, 15 miglia, 20 miglia e obiettivi maratona.
L'utente imposta i livelli di velocità iniziali.
P5) CALORIES: Imposta obiettivi per bruciare calorie. Le calorie bruciate sono calcolate in base alla distanza e alla velocità.
Intervals (15%Incline)
Segment =workout time�16
Level 1 2 3 4 5 6 7 8 9 10 11 12 13 14 15 16 17 18 19 20
Segment
1 0 0 0 0 0 0 0 0 0 0 0 0 0 0 0 0 0 0 0 0
2 0,5 0,5 0,5 0,5 0,5 0,5 0,5 0,5 1 1 1 1 1 1 1 1,5 1,5 1,5 1,5 1,5
3 0 0 0 0 0 0 0 0 0 0 0 0 0 0 0 0 0 0 0 0
4 1,5 2 2 2,5 3 3 3,5 3,5 4 4,5 5 5,5 5,5 6 6 6,5 7 7 8 8,5
5 0 0 0 0 0 0 0 0 0 0 0 0 0 0 0 0 0 0 0 0
6 2,5 2,5 3 3,5 4 4,5 4,5 5 5,5 6 7 7,5 8 8 8,5 9,5 9,5 10 11 11,5
7 0 0 0 0 0 0 0 0 0 0 0 0 0 0 0 0 0 0 0 0
8 3 3,5 4 4,5 5 5,5 6 6,5 7 8 9 9,5 10 10,5 11 12 12,5 13 14 15
9 0 0 0 0 0 0 0 0 0 0 0 0 0 0 0 0 0 0 0 0
10 3 3,5 4 4,5 5 5,5 6 6,5 7 8 9 9,5 10 10,5 11 12 12,5 13 14 15
11 0 0 0 0 0 0 0 0 0 0 0 0 0 0 0 0 0 0 0 0
12 3 3,5 4 4,5 5 5,5 6 6,5 7 8 9 9,5 10 10,5 11 12 12,5 13 14 15
13 0 0 0 0 0 0 0 0 0 0 0 0 0 0 0 0 0 0 0 0
14 3 3,5 4 4,5 5 5,5 6 6,5 7 8 9 9,5 10 10,5 11 12 12,5 13 14 15
15 0 0 0 0 0 0 0 0 0 0 0 0 0 0 0 0 0 0 0 0
16 3 3,5 4 4,5 5 5,5 6 6,5 7 8 9 9,5 10 10,5 11 12 12,5 13 14 15
Intervals (10%Incline)
Segment =workout time�16
Level 1 2 3 4 5 6 7 8 9 10 11 12 13 14 15 16 17 18 19 20
Segment
1 0 0 0 0 0 0 0 0 0 0 0 0 0 0 0 0 0 0 0 0
2 0,5 0,5 0,5 0,5 0,5 0,5 0,5 0,5 1 1 1 1 1 1 1 1,5 1,5 1,5 1,5 1,5
3 0 0 0 0 0 0 0 0 0 0 0 0 0 0 0 0 0 0 0 0
4 1,5 2 2 2,5 3 3 3,5 3,5 4 4,5 5 5,5 5,5 6 6 6,5 7 7 8 8,5
5 0 0 0 0 0 0 0 0 0 0 0 0 0 0 0 0 0 0 0 0
6 2,5 2,5 3 3,5 4 4,5 4,5 5 5,5 6 7 7,5 8 8 8,5 9,5 9,5 10 10 10
7 0 0 0 0 0 0 0 0 0 0 0 0 0 0 0 0 0 0 0 0
8 3 3,5 4 4,5 5 5,5 6 6,5 7 8 9 9,5 10 10 10 10 10 10 10 10
9 0 0 0 0 0 0 0 0 0 0 0 0 0 0 0 0 0 0 0 0
10 3 3,5 4 4,5 5 5,5 6 6,5 7 8 9 9,5 10 10 10 10 10 10 10 10
11 0 0 0 0 0 0 0 0 0 0 0 0 0 0 0 0 0 0 0 0
12 3 3,5 4 4,5 5 5,5 6 6,5 7 8 9 9,5 10 10 10 10 10 10 10 10
13 0 0 0 0 0 0 0 0 0 0 0 0 0 0 0 0 0 0 0 0
14 3 3,5 4 4,5 5 5,5 6 6,5 7 8 9 9,5 10 10 10 10 10 10 10 10
15 0 0 0 0 0 0 0 0 0 0 0 0 0 0 0 0 0 0 0 0
16 3 3,5 4 4,5 5 5,5 6 6,5 7 8 9 9,5 10 10 10 10 10 10 10 10
Segment =workout time�16
Intervals (12%Incline)
Level 1 2 3 4 5 6 7 8 9 10 11 12 13 14 15 16 17 18 19 20
Segment
1 0 0 0 0 0 0 0 0 0 0 0 0 0 0 0 0 0 0 0 0
2 0,5 0,5 0,5 0,5 0,5 0,5 0,5 0,5 1 1 1 1 1 1 1 1,5 1,5 1,5 1,5 1,5
3 0 0 0 0 0 0 0 0 0 0 0 0 0 0 0 0 0 0 0 0
4 1,5 2 2 2,5 3 3 3,5 3,5 4 4,5 5 5,5 5,5 6 6 6,5 7 7 8 8,5
5 0 0 0 0 0 0 0 0 0 0 0 0 0 0 0 0 0 0 0 0
6 2,5 2,5 3 3,5 4 4,5 4,5 5 5,5 6 7 7,5 8 8 8,5 9,5 9,5 10 11 11,5
7 0 0 0 0 0 0 0 0 0 0 0 0 0 0 0 0 0 0 0 0
8 3 3,5 4 4,5 5 5,5 6 6,5 7 8 9 9,5 10 10,5 11 12 12 12 12 12
9 0 0 0 0 0 0 0 0 0 0 0 0 0 0 0 0 0 0 0 0
10 3 3,5 4 4,5 5 5,5 6 6,5 7 8 9 9,5 10 10,5 11 12 12 12 12 12
11 0 0 0 0 0 0 0 0 0 0 0 0 0 0 0 0 0 0 0 0
12 3 3,5 4 4,5 5 5,5 6 6,5 7 8 9 9,5 10 10,5 11 12 12 12 12 12
13 0 0 0 0 0 0 0 0 0 0 0 0 0 0 0 0 0 0 0 0
14 3 3,5 4 4,5 5 5,5 6 6,5 7 8 9 9,5 10 10,5 11 12 12 12 12 12
15 0 0 0 0 0 0 0 0 0 0 0 0 0 0 0 0 0 0 0 0
16 3 3,5 4 4,5 5 5,5 6 6,5 7 8 9 9,5 10 10,5 11 12 12 12 12 12
INCLINE
INCLINE
INCLINE
Segmento = tempo dell'allenamento/16
Intervalli (Inclinazione 12%)
Livello
Segmento
INCLINAZIONE

ITALIANO
212
P6) HILL CLIMB: Simula una salita e una discesa collinare. Questo programma aiuta a tonificare la muscolatura e a migliorare la
capacità cardiovascolare. Le variazioni di inclinazione e i segmenti si ripetono ogni 30 secondi.
P7) CUSTOM: Consente di creare e riutilizzare il proprio allenamento ideale combinando velocità, inclinazione e obiettivi di tempo o
distanza. Il massimo della personalizzazione dei programmi. Si tratta di un programma con obiettivi basati su tempo o distanza.
P8) TARGET HEART RATE: Questo programma è pensato per migliorare la forma cardiovascolare generale. Basta
impostare la propria frequenza cardiaca target. Il programma monitorerà e regolerà automaticamente l'intensità per
mantenere la frequenza cardiaca all'interno dell'intervallo target durante l'allenamento – un metodo comprovato per
massimizzare i risultati in termini di dimagrimento e forma fisica. È necessario indossare una fascia toracica per tutta la
durata di questo programma. Vedere sotto per il calcolo della frequenza cardiaca target.
Segment 1 2 3 4 5 6 7 8 9 10
Time 30 sec 30 sec 30 sec 30 sec 30 sec 30 sec 30 sec 30 sec 30 sec 30 sec
Level 1 0 0 1 1,5 2 2,5 3 3 2,5 2 1,5 1
Level 2 0 0 1,5 2 2,5 3 3,5 3,5 3 2,5 2 1,5
Level 3 0 1 2 2,5 3 3,5 4 4 3,5 3 2,5 2
Level 4 0 1,5 2,5 3 3,5 4 4,5 4,5 4 3,5 3 2,5
Level 5 0 1,5 3 3,5 4 4,5 5 5 4,5 4 3,5 3
Level 6 0 1,5 3,5 4 4,5 5 5,5 5,5 5 4,5 4 3,5
Level 7 0 1,5 4 4,5 5 5,5 6 6 5,5 5 4,5 4
Level 8 0 2 4,5 5 5,5 6 6,5 6,5 6 5,5 5 4,5
Level 9 0 2 5 5,5 6 6,5 7 7 6,5 6 5,5 5
Level 10 0 2 5,5 6 6,5 7 7,5 7,5 7 6,5 6 5,5
Warm Up
4:00 Mins
Segmento
Time
Livello 1
Livello 2
Livello 3
Livello 4
Livello 5
Livello 6
Livello 7
Livello 8
Livello 9
Livello 10
Riscaldamento
4:00 min
30 secondi30 secondi30 secondi
30 secondi
30 secondi30 secondi30 secondi30 secondi30 secondi30 secondi

ITALIANO
213
Calcolo della frequenza cardiaca target:
Il primo passo per identificare l'intensità corretta dell'allenamento è determinare la propria frequenza cardiaca massima (max HR =
220 – età). Il metodo basato sull'età fornisce una stima statistica media della max HR ed è adatto alla maggior parte delle persone,
in particolare a chi è nuovo all'allenamento con monitoraggio della frequenza cardiaca.
Il metodo più preciso per determinare la max HR individuale è eseguire un test da sforzo massimale sotto supervisione di un
cardiologo o fisiologo dell'esercizio. Se hai più di 40 anni, sei in sovrappeso, sei stato sedentario per diversi anni o hai una storia
familiare di malattie cardiache, si consiglia un test clinico.
Questa tabella mostra esempi dell'intervallo di frequenza cardiaca per una persona di 30 anni che si allena in 5 diverse zone
cardiache. Ad esempio, la max HR di una persona di 30 anni è 220 – 30 = 190 bpm, e il 90% della max HR è 190 × 0,9 = 171 bpm.
Note aggiuntive sulla frequenza cardiaca target:
1). L'inclinazione del tapis roulant si regolerà automaticamente per avvicinarsi alla frequenza cardiaca specificata.
2). Se non viene rilevata alcuna frequenza cardiaca, l'unità non modificherà l'inclinazione.
3). Se la frequenza cardiaca supera di 25 battiti la zona target, il programma verrà interrotto.
Target Heart
Rate Zone
Workout
Duration
Example THR
(age 30)
Your THR Recommend For
Target Heart
Rate Zone
< 5 min
171-190 BPM
Fit persons for
athletic training
VERY HARD
90 - 100%
2-10 min 152-171 BPM Shorter Workouts
HARD
80 - 90%
10-40 min
133-152 BPM
Moderately long
Workouts
MODERATE
70 - 80%
40-80 min
114-133 BPM
Longer and
frequently repeated
shorter exercises
LIGHT
60 - 70%
20-40 min
104-114BPM
Weight management
and active recovery
VERY LIGHT
50 - 60%
Zona di Frequenza
Cardiaca Obiettivo
Durata
allenamento
Esempio THR
(età 30)
Il tuo THR Consigliato per
MOLTO INTENSO
90-100%
< 5 min 171-190 BPM
Persone allenate
per attività atletica
INTENSO
80 - 90%
2-10 min 152-171 BPM Allenamenti brevi
MODERATO
70 - 80%
10-40 min 133-152 BPM
Allenamenti
moderatamente lunghi
LEGGERO
60 - 70%
40-80 min 114-133 BPM
Esercizi più lunghi e brevi
ripetuti frequentemente
MOLTO LEGGERO
50 - 60%
20-40 min 104-114 BPM
Controllo del peso
e recupero attivo

ITALIANO
214
PER RESETTARE LA CONSOLE
Tenere premuto il tasto STOP per 3 secondi.
FINE DELL'ALLENAMENTO
Al termine dell'allenamento, l'unità emetterà un segnale acustico. Le informazioni sull'allenamento rimarranno visualizzate sulla console per
30 secondi, poi verranno azzerate.
CONNESSIONE TRAMITE BLUETOOTH 4.0LE
1) Verifica che il tuo dispositivo musicale sia compatibile con Bluetooth 4.0.
2) Vai nelle impostazioni Bluetooth del tuo dispositivo e scansiona i dispositivi.
3) Sul tuo dispositivo musicale, trova la lista dei dispositivi Bluetooth. Seleziona il tuo tapis roulant o l'unità ellittica che appare in questa lista.
Attendi che il tuo dispositivo musicale completi l'abbinamento con l'unità.
4) Saprai che l'abbinamento è riuscito quando il tuo dispositivo musicale mostrerà il tapis roulant o l'unità ellittica come dispositivo abbinato.
UTILIZZO DI PIÙ DISPOSITIVI MUSICALI
Se più dispositivi vengono abbinati all'unità (ad esempio: più utenti utilizzano il tapis roulant o l'unità ellittica e abbinano i loro dispositivi
musicali con essa), dovrai dissociare il dispositivo attualmente abbinato e poi abbinare nuovamente il tuo dispositivo seguendo la procedura
di abbinamento indicata sopra.
CONNESSIONE TRAMITE CAVO AUDIO
1) Collegare il cavo adattatore AUDIO in dotazione al jack AUDIO IN sul lato destro della console e al jack cuffie del dispositivo
multimediale.
2) Utilizzare i comandi del dispositivo multimediale per regolare i brani.
3) Scollegare il cavo adattatore AUDIO quando non in uso.
4) Se non si desidera utilizzare gli SPEAKERS, è possibile collegare le cuffie al jack AUDIO OUT sul lato destro della console. In questo modo,
se durante la corsa il cavo delle cuffie viene tirato accidentalmente, il dispositivo non cadrà a terra.

ITALIANO
215
COLLEGA IL TUO DISPOSITIVO ALL’APP JRNY PER ALLENAMENTI PIÙ DINAMICI
Se hai un abbonamento JRNY*, puoi accedervi tramite il tuo dispositivo quando è sincronizzato con la console di questa macchina.
Con l’abbonamento JRNY riceverai allenamenti guidati adattati a te.
* È necessaria una JRNY membership per usufruire dell’esperienza JRNY – visita global.bowflex.com/en/jrny.html per maggiori
dettagli. Dove disponibile (inclusi gli Stati Uniti), puoi ottenere una JRNY membership scaricando l’app JRNY sul tuo telefono o
tablet e iscrivendoti direttamente dall’app. Le membership JRNY potrebbero non essere disponibili in tutti i Paesi.

216
Manutenzione
& Risoluzione
Dei Problemi

ITALIANO
217
MANUTENZIONE
Una manutenzione preventiva è fondamentale affinché l’attrezzatura possa funzionare senza intoppi e per mantenere al minimo
la responsabilità dell’utente. L’attrezzatura deve essere esaminata a intervalli regolari. Le parti difettose devono essere sostituite
immediatamente. Un’attrezzatura che non funzioni correttamente deve essere mantenuta inutilizzata fino alla riparazione.
Verificare che chiunque effettui delle regolazioni o interventi di manutenzione o riparazione di qualsiasi tipo dispongadelle
qualifiche necessarie per tali operazioni.
AVVERTENZA
Per disattivare l’alimentazione del tapis roulant, estrarre il cavo dalla presa a parete.

ITALIANO
218
PROGRAMMA DI MANUTENZIONE
AZIONE FREQUENZA
Pulire ed esaminare il tapis roulant:
• Spegnere il tapis roulant con l'interruttore ON/OFF, quindi scollegare il cavo di alimentazione
dalla presa a parete.
• Pulire a fondo il nastro da corsa, il piano, il coperchio del motore e l'alloggiamento della console
con un panno umido. Non utilizzare mai solventi, poiché possono danneggiare il tapis roulant.
• Esaminare il cavo di alimentazione. Se il cavo di alimentazione è danneggiato, per assistenza
fare riferimento alle informazioni di contatto presenti sulla quarta di copertina della SCHEDA
INFORMATIVA.
• Assicurarsi che il cavo di alimentazione non si trovi sotto il tapis roulant oppure in qualsiasi altra
area dove possa essere schiacciato o tagliato durante lo stoccaggio ol'utilizzo.
• Verificare la tensione e l'allineamento del nastro da corsa. Assicurarsi che il nastro del tapis
roulant sia allineato, al fine di prevenire il danneggiamento di altri componenti.
• Se delle etichette risultano illeggibili o danneggiate, per assistenza fare riferimento alle
informazioni di contatto presenti sulla quarta di copertina della SCHEDA INFORMATIVA.
QUOTIDIANAMENTE
Pulire sotto il tapis roulant:
• Spegnere il tapis roulant con l'interruttore ON/OFF, quindi scollegare il cavo di alimentazione
dalla presa a parete.
• Piegare il tapis roulant in posizione verticale, assicurandosi che il fermo di bloccaggio sia
inserito.
• Spostare il tapis roulant.
• Pulire o aspirare eventuali particelle di polvere o altri oggetti che possono essersi accumulati
sotto il tapis roulant.
• Riportare il tapis roulant nella posizione precedente.
SETTIMANALMENTE

ITALIANO
219
IMPORTANTE
• Spegnere il tapis roulant con l'interruttore ON/OFF, quindi scollegare il cavo di alimentazione
dalla presa a parete. Attendere 60 secondi.
• Verificare che tutti i bulloni di assemblaggio dell'unità siano serrati correttamente.
• Rimuovere il coperchio del motore. Attendere finché TUTTE le schermate del display non si
spengono.
• Pulire il motore e l'area del pannello inferiore per eliminare eventuali particelle di tessuto o
polvere che possono essersi accumulate. Se non si effettua questa pulizia, può verificarsi un
guasto prematuro ai componenti elettrici principali.
• Pulire a fondo il nastro con un panno umido. Aspirare eventuali particelle nere/bianche che
possono accumularsi attorno all'unità a seguito del normale utilizzo deltapis roulant.
• Se il tapis roulant è dotato di ammortizzatori posti sotto il piano per facilitare il sollevamento,
lubrificare il tubo argentato degli ammortizzatori con uno spray abasedi Teflon reperibile
presso ferramenta o negozi di biciclette.
MENSILMENTE

ITALIANO
220
PROGRAMMA DI MANUTENZIONE
INGRASSAGGIO
OGNI 3 MESI O 480 KM
È necessario lubrificare il piano da corsa del proprio tapis roulant
ogni tre mesi o 480 km per mantenere prestazioni ottimali. Quando
il tapis roulant registra 480 km, visualizzerà il messaggio “LUBE”
(Lubrificare) o “LUBE BELT” (Lubrificare nastro). Il tapis roulant non
funzionerà durante la visualizzazione del messaggio. Il tapis roulant è
fornito di un flacone di lubrificante siliconico al 100% che può essere
utilizzato per due applicazioni.
Per acquistare altro lubrificante al silicone:
Contattare l’assistenza tecnica clienti.
Strumenti necessari:
• Chiave a T o chiave a brugola
• 100% olio di silicone
NASTRO DA
CORSA
PIANO DA
CORSA

ITALIANO
221
PROCEDURA:
1. Spegnere il tapis roulant con l’interruttore on/off e scollegare il cavo di alimentazione sulla presa a parete.
2. Usare il giramaschi a mandrino o la chiave a brugola per svitare i bulloni dei rulli posteriori
10-15 giri in senso antiorario. In questo modo si dovrebbe ottenere un gioco del nastro sufficiente al sollevamento.
3. Sollevare il nastro il più possibile e versare l’olio di silicone a zigzag su tutta la superficie del piano da corsa. Utilizzare
mezzo flacone di lubrificante siliconico. Non applicare l’olio di silicone sulla parte superiore del nastro da corsa.
Abbassare il nastro da corsa, quindi serrare entrambi i bulloni del rullo posteriore effettuando lo stesso numero di giri
effettuati per allentarli in senso orario.
4. Dopo aver applicato il lubrificante, collegare il cavo di alimentazione e inserire la chiave di sicurezza. Cancellare il
messaggio Lube Belt (Lubrificare nastro) mantenendo premuto prima il pulsante SPEED UP (Aumento velocità) poi il
pulsante STOP e premere ENTRAMBI i pulsanti per 5-7 secondi.
5. Restare lontani dalla macchina e premere START. Consentire al nastro di ruotare a 3 mpf (4,8 Km/h) per 3 minuti prima
di distribuire il silicone. Successivamente camminare sulla macchina a velocità moderata per 3 minuti per completare la
distribuzione del silicone e per controllare che tensione e allineamento del nastro da corsa siano corretti.
6. Fermare il nastro quando centrato e in tensione. Pulire l’olio in eccesso sui lati con un panno umido.
Premere qualsiasi pulsante per sospendere il messaggio di avviso di lubrificazione fino al prossimo allenamento.
Nota: In alcuni modelli più vecchi potrebbe essere necessario tenere premuto il pulsante Stop per 5 secondi per sospendere il
messaggio di 8 km di utilizzo.
Se il tapis roulant è dotato di ammortizzatori posti sotto il piano per facilitare il sollevamento, lubrificare il tubo argentato
degli ammortizzatori con uno spray a base di Teflon reperibile presso ferramenta o negozi di biciclette.
Visitare la sezione assistenza clienti del nostro sito Web per visualizzare i video di manutenzione “come fare”. Rivolgere al
supporto tecnico clienti domande relative all’applicazione di lubrificante al tapis roulant.

ITALIANO
222
TARATURA DEL NASTRO DA CORSA
Se si avverte una sensazione di scivolamento durante la corsa sul tapis roulant, serrare
il nastro da corsa. Nella maggior parte dei casi, il nastro si allunga a causa dell’utilizzo e
per questo motivo scivola. Si tratta di una regolazione normale e comune. Per eliminare
tale scivolamento, spegnere il tapis roulant e tarare entrambi i bulloni dei rulli posteriori
utilizzando la chiave a brugola fornita, ruotandoli di ¼ di giro verso destra (senso orario),
come indicato. Accendere il tapis roulant e controllare lo scivolamento. Ripetere se
necessario, ma non ruotare mai i bulloni dei rulli più di ¼ di giro alla volta. Il nastro è
correttamente tarato quando non si avverte più la sensazione di scivolamento.
AVVERTENZA
Il nastro da corsa NON deve muoversi durante la taratura. Il serraggio eccessivo del nastro
da corsa può causare l’eccessiva usura del tapis roulant e dei suoi componenti. Non serrare
mai troppo il nastro.
SERRAGGIO DEL LATO SINISTRO
DEL RULLO
SERRAGGIO DEL LATO DESTRO
DEL RULLO
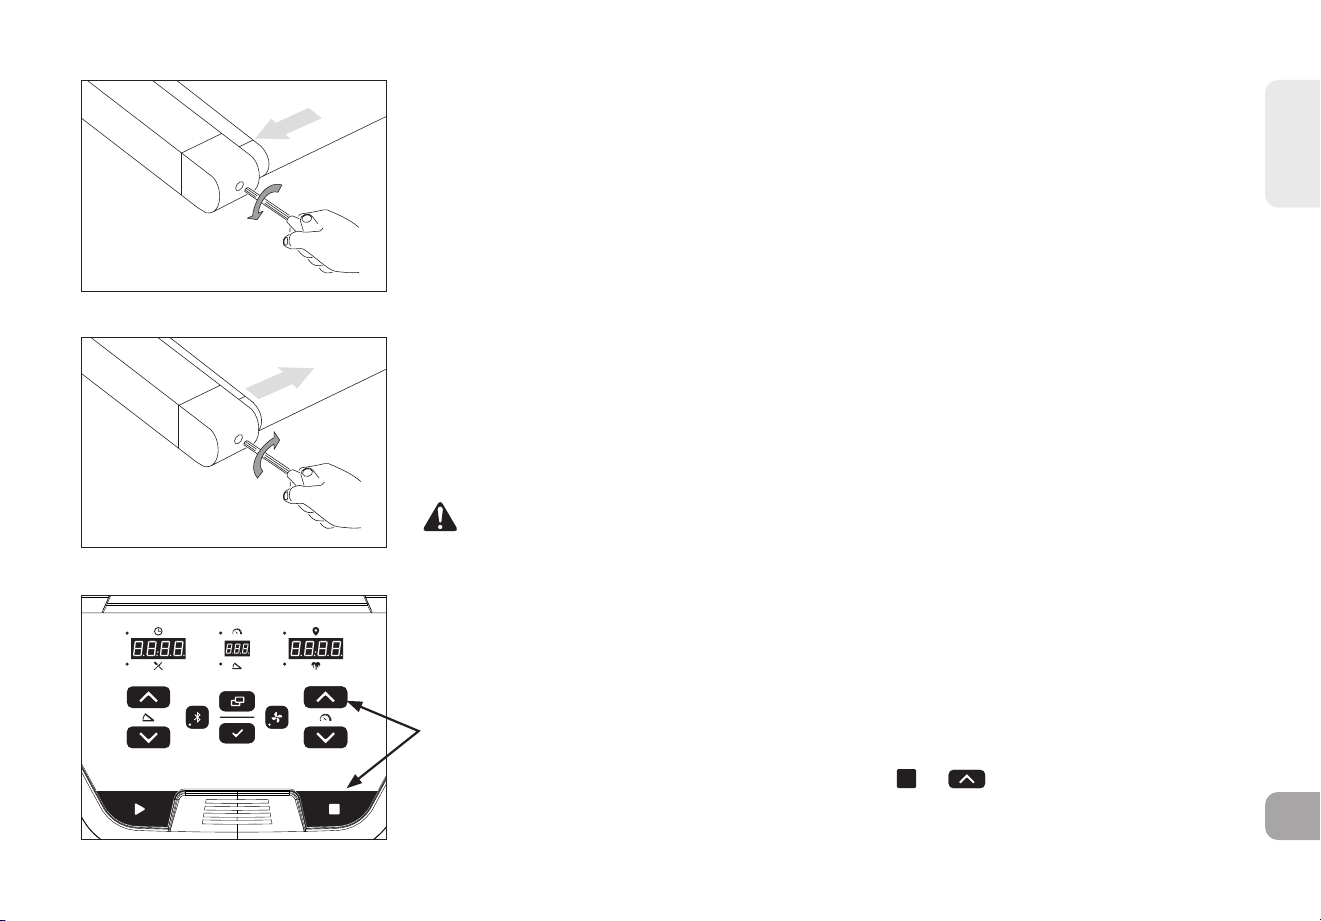
ITALIANO
223
CENTRATURA DEL NASTRO DA CORSA
Se il nastro da corsa è troppo spostato verso destra: utilizzando la chiave abrugola in
dotazione e con il tapis roulant a una velocità di 1 km/h, ruotare il bullone di regolazione
SINISTRO di ¼ di giro in senso antiorario e attendere che il nastro si regoli. Utilizzare
il segno sul coperchio del motore o la linea del componente come riferimento per
l’allineamento. Ripetere se necessario, finché il nastro non rimane centrato durante l’uso.
Se il nastro da corsa è troppo spostato verso sinistra: utilizzando la chiave abrugola in
dotazione e con il tapis roulant a una velocità di 1 km/h, ruotare il bullone di regolazione
SINISTRO di ¼ di giro in senso orario e attendere che il nastro si regoli. Utilizzare il segno
sul coperchio del motore o la linea del componente come riferimento per l’allineamento.
Ripetere se necessario, finché ilnastro non rimane centrato durante l’uso.
• Se ci si rende conto che il nastro scivola perché è troppo allentato, centrarlo
esuccessivamente tenderlo secondo necessità.
• Per un più facile accesso al bullone di regolazione, rimuovere i tappi terminali.
ATTENZIONE
Non azionare il nastro a una velocità superiore a
1 km/h durante la centratura. Mantenere sempre dita, capelli e indumenti lontano dal nastro.
IL NASTRO È TROPPO SPOSTATO
VERSO DESTRA
IL NASTRO È TROPPO SPOSTATO
VERSO SINISTRA
Per reimpostare l’avviso di lubrificazione del nastro
Il tapis roulant mostrerà il promemoria “LUBE BELT” ogni 150 miglia. Dopo aver lubrificato il
nastro, reimposta l’avviso tenendo premuti i pulsanti e per 3–5 secondi.
2
4
6
8
10
12
16
20

ITALIANO
224
RISOLUZIONE DEI PROBLEMI
DOMANDE FREQUENTI SUL PRODOTTO
I RUMORI PRODOTTI DAL MIO TAPIS ROULANT SONO NORMALI?
Tutti i tapis roulant producono un certo tipo di rumore martellante dovuto allo scorrere del nastro sui rulli, in particolar modo
quelli nuovi. Questo rumore diminuisce col tempo, anche se potrebbe non scomparire del tutto. Con il passare del tempo il nastro
si allunga e scorre in modo più fluido sui rulli.
PERCHÉ IL TAPIS ROULANT CHE HO ACQUISTATO È PIÙ RUMOROSO DI QUELLO IN NEGOZIO?
Tutti i prodotti di fitness sembrano più silenziosi in un grande negozio da esposizione, poiché vi è in genere un rumore di fondo più
elevato che a casa propria. Inoltre, il riverbero su un pavimento ricoperto di moquette è minore rispetto a quello su un pavimento
rivestito in legno. In alcuni casi, unmaterassino in gomma pesante consente di ridurre il riverbero attraverso il pavimento. Se un
prodotto per il fitness viene posizionato vicino a una parete, vi è maggiore rumore riflesso.
QUANDO DOVREI PREOCCUPARMI DI UN RUMORE?
Fintantoché il volume dei rumori emessi dal tapis roulant non supera quello di un normale tono divoce colloquiale, la situazione si
considera nella norma.
RISOLUZIONE DEI PROBLEMI DI BASE
PROBLEMA: la console non si accende.
SOLUZIONE: verificare quanto segue:
Si accende la luce rossa sull’interruttore ON/OFF? NOTA: alcuni modelli di tapis roulant non hanno uninterruttore che si accende.
In tal caso, procedere con le soluzioni sì e no qui di seguito.
Se la risposta è sì:
• Spegnere l’alimentazione, scollegare il cavo di alimentazione e attendere 60 secondi. Rimuovere ilcoperchio del motore. Prima
di procedere, attendere finché tutte le luci LED rosse sul pannello dicontrollo del motore non si spengono. Successivamente,
verificare che nessuno dei fili collegati alpannello inferiore sia allentato o scollegato.
• Verificare nuovamente che tutti i collegamenti siano allacciati, specialmente il cavo della console. Scollegare e ricollegare il

ITALIANO
225
cavo della console per verificare.
• Assicurarsi che il cavo della console non sia schiacciato
o danneggiato in alcun modo.
• Collegare il tapis roulant alla presa, portare
l’interruttore in posizione di accensione e controllare
sesul pannello di controllo del motore vengono
visualizzate luci LED accese.
Se la risposta è no:
• Verificare che la presa a cui è collegata l’unità sia
funzionante. Verificare nuovamente che l’interruttore
non sia scattato, che l’unità sia in un circuito dedicato
da 15 A e non sia collegata aunapresa dotata di
interruttore differenziale, a una prolunga, a uno
scaricatore di sovratensioni oa una presa multipla.
• Controllare che il cavo di alimentazione non sia
schiacciato o danneggiato eche sia collegato
correttamente alla presa E all’unità.
• Accertarsi che l’interruttore di accensione sia in
posizione ON.
PROBLEMA: sulla console viene visualizzato il messaggio
SAFETY KEY OFF (CHIAVE DI SICUREZZA OFF) oppure
compiano solo dei trattini.
SOLUZIONE: verificare quanto segue:
• Verificare che la chiave di sicurezza sia in posizione.
• Se si utilizza una chiave magnetica, accertarsi che sia
magnetizzata.
JOHNSON
SOTTO IL COPERCHIO DEL MOTORE
NASTRO
DI TRASMIS-
SIONE
MOTORE DI
TRASMIS-
SIONE
SENSORE
OTTICO
MOTORE DI
INCLINAZI-
ONE
PANNELLO
DI
CONTROLLO
DEL MOTORE
CAVO DELLA
CONSOLE
RULLO ANTERIORE
NASTRO DA CORSA
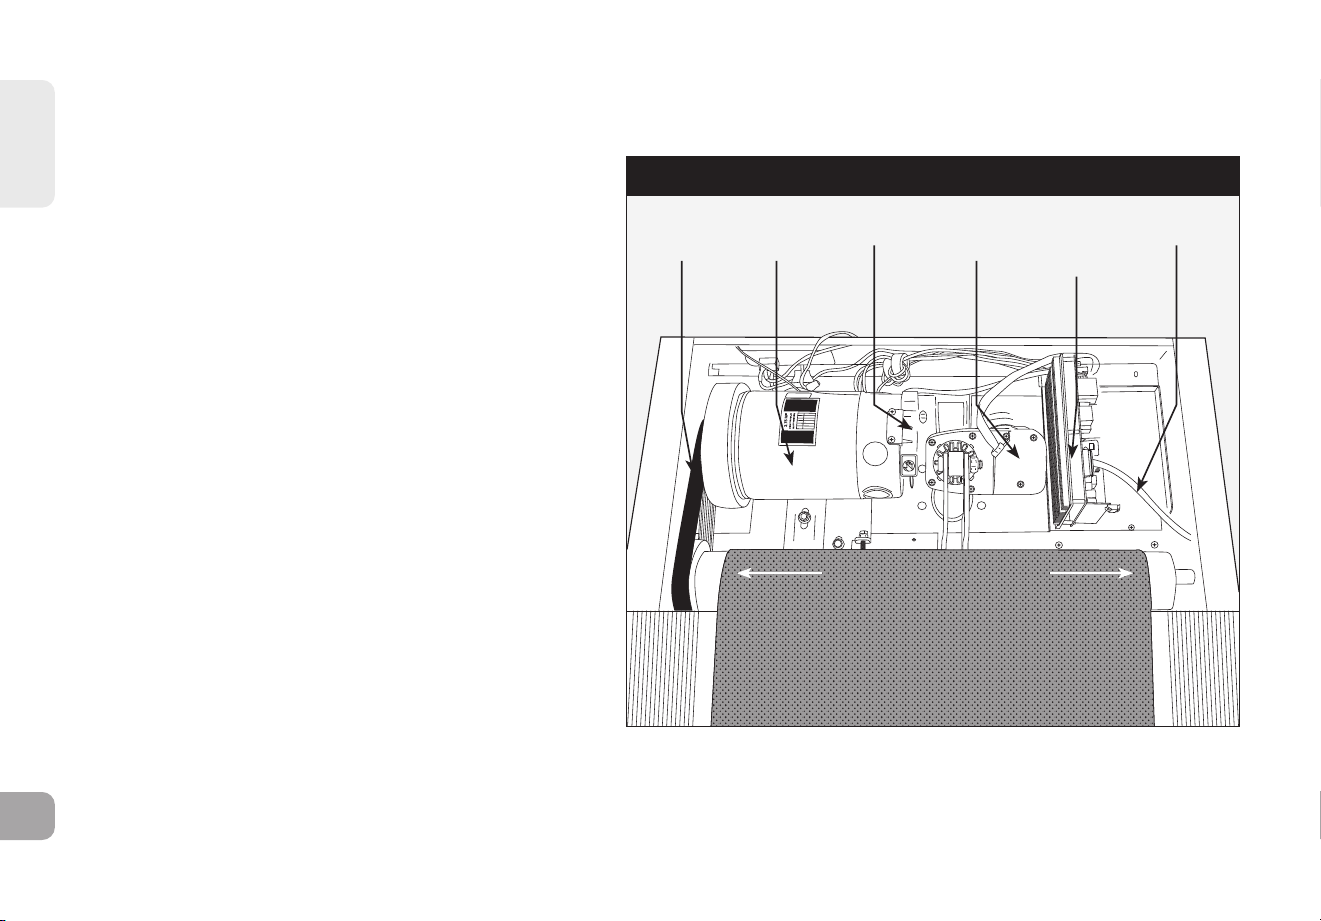
ITALIANO
226
RISOLUZIONE DEI PROBLEMI
RISOLUZIONE DEI PROBLEMI DI BASE
PROBLEMA: il nastro non si muove o si muove per un breve
periodo di tempo, ma la console funziona.
SOLUZIONE: verificare quanto segue:
• Accertarsi di seguire le raccomandazioni e le linee guida
dialimentazione delle ISTRUZIONI DI MESSA A TERRA
EFUNZIONAMENTO DI BASE contenute nel presente
manuale del proprietario. L’unità deve essere in un
circuito dedicato da 15 A e non essere collegata a una
presa dotata di interruttore differenziale. Noncollegare
l’unità a una prolunga, a uno scaricatore di sovratensioni
o a una presa multipla.
• Verificare se il nastro si muove. In caso affermativo,
controllare fino achepunto o per quanto tempo si
muove prima di fermarsi.
• Provare a far muovere il nastro manualmente. In caso
contrario, il nastro di trasmissione potrebbe essersi
sganciato oppure i cuscinetti del motore potrebbero
essere ingrippati.
• Spegnere il tapis roulant e scollegarlo dalla presa.
Rimuovere il coperchio di plastica del motore dalla parte
anteriore dell’unità svitando le viti a stella. Verificare che
il nastro di trasmissione sia correttamente allineato.
• Con il coperchio ancora rimosso, controllare i
collegamenti di fili e cavi, poiché potrebbero essersi
allentati o scollegati durante il trasporto o il montaggio.
Accertarsi che i collegamenti siano saldi e che non vi
siano filischiacciati, danneggiati, scollegati o bruciati.
PROBLEMA: la rampa inclinata non si muove, non scende o non sembra trovarsi al livello corretto.
JOHNSON
SOTTO IL COPERCHIO DEL MOTORE
NASTRO
DI TRASMIS-
SIONE
MOTORE DI
TRASMIS-
SIONE
SENSORE
OTTICO
MOTORE DI
INCLINAZI-
ONE
PANNELLO
DI
CONTROLLO
DEL MOTORE
CAVO DELLA
CONSOLE
RULLO ANTERIORE
NASTRO DA CORSA

ITALIANO
227
SOLUZIONE: verificare quanto segue:
• Accertarsi di seguire le raccomandazioni e le linee guida per l’alimentazione presenti alle pagine 4 e 5di questa GUIDA DEL
TAPIS ROULANT. L’unità deve essere in un circuito dedicato da 15 A e non essere collegata a una presa dotata di interruttore
differenziale. Non collegare l’unità a una prolunga, a uno scaricatore di sovratensioni o a una presa multipla.
• Accertarsi che il display della console cambi quando si premono i pulsanti di elevazione.
• Spegnere il tapis roulant e scollegarlo dalla presa. Verificare che i collegamenti dei cavi della console nella parte superiore
dell’albero siano saldi. Controllare che tutti i fili colorati siano inseriti completamente nel fascio di cavi.
• Rimuovere il coperchio di plastica del motore dalla parte anteriore dell’unità svitando le viti a stella. Controllare i collegamenti
di fili e cavi, poiché potrebbero essersi allentati o scollegati durante il trasporto o il montaggio. Accertarsi che i collegamenti
siano saldi e che non vi siano fili schiacciati, danneggiati, scollegati o bruciati.
PROBLEMA: gli altoparlanti non emettono alcun suono ma le cuffie funzionano.
SOLUZIONE: verificare quanto segue:
• Spegnere il tapis roulant e scollegarlo dalla presa. Rimuovere il coperchio di plastica del motore dallaparte anteriore dell’unità
svitando le viti a stella.
• Controllare i collegamenti di fili e cavi al pannello degli altoparlanti, vicino al pannello di controllo delmotore.
PROBLEMA: l’interruttore di circuito del tapis roulant scatta durante un allenamento.
SOLUZIONE: verificare quanto segue:
• Verificare che il tapis roulant sia collegato a un circuito dedicato da 15 A.
• Verificare che l’unità non sia collegata a una prolunga o a uno scaricatore di sovratensioni.
• Accertarsi che l’unità non sia collegata a una presa dotata di interruttore differenziale o inserita inuncircuito con una presa
dotata di interruttore differenziale.
PROBLEMA: il nastro da corsa non rimane centrato durante l’allenamento.
SOLUZIONE: verificare quanto segue:
• Assicurarsi che il tapis roulant sia su una superficie piana.
• Verificare che il nastro sia correttamente serrato e centrato (consultare le sezioni TARATURA eCENTRATURA DEL NASTRO
DA CORSA per indicazioni dettagliate).
PROBLEMA: la velocità di funzionamento non sembra corretta.

ITALIANO
228
SOLUZIONE:
• Spegnere il tapis roulant e scollegarlo dalla presa.
• Svitare le viti del coperchio del motore con un cacciavite a stella.
• Verificare che il sensore ottico sia inserito nel pannello di controllo del motore.
• Esaminare il collegamento/cavo del sensore di velocità per rilevare eventuali danni visibili.
RISOLUZIONE DEI PROBLEMI DI BASE
PROBLEMA: A livelli di inclinazione più elevati, viene visualizzato il messaggio “Errore intervallo velocità - Termine allenamento”.
SOLUZIONE:
• Questa è una funzione di sicurezza che interrompe automaticamente l’alimentazione del motore di azionamento quando
la velocità supera i limiti a causa della combinazione tra il carico sulla cinghia e l’elevato grado di inclinazione.
• Per evitare che l’allenamento termini automaticamente, ridurre la percentuale del livello di inclinazione.
RISOLUZIONE DEI PROBLEMI DI FREQUENZA CARDIACA (SOLO SENSORE IMPUGNATURA)
Controllare che nell’ambiente in cui si svolge l’allenamento non vi siano fonti di interferenza quali luci
fluorescenti, computer, recinzioni sotterranee, sistemi di sicurezza delle abitazioni o elettrodomestici contenenti
motori di grandi dimensioni. Tali elementi possono causare letture della frequenza cardiaca errate.
Può verificarsi una lettura errata nelle seguenti condizioni:
• Si stanno afferrando i manubri della frequenza cardiaca in modo troppo stretto. Tentare di mantenere
una pressione moderata quando si impugnano i manubri della frequenza cardiaca.
• In caso di movimento e vibrazione costanti dovuti all’impugnatura continua dei manubri della frequenza
cardiaca durante l’esercizio fisico. Se si ottengono letture errate della frequenza cardiaca, cercare di
stringere le impugnature solo per il periodo di tempo necessario a monitorare la frequenza cardiaca.
• Quando si respira pesantemente durante un allenamento.
• Quando le mani sono compresse a causa di un anello.
• Quando le mani sono asciutte o fredde. Cercare di inumidire i palmi sfregandoli tra di loro per scaldarli.
• In caso di forte aritmia.
• In caso di arteriosclerosi o disturbi della circolazione periferica.
• In caso di persone la cui pelle sul palmo di misurazione sia particolarmente spessa.

ITALIANO
229
SERVE ASSISTENZA?
Se la presente sezione non risolve il problema, sospendere l’uso dell’attrezzo e spegnerlo.
Contattare l’assistenza tecnica clienti.
Possono essere richieste le seguenti informazioni al momento della chiamata.
Si prega di avere a portata di mano i seguenti elementi:
• Nome del modello
• Numero di serie
• Prova d’acquisto
Alcune domande di risoluzione dei problemi che potrebbero essere poste sono:
• Da quanto tempo si verifica il problema?
• Il problema si verifica a ogni uso? Con tutti gli utenti?
• Se si percepisce un rumore, proviene dalla parte anteriore o da quella posteriore?
Di che tipo di rumore si tratta (martellio, stridore, cigolio, sibilo, ecc.)?
• L’unità è stata sottoposta alle operazioni di MANUTENZIONE secondo il programma previsto?
La risposta a queste e altre domande consentirà ai tecnici di inviare le parti di ricambio e il
servizio di assistenza necessari a far funzionare nuovamente il tapis roulant in uso.

230
ESPAÑOL

231
Instrucciones
de seguridad
importantes
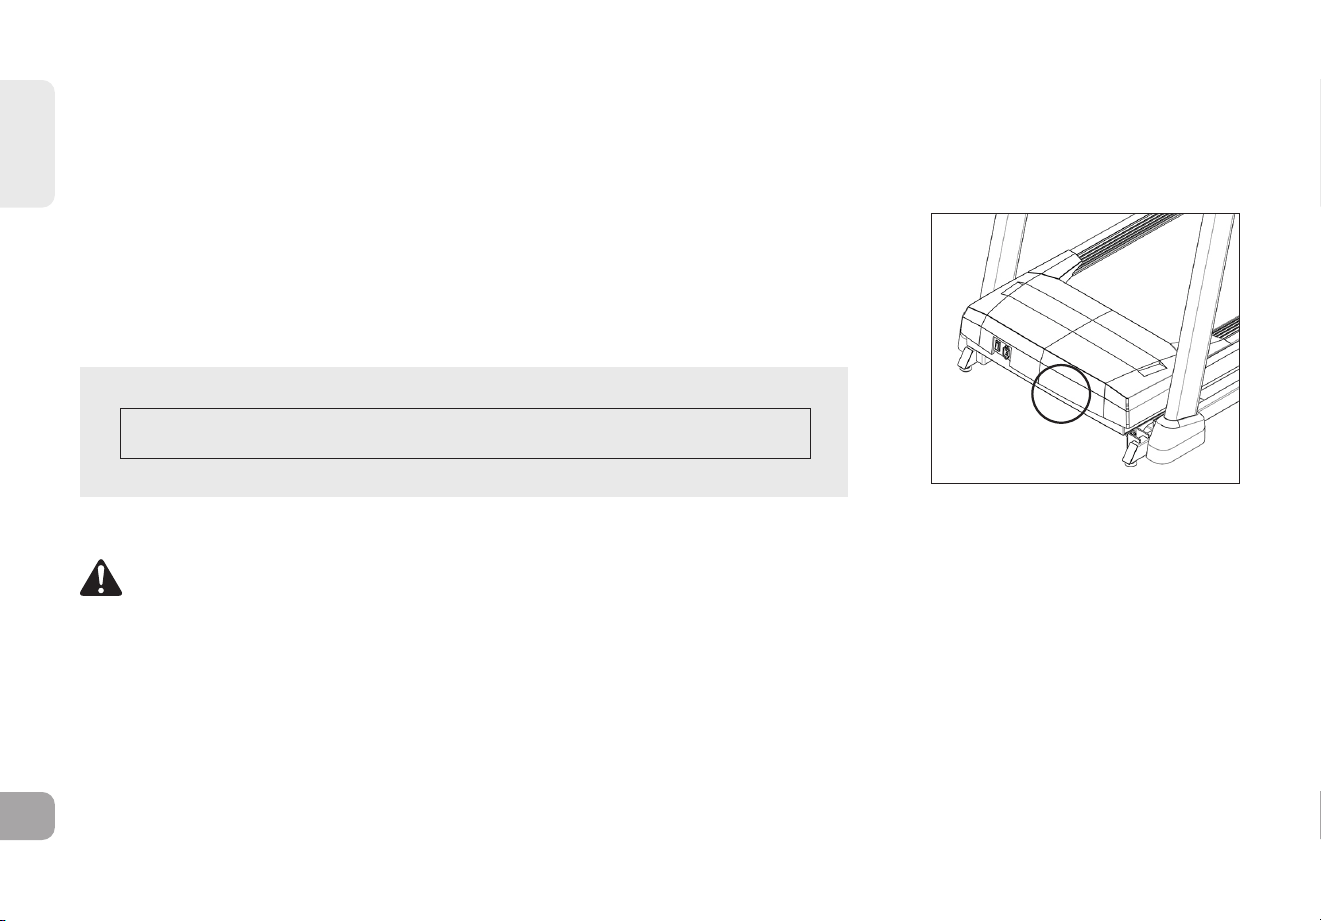
ESPAÑOL
232
Gracias por elegir la cinta de correr BowFlex T8.5J como su equipo de fitness. Le recomendamos encarecidamente que lea
atentamente este manual de usuario antes de iniciar el montaje de su equipo, especialmente las siguientes ADVERTENCIAS LAS
ADVERTENCIAS REDUCIRÁN EL RIESGO DE QUEMADURAS, INCENDIOS, DESCARGAS ELÉCTRICAS O LESIONES PERSONALES.
Antes de continuar, localice el número de serie de la cinta, que está situado en la pegatina
blanca con elcódigo de barras (cerca del interruptor de encendido/apagado y el cable de
alimentación),
e introdúzcalo enel espacio disponible a continuación.
INTRODUZCA EL NÚMERO DE SERIE Y EL NOMBRE DEL MODELO EN LAS CASILLAS
DISPONIBLES A CONTINUACIÓN:
NÚMERO DE SERIE:
NOMBRE DEL MODELO: BOWFLEX T8.5J
» Si se pone en contacto con el servicio técnico, indique el NÚMERO DE SERIE y el NOMBRE DEL MODELO.
• SI NO SIGUE ESTAS INSTRUCCIONES, PODRÍA SUFRIR LESIONES.
• Los sistemas de control de la frecuencia cardíaca pueden ser imprecisos. El ejercicio excesivo puede producir lesiones graves o
la muerte. Si siente dolor, pare de hacer ejercicio de inmediato.
• A la hora de hacer ejercicio, mantenga en todo momento un ritmo que le resulte cómodo.
• Si nota algún tipo de dolor, como, por ejemplo, dolores en el pecho, náuseas, mareos o dificultades para respirar, pare de hacer
ejercicio deinmediato y consulte a su médico antes de continuar. Un ejercicio excesivo o inadecuado puede resultar perjudicial
para la salud.
• No utilice prendas de vestir que se puedan enganchar en alguna pieza de la cinta.
• Póngase siempre zapatillas de deporte para utilizar el equipo.
• No salte sobre la cinta.
ADVERTENCIA
UBICACIÓN DEL NÚMERO DESERIE

ESPAÑOL
233
• Durante el ejercicio, no corra cerca del borde de la cinta para evitar el riesgo de lesiones.
• En ningún momento debe haber más de una persona en la cinta si esta está en marcha.
• Las personas con un peso superior a la capacidad de carga de la cinta de correr que se indica en el apartado
ESPECIFICACIONES TÉCNICAS nodeberán usarla. El incumplimiento de estas indicaciones dará lugar a la anulación de la
garantía.
• Al bajar la plataforma de la cinta, espere hasta que las patas traseras estén bien apoyadas en el suelo antes de subirse.
• No utilizar debajo sábanas o almohadas. Puede producirse un calentamiento excesivo que, a su vez, podría causar un incendio,
descargas eléctricas o daños personales.
• Conecte la máquina únicamente a una toma de corriente con conexión a tierra.
• Para desconectar la unidad, coloque todos los controles en posición de apagado y desconecte el enchufe de la toma.
• Desconecte la alimentación eléctrica antes de mover el equipo.
• No use el producto si algún cable o enchufe está dañado, incluso si funciona correctamente. No use ningún producto si parece
dañado o se ha sumergido en agua. Con el servicio de asistencia técnica para sustituciones o reparaciones y evitar riesgos.
• No deje la cinta sin vigilancia mientras está enchufada. Desenchúfela de la corriente cuando no la esté usando y antes de montar o
desmontar piezas.
• Las mascotas y los niños menores de 13años no deben estar EN NINGUNA CIRCUNSTANCIA a menos de 3metros de la cinta.
• Los niños menores de 13años no deben utilizar la cinta EN NINGUNA CIRCUNSTANCIA.
• Los niños mayores de 13 años o las personas con capacidades físicas, sensoriales o mentales reducidas, o con falta de
experiencia y conocimientos, no deben utilizar la cinta de correr, a menos que estén supervisados o que hayan recibido
instrucciones sobre el uso de la cinta decorrer por parte de una persona responsable de su seguridad.
• No retire las cubiertas protectoras a menos que así se lo indique un profesional y el distribuidor local. El mantenimiento
únicamente deberá realizarlo un técnico de mantenimiento autorizado.
• Desconecte la llave de seguridad para evitar que otras personas utilicen la máquina sin control.
• En las cintas equipadas con pasamanos laterales y una agarradera frontal para el apoyo del usuario y un desmontaje de
emergencia, pulse el botón de emergencia para detener el equipo y desmontarlo.
• El nivel de ruido de la cinta es inferior a 70 dB cuando no hay usuarios encima y superior a 70 dB cuando se está utilizando. Si el
ruido de la cinta le resulta molesto, pare el entrenamiento y tómese un descanso. La emisión de ruido con carga es mayor que
cuando no existe ninguna carga.
• Asegúrese de que la cinta está completamente parada antes de plegarla. No use la cinta cuando está plegada.
• Tenga en cuenta que las piezas de plástico, como las tapas de los extremos, se pueden desgastar.
• El nivel de seguridad de la cinta solo se puede mantener si se comprueba cada cierto tiempo si presenta algún desgaste o daño.
• Asegúrese de que el borde de la cinta se encuentre paralelo a la posición lateral de la barra lateral y no se coloque debajo de
esta última. Si la cinta no está centrada, deberá ajustarse antes de su uso.
• Use la cinta únicamente como se describe en el manual del producto y del usuario.

ESPAÑOL
234
• No utilice otros accesorios que no estén recomendados por el fabricante. Los accesorios pueden causar lesiones.
• Devuelva el equipo al centro de servicio para su revisión y reparación.
• Mantenga el cable de alimentación alejado de las superficies calientes. No emplee el cable de alimentación para mover el equipo
o como tirador.
• No use la cinta con el orificio de ventilación bloqueado. Mantenga el orificio de ventilación limpio y libre de pelos, pelusas y
similares.
• Para evitar las descargas eléctricas, no introduzca ni deje caer ningún objeto en las aberturas.
• No utilice el equipo en lugares en los que se emplean aerosoles (pulverizadores) o si se está administrando oxígeno.
• Esta cinta ha sido concebida para un uso exclusivamente doméstico. El incumplimiento de estas indicaciones dará lugar a la
anulación de la garantía.
• No utilice la cinta en estancias sin control de la temperatura, como, por ejemplo, garajes, porches, salas de billar, cuartos de
baño, aparcamientos cubiertos o espacios exteriores. Si la cinta se ha visto expuesta a temperaturas más bajas o a climas muy
húmedos, se recomienda encarecidamente ajustar su temperatura a la de la habitación antes de utilizarla por primera vez. El
incumplimiento de estas indicaciones dará lugar a la anulación de la garantía.
• Nuestra cinta de correr es pesada, de modo que debe tener cuidado a la hora de moverla y pedir ayuda si es necesario. No trate
de mover o transportar la cinta si no está es posición plegada en vertical y con el pasador de bloqueo fijo. Si no sigue estas
instrucciones, podría sufrir lesiones.
• No mueva ni levante la cinta del embalaje hasta que se especifique lo contrario en las instrucciones de montaje. Puede retirar el
envoltorio de plástico de los postes de la consola.
• Nunca abra la caja si está colocada boca abajo o de lado.
• Desembale y monte la unidad en el lugar en el que se va a utilizar.
• La cinta de correr suministrada está equipada con muelles de alta presión que pueden hacer que el bastidor de base inferior se
abra si se manipula de forma incorrecta.
• No extraiga la consola a menos que se lo indique el servicio de asistencia técnica. El mantenimiento deberá llevarlo a cabo
únicamente un técnico de mantenimiento autorizado.
• Asegúrese de contar con 2 personas para el montaje, esto facilitará el proceso de montaje.
ESPAÑOL
235
Para ver el vídeo de montaje, visite:
https://global.bowflex.com/en/assembly-videos.html
A partir de ahora, podrá montar su equipo cuando
le convenga. Para obtener instrucciones detalladas
sobre el montaje, el funcionamiento, los programas, la
resolución de problemas y el mantenimiento, escanee
el código QR de la izquierda para acceder al manual
completo.
Si no consigue escanear el código QR, puede visitar el
sitio web proporcionado aquí:
https://global.bowflex.com/en/manuals.html
ESPECIFICACIONES TÉCNICAS
Dimensiones
del equipo montado
(largo x ancho x alto)
193 x 86,4 x 144,8 cm /
76" x 34" x 57"
Peso del producto 85 kg / 187lbs.
Peso máx. del usuario 147 kg / 325 lbs.
Si tiene alguna pregunta, necesita ayuda con las piezas que faltan o necesita asistencia técnica o
mantenimiento para su equipo, póngase en contacto con el servicio de asistencia técnica.
¿NECESITA
AYUDA?
GARANTÍA
Si su equipo requiere un servicio de garantía, póngase en contacto con el servicio local de asistencia técnica.
Fabricante: Johnson Health Industry (Vietnam) Co., Ltd. | Dirección del fabricante: Lot CN-24, Thuan Thanh II Industrial Park,
Mao Dien Ward, Bac Ninh Province, Vietnam
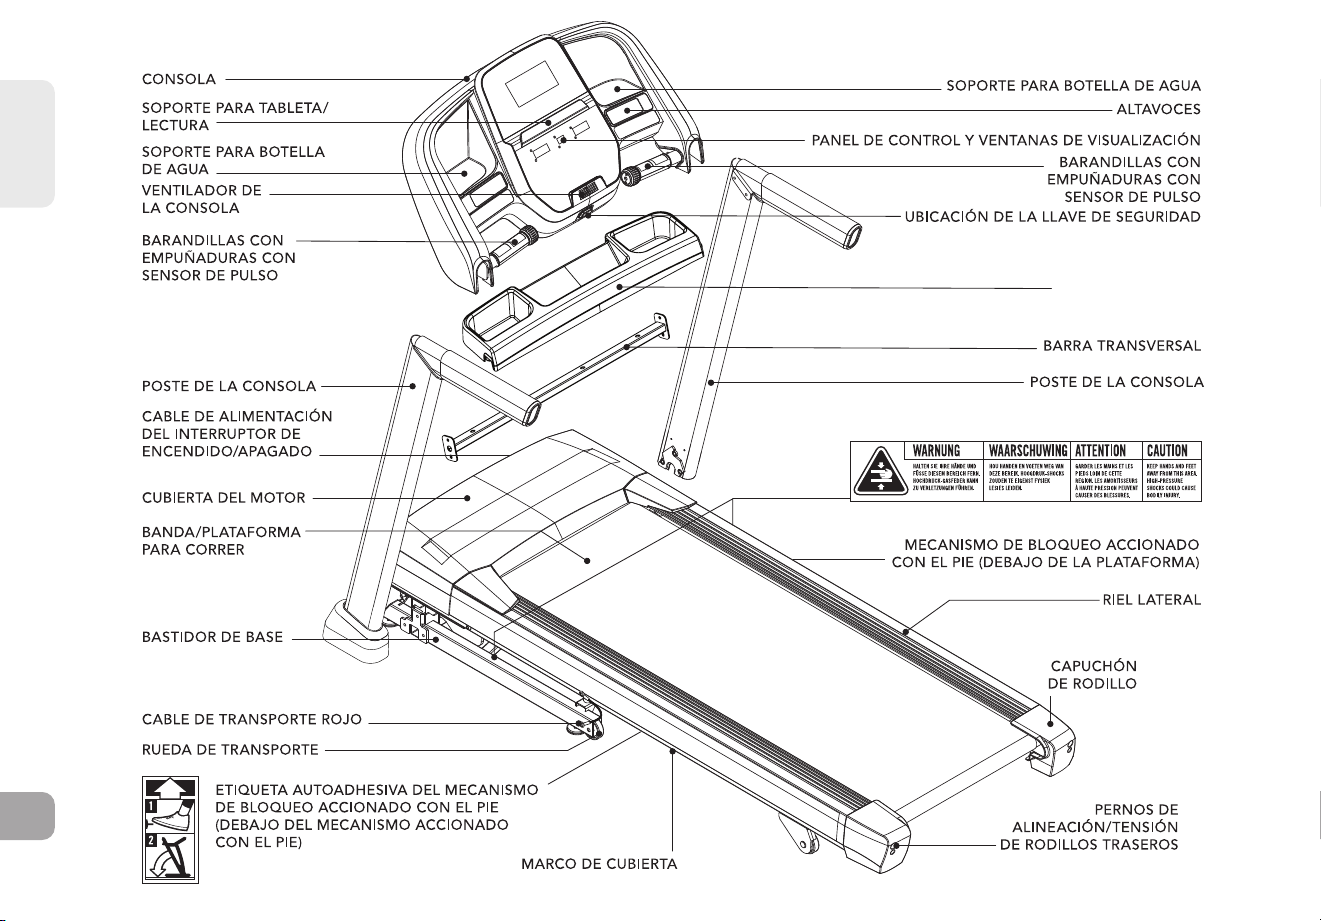
ESPAÑOL
236
BANDEJA DE
ALMACENAMIENTO

ESPAÑOL
237
HERRAMIENTAS INCLUIDAS:
F Llave en T de 6 mm
F Llave en L de 6 mm
F Llave en L de 5 mm
PIEZAS INCLUIDAS:
F 1 conjunto de consola
F 2 postes de consola
F barra transversal
F 1 juego de tornillería
F 1 llave de seguridad
F 1 cable adaptador de audio
F 1 botella de lubricante de silicona
(para 2 aplicaciones)
¡NO INTENTE LEVANTAR LA CAMINADORA! No mueva ni levante la caminadora
del embalaje hasta que se indique en las instrucciones de montaje. Puede quitar la
envoltura de plástico de los mástiles de la consola.
ADVERTENCIA
NOTA: Durante cada uno de los pasos del ensamblaje, asegúrese de que TODAS las tuercas
y pernos estén en su lugar y parcialmente enroscados antes de apretar NINGÚN perno.
NOTA: Aplicar una capa de grasa ligera puede ayudar a instalar las piezas. Se recomienda
usar cualquier grasa, como grasa de litio para bicicletas.
¡NO SEGUIR ESTAS INSTRUCCIONES PUEDE RESULTAR EN LESIONES!
ADVERTENCIA
Nunca abra la caja cuando esté colocada boca abajo o de lado.
Desembale y monte la unidad en el lugar donde se utilizará.
La caminadora incluida está equipada con resortes de alta presión que pueden hacer
que el armazón de la base inferior se abra si no se manipula correctamente.
Los cables de transporte rojos se instalan entre el armazón de la plataforma superior y
el armazón de la base inferior para evitar el movimiento del marco de la base inferior.
NO quite los cables de transporte rojos hasta que se le indique.
ADVERTENCIA
ADVERTENCIA
ADVERTENCIA

ESPAÑOL
238
CABLE DE
TRANSPORTE ROJO
CABLE DE
TRANSPORTE ROJO
PASO DE MONTAJE - DESEMBALAJE
A Coloque la caja de cartón de la caminadora sobre una superficie plana nivelada con la
parte inferior de la caja en el suelo.
B Corte las correas de las bandas en el exterior de la caja y retire la tapa de la caja.
C NO saque la caminadora de la caja. En su lugar, rompa las esquinas de la parte inferior
de la caja de la caminadora como se muestra. La caminadora debe montarse en una caja
aplanada como se muestra para proteger la superficie del piso.
D Corte las correas de las bandas dentro de la caja y retire todo menos el armazón de la
caminadora.
E Levante parcialmente la plataforma de la caminadora hacia arriba desde la parte trasera para
quitar todo el contenido que está debajo de esta. Los cables de transporte rojos a ambos
lados de la caminadora evitarán que la plataforma de la caminadora se levante por completo.
NUNCA incline la
caminadora boca abajo
o de costado. NO use
herramientas para quitar los
cables de transporte rojos
hasta que se le indique. Si
para quitar un componente
se necesitan herramientas,
espere hasta que las
Instrucciones de ensamblaje
le indiquen cómo quitarlo de
manera segura.
CORREA DE
LAS BANDAS
MARCO DE CUBIERTA
CABLE DE TRANSPORTE
ROJO
(LADOS IZQUIERDO Y
DERECHO)
ARMAZÓN DE LA BASE
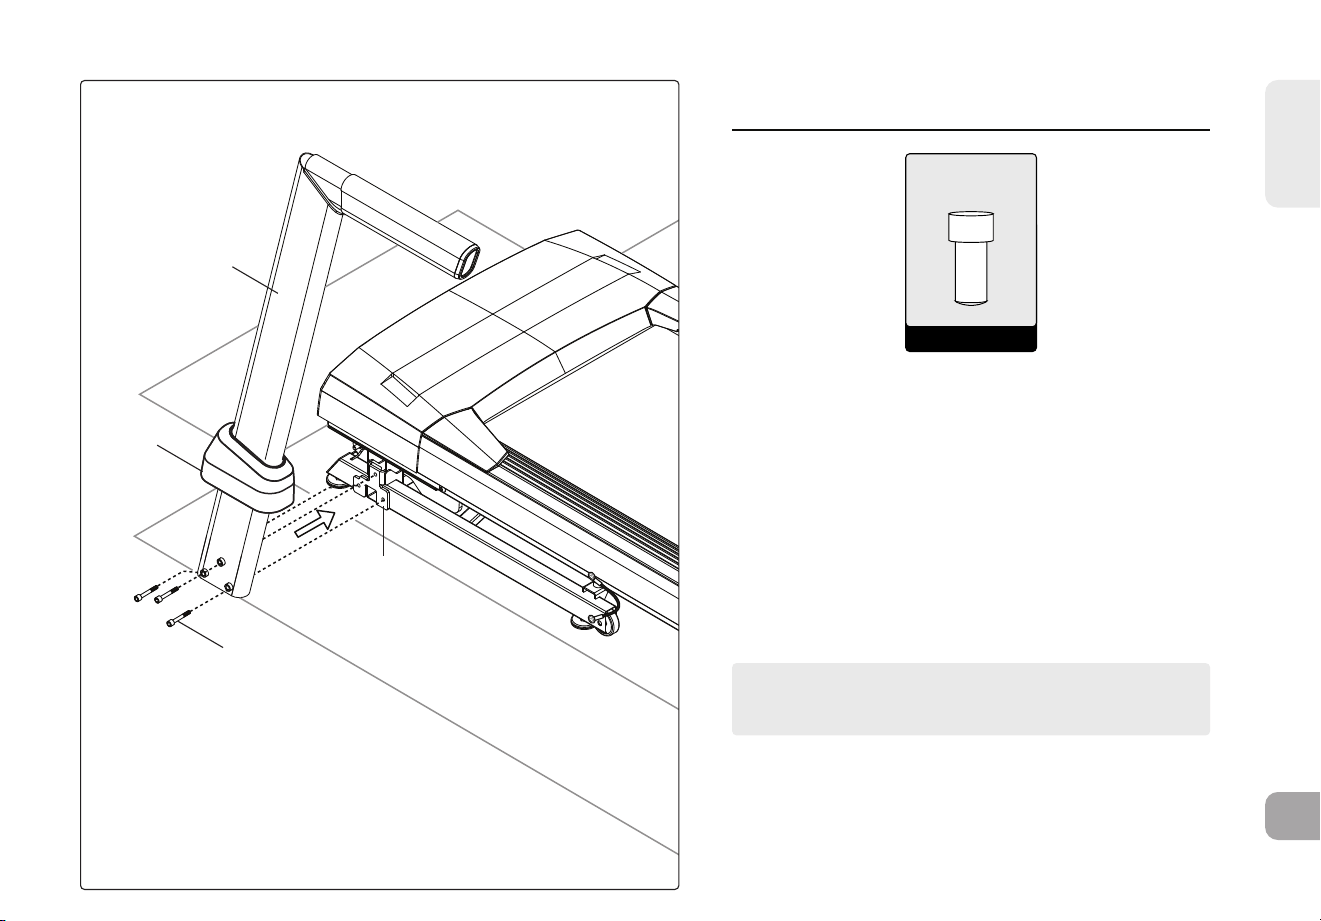
ESPAÑOL
239
A
2
1
8
NOTA: No apriete completamente los pernos hasta
después del PASO 4 DE MONTAJE.
A - CANT: 4
Perno (M8)
PASO 1 DE MONTAJE
1.1 Abra EL PAQUETE DE PIEZAS DE TORNILLERÍA
PARA LLEVAR A CABO EL PASO 1.
1.2 Deslice el PIE DEL POSTE IZQUIERDO DE LA
CONSOLA (8) sobre el POSTE IZQUIERDO DE LA
CONSOLA (1).
1.3 Fije el POSTE IZQUIERDO DE LA CONSOLA (1) al
BASTIDOR PRINCIPAL (2) con 3 PERNOS (A).
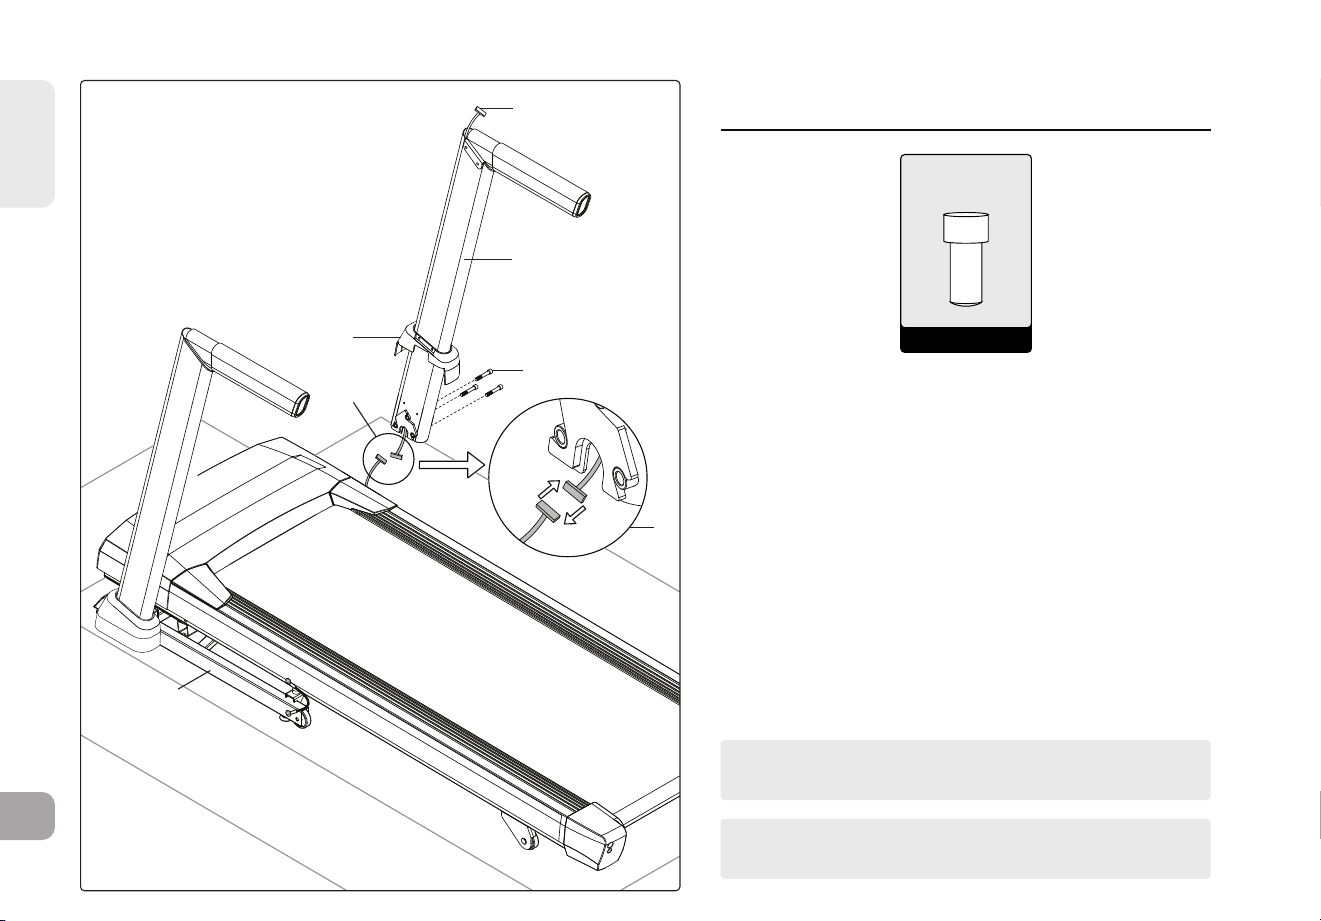
ESPAÑOL
240
4
9
3
3
A
2
3
A - CANT: 3
Perno (M8)
NOTA: Tenga cuidado de no pellizcar ningún cable
mientras conecta la consola.
NOTA: No apriete completamente los pernos hasta
después del PASO 4 DE MONTAJE.
PASO 2 DE MONTAJE
2.1 Abra la BOLSA DE LA TORNILLERÍA PARA ELPASO 2.
2.2 Deslice la FUNDA DEL MÁSTIL DERECHO DE LA
CONSOLA (9) hacia el MÁSTIL DERECHO DE LA
CONSOLA (4).
2.3
Conectar el ALAMBRE DE ALIMENTACIÓN DEL CABLE al
final del CABLE DE LA CONSOLA (3). Meta el ALAMBRE
DE ALIMENTACIÓN DEL CABLE por el POSTE DERECHO
DE LA CONSOLA (4). Una vez que haya pasado todo el
alambre de alimentación del cable a través del poste,
la punta superior del CABLE DE LA CONSOLA (3) debe
quedar en la parte superior del poste.
2.4
Una el POSTE DERECHO DE LA CONSOLA (4) al
BASTIDOR PRINCIPAL (2) con 3 PERNOS (A).
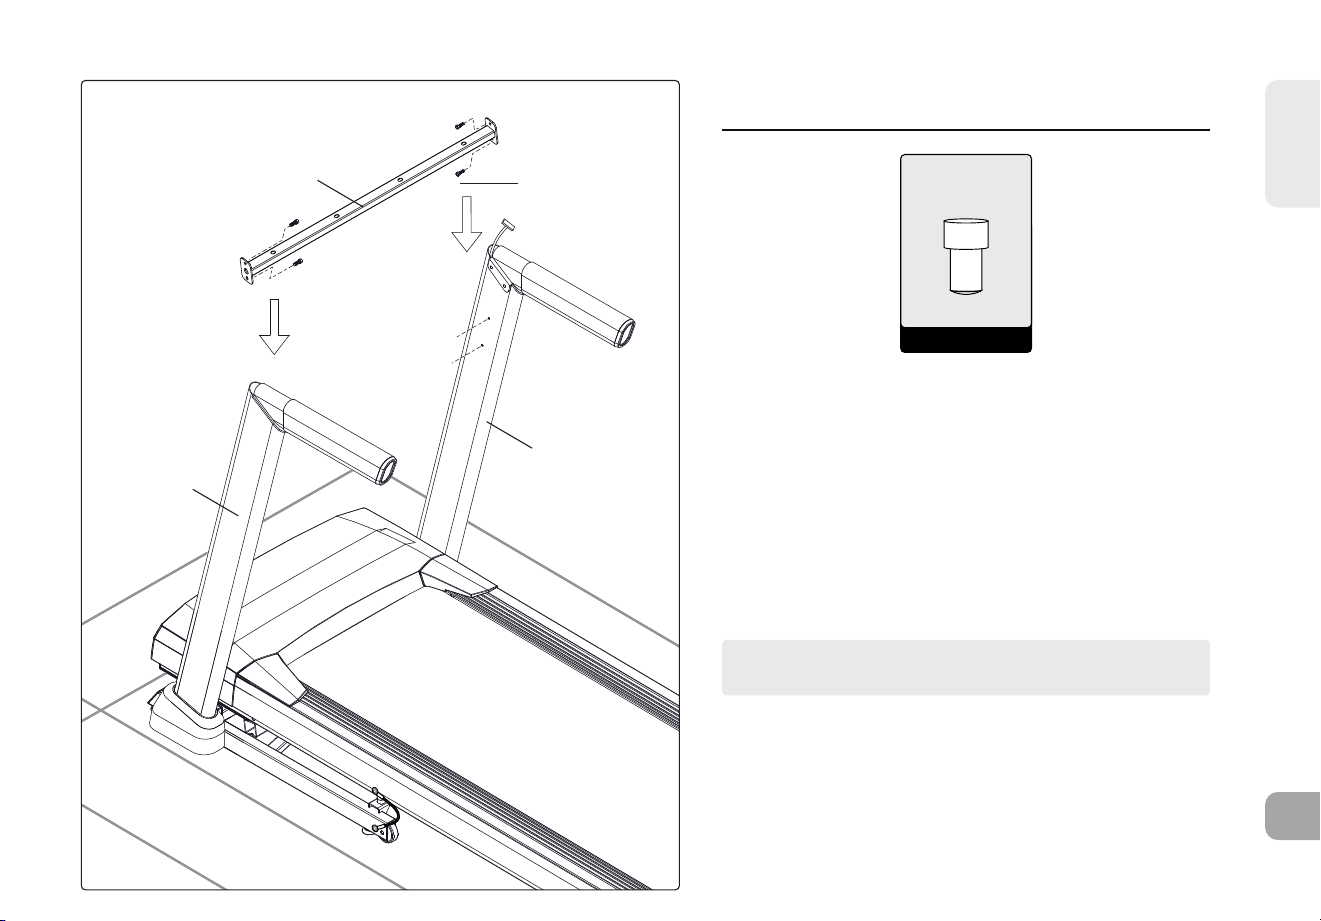
ESPAÑOL
241
D
1
6
4
D - CANT: 4
Perno (M6)
PASO 3 DE MONTAJE
3.1 Abra la BOLSA DE LA TORNILLERÍA PARA ELPASO
3.
3.2 Una el LADO IZQUIERDO de la BARRA
TRANSVERSAL (6) al POSTE VERTICAL (1) sin
ajustarlos demasiado con 2 PERNOS (A).
3.3 Una el LADO DERECHO de la BARRA TRANSVERSAL
(6) al POSTE VERTICAL (4) sin ajustarlos demasiado
con 2 PERNOS (D).
NOTA: No apriete completamente los pernos hasta
después del PASO 4 DE MONTAJE.
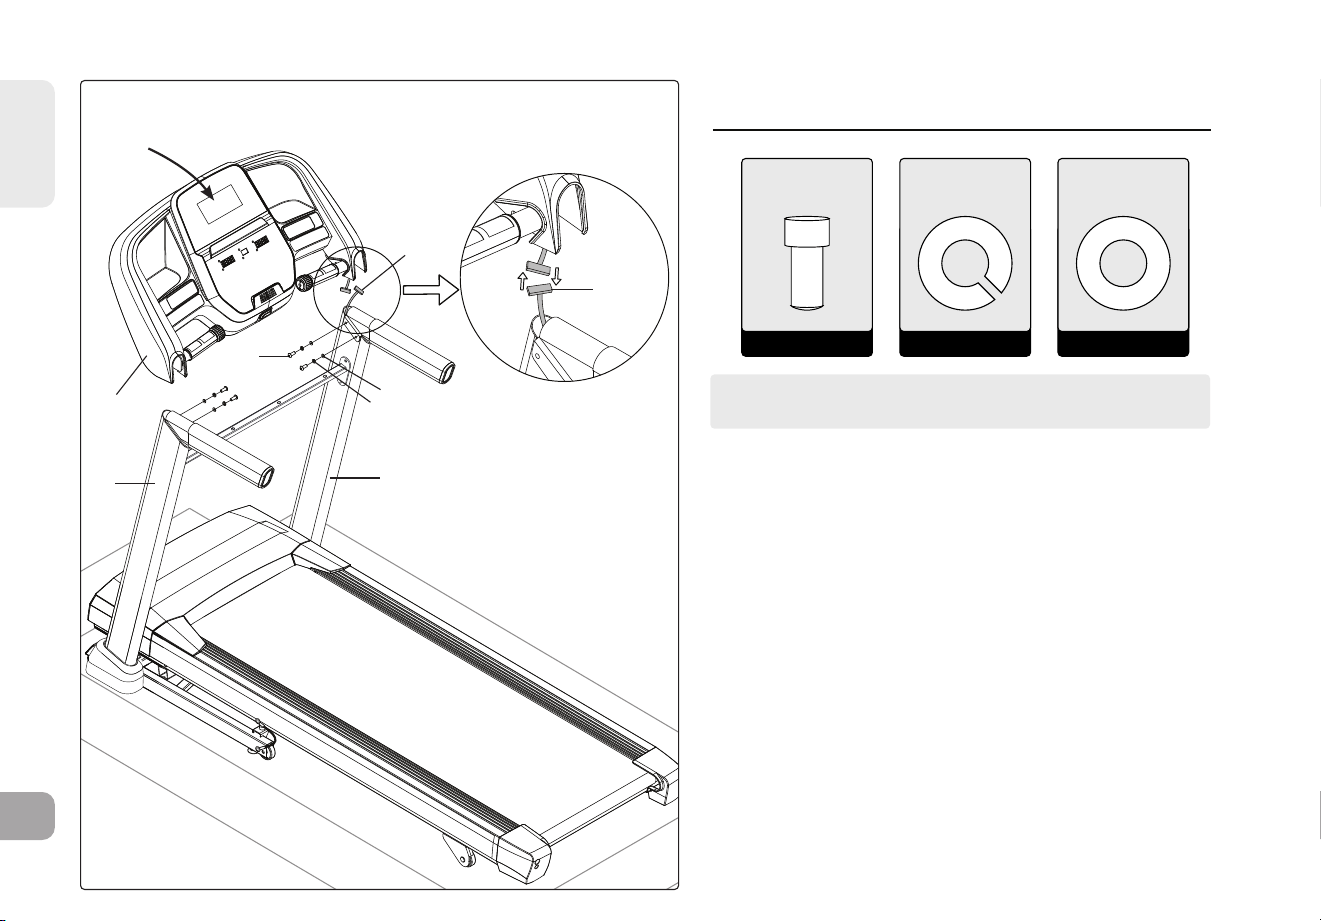
ESPAÑOL
242
B
C
A
(PASO 4.5)
4
3
3
1
5
NOTA: Tenga cuidado de no pellizcar ningún cable
mientras conecta la consola.
B - CANT: 4 C - CANT: 4
Arandela
Elástica
Arandela
Plana
A - CANT: 4
Perno (M8)
PASO 4 DE MONTAJE
4.1 Abra la BOLSA DE LA TORNILLERÍA PARA ELPASO 4.
4.2 Coloque suavemente la CONSOLA (5) encima de los
POSTES DE LA CONSOLA (1 Y 4). Una el LADO IZQUIERDO
primero con 2 PERNOS (A), 2ARANDELAS ELÁSTICAS (B)
y 2 ARANDELAS PLANAS (C).
4.3
Los CABLES DE LA CONSOLA (3) están ubicados dentro
del POSTE DE LA CONSOLA (4). Con el cable conductor
extraiga con cuidado el CABLE DE LA CONSOLA (3) del
POSTE DE LA CONSOLA (4). Separe y deseche el CABLE
CONDUCTOR. Conecte los CABLES DE LA CONSOLA (3) y
coloque con cuidado los cables en los postes para evitar
dañarlos.
4.4 Una el LADO DERECHO de la CONSOLA (5) con 2PERNOS
(A), 2 ARANDELAS ELÁSTICAS (B) y2 ARANDELAS
PLANAS (C).
4.5 Tire de la parte superior de la CONSOLA (5) hacia
laparte posterior de la caminadora y MANTENGA
LAPOSICIÓN mientras APRIETA LOS PERNOS ALA
IZQUIERDA Y DERECHA (A).
4.6 RECUERDE apretar por completo TODOS LOS PERNOS Y
TORNILLOS ahora que se terminó el montaje.

ESPAÑOL
243
6
E
7
E - QTY: 4
Vis
5.1 Abra EL PAQUETE DE PIEZAS DE TORNILLERÍA
PARA LLEVAR A CABO EL PASO 5.
5.2 Fije la BANDEJA PARA ACCESORIOS (7) a la
BARRA (6) mediante 4 TORNILLOS (A).
PASO 5 DE MONTAJE
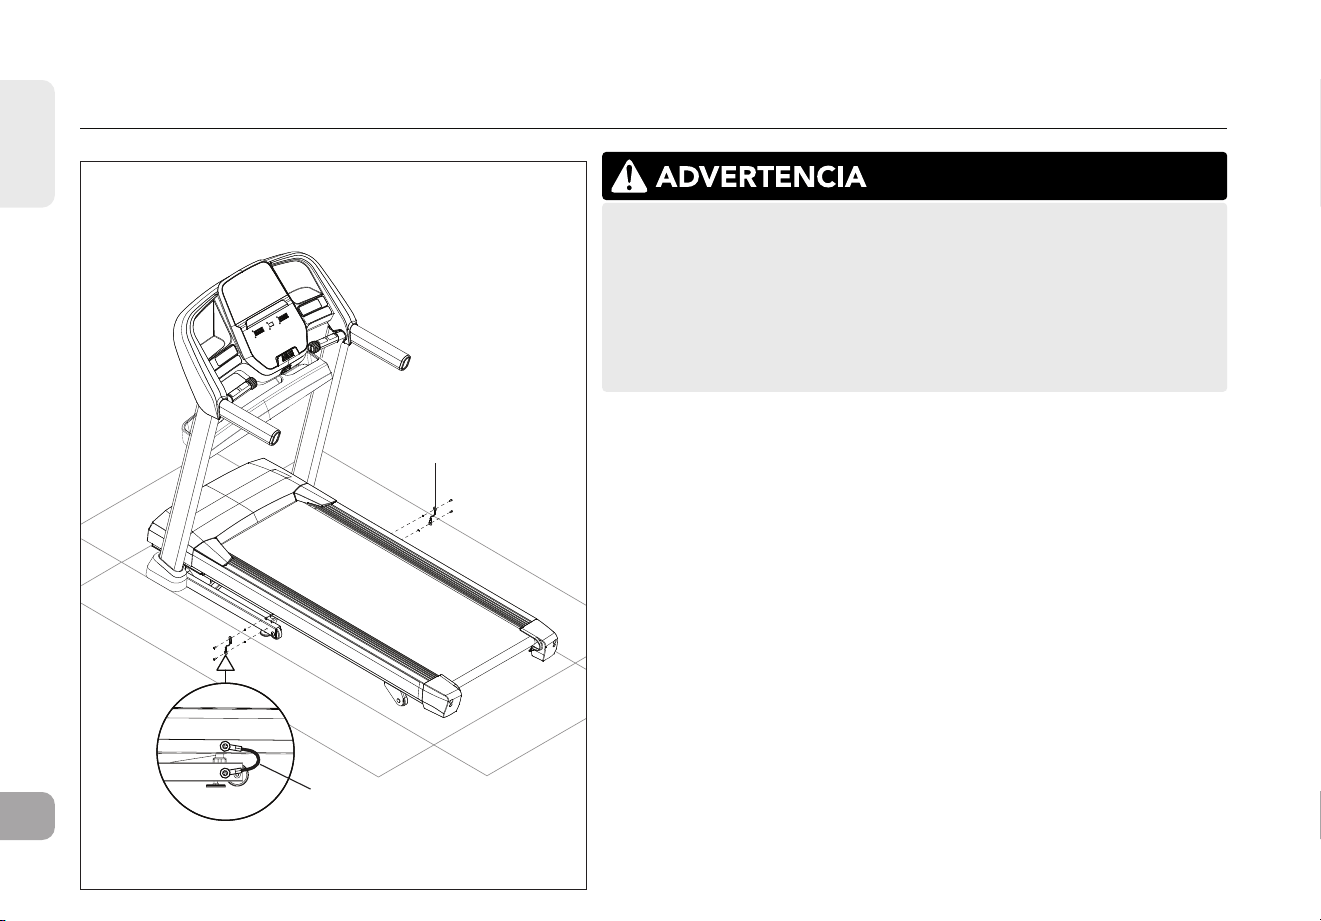
ESPAÑOL
244
CABLE DE TRANSPORTE ROJO
CABLE DE TRANSPORTE ROJO
¡NO SEGUIR ESTAS INSTRUCCIONES PUEDE RESULTAR EN LESIONES!
Una vez que los cables de transporte rojos se han desconectado
de la caminadora, los resortes de alta presión pueden hacer que el
armazón de la base inferior se abra. NUNCA incline la caminadora
boca abajo o de costado, y NUNCA la levante si los cables de
transporte rojos no están conectando al armazón de la plataforma
superior con el armazón de la base inferior.
PASO 6 DE MONTAJE - QUITAR LOS CABLES DE TRANSPORTE ROJOS
6.1 Asegúrese de que la caminadora esté apoyada en el piso por todas las
ruedas.
6.2 En el lado izquierdo de la caminadora, use la llave en L de 5 mm (incluida
en la caja) para quitar los dos pernos que conectan el cable de transporte
rojo al armazón de la plataforma superior y al armazón de la base inferior.
6.3 Reemplace ambos pernos (uno en el armazón de la plataforma superior
y otro en el armazón de la base inferior) y apriételos completamente
para bloquearlos en su lugar. Tenga en cuenta que para evitar que
posteriormente el armazón de la base inferior se abra durante el
transporte o el desmontaje de la caminadora, el cable de transporte rojo
se puede volver a conectar a la caminadora con estos mismos pernos.
6.4 Realice la misma operación en el lado derecho de la caminadora para
quitar los dos pernos que conectan el cable de transporte rojo al armazón
de la plataforma superior y al armazón de la base inferior.
6.5 Coloque de nuevo los dos pernos y apriételos completamente para
bloquearlos en su lugar.
6.6 Guarde los dos cables de transporte rojos para uso futuro colocándolos
en una bolsa de polietileno transparente junto con el manual del
propietario.
6.7 Cuando los cables de transporte rojos no estén instalados, transporte
la unidad ÚNICAMENTE en el suelo y ÚNICAMENTE después de que
esté completamente ensamblada y en la posición vertical plegada con el
pestillo de bloqueo asegurado.

ESPAÑOL
245
F - QTY: 4
Screw
PASO 7 DE MONTAJE
7.1 Abra EL PAQUETE DE PIEZAS DE TORNILLERÍA
PARA LLEVAR A CABO EL PASO 6.
7.2 NO OLVIDE apretar por completo los PERNOS
DE LA BARRA en los POSTES DE LA CONSOLA
(1 Y 4) cuando finalice el montaje. Levante la
PLATAFORMA (10) y colóquela en posición
vertical y de bloqueo.
7.3 Deslice el PIE IZQUIERDO DE LA CONSOLA (8)
hacia la parte inferior del POSTE IZQUIERDO DE
LA CONSOLA (1). Fíjelo con 2 PERNOS (A) en los
orificios del PIE IZQUIERDO DE LA CONSOLA (8)
al POSTE VERTICAL IZQUIERDO (1).
7.4 Deslice el PIE DERECHO DE LA CONSOLA (9)
a la parte inferior del POSTE DERECHO DE LA
CONSOLA (4). Fíjelo con 2 PERNOS (A) en los
orificios del PIE DERECHO DE LA CONSOLA (9) al
POSTE VERTICAL DERECHO (4).
Z06x4
F
4
10
1
8
9
9
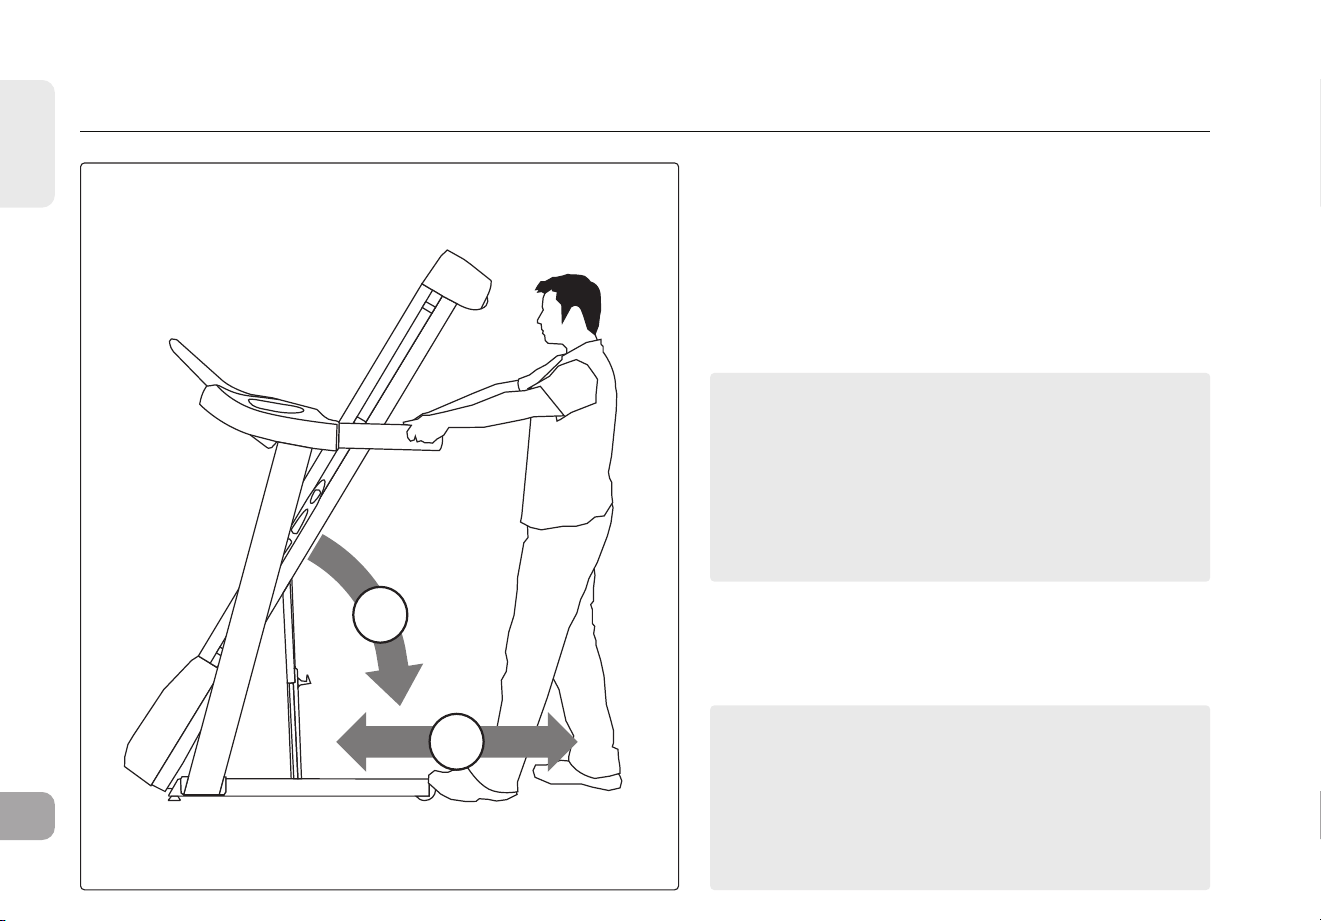
ESPAÑOL
246
1
2
¡MONTAJE COMPLETO!
Antes de usarla por primera vez, lubrique la
plataforma de la caminadora siguiendo las
instrucciones en la sección de mantenimiento en la
guía de la caminadora.
NOTA: Si posteriormente la caminadora debe
desmontarse o levantarse, use la llave en L de 5 mm
para volver a conectar los cables de transporte rojos
al armazón de la plataforma superior y al armazón
de la base inferior en los lados izquierdo y derecho
de la caminadora. Compruebe que el armazón de la
base inferior no pueda abrirse antes de levantar o
desarmar la caminadora.
PASO 8 DE MONTAJE - MOVER LA CAMINADORA
8.1 Para cambiarla de lugar, asegúrese de que esté
doblada y con los pestillos bien cerrados. Luego
agarre firmemente los manubrios, incline la
caminadora hacia atrás (1) y ruédela (2).
8.2 Mueva la caminadora para quitarla de la caja
aplanada y colóquela en su posición final, lista para
usar. Deseche la caja de cartón.

247
Configuración
y uso de la
caminadora

ESPAÑOL
248
UBICACIÓN DE LA CINTA
Coloca la cinta en una superficie nivelada y estable. Es necesario dejar una distancia de 30cm
frente a la cinta para el cable de alimentación. Deje un espacio libre por detrás de la cinta que
tenga, como mínimo, la anchura de la cinta y 2m de largo. Esta zona debe quedar libre de cualquier
obstáculo y permitir al usuario bajarse del aparato. En caso de emergencia, coloca ambas manos
en los apoyos laterales para los brazos para agarrarse y coloque los pies en las barras laterales.
Para poder acceder con facilidad, deberá dejarse un espacio accesible a ambos lados de la cinta
de 0,6m para que los usuarios puedan acceder a la cinta por ambos lados.
No coloques la cinta en un lugar donde bloquee una rejilla de ventilación o una salida de aire. La
cinta no se debe instalar en garajes, patios cubiertos, cerca de agua ni al aire libre.
INSTRUCCIONES PARA LA CONEXIÓN A TIERRA
El producto debe estar conectado a tierra. En caso de avería o error, la conexión a tierra
proporciona una vía de menor resistencia para la corriente eléctrica, lo que reduce el riesgo de
descarga eléctrica. El equipo incluye un cable con un conductor y un enchufe de conexión a tierra.
El enchufe debe estar conectado a una toma de corriente correctamente instalada y conectado a
tierra según los códigos y ordenanzas locales.
PELIGRO
• Una mala conexión del conductor de conexión a tierra puede conllevar un riesgo de descarga
eléctrica. Consulte a un electricista o técnico cualificado si tiene dudas sobre si el producto
está conectado a tierra adecuadamente. No cambie el enchufe del producto. Si no encaja
en la toma de corriente, contacte con un electricista cualificado para que instale una toma
apropiada.
• El producto está diseñado para su uso en un circuito de tensión nominal local y cuenta con un
enchufe deconexión a tierra. No deben usarse adaptadores con este producto.
• El producto debe utilizarse en un circuito exclusivo. Para saber si está utilizando un circuito
específico, desconecte la alimentación de dicho circuito y compruebe si algún otro dispositivo
se desconecta. En caso afirmativo, derive los dispositivos a otro circuito.
Nota: Un solo circuito suele integrar diversas tomas.
60 cm
(2 ft)
60 cm
(2 ft)
2 m (79 in)
30 cm (1 ft)
ESPACIO
LIBRE DE
OBSTÁCULOS
T8.5J

ESPAÑOL
249
CINTAS DE CORRER PLEGABLES
Para plegarla, agarre con firmeza el extremo trasero de la cinta. Levante con cuidado
el extremo de la plataforma deforma de la cinta hasta la posición vertical hasta que el
pasador de bloqueo quede encajado y bloquee con seguridad la plataforma en dicha
posición. Asegúrese de que la cubierta está bien encajada antes de soltarla.
DESPLIEGUE
Agarre con firmeza el extremo trasero de la cinta. Para desplegarla, presione suavemente
el pestillo de bloqueo con el pie hasta que se desenganche. Baje la plataforma al suelo
con cuidado.
EMPLEO DE LA LLAVE DE SEGURIDAD
La cinta no se encenderá si la llave de seguridad no está colocada en su posición. Enganche la pinza de la cuerda de seguridad
asu ropa. El diseño de esta llave de seguridadtienecomo objetivo cortar la alimentación eléctrica de la cinta si sufre unacaída.
Compruebe cada dos semanas que la llave de seguridadfunciona.
ADVERTENCIA: No emplee nunca la cinta sin sujetar la pinza de la llave de seguridad a su ropa. Antes de comenzar, tire de la
pinza de la llave de seguridad para asegurarse de que no se suelta dela ropa.
ALIMENTACIÓN ELÉCTRICA
La cinta funciona con una fuente de alimentación. Esta tiene que enchufarse a la toma situada en la parte frontal de la máquina, al
lado del estabilizador. Algunas elípticas tienen un interruptor al lado de la toma de corriente. Asegúrese de que está en la posición
ON (encendido). Desenchufe el cable cuando no use la bicicleta. NOTA: Algunas cintas tienen un interruptor ON/OFF (encendido/
apagado) detrás de la consola.
ADVERTENCIA: No utilice el producto si ha sufrido daños (tanto en la máquina como en el cable o el enchufe), si no funciona
correctamente o si se ha sumergido en agua.

ESPAÑOL
250
NIVELACIÓN DE LA CINTA
La cinta debe estar nivelada para sacarle el máximo partido. Una vez que ha colocado la cinta donde desea utilizarla, levante o
baje uno o ambos niveladores ajustables de la parte inferior de la estructura. Se recomienda emplear un nivel de carpintero. Si la
máquina no está nivelada, es posible que la cinta no siga correctamente su trayectoria. Una vez que ha nivelado la cinta, bloquee
los niveladores apretando las tuercas contra la estructura.
AJUSTAR ALTURA BLOQUEAR
MECANISMO
DE AJUSTE
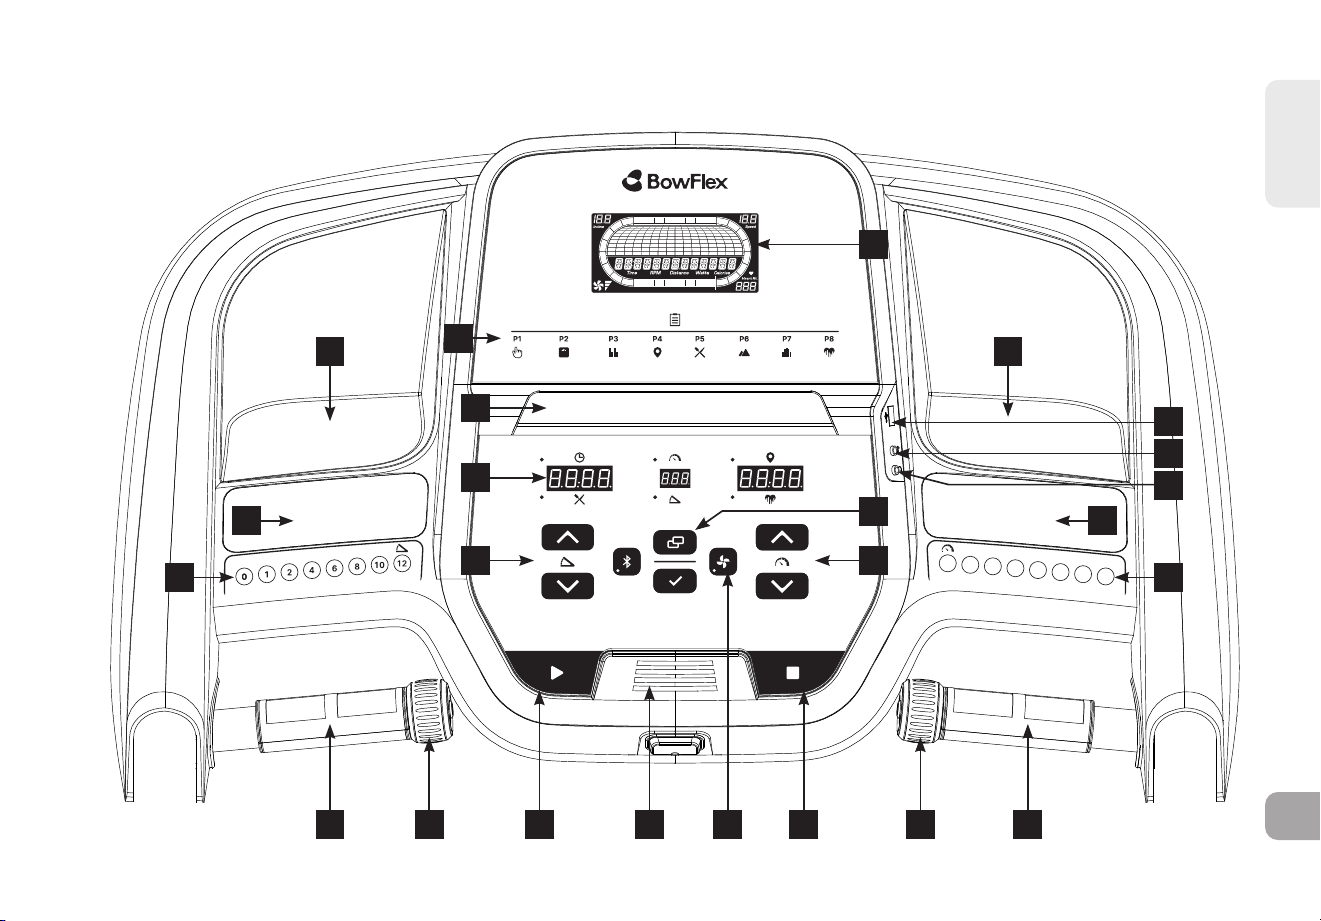
ESPAÑOL
251
2
4
6
8
10
12
16
20
Q
M M
P
N
IH
B
R
F G
A
J
O
Q
DS T U SEL K
C

ESPAÑOL
252
FUNCIONAMIENTO DE LA CONSOLA
Nota: Hay una lámina protectora delgada de plástico transparente en el revestimiento de la consola que debe quitarse antes de usarla.
A) VENTANAS DE LA PANTALLA LCD: Tiempo, RPM, Distancia, Vatios, Calorías, Inclinación, Velocidad, Frecuencia Cardíaca, Velocidad del
Ventilador.
B) INDICADORES LED: Tiempo, Velocidad, Distancia, Calorías, Inclinación, Frecuencia cardíaca.
C) INDICADORES DE ENTRENAMIENTO: indica qué entrenamiento está configurado para el programa actual.
D) START (INICIO): oprima para comenzar a hacer ejercicio, para comenzar una sesión específica de ejercicio o para reiniciar elejercicio después
de una pausa.
E) STOP (PARAR): oprima para hacer una pausa o terminar su sesión de ejercicio. Mantenga oprimida esta tecla durante 3segundos para poner
en cero la consola.
F) TECLAS +/- INCLINACIÓN: se utilizan para ajustar la inclinación en pequeños incrementos (incrementos de 0,5 %).
G) TECLAS +/- VELOCIDAD: se utilizan para ajustar la velocidad en pequeños incrementos (incrementos de 0,1 mph).
H) TECLAS RÁPIDAS DE INCLINACIÓN: se utilizan para alcanzar el nivel de inclinación deseado con mayor rapidez.
I) TECLAS RÁPIDAS DE VELOCIDAD: se utilizan para alcanzar la velocidad deseada con mayor rapidez.
J) CHANGE DISPLAY (CAMBIAR PANTALLA): Oprima esta tecla para cambiar la información de pantalla durante la sesión deejercicio.
K) TECLA DE VENTILADOR: al presionar el botón del ventilador se cambiará el nivel 1,2,3 y luego se apagará.
L) VENTILADOR: ventilador personal para la sesión de ejercicio.
M) ALTAVOCES: la música se reproduce a través de los altavoces cuando su reproductor de CD/MP3 está conectado a la consola.
N) TOMA DE ENTRADA DE AUDIO: conecte su reproductor de CD/MP3 a la consola utilizando el cable adaptador de audio incluido.
O) ENCHUFE DE SALIDA DE AUDIO/AURICULAR: conecte los auriculares en esta toma para escuchar música con ellos. Nota:Cuando los
auriculares están conectados a la toma de auriculares, el sonido ya no se escucha a través de los altavoces.
P) PUERTO USB: corriente de puerto USB 1A/5V.
Q) BOLSILLOS PARA BOTELLA DE AGUA: contiene equipos personales para la sesión de ejercicios.
R) SOPORTE PARA TABLETA/LECTURA: sostiene la tableta o el material de lectura.
S) EMPUÑADURAS PARA LA MEDICIÓN DE LA FRECUENCIA CARDÍACA: utilizadas para medir la frecuencia cardíaca.
T) RUEDA DE DESPLAZAMIENTO DELAINCLINACIÓN
: se utiliza para ajustar la inclinación en pequeños incrementos ( .5% ).
U) DE MARCACIÓN RÁPIDA : utilizado para ajustar la velocidad en pequeños incrementos ( .1MPH ).

ESPAÑOL
253
VENTANAS DE VISUALIZACIÓN
•
TIME (TIEMPO): se muestra en minutos:segundos. Indica el tiempo restante o el que ha pasado en su sesión deejercicio.
•
SPEED (VELOCIDAD): aparece en MPH. Indica a qué velocidad se mueve la superficie para caminar o correr.
•
DISTANCE (DISTANCIA): aparece en millas. Indica la distancia recorrida o la distancia por recorrer durante susesión de
ejercicio.
•
CALORIES (CALORÍAS): total de calorías quemadas o que restan por quemar durante su sesión de ejercicio.
•
INCLINE (INCLINACIÓN): aparece como porcentaje. Indica la inclinación de la superficie para caminar o correr.
•
HEART RATE (FRECUENCIA CARDÍACA): aparece como latidos por minuto (BPM, por sus siglas en inglés). Se utiliza para
monitorear la frecuencia cardíaca (se muestra cuando se sujetan ambas empuñaduras con sensor depulso).

ESPAÑOL
254
PARA EMPEZAR
1) Verifique que no haya ningún objeto ubicado en la banda que dificulte el movimiento de la caminadora.
2) Enchufe el cable de corriente y ENCIENDA la caminadora. (El interruptor de ENCENDIDO/APAGADO está al lado delcablede
corriente).
3) Párese sobre los rieles laterales de la caminadora.
4) Sujete el broche de la llave de seguridad en alguna parte de su ropa y asegúrese de que quede bien agarrado y de quenosepueda
soltar durante el funcionamiento de la caminadora.
5) Introduzca la llave de seguridad en su lugar en la consola.
6) Tiene dos opciones para comenzar su sesión de ejercicios.
A) INICIO RÁPIDO
Simplemente oprima la tecla de inicio START para comenzar a hacer ejercicio.
El tiempo, la distancia y las calorías comenzarán de cero. O…
B) SELECCIONE UN EJERCICIO U OBJETIVO
1) Seleccione su PROGRAMA con los botones +/- y presione ENTER cuando aparezca el PROGRAMA deseado.
2) Ajuste la CONFIGURACIÓN con los botones +/- y presione ENTER cuando aparezca la configuración deseada.
3) Presione START (INICIO) para comenzar.
ESPECIFICACIÓN PARA PROGRAMAS CON MÚLTIPLES SEGMENTOS
1) El usuario puede aumentar la velocidad y la inclinación en un determinado segmento y SÓLO AUMENTA PARA
ESE SEGMENTO. Para los siguientes segmentos, la máquina seguirá los valores de la tabla proporcionada.
2) El usuario puede disminuir la velocidad y la inclinación en cualquier segmento y disminuirá la misma cantidad para los siguientes
segmentos.
SISTEMA DE FITNESS CONECTADO BowFlex
Su máquina BowFlex está preparada para Bluetooth, lo que le permite utilizar la tecnología Bluetooth 4.0 para conectar de forma inalámbrica
su dispositivo y otras aplicaciones a su caminadora BowFlex.
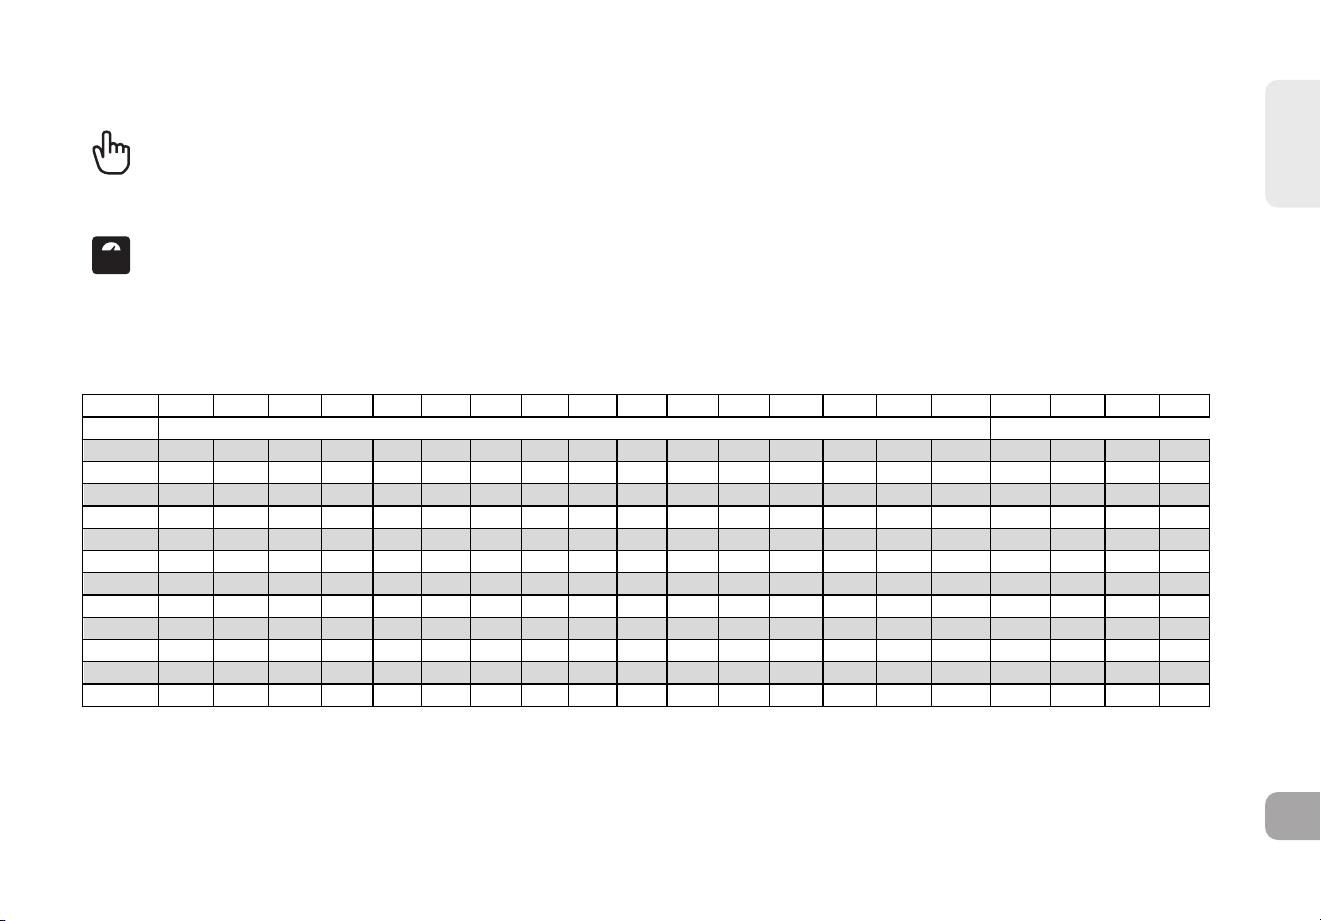
ESPAÑOL
255
P1) MANUAL: ajuste la velocidad y la inclinación de forma manual durante el ejercicio.
P2) PÉRDIDA DE PESO: ejercicio diseñado específicamente para alcanzar el peso. Promueve la pérdida de peso aumentando y
disminuyendo la inclinación, mientras te mantiene en tu zona de quema de grasa. Incluye 20 niveles. Los cambios de velocidad e
inclinación se repiten cada 30 segundos.
PERFILES DE SESIÓN DE EJERCICIOS
t/',d>K^^
^ĞŐŵĞŶƚсǁŽƌŬŽƵƚƚŝŵĞϭϲ
>ĞǀĞů ϭ Ϯ ϯ ϰ ϱ ϲ ϳ ϴ ϵ ϭϬ ϭϭ ϭϮ ϭϯ ϭϰ ϭϱ ϭϲ ϭϳ ϭϴ ϭϵ ϮϬ
^ĞŐŵĞŶƚ
ϭ Ϭ Ϭ Ϭ Ϭ Ϭ Ϭ ϭ Ϯ Ϯ Ϯϱ Ϯϱ Ϯϱ Ϯϱ Ϯϱ ϯϱ ϱ ϱ ϱ ϱ ϱ
Ϯ Ϭ Ϭ ϭ Ϯ Ϯϱ ϯϱ ϯϱ ϯϱ ϰϱ ϱϱ ϲ ϳ ϳϱ ϴϱ ϵϱ ϭϭ ϭϭ ϭϭ ϭϭϱ ϭϮ
ϯ ϭ Ϯ Ϯ Ϯ Ϯ Ϯ Ϯ Ϯ Ϯ Ϯϱ ϯϱ ϰϱ ϰϱ ϰϱ ϱϱ ϳ ϳϱ ϴϱ ϵ ϭϬ
ϰ ϭϱ ϯϱ ϰ ϱ ϱ ϱ ϱ ϱ ϲ ϳ ϳϱ ϴϱ ϵ ϭϬ ϭϭ ϭϮ ϭϮϱ ϭϯϱ ϭϰ ϭϱ
ϱ ϭ Ϯ Ϯ Ϯ Ϯ Ϯ Ϯϱ ϯϱ ϰ ϰϱ ϰϱ ϰϱ ϱϱ ϳ ϳϱ ϴϱ ϴϱ ϴϱ ϵϱ ϭϭ
ϲ ϭϱ ϯϱ ϯϱ ϯϱ ϱ ϲϱ ϳϱ ϴϱ ϵ ϭϬ ϭϬ ϭϬ ϭϬϱ ϭϭϱ ϭϮϱ ϭϯϱ ϭϯϱ ϭϯϱ ϭϯϱ ϭϯϱ
ϳ ϭ Ϯ Ϯ Ϯ Ϯ Ϯ Ϯϱ ϯϱ ϰ ϰϱ ϱ ϱϱ ϱϱ ϱϱ ϳ ϴϱ ϴϱ ϴϱ ϵ ϭϬ
ϴ ϭϱ ϯϱ ϰ ϱ ϱ ϱ ϱϱ ϲϱ ϳϱ ϴϱ ϵ ϭϬ ϭϬϱ ϭϭϱ ϭϭϱ ϭϮ ϭϯϱ ϭϱ ϭϱ ϭϱ
ϵ ϭϱ ϯϱ ϯϱ ϯϱ ϯϱ ϯϱ ϰ ϱ ϱ ϱϱ ϲ ϳ ϳ ϳ ϴϱ ϭϬ ϭϬϱ ϭϭ ϭϭϱ ϭϮ
ϭϬ ϭ Ϯ Ϯ Ϯ Ϯ Ϯ Ϯϱ ϯϱ ϰ ϰϱ ϰϱ ϰϱ ϰϱ ϰϱ ϲϱ ϴϱ ϴϱ ϴϱ ϵ ϭϬ
ϭϭ ϭϱ ϯϱ ϯϱ ϯϱ ϰ ϱ ϱ ϱ ϲ ϳ ϴϱ ϭϬ ϭϬϱ ϭϭϱ ϭϮϱ ϭϯϱ ϭϯϱ ϭϯϱ ϭϰ ϭϱ
ϭϮ ϭ Ϯ Ϯ Ϯ Ϯ Ϯ Ϯ Ϯ ϯ ϰϱ ϱϱ ϳ ϳ ϳ ϳϱ ϴϱ ϵ ϭϬ ϭϬ ϭϬ
ϭϯ ϭϱ ϯϱ ϰ ϱ ϱϱ ϲϱ ϳϱ ϴϱ ϴϱ ϴϱ ϵ ϭϬ ϭϬ ϭϬ ϭϭ ϭϮ ϭϮ ϭϮ ϭϮϱ ϭϯϱ
ϭϰ ϭ Ϯ Ϯ Ϯ Ϯϱ ϯϱ ϰ ϱ ϱ ϱϱ ϱϱ ϱϱ ϳ ϴϱ ϵ ϭϬ ϭϬϱ ϭϭ ϭϭϱ ϭϮ
ϭϱ Ϭ Ϭ Ϭ Ϭ ϭ Ϯ Ϯϱ ϯϱ ϰ ϰϱ ϰϱ ϰϱ ϱ ϱϱ ϳ ϴϱ ϵ ϭϬ ϭϬ ϭϬ
ϭϲ Ϭ Ϭ Ϭ Ϭ Ϭ Ϭ ϭ Ϯ Ϯ Ϯϱ Ϯϱ Ϯϱ Ϯϱ Ϯϱ ϯϱ ϱ ϱ ϱ ϱ ϱ
t/',d>K^^;ϭϬйŝŶĐůŝŶĞDĂdžͿ
^ĞŐŵĞŶƚсǁŽƌŬŽƵƚƚŝŵĞϭϲ
>ĞǀĞů ϭ Ϯ ϯ ϰ ϱ ϲ ϳ ϴ ϵ ϭϬ ϭϭ ϭϮ ϭϯ ϭϰ ϭϱ ϭϲ ϭϳ ϭϴ ϭϵ ϮϬ
^ĞŐŵĞŶƚ
ϭ Ϭ Ϭ Ϭ Ϭ Ϭ Ϭ ϭ Ϯ Ϯ Ϯϱ Ϯϱ Ϯϱ Ϯϱ Ϯϱ ϯϱ
ϱ ϱ ϱ ϱ ϱ
Ϯ Ϭ Ϭ ϭ Ϯ Ϯϱ ϯϱ ϯϱ ϯϱ ϰϱ ϱϱ ϲ ϳ ϳϱ ϴϱ ϵϱ ϭϬ ϭϬ ϭϬ ϭϬ ϭϬ
ϯ ϭ Ϯ Ϯ Ϯ Ϯ Ϯ Ϯ Ϯ Ϯ Ϯϱ ϯϱ ϰϱ ϰϱ ϰϱ ϱϱ ϳ ϳϱ ϴϱ ϵ ϭϬ
ϰ ϭϱ ϯϱ ϰ ϱ ϱ ϱ ϱ ϱ ϲ ϳ ϳϱ ϴϱ ϵ ϭϬ ϭϬ ϭϬ ϭϬ ϭϬ ϭϬ ϭϬ
ϱ ϭ Ϯ Ϯ Ϯ Ϯ Ϯ Ϯϱ ϯϱ ϰ ϰϱ ϰϱ ϰϱ ϱϱ ϳ ϳϱ ϴϱ ϴϱ ϴϱ ϵϱ ϭϬ
ϲ ϭϱ ϯϱ ϯϱ ϯϱ ϱ ϲϱ ϳϱ ϴϱ ϵ ϭϬ ϭϬ ϭϬ ϭϬ ϭϬ ϭϬ ϭϬ ϭϬ ϭϬ ϭϬ ϭϬ
ϳ ϭ Ϯ Ϯ Ϯ Ϯ Ϯ Ϯϱ ϯϱ ϰ ϰϱ ϱ ϱϱ ϱϱ ϱϱ ϳ ϴϱ ϴϱ ϴϱ ϵ ϭϬ
ϴ ϭϱ ϯϱ ϰ ϱ ϱ ϱ ϱϱ ϲϱ ϳϱ ϴϱ ϵ ϭϬ ϭϬ ϭϬ ϭϬ ϭϬ ϭϬ ϭϬ ϭϬ ϭϬ
ϵ ϭϱ ϯϱ ϯϱ ϯϱ ϯϱ ϯϱ ϰ ϱ ϱ ϱϱ ϲ ϳ ϳ ϳ ϴϱ ϭϬ ϭϬ ϭϬ ϭϬ ϭϬ
ϭϬ ϭ Ϯ Ϯ Ϯ Ϯ Ϯ Ϯϱ ϯϱ ϰ ϰϱ ϰϱ ϰϱ ϰϱ ϰϱ ϲϱ ϴϱ ϴϱ ϴϱ ϵ ϭϬ
ϭϭ ϭϱ ϯϱ ϯϱ ϯϱ ϰ ϱ ϱ ϱ ϲ ϳ ϴϱ ϭϬ ϭϬ ϭϬ ϭϬ ϭϬ ϭϬ ϭϬ ϭϬ ϭϬ
ϭϮ ϭ Ϯ Ϯ Ϯ Ϯ Ϯ Ϯ Ϯ ϯ ϰϱ ϱϱ ϳ ϳ ϳ ϳϱ ϴϱ ϵ ϭϬ ϭϬ ϭϬ
ϭϯ ϭϱ ϯϱ ϰ ϱ ϱϱ ϲϱ ϳϱ ϴϱ ϴϱ ϴϱ ϵ ϭϬ ϭϬ ϭϬ ϭϬ ϭϬ ϭϬ ϭϬ ϭϬ ϭϬ
ϭϰ ϭ Ϯ Ϯ Ϯ Ϯϱ ϯϱ ϰ ϱ ϱ ϱϱ ϱϱ ϱϱ ϳ ϴϱ ϵ ϭϬ ϭϬ ϭϬ ϭϬ ϭϬ
ϭϱ Ϭ Ϭ Ϭ Ϭ ϭ Ϯ Ϯϱ ϯϱ ϰ ϰϱ ϰϱ ϰϱ ϱ ϱϱ ϳ ϴϱ ϵ ϭϬ ϭϬ ϭϬ
ϭϲ Ϭ Ϭ Ϭ Ϭ Ϭ Ϭ ϭ Ϯ Ϯ Ϯϱ Ϯϱ Ϯϱ Ϯϱ Ϯϱ ϯϱ ϱ ϱ ϱ ϱ ϱ
t/',d>K^^;ϭϮйŝŶĐůŝŶĞDĂdžͿ
^ĞŐŵĞŶƚсǁŽƌŬŽƵƚƚŝŵĞϭϲ
>ĞǀĞů ϭ Ϯ ϯ ϰ ϱ ϲ ϳ ϴ ϵ ϭϬ ϭϭ ϭϮ ϭϯ ϭϰ ϭϱ ϭϲ ϭϳ ϭϴ ϭϵ ϮϬ
^ĞŐŵĞŶƚ
ϭ Ϭ Ϭ Ϭ Ϭ Ϭ Ϭ ϭ Ϯ Ϯ Ϯϱ Ϯϱ Ϯϱ Ϯϱ Ϯϱ ϯϱ ϱ ϱ ϱ ϱ ϱ
Ϯ Ϭ Ϭ ϭ Ϯ Ϯϱ ϯϱ ϯϱ ϯϱ ϰϱ ϱϱ ϲ ϳ ϳϱ ϴϱ ϵϱ ϭϭ ϭϭ ϭϭ ϭϭϱ ϭϮ
ϯ ϭ Ϯ Ϯ Ϯ Ϯ Ϯ Ϯ Ϯ Ϯ Ϯϱ ϯϱ ϰϱ ϰϱ
ϰϱ ϱϱ ϳ ϳϱ ϴϱ ϵ ϭϬ
ϰ ϭϱ ϯϱ ϰ ϱ ϱ ϱ ϱ ϱ ϲ ϳ ϳϱ ϴϱ ϵ ϭϬ ϭϭ ϭϮ ϭϮ ϭϮ ϭϮ ϭϮ
ϱ ϭ Ϯ Ϯ Ϯ Ϯ Ϯ Ϯϱ ϯϱ ϰ ϰϱ ϰϱ ϰϱ ϱϱ ϳ ϳϱ ϴϱ ϴϱ ϴϱ ϵϱ ϭϭ
ϲ ϭϱ ϯϱ ϯϱ ϯϱ ϱ ϲϱ ϳϱ ϴϱ ϵ ϭϬ ϭϬ ϭϬ ϭϬϱ ϭϭϱ ϭϮ ϭϮ ϭϮ ϭϮ ϭϮ ϭϮ
ϳ ϭ Ϯ Ϯ Ϯ Ϯ Ϯ Ϯϱ ϯϱ ϰ ϰϱ ϱ ϱϱ ϱϱ ϱϱ ϳ ϴϱ ϴϱ ϴϱ ϵ ϭϬ
ϴ ϭϱ ϯϱ ϰ ϱ ϱ ϱ ϱϱ ϲϱ ϳϱ ϴϱ ϵ ϭϬ ϭϬϱ ϭϭϱ ϭϭϱ ϭϮ ϭϮ ϭϮ ϭϮ ϭϮ
ϵ ϭϱ ϯϱ ϯϱ ϯϱ ϯϱ ϯϱ ϰ ϱ ϱ ϱϱ ϲ ϳ ϳ ϳ ϴϱ ϭϬ ϭϬϱ ϭϭ ϭϭϱ ϭϮ
ϭϬ ϭ Ϯ Ϯ Ϯ Ϯ Ϯ Ϯϱ ϯϱ ϰ ϰϱ ϰϱ ϰϱ ϰϱ ϰϱ ϲϱ ϴϱ ϴϱ ϴϱ ϵ ϭϬ
ϭϭ ϭϱ ϯϱ ϯϱ ϯϱ ϰ ϱ ϱ ϱ ϲ ϳ ϴϱ ϭϬ ϭϬϱ ϭϭϱ ϭϮ ϭϮ ϭϮ ϭϮ ϭϮ ϭϮ
ϭϮ ϭ Ϯ Ϯ Ϯ Ϯ Ϯ Ϯ Ϯ ϯ ϰϱ ϱϱ ϳ ϳ ϳ ϳϱ ϴϱ ϵ ϭϬ ϭϬ ϭϬ
/E>/E
/E>/E
/E>/E
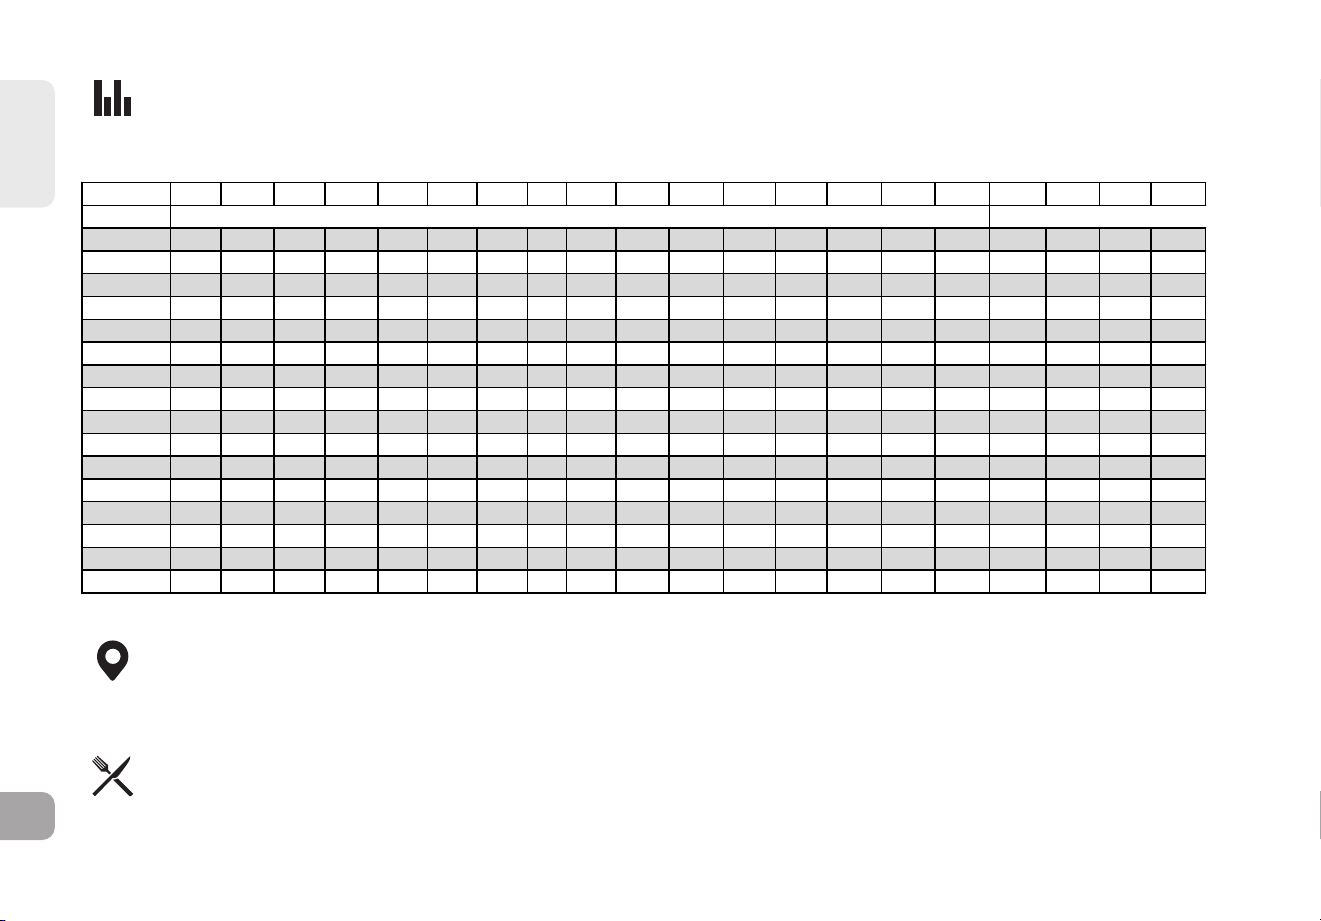
ESPAÑOL
256
P3) INTERVALOS: mejora su fuerza, velocidad y resistencia al aumentar y reducir la velocidad durante toda su sesión
de ejercicio para que participen tanto su corazón como otros músculos. Incluye 10 niveles.
Los cambios de velocidad y los segmentos se repiten cada 90 segundos y 30 segundos.
P4) DISTANCIA: Esfuércese y llegue más lejos durante la sesión de ejercicio con 13 distancias. Seleccione entre las metas de 1 milla,
2 millas, 5 kilómetros, 5 millas, 10 kilómetros, 8 millas, 15 kilómetros, 10 millas, 20 kilómetros, media maratón, 15 millas, 20 millas y
maratón. El usuario establece los niveles de velocidad iniciales.
P5) CALORÍAS: Establezca metas para quemar calorías. Las calorías quemadas se calculan utilizando la distancia y la velocidad.
Intervals (15%Incline)
Segment =workout time/16
Level 1 2 3 4 5 6 7 8 9 10 11 12 13 14 15 16 17 18 19 20
Segment
1 0 0 0 0 0 0 0 0 0 0 0 0 0 0 0 0 0 0 0 0
2 0.5 0.5 0.5 0.5 0.5 0.5 0.5 0.5 1 1 1 1 1 1 1 1.5 1.5 1.5 1.5 1.5
3 0 0 0 0 0 0 0 0 0 0 0 0 0 0 0 0 0 0 0 0
4 1.5 2 2 2.5 3 3 3.5 3.5 4 4.5 5 5.5 5.5 6 6 6.5 7 7 8 8.5
5 0 0 0 0 0 0 0 0 0 0 0 0 0 0 0 0 0 0 0 0
6 2.5 2.5 3 3.5 4 4.5 4.5 5 5.5 6 7 7.5 8 8 8.5 9.5 9.5 10 11 11.5
7 0 0 0 0 0 0 0 0 0 0 0 0 0 0 0 0 0 0 0 0
8 3 3.5 4 4.5 5 5.5 6 6.5 7 8 9 9.5 10 10.5 11 12 12.5 13 14 15
9 0 0 0 0 0 0 0 0 0 0 0 0 0 0 0 0 0 0 0 0
10 3 3.5 4 4.5 5 5.5 6 6.5 7 8 9 9.5 10 10.5 11 12 12.5 13 14 15
11 0 0 0 0 0 0 0 0 0 0 0 0 0 0 0 0 0 0 0 0
12 3 3.5 4 4.5 5 5.5 6 6.5 7 8 9 9.5 10 10.5 11 12 12.5 13 14 15
13 0 0 0 0 0 0 0 0 0 0 0 0 0 0 0 0 0 0 0 0
14 3 3.5 4 4.5 5 5.5 6 6.5 7 8 9 9.5 10 10.5 11 12 12.5 13 14 15
15 0 0 0 0 0 0 0 0 0 0 0 0 0 0 0 0 0 0 0 0
16 3 3.5 4 4.5 5 5.5 6 6.5 7 8 9 9.5 10 10.5 11 12 12.5 13 14 15
Intervals (10%Incline)
Segment =workout time/16
Level 1 2 3 4 5 6 7 8 9 10 11 12 13 14 15 16 17 18 19 20
Segment
1 0 0 0 0 0 0 0 0 0 0 0 0 0 0 0 0 0 0 0 0
2 0.5 0.5 0.5 0.5 0.5 0.5 0.5 0.5 1 1 1 1 1 1 1 1.5 1.5 1.5 1.5 1.5
3 0 0 0 0 0 0 0 0 0 0 0 0 0 0 0 0 0 0 0 0
4 1.5 2 2 2.5 3 3 3.5 3.5 4 4.5 5 5.5 5.5 6 6 6.5 7 7 8 8.5
5 0 0 0 0 0 0 0 0 0 0 0 0 0 0 0 0 0 0 0 0
6 2.5 2.5 3 3.5 4 4.5 4.5 5 5.5 6 7 7.5 8 8 8.5 9.5 9.5 10 10 10
7 0 0 0 0 0 0 0 0 0 0 0 0 0 0 0 0 0 0 0 0
8 3 3.5 4 4.5 5 5.5 6 6.5 7 8 9 9.5 10 10 10 10 10 10 10 10
9 0 0 0 0 0 0 0 0 0 0 0 0 0 0 0 0 0 0 0 0
10 3 3.5 4 4.5 5 5.5 6 6.5 7 8 9 9.5 10 10 10 10 10 10 10 10
11 0 0 0 0 0 0 0 0 0 0 0 0 0 0 0 0 0 0 0 0
12 3 3.5 4 4.5 5 5.5 6 6.5 7 8 9 9.5 10 10 10 10 10 10 10 10
13 0 0 0 0 0 0 0 0 0 0 0 0 0 0 0 0 0 0 0 0
14 3 3.5 4 4.5 5 5.5 6 6.5 7 8 9 9.5 10 10 10 10 10 10 10 10
15 0 0 0 0 0 0 0 0 0 0 0 0 0 0 0 0 0 0 0 0
16 3 3.5 4 4.5 5 5.5 6 6.5 7 8 9 9.5 10 10 10 10 10 10 10 10
Segment =workout time/16
Intervals (12%Incline)
Level 1 2 3 4 5 6 7 8 9 10 11 12 13 14 15 16 17 18 19 20
Segment
INCLINE
INCLINE
INCLINE
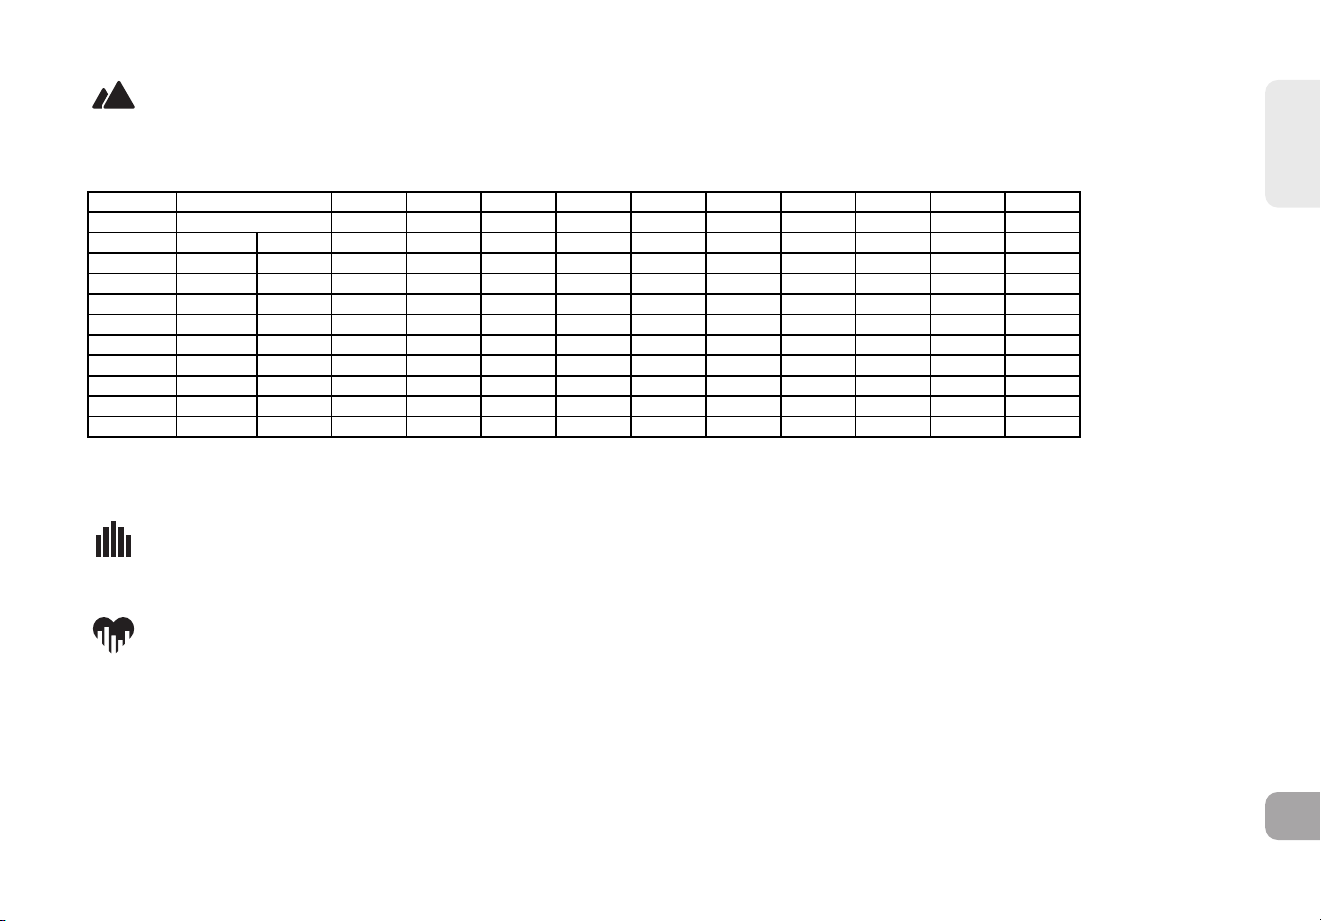
ESPAÑOL
257
Segmento
1 2 3 4 5 6 7 8 9 10
Tiempo
30 s 30 s 30 s 30 s 30 s 30 s 30 s 30 s 30 s 30 s
Nivel 1 0 0 1 1,5 2 2,5 3 3 2,5 2 1,5 1
Nivel 2 0 0 1,5 2 2,5 3 3,5 3,5 3 2,5 2 1,5
Nivel 3 0 1 2 2,5 3 3,5 4 4 3,5 3 2,5 2
Nivel 4 0 1,5 2,5 3 3,5 4 4,5 4,5 4 3,5 3 2,5
Nivel 5 0 1,5 3 3,5 4 4,5 5 5 4,5 4 3,5 3
Nivel 6 0 1,5 3,5 4 4,5 5 5,5 5,5 5 4,5 4 3,5
Nivel 7 0 1,5 4 4,5 5 5,5 6 6 5,5 5 4,5 4
Nivel 8 0 2 4,5 5 5,5 6 6,5 6,5 6 5,5 5 4,5
Nivel 9 0 2 5 5,5 6 6,5 7 7 6,5 6 5,5 5
Nivel 10 0 2 5,5 6 6,5 7 7,5 7,5 7 6,5 6 5,5
Calentamiento
4:00 minutos
P6) SUBIDA DE COLINA: Simula el ascenso y descenso de una colina. Este programa ayuda a tonificar los músculos y mejorar la
capacidad cardiovascular.
La inclinación cambia y los segmentos se repiten cada 30 segundos.
P7) PERSONALIZADO: Le permite crear y reutilizar la sesión de ejercicio perfecta para usted con una combinación específica
de velocidad, inclinación y tiempo o distancia. Lo máximo en programación personal. Se trata de un programa de metas en base
atiempo o distancia.
P8) FRECUENCIA CARDÍACA OBJETIVO: Este programa está diseñado para la mejora de los niveles de su capacidad de
acondicionamiento cardiovascular. Simplemente tiene que establecer su frecuencia cardíaca objetivo. El programa, luego, controla
y ajusta el nivel de intensidad para mantener su frecuencia cardíaca dentro de su rango objetivo mientras hace ejercicio, lo cual
representa un método comprobado para maximizar sus metas de pérdida de peso y de acondicionamiento físico. Necesita una correa
para pecho y debe usarla durante todo este programa. Consulte lo siguiente para calcular su frecuencia cardíaca objetivo.
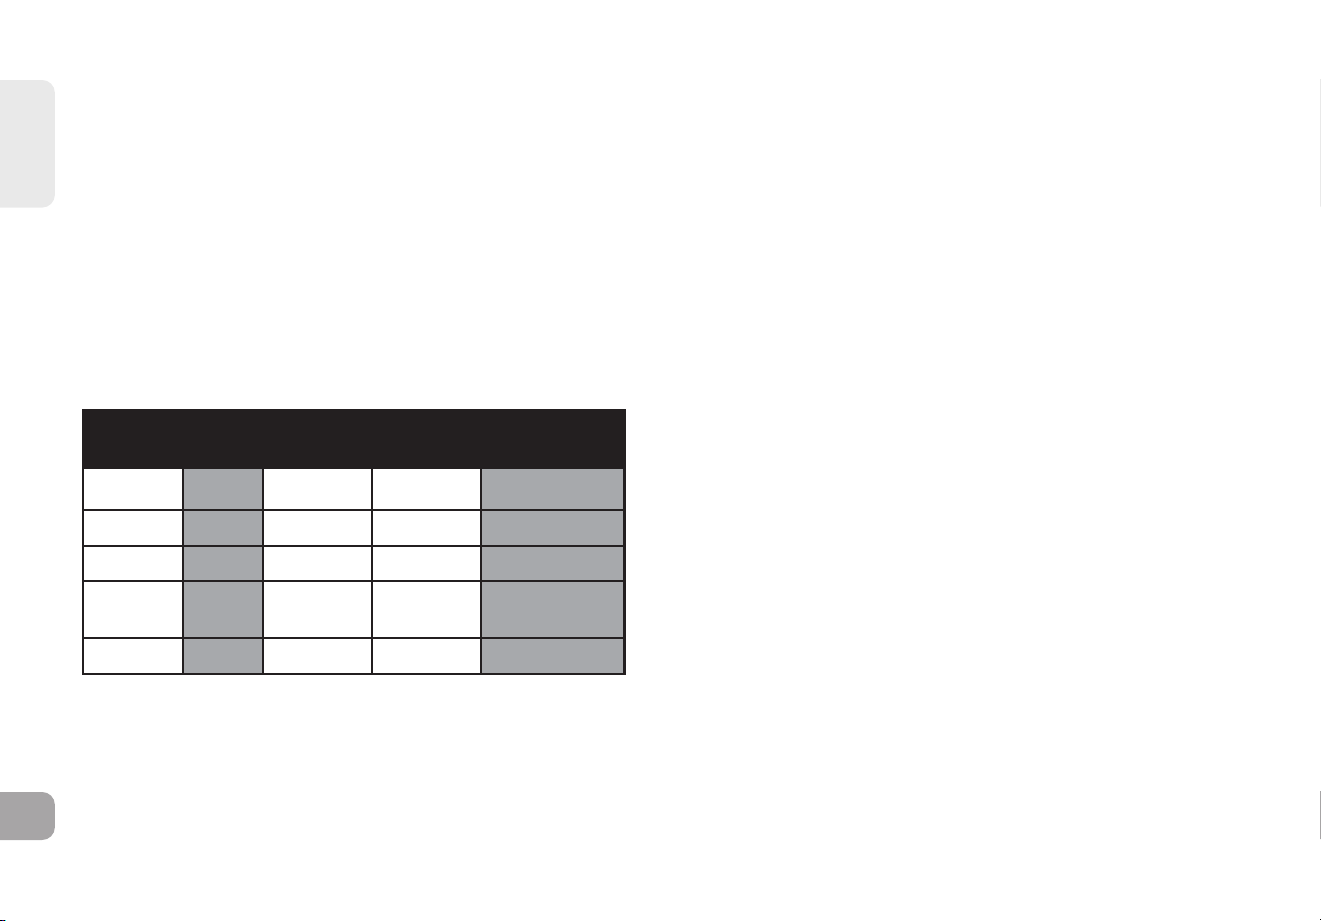
ESPAÑOL
258
Cálculo de la frecuencia cardíaca objetivo
El primer paso para determinar la intensidad adecuada para su acondicionamiento físico es determinar su frecuencia cardíaca máxima
(FCmáx.= 220 – su edad). El método basado en la edad es una predicción estadística promedio de su frecuencia cardíaca máxima y es
unabuena técnica para la mayoría de las personas, especialmente para los novatos en el entrenamiento basado en la frecuencia cardíaca.
La forma más precisa y exacta de determinar su frecuencia cardíaca máxima individual es que un cardiólogo o un fisiólogo experto en
ejercicio la determinen clínicamente por medio de una prueba de esfuerzo máximo. Si tiene más de 40 años de edad, si tiene exceso de
peso, si su vida ha sido sedentaria durante varios años o si tiene antecedentes de enfermedades cardíacas en su familia, es recomendable
que se realice pruebas clínicas.
Esta tabla muestra ejemplos del rango de frecuencia cardíaca para una persona de 30 años de edad que hace ejercicio en 5 zonas de
frecuencia cardíaca distintas. Por ejemplo, la frecuencia cardíaca máxima de una persona de 30 años de edad es 220 – 30 = 190 latidos/
minuto, y el 90% de la frecuencia cardíaca máxima es 190 × 0,9 = 171 latidos/minuto.
Duración
de la sesión
de ejercicio
Ejemplo
de frecuencia
cardíaca objetivo
(30 años de edad)
Su frecuencia
cardíaca objetivo
Recomendado para
< 5 min
171-190 LPM
Personas con buen
estado físico para
entrenamiento atlético
MUY FUERTE
90 – 100%
2-10 min 152-171 LPM
Sesiones de ejercicio
más cortas
FUERTE
80 – 90 %
10-40 min
133-152 LPM
Sesiones de ejercicio
moderadamente largas
MODERADO
70 – 80 %
40-80 min
114-133 LPM
Sesiones de ejercicio
más cortas con
repeticiones frecuentes
más prolongadas
LIGERO
60 – 70 %
20-40 min
104-114 LPM
Control de peso
y recuperación activa
MUY LIGERO
50 – 60 %
Zona de
frecuencia
cardíaca objetivo
Notas adicionales sobre la frecuencia cardíaca objetivo:
1). La inclinación de la caminadora se regulará automáticamente para que alcance su frecuencia cardíaca específica.
2). Si no se detecta ninguna frecuencia cardíaca, la unidad no cambiará la inclinación.
3). Si su frecuencia cardíaca está 25 latidos por encima de su zona objetivo, el programa se apagará.

ESPAÑOL
259
PARA REINICIAR LA CONSOLA
Mantenga presionada la tecla STOP (PARAR) durante 3 segundos.
FINALIZACIÓN DE SU SESIÓN DE EJERCICIO
Al finalizar su rutina, la unidad emitirá un pitido. La información del ejercicio aparecerá en la consola durante 30 segundos y,
luego, se borrará.
CONEXIÓN A TRAVÉS DE BLUETOOTH 4.0 LE
1) Compruebe que su dispositivo de música es compatible con Bluetooth 4.0.
2) Vaya a la configuración de Bluetooth del dispositivo y busque los dispositivos al alcance.
3) En su dispositivo de música, busque la lista de dispositivos Bluetooth. Seleccione su caminadora o máquina elíptica que aparecen en esta
lista. Espere a que su dispositivo de música finalice el emparejamiento con la unidad.
4) Usted sabrá cuándo el emparejamiento es satisfactorio cuando el dispositivo de música muestra que la caminadora o la máquina elíptica es
ahora un dispositivo emparejado.
USO DE DIVERSOS DISPOSITIVOS DE MÚSICA
Si está emparejando varios dispositivos con la unidad (es decir: varios usuarios están usando la caminadora o máquina elíptica y realizan el
enlazamiento de susdispositivos de música con esta) entonces tendrá que desvincular el dispositivo emparejado actualmente y, luego, volver
a acoplar su dispositivo a través del proceso de emparejamiento indicado anteriormente.
CONEXIÓN A TRAVÉS DE UN CABLE DE AUDIO
1) Conecte el CABLE ADAPTADOR DE AUDIO que se incluye a la TOMA DE ENTRADA DE AUDIO en el lado derecho de la consola y la
toma de los auriculares en su dispositivo de música.
2) Utilice los botones de dispositivo multimedia para ajustar los parámetros de las canciones.
3) Retire el CABLE ADAPTADOR DE AUDIO cuando no lo utilice.
4) Si no desea utilizar los ALTAVOCES, puede enchufar sus auriculares en la TOMA DE SALIDA DE AUDIO en el lado derecho de la consola.
Esto asegura quesiaccidentalmente tira del cable de los auriculares mientras corre, no tire el dispositivo al suelo.

ESPAÑOL
260
CONECTE SU DISPOSITIVO CON LA APLICACIÓN JRNY PARA ENTRENAMIENTOS MÁS
DINÁMICOS
Si tiene una suscripción a JRNY*, podrá acceder a ella desde su dispositivo al sincronizarlo con la consola de esta máquina. Con su
suscripción JRNY, recibirá entrenamientos guiados adaptados a usted.
* Se requiere una suscripción a JRNY para acceder a la experiencia JRNY – consulte global.bowflex.com/en/jrny.html para más
detalles. Donde esté disponible (incluidos los Estados Unidos), puede obtener una suscripción descargando la aplicación JRNY en
su teléfono o tableta y registrándose dentro de la app. Es posible que las suscripciones a JRNY no estén disponibles en todos los
países.

261
Mantenimiento &
Solución De
Problemas

ESPAÑOL
262
MANTENIMIENTO
El mantenimiento preventivo es la clave para que un equipo funcione correctamente, así como para reducir al mínimo la
responsabilidad del usuario. El equipo se debe someter a una inspección de forma periódica. Los componentes defectuosos deben
sustituirse inmediatamente. Si un equipo no funciona correctamente, debe mantenerse fuera de servicio hasta que se repare.
Asegúrese de que todas las personas que realizan ajustes o efectúan tareas de mantenimiento o reparación decualquier tipo estén
cualificadas para ello.
ADVERTENCIA
Para retirar la fuente de alimentación de la cinta, el cable de alimentación debe estar desconectado de la toma de corriente.

ESPAÑOL
263
PLAN DE MANTENIMIENTO
TAREA FRECUENCIA
Limpiar y comprobar la cinta:
• Apague la cinta utilizando el interruptor ON/OFF (ENCENDIDO/APAGADO) y desconecte el
cable de alimentación de la toma de corriente.
• Limpie la cinta, la plataforma, la cubierta del motor y la carcasa de la consola con untrapo
húmedo. No emplee nunca disolventes, puesto que podrían dañar la cinta.
• Examine el cable de alimentación. Si el cable de alimentación está dañado, consulte la
información de contacto en la cara posteriorde la TARJETA DE INFORMACIÓN para obtener
ayuda.
• Asegúrese de que el cable de alimentación no ha quedado bajo la cinta o en ningún otro lugar en
el que pueda estrangularse o seccionarse.
• Compruebe la tensión y la alineación de la cinta. Asegúrese de que la banda de rodadura no
dañará otros componentes de la cinta al estar desalineada.
• Si cualquier etiqueta está dañada o no se puede leer, consulte la información de contacto en la
cara posteriorde la TARJETA DE INFORMACIÓN para obtener ayuda.
DIARIA
Limpiar la zona bajo la cinta:
• Apague la cinta utilizando el interruptor ON/OFF (ENCENDIDO/APAGADO) ydesconecte el
cable de alimentación de la toma de corriente.
• Coloque la cinta en posición vertical y asegúrese de que el pestillo está bloqueado.
• Desplace la cinta.
• Limpie o aspire las partículas de polvo u otros objetos que puedan haberse depositado bajo la
cinta.
• Vuelva a colocar la cinta en su ubicación previa.
SEMANAL

ESPAÑOL
264
IMPORTANTE
• Apague la cinta utilizando el interruptor ON/OFF (ENCENDIDO/APAGADO) y desconecte el
cable de alimentación de la toma de corriente. Espere 60 segundos.
• Examine si todos los pernos de montaje de la máquina están apretados adecuadamente.
• Retire la cubierta del motor. Espere a que se apaguen TODAS las pantallas.
• Limpie el motor y el área de la placa inferior para retirar cualquier partícula de polvo o fibras
que se haya acumulado. Si no lleva a cabo esta acción, pueden aparecer fallos prematuros en
componentes eléctricos importantes.
• Limpie la banda con un trapo húmedo. Aspire cualquier partícula de color blanco o negro que
pueda acumularse alrededor de la cinta. Estas partículas pueden acumularse por el uso normal
de la cinta.
• Si la cinta dispone de amortiguadores de aire debajo de la plataforma para ayudarle a
levantarla, lubrique el tubo plateado del amortiguador con un espray deteflón (puede
encontrarlo en una ferretería local o tienda de bicicletas).
MENSUAL

ESPAÑOL
265
PLAN DE MANTENIMIENTO
CÓMO LUBRICAR LA BANDA
CADA 3 MESES O 480 KM
Es necesario lubricar la plataforma para correr de la caminadora cada
tres meses o 480 km a fin de mantener el rendimiento óptimo. Cuando
la caminadora registre 480 km, mostrará elmensaje “LUBE” (lubricar) o
“LUBE BELT” (lubricar banda). La caminadora no funciona mientras se
muestra el mensaje. Su caminadora vino con una botella de lubricante
100 % silicona, que puede utilizarse para dosaplicaciones.
Para adquirir lubricante de silicona adicional:
Póngase en contacto con el servicio de asistencia técnica.
Herramientas necesarias:
• Llave en T o Allen
• Aceite 100 % silicona
BANDA PARA
CORRER
PLATAFORMA
PARA
CORRER

ESPAÑOL
266
PROCEDIMIENTO :
1. Apague la caminadora con el interruptor de encendido/apagado ydesenchufe el cable de corriente en el tomacorriente
de pared.
2. Con la llave en T o la llave Allen, afloje los pernos de rodillos traseros con 10-15 vueltas en el sentido contrario al de las
agujas del reloj. Esto debe aflojar la banda lo suficiente para que usted lalevante.
3. Levante la banda todo lo que pueda y vierta un chorro de aceite desilicona en zigzag en toda la superficie de la
plataforma para correr. Utilice 1/2 botella de lubricante de silicona. No aplique el aceite de silicona encima de la banda
para correr. Apoye la banda para correr y luego apriete los pernos de rodillos traseros en el sentido de las agujas del reloj
la misma cantidad devueltas que usó para aflojarlos.
4. Después de haber hecho la lubricación de la banda, conecte la caminadora en el tomacorriente, y conecte la llave de
seguridad. Borre el mensaje “Lube Belt” al empujar primeramente sobre SPEED (+) y luego sobre STOP. Guarde sus dedos
sobre las dos teclas por 5 a 7 segundos.
5. Sin subirse a la máquina, presione START (Inicio). Deje que la banda avance a 3 millas por hora (4,8 kilómetros por hora)
durante tres minutos para comenzar a esparcir la silicona. Luego, camine sobre la máquina a una velocidad cómoda
durante 3 minutos paracompletar la dispersión de la silicona y verificar la tensión ylaalineación adecuadas de la banda
para correr.
6. Cuando la banda esté centrada y tensa, deténgala. Limpie cualquier exceso de aceite de los lados con un paño húmedo.
Oprima cualquier tecla para suspender hasta su próximo ejercicio el mensaje de advertencia de la lubrificación.
Nota: Algunos modelos antiguos pueden requerir que mantenga pulsado el botón de parada durante 5 segundos para
suspender el mensaje durante 8 km de uso.
Si su caminadora tiene amortiguadores de aire debajo de la plataforma para asistencia de elevación, lubrique el tubo
amortiguador de aire plateado con spray a base de teflón que se vende en su ferretería otienda de bicicletas local.
Visite la sección Asistencia al cliente de nuestro sitio web para ver los videos sobre cómo realizar el mantenimiento.
Comuníquese con elServicio de asistencia técnica a clientes con preguntas acerca delaaplicación de lubricante a la
caminadora.
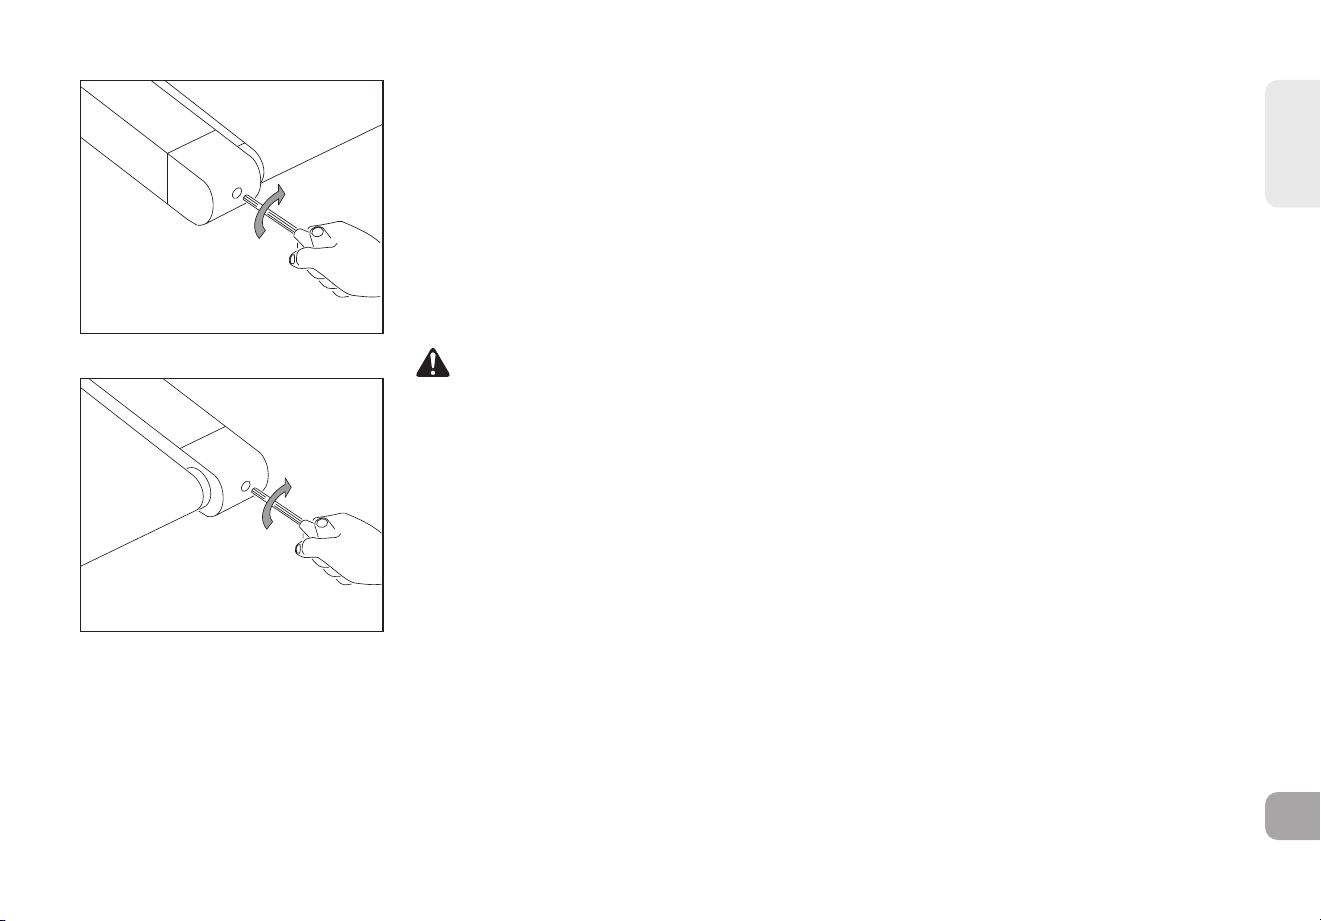
ESPAÑOL
267
TENSADO DE LA CINTA
Si siente que se desliza al correr, debe tensar la cinta. En la mayoría de los casos, la banda se
ensancha por el uso, lo que provoca el deslizamiento. Este es un ajuste normal y corriente.
Para eliminar el deslizamiento, apague la cinta y tense los pernos de ambos rodillos traseros
empleando la llave Allen que se suministra ygirándolos hacia la derecha (en el sentido de las
agujas del reloj) un cuarto de vuelta tal y como se muestra en las ilustraciones. Encienda la
cinta y compruebe que si experimenta una sensación de deslizamiento. Repita la operación si
es necesario, pero no gire nunca los pernos de los rodillos más de un cuarto de vuelta cada
vez. La banda tiene una tensión adecuada si no experimenta sensación de deslizamiento.
ADVERTENCIA
La cinta NO debe estar en funcionamiento al tensarla. Tensar en exceso la cinta puede
provocar un desgaste excesivo de la máquina y de sus componentes. Nunca tense la banda en
exceso.
TENSADO DE LA PARTE
IZQUIERDA DEL RODILLO
TENSADO DE LA PARTE
DERECHA DEL RODILLO
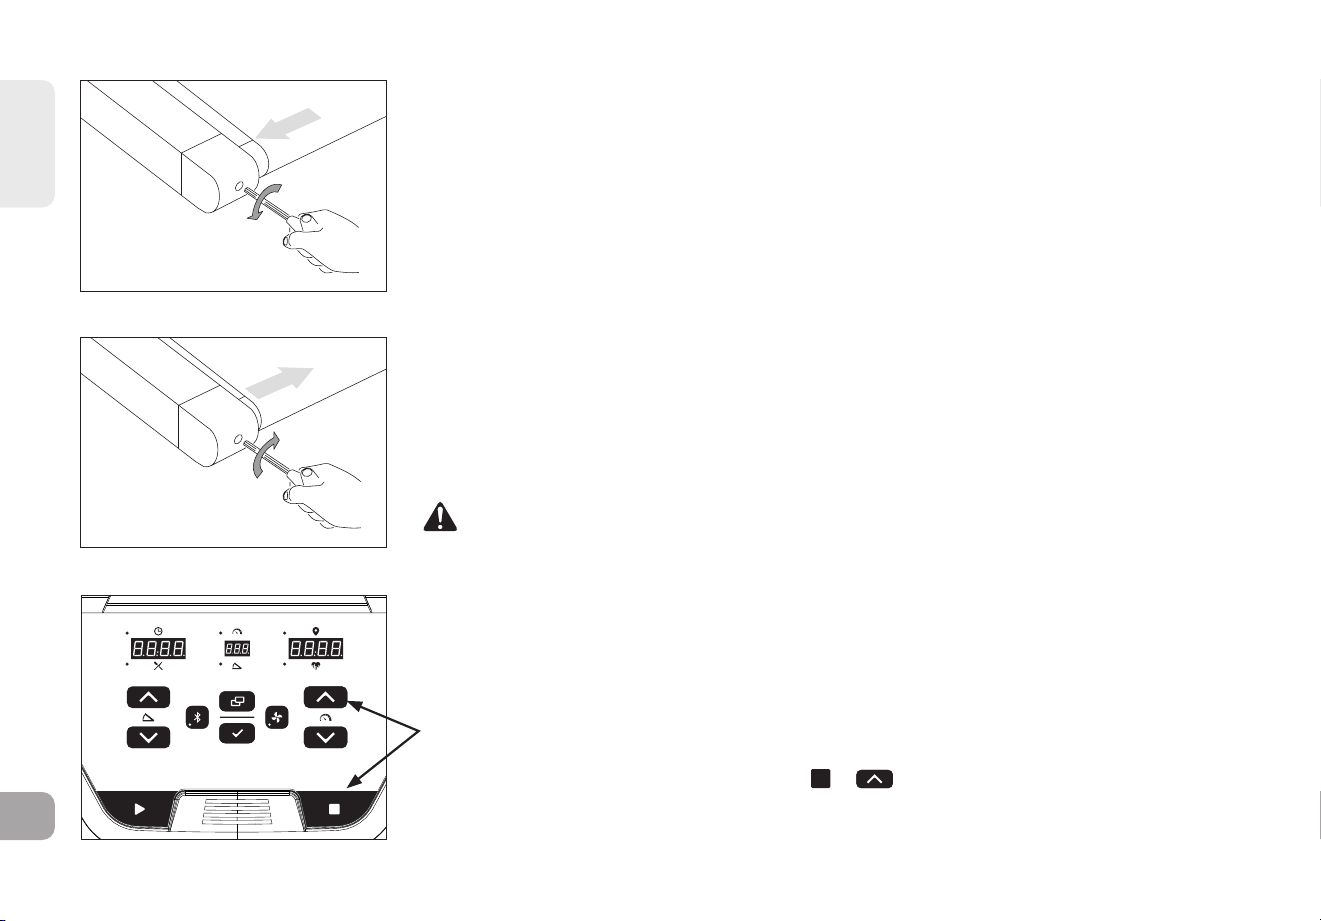
ESPAÑOL
268
CENTRADO DE LA CINTA
Si la cinta está demasiado hacia la derecha: Con ayuda de la llave Allen suministraday con
la cinta funcionando a 1 km/h, gire el perno de ajuste IZQUIERDO un cuarto en el sentido
contrario al de las agujas del reloj y espere a que la cinta se ajuste sola. Utilice la marca
o línea de la cubierta delmotor como referencia para la alineación. Repita los pasos si es
necesario hasta quelabanda permanezca centrada durante su utilización.
Si la cinta está demasiado hacia la izquierda: Con ayuda de la llave Allen suministrada y con
la cinta funcionando a 1 km/h, gire el perno de ajuste IZQUIERDO un cuarto en el sentido
de las agujas del reloj y espere a que la cinta se ajuste sola. Utilice la marca o línea de la
cubierta del motor como referencia para la alineación. Repita los pasos si esnecesario
hasta que la banda permanezca centrada durante su utilización.
• Si la banda se desplaza porque está demasiado aflojada, céntrela y ténsela cuanto sea
necesario.
• Para acceder con mayor facilidad al perno de ajuste, retire las tapas.
PRECAUCIÓN
No haga funcionar la banda a más de 1 km/h mientras la centra. Mantenga los dedos,
elpelo y la ropa siempre lejos de la banda.
LA BANDA ESTÁ DEMASIADO
HACIA LA DERECHA
LA BANDA ESTÁ DEMASIADO
HACIA LA IZQUIERDA
Para restablecer la advertencia de lubricación de la banda
La caminadora mostrará el recordatorio “LUBE BELT” cada 150 millas. Después de lubricar la
banda, mantén presionados los botones de y durante 3–5 segundos para reiniciar
la alerta.
2
4
6
8
10
12
16
20

ESPAÑOL
269
SOLUCIÓN DE PROBLEMAS
PREGUNTAS HABITUALES SOBRE EL PRODUCTO
¿SON NORMALES LOS RUIDOS DE MI CINTA?
Todas las cintas, especialmente las nuevas, emiten algún tipo de zumbido debido a que la banda pasa por encima de los rodillos.
El ruidodisminuirácon el paso del tiempo, aunque puede que no desaparezca totalmente. Con el paso del tiempo, la banda se
ensanchará y rodará suavemente sobre los rodillos.
¿POR QUÉ LA CINTA QUE HE ADQUIRIDO HACE MÁS RUIDO QUE LA QUE HABÍA EN LA TIENDA?
Todos los equipos de deporte parecen más silenciosos en una sala de exposición de una tienda grande porque normalmente
hay más ruido de fondo que en su casa. También habrá menos reverberación en un suelo de hormigón enmoquetado que en uno
recubierto con paneles de madera. A veces, una esterilla pesada de goma contribuirá a reducir la reverberación por el suelo. Si un
equipamiento deportivo se coloca cerca de una pared, habrá más ruido reflejado.
¿CUÁNDO DEBERÍA PREOCUPARME EL RUIDO?
Mientras los ruidos de su cinta no sean más altos que el tono de voz de una conversación habitual, puede considerarse que el ruido
es normal.
SOLUCIÓN DE PROBLEMAS BÁSICOS
PROBLEMA: La consola no se enciende.
SOLUCIÓN: Verifique lo siguiente:
¿Se enciende la luz roja del interruptor ON/OFF (ENCENDIDO/APAGADO)? NOTA: Algunos modelos de cinta no tienen un
interruptor que se encienda. Si este es el caso, por favor consulte las respuestas sí o no más abajo.
Sí:
• Apague el equipo, desconecte el cable de alimentación y espere 60 segundos. Retire la cubierta del motor. Espere a que se
apaguen todas las luces LED rojas del cuadro de control del motor antes de proceder. A continuación, verifique que ninguno de
los cables conectados al cuadro inferior está suelto o desconectado.
• Compruebe si todas las conexiones son correctas, especialmente el cable de la consola. Desconecte y vuelva a conectar el cable
de la consola para verificarlo.

ESPAÑOL
270
• Asegúrese de que el cable de la consola no está
estrangulado nidañado.
• Enchufe la cinta, accione el interruptor y observe si
algún LED se ilumina en el panel de control del motor.
No:
• Verifique que la toma de corriente a la que la cinta está
conectada funciona. Compruebe que el disyuntor del
circuito no ha saltado, está conectado a un circuito
específico de 15amperios y no a una toma de corriente
con GFCI, así como que no está enchufado a una regleta
protección contra sobretensiones, ni a un alargador.
• Verifique que el cable de alimentación no
está estrangulado ni dañado yestá conectado
adecuadamente a la toma de corriente Y a la máquina.
• Verifique que el interruptor está en posición de ON
(ENCENDIDO).
PROBLEMA: En la consola se puede leer SAFETY KEY
OFF (LLAVE DE SEGURIDAD DESACTIVADA) o solo
muestraguiones.
SOLUCIÓN: Verifique lo siguiente:
• Verifique que la llave de seguridad está correctamente
en su lugar.
• Si utiliza una llave magnética, asegúrese de que la llave
está magnetizada.
JOHNSON
PIEZAS BAJO LA CUBIERTA DEL MOTOR
CORREA
DEL MO-
TOR
MOTOR DE
ACCIONA-
MIENTO
SENSOR
ÓPTICO
MOTOR DE
INCLINA-
CIÓN
PANEL DE
CONTROL
DEL MOTOR
CABLE DE LA
CONSOLA
RODILLO FRONTAL
CINTA
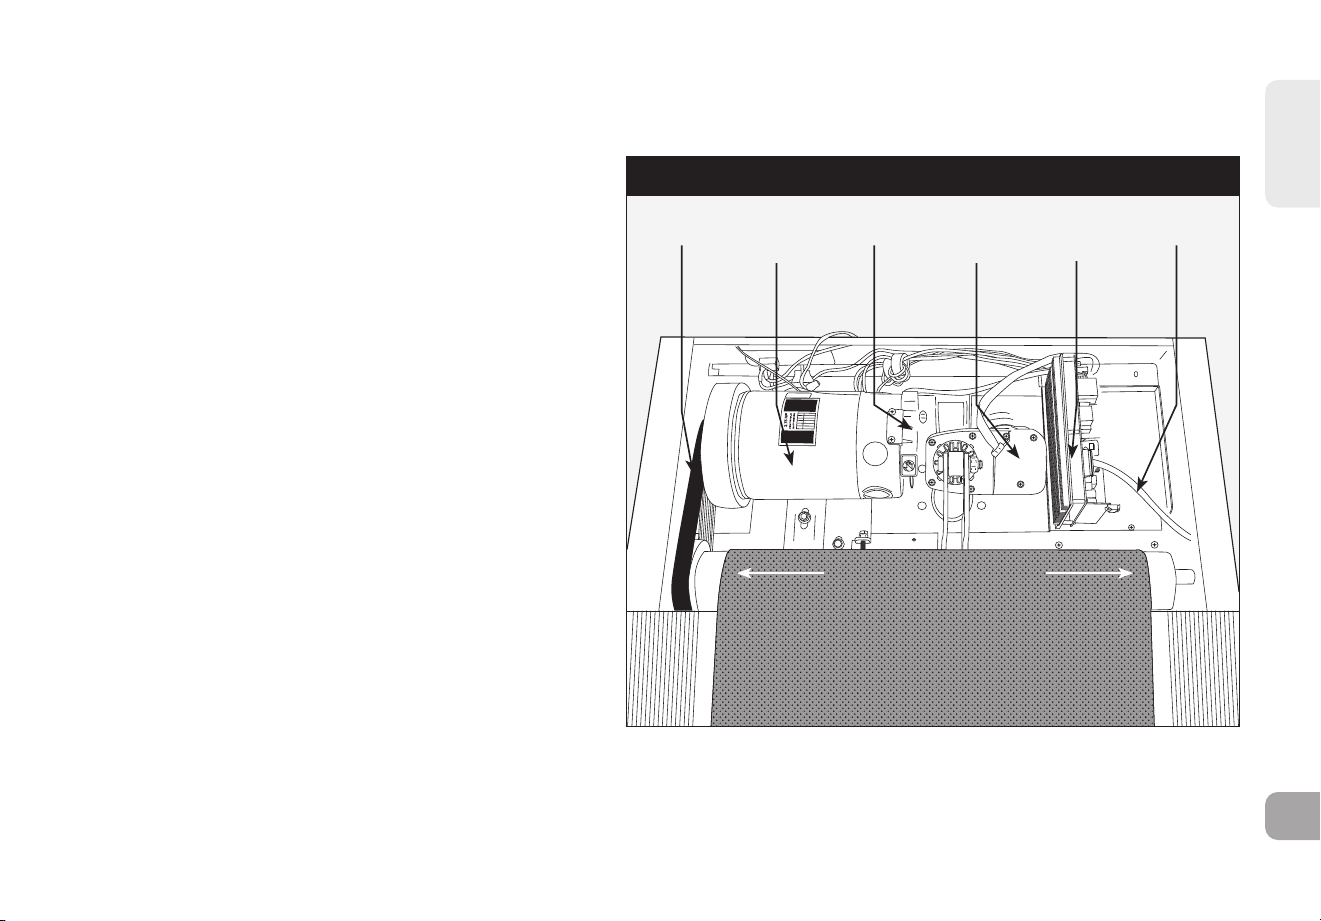
ESPAÑOL
271
SOLUCIÓN DE PROBLEMAS
SOLUCIÓN DE PROBLEMAS BÁSICOS
PROBLEMA: La banda se mueve muy poco o no se mueve,
pero la consola funciona.
SOLUCIÓN: Verifique lo siguiente:
• Asegúrese de que está siguiendo las recomendaciones
y directrices de alimentación de INSTRUCCIONES DE
PUESTA A TIERRA YFUNCIONAMIENTO BÁSICO de este
manual del propietario. Launidad debe estar conectada
a un circuito específico de 15amperios y no a una toma
de corriente con GFCI. No enchufe lamáquina a una
regleta o una protección contra sobretensiones, nia
unalargador.
• Compruebe si la banda se mueve. Si es así, anote la
distancia o el tiempo que se mueve antes de detenerse.
• Intente mover la banda con la mano. Si no puede, es
posible que la correa del motor se hayasoltado o que los
cojinetes del motor se hayan bloqueado.
• Apague la cinta y desconéctela de la toma de corriente.
Quite los tornillos de estrella para retirar la cubierta
de plástico del motor situada en la parte frontal de
la máquina. Compruebe que la correa del motorestá
alineada correctamente.
• Con la cubierta aún retirada, compruebe las conexiones
de los cables, ya que se pueden haber aflojado o
desconectado durante el envío o el montaje. Asegúrese
de que las conexiones son correctas y que ningún cable
esté engarzado, dañado, desconectado o quemado.
PROBLEMA: La inclinación no se mueve, no baja ni parece estar al nivel adecuado.
JOHNSON
PIEZAS BAJO LA CUBIERTA DEL MOTOR
CORREA
DEL MO-
TOR
MOTOR DE
ACCIONA-
MIENTO
SENSOR
ÓPTICO
MOTOR DE
INCLINA-
CIÓN
PANEL DE
CONTROL
DEL MOTOR
CABLE DE LA
CONSOLA
RODILLO FRONTAL
CINTA

ESPAÑOL
272
SOLUCIÓN: Verifique lo siguiente:
• Asegúrese de que sigue las recomendaciones y directrices de alimentación eléctrica de las páginas4 y5 de esta GUÍA DE LA
CINTA. La unidad debe estar conectada a un circuito específico de 15amperios y no a una toma de corriente con GFCI. No
enchufe la máquina a una regleta o una protección contra sobretensiones, ni a un alargador.
• Asegúrese de que la consola muestra un cambio en la pantalla cuando presione los botones de elevación.
• Apague la cinta y desconéctela de la toma de corriente. Verifique que las conexiones de cable de laconsola de la parte superior
del mástil estánconectadas correctamente. Asegúrese de que todos loscables multicolores están insertados en su totalidad en
el arnés del cable.
• Quite los tornillos de estrella para retirar la cubierta de plástico del motor situada en la parte frontal de la máquina. Compruebe
las conexiones de los cables, ya que se pueden haber aflojado odesconectado durante el envío o el montaje. Asegúrese de que
las conexiones son correctas yque ningún cable esté engarzado, dañado, desconectado o quemado.
PROBLEMA: Los altavoces no emiten sonido, pero los cascos sí funcionan.
SOLUCIÓN: Verifique lo siguiente:
• Apague la cinta y desconéctela de la toma de corriente. Quite los tornillos de estrella para retirar
la cubierta de plástico del motor situada en la parte frontal de la máquina.
• Compruebe las conexiones de los cables al panel del altavoz, situado al lado del panel de control del motor.
PROBLEMA: El disyuntor del circuito de la cinta se dispara durante unejercicio.
SOLUCIÓN: Verifique lo siguiente:
• Asegúrese de que la cinta está conectada a un circuito específico de 15 amperios.
• Verifique que la cinta no está conectada a un alargador ni aunaprotección contra sobretensiones.
• Compruebe que la máquina no está conectada a una toma de corriente con GFCI ni a un circuito que tenga dicha salida.
PROBLEMA: La cinta no permanece centrada durante el entrenamiento.
SOLUCIÓN
: Verifique lo siguiente:
• Asegúrese de que la cinta está colocada sobre una superficie llana.
• Verifique que la banda está tensada y centrada adecuadamente (consulte las secciones TENSADO y CENTRADO DE LA CINTA
para verinstrucciones más detalladas).
PROBLEMA: La velocidad de funcionamiento no parece precisa.

ESPAÑOL
273
SOLUCIÓN:
• Apague la cinta y desconéctela del enchufe.
• Quite los tornillos de la cubierta del motor con un destornillador de estrella.
• Verifique que el sensor óptico está conectado al panel de control del motor.
• Realice una inspección de la conexión y del cable del sensor de velocidad para detectar cualquier daño posible.
SOLUCIÓN DE PROBLEMAS BÁSICOS
PROBLEMA: En los niveles de inclinación más altos, aparece el mensaje “Error de rango de velocidad - Finalizando entrenamiento”.
SOLUCIÓN:
• Se trata de una función de seguridad que corta automáticamente la alimentación del motor de accionamiento cuando
lavelocidad está fuera de rango debido a la combinación de la carga en la cinta y el alto grado de inclinación
• Para evitar una interrupción automática del entrenamiento, reduzca el porcentaje del nivel de inclinación.
SOLUCIÓN DE PROBLEMAS SOBRE MEDICIONES DEL RITMO CARDIACO
(SOLO AGARRES DE MEDICIÓN)
Compruebe la zona donde se está entrenando para ver si hay fuentes de interferencia como tubos fluorescentes,
ordenadores, vallado subterráneo, sistemas de seguridad del hogar o equipos eléctricos con motores de
gran tamaño. Estos dispositivos puedenprovocar lecturas irregulares de la frecuencia cardiaca.
Puede experimentar lecturas irregulares bajo las siguientes condiciones:
• Agarrar en exceso las asas de medición de la frecuencia cardiaca. Trate de mantener una presión moderada al sujetar las asas
de medición de la frecuencia cardiaca.
• Movimiento y vibración constantes debido al agarre permanente de las asas de medición
mientras se entrena. Si recibe lecturas irregulares de su frecuencia cardiaca, trate de agarrar
las asas únicamente lo necesario para monitorizar su frecuencia cardíaca.
• Si respira fuertemente durante un entrenamiento.
• Si tiene las manos oprimidas por llevar un anillo.
• Si tiene las manos secas o frías. Trate de humedecer las palmasfrotándolas para calentarlas.
ESPAÑOL
274
¿NECESITA AYUDA?
Si esta sección no pone remedio al problema, deje de usar elequipo y apáguelo.
Póngase en contacto con el servicio de asistencia técnica.
Puede que se le solicite la siguiente información cuando llame. Tenga esta información a su disposición:
• Nombre de modelo
• Número de serie
• Prueba de compra
Estas son algunas de las preguntas que suelen hacerse para la solución de problemas:
• ¿Cuánto tiempo lleva experimentado este problema?
• ¿Ocurre este problema siempre que la utiliza?
¿Con cualquier usuario?
• Si escucha un ruido, ¿este viene de la parte delantera otrasera? ¿Qué tipo de ruido es (zumbido, chirrido, etc.)?
• ¿El mantenimiento de la máquina se ha realizado de acuerdo con el plan de MANTENIMIENTO?
La respuesta a estas y a otras preguntas permitirá a los técnicos enviar los recambios adecuados y prestar
el servicio necesario para que la cinta vuelva a funcionar y pueda volver a hacer ejercicio.
• Cualquier persona con una arritmia severa.
• Cualquier persona con arteriosclerosis u otro problema decirculación sanguínea periférica.
• Cualquier persona con la pielespecialmente gruesa en lapalmadonde se efectúa la medición.

275
繁體中文

276
重要安全指示
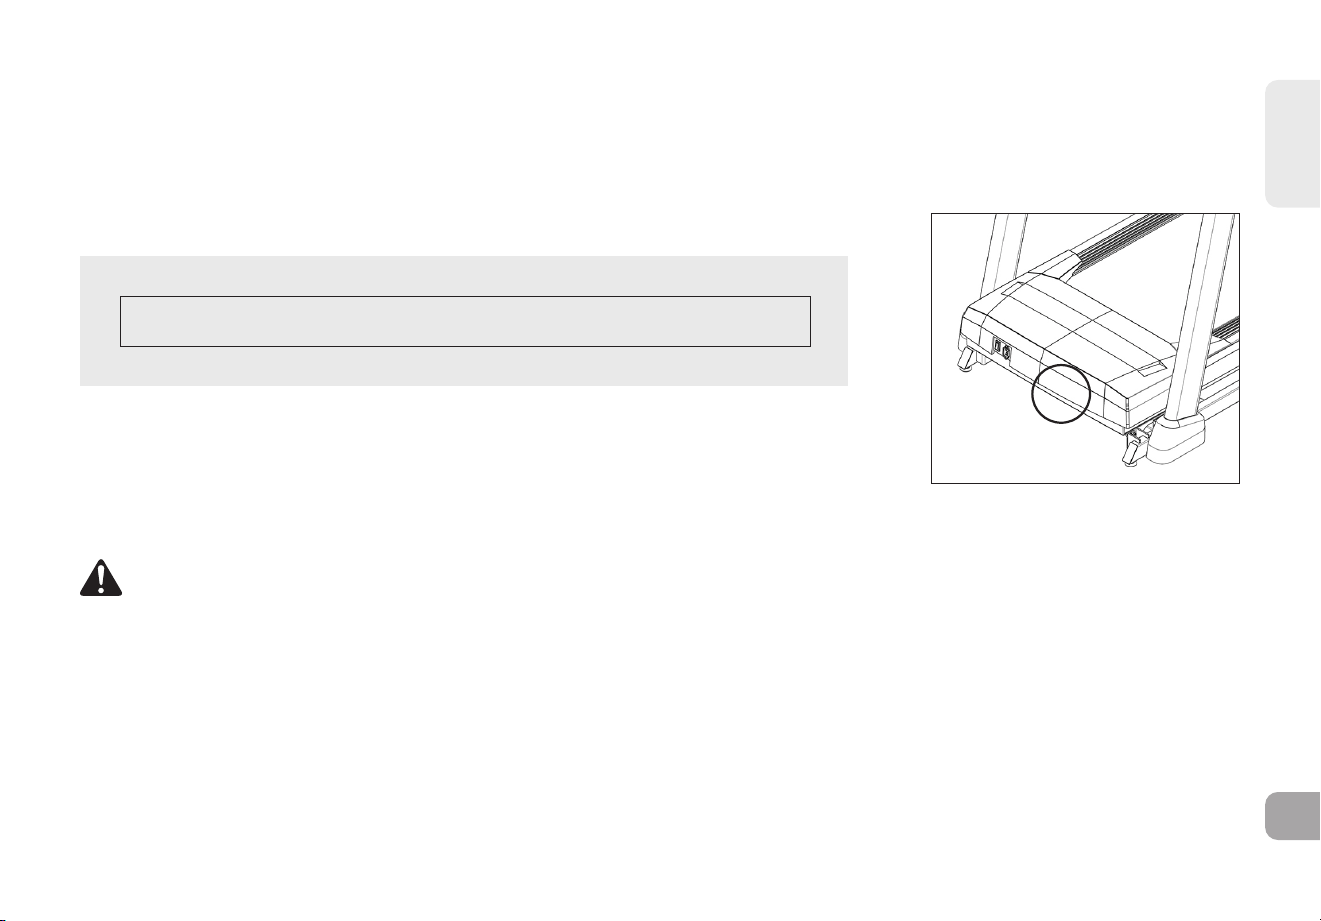
繁體中文
277
感謝您選購 BowFlex T8.5J 跑步機健身器材。誠摯建議您在開始組裝器材前仔細閱讀本使用手冊,尤其是以下警告指示!警告指示可減少燒燙傷、
觸電或受傷的風險或人身傷害:
開始前,請先找出在電源開關附近白色條碼貼紙上的跑步機序號,然後將其輸入下方空白處。
請在下面方框內輸入序號和機型名稱:.
產品序號:
型號名稱:.BOWFLEX T8.5J
» 來電諮詢服務時,請提供序號和型號名稱。
• 疏於遵照這些說明可能會導致人員受傷!
• 心率監測系統可能不準確。運動過量可能會導致嚴重受傷或死亡。若覺得頭暈,請立刻停止運動。
• 運動時請保持適當配速。
• 若感覺到各種不同的疼痛,包括胸痛、噁心、暈眩或呼吸困難等,應立即停止運動並諮詢醫師此症狀之後,才可繼續使用。不正確或過量的運動可
能損害健康。
• 請勿穿著可能被跑步機任何零件勾住的衣物。
• 使用本器材時請一律穿著運動鞋。
• 請勿在跑步機上跳躍。
• 運動時,請勿跑在跑帶邊緣,以避免受傷風險。
• 跑步機運作時,任何時候均只能由一人使用。
警告
序號位置

繁體中文
278
• 體重超過保固部分規定的承重能力之人員請勿使用跑步機。未遵守規定所導致的損害,皆不在保固範圍內。
• 將跑步機平台降下時,應確定其後腳已穩固立於地板後,才可踏上平台。
• 請勿在毯子或枕頭下使用。機體過熱可能會引發火災、觸電或人身傷害。
• 本健身器材必須使用正確接地的電源插座。
• 若要中斷電源,請將所有控制功能切換至關閉位置,然後拔下電源插頭。
• 移動設備之前,請切開所有電源。
• 器材的電線或插頭損壞時,即使器材能正常運作,也切勿操作器材。如果產品出現損壞或曾經浸水,請勿操作產品。請聯絡客戶技術支持進行更換
或維修,以避免危險。
• 連接電源時,切勿讓跑步機處於無人看管狀態。不使用器材時以及在安裝或拆下零件之前,請拔除電源插頭。
• 任何時候,寵物或 13 歲以下的兒童須距離跑步機 3 公尺以上。
• 任何時候,13 歲以下兒童絕不應使用跑步機。
• 13 歲以上的孩童或具備身體、知覺或精神能力缺陷,或缺乏經驗和知識的人士均不應使用跑步機,如欲使用,應接受可負責其安全之人士指導使用
跑步機。
• 除非經專業人員和當地經銷商指示,否則請勿拆下保護蓋。維修服務只能由經授權的維修服務技師進行。
• 斷開安全開關,以防止第三方濫用。
• 跑步機配備側扶手和前把手,供使用者支撐和緊急離開,按下緊急按鈕即可停止機器,緊急離開器材。
• 跑步機上沒有使用者時,噪音水平低於 70 分貝,使用時會超過 70 分貝。如果跑步機的噪音對您造成困擾,請停止運動並休息一下。載重狀態下
的噪音量會比無載重更大。
• 折疊跑步機之前,請確保跑步機完全停止。請勿於折疊時操作跑步機。
• 請注意,端蓋等塑膠零件容易磨損。
• 必須定期檢查是否有損壞和磨損,方可維持跑步機的安全等級。
• 請確保跑帶的邊緣與側邊裝飾護條平行,並且不會在側邊裝飾護條下方移動。如果跑帶未居中,必須在使用前進行調整。
• 請僅依照跑步機指南和使用手冊說明使用跑步機。
• 請勿使用非製造商建議的其他配件。使用不當配件可能會造成人身傷害。
• 請將器材送回客戶服務中心進行檢修。
• 請讓電源線遠離高溫表面。請勿使用隨附的電源線搬運本器材,請勿將電線當成把手使用。
• 通風口堵塞時,請勿操作跑步機。請保持通口清潔,沒有棉絮、毛髮等。
• 為避免觸電,請勿將任何物品放入或插入任何開口。
• 請勿在使用噴霧產品的地方或供應氧氣時操作器材。
• 本跑步機僅供家庭使用。未遵守規定所導致的損害,皆不在保固範圍內。
• 請勿在任何無法控制溫度的地點使用跑步機,例如但不限於車庫、陽台、泳池區、浴室、露天車棚或戶外。如果跑步機暴露在較低溫度或高濕度的
氣候下,強烈建議於第一次使用前為跑步機暖機到室溫。未遵守規定所導致的損害,皆不在保固範圍內。
• 跑步機很重,移動時請小心,並視需要尋求協助。請勿嘗試移動或搬運跑步機,必須先讓跑步機處於直立折疊位置,並固定鎖扣。如果未遵守.
上述指示,可能會導致受傷。

繁體中文
279
• 請依照組裝說明指示的時機,再將跑步機從包裝內取出或抬起。您可以拆下儀表支撐桿的塑膠膜。
• 請勿於包裝箱倒置或側放時打開包裝箱。
• 請於預計使用位置拆封和組裝器材。
• 封閉式跑步機配備高壓裝置,如果操作不當,可能會導致下層主架彈開。
• 除非經客服技術人員指示,請勿拆下儀表護蓋。維修只能由授權維修技術人員進行。
• 可由 2 人一起組裝,組裝過程將會更加輕鬆。
取得審驗證明之低功率射頻器材,非經核准,公司、商號或使用者均不得擅自變更頻率、加大功率或變更原設計之特性與功能。
低功率射頻器材之使用不得影響飛航安全及干擾合法通信;經發現有干擾現象時,應立即停用,並改善至無干擾時方得繼續使用。
前述合法通信,指依電信管理法規定作業之無線電通信。低功率射頻器材須忍受合法通信或工業、科學及醫療用電波輻射性電機設備之干擾。
補充:應避免影響附近雷達系統之操作。
NCC 低功率射頻器材警語

繁體中文
280
技術規格
裝配尺寸
(長 x 寬 x 高)
193 x 86.4 x 144.8 公分 /
76 x 34 x 57 英吋
產品重量 85 公斤 / 187 磅
使用者體重承載上限 147 公斤 / 325 磅
您現在可以開始組裝設備。有關組裝、操作、程式、故障.
排除和維護的詳細說明,請掃描左邊的.QR.碼以查看完整.
手冊。.
如果掃描 QR 碼失敗,您可以前往此處提供的網站:
https://global.bowflex.com/en/manuals.html
欲觀看組裝影片,請瀏覽:
https://global.bowflex.com/en/assembly-videos.html
如果有任何疑問、缺少零件,或需要器材的技術支援或保養,請聯絡客戶技術支援。
需要協助嗎?
保固
如果您的器材需要保固服務,請聯繫當地的客戶技術支援。
製造/委製/進口商:喬山健康科技(股)公司
|
地址:台灣台中市大雅區東大路2段999號

繁體中文
281
STORAGE TRAY
控制台
平板 / 閱讀架
水壺架
控制台支柱
馬達護蓋
底座機架
跑板機架
紅色運輸電纜
搬運輪
踏板鎖扣標籤.
(位於鎖扣下方)
電源開關與電源線
跑帶/跑板
水壺架
心率感應把手
安全鎖插槽位置
心率感應把手
控制面板與顯示視窗
揚聲器
控制台蓋
收納托盤
橫桿
側邊踏板
滾輪端蓋
後滾輪張力/校正螺栓
控制台支柱
踏板鎖扣(位於跑板下方)

繁體中文
282
工具清單:
F 6mm T 型扳手
F 6mm L 型扳手
F 5mm L 型扳手
零件清單:
F 1 控制台組件
F 2 控制台支柱
F 1 橫桿
F 1 體配件包
F 1 安全鎖
F 1 音訊轉接線
F 1 矽膠潤滑油(可用 2 次)
請勿嘗試提舉跑步機!除非組裝說明中特別指示,否則請勿自行從包裝中移動或提舉跑
步機。您可以拆除控制台支柱上的塑膠包裝。
注意:在每個組裝步驟中,請確保所有的螺母和螺栓已經到位並且部分擰緊,再完全擰緊所有
螺栓。
注意:安裝硬體時,適量塗抹潤滑脂,有助於順利安裝。建議使用鋰基潤滑脂等潤滑脂。
未依照指示操作可能會造成傷害!
切勿在紙箱上下顛倒或側放的情況下開箱。
請於設備預定使用的位置進行拆箱與組裝。
包裝內的跑步機配備高壓彈簧,若操作不當,可能導致底部機架突然彈開。
紅色運輸電纜是用來固定上層跑板機架與下層底座機架,避免其移動。請勿在指示前拆
除紅色運輸電纜。
警告
警告
警告
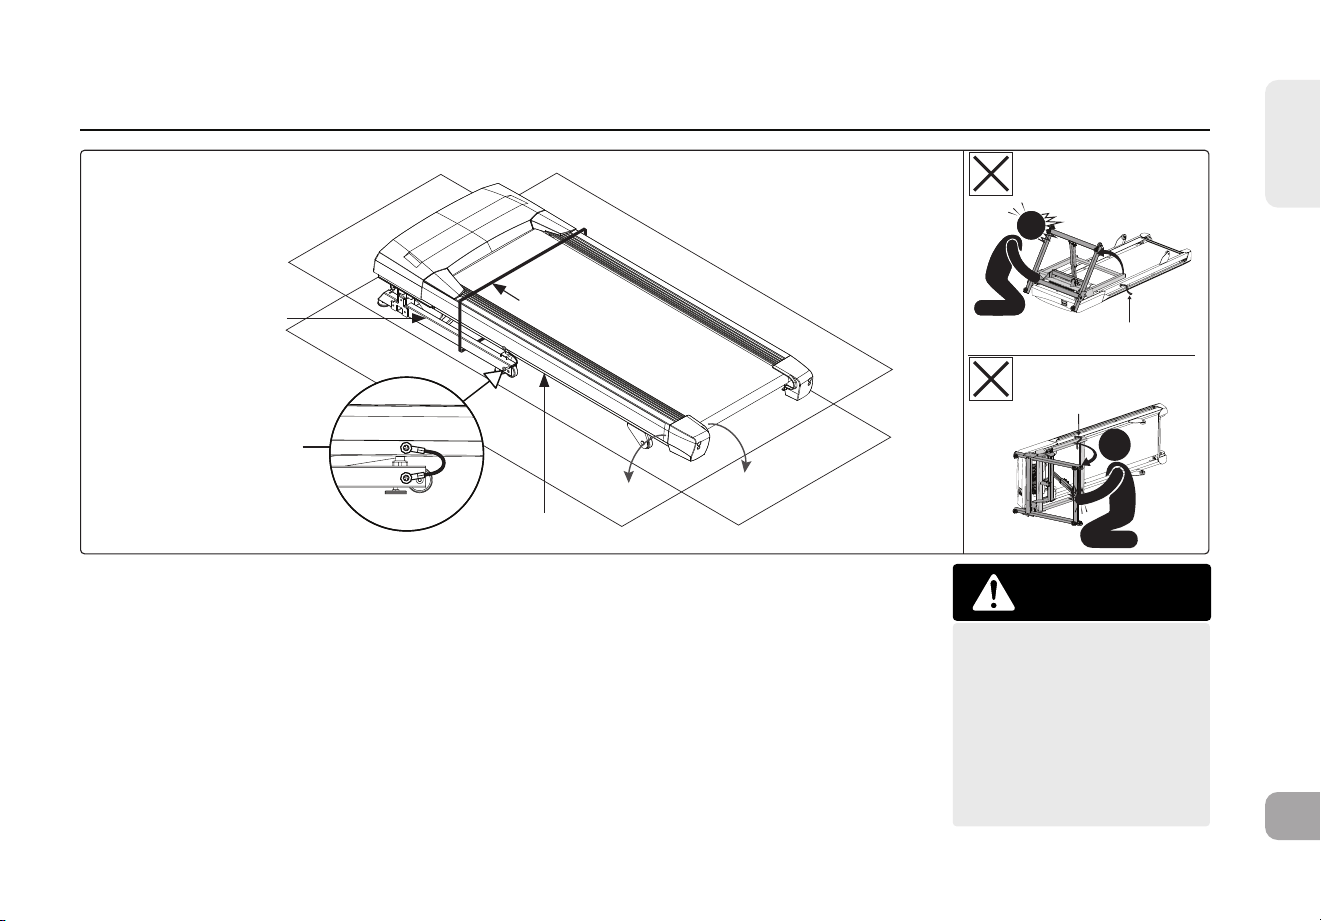
繁體中文
283
RED TRANSPORT
CABLE
RED TRANSPORT
CABLE
組裝步驟 - 開箱
束帶
跑板機架
紅色運輸電纜
(左側與右側)
底座機架
A 將跑步機包裝箱放置於平坦的表面,箱底朝下。
B 剪開箱外側的束帶並移除箱蓋。
C 請勿直接將跑步機從箱中取出,請依照圖示撕開箱底的角落。跑步機應放置於展開的包裝箱內組
裝,以保護地板。
D 剪開箱內的束帶,並移除箱內所有物品,僅保留跑步機機架。
E 從後方輕輕抬起跑板,將跑板下方的所有物品取出。跑步機兩側的紅色運輸電纜會阻止跑步機完
全抬起。
請勿將跑步機顛倒或側放。
請勿在指示前拆除紅色運輸
電纜。若某部件需使用工具
拆卸,請等到組裝說明指示
您如何安全拆卸後再進行。
紅色運輸電纜
紅色運輸電纜
警告

繁體中文
284
A
2
1
注意:請勿於步驟 4 完成前將螺栓完全鎖緊。
A - 數量:3
螺栓 (M8)
8.3 開啟步驟 1 的硬體配件。
8.4 將左側控制台支柱護套 (8) 滑入左側控制台支柱 (1)。
8.5 使用 3 顆螺栓 (A) 將左側控制台支柱 (1) 固定於底座機
架 (2)。
8
組裝步驟 1
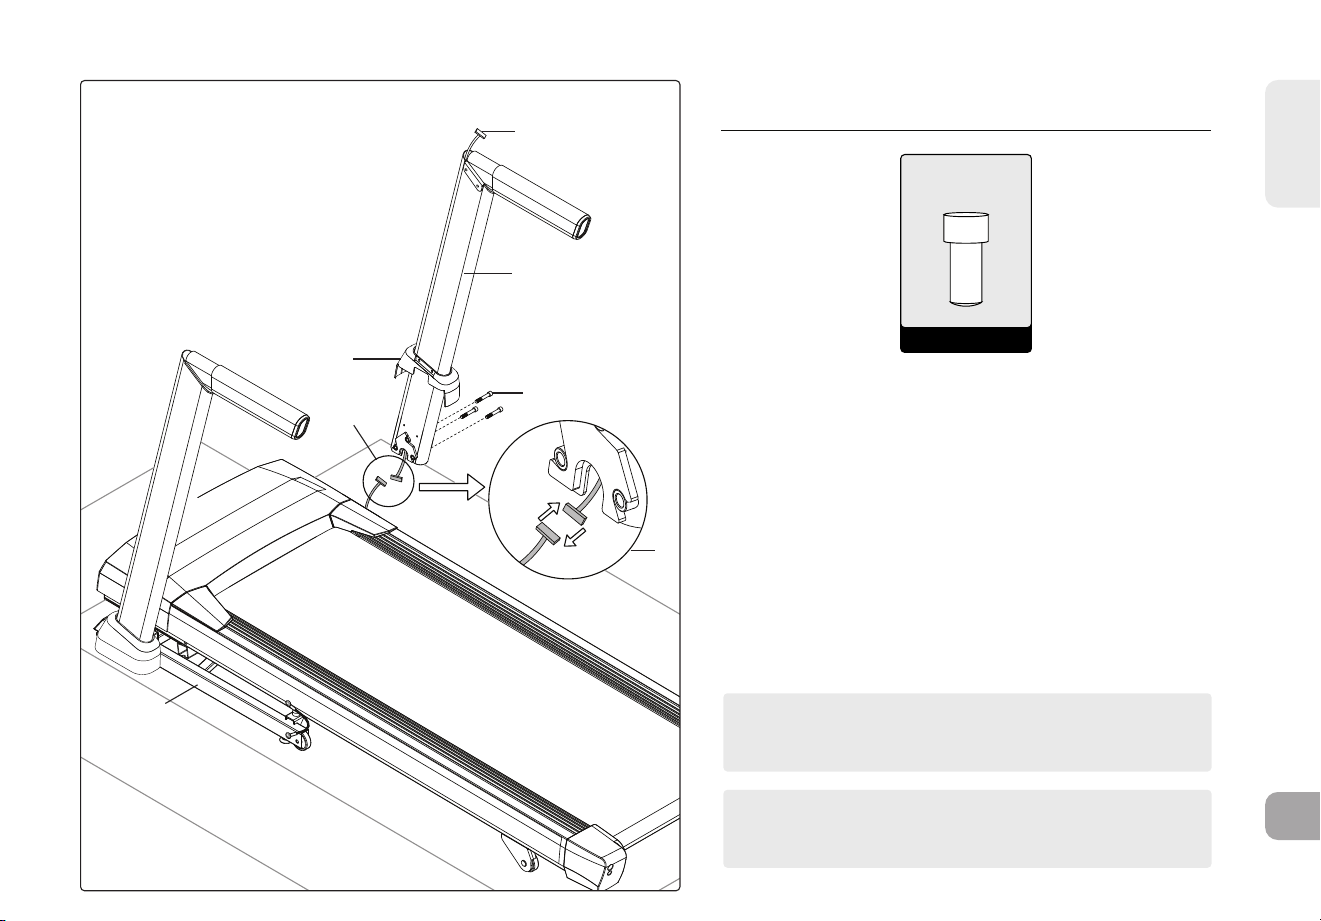
繁體中文
285
注意:請勿於步驟 4 完成前將螺栓完全鎖緊。
4
9
3
3
A
2
3
注意:在組裝控制台時,請小心不要壓到任何電線。
A - 數量:3
螺栓 (M8)
組裝步驟 2
10.1 開啟步驟 2 的硬體配件。
10.2 將右側控制台支柱護套 (9) 滑入右側控制台支柱 (4)。
10.3 將控制台電纜 (3) 從跑步機底座機架拉出。將主機架
(2) 上的控制台電纜 (3) 連接至右側控制台支柱 (4) 底
部的控制台電纜 (3)。控制台電纜 (3) 的另一端應位於
支柱頂端。
10.4 使用 3 顆螺栓 (A) 將右側控制台支柱 (4) 固定於主機
架 (2)。

繁體中文
286
注意:請勿於步驟 4 完成前將螺栓完全鎖緊。
D
1
6
4
D - 數量:4
螺栓 (M6)
組裝步驟 3
3.1 開啟步驟 3 的硬體配件。
3.2 使用 2 顆螺栓 (A),將橫桿 (6) 左側鬆開固定於直立支柱 (1)。
3.3 使用 2 顆螺栓 (D),將橫桿 (6) 右側鬆開固定於直立支柱 (4)。
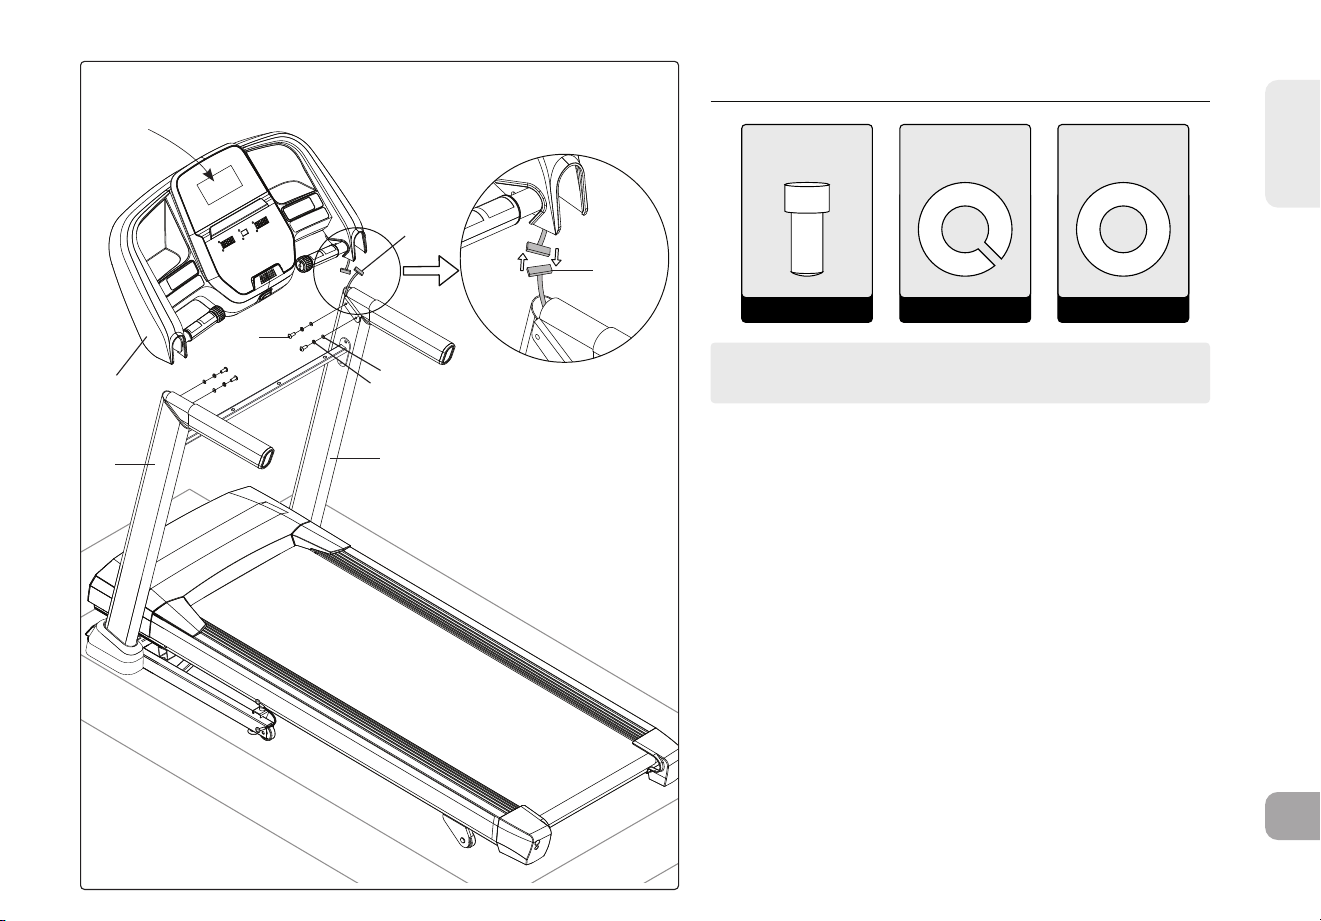
繁體中文
287
注意:在組裝控制台時,請小心不要壓到任何電線。
B
C
A
(步驟 4.5)
4
3
3
1
5
B - 數量:4 C - 數量:4A - 數量:4
螺栓 (M8) 彈簧墊圈 平墊圈
組裝步驟 4
4.1 開啟步驟 4 的硬體配件。
4.2 輕放控制台 (5) 於控制台支柱 (1 與 4) 上方。先以 2 顆螺
栓 (A)、2 顆彈簧墊圈 (B) 及 2 顆平墊圈 (C) 固定左側。
4.3 控制台電纜 (3) 收納於右側控制台支柱 (4) 內,利用引線將
控制台電纜 (3) 从右側控制台支柱 (4) 拉出,拆除並丟棄引
線。連接控制台電纜 (3),並小心將線材收納於支柱內以免
損壞。
4.4 使用 2 顆螺栓 (A)、2 顆彈簧墊圈 (B) 及 2 顆平墊圈 (C) 將
控制台 (5) 右側固定。
4.5 將控制台 (5) 頂部向跑步機後方拉緊並保持不動,同時鎖
緊左右兩側的螺栓 (A)。
4.6 組裝完成後,請務必將所有螺栓與螺絲完全鎖緊。

繁體中文
288
E - 數量:4
螺絲
組裝步驟 5
13.1 開啟步驟 5 的硬體配件。
13.2 使用 4 顆螺絲 (E) 將配件托盤 (7) 固定於橫桿 (6)。
6
E
7
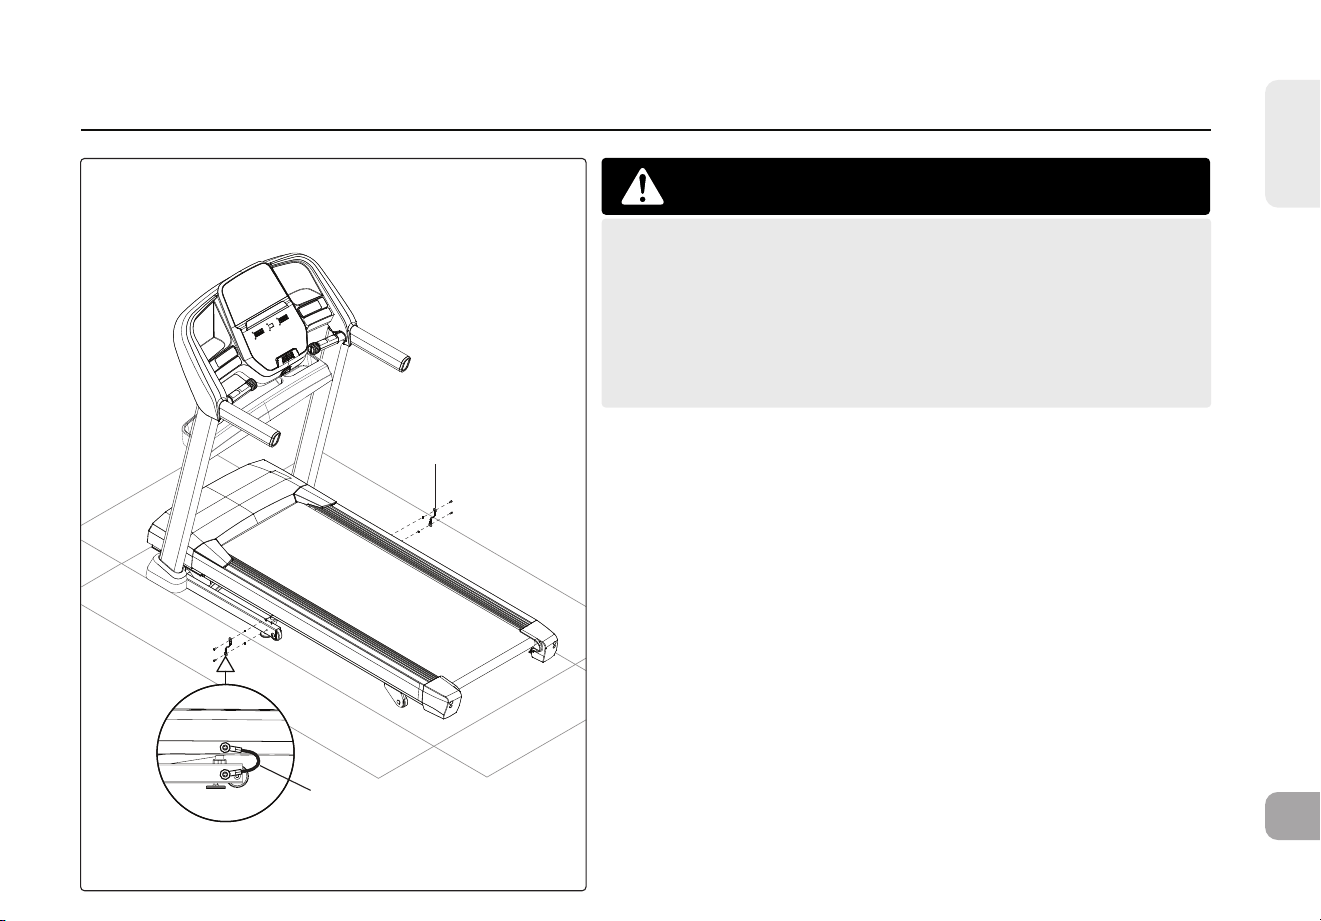
繁體中文
289
未依照指示操作可能會造成傷害!
一旦紅色運輸電纜從跑步機上拆除,內建的高壓彈簧會使下部底座機架迅速
彈開。絕對不要將跑步機顛倒或側放,並且在紅色運輸電纜未將上部跑板機
架與下部底座機架連接時,切勿提起本設備。
紅色運輸電纜
紅色運輸電纜
警告
組裝步驟 6 - 拆除紅色運輸電纜
14.1 確保跑步機穩定地放置,並且所有的輪子都接觸地面。
14.2 在跑步機左側,使用隨箱提供的 5mm L 型扳手拆除兩顆螺栓,將紅色運
輸電纜與上部跑板機架和下部底座機架連接。
14.3 將兩顆螺栓(分別位於上部跑板機架和下部底座機架)安裝回原位並擰緊
以鎖定。請注意,為了防止未來在運輸或拆卸跑步機時下部底座機架彈
開,可使用相同的螺栓重新安裝紅色運輸電纜。
14.4 在跑步機右側執行相同操作,拆除兩顆螺栓,將紅色運輸電纜從上部跑板
機架和下部底座機架中移除。
14.5 將兩顆螺栓重新安裝並擰緊。
14.6 將紅色運輸電纜保留並放入透明塑膠袋中,與使用者手冊一同保存。
14.7 當紅色運輸電纜未安裝時,僅能將設備置於地面運輸,並且必須等到完全
組裝並鎖住後再移動設備。

繁體中文
290
組裝步驟 7
15.1 開啟步驟 7 的硬體配件。
15.2 組裝完成後,務必將橫桿螺栓固定於控制台支柱 (3
與 4)。將跑板 (10) 抬至直立鎖定位置。
15.3 將左側控制台護套 (8) 滑入左側控制台支柱 (3) 底
部。使用 2 顆螺栓 (F) 從左側控制台護套 (8) 的螺
絲孔穿入,固定於左側直立支柱 (3)。
15.4 將右側控制台護套 (9) 滑入右側控制台支柱 (4) 底
部。使用 2 顆螺栓 (F) 從右側控制台護套 (9) 的螺
絲孔穿入,固定於右側直立支柱 (4)。
F - 數量:4
螺絲
Z06x4
F
4
10
1
8
9
9
繁體中文
291
組裝完成!
在首次使用前,請依照跑步機指南中的維護部分說明,對
跑步機跑板進行潤滑。
注意:若將來需要拆卸或搬起跑步機,請使用 5mm L 型扳手
重新安裝紅色運輸電纜,將其固定在跑步機左側和右側的上
部跑板機架和下部底座機架上。在拆卸或搬起跑步機之前,
請確認下部底座機架不會因為紅色運輸電纜未安裝而彈開。
1
2
組裝步驟 8 - 移動跑步機
16.1 將跑步機折疊並確保鎖住。緊握把手,將跑步機向後傾斜
(1) 並滾動 (2)。
16.2 將跑步機從展平的箱子上移開,並放置到最終位置,準備使
用。丟棄紙箱。

292
跑步機的
安裝與使用

繁體中文
293
跑步�放置位置
請將跑步機放置在平坦穩固的表面。跑步機前方應留下 30 公分的空間設置電源線。請在跑步機後方留一個清空
區域,寬度應至少和跑步機同寬,且長度至少 2 公尺。此區域必須清空障礙物,並為使用者提供離開器材的暢通
路線。
發生緊急情況時,請將雙手放在兩側扶手上支撐自己,並將雙腳放在側邊裝飾護條上。
為了方便使用,跑步機兩側應留下 60 公分的空間,供使用者戶從任何一側進出跑步機。
請勿將跑步機放置在可能阻擋會通風口或通氣孔的區域。跑步機不應放在車庫、遮雨棚、水邊或戶外。
���明
本產品必須接地。如果跑步機發生異常或故障,正確接地可為電流提供最小電阻的路徑,以降低觸電的風險。
本產品配備附有器材接地導體的電線和接地插頭。插頭必須插入依據當地法規和法令安裝和接地適當插座中。
危險!
• 不當連接器材接地導體可能會導致觸電。如果您不確定產品是否正確接地,請諮詢合格的電工或維修服務供應
商。請勿擅自改造產品隨附的插頭。如果插頭與插座不符,請找合格電工安裝適當的插座。
• 本產品適用於標稱局部電壓電路,並配備接地插頭。本產品不應使用轉接器。
• 本產品必須使用專用電路。若要判斷是否使用了專用電路,請關閉該電路的電源,並觀察其他裝置斷電。.
如果有請將器材移到其他電路。
請注意:一條電路上通常有多個插座。
60 公分
(2 英呎)
60 公分
(2 英呎)
2 公尺(79 英吋)
30 公分( 1 英呎)
自由區域
T8.5J
折疊跑步�
若要展開,請緊抓住跑步機的後端。小心地將跑步機平台的後端抬起至直立位置,直到卡扣接合,.
並牢固地將平台鎖定到位。請確保平台牢牢固定,然後再鬆開。
展開
緊抓住跑步機的後端。若要展開,請輕輕按下腳部卡扣,直到卡扣卸除。小心地將平台降到地面。
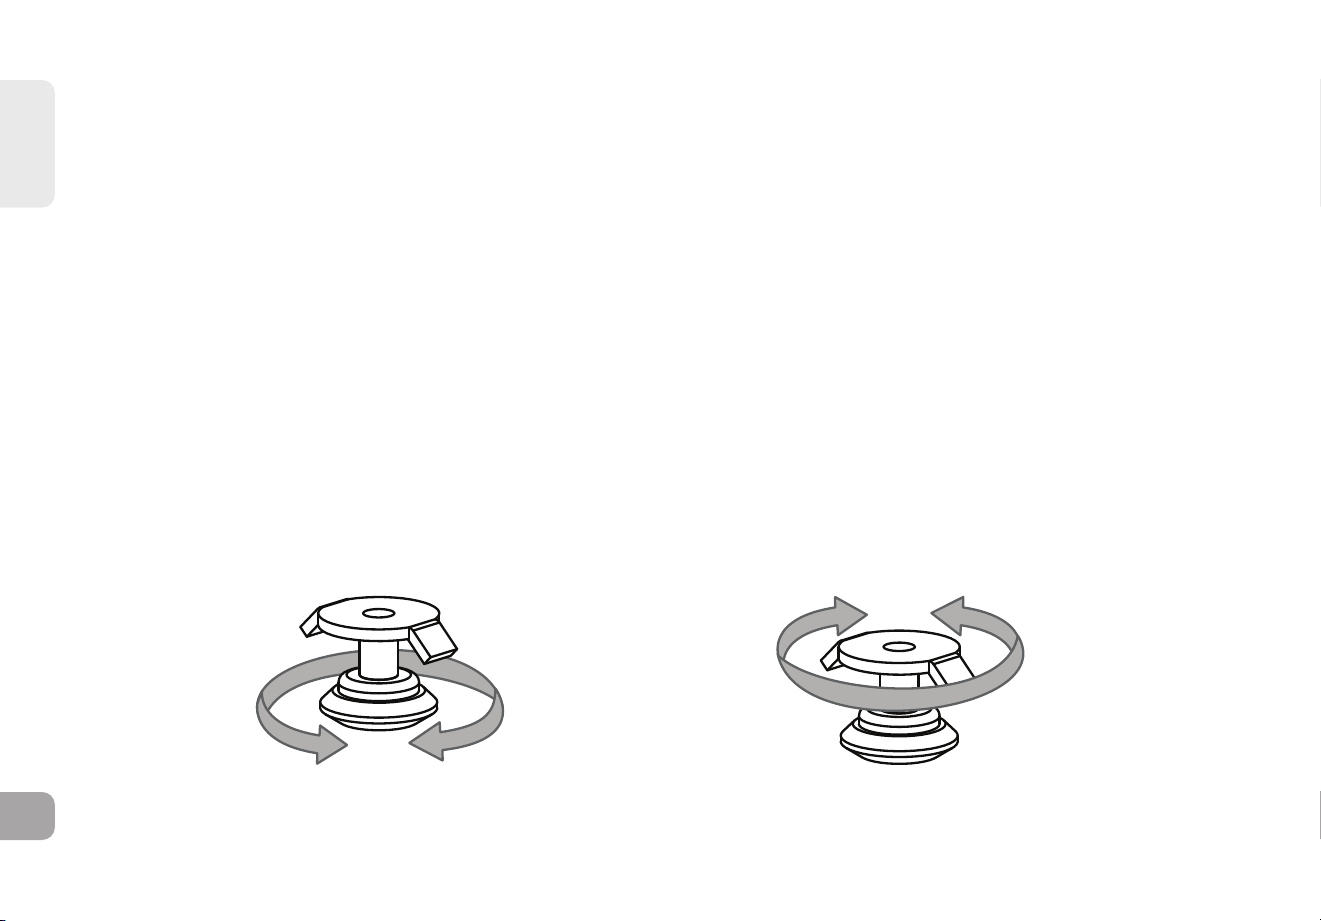
繁體中文
294
使用��開關
必須先插入安全開關,跑步機才會啟動。將繩扣末端夾緊您的衣服。此安全開關會在您因任何因素不慎滑落跑步機時,切斷跑步機的電源。請每兩週
檢查安全開關能否正常操作。
�告 切勿在尚未將安全開關繩扣夾緊衣物前使用跑步機。先拉扯安全鑰匙繩扣以確保其不會鬆脫。
�源
跑步機由電源供應器供電。電源必須插入電源插孔,插孔位置在機器前方貼地桿的附近。部分跑步機有電源開關,位於電源插孔旁邊。請確定其位於
開啟位置。不使 用時請將電源線拔除。請注意:有些跑步機有開關裝置,位置在儀表的後方。
�告!如果產品的電線或插頭有損壞、未能正常運作,或者產品已經損壞或浸入水中,則切勿操作本產品。請參考資訊卡背面的聯絡資訊尋求協助。
調整跑步機的水平
跑步機須放平以發揮最佳使用效果。將跑步機放置在預定的使用位置後,請調高或調降位於跑步機車架底部的其中一個或兩個調整旋鈕。建議使用水
平尺測量。如果跑步機沒有平放好,跑帶可能會偏移。完成跑步機的水平調整後,將螺帽旋緊在車架上,並將調整桿鎖住定位。
調整高度 栓鎖調整

繁體中文
295
2
4
6
8
10
12
16
20
Q
M M
P
N
IH
B
R
F G
A
J
C
O
Q
DS T U SEL K

繁體中文
296
控制台操作方法
注意:控制台覆蓋層上有一層薄薄的透明保護膜,使用前請將其移除。
A) LCD 顯示:時間、轉速、距離、瓦特、卡路里、坡度、速度、心率、風扇速度。
B) LED 顯示:時間、速度、距離、卡路里、坡度、心率。
C) 鍛鍊程式:列出所有可在鍛鍊過程中選擇的程式。
D) 啟動:按下此鍵開始鍛鍊、啟動鍛鍊或在暫停後繼續鍛鍊。
E) 停止:按下此鍵暫停或結束鍛鍊。長按 3 秒鐘可重置控制台。
F) 坡度 +/- 鍵:用於小幅度調整坡度(0.5% 的增量)。
G) 速度 +/- 鍵:用於小幅度調整速度(0.1 mph 的增量)。
H) 坡度快捷鍵:用於快速達到所需坡度。
I) 速度快捷鍵:用於快速達到所需速度。
J) 更改顯示:按下此鍵可在鍛鍊過程中切換顯示內容。
K) 風扇鍵:按下風扇鍵可調整風扇等級,依序為 1、2、3,然後關閉。
L) 風扇:個人鍛鍊風扇。
M) 揚聲器:當您的 CD / MP3 播放器與控制台連接時,音樂將通過揚聲器播放。
N) 音頻輸入插孔:使用隨附的音訊轉接線將 CD / MP3 播放器插入控制台。
O) 音頻輸出 / 耳機插孔:將耳機插入此插孔,即可通過耳機收聽音樂。
注意:當耳機插入耳機插孔時,聲音將不再通過喇叭播放。
P) USB 輸入:1A/5V USB 輸出電源。
Q) 水壺口袋:可放置個人運動用品。
R) 平板 / 閱讀架:可放置平板或閱讀材料。
S) 心率感應把手:用於測量心率。
T) 坡度滾輪:用於小幅度調整坡度 (.5%)。
U) 速度滾輪:用於小幅度調整速度 (.1 MPH)。

繁體中文
297
顯示視窗
• TIME:顯示為分鐘:秒數。顯示您鍛鍊過程中剩餘的時間或已經過的時間。
.• SPEED:以 MPH 顯示。顯示行走或跑步表面的移動速度。
• DISTANCE:以英里顯示。顯示您在鍛鍊中已走過的距離或剩餘的距離。
• CALORIES:顯示您鍛鍊過程中已燃燒的總卡路里或剩餘待燃燒的卡路里。
• INCLINE:以百分比顯示。顯示行走或跑步表面的坡度。
• HEART RATE:以 BPM(每分鐘心跳次數)顯示。用來監測您的心跳(當雙手握住心跳感應器時,會顯示心跳數據)。

繁體中文
298
開始
1) 請確認跑步帶上無任何物品,以免影響跑步機運作。
2) 插上電源線並將跑步機電源開啟。(電源開關位於電源線旁。)
3) 站在跑步機的側邊踏板上。
4) 將安全鑰匙夾固定於服裝上,確保其穩固連接且不會在使用過程中脫落。
5) 將安全鑰匙插入控制台上的安全鑰匙孔。
6) 您有兩種方式可以開始鍛鍊:
A) 快速啟動
直接按下 START 鍵開始鍛鍊。
時間、距離與卡路里將從 0 開始累計。或是……
B) 選擇鍛鍊程式或目標模式
1) 使用 +/- 鍵選擇您所需的 PROGRAM,並按下 ENTER 鍵確認顯示的 PROGRAM。
2) 使用 +/- 鍵調整 SETTING,並按下 ENTER 鍵確認顯示的 SETTING。
3) 按下 START 鍵開始鍛鍊。
多重分段程式規格
1) 使用者可於任一分段中調整速度與坡度,該變更僅套用於當前分段。
後續分段將依照原始程式設定表執行。
2) 使用者亦可於任一分段中降低速度與坡度,該減幅將持續套用至後續所有分段。
BOWFLEX 連接健身系統
您的 BowFlex 機器支援 Bluetooth 4.0 技術,讓您可以無線連接您的設備和其他應用程式,與您的 BowFlex 跑步機連接。
繁體中文
299
P1) 手動:在運動過程中手動調整您的速度和坡度。
鍛鍊模式說明
P2) 減重:專為減重設計的運動模式。通過增加和減少坡度來促進減重,同時保持在燃脂區域內。包括 20 個等級。
WEIGHT LOSS
Segment = workout time / 16
Level 1 2 3 4 5 6 7 8 9 10 11 12 13 14 15 16 17 18 19 20
Segment
1 0 0 0 0 0 0 1 2 2 2.5 2.5 2.5 2.5 2.5 3.5 5 5 5 5 5
2 0 0 1 2 2.5 3.5 3.5 3.5 4.5 5.5 6 7 7.5 8.5 9.5 11 11 11 11.5 12
3 1 2 2 2 2 2 2 2 2 2.5 3.5 4.5 4.5 4.5 5.5 7 7.5 8.5 9 10
4 1.5 3.5 4 5 5 5 5 5 6 7 7.5 8.5 9 10 11 12 12.5 13.5 14 15
5 1 2 2 2 2 2 2.5 3.5 4 4.5 4.5 4.5 5.5 7 7.5 8.5 8.5 8.5 9.5 11
6 1.5 3.5 3.5 3.5 5 6.5 7.5 8.5 9 10 10 10 10.5 11.5 12.5 13.5 13.5 13.5 13.5 13.5
7 1 2 2 2 2 2 2.5 3.5 4 4.5 5 5.5 5.5 5.5 7 8.5 8.5 8.5 9 10
8 1.5 3.5 4 5 5 5 5.5 6.5 7.5 8.5 9 10 10.5 11.5 11.5 12 13.5 15 15 15
9 1.5 3.5 3.5 3.5 3.5 3.5 4 5 5 5.5 6 7 7 7 8.5 10 10.5 11 11.5 12
10 1 2 2 2 2 2 2.5 3.5 4 4.5 4.5 4.5 4.5 4.5 6.5 8.5 8.5 8.5 9 10
11 1.5 3.5 3.5 3.5 4 5 5 5 6 7 8.5 10 10.5 11.5 12.5 13.5 13.5 13.5 14 15
12 1 2 2 2 2 2 2 2 3 4.5 5.5 7 7 7 7.5 8.5 9 10 10 10
13 1.5 3.5 4 5 5.5 6.5 7.5 8.5 8.5 8.5 9 10 10 10 11 12 12 12 12.5 13.5
14 1 2 2 2 2.5 3.5 4 5 5 5.5 5.5 5.5 7 8.5 9 10 10.5 11 11.5 12
15 0 0 0 0 1 2 2.5 3.5 4 4.5 4.5 4.5 5 5.5 7 8.5 9 10 10 10
16 0 0 0 0 0 0 1 2 2 2.5 2.5 2.5 2.5 2.5 3.5 5 5 5 5 5
WEIGHT LOSS (10%incline Max)
Segment = workout time / 16
Level 1 2 3 4 5 6 7 8 9 10 11 12 13 14 15 16 17 18 19 20
Segment
1 0 0 0 0 0 0 1 2 2 2.5 2.5 2.5 2.5 2.5 3.5
5 5 5 5 5
2 0 0 1 2 2.5 3.5 3.5 3.5 4.5 5.5 6 7 7.5 8.5 9.5 10 10 10 10 10
3 1 2 2 2 2 2 2 2 2 2.5 3.5 4.5 4.5 4.5 5.5 7 7.5 8.5 9 10
4 1.5 3.5 4 5 5 5 5 5 6 7 7.5 8.5 9 10 10 10 10 10 10 10
5 1 2 2 2 2 2 2.5 3.5 4 4.5 4.5 4.5 5.5 7 7.5 8.5 8.5 8.5 9.5 10
6 1.5 3.5 3.5 3.5 5 6.5 7.5 8.5 9 10 10 10 10 10 10 10 10 10 10 10
7 1 2 2 2 2 2 2.5 3.5 4 4.5 5 5.5 5.5 5.5 7 8.5 8.5 8.5 9 10
8 1.5 3.5 4 5 5 5 5.5 6.5 7.5 8.5 9 10 10 10 10 10 10 10 10 10
9 1.5 3.5 3.5 3.5 3.5 3.5 4 5 5 5.5 6 7 7 7 8.5 10 10 10 10 10
10 1 2 2 2 2 2 2.5 3.5 4 4.5 4.5 4.5 4.5 4.5 6.5 8.5 8.5 8.5 9 10
11 1.5 3.5 3.5 3.5 4 5 5 5 6 7 8.5 10 10 10 10 10 10 10 10 10
12 1 2 2 2 2 2 2 2 3 4.5 5.5 7 7 7 7.5 8.5 9 10 10 10
13 1.5 3.5 4 5 5.5 6.5 7.5 8.5 8.5 8.5 9 10 10 10 10 10 10 10 10 10
14 1 2 2 2 2.5 3.5 4 5 5 5.5 5.5 5.5 7 8.5 9 10 10 10 10 10
15 0 0 0 0 1 2 2.5 3.5 4 4.5 4.5 4.5 5 5.5 7 8.5 9 10 10 10
16 0 0 0 0 0 0 1 2 2 2.5 2.5 2.5 2.5 2.5 3.5 5 5 5 5 5
WEIGHT LOSS (12%incline Max)
Segment = workout time / 16
Level 1 2 3 4 5 6 7 8 9 10 11 12 13 14 15 16 17 18 19 20
Segment
1 0 0 0 0 0 0 1 2 2 2.5 2.5 2.5 2.5 2.5 3.5 5 5 5 5 5
2 0 0 1 2 2.5 3.5 3.5 3.5 4.5 5.5 6 7 7.5 8.5 9.5 11 11 11 11.5 12
3 1 2 2 2 2 2 2 2 2 2.5 3.5 4.5 4.5
4.5 5.5 7 7.5 8.5 9 10
4 1.5 3.5 4 5 5 5 5 5 6 7 7.5 8.5 9 10 11 12 12 12 12 12
5 1 2 2 2 2 2 2.5 3.5 4 4.5 4.5 4.5 5.5 7 7.5 8.5 8.5 8.5 9.5 11
6 1.5 3.5 3.5 3.5 5 6.5 7.5 8.5 9 10 10 10 10.5 11.5 12 12 12 12 12 12
7 1 2 2 2 2 2 2.5 3.5 4 4.5 5 5.5 5.5 5.5 7 8.5 8.5 8.5 9 10
8 1.5 3.5 4 5 5 5 5.5 6.5 7.5 8.5 9 10 10.5 11.5 11.5 12 12 12 12 12
9 1.5 3.5 3.5 3.5 3.5 3.5 4 5 5 5.5 6 7 7 7 8.5 10 10.5 11 11.5 12
10 1 2 2 2 2 2 2.5 3.5 4 4.5 4.5 4.5 4.5 4.5 6.5 8.5 8.5 8.5 9 10
11 1.5 3.5 3.5 3.5 4 5 5 5 6 7 8.5 10 10.5 11.5 12 12 12 12 12 12
12 1 2 2 2 2 2 2 2 3 4.5 5.5 7 7 7 7.5 8.5 9 10 10 10
13 1.5 3.5 4 5 5.5 6.5 7.5 8.5 8.5 8.5 9 10 10 10 11 12 12 12 12 12
14 1 2 2 2 2.5 3.5 4 5 5 5.5 5.5 5.5 7 8.5 9 10 10.5 11 11.5 12
15 0 0 0 0 1 2 2.5 3.5 4 4.5 4.5 4.5 5 5.5 7 8.5 9 10 10 10
16 0 0 0 0 0 0 1 2 2 2.5 2.5 2.5 2.5 2.5 3.5 5 5 5 5 5
INCLINE
INCLINE
INCLINE
減重 (最大坡度 12%)
分段 = 鍛鍊時間 / 16
等級
分段
坡度

繁體中文
300
P3) 間歇鍛鍊:通過在運動過程中增減坡度,改善您的力量、速度和耐力,並動員心臟及其他肌肉。包括 20 個等級。
P4) 距離鍛鍊:在運動過程中挑戰自己,並達到更遠的目標,共有 13 個距離訓練選項。選擇 1 英里、2 英里、5 公里、5 英里、.
10 公里、8 英里、15 公里、10 英里、20 公里、半馬、15 英里、20 英里和馬拉松目標。
使用者設定起始速度等級。
P5) 卡路里鍛鍊:設置燃燒卡路里的目標。燃燒的卡路里數是根據距離和速度計算的。
Intervals (15%Incline)
Segment =workout time/16
Level 1 2 3 4 5 6 7 8 9 10 11 12 13 14 15 16 17 18 19 20
Segment
1 0 0 0 0 0 0 0 0 0 0 0 0 0 0 0 0 0 0 0 0
2 0.5 0.5 0.5 0.5 0.5 0.5 0.5 0.5 1 1 1 1 1 1 1 1.5 1.5 1.5 1.5 1.5
3 0 0 0 0 0 0 0 0 0 0 0 0 0 0 0 0 0 0 0 0
4 1.5 2 2 2.5 3 3 3.5 3.5 4 4.5 5 5.5 5.5 6 6 6.5 7 7 8 8.5
5 0 0 0 0 0 0 0 0 0 0 0 0 0 0 0 0 0 0 0 0
6 2.5 2.5 3 3.5 4 4.5 4.5 5 5.5 6 7 7.5 8 8 8.5 9.5 9.5 10 11 11.5
7 0 0 0 0 0 0 0 0 0 0 0 0 0 0 0 0 0 0 0 0
8 3 3.5 4 4.5 5 5.5 6 6.5 7 8 9 9.5 10 10.5 11 12 12.5 13 14 15
9 0 0 0 0 0 0 0 0 0 0 0 0 0 0 0 0 0 0 0 0
10 3 3.5 4 4.5 5 5.5 6 6.5 7 8 9 9.5 10 10.5 11 12 12.5 13 14 15
11 0 0 0 0 0 0 0 0 0 0 0 0 0 0 0 0 0 0 0 0
12 3 3.5 4 4.5 5 5.5 6 6.5 7 8 9 9.5 10 10.5 11 12 12.5 13 14 15
13 0 0 0 0 0 0 0 0 0 0 0 0 0 0 0 0 0 0 0 0
14 3 3.5 4 4.5 5 5.5 6 6.5 7 8 9 9.5 10 10.5 11 12 12.5 13 14 15
15 0 0 0 0 0 0 0 0 0 0 0 0 0 0 0 0 0 0 0 0
16 3 3.5 4 4.5 5 5.5 6 6.5 7 8 9 9.5 10 10.5 11 12 12.5 13 14 15
Intervals (10%Incline)
Segment =workout time/16
Level 1 2 3 4 5 6 7 8 9 10 11 12 13 14 15 16 17 18 19 20
Segment
1 0 0 0 0 0 0 0 0 0 0 0 0 0 0 0 0 0 0 0 0
2 0.5 0.5 0.5 0.5 0.5 0.5 0.5 0.5 1 1 1 1 1 1 1 1.5 1.5 1.5 1.5 1.5
3 0 0 0 0 0 0 0 0 0 0 0 0 0 0 0 0 0 0 0 0
4 1.5 2 2 2.5 3 3 3.5 3.5 4 4.5 5 5.5 5.5 6 6 6.5 7 7 8 8.5
5 0 0 0 0 0 0 0 0 0 0 0 0 0 0 0 0 0 0 0 0
6 2.5 2.5 3 3.5 4 4.5 4.5 5 5.5 6 7 7.5 8 8 8.5 9.5 9.5 10 10 10
7 0 0 0 0 0 0 0 0 0 0 0 0 0 0 0 0 0 0 0 0
8 3 3.5 4 4.5 5 5.5 6 6.5 7 8 9 9.5 10 10 10 10 10 10 10 10
9 0 0 0 0 0 0 0 0 0 0 0 0 0 0 0 0 0 0 0 0
10 3 3.5 4 4.5 5 5.5 6 6.5 7 8 9 9.5 10 10 10 10 10 10 10 10
11 0 0 0 0 0 0 0 0 0 0 0 0 0 0 0 0 0 0 0 0
12 3 3.5 4 4.5 5 5.5 6 6.5 7 8 9 9.5 10 10 10 10 10 10 10 10
13 0 0 0 0 0 0 0 0 0 0 0 0 0 0 0 0 0 0 0 0
14 3 3.5 4 4.5 5 5.5 6 6.5 7 8 9 9.5 10 10 10 10 10 10 10 10
15 0 0 0 0 0 0 0 0 0 0 0 0 0 0 0 0 0 0 0 0
16 3 3.5 4 4.5 5 5.5 6 6.5 7 8 9 9.5 10 10 10 10 10 10 10 10
Segment =workout time/16
Intervals (12%Incline)
Level 1 2 3 4 5 6 7 8 9 10 11 12 13 14 15 16 17 18 19 20
Segment
1 0 0 0 0 0 0 0 0 0 0 0 0 0 0 0 0 0 0 0 0
2 0.5 0.5 0.5 0.5 0.5 0.5 0.5 0.5 1 1 1 1 1 1 1 1.5 1.5 1.5 1.5 1.5
3 0 0 0 0 0 0 0 0 0 0 0 0 0 0 0 0 0 0 0 0
4 1.5 2 2 2.5 3 3 3.5 3.5 4 4.5 5 5.5 5.5 6 6 6.5 7 7 8 8.5
5 0 0 0 0 0 0 0 0 0 0 0 0 0 0 0 0 0 0 0 0
6 2.5 2.5 3 3.5 4 4.5 4.5 5 5.5 6 7 7.5 8 8 8.5 9.5 9.5 10 11 11.5
7 0 0 0 0 0 0 0 0 0 0 0 0 0 0 0 0 0 0 0 0
8 3 3.5 4 4.5 5 5.5 6 6.5 7 8 9 9.5 10 10.5 11 12 12 12 12 12
9 0 0 0 0 0 0 0 0 0 0 0 0 0 0 0 0 0 0 0 0
10 3 3.5 4 4.5 5 5.5 6 6.5 7 8 9 9.5 10 10.5 11 12 12 12 12 12
11 0 0 0 0 0 0 0 0 0 0 0 0 0 0 0 0 0 0 0 0
12 3 3.5 4 4.5 5 5.5 6 6.5 7 8 9 9.5 10 10.5 11 12 12 12 12 12
13 0 0 0 0 0 0 0 0 0 0 0 0 0 0 0 0 0 0 0 0
14 3 3.5 4 4.5 5 5.5 6 6.5 7 8 9 9.5 10 10.5 11 12 12 12 12 12
15 0 0 0 0 0 0 0 0 0 0 0 0 0 0 0 0 0 0 0 0
16 3 3.5 4 4.5 5 5.5 6 6.5 7 8 9 9.5 10 10.5 11 12 12 12 12 12
INCLINE
INCLINE
INCLINE
分段 = 鍛鍊時間 / 16
間歇(12% 坡度)
等級
分段
坡度

繁體中文
301
P6) 登山訓練:模擬山坡上升和下降。此程序有助於塑造肌肉並改善心血管能力。坡度變化並且每 30 秒重複一次。
P7) 自訂鍛鍊:允許您創建並重複使用您完美的鍛鍊計劃,結合特定的速度、坡和時間或距離。個人化鍛鍊的最佳選擇。這是基於時間或
距離的目標程序。
P8) 目標心率鍛鍊:此模式設計用於提升整體心肺耐力。使用者只需設定目標心率值,系統會自動監測並調整坡度,以維
持心率在設定區間內。此方法已被證實為有效燃脂與提升心肺功能的訓練方式。執行此模式時需配戴胸帶,並於整個訓練
過程中保持配戴狀態。請參考下方說明計算您的目標心率。
Segment 1 2 3 4 5 6 7 8 9 10
Time 30 sec 30 sec 30 sec 30 sec 30 sec 30 sec 30 sec 30 sec 30 sec 30 sec
Level 1 0 0 1 1.5 2 2.5 3 3 2.5 2 1.5 1
Level 2 0 0 1.5 2 2.5 3 3.5 3.5 3 2.5 2 1.5
Level 3 0 1 2 2.5 3 3.5 4 4 3.5 3 2.5 2
Level 4 0 1.5 2.5 3 3.5 4 4.5 4.5 4 3.5 3 2.5
Level 5 0 1.5 3 3.5 4 4.5 5 5 4.5 4 3.5 3
Level 6 0 1.5 3.5 4 4.5 5 5.5 5.5 5 4.5 4 3.5
Level 7 0 1.5 4 4.5 5 5.5 6 6 5.5 5 4.5 4
Level 8 0 2 4.5 5 5.5 6 6.5 6.5 6 5.5 5 4.5
Level 9 0 2 5 5.5 6 6.5 7 7 6.5 6 5.5 5
Level 10 0 2 5.5 6 6.5 7 7.5 7.5 7 6.5 6 5.5
Warm Up
4:00 Mins
分段
時間
等級 1
等級 2
等級 3
等級 4
等級 5
等級 6
等級 7
等級 8
等級 9
等級 10
暖身
4:00 分鐘
30 秒鐘30 秒鐘30 秒鐘30 秒鐘30 秒鐘30 秒鐘30 秒鐘30 秒鐘30 秒鐘30 秒鐘

繁體中文
302
計算目標心率:
確定鍛鍊強度的第一步是找出您的最大心率 (max HR = 220 – 年齡)。基於年齡的方法提供您最大心率的平均預測,是大多數人使用的有
效方法,特別是對於剛開始進行心率訓練的人來說。
最精確的方法是由心臟病醫生或運動生理學家通過最大運動負荷測試來進行臨床測試。如果您超過 40 歲、超重、已經很久沒有運動,
或有家族心臟病史,建議進行臨床測試。
此圖表展示了一位 30 歲人在 5 個不同心率區間內的心率範圍。例如,一個 30 歲的人的最大心率是 220 - 30 = 190 bpm,90% 最大心率
是 190 × 0.9 = 171 bpm。
目標心率訓練的附加說明:
1). 跑步機的坡度會自動調整,讓您的心率接近設定範圍。
2). 如果無法檢測到心率,設備將不會改變坡度。
3). 如果您的心率超過目標區間 25 次,程序將停止。
Target Heart
Rate Zone
Workout
Duration
Example THR
(age 30)
Your THR Recommend For
Target Heart
Rate Zone
< 5 min
171-190 BPM
Fit persons for
athletic training
VERY HARD
90 - 100%
2-10 min 152-171 BPM Shorter Workouts
HARD
80 - 90%
10-40 min
133-152 BPM
Moderately long
Workouts
MODERATE
70 - 80%
40-80 min
114-133 BPM
Longer and
frequently repeated
shorter exercises
LIGHT
60 - 70%
20-40 min
104-114BPM
Weight management
and active recovery
VERY LIGHT
50 - 60%
目標心率區間 鍛鍊時長
範例目標心率
(30 歲)
您的目標心率 適用於
非常強度
90-100%
< 5 分鐘
171-190 BPM
適合有運動訓練.
經驗的人
強度
80 - 90%
2-10 分鐘
152-171 BPM
較短的訓練
中等強度
70 - 80%
10-40 分鐘
133-152 BPM
中等時長訓練
輕度強度
60 - 70%
40-80 分鐘
114-133 BPM
較長且經常重複的.
較短訓練
非常輕度
50 - 60%
20-40 分鐘
104-114 BPM
適合體重管理和.
主動恢復

繁體中文
303
重置控制台
長按 STOP 鍵 3 秒。
完成鍛鍊
完成鍛鍊時,設備會發出提示音,訓練資料將保留於螢幕 30 秒後自動重置。
BLUETOOTH 4.0LE 配對方式
1) 確保您的音樂設備支援 Bluetooth 4.0。
2) 進入設備的 Bluetooth 設置,並掃描可用設備。
3) 在您的音樂設備上,找到 Bluetooth 設備列表。選擇顯示在列表中的跑步機或橢圓機設備。等待您的音樂設備完成與設備的配對。
4) 當您的音樂設備顯示跑步機或橢圓機設備已成功配對時,表示配對已成功。
使用多個音樂設備
如果有多個設備與跑步機或橢圓機配對(例如:多位使用者正在使用該設備並將他們的音樂設備與其配對),則您需要解除當前配對的設備,並
按照上述配對程序重新配對您的設備。
透過音訊線連接
1) 將隨附的音訊轉接線連接到控制台右側的 AUDIO IN JACK 和您的媒體設備的耳機插孔。
2) 使用您的媒體設備按鈕來調整歌曲設置。
3) 當不使用時,請拔掉音訊轉接線。
4) 如果您不想使用揚聲器,您可以將耳機插入控制台右側的 AUDIO OUT JACK。這樣可以確保如果您在運動時不小心拉到耳機線,設備不會掉
到地上。

繁體中文
304
將您的裝置連接至 JRNY APP,享受更具動態性的訓練體驗
如果您擁有 JRNY 會員資格*,當裝置與本機控制台同步後,即可透過您的裝置存取 JRNY 功能。透過 JRNY 會員,您可以獲得依照個人需求調整的
引導式訓練。
* 使用 JRNY 體驗需要 JRNY 會員資格 – 詳情請見 global.bowflex.com/en/jrny.html。若您位於提供服務的地區(包括美國),可以在手機或
平板上下載 JRNY App 並在 App 內註冊來取得 JRNY 會員。JRNY 會員服務可能並未在所有國家提供。

305
保養與疑難排解

繁體中文
306
保養
預防性保養是保持器材功能正常及善盡安全責任的關鍵。請定期檢查器材。故障的零組件必須立即更換。功能出現異常的器材務必要暫停使用,直到
修復為止。確認負責調整或維護/維修器材的人員均為合格人員。
警告
若要關閉跑步機電源,必須將電源線從壁裝插座拔下。

繁體中文
307
保養時間表
措施 頻率
清潔與檢查跑步機:
•..關閉跑步機的電源開關,然後從牆上插座中拔出電源線插頭。
•..用濕布擦拭跑帶、跑台、馬達護蓋和儀表外殼。切勿使用溶劑,否則可能會導致跑步機損壞。
•..檢查電源線。如果電源線損壞,請參考資訊卡背面的聯絡資訊以尋求協助。
•..確認電源線未在跑步機下方或任何其他可能會卡住或切斷電源線的區域。
•..檢查跑帶的張力以及是否有居中。確認跑步機上的其他所有組件均不會因為跑帶偏移而受損。
•..如果標籤受損或模糊不清,請參考資訊卡背面的聯絡資訊以尋求協助。
每天
清潔跑步機下方:
•..關閉跑步機的電源開關,然後從牆上插座中拔出電源線插頭。
•..將跑步機收摺為直立型態,並確認固定銷牢牢鎖住。
•..移動跑步機。
•..擦拭或使用真空吸塵器清掃可能堆積在跑步機下方的所有灰塵或其他物體。
•..將跑步機移回原位。
每週
重要!
•..關閉跑步機的電源開關,然後從牆上插座中拔出電源線插頭。等候.60.秒。
•..檢查機器所有組裝螺絲的鬆緊度是否適當。
•..拆下馬達護蓋。等候所有顯示螢幕關閉。
•..清潔馬達和下層板區域,清掃任何可能堆積的棉絮或灰塵。若未執行此步驟,可能會導致關鍵的電子零件提早故障。
•..以濕布徹底擦拭跑帶。使用真空吸塵器清掃裝置周圍可能堆積的所有黑白粉塵微粒。這些粉塵微粒可能是在跑步機正
常使用過程中堆積的。
•..如果您的跑步機在跑台底下有氣壓式避震器作為提升輔助,請使用鐵氟龍噴劑潤滑銀色的氣壓式避震器管,相關產品
可以在當地的五金店或自由車店買到。
每月

繁體中文
308
維護計劃
潤滑
每 3 個月或里程數累積 480 公里
以維持跑步機最佳效能,每 3 個月或里程數累積達 480 公里後必須潤滑
一次跑步機跑台。 在跑步機里程記錄達 480 公里時,會顯示「LUBE」
或「LUBE BELT」訊息。 該訊息顯示時,無法操作跑步機。 您購買
跑步機時有隨附一瓶 100% 的矽潤滑油,可用於兩次潤滑上油。
若要購買額外矽利康潤滑油:
請聯絡客戶技術支援。
所需工具:
• T 型扳手或六角扳手
• 100% 矽潤滑油
跑帶
跑台

繁體中文
309
程序:
1. 關閉跑步機的電源,並將電源線插頭從插座中拔出。
2. 使用 T 型扳手或內六角扳手鬆開後滾輪螺絲
以逆時鐘方向轉動 10-15 圈。 這樣可放鬆跑帶到能掀起的程度。
3. 盡量拉起跑帶,將矽潤滑油依鋸齒狀擠出到整個跑台表面。 使用半瓶矽潤滑油。 請勿將矽潤滑油塗在跑
帶的上方。 將跑帶放下,然後依順時鐘方向,以鬆開時同樣的圈數鎖緊兩個後滾軸螺絲。
4. 塗上矽潤滑油後,插上電源線並插入安全鑰匙。 先按下「SPEED UP」(加速) 按鈕,然後按
「STOP」(停止) 按鈕,然後兩個按鈕同時按住 5-7 秒,重設「Lube Belt」訊息。
5. 離開跑步機並按下「START」(開始)。 讓跑帶以 4~5 kph 運轉 3 分鐘以擴散矽潤滑油。 以適當的速
度在機器上步行 3 分鐘,使矽潤滑油散佈開來,並檢查跑帶的鬆緊度和調正是否恰當。
6. 在跑帶置中且拉緊後,停止跑帶。 使用濕布擦去側邊多餘的矽潤滑油。
按任意鍵以暫停潤滑警告訊息,一直到您下次健身使用。
請注意:某些較舊型號可能會要求您按住「停止」5 秒,才能在使用 8 公里後暫停顯示訊息。
如果您的跑步機在跑台底部有氣壓棒作為提升輔助,請使用鐵氟龍噴劑潤滑銀色的氣壓棒,相關產品可以在當地的五金店或自行車店買到。
請造訪我們網站的「Customer Support」(客戶支援) 部分,觀賞說明維護方式的影
片。 關於對跑步機塗抹潤滑油的任何問題,請聯絡客戶服務專線。
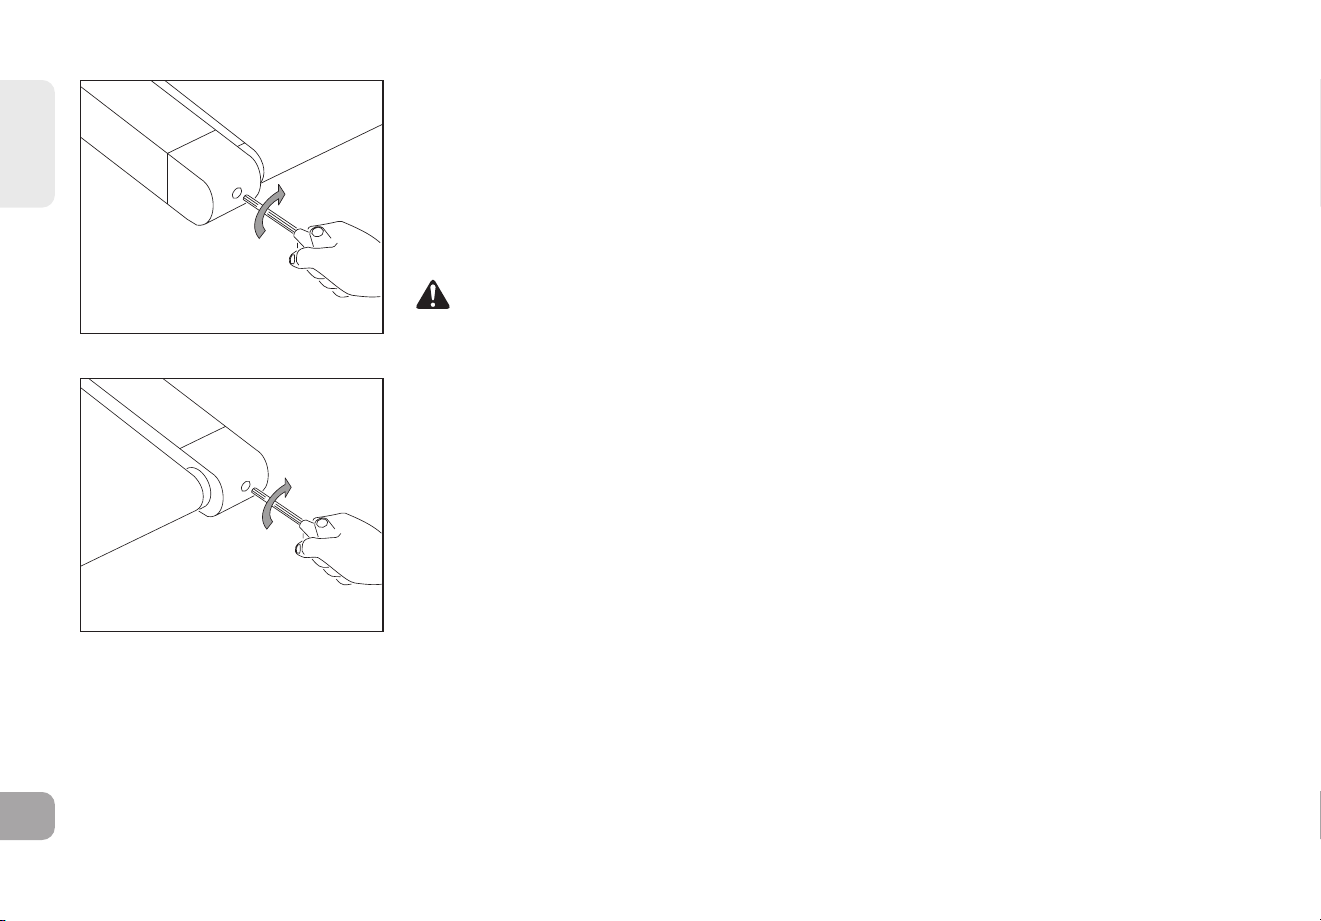
繁體中文
310
調整跑帶
如果在跑步機上跑步時有打滑的感覺, 您必須調緊跑帶。在大多數的情況下, 跑步機使用一段時間後,
跑帶會拉長,造成跑帶打滑。這屬於正常性的一般調整。如果要消除打滑感,請先關閉跑步機請先關閉跑步機, 使用隨貨
附贈的內六角扳手轉緊後滾軸的兩個螺絲後滾軸的兩個螺絲, 依圖示向右 (順時鐘) 旋轉螺絲 ¼ 圈。 啟動跑步機並檢查跑帶
是否還有打滑。必要時重複上述步驟, 但切勿切勿一次將滾軸螺絲旋轉超過 ¼ 圈。跑帶適度調緊後,就不會
再出現打滑的感覺。
警告
跑帶在調緊過程中不應移動。跑帶調得太緊會對跑步機及其零件造成過度磨損。切勿過度調緊跑帶。
調緊滾軸左側
調緊滾軸右側
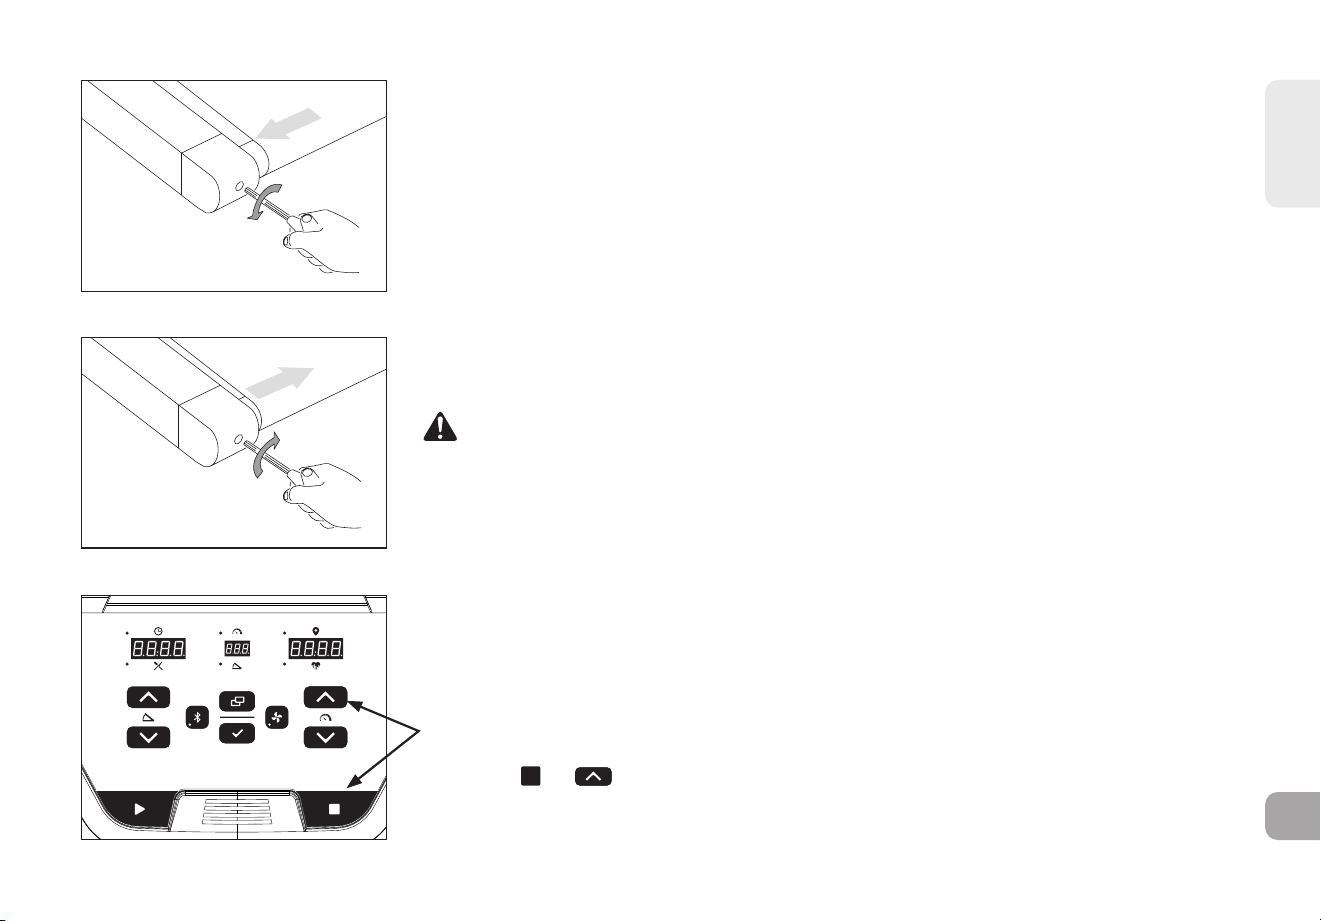
繁體中文
311
跑帶居中
若跑帶偏右:若跑帶偏右:使用隨貨附贈的內六角扳手並且將跑步機以 1 km/h 的速度運轉,將左左調整螺絲以逆時鐘方
向旋轉 ¼ 圈,等待跑帶自行調整。使用馬達護蓋標記或零件線作為對齊的參考。必要時重複上述步驟,
直到跑帶在使用時能保持在中心位置。
若跑帶偏左:若跑帶偏左:使用隨貨附贈的內六角扳手並且將跑步機以 1 km/h 的速度運轉,將左左調整螺絲以順時鐘方
向旋轉 ¼ 圈,等待跑帶自行調整。使用馬達護蓋標記或零件線作為對齊的參考。必要時重複上述步驟,
直到跑帶在使用時能保持在中心位置。
• 如果您發現跑帶因為過鬆而滑動,請置中並視需要調緊。
• 為使得調整螺絲更加容易檢修,請將套管取下。
小心
導正跑帶時,請勿讓跑帶運轉的轉速超過 1 km/h。請隨時注意不要讓手指、頭髮和衣服靠近跑帶。
跑帶太偏右
跑帶太偏左
重設潤滑皮帶警示
每行走 150 英里,跑步機會閃爍「LUBE BELT」潤滑皮帶提醒。完成潤滑後,
請同時按住 與 按鈕 3–5 秒來重設提醒。
2
4
6
8
10
12
16
20

繁體中文
312
常見產品問題
我的跑步機發出的聲音正常嗎?我的跑步機發出的聲音正常嗎?
所有跑步機均會因跑帶在滾輪上輸送而發出特有的碰碰聲,尤其是新跑步機。這種聲音會隨著跑步機使用時間越久而逐漸轉弱,但可能不會完全消失。跑帶將
隨著時間拉長,其在滾輪上的移動也會更加順暢。
為何我為何我購買的跑步機所發出的聲音比店內的跑步機還購買的跑步機所發出的聲音比店內的跑步機還要大聲?要大聲?
由於店內大型展示間的背景噪音通常多您家中的噪音,因此所有在大型展示間內的健身產品都會顯得比較安靜。此外,鋪有地毯的實心地板發出的回音會比鋪
木地板來得低。有時使用專用地墊有助於降低地板發出的回音音量。若健身產品靠牆擺放,將反射更多噪音。
我何時需要擔心跑步機的聲音可我何時需要擔心跑步機的聲音可能有異常?能有異常?
只要跑步機發出的聲音與正常說話的音量差不多,都算是正常現象。
基本故障排解
問題問題:儀表沒有亮燈。
解決方法解決方法:請檢查下列事項:
開關上的紅燈是否亮起?請注意:有些型號的跑步機未設有會亮起的開關。若是如此,請繼續按照以下是和否解決方法操作
若為是:
• 關閉電源,拔出電源線插頭並等候 60 秒。拆下馬達護蓋。等到馬達控制板上的紅色 LED 燈全數熄滅之後再繼續。接著,確認所有連接至下控制板的電線皆
未鬆脫或被拔下。
• 再次檢查所有接線是否有接好,尤其是儀表線。請拔出儀表線並重新連接,以確認有確實接好。
• 確認儀表線沒有受到任何擠壓或損壞。
• 插上跑步機插頭,開啟電源開關,尋找馬達控制板上是否有任何亮起的 LED。
疑難排解

繁體中文
313
若為否:
• 確認跑步機連接的插座功能是否正常運作。再次檢查斷路器並未
跳電,且位於15 安培的專用
電路,而非接地故障斷路器,同時並未插入電源板/突波保護器或
延長線。
• 確認電源線未受到擠壓或損壞,並有正確插入插座和機器。
• 確認電源開關已切至「開啟」位置。
問題問題:主控台顯示 SAFETY KEY OFF (未插入安全開關) 或者僅顯
示虛線。
解決方法解決方法:請檢查下列事項:
• 確認安全開關固定定位。
• 如果使用的是磁性安全開關,請確定安全開關已磁化。
JOHNSON
馬達蓋底部
驅動皮帶驅動皮帶 驅動馬達驅動馬達 光學感測器光學感測器 坡度馬達坡度馬達 馬達控制板馬達控制板 儀表線儀表線
前滾輪前滾輪
跑帶跑帶

繁體中文
314
疑難排解
基本故障排解
問題問題:跑帶沒有移動或是短暫移動,但是儀表運作正常。
解決方法解決方法:請檢查下列事項:
• 請確保您遵循本使用手冊的接地說明和基本操作的建議與電源準
則。裝置應該位於 15 安培的專用電路,而不是位於接地故障斷
路器插座。請勿將機器插入電源板/突波保護器或延長線。
• 檢查是否有任何跑帶移動的情況。如果有,請記錄移動了多遠的
距離或是過了多久才停下。
• 嘗試用手移動跑帶。如果沒有,驅動皮帶可能鬆脫或是馬達軸承
可能已經卡住。
• 關閉跑步機並且將電源插頭拔下。將十字螺絲卸下,把機器前方
的塑膠馬達護蓋取下。檢查驅動皮帶是否適當調正。
• 還不要將馬達護蓋裝上,請檢查線路與纜線連線,因為它們在運
送或是組裝過程中可能已經鬆脫。確定連接是否牢固,而且沒有
線路捲曲、損壞、中斷或燒焦。
問題問題:升降坡度沒有移動,不會下降或者似乎不是在正確的水平。
解決方法解決方法:請檢查下列事項:
• 請確定您已遵照本跑步機指南第 4 頁與第 5 頁的建議與電源準
則。裝置應該位於 15 安培的專用電路,
而不是位於接地故障斷路器插座。請勿將機器插入電源板/突波保
護器或延長線。
• 請確定在按住坡度按鈕時,儀表在顯示幕上顯示變化。
• 關閉跑步機並且將電源插頭拔下。確認機柱上方的儀表纜線連線
已牢固連接。確定所有多色線路已完全插入束帶。
• 將十字螺絲卸下,把機器前方的塑膠馬達護蓋取下。檢查線路與纜線連線,因為它們在運送或是組裝過程中可能已經鬆脫。確定連接是否牢固,
而且沒有線路捲曲、損壞、中斷或燒焦。
JOHNSON
馬達蓋底部
驅動皮帶驅動皮帶 驅動馬達驅動馬達 光學感測器光學感測器 坡度馬達坡度馬達 馬達控制板馬達控制板 儀表線儀表線
前滾輪前滾輪
跑帶跑帶

繁體中文
315
問題問題:喇叭沒有聲音,但是耳機有聲音。
解決方法解決方法:請檢查下列事項:
• 關閉跑步機並且將電源插頭拔下。將十字螺絲卸下,把機器前方的塑膠馬達護蓋取下。
• 檢查線路和纜線與喇叭主機板的連線,喇叭主機板的位置在馬達控制板的附近。
問題問題:跑步機的電流保護器在使用期間跳電。
解決方法解決方法:請檢查下列事項:
• 確認跑步機有連接 15 安培的專用電路。
• 確認機器沒有使用延長線或突波保護器。
• 確認機器並未插入接地故障斷路器插座或是有接地故障斷路器插座的電路上。
問題問題:跑帶在使用期間脫離中間位置。
解決方法解決方法:請檢查下列事項:
• 確認跑步機有安放於平面上。
• 確認跑帶有確實調緊並居中 (詳細說明請參閱「調緊跑帶」和「跑帶居中」小節)。
問題問題:運轉速度不正確。
解決方法解決方法:
• 關閉跑步機並且將牆壁的電源插頭拔下。
• 使用十字螺絲起子將馬達蓋螺絲的螺絲卸下。
• 請確認光學感測器已經插入馬達控制板。
• 檢查速度感測纜線/連線是否有任何可見的損壞。

繁體中文
316
基本故障排解
問 題: 在較高坡度會出現以下訊息:「速度範圍錯誤 — 結束運動」。
解決方法:解決方法:
• 此為安全功能,當由於跑帶負重與坡度角度偏高的組合導致速度超出範圍時,會自動切斷驅動馬達電源
• 為防止運動自動結束,請降低坡度等級百分比。
心率疑難排解 (僅適用於心率感測握把)
檢查您的運動環境是否存有干擾源,例如螢光燈、電腦、電子圍籬、居家保全系統或包含大型馬達的電器。上述物品可能會造成心率讀數起伏不定。
下列情況下可能會造成讀數起伏不定:
• 心率握把握得太緊。請試著以適中力道握住心率握把。
• 因為在運動時持續握住心率握把,造成手不停地移動和震動。如收到起伏不定的心率讀數,請試著握住把手直到足以監測到心率即可。
• 在運動時呼吸困難。
• 雙手因戴著戒指而使活動受限。
• 雙手乾燥或冰冷。試著摩擦雙掌取暖,讓手掌濕潤。
• 患有嚴重心律不整。
• 患有動脈硬化症或末梢血管循環病變的人。
• 測量心率的手掌皮膚特別厚。

繁體中文
317
需要協助?
如果此疑難排解章節無法解決問題,請停止使用並關閉健身車。
請聯絡客戶技術支援。
致電經銷商時可能會詢問您以下資訊。請先準備好下列項目資訊:
• 型號
• 序號
• 購買證明
以下是幾個可能經常會被詢問的疑難排解問題:
• 此問題已發生多久時間?
• 每次使用時都會發生此問題嗎?每個使用者都會遇到此問
題嗎?
• 如果有聽到噪音,聲音是從前面或後面發出來的?噪音聽起來像是 (碰撞聲、摩擦聲、嘎吱聲或唧唧聲等)?
• 跑步機是否有按照保養時程定期保養?
回答上述及其他問題,將有助於技術人員判斷需更換零件, 並提供合適的服務,讓您的跑步機再次運作!

318
RED INFO
T8.5J
RED INFO
RF Module Model RF Module Type Frequency Max Transmission Power
WLT8761M BT 5.0 & BLE 2.4G 9.22dBm
Simplied Declaration of Conformity
Johnson Health Tech (including Johnson Health
Tech Co. Ltd., Johnson Industries Shanghai, and
Johnson Industries Viet Nam), having an Authorized
Representative located in the below locations,
declares under our sole responsibility that the product
accompanied by this Simplied Declaration meets the
essential requirements of the EU and UK directives,
including the requirements of the RED Directive
(2014/53/EU) and the Radio Equipment Regulations
2017 (UK).
Déclaration de conformité simpliée
Johnson Health Tech (y compris Johnson Health Tech
Co. Ltd, Johnson Industries Shanghai, et Johnson
Industries Viet Nam), ayant un représentant autorisé
situé dans les localités ci-dessous, déclare sous sa
seule responsabilité que le produit accompagné de
cette déclaration simpliée répond aux exigences
essentielles des directives de l’UE et du Royaume-
Uni, y compris les exigences de la directive RED
(2014/53/EU) et de la réglementation sur les
équipements radio 2017 (Royaume-Uni).
Vereenvoudigde conformiteitsverklaring
Johnson Health Tech (inclusief Johnson Health Tech
Co. Ltd., Johnson Industries Shanghai en Johnson
Industries Viet Nam), met een geautoriseerde
vertegenwoordiger op de onderstaande locaties,
verklaart op eigen verantwoordelijkheid dat het
product dat vergezeld gaat van deze vereenvoudigde
verklaring voldoet aan de essentiële vereisten van de
EU- en Britse richtlijnen, waaronder de vereisten van
de RED-richtlijn (2014/53/EU) en de Radio Equipment
Regulations 2017 (VK).
The Authorised Representative for the EU is:
Johnson Health Tech. GmbH
Europaallee 51, D-50226 Frechen, Germany
Telephone: +49 (0) 2234/9997-100
Le représentant autorisé pour l’UE est:
Johnson Health Tech. GmbH
Europaallee 51, D-50226 Frechen, Allemagne
Téléphone : +49 (0) 2234/9997-100
De geautoriseerde vertegenwoordiger voor de EU is:
Johnson Health Tech. GmbH
Europaallee 51, D-50226 Frechen, Duitsland
Telefoon : +49 (0) 2234/9997-100
The Authorised Representative for the UK is:
Johnson Health Tech. Digital UK Limited
Unit 2, 40.40 Link, Mill End Road,
High Wycombe, HP12 4AX,
United Kingdom
Le représentant autorisé pour R.-U. est:
Johnson Health Tech. Digital UK Limited
Unité 2, 40.40 Link, Mill End Road,
High Wycombe, HP12 4AX,
Royaume-Uni
De geautoriseerde vertegenwoordiger voor de VK is:
Johnson Health Tech. Digital UK Limited
Eenheid 2, 40.40 Link, Mill End Road,
High Wycombe, HP12 4AX,
Verenigd Koninkrijk
EU Web Contact UK Web Contact
DE/UK REPRESENTATIVE CONTACT INFO

319
RED INFO
DE/UK REPRESENTATIVE CONTACT INFO
EU Web Contact UK Web Contact
Vereinfachte
Konformitätserklärung
Johnson Health Tech (einschließlich
Johnson Health Tech Co. Ltd.,
Johnson Industries Shanghai und
Johnson Industries Vietnam) erklärt
mit einem autorisierten Vertreter an
den unten aufgeführten Standorten
in alleiniger Verantwortung,
dass das dieser vereinfachten
Erklärung beiliegende Produkt die
grundlegenden Anforderungen der
EU- und britischen Richtlinien erfüllt,
einschließlich der Anforderungen der
RED-Richtlinie (2014/53/EU) und der
Funkanlagenverordnung 2017 (UK).
Dichiarazione di conformità
semplicata
Johnson Health Tech (incluse Johnson
Health Tech Co. Ltd., Johnson Industries
Shanghai e Johnson Industries
Viet Nam), con un rappresentante
autorizzato con sede nelle sedi sotto
indicate, dichiara sotto la propria
esclusiva responsabilità che il prodotto
corredato dalla presente Dichiarazione
semplicata soddisfa i requisiti
essenziali delle direttive UE e del Regno
Unito, inclusi i requisiti della Direttiva
RED (2014/53/UE) e del Regolamento
sulle apparecchiature radio del 2017
(Regno Unito).
Declaração Simplicada de
Conformidade
A Johnson Health Tech (incluindo
a Johnson Health Tech Co. Ltd., a
Johnson Industries Shanghai e a
Johnson Industries Viet Nam), tendo um
Representante Autorizado localizado
nos locais abaixo indicados, declara
sob a nossa exclusiva responsabilidade
que o produto acompanhado por esta
Declaração Simplicada cumpre os
requisitos essenciais das diretivas da
UE e do Reino Unido, incluindo os
requisitos da Diretiva RED (2014/53/UE)
e o Regulamento de Equipamentos de
Rádio de 2017 (Reino Unido).
Declaración Simplicada de
Conformidad
Johnson Health Tech (incluyendo
Johnson Health Tech Co. Ltd.,
Johnson Industries Shanghai y
Johnson Industries Viet Nam), con un
Representante Autorizado ubicado
en las ubicaciones indicadas a
continuación, declara bajo su exclusiva
responsabilidad que el producto
acompañado por esta Declaración
Simplicada cumple con los requisitos
esenciales de las directivas de la UE y
el Reino Unido, incluyendo los requisitos
de la Directiva RED (2014/53/UE) y el
Reglamento de Equipos Radioeléctricos
de 2017 (Reino Unido).
Der Bevollmächtigte für die EU ist:
Johnson Health Tech. GmbH
Europaallee 51, D-50226 Frechen,
Deutschland
Telephone: +49 (0) 2234/9997-100
Il rappresentante autorizzato per l'UE è:
Johnson Health Tech. GmbH
Europaallee 51, D-50226 Frechen,
Germania
Téléphone : +49 (0) 2234/9997-100
O Representante Autorizado para a UE é:
Johnson Health Tech. GmbH
Europaallee 51, D-50226 Frechen,
Alemanha
Telefoon : +49 (0) 2234/9997-100
El representante autorizado para la UE es:
Johnson Health Tech. GmbH
Europaallee 51, D-50226 Frechen,
Alemania
Telephone: +49 (0) 2234/9997-100
Der autorisierte Vertreter für das
Vereinigte Königreich ist:
Johnson Health Tech.
Digital UK Limited
Einheit 2, 40.40 Link, Mill End Road,
High Wycombe, HP12 4AX,
Vereinigtes Königreich
Il rappresentante autorizzato per il
Regno Unito è:
Johnson Health Tech.
Digital UK Limited
Unità 2, 40.40 Link, Mill End Road,
High Wycombe, HP12 4AX,
Regno Unito
O Representante Autorizado para o
Reino Unido é:
Johnson Health Tech.
Digital UK Limited
Unidade 2, 40.40 Link, Mill End Road,
High Wycombe, HP12 4AX,
Reino Unido
El representante autorizado para el
Reino Unido es:
Johnson Health Tech.
Digital UK Limited
Unidad 2, 40.40 Link, Mill End Road,
High Wycombe, HP12 4AX,
Reino Unido

T8.5J-21 Rev. 1.1 B | 1000532788 © 2025 BowFlex