

Ultra-compact MIDI keyboard controller
USER MANUAL

Contents
2
Table of Contents
Contents 2
English 3
iRig Keys 2 3
Features 4
Register your iRig Keys 2 4
1 Installation and setup 5
1.1 iOS devices 5
1.2 Mac or Windows based computers 8
2 Playing with iRig Keys 2 9
2.1 Octave shift buttons 9
2.2 Volume 9
2.3 5-8 button 10
2.4 Knobs 10
2.5 Pitch bend - iRig Keys 2 and iRig Keys 2 Pro 10
2.6 Modulation wheel - iRig Keys 2 and iRig Keys 2 Pro 10
2.7 Pedal - iRig Keys 2 and iRig Keys 2 Pro 11
2.8 Prog buttons 11
2.9 MIDI IN/OUT ports 11
3 Factory default settings 12
4 EDIT mode 12
4.1 Set the MIDI transmit channel 13
4.2 Set different velocity (touch) response 13
4.3 Assign a specific MIDI control change number to the knobs 1 to 8 14
4.4 Assign a specific MIDI control change number to the DATA knob 14
4.5 Assign a specific MIDI control change number to the DATA push 15
4.6 Send specific MIDI program changes numbers and set current program number 15
4.7 Send “All Notes Off” MIDI message - iRig Keys 2 and iRig Keys 2 Pro 16
4.8 Transpose the keyboard in semitones - iRig Keys 2 and iRig Keys 2 Pro 16
4.9 Reset iRig Keys 2 17
5 SETs 17
5.1 How to load a SET 17
5.2 How to program a SET 18
5.3 How to save a SET 18
6 Standalone mode 18
Troubleshooting 19
Warranty 19
Support and more info 19
Regulatory 20

English
3
iRig Keys 2
Thank you for purchasing iRig Keys 2.
iRig Keys 2 series is a line of versatile mobile keyboard MIDI controllers, with audio output, designed to be
directly compatible with iPhone/iPod touch/iPad. It is also compatible with Mac and Windows-based computers.
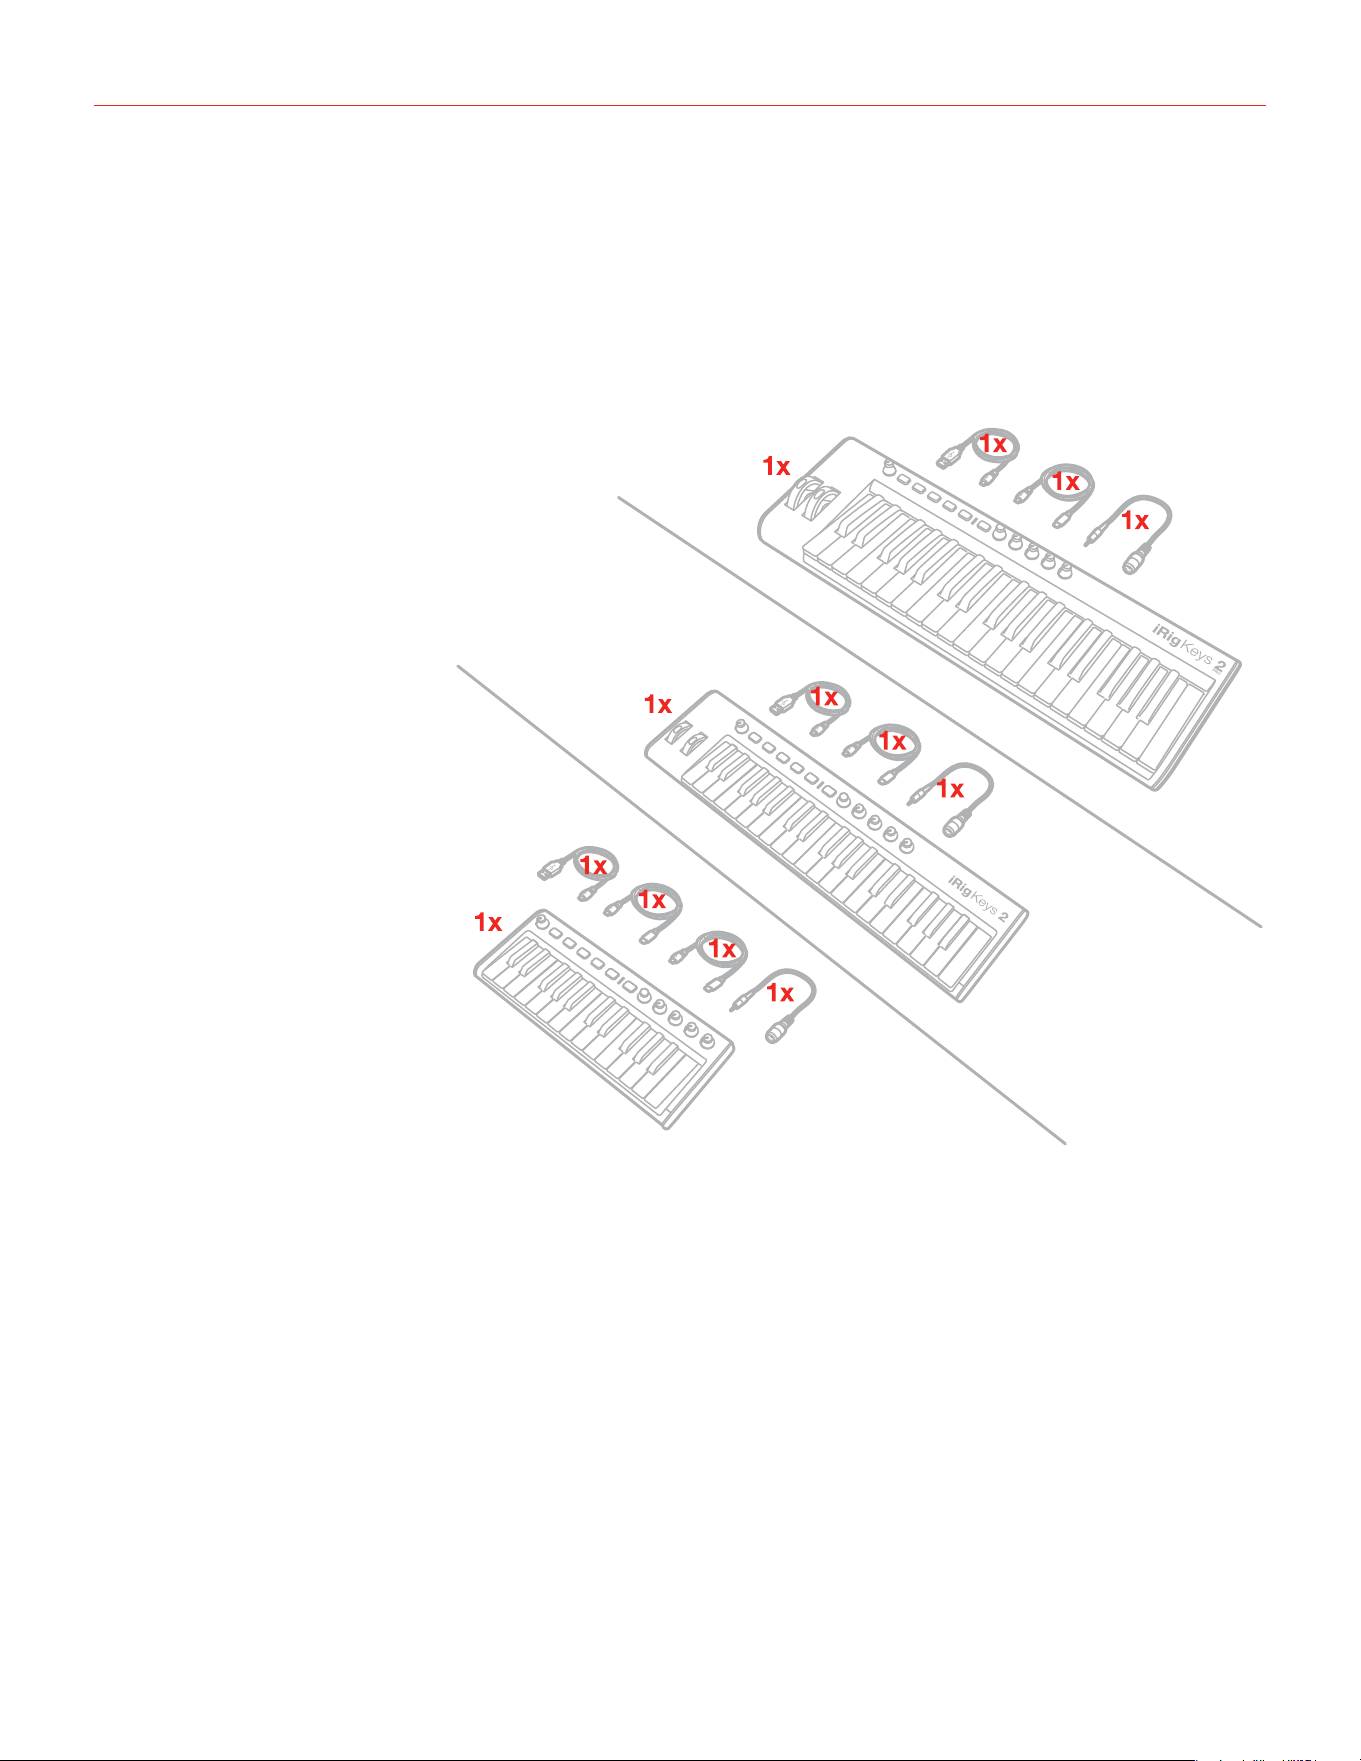
Your package contains:
iRig Keys 2 Pro
iRig Keys 2
iRig Keys 2 Mini
• iRig Keys 2.
• Lightning Cable.
• USB Cable.
• MIDI cable adapter.
• Registration Card.

English
4
Features
• 37-note velocity-sensitive keyboard (mini-size for iRig Keys 2, full-size for iRig Keys 2 Pro). 25-note velocity-
sensitive keyboard (mini-size for iRig Keys 2 Mini)
• 1/8” TRS headphones output.
• MIDI IN/OUT ports.
• Works as a stand-alone controller.
• Compatible with iPhone, iPod touch, iPad.
• Compatible with Mac and Windows-based computers.
• Pitch Bend Wheel (iRig Keys 2 and iRig Keys 2 Pro).
• Modulation Wheel (iRig Keys 2 and iRig Keys 2 Pro).
• Illuminated Octave Up/Down buttons.
• Illuminated Program Change Up/Down buttons.
• 4 User SETs for quick setup recall.
• 4+4 Assignable Control Knobs.
• Assignable push-encoder.
• Edit mode.
• Sustain / Expression Pedal jack (iRig Keys 2 and iRig Keys 2 Pro).
• USB or iOS device powered.
Register your iRig Keys 2
By registering, you can access technical support, activate your warranty and receive free JamPoints™ which will
be added to your account. JamPoints™ allow you to obtain discounts on future IK purchases! Registering also
keeps you informed of all the latest software updates and IK products.
Register at: www.ikmultimedia.com/registration
English
5
1 Installation and setup
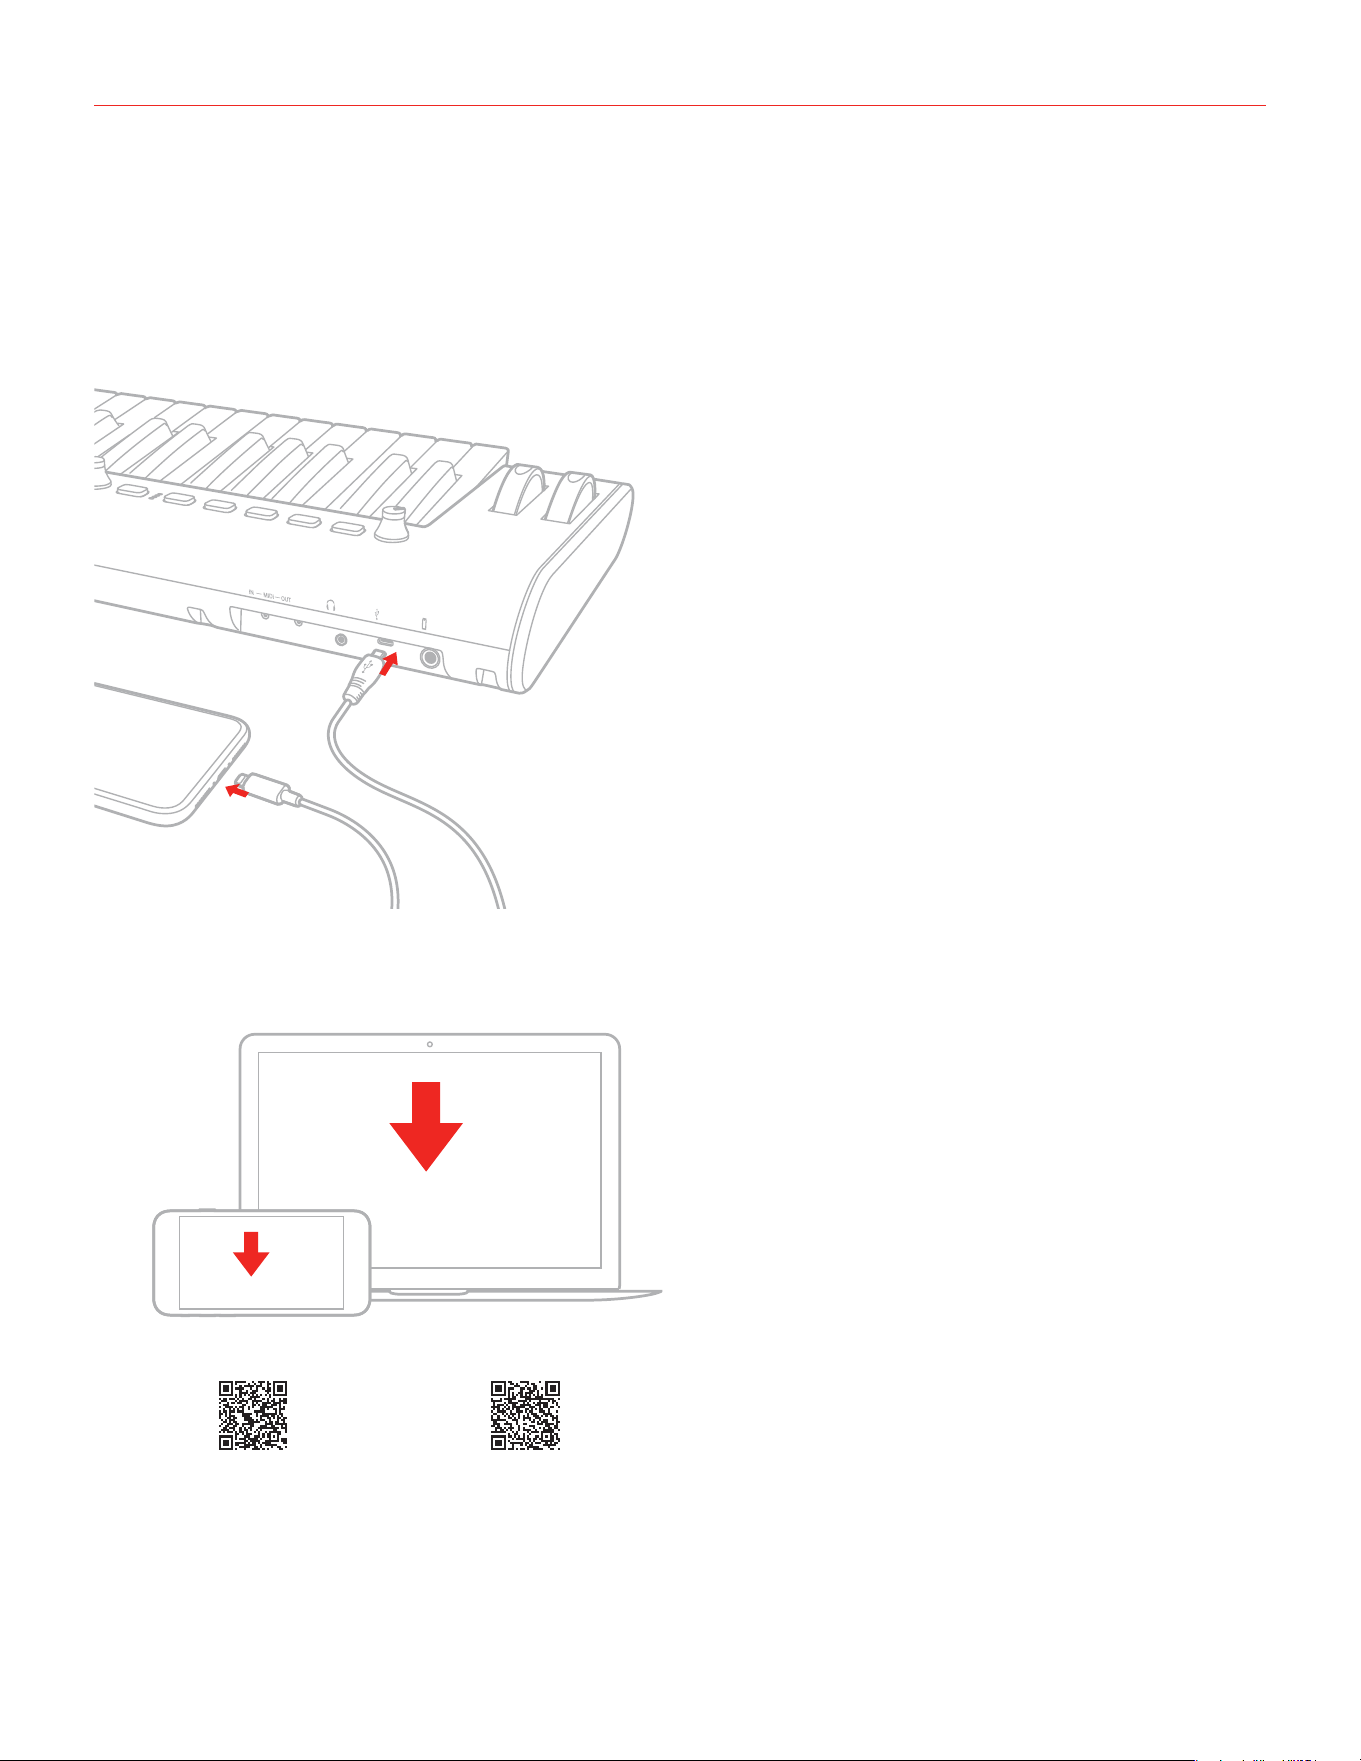
1.1 iOS devices
1. Connect the included Lightning cable to the micro-USB port on iRig Keys 2.
2. Connect the Lightning connector to the iPhone/iPod touch/iPad.
1
2
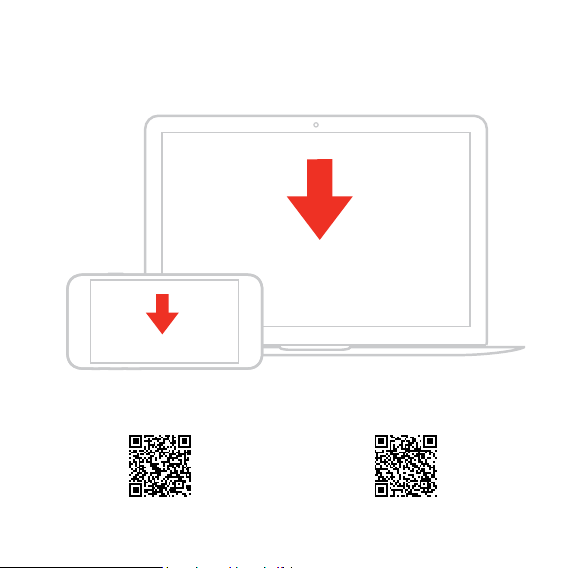
3. If you have not done so already, download the included app from the App Store and launch it.
DOWNLOAD
ikdownloads.com/irigkeys2 ikdownloads.com/irigkeys2pro
SampleTank 4 SE
SampleTank Free

English
6
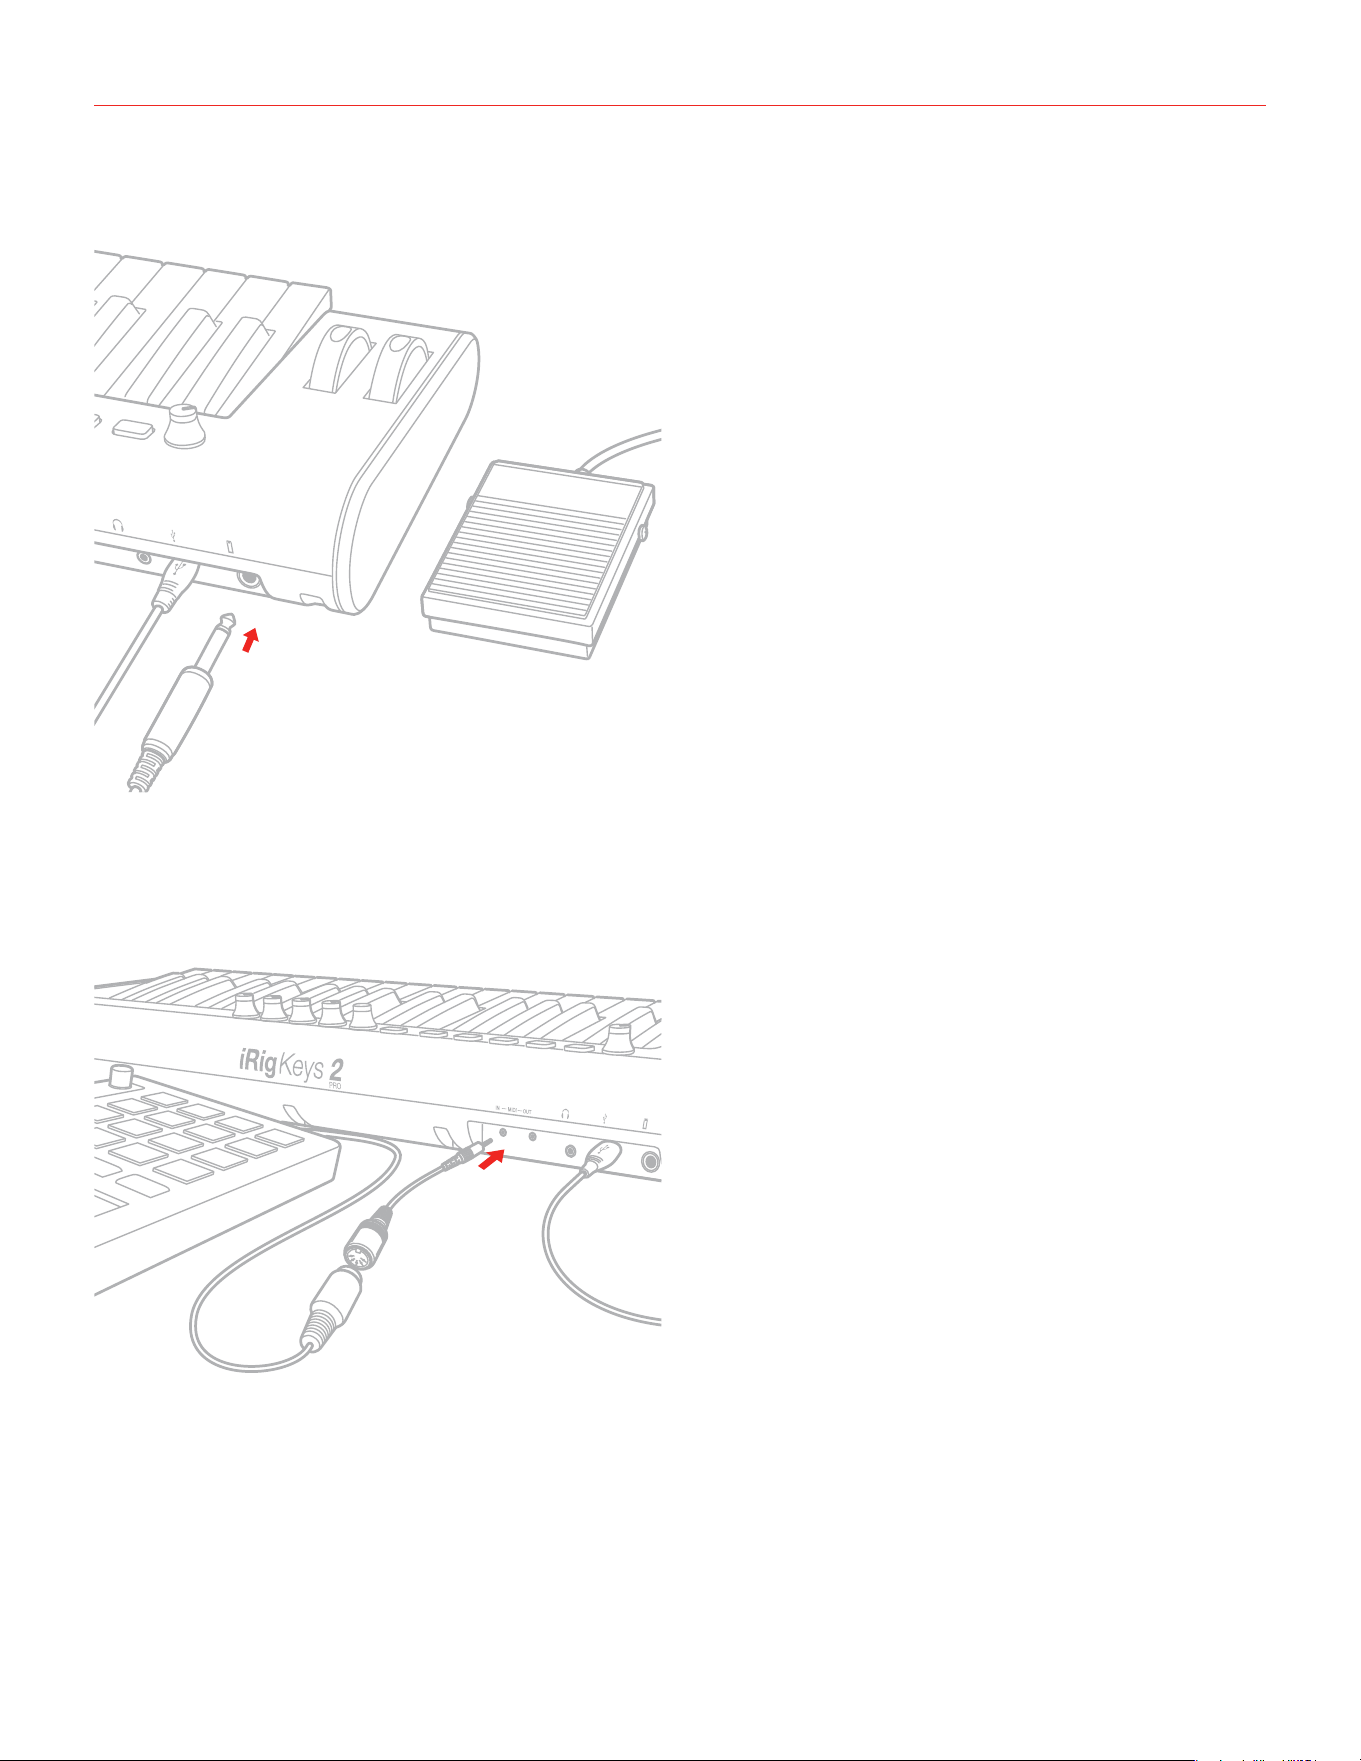
4. If needed, connect a footswitch/expression pedal to the TRS connector on iRig Keys 2 (not for Mini).
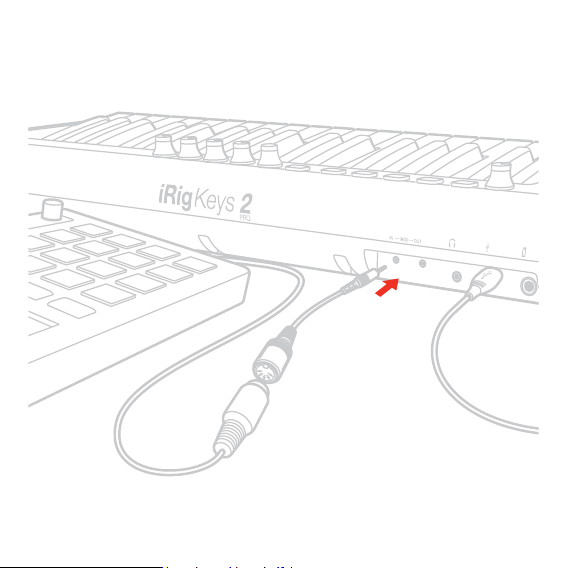
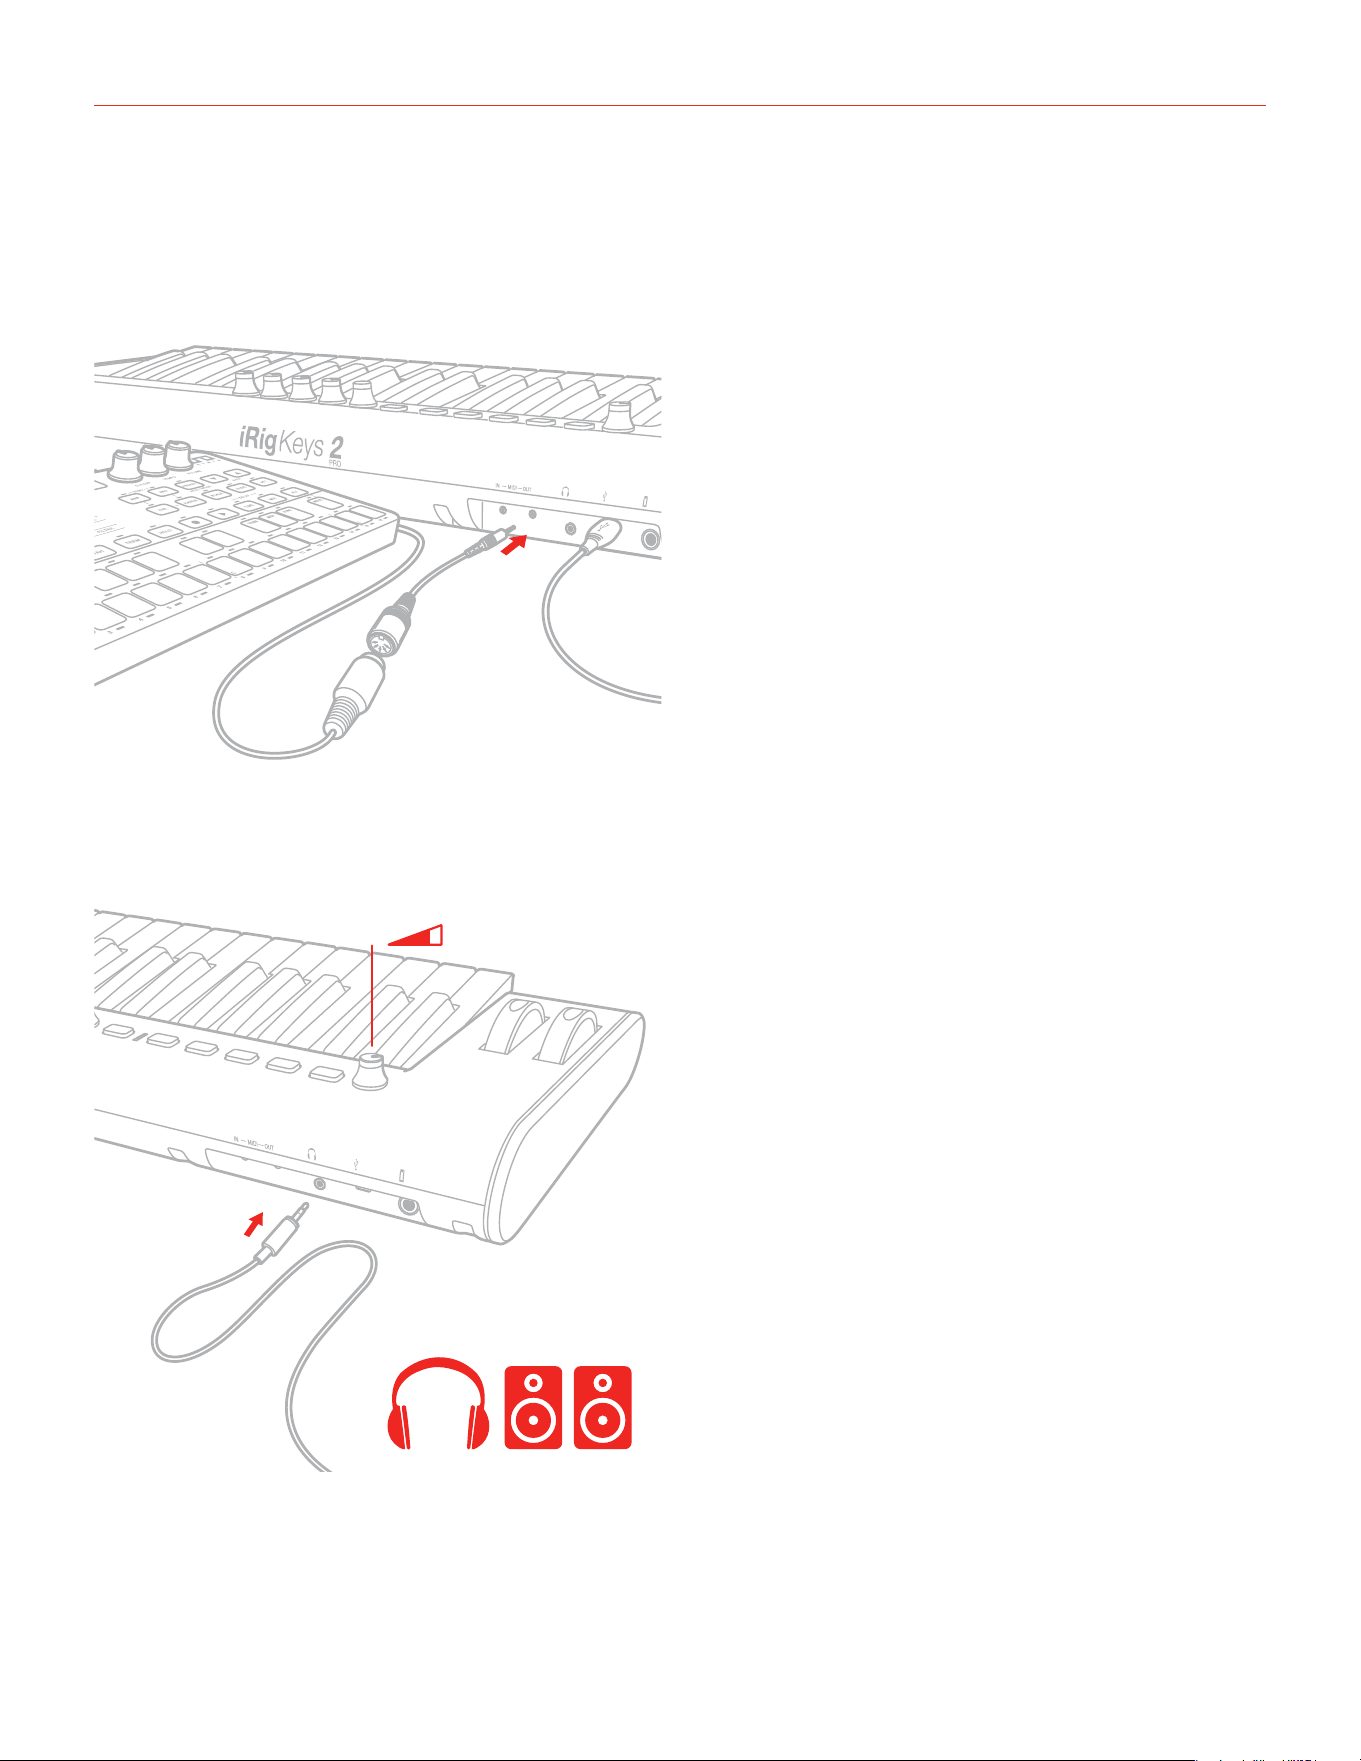
5. To play MIDI compatible apps from an external controller, use the included MIDI cable adapter and a
standard MIDI cable (not included) to connect your controller’s MIDI OUT port to iRig Keys 2’s MIDI IN port.
MIDI IN

English
7
6. To control an external MIDI device, use the included MIDI cable adapter and a standard MIDI cable (not
included) to connect the MIDI OUT port of the iRig Keys 2 to the MIDI IN port of the external device.
MIDI OUT
7. Connect your headphones or powered speakers to the Headphone Output jack on iRig Keys 2 and set its
level via the dedicated volume control.
English
8
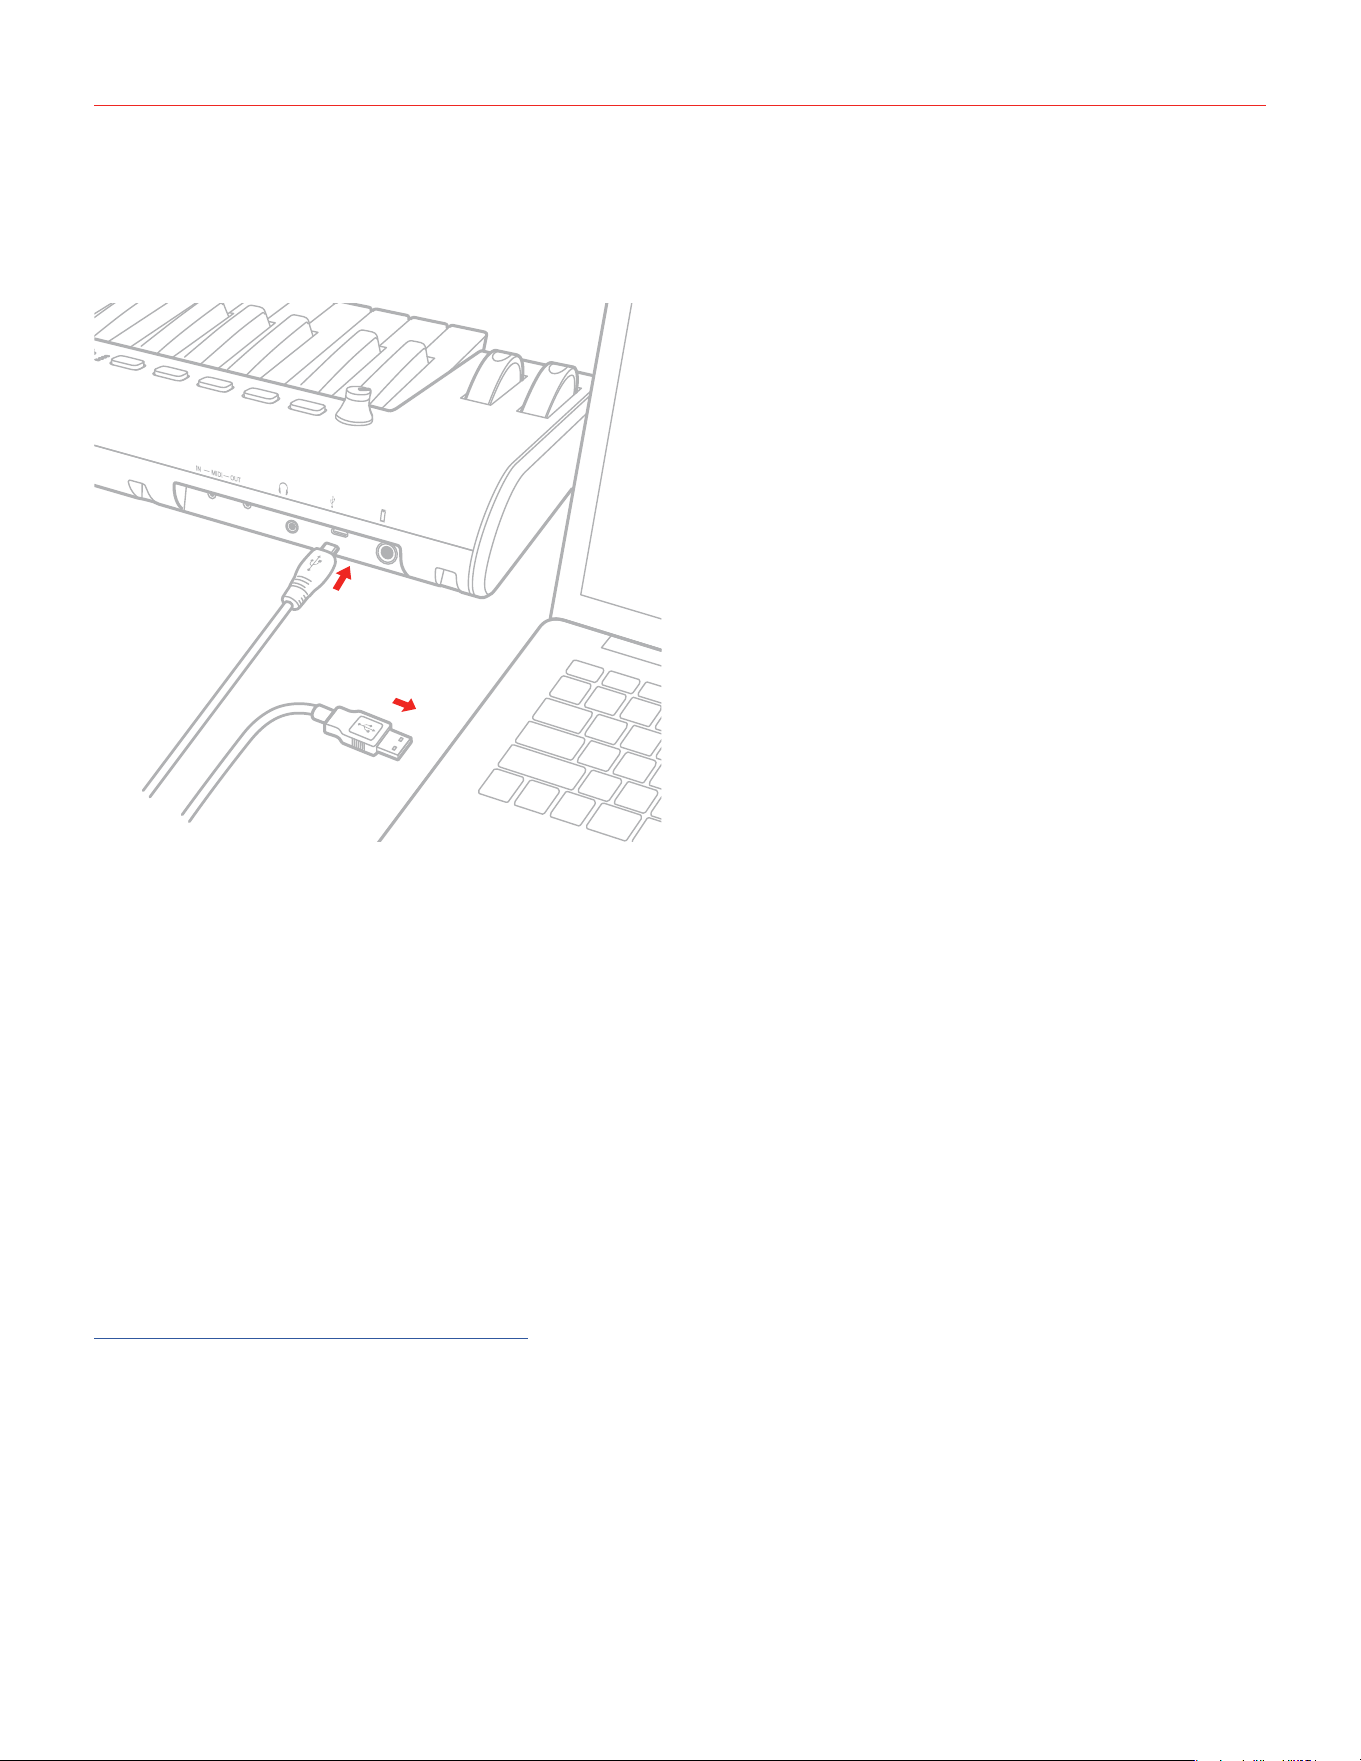
1.2 Mac or Windows based computers
1. Connect the included USB cable to the micro-USB port on iRig Keys 2.
2. Connect the USB plug to a free USB socket on your computer.
2
1
3. If needed, connect a footswitch/expression pedal to the TRS connector on iRig Keys 2.
4. To play MIDI compatible apps from an external controller, use the included MIDI cable adapter and a
standard MIDI cable (not included) to connect your controller’s MIDI OUT port to iRig Keys 2’s MIDI IN port.
5. To control an external MIDI device, use the included MIDI cable adapter and a standard MIDI cable (not
included) to connect the MIDI OUT port of the iRig Keys 2 to the MIDI IN port of the external device.
6. Depending on the software you use, you might need to select “iRig Keys 2” from the available MIDI IN
devices.
7. Connect your headphones or powered speakers to the Headphone Output jack on iRig Keys 2 and set its
level via the dedicated volume control.

English
9
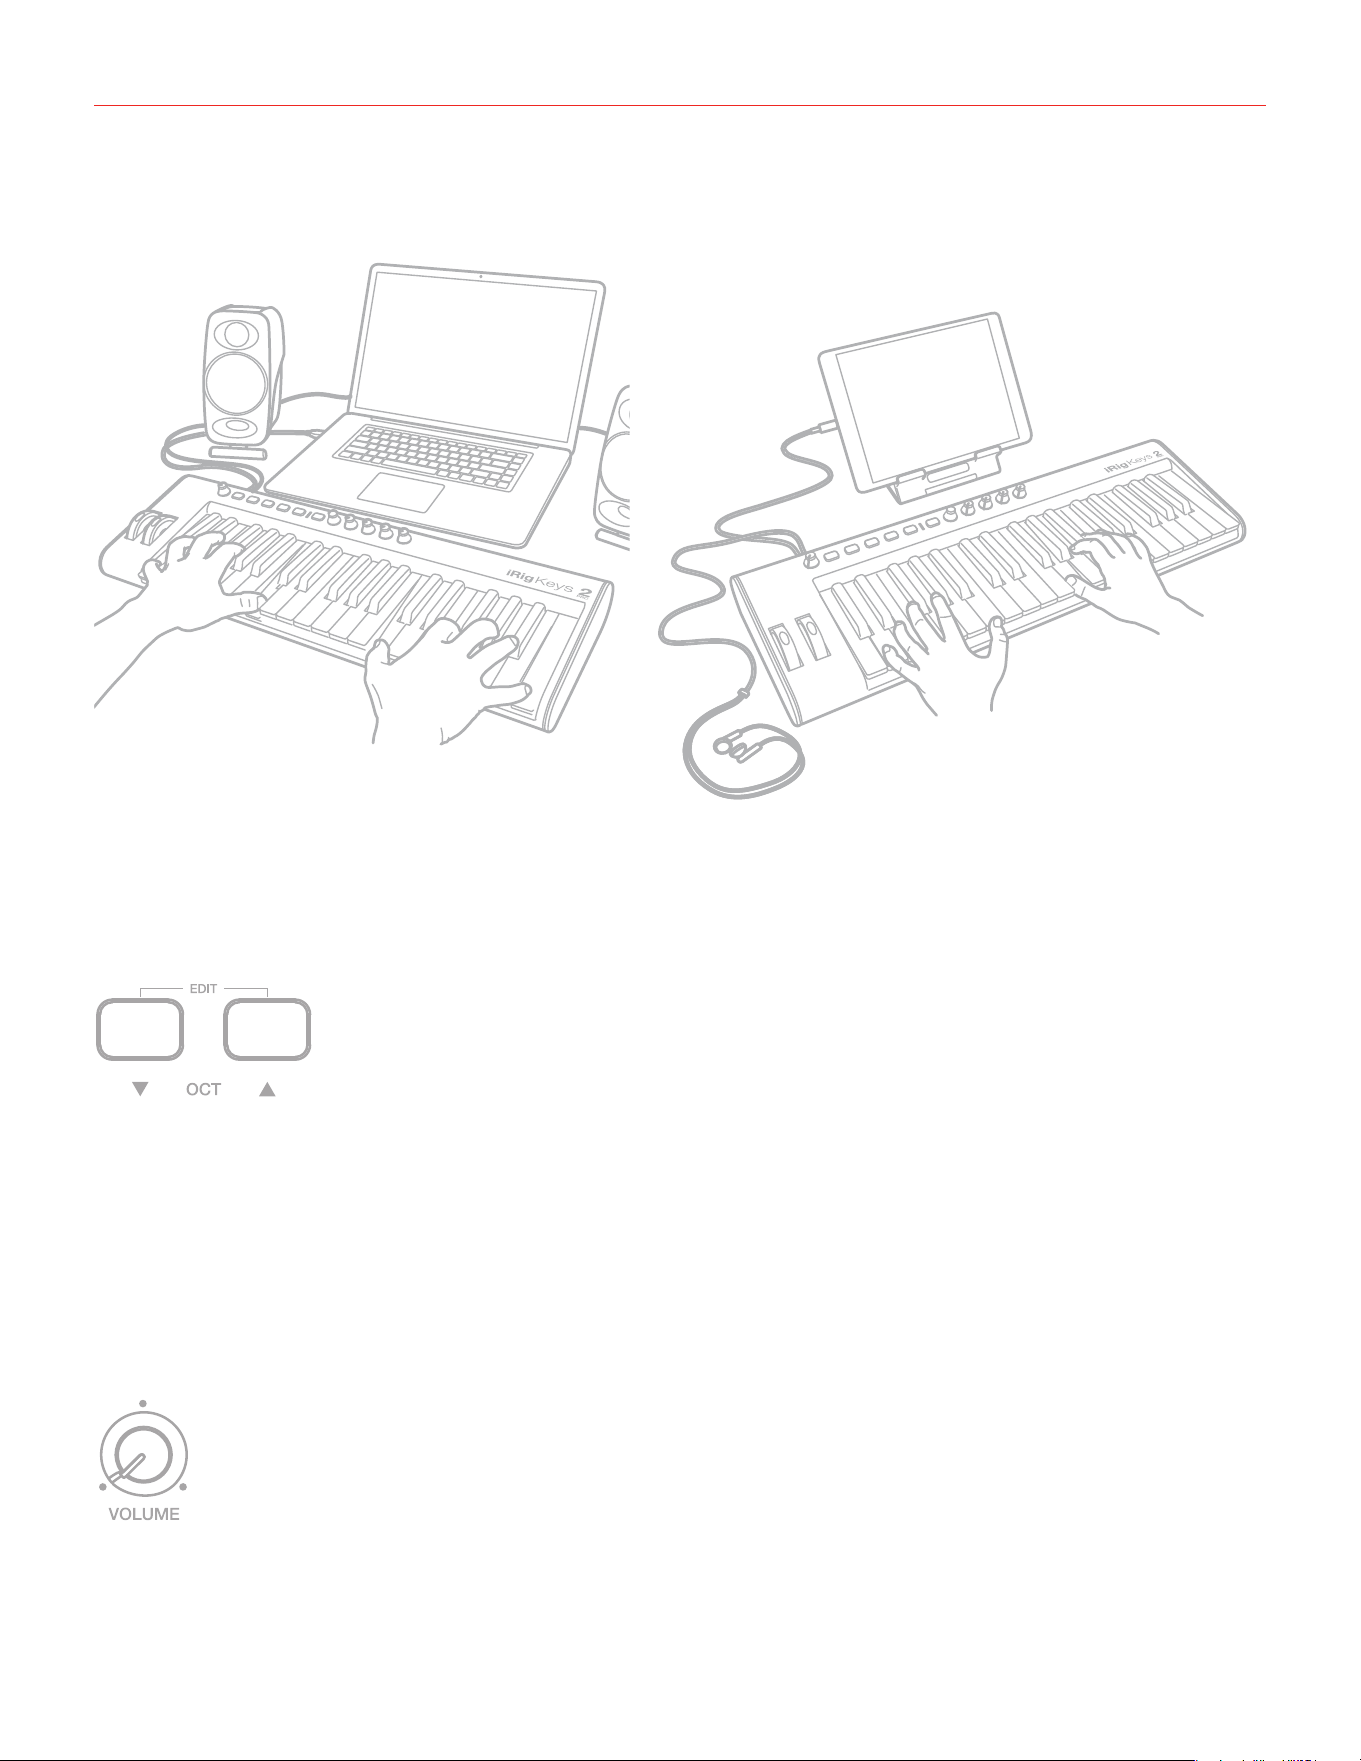
2 Playing with iRig Keys 2
You can start playing as soon as you connect iRig Keys 2 to your iOS device or computer and launch a virtual
instrument app or plug-in. Pressing the keys on the iRig Keys 2 keyboard sends MIDI note messages. iRig Keys
2 has a 37-note keyboard that is approximately centered in the middle of a full 88-note piano keyboard.
2.1 Octave shift buttons
By default, iRig Keys 2 plays notes between C2 and C5. If you need to play notes lower or higher than this
range, you can shift the whole keyboard in octaves using the OCT up and down buttons.
When the LEDs for both OCT buttons are off, no octave shift is applied. You can shift a maximum of 3 octaves
up or 4 octaves down. OCT up or down buttons will illuminate when an octave shift is active.
The OCT up or down buttons will flash each time you press them.
The number of times they flash corresponds to the number of octaves up or down the keyboard is shifted.
2.2 Volume
This knob adjust the audio level of the headphones output.

English
10
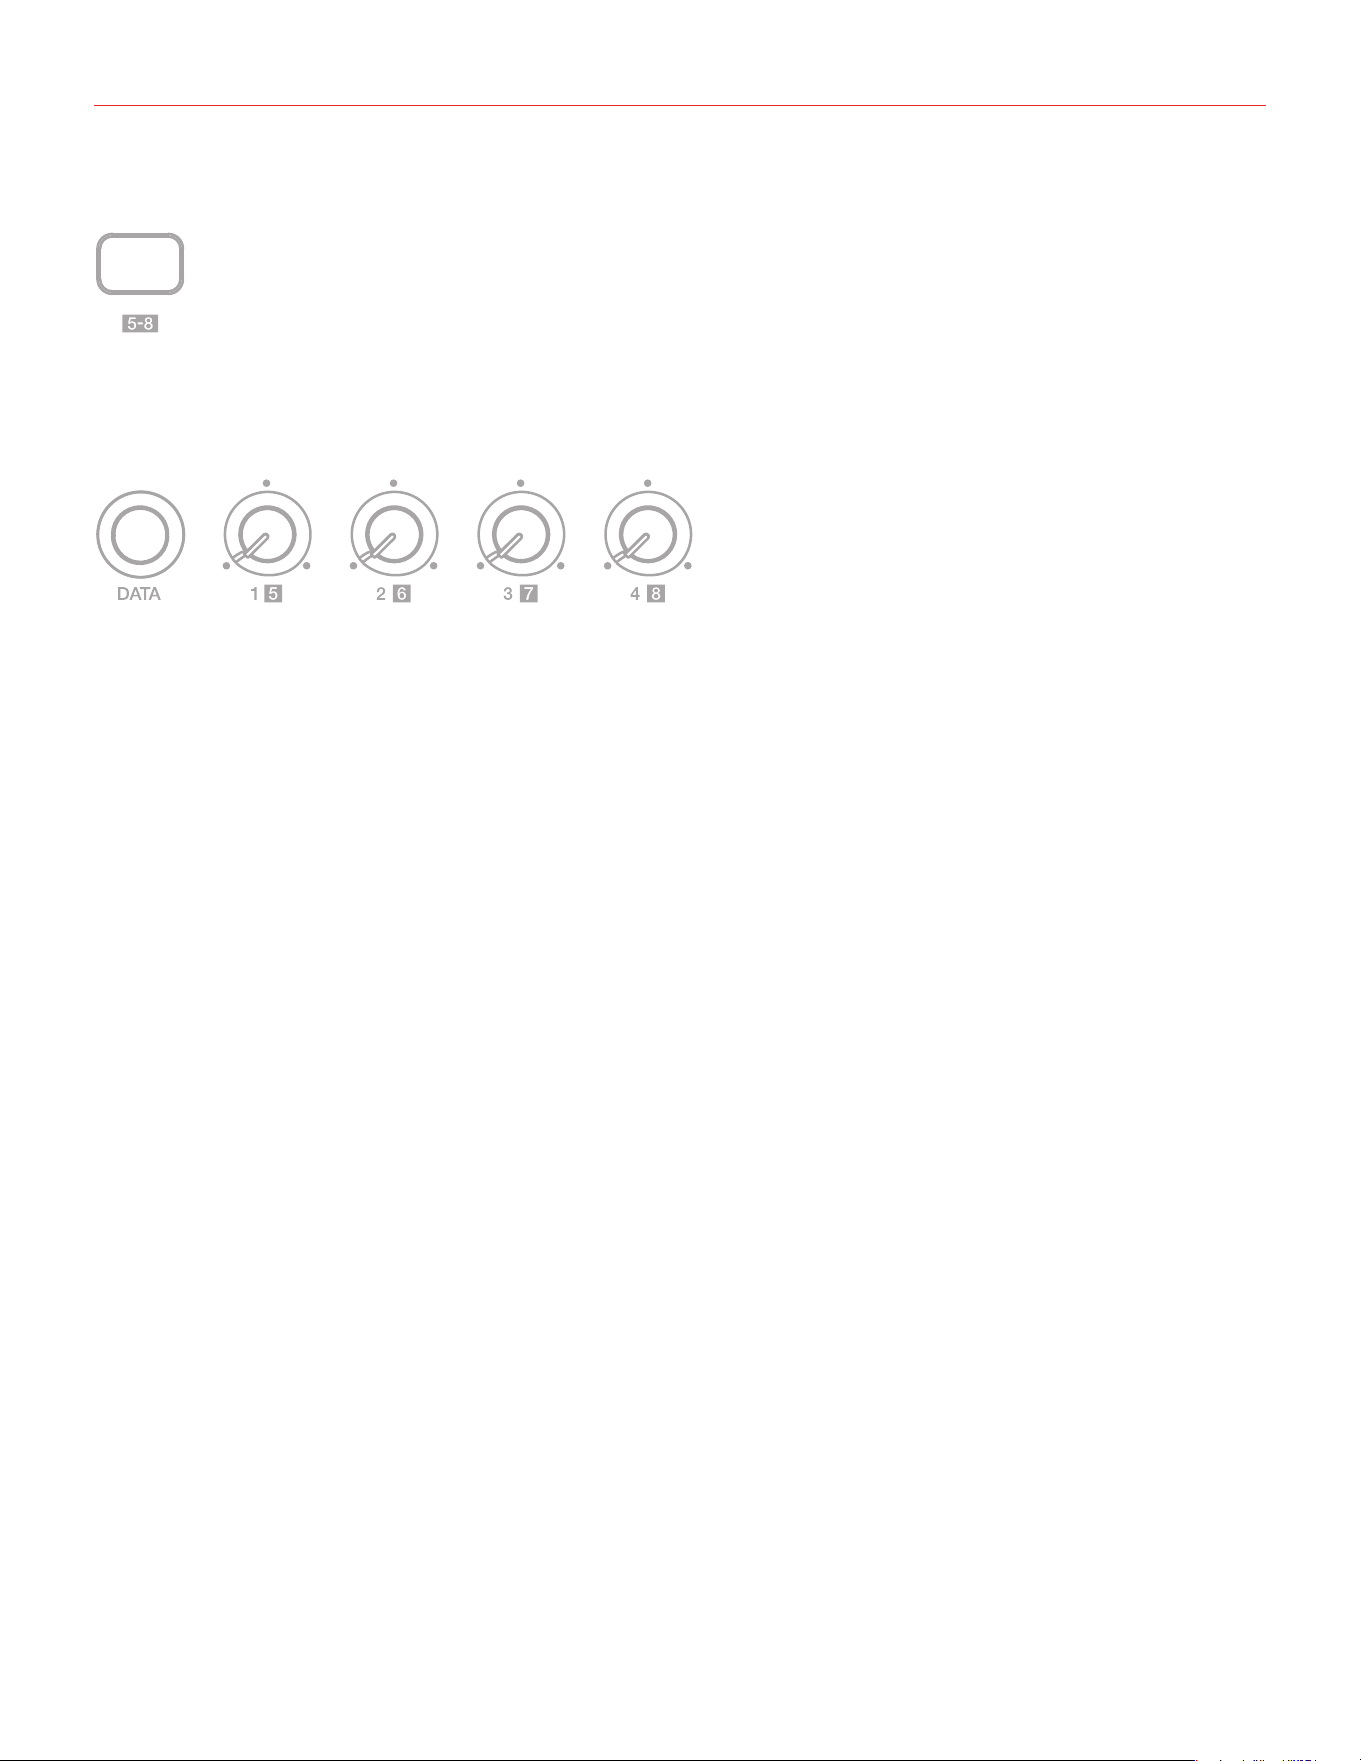
2.3 5-8 button
The 5-8 button activates the knobs from 5 to 8.
2.4 Knobs
The DATA knob act as browsing control when used in specific software or can be used to send a generic
CC number programmable by the user. Refer to the dedicated section on this manual for complete editing
instructions.
This knob can have different behavior (Relative or Absolute):
When working in Absolute (ABS) mode the knob will send values from 0 to 127 on the selected CC (+1
increments per clockwise encoder steps and -1 decrements per counter-clockwise encoder steps).
Once values 0 or 127 are reached they will be continued to be sent if the knob is rotated in the same direction.
The starting value from which to send +1 or -1 values will always be the last one sent by the knob the last time it
was moved.
When working in Relative (REL) mode the knob will send custom values to the selected CC. This will allow the
host application to browse long lists of elements easily.
The Knobs 1 to 8 can be assigned to any Control change number. When the 5-8 function is active the knobs
from 5 to 8 are activated. Refer to the dedicated section on this manual for complete editing instructions.
2.5 Pitch bend - iRig Keys 2 and iRig Keys 2 Pro
Move this wheel up or down to send Pitch Bend messages. The wheel has a central rest position.
Moving the wheel up will increase the pitch; moving it down will decrease the pitch.
Note that the amount of pitch change depends on how the receiving virtual instrument is set.
2.6 Modulation wheel - iRig Keys 2 and iRig Keys 2 Pro
Move this wheel to send Modulation Wheel messages (MIDI CC#01). The lowest position sends a value of 0; the
highest position sends a value of 127.
Most instruments use this message to control the amount of vibrato or tremolo in the sound, but note that this
depends solely on how the receiving instrument itself is programmed and not on the iRig Keys 2 settings.

English
11
2.7 Pedal - iRig Keys 2 and iRig Keys 2 Pro
iRig Keys 2 supports both Sustain Pedals and Expression Pedals. Connect a NORMALLY OPEN sustain pedal
to the jack BEFORE connecting iRig Keys 2 to the iOS device or to the computer. When the pedal is depressed,
you will sustain all keyed notes until the pedal is released. iRig Keys 2 sends MIDI CC#64 with a value of 127
when the pedal is depressed and a value of 0 when released.
Connect a continuous expression pedal to the jack BEFORE connecting iRig Keys 2 to the iOS device or to
the computer to control EXPRESSION on the sounds you’re playing. iRig Keys 2 sends MIDI CC#11 when the
expression pedal is moved. These messages will be routed both to the physical MIDI OUT port and to the USB
port.
2.8 Prog buttons
Sound modules like virtual instrument apps or plug-ins can switch sounds when they receive the Program
Change MIDI message. iRig Keys 2 sends Program Changes by pressing the PROG up or down buttons.
Starting with the currently selected program, iRig Keys 2 will send the next higher program numbers when you
press PROG UP and lower program numbers when you press PROG DOWN. To set the current program see
the chapter, “EDIT mode”.
2.9 MIDI IN/OUT ports
The physical MIDI OUT port send all the MIDI messages (CC, PC and Notes) sent by the keyboard and by the
connected host.
The MIDI messages entering the MIDI IN port will be routed to the USB port only.

English
12
3 Factory default settings
By default each SET has the following factory settings:
Program Change: 0
Keyboard MIDI CH: 1
Keyboard Velocity: 4 (Normal)
Keyboard Transpose: C
Octave shift: from C2 to C5
5-8: OFF
DATA knob: CC#22 Relative mode
DATA push: CC#23
Knob 1: CC#12
Knob 2: CC#13
Knob 3: CC#14
Knob 4: CC#15
Knob 5: CC#16 (with 5-8 button ON)
Knob 6: CC#17 (with 5-8 button ON)
Knob 7: CC#18 (with 5-8 button ON)
Knob 8: CC#19 (with 5-8 button ON)
Expression Pedal: Expression CC#11 (val=0:127)
Sustain Pedal: Sustain CC#64 Momentary action (val=127 depressed; val=0 released)
4 EDIT mode
iRig Keys 2 allows you to customize most of its parameters to match any kind of need.
In EDIT mode you can:
• Set the MIDI Transmit Channel.
• Set different touch (velocity) sensitivities.
• Assign a specific MIDI Control Change number to the knobs.
• Send specific MIDI Program Change numbers and set the current program number.
• Send “All Notes Off” MIDI message.
• Transpose the keyboard in semitones.
• Reset a specific SET to factory state.

English
13
To enter in EDIT mode, press both OCT buttons.
Both OCT buttons will light up to indicate EDIT mode.
You can exit EDIT mode at any time by pressing the key marked “CANCEL/NO”.
4.1 Set the MIDI transmit channel
MIDI instruments can respond to 16 different MIDI channels. For iRig Keys 2 to play an instrument, you need the
iRig Keys 2 MIDI Transmit Channel to match the receiving channel of your instrument.
To set the MIDI Transmit Channel:
• Enter EDIT mode (see beginning of Chapter 4).
• Press the key (MIDI CH). Both OCT buttons will flash.
• Enter the MIDI Channel number you need using the keys marked from 0 to 9. Valid numbers are from 1 to
16, so when needed, you can enter two digits consecutively.
• Press the key (ENTER/YES) to confirm your input. Both PROG buttons will flash to show the setting has
been accepted, and iRig Keys 2 will automatically exit EDIT mode.
4.2 Set different velocity (touch) response
The keyboard on iRig Keys 2 is velocity sensitive. Usually this means that the harder you hit the keys, the
louder the sound that is produced. However this ultimately depends on how the instrument you’re controlling is
programmed and your playing style.
In order to match the style of individual users, iRig Keys 2 offers six different velocity response settings:
0. FIXED, 64. This setting will always send a fixed MIDI velocity value of 64 without any touch response.
1. FIXED, 100. This setting will always send a fixed MIDI velocity value of 100 without any touch response.
2. FIXED, 127. This setting will always send a fixed MIDI velocity value of 127 without any touch response.
3. VEL SENS, LIGHT. Use this setting if you prefer a light touch on the keys. This is especially useful when you
need to play fast passages or program drum patterns.
4. VEL SENS, NORMAL. This setting is the default setting and works well in most cases.
5. VEL SENS, HEAVY. Use this setting if you prefer a heavy touch on the keys.

English
14
To set the velocity response:
• Enter EDIT mode (see beginning of Chapter 4).
• Press the key (VEL), both OCT buttons will flash.
• Enter your velocity response selection by using the keys marked from 0 to 5.
• Press the key (ENTER/YES) to confirm your input. Both PROG buttons will flash to show the setting has
been accepted, and iRig Keys 2 will automatically exit EDIT mode.
4.3 Assign a specific MIDI control change number to the knobs 1 to 8
You can customize the MIDI Control change number that is associated with each knob.
To assign a Controller number to the knobs:
• Enter EDIT mode (see beginning of Chapter 4).
• Press the key (KNOB), both OCT buttons will flash.
• Enter the knob’s number you want to edit using the keys marked from 1 to 8. For example: if you enter the
number 7, it means that you want to edit the knob 7, and so on. Invalid input will be shown by an alternating
flashing of both OCT and PROG buttons. Press the key (ENTER/YES) to confirm your input.
• Enter the MIDI CC number you need using the keys marked from 0 to 9. Valid numbers are from 0 to 119,
so you can enter up to three digits consecutively when needed. Invalid input will be shown by an alternating
flashing of both OCT and PROG buttons.
• Press the key (ENTER/YES) to confirm your input. Both PROG buttons will flash to show the setting has
been accepted, and iRig Keys 2 will automatically exit EDIT mode.
4.4 Assign a specific MIDI control change number to the DATA knob
You can customize the MIDI Control change number that is associated with the DATA knob.
To assign a Controller number to the DATA knob:
• Enter EDIT mode (see beginning of Chapter 4).
• Press the key (DATA), both OCT buttons will flash.
• Press the key (ABS) or (REL) to assign an Absolute or Relative behavior to the DATA knob.

English
15
• Enter the MIDI CC number you need using the keys marked from 0 to 9. Valid numbers are from 0 to 119,
so you can enter up to three digits consecutively when needed. Invalid input will be shown by an alternating
flashing of both OCT and PROG buttons.
• Press the key (ENTER/YES) to confirm your input. Both PROG buttons will flash to show the setting has
been accepted and iRig Keys 2 will automatically exit EDIT mode.
4.5 Assign a specific MIDI control change number to the DATA push
You can customize the MIDI Control change number that is associated with the DATA push.
To assign a Controller number to the DATA push:
• Enter EDIT mode (see beginning of Chapter 4).
• Press the key (DATA), both OCT buttons will flash.
• Push the DATA knob.
• Enter the MIDI CC number you need using the keys marked from 0 to 9. Valid numbers are from 0 to 127,
so you can enter up to three digits consecutively when needed. Invalid input will be shown by an alternating
flashing of both OCT and PROG buttons.
• Press the key (ENTER/YES) to confirm your input. Both PROG buttons will flash to show the setting has
been accepted and iRig Keys 2 will automatically exit EDIT mode.
4.6 Send specific MIDI program changes numbers and set current program number
iRig Keys 2 can send MIDI Program Changes in two ways:
1. Program Changes are sent sequentially by using the PROG up and PROG down buttons.
2. Program Changes are sent directly by sending a specific Program Change number from within EDIT mode.
After sending a specific Program Change number, the PROG up and down buttons will work sequentially
from that point.

English
16
To send a specific Program Change number:
• Enter EDIT mode (see beginning of Chapter 4).
• Press the key (PROG), both OCT buttons will start flashing.
• Enter the Program Change number using the keys marked from 0 to 9. Valid numbers are from 1 to 128, so
you can enter up to three digits consecutively when needed.
• Press the key (ENTER/YES) to confirm your input. Both PROG buttons will flash to show the setting has
been accepted, and iRig Keys 2 will automatically exit EDIT mode.
4.7 Send “All Notes Off” MIDI message - iRig Keys 2 and iRig Keys 2 Pro
Sometimes it may be necessary to stop all notes playing on the current MIDI channel when they are stuck or
when controllers are not resetting properly.
iRig Keys 2 can send MIDI CC# 121 + 123 to reset all controllers and stop all notes.
To reset all controllers and set all notes off:
• Enter EDIT mode (see beginning of Chapter 4).
• Press the key (ALL NOTES OFF).
Both PROG buttons will flash to show the reset has been sent, and iRig Keys 2 will automatically exit EDIT
mode.
4.8 Transpose the keyboard in semitones - iRig Keys 2 and iRig Keys 2 Pro
The iRig Keys 2 keyboard can be transposed in semitones. This can be useful when, for example, you need to
play a song that is in a difficult key, but you still want to physically play it in an easier or more familiar key.
To transpose iRig Keys 2:
• Enter EDIT mode (see beginning of Chapter 4).
• Press the key (TRANSP), both OCT buttons will start flashing.
• Press any note on the keyboard: from this moment on, when you press a C key, iRig Keys 2 will actually
send the MIDI note you pressed at this step.
• Both PROG buttons will flash to show the semitone transpose has been set, and iRig Keys 2 will
automatically exit EDIT mode.

English
17
Example
If you need to play a song that has been recorded in key of D#, but you would like to play it on the keyboard as
if it was in C, do the following:
• Enter in EDIT mode.
• Press the key (TRANSP).
• Press any D# key on the keyboard.
From this moment on when you press a C key on the keyboard, iRig Keys 2 will actually send a D# MIDI note.
All other notes are transposed by the same amount.
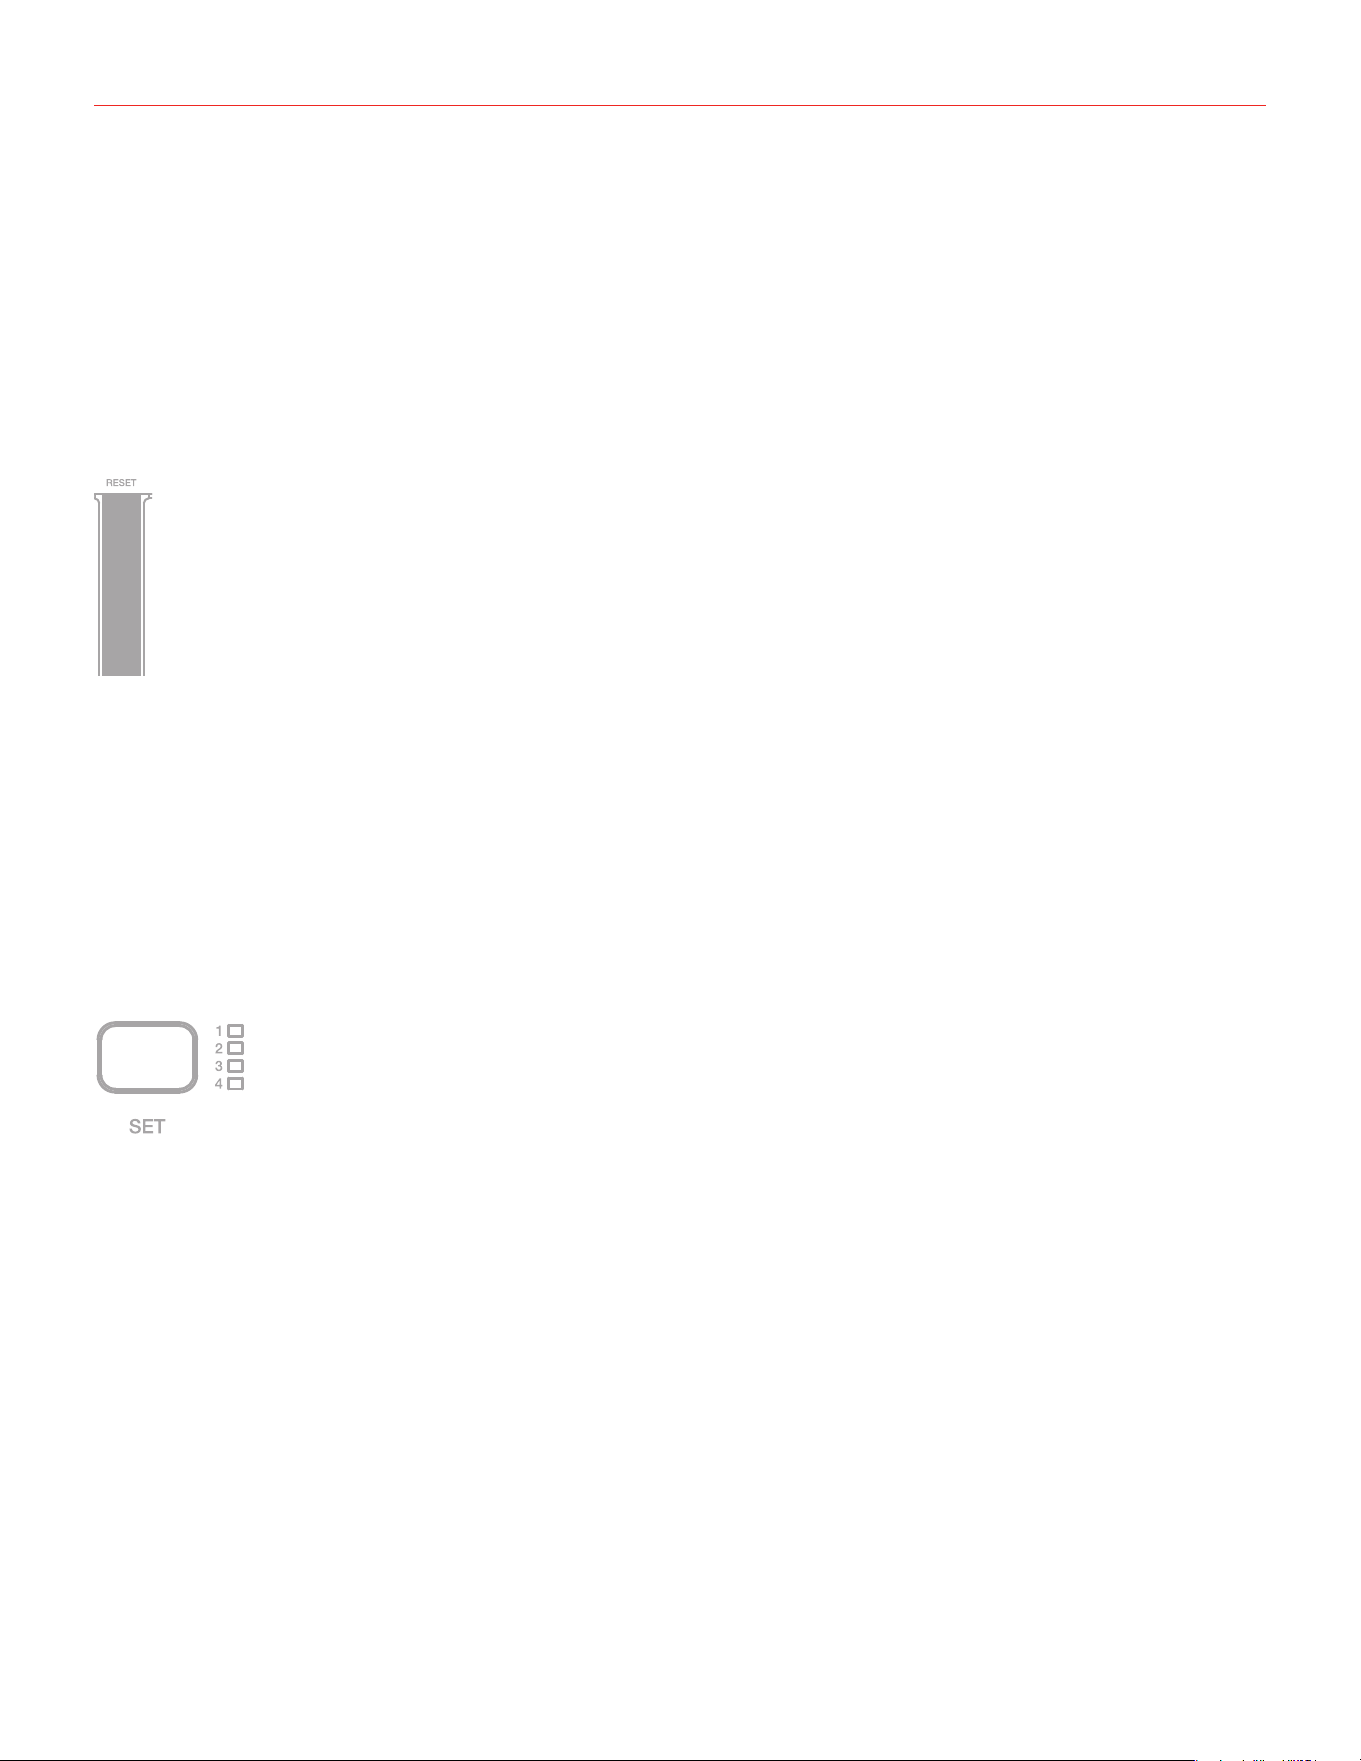
4.9 Reset iRig Keys 2
iRig Keys 2 can be reset to its original factory state. This can be done independently for each one of the SETs.
To reset iRig Keys 2’s SET:
• Load the SET you would like to reset.
• Enter EDIT mode (see beginning of Chapter 4).
• Press the key (RESET).
• Both PROG buttons will flash to show the SET has been reset, and iRig Keys 2 will automatically exit EDIT
mode.
5 SETs
iRig Keys 2 offers many options to satisfy the most demanding user. However, when the keyboard is used live or
to control many different instruments, it could be time consuming and tricky to manually set all the parameters
you need each time.
For this reason, iRig Keys 2 has 4 user configurable presets that can be recalled on the fly by pressing just one
button, these are called SETs.
5.1 How to load a SET
To load any of the four SETs just press the SET button. Each time the SET button is pressed, iRig Keys 2 loads
the NEXT SET, cycling this way:
-> SET 1 -> SET 2 -> SET 3 -> SET 4 -> SET 1 …
English
18
5.2 How to program a SET
To program a specific SET, always select it before, then set up iRig Keys 2 as you prefer (see the Chapters
“Playing with iRig Keys 2” and “Edit mode”). Until the SET is not saved, the corresponding SET’s LED will flash
periodically.
5.3 How to save a SET
To store a SET so that it will permanently save all settings that you have made, HOLD the SET button for two
seconds. The current SET LED will flash to confirm that the SET has been saved. Remember to always save a
SET if you have made modifications to it that you would like to keep.
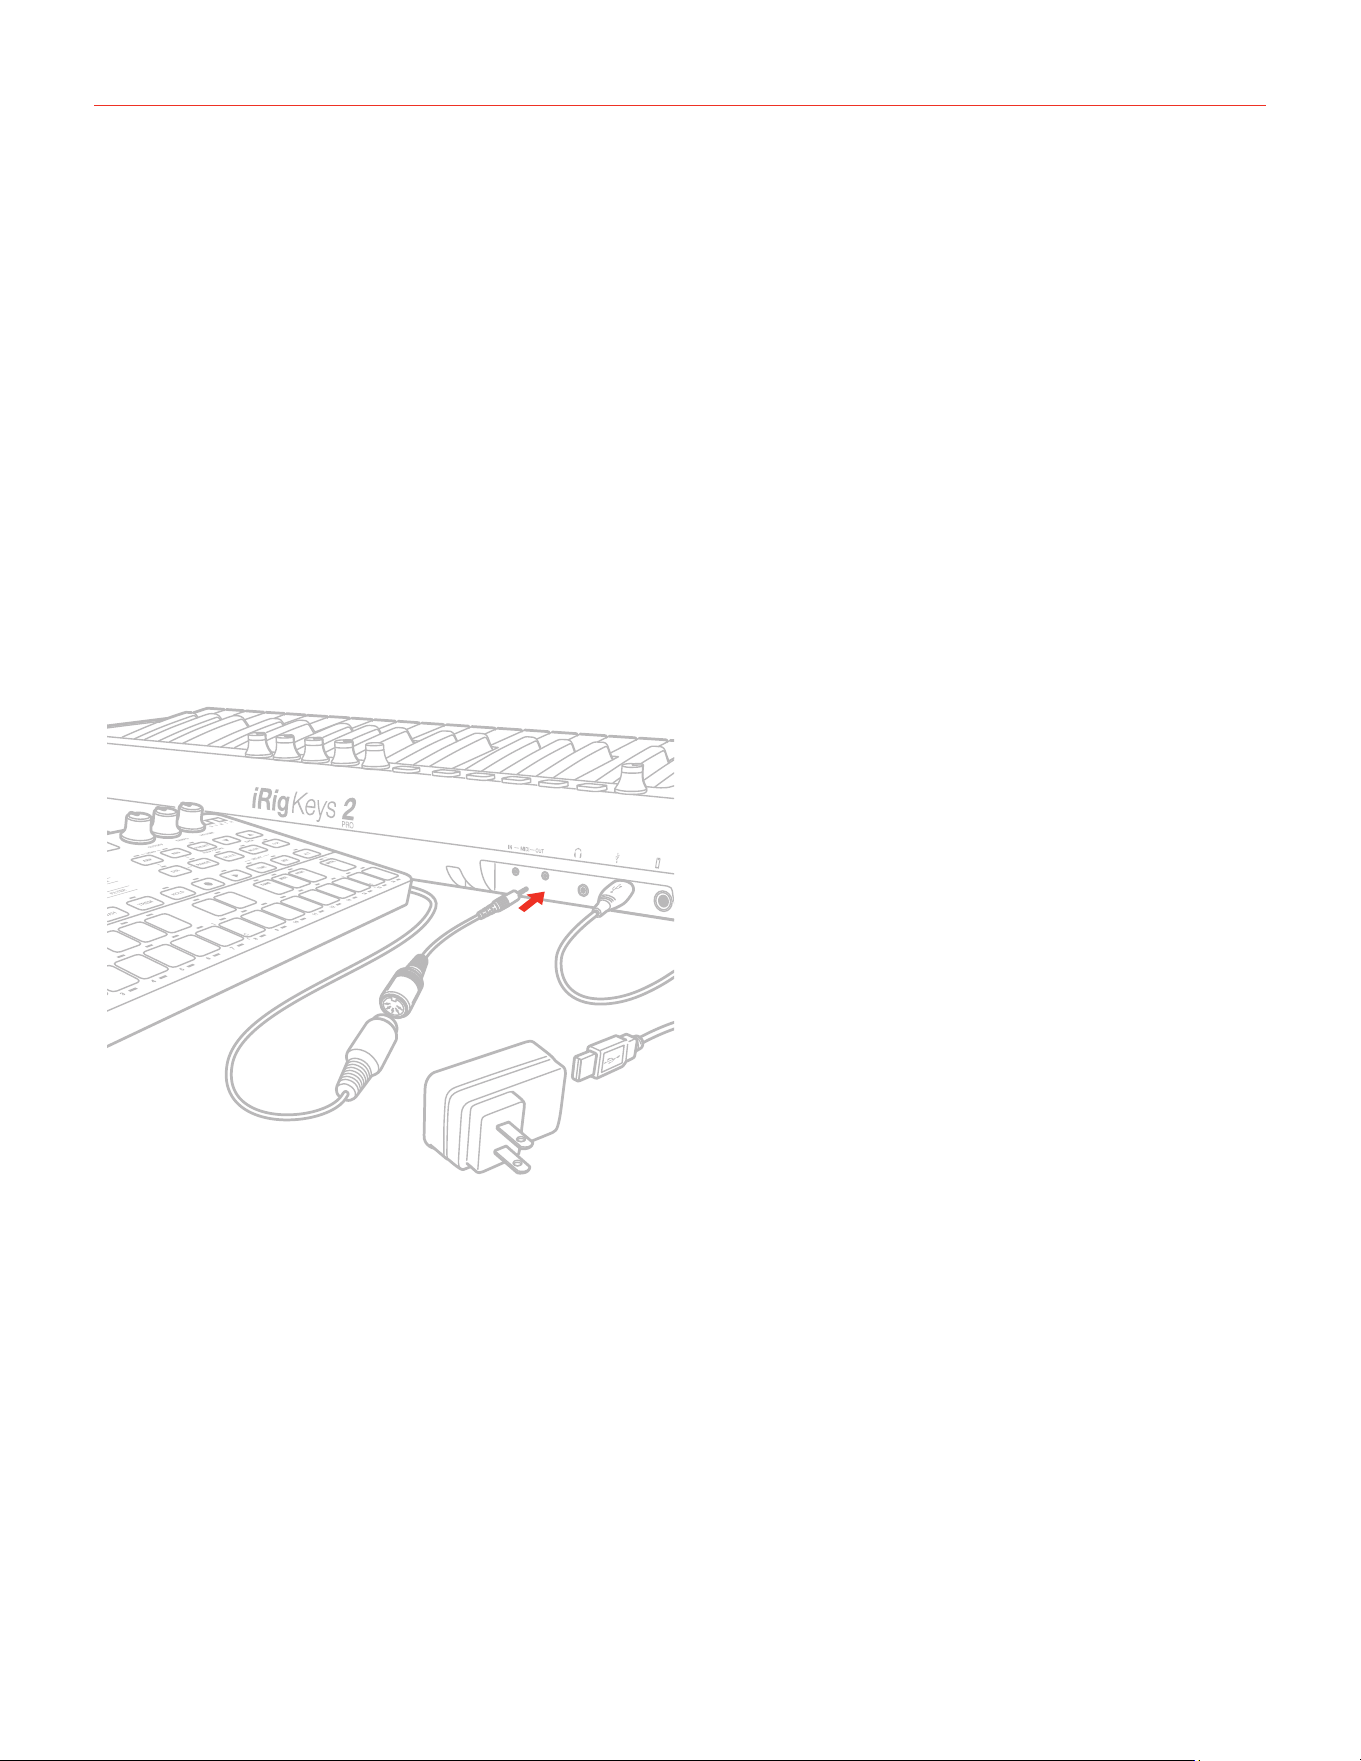
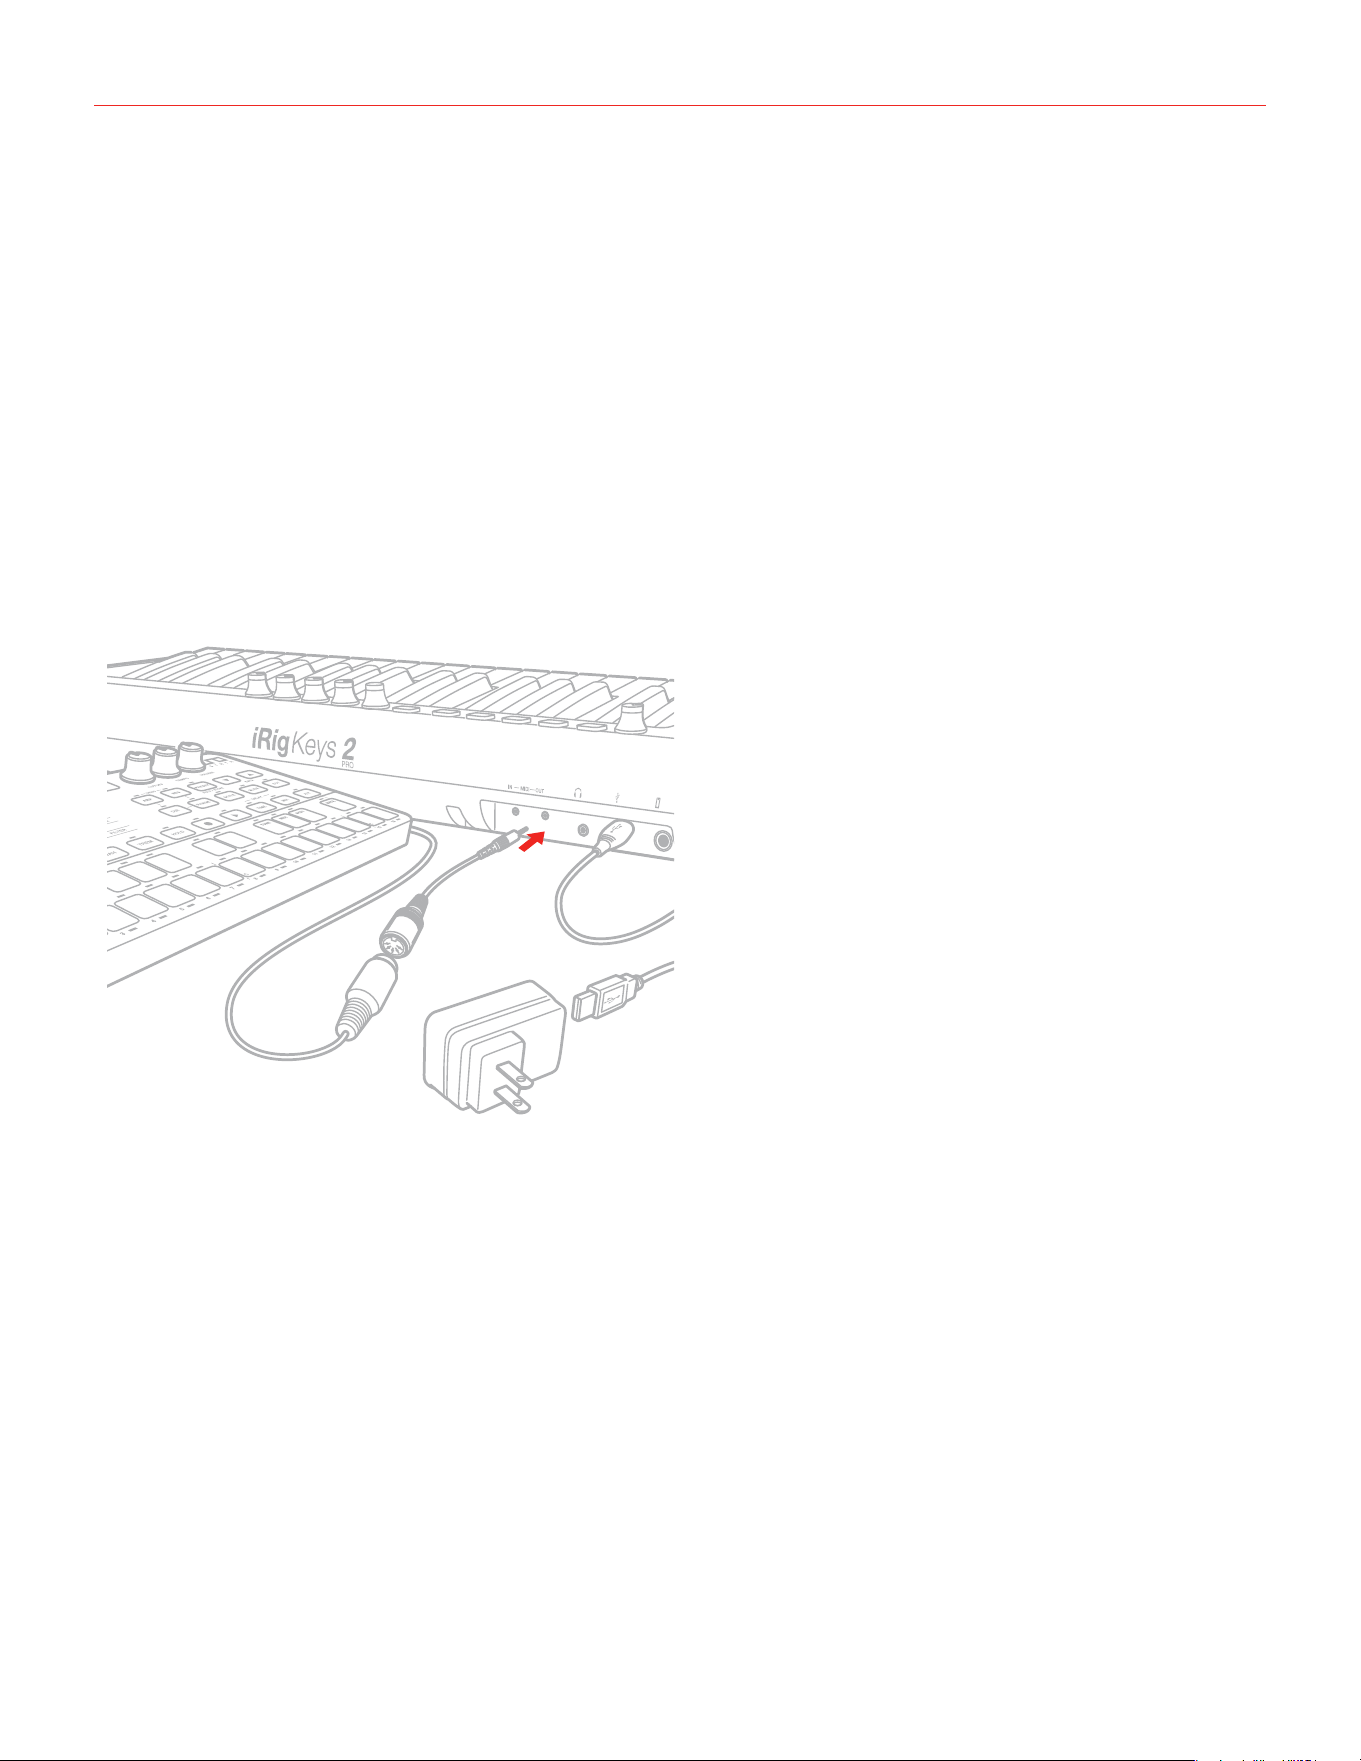
6 Standalone mode
STANDALONE MIDI OUT
5V DC
*
The iRig Keys 2 can work as a stand-alone controller when no host is connected. You can use the iRig Keys
2 to control an external MIDI module (using the physical MIDI OUT port), by connecting the iRig Keys 2’s USB
to a power outlet using an optional USB power adapter. All the messages generated by the keyboard will be
routed to the MIDI OUT port. All the editing capabilities remain active, so it is still possible to edit the keyboard
and save sets. It is also possible to connect an external MIDI device to the MIDI IN port of iRig Keys 2: in this
situation the MIDI IN messages will be routed to the physical MIDI OUT port.
* Power adapter not included

English
19
Troubleshooting
I have connected iRig Keys 2 to my iOS device, but the keyboard doesn’t turn on.
In this case, make sure an app that uses Core MIDI (like iGrand Piano or SampleTank from IK Multimedia) is
open and running on your iOS device. In order to save the iOS device battery, iRig Keys 2 only turns on when
there is an app running that can use it.
iRig Keys 2 doesn’t play my instrument even if though it is turned ON.
Make sure the MIDI Transmit Channel matches the receiving MIDI channel of your instrument. See the
paragraph “Set MIDI Transmit Channel”.
iRig Keys 2 suddenly appears to have different settings from those I used.
You have probably loaded a different SET.
Warranty
Please visit:
www.ikmultimedia.com/warranty
for the complete warranty policy.
Support and more info
www.ikmultimedia.com/support
www.irigkeys2.com
Apple is not responsible for the operation of this device or its compliance with safety and regulatory standards.

20
Regulatory
2020/02/27
IK Multimedia
IK Multimedia Production Srl
Via dell’Industria 46, 41122 Modena, Italy
Phone: +39-059-285496 - Fax: +39-059-2861671
IK Multimedia US LLC
590 Sawgrass Corporate Pkwy, Sunrise, FL 33325
Phone: (954) 846-9101 - Fax: (954) 846-9077
IK Multimedia Asia
TB Tamachi Bldg. 1F, MBE #709,
4-11-1 Shiba, Minato-ku, Tokyo 108-0014
www.ikmultimedia.com/contact-us
“Made for iPod,” “Made for iPhone,” and “Made for iPad” mean that an electronic accessory has been designed to connect specically to iPod, iPhone, or iPad, respectively, and has been certied by
the developer to meet Apple performance standards. Apple is not responsible for the operation of this device or its compliance with safety and regulatory standards. Please note that the use of this
accessory with iPod, iPhone, or iPad may affect wireless performance.
iRig® Keys 2, iGrand Piano™ and SampleTank® are trademarks property of IK Multimedia Production Srl. All other product names and images, trademarks and artists names are the property of their
respective owners, which are in no way associated or afliated with IK Multimedia. iPad, iPhone, iPod touch Mac and Mac logo are trademarks of Apple Computer, Inc., registered in the U.S. and other
countries. Lightning is a trademark of Apple Inc. App Store is a service mark of Apple Inc.
Ultra-compact MIDI keyboard controller
ユ ー ザ ー・マ ニ ュ ア ル
Japanese

Contents
2
目次
コンテンツ2
日本語3
iRig Keys 23
主な機能4
iRig Keys 2の登録4
1 インストールと設定5
1.1iOSデバイス5
1.2macOS/WindowsPC8
2 iRig Keys 2を使用する9
2.1OCT-オクターブ シフト ボ タン 9
2.2VOLUME-ボリューム 9
2.35-8ボタン 10
2.4ノブ 10
2.5PITCH-ピッチベ ンド-iRigKeys2とiRigKeys2Pro 10
2.6MOD-モ ジュレー ションホ イー ル -iRigKeys2とiRigKeys2Pro 10
2.7ペダル-iRigKeys2とiRigKeys2Pro 11
2.8PROG-プログラムボタン 11
2.9MIDIIN/OUT(入出力)ポート 11
3 工場出荷設定 12
4 EDIT - エ ディット モ ード 12
4.1MIDI-MIDI送信チャンネル設定 13
4.2VEL-ヴ ェ ロ シ テ ィ 感 度( タ ッ チ レ ス ポ ン ス )設 定 13
4.3KNOB-MIDIコントロールチェンジ(CC)番号設定-ノブ1-8 14
4.4DATA-MIDIコントロールチャンジ(CC)番号設定-DATAノブ 14
4.5DATA-MIDIコントロールチェンジ(CC)番号設定-DATAプッシュ 15
4.6PROG-MIDIプログラムチェンジ番号送信、現在のプログラム番号設定 15
4.7ALLNOTESOFF-MIDI情報“オールノートオフ”の送信-iRigKeys2とiRigKeys2Pro 16
4.8TRANSP-キーボードトランスポーズ(半音単位)-iRigKeys2とiRigKeys2Pro 16
4.9RESET-iRigKeys2の 本 体 リ セット 17
5 SET - セット 17
5.1SETの切替 17
5.2SETの設定 18
5.3SETの保存 18
6 スタンドアローンモード 18
トラブ ル シュー ティング 19
保証 19
サポートとその他の情報について 19
Regulatory - 規制基準 20
日本語
3
iRig Keys 2
この度は、iRigKeys2をお求め頂き、誠に有難うございます。
iRigKeys2シリーズは、iPhone/iPodtouch/iPadと直接繋いて使用できる様に設計された、オーディオ出力を装備した多目的のモバイル
キーボード・MIDIコントローラーです。また、macOSとWindowsコンピューターでもご利用頂けます。
以下、パッケージ同梱物になります:
iRig Keys 2 Pro
iRig Keys 2
iRig Keys 2 Mini
•
iRigKeys2本体
•
Lightningケーブルx1本
•
USB-Aケーブルx1本
•
USB-Cケーブルx1本
(iRigKeys2Miniのみ)
•
MIDIケーブルアダプターx1
•
登録カード(RegistrationCard)x1

日本語
4
主な機能
•
37鍵ヴェロシティ対応キーボード(iRigKeys2=ミニサイズ、iRigKeys2Pro=フルサイズ)、25鍵ヴェロシティ対応ミニサイズキーボー
ド(iRigKeys2Mini)
•
1/8”TRS(3.5mmステレオミニ)ヘッドフォン出力
•
MIDI入出力ポート
•
単独のコントローラーとして動作可能(スタンドアローンモード)
•
iPhone,iPodtouch,iPadに対応
•
macOSおよびWindowsコンピューターに対応
•
ピッチベンドホイール(iRigKeys2とiRigKeys2Pro)
•
モジュレーションホイール(iRigKeys2とiRigKeys2Pro)
•
オクターブアップ/ダウンボタン(自照式)
•
プログラムチェンジアップ/ダウンボタン(自照 式)
•
4xユーザーセットの保持と切替-設定のクイックリコール
•
4+4アサイン可能なコントロールノブ
•
アサイン可能なプッシュボタン付きエンコーダー
•
エ ディット モ ード
•
サスティン/エクスプレッションペダル端子(iRigKeys2とiRigKeys2Pro)
•
USBまたはiOSデバイスによる電源供給
iRig Keys 2の登録
同梱のカードに記載されたSerialNumberを登録をすることで、テクニカルサポートへのアクセス、保証の有効および無料のJamPoints™
をお客様のアカウントを通じて受け取ることが可能になります。JamPoints™は、将来IK製品をお求め頂く際の割引としてご利用頂けます。
また、ご登録頂くことで、最新のソフトウェアアップデートやIK製品に関する情報を随時受け取ることが可能になります。
登録はこちらから:
www.ikmultimedia.com/registration
ユーザー登録後に提供される特典ソフトウェア
www.ikmultimedia.com/products/irigkeys2/index.php?p=apps
特典ソフトウェアの入手/アンロック方法
www.ikmultimedia.com/freebonuscontent/
日本語
5
1 インストールと設定
1.1iOSデバイス
1.
付属のLightningケーブルをiRigKeys2のmicro-USBポートに接続します。
2.
Lightning端子をiPhone/iPodtouch/iPadに接続します。
1
2
3.
AppStoreから付属のアプリをダウンロード(お済みで無い場合)し、起動をします。
無 料 ダウンロ ードはこちら
ikdownloads.com/irigkeys2 ikdownloads.com/irigkeys2pro
SampleTank 4 SE
SampleTank CS
日本語
6
4.
必要に応じて、iRigKeys2のTRSジャックにフットスイッチ/エクスプレッションペダルを接続します。(Miniは非対応)
5.
外部のMIDIコントローラーを接続して、同時使用する場合は、付属のMIDIケーブルアダプターをiRigKeys2のMIDIINに接続し、市販
のMIDIケーブル(別売)を用いて、MIDIアダプターとコントローラーのMIDIOUTを接続します。
MIDI IN
日本語
7
6.
MIDI音源など、外部のMIDI機器を演奏する場合は、付属のMIDIケーブルアダプターをiRigKeys2のMIDIOUTに接続し、市販のMIDI
ケーブル(別売)を用いて、MIDIアダプターとMIDI音源/デバイスのMIDIINを接続します。
MIDI OUT
7.
ヘッドフォンやパワードモニタースピーカーとの接続は、iRigKeys2ヘッドフォン出力を使用します。接続後、専用のボリュームコント
ロールで適切な音量に調節します。
日本語
8
1.2macOSおよびWindowsPC
1.
付属のUSBケーブルをiRigKeys2のmicro-USBポートに接続します。
2.
もう片側のUSB端子をコンピューターのUSBポートに接続します。
2
1
3.
必要に応じて、iRigKeys2のTRSジャックにフットスイッチ/エクスプレッションペダルを接続します。(Miniは非対応)
4.
外部のMIDIコントローラーを接続して、同時使用する場合は、付属のMIDIケーブルアダプターをiRigKeys2のMIDIINに接続し、市販
のMIDIケーブル(別売)を用いて、MIDIアダプターとコントローラーのMIDIOUTを接続します。
5.
MIDI音源など、外部のMIDI機器を演奏する場合は、付属のMIDIケーブルアダプターをiRigKeys2のMIDIOUTに接続し、市販のMIDI
ケーブル(別売)を用いて、MIDIアダプターとMIDI音源/デバイスのMIDIINを接続します。
6.
ご利用のソフトウェアによっては、“iRigKeys2”をMIDI入力デバイスとして設定をする必要があります。
7.
ヘッドフォンやパワードモニタースピーカーとの接続は、iRigKeys2ヘッドフォン出力を使用します。接続後、専用のボリュームコント
ロールで適切な音量に調節します。
備考
WindowsPCの使用時、ヘッドフォン出力から低レイテンシーで(遅延の少ない)再生音をモニターするには、iRigASIODriver
forWindowsをお使いください。iRigASIODriverforWindowsは、ユーザー登録後、下記よりダウンロードしていただけます。
iRigASIODriverforWindowsのダウンロード
www.ikmultimedia.com/userarea/drivers/
日本語
9
2 iRig Keys 2を使用する
iRigKeys2とiOSデバイスまたはコンピューターの接続を完了すれば、即座にヴァーチャルインストゥルメントやプラグインを起動して、演奏
をすることが出来ます。iRigKeys2のキーボードは、MIDIノート情報を送信します。iRigKeys2の37の鍵盤は、88鍵仕様キーボードのほぼ
中央の音域に設定されています。
2.1OCT-オクターブシフトボタン
通常、iRigKeys2のキーボードは、C2からC5の範囲のMIDIノートを送信します。高い、あるいは低い音域を演奏するには、2つのオクターブシ
フト(OCT)ボタンで、その範囲を変更します。
2つのOCTボタンのLEDが消灯している場合は、デフォルトの音域を示します。ボタン操作で、音域を最大3オクターブ上、4オクターブ下にシフ
ト出来ます。オクターブシフトを行った際、設定に応じていずれのOCTボタンが点灯し、そのことを示します。
OCTボタンを操作した際、点滅によって操作したことを示します。
その際の点滅回数が、デフォルトの範囲からシフトしたオクターブ数を示します。
2.2VOLUME-ボリューム
このノブは、ヘッドフォン出力のオーディオ音声レベルの調節に使用します。
日本語
1 0
2.35-8ボタン
5-8ボタンは、ノブ:1-4を5-8として扱う際に使用します。ボタンオン時、4つのノブはそれぞれノブ5から8として機能します。
2.4ノブ
DATAノブは、特定のソフトウェアでのブラウジング操作に使用します。それ以外の場合、ユーザー設定されたMIDICC情報を扱う汎用のコン
トローラーとしても利用可能です。設定に関する詳細は、このマニュアルの該当項目に記載しています。
このノブは、動作モード(RelativeまたはAbsolute)の設定が可能です:
Absolute(ABS=絶対値)モードでは、MIDICCの値:0から127を送信します。(エンコーダーステップは値=1に相当し、時計回りに操作した
場合、ステップ刻みごとに値が1つずつ増加し、反時計回りに操作した場合、ステップ刻みごとに値が1つずつ減少します。)
限界値の0または127に達すると、それ以上同じ方向に操作しても値は変わりません。
こ の モ ー ド で は 、ノ ブ の 直近操作(最後に操作された時点)値を基準に増減します。
Relative(REL=相対値)モードでは、MIDICCの値を特別な形で扱います。このモードは、ホストアプリケーションで長いリストのブラウジン
グ操作をする際に使用します。
4つのノブ(1/5-4/8)は、MIDICCを扱います。1つのノブで2つの情報を割当て、5-8ボタンの操作に従った情報を扱います。(5-8ボタンオフ時
はノブ1-4、オン時はノブ5-8として機能します。)設定に関する詳細は、このマニュアルの該当項目に記載しています。
2.5PITCH-ピッチベンド-iRigKeys2とiRigKeys2Pro
このホイールは、MIDIピッチベンド情報を扱います。ホイールを離すとセンターポジションに戻ります。
ホイールを上げるとピッチは上昇し、下げると下降します。
ご注意:実際のピッチベンド量は、ご利用(この情報を受け取る側)のソフトウェアの設定や仕様に依存します。
2.6MOD-モジュレーションホイール-iRigKeys2とiRigKeys2Pro
このホイールは、MIDIモジュレーションホイール情報(CC#01)を扱います。一番下のポジションで値:0、一番上で値:127を送信します。
通常、このコントロールで音色のビブラートやトレモロ量を扱いますが、その限りではありません。モジュレーションホイール(MIDICC#1)の操作
対象は、iRigKeys2ではなく、受信側の設定になります。

日本語
1 1
2.7ペダル-iRigKeys2とiRigKeys2Pro
iRigKeys2は、サスティンペダルやエクスプレッションペダルを接続して使用することが可能です。サスティンペダルを接続する場合、iRig
Keys2をiOSデバイスやコンピューターと繋ぐ前に接続しておきます。この際、ペダルは踏まずにオープンの状態してから、iOSデバイスやコ
ンピューターと接続をして下さい。iRigKeys2はMIDICC#64を扱い、サスティンペダルを踏み込んだ場合、値:127が送信され、全てのMIDI
ノートにサスティン効果が適用されます。ペダルを足を離すと値:0が送信されます。
エクスプレッションペダルを接続する場合、iRig Keys 2をiOSデバイスやコンピューターと繋ぐ前に接続しておきます。ペダルを動かすと、
iRigKeys2はその動作に従ったMIDICC#11の値を送信します。これらの情報は、MIDIOUTポートとUSBポートを通じて送信されます。
2.8PROG-プログラムボタン
2つのPROG(プログラム)ボタンは、MIDIのプログラムチェンジ情報を扱います。ボタン操作で、プログラムチェンジ番号が+1または-1、iRig
Keys2から送信されます。プログラムチェンジ情報は、主に音色の切り替えに使用し、それに対応したソフトウェアや音 源 モ ジュールで扱うこと
が可能です。
これらのボタン操作に応じて、対応の音源モジュールやヴァーチャルインストゥルメントは、現在のプログラム番号から1つ次(アップボタン操
作)、または1つ前(ダウンボタン操作)に切替ります。現在のプログラム番号の設定に関する詳細は、このマニュアルの“エディットモード”の章
に記 載しています。
2.9MIDIIN/OUT(入出力)ポート
MIDIOUTポートは、キーボード本体とUSB接続を介したホストアプリケーションのMIDI情報(CC、プログラムチェンジ、ノート)を出力します。
MIDIINポートから入力されたMIDI情報は、USBポートに送られます。

日本語
1 2
3 工場出荷設定
工場出荷時の設定は以下の通りです(全セット共通):
プログラムチェンジ:0
キーボードMIDIチャンネル:1
キーボードヴェロシティ: 4(Normal)
キー ボードトランス ポーズ :C
オクターブシフト: C2~C5
5-8:OFF
D AT Aノブ: CC#22Relativeモード
DATAプッシュ: CC#23
ノブ1 : CC#12
ノブ2 : CC#13
ノブ3 :CC#14
ノブ4 : CC#15
ノブ5 : CC#16(5-8ボタン=オン)
ノブ6 : CC#17(5-8ボタン=オン)
ノブ7 : CC#18(5-8ボタン=オン)
ノブ8 :CC#19(5-8ボタン=オン)
エクスプレッションペ ダル :ExpressionCC#11(値=0~127)
アッスティンペ ダル : SustainCC#64(モメンタリー、オン値=127、オフ値=0)
4 EDIT - エディットモード
iRigKeys2は、ご自身の用途に合わせて殆どのパラメーター設定をカスタマイズすることが出来ます。
エディットモードでは、以下の設定変更と実行が可能です:
•
MIDI送信チャンネル設定.
•
キーボードのタッチレスポンス(ヴェロシティ感度)設定
•
ノブのMIDIコントロールチェンジ(CC)情報の割当
•
特定のMIDIプログラムチェンジ番号の送信と現在のMIDIプログラムチェンジ番号設定
•
“オールノートオフ”MIDI情報の送信
•
キーボードトランスポーズ設定
•
セット の ファ クトリ ー リセット

日本語
1 3
エディットモードに入るには、2つのOCTボタンを同時に押します。
エディットモードに入ると、2つのOCTが同時に点灯し、そのことを示します。
エディットモードでの設定項目の選択は、パネル上にラベル印字された鍵盤を使用します。
エディットモードを終了するには、“CANCEL/NO”とラベル印字されている箇所の鍵盤を押します。
4.1MIDICH-MIDI送信チャンネル設定
MIDI規格では16のチャンネルが策定されています。iRigKeys2のキーボードを使ってMIDI音源・楽 器 を演奏する場合、iRigKeys2の送信チャン
ネルと音源側の受信チャンネルを合わせる必要があります。
MIDI送信チャンネルの設定方法は次の通りです:
•
エディットモードに入ります。(この章の冒頭に記載)
•
“MIDICH”と印字された箇所の鍵盤を押します。この操作をすると2つのOCTボタンが点滅を開始します。
•
0から9まで、ラベル印字された鍵盤を使用して、目的のMIDIチャンネル番号を入力します。有効値は1から16までですので、必要に
応じて2桁の数字を連続して入力します。
•
設定入力を確認した後、“ENTER/YES”と印字された鍵盤を押して、設定を確定します。2つのPROGボタン点滅で設定の適用を示し、
iRigKeys2は自動で、エディットモードを終了します。
4.2VEL-ヴェロシティ感度(タッチレスポンス)設定
iRigKeys2のキーボードはヴェロシティセンシティブ仕様です。つまり、打鍵の強さに応じて音量の大小を表現出来ます。この機能を活用するこ
とで、演奏スタイルと音色の響き方を合致させたり、より豊かな表現力を生み出す源となります。
iRigKeys2には、様々演奏スタイルに合わせて6つのヴェロシティ設定が用意されています:
0.
FIXED,64(64固定):打鍵の強さに対する反応は無効となり、常にヴェロシティ値:64を出力します。.
1.
FIXED,100(100固定):打鍵の強さに対する反応は無効となり、常にヴェロシティ値:100を出力します。
2.
FIXED,127(127固定):打鍵の強さに対する反応は無効となり、常にヴェロシティ値:127(最大値)を出力します。
3.
VELSENS,LIGHT(ソフト設定):軽い鍵盤タッチの設定です。速いパッセージの演奏やドラムパターンのリアルタイム入力に適しています。
4.
VELSENS,NORMAL(通常設定):デフォルトの鍵盤タッチです。まずはこの設定で確認することをお勧めします。
5.
VELSENS,HEAVY(ヘビー設定):重い鍵盤タッチの設定です。

日本語
1 4
ヴェロシティ設定の手順は次の通りです:
•
エディットモードに入ります。(この章の冒頭に記載)
•
“VEL”と印字された箇所の鍵盤を押します。この操作をすると2つのOCTボタンが点滅を開始します。
•
0から5まで、ラベル印字された鍵盤を使用して、目的のヴェロシティ感度を設定します。
•
設定入力を確認した後、“ENTER/YES”と印字された鍵盤を押して、設定を確定します。2つのPROGボタン点滅で設定の適用を示し、
iRigKeys2は自動で、エディットモードを終了します。
4.3KNOB-MIDIコントロール・チェンジ番号設定-ノブ1-8
ノブ1-8はそれぞれ、扱うMIDIコントロールチェンジ(CC)情報の関連付けを個別にカスタマイズすることが可能です。
ノブ1-8のコントロールチェンジ割当て方法は次の通りです:
•
エディットモードに入ります。(この章の冒頭に記載)
•
“KNOB”と印字された箇所の鍵盤を押します。この操作をすると2つのOCTボタンが点滅を開始します
•
1から8まで、ラベル印字された鍵盤を使用して、目的のノブを選択します。例えば、鍵盤7を押した場合、ノブ7に対する設定をします。無
効な選択をした場合、全てのOCTとPROGボタンが点滅し、注意喚起をします。目的のノブの番号に間違いなければ、“ENTER/YES”と
印字された鍵盤を押して次に進みます。.
•
0から9まで、ラベル印字された鍵盤を使用して、目的のMIDICC番号を設定します。有効値は0から119までですので、必要に応じて
3桁の数字を連続して入力します。無効値の入力は、全てのOCTとPROGボタンの点滅によって、注意喚起されます。
•
設定入力を確認した後、“ENTER/YES”と印字された鍵盤を押して、設定を確定します。2つのPROGボタン点滅で設定の適用を示し、
iRigKeys2は自動で、エディットモードを終了します。
4.4DATA-MIDIコントロール・チェンジ番号設定-DATAノブ
DATAノブが扱うMIDIコントロールチェンジ(CC)情報の関連付けをカスタマイズすることが可能です。
DATAノブのコントロールチェンジ割当て方法は次の通りです:
•
エディットモードに入ります。(この章の冒頭に記載)
•
“DATA”と印字された箇所の鍵盤を押します。この操作をすると2つのOCTボタンが点滅を開始します。
•
次にDATAノブのモード:AbsoluteもしくはRelativeを設定します。“ABS”または“REL”と印字された箇所の鍵盤、いずれかを押します。

日本語
1 5
•
0から9まで、ラベル印字された鍵盤を使用して、目的のMIDICC番号を設定します。有効値は0から119までですので、必要に応じて
3桁の数字を連続して入力します。無効値の入力は、全てのOCTとPROGボタンの点滅によって、注意喚起されます。
•
設定入力を確認した後、“ENTER/YES”と印字された鍵盤を押して、設定を確定します。2つのPROGボタン点滅で設定の適用を示し、
iRigKeys2は自動で、エディットモードを終了します。
4.5DATA-MIDIコントロール・チェンジ番号設定-DATAプッシュ
DATAノブは回した際の操作とは個別に、押した際のコントロール情報を別に扱うことが可能です。DATAノブを押した際の扱うMIDIコントロ
ールチェンジ(CC)情報の関連付けをカスタマイズすることが可能です。
DATAノブを押した際のコントロールチェンジ割当て方法は次の通りです:
•
エディットモードに入ります。(この章の冒頭に記載)
•
“DATA”と印字された箇所の鍵盤を押します。この操作をすると2つのOCTボタンが点滅を開始します。
•
D AT Aノブを 押します。
•
0から9まで、ラベル印字された鍵盤を使用して、目的のMIDICC番号を設定します。有効値は0から119までですので、必要に応じて
3桁の数字を連続して入力します。無効値の入力は、全てのOCTとPROGボタンの点滅によって、注意喚起されます。
•
設定入力を確認した後、“ENTER/YES”と印字された鍵盤を押して、設定を確定します。2つのPROGボタン点滅で設定の適用を示し、
iRigKeys2は自動で、エディットモードを終了します。
4.6PROG-MIDIプログラム・チェンジ番号送信、現在のプログラム番号設定
iRigKeys2では、2通りのMIDIプログラムチェンジ送信が可能です。
1.
2つのPROGボタンを使用して、プログラムを順番に変更します。.
2.
エディットモードで、特定のプログラムチェンジ番号を直接送信します。特定の番号送信後、2つのPROGボタンは、この番号を基準にし
たプログラムチェンジの順番切替をします。

日本語
1 6
特定のプログラムチェンジ番号送信手順は次の通りです:
•
エディットモードに入ります。(この章の冒頭に記載)
•
“PROG”と印字された箇所の鍵盤を押します。この操作をすると2つのOCTボタンが点滅を開始します。
•
0から9まで、ラベル印字された鍵盤を使用して、目的のMIDIプログラムチェンジ番号を設定します。有効値は0から128までですの
で、必要に応じて3桁の数字を連続して入力します。
•
設定入力を確認した後、“ENTER/YES”と印字された鍵盤を押して、設定を確定します。2つのPROGボタン点滅で設定の適用を示し、
iRigKeys2は自動で、エディットモードを終了します。
4.7ALLNOTESOFF-MIDI情報“オール・ノート・オフ”の送信-iRigKeys2とiRigKeys2Pro
オールノートオフ情報は、現在演奏中のMIDIチャンネルのノートがスタック(鳴りっぱなし)状態であったり、コントローラーが正しくリセット
されていない場合に使用します。
iRigKeys2は、MIDICC#121と123を同時送信し、全てのコントローラー情報のリセットとノートを停止します。
オールコントローラーリセットとオールノートオフの送信手順は次の通りです:
•
エディットモードに入ります。(この章の冒頭に記載)
•
“ALLNOTESOFF”と印字された箇所の鍵盤を押します。
2つのPROGボタン点滅で情報の送信完了を示し、iRigKeys2は自動で、エディットモードを終了します。
4.8TRANSP-キーボード・トランスポーズ(半音単位)-iRigKeys2とiRigKeys2Pro
TheiRigKeys2のキーボードは、半音単位でトランスポーズすることが可能です。この機能は、楽曲を別のキーで演奏する際、鍵盤ポジションを
変えずに弾くことが出来ます。つまり、和音の押さえ方を変えずに済みます。
iRigKeys2のトランスポーズ設定は次の通りです:
•
エディットモードに入ります。(この章の冒頭に記載)
•
“TRANSP”と印字された箇所の鍵盤を押します。この操作をすると2つのOCTボタンが点滅を開始します。
•
任意の鍵盤を押して、基準となるキーを設定します。そしてその時点からCの鍵盤を押すと、iRigKeys2はトランスポーズしたMIDIノート
の送信する様になります。
•
2つのPROGボタン点滅でトランスポーズ設定の適用を示し、iRigKeys2は自動で、エディットモードを終了します。
日本語
1 7
例
例えば、D#のキーで録音をした楽曲を演奏する際、通常のC調の曲の様に鍵盤演奏をする場合、以下の操作をします:
•
エ ディットモ ー ド に 入 りま す 。
•
“TRANSP”と印字された箇所の鍵盤を押します。
•
キーボードのD#の鍵盤をいずれかを押します。
そしてこの時点で、Cの鍵盤を押すと、iRigKeys2はD#のノートを送信します。同様に全てのノートは同じ量でトランスポーズされます。
4.9RESET-iRigKeys2の本体リセット
iRigKeys2は、工場出荷時の状態にリセットすることが可能です。この操作は、iRigKeys2のセットごとに行います。
iRigKeys2セットのリセット手順は次の通りです:
•
S E T ボ タン を 押 して 、リ セット をす る セット に 切 り 替 え ます 。
•
エディットモードに入ります。(この章の冒頭に記載)
•
“RESET”と印字された箇所の鍵盤を押します。
•
2つのPROGボタン点滅で現在のセットに対するリセットが完了したことを示し、iRigKeys2は自動で、エディットモードを終了します。
5 SET - セット
iRigKeys2は、offersmanyoptionstosatisfythemostdemandinguser.However,whenthekeyboardisusedliveortocontrol
manydifferentinstruments,itcouldbetimeconsumingandtrickytomanuallysetalltheparametersyouneedeachtime.
Forthisreason,iRigKeys2has4userconfigurablepresetsthatcanberecalledontheflybypressingjustonebutton,these
arecalledSETs.
iRigKeys2には、最も要求の厳しいユーザーを満足させるための多くの設定が用意されています。しかし、キーボードをライブで使用したり、
多くの異なる音源・楽器の演奏や操作に使用したりする場合、その都度、全てのパラメーターを手動で設定し直すのは、とても面倒です。
そのため、iRigKeys2にはセット(SET)と呼ばれるユーザー設定可能なプリセットが用意されており、ボタンを1つ押すだけで、予め設定さ
れたセットを最大4つ、その場で切り替えることが可能です。
5.1SETの切替
SETボタンの操作で、4つのセットを順番に切り替えることが可能です。ボタンを押す度に、iRigKeys2は、以下の様に次のセットの設定が適
用 さ れ ま す:
->SET1->SET2->SET3->SET4->SET1…
日本語
1 8
5.2SETの設定
特定のセットを設定する前に、必ず事前にセットの選択をしてからiRigKeys2の設定を行います。(設定操作については、“iRigKeys2を使用
する”と“エディットモード”の章に記載しています。)保存されていないセットは、そのセットのLEDが定期的に点滅することで、設定変更が未
保存であることを示します。
5.3SETの保存
変更したすべての設定を恒久的に保持するには、セットを保存します。セットの保存は、SETボタンを2秒間押し続けます。関連するSETLED
が点滅をしましたら、そのセットが保存されたことを示します。設定変更を保持されたい場合は、忘れずに保存操作を心がけて下さい。
6 ス タ ン ド ア ロ ー ン・モ ー ド
MIDI OUTを使用します
5V DC
*
* 電源アダプターは別売です
iRigKeys2は、iOSデバイスやコンピューターとUSB接続しない場合、あるいはホストアプリケーションが起動していない場合、単独のMIDI
コントローラーとして利用することが可能です。このことをスタンドアローンモードと呼びます。iRigKeys2のUSB端子に市販のUSB電源ア
ダプターを介して、電源コンセントに接続することで、iRigKeys2(のMIDIOUTポートを通じて)外部のMIDI音源モジュールを演奏・操作す
ることが出来ます。キーボードで発生したMIDI情報は全て、MIDIOUTポートを通じて送信されます。すべての機能は有効で、セットとして保
存することも可能です。また、外部MIDIデバイスをiRigKeys2のMIDIINポートに接続することも可能で、この場合、MIDIINで受信したMIDI
情報は、そのままMIDIOUTポートから出力されます。

日本語
1 9
ト ラ ブ ル・シュ ー ティン グ
iRig Keys 2をiOSデバイスに繋いたが、キーボードがオンにならない
この場合、ご利用のアプリがCoreMIDIに対応しているかどうか、確認をします。例えば、IKMultimediaのiGrandPianoやSampleTank
は対応していますので、これらのアプリで確認をします。また、ご利用のiOSデバイスのバッテリー残量が十分かどうかもご確認下さい。iRig
Keys2は、有効なアプリが起動している場合のみ、使用可能です。
iRig Keys 2はオンになっているが、それでもインストゥルメント・楽器の演奏が出来ない
MIDI送信チャンネルとご利用のインストゥルメント・楽器のMIDIチャンネルが合致しているかどうか、ご確認下さい。iRigKeys2のMIDIチャン
ネルの設定方法は、“MIDI送信チャンネル設定”の項目に記載しています。.
iRig Keys 2がいつもと違う設定になっている
恐らく違うセットに切り替わっている可能性があります。SETボタンを押して、セットをご確認下さい。
保証
保証規約に関しては、下記のリンクに記載しています:
www.ikmultimedia.com/warranty
サポートおよびその他の情報
www.ikmultimedia.com/support
www.irigkeys2.com
Appleはこのデバイスの動作、および安全性と規制基準への準拠に関する責務は負いません。

Regulatory
2 0
Regulatory
2020/02/27
IK Multimedia
IK Multimedia Production Srl
Viadell’Industria46,41122Modena,Italy
Phone:+39-059-285496-Fax:+39-059-2861671
IK Multimedia US LLC
590SawgrassCorporatePkwy,Sunrise,FL33325
Phone:(954)846-9101-Fax:(954)846-9077
IK Multimedia Asia
TBTamachiBldg.1F,MBE#709,
4-11-1Shiba,Minato-ku,Tokyo108-0014
www.ikmultimedia.com/contact-us
“MadeforiPod,”“MadeforiPhone,”and“MadeforiPad”meanthatanelectronicaccessoryhasbeendesignedtoconnectspecicallytoiPod,iPhone,oriPad,respectively,andhasbeen
certiedbythedevelopertomeetAppleperformancestandards.Appleisnotresponsiblefortheoperationofthisdeviceoritscompliancewithsafetyandregulatorystandards.Pleasenote
thattheuseofthisaccessorywithiPod,iPhone,oriPadmayaectwirelessperformance.
iRig®Keys2,iGrandPiano™andSampleTank®aretrademarkspropertyofIKMultimediaProductionSrl.Allotherproductnamesandimages,trademarksandartistsnamesarethepropertyof
theirrespectiveowners,whichareinnowayassociatedoraliatedwithIKMultimedia.iPad,iPhone,iPodtouchMacandMaclogoaretrademarksofAppleComputer,Inc.,registeredinthe
U.S.andothercountries.LightningisatrademarkofAppleInc.AppStoreisaservicemarkofAppleInc.
“MadeforiPod,”“MadeforiPhone,”および“MadeforiPad”は、電子アクセサリは、iPod、iPhoneおよびiPadへの接続専用に設計された製品であり、Appleが定める性 能 基 準 に適 合していることをデベロッパが認定済
みです。Appleはこのデバイスの動作、および安全性と規制基準への準拠に関する責務は負いません。このアクセサリーの使用において、iPod、iPhoneまたはiPadのワイヤレスパフォーマンスに影響する場合があります。
iRig®Keys2,iGrandPiano™およびSampleTank®は、IKMultimediaProductionSrlの登録商標です。その他の製品名、画像、アーティスト名はその権利帰属者の所有物であり、IKMultimediaとは協賛または契約関
係 に は ありません 。iPad,iPhone,iPodtouchMacとMaclogoは米国およびその他の国で登録されたAppleComputer,Inc.,の商 標です。LightningはAppleInc.の商 標です。AppStoreはAppleInc.サービスマークです。