
Mobile 2-channel audio/MIDI interface for
iPhone, iPad, Android and Mac/PC
USER MANUAL

Contents
2
Table of Contents
Contents
2
English 3
Safety information 3
iRig Pro Duo I/O 3
Register your iRig Pro Duo I/O 3
iRig Pro Duo I/O overview 4
Installation and setup 5
Battery life 5
iOS/Android devices 6
Mac/PC 10
Connecting an external power supply 10
iRig Pro Duo I/O LEDs 11
Status / Audio level LEDs 11
Phantom and MIDI LEDs 11
Direct monitoring 12
Connecting microphones 12
Dynamic microphones 13
Condenser microphones 13
Ribbon microphones 14
Connecting instruments 15
Connecting monitors and headphones 15
MIDI IN/OUT 15
MIDI IN 15
MIDI OUT 16
Setting input gain on iRig Pro Duo I/O 16
Troubleshooting 17
Specifications 18
Warranty 19
Support and more info 19
English
3
Safety information
CAUTION: RISK OF EXPLOSION IF BATTERY IS REPLACED BY AN INCORRECT TYPE. DISPOSE OF USED
BATTERIES ACCORDING TO THE INSTRUCTIONS.
iRig Pro Duo I/O can ONLY be used with:
• Consumer grade non-rechargeable CARBON-ZINC batteries
• ALKALINE batteries
• Consumer grade Ni-MH rechargeable batteries
iRig Pro Duo I/O
Thank you for purchasing iRig Pro Duo I/O.
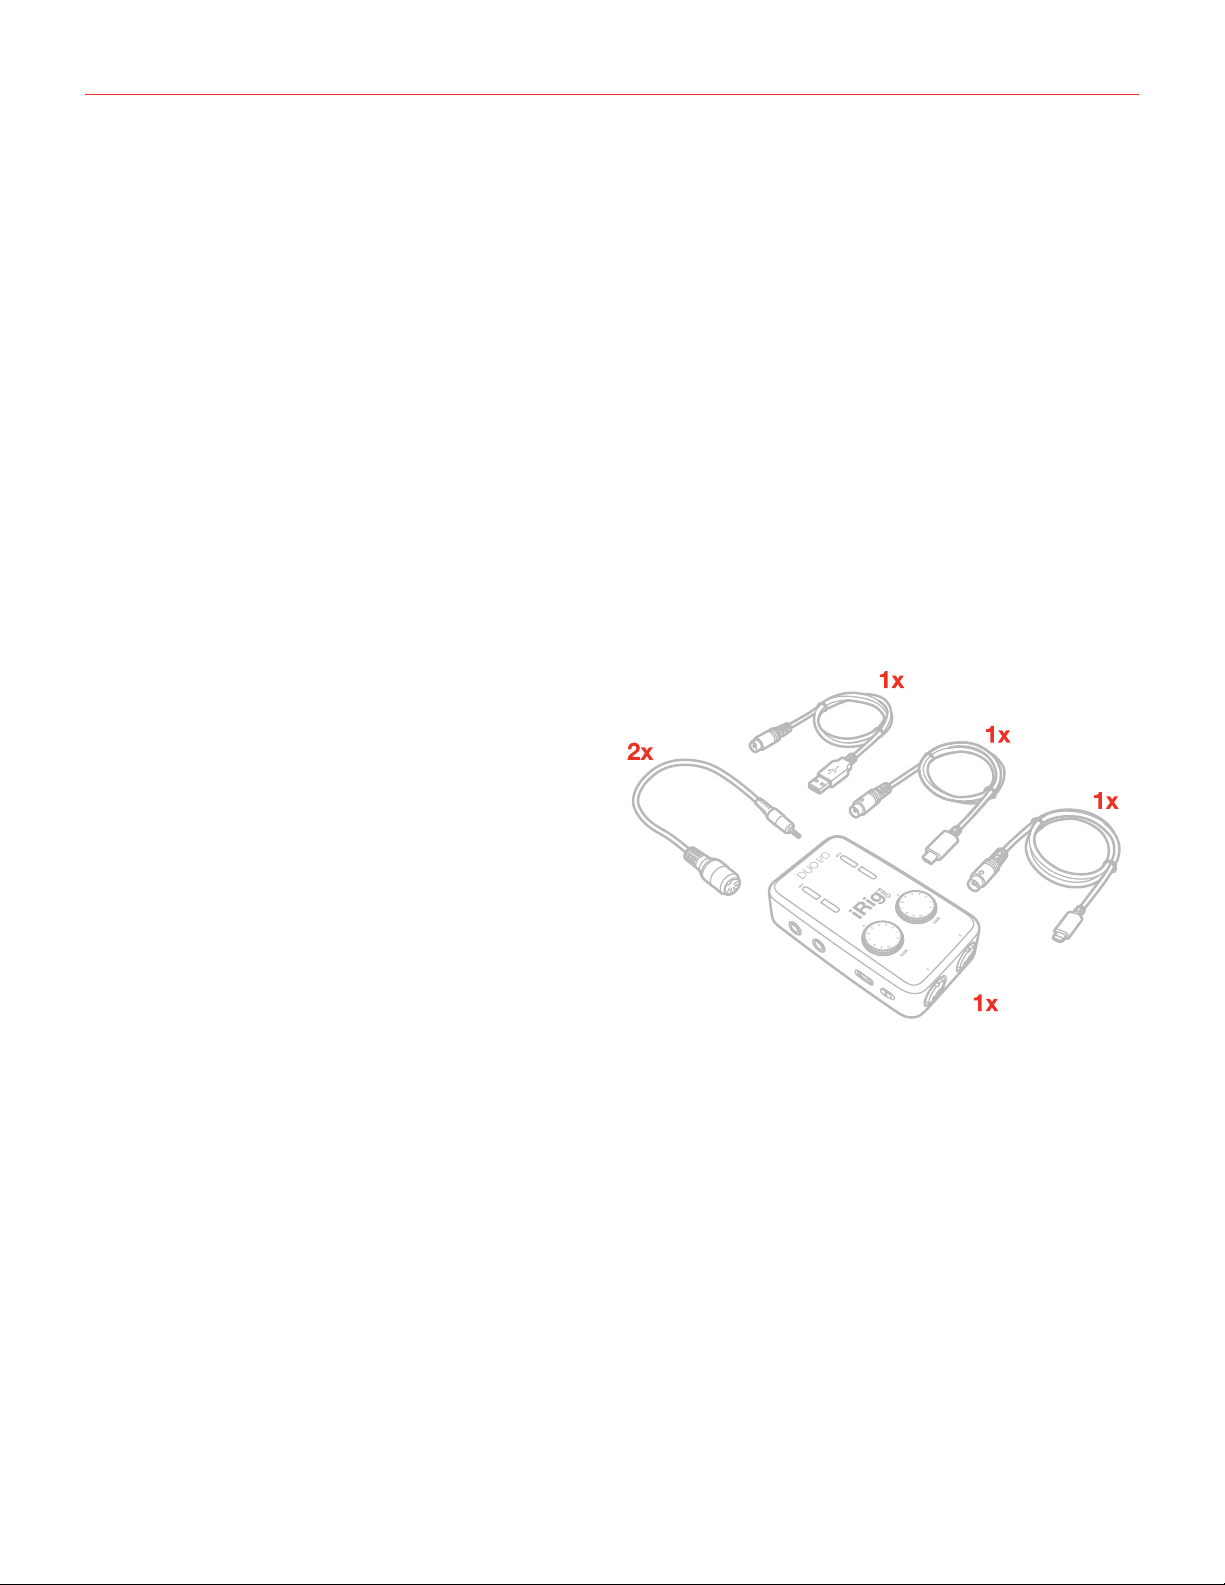
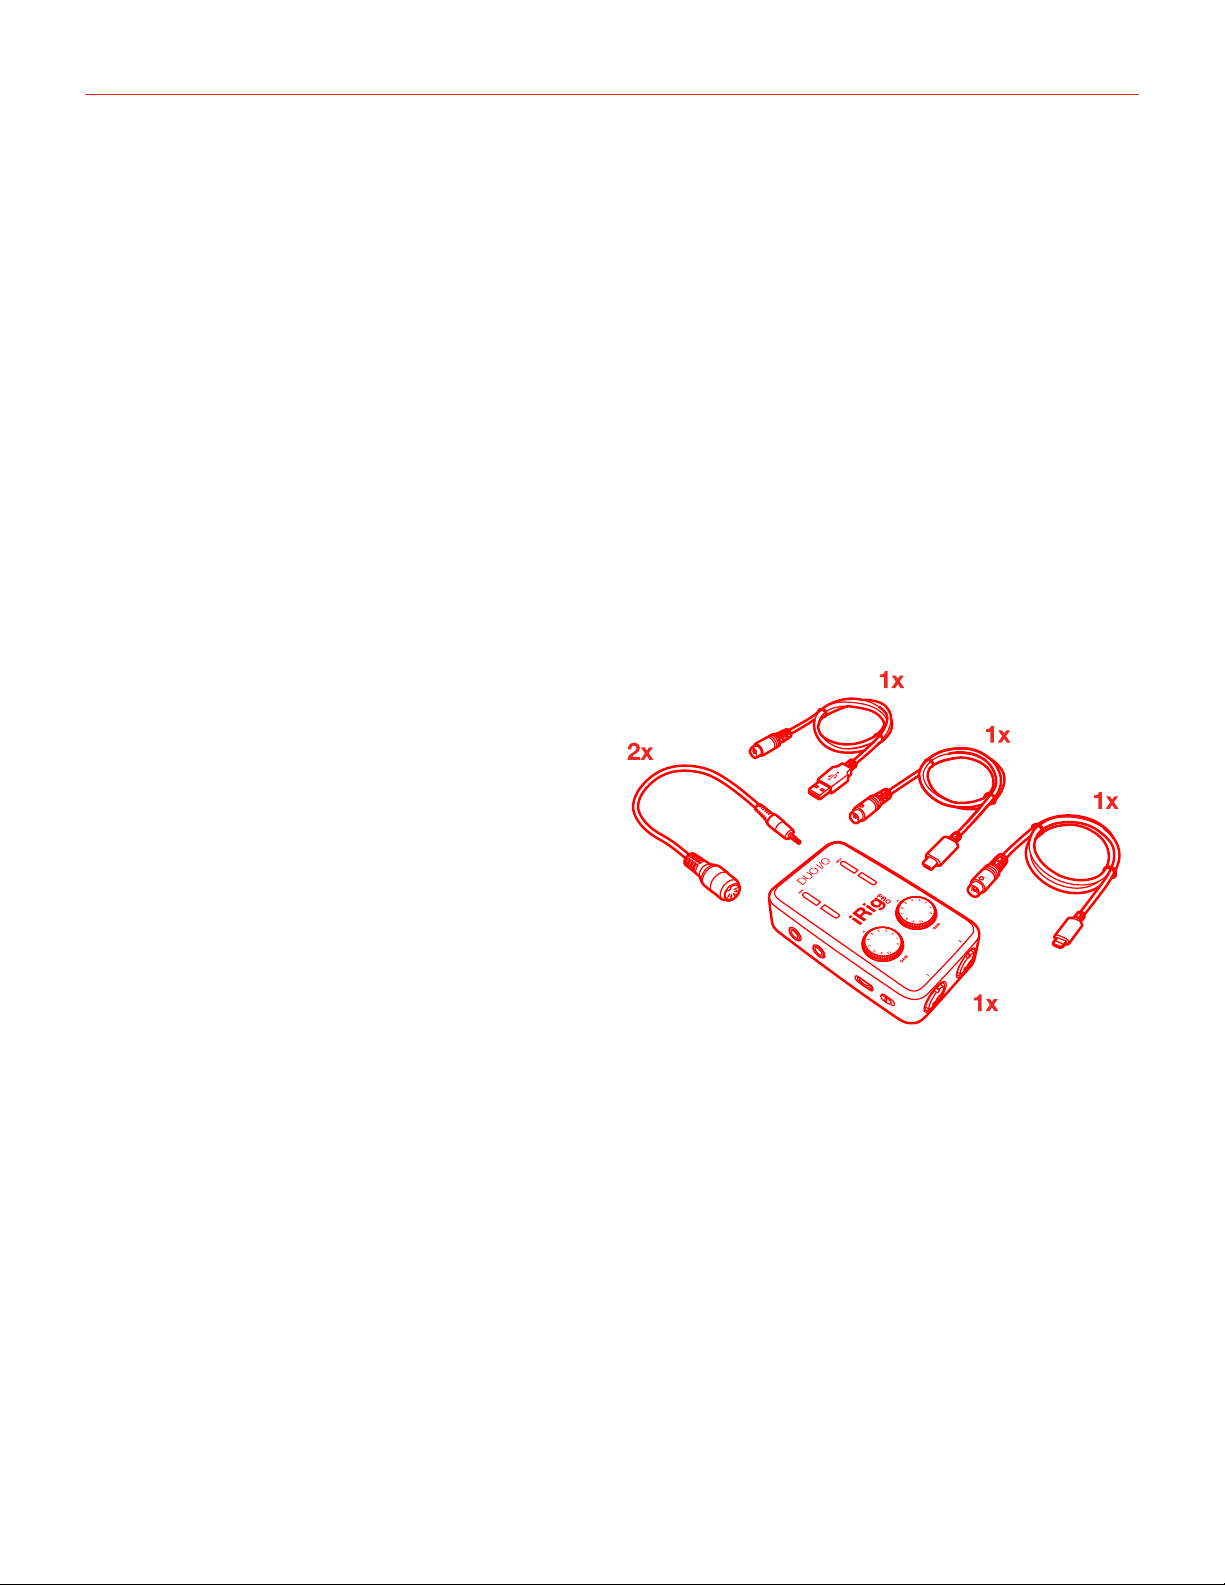
Your package contains:
• iRig Pro Duo I/O
• 2 AA batteries (alkaline)
• Mini-DIN to Lightning cable
• Mini-DIN to USB-A cable
• Mini-DIN to USB-C cable
• 2 MIDI adapters
• Quick start guide
• Registration card
iRig Pro Duo I/O is a universal mobile 2 channel audio and MIDI interface with an ultra-compact and highly
portable enclosure, that packs all the necessary connections for making and recording high-quality music on
the go with iOS/Android or Mac/PC. On iOS and Mac iRig Pro Duo I/O is plug-and-play, simply connect it to the
host device and it’s ready to start recording (on Windows based DAWs, IK Multimedia’s proprietary driver needs to
be installed for latency control).
Register your iRig Pro Duo I/O
By registering, you can access technical support, activate your warranty and receive free JamPoints™ which will
be added to your account. JamPoints™ allow you to obtain discounts on future IK purchases! Registering also
keeps you informed of all the latest software updates and IK products.
Register at: www.ikmultimedia.com/registration
English
4
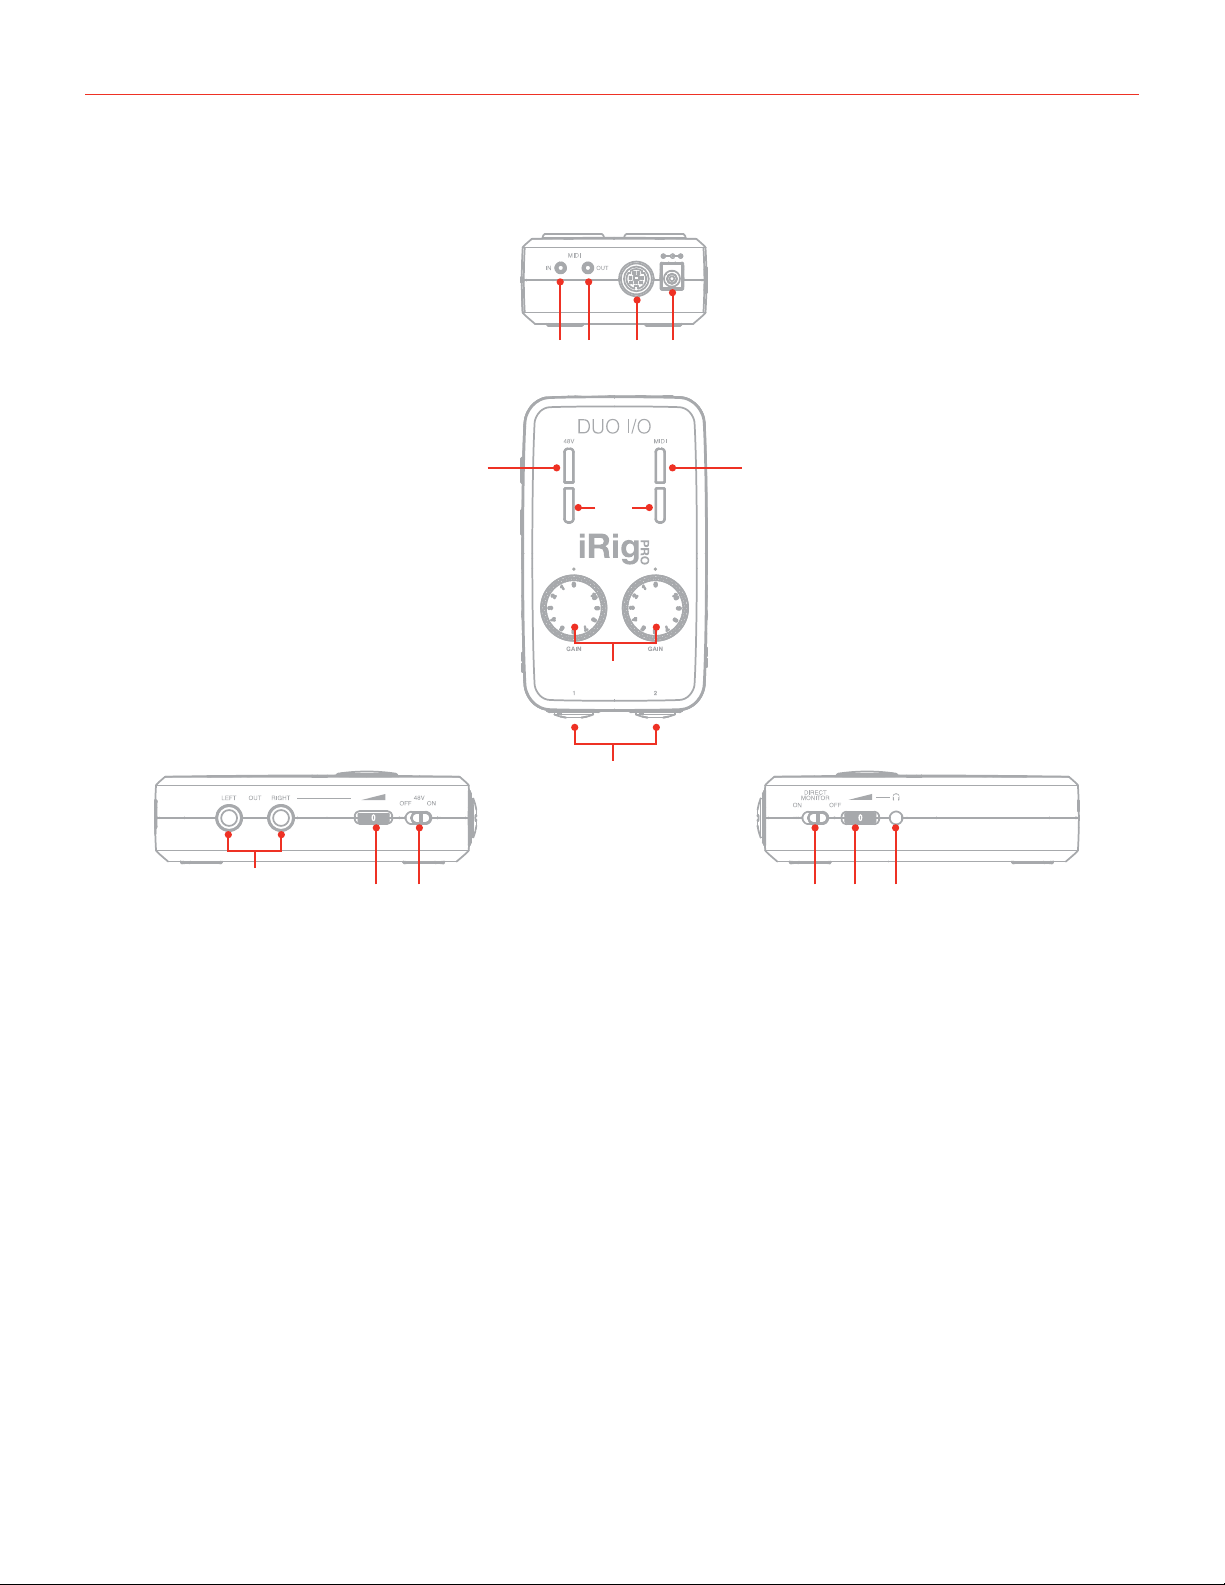
iRig Pro Duo I/O overview
1. Microphone/Instrument inputs
2. Input gain knobs
3. Audio level/Status LEDs
4. Phantom power (+48V) LED
5. MIDI LED
6. Headphone output
7. Main line outputs
8. Direct monitor switch
9. Phantom power (+48V) switch
10. Headphone level control
11. Main output level control
12. Mini-DIN device port
13. MIDI IN port
14. MIDI OUT port
15. 9V DC IN
1
1213 14 15
7
2
3
4 5
68 10911
English
5
Installation and setup
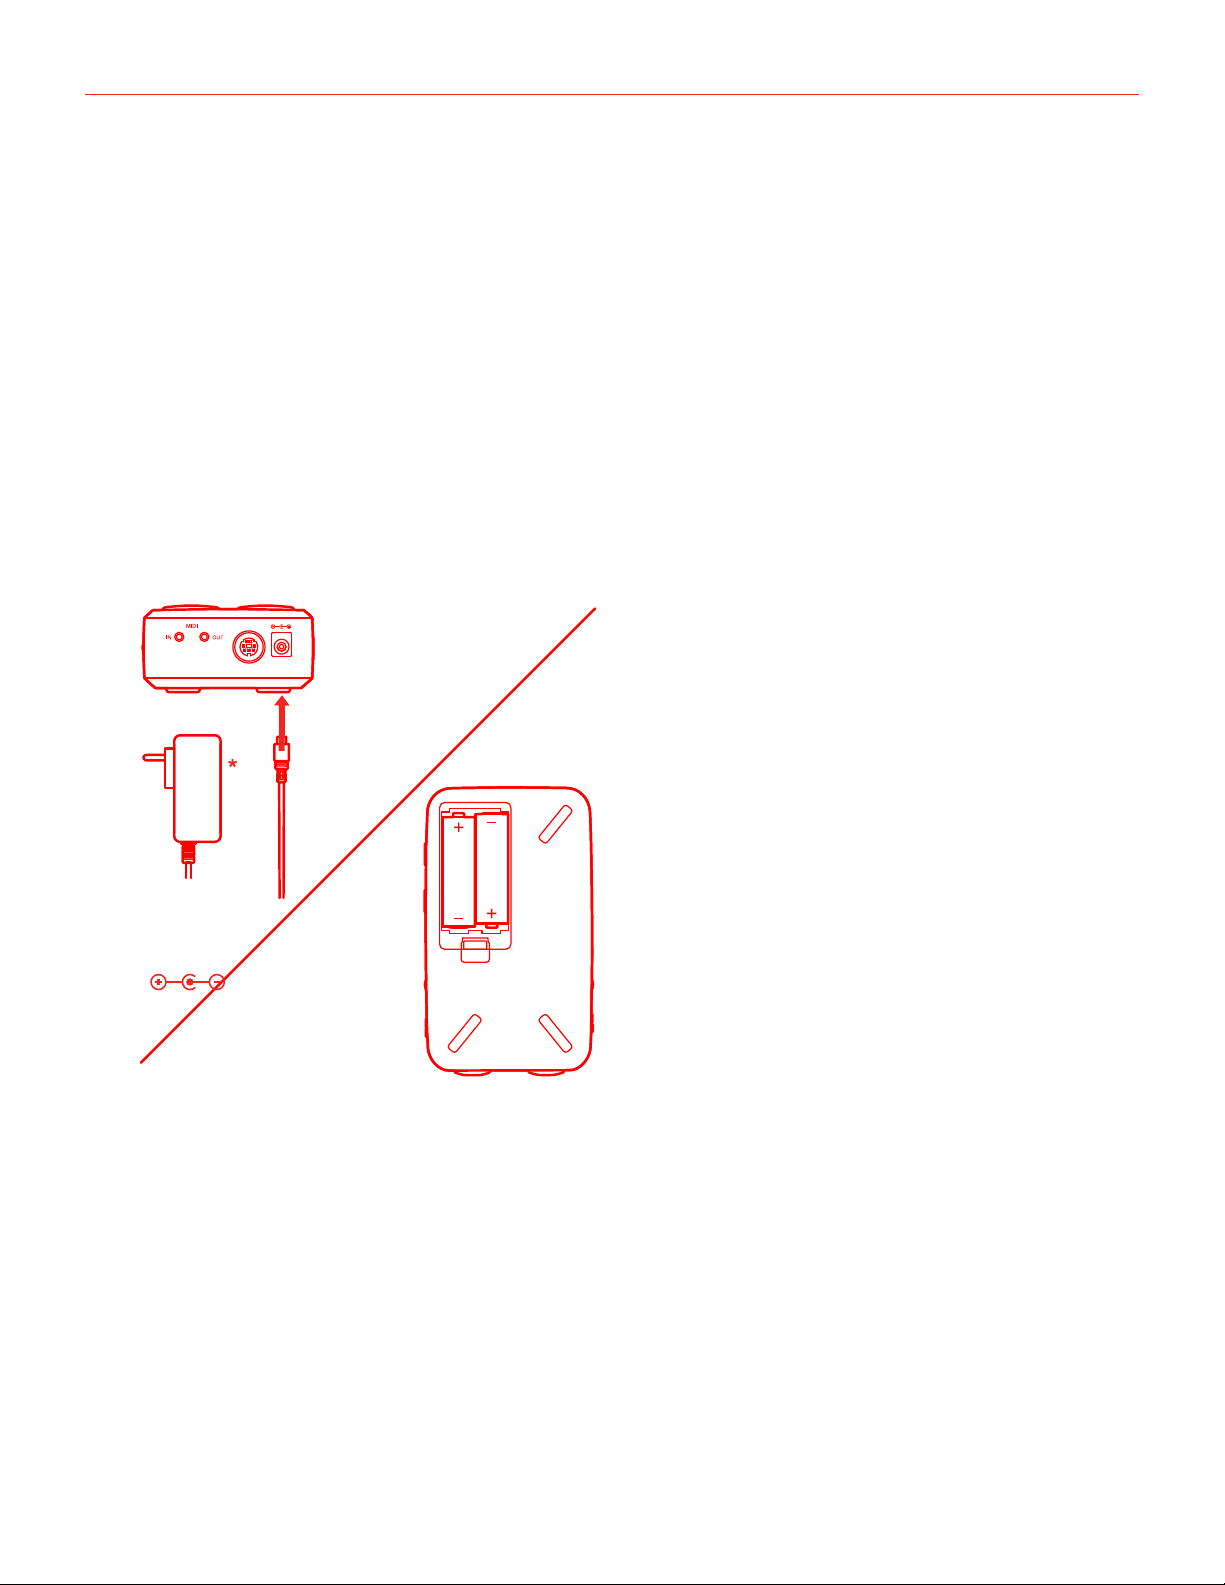
For iOS users: when working with iOS devices, iRig Pro Duo I/O only works when powered by two AA batteries.
See specifications about battery life. Insert the included AA batteries in the battery compartment on the bottom
side of iRig Pro Duo I/O. If you want to play for a long time, you can connect the DC In port on iRig Pro Duo I/O
to an external 9VDC - 500mA (minimum) PSU, for unlimited playing time without a battery.
IMPORTANT: the external power supply will NOT charge the device’s battery.
For MAC/PC and Android users: when connected to an USB class compliant host, iRig Pro Duo I/O can be
powered as follow:
• By internal AA batteries;
• USB powered, ONLY if the host device is capable of providing enough current. When connected to Android
devices, we recommend that you use the internal batteries or the external PSU to avoid running out of
battery life;
• By external 9V PSU (no matter if batteries are installed).
Battery life
Recording - Max load*: 3 hours, 30 minutes (NiMH rechargeable); 45 minutes (Alkaline)
Playback - Min load**: 10 hours (NiMH rechargeable); 3 hours (Alkaline)
*Max load condition is as follow: both inputs connected to two 1,5mA phantom powered loads, input gains set
to maximum, outputs set to maximum.
**Min load condition is as follow: music playing, phantom power OFF.
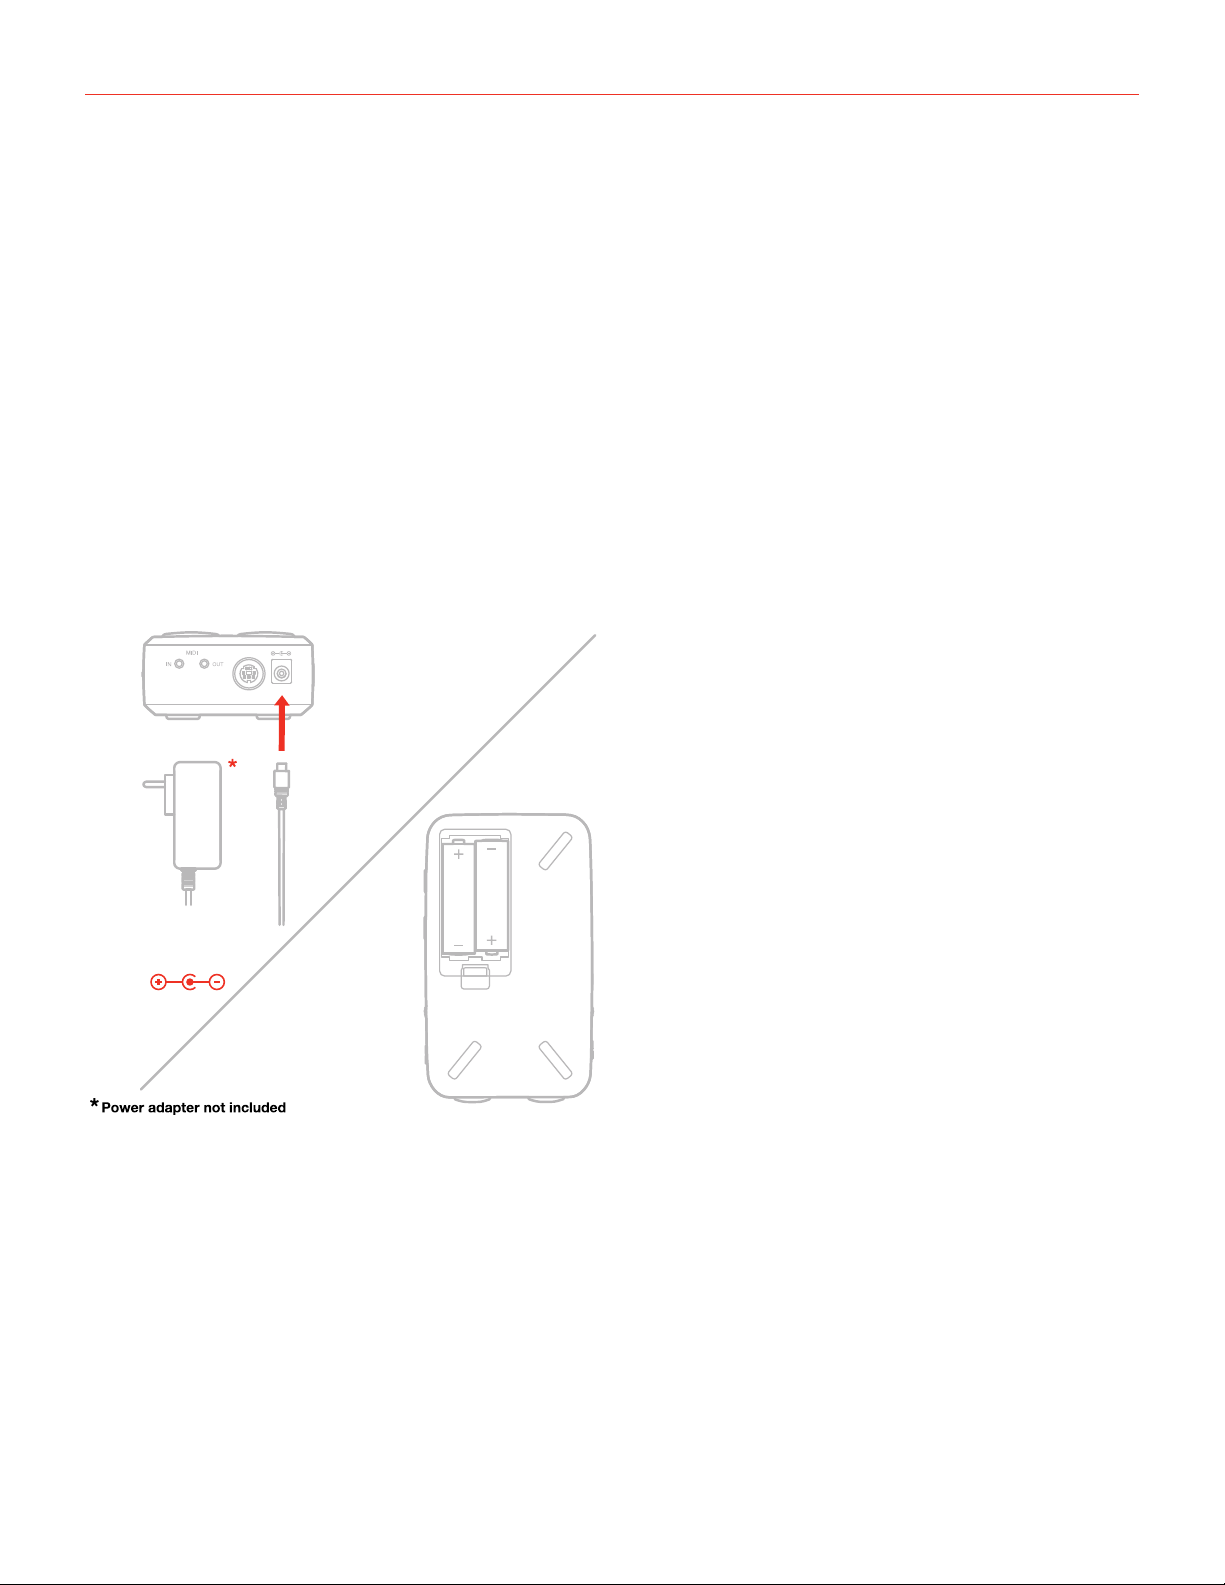
IMPORTANT: iRig Pro Duo I/O is powered by
batteries even when it is connected to a USB port.
This allows it to work even with USB ports that can
only provide a small amount of current. If you want
your iRig Pro Duo I/O to be powered by the USB
port please remember to REMOVE the batteries
from it.
9VDC
from 500mA up
English
6
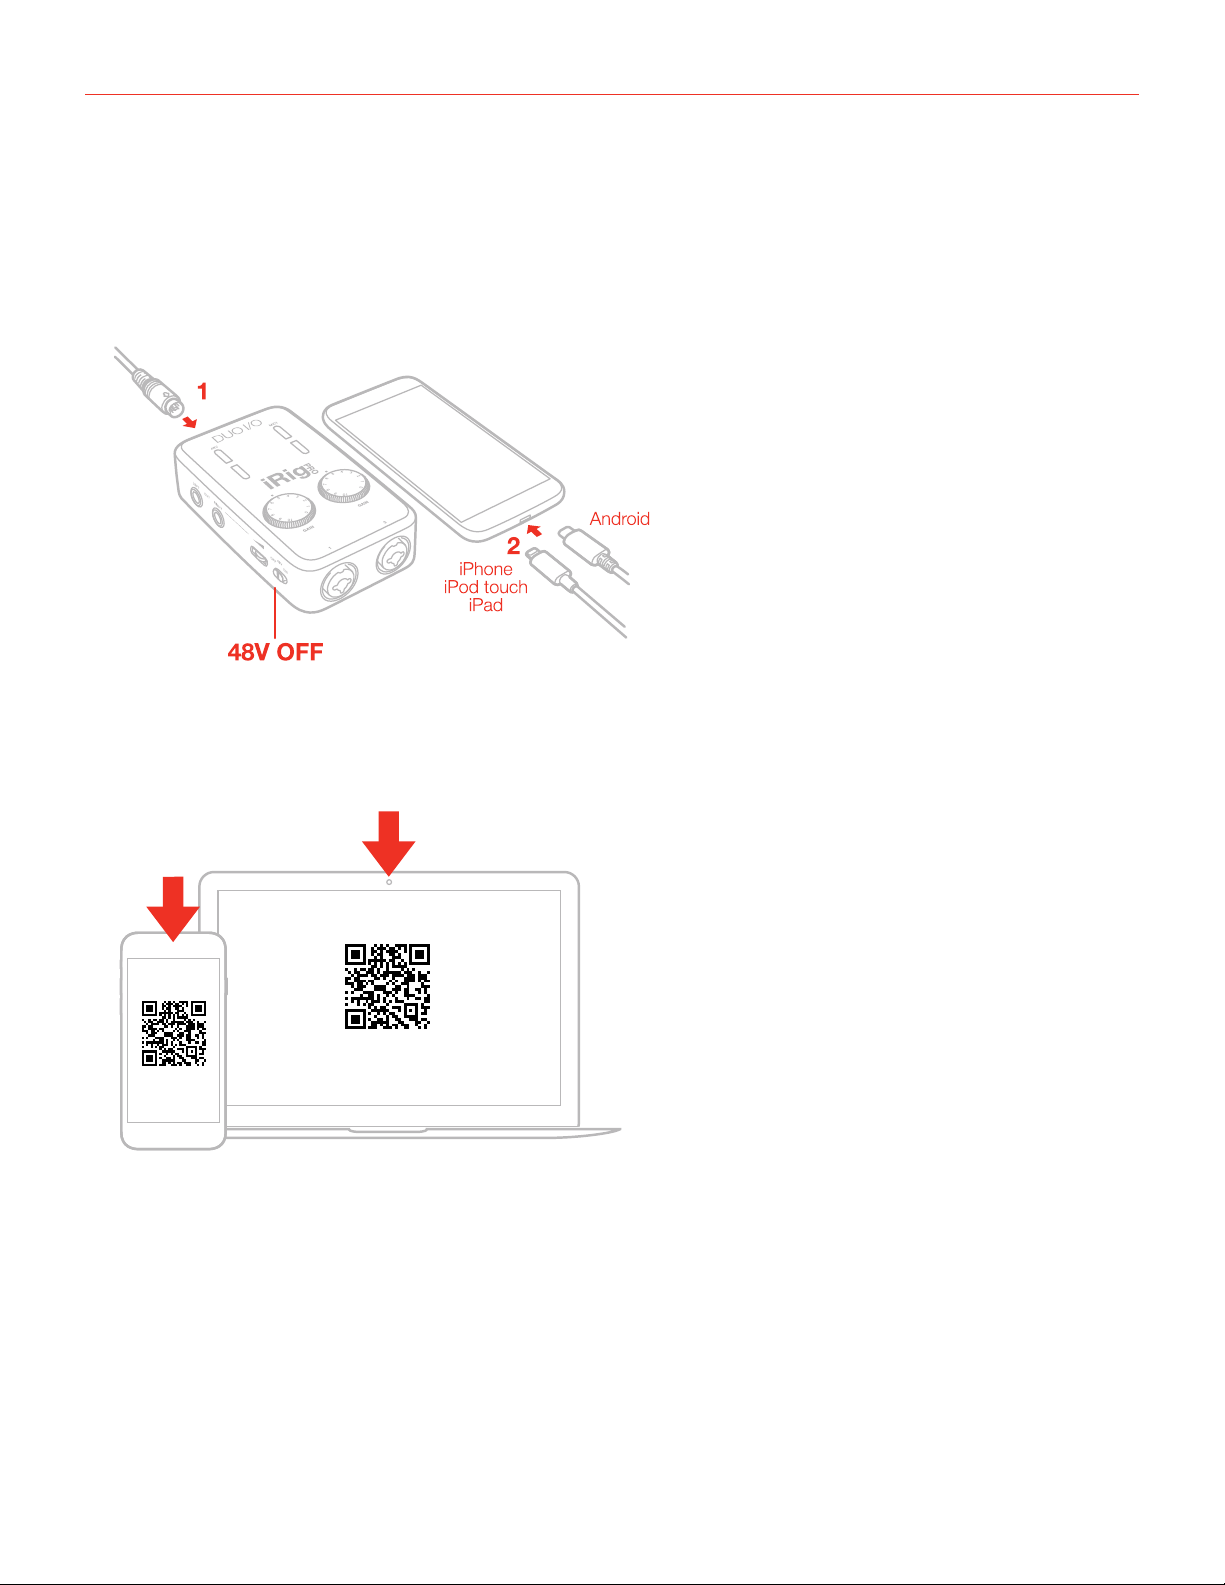
iOS/Android devices
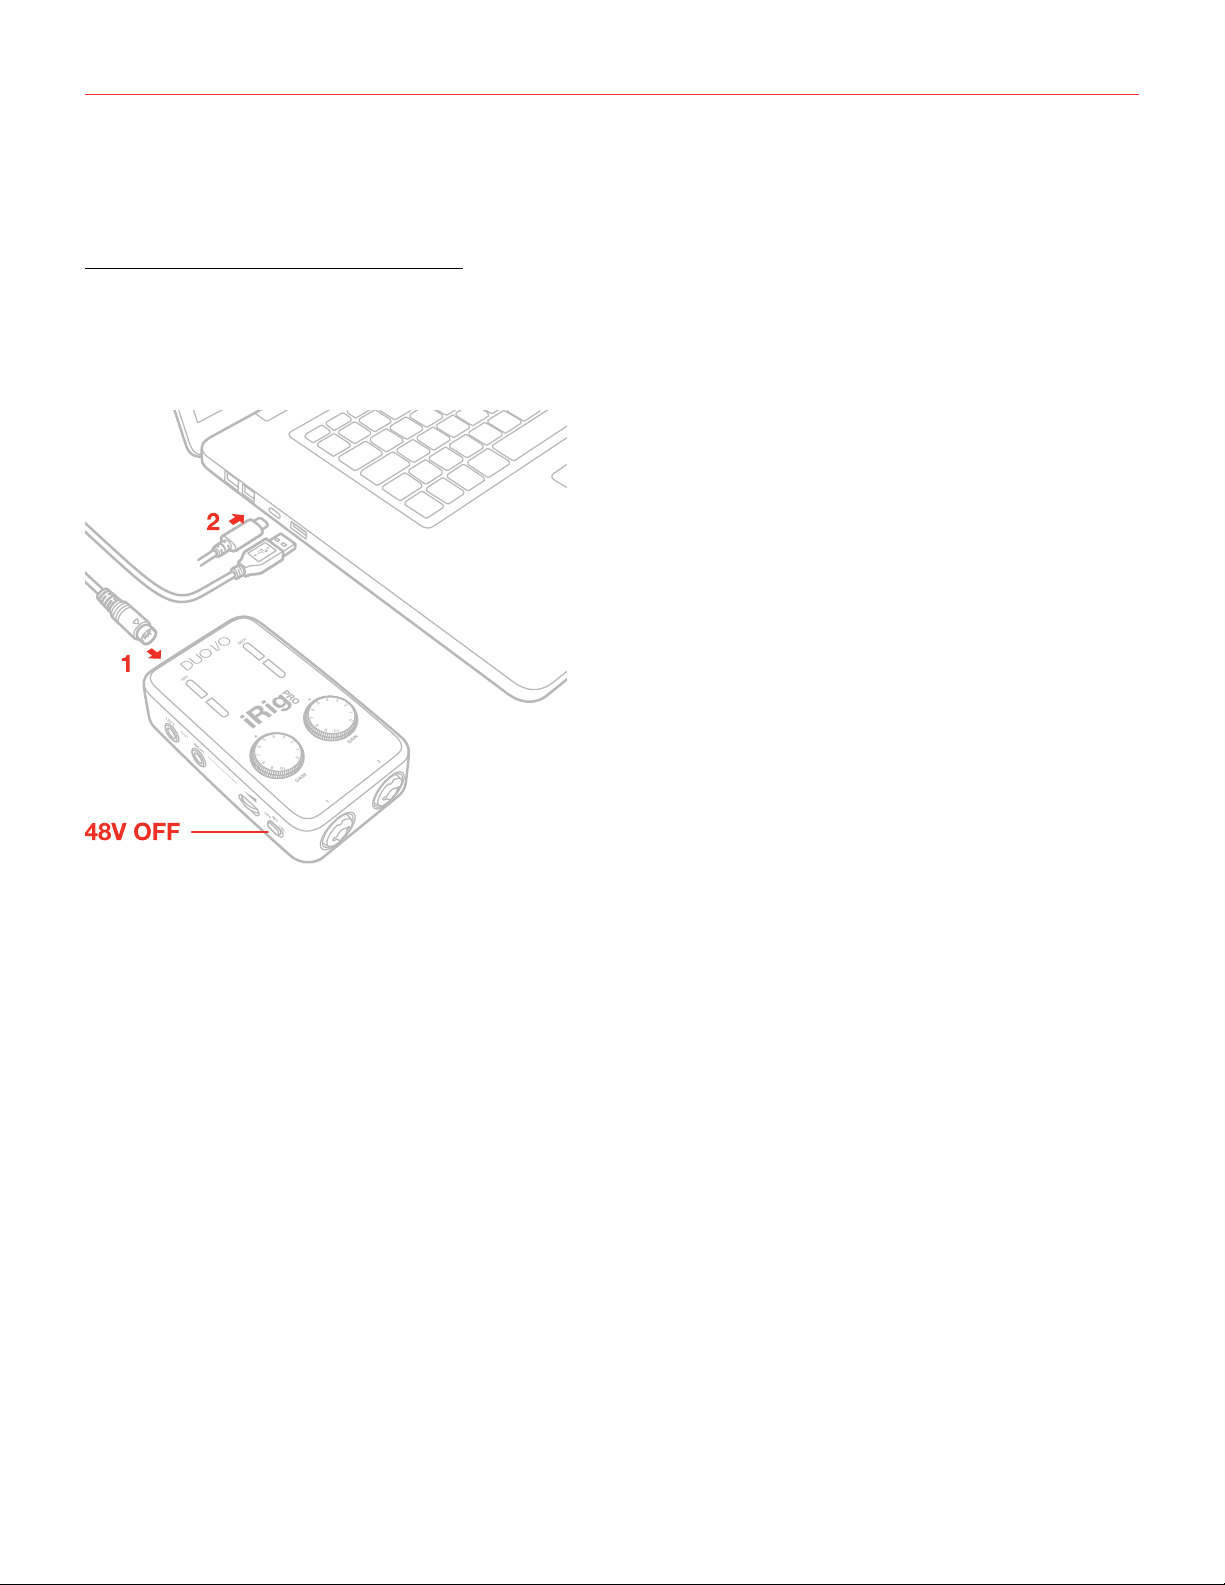
1. Connect the included Lightning or USB cable to iRig Pro Duo I/O Mini-DIN port.
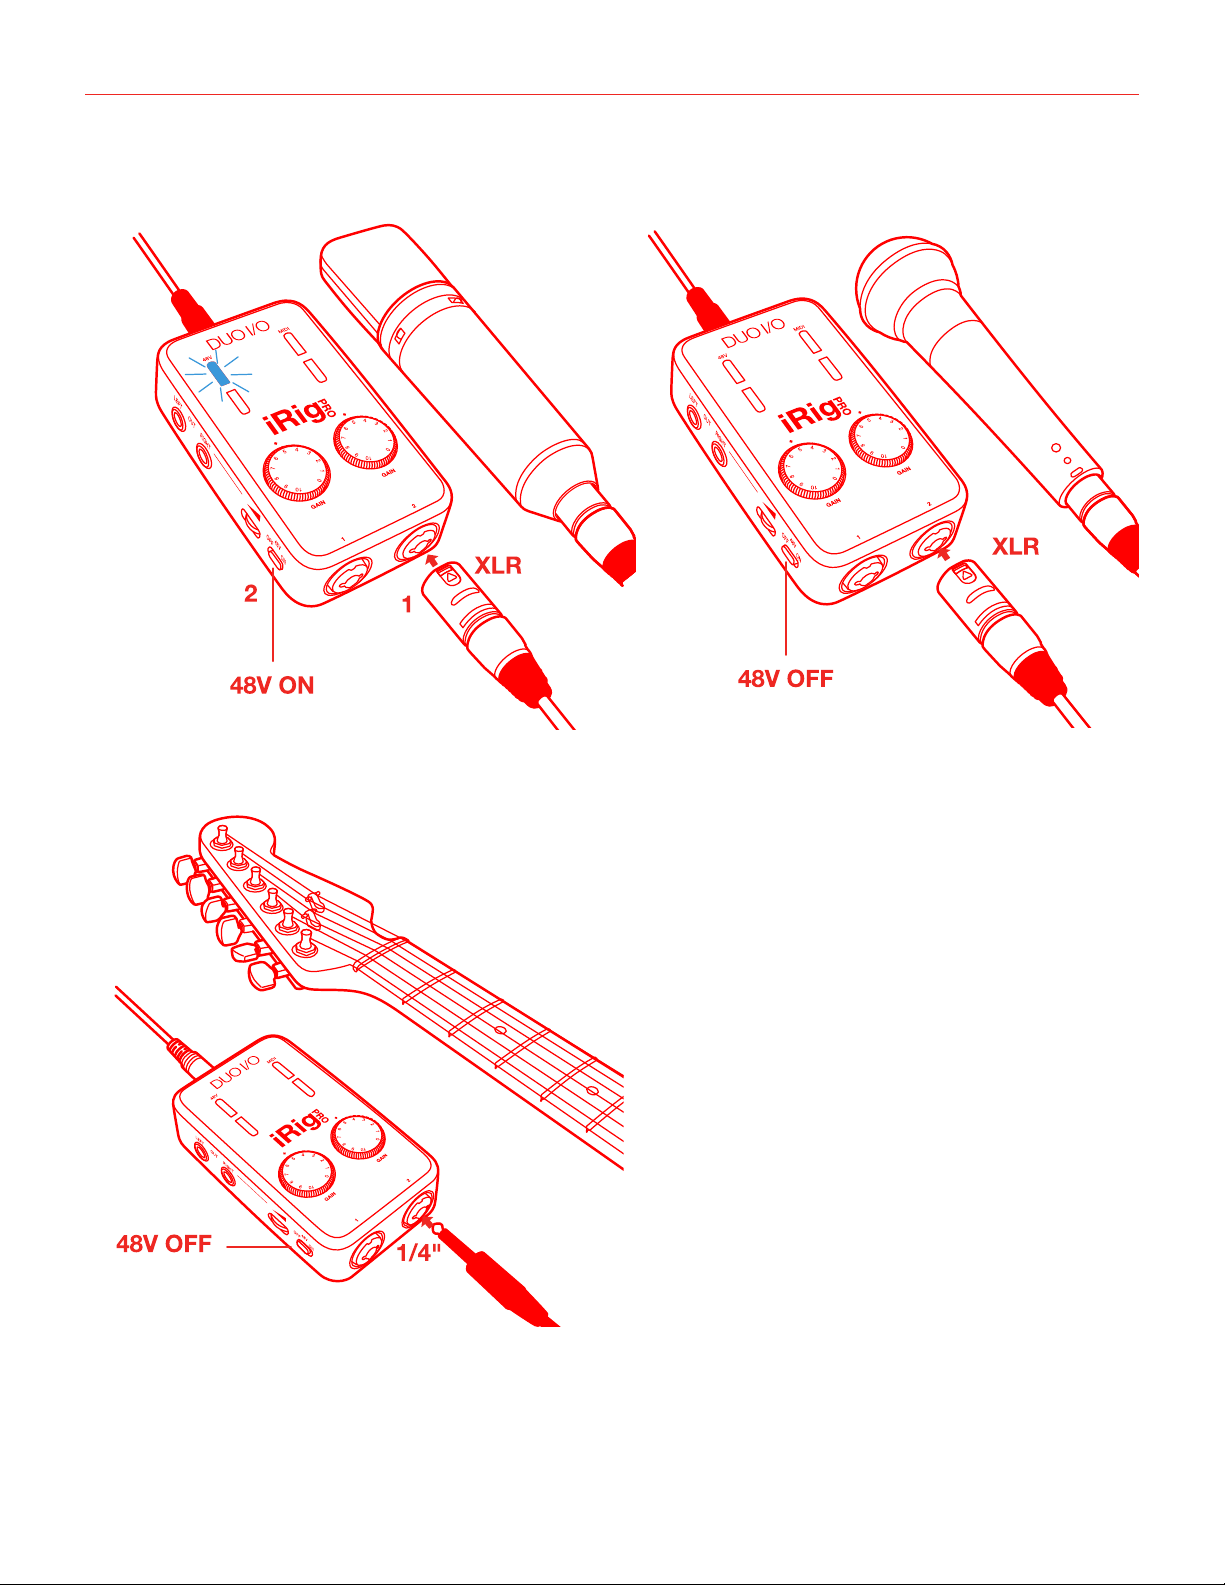
2. Connect the Lightning or USB cable to your iOS or Android device. Make sure phantom power is turned off
by setting the phantom power switch to the OFF position. Check that the phantom power LED is OFF.
3. Download the IK apps and software.
FREE DOWNLOAD
IK software, apps, in-app content
ikdownloads.com/irigproduoio
English
7
4. If you are using a microphone connect it using an XLR cable to one of the iRig Pro Duo I/O microphone
inputs.
5. If you are using an instrument like a guitar or a bass, connect it using a regular ¼” guitar cable to one of the
iRig Pro Duo I/O instrument inputs.
English
8
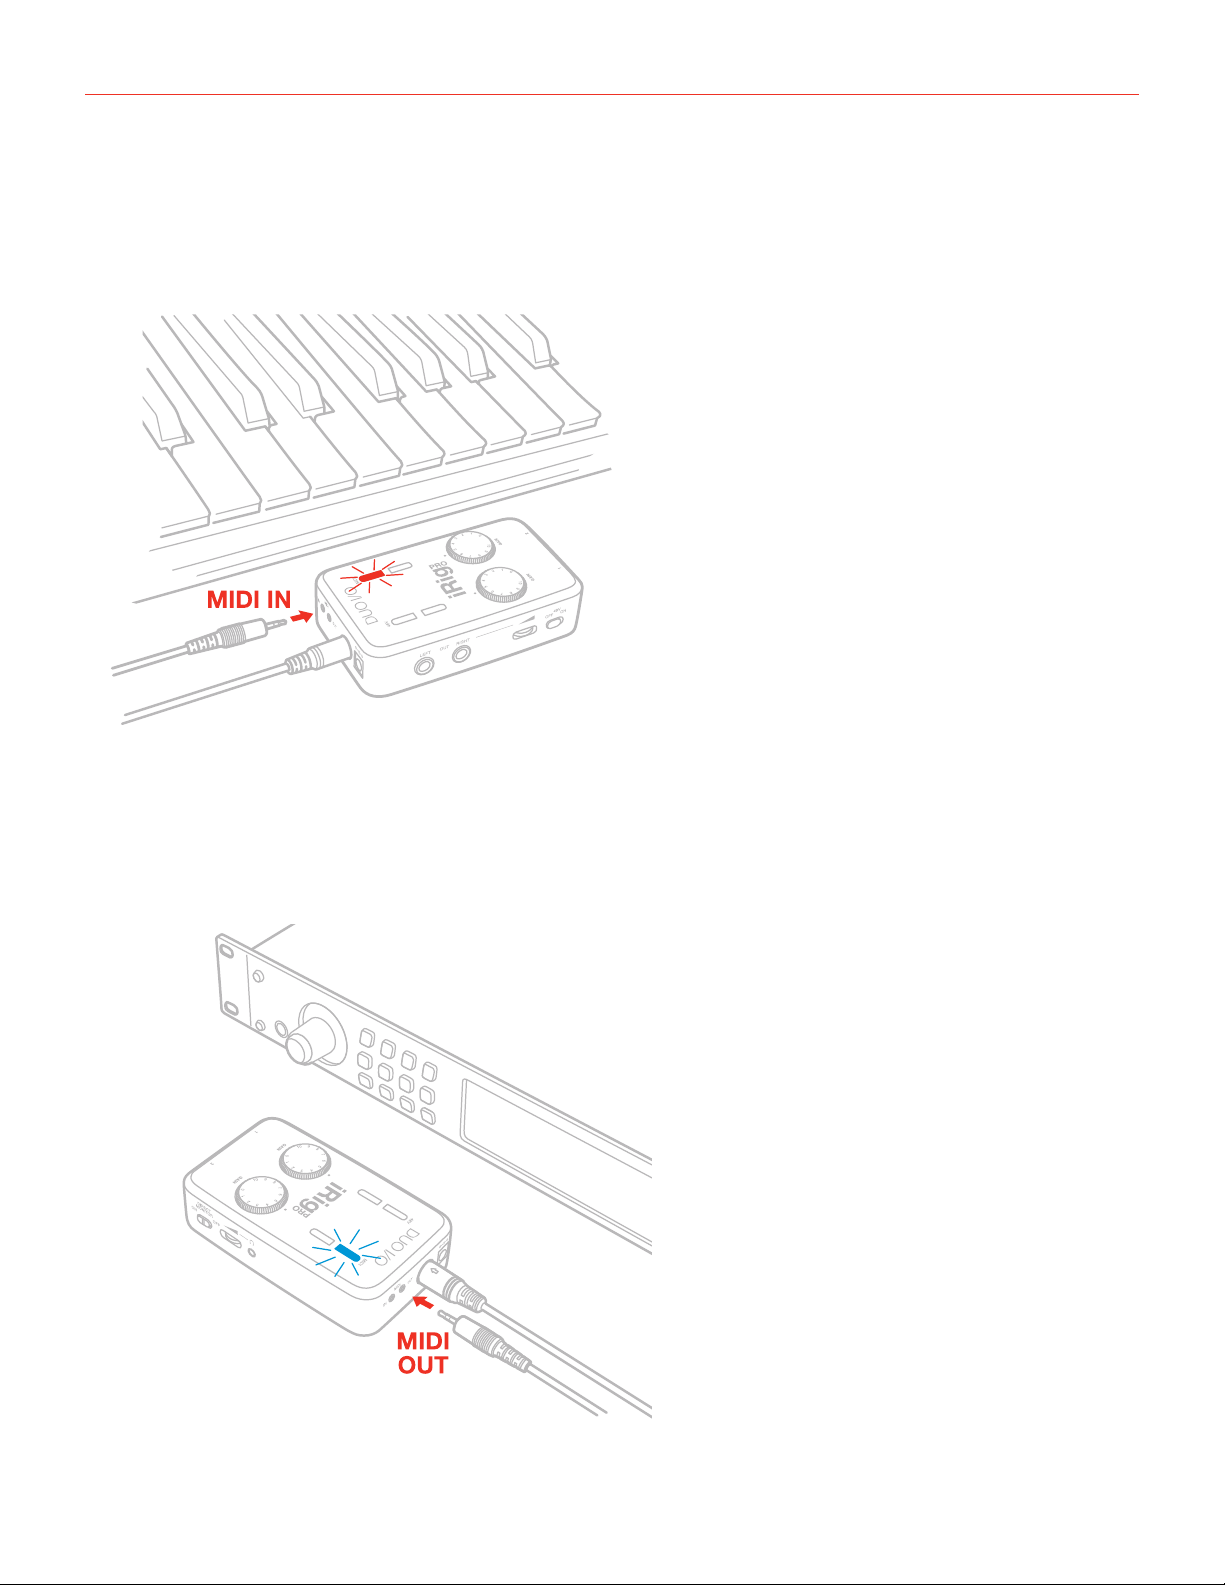
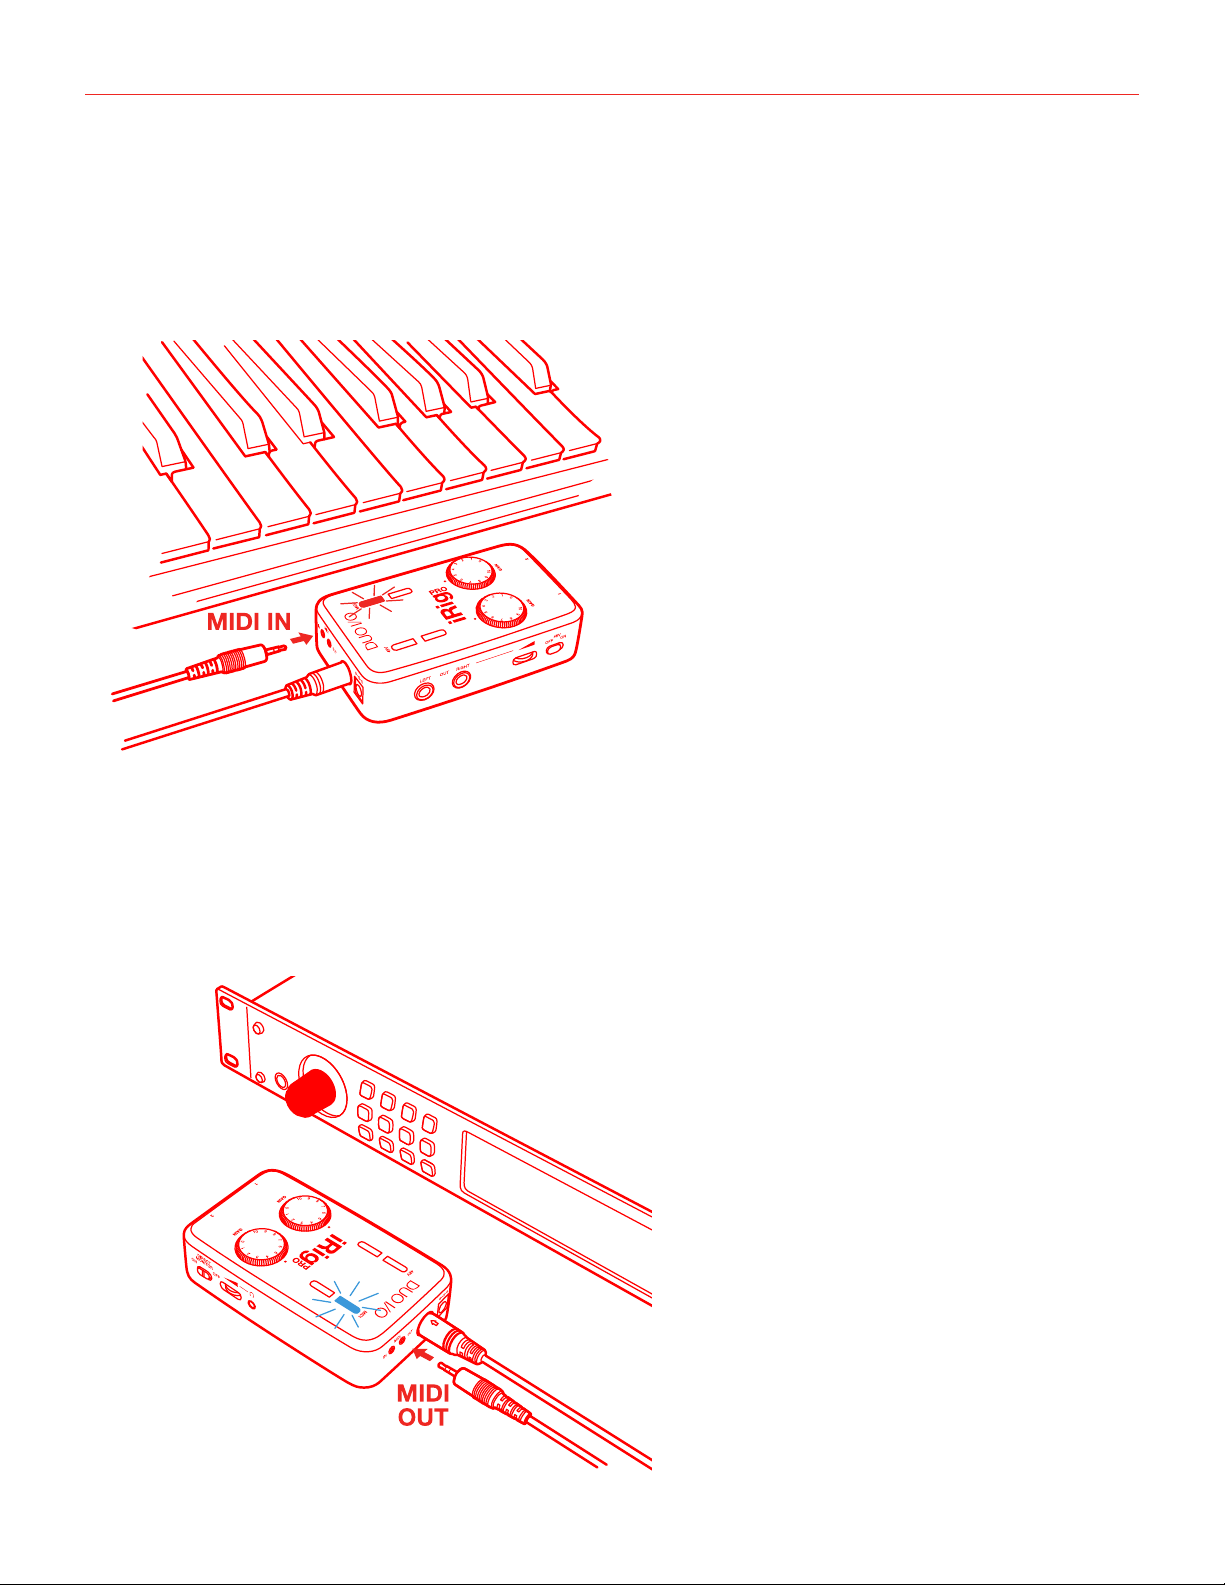
6. To play MIDI compatible apps from an external controller, use the included MIDI cable to connect your
controller’s MIDI OUT port to iRig Pro Duo I/O’s MIDI IN port. Always check the specific MIDI input settings
in your app to make sure that the app is ready to receive incoming MIDI data.
7. To control an external MIDI device from an app, use the included MIDI cable to connect the MIDI OUT port
of the iRig Pro Duo I/O to the MIDI IN port of the external device. Always check for specific MIDI output
settings in your app to make sure they are set to transmit MIDI data.
English
9
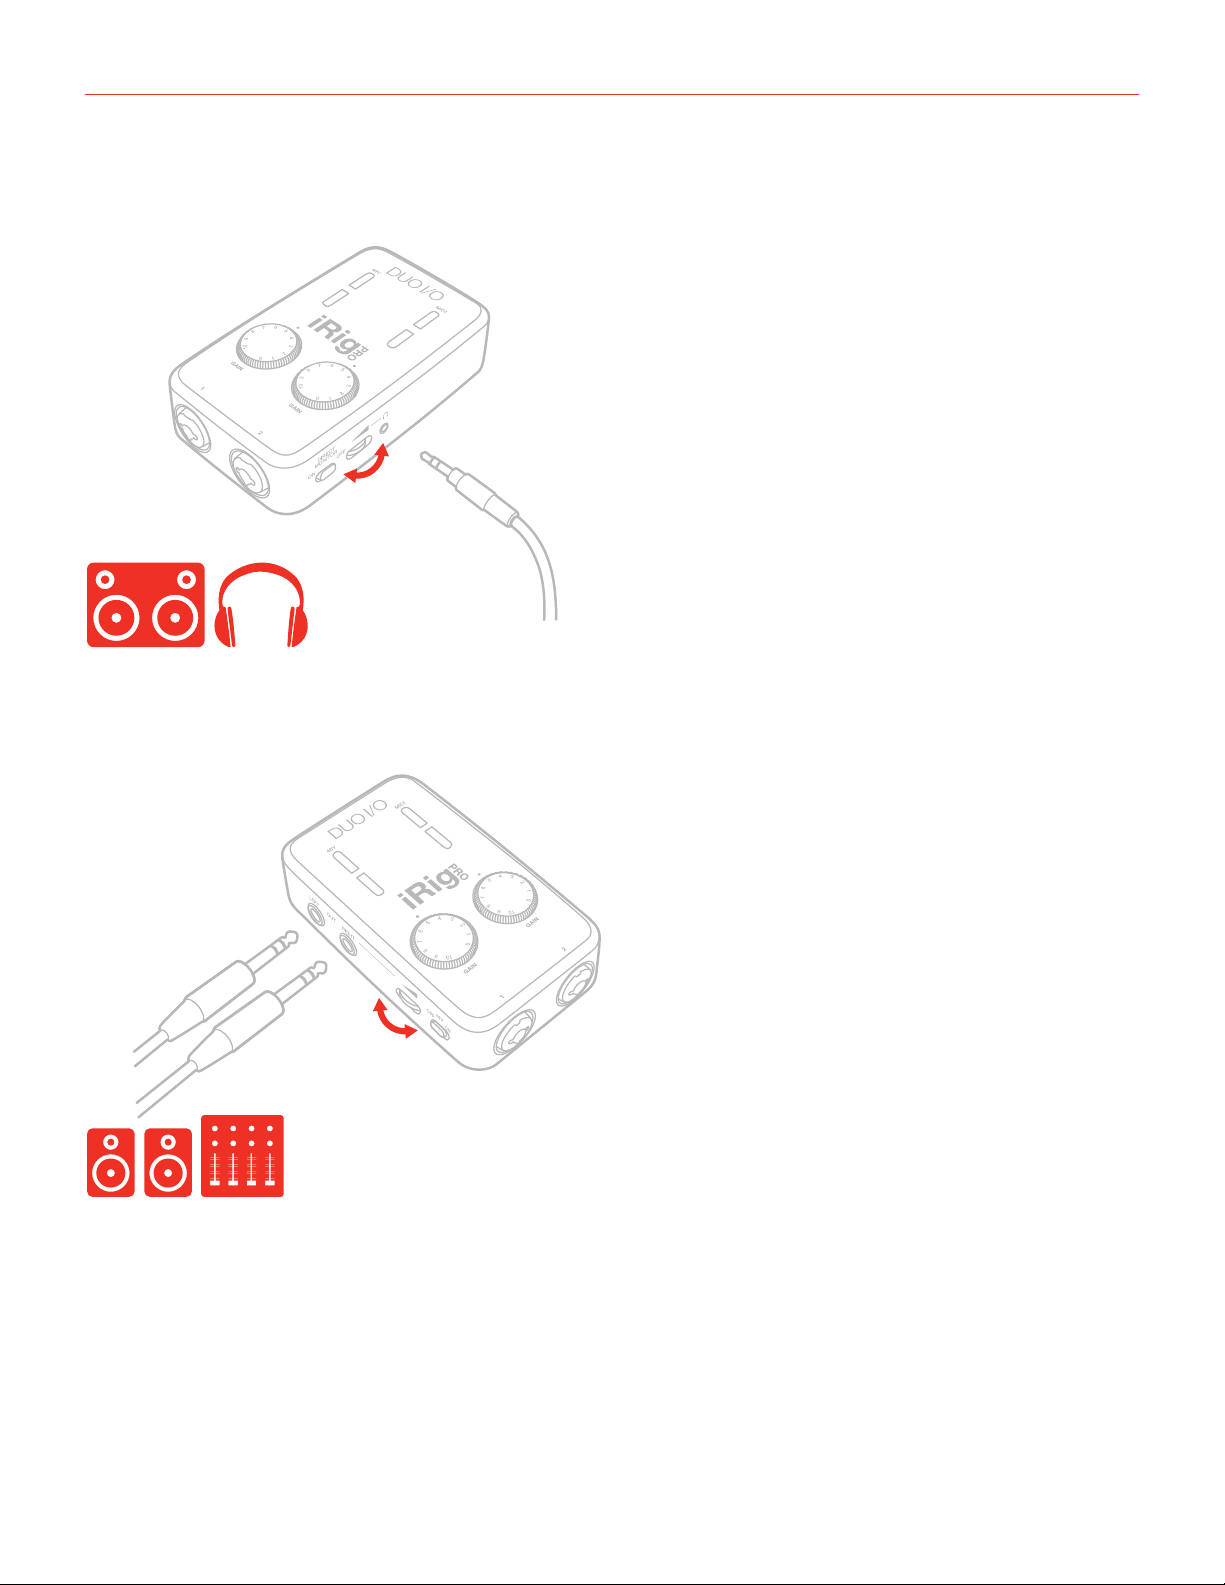
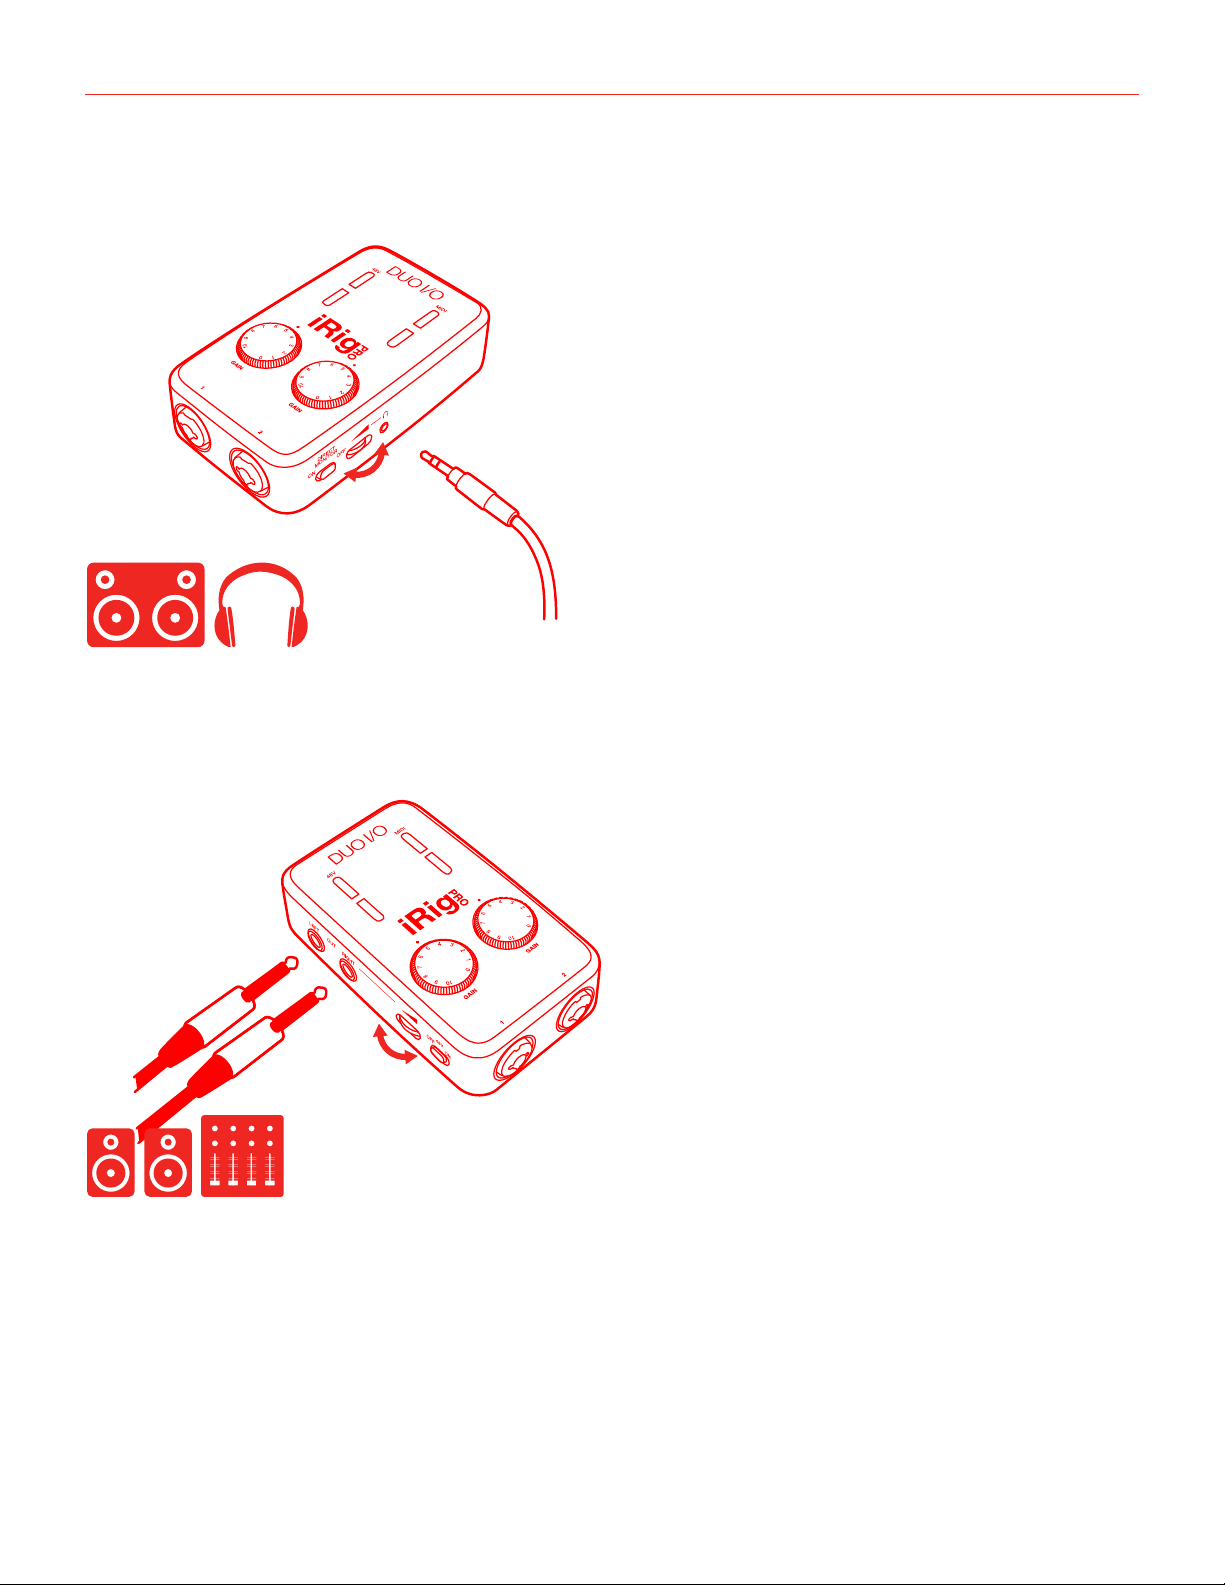
8. Connect your headphones to the Headphone Output jack on iRig Pro Duo I/O and set its level via the
dedicated volume wheel.
9. Connect your mixer or powered speakers to the Main Line Output jacks on iRig Pro Duo I/O and set its level
via the dedicated volume wheel. These outputs are high quality balanced outputs, so you don’t need to use
any DI box when connecting to a PA or Mixer onstage.
English
10
Mac/PC
On Windows based DAWs, IK Multimedia’s proprietary driver needs to be installed for latency control. Please visit
https://www.ikmultimedia.com/userarea/ to download the driver.
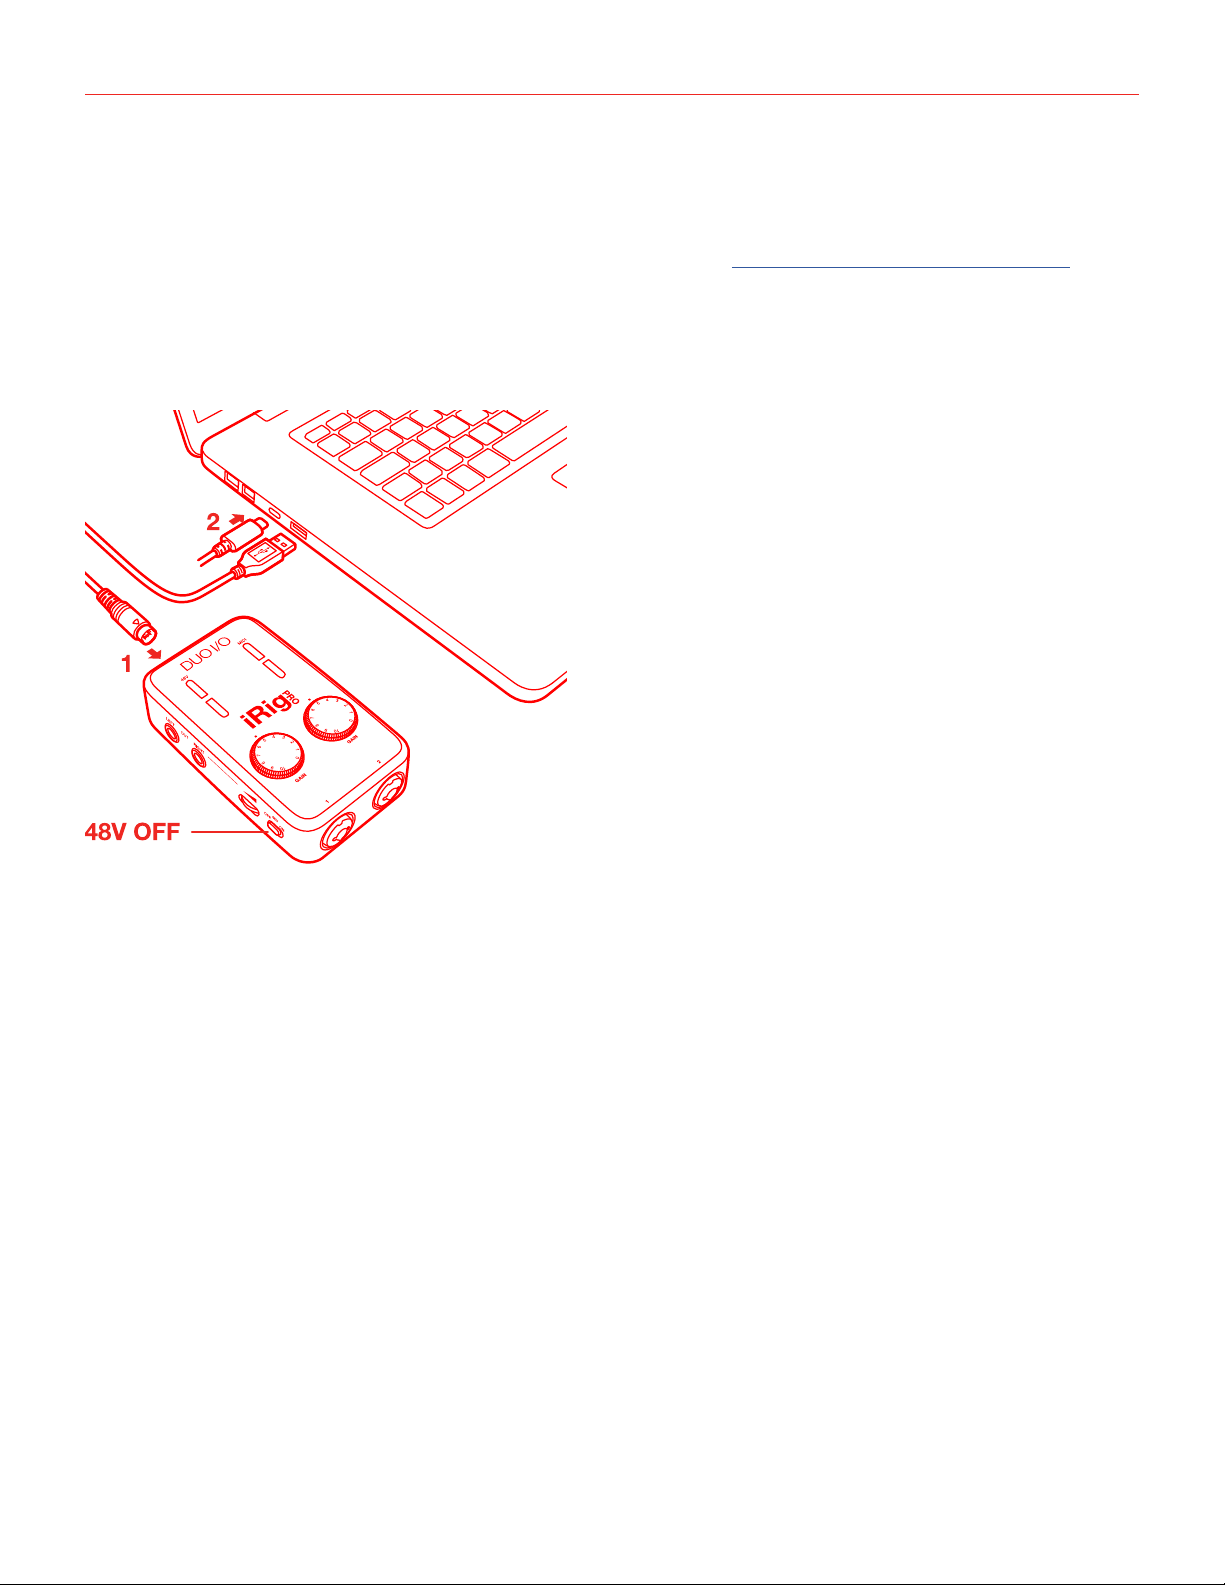
1. Connect the included USB cable to iRig Pro Duo I/O’s Mini-DIN connector.
2. Connect the USB cable to a free USB port on your Mac/PC.
3. Make sure phantom power is turned off by setting the Phantom Power switch to the OFF position. Check
that the phantom power LED is OFF.
4. If you are using a microphone connect it using an XLR cable to one of the iRig Pro Duo I/O microphone
inputs.
5. Ifyouareusinganinstrumentlikeaguitarorabass,connectitusingaregular1⁄4”guitarcabletooneofthe
iRig Pro Duo I/O instrument inputs.
6. Launch AmpliTube or any other Core Audio-compatible application and select “iRig Pro Duo” as the input
device from your system’s audio preferences.
7. Connect your headphones to the headphone output jack on iRig Pro Duo I/O and set its level via the
dedicated volume wheel.
8. Connect your mixer or powered speakers to the Main Line Output jacks on iRig Pro Duo I/O and set its level
via the dedicated volume wheel.
Connecting an external power supply
If you want to play for an extended period of time when connected to your iOS device, you can connect the DC
In port on iRig Pro Duo I/O to an external power supply (not included), this way you don’t need to worry about
iRig Pro Duo I/O’s battery life. You can use any guitar pedal power supply unit: 9VDC - 500mA
IMPORTANT: the external power supply will NOT charge the device’s battery.

English
11
iRig Pro Duo I/O LEDs
The four LEDs on iRig Pro Duo I/O give you important information about the unit’s operative status. Each status
is indicated by a different color.
Status / Audio level LEDs
For each channel iRig Pro Duo I/O will show the audio signal level and the status of the unit as follow:
• Both LEDs Off: iRig Pro Duo I/O is not connected to any power source.
• Both LEDs Dark blue: iRig Pro Duo I/O is connected and in standby mode.
• Ch. LED Bright blue: iRig Pro Duo I/O is connected and a signal is present at the input of the corresponding
channel.
• Ch. LED Green: The input signal of the corresponding channel is low.
• Ch. LED
Orange: The input signal of the corresponding channel is OK.
• Ch. LED Red: The input signal of the corresponding channel is too high.
Phantom and MIDI LEDs
The two upper LEDs show the phantom power and MIDI status.
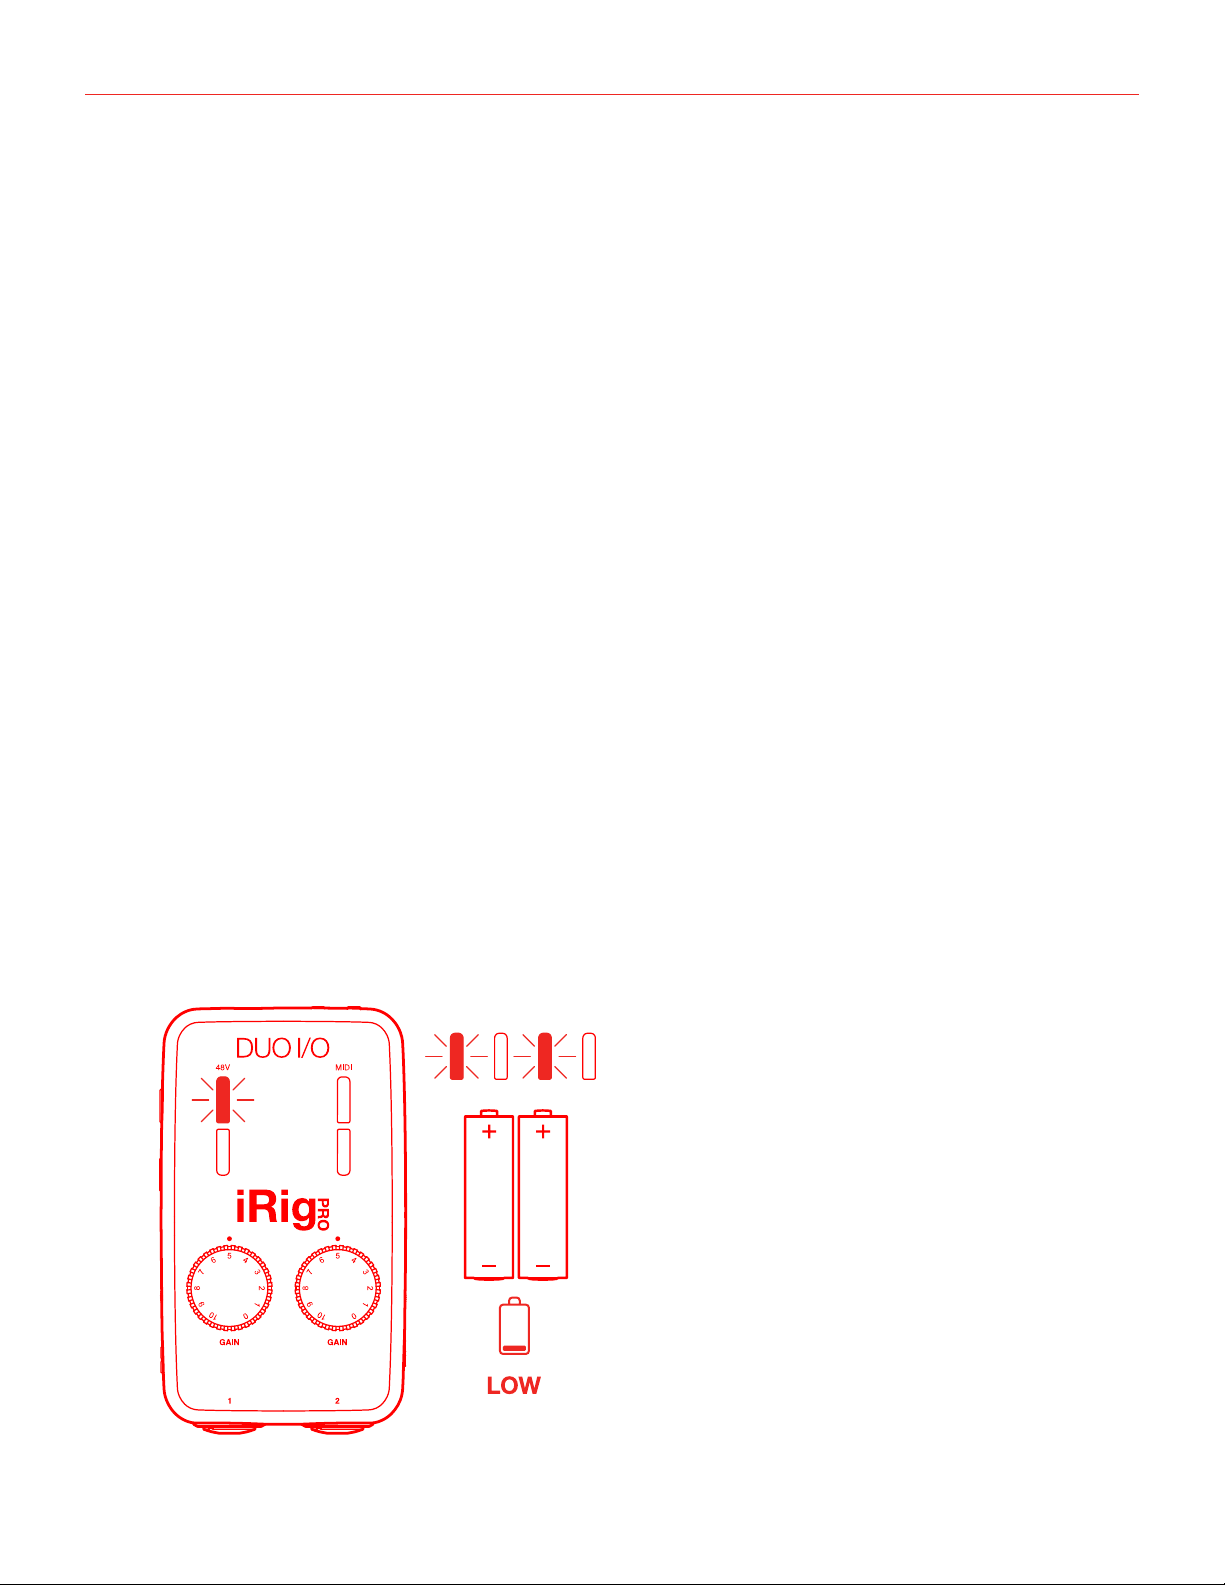
Phantom LED
• Off: phantom power is OFF
• Flashing Blue: phantom power is powering ON. To avoid audio bumps iRig Pro Duo I/O is muted while
phantom power is turning ON, so it is normal to not hear any signal until this LED turns steady BLUE when
turning on +48V phantom power.
• Steady Blue: phantom power is ON
• Flashing
Red: internal AA batteries are LOW! Before iRig Pro Duo I/O shuts down this LED will start blinking.
This means that the battery level is low and it should be replaced as soon as possible.
!

English
12
MIDI LED
• Off: iRig Pro Duo I/O is not receiving any MIDI messages.
• Blinking
Blue: iRig Pro Duo I/O is transmitting MIDI messages.
• Blinking
Red: iRig Pro Duo I/O is receiving MIDI messages.
Direct monitoring
When recording an audio signal into your audio software, there is often a slight delay before it reaches the
outputs of the software and iRig Pro Duo I/O. This delay, called latency, is caused by the computer processing
required to convert and record audio. Since this delay can be distracting, iRig Pro Duo I/O provides a direct
monitoring path from the inputs to the outputs, which is activated by the Direct Monitor switch. When Direct
Monitoring is enabled, the input signal is mixed with the output signal from your audio software and routed
directly to both the Line and Headphone outputs. This lets you hear the “live” inputs without latency. The Direct
Monitor switch has no effect on what is being recorded by your software. When using the Direct Monitor feature,
make sure any software monitoring option for direct (or “low latency”) monitoring is disabled. Disabling low
latency monitoring prevents “double-monitoring” of input audio signals when using the Direct Monitoring feature.
When “double-monitoring” occurs, there will be an increase in volume and an undesirable “phasing” sound. For
more details about its monitoring function, refer to the documentation for your audio software.
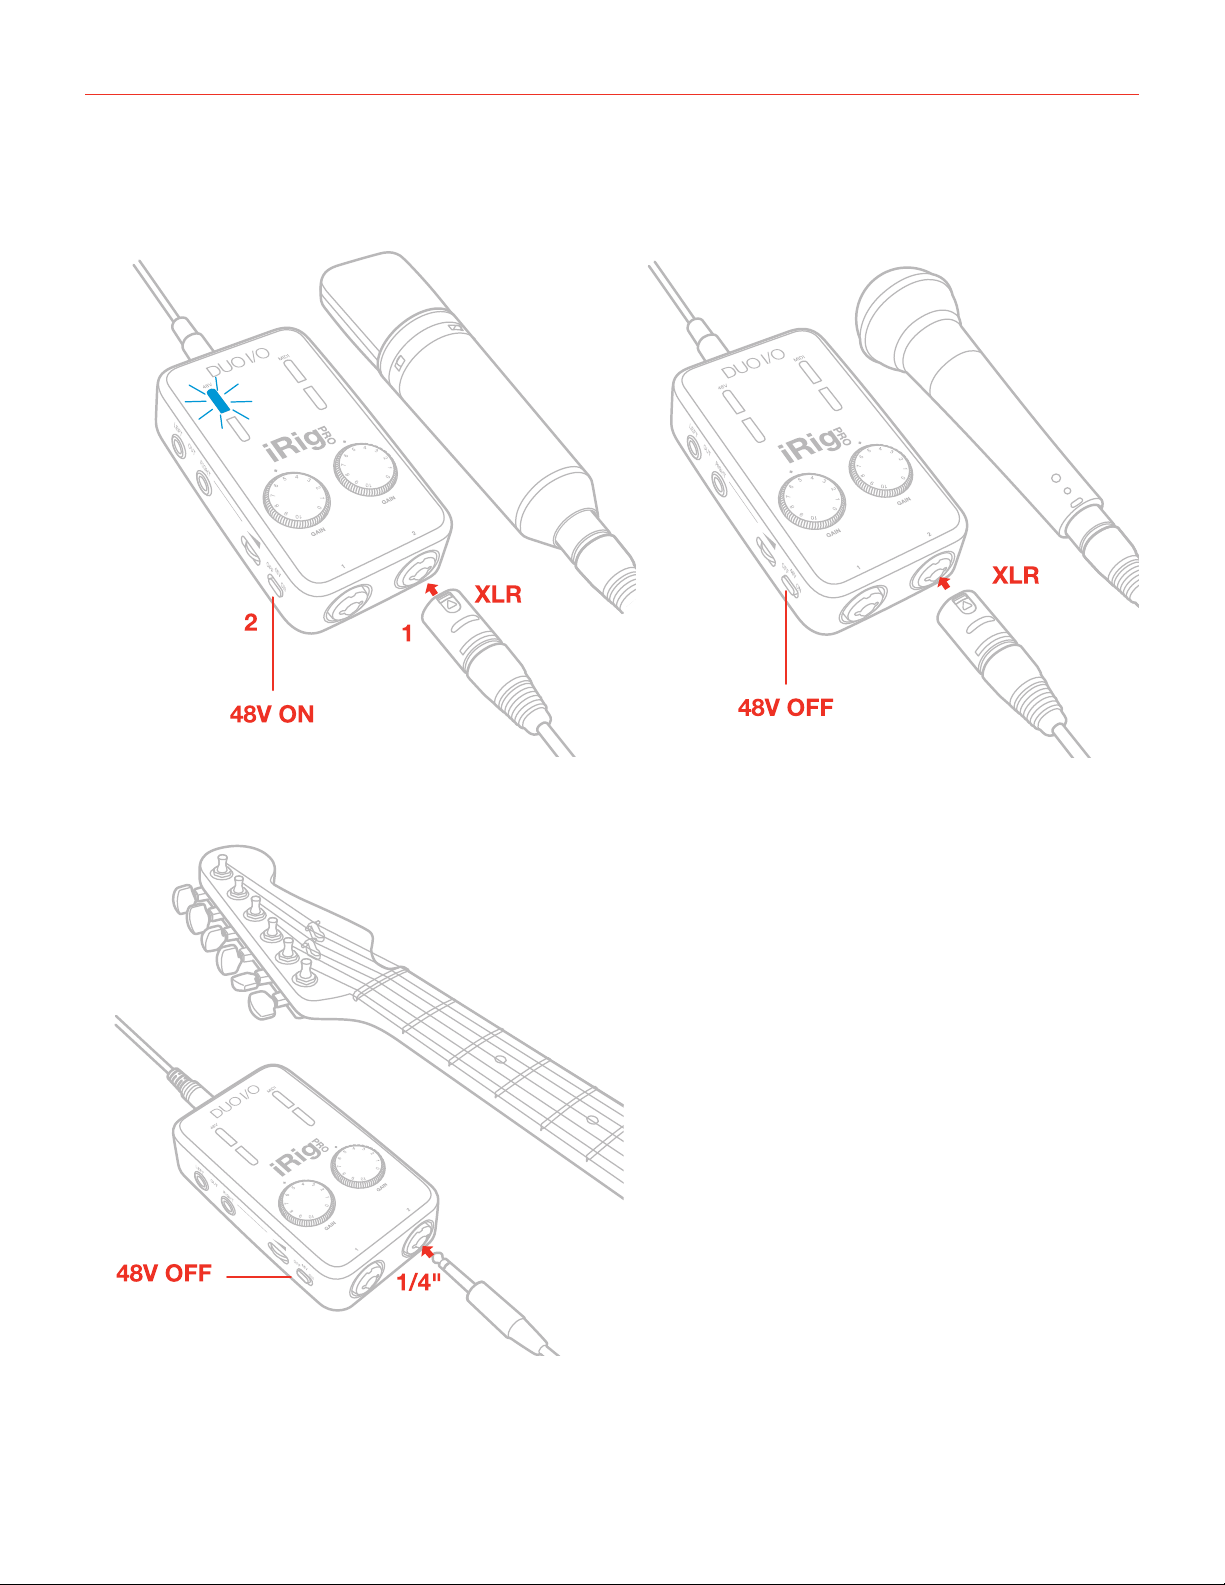
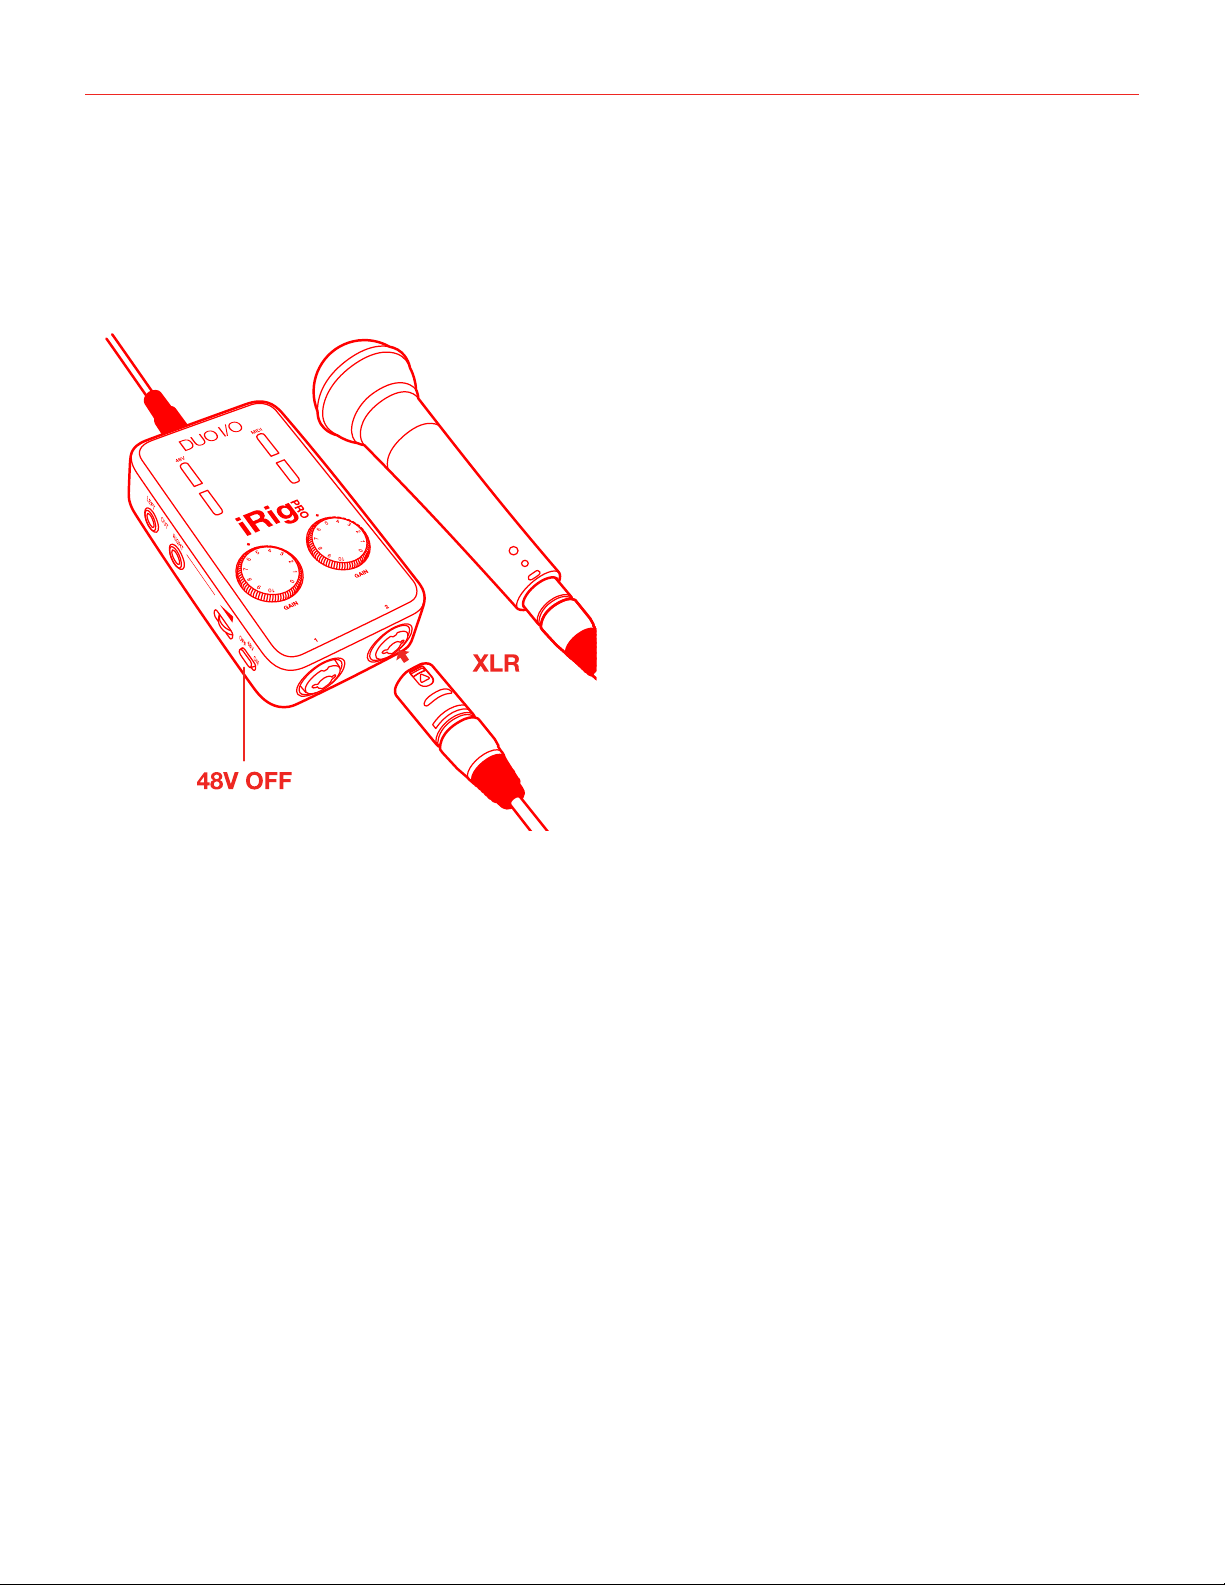
Connecting microphones
Always connect microphones to iRig Pro Duo I/O with XLR-to-XLR balanced cables. This will ensure a pristine
and clean performance from your microphone with iRig Pro Duo I/O.
NOTE: In your audio software, select the appropriate iRig Pro Duo I/O input (1 or 2) as the source of the track
you will be recording to. Adjust the channel gain knob until you have a sufficient audio signal without clipping.

English
13
Dynamic microphones
Before connecting dynamic microphones make sure phantom power is turned OFF. Check that the Phantom
Power switch is in the OFF position and that the Phantom LED is turned off.
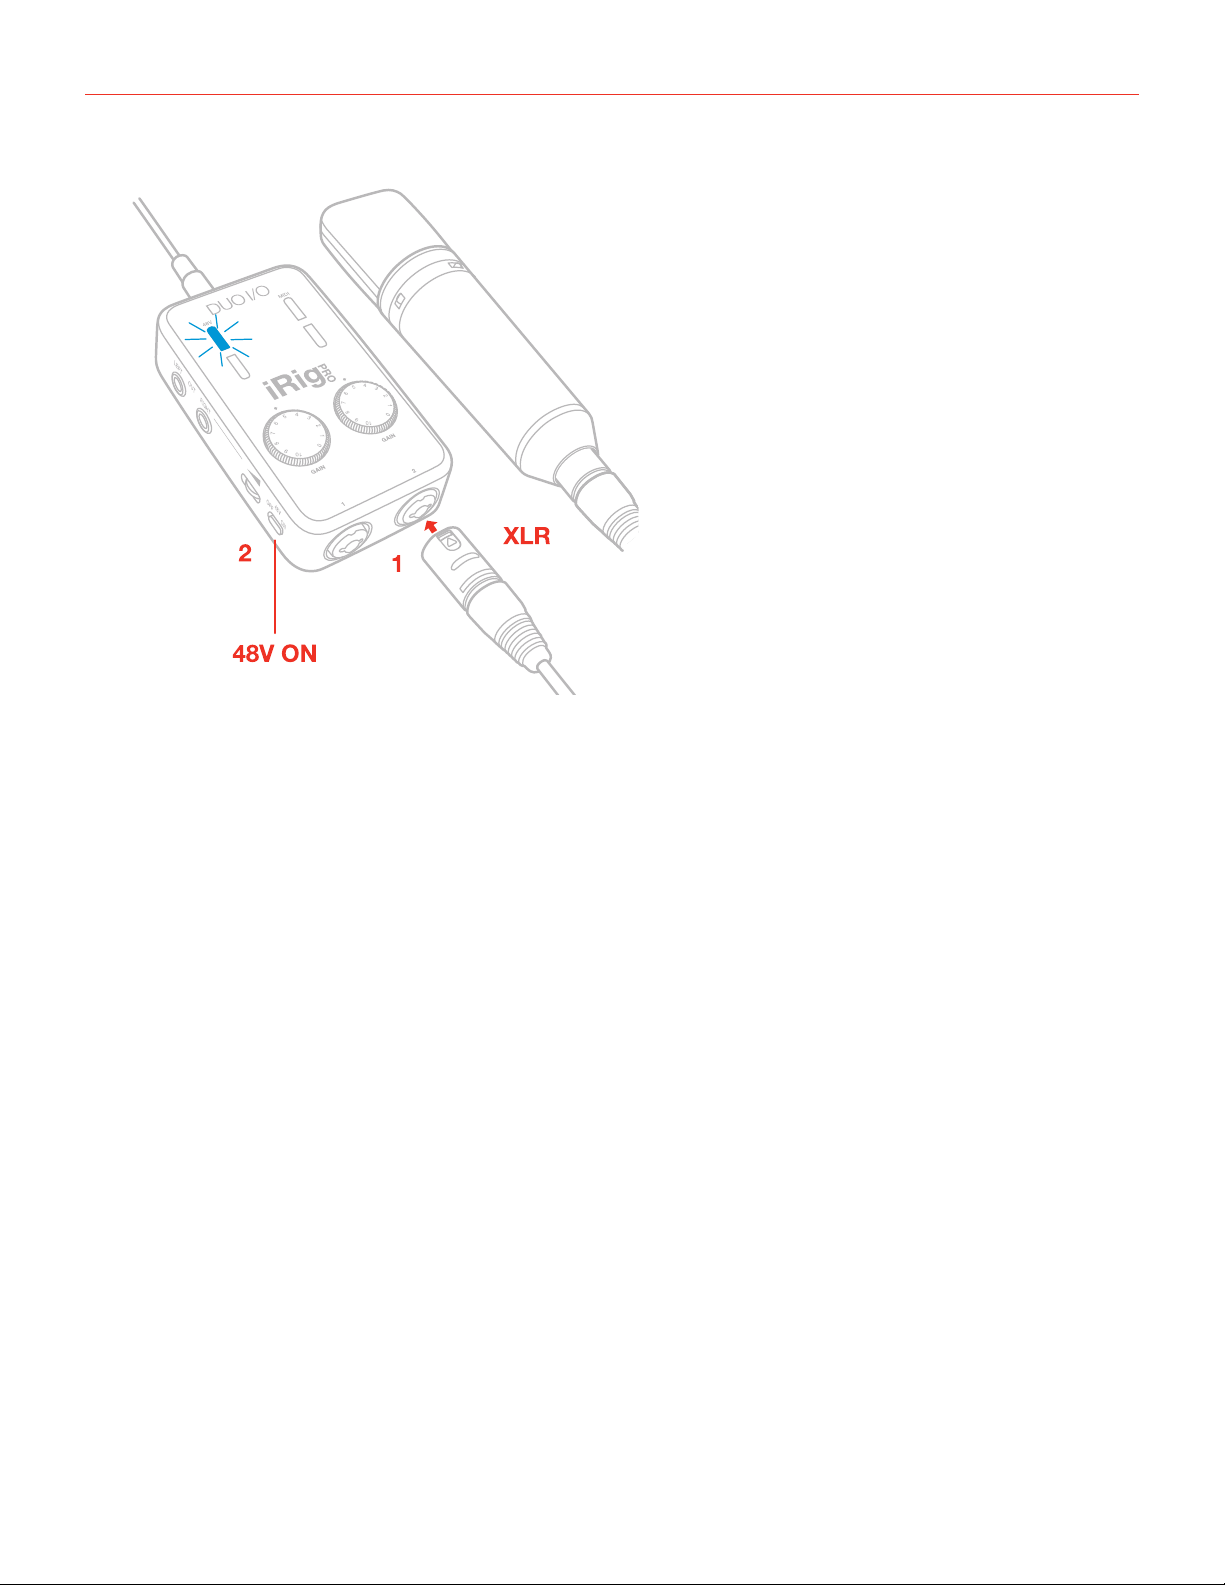
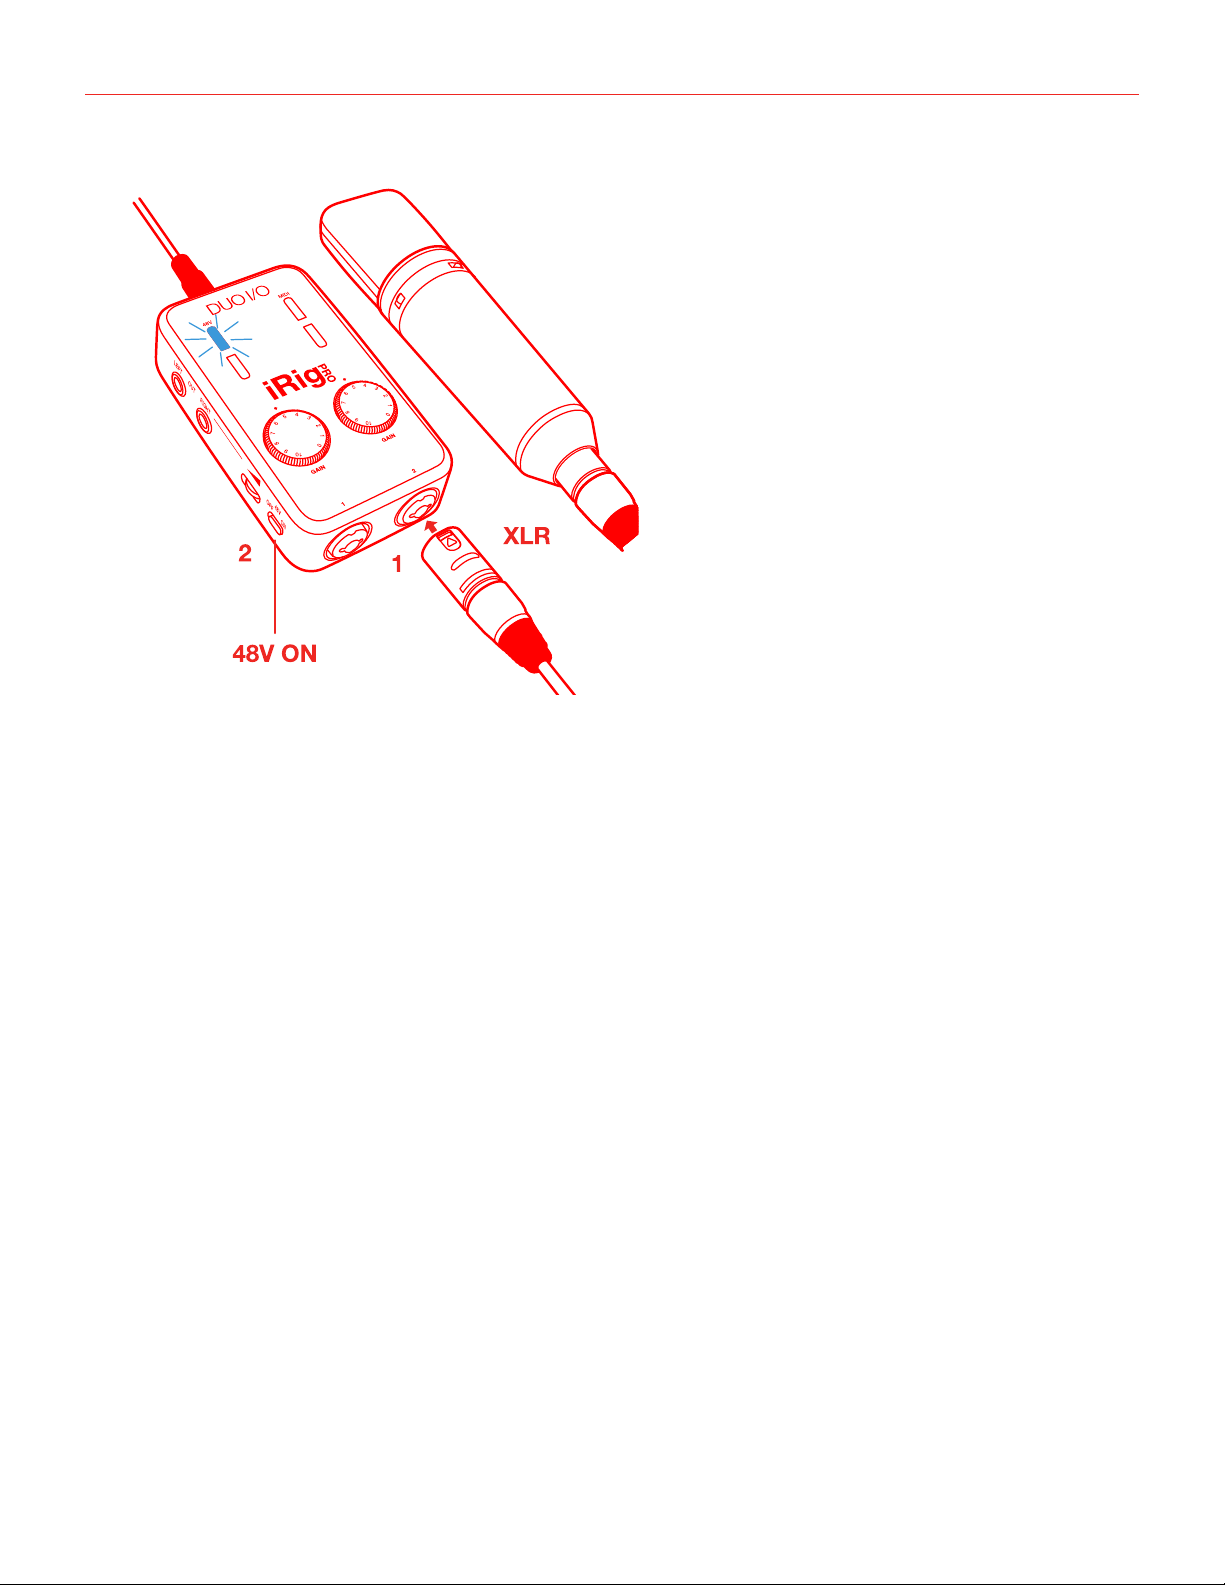
Condenser microphones
Most condenser microphones require external phantom power. If phantom power is ON, switch it OFF, and
then connect your microphone. Turn phantom power ON only after the microphone is connected. Once it’s
turned ON, check that the phantom power LED has become blue (it will flash for a few seconds before staying
on). If the LED doesn’t turn blue, check that working batteries are inserted in the iRig Pro Duo I/O’s battery
compartment on the bottom side, and that an application that is using iRig Pro Duo I/O is open. Phantom power
will NOT turn ON if iRig Pro Duo I/O is in standby (status LED lit up dark blue).
English
14
Ribbon microphones
Before connecting a ribbon microphone, turn OFF phantom power and check the microphone’s operating
instruction manual to see if it requires it. Most ribbon microphones don’t require phantom power, and some can
even be damaged by it. If you’re in doubt just leave it OFF. If the microphone won’t work, check its user manual,
it may need phantom power. Please note that when +48V phantom power is turned on, it works on both
channels simultaneously. It is not possible to turn +48V phantom power on one channel only.

English
15
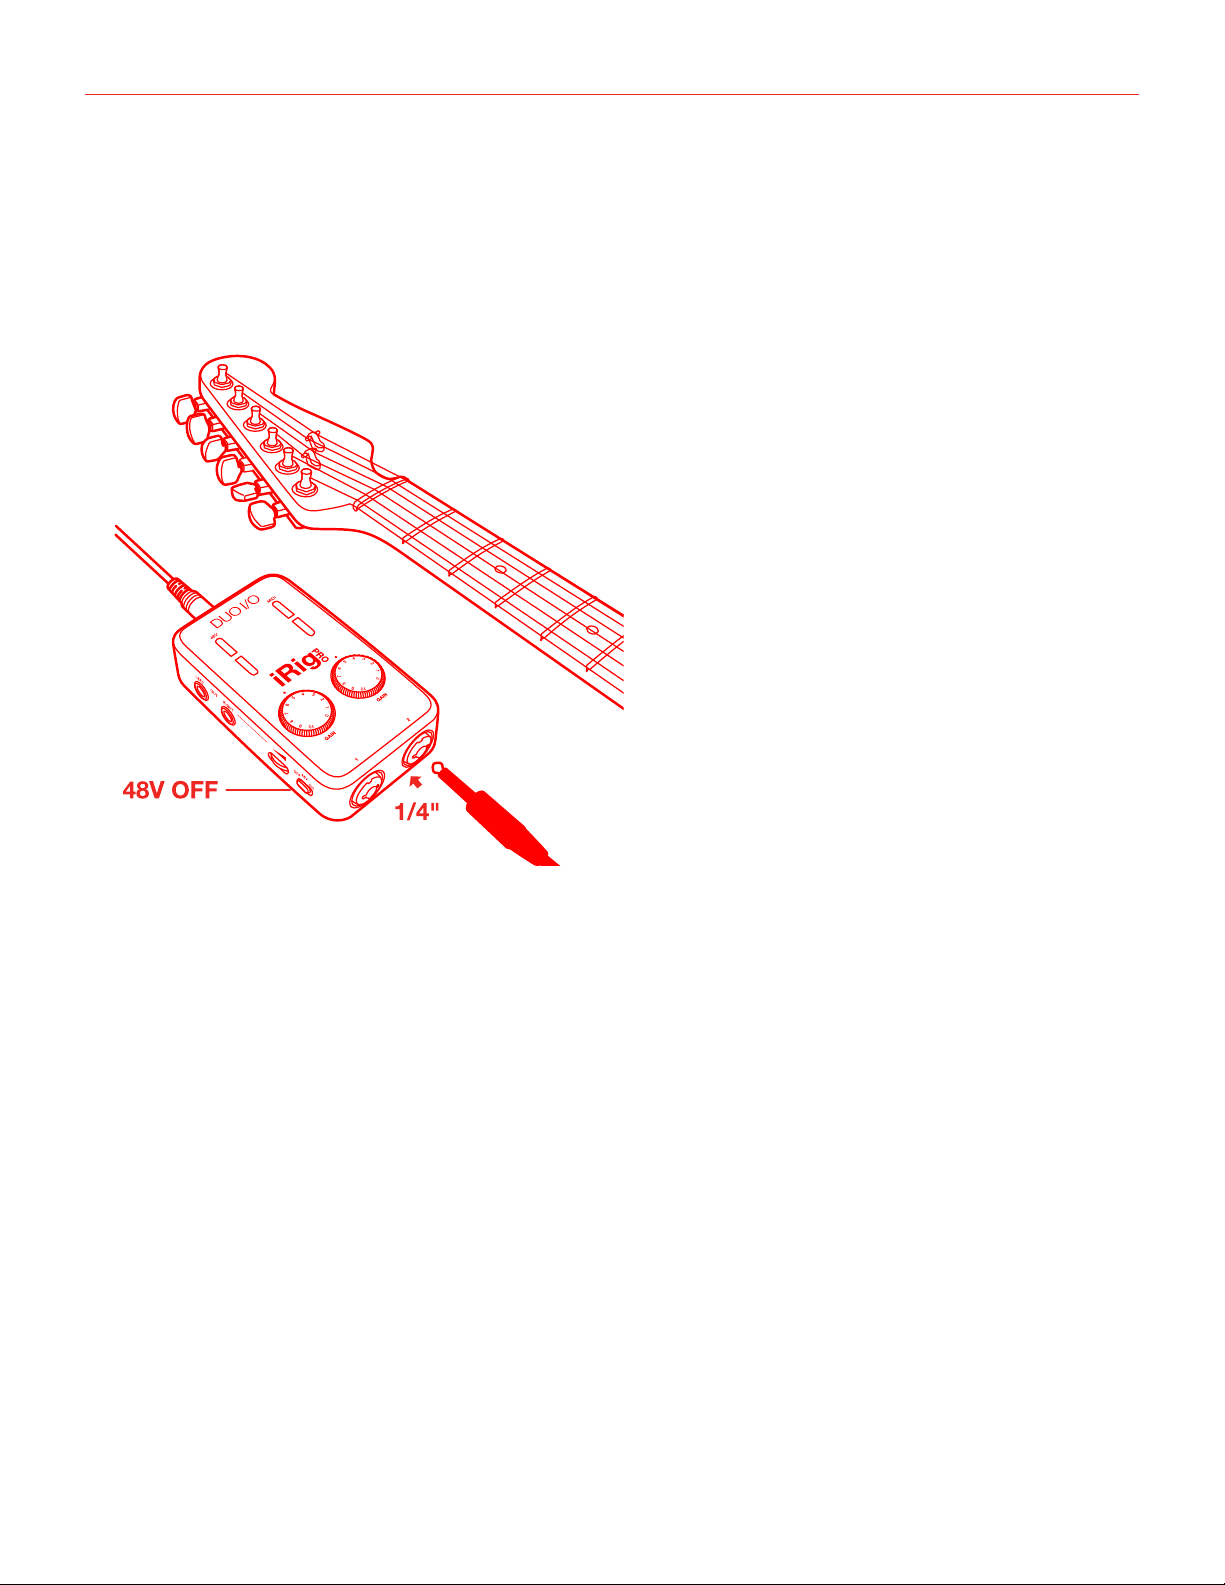
Connecting instruments
Connect your guitars, basses or any other mono instruments to the instrument inputs on iRig Pro Duo I/O using
an1⁄4”plugunbalanced(TSor“mono”)guitarcord.
IMPORTANT: the instrument input on iRig Pro Duo I/O will NOT work if a cable with balanced (TRS or “stereo”)
1⁄4”plugisused.
NOTE: In your audio software, select the appropriate iRig Pro Duo I/O input (1 or 2) as the source of the track
you will be recording to. Adjust the channel gain knob until you have sufficient audio signal without clipping.
Connecting monitors and headphones
• Connect a pair of active studio monitors or an audio amplifier to the 1/4” Line Output jacks labeled Left-
Right. If your monitor inputs or amplifier inputs are the RCA type, use 1/4” to RCA cables or adapters to
make the connection.
• Connect headphones to the 1/8” output jack and adjust its level via the headphone thumbwheel.
MIDI IN/OUT
MIDI IN
• Connect the 2.5mm-to-MIDI cable to the iRig Pro Duo I/O MIDI IN port and to the MIDI OUT port on your
keyboard or controller.
• Open a Core MIDI compatible application on your iOS device or on your computer and set “iRig Pro Duo
I/O” as the MIDI input device.
• When iRig Pro Duo I/O is receiving MIDI messages the MIDI LED will blink blue.

English
16
MIDI OUT
• Connect the 2.5mm-to-MIDI cable to the iRig Pro Duo I/O MIDI OUT port and to the MIDI IN port on, for
example, your sound module.
• Open a Core MIDI compatible application on your iOS device or on your computer.
• When iRig Pro Duo I/O is sending MIDI messages the MIDI LED will blink blue.
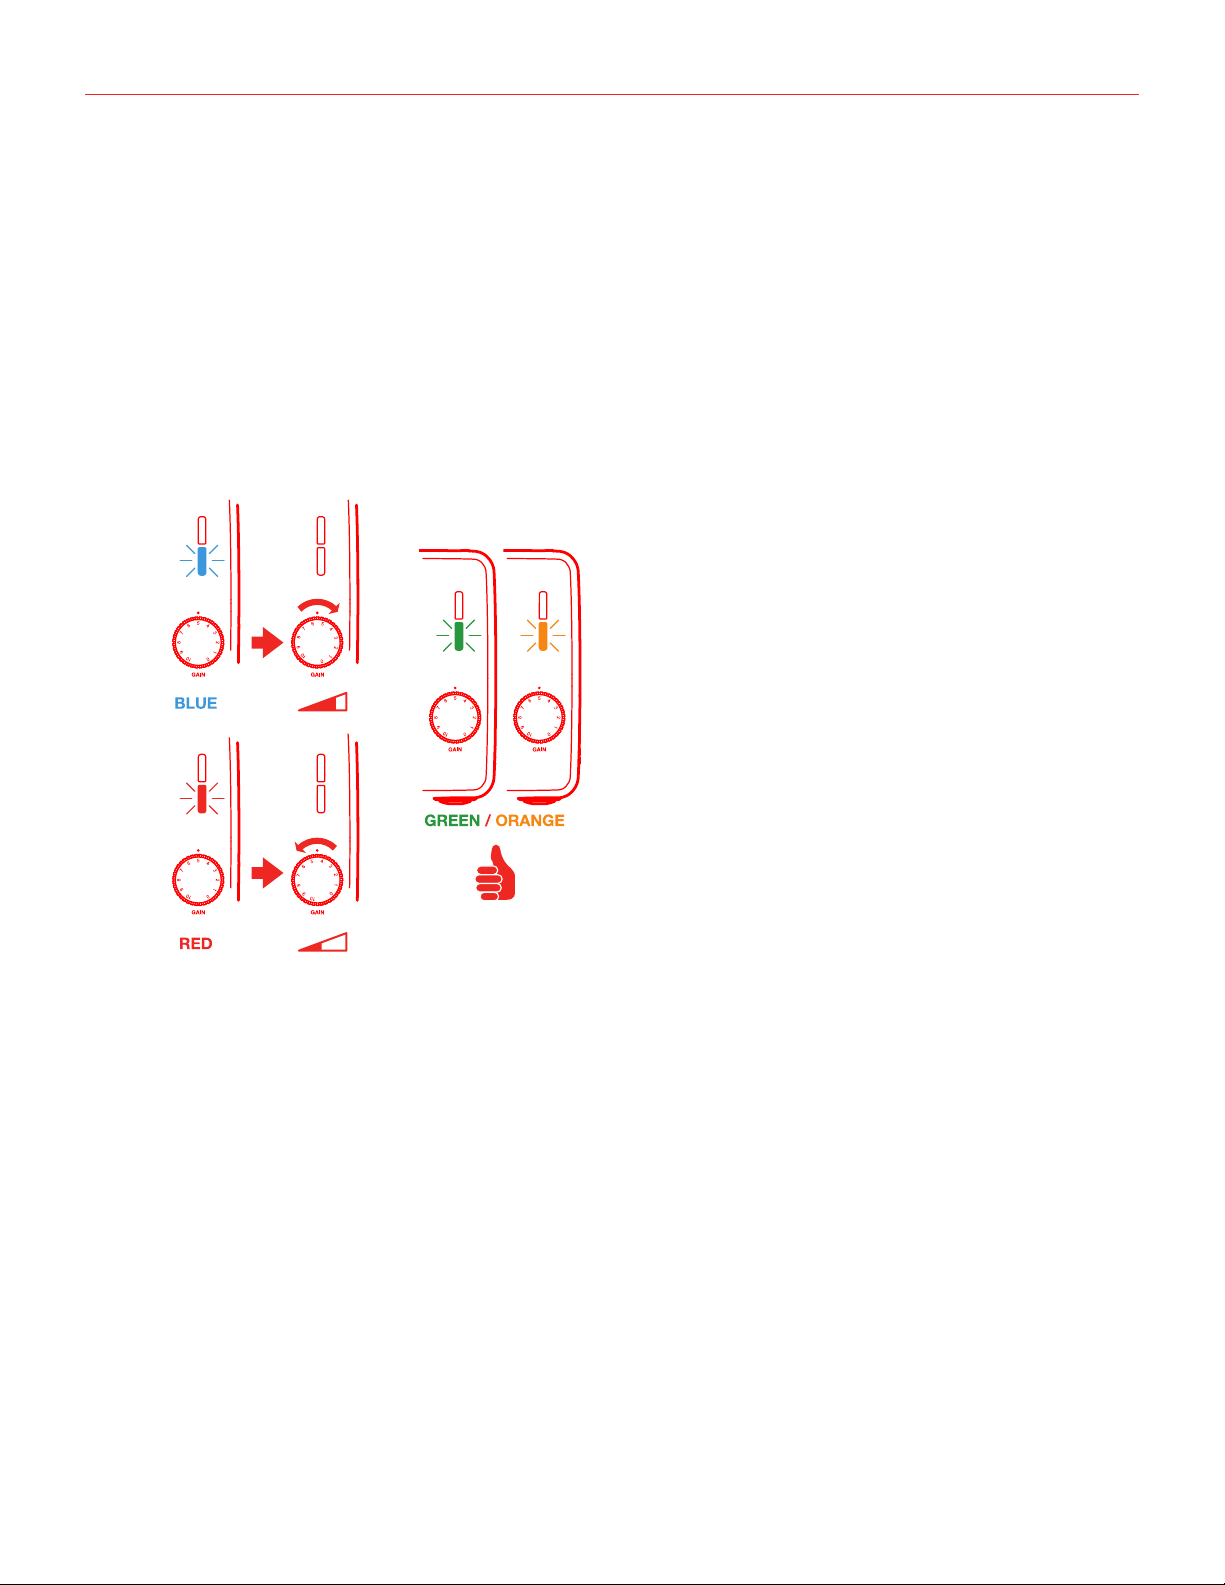
Setting input gain on iRig Pro Duo I/O
When talking or singing into your microphone, or when playing your instrument, check the audio level/status
LED of the corresponding channel on iRig Pro Duo I/O.
• If the LED is alternating between BLUE and GREEN, or is always GREEN, you should increase the iRig Pro
Duo I/O input gain by rotating the GAIN control clockwise.
• If the LED sometimes flashes RED, you should decrease the iRig Pro Duo I/O input gain by rotating the
GAIN control counter-clockwise.
• When your gain setting is optimal, the LED should alternate between GREEN and ORANGE while you play
or sing.

English
17
Troubleshooting
Sound is distorted.
You’re probably overloading the input. Check that the input gain on iRig Pro Duo I/O is set properly. If the Audio
Level LED is red when you play your instrument or sing or talk into a mic, decrease the input gain as described
in this guide.
I don’t get any sound.
In order for iRig Pro Duo I/O to turn on, a Core Audio-compatible audio app must first be launched on your iOS
device or Mac.
iOS: be sure you are using an app that works with audio input from the Lightning dock connector.
Mac: be sure you have set “iRig Pro Duo” as the audio or MIDI input device on the audio app you are using.
Phantom power doesn’t turn ON.
Check that you have inserted working AA batteries in iRig Pro Duo I/O’s battery compartment, or that you’ve
connected iRig Pro Duo I/O to an external power supply.
I can’t get any sound from my condenser microphone.
Your microphone may need phantom power. Turn phantom power on by moving the iRig Pro Duo I/O switch to
the ON position and check that the Phantom LED has turned on.
I can’t get any sound from my guitar / instrument input.
iRigProDuoI/Oonlyworkswith1⁄4”MONOguitarcables.Neverusestereo(TRS)plugscablesastheiRigPro
Duo I/O instrument inputs will be muted.
When I connect iRig Pro Duo I/O to my computer or Android device I get a message that says that this
device needs more power and the USB port will be disabled. How can I use my iRig Pro Duo I/O on my
host device?
This means your USB host device is not capable of providing the necessary current. Please install two AA
batteries in iRig Pro Duo I/O in order to use it with this USB host.
I have connected iRig Pro Duo I/O to my iPhone or iPad but it doesnt’ turn ON.
iRig Pro Duo I/O only works with AA batteries when connected to iOS devices.
I use iRig Pro Duo I/O onstage and get buzzes and noises when connected to a PA system or main
mixer.
Always connect iRig Pro Duo I/O outputs with balanced TRS cables to balanced line inputs. This way your
signal will always be perfectly clear.
I do remote recording with my iPad using iRig Pro Duo I/O and two condenser microphones and the iRig
Pro Duo I/O’s battery life is very short under these conditions.
Use rechargeable high-performance AA batteries from 1,900 mA/h up. iRig Pro Duo I/O will last approx 3.5
hours in these recording conditions.

English
18
Specifications
Microphone Input
Microphone Inputs: 2x balanced, XLR. Pin 2: hot / Pin 3: cold / Pin 1: ground
Microphone Input Level: from 6 mVpp to 1.4 Vpp
Microphone Input Impedance: 3,2 kOhms
Gain Range: 50 dB
Phantom Power: +48V ± 4V
Frequency Response: 20 Hz to 20 kHz (+-1.5dB)
Input Noise: -103 dB(A), -97 dB RMS
Instrument Input
Instrument Inputs: 2x unbalanced, Hi-Z, TS 1/4” Jack, Tip: signal / Shield: ground
Instrument Input Level: from 30 mVpp to 6.9 Vpp
Instrument Input Impedance: 1 MOhms
Gain Range: 27 dB
Frequency Response: 20 Hz to 20 kHz (+-1.5dB)
Input Noise: -103 dB(A), -97 dB RMS
Line Output
Line Outputs: 2x balanced, TRS 1/4” Jack, Tip: hot / Ring: cold / Shield: ground
Floating Balanced Outputs with automatic level compensation when working in unbalanced mode
Maximum Output Level: +16 dBu into 600 Ohms balanced load
Instrument Input Impedance: 1 MOhms
Frequency Response: from 10 Hz to 21 kHz (-3dB)
Output Dynamic Range: 106 dB(A)
Output Impedance: 150 Ohms balanced
Common
AD and DA Resolution: 24-bit
Sampling Rate: 44.1 kHz and 48 kHz
Power: USB bus power, battery power (2xAA), or DC power supply (9VDC - 500mA min. positive outside - not
included)
Metering: Multicolor LED
Size: 75mm/2.95” x 127mm/5” x 37mm/1.46”
Weight: 197.2g/6.96oz (batteries excluded)

English
19
Battery Life:
• Recording - Max load*: 3 hours, 30 minutes (NiMH rechargeable); 45 minutes (Alkaline)
• Playback - Min load**: 10 hours (NiMH rechargeable); 3 hours (Alkaline)
*Max load condition: both inputs connected to two 1,5mA phantom powered loads, input gains set to
maximum, outputs set to maximum.
**Min load condition is as follow: music playng, phantom power OFF.
Warranty
Please visit:
www.ikmultimedia.com/warranty
for the complete warranty policy.
Support and more info
www.ikmultimedia.com/support
Apple is not responsible for the operation of this device or its compliance with safety and regulatory standards.
20
“MadeforiPod,”“MadeforiPhone,”and“MadeforiPad”meanthatanelectronicaccessoryhasbeendesignedtoconnectspecicallytoiPod,iPhone,oriPad,respectively,andhasbeencertied
by the developer to meet Apple performance standards. Apple is not responsible for the operation of this device or its compliance with safety and regulatory standards. Please note that the use of
this accessory with iPod, iPhone, or iPad may affect wireless performance.
iRig® Pro Duo I/O, AmpliTube®, iRig® Recorder, VocaLive®, SampleTank® are trademarks property of IK Multimedia Production Srl. iPad, iPhone, iPod touch, Retina and Mac are trademarks of Apple
Inc., registered in the U.S. and other countries. iPad Air, iPad mini, and Lightning are trademarks of Apple Inc. All other trademarks are property of their respective owners.
2020/01/22
Mobile 2-channel Audio/MIDI Interface
for iPhone, iPad and Mac/PC
ユーザー・マニュアル
Japanese

Contents
2
Table of Contents
目次
2
日本語3
安全にご利用いただくためのお知らせ3
iRig Pro Duo I/O3
製品登録3
概要4
インストールと設定5
電池駆動時間5
iOS/Androidデバイス6
Mac/PC10
外部パワーサプライ(電源アダプター)の接続10
LED11
ステイタス/オーディオレベルLED11
ファンタム電源とMIDILED11
ダイレクトモニタリング12
マ イク ロ フォン の接続12
ダイナミックマイクロフォン13
コンデンサーマイクロフォン13
リボンマイクロフォン14
楽器を繋ぐ15
モニ タ ースピ ー カー とヘッド フォン 接続15
MIDI入出力15
MIDI入力15
MIDI出力16
iRig Pro Duo I/Oの入力ゲイン設定16
トラブルシューテ ィング17
製品仕様18
保証19
サポートおよびその他の情報19
日本語
3
安全にご利用いただくためのお知らせ
注意:適合しないバッテリーの使用は爆発を招く危険性があります。このガイドに従って適切なバッテリーのみをご利
用下さい。
iRig Pro Duo I/Oは、以下の種類の電池のみ使用可能です:
民生用の充電非対応のマンガン乾電池
アルカリ乾電池
民生用のニッケル水素(Ni-MH)充電池
iRig Pro Duo I/O
この度は、iRigProDuoI/Oをお 求 め 頂き、誠 に有 難うございます。
以下、パッケージの同梱物になります:
•
iRigProDuoI/O本体
•
単三型乾電池(アルカリ)x2本
•
Mini-DINtoLightningケーブルx1本
•
Mini-DINtoUSB-Aケーブルx1本
•
Mini-DINto
USB-Cケーブルx1本
•
MIDIアダプター・ケーブルx2本
•
登録カード(RegistrationCard)x1
iRigProDuoI/Oはユニバーサルタイプの2チャンネルモバイルオーディオ/MIDIインターフェイスです。可搬性に優れた
ウルトラコンパクトサイズながら、音楽制作と高品位のレコーディングに必要な接続端子をすべて備えています。iOS/
AndroidもしくはMac/PCでご利 用 いただ け、特 に iOSとMac環境では、iRigProDuoI/Oをホストデバイスに繋ぐだけ
で、即座にレコーディング可能です。(Windows環境のDAWでは、適切なレイテンシー設定の為、IKMultimediaより供
給されたドライバーをインストールする必要があります。)
iRig Pro Duo I/Oの登録
登録をすることで、テクニカルサポートへのアクセス、保証の有効および無料のJamPoints™をお客様のアカウントを
通じて受け取ることが可能になります。JamPoints™は、将来IK製品をお求め頂く際の割引としてご利用頂けます。ま
た、ご登録頂くことで、最新のソフトウェアアップデートやIK製品に関する情報を随時受け取ることが可能になります。
登録はこちらから: www.ikmultimedia.com/registration

日本語
4
iRig Pro Duo I/O 製品概要
1.
マイクロフォン/楽器入力
2.
入力ゲイン(GAIN)ノブ
3.
オーディオレベル/ステイタスLED
4.
ファンタム電源(+48V)LED
5.
MIDILED
6.
ヘッドフォン出力
7.
メインライン出力(LEFT/RIGHTOUT)
8.
ダイレクトモニター(DIRECTMONITOR)ス イッチ
9.
ファンタム電源(+48V)スイッチ
10.
ヘッドフォンボリューム
11.
出力ボリューム
12.
デバイス入力(Mini-DIN)
13.
MIDI入力(IN)ポート
14.
MIDI出力(OUT)ポート
15.
外部電源入力(9VDCIN)
1
12131415
7
2
3
45
6810911
日本語
5
インストールと設定
iOSデバイス接続時: iOSデバイスの場合、iRigProDuoI/Oは2つの単三型(AA)パッテリーの駆動で使用可能です。駆
動時間については、電池駆動時間の項目をご覧下さい。iRigProDuoI/Oの底面にある裏蓋を開け、電池ケースに付
属の単三電池を装着します。長時間ご利用予定の場合は、市販の9VDC-500mA(最低)外側(+)の電源アダプターをご
用意頂くことで、電池の駆動時間を気にせず、ご利用出来ます。
重要:外部電源アダプターは、デバイスバッテリーの充電には使用出来ませんので、ご注意下さい。
MAC/PC、バイス接続時:USBクラス・コンプライアン・トホストに接続すると、iRigProDuoI/Oは以下の方法で電源供
給されます:
•
単3電池x2本
•
USBバスパワー(ホストデバイスが駆動に十分な電源を供給出来る場合)。Androidデバイスの場合は、単3電池も
しくは外部電源アダプターの使用を推奨します。
•
9V電源アダプタ(別売。接続時は単3電池装着不要)
電池駆動時間
レコーディング-最大消費時*:3時間30分(NiMH-ニッケル水素準電池)、45分(アルカリ乾電池)
再生-最小消費時**:10時間(NiMH-ニッケル水素準電池)、3時間(アルカリ乾電池)
*電源最大消費設定:2つのファンタム電源1.5mAを有効にし、入力ゲインを最大、出力を最大にした場合。
**電源最小消費設定:音楽再生のみ、ファンタム電源オフにした場合。
重要:iRigProDuoI/Oは、USB接続した場合も内蔵
電池による駆動を優先します。Androidデバイス、専用
電源のないハブなど、USBバスパワーが十分でない場
合は電池を装着してください。USBバスパワー動作が
確実な場合は、電池を外してお使い下さい。
9VDC
500mA以上
*電源アダプターは別売になります。

日本語
6
iOS/Androidデバイス
1.
付属のLightningまたはUSBケーブルをiRigProDuoI/Oデバイス入力(Mini-DIN)ポートに接続します。
2.
LightningまたはUSBケーブルのもう片側をiOSまたはAndroidデバイスに接続します。この際、ファンタム(+48V)
スイッチがOFFポジションにあることと48VLEDが点灯していないことをご確認下さい。
3.
IKAppとソフトウェアのダウンロードをします。
無料 ダウンロ ード
IKソフトウェア、Appとアプリ内コンテンツ
ikdownloads.com/irigproduoio
日本語
7
4.
マイクロフォンを接続する場合は、市販のXLRケーブルで、iRigProDuoI/Oのマイクロフォン入力と繋ぎます。
5.
エレキギターやベースなどの楽器を接続する場合は、市販のギターシールド(¼”標準プラグ)で、iRigProDuoI/O
の楽器入力と繋ぎます。
日本語
8
6.
キーボードなどの外部コントローラーで、MIDI対応Appの演奏や操作をする場合は、付属のMIDIアダプターと市
販のMIDIケーブルを使用して繋ぎます。MIDIポートは入出力が独立していますので、MIDIコントローラーのMIDI
OUTは、iRigProDuoI/OのMIDIINと繋ぎます。接続後、ご利用のAppが、iRigProDuoI/OからのMIDI信号を受
信出来る設定になっているかどうか、ご確認下さい。
7.
MIDI対応App上のMIDI情報を外部のMIDIデバイスに送信して演奏や操作をする場合は、付属のMIDIアダプター
と市販のMIDIケーブルを使用して繋ぎます。MIDIポートは入出力が独立していますので、iRigProDuoI/OのMIDI
OUTとMIDIデバイスのMIDIINを繋ぎます。接続後、ご利用のAppが、iRigProDuoI/OにMIDI信号を送信出来る
設定になっているかどうか、ご確認下さい。
日本語
9
8.
ヘッドフォンを接続する場合は、iRigProDuoI/Oのヘッドフォン出力(3.5mmステレオミニ)を使用します。接続後、
音量を適切なレベルになるように調節をします。
9.
ミキサーやパワードスピーカーは、iRigProDuoI/Oの左右、それぞ れのMain出力(
¼”標準またはTRSプラグ)を
使用します。接続後、音量を適切なレベルになるように調節をします。この出力は高品位のバランス接続に対応し
ますので、DIボックスを用いることなく、TRSバランスプラグのケーブルを使用してPAやステージミキサーと繋ぐこ
とが出来ます。
日本語
10
Mac/PC
Windows環境のDAWをご利用の場合、適切なレイテンシー設定の為、IKMultimediaより供給されたASIOドライバ
ーをインストールする必要があります。UserArea>MyProductsページwww.ikmultimedia.com/userarea/より、
ASIOドライバーのダウンロードとインストールを行って下さい。
1.
付属のUSBケーブルをiRigProDuoI/Oデバイス入力(Mini-DIN)ポートに接続します。
2.
USBケーブルのもう片側をMac/PCのUSBポートに接続します。
3.
この際、ファンタム(+48V)スイッチがOFFポジションにあることと48VLEDが点灯していないことをご確認下さい。
4.
マイクロフォンを接続する場合は、市販のXLRケーブルで、iRigProDuoI/Oのマイクロフォン入力と繋ぎます。
5.
エレキギターやベースなどの楽器を接続する場合は、市販のギターシールド(¼”標準 プラグ)で、iRigProDuoI/O
の楽器入力と繋ぎます。
6.
AmpliTube、もしくは その 他 の CoreAudio対応アプリケーションを起動し、オーディオ環境設定で、“iRigProDuo”
を入力デバイスとして設定します。
7.
ヘッドフォンを接続する場合は、iRigProDuoI/Oのヘッドフォン出力(3.5mmステレオミニ)を使用します。接続後、
音量を適切なレベルになるように調節をします。
8.
ミキサーやパワードスピーカーは、iRigProDuoI/Oの左右、それぞ れのMain出力(
¼”標準またはTRSプラグ)を
使用します。接続後、音量を適切なレベルになるように調節をします。
外部パワーサプライ(電源アダプター)の接続
iOSデバイスでの使用時に稼働時間を延長されたい場合、RigProDuoI/Oの外部電源入力(9VDCIN)ポートに市販
の9VDC-500mA以上、外側(+)の電源アダプター(ギター用のエフェクト・ペダル用で一般的な仕様)を接続すること
で、電池の寿命を気にすることなく、ご利用頂けます。
重要:この電源アダプターを通じたデバイスの充電は出来ません。
日本語
11
LED
iRigProDuoI/Oは4つのLEDを装備し、ユニットの動作状況と重要な情報を点灯色を通じてお知らせします。
ステイタス/オーディオレベルLED
iRigProDuoI/Oのオーディオ信号レベルの状況をお知らせするLEDがチャンネル毎に用意されています。以下、そ の
点灯色と状況の関係になります:
•
2つのLEDが共にオフ:iRigProDuoI/Oに電源が供給されていないことを示します。
•
2つのLEDが共に
暗い青色:iRigProDuoI/Oが接続され、スタイバイモードであることを示します。
•
どれかのチャンネルLEDが
明るい青色:iRigProDuoI/Oが接続され、そのチャンネルに信号が入力されているこ
とを示します。
•
どれかのチャンネルLEDが
緑色:そのチャンネル入力信号が低いことを示します。
•
どれかのチャンネルLEDが
橙色:そのチャンネルに十分な音量の信号が入力されていることを示します。
•
どれかのチャンネルLEDが
赤色:そのチャンネルの信号が入力過多であることを示します。
ファンタム電源とMIDILED
上の2つのLEDは、ファンタム電源とMIDI信号の状況をお知らせします。
ファンタム電源(48V)LED
•
オフ:側面のファンタム電源(48V)スイッチがOFFポジションに設定されていて、電源供給しないことを示します。
•
青色
の点滅:ファンタム電源スイッチがONに設定され、電源供給を開始することを示します。この間、電源オンによ
る不用意なオーディオ信号の発生を防ぐ為、iRigProDuoI/Oは、ファンタムの安定電源供給まで、ミュート状態に
なります。これは一時的なもので、故障ではありません。使用可能な状態になれば、ミュートは自動解除されます。
•
青色
の常時点灯:ファンタム電源がオンであること示します。(自動ミュート解除)
•
赤色
の点滅:バッテリー容量が不足していること示します!iRigProDuoI/Oが終了になる前、このLEDが点滅を始
めます。この場合、速やかにバッテリー交換を行って下さい。
!

日本語
12
MIDI LED
•
オフ:iRigProDuoI/OがMIDI情報を受けていないことを示します。
•
青色
の点滅:iRigProDuoI/OがMIDI情報を送信していることを示します。
•
赤色
の点滅:iRigProDuoI/OがMIDI情報を受信していることを示します。
ダイレクト・モニタリング
オーディオソフトウェア使用したオーディオ信号のレコーディングをする際、iRigProDuoI/Oからソフトウェアに信号
が達するまで、(聴感できる出来ないに関わらず)若干な遅延が生じます。この遅延はレイテンシーと呼ばれ、信号の距
離、オーディオのデジタル変換とコンピューター処理など複合的な要因によって発生します。
収録時のレイテンシーが気になる場合、本体横のDIRECTMONITORスイッチをオンにして、ダイレクト・モニタリングを
有効にします。この機能は、iRigProDuoI/Oの入力からヘッドフォン出力までを直接繋ぎ、遅れのないモニター環境を
提供します。
ダイレクト・モニタリングを有効に した場合、マイ クロフォンの信号はオーディオソフトウェアの出力信号とミックスさ
れ 、ヘッドフォン出 力されます。DIRECTススイッチは、ご利用ソフトウェアのレコーディング音声には影響を与えません。
ダイレクト・モニタリングを利用する際、ソフトウェア側の類似機能(録音モニター、ダイレクト、あるい は低レイテンシー
モニターなど)をオフにする必要があります。iRigProDuoI/Oとソフトウェアの両方でモニター機能をオンにした場合、
モニター音声が二重、あるいは不要なディレイ、フランジャー効果などが発生します。ご利用オーディオソフトウェアの
マニュアルのモニタリング機能に関する記述も合わせてご確認下さい。
マイク ロフォンの接続
iRigProDuoI/Oとマイクロフォンを繋ぐ場合、必ず市販のXLR-to-XLRバランスケーブルをご利用下さい。XLRケーブル
での接続のみがマイクロフォンの信号をクリアかつ適切に扱うことが出来ます。
注意:録音を開始する前に、ご利用のオーディオソフトウェアで、該当するiRigProDuoI/Oの入力(1または2)を選択し
ます。そして音量過多にならないように(不要な歪みが発生しないように)、チャンネルゲインが適切になるように調節
します。
日本語
13
ダイナミック・マイクロフォン
ダイナミックタイプのマイクロフォンをご使用の際、ファンタム電源は不要ですので、予めオフにします。機器に損傷与え
ない為にもファンタム(+48V)スイッチがOFFポジションにあることと48VLEDが点灯していないことをご確認してから
接続をして下さい。
コンデンサー・マイクロフォン
殆どのコンデンサーマイクロフォンは、ファンタム電源供給を必要とします。接続をする前、ファンタム電源は予めオフ
にします。ファンタム(+48V)スイッチがOFFポジションにあることと48VLEDが点灯していないことをご確認上、マイク
ロフォンの接続を行って下さい。
接続後、ファンタム(+48V)スイッチをONポジションにし、ファンタム電源LEDの青色点滅が、常時点灯になる
までお待ち下さい。青色の常時点灯になれば、ご利用可能の状態になります。万が一点灯しない場合、iRig
ProDuoI/Oのバッテリーの状態、あるいは電源ソースをご確認下さい。また、iRigProDuoI/Oがスタンバイ
モード(ステイタスLEDが暗く青色に点灯している)状態では、ファンタム電源をオンにすることが出来ません。
日本語
14
リボンマイクロフォン
リボンタイプのマイクロフォンをご使用の際、予めオフにします。ファンタム(+48V)スイッチがOFFポジションにあるこ
とと48VLEDが点灯していないことをご確認してから接続をします。殆どのリボンマイクロフォンは、ファンタム電源を
必要としませんが、ごく一部のマイクロフォンでは必要としますので、まずマイクロフォンのマニュアルをご確認下さい。
ファンタム電源は不要の機器に損傷を与える可能性がある為、ご不明の場合はまず、オフの状態でマイクロフォンが使
用出来るかどうかご確認下さい。出来ない場合、オンにしてご確認下さい。また、ファンタム電源スイッチをオンにした
場合、両方のチャンネルに給電されることもご留意下さい。片方のチャンネルのみオンにすることは出来ません。
日本語
15
楽器の接続
エレキギターやベースなどの楽器とiRigProDuoI/Oを繋ぐ場合は、1⁄4”(標準)プラグ仕様のアンバランスケーブル(一
般的な市販のギターシールド)をご使用下さい。
重要:iRigProDuoI/Oの楽器入力に1⁄4”(TRS、またはステレオ)プラグのバランスーブルの接続は機能しませんので
ご注意下さい。
注意:録音を開始する前に、ご利用のオーディオソフトウェアで、該当するiRigProDuoI/Oの入力(1または2)を選択します。
そして音量過多にならないように(不要な歪みが発生しないように)、チャンネルゲインが適切になるように調節します。
モニタ ーと ヘッド フォン接続
•
アクティブスタジオモニタースピーカー(ペア)、もしくはオーディオアンプと接続する場合は、iRigProDuoI/Oの
MAINOUT、L(左)とR(右)の1/4”ライン出力を使用します。スピーカー、或いはアンプの入力がRCA(赤白)タイプ
の場合、1/4”toRCAケーブルやアダプターを使用して接続して下さい。.
•
ヘッドフォン接続は、1/8”(3.5mm)のミニステレオ出力を使用します。接続後、適切な音量に調節します。
MIDI入出力
MIDI入力
•
付属の2.5mm-to-MIDIケーブルをiRigProDuoI/OのMIDIINポートに接続し、もう片方を市販のMIDIケーブルと
MIDIキーボードなどのコントローラーのMIDIOUTと接続します。
•
iOSデバイス或いはコンピューターで、CoreMIDI対応Appを起動し、“iRigProDuoI/O”をMIDI入力デバイスとし
て選択します。
•
iRigProDuoI/OはMIDI情報を受けると、MIDILEDが赤色に点滅します。
日本語
16
MIDI出力
•
付属の2.5mm-to-MIDIケーブルをiRigProDuoI/OのMIDIOUTポートに接続し、もう片方を市販のMIDIケーブル
と音源モジュールなどのMIDIINと接続します。
•
iOSデバイス或いはコンピューターで、CoreMIDI対応Appを起動します。
•
iRigProDuoI/OはMIDI情報を出力すると、MIDILEDが青色に点滅します。
iRig Pro Duo I/Oの入力ゲイン設定
iRigProDuoI/Oと接続したマイクロフォンに音声、或いは楽器を演奏する際、接続チャンネルのオーディオレベル/ス
テイタスLEDで、信号レベルを確認しながら適切なゲイン設定をします。
•
LEDが
青と緑色の間で変化、或いは常に緑色の場合、iRigProDuoI/OのGAINコントロールを時計回りに回して、
入力レベルを引き上げます。
•
LEDが
赤色点滅する場合、iRigProDuoI/OのGAINコントロールを反時計回りに回して、入力レベルを下げます。
•
LEDが
緑から橙色の間で変化する場合、演奏や歌唱の音量が適切であることを示します。

日本語
17
トラブルシューティング
音が歪む
恐らく入力レベル過多になっています。まず、iRigProDuoI/OのGAINノブの設定が適切かどうかを確認します。楽器の
演奏、あるいはマイクに声を入力した際、オーディオレベルLEDが赤く点灯する場合、GAIN設定を下げます。
音が入力されない
iRigProDuoI/Oの電源が入っているかどうか、確認をします。そしてmacOSまたはiOS環境の場合、CoreAudio対応
のオーディオアプリケーションが起動していることを確認します。
iOS:AppのオーディオがLightningドックコネクターからのオーディオ入力に対応していることを確認します。
macOS:アプリケーションのオーディオやMIDI設定で、“iRigProDUOI/O”が選択されていることを確認します。
ファンタ ム電源がオ ンにならない
iRigProDuoI/Oをバッテリー駆動でご利用の場合は、バッテリー残り容量が十分であるかどうか、極性が正しく装着
されているかどうかをご確認下さい。或いはiRigProDuoI/Oを外部の電源アダプターに接続してご確認下さい。
コン デ ンサ ーマ イクフォンか ら音が入 らない
ご利用のマイクロフォンが+48Vのファンタム電源に対応していることを確認します。iRigProDUOI/Oの+48Vスイッチ
がオンになっていることを確認します。XLR3ピンケーブルでiRigProDUOI/OのINPUTコネクターに接続されている
ことを確認します。
ギター(楽器)から音が入らない
ご利用の楽器とiRigProDUOI/Oが市販のギターシールド(1/4"モノプラグのケーブル)で接続されていることを確認
します。TRS(ステレオ)タイプのケーブルを使用した場合、iRigProDUOI/Oの入力はミュート状態になります。
iRig Pro Duo I/Oをコンピューター やAndroidデバイスに接続した際、"このデバイスを稼働させるための電源がた
りません。USBポートを無効にします。”類のメッセージが表示されました。iRig Pro Duo I/Oをホス ト デバイスで使用
する方法は?
この様なメッセージが表示されたな場合、ご利用のデバイスではiRigProDuoI/Oが稼働する為の十分なUSBバス電
源を供給出来ないことを意味します。従いまして、単三型(AA)電池を2つiRigProDuoI/Oに装着して、バッテリー駆動
でご利用下さい。
iRig Pro Duo I/OをiPhoneやiPadに繋いでもオンにならない
iRigProDuoI/OをiOSデバイスと接続して使用する場合、単三型(AA)電池を2つiRigProDuoI/Oに装着する必要が
あります。.
iRig Pro Duo I/Oをステージで使 用する際 、PA システムやメインミキサーと接 続すると“ブーン”というノイズ を発します
iRigProDuoI/Oの出力をTRSバランス仕様のケーブルで、機器のバランス入力に接続して下さい。この方法で、常にク
リアな信号が得られる様になります。
iPadとiRig Pro Duo I/O、2本のコンデ ンサーマイクロフ ォン で リ モー ト レコーディングを し ようとす る と、iRig Pro
Duo I/Oがすぐに電池切れになります
この場合充電式の容量が1,900mA/hの高性能単三型(AA)バッテリーをご利用下さい。このケースで、iRigProDuoI/
Oは約3.5時間ほど、レコーディングを行うことが可能です。

日本語
18
製品仕様
マ イク ロフォン入力
入力コネクター:2xXLR3ピンメス、バランス仕様、ピン2:ホット/ピン3:コールド/ピン1:グランド
入力レベル:6mVppから1.4Vpp
入力インピーダンス:3.2kΩ
ゲインレンジ:50dB
ファンタム電源:+48V±4V
周波数特性:20Hz-20kHz(+-1.5dB)
入力ノイズ:-103dB(A),-97dBRMS
楽器入力
入力コネクター:2x1/4”TSアンバランス、Hi-Z、Tip:信号/シールド:グランド
入力レベル:30mVppから6.9Vpp
入力インピーダンス:1MΩ
ゲインレンジ:27dB
周波数特性:20Hz-20kHz(+-1.5dB)
入力ノイズ:-103dB(A),-97dBRMS
ラ イン 出力
出力コネクター:2x1/4”TRSバランス、Tip:ホット/Ring:コールド/シールド:グランド
フローティングバランス出力:アンバランスモード時の自動レベル補正機能を装備
最大出力レベル:+16dBu@600Ωバランスロード
周波数特性:10Hz-21kHz(-3dB)
出力ダイナミックレンジ:106dB(A)
出力インピーダンス:150Ωバランス
その他
AD / DA 分解能: 24-bit
サンプリングレート:44.1kHzまたは48kHz
電源:USBバス電源、バッテリー電源(2x単三型/AA)、外部DCパワーサプラ イ(別売、9VDC-500mAmin.センターマ
イナス)
メーター表示: マルチカラーLED
寸法:75mm/2.95”x127mm/5”x37mm/1.46”
重量:197.2g/6.96oz(バッテリー含まず)

日本語
19
バッテリー 寿 命
•
レコーディング時-最大消費*:3時間30分(NiMH-ニッケル水素準電池)、45分(アルカリ乾電池)
•
再生時-最小消費時**:10時間(NiMH-ニッケル水素準電池)、3時間(アルカリ乾電池)
*電源最大消費設定:2つのファンタム電源1.5mAを有効にし、入力ゲインを最大、出力を最大にした場合。
**電源最小消費設定:音楽再生のみ、ファンタム電源オフにした場合。
保証
保証規約に関しては、下記のリンクに記載しています:
www.ikmultimedia.com/warranty
サポートおよびその他の情報
www.ikmultimedia.com/support
Appleはこのデバイスの動作、および安全性と規制基準への準拠に関する責務は負いません。

20
“MadeforiPod,”“MadeforiPhone,”and“MadeforiPad”meanthatanelectronicaccessoryhasbeendesignedtoconnectspecicallytoiPod,iPhone,oriPad,respectively,andhasbeen
certiedbythedevelopertomeetAppleperformancestandards.Appleisnotresponsiblefortheoperationofthisdeviceoritscompliancewithsafetyandregulatorystandards.Pleasenote
thattheuseofthisaccessorywithiPod,iPhone,oriPadmayaectwirelessperformance.
iRig®ProDuoI/O,AmpliTube®,iRig®Recorder,VocaLive®,SampleTank®aretrademarkspropertyofIKMultimediaProductionSrl.iPad,iPhone,iPodtouch,RetinaandMacaretrademarksof
AppleInc.,registeredintheU.S.andothercountries.iPadAir,iPadmini,andLightningaretrademarksofAppleInc.Allothertrademarksarepropertyoftheirrespectiveowners.
“MadeforiPod,”“MadeforiPhone,”および“MadeforiPad”は、電子アクセサリは、iPod、iPhoneおよびiPadへの接続専用に設計された製品であり、Appleが定める性能基準に適合していることをデベロッパが
認定済みです。Appleはこのデバイスの動作、および安全性と規制基準への準拠に関する責務は負いません。このアクセサリーの使用において、iPod、iPhoneまたはiPadのワイヤレスパフォーマンスに影響する場合
があります。
iRig®ProDuoI/O,AmpliTube®,iRig®Recorder,VocaLive®,SampleTank®は、IKMultimediaProductionSrlの登録商標です。その他の製品名、画像、アーティスト名はその権利帰属者の所有物であり、IK
Multimediaとは協賛または契約関係にはありません。iPad,iPhone,iPodtouch,RetinaとMacは米国およびその他の国で登録されたAppleComputer,Inc.,の商標です。PadAir,iPadminiとLightningはApple
Inc.の商標です。AppStoreはAppleInc.サービスマークです。AndroidはGoogleInc.の商標です。GooglePlayはGoogleInc.の商標です。
2020/01/22