Line 6 POD GO Guitar Multieffects Pedal
Product's Documents
Below are documents related to this product, you can read online or download:
- Owner's manual - (English) Read Online | Download pdf
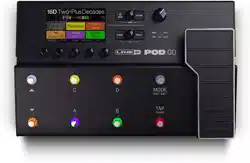

1. Main Display This color LCD is your window into the power of POD Go
2.  VIEW If you ever get lost, press this button to return home. Press again to toggle between the two main Home views—see ' Play View" and 'Edit View".
3. ACTION Press this button to open the action panel for the selected block or menu. From Edit view, the action panel lets you move, copy, and paste blocks. Other menus may have unique action panels: for example, the Global Settings action panel lets you reset all global settings at once.
Press and ACTION together to open the Save menu for renaming and saving changes to a preset. Press both buttons twice to quick save. See ' Saving/Namina a Preset".
4. Upper Knob In Play view, turn this knob to select a preset. Press this knob to open the preset list. In Edit view, turn this knob to select a block for editing. Press this knob to bypass/enable the selected block.
5. Lower Knob In Edit view, turn this knob to change the current block's model. Press this knob to open the model list. See "Choosing a Block's Model".
6.  Press to view more parameters for the selected block or menu. Press both to dive deeper into POD Go. and you'll find Bypass/Control. Global EQ. and Global Settings menus.
7. VOLUME Turn this knob to control the mam output and headphones volume.
8. WAH/EXP 1, VOL/EXP 2 LEDs These tell you whether the built-in expression pedal is acting as EXP 1 (red) or EXP 2 (green). By default, the Wah block is assigned to EXP 1 and the Volume Pedal block is assigned to EXP 2.
9. Knobs 1 -5 Turn one of the five knobs below the main display to adjust the parameter's value: press the knob to reset the parameter s value. To assign the parameter to snapshot control, press and turn the knob: the value will appear white and in brackets. If a rectangular button appears above a knob, press the knob to engage its function.
SHORTCUT: For most time-based parameters such as delay time or modulation speed, press the knob to toggle between setting the value in ms or Hz and note divisions (1/4-note. dotted 1/8-note. etc.).
10. Expression Pedal Move the expression pedal to control volume, wah, or a customized combination of amp and/or effects parameters. Activate the hidden toe switch to toggle between EXP 1 and EXP 2. (The LEDs tell you which one is active.) If an external pedal is connected to the rear panel EXP 2 jack, the built-in pedal becomes EXP 1 only. See 'Bypass/Control" for more information.
11. Footswitches 1 -6 The six footswitches below the LCD have colored LED rings that tell you the current state of the assigned block or its function. See "Play View" for more information.
12. MODE/EDIT/EXIT Switch Press MODE to toggle between Stomp and Preset footswitch modes. Press MODE/EDIT/EXIT to exit Snapshot or 6 Switch Loo per modes.
13. TAP/TUNER Switch Press TAP two or more times to set the BPM (beats per minute) of any tempo-based effects, such as delay or modulation. Press TAP once to restart any LFO-based modulation effects. Hold TAP for one second to open the Tuner. See "The Tuner".

14. GUITAR IN Connect your guitar or bass to the GUITAR IN jack.
15. EXP 2, FOOTSWITCH 7/8 Connect an expression pedal here to adjust a wide variety of parameters. Alternatively, one (or with a Y-cable. two) external footswitches can be added to access additional stomps. (FS7=tip. FS8=ring). For external footswitches. the momentary (unlatched) type should be used.
16. FX LOOP These stereo 1/4" in and out jacks can be used as an FX loop for inserting external stompboxes between specific blocks in POD Go, or as inputs and outputs for running 4-Cable Method rigs. See "POD Go in 4-Cable Method". Alternatively, the TRS Return/AUX input can act as an always-on, Aux In for monitoring mixers, keyboards, drum machines, or MP3 players. To set the function of the Return L/R jack, see "Global Settings > Ins/Outs".
17. MAIN OUT L/MONO, RIGHT These 1/4* outputs can accommodate either unbalanced TS cables to connect to your guitar amp or other pedals, or balanced TRS cables to connect to your mixing console or studio monitors. When connecting to a mono pedal or single amp. connect only the L/MONO 1/4" jack.
18. AMP OUT This unbalanced output is meant to send directly to the front of your guitar amp. By default, it reflects the same output as the MAIN outputs (except in mono), but it can be globally switched to be tapped off directly before the Cab/ IR block. This way. you can send a cab-emulated signal to your mixer (or FRFR speaker) while simultaneously sending a non-cab-emulated signal to your guitar amp.
19. PHONES Connect stereo headphones here; turn the VOLUME knob to adjust volume.
20. USB POD Go also functions as a multichannel. 24-bit audio interface for Mac and Windows computers, with Dl. re-amping, and MIDI functionality built in. Use of a USB 2.0 or 3.0 port is required—do not use an external USB hub. POD Go can also record to an Apple iPad or Phone mobile device (with optional Apple Camera Connection Kit).
21. DC In Line 6 recommends using only the supplied DC-3h power supply.
22. Power Switch When's the last time a floor-based POD had a power switch? A long time. You're welcome.
There are many ways to connect POD Go to other gear, and the following pages illustrate only a few.
POD Go with an Amp and/or Powered Speakers
Depending on how complex your tones are POD Go may be able to act as your entire processing rig, providing amp modeling, cab modeling or cab IRs (Impulse Responses), effects, looping, and even a tuner.
When connecting POD Go to a powered speaker (or two powered speakers in stereo), set the main outputs to line level. See "Global Settings > Ins/Quts'.
You can connect an additional expression pedal or momentary footswitch—or with a Y cable, two momentary type footswitches—to the POD Go EXP 2 | FS 7/8 jack.

TIP: The Line 6 Powercab* and Powercab Plus active guitar speaker systems W are specifically designed for use with today’s modelers—and excellent for use with your POD Go!
POD Go in the Studio
POD Go also includes a multichannel USB audio/MIDI interface for your production studio. It can re-amp, or use USB audio streams to process tracks or busses in your DAW (Digital Audio Workstation) after they're recorded. See "USB Audio/MIDI" for more information.

POD Go in 4-Cable Method
"4-Cable Method" is a popular and flexible way of hooking things up, allowing you to route some effects blocks (most often drives, distortions, wahs. and compressors) before your real amp's preamp and other effects blocks (often time-based effects like delays and reverbs) in its effects loop.
Pop quiz: How many cables should be used in a 4-Cable Method setup? #yougetnopoints

POD Go has two main views—Play view and Edit view. Play view is typically used when performing or jamming.
1. Press  VIEW to select Play view.
The current preset number and name appear along the top of the display and the current footswitch mode's assignments appear on the lower half:
2. Press the MODE footswitch to toggle between Stomp and Preset footswitch modes (see below).
While in Play view, turning Knobs 1 -5 briefly replaces the bottom row of footswitch boxes with the selected block's parameters:

Stomp Footswitch Mode

Stomp mode is where you'll spend mo3t of your time, as it most closely resembles the feel and behavior of a traditional pedalboard.
Step on FS1-FS6 to bypass/enable the assigned block or toggle between two values of one or more parameters.
Preset Footswitch Mode

Step on  to queue the next bank of presets.
Step on  to queue the previous bank of presets.
The bank's presets flash, indicating they are ready to load.
Step on A, B, C, or D to load a preset.
Snapshot Footswitch Mode

Snapshots are almost like presets within a preset, as they instantly, and seamlessly, recall every block's bypass state and up to 64 simultaneous parameter settings. See 'Snapshots' for more information.
1. Start from Preset Mode.
2. Press and together to enter Snapshot mode.
3. Step on A, B, C, or D to select Snapshot 1, 2, 3, or 4.
POD Go has two main views —Play view and Edit view. Edit view is used for creating and tweaking your tones.
PressVIEW to select Edit view.
Colored blocks representing amps, cabs, effects, and other items appear on the upper half of the display, and the selected block’s parameters appear on the lower half:

Blocks are objects that represent various elements of your tone, such as amps, cabs, effects, loopers, inputs, outputs, and impulse responses. The illustration below explains which blocks are available at any given time in POD Go.
1. While in Edit view, turn the Upper Knob to select blocks.
Alternatively, press a Stomp mode footswitch to automatically select the block assigned to it. The assigned block is bypassed (or if already bypassed, enabled) and its parameters appear along the bottom of the screen.
2. Press the Upper Knob to toggle the block on and off.
Bypassed blocks appear semi-transparent.
3. Turn Knobs 1-5 below the screen.
Some blocks have more than one page of parameters, in which case dots on the right side of the inspector indicate the current page. For example, the dots below indicate that page 1 parameters are visible (the colored dot) and a total of three pages of parameters are available:

SHORTCUT: For most time-based parameters such as delay time or ^ modulation speed, press the knob to toggle between setting the value in ms or Hz and note divisions (1/4-note, dotted 1/8-note, etc.).
4. Press  to access more parameters (if available).

1. If not already there, press  VIEW to select Edit view.
2. Turn the Upper Knob to select the desired block, then turn the Lower Knob to change its model.
Selecting models within the same category can be very quick. However, as POD Go has hundreds of items to choose from, using this method to, say, change an effect block from a Distortion (beginning of the list) into a Looper (end of the list) is very slow. Instead, you should open the model list:
3. Press the Lower Knob to open the model list:

Turn the Upper Knob to select model categories (if applicable).
Effects blocks have nine categories to choose from. The Amp/Preamp and Cab/IR blocks have two. The Preset EQ block lets you choose from up to seven different EQs.
Turn the Lower Knob to scroll items in the list.
4. To close the model list, press the Lower Knob again (or press to cancel).
1. If not already there, press VIEW to select Edit view.
2. Turn the Upper Knob to select any block (other than Input or Output) and press ACTION.
The block appears "picked up and the action panel appears.

3. Turn the Upper Knob to move the block.
4. Press ACTION again (or ) to close the action panel.
Blocks can be copied and then pasted onto either another block location, or into an entirely different preset.
1. From Edit view, select the block you wish to copy and press ACTION.
2. Press Knob 1 (Copy Block).
3. Select the location you wish to paste the block—even in a different preset—and press ACTION.
4. Press Knob 2 (Paste Block).
POD Go has 256 preset locations, split into two setlists of 128 presets each—Factory and User.
1. If not already there, press VIEW to select Play view.
2. Press the Upper Knob to open the Preset list:

Turn the Upper Knob to select the Factory or User preset folder, the Lower Knob to Turn select a preset.
Turn Knob 1 (Reorder Preset) to move the selected preset up and down the list.
Turn Knob 5 (Snapshot) to select Snapshot 1-4 without having to be in Snap-shot footswitch mode. See "Snapshots" for more information.
1. Press and ACTION together to open the Save Preset screen:

Turn the Upper Knob to move the cursor left and right.
Turn Knob 4 (Character) to change the selected character.
Press Knob 2 (Delete) to delete the selected character and shift all following characters to the left.
2. Turn Knob 3 (Destination Setlist) and the Lower Knob to choose the setlist and preset location you wish to overwrite.
Any of the 256 presets can be overwritten, not just presets in the User setlist.
3. Press Knob 5 (Save).
Press TAP/TUNER repeatedly to set the tempo in BPM (Beats Per Minute).
Certain Delay and Modulation parameters, such as Time and Speed, can be represented with fixed numeric values (ms or Hz) or note values (1/4-note, dotted 1 /8-note, etc.). When set to note values, the parameter will follow Tap Tempo or incoming (USB) MIDI clock. Press the parameter knob to toggle between ms (or Hz) and note values.

The current tempo can also be set from "Global Settings > MIDI/Tempo".
SHORTCUT: From Edit view, press TAP to briefly display Tempo parameters.

Knob | Parameter | Description |
4 | Tempo | Choose whether the tempo is stored and recalled with each snapshot, recalled with each preset, or is applied globally across all presets and snapshots. |
5 | BPM | Depending on the Knob 4 (Tempo) setting, this Beats Per Minute value is saved per snapshot, per preset, or globally. |
1. Hold the TAP/TUNER switch until the Tuner screen appears:

2. Pluck an individual string on your guitar.
When the colored box is left of center, your string is flat. When the colored box is right of center, your string is sharp. When the colored box approaches the correct tuning, a second smaller colored box can be used for more precision. When both arrows are illuminated, your string is perfectly in tune.
3. To exit the Tuner, step on any footswitch.
All tuner settings are global.
Tuner Settings
Knob | Parameter | Description |
1 | Output | Determines whether your guitar is muted completely ("Mute”) or audible with no processing applied ("Bypass") while tuning |
2 | Reference | If you'd like to tune to a reference other than standard 440 Hz, select from 425 to 455 Hz. |
3 | Type | Choose from "Fine" (color-changing needle tuner with fine tuning bar), "Coarse" (color-changing needle tuner with no fine tuning bar), and "Strobe." |
The Input and Output blocks appear at the far left and right of your signal flow.

From Edit view, turn the Upper Knob to select the Input block and then turn the Lower Knob to change the input.
Guitar POD Go users should choose the Guitar input.
USB 3/4 USB inputs 3/4 can be used for re-amping, or processing tracks from your Mac or Windows DAW software.
NOTE: POD Go also receives input from USB 112, but it's dedicated for monitoring f audio from your computer (or iPad) and bypasses all processing blocks. As such, USB 1/2 is not available as an input block source.
Input Settings
Knob | Parameter | Description |
| 1 | Gate | Turns the Input noise gate on and off. |
| 2 | Threshold | Sets the input level at which the noise gate acts on the signal. If your guitar gets cut off abruptly, turn the Threshold down. |
| 3 | Decay | Determines how abruptly the noise gate is applied once the signal drops below the threshold level. |
Output Settings
Knob | Parameter | Description |
1 | Pan | Sets the balance between the left and right outputs. If you're only running the LEFT/MONO output, leave this set to Center. |
2 | Level | Sets the overall level of the entire preset. |
Loading custom impulse responses requires connecting to the POD Go Edit software in your Mac or Windows computer.
1. Connect POD Go to your computer via USB and open the POD Go Edit application.
2. Click the Impulses folder.

3. Drag one or more IR files from the desktop or any Finder window directly into the POD Go Edit app's Impulses list.
POD Go Edit updates the POD Go hardware's IR list automatically.
Impulse Response Settings
Knob | Parameter | Description |
1 | IR Select | Selects one of the 128 available impulse responses. If a location contains an IR, its name appears in the inspector header. |
2 | Low Cut | Filters a portion of the IR's bass and/or treble frequencies. |
3 | High Cut | which can help remove rumble and/or high-end harshness. |
4 | Mix | Blends the IR signal with the dry signal passed through the IR block. When set to 0%, the path bypasses the IR completely. When set to 100%, the entire path is fed through the IR, and no dry signal is heard. |
5 | Level | Adjusts the overall output level of the IR block. -18.0dB is normal. |
A single mono or stereo Looper can be added as one of the four effects blocks.

Looper Models (Mono or Stereo) | |
Model | Based On* |
6 Sw Mono Looper | Line 6 Original |
1 Sw Mono Looper | Line 6 Original |
6 Sw Stereo Looper | Line 6 Original |
1 Sw Stereo Looper | Line 6 Original |

Looper Settings

1. Add a 6 Switch Looper block to your preset.
2. Press the Looper assigned footswitch to open Looper mode:

3. When finished, press MODE/EDIT/EXIT.
NOTE: If you press while loop playback is stopped, this will always record a T new loop, and any previous recording will be discarded.
1. Add a 1 Switch Looper block to your preset.
2. Press the Looper switch.
The LED lights red, indicating the loop is recording.
3. Press the Looper switch again.
The LED lights green, indicating the loop is playing back.
4. Press the Looper switch again.
The LED lights amber, indicating :he loop is in overdub mode. Subsequent presses of IIie switch toggle between play and overdub mode.
5. While the Looper is in play or overdub mode, press and hold the switch for 1 second.
The most recent recording is undone. Holding the switch again will redo the recording.
6. Quickly double-press the Looper switch.
Playback/recording stops and the LED lights white, indicating a loop is in memory.
7. While Looper playback/recording is stopped, press and hold the switch.
The recording is deleted and the LED lights dim white.
The FX Loop lets you dynamically insert your favorite external stompboxes (or rack effects) into any location in your preset.

NOTE: The FX Loop can be set for instrument (for inserting stompboxes) or line level operation. See "Global Settings > Ins/Outs"
FX Loop Settings
| Page | Knob | Parameter | Description |
| 1 | 1 | Send | Adjusts the level sent to your external device. |
2 | Return | Adjusts the level received at the Return jack. | |
3 | Mix | Blends the FX loop signal vs. the dry signal passed through the FX Loop block. When set to 0%, the path bypasses the FX loop completely. When set to 100%, the entire path is fed through the FX loop, and no dry - thru signal is heard. | |
| 2 |
1 | Trails | Trails Off: An external stompbox would be instantly muted when the FX Loop block is bypassed. Trails On: An external delay or reverb stompbox would continue to decay naturally when the FX Loop block is bypassed or a different snapshot is selected. |
On Play and Edit views, a small camera icon appears on the right side of the screen. Its number indicates the current snapshot.

Snapshots are presets within a preset.
Imagine you have eight pet octopuses, all slithering around your amp and pedalboard. Instead of tap-dancing on your pedals (and accidentally stepping on a tentacle), you shout "Okay, gang—here's the verse... now:*’ and your octopuses switch some pedals on, switch other pedals off, and tweak al your amps and pedals' knobs to make the best possible settings for your song's verse, all seamlessly with spillover delay and reverb trails. Then you shout "Ready for the chorus... now!" and your octopuses instantly tweak everything for your song's chorus. That's the power of snapshots.

The only thing your octopuses/snapshots can't do is rearrange your pedalboard or swap out an effect or amp for a different one (unless both effect blocks exist in the same preset).
Each preset can have up to 64 parameters assigned to Snapshots; hence, eight octopuses with eight tentacles each. The octopuses can remember four separate groups of on/off statuses and setting tweaks per preset (say, for your verse, chorus, solo, and overindulgent noise segue); that is. POD Go has four snapshots per preset.
Each of the four snapshots in POD Go stores and recalls the state of certain elements in the current preset, including:
NOTE: The bypass state of blocks is automatically stored and recalled per t snapshot. Optionally, you can exclude a block s bypass state from being affected by snapshots by choosing Off for the Snapshot Bypass option— available for the selected block by pressing ACTION while in Edit view.
Depending on how you configure them, snapshots can act as four variations of the same tone, four drastically different tones, or any combination thereof—all within the same preset. In many cases, a single preset's snapshots may accommodate all the various tones required for a song.
1. From Preset footswitch mode, press  together to enter Snapshot mode.
2. Step on A, B, C, or D to select a different Snapshot (1, 2, 3, or 4).
3. Adjust the preset by doing one or more of the following:

4. Switch back to the snapshot you started with.
POD Go instantly and seamlessly returns to its previous state. Remember to save your preset to retain all your snapshot settings.*
*NOTE: If you've changed "Global Settings > Preferences11 > Snapshot Edits t to “Discard," you must save the preset before selecting a different snapshot; otherwise any edits will be discarded!
Press  and ACTION together twice to save the preset.
Saving a preset stores all of its 4 snapshots automatically.
NOTE: Selecting a preset recalls the snapshot that was active when the preset ? was saved.
Tips for Creative Snapshot Use
By default, adding an effects block automatically assigns it to the next unused stomp footswitch. (You can disable this "FS Auto Assign' behavior within the Global Settings > Switches/Pedals" menu.) In addition, the Wah block is automatical controlled by EXP 1 and the Volume Pedal block is automatically controlled by EXP 2. and both the Wah and Volume Pedal blocks have their Bypass assigned to the on-board pedal's Toe Switch. The Pitch - Pitch Wham, when added to an Effects block, is automatically controlled by EXP 1.
However, you may also assign footswitches to toggle between two values of a given parameter or parameters, or even have parameters instantly change when selecting different snapshots within a preset.
If a parameter has a controller assigned, its value appears in white text with brackets:

1. While in Edit view, turn the Upper Knob to select the block you wish to assign to a footswitch.
2. While in Stomp footswitch mode, press and hold a stomp switch under the display until the following dialog appears:

If you want to replace any other blocks that may already be assigned to the footswitch. turn Knob 4 (Assign) to "Replace." Otherwise, leave it set to "Merge," which allows for multiple blocks to be assigned to the same switch.
3. Press Knob 5 (OK).
1. Press and hold the knob for the parameter you wish to control.
POD Go jumps to the Bypass/Control page and displays the parameter at Knob 1 (Parameter).

2. Press Knob 5 (Learn) and then move a connected expression pedal or press a stomp footswitch.
The "learned" pedal or switch appears above Knob 2 (Controller).
3. If desired, turn Knob 3 (Min Value) and Knob 4 (Max Value) to set the range you wish to control.
TIP: To reverse controller behavior, swap the min and max values.
4. Press to return to the Home screen.
1. Press  together to open the Menu.
2. Press Knob 1 (Bypass/Control).
The Bypass/Control screen looks very similar to the Edit screen:

3. Turn the Upper Knob to select the block you want to control.
4. Turn Knob 1 (Parameter) to choose the type of parameter you want to control.
Input and Output blocks cannot be bypassed, but their parameters can be assigned to controllers.
When Knob 1 (Parameter) is set to "Bypass," turn Knob 2 (Switch) to select the desired footswitch or expression pedal to turn the block on and off.
None Removes the bypass assignment.
FS1-FS8 Stepping on the Stomp mode footswitch turns the block on and off.
Note that FS7 or FS8 won't function unless Global Settings > Switches/ Pedals > EXP 2 FS7/8 is set to "FS7/8."
EXP 1, EXP 2 Moving the expression pedal automatically enables (or bypasses) the block.
Selecting EXP 1 or 2 displays Knob 3 (Position) and Knob 4 (Wart). Position determines where in the expression pedal's travel the block is enabled or bypassed. 0% is heel down: 99% is toe down. Wait determines how long POD Go waits before bypassing the block: for example, you wouldn't want the wah to turn off every time you touched the heel down position in your big funk wah solo.
8? TIP: By default, bypass toggling for the block via EXP 1 or EXP 2 is configured
¥ for "heel down = off" behavior. To reverse bypass behavior, press the Upper Knob (bypass). In such case, the block will be bypassed when moving the expression pedal past the configured Position location. Since it is possible to configure the bypass of multiple blocks to be assigned to an expression pedal, you can set each block's Position value differently - thereby allowing the pedal to turn some blocks on and others off at different positions in the pedal's travel.
When Knob 1 (Parameter) is set to anything but "Bypass," turn Knob 2 (Controller) to select the desired footswitch or expression pedal.
None Removes the controller assignment.
EXP 1 or 2 Expression pedals are the most common type of controller, used to control volume, wah. pitch wham. etc.
FS1-FS8 Stepping on a Stomp mode footswitch can toggle between a parameter's min and max values.
Snapshot Although all controller-assigned parameters are updated per snapshot, an additional "Snapshots" controller is available when other controllers are already used.
If desired, turn Knob 3 (Min Value) and Knob 4 (Max Value) to set the range you wish to control.
TIP: To reverse controller behavior, swap the min and max values.
5. Press to return to the Home screen.
Clearing a block's assignments clears both its footswitch (bypass) assignment and any of its parameters' controller assignments.
1. From the Bypass/Control screen, select the block whose assignments you want to clear and press ACTION.
2. Press Knob 1 (Clear Assign).
The Global Settings menu contains additional parameters that apply to all presets such as input and output levels, footswitch configurations, etc.
1. Press  together to open the Menu.
2. Press Knob 5 (Global Settings).
The Global Settings screen appears:

3. Turn the Upper Knob to select one of the submenus.
II necessary, press PAGE |> to view more parameters.
Restoring the Global Settings returns then- to factory default. Performing this reset does not affect any presets you may have created.
1. From the Global Settings menu, press ACTION.
2. Press Knob 1 (Factory Settings).
The following dialog appears:

3. Press Knob 5 (OK).

Page | Knob | Parameter | Description |
| 1 | 1 | Guitar In Pad | If your guitar or bass has active or really loud pickups, you may want to turn this on. There's really no rule: use what sounds best. |
2 | Main Out Level | Choose "Line" when connecting the MAIN OUT jacks to powered speakers or mixers; choose "Instrument" when connecting to stompboxes or the front of guitar amps. When using a single speaker or amp, connect only the LEFT/MONO 1/4” jack. | |
3 | Amp Out Source | Choose "Main Out" if you want the POD Go AMP OUT jack to echo the MAIN OUTS (except in mono); choose "Pre Cab/IR“ if you want the AMP OUT jack to be tapped off directly before the Cab/IR block (and therefore, would not include the Cab/IR block or any blocks after it). This way, you can send a cab-emulated signal to your powered speakers (or mixer) while simultaneously sending a non-cab-emulated signal straight into your guitar amp. | |
4 | FX Loop Level | Determines whether the FX LOOP jacks should accommodate stompboxes (“Instrument") or line level studio rack type processors ("Line"). | |
5 | Return Type | Determines whether the signal received at the stereo RETURN/AUX jack should be used for the FX Loop block—or—act as an always-on, stereo Aux In (no processing) for jamming along with MP3 players, drum machines. DJ mixers, etc. | |
| 2 | 1 | USB In 1/2 Trim | Sets the level of incoming audio from USB 1/2 for jamming along with YouTube™, Spotify, your DAW, etc. Normally, this should be left at O.OdB. |

Page | Knob | Parameter | Description |
1 | 1 | Link Amp/Cab | Determines whether or not changing the Amp/Preamp block's model will automatically change the Cab block's model to match. |
2 | Snapshot Edits | Determines whether or not any edits made to a snapshot (block on/off, parameter control, tempo) are remembered when returning to that snapshot. When set to "Recall," any snapshot edits are recalled when jumping from snapshot to snapshot, and appear as you last left them. When set to “Discard." any snapshot edits are discarded when jumping from snapshot to snapshot, and appear as the preset was last saved. If you want to save changes made to a snapshot while Snapshot Edits is set to "Discard,” press | |
3 | Tempo Pitch | Determines how delay repeats sonically behave when repeatedly pressing TAP. "Authentic" respects the natural pitch fluctuations inherent when changing a real delay pedal's time knob; "Transparent* minimizes these artifacts. | |
Global Settings > Switches/Pedals | |||
Page | Knob | Parameter | Description |
1 | 1 | Stomp Block Sel | Determines whether pressing a Stomp mode footswitch automatically selects the assigned block for editing. |
2 | FS Auto Assign | Determines whether newly added effects blocks are automatically assigned to unused Stomp mode switches for block bypass. When set to "Off," you must manually assign blocks to footswitches. | |
3 | Stomp Mode | By default, Stomp footswitch mode displays 6 stomps. You may also choose “4 Switches", which replaces FS1 and FS4 with switches, so you can access preset banks and snapshots from without leaving Stomp mode. switches, so you can access preset banks and snapshots from without leaving Stomp mode. | |
4 | Snapshot Mode | When set to "Auto Return," POD Go returns to Preset mode after selecting a snapshot. When set to "Manual," POD Go stays in Snapshot mode until pressing MODE/EDIT/EXIT. When set to "Toggle," pressing toggles between Preset and Snapshot footswitch modes and POD Go remembers this state even after switching to Stomp mode. | |
5 | Switches | When set to “Presets" or "Snapshots," change to PRESET or SNAPSHOT , where pressing either switch instantly Un/Down selects the next/previous preset or snapshot, without a bank queue. This is useful if you've programmed a fixed set list for your show a just want to increment through presets or snapshots. SHORTCUT: At any time, press and hold both to cycle through BANK PRESET . and SNAPSHOT or SNAPSHOT , where pressing either switch instantly Un/Down selects the next/previous preset or snapshot, without a bank queue. This is useful if you've programmed a fixed set list for your show a just want to increment through presets or snapshots. SHORTCUT: At any time, press and hold both to cycle through BANK PRESET . and SNAPSHOT | |
2 | 1 | EXP 2 FS7/8 | Determines whether the EXP 2 | FOOTSWITCH 7/8 jack acts as an Expression Pedal 2 input—or—a dual footswitch input for adding two additional stomp switches. |
2 | EXP 1 Polarity | If your external expression pedal appears to work backwards—for example, a Volume pedal block is loudest with the heel all the way down set this to "Inverted." | |
3 | EXP 2 Polarity | ||
4 | EXP 1 Position | Determines whether the POD Go expression pedal positions are recalled per snapshot, per preset, or applied globally. If you want a Volume | |
5 | EXP 2 Position | Pedal or Wah to maintain its position when switching presets, set this to "Global." | |
3 | 1 | Switch LEDs | Determines whether the Stomp mode footswitches' colored LED rings appear dim when bypassed ("Dim/Lit"), or off when bypassed ("Off/Lit"). When playing in bright sunlight, you may want to set to this to "Off/Lit“ to increase contrast. |
2 | Tap Display | Determines how the Tempo is displayed. "LED Flash* flashes the red TAP LED, "Tempo Panel" opens the Tempo Panel when stepping on TAP while in Edit View, and "LED+Panel" does both. | |

Knob | Parameter | Description |
1 | MIDI Channel | Sets the system base MIDI channel that POD Go uses for both receiving and sending MIDI communication via USB. |
2 | Tx/Rx MIDI PC | Determines whether POD Go transmits a Program Change (PC) message via USB when recalling presets. It also determines whether it responds to incoming PC messages via USB. |
3 | Rx MIDI Clock | Determines whether POD Go responds to incoming MIDI beat clock via USB. |
4 | Tempo Select | Choose whether the tempo is stored and recalled with each snapshot, recalled with each preset, or is applied globally across all presets and snapshots. |
5 | BPM | Depending on the Knob 4 (Tempo Select) setting, this Beats Per Minute tempo value is saved per snapshot, per preset, or globally. |

 and ACTION together twice before selecting another.