
www.philips.com/welcome
75BDL3003H
V1.00
User Manual (English)

75BDL3003H
ii
Safety Instructions
Safety precautions and maintenance
WARNING: Use of controls, adjustments or procedures other than those specied in this documentation may result in exposure to
shock, electrical hazards and/or mechanical hazards.
Read and follow these instructions when connecting and using your display:
Operation:
• Keepthedisplayoutofdirectsunlightandawayfromstovesoranyotherheatsources.
• Removeanyobjectthatcouldfallintoventilationholesorpreventpropercoolingofthedisplay’selectronics.
• Donotblocktheventilationholesonthecabinet.
• Whenpositioningthedisplay,makesurethepowerplugandoutletareeasilyaccessible.
• Whenturningoffthedisplaybydetachingthepowercord,wait6secondsbeforere-attachingthepowercordfornormaloperation.
• EnsuretheuseofanapprovedpowercordprovidedbyPhilipsatalltimes.Ifyourpowercordismissing,pleasecontactyourlocalservicecenter.
• Donotsubjectthedisplaytoseverevibrationorhighimpactconditionsduringoperation.
• Donotknockordropthedisplayduringoperationortransportation.
• Theeyeboltisforusageinshort-timemaintenanceandinstallation.Wesuggestnottousetheeyeboltformorethan1hour.Prolongusageis
prohibited.Pleasekeepaclearsafetyareaunderthedisplaywhileusingtheeyebolt.
Maintenance:
• Toprotectyourdisplayfrompossibledamage,donotputexcessivepressureontheLCDpanel.Whenmovingyourdisplay,grasptheframetolift;do
notliftthedisplaybyplacingyourhandorngersontheLCDpanel.
• Unplugthedisplayifyouarenotgoingtouseitforanextensiveperiodoftime.
• Unplugthedisplayifyouneedtocleanitwithaslightlydampcloth.Thescreenmaybewipedwithadryclothwhenthepowerisoff.However,never
useorganicsolvent,suchas,alcohol,orammonia-basedliquidstocleanyourdisplay.
• Toavoidtheriskofshockorpermanentdamagetotheset,donotexposethedisplaytodust,rain,wateroranexcessivelymoistenvironment.
• Ifyourdisplaybecomeswet,wipeitwithdryclothassoonaspossible.
• Ifaforeignsubstanceorwatergetsinyourdisplay,turnthepoweroffimmediatelyanddisconnectthepowercord.Thenremovetheforeignsubstance
orwater,andsendtheunittothemaintenancecenter.
• Donotstoreorusethedisplayinlocationsexposedtoheat,directsunlightorextremecold.
• Inordertomaintainthebestperformanceofyourdisplayandensurealongerlifetime,westronglyrecommendusingthedisplayinalocationthatfalls
withinthefollowingtemperatureandhumidityranges.
- Temperature:0-40°C32-104°F
- Humidity:20-80%RH
• LCDpaneltemperatureneedtobe25degreesCelsiusatalltimeforbetterluminanceperformance.
IMPORTANT:Alwaysactivateamovingscreensaverprogramwhenyouleaveyourdisplayunattended.Alwaysactivateaperiodicscreenrefresh
applicationiftheunitwilldisplayunchangingstaticcontent.Uninterrupteddisplayofstillorstaticimagesoveranextendedperiodmaycause“burnin”,
alsoknownas“after-imaging”or“ghostimaging”,onyourscreen.Thisisawell-knownphenomenoninLCDpaneltechnology.Inmostcases,the“burned
in”or“after-imaging”or“ghostimaging”willdisappeargraduallyoveraperiodoftimeafterthepowerhasbeenswitchedoff.
WARNING:Severe“burn-in”or“after-image”or“ghostimage”symptomswillnotdisappearandcannotberepaired.Thisisalsonotcoveredunderthe
termsofyourwarranty.
Service:
• Thecasingcovershouldbeopenedonlybyqualiedservicepersonnel.
• Ifthereisanyneedforrepairorintegration,pleasecontactyourlocalservicecenter.
• Donotleaveyourdisplayunderdirectsunlight.
Ifyourdisplaydoesnotoperatenormally,havingfollowedtheinstructionssetoutinthisdocument,pleasecontactatechnicianoryour
localservicecenter.
75BDL3003H
iii
Read and follow these instructions when connecting and using your display:
• Unplugthedisplayifyouarenotgoingtouseitforanextensiveperiodoftime.
• Unplugthedisplayifyouneedtocleanitwithaslightlydampcloth.Thescreenmanybewipedwithadryclothwhenthepoweris
off.However,neverusealcohol,solventsorammonia-basedliquids.
• Consultaservicetechnicianifthedisplaydoesnotoperatenormallywhenyouhavefollowedtheinstructionsinthismanual.
• Thecasingcovershouldbeopenedonlybyqualiedservicepersonnel.
• Keepthedisplayoutofdirectsunlightandawayfromstovesoranyotherheatsources.
• Removeanyobjectthatcouldfallintotheventsorpreventpropercoolingofthedisplay’selectronics.
• Donotblocktheventilationholesonthecabinet.
• Keepthedisplaydry.Toavoidelectricshock,donotexposeittorainorexcessivemoisture.
• WhenturningoffthedisplaybydetachingthepowercableorDCpowercord,waitfor6secondsbeforere-attachingthepower
cableorDCpowercordfornormaloperation..
• Toavoidtheriskofshockorpermanentdamagetothesetdonotexposethedisplaytorainorexcessivemoisture.
• Whenpositioningthedisplay,makesurethepowerplugandoutletareeasilyaccessible.
• IMPORTANT:Alwaysactivateascreensaverprogramduringyourapplication.Ifastillimageinhighcontrastremainsonthe
screenforanextendedperiodoftime,itmayleavean‘after-image’or‘ghostimage’onthefrontofthescreen.Thisisawell-known
phenomenonthatiscausedbytheshortcomingsinherentinLCDtechnology.Inmostcasestheafterimagewilldisappeargradually
overaperiodoftimeafterthepowerhasbeenswitchedoff.Beawarethattheafter-imagesymptomcannotberepairedandisnot
coveredunderwarranty.
EU Declaration of Conformity
ThisdevicecomplieswiththerequirementssetoutintheCouncilDirectiveontheApproximationoftheLawsoftheMemberStatesrelatingto
ElectromagneticCompatibility(2014/30/EU),Low-voltageDirective(2014/35/EU),RoHSdirective(2011/65/EU).
ThisproducthasbeentestedandfoundtocomplywiththeharmonizedstandardsforInformationTechnologyEquipment,theseharmonizedstandards
publishedunderDirectivesofOfcialJournaloftheEuropeanUnion.
ESD Warnings
Whenuserclosetothemonitormaycausetheequipmentdischargeandreboottothedisplayofmainmenu.
Warning:
ThisequipmentiscompliantwithClassAofEN55032/CISPR32.Inaresidentialenvironmentthisequipmentmaycauseradiointerference.
Federal Communications Commission (FCC) Notice (U.S. Only)
NOTE:ThisequipmenthasbeentestedandfoundtocomplywiththelimitsforaClassAdigitadevice,pursuanttopart15ofthe
FCCRules.Theselimitsaredesignedtoprovidereasonableprotectionagainstharmfulinterferencewhentheequipmentisoperated
inacommercialenvironment.Thisequipmentgenerates,uses,andcanradiateradiofrequencyenergyand,ifnotinstalledandusedin
accordancewiththeinstructionmanual,maycauseharmfulinterferencetoradiocommunications.Operationofthisequipmentina
residentialareaislikelytocauseharmfulinterferenceinwhichcasetheuserwillberequiredtocorrecttheinterferenceathisown
expense.
Changesormodicationsnotexpresslyapprovedbythepartyresponsibleforcompliancecouldvoidtheuser’sauthoritytooperatethe
equipment.
UseonlyanRFshieldedcablethatwassuppliedwiththedisplaywhenconnectingthisdisplaytoacomputerdevice.
Topreventdamagewhichmayresultinreorshockhazard,donotexposethisappliancetorainorexcessivemoisture.
ThisdevicecomplieswithPart15oftheFCCRules.Operationissubjecttothefollowingtwoconditions:(1)Thisdevicemaynotcauseharmful
interference,and(2)thisdevicemustacceptanyinterferencereceived,includinginterferencethatmaycauseundesiredoperation.
75BDL3003H
iv
Canada:
IndustryCanadastatement:
ThisdevicecomplieswithRSS-247oftheIndustryCanadaRules.Operationissubjecttothefollowingtwoconditions:(1)Thisdevicemaynotcause
harmfulinterference,and(2)thisdevicemustacceptanyinterferencereceived,includinginterferencethatmaycauseundesiredoperation.
CedispositifestconformeàlanormeCNR-247d’IndustrieCanadaapplicableauxappareilsradioexemptsdelicence.Sonfonctionnementestsujetaux
deuxconditionssuivantes:(1)ledispositifnedoitpasproduiredebrouillagepréjudiciable,et(2)cedispositifdoitacceptertoutbrouillagereçu,ycompris
unbrouillagesusceptibledeprovoquerunfonctionnementin
Brazil:
ANATELRFSTATEMENT
PerArticle6ofResolution506,equipmentofrestrictedradiationmustcarrythefollowingstatementinavisiblelocation
“Esteequipamentooperaemcarátersecundário,istoé,nãotemdireitoaproteçãocontrainterferênciaprejudicial,mesmodeestaçõesdomesmotipo,e
nãopodecausarinterferênciaasistemasoperandoemcaráterprimário.”
ANATELBODYSARSTATEMENT
“Esteprodutoatendeaosrequisitostécnicosaplicados,incluindooslimitesdeexposiçãodaTaxadeAbsorçãoEspecícareferenteacamposelétricos,
magnéticoseeletromagnéticosderadiofrequência,deacordocomasresoluçõesn°303/2002e533/2009.Esteprodutoatendeàsdiretrizesdeexposição
àRFnaposiçãonormaldeusoapelomenosXcentímetroslongedocorpo,tendosidoosensaiosdeSARparacorporealizadoaXcmdeacordocom
oinformativoderecomendaçãoapresentadonomanualdofabricante.”
Polish Center for Testing and Certication Notice
Theequipmentshoulddrawpowerfromasocketwithanattachedprotectioncircuit(athree-prongsocket).Allequipmentthatworkstogether(computer,
display,printer,andsoon)shouldhavethesamepowersupplysource.
Thephasingconductoroftheroom’selectricalinstallationshouldhaveareserveshort-circuitprotectiondeviceintheformofafusewithanominalvalue
nolargerthan16amperes(A).
Tocompletelyswitchofftheequipment,thepowersupplycablemustberemovedfromthepowersupplysocket,whichshouldbelocatednearthe
equipmentandeasilyaccessible.
Aprotectionmark“B”conrmsthattheequipmentisincompliancewiththeprotectionusagerequirementsofstandardsPN-93/T-42107andPN-89/
E-06251.
75BDL3003H
v
Electric, Magnetic and Electromagnetic Fields (“EMF”)
1. Wemanufactureandsellmanyproductstargetedatconsumers,which,likeanyelectronicapparatus,ingeneralhavetheabilitytoemitandreceive
electromagneticsignals.
2. OneofourleadingBusinessPrinciplesistotakeallnecessaryhealthandsafetymeasuresforourproducts,tocomplywithallapplicablelegal
requirementsandtostaywellwithintheEMFstandardsapplicableatthetimeofproducingtheproducts.
3. Wearecommittedtodevelop,produceandmarketproductsthatcausenoadversehealtheffects.
4. Weconrmthatifitsproductsarehandledproperlyfortheirintendeduse,theyaresafetouseaccordingtoscienticevidenceavailabletoday.
5. WeplayanactiveroleinthedevelopmentofinternationalEMFandsafetystandards,enablingustoanticipatefurtherdevelopmentsinstandardization
forearlyintegrationinitsproducts.
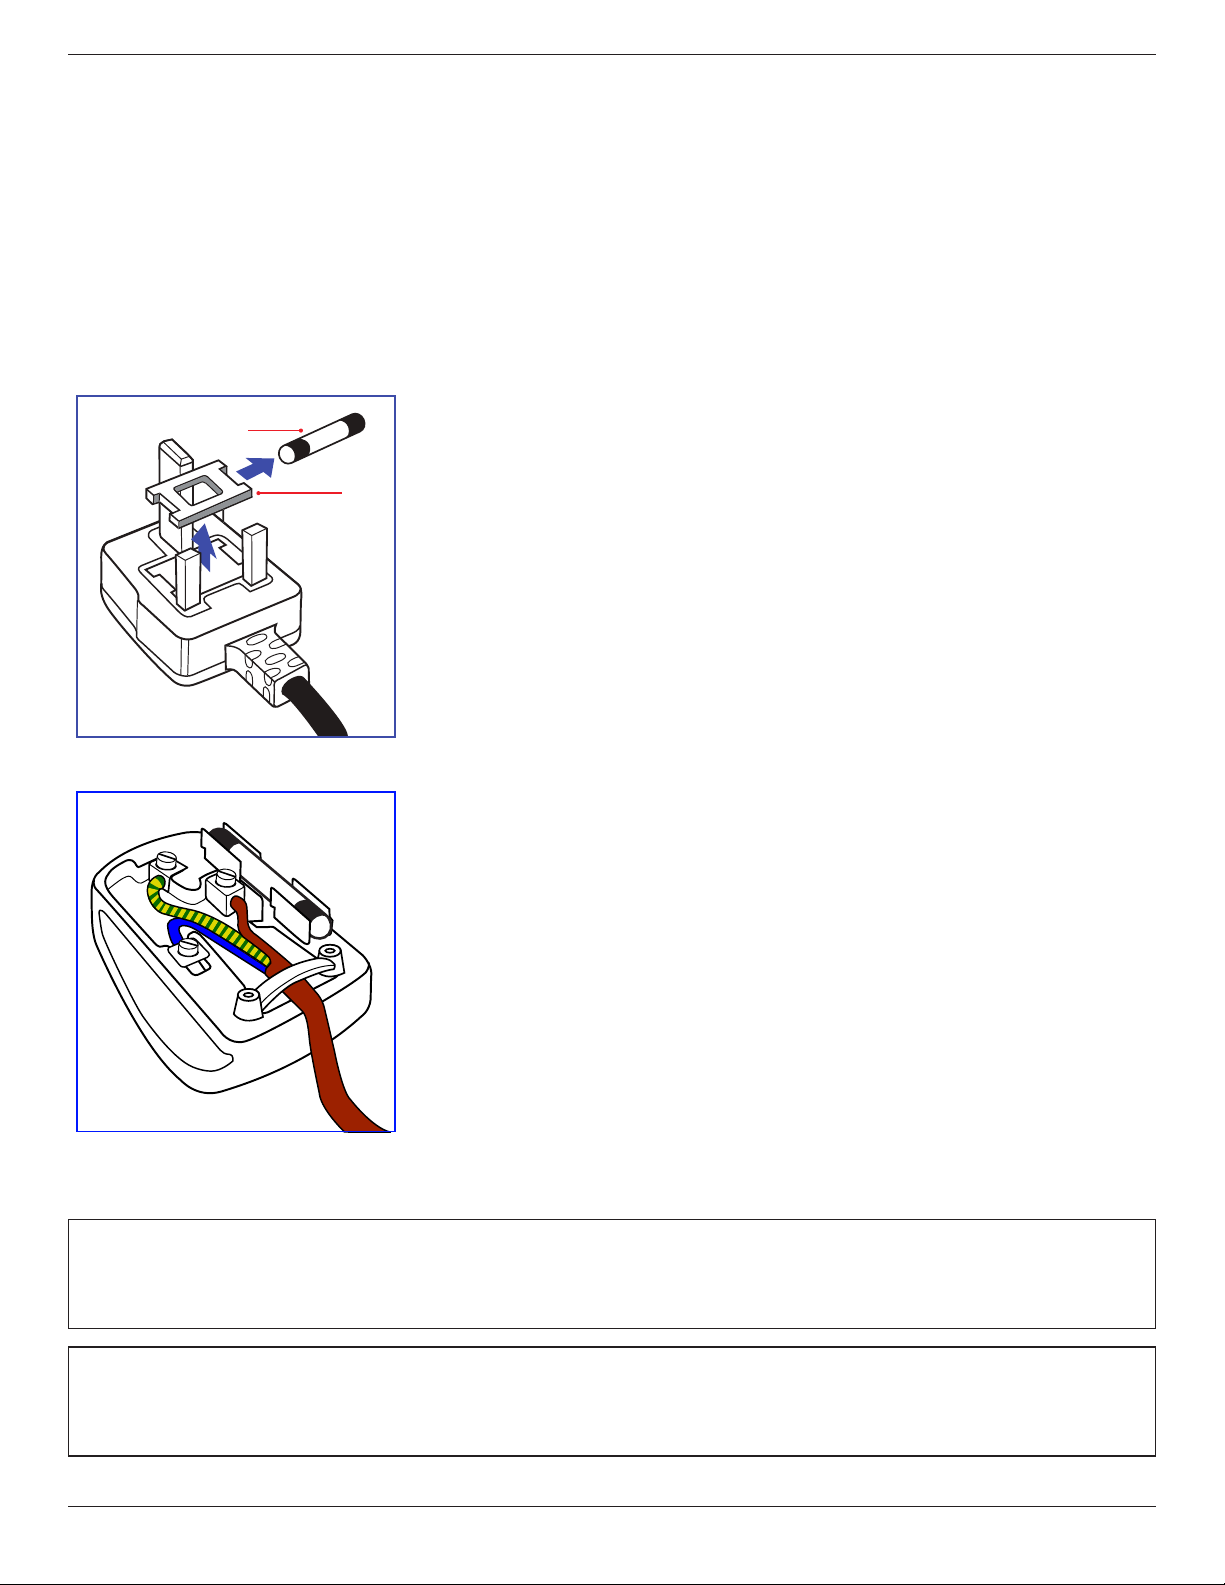
Information for U.K. only
(A)
(B)
WARNING - THIS APPLIANCE MUST BE EARTHED.
Important:
Thisapparatusissuppliedwithanapprovedmoulded13Aplug.Tochangeafuseinthistypeofplug
proceedasfollows:+
1. Removefusecoverandfuse.
2. FitnewfusewhichshouldbeaBS13625A,A.S.T.A.orBSIapprovedtype.
3. Retthefusecover.
Ifthettedplugisnotsuitableforyoursocketoutlets,itshouldbecutoffandanappropriate3-pin
plugttedinitsplace.
Ifthemainsplugcontainsafuse,thisshouldhaveavalueof5A.Ifaplugwithoutafuseisused,thefuse
atthedistributionboardshouldnotbegreaterthan5A.
NOTE: Theseveredplugmustbedestroyedtoavoidapossibleshockhazardshoulditbeinserted
intoa13Asocketelsewhere.
How to connect a plug
Thewiresinthemainsleadarecolouredinaccordancewiththefollowingcode:
BLUE-“NEUTRAL”(“N”)
BROWN-“LIVE”(“L”)
GREEN&YELLOW-“EARTH”(“E”)
1. TheGREEN&YELLOWwiremustbeconnectedtotheterminalintheplugwhichismarkedwith
theletter“E”orbytheEarthsymbolorcolouredGREENorGREEN&YELLOW.
2. TheBLUEwiremustbeconnectedtotheterminalwhichismarkedwiththeletter“N”orcoloured
BLACK.
3. TheBROWNwiremustbeconnectedtotheterminalwhichmarkedwiththeletter“L”or
colouredRED.
Beforereplacingtheplugcover,makecertainthatthecordgripisclampedoverthesheathofthelead
-notsimplyoverthethreewires.
North Europe (Nordic Countries) Information
Placering/Ventilation
VARNING:
FÖRSÄKRADIGOMATTHUVUDBRYTAREOCHUTTAGÄRLÄTÅTKOMLIGA,NÄRDUSTÄLLERDINUTRUSTNINGPÅPLATS.
Placering/Ventilation
ADVARSEL:
SØRGVEDPLACERINGENFOR,ATNETLEDNINGENSSTIKOGSTIKKONTAKTERNEMTTILGÆNGELIGE.

75BDL3003H
vi
Paikka/Ilmankierto
VAROITUS:
SIJOITALAITESITEN,ETTÄVERKKOJOHTOVOIDAANTARVITTAESSAHELPOSTIIRROTTAAPISTORASIASTA.
Plassering/Ventilasjon
ADVARSEL:
NÅRDETTEUTSTYRETPLASSERES,MÅDUPASSEPÅATKONTAKTENEFORSTØMTILFØRSELERLETTEÅNÅ.
China RoHS
根据中国大陆《电子电气产品有害物质限制使用标识要求》,以下部分列出了本产品中可能包含的有害物
质的名称和含量。
部件名称
有害物质
铅
(Pb)
汞
(Hg)
镉
(Cd)
六价铬
(Cr (VI))
多溴联苯
(PBB)
多溴二苯醚
(PBDE)
外壳 ○ ○ ○ ○ ○ ○
液晶显示屏/灯管 × × ○ ○ ○ ○
电路板组件* × ○ ○ ○ ○ ○
电源适配器 × ○ ○ ○ ○ ○
电源线/连接线 × ○ ○ ○ ○ ○
遥控器 ○ ○ ○ ○ ○ ○
本表格依据SJ/T 11364 的规定编制。
*: 电路板组件包括印刷电路板及其构成的零部件,如电阻、电容、集成电路、连接器等。
O: 表示该有害物质在该部件所有均质材料中的含量均在 GB/T 26572规定的限量要求以下。
X: 表示该有害物质至少在该部件的某一均质材料中的含量超出GB/T 26572规定的限量要求。
上表中打“×”的部件,应功能需要,部分有害物质含量超出GB/T 26572规定的限量要求,但符合欧盟RoHS
法规要求(属于豁免部分)。
备注:上表仅做为范例,实际标示时应依照各产品的实际部件及所含有害物质进行标示。
10
環保使用期限
此標識指期限(十年),電子電氣產品中含有的有害物質在正常使用的條件下不會發生外泄或突變,電子
電氣產品用戶使用該電子電氣產品不會對環境造成嚴重污染或對其人身、財產造成嚴重損害的期限。
75BDL3003H
vii
《废弃电器电子产品回收处理管理条例》提示性说明
为了更好地关爱及保护地球,当用户不再需要此产品或产品寿命终止时,请遵守国家废弃电器电子产品
回收处理相关法律法规,将其交给当地具有国家认可的回收处理资质的厂商进行回收处理。
娤⌈
㨢᳸$䵥ᵥ⍿Ʋ◦䏝㯹䉭❁ᳫ濕媣ᵥ⍿⊭侻廞ノ㒞䵽䏳ⴰㄮƲ◦店䢋⾃濕⊭侻斾堿䏦ヵ
⪷ⴰㄮ悅⊔⩜⊭圊䕂㉨㑻Ʋ
單元
限用物質及其化學符號
鉛
(Pb)
汞
(Hg)
鎘
(Cd)
六價鉻
(Cr
+6
)
多溴聯苯
(PBB)
多溴二苯醚
(PBDE)
塑料外框 ○ ○ ○ ○ ○ ○
後殼 ○ ○ ○ ○ ○ ○
- ○ ○ ○ ○ ○
電路板組件 - ○ ○ ○ ○ ○
底座 ○ ○ ○ ○ ○ ○
電源線 - ○ ○ ○ ○ ○
其他線材 - ○ ○ ○ ○ ○
遙控器 - ○ ○ ○ ○ ○
備考1.〝○〞係指該項限用物質之百分比含量未超出百分比含量基準值。
備考2.〝-〞係指該項限用物質為排除項目。
液晶面板
警語 : 使用過度恐傷害視力。
注意事項 :
(1) 使用30分鐘請休息10分鐘。
(2) 未滿2歲幼兒不看螢幕,2歲以上每天看螢幕不要超過1小時。
警告使用者 :
此為甲類資訊技術設備 , 於居住環境中使用時 , 可能會造成射頻擾動 , 在此種情況下 , 使用者會被
要求採取某些適當的對策。
Turkey RoHS:
TürkiyeCumhuriyeti:EEEYönetmeliğineUygundur
Ukraine RoHS:
ОбладнаннявідповідаєвимогамТехнічногорегламентущодообмеженнявикористаннядеякихнебезпечнихречовинвелектричномута
електронномуобладнанні,затвердженогопостановоюКабінетуМіністрівУкраїнивід3грудня2008№1057

75BDL3003H
viii
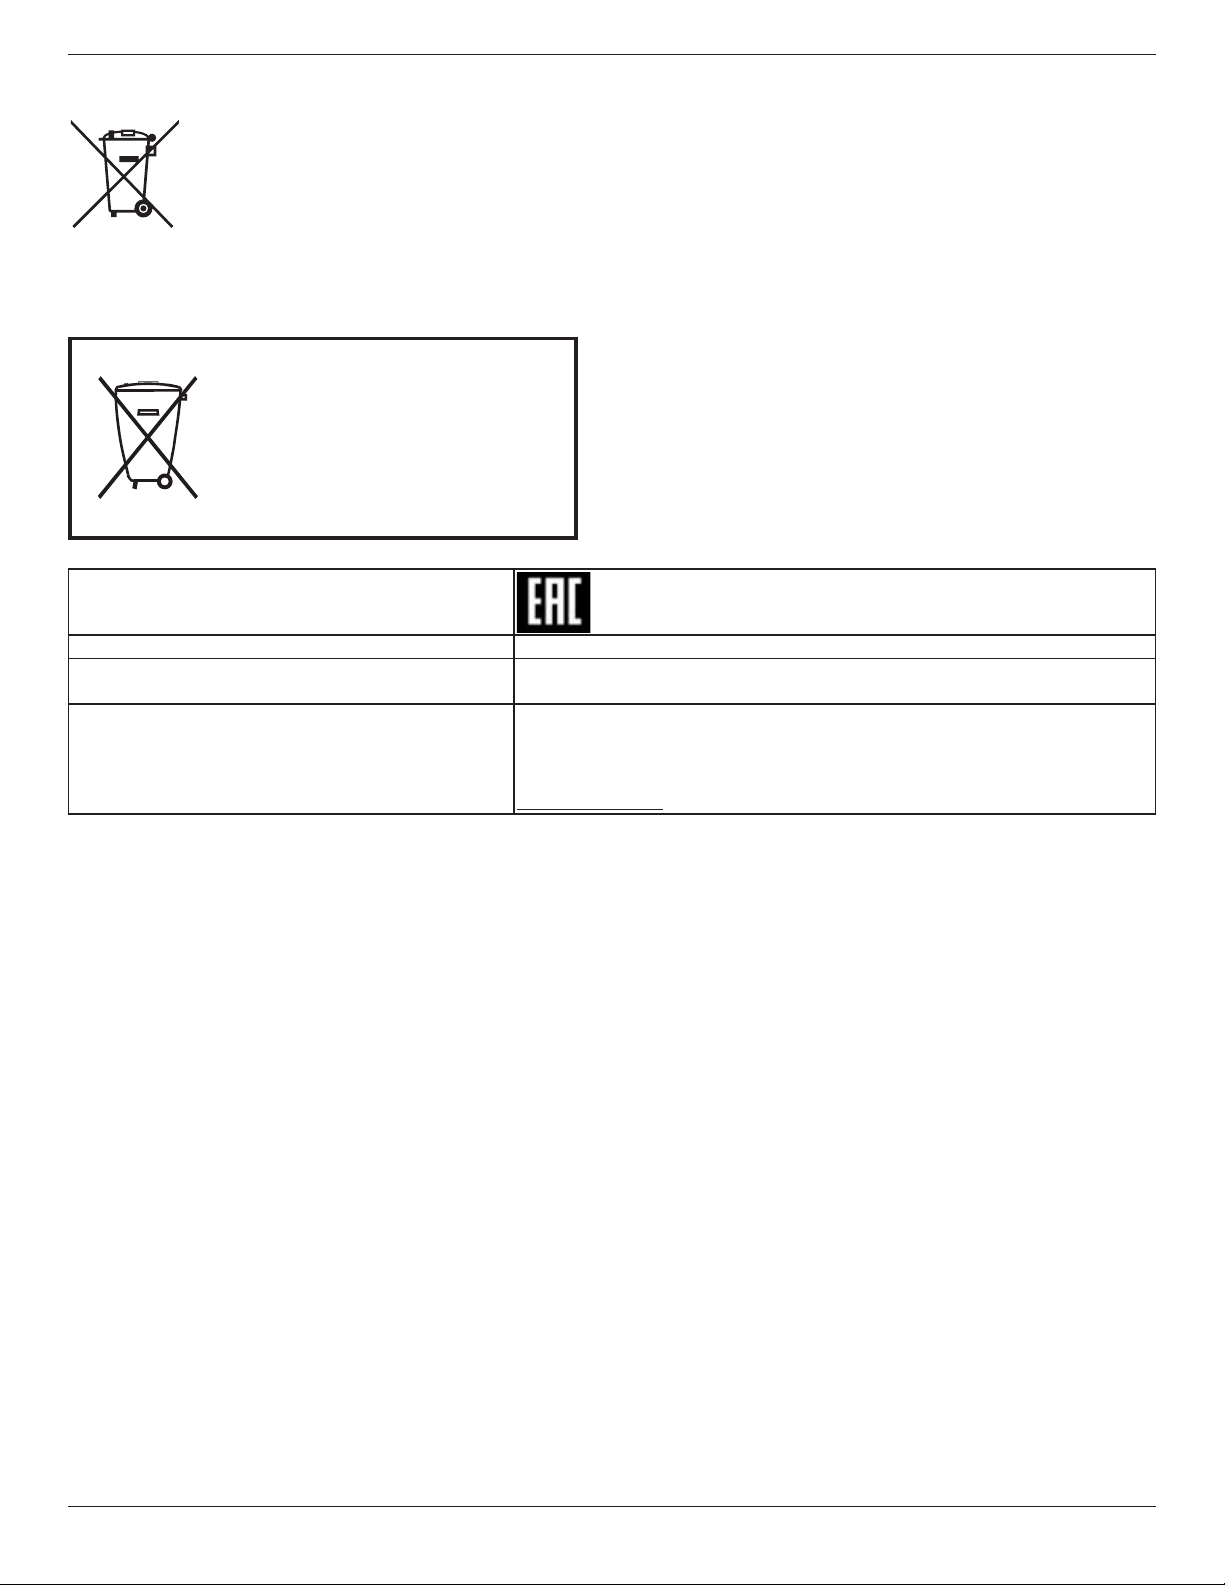
End-of-Life Disposal
YournewPublicInformationDisplaycontainsmaterialsthatcanberecycledandreused.Specializedcompaniescanrecycleyourproducttoincreasethe
amountofreusablematerialsandtominimizetheamounttobedisposedof.
PleasendoutaboutthelocalregulationsonhowtodisposeofyourolddisplayfromyourlocalPhilipsdealer.
(For customers in Canada and U.S.A.)
Thisproductmaycontainleadand/ormercury.Disposeofinaccordancetolocal-stateandfederalregulations.Foradditionalinformationonrecycling
contactwww.eia.org(ConsumerEducationInitiative)
Waste Electrical and Electronic Equipment-WEEE
Attention users in European Union private households
Thismarkingontheproductoronitspackagingillustratesthat,underEuropeanDirective2012/19/EUgoverningusedelectricaland
electronicappliances,thisproductmaynotbedisposedofwithnormalhouseholdwaste.Youareresponsiblefordisposalofthis
equipmentthroughadesignatedwasteelectricalandelectronicequipmentcollection.Todeterminethelocationsfordroppingoffsuch
wasteelectricalandelectronic,contactyourlocalgovernmentofce,thewastedisposalorganizationthatservesyourhouseholdorthe
storeatwhichyoupurchasedtheproduct.
Attention users in United States:
PleasedisposeofaccordingtoallLocal,StateandFederalLaws.Forthedisposalorrecyclinginformation,contact:www.mygreenelectronics.comorwww.
eiae.org.
End of Life Directives-Recycling
YournewPublicInformationDisplaycontainsseveralmaterialsthatcanberecycledfornewusers.
PleasedisposeofaccordingtoallLocal,State,andFederallaws.
AsanENERGYSTARPartner,wehavedeterminedthatthisproductmeetstheENERGYSTARguidelinesforenergyefciency.
Restriction on Hazardous Substances statement (India)
Thisproductcomplieswiththe“E-Waste(Management)Rules,2016”CHAPTERV,rule16,sub-rule(1).WhereasNewElectricalandElectronic
EquipmentandtheircomponentsorconsumablesorpartsorsparesdonotcontainLead,Mercury,Cadmium,HexavalentChromium,polybrominated
biphenylsandpolybrominateddiphenylethersbeyondamaximumconcentrationvalueof0.1%byweightinhomogenousmaterialsforlead,mercury,
hexavalentchromium,polybrominatedbiphenylsandpolybrominateddiphenylethersandof0.01%byweightinhomogenousmaterialsforcadmium.
exceptofexemptionssetinSchedule2oftheRule.
E-Waste Declaration for India
Thissymbolontheproductoronitspackagingindicatesthatthisproductmustnotbedisposedofwithyourotherhouseholdwaste.
Insteaditisyourresponsibilitytodisposeofyourwasteequipmentbyhandingitovertoadesignatedcollectionpointfortherecycling
ofwasteelectricalandelectronicequipment.Theseparatecollectionandrecyclingofyourwasteequipmentatthetimeofdisposal
willhelptoconservenaturalresourcesandensurethatitisrecycledinamannerthatprotectshumanhealthandtheenvironment.
FormoreinformationaboutE-wastepleasevisithttp://www.india.philips.com/about/sustainability/recycling/index.pageandtoknow
whereyoucandropoffyourwasteequipmentforrecyclinginIndiapleasecontactonbelowgivencontactdetails.
Helplinenumber:1800-425-6396(MondaytoSaturday,9a.m.to5:30pm)
CentralizedE-wastecollectioncenter
Address:TPVTechnologyIndiaPrivateLimited,
59,MaheswariNagar,1stMainRoad,MahadevapuraPost,WhiteeldRoad
Bangalore,Karnataka,PIN:560048,Tel:080-3023-1000
E-mail:[email protected]
75BDL3003H
ix
Batteries
ForEU:Thecrossed-outwheeledbinimpliesthatusedbatteriesshouldnotbeputtothegeneralhouseholdwaste!Thereisaseparate
collectionsystemforusedbatteries,toallowpropertreatmentandrecyclinginaccordancewithlegislation.
Pleasecontactyourlocalauthorityfordetailsonthecollectionandrecyclingschemes.
ForSwitzerland:Theusedbatteryistobereturnedtothesellingpoint.
Forothernon-EUcountries:Pleasecontactyourlocalauthorityforcorrectmethodofdisposaloftheusedbattery.
According to EU directive 2006/66/EC, the battery can’t be disposed improperly. The battery shall be separated
to collect by local service.
Após o uso, as pilhas
deverão ser entregues ao
estabelecimento comercial
ou
e/ou baterias
rede de assistência técnica
autorizada.
Information for EAC
Month and year of manufacturing please refer information in Rating label.
Name and location of manufacturer ООО “Профтехника”
Адрес: 3-й Проезд Марьиной рощи, 40/1 офис 1. Москва, 127018, Россия
Importer and information Наименование организации: ООО “Профтехника”
Адрес: 3-й Проезд Марьиной рощи, 40/1 офис 1. Москва, 127018, Россия
Контактное лицо: Наталья Астафьева,
+7 495 640 20 20
nat@profdisplays.ru

75BDL3003H
x
Table Of Contents
1. Unpacking and Installation .......................................................1
1.1. Unpacking.........................................................................................1
1.2. PackageContents........................................................................1
1.3. InstallationNotes.........................................................................1
1.4. MountingonaWall....................................................................2
1.4.1. VESAGrid....................................................................2
1.5. MountinginPortraitPosition................................................3
1.5.1. Howtousethelogoguiderforportrait
position...........................................................................3
1.5.2. Howtoremovethelogo.....................................3
1.6. UsingofRemotesensorandpowerindicator............3
2. Parts and Functions ...................................................................4
2.1. ControlPanel.................................................................................4
2.2. Input/OutputTerminals.............................................................5
2.3. RemoteControl...........................................................................6
2.3.1. Generalfunctions.....................................................6
2.3.2. IDRemoteControl.................................................7
2.3.3. Insertingthebatteriesintheremote
control.............................................................................8
2.3.4. Handlingtheremotecontrol.............................8
2.3.5. Operatingrangeoftheremotecontrol......8
3. Connecting External Equipment.............................................9
3.1. ConnectingExternalEquipment(DVD/VCR/VCD)9
3.1.1. UsingCOMPONENTvideoinput.................9
3.1.2. UsingVideoSourceinput.....................................9
3.1.3. UsingHDMIvideoinput...................................10
3.2. ConnectingaPC.......................................................................10
3.2.1. UsingVGAinput.....................................................10
3.2.2. UsingDVIinput......................................................10
3.2.3. UsingHDMIinput.................................................11
3.2.4. UsingDisplayPortinput.....................................11
3.3. ConnectingAudioEquipment...........................................11
3.3.1. Connectingexternalspeakers........................11
3.3.2. Connectinganexternalaudiodevice........12
3.4. ConnectingMultipleDisplaysinaDaisy-chain
Conguration..............................................................................12
3.4.1. Displaycontrolconnection..............................12
3.4.2. Digitalvideoconnection....................................12
3.5. IRconnection..............................................................................13
3.6. IRPass-throughConnection...............................................13
3.7. Wire-connectingtoNetwork...........................................13
4. Operation ................................................................................. 14
4.1. WatchtheConnectedVideoSource............................14
4.2. PlaymultimedialesfromUSBdevice.........................14
4.3. Playoptions..................................................................................14
4.3.1. Playingmusicles..................................................14
4.3.2. Playingmovieles.................................................14
4.3.3. Playingphotoles.................................................14
4.4. HowtouseOperabrowser(HTML5).......................15
5. OSD Menu ............................................................................... 16
5.1. NavigatingtheOSDMenu................................................16
5.1.1. NavigatingtheOSDmenuusingthe
remotecontrol........................................................16
5.1.2. NavigatingtheOSDmenuusingthe
display’scontrolbuttons....................................16
5.2. OSDMenuOverview...........................................................16
5.2.1. Picturemenu............................................................16
5.2.2. Screenmenu............................................................17
5.2.3. Audiomenu..............................................................18
5.2.4. PIPmenu....................................................................18
5.2.5. Conguration1menu..........................................19
5.2.6. Conguration2menu..........................................20
5.2.7. Advancedoptionmenu.....................................21
5.2.8. Inputmenu................................................................24
6. USB device compatibility ....................................................... 25
7. Input Mode ............................................................................... 27
8. Pixel Defect Policy .................................................................. 28
8.1. PixelsandSub-Pixels...............................................................28
8.2. TypesofPixelDefects+DotDenition....................28
8.3. BrightDotDefects...................................................................28
8.4. DarkDotDefects.....................................................................29
8.5. ProximityofPixelDefects...................................................29
8.6. PixelDefectTolerances.........................................................29
8.7. MURA.............................................................................................29
9. Cleaning and Troubleshooting .............................................. 30
9.1. Cleaning..........................................................................................30
9.2. Troubleshooting.........................................................................31
10. Technical Specications ......................................................... 32
75BDL3003H
1
1. Unpacking and Installation
1.1. Unpacking
• Thisproductispackedinacarton,togetherwiththestandardaccessories.
• Anyotheroptionalaccessorieswillbepackedseparately.
• Duetothesizeandweightofthisdisplayitisrecommendedfortwopeopletomoveit.
• Afteropeningthecarton,ensurethatthecontentsarecompleteandingoodcondition.
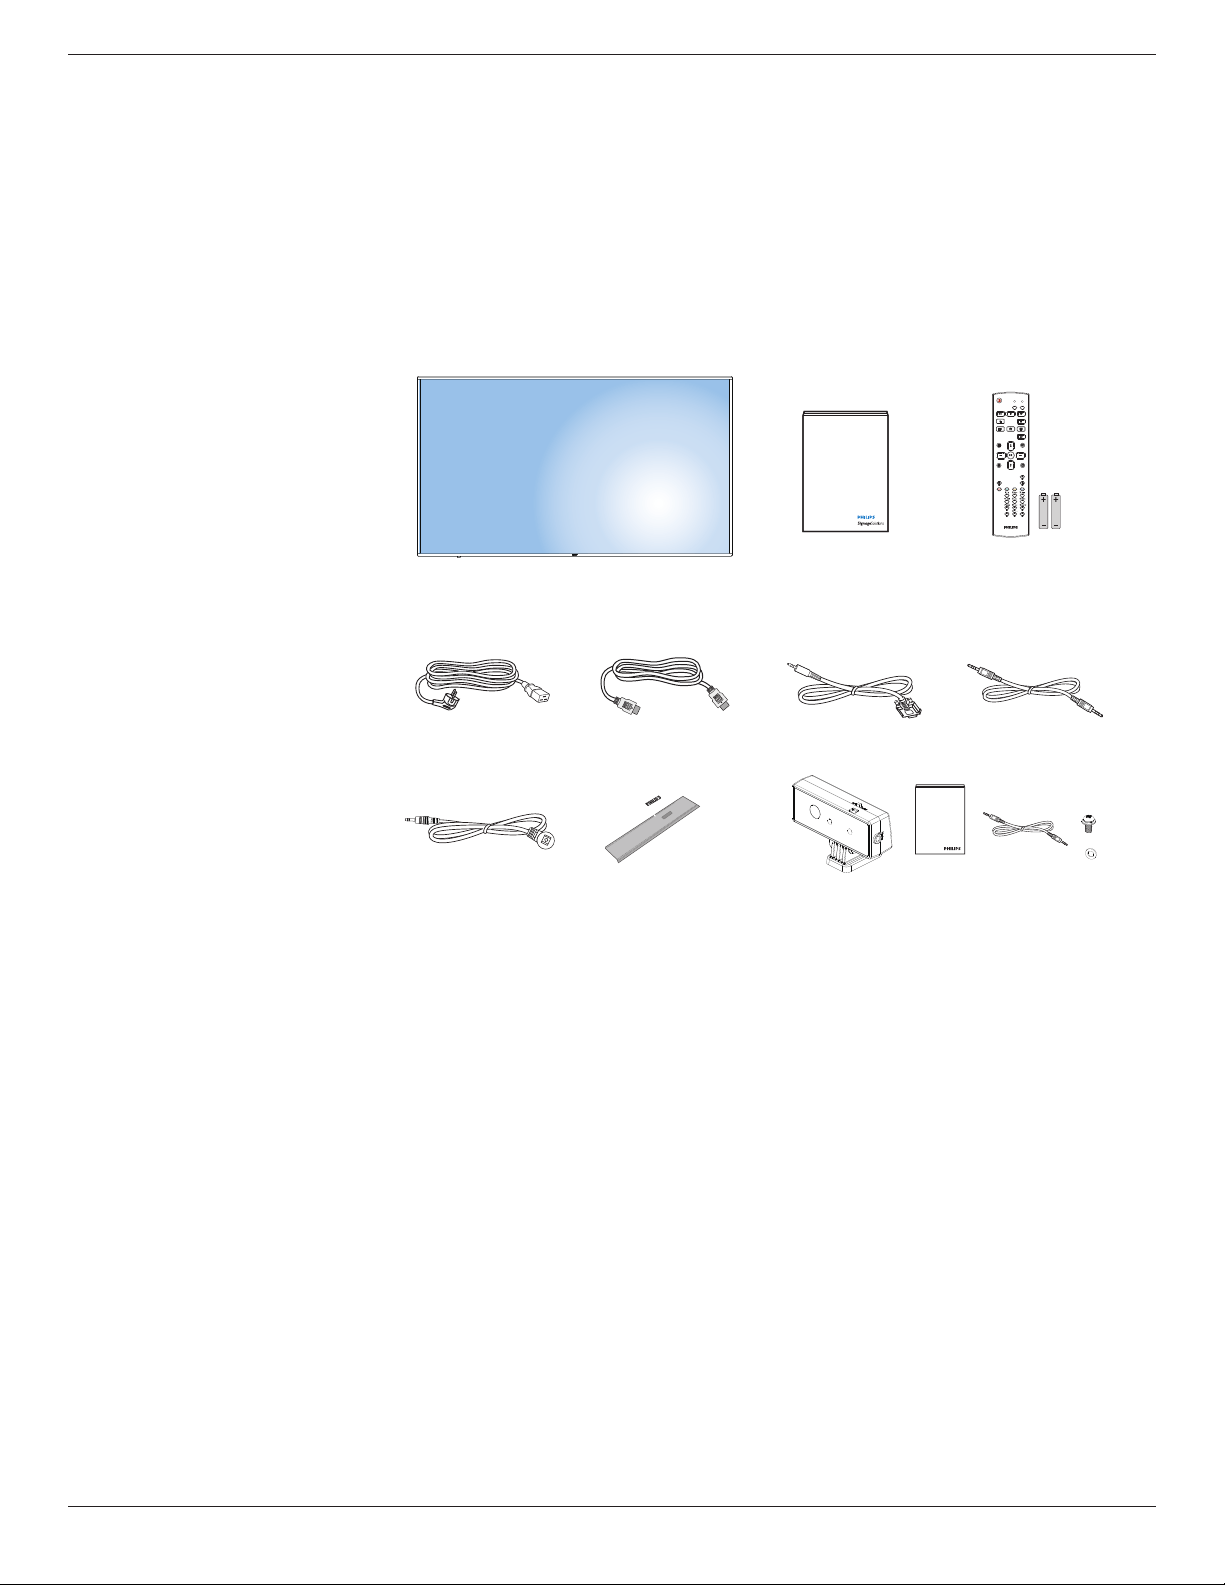
1.2. Package Contents
Pleaseverifythatyoureceivedthefollowingitemswithyourpackagecontent:
• LCDdisplay
• Quickstartguide
• RemotecontrolwithAAAbatteries
• Powercord(1.8m)
• HDMIcable(1.8m)
• RS232cable(3m)
• RS232daisychaincable(3m)
• IRsensorcable(1.8M)
• Logo&Logoguider
• Externalsensorbox(Optional)
* The supplied power cord varies depending on destination.
Power Cord
Logo guider & Logo CRD41 External sensor box (Optional)
Quick start guide
Remote Control
and AAA Batteries
RS232 Daisy Chain CableHDMI Cable RS232 Cable
FORMAT
SOURCE
INFOLIST
OPTIONSADJUST
VOL
NORMAL
ID
ID SET ENTER
IR Sensor Cable
x2
x1
*Differencesaccordingtoregions.
Displaydesignandaccessoriesmaydifferfromthoseillustratedabove.
NOTES:
• Forallotherregions,applyapowercordthatconformstotheACvoltageofthepowersocketandhasbeenapprovedbyandcomplieswiththe
safetyregulationsoftheparticularcountry.
• Youmightliketosavethepackageboxandpackingmaterialforshippingthedisplay.
1.3. Installation Notes
• Duetothehighpowerconsumption,alwaysusetheplugexclusivelydesignedforthisproduct.Ifanextendedlineisrequired,pleaseconsultyour
serviceagent.
• Theproductshouldbeinstalledonaatsurfacetoavoidtipping.Thedistancebetweenthebackoftheproductandthewallshouldbemaintained
forproperventilation.Avoidinstallingtheproductinthekitchen,bathroomoranyotherplaceswithhighhumiditysoasnottoshortentheservicelife
oftheelectroniccomponents.
• Theproductcannormallyoperateonlyunder3000minaltitude.Ininstallationsataltitudesabove3000m,someabnormalitiesmaybeexperienced.
75BDL3003H
2
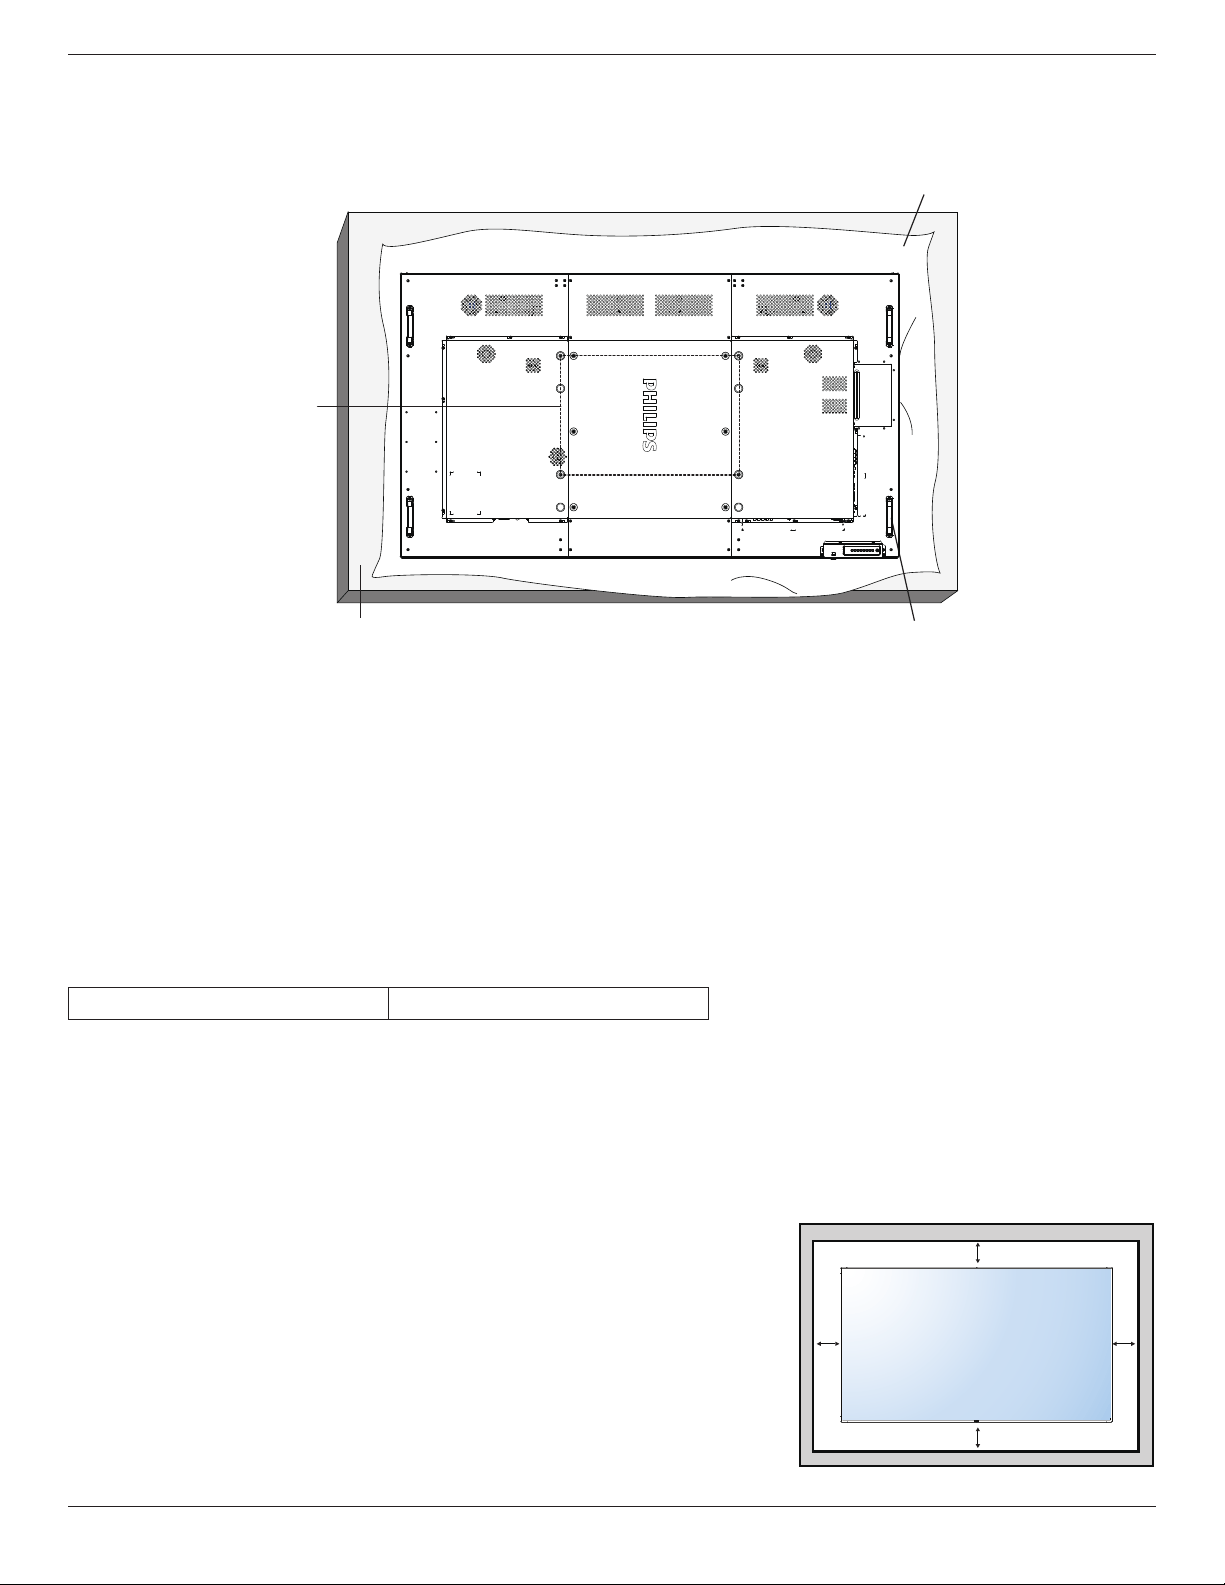
1.4. Mounting on a Wall
Tomountthisdisplaytoawall,youwillhavetoobtainastandardwall-mountingkit(commerciallyavailable).Werecommendusingamountinginterface
thatcomplieswithTUV-GSand/orUL1678standard.
Protective Sheet
VESA Grid
Carrying handleTable
1. Layaprotectivesheetonatable,whichwaswrappedaroundthedisplaywhenitwaspackaged,beneaththescreensurfacesoasnottoscratchthe
screenface.
2. Ensureyouhaveallaccessoriesformountingthisdisplay(wallmount).
3. Followtheinstructionsthatcomewiththebasemountingkit.Failuretofollowcorrectmountingprocedurescouldresultindamagetotheequipment
orinjurytotheuserorinstaller.Productwarrantydoesnotcoverdamagecausedbyimproperinstallation.
4. Forthewall-mountingkit,useM8mountingscrews(havingalength15mmlongerthanthethicknessofthemountingbracket)andtightenthem
securely.
5. Unitweightis54.1Kg.Theequipmentanditsassociatedmountingmeansstillremainsecureduringthetest.ForuseonlywithULlistedWallMount
Bracketwithminimumweight/load≥54.1Kg.
6. Portraitisnotallowed.
1.4.1. VESA Grid
75BDL3003H
600(H)x400(V)mm
Caution:
Topreventthedisplayfromfalling:
• Forwallorceilinginstallation,werecommendinstallingthedisplaywithmetalbracketswhicharecommerciallyavailable.Fordetailedinstallation
instructions,refertotheguidereceivedwiththerespectivebracket.
• Tolessentheprobabilityofinjuryanddamageresultingfromfallofthedisplayincaseofearthquakeorothernaturaldisaster,besuretoconsultthe
bracketmanufacturerforinstallationlocation.
Ventilation Requirements for enclosure locating
Toallowheattodisperse,leavespacebetweensurroundingobjectsasshowninthediagrambelow.
100 mm
100 mm
100 mm
100 mm
75BDL3003H
3
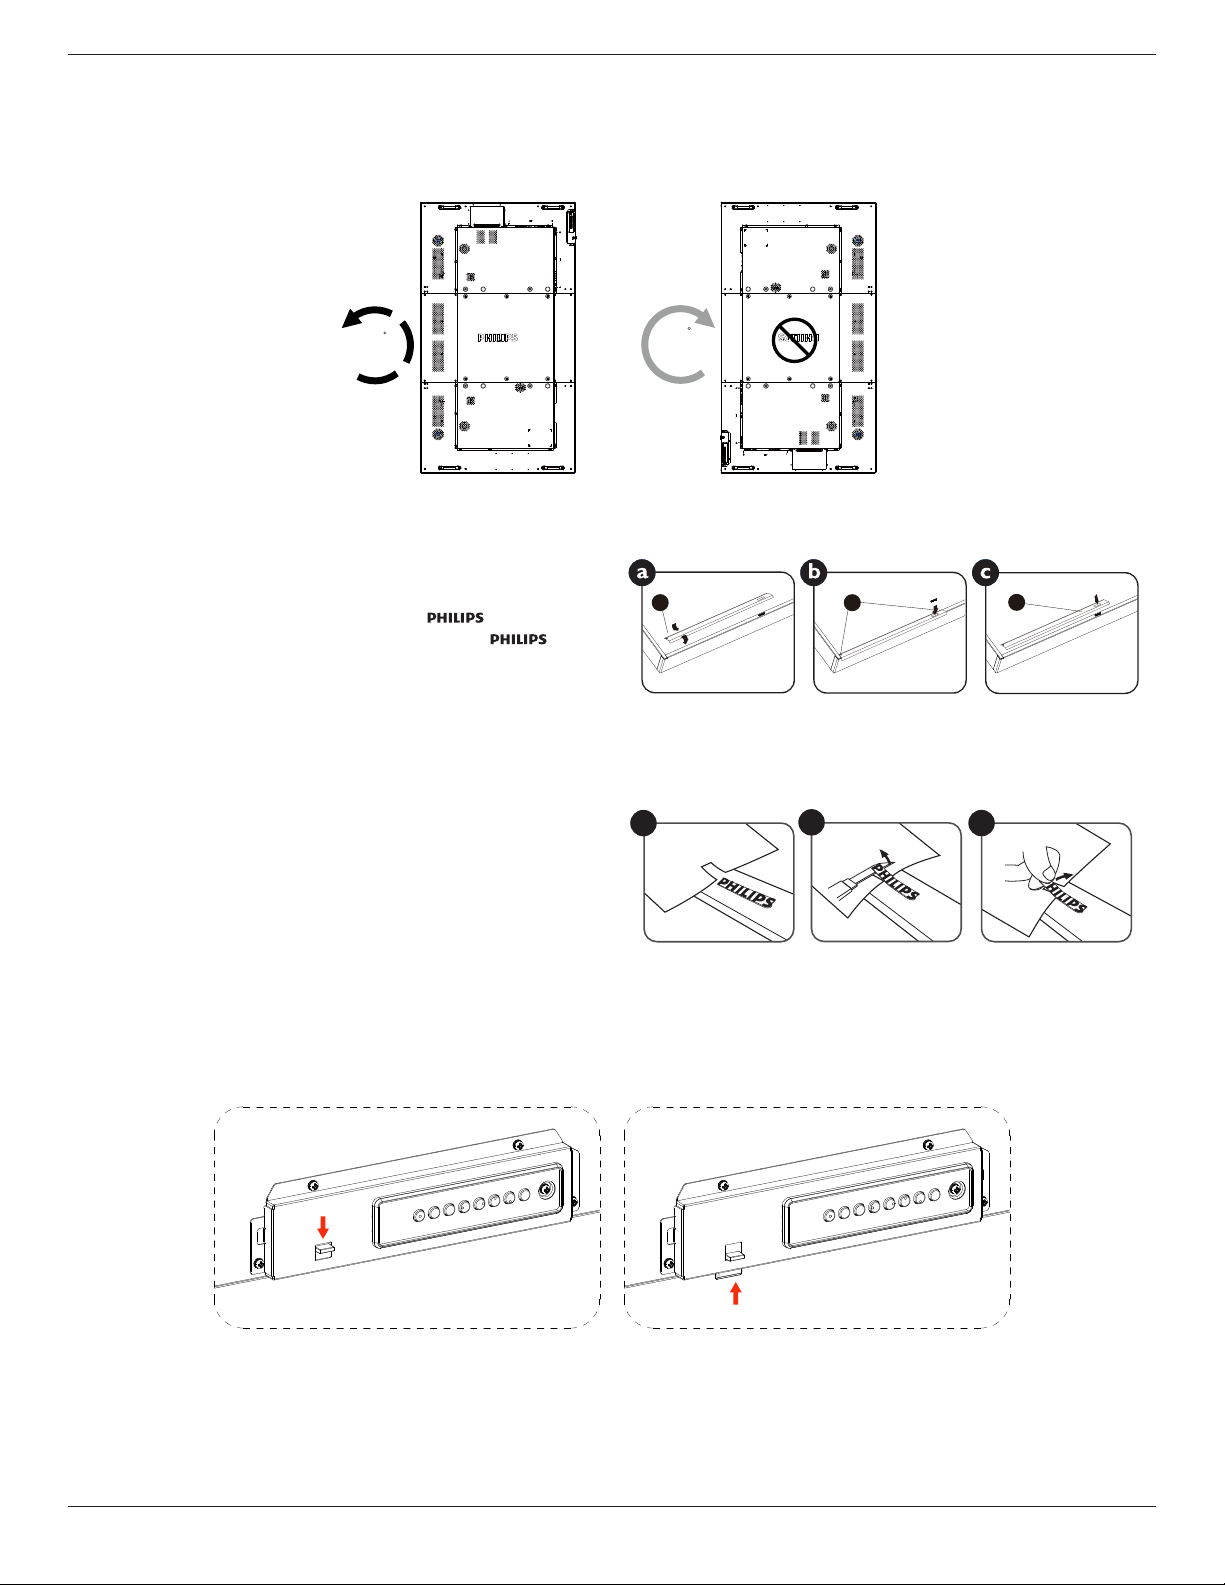
1.5. Mounting in Portrait Position
Thisdisplaycanbeinstalledinportraitposition.
1. Removethetablestand,ifattached.
2. Rotate90degreesanticlockwisewhenfacingthedisplayattheback.
90
90
1.5.1. How to use the logo guider for portrait position
1. Puttheguideronthelower-leftcornerofthefrontbezelofthedisplay.
Folddownbothofitsedges.
2. Peelofftheprotectivelmatthebackofthe“ ”logosticker.
Holdandpresstheguiderwithyourlefthand.Putthe“ ”logo
stickerwithitsadhesivesidedownintothelogoholewithyourright
hand,andpresstomakeitsticktightlyontothefrontbezel.
3. Removetheguider.
2
1
3
1.5.2. How to remove the logo
1. Prepareapieceofpaperwithacuttingareaoflogoasaprotectorto
preventthefrontbezelfromscratching.
2. Usingaknife,carefullyremovethelogostickerwiththepaperplacing
beneath.
3. Tearoffthelogosticker.
1
2
3
NOTE: Wheninstallingthedisplayonawall,pleaseconsultaprofessionaltechnicianforproperinstallation.Weacceptnoliabilityforinstallationsnot
performedbyaprofessionaltechnician.
1.6. Using of Remote sensor and power indicator
1. Pull down the lens to have better remote control performance and easy to observe the light information of power status.
2. Push up the lens before mounting the display for video wall application.
3. Pull/Push the lens until hearing the click sound
75BDL3003H
4
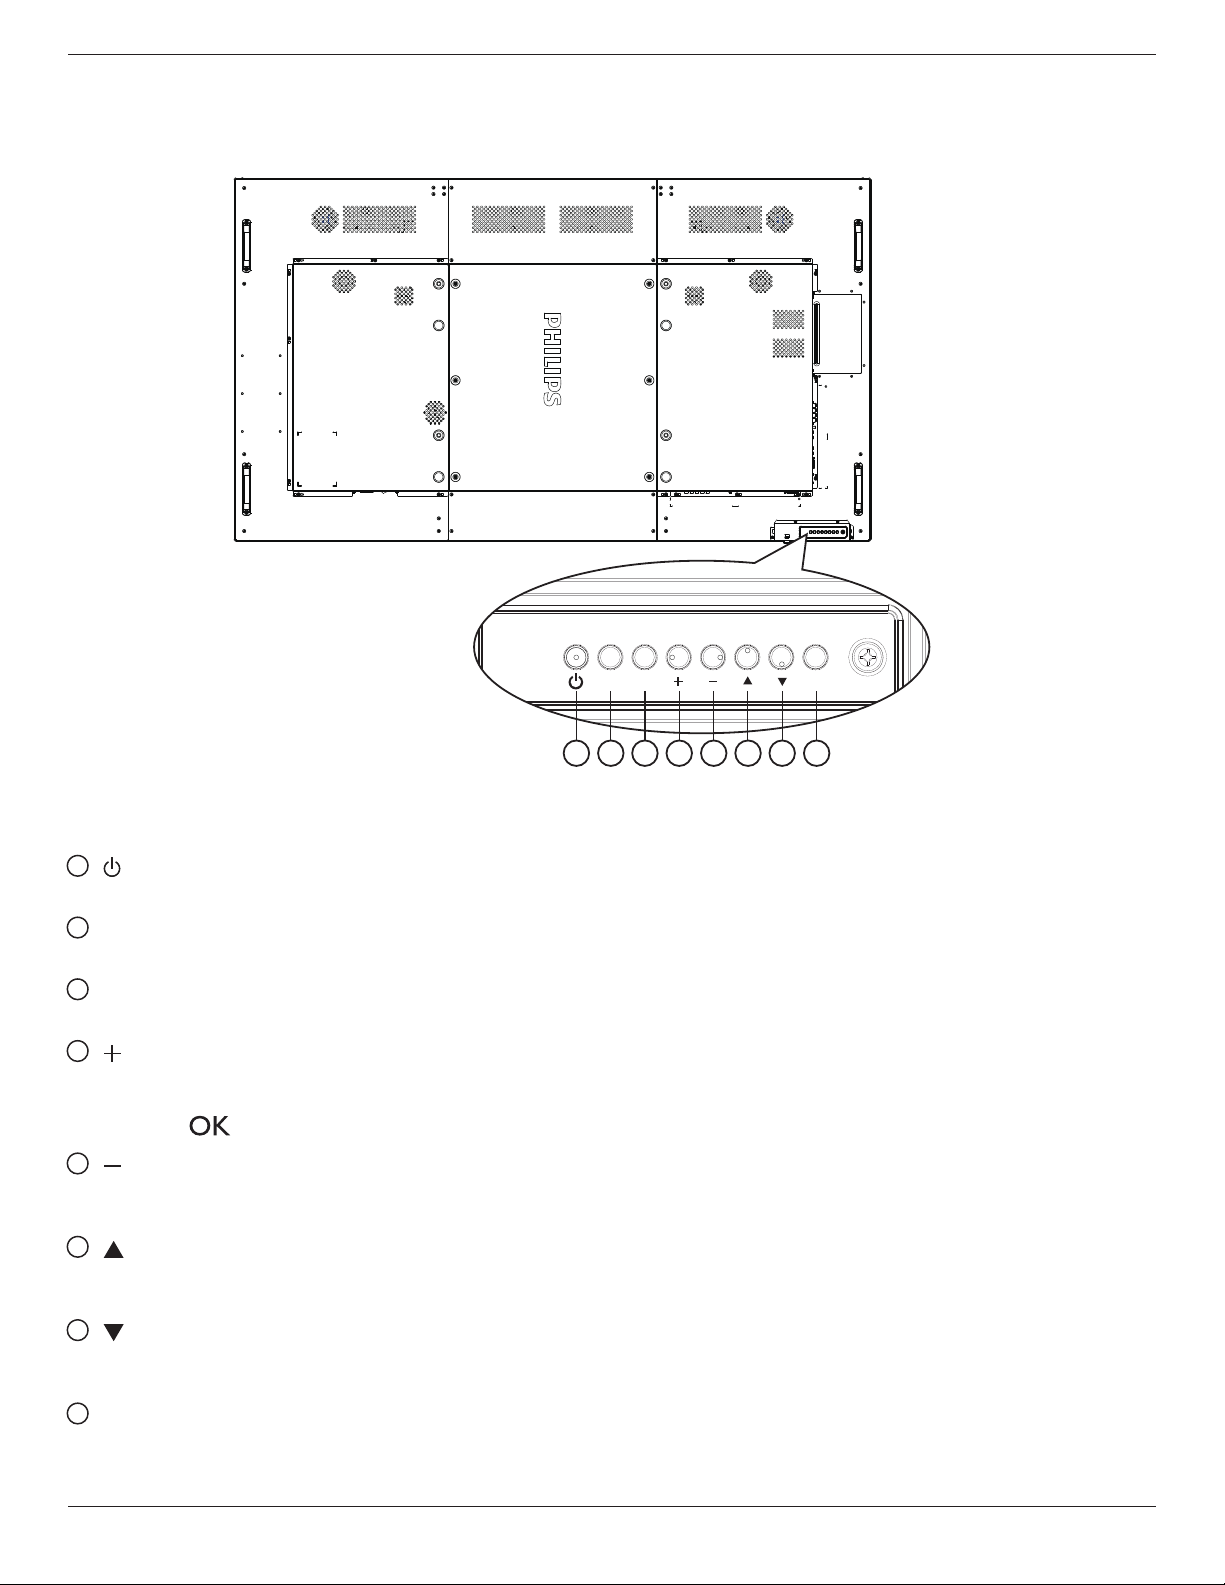
2. Parts and Functions
2.1. Control Panel
1 2 3 4 5 6 7 8
MUTE INPUT
MENU
1
[ ] button
Usethisbuttontoturnthedisplayonorputthedisplaytostandby.
2
[MUTE] button
SwitchtheaudiomuteON/OFF.
3
[INPUT] button
Usethisbuttontoselecttheinputsource.
4
[ ] button
IncreasetheadjustmentwhileOSDmenuison,orincreasethe
audiooutputlevelwhileOSDmenuisoff.
• Usedas[ ]buttonintheOn-Screen-Displaymenu.
5
[ ] button
DecreasetheadjustmentwhileOSDmenuison,ordecreasethe
audiooutputlevelwhileOSDmenuisoff.
6
[ ] button
MovethehighlightbaruptoadjusttheselecteditemwhileOSD
menuison.
7
[ ] button
MovethehighlightbardowntoadjusttheselecteditemwhileOSD
menuison.
8
[MENU] button
ReturntopreviousmenuwhileOSDmenuison,ortoactivatethe
OSDmenuwhenOSDmenuisoff.
75BDL3003H
5
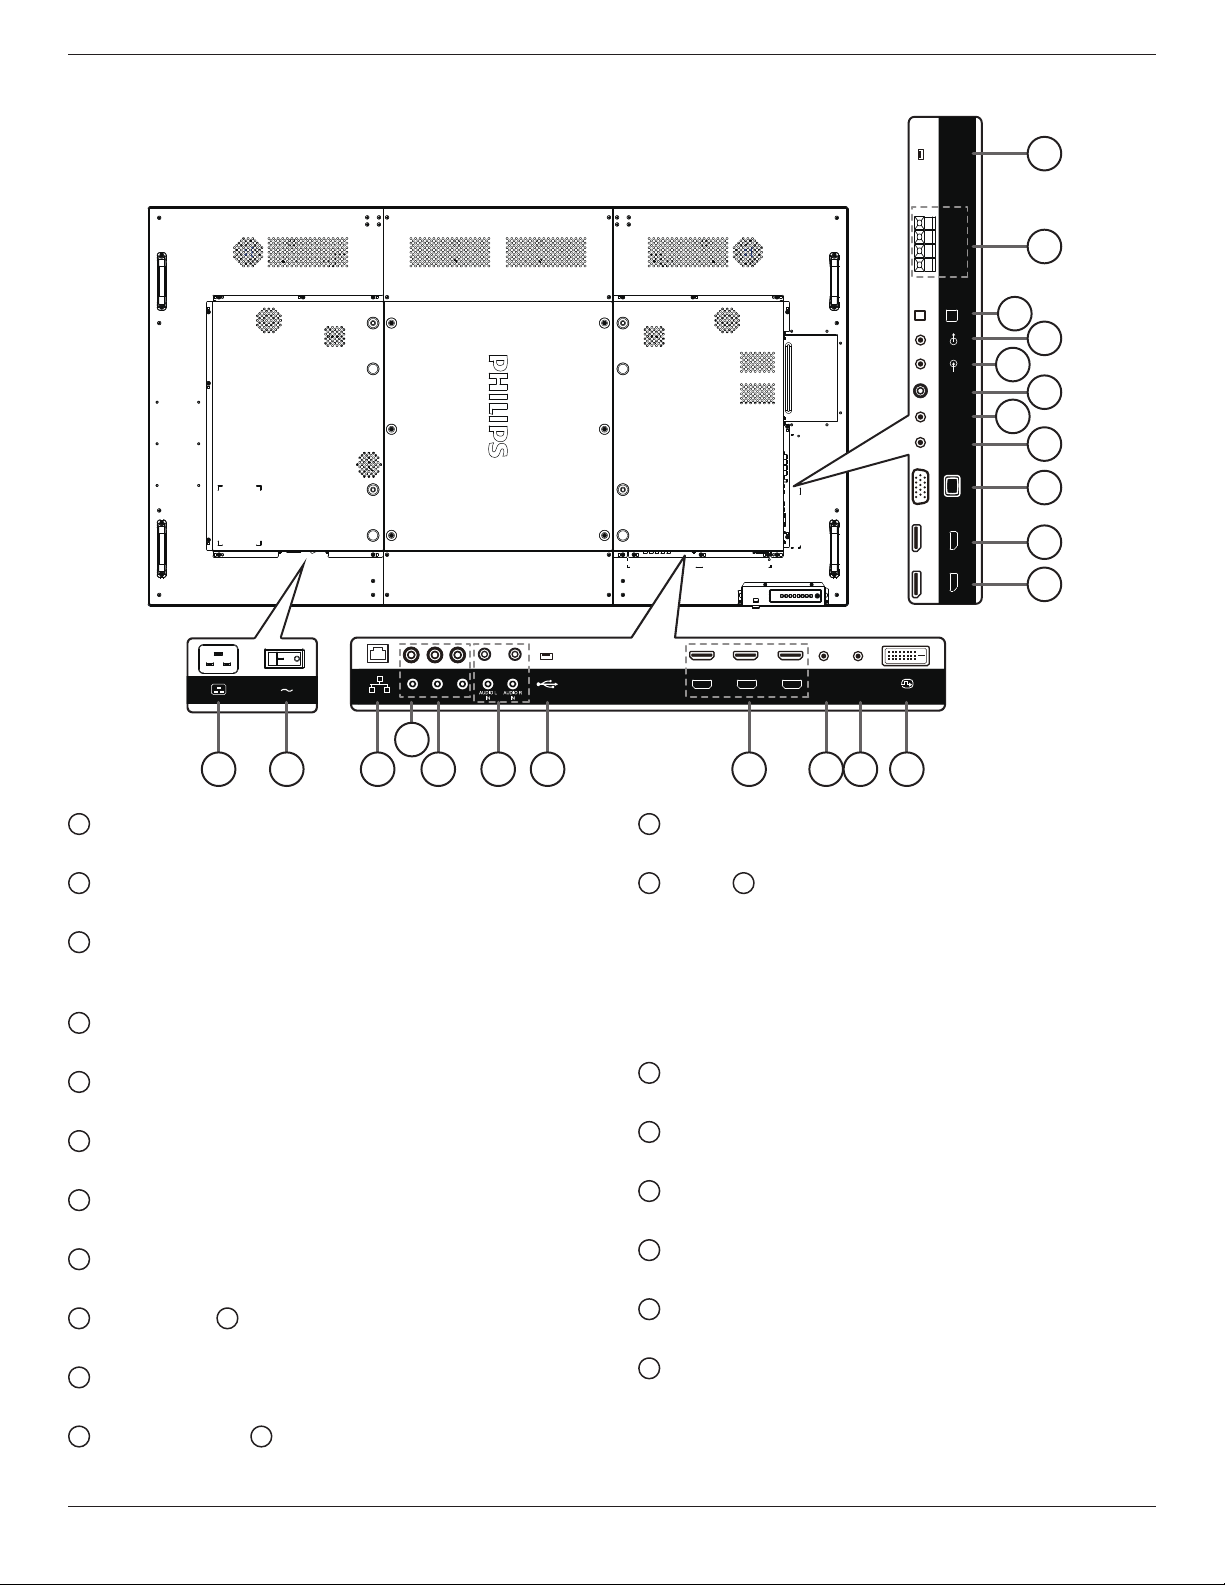
2.2. Input/Output Terminals
DVI(DVI-D) IN
HDMI1 IN
HDMI2 IN HDMI3 IN
RS232 OUTRS232 IN
USB
PrPb
LAN
Y/CVBS
VGA IN
DP IN DP OUT
EXT. SPK
TERMINAL
SPEAKER
SWITCH
AUDIO IN AUDIO OUT
IR-IN IR-OUT
SPDIF
OUT
Service
Port Only
12
13
14
15
16
17
18
19
20
21
22
1 2 3
4
5 6 7 8 9 10 11
1
AC IN
ACpowerinputfromthewalloutlet.
2
MAIN POWER SWITCH
Switchthemainpoweron/off.
3
RJ-45
LANcontrolfunctionfortheuseofremotecontrolsignalfrom
controlcenter.
4
Y/CVBS
Videosourceinput.
5
COMPONENT IN
ComponentYPbPrvideosourceinput.
6
AUDIO IN
AudioinputfromexternalAVdevice(RCA).
7
USB PORT
ConnectyourUSBstoragedevice.
8
HDMI1 IN / HDMI2 IN / HDMI3 IN
HDMIvideo/audioinput.
9
RS232C IN /
10
RS232C OUT
RS232Cnetworkinput/outputfortheloop-throughfunction.
11
DVI IN
DVI-Dvideoinput.
12
DisplayPort IN /
13
DisplayPort OUT
DisplayPortvideoinput/output.
14
VGA IN (D-Sub)
VGAvideoinput.
15
IR IN /
16
IR OUT
IRsignalinput/outputfortheloop-throughfunction.
NOTES:
• Thisdisplay’sremote
controlsensorwillstopworkingifthejack
[IR IN]isconnected.
• ToremotelycontrolyourA/Vdeviceviathisdisplay,refertopage
13forIR Pass Throughconnection.
17
SPDIF OUT
Digitalaudiooutput
18
AUDIO IN
AudioinputforVGAsource(3.5mmstereophone).
19
AUDIO OUT
AudiooutputtoexternalAVdevice.
20
SPEAKER SWITCH
Internalspeakeron/offswitch.
21
SPEAKERS OUT
Audiooutputtoexternalspeakers.
22
USB SERVICE PORT
ConnecttoUSBstorageformainboardFirmwareupdate.
NOTE:
It’sforupdatingrmwareonly.
Removetheplasticplugrstbeforeusing.
75BDL3003H
6
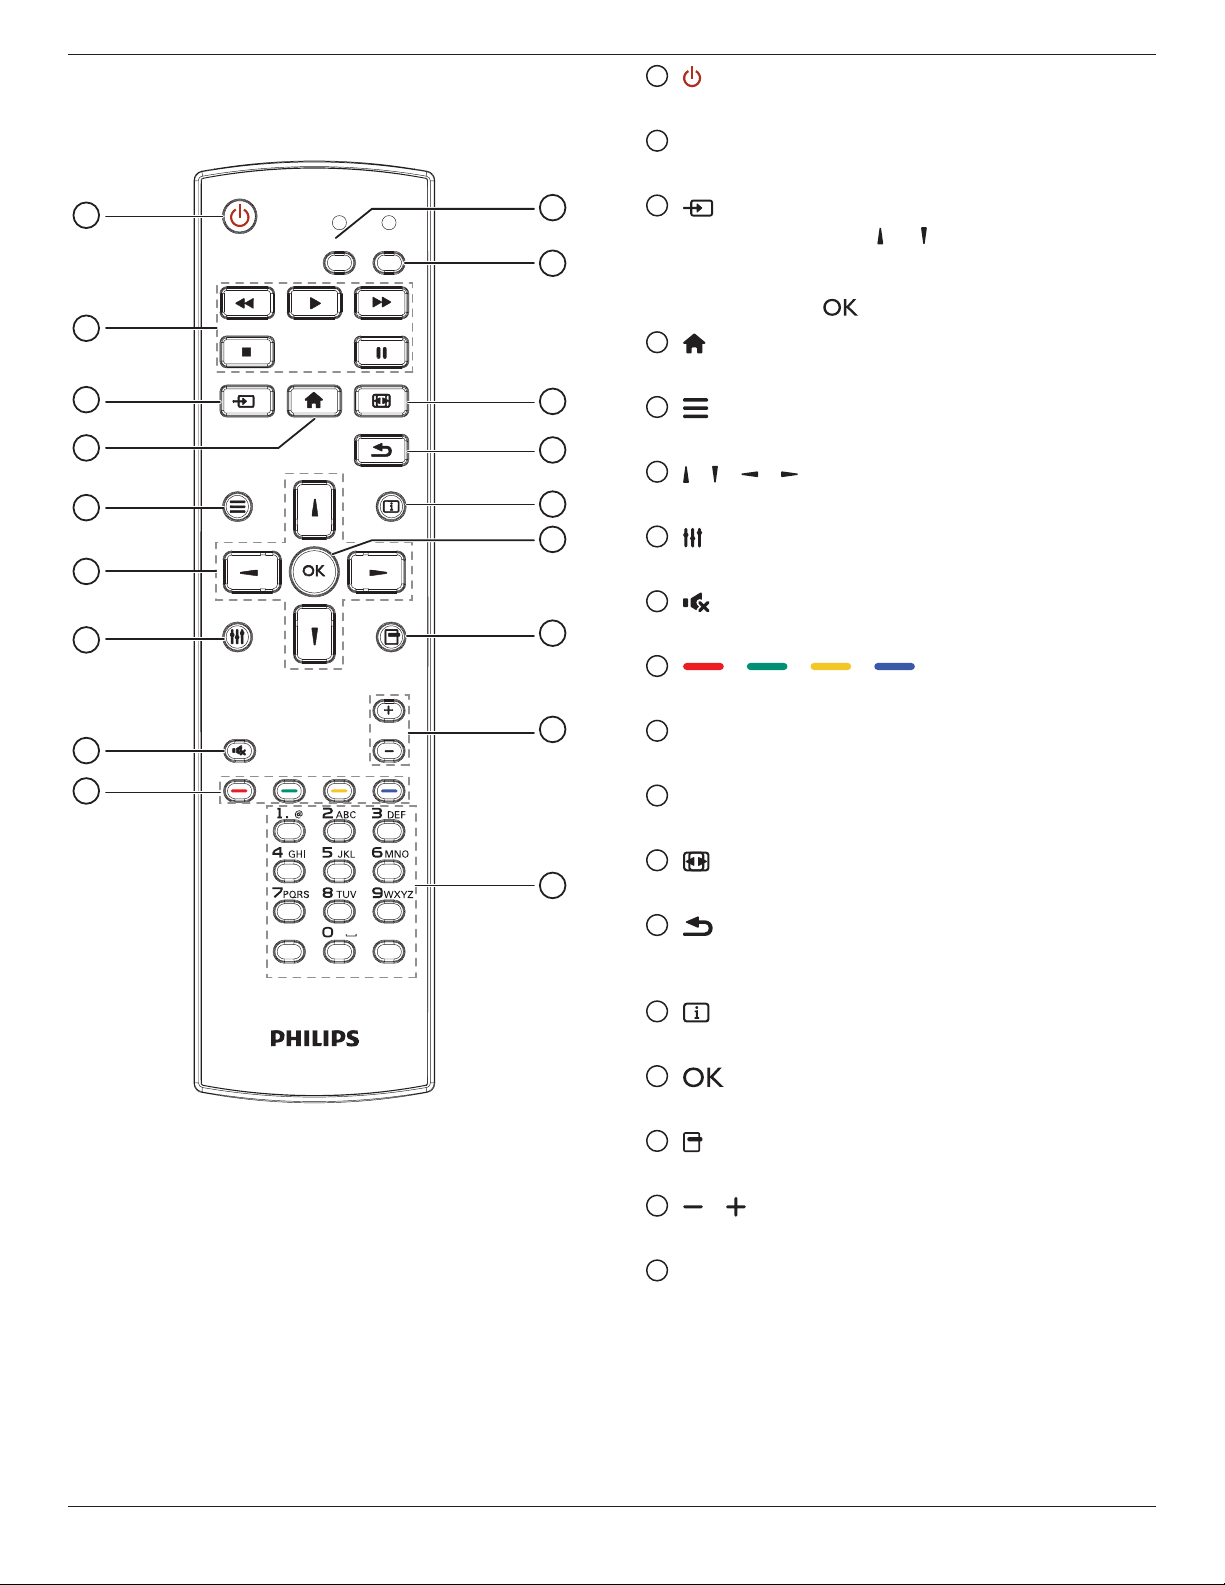
2.3. Remote Control
2.3.1. General functions
FORMAT
SOURCE
INFOLIST
OPTIONSADJUST
VOL
NORMAL
ID
ID SET ENTER
1
10
11
12
13
14
15
16
17
18
2
3
4
5
6
7
8
9
1
[ ] POWER button
Turnthedisplayonorputthedisplaytostandby.
2
[PLAY] buttons
Controlplaybackofmediales.
3
[ ] SOURCE button
Chooseinputsource.Press[ ]or[ ]buttontochoosefrom
DisplayPort
,
DVI-D
,
VGA
.
HDMI 1
,
HDMI 2
,
HDMI 3
,
Component
,
Video
,
USB
,
BROWSER
,
SmartCMS
,or
Card OPS
.Press[ ]buttontoconrmandexit.
4
[ ] HOME button
AccesstheOSDmenu.
5
[ ] LIST button
Nofunction.
6
[ ] [ ] [ ] [ ] NAVIGATION buttons
Navigatethroughmenusandchooseitems.
7
[ ] ADJUST button
ToautoadjustforVGAinputonly.
8
[ ] MUTE button
Presstoturnthemutefunctionon/off.
9
[ ] [ ] [ ] [ ] COLOR buttons
Choosetasksoroptions.
10
[NORMAL] buttons
Switchtonormalmode.
11
[ID] buttons
SwitchtoIDmode.
12
[ ] FORMAT button
Changezoommode.
13
[ ] BACK button
Returntothepreviousmenupageorexitfromtheprevious
function.
14
[ ] INFO button
Displayinformationaboutcurrentactivity.
15
[ ] button
Conrmanentryorselection.
16
[ ] OPTIONS button
Accesscurrentlyavailableoptions,pictureandsoundmenus.
17
[ ] [ ] VOLUME button
Adjustvolume.
18
[NUMERIC] buttons
Entertextfornetworksetting,andsetupIDforIDmode.
75BDL3003H
7
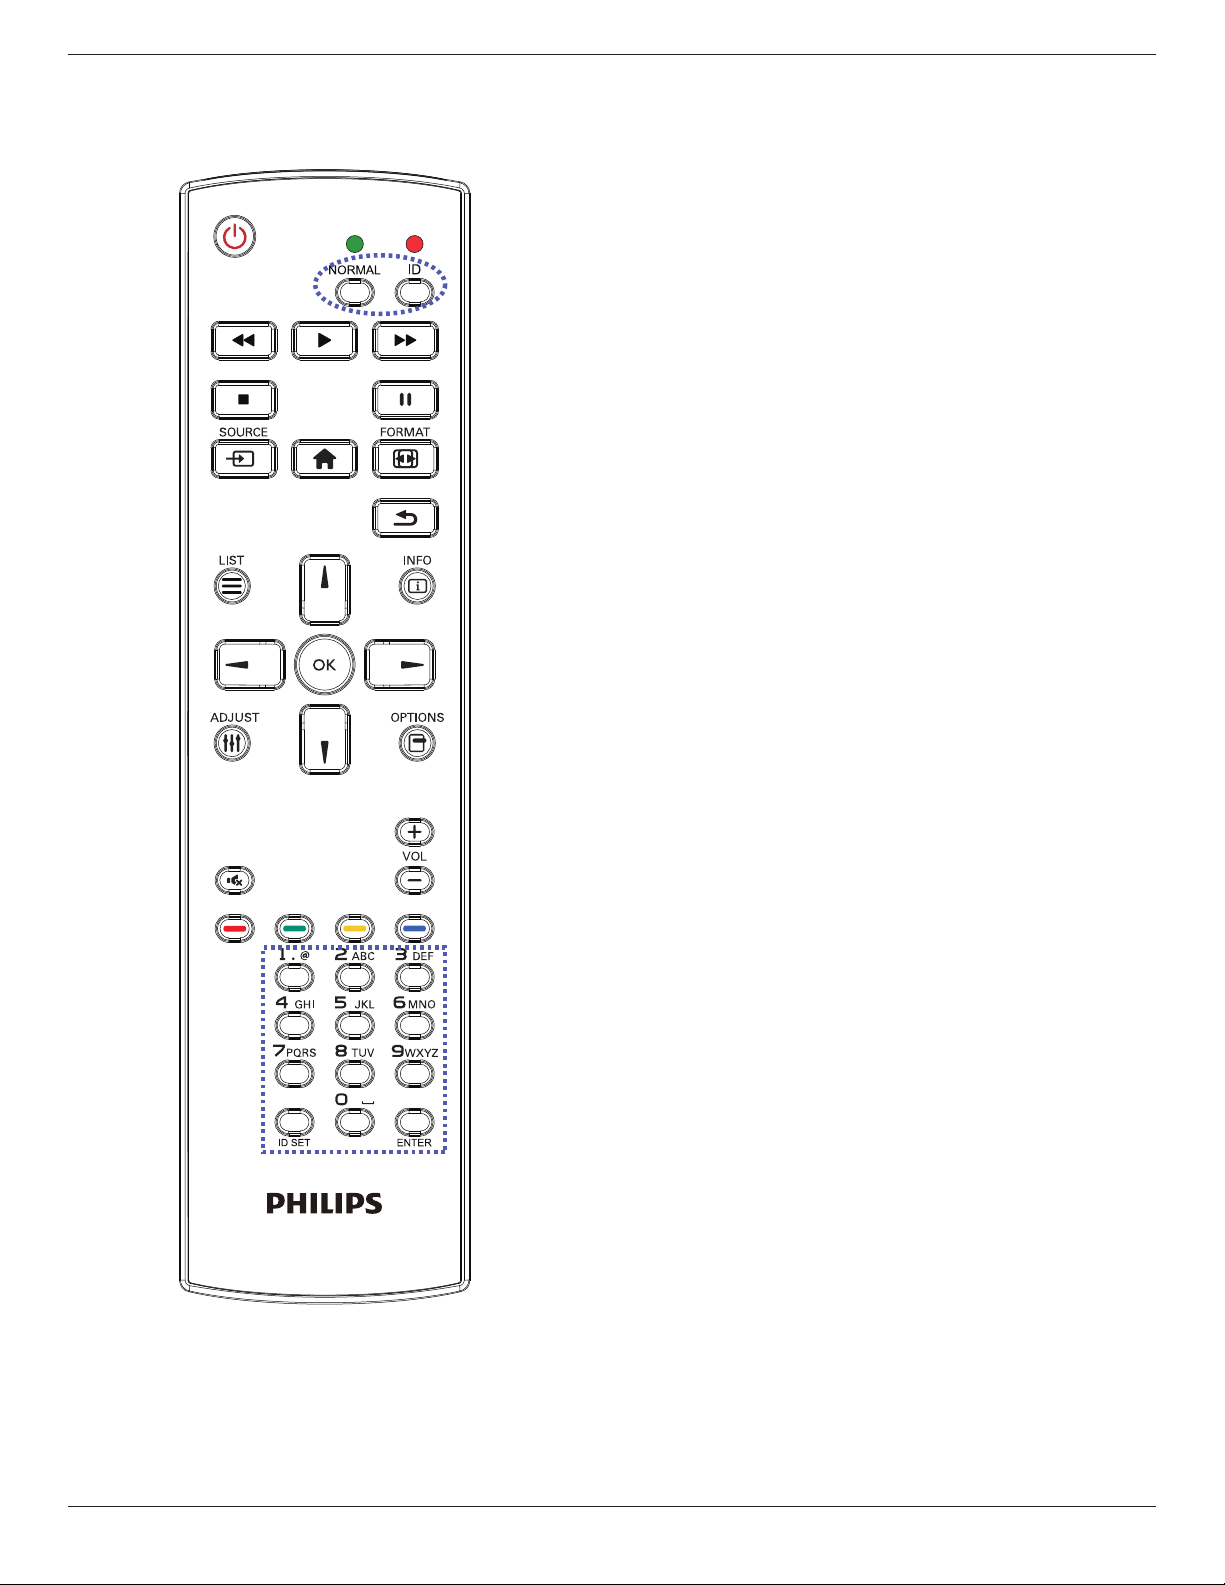
2.3.2. ID Remote Control
YoucansettheremotecontrolIDwhenyouwanttousethisremote
controlononeofseveraldifferentdisplays.
Press[ID]button.TheredLEDblinkstwice.
1. Press[IDSET]buttonformorethan1secondtoentertheID
Mode.TheredLEDlightsup.
Pressthe[IDSET]buttonagainwillexittheIDMode.TheredLED
lightsoff.
Pressthedigitnumbers[0]~[9]toselectthedisplayyouwantto
control.
Forexample:press[0]and[1]fordisplayNo.1,press[1]and[1]for
displayNo.11.
Thenumbersavailablearefrom[01]~[255].
2. Notpressinganybuttonwithin10secondswillexittheIDMode.
3. Ifanerrorpressingofbuttonsotherthanthedigitsoccured,wait
1secondaftertheredLEDlightsoffandthenlightsupagain,then
pressthecorrectdigitsagain.
4. Press[ENTER]buttontoconrm.TheredLEDblinkstwiceand
thenlightsoff.
NOTE:
• Press[NORMAL]button.ThegreenLEDblinkstwice,indicatingthe
displayisinnormaloperation.
• ItisnecessarytosetuptheIDnumberforeachdisplaybefore
selectingitsIDnumber.
• Use“
F
”(pause)keyontheremotecontrollertofreezethe
screen.Use“
I
”(play)keyontheremotecontrollertounfreeze
thescreen.
• The“freeze”featureonlycanbeadoptedon“real”videosources
likeVGA,AV,YPbPr,HDMI,DVI,DP.
• Anyoperationontheremotecontrollerorvideomodechangewill
unfreezethescreen.
75BDL3003H
8
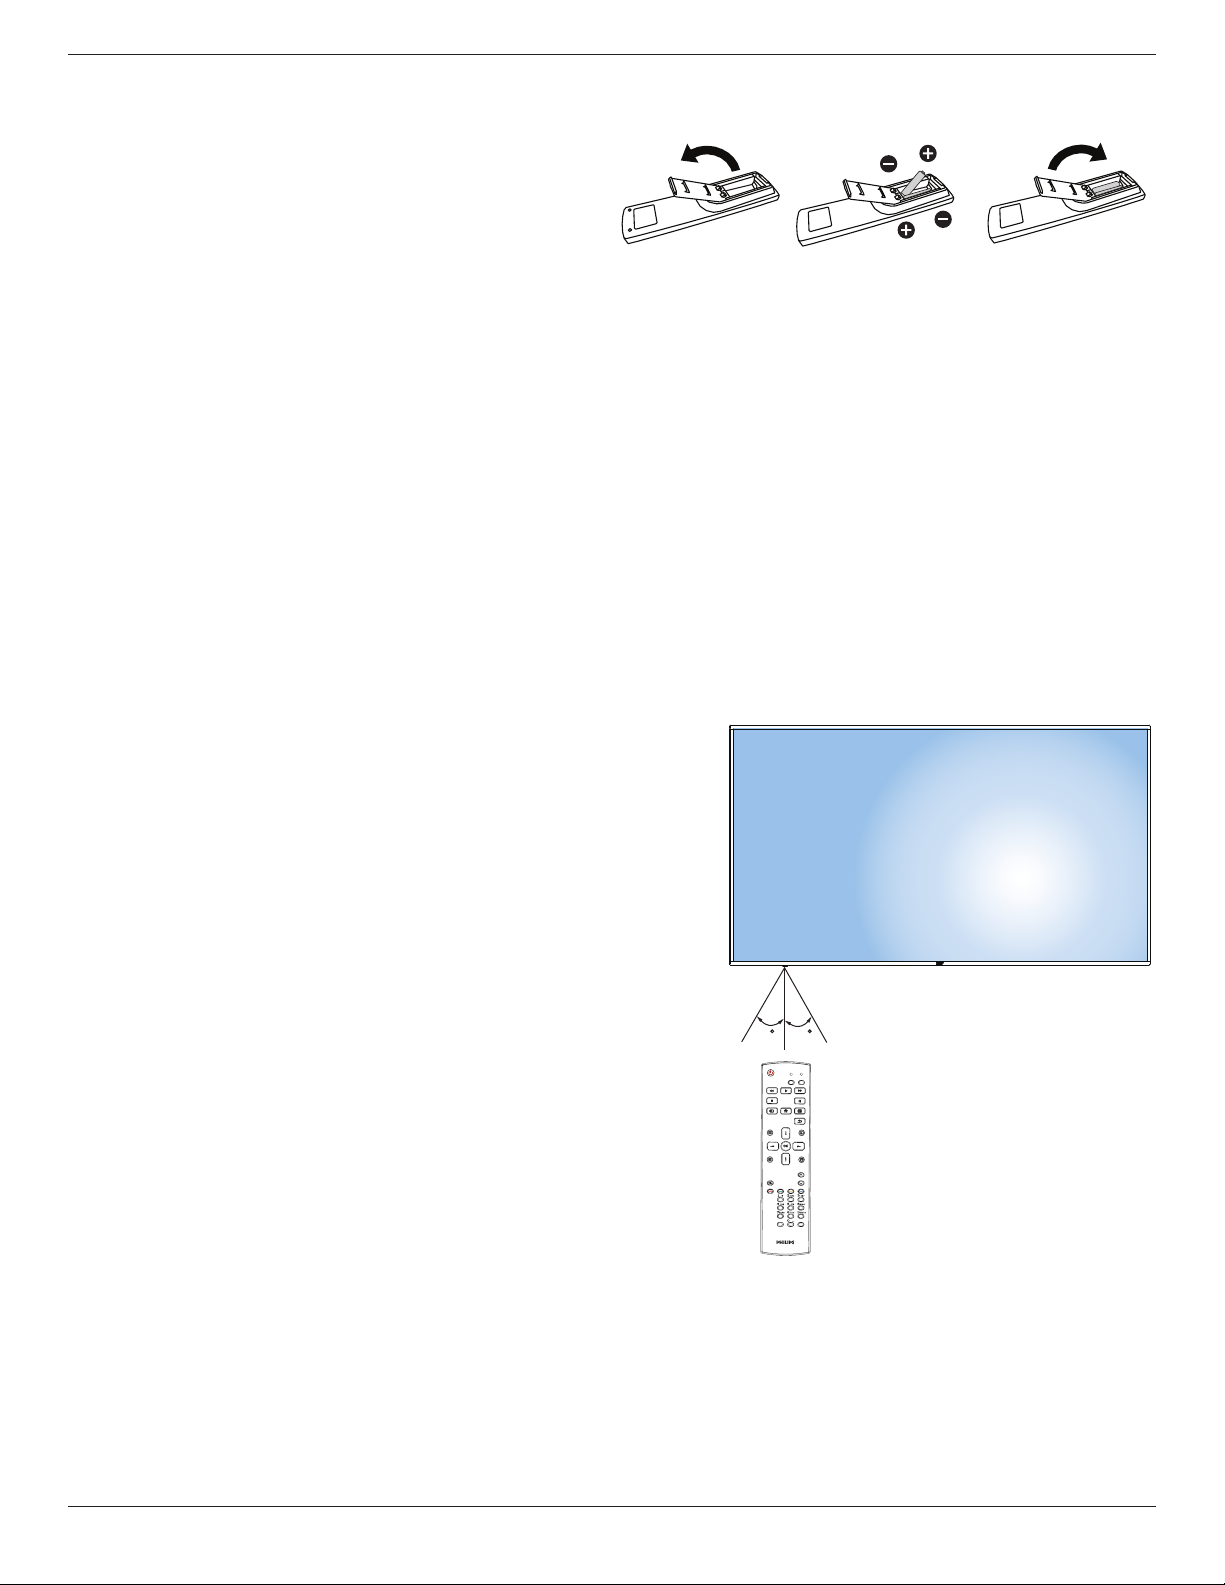
2.3.3. Inserting the batteries in the remote control
Theremotecontrolispoweredbytwo1.5VAAAbatteries.
Toinstallorreplacebatteries:
1. Pressandthenslidethecovertoopenit.
2. Alignthebatteriesaccordingtothe(+)and(–)indicationsinsidethe
batterycompartment.
3. Replacethecover.
Caution:
Theincorrectuseofbatteriescanresultinleaksorbursting.Besuretofollowtheseinstructions:
• Place“AAA”batteriesmatchingthe(+)and(–)signsoneachbatterytothe(+)and(–)signsofthebatterycompartment.
• Donotmixbatterytypes.
• Donotcombinenewbatterieswithusedones.Itcausesshorterlifeorleakageofbatteries.
• Removethedeadbatteriesimmediatelytopreventthemfromliquidleakinginthebatterycompartment.Don’ttouchexposedbatteryacid,asitcan
damageyourskin.
NOTE: Ifyoudonotintendtousetheremotecontrolforalongperiod,removethebatteries.
2.3.4. Handling the remote control
• Donotsubjecttostrongshock.
• Donotallowwaterorotherliquidtosplashtheremotecontrol.Iftheremotecontrolgetswet,wipeitdryimmediately.
• Avoidexposuretoheatandsteam.
• Otherthantoinstallthebatteries,donotopentheremotecontrol.
2.3.5. Operating range of the remote control
Pointthetopoftheremotecontroltowardthedisplay’sremotecontrolsensorwhen
pressingabutton.
Usetheremotecontrolwithinadistanceoflessthan5m(pullthelensdownanduse
theremotecontrolfromthefront)/26ftfromthedisplay’ssensor,andahorizontaland
verticalangleoflessthan20degrees.
NOTE:
• Theremotecontrolmaynotfunctionproperlywhentheremotecontrolsensoron
thedisplayisunderdirectsunlightorstrongillumination,orwhenthereisanobstacle
inthepathofsignaltransmission.
• UsingIRsensorcableforbetterremotecontrolperformance.(Pleaserefertothe
instructionsof3.5).
FORMAT
SOURCE
INFOLIST
OPTIONSADJUST
VOL
NORMAL
ID
ID SET ENTER
20 20
75BDL3003H
9
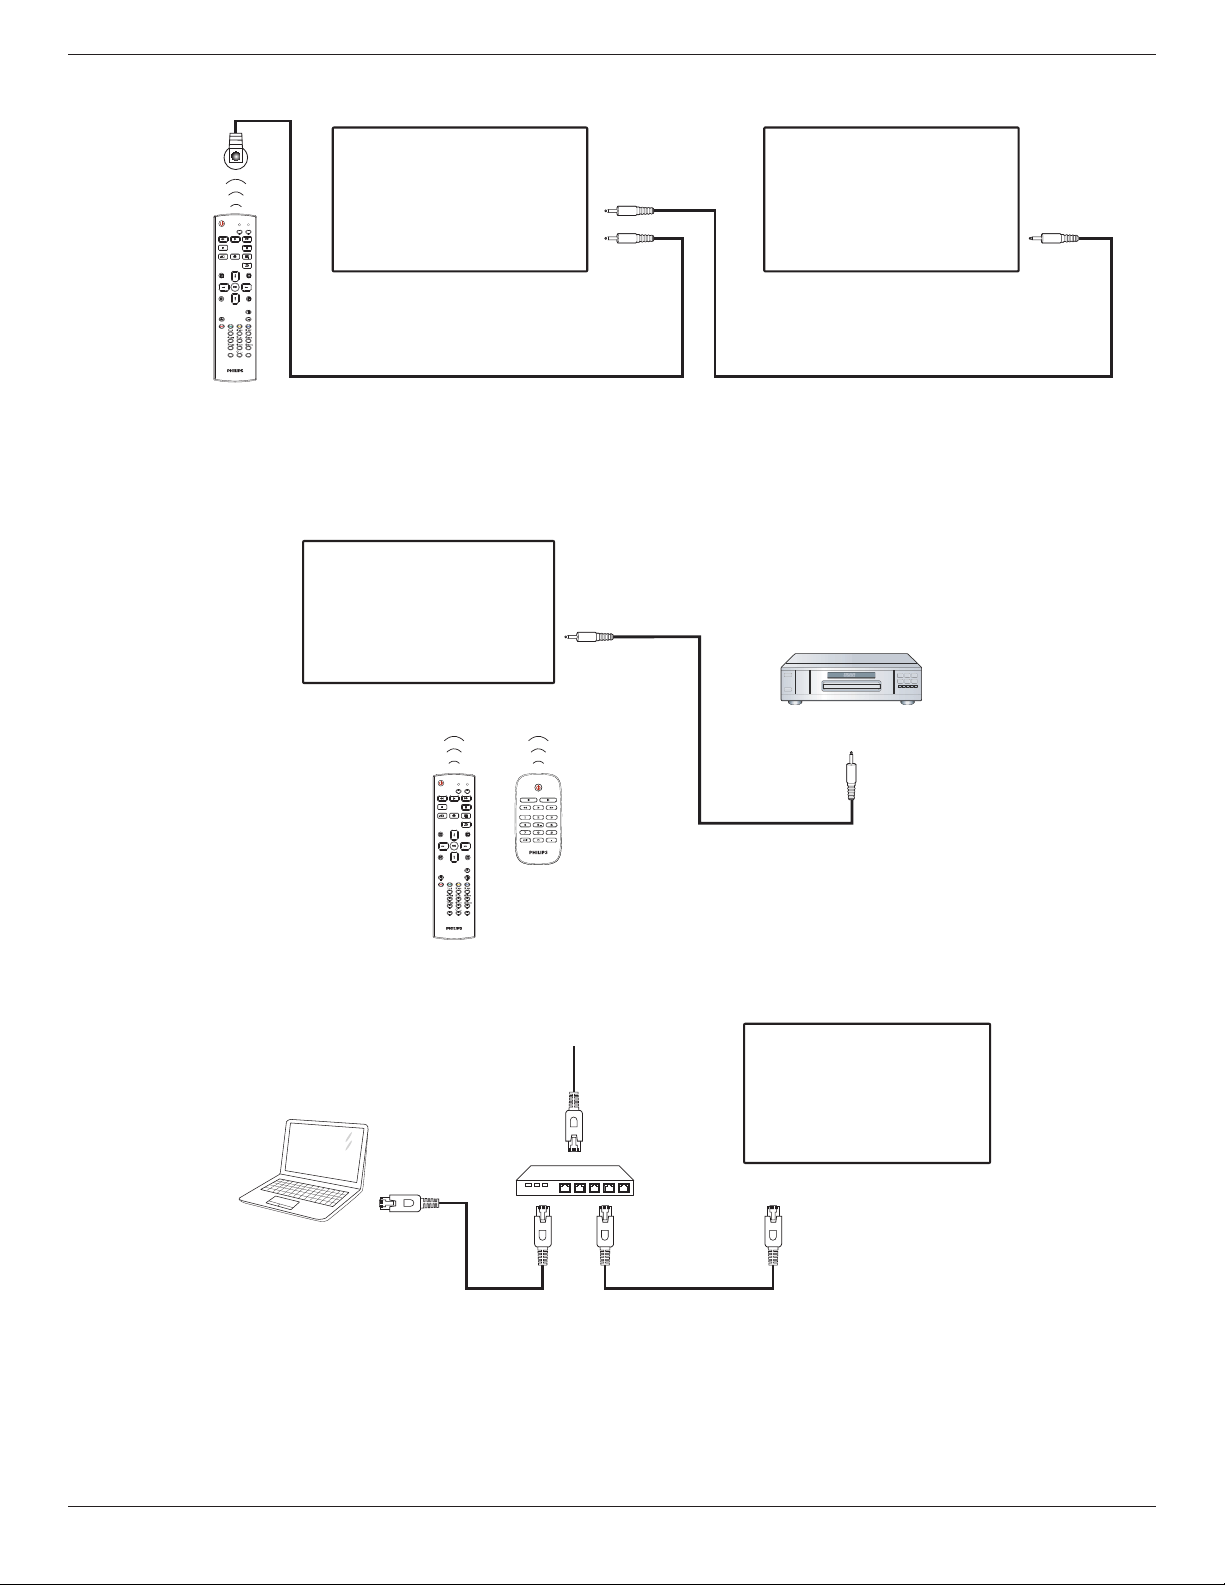
3. Connecting External Equipment
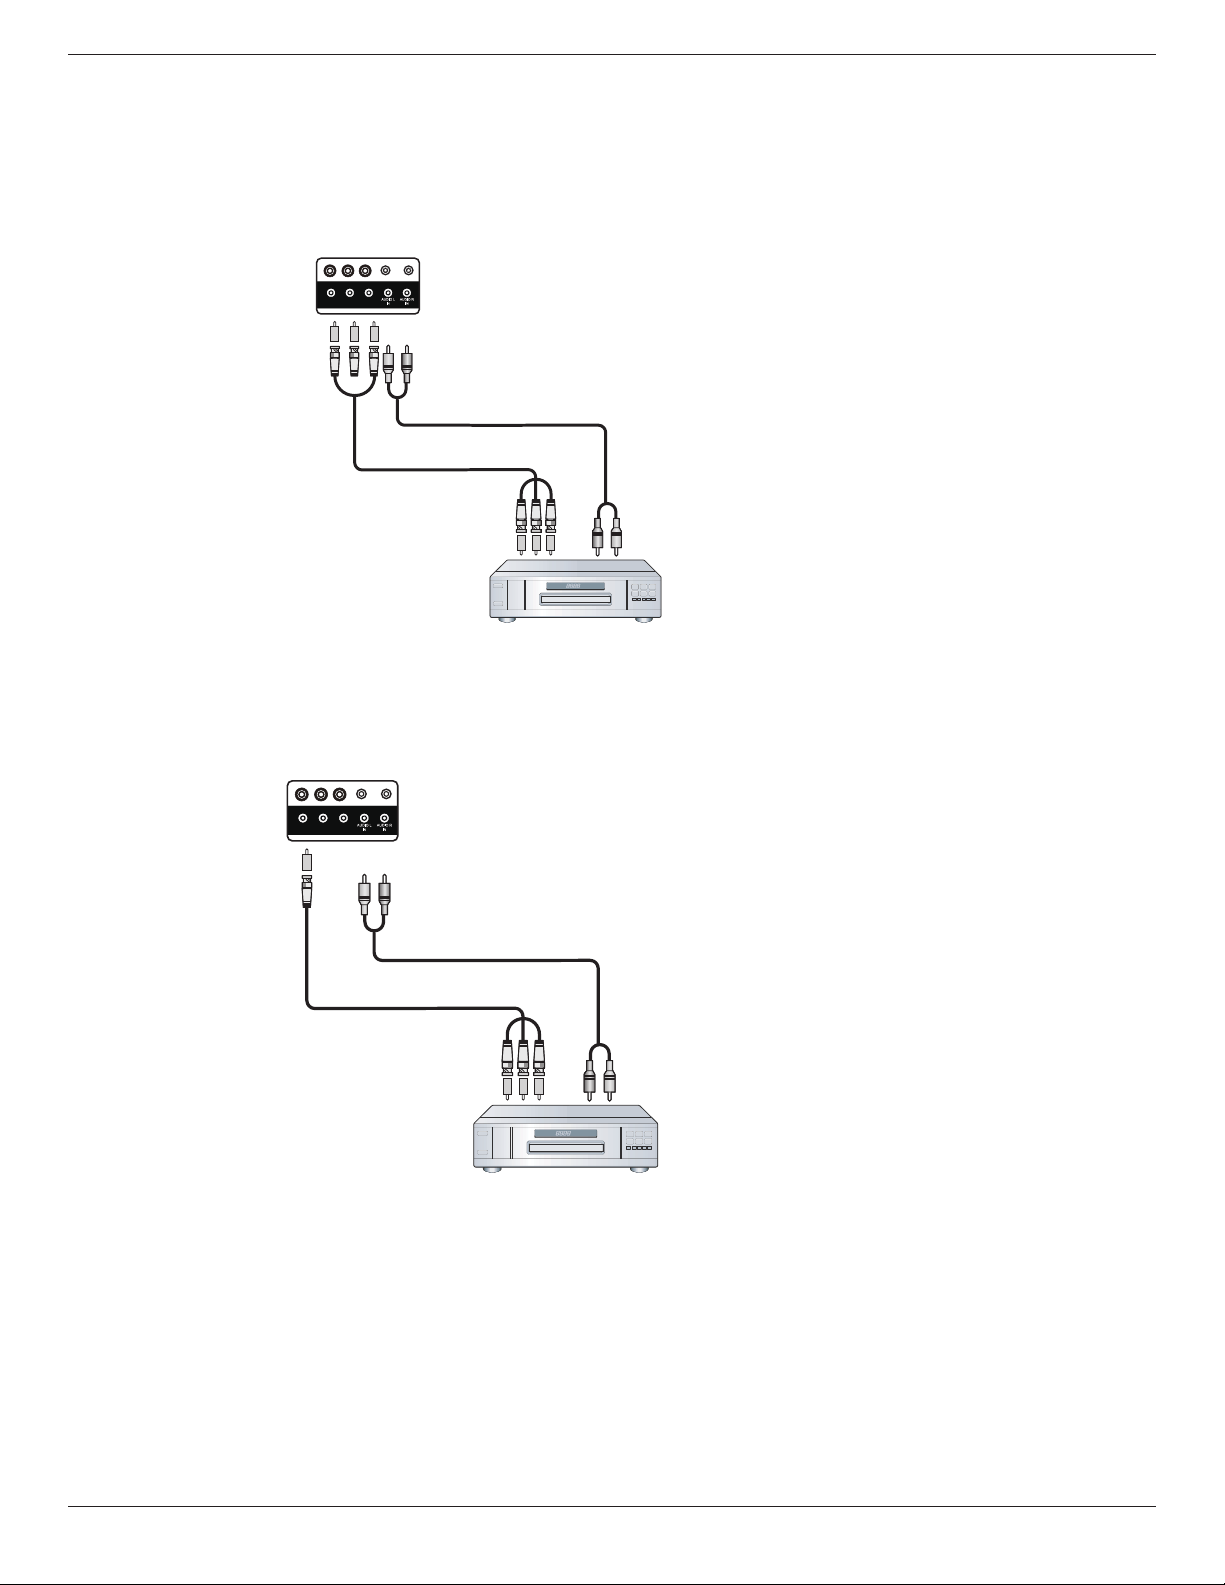
3.1. Connecting External Equipment (DVD/VCR/VCD)
3.1.1. Using COMPONENT video input
DVD / VCR / VCD
COMPONENT Out
(YPbPr)
Audio Out
[AUDIO IN]
[COMPONENT IN]
(YPbPr)
[R][L]
HDMI1 IN
HDMI2 IN HDMI3 IN
RS232 OUTRS232 IN
USB
PrPb
LAN
Y/CVBS
3.1.2. Using Video Source input
DVD / VCR / VCD
Audio Out
[AUDIO IN]
[R][L]
HDMI1 IN
HDMI2 IN HDMI3 IN
RS232 OUTRS232 IN
USB
PrPb
LAN
Y/CVBS
Y/CVBS Out
[Y/CVBS IN]
75BDL3003H
10
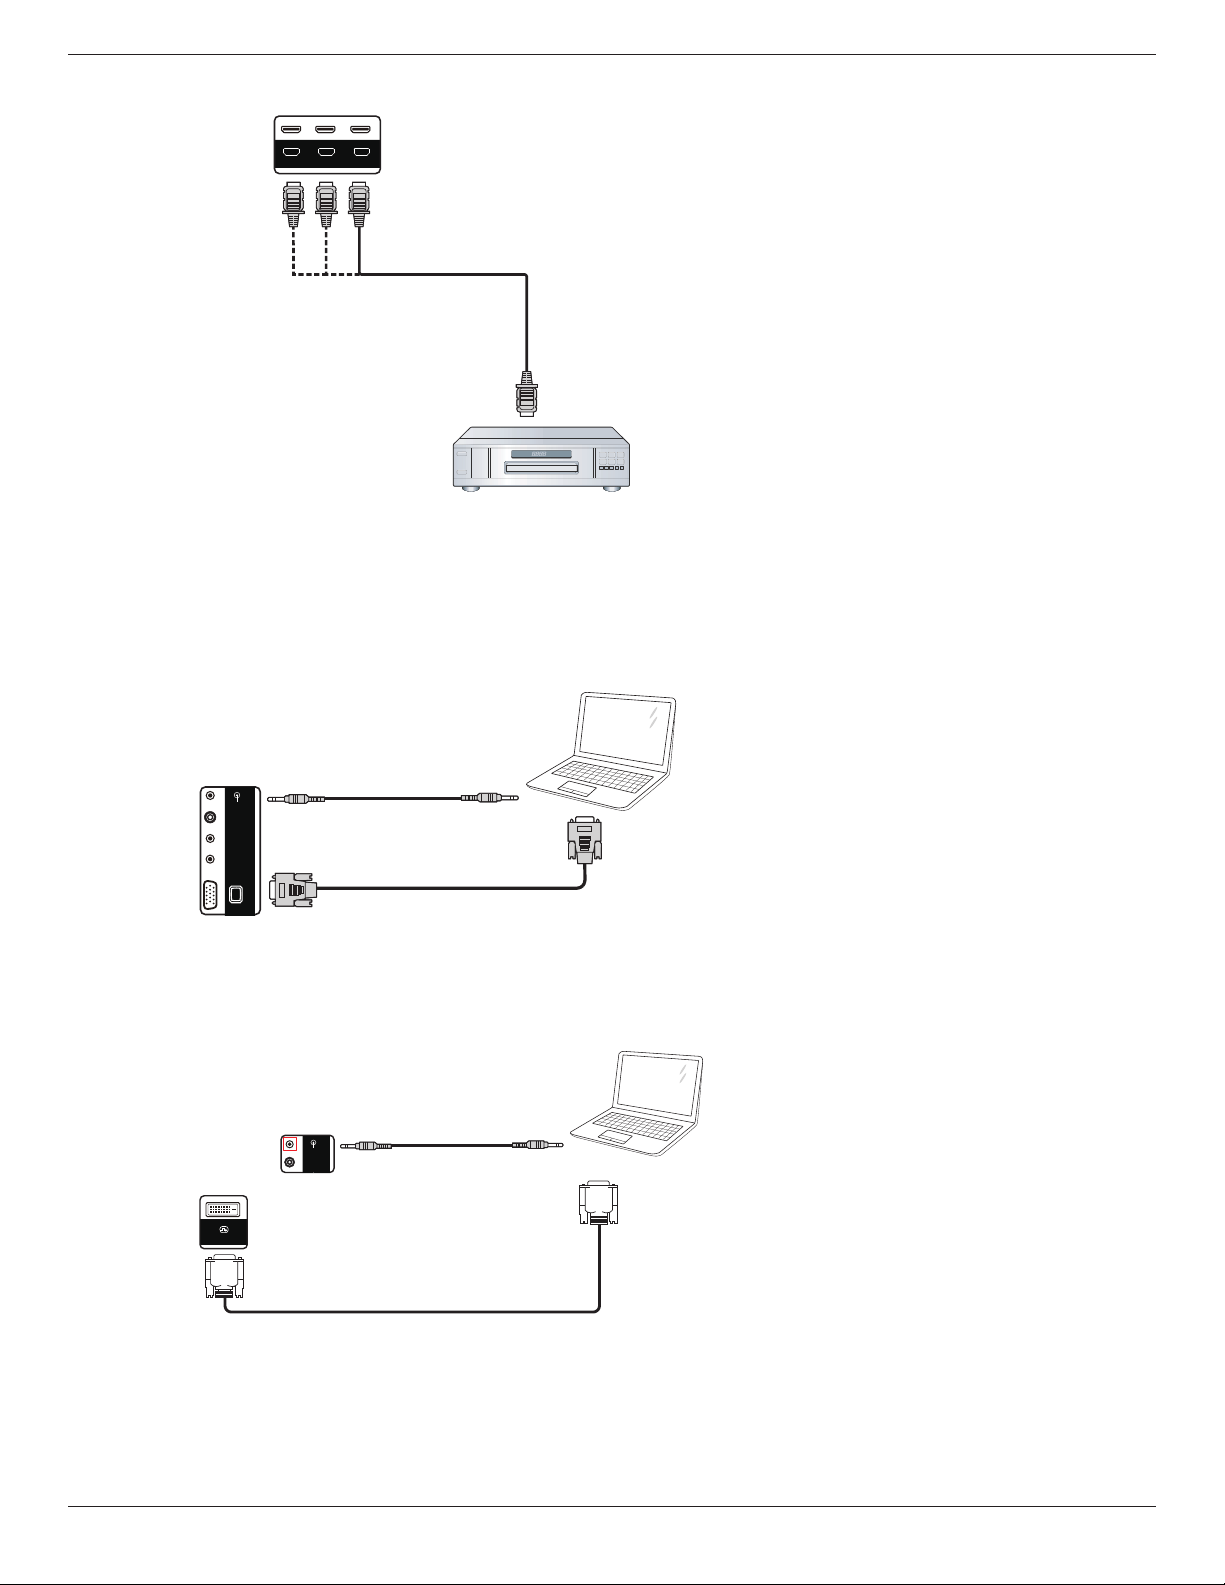
3.1.3. Using HDMI video input
DVD / VCR / VCD
DVI(DVI-D) IN
HDMI1 IN
HDMI2 IN HDMI3 IN
RS232 OUTRS232 IN
HDMI Out
[HDMI IN]
3.2. Connecting a PC
3.2.1. Using VGA input
PC
[VGA IN]
[VGA AUDIO IN]
VGA Out
D-Sub 15 pin
Audio Out
VGA IN
DP OUT
EXT. SPK
TERMINAL
SPEAKER
SWITCH
AUDIO IN
AUDIO OUT
IR-IN IR-OUT
SPDIF
OUT
3.2.2. Using DVI input
PC
[VGA AUDIO IN]
Audio Out
VGA IN
DP IN DP OUT
EXT. SPK
TERMINAL
SPEAKER
SWITCH
AUDIO IN
AUDIO OUT
IR-IN IR-OUT
SPDIF
OUT
DVI(DVI-D) IN
DVI Out
[DVI IN]
75BDL3003H
11
3.2.3. Using HDMI input
DVI(DVI-D) IN
HDMI1 IN
HDMI2 IN HDMI3 IN
RS232 OUTRS232 IN
HDMI Out
[HDMI IN]
PC
3.2.4. Using DisplayPort input
PC
VGA IN
DP IN DP OUT
SPEAKER
SWITCH
AUDIO IN AUDIO OUT
IR-IN IR-OUT
SPDIF
OUT
DisplayPort Out
[DisplayPort IN]
3.3. Connecting Audio Equipment
3.3.1. Connecting external speakers
VGA IN
EXT. SPK
TERMINAL
SPEAKER
SWITCH
AUDIO IN AUDIO OUT
IR-IN IR-OUT
SPDIF
OUT
External speakers
75BDL3003H
12
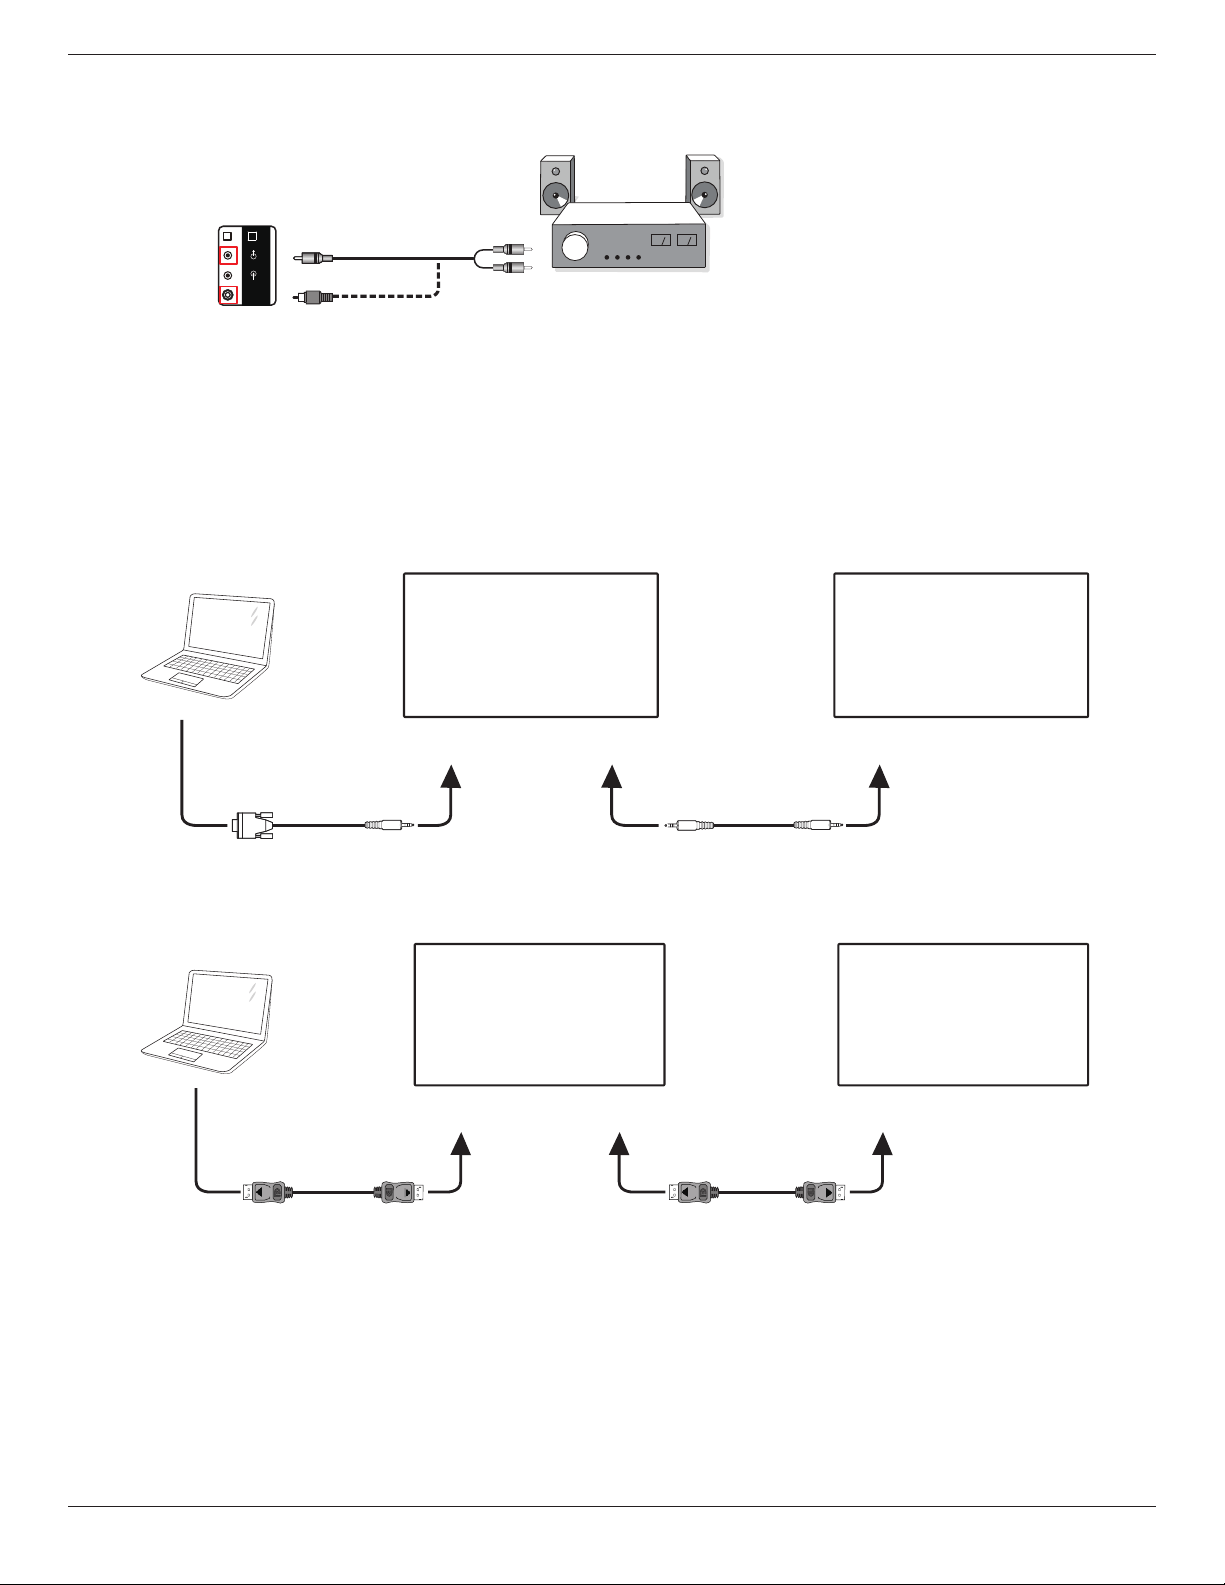
3.3.2. Connecting an external audio device
EXT. SPK
TERMINAL
SPEAKER
SWITCH
AUDIO IN AUDIO OUT
IR-IN IR-OUT
SPDIF
OUT
Stereo Amplifier
[AUDIO OUT]
Audio In
[SPDIF OUT]
3.4. Connecting Multiple Displays in a Daisy-chain Configuration
Youcaninterconnectmultipledisplaystocreateadaisy-chaincongurationforapplicationssuchasavideowall.
NOTE: Maximum25displays(5x5)canbeusedinadaisy-chainconguration.
3.4.1. Display control connection
Connectthe[RS232COUT]connectorofDISPLAY1tothe[RS232CIN]connectorofDISPLAY2.
DISPLAY 1 DISPLAY 2
PC
[RS-232C IN]
[RS-232C]
[RS-232C OUT] [RS-232C IN]
3.4.2. Digital video connection
Connectthe[DPOUT]connectorofDISPLAY1tothe[DPIN]connectorofDISPLAY2.
PC
[DP IN]
[DP]
[DP OUT] [DP IN]
DISPLAY 1 DISPLAY 2
75BDL3003H
13
3.5. IR connection
FORMAT
SOURCE
INFOLIST
OPTIONSADJUST
VOL
NORMAL
ID
ID SET ENTER
DISPLAY 1 DISPLAY 2
[IR IN]
[IR OUT]
[IR IN]
External
IR Receiver
NOTE:
1. Thisdisplay’sremotecontrolsensorwillstopworkingifthe[IR IN]isconnected.
2. IRloopthroughconnectioncansupportupto9displays.
3.6. IR Pass-through Connection
DVD / VCR / VCD
(DVD / VCR / VCD)
Remote Control
FORMAT
SOURCE
INFOLIST
OPTIONSADJUST
VOL
NORMAL
ID
ID SET ENTER
[IR OUT]
[IR IN]
3.7. Wire-connecting to Network
PC
[RJ-45]
[RJ-45]
ROUTER
INTERNET
75BDL3003H
14
4. Operation
NOTE: Thecontrolbuttondescribedinthissectionismainlyonthe
remotecontrolunlessspeciedotherwise.
4.1. Watch the Connected Video Source
Seepage13forexternalequipmentsconnection.
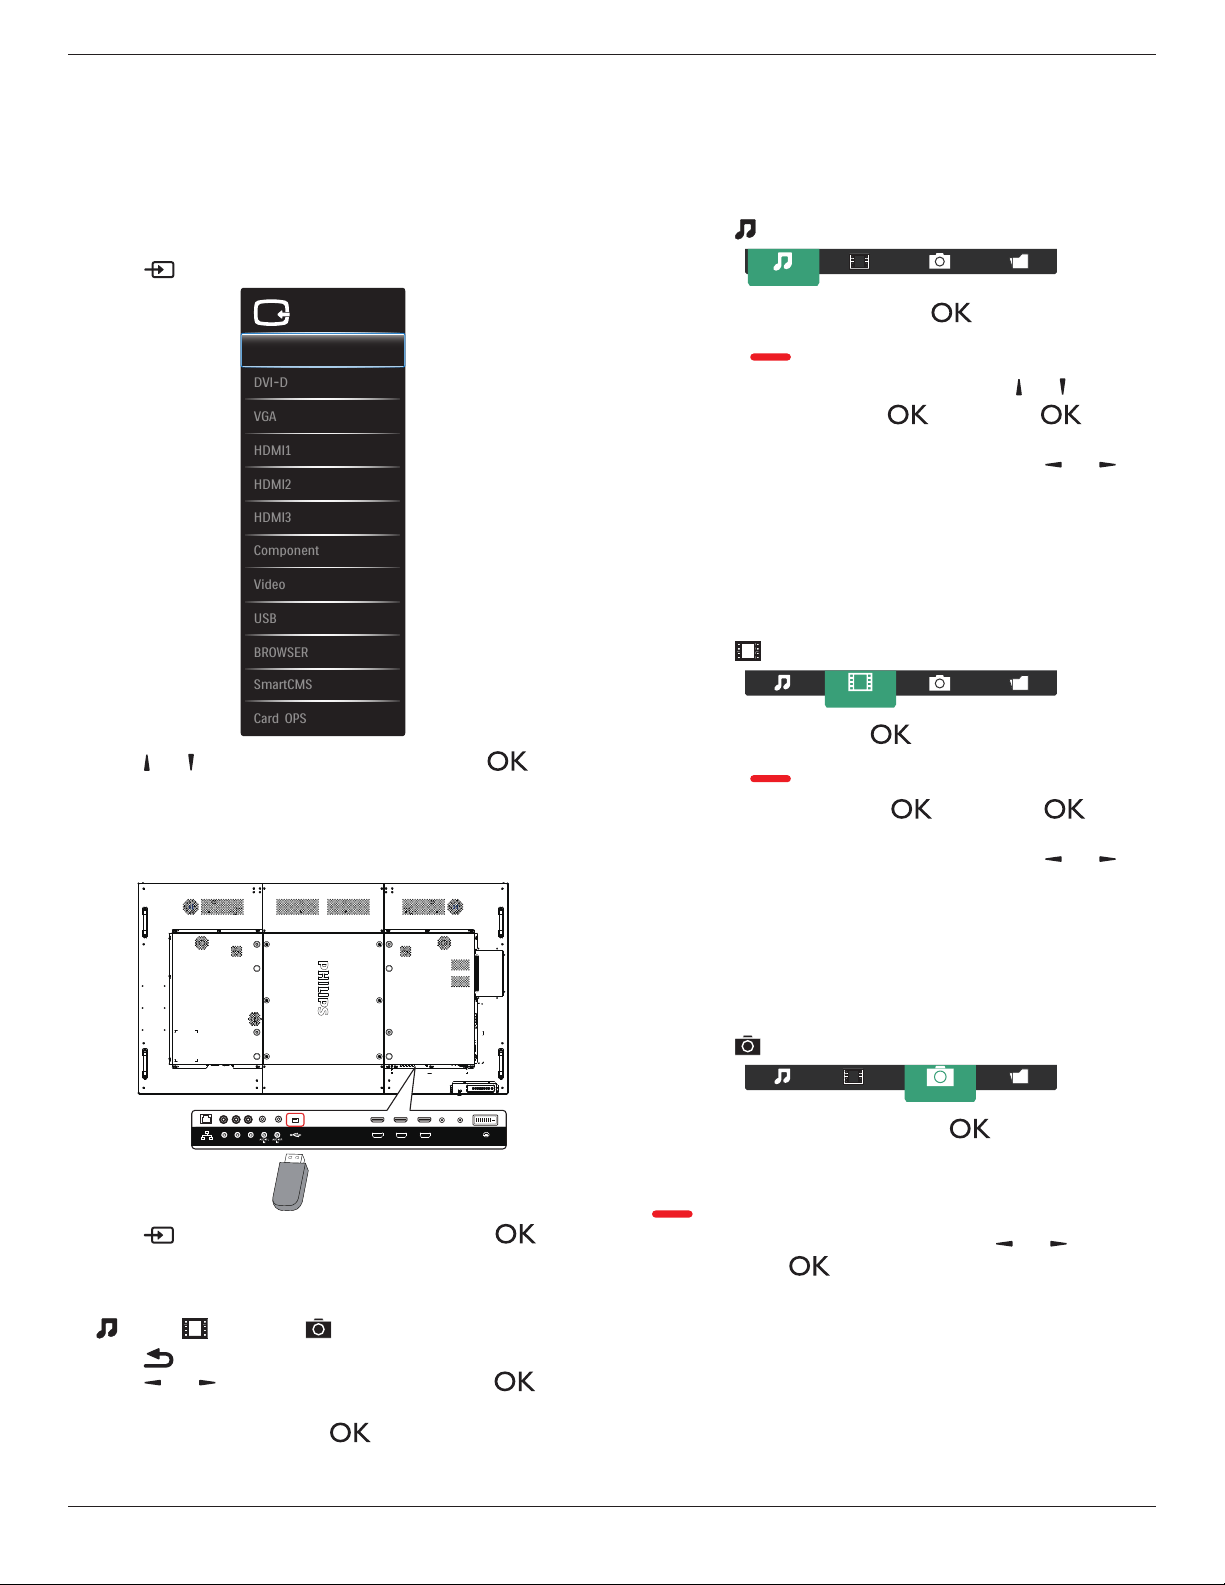
1. Press
[ ] SOURCEbutton.
VGA
HDMI1
HDMI2
HDMI3
DVI-D
Displayport
Video source
Video
USB
BROWSER
Component
Card OPS
SmartCMS
2. Press[ ]
or[ ]buttontochooseadevice,thenpress[ ]
button.
4.2. Play multimedia files from USB device
1. ConnectyourUSBdevicetotheUSBportonthedisplay.
DVI(DVI-D) IN
HDMI1 IN
HDMI2 IN HDMI3 IN
RS232 OUTRS232 IN
USB
PrPb
LAN
Y/CVBS
2. Press[ ] SOURCEbutton,choose
USB
,andpress[ ]
button.
3. TheconnectedUSBdeviceisdetectedautomaticallyforallits
playableles,whichwillbeautomaticallysortedinto3types:
Music
,
Movie
,and
Photo
.
4. Press[ ] BACKbuttontogouptothetoplayerinthescreen.
Press[ ]
or[ ]buttontochoosetheletype.Press[ ]
buttontoenteritsplaylist.
5. Choosetheleyouwant.Press[ ]buttontostartplaying.
6. Followtheon-screeninstructiontocontroltheplayoption.
7. Press[PLAY] buttons(
H F G I J
)tocontrolplaying.
4.3. Play options
4.3.1. Playing music files
1. Choose
Music
inthetopbar.
Music
2. Chooseonemusictrack,andpress[ ]button.
• Toplayallthetracksinafolder,chooseonemusicle.Then,
press[ ] to
Play All
.
• Toskiptothenextorprevioustrack,press[ ] or [ ]button.
• Topausethetrack,press[ ]button.Press[ ]button
againtoresumeplayback.
•
Toskipbackwardorforward10seconds,press[ ]or[ ]
button.
• Tosearchbackwardorforward,press[
G
]
or
[
J
]button,
pressrepeatedlytotogglebetweendifferentspeeds.
• Tostopthemusic,press[
H
]button.
4.3.2. Playing movie files
1. Choose
Movie
inthetopbar.
Movie
2. Chooseavideo,andpress[ ]button.
• Toplayallthevideosinafolder,chooseonevideole.Then,
press[ ] to
Play All
.
• Topausethevideo,press[ ]button.Press[ ]button
againtoresumeplayback.
•
Toskipbackwardorforward10seconds,press[ ]or[ ]
button.
• Tosearchbackwardorforward,press[
G
]
or
[
J
]button,
pressrepeatedlytotogglebetweendifferentspeeds.
• Tostopthevideo,press[
H
]button.
4.3.3. Playing photo files
1. Choose
Photo
inthetopbar.
Photo
2. Chooseaphotothumbnail,thenpress ]button.
Start a slideshow
Iftherearemultiplephotosinafolder,chooseaphoto.Then,press
[ ] to
Play All
.
•
Toskiptothepreviousornextphoto,press[ ]or[ ]button,
andthenpress[ ]button.
• Tostoptheslideshow,press[
H
]button.
75BDL3003H
15
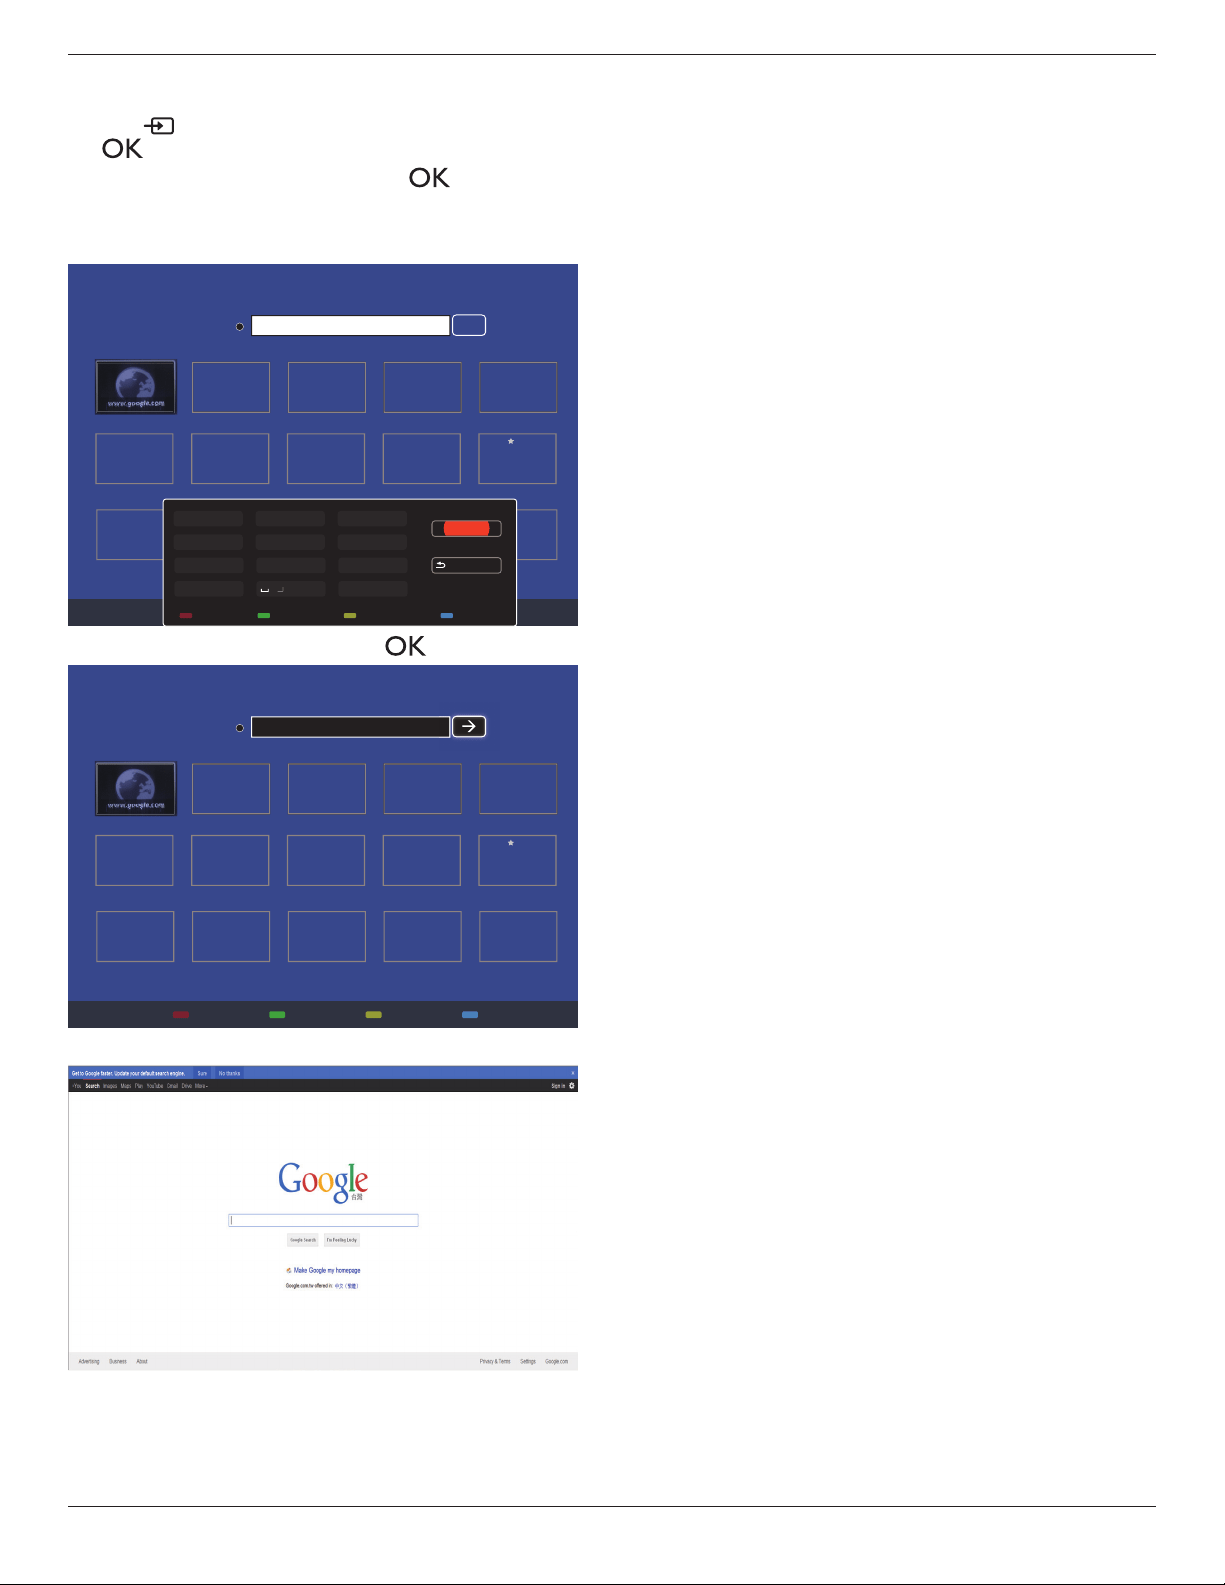
4.4. How to use Opera browser (HTML5)
1. Press[ ] SOURCEbutton,choose
BROWSER
,andpress
[ ]button.
2. MovethecursortoURLaddressbar.Press[ ] buttonandit
willpopouttheon-screenkeyboard.Youcanmovethecursorto
entertheURLaddress.AfternishingtheURLaddress,choose
Done
.
History
Bookmark
Web Address:
X
Internet
www.google.com
http://
w
w
w
w
w
w
w
w
w
w
w
w
w
w
w
w
w
w
w
w
w
w
w
w
w
w
w
w
w
w
w
w
w
w
w
w
w
w
w
w
w
w
w
w
w
w
w
w
w
w
w
w
w
w
w
w
w
w
w
w
w
w
w
w
w
w
w
w
w
w
w
w
w
w
w
w
w
w
w
w
w
ww
w
w
w
w
w
w
w
w
w
w
w
w
w
w
w
w
w
w
w
w
w
w
w
w
w
w
w
w
w
w
w
w
w
w
w
w
w
w
w
w
w
w
w
w
w
w
w
w
w
w
w
w
w
w
w
w
w
w
w
w
w
w
w
w
w
w
w
w
w
w
w
w
w
w
w
w
w
w
w
w
w
w
w
w
w
w
w
w
w
w
w
w
w
w
w
w
w
w
w
w
w
w
w
w
w
w
w
w
w
w
w
w
w
w
w
w
w
w
w
w
w
w
w
w
w
w
w
w
w
w
w
w
w
w
w
w
w
w
w
w
w
w
w
w
w
w
w
w
w
w
w
w
w
w
w
w
w
w
w
w
w
w
w
w
w
w
w
w
w
w
w
w
w
w
w
w
w
w
w
w
w
w
w
w
w
w
w
w
w
w
w
w
w
w
w
w
w
w
w
w
w
w
w
w
w
w
w
w
w
w
w
w
w
w
w
w
w
w
w
w
w
w
w
w
w
w
w
w
w
w
w
w
w
w
w
w
w
w
w
w
w
w
w
w
w
w
w
w
w
w
w
w
w
w
w
w
w
w
ww
w
w
w
w
w
w
w
w
w
w
w
w
w
w
w
w
w
w
w
w
w
w
w
w
w
w
w
w
w
w
w
w
w
w
w
w
w
w
w
w
w
w
w
w
w
w
w
w
w
w
w
w
w
w
w
w
w
w
w
w
w
w
w
w
w
w
w
w
w
w
w
w
w
w
w
w
w
w
w
w
w
w
w
w
w
w
w
w
w
w
w
w
w
w
w
w
w
w
w
w
w
w
w
w
w
w
w
w
w
w
w
w
w
w
w
w
w
w
w
w
w
w
w
w
w
w
w
w
w
w
w
w
w
w
w
w
w
w
w
w
w
w
w
w
w
w
w
w
w
w
w
w
w
w
w
w
w
w
w
w
w
w
w
w
w
w
w
w
w
w
w
w
w
w
.
.
.
.
g
g
g
g
g
g
g
gg
g
g
g
g
g
g
g
g
g
g
g
g
g
g
g
g
g
g
g
g
g
g
g
g
g
g
g
g
g
g
g
g
g
g
g
g
g
g
g
g
g
g
g
g
g
g
g
g
g
g
g
g
g
g
g
g
g
g
g
g
g
g
g
g
g
g
g
g
g
g
g
g
g
g
g
g
g
g
g
g
g
g
g
g
g
g
g
g
g
g
g
g
g
g
g
g
g
g
g
g
g
g
g
g
g
g
g
g
g
g
g
g
g
g
g
g
g
g
g
g
g
g
g
g
g
o
o
o
o
o
o
o
o
o
o
o
o
o
o
o
o
o
o
o
o
o
o
o
o
o
o
o
o
o
o
o
o
o
o
o
o
o
o
o
o
o
o
o
o
o
o
o
o
o
o
o
o
o
o
o
o
o
o
o
o
o
o
o
o
o
o
o
o
o
o
o
o
o
o
o
o
o
o
o
o
o
o
o
o
o
o
o
o
o
o
o
o
o
o
o
o
o
o
o
o
o
o
o
o
o
o
o
o
o
o
o
o
o
o
o
o
o
o
o
o
o
o
o
o
o
o
o
o
o
o
o
o
o
o
o
o
o
o
o
o
o
o
o
o
o
o
o
o
o
o
o
o
o
o
o
o
o
o
o
o
o
o
o
o
o
o
o
o
o
o
o
o
o
o
o
o
o
o
o
o
o
o
o
o
o
o
o
o
o
o
o
o
o
o
o
o
o
o
o
o
o
o
o
o
o
o
o
o
o
o
o
o
o
o
o
o
o
o
o
o
o
o
o
o
o
o
o
o
o
o
o
o
o
o
o
o
o
o
o
o
o
o
o
o
o
o
o
o
o
o
o
o
o
o
o
o
o
o
o
o
o
o
o
o
o
o
o
o
o
o
o
o
o
o
o
o
o
o
o
o
o
o
o
o
o
o
o
o
o
o
o
o
o
o
o
o
o
o
o
o
o
o
o
o
o
o
o
o
o
o
o
o
o
o
g
g
g
g
g
g
g
g
g
g
g
g
g
g
g
g
g
g
g
g
g
g
g
g
g
g
g
g
g
g
g
g
g
g
g
g
g
g
g
g
g
g
g
g
g
g
g
g
g
g
g
g
g
g
g
g
g
g
g
g
g
g
g
g
g
g
g
g
g
g
g
g
g
g
g
g
g
g
g
g
g
g
g
g
g
g
g
g
g
g
g
g
g
g
g
g
g
g
g
g
g
g
g
g
g
g
g
g
g
g
g
g
g
l
l
l
l
l
l
l
l
l
l
l
l
l
l
l
l
l
l
l
l
l
l
l
l
l
l
l
l
l
l
l
l
l
l
l
l
l
l
l
l
l
l
l
l
l
l
l
l
l
l
l
l
l
l
l
l
l
l
l
l
l
l
l
l
l
l
l
l
l
l
l
l
l
l
l
l
l
e
e
e
e
e
e
e
e
e
e
e
e
e
e
e
e
e
e
e
ee
e
e
e
e
e
e
e
e
e
e
e
e
e
e
e
e
e
e
e
e
e
e
e
e
e
e
e
e
e
e
e
e
e
e
e
e
e
e
e
e
e
e
e
e
e
e
e
e
e
e
e
e
e
e
e
e
e
e
e
e
e
e
e
e
e
e
e
e
e
e
e
e
e
e
e
e
e
e
e
e
e
e
e
e
e
e
e
e
e
e
e
e
e
e
e
e
e
e
e
e
e
e
e
e
e
e
e
e
e
e
e
e
e
e
e
e
e
e
e
e
e
e
e
e
e
e
.
.
..
c
c
c
c
c
c
c
c
c
c
c
c
c
c
c
c
c
c
c
c
c
c
c
c
c
c
c
c
c
c
c
c
c
c
c
c
c
c
c
c
c
c
c
c
c
c
c
c
c
c
c
c
c
c
c
c
c
c
c
c
c
c
c
c
c
c
c
c
c
c
c
c
c
c
c
c
c
c
c
c
c
c
c
c
c
c
c
c
c
c
c
c
c
c
c
c
c
c
c
c
c
c
c
c
c
c
o
o
o
o
o
o
o
o
o
o
o
o
o
o
o
o
o
o
o
o
o
oo
o
o
o
o
o
o
o
o
o
o
o
o
o
o
o
o
o
o
o
o
o
o
o
o
o
o
o
o
o
o
o
o
o
o
o
o
o
o
o
o
o
o
o
o
o
o
o
o
o
o
o
o
o
o
o
o
o
o
o
o
o
o
o
o
o
o
o
m
m
m
m
m
m
m
m
m
m
m
m
m
m
m
m
m
m
m
m
m
m
m
m
m
m
m
m
m
m
m
m
m
m
m
m
m
m
m
m
m
m
m
m
m
m
m
m
m
m
m
m
m
m
m
m
m
m
m
m
m
m
m
m
m
m
m
m
m
m
m
m
m
m
m
m
m
m
m
m
m
m
m
m
m
m
m
m
m
m
m
m
m
m
m
m
m
m
m
m
m
m
m
m
m
m
m
m
m
m
m
m
m
m
m
m
m
m
Done
Hide
. , @ ‘
g h i
p q r s
a b c
j k l
t u v
? ! -
<
d e f
m n o
w x y z
abc ABC 123 www Backspace
3. Movethecursorto“
”iconandpress[ ] button.
History
Bookmark
Web Address:
X
Internet
www.google.com
http://www.google.com
w
w
w
w
w
w
w
w
w
w
w
w
w
w
w
w
w
w
w
w
w
w
w
w
w
w
w
w
w
w
w
w
w
w
w
w
w
w
w
w
w
w
w
w
w
w
w
w
w
w
w
w
w
w
w
w
w
w
w
w
w
w
w
w
w
w
w
w
w
w
w
w
w
w
w
w
w
w
w
w
w
w
w
w
w
w
w
w
w
w
w
w
w
w
w
w
w
w
w
w
w
w
w
w
w
w
w
w
w
w
w
w
w
w
w
w
w
w
w
w
w
w
w
w
w
w
w
w
w
w
w
w
w
w
w
w
w
w
w
w
w
w
w
w
w
w
w
w
w
w
w
w
w
w
w
w
w
w
w
w
w
w
w
w
w
w
w
w
w
w
w
w
w
w
w
w
w
w
w
w
w
w
w
w
w
w
w
w
w
w
w
w
w
w
w
w
w
w
w
w
w
w
w
w
w
w
w
w
w
w
w
w
w
w
w
w
w
w
w
w
w
w
w
w
w
w
w
w
w
w
w
w
w
w
w
w
w
w
w
w
w
w
w
w
w
w
w
w
w
w
w
w
w
w
w
w
w
w
w
w
w
w
w
w
w
w
w
w
w
w
w
w
w
w
w
w
w
w
w
w
w
w
w
w
w
w
w
w
w
w
w
w
w
w
w
w
w
w
w
w
w
w
w
w
w
w
w
w
w
w
w
w
w
w
w
w
w
w
w
w
w
w
w
w
w
w
w
w
w
w
w
w
w
w
w
w
w
w
w
w
w
ww
w
w
w
w
w
w
w
w
w
w
w
w
w
w
w
w
w
w
w
w
w
w
w
w
w
w
w
w
w
w
w
w
w
w
w
w
w
w
w
w
w
w
w
w
w
w
w
w
w
w
w
w
w
w
w
w
w
w
w
w
w
w
w
w
w
w
w
w
w
w
w
w
w
w
w
w
w
w
w
w
w
w
w
w
w
w
w
w
w
w
w
w
w
w
w
w
w
w
w
w
w
w
w
w
w
w
w
w
w
w
w
w
w
w
w
w
w
w
w
w
w
w
w
w
w
w
w
w
w
w
w
w
w
w
w
w
w
w
w
w
w
w
w
w
w
w
w
w
w
w
w
w
w
w
w
w
w
w
w
w
w
w
w
w
w
w
w
w
w
w
w
w
w
w
.
.
.
.
g
g
g
g
g
g
g
gg
g
g
g
g
g
g
g
g
g
g
g
g
g
g
g
g
g
g
g
g
g
g
g
g
g
g
g
g
g
g
g
g
g
g
g
g
g
g
g
g
g
g
g
g
g
g
g
g
g
g
g
g
g
g
g
g
g
g
g
g
g
g
g
g
g
g
g
g
g
g
g
g
g
g
g
g
g
g
g
g
g
g
g
g
g
g
g
g
g
g
g
g
g
g
g
g
g
g
g
g
g
g
g
g
g
g
g
g
g
g
g
g
g
g
g
g
g
g
g
g
g
g
g
g
g
o
o
o
o
o
o
o
o
o
o
o
o
o
o
o
o
o
o
o
o
o
o
o
o
o
o
o
o
o
o
o
o
o
o
o
o
o
o
o
o
o
o
o
o
o
o
o
o
o
o
o
o
o
o
o
o
o
o
o
o
o
o
o
o
o
o
o
o
o
o
o
o
o
o
o
o
o
o
o
o
o
o
o
o
o
o
o
o
o
o
o
o
o
o
o
o
o
o
o
o
o
o
o
o
o
o
o
o
o
o
o
o
o
o
o
o
o
o
o
o
o
o
o
o
o
o
o
o
o
o
o
o
o
o
o
o
o
o
o
o
o
o
o
o
o
o
o
o
o
o
o
o
o
o
o
o
o
o
o
o
o
o
o
o
o
o
o
o
o
o
o
o
o
o
o
o
o
o
o
o
o
o
o
o
o
o
o
o
o
o
o
o
o
o
o
o
o
o
o
o
o
o
o
o
o
o
o
o
o
o
o
o
o
o
o
o
o
o
o
o
o
o
o
o
o
o
o
o
o
o
o
o
o
o
o
o
o
o
o
o
o
o
o
o
o
o
o
o
o
o
o
o
o
o
o
o
o
o
o
o
o
o
o
o
o
o
o
o
o
o
o
o
o
o
o
o
o
o
o
o
o
o
o
o
o
o
o
o
o
o
o
o
o
o
o
o
o
o
o
o
o
o
o
o
o
o
o
o
o
o
o
o
o
o
g
g
g
g
g
g
g
g
g
g
g
g
g
g
g
g
g
g
g
g
g
g
g
g
g
g
g
g
g
g
g
g
g
g
g
g
g
g
g
g
g
g
g
g
g
g
g
g
g
g
g
g
g
g
g
g
g
g
g
g
g
g
g
g
g
g
g
g
g
g
g
g
g
g
g
g
g
g
g
g
g
g
g
g
g
g
g
g
g
g
g
g
g
g
g
g
g
g
g
g
g
g
g
g
g
g
g
g
g
g
g
g
g
l
l
l
l
l
l
l
l
l
l
l
l
l
l
l
l
l
l
l
l
l
l
l
l
l
l
l
l
l
l
l
l
l
l
l
l
l
l
l
l
l
l
l
l
l
l
l
l
l
l
l
l
l
l
l
l
l
l
l
l
l
l
l
l
l
l
l
l
l
l
l
l
l
l
l
l
l
e
e
e
e
e
e
e
e
e
e
e
e
e
e
e
e
e
e
e
ee
e
e
e
e
e
e
e
e
e
e
e
e
e
e
e
e
e
e
e
e
e
e
e
e
e
e
e
e
e
e
e
e
e
e
e
e
e
e
e
e
e
e
e
e
e
e
e
e
e
e
e
e
e
e
e
e
e
e
e
e
e
e
e
e
e
e
e
e
e
e
e
e
e
e
e
e
e
e
e
e
e
e
e
e
e
e
e
e
e
e
e
e
e
e
e
e
e
e
e
e
e
e
e
e
e
e
e
e
e
e
e
e
e
e
e
e
e
e
e
e
e
e
e
e
e
e
.
.
..
c
c
c
c
c
c
c
c
c
c
c
c
c
c
c
c
c
c
c
c
c
c
c
c
c
c
c
c
c
c
c
c
c
c
c
c
c
c
c
c
c
c
c
c
c
c
c
c
c
c
c
c
c
c
c
c
c
c
c
c
c
c
c
c
c
c
c
c
c
c
c
c
c
c
c
c
c
c
c
c
c
c
c
c
c
c
c
c
c
c
c
c
c
c
c
c
c
c
c
c
c
c
c
c
c
c
o
o
o
o
o
o
o
o
o
o
o
o
o
o
o
o
o
o
o
o
o
oo
o
o
o
o
o
o
o
o
o
o
o
o
o
o
o
o
o
o
o
o
o
o
o
o
o
o
o
o
o
o
o
o
o
o
o
o
o
o
o
o
o
o
o
o
o
o
o
o
o
o
o
o
o
o
o
o
o
o
o
o
o
o
o
o
o
o
o
m
m
m
m
m
m
m
m
m
m
m
m
m
m
m
m
m
m
m
m
m
m
m
m
m
m
m
m
m
m
m
m
m
m
m
m
m
m
m
m
m
m
m
m
m
m
m
m
m
m
m
m
m
m
m
m
m
m
m
m
m
m
m
m
m
m
m
m
m
m
m
m
m
m
m
m
m
m
m
m
m
m
m
m
m
m
m
m
m
m
m
m
m
m
m
m
m
m
m
m
m
m
m
m
m
m
m
m
m
m
m
m
m
m
m
m
m
m
4. Now,youcanseethewebpage.
NOTES:
• TheOperabrowserdoesnotsupportFLASHformat.
• Thebrowserisnotavideosource.Itwillnotstayatthebrowser
screenafteryourestartthedisplay.
75BDL3003H
16
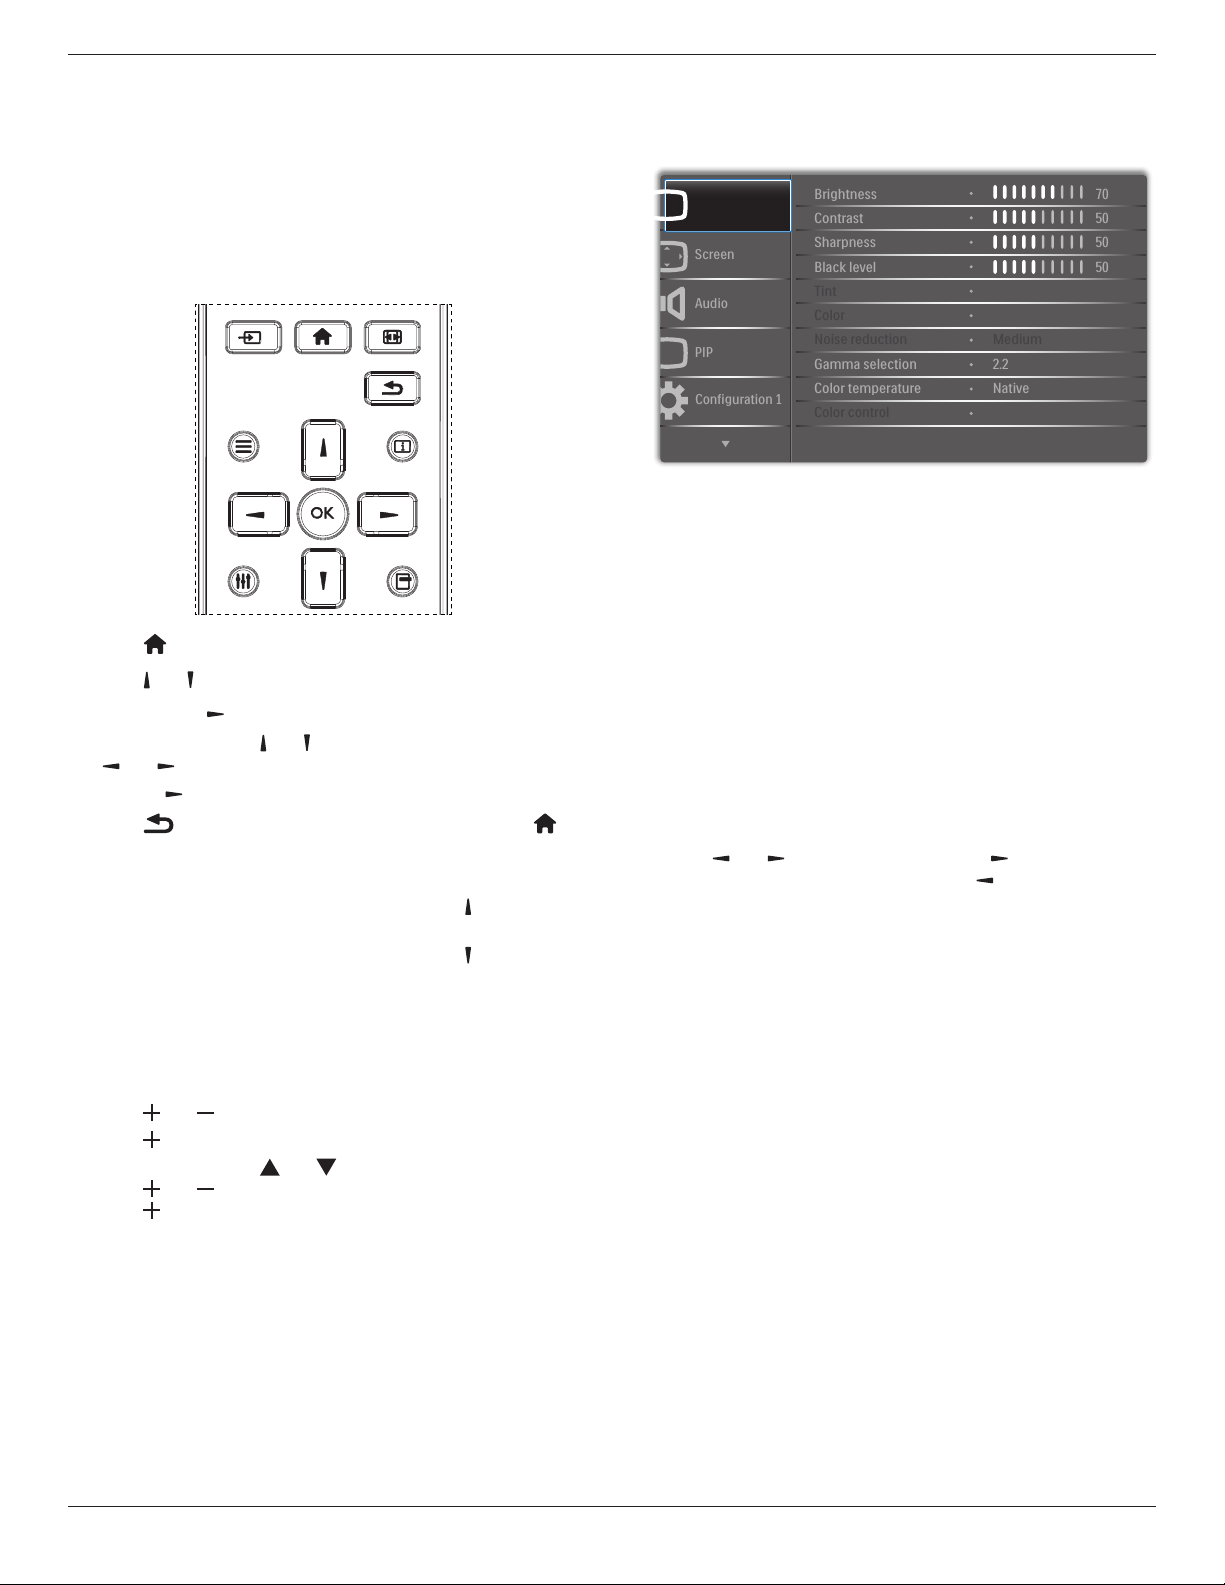
5. OSD Menu
AnoverallviewoftheOn-ScreenDisplay(OSD)structureisshown
below.Youcanuseitasareferenceforfurtheradjustingyourdisplay.
5.1. Navigating the OSD Menu
5.1.1. Navigating the OSD menu using the
remote control
FORMAT
SOURCE
INFOLIST
OPTIONSADJUST
1. Press[ ] buttonontheremotecontroltodisplaytheOSDmenu.
2. Press[ ] or[ ] buttontochoosetheitemyouwanttoadjust.
3. Press[OK]or[ ] buttontoenterthesubmenu.
4. Inthesubmenu,press[ ] or[ ]buttontotoggleamongitems,press
[ ]
or[ ]buttontoadjustsettings.Ifthereisasubmenu,press
[OK]or[ ]buttontoenterthesubmenu.
5. Press[ ]buttontoreturntothepreviousmenu,orpress[ ]
buttontoexittheOSDmenu.
NOTES:
• WhenthereisnoOSDmenuonthescreen,press[ ]todisplaythe
menuof{Smart picture}.
• WhenthereisnoOSDmenuonthescreen,press[ ]todisplaythe
menuof{Audio source}.
5.1.2. Navigating the OSD menu using the
display’s control buttons
1. Press[MENU]buttontodisplaytheOSDmenu.
2. Press[ ]or[ ]buttontochoosetheitemyouwanttoadjust.
3. Press[ ]buttontoenterthesubmenu.
4. Inthesubmenu,press[ ]or[ ]buttontotoggleamongitems,
press[ ]or[ ]buttontoadjustsettings.Ifthereisasubmenu,
press[ ]buttontoenterthesubmenu.
5. Press[MENU]buttontoreturntothepreviousmenu,orpress
[MENU]buttonseveraltimestoexittheOSDmenu.
5.2. OSD Menu Overview
5.2.1. Picture menu
P
Audio
PIP
Screen
Picture
Configuration 1
Contrast
Sharpness
Tint
Color
Brightness
Black level
Noise reduction
Color temperature
Color control
Gamma selection
50
50
70
50
Medium
Native
2.2
Brightness
AdjusttheoverallimagebrightnessbychangingtheintensityoftheLCD
panel’sbacklight.
Contrast
Adjusttosharpenthepicturequality.Theblackportionsofthepicture
becomericherindarknessandthewhitebecomebrighter.
Sharpness
Adjusttoimprovetheimagedetail.
Black level
Videoblacklevelisdenedasthelevelofbrightnessatthedarkest
(black)partofavisualimage.Adjusttochangetheimagebrightness.
Tint
Adjusttochangethecolortintoftheimage.
Usethe[ ]
or[ ]buttontoadjust.Pressthe[ ]buttonandthe
eshtonecolorturnsslightlygreen.Pressthe[ ]buttonandtheesh
tonecolorturnsslightlypurple.
NOTE: ThisitemfunctionalforVideomode(YUVcolorspace)only.
Color
Adjusttoincreaseordecreasetheintensityofcolorsintheimage.
NOTE: ThisitemfunctionalforVideomode(YUVcolorspace)only.
Noise reduction
Adjusttoremovethenoiseintheimage.Youcanselectasuitablenoise
reductionlevel.
Choosefrom:{Off}/{Low}/{Medium}/{High}.
NOTE: ThisitemfunctionalforVideomode(YUVcolorspace)only.
Gamma selection
Gammaiswhatcontrolstheoverallbrightnessofanimage.Images
whicharenotcorrectedproperlycanappeartoowhiteortoodark,so
controllingthegammaproperlycanhaveahugeinuenceontheoverall
picturequalityofyourdisplay.
Theoptionsare:{Native}/{2.2}/{2.4}/{S gamma}/{D-image}.
Color temperature
Selectacolortemperaturefortheimage.Alowercolortemperature
willhaveareddishtint,whilstahighercolortemperaturegivesoffa
morebluishtint.
Choosefrom:{3000K}/{4000K}/{5000K}/{6500K}/{7500K}/
{9300K}/{10000K}/{Native}/{User 1}/{User 2}.
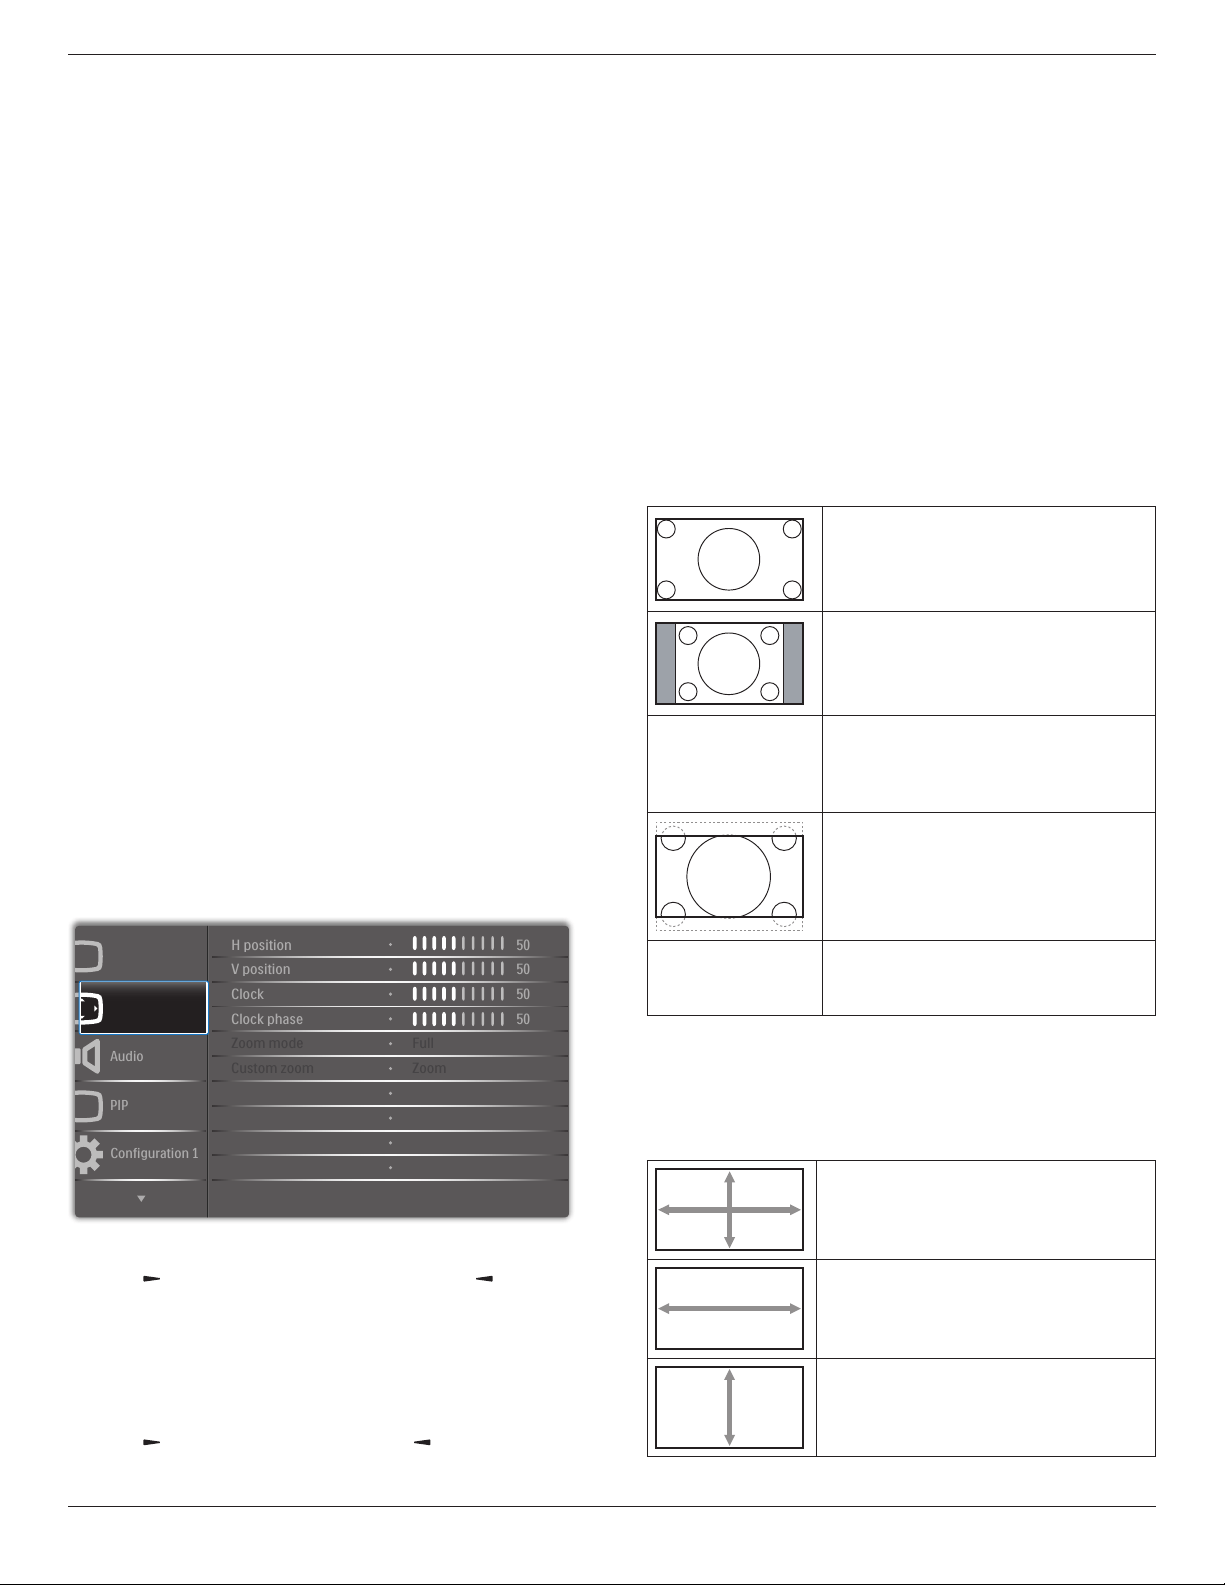
75BDL3003H
17
Color control
Youcanadjustthecolortonesoftheimagepreciselybychangingthe
User-R(Red),User-G(Green)andUser-B(Blue)settingsindependently
whenthefollowingcondition:
{Picture}-{Color temperature}-{User}settingto[User 1]
Or,youcanadjustthecolortonesper100Kintherangeof2000Kto
10000Kwhenthefollowingcondition:
{Picture}-{Color temperature}-{User}settingto[User 2]
Smart picture
Thefollowingsmartpicturemodesareavailablefor:
• PCmode:{Standard}/{Highbright} /{sRGB}.
• Videomode:{Standard}/{Highbright}/{Cinema}.
Smart contrast
Smartcontrastfunctionistoenhanceimagecontrastondarkerscenes
whenactivated.The{Brightness}settinginthePicturemenuwillbe
disabledwhenSmartContrastisactivated.
Smart power
Setthedisplaytoreducethepowerconsumptionautomatically.
Theoptionsare:{Off}/{Medium}/{High}.
Light sensor
Lightsensorfunctionistoadjustbrightnessautomaticallywhenambient
lightchanged
Scan mode
Changethedisplayareaoftheimage.
• {Over scan}-Displayabout95%oftheoriginalsizeoftheimage.
Therestoftheareassurroundingtheimagewillbecutoff.
• {Under scan}-Displaytheimageinitsoriginalsize.
Picture reset
ResetallsettingsinthePicturemenu.
5.2.2. Screen menu
P
Audio
PIP
Screen
Picture
Configuration 1
V position
Clock
Zoom mode
Custom zoom
H position
Clock phase
Screen reset
50
50
50
50
Cancel
Zoom
Full
H position
Pressthe[ ]buttontomovetheimagetotheright,or[ ]tomove
theimagetotheleft.
NOTES:
• HpositionadjustmentisfunctionalforVGAinputonly.
• Hpositioncannotbeadjustedwhen{Pixel Shift}isactivated.
V position
Pressthe[ ]buttontomovetheimageup,or[ ]tomovetheimage
down.
NOTES:
• VpositionadjustmentisfunctionalforVGAinputonly.
• Vpositioncannotbeadjustedwhen{Pixel Shift}isactivated.
Clock
Adjustthewidthoftheimage.
NOTE: ThisitemisfunctionalforVGAinputonly.
Clock phase
Adjusttoimprovethefocus,clarityandstabilityoftheimage.
NOTE: ThisitemisfunctionalforVGAinputonly.
Zoom mode
Thepicturesyoureceivemaybetransmittedin16:9format(wide
screen)or4:3format(conventionalscreen).The16:9pictures
sometimeshaveablackbandatthetopandbottomofthescreen
(letterboxformat).ZoomModewillbedeactivatedwhen{Pixel Shift}is
activatedorturnedon,andwhen{Tiling}isenabled.
Choosefrom:{Full}/{Normal}/{Real}/{21:9}/{Custom}.
Full
Thismoderestoresthecorrectproportions
ofpicturestransmittedin16:9usingthefull
screendisplay.
Normal
Thepictureisreproducedin4:3formatand
ablackbandisdisplayedoneithersideofthe
picture.
Real
Thismodedisplaystheimagepixel-by-pixel
onscreenwithoutscalingtheoriginalimage
size.
21:9
Thepictureisenlargedto21:9format.This
modeisrecommendedwhendisplaying
picturesthathaveblackbandsatthetopand
bottom(letterboxformat).
Custom
Choosetoapplythecustomzoomsettingsin
theCustomZoomsubmenu.
Custom zoom
Youcanusethisfunctiontofurthercustomizethezoomsettingstosuit
theimageyouwanttodisplay.
NOTE: Thisitemisfunctionalonlywhenthe{Zoom mode}issetto
{Custom}.
Zoom
Expandsthehorizontalandverticalsizesofthe
imagesimultaneously.
H zoom
Expandsthehorizontalsizeoftheimageonly.
V zoom
Expandstheverticalsizeoftheimageonly.
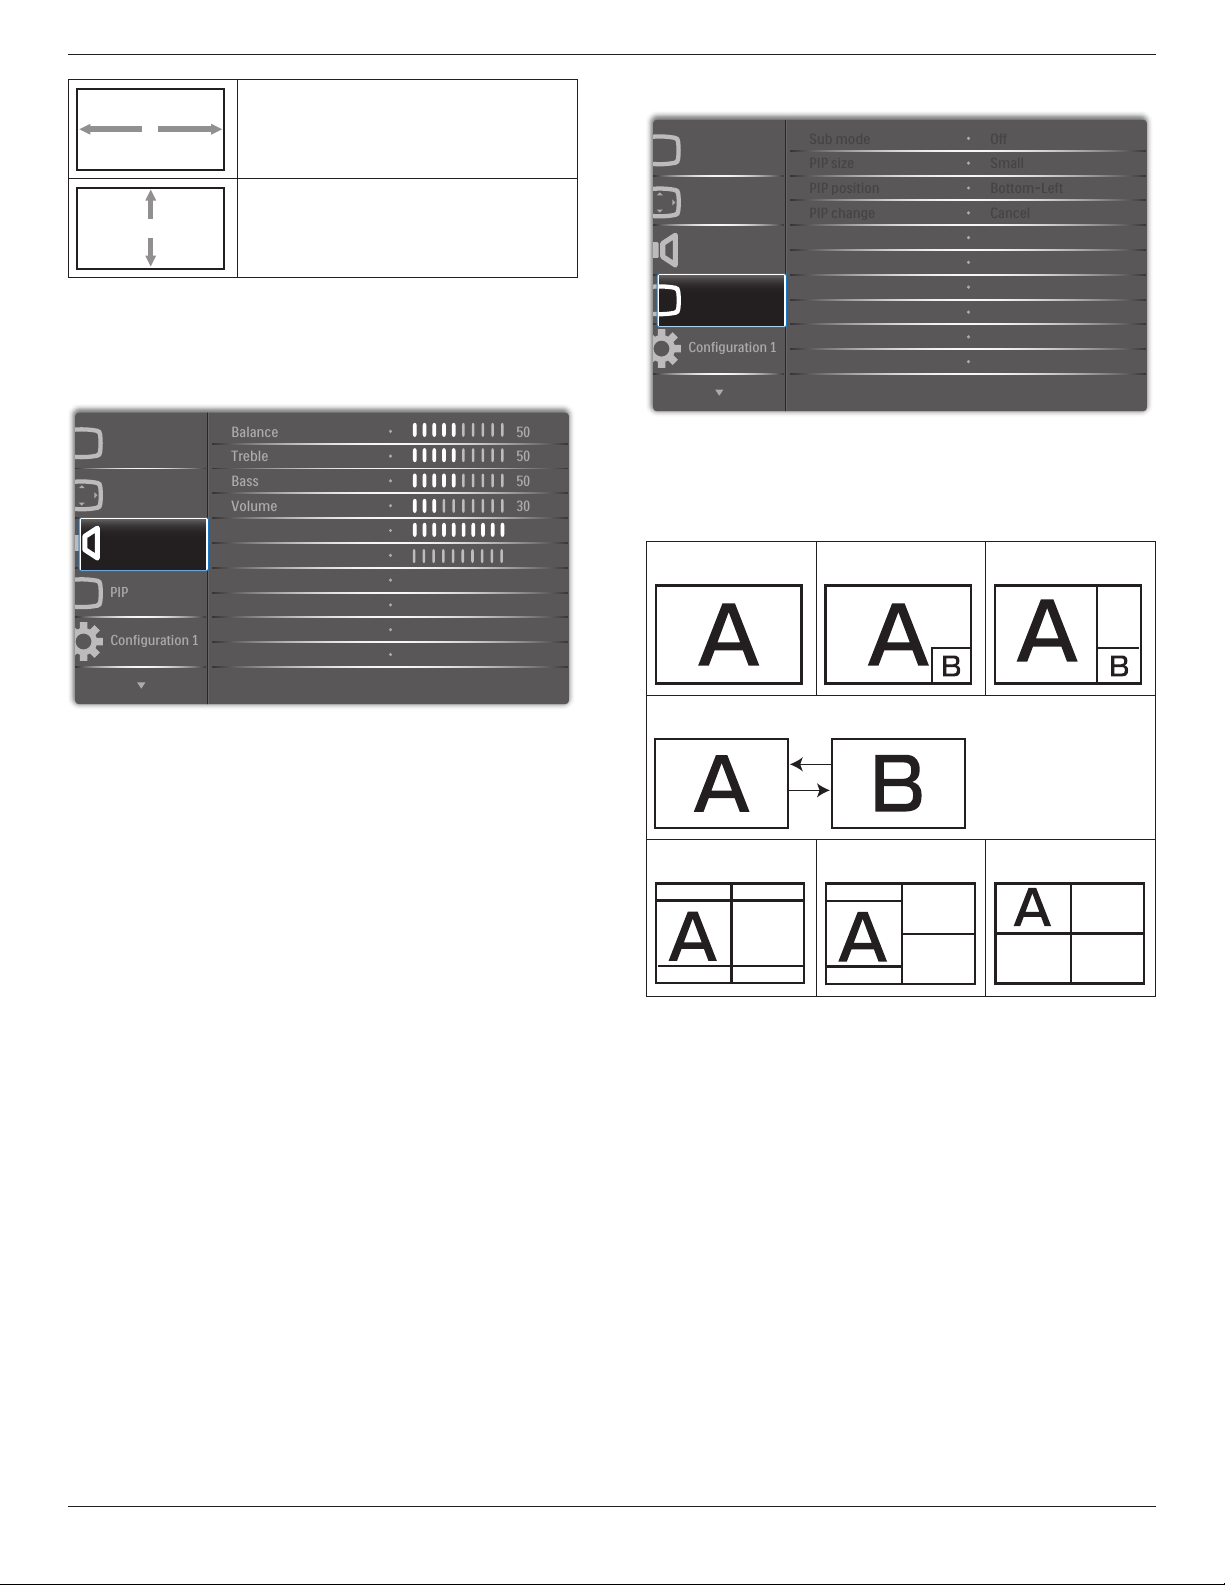
75BDL3003H
18
H position
Movesthehorizontalpositionoftheimageleft
orright.
V position
Movestheverticalpositionoftheimageupor
down.
Screen reset
ResetallsettingsintheScreenmenutofactorypresetvalues.
5.2.3. Audio menu
P
Audio
PIP
Screen
Picture
Configuration 1
Treble
Bass
Maximum volume
Minimum volume
Balance
Volume
Mute
50
50
50
30
Off
0
100
Audio reset Cancel
Balance
Adjusttoemphasizeleftorrightaudiooutputbalance.
Treble
Adjusttoincreaseordecreasehigher-pitchedsounds.
Bass
Adjusttoincreaseordecreaselower-pitchedsounds.
Volume
Adjusttoincreaseordecreasetheaudiooutputlevel.
Maximum volume
Adjustyourownlimitationforthemaximumvolumesetting.Thisstops
thevolumefrombeingplayingattooloudalevel.
Minimum volume
Adjustyourownlimitationfortheminimumvolumesetting.
Mute
Turnthemutefunctionon/off.
Audio reset
ResetallsettingsintheAudiomenutofactorypresetvalues.
5.2.4. PIP menu
PP
Audio
PIP
Screen
Picture
Configuration 1
PIP size
PIP position
PIP reset
Sub mode
PIP change
Small
Bottom-Left
Off
Cancel
Cancel
Sub mode
SelectthePIP(Picture-in-Picture)mode.
Choosefrom:{Off}/{PIP}/{POP}/{Quick swap}/{PBP 2Win}/{PBP
3Win}/{PBP 4Win}.
Off PIP POP
Quick swap
Switchmainontopor
subontop.
PBP 2Win PBP 3Win PBP 4Win
Sub Win1
Input
Sub Win1
Input
Sub Win2
Input
Sub Win1
Input
Sub Win3
Input
Sub Win2
Input
PIP size
SelectthesizeofthesubpictureinthePIP(Picture-in-Picture)mode.
Choosefrom:{Small}/{Medium}/{Large}.
PIP position
SelectthepositionofthesubpictureinthePIP(Picture-in-Picture)
mode.
Choosefrom:{Bottom-Right}/{Bottom -Left}/{Top-Right}/{Top-
Left}.
PIP change
ExchangeinputsignalofMainandSubforPIP/POP/Quick swap
mode.
PIP reset
ResetallsettingsinthePIPmenutofactorypresetvalues.
NOTES:
• ThePIPfunctionisavailableonlyforthefollowingcondition:
{Advanced option}-{Tiling}-{Enable}settingto[No].
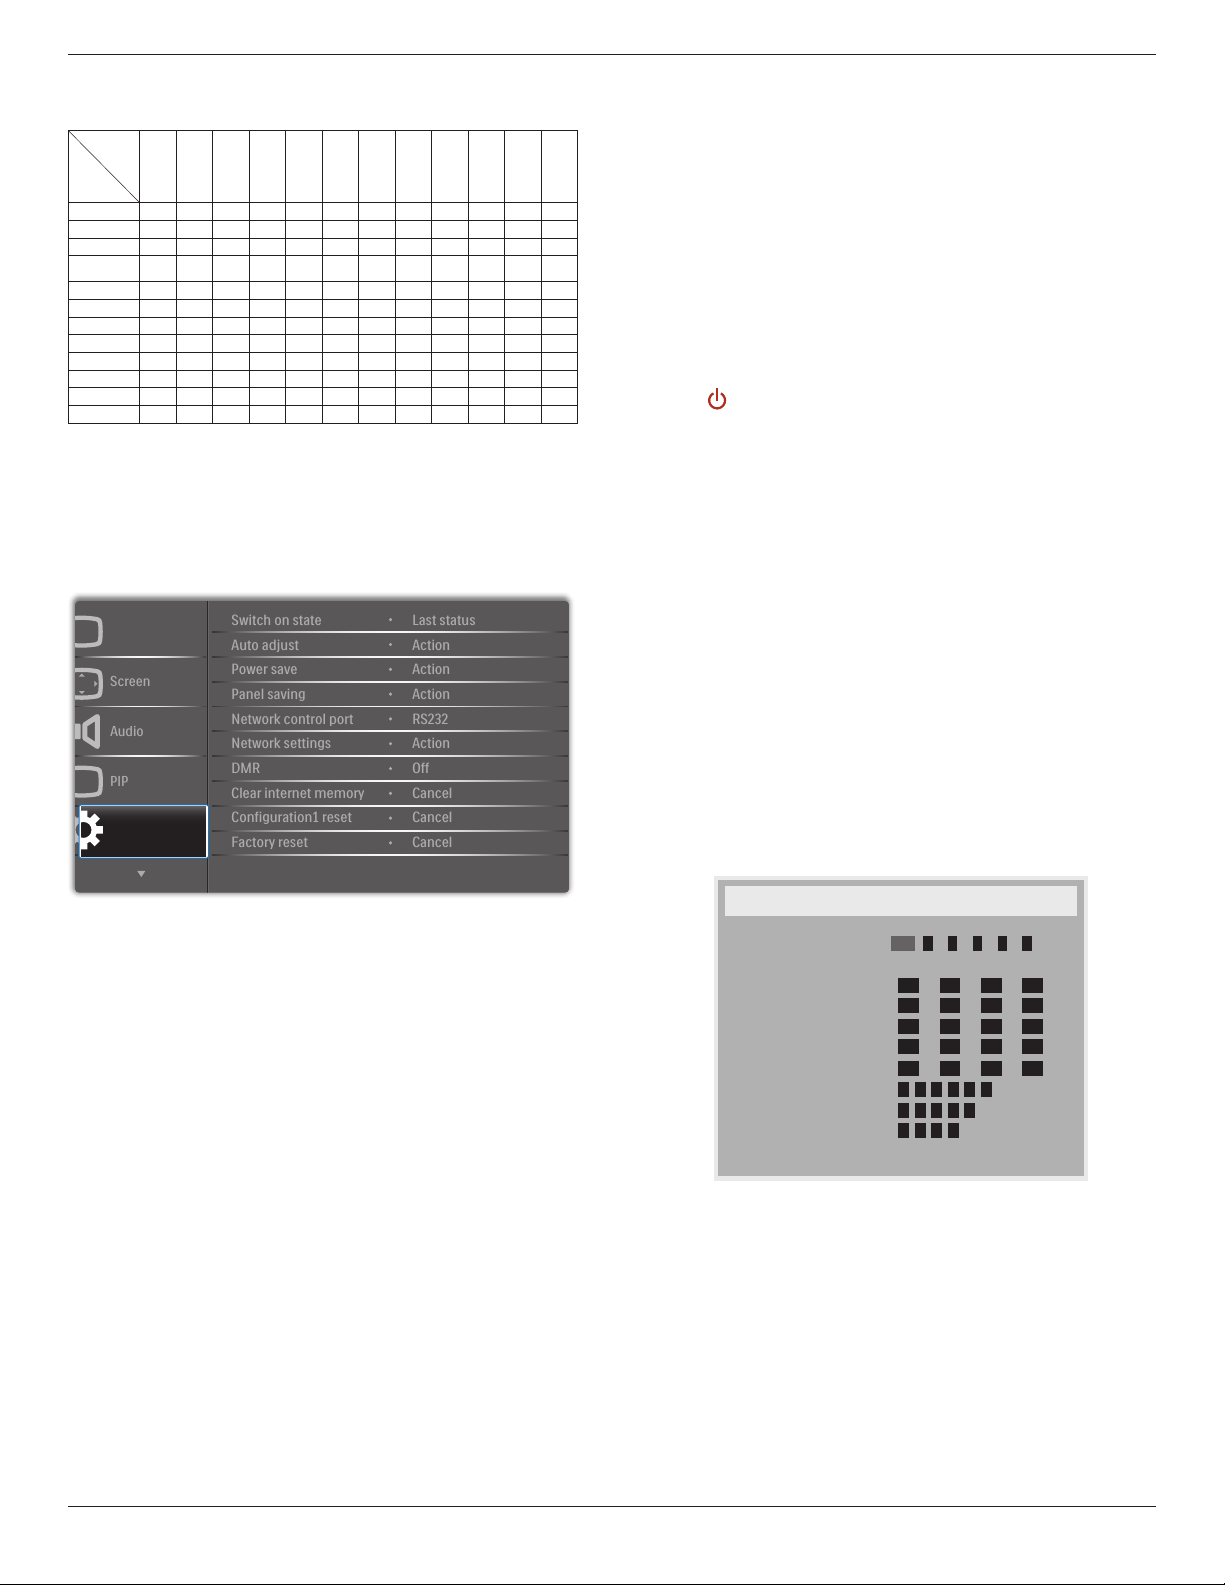
75BDL3003H
19
• ThePIPfunctionisavailableonlyforcertainsignalsource
combinationsasshowninthetablebelow.
Main
Sub
DP
OPS
HDMI1
VGA
HDMI2
HDMI3
COMP
VIDEO
USB
BROWSER
SmartCMS
DVI
DP O O O O O O O O O O O O
OPS O O X O O O O O O O O O
HDMI1 O X O O O O O O O O O O
VGA O O O O O O O O O O O O
HDMI2 O O O O O X O O O O O O
HDMI3 O O O O X O O O O O O O
COMP O O O O O O O X X X X O
VIDEO O O O O O O X O X X X O
USB O O O O O O X X O X X O
BROWSER O O O O O O X X X O X O
SmartCMS O O O O O O X X X X O O
DVI O O O O O O O O O O O O
(O:PIPfunctionavailable,X:PIPfunctionunavailable)
• TheavailabilityofthePIPfunctionwillalsodependontheresolution
oftheinputsignalbeingused.
5.2.5. Configuration1 menu
P
Audio
PIP
Screen
Picture
Configuration 1
Auto adjust
Power save
Network control port
Network settings
Switch on state
Panel saving
DMR
Configuration1 reset
Factory reset
Clear internet memory
Action
Action
Last status
Action
Off
Cancel
Cancel
RS232
Cancel
Action
Switch on state
Selectthedisplaystatususedforthenexttimeyouconnectthepower
cord.
• {Power off}-Thedisplaywillremainoffwhenthepowercordis
connectedtoawalloutlet.
• {Forced on}-Thedisplaywillturnonwhenthepowercordis
connectedtoawalloutlet.
• {Last status}-Thedisplaywillreturntothepreviouspowerstatus
(on/off/standby)whenremovingandreplacingthepowercord.
Auto adjust
UsethisfunctiontoautomaticallyoptimizethedisplayofVGAinput
image.
NOTE: ThisitemisfunctionalforVGAinputonly.
Power save
Usethissettingtoreducethepowerautomatically.
• {RGB}-Select{On}toletthedisplayenterpowersavingmode
whennosignalisdetectedfromthePCmode(RGBcolorspace)
inputsafter10seconds.
• {Video}-Select{On}toenterpowersavingmodewhennosignal
isdetectedfromtheVIDEOmode(YUVcolorspace)inputsafter
10seconds.
Panel saving
Choosetoenablethepanelsavingfunctionsandthusreducetheriskof
“imagepersistence”or“ghost-imaging”.
• {Cooling Fan}-Choosetoadjustthecoolingfan’sspeedof
rotation.Select{Auto}toturnon/offthecoolingfanaccordingto
thedisplay’stemperature.
Choosefrom:{Auto}/{Off}/{Low}/{Medium}/{High}.
NOTES:
• Thedefault{Auto}optionwillstartrunningthecoolingfanif
thetemperatureof40°C (104°F)isreached,andstoprunning
thecoolingfanifthetemperatureof38°C (100°F).
• Atemperature-warningmessagewillbeshownonthescreenif
thetemperaturereaches68°C(154°F).Allkeyfunctionsexcept
[ ]keywillthenbedisabled.
• Oncethetemperaturereaches70°C(158°F),thedisplaypower
willbeshutdownautomatically.
• {Brightness}-Select{On}andtheimagebrightnesswillbereduced
toanappropriatelevel.TheBrightnesssettinginthePicturemenu
willbeunavailablewhenselected.
• {Pixel shift}-Selectthetimeinterval({Auto}/{10~900}Seconds
/{Off})forthedisplaytoslightlyexpandtheimagesizeandshift
thepositionofpixelsinfourdirections(up,down,left,orright).
ActivatingPixelShiftwilldisableHPosition,VPositionandZoom
ModeintheScreenMenu.
Network control port
Selectthenetworkcontrolport.
Choosefrom:{RS232}/{Card OPS RS232}/{LAN ->RS232}.
NOTE: AfterconnectedtoyourOPSdevice,theoption{Card OPS
RS232}isfunctional.
Network settings
Assign{IP address},{Subnet Mask},and{Default gateway}forthe
display.
Network settings
Network host name
DHCP
IP address
Subnet mask
Default gateway
Login user name
Login password
P
172
255
0
0
H
-
-
-
0
[ OK ]
change [OK] in STORE
L
Disable
16
255
0
0
-
-
-
0
0
0
0
1
0
0
-
-
-
DNS1
DNS2
MAC address
0 1
0
-
0
-
0 0
-
0
-
0
-
0 0
-
a d
m
ni
0
• Networkhostname
• DHCP-ChoosetoenableordisabletheDHCPfunction.Ifenabled,
thedisplaywillbeassignedIPaddress,SubnetmaskandDefault
gatewayautomatically.Ifdisabled,youwillbepromptedtoenterthe
followingvaluesmanually.Press[OK]buttontostoreandsavethe
chosenvalues.
• IPaddress
• Subnetmask
• Defaultgateway
• DNS1
• DNS2
• MACaddress
• Loginusername(Thedefaultusernameis{admin})
• Loginpassword(Thedefaultpasswordis{0000})
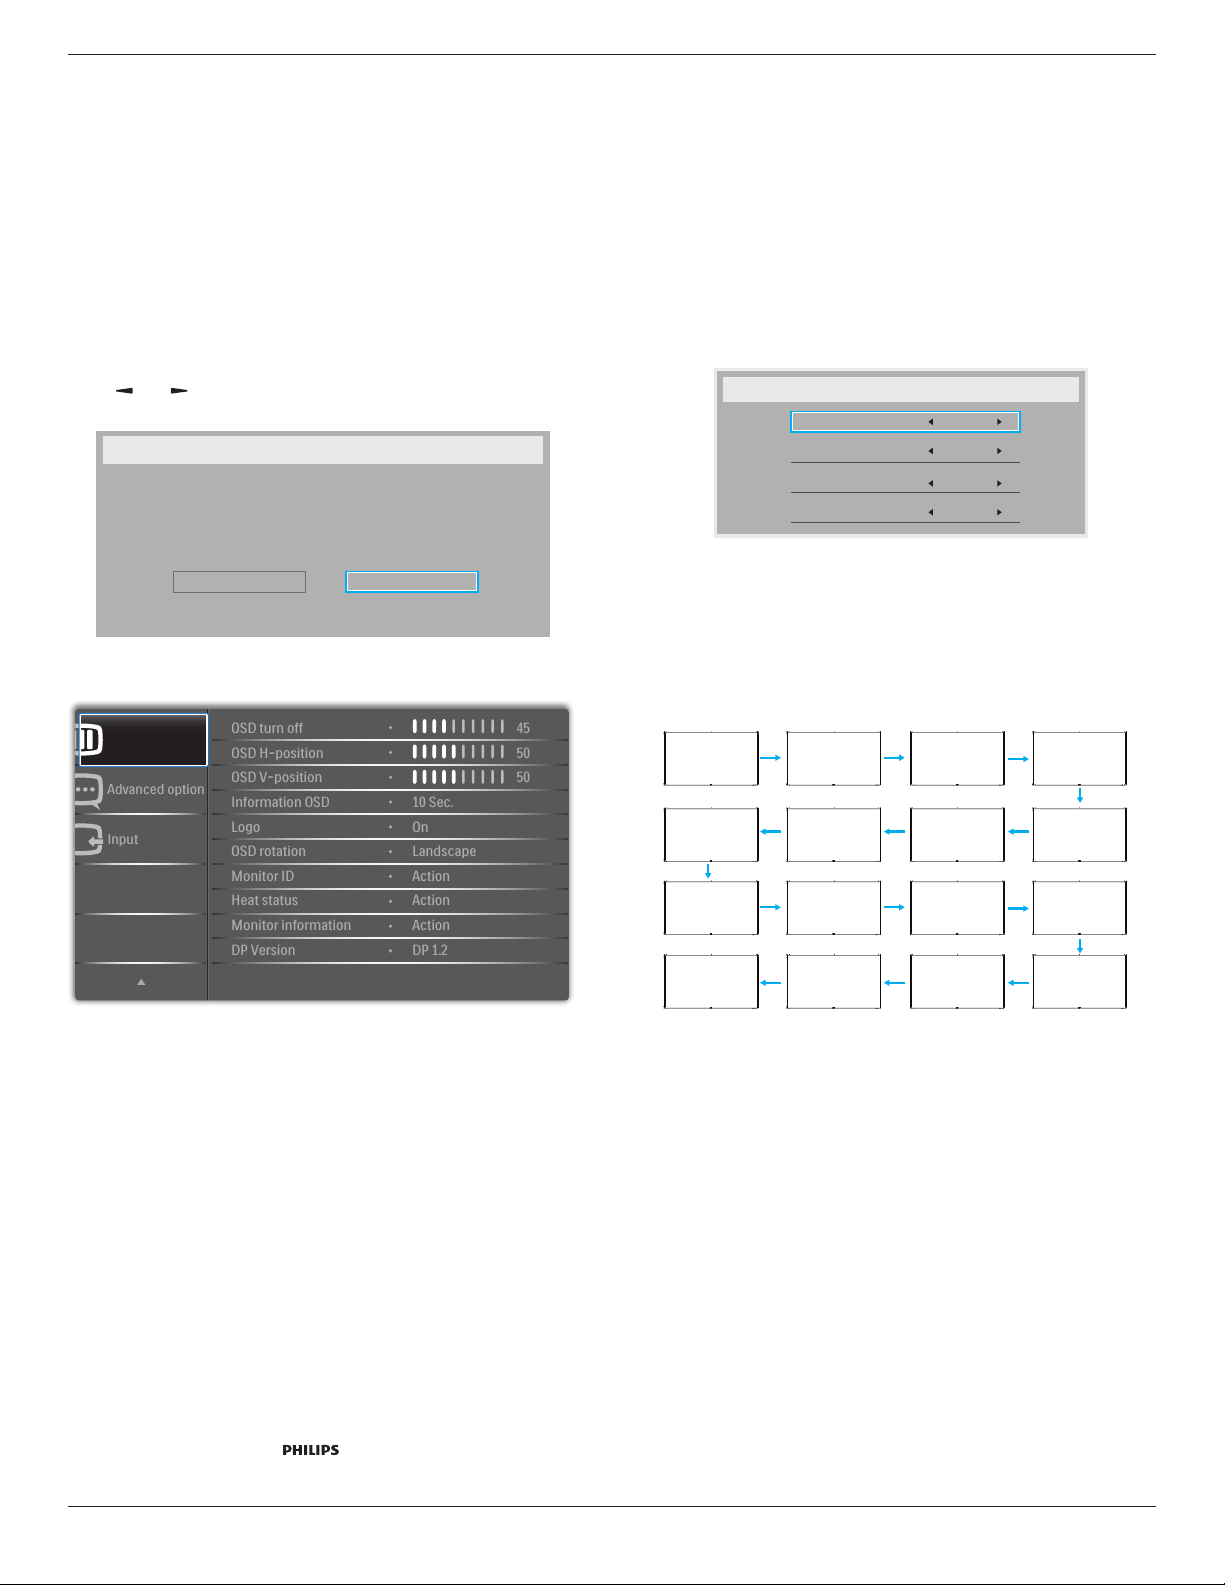
75BDL3003H
20
DMR
Receivemultimedialesfromtheconnecteddevicebyyournetwork.
Clear internet memory
Clearallthecookies,bookmarks,historylistandtextusedforlling
automatically.
Conguration1 reset
ResetallsettingsinConguration1menutothefactorypresetvalues.
Factory reset
ResetallsettingsintheOSDmenusof{Picture},{Screen},{Audio},{PIP},
{Conguration1},{Conguration2},and{Advanced option}tothe
factorypresetvalues.
Press[ ]
or[ ]buttontoselect{Reset},andpress[OK]buttonto
dothereset.
Factory reset
Cancel
Reset
5.2.6. Configuration2 menu
Input
Advanced option
Configuration 2
OSD H-position
OSD V-position
Logo
OSD rotation
OSD turn off
Information OSD
Monitor ID
Monitor information
DP Version
Heat status
50
50
45
10 Sec.
Action
Action
Action
On
Landscape
DP 1.2
OSD turn off
SettheperiodoftimetheOSD(on-screendisplay)menustaysonthe
screen.
Theoptionsare:{0 ~ 120}seconds.
OSD H-position
AdjustthehorizontalpositionoftheOSDmenu.
OSD V-position
AdjusttheverticalpositionoftheOSDmenu.
Information OSD
SettheperiodoftimetheinformationOSDisdisplayedontheupper
rightcornerofthescreen.TheinformationOSDwilldisplaywheninput
signalischanged.
TheinformationOSDwillremainonthescreenwith{Off}selection.
Theoptionsare:{Off,1 ~ 60}seconds.
Logo
Enableordisabletoshowthe logowhenyouturnonthe
display.
OSD rotation
RotatetheOSDMenu.
Theoptionsare:
• {Landscape}(Default)
• {Portrait}
Monitor ID
SettheIDnumberforcontrollingthedisplayviatheRS232C
connection.EachdisplaymusthaveauniqueIDnumberwhenmultiple
setsofthisdisplayareconnected.MonitorIDnumberrangeisbetween
1to255.
Theoptionare:{Monitor group}/{Tiling matrix}/{Auto ID}
Monitor Id
Monitor Id
Monitor group
Tiling matrix
Auto ID
1
1
1
End
• {Monitor group}
Theoptionsare:{1-255}.Thedefaultsettingis1.
• {Tiling matrix}
Tilingmatrixnumberrangeisbetween1to15.1isdefaultsetting.
The{Auto ID}setupfunctionenablessettingup{Monitor ID}of
connectedmachineaccordingto{Tiling matrix}settings.
Example:Tilingmatrixsetsas4
1 2
5 6
3 4
7 8
9 10 11 12
13 14 15 16
• {Auto ID}
Theoptionare:{Start}/{End}.Thedefaultis{End}.
• SwitchtoStartoptiontosetupIDsofmachinesbackward
fromcurrentone.
• Oncethesetupiscompleted,theoptionexitstoEnd
automatically.
• Tousethisfunction,serialconnectallmachineswithRS-232
cableandsettheirControlportstoRS-232,too.
Heat status
Thisfunctionallowsyoutocheckthethermalstatusofthedisplayat
anytime.
Monitor information
Showsinformationaboutyourdisplay,includingmodelnumber,serial
number,operatinghoursandsoftwareversion.
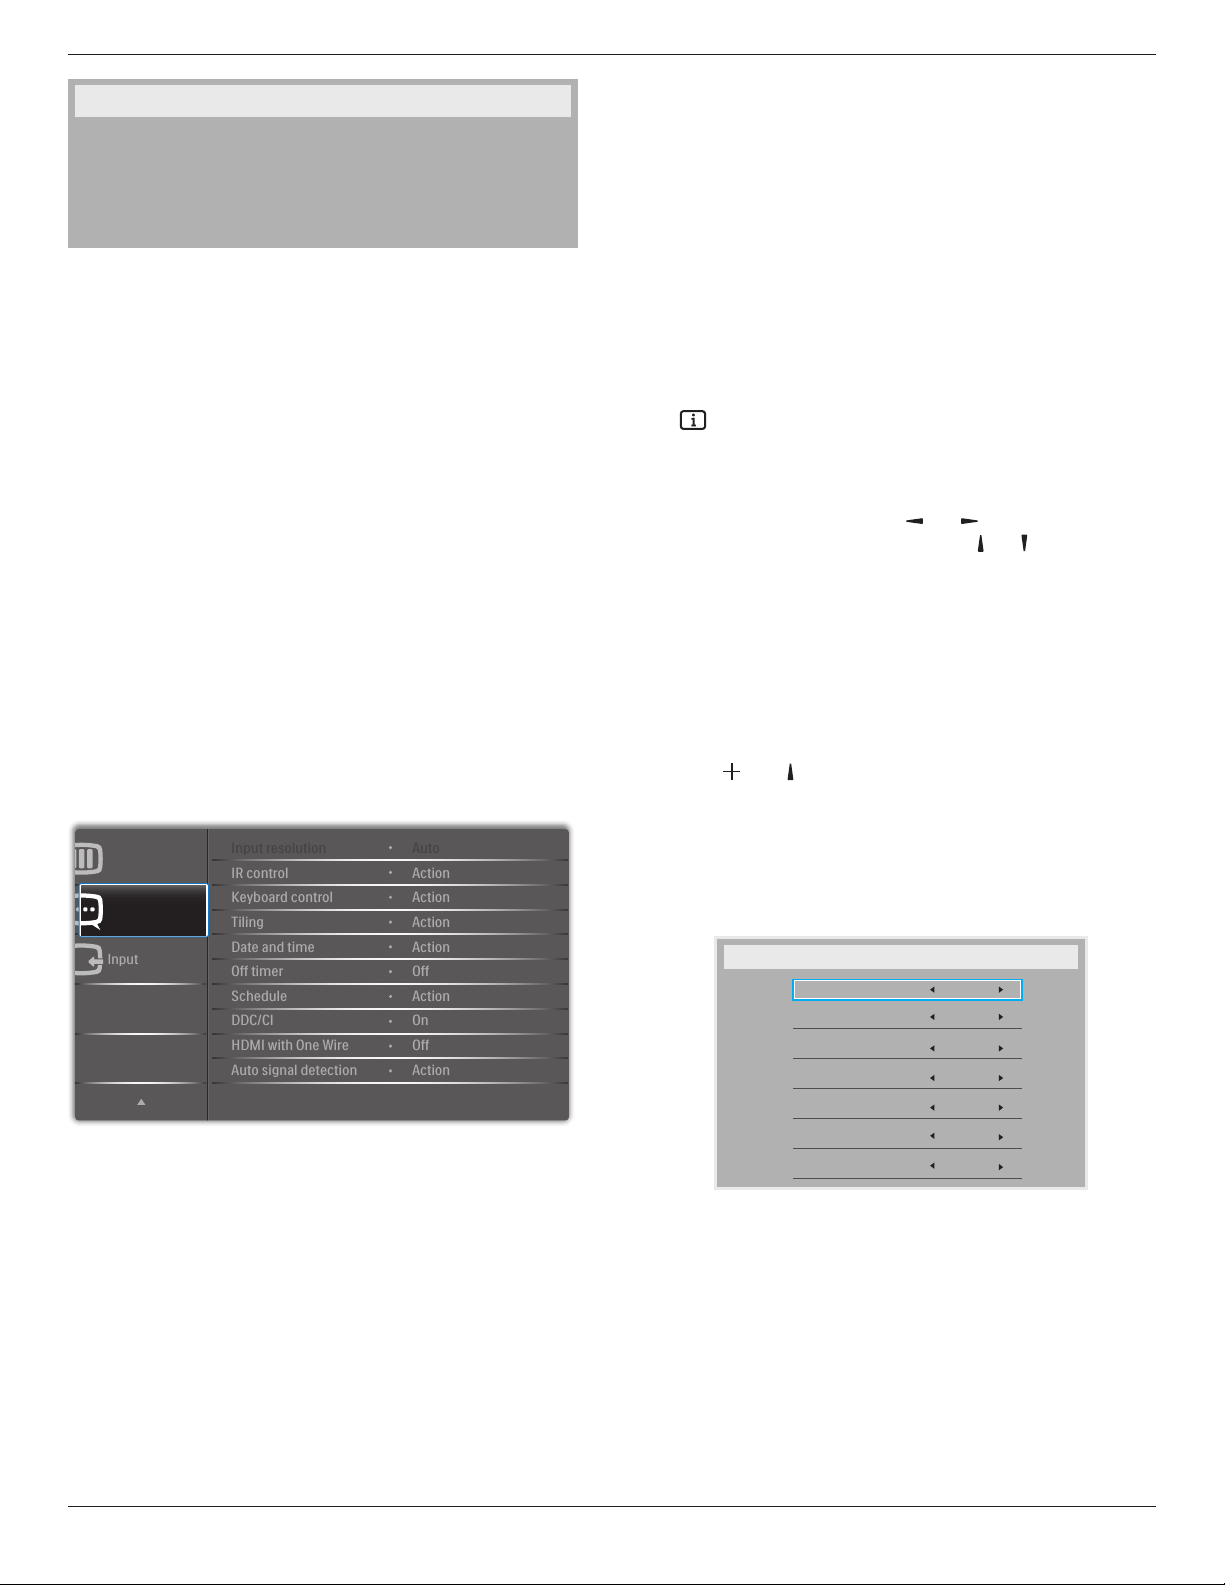
75BDL3003H
21
DP Version
Theoptionare:{DP 1.1}/{DP 1.2}/{DP 1.2 multi}.Thedefaultis{DP
1.1}.
Human sensor
Setthedisplaytoturnonbacklightifitdoessensorhumanandturnoff
backlightafteranamountoftimespecied
Theoptionsare:{Off,10 ~ 60}minutes.
HDMI edid
Theoptionare:{HDMI 1.4}/{HDMI 2.0}.Thedefaultis{HDMI 1.4}.
NOTE: HDMI2.0optionistosupportHDMI2.0equipmentuse.
Image rotation
SetthepictureofmainWindowtorotate270degrees.
Theoptionsare:{Off}(default)/{On}.
Power LED light
ChoosetocontrolthepowerLED.
Theoptionsare:{Off}/{On}(default).
Conguration2 reset
ResetallsettingsinConguration2menutothefactorypresetvalues.
5.2.7. Advanced option menu
Input
Advanced option
Configuration 2
IR control
Keyboard control
Date and time
Off timer
Input resolution
Tiling
Schedule
HDMI with One Wire
Auto signal detection
DDC/CI
Action
Action
Auto
Action
Action
Off
On
Action
Off
Action
Input resolution
SettheresolutionoftheVGAinput.Thisisonlyrequiredwhenthe
displayisunabletodetecttheVGAinputresolutioncorrectly.
NOTE: ThisitemisfunctionalforVGAinputonly.
Theoptionsare:
• {1024x768/1280x768/1360x768 / 1366x768}
• {1400x1050/1680x1050}
• {1600x1200/1920x1200}
• {Auto}:Determinestheresolutionautomatically.
Theselectedsettingswillbecomeeffectiveafterturningoffthepower
andturningitonagain.
IR control
Selecttheoperationmodeoftheremotecontrolwhenmultiple
displaysareconnectedviaanRS232Cconnection.
• {Normal} -Alldisplayscanbeoperatednormallybytheremote
controlunit.
• {Primary}-Designatethisdisplayastheprimarydisplayforremote
controloperation.Onlythisdisplaycanbeoperatedbytheremote
control.
• {Secondary}-Designatethisdisplayasthesecondarydisplay.This
displaycannotbeoperatedbytheremotecontrol,andwillonly
receivethecontrolsignalfromtheprimarydisplayviatheRS232C
connection.
• {Lock All}/{Lock all but Volume}/{Lock all but Power}-Lockthe
remotecontrolfunctionofthisdisplay.Tounlock,pressandholdthe
[ ]INFObuttonontheremotecontrolfor5(ve)seconds.
NOTE: AfterthemainOSDmenuvanished,thePrimary/Secondary
OSDwillbedisplayedfor3seconds.Or,press[OK]button
todisplaythePrimary/SecondaryOSDwhennootherOSD.
1. DuringthePrimaryOSD,press[ ]
or[ ]buttontoadjustthe
valueof{Control Monitor ID},andpress[ ] or[ ]buttontoadjust
thevalueof{Control Group ID}.
Keyboard control
Choosetoenableordisablethedisplaykeyboard(controlbuttons)
function.
• {Unlock}-Enablethekeyboardfunction.
• {Lock All}/{Lock all but Volume}/{Lock all but Power}-Disable
thekeyboardfunction.
NOTE: Toenableordisablethekeyboardcontrollock,pressboth
[ ]and[ ]buttonsandholddowncontinuouslyformore
than3seconds.
Tiling
Withthisfunctionyoucancreateasinglelarge-screenmatrix(video
wall)thatconsistsofupto150setsofthisdisplay(up to 10-sets on the
vertical and 15-sets on the horizontal sides).Thisfunctionrequiresa
daisy-chainconnection.
Tiling
H monitors
V monitors
Position
Frame comp.
Enable
Switch on delay
1
1
1
No
No
O
Brightness Normal

75BDL3003H
22
Example: 2 x 2 screen matrix (4 displays)
Hmonitors=2displays
Vmonitors=2displays
1 2
3 4
H monitors
V monitors
Position
Example: 5 x 5 screen matrix (25 displays)
Hmonitors=5displays
Vmonitors=5displays
1 2
6 7
3 4
8 9
5
10
11 12 13 14 15
16 17 18 19 20
21 22 23 24 25
H monitors
V monitors
Position
• {H monitors}-Selectthenumberofdisplaysonthehorizontalside.
• {V monitors}-Selectthenumberofdisplaysontheverticalside.
• {Position}-Selectthepositionofthisdisplayinthescreenmatrix.
• {Frame comp.}-Choosetoturntheframecompensation
functiononoroff.Ifselected{Ye s },thedisplaywilladjusttheimage
tocompensateforthewidthofthedisplaybezelsinorderto
accuratelydisplaytheimage.
Frame comp. - Yes
Frame comp. - No
• {Enable}-ChoosetoenableordisabletheTilingfunction.Ifenabled,
thedisplaywillapplythesettingsin{H monitors},{V monitors},
{Position},and{Frame comp.}.
• {Switch on delay}-Setthepower-ondelayingtime(inseconds).
Thedefaultoption{Auto}allowsasequentialpowering-onforeach
displaybytheirIDnumberwhenmultipledisplaysareconnected.
Theoptionsare:{Off/Auto/2 ~ 255}
• {Brightness}: {Normal}/{ACS}
{Normal}:ApplyOSDuserbrightnesssettingvalue(backlight)
{ACS}:Applybrightnessvalue(backlight)whichisadjustedbyColor
Calibrationtool.Cannotadjustbrightness(backlight)relatedsetting
inOSD.
NOTE: TheTilingfunctionwillbedisabledduringusingPIPfunction.
Date and time
Adjustthecurrentdateandtimeforthedisplay’sinternalclock.
Date and time
Year
Month
Day
Hour
Minute
Daylight saving time
Current date time
2014 . 08 . 04 20 : 20 : 17
Press [OK] to set clock
2014
08
04
20
20
1. Press[OK]buttontoenterthesubmenu.
2. Press[ ] or[ ]buttontotogglebetween{Year},{Month},{Day},
{Hour},{Minute},and{Daylight saving time}.
3. Press[ ]
or[ ]buttontoadjustallsettingsexcept{Daylight
saving time}.
4. Press[OK]buttontoenterthe{Daylight saving time}submenu.
Daylight saving time
Daylight saving start date
Daylight saving stop date
Correction time
Daylight saving correction
Sunday of
Jan
0.5 Hour
Off
Sep
1st
1st Sunday of

75BDL3003H
23
5. Press[ ]
or[ ]buttontoselectitem,press[ ] or[ ] buttonto
adjust.
• {Daylight saving start date}-Select{1st/2nd/3rd/4th/last}
Sundayofthemonth{Jan ~ Dec}.
• {Daylight saving stop date}-Select{1st/2nd/3rd/4th/last}
Sundayofthemonth{Jan ~ Dec}.
• {Correction time}-Theoptionsare:{0.5/1.0/1.5/2.0}
• {Daylight saving correction}Select{On}toenablethisfunction.
Off Timer
Setthedisplaytoturnitselfofftostandbymodewithinanamountof
timespecied.
Theoptionsare:{Off,1 ~ 24}hoursfromcurrenttime.
NOTE: Whenthe“Offtimer”isactivated,the“Schedule”settingswill
bedisabled.
Schedule
Thisfunctionallowsyoutoprogramupto7(seven)differentscheduled
timeintervalsforthedisplaytoactivate.
Youcanselect:
• Thetimeforthedisplaytoturnonandturnoff.
• Thedaysinaweekforthedisplaytoactivate.
• Whichinputsourcethedisplaywilluseforeachscheduled
activationperiod.
NOTE: Werecommendyoutosetupcurrentdateandtimeinthe
{Date and time}menubeforeusingthisfunction.
1. Press[OK]or[ ]buttontoenterthesubmenu.
Schedule
Today
1
2
3
4
5
7
6
2014 . 11 . 04 TUE 20 : 19 : 55
On
:
_
:
_ _ _ _
Off
Input
WED
SAT
MON
THU
SUN
TUE
FRI
Every week
USB play list
2. Press[ ] or[ ] buttontoselectascheduleitem(itemnumber1~7),
andthenpress[OK]buttontomarkittheitemnumber.
Schedule
Today
1
2
3
4
5
7
6
2014 . 11 . 04 TUE 20 : 19 : 55
On
:
_
:
_ _ _ _
Off
Input
WED
SAT
MON
THU
SUN
TUE
FRI
Every week
USB play list
4
1
3
2
5
3. Press[ ]
or[ ]buttontoselecttheschedule:
1
Power-onschedule:Press[ ] or[ ]buttontosetthehour
andminuteforthedisplaytoturnon.
2
Power-offschedule:Press[ ] or[ ] buttontosetthehour
andminuteforthedisplaytoturnoff.
Selectorleaveanempty“__”forboththehourandminuteslotif
youdonotwanttousethispower-onorpower-offschedule.
3
Input-sourceselection:Press[ ] or[ ] buttontoselectan
inputsource.Ifnoinputsourceisselected,theinputsource
willremainthesameaslastselected.
4
Dateschedule:Press[ ]buttontoselectwhichdayina
weekthisscheduleitemwillbetakeeffect,andthenpressthe
[OK]button.
5
WhenInput-sourceselecttoUSB,enabletoaccessUSB play
listsetting:
0001/0002
Options Exit
Photo
Photo
Video
- Press[ ] [ ] buttonstochooseles.
- Press[ ] [ ]buttonstoswitchPlaylistandFileManager.
- Press[OK]buttontosetorcleartheplaylist.
- Tosavetheplaylist,press[ ] andchooseSave list.
0004/0004
Options Exit
Photo
Photo
[..]
Movie.avi
\media\photo
Photo1.jpg
Photo2.jpg
Photo3.jpg
Sort
Recursive Parser
Media Type
Save list
4.
Foradditionalschedulesettings,press[ ],thenrepeatthesteps
above.Acheckmarkintheboxnexttothenumberoftheschedule
itemindicatesthattheselectedscheduleisineffect.
NOTES:
• Iftheschedulesoverlap,thescheduledpower-ontimetakespriority
overscheduledpower-offtime.
• Iftherearetwoscheduleitemsprogrammedforthesametime,the
highestnumberedscheduletakespriority.Forexample,ifschedule
items#1and#2bothsetthedisplaytopoweronat7:00AMand
offat5:00PM,thenonlyscheduleitem#1willtakeeffect.
• EachPlaylistsupportsupto30les.
• Playlistwillnotbeclearedafter{Factory reset}.Youhaveto
manuallyremovethelesordeleteusb_schedulinglist.txtinthe
USB.
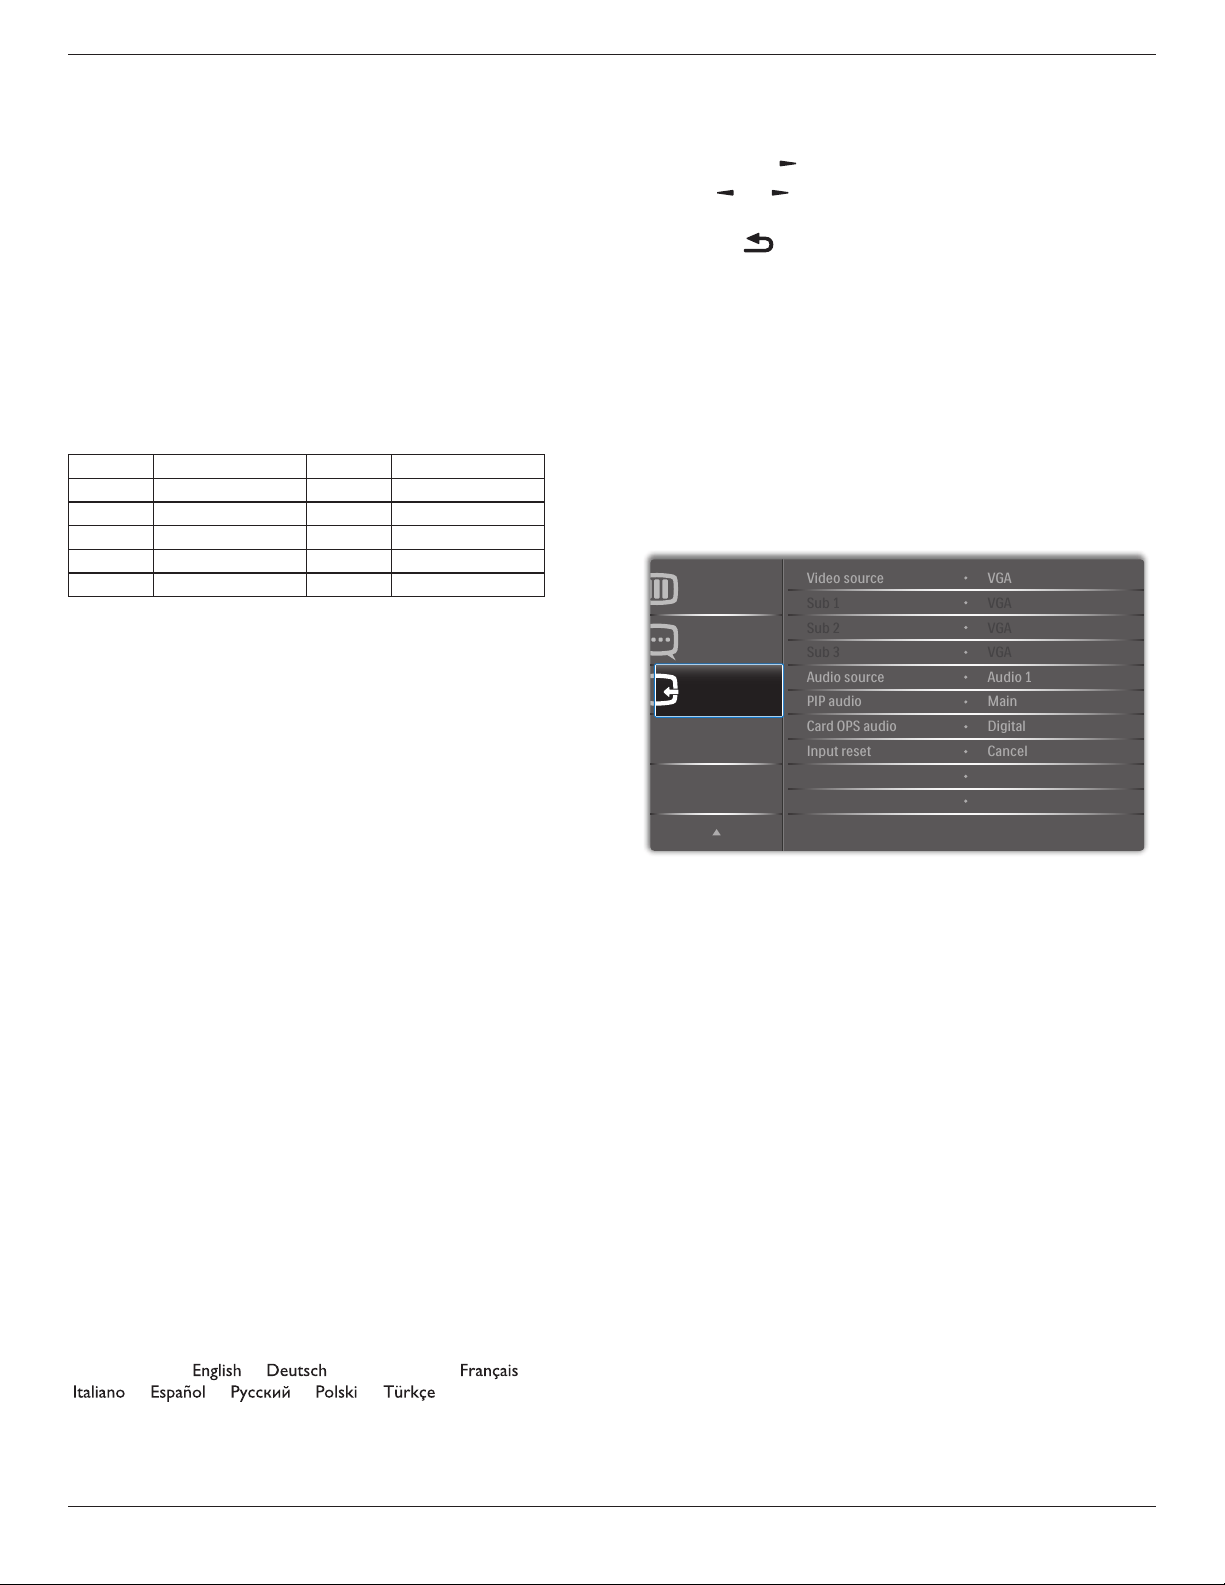
75BDL3003H
24
DDC/CI
ChoosetoturnonorofftheDDC/CIcommunicationfunction.Select
{On}fornormaluse.
DDC/CI(CommandInterface)speciesameansforacomputerto
sendcommandstothemonitor,aswellasreceivesensordatafromthe
monitor,overthebidirectionallinksuchasDDC2Ab/Bi/B+.
Speciccommandstocontrolmonitorsaredenedinaseparate
MonitorControlCommandSet(MCCS)standard.
DDC/CImonitorsaresometimessuppliedwithanexternalcolorsensor
toallowautomaticcalibrationofthemonitor’scolorbalance.Sometilting
DDC/CImonitorssupportanautopivotfunction,wherearotation
sensorinthemonitorenablestheoperatingsystemtokeepthedisplay
uprightasthemonitorismovedbetweenitsportraitandlandscape
positions.
ThefollowingDDC/CIcommandsshouldbesupportedviacommand
line:
No. Commands No. Commands
1 SetBrightness 6 GetBrightness
2 SetContrast 7 GetContrast
3 SetRedGain 8 GetRedGain
4 SetGreenGain 9 GetGreenGain
5 SetBlueGain 10 GetBlueGain
HDMI with One Wire
CECcontrol.
• {Off} -DisableCEC.(Default)
• {On}-EnableCEC.
Auto signal detection
Choosetoletthedisplaydetectanddisplayavailablesignalsources
automatically.
• {Off}-Onceasignalisconnected,itcanonlybeselectedmanually.
Iftheselectedinputisnosignal,setthedisplaytodisplaytheimage
automaticallyaccordingtothesearchorderofeachoption.
Theoptionsare:{All} / {PC source only} / {Video source only} /
{Failover}
• {All}:DP / HDMI1 / HDMI2 / HDMI3 / DVI / VGA / Component /
OPS.
• {PC source only}:DP / DVI / VGA / CardOPS.
• {Video source only}:HDMI1 / HDMI2 / HDMI3 / Component.
• {Failover}
- Failover1-12:User-denedsetting.Default:HDMI.
OPS settings
SettheOPScongurationundereachpowercondition.
• {Auto}-Afterselecting{Card OPS}forvideosourceinput,theOPS
willbesettooffwhenthedisplaypowerissettooff,orsettoon
whenthedisplaypowerissettoon.Whensettoothervideosource
inputs,theOPSwillalwaysbesettoon.
• {Always off}-TheOPSwillalwaysbesettooff.
• {Always on}-TheOPSwillalwaysbesettoon.
Language
SelectthelanguageusedintheOSDmenu.
Theoptionsare:{ }/{ }/{
简体中文
}/{ }/
{ }/{ }/{ }/{ }/{ }/{
繁體中文
}/
{
日本語
}/{Português}.
Advanced option reset
Resetallsettingsexcept{Date and Time}intheAdvanced optionmenu
tofactorypresetvalues.
1. Press[OK]or[ ]buttontoenterthesubmenu.
2. Press[ ]
or[ ]buttontoselect{Reset}andpressthe[OK]
buttontorestoresettingstofactorypresetvalues.
3.
Pressthe[ ]buttonorselect{Cancel}andpressthe[OK]
buttontocancelandthenreturntothepreviousmenu.
APM
Powersavesetting.
• Off (TCP off/WOL off)-notsupportWOL/notsupportwakeup
onTCPsocket/notsupportwakeuponwebpage.
• Mode 1 (TCP off/WOL on)-supportWOL/notsupportwakeup
onTCPsocket/notsupportwakeuponwebpage.
• Mode 2 (TCP on/WOL off)-notsupportWOL/supportwakeup
onTCPsocket/supportwakeuponwebpage.
5.2.8. Input menu
Input
Advanced option
Configuration 2
Sub 1
Sub 2
Audio source
PIP audio
Video source
Sub 3
Card OPS audio
Input reset
VGA
VGA
VGA
VGA
Digital
Cancel
Audio 1
Main
Video source
Selectavideoinputsource.
Choosefrom:{Displayport}/{DVI-D}/{VGA}/{HDMI1}/{HDMI2}/
{HDMI3}/{Component}/{Video}/{USB}/{BROWSER}/{SmartCMS}
/{Card OPS}.
Sub 1
SelecttheinputsignalforthesubWin1picture.
Choosefrom:{Displayport}/{DVI-D}/{VGA}/{HDMI1}/{HDMI2}/
{HDMI3}/{Component}/{Video}/{USB}/{BROWSER}/{SmartCMS}
/{Card OPS}.
Sub 2
SelecttheinputsignalforthesubWin2picture.
Choosefrom:{Displayport}/{DVI-D}/{VGA}/{HDMI1}/{HDMI2}/
{HDMI3}/{Component}/{Video}/{USB}/{BROWSER}/{SmartCMS}
/{Card OPS}.
Sub 3
SelecttheinputsignalforthesubWin3picture.
Choosefrom:{Displayport}/{DVI-D}/{VGA}/{HDMI1}/{HDMI2}/
{HDMI3}/{Component}/{Video}/{USB}/{BROWSER}/{SmartCMS}
/{Card OPS}.
Audio source
Selecttheaudioinputsourceaccordingtotheaudiosignalsource
connectedtotheaudioinputandHDMIsocketsonthedisplay.

75BDL3003H
25
Choosefrom:{Analog}/{Displayport}/{Audio1}/{Audio2}/{Media}.
PIP audio
SelecttheaudiosourcethePIP(Picture-in-Picture)mode.
• {Main}-Selectaudiofromthemainpicture
• {Sub 1}-Selectaudiofromthesub1picture.
• {Sub 2}-Selectaudiofromthesub2picture.
• {Sub 3}-Selectaudiofromthesub3picture.
Card OPS audio
SelecttheanalogordigitalaudiomodeforcardOPS.
Input reset
ResetallsettingsintheInputmenutofactorypresetvalues.
6. USB device compatibility
USB Video Subtitle Formats (for language subtitles, etc.)
File
Extensions
Container Videocodec Maximumresolution Max.FrameRate(fps)
Max.BitRate
(Mbps)
Audiocodec
.mpg
mpeg
.vob
PS
MPEG-1 1920x1080 25p,30p,50i,60i 30
MPEG-1(L1&L2),
MPEG-1,2,2.5L3,
AAC/HE-AAC(v1&v2),
DVD-PCM,AC3
MPEG-2 1920x1080 25p,30p,50i,60i 30
MPEG-4ASP 1920x1080 25p,30p,50i,60i 30
H.264 1920x1080 25p,30p,50p,60p,60i 30
.ts TS
MPEG-2 1920x1080 25p,30p,50i,60i 30
MPEG-1(L1&L2),
MPEG-1,2,2.5L3,
AAC/HE-AAC(v1&v2),
AC3,E-AC3,
DolbyPulse
MPEG-4ASP 1920x1080 25p,30p,50i,60i 30
H.264 1920x1080 25p,30p,50p,60p,60i 30
MVC
1920x1080i@eldrate=50,60Hz
1920x1080p@framerate=24,25,30Hz
1280x720p@framerate=50,60Hz
- 30
.ts
.m2ts
.mts
.mt2
MaTSTTS
MPEG-2 1920x1080 25p,30p,50i,60i 30
MPEG-1(L1&L2),
MPEG-1,2,2.5L3,
AAC/HE-AAC(v1&v2),
AC3,E-AC3,
DolbyPulse
MPEG-4ASP 1920x1080 25p,30p,50i,60i 30
H.264 1920x1080 25p,30p,50p,60p,60i 30
MVC
1920x1080i@eldrate=50,60Hz
1920x1080p@framerate=24,25,30Hz
1280x720p@framerate=50,60Hz
- 30
.ts
.m2ts
.mts
AVCHD
MPEG-2 1920x1080 25p,30p,50i,60i 30
MPEG-1(L1&L2),
MPEG-1,2,2.5L3,
AAC/HE-AAC(v1&v2),
AC3,E-AC3,
DolbyPulse
MPEG-4ASP 1920x1080 25p,30p,50i,60i 30
H.264 1920x1080 25p,30p,50p,60p,60i 30
.ts
.m2ts
.mts
AVCHD MVC
1920x1080i@eldrate=50,60Hz
1920x1080p@framerate=24,25,30Hz
1280x720p@framerate=50,60Hz
- 30
MPEG-1(L1&L2),
MPEG-1,2,2.5L3,
AAC/HE-AAC(v1&v2),
AC3,E-AC3,
DolbyPulse
.m4v M4V H.264 1920x1080 25p,30p,50p,60p,60i 30 AAC
.ism/Manifest
.mpd
fragMP4
H.264 1920x1080 25p,30p,50p,60p,60i 30
AAC/HE-AAC(v1&v2),
AC3,E-AC3,WMA,
WMA-PRO
MVC
1920x1080i@eldrate=50,60Hz
1920x1080p@framerate=24,25,30Hz
1280x720p@framerate=50,60Hz
- 30

75BDL3003H
26
.mp4 MP4
MPEG-4ASP 1920x1080 25p,30p,50i,60i 30
AAC/HE-AAC(v1&v2),
AC3,E-AC3,WMA,
WMA-PRO
H.264 1920x1080 30
MVC
1920x1080i@eldrate=50,60Hz
1920x1080p@framerate=24,25,30Hz
1280x720p@framerate=50,60Hz
- 30
WMV9/VC1 1920x1080 30p,60i 30
.mkv
.mk3d
MKV
MPEG-4ASP 1920x1080 25p,30p,50i,60i 30
MPEG-1(L1&L2),
MPEG-1,2,2.5L3,
AAC/HE-AAC(v1&v2),
AC3,E-AC3,WMA,
WMA-PRO
H.264 1920x1080 30
USB Multimedia Formats
FileExtensions Container Videocodec Maximumresolution
Frequency
(kHz)
Max.BitRate
(Mbps)
Audiocodec
.mp3 MP3 - - 48 384 MPEG-1,2,2.5L3
.wma
.asf
WMA
(V2uptoV9.2)
- - 48 192 WMA
.wma WMAPro - - 96 768 WMA,WMAPro
.wav(PC)
LPCM -
-
192 768
LPCM
.aif(mac)
.aiff(mac)
LPCM - - 192 768 LPCM
.aac
.mp4
.m4a
AAC - - 48 1024 AAC,HE-AAC(v1&v2)
.pls
.m3u
Playlists - - - - -
.m4a M4A - - 48 1024 AAC,HE-AAC(v1&v2)
USBPhotoleformattype:JPEG,BMP,PNG,GIF
NOTES:
• Soundorvideomaynotworkifthecontentshaveastandardbitrate/framerateabovethecompatibleFrame/seclistedinthetableabove.
• VideocontentwithaBitrateorFrameratelargerthantheratespeciedinthetableabovecancausechoppyvideoduringplayback.
75BDL3003H
27
7. Input Mode
FHD Preset Mode (VGA/DVI timing support):
Item Resolution H.Freq.(KHz) V.Freq.(Hz) BW(MHz)
1 640x350 31.469 70.086 25.175
2 640x480 31.469 59.94 25.175
3 640x480 35 66.67 30.240
4 640x480 37.861 72.809 31.500
5 640x480 37.5 75 31.500
6 720x400 31.469 70.087 28.322
7 800x600 35.156 56.25 36.000
8 800x600 37.879 60.317 40.000
9 800x600 48.077 72.188 50.000
10 800x600 46.875 75.000 49.500
11 832x624 49.726 74.551 57.284
12 848x480 31 60.000 33.750
13 960x720 56.4 75.000 72.420
14 960x720 44.74 59.973 57.580
15 1024x768 48.363 60.004 65.000
16 1024x768 56.476 70.069 75.000
17 1024x768 60.023 75.029 78.750
18 1024x768 61.08 75.781 86.000
19 1024x768 35.5 43.000 44.900
20 1152x864 53.986 59.985 79.900
21 1152x864 53.783 59.959 81.750
22 1152x864 63.851 70.012 94.499
23 1152x864 67.5 75.000 108.000
24 1152x870 68.681 75.062 100.000
25 1152x900 61.846 66.004 94.500
26 1152x900 71.809 76.149 108.000
27 1280x720 44.772 60.000 74.500
28 1280x720 52.5 70.000 89.040
29 1280x768 47.776 59.870 79.500
30 1280x768 60.289 74.893 102.250
31 1280x800 49.7 59.810 83.500
32 1280x800 62.8 74.930 106.500
33 1280x960 60 60.000 108.000
34 1280x960 75.171 75.021 129.895
35 1280x1024 63.981 60.020 108.000
36 1280x1024 71.691 67.189 117.000
37 1280x1024 76.02 71.448 130.223
38 1280x1024 79.976 75.025 135.000
39 1280x1024 81.13 76.110 135.000
40 1360x768 47.712 60.015 85.500
41 1366x768 47.712 59.790 85.500
42 1440x900 55.469 59.901 88.750
43 1440x900 55.935 59.887 106.500
44 1440x900 70.635 74.984 136.750
45 1400x1050 64.744 59.948 101
46 1440x1050 65.3 60.000 121.750
47 1400x1050 82.278 74.867 156
48 1600x900 55.54 60.000 97.750
49 1600x1200 75 60 162
50 1680x1050 65.29 59.954 146.250
51 1680x1050 64.674 59.883 119.000
52 1920x1080 66.587 59.934 138.500
53 1920x1080 67.5 60.000 148.500
54 1920x1080 67.1584 59.963 173.000
55 1920x1080 67.08 60 172.798
56 1920x1200 74.038 59.950 154.000
UHD Preset Mode (DP/HDMI timing support):
Item Resolution H.Freq.(KHz) V.Freq.(Hz) BW(MHz)
1 3840x2160 53.946 23.900 296.703
2 3840x2160 54 24.000 297.000
3 3840x2160 56.25 25.000 297.000
4 3840x2160 67.432 29.900 296.703
5 3840x2160 67.5 30.000 297.000
6 4096x2160 54 24.000 297.000
7 3840x2160 135 60.000 594.000
Video timing support (HDMI/DVD HD/DVI):
480i,480p,576i,576p,720p,1080i,1080p,4Kx2K(exceptDVI).
NOTES:
• ThePCtextqualityisoptimuminHD1080mode(1920x1080,
60Hz).
• YourPCdisplayscreenmightappeardifferentdependingonthe
manufacturer(andyourparticularversionofWindows).
• CheckyourPCinstructionbookforinformationaboutconnecting
yourPCtoadisplay.
• Ifaverticalandhorizontalfrequency-selectmodeexists,select60Hz
(vertical)and31.5KHz(horizontal).Insomecases,abnormalsignals
(suchasstripes)mightappearonthescreenwhenthePCpower
isturnedoff(orifthePCisdisconnected).Ifso,pressthe[INPUT]
buttontoenterthevideomode.Also,makesurethatthePCis
connected.
• WhenhorizontalsynchronoussignalsseemirregularinRGBmode,
checkPCpowersavingmodeorcableconnections.
• ThedisplaysettingstablecompliestotheIBM/VESAstandards,and
basedontheanaloginput.
• TheDVIsupportmodeisregardedassametothePCsupport
mode.
• Thebesttimingfortheverticalfrequencytoeachmodeis60Hz.
• WhentheinputsourceisComponentorVideo,theInformation
OSDwillbedisplayedslowlythanotherinputsources.
• NomattertheresolutionofComponentsourceorVideosource
input,theresultofZoommodesettingisthesameas1080P
resolution.
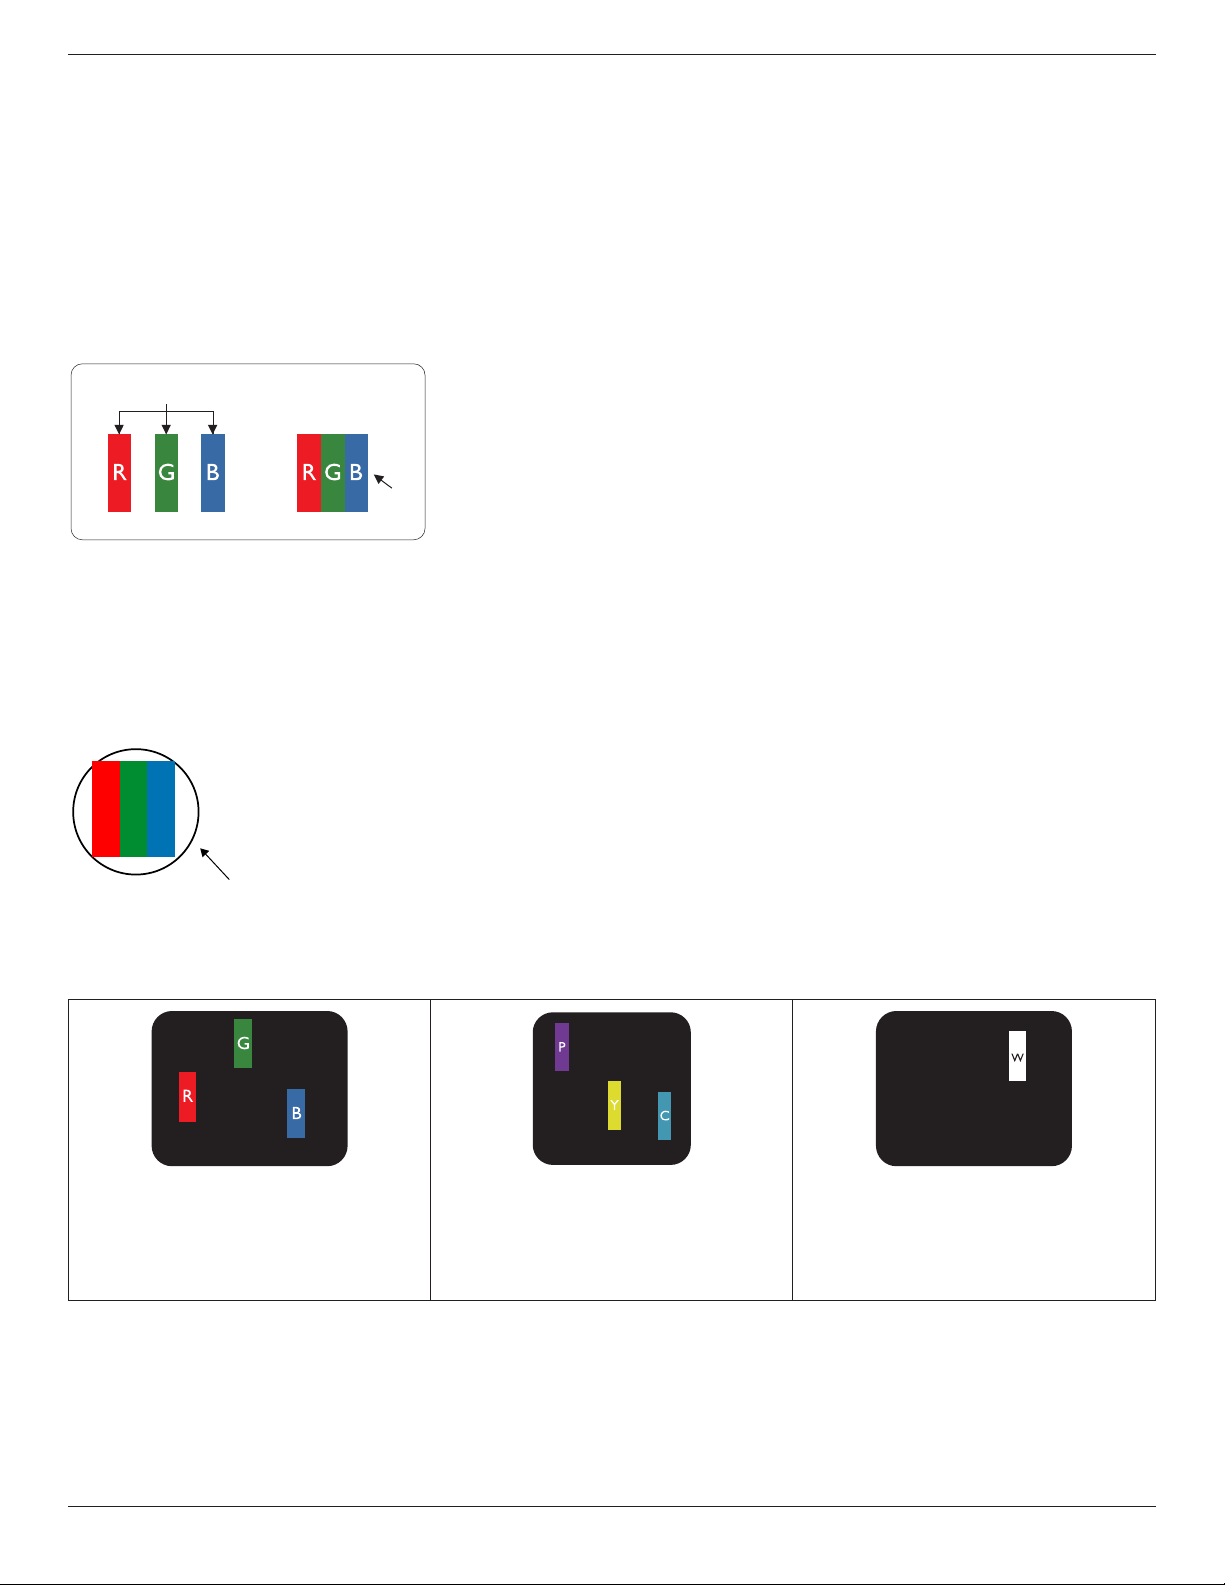
75BDL3003H
28
8. Pixel Defect Policy
Westrivetodeliverthehighestqualityproductsandusesomeoftheindustry’smostadvancedmanufacturingprocesseswhilstpracticingstringentquality
control.However,pixelorsub-pixeldefectsonthePDP/TFTpanelsusedinPlasma-&LCD-displaysaresometimesunavoidable.Nomanufacturercan
guaranteethatallpanelswillbefreefrompixeldefects,butPhilipsguaranteesthatanyPlasma-&LCD-displayswithanunacceptablenumberofdefects
willberepairedduringthewarrantyperiodinlinewithyourlocalguaranteeconditions.
ThisnoticeexplainsthedifferenttypesofpixeldefectsanddenestheacceptabledefectlevelfortheLCDscreen.Inordertoqualifyforrepairunder
warranty,thenumberofpixeldefectsmustexceedacertainlevelasshowninthereferencetable.IftheLCDscreeniswithinspecicationawarranty
exchange/claimbackwillberefused.Additionally,becausesometypesorcombinationsofpixeldefectsaremorenoticeablethanothers,Philipssetseven
higherqualitystandardsforthose.
8.1. Pixels and Sub-Pixels
subpixel
pixel
Apixel,orpictureelement,iscomposedofthreesub-pixelsintheprimarycolorsofred,greenand
blue.Manypixelstogetherformanimage.Whenallsub-pixelsofapixelarelit,thethreecolored
sub-pixelstogetherappearasasinglewhitepixel.Whenallaredark,thethreecoloredsub-pixels
togetherappearasasingleblackpixel.Othercombinationsoflitanddarksub-pixelsappearas
singlepixelsofothercolors.
8.2. Types of Pixel Defects + Dot Definition
Pixelandsub-pixeldefectsappearonthescreenindifferentways.Therearethreecategoriesofpixeldefectsandseveraltypesofsub-pixeldefectswithin
eachcategory.
Dot denition = What is a defective “Dot”? :
Oneormoredefective,adjacentsub-pixelaredenedasone“dot”.Theno.ofdefectivesub-pixelsarenotrelevanttodeneadefectivedot.Thismeans
thatadefectivedotcanconsistofone,twoorthreedefectivesub-pixelswhichcanbedarkorlit.
RR G B
Onedot=OnePixel;consistsofthreesub-pixelsofRed,Green,andBlue.
8.3. Bright Dot Defects
Brightdotdefectsappearaspixelsorsub-pixelsthatarealwayslitor“on”.Thesearetheexamplesofbrightdotdefects:
Onelitred,greenorbluesubpixel Twoadjacentlitsubpixels:
Red+Blue=Purple
Red+Green=Yellow
Green+Blue=Cyan(LightBlue)
Threeadjacentlitsubpixels(onewhitepixel)
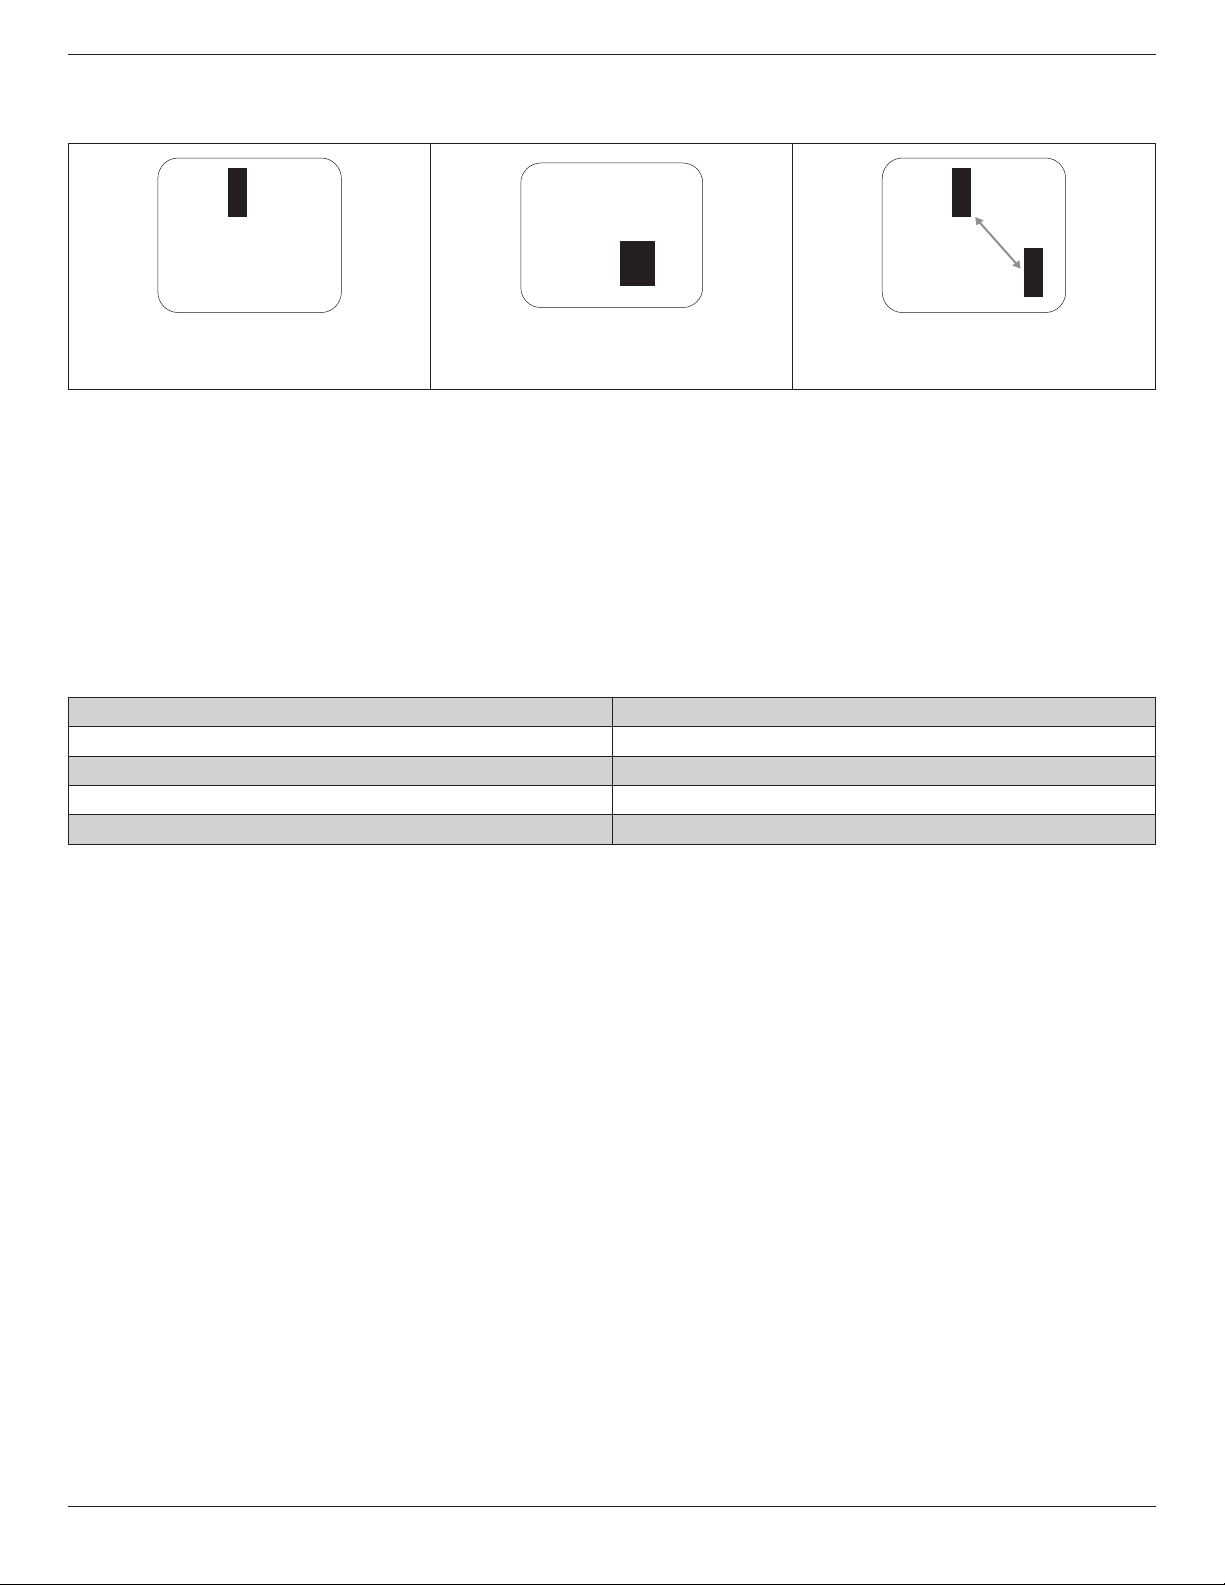
75BDL3003H
29
8.4. Dark Dot Defects
Blackdotdefectsappearaspixelsorsub-pixelsthatarealwaysdarkor“off”.Thesearetheexamplesofblackdotdefects:
Onedarkdot Twoadjacentdarkdots=1pairofdarkdots Twodarkdots,specicationsdenesthe
minimumdistancebetweendarkdots
8.5. Proximity of Pixel Defects
Becausepixelandsub-pixelsdefectsofthesametypethatarenearbyoneanothermaybemorenoticeable,Philipsalsospeciestolerancesforthe
proximityofpixeldefects.Inthetablebelowyoucanndspecicationsabout:
• Allowedamountofadjacentdarkdots=(adjacentdarkdots=1pairofdarkdots)
• Minimumdistancebetweendarkdots
• Totalno.ofalldefectivedots
8.6. Pixel Defect Tolerances
Inordertoqualifyforrepairduetopixeldefectsduringthewarrantyperiod,aPDP/TFTpanelinaPhilipsPlasma/LCD-displaymusthavepixelorsub-
pixeldefectsexceedingthetoleranceslistedinthefollowingtable.
BRIGHTDOTEFFECT ACCEPTABLELEVEL
1litsubpixel 2
BLACKDOTEFFECT ACCEPTABLELEVEL
1darksubpixel 10
TOTALDOTDEFECTSOFALLTYPES 12
NOTE:*1or2adjacentsubpixeldefects=1dotdefect
8.7. MURA
Darkspotsorpatchesmayoccasionallyappearonsomeliquidcrystaldisplay(LCD)panels.ThisisknownwithintheindustryasMura,whichisaJapanese
termfor“unevenness.”Itisusedtodescribeanirregularpatternorareainwhichunevenscreenuniformityappearsundercertainconditions.Muraisa
resultofthedeteriorationoftheliquidcrystalalignmentlayerandismostcommonlycausedbylong-termoperationunderhighambienttemperatures.It
isanindustry-widephenomenonandMuraisnotrepairable.Itisalsonotcoveredbyourwarrantyterms.
MurahasbeenaroundsincetheintroductionofLCDtechnologyandwithscreensgettingbiggerandinoperation24/7,manydisplaysarerunninginlow
lightconditions.ThisalladdstothepossibilityofMuraaffectingdisplays.
HOW TO SPOT MURA
TherearemanysymptomsofMuraandalsomultiplecauses.Severalofthesearelistedbelow:
• Impuritiesorforeignparticlesinthecrystalmatrix
• UnevendistributionofLCDmatrixduringmanufacturing
• Non-uniformluminancedistributionofthebacklight
• Panelassemblyinducedstress
• FlawswithintheLCDcells
• Thermalinducedstress-hightemperatureoperationoverlongperiodsoftime
HOW TO AVOID MURA
AlthoughwecannotguaranteethecompleteeradicationofMuraeverytime,ingeneraltheappearanceofMuracanbeminimizedbythesemethods:
• Lowerthebacklightbrightness
• Useascreensaver
• Reducetheambienttemperaturearoundtheunit

75BDL3003H
30
9. Cleaning and Troubleshooting
9.1. Cleaning
Caution When Using the Display
• Donotbringyourhands,faceorobjectsclosetotheventilationholesofthedisplay.Thetopofthedisplayisusuallyveryhotduetothehigh
temperatureofexhaustairbeingreleasedthroughtheventilationholes.Burnsorpersonalinjuriesmayoccurifanybodypartsarebroughttoo
close.Placinganyobjectnearthetopofthedisplaycouldalsoresultinheatrelateddamagetotheobjectaswellasthedisplayitself.
• Besuretodisconnectallcablesbeforemovingthedisplay.Movingthedisplaywithitscablesattachedmaydamagethecablesandthuscausere
orelectricshock.
• Disconnectthepowerplugfromthewalloutletasasafetyprecautionbeforecarryingoutanytypeofcleaningormaintenanceprocedure.
Front Panel Cleaning Instructions
• Thefrontofthedisplayhasbeenspeciallytreated.Wipethesurfacegentlyusingonlyacleaningclothorasoft,lint-freecloth.
• Ifthesurfacebecomesdirty,soakasoft,lint-freeclothinamilddetergentsolution.Wringtheclothtoremoveexcessliquid.Wipethesurfaceof
thedisplaytoremovedirt.Thenuseadryclothofthesametypetodry.
• Donotscratchorhitthesurfaceofthepanelwithngersorhardobjectsofanykind.
• Donotusevolatilesubstancessuchasinsertsprays,solventsandthinners.
Cabinet Cleaning Instructions
• Ifthecabinetbecomesdirty,wipethecabinetwithasoft,drycloth.
• Ifthecabinetisextremelydirty,soakalint-freeclothinamilddetergentsolution.Wringtheclothtoremoveasmuchmoistureaspossible.Wipe
thecabinet.Useanotherdryclothtowipeoveruntilthesurfaceisdry.
• Donotallowanywaterordetergenttocomeintocontactwiththesurfaceofthedisplay.Ifwaterormoisturegetsinsidetheunit,operating
problems,electricalandshockhazardsmayresult.
• Donotscratchorhitthecabinetwithngersorhardobjectsofanykind.
• Donotusevolatilesubstancessuchasinsertsprays,solventsandthinnersonthecabinet.
• DonotplaceanythingmadefromrubberorPVCnearthecabinetforanyextendedperiodsoftime.

75BDL3003H
31
9.2. Troubleshooting
Symptom Possible Cause Remedy
No picture is displayed 1. Thepowercordisdisconnected.
2. Themainpowerswitchonthebackofthe
displayisnotswitchedon.
3. Theselectedinputhasnoconnection.
4. Thedisplayisinstandbymode.
1. Pluginthepowercord.
2. Makesurethepowerswitchisswitchedon.
3. Connectasignalconnectiontothedisplay.
Interference displayed on the display or audible
noise is heard
Causedbysurroundingelectricalappliancesor
uorescentlights.
Movethedisplaytoanotherlocationtoseeisthe
interferenceisreduced.
Color is abnormal Thesignalcableisnotconnectedproperly. Makesurethatthesignalcableisattachedrmly
tothebackofthedisplay.
Picture is distorted with abnormal patterns 1. Thesignalcableisnotconnectedproperly.
2. Theinputsignalisbeyondthecapabilitiesof
thedisplay.
1. Makesurethatthesignalcableisattached
rmly.
2. Checkthevideosignalsourcetoseeifit
isbeyondtherangeofthedisplay.Please
verifyitsspecicationswiththisdisplay’s
specicationsection.
Display image doesn’t ll up the full size of the
screen
1. Thezoommodeisnotsetcorrectly.
2. ScanModemaybesetincorrectlyto
underscan.
3. Iftheimageexceedsthescreensize,Scan
ModemayneedtobesettoUnderscan.
UsetheZoommodeorCustomzoomfunction
intheScreenmenutonetunedisplaygeometry
andtimefrequencyparameter.
Can hear sound, but no picture Improperlyconnectedsourcesignalcable. Makesurethatbothvideoinputsandsound
inputsarecorrectlyconnected.
Can see picture but no sound is heard 1. Improperlyconnectedsourcesignalcable.
2. Volumeisturnedallthewaydown.
3. {Mute}isturnedon.
4. Noexternalspeakerconnected.
1. Makesurethatbothvideoinputsandsound
inputsarecorrectlyconnected.
2. Press[ ]or[ ]buttontohearsound.
3. SwitchMUTEoffbyusingthe[ ]button.
4. Connectexternalspeakersandadjustthe
volumetoasuitablelevel.
Some picture elements do not light up Somepixelsofthedisplaymaynotturnon. Thisdisplayismanufacturedusinganextremely
highlevelofprecisiontechnology:however,
sometimessomepixelsofthedisplaymaynot
display.Thisisnotamalfunction.
After-Images can still be seen on the display
after the display is powered off. (Examples
of still pictures include logos, video games,
computer images, and images displayed in 4:3
normal mode)
Astillpictureisdisplayedforanoverextended
periodoftime
Donotallowastillimagetobedisplayedfor
anextendedperiodoftimeasthiscancausea
permanentafter-imagetoremainonthedisplay.
TEXT readability on the screen is NOT good.. Thetestpattern(Background:Gray,Text:light
RGBcolor)ishardconditionfortextreadability
becausetheluminancedifferencebetween
backgroundandtextisnotsobig.
Usinghighcontrasttext/backgroundcolor.For
example,touse
textcolorwithblack/whitecolorseries,andthe
backgroundisverydifferentcolorwithtextto
improvereadability.
75BDL3003H
32
10. Technical Specifications
Display:
Item Specications
ScreenSize(ActiveArea) 74.5inches(189.3cm)
AspectRatio 16:9
Numberofpixels 3840(H)x2160(V)
Pixelpitch 0.429x0.429mm
Colordepth 10bit(D)1.07Billioncolors
Brightness 3000cd/m
2
(typ.)
Contrastratio 1200:1
Viewingangle 89degrees
In/Out Terminals:
Item Specications
SpeakerOutput InternalSpeakers
ExternalSpeakers
10W(L)+10W(R)[RMS]/8Ω
1Way1SpeakerSystem
82dB/W/M/160Hz~13KHz
SPDIFOutput SPDIFPort SerialdigitalaudiooutputwheninputisHDMI
AudioOutput 3.5mmStereox1 0.5V[rms](Normal)/2Channel(L+R)
AudioInput RCAJackx2
3.5mmStereox1
0.5V[rms](Normal)/2Channel(L+R)
RS232C 2.5mmPhonejackx2 RS232Cin/RS232Cout
RJ-45
RJ-45Jackx1(8pin) 10/100LANPort
HDMIInput HDMIJackx3
(TypeA)(19pin)
DigitalRGB:TMDS(Video+Audio)
MAX:
Video-720p,1080p,1920x1080/60Hz(WUXGA),4K/2K30/60Hz
Audio-48KHz/2Channel(L+R)
SupportsLPCMonly
DVI-DInput DVI-Djack DigitalRGB:TMDS(Video)
VGAInput D-SubJackx1(15pin) AnalogRGB:0.7V[p-p](75Ω),H/CS/V:TTL(2.2kΩ),SOG:1V[p-p](75Ω)
MAX:720p,1080p,1920x1080/60Hz(WUXGA)
ComponentInput RCAJackx3 Y:1V[p-p](75Ω),Pb:0.7V[p-p](75Ω),Pr:0.7V[p-p](75Ω)
MAX:480i,576i,480p,576p,720p,1080i,1080p
VideoInput RCAx1(Sharewith
Component_Y)
Composite1V[p-p](75Ω)
Displayportin/out DisplayportJackx2
(20pin)
DigitalRGB:TMDS(Video+Audio)
MAX:
Video-3840×2160@60Hz
Audio-48KHz/2Channel(L+R)
SupportsLPCMonly
IRInput/Output 3.5mm×2 IRpassthroughorIRdaisychain
USBInput USB×1(TypeA) USB2.0,Multimediaplayonly
General:
Item Specications
PowerSupply AC100-240V,50-60Hz
PowerConsumption
750W(max)
400W(typ)
NA(EPA6.0)
<0.5W(standbymode)
Dimensions(WithoutStand) 1681.2(W)x955.6(H)x142.4(D@Handle)/132.4(D@WallMount)mm
Weight(WithoutStand) 54.1Kg

75BDL3003H
33
GrossWeight(WithoutStand) 65.5Kg
Product Fiche :
Item Specications
EnergyEfciencyClass C
VisibleScreenSize 189.3cm/74.5inch
OnModePowerConsumption(W) 382W
AnnualEnergyConsumption(kWh) 558kWh
StandbyPowerConsumption(W) 0.50W
OffModePowerConsumption(W) 0.50W
DisplayResolution(Pixels) 3840x2160p
NetworkStandby(W) 31W
Environmental Condition:
Item Specications
Temperature Operational 0~40°C
Storage -20~60°C
Humidity Operational 20~80%(withoutcondensation)
Storage 5~95%(withoutcondensation)
Altitude Operational 0~3,000m
Storage/Shipment 0~9,000m
Internal Speaker:
Item Specications
Type 1Way1Speaker
Input 10W(RMS)
Impedance 8Ω
OutputSoundPressure 82dB/W/M
FrequencyResponse 160Hz~13KHz

2017 © Koninklijke Philips N.V. All rights reserved.
Philips and the Philips Shield Emblem are registered trademarks of
Koninklijke Philips N.V. and are used under license from
Koninklijke Philips N.V.
Specications are subject to change without notice.