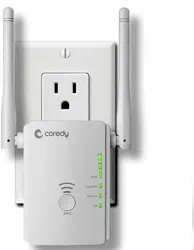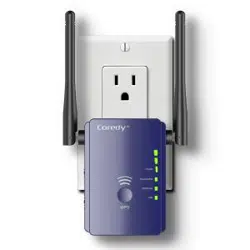

Coredy E300
Mini Range Extender/Aessess Point/Router
GET STARTED

Preparing...........................................................................
Setup Process...............................................................
Web-Browser Method..................................................
WPS - Method................................................................
Overview................................................................................
Using as a Extender..........................................................
When to Use Your Extender........................................
How the Extender Works.............................................
Power on the Extender..................................................
Connect to an Existing WiFi Network.....................
Method 1: Connect with a web browser............
Method 2:Connect with WPS ................................
Connect an Ethernet-Enabled Device......................
Using as a Access Point...................................................
Cable Your AP....................................................................
Using as a Router...............................................................
Change the Extender Settings.....................................
To change the admin password................................
To set up the time of Extender...................................
Save/Reload your Extender setting..........................
Update the Router Firmware......................................
Hide extender's wireless network.............................
TROUBLESHOOTING........................................................
1
1
1
2
3
6
6
6
7
8
8
11
13
14
15
17
21
21
21
22
23
24
25
User Manual
Quick Installation Guide

01
Preparing:
Below setup guide just for REPEATER Mode. If you need
setup by AP and Router mode, please refer to User
Manual. More details about troubleshoots please go to
User Manual.
1. Route works normal.
2. Switch the side button of repeater into “ON” & “Repeater”
3. Electrical Outlet close to router.
Web-Browser Method:
1.
Plug it into an electrical outlet ( closest to your primary
router/WiFi access point )
2.
Use your Smart-Phone to connect with the repeater (find
"Coredy E300" and connect with it, if password request
try PIN number of the rear panel)
3.
Visit http://ap.setup/ or the IP address 192.168.10.1
from a web browser.
4.
Log-in to the Admin Page by using "admin" in a
lower-case for both username and password, and then
click "repeater wizard" in the next window.
5.
Choose your Router's/AP's network in the next window
and select it.
Setup Process
Quick Installation Guide

02
WPS - Method:
You can also use the WPS function as an alternative
Set-up method, if you have a WPS button available on your
primary router.
Hold the WPS button of your Primary Router/WiFi AP till
the WPS LED starts blinking.
Press and hold the WPS 3 seconds on the Rear Panel.
Once WPS light starts blinking on it as well, please wait for
a minute for The primary router/AP and the Extender E300
to pair up and then connect to the "Coredy E300_EXT"
SSID in your Smart Phone using your primary router's WIFI
password.
6.
Enter your Router's/AP's WIFI password in the
Password/WIFI Key/Security key column and click on
"Apply"
7.
In the next window, you'll see the reboot process with a
Bar. When the Bar reaches 100%, (Leave the device for
1 minute to let it reboot itself).
8.
Open the list of available networks again using your
smartphone. Find out the New SSID "Coredy
E300_EXT" and connect with it using the same
password as of your primary router/AP.
9.
If the internet works, unplug Coredy E300 and plug it
halfway between your Router and the Device intended
for the internet usage/dead zones in your home where
you were getting low to no WIFI signals.
03
Package Contents:
Front Panel
The Coredy E300 WiFi Range Extender is a network device
with multifunction, which can be using for increasing the
distance of a WiFi network by boosting the existing WiFi
signal and enhancing the overall signal quality over long
distances. An extender repeats the signals from an existing
WiFi router or access point.
The Coredy E300 WiFi Range Extender also can be used
as an Access Point or Router.
Coredy E300 Mini WiFi Range Extender x 1
Quick Installation Guide x 1
User Manual x 1
RJ-45 Networking Cable x 1
Reset Pin x 1
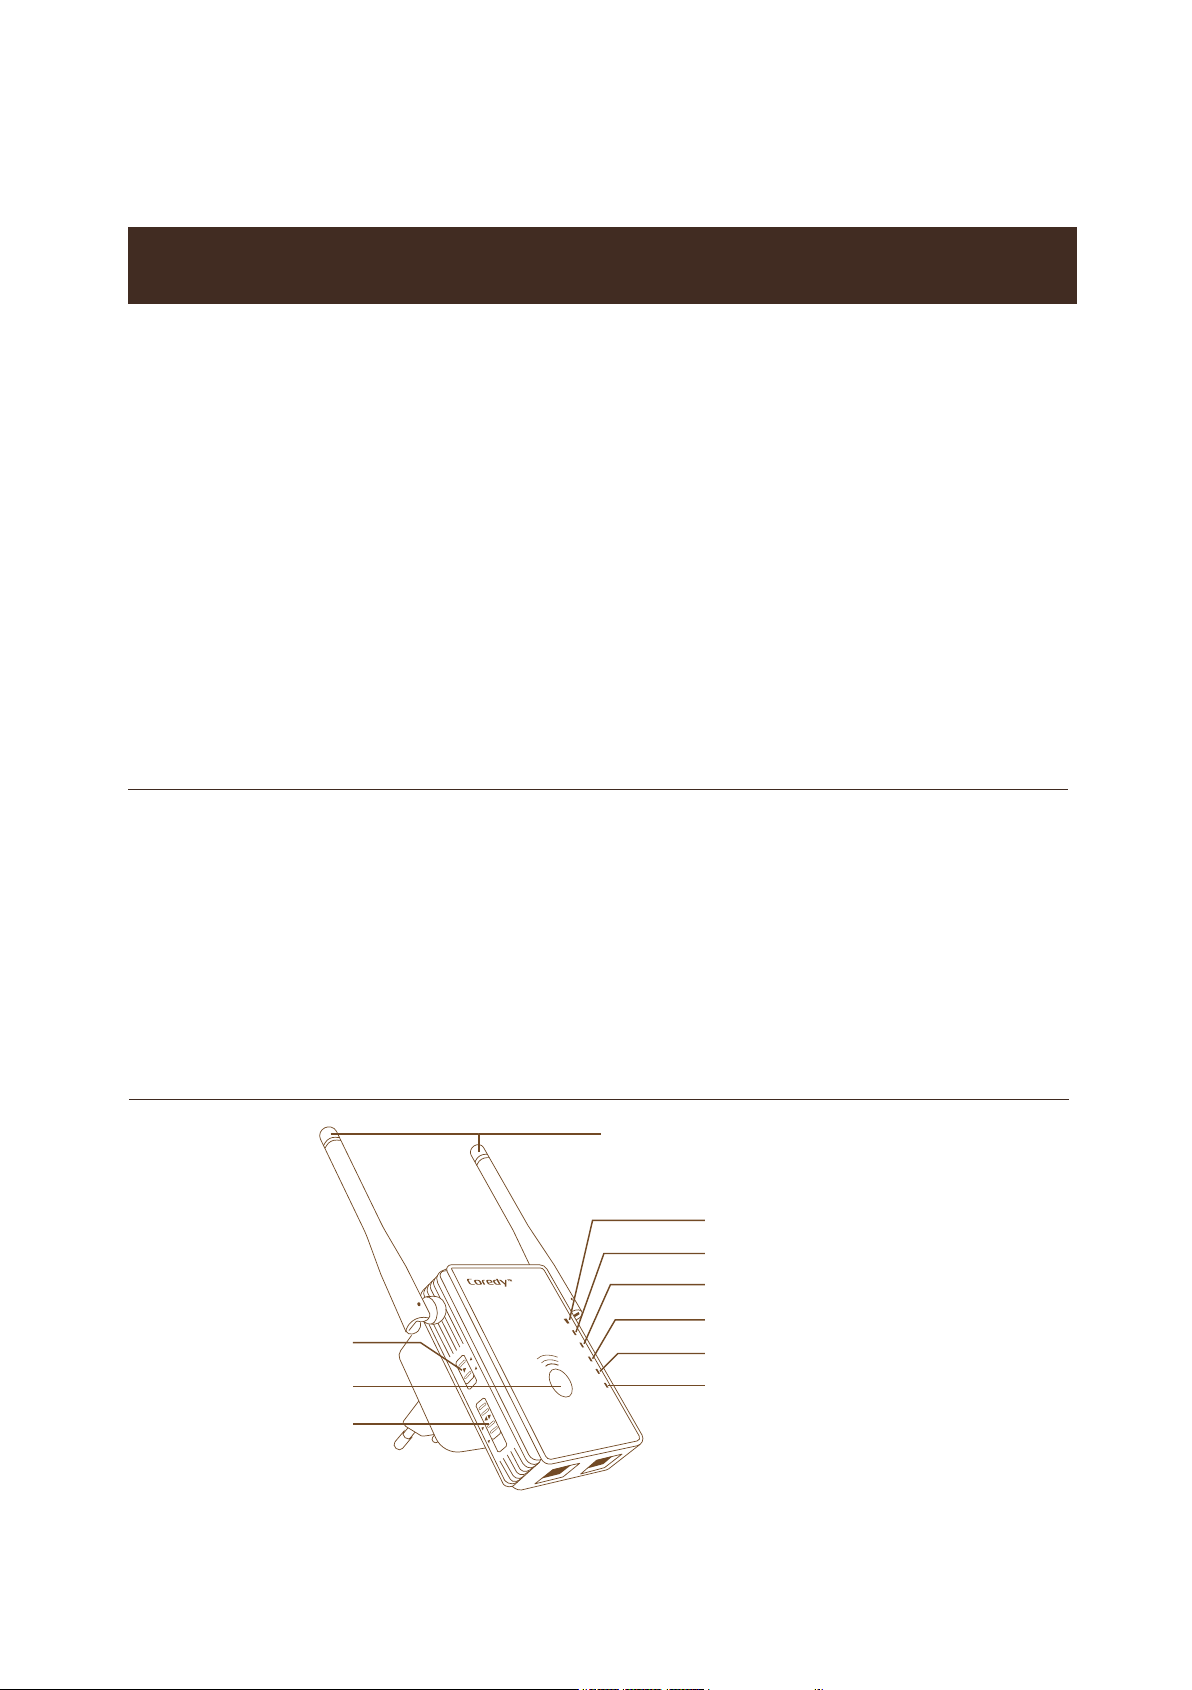
Overview
User Manual
WPS
WLAN
Power/WPS
WAN/LAN
LAN
ON
OFF
Repeater
Access Point
Router
Power Switch
WPS Button
Mode Selector Switch
WLAN LED 1
WLAN LED 2
WLAN LED 3
Power/ WPS LED
WAN/ LAN LED
LAN LED
2 x External Antennas
04
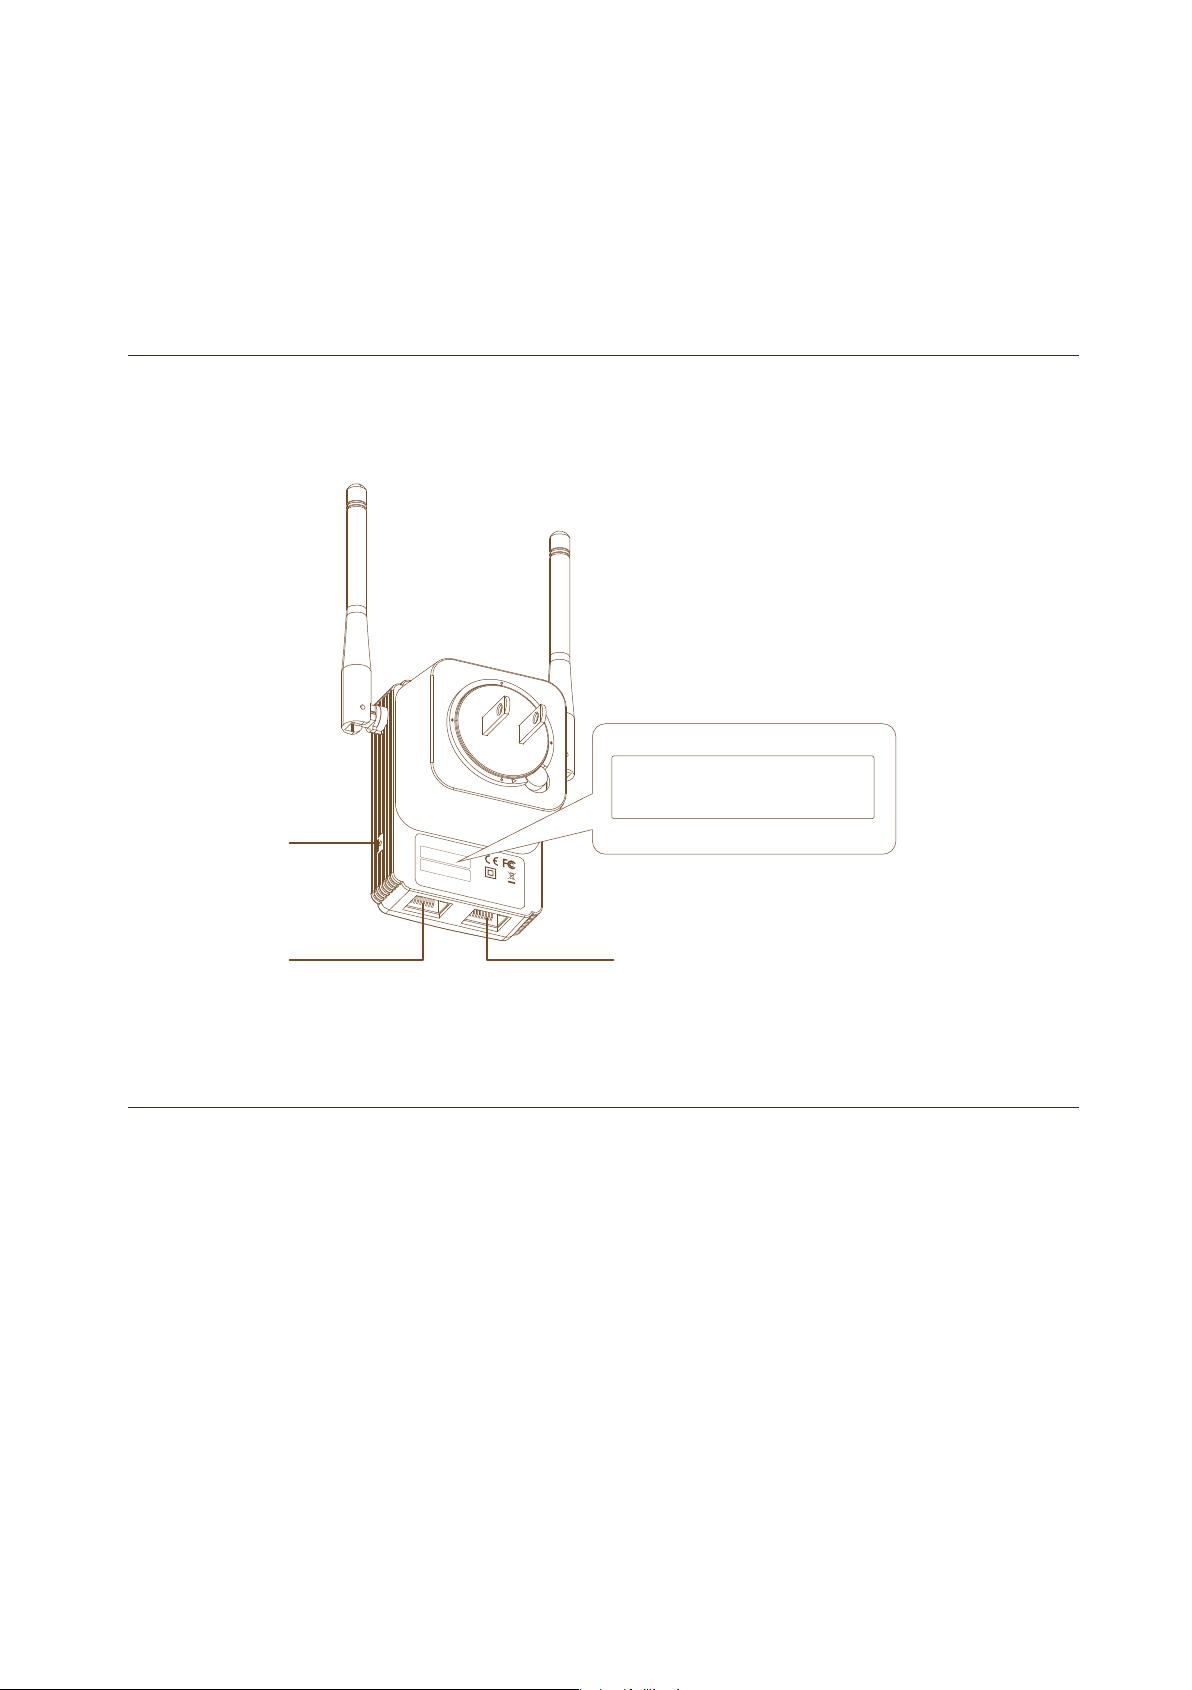
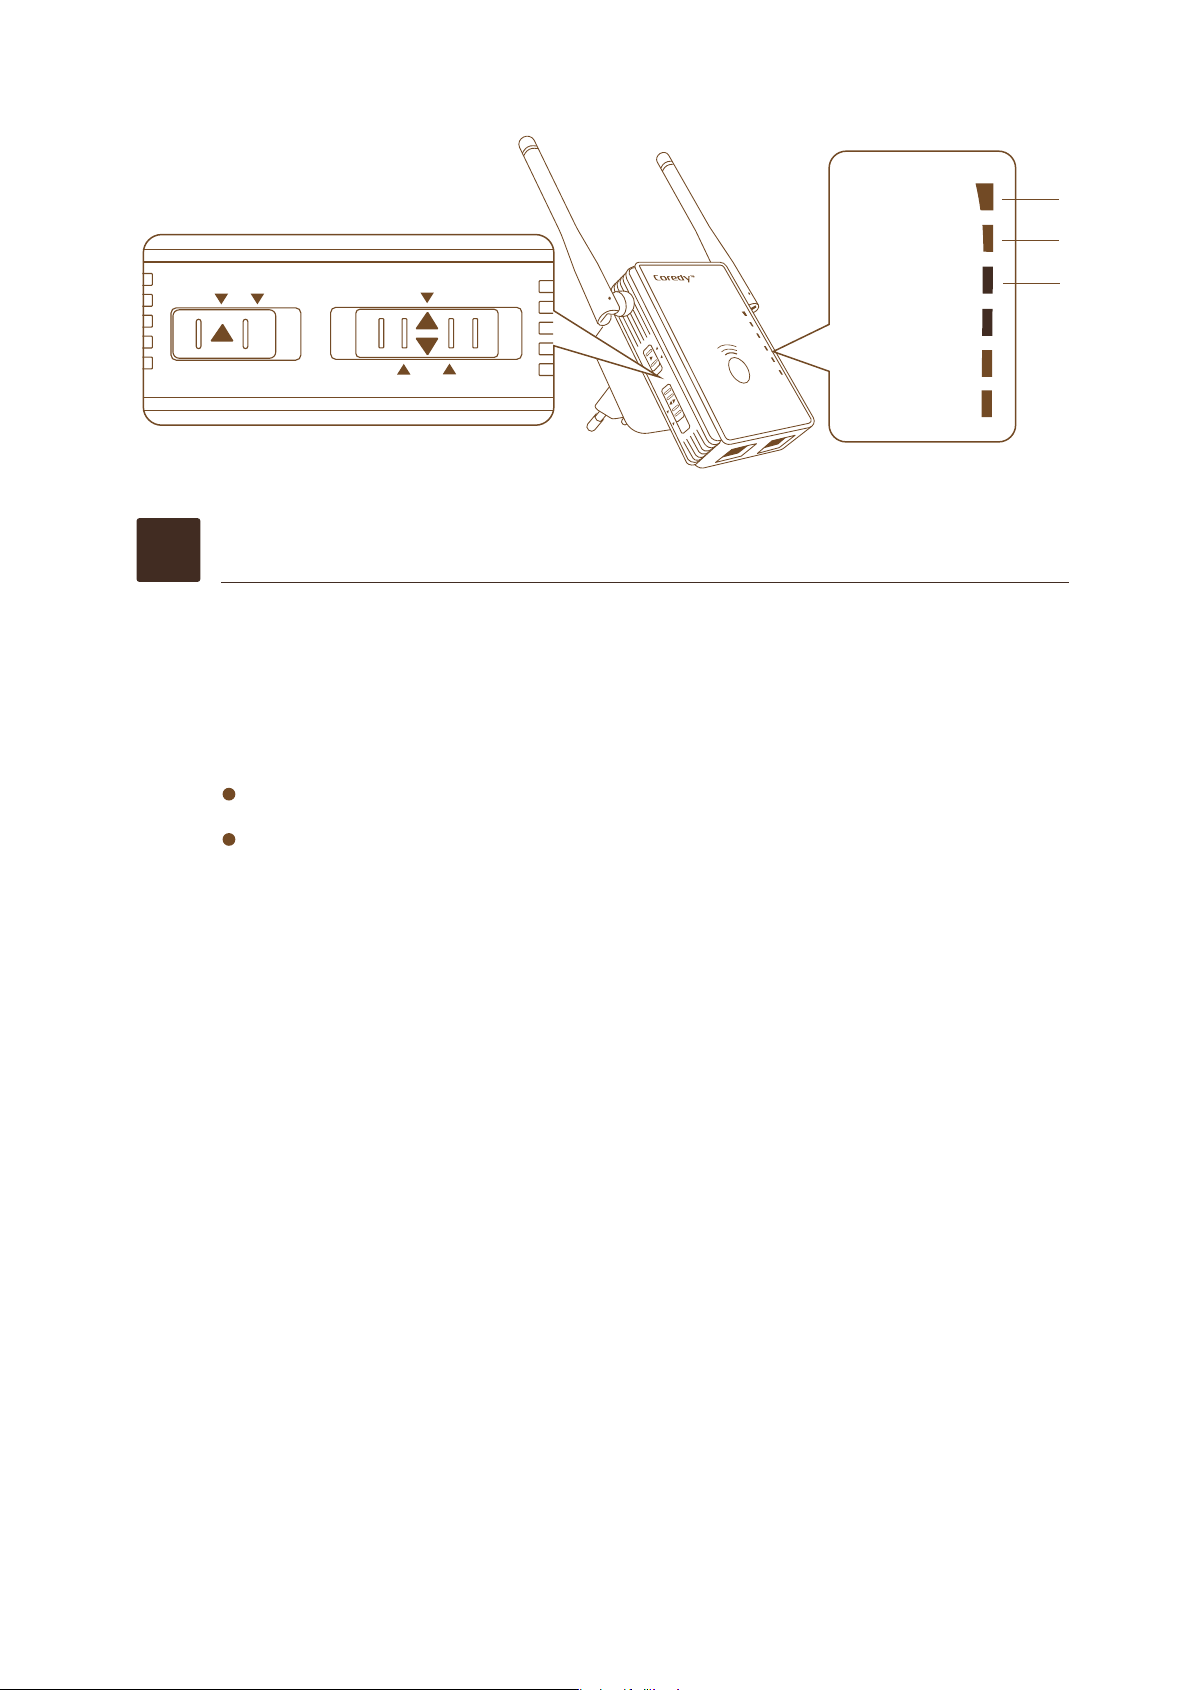
Rear Panel
Before you install your extender, familiarize yourself with its
LEDs, buttons, and port.
Some computer required to type the password (pin number
on the label) during the initial login.
Lit amber. The E300 is starting.
Blinking. Press and hold the WPS 3 seconds on the Rear
Panel lets you use WPS to join the WiFi network without
typing the WiFi password. The WPS LED blinks amber
during this process.
Off. Power is not supplied to the router.
LED Descriptions
Power/WPS LED
RESET
WAN/LAN
LAN
WiFi AP/PEPEATER
Input:100-240V~
50/60Hz.0.3A
MAC:80:3F:5D:93:6B:46
PIN:96612545
MADE IN CHINA V3
WS-WN578R2 REV .A
SN:WS1506270029
Default IP:192.168.10.1
URL:http://ap.setup
User&Password:admin
MAC:80:3F:5D:8A:7E:AA
PIN:XXXXXXXX
05
Lit amber. The E300 is starting.
Blinking fast. The port is sending or receiving traffic.
Off. No Ethernet cable is connected.
WAN/LAN LED
Lit amber. The extender has detected an Ethernet cable
connection to the AP or other device.
Blinking fast. The port is sending or receiving traffic.
Off. No Ethernet cable is connected.
LAN LED
WLAN LED 1 – LED 3
Wi-Fi fadio is operating
Best connection
Good connection
Poor connection
No connection
(This LED indicates the connection
between the extender and the router
or access point )
Mode
LEDs
Description
Aeccess Point
Router
Repeater
ON
Bliking
OFF OFF
ON
OFF OFF
ON OFF
ON
ON
ON ON
ON
ON
Wi-Fi fadio is operating
ON
ON
ON
1
2 3

06
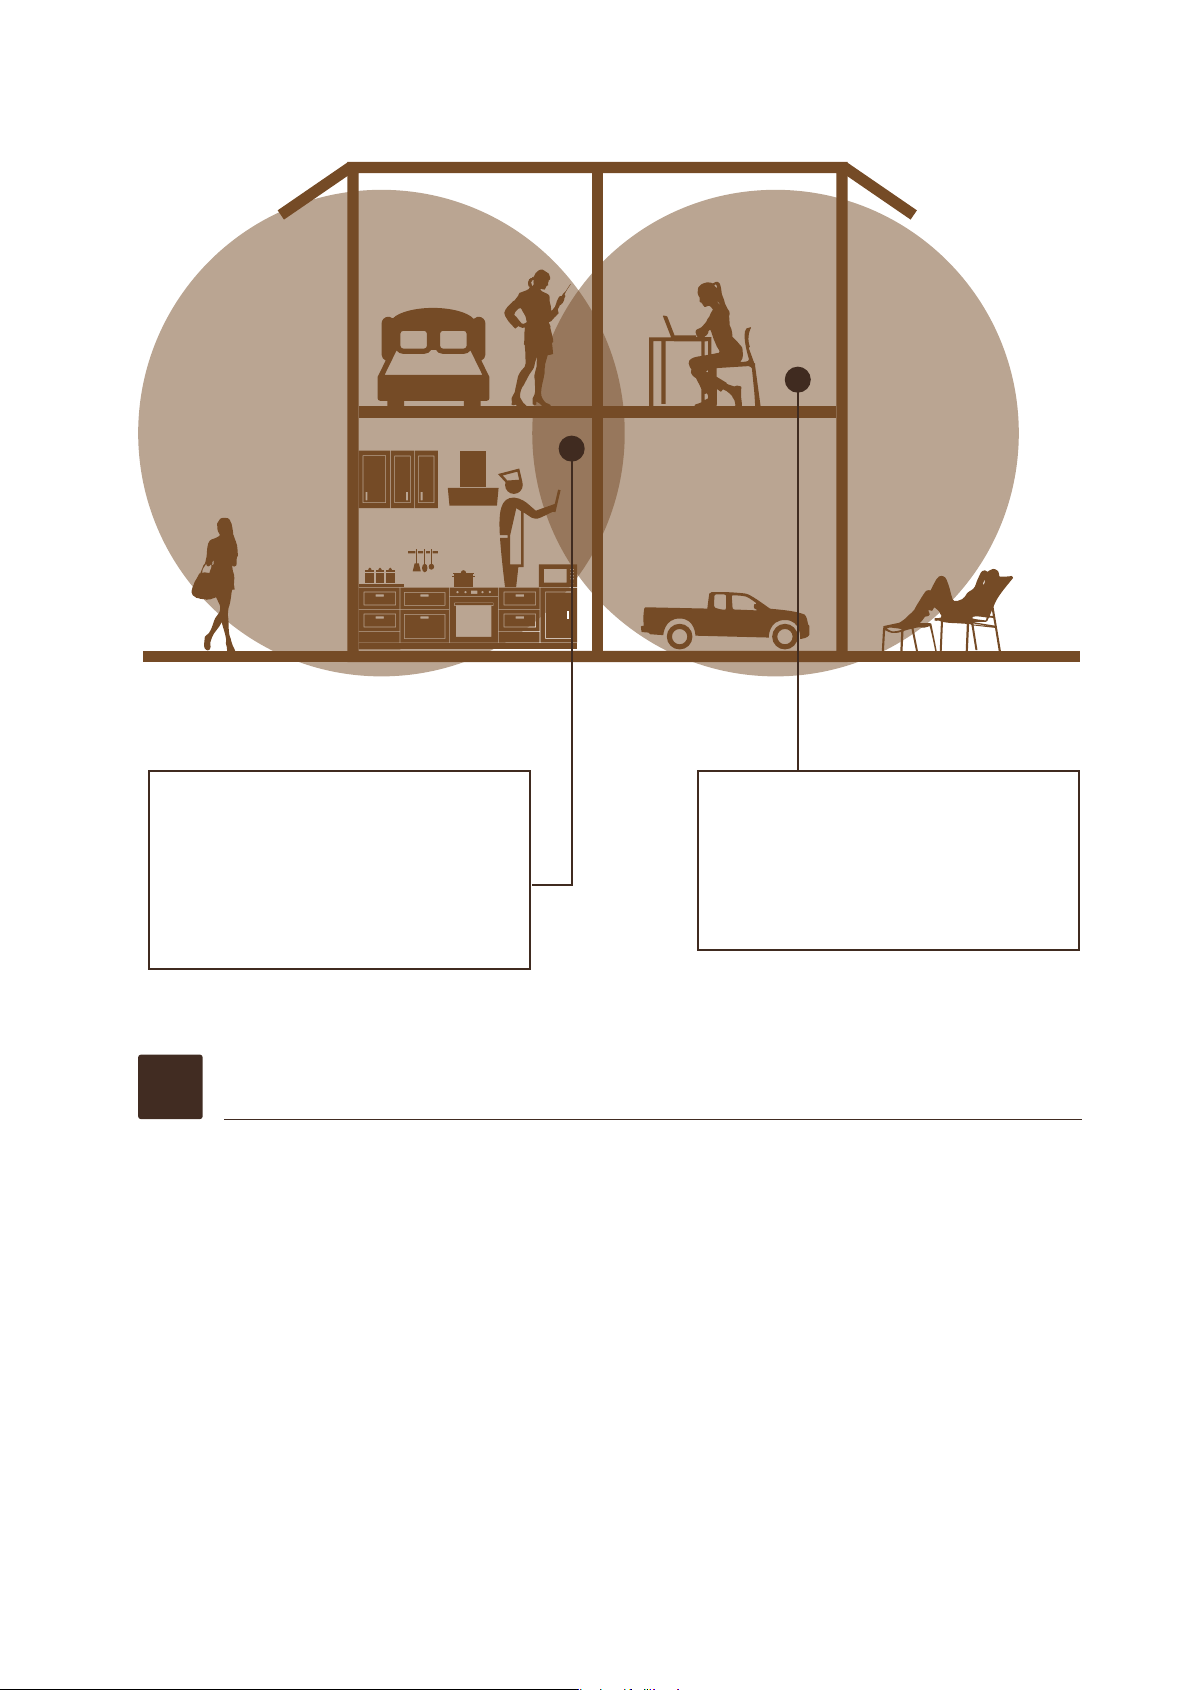
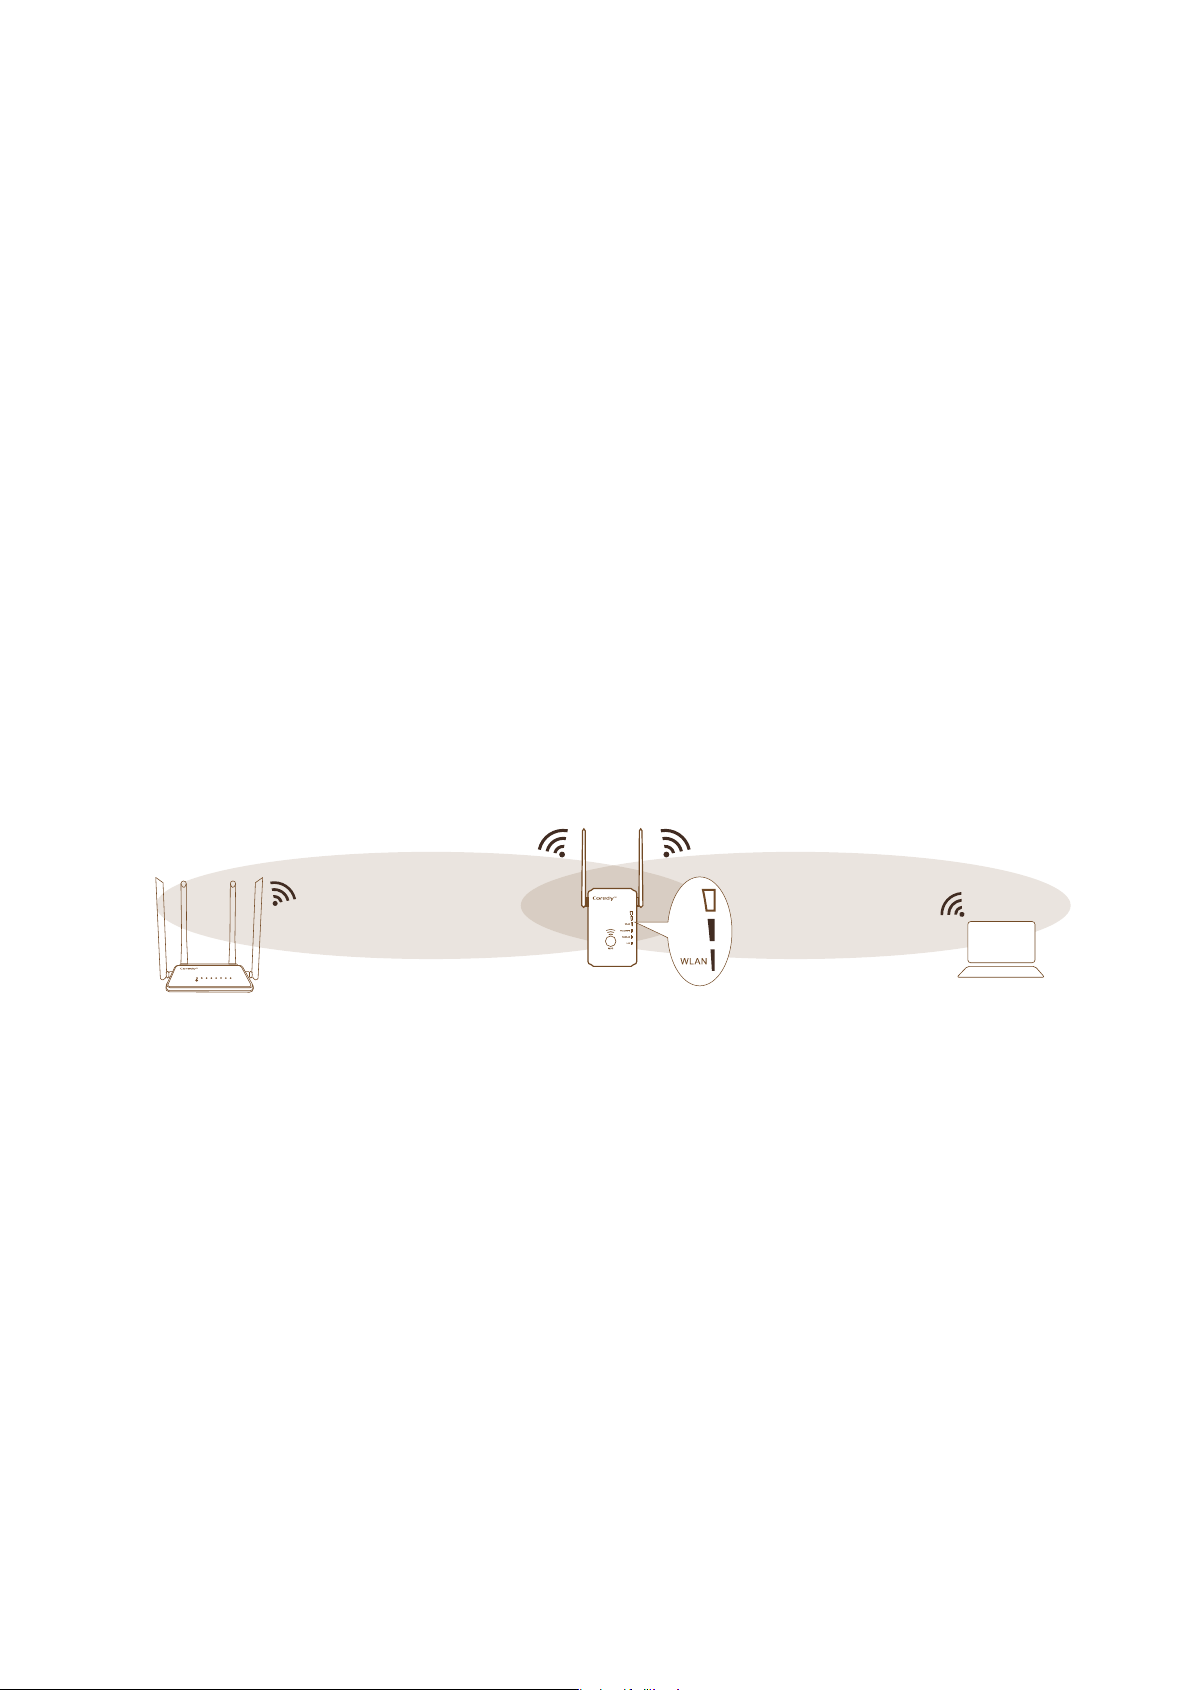
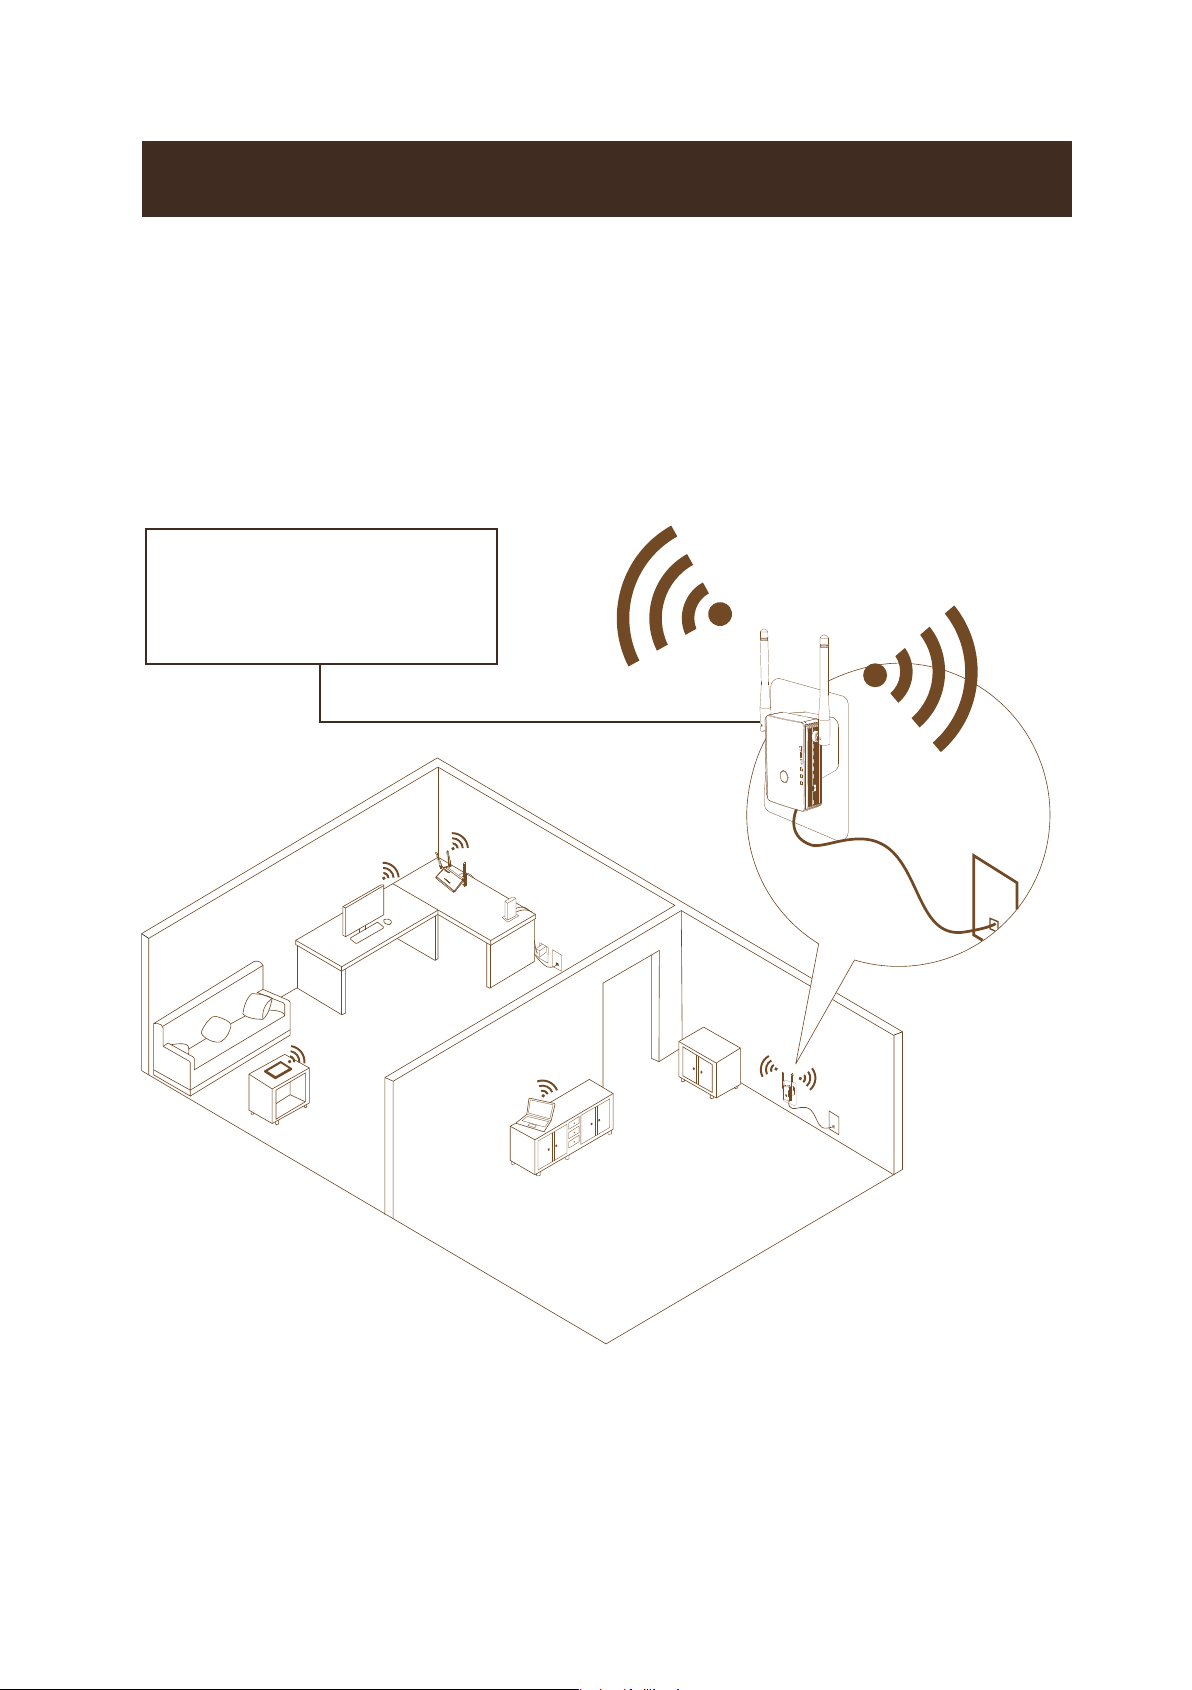
When to Use Your Extender
We recommend that you connect through the extender
network only when the WiFi device is in a “dead zone”
where connection from the existing network is poor or
nonexistent. Data traffic routed through the extender is
inherently slower than traffic routed directly from the
network.
How the Extender Works
The extender works like a bridge between a WiFi router (or
a WiFi access point) and a WiFi device outside the range
of the WiFi router. The extender performs two main jobs:
The extender connects to a working WiFi network.
When the extender connects over WiFi to an existing
network, it functions as a network client, similar to how a
WiFi device connects to a network.
Using as a Extender
The extender acts as an access point for WiFi devices.
The extender broadcasts its own WiFi network that WiFi
devices can join. In its role as an access point, the
extender performs tasks that WiFi routers do, such as
broadcasting its network name (SSID).
The extender must do each of these jobs so that both
ends of the bridge are in place.
07
Turn the Power On/Off button to “On” and Mode
Switch Button to “Repeater” on the side of the
extender, plug the extender into an electrical outlet,
place your extender in the same room as your WiFi
router.
Proximity to the WiFi router is required only during the
initial setup process.
Power on the Extender
1
Boosts the range of your
existing WiFi and creates
a stronger signal in hard
to reach areas.
WiFi Range Extender
sometimes your router
does not provide the WiFi
coverage you need
Existing WiFi
08
To extend the range of your WiFi network, you must
connect the extender to your existing WiFi network.
You can do this in one of two ways:
Method 1. Connect with a web browser.
Method 2. Connect with WPS. For more
information, see Method 2: Connect with WPS.
For more 11.
WPS
WLAN
Power/WPS
WAN/LAN
LAN
ON
OFF
Repeater
Access Point
Router
Power/WPS
WLAN
WAN/LAN
LAN
Access Point
Router
Repeater
ON OFF
1
2
3
Connect to an Existing WiFi Network
2
1.
Use a WiFi network manager on a computer or mobile
device (recommended) to find and connect to the
extender WiFi network “Coredy E300” , type the
password (PIN number) on the label of rear panel
extender if required.
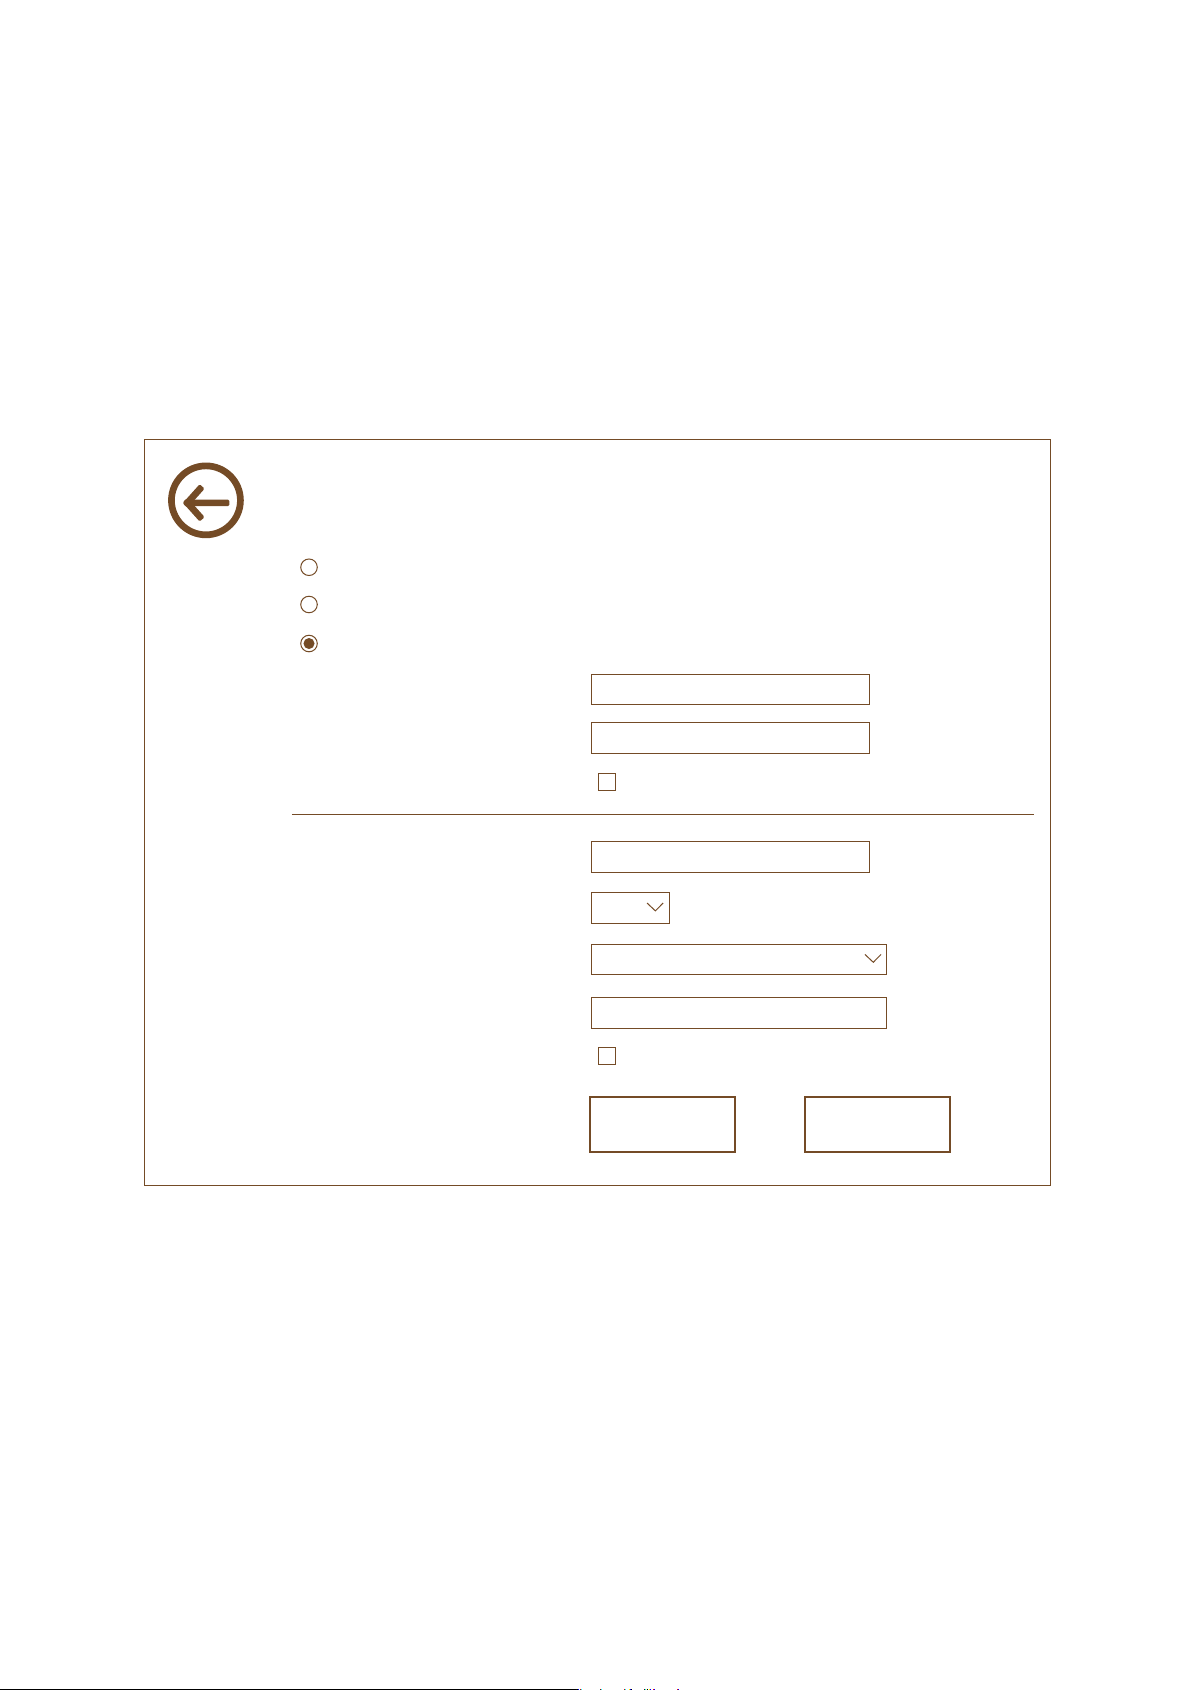
Method 1: Connect with a web browser
09
2.
Launch a web browser, enter http://192.168.10.1/ or
http://ap.setup/ in the address field of the web browser,
when prompted, enter admin for the user name and
admin for the password, both in lowercase letters.
3.
Click the Repeater in the Mode Wizard field.
4.
Click the Select button to choose a WiFi network to extend
Wireless Repeater Mode
SSID
Your Target Network Name
David
Connect to Your Target Network Name
Coredy E300_EXT
Hide Password
Security key
Repeater SSID
Apply
The Repeater Wreless key same as your Wireless AP/Router
6
11
WPA2-PSK
WPA2-PSK
Channel Security
Signal
Select
The password of your Target Network
Refresh
WLAN
Power/WPS
WAN/LAN
LAN
MAC:80:3F:5D:8A:7E:AA
PIN:XXXXXXXX

10
5.
In the Key (Network password) field, type the existing WiFi
network password (also called the passphrase or security
key) and click the Apply button, wait 1 minute to reboot the
extender.
Note: Click the Refresh button if the wireless Network list
couldn't loads completely or successfully.
7.
Unplug the extender and move it to a new location that is
about halfway between your router and the area with a
poor router WiFi signal.
6.
Find and connect to the new extended WiFi network on
your computer or WiFi device.
The extender creates a new extended WiFi network. The
extender’s new WiFi network name is “Coredy
E300_EXT”, use the same WiFi password that you use for
your WiFi router.
Note: If the extender doesn’t connect to the router, the
WLAN LED 1 keeps blinking and the extender’s new WiFi
network name doesn’t change to “Coredy E300_EXT” .
If the WLAN LED 1 keeps blinking and the extender’s new
WiFi network name change to “Coredy E300_EXT” , you
might type the incorrect password during on step 5.
WLAN WAN LAN1 LAN2 LAN3 LAN4 WPS

11
9.
If only the WLAN LED 1 light amber , plug the extender into
an outlet closer to the router and try again.
Keep moving the extender to outlets closer to the router
until the WLAN LED 1 , LED 2 and LED 3 light amber
simultaneously.
Note: Place the extender in an elevated location and
minimizing the number walls and ceilings between the
router and your other devices.
Use the WLAN LED 1 – LED 3 to help you choose a spot
where the extender-to-router connection is optimal.
The location that you choose must be within the range of
your existing WiFi router network.
Wi-Fi Protected Setup (WPS) lets you join a secure
WiFi network without typing the network name and
password.
Note: WPS does not support WEP network security. If
you are using WEP security, follow the instructions in
Method 1: Connect with a web browser on page 8.
Method 2: Connect with WPS
12
1.
Press the WPS button on the front panel of the extender.
The WPS LED blinks.
2.
Within two minutes, press the WPS button on your router
or access point.
When the extender connects to your existing WiFi network
successful, the extender's new WiFi network name will
change to “Coredy E300_EXT", and the WLAN LED1 -
LED 3 will light amber (check the WLAN LED Descriptions
on Page 5), confirm it on your computer or WiFi device.
If the extender could not connect to your existing WiFi
network, try again. If it still does not work, see Method 1:
Connect with a web browser on page 8.
3.
Unplug the extender and move it to a new location that is
about halfway between your router and the area with a
poor router WiFi signal.
4.
Use the WLAN LED 1 – LED 3 to help you choose a spot
where the extender-to-router connection is optimal.
5.
If only the WLAN LED 1 light amber , plug the extender into
an outlet closer to the router and try again.
Keep moving the extender to outlets closer to the router
until the WLAN LED 1 , LED 2 and LED 3 light amber
simultaneously.
The location that you choose must be within the range of
your existing WiFi router network.
WLAN WAN LAN1 LAN2 LAN3 LAN4 WPS
13
Connect an Ethernet-Enabled Device
After the extender is connected to your existing WiFi
network, you can connect a wired device to the extender
using an Ethernet cable. That device can then access your
existing network through the WiFi connection.
WLAN WAN LAN1 LAN2 LAN3 LAN4 WPS
WLAN
Power/WPS
WAN/LAN
LAN
6.
Find and connect to the new extended WiFi network on
your computer or WiFi device.
The extender creates a new extended WiFi network. The
extender’s new WiFi network name is “Coredy
E300_EXT”, use the same WiFi password that you use for
your WiFi router.
Note: Place the extender in an elevated location and
minimizing the number walls and ceilings between the
router and your other devices.
Note: If the extender doesn’t connect to the router, the
WLAN LED 1 keeps blinking and the extender’s new WiFi
network name doesn’t change to “Coredy E300_EXT” .
14
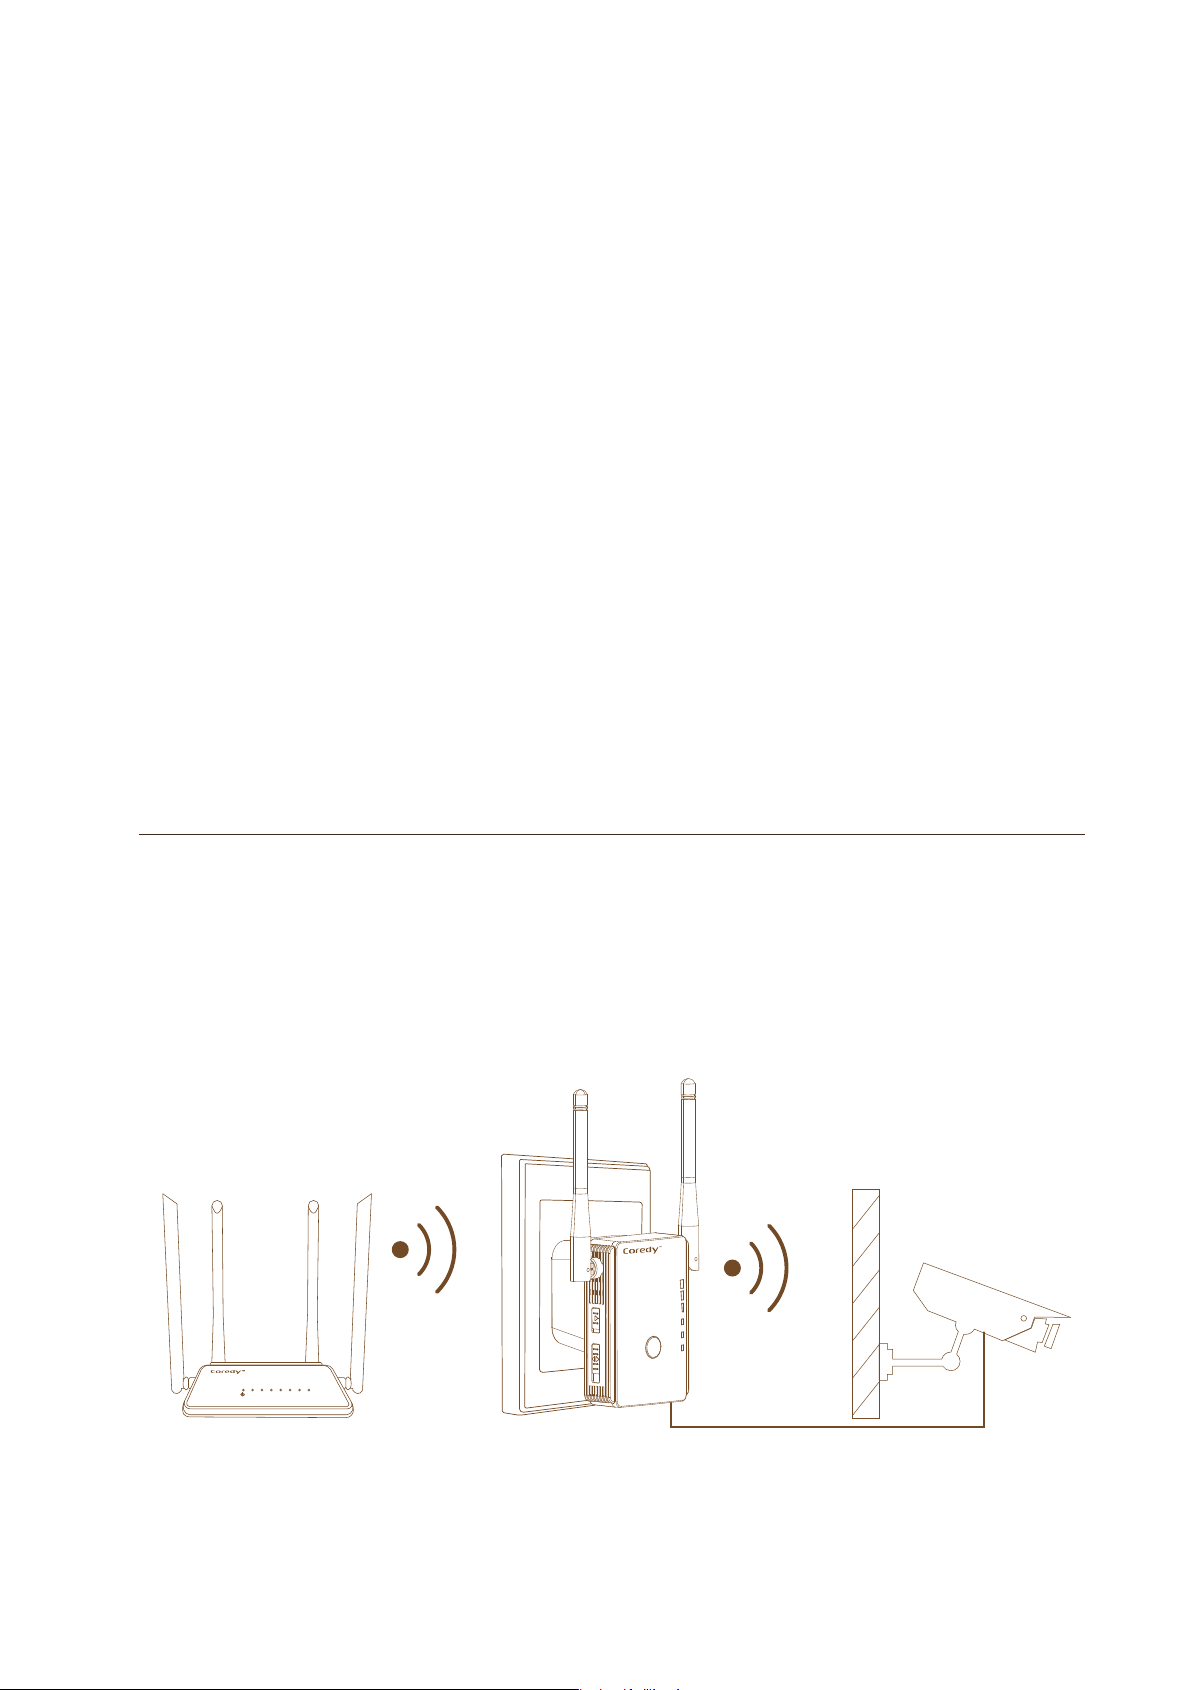
Using as a Access Point
The Coredy E300 WiFi Range Extender also can be used
as an Access Point, An access point receives data by wired
Ethernet (such as hotel’s wired Ethernet), and converts to a
2.4Gig Hz wireless signal. It sends and receives wireless
traffic to and from nearby wireless clients.
WiFi AP coverts the
wired network to a
new WiFi network.
15
Cable Your AP
The following image shows how to cable your AP:
1. Power on the AP, turn the Power On/Off button to “On”
and Mode Switch Button to “Access Point” on the side of
the AP, plug the AP into an electrical outlet.
2. Connect the AP to your wired Ethernet port with the
Ethernet cable came with your AP.
3. Use a WiFi network manager on a computer or mobile
device (recommended) to find and connect to the AP
WiFi network “Coredy E300” , type the password (PIN
number) on the label of rear panel AP if required.
WLAN
Power/WPS
WAN/LAN
LAN
MAC:80:3F:5D:8A:7E:AA
PIN:XXXXXXXX
WAN Port
LAN Port WAN Port
Ethernet cable
LAN4 LAN3 LAN2 LAN1 WAN
Internet
DSL or Cable
WLAN
Power/WPS
WAN/LAN
LAN
16
4. Launch a web browser, enter http://192.168.10.1/ or
http://ap.setup/ in the address field of the web browser,
when prompted, enter admin for the user name and
admin for the password, both in lowercase letters.
5. Click the AP in the Mode Wizard field.
6. Select the Security Type as WAP/WPA2 Mixed
(recommended) and type the password of the WiFi
Network in the Key field.
7. Click Apply button, the AP will take 1 minute to reboot.
8. Find and connect to the new converted WiFi network on
your computer or WiFi device.
The AP creates a new extended WiFi network. The AP’s
new WiFi network name is “Coredy E300”, use the WiFi
password that you set.
Wireless AP Mode
SSID
Coredy E300
11
Channel
Security Type
Security Key
WAP/WPA2 Mixed
Password of the WiFi Network
Hide Characters
Apply
Cancel

17
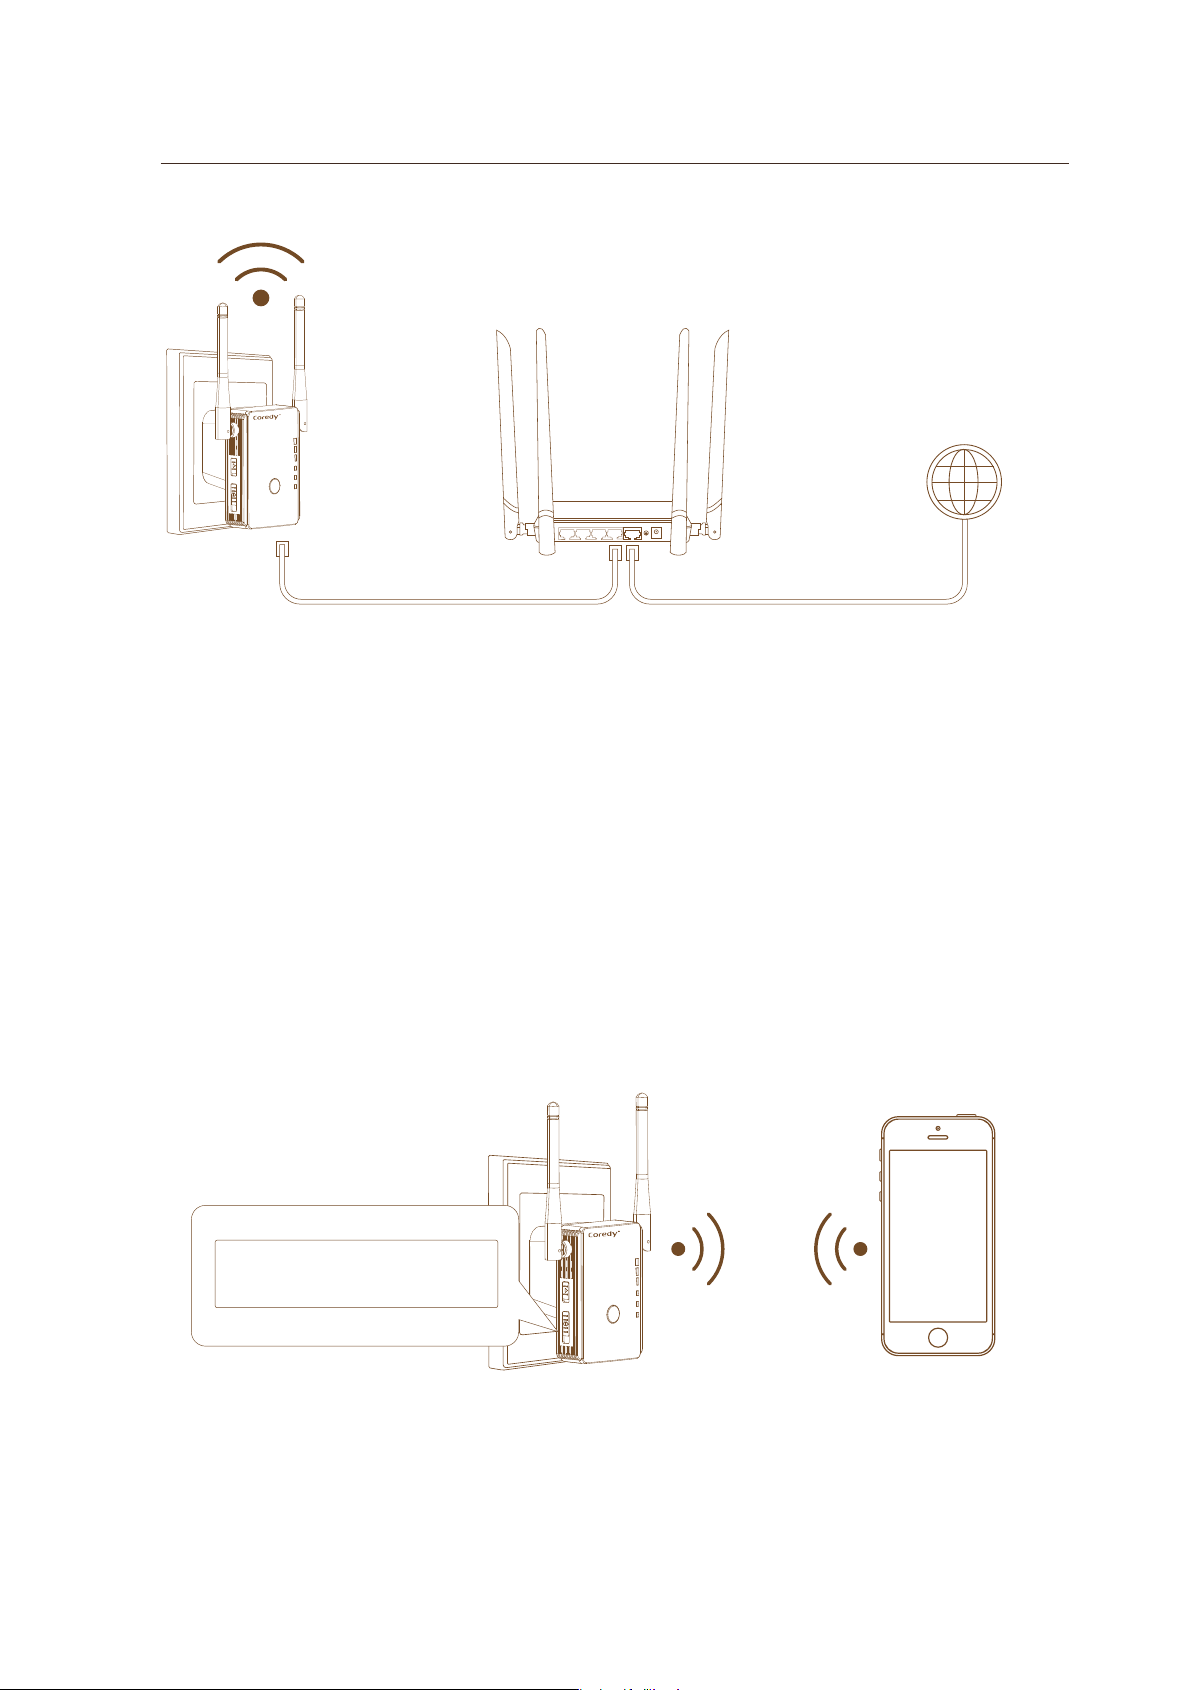
Using as a Router
The Coredy E300 WiFi Range Extender also can be used
as a Router.
1. Prepare your modem unplug your modem's power. If it
has a battery backup, remove the battery.
2. Connect your modem, plug in your modem, Put the
battery back in. Then cable the modem to the blue WAN
port on the router.
3. Power on the router, turn the Power On/Off button to
“On” and Mode Switch Button to “Router” on the side of
the router, plug the router into an electrical outlet.
4. Connect a computer, you can use an Ethernet cable or
connect with WiFi.
WLAN
Power/WPS
WAN/LAN
LAN
Modem
Power adapter
WAN Port
Ethernet cable
Ethernet cable
Internet
DSL or Cable
18
We recommend that using a smart phone to connect with
WiFi, the default WiFi network name is “Coredy E300”,
type the password (PIN number) on the label of rear
panel router if required.
5. Launch a web browser, enter http://192.168.10.1/ or
http://ap.setup/ in the address field of the web browser,
when prompted, enter admin for the user name and
admin for the password, both in lowercase letters.
6. Click the Router in the Mode Wizard field.
7. Configuring the internet connection, Before start
connect to the internet, you might need the following
information to set up your router, if you cannot locate this
information, ask your internet service provider (ISP) to
provide it.
The ISP configuration information for your DSL account
DSL user name and password
Dynamic IP or static IP address settings (special
deployment by ISP, this setting is rare)
WLAN
Power/WPS
WAN/LAN
LAN
MAC:80:3F:5D:8A:7E:AA
PIN:XXXXXXXX
19
8. Position Your Router
The router lets you access your network anywhere within
the operating range of your wireless network. However,
the operating distance or range of your wireless
connection can vary significantly depending on the
physical placement of your router.
If your ISP provides you the DSL details, Select “ ADSL
Dial-up (PPPoE) “, enter the DSL user name and
password, select the Security Type as “WPA/WPA2
Mixed” (recommended) and set the Wi-Fi Network
password in “Key” field, click Apply button, the router will
take 1 minute to reboot.
Wireless Router Mode
Internet service providers offer a fixed IP address (static IP)
Automatically obtain an IP address (dynamic IP)
ADSL Dial-up (PPPoE)
User Name
DSL_user name
Password
DSL_password
Hide Characters
SSID
Coredy E300_EXT
Channel
2
Security Mode
WPA/WPA2 Mixed
Key
Password of WiFi Network
Hide Characters
Apply
24
Cancel

20
1)
Place your router near the center of the area where your
computers and other devices operate, and within line of
sight to your wireless devices.
2)
Make sure that the router is within reach of an AC power
outlet and near Ethernet cables for wired computers.
3)
Place the router in an elevated location, minimizing the
number walls and ceilings between the router and your
other devices.
4)
Place the router away from electrical devices such as
these:
Ceiling fans
Home security systems
Microwaves
Computers
Base of a cordless phone
2.4 GHz cordless phone
5)
Place the router away from large metal surfaces, large
glass surfaces, and insulated walls such as these:
Ceiling fans
Home security systems
Microwaves
Computers
Base of a cordless phone
2.4 GHz cordless phone
6)
(Optional) If you have adjacent access points, use
different radio frequency channels to reduce
interference.
21
Change the Extender Settings
1. Launch a web browser.
2. Enter http://192.168.10.1/ or http://ap.setup/ in
the address field of the browser login screen
displays.
3. Enter admin for the user name and admin for the
password, both in lowercase letters. The BASIC
Home screen displays.
4. Select “Password”
5. Type your new user name and password twice.
6. Click the Apply button, Your changes are saved.
1. Launch a web browser.
2. Enter http://192.168.10.1/ or http://ap.setup/ in
the address field of the browser login screen
displays.
3. Enter admin for the user name and admin for the
password, both in lowercase letters. The BASIC
Home screen displays.
Set up the time and time zone of the extender
Password
Time Zone Settings
Save/Reload Settings
Upgrade Firmware
Reboot DeviceManagement
To change the admin password
1
To set up the time of Extender
2

22
4. Select the Time Zone Settings.
5. Enter the Current Date and Current Time in field,
click Apply.
1.
2.
3.
4.
Launch a web browser.
Enter http://192.168.10.1/ or http://ap.setup/ in
the address field of the browser login screen
displays.
Enter admin for the user name and admin for the
password, both in lowercase letters. The BASIC
Home screen displays.
Select Save/Reload Setting
5. Click the Save button to save the current setting
and click browse and upload to reload the saved
setting.
You can use this feature to save your extender’s
setting and reload it easy when you reset the router to
factory setting or update the router firmware.
Password
Time Zone Settings
Save/Reload Settings
Upgrade Firmware
Reboot DeviceManagement
Password
Time Zone Settings
Save/Reload Settings
Upgrade Firmware
Reboot DeviceManagement
Save/Reload your Extender setting
3
23
The extender firmware (routing software) is stored in
flash memory. You might check if new firmware is
available at www.coredytech.com and to update your
product.
1.
Launch a web browser.
2.
Enter http://192.168.10.1/ or http://ap.setup/ in
the address field of the browser login screen
displays.
3.
Enter admin for the user name and admin for the
password, both in lowercase letters. The BASIC
Home screen displays.
4.
Select Upgrade Firmware
5.
Select a firmware file and click Upgrade.
6.
Reset the extender to factory setting after reboot
finished.
WARNING:
To avoid the risk of corrupting the firmware, do
not interrupt the upgrade. For example, do not
close the browser, click a link, or load a new
page. Do not turn off the router.
Password
Time Zone Settings
Save/Reload Settings
Upgrade Firmware
Reboot DeviceManagement
Update the Extender Firmware
4

24
You can hide the wireless network that which is hidden
and does not display in your wireless client’s scanning
list, other people cannot join the wireless network if
they don’t know your wireless network SSID name
exactly. For example, the Wi-Fi thief could not using
your wireless network even they know your Wi-Fi
Password.
1.
Launch a web browser.
2.
Enter http://192.168.10.1/ or http://ap.setup/ in
the address field of the browser login screen
displays.
3.
Enter admin for the user name and admin for the
password, both in lowercase letters. The BASIC
Home screen displays.
4.
Select Wireless Settings > Broadcast SSID
Select the Disable check box to hide the wireless
network.
5.
Change the SSID name easy to remember and
write it down, click Apply.
6.
Google how to join a hidden network + “your device
name”, For example: Google “how to join a hidden
network on iPhone”
Hide extender's wireless network
5
25
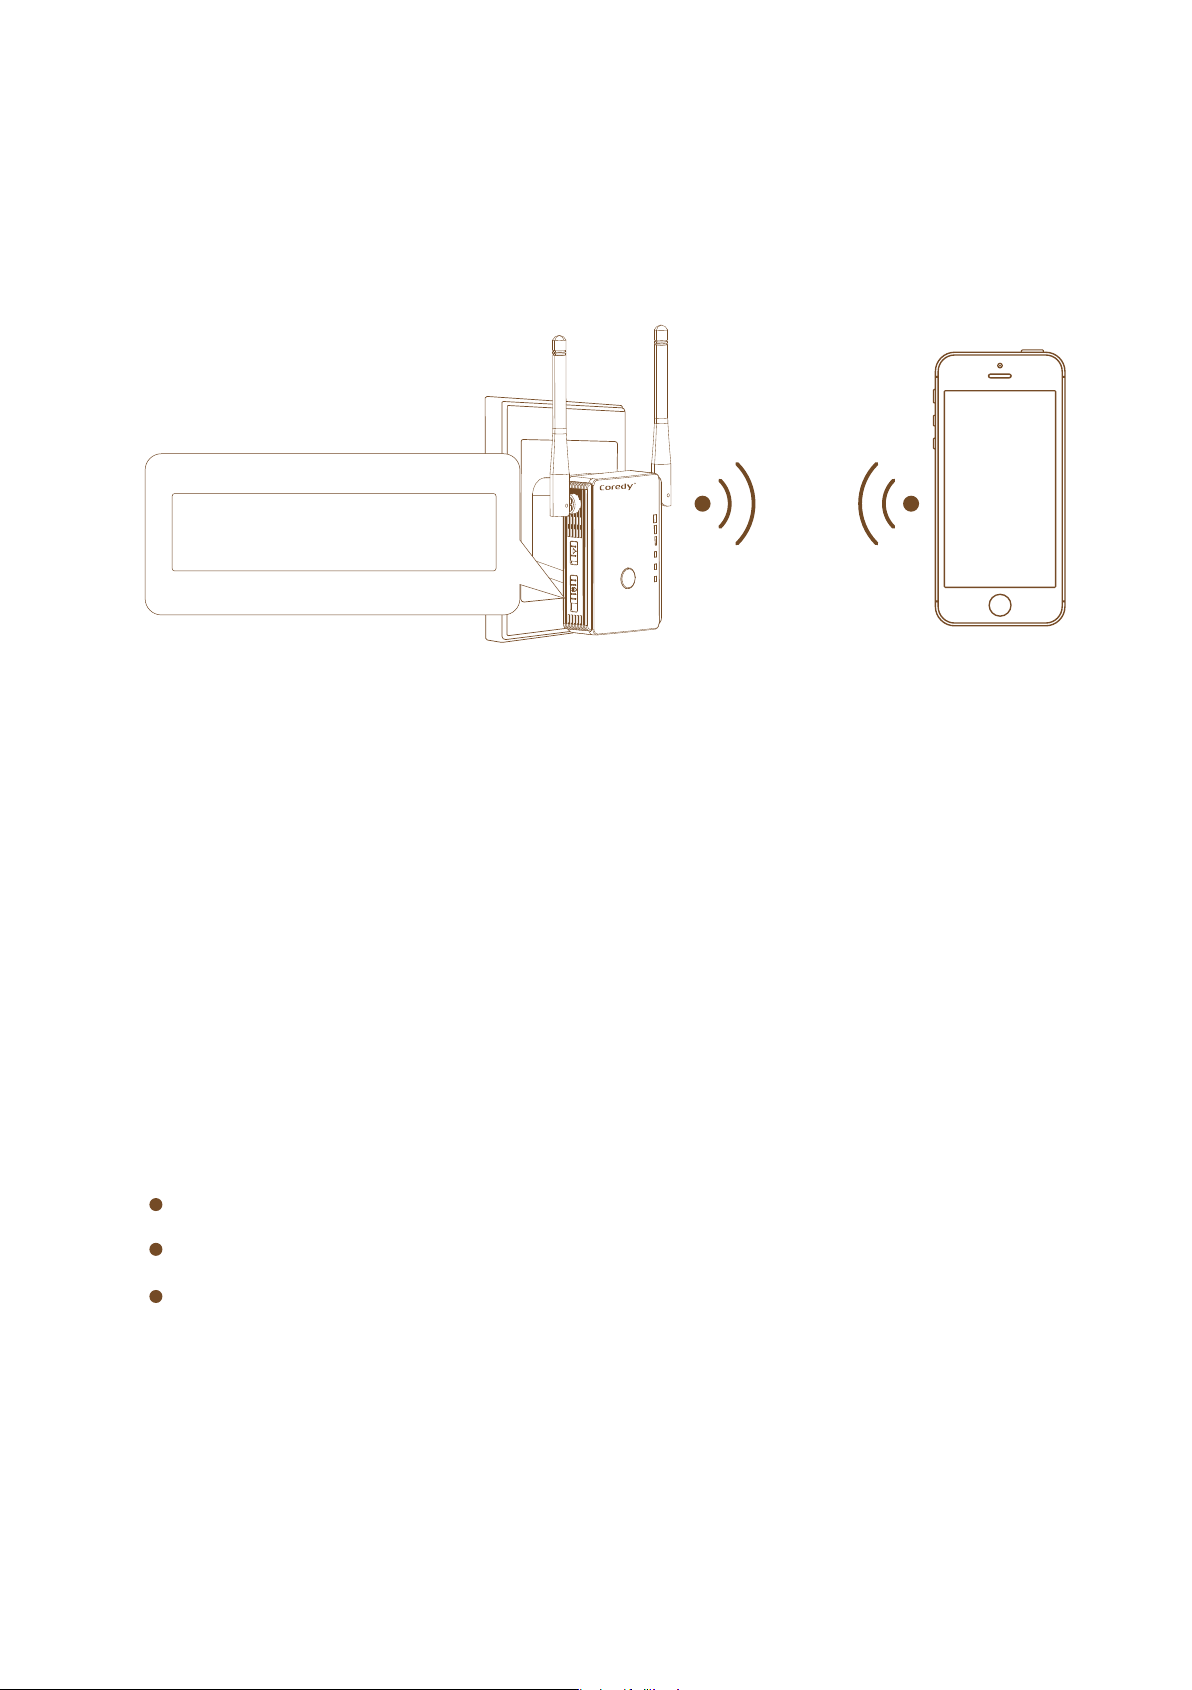
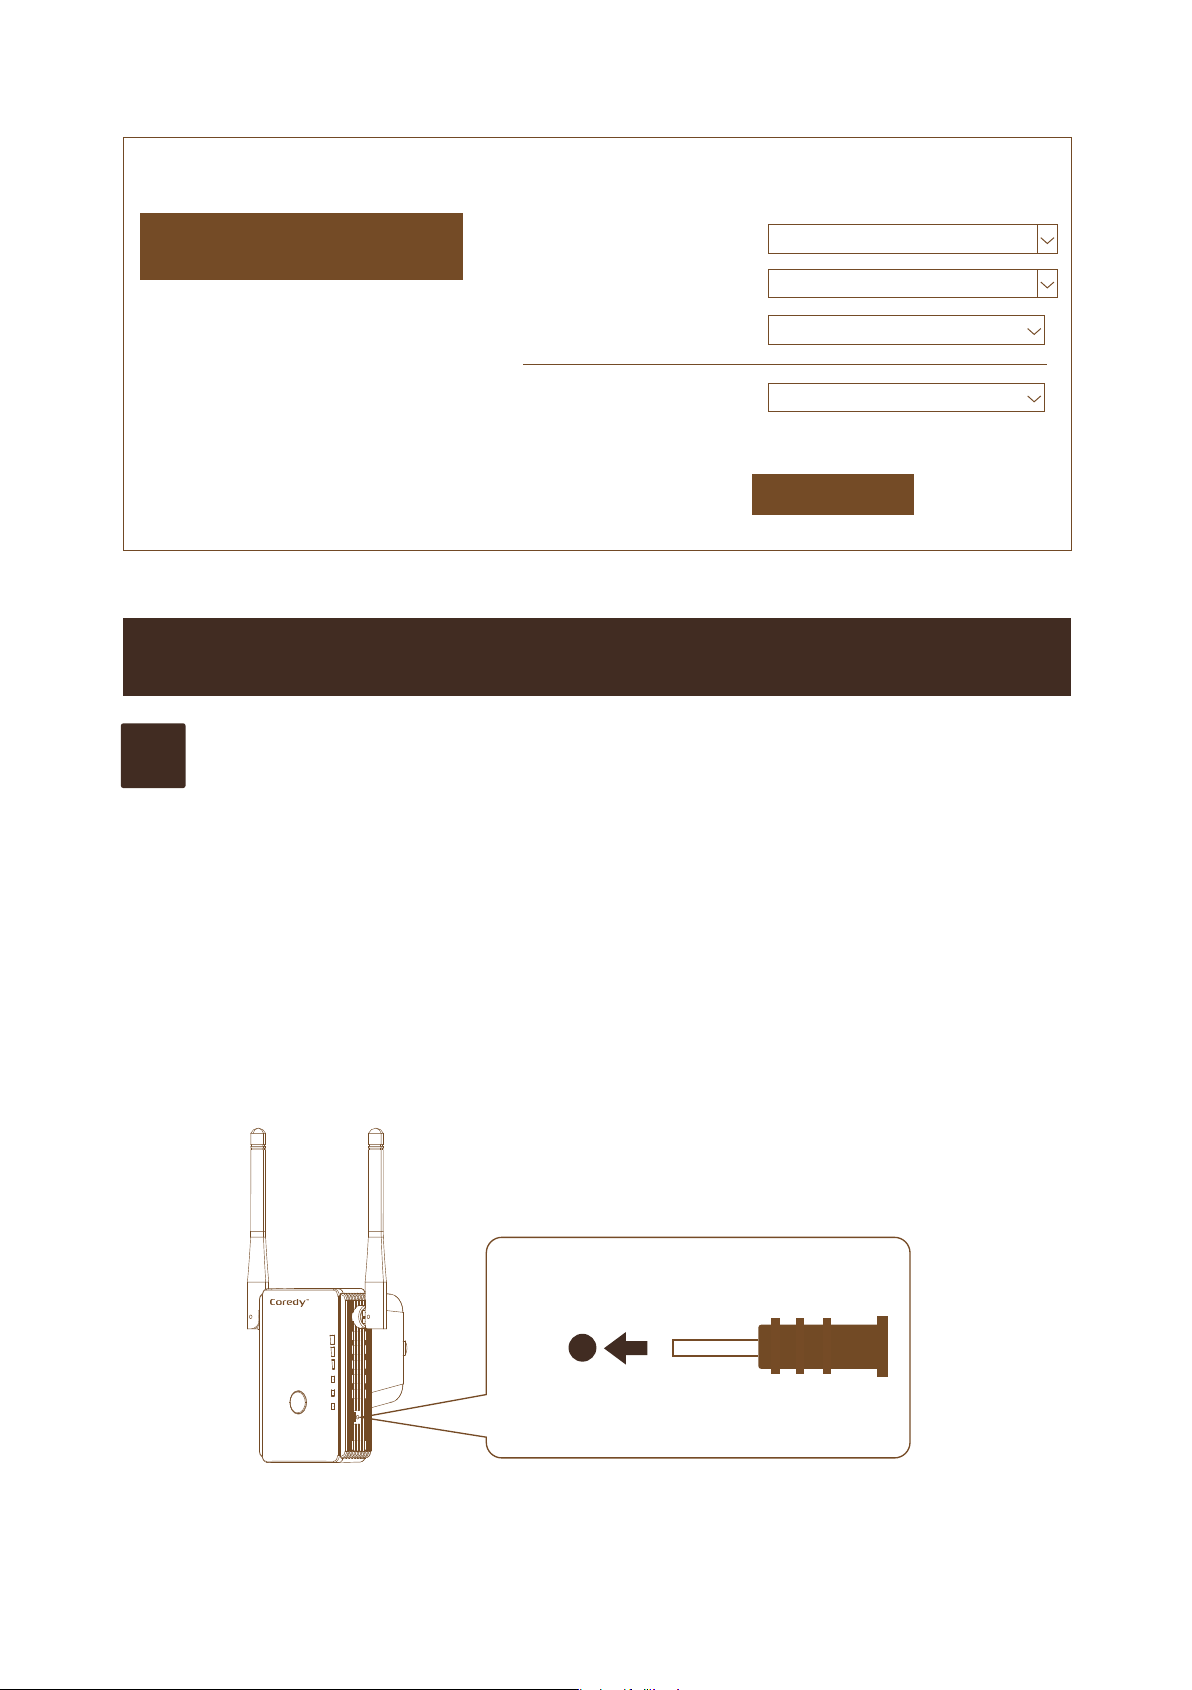
1.
Using a reset pin come with package to press and hold the
Factory Reset button on the extender at least three
seconds untill the LAN and WAN/LAN Leds lights green.
2.
Release the Factory Reset button and wait for the extender
to reboot.
The extender resets and returns to the factory default
settings.
Wireless Settings Basic Settings
Basic Settings
Apply
Setup Wireless Basic Configuration
Advanced Settings
Broadcast SSID
Disable
Wireless Advanced Configuration
WPS
Wi-Fi Protected Setup
Schedule
Wireless Schedule
Back
Back to home page
SSID
easytoremember
Channel
2
Secutity Type
Disable
TROUBLESHOOTING
Reset
WLAN
Power/WPS
WAN/LAN
LAN
Q1
How to reset E300 to factory settings?

26
Make sure that your computer is set up to use
DHCP (most are).
Relaunch the web browser and type
http://192.168.10.1/ or http://ap.setup/ in the
address field. Type your user name and password
and click the LOG IN button.
Reset the extender to factory setting.
The extender is probably placed at the borderline of
the range covered by the router or access point.
1.
Unplug the extender and move it to a new location
that is about halfway between your router and the
area with a poor router WiFi signal.
2.
Using a smart phone to help you choose a spot
where the extender-to-router connection is optimal.
3.
If there is not full WiFi signal on your smart phone ,
plug the extender into an outlet closer to the router
and try again.
The location that you choose must be within the
range of your existing WiFi router network.
WLAN WAN LAN1 LAN2 LAN3 LAN4 WPS
Q2
I am connected to Coredy E300_EXT and
launched a browser, but I cannot log in the Setup
Page/Web Management Page?
Q3
What can I do if my device keep disconnecting
from extender?

27
The extender is probably placed at the borderline of
the range covered by the router or access point. For
more information, see the solution on Q3.
If you are using WEP security, make sure that you are
typing the network password in the correct field.
Place the extender in an elevated location, If your
extender can obtain an IP address but your computer
is unable to load any web pages from the Internet,
check the following:
Your computer might not recognize any DNS server
addresses. A DNS server is a host on the Internet that
translates Internet names (such as www addresses)
to numeric IP addresses.
Ask your Internet Service Provider (ISP) to provide
the correct DNS address or Google the correct the
4.
Plug the extender into an electrical outlet in an
elevated location and minimizing the number walls
and ceilings between the router and your other
devices.
Keep moving the extender to outlets closer to the
router until the full WiFi signal on smart phone.
Q4
The web browser setup guide keeps asking me
for my network password (passphrase) or
security key, and I am sure I have entered the
correct password. What can I do?
Q5
Troubleshoot Internet Browsing?

28
DNS for you, configure your computer manually with
a DNS address, as explained in the documentation
for your computer, if you don’t know how to manually
the DNS, contact technical support at
www.coredytech.com/support or Google “how to
manually set DNS windows 7” .
To join a WiFi network, you must know its network
name (also called the SSID) so that you can select it.
If the network is secure, you must know the
passphrase or key. If the extender does not connect
to the network that you select, the cause might be one
of the following:
It is possible that you typed the network name,
passphrase, or key incorrectly. Use Connect to an
Existing WiFi Network Setup (see Method 1:
Connect with a web browser on page 8) to select
a WiFi network and retype the passphrase or key.
The passphrase or key is case-sensitive. For
example, PASSWORD25 is not the same as
Password25 or password25.
If the extender cannot detect your WiFi network,
check to see if your WiFi network is still working.
Make sure that the WiFi router is turned on. If
possible, move the extender closer to the WiFi
router.
Q6
Cannot Join a WiFi Network and Receive an Error
Message?

29
If you have adjacent access points, use different radio
frequency channels to reduce interference.
In some regions, not all channels are available. Do
not change the channel number unless you
experience interference (shown by lost connections
or slow data transfers). If this happens, experiment
with different channels to see which is the best, or
Google “How to choosing the right channel”.
If you like to change the channel number on
Repeater mode of the extender, you must to change
the channel on your main router, the extender will
change its channel number automatically as your
main router. Check the user manual of your router or
ask the supplier of your router for how to change the
channel.
Sometimes extender’s WiFi connection between the
WiFi router and the extender is poor. You can
establish the best connection with a clear line of
sight between the extender and the WiFi router.
Make sure that no physical obstacles exist between
the extender and the WiFi router, and try to move the
extender closer to the WiFi router.
Q7
Change the wireless channel to reduce
interference?

23
Mini Range Extender/Aessess Point/Router
MODEL: Coredy E300
Toll Free US: +1-800-999-8470
(English Service) Mon-Fri 10:00-19:00 (CST)
Toll Free UK: +44-808-134-9909
(English Service) Mon-Fri 15:00-01:00 (GMT)
E-Mail: [email protected]
Website: www.coredy.com