
User guide.

2
GENERAL SAFETY
INFORMATION
• This appliance is not
intended for use by persons
(including children) with
reduced physical, sensory,
or mental capabilities, or
lack of experience and
knowledge, unless they
are closely supervised and
instructed concerning use of
the appliance by a person
responsible for their safety.
Close supervision is necessary
when any appliance is used
by or near children. Children
should be supervised to
ensure that they do not play
with the appliance.
• Do not use outdoors.
NEVER LEAVE THE
NUTRIBULLET
®
UNATTENDED
WHILE IT IS IN USE
ALWAYS UNPLUG THE
NUTRIBULLET
®
WHEN NOT
IN USE
Important safeguards.
Warning! To avoid the risk of serious injury, carefully read all
instructions before operating your NutriBullet
®
. When using any
electrical appliance, basic safety precautions should always be
observed, including the following important information.
Save these instructions!
FOR HOUSEHOLD USE ONLY
HEAT & PRESSURE
SAFETY
• Always use extreme care and
attention when blending hot
liquids or hot ingredients. The
release of thermal energy
from the ingredients and
friction from the rotating
blades (during the blending
process) can further heat
and pressurize the mixture.
Only operate with vented lid
securely attached.
• Allow to cool before
assembling or disassembling
parts and before cleaning
the appliance.
BLENDING WITH
NUTRIBULLET
®
CUPS:
To avoid personal injury,
never blend hot or
carbonated ingredients
or liquid in any sealed
NutriBullet
®
cup! Only use
the Pitcher with the vented
lid when blending hot or
warm ingredients.
!

3
Heated ingredients can
pressurize sealed containers
when agitated and cause
cup and blade separation or
violently expel hot contents
upon opening. Always
start the blending process
with room temperature or
refrigerated ingredients and
liquids (21°C/70°F or cooler).
When using the sealed
cup, only blend for one
minute or less. Friction
from prolonged operation
can heat ingredients and
generate internal pressure
in the sealed container. This
pressure can cause the cup
and blade to separate or
blended contents to erupt
from the container, resulting
in possible personal injury
and/or property damage. If
the sealed NutriBullet
®
cups
are warm to the touch, power
o your machine leaving the
cup attached to the base
and allow the vessel to cool
for fifteen minutes or more.
Allow contents to settle before
slowly releasing the cup
from the motor base. With
the NutriBullet
®
cup, pointed
away from your face and
body, slowly unscrew the
easy-twist extractor blade
to gently release any
residual pressure.
If you need to blend for
longer than one minute,
blend for 1-minute intervals.
After each 1-minute interval,
allow the motor base to shut
o completely and wait at least
one minute before starting
the next cycle. Do not run
for more than 3 consecutive
1-minute intervals to prevent
the contents from overheating.
Allow contents to settle for 2-3
minutes after the third blending
cycle to prevent overheating
and build-up of pressure.
Sugar in fruits and vegetables
can ferment over time,
releasing gases that cause
pressure to build up in a
sealed NutriBullet
®
cup. Do
not store any smoothies or
blended mixtures in vessels
sealed with the easy-twist
extractor blade. If you will
not consume your smoothie
immediately, remove the
easy-twist extractor blade
and cover your NutriBullet
®
cup with plastic wrap before
refrigerating. If your smoothie
or blended mixture was
made in the pitcher, transfer
to another storage container
before refrigerating. Never
store any blended mixture in
a sealed cup unrefrigerated,
or for any prolonged period
of time; contents will spoil and
ferment, producing gases that
might cause eruption.
Never blend carbonated
liquids or eervescing
ingredients (e.g., baking
soda, baking powder, yeast,
etc.). Pressure from released
gases can cause a sealed
WARNING!
WARNING!

4
blending container to burst,
resulting in possible injury
and/or property damage.
BLENDING WITH
THE PITCHER:
Use extra caution when
blending hot liquids or
ingredients in the pitcher.
Never turn the power on
while using the pitcher
without the vented lid cap
inserted and locked into the
pitcher lid, as ingredients
can splash, and if hot or
warm, could potentially
cause thermal injury and/or
property damage.
Steam and splattering
ingredients can escape
through the pitcher lid,
potentially scalding and/or
burning the user. NEVER blend
hot liquids or ingredients
in your pitcher without the
pitcher lid and vented lid cap
locked and attached. The
vented lid cap allows steam
and pressure to escape, while
guarding against excess
splashing. NEVER blend
hot or carbonated
ingredients or liquids in
your NutriBullet
®
cups or
any other sealed vessel.
When blending hot liquids,
add liquid and solid
ingredients to your pitcher
below their respective MAX
lines. Attach the pitcher
lid with the vented lid cap
inserted and locked. Press
POWER and begin blending
by selecting the desired
program or if you are using
manual speeds, start blending
on the LOW setting. Once
ingredients are integrated,
adjust speed as needed.
When using the pitcher with
vented lid to blend hot liquids
or ingredients longer than one
minute, always use caution
when opening the pitcher lid.
BLADE SAFETY
Never store any easy-twist
extractor blade in the
motor base unattached
to a NutriBullet
®
cup. An
exposed blade can present
a laceration hazard.
Blades are sharp! Handle
carefully. Use care when
handling any blade. To
avoid laceration injury, do
not handle or touch any
blade edge.
AVOID CONTACT WITH
MOVING PARTS! Keep hands
and utensils out of and away
from blades while blending
food to reduce the risk of
severe personal injury.
WARNING!
WARNING!WARNING!

5
• TO REDUCE THE RISK OF
PERSONAL INJURY OR
PROPERTY DAMAGE,
never place the easy-twist
extractor blade on the
motor base without the cup
properly attached. Make
sure the easy-twist extractor
blade is securely twisted
(hand-tightened) onto the
NutriBullet
®
cup before
placing it on the motor base
and operating the NutriBullet
®
Smart Touch Blender™
Combo. Check to make sure
the easy-twist extractor
blade is aligned properly
before placing it on the motor
base and operating your
NutriBullet
®
Smart
Touch Blender Combo™.
• After blending, turn the power
button o. Wait to remove the
NutriBullet
®
cup/easy-twist
extractor blade assembly or
the pitcher from the motor
base until the blades come to
a full stop and the unit powers
down completely. Taking the
blending vessel o the unit
prior to complete power down
can cause damage to the
easy-twist extractor blade
coupling or motor gear.
Never use the NutriBullet
®
Smart Touch Blender™
Combo without adding
liquid, as doing so may
damage the blades.
• The cyclonic action
®
of your
NutriBullet Smart Touch
Blender™ Combo requires
the use of liquids to make
smoothies and other nutritious
items. The NutriBullet
®
Smart
Touch Blender™ Combo is not
intended to be used without
liquids, or as an ice crusher.
ALWAYS ADD LIQUID to
your recipe.
• DO NOT USE the easy-twist
extractor blade for grinding
dry ingredients such as
grains, cereal, or coee,
as this may damage the
motor and/or the easy-twist
extractor blade.
• We recommend replacing
your easy-twist extractor
blade every 6 months
(depending on use) or
as needed for optimal
performance as the blade
dulls with use.
PITCHER SAFETY
• Always operate the pitcher
with the pitcher lid securely
in place. Pitcher lid must be
locked onto the pitcher in
order to operate the unit.
• With recipes that require
certain ingredients to be
incorporated during blending,
first add the base ingredients,
seal the pitcher lid with vented
lid cap attached, and begin
blending. Then, once the
ingredients are well mixed,

6
twist open the vented lid cap
and carefully pour or drop
ingredients into the mixture.
If your blended mixture is hot
or warm, use caution when
opening the vented lid cap.
Open the vented lid cap slowly.
• Keep hands and utensils,
other than the tamper
provided, out of container
while blending to reduce the
risk of severe injury to persons
or damage to the blender.
The cover must remain in
place when using the tamper
through the cover opening.
A scraper may be used but
must be used only when the
blender is not running.
• If you need to push ingredients
closer to the blade, ONLY USE
THE TAMPER PROVIDED with
the NutriBullet
®
Smart Touch
Blender™ Combo. DO NOT
use any apparatus other than
the tamper to push ingredients
toward the blade. The tamper
is specifically designed not to
come in contact with the blade.
Spatulas, spoons and other
tools can make contact with
the blade, which may result
in damage to the machine,
shattering of the vessel,
damage to property, and/or
possible injury.
• NEVER USE YOUR FINGERS
OR ANY PART OF YOUR HAND
TO PUSH INGREDIENTS
DOWN TOWARD THE BLADE.
Only use the provided tamper.
ELECTRICAL SAFETY
Do not use this product
in locations with dierent
electrical specifications or
plug types. Do not operate
with any type of plug
adapter or voltage converter
device, as these may cause
electrical shorting, fire,
electric shock, personal
injury, or product damage.
• The use of attachments,
including canning jars, is
not recommended and may
cause fire, electric shock,
personal injury, or product
damage and will void the
product’s warranty.
• To avoid the risk of electric
shock, never immerse the
cord, plug, or motor base of
the NutriBullet
®
Smart Touch
Blender™ Combo in water
or other liquids. Discontinue
use if the cord, plug, or
motor base is damaged.
• Always POWER OFF and
UNPLUG the NutriBullet
®
Smart Touch Blender™
Combo when it is not in use
or BEFORE assembling,
disassembling, changing
accessories, or cleaning.
Do not attempt to handle
the NutriBullet
®
Smart Touch
Blender™ Combo until all
parts have stopped moving.
• To unplug, grasp the plug and
pull from the outlet. Never pull
from the power cord.
WARNING!

7
• The Smart Touch Blender™
Combo is ready to operate
when unit is plugged in and
power icon is illuminated.
Avoid inadvertent contact
with the touch screen display.
• Do not allow the cord to hang
over the edge of the table or
counter. Do not pull, twist, or
damage the power cord. Do
not allow the cord to touch hot
surfaces, including the stove.
• If the motor stops working,
unplug the motor base and
let it cool for at least 15
minutes before attempting to
use it again. Your NutriBullet
®
has an internal thermal
breaker that shuts o the
motor when it overheats. The
thermal breaker will reset
when the unit is unplugged,
and the thermal breaker
cools down suciently.
• This appliance has important
markings on the plug. The
attachment plug or entire
cord set is not suitable for
replacement. If damaged, the
appliance will be replaced.
STOVETOP
HEATING SAFETY
Do not blend hot
ingredients in any sealed
NutriBullet
®
cup!
To heat items that have been
blended at room temperature
or cooler (21°C/70°F or less),
transfer mixture to a stove
top pot to heat. Always use
a thermometer to test the
internal temperature of
cooked ingredients; they may
feel cool to the touch, yet still
be hot inside.
The NutriBullet
®
Smart Touch
Blender™ Combo is not
intended for use on the stove
top. Do not place the motor
base or any NutriBullet
®
accessory on the stove or
microwave or immerse in
boiling water. This may result
in damage to the accessory.
• Do not place any of the
NutriBullet
®
Smart Touch
Blender™ Combo parts in a
microwave, oven, or in a stove
top pot, or immerse in boiling
water, as this may result in
damage to the part.
• Do not place on or near a hot
gas or electric burner, or in a
heated oven.
VENTILATION WARNINGS
To prevent a fire hazard,
power base openings
(underneath the motor base)
should be free of dust and
lint and never obstructed
with flammable materials
such as newspapers,
tablecloths, napkins, dish
towels, place mats or other
similar type materials.
• CAUTION! Always operate
the NutriBullet
®
Smart Touch
Blender™ Combo on a level
surface, leaving unobstructed
WARNING!
WARNING!WARNING!

8
space beneath and around
the motor base to permit
proper air circulation. Vents
on the bottom of the product
are provided for ventilation
to ensure reliable motor
operation and to
prevent overheating.
MEDICAL SAFETY
• The information contained
in this User Guide or Recipe
Guide is not meant to replace
the advice of your physician.
Always consult your physician
regarding health and
nutrition concerns.
MEDICATION INTERACTIONS:
• If you are taking any
medication, especially
cholesterol-lowering
medication, blood
thinners, blood pressure
drugs, tranquilizers, or
antidepressants, please check
with your physician before
trying any of the recipes
contained in this guide or the
recipe guide.
• Avoid blending the following
seeds and pits in the
NutriBullet
®
Smart Touch
Blender™ Combo, as they
contain a chemical known to
release cyanide into the body
when ingested: apple seeds,
cherry pits, plum pits, peach
pits, and apricot pits. Fruit pits
may also cause damage to
the pitcher.
ADDITIONAL
INSTRUCTIONS FOR
PROPER USAGE
• TO AVOID LEAKAGE, DO
NOT OVERFILL THE BLENDING
VESSELS! The pitcher is
marked with two MAX lines:
one for solid ingredients
(higher line) and one for
liquid ingredients (lower line).
Your NutriBullet
®
cups are
also marked with a MAX line.
When filling the blending
vessels, make sure your
ingredients do not exceed
their respective MAX lines.
Exceeding the indicated MAX
lines can result in leakage,
and may lead to dangerous
pressurization.
• Blending vessels and easy-twist
extractor blades are specific to
the exact model of NutriBullet
®
Smart Touch Blender™
Combo you possess. Use of
incompatible parts (parts from
other models) may result in
damage to your NutriBullet
®
Smart Touch Blender™ Combo
or create safety hazards. When
ordering replacement parts
(NutriBullet
®
cups, pitcher,
easy-twist extractor blades) on
nutribullet.com or via customer
service, please specify the
machine model to ensure
you receive parts that are
compatible with your unit.

9
!
Save these
instructions!
If you have any comments,
questions, or concerns, please
go to nutribullet.com. Or call
customer service at:
1 (800) 523-5993.
• Always use genuine
NutriBullet
®
replacement
parts. After market parts are
not made to NutriBullet’s
specifications and may
damage your unit or cause
serious injury.
• Periodically inspect all
NutriBullet
®
Smart Touch
Blender™ Combo components
for damage or wear that
may impair proper function
or present an electrical
hazard. Make sure that the
power cord and plug are
undamaged. Discontinue
use and replace blending
vessels if you detect cracking,
cloudiness, or damage to the
plastic. Ensure that the blades
rotate freely and that the
structure is undamaged. Make
sure that the motor base is
unobstructed and clean. Follow
maintenance recommended
in the User Guide and never
operate your NutriBullet
®
with
damaged components. If your
NutriBullet
®
malfunctions in any
way, immediately discontinue
use and contact customer
service at 1 (800) 523-5993.
You may purchase new
NutriBullet
®
cups, pitchers,
and easy-twist extractor
blades at nutribullet.com or by
contacting customer service.

10

11
Contents.
12 What’s included
13 Assembly guide
14 Getting started
14 Safety guide
14 Pitcher assembly & use
18 NutriBullet
®
cup assembly & use
20 Blending control panel
20 Manual speeds
22 Intelligent programs
24 Care & maintenance
24 How to clean the NutriBullet
®
26 How to store
26 Replacement parts
27 NutriBullet
®
Smart Touch Blender™
Combo one-year limited warranty
30 Warranty registration
Thank you for purchasing the NutriBullet
®
Smart
Touch Blender™ Combo.
12
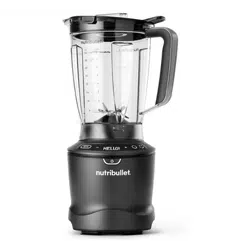
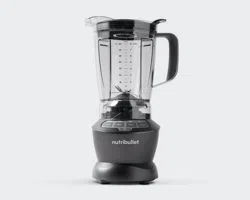
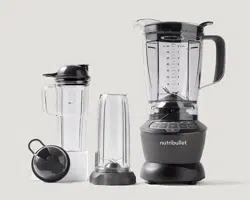
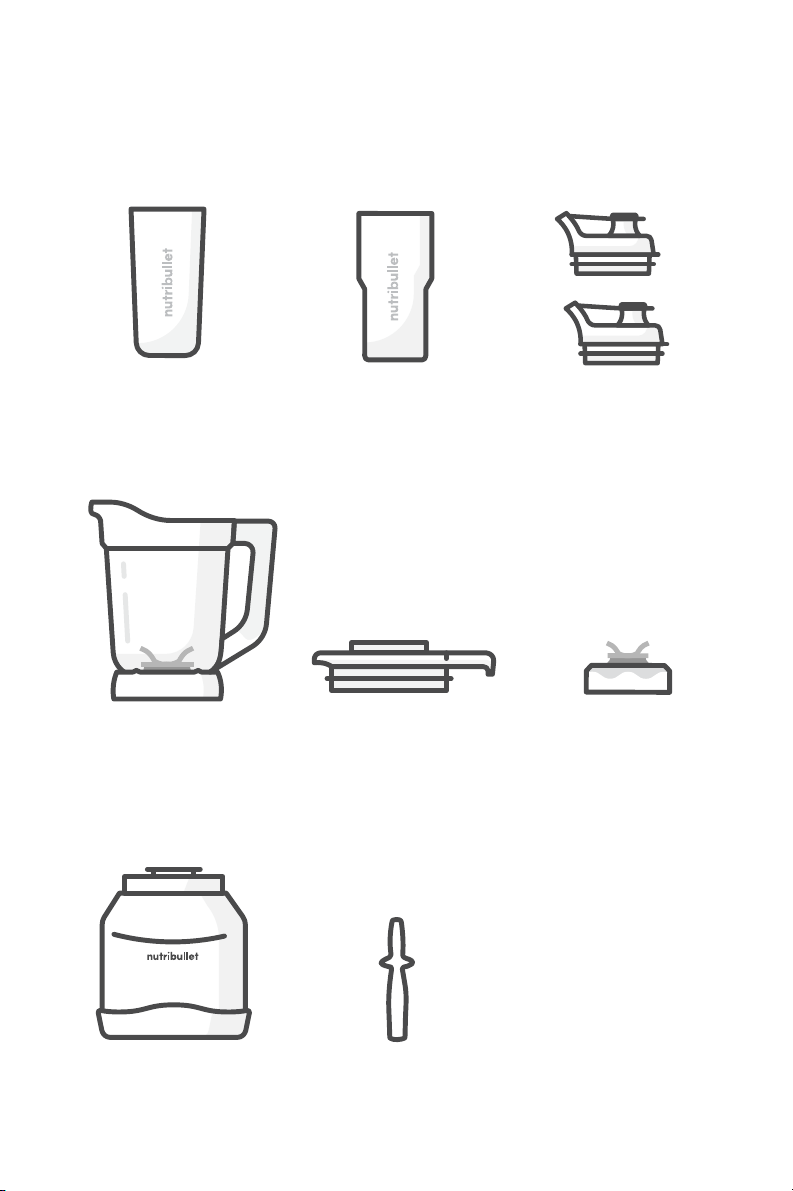
What’s included.
1 32-oz
cup
1 pitcher with
integrated blade
1 motor base
1 pitcher lid with
pour spout
1 tamper
1 20-oz
travel cup
2 to-go lids
1 easy-twist
extractor blade
13
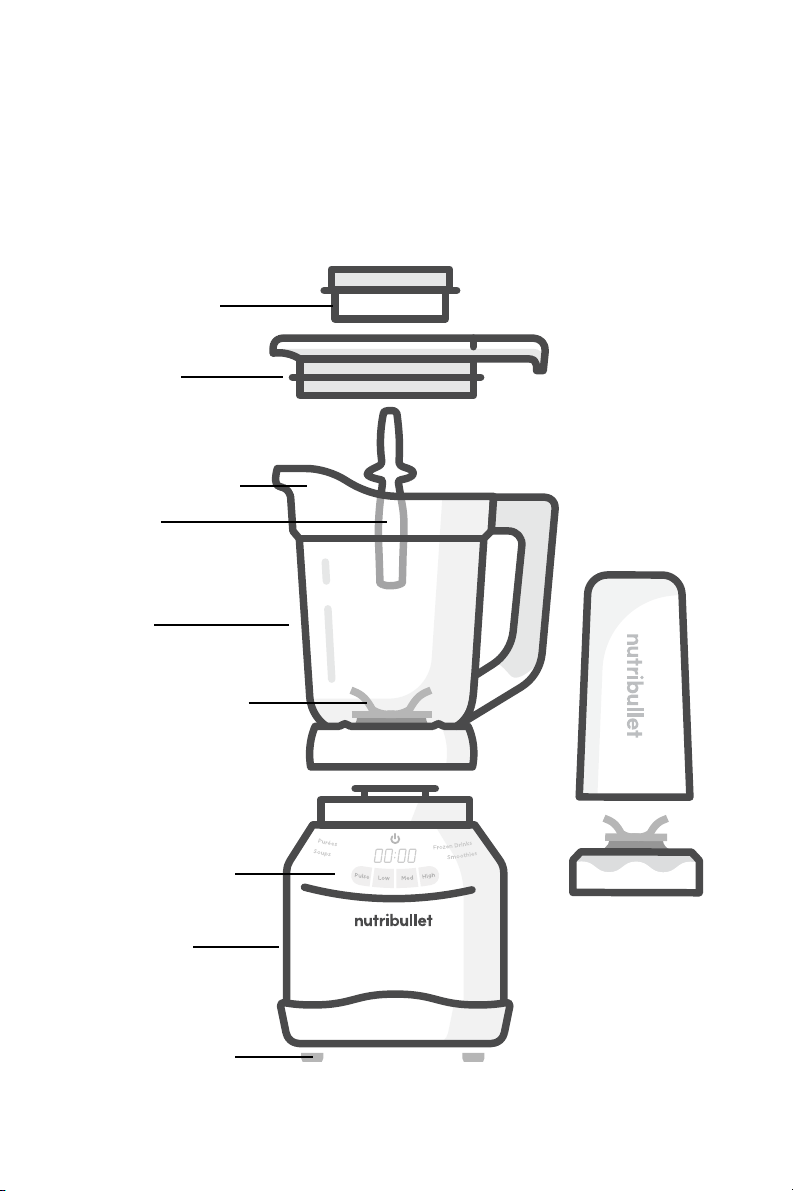
Assembly guide.
NutriBullet
®
cup
vented lid cap
pitcher lid
pitcher
easy-pour spout
tamper
integrated blade
blender control
panel
motor base
suction cup feet
easy-twist
extractor blade

Getting
started.
Pitcher assembly
& use.
Place the motor base on
a clean, dry, level surface
such as a counter or table.
1
Review all warning and caution
statements in the Important Safeguards
section (pg 2-9) and on the previous
page before proceeding to Step 1.
Use extra caution when
blending hot liquids or
ingredients in the pitcher.
Steam and splatters can escape
through the vented lid, potentially
causing scalding and/or burns.
NEVER blend hot liquids in your
pitcher without the pitcher lid
and vented lid cap attached. The
vented lid cap is ventilated to allow
steam and pressure to release,
while guarding against excess
splashing. NEVER blend hot liquids
in your NutriBullet cups or any
other sealed vessel, only use the
vented pitcher.
When blending hot liquids in the
vented pitcher, add liquid and solid
ingredients to your pitcher below
their respective MAX lines. Attach
the pitcher lid with the vented lid
cap inserted. Press POWER , then
select desired program or begin
blending on LOW setting. Once
ingredients are integrated and
the mixture is level (no splashing),
increase speed as needed.
Always use care when opening
the pitcher lid after blending hot
ingredients making sure that excess
pressure has been released.
PLEASE KEEP
THESE IMPORTANT
SAFEGUARDS IN
MIND WHEN USING
THE APPLIANCE:
• Make sure the base is plugged in
for use.
• Never run the appliance while empty.
• Appliance accessories are not
intended to be used in the microwave
as it may damage the accessories.
• Never leave the appliance
unattended while in use.
Never blend hot or carbonated
liquids or ingredients when using
any sealed NutriBullet cups.
Heated ingredients can pressurize
sealed containers when agitated
and violently expel hot contents upon
opening. Always start the blending
process with room temperature or
refrigerated ingredients and liquids
(21°C/70°F or cooler).
WARNING!
WARNING!
14
15
Place the pitcher (lid-side up)
onto the motor base and twist
clockwise to lock it into place.
When you hear the click, it’s
locked and ready to blend.
NOTE: You may need to twist the
pitcher slightly until you feel
it settle into the grooves on top of
the base.
4
2
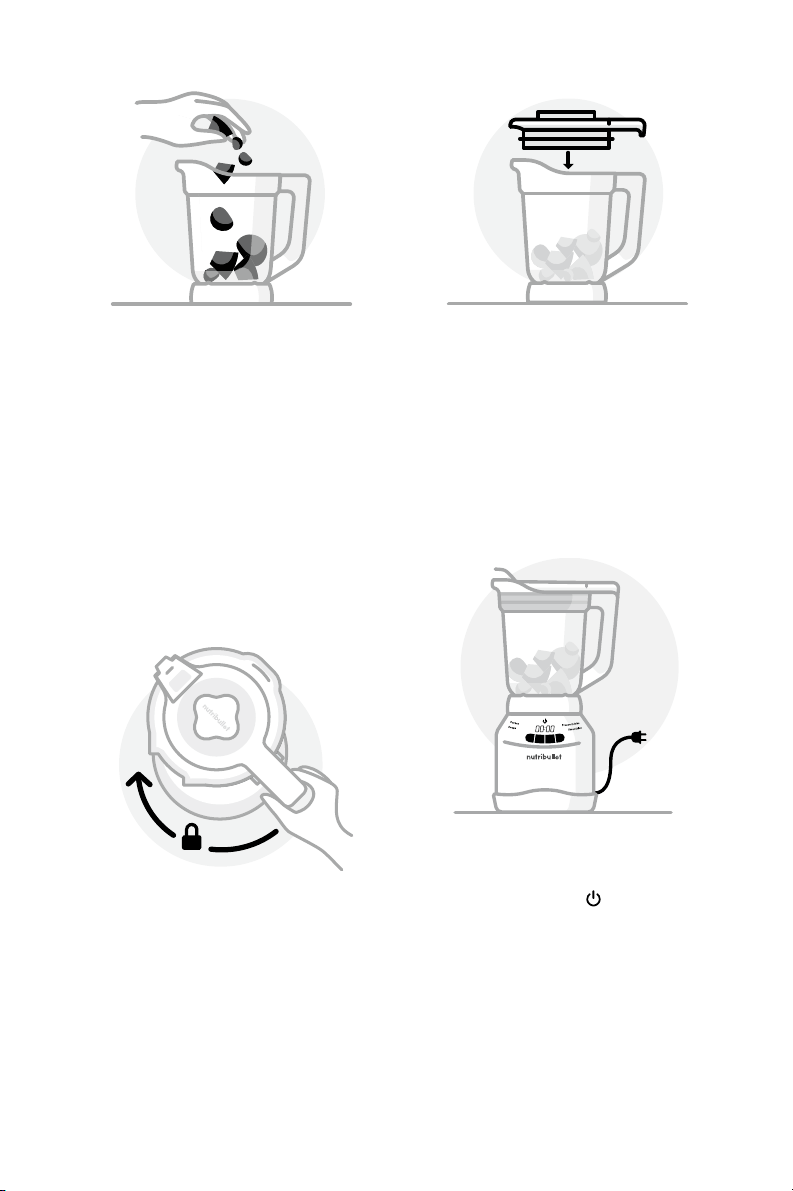
Place the pitcher on a
clean, dry, level surface.
Add the ingredients to the
pitcher, making sure they do
not exceed the MAX line.
3
Place the lid on top of the
pitcher and press down firmly
until locked in place. Place the
lid cap over the lid opening,
then press down and twist
until locked in place.
NOTE: The blending pitcher is
marked with two MAX lines: one for
solid ingredients (higher line) and
one for liquids (lower line). When
filling the blender, make sure your
ingredients do not exceed their
respective MAX lines.
NOTE: The motor will not run unless
the lid is locked in place.
5
Plug the power cord into
an electrical outlet and
press POWER to turn
on the blender. Once the
pitcher is fully locked and
the unit is plugged in, the
Blending Control Panel will
illuminate and the unit will
be ready to operate.
NOTE: If pitcher lid and pitcher are
not fully secured onto the base,
control panel will not illuminate.
16
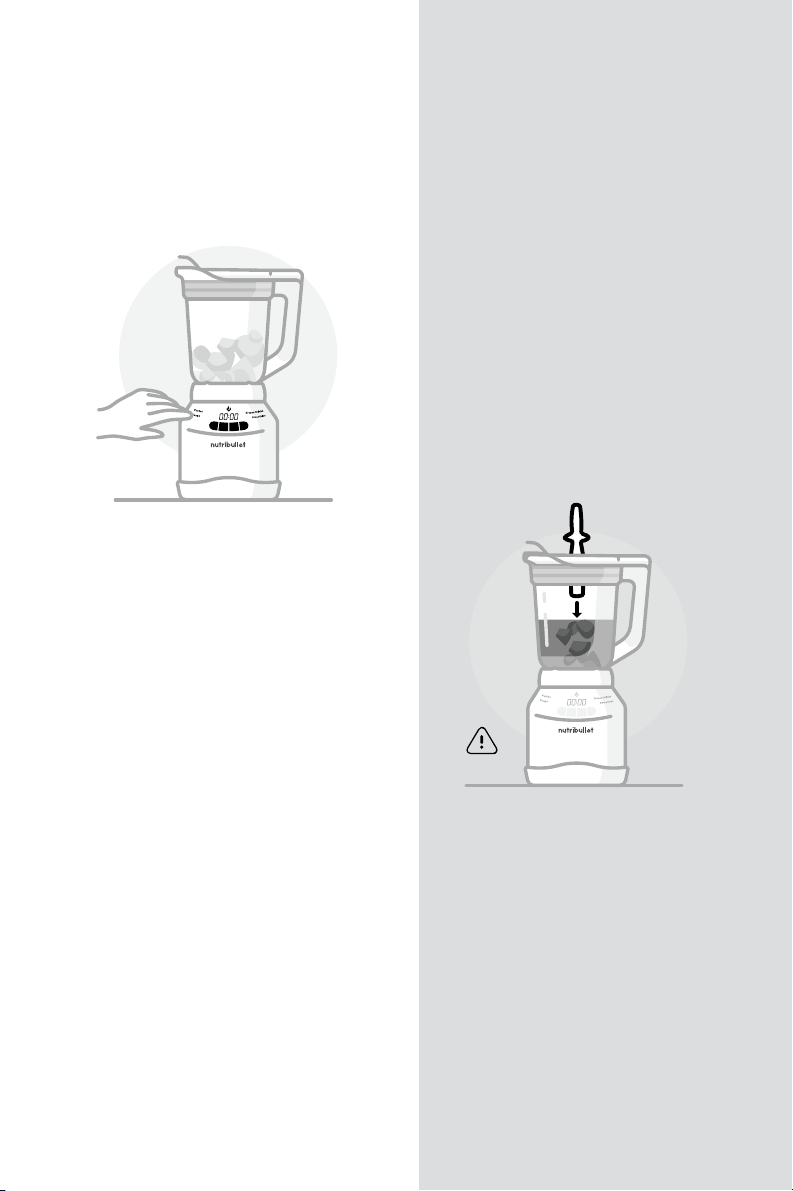
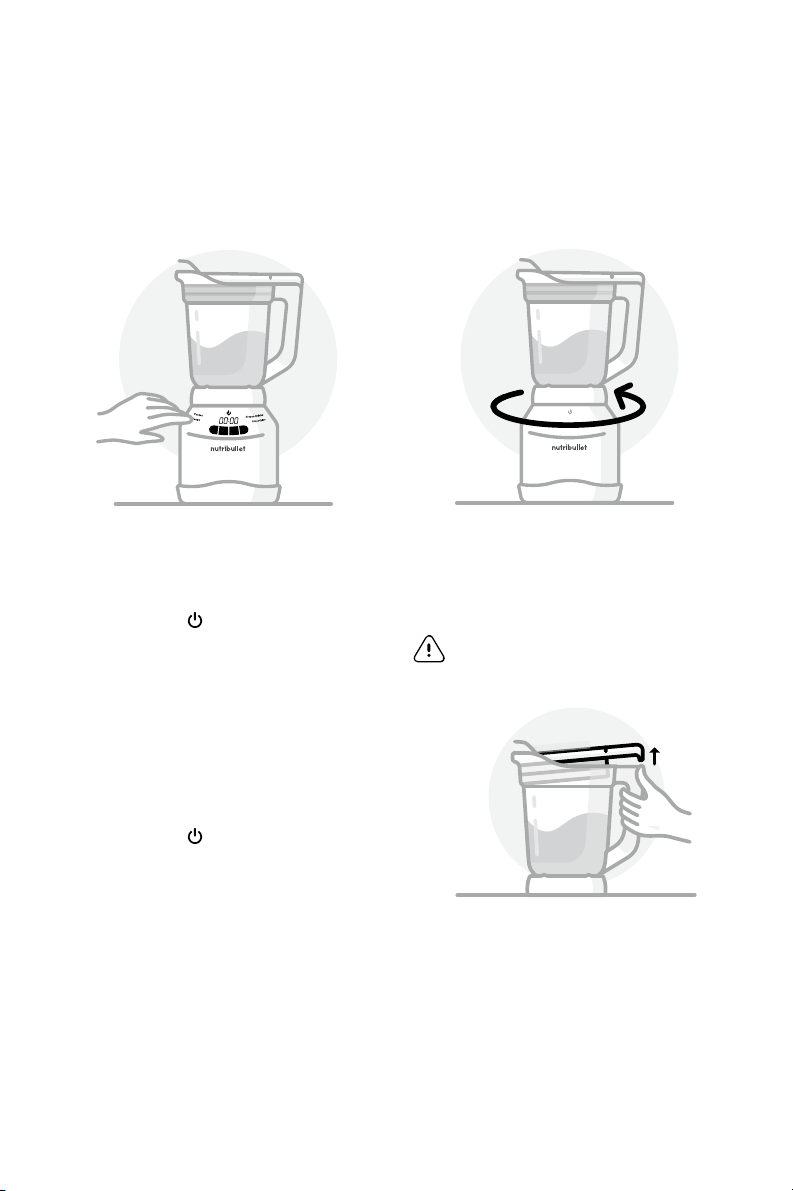
6
To begin blending, select
a manual speed or
program on the Blending
Control Panel. To pause
blending, press the current
speed or program once,
the unit will stop running
and the timer will pause. To
resume blending, press a
manual speed or the same
program again.
NOTE: Go to the blending control
panel section on pages 20-23 for
speed and program definitions,
images, and other information.
CAUTION: Do not use any
apparatus other than the
tamper to push ingredients
toward the blade. The tamper
is specifically designed not to
come in contact with the blade.
Spatulas, spoons and other
tools are long enough to reach
the blade, which may result
in damage to the machine,
damage to property, and
possible injury.
NOTE: If you need to add
additional ingredients while
blending, switch the setting to
LOW and remove the lid cap
from the pitcher lid, leaving the
lid attached. Add ingredients
through the hole in the top
of the lid, followed by the
tamper if necessary. Replace
the lid cap, then increase to
your desired speed. DO NOT
attempt to add items through
the vent hole when blending
HOT ingredients.
17
Twist pitcher counterclockwise
and lift o the motor base.
Pour and enjoy!
WARNING: Blades are sharp. Never
insert your hands into the pitcher.
When you have reached your
desired consistency, stop
the appliance by pressing
POWER . If you are using
a program, you will hear
a beep when the program
has completed. Wait for the
blades to stop turning. The
unit will enter idle-mode.
The timer will reset and the
Blending Control Panel will
remain illuminated. Press
POWER again to turn o
the unit completely and the
illuminated display will
turn o.
7
8
NOTE: Press up with your thumb on
the tab near handle first to loosen
pitcher lid for easy removal!
WARNING: NEVER BLEND
HOT OR CARBONATED
INGREDIENTS OR LIQUIDS
IN THE SEALED VESSEL, as
doing so may cause excessive
pressure buildup, resulting in
risk of personal injury and or
property damage.
NutriBullet
®
cup
assembly & use.
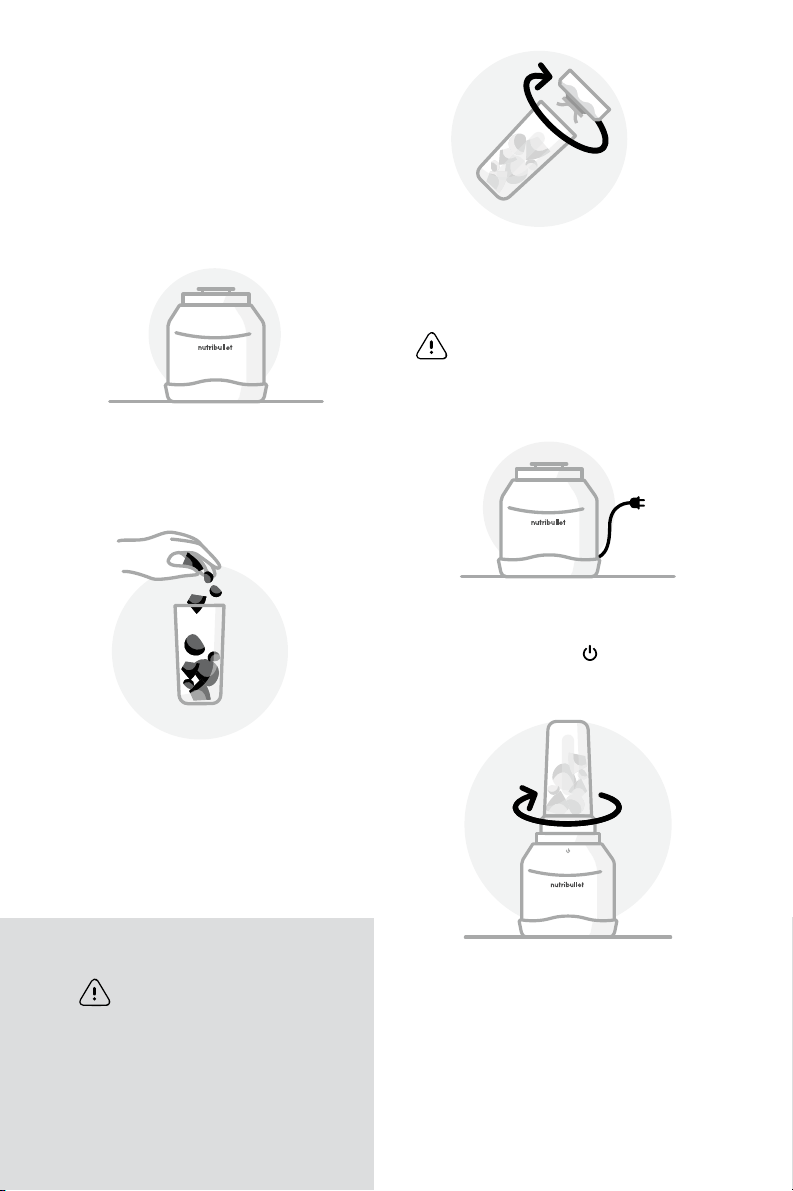
Plug the power cord into
an electrical outlet and
press POWER to turn on
the blender.
4
1
2
3
Twist the easy-twist
extractor blade onto the
cup until tightly sealed.
WARNING: Handle the easy-twist
extractor blade assembly with care, as
the blades are sharp. Never leave the
appliance unattended while in use.
Place the motor base on
a clean, dry, level surface
such as a counter or table.
5
Turn the cup upside down
and place it onto the motor
base, gently turning the
cup clockwise to lock into
the motor base.
NOTE: The cup must be locked onto
the base for the unit to operate.
Review all warning and caution
statements in the Important Safeguards
section (pg 3-9) and on the previous
page before proceeding to Step 1.
Add ingredients to
the NutriBullet
®
cup.
NOTE: Do not overfill! To avoid
leakage, do not add ingredients
beyond the MAX line.
18
6
7
8
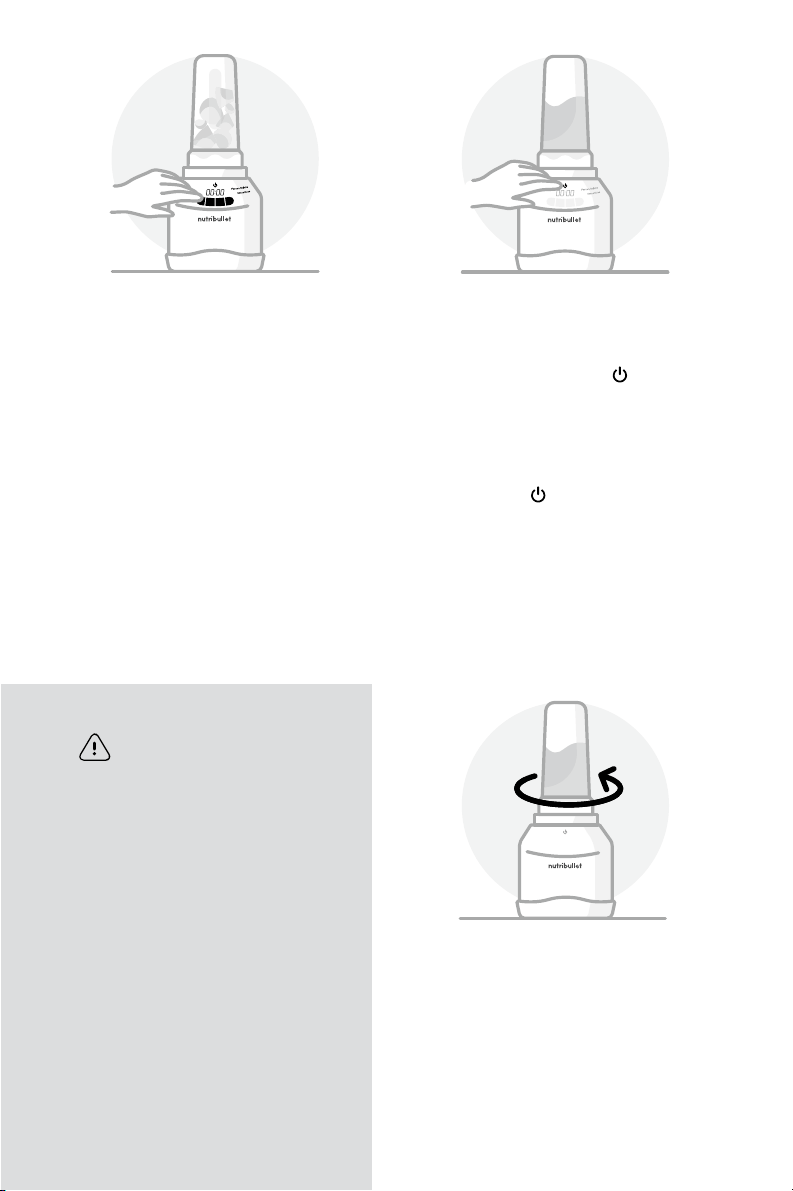
To begin blending, select a
manual speed or program
on the Blending Control
Panel. To pause blending,
press the current speed
or program once, the unit
will stop running and the
timer will pause. To resume
blending, press a manual
speed or the same program.
NOTE: Proceed to the blending
control panel chart on page 20 for
speed definitions.
When you have reached
your desired consistency,
stop the appliance by
pressing POWER . The
unit will enter idle-mode.
The timer will reset and the
Blending Control Panel will
remain illuminated. Press
POWER again to turn o
the unit completely.
NOTE: speeds will automatically
shut o after 60 seconds.
Unlock the assembly by
gently twisting the cup
counterclockwise. You will
hear a click. Enjoy!
NOTE: Blending should never take
longer than one minute to yield
smooth and creamy results.
CAUTION
Do not remove the easy-twist
extractor blade from the
NutriBullet
®
cup until blending
has completely ceased. Do not
use the easy-twist extractor blade
as a storage lid for your cup.
Some foods may contain active
ingredients or release gases that
will expand if left in a sealed
container, resulting in excessive
pressure buildup that can pose
a risk of injury. When storing
contents in the cup, use plastic
wrap or foil to seal your container.
Always point contents away from
your body when unsealing.
19
20
Blending control panel:
manual speeds.
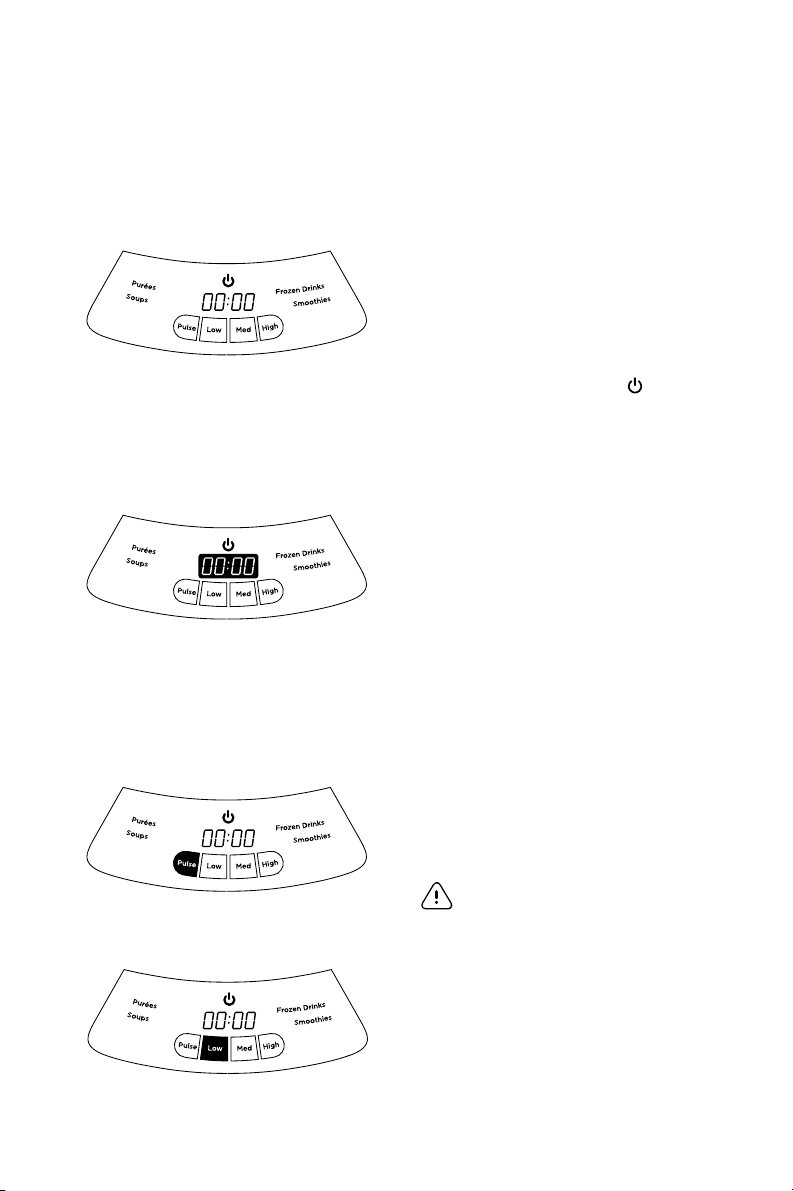
TIMER
When using a blending speed:
timer starts at zero (00:00) and
increases during operation,
showing time elapsed since
blending began. When using
program presets: timer counts
down during operation until
program is completed.
PULSE
Use to control chopping
and processing.
WARNING: DO NOT use this setting
with hot ingredients as ingredients
may splash.
TURNING ON/OFF
The power button controls the
master power of the appliance.
If pitcher with pitcher lid or
NutriBullet
®
cup is locked in
place, pressing POWER
will indicate the motor is
powered on and illuminate
the Blending Control Panel.
LOW SPEED
Use to mix thin batters,
gravies and marinades. Or, to
scramble eggs, process cooked
foods and uncooked fruits.
21
WARNING!
NEVER BLEND HOT LIQUIDS OR OTHER HOT INGREDIENTS IN ANY SEALED
NUTRIBULLET
®
CUP Doing so may cause excessive pressure buildup, resulting
in risk of personal injury or property damage. Hot items should only be
blended in the pitcher using proper safeguards.
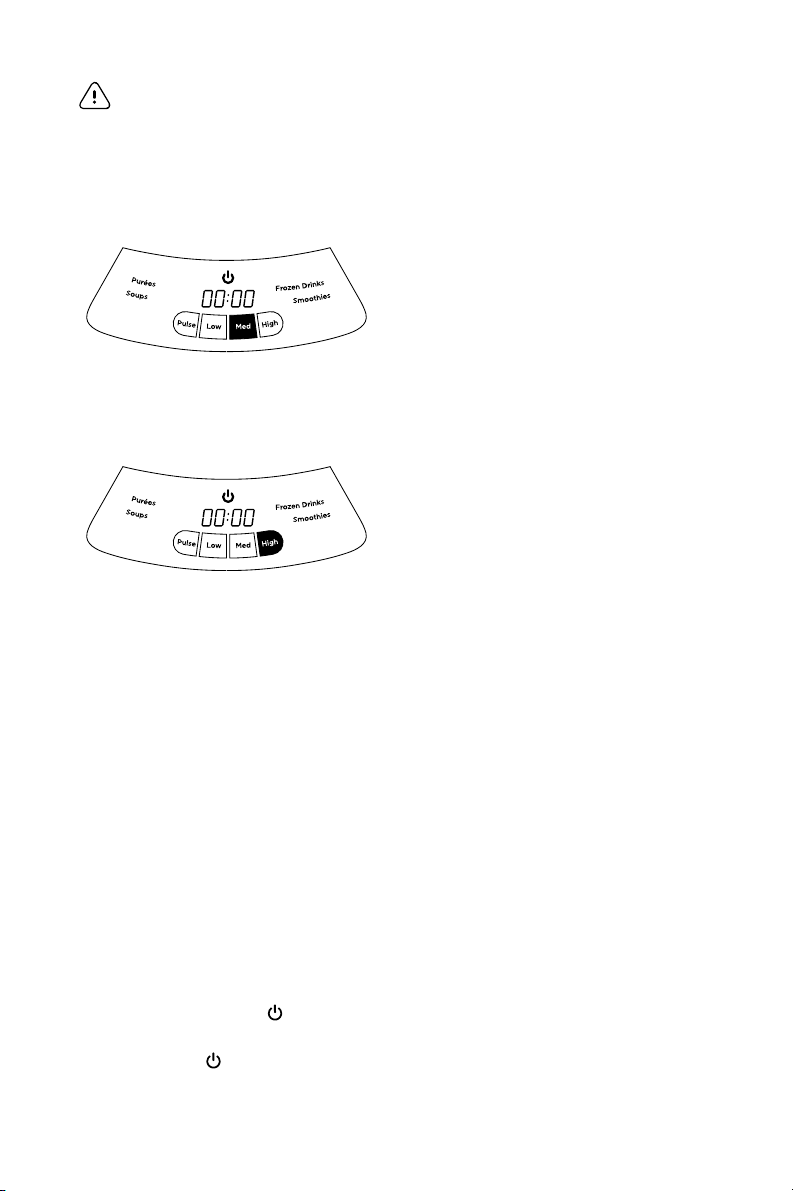
MEDIUM SPEED
Use to cream soups, blend
sauces and spreads, or mix dips.
Also great for grinding nuts,
making mixed drinks, powdered
drinks or milkshakes.
HIGH SPEED
Use to liquefy thick mixtures
and extract frozen fruits and
vegetables into smoothies.
TO SELECT A SPEED
Press the desired speed once
to turn on. The selected speed
will illuminate and the rest of
the speeds will dim. To toggle to
another blending speed, press
the inactive, dimmed speed
desired. To pause blending
at any point, press the active
speed, the motor will stop and
the timer will pause counting.
To resume blending, press a
manual speed button again. To
return to main blending control
panel, press POWER once. To
fully power down after pausing,
press POWER twice and
unplug the unit.
PULSE
Press and release the PULSE
button to chop ingredients. If you
hold the PULSE button down,
it will continue to run until you
release it. Do not hold and run
the pulse continuously for more
than one minute.
NOTE: If the unit stops running and
power and timer display are flashing,
your device may be overheated.
Unplug your device and wait 15 minutes.
Plug back in to reset.
22
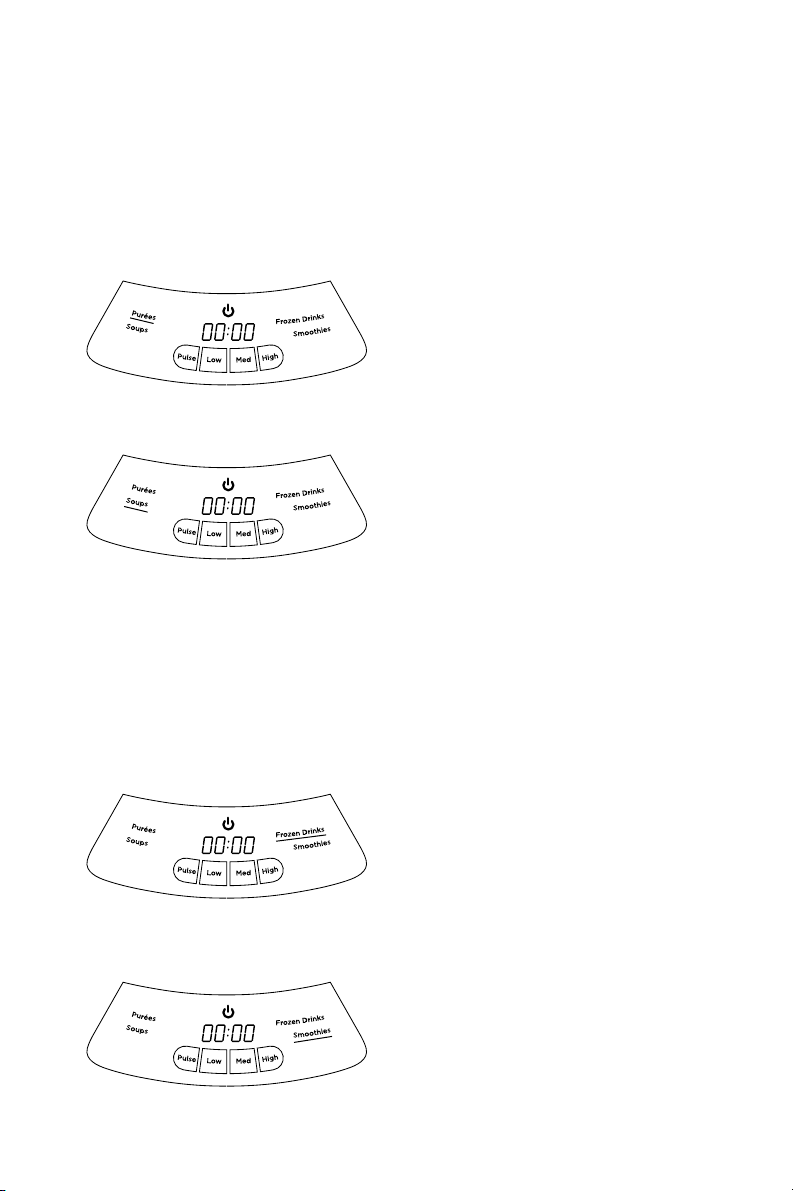
PURÉES
Delivers a perfectly smooth
texture — ideal for dips, sauces
and spreads of all kinds.
SOUPS
Blends sweet or savory
ingredients into the silkiest of
ready to heat soups and chilled
gazpachos. The Soups program
is only available when using
the pitcher.
NOTE: The Soups program does not heat
the ingredients you are blending. Always
be careful when opening the pitcher after
blending hot or warm ingredients.
FROZEN DRINKS
Perfect for ice-blended
mocktails or cocktails, and
frappe style drinks.
SMOOTHIES
Easily turn fresh or frozen fruits
and vegetables into sippable
nutritious smoothies.
Blending control panel:
intelligent programs.

23
TO SELECT A PROGRAM
Press the desired program to
turn on. The selected program
will illuminate and the rest of
the blending control panel
will disappear. The program
will start to run, and timer will
countdown until the program is
complete. When the program
is complete, there will be
an audible alert and main
blending control panel will
be illuminated. To pause a
program before completion,
press the active program. The
motor will stop and the timer
will pause counting. To resume
the program, press the program
button again. To return to main
blending control panel, press
POWER once. To fully power
down, press POWER twice
and unplug the unit.
Our intelligent programs are
expertly designed to give you
the perfect results every time.
During each program, the unit
may pulse, change speeds,
and blend as needed until the
program is complete.
NOTE: If the unit stops running and
power and timer display are flashing,
your device may be overheated.
Unplug your device and wait 15 minutes.
Plug back in to reset.

24
Care & maintenance.
MOTOR BASE:
• To avoid risk of injury, NEVER
attempt to clean the actuator
system on the motor base
while the NutriBullet
®
Smart
Touch Blender™ Combo is
plugged in.
• Do not attempt to remove any
pieces from the motor base.
• Use a sponge or dish cloth
dampened with warm soapy
water to wipe down the
motor base until clean.
• If necessary, you may use
a small brush to scrub the
actuator system area to
ensure it’s clean.
• To clean leakage residue
from the motor base, wipe
with a damp sponge and
warm water.
• If necessary, you may use
a small brush to scrub the
actuator system area to
ensure it’s clean.
WARNING: Never submerge
the motor base in water.
Here’s how to clean
the NutriBullet
®
:
STEP 1:
The most important thing —
ALWAYS POWER OFF THE UNIT
and UNPLUG the motor base
from the power outlet when it
is not in use. Do not attempt to
handle the appliance until all
parts have stopped moving!
This includes during assembly
and disassembly, while
changing accessories during
cleaning, and any time you
leave the machine unattended.
STEP 2:
Detach the NutriBullet
®
cup /
easy-twist extractor blade or
pitcher from the motor base.
STEP 3:
Clean the individual
components (motor base,
easy-twist extractor blade,
NutriBullet
®
cups) as
recommended on the
following pages.
Cleaning the NutriBullet
®
is easy. The pitcher is dishwasher-safe while
the cups and to-go lids are TOP RACK dishwasher-safe. The easy-
twist extractor blade and motor base can be quickly hand-washed
with soap and water. Read on for best practices.

25
NUTRIBULLET
®
CUPS
& TOGO LIDS:
These items are TOP RACK
dishwasher-safe. We
recommend rinsing and briefly
scrubbing them with a dish
brush to remove any remaining
debris before placing in the
dishwasher. NEVER use the
sanitize cycle to wash the cups
— heat this high can warp
the plastic.
NUTRIBULLET
®
PITCHER:
WARNING: Blades are sharp!
Use caution when cleaning
the pitcher.
• The pitcher is top-rack
dishwasher-safe. We
recommend rinsing and
briefly scrubbing it with a
dish brush to remove any
remaining debris before
placing in the dishwasher.
NEVER use the sanitize cycle
to wash the pitcher — heat
this high can warp the plastic.
• If preferred, hand-wash
the pitcher with soap and
water. Stuck-on ingredients
might require extra
scrubbing from a dish brush
or sponge. The blades are
sharp. Take care not to
touch while hand-washing.
EASYTWIST
EXTRACTOR BLADE:
• Blades are sharp! Handle
the easy-twist extractor
blade with care when
cleaning! It is best to clean
blades immediately after use
to reduce buildup of residue.
If food particles get stuck,
use a small brush or sponge
to target and dislodge them.
• Do not remove any
components of the easy-
twist extractor blade; this
can result in permanent
damage to the blade,
resulting in leakage when
blending. If, over time, the
easy-twist extractor blade
becomes loose or damaged,
you may order a new easy-
twist extractor blade at
nutribullet.com or contact
customer service.
• Dry the easy-twist extractor
blade completely after
every use.
• Regularly check the
condition of the bottom
of the blade for cracking
or breakage. If damaged,
replace easy-twist extractor
blade immediately to prevent
possible personal injury.

26
• Regularly check the
structure of the pitcher and
twisting threads for cracking,
crazing, or breakage.
If damaged, replace
immediately to prevent
possible personal injury.
TAMPER
• Always hand-wash the
tamper with soap and water.
Stuck-on ingredients might
require extra scrubbing from
a dish brush or sponge.
Replacement parts.
To order additional parts and accessories, please visit our website
at nutribullet.com/shop/accessories or feel free to contact
customer service: 1 (800) 523-5993.
How to store:
Store the NutriBullet
®
Smart
Touch Blender™ Combo pitcher
upright with the pitcher lid
secured on top. Do not place
anything on top of the pitcher
lid. Store remaining pieces in a
safe place where they will not be
damaged and won’t cause harm.
WARNING: NEVER store the easy-
twist extractor blade on the motor
base without a NutriBullet
®
cup or
the pitcher as the exposed blades
pose a serious laceration hazard.

27
NutriBullet
®
Smart
Touch Blender
™
Combo one-year
limited warranty.
LIMITED WARRANTY
FOR NUTRIBULLET
®
NutriBullet's limited warranty
obligations are confined to the
terms set forth below:
NutriBullet, LLC (“NutriBullet”)
warrants this NutriBullet
®
against defects in materials
and workmanship for a period
of one year from the date
of original retail purchase.
This limited warranty is valid
only in the country in which
the product is purchased
and comes with the product
at no extra charge, however
shipping and processing fees
will be incurred for returns,
replacements and or refunds.
If a defect exists, and
NutriBullet
®
is obligated under
this limited warranty, at its
option NutriBullet
®
will (1) repair
the product at no charge, using
new or refurbished replacement
parts, (2) exchange the product
with a product that is new or
that has been manufactured
from new or serviceable used
parts and is at least functionally
equivalent to the original
product, or (3) refund the
purchase price of the product. A
replacement product assumes
the remaining warranty of the
original product. A repaired
product has a one-year
warranty from the date of
repair. When a product or part
is exchanged, any replacement
item becomes your property
and the replaced item becomes
NutriBullet’s property. When a
refund is given, your product
becomes NutriBullet’s property.
OBTAINING WARRANTY
SERVICE
For limited warranty service,
simply call our customer
service department at
1 (800) 523-5993 or contact
us via email from our website
at nutribullet.com, simply click
the contact us link, fill out and
submit the customer contact
form and we will be glad to
help you. When you contact our

28
customer service department
you will be asked for your
name, address, telephone
number and to provide proof of
the original purchase (receipt)
containing a description of the
product(s), purchase date, and
the appropriate NutriBullet
®
serial number(s). Before you
send your product for limited
warranty service please make
sure to keep a copy of all
relevant documents for your
files (receipt, etc.). It is always
recommended to purchase
product insurance and tracking
services when sending your
product for service. Remember,
shipping and processing fees
will be incurred and are not
covered by the one-year
limited warranty.
EXCLUSIONS & LIMITATIONS
This NutriBullet
®
One-Year
Limited Warranty applies only to
NutriBullet
®
products distributed
by or for NutriBullet
®
that can
be identified by the “NutriBullet”
trademark, trade name, logo
and bar code. NutriBullet
®
Blender Combo’s One-Year
Limited Warranty does not apply
to any other products that may
appear to be authentic, but
were not distributed/sold by
NutriBullet, LLC.
Normal wear and tear is not
covered by this limited warranty.
This limited warranty applies
to consumer use only, and
is void when the product
is used in a commercial or
institutional setting.
This limited warranty extends
only to the original consumer
purchaser and is not
transferable. In addition, proof of
purchase must be demonstrated.
Repair or replacement of
the product (or, if repair or
replacement is not feasible, a
refund of the purchase price)
is the exclusive remedy of the
consumer under this limited
warranty. NutriBullet, LLC shall
not be liable for any incidental
or consequential damages for
breach of this limited warranty
or any implied warranty on
this product.
This limited warranty gives
you specific legal rights, and
you may also have other rights
which vary from state to state.
NutriBullet
®
is not liable for
any damage to products not
covered by this warranty (e.g.,
cups, book, User Guide).
This limited warranty does not
apply: (a) to damage caused
by accident, abuse, misuse,
or misapplication; (b) to
damage caused by improper
maintenance (including
unauthorized parts service);

29
(c) to a product or a part that
has been modified in any way;
(d) if any NutriBullet
®
serial
number or trademark has been
removed or defaced; and or (e)
if the product has been used
with an adapter/converter.
THIS LIMITED WARRANTY
AND THE REMEDIES SET
FORTH ABOVE ARE EXCLUSIVE
AND IN LIEU OF ALL OTHER
WARRANTIES, REMEDIES
AND CONDITIONS, WHETHER
ORAL OR WRITTEN, EXPRESS
OR IMPLIED. NUTRIBULLET
®
SPECIFICALLY DISCLAIMS ANY
AND ALL IMPLIED WARRANTIES,
INCLUDING, WITHOUT
LIMITATION, WARRANTIES
OF MERCHANTABILITY AND
FITNESS FOR A PARTICULAR
PURPOSE. IF NUTRIBULLET
CANNOT LAWFULLY DISCLAIM
IMPLIED WARRANTIES UNDER
THIS LIMITED WARRANTY,
ALL SUCH WARRANTIES,
INCLUDING WARRANTIES
OF MERCHANTABILITY AND
FITNESS FOR A PARTICULAR
PURPOSE ARE LIMITED IN
DURATION TO THE DURATION
OF THIS LIMITED WARRANTY.
No NutriBullet
®
reseller, agent, or
employee is authorized to make
any modification to this warranty.
NUTRIBULLET IS NOT
RESPONSIBLE FOR DIRECT,
SPECIAL, INCIDENTAL OR
CONSEQUENTIAL DAMAGES
RESULTING FROM ANY
BREACH OF WARRANTY
OR CONDITION, OR UNDER
ANY OTHER LEGAL THEORY,
INCLUDING BUT NOT LIMITED
TO LOST PROFITS, DOWNTIME,
GOODWILL, DAMAGE TO
OR REPLACEMENT OF
EQUIPMENT AND PROPERTY.
NUTRIBULLET
®
SPECIFICALLY
DOES NOT REPRESENT THAT
IT WILL BE ABLE TO REPAIR
ANY PRODUCT UNDER THIS
LIMITED WARRANTY.
Some states and provinces
do not allow the exclusion
or limitation of incidental or
consequential damages or
exclusions or limitations on the
duration of implied warranties
or conditions, so the above
limitations or exclusions may not
apply to you. This warranty gives
you specific legal rights, and you
may also have other rights that
vary by state or province.
30
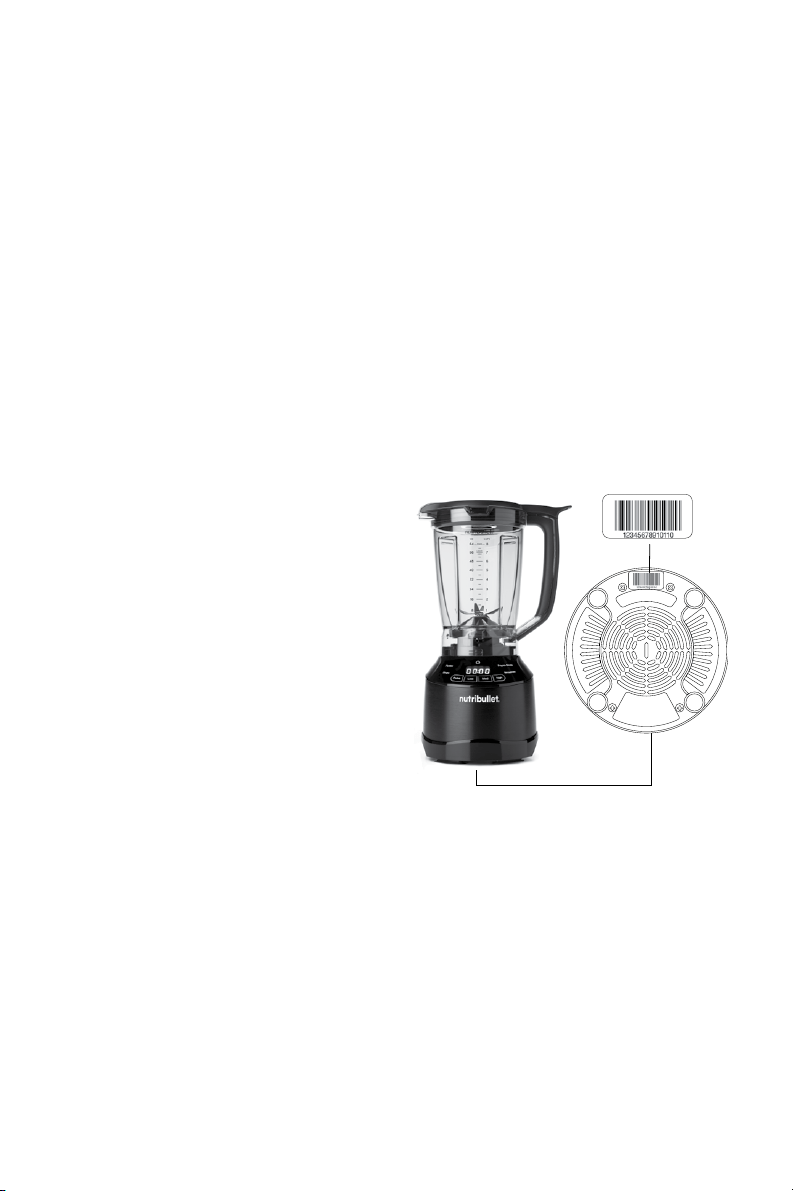
Warranty registration.
How to find serial number
under the motor base.
Please visit nutribullet.com/
warranty-registration or call
1 (800) 523-5993 to register
your new NutriBullet
®
Smart
Touch Blender™ Combo. You
will be asked to enter the Serial
Number* of your product, along
with the purchase date and
place of purchase.
The registration will enable us
to contact you in the unlikely
event of product safety
notification. By registering
your product you acknowledge
to have read and understood
the instructions for use, and
warnings set forth in the
accompanying instructions.


1 (800) 523-5993 | nutribullet.com
NutriBullet, LLC | www.nutribullet.com | All rights reserved.
NutriBullet
®
and the NutriBullet logo are trademarks of CapBran Holdings, LLC
registered in the U.S.A. and worldwide.
Illustrations may dier from the actual product. We are constantly striving
to improve our products, therefore the specifications contained herein
are subject to change without notice.
201116_NBF50520