User guide.


3
PERSONAL SAFETY
BLADES ARE SHARP! HANDLE
CAREFULLY. Use care when
handling any blade. To avoid
laceration injury, do not
handle or touch any blade
edge. Always hold the S-blade
by its upper plastic part.
AVOID CONTACT WITH
MOVING PARTS! Keep hands
and utensils out of and
away from the attachments
(especially the blade or whisk)
while blending food to reduce
the risk of severe personal
injury.
Never continuously operate
for longer than necessary to
create your recipe — generally
less than one minute.
Important safeguards &
cautionary information.
Warning! To avoid the risk of serious injury, carefully
read all instructions before operating your NutriBullet
®
.
When using any electrical appliance, basic safety
precautions should always be observed, including
the following important information.
Never blend carbonated
liquids or eervescing
ingredients (e.g., baking
soda, baking powder, yeast,
etc.). Pressure from released
gases can cause a sealed
NutriBullet® container (such
as the chopper container) to
burst, resulting in possible
injury and/or property
damage. Blade friction from
prolonged operation could
heat ingredients and generate
internal pressure in the sealed
chopper container.
Caution must be observed if
hot liquid is poured into the
product (food processor or
blender) as it can be ejected
out of the appliance due to
sudden steaming.
WARNING!
WARNING!
Save these instructions!
FOR HOUSEHOLD USE ONLY
!

4
While unlikely, friction from
the rotating blade when using
the chopper can potentially
cause ingredients to heat and
generate internal pressure in
the sealed chopper container,
if permitted to run for longer
than a minute. If the container
is warm to touch allow it to cool
completely before carefully
opening, pointed away from
your body to avoid injury.
Make sure the blending arm is
completely submerged down
in your mixture to prevent
splattering. Never blend
near the top of your mixture,
especially if you are blending
hot ingredients so as to avoid
thermal injuries.
After chopping, allow the
contents to settle and release
any pressure that may have
built up during the chopping
process. As you detach the
chopper from the motor body,
have the container pointed
away from you in case there is
any built-up pressure.
Keep hands, hair, clothing,
as well as spatulas and
other utensils away from the
attachments during operation
to reduce the risk of injury to
persons or damage to the
product.
To reduce the risk of injury,
never place cutting blade on
base without first putting bowl
properly in place.
Be certain cover is securely
locked in place before
operating appliance.
Always make sure that your
NutriBullet
®
is unplugged
before you attempt to remove
or attach the blending arm.
After you have finished
blending, always turn- o
your blender and wait until the
motor comes to the complete
stop before removing the
blending arm from the mixture,
especially if the mixture is hot
so as to avoid thermal injuries.
This appliance is not
intended for use by persons
(including children) with
reduced physical, sensory,
or mental capabilities, or
lack of experience and
knowledge, unless they
are closely supervised and
instructed concerning use of
the appliance by a person
responsible for their safety.
Children should be supervised
to ensure that they do not play
with the appliance.
Do not use outdoors.

5
Do not use this product
in locations with dierent
electrical specifications or
plug types. Do not operate
with any type of plug adapter
or voltage converter device,
as these may cause electrical
shorting, fire, electric shock,
personal injury or product
damage. The cord is not
suitable for replacement.
The use of third-party
attachments, including canning
jars, is forbidden and may cause
fire, electric shock, personal
injury, or product damage and
will void the warranty.
To avoid risk of electric shock,
never immerse the cord,
plug, or motor unit of blender
in water or other electrical
current conducting liquids.
Avoid blending the following
seeds and pits in the
NutriBullet
®
, as they contain
a chemical known to release
cyanide into the body when
ingested: apple seeds, cherry
pits, plum pits, peach pits, and
apricot pits. Fruit pits may also
cause damage to the blade
and other attachment parts.
The information contained in
this user guide is not meant
to replace the advice of your
physician. Always consult
your physician regarding
health and nutrition concerns.
If you are taking any
medication, especially cholesterol
lowering medication, blood
thinners, blood pressure
drugs, tranquilizers, or
antidepressants, please check
with your physician before
trying any of the recipes
contained in this guide.

6
PRODUCT SAFETY
Always unplug the NutriBullet
®
when not in use.
To prevent possible separation
of components during operation,
you must properly align,
securely attach (hand tighten),
and fully lock attachments to
the motor body, and check for
separation before operating
your NutriBullet®.
Once you are done using your
NutriBullet®, wait until the
motor comes to a complete
stop and the unit powers down
completely before removing any
attachment from the motor body.
Taking the chopping container
o the unit prior to complete
power down can cause damage
to the S-blade coupling or other
parts.
Never blend using the blending
arm without at least some
liquid, as doing so may damage
the blade or motor. When using
the Food Chopper attachment
you may chop dry ingredients.
In most cases, your NutriBullet
®
requires the use of liquids to
blend or whisk ingredients
properly. Avoid blending food
without at least one liquid
ingredient.
DO NOT USE the blending arm,
for grinding dry ingredients such
as grains, cereal, or coee, as
this may damage the motor, the
blade, the whisk, or the chopper.
Always UNPLUG the NutriBullet
®
when it is not in use or BEFORE
assembling, disassembling,
changing accessories, or
cleaning. Do not attempt to
handle the NutriBullet
®
until all
parts have stopped moving.
Switch o the appliance and
disconnect from power supply
before changing accessories or
handling moving parts.
To unplug, grasp the plug and
pull from the outlet. Never pull
from the power cord.
Do not operate any appliance
with a damaged cord or
plug or after the appliance
malfunctions, or is dropped or
damaged in any manner.
If the supply cord is damaged, it
must be replaced by a qualified
electrician in order to avoid a
hazard.
Discontinue use if the cord,
plug, or motor unit is damaged
Do not allow the cord to hang
over the edge of the table or
counter. Do not pull, twist, or
damage the power cord. Do not

7
allow cord to touch hot surfaces,
including the stove.
Periodically inspect all
NutriBullet
®
components for
damage or wear that may impair
proper function or present an
electrical hazard. Assure that
the power cord and plug are
undamaged. Discontinue use
and replace NutriBullet
®
cup if
you detect cracking, crazing,
cloudiness, or damage to the
plastic. Assure that the blades
rotate freely. Never operate
your NutriBullet
®
with damaged
components. If your NutriBullet
®
malfunctions in any way,
immediately discontinue use.
If the motor stops working and
feels hot, unplug the appliance
and let it cool for an hour before
attempting to use it again. Your
NutriBullet
®
has an internal
thermal breaker that shuts o
the motor when it overheats.
The thermal breaker will reset
when the unit is unplugged and
the thermal breaker cools down
suciently.
CAUTION: In order to avoid
a hazard due to inadvertent
resetting of the thermal cut-
out, this appliance must not be
supplied through an external
switching device, such as a
timer, or connected to a circuit
that is regularly switched on and
o by the utility
Never place your NutriBullet
®
on
top of flammable materials such
as newspapers, tablecloths,
napkins, dish towels, place
mats, or other similar types of
materials.
Do not place any NutriBullet
®
parts in the microwave or
oven. Only the Blending Arm
attachment or Whisk attachment
may be immersed in liquid or
used on the stove top, but always
keep the motor body dry.
To avoid leakage or spillage,
do not overfill the cup or bowl!
DO NOT EXCEED THE MAX LINE.
Make sure to always allow
room, at least 100mm, at the top
of whatever container you are
blending in. The blending action
of the NutriBullet
®
Immersion
Blender requires space to
blend, whisk, or chop eectively
blending in a full container can
result in leakage or spillage.
Remove whisk from the product
before washing.
Periodically inspect all
NutriBullet
®
components for
damage or wear that may impair
proper function or present an
electrical hazard. Make sure

8
that the power cord and plug are
undamaged. Discontinue use
and replace blending vessels if
you detect cracking, cloudiness,
or other damage to the vessel,
or damage to the motor unit,
motor body, or any attachments.
Ensure that the blades or whisk
rotate freely and that the
structure is undamaged. Follow
the recommended procedures
in the Care and Maintenance
section of this guide, and never
operate your NutriBullet
®
with
damaged components.
If your NutriBullet
®
malfunctions
in any way, immediately
discontinue use. We recommend
replacing your cup every six
months.
Attachments and accessories
are specific to the exact model of
NutriBullet
®
. Use of incompatible
parts (parts from other models)
may result in damage to your
NutriBullet
®
or create safety
hazards. When replacing cups
or blades or ordering additional
attachments or accessories
from www.bulletbrands.com.
au / www.bulletbrands.co.nz
or by contacting Customer
Service: (AU: 1300 285 538 /
NZ: 0800 232 633).
!
If any of the contained
instructions or warnings
are not understood, please
contact NutriBullet
®
Customer
Service for assistance at
www.bulletbrands.com.au
/ www.bulletbrands.co.nz.
Or call the Customer Service
team at: 1300 285 538 (AUS) /
0800 232 633 (NZ).
9
10

11
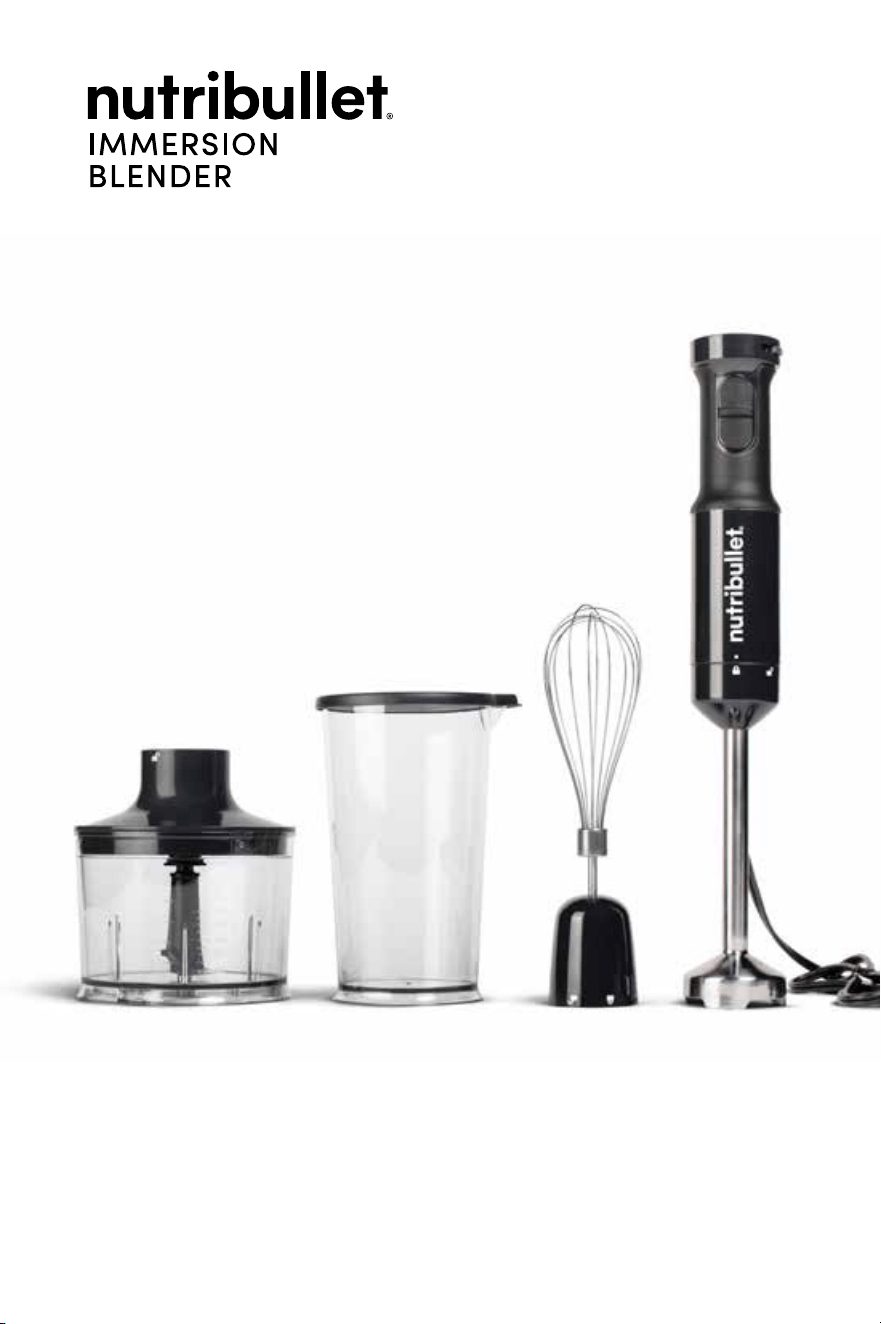
Contents.
Thank you for purchasing the NutriBullet
®
Immersion Blender.
03 Important safeguards
12 What’s included
13 Assembly guide
14 Before first use
14 Assembly
16 Usage instructions
16 Overview
19 Using the blending arm
22 Using the whisk
24 Using the chopper
26 Disassembly
27 Blending tips
28 Troubleshooting
29 Care and maintenance
30 How to store
30 Replacement parts
31 Recipes
12
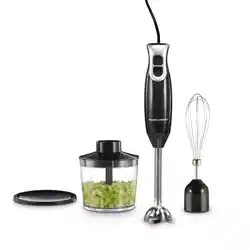
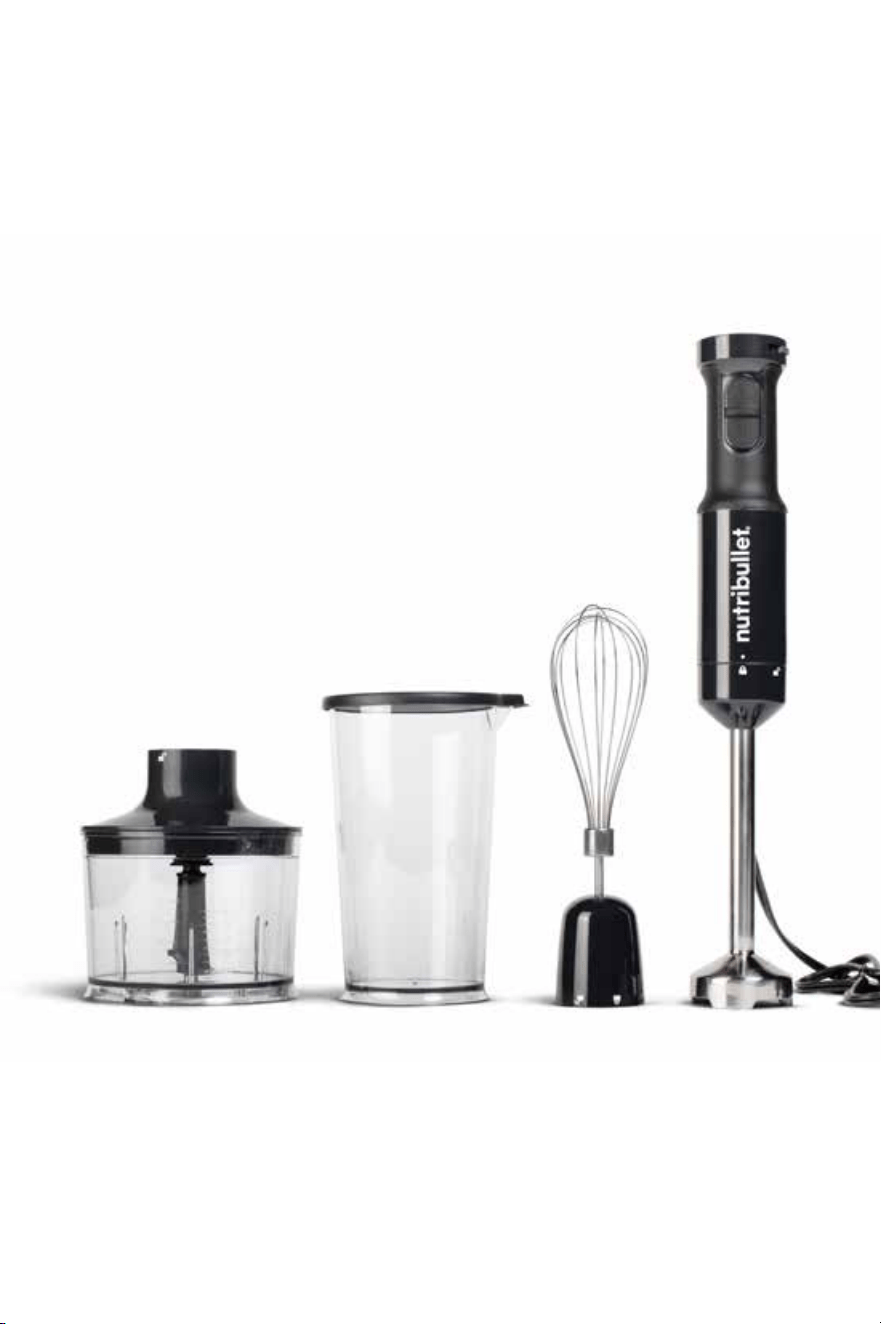
What’s included.
900 ml cup & lid
chopping blade
600 ml chopping
bowl & lid
motor body
20 cm blending arm
whisk
& whisk holder
13
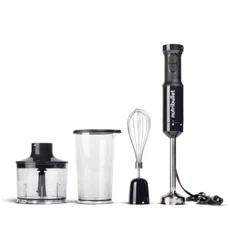
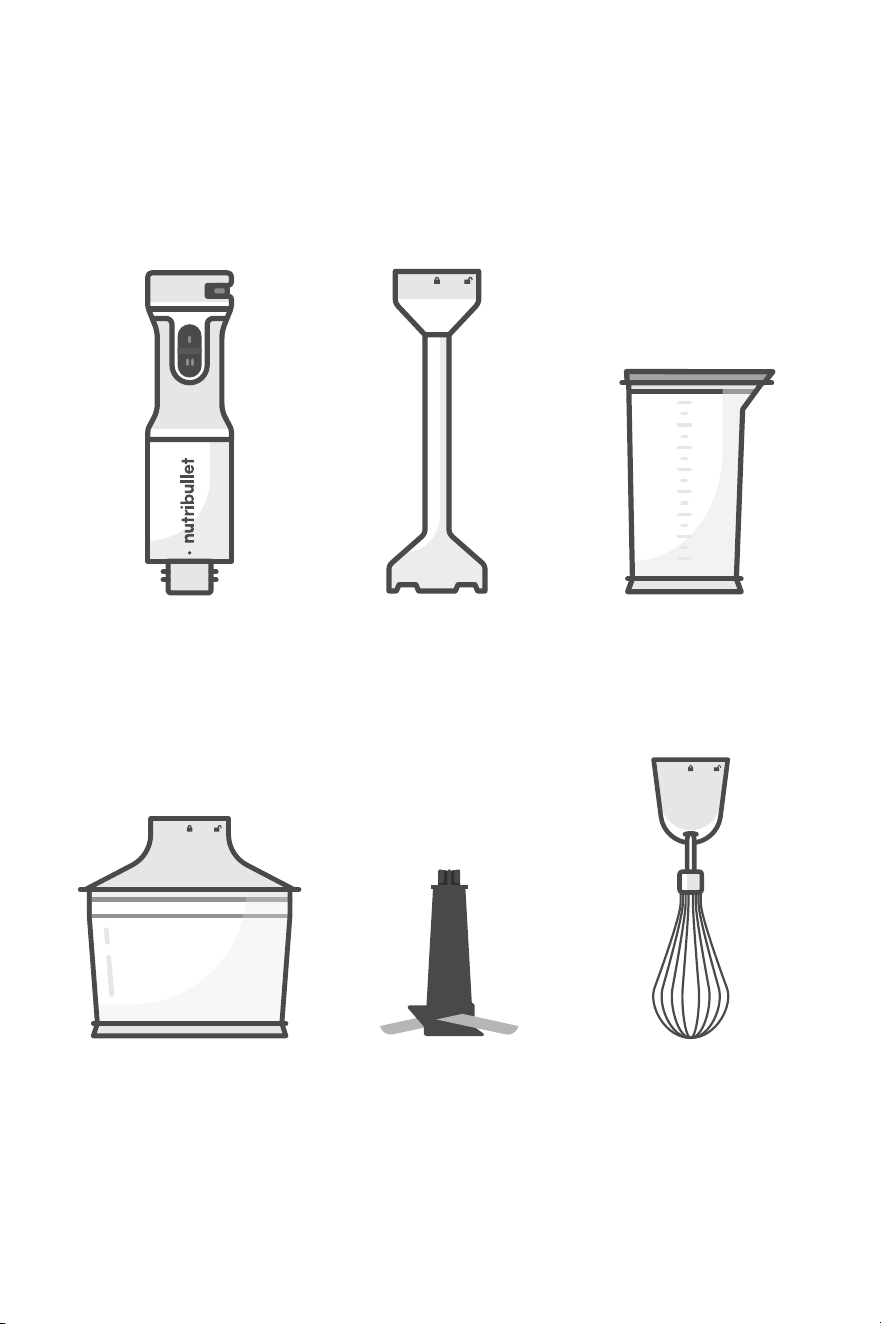
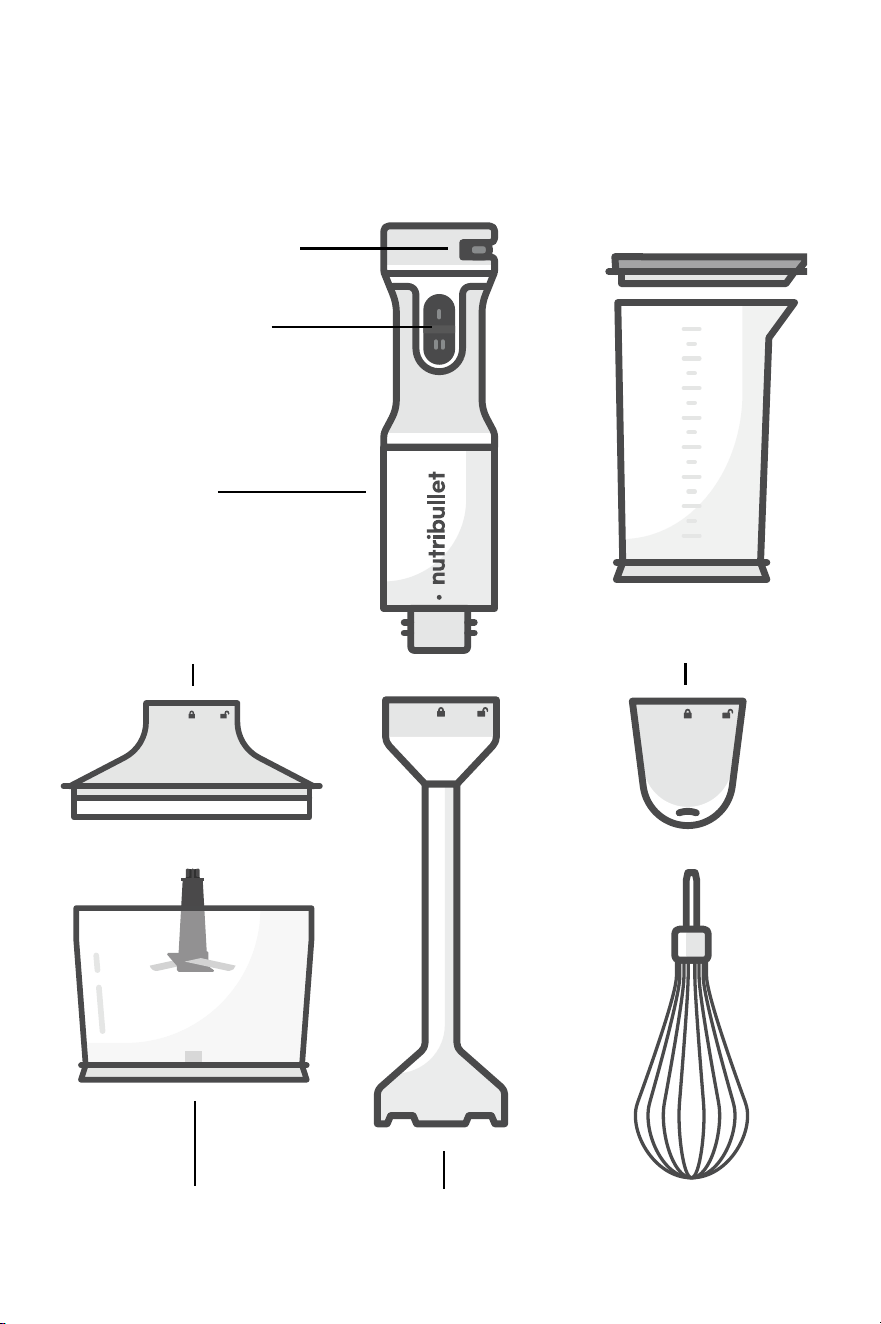
Assembly guide.
600 ml chopping
bowl
900 ml cup & lid
chopping bowl lid
variable speed dial
low & high speed
buttons
motor body
20 cm blending arm
whisk holder
whisk
chopping blade
14
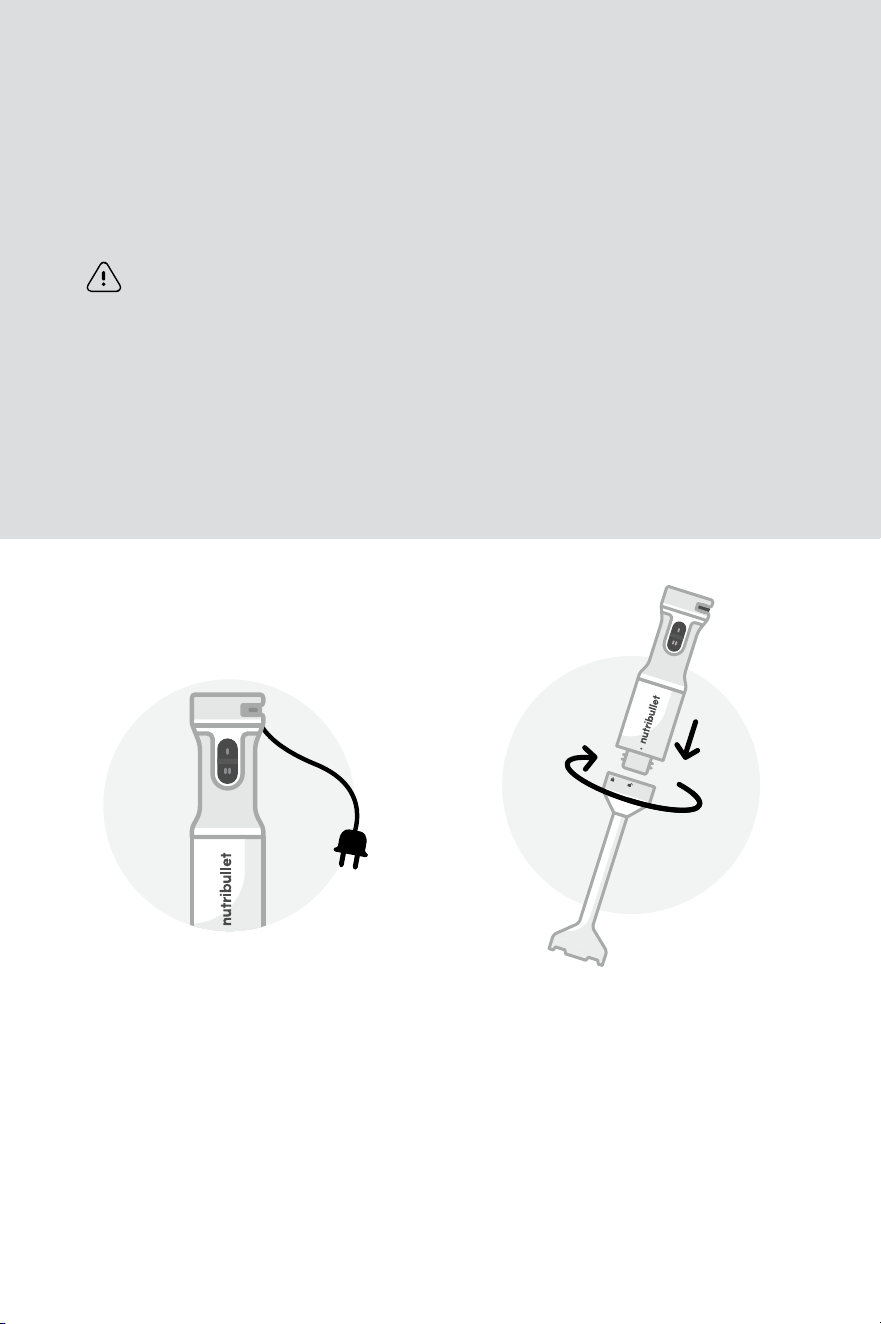
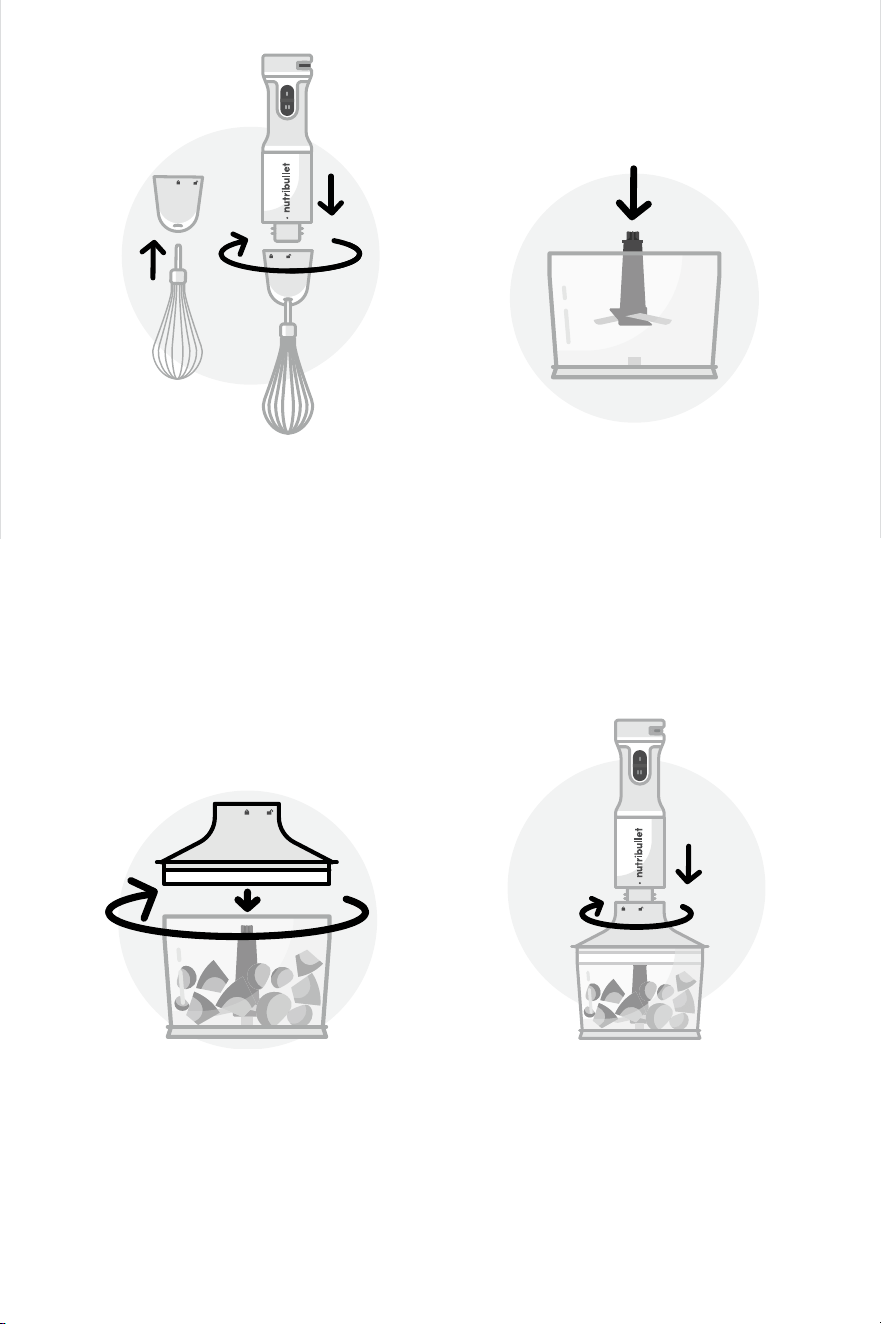
Assembly.
1 Before starting assembly,
make sure that the
appliance is unplugged.
2 Attach one of the
Immersion Blender
accessories (blending arm,
whisk, or chopping bowl)
onto the bottom of the
main motor body:
2a BLENDING ARM: Insert the
bottom of the motor body
into the top of the blending
arm; push the motor body
down and turn it clockwise
until it locks.
Getting
started.
WARNING: Never submerge
the motor body in water or
any other liquid.
Before using your blender for the
first time, please take a moment
to perform the steps below
1. UNPACK: Open box. Remove
blender and attachments. Place
all parts on a flat dry surface.
2. CLEAN: Rinse all detachable
parts and accessories (except
the motor body and chopping
bowl lid) with warm, soapy
water. Dry. Clean the motor
body and chopping bowl lid
with a damp cloth.
15
2b WHISK: Insert the top of the
whisk into the bottom of the
whisk holder. Then insert the
bottom of the motor body
into the top of the whisk
holder, pushing the motor
body down and turning
clockwise until it locks.
2c CHOPPER: Place S-blade
onto center pin of chopping
bowl. Press down on blade
and lock it in place.
WARNING: Blade is sharp! Handle
carefully. Always hold it by the
upper plastic part.
Attach top of chopping
bowl lid to bottom of motor
body; turn motor body
clockwise until it locks.
After loading food into
chopping bowl, place
chopping bowl lid onto top
of chopping bowl and lock it
in place.
16
Usage instructions:
overview.
1 Prepare foods for blending;
make sure only blendable
foods are used.
• Remove any hard seeds,
pits, and skin – for
example, peel, pits, and
rind should be removed
from oranges, lemons,
grapefruits, and melons.
• Cut foods into smaller
pieces if needed.
• Do not attempt to process
overly thick or hard foods
(since these may damage
the motor or blade).
• Do not blend hard fruits or
vegetables without liquid.
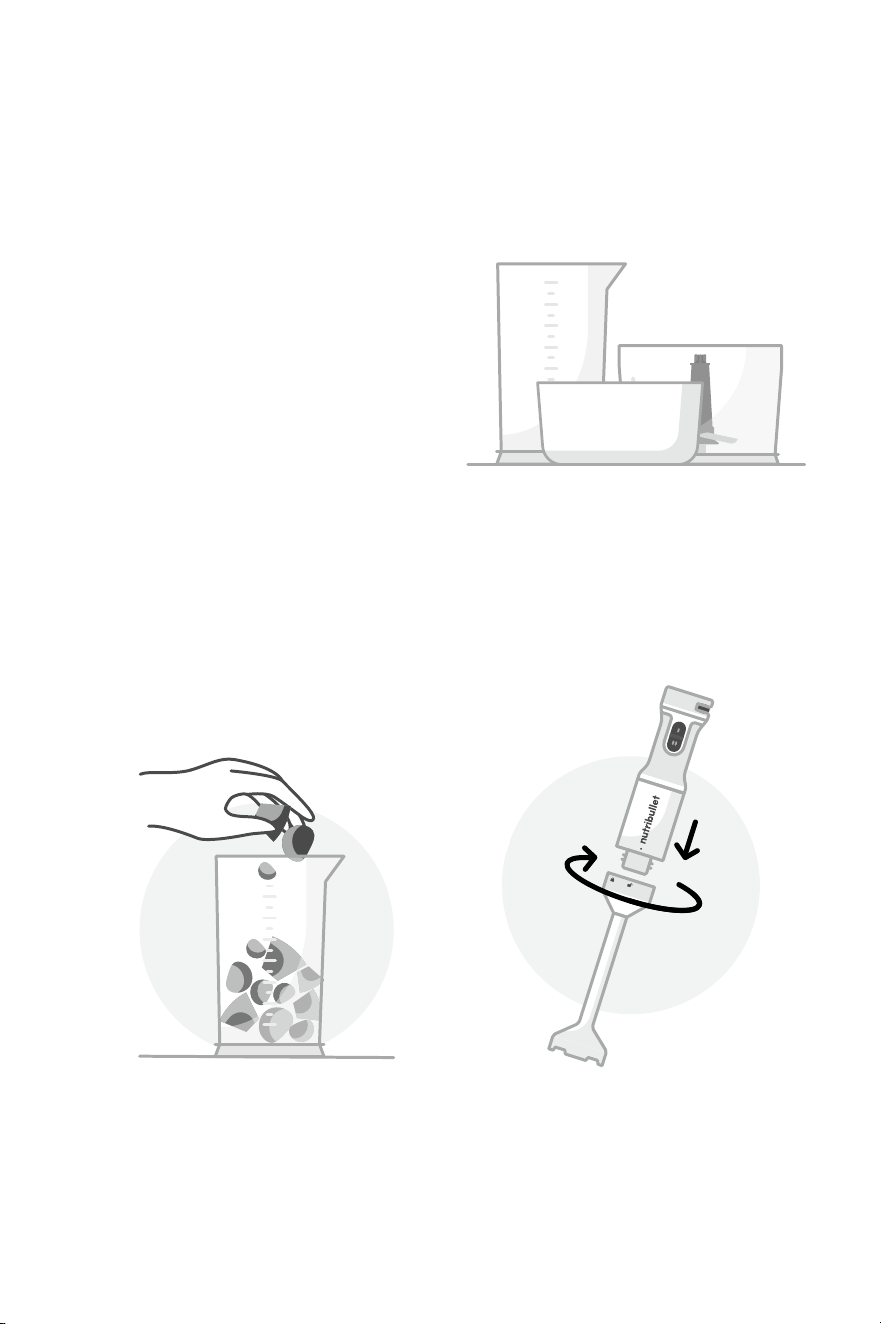
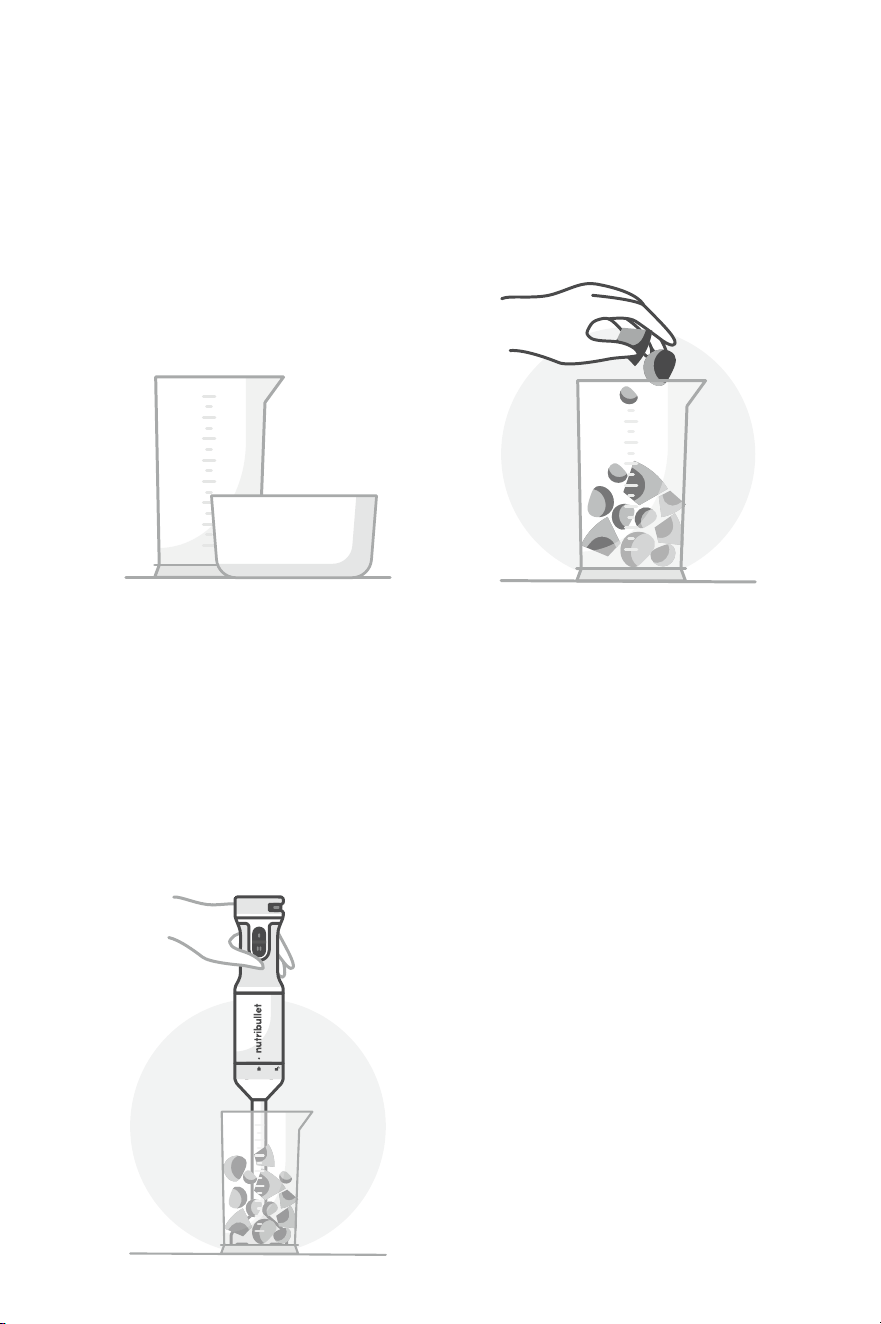
2 Place mixing vessel (cup,
cooking pot, mixing bowl
or chopping bowl) on flat,
dry surface.
3 Put food and/or liquid
into cup, mixing bowl,
or chopper. If using the
measuring cup included
in your set, DO NOT
exceed the MAX fill line.
4 Make sure your selected
attachment is tightly
fastened to the bottom of
the motor body and locked
in place. (See Assembly
section.). The blender is
now ready to operate.
17
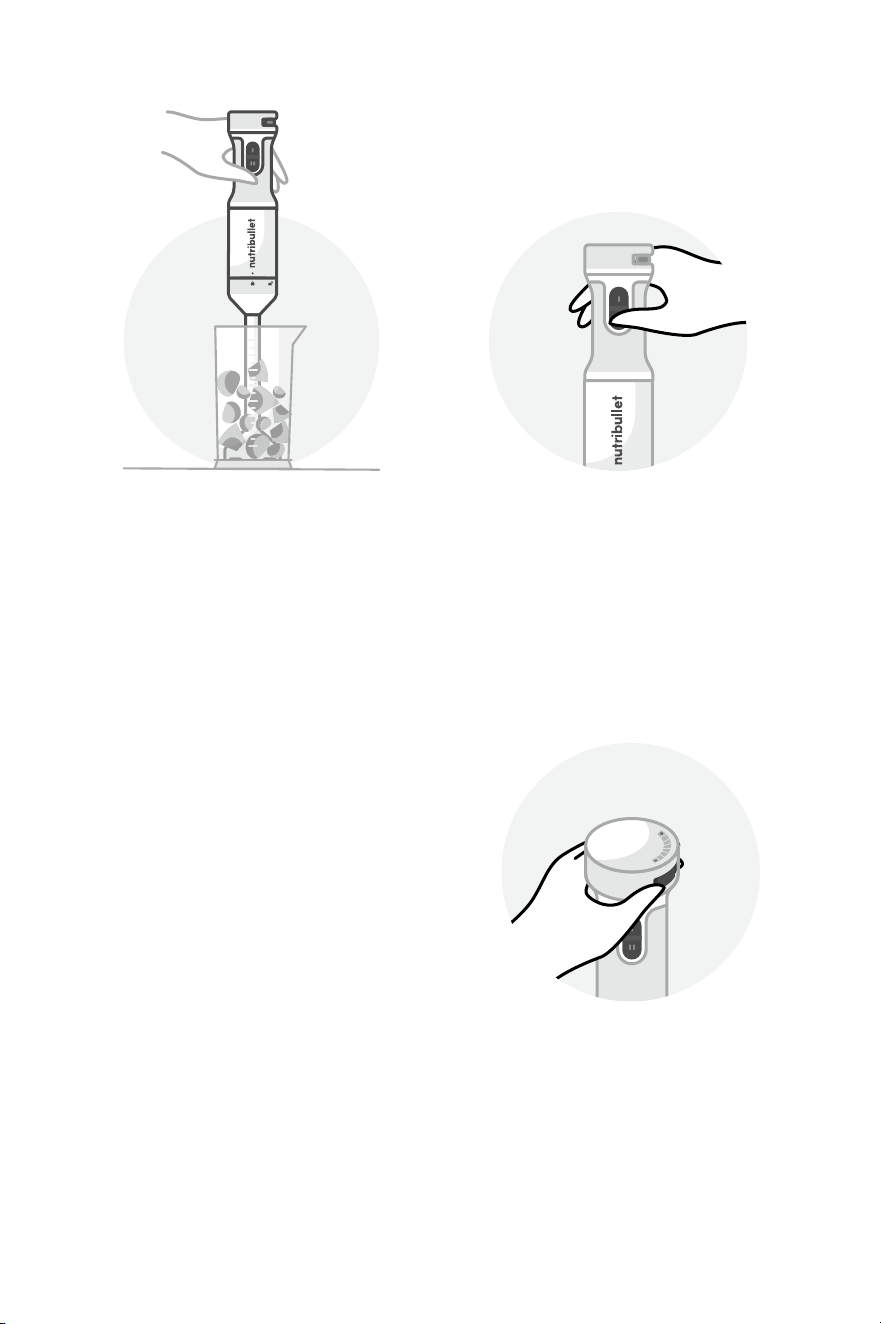
5 Carefully submerge the
blending arm or whisk
into the mixing vessel with
ingredients that you wish
to mix or blender. Do not
depress the power button
before putting the blending
arm into the mixing vessel
as it will cause splattering.
Also, do not blend near the
top of your mixture so as to
prevent splattering.
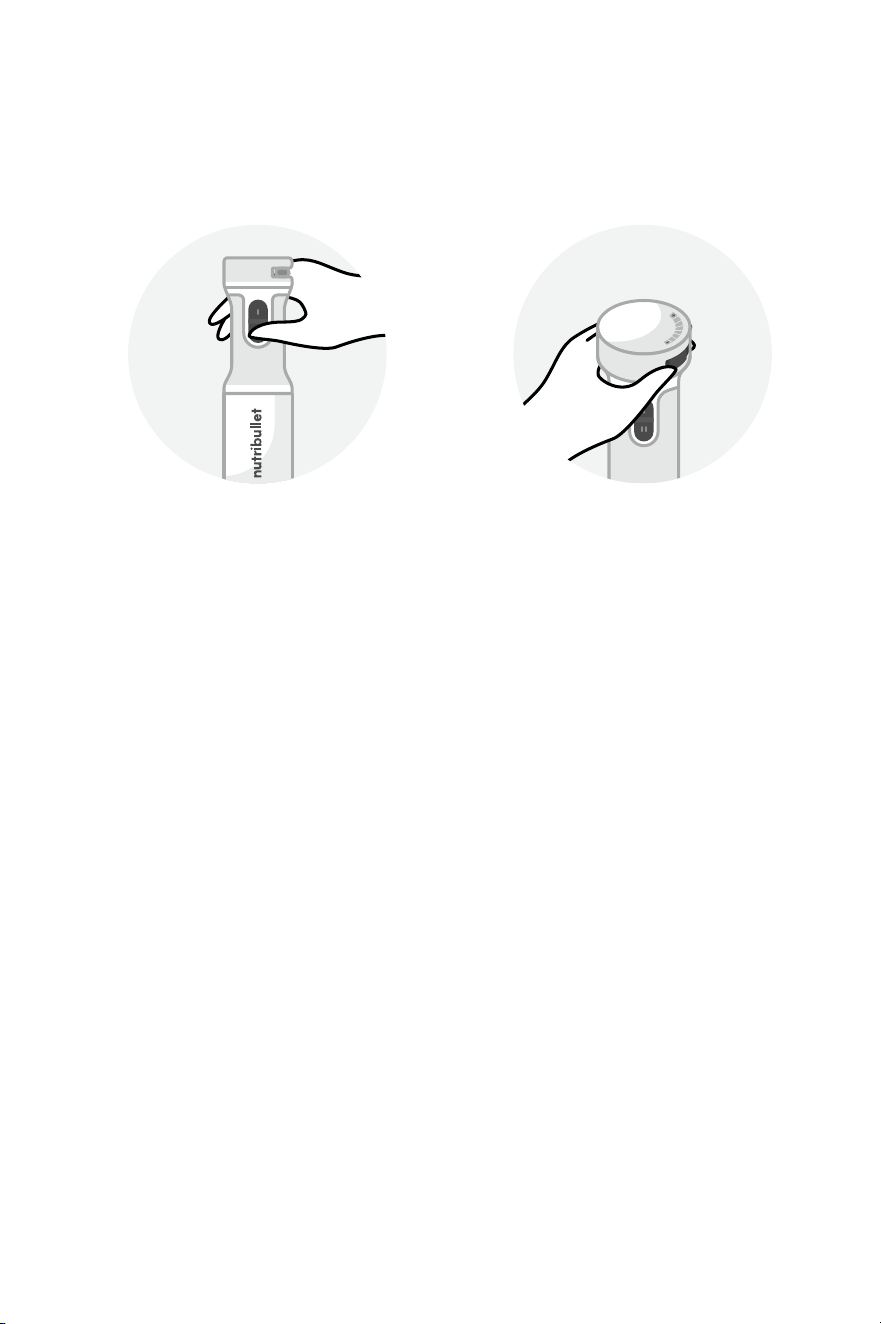
6 Press and hold the Low-
speed (I) or High-speed
(II) Power Button to
operate unit. If desired,
fine tune blending speed
by the variable Speed Dial
while pressing the Low-
Speed button.
Before pressing either
Power Button, you can finely
adjust the speed by turning
the Variable Speed Dial
and then pressing the
Low-Speed button.
18
Pressing either power
button activates the motor.
Releasing the button stops
the unit. The button must
be depressed continuously
for blending operation
to continue.
Once the motor is activated,
the attachment will start
turning and processing your
food/liquid.
CAUTION: Do not operate the
unit for long periods of time
without blending any ingredients.
CAUTION: Do not put fingers,
palms, utensils, or foreign
objects on or near attachment
during operation.
NOTE: The Variable Speed
Dial may only be used when
pressing the Low-speed button.
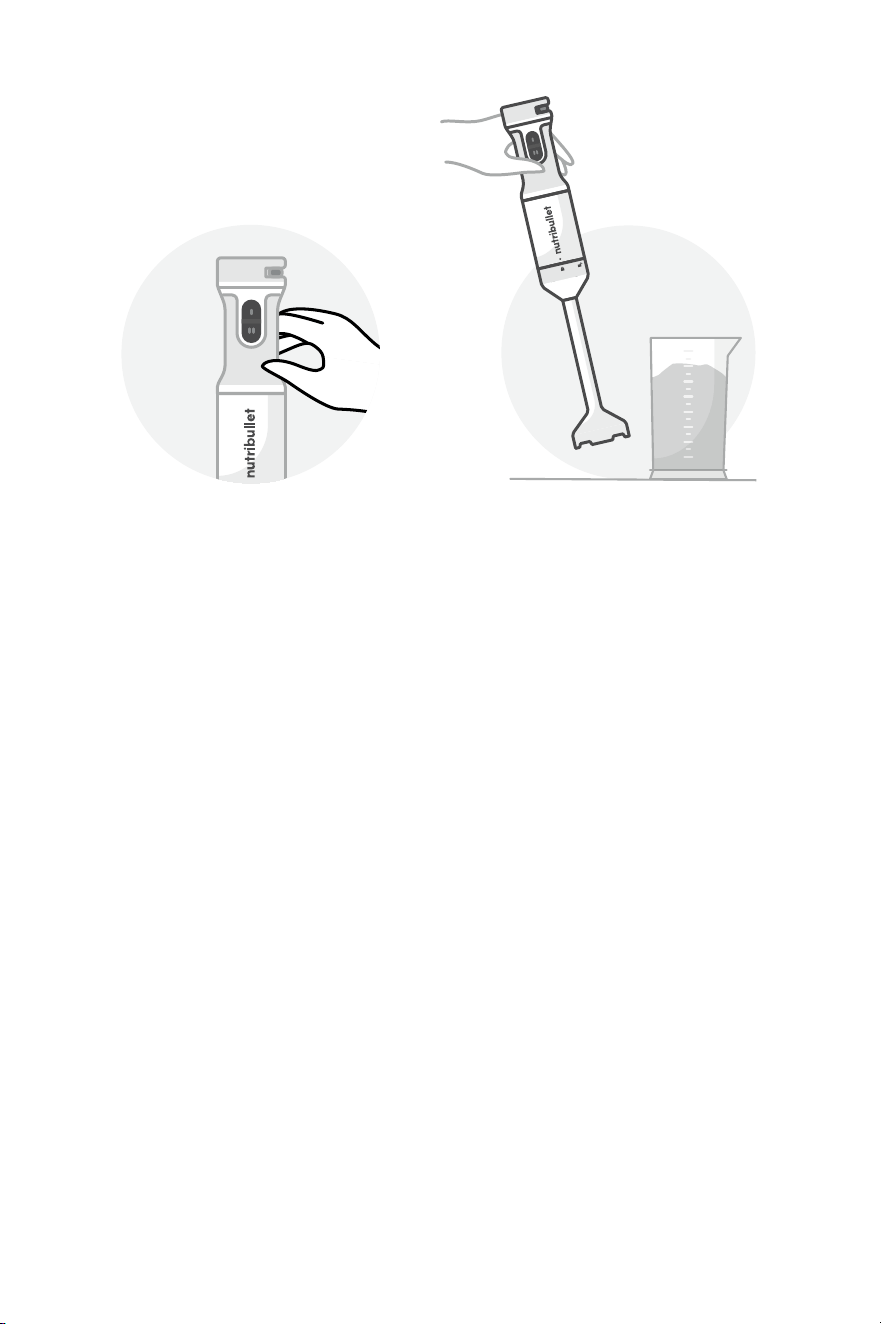
7 When you are done, release
the power button to shut o
the blender.
CAUTION: Wait until the motor
comes to a complete stop before
removing the blending arm from
the mixture, especially if the mixture
is hot so as to avoid splatter and
thermal injuries.
8 Place the motor body and
attachment safely on the
counter (or other flat, dry
surface).
9 If you have no more food
items to process, unplug the
blender and enjoy your food/
beverage, or store it for later.
10 Clean the motor body and
attachments as soon as
possible to avoid residue
buildup; disassemble and
store unit safely.
19
Using the blending arm.
The blending arm is perfectly suited for preparing a wide range of
dishes, such as dips, sauces, soups, condiments, milkshakes, even
baby food — as well as for many other mixing needs. For best
results, always include one or more liquid ingredients.
1 Place mixing vessel (cup,
cooking pot, or mixing bowl)
on flat, dry surface. Make sure
your selected attachment is
tightly fastened to the bottom
of the motor body and locked
in place. (See Assembly
section.). The blender is now
ready to operate.
2 Place the prepared food
and/or liquid into your
mixing vessel, without
forcing items in and
without overfilling.
CAUTION: Do not blend too much
food or liquid at one time. Don’t
overfill cup or bowl. If using the
measuring cup included in your set,
DO NOT exceed the MAX fill line.
3 Place the blending arm
into the mixing vessel
containing the items you
wish to blend.
NOTE: Do not place blender in
cup or bowl at an angle. Make
sure blender is fully upright.
CAUTION: Do not press the
power button before placing the
blending arm into the container
as it will cause splattering.
20
4 Press and hold the Low-
speed (I) or High-speed
(II) Power Button to
operate unit. If desired,
fine tune blending speed
by turning the Variable
Speed Dial while pressing
the Low-Speed button.
Before pressing either speed
button, you can finely adjust
the speed by turning the
Speed Dial and then pressing
the Low-Speed button.
NOTE: The Variable Speed Dial
may only be used when pressing
the Low-speed button.
Pressing either speed
button activates the motor.
Releasing the button stops
the unit. The button must
be depressed continuously
for blending operation
to continue.
CAUTION: Do not operate the
unit for long periods of time without
blending any ingredients.
CAUTION: Do not put fingers,
palms, utensils, or foreign
objects on or near attachment
during operation.
21
5 When you are done, release
the power button to shut o
the blender.
6 Remove the blender from
your mixing vessel. Gently
shake o any excess mixture
from the blending arm.
22
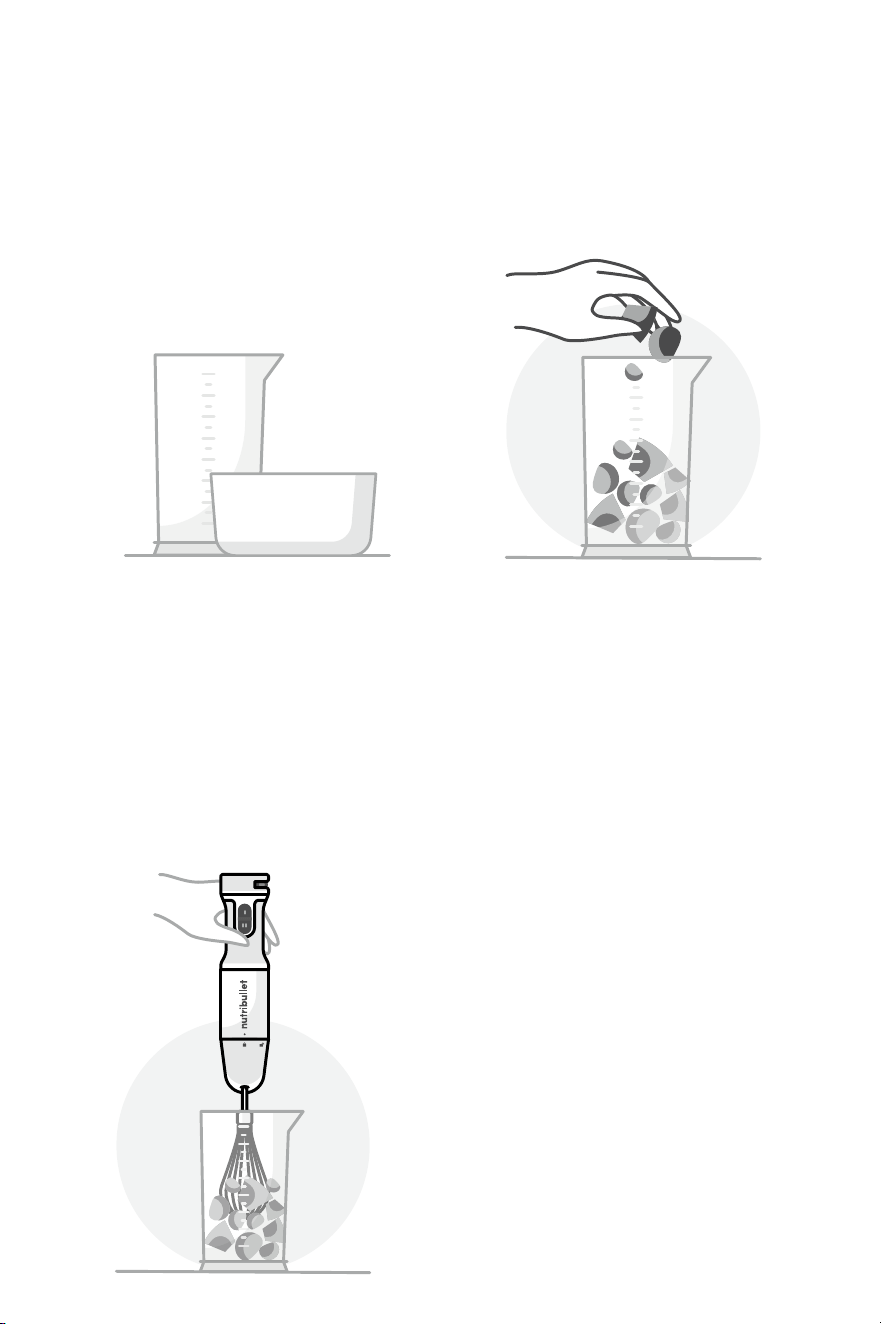
Using the whisk.
Use the whisk only for light or fluy foods such as whipping cream,
beating egg whites, and mixing “ready-mix” desserts. Items to whisk
should be moist, with one or more liquid ingredients.
1 Place mixing vessel (cup,
cooking pot or mixing
bowl) on flat, dry surface.
Make sure your selected
attachment is tightly
fastened to the bottom of
the motor body and locked
in place. (See Assembly
section.). The blender is
now ready to operate.
2 Place the prepared food
and/or liquid into your
mixing vessel, without
forcing items in and
without overfilling.
CAUTION: Do not blend too much
food or liquid at one time. Do not
overfill cup or bowl. If using the
measuring cup included in your set,
DO NOT exceed the MAX fill line.
3 Place the whisk upright in
your mixing vessel.
NOTE: Do not place blender in
cup or bowl at an angle. Make
sure blender is fully upright.
CAUTION: Do not press the
power button before placing the
blending arm into the container
as it will cause splattering.
23
4 Press and hold the Low
speed button (I) to begin
whisking operation.
NOTE: IT IS RECOMMENDED
TO ONLY USE THE WHISK
ATTACHMENT WITH LOW-SPEED.
CAUTION: Avoid using the whisk
for longer than 2 minutes, and
avoid whisking items without a
liquid ingredient.
5 When you are done, release
the Low speed button (I) to
shut o the blender.
6 Remove the blender from
your mixing vessel. Gently
shake o any excess mixture
from the blending arm.
24
Using the chopper.
The chopper is great for processing a wide variety of foods, such as
chopping onion, herbs, garlic, walnuts, almonds, and much more.
CAUTION: Don’t chop hard food items
(ice cubes, nutmeg, coee beans, grains).
1 Place the chopping bowl on
a clean, dry surface. Make
sure the surface is anti-slip.
2 Place the blade onto the
center pin of the chopping
bowl. Press down on the
blade and lock it onto
the bowl.
3 Load food items into the
chopping bowl, being
careful not to overfill or
force food into the bowl.
4 Place the chopping bowl
lid onto the chopping bowl
and turn it clockwise to lock
it in place.
25
5 Place the bottom of the
motor body onto the top
of the chopping bowl lid
and push down, turning the
motor body clockwise until
it locks in place.
6 Press and hold the Low
speed button (I) to begin
chopping. ONLY USE LOW
SPEED FOR CHOPPING.
NOTE: During operation, hold the
motor body with one hand and the
chopping bowl with the other.
CAUTION: Avoid chopping hard
foods for longer than 5 seconds.
7 When done chopping,
release the power button
and wait for the unit to
fully turn o.
8 Once the S-blade has
stopped turning, detach
the motor body from the
chopping bowl lid.
26
Disassembly.
1 Make sure the blender
is OFF and unplugged.
Ensure that the motor has
completely stopped, the
blade or whisk has stopped
moving, and all moving
parts have stopped before
disassembling the blender.
.
2 If using the blending
arm or whisk: remove the
blender from your mixing
cup or bowl.
3 Detach the motor body from
the blending arm, whisk, or
chopping bowl attachment.
4 Separate attachment
parts, if needed (Whisk–
Whisk holder; Chopping
Bowl – S blade – lid). The
blending arm attachment is
one single part.

27
PROPER PRODUCE PREP
Prepare food items such as fruits
and vegetables before inserting
them into your cup or bowl:
• Clean produce properly.
Rinse with lukewarm water,
produce wash, or water and
apple cider vinegar.
• Peel or remove skin as needed.
Foods with thick or hard skin
must be peeled before being
put into the blender.
• Remove rind from all citrus
fruits before blending.
• Remove large pits and seeds
from stone fruit before
blending. Stone fruit may be
used only if the seeds or pits
have been removed. Fruit with
hard cores must be pitted.
The cores of peach, plum,
mango, and apricot should
not be processed, to avoid any
potential malfunction.
• Pre-chop larger food items
down to the right size – small
enough to fit easily into your
bowl or cup, without having to
force pieces in.
• Longer or thicker foods with
less moisture and hard fiber
should be cut into slices.
• Leafy vegetables and foods
with long, hard fiber (such
as celery, wild celery herb,
collard): Cut the stems into
slices 3-5 cm long.
Blending tips.
BLADE SAFETY
• Never put your palms, fingers,
utensils, or foreign objects on
or near blender attachments
while attached to the blender
(especially during blending).
CAUTION: blades in the blender
arm and chopper are very sharp!
Avoid touching them.
• Do not overload your cup,
mixing bowl, or chopping
bowl with food or thick
mixtures, as this may cause
the blade to stop functioning
properly (rotating motion may
be impeded).
CHANGING
BLENDING SPEED
This Immersion Blender features
two main speed settings (Low and
High), and a variable speed dial.
Always start on Low-speed when
blending to prevent suction
of the blade to the bottom
of the blending vessel. Once
ingredients are broken down,
switch to High-speed if desired.
When using the Low button,
turn speed dial to the right to
increase blending speed.

28
BEFORE BLENDING:
UNIT ASSEMBLED BUT
CANNOT POWER ON
If the unit is not operating, this
may be due to parts not being
fully locked in place. Check to
make sure the attachment you
are using is locked tightly onto
the main body of the blender.
DURING OPERATION:
BLENDER STOPS
(STUCK, NOT BLENDING,
NOT OPERABLE)
In the unlikely event that the
blending arm, whisk, or chopper
gets stuck and blending stops,
release the power button, wait
for the unit to shut o, and look
at your mixture (the items
you’re processing).
If the problem seems to be an
overly thick mixture that caused
the blade to stop moving, try
adding water or other liquid
Troubleshooting.
to soften the mixture, or try
separating the mixture by
hand, or removing some of
the mixture. Then try blending,
whisking, or chopping again
on the loosened or thinned
out mixture.
Also check the cutting area
of your attachment (blade or
whisk) to see if there is residue
or food particle buildup; if so,
rinse o with warm water, then
try blending again.
If the blender still won’t
operate, turn it o, unplug
it, disassemble it, then
reassemble it. After reassembly,
power on the blender and
see if normal function has
been restored.
OVERHEATING
To avoid overheating, allow
the immersion blender to cool
down for at least 5 minutes
between uses.

29
6 Be sure to properly clean
the blade or whisk every
time you use them. Leftover
traces of food can cause
residue buildup on the
blade or whisker, which
may degrade blending
performance or inhibit
maximum blending.
CAUTION: Blade is sharp, so
handle carefully during cleaning.
7 Clean the motor unit with a
damp cloth only.
WARNING: Never immerse the
motor unit in water or other liquid.
8 Let all parts dry thoroughly,
then store the appliance and
its attachments in a dry place.
PRO TIP: Clean your appliance as
soon as possible after using it. If
allowed to sit, food residue may dry
on the blade, whisk, or other parts,
which can make it more dicult to
remove. If any food residue does
cake onto parts of the unit (other
than the motor unit or chopping
bowl lid), let those parts soak in hot
water for 30 minutes, which should
soften the residue and make it
easier to remove.
Cleaning the NutriBullet
®
Immersion Blender is quick and easy. All parts
(except for the motor unit and chopping bowl lid) can be cleaned by
simply rinsing with warm soapy water and some parts may be put into
the dishwasher. Here are some tips for cleaning and best practices.
1 Always make sure the
unit is unplugged before
you begin assembly,
disassembly, cleaning, or
storage of the unit.
2 Detach and separate the
parts of the blender (see
Disassembly section).
3 Remove the contents of
the mixing vessel or
chopping bowl.
4 Clean chopping bowl,
whisk, blending cup and
chopping blade with warm
soapy water or place in the
dishwasher.
5 The whisk holder, chopping
bowl lid and blending arm
should be cleaned with warm
soapy water. Do not soak
these parts or place in the
dishwasher as it may damage
the internal gears.
CAUTION: Blending arm, whisk
holder and chopping bowl lid are
NOT dishwasher safe. Do not place
these parts in the dishwasher as it
may damage the internal gears of
these attachments.
CAUTION: Do not use a metal
sponge to clean the parts, as that
may scratch or damage them.
Care and maintenance.

30
Replacement parts.
To order additional parts and accessories, please visit our website at:
bulletbrands.com.au
bulletbrands.co.nz
How to store.
You can save blended, whisked, or chopped contents for future use by
putting them in a cup or bowl, covered by plastic wrap or other cover, and
storing them in your refrigerator. When not in use, store the blender in a safe
dry place where parts will not be damaged and won’t cause harm.

31
2
1 TBSP
11/4 CUP
1 CUP
2 TBSP
2 TSP
1/2 TSP
2 TSP
1/2 TSP
1/2 CUP
MEDIUM BANANAS
(1½ CUPS MASHED
BANANAS)
COCONUT OIL
UNSWEETENED
ALMOND MILK
(RESERVE ¼ CUP TO
THIN OUT BATTER)
ALL PURPOSE
FLOUR
SUGAR
BAKING POWDER
SALT
CINNAMON
GROUND NUTMEG
WALNUTS, TOASTED
Banana bread pancakes.
4 SERVINGS; YIELDS 4-200mm PANCAKES
1 In the blender cup, blend
2 bananas, coconut oil and
1 cup of almond milk on
LOW, pulse until blended.
2 Add flour, sugar, baking
powder, salt, cinnamon,
nutmeg and blend
on LOW speed.
3 Mix in walnuts. Add in
more almond milk if
needed to thin out batter.
4 Heat a skillet or griddle over
medium. Carefully rub skillet
with an oiled paper towel.
5 For each pancake, spoon
2-3 tablespoons of batter
onto skillet leaving 1” apart
from other pancakes.
6 Cook until surface of
pancakes has some bubbles,
around 1-2 minutes. With
spatula, carefully flip
and cook the other side
for 1-2 more minutes
until golden brown.
NUTRITION FACTS PER
1 PANCAKE SERVING
330 calories, 14g fat, 48g carbs, 4g fiber,
14g sugar, 6g protein. Nutrition facts are
based on the recipe as listed.
Recipes.

32
20
6
1/2
2 TBSP
8 LEAVES
1 TBSP
1 TBSP
1 TBSP
2
1 TBSP
1/2 TBSP
1/4 CUP
ROMA TOMATOES
(OR USE 2-28 OZ
CANS OF PEELED
TOMATOES)
GARLIC CLOVES
LARGE ONION,
CHOPPED
BROWN SUGAR
BASIL
OREGANO DRIED
ITALIAN SEASONING
BALSAMIC VINEGAR
BAY LEAVES
SALT
PEPPER
EXTRA VIRGIN
OLIVE OIL
Tomato marinara.
18 SERVINGS; YIELDS 9 CUPS
1 Score 20 roma tomatoes
(place a shallow X on the
bottom of each tomato).
2 Bring a pot of water to a boil.
Submerge tomatoes in boiling
water for 15-20 seconds,
depending on ripeness, until
the skins are loosened.
3 Move the blanched tomatoes
to a bowl of ice or cold water.
Peel the skins o from the X.
4 Add peeled tomatoes to
a pot and crush tomatoes
with blender on LOW
speed for 5 seconds.
5 Add the remaining
ingredients to the pot —
garlic, onion, brown sugar,
oregano, italian seasoning,
balsamic vinegar, bay leaves,
salt, pepper and olive oil.
6 Bring to a boil. Turn heat
down to simmer on low
for 45 minutes - 1 hour.
7 Remove bay leaves.
8 Blend sauce until you
reach desired consistency.
For chunkier sauce blend
4-5 pulses. for smoother
consistency, blend 5-10 pulses.
9 Add in 8 leaves of basil
and simmer for 30 more
minutes until thick.
NUTRITION FACTS PER
1/2 CUP SERVING
45 calories, 3g fat, 4g carbs, 1g fiber,
3g sugar, 1g protein. Nutrition facts are
based on the recipe as listed.

33
1/2
1/2
1
1/2
2 CUPS
8
1/2 CUP
2 TBSP
1/2 TSP
1/2 TSP
2 TBSP
ONION, SMALL
ZUCCHINI, MEDIUM
CARROT, MEDIUM
RED CAPSICUM,
MEDIUM
SPINACH
EGGS
REDUCED-FAT MILK
NUTRITIONAL
YEAST
SALT
PEPPER
EXTRA VIRGIN
OLIVE OIL
Veggie frittata.
4-6 SERVINGS; YIELDS 25cm FRITTATA
1 Preheat oven to 180°C.
2 Chop all vegetables in the
chopping bowl and set aside.
3 In the cup, whisk eggs, milk,
nutritional yeast, salt and
pepper and set aside.
4 In a 25cm cast iron pan,
add 2 tablespoons of
oil and saute chopped
vegetables on medium
heat until softened.
5 Turn heat o and pour
in egg mixture (make
sure vegetables are
evenly spread out).
6 Bake in oven for 15 minutes.
NUTRITION FACTS PER
1/6 FRITTATA SERVING
150 calories, 11g fat, 48g carbs, 5g fiber,
3g sugar, 9g protein. Nutrition facts are
based on the recipe as listed.

34
2 TBSP
3
2
1 CUP
1
1
1
1/4
1/2 TSP
1 SPRIG
1 SPRIG
950mL
EXTRA VIRGIN
OLIVE OIL
ZUCCHINI,
MEDIUM, CHOPPED
INTO 1” PIECES
LEEKS, CHOPPED
INTO 1” PIECES
(WHITE & PALE
GREEN PARTS ONLY)
CAULIFLOWER
FLORETS
HEAD OF GARLIC
CARROT, MEDIUM
CELERY STALK,
MEDIUM
ONION, MEDIUM
SALT
MARJORAM
BASIL
VEGETABLE BROTH
Roasted leek & zucchini soup.
6 SERVINGS; YIELDS 6 CUPS
1 Preheat oven to 180°C.
2 Drizzle olive oil on zucchini,
leeks, cauliflower and
garlic bulb with and roast
at 180°C for 45 minutes.
3 In the chopper, add
carrot, celery and onion.
Pulse 5 times on high
until finely chopped.
4 In a 4 quart pot, saute
chopped vegetables with
oil and salt until softened.
5 Add vegetable broth,
marjoram, basil and
bring to a boil.
6 Add roasted vegetables
to pot and nutritional
yeast. Bring to simmer
and turn o heat.
7 Blend on LOW until smooth.
NUTRITION FACTS PER
1 CUP SERVING
100 calories, 5g fat, 13g carbs, 2g fiber,
6g sugar, 3g protein. Nutrition facts
are based on the recipe as listed.

35
11/2 CUP
4 CUPS
1 TSP
1/2 TSP
2
1/2
1
1 TBSP
4
950ML
1
1 SPRIG
1/2 CUP
SPLIT PEAS
WATER
SALT
PEPPER
CARROTS, SMALL
ONION, MEDIUM
POTATO
CANOLA OIL
GARLIC CLOVES
VEGETABLE BROTH
BAY LEAF
THYME
NUTRITIONAL
YEAST
Split pea soup.
6 SERVINGS; YIELDS 6 CUPS
1 Bring water to a boil and add
split peas, salt and pepper.
2 Turn heat to low and
simmer until water is mostly
evaporated and peas are
cooked (about 45 minutes).
3 Use chopper to chop
two carrots, onion
and yukon potato.
4 In a 4 quart pot, add oil
and saute garlic and
vegetables until softened.
5 Add 950mL of vegetable
broth to pot and
bring to a simmer.
6 Add bay leaf, thyme and
nutritional yeast and
simmer for 30 minutes,
then remove bay leaf.
7 Blend on LOW until smooth
or desired consistency,
use circular motions,
about 1 minute.
8 Adjust salt and pepper to taste.
NUTRITION FACTS PER
1 CUP SERVING
280 calories, 3g fat, 48g carbs, 16g fiber,
7g sugar, 16g protein. Nutrition facts are
based on the recipe as listed.

36
1 TBSP
1 HEAD
4
1 TBSP
1 SPRIG
1 SPRIG
1/2 CUP
1/4 TSP
CANOLA OIL
CAULIFLOWER (4
CUPS OF FLORETS)
GARLIC CLOVES
PLANT-BASED
BUTTER
THYME (REMOVE
LEAVES)
ROSEMARY
(REMOVE LEAVES)
UNSWEETENED
ALMOND MILK
SALT
Roasted cauliflower mash.
6 SERVINGS; YIELDS 3 CUPS
1 Preheat oven to 190°C.
Drizzle oil on cauliflower
florets and garlic and roast
in the oven for 40 minutes.
2 In a pot, add butter,
thyme, rosemary and
garlic on low heat, then
add roasted cauliflower,
almond milk and salt.
3 Blend on HIGH until
smooth consistency. Add
more milk if needed.
NUTRITION FACTS PER
1/2 CUP SERVING
70 calories, 4.5g fat, 6g carbs, 2g fiber,
2g sugar, 2g protein. Nutrition facts are
based on the recipe as listed.
4
1/4 TSP
1/4 TSP
2 TSP
100G
EGG YOLKS
SALT
PEPPER
LEMON JUICE
BUTTER (MELTED)
Hollandaise sauce.
10 SERVINGS; YIELDS 295mL
1 Add all ingredients to
blend cup except butter
and whisk on LOW.
2 Slowly drizzle in butter into
mixture while whisking on
LOW until all incorporated.
3 Put mixture in microwave for
15 seconds and whisk for 1
minute then microwave for
10 seconds and whisk for
another minute and repeat
if necessary until reaching
a thick velvety consistency.
NUTRITION FACTS PER
2 TBSP SERVING
100 calories, 11g fat, 0g carbs, 0g fiber,
0g sugar, 1g protein. Nutrition facts are
based on the recipe as listed.

37
1 HEAD
2
1 TBSP
1/4 TSP
1/4 TSP
1/2 TSP
11/4 CUP
GARLIC
EGGS
LEMON JUICE
SALT
PEPPER
YELLOW MUSTARD
EXTRA VIRGIN
OLIVE OIL
Roasted garlic aioli.
12 SERVINGS; YIELDS 1½ CUPS OR 350mL
ROASTED GARLIC
1
Preheat oven to 200°C.
2 Drizzle 1 tsp olive oil on
aluminum foil and wrap
garlic cloves inside.
3 Place in center of oven on
sheet pan and roast for 45
to 55 minutes. Garlic is done
when fragrant and cloves
are soft enough to squeeze.
4 Set aside to cool completely.
Once cool, gently loosen
and remove skins.
NUTRITION FACTS PER
2 TBSP SERVING
220 calories, 24g fat, 1g carbs, 0g fiber,
0g sugar, 1g protein. Nutrition facts are
based on the recipe as listed.
MAYO FROM SCRATCH
5
Crack 2 eggs into blender cup.
6 Add 1 Tbsp lemon juice,
¼ tsp salt, ¼ tsp pepper,
½ tsp mustard. Blend
all ingredients for 10
seconds on LOW speed.
7 Add ¼ cup of olive oil and
blend for 20 seconds on
HIGH to max setting and
repeat four more times until
1 ¼ cup of oil is incorporated.
8 Blend until thick and creamy.
GARLIC AIOLI
9
In the blender cup, add 1½
cups of mayo, 16 cloves of
roasted garlic (one head of
garlic), ½ tsp of lemon juice,
¼ tsp salt. Blend on HIGH
on max setting for 1 minute.
OPTIONAL: add 2 tsp
sriracha or chili powder
for a spicy garlic aioli.

38
3/4 CUP
1/4 CUP
3 TBSP
1 TSP
1 TBSP
1
1/2 TSP
1/2 TSP
OLIVE OIL
BALSAMIC VINEGAR
MAPLE SYRUP
DIJON MUSTARD
SHALLOT, MINCED
GARLIC CLOVE,
MINCED (1 TSP)
SALT
BLACK PEPPER
Easy balsamic vinaigrette.
10 SERVINGS; YIELDS 295mL
1 Add all ingredients to
blender cup and blend until
ingredients are combined.
NUTRITION FACTS PER
2 TBSP SERVING
170 calories, 17g fat, 5g carbs, 0g fiber,
5g sugar, 0g protein. Nutrition facts are
based on the recipe as listed.
11/2 CUP
1 TBSP
1 TBSP
HEAVY CREAM
LAVENDER
CONFECTIONERS
SUGAR
NUTRITION FACTS PER
1/4 CUP SERVING
90 calories, 9g fat, 2g carbs, 0g fiber,
2g sugar, 1g protein. Nutrition facts are
based on the recipe as listed.
Lavender whipped cream.
6 SERVINGS; YIELDS 11/2 CUPS
1 In a small pot, bring
heavy cream to a simmer
and turn heat o.
2 Add lavender buds to
pot and let it steep until
mixture is cool. Refrigerate
for two hours.
3 Strain and remove
lavender from cream.
4 Add cream to blender cup
with confectioners sugar.
With whisk attachment,
blend on HIGH for 4 minutes.
5 Serve with fruit and desserts.

39
2
1 CUP
8
1/4 CUP
30ML
2 TBSP
1 TBSP
BANANAS, FROZEN,
SLICED
CAULIFLOWER
FLORETS, FROZEN
OR FROZEN RICED
CAULIFLOWER
MINT LEAVES
UNSWEETENED
ALMOND MILK
GINGER JUICE OR
1” PIECE GINGER,
FRESH
LEMON JUICE
AGAVE, OPTIONAL
Ginger mint nice cream.
5 SERVINGS; YIELDS 590mL
1 Add all ingredients to
blender cup and blend in
circular motion, up and down
until smooth ~1 minute.
2 Pour into a container to
store in freezer for at least
2 hours before serving.
3 Serve with chopped fruit —
pineapple or blueberries.
NUTRITION FACTS PER
1/2 CUP SERVING
70 calories, 0g fat, 16g carbs, 2g fiber,
9g sugar, 1g protein. Nutrition facts are
based on the recipe as listed.

40
900g
1/4 CUP
1/2 CUP
2 TBSP
2 TBSP
1/4 CUP
OPTIONAL:
LOW-FAT GREEK
YOGURT (DAIRY OR
NON-DAIRY)
RASPBERRIES,
FRESH
BLUEBERRIES,
FRESH
CHIA SEEDS
HONEY (OR MAPLE)
MIXED NUTS,
UNSALTED
DRIZZLE MORE
HONEY OR
SWEETENER OVER
YOGURT SPREAD
OR USE VANILLA
YOGURT
Berry chia swirl yogurt
bark with chopped nuts.
12 SERVINGS; YIELDS 680g
1 On a lined baking sheet,
spread yogurt evenly.
2 Blend 1/4 cup of berries,
chia seeds, and honey and
set aside to let it thicken
(about 2 minutes).
3 In the chopping cup, pulse
mixed nuts 3-5 times.
4 Dot the yogurt spread with
the blended berries using
a toothpick to swirl in the
berries into the yogurt.
5 Top with nuts and
whole berries.
6 Freeze for at least
2 hours or overnight.
7 Break apart and store
in airtight container.
NUTRITION FACTS
PER 55g SERVING
100 calories, 4g fat, 8g carbs, 1g fiber,
6g sugar, 8g protein. Nutrition facts
are based on the recipe as listed.


42
If your product becomes
defective due to faulty
material or workmanship
within a period of 1
year from the date of
purchase, we warrant
to do the following:
• For New Zealand Consumers:
We will replace the product
with a new product, free of
charge, or repair the product
at our cost, at our discretion.
• For Australian Consumers:
Our goods come with
guarantees that cannot
be excluded under the
Australian Consumer
Law. You are entitled to
a replacement or refund
for a major failure and for
compensation for any other
reasonably foreseeable
loss or damage. You are
also entitled to have the
goods repaired or replaced
if the goods fail to be of
acceptable quality and the
failure does not amount to
a major failure.
one (1) year limited
replacement warranty
statement.
YOUR WARRANTY
IS SUBJECT TO THE
FOLLOWING CONDITIONS:
• DO NOT operate the
appliance with a damaged
plug or cord, or if the unit has
been dropped, damaged or
dropped in water. To avoid
the risk of electric shock, do
not disassemble or attempt
to repair the appliance
on your own. If the supply
cord is damaged, it must
be replaced by a qualified
electrician in order to avoid
a hazard. Incorrect re-
assembly or repair can
cause a risk of electric shock
or injury to persons when the
appliance is used.
• The item has not been
misused, abused, neglected,
altered, modified or repaired
by anyone.
• The item has been subjected
to fair wear and tear.
• The item has not been used
for trade, professional or
hire purposes.

43
• The item has not sustained
damage through foreign
objects, substances or accident.
YOUR WARRANTY
DOES NOT COVER:
• Components that are
subject to natural wear
and tear caused by
normal use in accordance
with operating instructions.
• Unauthorised/improper
maintenance/handling or
overload is excluded from
this warranty.
• For guarantee claims, you
will need to submit a proof
of purchase in the form of
a valid receipt that displays
date and place of purchase.
This warranty does not replace
but is in addition to your
statutory rights.
This warranty does not apply
to accessories supplied with
the item.
This warranty applies only to
the original purchaser and
may not be transferred.
Replacement items will
be covered by the limited
warranty for the balance of the
warranty period from the date
of the original purchase.
PLEASE NOTE:
Only the defective product
or parts returned to place of
purchase will be replaced
under this warranty.
NEW ZEALAND
PO Box 100-707
NSMC
Auckland 0745
0800 285538
www.bulletbrands.co.nz
AUSTRALIA
PO Box 574
South Morang
Victoria 3752
1300 285538
www.bulletbrands.com.au
NutriBullet is a registered trademark of CapBran Holdings, LLC.
Copyright © 2020 CapBran Holdings, LLC. All rights reserved.
Los Angeles, CA 90025, USA. Made in China.

bulletbrands.com.au / bulletbrands.co.nz
NUTRIBULLET
®
is the registered trademark of CAPBRAN HOLDINGS, LLC
Copyright © 2021 CAPBRAN HOLDINGS, LLC. Distributed by CAPITAL BRANDS
DISTRIBUTION, LLC. LOS ANGELES, CA 90025 USA
All Rights Reserved. MADE IN CHINA.
220-240VAC 50-60Hz 800W
Illustrations may dier from the actual product. We are constantly striving
to improve our products, therefore the specifications contained herein
are subject to change without notice.
210602_NBI07110 (NBI-100)