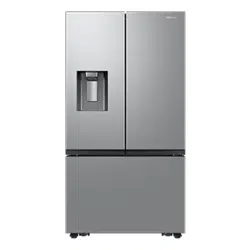
Water pitcher (AutoFill Pitcher) (applicable models only)
The AutoFill Pitcher function lets you enjoy cold brewed tea in your refrigerator.
01 Lid
02 Sealed mouth
03 Infuser
04 Body
To fill the Water pitcher
1. Grasp a handle groove of the sealed mouth, and then pull up to open the lid.
2. Put tea leaves or fruit to your taste into the infuser.
3. Enable the AutoFill Pitcher function on the main panel. Open the left door of the fridge door, and then mount the water pitcher onto the holder. Push it straight in as shown in the illustration on the left.
4. Close the door. The water pitcher will start to fill with chilled water a short time later.
5. To drink tea, open the door and detach the water pitcher. Pull it straight out.
CAUTION
We recommend consuming fruit infused water within 24 hours. After that, the infused water can spoil over time.
You must clean the water pitcher after you have consumed the infused water. Also clean the water pitcher if you haven't used it for a long time.
To prevent the water pitcher from tipping over or leaking, make sure the water pitcher fits in the water pitcher holder.
To prevent the water pitcher from spilling over or leaking, make sure the sealed mouth is properly inserted.
NOTE
If the front side (specifically marked area) of the water pitcher has too much moisture, the water pitcher may not fully fill. Remove the moisture, and then try again.
The AutoFill Pitcher function will stop supplying water to the water pitcher if the water pitcher does not fill after a certain amount of time. If this happens, check if the water line is properly connected. Remove and reinsert the water pitcher, and then try again.
NOTE
Wipe around the infuser holder if the infuser overflows or leaks.
Water drops off if the rubber cap is opened.
The AutoFill Pitcher indicator (AutoFill On /AutoFill Off ) blinks if there is a leak. In case of a leak, open the rubber cap so that the leaked water drains. The indicator will then turn off. However, if the indicator continues to blink, there might be a system failure. Contact your local Samsung service center.
The AutoFill Pitcher indicators ( AutoFill On/AutoFill Off ) blink if there is a leak. See page 39 for more information.
AutoFill Off blinks if you open the door and remove or insert the pitcher with the AutoFill Pitcher function off. To stop the blinking, close the door or, turn the AutoFill Pitcher function on.
Inner dispenser (applicable models only)
To dispense chilled water, put a water glass under the dispenser, and then push the dispenser lever.
Ice maker
The refrigerator has a built-in ice maker that automatically dispenses ice so that you can enjoy filtered water with cubed or crushed ice.
Ice making
After you have installed your refrigerator and plugged it in, follow these instructions to ensure proper ice making and to keep the ice bucket full of ice:
Let the refrigerator operate for at least 24 hours to ensure optimal performance.
Dispense the first 4 to 6 ice cubes into a glass.
Wait another 8 hours and dispense another 4 to 6 ice cubes.
Then, wait another 16 hours and dispense the first glass-full of ice.
Diagnosis
If ice does not dispense, first check the ice maker.
Press Test on the side of the ice maker. You will hear a chime (ding-dong) when you press the button.
You will hear another chime if the ice maker is operating properly
If You Turn the Ice Maker Off
If you press and hold Ice Maker for more than 3 seconds to turn the ice maker off, make sure to remove all ice cubes from the ice bucket. Remaining ice cubes may clump together, making it difficult to remove them.
Water clouding
Water supplied to the refrigerator flows through a core alkaline filter. During this filtering process, the water pressure of the water increases and the water becomes saturated with oxygen and nitrogen. This causes the water to look misty or cloudy temporarily when dispensed. This is normal and the water will look clear after a few seconds.
Maintenance
Handling and care
Fridge shelves
The appearance of the shelves differs by model.
To remove a shelf, fully open the corresponding door. Hold the front of the shelf, and then gently lift up and slide out.
To reinsert, hold the shelf at an angle so the front is higher than the back, and then insert the top hook into the top shelf notch. Then, lower the shelf and insert the bottom shelf hook into the bottom shelf notch.
CAUTION
The tempered glass shelves are heavy. Use caution when removing them.
The shelf must be inserted correctly. Do not insert upside down.
Glass containers may scratch the surface of glass shelves.
Door bins
To remove the door bin, hold the front sides of the bin, and then gently lift up to remove.
To reinsert, insert the door bin slightly above its final location making sure that the back of the bin is against the door. Hold the rear of the door bin with both hands, and then press down so that it fits snugly
CAUTION
Do not remove a bin that is filled with food. Empty the bin beforehand.
Use caution when opening the door if the bottom bin contains larger bottles, which may fall over.
Do not allow children to play with the bins. Sharp corners of the bin may cause injury
Fridge drawers
Vegetable / fruit drawers
Gently lift up the front of the drawer and slide out.
We recommend that you remove the door bins before removing the drawer. This is to prevent damage to the door bins.
To reinsert, insert the drawer into the frame rails and then slide inward.
Wide Pantry (applicable models only)
To remove, fully open the Wide Pantry. Then, slightly lift the front side and pull straight out.
To reinsert, push the rails to the back of the refrigerator. Then, place the Wide Pantry onto the rails and slide it back until it is in place.
Freezer baskets
1. Fully open the freezer drawer.
2. Lift the ice bucket to remove.
Upper basket
To remove, fully slide open the freezer drawer. Lift up the front of the upper basket and pull to remove.
To reinsert, align the front wheels of the upper basket with the end of the lower basket. Slide the upper basket to the front.
Lower basket
To remove, first remove the upper basket. Then, tilt up the front of the lower basket to pull out.
To reinsert, put the basket onto the rail assembly rear side first.
Cleaning
Interior and exterior
WARNING
Do not use benzene, thinner, home/car detergent, or Clorox™ to clean the refrigerator. They may damage the surface of the refrigerator and cause a fire.
Do not spray water onto the refrigerator. This may cause electric shock.
Regularly use a dry cloth to remove all foreign substances such as dust or water from the power plug terminals and contact points.
Unplug the power cord.
Use a moistened, soft, lint-free cloth or paper towel to clean the refrigerator’s interior and exterior.
When done, use a dry cloth or paper towel to dry well.
Plug in the power cord.
Rubber seals
If the rubber seals of a door become dirty, the door may not close properly and reducing refrigerator performance and efficiency. Use a mild detergent and damp cloth to clean the rubber seals. Then, dry well with a cloth.
Rear panel
To keep cords and exposed parts of the rear panel free of dirt, vacuum the panel once or twice a year.
Replacement
Water filter
The Filter Reset indicator (Filter ) turns red to let you know it is time to replace the water filter. Before replacing the filter, make sure the water supply line is shut off.
1. Shut off the water supply line.
2. Turn the knob of the filter cartridge 90 degrees counterclockwise (1/4 turn). The filter cartridge unlocks.
3. Pull out to remove the cartridge.
- If the water filter is severely contaminated, the cartridge may not be easy to remove. If that is the case, use force to remove the cartridge.
- To prevent water leaks from the filter opening, pull the cartridge straight out while removing it.
4. Insert a new filter cartridge. Use only Samsung-provided or approved filters.
5. Turn the cartridge knob clockwise to lock into place.
6. Press and hold Ice Maker on the main panel for 3 seconds to reset the life cycle detector. The Filter Reset indicator ( Filter ) turns off.
Reverse osmosis water filtration system
The water pressure of the water supply system to a reverse osmosis water filtration system must be between 30 to 120 psi (206 to 827 kPa). The water pressure of the reverse osmosis water filtration system to the refrigerator’s cold water line must be at least 40 psi (276 kPa). If the water pressure is below these specifications:
Check if the sediment filter in the reverse osmosis system is blocked. Replace the filter if necessary.
Refill the water tank in the reverse osmosis system with water.
If your refrigerator has a water filter, it may further reduce the water pressure when used in conjunction with a reverse osmosis system. Remove the water filter.
For more information or servicing, contact a licensed plumbing professional.
Ordering a new filter
To purchase a new water filter, contact a local Samsung service center or visit samsungparts on the web.
LED Lamps
To replace the lamps of the refrigerator, contact a local Samsung service center.
Troubleshooting
General
Temperature
Symptom
Possible causes
Solution
Fridge/freezer does not operate. Fridge/freezer temperature is warm.
Power cord is not plugged in properly.
Properly plug in the power cord.
Temperature control is not set correctly
Set the temperature lower.
Refrigerator is located near a heat source or direct sunlight.
Keep the refrigerator away from direct sunlight or a heat source
Not enough clearance between refrigerator and nearby walls or cabinets.
Make sure there is a gap of at least 2.5 inches (5 cm) between the refrigerator back and sides and any nearby walls or cabinets.
The refrigerator is overloaded. Food is blocking the refrigerator vents.
Do not overload the refrigerator. Do not allow food to block ventilation.
Fridge/freezer is over-cooling.
Temperature control is not set correctly.
Set the temperature higher.
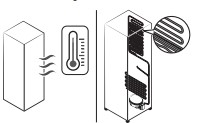
Interior wall is hot.
Refrigerator has heat-proof piping in the interior wall.
To prevent condensation from forming, the refrigerator has heat-proof piping in the front corners. If the ambient temperature rises, this equipment may not work effectively. This is not a system failure.
Odors
Symptom
Possible causes
Solution
Refrigerator has odors.
Spoiled food.
Clean the refrigerator and remove any spoiled food.
Food with strong odors.
Make sure strong smelling food is wrapped airtight.
Frost
Symptom
Possible causes
Solution
Frost around the vents.
Food is blocking the vents.
Make sure no food blocks the refrigerator vents.
Frost on interior walls.
Door is not closed properly.
Make sure food does not block the door. Clean the door gasket.
Condensation
Symptom
Possible causes
Solution
Condensation forms on the interior walls.
If door is left open, moisture enters the refrigerator.
Remove the moisture and do not leave a door open for extended periods of time.
Food with high moisture content.
Make sure food is wrapped airtight.
Water/ice (dispenser models only)
Symptom
Possible causes
Solution
Water flow is weaker than normal.
Water pressure is too low.
Make sure the water pressure is between 20 to 120 psi (138 to 827 kPa).
Ice maker makes a buzzing sound.
The ice maker function is activated, but the water supply to the refrigerator has not been connected
Press Ice Maker off .
Ice maker does not make ice.
Ice maker has just been installed.
You must wait 12 hours for the refrigerator to make ice.
Freezer temperature is too low.
Set the freezer temperature below 0 °F (-18 °C) or -4 °F (-20 °C) in warm, ambient air.
Dispenser Lock is activated.
Deactivate Dispenser Lock.
Ice maker is off.
Turn on the ice maker.
Ice does not dispense.
Ice may jam if the ice dispenser is not used for a long time (approx. 3 weeks).
If you won't be using the refrigerator for a long time, empty the ice bucket and turn off the ice maker.
Ice bucket is not properly inserted
Make sure the ice bucket is properly inserted.
Water line is not connected properly or water supply is not on.
Check if the water line is installed correctly. Check if the water line stop cock is closed.
Water does not dispense.
Water line is not connected properly or water supply is not on.
Check the water installation conditions.
Dispenser Lock is activated.
Deactivate Dispenser Lock
A third-party water filter was installed.
Use only Samsung-provided or approved filters.
Unapproved filters may leak and damage the refrigerator.
Water filter indicator turns on or blinks.
Replace the water filter. After replacing, reset the filter indicator sensor.
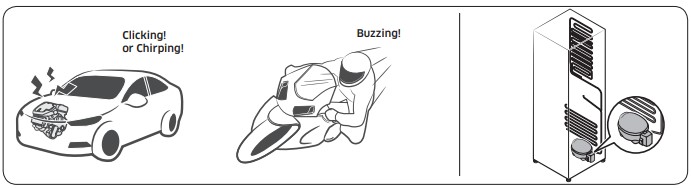
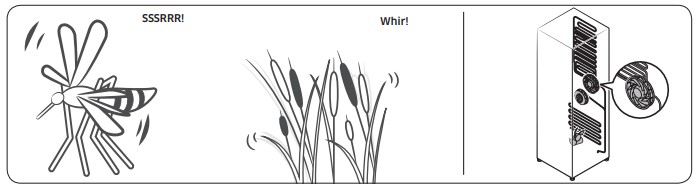
Do you hear abnormal sounds from the refrigerator?
Before calling for service, review the checkpoints below. Any service calls related to normal sounds will be charged to the user.
These sounds are normal.
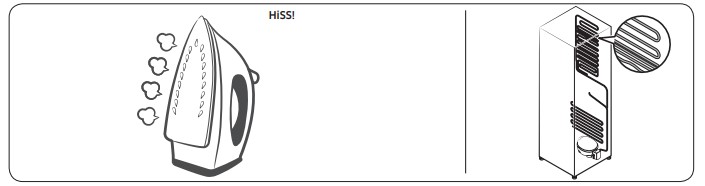
When starting or ending an operation, the refrigerator may make sounds similar to a car engine ignition. As the operation stabilizes, the sounds will decrease.
While the fan is operating, these sounds may occur. When the refrigerator reaches the set temperature, the fan sound will stop.
During a defrost cycle, water may drip on the defrost heater, causing sizzling sounds.
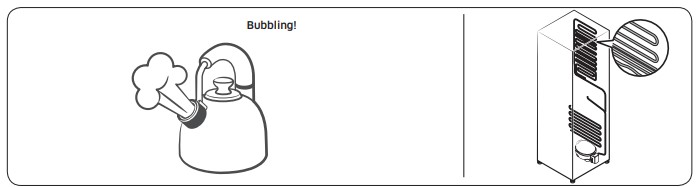
As the refrigerator cools or freezes, refrigerant gas moves through sealed pipes, causing bubbling sounds.
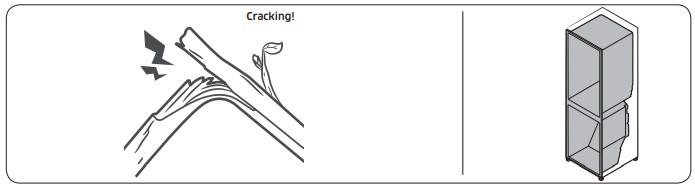
As the refrigerator temperature increases or decreases, plastic parts contract and expand, creating knocking noises. These noises occur during the defrosting cycle or when electronic parts are working.
For ice maker models: When the water valve opens to fill the ice maker, buzzing sounds may occur.
Due to pressure equalizing when you open and close the refrigerator door, whooshing sounds may occur.

 °C
°C 


 CAUTION


 NOTE
NOTE 


 CAUTION