User Manual 28 cu. ft. Large Capacity 3-Door French Door Refrigerator Samsung RF28T5001SR/AA
Installation
Follow these instructions carefully to ensure a proper installation of this refrigerator and to prevent accidents before using it.
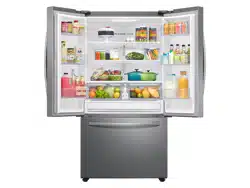
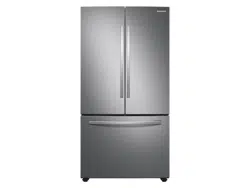
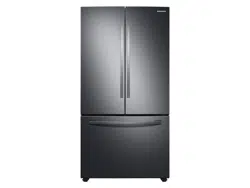
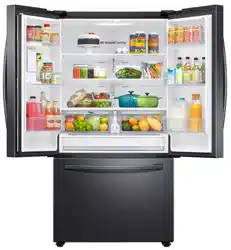
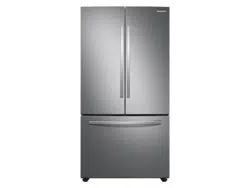
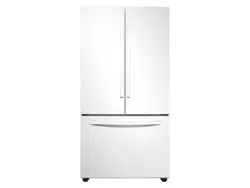
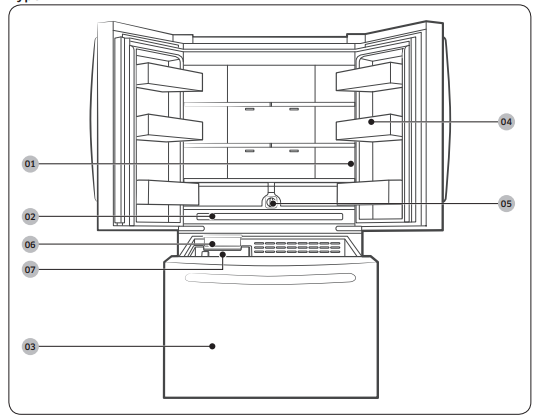
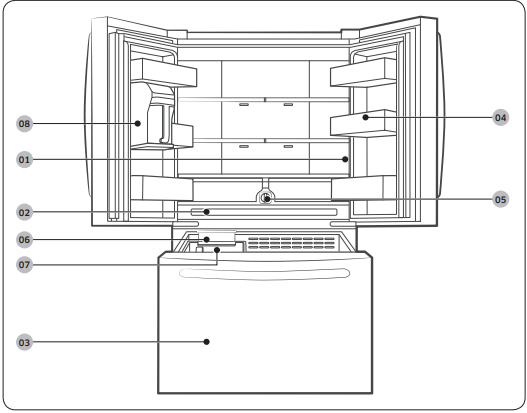
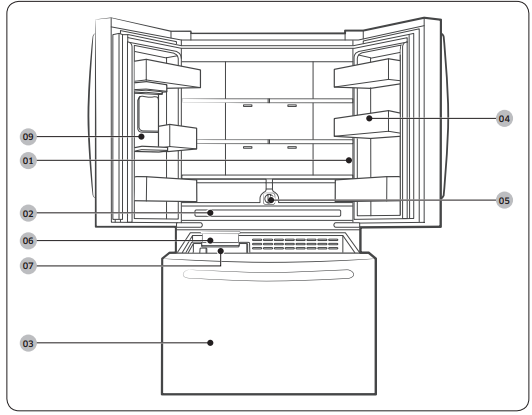
Refrigerator at a glance
The actual refrigerator and provided parts of your refrigerator may differ from the illustrations in this manual, depending on the model and the country.
Type A
Type B
Type C
Type D
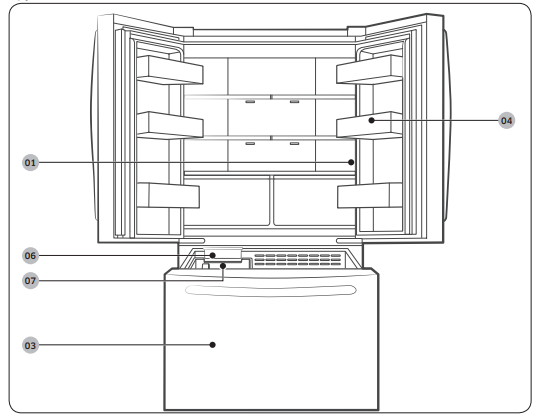
01 Main panel
02 Wide Pantry *
03 Freezer 04 Door bins
05 Water filter *
06 Ice Maker *
07 Ice bucket *
08 AutoFill Pitcher *
09 Inner dispenser *
* applicable models only
NOTE
- For energy efficiency, keep all shelves, drawers, and baskets in their original positions.
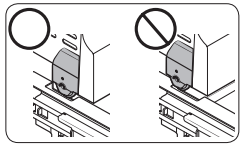
- When closing the door, make sure the vertical hinged section is in the correct position to avoid scratching the other door.
- If the vertical hinged section is reversed, put it back into the correct position, and then close the door.
- Moisture may form at times on the vertical hinged section.
- If you close a door forcefully, the other door may open.
- If the internal or external LED lamp is out of order, contact a local Samsung service center.
- If the door is left open for too long, the top internal LED will blink. This is normal.
Step-by-step installation
Select a site that:
- Has a solid, level surface without carpeting or flooring that may obstruct ventilation
- Is away from direct sunlight
- Has adequate room for opening and closing the door
- Is away from any heat sources
- Provides room for maintenance and servicing • Has a temperature range between 50 °F (10 °C) and 109 °F (43 °C)
CAUTION
- If your refrigerator is equipped with an ice maker, provide extra space at the rear of the refrigerator for the water line connection.
- When you install the refrigerator next to a fixed wall, you must provide a minimum clearance of 3 3/4" (95 mm) from the wall to allow the door to swing open.
NOTE
To facilitate moving your refrigerator to its final location, be sure to measure the width and height of doorways, thresholds, ceilings, stairways, and anything else that needs to be taken into consideration to ensure you can move your refrigerator safely. The following diagram illustrates the exact height and depth (factory specifications) of your refrigerator.
Clearance
See the following figures and tables for space requirements for installation.

If the refrigerator cannot pass through the entrance due to its size, see .
NOTE
- To prevent floor damage, make sure the front leveling legs are in the upright position.
- The surface you install the refrigerator on must support a fully loaded refrigerator.
- To protect the floor, put a large piece of cardboard along the path to the refrigerator's final installation location.
- Once the refrigerator is in its final position, do not move it unless necessary to protect the floor. If you have to move the refrigerator, place thick paper or cloth such as old carpets along the path of movement.

- STEP 3 Door removal for entrance
If the refrigerator cannot pass through the entrance to your home or kitchen due to its size, follow these instructions to remove and then re-install the refrigerator's doors. If you do not need to remove the doors, go to page 29 to continue the installation procedure.
WARNING
Unplug the power cord of the refrigerator before removing the doors.
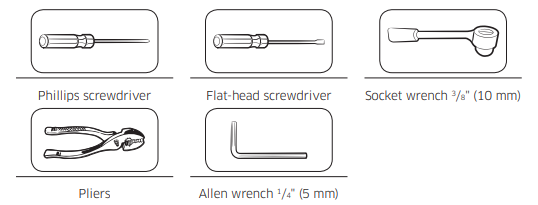
Tools required (not provided)
Detach the fridge doors
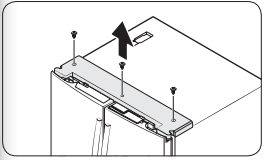
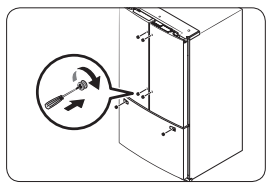
Left door
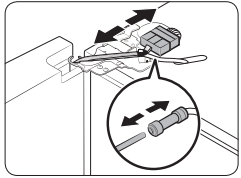
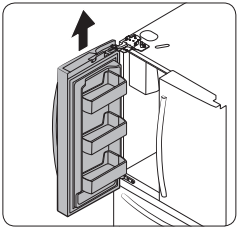
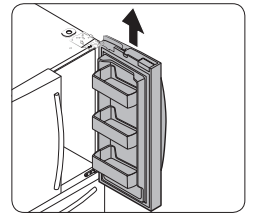
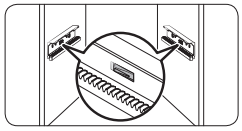
1. With the doors closed, use a Phillips head screwdriver to remove the screws (x3) in the top cover.
2. Disconnect the wires and the water tube from the left-side door. Do the following sequentially:
Decouple the connector.
While holding down one end of the water line coupler, disconnect the water tube.
CAUTION
Keep the water tube clips out of children’s reach.
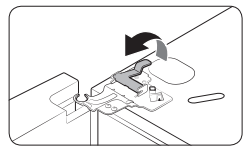
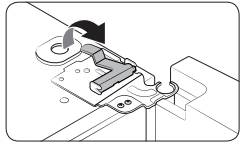
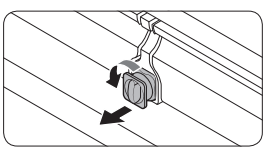
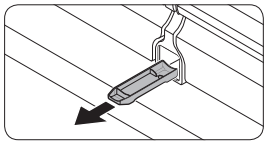
3. Gently draw up the clamp. To prevent finger injuries, do not apply a sudden force to the clamp.
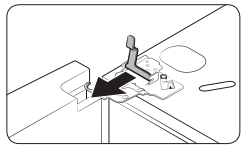
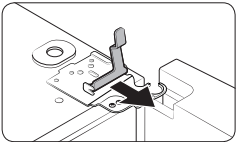
4. Pull the clamp to remove it.
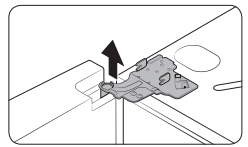
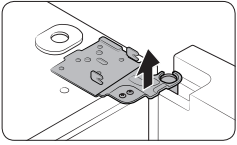
5. Open the door 90 degrees. While holding the door, pull up and remove the top hinge. Be careful not to damage the connector wires when you remove the hinge.
NOTE
Be careful not to drop the hinge on the floor.
6. Gently pull up the door vertically to remove. Do not apply excessive force to the door. The door may fall, causing physical injury.
7. Lay the door down on a flat surface.
CAUTION
Please put the door down slowly to prevent scratches.
Right door
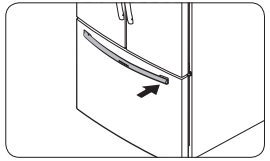
1. Gently draw up the clamp. To prevent finger injuries, do not apply a sudden force to the clamp.
2. Pull the clamp to remove it.
NOTE
Be careful not to drop the clamp on the floor.
3. Open the door 90 degrees. While holding the door, pull up and remove the top hinge. Be careful not to damage the connector wires when you remove the hinge.
NOTE
Be careful not to drop the hinge on the floor.
4. Gently pull up the door vertically to remove. Do not apply excessive force to the door. The door may fall, causing physical injury.
5. Lay the door down on a flat surface.
To reattach the fridge door
After you have moved the refrigerator to its final location, reattach the doors by following the removal instructions in reverse order.
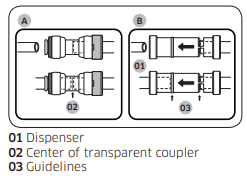
CAUTION To prevent water leaks from the dispenser, the water line must be fully connected. Make sure both tubes of the water line are inserted fully to the center of transparent coupler (A) or the guidelines (B).
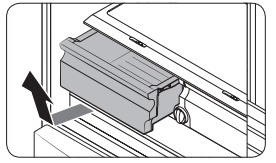
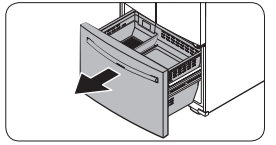
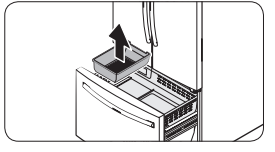
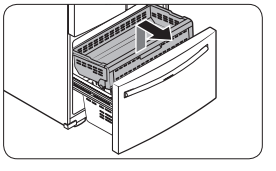
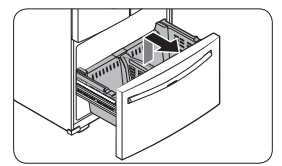
To detach the freezer drawer
1. Lift up the front of the upper basket and pull to remove.
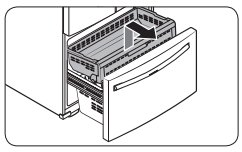
2. Then, pull up to remove the lower basket from the rail assembly.
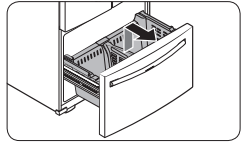
3. Press down the hooks to unlock the rail assembly.
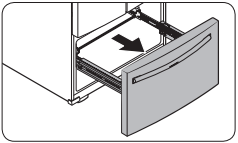
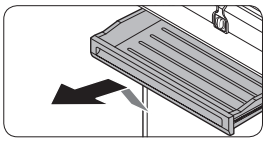
4 While holding the upper area of the freezer drawer front, slide the drawer out all the way to remove the freezer drawer from the rail assembly.
CAUTION
-
Be careful not to scratch or dent the rail assembly.
-
Make sure you mount the freezer baskets in the correct position. Otherwise, the door will not open or close properly, which causes frost to build up.
-
Do not store too much food in the freezer drawer. This prevents the freezer drawer from closing properly, resulting in frost buildup.
To reattach the freezer drawer
Once the refrigerator is in or near its final location, re-attach the freezer drawer by following the directions in the reverse order of removal.
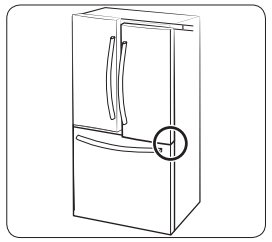
- STEP 4 Leveling the refrigerator
CAUTION
- When installed, the refrigerator must be leveled on a flat, solid floor. Not leveling the refrigerator can cause damage to the refrigerator or physical injury.
- Leveling must be performed with the refrigerator empty. Make sure no food items are inside the refrigerator.
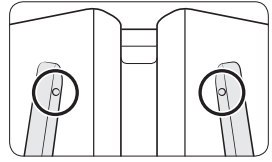
- For safety reasons, adjust the front a little higher than the rear. Level the refrigerator using the special screws (levelers) on the front legs. Use a flat-head screwdriver to turn the levelers.
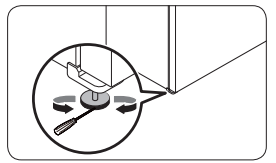
To adjust the height of the left side: Insert a flat-head screwdriver into the leveler of the left side front leg. Turn the leveler clockwise to raise the left side or turn it counterclockwise to lower.
To adjust the height of the right side: Insert a flat-head screwdriver into the leveler of the right side front leg. Turn the leveler clockwise to raise the right side or turn it counterclockwise to lower.
- STEP 5 Adjust the door height and the door gap
Snap rings
The height of a door can be adjusted using the provided snap rings, which come in 4 different sizes (1 mm, 1.5 mm, 2 mm, and 2.5 mm).

To adjust the height of a door
1. Check the height difference between the doors, and then lift up and hold the door with the lower height.
2. Insert a suitable-sized snap ring (A) between the door grommet (B) and the hinge as shown.

CAUTION
- Insert only one snap ring. If you insert two or more snap rings, the rings may slip out or make a rubbing noise.
- Keep the snap rings out of children’s reach and keep them for future use.
- Do not raise the door too much. The door can contact and damage the top cover.
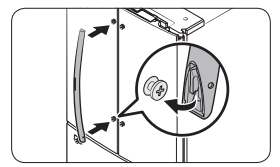
- STEP 6 Attach the handles
CAUTION The refrigerator handles must be oriented in the correct direction.
- The fridge handles must be attached so that the holes on each face each other.
- The freezer handle must be attached so that its hole faces downwards.
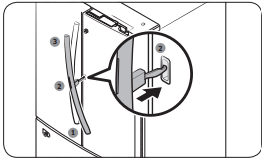
1. Using a Phillips screwdriver, attach the handle screws to the refrigerator, two for each handle respectively, as shown in the illustration to the left.
2. Attach the handle to the handle screws on the door.
For type B handle: Insert the hook on the middle of the handle to its designated hole on the door, and then place the upper and lower part of the handles to the handle screws.
NOTE The design of the right side door handle may differ depending on your model.
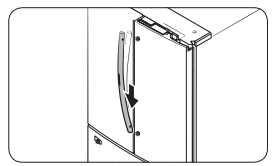
3. Push the handle down.
4. Insert an Allen wrench into the handle hole, and then turn it clockwise to tighten.
5. Repeat Steps 2 through 4 with the second refrigerator door handle.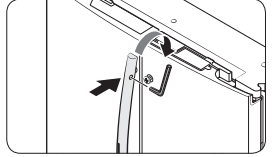
6. To attach the freezer handle to the refrigerator, first place the left side of the freezer handle onto the left handle screw, and then push it to the left.
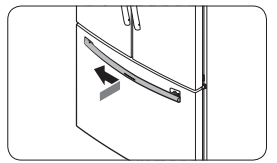
7. Then, place the right side of the freezer handle onto the right handle screw
8. Insert an Allen wrench into the handle hole, and then turn it clockwise to tighten. 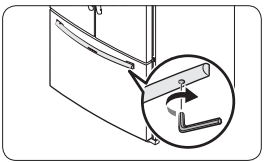
- STEP 7 Connect the water dispenser line (applicable models only)
A water dispenser with a filter is one of the helpful features on your new refrigerator. To help promote better health, the water filter removes unwanted particles from your water. However, it does not sterilize or destroy microorganisms. You may need to purchase a water purifying system to do that.
The water line also connects to the ice maker. For the ice maker to operate properly, water pressure of 30 to 120 psi (206 to 827 kPa) psi is required. If the refrigerator is installed in an area with low water pressure (below 30 psi / 206 kPa), you can install a booster pump to compensate for the low pressure.
After you have connected the water line, make sure the water storage tank inside the refrigerator is properly filled. To do this, press the water dispenser lever until water runs from the water outlet
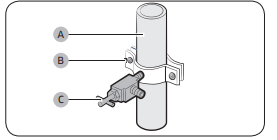
1. Shut off the main water source.
2. Insert the pipe clamp (B) and the shutoff valve (C) into the cold water line (A). A B
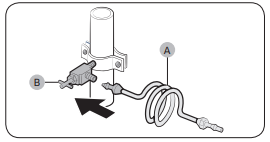
3. Connect the water line installation kit (A) to the shutoff valve (B).
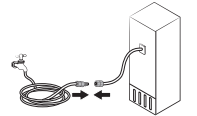
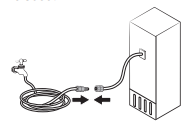
Connect the water supply line to the refrigerator
There are several items you must purchase to complete this connection. You may find these items sold as a kit at your local hardware store.

NOTE
If you have to relocate the refrigerator after connecting the water line (C), make sure the joined section of the water line is straight.
CAUTION
Do not mount the water filter on any part of the refrigerator. This may damage the refrigerator.

1. Connect the household water line to the assembled compression fitting.
- If you are using copper tubing, slip the compression nut (07) (not supplied) and ferrule (not supplied) on the copper tubing (not supplied) as shown.
- If you are using plastic tubing (08), insert the molded end (Bulb) of the plastic tubing (08) into the compression fitting.
2. Tighten the compression nut (07) onto the compression fitting. Do not over-tighten the compression nut (07).
3. Turn the water on and check for any leakage. If you find water drops or leakage in the connection areas, turn off the main water supply. Check the connections and, if necessary, tighten.
4. Flush 1 gallon of water through the filter before drinking or using the water from the refrigerator. (Flush approximately 6 minutes.) To flush, press a large glass or cup against the water dispenser lever. Fill the glass, empty it, and then repeat.
5. After you turn on the refrigerator, let the ice maker make ice for 1 to 2 days. Over that period of time, throw out the first 1 or 2 buckets of ice the ice maker makes to ensure all impurities have been removed from the water line.
NOTE
Only connect the water line to a potable water source.
- If you have to repair or disassemble the water line, cut off 1/4“ of the plastic tubing to make sure you get a snug, leak-free connection.
- You can test the water line quickly using a paper cup. Under normal conditions, the water dispenser can fill a 5 3/4 oz. (170 cc) cup in about 10 seconds.
- STEP 8 Initial settings
By completing the following steps, the refrigerator should be fully functioning.
1. Plug the power cord into the wall socket to turn the refrigerator on.
2. Open the door, and check if the interior light lights up.
3. Set the temperature to the coldest setting, and wait for about an hour. Then, the freezer will be slightly chilled, and the motor should be running smoothly.
4. Wait until the refrigerator reaches the set temperature. Now the refrigerator is ready for use.
When installation is complete, confirm that:
- The refrigerator is plugged into an electrical outlet and grounded properly.
- The refrigerator is installed on a flat, level surface with a reasonable clearance from walls and cabinets.
- The refrigerator is level and is sitting firmly on the floor.
- The door opens and closes freely, and the interior light turns on automatically when you open the door
Operations
Main panel

NOTE
- When you change the temperature on the panel, the panel displays the actual temperature inside the refrigerator until the temperature matches the temperature you set. Then, the panel displays the new set temperature. Note that it will take time for the refrigerator to reach the new temperature. This is normal. During this time, you do not need to set the temperature again.
- To ensure optimal performance, we recommend setting the temperature to 0 °F (-18 °C) for the freezer, and 37 °F (3 °C) for the fridge.
- The temperature in the refrigerator may rise if you open the door frequently or put a large amount of food into the refrigerator. If this happens, the temperature display blinks until the refrigerator returns to the specified temperature settings. If the blinking continues for an extended time, contact a local Samsung service center for technical assistance.
- The display of the main panel turns on only if the door is opened and turns off if the door is closed.
- If you set the Lock functoin on the main panel, the main panel locks automatically 1 minute after inactivity.
01 Fridge / °F °C (3 sec)
Fridge
You can use the Fridge button to set the fridge temperature.
Press Fridge repeatedly to select a desired temperature between 34 °F (1 °C) and 44 °F (7 °C).
The temperature indicator displays the current temperature or selected temperature.
°F ↔ °C
You can also use the Fridge button to switch the temperature scale between Celsius and Fahrenheit.
To switch the temperature scale, press and hold Fridge for 3 seconds to change the current temperature scale.
02 Power Cool (3 sec) / AutoFill Pitcher
Power Cool
Power Cool speeds up the cooling process at maximum fan speed. This is useful to quickly cool food that spoils quickly, or after the door is left open for some time. The fridge keeps running at full speed for several hours and then returns to the previous temperature.
Press and hold Power Cool for 3 seconds.
Press and hold Power Cool (or AutoFill Pitcher for RF28T502*** model) for 3 seconds.
The corresponding indicator ( ) lights up, and the refrigerator will speed up the cooling process for you
AutoFill Pitcher (RF28T502*** model only)
If the Lock indicator ( ) is off, press AutoFill Pitcher turn AutoFill Pitcher on. Then, open the left door of the fridge and insert the water tank. Close the door and the water tank starts to fill with water up to the preset level.
If the Lock Indicator () is on, indicating the Lock function is active, press and hold Lock for 3 seconds to deactivate the Lock function. When the Lock indicator turns off, immediately press AutoFill Pitcher to turn AutoFill Pitcher on. Then, open the left door of the fridge and insert the water tank. Close the door and the water tank starts to fill with water up to the preset level.
NOTE
- When you turn off the Lock function, you must press AutoFill Pitcher within one minute or the Lock function will automatically reactivate. You cannot turn the AutoFill Pitcher function on if the Lock function is active. For more information on the Lock function, see page 43. To turn the function off, press the AutoFill Pitcher again.
- By default, AutoFill Pitcher is disabled. Enable this function after you have installed the water line.
 blinks if you open the door and remove or insert the pitcher with the AutoFill Pitcher function off. To stop the blinking, close the door or, turn the AutoFill Pitcher function on.
 - The AutoFill Pitcher indicators (
 / ) blink if there is a leak. If this is the case, follow these steps.
a. Open the rubber cap and drain water.
b. When draining is complete, the indicators stop blinking and turn solid.
c. Close the rubber cap.
- If the indicators continue to blink, this might be a system failure. Contact a local service center.
03 Freezer / Power Freeze (3 sec)
Freezer
The Freezer button can be used to set the freezer temperature, or to activate Power Freeze. Available temperatures are between 5 °F (-15 °C) and -8 °F (-23 °C).
Power Freeze
Power Freeze speeds up the freezing process at maximum fan speed. The freezer keeps running at full speed for 50 hours and then returns to the previous temperature.
To activate Power Freeze, press and hold Freezer for 3 seconds. The corresponding indicator ( ) lights up, and the refrigerator will speed up the freezing process for you.
To deactivate, press and hold Freezer for 3 seconds again. The freezer returns to the previous temperature setting.
To freeze large amounts of food, activate Power Freeze for at least 20 hours before putting food in the freezer.
NOTE
Using Power Freeze increases power consumption. Make sure you turn it off and return to the previous temperature if you do not intend to use it.
04 Ice Maker / Filter Reset (3 sec)
Ice Maker
Press Ice Maker to turn the ice maker on or off.
The ice maker has 2 indicators ( /
/ ) to indicate its operating status.
When the ice maker operates, the corresponding indicator () turns on.
When the ice maker is turned off, the corresponding indicator () turns on. To enable ice making, you must turn the ice maker on.
Filter Reset
After about 6 months (and typically, about 300 gallons (1200 L) of water), the Filter indicator blinks red for several seconds when you open the door, reminding you that the filter needs to be replaced. When this happens, replace the filter, and then press and hold Ice Maker for 3 seconds. The filter lifecycle will be reset and the Filter indicator turns off.
NOTE
Some regions have relatively large amounts of lime in their water. This can reduce the lifecycle of the filter. In these areas, you will have to replace the water filter more often than specified above.
If water is not dispensing properly, the water filter is most likely clogged. Replace the water filter.
05 Door Alarm
Door Alarm
If the door is left open for more than 2 minutes, an alarm will sound and the alarm indicator will blink. You can toggle the alarm on and off by pressing Door Alarm. The alarm is enabled by factory default. If the door is left open for 5 minutes, internal lights (in the fridge and freezer) will blink for 10 seconds and then turn on. The whole process will be repeated every minute for 5 minutes. This is to alert hearing-impaired users that a door is open. Note that this function is normal.
06 Lock (3 sec)
Lock
To prevent accidental setting changes, press and hold Lock for 3 seconds. The main panel will be disabled and the Lock indicator () will turn on.
When the Lock function is on, the indicator blinks if any button on the main panel is pressed.
If you press and hold the button again for more than 3 seconds, the Lock function will be deactivated.
However, the Lock function will be reactivated if no button is pressed within 1 minute.
07 Sabbath Mode
The Sabbath mode stays active for 85 hours once it is activated. After that, it will be deactivated automatically.
- To activate Sabbath Mode, press and hold Door Alarm and Lock simultaneously for 5 seconds. When the refrigerator is in Sabbath mode, the buttons, the display, and the internal lights do not function. The refrigerator and freezer, however, continue to cool.
- To deactivate Sabbath Mode, press and hold Door Alarm and Lock simultaneously again for 5 seconds.
08 Cooling Off
Cooling Off mode (also called Shop mode) is designed for use by retailers when they are displaying refrigerators on a retail floor. In Cooling Off mode, the refrigerator’s fan motor and lights operate normally, but the compressors do not run so neither the refrigerator nor the freezer become cold.
To enter or exit the Cooling Off mode, press and hold Fridge and Power Cool (or Fridge and AutoFill Pitcher for RF28T502*** model) simultaneously for 6 seconds. Then, when the display blinks, press Lock.
When the Cooling Off mode is on, the refrigerator chime sounds, and the refrigerator shows “0” on the fridge temperature display and “FF” on the freezer temperature display
Special features
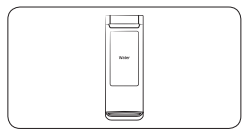
Water pitcher (AutoFill Pitcher) (applicable models only)
The AutoFill Pitcher function lets you enjoy cold brewed tea in your refrigerator.
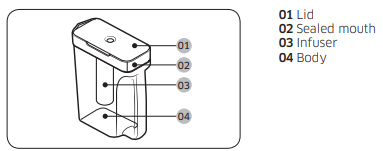
To fill the Water pitcher
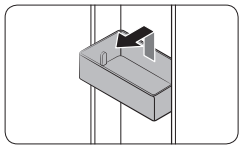
1. Grasp a handle groove of the sealed mouth, and then pull up to open the lid.
2. Put tea leaves or fruit to your taste into the infuser.
NOTE If you want to keep the infused water in its initial concentration, turn the AutoFill Pitcher function off.

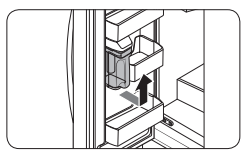
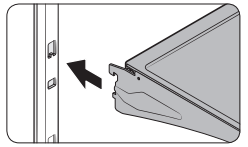
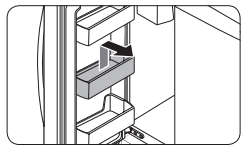
3. Enable the AutoFill Pitcher function on the main panel. Open the left door of the fridge door, and then mount the water pitcher onto the holder. Push it straight in as shown in the illustration on the left.
4. Close the door. The water pitcher will start to fill with chilled water a short time later.

5. To drink tea, open the door and detach the water pitcher. Pull it straight out.
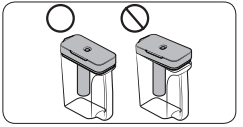
- To prevent the water pitcher from tipping over or leaking, make sure the water pitcher fits in the water pitcher holder.

- To prevent the water pitcher from spilling over or leaking, make sure the sealed mouth is properly inserted.
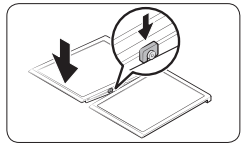
NOTE
- If the front side (specifically marked area) of the water pitcher has too much moisture, the water pitcher may not fully fill. Remove the moisture, and then try again.
- The AutoFill Pitcher function will stop supplying water to the water pitcher if the water pitcher does not fill after a certain amount of time. If this happens, check if the water line is properly connected. Remove and reinsert the water pitcher, and then try again.

NOTE
- Wipe around the infuser holder if the infuser overflows or leaks.
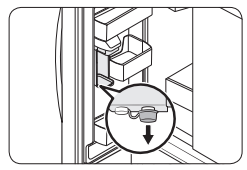
- Water drops off if the rubber cap is opened.
- The AutoFill Pitcher indicator (
 / ) blinks if there is a leak. In case of a leak, open the rubber cap so that the leaked water drains. The indicator will then turn off. However, if the indicator continues to blink, there might be a system failure. Contact your local Samsung service center.
- The AutoFill Pitcher indicators (/) blink if there is a leak. See page 39 for more information.
- blinks if you open the door and remove or insert the pitcher with the AutoFill Pitcher function off. To stop the blinking, close the door or, turn the AutoFill Pitcher function on.
Inner dispenser (applicable models only)
To dispense chilled water, put a water glass under the dispenser, and then push the dispenser lever.
Ice maker
The refrigerator has a built-in ice maker that automatically dispenses ice so that you can enjoy filtered water with cubed or crushed ice.
Ice making
After you have installed your refrigerator and plugged it in, follow these instructions to ensure proper ice making and to keep the ice bucket full of ice:
1. Let the refrigerator operate for at least 24 hours to ensure optimal performance.
2. Dispense the first 4 to 6 ice cubes into a glass.
3. Wait another 8 hours and dispense another 4 to 6 ice cubes.
4. Then, wait another 16 hours and dispense the first glass-full of ice.
NOTE
- If you consume all the ice at once, you must wait 8 hours before dispensing the first 4 to 6 cubes. This ensures that the ice bucket is filled with ice properly.
- Ice cubes generated rapidly may look white, which is normal.
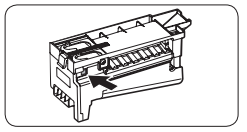
Diagnosis
If ice does not dispense, first check the ice maker.
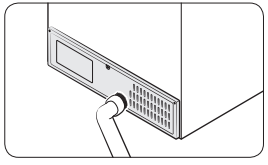
1. Press Test on the side of the ice maker. You will hear a chime (ding-dong) when you press the button.
2. You will hear another chime if the ice maker is operating properly.
If You Turn the Ice Maker Off
If you press and hold Ice Maker for more than 3 seconds to turn the ice maker off, make sure to remove all ice cubes from the ice bucket. Remaining ice cubes may clump together, making it difficult to remove them.
NOTE
- Removal of the ice bucket does not affect the thermal and mechanical performance of the refrigerator.
Water clouding
Water supplied to the refrigerator flows through a core alkaline filter. During this filtering process, the water pressure of the water increases and the water becomes saturated with oxygen and nitrogen. This causes the water to look misty or cloudy temporarily when dispensed. This is normal and the water will look clear after a few seconds.
Maintenance
Handling and care
Fridge shelves
The appearance of the shelves differs by model.
- To remove a shelf, fully open the corresponding door. Hold the front of the shelf, and then gently lift up and slide out.
NOTE
Do not lift up the shelf fully when removing or reinserting the shelf. The rear wall of the fridge room can be dented.

- To reinsert, hold the shelf at an angle so the front is higher than the back, and then insert the top hook into the top shelf notch. Then, lower the shelf and insert the bottom shelf hook into the bottom shelf notch.
CAUTION
- The tempered glass shelves are heavy. Use caution when removing them. • The shelf must be inserted correctly. Do not insert upside down.
- Glass containers may scratch the surface of glass shelves.
Door bins
- To remove the door bin, hold the front sides of the bin, and then gently lift up to remove.
- To reinsert, insert the door bin slightly above its final location making sure that the back of the bin is against the door. Hold the rear of the door bin with both hands, and then press down so that it fits snugly.
CAUTION
- Do not remove a bin that is filled with food. Empty the bin beforehand.
- Use caution when opening the door if the bottom bin contains larger bottles, which may fall over.
- Do not allow children to play with the bins. Sharp corners of the bin may cause injury.
Fridge drawers
Vegetable / fruit drawers
Gently lift up the front of the drawer and slide out.
- We recommend that you remove the door bins before removing the drawer. This is to prevent damage to the door bins.
- To reinsert, insert the drawer into the frame rails and then slide inward.
Wide Pantry (applicable models only)
- To remove, fully open the Wide Pantry. Then, slightly lift the front side and pull straight out.
- To reinsert, push the rails to the back of the refrigerator. Then, place the Wide Pantry onto the rails and slide it back until it is in place.
Freezer baskets
1. Fully open the freezer drawer.
2. Lift the ice bucket to remove.
Upper basket
- To remove, fully slide open the freezer drawer. Lift up the front of the upper basket and pull to remove.
- To reinsert, align the front wheels of the upper basket with the end of the lower basket. Slide the upper basket to the front.
Lower basket
- To remove, first remove the upper basket. Then, tilt up the front of the lower basket to pull out.
- To reinsert, put the basket onto the rail assembly rear side first.
CAUTION
- Do not twist the basket when removing or reinserting the basket. The basket can be scratched.
- To prevent physical injury, property damage, or suffocation, keep children away from freezer baskets that have been removed.
- Do not remove the divider.
- Put the wheels of the upper basket on the end of the rails of the lower basket. Then, slide the upper basket all the way to the front. Otherwise, the drawer will not open or close properly, which will cause frost to build up.
Cleaning
Interior and exterior
Regularly use a dry cloth to remove all foreign substances such as dust or water from the power plug terminals and contact points.
1. Unplug the power cord.
2. Use a moistened, soft, lint-free cloth or paper towel to clean the refrigerator’s interior and exterior.
3. When done, use a dry cloth or paper towel to dry well.
4. Plug in the power cord.
Rubber seals
If the rubber seals of a door become dirty, the door may not close properly and reducing refrigerator performance and efficiency. Use a mild detergent and damp cloth to clean the rubber seals. Then, dry well with a cloth.
Rear panel
To keep cords and exposed parts of the rear panel free of dirt, vacuum the panel once or twice a year.
CAUTION
Do not remove the rear panel cover. Electric shock may occur.
Water filter
The Filter Reset indicator ( Filter ) turns red to let you know it is time to replace the water filter. Before replacing the filter, make sure the water supply line is shut off.
1. Shut off the water supply line.
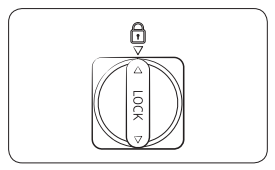
2. Turn the knob of the filter cartridge 90 degrees counterclockwise (1/4 turn). The filter cartridge unlocks.
3. Pull out to remove the cartridge.
If the water filter is severely contaminated, the cartridge may not be easy to remove. If that is the case, use force to remove the cartridge.
To prevent water leaks from the filter opening, pull the cartridge straight out while removing it.
4. Insert a new filter cartridge. Use only Samsung-provided or approved filters.
5. Turn the cartridge knob clockwise to lock into place.
6. Press and hold Ice Maker on the main panel for 3 seconds to reset the life cycle detector. The Filter Reset indicator ( Filter ) turns off.
NOTE
- For type A model (RF28T5000***) discard first 2 buckets of ice after changing the filter.
Reverse osmosis water filtration system
The water pressure of the water supply system to a reverse osmosis water filtration system must be between 30 to 120 psi (206 to 827 kPa).
The water pressure of the reverse osmosis water filtration system to the refrigerator’s cold water line must be at least 40 psi (276 kPa). If the water pressure is below these specifications:
- Check if the sediment filter in the reverse osmosis system is blocked. Replace the filter if necessary.
- Refill the water tank in the reverse osmosis system with water.
- If your refrigerator has a water filter, it may further reduce the water pressure when used in conjunction with a reverse osmosis system. Remove the water filter.
For more information or servicing, contact a licensed plumbing professional.
Ordering a new filter
To purchase a new water filter, contact a local Samsung service center or visit www. samsungparts.com on the web.
LED Lamps
To replace the lamps of the refrigerator, contact a local Samsung service center.
Troubleshooting
General
Temperature
Fridge/freezer does not operate. Fridge/freezer temperature is warm.
Possible causes
- Power cord is not plugged in properly.
- Temperature control is not set correctly.
- Refrigerator is located near a heat source or direct sunlight.
- Not enough clearance between refrigerator and nearby walls or cabinets.
- The refrigerator is overloaded. Food is blocking the refrigerator vents.
Solution
- Properly plug in the power cord.
- Set the temperature lower.
- Keep the refrigerator away from direct sunlight or a heat source.
- Make sure there is a gap of at least 2.5 inches (5 cm) between the refrigerator back and sides and any nearby walls or cabinets.
- Do not overload the refrigerator. Do not allow food to block vents.
Fridge/freezer is over-cooling.
Possible causes
- Temperature control is not set correctly.
Solution
- Set the temperature higher.
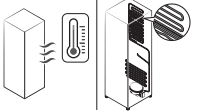
Interior wall is hot.
Possible causes
- Refrigerator has heat-proof piping in the interior wall.
Solution
- To prevent condensation from forming, the refrigerator has heat-proof piping in the front corners. If the ambient temperature rises, this equipment may not work effectively. This is not a system failure.
Odors
Refrigerator has odors.
Possible causes
- Spoiled food.
- Food with strong odors.
Solution
- Clean the refrigerator and remove any spoiled food.
- Make sure strong smelling food is wrapped airtight.
Frost
Frost around the vents.
Possible causes
- Food is blocking the vents.
Solution
- Make sure no food blocks the refrigerator vents.
Frost on interior walls.
Possible causes
- Door is not closed properly.
Solution
- Make sure food does not block the door. Clean the door gasket.
Condensation
Condensation forms on the interior walls.
Possible causes
- If door is left open, moisture enters the refrigerator.
- Food with high moisture content.
Solution
- Remove the moisture and do not leave a door open for extended periods of time.
- Make sure food is wrapped airtight.
Water/ice (dispenser models only)
Water flow is weaker than normal.
Possible causes
- Water pressure is too low.
Solution
- Make sure the water pressure is between 30 to 120 psi (206 to 827 kPa).
Ice maker makes a buzzing sound.
Possible causes
- The Ice Maker function is activated, but the water supply to the refrigerator has not been connected.
Solution
Ice maker does not make ice.
Possible causes
- Ice maker has just been installed.
- Freezer temperature is too high.
- Dispenser panel Lock is activated.
- Ice maker is off.
Solution
- You must wait for 12 hours for the refrigerator to make ice.
- Set the freezer temperature below 0 °F (-18 °C) or -4 °F (-20 °C) in warm ambient air.
- Deactivate dispenser panel Lock.
- Turn on the ice maker.
Ice does not dispense.
Possible causes
- Ice may jam if the ice dispenser is not used for a long time (approx. 3 weeks).
- Ice bucket is not properly inserted.
- Water line is not connected properly or water supply is not on.
Solution
- If you won't be using the refrigerator for a long time, empty the ice bucket and turn off the ice maker.
- Make sure the ice bucket is properly inserted.
- Check if the water line is installed correctly. Check if the water line stop cock is closed.
Water does not dispense.
Possible causes
- Water line is not connected properly or water supply is not on.
- Dispenser panel Lock is activated.
- A third-party water filter was installed.
- Water filter indicator turns on or blinks.
Solution
- Check if the water line is installed correctly. Check if the water line stop cock is closed.
- Deactivate dispenser panel Lock.
- Use only Samsung-provided or approved filters.
- Unapproved filters may leak and damage the refrigerator.
- Replace the water filter. After replacing, reset the filter indicator sensor.
Do you hear abnormal sounds from the refrigerator?
Before calling for service, review the information below. If you still have questions about sounds your refrigerator is making, please call Samsung Customer Care at 1-800-SAMSUNG (726-7864). Note that you will be charged for any service visits related to normal operating sounds in which no defects were found.
These sounds are normal.
- When starting or ending an operation, the refrigerator may make sounds similar to a car engine ignition. As the operation stabilizes, the sounds will decrease.

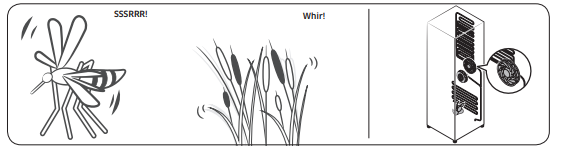
- While the fan is operating, these sounds may occur. When the refrigerator reaches the set temperature, the fan sound will stop.
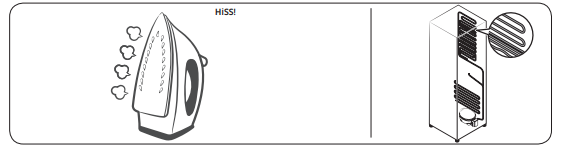
- During a defrost cycle, water may drip on the defrost heater, causing sizzling sounds.
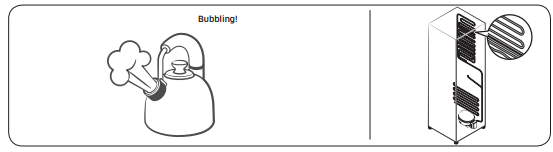
- As the refrigerator cools or freezes, refrigerant gas moves through sealed pipes, causing bubbling sounds. Bubbling!
- As the refrigerator temperature increases or decreases, plastic parts contract and expand, creating knocking noises. These noises occur during the defrosting cycle or when electronic parts are working.

- For ice maker models: When the water valve opens to fill the ice maker, you may hear a buzzing sound.
- Due to pressure equalizing when you open and close the refrigerator door, you may hear a whooshing sound
LIMITED WARRANTY (U.S.A.)
SAMSUNG REFRIGERATOR
LIMITED WARRANTY TO ORIGINAL CONSUMER PURCHASER WITH PROOF OF PURCHASE
This SAMSUNG brand product, as supplied and distributed by Samsung Electronics America, Inc. (SAMSUNG) and delivered new, in the original carton to the original consumer purchaser, is warranted by SAMSUNG against manufacturing defects in materials or workmanship for the limited warranty period of:
One (1) year parts and labor
Five (5) years parts and labor on Sealed Refrigeration System Only (Compressor, Evaporator, Condenser, Drier, and Connecting Tubing)
Ten (10) years part and Five (5) years labor on Digital Inverter Compressor Only
This limited warranty is valid only on products purchased and used in the United States that have been installed, operated, and maintained according to the instructions attached to or furnished with the product. To receive warranty service, the purchaser must contact SAMSUNG at the address or phone number provided below for problem determination and service procedures. Warranty service can only be performed by a SAMSUNG authorized service center. The original dated bill of sale must be presented upon request as proof of purchase to SAMSUNG or SAMSUNG’s authorized service center to receive warranty service.
SAMSUNG will provide in-home service within the contiguous United States during the warranty period at no charge, subject to availability of SAMSUNG authorized servicers within the customer’s geographic area. If in-home service is not available, SAMSUNG may elect, at its option, to provide transportation of the product to and from an authorized service center. If the product is located in an area where service by a SAMSUNG authorized servicer is not available, you may be responsible for a trip charge or required to bring the product to a SAMSUNG authorized service center for service.
To receive in-home service, product must be unobstructed and accessible to the service agent.
During the applicable warranty period, a product will be repaired, replaced, or the purchase price refunded, at the sole option of SAMSUNG. SAMSUNG may use new or reconditioned parts in repairing a product, or replace the product with a new or reconditioned product. Replacement parts and products are warranted for the remaining portion of the original product’s warranty or ninety (90) days, whichever is longer. All replaced parts and products are the property of SAMSUNG and you must return them to SAMSUNG.
This limited warranty covers manufacturing defects in materials or workmanship encountered in normal household, noncommercial use of this product and shall not cover the following: damage that occurs in shipment, delivery, installation, and uses for which this product was not intended; damage caused by unauthorized modification or alteration of the product; product where the original factory serial numbers have been removed, defaced, changed in any way, or cannot be readily determined; cosmetic damage including scratches, dents, chips, and other damage to the product’s finishes; damage caused by abuse, misuse, pest infestations, accident, fire, floods, or other acts of nature or God; damage caused by use of equipment, utilities, services, parts, supplies, accessories, applications, installations, repairs, external wiring or connectors not supplied or authorized by SAMSUNG; damage caused by incorrect electrical line current, voltage, fluctuations and surges; damage caused by failure to operate and maintain the product according to instructions; in-home instruction on how to use your product; and service to correct installation not in accordance with electrical or plumbing codes or correction of household electrical or plumbing (i.e., house wiring, fuses, or water inlet hoses). The cost of repair or replacement under these excluded circumstances shall be the customer’s responsibility.
Visits by an authorized servicer to explain product functions, maintenance or installation are not covered by this limited warranty. Please contact SAMSUNG at the number below for assistance with any of these issues.
EXCLUSION OF IMPLIED WARRANTIES
IMPLIED WARRANTIES, INCLUDING THE IMPLIED WARRANTIES OF MERCHANTABILITY OR FITNESS FOR A PARTICULAR PURPOSE, ARE LIMITED TO ONE YEAR OR THE SHORTEST PERIOD ALLOWED BY LAW. Some states do not allow limitations on how long an implied warranty lasts, so the above limitations or exclusions may not apply to you. This warranty gives you specific rights, and you may also have other rights, which vary from state to state.
LIMITATION OF REMEDIES
YOUR SOLE AND EXCLUSIVE REMEDY IS PRODUCT REPAIR, PRODUCT REPLACEMENT, OR REFUND OF THE PURCHASE PRICE AT SAMSUNG’S OPTION, AS PROVIDED IN THIS LIMITED WARRANTY. SAMSUNG SHALL NOT BE LIABLE FOR SPECIAL, INCIDENTAL OR CONSEQUENTIAL DAMAGES, INCLUDING BUT NOT LIMITED TO TIME AWAY FROM WORK, HOTELS AND/OR RESTAURANT MEALS, REMODELING EXPENSES, LOSS OF REVENUE OR PROFITS, FAILURE TO REALIZE SAVINGS OR OTHER BENEFITS REGARDLESS OF THE LEGAL THEORY ON WHICH THE CLAIM IS BASED, AND EVEN IF SAMSUNG HAS BEEN ADVISED OF THE POSSIBILITY OF SUCH DAMAGES. Some states do not allow exclusion or limitation of incidental or consequential damages, so the above limitations or exclusions may not apply to you. This warranty gives you specific rights, and you may also have other rights, which vary from state to state.
SAMSUNG does not warrant uninterrupted or error-free operation of the product. No warranty or guarantee given by any other person, firm, or corporation with respect to this product shall be binding on SAMSUNG.
Warranty Information (CANADA)
If your refrigerator needs service
Do not hesitate to call any Samsung Authorized Service Center nearby giving them your name, address and telephone number if your product is not functioning properly.
Limited Warranty for Original Purchaser
This Samsung product is warranted by Samsung Electronics Canada Inc. (hereafter referred to as SECA) against manufacturing defects in material or workmanship for the following periods:
Labor : 1 year (in-home)
Parts : 1 year
Inverter Compressor : 10 years (Part only)
SECA further warrants that if this product fails to operate properly within the specified warranty period and the failure is due to improper workmanship or defective material, SECA will repair or replace the product at its option. In-home service is not available in all areas. Contact us to find out if in-home service is currently available in your area by using the contact information at the back of this warranty.
All warranty repairs or part replacements must be performed by a SECA Authorized Service Center.
Obligation to the Original Owner
The original dated sales receipt must be retained by the customer and is the only acceptable proof of purchase. It must be presented to a SECA Authorized Service Center at the time service is requested before warranty services are rendered. On all carry-in models, transportation to and from the Authorized Service Center is the responsibility of the customer.
Exclusions of the Warranty
This warranty does not cover damage due to accident, fire, flood, and/or other Acts of God, misuse, incorrect line voltage, improper installation, improper or unauthorized repairs, commercial use, or damage that occurs during shipping. Customer adjustments which are explained in this owners manual are not covered under the terms of this warranty. This warranty will automatically be voided for any unit found with a missing or altered serial number. This warranty is valid only on products purchased and used in Canada