
1 Left : 1 Right : 1
Angle Adjustment Bracket Bracket Accessories
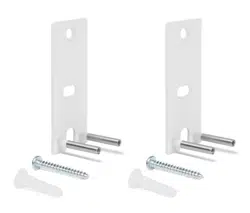
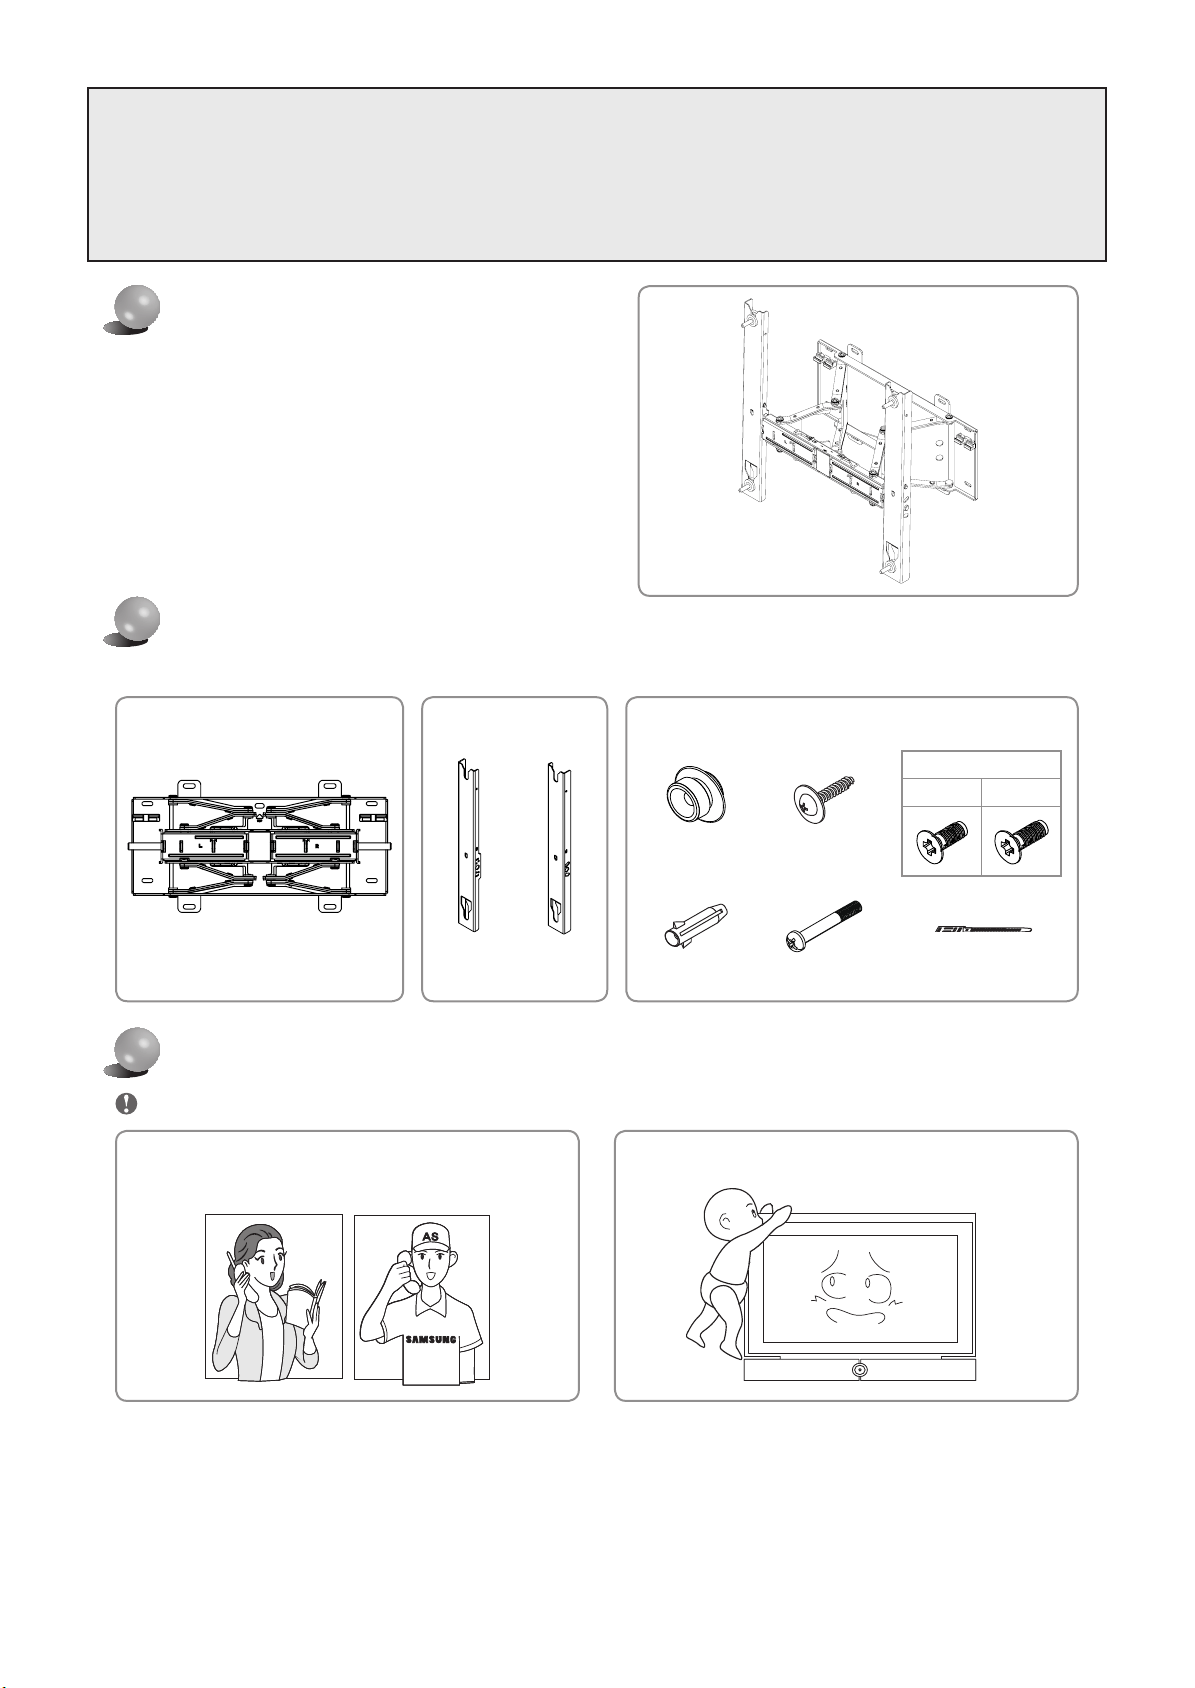
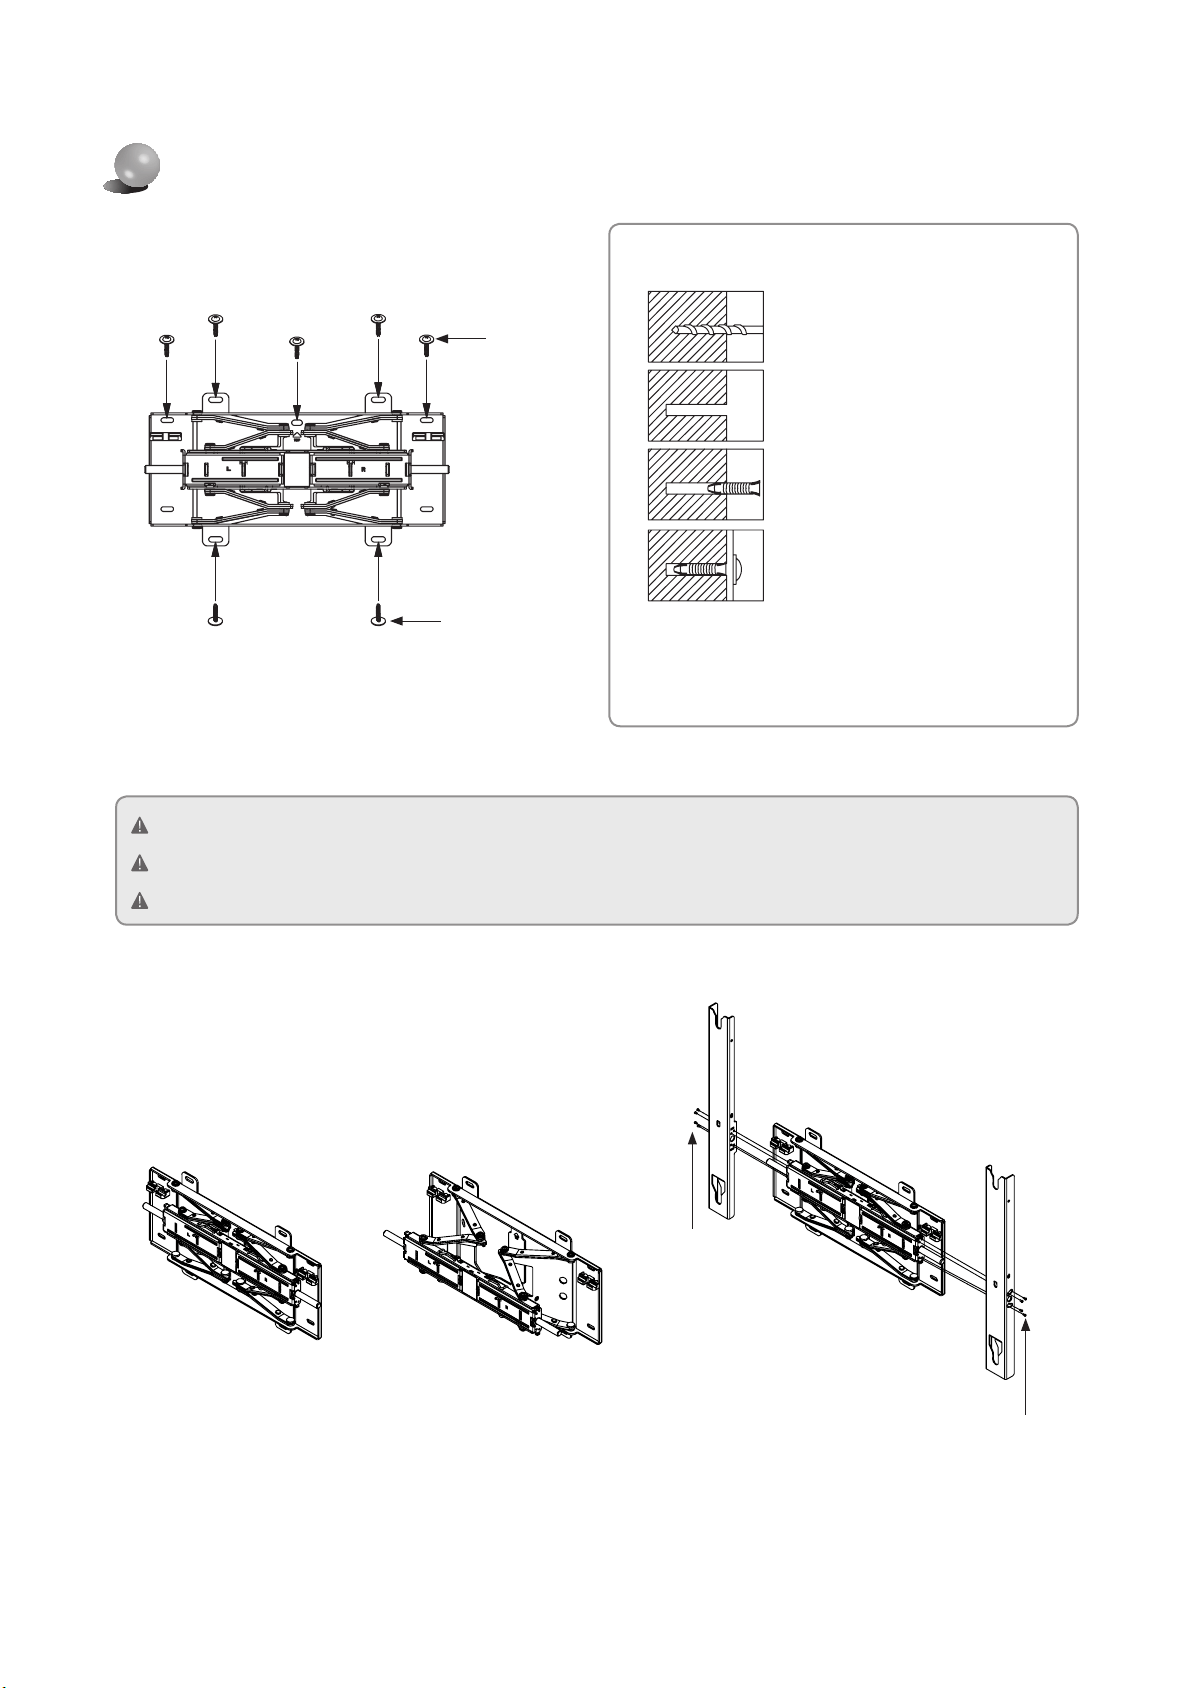
Plastic hangers : 4
Screwsⓐ : 8
Anchor : 8 Wire Fixing Tool : 1
Screw
ⓑ
: 8
Angle Adjustment and Rotation Type
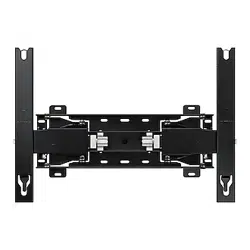
Wall-Mount Bracket Installation Guide
WMN4277SH
Product Image
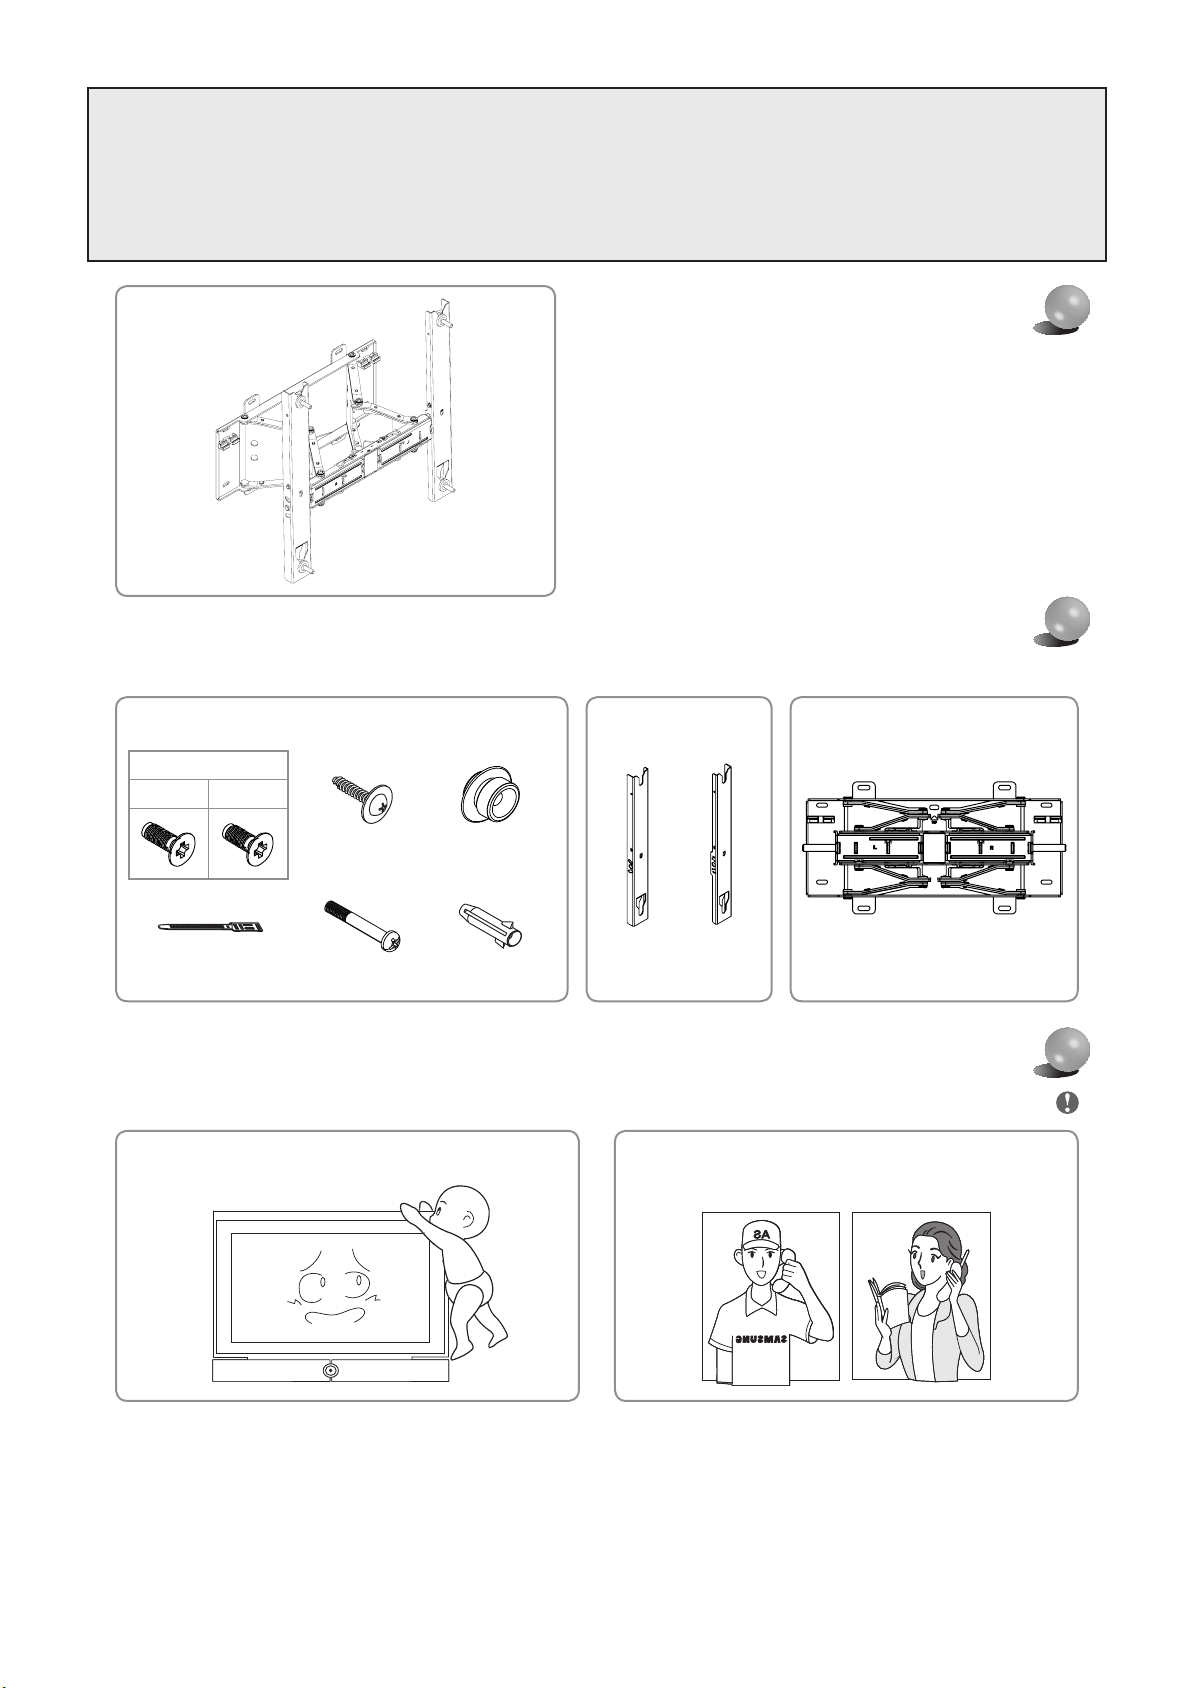
Components
Only use the supplied components for the bracket installation.
Safety Instructions
Be sure to contact an authorized service center when installing your set.
1. Be sure to keep the product away from children. There can be serious damage on the head when hit by the edge of the product.
2. Be careful when you adjust the angle or rotate the set. The product can be damaged if it is too close to touch the wall.
(Attach some sponges to 4 corners of the product to avoid the product or wall damage.)
3. Do not install the product in a place with high temperature and high humidity. Avoid to install the product on the wall which cannot bear the weight.
4. Since there is a danger of electric shock, do not insert your fi ngers into the TV stand installation hole while installing the TV.
5. Make sure to cover the TV stand installation hole with the hole cover supplied with the TV before completing the wall installation.
Contact a qualified technician at your dealer for
moving or replacing the product after the installation.
Do not hang on or give sudden impacts to the product.
English
Screwsⓒ : 4
M8X35 M8X40
[WMN4277SH]IB_ASIA_Rev_1.0L11.indb 1 2014-02-06 10:31:11
2
6
4
3
7
5
1
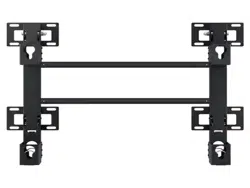
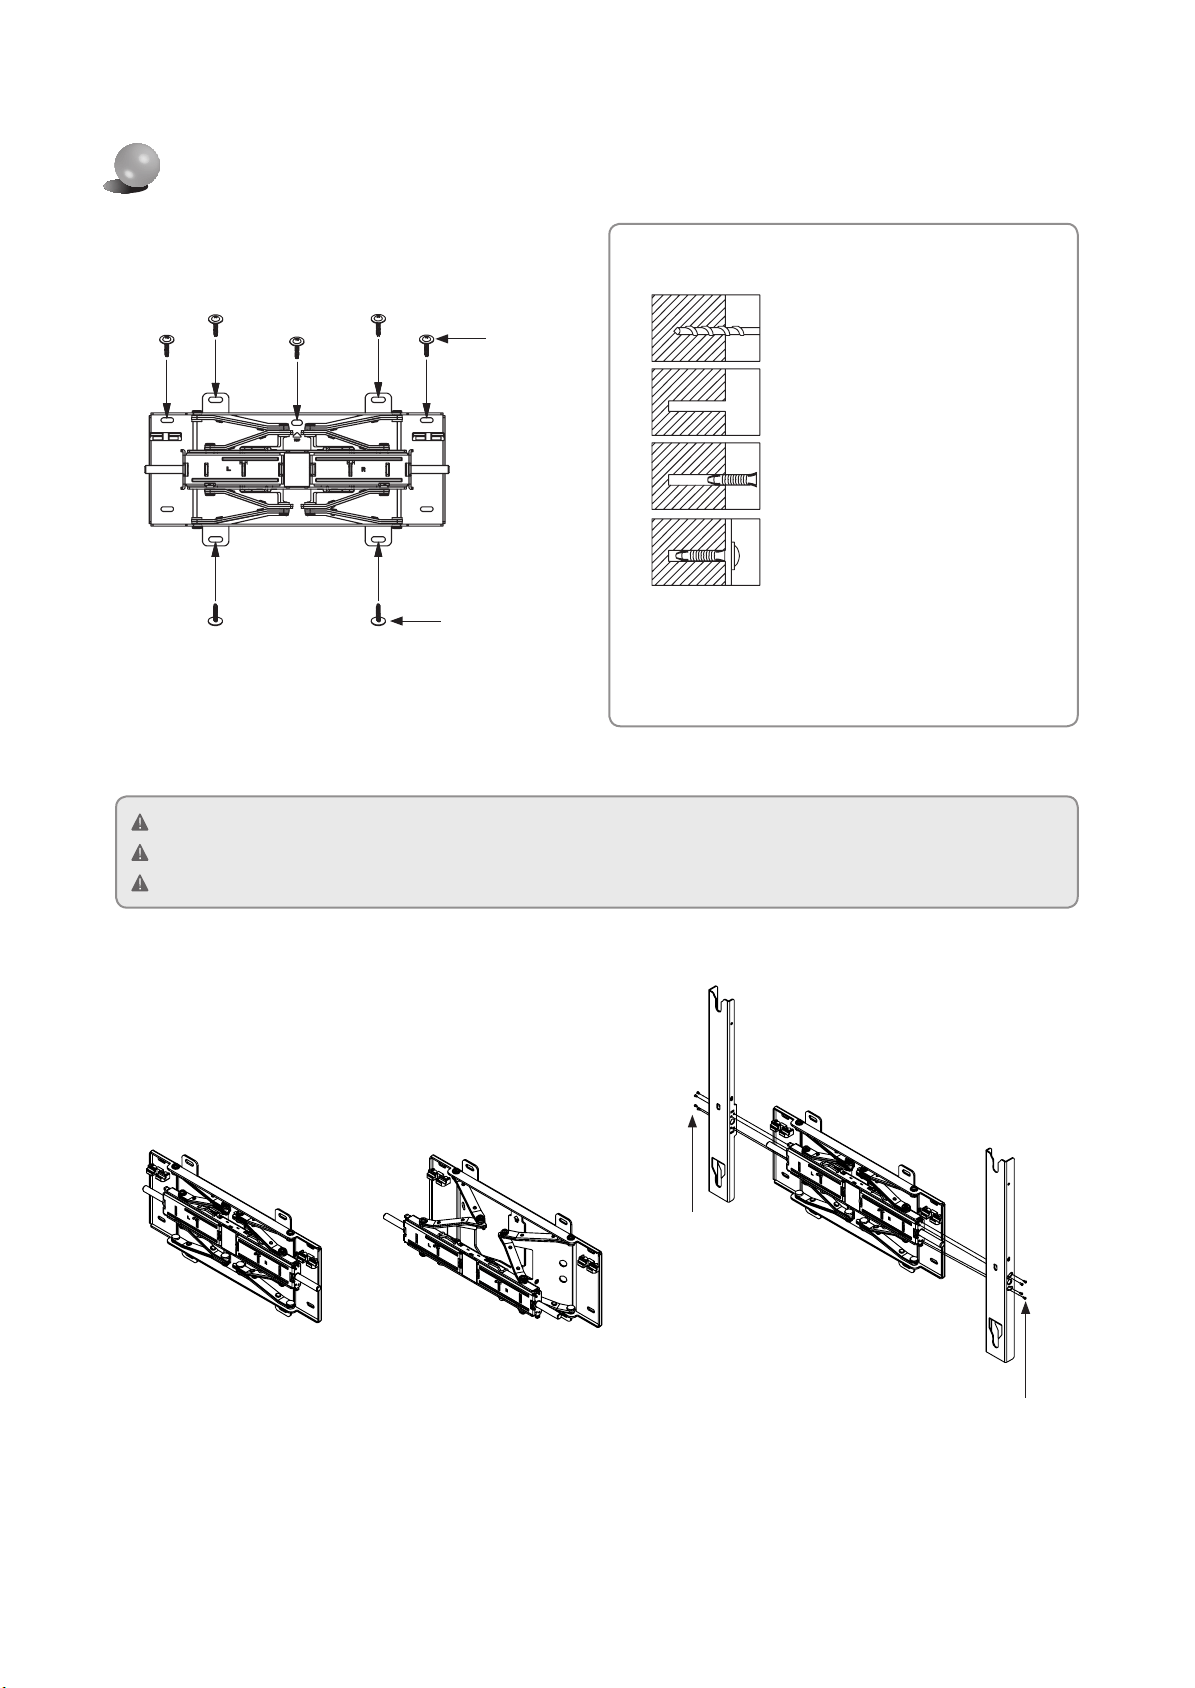
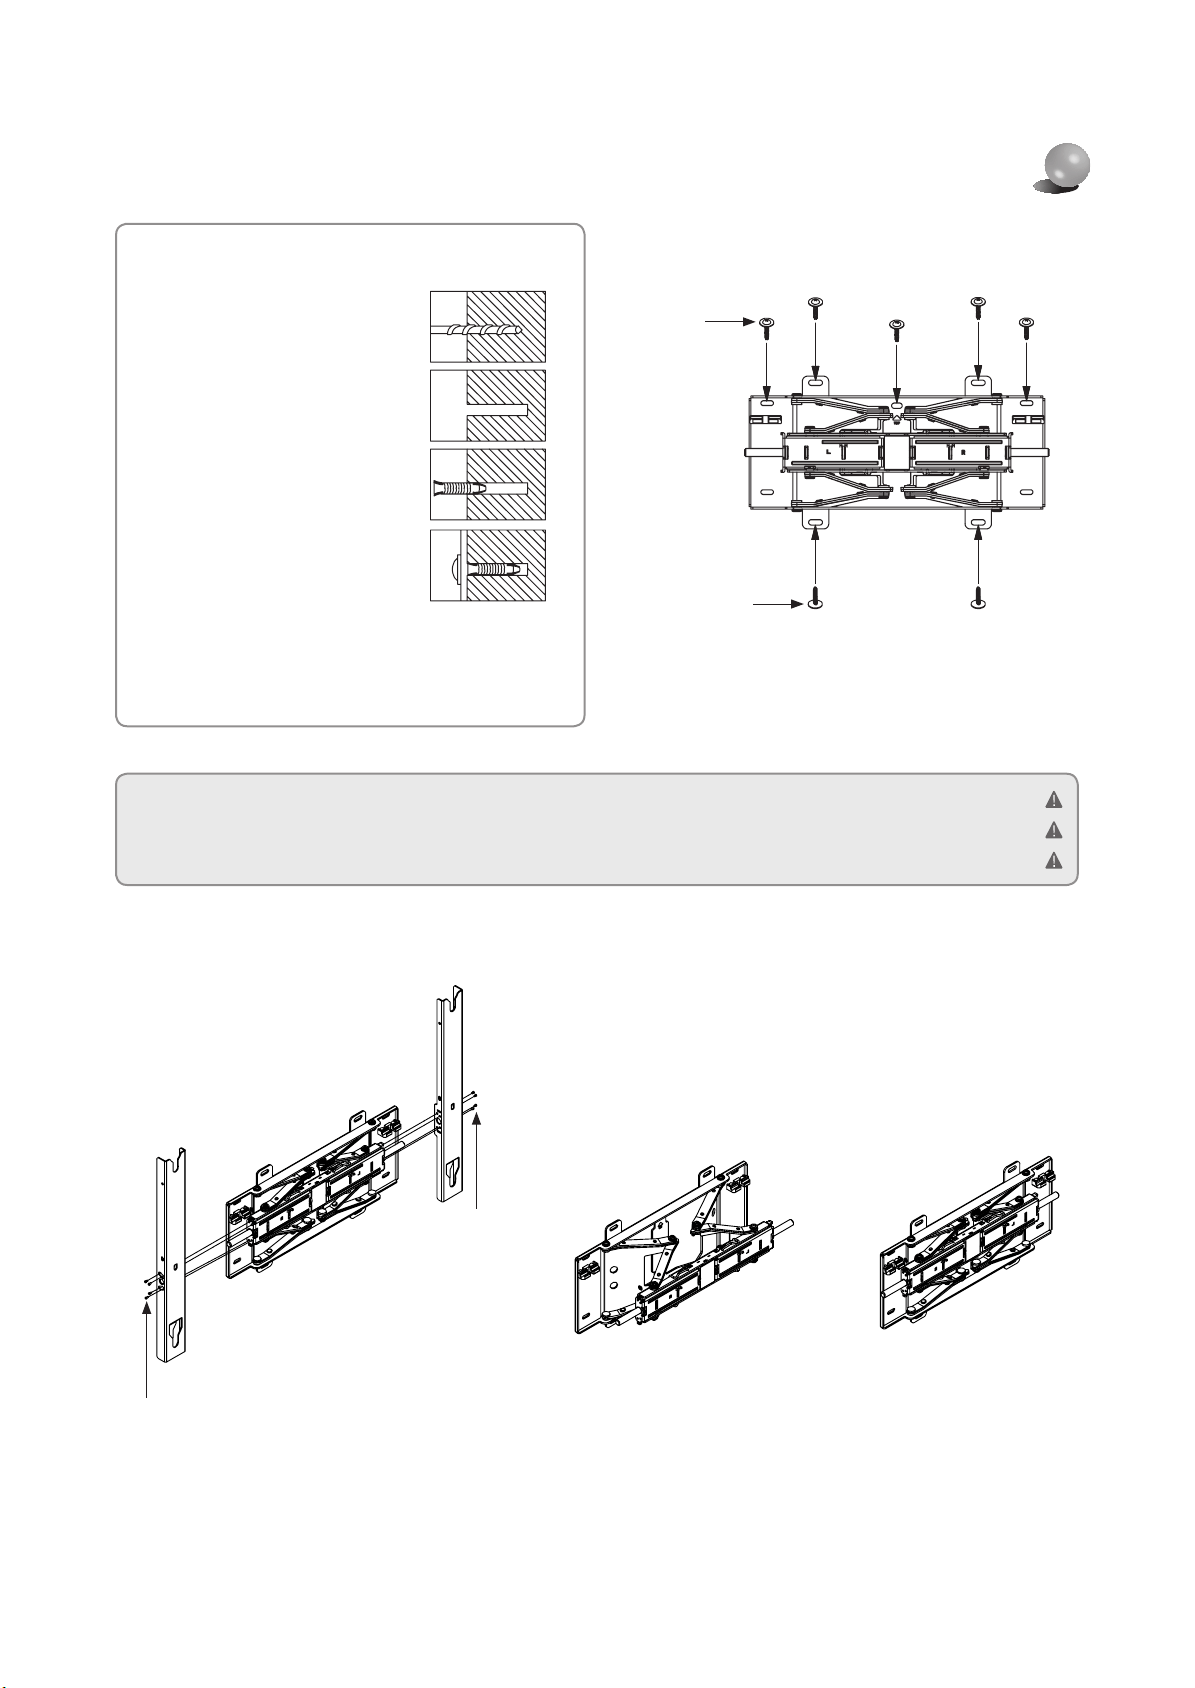
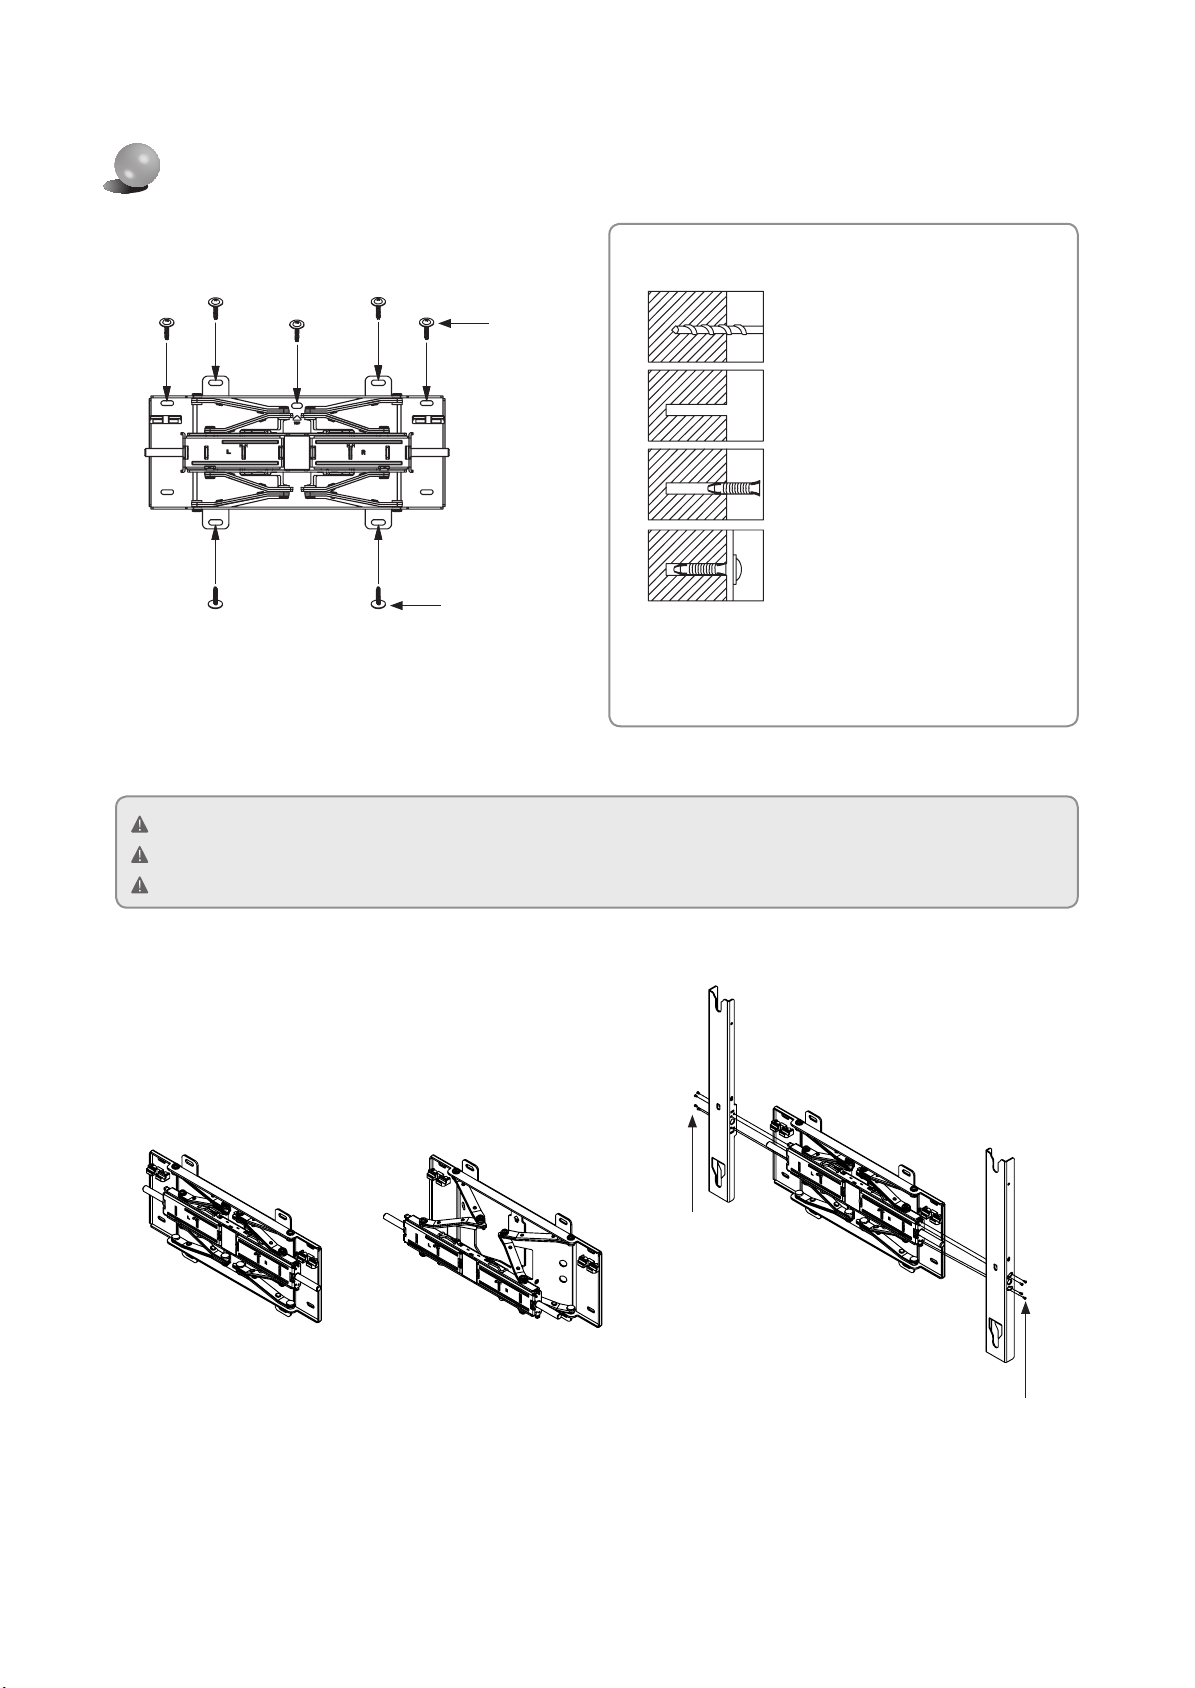
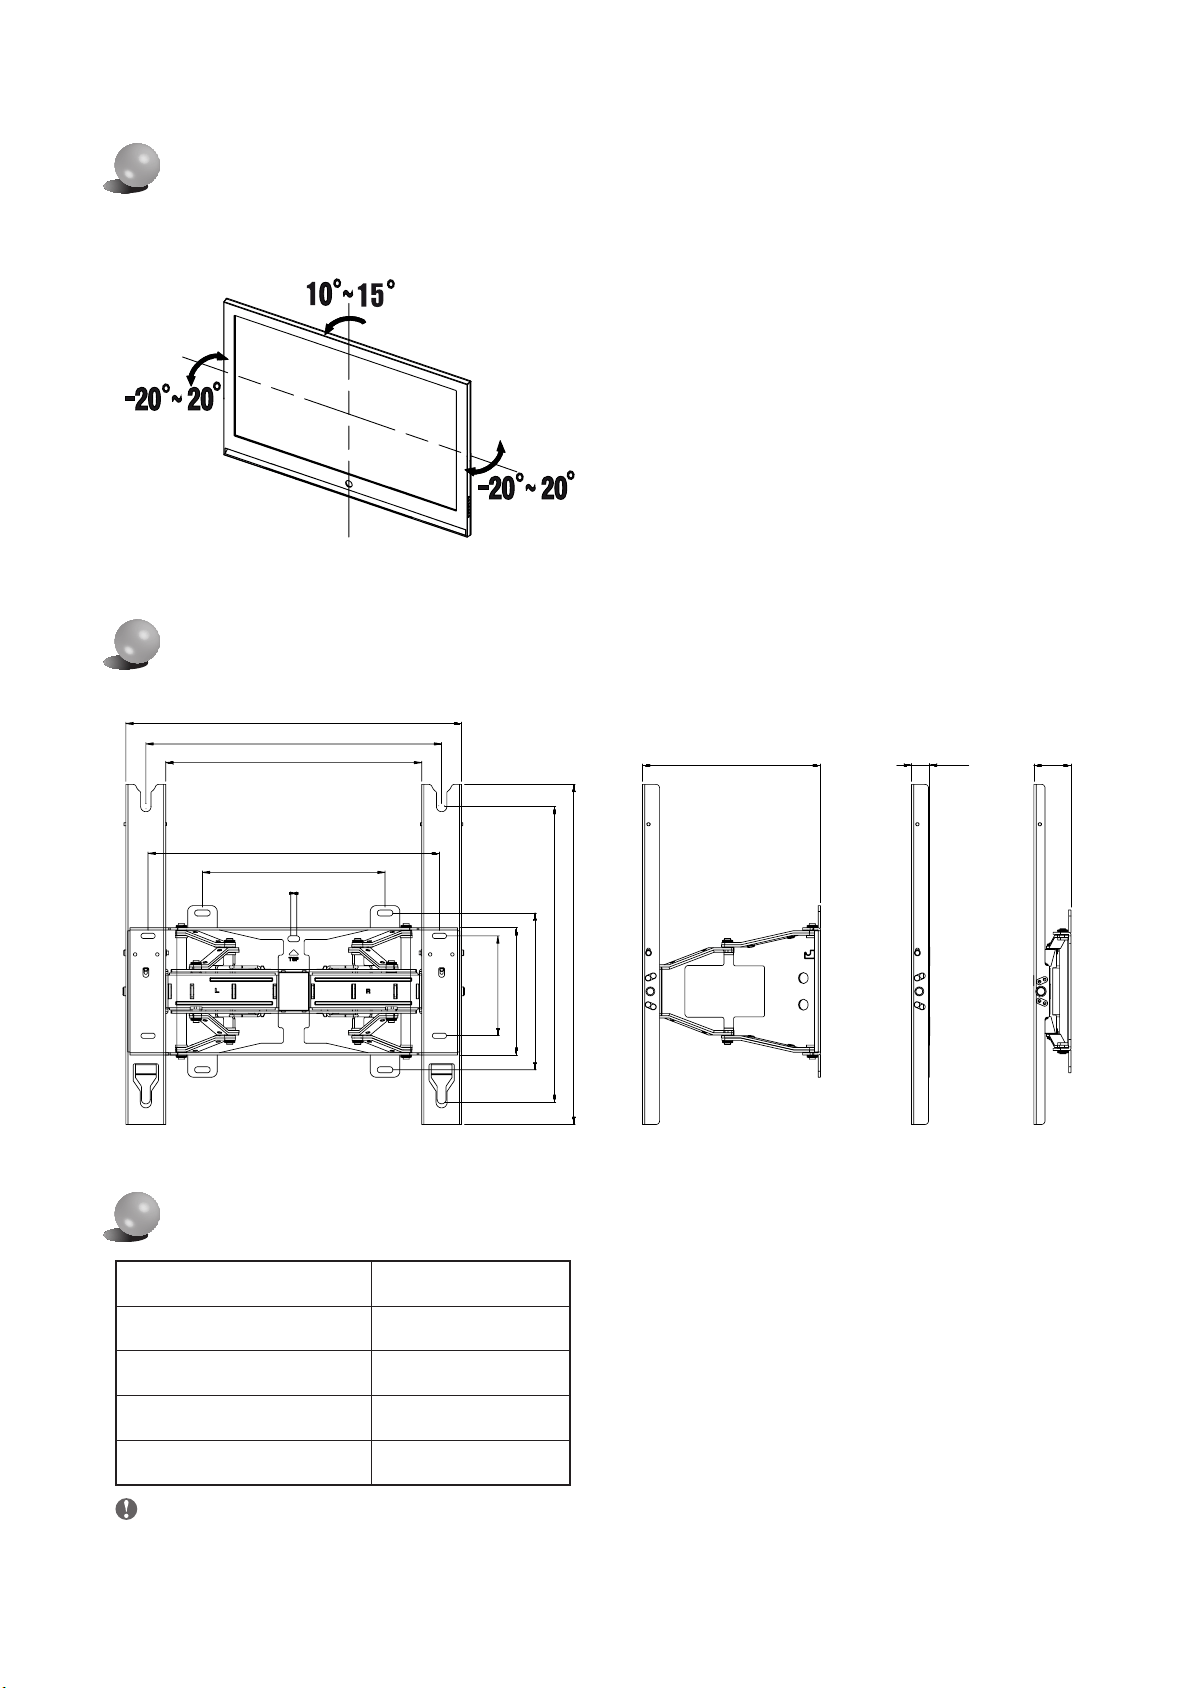
Wall Bracket Assembly
1
Install the angle adjustment bracket on the wall as shown in
the figure.
Tighten the angle adjustment bracket by using anchors and
screwsⓐ orderly from ① to ⑦.
If it cannot be installed on the assigned area, install at the
nearest place.
Check the solidity of the wall before the installation. Strengthen the wall and install the bracket if the wall is not firm enough.
The supplied screws and anchors are for installing on concrete walls.
For the wall of plaster, marble, or steel, use the appropriate screws.
How to Tighten Anchors or Screwsⓐ
Use the drill with the required size when making a hole in
the wall. Be sure to follow the directions for the installation
to avoid safety problems.
Make a hole in the wall with the drill of
6X50.
Clean up the hole.
Insert the supplied anchor to the hole.
Match the angle adjustment bracket to the
holes on the wall and tighten the screwsⓐ.
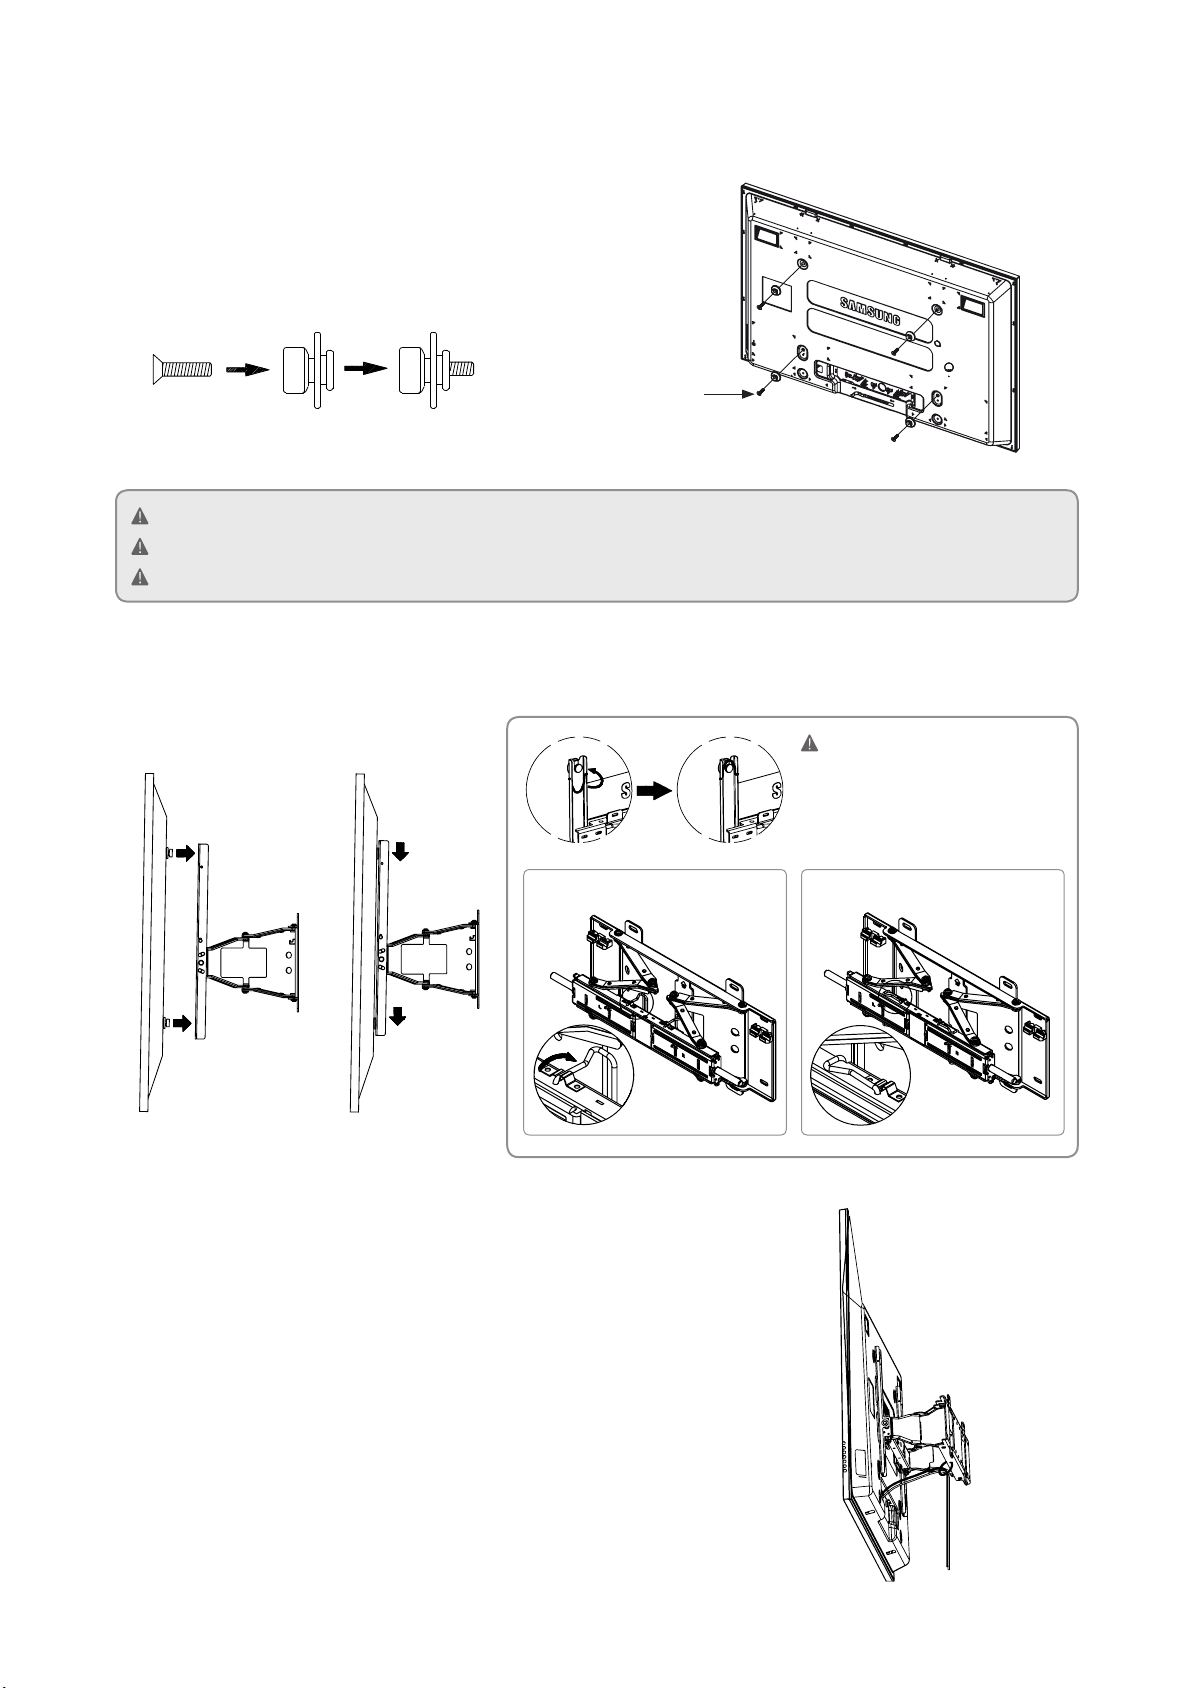
2
Securely fix the set to the wall. Pull the bracket forward and
unfold it. Insert the bracket to the assigned area of the angle
adjustment bracket and tighten the supplied 8 screwsⓑ.
(Same for both left and right side)
Screwⓑ 4EA
Screwⓑ 4EA
Screwⓐ 5EA
Screwⓐ 2EA
[WMN4277SH]IB_ASIA_Rev_1.0L11.indb 2 2014-02-06 10:31:12

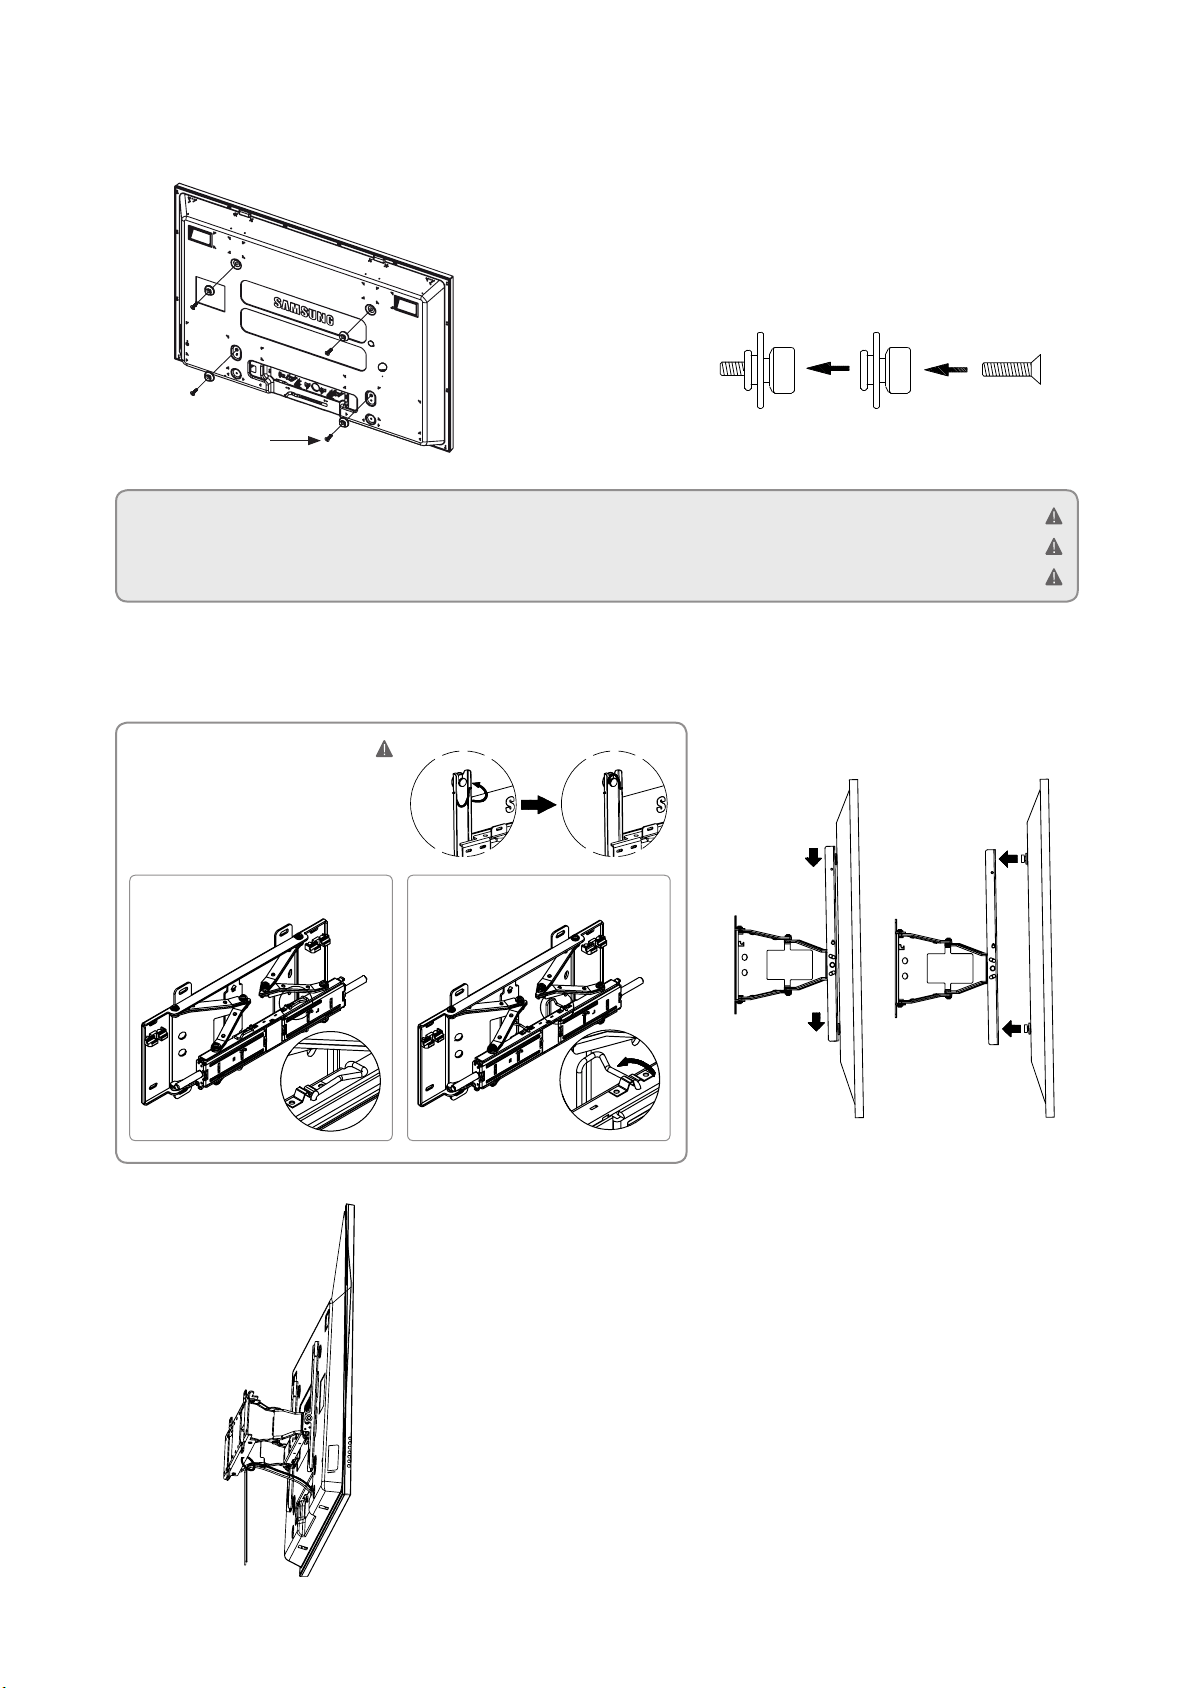
Mount the product on the wall bracket. Be sure to check on the left and right side to see if it is properly fixed.
Be careful when installing the product or adjusting the angle as fingers can be caught in the holes.
Be sure the wall bracket is securely fixed to the wall. Falling down the product may cause physical damage.
4
Pull the wall bracket fixing part forward. Two people are required to install the product on the assigned area of the wall bracket.
5
For managing the power cord and other cables for peripheral equipments,
bundle the wires by using the supplied wire fixing tool. Be sure the wires are not
unbundled or came off when rotating or operating.
Insert the cables and pull the angle adjustment bracket forward.
Arrange the wires by using the hole to avoid the interference with wires when
rotating the set.
Check the operation 2 ~ 3 times and fix the wall molding if it works properly.
Install the TV set to the wall
bracket and rotate the 2 safety
pins on the upper part to fix.
[Slim, Normal TV]
[Slim, Normal TV] [Ultra-Slim Only]
Screwⓒ 4EA
Use M8X40 screws for LED E series 75" and LED F8000 75" models.
3
Remove the screws from the main body of the TV, assemble the 4 enclosed
plastic hangers and screwsⓒ as shown by the figure and firmly fasten them to
the back of the main body of the TV.
[WMN4277SH]IB_ASIA_Rev_1.0L11.indb 3 2014-02-06 10:31:13
465
240.5 24.5 50
400
346
8
247
394
135
172
212
400
442
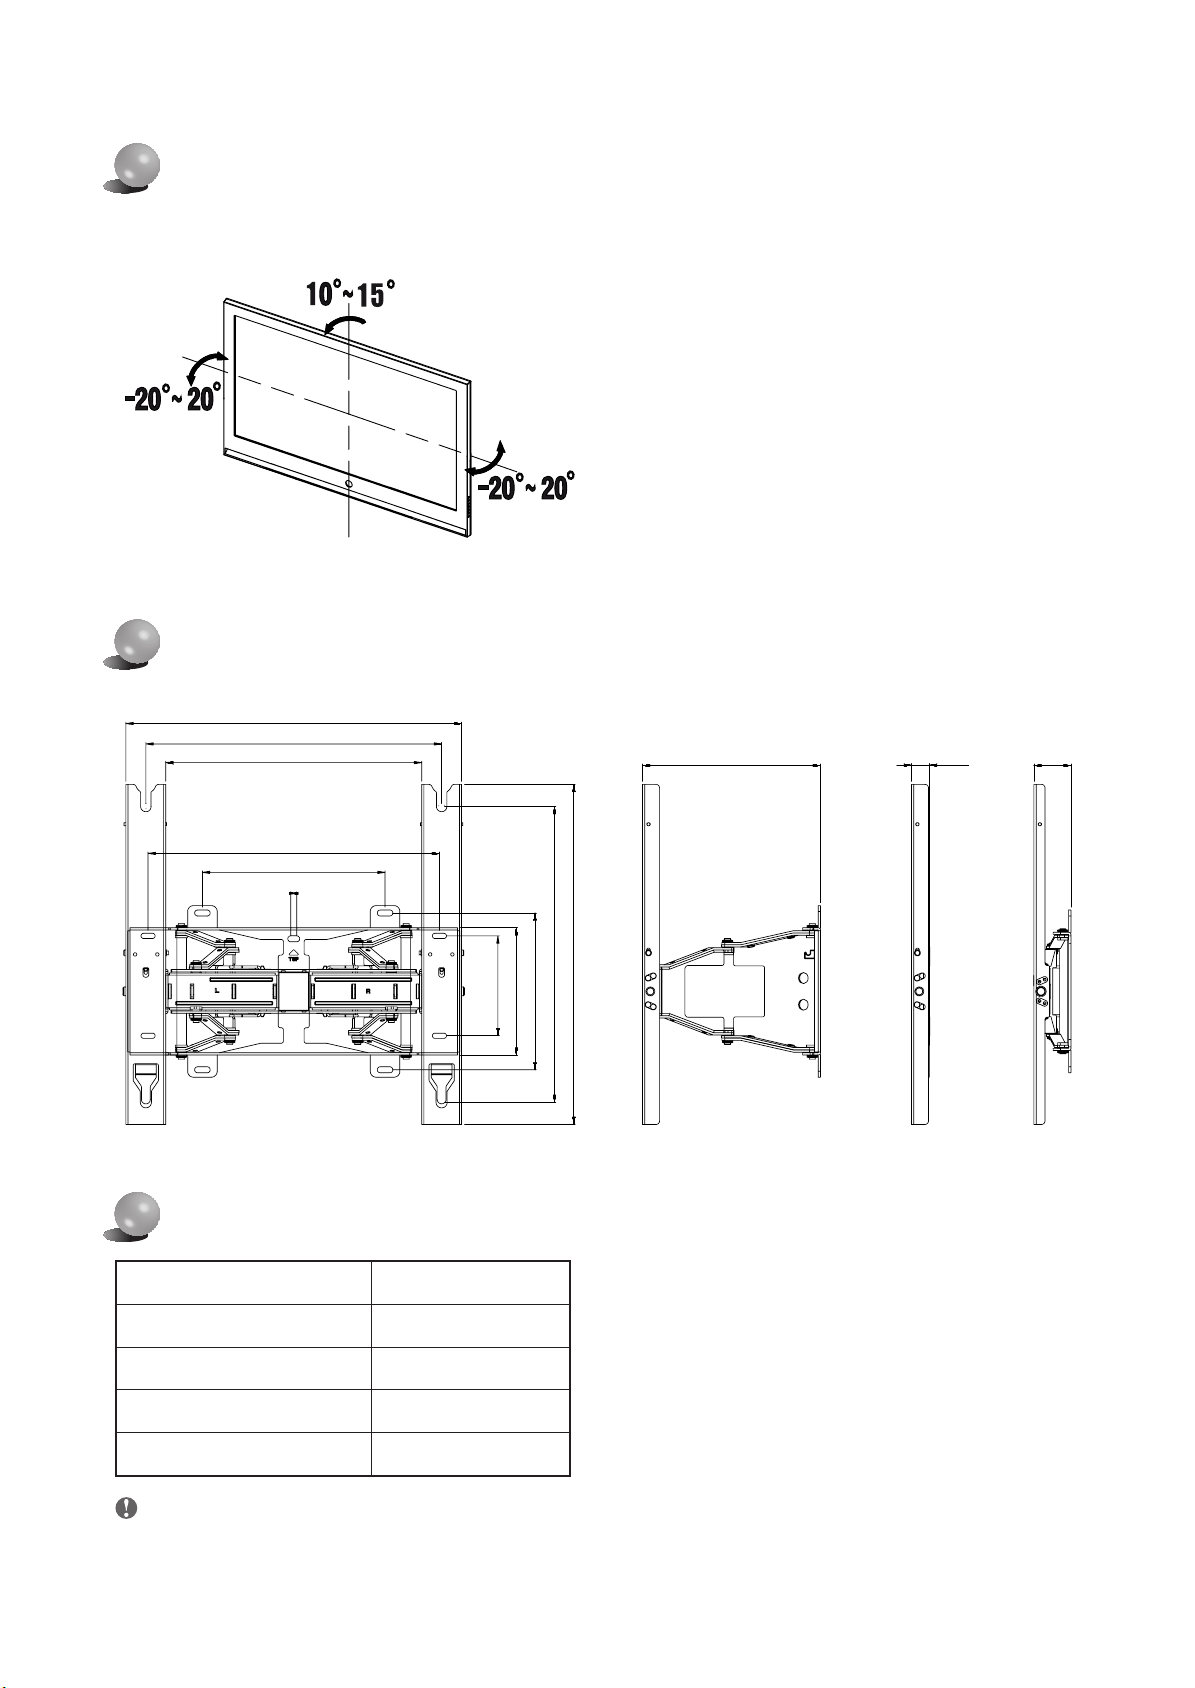
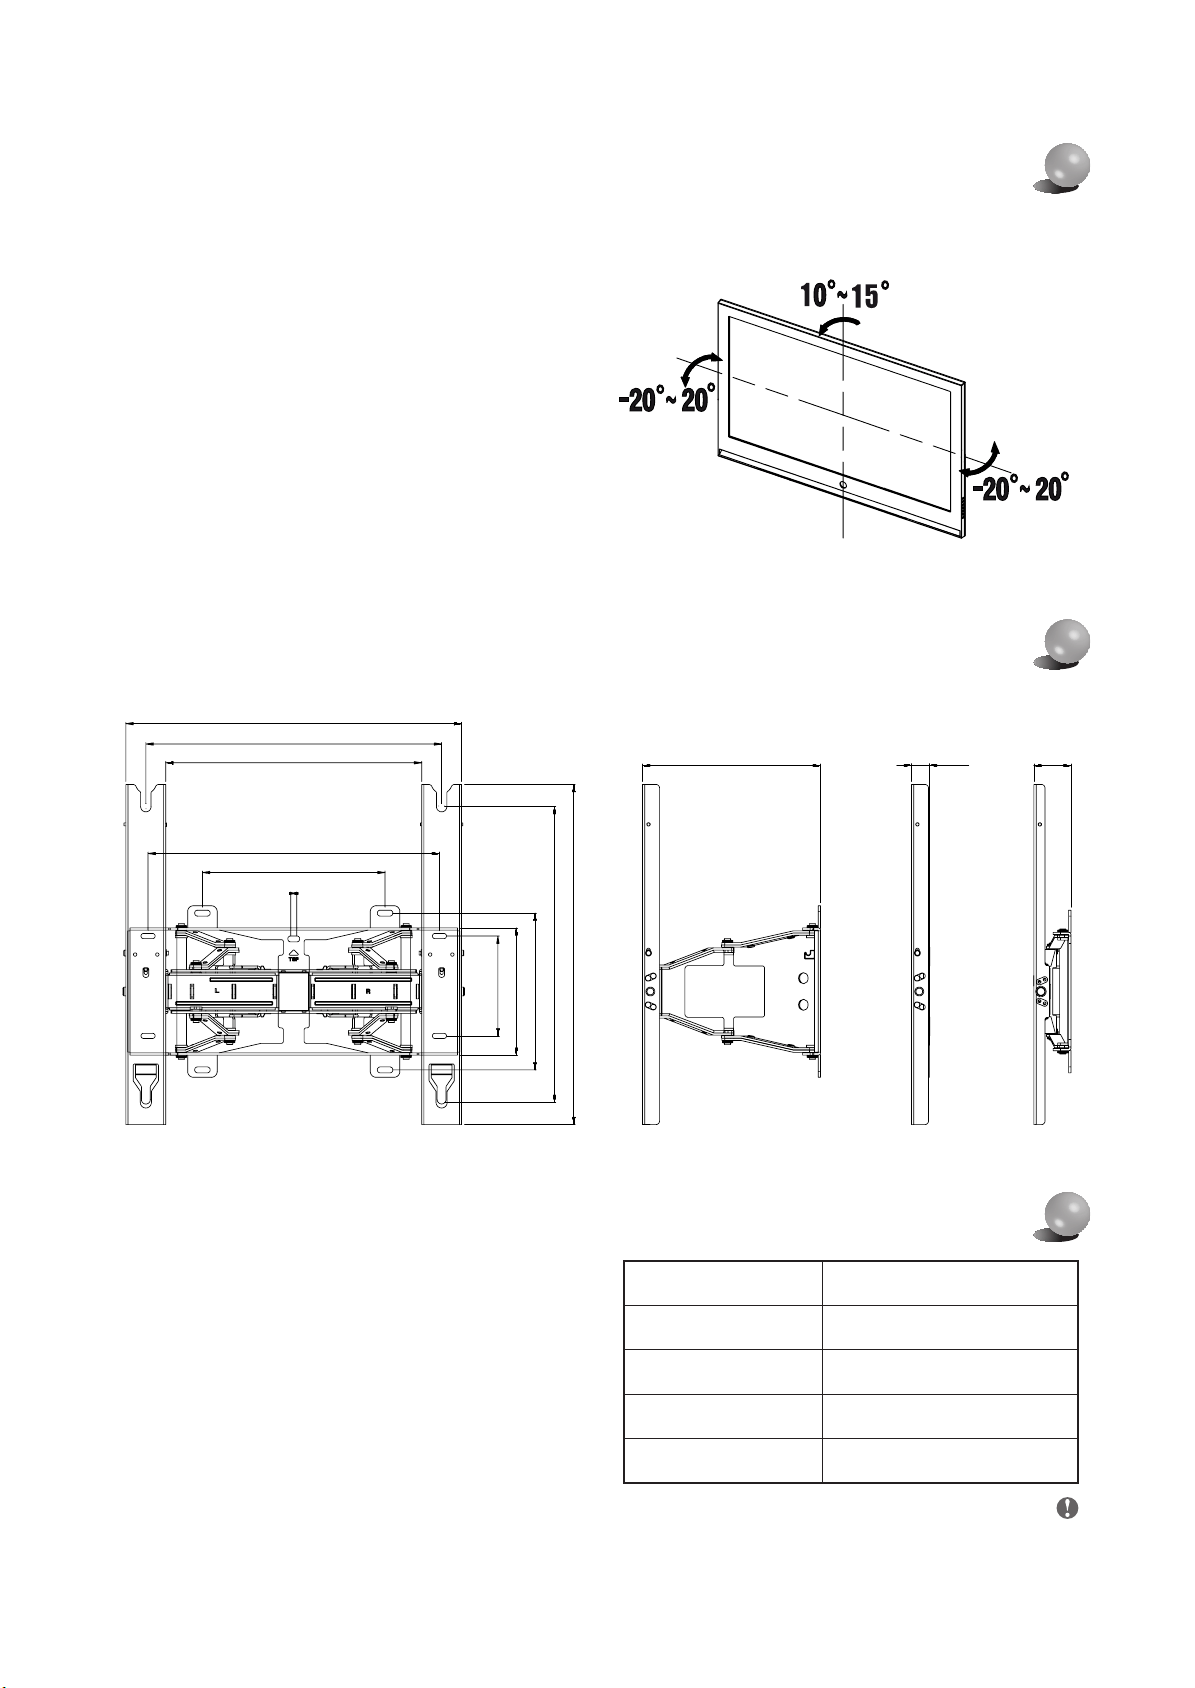
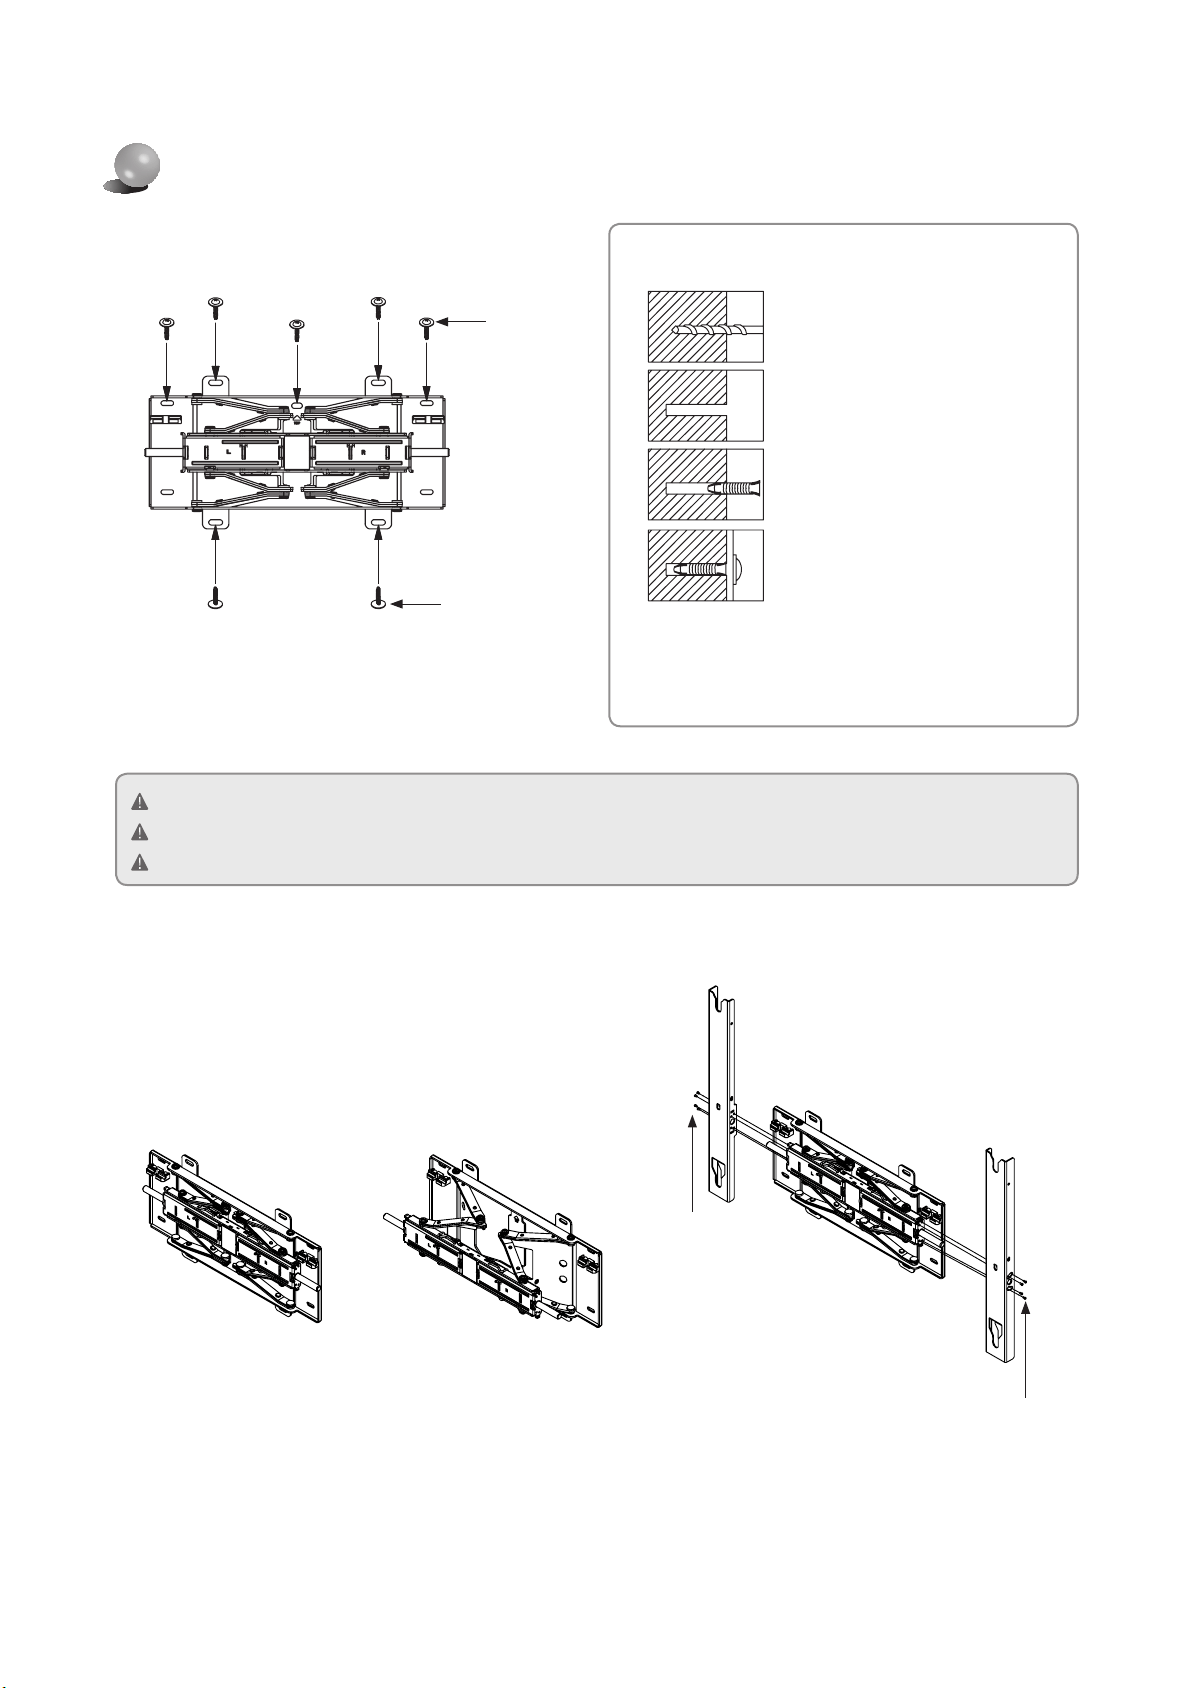
Product Specifications
Product Standards
Information in this document is subject to change without notice.
Width (mm) 465
Height (mm) 442
Dept (mm) 24.5
Weight (Kg) 5.5
Bracket VESA Standard 400 X 400
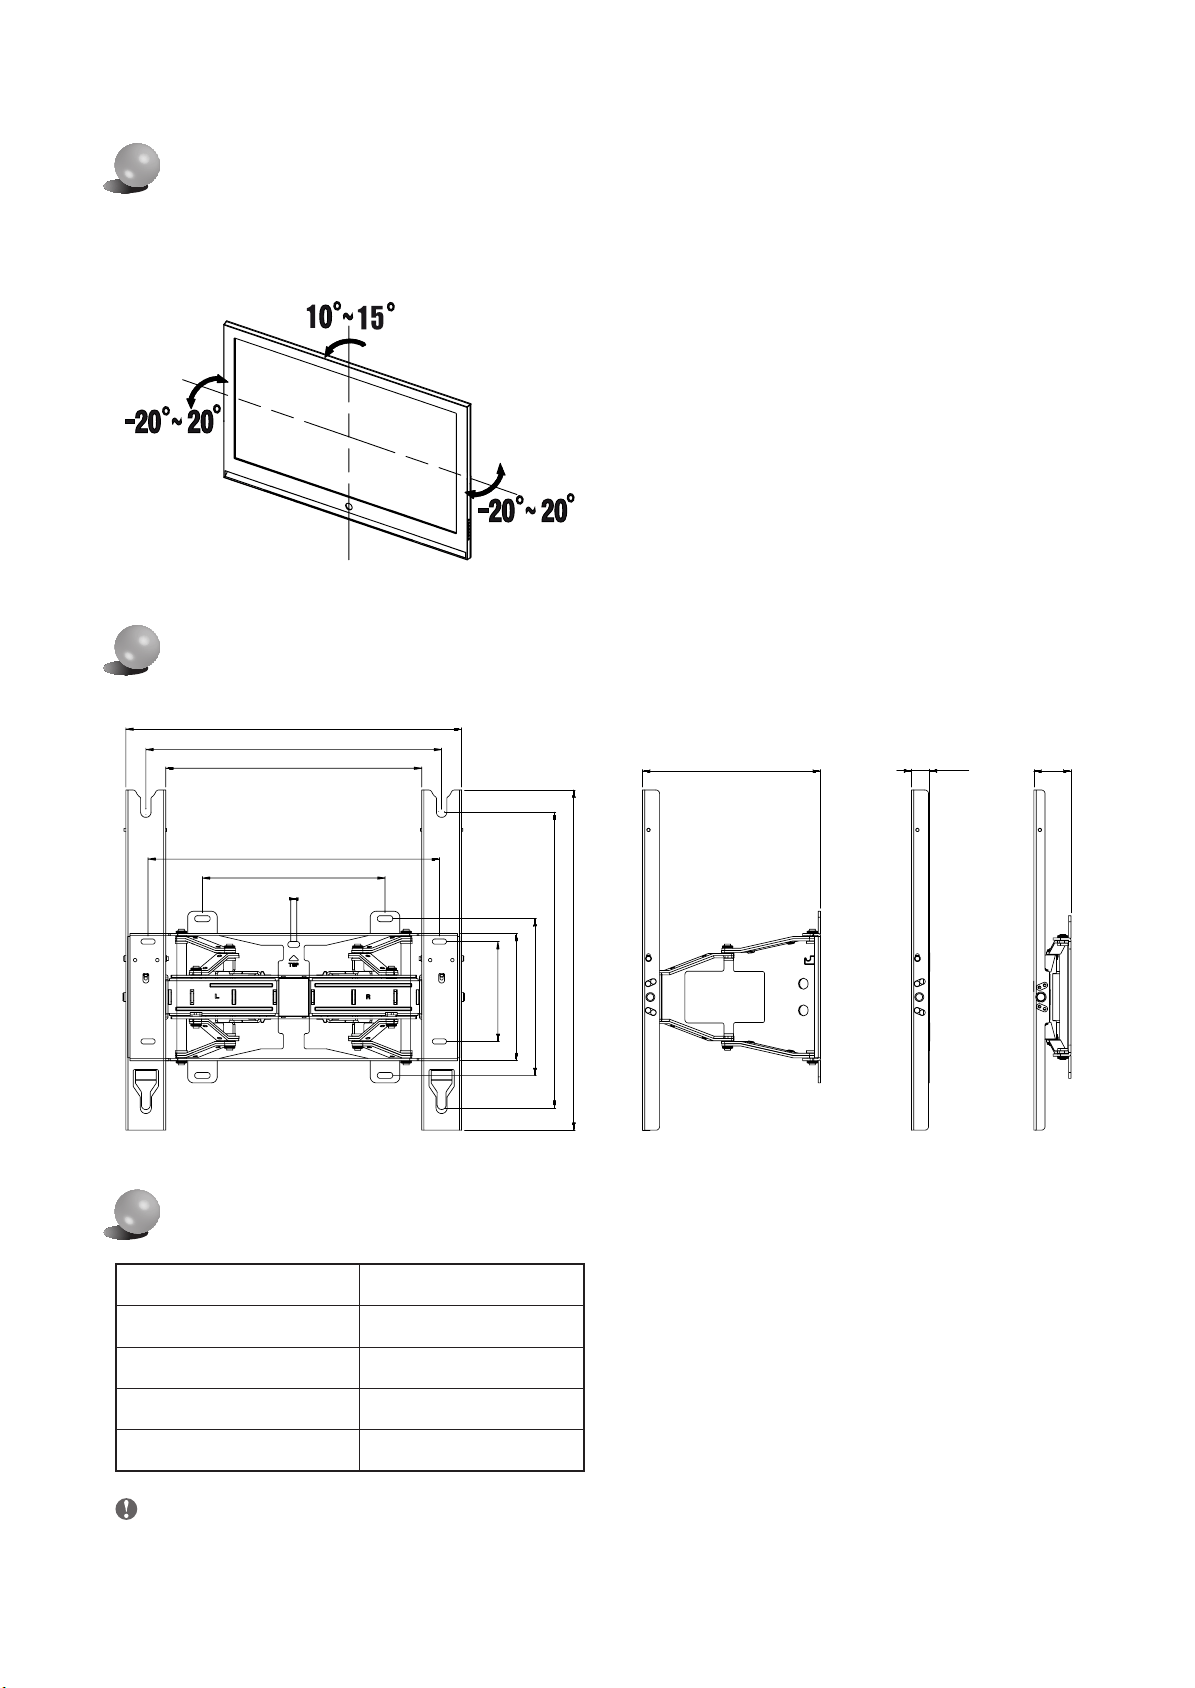
Do not adjust the angle with force. The product can be
damaged if it is too close to touch the wall.
Hold the left and right side of the product when you want to
adjust the left and right angle.
Hold the top center to adjust the down angle.
You can adjust the angle to left, and right side between
-20º ~ 20º, to down side to 10º ~ 15º.
The adjustable angle range may be vary depending on the
model.
Wall Bracket Angle Adjustment
The smooth moving mechanism is applied to this product to move the product smoothly for convenience.
[WMN4277SH]IB_ASIA_Rev_1.0L11.indb 4 2014-02-06 10:31:13
WMN4277SH
4 : ⓒ
M8X40 M8X35
1
8 :
ⓐ
8 :
ⓑ
[WMN4277SH]IB_ASIA_Rev_1.0L11.indb 5 2014-02-06 10:31:14
2
6
4
3
7
5
1
1
①ⓐ
.⑦
ⓐ
.6x50
.ⓐ
2
ⓑ
4EA ⓑ
4EA ⓑ
5EA ⓐ
2EA ⓐ
[WMN4277SH]IB_ASIA_Rev_1.0L11.indb 6 2014-02-06 10:31:15
4
5
4EA ⓒ
ⓒ
3
75LED F800075LED EM8X40
[WMN4277SH]IB_ASIA_Rev_1.0L11.indb 7 2014-02-06 10:31:16
465
240.5 24.5 50
400
346
8
247
394
135
172
212
400
442
465
442
24.5
5.5
VESA400 × 400
20º-20º
15º10º
[WMN4277SH]IB_ASIA_Rev_1.0L11.indb 8 2014-02-06 10:31:16

Faites appel à un technicien compétent chez votre détaillant si
vous voulez déplacer ou remplacer l’appareil après l’installation.
Évitez de vous accrocher à l’appareil ou de le heurter.
Guide d’installation du support mural
rotatif à réglage d’angle
WMN4277SH
Image du produit
Éléments
Consignes de sécurité
N’utilisez que les éléments fournis pour l’installation du support.
Communiquez avec un centre de service autorisé lorsque vous installez votre écran.
1. Placez l’appareil hors de portée des enfants. De sérieuses blessures à la tête peuvent survenir si l'on heurte le bord de l’écran.
2. Faites attention lorsque vous réglez l’angle de l’appareil ou que vous le faites tourner. L’appareil risque de s’endommager s’il est placé trop près du
mur. (Fixez des éponges aux quatre coins afin d’éviter d’endommager l'appareil ou le mur.)
3. N’installez pas l’appareil dans une pièce où la température et l’humidité sont élevées. Évitez d’installer l’appareil sur un mur qui ne peut en
supporter le poids.
4. Ne mettez pas vos doigts dans la fente du support du téléviseur au moment de l'installation. Il y a risque d’électrocution.
5. Assurez-vous de couvrir la fente au moyen du couvercle fourni avec le téléviseur avant de terminer l'installation au mur.
Français canadien
Visⓒ : 4
M8x35 M8x40
1 Gauche : 1 Droite : 1
Support à réglage d’angle Support Accessoires
Support en
plastique : 4
Vis
ⓐ : 8
Ancrage : 8 Outil de fixation de fils : 1
Vis
ⓑ : 8
[WMN4277SH]IB_ASIA_Rev_1.0L11.indb 9 2014-02-06 10:31:17

2
6
4
3
7
5
1
Ensemble de support mural
1
Installez le support à réglage d’angle sur le mur tel
qu’illustré.
Fixez le support à réglage d’angle à l’aide des ancrages et
des visⓐ, en ordre de ① à ⑦.
S’il s’avère impossible de l’installer à l’endroit voulu, placez-le
à proximité.
Vérifiez la solidité du mur avant l’installation. Si le mur n’est pas assez solide, renforcez-le, puis installez le support.
Les vis et les ancrages fournis sont conçus pour un mur de béton.
Pour un mur de plâtre, de marbre ou d’acier, utilisez les vis appropriées.
Serrage des ancrages et des visⓐ
Utilisez un foret de dimension appropriée pour percer les
trous. Assurez-vous de suivre les directives d'installation
afin d'éviter des problèmes de sécurité.
Faites un trou dans le mur à l’aide d’un
foret 6x50.
Nettoyez le trou.
Introduisez l’ancrage fourni.
Alignez le support sur les trous du mur et
vissez les vis ⓐ.
2
Fixez solidement l’appareil au mur. Tirez le support vers l’avant
et dépliez-le. Introduisez le support à l’endroit prévu du support à
réglage d’angle et vissez les huit vis fournies ⓑ (Procédez de la
même manière à gauche et à droite).
Visⓑ 4EA
Visⓑ 4EA
Visⓐ 5EA
Visⓐ 2EA
[WMN4277SH]IB_ASIA_Rev_1.0L11.indb 10 2014-02-06 10:31:18

Fixez l’appareil au support mural. Assurez-vous qu'il est bien fixé à gauche et à droite.
Prenez garde durant l'installation de l'appareil ou le réglage de l'angle, car vos doigts risquent de se coincer dans les orifices.
Assurez-vous que le support mural est bien fixé au mur. L’appareil risque de causer des dommages s’il tombe.
4
Tirez la pièce de fixation du support mural vers l'avant. Deux personnes sont nécessaires pour installer l’appareil dans la zone
appropriée du support.
5
Pour ranger le cordon d’alimentation et autres câbles de périphérique, regroupez
les fils à l’aide de l’outil fourni. Assurez-vous que les fils ne se libèrent pas au
moment de la rotation ou du fonctionnement.
Insérez les câbles et tirez le support à réglage d’angle vers l’avant.
Placez les fils en utilisant le trou afin d’éviter toute entrave avec les fils durant la
rotation de l’écran.
Vérifiez le fonctionnement à deux ou trois reprises, puis fixez la moulure murale
si tout est parfait.
Installez le téléviseur sur le
support et faites pivoter les deux
goupilles de sécurité à la partie
supérieure pour fixer le tout.
[téléviseur mince, normal]
[téléviseur mince, normal] [Ultramince seulement]
Visⓒ 4EA
3
Retirez les vis du panneau principal du téléviseur, assemblez les 4 supports
en plastique fournis et les visⓒ tel qu'illustré, puis serrez-les fermement à
l'arrière du panneau principal du téléviseur.
Utilisez les vis M8x40 pour les modèles DEL des séries E et F8000 de 75 pouces.
[WMN4277SH]IB_ASIA_Rev_1.0L11.indb 11 2014-02-06 10:31:19

465
240.5 24.5 50
400
346
8
247
394
135
172
212
400
442
Spécifications
Normes de l’appareil
Le contenu du présent document est susceptible d'être modifié sans préavis.
Largeur (mm) 465
Hauteur (mm) 442
Profondeur (mm) 24.5
Poids (kg) 5.5
Support VESA standard 400 X 400
N’ajustez pas l’angle en exerçant de la force. L’appareil
risque de s’endommager s’il est placé trop près du mur.
Tenez les côtés gauche et droit de l’appareil lorsque vous
voulez régler l’angle vers la gauche et la droite.
Tenez le haut de l'écran, au centre, pour régler l'angle vers
le bas.
Vous pouvez ajuster la position de l’écran vers la gauche
et la droite selon un angle de 20º, et vers le bas selon un
angle de 10º à 15º. L'angle de réglage peut varier selon le
modèle.
Réglage de l'angle du support mural
Le mécanisme de déplacement de l'appareil sert à mouvoir ce dernier en douceur.
[WMN4277SH]IB_ASIA_Rev_1.0L11.indb 12 2014-02-06 10:31:19

1 Kiri : 1 Kanan : 1
Braket Pengaturan Sudut Braket Aksesori
Gantungan plastik : 4
Sekrupⓐ : 8
Angkur : 8 Alat Pengencang Kabel : 1
Sekrup
ⓑ
: 8
Panduan Pemasangan Braket Pemasangan Dinding
Tipe Pengaturan Sudut dan Putar
WMN4277SH
Gambar Produk
Komponen
Gunakan hanya komponen yang disertakan untuk pemasangan braket.
Petunjuk Keselamatan
Pastikan untuk menghubungi pusat servis resmi apabila memasang perangkat Anda.
1. Pastikan untuk menjauhkan produk dari jangkauan anak-anak. Dapat menyebabkan cedera parah pada kepala apabila terbentur tepi produk.
2. Berhati-hatilah ketika Anda mengatur sudut atau memutar perangkat. Produk bisa rusak jika terlalu dekat hingga menyentuh dinding.
(Pasang spons ke 4 sudut produk untuk menghindari kerusakan pada produk atau dinding.)
3. Jangan pasang produk di tempat dengan suhu tinggi dan kelembapan tinggi. Hindari memasang produk di dinding yang tidak mampu menyangga bobotnya.
4. Karena berisiko menimbulkan sengatan listrik, jangan masukkan jari Anda ke lobang pemasangan dudukan TV ketika memasang TV.
5. Pastikan untuk menutup lubang pemasangan dudukan TV dengan penutup lubang yang disertakan dengan TV setelah menyelesaikan pemasangan
dinding.
Hubungi teknisi yang memenuhi syarat di dealer Anda untuk
memindahkan atau mengganti produk setelah pemasangan.
Jangan bergantung atau menyebabkan produk terkena
benturan mendadak.
Indonesia
Sekrupⓒ : 4
M8X35 M8X40
[WMN4277SH]IB_ASIA_Rev_1.0L11.indb 13 2014-02-06 10:31:20

2
6
4
3
7
5
1
Perakitan Braket Dinding
1
Pasang braket pengaturan sudut di dinding seperti
ditunjukkan pada gambar.
Kencangkan braket pengaturan sudut menggunakan angkur
dan sekrupⓐ secara urut dari ① sampai ⑦.
Jika tidak dapat dipasang di area yang ditetapkan, pasang di
tempat yang terdekat.
Periksa kekokohan dinding sebelum pemasangan. Perkuat dinding sebelum memasang braket jika dinding tidak cukup kokoh.
Sekrup dan angkur yang disertakan adalah untuk memasang di dinding beton.
Untuk dinding plester, marmer, atau baja, gunakan sekrup yang sesuai.
Cara Mengencangkan Angkur atau Sekrupⓐ
Gunakan bor dengan ukuran yang dibutuhkan ketika
melubangi dinding. Pastikan untuk mematuhi petunjuk
pemasangan untuk menghindari masalah keselamatan.
Buat lubang di dinding dengan bor 6X50.
Bersihkan lubang.
Pasang angkur yang disertakan ke lubang.
Tempatkan braket pengaturan sudut tepat
ke lubang di dinding lalu kencangkan
sekrupⓐ.
2
Kencangkan perangkat ke dinding. Tarik braket ke depan lalu
buka lipatannya. Masukkan braket ke area braket pengaturan
sudut yang ditetapkan lalu kencangkan 8 sekrup yang
disertakanⓑ. (Sama untuk sisi kiri dan kanan)
Sekrupⓑ 4BH
Sekrupⓑ 4BH
Sekrupⓐ 5BH
Sekrupⓐ 2BH
[WMN4277SH]IB_ASIA_Rev_1.0L11.indb 14 2014-02-06 10:31:21
Pasang produk di braket dinding. Pastikan memeriksa sisi kiri dan kanan untuk melihat apakah sudah terpasang dengan benar.
Berhati-hatilah ketika memasang produk atau mengatur sudut karena jari bisa terjepit di lubang.
Pastikan braket dinding terpasang dengan kuat di dinding. Jika produk jatuh bida menyebabkan cedera fisik.
4
Tarik bagian pengencang braket dinding ke depan. Dibutuhkan dua orang untuk memasang produk di area braket dinding yang
ditetapkan.
5
Untuk mengelola kabel daya dan kabel lainnya untuk peralatan periferal, ikat kabel
menggunakan alat pengencang kabel yang disertakan.
Pastikan kabel tidak terurai ikatannya atau terlepas ketika perangkat diputar atau
dioperasikan.
Masukkan kabel lalu tarrik braket pengaturan sudut ke depan.
Rapikan kabel menggunakan lubang untuk menghindari gangguan kabel ketika
memutar perangkat.
Periksa pengoperasian 2 ~ 3 kali lalu kencangkan ke dinding jika telah bekerja
dengan benar.
Pasang perangkat TV ke
braket dinding lalu putar 2 pin
pengaman di bagian atas untuk
mengencangkannya.
[TV Slim, Normal]
[TV Slim, Normal] [Hanya Ultra-Slim]
Sekrupⓒ 4BH
Gunakan sekrup M8X40 untuk model LED seri E 75" dan LED F8000 75".
3
Lepaskan sekrup dari unit utama TV, pasang 4 gantungan plastik dan
sekrupⓒ seperti ditunjukkan pada gambar lalyu kencnagkan ke bagian
belakang unit utama TV.
[WMN4277SH]IB_ASIA_Rev_1.0L11.indb 15 2014-02-06 10:31:22

465
240.5 24.5 50
400
346
8
247
394
135
172
212
400
442
Spesifikasi Produk
Standar Produk
Informasi dalam dokumen ini dapat berubah tanpa pemberitahuan.
Lebar (mm) 465
Tinggi (mm) 442
Dalam (mm) 24,5
Berat (Kg) 5,5
Braket Standar VESA 400 X 400
Jangan ubah sudutnya secara paksa. Produk bisa rusak jika
terlalu dekat hingga menyentuh dinding.
Tahan sisi kiri dan kanan produk apabila Anda ingin
menyesuaikan sudut kiri dan kanan.
Tahan bagian tengah atas untuk menyesuaikan sudut turun.
Anda dapat mengatur sudut ke sisi kiri, dan kanan di
antara -20º ~ 20º, ke sisi bawah hingga 10º ~ 15º.
Rentang sudut yang dapat diatur mungkin berbeda-beda
tergantung model.
Pengaturan Sudut Braket Dinding
Produk ini dilengkapi mekanisme penggerak mulus untuk kenyamanan Anda dalam mengatur posisi produk.
[WMN4277SH]IB_ASIA_Rev_1.0L11.indb 16 2014-02-06 10:31:22
각도 조절 및 회전형 벽걸이 지지대 사용설명서
WMN4277SH
벽걸이 완제품
구성품
안전을 위한 주의사항
벽걸이설치시반드시제공되는구성품및부품을사용하여주세요.
제품설치는반드시판매점에서지정한전문설치업자에게의뢰해주세요.
설치후제품을이동하거나교체시에는반드시
판매점에서지정한전문설치업자에게문의하세요.
설치후매달리거나심한충격을주지마세요.
부속품
걸이용플라스틱
:4개
나사ⓐ:8개
앵커:8개
와이어고정부품:1개
나사ⓑ:8개
나사ⓒ:4개
M8X35 M8X40
각도조절장치 브라켓
1개
왼쪽:1개 오른쪽:1개
1. 제품아래에서아이가놀지못하게하세요.모서리에머리가부딪칠수있습니다.
2. 각도조절을하거나회전시에제품의뒷면이벽과부딪칠수있으니주의하세요.
(모서리4곳에스폰지등을부착하면벽과제품이상하는것을방지할수있습니다.)
3. 고온다습한곳이나제품의무게를견디지못하는벽에는설치하지마세요.
4. 감전의위험이있으므로벽걸이설치중에TV제품하단의스탠드분리홈에절대손을넣지마세요.
5. TV제품의스탠드가분리된홈은TV제품에있는별도의덮개를반드시막고벽걸이설치작업을완료하여주세요.
[WMN4277SH]IB_ASIA_Rev_1.0L11.indb 17 2014-02-06 10:31:23
벽걸이 설치 방법
1
각도조절장치를그림과같이벽면에고정하십시오.
각도조절장치를앵커와나사ⓐ로그림과같이①번에서
⑦번까지순서대로고정시키세요.
불가피하게지정된위치에고정하지못할경우에는가장
인접한곳으로이동하여고정하세요.
2
그림과같이벽면에본체를단단히고정시킨후에전면으로
당겨서펼쳐진브라켓을각도조절장치의지정한위치에
삽입하여동봉된나사ⓑ8개를이용하여고정하십시오.
(좌/우동일)
벽의강도를확인한후에강도가충분하지못한곳은반드시적절한보강작업을한뒤에설치하세요.
동봉된나사와앵커는목재와콘크리트체결용입니다.
벽을확인하여석고보드,대리석,철판등에는적절한전용체결나사를사용하세요.
나사ⓑ4개
나사ⓑ4개
벽에구멍을뚫을때에는반드시지정된직경의드릴
비트및드릴을사용하세요.지정되지않은방법으로
설치할경우에는안전상의문제가발생될수있습니다.
앵커및나사ⓐ고정방법
6X50의드릴로구멍을뚫으세요.
뚫은구멍을청소하세요.
구멍에동봉된앵커를삽입하세요.
각도조절장치를구멍에맞추어나사
ⓐ를체결하세요.
2
6
4
3
7
5
1
나사ⓐ5개
나사ⓐ2개
[WMN4277SH]IB_ASIA_Rev_1.0L11.indb 18 2014-02-06 10:31:23

본체를벽걸이에걸은후에모두정확하게걸렸는지좌,우측면에서필히확인하세요.
설치및각도조절시손가락이끼일수있으니조심하세요.
벽걸이브라켓이벽에단단하게고정되어있지않으면본체가떨어져다칠수있으니단단하게고정하세요.
벽걸이에TV본체를완전히
고정한후에벽걸이양쪽상부
2개소의안전고리를그림과
같이회전하여고정되도록
하십시오.
[일반사용시] [슬림사용시]
5
전원선및기타주변기기연결선의처리는동봉된와이어고정부품을사용하여그림과같이
묶은후에회전및작동시에이탈되거나빠지지않는지확인해
주시길바랍니다.
케이블을삽입한후에각도조절장치를전면으로최대한당긴후에
와이어를그림과같이각도조절기의지정한구멍을이용하여정형하게되면회전시에연
결선과간섭되지않습니다.
2~3회동안동작확인후,이상이없을시에는벽면몰딩을고정바랍니다.
3
TV본체의나사를제거한후에,동봉된걸이용플라스틱과나사ⓒ4개를그림과같
이결합하여TV본체뒷면에단단하게조여주세요.
[일반사용시]
LEDE-Series75",LEDF800075"모델은M8X40나사를사용하세요.
4
그림과같이벽걸이의브라켓고정부를전면으로최대한당긴후에TV본체를반드시두사람이들고벽걸이의지정부위에걸어주십시오.
나사ⓒ4개
[WMN4277SH]IB_ASIA_Rev_1.0L11.indb 19 2014-02-06 10:31:24
제품의각도를조정할때너무강한힘을주면제품이
벽면과부딪쳐손상을입을수있으니주의하세요.
좌우각도를조정할때에는제품의양옆부분을잡아주고,아래각도
를조정할때에는제품윗면의가운데를잡으면
부드럽게원하는각도로조절할수있습니다.
각도조절은좌/우방향으로-20° ~ 20°까지,
아래방향으로10° ~ 15°까지임의로조절할수있습니다.모델에
따라각도조절장치의각도가상이할수있습니다.
제품 규격
제품의외관이나사양등은제품의개량을위해서,사전에예고없이변경될수있습니다.
폭(mm) 465
높이(mm) 442
깊이(mm) 24.5
무게(Kg) 5.5
벽걸이VESA규격 400X400
제품 사양
구성품
본제품은소비자의편리성을위해SMOOTHMOVINGMECHANISM을도입하여아주부드럽게움직이도록
설계되어있습니다.
465
240.5 24.5 50
400
346
8
247
394
135
172
212
400
442
[WMN4277SH]IB_ASIA_Rev_1.0L11.indb 20 2014-02-06 10:31:25

Izquierda : 1 Derecha : 1
Comuníquese con un técnico calificado de su distribuidor para
mover o reemplazar el producto después de la instalación.
No se cuelgue ni someta al producto a impactos
repentinos.
Guía de instalación de soporte de pared de
ajuste angular y rotación
WMN4277SH
Imagen del producto
Componentes
Instrucciones de seguridad
Utilice únicamente los componentes provistos para la instalación del soporte.
Asegúrese de contactarse con un centro de servicio autorizado al instalar su aparato.
1. Asegúrese de mantener el producto alejado del alcance de los niños. Un golpe contra el borde del producto puede ocasionar lesiones graves en la
cabeza.
2. Tenga cuidado de ajustar el ángulo o girar el aparato. El producto puede dañarse si está demasiado cerca como para tocar la pared.
(Coloque topes de esponja en los 4 ángulos del producto para evitar daños al producto o la pared.)
3. No instale el producto en un lugar con altos niveles de temperatura o humedad. Evite instalar el producto sobre una pared que no puede soportar peso.
4. Dado que existe el riesgo de descarga eléctrica, no inserte el dedo en el orificio de instalación del pie del televisor durante la instalación.
5. Asegúrese de cubrir el orificio de instalación del pie del televisor con la cubierta provista con el televisor antes de finalizar la instalación en la pared.
Español
Tornillosⓒ: 4
M8X35 M8X40
1
Soporte de ajuste angular Soporte Accesorios
Colgador plástico : 4
Tornillo
ⓐ : 8
Anclaje : 8
Herramienta de
sujeción de cables : 1
Tornillo
ⓑ : 8
[WMN4277SH]IB_ASIA_Rev_1.0L11.indb 21 2014-02-06 10:31:26

2
6
4
3
7
5
1
Conjunto del soporte de pared
1
Instale el soporte de ajuste angular en la pared como lo
ilustra la figura.
Ajuste el soporte de ajuste de ángulo con los anclajes y los
tornillosⓐ en orden del ① al ⑦.
Si no puede instalarse en el área asignada, instálelo en el
lugar más cercano.
Verifi
que la solidez de la pared antes de la instalación. Refuerce la pared e instale el soporte si la pared no es lo suficientemente firme.
Los tornillos y anclajes provistos son para la instalación en las paredes de concreto.
Para las paredes de yeso, mármol o acero, utilice los tornillos adecuados.
Cómo ajustar los anclajes o tornillosⓐ
Utilice el taladro con una mecha del tamaño adecuado al hacer
un agujero en la pared. Asegúrese de seguir las instrucciones
de instalación a fin de evitar problemas de seguridad.
Haga un orificio en la pared con una mecha
de 6X50.
Limpie el orificio.
Inserte el anclaje provisto en el orificio.
Alinee el soporte de ajuste de ángulo con
los orificios de la pared y ajuste los
tornillosⓐ.
2
Ajuste el aparato a la pared. Empuje el soporte hacia adelante
y estírelo. Inserte el soporte en el área asignada del soporte de
ajuste de ángulo y ajuste los 8 tornillos provistosⓑ.
(Realice la misma operación para el lado izquierdo y el derecho)
Tornilloⓑ 4EA
Tornilloⓑ 4EA
Tornilloⓐ 5EA
Tornilloⓐ 2EA
[WMN4277SH]IB_ASIA_Rev_1.0L11.indb 22 2014-02-06 10:31:26

Coloque el producto en el soporte de pared. Asegúrese de verificar el lado izquierdo y el derecho para ver que esté ajustado correctamente.
Tenga cuidado al instalar el producto o ajustar el ángulo dado que puede agarrarse los dedos en los orificios.
Asegúrese de que el soporte de pared esté bien ajustado a la pared. Al caer, el producto puede provocar lesiones físicas.
4
Empuje hacia adelante la parte ajustable del soporte de pared. Se requieren dos personas para instalar el producto en el área
asignada del soporte de pared.
5
Para manejar el cable de alimentación y otros cables de equipos periféricos,
enrolle los cables y sujételos con la herramienta de sujeción de cables.
Asegúrese de que los cables no se desenrollen ni se suelten al rotar o activar
el aparato.
Inserte los cables y empuje el soporte de ajuste de ángulo hacia adelante.
Acomode los cables utilizando el orificio a fin de evitar la interferencia con los
cables al girar el aparato.
Verifique la operación 2 ~ 3 veces y ajústelos a la pared si funciona adecuadamente.
Instale el televisor al soporte
de pared y gire los 2 pernos de
seguridad en la parte superior
para ajustarlo.
[TV delgada, normal]
[TV delgada, normal]
[Sólo para el modelo ultra delgado]
Tornilloⓒ 4EA
3
Retire los tornillos del cuerpo principal del televisor, monte los cuatro
colgadores de plástico y los tornillosⓒ como muestra la figura y ajústelos
firmemente en la parte posterior del cuerpo principal del televisor.
Use tornillos M8X40 para los modelos LED serie E de 75" y LED F8000 de 75".
[WMN4277SH]IB_ASIA_Rev_1.0L11.indb 23 2014-02-06 10:31:27

465
240.5 24.5 50
400
346
8
247
394
135
172
212
400
442
Especificaciones del producto
Estándares del producto
La información de este documento está sujeta a cambios sin previo aviso.
Ancho (mm) 465
Altura (mm) 442
Profundidad (mm) 24.5
Peso (Kg.) 5.5
Soporte norma VESA 400 X 400
No ajuste el ángulo con fuerza. El producto puede dañarse si
está demasiado cerca como para tocar la pared.
Sostenga el lado izquierdo y derecho del producto cuando
desee ajustar el ángulo izquierdo y derecho.
Sostenga la parte central superior para ajustar el ángulo de
descenso.
Puede ajustar el ángulo hacia la izquierda y la derecha entre
-20º ~ 20º y hacia abajo entre 10º ~ 15º. El rango de ángulo
ajustable puede variar dependiendo del modelo.
Ajuste del ángulo del soporte de pared
El mecanismo de movimiento suaves se incorpora al producto para mayor comodidad.
[WMN4277SH]IB_ASIA_Rev_1.0L11.indb 24 2014-02-06 10:31:28

安装后若要移动或更换本产品,请联系经销商,
由合格的技术人员来完成。
请勿在本产品上悬挂任何物体或使其受到猛然撞击。
角度调整和旋转型壁挂支架安装指南
WMN4277SH
产品图片
组件
安全说明
仅使用随附的组件安装支架。
在安装本产品时,请务必联系授权的服务中心。
1.确保儿童不会触碰到本产品。如果头部被产品边缘撞到,可能会造成严重伤害。
2.在调整角度或旋转电视时请小心谨慎。如果本产品接触到墙壁,可能会受损。
(在产品的4个角垫一些海绵,以免产品或墙壁损坏。)
3.请勿在高温高湿环境中安装本产品。不要将本产品安装到不能承受其重量的墙壁上。
4.由于存在触电危险,在安装电视时,切勿将您的手指插入电视支架安装孔。
5.确保使用电视随附的孔盖将电视支架安装孔盖上,然后再完成墙壁安装。
简体中文
螺钉ⓒ:4
M8X35 M8X40
1 左:1 右:1
角度调整支架 支架 配件
塑料吊架:4
螺钉ⓐ:8
地脚螺钉:8 束线带:1螺钉ⓑ:8
[WMN4277SH]IB_ASIA_Rev_1.0L11.indb 25 2014-02-06 10:31:28
2
6
4
3
7
5
1
壁挂支架组装
1
如图所示,将角度调整支架安装到墙壁上。
按照①到⑦的顺序,使用地脚螺钉和螺钉ⓐ固定角度
调整支架。
如果无法安装到指定区域,请安装到最靠近的位置。
安装前应检查墙壁的坚固性。如果墙壁不够坚固,请先巩固墙壁再安装支架。
随附的螺钉和地脚螺钉适用于在混凝土墙壁上进行安装。
对于石膏、大理石或钢制墙面,请使用适当的螺钉。
如何拧紧地脚螺钉或螺钉ⓐ
在墙上钻孔时,请使用指定尺寸的钻头。确保遵从安
装指示以免出现安全问题。
使用6X50的钻头在墙上钻孔。
清理钻孔。
将随附的地脚螺钉插入孔中。
将角度调整支架对准墙上的孔,然后
拧紧螺钉ⓐ。
2
将本产品牢牢固定到墙上。向前拉动支架,将其展开。
然后将支架插入角度调整支架的指定区域,拧紧随附的8颗
螺钉ⓑ。(左右侧相同)
螺钉ⓑ4个
螺钉ⓑ4个
螺钉ⓐ5个
螺钉ⓐ2个
[WMN4277SH]IB_ASIA_Rev_1.0L11.indb 26 2014-02-06 10:31:29

将本产品固定到壁挂支架上。请务必检查左右两侧,确保均已正确固定。
安装本产品或调整角度时请小心谨慎,以防手指卡在孔中。
确保壁挂支架牢牢固定在墙上。产品坠落可能会导致物理损坏。
4
向前拉动壁挂支架的固定部件。将本产品安装到壁挂支架的指定区域需要两个人。
5
使用随附的束线带捆好线缆,以便管理电源线和外围设备的其他线缆。
确保在旋转或操作时线缆不会松开或脱落。
插入线束并向前拉动角度调整支架。
通过孔洞来调整线束,以免在旋转本产品时受到线束的干扰。
检查操作2至3次,如果工作正常,请修复墙模。
将电视安装到壁挂支架上,
旋转上方的2个安全销进行
固定。
[纤薄、普通电视]
[纤薄、普通电视] [仅超薄电视]
螺钉ⓒ4个
3
卸下电视主体的螺钉,按图示装上电视附带的
4个塑料吊架和螺钉ⓒ并将其牢固地紧固到电视主体的背面板上。
对于LEDE系列75"型号和LEDF800075"型号,请使用M8X40螺钉。
[WMN4277SH]IB_ASIA_Rev_1.0L11.indb 27 2014-02-06 10:31:30

465
240.5 24.5 50
400
346
8
247
394
135
172
212
400
442
产品规格
产品标准
本文档中的信息如有变更,恕不另行通知。
宽度(毫米) 465
高度(毫米) 442
厚度(毫米) 24.5
重量(千克) 5.5
支架VESA标准 400X400
调整角度时请勿过度用力。如果本产品接触到墙壁,
可能会受损。
如果要调整左右角度,可抓住本产品的左右两侧。
如果要调整向下角度,可抓住顶端的中部。
您可调整的左右角度范围为-20°~20°,向下角度范围为
10°~15°。可调整的角度范围因机型而异。
壁挂支架角度调整
本产品采用平滑移动机制,以便于您平滑移动本产品。
[WMN4277SH]IB_ASIA_Rev_1.0L11.indb 28 2014-02-06 10:31:30

產品安裝後若要搬動或更換,
請向您的經銷商洽詢合格的技師。
切勿懸吊在產品上或突然撞擊產品。
角度調整與旋轉型掛牆托架安裝指南
WMN4277SH
產品圖例
安全說明
請務必洽詢經授權的服務中心幫您安裝。
1. 請勿讓兒童靠近產品。若頭部撞到產品邊緣,可能會造成嚴重的傷害。
2. 調整電視角度或進行旋轉時,請務必小心。如果產品太靠近或者貼著牆壁,可能會造成損壞。
(產品四個角請加上海綿,以防損害產品或牆壁。)
3. 請勿將產品安裝在高溫和濕氣高的地方。避免將產品安裝在無法承載產品重量的牆上。
4. 安裝電視時,請勿將手指插入電視架的安裝孔中,以防觸電危險。
5. 將電視安裝到牆上後,請務必使用電視隨附的蓋帽將電視架的安裝孔蓋住。
繁體中文
組件
請僅使用所提供的組件安裝托架。
1 左:1 右:1
角度調整支架 支架 附件
塑膠掛件:4
螺絲ⓐ:8
固定用螺栓:8 束線帶:1螺絲ⓑ:8
螺絲ⓒ:4
M8X35 M8X40
[WMN4277SH]IB_ASIA_Rev_1.0L11.indb 29 2014-02-06 10:31:31

2
6
4
3
7
5
1
掛牆托架組件
1
按照圖示將角度調整支架安裝到牆上。
使用固定用螺栓和螺絲ⓐ按照①到⑦的順序將角度調整
支架鎖緊固定住。
如果無法安裝在指定的區域,請安裝在最近的地方。
在安裝之前應檢查牆壁的強度。如果牆壁不夠堅固,請強化牆壁並安裝托架。
所提供的螺絲和固定用螺栓適合安裝於水泥牆。
若是石膏、大理石或鋼製牆面,請使用適當的螺絲。
如何鎖緊固定用螺栓和螺絲ⓐ
在牆上鑽洞時,請使用具有適當大小鑽頭的鑽孔機。
請務必遵循指示進行安裝,以防安全問題。
使用6X50鑽孔機在牆上鑽洞。
清理孔洞。
將隨附的固定用螺栓插入孔中。
將角度調整支架對準牆上的孔洞,
然後鎖緊螺絲ⓐ。
2
穩固地將支架固定到牆上。將支架往前拉並予以折疊。
將托架插入角度調整支架的指定區域,並使用提供的8個螺絲
ⓑ鎖緊。(左右兩側均相同)
螺絲ⓑ4個
螺絲ⓑ4個
螺絲ⓐ5個
螺絲ⓐ2個
[WMN4277SH]IB_ASIA_Rev_1.0L11.indb 30 2014-02-06 10:31:32

將產品裝到掛牆托架上。請務必檢查左右兩側,確定已妥當固定。
安裝產品或調整角度時請小心,手指可能會不小心卡到孔洞中。
確定掛牆托架已安全地固定在牆上。產品掉落可能會傷及人體。
4
將掛牆托架的固定零件往前拉。要將產品安裝在掛牆托架的指定區域需要兩個人共同完成。
5
若要整理電源線和周邊設備的其他纜線,請使用隨附的束線帶將纜線捆束起來。
確定纜線在旋轉或操作產品時是否已捆束或者散落。
將纜線插入,然後將角度調整支架往前拉。利用孔洞整理纜線,以避免旋轉
時卡到纜線。檢查操作2~3次,並將嵌線固定。
將電視安裝到掛牆托架,
並旋轉上方的2個保險銷。
[薄型標準電視]
[薄型標準電視] [僅限超薄型]
螺絲ⓒ4個
3
取下電視主體上的螺絲,將4個隨附的塑膠掛鉤安裝到電視主體的背面並使
用螺絲ⓒ(如圖所示)鎖緊。
對於LEDE系列75吋和LEDF800075吋型號請使用M8X40螺絲。
[WMN4277SH]IB_ASIA_Rev_1.0L11.indb 31 2014-02-06 10:31:33
465
240.5 24.5 50
400
346
8
247
394
135
172
212
400
442
產品規格
產品標準
本文件中的資訊如有變更,恕不另行通知。
寬度(毫米) 465
高度(毫米) 442
深度(毫米) 24.5
重量(公克) 5.5
支架VESA標準 400X400
請勿用力調整角度。如果產品太靠近或者貼著牆壁,
可能會造成損壞。
調整左右角度時,請握住產品的左右側。
調整往下角度時請握住上方中央。
您可以向左或向右調整角度-20°~20°,
向下調整角度10°~15°。
依機型而定,可調整的角度範圍可能不同。
掛牆托架角度調整
本產品採用流暢移動機制,以便於平穩地移動產品。
[WMN4277SH]IB_ASIA_Rev_1.0L11.indb 32 2014-02-06 10:31:33

1 ซ้าย: 1 ขวา: 1
โครงสำ�หรับปรับมุม โครง อุปกรณ์เสริม
ที่แขวนพลาสติก: 4
สกรู
ⓐ: 8
พุก: 8 อุปกรณ์ยึดสาย: 1สกรู
ⓑ: 8
คู่มือก�รติดตั้งโครงก�รปรับมุมและโครงยึดติดผนังแบบหมุน
WMN4277SH
ภ�พผลิตภัณฑ์
องค์ประกอบ
ใช้เฉพาะองค์ประกอบที่ให้มาสำาหรับการติดตั้งโครงยึด
คำ�แนะนำ�เพื่อคว�มปลอดภัย
โปรดติดต่อศูนย์บริการที่ได้รับอนุญาตเมื่อติดตั้งอุปกรณ์ของคุณ
1. โปรดเก็บผลิตภัณฑ์ให้พ้นมือเด็ก อาจเกิดการบาดเจ็บร้ายแรงถ้าศีรษะชนกับขอบผลิตภัณฑ์
2. ใช้ความระมัดระวังเมื่อปรับมุมหรือหมุนอุปกรณ์ ผลิตภัณฑ์อาจเกิดความเสียหายถ้าอยู่ใกล้กับผนังมากเกินไป
(ติดฟองน้ำากับมุมทั้ง 4 ด้านของผลิตภัณฑ์เพื่อป้องกันความเสียหายกับผลิตภัณฑ์หรือผนัง)
3. ห้ามติดตั้งผลิตภัณฑ์ในที่ที่มีความร้อนหรือความชื้นสูง หลีกเลี่ยงการติดตั้งผลิตภัณฑ์กับผนังที่ไม่สามารถรองรับน้ำาหนัก
4. เนื่องจากอันตรายจากไฟฟ้าช็อต ห้ามสอดนิ้วในรูติดตั้งของขายึดติดผนังขณะที่ติดตั้งโทรทัศน์
5. โปรดปิดรูสำาหรับการติดตั้งขายึดติดผนังของโทรทัศน์ด้วยที่ปิดซึ่งมีให้พร้อมกับโทรทัศน์ ก่อนที่จะสิ้นสุดการติดตั้งที่ผนัง
ติดต่อช่างที่มีความชำานาญของตัวแทนจำาหน่าย
สำาหรับการย้ายหรือเปลี่ยนผลิตภัณฑ์หลังจากติดตั้งแล้ว
อย่าโหนหรือกระแทกผลิตภัณฑ์
ไทย
สกรูⓒ: 4
M8X35 M8X40
[WMN4277SH]IB_ASIA_Rev_1.0L11.indb 33 2014-02-06 10:31:34
2
6
4
3
7
5
1
ชุดประกอบโครงยึดติดผนัง
1
ติดตั้งโครงปรับมุมกับผนังตามที่แสดงในภาพ
ขันโครงปรับมุมโดยใช้พุกและสกรู
ⓐ ตามลำาดับจาก ① ถึง ⑦
ถ้าไม่สามารถติดตั้งในพื้นที่ที่กำาหนด
ให้ติดตั้งในสถานที่ที่ใกล้เคียงที่สุด
ตรวจสอบความแข็งแรงของผนังก่อนที่จะติดตั้ง เสริมความแข็งแรงของผนังก่อนที่จะติดตั้งโครงยึดถ้าผนังไม่แข็งแรงพอ
สกรูและพุกที่ให้มามีไว้สำาหรับการติดตั้งกับผนังคอนกรีต
สำาหรับผนังพลาสเตอร์ หินอ่อนหรือโลหะ โปรดใช้สกรูที่เหมาะสม
วิธีขันพุกหรือสกรู ⓐ
ใช้สว่านที่มีขนาดตามกำาหนดเมื่อเจาะรูที่ผนัง ปฏิบัติตามคำา
แนะนำาสำาหรับการติดตั้ง เพื่อป้องกันปัญหาด้านความปลอดภัย
เจาะรูผนังโดยใช้ดอกสว่าน 6X50
ทำาความสะอาดรูที่เจาะ
ใส่พุกที่ให้มาในรู
วางโครงปรับมุมเข้ากับรูที่ผนัง และขันสกรู
ⓐ
2
ยึดอุปกรณ์เข้ากับผนังให้แน่นหนา ดึงโครงออกด้านหน้าและคลายออก
ใส่โครงเข้ากับพื้นที่ที่กำาหนดของโครงปรับมุม และขันสกรู 8 ตัวที่ให้มา ⓑ
(เหมือนกันทั้งด้านซ้ายและขวา)
สกรูⓑ 4EA
สกรู
ⓑ 4EA
สกรูⓐ 5EA
สกรู
ⓐ 2EA
[WMN4277SH]IB_ASIA_Rev_1.0L11.indb 34 2014-02-06 10:31:35

ยึดผลิตภัณฑ์กับโครงยึดติดผนัง โปรดตรวจสอบด้านซ้ายและด้านขวาเพื่อดูว่ามีการยึดอย่างเหมาะสม
ใช้ความระมัดระวังเมื่อติดตั้งผลิตภัณฑ์หรือปรับมุม เนื่องจากนิ้วอาจติดในช่องได้
โปรดตรวจสอบว่าโครงยึดติดผนังมีการยึดกับผนังอย่างแน่นหนา ถ้าผลิตภัณฑ์ตกหล่นอาจทำาให้เกิดความเสียหายได้
4
ดึงส่วนยึดของโครงยึดติดผนังไปด้านหน้า ต้องใช้คนสองคนในการติดตั้งผลิตภัณฑ์กับพื้นที่ของโครงยึดติดผนัง
5
สำาหรับการจัดการสายไฟและสายอื่นๆ ของอุปกรณ์ต่อพ่วง ให้มัดสายโดยใช้อุปกรณ์ยึดสายที่ให้มา
โปรดตรวจสอบว่าสายไม่ได้พันกันหรือหลุดออกเมื่อหมุนหรือใช้งาน
ใส่สายและดึงโครงปรับมุมไปด้านหน้า จัดสายโดยร้อยผ่านรู
เพื่อป้องกันการเกิดสัญญาณรบกวนกับสายเมื่อหมุนอุปกรณ์ ตรวจสอบการทำางาน 2 ~ 3
ครั้ง และยึดแบบของผนังถ้าอุปกรณ์ทำางานอย่างถูกต้อง
ติดตั้ง TV กับโครงยึดติดผนัง
และหมุนหมุดนิรภัย 2
ตัวที่ส่วนบนเพื่อยึด
[TV แบบบาง ปกติ]
[TV แบบบาง ปกติ] [แบบบางพิเศษเท่านั้น]
สกรูⓒ 4EA
ใช้สกรู M8X40 สำาหรับ LED E ซีรี่ส์ 75" และ LED F8000 75"
3
คลายสกรูจากตัวเครื่อง TV ประกอบที่แขวนพลาสติก 4 ชิ้นที่ให้มา และสกรู ⓒ
ตามที่แสดงในภาพ และขันให้แน่นกับด้านหลังของ TV
[WMN4277SH]IB_ASIA_Rev_1.0L11.indb 35 2014-02-06 10:31:36

465
240.5 24.5 50
400
346
8
247
394
135
172
212
400
442
ข้อมูลจำ�เพ�ะของผลิตภัณฑ์
ม�ตรฐ�นผลิตภัณฑ์
ข้อมูลในเอกสารนี้อาจมีการเปลี่ยนแปลงโดยไม่ต้องแจ้งให้ทราบ
ความกว้าง (มม.) 465
ความสูง (มม.) 442
ความลึก (มม.) 24.5
น้ำาหนัก (กก.) 5.5
โครงยึดมาตรฐาน VESA 400 X 400
ห้ามใช้แรงในการปรับมุม
ผลิตภัณฑ์อาจเกิดความเสียหายถ้าอยู่ใกล้กับผนังมากเกินไป
จับด้านซ้ายและขวาของผลิตภัณฑ์เมื่อต้องการปรับมุมซ้ายขวา
จับที่กึ่งกลางด้านบนเพื่อปรับมุมลง
คุณสามารถปรับมุมซ็ายและขวาได้ระหว่าง
-20° ~ 20° และปรับลงได้ถึง 10° ~ 15°
ช่วงของมุมที่ปรับได้อาจแตกต่างกันไปในแต่ละรุ่น
ก�รปรับมุมของโครงยึดติดผนัง
ผลิตภัณฑ์นี้มีกลไกการเคลื่อนไหวที่นุ่มนวล เพื่อให้คุณสามารถปรับผลิตภัณฑ์ได้อย่างนุ่มนวลและสะดวก
[WMN4277SH]IB_ASIA_Rev_1.0L11.indb 36 2014-02-06 10:31:36

WMN4277SH
Ürün Resmi
Türkçe
Vidalarⓒ: 4
M8X35 M8X40
1 Sol: 1
Braket Aksesuarlar
Vida
ⓐ: 8
Dubel: 8
Kablo Sabitleme
Vida
ⓑ: 8
[WMN4277SH]IB_ASIA_Rev_1.0L11.indb 37 2014-02-06 10:31:37

2
6
4
3
7
5
1
1
① ila ⑦ⓐ
ayar braketini sabitleyin.
Dubeller veya Vidalarⓐ
ⓐ
2
ⓑ
Vidaⓑ 4EA
Vidaⓑ 4EA
Vidaⓐ 5EA
Vidaⓐ 2EA
[WMN4277SH]IB_ASIA_Rev_1.0L11.indb 38 2014-02-06 10:31:37

4
5
düzenleyin.
ve sabitlemek için üst taraftaki
2 emniyet pimini çevirin.
Vidaⓒ 4EA
3
ⓒ
[WMN4277SH]IB_ASIA_Rev_1.0L11.indb 39 2014-02-06 10:31:38

465
240.5 24.5 50
400
346
8
247
394
135
172
212
400
442
465
Yükseklik (mm) 442
Derinlik (mm) 24.5
5.5
400 X 400
[WMN4277SH]IB_ASIA_Rev_1.0L11.indb 40 2014-02-06 10:31:39

1 Trái: 1
ⓐ: 8
ⓑ: 8
WMN4277SH
ⓒ: 4
M8X35 M8X40
[WMN4277SH]IB_ASIA_Rev_1.0L11.indb 41 2014-02-06 10:31:40

2
6
4
3
7
5
1
1
vítⓐ①⑦.
ⓐ
ⓐ.
2
ⓑ
ⓑ 4EA
ⓑ 4EA
ⓐ 5EA
ⓐ 2EA
[WMN4277SH]IB_ASIA_Rev_1.0L11.indb 42 2014-02-06 10:31:40

4
5
ⓒ 4EA
3
ⓒ
TV.
[WMN4277SH]IB_ASIA_Rev_1.0L11.indb 43 2014-02-06 10:31:41

465
240.5 24.5 50
400
346
8
247
394
135
172
212
400
442
465
442
24.5
5.5
400 X 400
máy.
Rev 1.0
[WMN4277SH]IB_ASIA_Rev_1.0L11.indb 44 2014-02-06 10:31:42