Loading ...
Loading ...
Loading ...
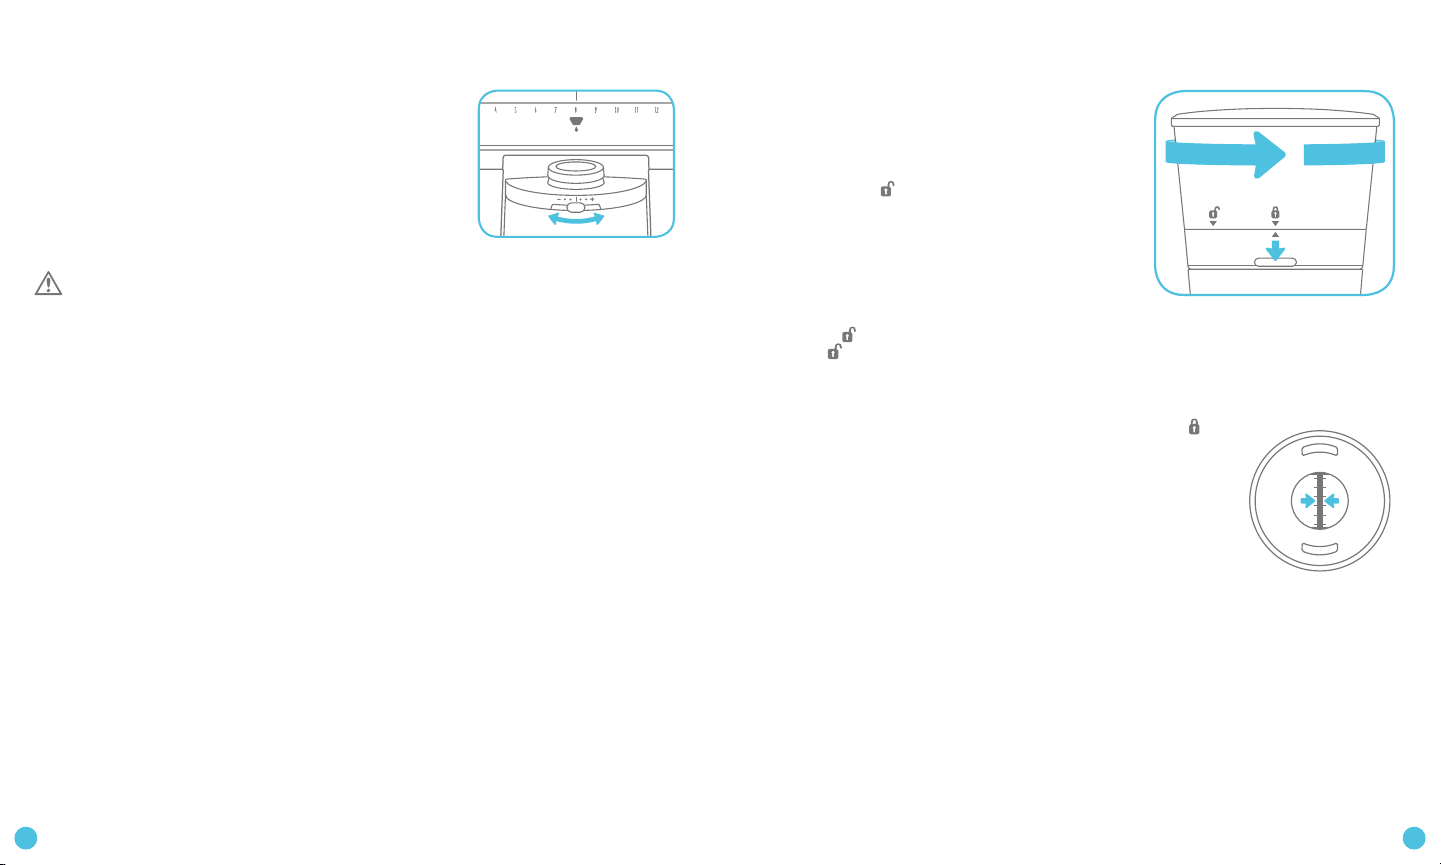
TO REMOVE/REPLACE HOPPER
Always unplug power cord from outlet before removing or replacing bean hopper.
To Remove Hopper:
1. Press down on and hold hopper release lever on
back of Grinder with one hand.
2. Keep pressing lever and twist hopper counter-
clockwise with other hand until the arrow lines
up with the
icon.
3. Lift hopper with lid straight up and off of the
Grinder.
To Replace Hopper:
1. Make sure there is no coffee debris on the
at surface around the burrs. For cleaning
instructions, please see pg. 16.
2. Align
icon on hopper with the arrow above release button. If you do not align
the
icon with the arrow, the hopper will not be installed properly and the Grinder
will not work.
3. Gently slide hopper straight down onto Grinder. The hopper should seat easily and
sit straight. If hopper sits crookedly, remove and try again until it sits straight.
4. Twist hopper clockwise until the arrow aligns with the
icon
and release button clicks into place.
NOTE: The bean hopper is designed with a “trap door” that automatically closes when the hopper is removed.
The “trap door” allows for easy bean changing and mess-free cleaning.
Underside of hopper
TO ADJUST COFFEE STRENGTH
If you nd your coffee too weak or too strong, you can ne tune the dosage for next time.
1. Move the Strength Adjuster to the right to add a little
more ground coffee, or to the left for a little less. Each
position of the Strength Adjuster represents a change
of one gram per cup.
For example, if you select 4 cups and move the Strength
Adjuster one position to the right, the Grinder will produce
an additional 4 grams.
(4 x 8 grams + 4 x 1 gram = 36 grams)
Note:
• The Strength Adjuster only works in cups mode.
• Never overfill the ground coffee container. Grounds can back up, block the grounds chute and jam or burn out the motor.
Caution: Do not operate this appliance for longer than 4 minutes at a time as this can cause overheating. Allow Grinder to cool for at
least 2 minutes after each use. Allow the appliance to cool down 10-15 minutes after long operation. If the motor overheats, the Grinder will stop
working. The display will show a 30 minute countdown during which you cannot use the Grinder. Wait until the countdown has ended before
using the Grinder again.
TO SWITCH GROUND COFFEE CONTAINER
or ZERO THE SCALE
The Grinder is designed and programmed to work with the steel plate, ground coffee
container and lid it comes with.
If you prefer to grind in a different container than the one provided with the unit, you will
have to tare the machine (which will set the scale to zero) with the new container on the
scale.
1. Place the container you decide to use on the base. It can be a different container or
our container without the lid or the steel plate, whatever combination works for you.
2. Press and hold the OXO button. You will pass the mode selection screen. After
the mode selection, you will see a 3 second countdown. Keep holding during the
countdown. When the countdown reaches “0”, the Grinder will tare with the new
container, display “0 g” or “0 cup” and be ready to grind.
3. The Grinder is now tared with the container you selected. If unplugged, the Grinder
will remember this tare. If you decide to use a different container or switch back to
the one provided with the Grinder, repeat steps 1 and 2 with new container.
1413
Loading ...
Loading ...
Loading ...