USER MANUAL
Mamibot
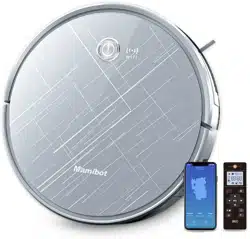
EXVAC890 GLORY
LDS LASER SLAM
ROBOT VACUUM CLEANER
20201211Ver.
Thanks for using Mamibot product. Please kindly be aware of that this manual is
made for our two versions of EXVAC890, with different configurations:
Version 1.: EXVAC890 GLORY Dust Collector Version (with CRAFT-X)
Version 2.: EXVAC890 GLORY General Version (Without CRAFT-X)
Please subject to the exact product you buy from your sellers accordingly.
EN
DE
FR
PL
Thanks for purchasing Mamibot Laser Slam robot
vacuum cleaner EXVAC890 GLORY.
We hope GLORY will bring you a smarter and more
convenient lifestyle.
If you encounter any problem not mentioned herein,
please contact [email protected].
For more details, please visit our official website:
http://www.mamibot.com.
Please read all instructions before using this product,
and keep it properly for future reference.
Mamibot

2 Safety Instructions
To know GLORY
5 Features of GLORY
7 What’s in the package
6 Specification
8 GLORY Components
11 Remote Control
14 GLORY Working Mode
To use GLORY
16 Notice before use
18 Start/Stop/Pause/Sleeping
19 Charging your GLORY
21 Wi-Fi Setup and APP Connecting
25 How to Set the Clock/Sechdule
27 How to use Water Tank
Cleaning and Maintenance
28 Clean the Side Brushes
28 Clean the Dust box
30 Clean the Water Tank
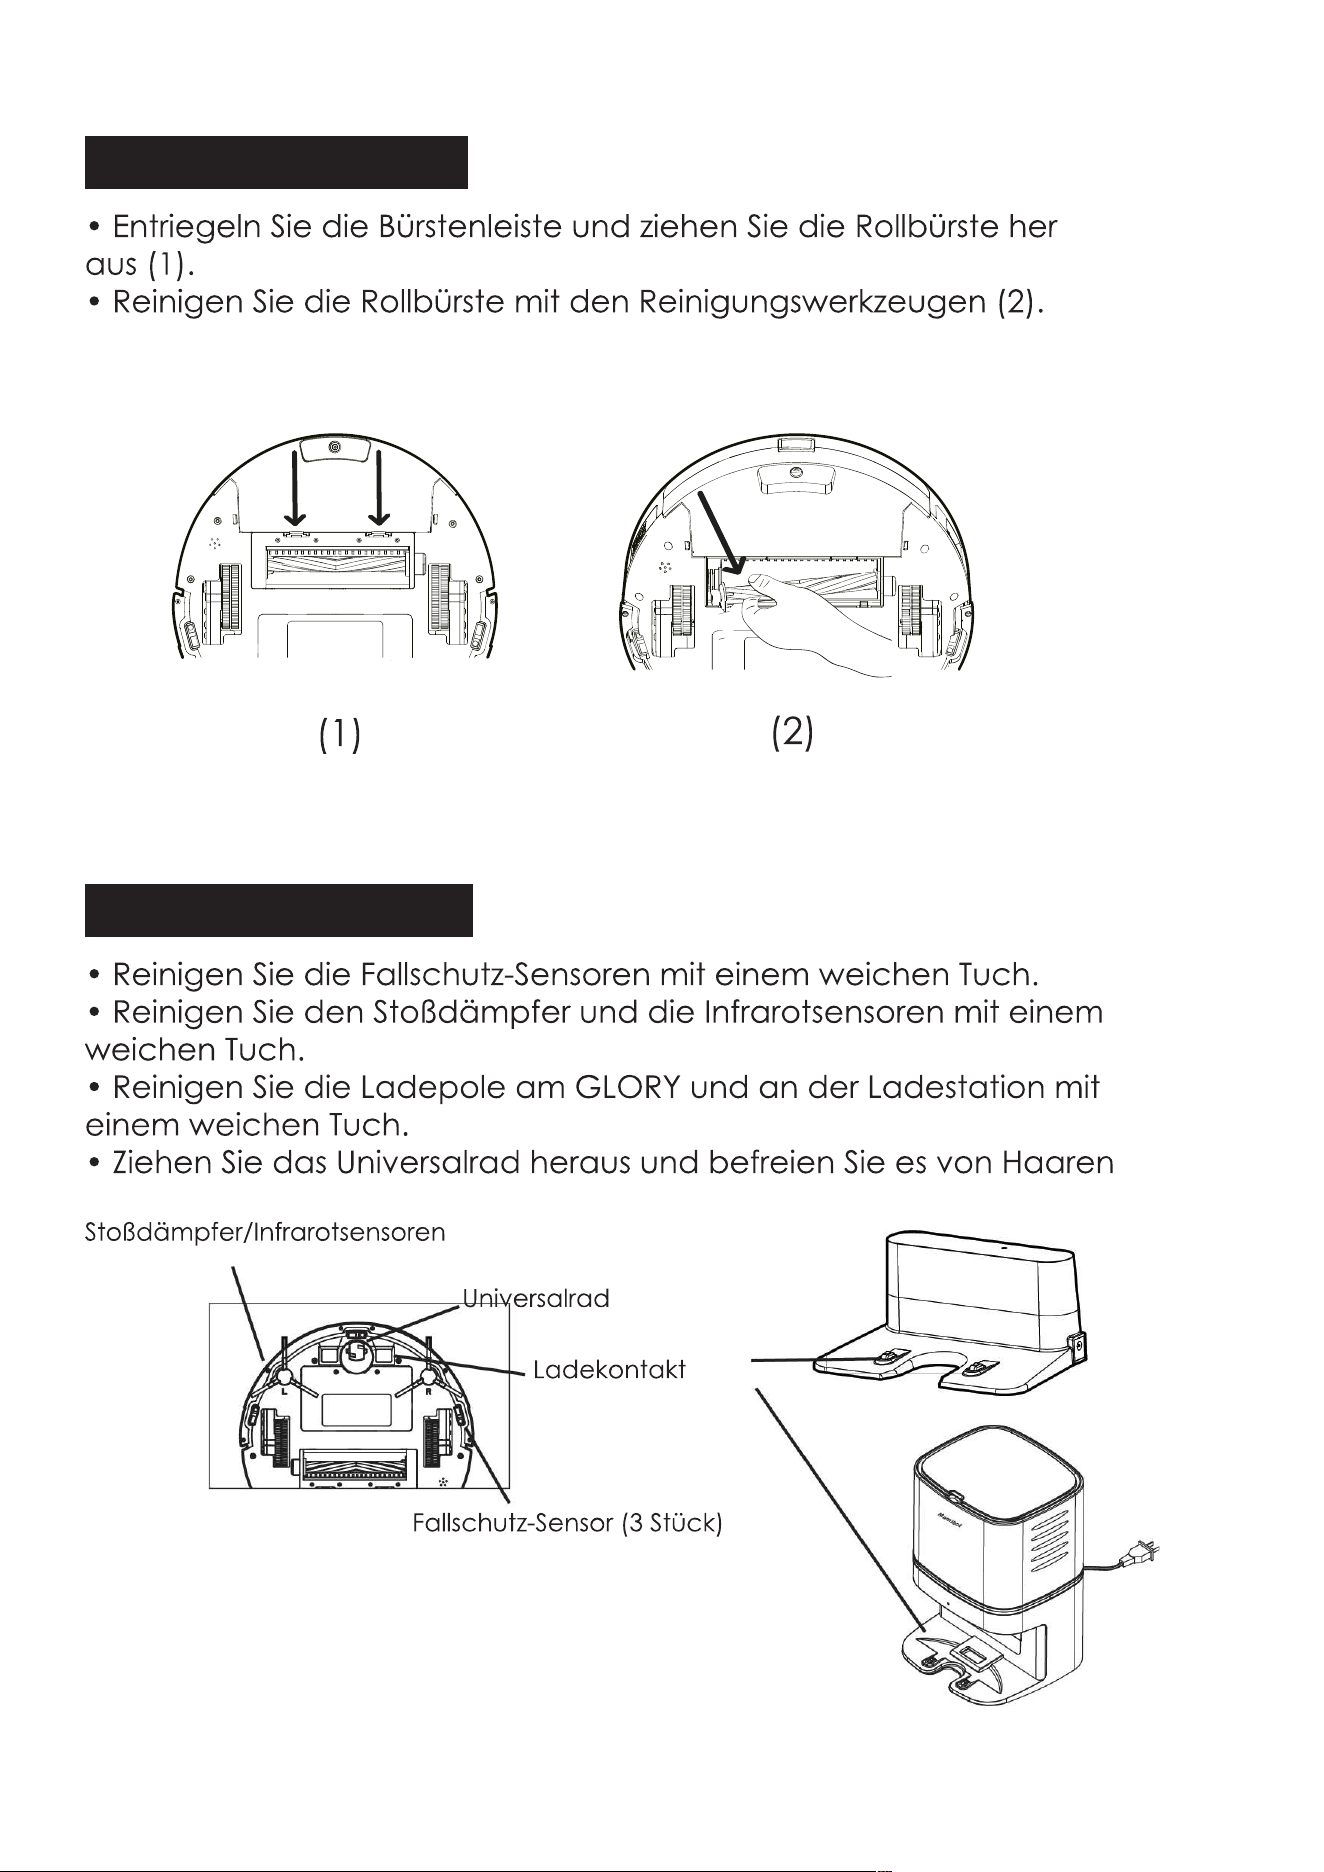
31 Clean the Rolling Brush
31 Clean other Parts
32 Cleaning / Replacement Frequency Recommended
33 Troubleshooting
Table of Contents
35 GLORY Anatomy
37 Recycling of GLORY
1
36 Name and Content of Hazardous Substances
Please read all instructions carefully, and keep it at hand for setting up,
using and maintaining GLORY. Any operation that against the following
instructions may damage GLORY or cause injury.
Notes for Main Unit and Components
Warning
01.Do not disassemble,repair or refit GLORY without authorization;
otherwise it may damage GLORY or pose a hazard.
02.Do not use the product in an environment with risk of fire or explosion.
03.Only the original power adapter can be used for GLORY; otherwise
GLORY may be damaged or catch on fire.
04.Do not stand or sit on GLORY; doing so could damage GLORY or
cause it to fall over.
05.When the metal part of the power plug is dusty, please wipe it with
a dry cloth.
06.The power adapter is applied to a 100-240V AC voltage. Please plug
into the socket properly and keep away from children.
07.Do not wash or soak the main body and electronic accessories in
water; otherwise GLORY may be damaged by a short circuit.
08.Do not damage, load weight on, heat, pull, or bend GLORY.
09.During cleaning, please pay attention to the safety of toddlers and
elders at home to avoid injury(Please pay special attention to toddlers).
10.This product is for home use. Please do not use it outdoors.
11.Do not allow metal and conductive materials to contact the batt-
ery; doing so may cause a short circuit.
12.Do not allow to be used as toy. Close attention is necessary when
used by or near children.
Attentions
01.Do not touch GLORY with wet hands; doing so may cause an electric
shock.
02.Please do not place GLORY in places where it could easily fall,
such as tables, chairs, high platforms in room, etc.
03.The product has a sophisticated design and should be protected
from long-term exposure to sunlight.
04.Please do not use GLORY in humid environments, such as bath-rooms.
05.Please do not place GLORY near cigarette butts, lighters or other
open fires.
06.Please clean GLORY after charging finished.
07.Please turn off the power switch on the side of GLORY when GLORY
is out of service for a long time.
08. Please check carefully to see if the power adapter is connected to
the socket prior to use, to avoid damage to the robot.
Safety Instructions
2
09.Before using GLORY, please remove all vulnerable items on the
floor, such as glass, lamps, and items such as wires and curtains that
may entangle with the side brush and suction passages.
10.When the dust box is full, please empty it in time.
11.Please do not use GLORY to clean the construction waste.
12.The operating temperature of the product ranges from 0 40 ;
please do not use it in a high temperature environment.
13.Be aware that GLORY just moves around on its own, please take
care when walking in the area where GLORY is cleaning.
14.Before GLORY is scrapped, please remove the battery from
the robot. When you remove the battery, please ensure that GLORY
is not connected to a power supply. Please recycle the battery safely
for environmental protection.
Danger
01.Always use a dedicated battery adapter to avoid leakage,heating
or explosion.
02.Do not short-circuit the battery or remove the battery; doing so
may cause leakage, heating or explosion.
03.Do not transport or preserve with necklaces, hairpins, and other
metal objects; doing so may lead to short circuit, resulting in leakage,
heating or explosion.
04.Do not burn or heat the battery; doing so may cause leakage,
heating or explosion.
Attention
01. If abnormal overheating is discovered during charging,stop using
it immediately to avoid leakage, heating or explosion.
02. To prolong the service life of the battery,please remove the battery
and place it in a cool, dry environment if it is out of service for a long
time; this will avoid leakage, heating or explosion.
03. Do not soak in water or let it come into contact with any liquid;
otherwise it may cause leakage, heating and explosion.
04. Be sure to stop using it immediately in case of any exception
(e.g.discoloration or deformation), to avoid leakage, heating and
explosion.
05. Always use tape to insulate the battery’s electrode when recycling
or disposing of it.
06. If the battery leaks, wipe it clean with a dry cloth, recycle it in time,
or discard it.
Notes for Battery
3
Warning
01. When skin or clothing is exposed to the battery electrolyte, imme-
diately wash with clean water to avoid inflammation of skin, etc.
02. Do not use the rechargeable battery on other devices. This batte-
ry is only suitable for GLORY.
03. If the battery’s outer box is found to be deformed and expanded,
or leakage of electrolytes is found, do not charge or continue to use
to avoid danger.
04. Do not throw or inflict a strong impact on the battery; doing so
may cause leakage,heating and explosion.
05. Do not disassemble the battery pack; doing so may cause batte-
ry explosion and electrolyte outflow, leading to fire,explosion and
other dangers.
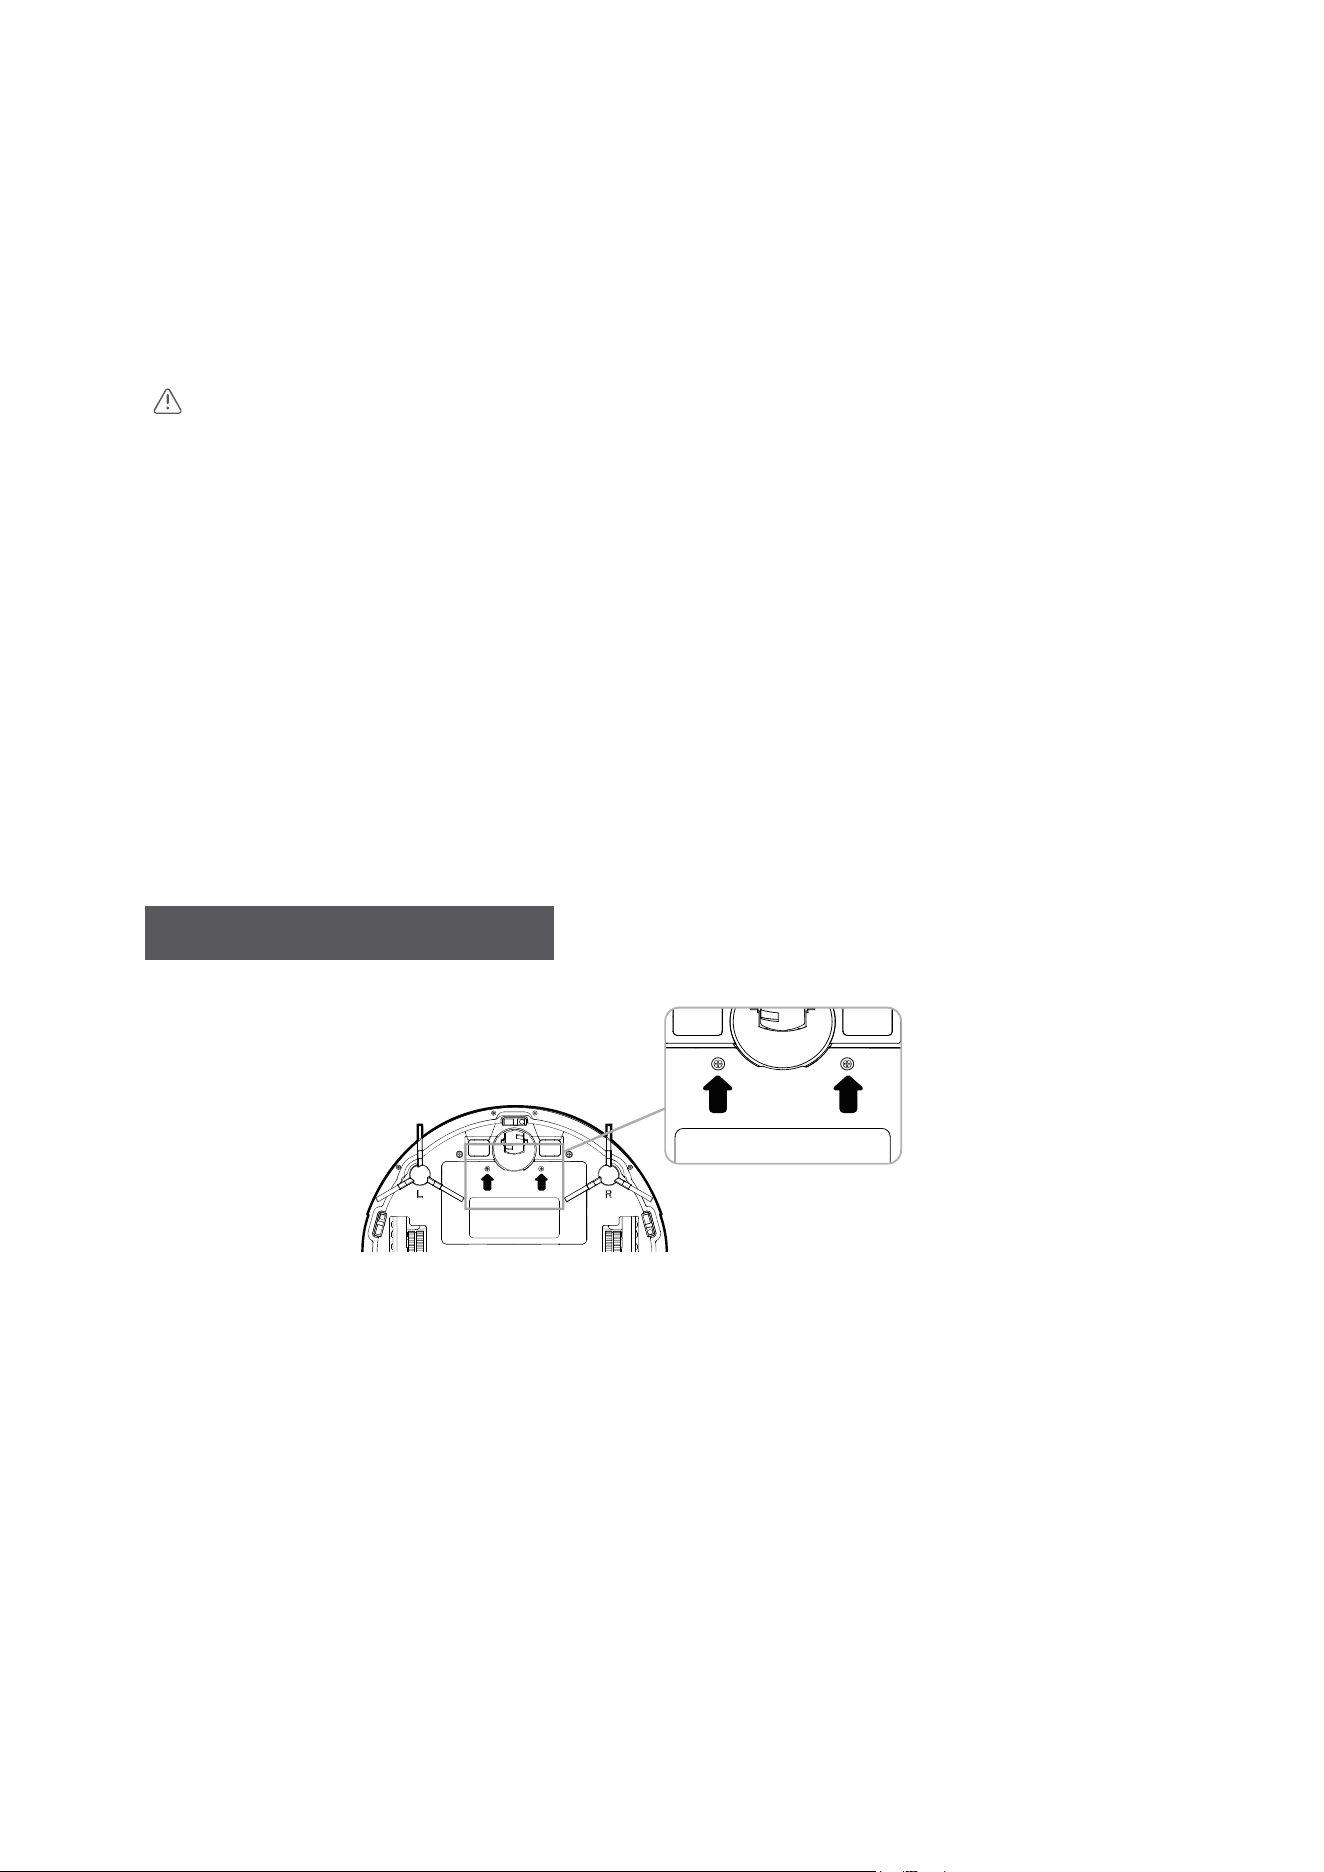
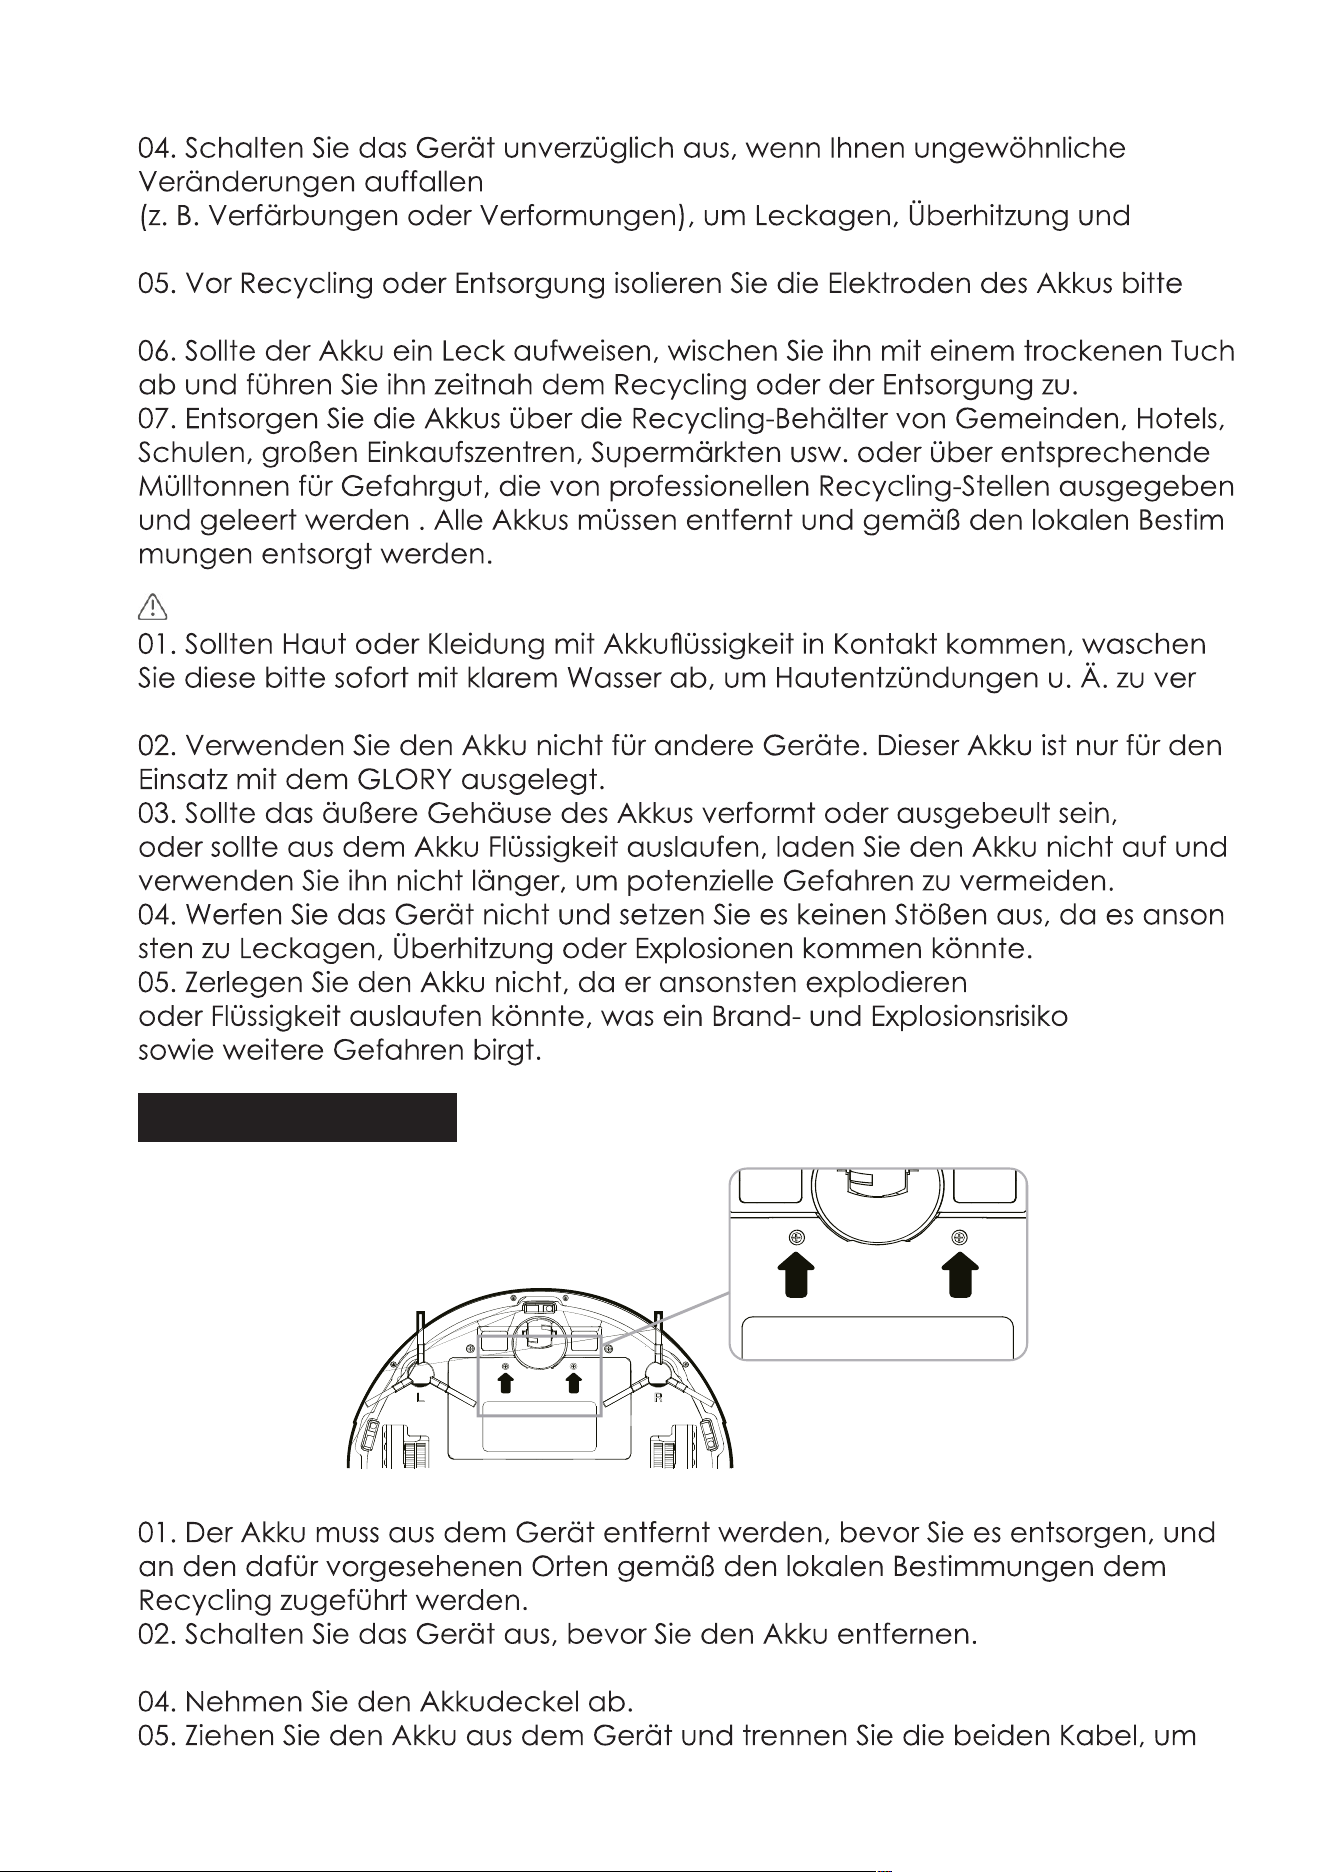
01.The battery must be removed from GLORY before GLORY is scrapp
-ed, and the battery must be put into the designated places or in-
stitutions according to the local regulations.
02.Before removing the battery, please turn the main power switch
off.
03.Take out two screws on the battery cover with a screw driver.
04.Take out the battery cover.
05.Take out the battery and unplug the electric wires to remove the
battery.
07. Put the recycled batteries in the recycling bins set up by the
community, hotels, schools, large shopping malls, supermarkets, etc
or the hazardous trash can be collected by professional recycling agen
-cies. Discarded batteries must be removed and disposed
in accordance with local laws and regulations.
How to remove the battery
4
Features of GLORY
Laser & Gyroscope Navigation
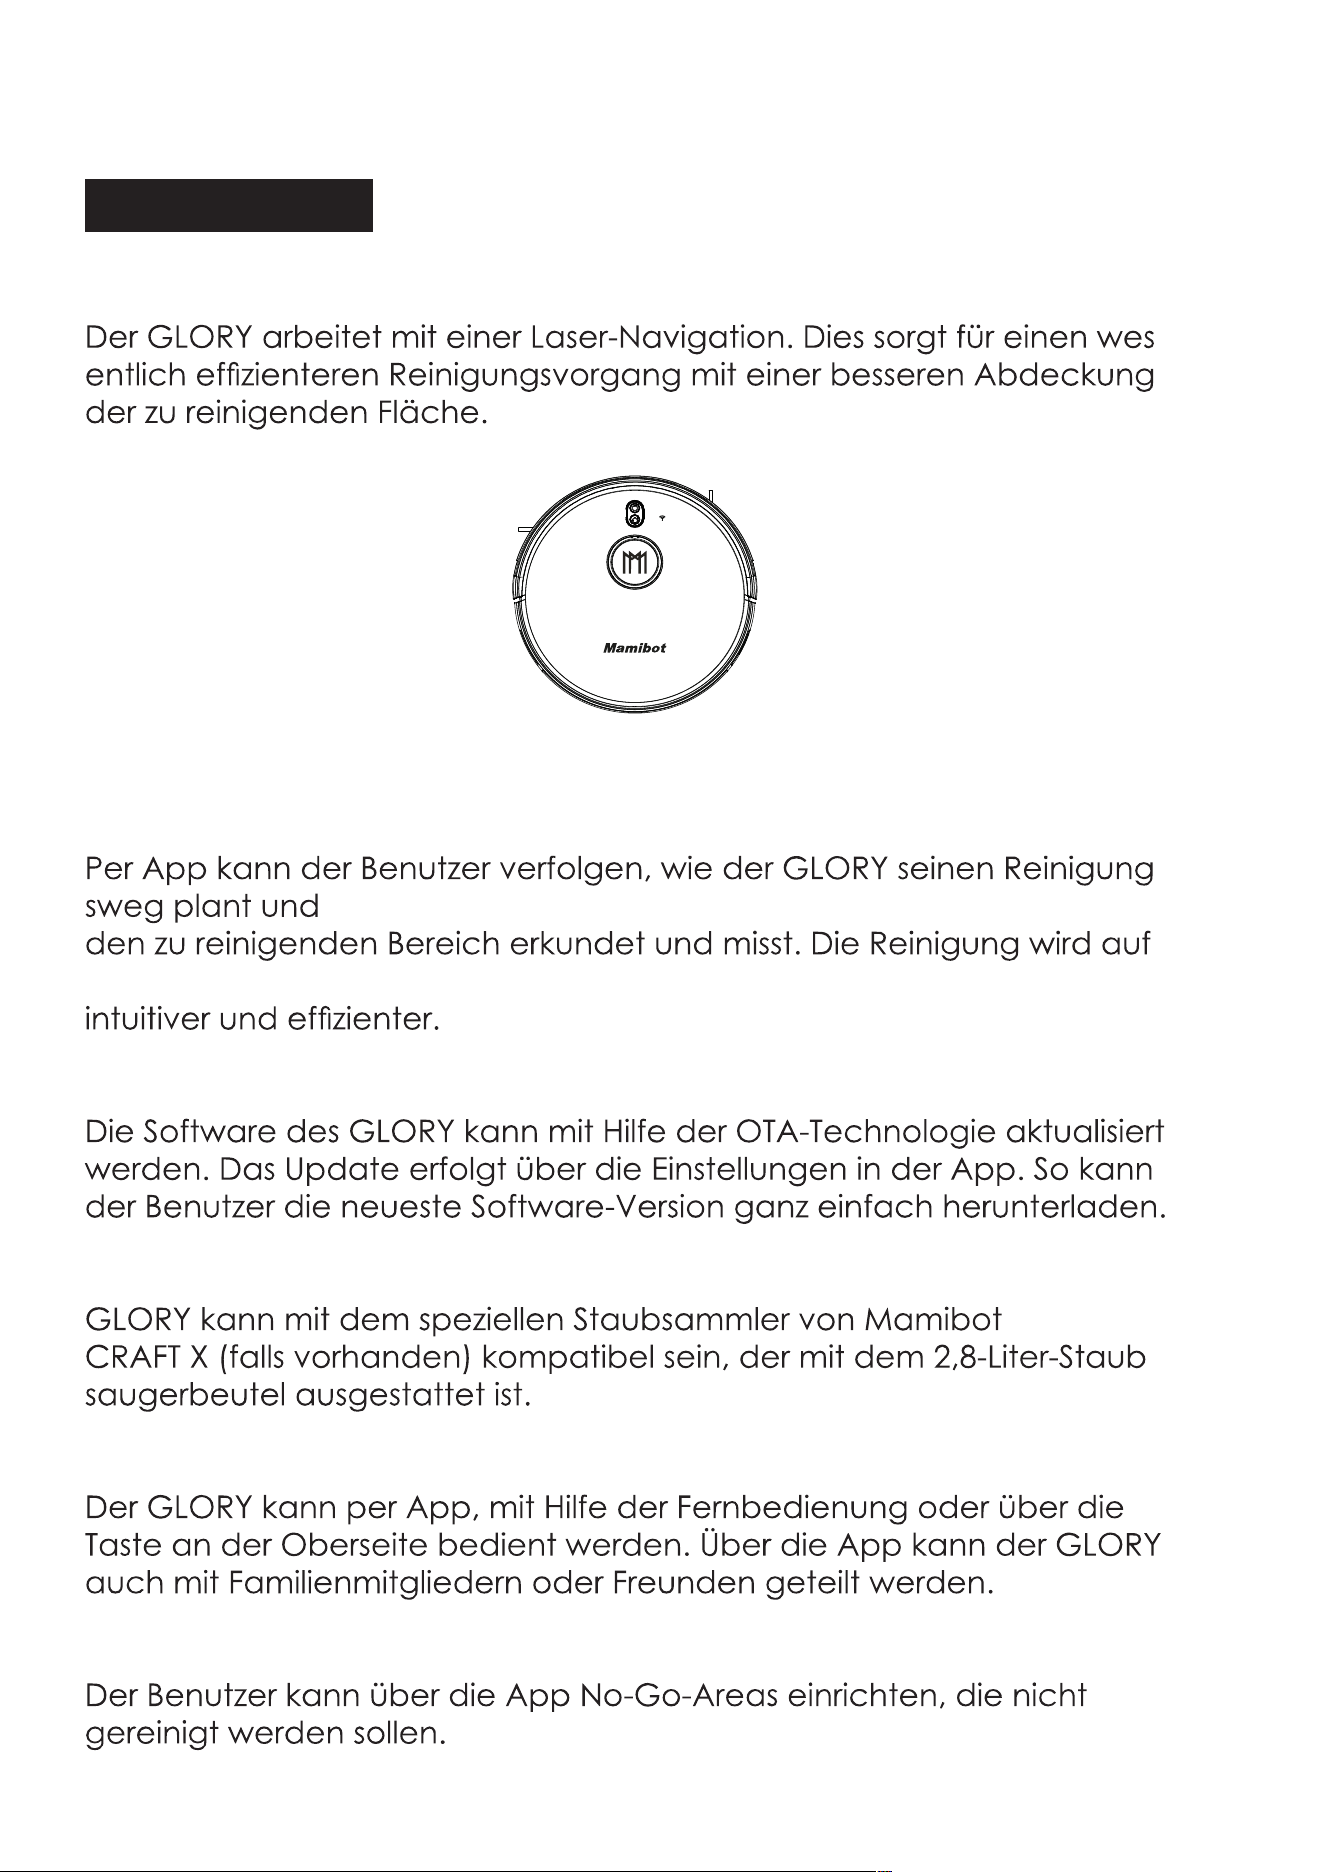
GLORY works under the navigation of Laser localization. It can greatly
lower the rates of repeat cleaning or missing cleaning, enhance the
cleaning coverage & efficiency.
Visualable Working Map
Users can see how GLORY plan the cleaning path via APP, and get to
know the cleaned areas or to be cleaned areas. It makes the clean-
ing work more intuitive and clearer.
OTA(Over-the Air) Updates
The software of GLORY can be updated via OTA technology which
shows in the SETTING of APP. Users can get the latest software version
easily.
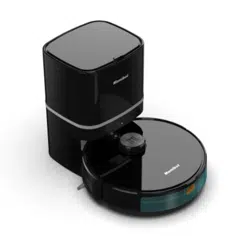
Competiable with Dust Collector-CRAFT X
GLORY can be competiable with the Mamibot specified dust collector
-CRAFT X(if there is) which loaded with the 2.8L disposal dust bag.
Multiple Opeartion Mode
GLORY can be operated via APP, Remote control or Physical switch
on the top button. GLORY can be shared with your families or friends
through APP.
Not-to-go Area Setting
Users can set Not-to-go area via APP to forbid GLORY to clean specific
areas that you don’t want it to.
To know GLORY
5
Mamibot
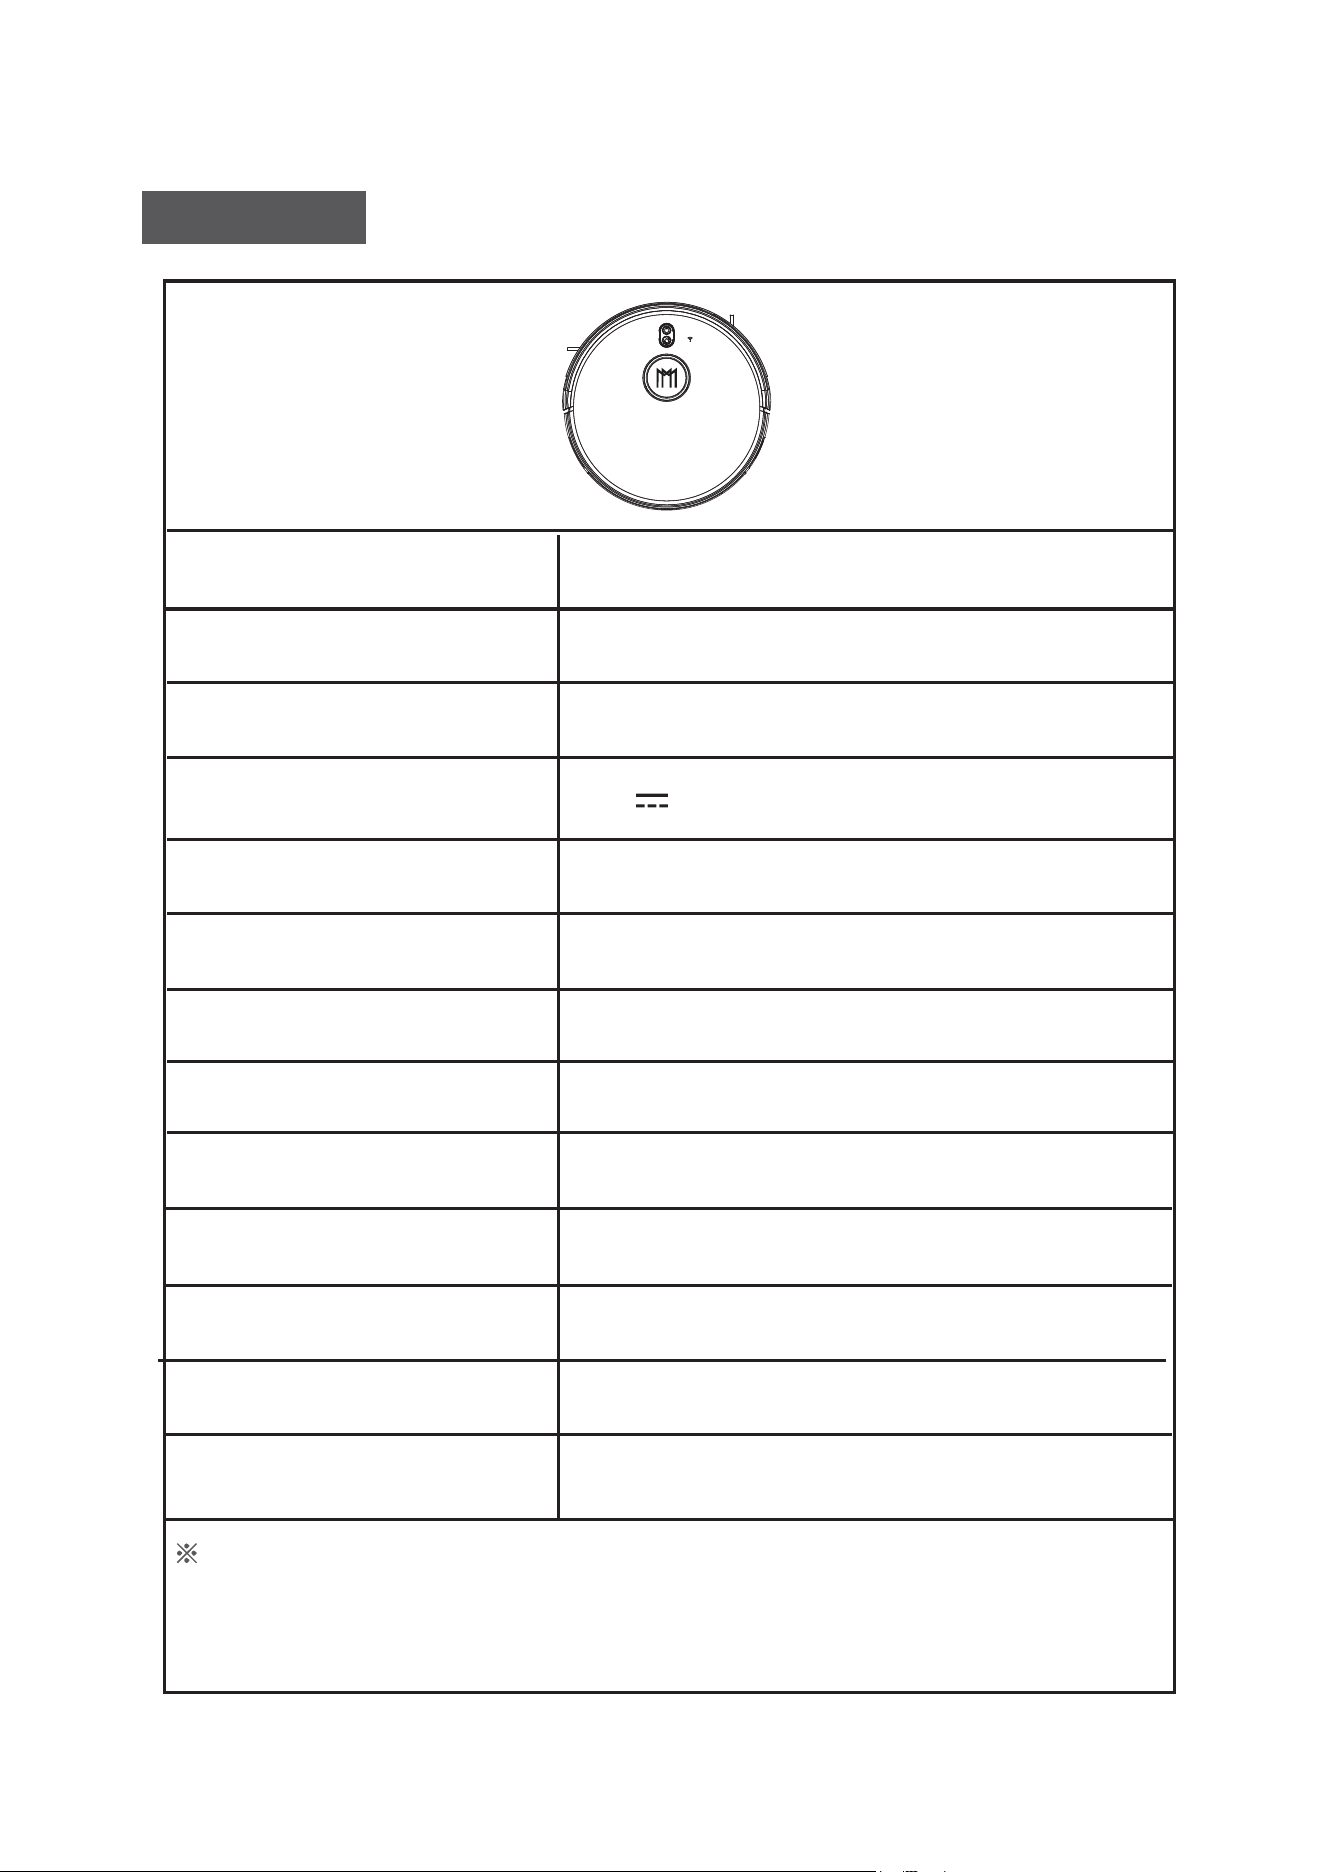
Specifications
Product Model
Size of Main Unit
Net Weight
Input
Power Consumption
Battery Type
Battery Capacity
Battery Voltage
Dust Box Capacity
Water Tank Capacity
Working Time
Charging Time
Control
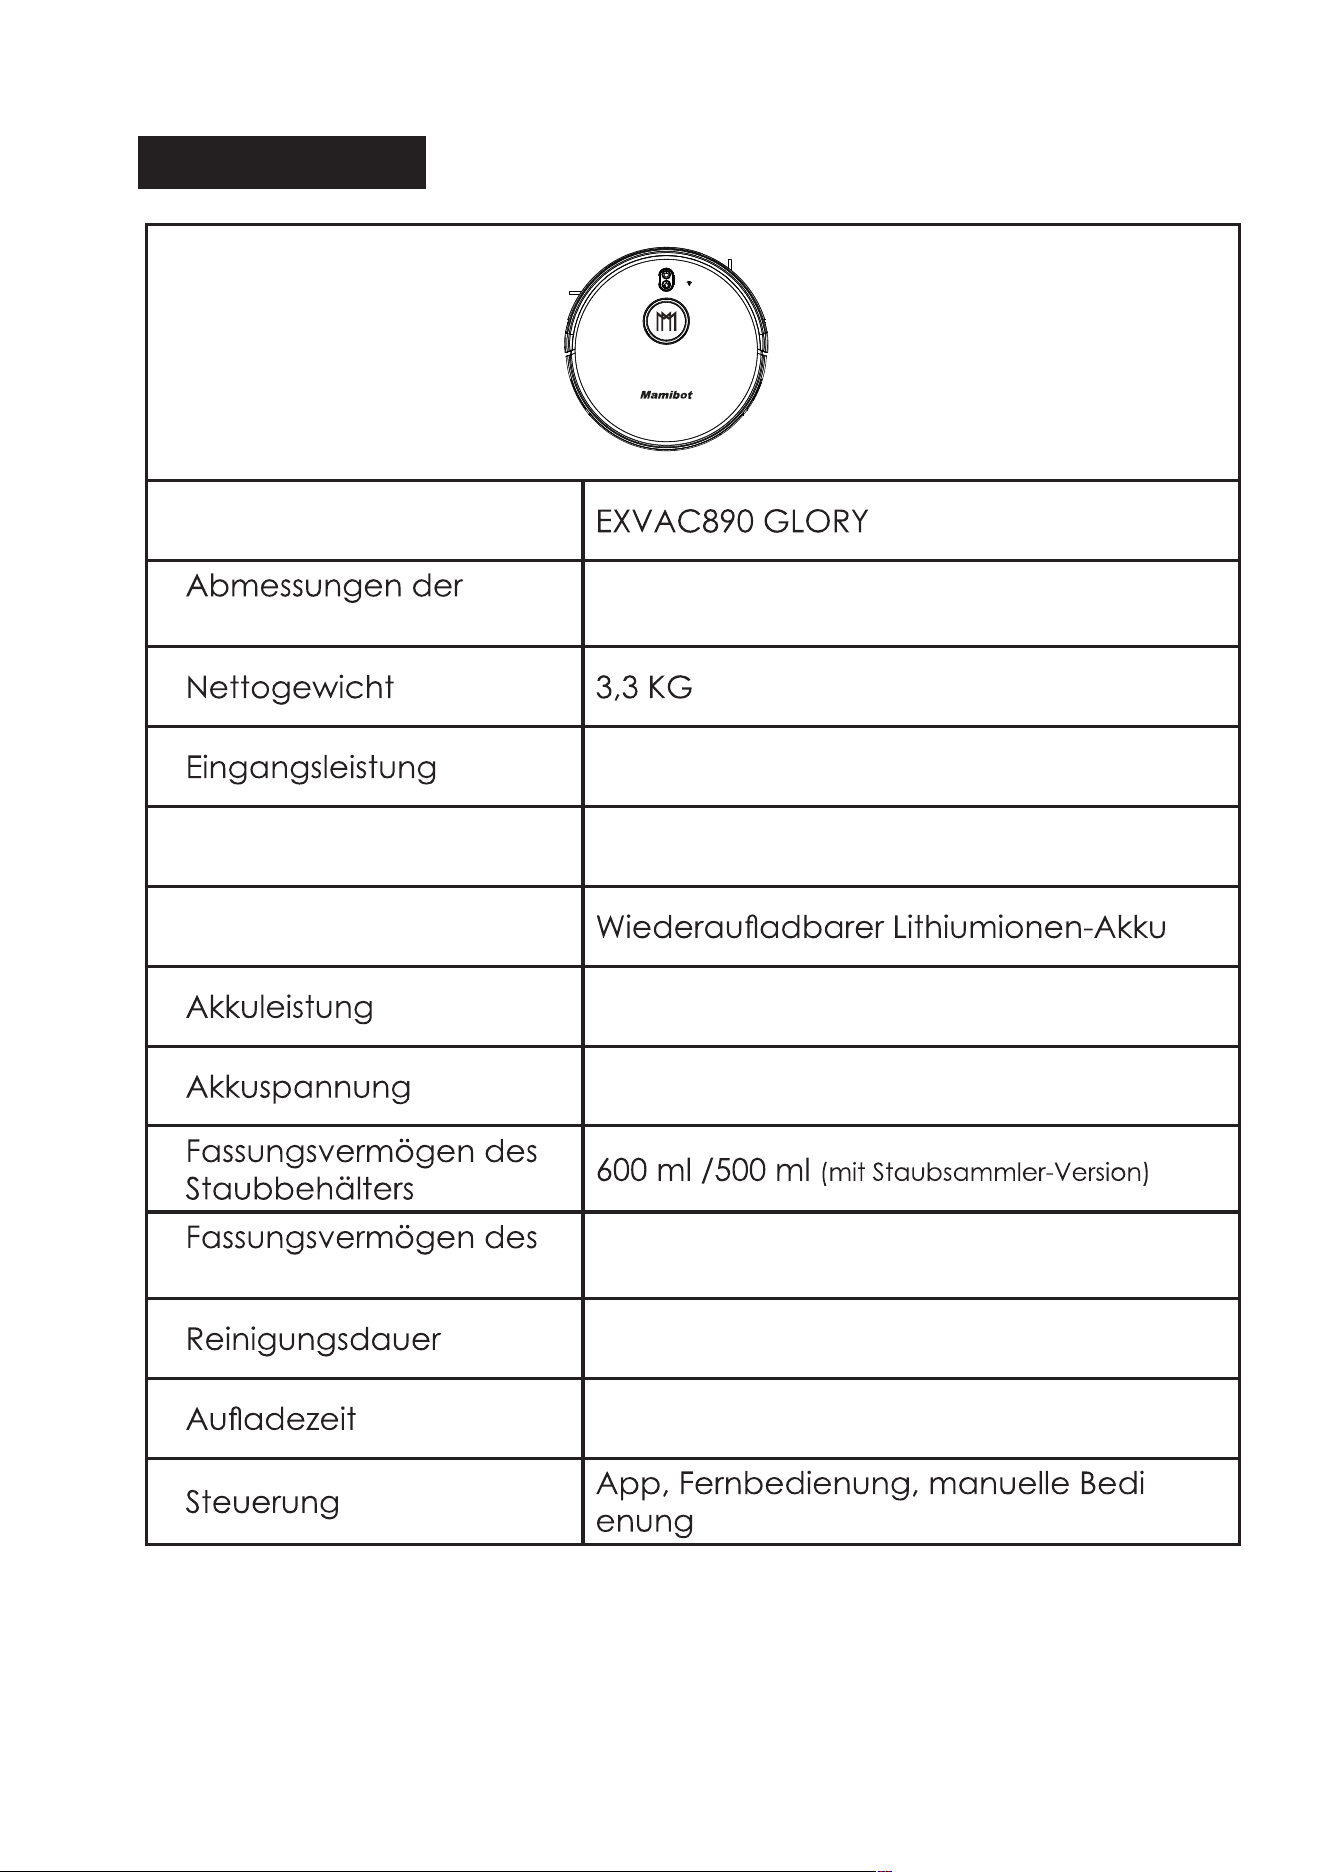
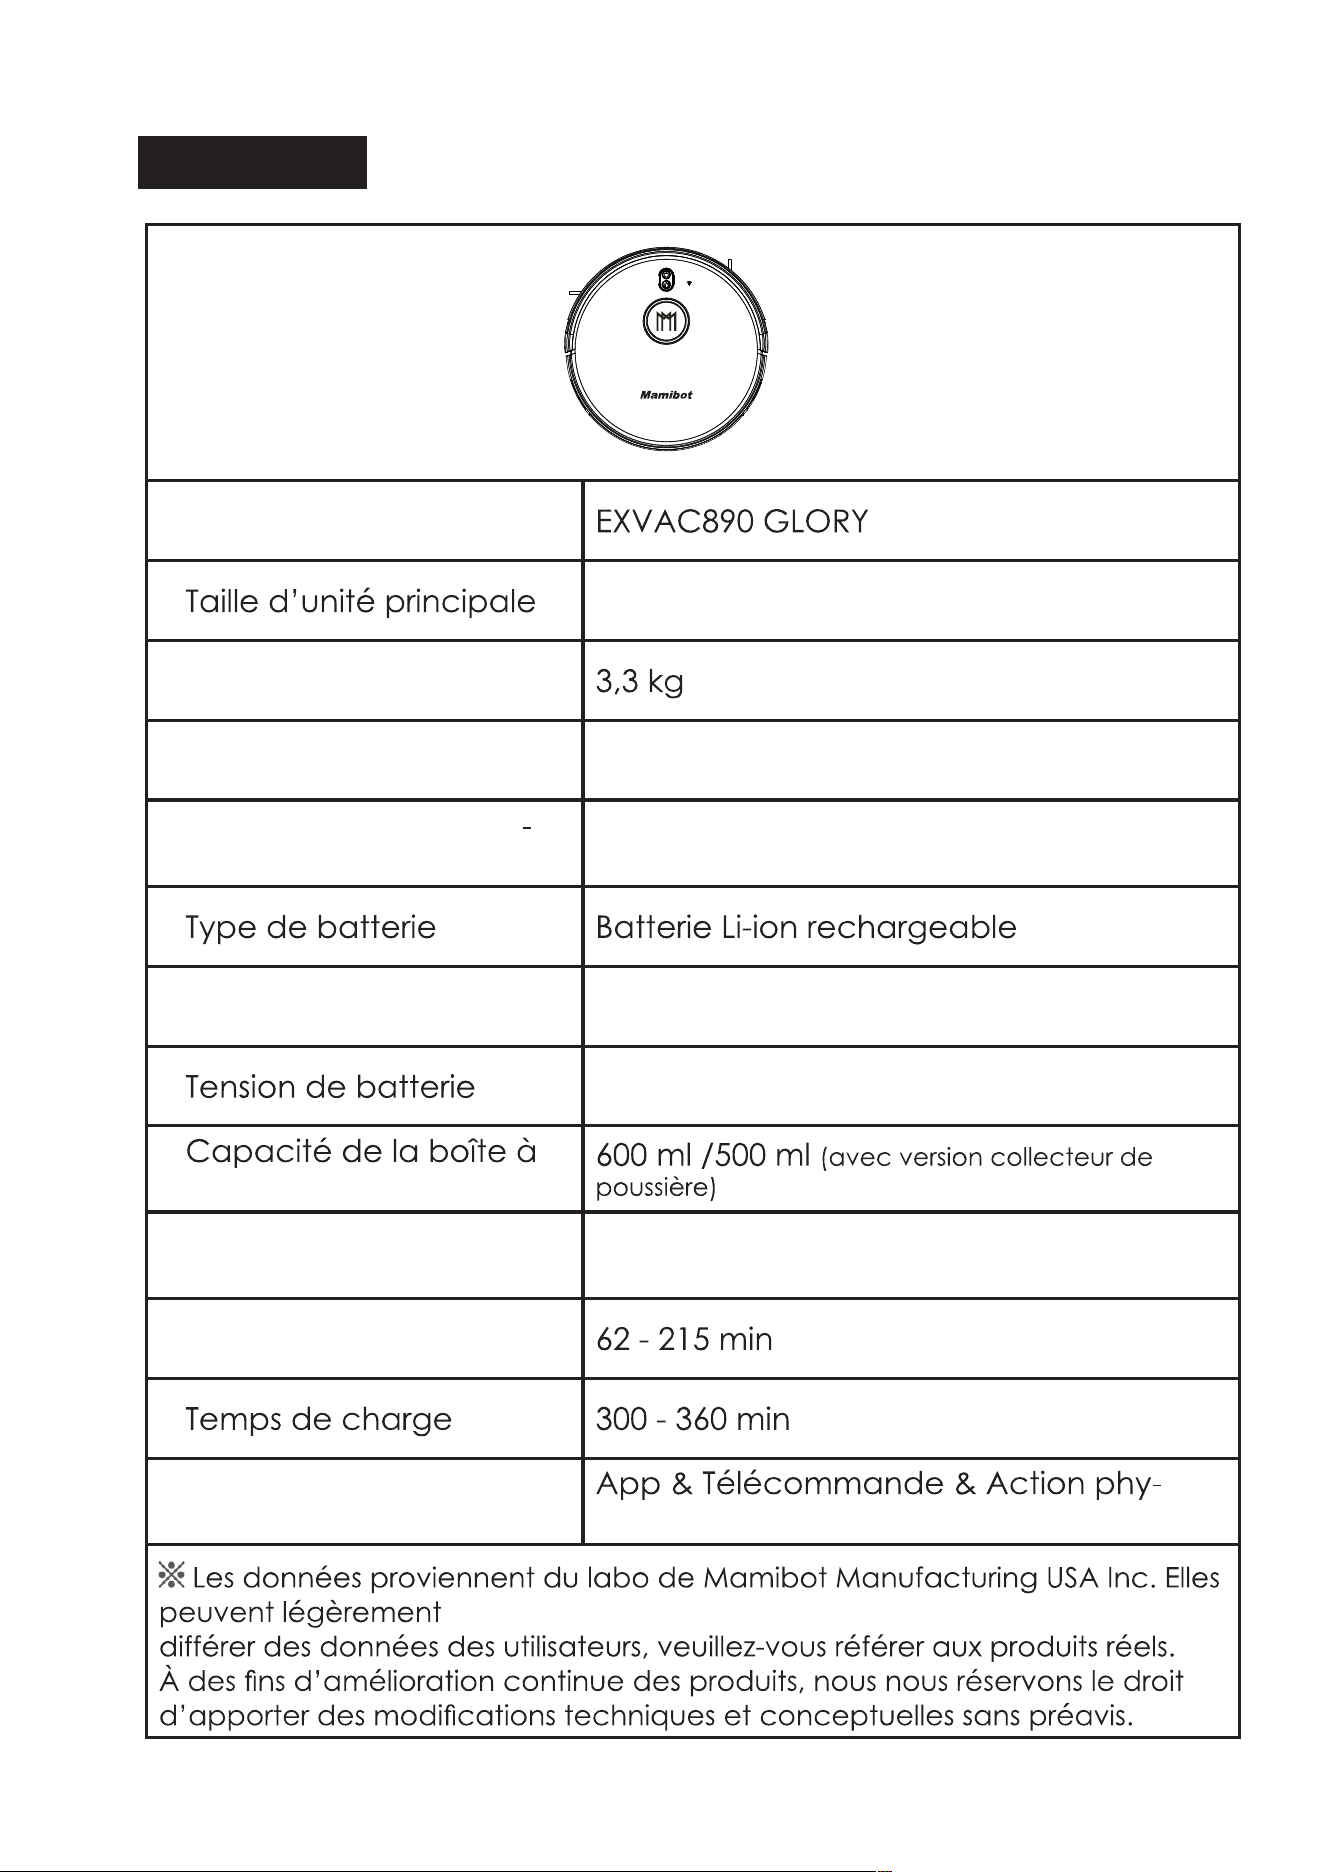
EXVAC890 GLORY
330*98 mm
3.3KG
19V 1.0A
60W
Rechargeable Li-ion Battery
5200mAh
14.4V
600 ml /500 ml
(With Dust Collector Version)
370 ml
62-215 mins
300-360 mins
APP & Remote Control & Physical Press
The data come from the lab of Mamibot Manufacturing USA Inc.It may be
slightly different from the users’ data, please subject to the actual products. For
continous products improvment, we reserve the right to any technical and design
change without prior notice.
6
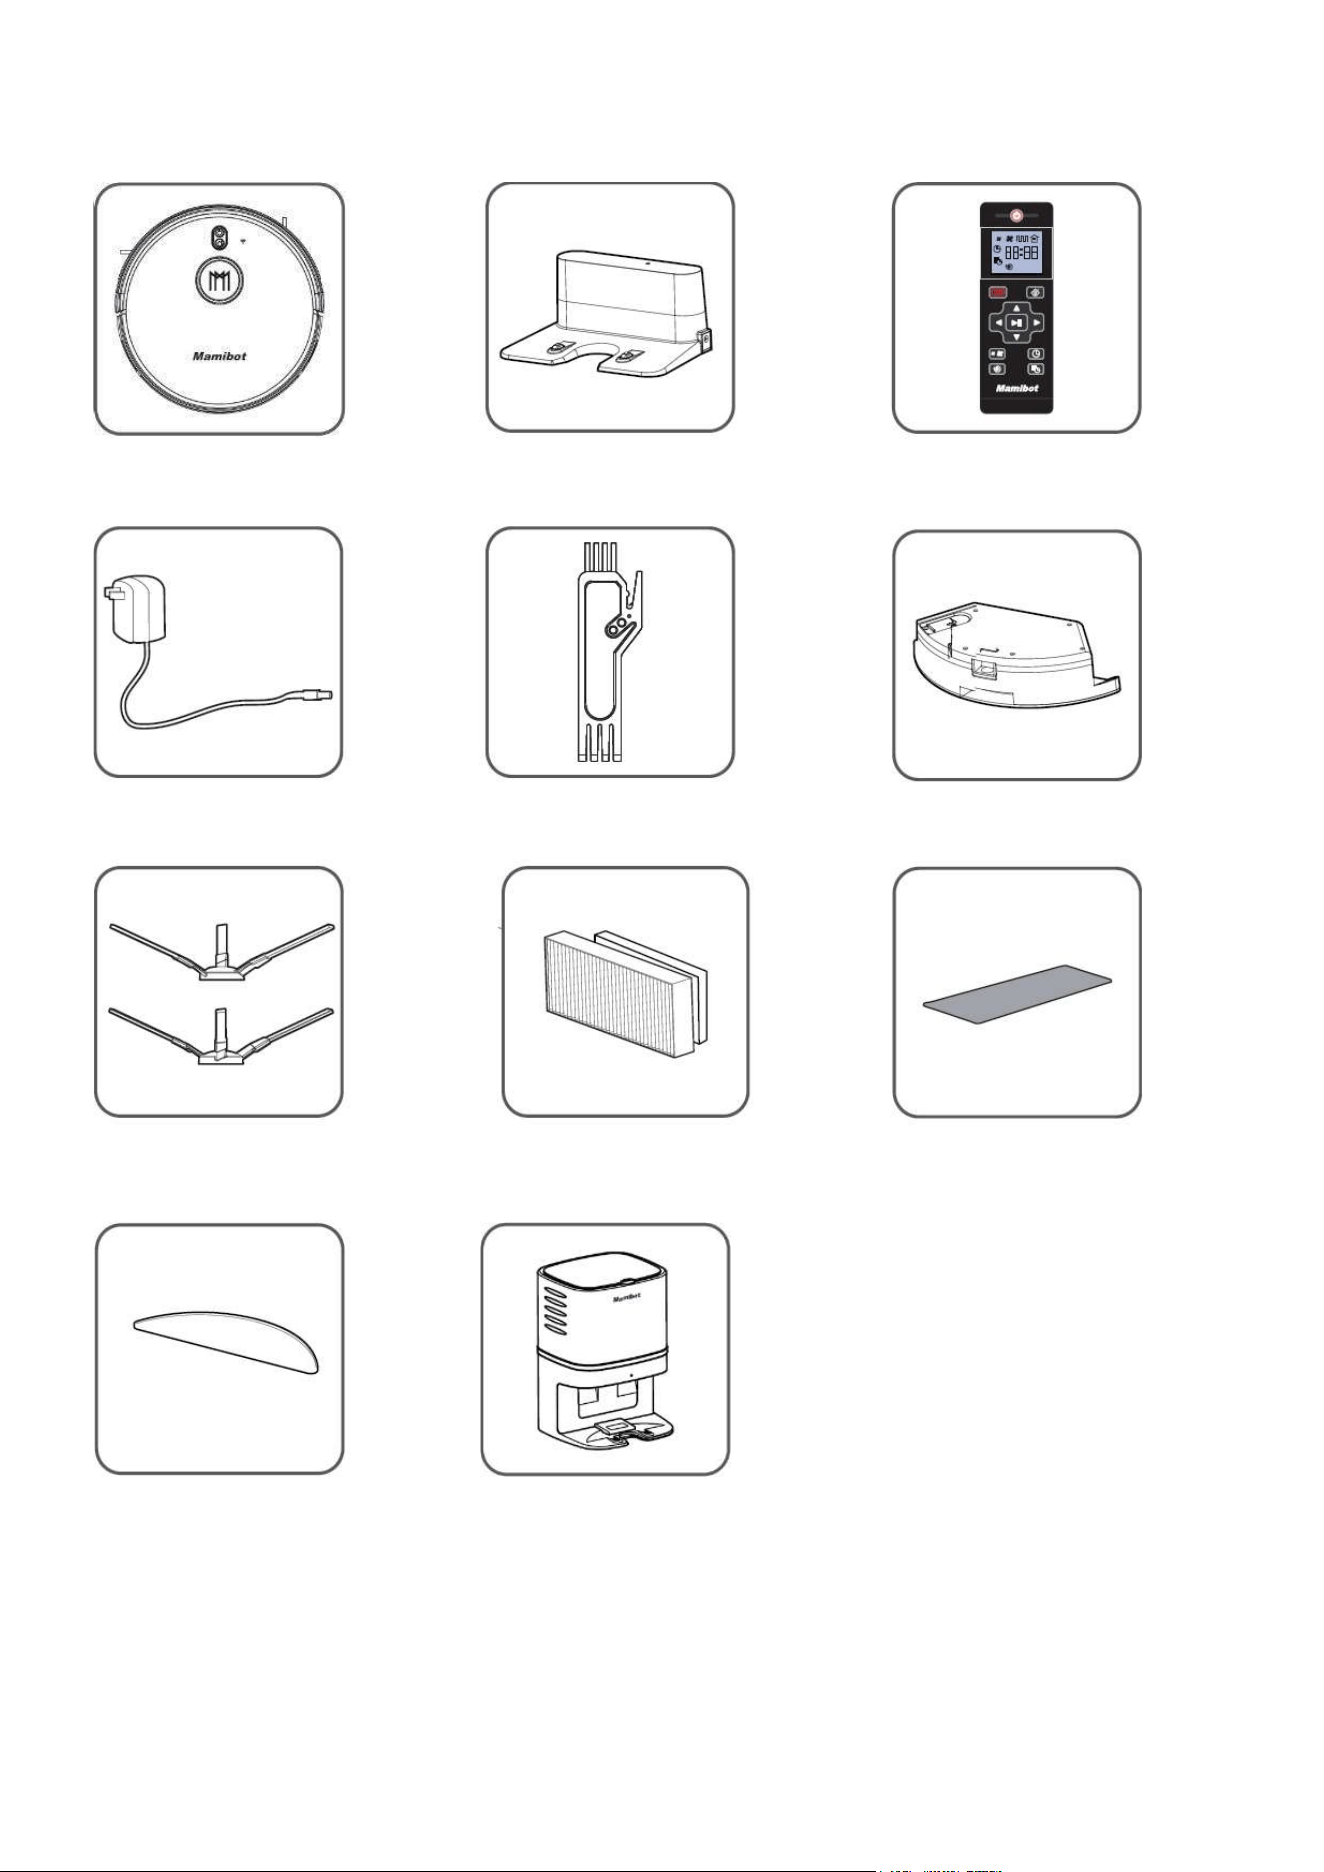
Mamibot
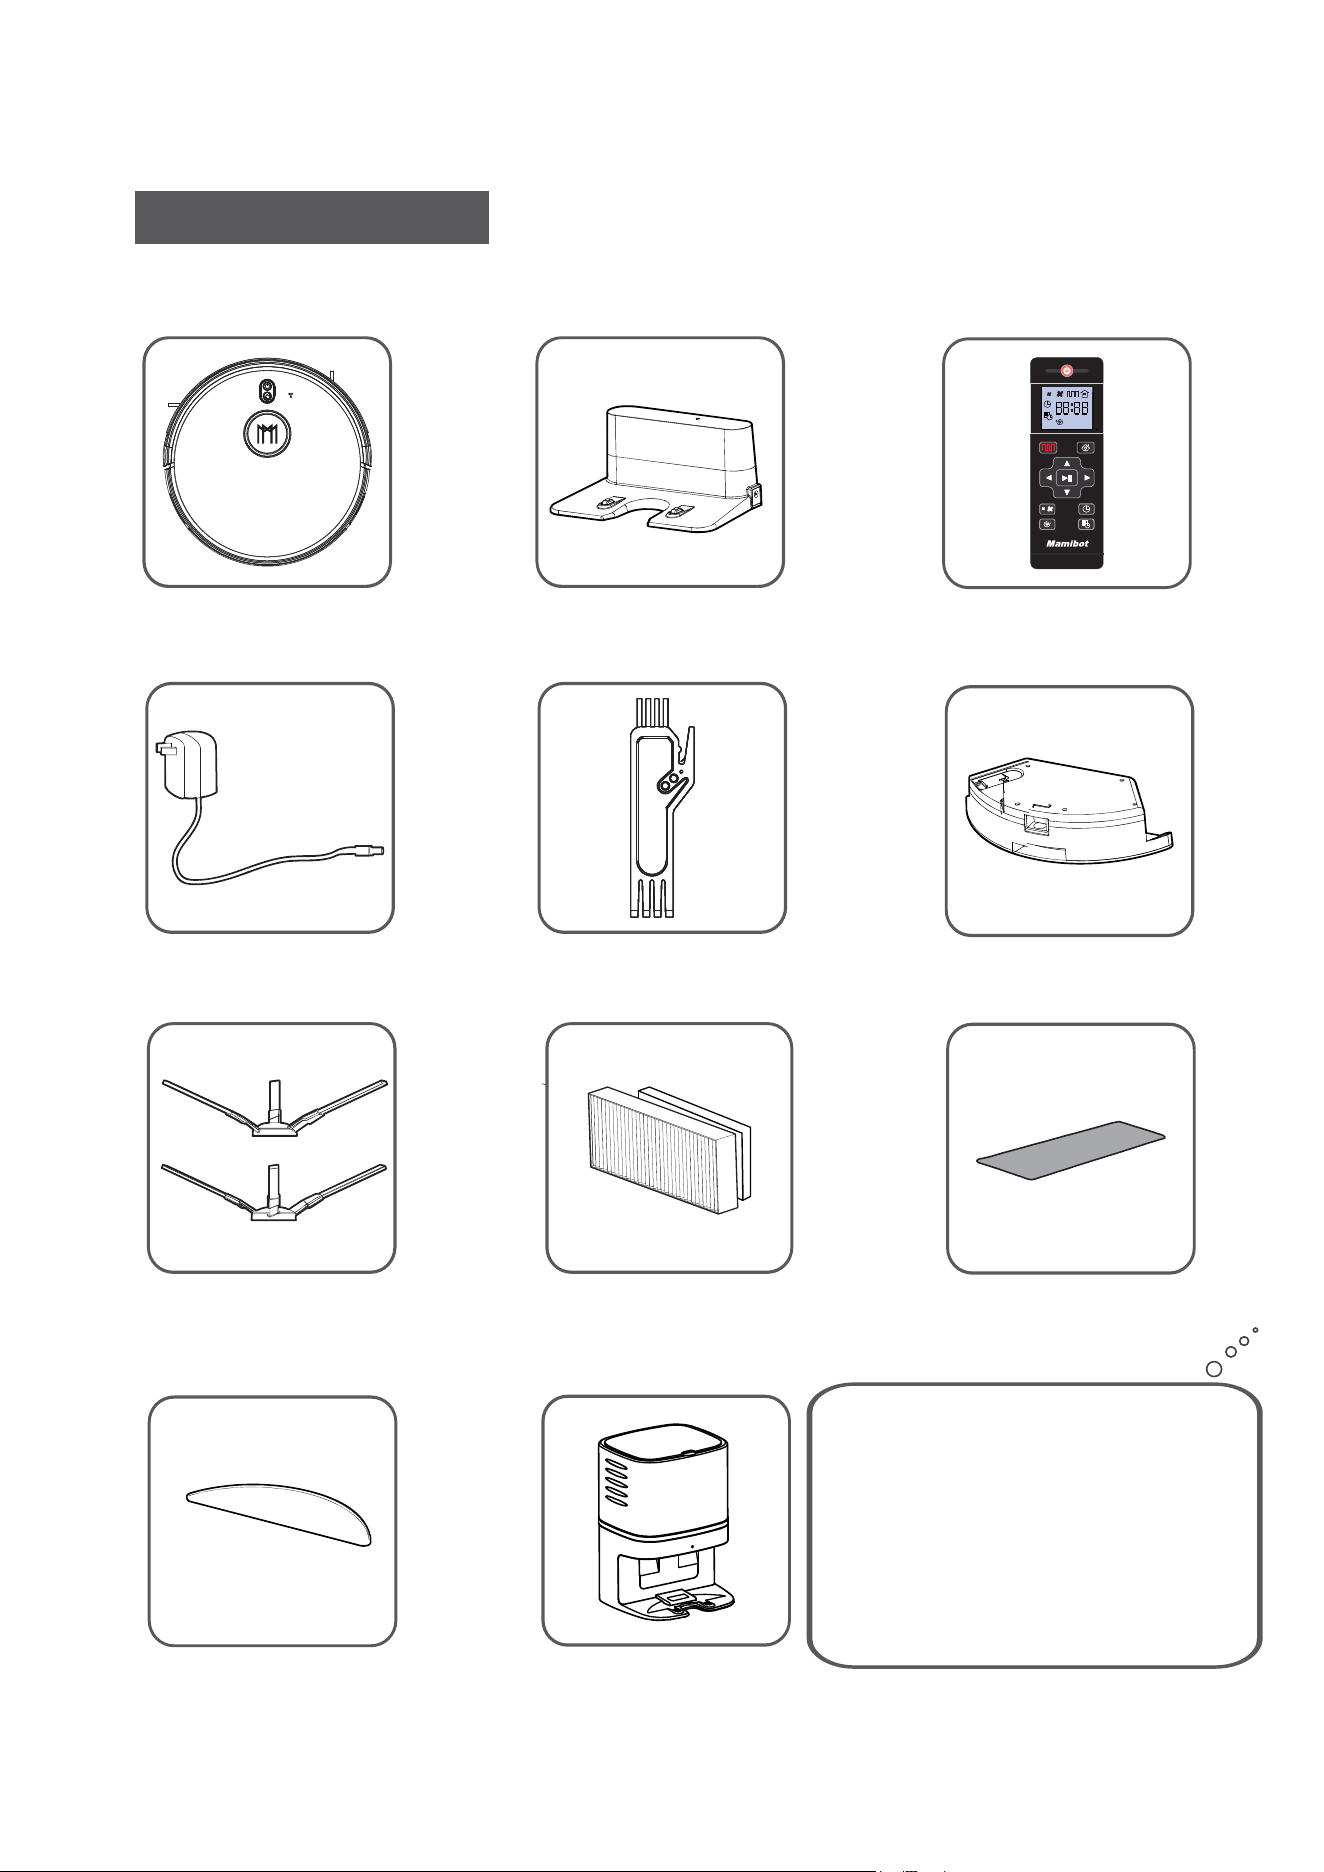
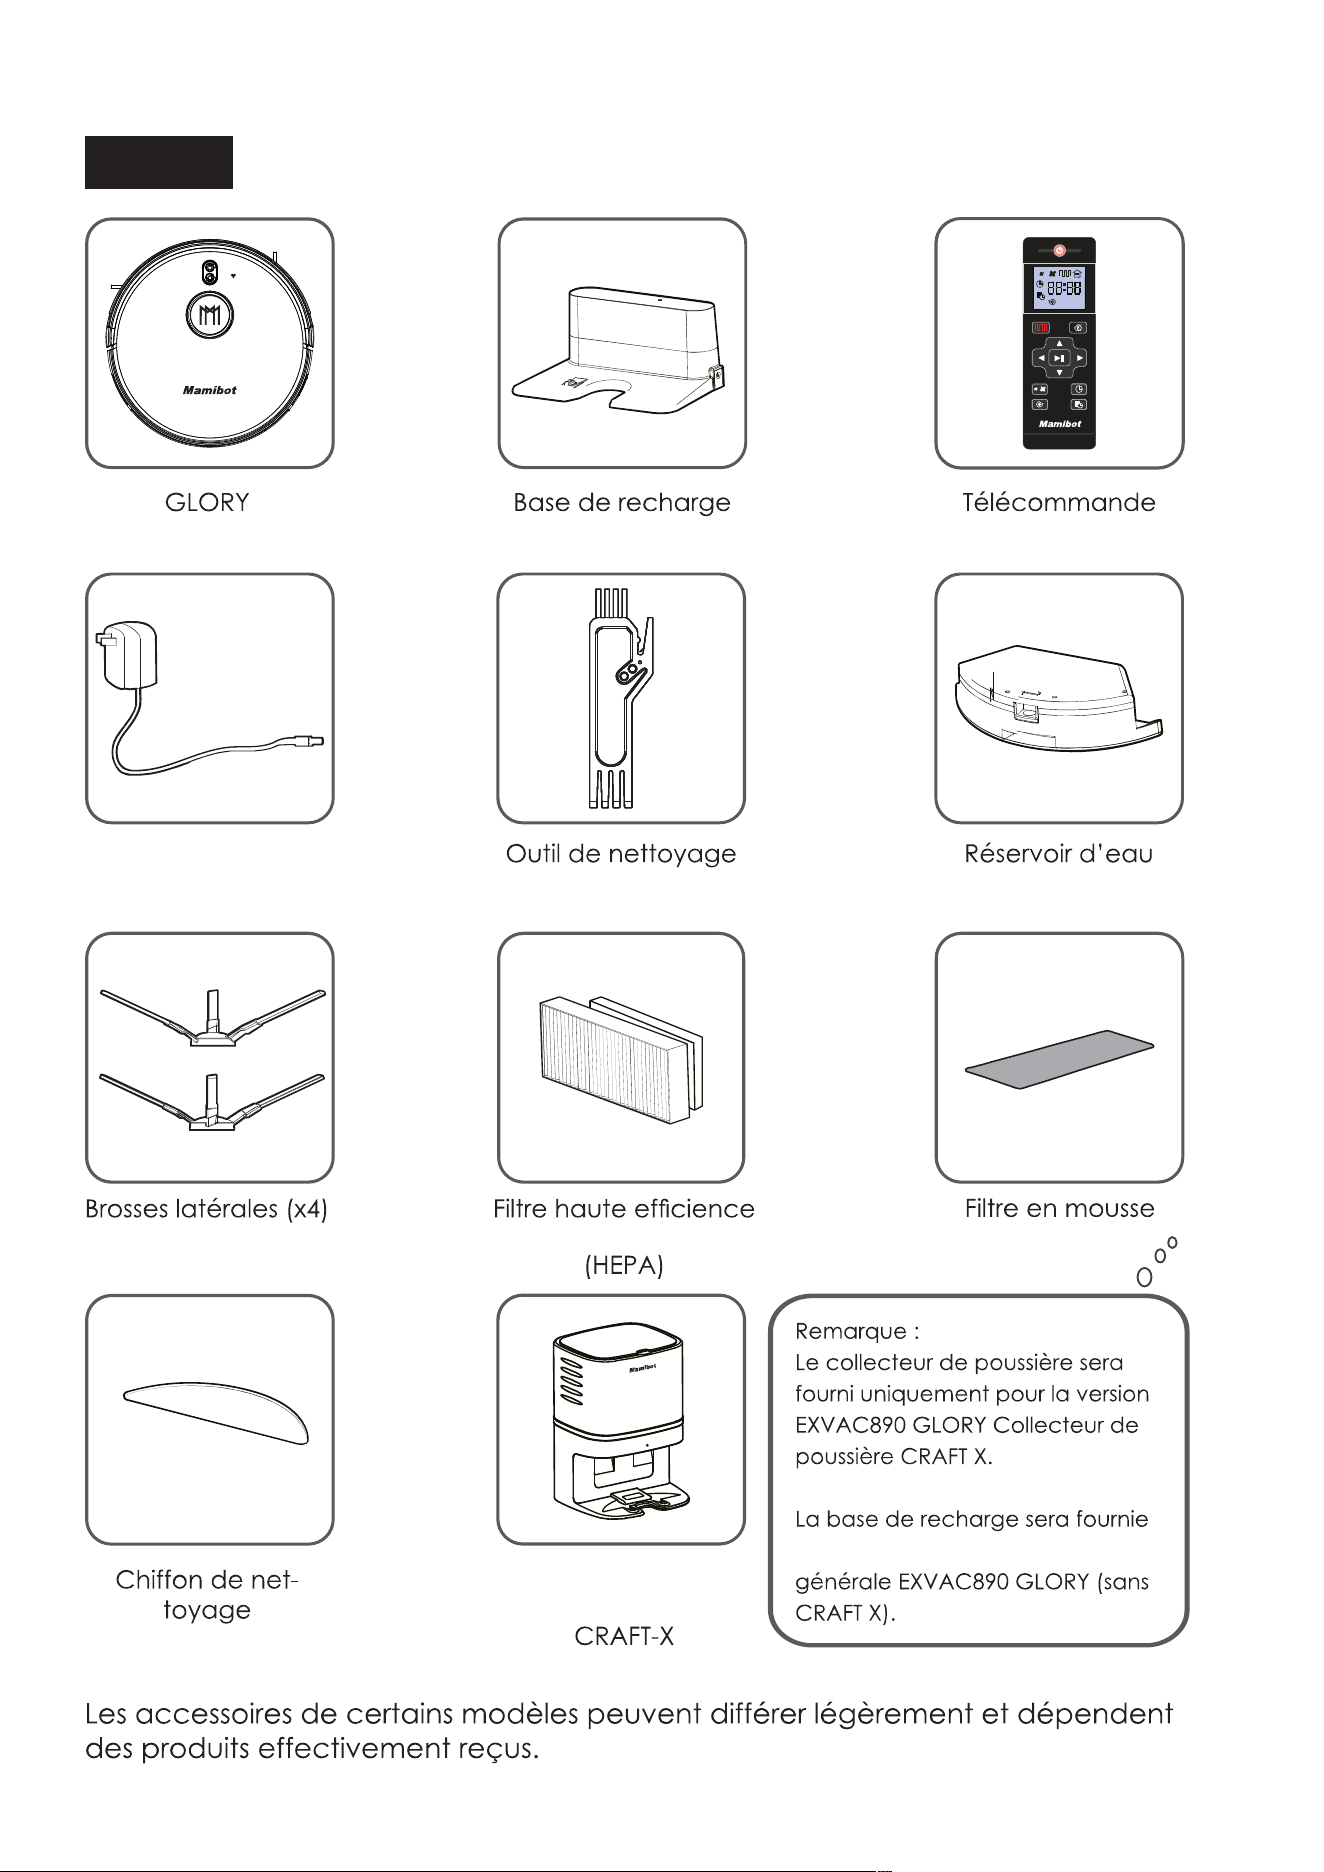
GLORY Charging Base
Remote Control
Power Adapter Cleaning Tool
Water Tank
Side Brushes(x4)
Mopping Cloth
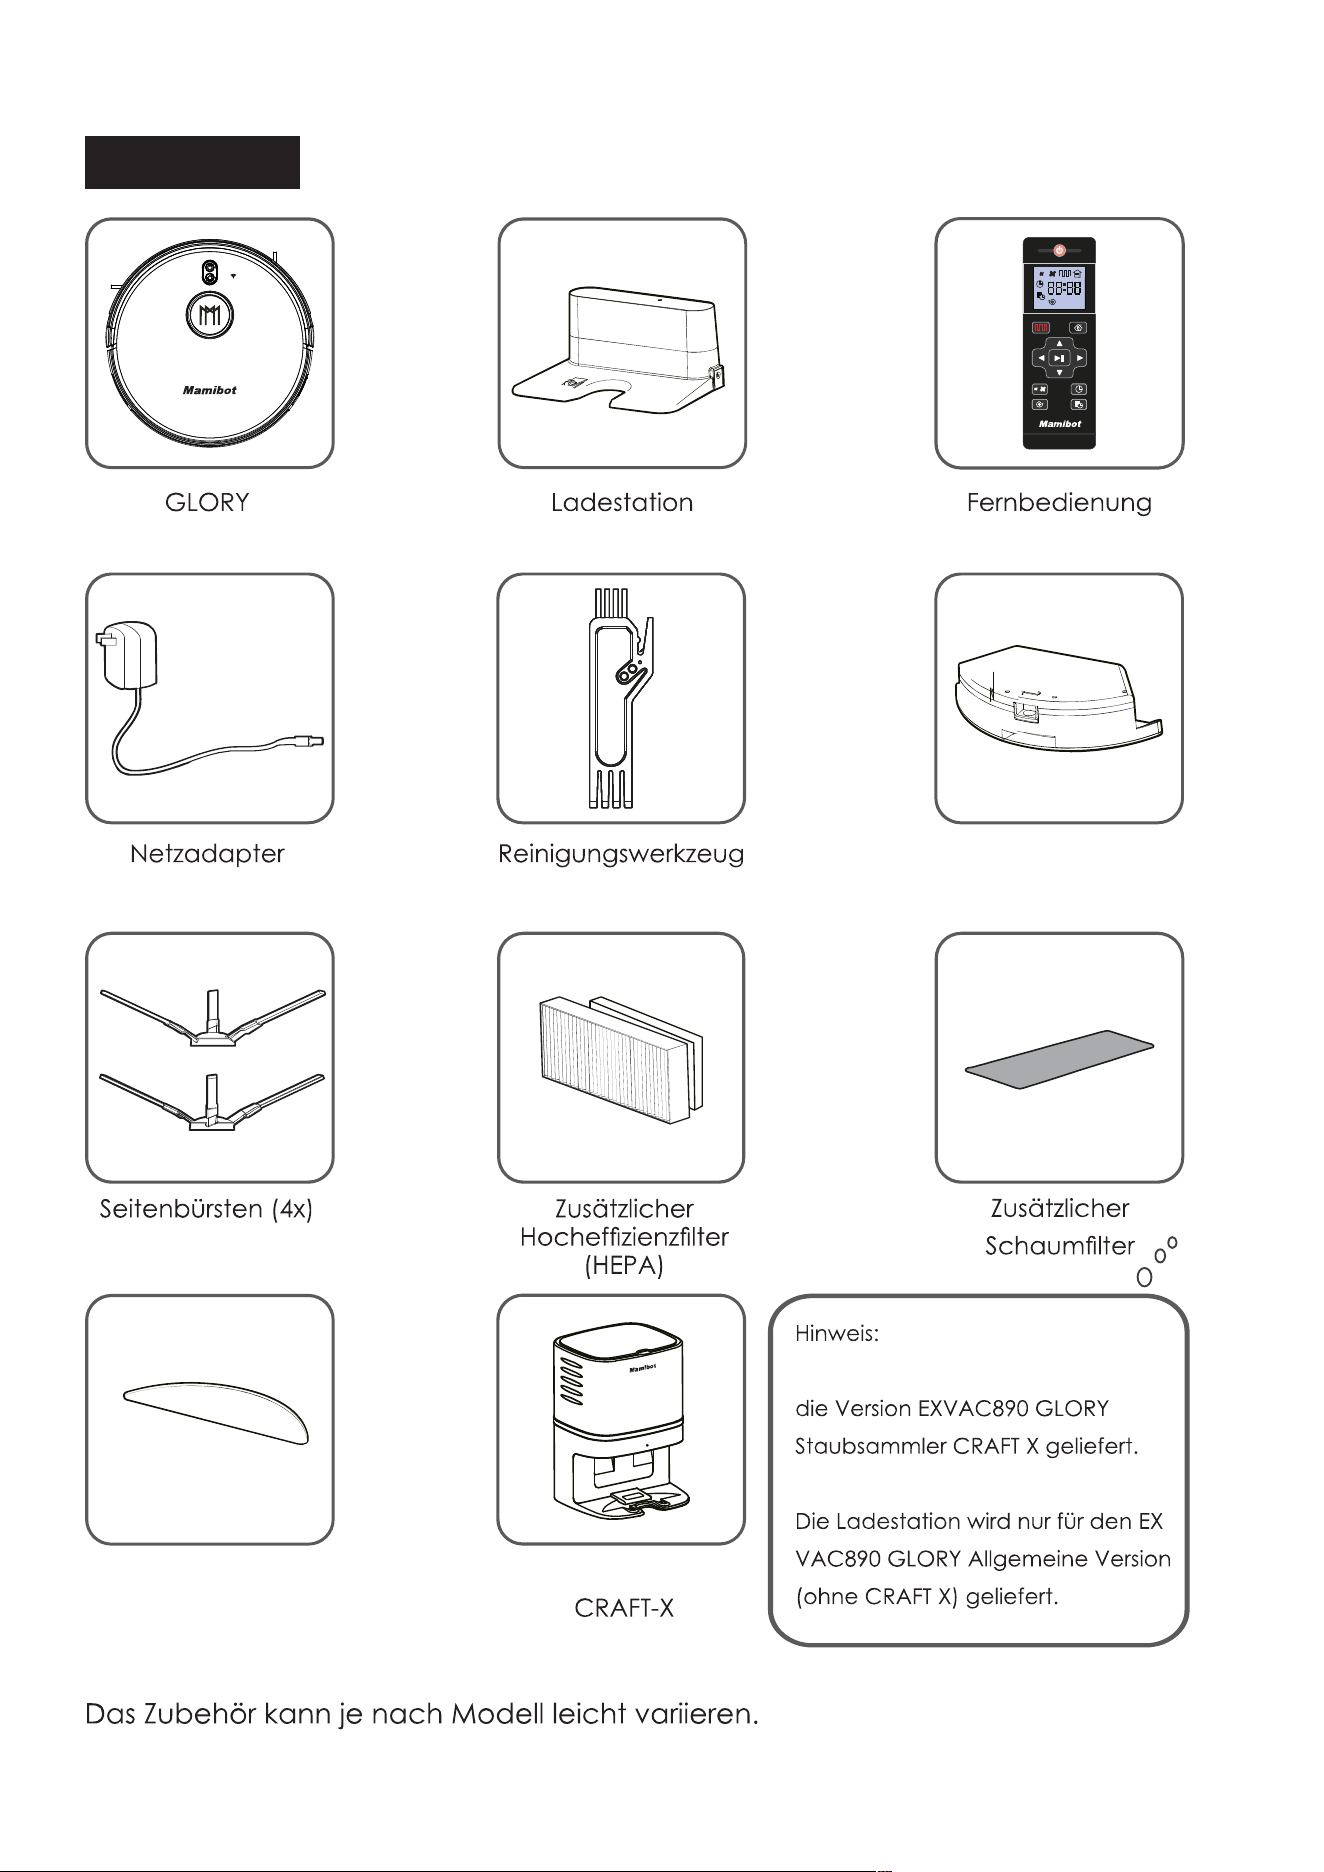
Accessories of some models may be slightly different and they
are subject to the actual received products.
What’s in the package
Additional
Foam Filter
High-efficient Filter
(HEPA)
Additional
7
Mamibot
Dust Collector
CRAFT-X
Ma
m
i
b
o
t
Notice:
Dust Collector will only be supplied
for the EXVAC890 GLORY Dust
Collector -CRAFT X Version.
Charging Base will only be supplied
for the EXVAC890 GLORY General
Version (Without CRAFT X).
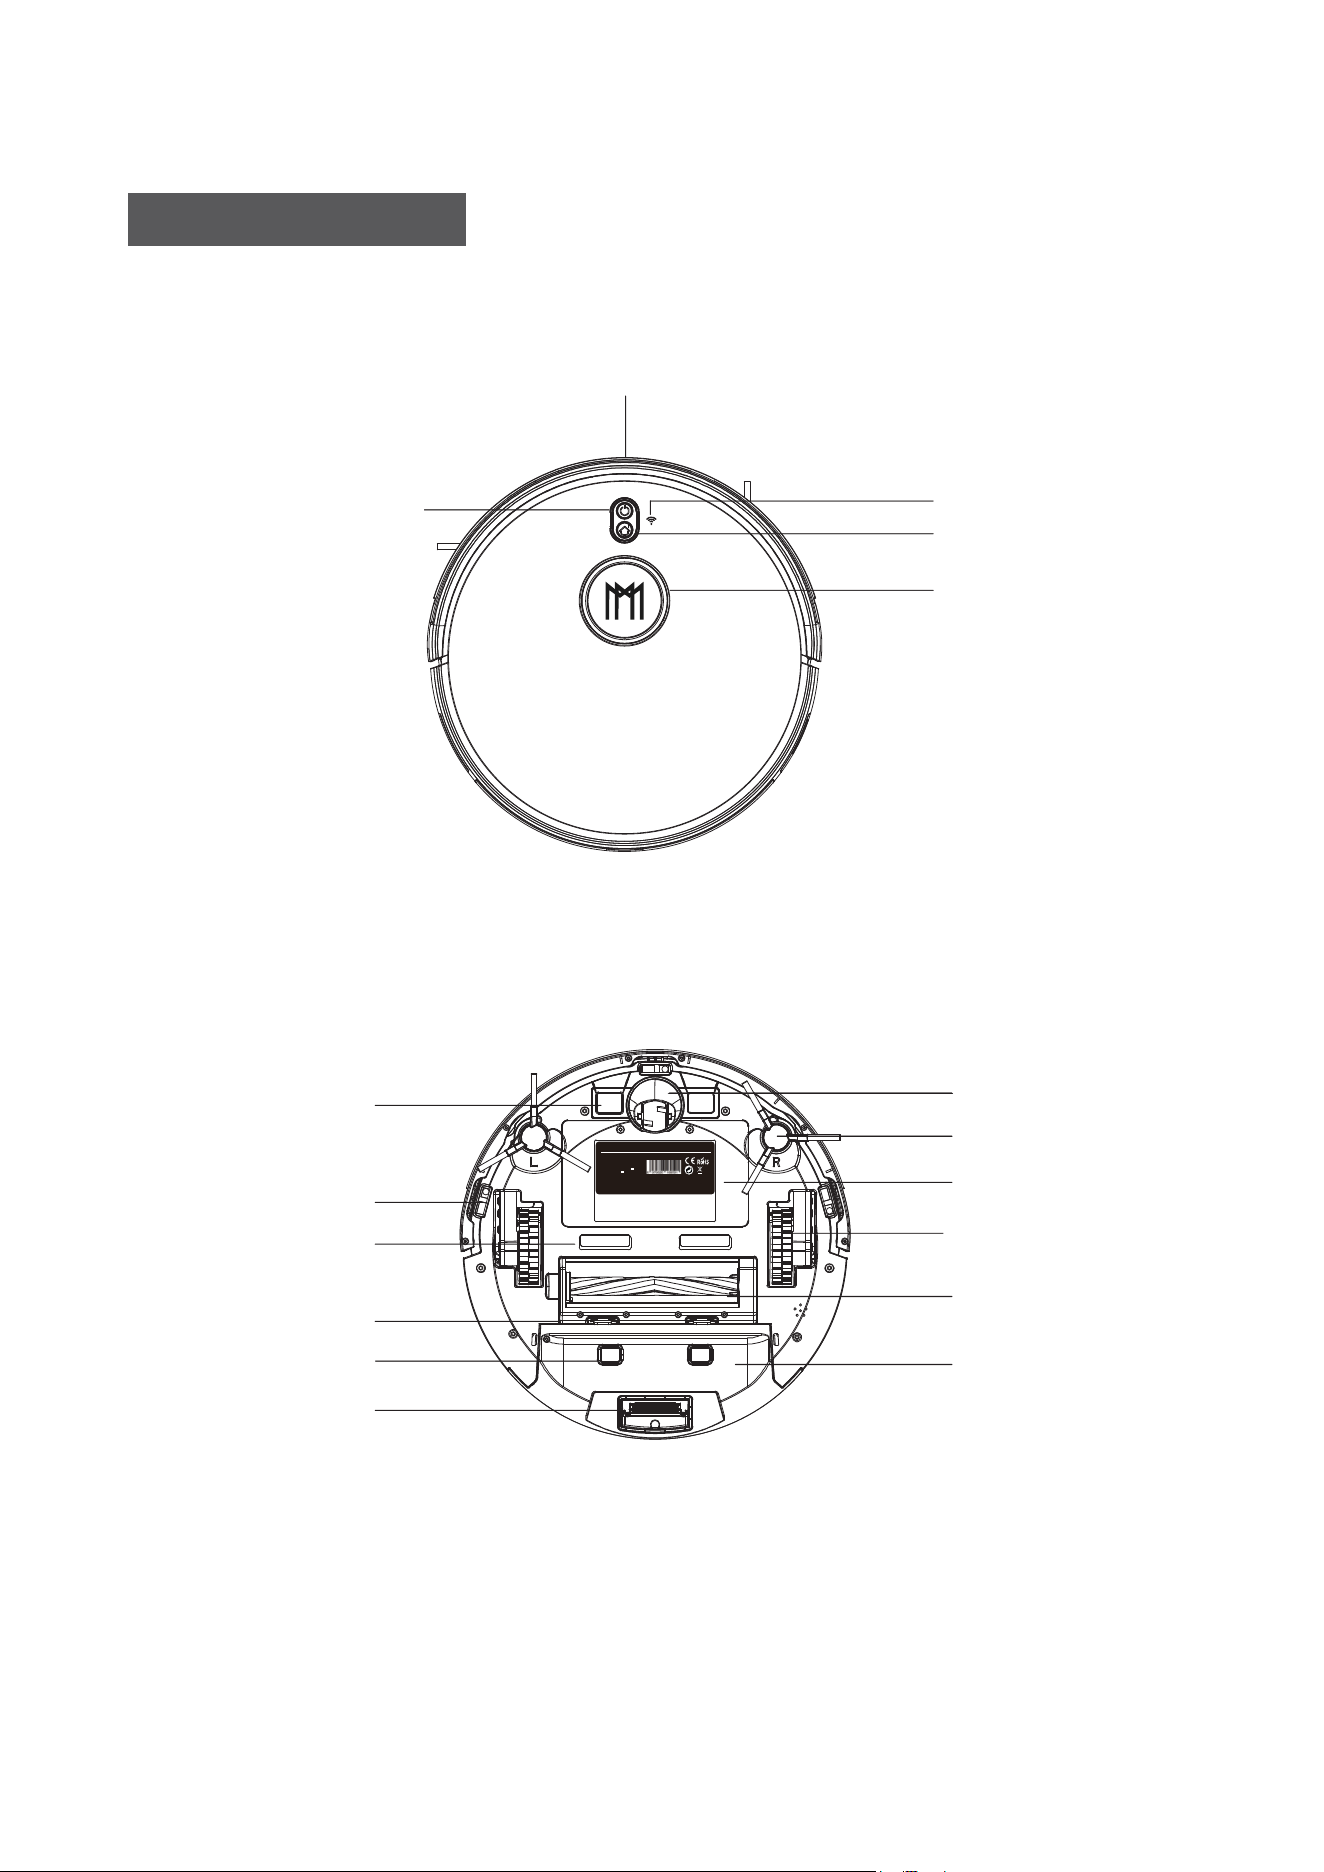
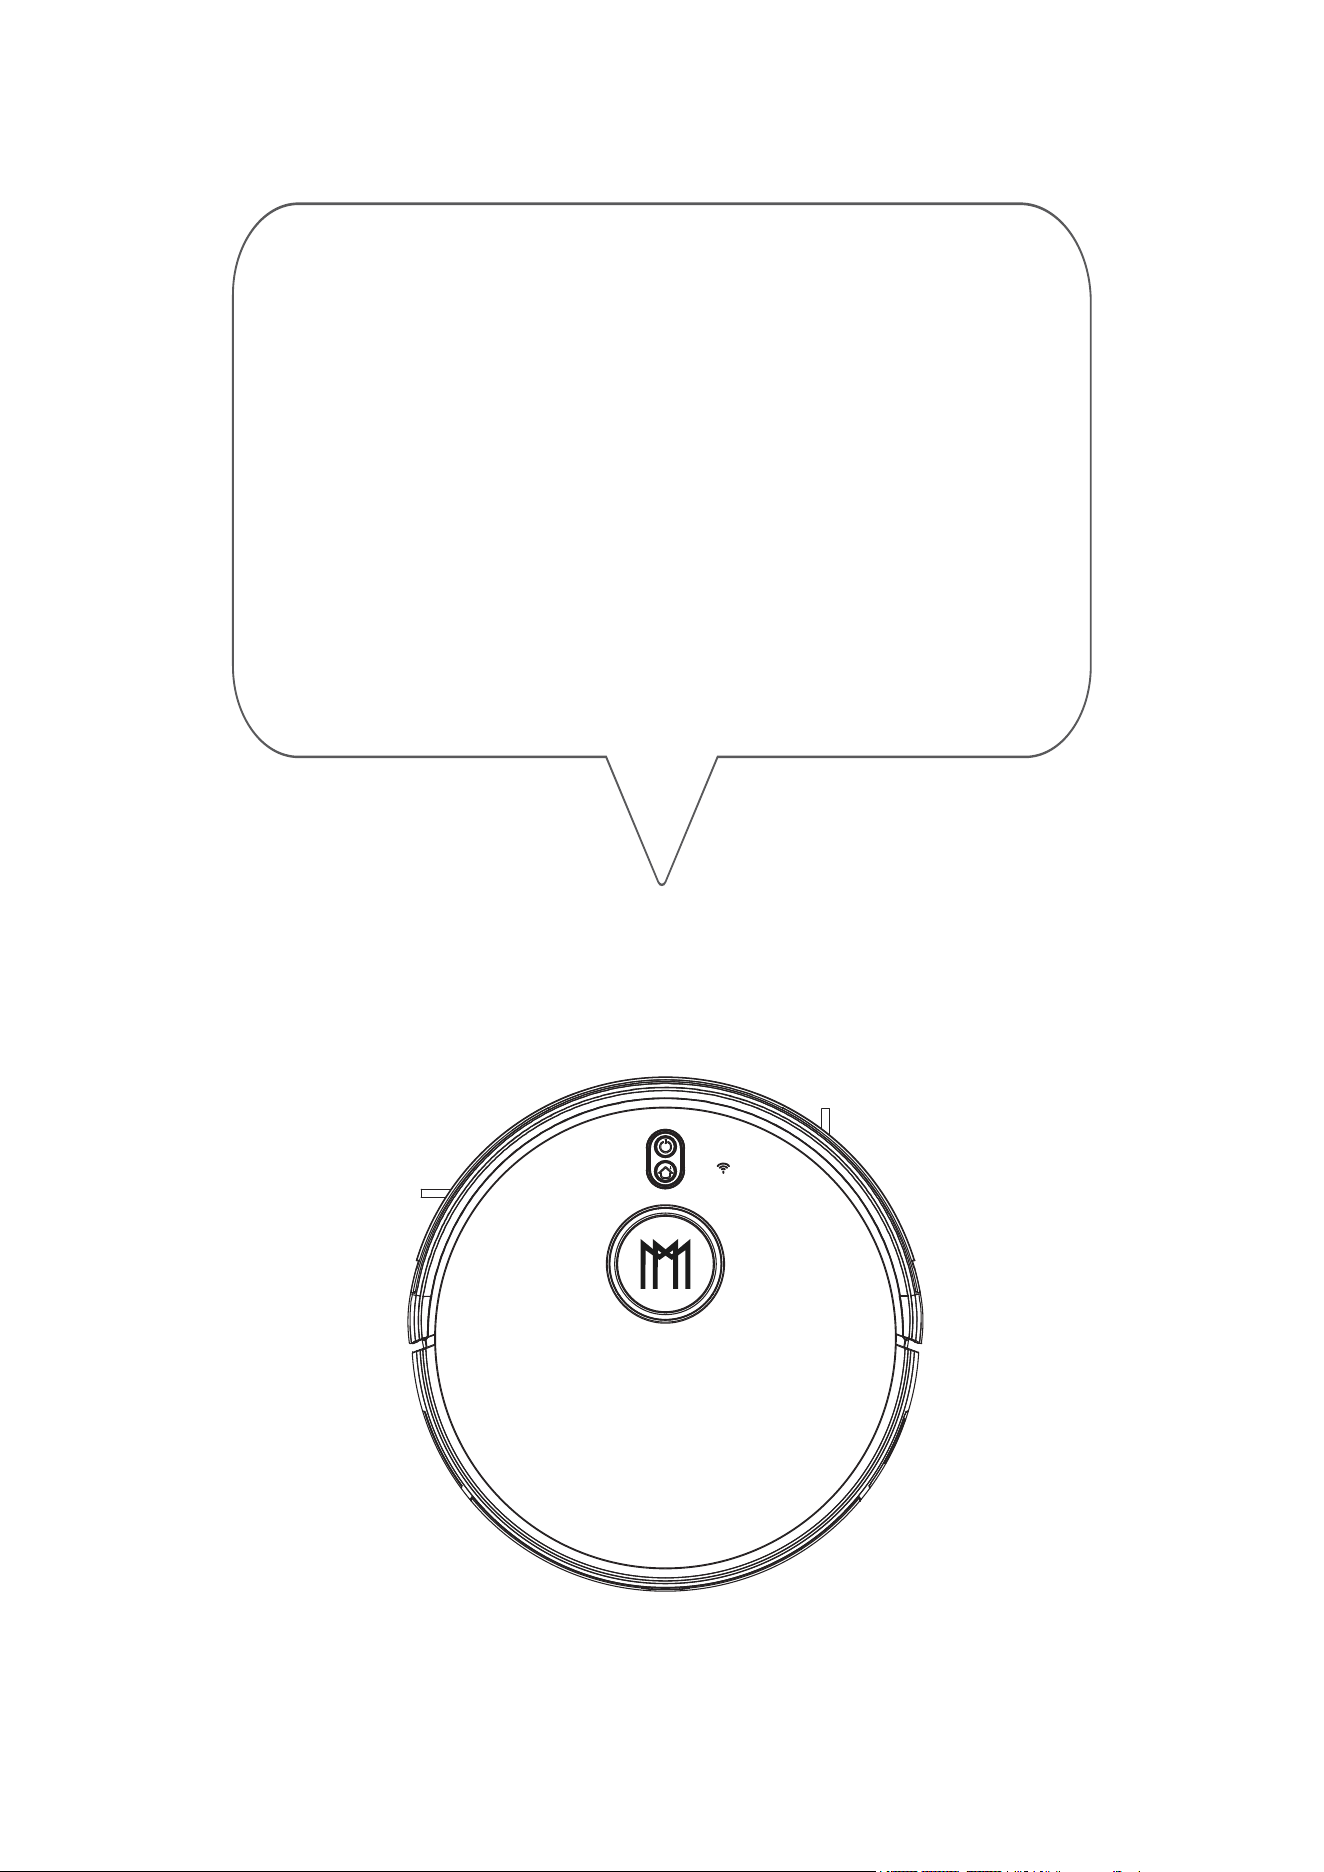
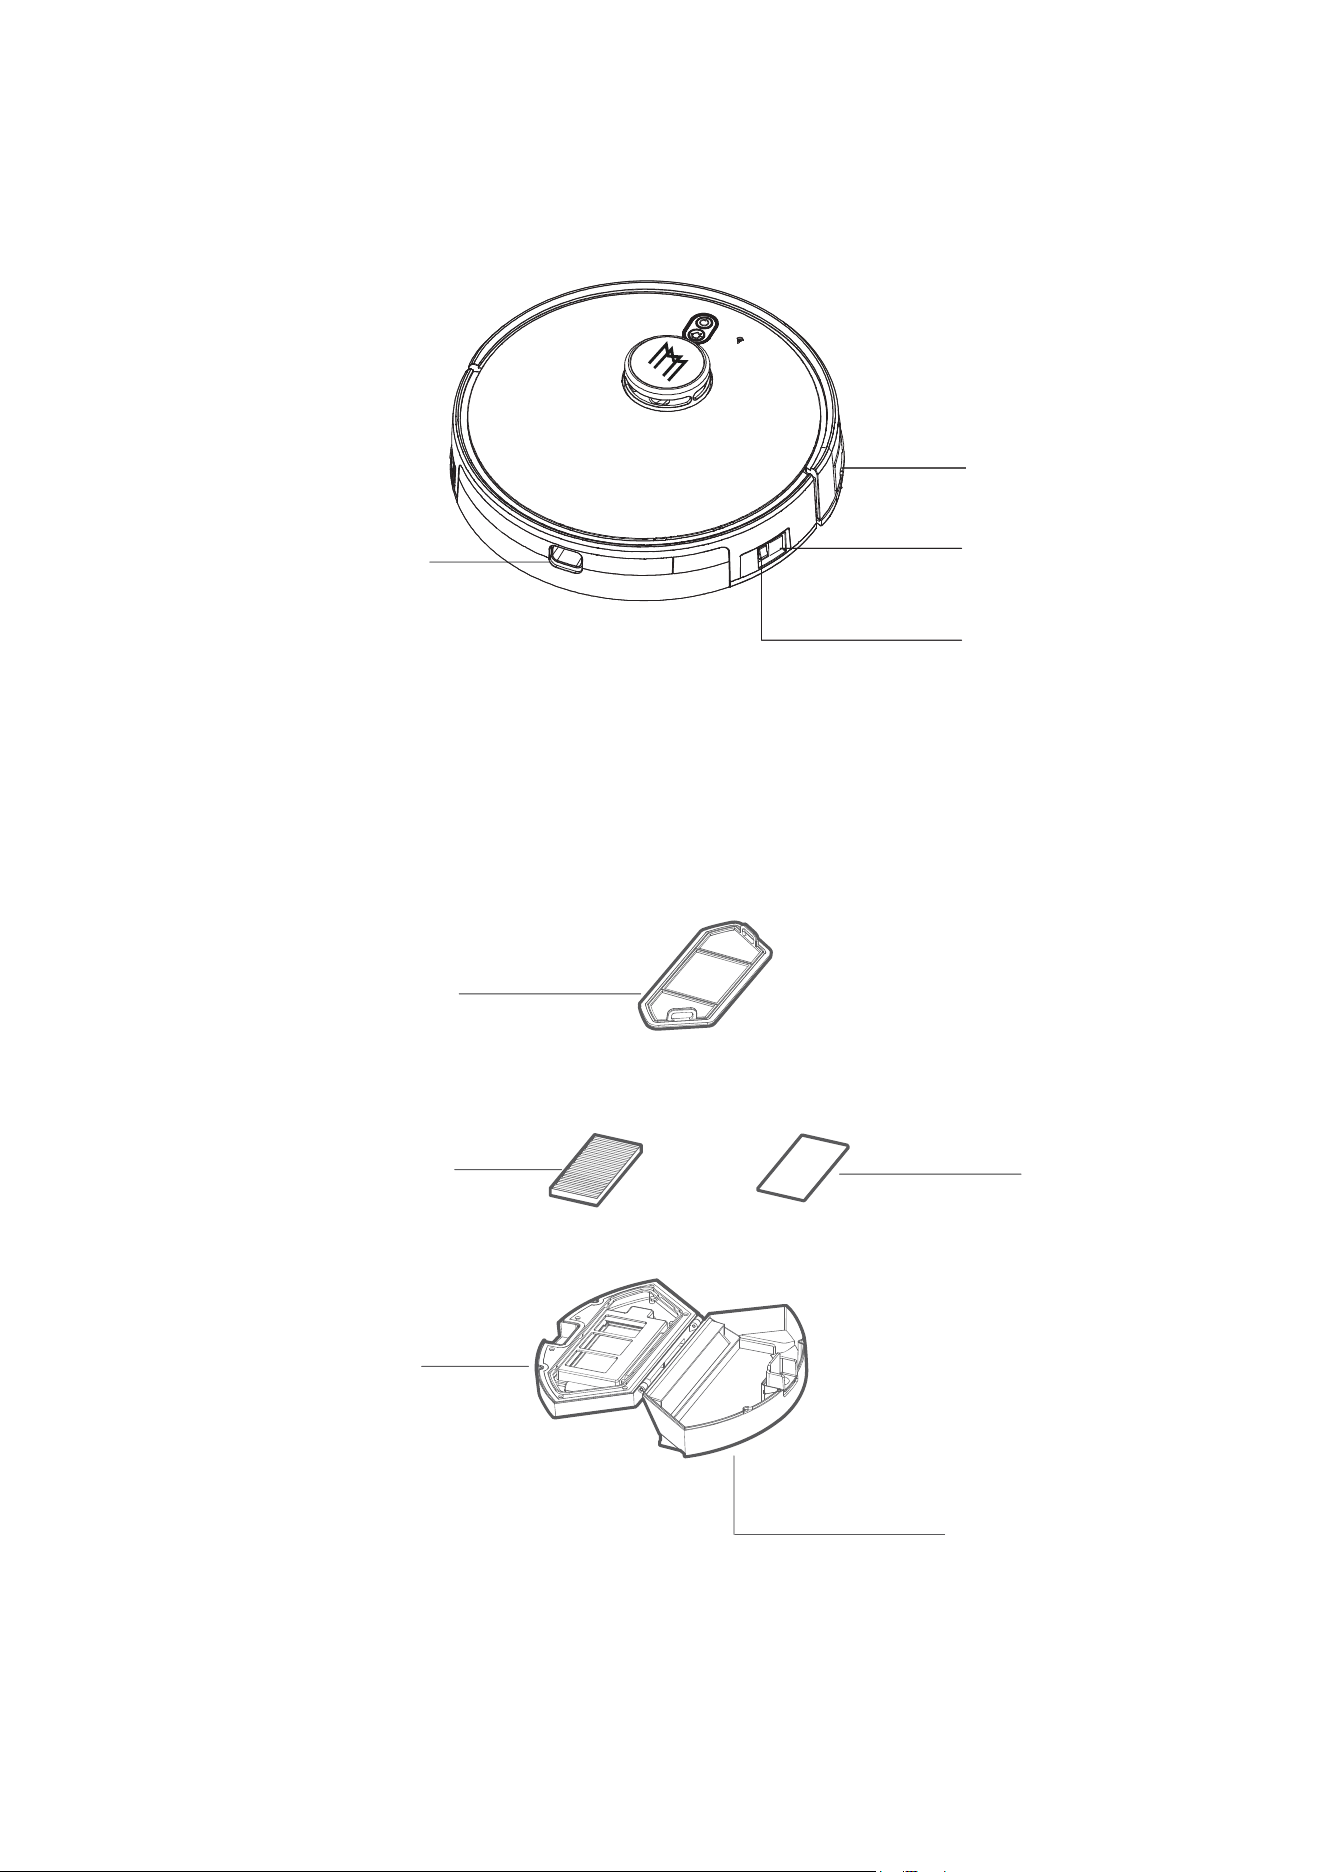
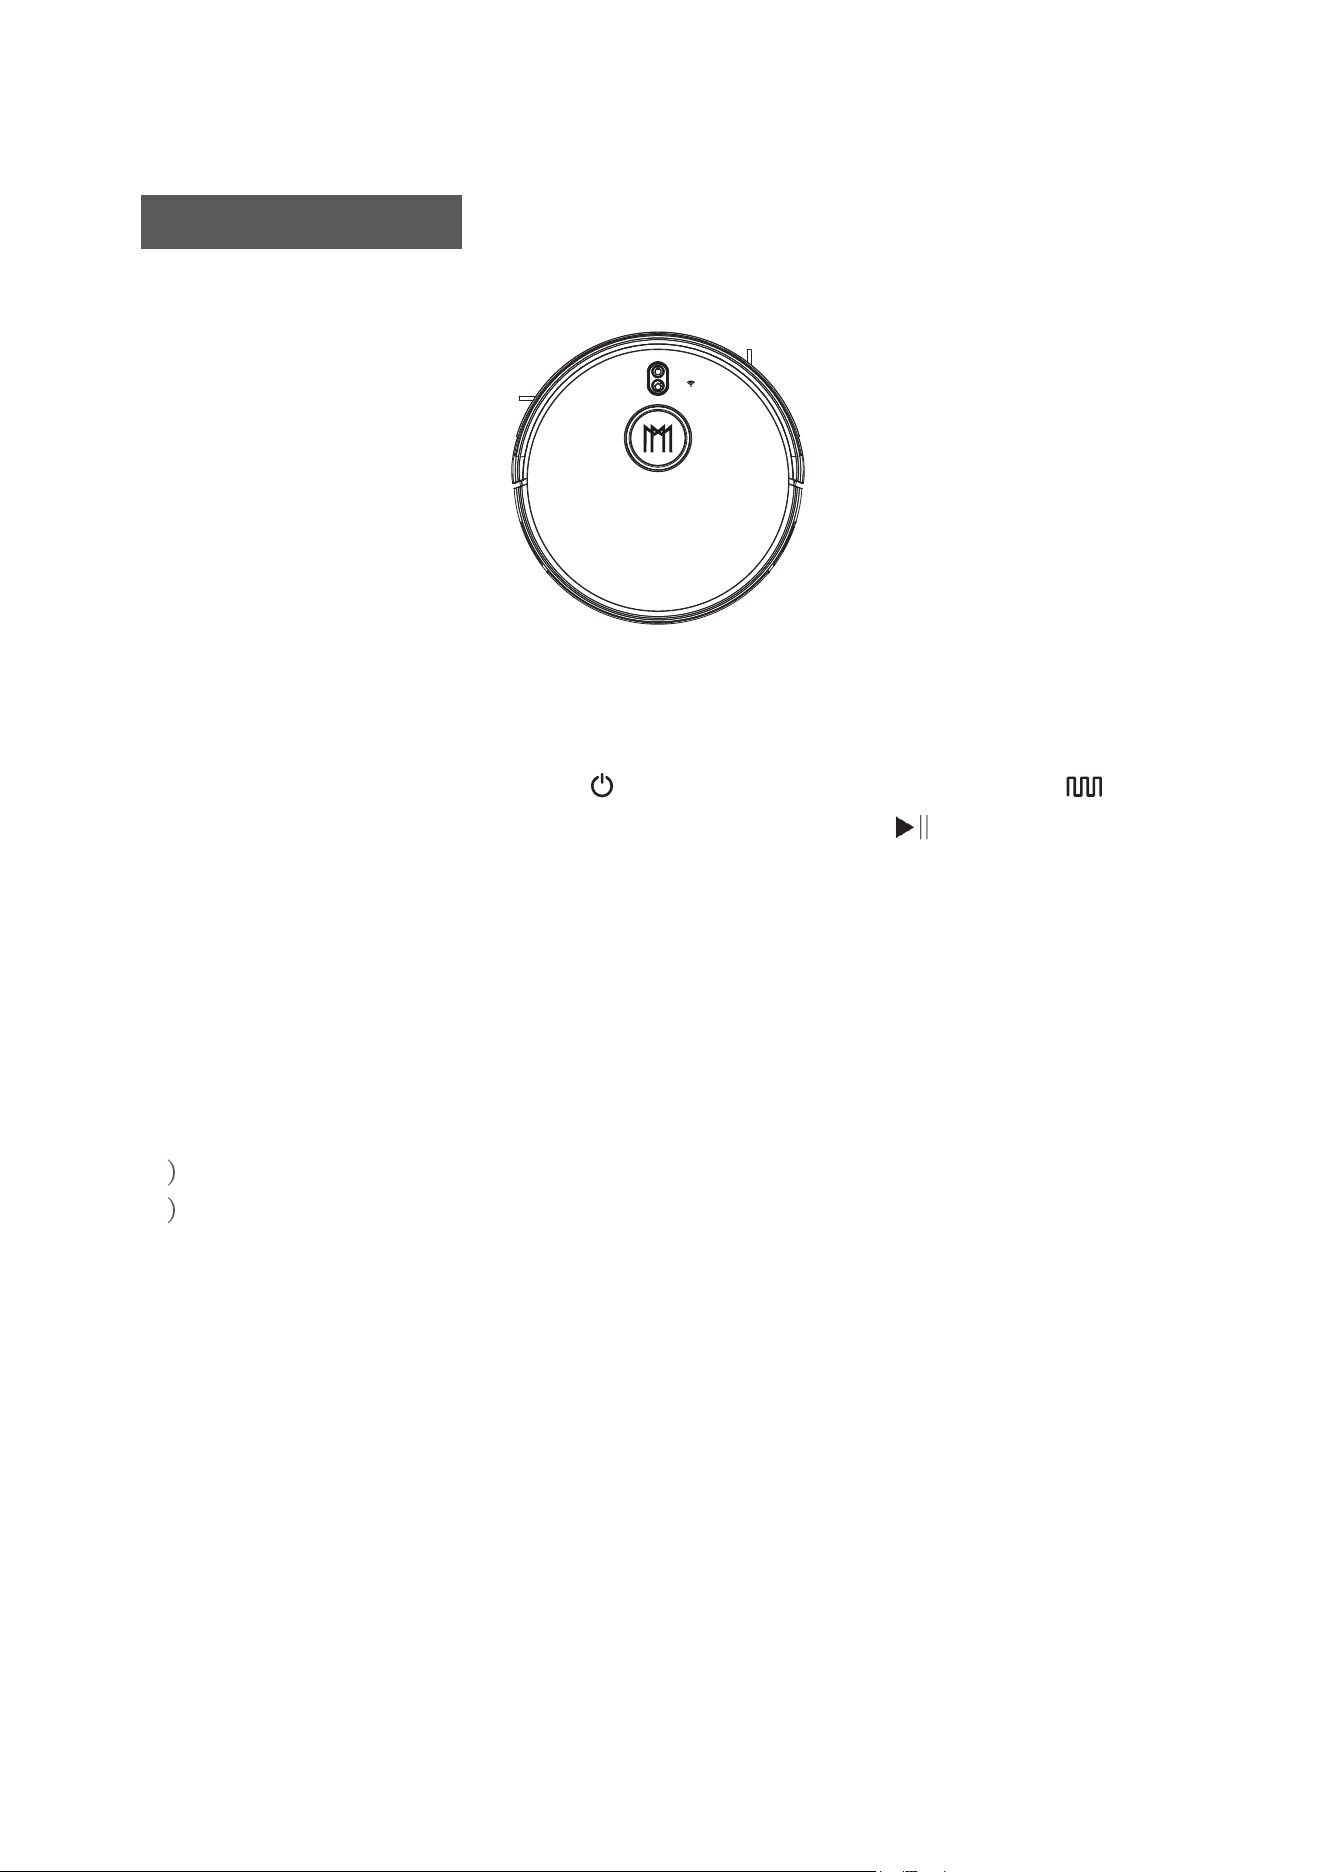
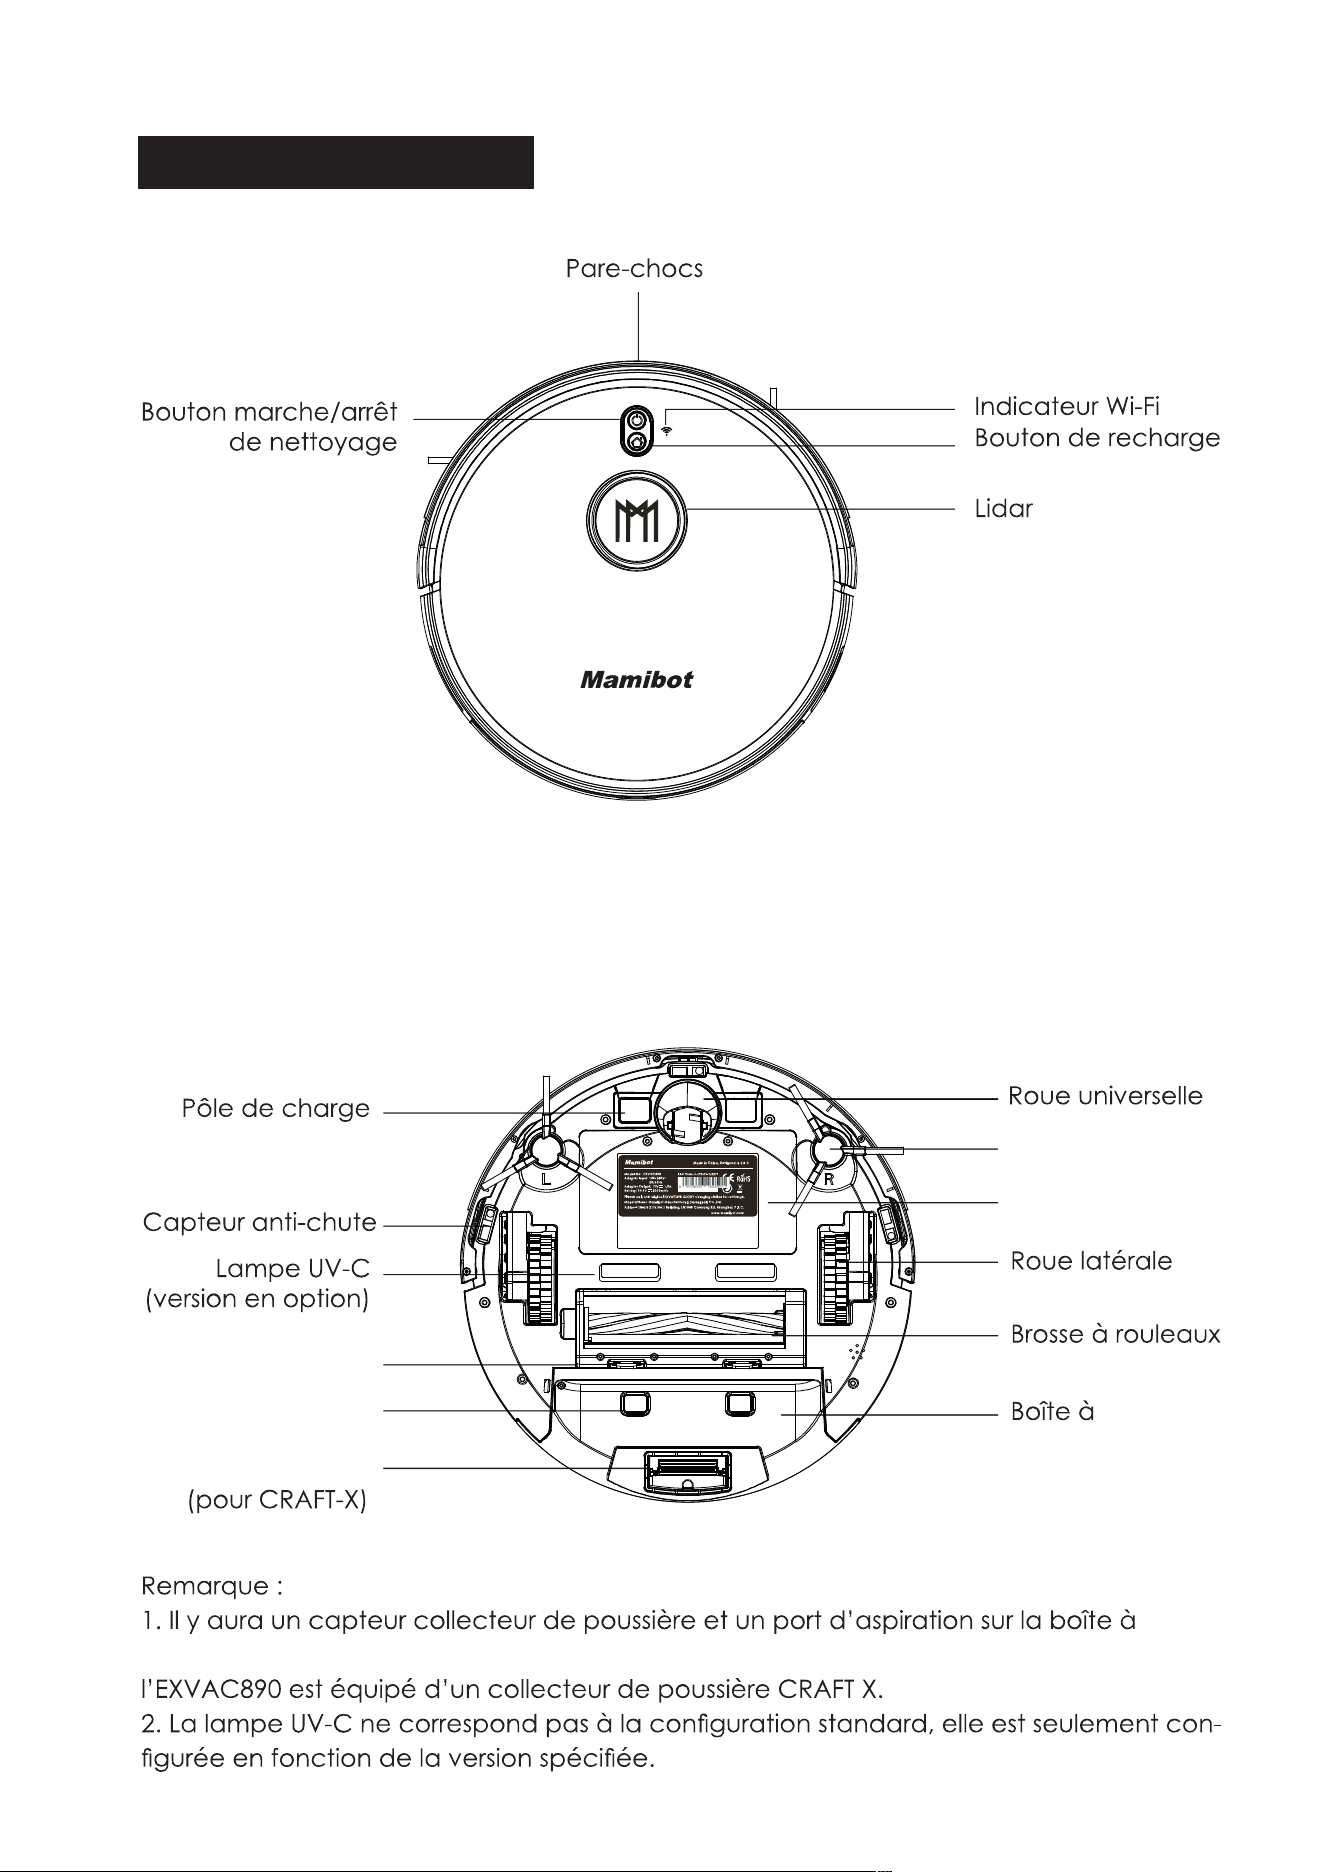
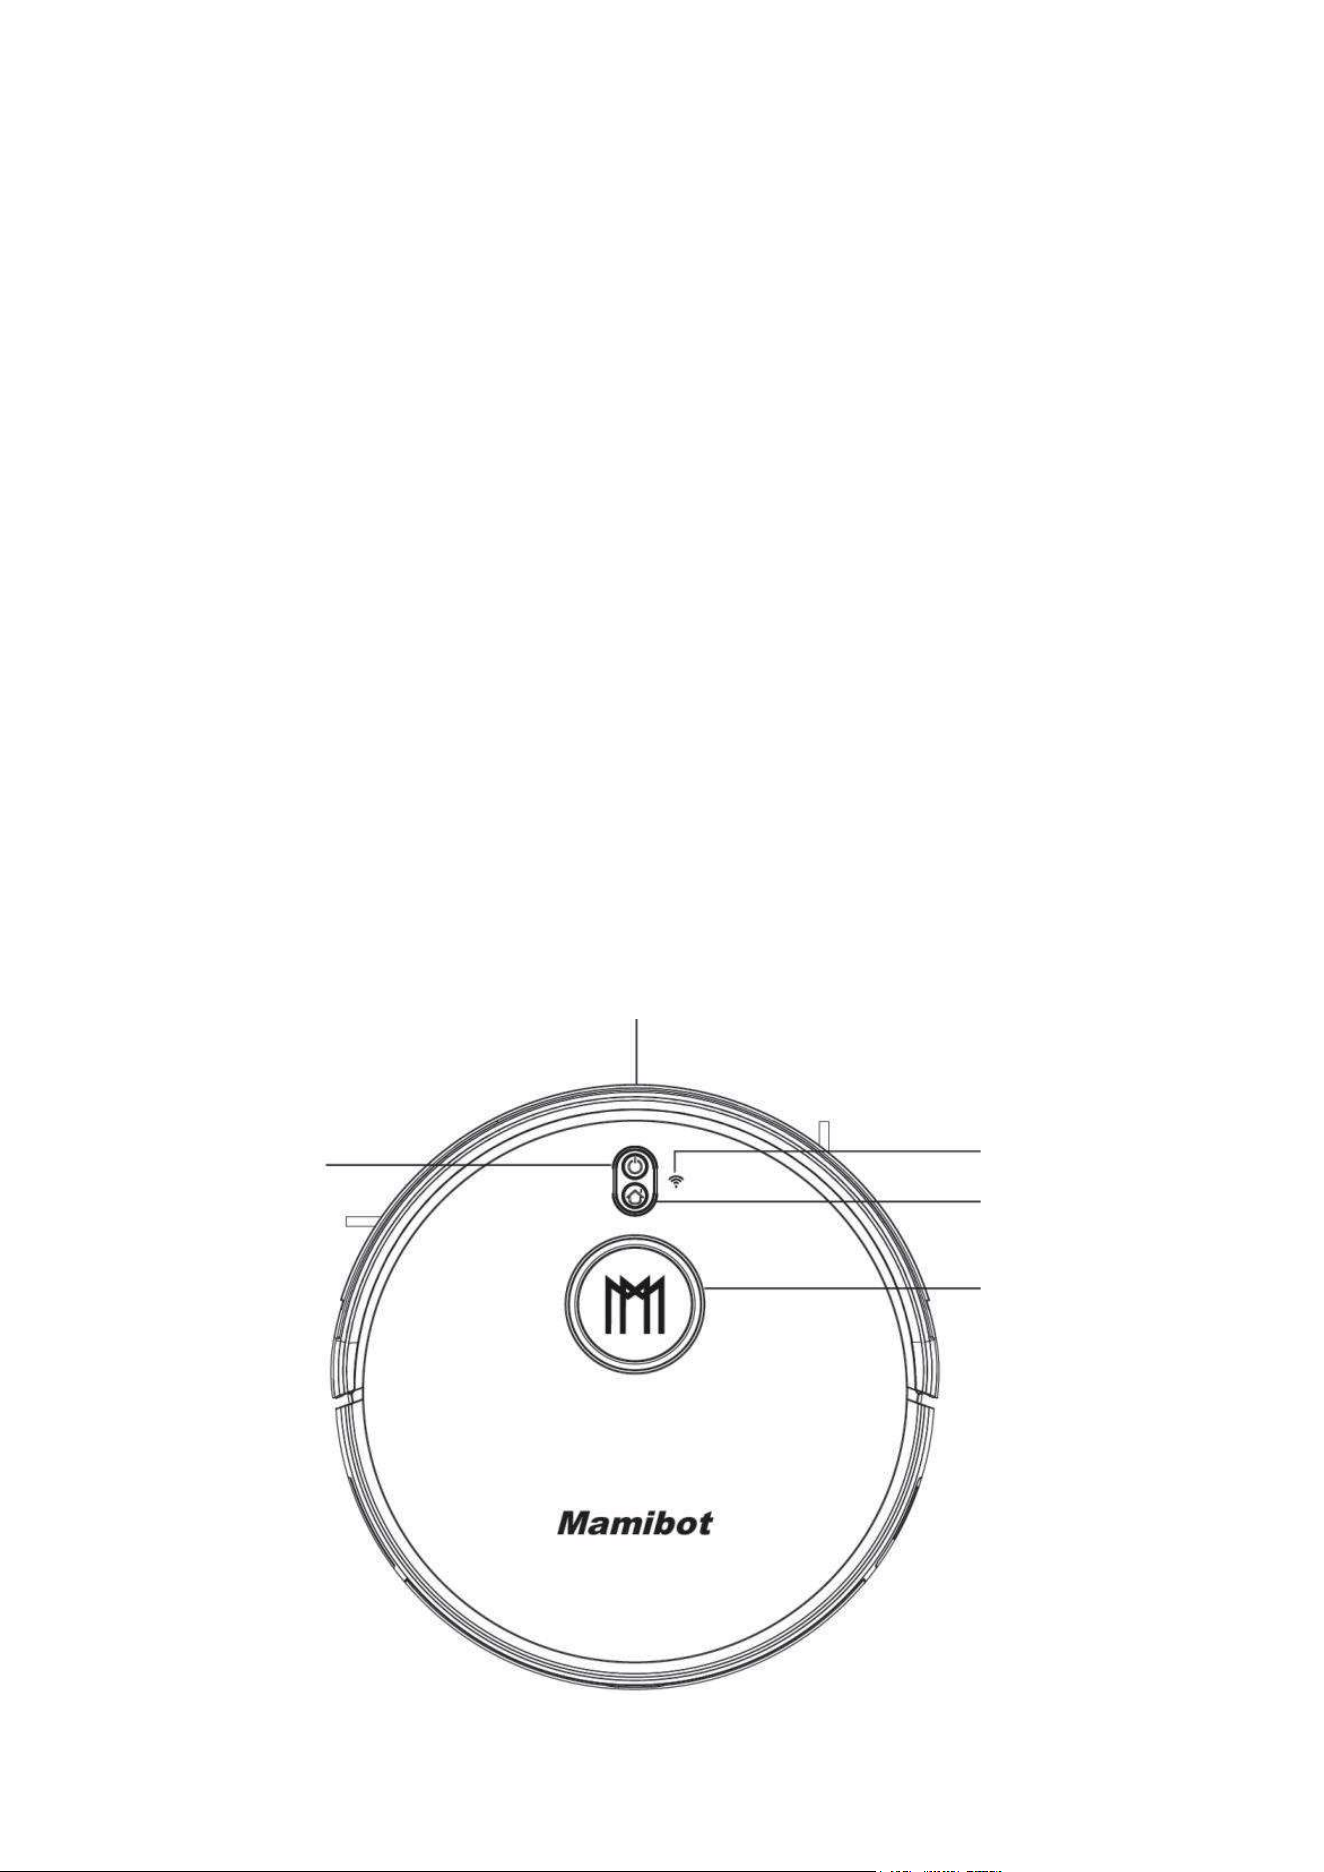
GLORY COMPONENTS
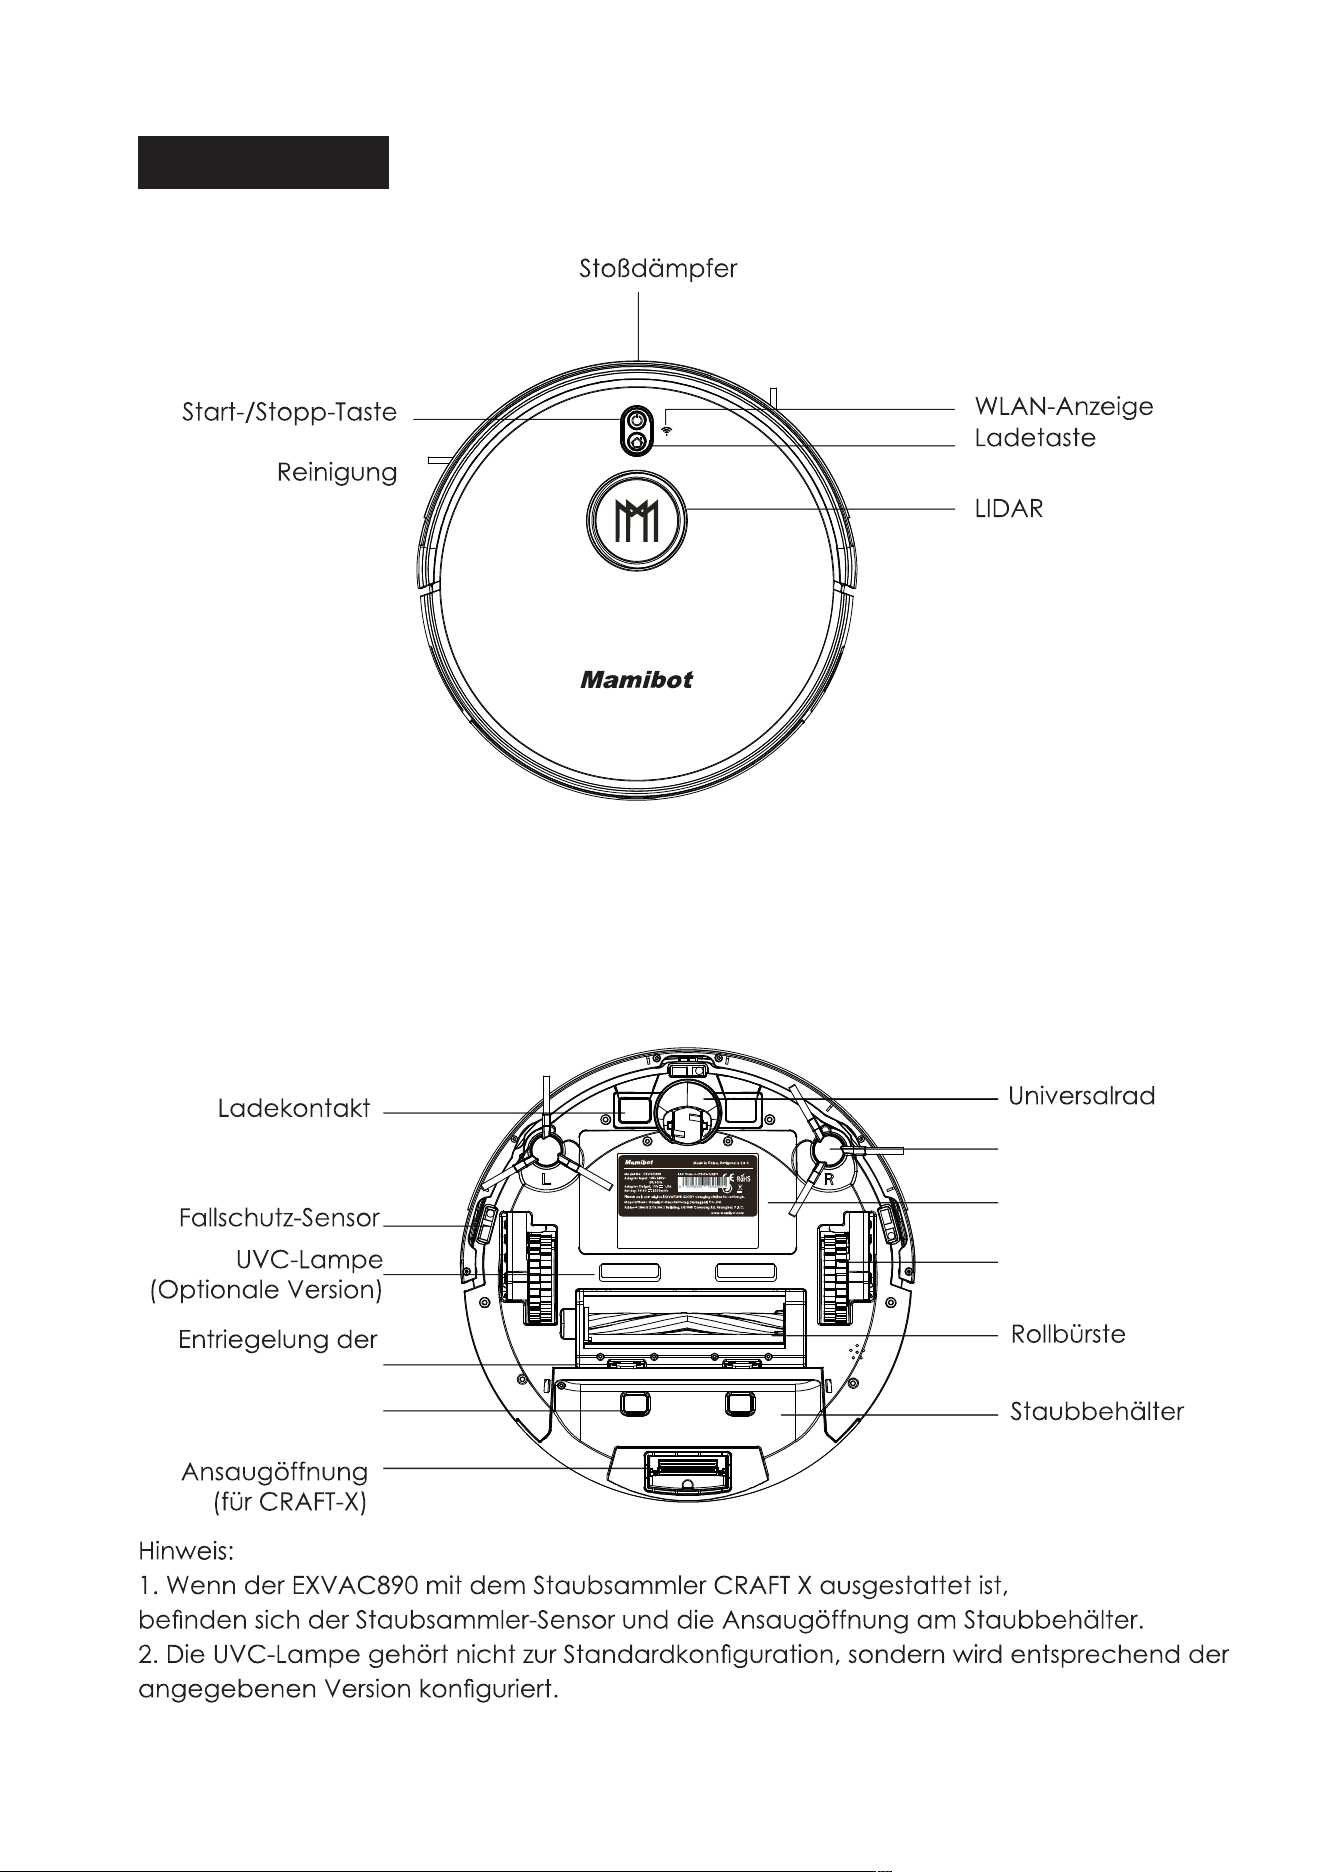
TOP
Bumper
Recharge Button
Wi-Fi Indicator
Lidar
Auto Cleaning Start
/Stop Button
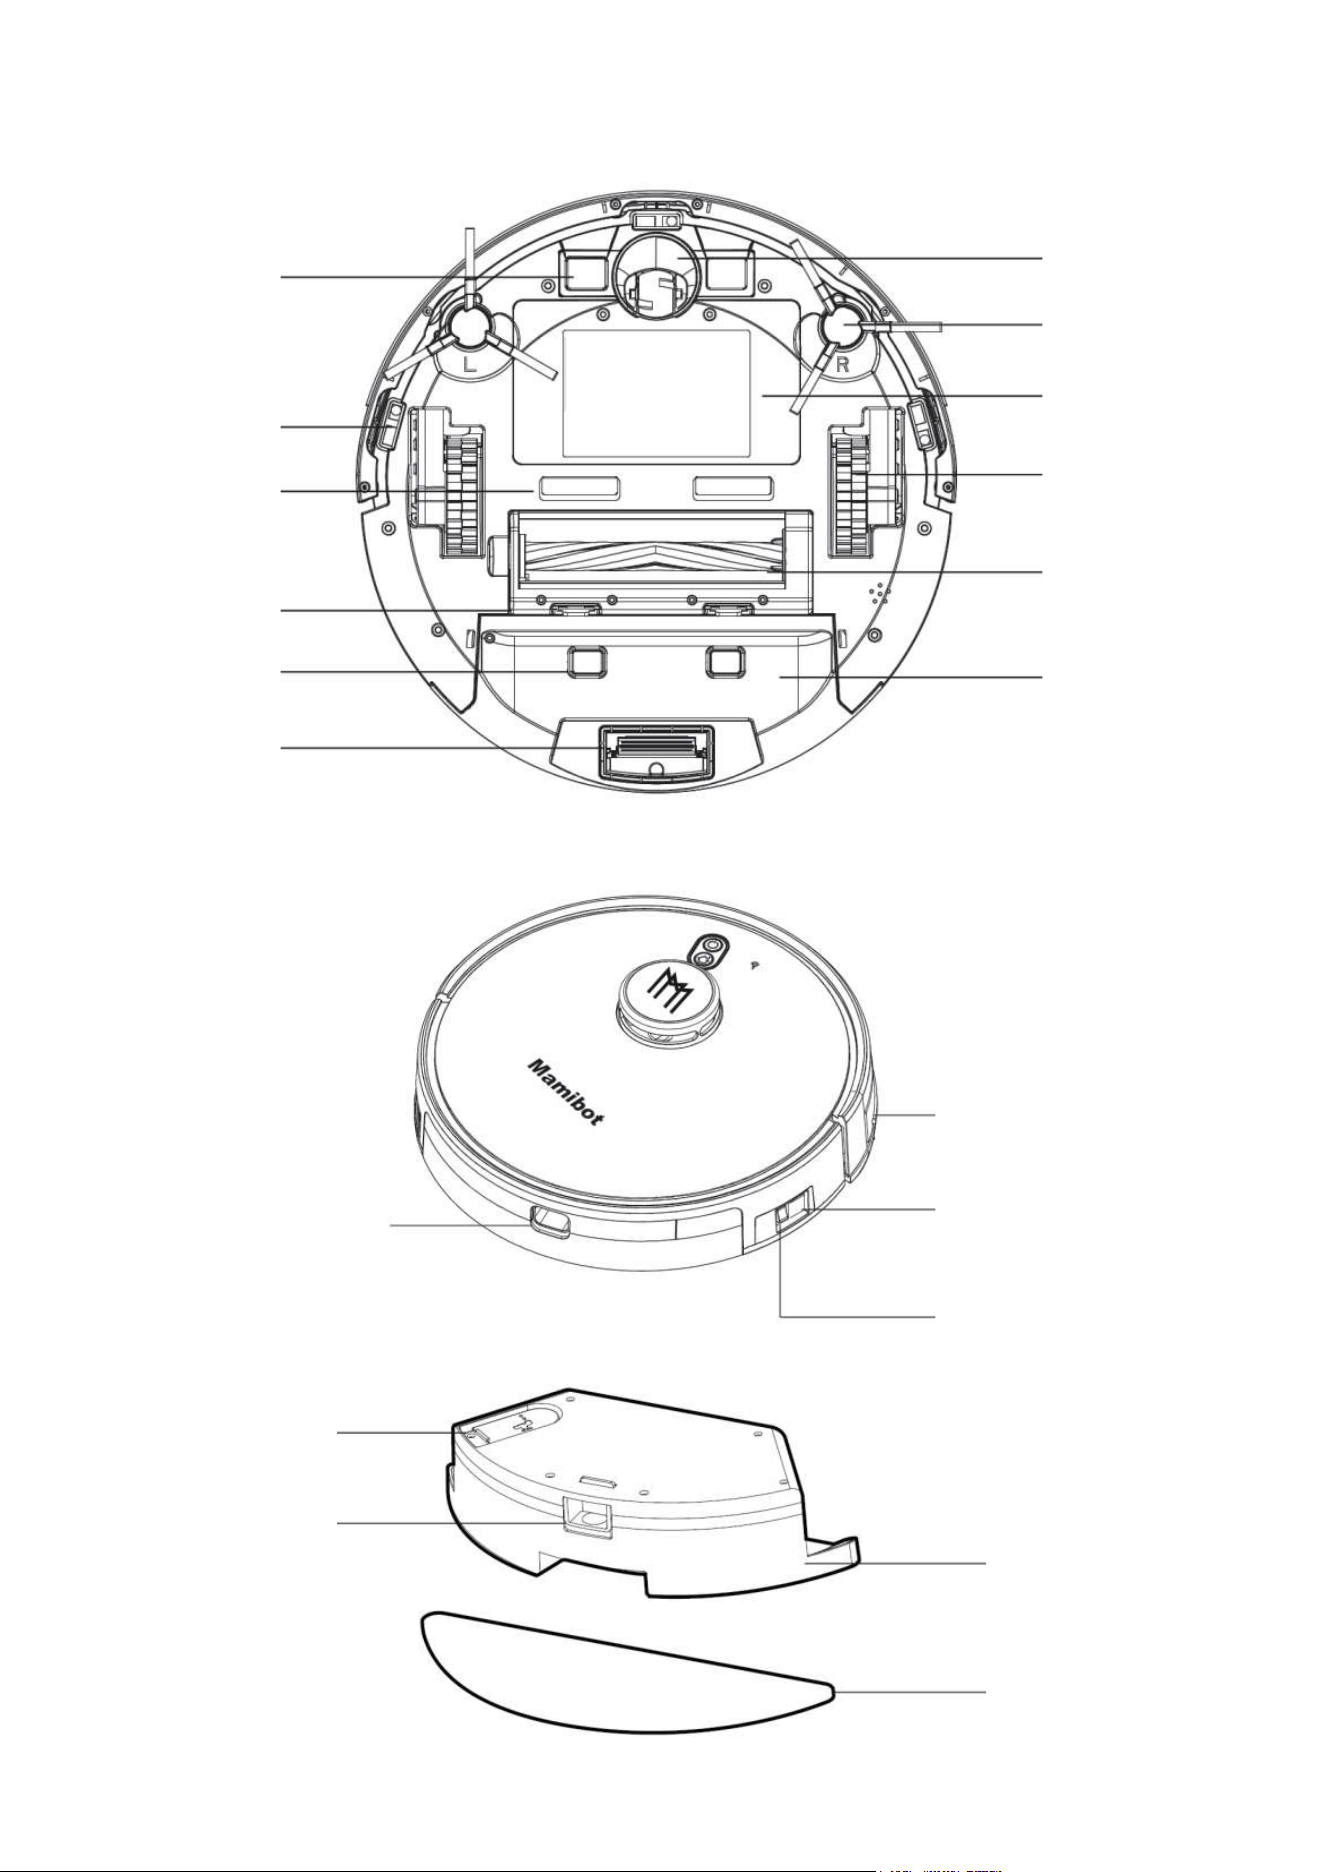
BOTTOM
Charging Pole
Universal Wheel
Side Brush
Anti-falling Sensor
Battery Cover
Side Wheel
Rolling Brush
Brush Guard
Suction Port (for CRAFT-X)
Dust Box
8
Manufacturer: Mamibot Manufacturing (Shanghai) Co.,Ltd.
Address: North 21th,No.1 Building, LN1040 Caoyang Rd, Shanghai, P.R.C.
Please only use original EXVAC890 GLORY charging station for recharge.
Made in China, Designed in U.S.A
Model No.: EXVAC890
Adapter Input: 100-240V~
50/60Hz
Adapter Output: 19V 1.0A
Battery: 14.4V 5200mAh
Mamibot
EAN Code: 6-970626-160591
www.mamibot.com
Mamibot
Note:
1. There will be Dust Collector Sensor and Suction Port on the dust box if EXVAC890 is
equipped with Dust Colletor-CRAFT X.
2. UV-C Lamp is not the standard configuration, it is only configured according to the
specified version.
Dust Collector Sensor
UV-C Lamp
(Optional Version)
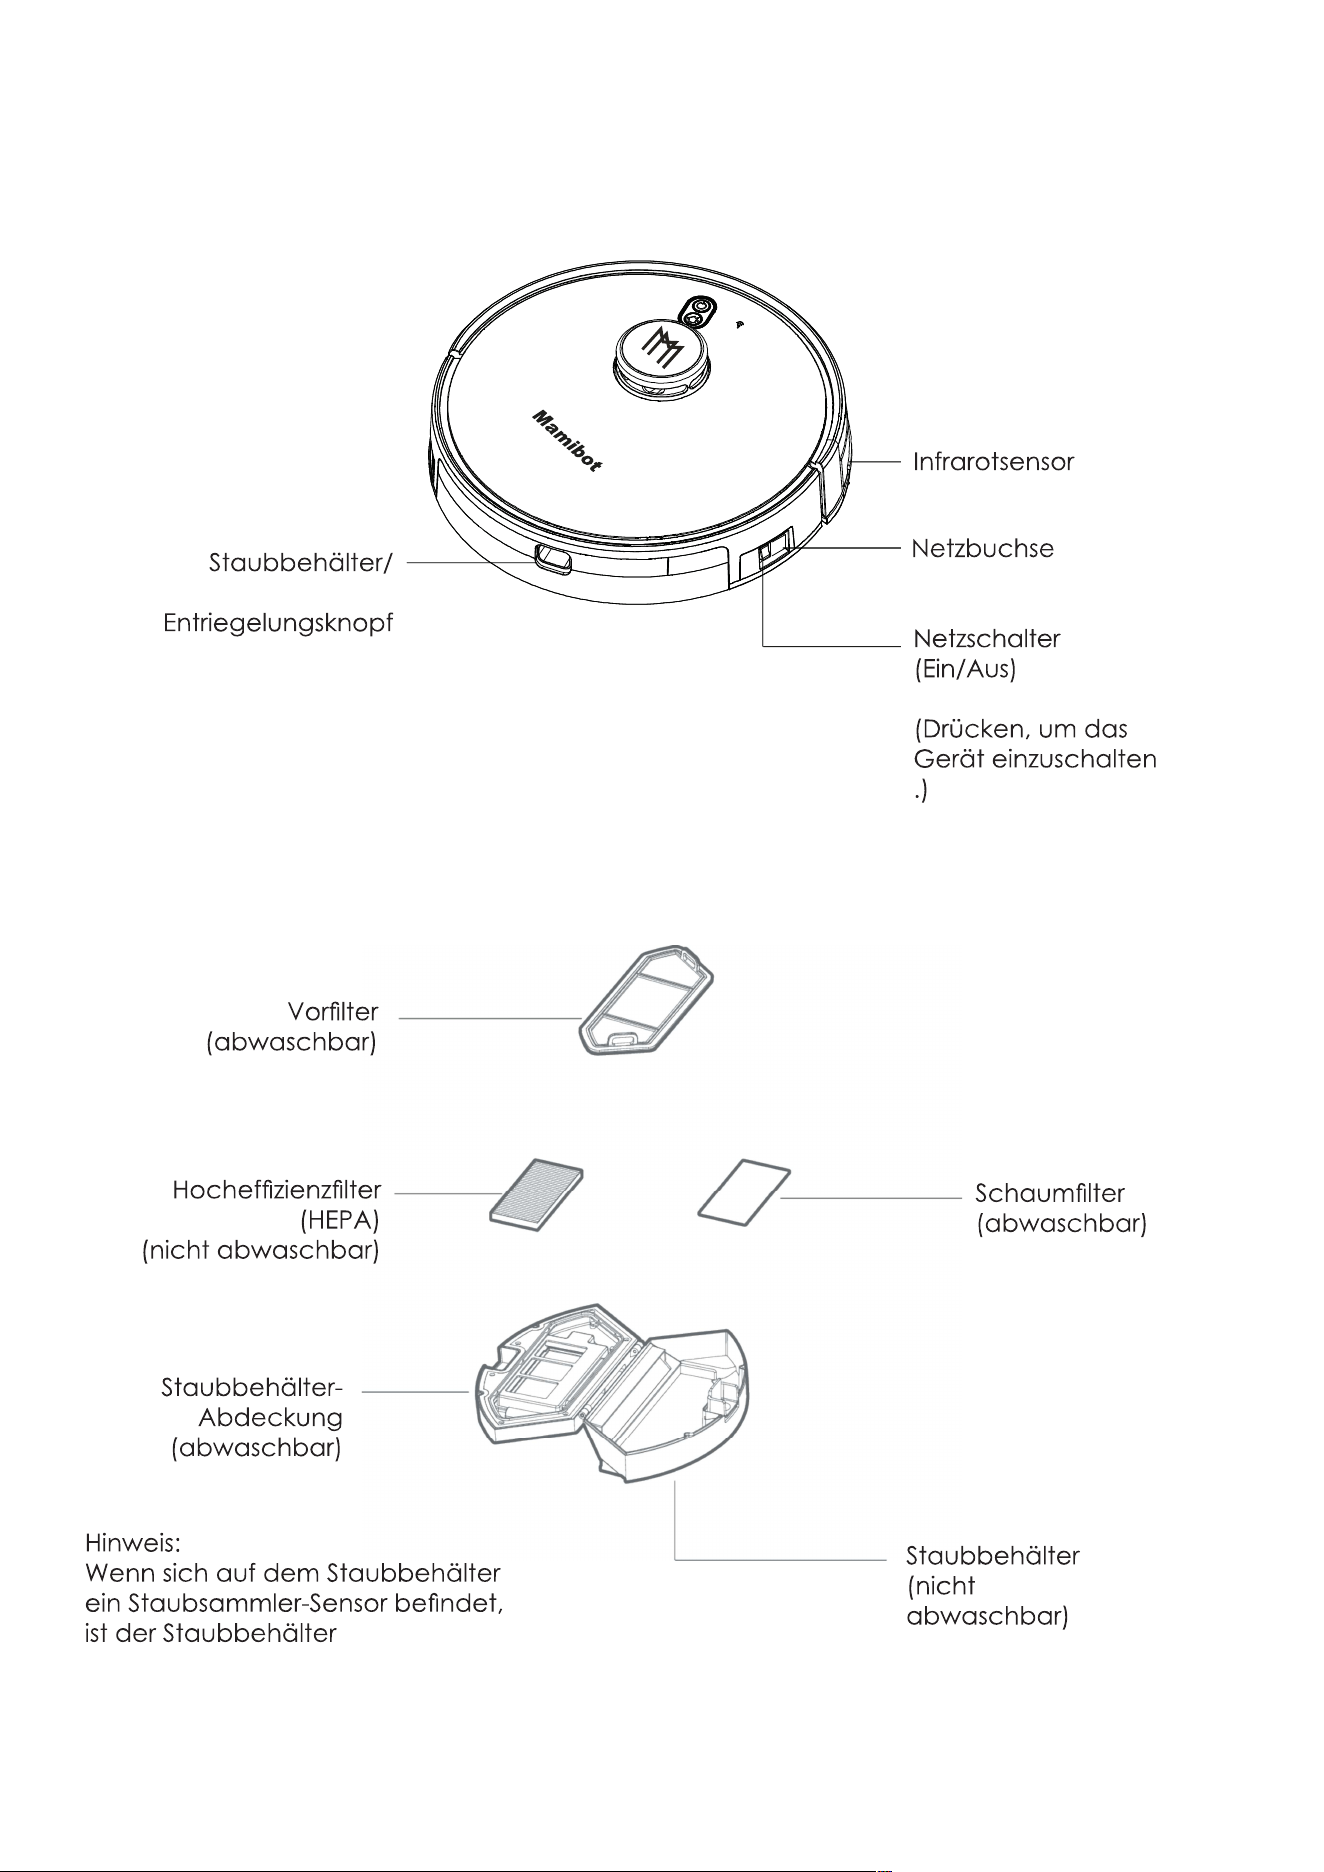
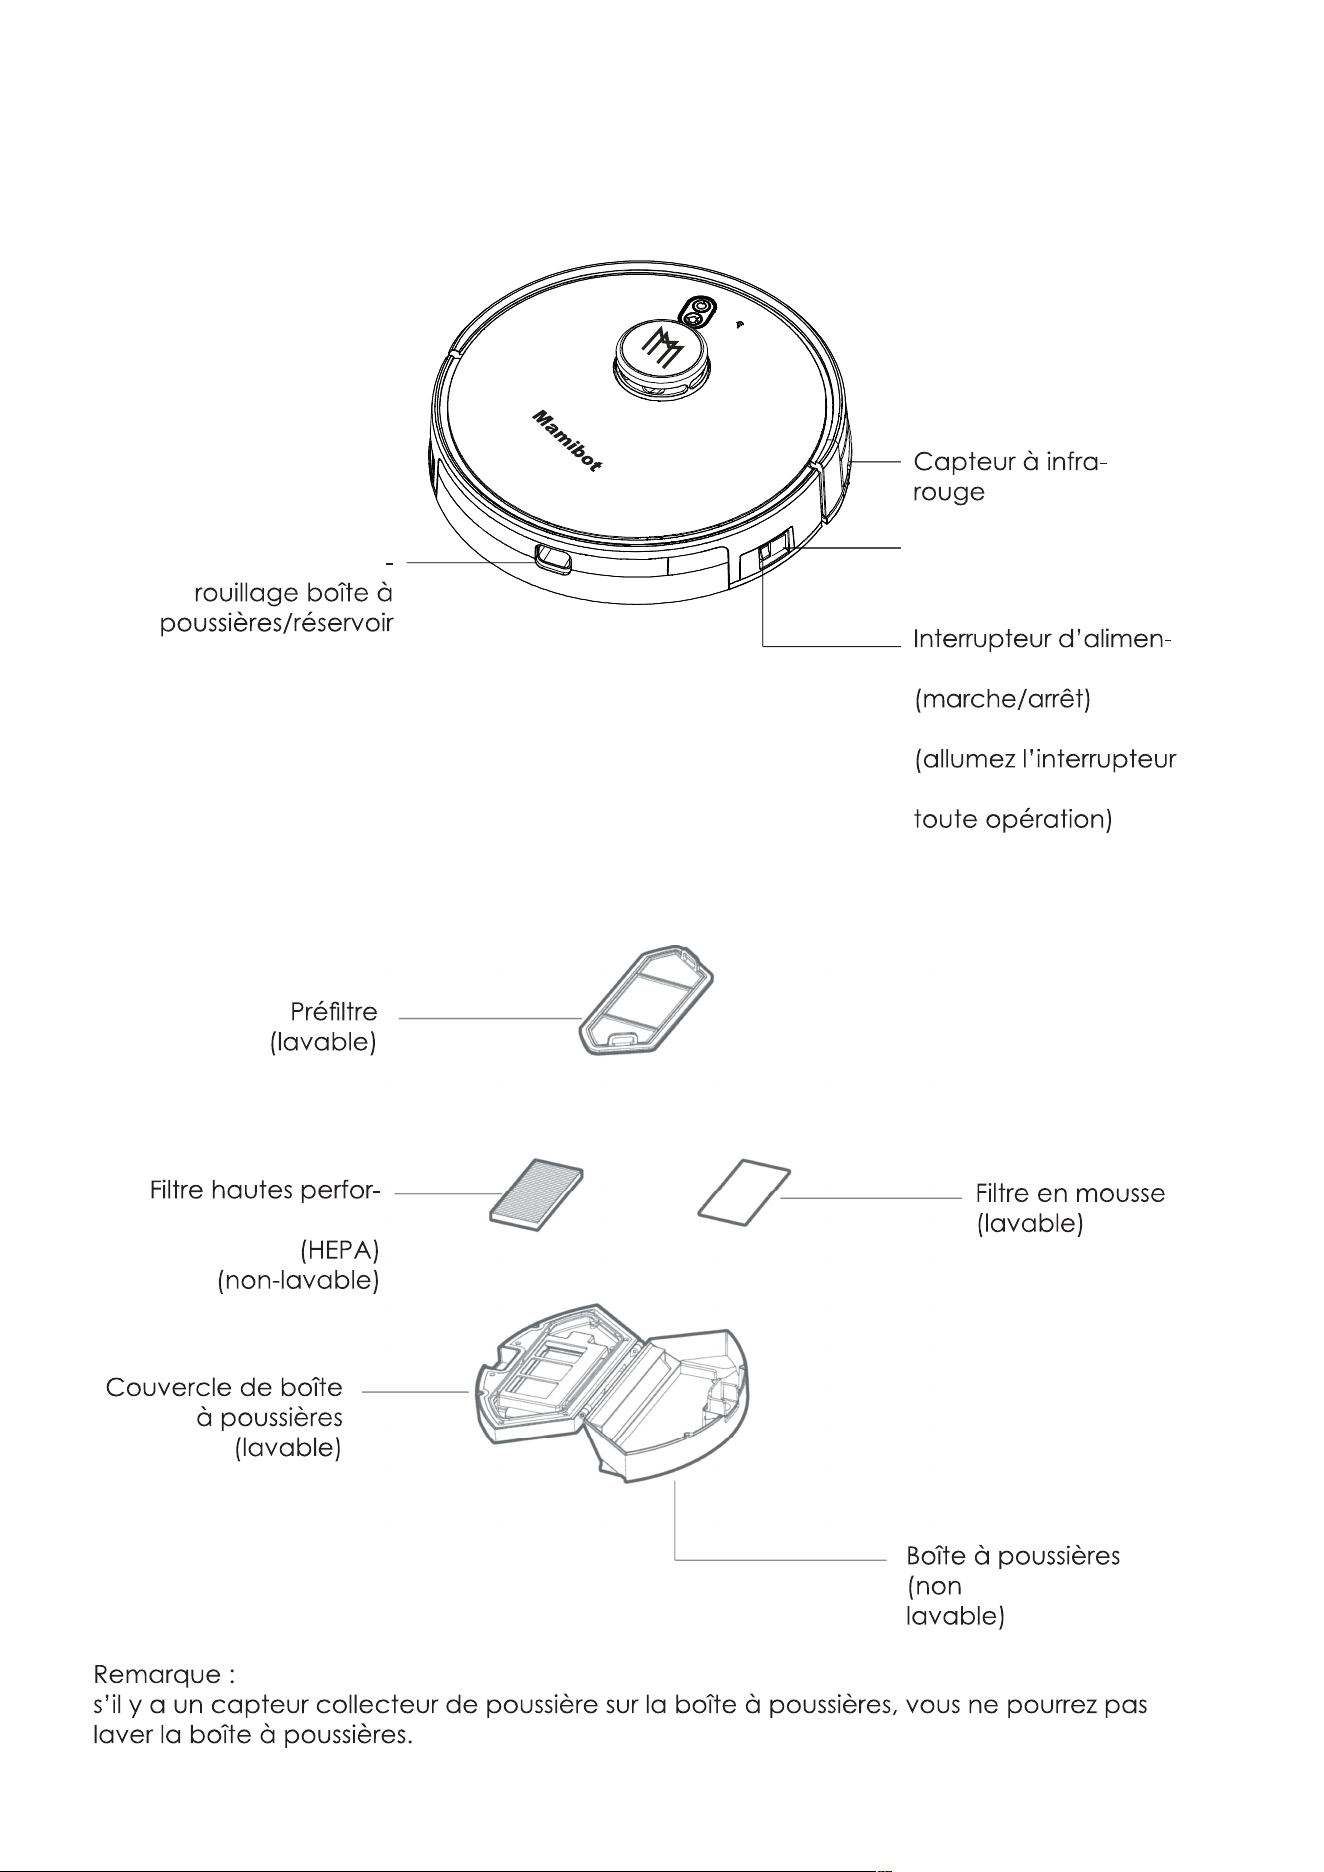
SIDE
DC Power Socket
Main Power Switch
(On/Off)
Dust Box/Water tank
Release Button
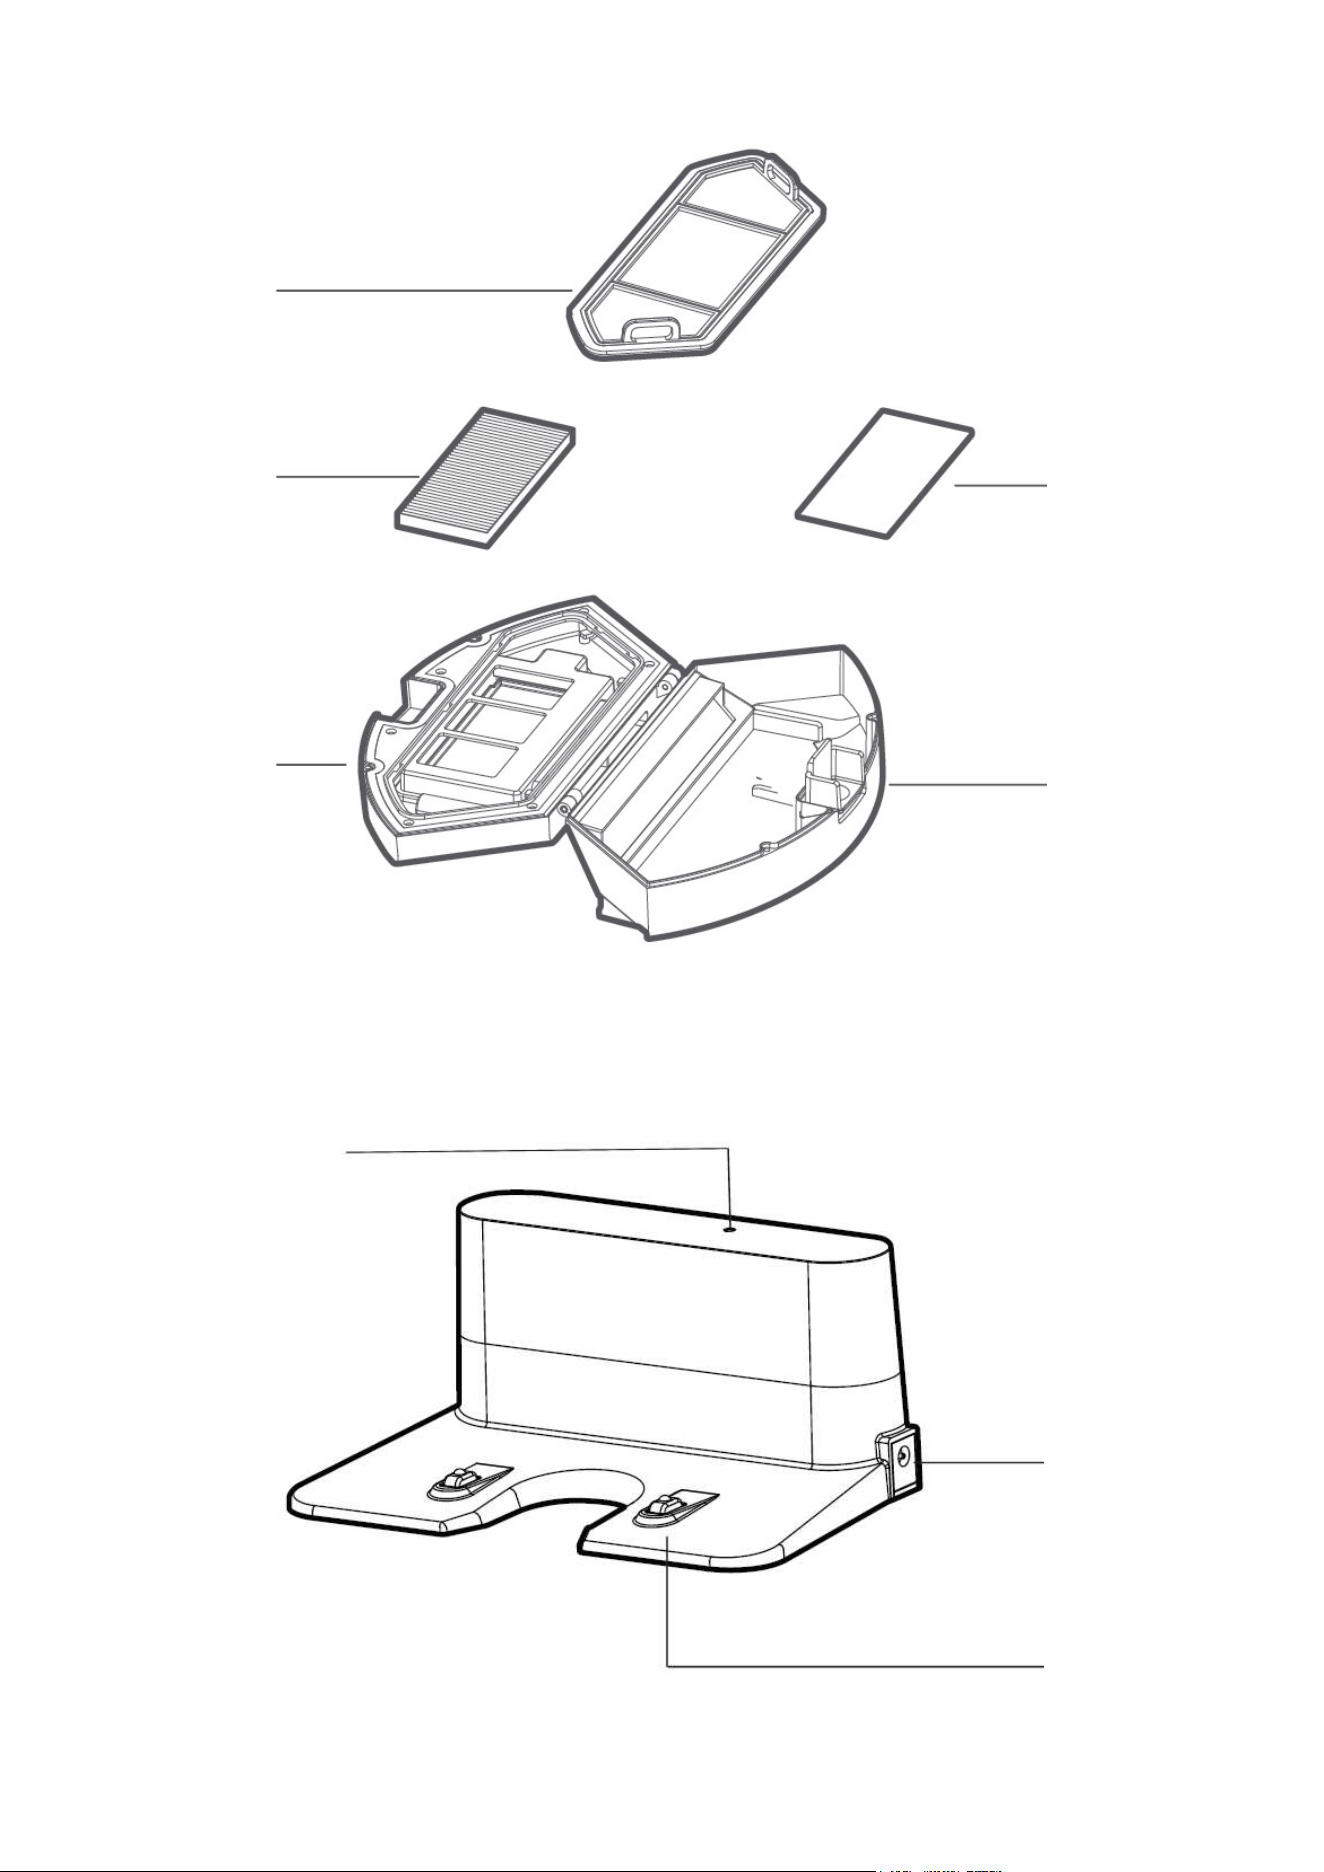
DUST BOX
Pre-Filter
High-Perfomance Filter
(HEPA)
Foam Filter
Dust Box
Dust Box Cover
Infrared Sensor
9
(Turn on it before any
operation is excuted)
(washable)
(Can not be washed)
(Can not be washable)
(Can not be washed)
(washable)
M
a
mi
b
o
t
Note:
If there is dust collector sensor
on the dust box,the dust box
can not be washed.
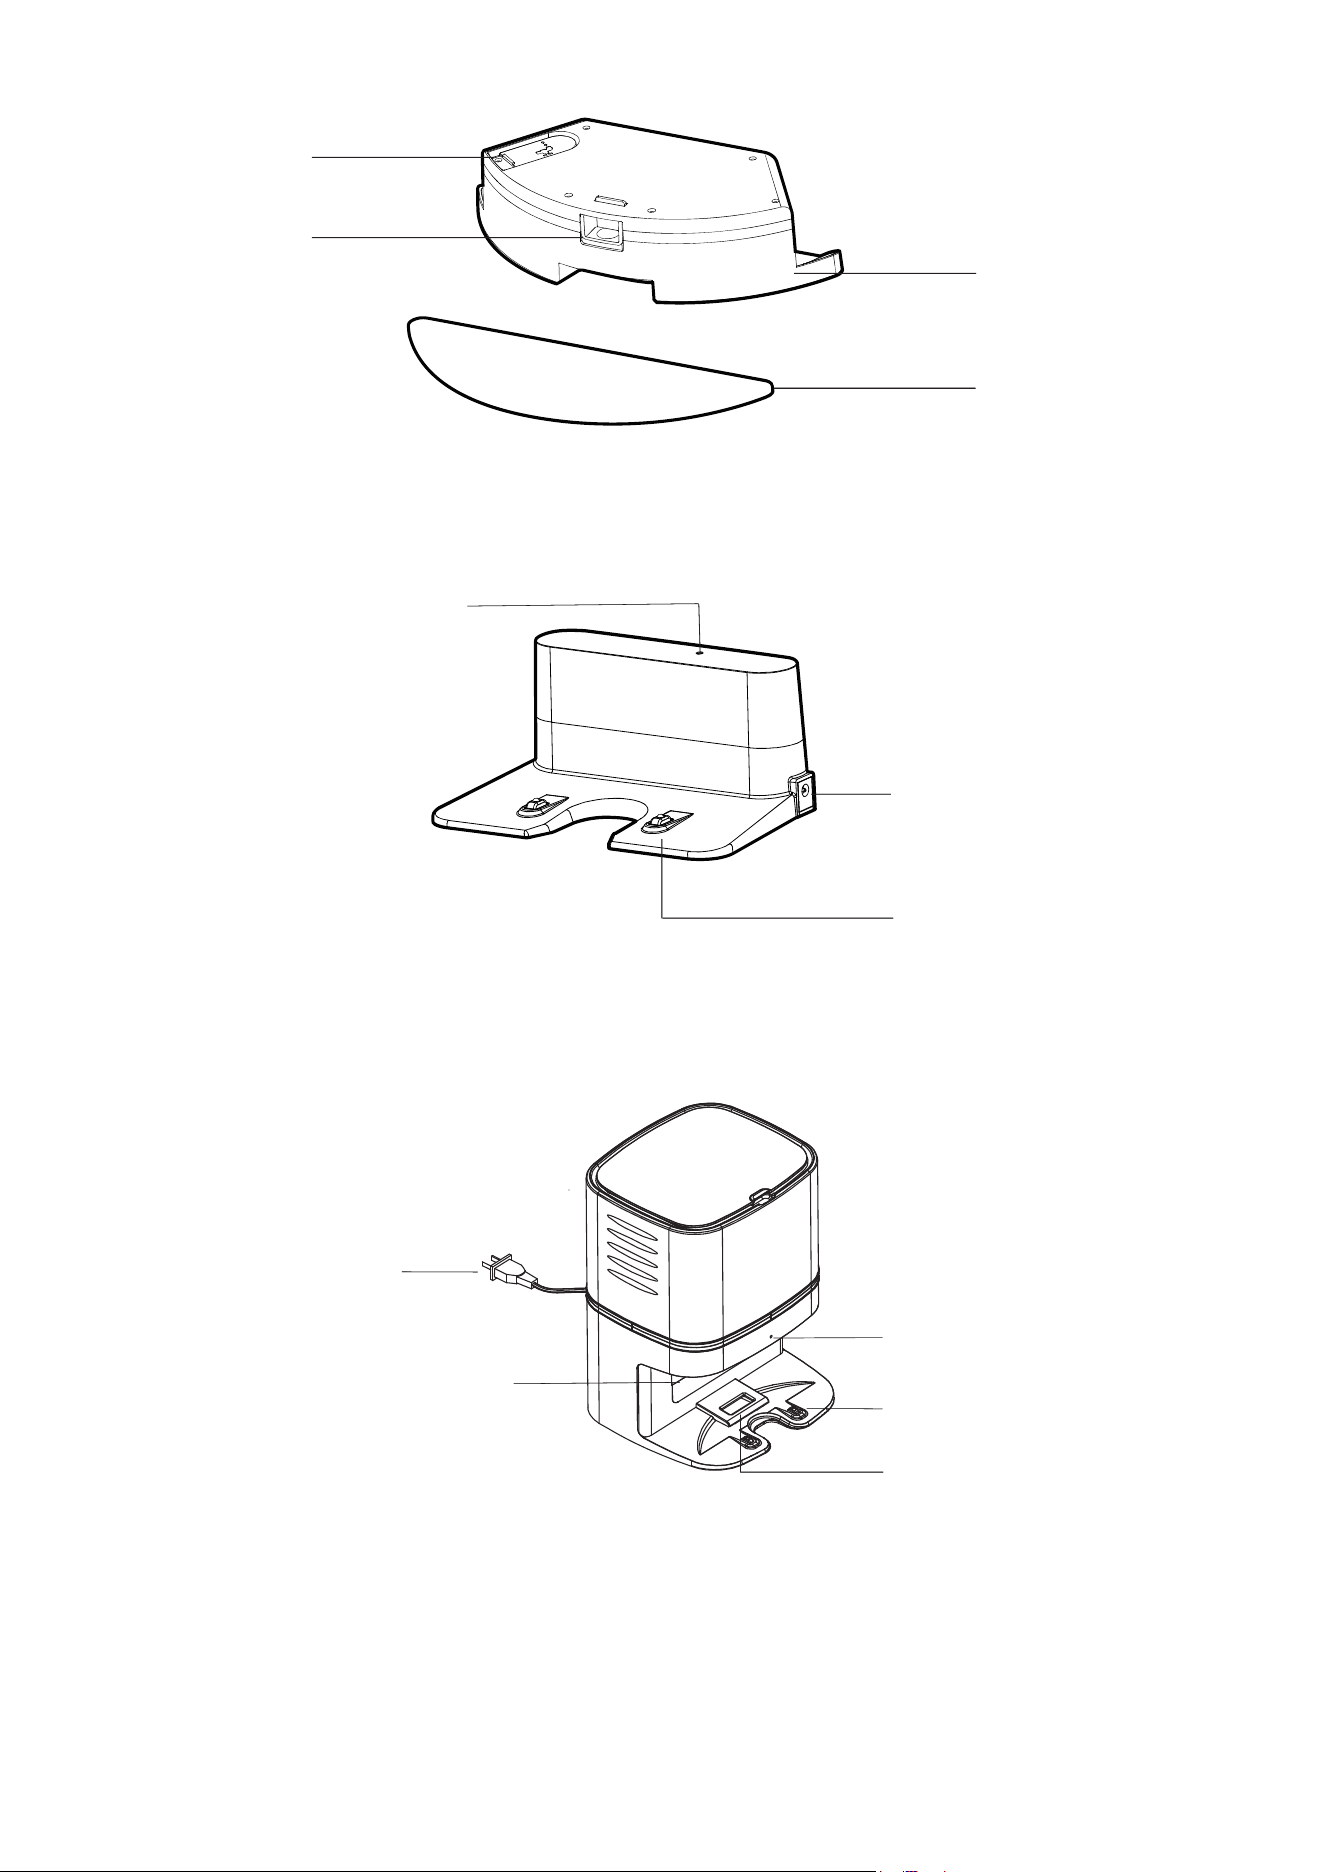
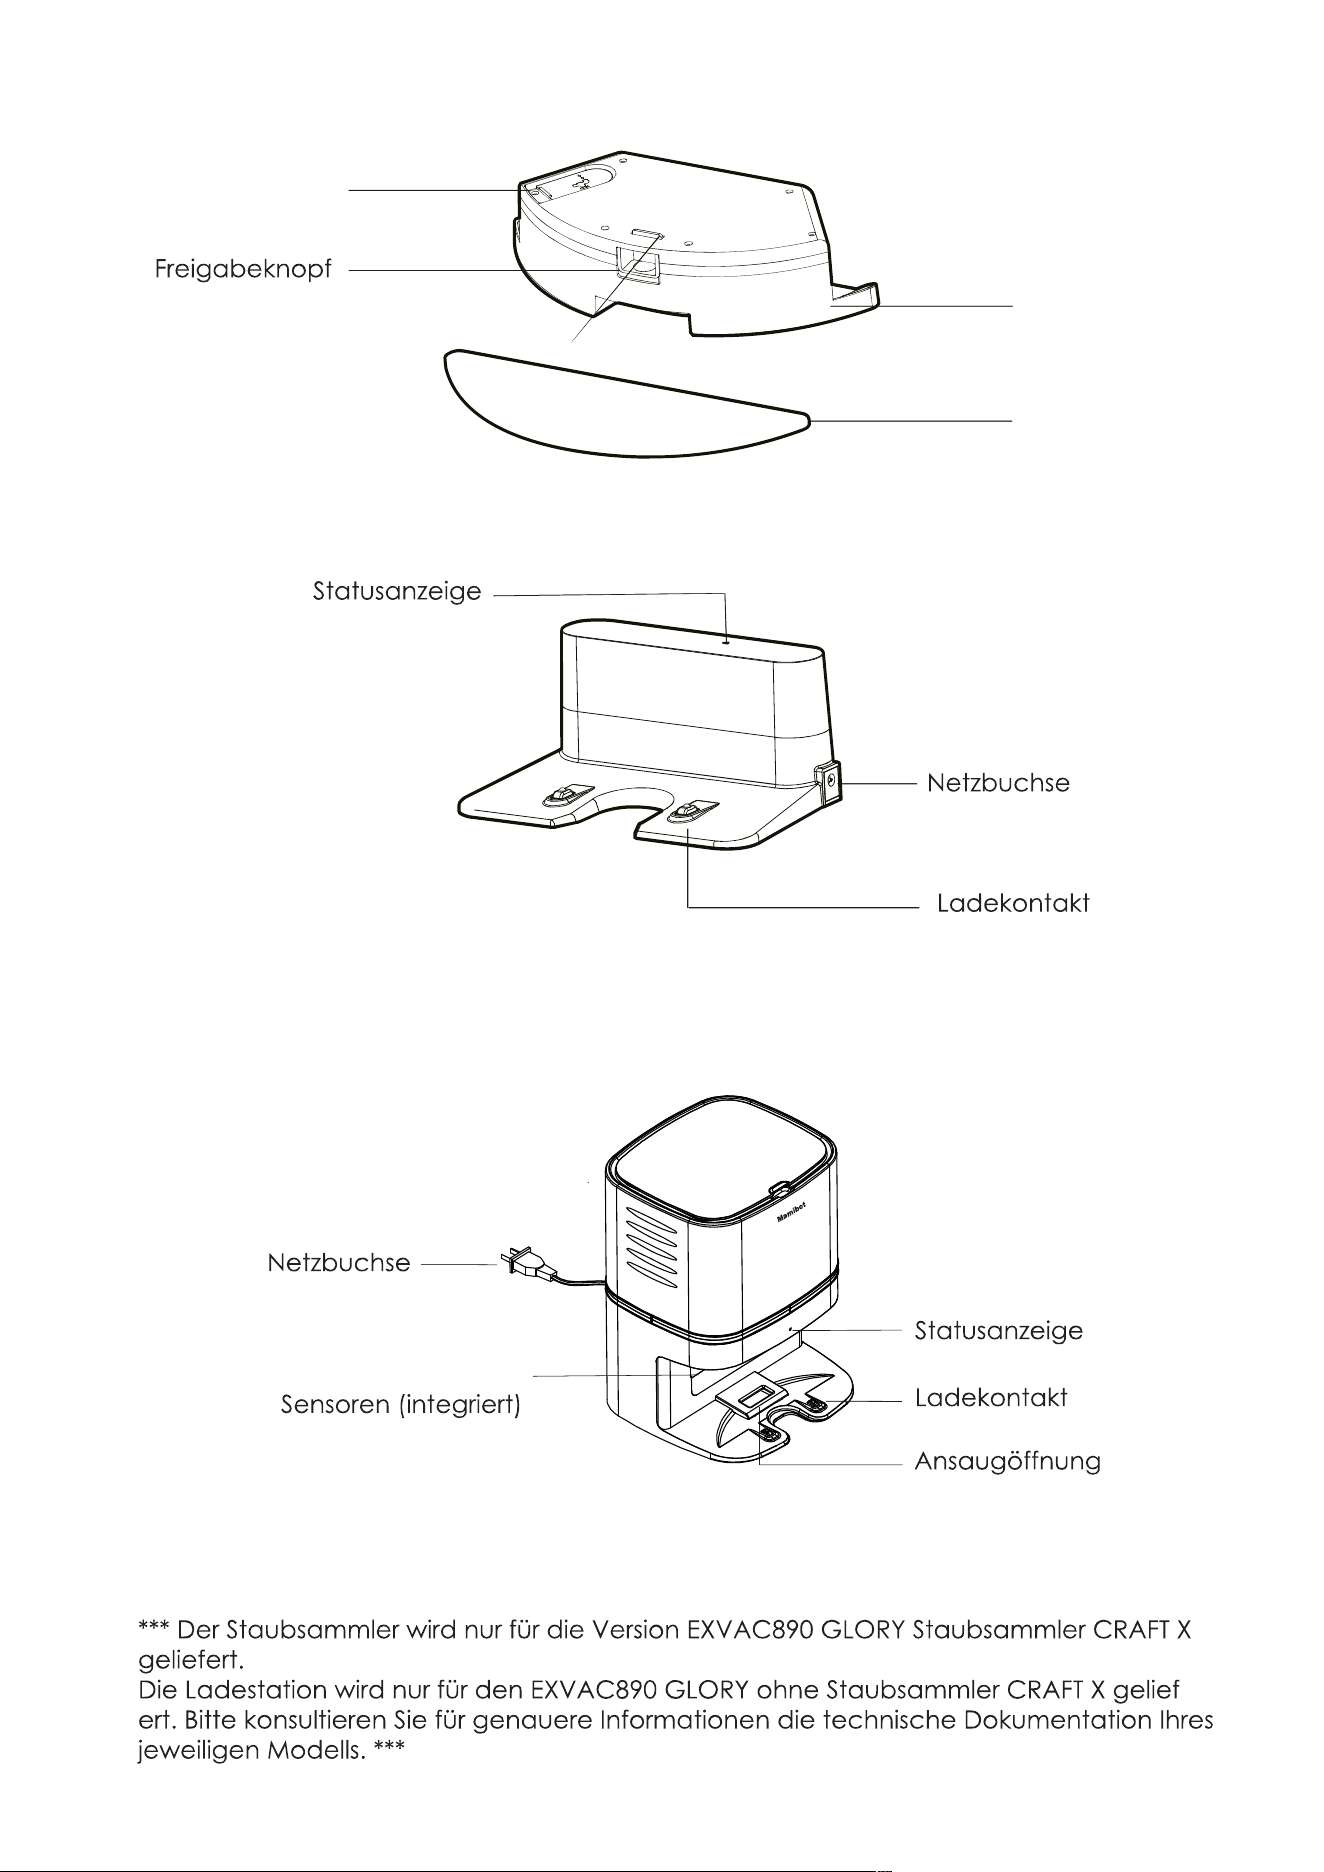
WATER TANK
CHARGING BASE/DOCK
For EXVAC890 GLORY general Version
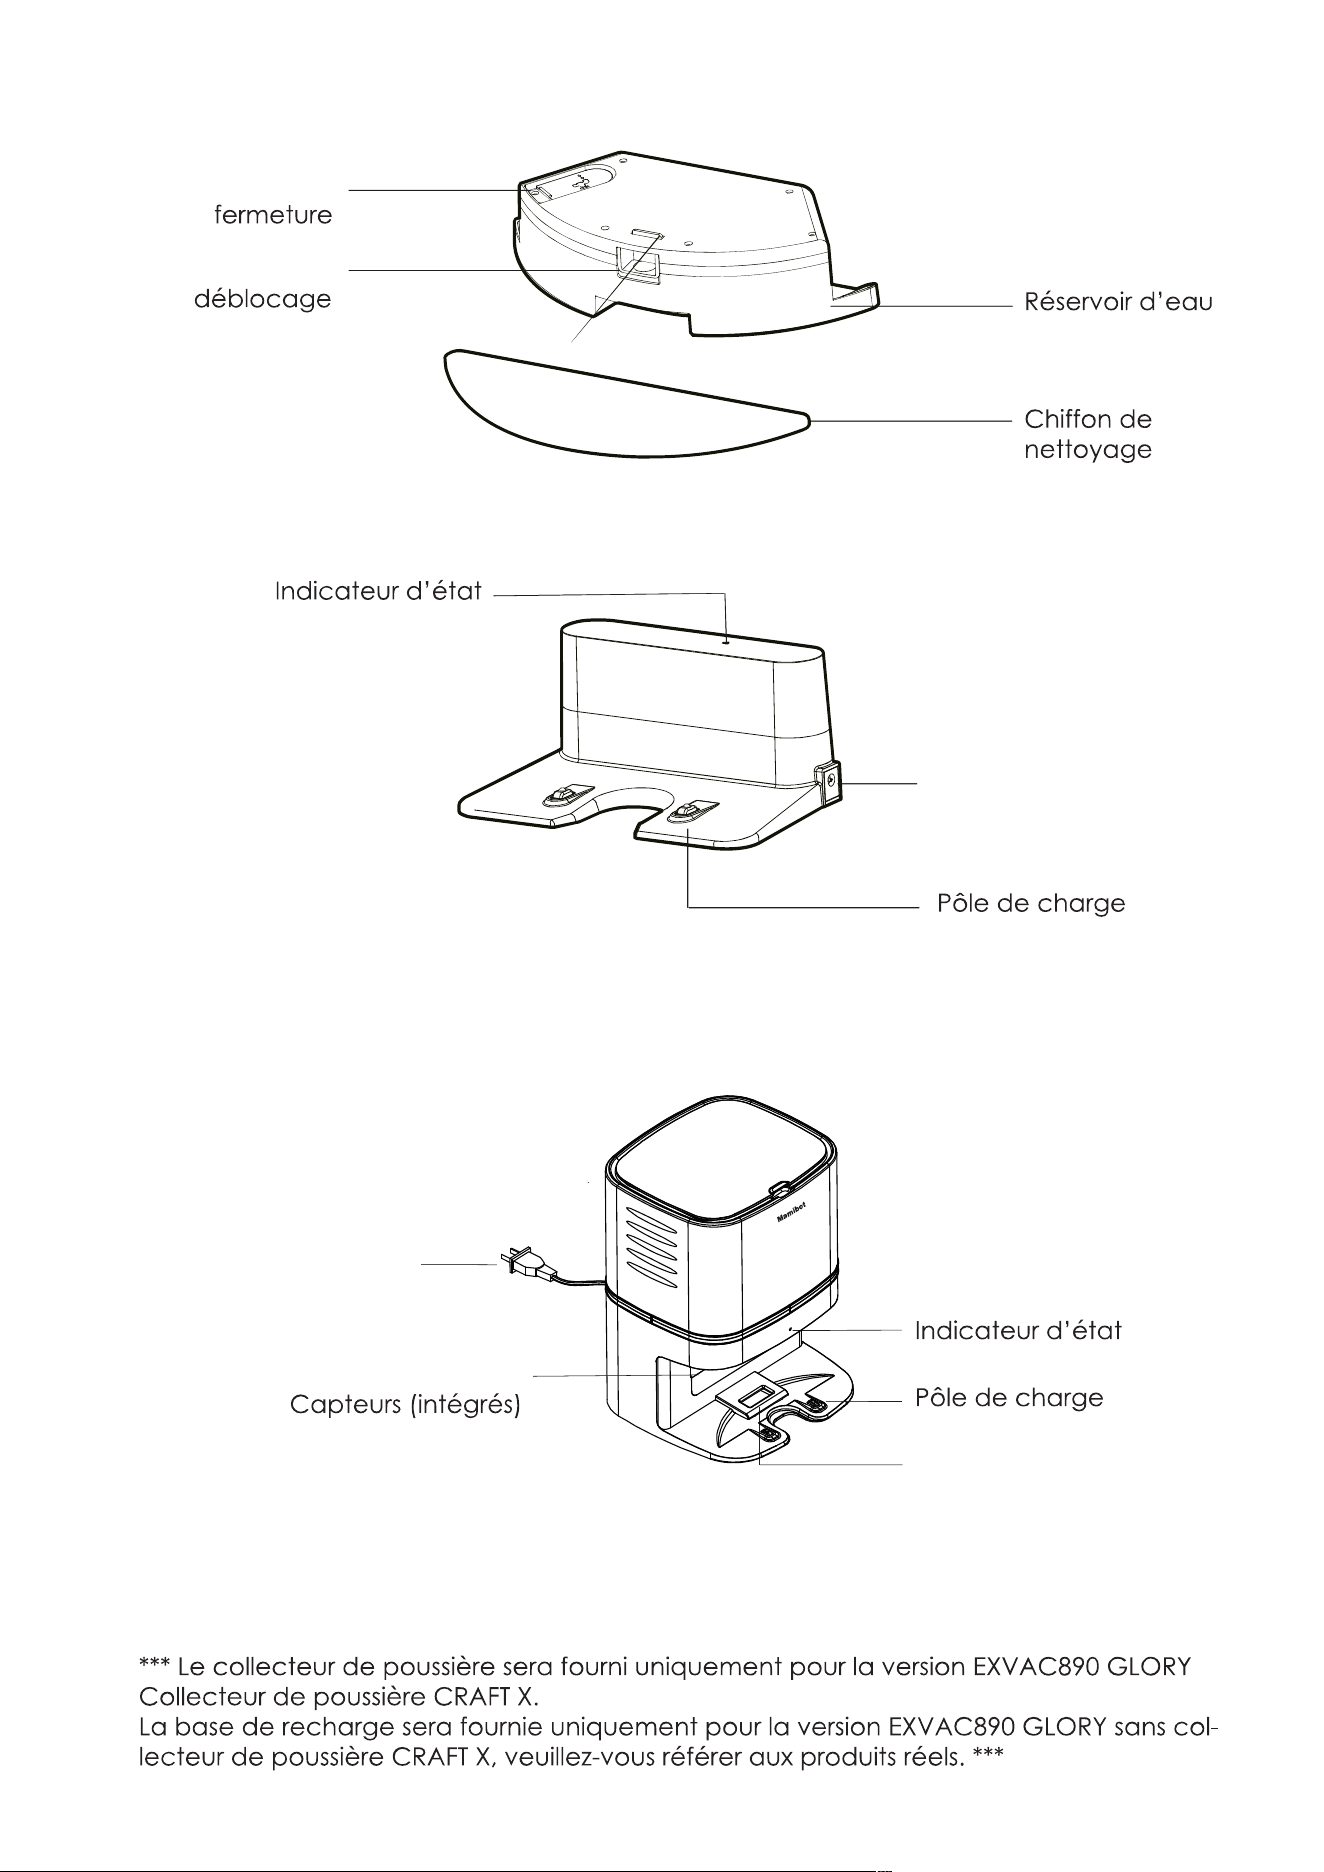
Sealing Cap
Release Button
Water Tank
Mopping Cloth
Status Indicator
DC Power Socket
Charging Pole
10
DUST COLLECTOR
For EXVAC890 Dust Collector-CRAFT X Version
Status Indicator
AC Power Socket
Dust Collector Sensors(Built-in)
Charging Pole
Suction Port
M
a
mib
o
t
***
Dust Collector will only be supplied for the EXVAC890 GLORY Dust Collector -CRAFT X Version.
Charging Base will only be supplied for the EXVAC890 GLORY without Dust collector-CRAFT X
Version, please
subject to the actual received products.
***
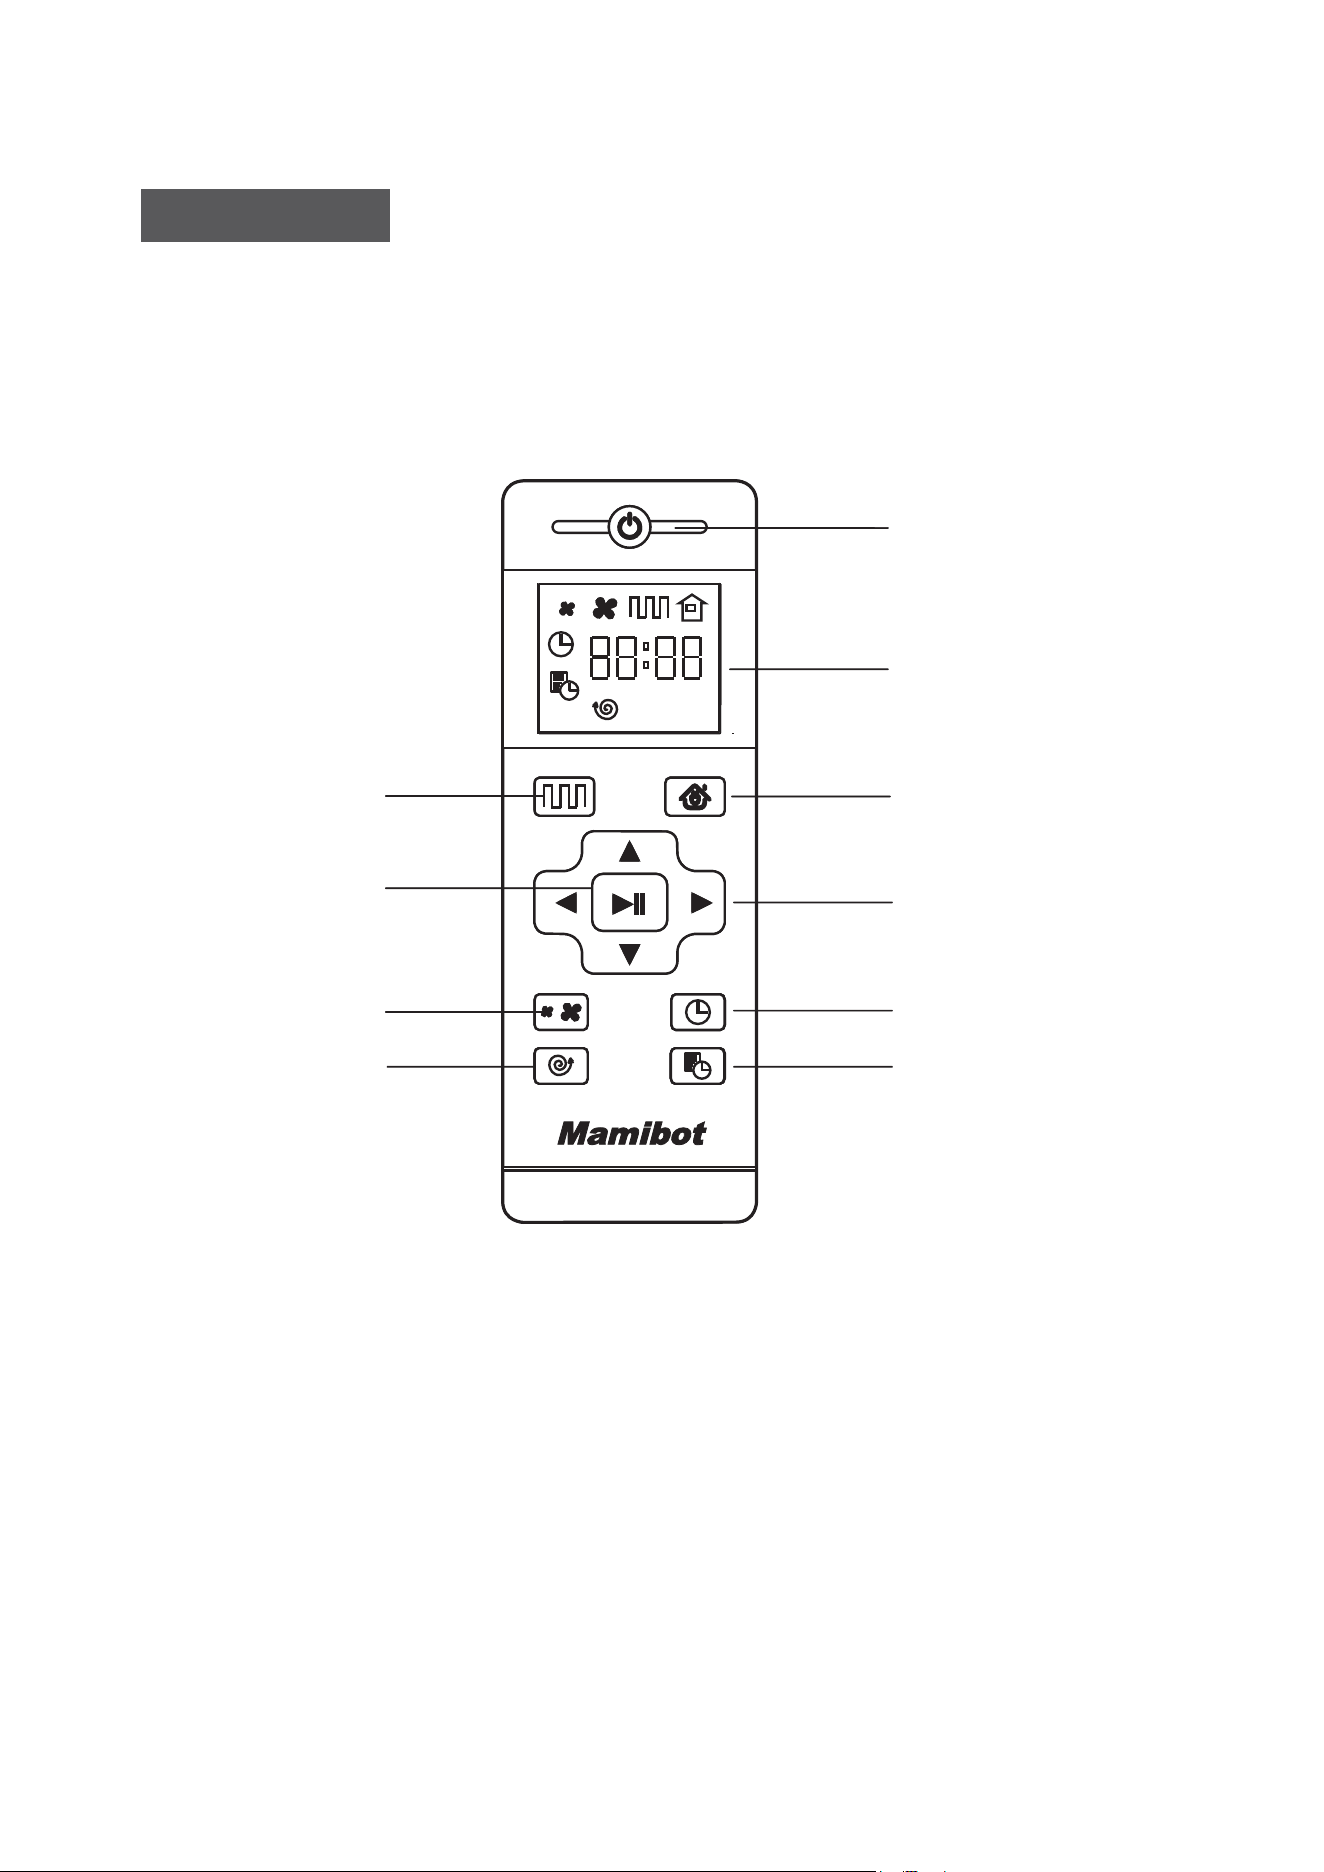
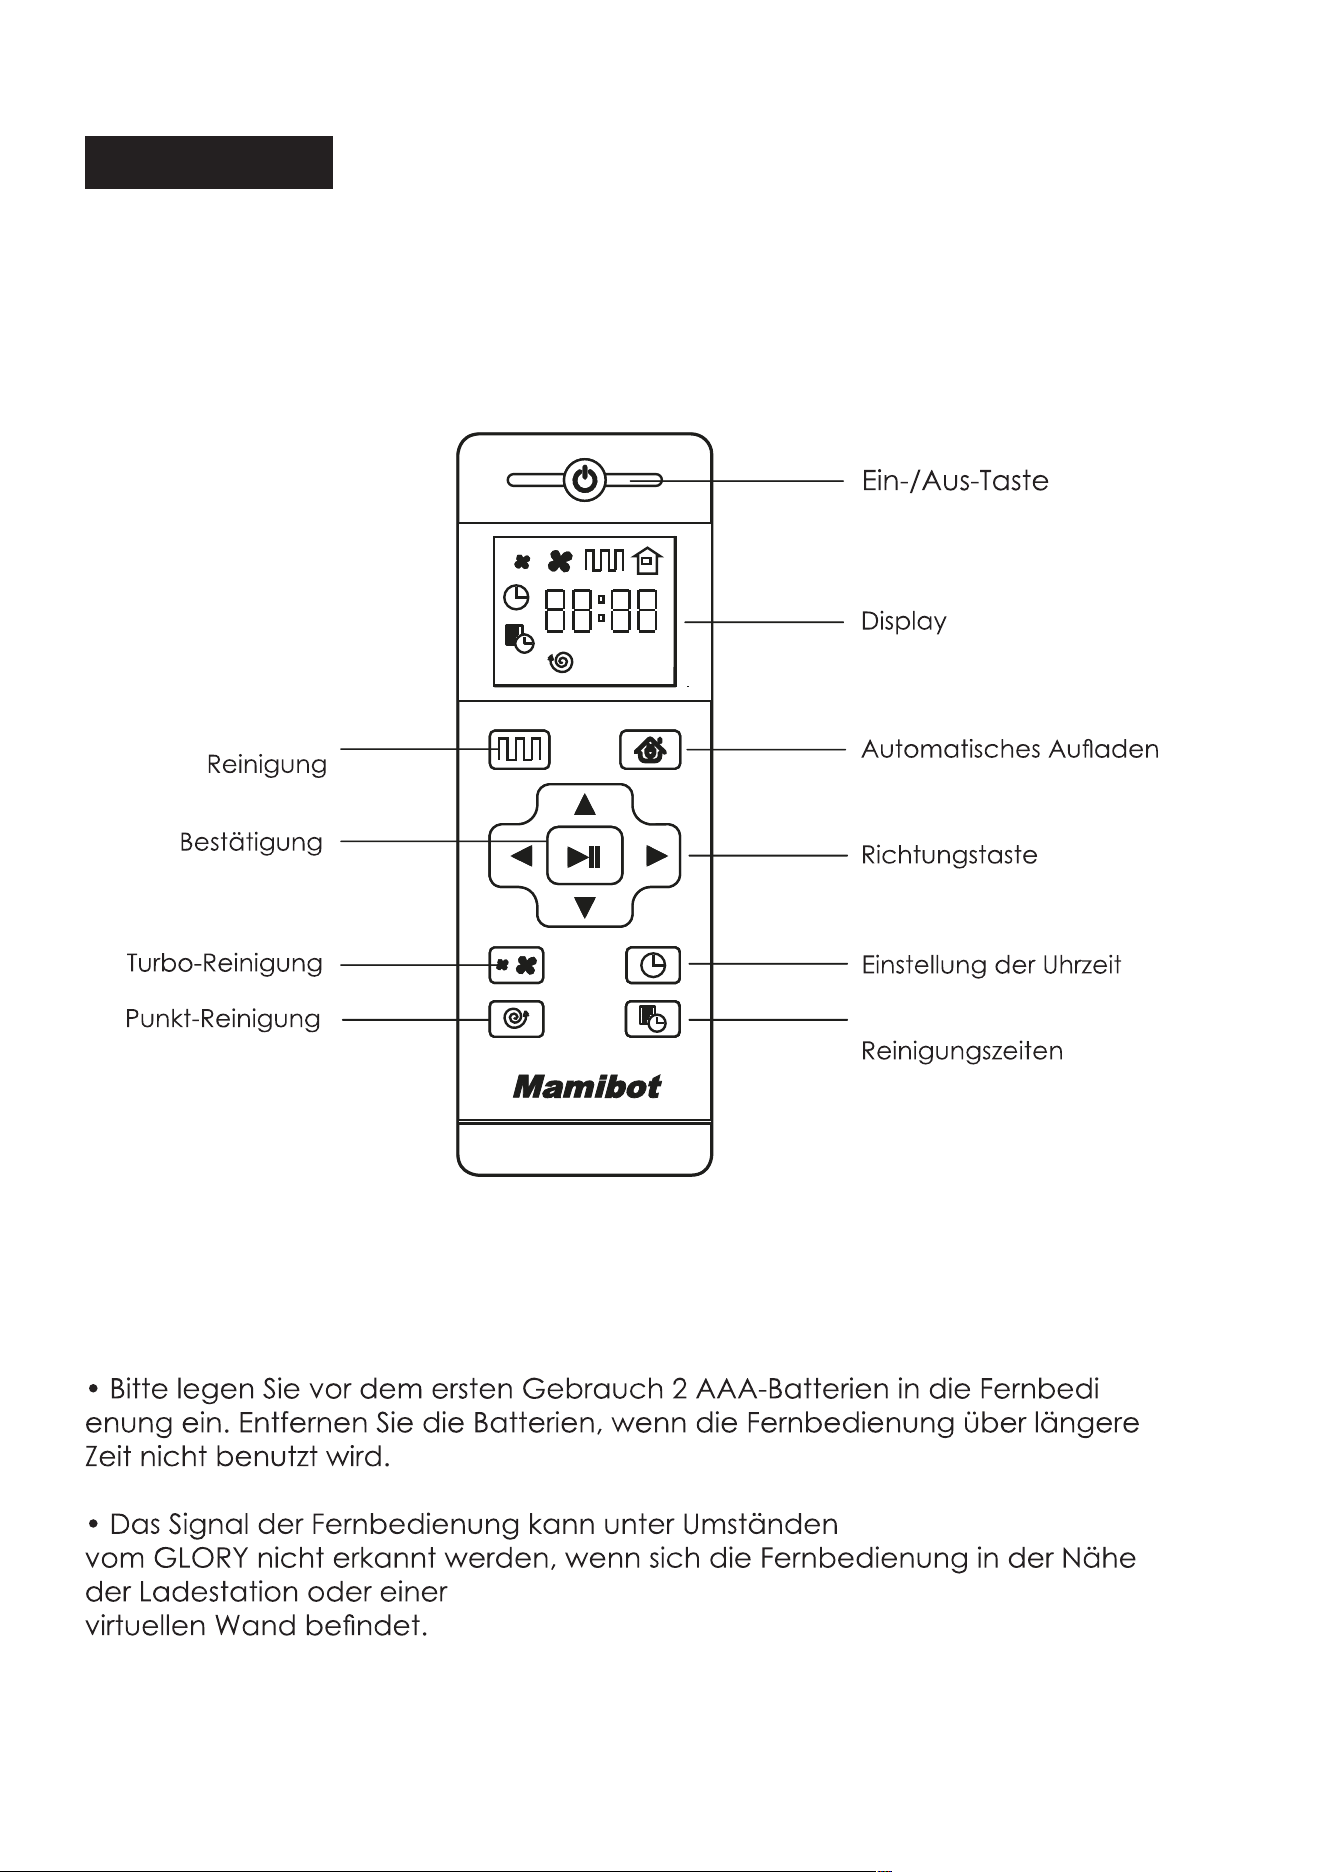
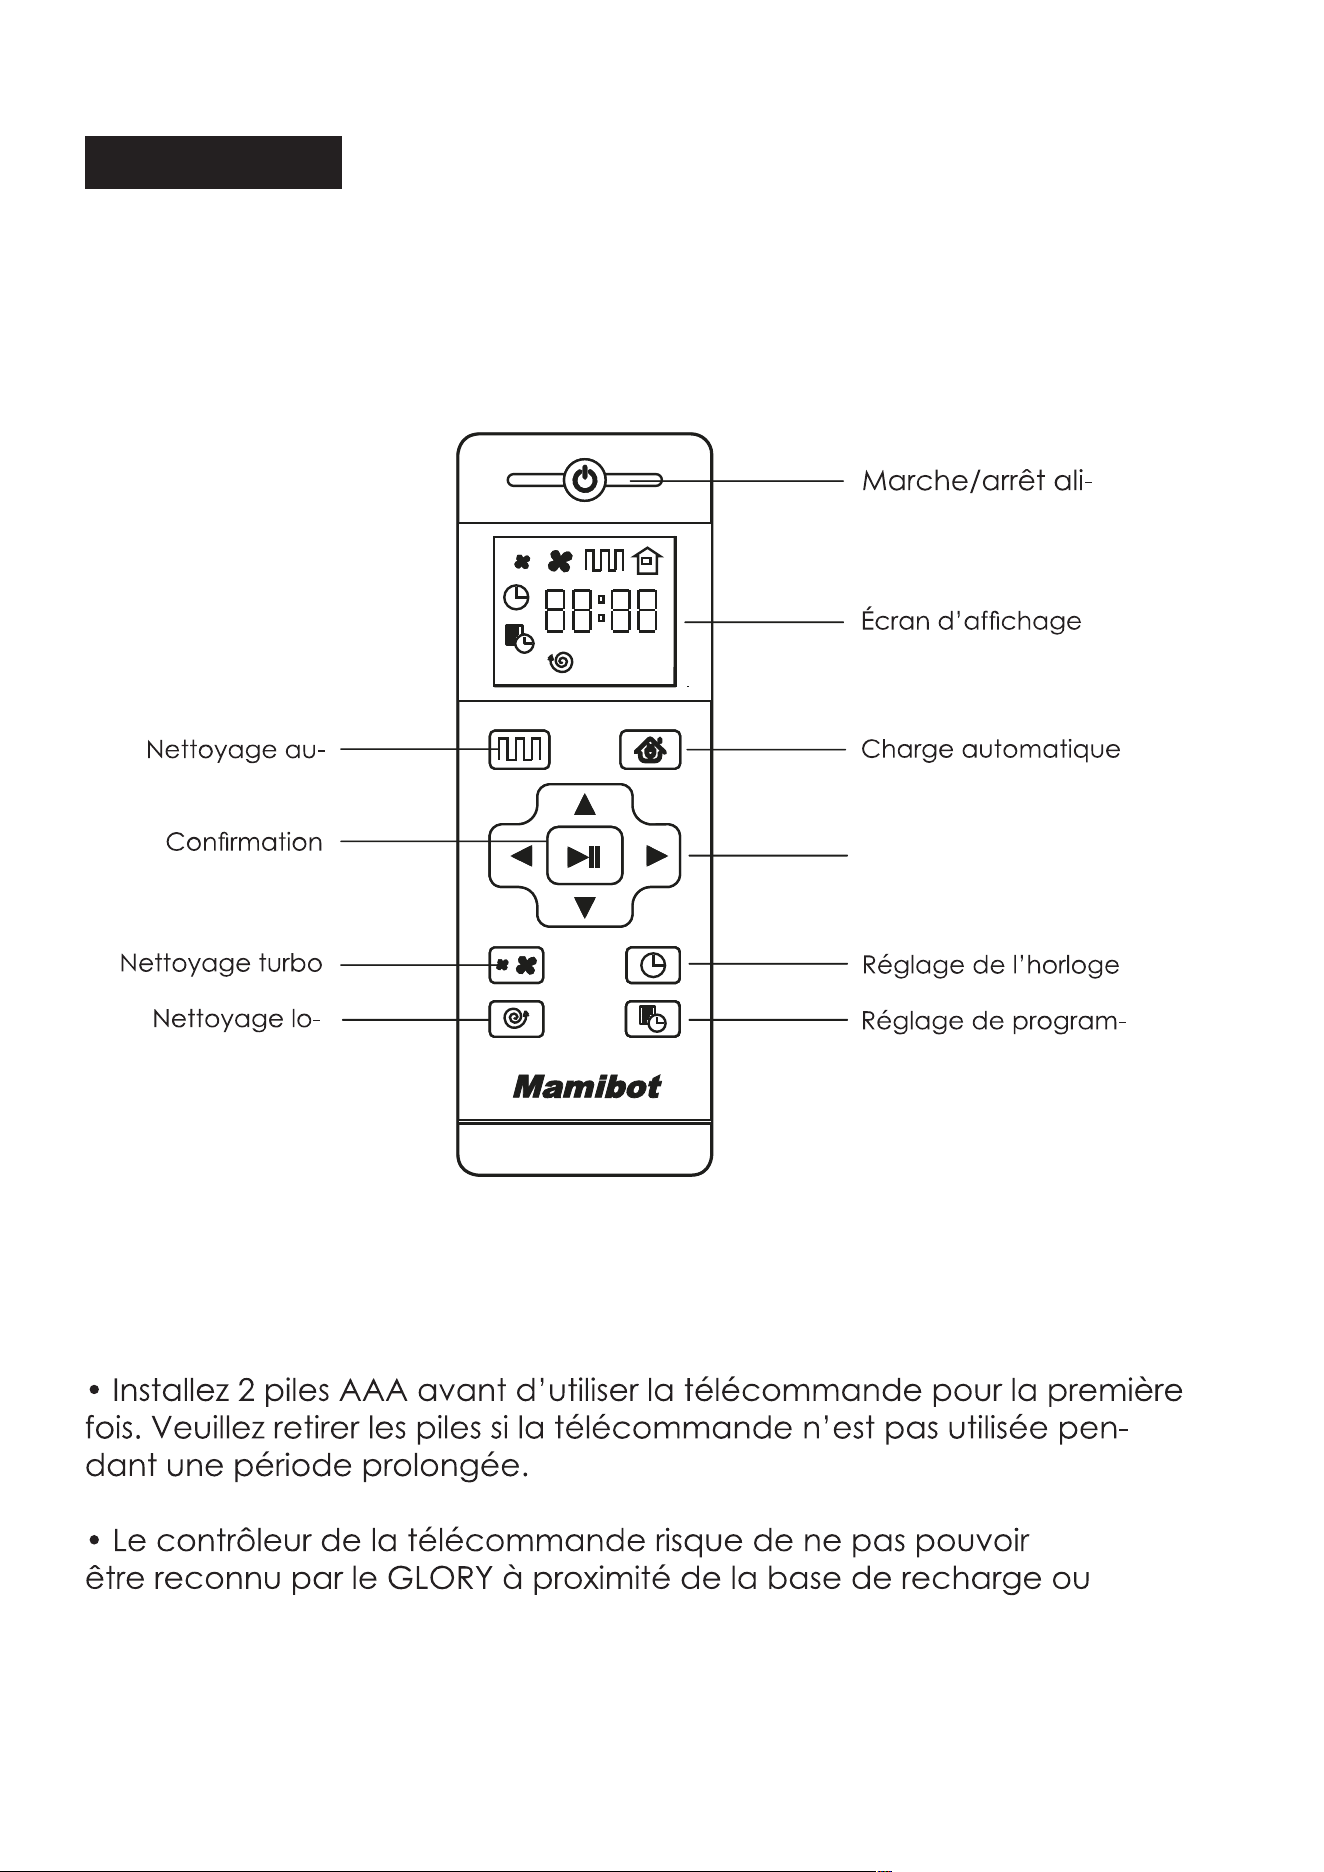
Power On/Off
Display Screen
Auto Charging
Direction Button
Clock Setting
Schedule Setting
Auto Cleaning
Confirmation
Turbo Mode
Spot Cleaning
• Install 2xAAA batteries before using the remote control for the first
time. Please remove the battery if users don’t use the remote control
for a long time.
• The commander from the remote control may not be able to be
recoganized by GLORY if it is in the vicinity of the charginig base or
physical vitual wall.
Remote Control
11
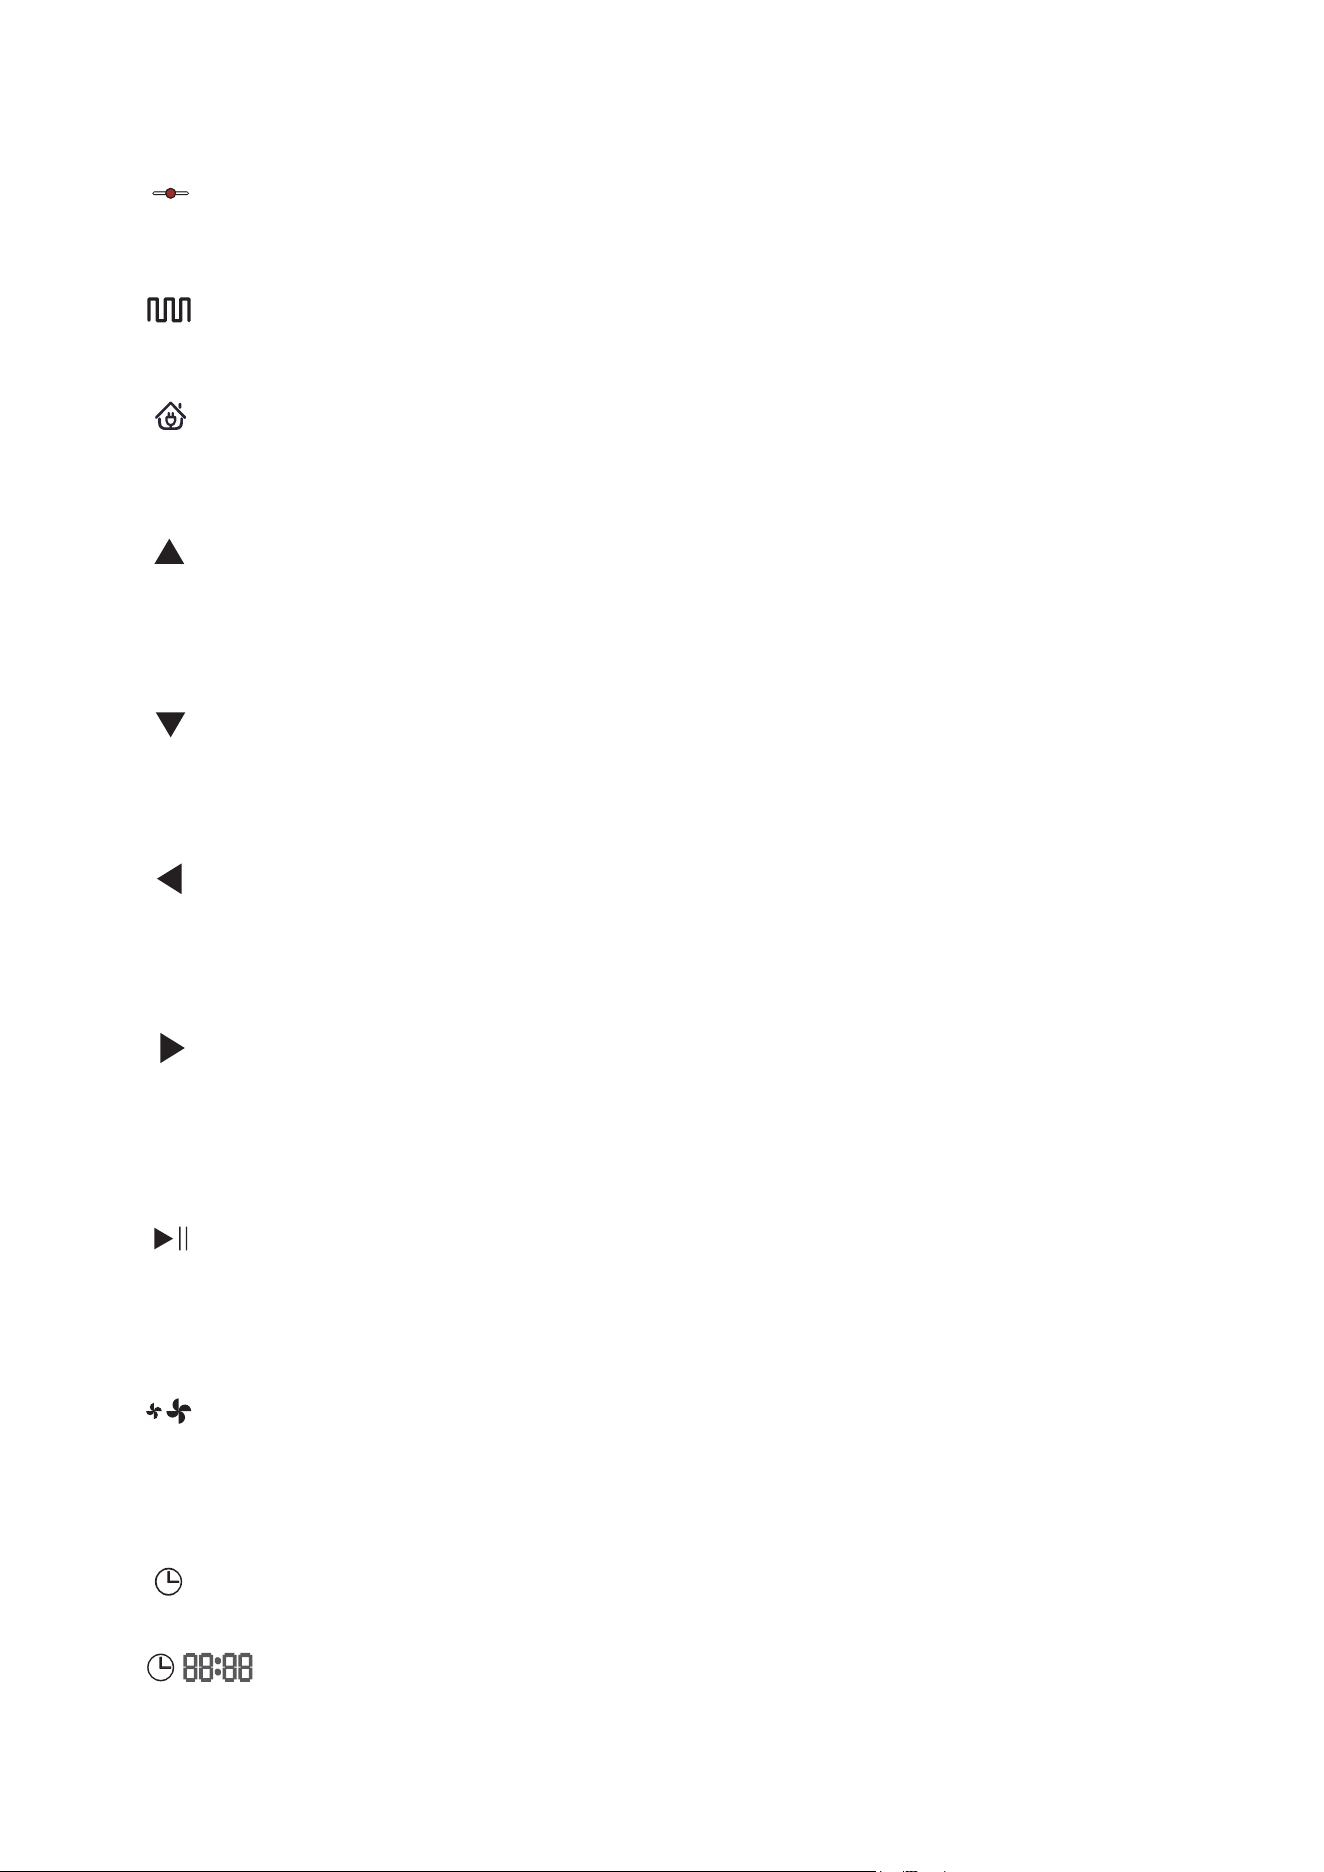
Power on/Off
Press this button to power the GLORY On or Off.
Auto Cleaning Button
Press this button to enter the Auto Cleaning mode.
Auto Charging
Press this button to enter the Auto Charging mode, and the screen
displays on remote control.
Forward /+
Press this button to continue moving forwards in standby model, release
it to return to standby mode. Press this button to increase the number
at the Schedule setting mode,
Back /-
Press this button, robot will rotate 180 degrees. Press this button to
decrease the number in the Schedule setting mode,
Left Arrow
Press this button to continue turning left when in standby mode, release
it to return to standby mode. Press this button to set the hour in the
Schedule setting mode.
Right Arrow
Press this button to continue turning right when in standby mode, release
it to return to standby mode. Press this button to set the minute in the
Schedule setting mode.
Confirmation/Pauze
It is for confirmation in Schedule or Clock setting mode. It is the Pause
or Start button. It is also the button for waking up if GLORY is powered off
by the remote.
Turbo Mode
Press this button to adjust the suction power in any working model.
There are Normal suction and Turbo Suction for your option. Users can
also adjust the suction mode on APP.
Clock Setting
Press this button to set the clock and the Confirmation button to exit.
12
Schedule Setting
Press this button to set the schedule when in standy mode, the icon
will flash, and press this button or Confirmation button to save the data
and exit, then the icon will always display on the screen. Press this
button for 3S to cancel the Schedule, and the icon will disappear.
Spot Cleaning
Press this button to enter the Spot Cleaning mode.
13

GLORY Working Mode
Auto Cleaning
The Laser of GLORY will explore one part of the room first, then start to
clean the detected room in ”Zigzag” path. After the detected area
cleaning is finished, GLORY will explore other new areas for next plan
until the whole room cleaning is completed. GLORY works in Auto
cleaning mode when press the Start/Stop button on GLORY, or the Auto
cleaning button on the remote control, or the Start button on the App.
Turbo Mode
Press the button in the Auto Cleaning mode to enter the Turbo
mode. Users can also adjust the suction power via APP, there are
FOUR levels including: Silence, Standard, Strong suction and MAX.
Mopping Mode
To enter the Mopping mode with water tank attached to the robot,
GLORY will work as the path in Auto Cleaning mode. There are three
levels of water dripping speed: low,medium and high.
Not-to-go Area Setting
To set the area which users’do not want GLORY to enter by the APP,
it is similar to the function of a virtual wall.
Spot Cleaning
Press this button to enter Spot cleaning mode.
Position
Press the Position button on the APP, GLORY will say “I am here”, it would
be useful for finding GLORY if it is stuck.
Notice:
The main power switch of GLORY should be kept on.
The remaining battery of GLORY is more than 5%.
The voice of GLORY is switched on.
14
Before
Removing
Removed
Breakpoint
Recharging
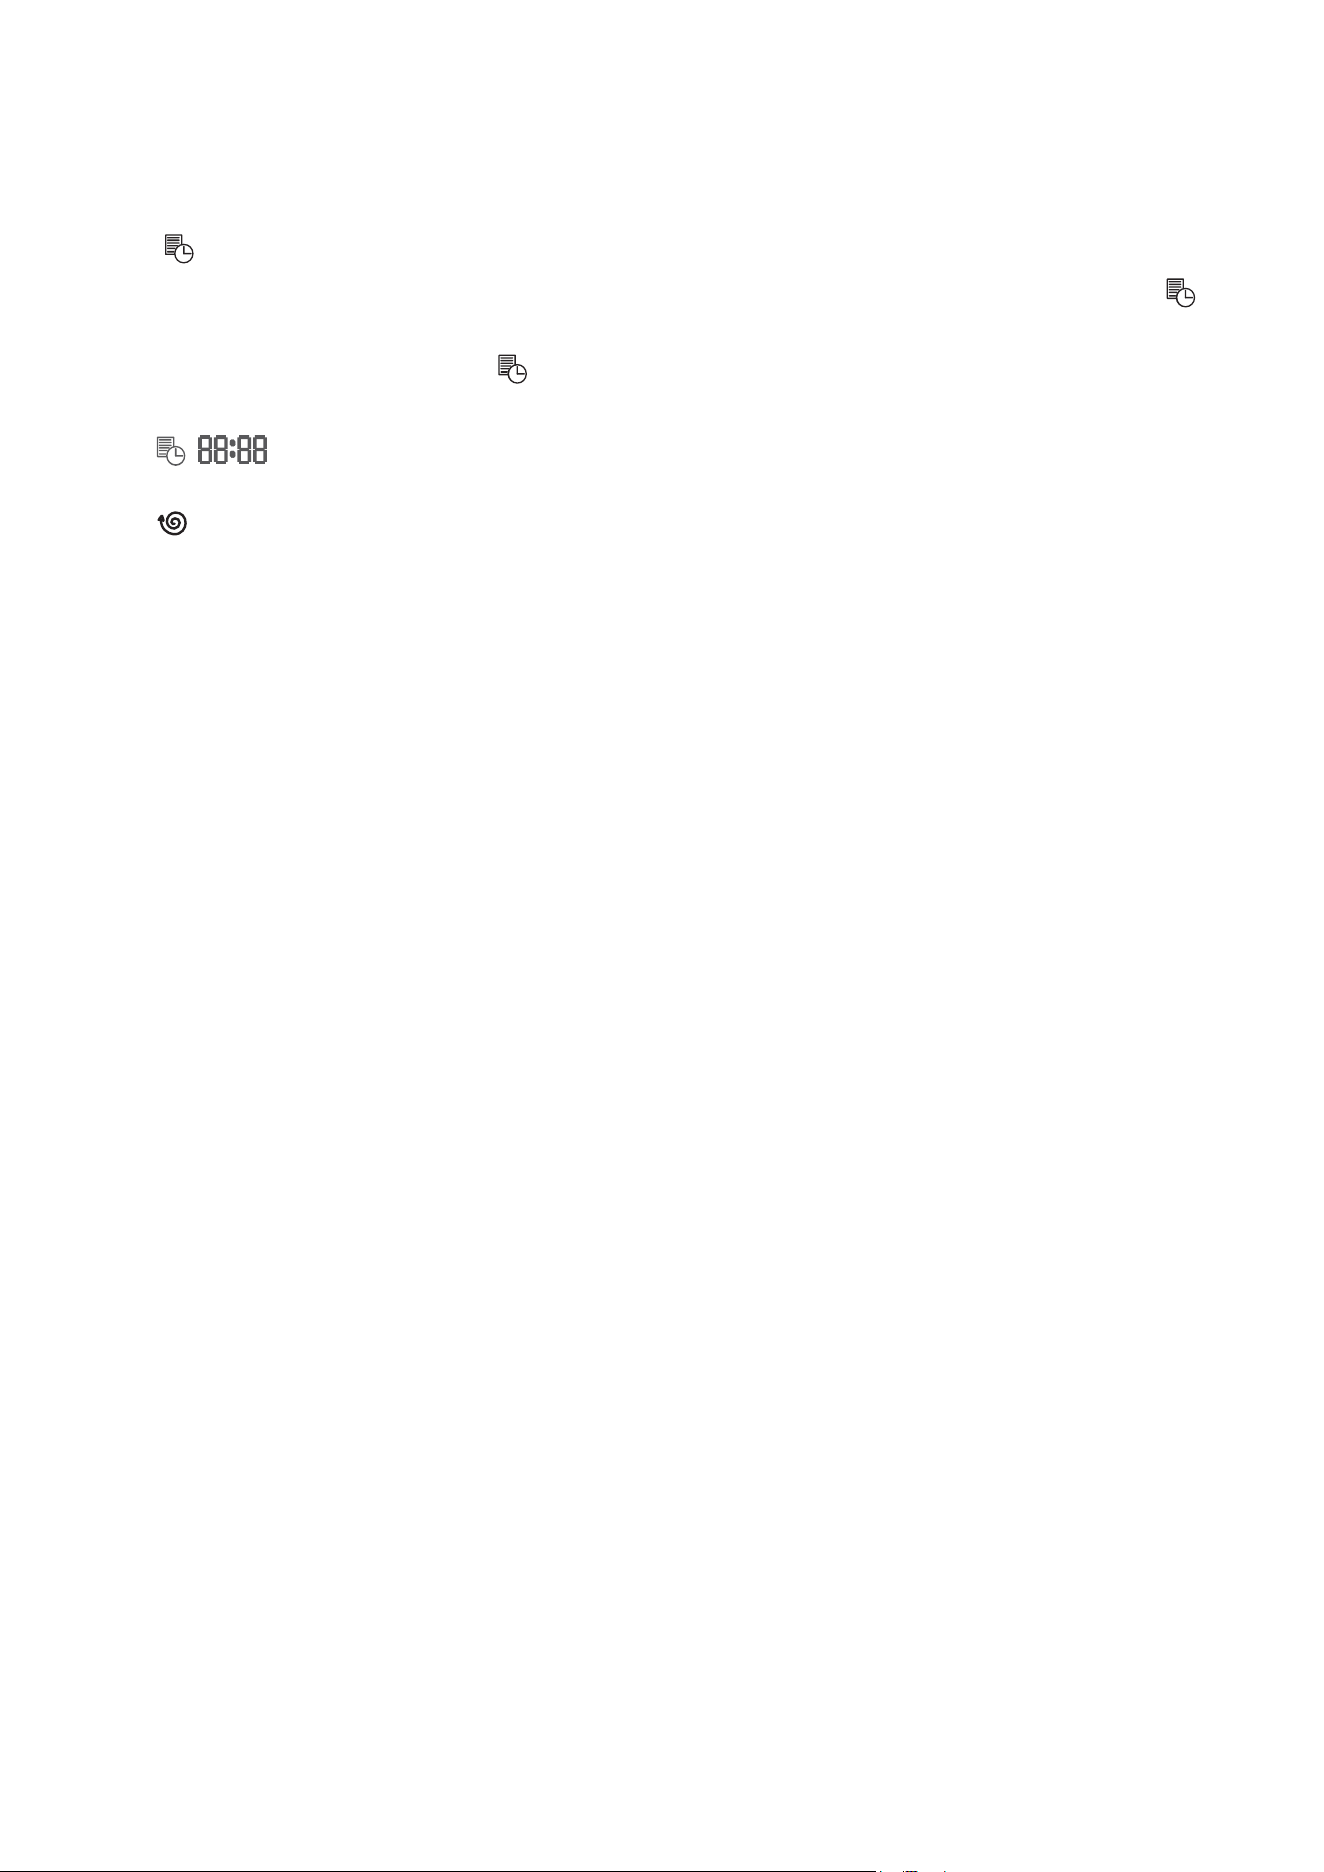
Resume from Breakpoint
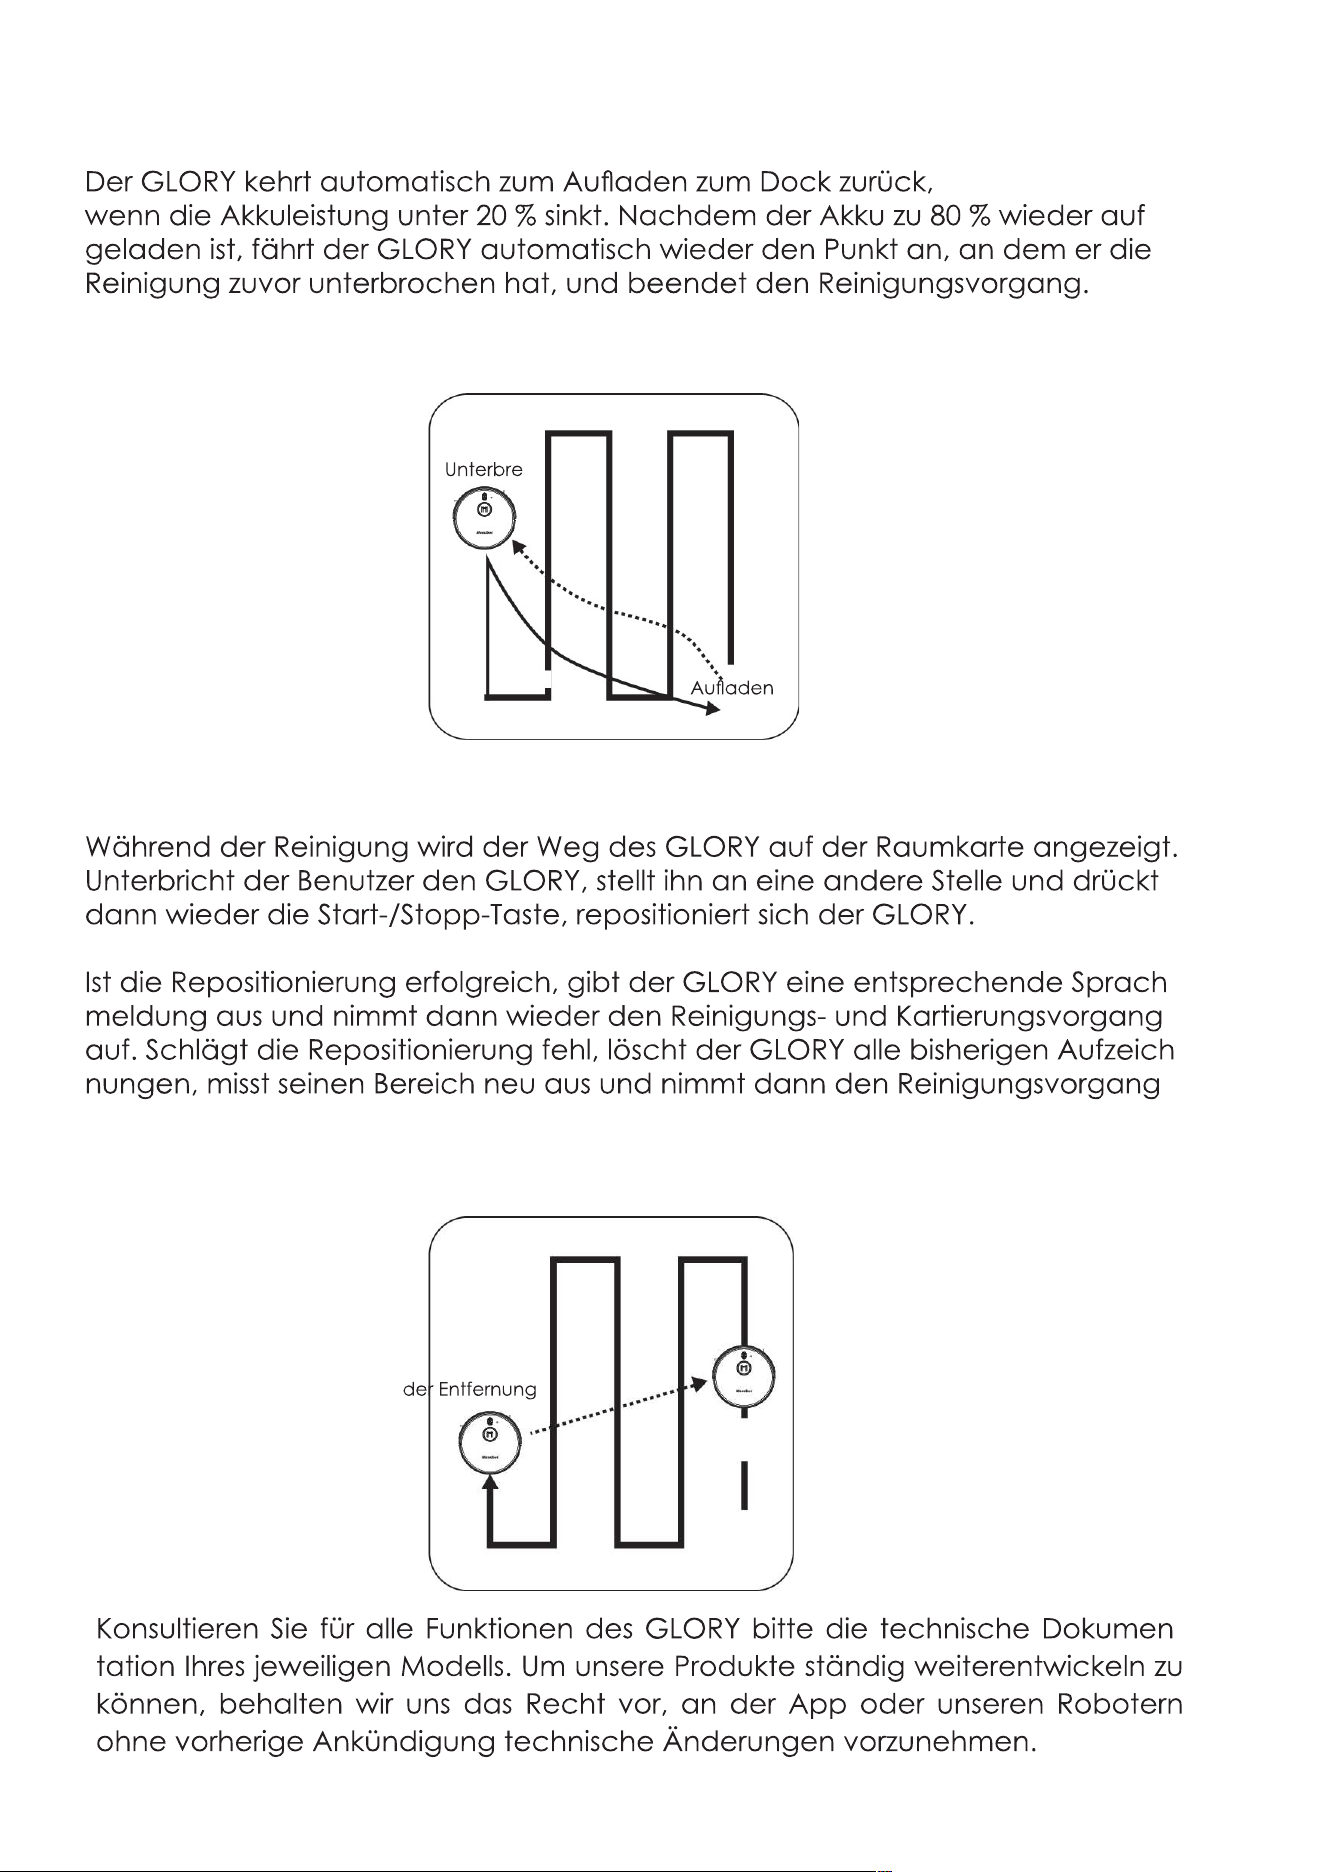
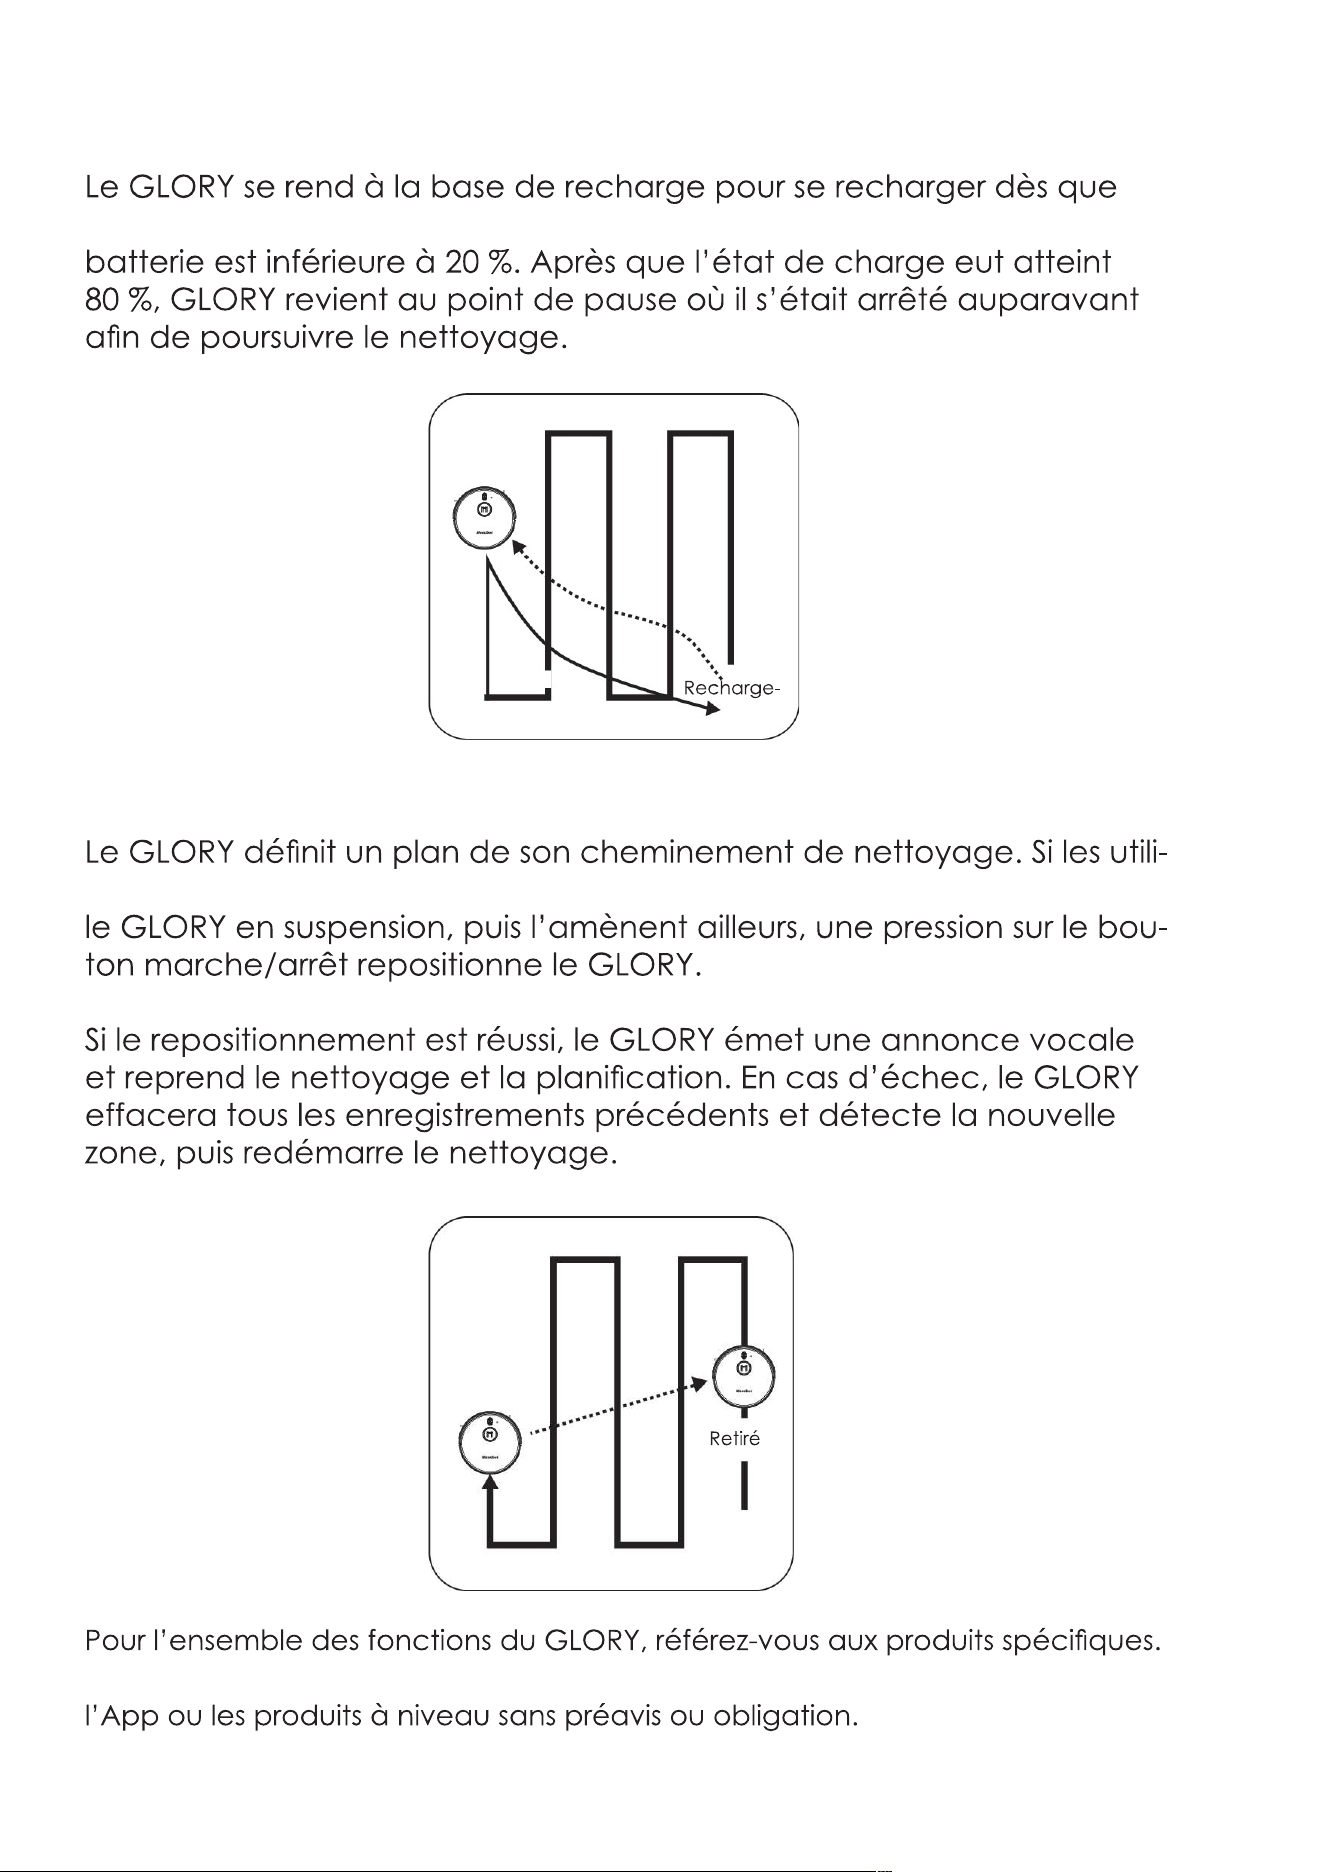
GLORY will go to the charging base for recharging when the battery
power is lower than 20%. After the charging status reaches 80%, GLORY will
go back to the breakpoint where it was stopped earlier to continue the
cleaning.
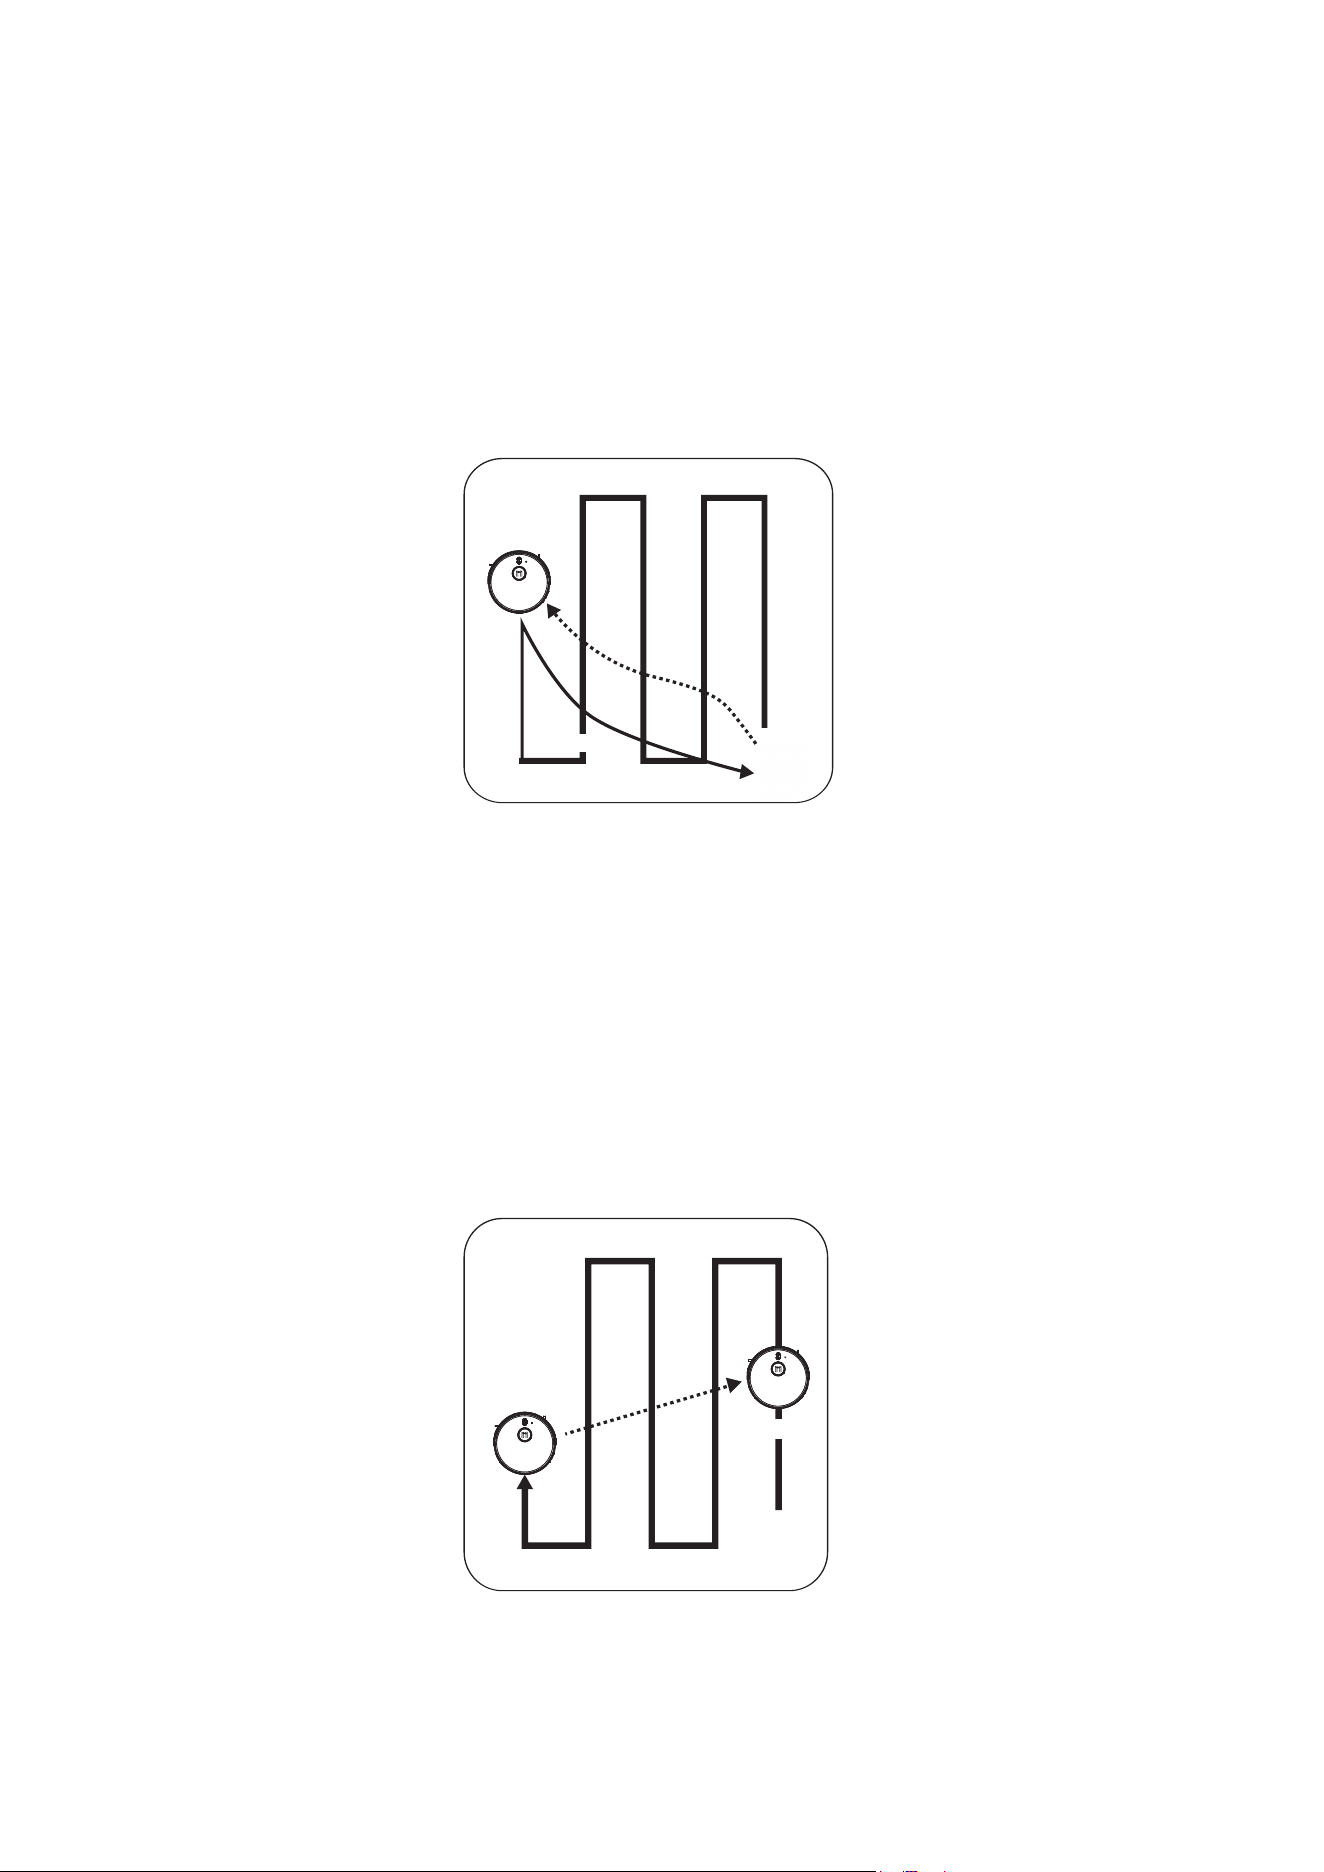
Reposition
GLORY will set up a map of its path when cleaning. If users suspend
GLORY and move it to other areas, then press the Start/Stop button,
GLORY will reposition.
If the repostioning is successful, there will be a promopt voice from
GLORY, then resume the cleaning and mapping. If failed, GLORY will
delete all the previous records and detect new area, then re-start cleaning.
15
About functions of GLORY, please subject to the actual products.
In order to improve the product, we reserve the right to upgrade
the APP or the products without prior notice or obligation.
Mamibot
Mamibot
Mamibot
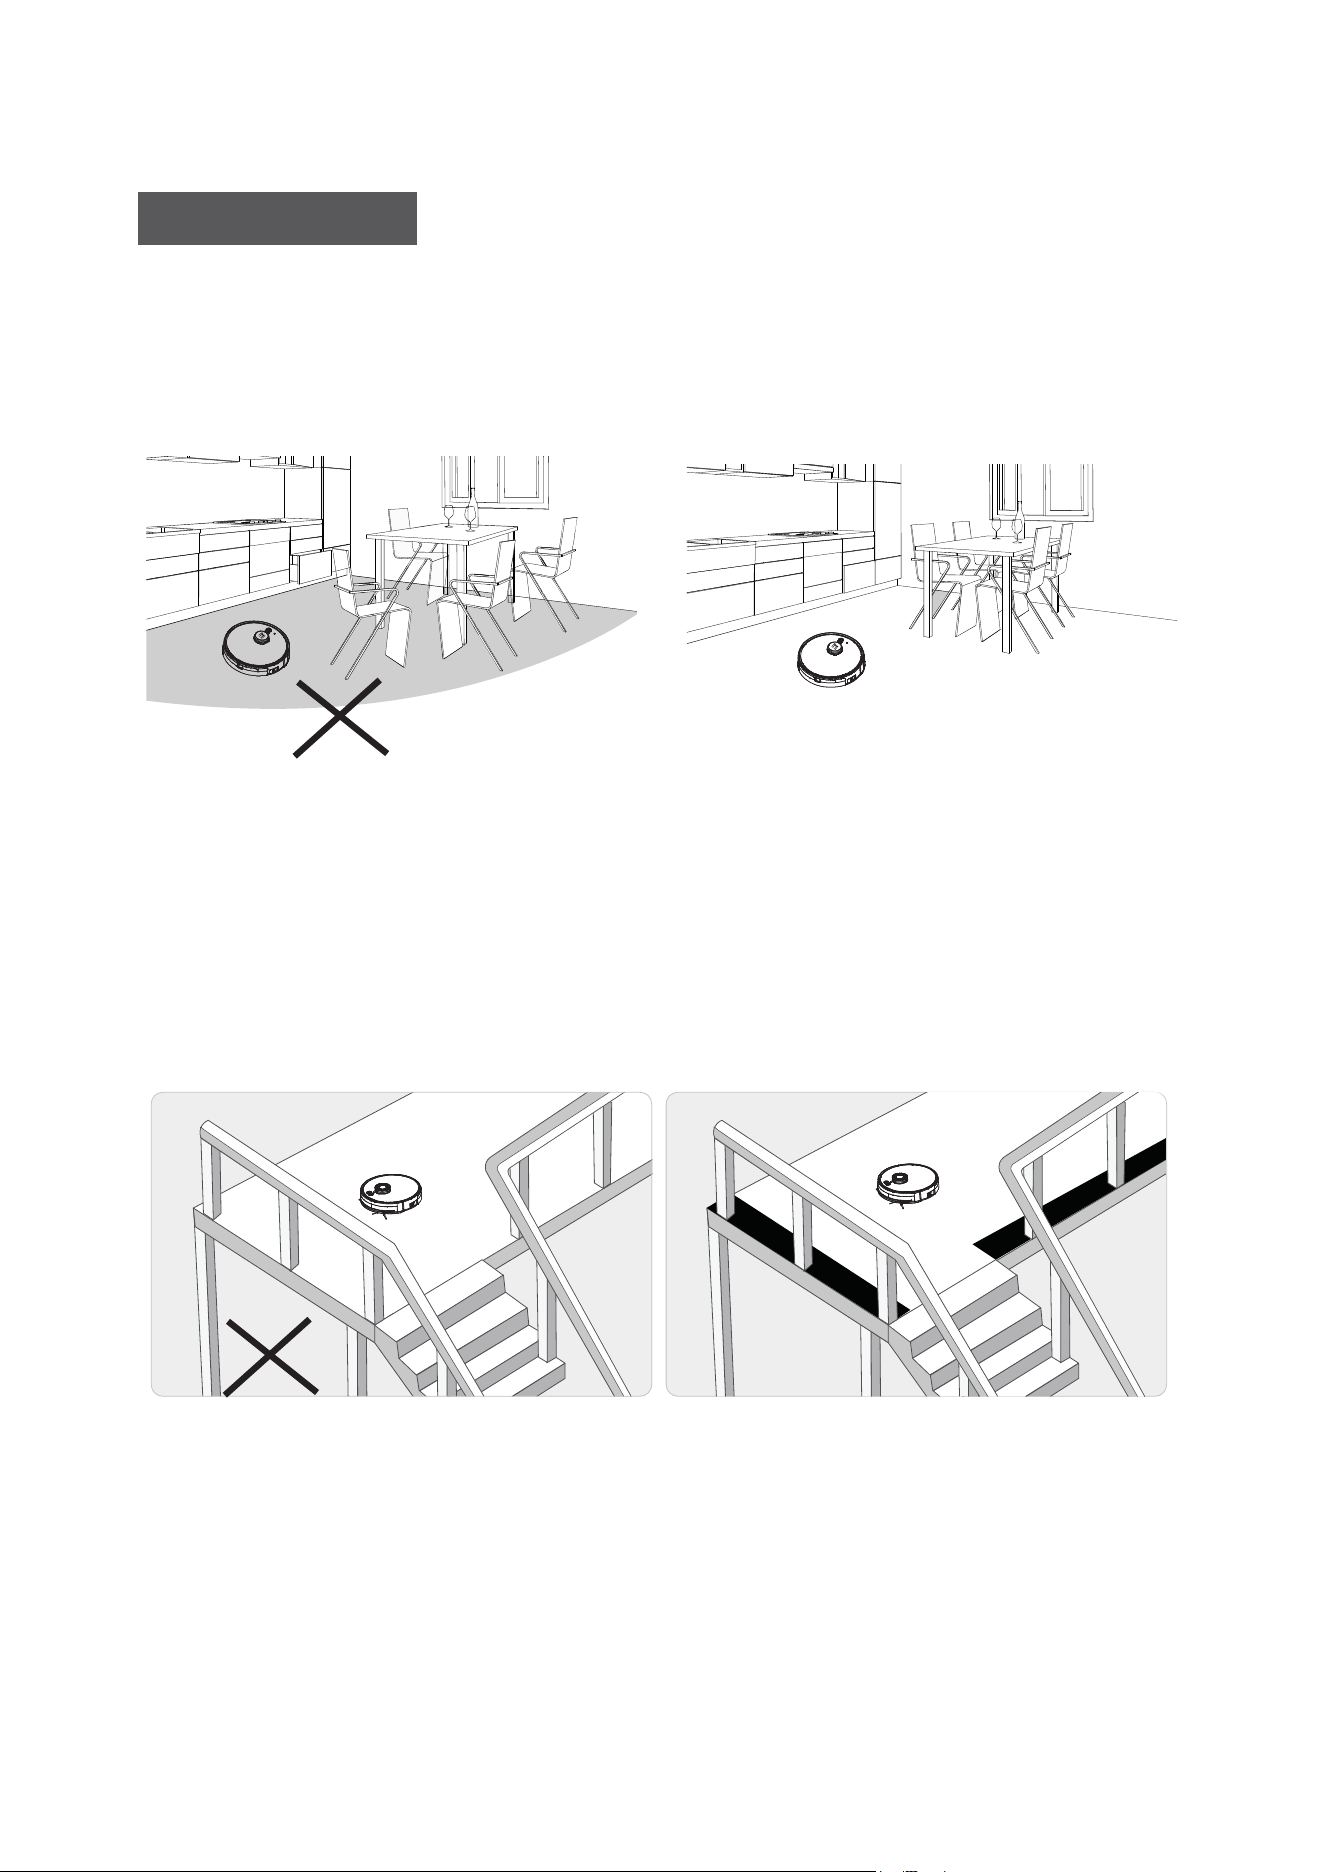
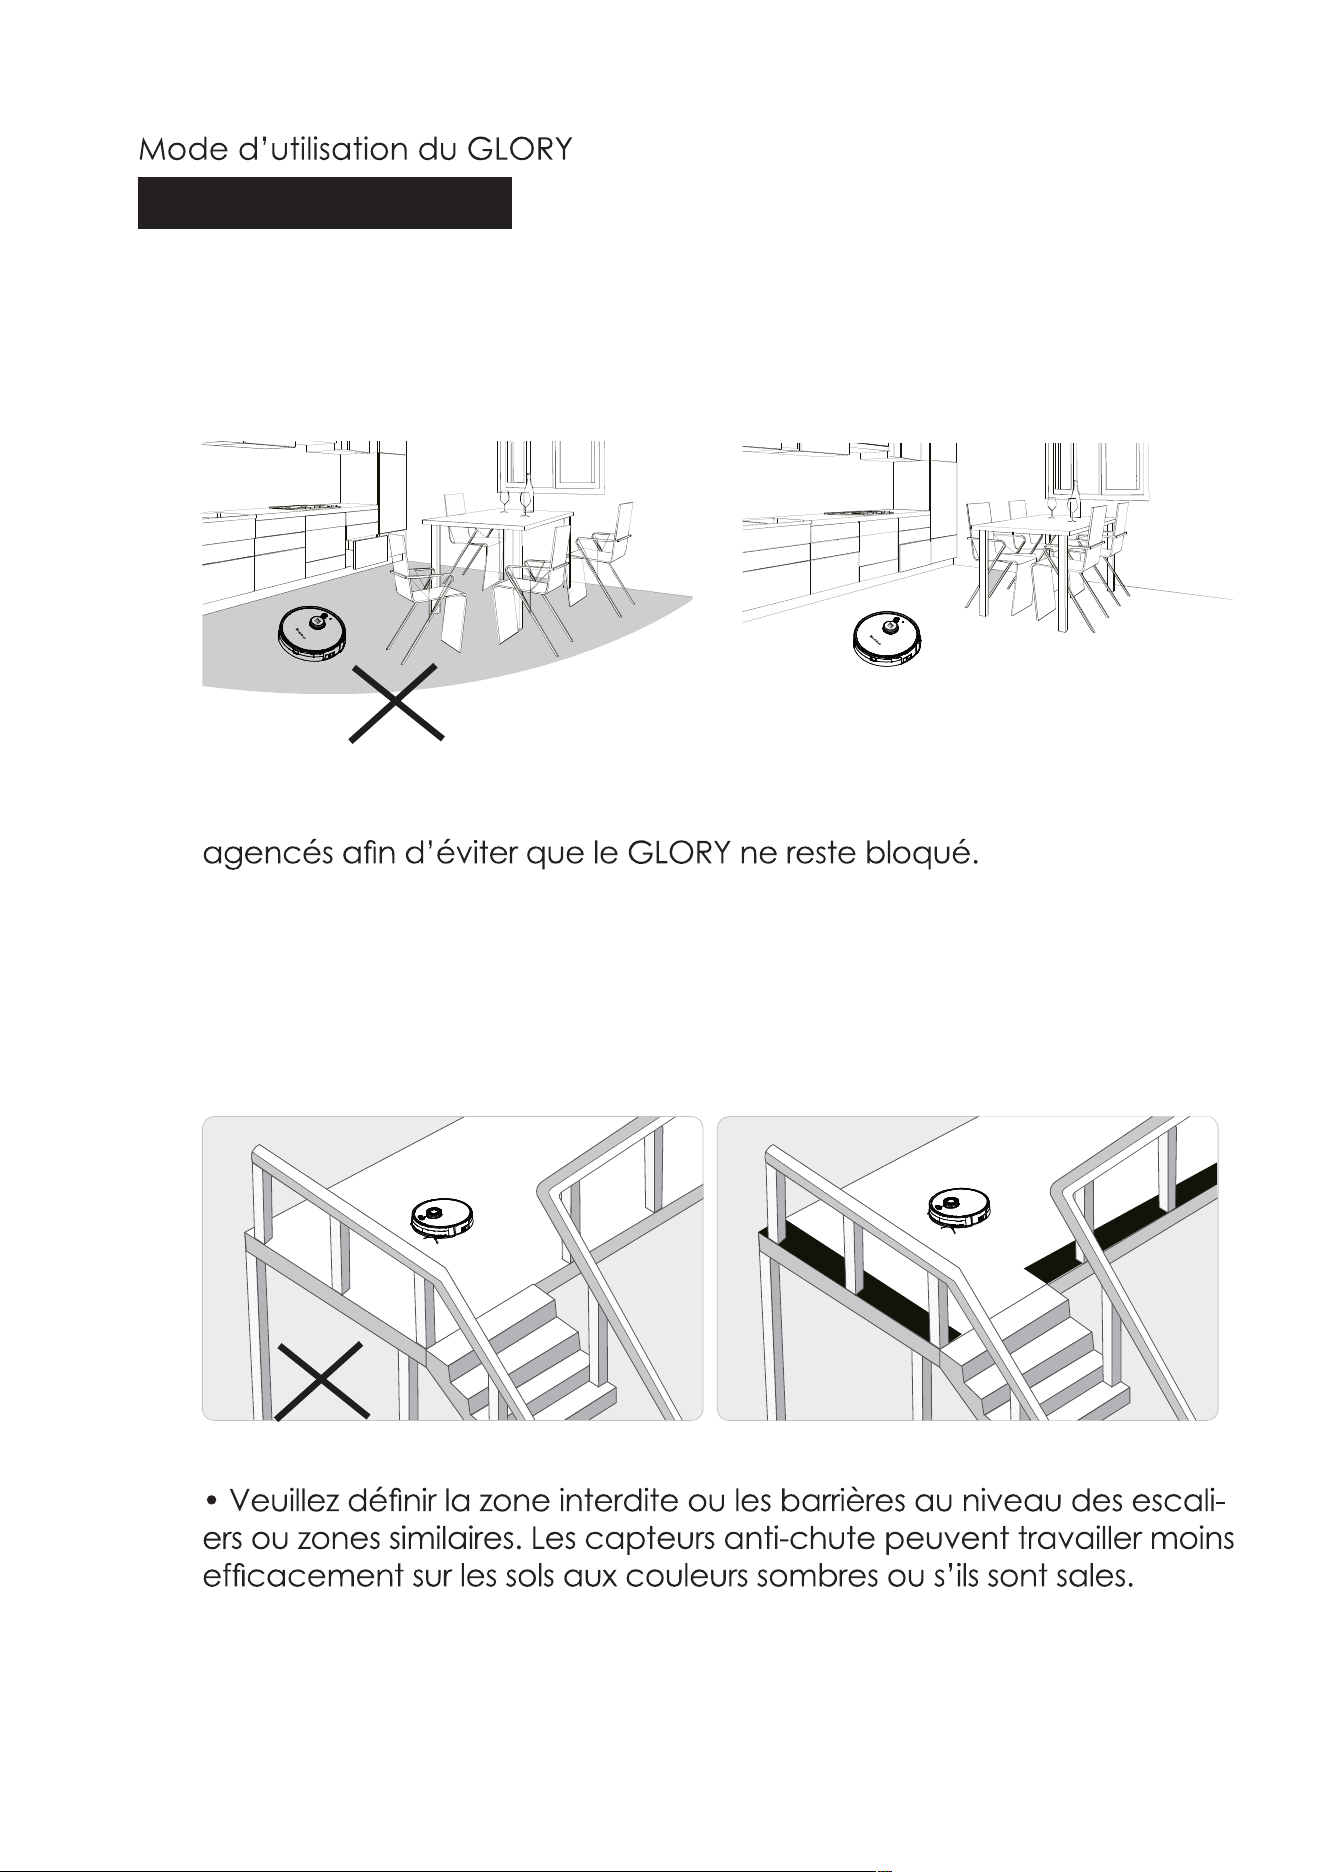
• Please make sure all furnitures are properly organized to prevent
GLORY from getting stuck.
M
a
m
i
b
o
t
• Please set the forbidden area or fences at the stairway or similar
areas. Anti-falling sensors may work less effectively if it works on the
dark-colored floors or it is dirty.
Notice Before Use
To use GLORY
16
M
a
m
i
b
o
t
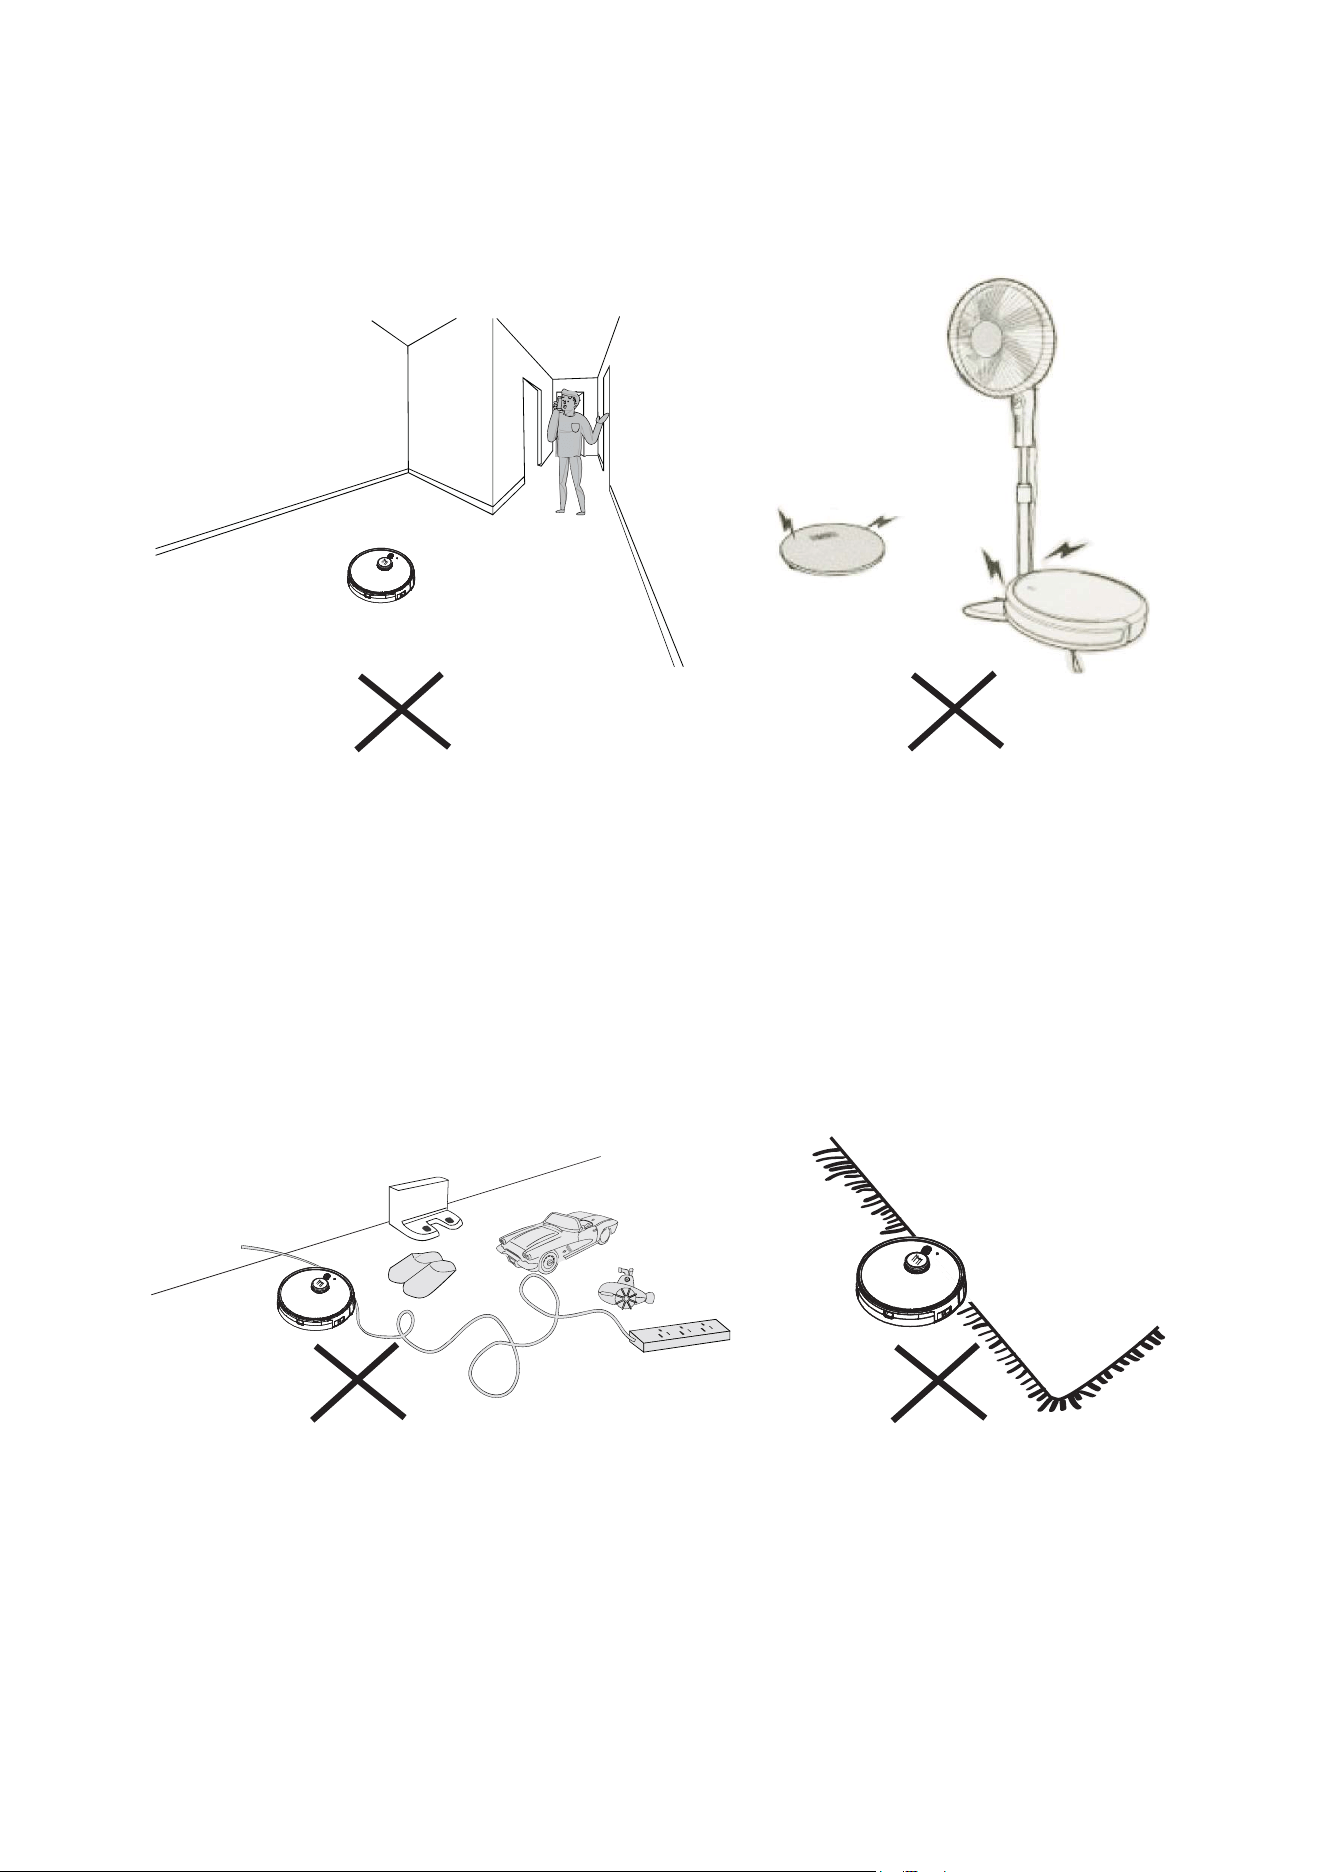
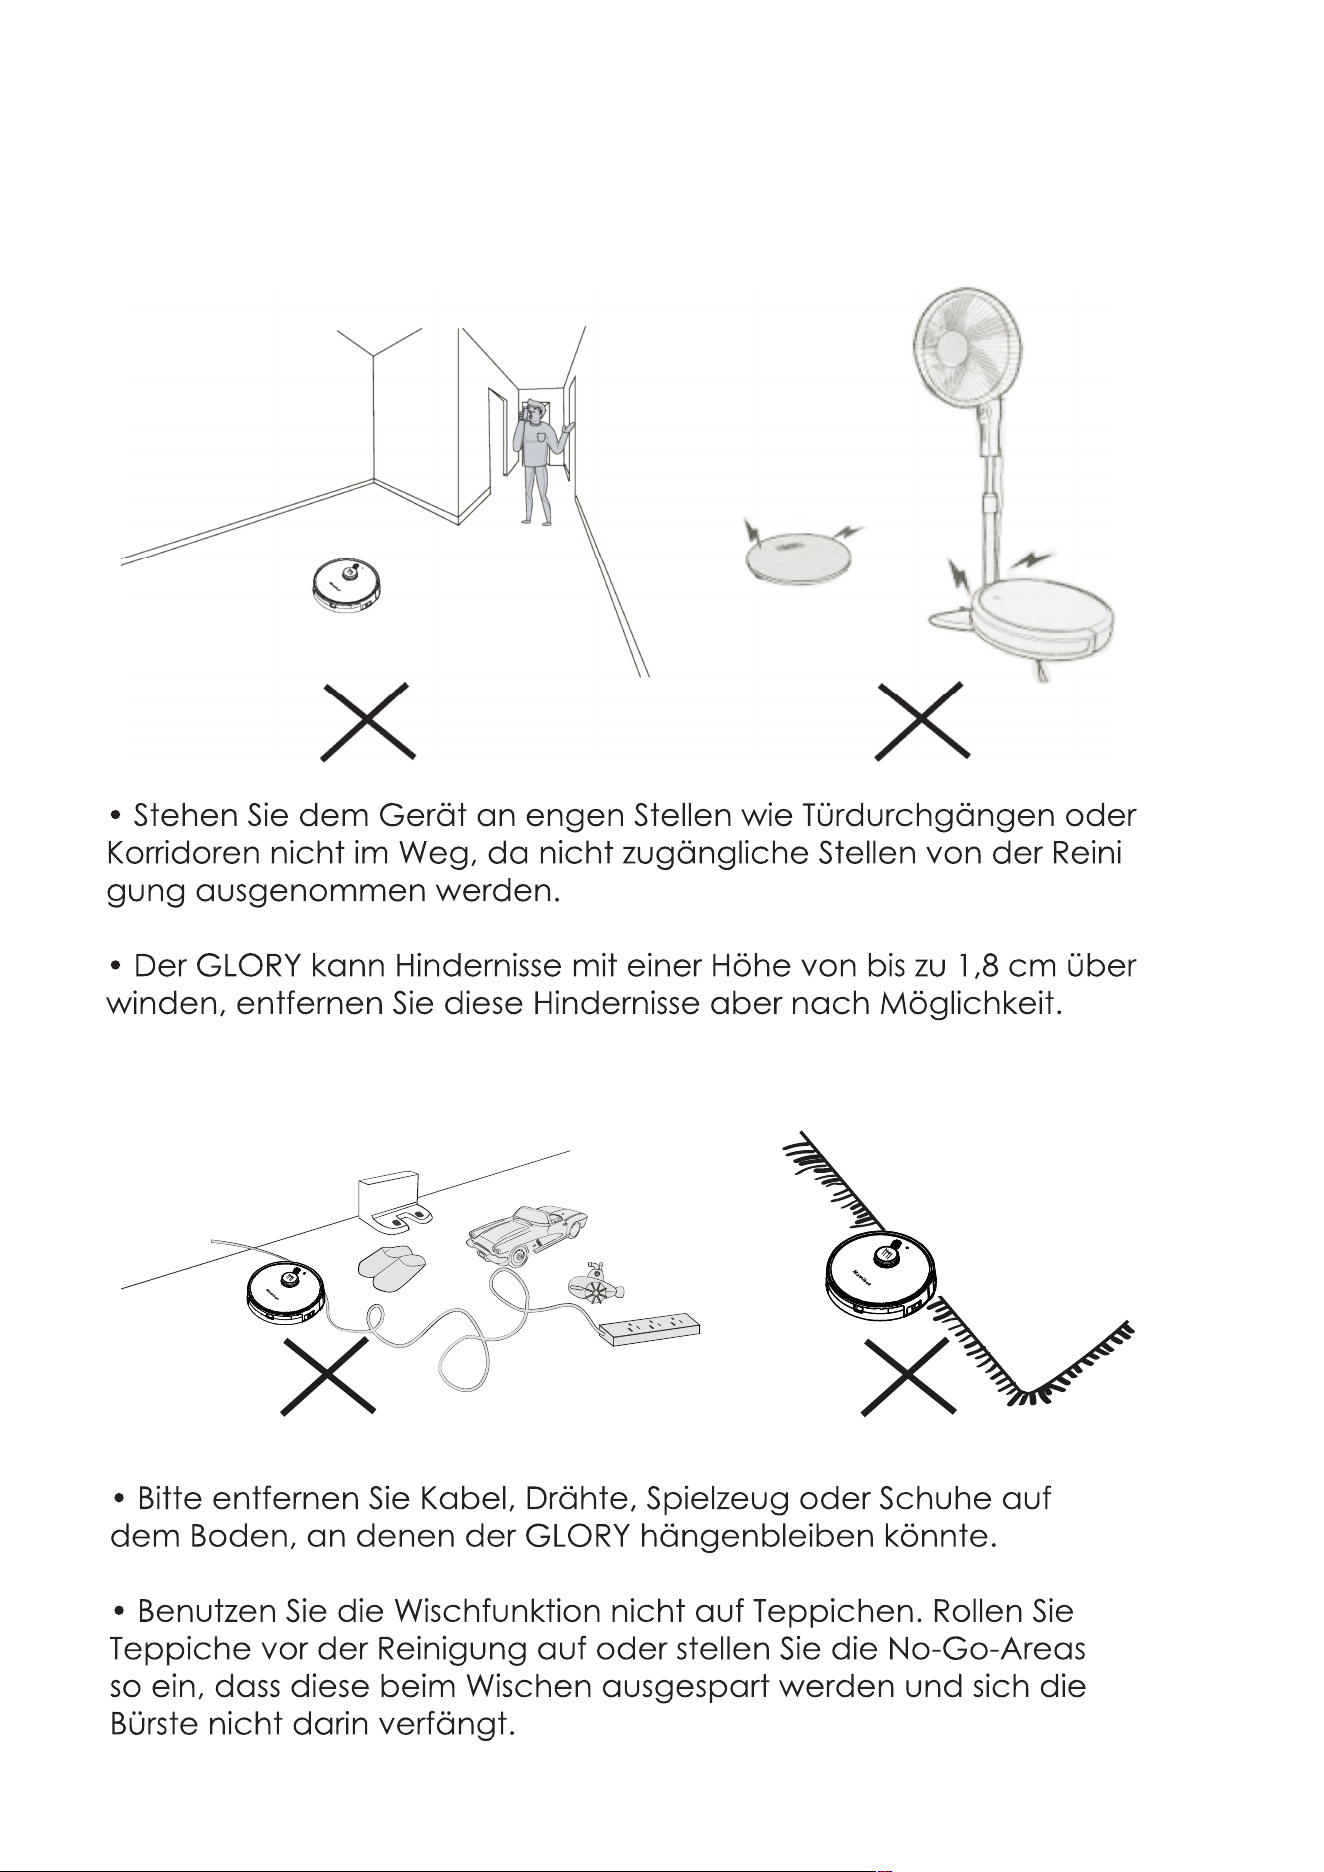
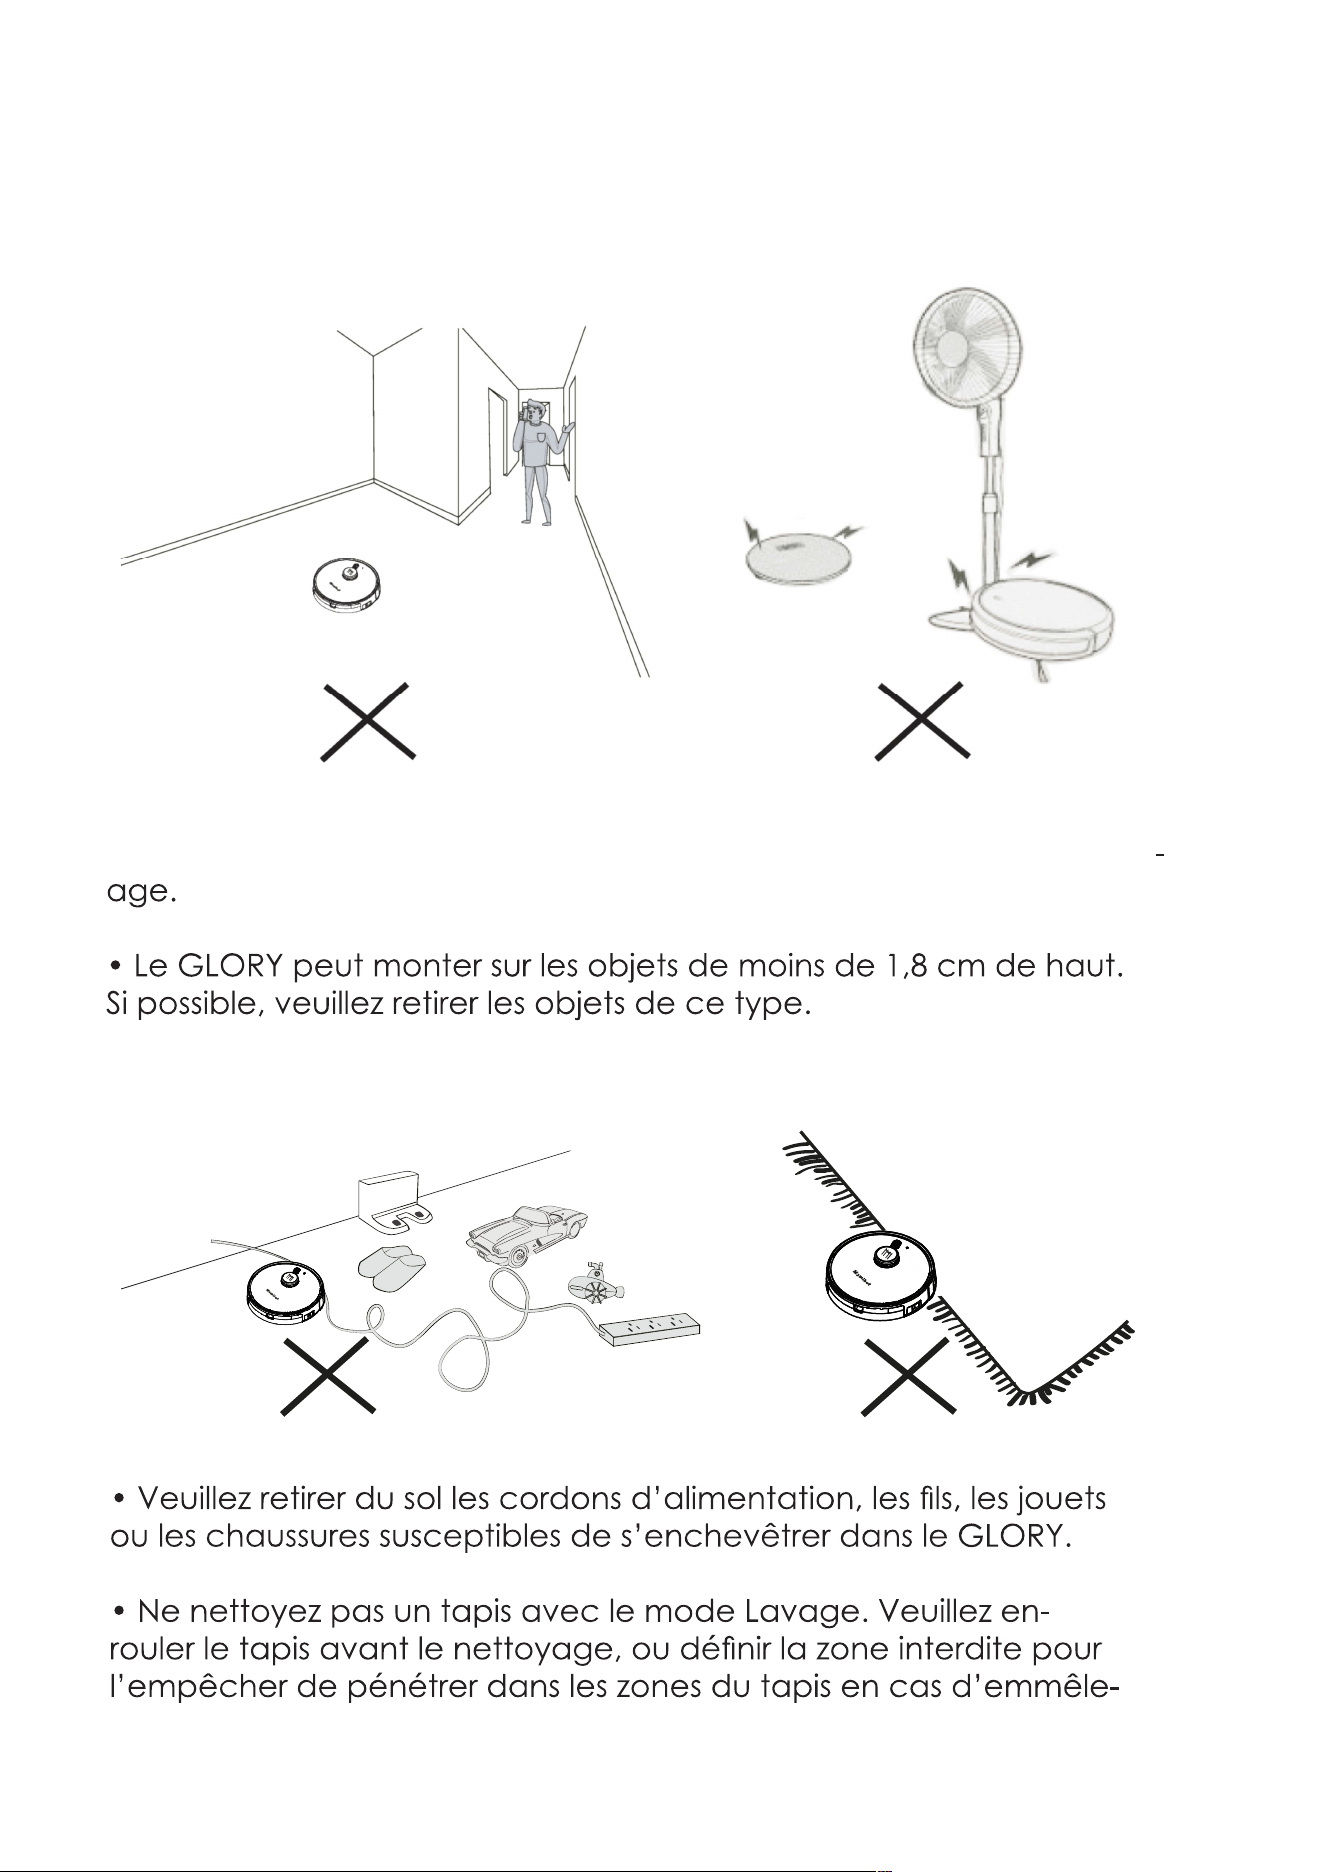
• Please remove the power cords, wires, toy or shoes that may
entangle GLORY on the floor.
• Do not clean the carpet in mopping mode. Please roll up the
carpet before cleaning, or set the not-to-go area to prevent it from
entering carpet areas in case of brush tangling.
• Do not stand around at the narrow spaces, such as thresholds or
aisles, or it will lower the coverage rate of cleaning.
• GLORY may climb on top of objects less than 1.8cm/0.70in in height,
please remove the similar objects if possible.
17
M
a
m
i
b
o
t
M
a
m
i
b
ot
M
a
m
i
b
o
t
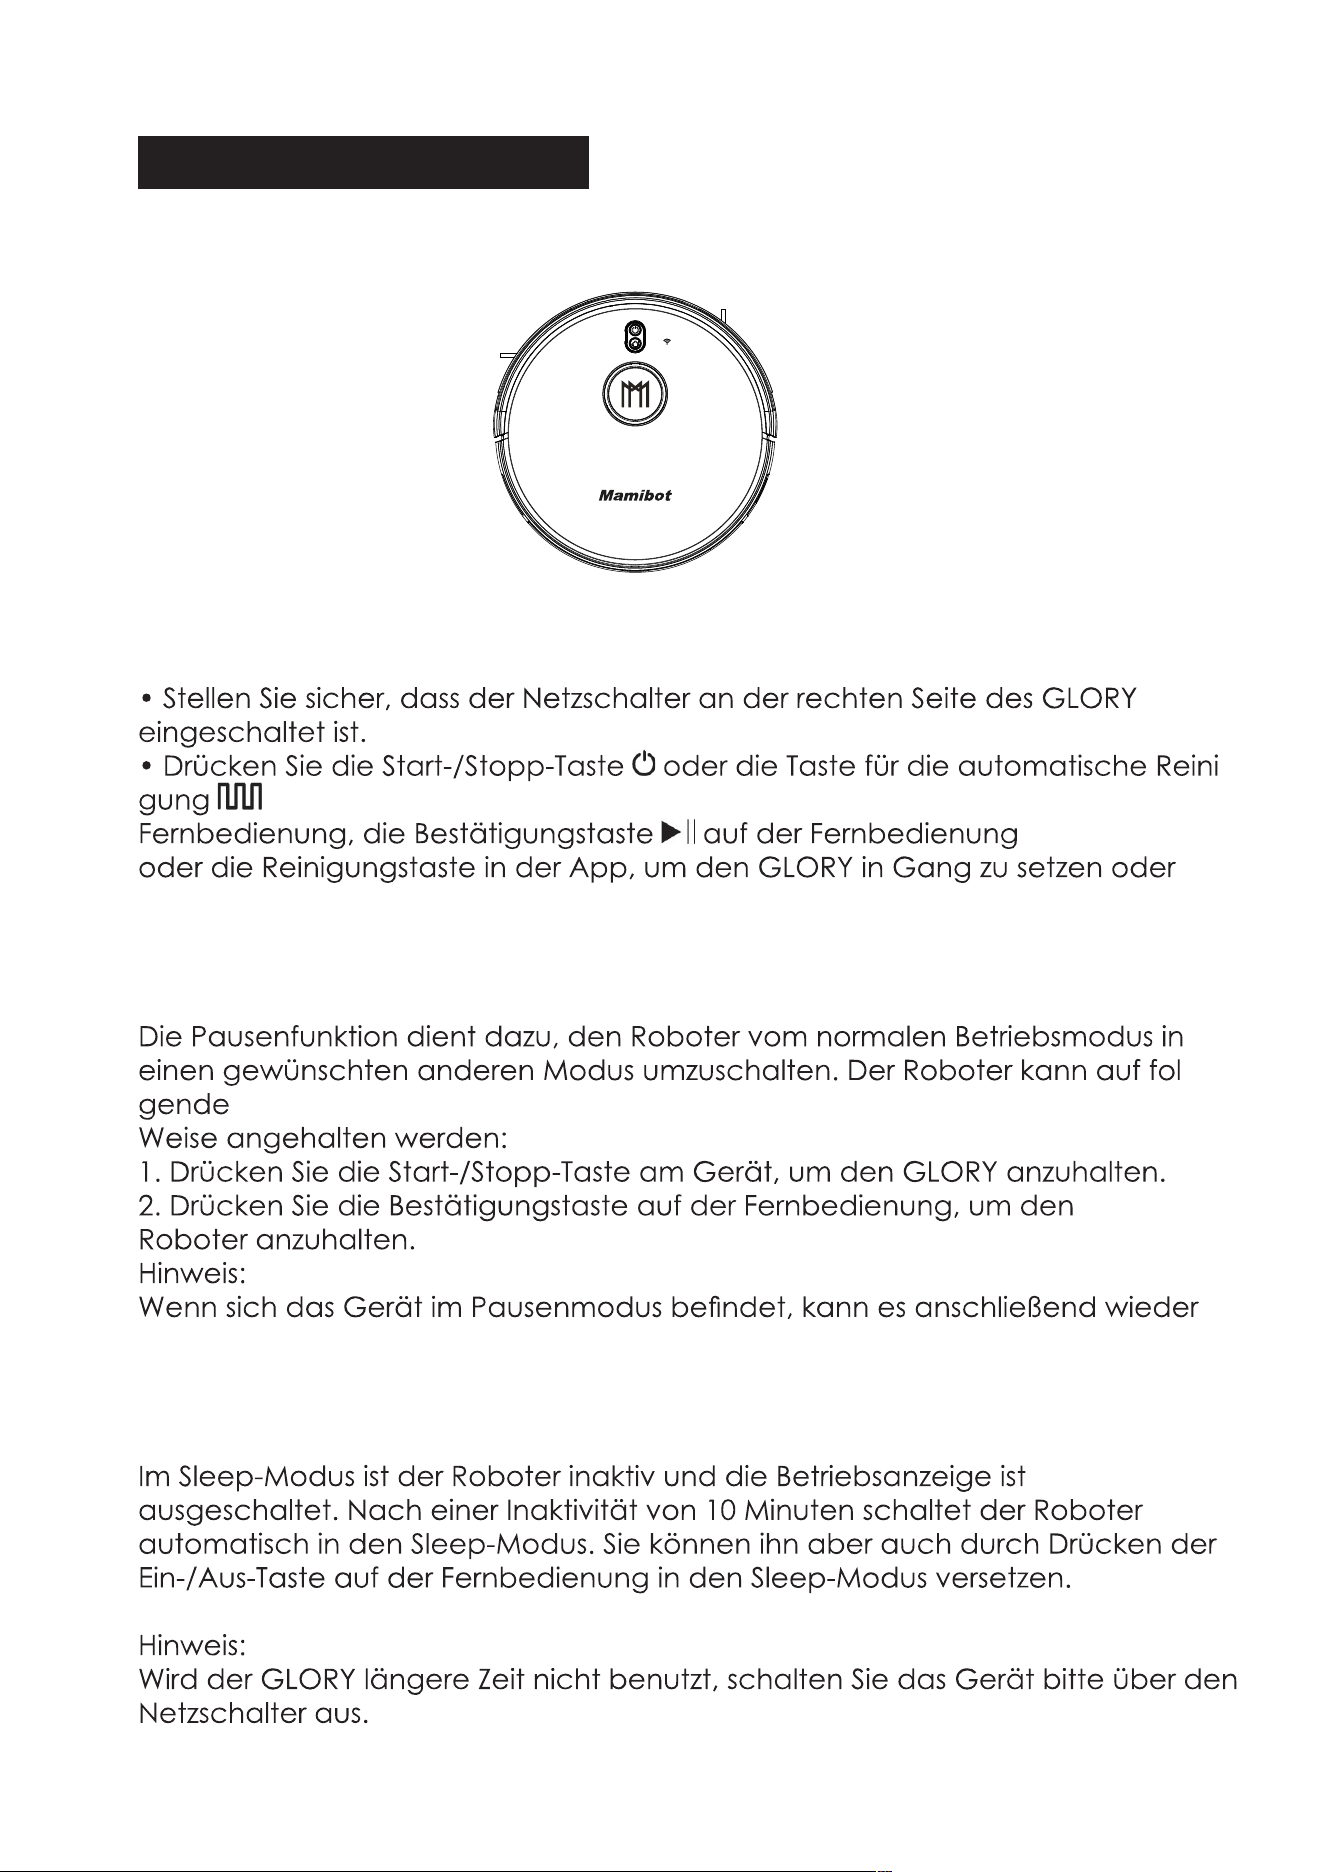
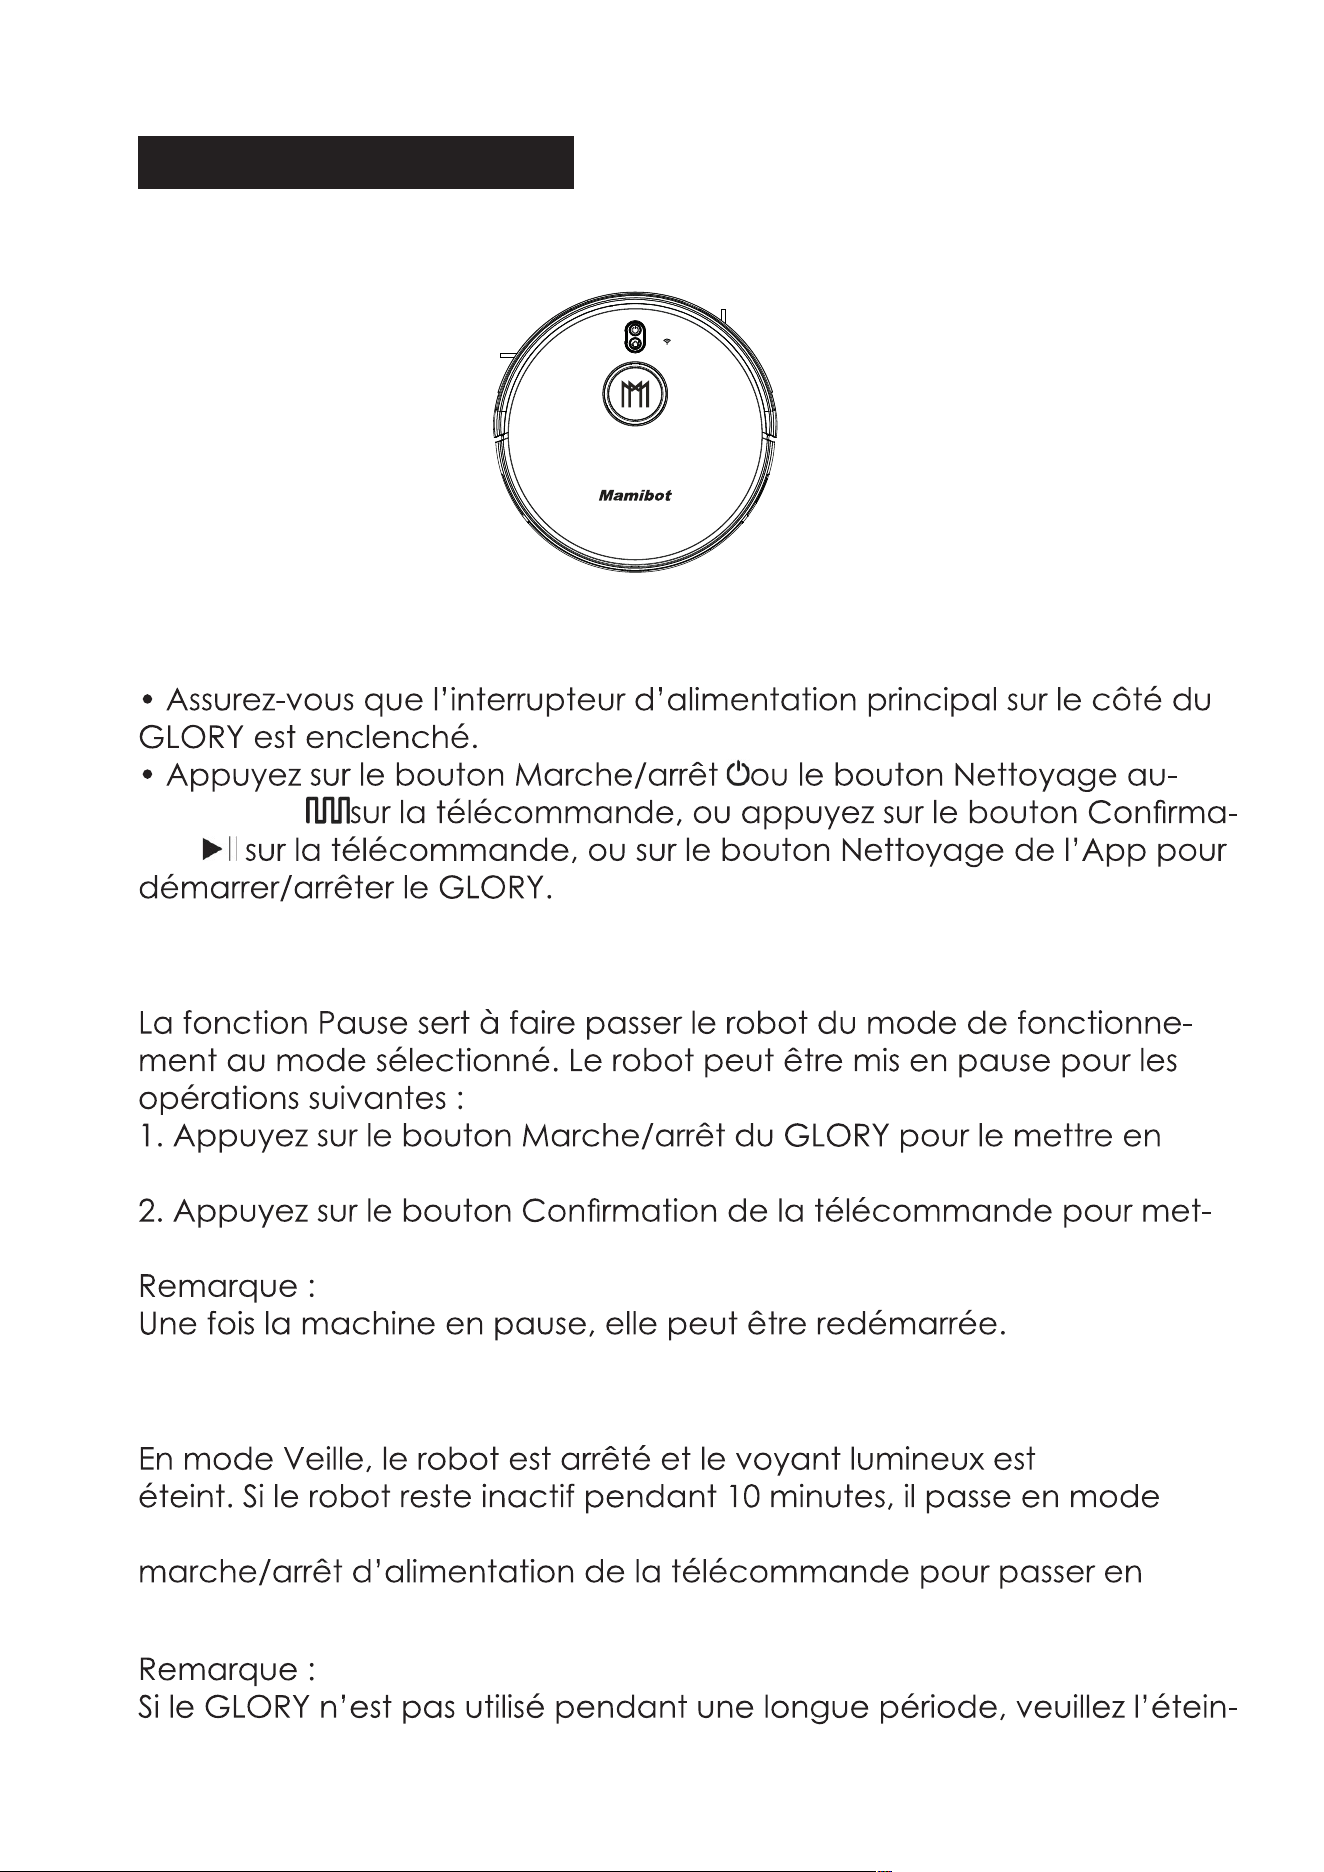
• Make sure the main power switch at right side of GLORY is turned on.
• Press the Start/Stop Button or the Auto Cleaning Button on the
remote control, or press the Confirmation Button on the remote
control, or the Cleaning Button on APP to Start/Stop GLORY.
Pause/Standby
The pause function is to switch the robot from the operating mode to
the selected mode, and the robot can be paused by the following
operations:
1 . Press the Start/Stop Button on GLORY to pause it.
2 . Press the Confirmation button on the remote control to pause the
robot.
Notice:
After the machine is paused, the machine can be re-operated.
Sleep
Sleep mode means that the robot is stopped and the indicator light is
off. If the Robot is not active within 10 minutes, the robot will enter Sleep
mode automatically, also press the power on/off button on the remote
control can enter the sleep mode.
Note:
If GLORY is out of service for a long time, please turn off the main
power switch.
Start / Stop Cleaning
18
Mamibot
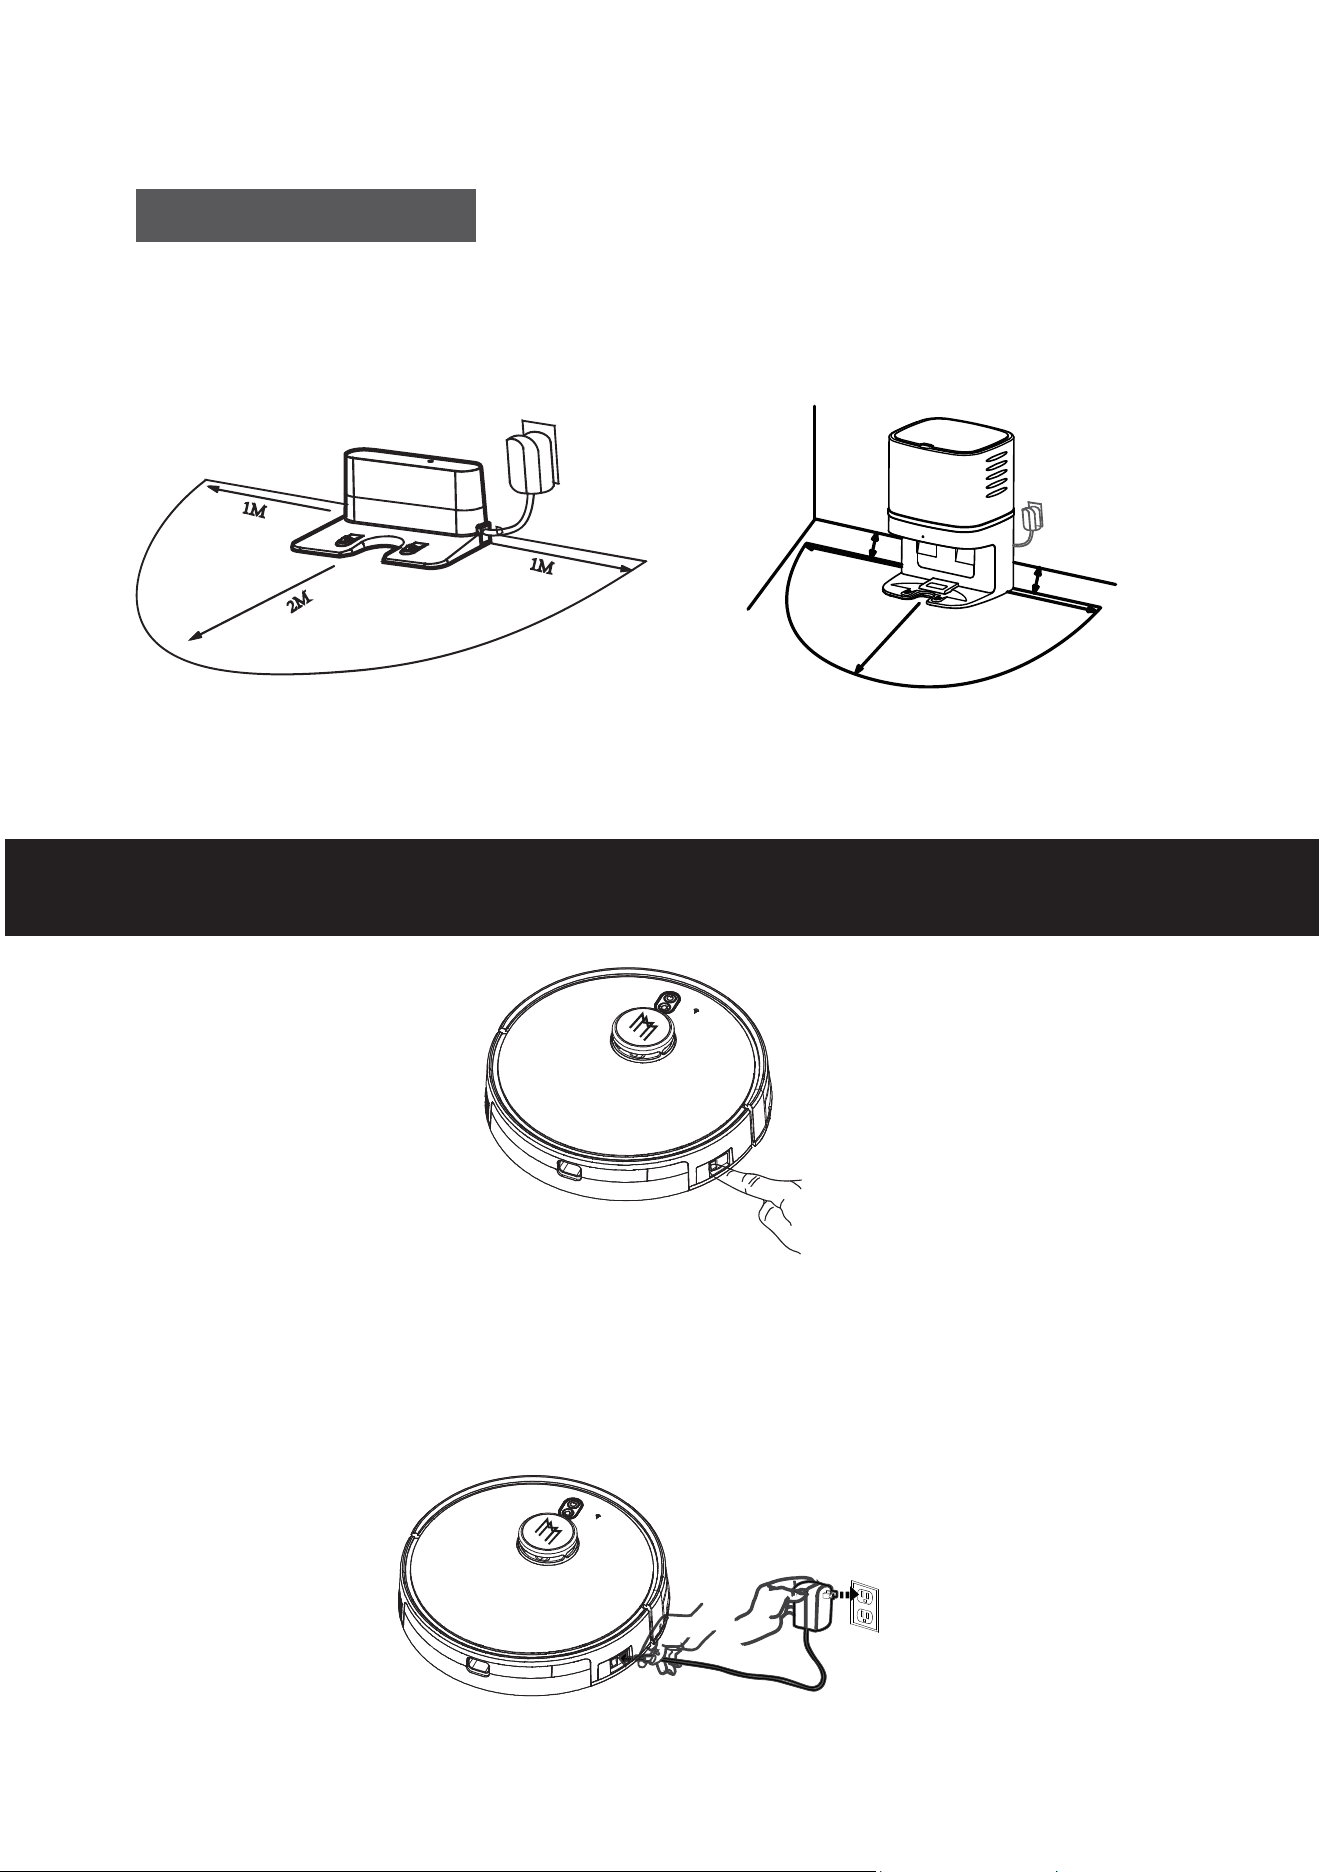
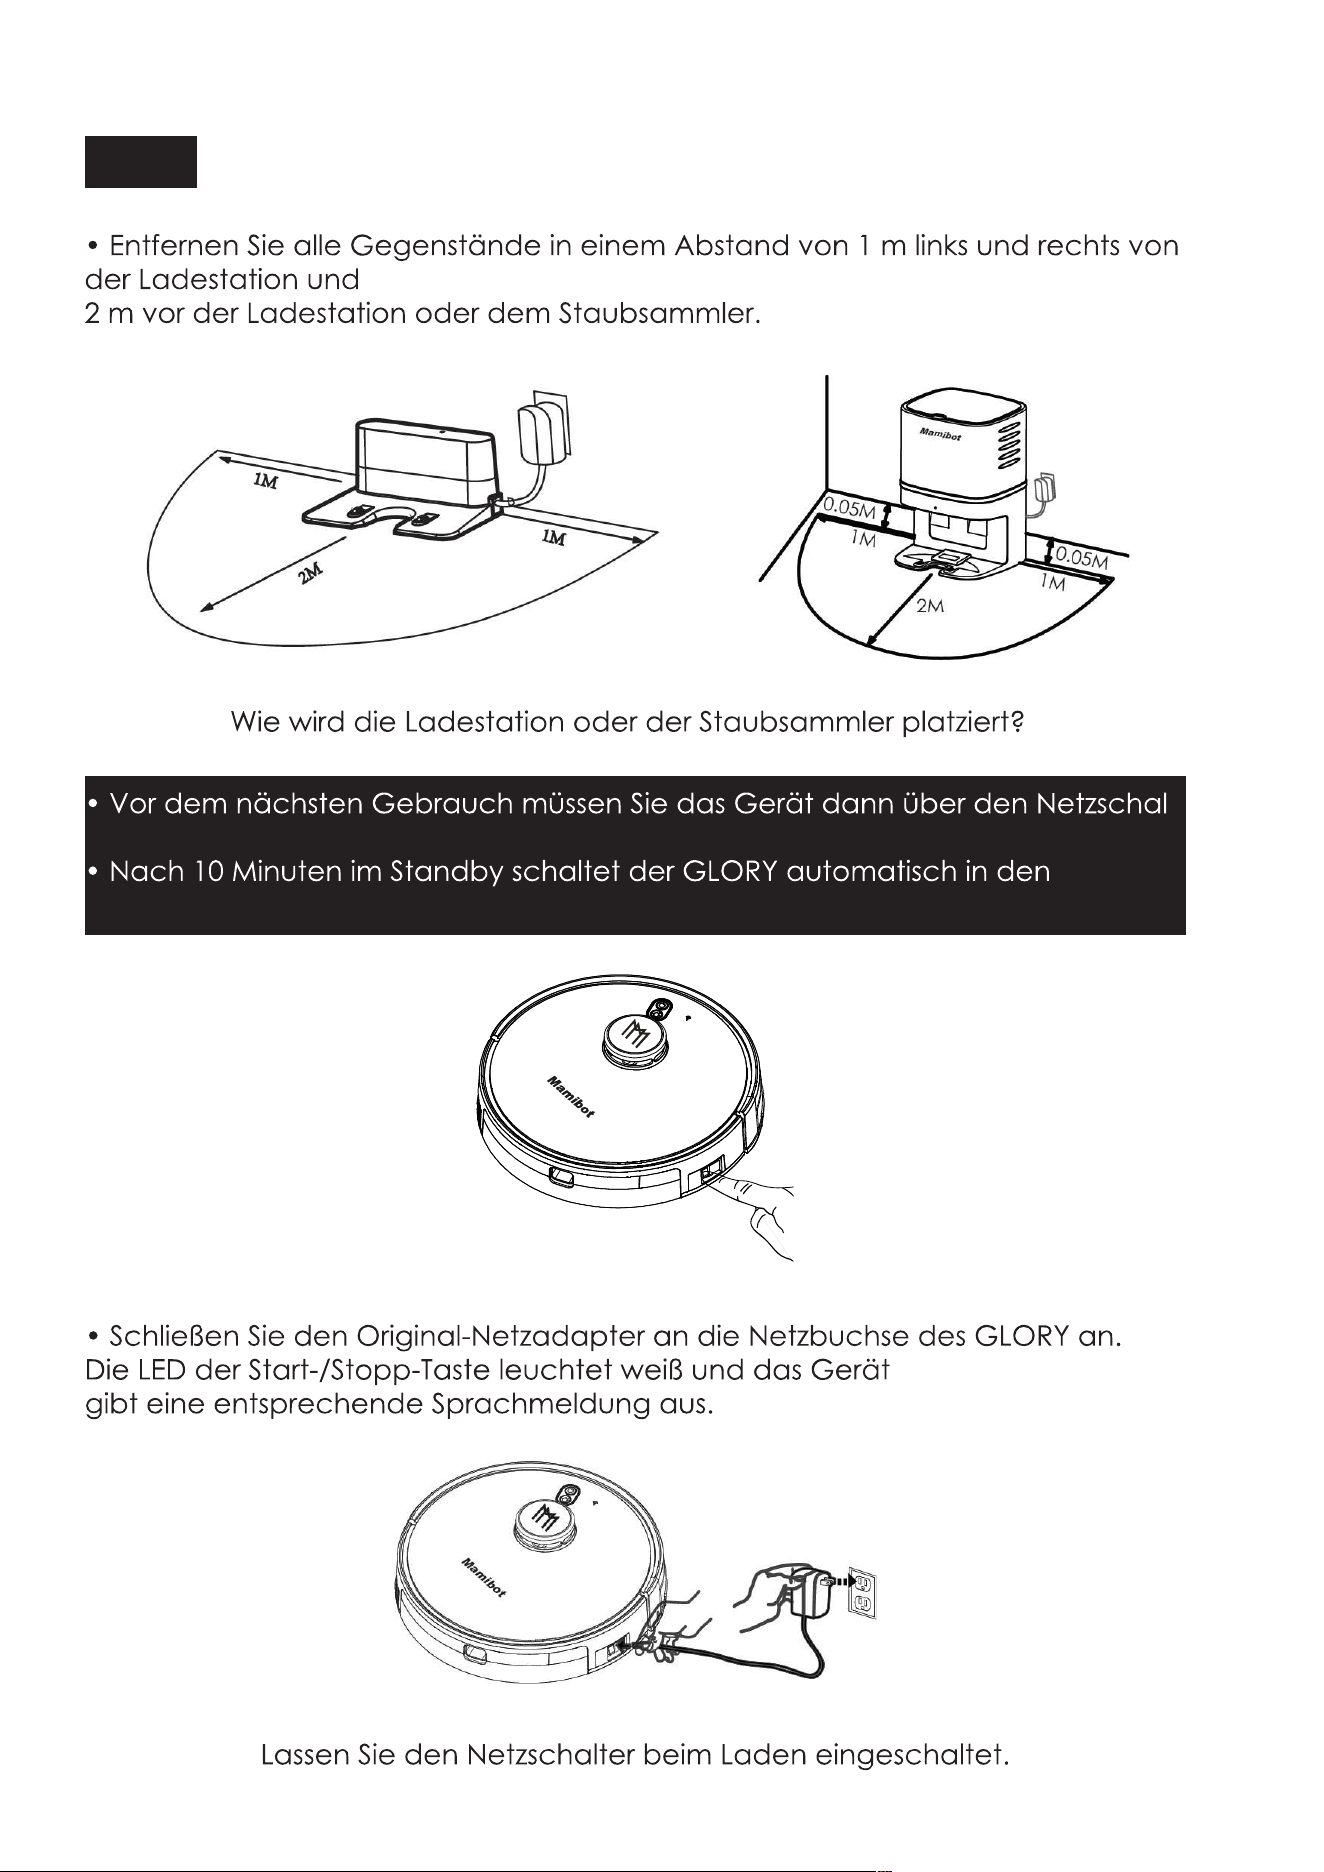
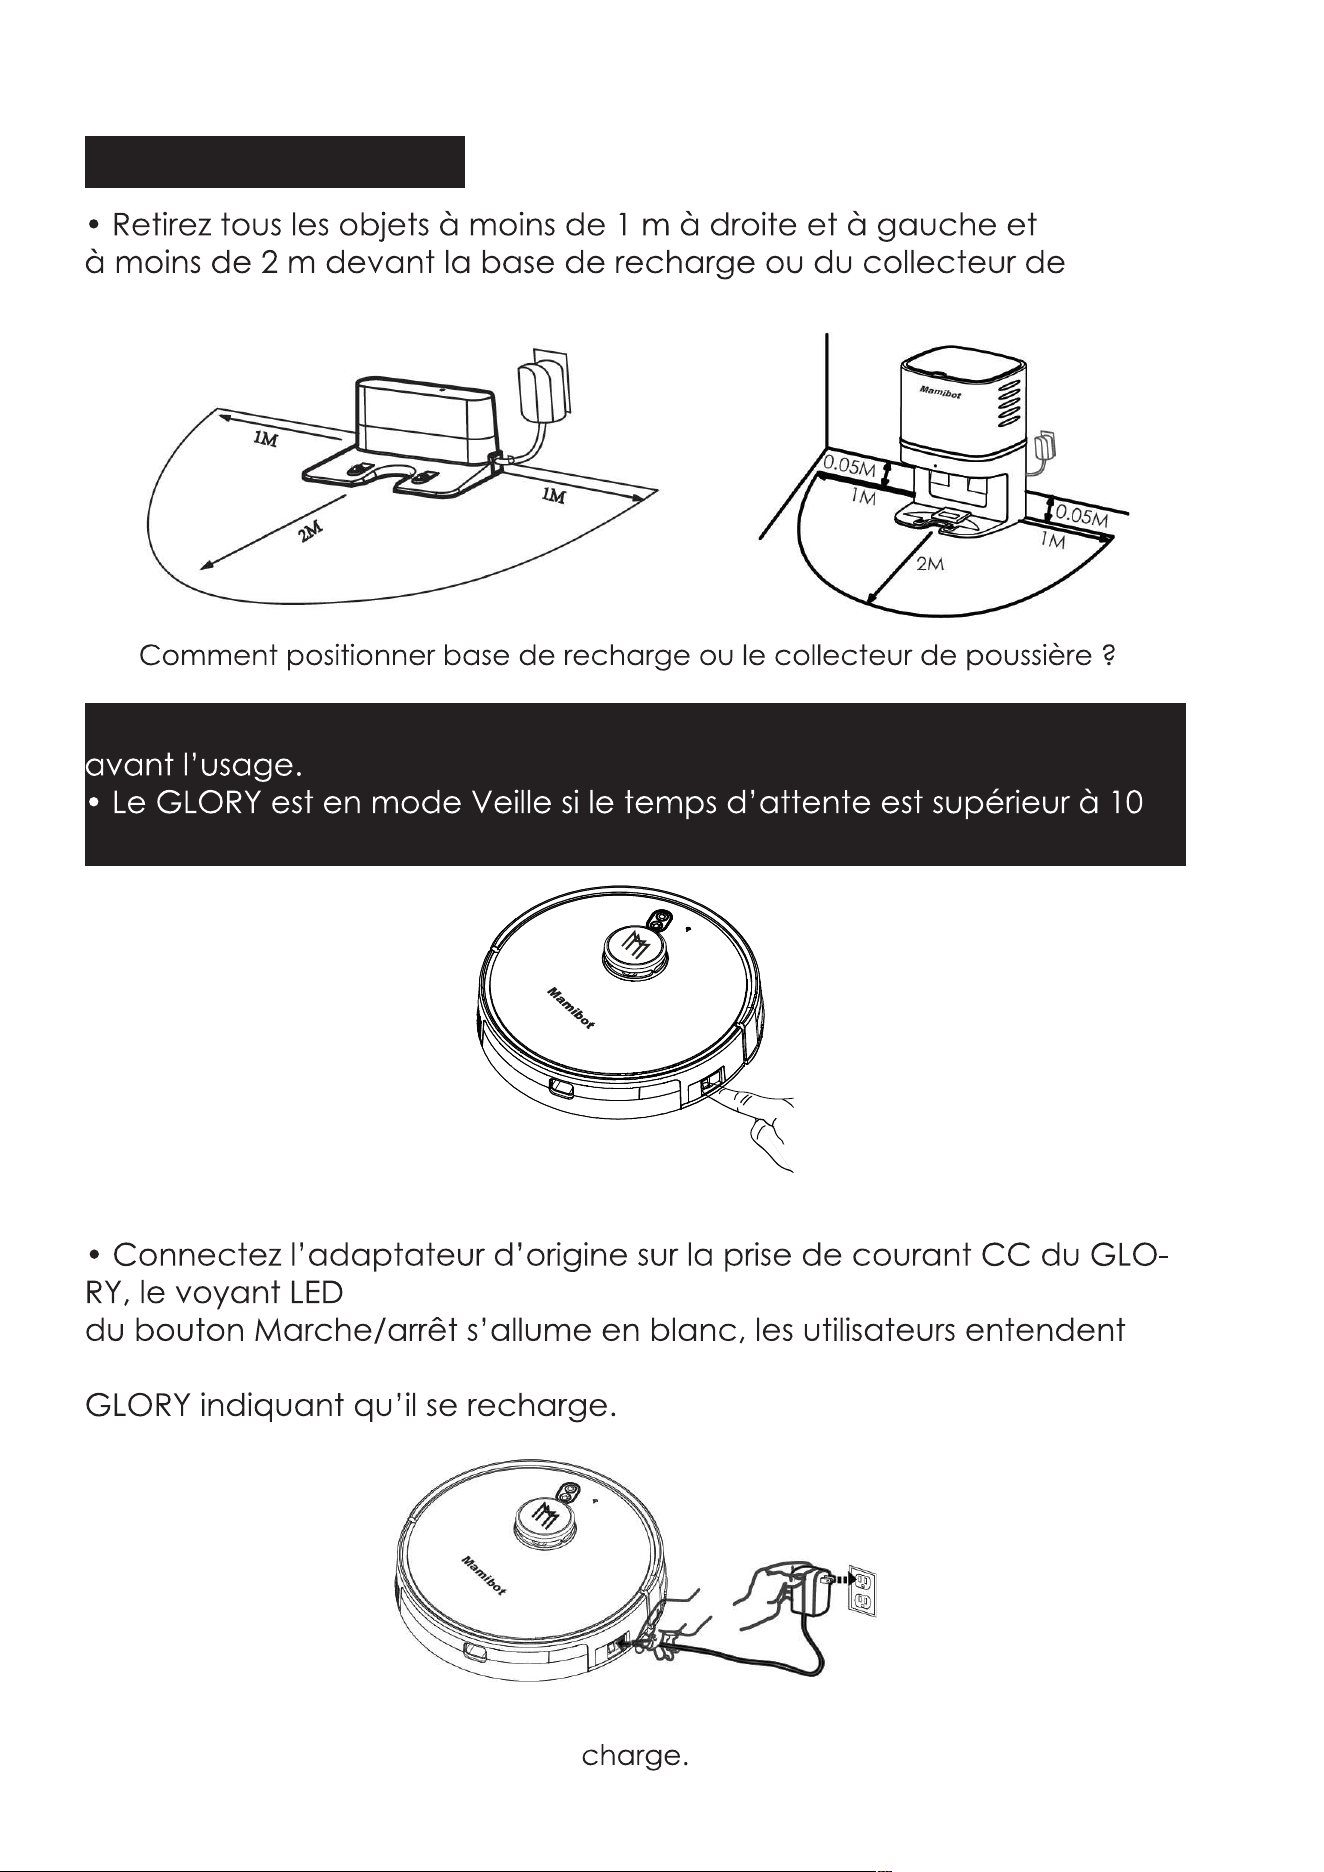
• Remove all objects within 1m/3.3ft of the left and right side and
2m/6.6ft of the front of the charging base or dust collector.
• Please do not forget to turn the main power switch on before use.
• GLORY will be in Sleep mode if the standby time is more than 10 min.
Charge Method A
Please keep the main power switch on when charging.
• Connetct the original adapter with GLORY DC power socket, the LED
button of Start/Stop button will be in white, users will hear the voice
prompt of charging from the GLORY.
Charging your GLORY
M
am
i
bo
t
19
M
a
m
ib
o
t
1M
1M
2M
0
.
0
5
M
0
.
05M
M
am
ib
o
t
How to place the charging base or dust collector?
• GLORY can only be charged by the orignal power adapter and
charging base, dust collector CRAFT X provided by Mamibot.
• GLORY may not be able to find the charging base quickly, it will
improve the efficiency of finding charging base after working several
times.
• Please charge GLORY for 12 hours for the first time. Both the LED
indicator on the Start/Stop button and Auto charge button will be white.
• Pease let GLORY run out of power at the first use.
• Users can press the Auto Recharge button on GLORY or on the remote
control, or press the Recharge button on APP to order GLORY to find
charging base.
• Please turn off the main power switch if the robot will be out of service
for a long time.
• Please charge GLORY as soon as possible after the battery is used up.
• The battery should be repaired and replaced by the after-sales service
center.
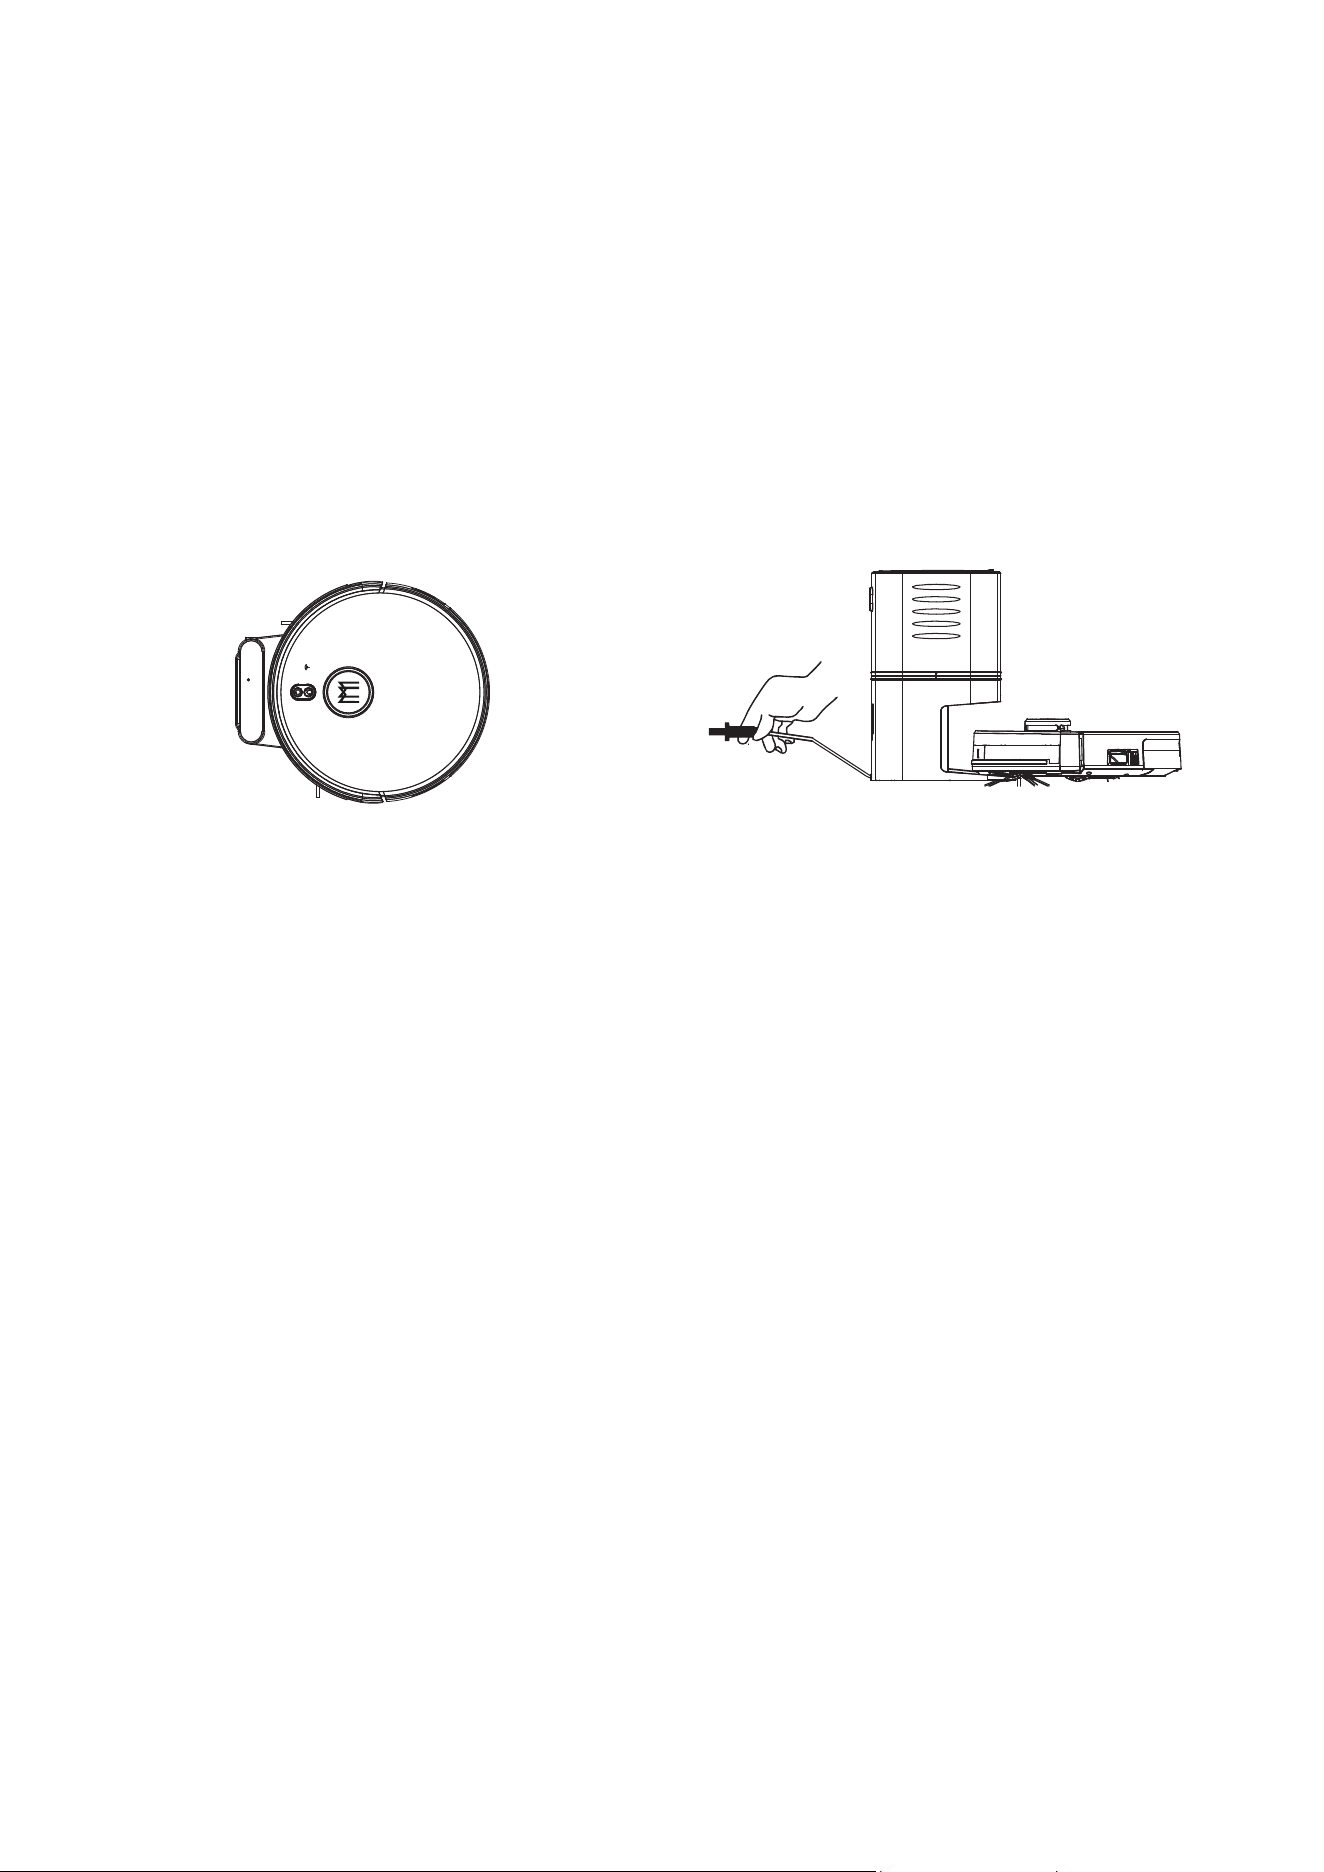
Charge Method B:
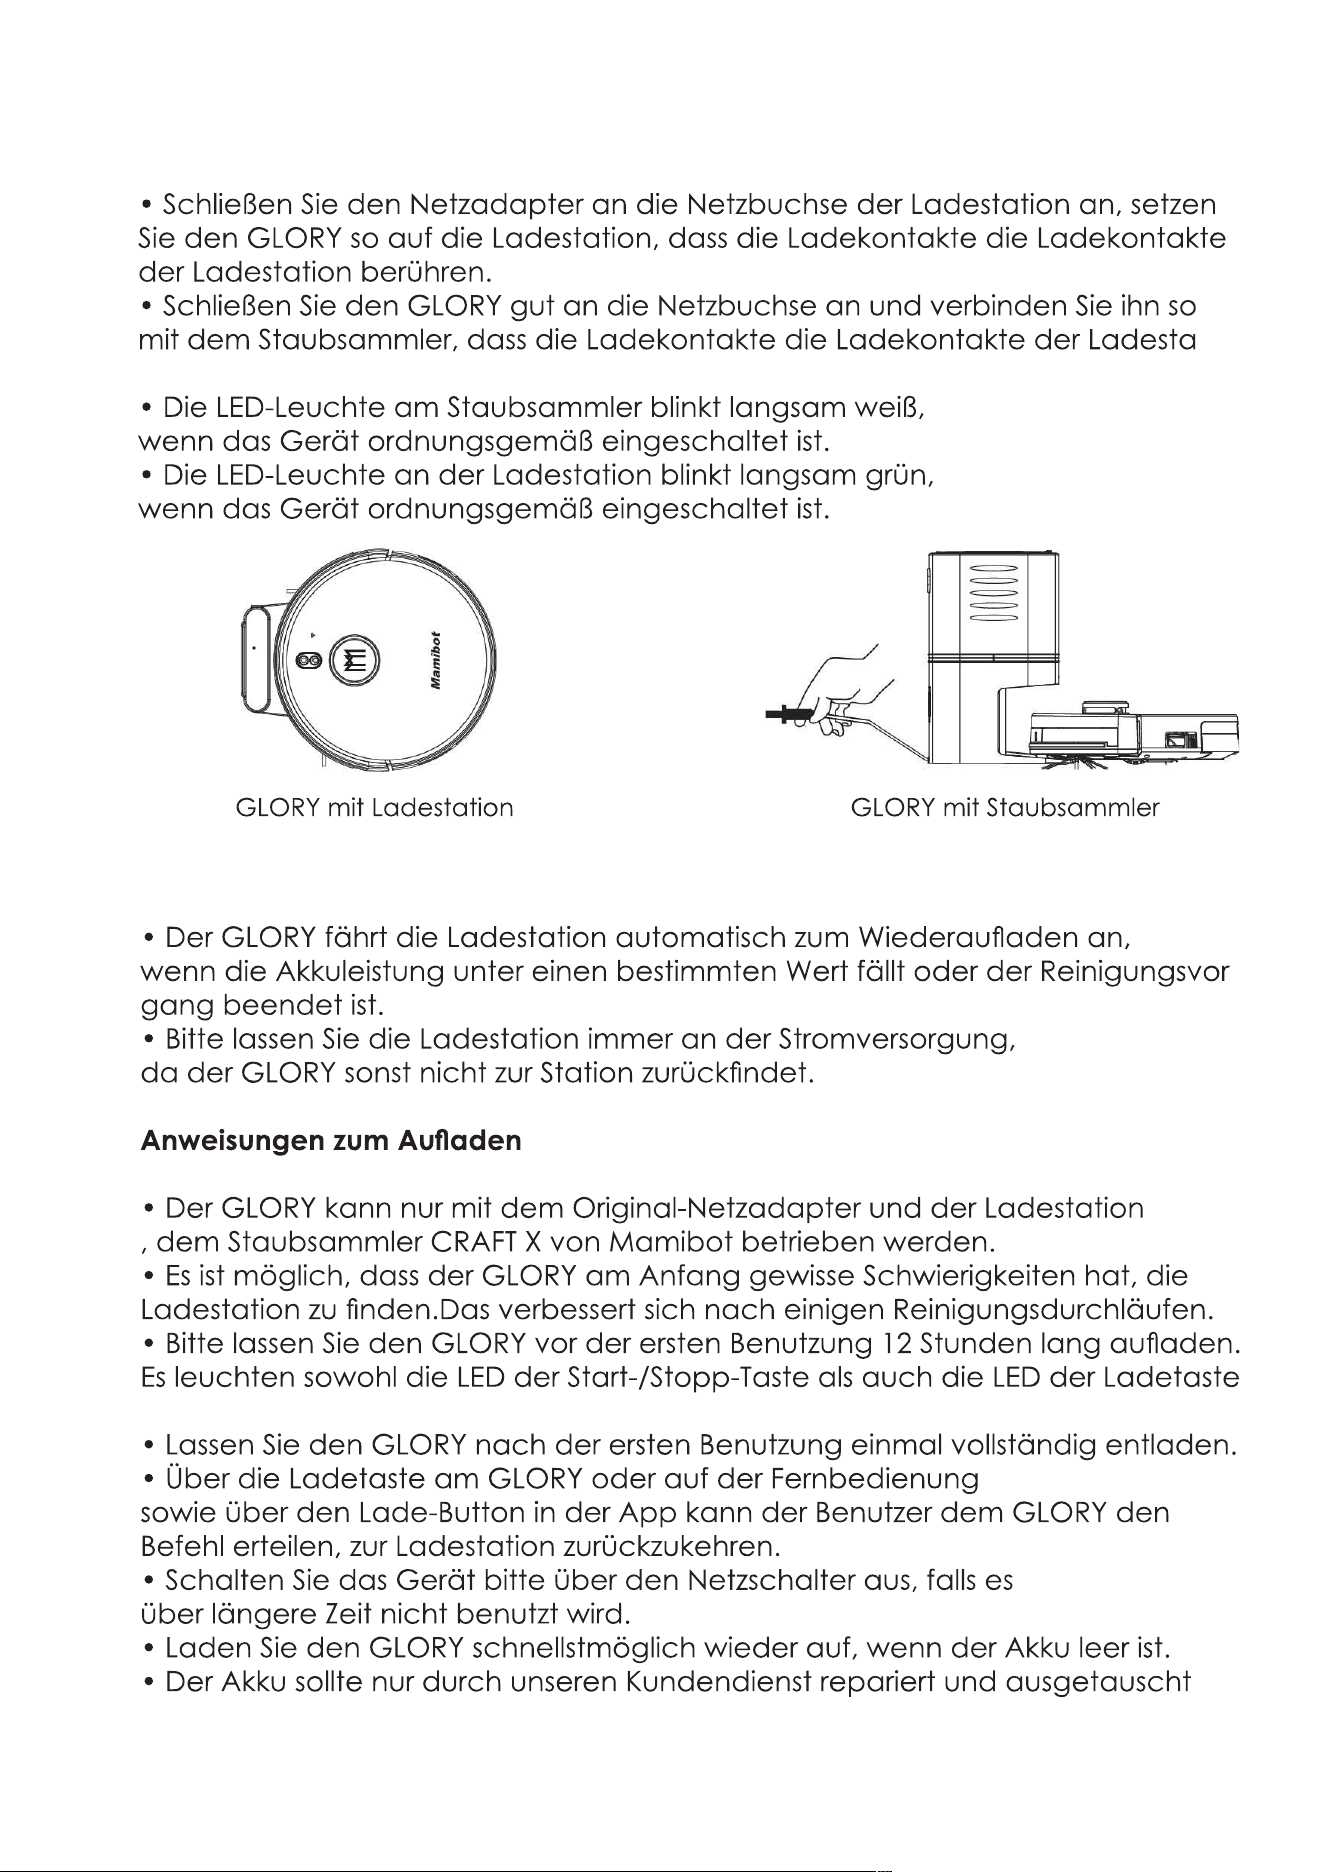
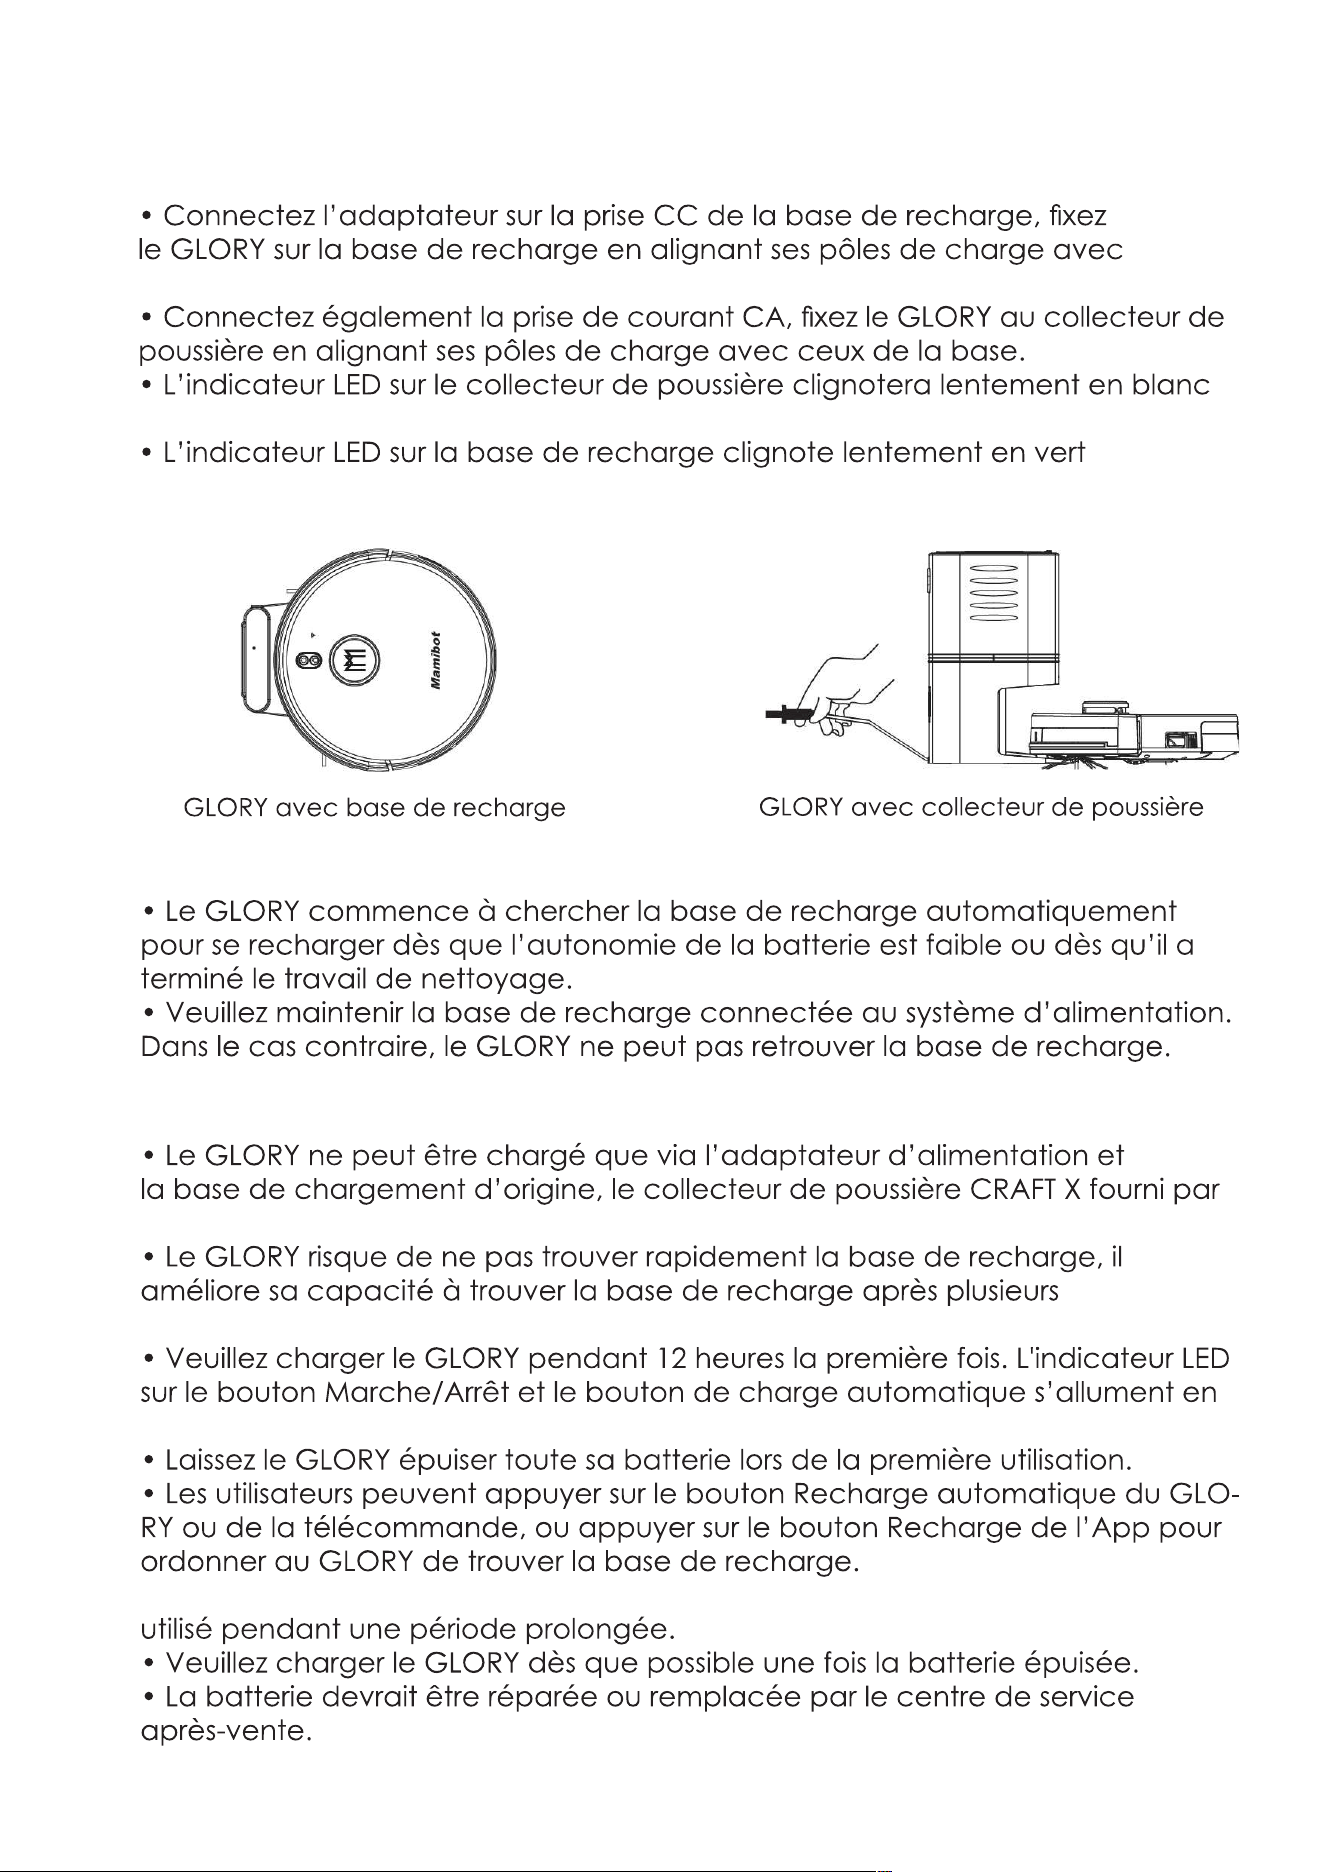
• Connet the adapter with the DC socket of the charging base, attach
GLORY to the charging base by aligning its charging poles with the
charging poles on the base.
• Connet the AC power socket well, attach GLORY to the dust collector
by aligning its charging poles with the charging poles on the base.
• The LED indicator on the dust collector will be slowly flashing white
if it is switched on properly.
• The LED indicator on the charging base will be slowly flashing green
if it is switched on properly.
Auto Recharge
• GLORY will start to find the charging base automatically for recharge
when the battery power is low or GLORY finishes the cleaning work.
• Please keep the charging base connected with the power system, or
GLORY will not be able to find the charging base.
Charging instruction
20
Mamibot
OR
GLORY With Charging Base GLORY With Dust Collector
Before Wi-Fi setup, please make sure that GLORY and your Wi-Fi network
meet the following requirements.
Wi-Fi Setup Requirements
1. The Wi-Fi Network you are using is 2.4GHz router or a dual-band router.
GLORY does not support 5GHz frequency band.
2. The Wi-Fi network you are using supports 802.11b/g/n and IPv4 protocol.
3. Please make sure that there is no illegal character in your SSID, or the
Wi-Fi may not be recognized.
4. Please don’t use a virtual Private Network(VPN) for connection.
5. Please make sure that your password is correct when entering.
6. Please make sure GLORY is fully charged or on the dock station, and the
main power switch on the side of GLORY is turned on.
7. Please make sure that you hear the voice of prompt for connection,
and the Wi-Fi status light flashes white slowly.
8. Please make sure that your GLORY, Router and Smartphone are as close
as possible.
APP Connecting
21
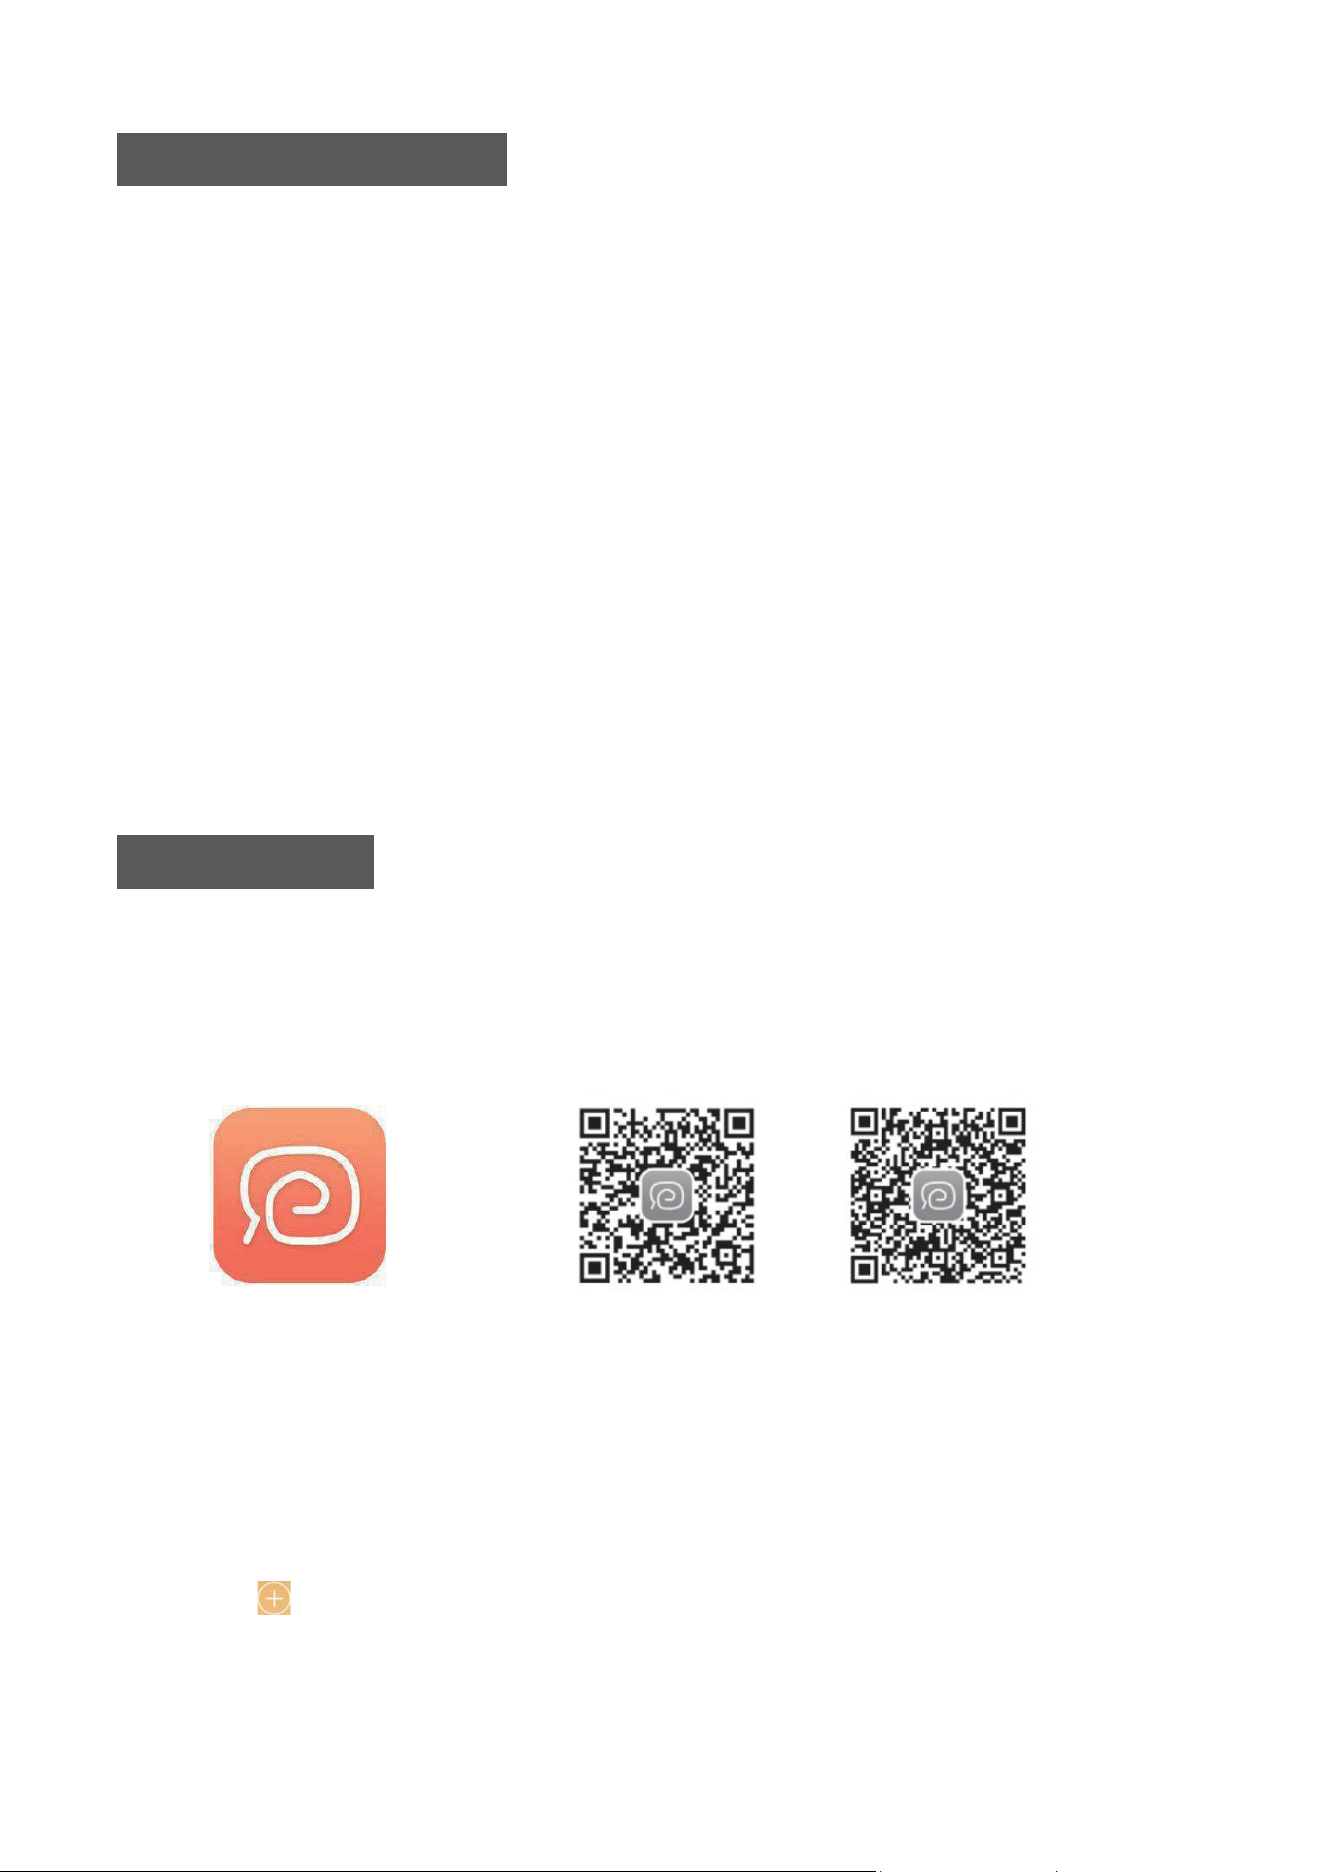
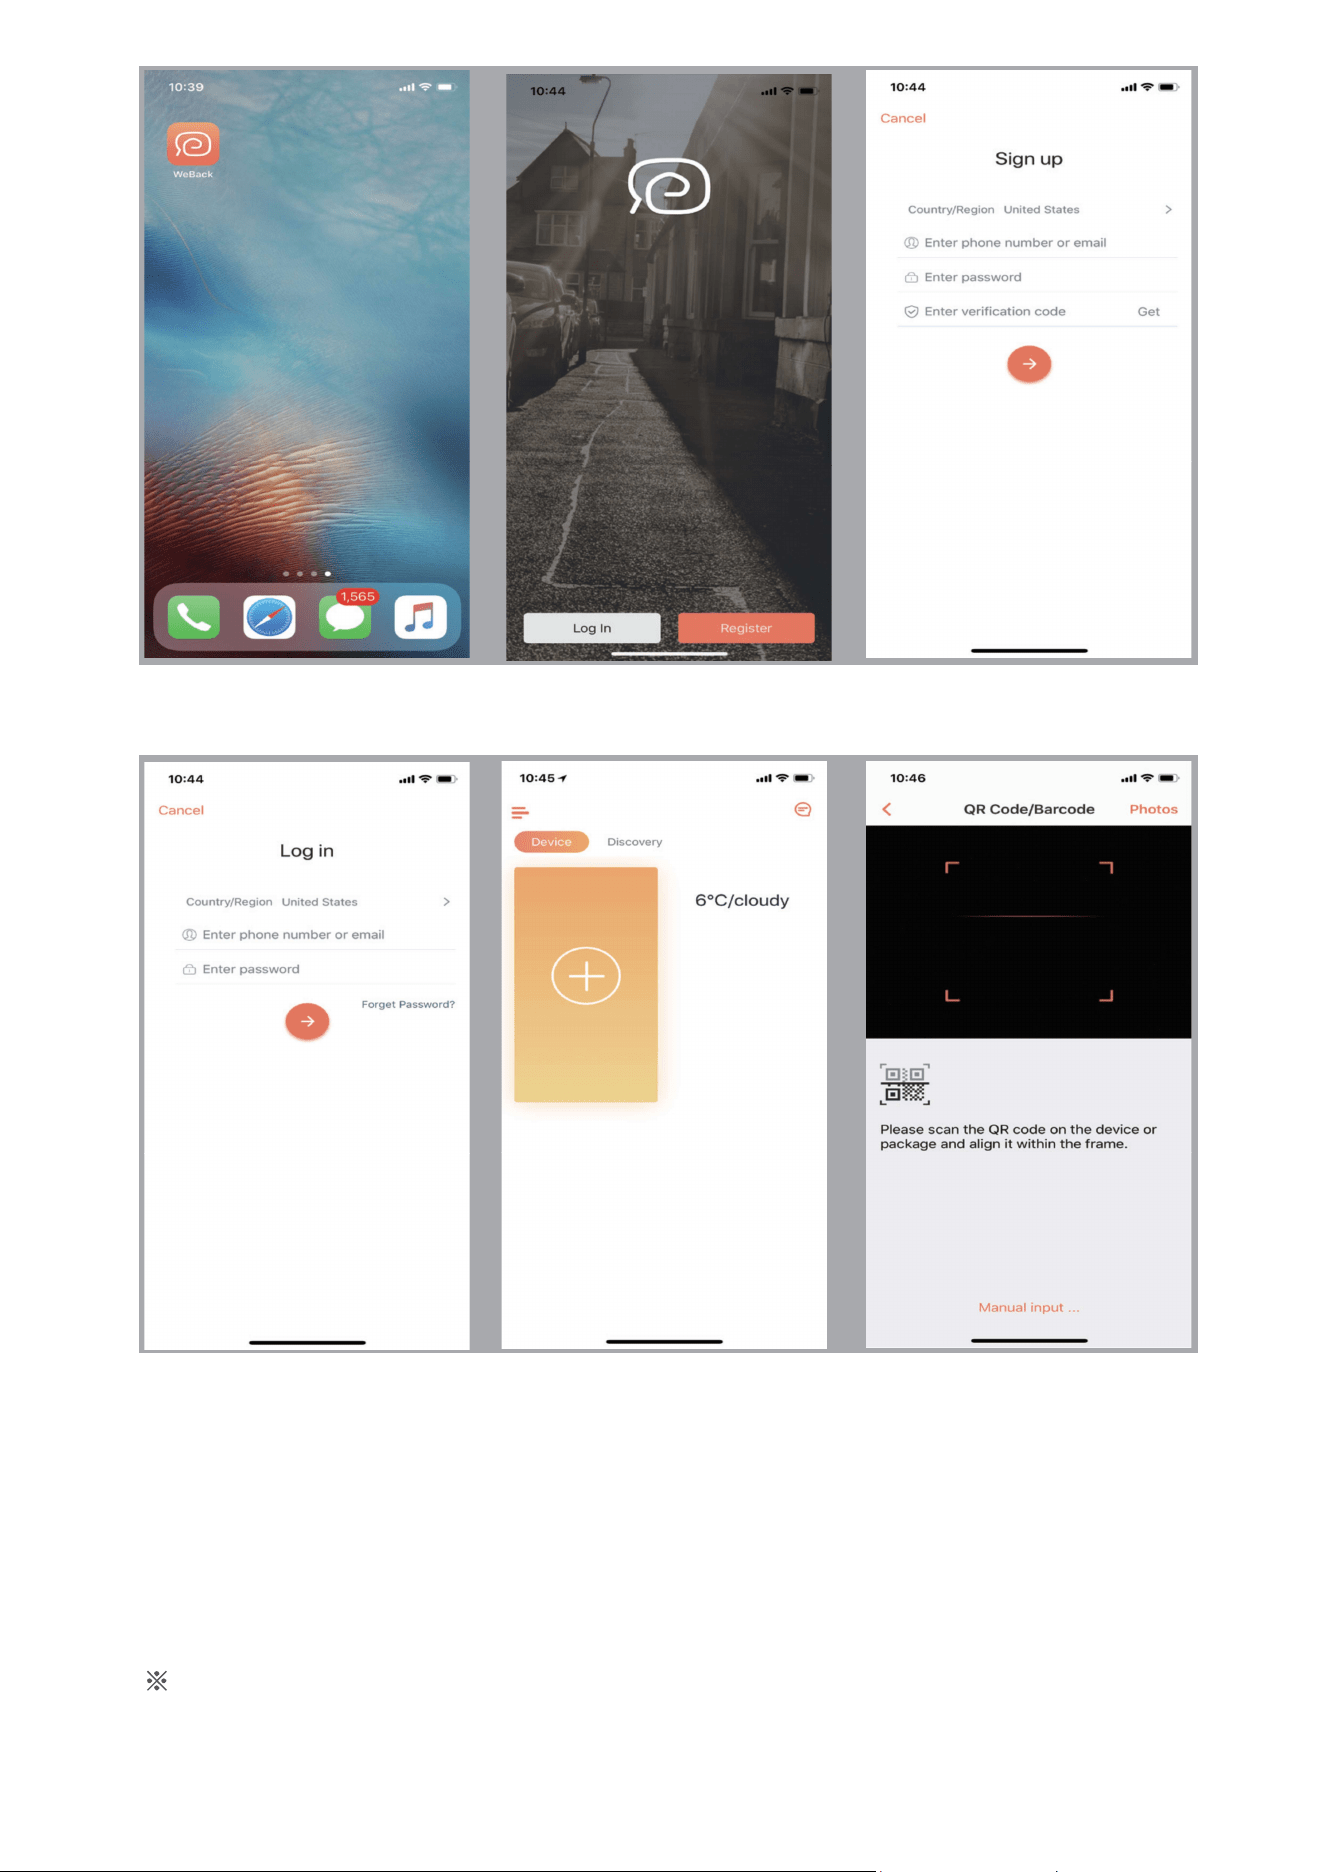
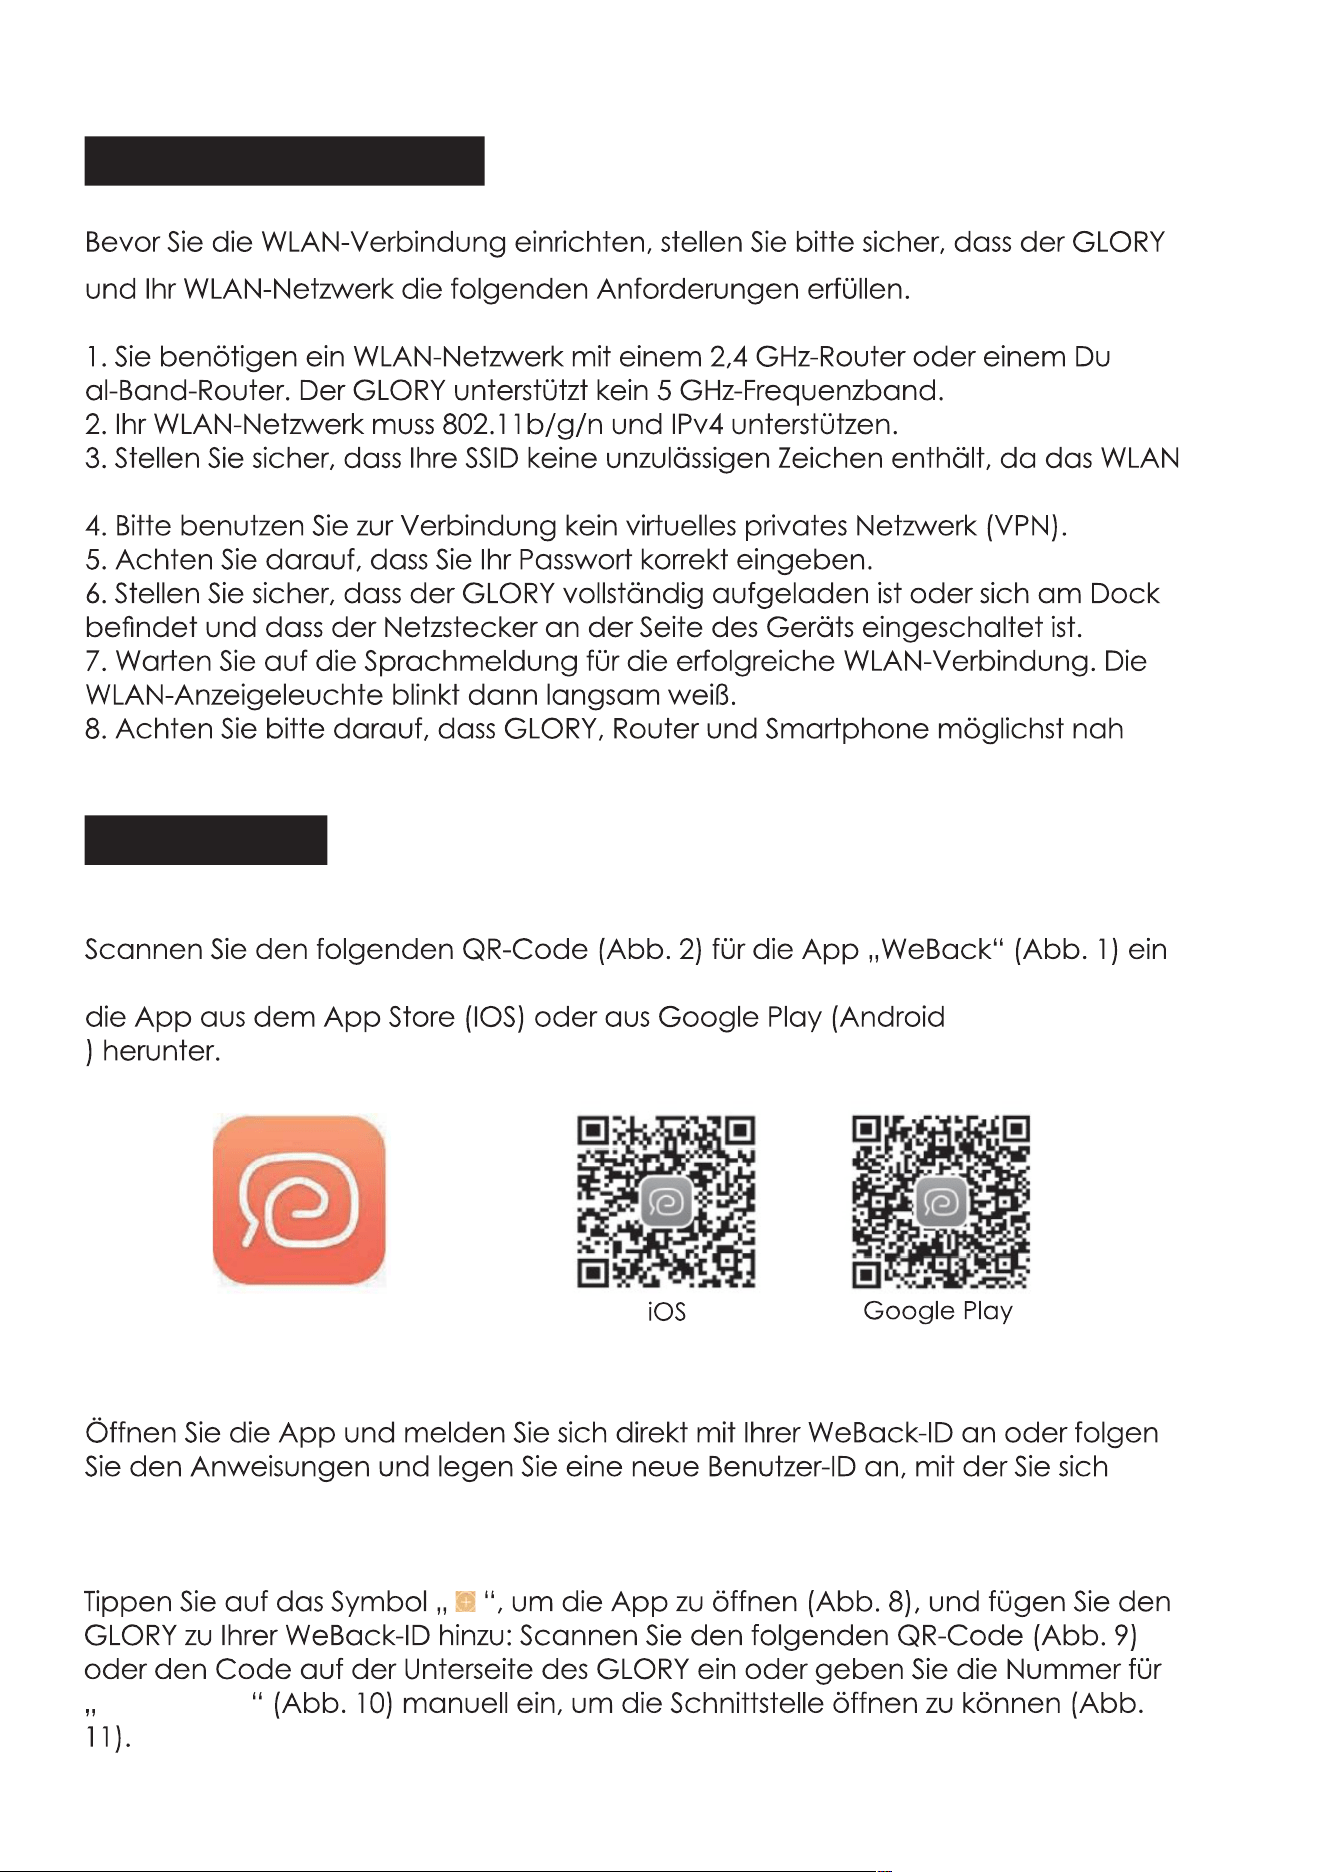
1. App downloading
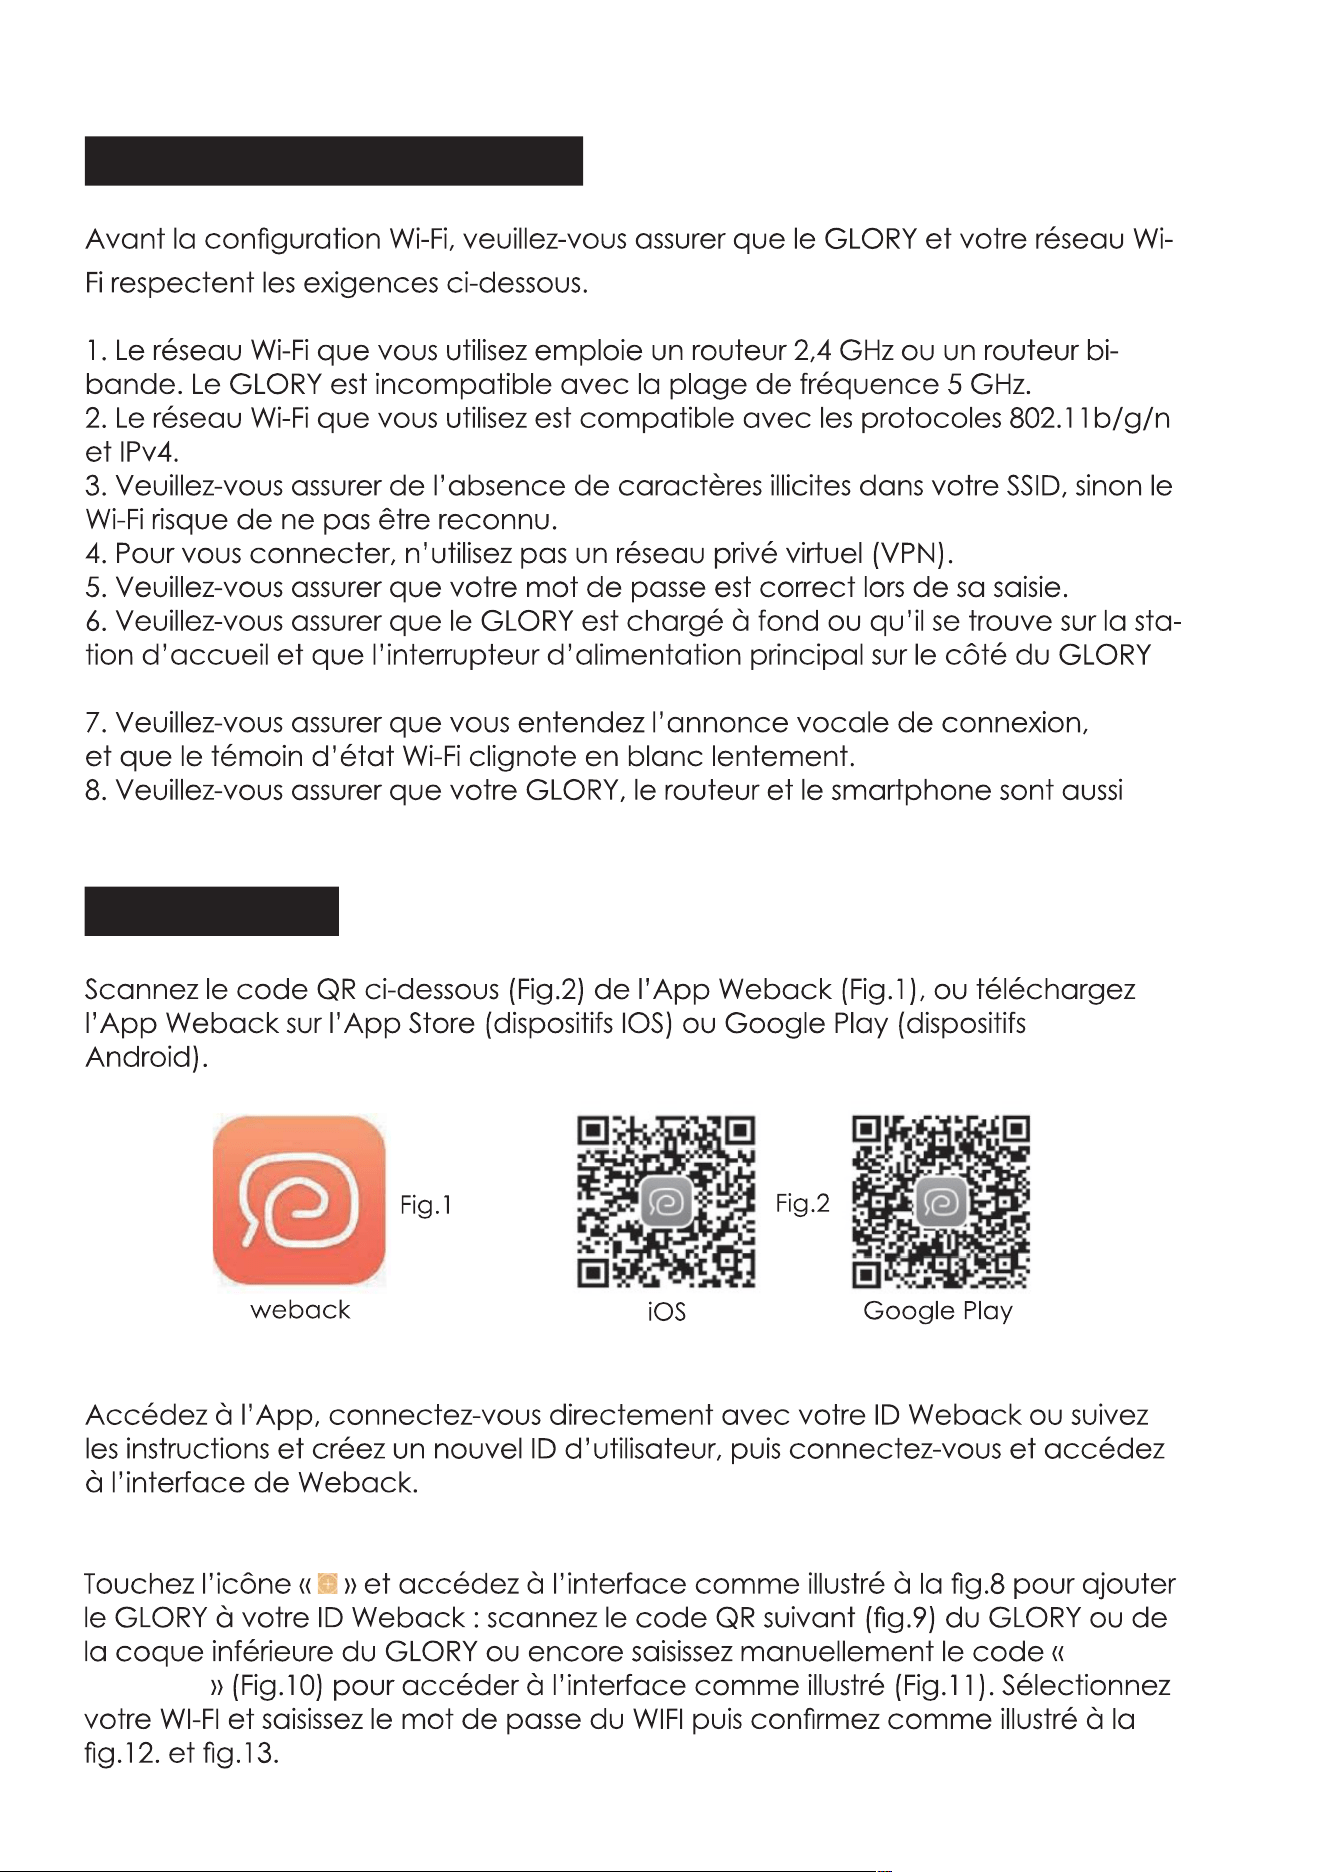
Scan the below QR code(Fig.2) of Weback app(Fig.1), or down load the
Weback app from the App Store(IOS devices) or Google Play(Android
devices).
weback
Fig.1
Fig.2
IOS Google Play
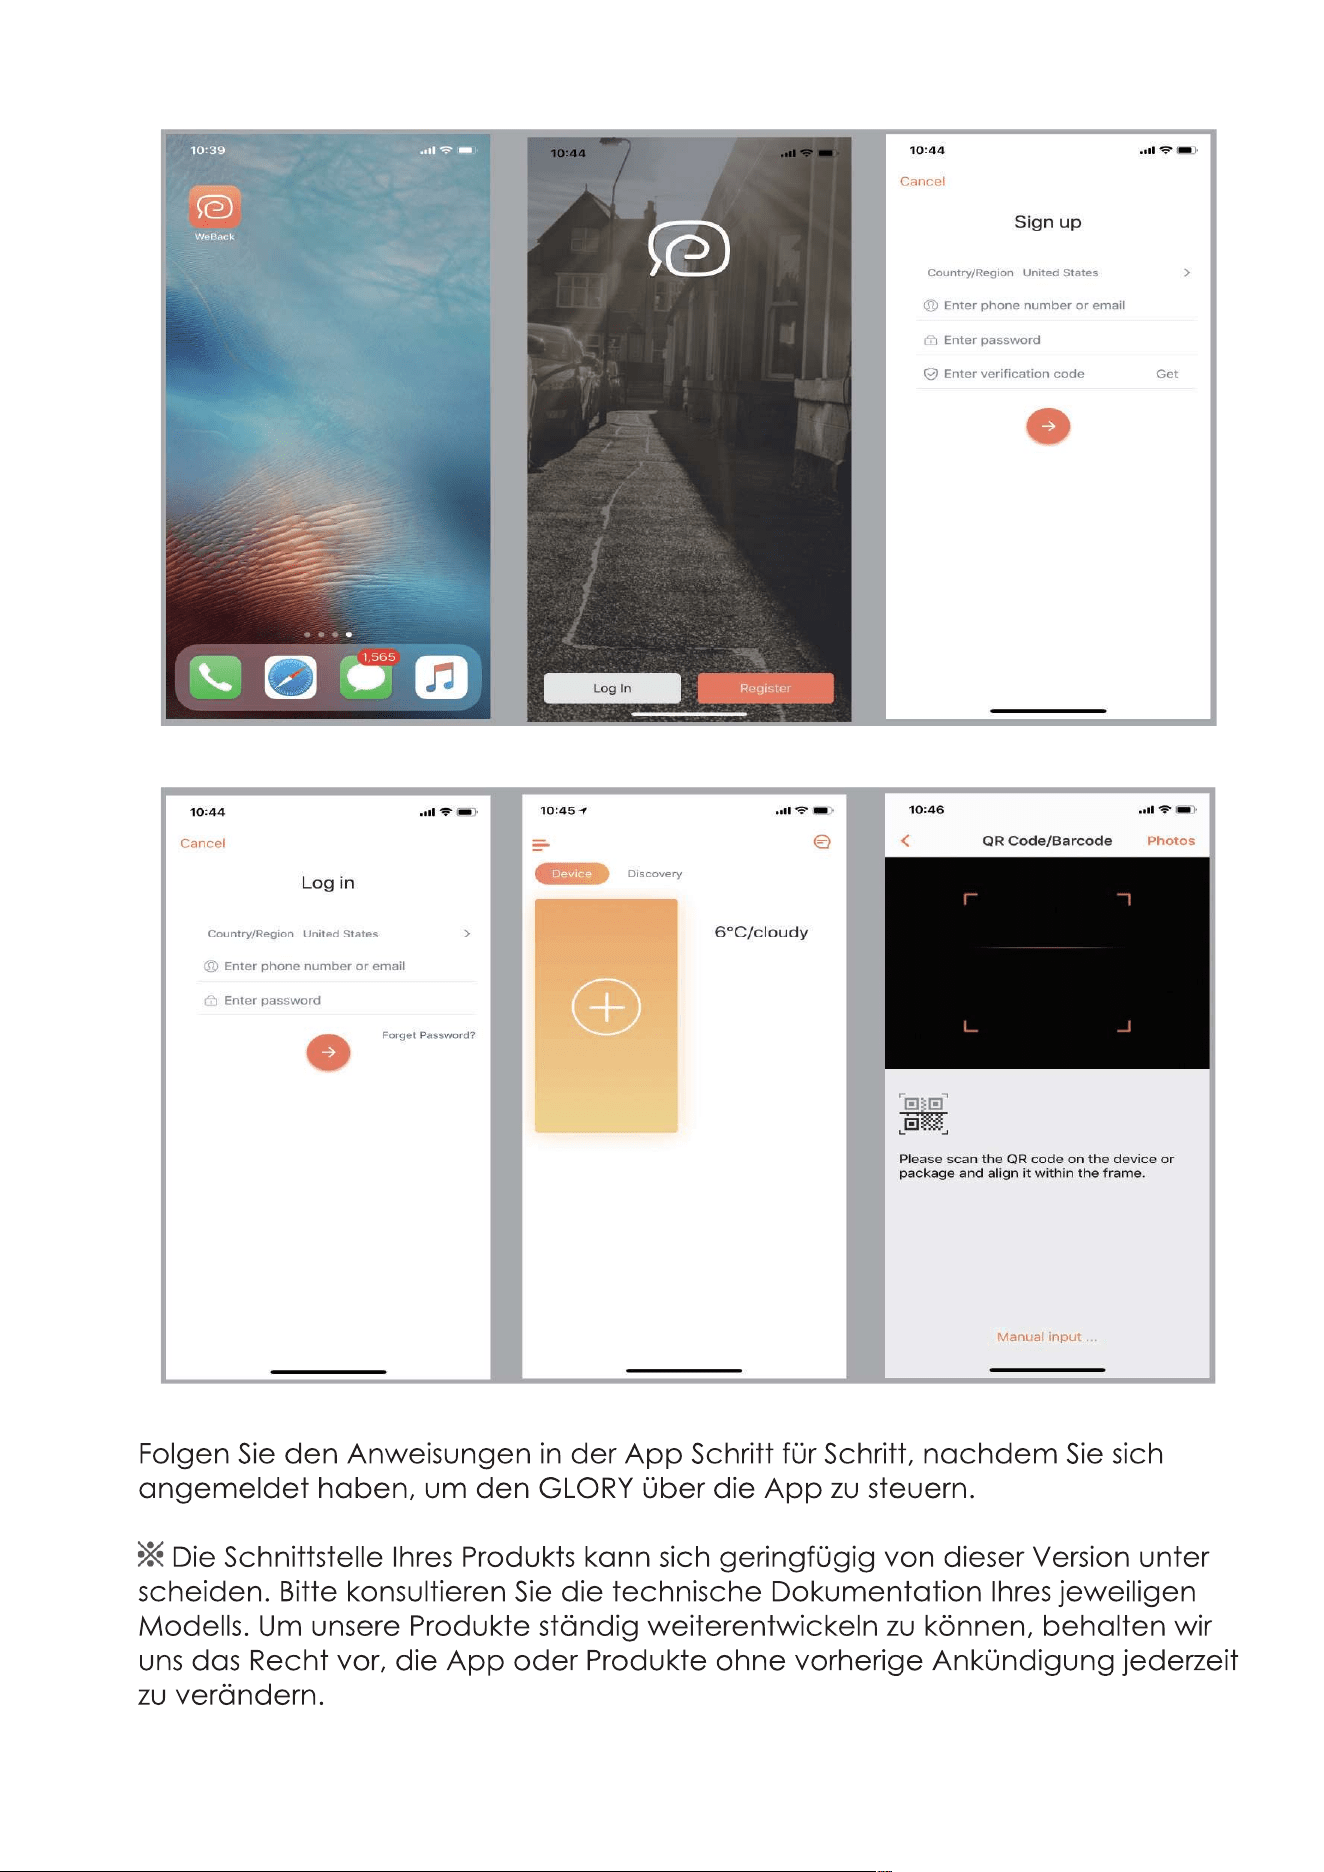
2. Log in/Register weback ID.
Enter the app, log in with your weback ID directly, or follow the instructions
and creat a new user ID, then log in and enter weback interface.
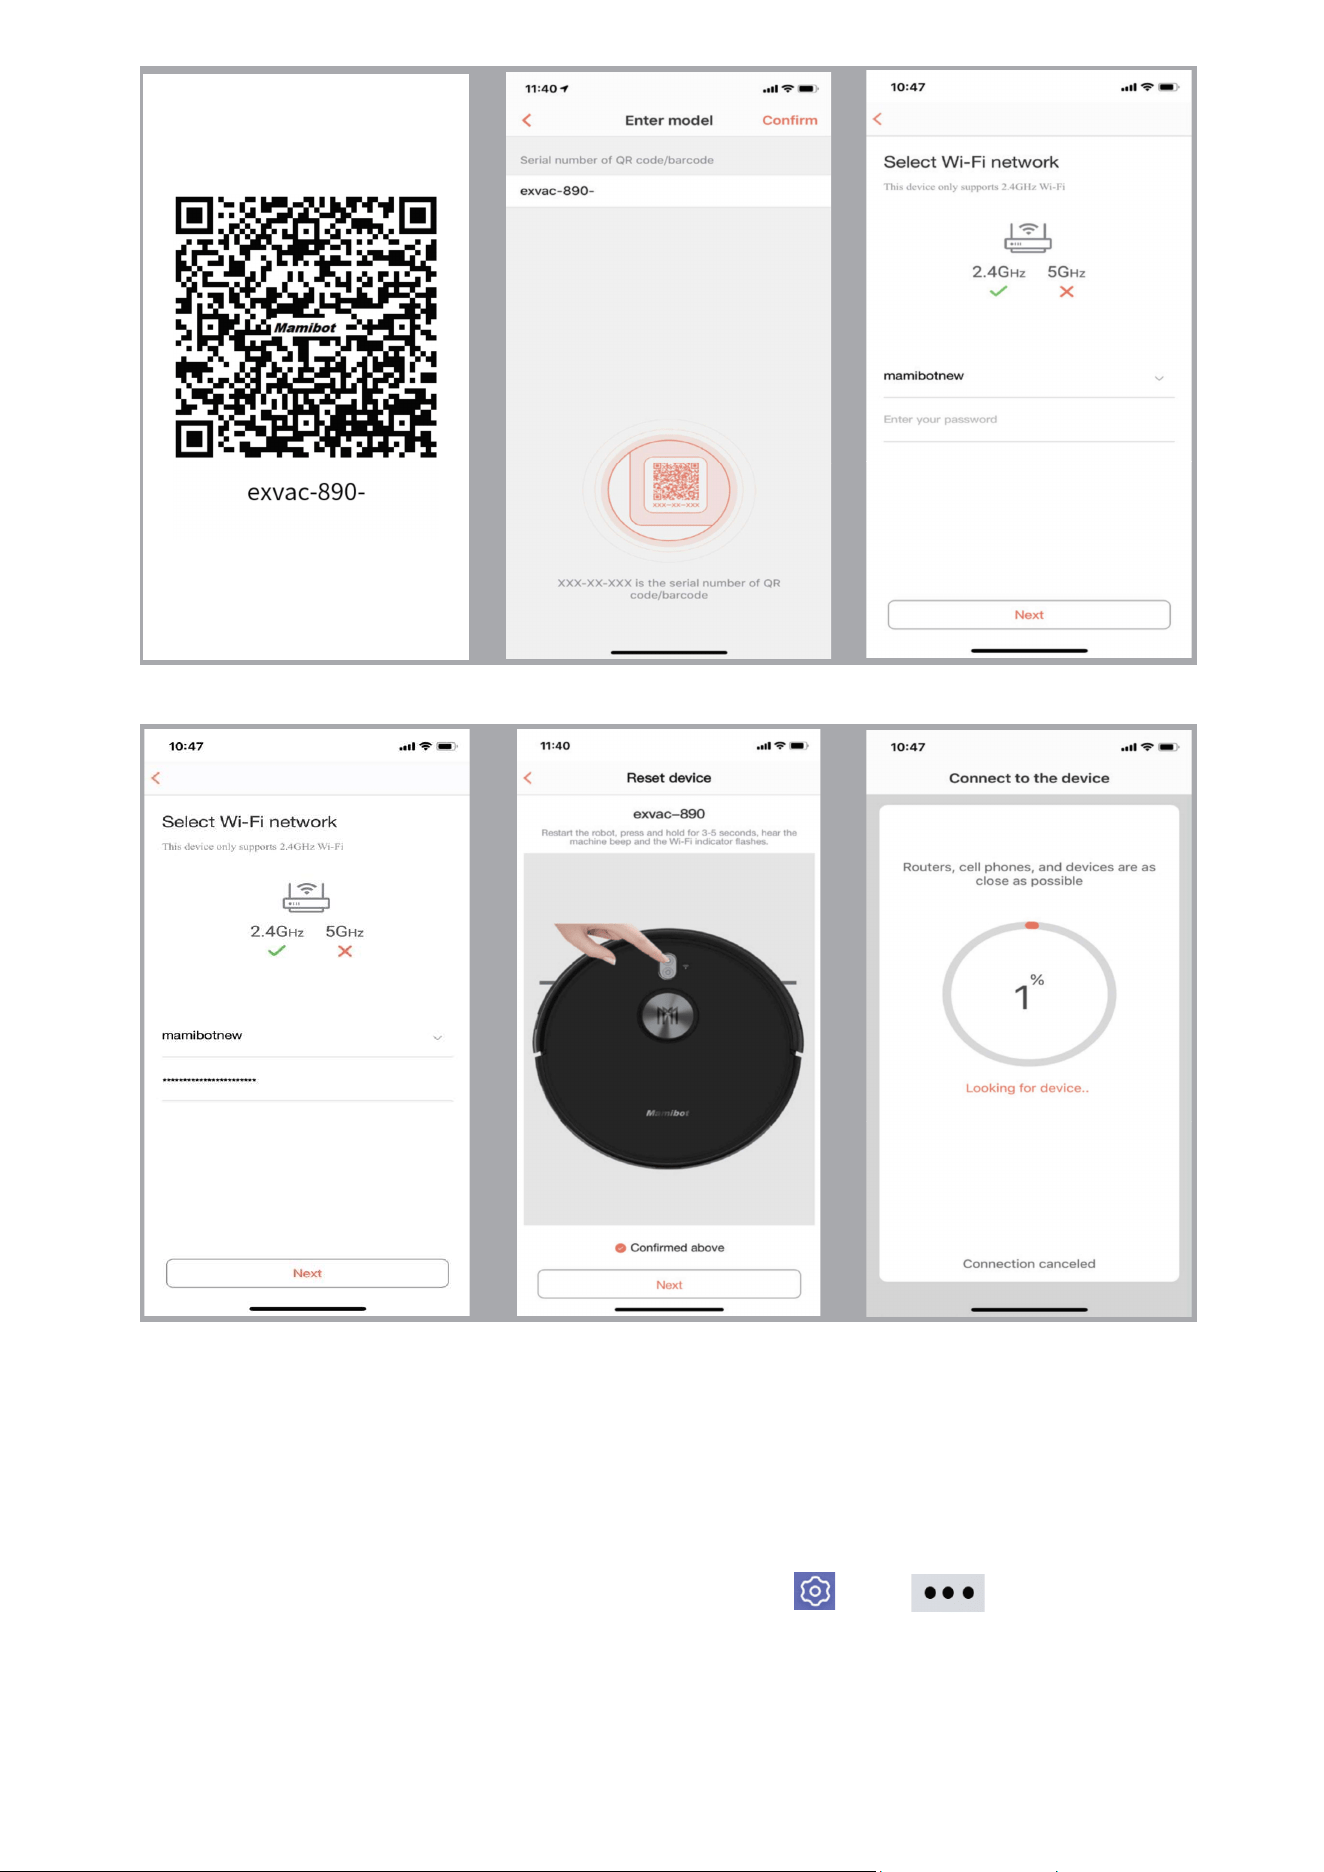
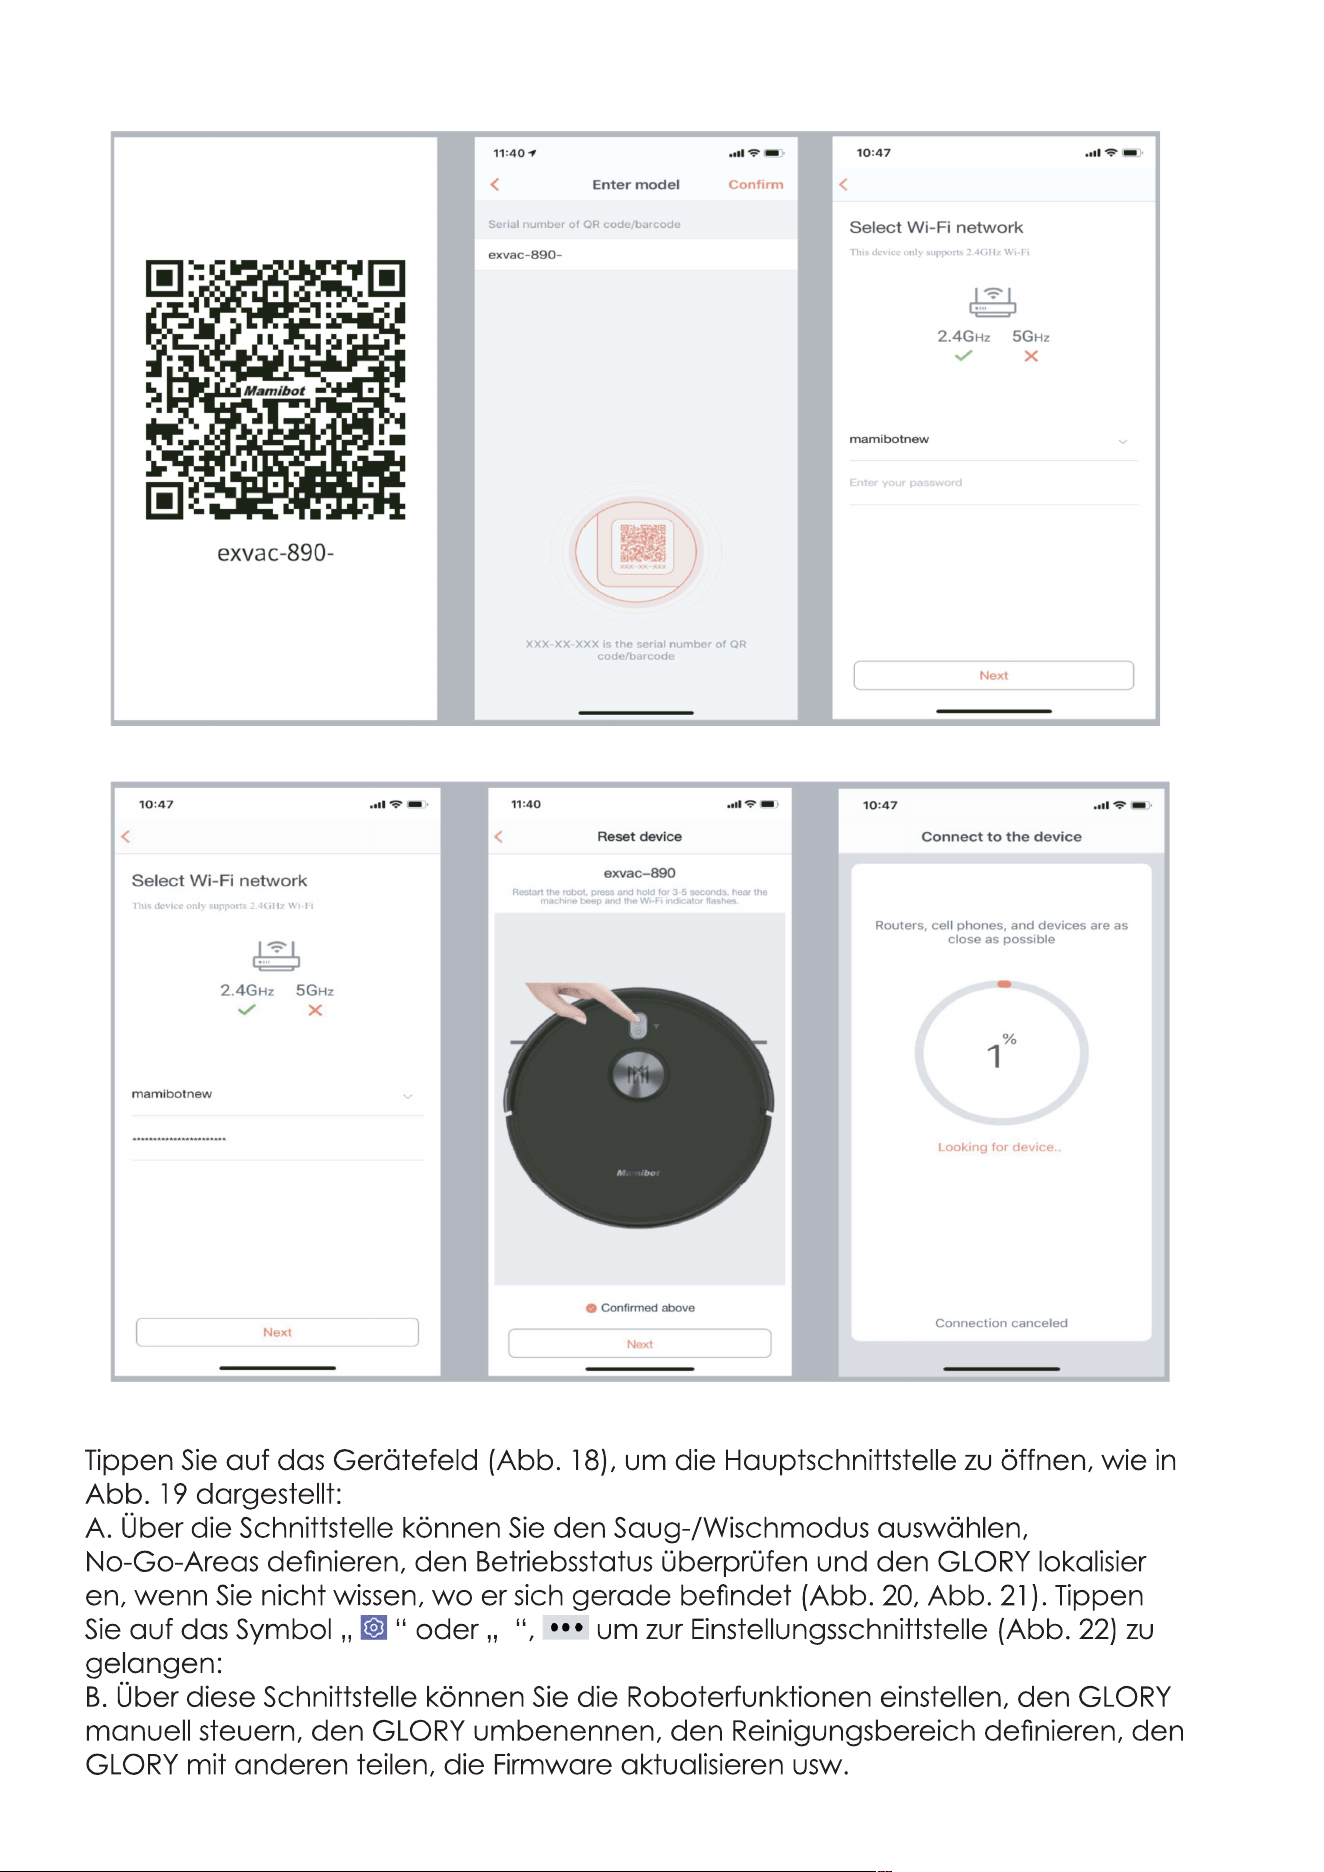
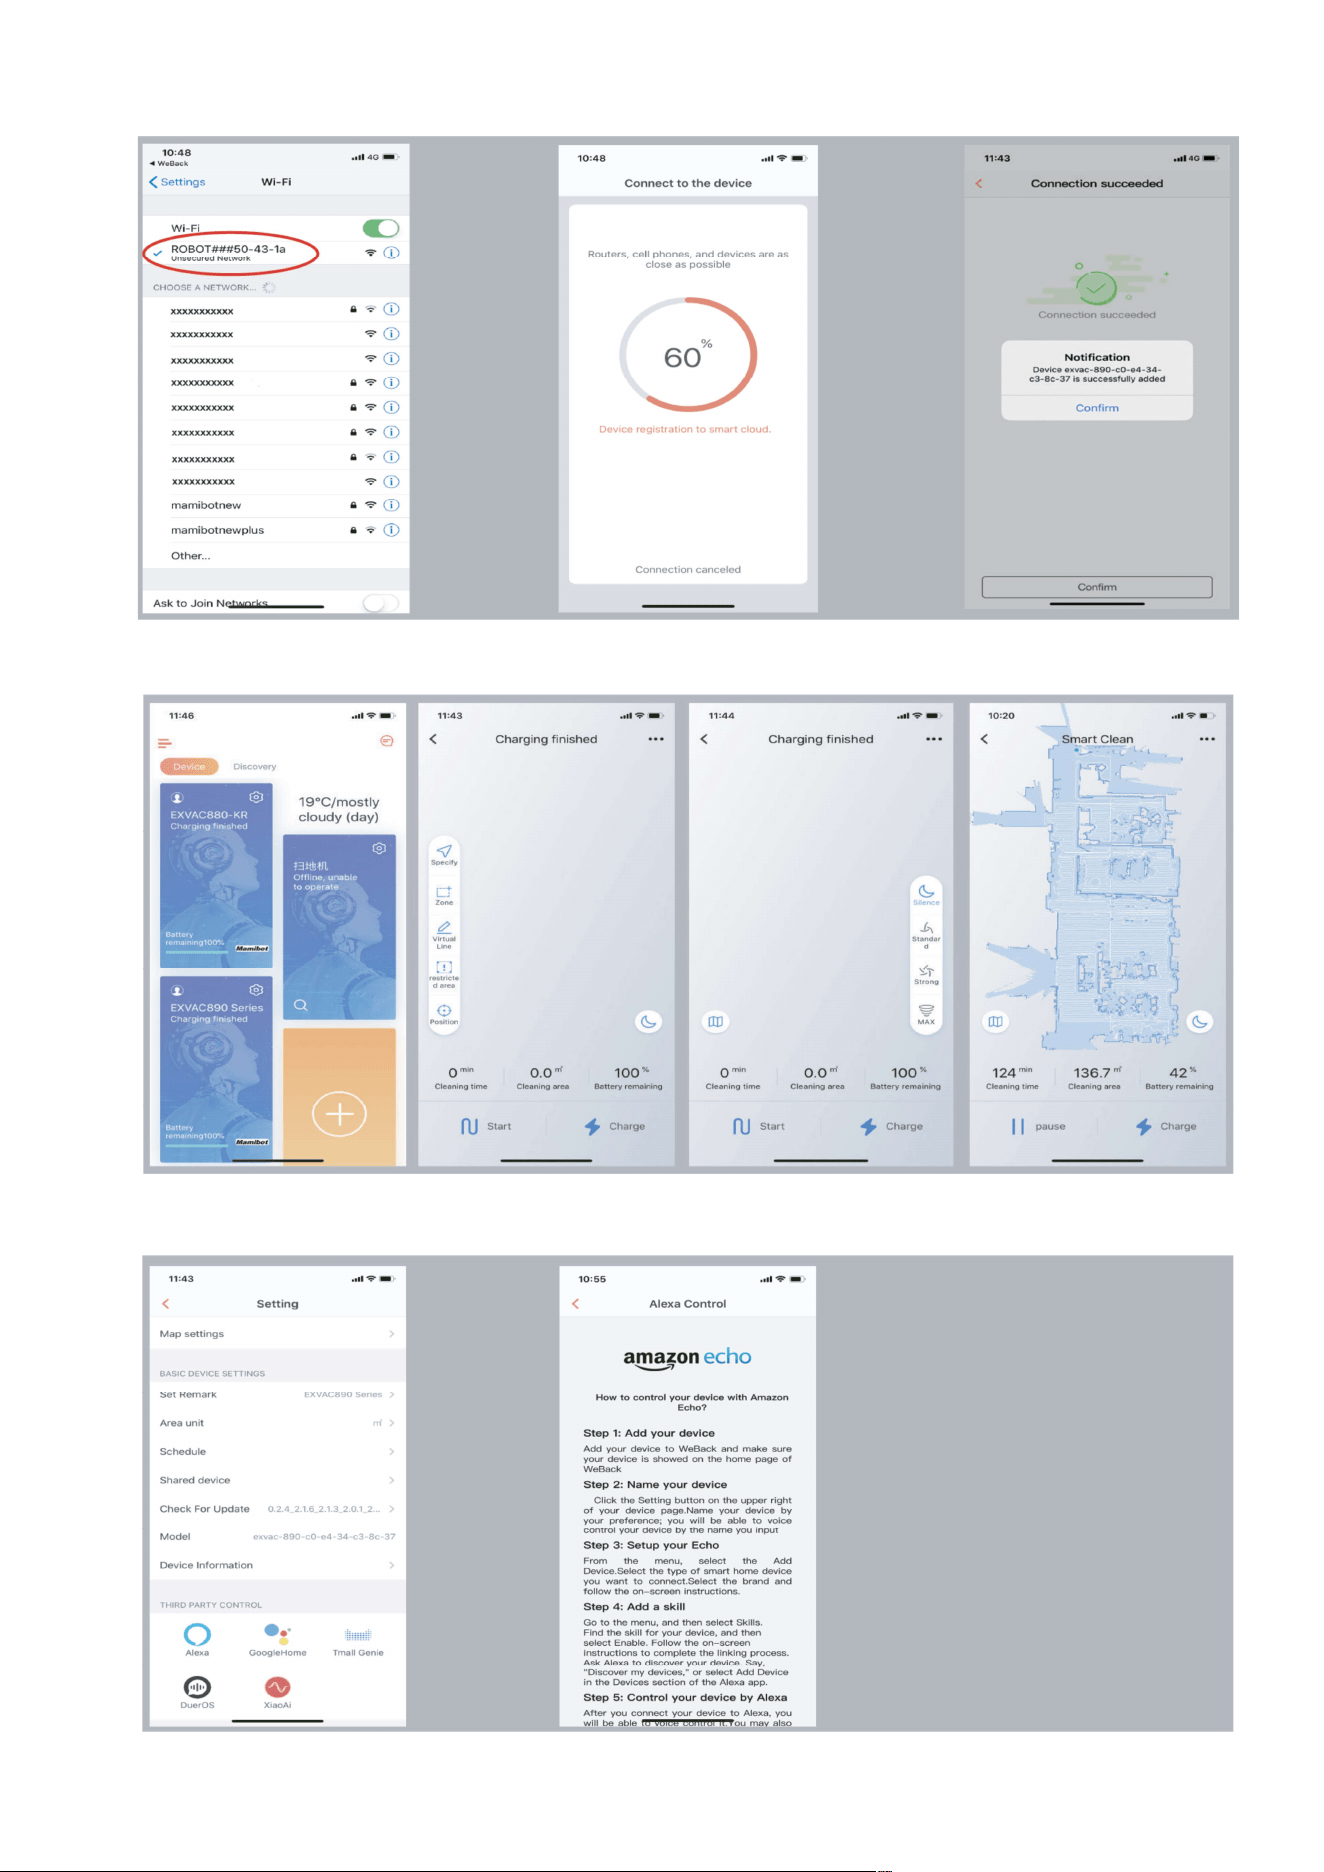
3. Connect the GLORY to the App.
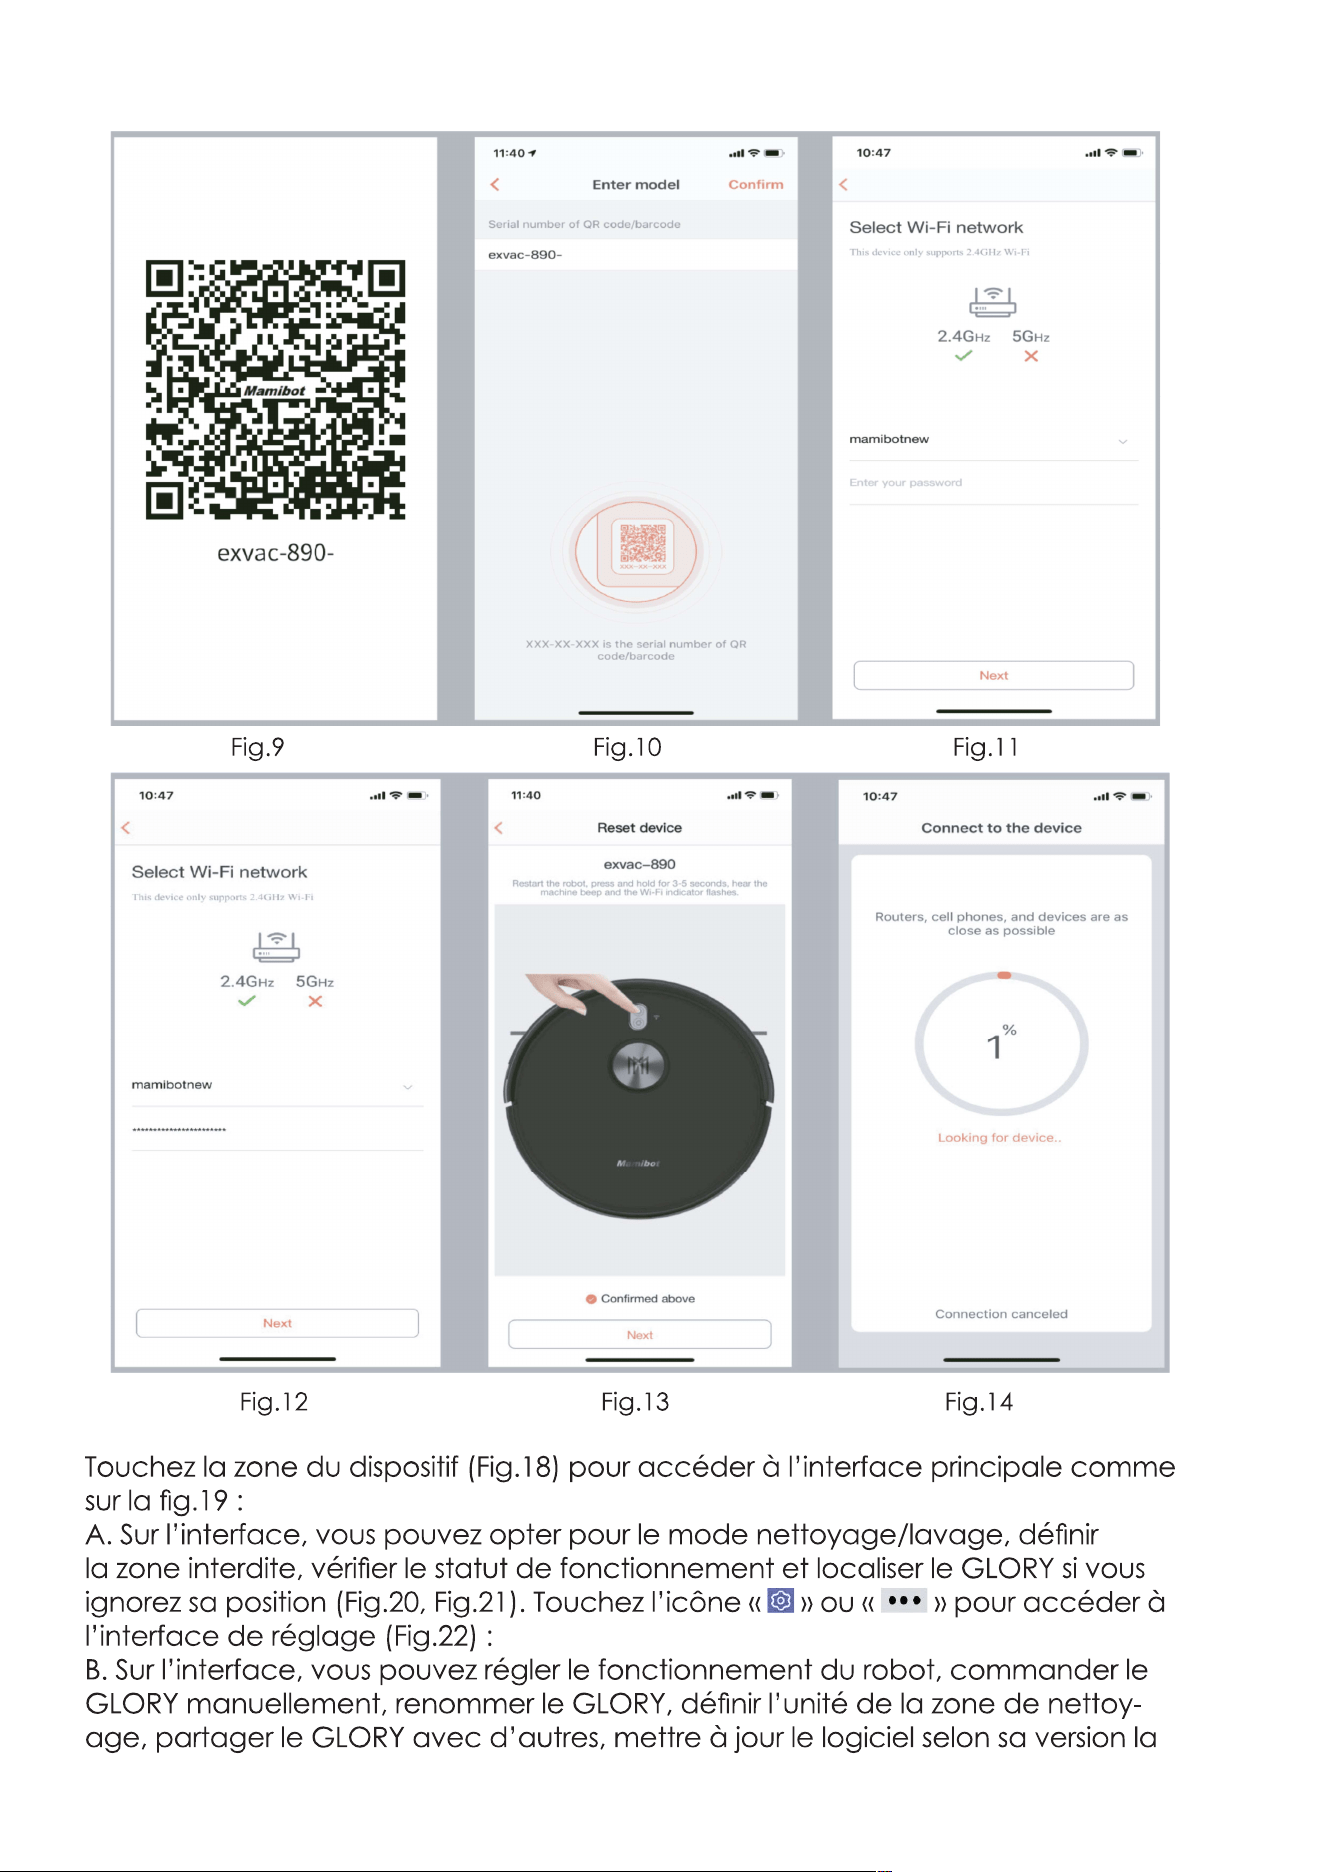
Tap the “ ” icon and enter the interface as Fig.8 to add GLORY to your
weback ID: Scan the following QR code (Fig.9) of GLORY or from bottom
shell of GLORY or manual input the number of “exvac-890-”(Fig.10) to
enter the interface as(Fig.11). Choosing your WIFI and enter password of
the WIFI, then confirm as Fig.12. and Fig.13.
The interface may be slightly different from the final product, please subject
to the actual products. In order to improve the product, we reserve the right to
upgrade the APP or the products without prior notice or obligation.
22
Fig.3
Following the instructions of App step by step, after connecting
successfully, you can control GLORY via App.
Fig.4 Fig.5
Fig.6
Fig.7 Fig.8
23
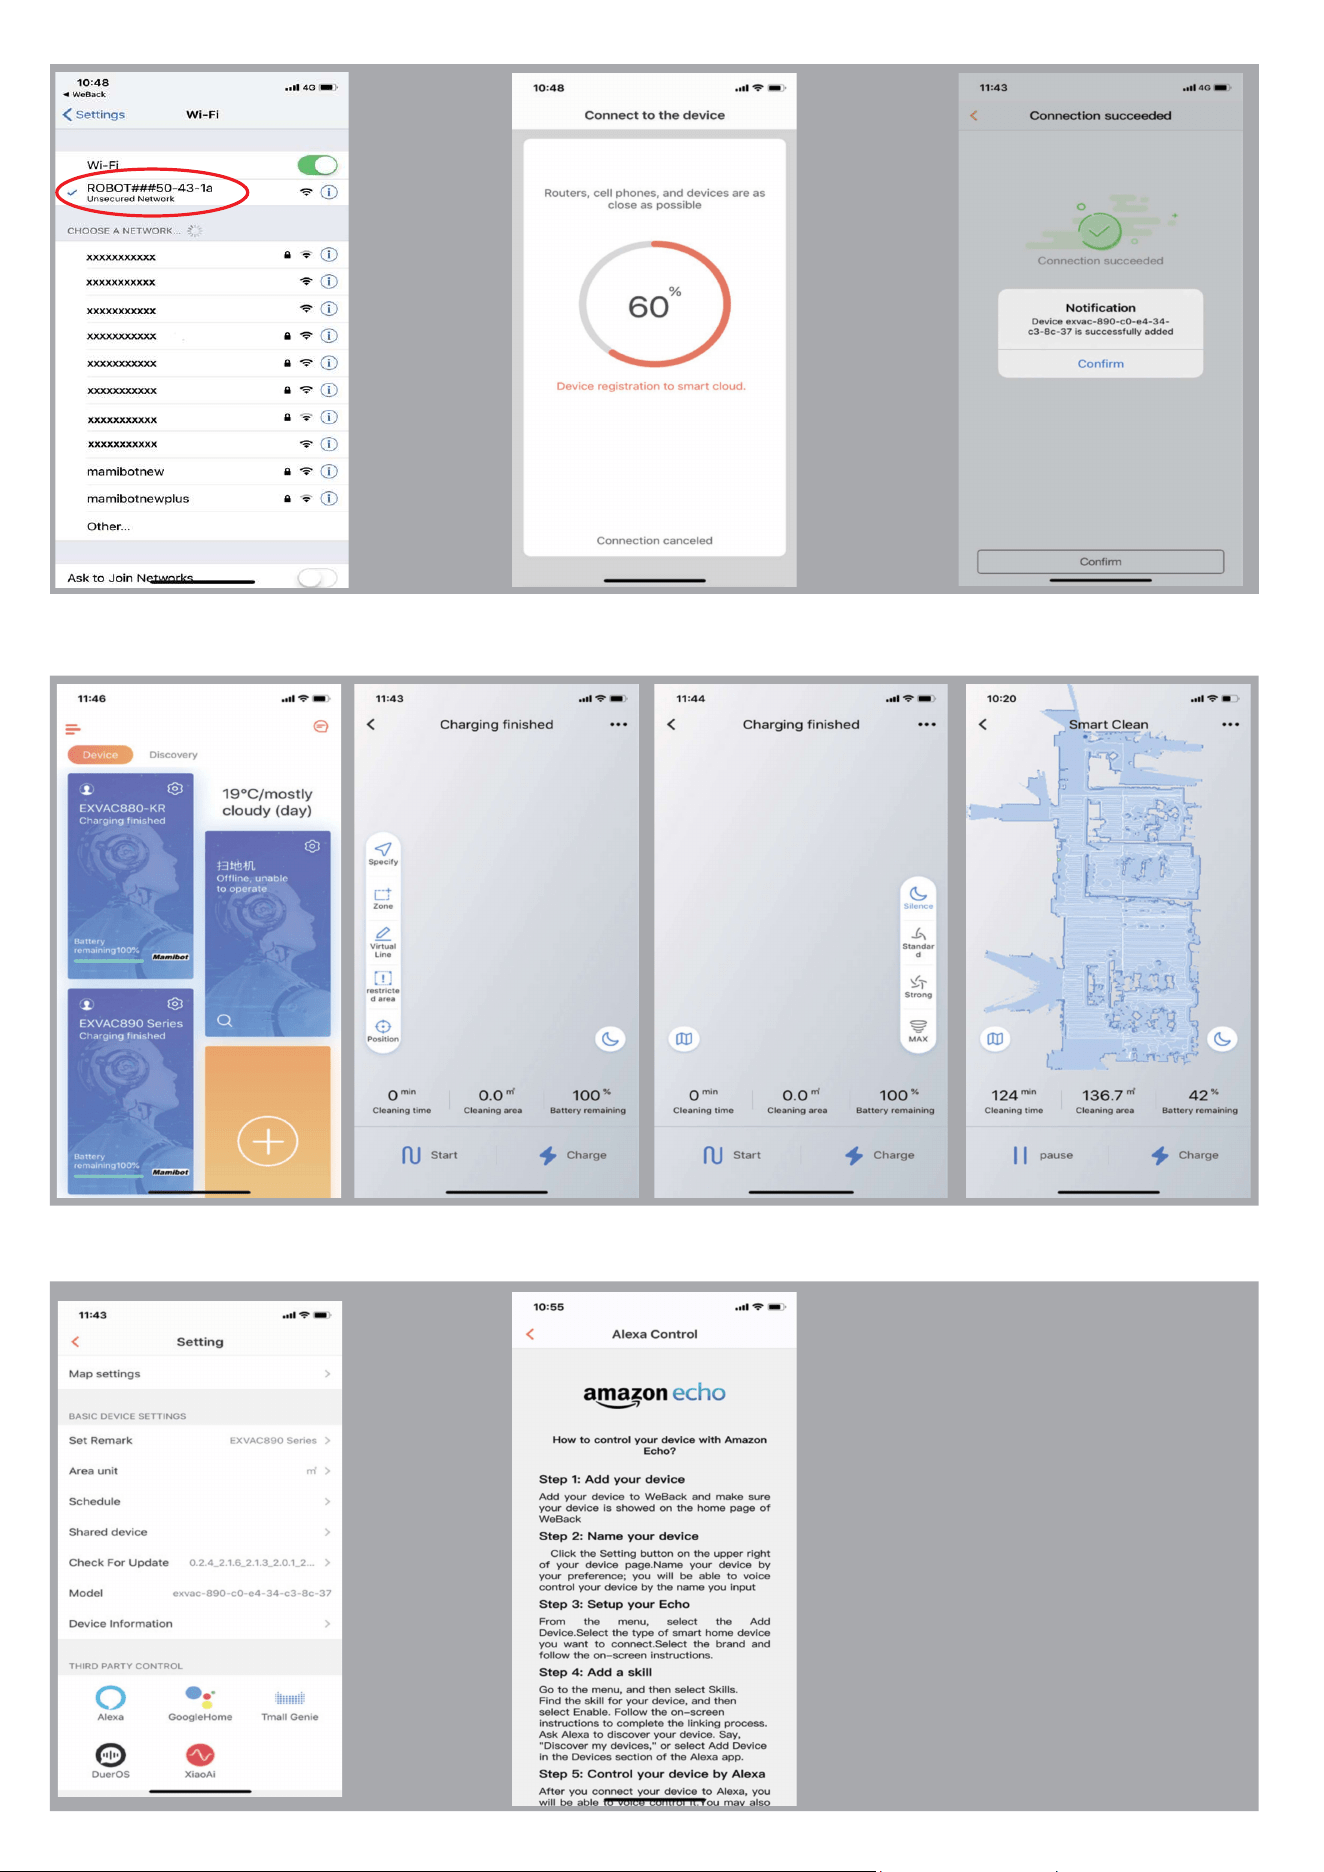
3. Control the GLORY via App.
Tap the device area(Fig.18) to enter main interface as Fig.19:
A). On the interface, you can choose the cleaning/mopping mode, set
the Not-to-go area, check the working status and locate the GLORY if you
don’t know where it is(Fig.20, Fig.21). Tap the “ ”or “ ” icon to enter
the setting interface(Fig.22):
B). On the interface, you can set the robot function, control GLORY
manually, rename the GLORY, set the unit of cleaning area, share the
GLORY to others, update the latest version of firmware,etc.
Fig.9
Fig.12
Fig.10
Fig.13
Fig.14
Fig.11
24
Fig.15 Fig.16 Fig.17
Fig.18 Fig.19 Fig. 21
Fig. 23
Fig.20
C). On the interface, you
can also get to know the
guides of connecting GLORY
to the third-party Apps, such
as Alexa, Google home,etc
(as Fig.22&Fig.23).
Fig. 22
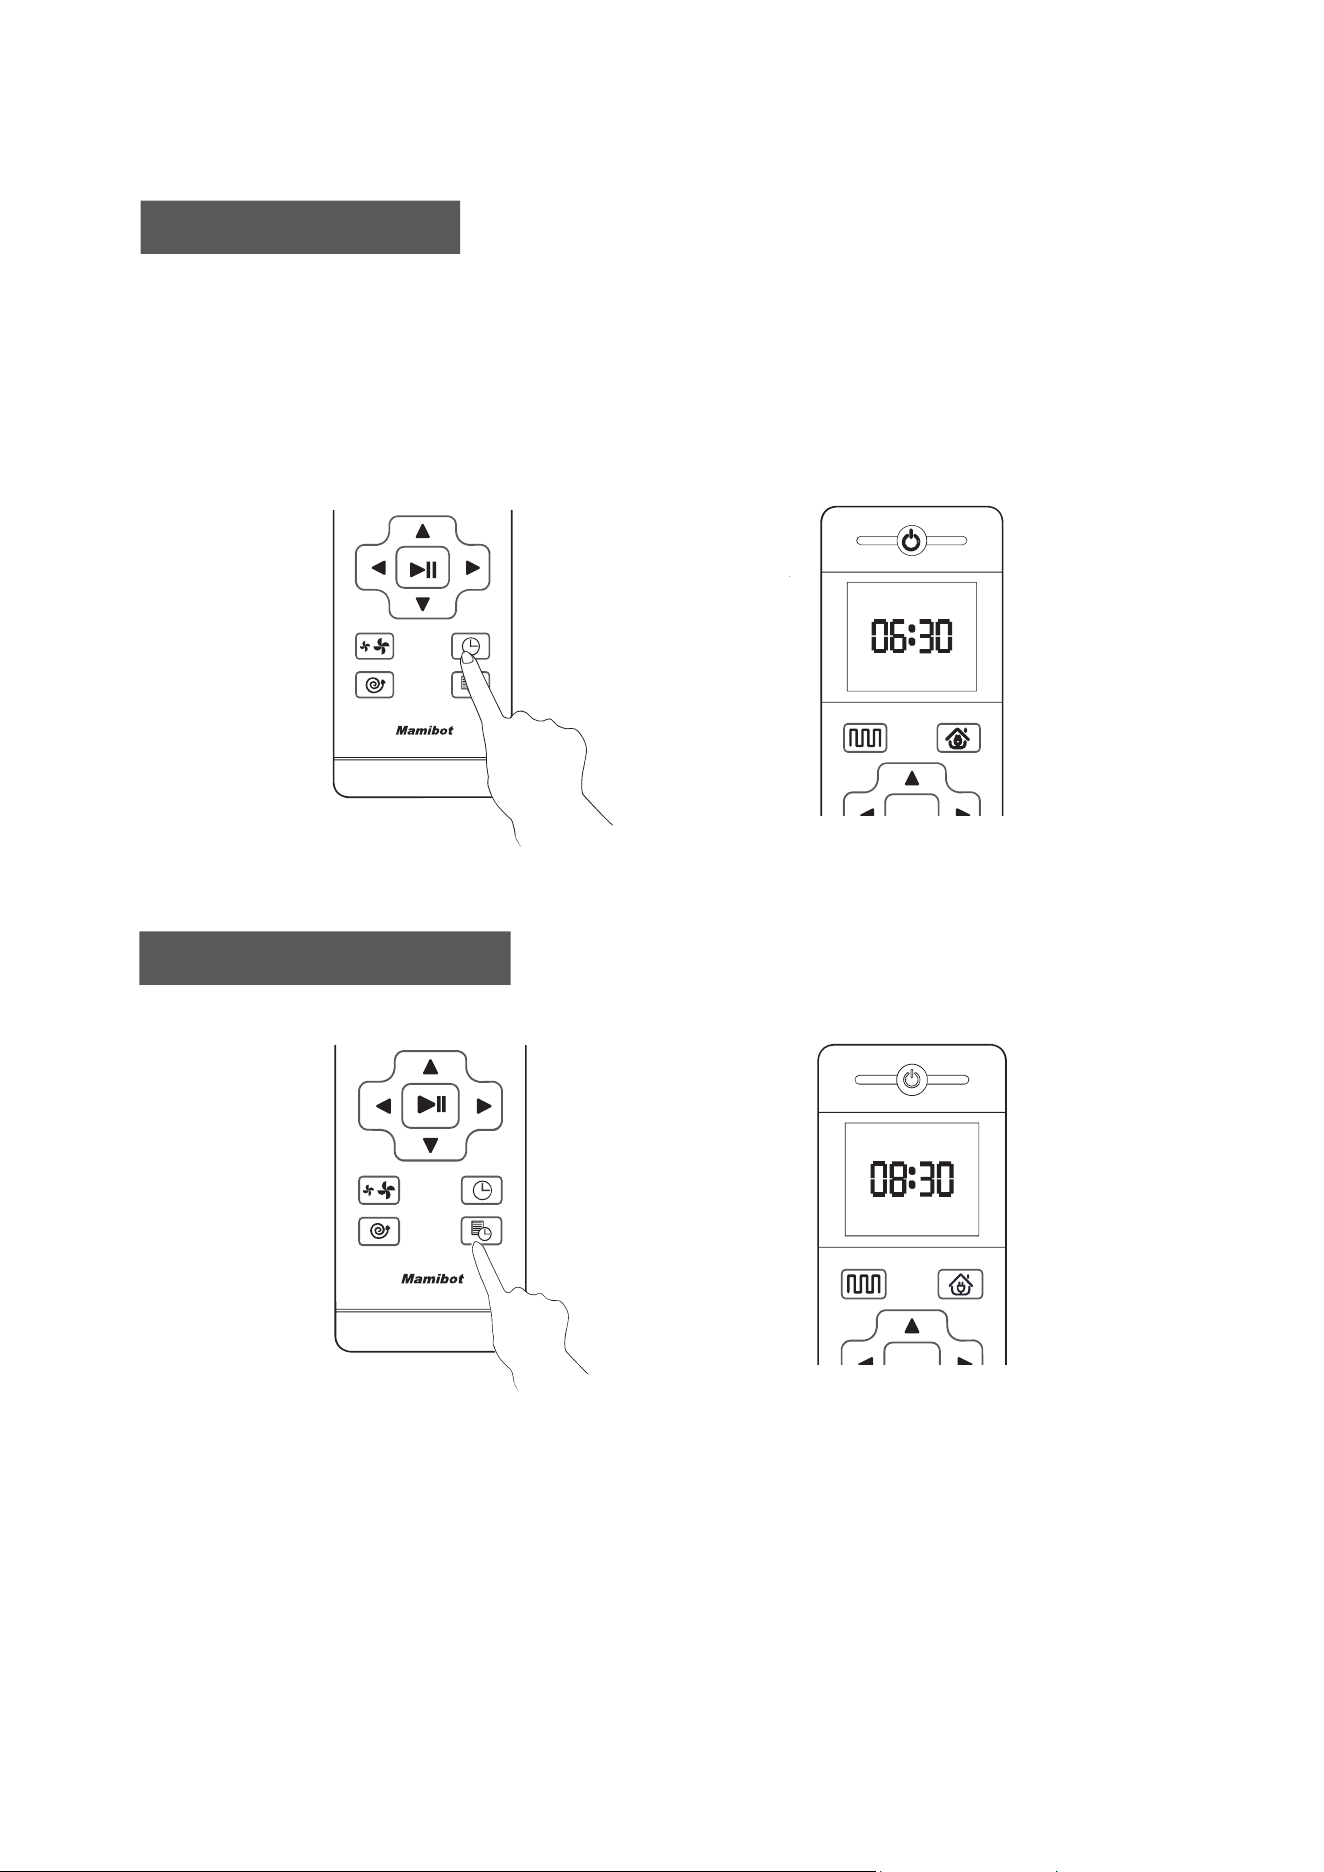
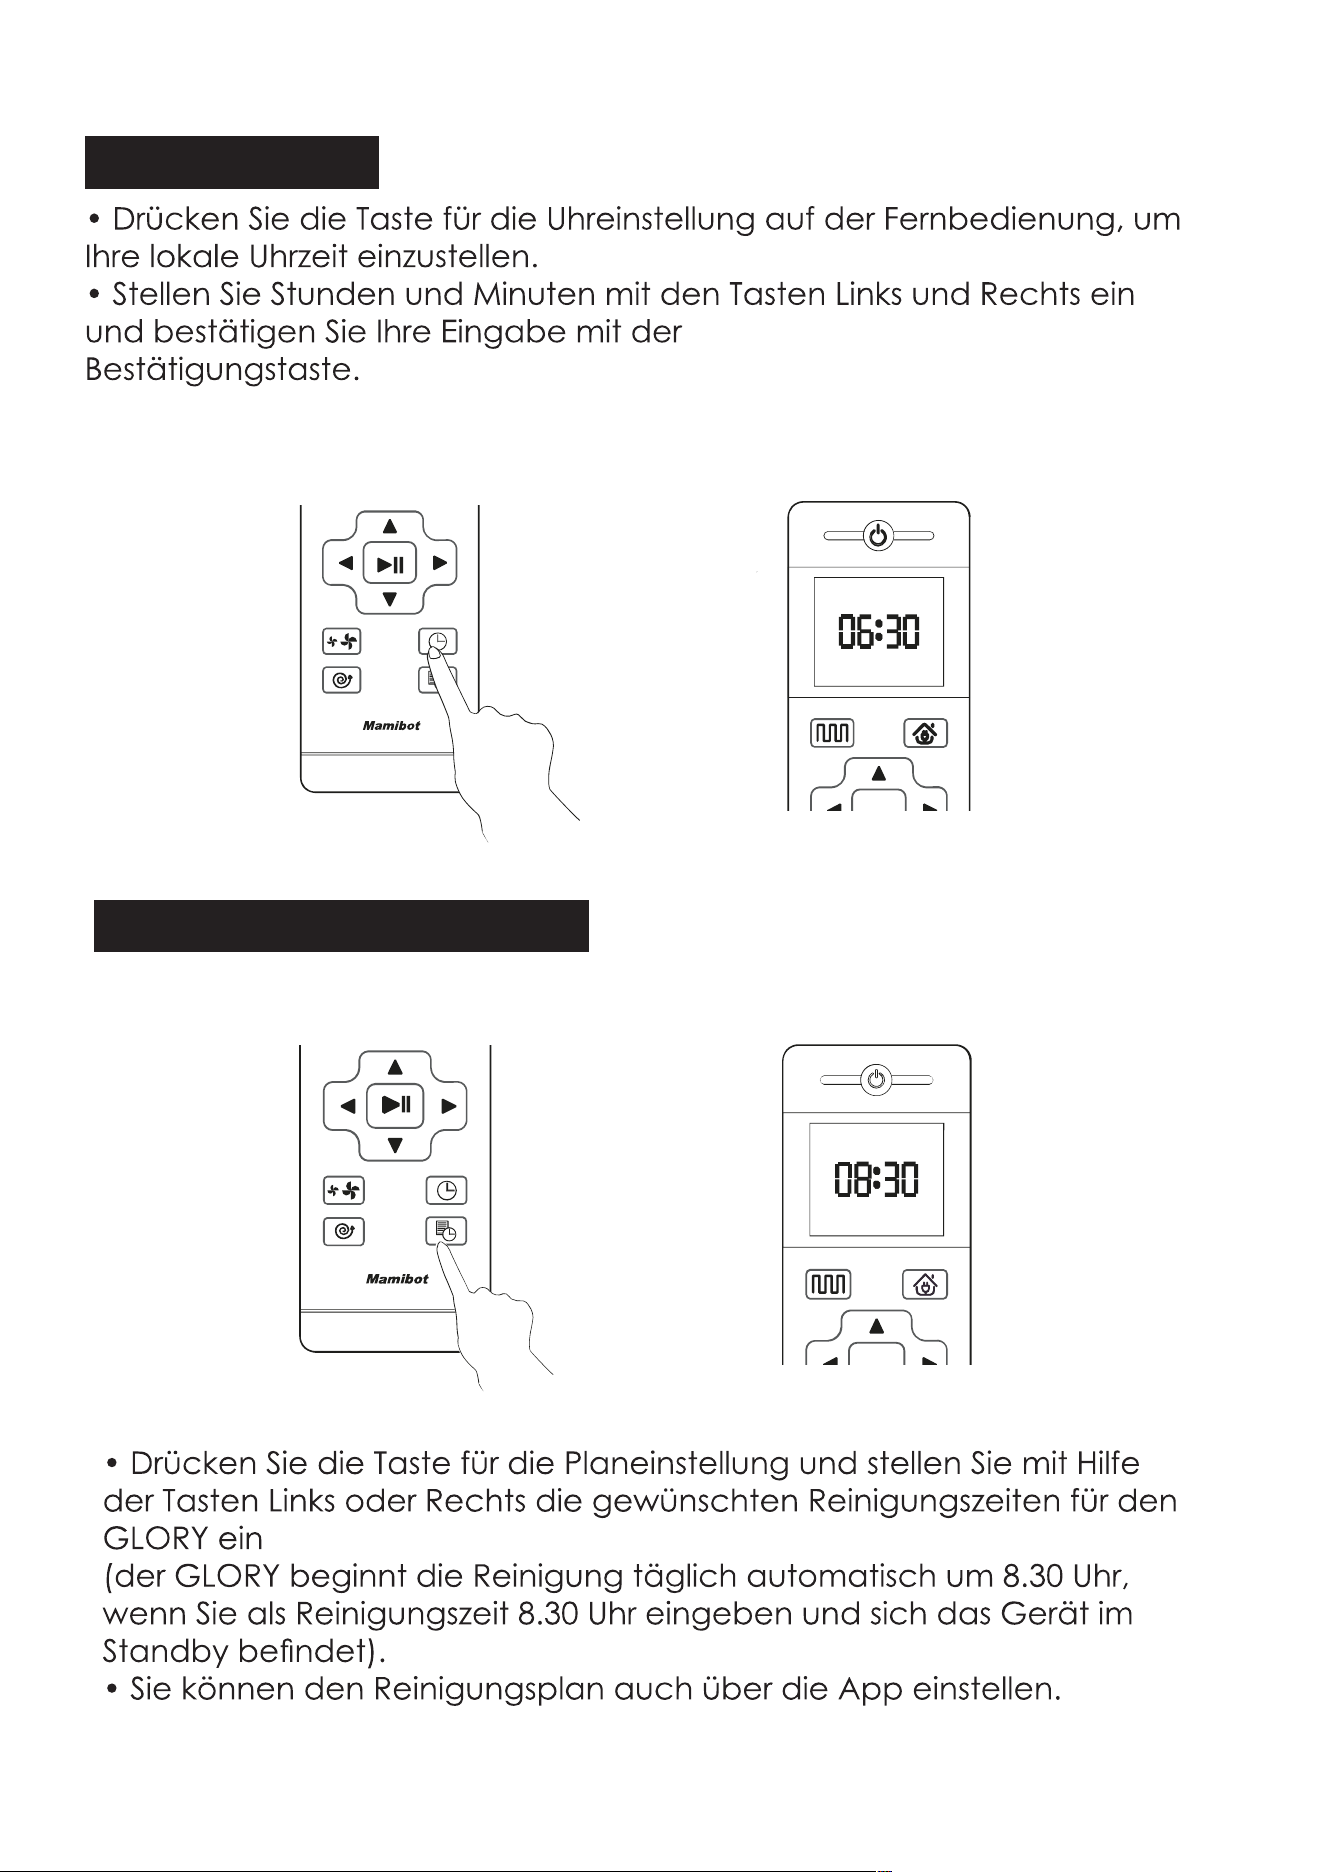
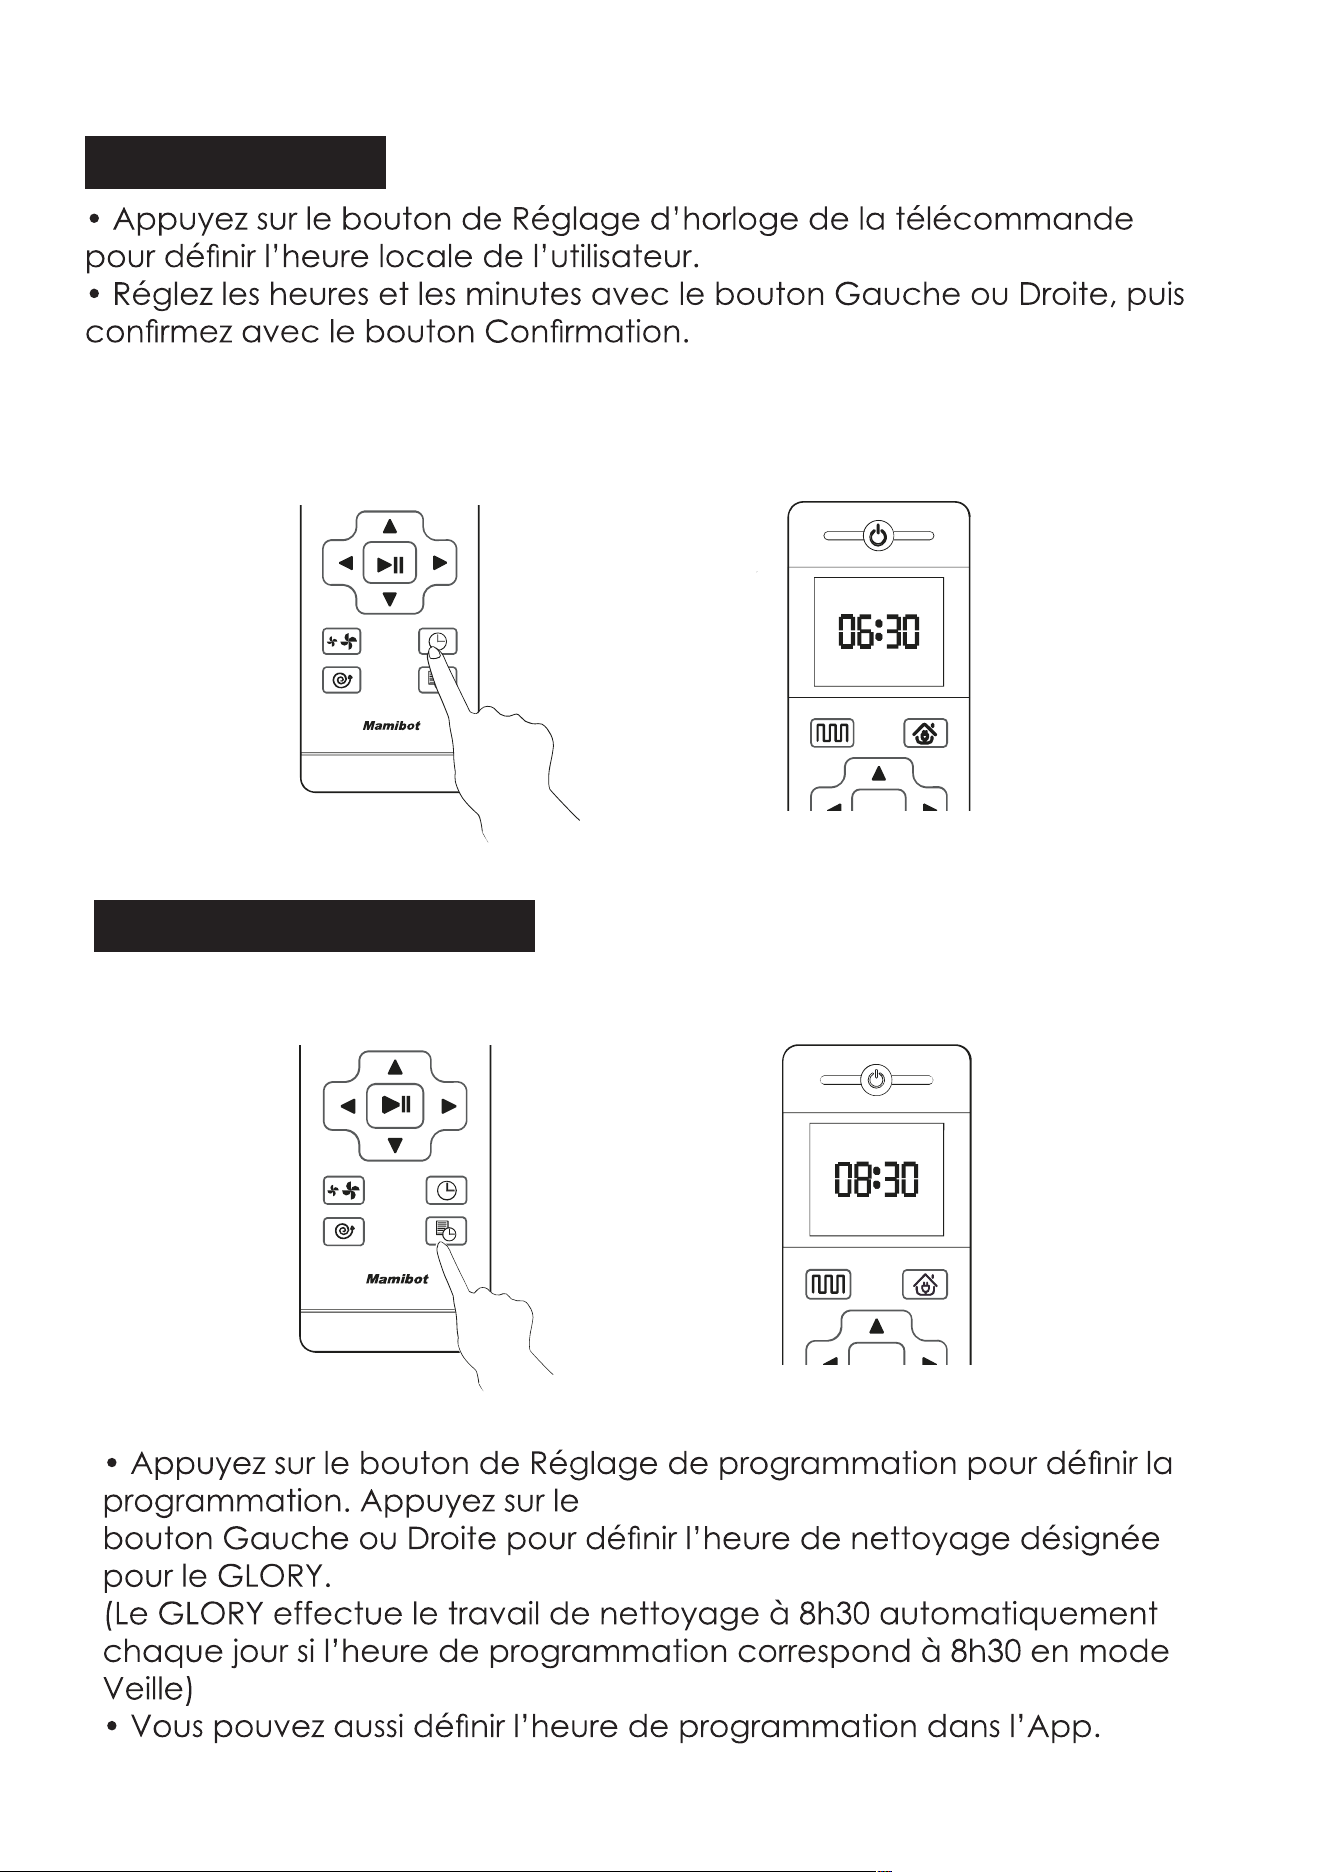
• Press the Schedule Setting Button to set the schedule, press the
Left or Right Button to set the appointed cleaning time for GLORY.
(GLORY will start cleaning at 8:30 a.m. automatically every day if the
Scheduled time is 8:30 a.m. in the standby mode)
• You can also set the Schedule time on APP.
How to set the clock
How to set the schedule
25
• Press the Clock Setting button on the remote control to set the users‘
local time.
• To set the hour and minutes with Left or Right Button, then confirm with
Confirmation Button.

Attention
• Please keep the main power switch on so that GLORY can start
cleaning work at scheduled time.
• Please make sure the battery power is higher than 20%, if the battery
power is less than 20%, GLORY will go to recharge.
• The schedule via remote control will be cancelled automatically if
the main power switch is turned off. The Schedule on APP could only
be cancelled via APP.
• The schedule on remote control can be also cancelled if press the
Schedule Setting Button for 3 seconds.
26
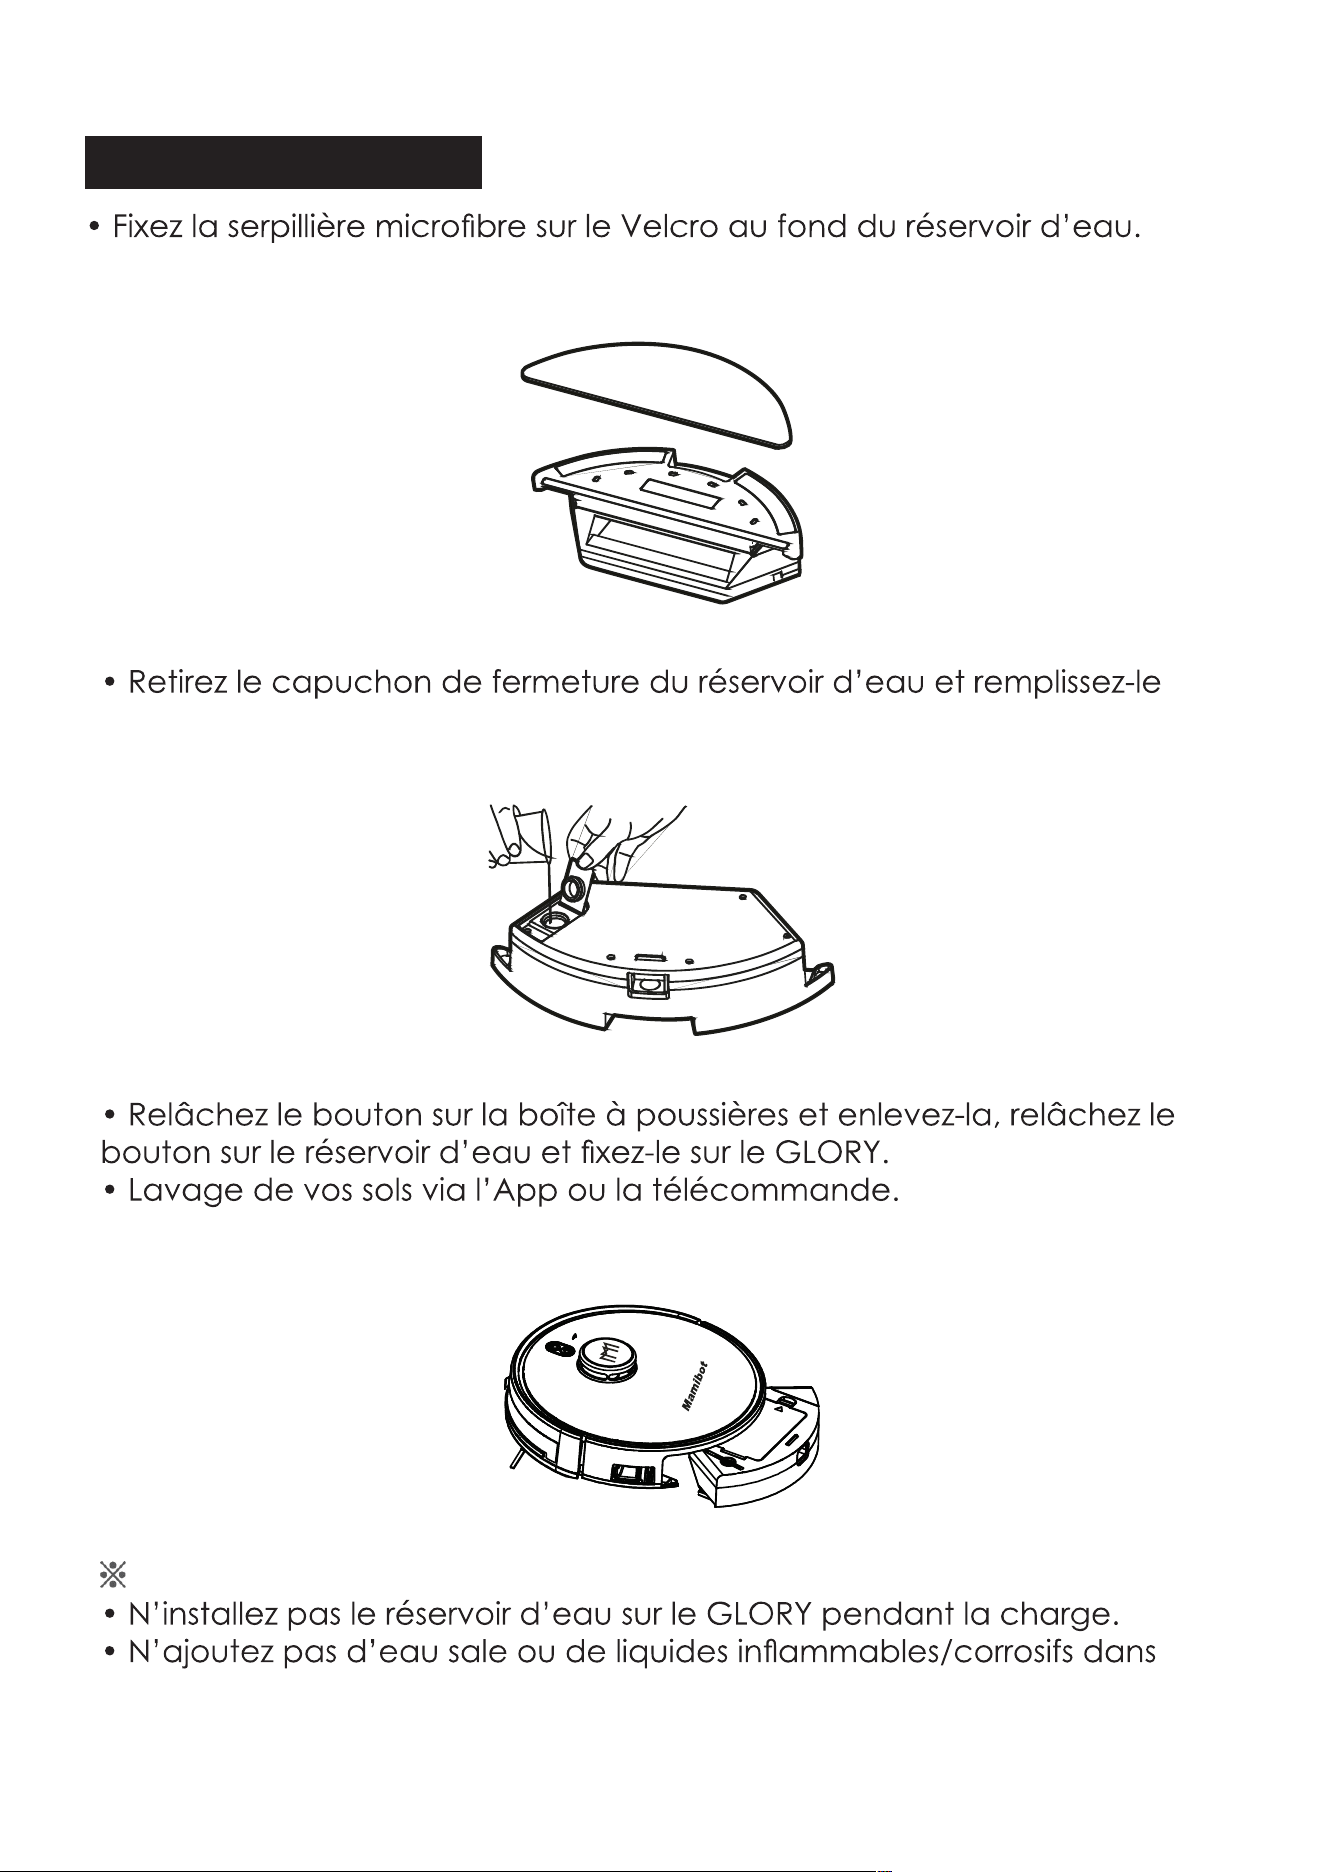
Attention
• Do not put the water tank on GLORY when charging.
• Do not add dirty water or corrision/flammable liquid into water
tank.
How to use water tank
• Remove the sealing cap from the water tank and fill it up with clear
water, then cover it.
• Attach the microfiber mop to the vlecro at the bottom of water tank.
• Release the button on the dust box and take it out, release the
button on the water tank and fix it on GLORY.
• Mopping your floor via APP or Remote control.
27
M
a
m
i
b
o
t
Cleaning and Maintenance
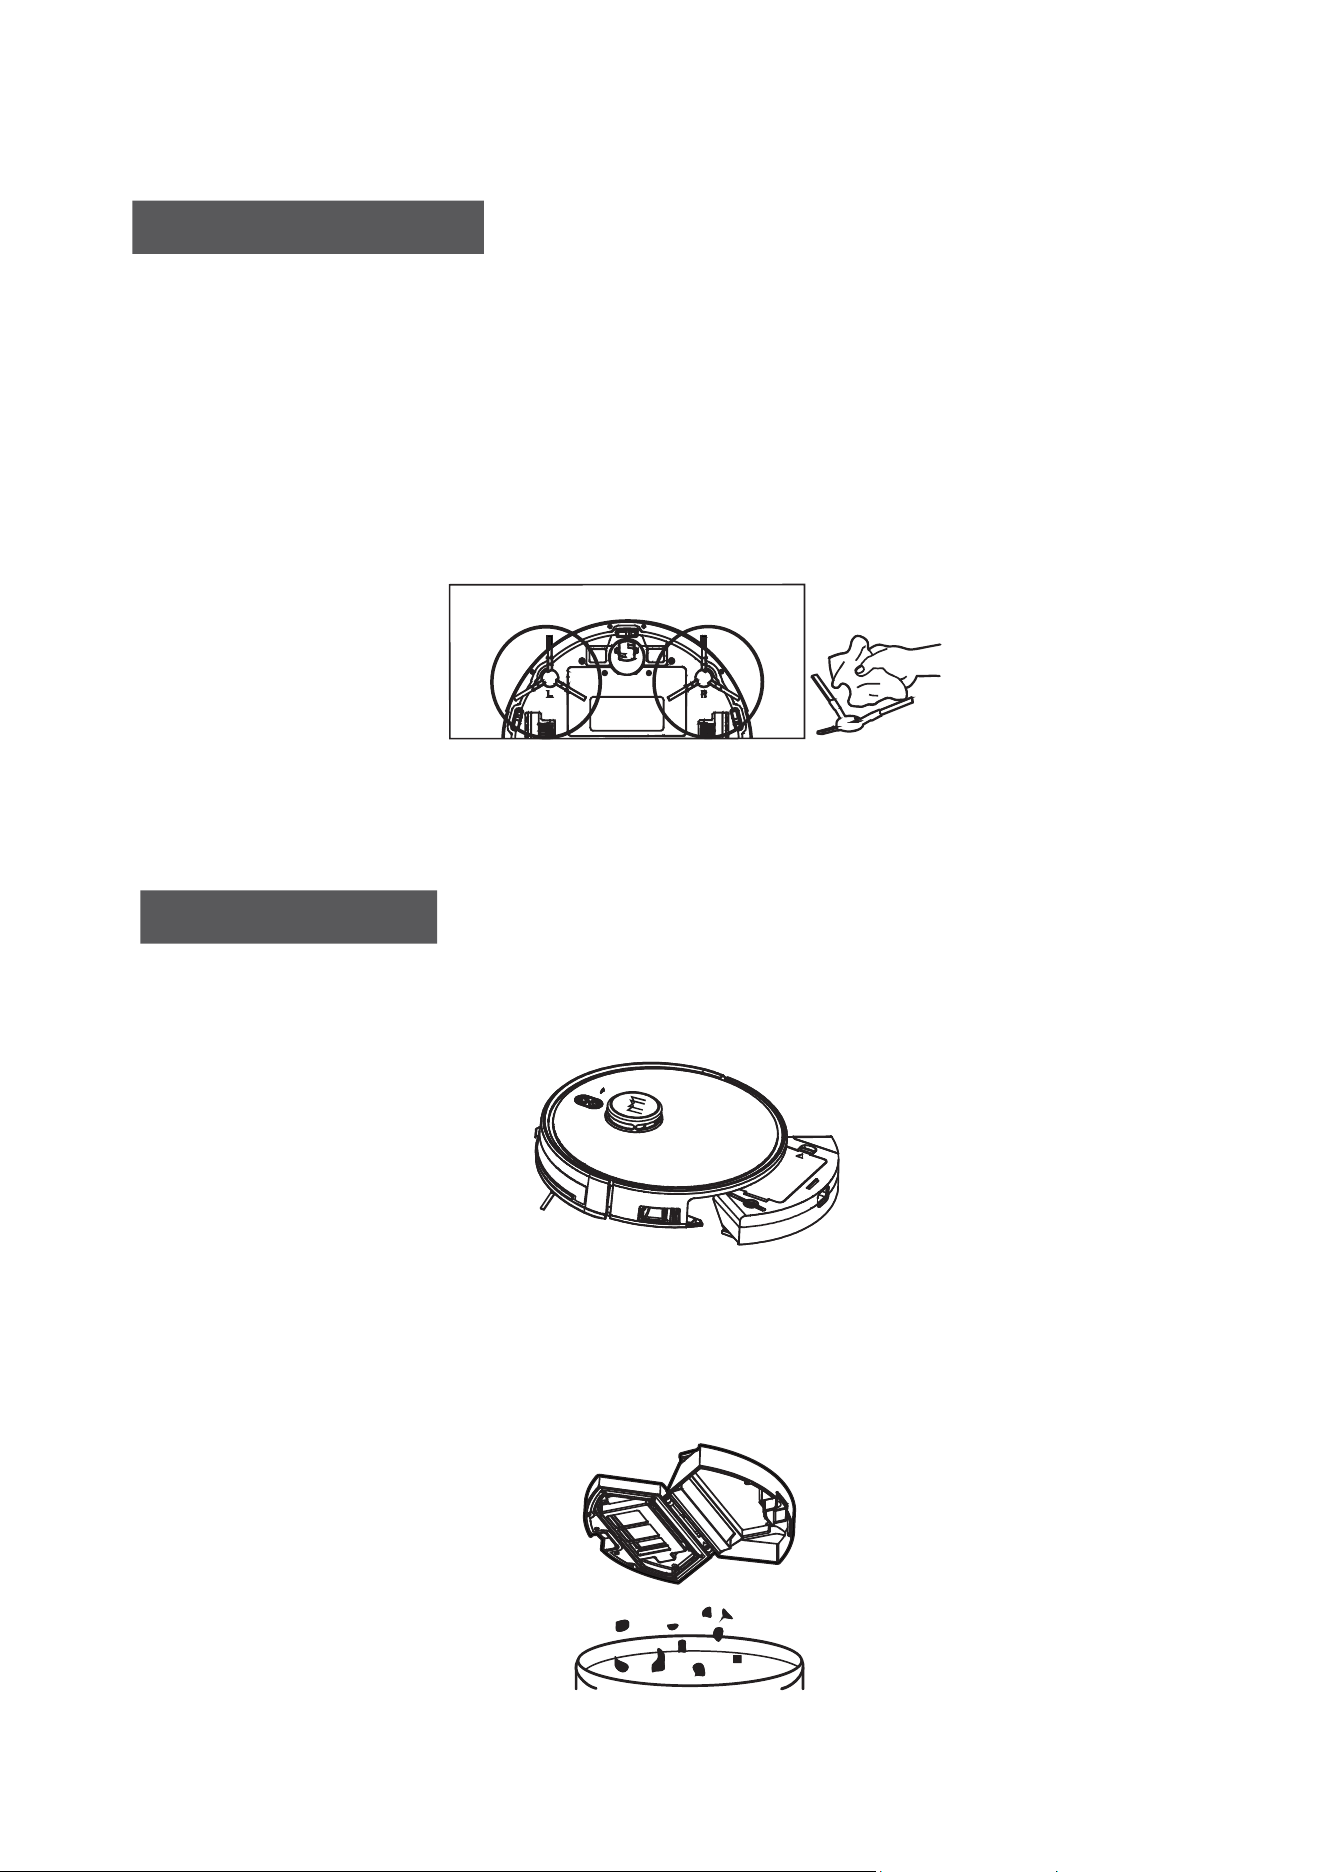
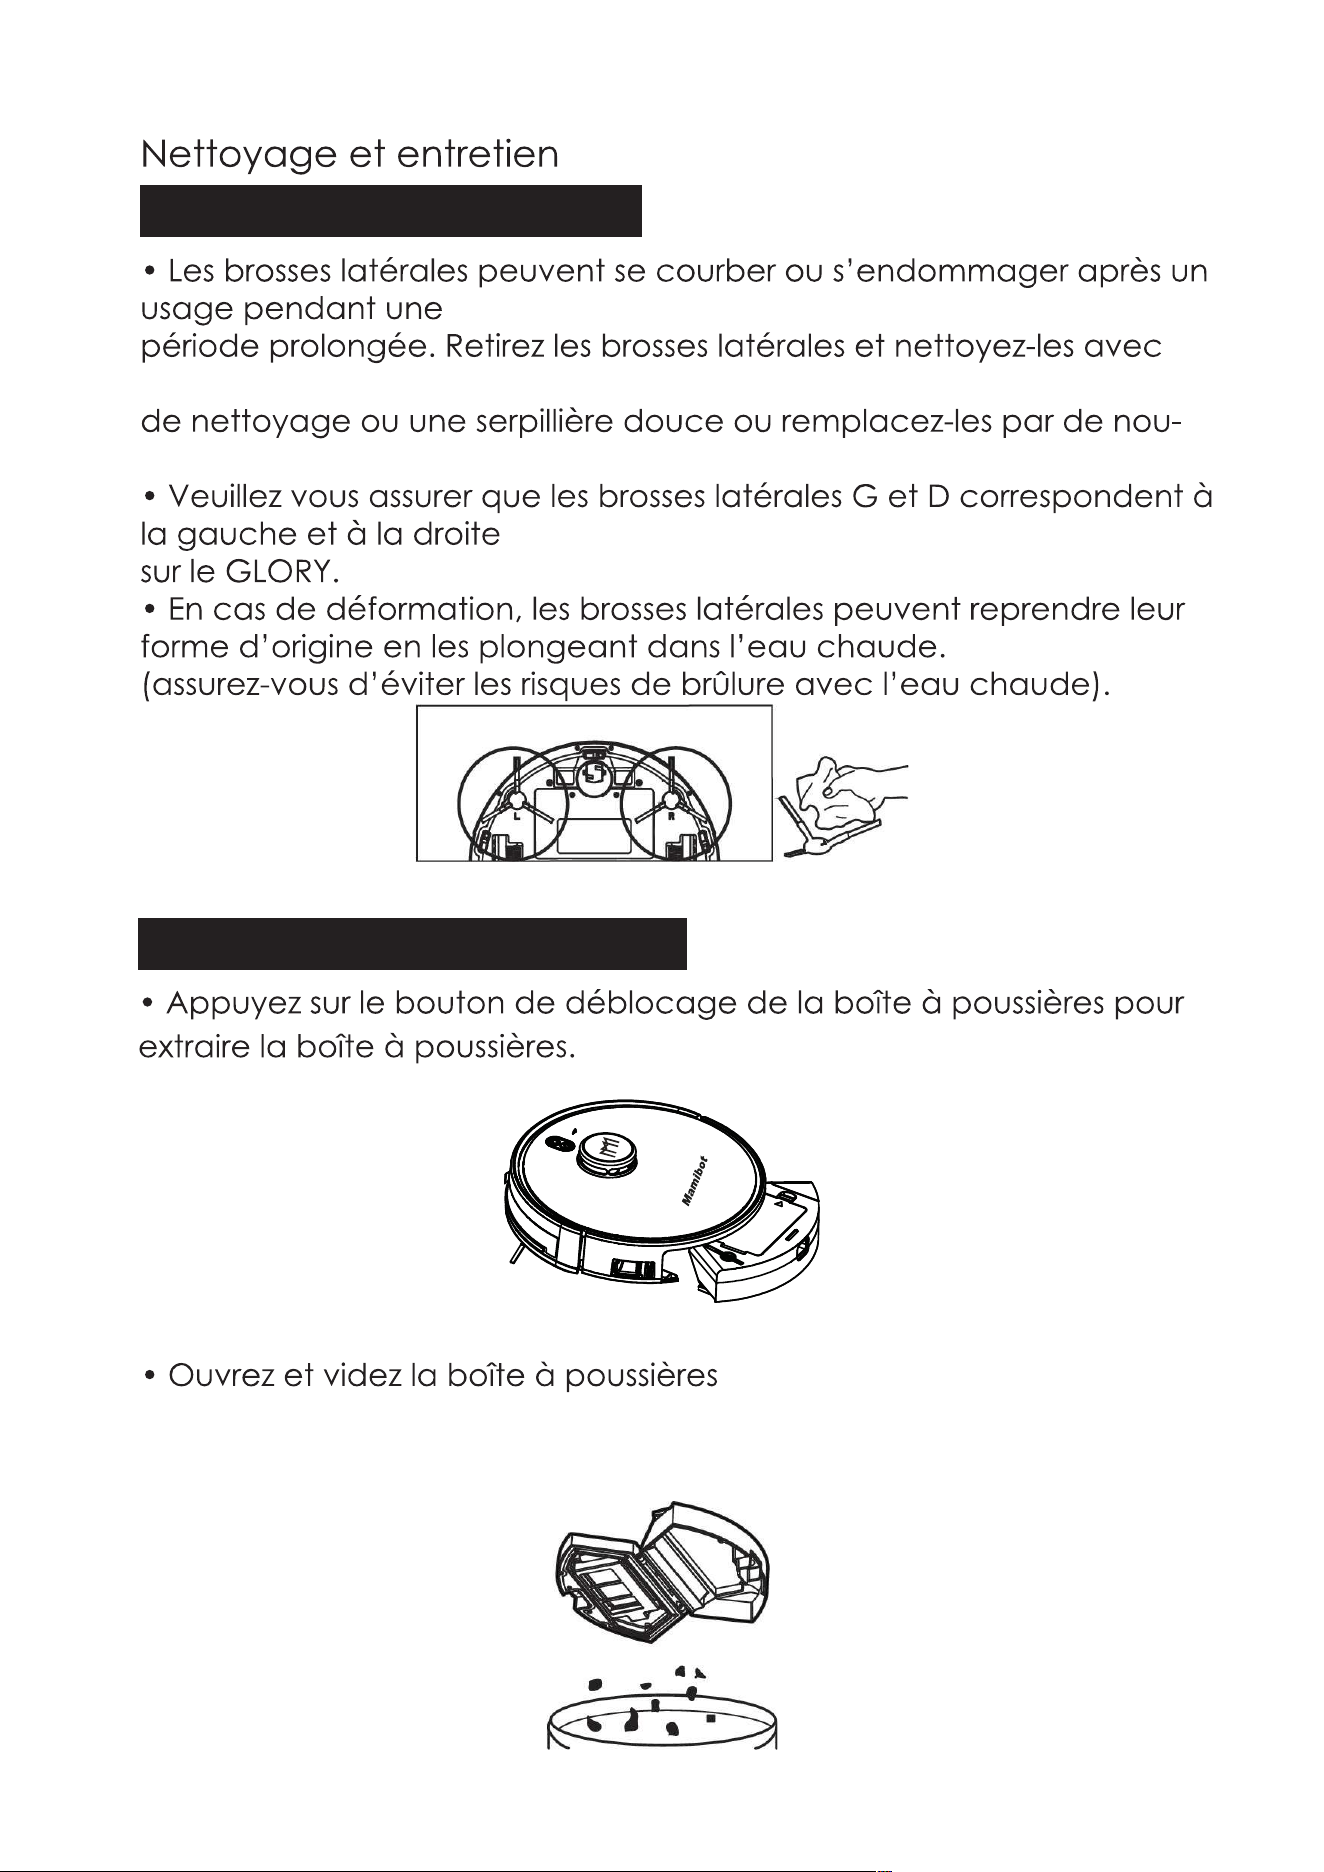
Clean the Side Brushes
• The side brushes can be bent or damaged after being used for a
period time. Pull off the side brushes and clean them with the cleaning
tool or soft mop, or replace them with new side brushes.
• Please make sure the L and R side brushes correspond to the L and R
on GLORY.
• The side brushes can be reshaped with hot water if deformed.
(Please take care of yourself to avoid being scalded by hot water).
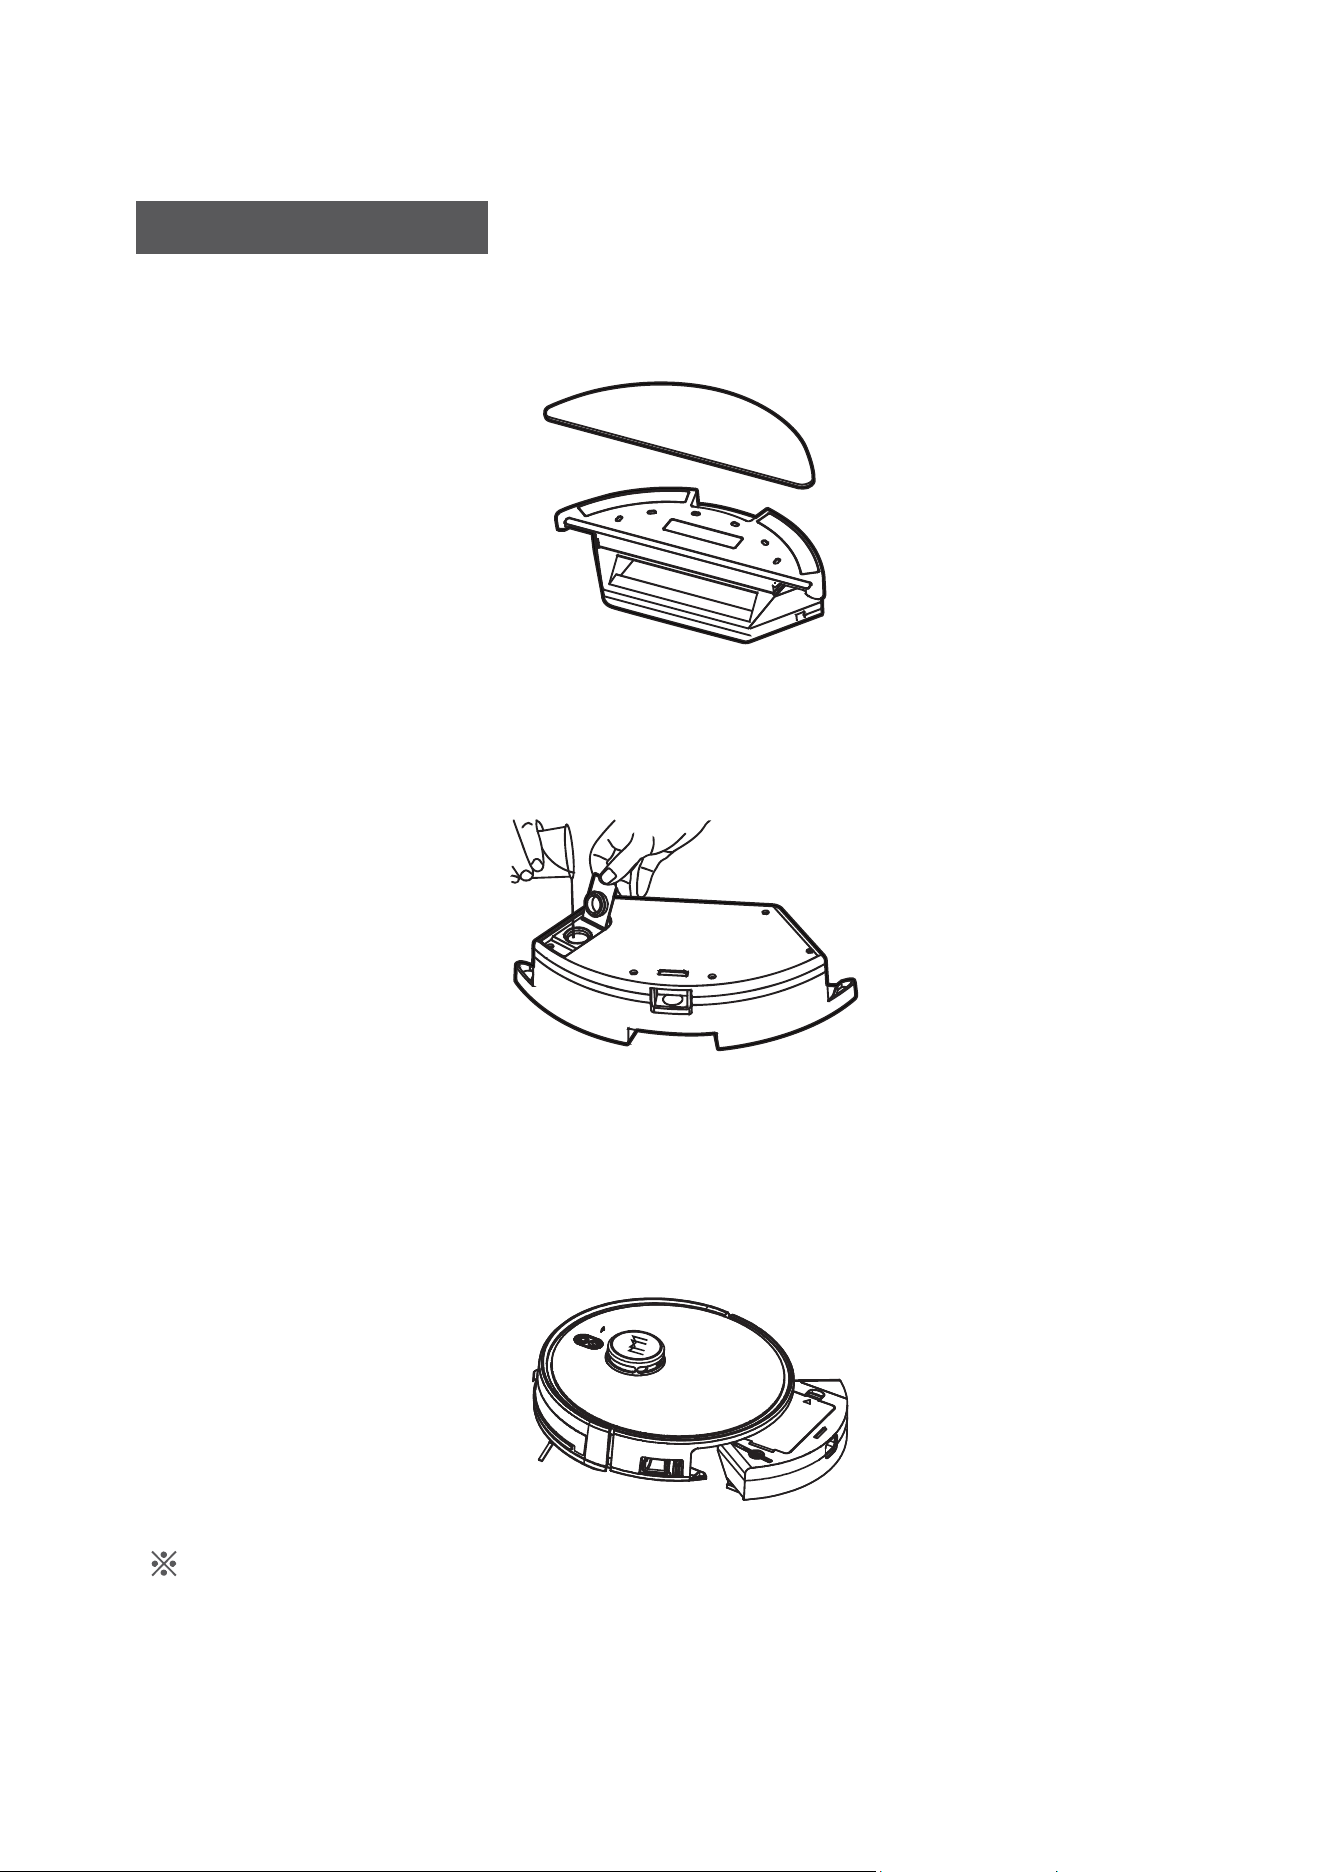
Clean the Dust Box
• Press the dust box release button to pull the dust box out.
• Open and empty the dust box
28
M
amibot
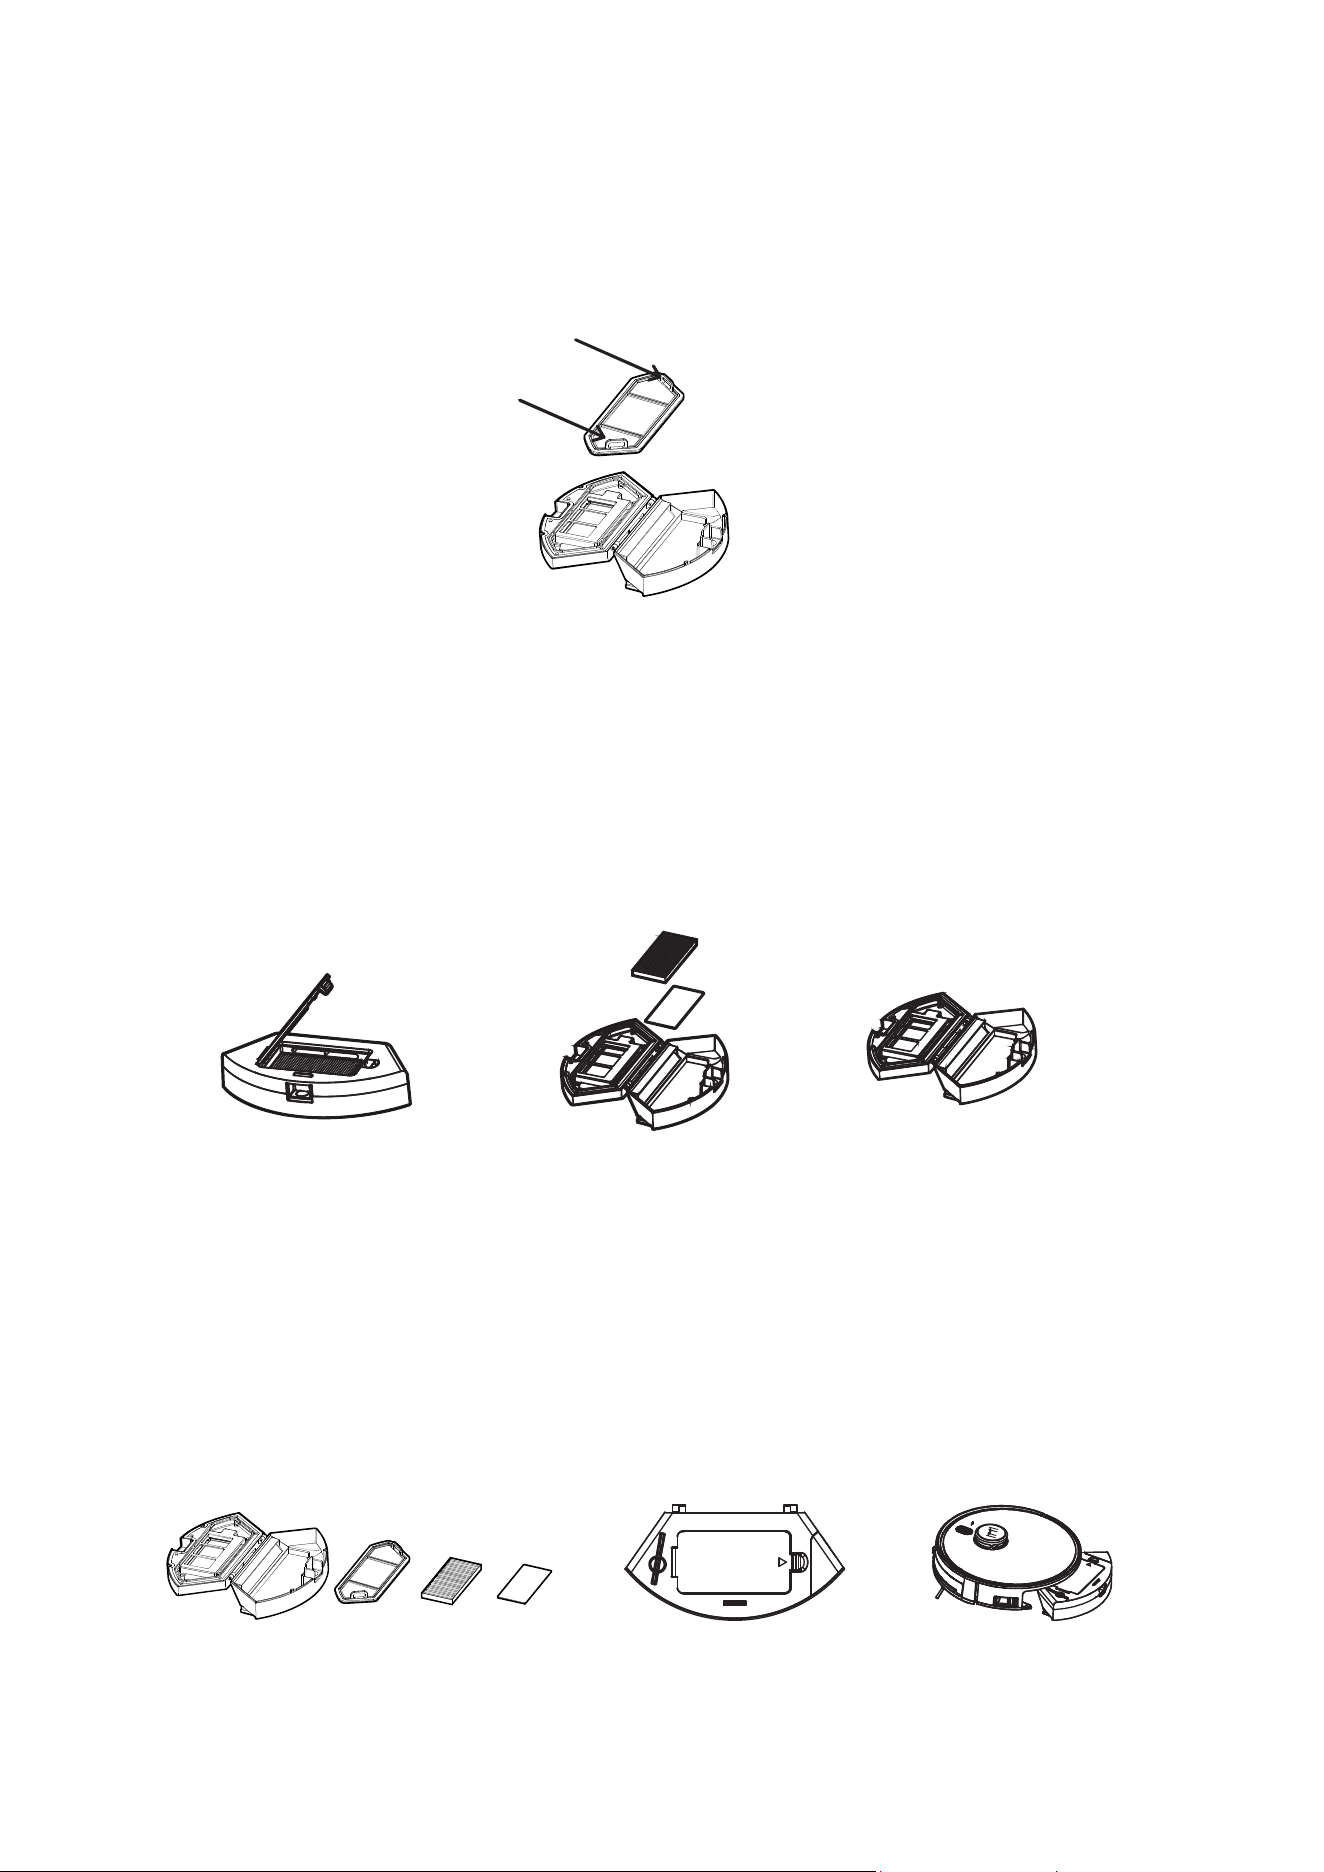
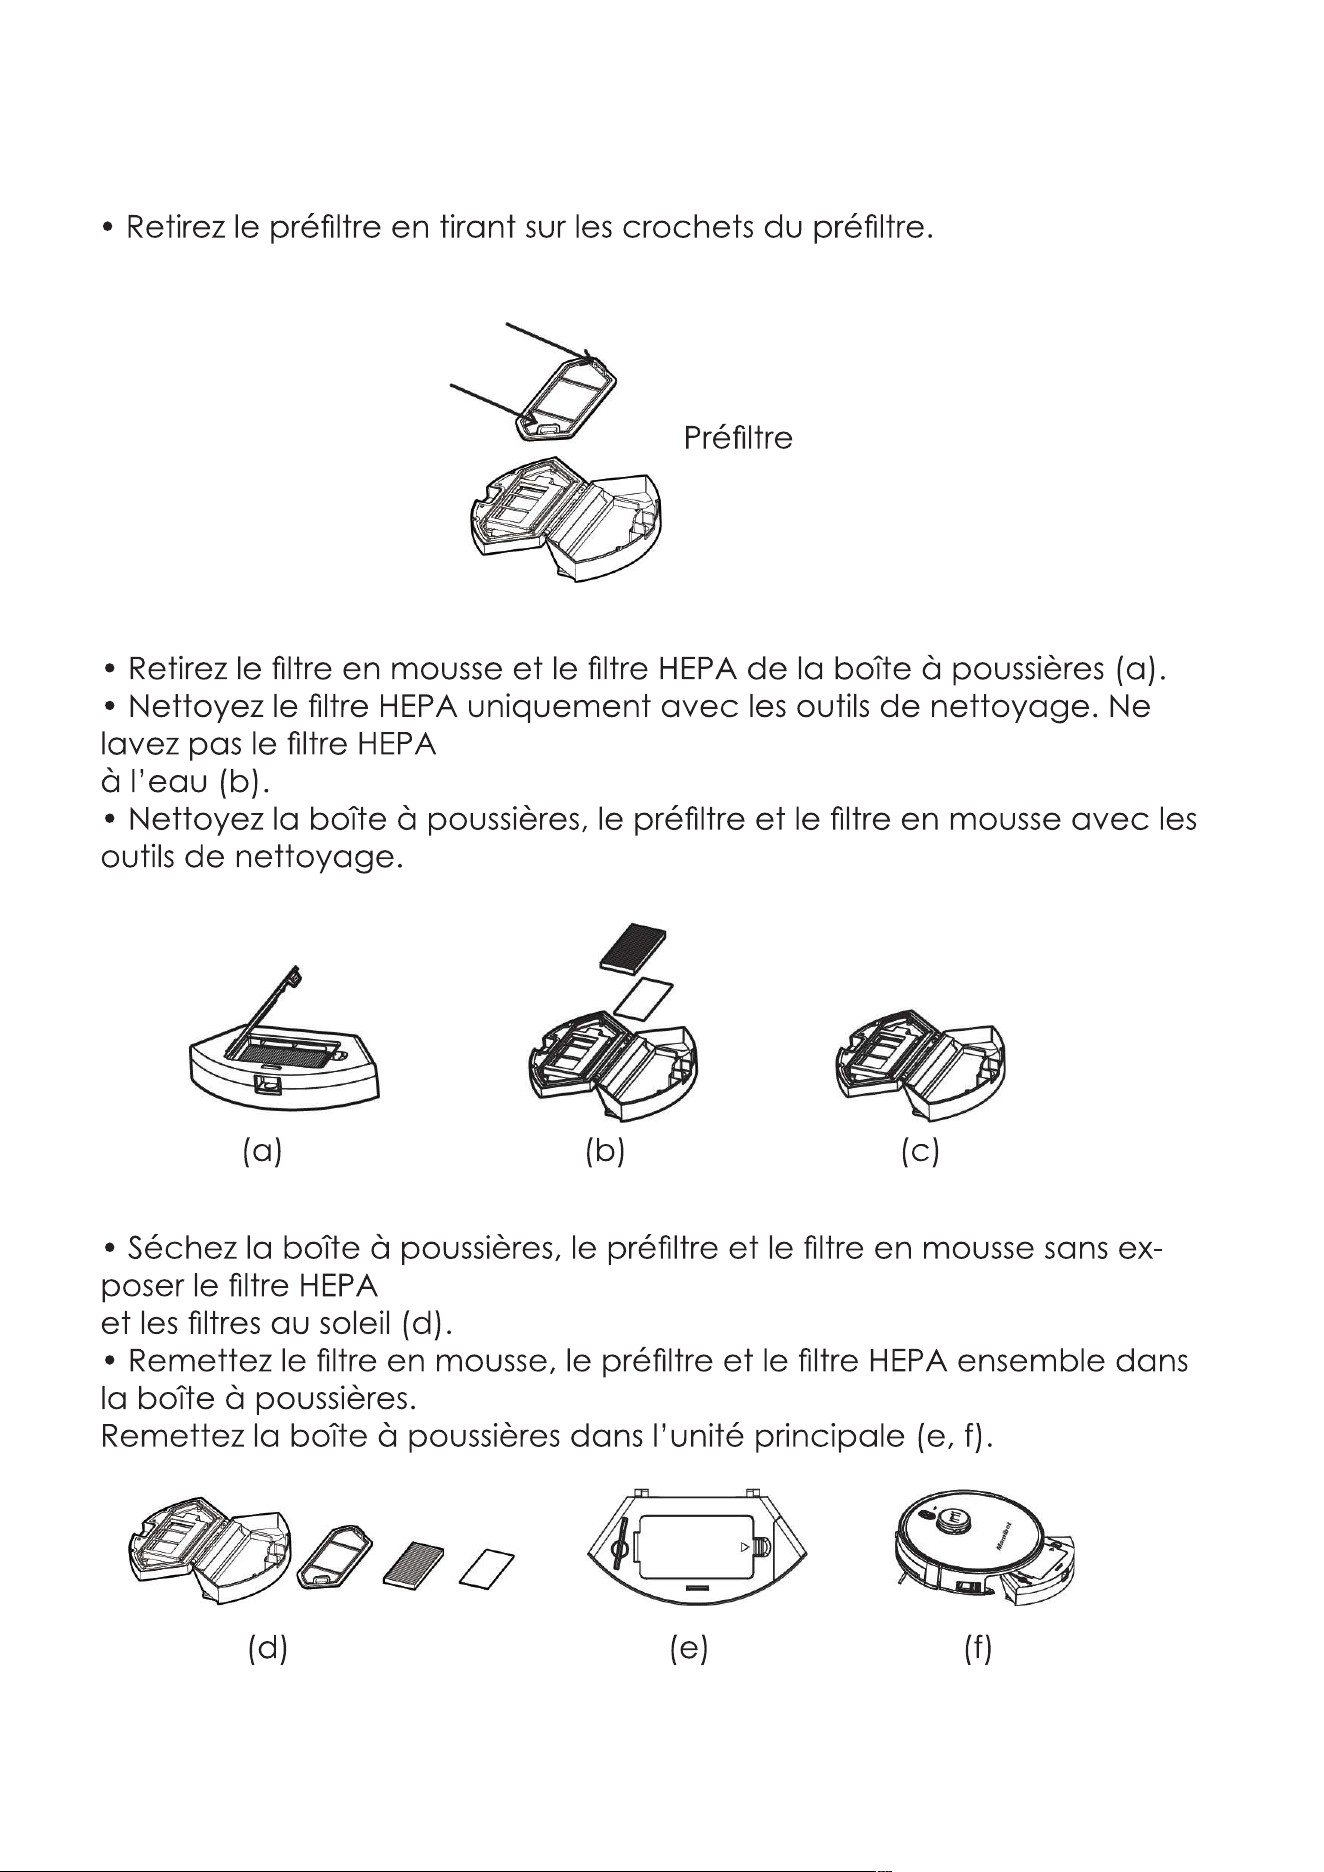
• Remove the pre-filter by pulling the hooks on the pre-filter.
• Take out the foam filter and HEPA from the dust box(a).
• Clean the HEPA only with the cleaning tools, do not wash the HEPA
with water(b).
• Clean the dust box, pre-filter and foam filter with the cleaning tools .
• Dry the dust box, pre-filter, foam filter, do not exposure the HEPA
and filters to the sun(d).
• Put the foam filter, pre-filter, HEPA back together into the dust box.
Put the dust box back into the main unit(e,f).
(b)
(e)
(c)
(f)
(a)
(d)
29
Pre-filter
M
a
mi
b
o
t
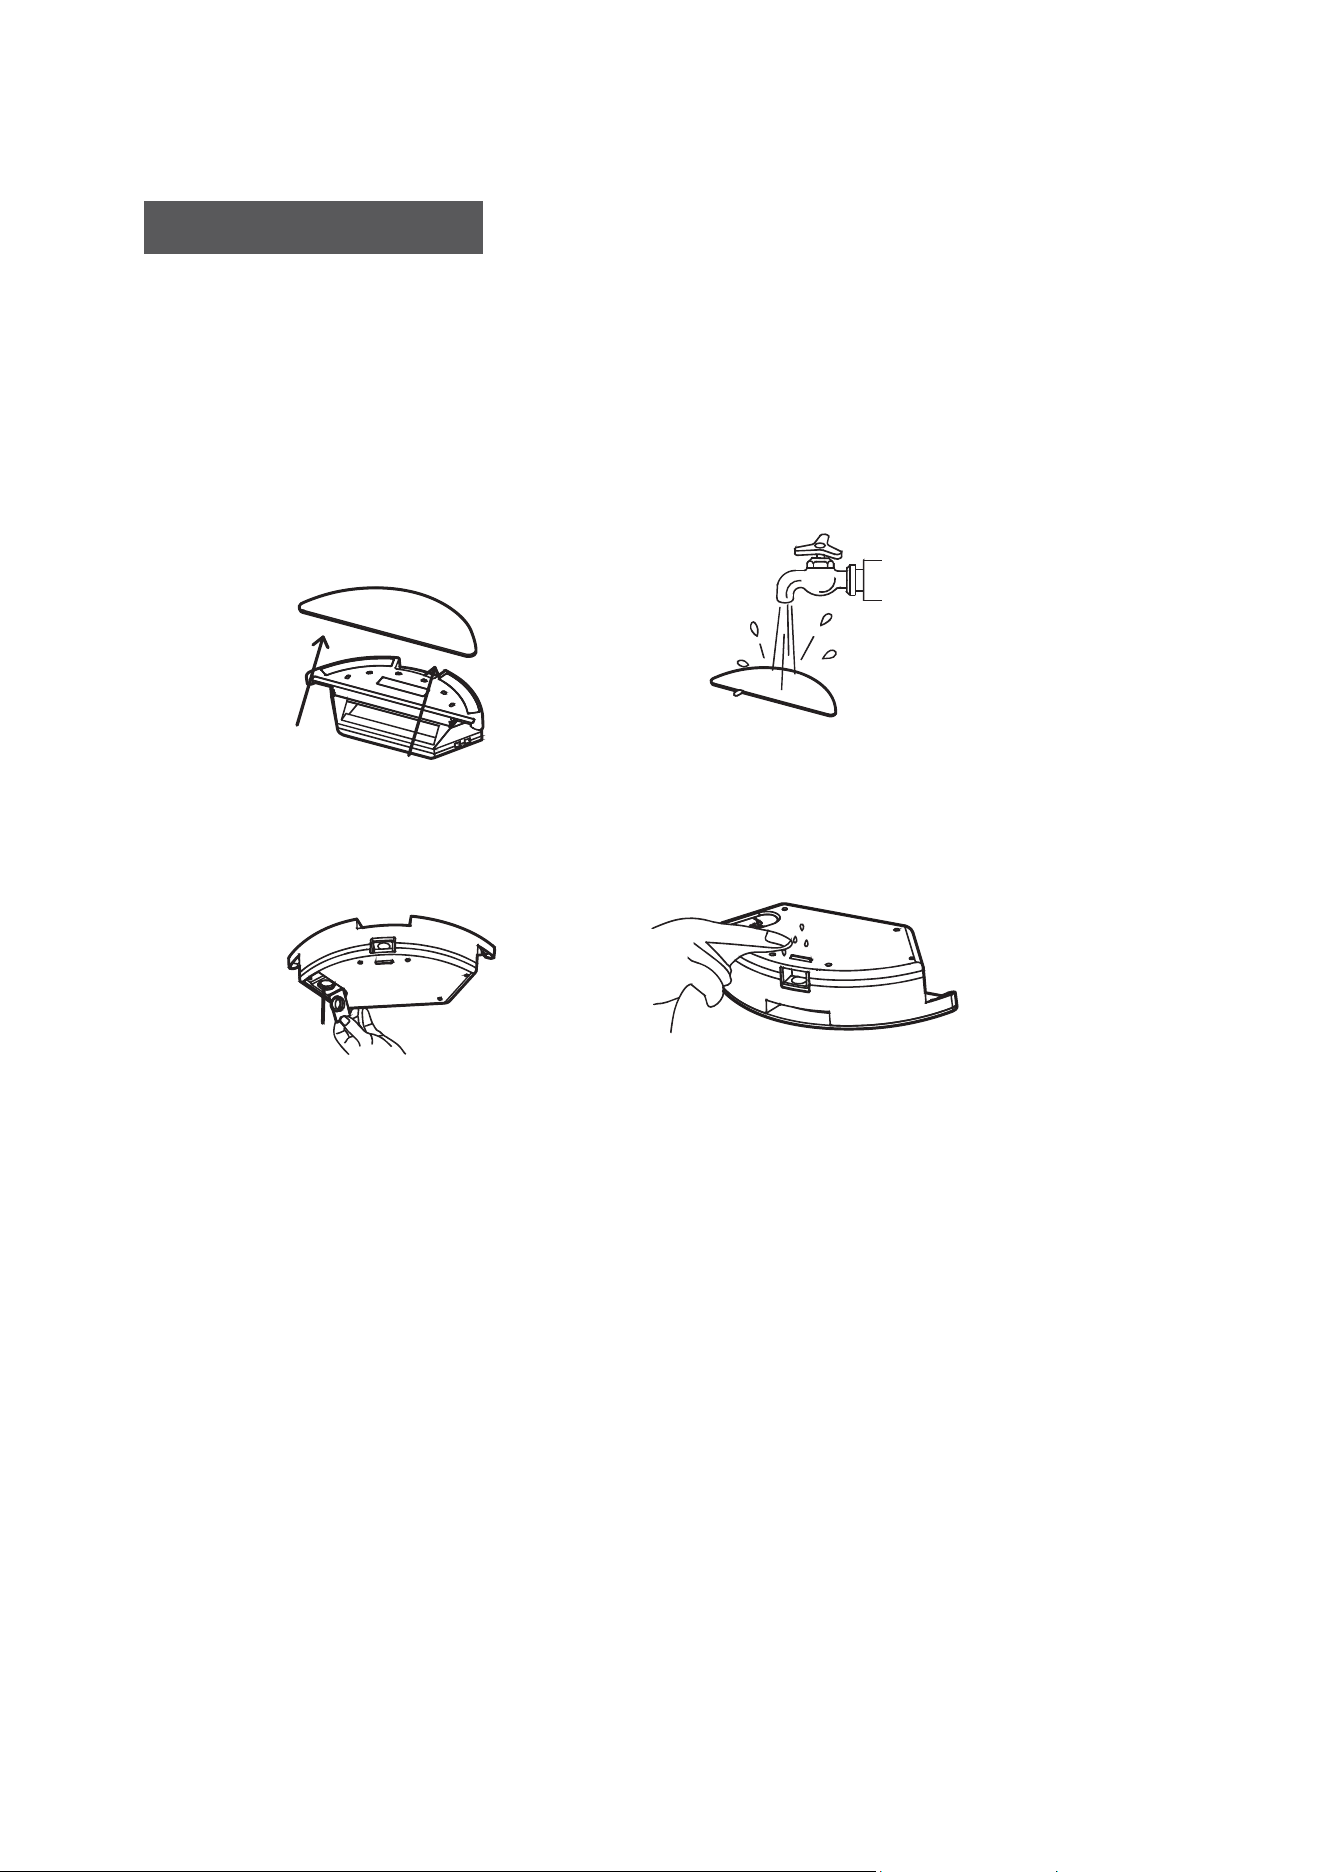
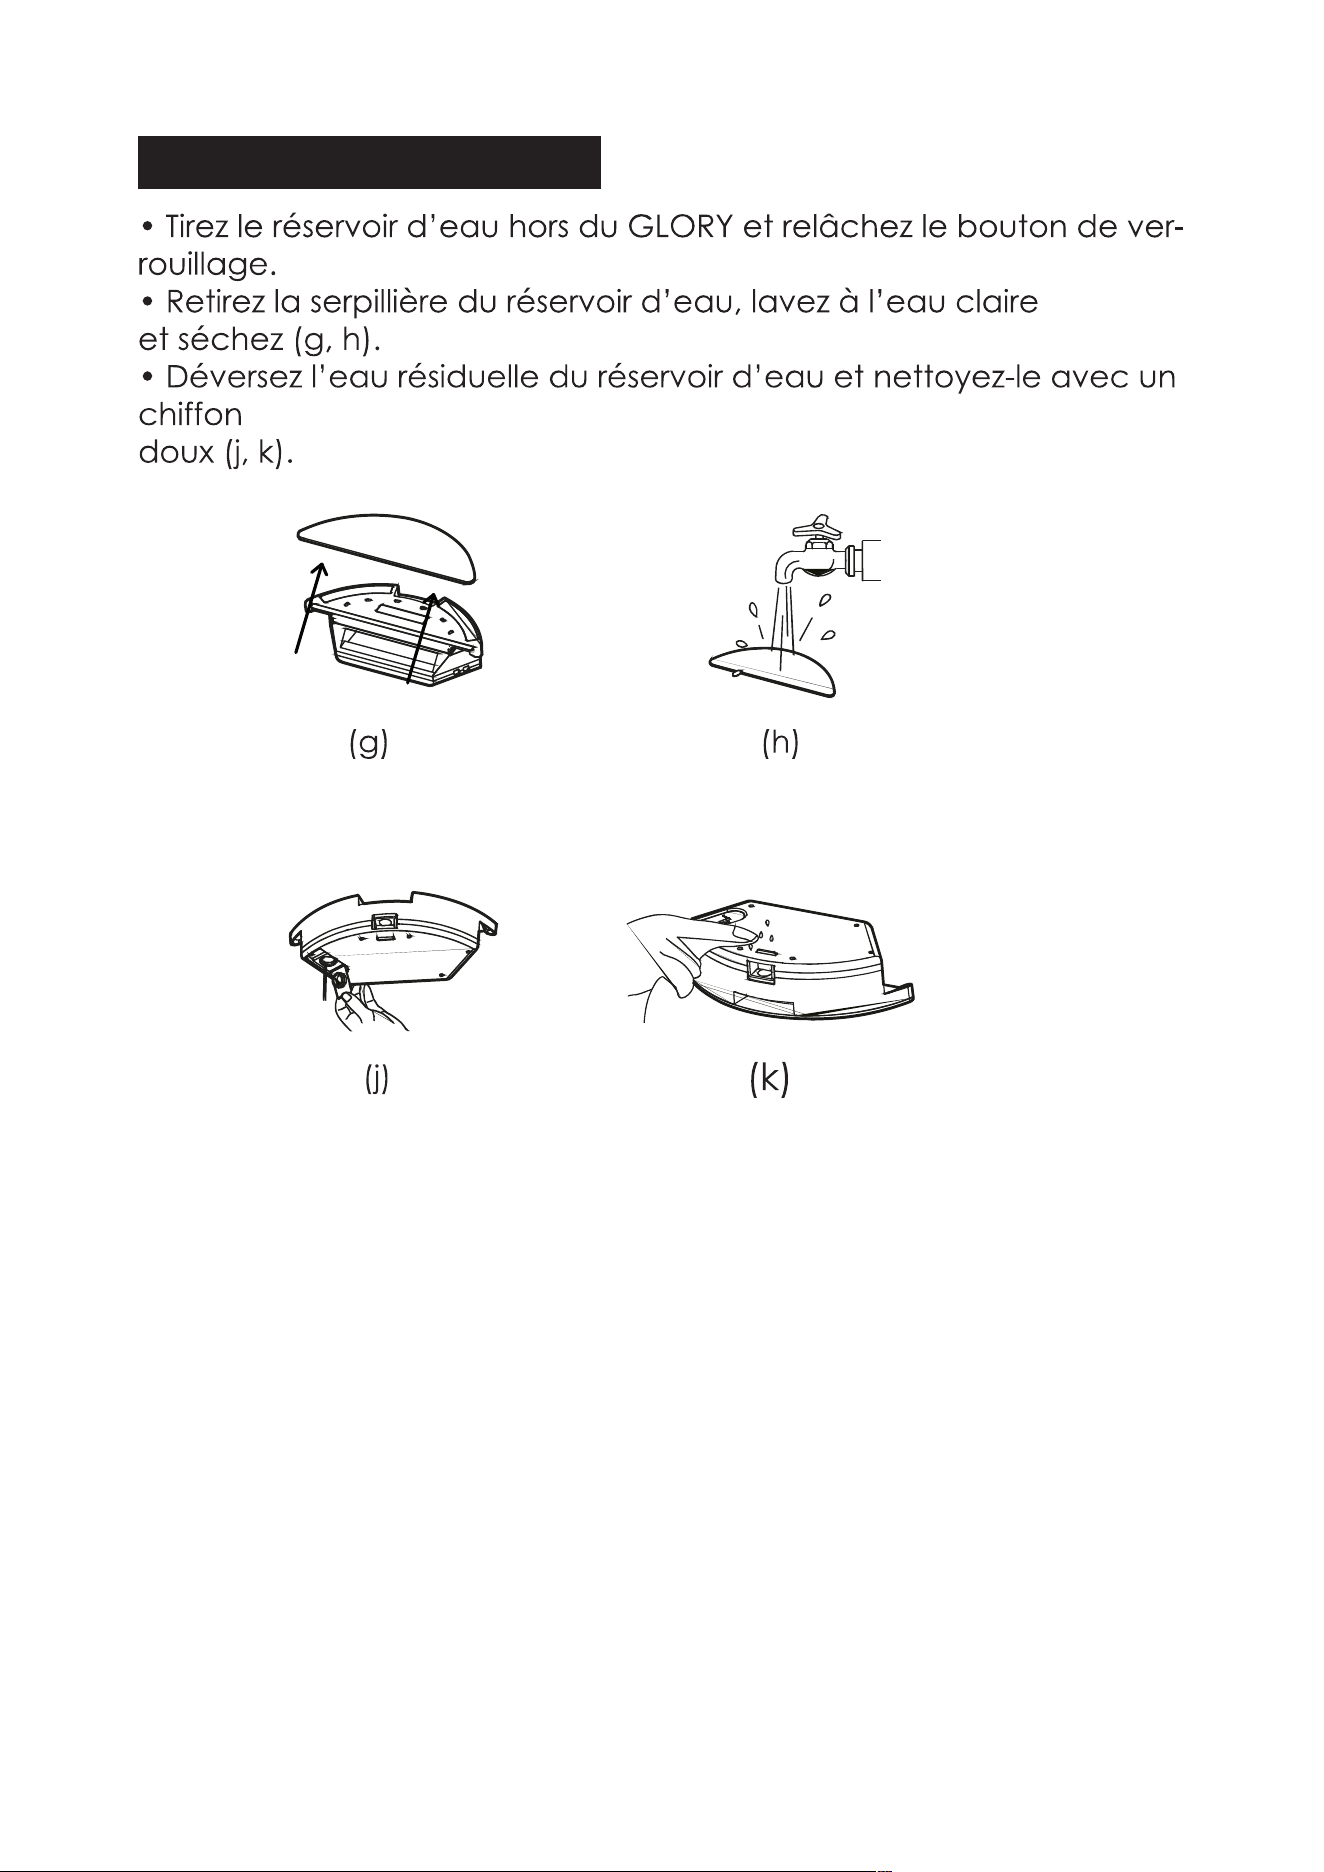
Clean the Water Tank
• Pull the water tank off from GLORY, and release the lock button.
• Remove the mop from the water tank, and wash it with clear water,
then dry it(g,h).
• Pour the rest water in the water tank out, and clean it with soft
cloth(j,k).
(g)
(j)
(h)
(k)
30
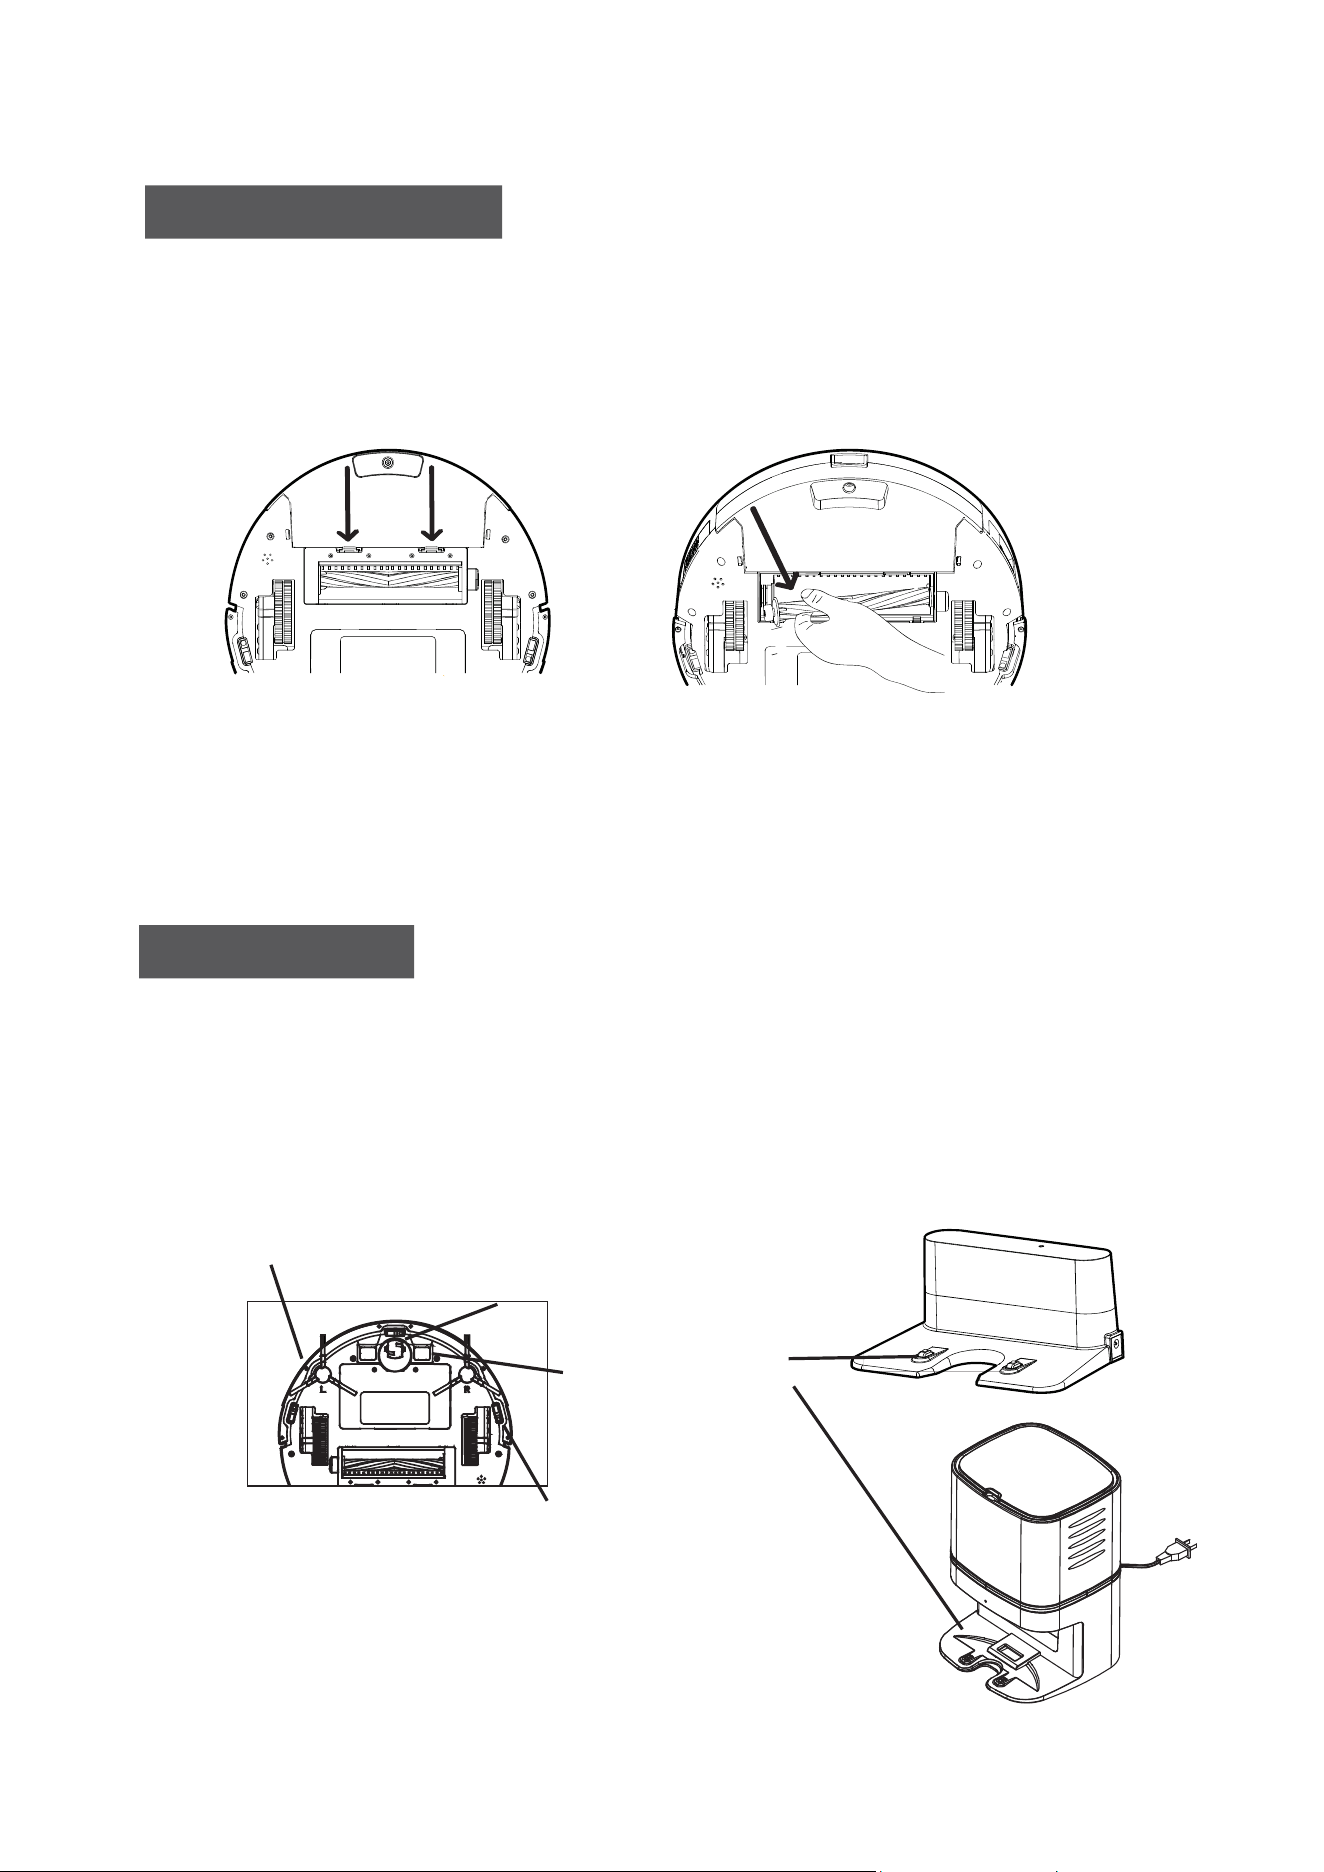
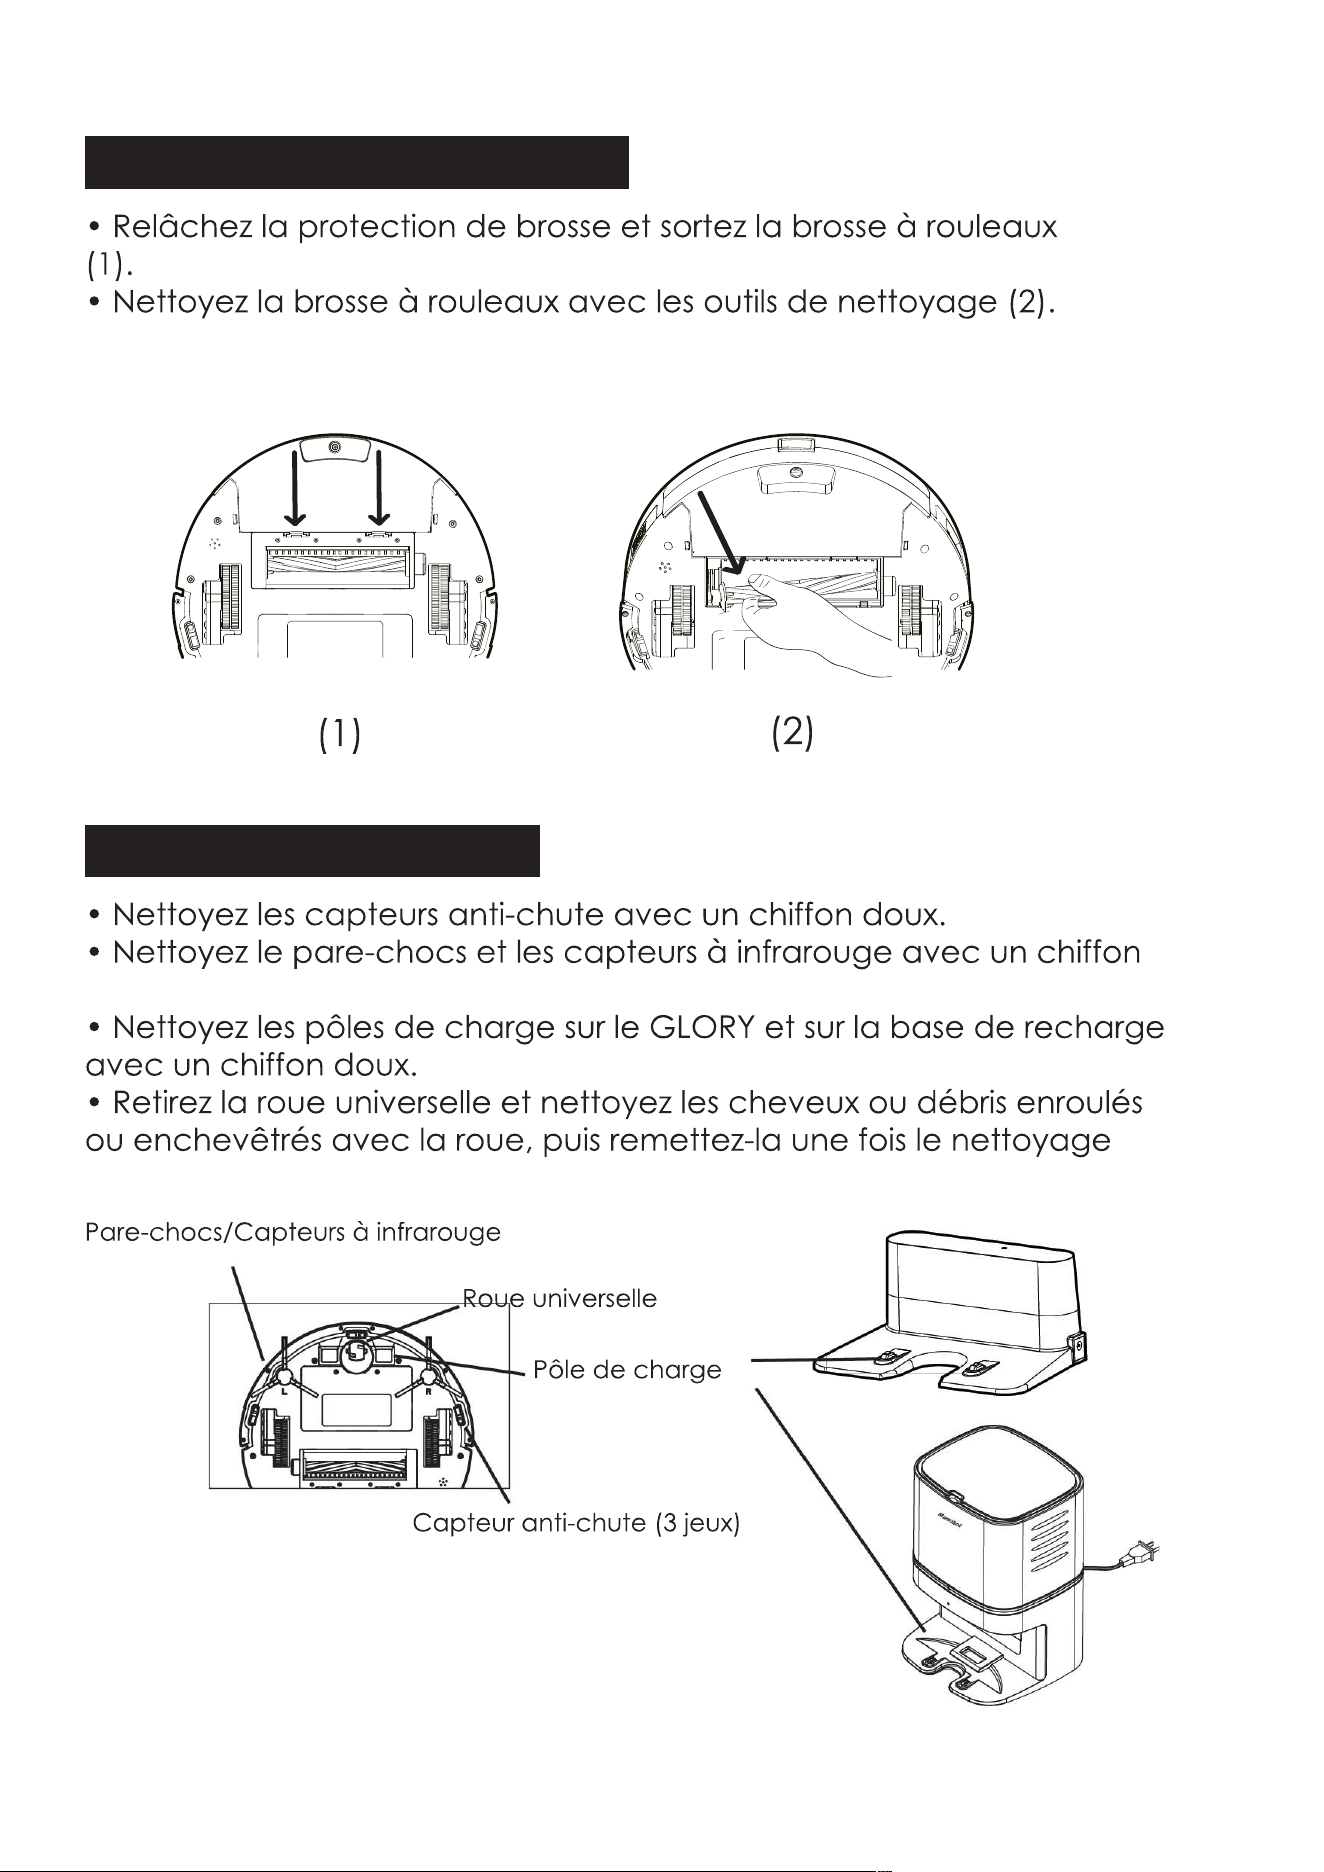
Clean the Rolling Brush
• Release the brush guard and pull out the rolling brush(1).
• Clean the rolling brush with cleaning tools(2).
Clean other Parts
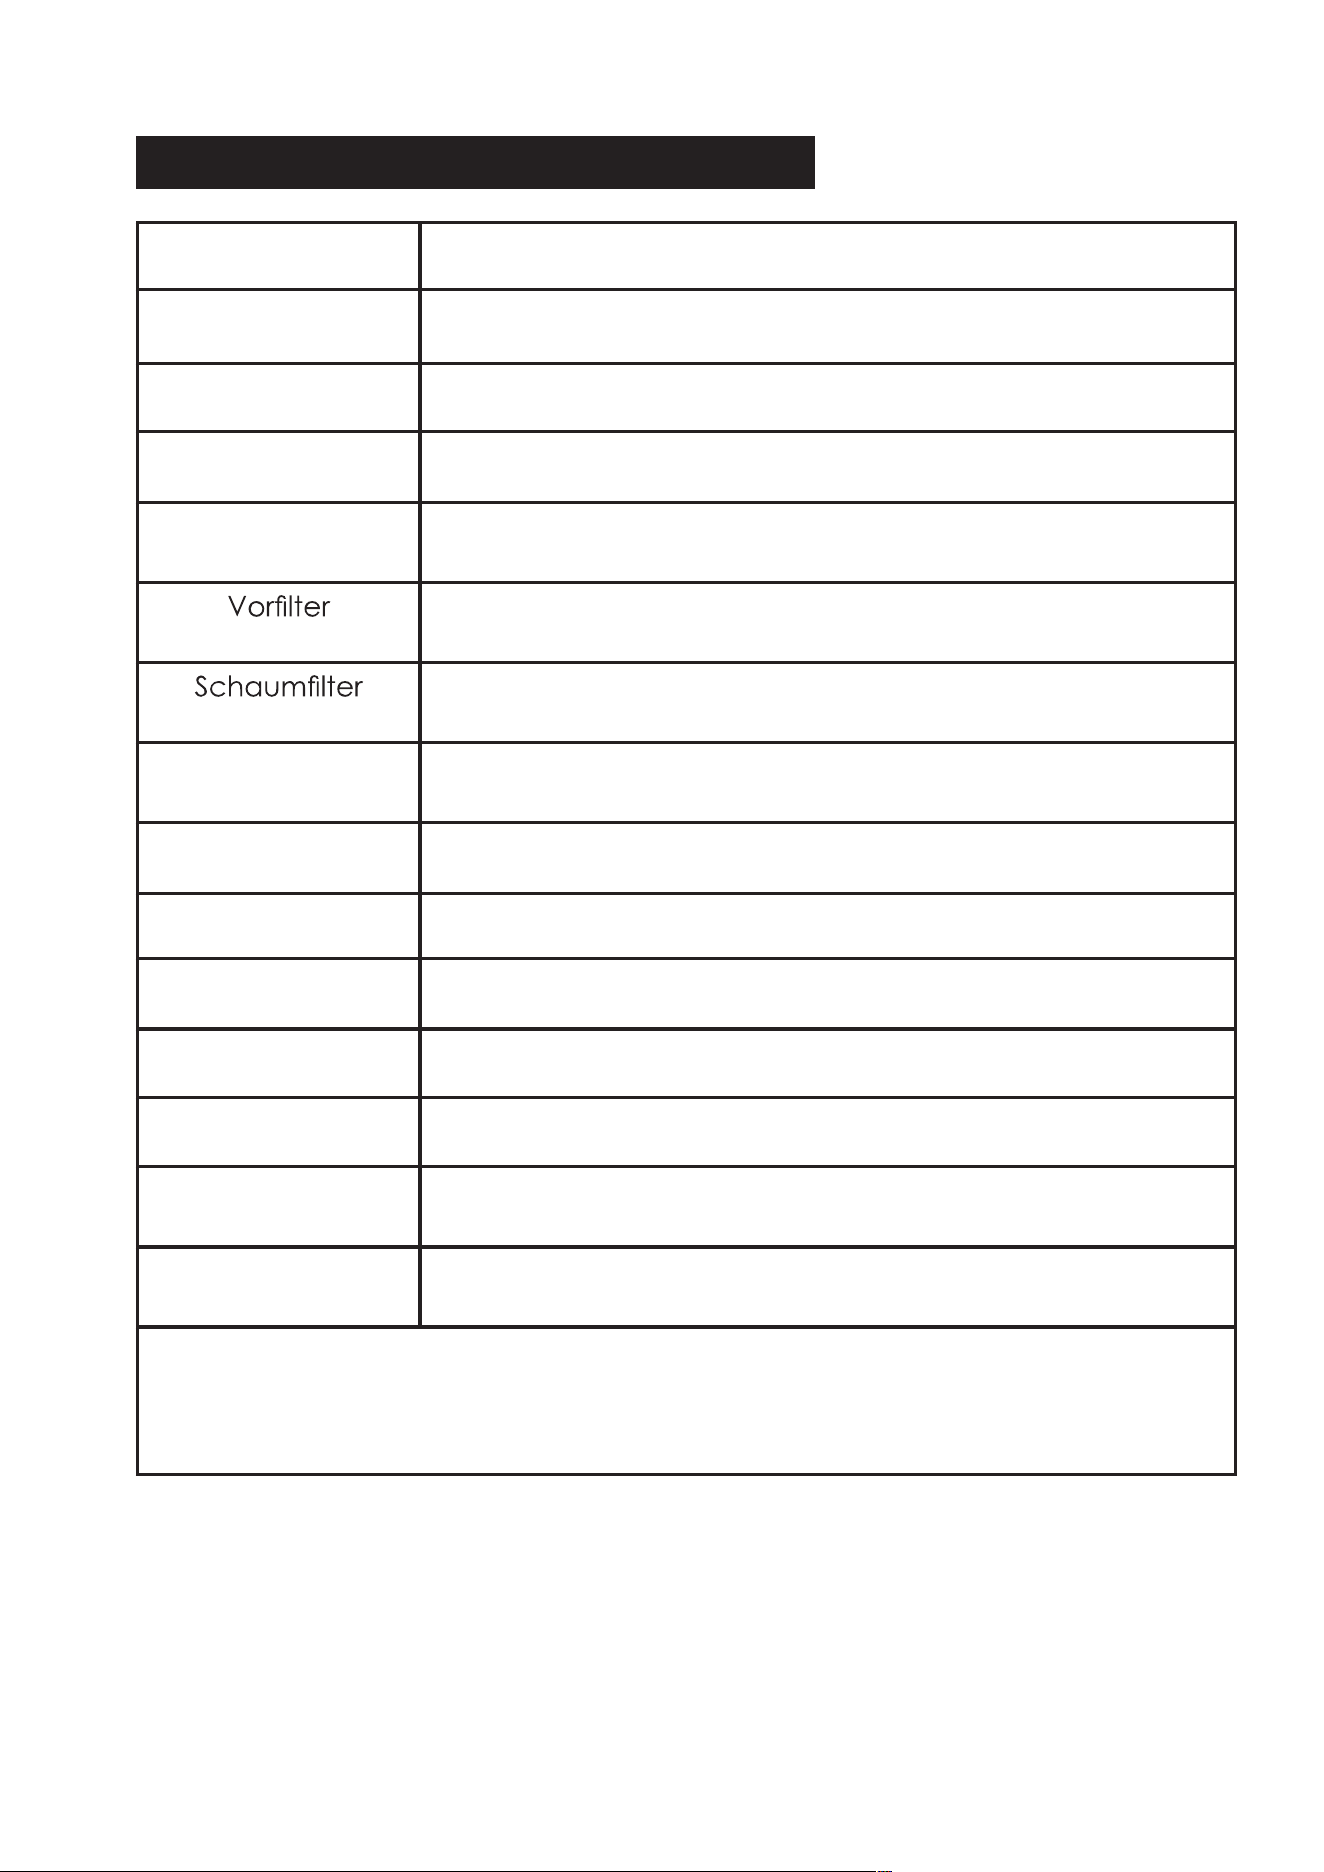
• Clean the Anti-falling sensors with soft cloth.
• Clean the Bumper and Infrared sensors with soft cloth.
• Clean the charging pole on GLORY and charging base with soft cloth.
• Pull out the Universal wheel and clean the hair or debris wrapped
or entangled with the wheel, then reinstall it after cleaning finished.
(2)
(1)
Charging Pole
Universal wheel
Bumper/Infrared sensors
Anti-falling sensor(3sets)
31
M
a
mi
b
o
t
Cleaning / Replacement Frequency Recommended
Part
Side Brushes
Rolling Brush
Dust Box
HEPA
Pre-filter
Foam Filter
Bumper
Mopping Cloth
Infrared sensors
Charging Pole
Universal Wheel
Cleaning every 2-3 times use; Replacement every
3-6months.
Cleaning after each use.
Cleaning every month; Replacment every 3-6months.
Cleaning every month; Replacment every 3-6months.
Cleaning every 2-3 times use; Replacement every
3-6months.
Cleaning every 2-3 times use; Replacement every
3-6months.
Cleaning after each use; Replacement 6-12months.
Cleaning every month
Cleaning every month
Cleaning every month
Cleaning every month
Cleaning every month
Cleaning after each use
Cleaning every month
Cleaning / Replacement Frequency Recommended
Note:
Above frequency is only for your reference. The final cleaning/replacment
frequency should subject to your exact use frequency.
Dust Collector Sensor
(If there is)
UV-C Lamp
(If there is)
Suction Port
(If there is)
32
Troubleshooting
Problems
Solutions
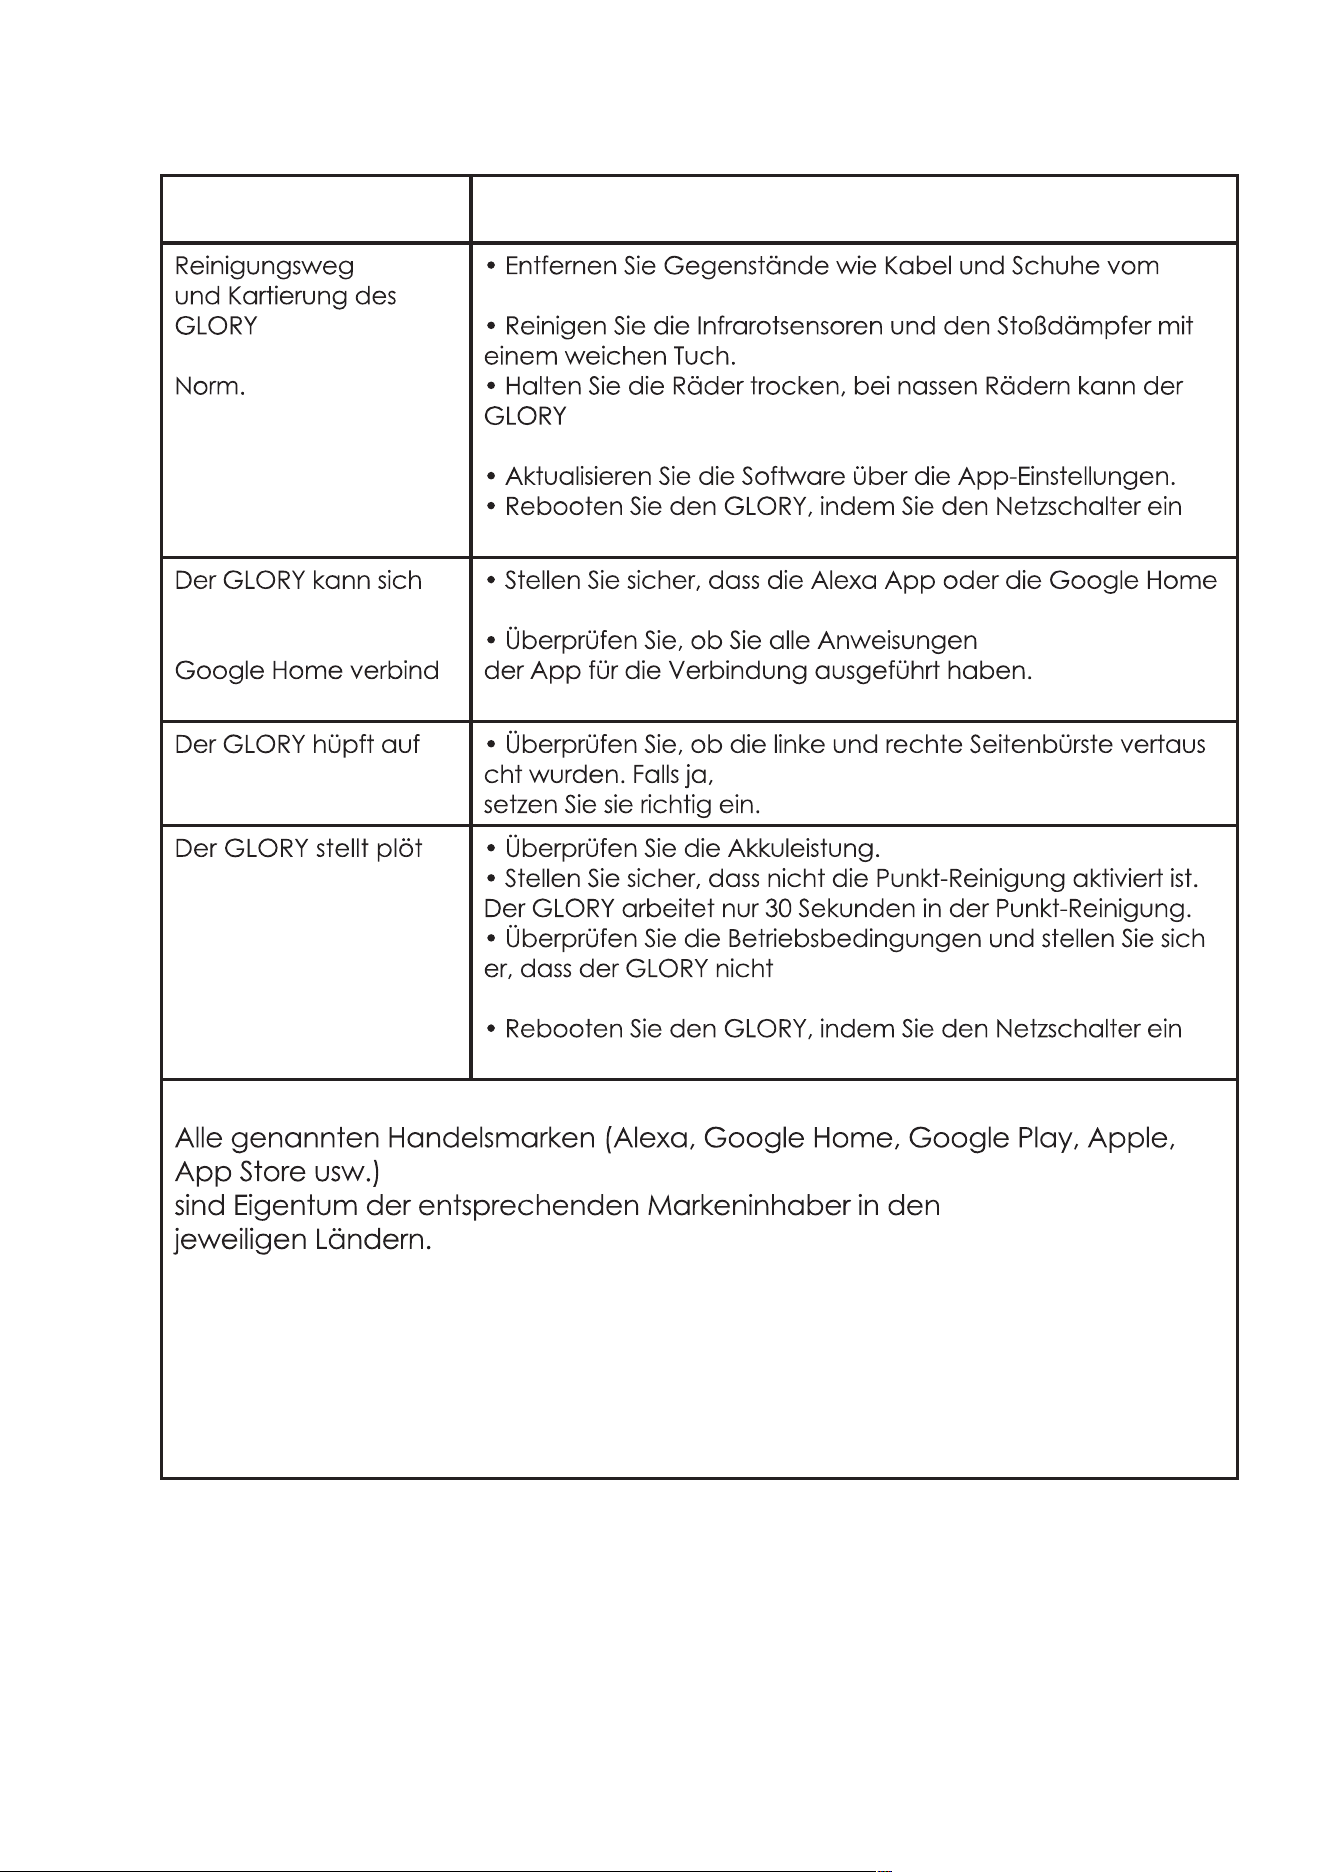
GLORY can not be
charged
• Make sure the adapter is connected with power supply and
charging dock correctly and the indicator lights up.
• Clean the charging poles on charging base and GLORY
with dry and soft cloth,then charge again.
• Charge GLORY via adapter directly.
GLORY can not be
activated.
• Make sure the main power switch is turned on.
• Make sure GLORY is fully charged.
• Make sure the remote control is not out of power or
replace it with new AAA battery.
• Make sure your remote control signal is within the range of
GLORY 5m/16ft).
• Control GLORY via APP. GLORY may not be controlled by
the remote control if it stays on charging dock.
The remote control
does not work.
• Replace new AAA battery.
• Make sure the remote control is within the range of GLORY
(5m/16ft).
• Make sure the main power switch is turned on.
GLORY does not work
as scheduled.
• Make sure the main power switch is turned on.
• The Scheduled time will be cancelled if it is rebooted.
Please set the schedule time via APP.
• Make sure GLORY is fully charged.
• Make sure GLORY is not stuck at some places.
GLORY goes back to
recharge before
finishing cleaning.
• GLORY will go back to recharge if the battery power is
lower than 20%, make sure GLORY is fully charged.
• Reboot GLORY by turning off / on the main power switch.
GLORY step back
when working.
• Avoid GLORY to work on the dark floor or under the direct
irradiation of sunlight.
• Clean the Infrared sensors and the bumper with soft cloth.
Suction power is
weak than before.
• Clean and empty the dust box.
• Clean the pre-filter, foam filter and HEPA and also keep
them dry.
• Clean the rolling brush.
• Clean the suction inlet.
GLORY can not
connect to users’
Wi-Fi network.
• 5G router network is not avaiable for GLORY. Make sure the
router network supports 2.4GHz.
• Keep the router, GLORY and smartphone be closer to each
other, proceed with connection as per manuals & APP
instructions.
33
Solutions
The working path
and map of GLORY
is abnormal.
• Remove the objects, such as cables, shoes from the floor.
• Clean the Infrared sensors and bumper with soft cloth.
• Keep the wheels dry, the path of GLORY will be abnormal
if the wheels are wet.
• Upgrade the latest version of firmware through APP setting.
• Reboot GLORY by turning off / on the main power switch.
GLORY can not
connect to Alexa or
google home.
• Make sure users have installed Alexa or google home app.
• Make sure users have followed the guide of connection
from APP.
Attention:
All the referred trade marks: Alexa, google home, google play, Apple,
APP store etc, the trademarks belong to their registered company in the
correspond countries or areas.
GLORY is bouncing up
and down.
GLORY Stops working
suddenly.
• Check the battery power.
• Make sure the cleaning mode is not in the Spot Cleaning .
GLORY will work only 30 seconds in the Spot Cleaning mode.
• Check the working conditions and make sure GLORY is not
trapped by obstacles.
• Reboot GLORY by turning off/on the main power switch.
• Check if the L and R brush installed in reverse, if yes, reinstall
them properly.
34
Problems
Notice:
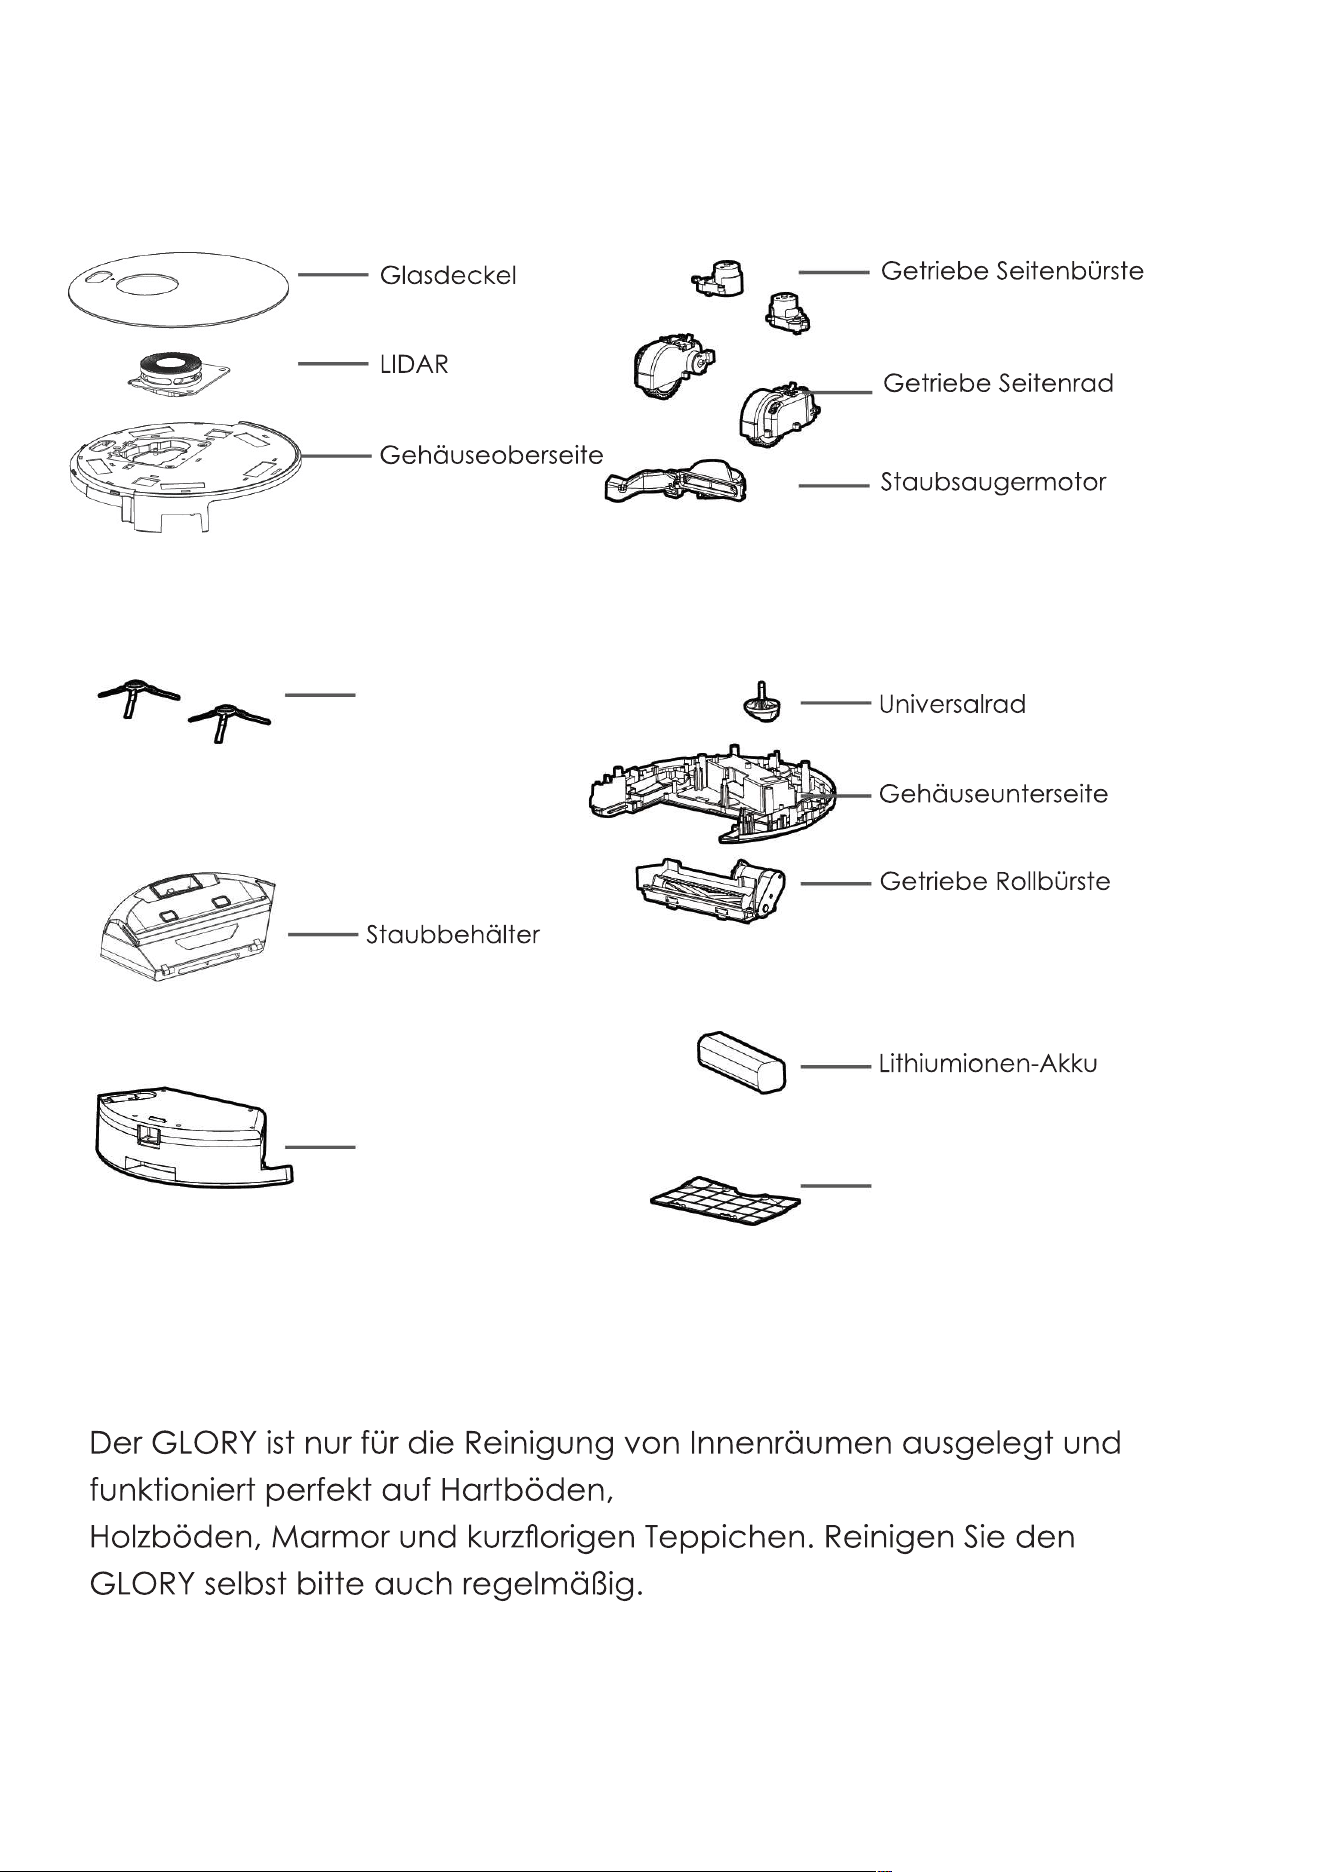
GLORY is only for indoor cleaning, it works well on the hard floor,
wooden floor,marble floor or short carpet floor. Please also keep
regular cleaning for GLORY.
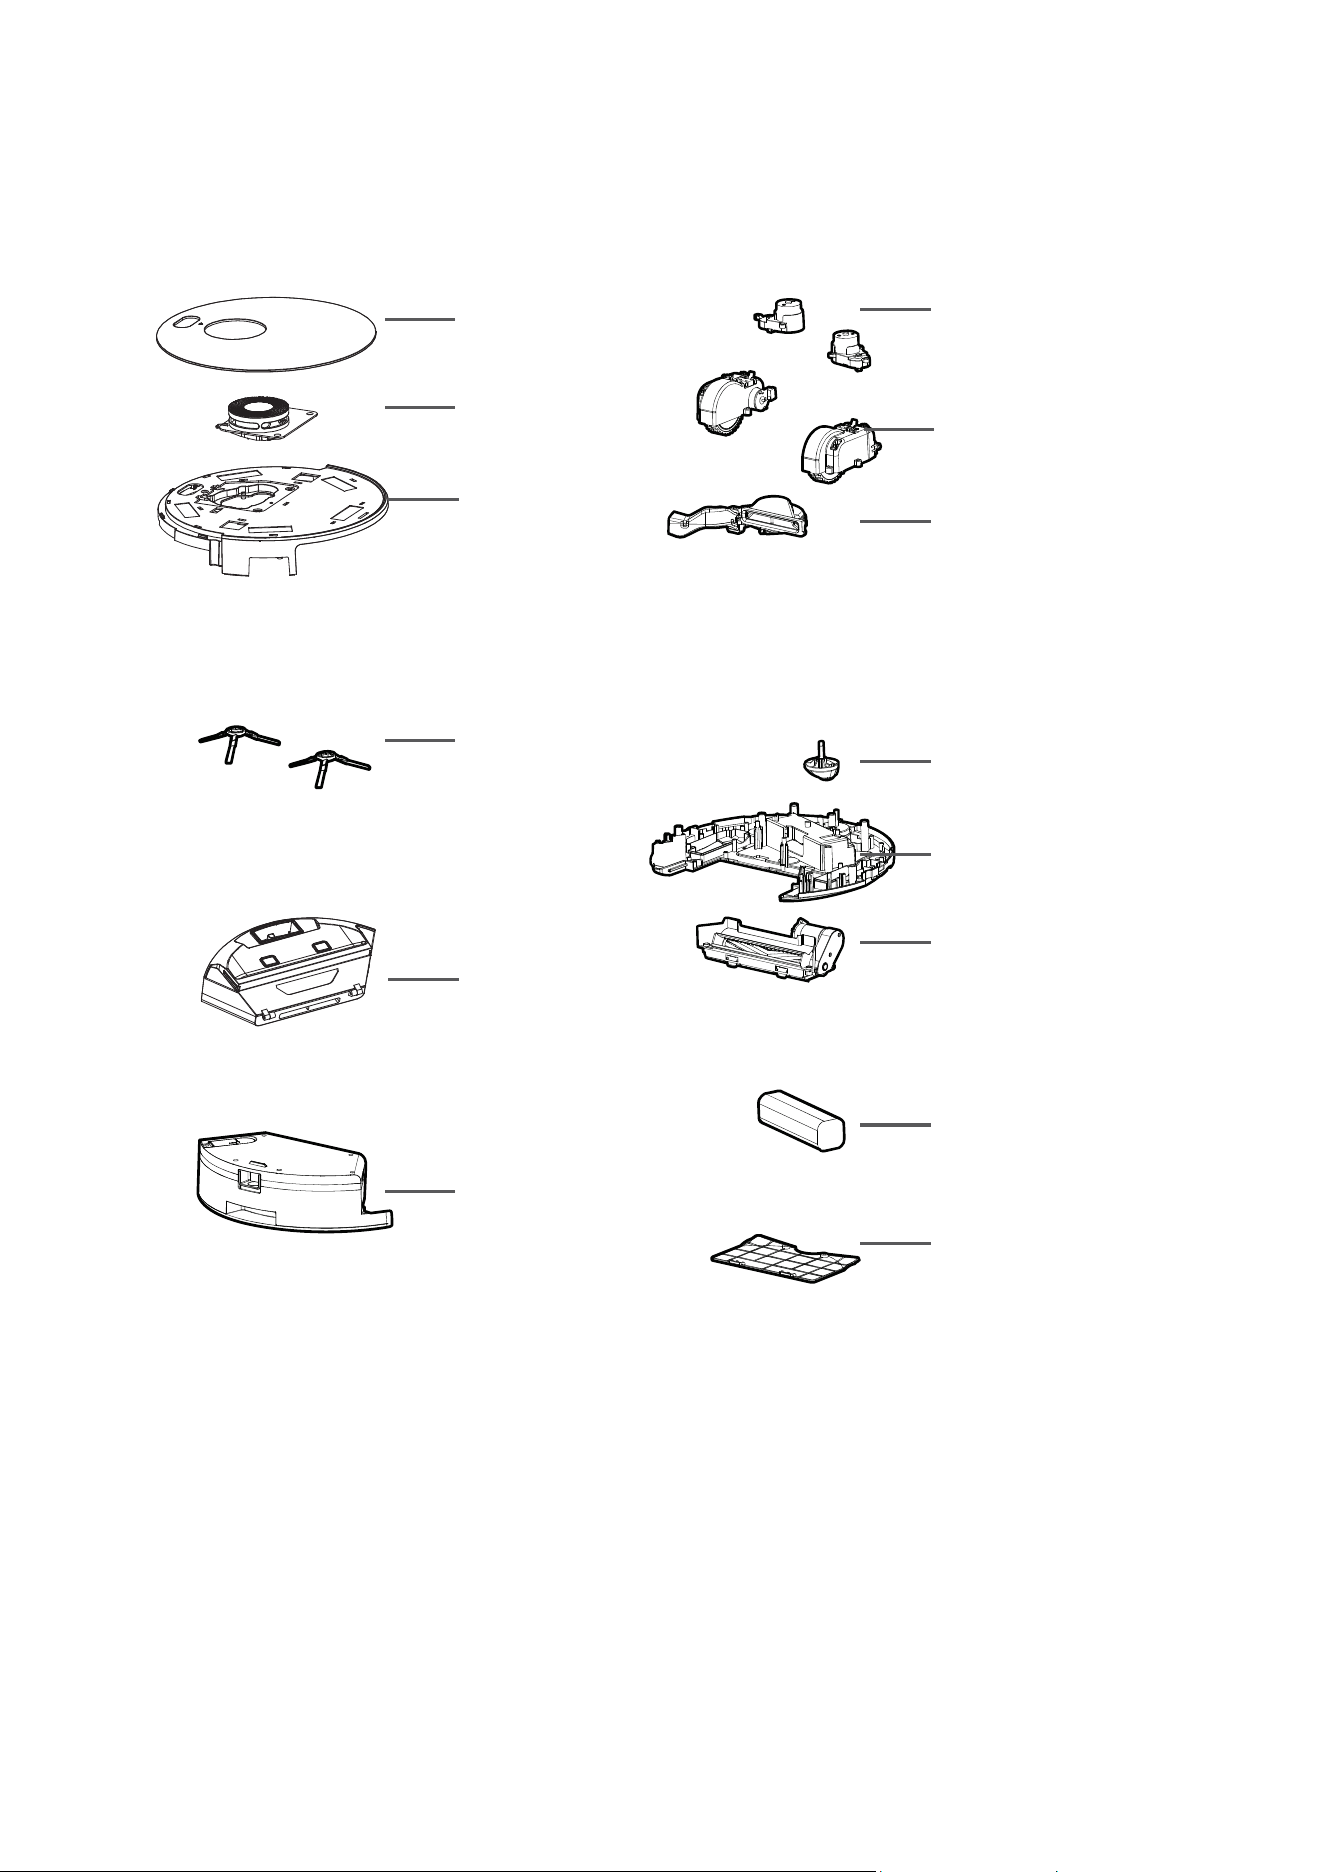
GLORY Anatomy
Top glass cover
Lidar
Top Shell
Side Brush
Dust Box
Water Tank
Side Brush Gearbox
Side Wheel Gearbox
Vacuum Motor set
Universal Wheel
Bottom Shell
Rolling Brush Gearbox
Li-ion Battery
Battery Cover
35
36
Plastic Shell PCB Cables Metal Parts Adapter
Electronic
Components
Rubber
Components
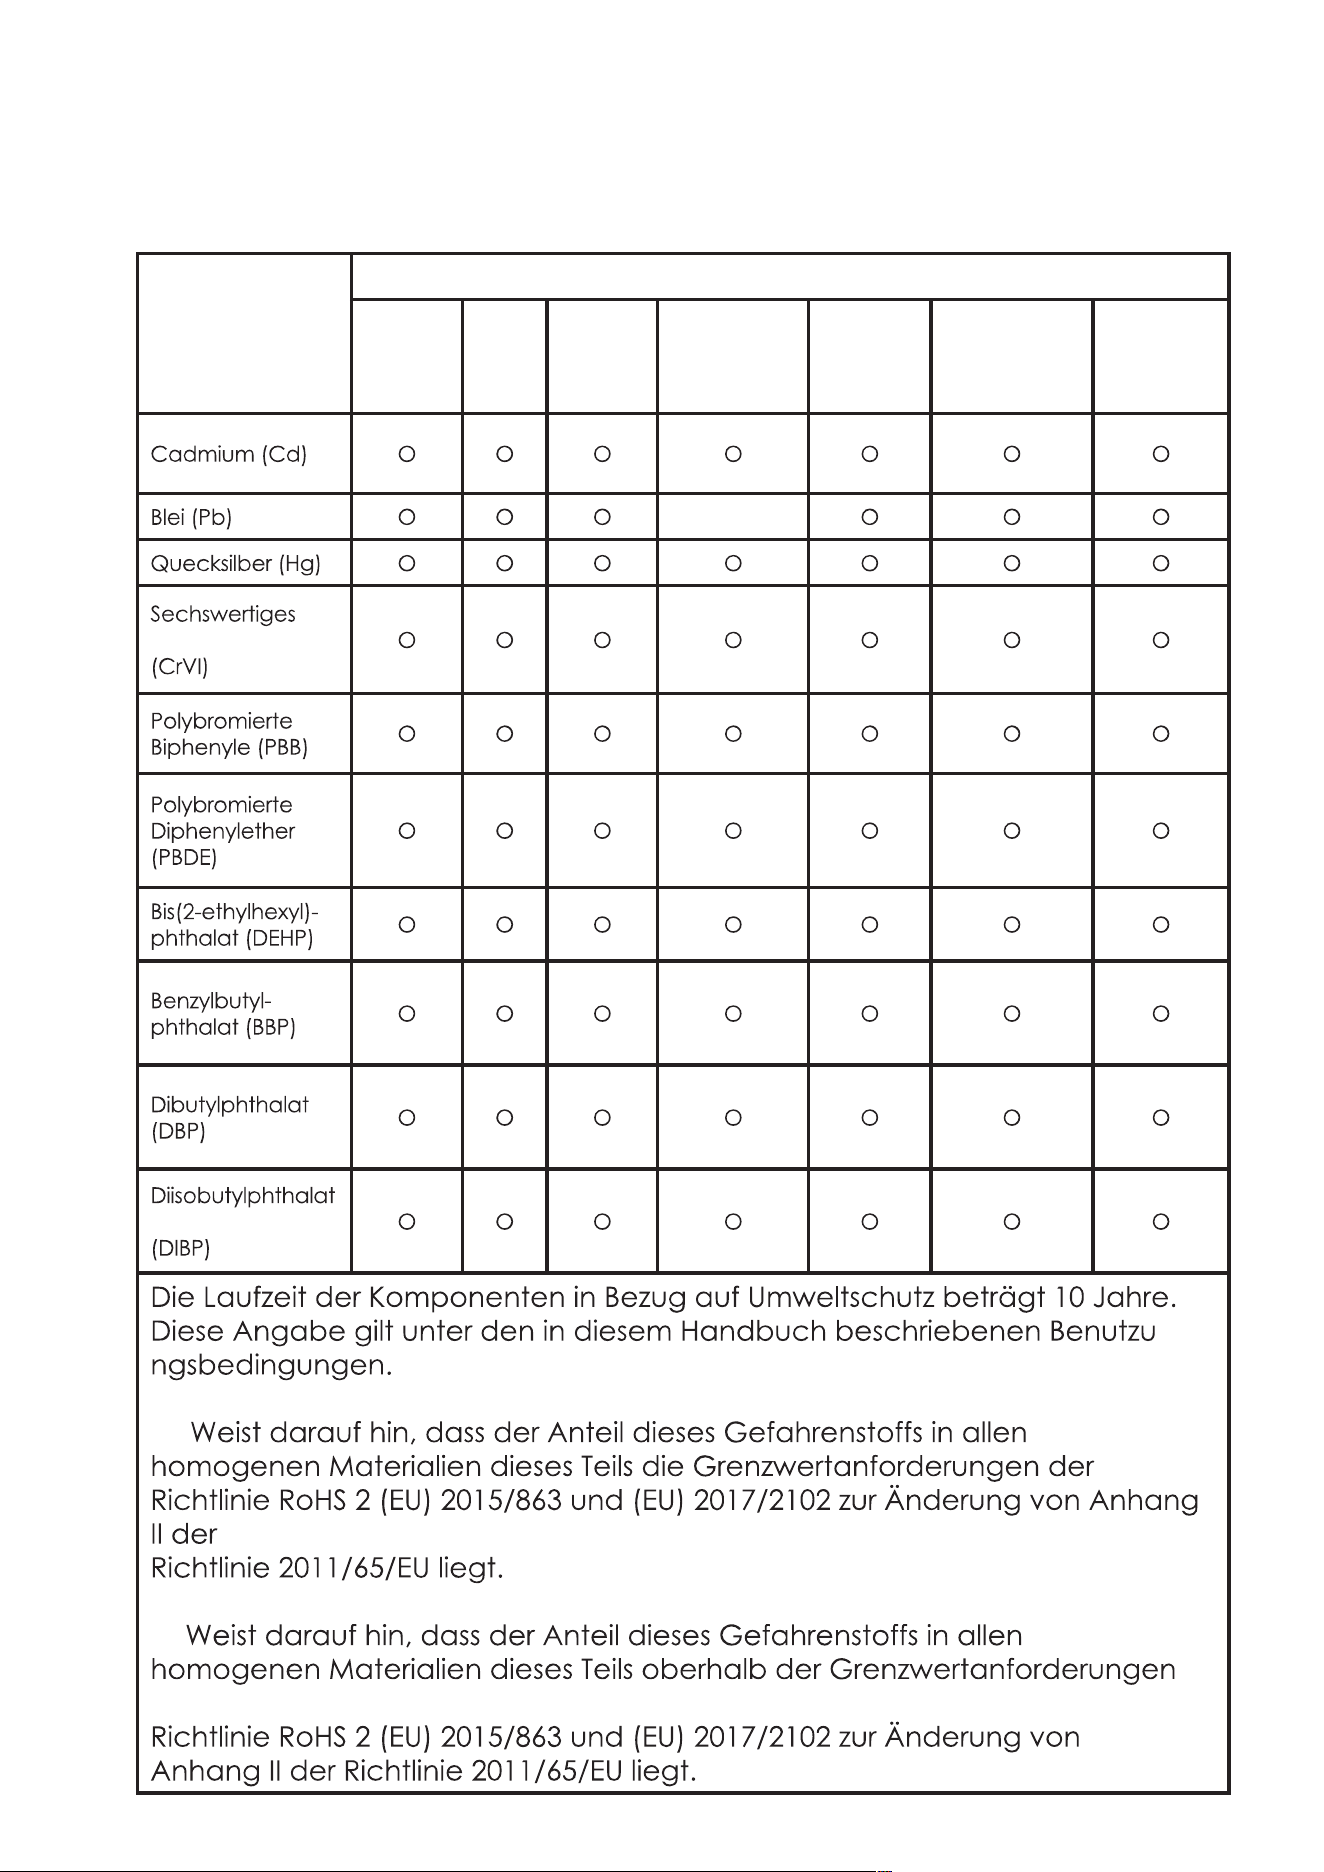
Content of Hazardous Substances
Component
Cadmium(Cd)
Lead(Pb)
Mercury(Hg)
Hexavalent Chromium
(CrVI)
Polybrominated
Biphenyls(PBB)
Polybrominated
Diphenyl Ethers
(PBDE)
Bis(2-ethylhexyl)
Phthalate(DEHP)
Butyl Benzyl
Phthalate (BBP)
Dibutyl Phthalate
(DBP)
Diisobutyl Phthalate
(DIBP)
O O O O O O O
O O O X O O O
O O O O O O O
O O O O O O O
O O O O O O O
O O O O O O O
O O O O O O O
O O O O O O O
O O O O O O O
O O O O O O O
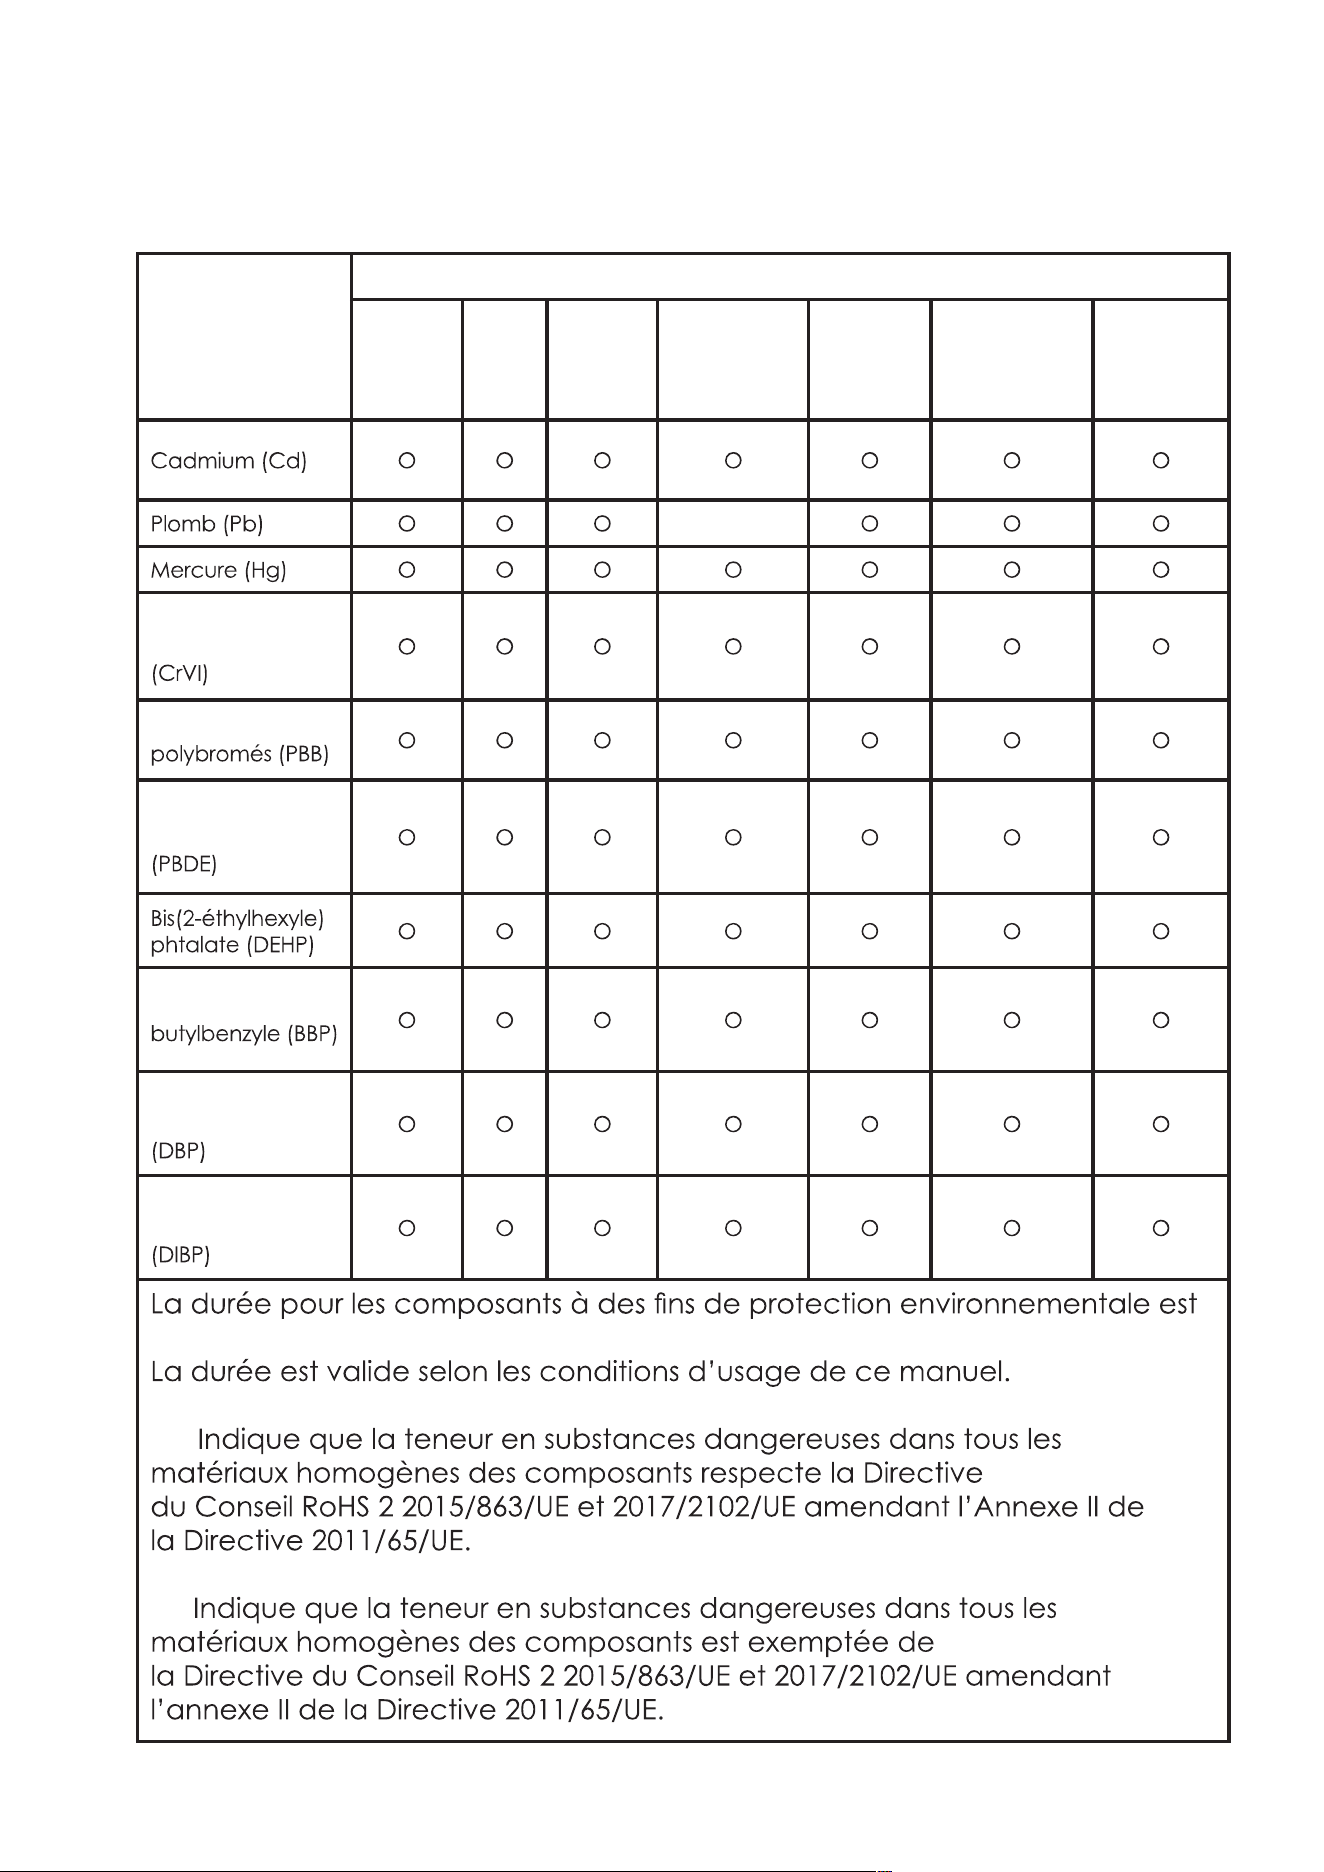
The time of the components for environment protection concern is 10 years.
The time is valid under the use conditions of this manual.
O: It indicates that the content of the hazardous substances in all
homogeneous materials of the compoents is in compliance with the council
RoHS 2 Directive (EU) 2015/863 and (EU) 2017/2102 amending Annex II to
Directive 2011/65/EU.
X: It indicates that the content of the hazardous substances in all
homogeneous materials of the compoents is the exempt item according to
the council RoHS 2 Directive (EU) 2015/863 and (EU) 2017/2102 amending
Annex II to Directive 2011/65/EU.
Name and Content of Hazardous Substances
Manufacturer:
Mamibot Manufacturing (Shanghai) Co.,Ltd.
21st FL, No 1st, LN1040 Caoyang Rd, Shanghai, 200063. P.R.C.
Mamibot Manufacturing USA Inc.
One Commerce Center, 1201 Orange St, Wilmington, DE 19899 USA
Tel: 001 302-428-9888 [email protected] www.mamibot.com
Supervised by
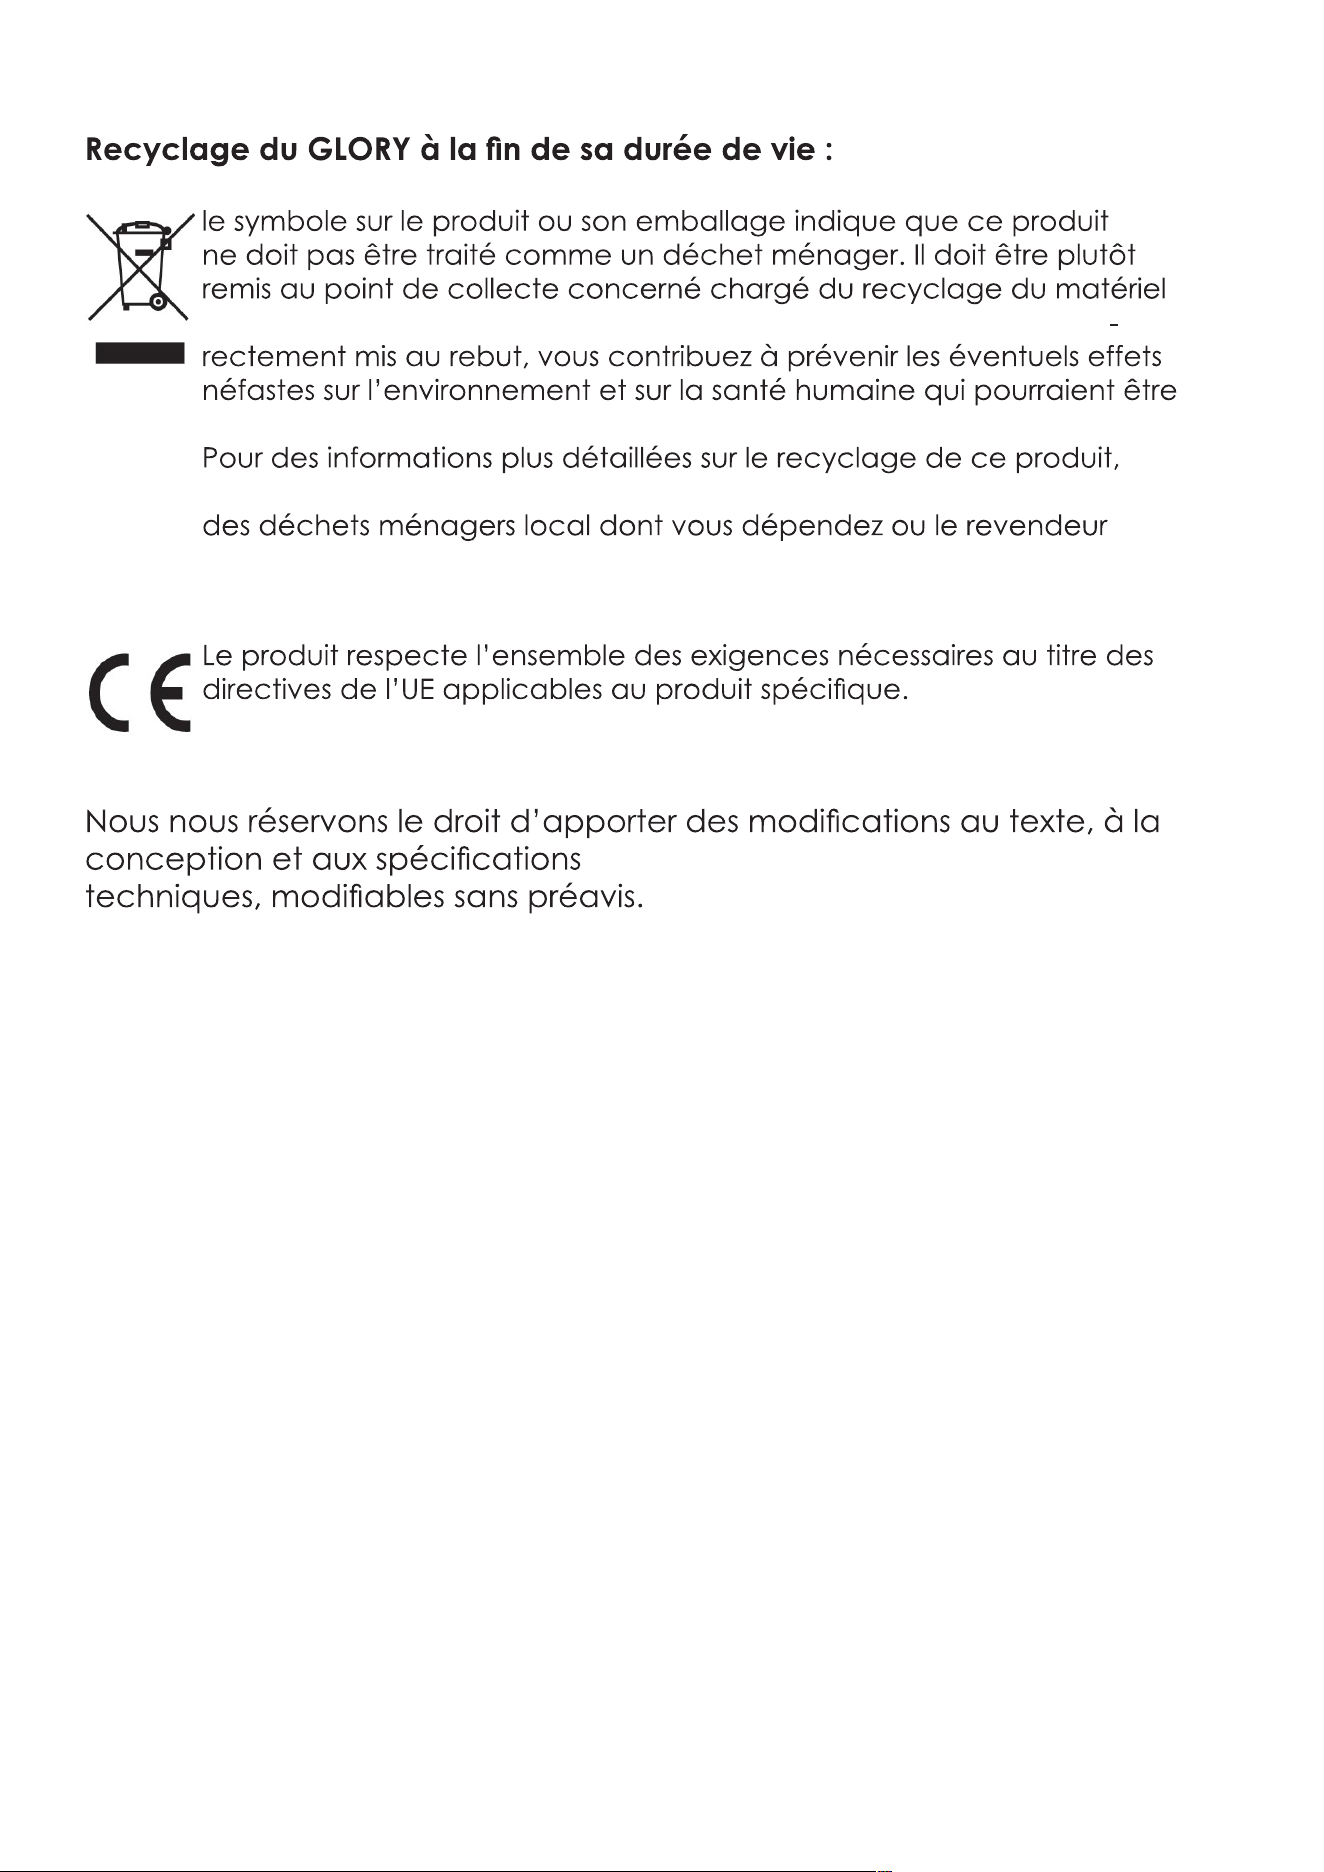
Recycling of GLORY at the end of its lifespan:
The symbol on the product or on its packaging indicates that this product
may not be treated as household waste. Instead it should be taken to
the appropriate collection point for the recycling of electrical and
electronic equipment. Byensuring this product is disposed of correctly,
you will help prevent potential negative consequences for the environ-
ment and human health, which could otherwise be caused by in-
appropriate waste handling of this product. For more detailed infor-
mation about recycling of this product, please contact your local
council, your household waste disposal service or the shop where you
purchased the product.
The product meets all the necessary requirements of the EU directives
applicable to the specific product.
We reserve the right to changes in text, design, and technical specifi-
cations which are subject to change without prior notice.
37

38
EXVAC890 GLORY
LDS LASER SLAM
STAUBSAUGER-ROBOTER
GEBRAUCHSANLEITUN
G
Vielen Dank, dass Sie ein Mamibot-Produkt verwenden. Bitte beachten
Sie, dass dieses Handbuch für unsere beiden Versionen des EXVAC890
Version 1.: EXVAC890 GLORY Staubsammler-Version (mit CRAFT-X)
Version 2.: EXVAC890 GLORY Allgemeine Version (ohne CRAFT-X)
Bitte konsultieren Sie die technische Dokumentation des Produkts, das
Sie erworben haben.
20201211Ver]
DE
-
entschieden haben.
behandelt werden,
wenden Sie sich bitte an unseren Kundendienst unter
Inhalt
2 Sicherheitshinweise
Beschreibung
5 Produktmerkmale
6
7
8 Komponenten
11
14
Bedienung
16
18
19
21
25
27
Reinigung und Wartung
28
28
30
31
31
32
33 Problemlösung
35 Aufbau des Geräts
36 Verwendete Gefahrenstoffe
37 Recycling
2
Sicherheitshinweise
-
Hinweise zu Haupteinheit und Komponenten
Warnung
-
-
Kindern fern.
-
bereich verwenden.
11. Achten Sie darauf, dass der Akkukontakt nicht mit Metall oder leitenden
kann.
Wichtige Hinweise
-
dezimmern.
3
-
-
Hinweise zum Akku
GEFAHR
-
-
-
-
sionen verursachen.
-
sionen führen kann.
Wichtige Hinweise
vermeiden.
-
sionen vermeiden.
4
Explosionen zu vermeiden.
immer mit Klebeband.
-
Warnung
-
meiden.
-
Entnehmen des Akkus
03. Entfernen Sie die beiden Schrauben auf dem Akkudeckel.
den Akku zu entfernen.
5
Beschreibung
Produktmerkmale
Navigation via Laser und Gyrosensor
-
Raumkarte visualisieren
-
diese Weise
Updates per OTA-Technologie („Over-the-Air“)
Kompatibel mit dem Staubsammler CRAFT X
-
Unterschiedliche Bedienungsarten
Einstellung von No-Go-Areas
6
Technische Daten
Produktmodell
Haupteinheit
330 x 98 mm
19 V 1,0 A
Stromverbrauch 60 W
Art des Akkus
5200 mAh
14,4 V
Wassertanks
370 ml
62 - 215 min
300 - 360 min
-
7
Lieferumfang
Staubsammler
Der Staubsammler wird nur für
-
Wassertank
Wischtuch
8
KOMPONENTEN
für die automatische
Seitenbürste
Akkudeckel
Seitenrad
Bürstenleiste
Staubsammler
Sensor
UNTERSEITE
9
Wassertank
SEITE
nicht abwaschbar.
STAUBBEHÄLTER
10
Verschlusskappe
Wassertank
Wischtuch
WASSERTANK
Staubsammler
LADESTATION/DOCK
Für EXVAC890 GLORY allgemeine Version
STAUBSAMMLER
Für die Version EXVAC890 Staubsammler-CRAFT X
-
11
Fernbedienung
Einstellen der
Automatische
-
12
13
-
-
14
Reinigungsmodi
Automatische Reinigung
-
-
Turbo-Modus
Wischmodus
Einstellung von No-Go-Areas
Punkt-Reinigung
Position
-
mten Stelle blockiert ist.
15
Wiederaufnahme der Reinigung vom Unterbrechungspunkt aus
-
Repositionierung
-
-
wieder auf.
-
-
Vor
Entfernt

16
Vor der ersten Benutzung
17
-
-
18
Reinigung starten / beenden
-
auf der
anzuhalten.
Pause/Standby
-
aktiviert werden.
Sleep
19
Laden
-
ter wieder einschalten.
Sleep-Modus.
Laden: Methode A
20
Laden: Methode B
-
tion berühren.
ODER
Automatisches Laden
-
weiß.
werden.
21
WLAN-Systemanforderungen
-
sonst eventuell nicht erkannt wird.
beieinander sind.
App-Verbindung
1. Herunterladen der App
oder laden Sie
2. Login/Anlegen einer WeBack-ID
dann bei WeBack anmelden.
3. Verbindung des Geräts mit der App.
exvac-890-
Abb. 2
Abb. 1
WeBack
22
-
Abb. 3
Abb. 6
Abb. 4
Abb. 7
Abb. 5
Abb. 8
23
Abb. 9
Abb.12
Abb. 10
Abb. 13
Abb. 11
Abb. 14
3. Bedienung des GLORY über die App
-

24
Abb. 15
Abb. 18
Abb. 22 Abb. 23
C. Über die Schnittstelle
können Sie
können Sie auch erfahren,
wie Sie den GLORY
mit Apps von Drittanbietern
verbinden, z. B.
Alexa, Google Home usw.
(s. Abb. 22 und Abb. 23).
Abb. 16
Abb. 19 Abb. 20
Abb. 17
Abb. 21
25
Einstellung der Uhr
Einstellung des Reinigungsplans
26
Wichtige Hinweise
er
-
splan in der App kann auch nur
27
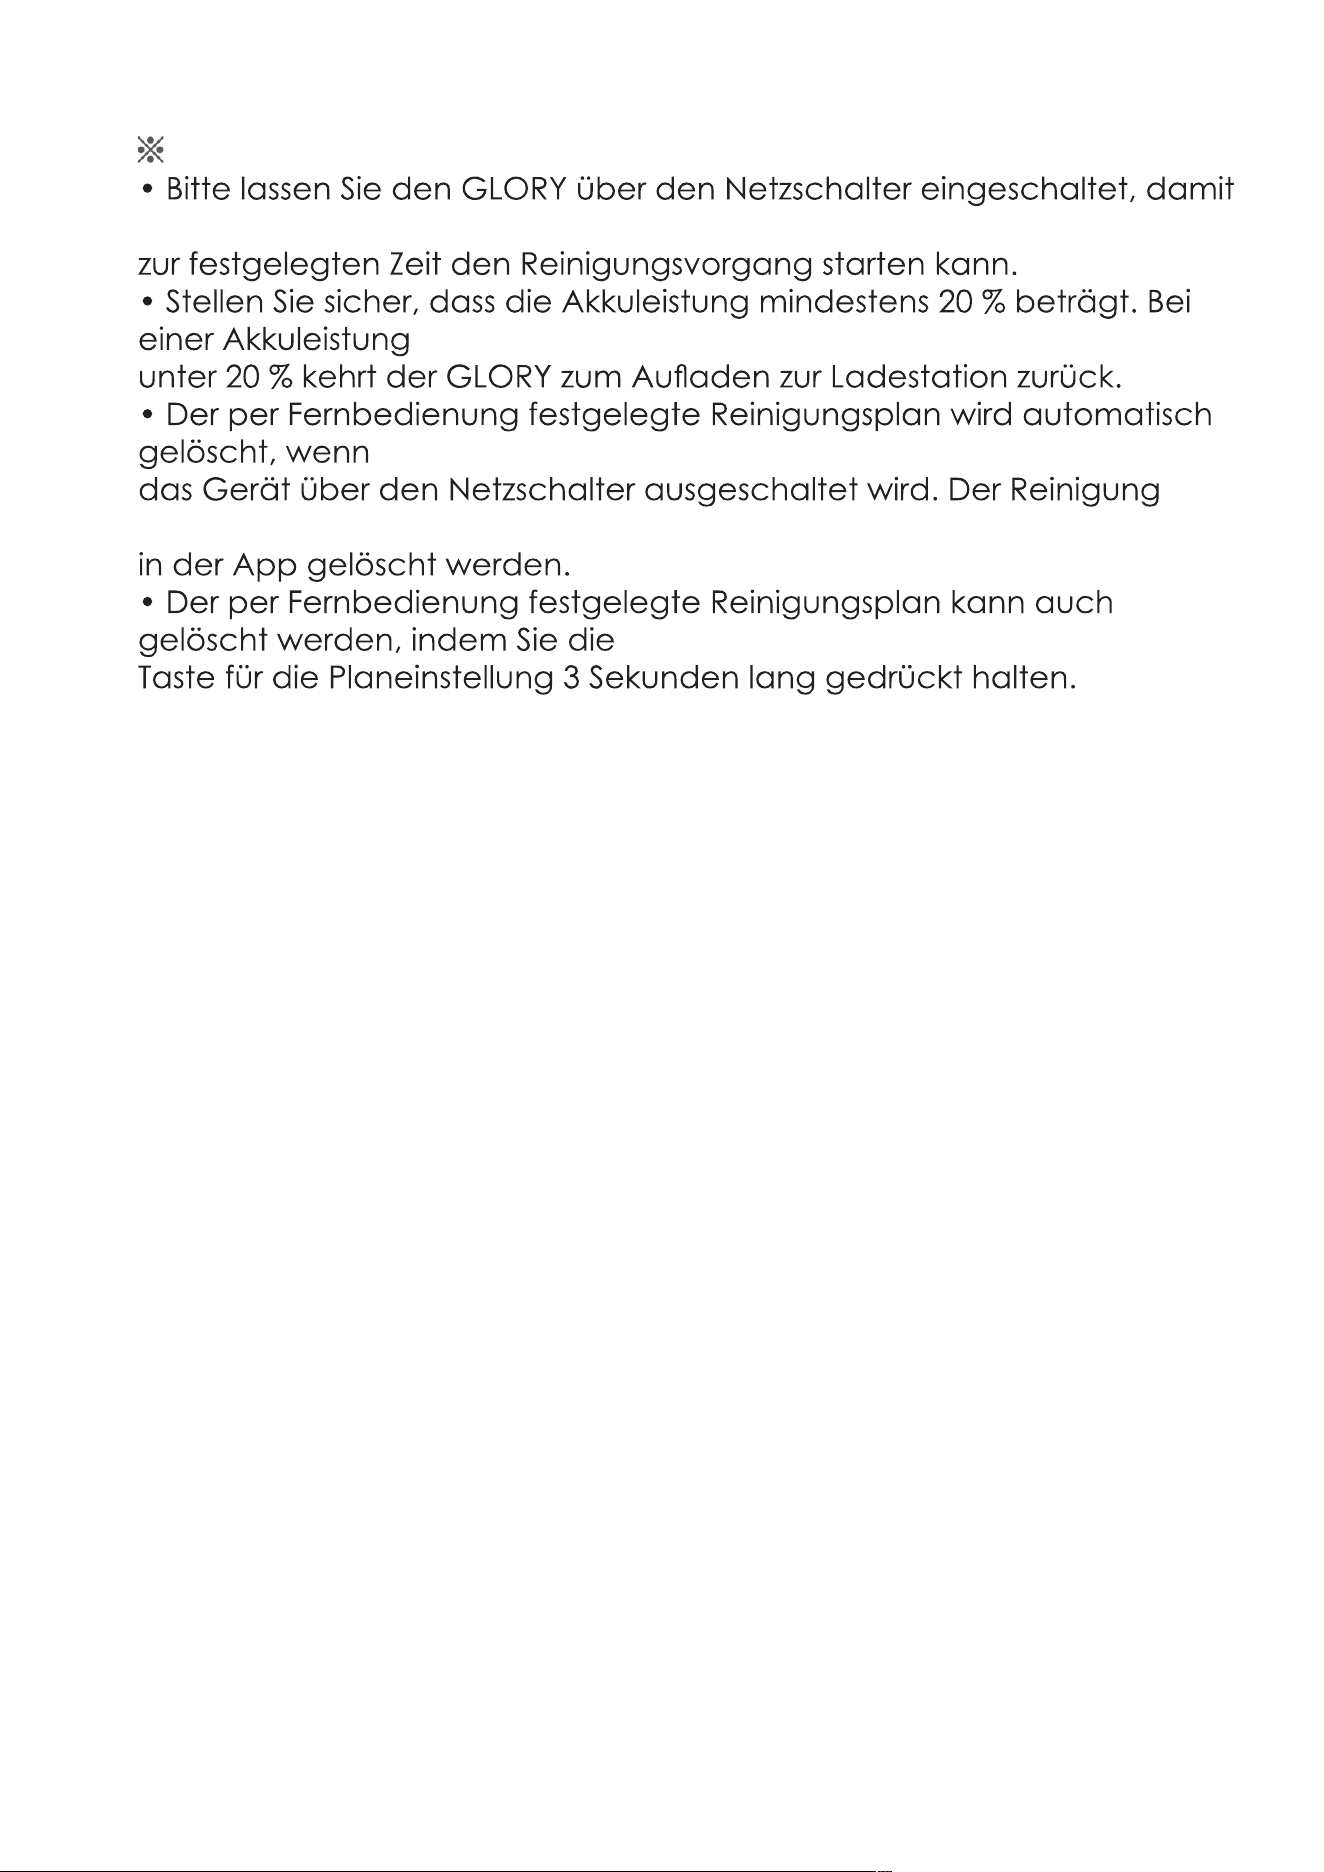
Verwendung des Wassertanks
-
seite des Wassertanks.
• Entfernen Sie die Verschlusskappe des Wassertanks und füllen Sie den
Wasser. Anschließend schließen Sie die Verschlusskappe wieder.
-
men Sie diesen, drücken Sie dann den
-
-
en wird.
-
Wassertank.
28
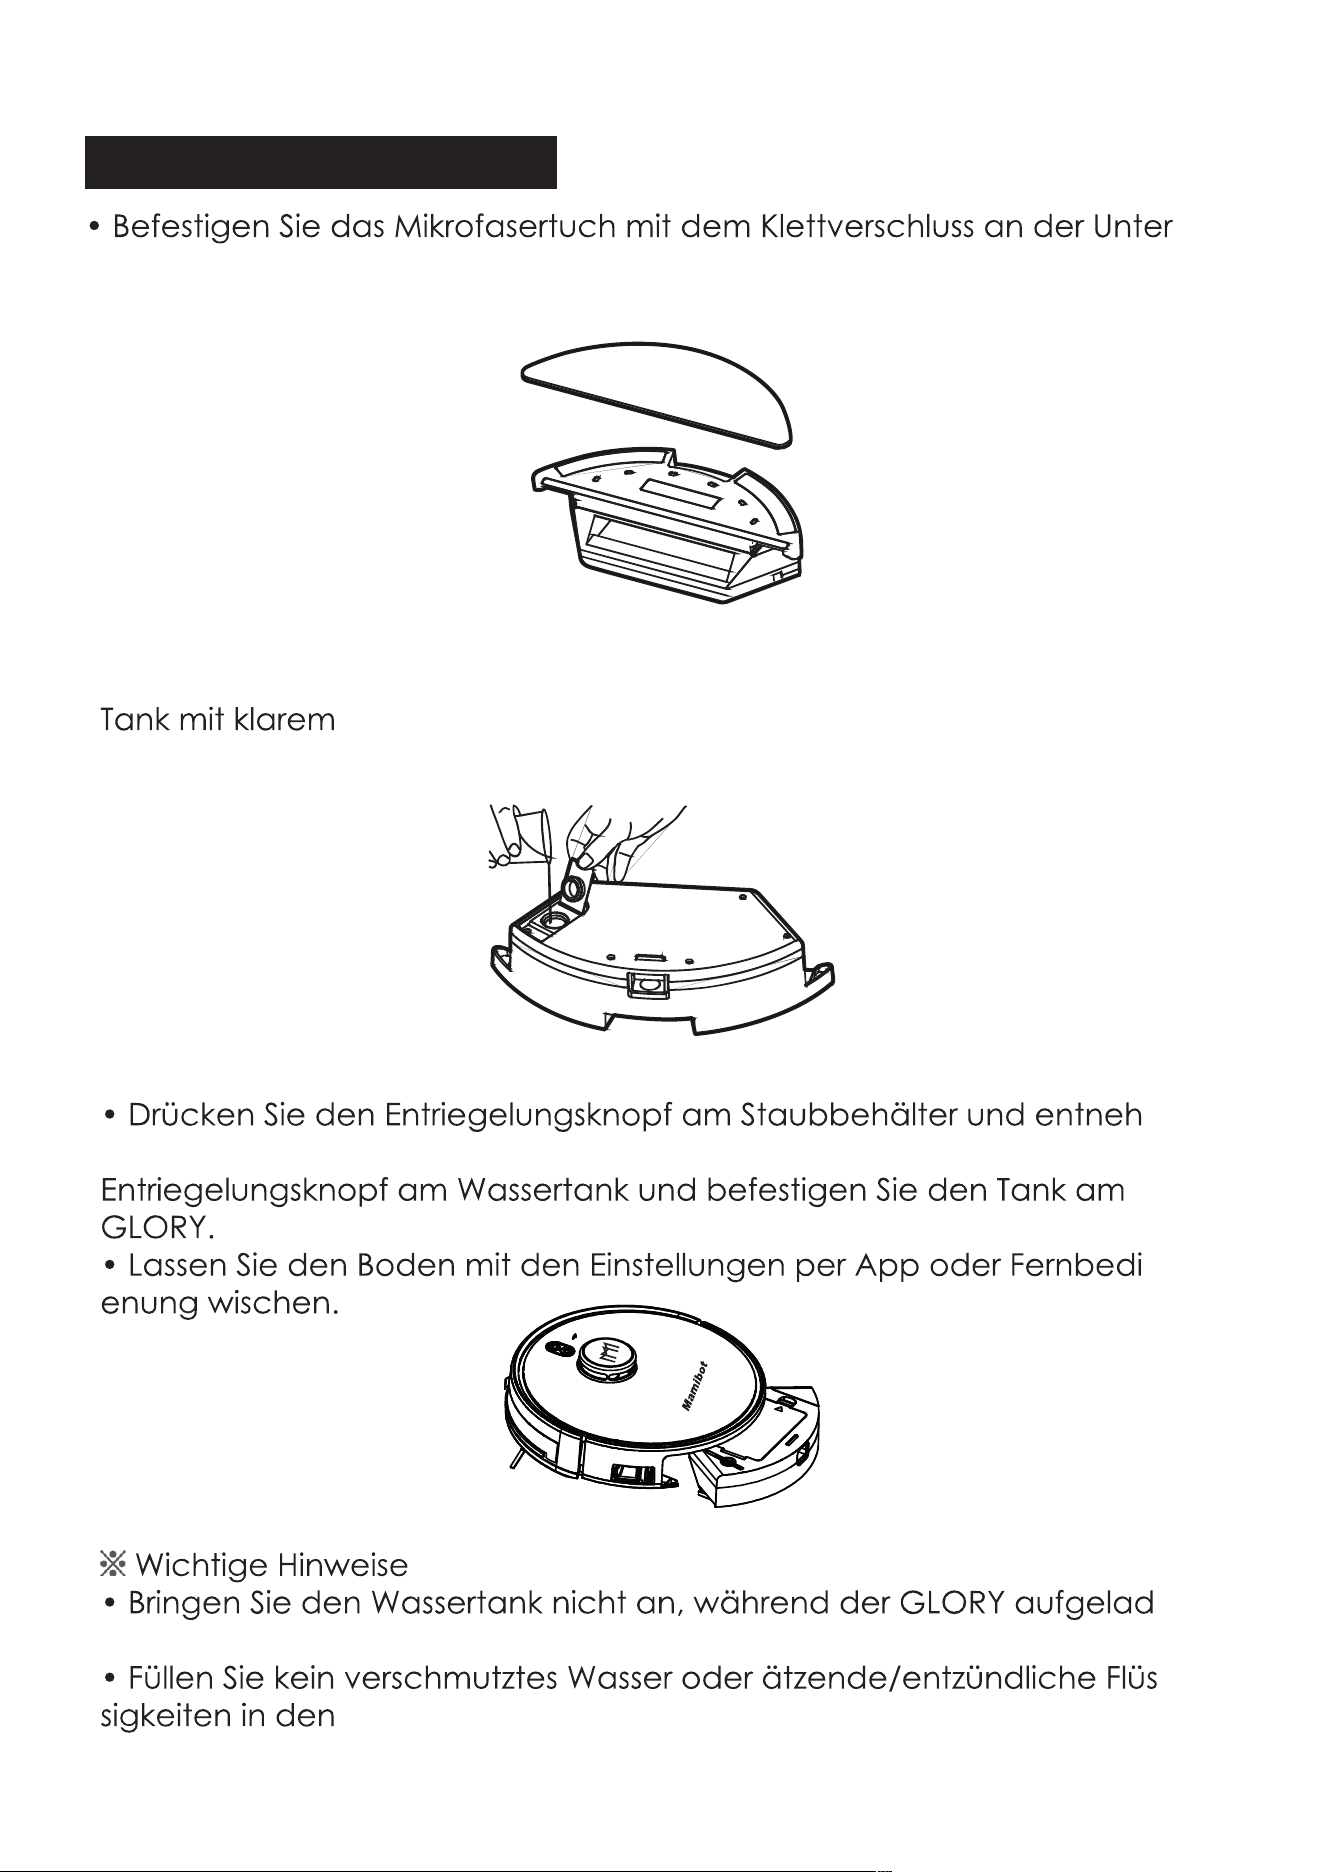
Reinigung der Seitenbürste
neue Seitenbürsten aus.
werden, wenn sie verformt sind.
Reinigung des Staubbehälters
entnehmen.

29
herausziehen.
-
Sie ihn niemals
-
30
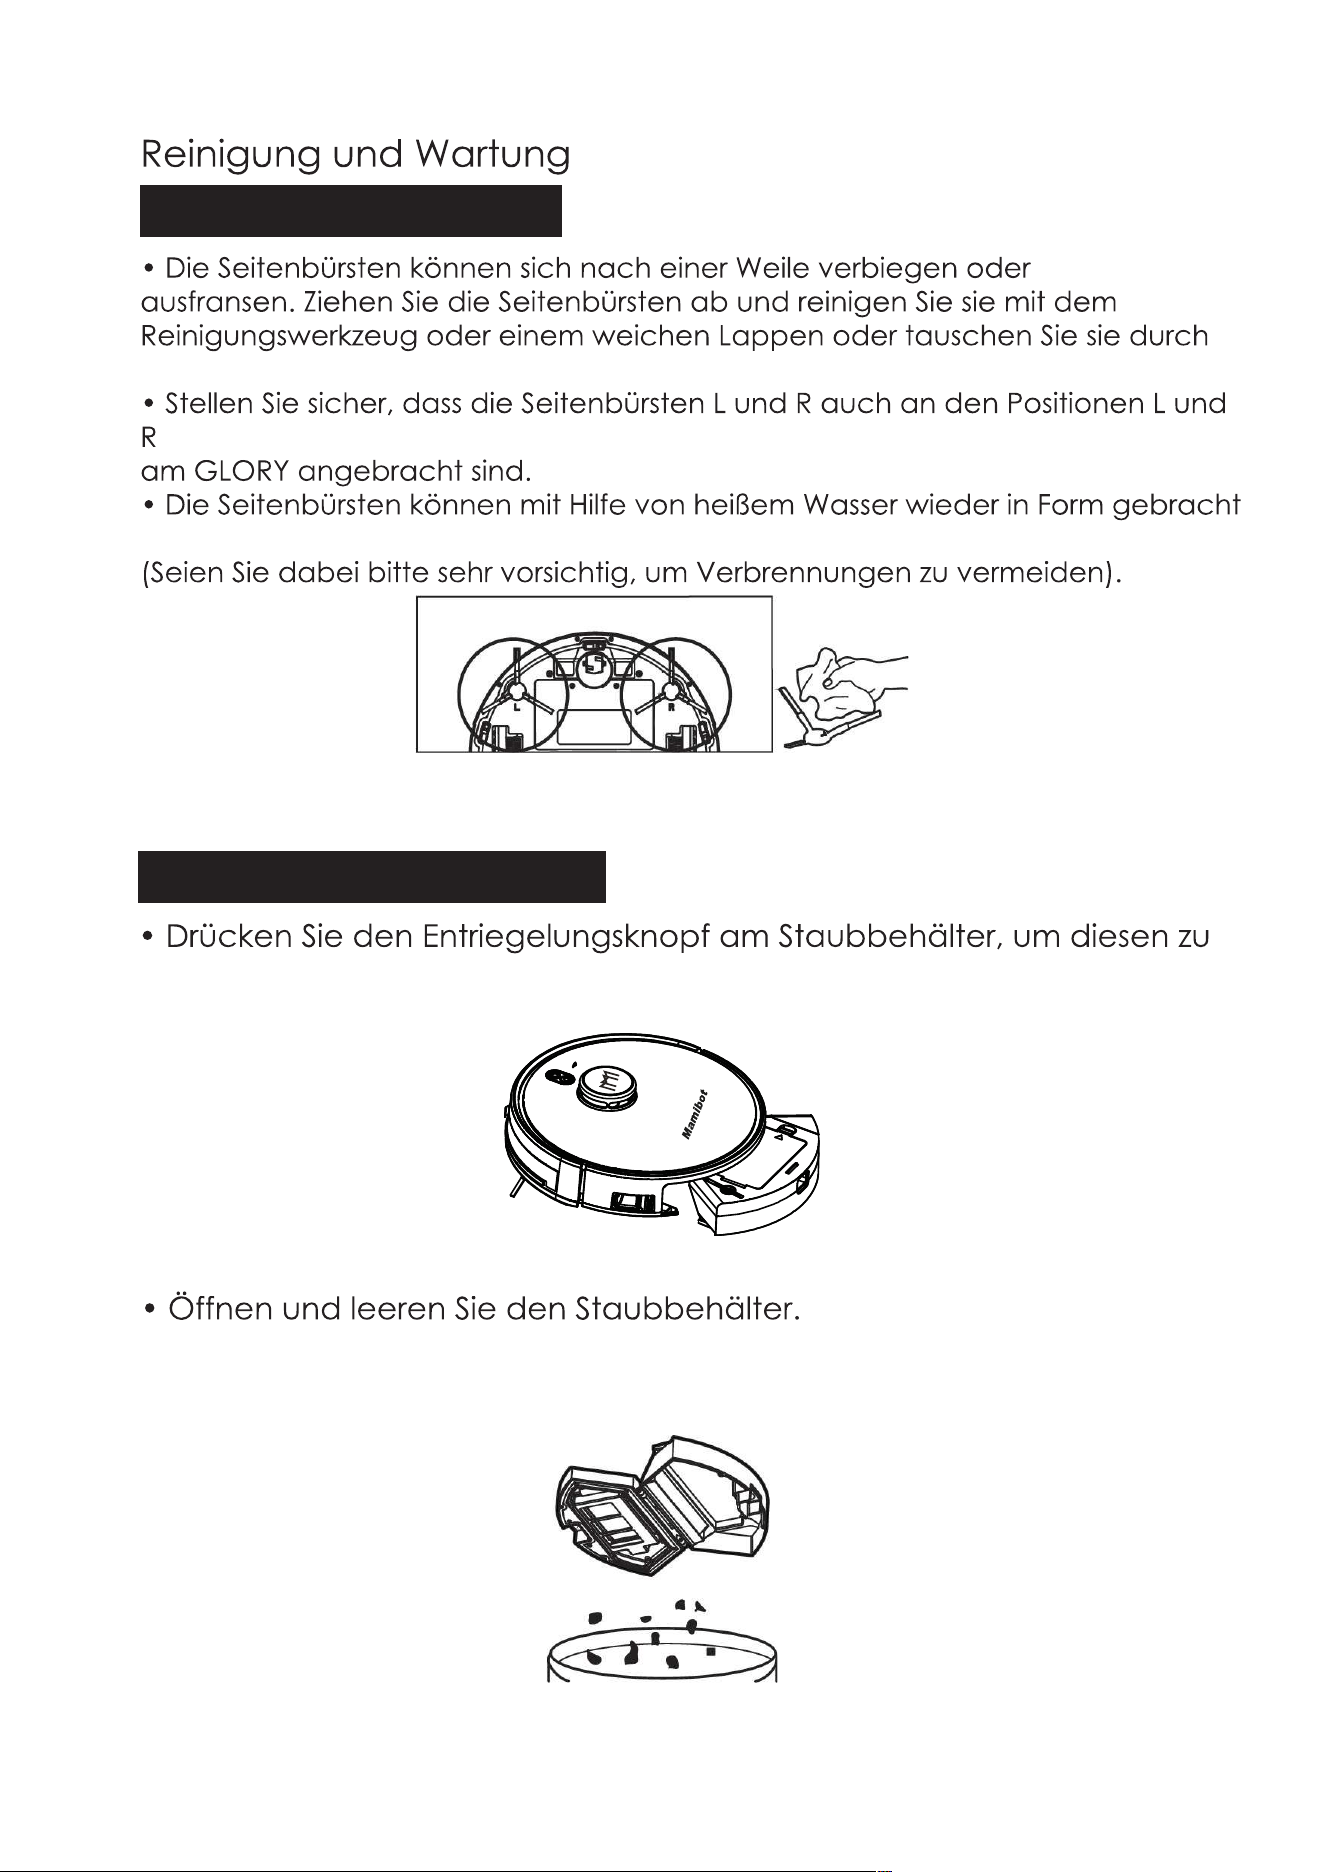
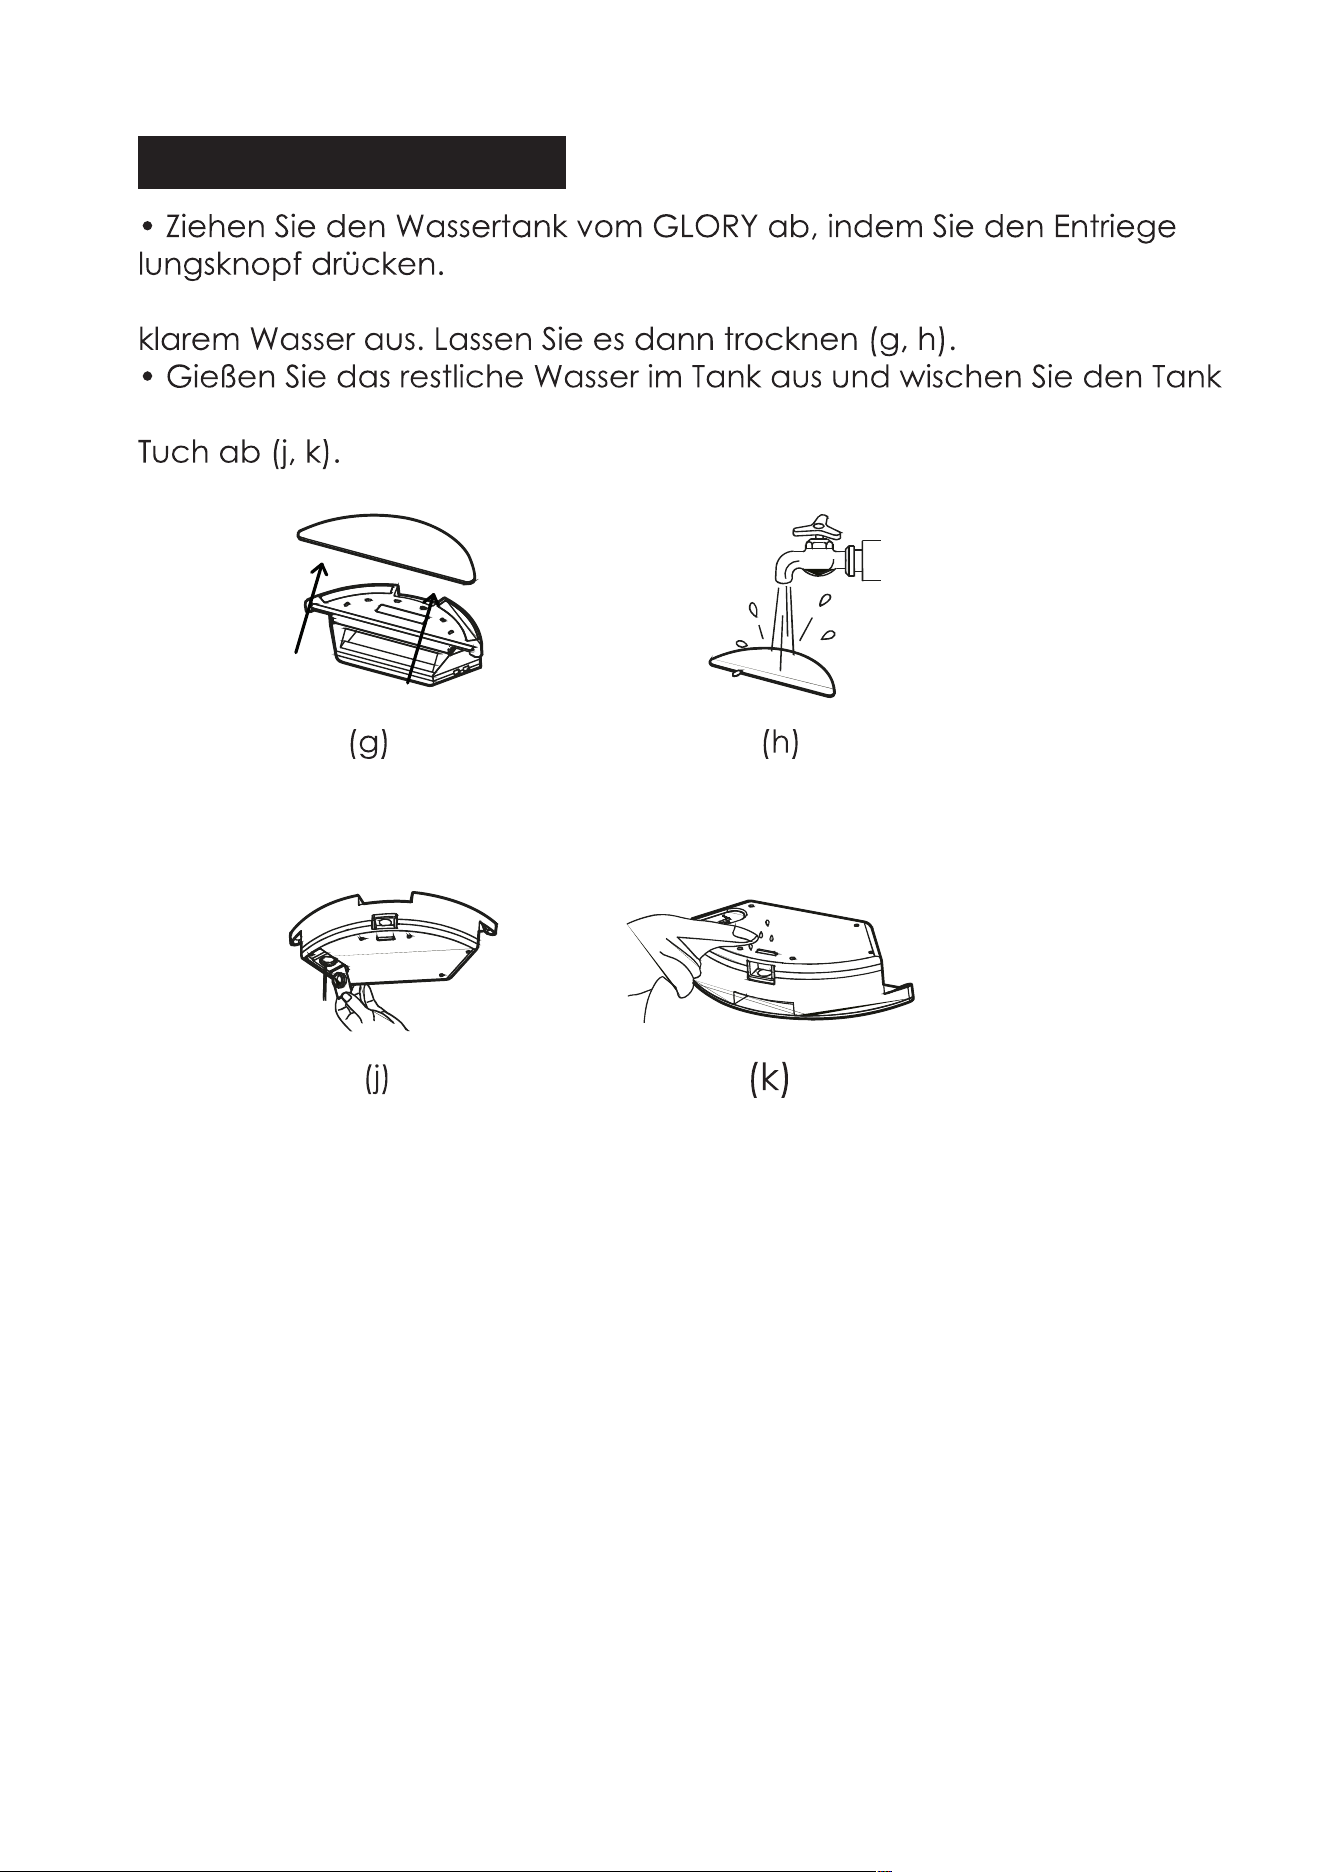
Reinigung des Wassertanks
-
• Entfernen Sie das Wischtuch vom Wassertank und spülen Sie es mit
mit einem weichen
31
Reinigung der Rollbürste
-
Reinigung sonstiger Teile
32
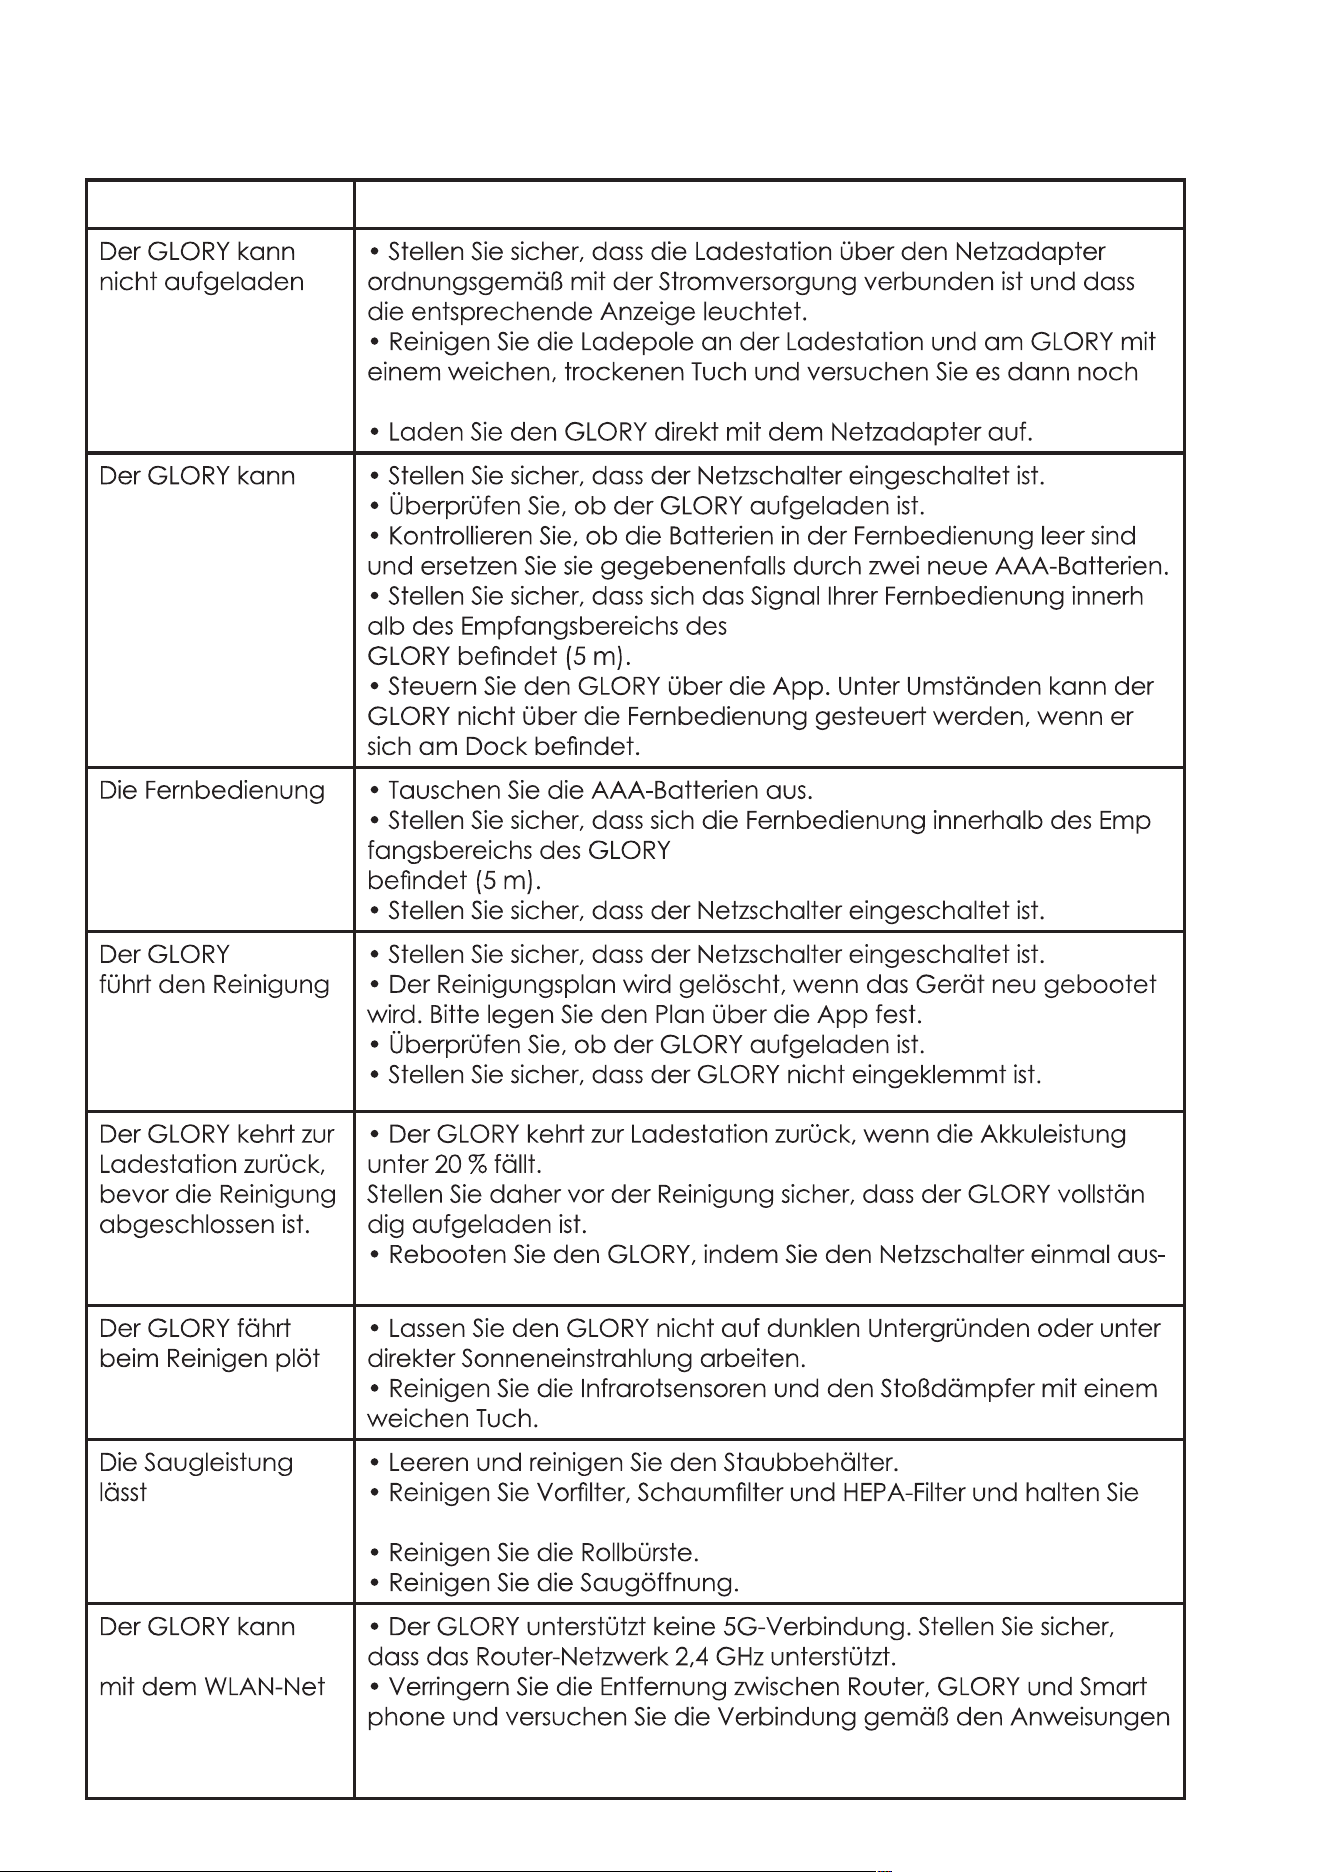
Reinigung / Empfohlene Austauschfrequenz
Bauteil Reinigung / Empfohlene Austauschfrequenz
Seitenbürsten Monatlich reinigen; alle 3-6 Monate austauschen.
Rollbürste Monatlich reinigen; alle 3-6 Monate austauschen.
Staubbehälter Nach jeder Benutzung reinigen.
HEPA-Filter Alle 23 Durchgänge reinigen; alle
3-6 Monate austauschen.
Alle 2-3 Durchgänge reinigen; alle
3-6 Monate austauschen.
Alle 2-3 Durchgänge reinigen; alle
3-6 Monate austauschen.
Wischtuch Nach jeder Benutzung reinigen; alle 6-12 Monate austaus-
chen.
Universalrad Monatlich reinigen
Infrarotsensoren Monatlich reinigen
Stoßdämpfer Monatlich reinigen
Ladekontakt Monatlich reinigen
Monatlich reinigen
UVC-Lampe
(falls vorhanden)
Nach jeder Benutzung reinigen
Ansaugöffnung
(falls vorhanden)
Monatlich reinigen
Hinweis:
Die oben genannten Intervalle dienen nur als Richtwerte. Die tatsächlichen
Reinigungs-/Austauschintervalle
hängen von der effektiven Nutzung ab.
Staubsammelsensor
(falls vorhanden)
33
Problemlösung
Probleme Lösungen
werden.
einmal.
nicht aktiviert
werden.
-
funktioniert nicht.
-
-
splan
nicht aus.
-
und wieder anschalten.
-
zlich zurück.
nach.
diese trocken.
sich nicht
-
zwerk
des Benutzers
verbinden.
-
im Handbuch und der App herzustellen.
34
Probleme Lösungen
entsprechen nicht der
Boden.
nicht seinen normalen Kurs halten.
-
mal aus- und wieder anschalten.
nicht
mit Alexa oder
-
en.
App installiert ist.
und ab.
-
-
zlich die Arbeit
ein.
-
durch Hindernisse blockiert ist.
-
mal aus- und wieder anschalten.
Achtung:
35
Aufbau des Geräts
Seitenbürste
Wassertank
Akkudeckel
Hinweis:
36
Komponente
Enthaltene Gefahrenstoffe
Kunstst-
offge-
häuse
PCB Kabel Metallteile Netzteil
Elektronik-
komponent-
en
Gummi
Kompo-
nenten
X
Chrom
-
O:
X:
der
Verwendete Gefahrenstoffe

37
Recycling des GLORY am Ende der Lebensdauer:
-
damit die elektrischen und elektronischen Komponenten wiederverw-
-
Hersteller:
Mamibot Manufacturing (Shanghai) Co.,Ltd.
21st FL, No 1st, LN1040 Caoyang Rd, Shanghai, 200063. P.R.C.
Überwacht durch
Mamibot Manufacturing USA Inc.
One Commerce Center, 1201 Orange St, Wilmington, DE 19899 USA

38
EXVAC890 GLORY
LDS LASER SLAM
ASPIRATEUR ROBOT
MANUEL D’UTILISATION
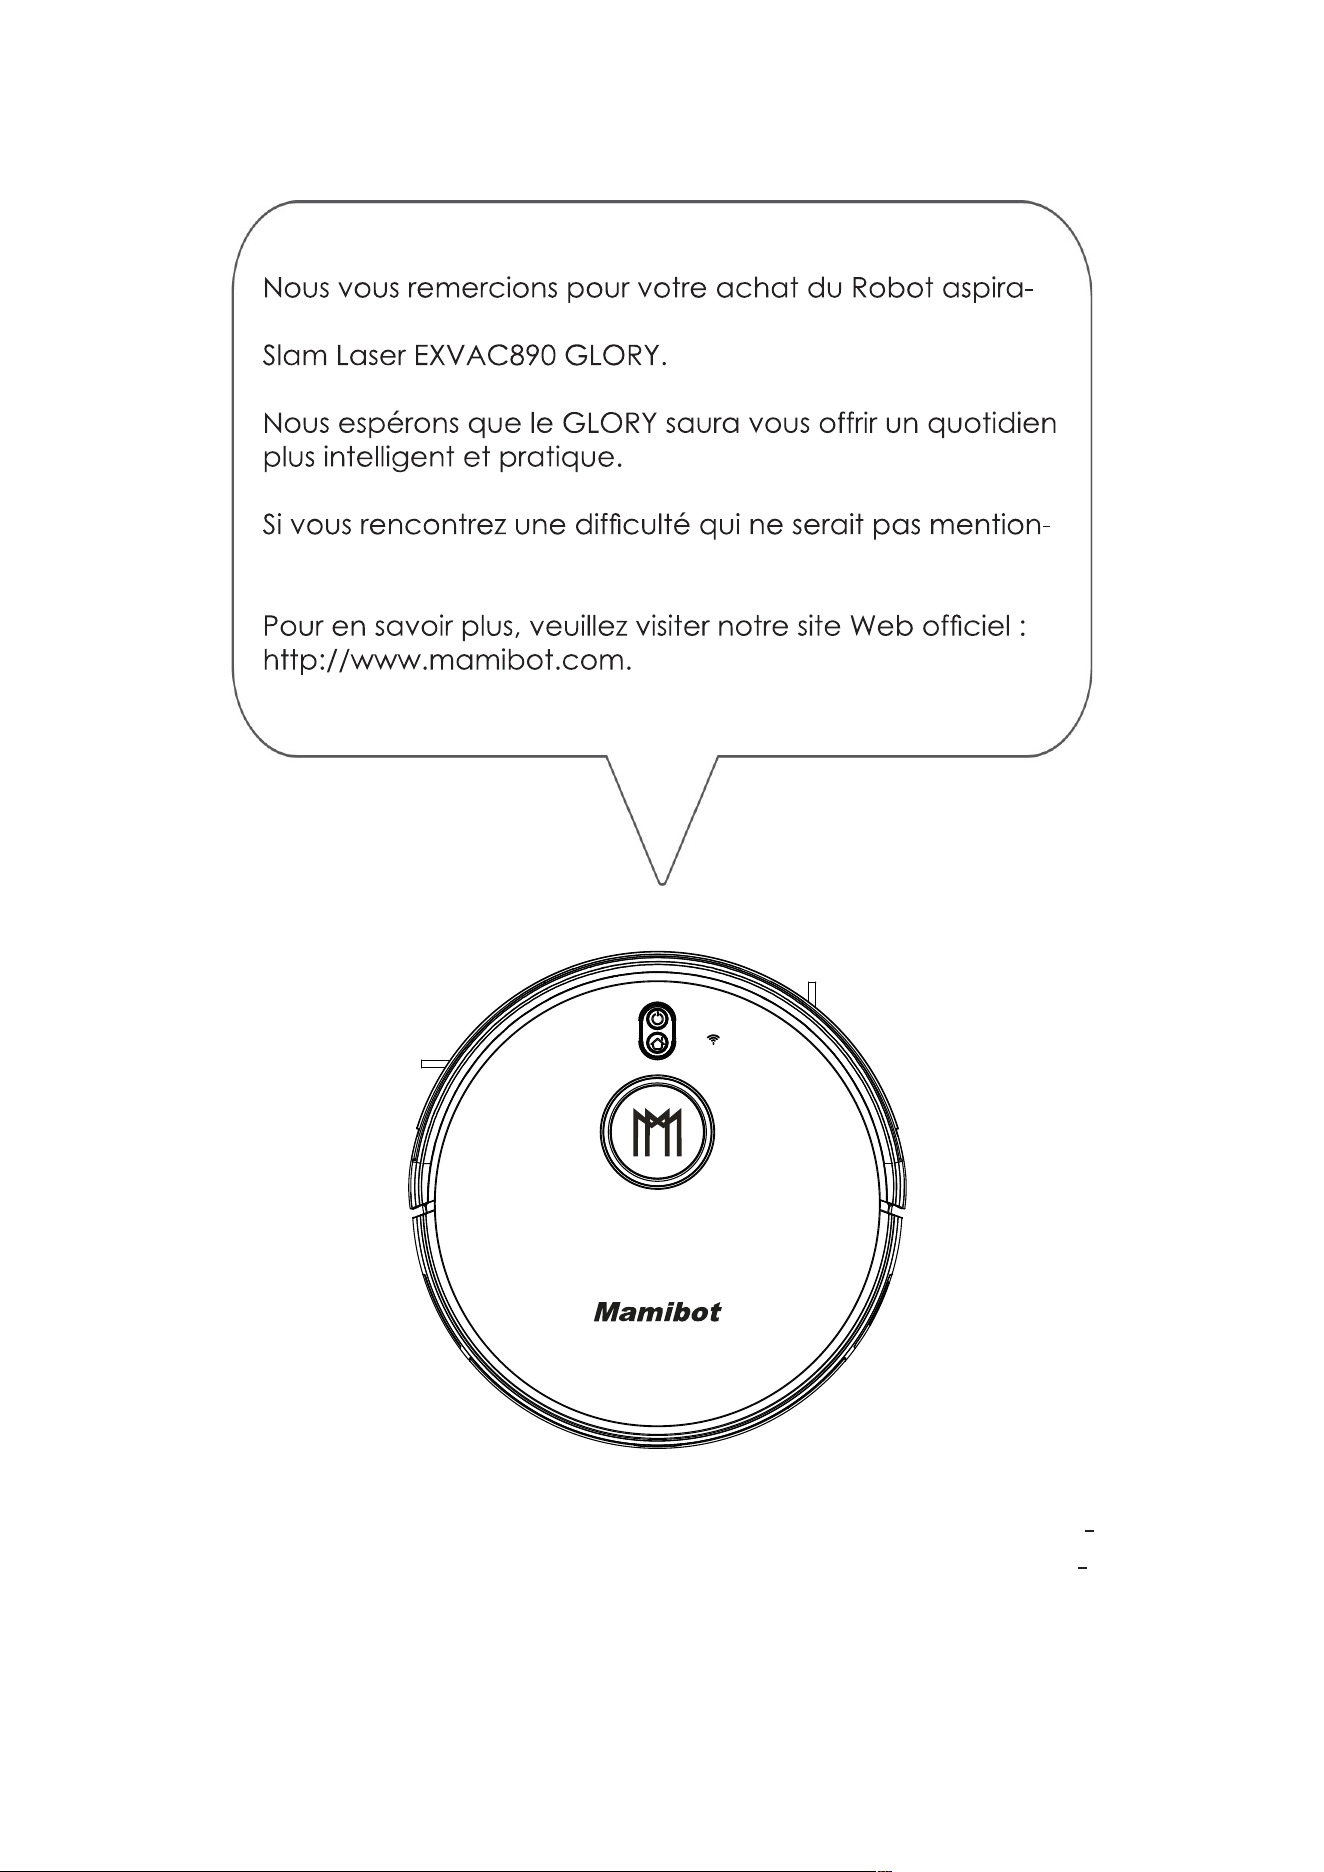
Merci d’avoir acheté le robot aspirateur Mamibot. Veuillez noter que ce
manuel est conçu pour nos deux versions du modèle EXVAC890, avec
:
Version 1 : EXVAC890 GLORY Version Collecteur de poussière (avec
CRAFT-X)
Version 2 : EXVAC890 GLORY Version générale (sans CRAFT-X)
Veuillez-vous référer exactement au produit que vous achetez auprès
de votre distributeur.
20201211Ver.
FR
Avant d’utiliser cet appareil, veuillez lire toutes les instruc
tions et conserver ce mode d’emploi pour une consulta
tion ultérieure.
teur Mamibot
née ici, veuillez contacter sal[email protected].
Table des matières
2 Consignes de sécurité
Connaître le GLORY
5
6
7 Contenu
8
11
14
Comment utiliser le GLORY
16
18
19
21
25
27
Nettoyage et entretien
28
28
30
31
31
32
33 Dépannage
35 Anatomie du GLORY
36 Nom et teneur en substances dangereuses
37 Recyclage du GLORY
2
Consignes de sécurité
ures.
Notes pour l’unité principale et les composants
Avertissement
02. N’utilisez pas le produit dans un environnement présentant un risque d’in
cendie ou d’explosion.
l’écart.
07. Ne lavez et ne trempez pas le bloc principal et les accessoires électroniques
extérieur.
11. Ne permettez pas que le métal ou les matériaux conducteurs entrent en
Mises en garde
les salles de bain.
3
tion.
tion.
supérieure.
Informations relatives à la batterie
Danger
01. Utilisez systématiquement un adaptateur de batterie dédié pour éviter les
Attention
03. Ne trempez pas la batterie dans l’eau et évitez tout contact avec un quel
sions.

4
municipalité, les hôtels, les écoles, les centres commerciaux, les supermarchés,
Avertissement
04. Ne lancez pas la batterie et ne lui occasionnez pas d’impact conséquent.
05. Ne démontez pas le pack de batterie. Vous risqueriez de causer une
Retrait de la batterie
02. Avant le retrait de la batterie, veuillez désactiver l’interrupteur d’alimentation
principal.
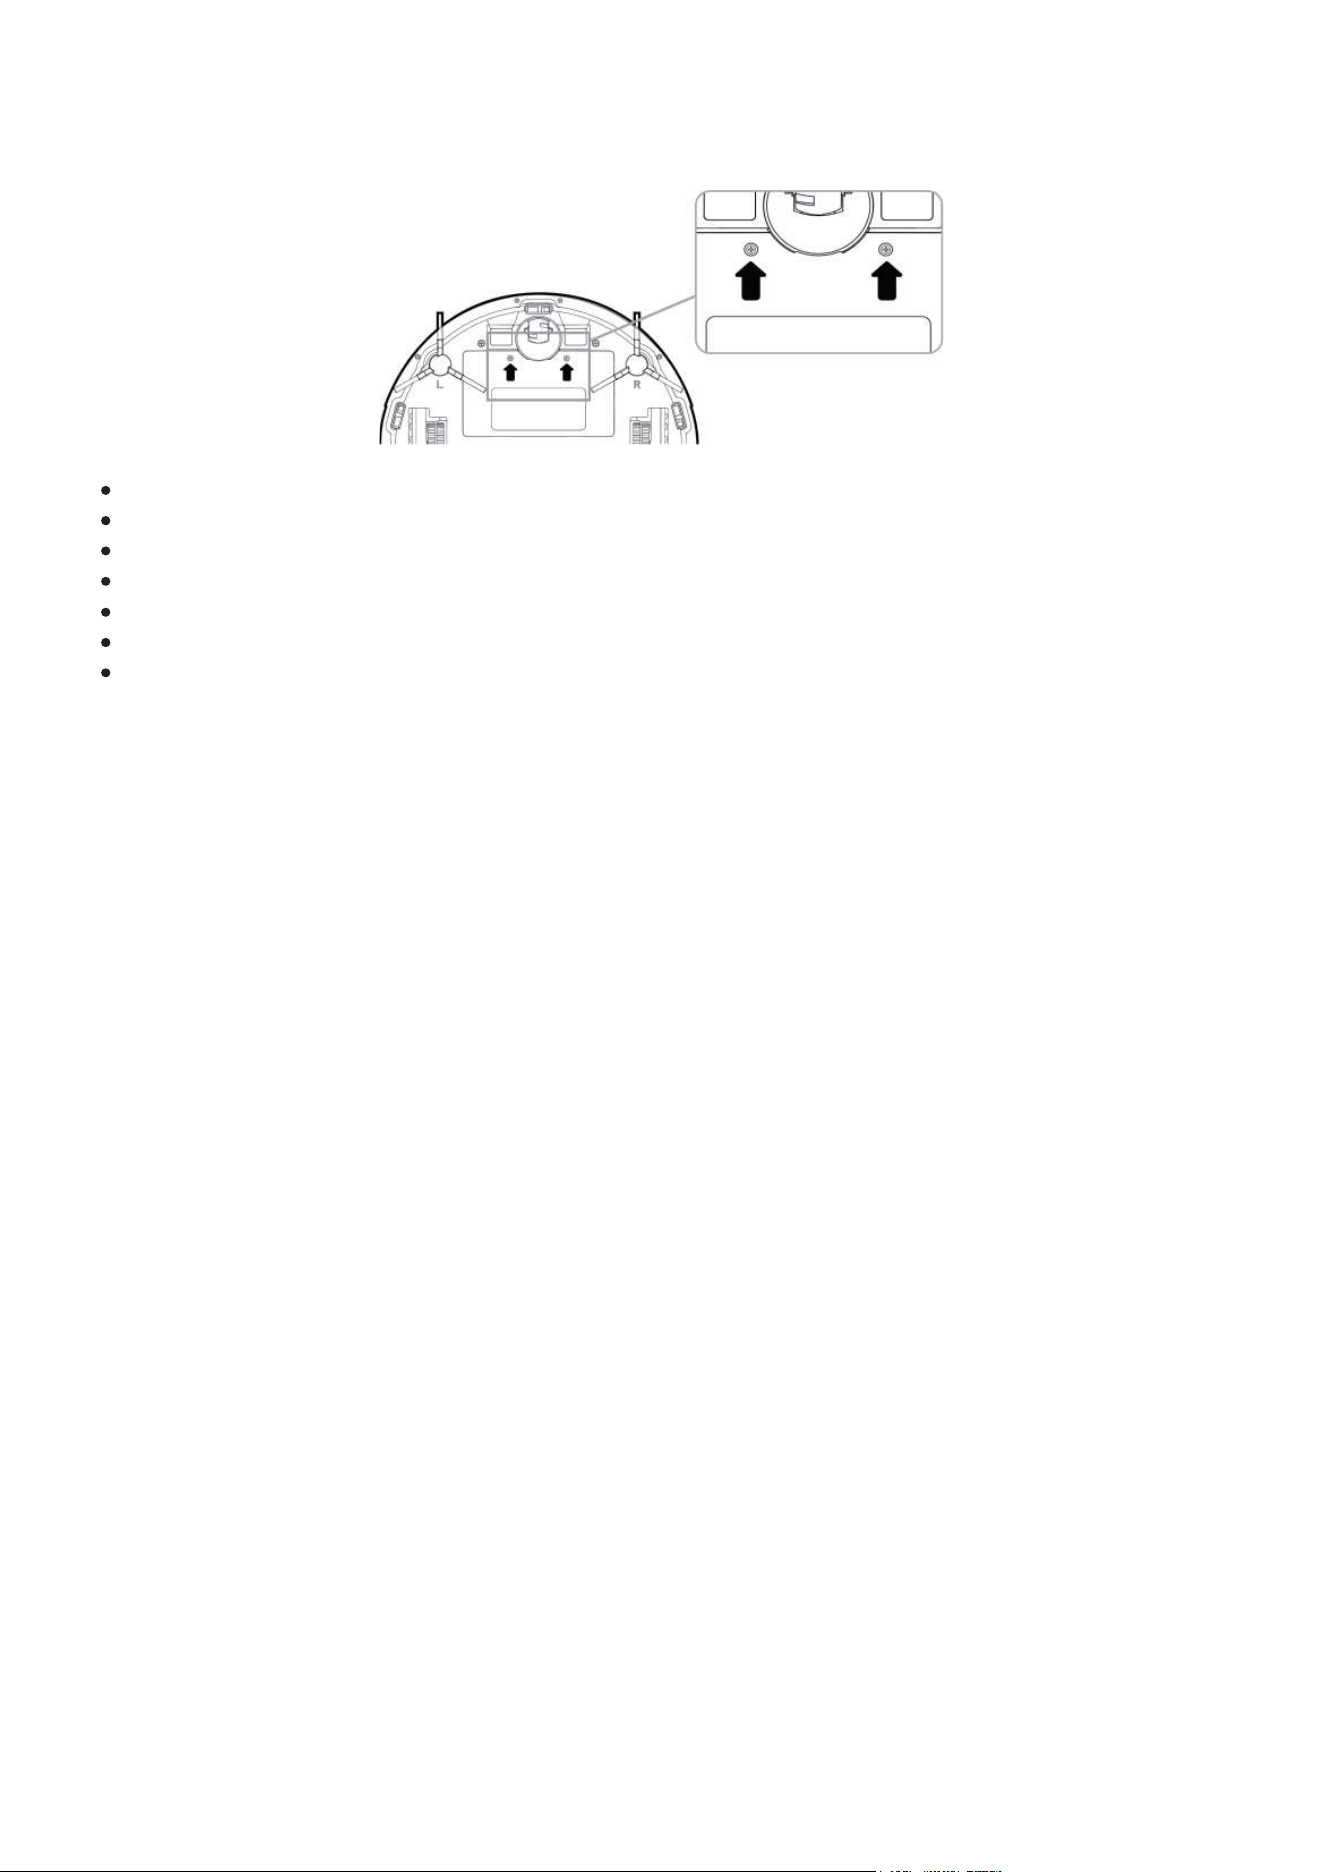
03. Enlevez les deux vis du couvercle de la batterie avec un tournevis.
batterie.
5
Connaître le GLORY
Caractéristiques du GLORY
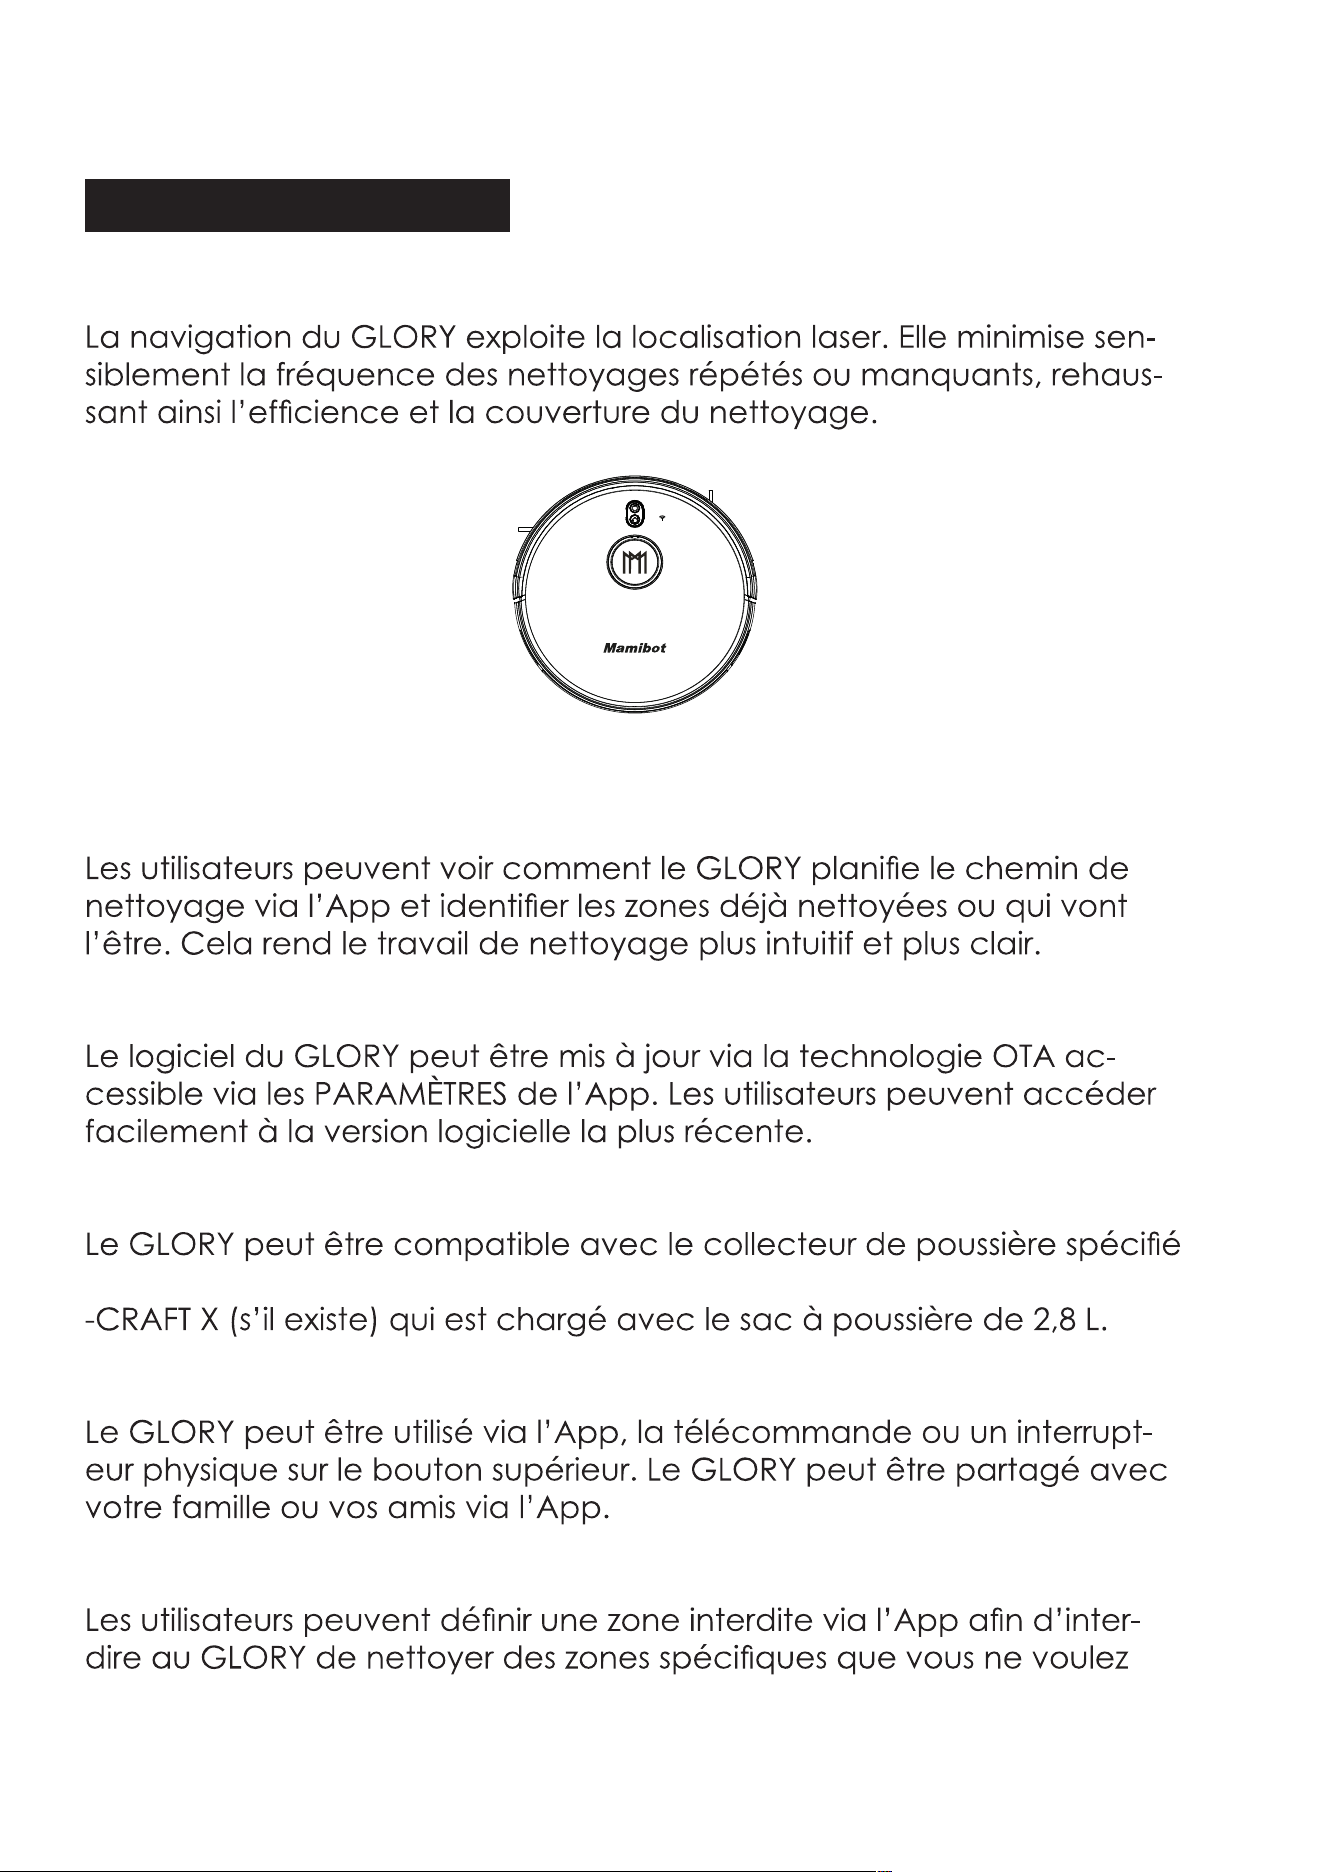
Navigation laser et gyroscopique
Plan de travail visualisable
Mises à jour OTA (Over-the Air – Liaison radio)
Compatible avec le collecteur de poussière CRAFT X
par Mamibot
Mode de fonctionnement multiple
Réglage de zone interdite
pas qu’il nettoie.
6
Spécifications
Modèle du produit
330*98 mm
Poids net
Entrée 19 V 1,0 A
Consommation électri
que
60 W
Capacité de la batterie 5200 mAh
14,4 V
poussières
Capacité du réservoir
d’eau
370 ml
Autonomie en service
Commandes
sique
7
Contenu
Adaptateur
secteur
additionnel
Collecteur de
poussière
uniquement pour la version
additionnel
8
COMPOSANTS DU GLORY
automatique
HAUT
Brosse latérale
Couvercle de
batterie
poussières
Protection de
brosse
Capteur collecteur
de poussière
Port d’aspiration
BAS
poussières si
9
tation principal
avant l’exécution de
Prise de courant CC
Bouton de déver
d’eau
CÔTÉ
mances
BOÎTE À POUSSIÈRES
10
Capuchon de
Bouton de
RÉSERVOIR D’EAU
Prise de courant CC
Port d’aspiration
Prise de courant CA
Collecteur de poussière
BASE DE RECHARGE/STATION D’ACCUEIL
Pour la version générale EXVAC890 GLORY
COLLECTEUR DE POUSSIÈRE
Pour le collecteur de poussière EXVAC890 CRAFT Version X
11
Télécommande
mentation
mation
Bouton de direction
tomatique
calisé
du mur virtuel physique.

12
tique.
Appuyez sur ce bouton pour continuer d’avancer en mode veille,
est éteint avec la télécommande.
soit le mode de travail.
13
mation pour quitter.
l’icône
14
Mode de travail du GLORY
Nettoyage automatique
encore avec le bouton Démarrer de l’App.
Mode Turbo
Puissant et MAX.
Mode lavage
Réglage de zone interdite
Nettoyage localisé
Position
bloqué.
clenché.
15
Reprise depuis Point de pause
l’autonomie de la
Repositionnement
sateurs mettent
Par souci d’amélioration du produit, nous nous réservons le droit de mettre
Point de
Avant
le retrait
16
Remarque avant usage
• Veuillez vous assurer que tous les meubles sont correctement
17
• Ne vous tenez pas dans les espaces restreints, comme les seuils
et couloirs. Vous risqueriez de réduire le taux de couverture du nettoy
ment des brosses.
18
Marche/arrêt de nettoyage
tomatique
tion
Pause/Veille
pause.
tre en pause le robot.
Veille
Veille automatiquement. Vous pouvez aussi appuyer sur le bouton
mode Veille.
dre en appuyant sur l’interrupteur d’alimentation principal.
19
Charge de votre GLORY
poussière.
• N’oubliez pas d’enclencher l’interrupteur d’alimentation principal
min.
Méthode de charge A
l’annonce vocale du
Veuillez maintenir enclenché l’interrupteur d’alimentation principal pendant la
20
Méthode de charge B :
ceux de la base.
s’il est bien branché.
s’il est bien branché.
OU
Recharge automatique
Instructions de charge
Mamibot.
sessions de travail.
blanc.
• Veuillez éteindre l’interrupteur d’alimentation principal si le robot n’est pas
21
Configuration minimale pour le Wi-Fi
est enclenché.
proches que possible.
Connexion d’App
1. Téléchargement de l’App
2. Connexion / Enregistrement ID Weback.
3. Connectez le GLORY à l’App.
ex-
vac-890-

22
ion, vous pouvez c
23
3. Commandez le GLORY via l’App.
plus récente, etc.
24
Fig.15
Fig.18
Fig.22 Fig.23
C. Sur l’interface, vous
pouvez aussi prendre con-
naissance des
guides de connexion du
GLORY
à des Apps de tiers, tels que
Alexa, Google home, etc
(comme illustré à la Fig.22 et
Fig.23).
Fig.16
Fig.19 Fig.20
Fig.17
Fig.21
25
Réglage d’horloge
Réglage de programmation
26
Attention
• Veuillez maintenir l’interrupteur d’alimentation principal enclenché de
ment si
sur l’App peut uniquement
appuyant sur le
27
Usage du réservoir d’eau
d’eau
Attention
le réservoir
28
Nettoyage des brosses latérales
l’outil
velles brosses latérales.
Nettoyage de la boîte à poussières
29
30
Nettoyage du réservoir d’eau
31
Nettoyage de la brosse à rouleaux
Nettoyage des autres pièces
doux.
terminé.
32
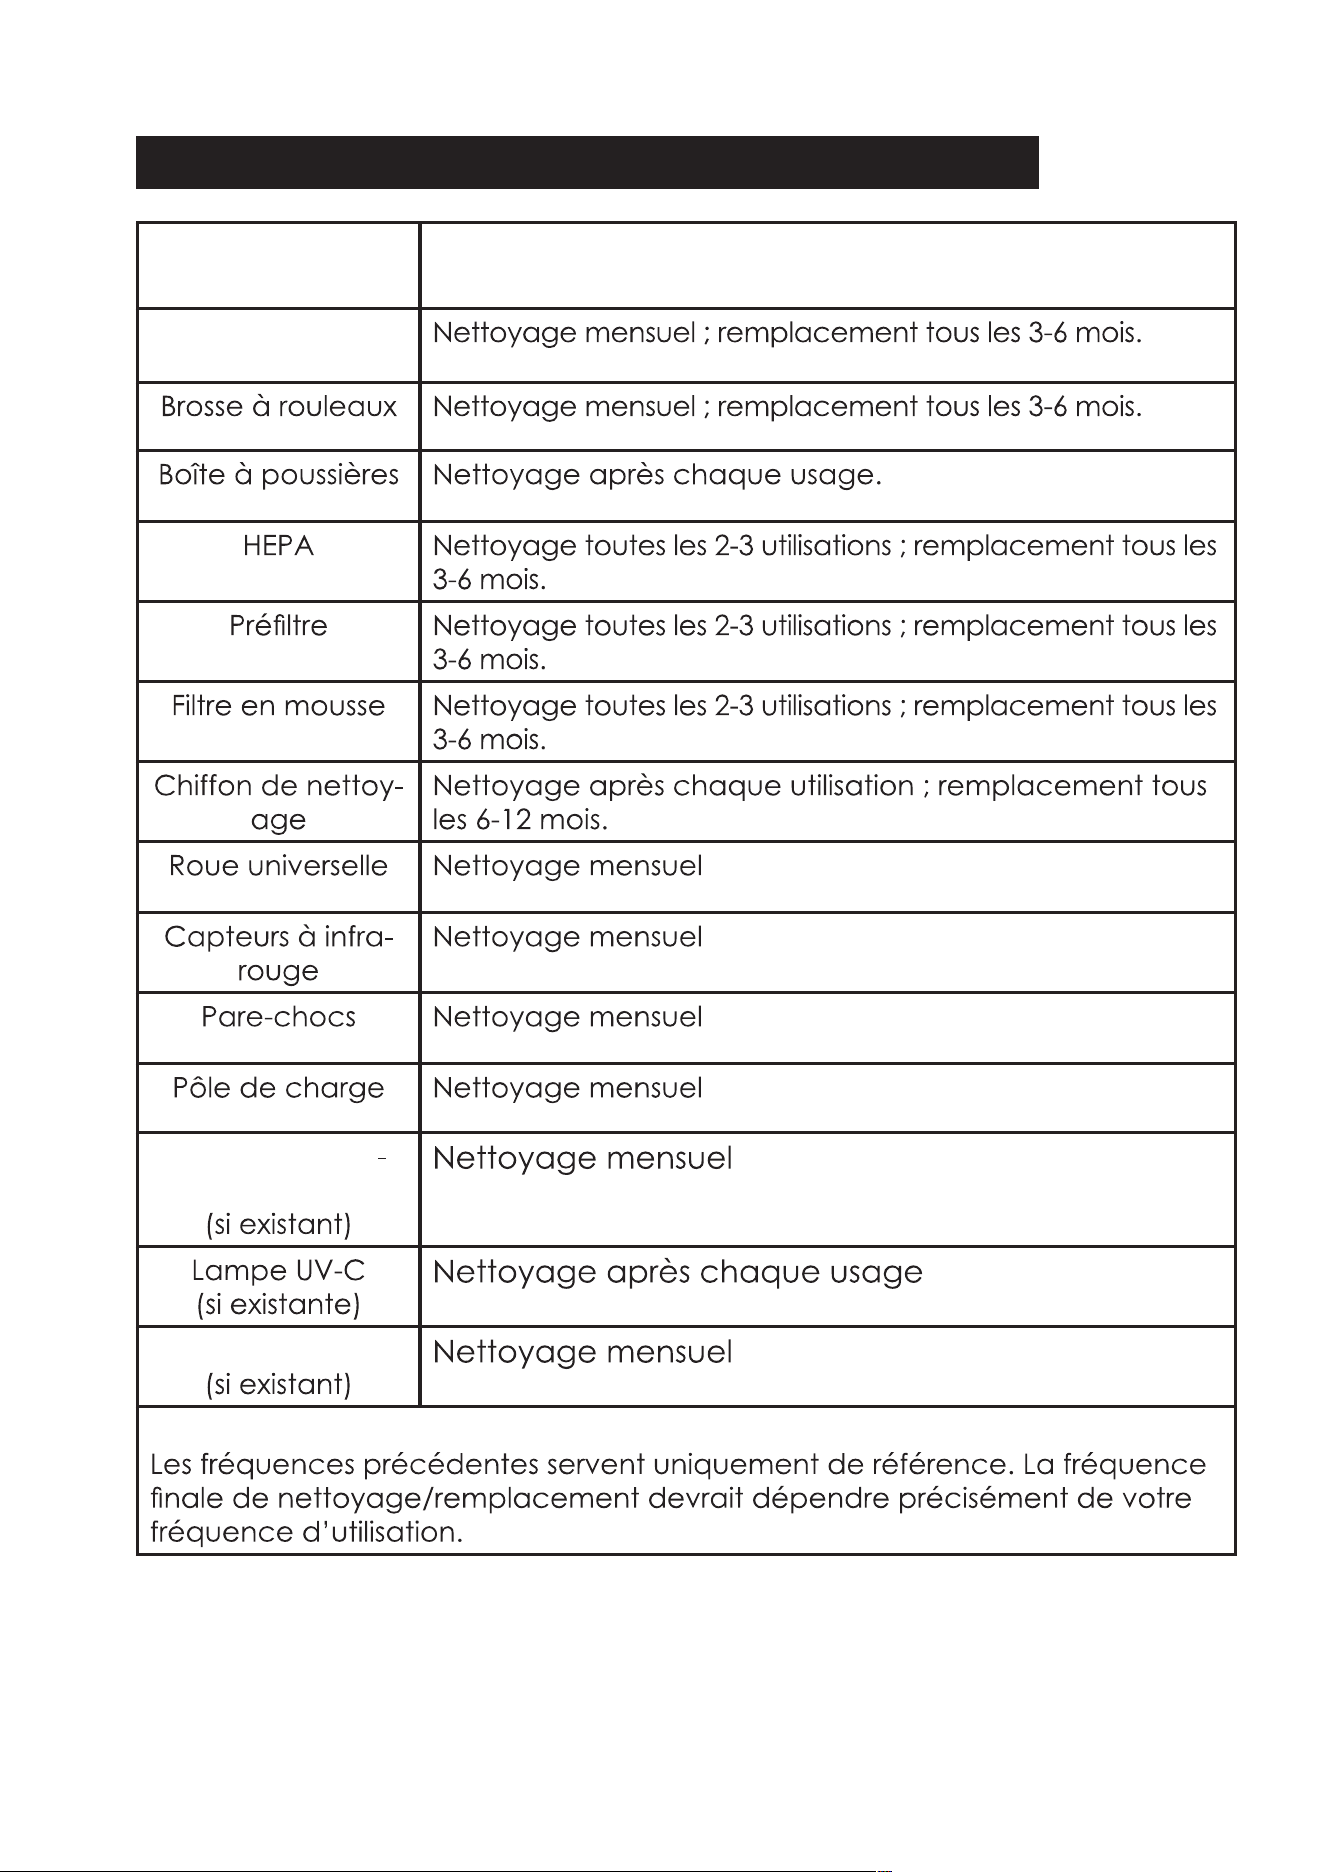
Fréquences recommandées de nettoyage/remplacement
Pièce Fréquences recommandées de nettoyage/rem-
placement
Brosses latérales
Capteur collec
teur de poussière
Port d’aspiration
Remarque :
33
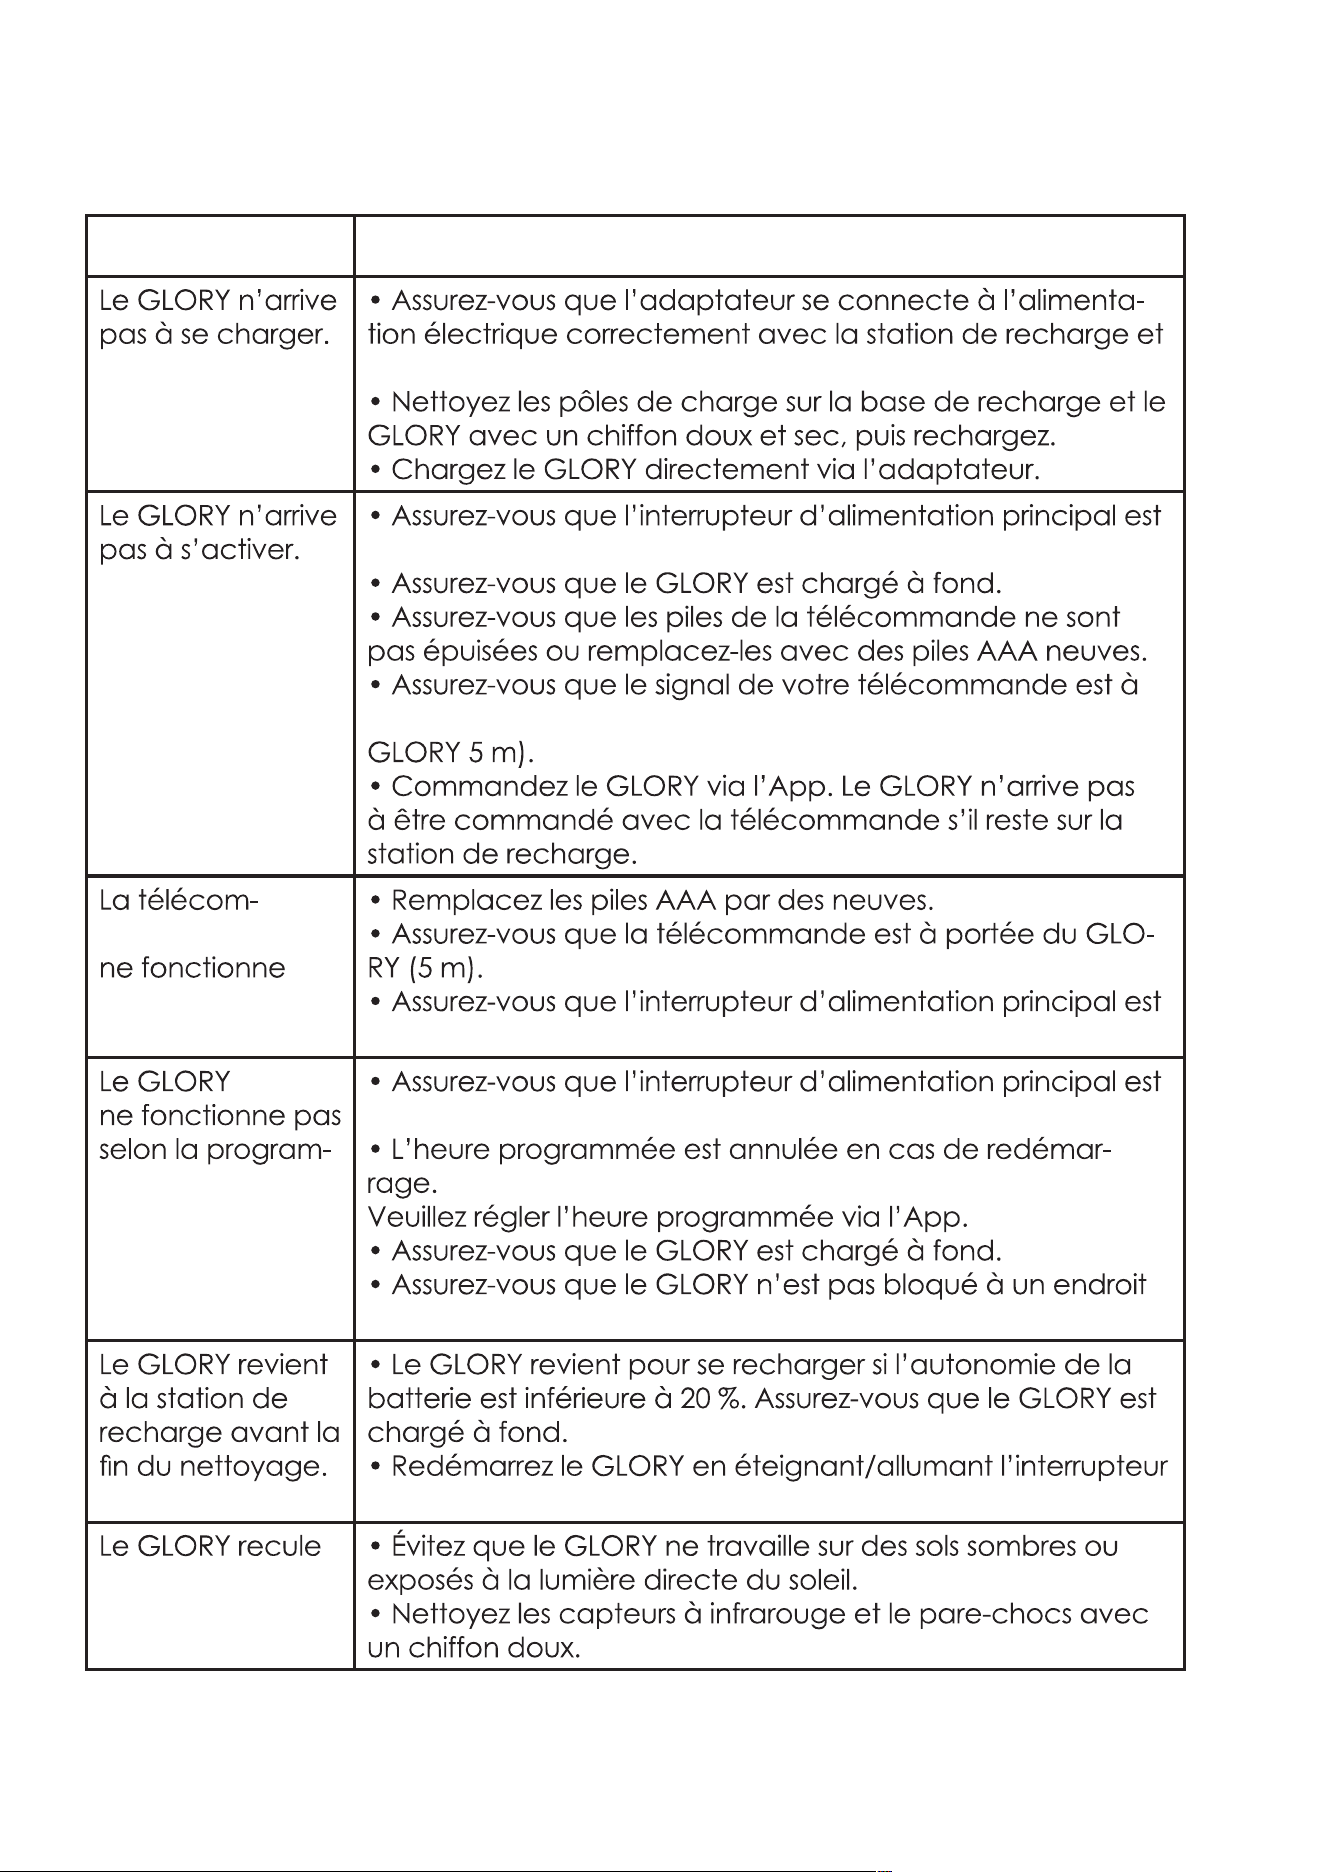
Dépannage
Problèmes Solutions
que le voyant s’allume.
enclenché.
portée du
mande
pas.
enclenché.
mation.
enclenché.
quelconque.
d’alimentation principal.
lorsqu’il est en
service.
34
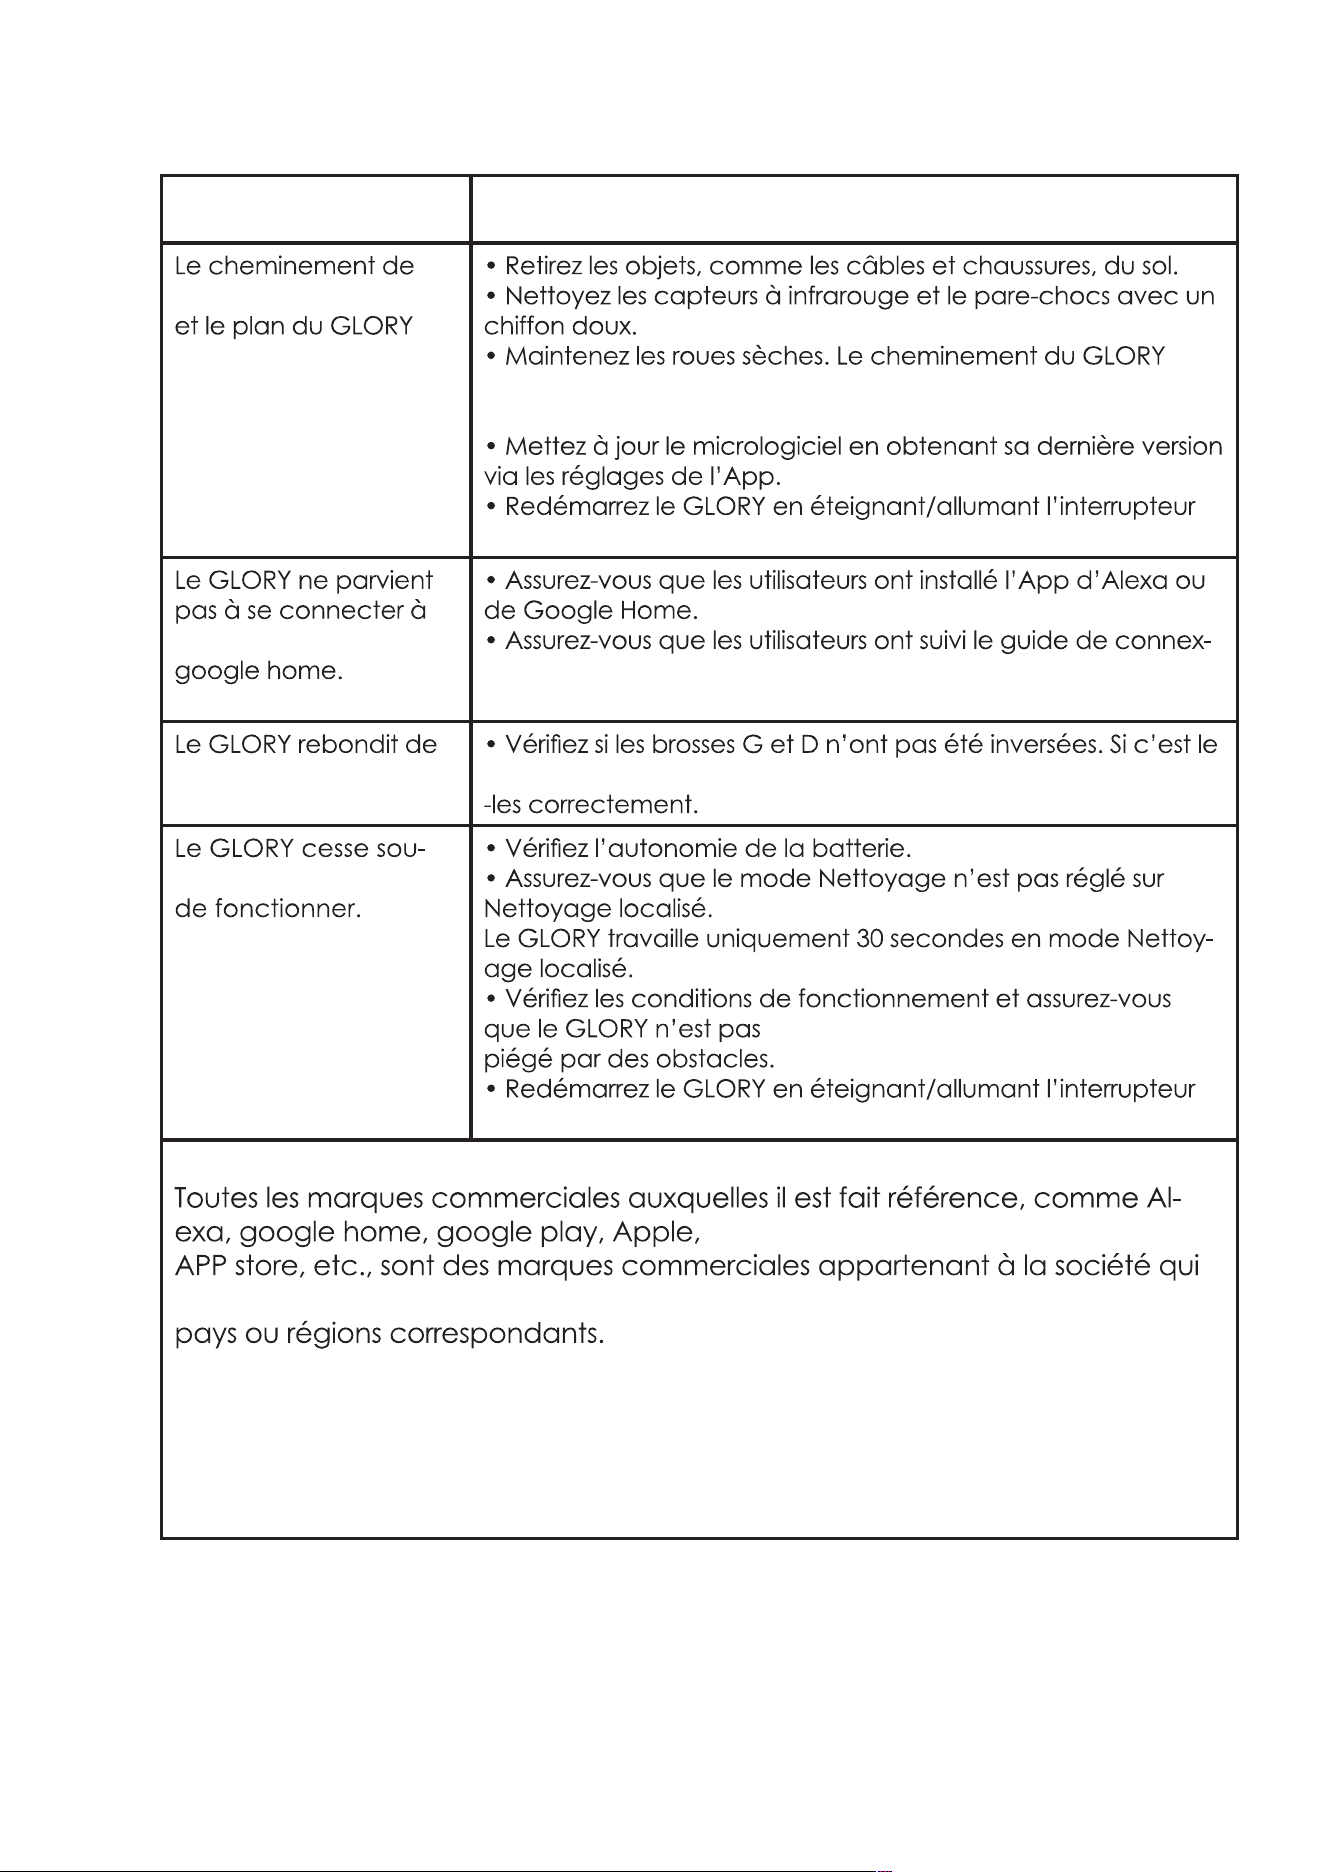
Problèmes Solutions
travail
sont anormaux.
devient anormal
si les roues sont mouillées.
d’alimentation principal.
Alexa ou
ion
de l’App.
haut
en bas.
cas, réinstallez
dainement
d’alimentation principal.
Attention :
les a déposées dans les
35
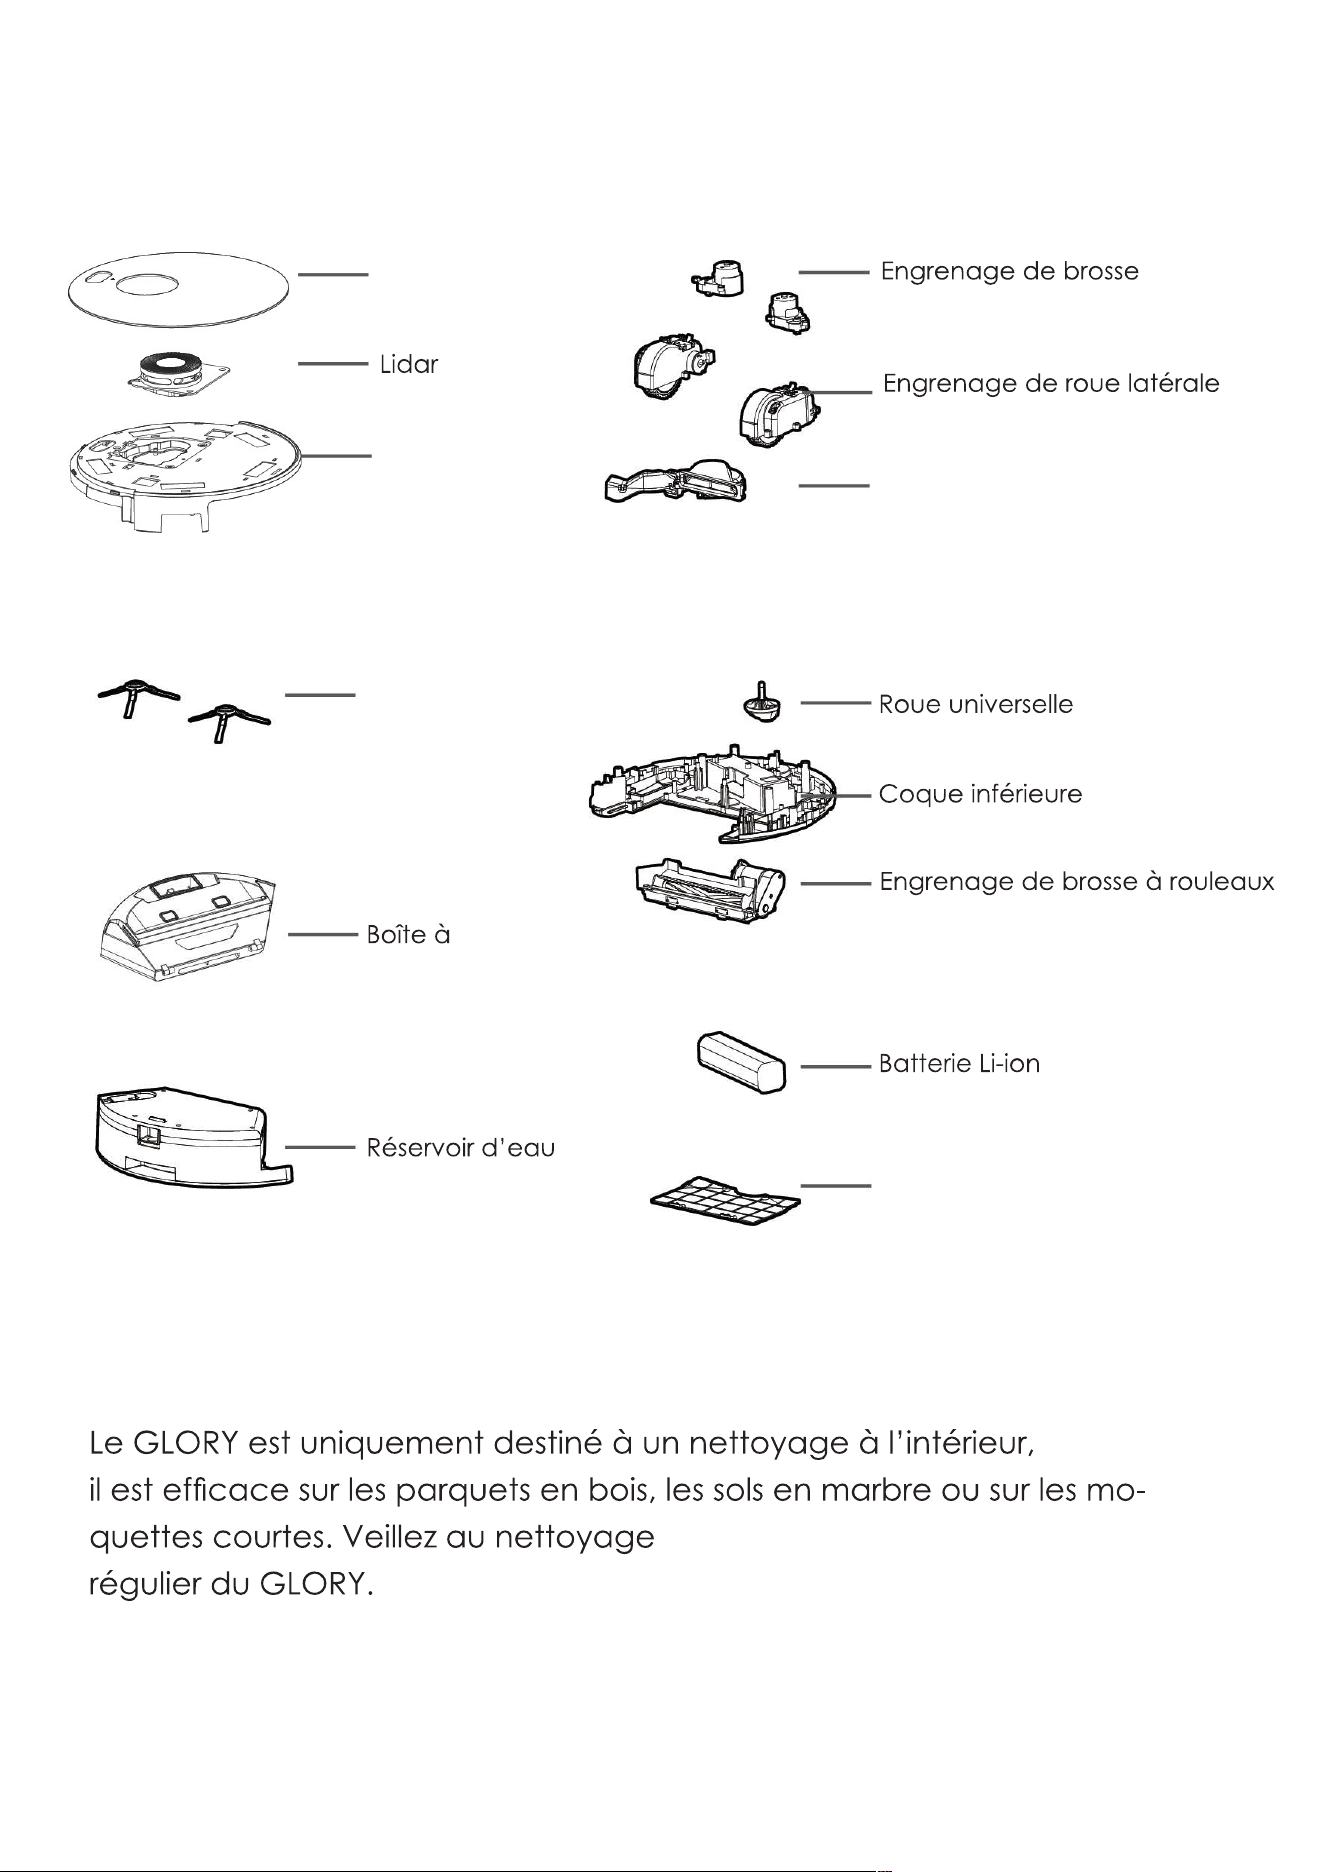
Anatomie du GLORY
Couvercle en verre
supérieur
Coque supérieure
latérale
Kit de moteur d’aspiration
Brosse latérale
poussières
Couvercle de batterie
Remarque :
36
Composant
Teneur en substances dangereuses
Coque
plas-
tique
CI Câbles
Pièces
métalliques
Adapta-
teur
Composants
électron-
iques
Caoutch-
ouc
Com-
posants
X
Chrome
hexavalent
Biphényles
Diphényléthers
polybromés
Phtalate de
Phtalate de
dibutyle
Phtalate de
diisobutyle
de 10 ans.
O :
X :
Nom et teneur en substances dangereuses
37
électrique et électronique. En vous assurant que ce produit est cor
causés par une manipulation inappropriée des déchets de ce produit.
veuillez contacter l’administration communale, le service de traitement
auprès duquel vous avez acheté le produit.
Fabricant :
Mamibot Manufacturing (Shanghai) Co.,Ltd.
21st FL, No 1st, LN1040 Caoyang Rd, Shanghai, 200063. R.P.C.
Supervisé par
Mamibot Manufacturing USA Inc.
One Commerce Center, 1201 Orange St, Wilmington, DE 19899 États-Unis

38

PL
0
INSTRUKCJA OBSŁUGI
Automatyczny robot odkurzający
Mamibot EXVAC890 GLORY
General version
Mamibot EXVAC890 GLORY
Dust Collector CRAFT X version
(ver. 12.2020)

1
Dziękujemy za wybór i zakup automatycznego
odkurzacza z laserowym systemem radarowym,
robota Mamibot EXVAC890 GLORY.
Mamy nadzieję, że spełni on Państwa oczekiwania i
znacznie ułatwi codzienne prace domowe.
Spis treści
1. Ostrzeżenia i ważne informacje dotyczące bezpieczeństwa 2
2. Wyjmowanie akumulatora 4
3. Podstawowe informacje o robocie GLORY 4
4. Opis robota GLORY 6
5. Funkcje GLORY 9
6. Obsługa GLORY 13
7. Korzystanie z robota za pomocą aplikacji w smartfonie 15
8. Czyszczenie i konserwacja 22
9. Zalecany harmonogram czyszczenia i wymiany elementów 25
10. Rozwiązywanie problemów 26
11. Anatomia urządzenia 27
12. Informacja o gwarancji i utylizacji 28
Mamibot Manufacturing USA Inc. Mamibot Manufacturing (Shanghai) Co.Ltd
Orange Street #600, New Castle, North 21th, No.1 Building,
Wilmington, Delaware 19899, USA LN1040 Caoyang Rd, Shanghai, P.R.C.
www.mamibot.com
Dystrybutor na Polskę:Action S.A.ul. Dawidowska 10
Zamienie, 05-500 Piaseczno

2
1.Ostrzeżenia i ważne informacje dotyczące
bezpieczeństwa
1.1 Przed rozpoczęciem użytkowania urządzenia, koniecznie zapoznaj się z całą
instrukcją obsługi.
GLORY przeznaczony jest do użytku domowego. Nie używaj go na zewnątrz.
Aby uniknąć obrażeń, podczas pracy należy zwrócić uwagę na bezpieczeństwo
małych dzieci i osób starszych.
Urządzenia nie powinny obsługiwać dzieci oraz osoby o ograniczonych zdolnościach
fizycznych, sensorycznych lub umysłowych. Osoby bez doświadczenia i odpowiedniej
wiedzy mogą używać to urządzenia tylko pod nadzorem dorosłych, po odpowiednim
przeszkoleniu jak z niego korzystaćw bezpieczny sposób i rozumieją, z jakim
ryzykiem to sięwiąże.
Należy pilnować, aby dzieci nie bawiły się robotem.
Urządzenie służy do czyszczenia powierzchni płaskich i o niewielkim nachyleniu.
Przed użyciem robota GLORY należy usunąć wszystkie delikatne przedmioty z
podłogi, takie jak szkło, lampy, przewody elektryczne, kable USB, zasilacze
telefonów komórkowych, zasłony itp., gdyżmogą zaplątać się w szczotki i kanały
ssące odkurzacza.
Użytkownik jest zobowiązany samodzielnie oceniać czy, gdzie i jak bezpiecznie
używać tego typu urządzenie w sposób odpowiedzialny i nie zagrażający nikomu i
niczemu.
1.2 Informacje dotyczące bezpieczeństwa.
Zasilacz i akumulatory / baterie.
Stosuj wyłącznie zasilacz dostarczony razem z urządzeniem.
Stosowanie innego zasilacza może spowodować awarię robota lub stworzyć
zagrożenie.
Należy używać odpowiedniego, dobrze zamontowanego gniazdka elektrycznego i
upewnićsię, że zasilacz i przewody nie są niczym obciążone.
Zaleca się, aby używane gniazdo sieciowe było łatwo dostępne w razie konieczności
szybkiego odłączenia sprzętu.
Zapewnij odpowiednią wentylację wokół zasilacza / stacji dokującej. Podczas pracy
zasilacz może nagrzewać się. Jest to zjawisko normalne.
Jeśli GLORY nie będzie używany przez dłuższy czas, proszę wyłączać główny
wyłącznik zasilania z boku GLORY.
Nie używaj urządzenia w środowisku o dużej wilgotności.
Nigdy nie dotykaj zasilacza, bazy i robota mokrymi rękami.
Podłącz zasilacz do sieci elektrycznej o odpowiednich parametrach. Wymagania
dotyczące napięcia można znaleźć na etykietce zasilacza.
Jeśli zauważysz uszkodzenie przewodu zasilającego lub wtyczki, nie używaj więcej
takiego zasilacza. Natychmiast odłącz taki zasilacz od sieci.
Odłączaj zasilanie ciągnąc za wtyczkę, a nie za przewód zasilający.
Odłączaj zasilanie, jeśli chcesz czyścić lub konserwować urządzenie.
Nie rozbieraj, nie próbuj naprawiać zasilacza sieciowego. Wewnątrz nie ma żadnych
części przydatnych dla użytkownika.
W razie awarii wymieniaj cały zasilacz. Skontaktuj się ze sprzedawcą Mamibot w celu
uzyskania pomocy.
W przypadku niewłaściwego obchodzenia się z akumulatorem, może powstać
niebezpieczeństwo pożaru lub poparzenia czynnikami chemicznymi.
3
Nie baw się akumulatorem, nie rozbieraj, nie rób zwarcia, nie podgrzewaj powyżej
60°C (140°F), nie wrzucaj do ognia, nie wykorzystuj do innych celów.
Jeśli zakończysz już korzystanie z urządzenia i chcesz pozbyć się zużytego, starego
sprzętu, zanieś go do lokalnego centrum recyklingu w celu utylizacji.
Przestrzegaj wszystkich zaleceń z instrukcji obsługi i użytkowania.
Nie narażaj urządzenia na działanie deszczu ani wilgoci, trzymaj je z dala od płynów.
Unikaj wystawiania urządzenia na bezpośrednie działanie promieni słonecznych lub
źródeł intensywnego ciepła (takie jak kaloryfery, grzejniki, piece itp.).
Nie umieszczaj urządzenia w pobliżu silnych pól magnetycznych.
Trzymaj urządzenie i akcesoria z dala od dzieci.
Temperatura pracy robota: 0°C ~ 40°C (32°F ~ 104°F).
Akumulatory mogą być wymieniane wyłącznie przez producenta lub jego
przedstawiciela serwisowego.
Zużyte akumulatory i baterie należy utylizować zgodnie z lokalnymi przepisami.
Baterię należy wyjąć z GLORY przed utylizacją i składowaćw wyznaczonych
miejscach.
Przed wyjęciem baterii w celu utylizacji, urządzenie należy odłączyć od sieci
zasilającej.
Urządzenie należy użytkować zgodnie ze wskazówkami zawartymi w niniejszej
instrukcji obsługi.
Producent nie ponosi odpowiedzialności za jakiekolwiek szkody lub obrażenia
spowodowane niewłaściwym użytkowaniem.
1.3 Ryzyko porażenia prądem!
Zawsze wyłączaj urządzenie przed przystąpieniem do czyszczenia lub konserwacji.
Nigdy nie wyciągaj wtyczki z gniazdka za przewód zasilający. Ciągnij zawsze za samą
wtyczkę.
Nigdy nie rozbieraj i nie naprawiaj urządzenia samodzielnie.
Naprawy urządzeń elektrycznych mogą być wykonywane wyłącznie przez
autoryzowane centrum obsługi klienta.
Nie wkładaj żadnych przedmiotów w otwory w urządzeniu.
Nie modyfikuj konstrukcji urządzenia.
Nie używaj robota, jeśli zauważysz jakiekolwiek uszkodzenie urządzenia, zasilacza
lub przewodów zasilających.
W przypadku uszkodzenia skontaktuj się z lokalnym działem obsługi klienta.
Nie czyść robota, zasilacza ani przewodów zasilających wodą ani innymi płynami.
Nie używaj robota na wilgotnym podłożu lub w miejscach, w których może on mieć
kontakt z płynami lub być zanurzony w wodzie, np. w łazience pod prysznicem.
Nie używaj robota w ryzykownych miejscach, takich jak np. przy kominku, przy
basenie itp.
Uważaj, aby nie uszkodzić, nie zginać, nie skręcać przewodów zasilających.
Uszkodzony przewód może spowodować porażenie prądem elektrycznym.
Jeśli napotkasz jakikolwiek problem nie wymieniony w niniejszym dokumencie,
skontaktuj się ze sprzedawcą lub mailowo z sales@mamibot.com.
Aby uzyskać więcej informacji, odwiedź naszą oficjalną stronę internetową:
http://www.mamibot.com.
Przeczytaj wszystkie instrukcje przed użyciem tego produktu.
Instrukcję obsługi zachowaj na przyszłość.
4
2. Wyjmowanie akumulatora
(utylizacja/wymiana)
.
Wyłącz urządzenie.
OdwróćGLORY kołami do góry.
Odkręć wkrętakiem dwie śruby.
Zdejmij pokrywę.
Wysuń akumulator.
Odłącz przewody.
Jeśli wymieniasz akumulator, wykonaj następnie wymienione czynności w odwrotnej
kolejności montując nowy akumulator.
3. Podstawowe informacje o robocie GLORY
3.1 Cechy charakterystyczne
Kompatybilny z kolektorem zebranego kurzu i śmieci CRAFT X
Robot GLORY jest być kompatybilny z kolektorem Mamibot-CRAFT X pozwalającym
automatycznie opróżniać zbiornik kurzu i śmieci robota do własnego, dużego worka o
pojemności 2,8 l.
System nawigacji laserowej (Lidar)
GLORY działa w oparciu o system radarowej lokalizacji laserowej. Pozwala to znacznie
zwiększyć skuteczność i zasięg czyszczenia, eliminując do minimum ilość nieobsłużonych
miejsc.
Wizualizacja mapy terenu.
Użytkownik, za pomocą aplikacji w smartfonie może obserwować, jaką mapę
pomieszczeń stworzył sobie GLORY i jaką planuje ścieżkę czyszczenia. Pozwala to
dodatkowo zanalizować, czy jakieś przeszkody nie powodują ograniczania dostępu do
niektórych rejonów. Dzięki temu sprzątanie staje siębardziej wydajne, intuicyjne i
przejrzyste.
Aktualizacja OTA (Over-the Air)
Oprogramowanie wewnętrzne robota GLORY można aktualizować za pomocą technologii
OTA, która jest dostępna w aplikacji, w smartfonie.
Różnorodne sposoby sterowania
GLORY można obsługiwaćprzyciskami na obudowie, pilotem zdalnego sterowania, za
pomocą aplikacji w smart fonie. Dostęp do robota można dodatkowo udostępnić w
smartfonie innym użytkownikom aplikacji.
Ustawianie obszaru zakazanego.
W razie potrzeby, użytkownik może za pomocą aplikacji określićobszary niedostępne, do
których robot nie ma prawa wstępu.
5
3.2 Zawartość opakowania
* Kolektor kurzu CRAFT X jest dostarczany wyłącznie z
EXVAC890 GLORY w wersji „Dust Collector-CRAFT X”
* Stacja ładująca jest dostarczana wyłącznie z EXVAC890
GLORY w wersji „General”
R
o
b
o
t
G
L
O
R
Y
*
B
a
za
/
s
t
a
c
j
a
ł
a
d
u
j
ą
c
a
P
il
o
t
zda
l
n
e
g
o
s
t
e
r
o
wa
n
i
a
Zasilacz sieciowy Narzędzie do czyszczenia Zbiornik na wodę
Szczotki boczne (x4) Dodatkowy filtr HEPA Dodatkowy filtr z gąbki
Ściereczka mopa * Kolektor CRAFT X
6
3.3 Dane techniczne
Model produktu EXVAC890
Rozmiar jednostki głównej 330 * 98 mm
Waga netto 3,3 kg
Napięcie zasilania AC 230V 50Hz
Napięcie zasilające robota DC 19V 1,0A
Pobór mocy 60W
Typ akumulatora litowo-jonowy
Pojemnośćakumulatora 5200mAh
Napięcie akumulatora 14,4V
Pojemność pojemnika na kurz 600ml/500ml
Pojemność zbiornika na wodę 370 ml
Czas pracy 62-215 min
Czas ładowania 300-360 min
Parametry rzeczywiste mogą nieznacznie różnić się od wyżej podawanych.
Produkty Mamibot są ciągle ulepszane i ich właściwości oraz funkcje mogą ulegać
modyfikacji. Producent i dystrybutor zastrzegają sobie prawo do wprowadzania zmian
technicznych i projektowych bez wcześniejszego powiadomienia.
4. Opis robota GLORY
4.1. Widok z góry
Z
d
e
r
z
a
k
Przycisk START/STOP
automatyczne sprzątanie Wskaźnik WiFi
Przycisk
Powrót do bazy - Ładowanie
LIDAR
system radaru laserowego
7
4.2. Widok od spodu
4.3. Widok z boku
4.4. Zbiornik na wodę
K
ó
ł
k
o
w
i
e
l
o
k
i
e
r
u
n
k
o
we
Kontakty ładowania
Szczotki boczne
Pokrywa akumulatora
Czujniki zbocza
Koła napędowe
Lampa UV (opcja)
Szczotka główna
Osłona szczotki obrotowa
głównej
Kontakty elektr. Pojemnik na
stacji kolektora kurzu kurz i śmieci
Port opróżniania pojemnika kurzu
dla kolektora CRAFT-X
Czujnik podczerwieni
Zbiornik na kurz Gniazdo
i śmieci zasilania
Główny wyłącznik
zasilania
Zaś
l
e
p
k
a
w
l
e
wu
wody
Przycisk zwalniający
blokadę zbiornika wody
Zbiornika na wodę
Ściereczka mopa
8
4.5. Zbiornik na kurz i śmieci
4.6. Stacja - baza ładująca (dostarczana wyłącznie w wersji „General”)
O
s
ł
o
n
a
f
il
t
r
a
z
f
il
t
r
em
w
s
t
ę
p
n
y
m
Wysokowydajny filtr
HEPA Filtr piankowy
(nie wolno myć) (można myć)
Otwarta pokrywa
zbiornika na kurz Zbiornik
na kurz śmieci
(można myć)
Kontrolka – wskaźnik stanu
Gniazdko zasilacza
Styki elektryczne do ładowania robota
9
4.7. CRAFT-X Stacja - baza ładująca z systemem automatycznego opróżniania
pojemnika na kurz i śmieci (dostarczana wyłącznie w wersji „CRAFT-X”)
5. Funkcje robota GLORY
5.1. Pilot zdalnego sterowania
Przed pierwszym użyciem pilota zainstaluj dwie baterie AAA.
Wyjmij baterie, jeśli pilot nie będzie używany przez dłuższy czas.
Sygnał pilota może być nie rozpoznany przez robota GLORY, jeśli znajduje się on w pobliżu bazy ładującej, ściany
fizycznej lub wirtualnej.
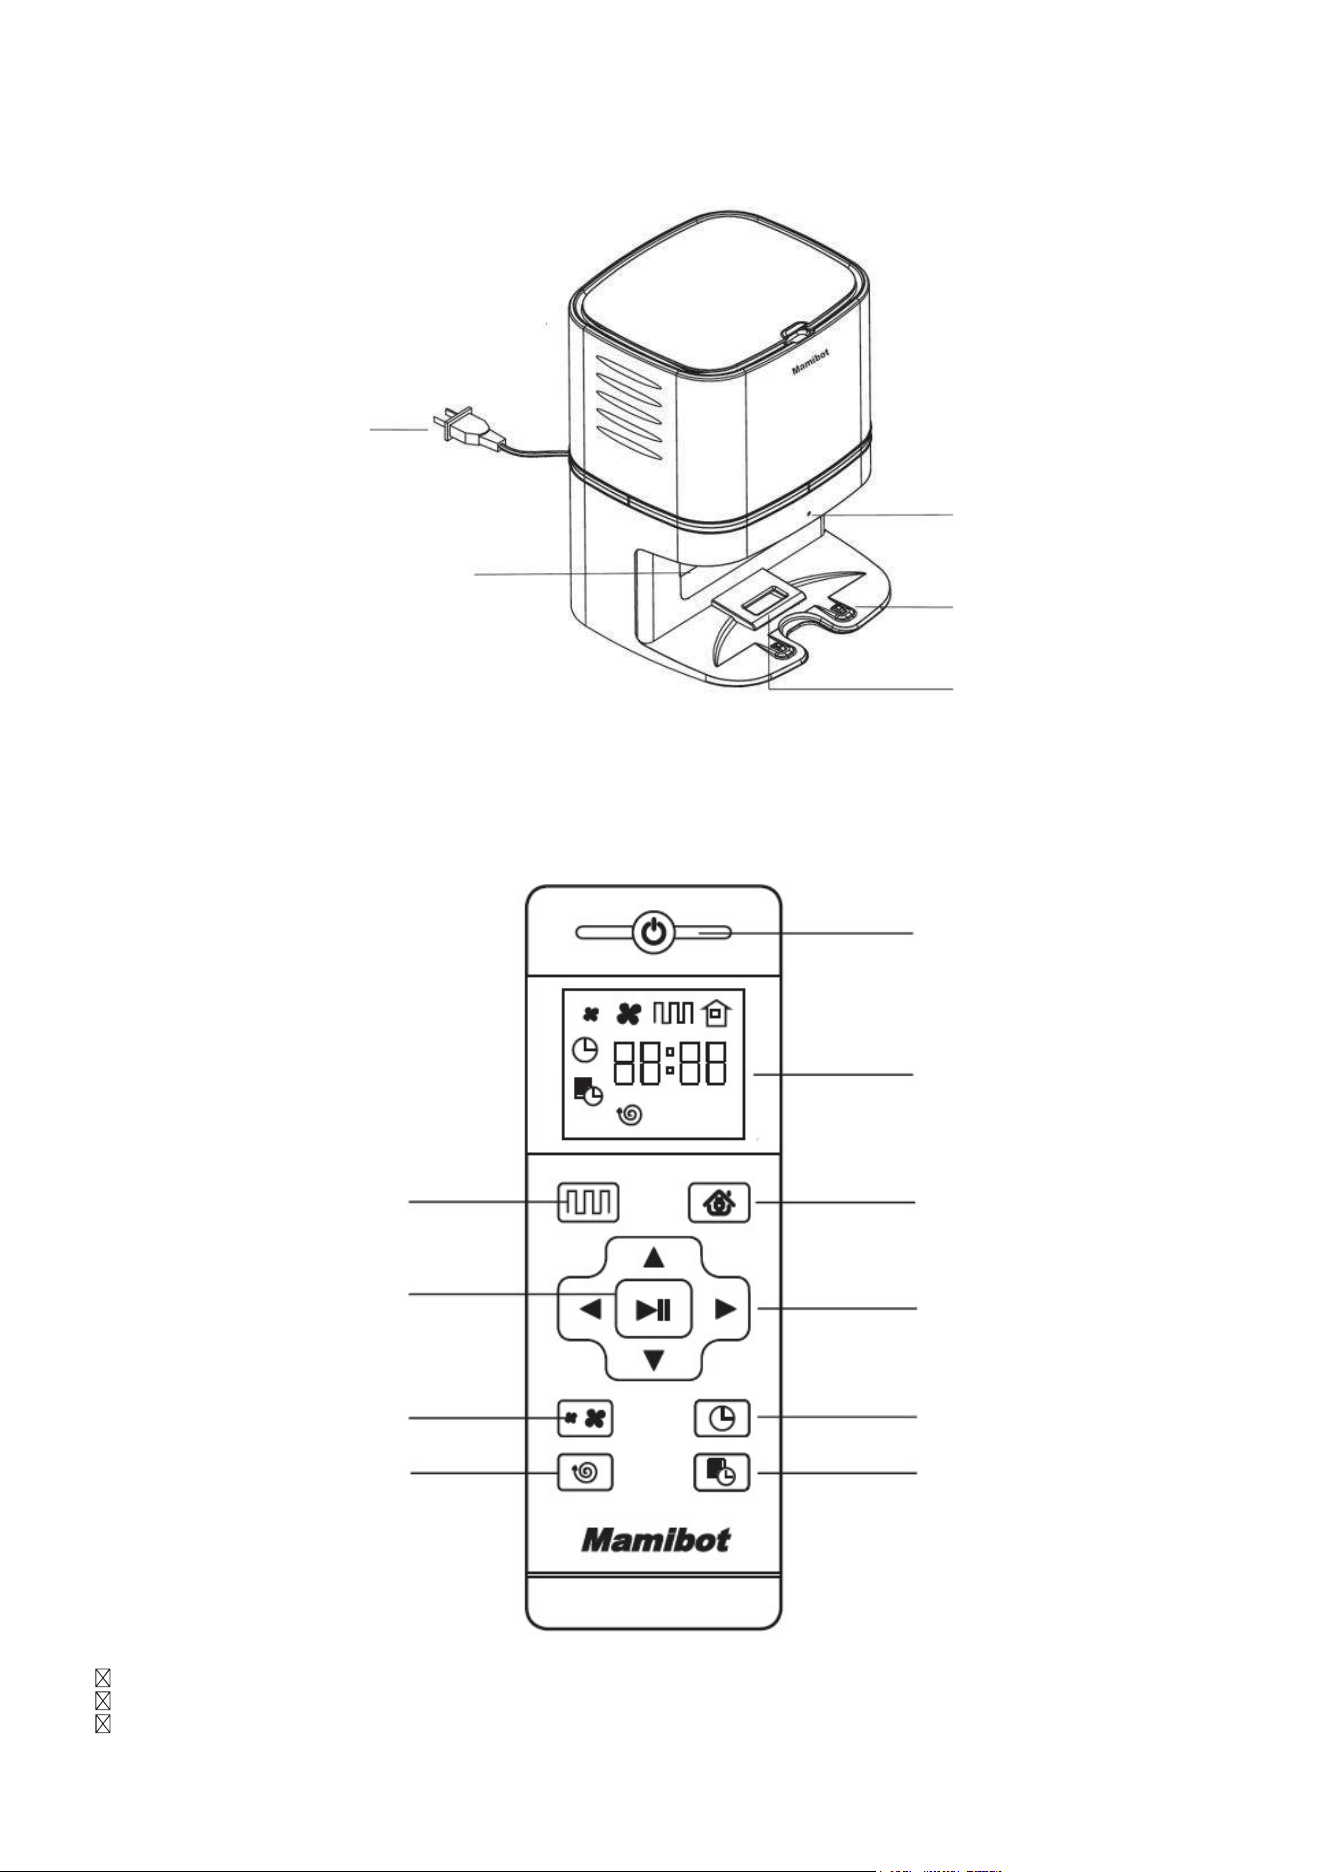
ON/OFF
Włączanie/Wyłączanie robota
Wyświetlacz LCD
Automatyczne sprzątanie Automatyczne ładowanie
Pauza/Wznowienie
/ zatwierdzenie w menu Strzałki
kierunkowe
Wybór mocy ssania Ustawianie zegara
Sprzątanie punktowe Programowanie
harmonogramu
Przewód zasilający AC230V
Kontrolka –
wskaźnik stanu
Wewnętrzne sensory
Kolektora kurzu Styki elektryczne
do ładowania robota
Otwór systemu
zasysania

10
ON/OFF Zasilanie włącz/wyłącz: Naciśnij ten przycisk, aby włączyć lub wyłączyć
GLORY, pod warunkiem, że główne zasilanie (z boku robota) jest włączone.
Automatyczne sprzątanie: Naciśnij ten przycisk, aby uruchomićtryb automatycznego
sprzątania.
Automatyczne ładowanie: Naciśnij ten przycisk, aby włączyć tryb automatycznego
ładowania akumulatora podczas pracy, jeśli zajdzie taka konieczność (na ekranie LCD
pojawi się odpowiednia ikona).
Strzałka w górę: Do przodu w trybie zdalnego sterowania ruchem, zwiększanie liczb w
trybie ustawień harmonogramu,
Strzałka w dół: Obrót robota o 180 stopni, aby mógł jechać do tyłu, zmniejszanie liczb
w trybie ustawień harmonogramu.
Strzałka w lewo: Zakręt w lewo w trybie zdalnego sterowania ruchem, ustawianie
godzin w trybie ustawień harmonogramu.
Strzałka w prawo: Zakręt w prawo w trybie zdalnego sterowania ruchem, ustawianie
minut w trybie ustawień harmonogramu.
Zatwierdzenie/Pauza/Wznowienie: Służy do potwierdzenia w trybie ustawień
harmonogramu lub zegara, w czasie pracy jest to przycisk Pauza-Wznowienie.
Wybór mocy ssania: Naciśnij ten przycisk, aby zmienić moc ssania w dowolnym trybie
pracy robota. Dostępne są trzy poziomy: Cichy, Standard i Turbo.
Ustawianie zegara: Naciśnij ten przycisk, aby wejść w tryb ustawiania zegara, a
przycisk potwierdzenia, aby zakończyć.
Harmonogram: Naciśnij ten przycisk, aby wejść w tryb programowania harmonogramu
w trybie gotowości, na ekranie będzie migać odpowiednia ikona, po wprowadzeniu
danych, naciśnij ten przycisk ponownie lub przycisk potwierdzenia, aby zapisać dane i
wyjść. Na ekranie będzie zawsze wyświetlana ikona harmonogramu.
Naciśnij przycisk harmonogramu przez 3 sekundy, a harmonogram zostanie wyłączony i
ikona zniknie z ekranu LCD.
Sprzątanie punktowe: Naciśnij ten przycisk, aby uruchomićtryb sprzątania
punktowego, czyli obszaru 2 x 2 m wokół obecnej lokalizacji robota.
5.2. Tryb pracy GLORY
Automatyczne sprzątanie.
Laserowy system nawigacyjny robota GLORY najpierw zbada geografię pomieszczenia, a
następnie zaplanuje i posprząta lokal poruszając się zygzakiem.
Po zakończeniu sprzątania bieżącego pomieszczenia, GLORY zbada kolejne, wykona
kolejn
y plan, posprząta i tak dalej, aż do zakończenia czyszczenia całego mieszkania.
GLORY można uruchomić do pracy w trybie automatycznego sprzątania za pomocą
przycisku Start/Stop na obudowie, przyciskiem automatycznego czyszczenia na pilocie
lub przyciskiem Start w aplikacji w smart fonie.

11
Wybór mocy ssania.
Naciskając ten przycisk podczas pracy w trybie automatycznego sprzątania, można
zmieniać moc ssania odkurzacza, a co za tym idzie poziom głośności pracy. Do dyspozycji
sątrzy poziomy: Cichy, Standard i Turbo. Zmianę można również wykonać odpowiednim
przyciskiem w aplikacji w smart fonie.
Tryb mopa (sprzątanie na mokro)
Aby uruchomićtryb sprzątania na mokro, należy zbiornik na kurz zamienić na zbiornik z
wodą i przyczepioną ściereczką mopa. Po uruchomieniu robota GLORY będzie poruszał się
po ścieżce sprzątania automatycznego. W tym trybie można za pomocą aplikacji wybrać
jeden z trzech poziomów dozowania wody do mopa: niski, średni i wysoki.
Ustawienie obszaru zakazanego / niedostępnego.
Aplikacja w smart fonie pozwala ustawić obszary, do których robot nie powinien
wjeżdżać. Działa to podobnie, jak tzw. wirtualna ściana.
Sprzątanie punktowe
Naciśnij ten przycisk, aby przejść do trybu czyszczenia punktowego.
Wyszukiwanie
Naciśnij w aplikacji przycisk „Pozycjonowanie”, a GLORY wygeneruje sygnały dźwiękowe,
pozwalające na odszukanie robota zagubionego lub zablokowanego gdzieś w dużym
domu z wieloma pomieszczeniami.
UWAGI:
Główny wyłącznik zasilania GLORY musi być włączony.
Poziom naładowania akumulatora musi być na poziome minimum 5%.
Funkcja „Dźwięk: w robocie WIOSR musi byćwłączona.
Wznowienie z punktu przerwania.
Jeśli podczas pracy poziom naładowania akumulatora spadnie poniżej 20%, GLORY
przerwie pracę, uda siędo bazy ładującej w celu uzupełnienia energii. Gdy stan
ładowania osiągnie 80%, GLORY automatycznie powróci do punktu, w którym przerwał
pracę i będzie kontynuować zadanie.
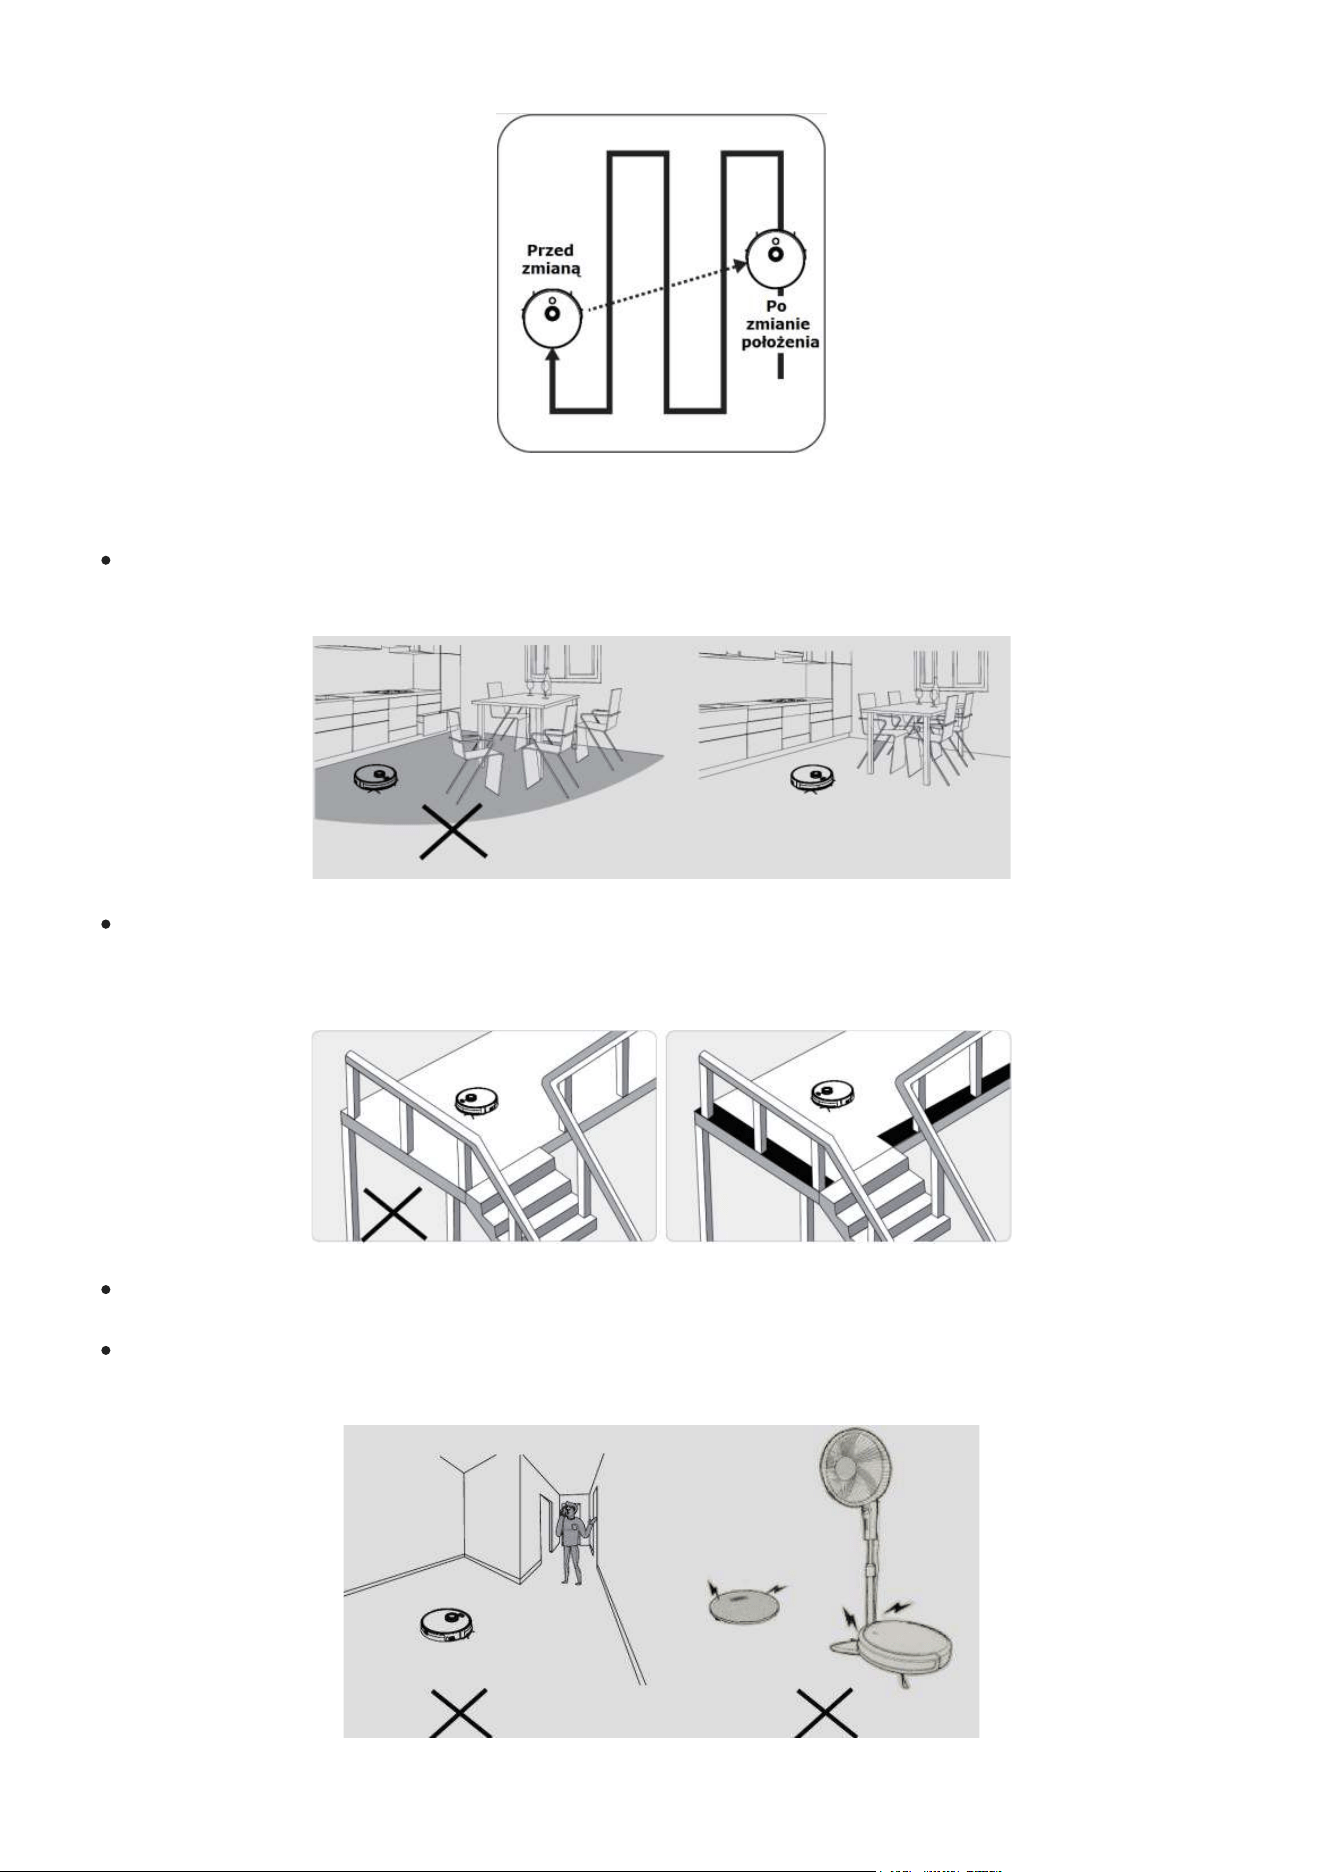
Zmiana położenia
GLORY tworzy sobie mapę pomieszczenia i planuje ścieżkę sprzątania. Jeśli użytkownik
wstrzyma pracęGLORY, przeniesie go w inne miejsce, a następnie naciśnie przycisk
Start/Wznowienie GLORY ruszy z nowej pozycji. Jeśli zmiana położenia powiedzie się i nie
zaburzy zapisanej mapy, GLORY wyda komunikat dźwiękowy i wznowi zadanie
sprzątania. Jeśli się nie powiedzie, GLORY usunie z pamięci poprzednie dane, od nowa
zbada obszar i dopiero wtedy rozpocznie sprzątanie.
12
5.3. Przygotowanie pomieszczeń do pracy robotem GLORY.
Upewnij się, że wszystkie meble są odpowiednio uporządkowane i nie będą
blokowały odkurzacza GLORY podczas pracy.
Proszę zaprogramować obszary zakazane lub bariery na klatce schodowej i w
podobnych miejscach. Czujniki zapobiegające upadkowi mogą działać mniej
skutecznie, jeśli działają na ciemnych podłogach lub są zabrudzone.
Nie stawaj nic w wąskich przestrzeniach lub przejściach, ponieważmoże to
zmniejszyć skuteczność sprzątania.
GLORY jest w stanie wjechać na przedmioty o wysokości do 1,8 cm. Jeśli stwarza to
jakieś zagrożenie, należy je usunąć.
13
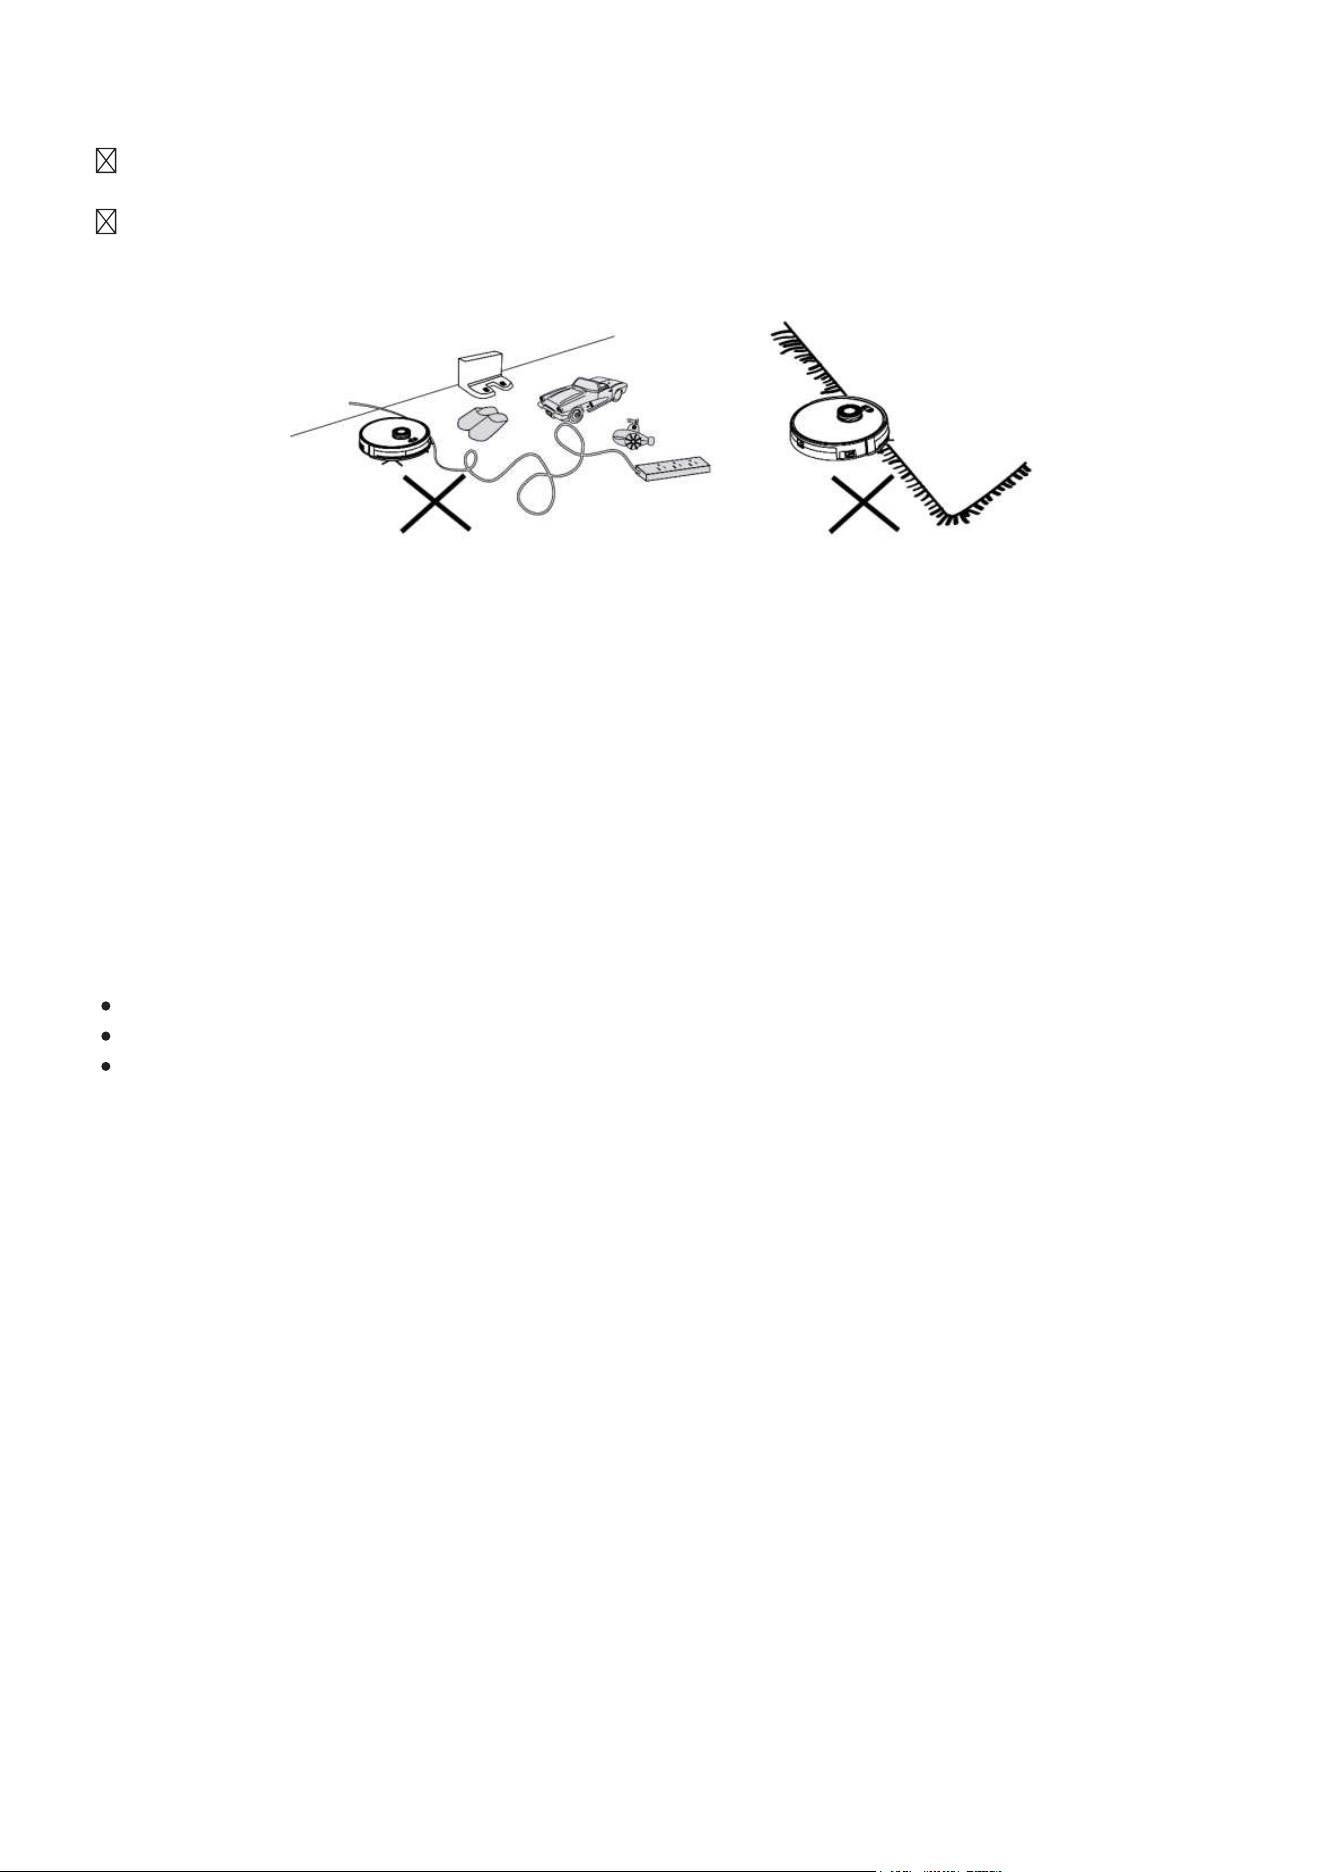
Usuń z podłogi kable zasilające, przewody, zabawki, paski, czy buty ze sznurówkami,
gdyż mogą zaplątać się w szczotki odkurzacza GLORY.
Nie czyść dywanów na mokro, za pomocą funkcji mopa. Przed czyszczeniem zwiń
dywan lub zaprogramuj obszar, na który robot ma nie wchodzić.
6. Obsługa robota GLORY
6.1. Rozpoczęcie/zatrzymanie sprzątania – START/STOP
• Upewnij się, że główny wyłącznik zasilania z prawej strony obudowy odkurzacza GLORY
jest włączony.
• Naciśnij przycisk Start/Stop na odkurzaczu, przycisk automatycznego sprzątania na
pilocie lub przycisk sprzątania w aplikacji w smart fonie.
6.2.
Pauza/Gotowość – PAUSE/STANDBY
Funkcja „Pauza – wstrzymanie” polega na tymczasowym wstrzymaniu pracy robota, np.
w celu odebrania telefonu lub usunięcia potencjalnej przeszkody:
Naciśnij przycisk Start / Stop na górnej obudowie odkurzacza GLORY.
Naciśnij przycisk potwierdzenia na pilocie, aby wstrzymać urządzenie.
Po wstrzymaniu robota (Pauza), można go ponownie uruchomić tym samym
przyciskiem.
6.3. Uśpienie – SLEEP
W trybie uśpienia robot jest zatrzymany, a lampka kontrolna jest wyłączona. Jeśli robot
nie będzie aktywny ponad 10 minut, automatycznie przejdzie w tryb uśpienia. Można też
nacisnąćprzycisk włączania/wyłączania na pilocie zdalnego sterowania.
Uwaga:
Jeśli GLORY ma nie działać przez dłuższy okres czasu, wyłączaj główny wyłącznik
zasilania z boku obudowy.
6.4. Ładowanie akumulatora
Ustaw stację ładującą przy ścianie w taki sposób, aby z lewej i z prawej strony był 1metr
wolnej przestrzeni, a z przodu 2metry. Jeśli używasz kolektora CRAFT-X, ustaw go
podobnie, z tym, że zachowaj od ściany minimum 5 cm odległości.
Usuń z otaczającego obszaru wszelkie przedmioty. Jest to konieczne, żeby robot mógł
bezproblemowo zaparkować i korzystać z funkcji automatycznego ładowania.
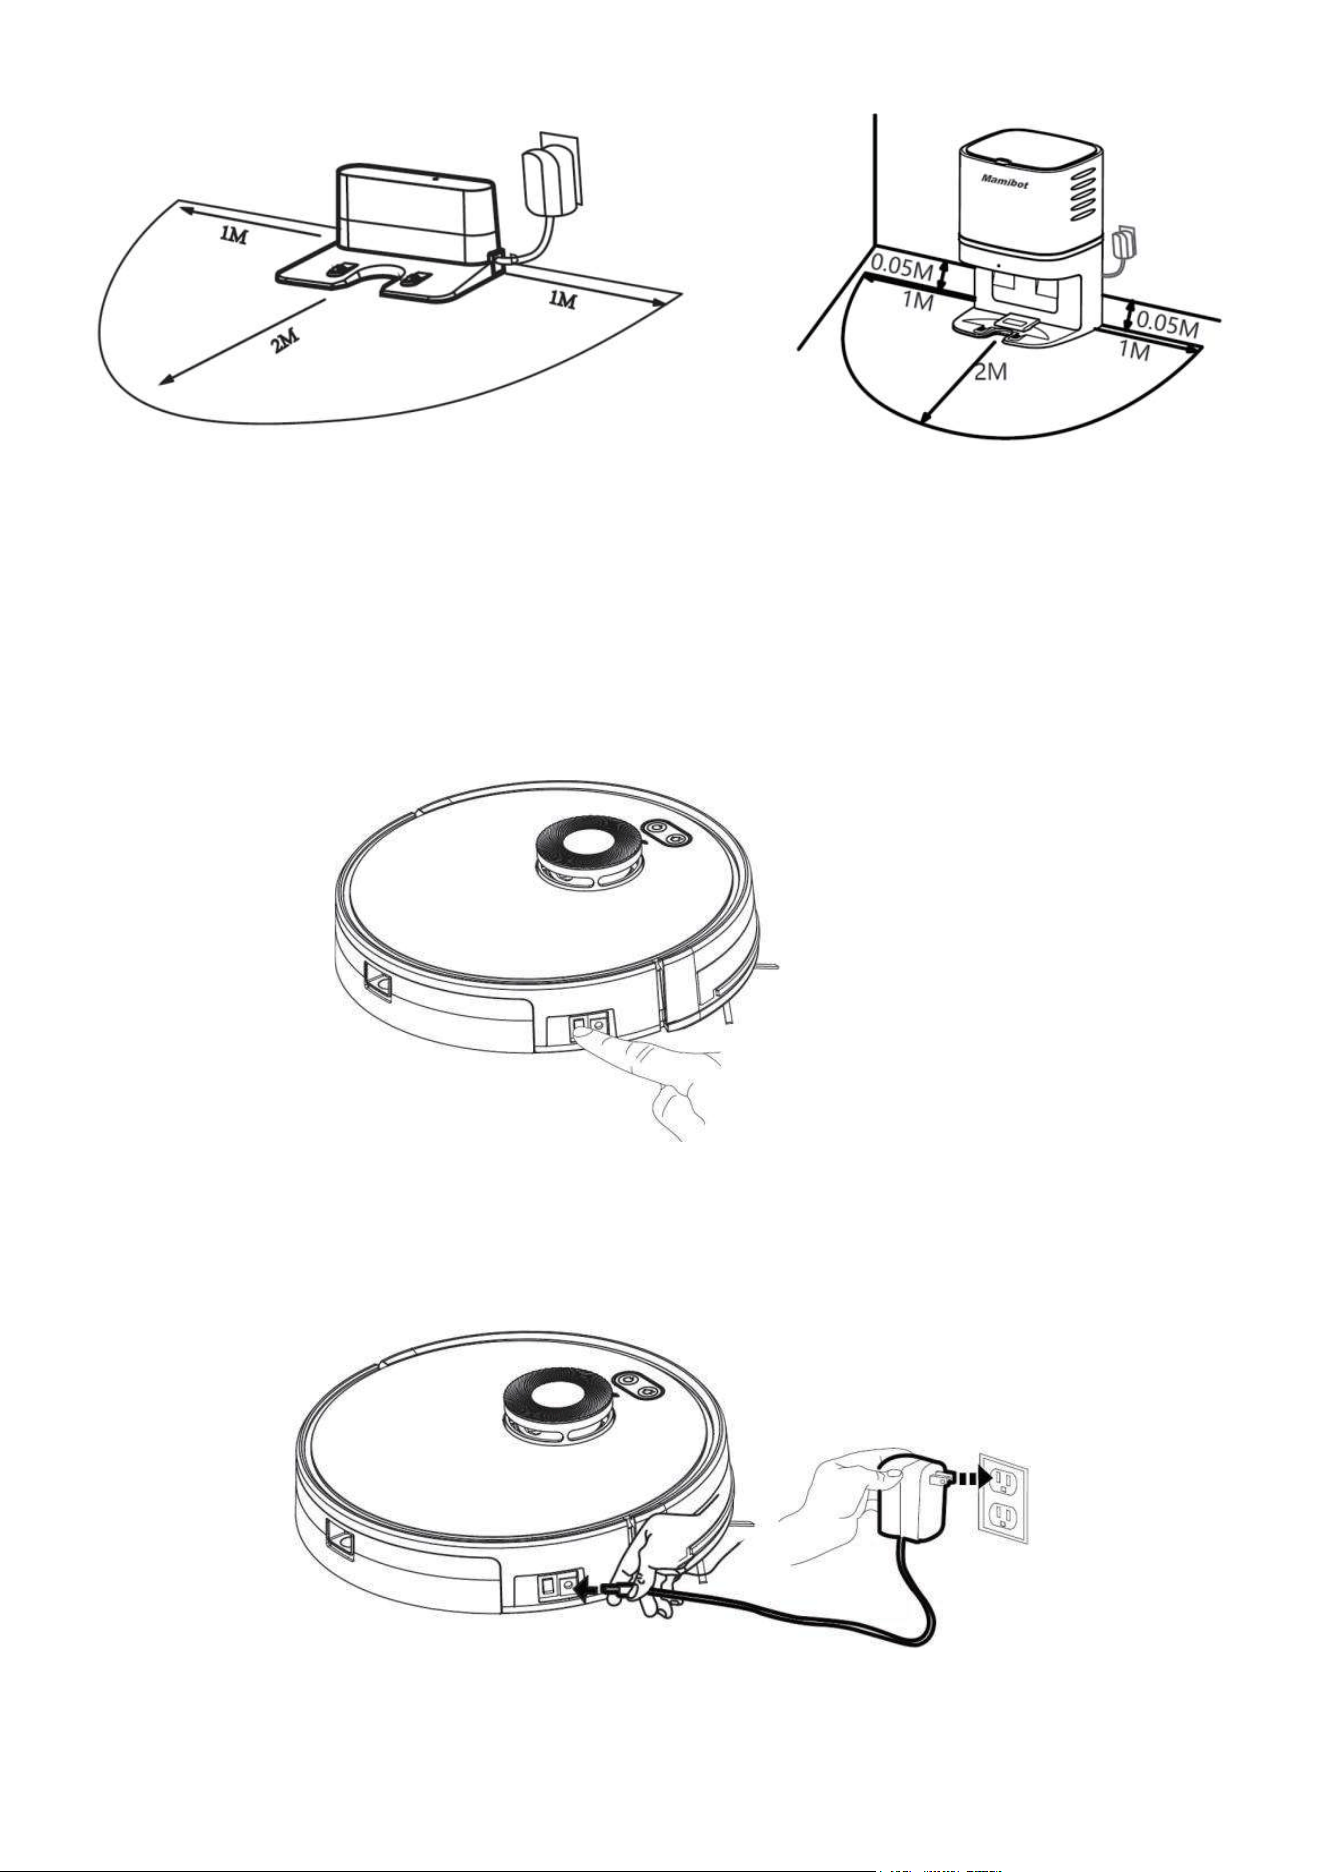
14
Ustawienie standardowej Ustawienie stacji kolektora
stacji dokującej kurzu CRAFT-X
• Przed użyciem lub ładowaniem, nie zapomnij włączyć główny włącznik zasilania z boku
odkurzacza.
Główny włącznik
Metoda ładowania A
Podłącz oryginalny zasilacz sieciowy do gniazda DC z boku robota GLORY, kontrolka LED
w przycisku Start/Stop zaświeci się na biało i pojawi się komunikat głosowy o ładowaniu..
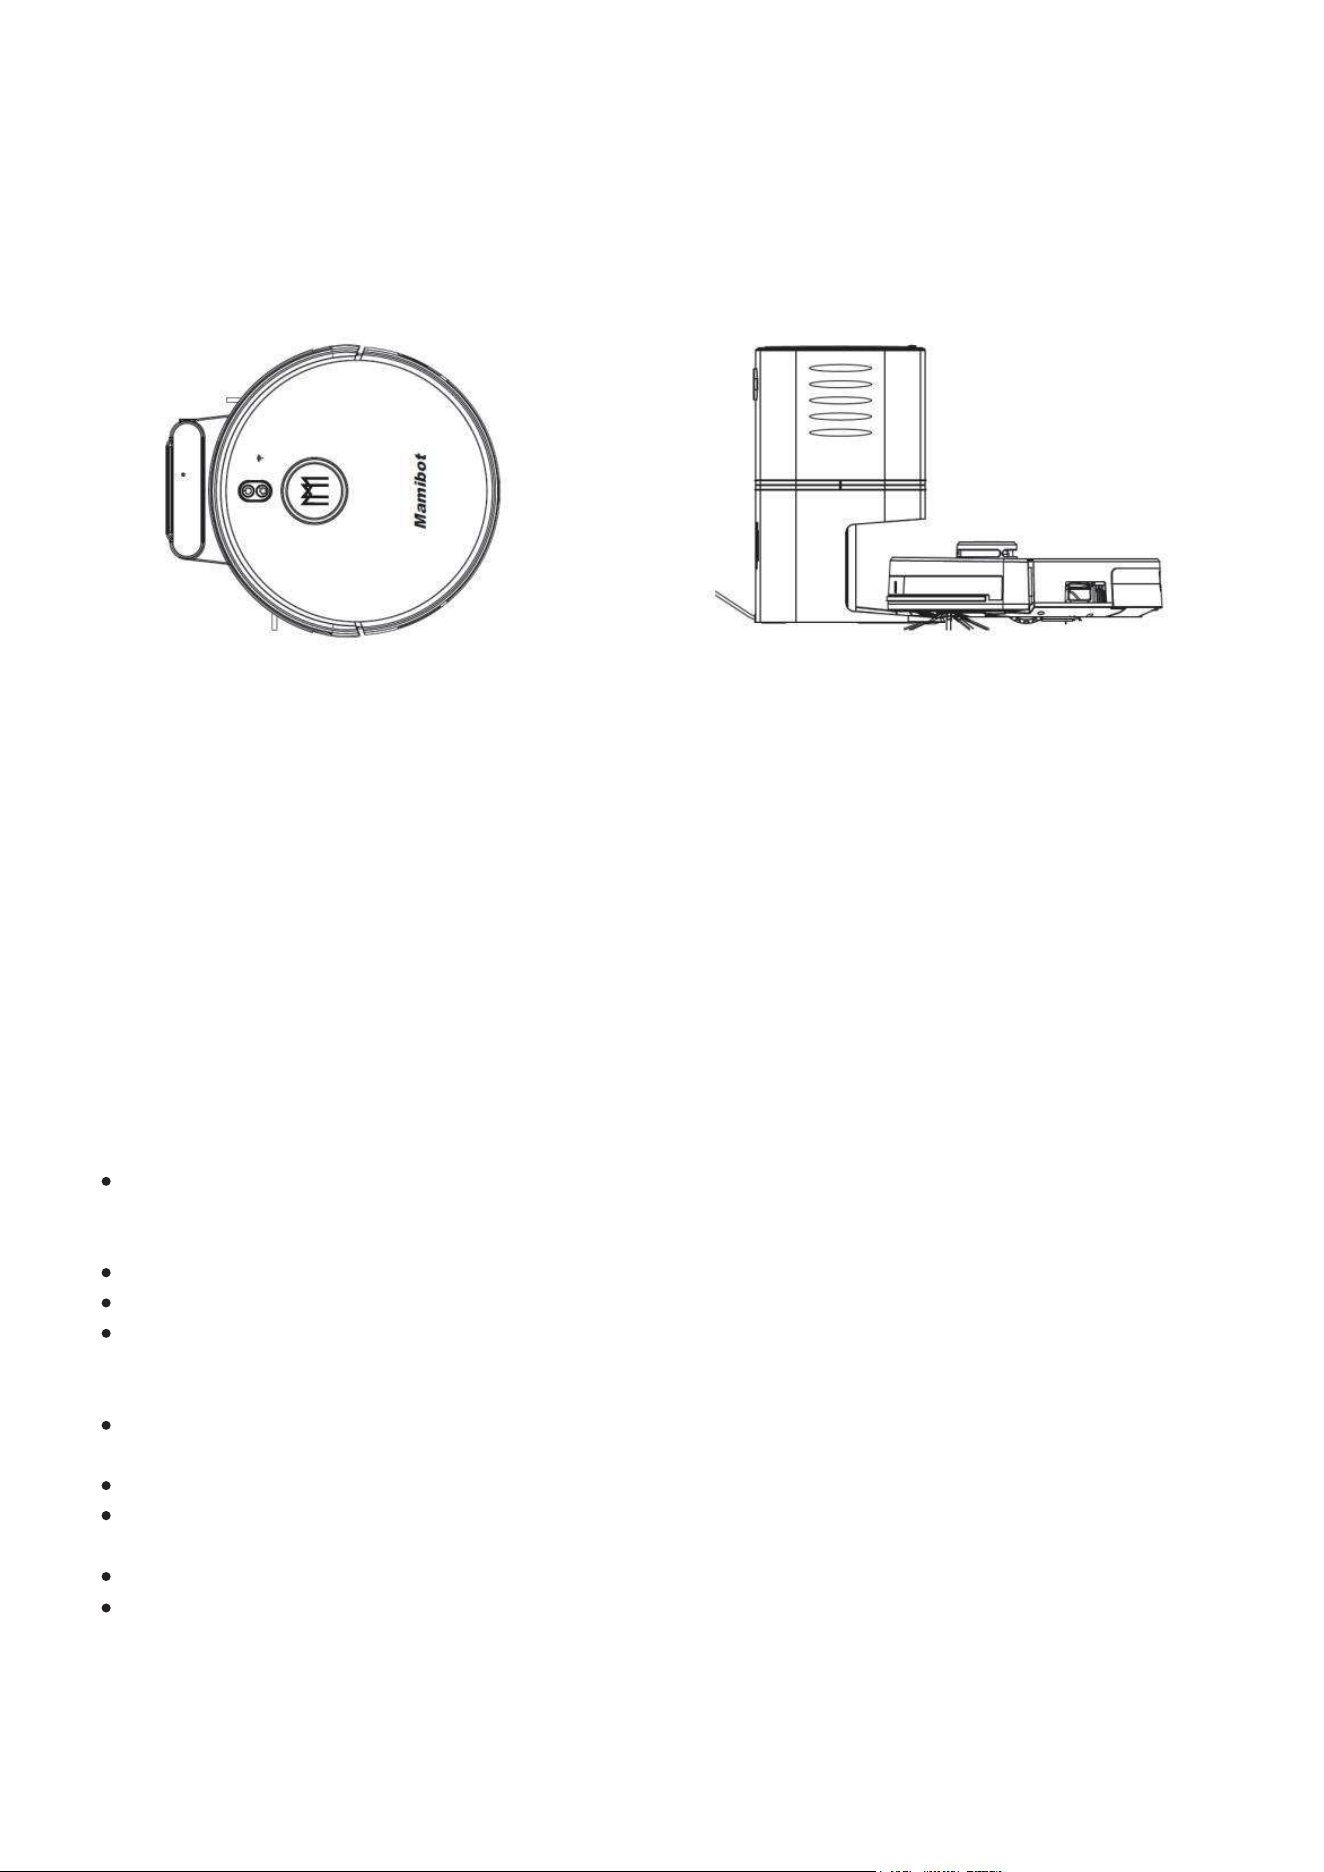
15
Metoda ładowania B
Podłącz kolektor CRAFT-X do sieci lub oryginalny zasilacz sieciowy do gniazda DC bazy
ładującej, umieść odkurzacz GLORY na bazie, dopasowując kontakty ładowania w robocie
do styków na podstawie.
Jeśli odkurzacz zostanie prawidłowo umieszczony, kontrolka LED na bazie ładującej
zacznie powoli migać na zielono.
GLORY można ładować tylko za pomocą oryginalnych zasilaczy i baz ładujących
dostarczanych przez firmęMamibot.
Ładowanie automatyczne
• GLORY potrafi automatycznie znaleźćbazę ładującą w celu naładowania, jeśli poziom
energii w akumulatorze jest niski lub gdy zakończy zadanie sprzątania.
• Baza ładująca musi być zawsze podłączona do sieci zasilającej. W przeciwnym razie
GLORY nie będzie w stanie jej zlokalizować.
Instrukcja ładowania
W początkowym okresie użytkowania, GLORY może mieć problemy z lokalizowaniem
stacji bazowej. Sytuacja poprawi się po kilkukrotnym użyciu robota i dokładnym
zapoznaniem się z mapą pomieszczeń.
Przy pierwszym użyciu, pozwól, aby GLORY zużył cały zapas energii z akumulatora.
Przy pierwszym ładowaniu, proszę ładować GLORY przez 12 godzin.
Aby rozkazać robotowi GLORY znalezienie bazy ładującej można nacisnąć przycisk
automatycznego ładowania na robocie, na pilocie lub nacisnąć przycisk „Recharge” w
aplikacji w smart fonie.
Wyłącz główny wyłącznik zasilania, jeśli robot nie będzie używany przez dłuższy
czas. Przedłuży to żywotność akumulatora.
Naładuj akumulator raz na pół roku, jeśli nie używasz robota.
Proszę ładowaćGLORY jak najszybciej po rozładowaniu. Przedłuża to żywotność
akumulatora.
Akumulator powinien być wymieniany przez centrum obsługi posprzedażnej.
Akumulator należy utylizować po wyjęciu z robota osobno.

16
7. Korzystanie z robota GLORY
7.1. Wymagania dotyczące sieci Wi-Fi
Przed konfiguracją Wi-Fi upewnij się, żeGLORY i Twoja sieć Wi-Fi spełniają następujące
wymagania:
Używana sieć Wi-Fi bazuje na routerze obsługującym pasmo 2,4 GHz.
GLORY nie obsługuje pasma 5GHz.
Używana sieć Wi-Fi obsługuje protokoły 802.11b/g/n i IPv4.
Upewnij się, że identyfikator SSID twojej sieci nie ma w nazwie nietypowych znaków,
w przeciwnym razie sieć Wi-Fi może nie zostać rozpoznana przez robota GLORY.
Do połączenia nie używaj wirtualnej sieci prywatnej (VPN).
Upewnij się, że pamiętasz poprawnie hasło do logowania się w sieci.
Upewnij się, że GLORY jest w pełni naładowany lub znajduje się na stacji dokującej,
a główny włącznik zasilania z boku GLORY jest włączony.
Przed konfiguracją umieść robot GLORY i smartfon blisko routera.
7.2. Nawiązywanie połączenia GLORY – Smartfon.
1. Pobierz aplikację Weback. W tym celu zeskanuj poniższy kod QR aplikacji Weback
lub wyszukaj i pobierz Weback.apk z App Store lub Google Play.
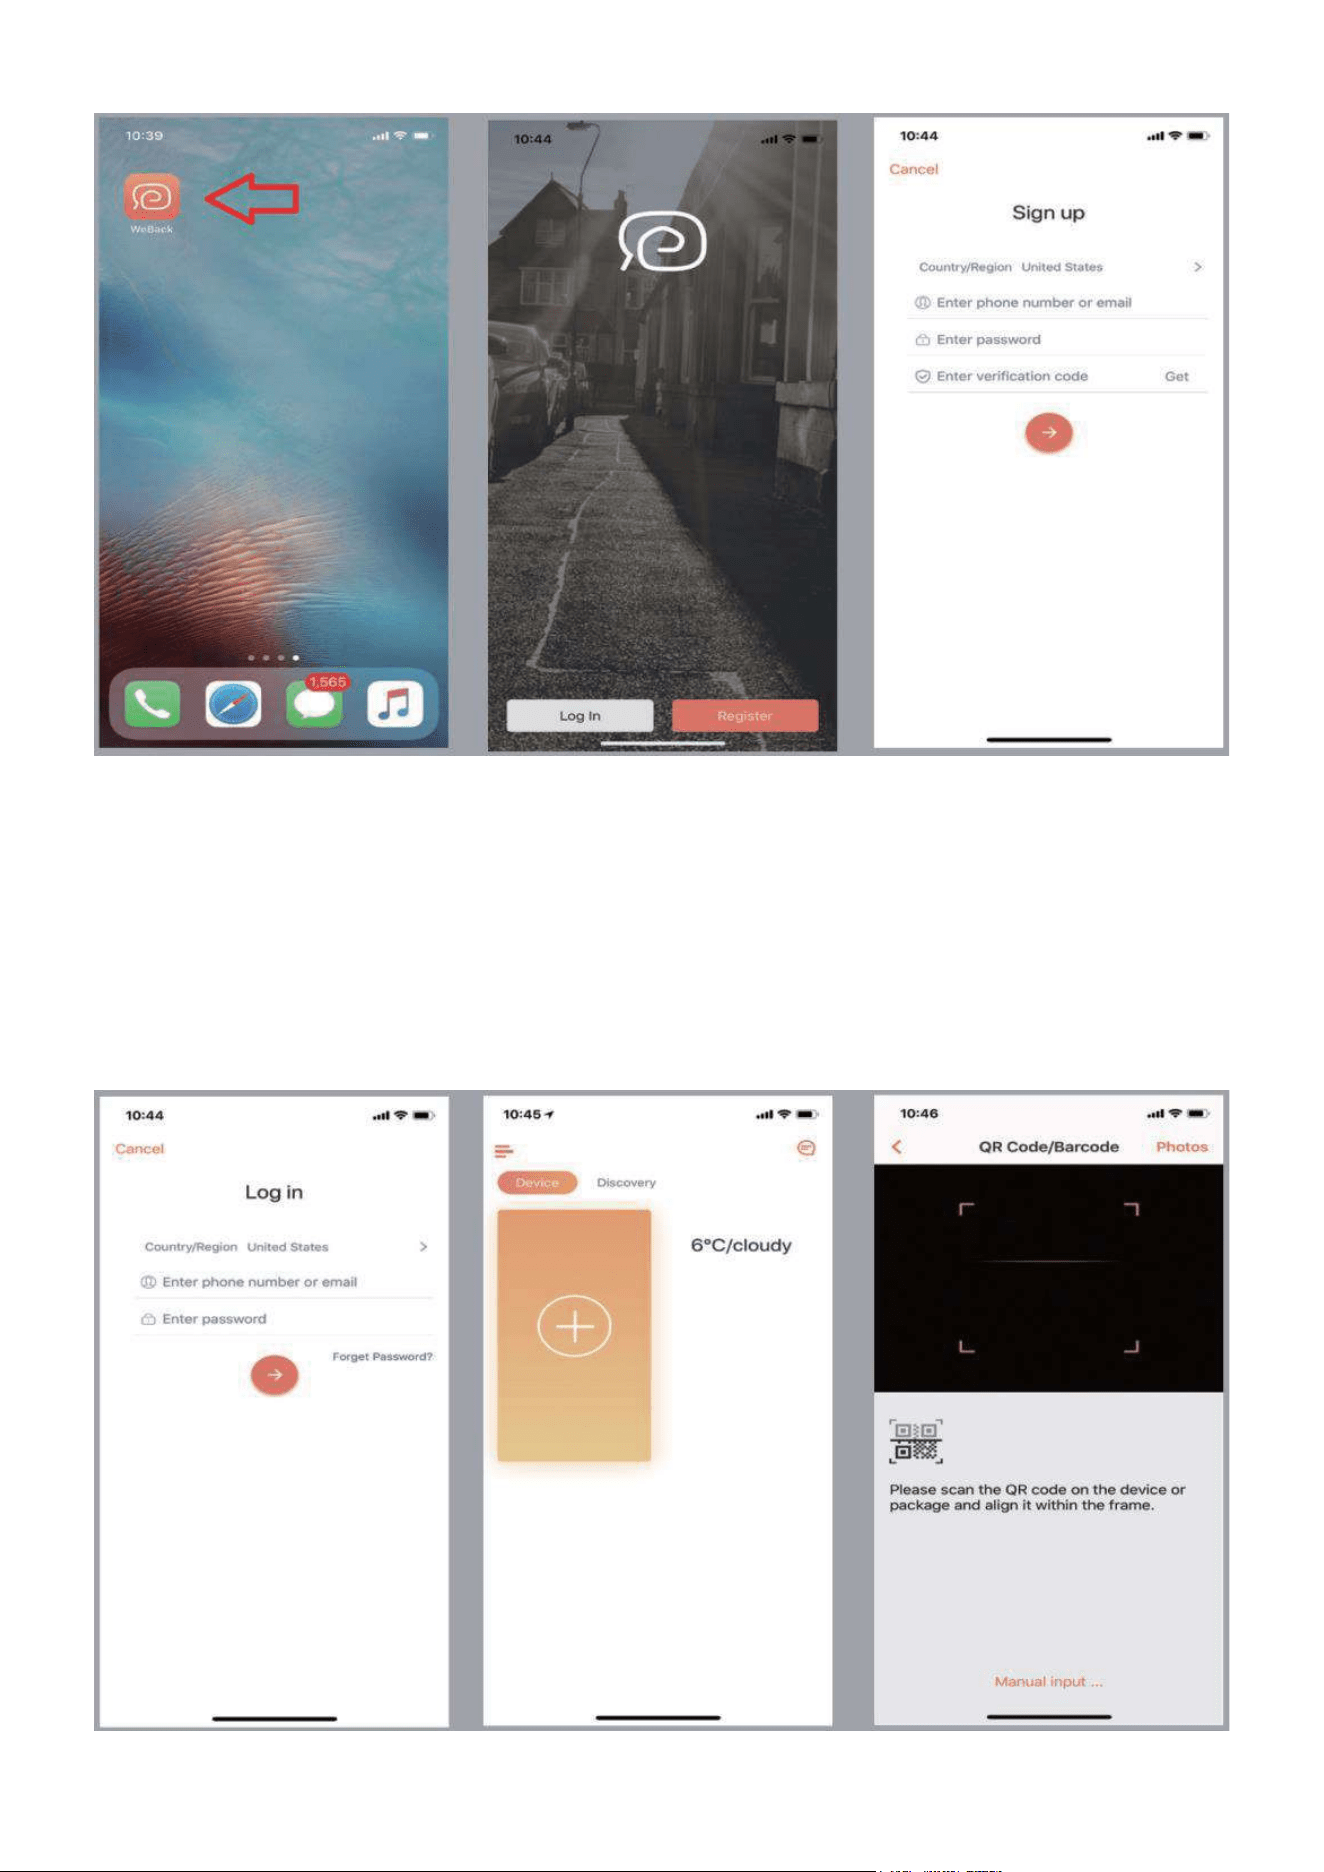
17
Rys. 1 Rys. 2 Rys. 3
2. Zaloguj się / Zarejestruj Weback ID.
Uruchom aplikację (Rys.1), zaloguj się Log In bezpośrednio za pomocą swojego
identyfikatora Weback ID (Rys.2 – Rys.4). Jeśli nie posiadasz jeszcze własnego
identyfikatora wybierz Register (Rys.2 – Rys.3), i postępuj zgodnie z instrukcjami
procesu rejestracji Sign up. Po utworzeniu własnego, nowego identyfikator użytkownika
zaloguj się (Rys.4) i przejdź do interfejsu aplikacji weback (Rys.5).
Rys. 4 Rys. 5 Rys. 6
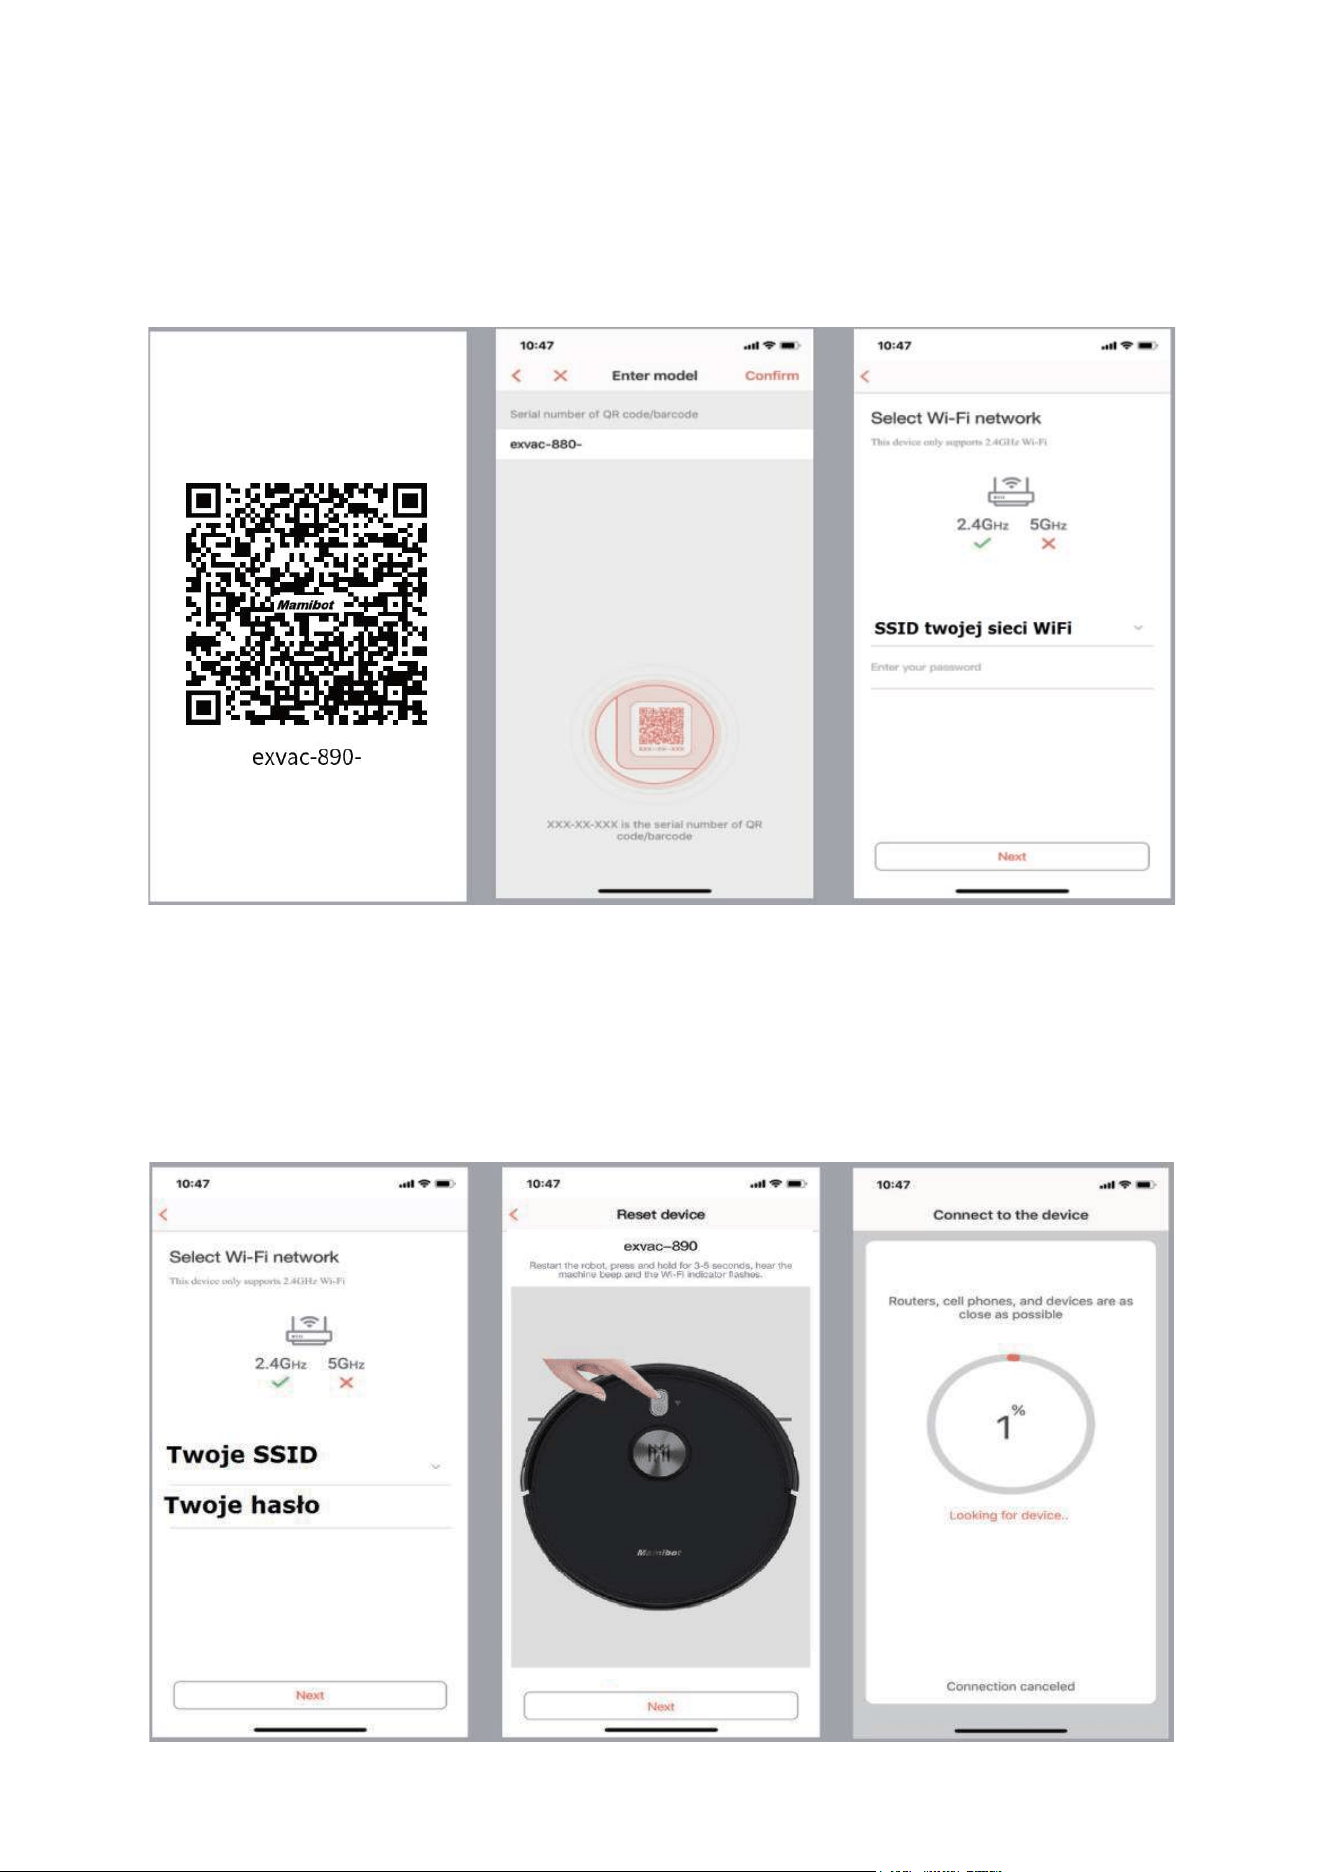
18
3. Połączenie robota GLORY z aplikacją.
Aby połączyć robot GLORY z kontem „Weback ID”, naciśnij w aplikacji ikonę„+”
„dodawanie urządzenia” (Rys.5). W kolejnym oknie (Rys.6) zeskanuj kod QR z
opakowania lub od spodu robota GLORY (Rys.7) lub ręcznie wprowadź numer seryjny
„exvac-890-****” (Rys.8)
Rys. 7 Rys. 8 Rys. 9
4. Podłączenie do sieci Wi-Fi
Przejdź do interfejsu ustawień Wi-Fi (Rys.9), wybierz swoją sieć, wprowadź hasło i
zatwierdź Next (Rys.10), zresetuj GLORY wciskając przycisk ON/OFF ok.5 sekund, aż
kontrolka WiFi zacznie migać i pojawi się komunikat dźwiękowy.
Rys. 10 Rys. 11 Rys. 12
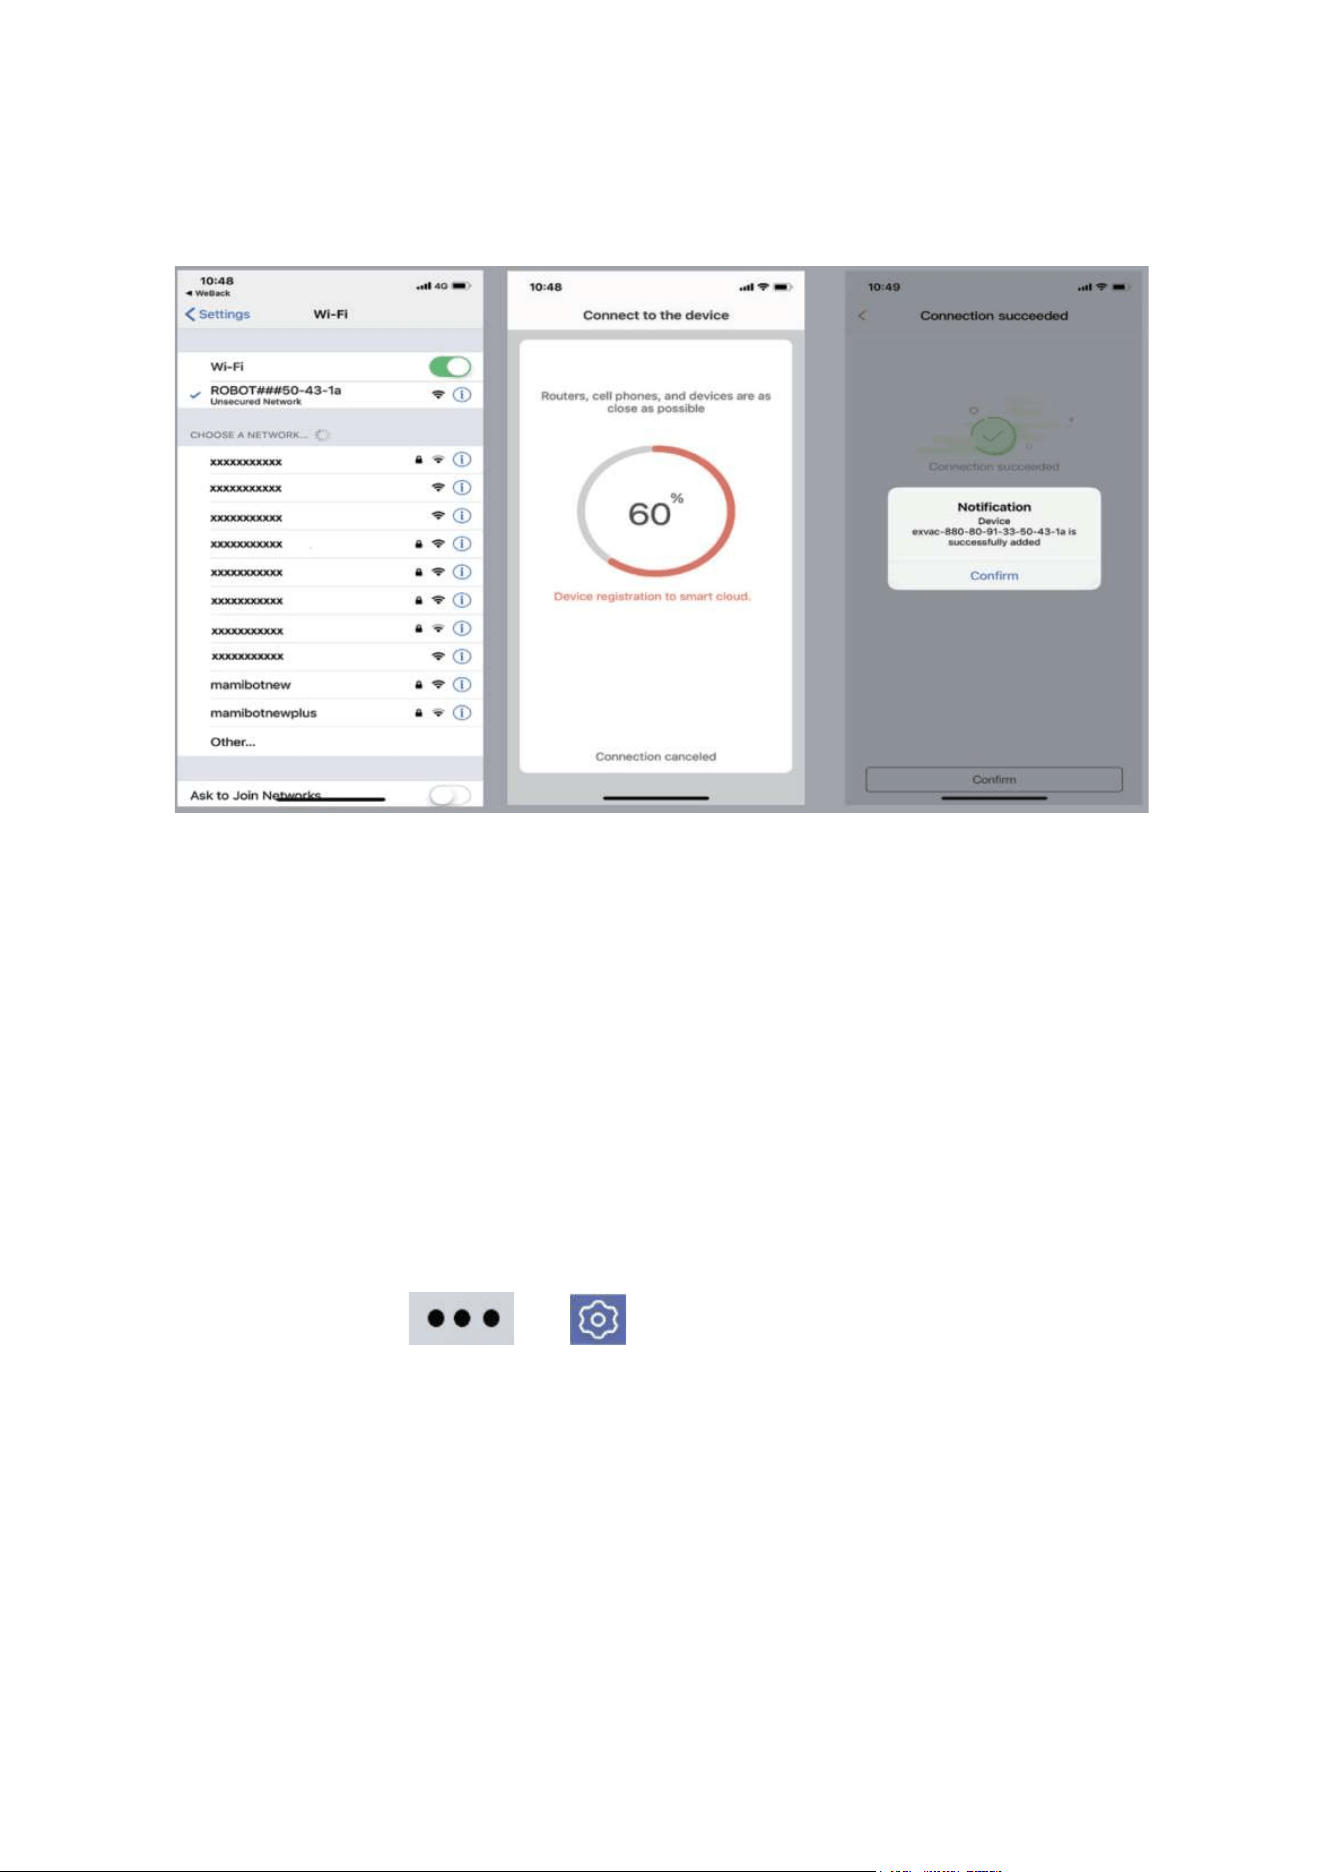
19
Po potwierdzeniu wykonania funkcji RESET w robocie, naciśnij Next (Rys.11) i pojawi się
okno z informacją o postępie w podłączaniu robota GLORY do lokalnej sieci WiFi i aplikacji
w twoim smartfonie. Po pomyślnym połączeniu, można już sterować robotem GLORY
poprzez aplikację Weback.
Rys. 13 Rys. 14 Rys. 15
Wybór sieci Postęp podłączania Połączenie pomyślne
UWAGA: W związku z ciągłym ulepszeniem produktów i oprogramowania zastrzegamy
sobie prawo do aktualizacji aplikacji lub produktów bez wcześniejszego powiadomienia.
Z tego powodu rzeczywisty interfejs aplikacji może nieznacznie różnić się od
prezentowanego w instrukcji.
7.3. Obsługa odkurzacza GLORY za pomocą aplikacji w
smartfonie.
Z jednej aplikacji można sterować kilka urządzeń. Klikając w ikonę swojego urządzenia
(Rys.16) i przejdziesz do głównego interfejsu zdalnej obsługi robota GLORY (Rys.17)
Wybierając START można od razu przystąpić do automatycznego sprzątania.
Wchodząc w ustawienia lub uruchomisz menu ustawień (Rys.18 Rys.19).
Będziesz tutaj miał dostęp do wszystkich zaawansowanych funkcji robota. Np.: zdalne
sterowanie ruchem, wybór trybu odkurzanie / zmywanie, wybór mocy ssania, ustawianie
obszarów zakazanych, kontrola stanu pracy, lokalizacja GLORY, jeśli nie wiesz, gdzie się
w domu znajduje, programowanie harmonogramu, możliwość zmiany nazwy robota
GLORY (przydatne, gdy masz ich więcej niż jeden). Można tutaj równieżudostępnić
GLORY innym użytkownikom, zaktualizować oprogramowania i wiele innych.
W ustawieniach możesz również znaleźć informację jak połączyć robota GLORY z
aplikacjami innych producentów, jak Alexa, Google Home i inn. (Rys.21)
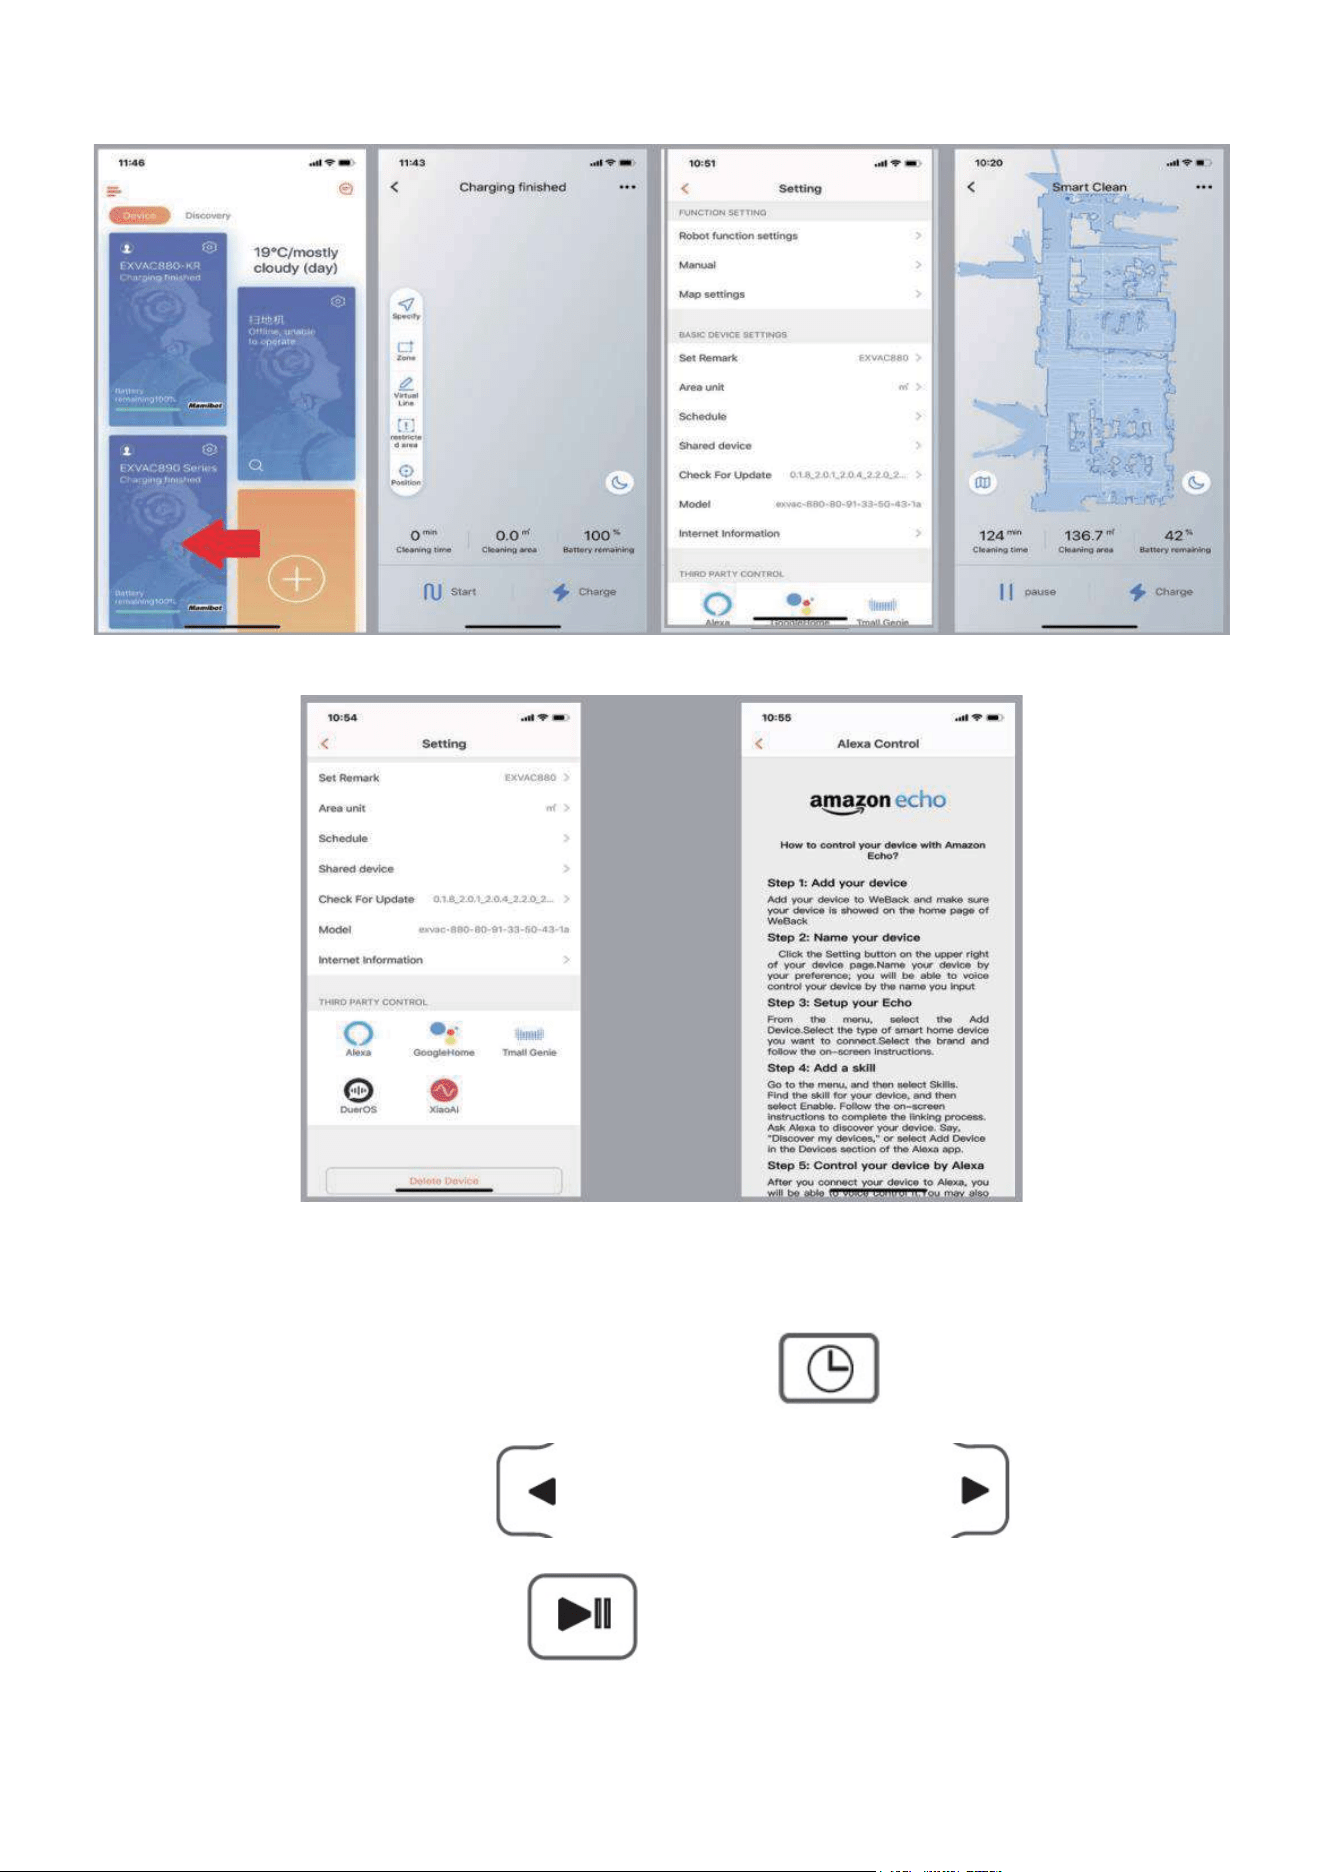
20
Rys. 16 Rys. 17 Rys. 18 Rys. 19
Rys. 20 Rys. 21
7.4. Ustawianie zegara.
W celu ustawienia zegara .naciśnij na pilocie przycisk
Ustaw godzinę strzałką w lewo , a minuty strzałką w prawo .
Zatwierdź ustawienia przyciskiem .
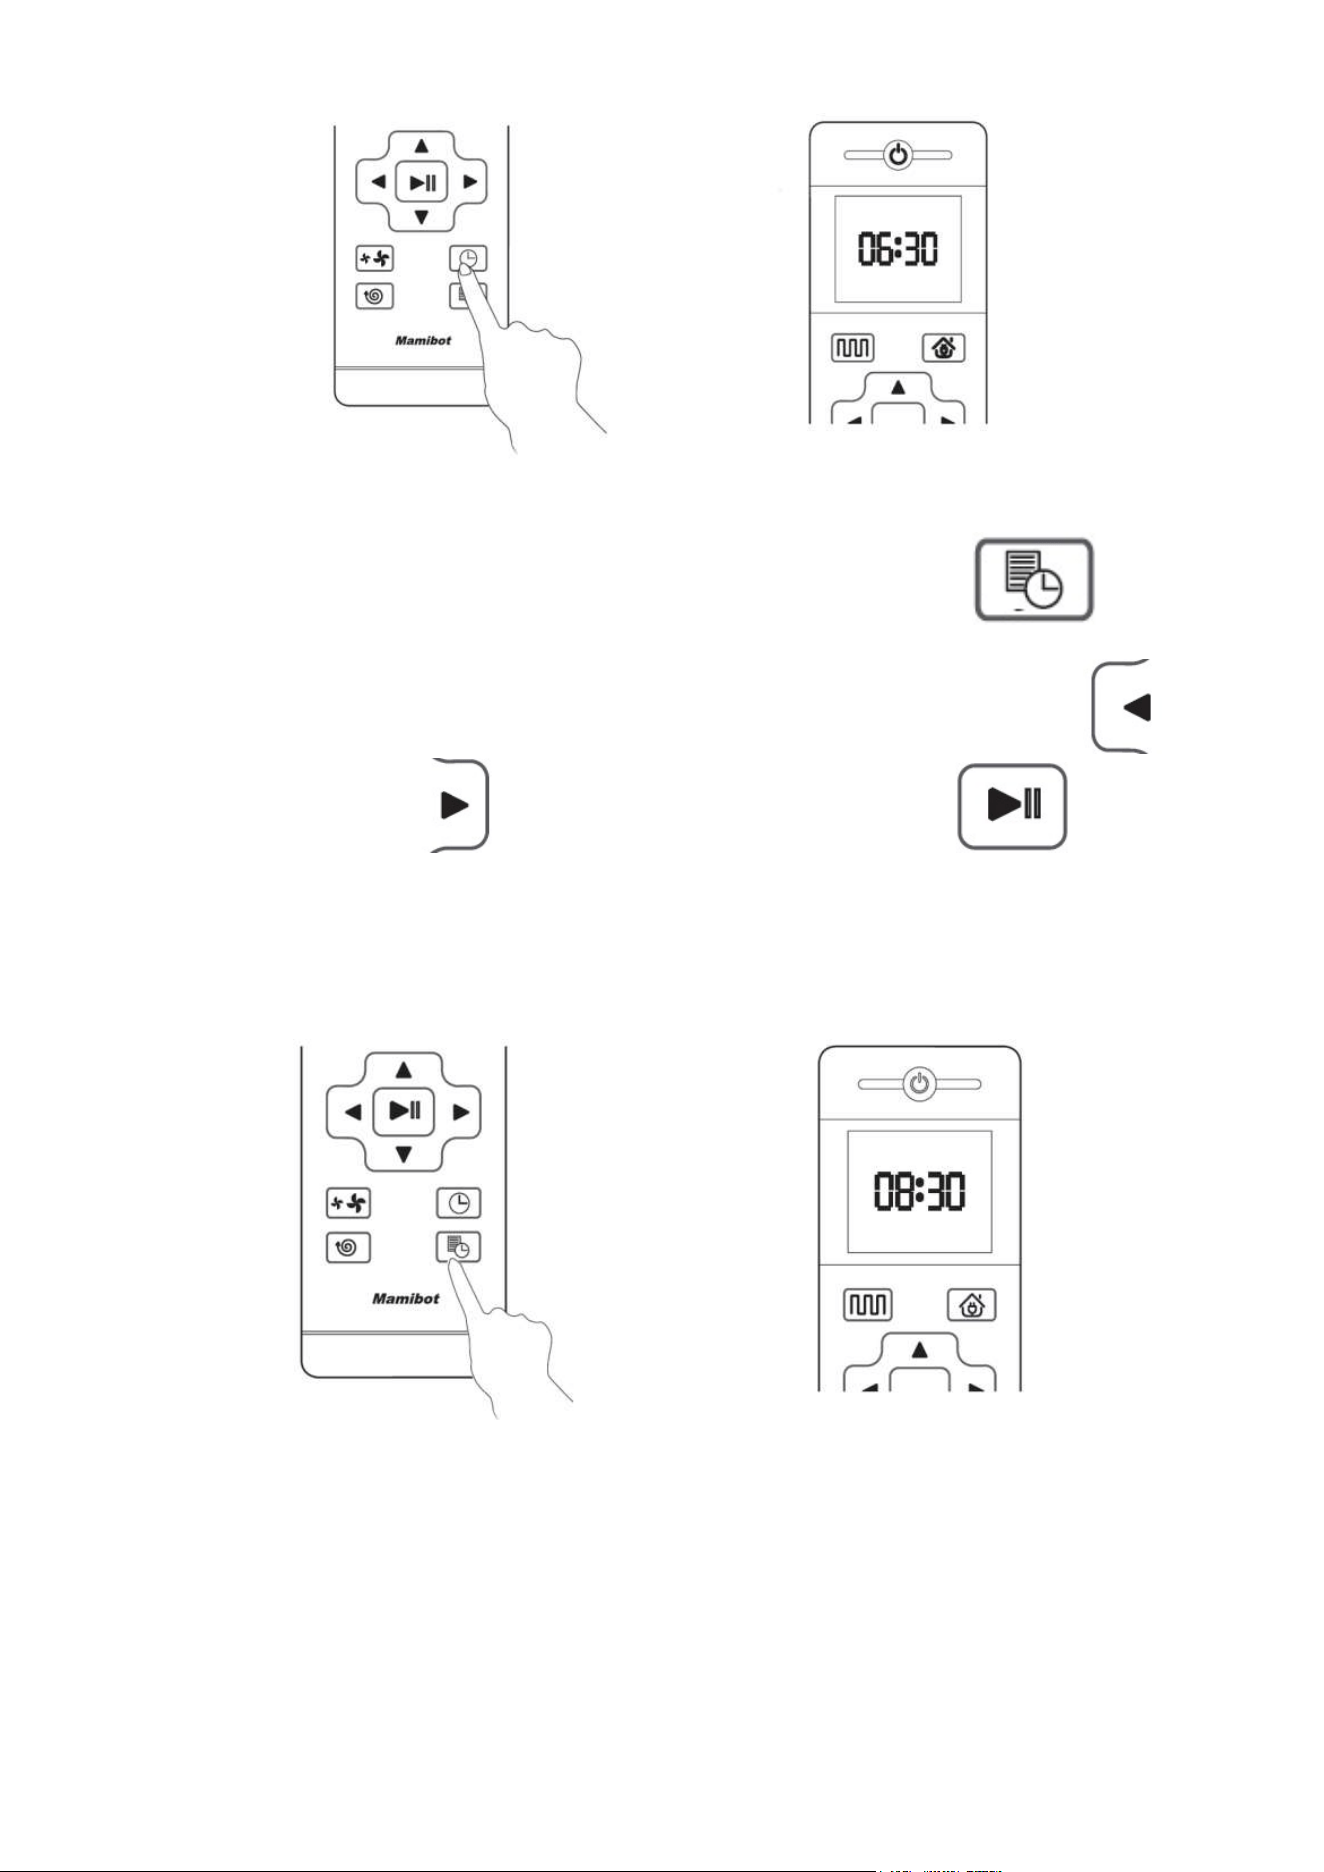
21
7.5. Ustawianie harmonogramu.
W celu zaplanowania pracy robota GLORY naciśnij na pilocie przycisk
Następnie ustaw godzinę i minutę rozpoczęcia pracy. Godzinę strzałką w lewo , a
minutę strzałką w prawo . Zatwierdź ustawienia przyciskiem .
Poniższe, przykładowe ustawienie spowoduje, że GLORY będzie automatycznie
rozpoczynał sprzątanie codziennie o 8:30
Harmonogram można również ustawić za pomocąaplikacji.
Uwagi:
• Aby GLORY mógł wykonaćsprzątanie w zaplanowanym czasie, włącznik główny w
obudowie musi pozostawać włączony.
• Upewnij się, że poziom naładowania baterii jest wyższy niż 20%. W przeciwnym
wypadku GLORY zacznie od naładowania akumulatora.
• Jeśli główny włącznik zasilania zostanie wyłączony, harmonogram ustawiony pilotem
zdalnego sterowania zostanie anulowany. Harmonogram w aplikacji można anulować
tylko za pośrednictwem aplikacji.
• Harmonogram na pilocie można również anulować ręcznie, naciskając i przytrzymując
przycisk ustawiania przez 3 sekundy.
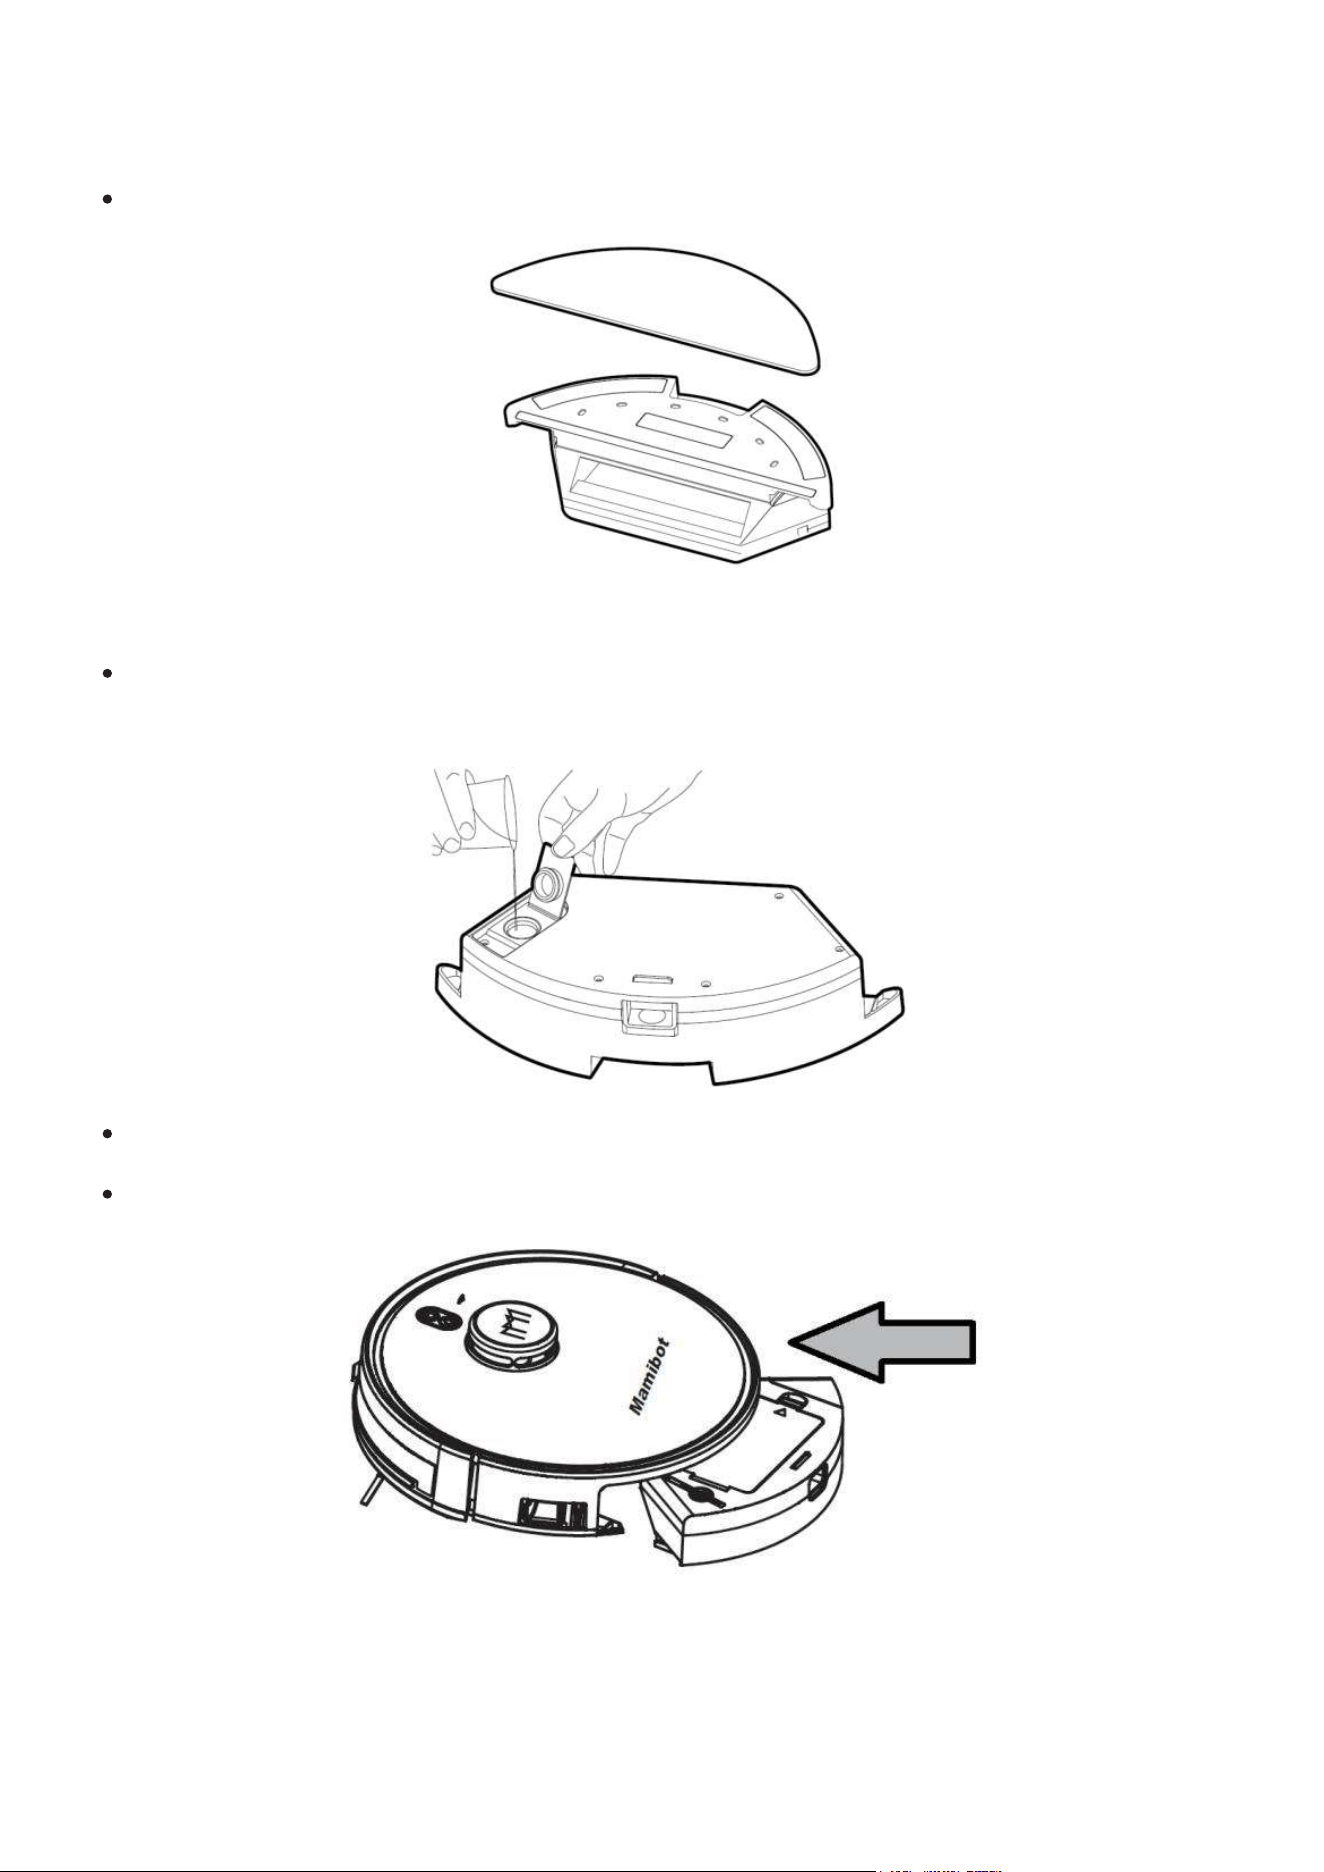
22
7.6. Korzystania ze zbiornika na wodę.
Przymocuj ściereczkę mopa (z mikrofibry) do rzepówv od spodu zbiornika na wodę.
Wyjmij korek uszczelniający, napełnij zbiornik czystą wodą, a następnie dokładnie
zamknij
Wyjmij pojemnik na kurz i w jego miejsce umieść napełniony zbiornik z wodą i
ściereczką mopa.
Uruchom mycie podłogi za pomocą aplikacji lub pilota.
Uwagi:
• Nie kładź zbiornika wody na robocie GLORY podczas ładowania.
• Nie wlewaj do zbiornika brudnej wody, nie dodawaj płynów żrących ani łatwopalnych.
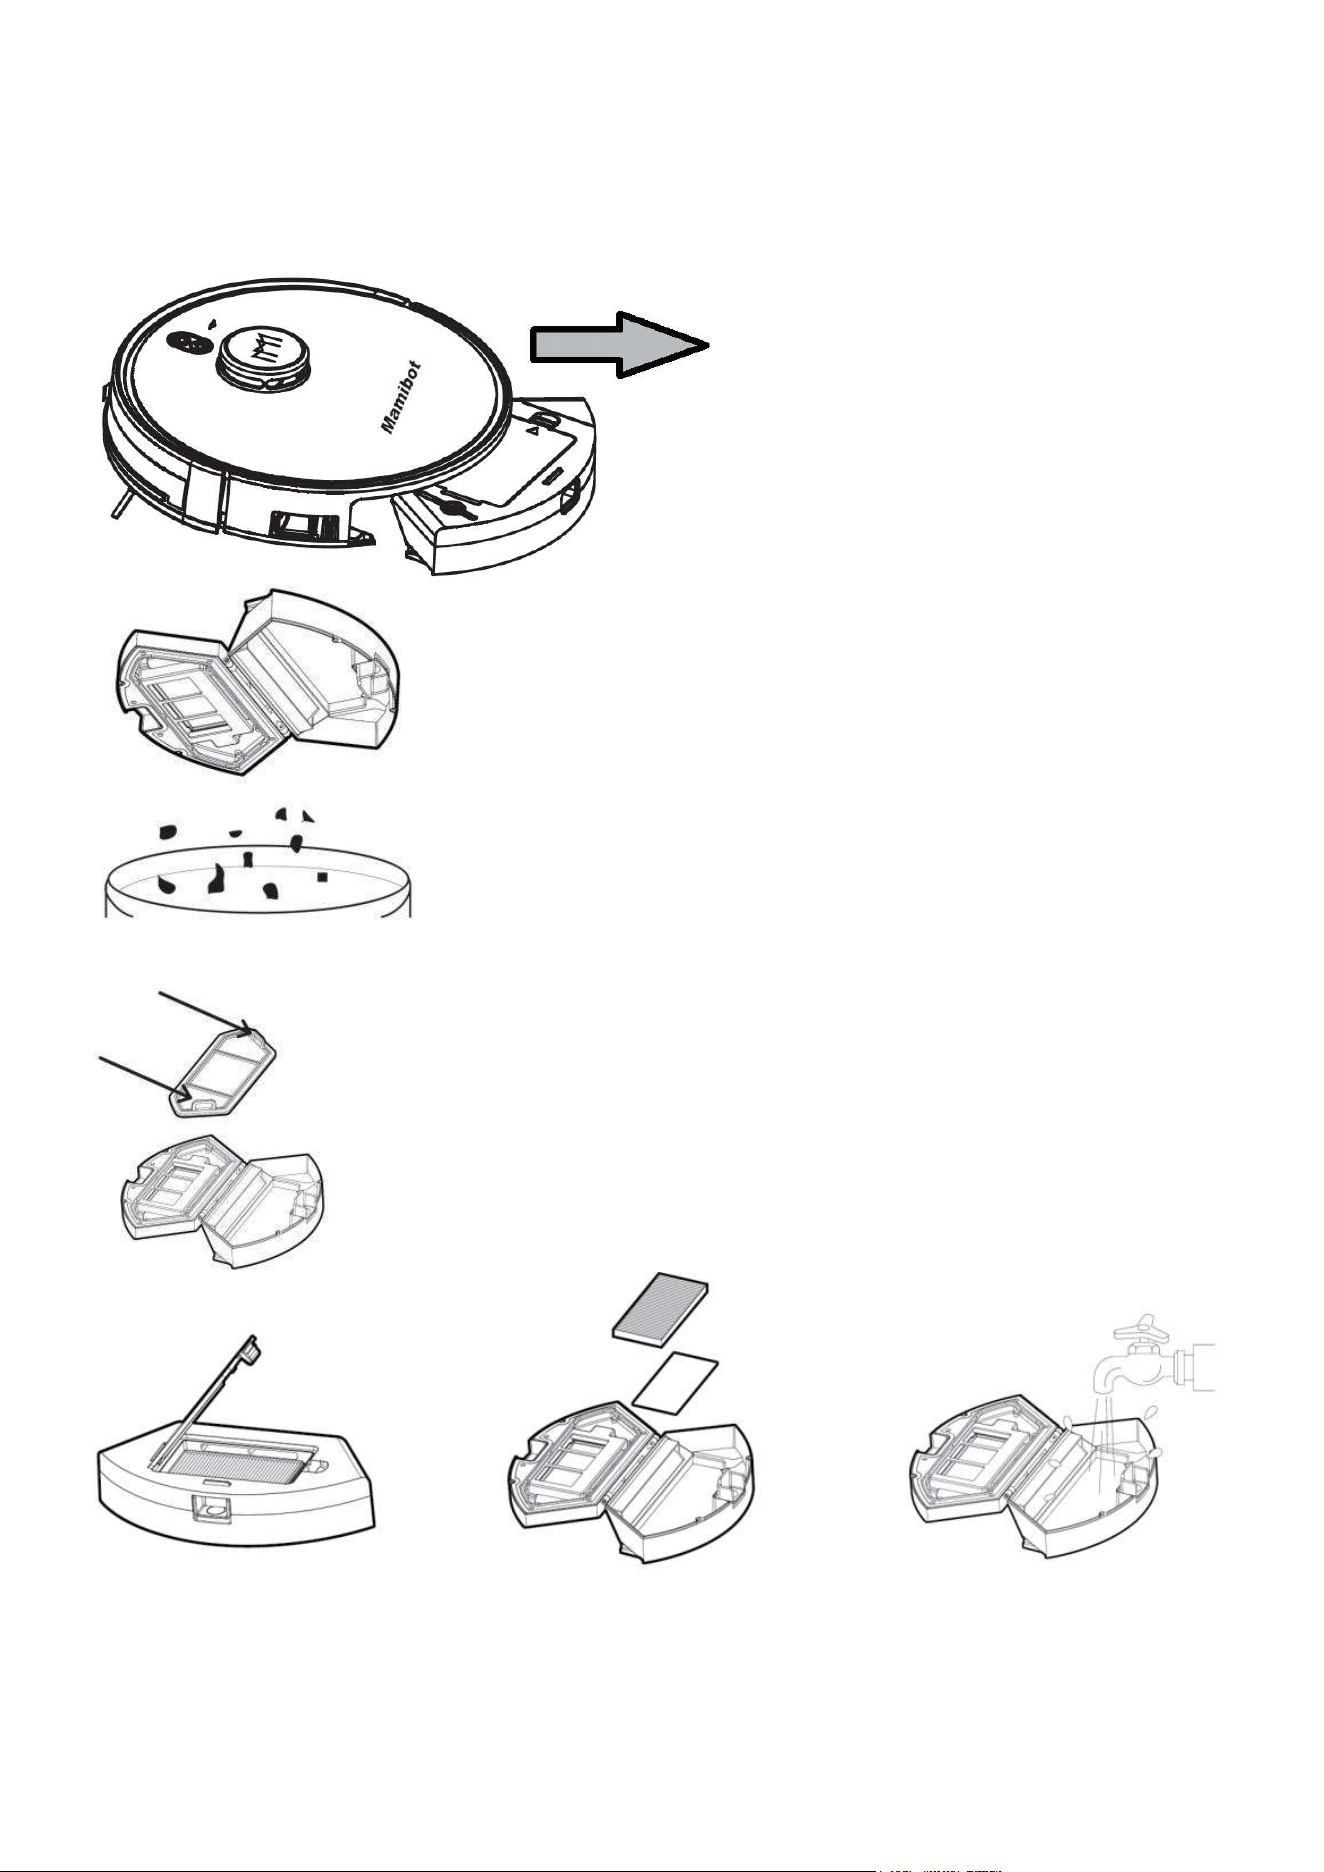
23
8. Czyszczenie i konserwacja robota GLORY
8.1. Czyszczenie zbiornika na kurz i śmieci
• Naciśnij przycisk zwalniający i
wyjmij z robota pojemnik na kurz
• Otwórz pojemnik i usuń zawartość do kosza na śmieci
• Osłona mocująca filtry z siatką wstępnie filtrującą
jest mocowana na dwóch zaczepach.
• Wyjmij osłonę filtra mocowaną na dwóch zaczepach
• Wyjmij filtr piankowy i filtr HEPA
• Filtr HEPA można czyścić tylko na sucho, za pomocą narzędzi czyszczących.
• Nie myj filtra HEPA wodą.
• Pojemnik na kurz, filtr wstępny i filtr piankowy można czyścićza pomocą narzędzi do
czyszczenia lub myć bezpośrednio pod bieżącąwodą. Z wyjątkiem filtra HEPA!
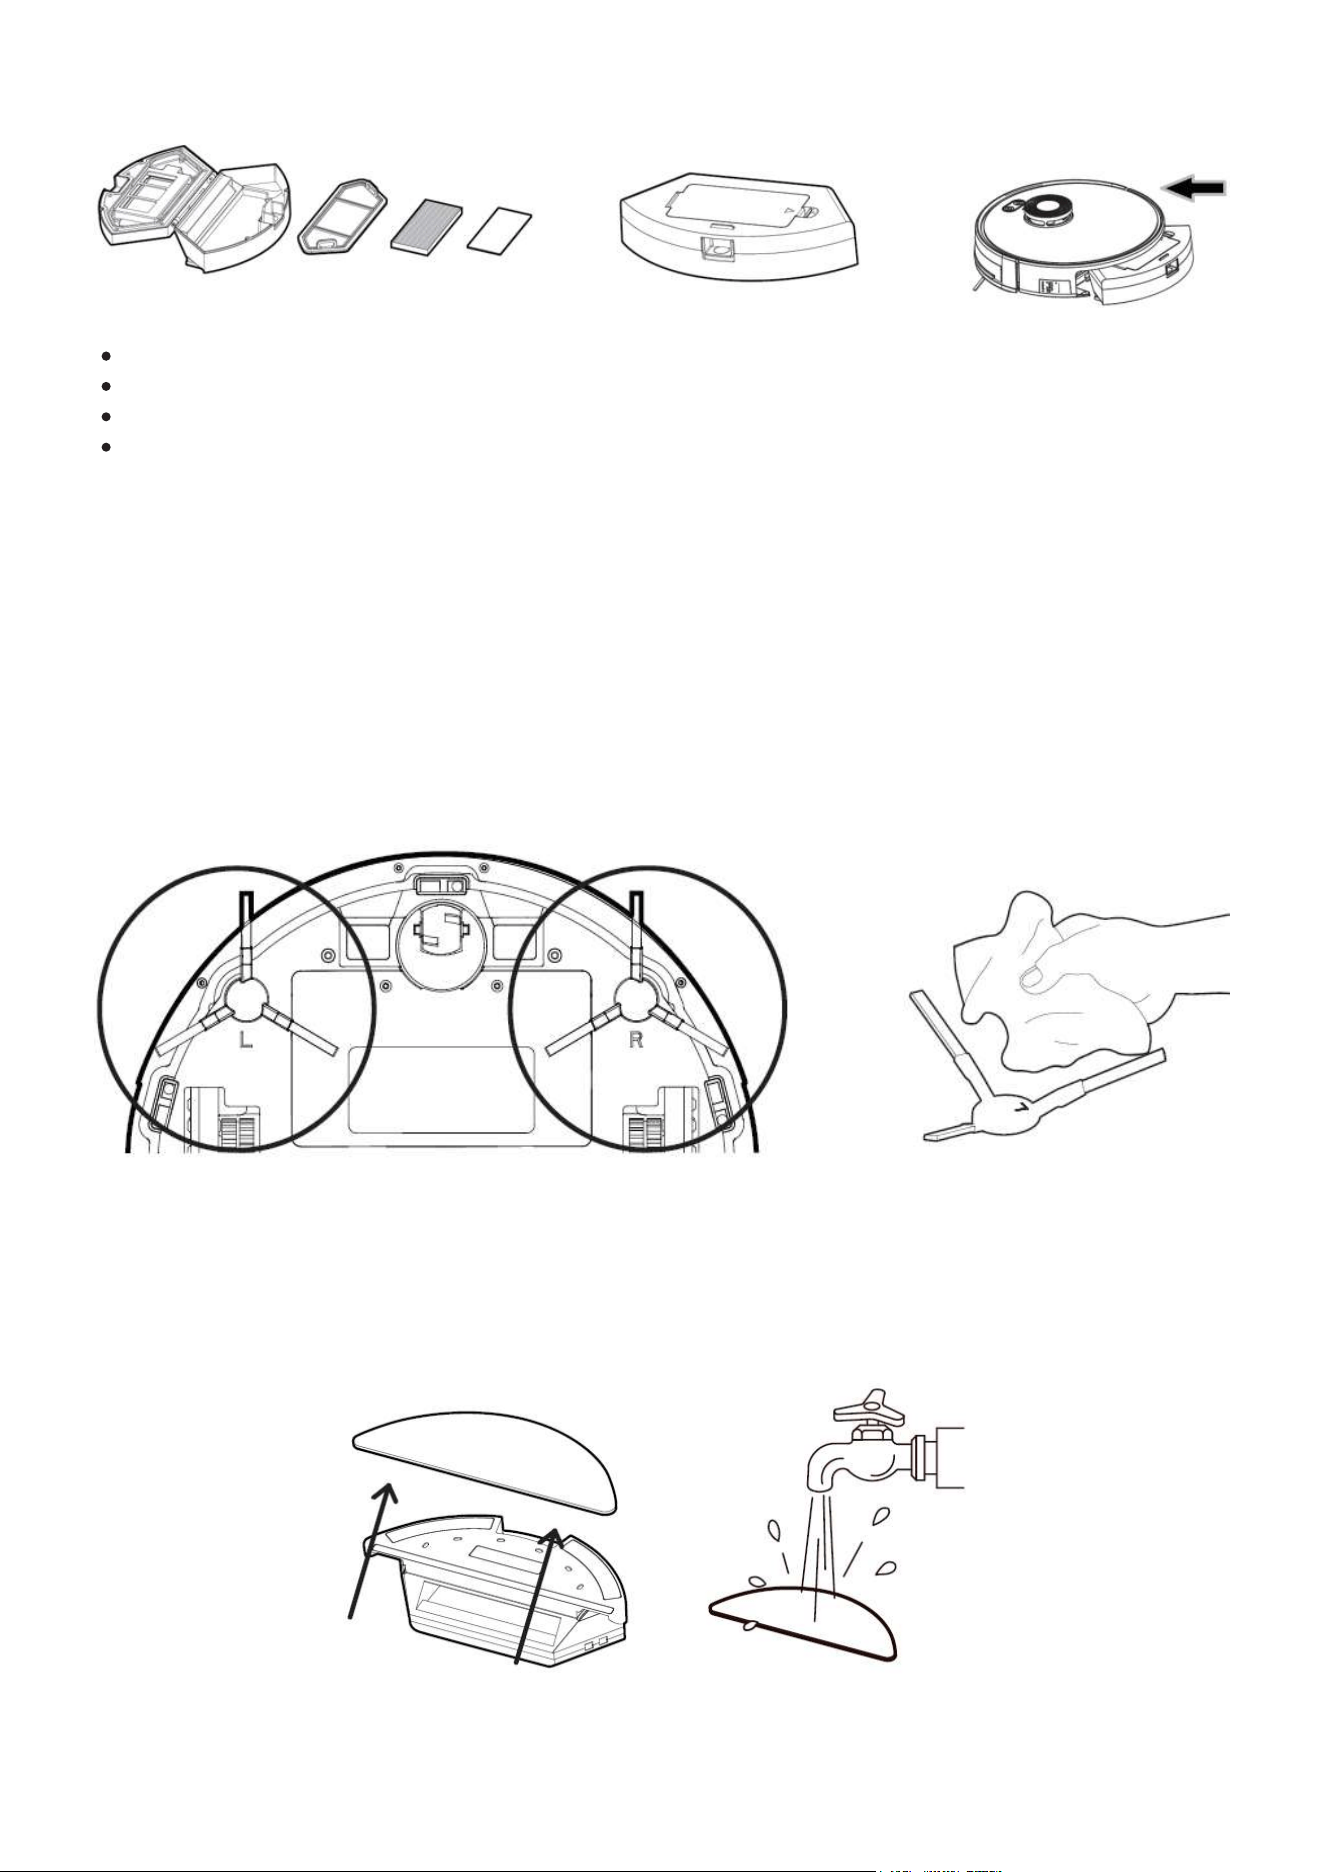
24
Osusz pojemnik na kurz, filtr wstępny i filtr piankowy.
Włóż filtr piankowy, filtr wstępny i HEPA z powrotem do pojemnika na kurz.
Zamontuj osłonę mocującą z siatką.
Włóżskompletowany pojemnik na kurz do jednostki głównej
8.2. Czyszczenie szczotek bocznych.
• Po dłuższym użytkowaniu szczotki boczne mogą być powyginane lub uszkodzone.
• Odkształcone szczotki boczne można próbować przywrócić do pierwotnego kształtu za
pomocągorącej wody. Proszę uważać na ręce, aby sięnie poparzyć.
• Uszkodzone szczotki należy wymienić.
• Po zdjęciu, szczotki boczne należy wyczyść przyrządem do czyszczenia lub miękką
szmatką.
• Upewnij się przy montażu, że szczotki boczne prawa R i lewa L sązakładane zgodnie z
oznaczeniem L i R na obudowie GLORY.
8.3. Czyszczenie zbiornika na wodę
• Zwolnij przycisk blokady i wyciągnij zbiornik na wodę.
• Odczep ściereczkę mopa od zbiornika na wodę, wypłucz w czystej wodzie, a następnie
wysusz.
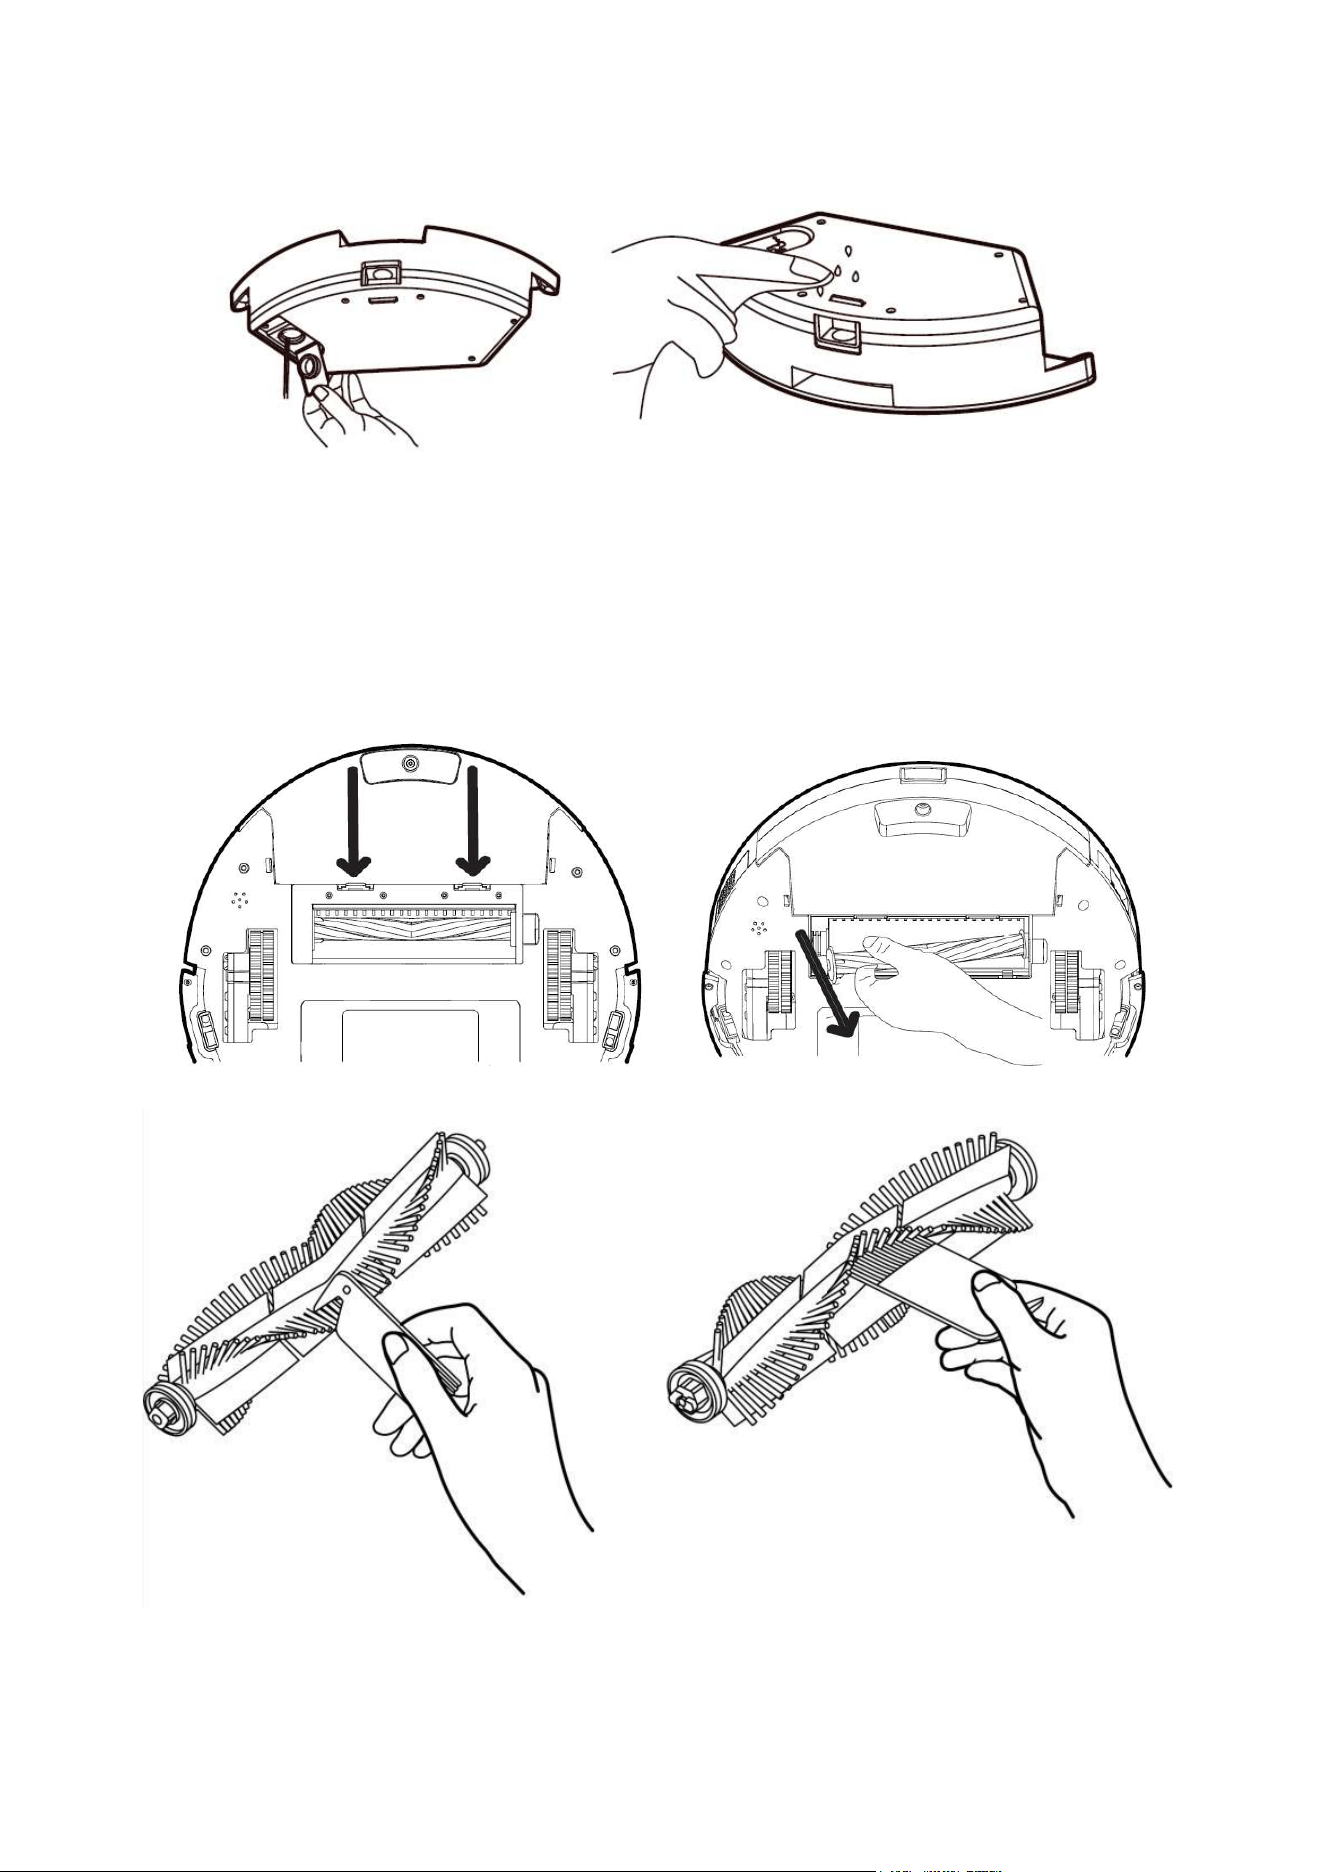
25
• Wylej pozostałą w zbiorniku wodę, wypłucz pojemnik i wyczyść miękką szmatką.
8.4. Czyszczenie głównej szczotki obrotowej
• Zwolnij dwa zaczepy i zdejmij osłonę szczotki. Wyciągnij pod kątem wałek szczotki.
• Oczyścić szczotkę za pomocą narzędzi czyszczących, dokładnie wyczesując włosie.
• Zamontuj z powrotem wykonując czynności w odwrotnej kolejności.
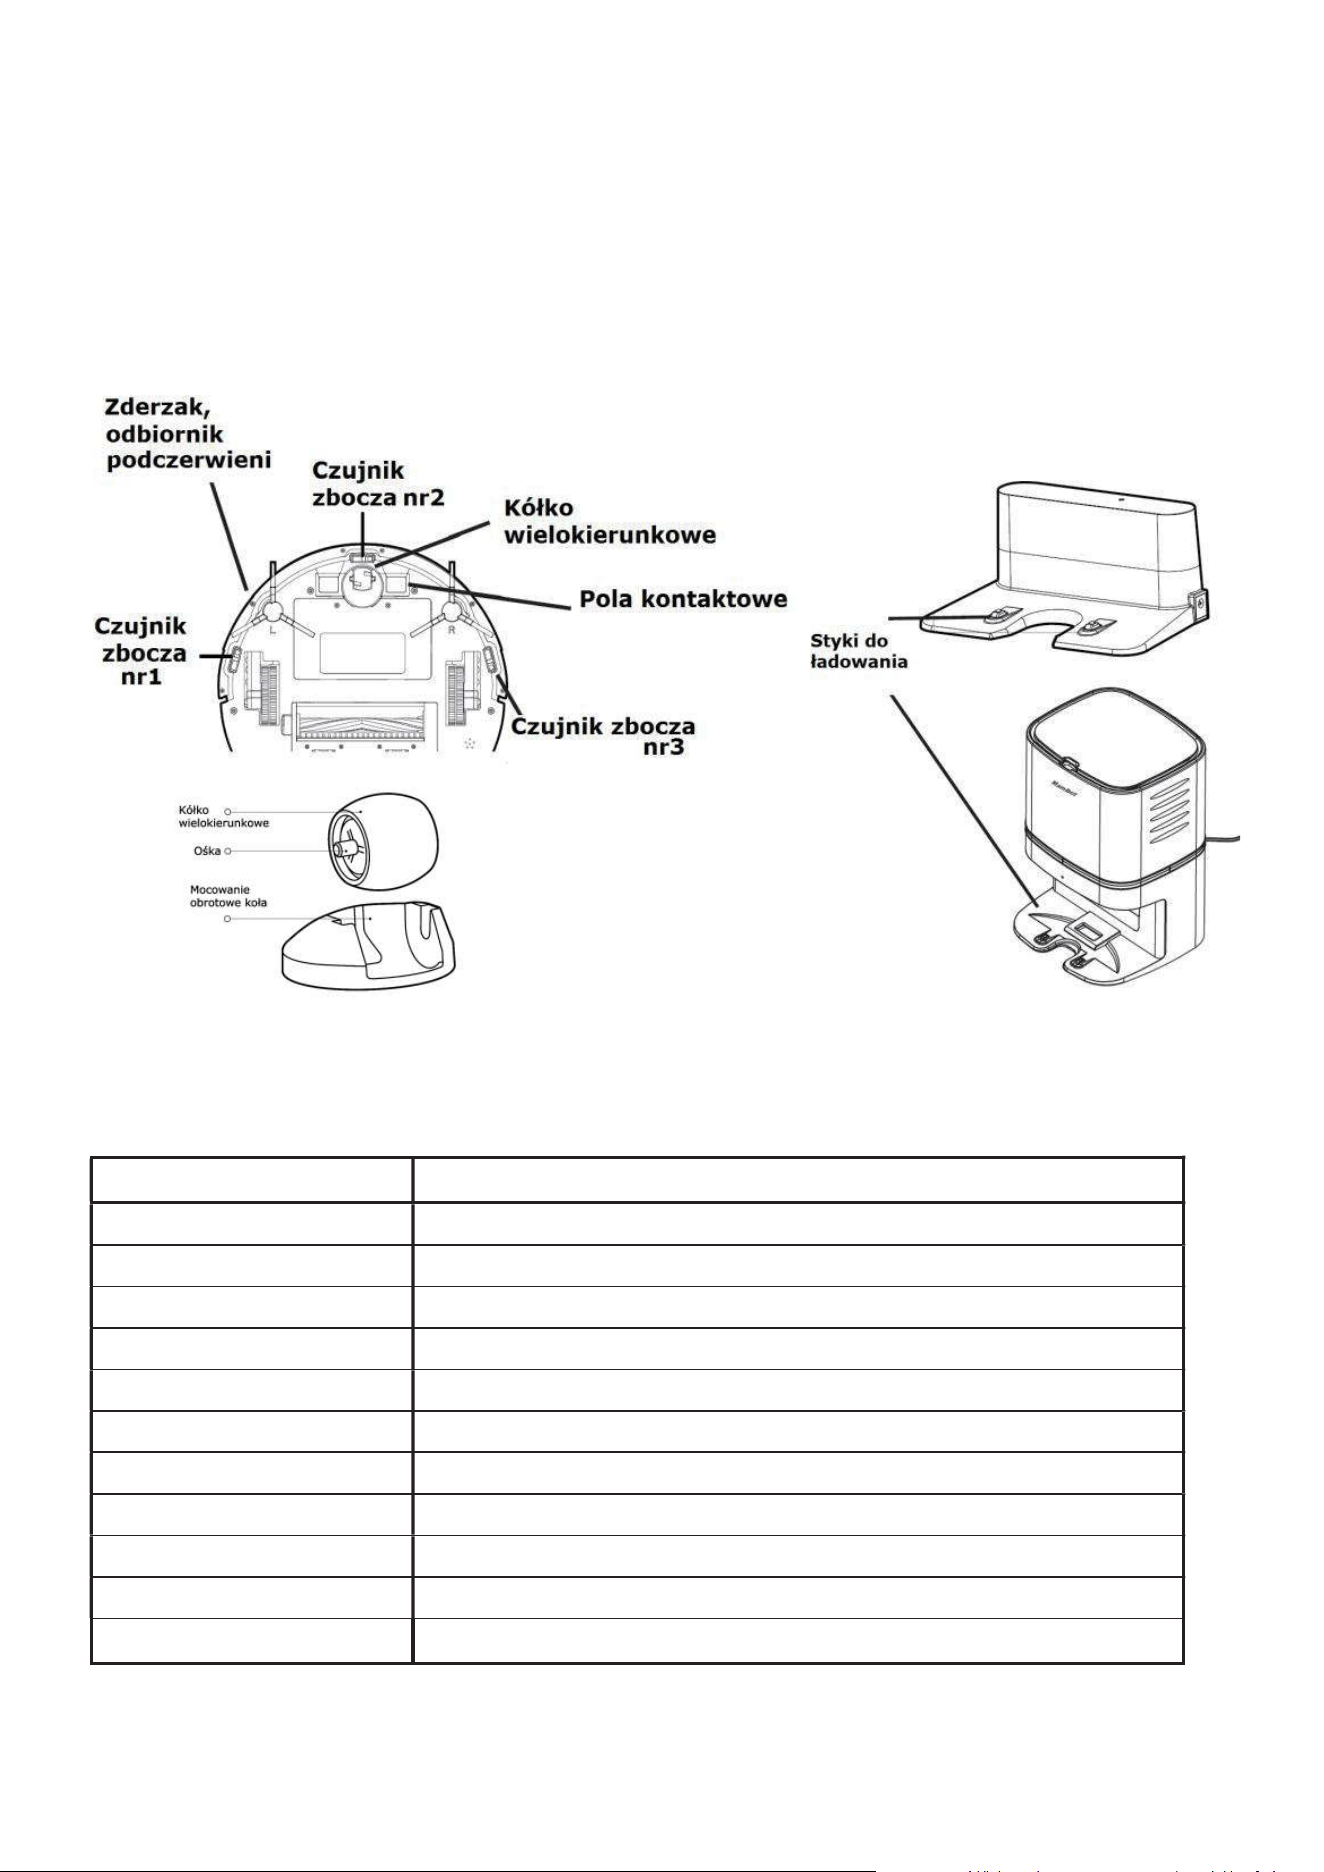
26
8.5. Czyszczenie pozostałych, istotnych elementów
• Wyczyść miękką szmatką trzy czujniki zbocza/uskoku zapobiegające upadkowi.
• Wyczyść zderzak i odbiornik podczerwieni miękką szmatką.
• Wyczyść pola i styki kontaktowe służące do ładowania akumulatora GLORY. Dwa na
spodzie robota i dwa w bazie ładującej.
• Wyciągnij uniwersalne koło i usuń z osi nawinięte lub zaplątane włosy, nitki lub inne
zanieczyszczenia, a następnie zamontuj je ponownie po zakończeniu czyszczenia.
9. Zalecany harmonogram czyszczenia i wymiany
elementów.
E
l
e
m
e
nt
H
a
r
m
on
o
gr
a
m
S
z
c
z
o
t
k
i
g
łó
w
na
i
b
o
c
z
n
e
C
zy
śc
i
ć
r
a
z
w
m
i
e
s
i
ą
c
u
P
o
j
e
m
n
i
k
n
a
k
u
r
z
C
zy
śc
i
ć
po
op
r
ó
ż
n
ie
n
iu
,
p
o
k
a
ż
d
yc
h
2
-
4
u
ży
c
ia
c
h
Fi
l
t
r
H
E
P
A
C
zy
śc
i
ć
po
k
a
ż
d
y
c
h
2
-
4
u
ży
c
i
a
c
h
.
W
y
m
i
an
a
c
o
3
-
6
m
i
e
s
i
ę
c
y
Fi
l
t
r
w
st
ępn
y
i
p
ia
n
k
o
w
y
C
zy
śc
i
ć
po
k
a
ż
d
y
c
h
2
-
4
u
ży
c
i
a
c
h
.
W
y
m
i
an
a
c
o
3
-
6
m
i
e
s
i
ę
c
y
Ś
c
ie
r
e
c
z
k
a
mo
p
a
C
zy
śc
i
ć
po
k
a
ż
d
y
m
u
ży
c
iu
.
W
y
m
i
a
na
c
o
6
-
12
m
i
e
s
ię
c
y
K
ó
ł
k
o
p
r
z
edn
ie
C
zy
śc
i
ć
r
a
z
w
m
i
e
s
i
ą
c
u
O
d
b
io
r
n
i
k
I
R
C
zy
śc
i
ć
r
a
z
w
m
i
e
s
i
ą
c
u
Zd
e
r
z
a
k
C
zy
śc
i
ć
r
a
z
w
m
i
e
s
i
ą
c
u
S
t
y
k
i
e
l
e
k
t
r
y
c
z
n
e
C
zy
śc
i
ć
r
a
z
w
m
i
e
s
i
ą
c
u
La
m
p
a
U
V
(
j
e
ś
l
i
j
e
s
t
)
P
r
z
e
t
r
zy
j
z
k
u
r
z
u
p
r
z
ed
u
ży
c
i
e
m
P
o
r
t
s
ys
t
e
m
u
o
d
s
y
s
an
ia
C
zy
śc
i
ć
r
a
z
w
m
i
e
s
i
ą
c
u
UWAGA: Rzeczywista częstotliwość w/w czynności powinna być uzależniona od stopnia
wykorzystywania robota i poziomu zanieczyszczenia obsługiwanych pomieszczeń.

27
10. Rozwiązywanie problemów
Jeśli podczas pracy odkurzacza zauważysz jakiśproblem, skorzystaj z poniższej listy:
Robot GLORY na nic nie reaguje. Włącz główny włącznik z boku obudowy.
Nie można włączyć urządzenia. Poziom naładowania baterii jest za niski. Umieść
odkurzacz w stacji ładującej, aby się naładował. Temperatura akumulatora jest za niska
lub za wysoka. Urządzenie należy używać w zakresie dodatnich temperatur 4 - 40 st. C.
Nie można naładować odkurzacza. Stacja ładująca nie jest podłączona. Upewnij się,
że oba końce kabla zasilającego są prawidłowo podłączone (do kontaktu i do stacji). Pola
kontaktowe mogą byćzanieczyszczone. Wyczyść je zarówno na stacji ładującej jak i od
spodu odkurzacza. Sprawdź, czy wskaźnik ładowania świeci.
Długi czas ładowania. W przypadku używania urządzenia w wysokich lub niskich
temperaturach, system automatycznie ogranicza prąd ładowania. Zwiększa to żywotność
baterii. Przyczyną może być również zanieczyszczenie styków ładowania. Wyczyść je
zarówno na stacji ładującej jak i od spodu odkurzacza.
Robot GLORY nie ładuje się automatycznie. W pobliżu stacji ładującej znajduje się
zbyt wiele przeszkód i odkurzacz nie może do niej dotrzeć, lub nie możejej zlokalizować.
Proszę usunąć potencjalne przeszkody, umieścić stacje ładującą na otwartej przestrzeni.
Robot GLORY nie wraca do stacji bazowej. Czujnik lokalizator stacji ładowania jest
zanieczyszczony. Przetrzyj czujnik w robocie oraz obudowę stacji dokującej.
Nieprawidłowe zachowanie. Proszę wyłączyć i włączyć jednostkę główną. Sprawdź,
czy laser nie został zablokowany, nie może się obracać. Usuń wszelkie blokady i spróbuj
ponownie. Zderzak zablokował się. Aby usunąć obce ciała, lekko stuknij zderzak.
Wyczyśćwszystkie czujniki.
Nietypowy hałas podczas sprzątania. W szczotkę główną, boczną lub koła zaplątały
się obce ciała (włosy, nitki, tasiemki). Proszę je usunąć po wyłączeniu zasilania.
Zmniejszona wydajność sprzątania, na podłodze pozostają śmieci i kurz.
Pojemnik na kurz i śmieci jest pełny. Opróżnij go. Filtry mogą być zablokowany. Wyczyść
je. W główną szczotkę zaplątały się ciała obce. Proszę wyczyścić.
Nie działa pilot zdalnego sterowania. Wymień baterie w pilocie, wyczyść okienko
odbiornika / czujniki w odkurzaczu.
Robot GLORY nie wykonał zaplanowanego zadania. Wyłączenie głównego
wyłącznika zasilania wymazuje zadania zaplanowane pilotem zdalnego sterowania.
Programuj zadania aplikacją w smartfonie. Poziom naładowania baterii jest niski.
Zaplanowane czyszczenie można rozpocząć tylko wtedy, gdy poziom naładowania
akumulatora jest wyższy niż 20%.
Robot GLORY porusza się w nietypowy sposób. Główne koła mogły się zablokować
po wkręceniu nitek, włosów lub innych obiektów. Oczyść koła i uruchom odkurzacz
ponownie.
Uwaga: Zresetowanie systemu i /lub aktualizacja oprogramowania mogą rozwiązać
niektóre problemy.

28
11. Anatomia robota GLORY
UWAGA:
Odkurzacz GLORY jest przeznaczony wyłącznie do użytku domowego, do pracy wewnątrz
pomieszczeń, dobrze sprawdza się na podłogach twardych, drewnianych, marmurowych i
na wykładzinach lub dywanach z krótkim włosem.

29
12. Informacja o gwarancji.
Gwarancja.
Firma MAMIBOT gwarantuje, że z wyłączeniem niżej wyszczególnionych ograniczeń,
Produkt (z wyłączeniem baterii, akumulatorów) będzie prawidłowo działał przez okres
dwóch lat (24 miesiące) od daty zakupu.
Gwarancja na akumulator: 12 miesięcy.
Gwarancji udziela użytkownikowi końcowemu sprzedawca. Wszelkie sprawy związane z
realizacją roszczeń gwarancyjnych należy załatwiać u sprzedawcy.
Gwarancja obejmuje wyłącznie wady materiałowe lub produkcyjne.
Gwarancja nie obejmuje elementów podlegających naturalnemu zużyciu, materiałów
eksploatacyjnych (nakładki czyszczące, baterie, linka zabezpieczająca itp.).
Gwarancja nie obejmuje uszkodzeń mechanicznych.
Gwarancja traci ważność w przypadku stwierdzenia prób samodzielnej naprawy.
Zgłaszając reklamację w ramach gwarancji, należy przedstawić oryginalny, czytelny
dowód zakup z datą zakupu.
Gwarancja nie obejmuje wad wynikających z normalnego zużycia.
Gwarancja nie obejmuje wad spowodowanych nieostrożnym lub niewłaściwym
użytkowaniem, szkód powstałych w wyniku wypadku, pożaru, zalania, uderzenia pioruna
lub innych działań natury, problemów związanych ze złymi parametrami sieci zasilającej.
Gwarancja traci ważność w przypadku uszkodzenia plomb na obudowie (jeśli są), w
przypadku widocznych śladów manipulowania przy urządzeniu, uszkodzeń
spowodowanych używaniem w sposób inny, niż ten, do którego produkt został
przeznaczony, nieprzestrzegania instrukcji obsługi, celowego lub umyślnego uszkodzenia,
stosowania części zamiennych lub innych elementów zamiennych (w tym materiałów
eksploatacyjnych), które nie są dostarczone lub zalecane przez producenta, wszelkich
zmian lub modyfikacji produktu, które zostały przeprowadzone przez użytkownika lub
osoby trzecie.
Niniejsza gwarancja jest nieważna, jeśli numer seryjny produktu jest nieczytelny lub go
brak.
30
Informacja o recyklingu i utylizacji (WEEE).
Unia Europejska
Umieszczenie tego symbolu na sprzęcie informuje, żenie należy pozbywać się go wraz z
innymi odpadami z gospodarstwa domowego. Zgodnie z prawem Unii Europejskiej,
zużyty sprzęt elektryczny i elektroniczny, który ma zostać zutylizowany, musi zostać
oddzielony od odpadów domowych. Prywatne gospodarstwa domowe w krajach
członkowskich Unii Europejskiej mogą bezpłatnie zwracać zużyty sprzęt elektryczny i
elektroniczny do wyznaczonych punktów zbi
órki odpadów. Aby uzyskać więcej informacji,
należy skontaktować się z lokalnymi organami zajmującymi się utylizacją odpadów.
W niektórych krajach członkowskich przy zakupie nowego sprzętu lokalny sprzedawca
może mieć obowiązek odebrania zużytego sprzętu bez opłat. Aby uzyskać dodatkowe
informacje, należy skontaktować się ze sprzedawcą.
To urządzenie jest zgodne z dyrektywami europejskimi
mającymi zastosowanie do tego typu produktów.
Producent zastrzega sobie prawo do wprowadzania zmian w urządzeniu
bez specjalnego powiadomienia.
Mamibot Manufacturing USA Inc.
Orange Street #600, New Castle, Wilmington, Delaware 19899, USA9
www.mamibot.com, sales@mamibot.com, Phone: 001 302 428 9888
Producent: Mamibot Manufacturing (Shanghai) Co.Ltd
North 21th, No.1 Building, LN1040 Caoyang Rd, Shanghai, P.R.C.
Dystrybutor na Polskę:
Action S.A. ul. Dawidowska 10, Zamienie, 05-500 Piaseczno

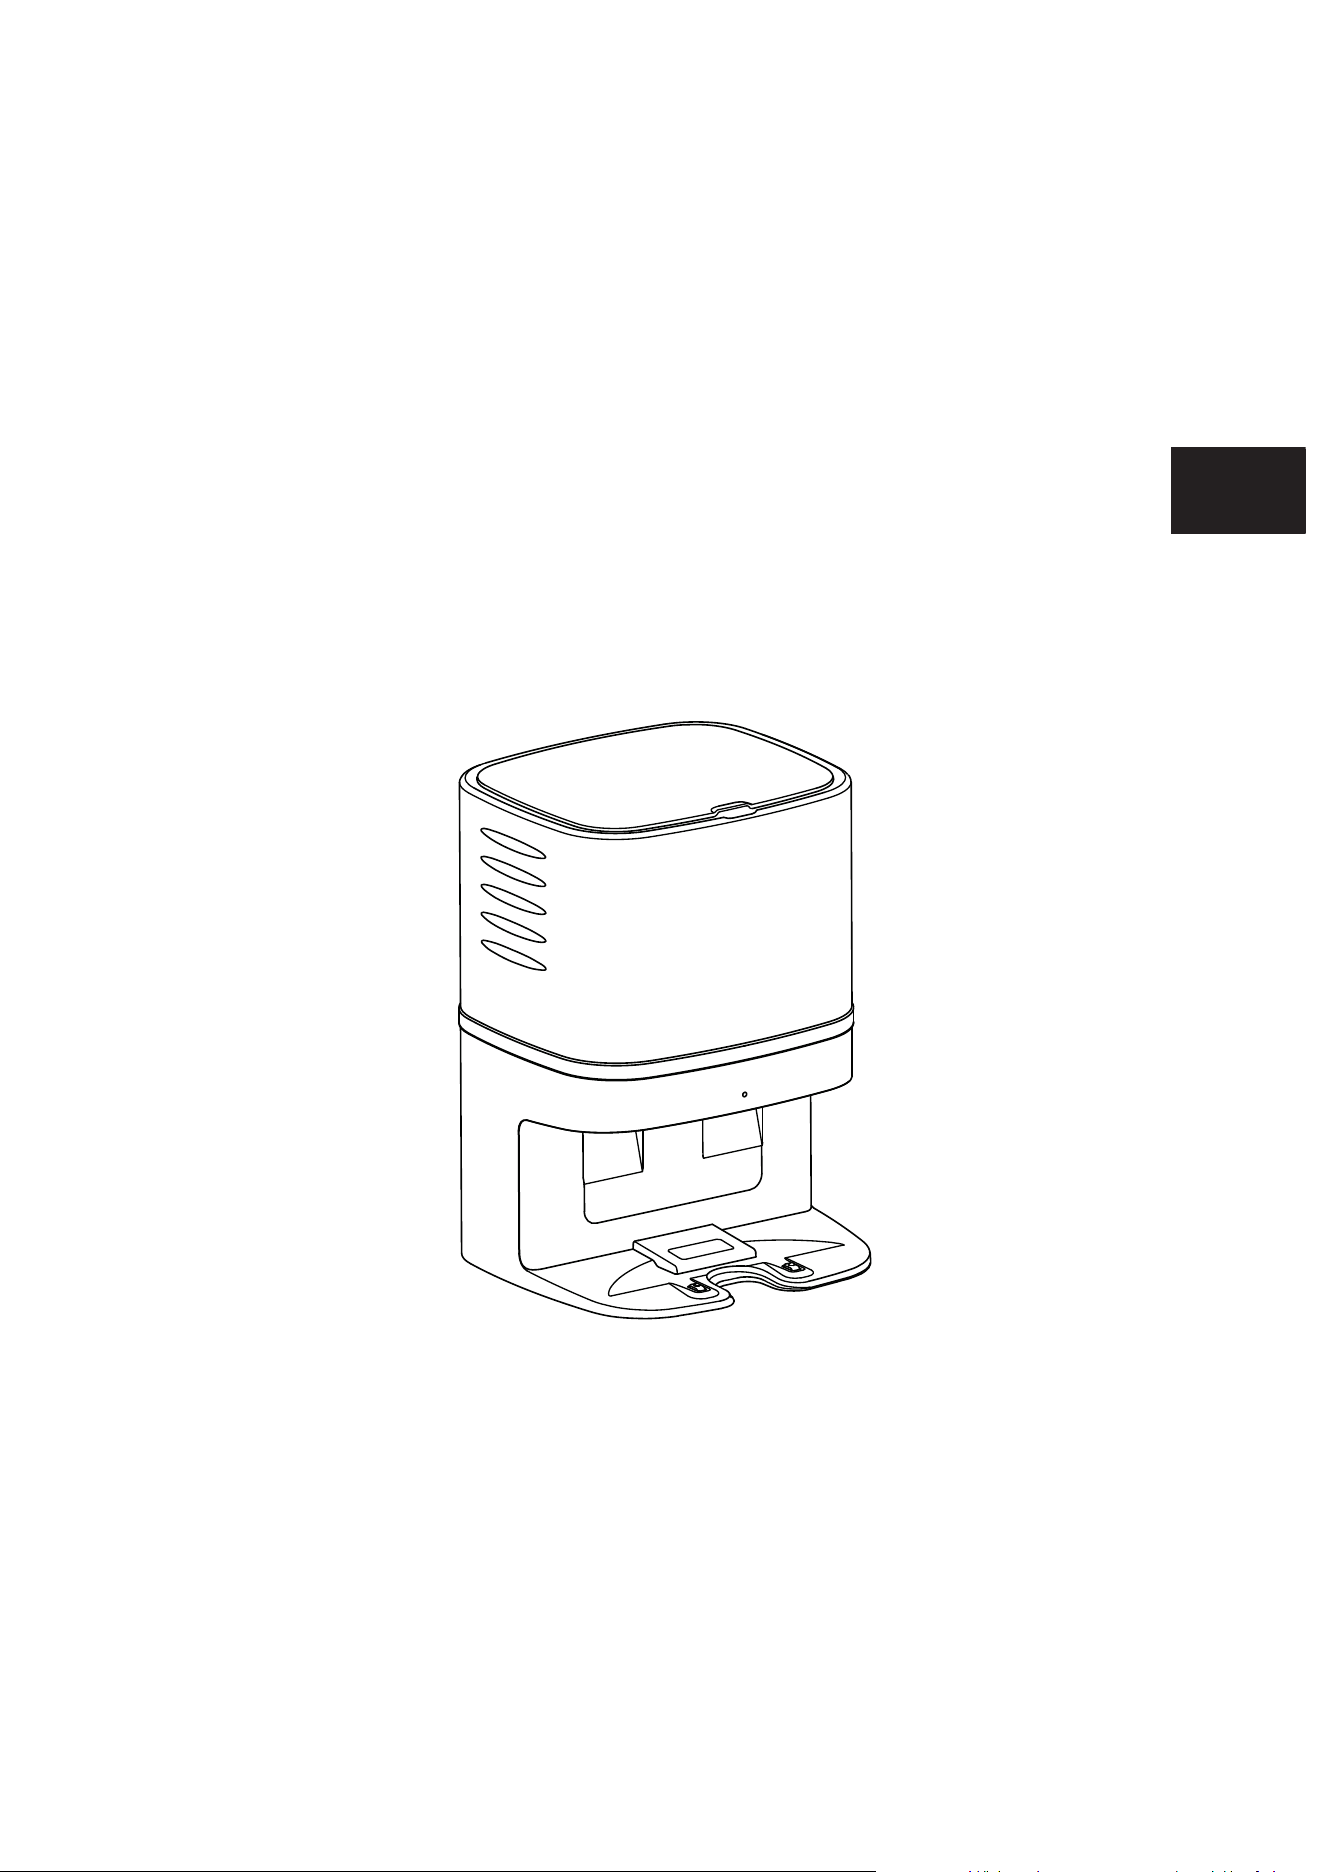
User Manual
Dust Collector -CRAFT X
Mamibot
M
a
m
i
b
o
t
Specified For EXVAC890 GLORY
EN
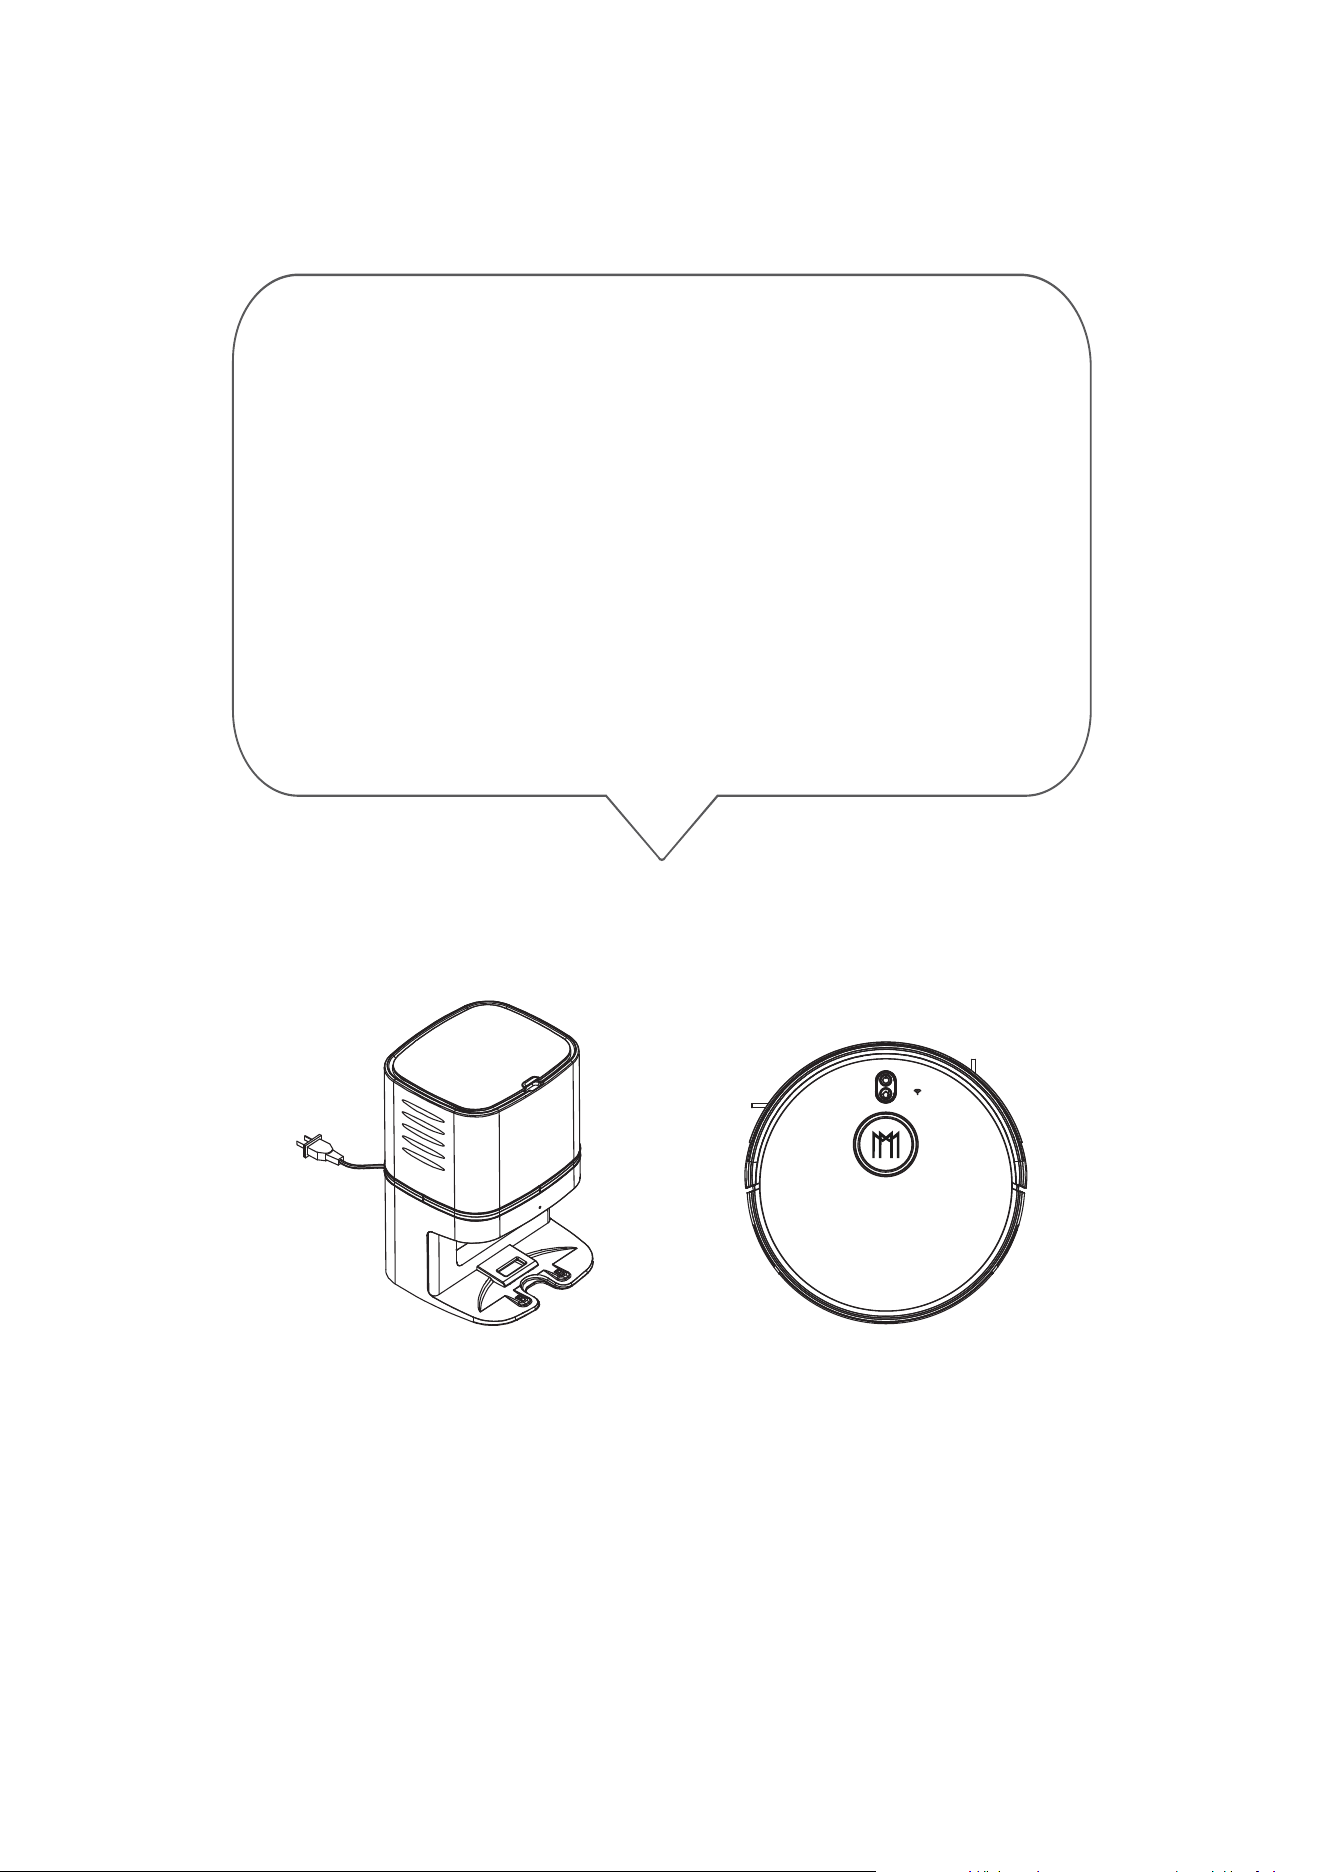
Please read all instructions before using this product, and keep it
properly for future reference.
Thanks for purchasing Mamibot Dust Collector
CRAFT X which is specified for EXVAC890 GLORY.
We hope the configuration of CRAFT X and EXVAC890
GLORY will bring you a smarter, easier, and more
convenient lifestyle.
If you encounter any problem not mentioned herein,
please contact [email protected].
For more details, please visit our official website:
http://www.mamibot.com.
Mamibot
M
am
i
bo
t

1
Safety Instructions
Notes for Main Unit and Components
2
CRAFT X Components
4-6 Operation
Place the Dust Collector - CRAFT X
Place the Disposable Dust Bag
Indicator Status
Charging/Vacuuming
Dust Bag Replacment
3 Specifications
Table of Contents
7 CRAFT X Anatomy
Recycling of CRAFT X
8 Name and Content of Hazardous Substances

1
Warning
01.Do not disassemble,repair or refit CRAFT X without authorization;
otherwise it may damage CRAFT X or pose a hazard.
02.Do not use the product in an environment with risk of fire or explosion.
03.Only the original plug can be used for CRAFT X; otherwise CRAFT X
may be damaged or catch on fire.
04.Do not stand or sit on CRAFT X; doing so could damage CRAFT X or
cause it to fall over.
05.When the metal part of the power plug or charing pins are dusty,
please wipe it with a dry cloth.
06.The power plug is applied to a 100-240V AC voltage. Please plug
into the socket properly and keep away from children.
07.Do not wash or soak the main body and electronic accessories in
water; otherwise CRAFT X may be damaged by a short circuit.
08.Do not damage, load weight on, heat, pull, or bend CRAFT X.
09.This product is for home use. Please do not use it outdoors.
10.Do not allow metal and conductive materials to contact the pins,
doing so may cause a short circuit.
11.Do not allow to be used a toy.
Attention:
01.Do not touch CRAFT X with wet hands; doing so may cause an electric
shock.
02.Please do not place CRAFT X in places where it could easily fall, such
as tables, chairs, high platforms in room, etc.
03.The product has a sophisticated design and should be protected
from long-term exposure to sunlight.
04.Please do not use CRAFT X in humid environments, such as bath-rooms.
05.Please do not place CRAFT X near cigarette butts, lighters or other
open fires.
06.Please clean CRAFT X after charging finished.
07.Please unplug CRAFT X when CRAFT X is out of service for a long time.
08. Please check carefully to see if the plug is connected well for use,
to make sure the EXVAC890 GLORY can find it.
Notes for Main Unit and Components
Please read all instructions carefully, and keep it at hand for setting up,
using and maintaining CRAFT X. Any operation that against the following
instructions may damage CRAFT X or cause injury.
Safety Instructions
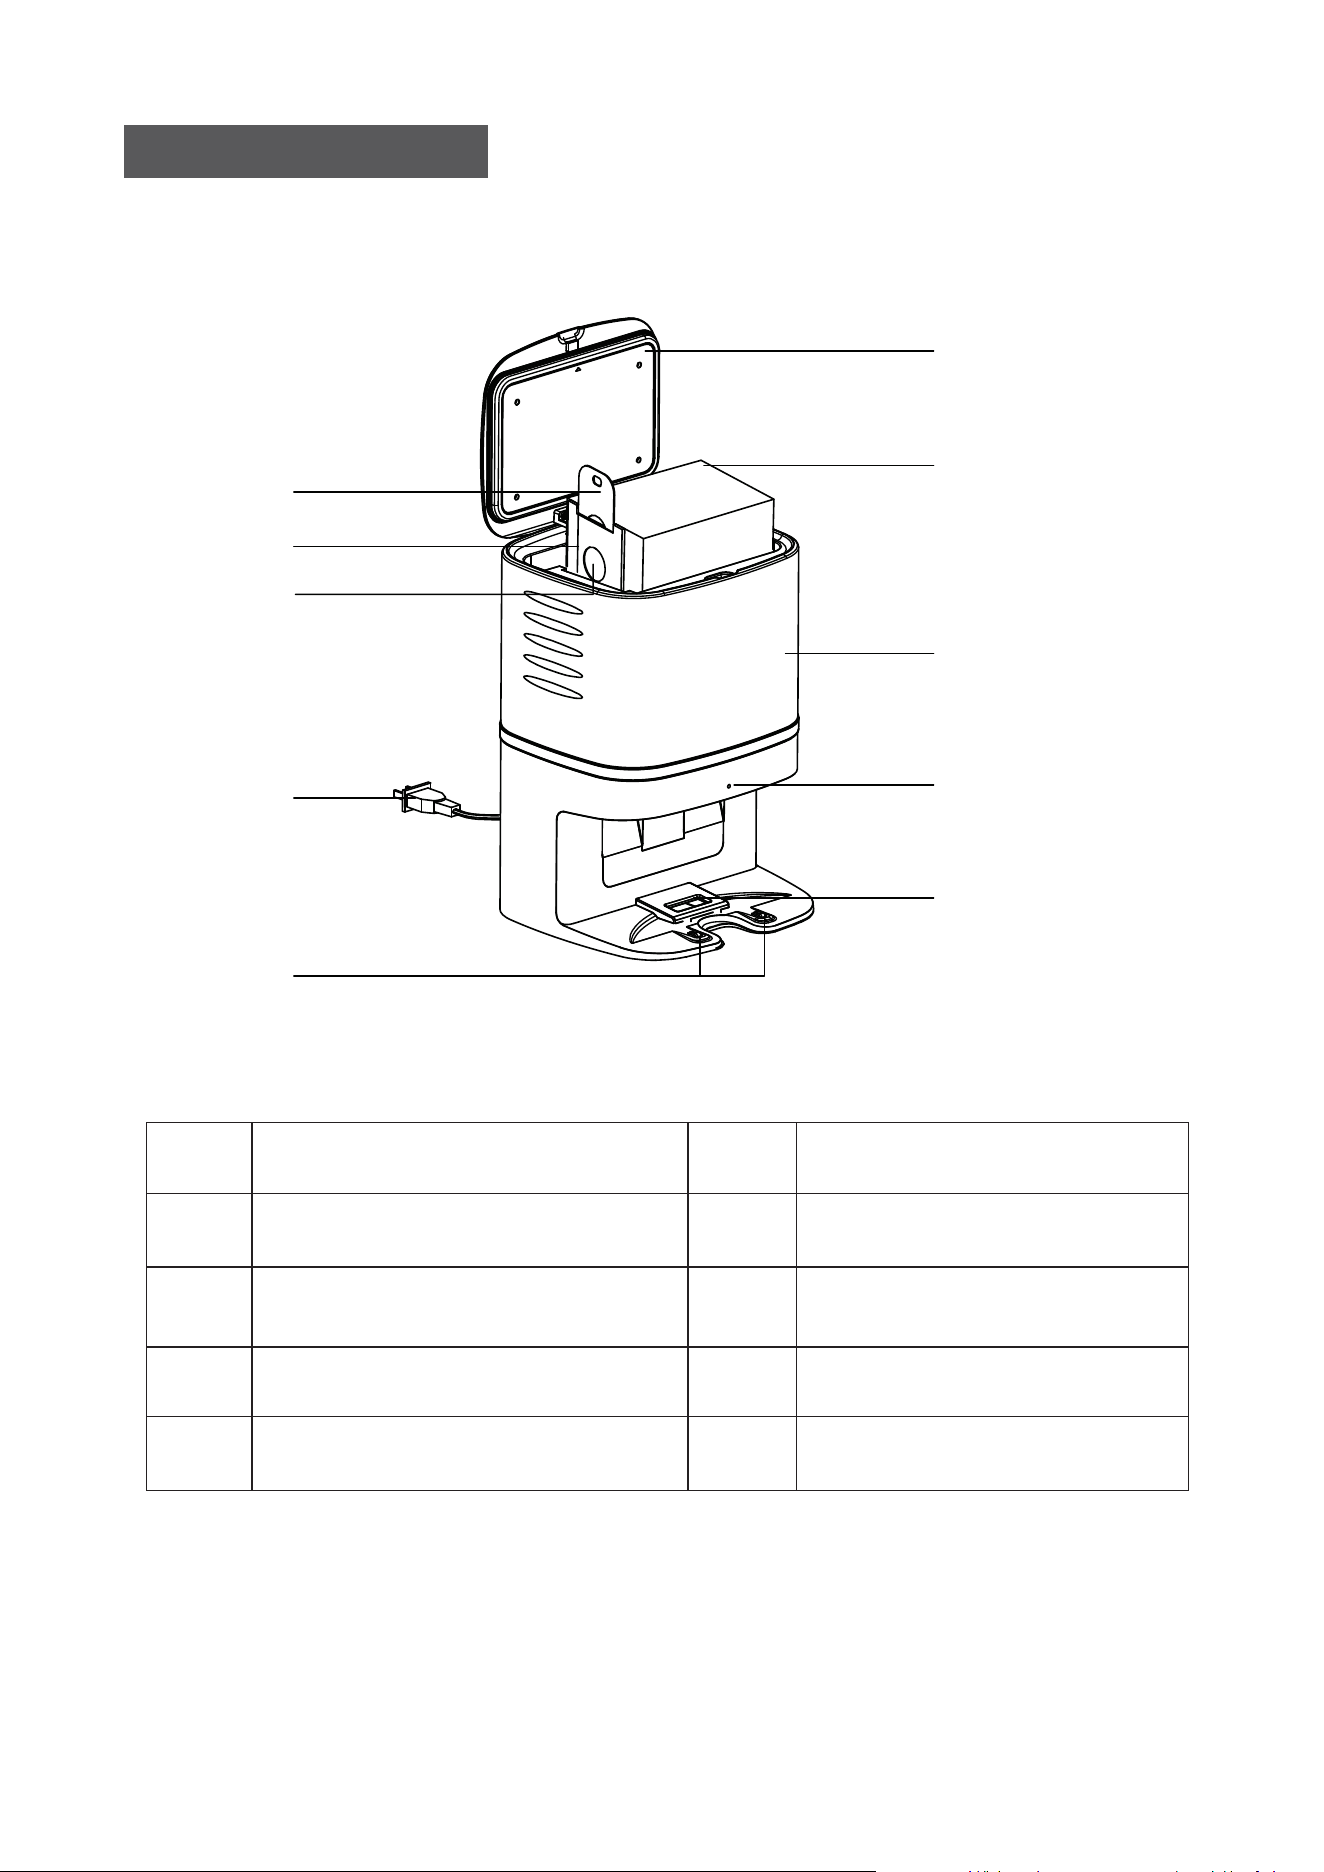
2
10
9
8
4
5
3
1
2
6
7
CRAFT X COMPONENTS
1
2
3
4
5
Lid
Diposable Dust Bagx5pcs
Dust Bag Handle
Dust Bag Cardboard
Dust Bag Suction Port
Mainbody
Power Plug
Indicator
Dust Box Suction Port
Charing Pin
6
7
8
9
10
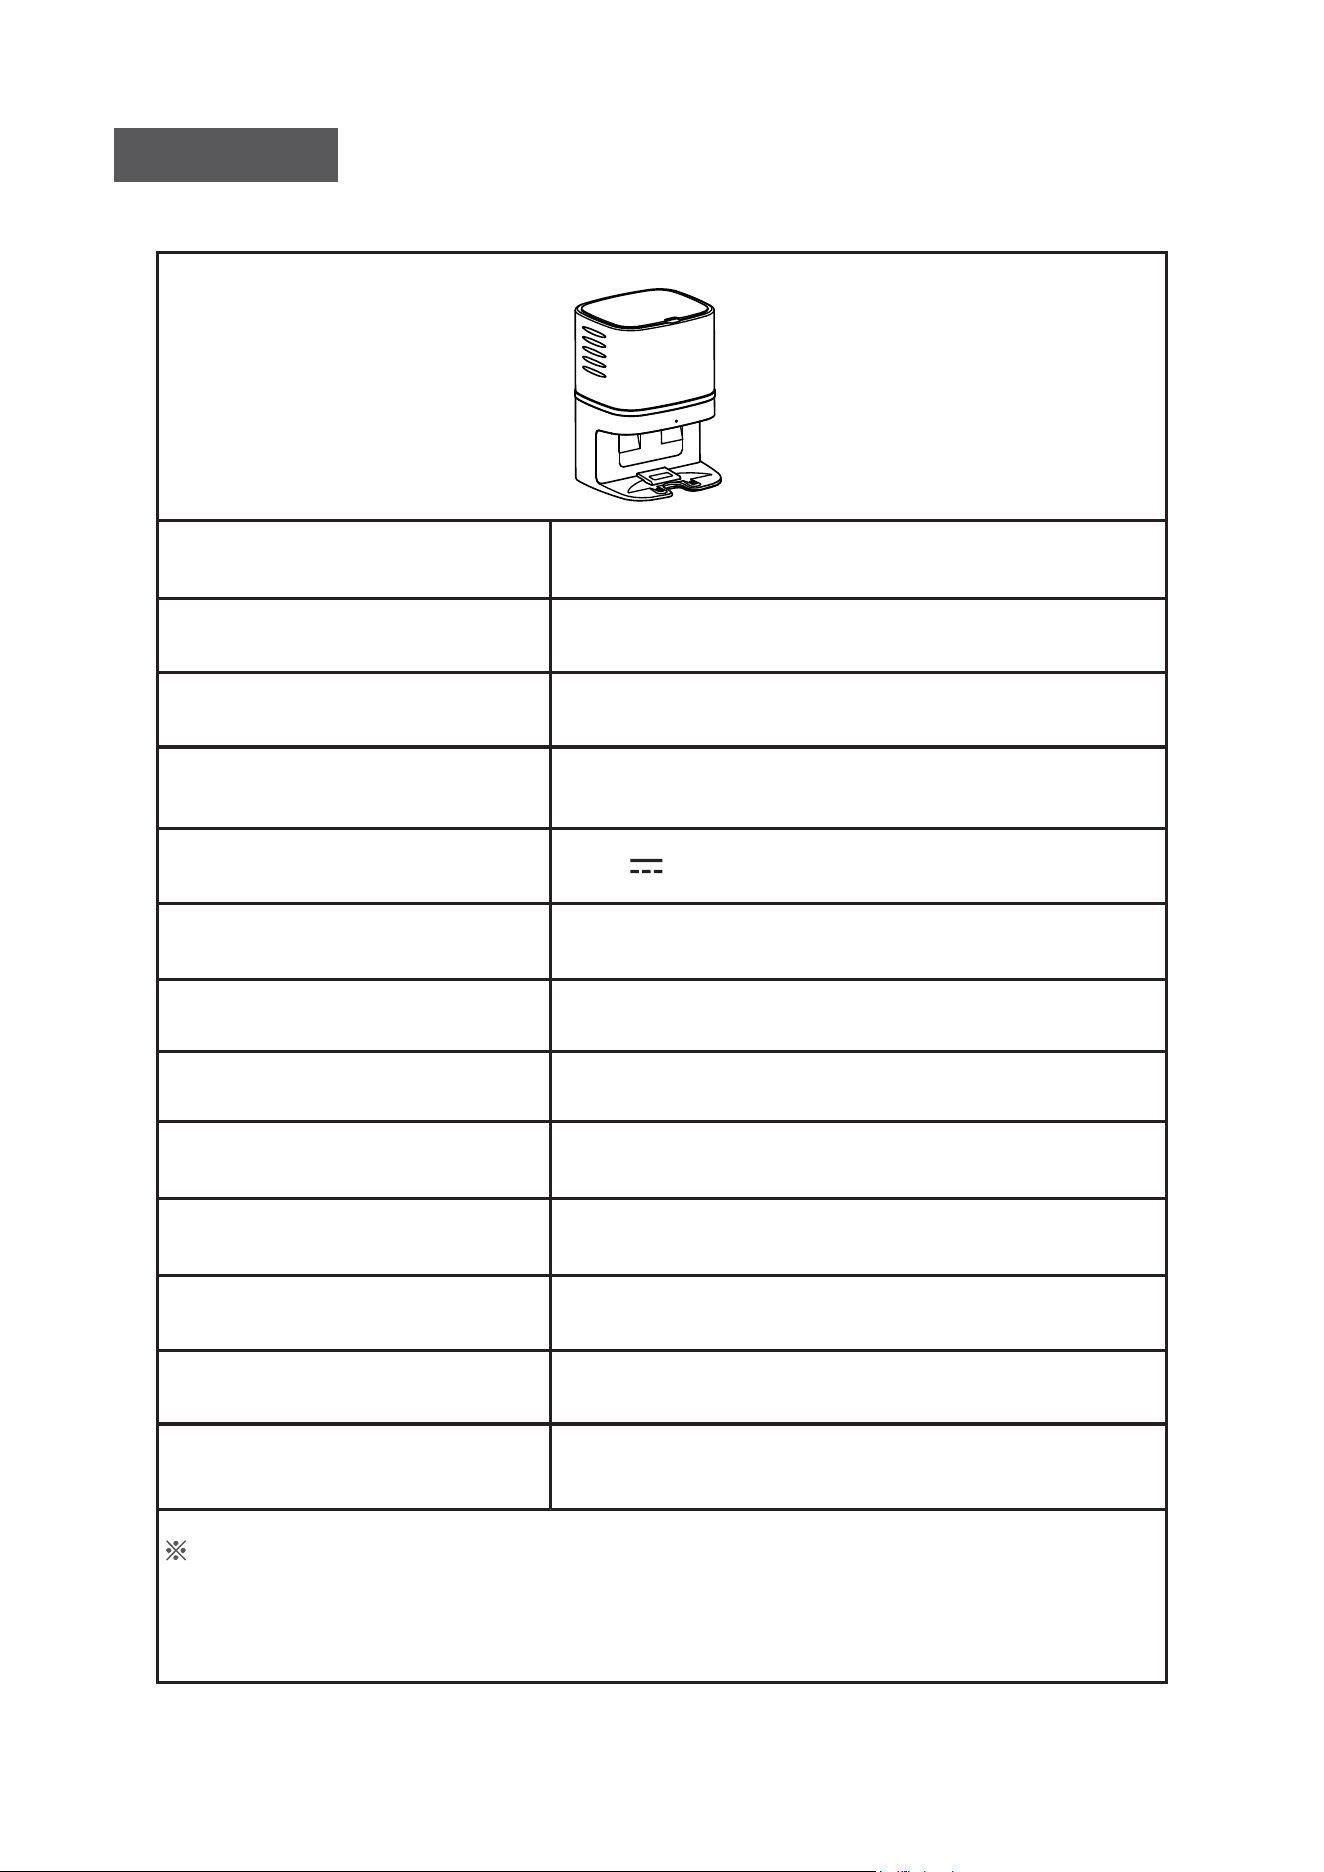
3
Product Model
Size of Main Unit
Net Weight
Input
Output
Rated Power
Working Noise
Suction Power
Suction Time
Dust Bag Capacity
Dust Bag Size
Lifetime
Applied Type
CRAFT X
236*246*346 mm
3.2KG
220-230V5A
19V 1A
1050W
about 80dB
30 kPa
15S
2.8L
EXVAC890 GLORY
600hrs
170*130*130mm
Specifications
The data come from the lab of Mamibot Manufacturing USA Inc.It may be
slightly different from the users data, please subject to the actual products. For
continuous products improvment, we reserve the right to any technical and
design change without prior notice.
M
a
m
i
bo
t
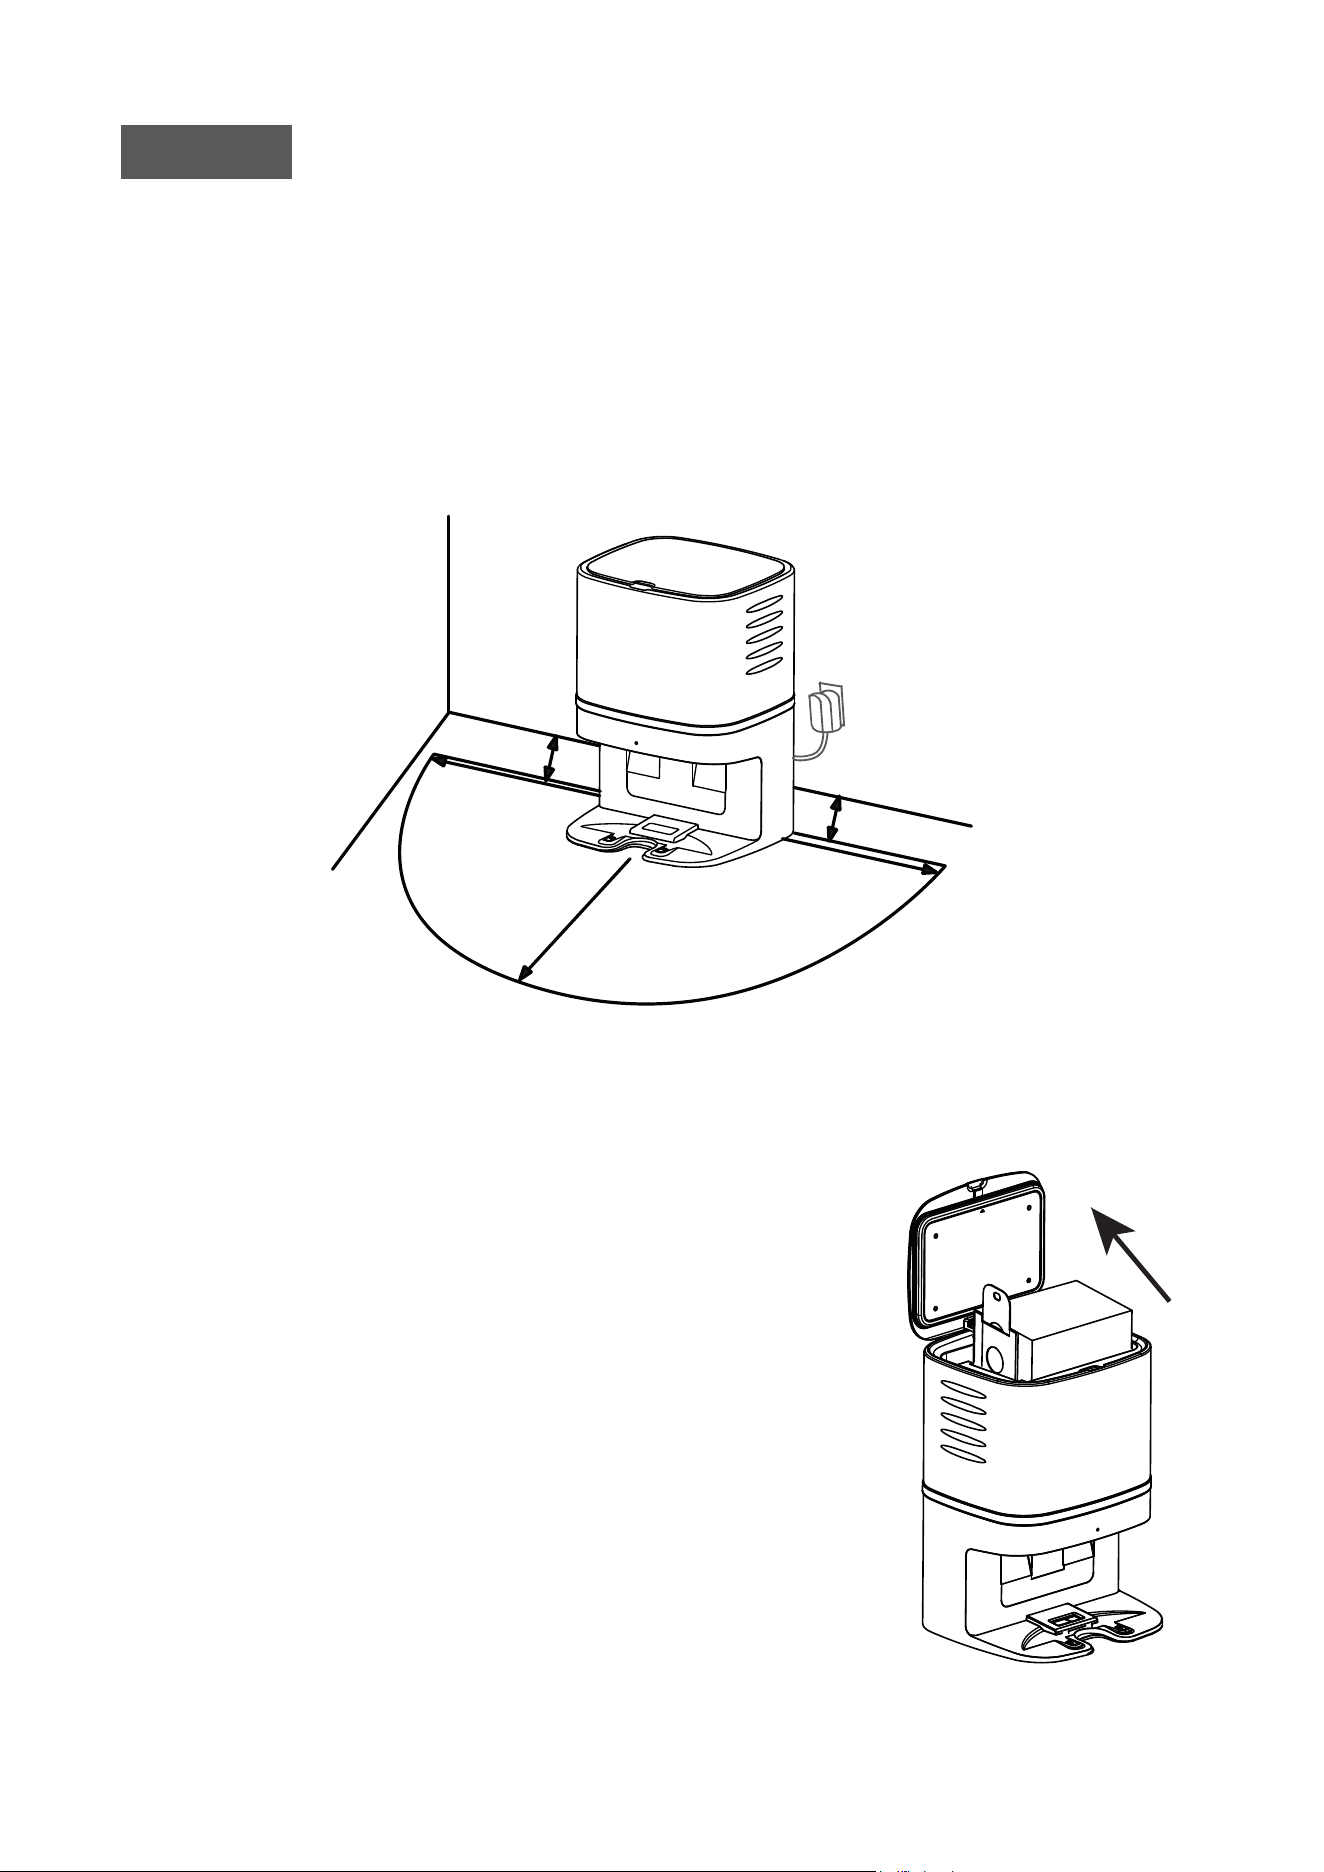
4
1M
1M
2M
0.0
5
M
0.05M
M
a
mibo
t
• Remove all objects within 1m/3.3ft of the left and right side and
2m/6.6ft of the front of the CRAFT X.
• Please make sure the disposable dust bag is placed on CRAFT X well
before use.
If there is a charging base for the robot, the distance between the
CRAFT X and the charging should be more than 4M.
Operation
Place the Dust Colletor - CRAFT X
Place the Disposable Dust Bag
M
a
mi
bot
1). Unplug the power, then open the lid of
CRAFT X.
2). Take the diposable dust bag from the
package, insert the cardboardof dust bag
into the card slot on CRAFT X, then push to
the end.
3). Check the handle of the dust bag, make
sure the handle is put to the end of the slot,
and the suction port on the cardboard is
open.
4). Tidy the dust bag up and close the lid,
check the status of the indicator, make
sure that the indicator flashes white slowly.
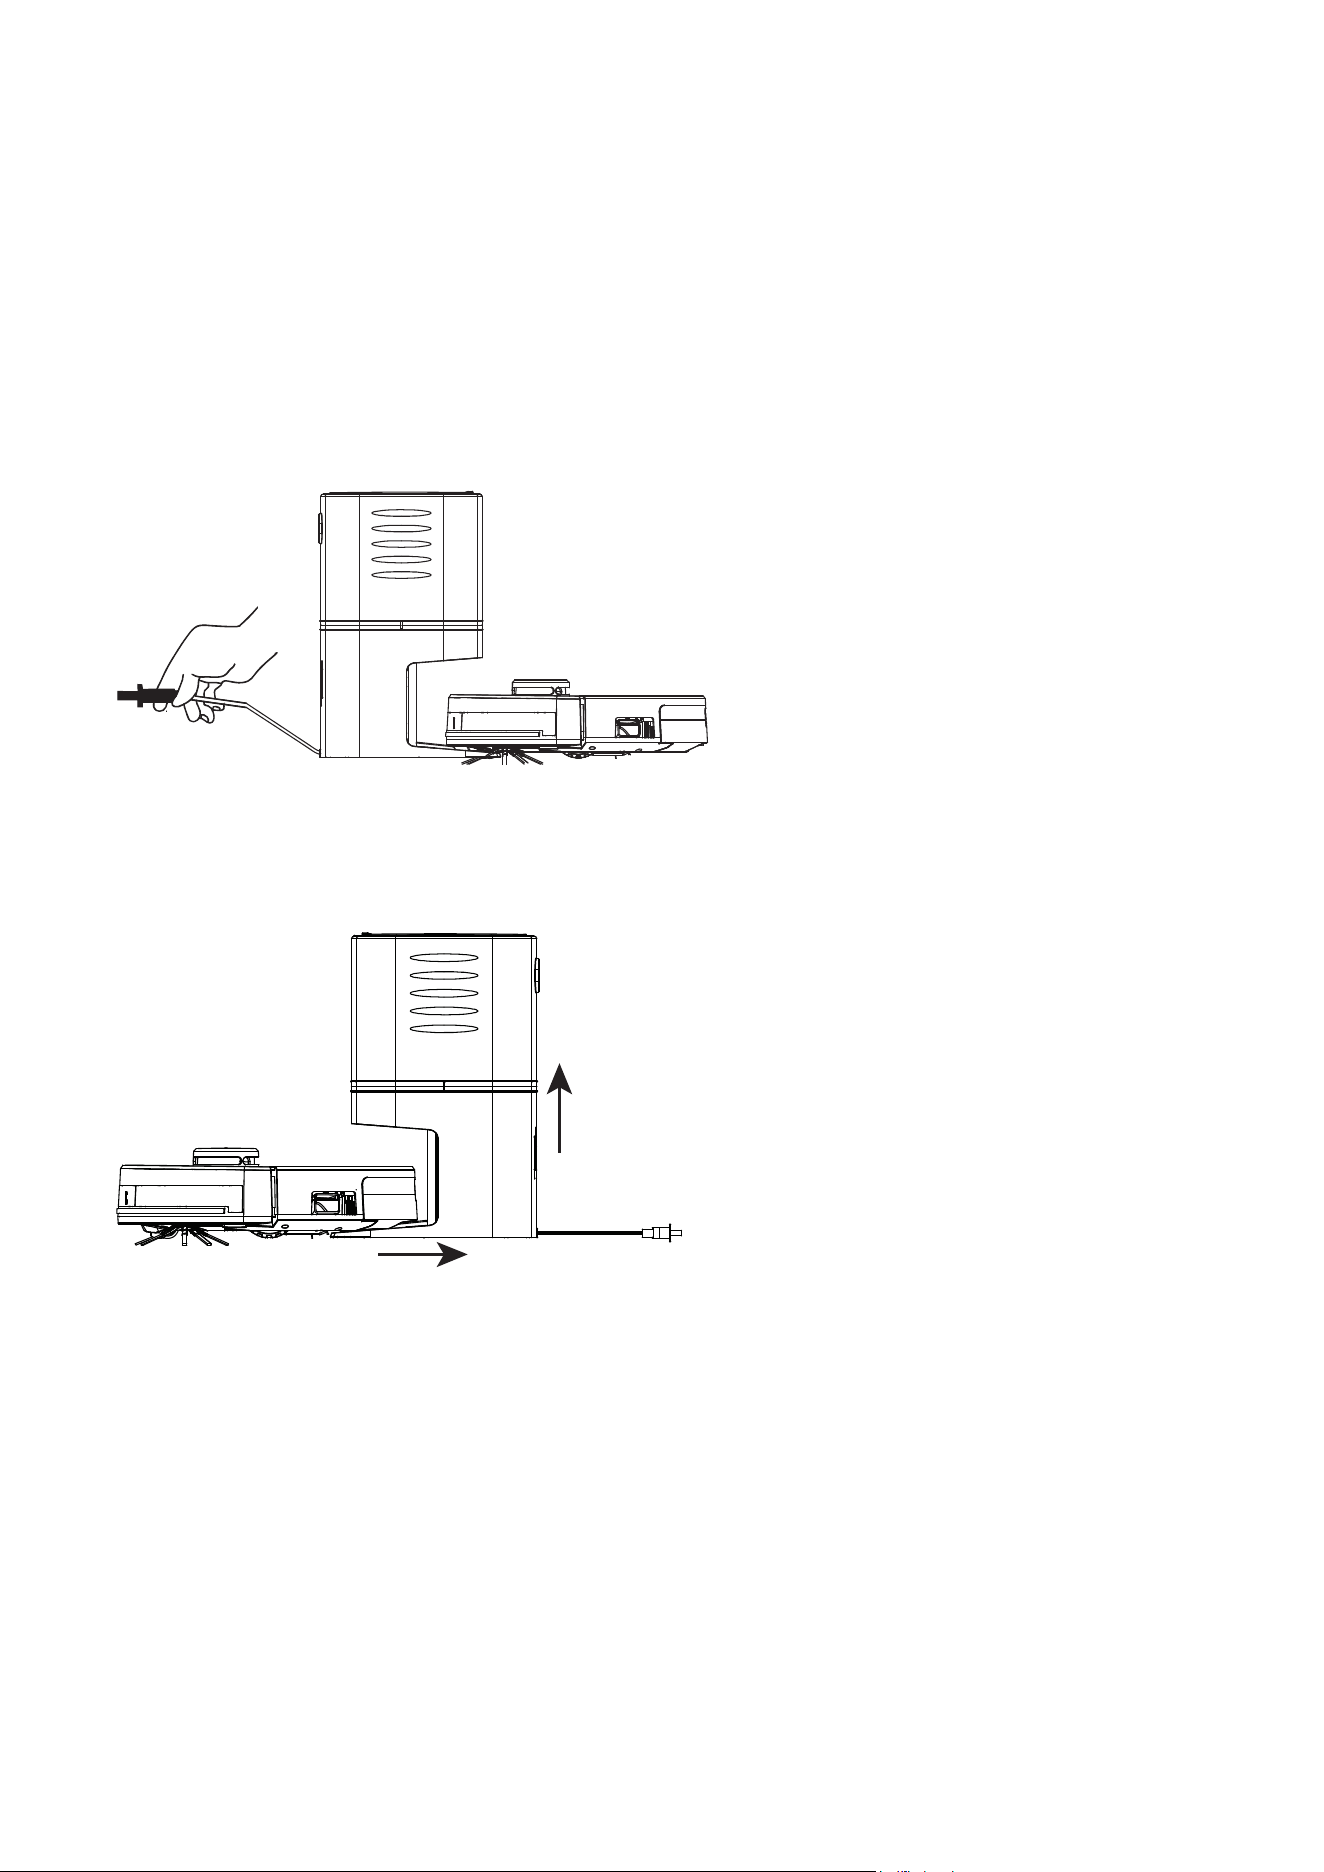
5
Indicator Status
• White indicator flashes slowly: Normal
• White indicator keeps on: Vacuuming
• Red indicator flashes quickly: Dust bag is not placed properly
• Red indicator flashes slowly: Suction pipe or port are blocked.
Charging/Vacuming
Charging:
• Please make sure the power
plug is connected well.
• The GLORY will go to find the
CRAFT X when the battery is
low or cleaning finished.
• If the charging pins do not
connect well when charging,
please place GLORY on CRAFT
X manually.
Vacuuming:
• Please make sure the power
plug is connected well.
• The GLORY will go to find the
CRAFT X when the battery is
low or cleaning finished, then
the CRAFT X will vacuum the
dusts from the dust box of
GLORY first, then turn around
and start charging.
Notice:
CRAFT X will vacuum the debris from the dust box of GLORY automatically,
please clean the disposable dust bag when the dust bag is full.
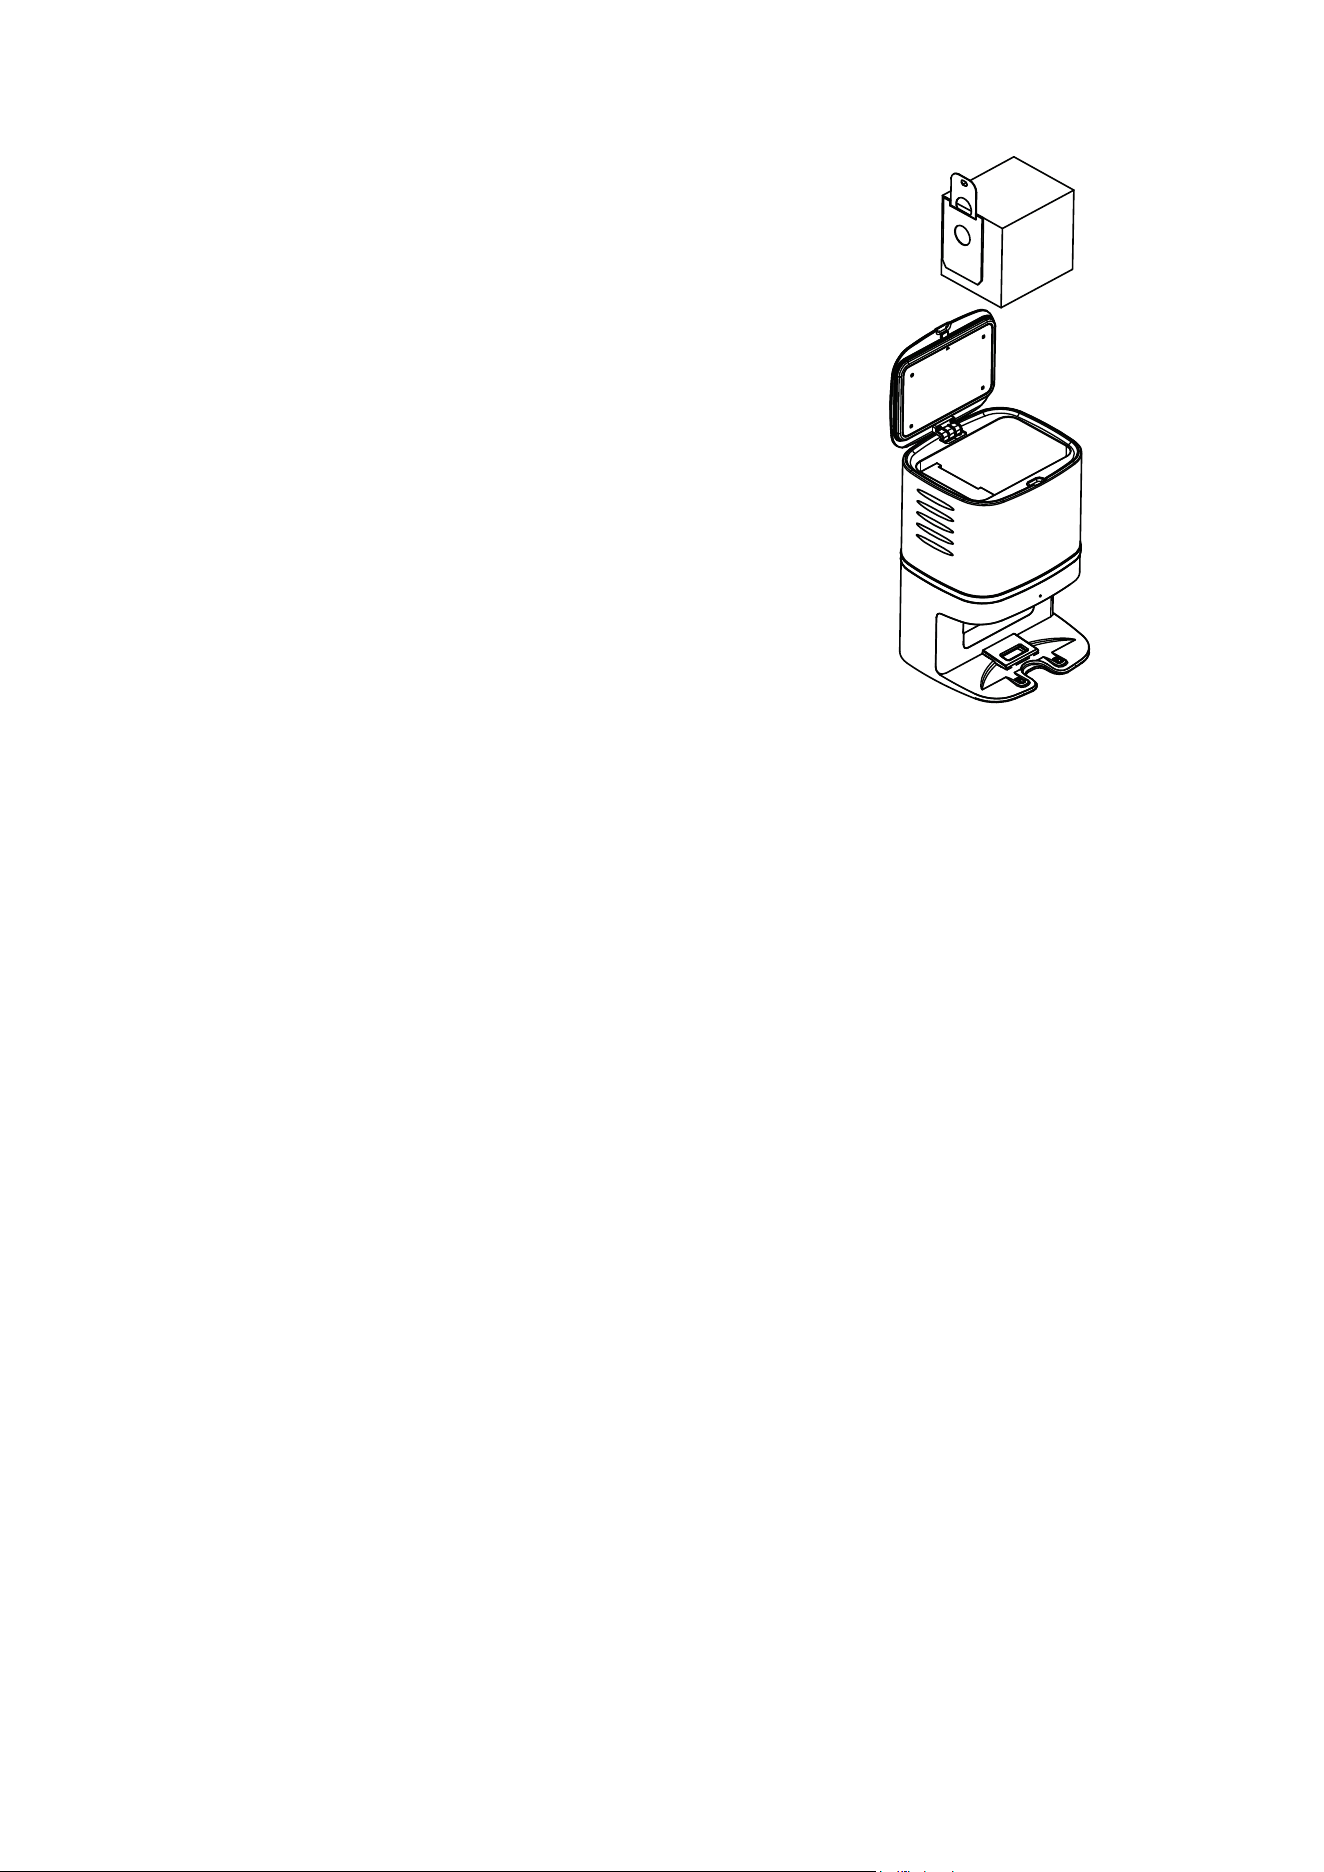
6
Dust Bag Replacement
1). Unplug the power first, then open
the lid of CRAFT X.
2). Pinch the handle of the dust bag
and pull it upwards, then throw the
dust bag into the trash.
3). Take a new dust bag from the pacakge,
following the steps of placing the dust
bag.
4). Close the lid.
5). Clean the main body with soft cloth.
6). Plug the power and start to use again
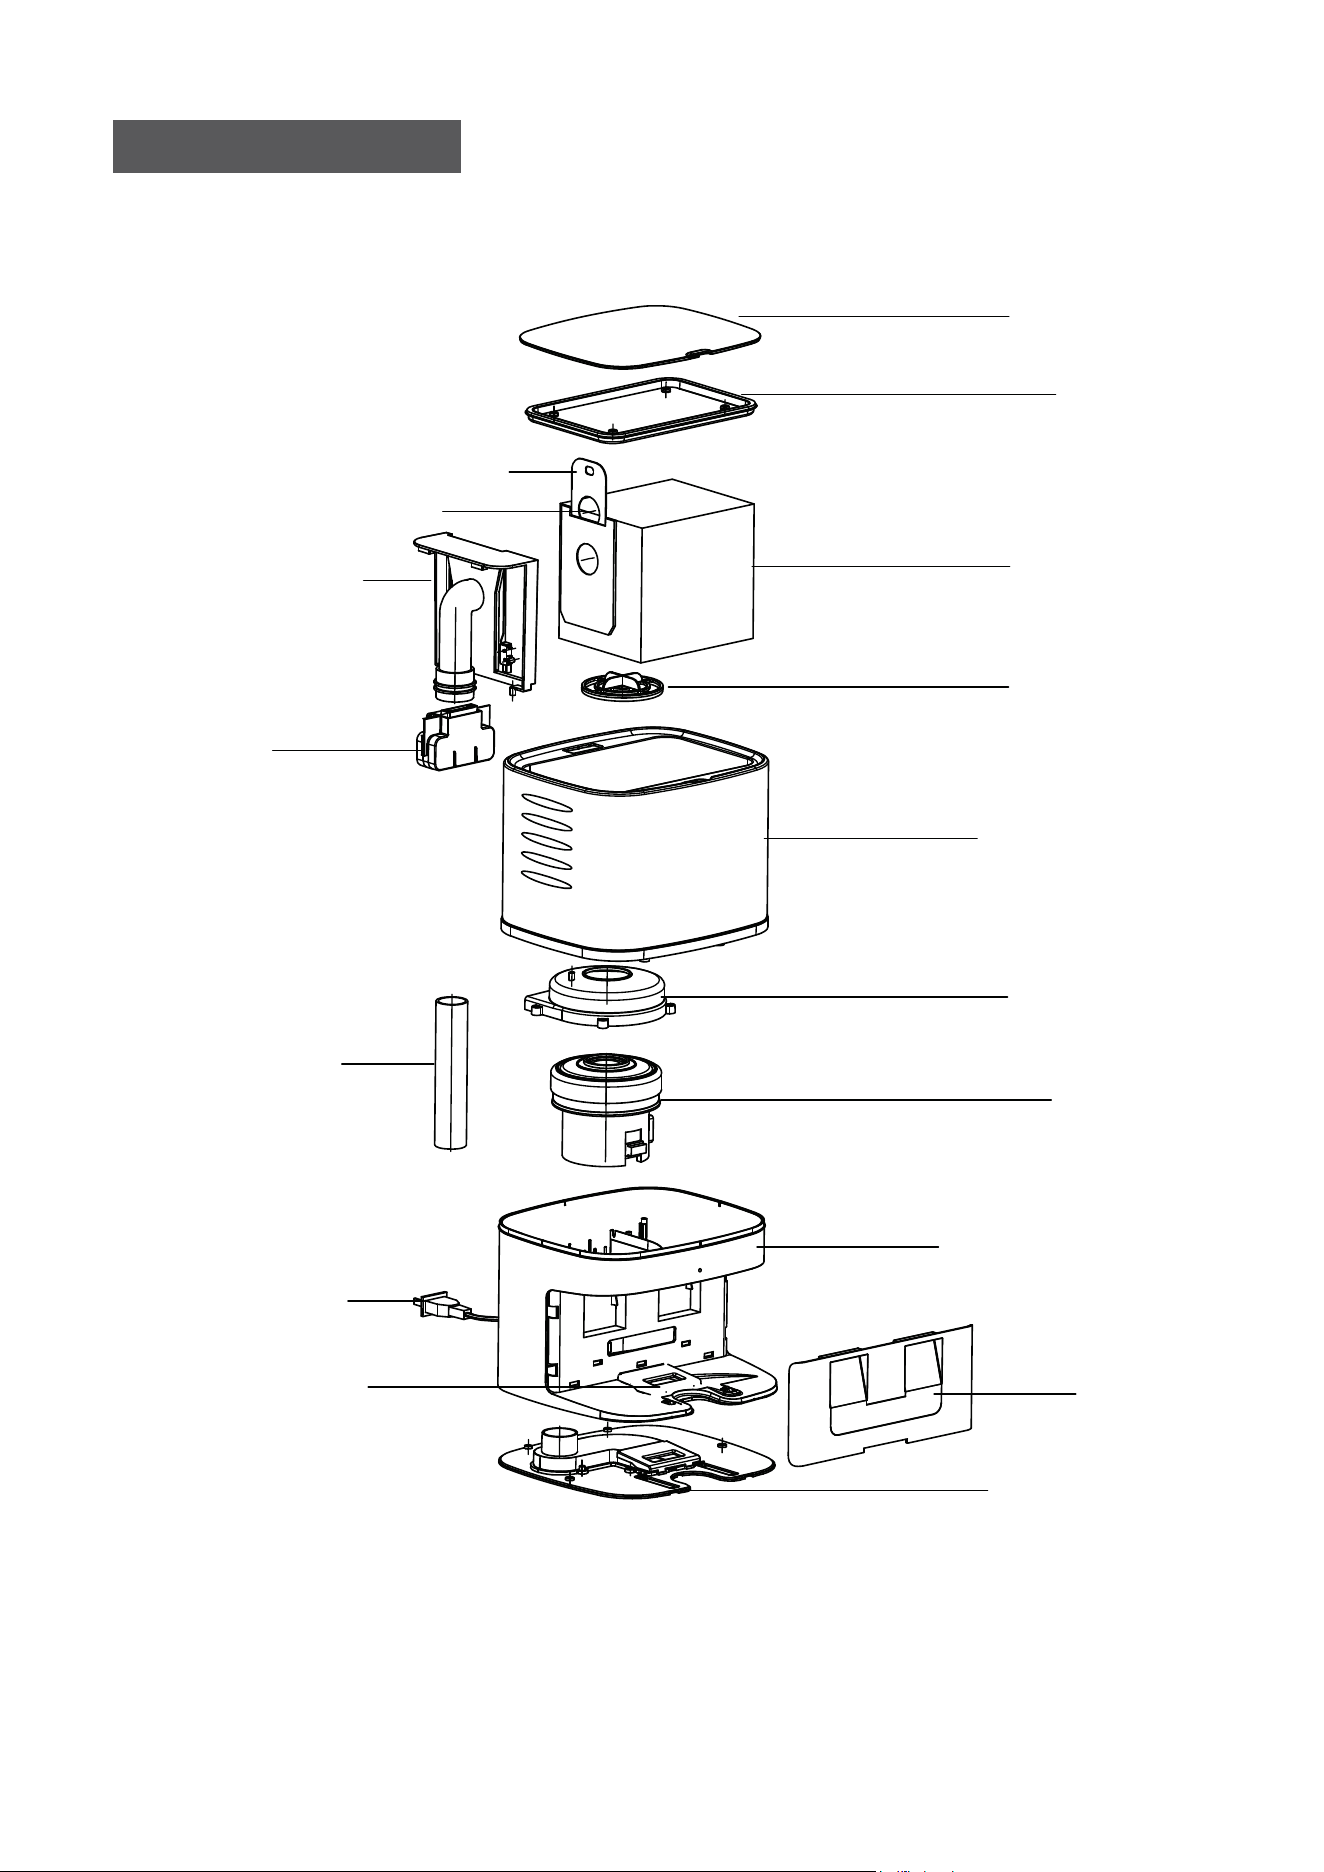
Lid
Lining
Dust bag
Filter
Shell
Motor cover
Motor
Base
Lens
Bottom lid
Suction Port
Air suction pipe
Handle
Air passage
Power Plug
Dust bag Handle
Suction Port
7
CRAFT X Anatomy
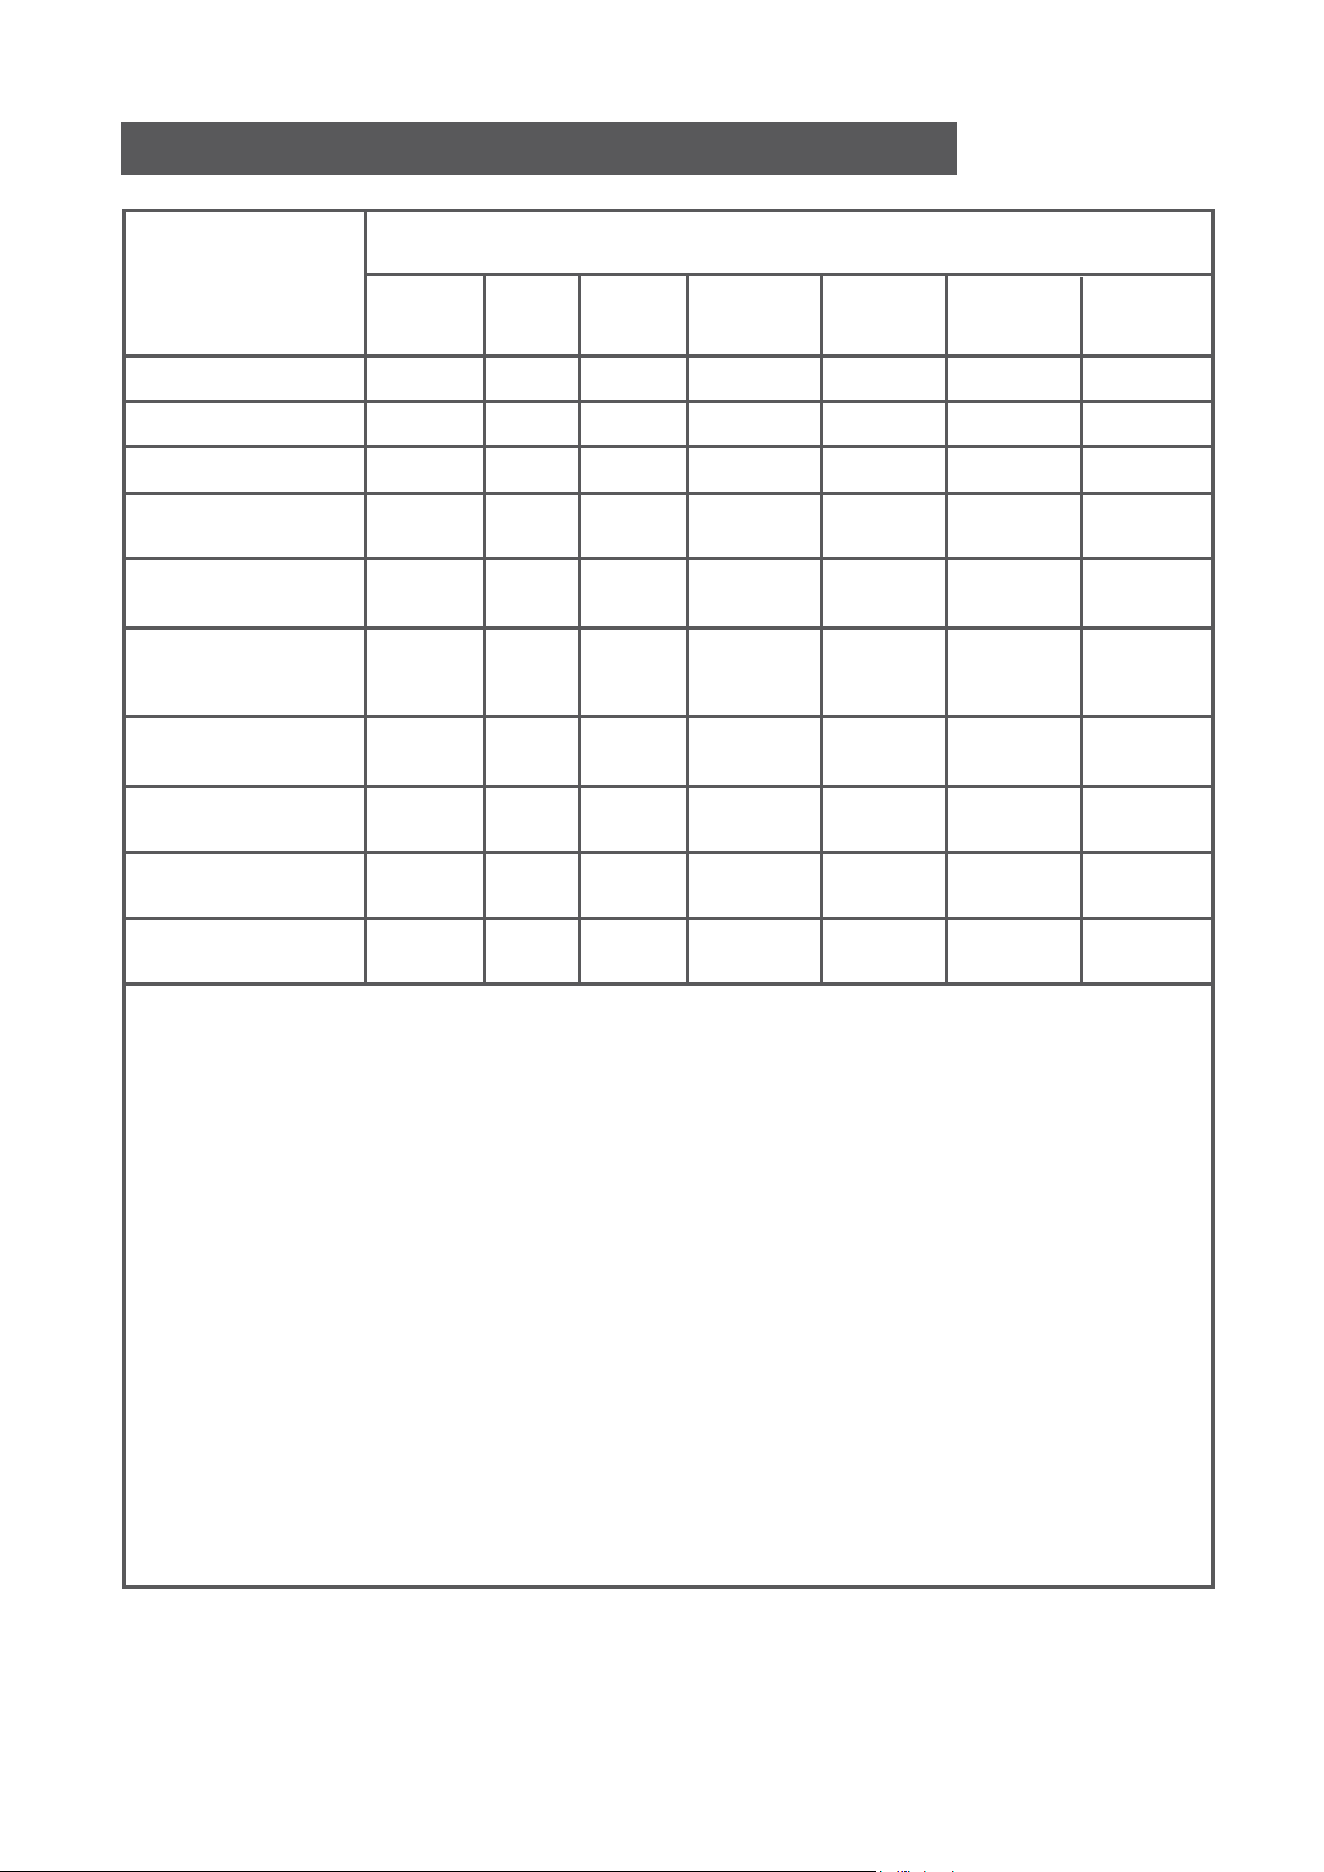
8
Plastic Shell PCB Cables Metal Parts Adapter
Content of Hazardous Substances
Component
Cadmium(Cd)
Lead(Pb)
Mercury(Hg)
Hexavalent Chromium
(CrVI)
Polybrominated
Biphenyls(PBB)
Polybrominated
Diphenyl Ethers
(PBDE)
Bis(2-ethylhexyl)
Phthalate(DEHP)
Butyl Benzyl
Phthalate (BBP)
Dibutyl Phthalate
(DBP)
Diisobutyl Phthalate
(DIBP)
O O O O O O O
O O O X O O O
O O O O O O O
O O O O O O O
O O O O O O O
O O O O O O O
O O O O O O O
O O O O O O O
O O O O O O O
O O O O O O O
The time of the components for environment protection concern is 10 years.
The time is valid under the use conditions of this manual.
O: It indicates that the content of the hazardous substances in all
homogeneous materials of the compoents is in compliance with the council
RoHS 2 Directive (EU) 2015/863 and (EU) 2017/2102 amending Annex II to
Directive 2011/65/EU.
X: It indicates that the content of the hazardous substances in all
homogeneous materials of the compoents is the exempt item according to
the council RoHS 2 Directive (EU) 2015/863 and (EU) 2017/2102 amending
Annex II to Directive 2011/65/EU.
Name and Content of Hazardous Substances
Electronic
Components
Rubber
Components
Manufacturer:
Mamibot Manufacturing (Shanghai) Co.,Ltd.
21st FL, No 1st, LN1040 Caoyang Rd, Shanghai, 200063. P.R.C.
Mamibot Manufacturing USA Inc.
One Commerce Center, 1201 Orange St, Wilmington, DE 19899 USA
Tel: 001 302-428-9888 sales@mamibot.com www.mamibot.com
Supervised by
Recycling of CRAFT X at the end of its lifespan
The symbol on the product or on its packaging indicates that
this product may not be treated as household waste. Instead
it should be taken to the appropriate collection point for the
recycling of electrical and electronic equipment. Byensuring
this product is disposed of correctly, you will help prevent
potential negative consequences for the environment and
human health, which could otherwise be caused by
inappropriate waste handling of this product. For more
detailed information about recycling of this product, please
contact your local council, your household waste disposal
service or the shop where you purchased the product.
The product meets all the necessary requirements of the EU
directives applicable to the specific product.
We reserve the right to changes in text, design, and technical specifi-
cations which are subject to change without prior notice.
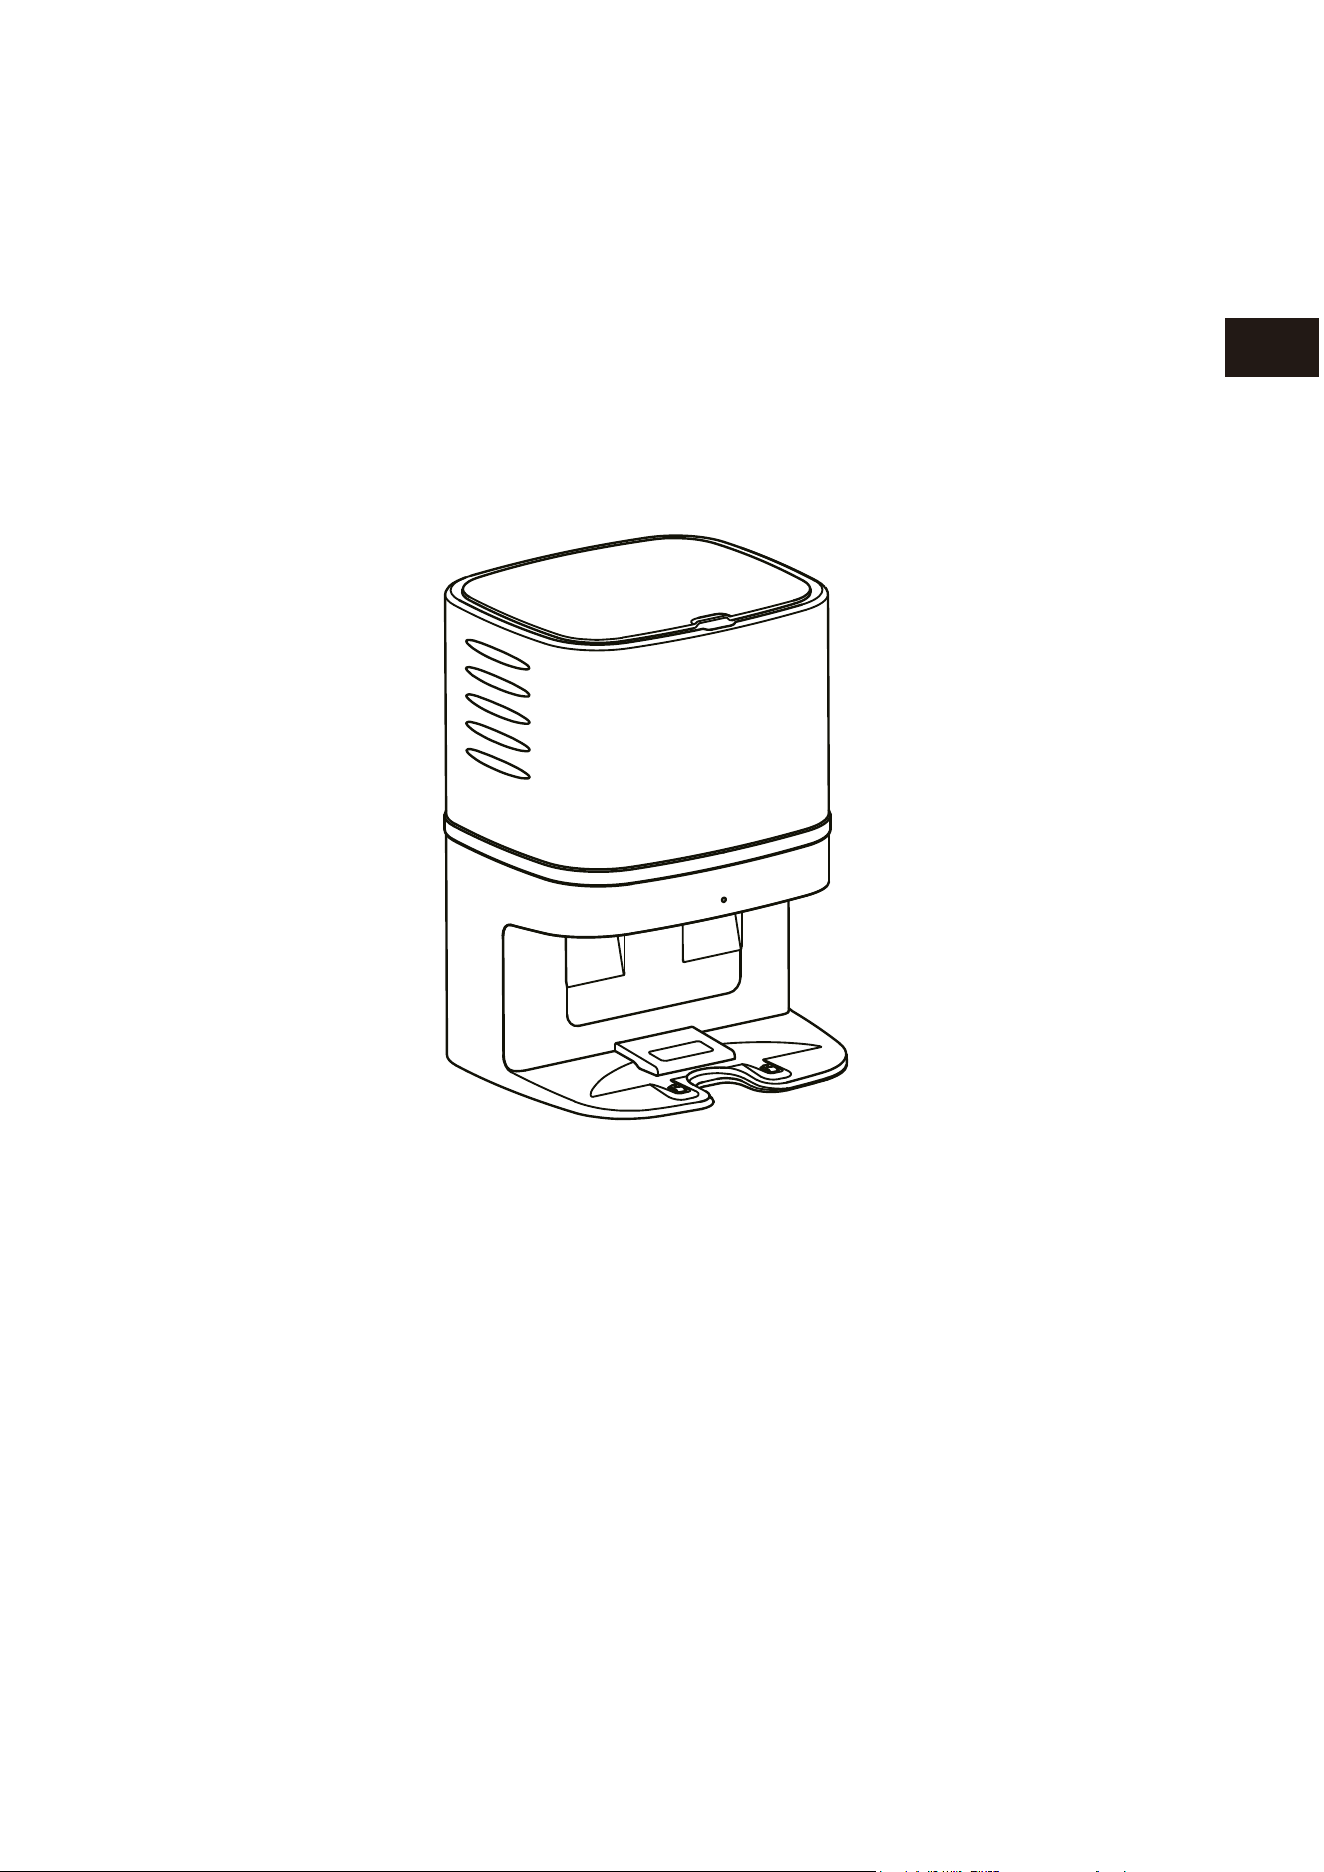
Mamibot
CRAFT X Absaugstation
Für EXVAC890 GLORY
Gebrauchsanleitung
Ma
m
i
bot
DE
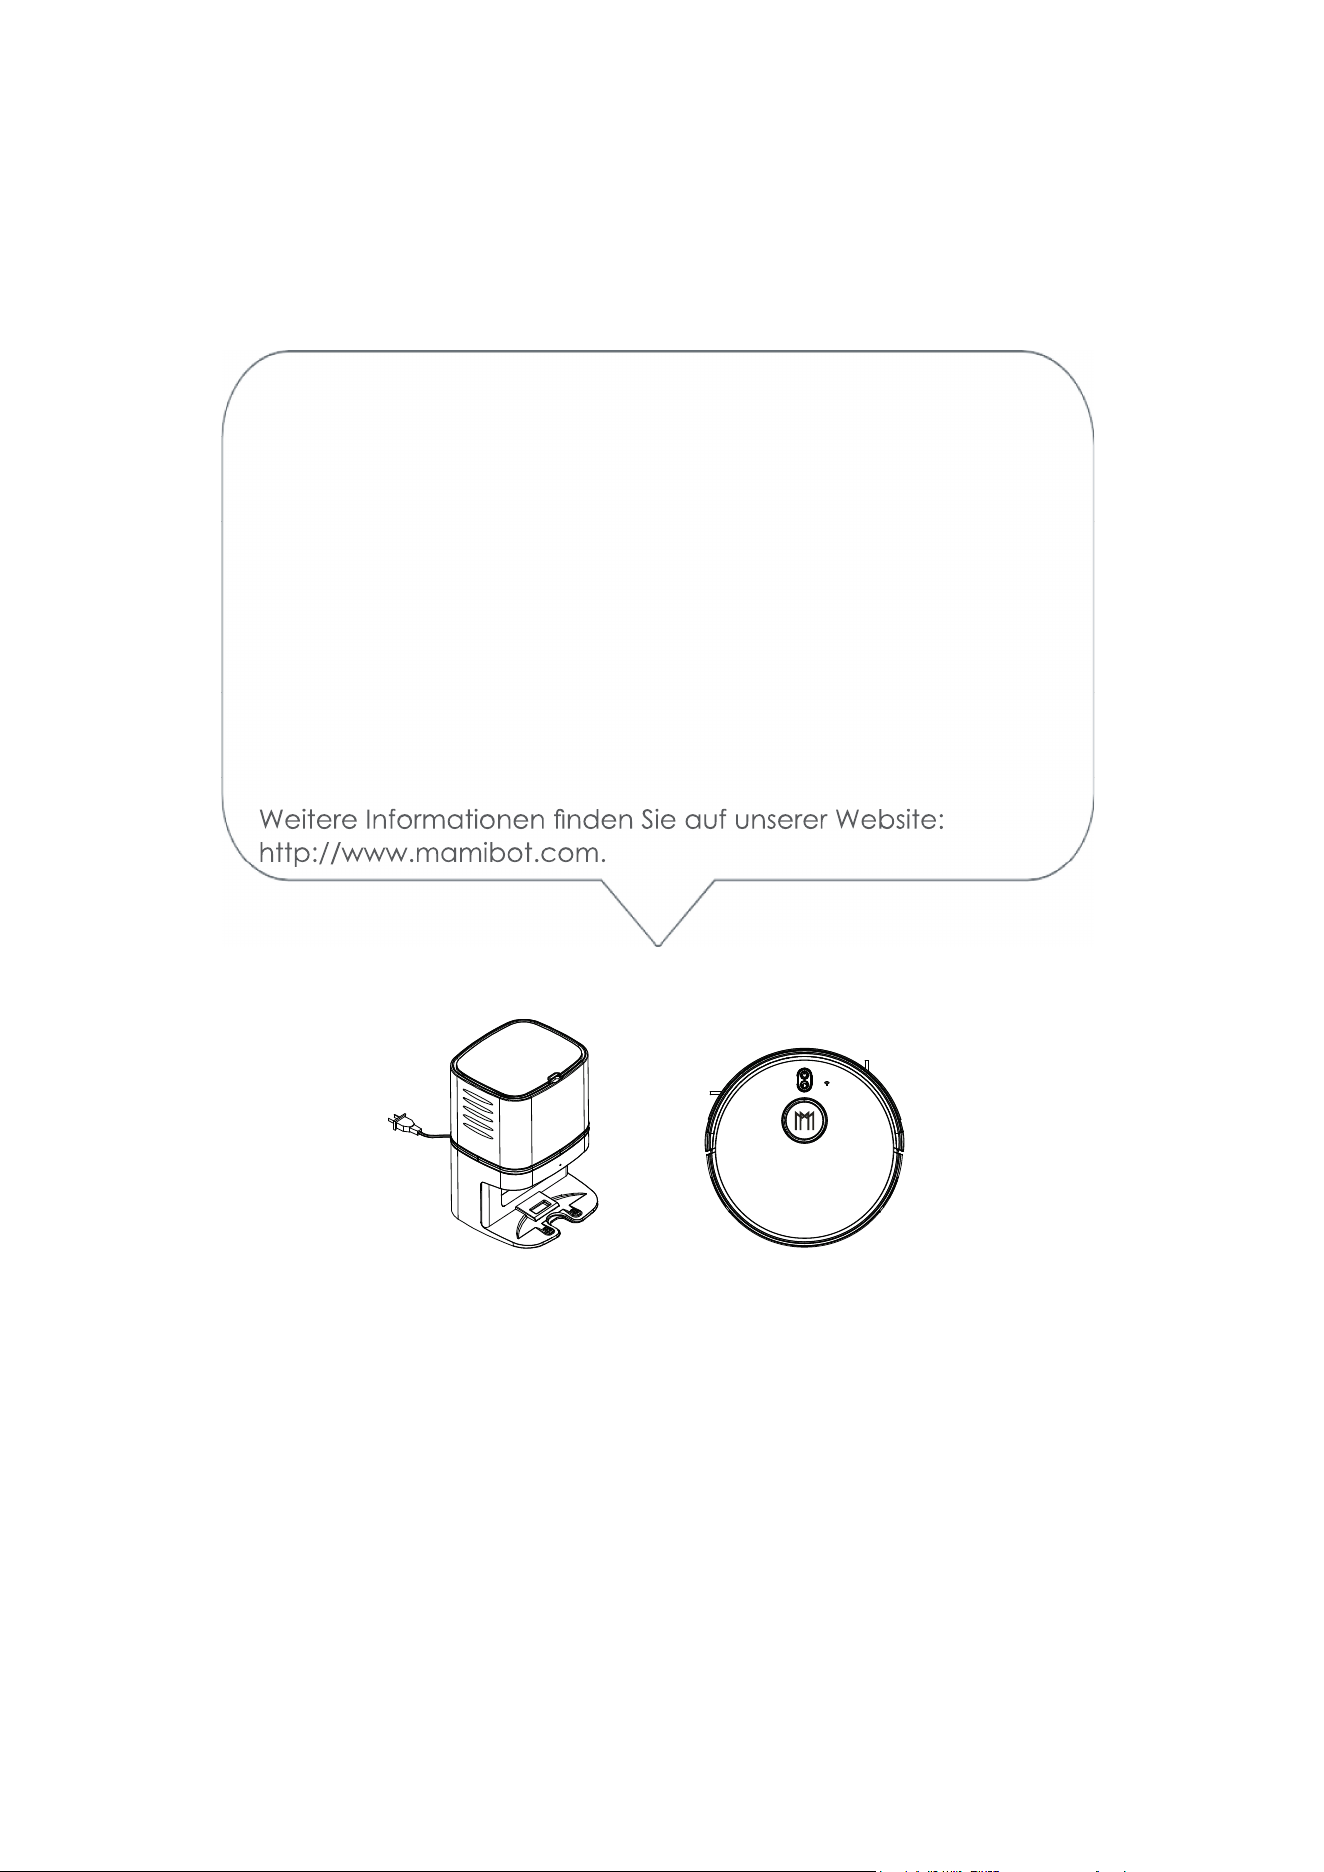
Bitte lesen Sie vor dem Gebrauch des Geräts die gesamte Bedienungsanleitung
sorgfältig durch und bewahren Sie sie für späteres Nachschlagen auf.
Vielen Dank für den Kauf der Mamibot CRAFT X Absaug-
station, die für den EXVAC890 GLORY konzipiert ist.
Wir hoffen, dass die Kombination von CRAFT X und EXVAC890
GLORY Ihnen einen intelligenteren, einfacheren und angeneh-
meren Lebensstil ermöglicht.
Sollten Sie auf Probleme stoßen, die in dieser Anleitung nicht
behandelt werden, wenden Sie sich bitte an sales@mamibot.
com.
Mamibot
M
a
mi
b
o
t
Inhalt
1 Sicherheitshinweise
Hinweise zu Haupteinheit und Komponenten
2 CRAFT X – Komponenten
3 Technische Daten
4-6 Betrieb
Aufstellen der CRAFT X Absaugstation
Einsetzen des Einwegstaubbeutels
Wechseln des Staubbeutels
7 Aufbau des CRAFT X
8 Enthaltene Gefahrenstoffe
Recycling des CRAFT X

1
Sicherheitshinweise
Lesen Sie alle Anleitungen sorgfältig durch und halten Sie sie bei Aufbau, Gebrauch
und Wartung des CRAFT X griffbereit. Jeder Gebrauch, bei dem die folgenden Anlei-
tungen nicht befolgt werden, kann eine Beschädigung des CRAFT X oder Verletzungen
nach sich ziehen.
Hinweise zu Haupteinheit und Komponenten
Warnung
01. Zerlegen, reparieren oder überholen Sie den CRAFT X nicht eigenmächtig, da er
sonst beschädigt werden oder eine Gefährdung darstellen kann.
02. Verwenden Sie das Produkt nicht in einer Umgebung, in der Brand- oder Explosions-
gefahr besteht.
03. Für den CRAFT X darf nur der Originalstecker verwendet werden; andernfalls kann der
CRAFT X beschädigt werden oder in Brand geraten.
04. Stellen oder setzen Sie sich nicht auf die CRAFT X, da hierdurch das Gerät bes-
chädigt werden oder umstürzen könnte.
05. Wenn die Metallteile des Netzsteckers oder die Ladekontakte staubig sind,
wischen Sie sie mit einem trockenen Tuch ab.
06. Der Netzstecker ist für eine Spannung von 100–240 V AC ausgelegt. Stecken Sie
den Stecker korrekt in die Steckdose und halten Sie das Gerät von Kindern fern.
07. Waschen oder tauchen Sie das Hauptgehäuse und die elektronischen Bauteile
nicht in Wasser ein, da die CRAFT X sonst durch einen Kurzschluss beschädigt
werden kann.
08. Beschädigen Sie die CRAFT X nicht, belasten Sie sie nicht mit Gewichten und
erwärmen, ziehen oder verbiegen Sie sie nicht. 09. Dieses Produkt ist für den
Gebrauch in Innenräumen bestimmt. Nicht im Außenbereich verwenden.
10. Achten Sie darauf, dass die Stifte nicht mit Metall oder leitenden Materialien in
Berührung kommen, da sonst ein Kurzschluss entstehen könnte.
11. Das Gerät ist kein Spielzeug.
Achtung:
01. Berühren Sie die CRAFT X nicht mit feuchten Händen, da sonst die Gefahr eines Strom-
schlags besteht.
02. Stellen Sie die CRAFT X nicht an Orten auf, von denen er leicht herabfallen kann, wie
z. B. auf Tische, Stühle, hohe Podeste im Raum usw.
03. Um das speziell konstruierte Gehäuse des Geräts nicht zu beeinträchtigen, schüt-
zen Sie es bitte vor längerer direkter Sonneneinstrahlung.
04. Verwenden Sie die CRAFT X nicht in feuchten Umgebungen wie Badezimmern.
05. Stellen Sie die CRAFT X nicht in der Nähe von brennenden Zigaretten, Feuerzeugen
oder anderem offenen Feuer auf.
06. Reinigen Sie die CRAFT X nach Beendigung des Ladevorgangs.
07. Trennen Sie die CRAFT X vom Stromnetz, wenn die Station für längere Zeit nicht benutzt
wird.
08. Prüfen Sie sorgfältig, ob der Stecker für die Verwendung angeschlossen ist, damit der
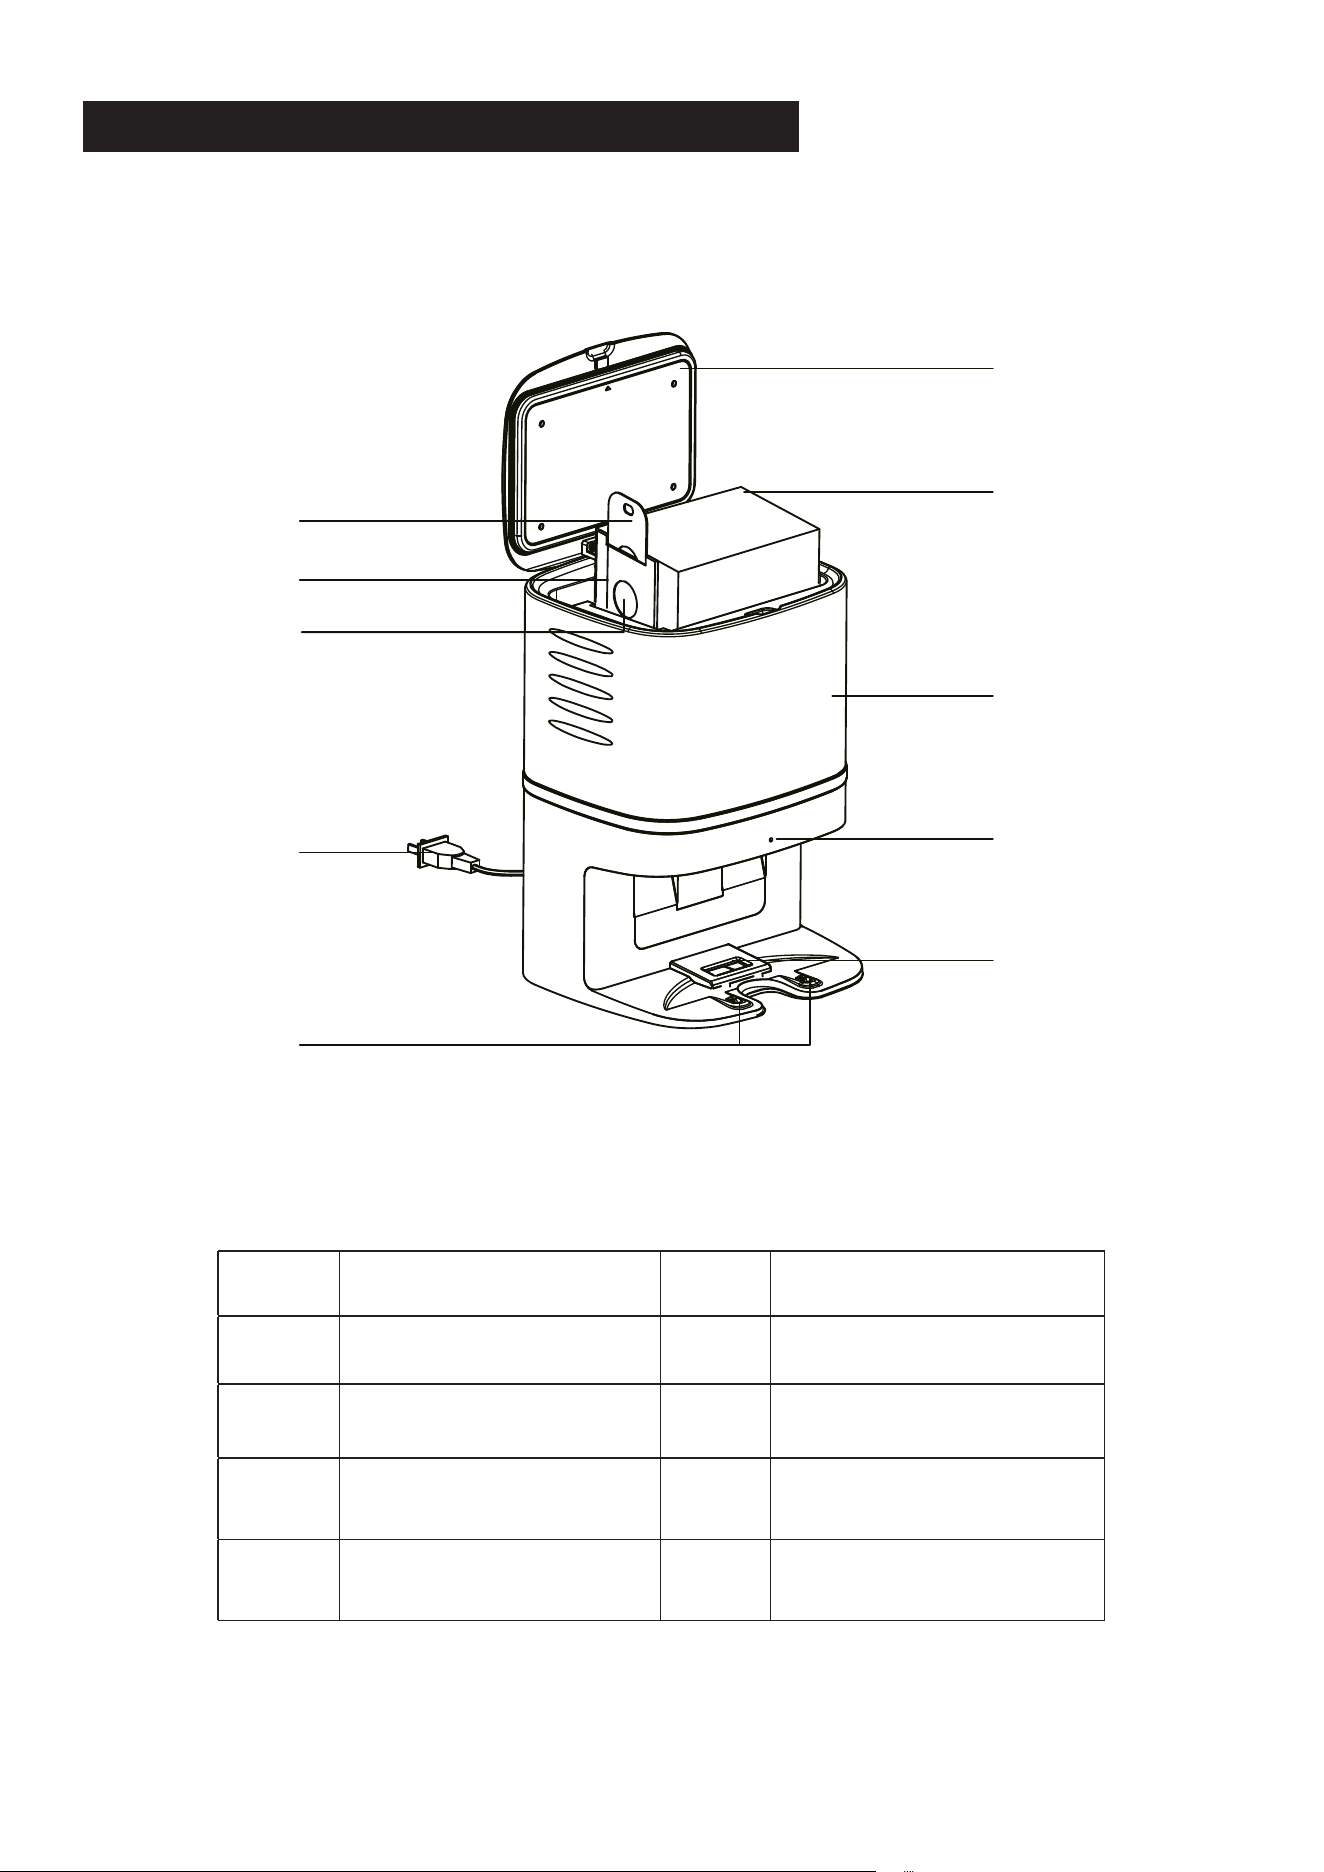
2
KOMPONENTEN DER CRAFT X ABSAUGSTATION
1 Deckel 6 Hauptgehäuse
2 Einwegstaubbeutel x 5 7 Netzstecker
3 Staubbeutelgriff 8 Statusanzeige
4 Kartoneinsatz der
Staubbox
9 Saugöffnung des
Staubbeutels
5 Staubbeutel-Saugöff-
nung
10 Ladekontakt
10
9
8
4
5
3
1
2
6
7
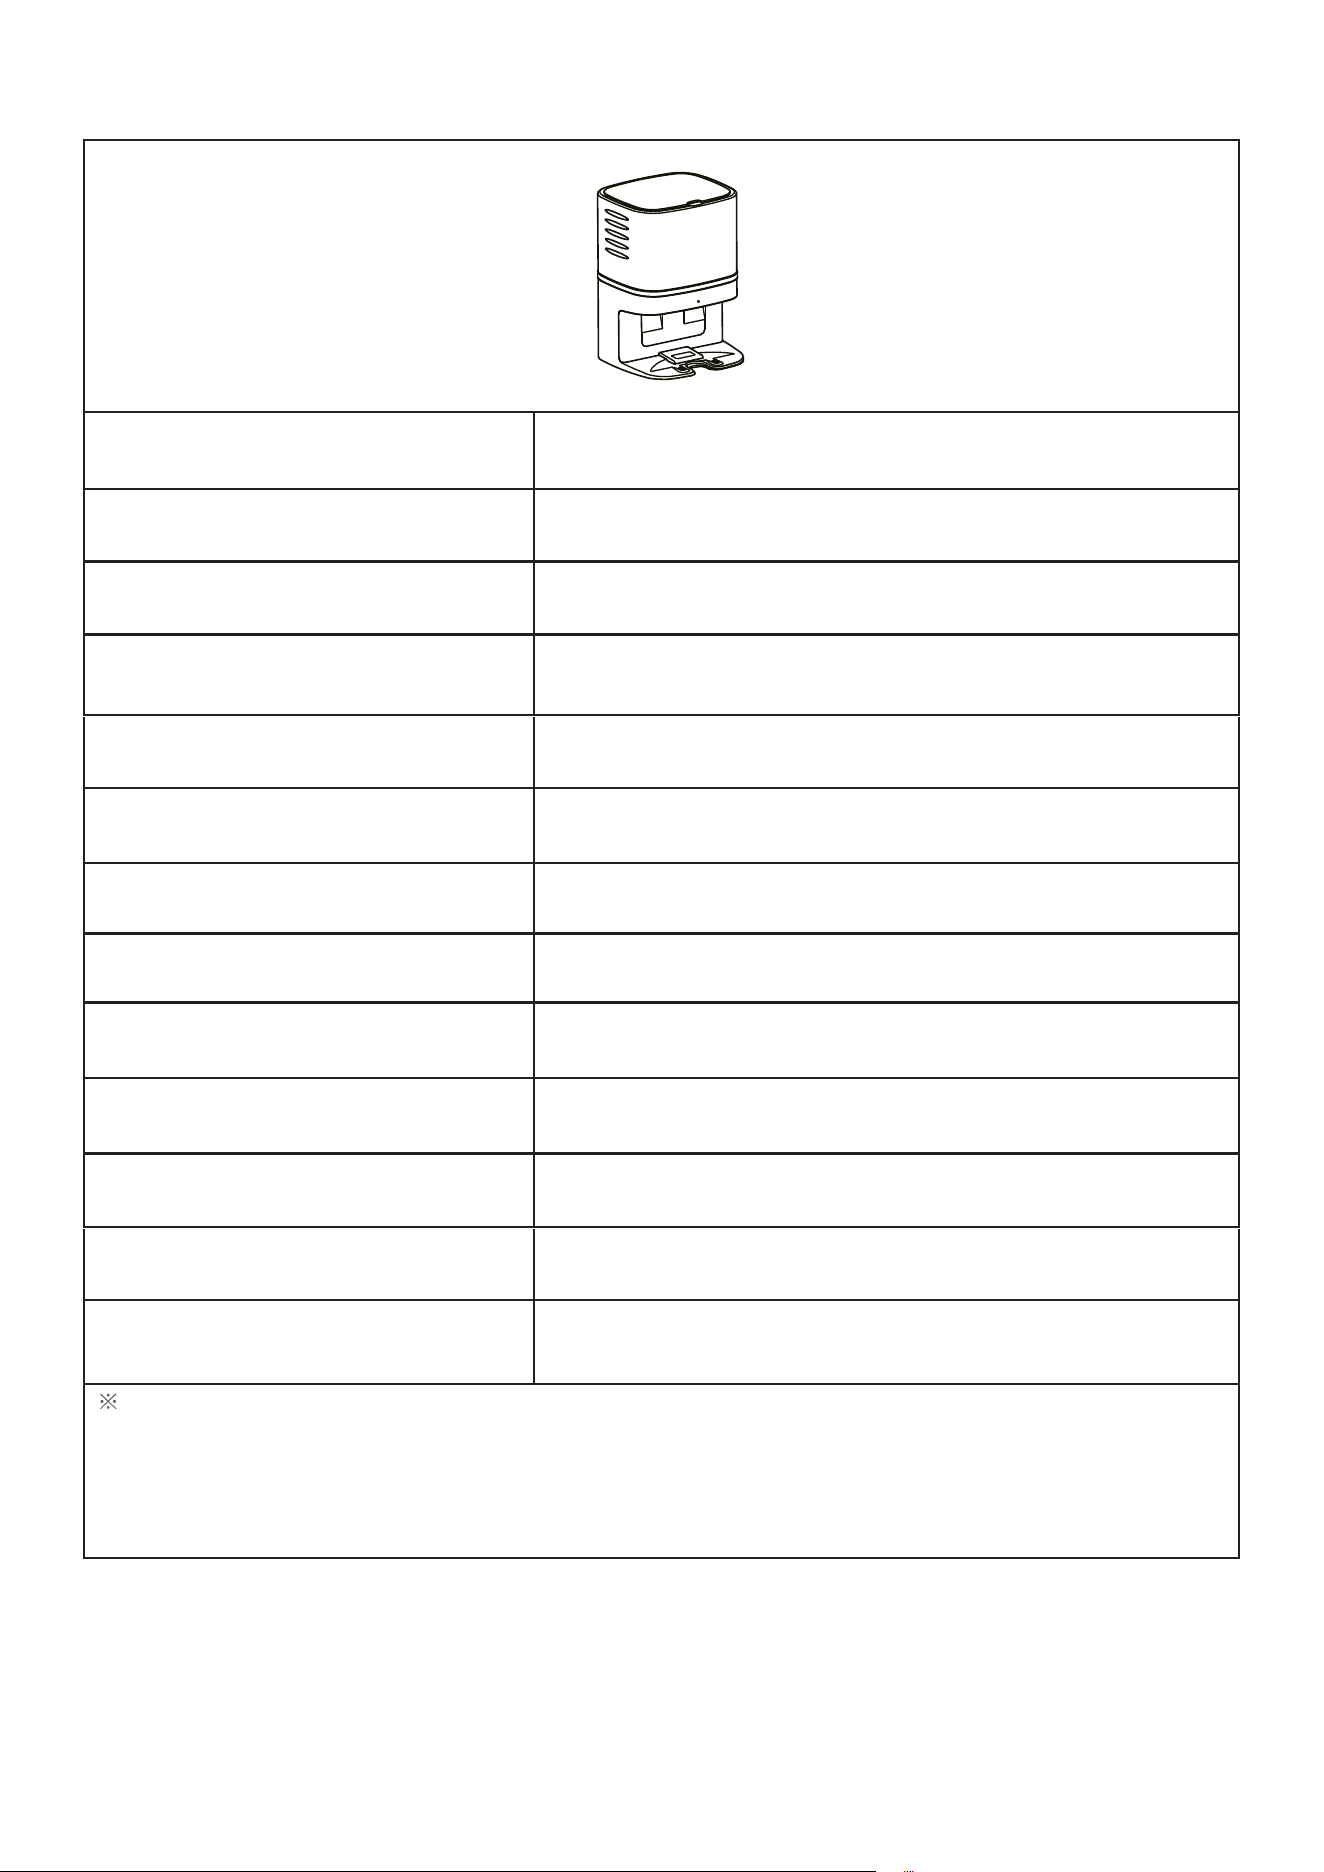
3
Produktmodell CRAFT X
Abmessungen der Hauptein-
heit
236 x 246 x 346 mm
Nettogewicht 3,2 kg
Eingangsstrom 220-230V5A
Ausgangsstrom 19 V 1 A
Nennleistung 1050 W
Betriebsgeräusch ca. 80 dB
Saugleistung 30 kPa
Absaugdauer 15 s
Staubbeutelkapazität 2,8 l
Staubbeutelabmessungen 170 x 130 x 130 mm
Lebensdauer 600 h
Für Modell EXVAC890 GLORY
Die Daten stammen aus dem Labor von Mamibot Manufacturing USA Inc. Sie können beim Benutzer
je nach konkretem Produkt geringfügig anders ausfallen. Im Interesse der ständigen Produktverbesserung
behalten wir uns das Recht vor, technische und gestalterische Änderungen ohne vorherige Ankündigung
vorzunehmen.
M
a
m
i
b
o
t
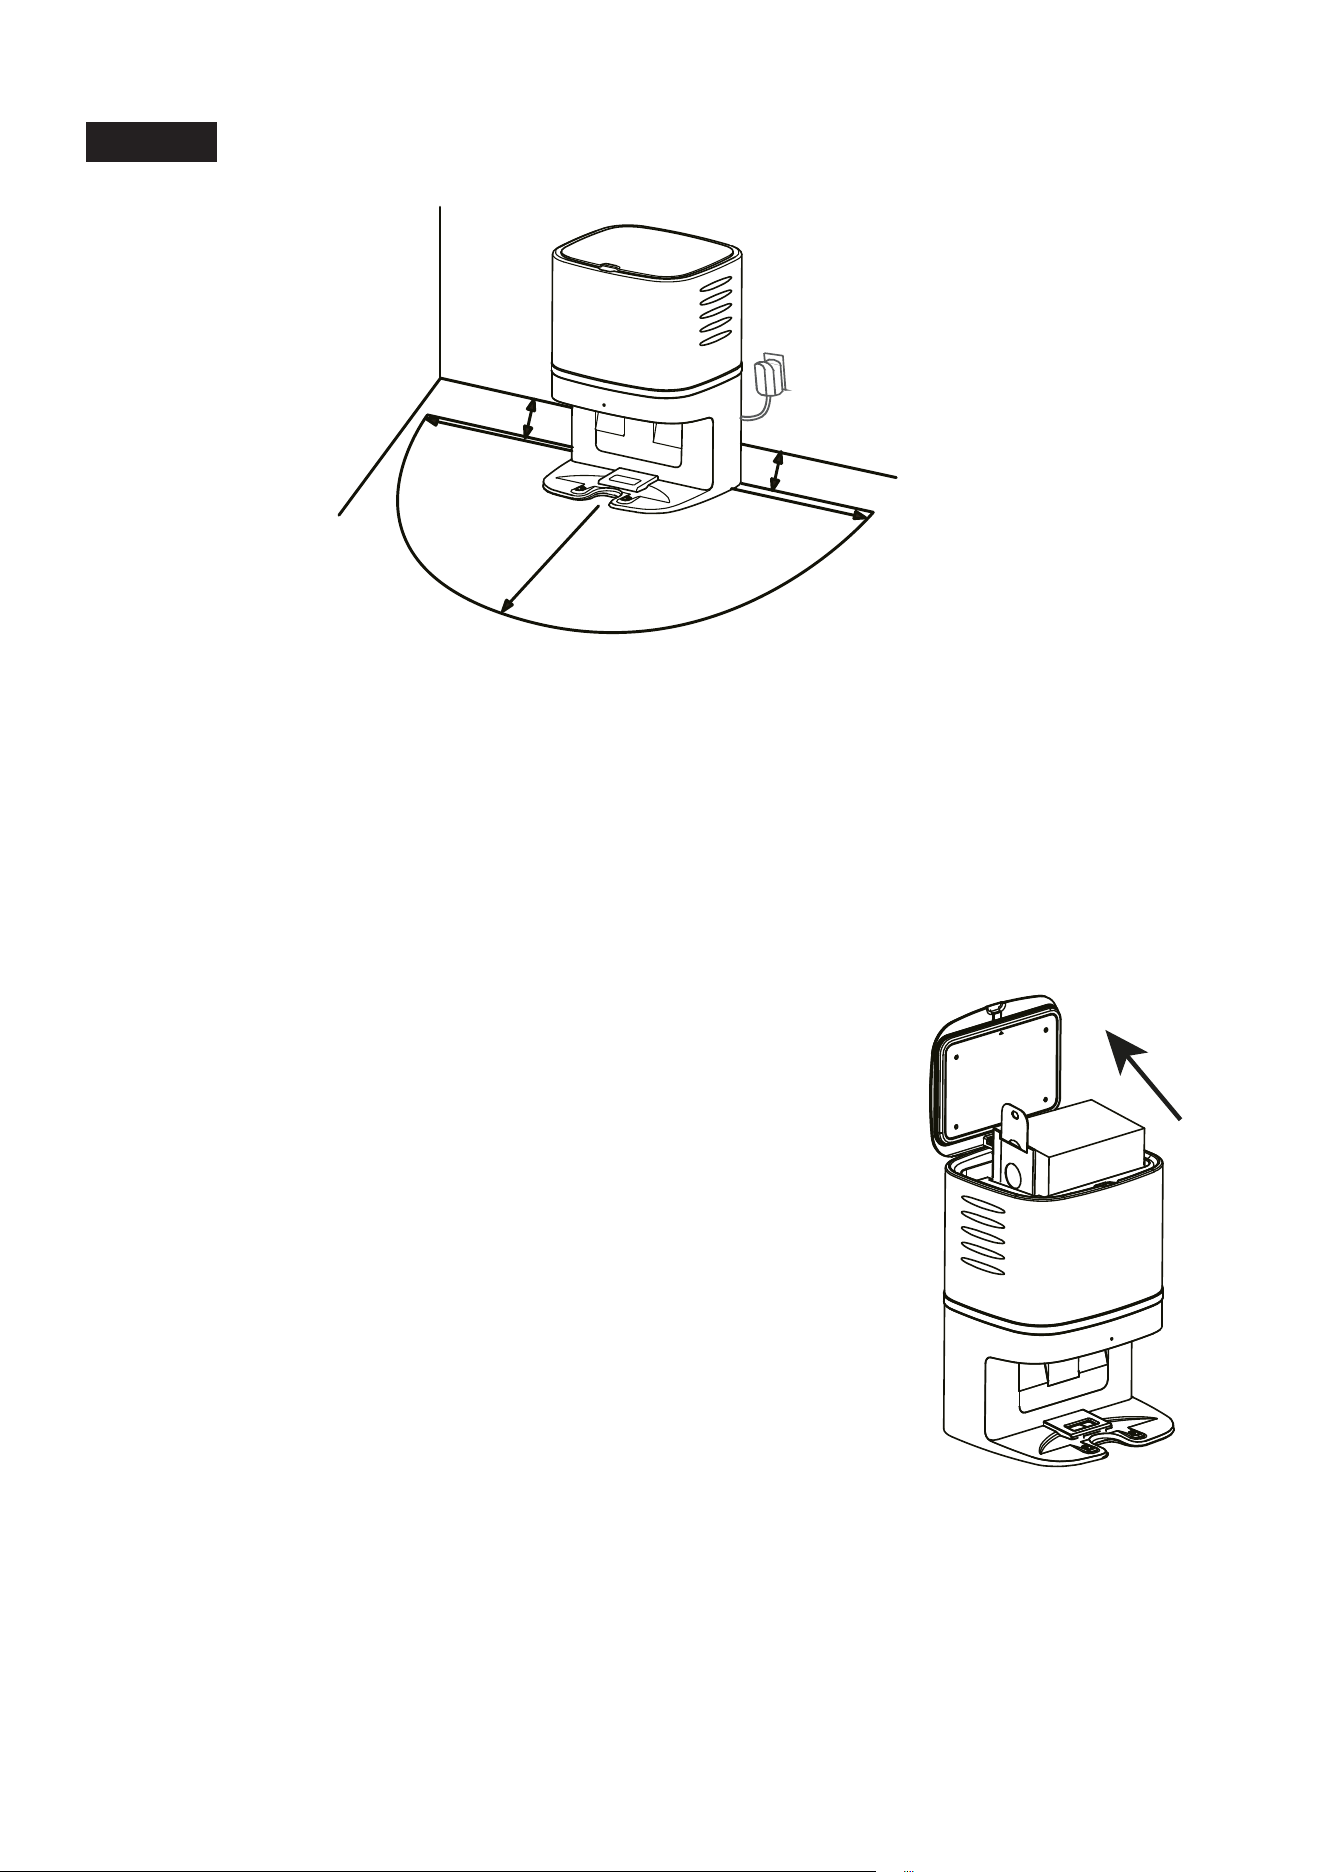
4
Betrieb
Aufstellen der CRAFT X Absaugstation
• Entfernen Sie alle Gegenstände in einem Abstand von 1 m links und rechts und
2 m vor der CRAFT X.
• Setzen Sie vor der Benutzung den Einwegstaubbeutel in die CRAFT X ein.
Wenn eine Ladestation für den Roboter vorhanden ist, sollte der Abstand zwischen
der CRAFT X und der Ladestation mehr als 4 m betragen.
Einsetzen des Einwegstaubbeutels
1). Ziehen Sie den Netzstecker der CRAFT X und öffnen Sie
dann den Deckel.
2). Nehmen Sie den Einwegstaubbeutel aus der Verpackung
und schieben Sie den Kartoneinsatz des Staubbeutels bis
zum Anschlag in den Halter an der CRAFT X.
3). Achten Sie darauf, dass der Griff des Staubbeutels
nach oben zeigt und dass die Saugöffnung im
Kartoneinsatz vollständig offen ist.
4). Bringen Sie den Staubbeutel in seine korrekte Form und
schließen Sie den Deckel. Prüfen Sie, ob die Statusanzeige
langsam weiß blinkt.
1M
1
M
2M
0.05M
0.05M
M
a
mi
b
ot
M
a
mi
b
o
t
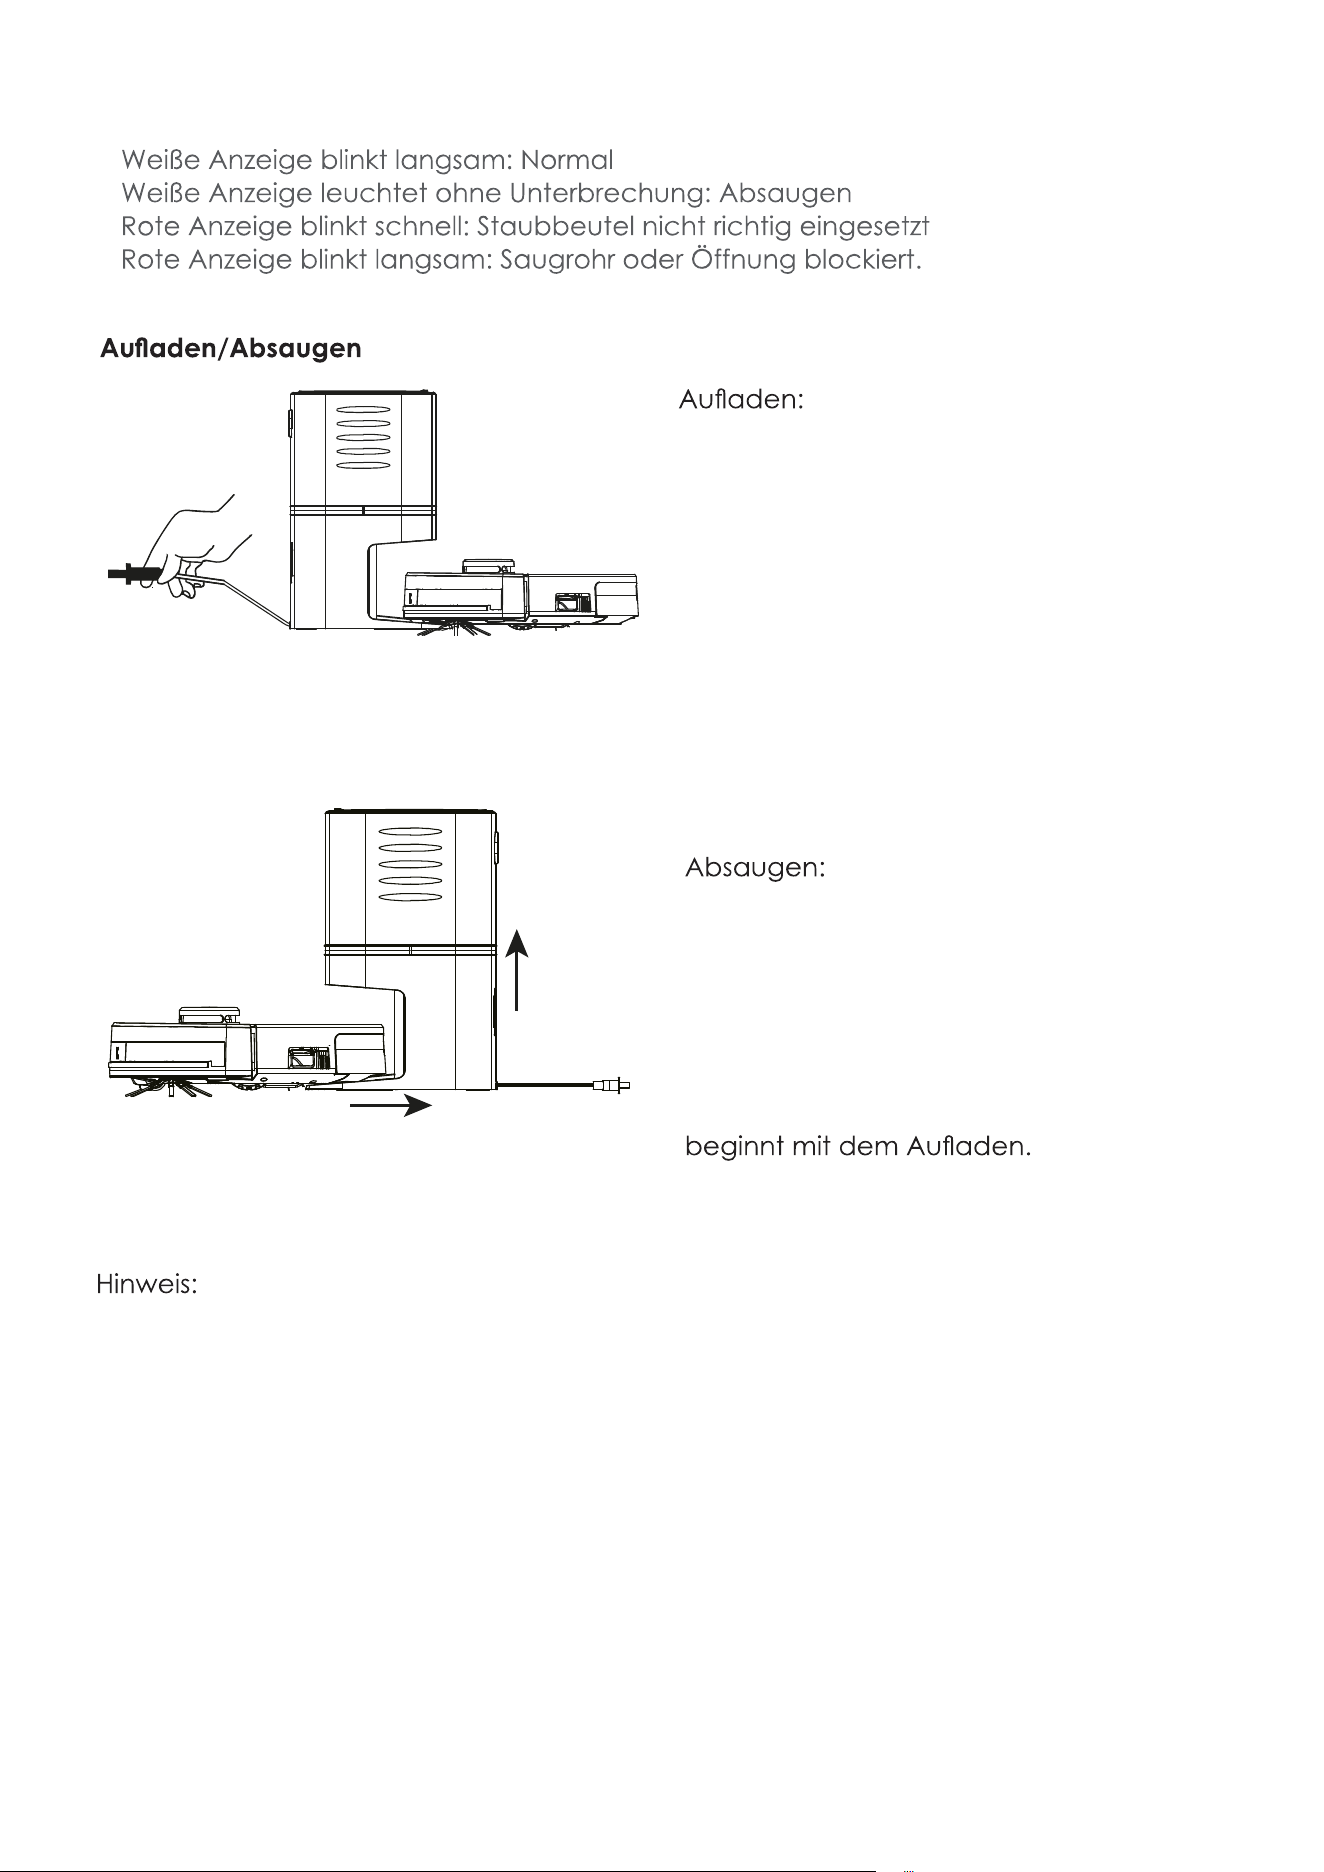
5
Statusanzeige
•
•
•
•
• Vergewissern Sie sich, dass der Netzs-
tecker richtig angeschlossen ist.
• Der GLORY sucht die CRAFT X auf, wenn
der Akku schwach oder die Reinigung
abgeschlossen ist.
• Wenn die Ladekontakte beim Laden
keinen richtigen Kontakt haben, stellen
Sie den GLORY mit der Hand auf die
CRAFT X.
• Vergewissern Sie sich, dass der Netzs-
tecker richtig angeschlossen ist.
• Der GLORY sucht die CRAFT X auf,
wenn der Akku schwach oder die
Reinigung beendet ist. Dann saugt
die CRAFT X Absaugstation zuerst den
Staub aus der Staubbox des GLORY,
anschließend dreht sich dieser um und
Die CRAFT X Absaugstation saugt den Staub automatisch aus dem Staubbehälter des
GLORY. Wechseln Sie den Einwegstaubbeutel, wenn er voll ist.
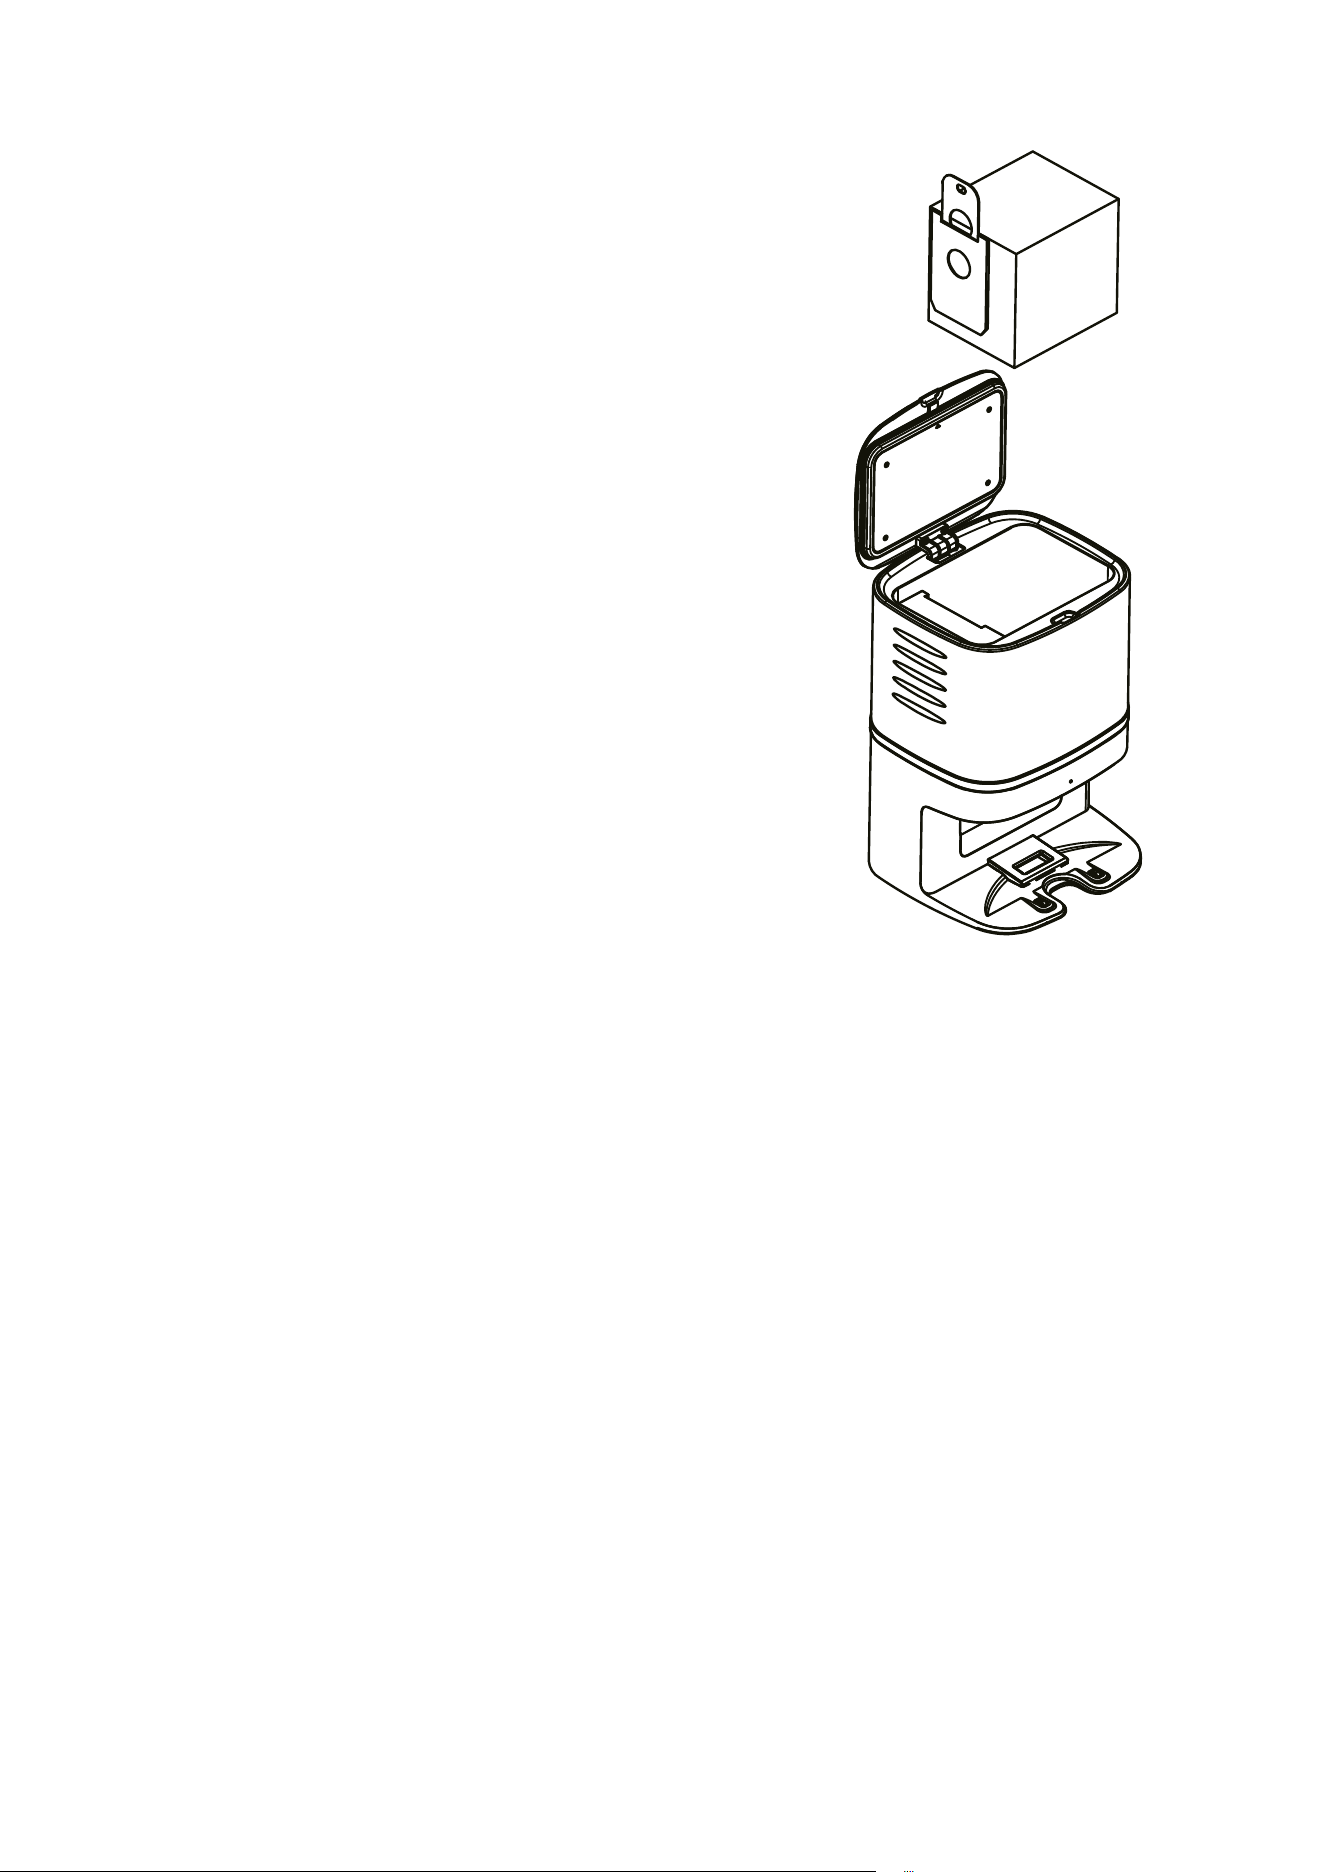
6
Wechsel des Staubbeutels
1). Ziehen Sie zuerst den Netzstecker und öffnen
Sie dann den Deckel der CRAFT X Absaug
station.
2). Nehmen Sie den Griff des Staubbeutels und
ziehen Sie ihn nach oben. Geben Sie den
Staubbeutel in den Hausmüll.
3). Nehmen Sie einen neuen Staubbeutel aus
der Packung und gehen Sie vor wie unter
„Einsetzen des Staubbeutels“ beschrieben.
4). Schließen Sie den Deckel.
5). Reinigen Sie das Gehäuse mit einem we
ichen Tuch.
6). Verbinden Sie das Gerät wieder mit dem
Stromnetz (Netzstecker einstecken) und
nehmen Sie es wieder in Betrieb.
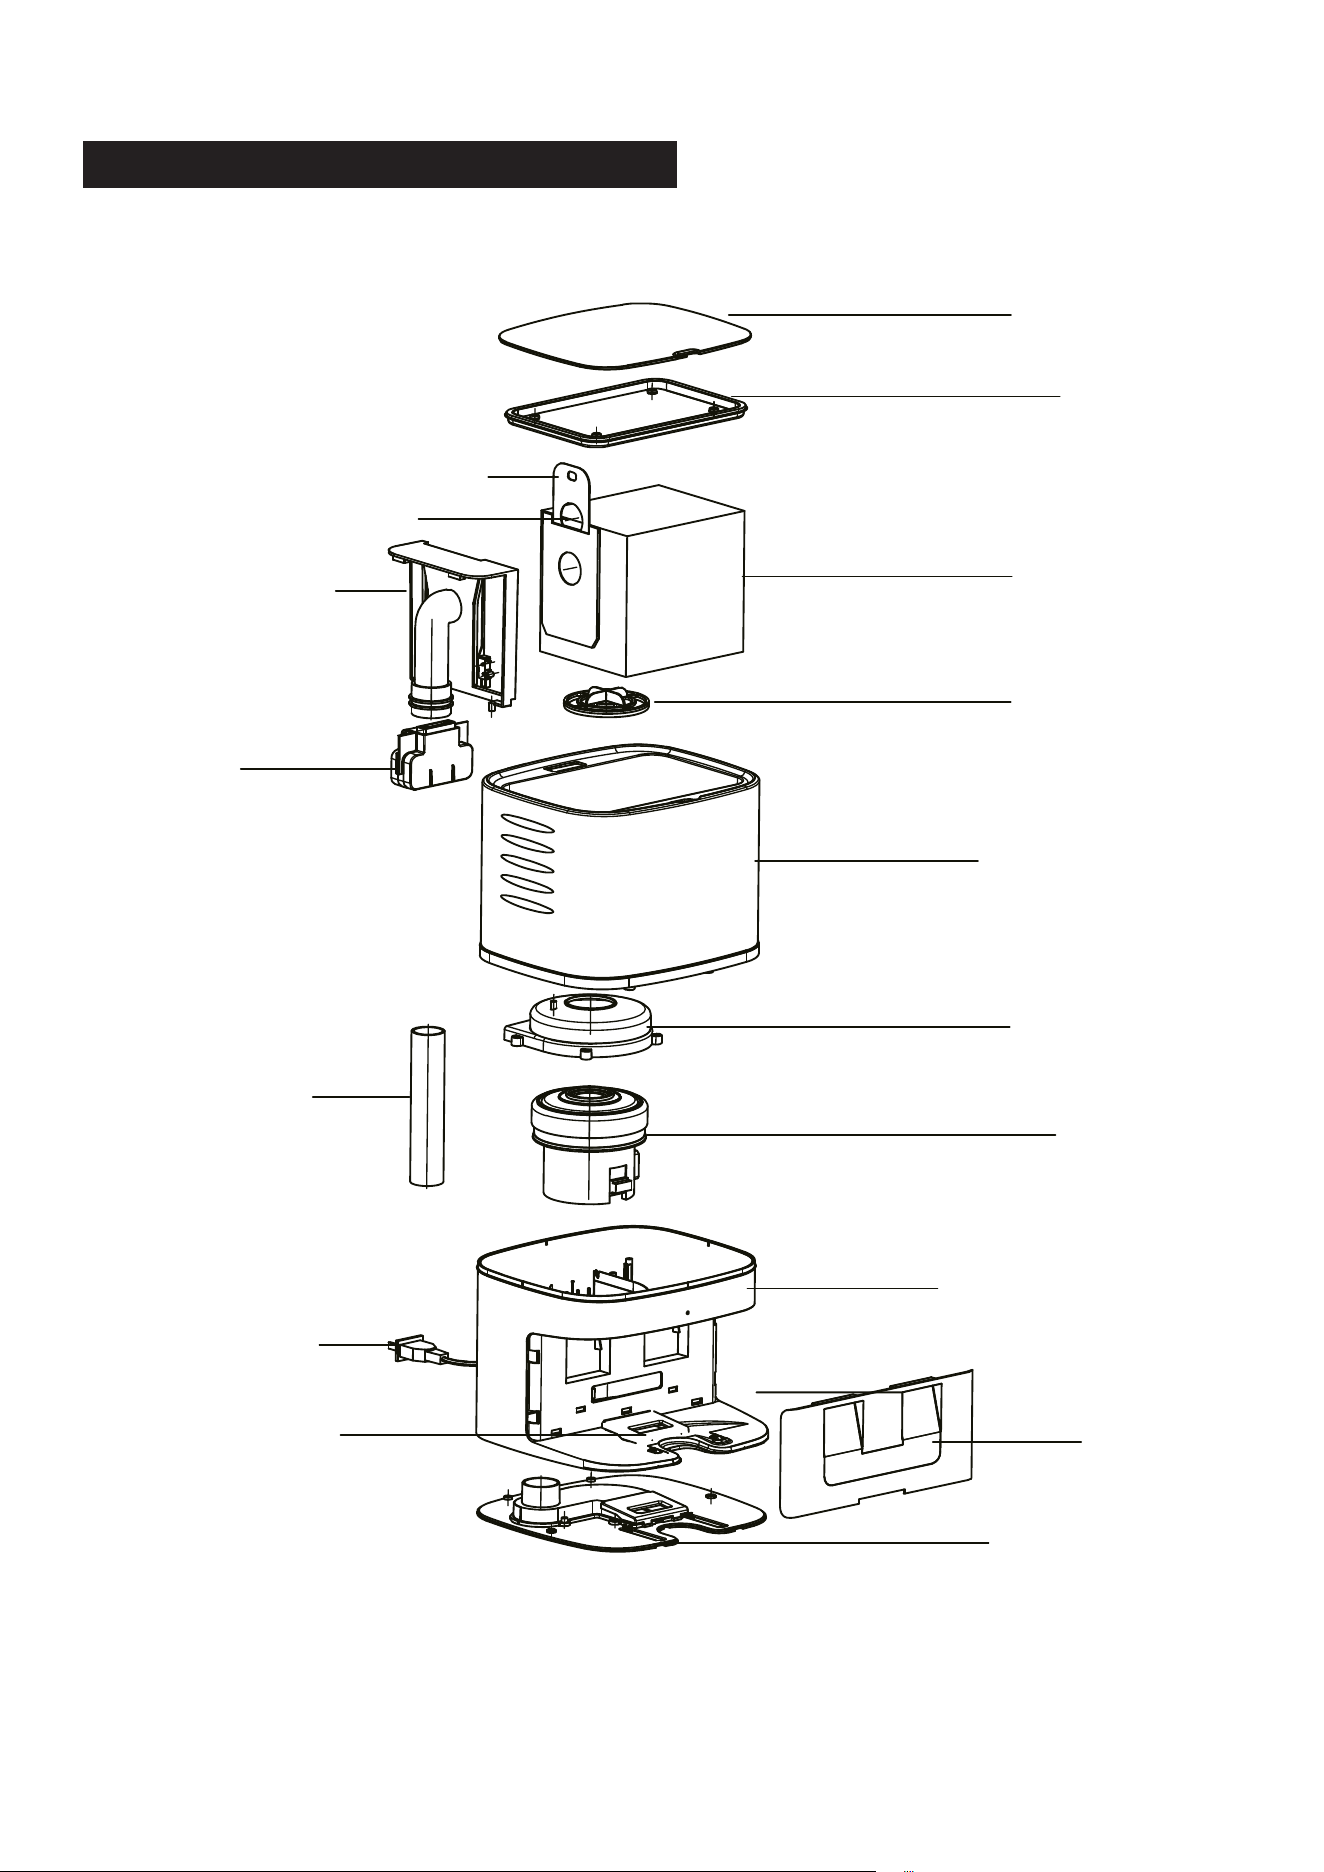
7
AUFBAU DER CRAFT X ABSAUGSTATION
Dichtung
Staubbeutel
Filter
Gehäuse
Motorabdeckung
Motor
Sockel
Blende
Unterer Deckel
Saugöffnung
Netzstecker
Luftrohr
Griff
Saugrohr
Ansaugöffnung
Staubbeutelgriff
Deckel
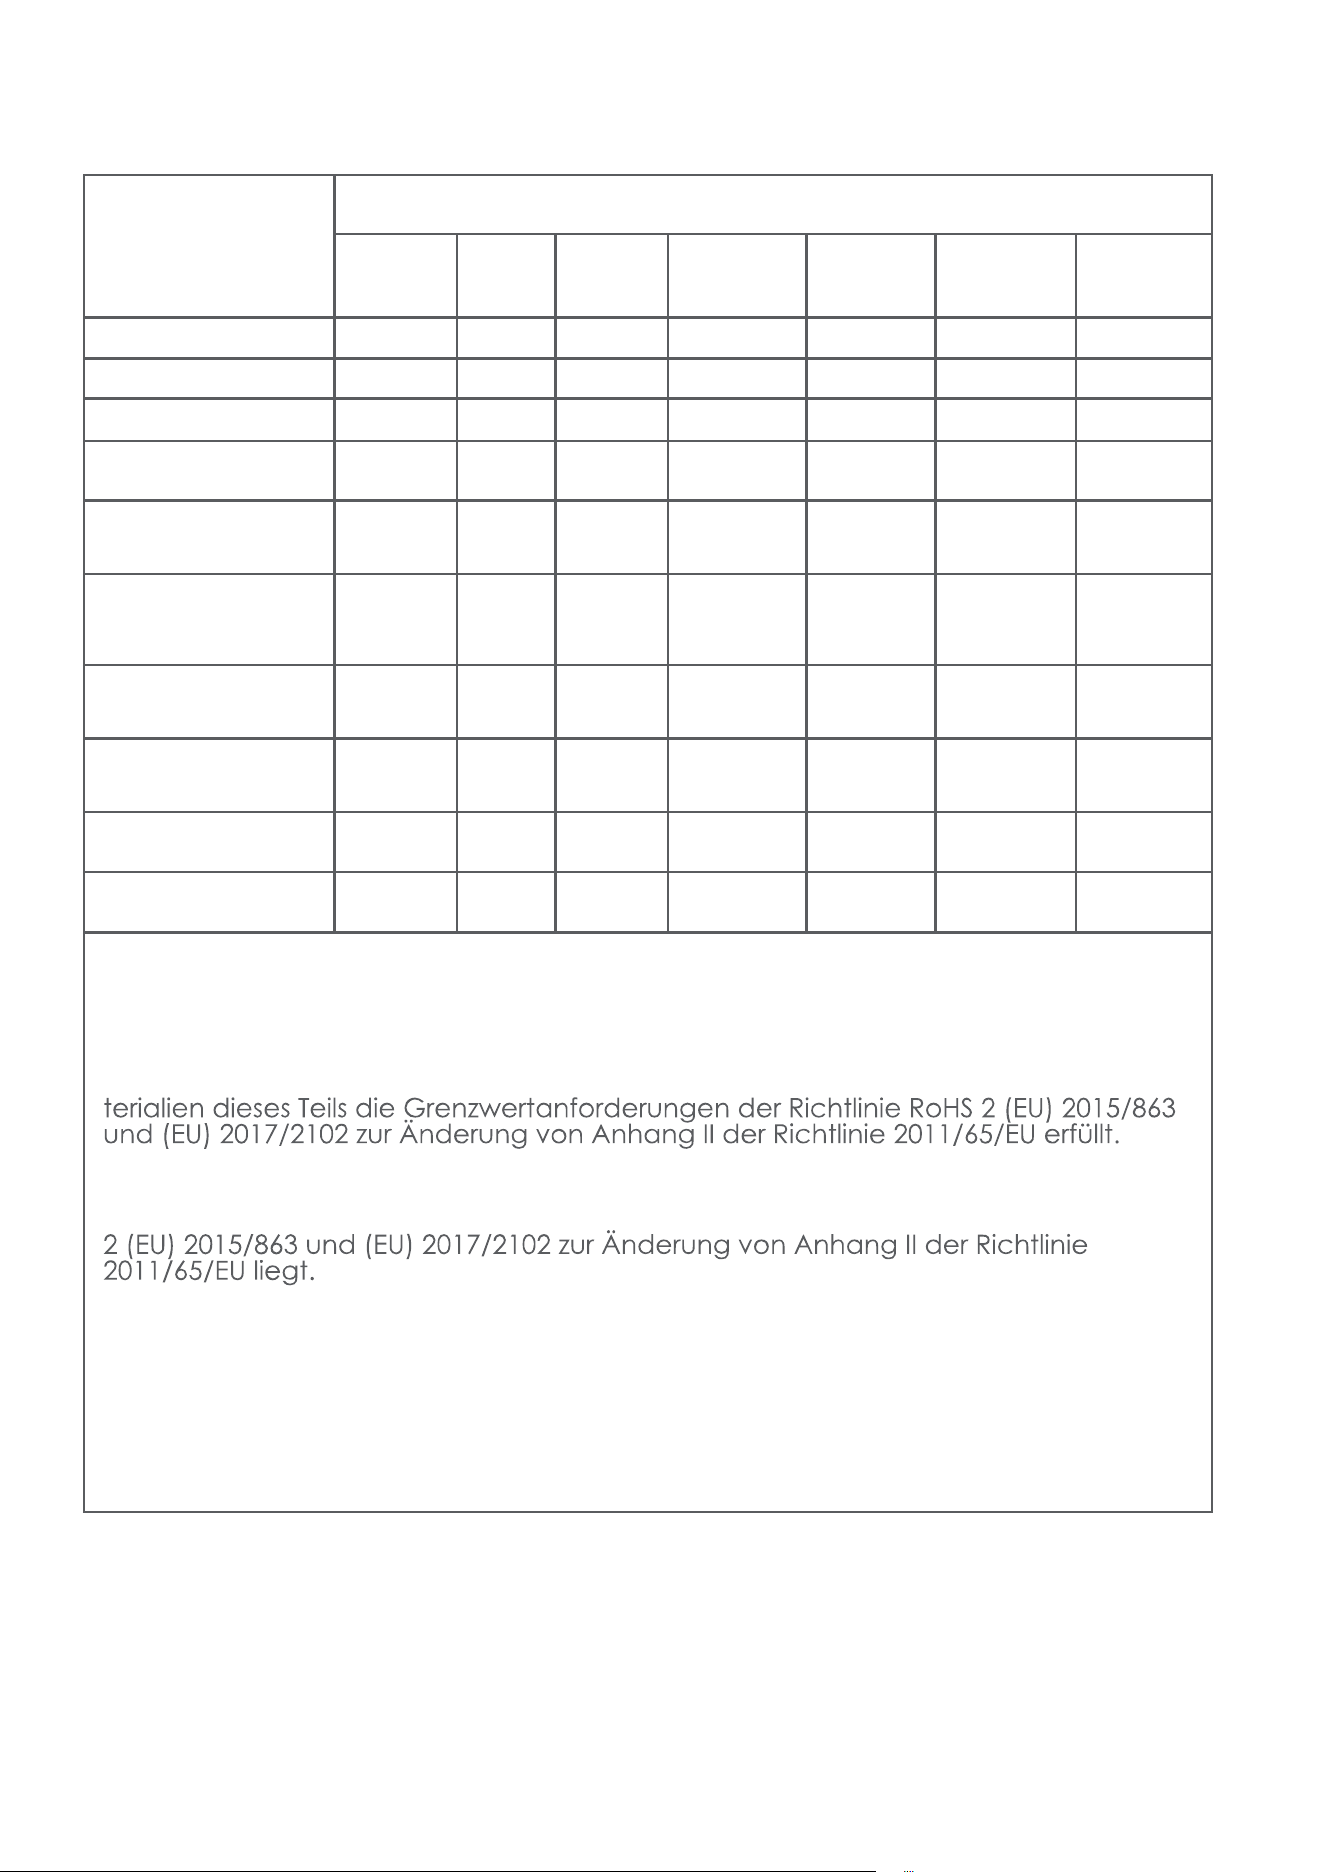
8
Komponente
Enthaltene Gefahrenstoffe
Kunststoff-
gehäuse
PCB Kabel Metallteile Netzteil
Elektron-
ikkompo-
nenten
Gummi-
kompo-
nenten
Cadmium (Cd) O O O O O O O
Blei (Pb) O O O X O O O
Quecksilber (Hg) O O O O O O O
Hexavalentes Chrom
(CrVI)
O O O O O O O
Polybromierte
Biphenyle (PBB)
O O O O O O O
Polybromierte
Diphenylether
(PBDE)
O O O O O O O
Bis(2-ethylhexyl)
phthalate (DEHP)
O O O O O O O
Butylbenzyl-
phthalat (BBP)
O O O O O O O
Dibutylphthalat
(DBP)
O O O O O O O
Diisobutylphthalat
(DIBP)
O O O O O O O
Die Laufzeit der Komponenten in Bezug auf den Umweltschutz beträgt 10 Jahre.
Diese Angabe gilt unter den in diesem Handbuch beschriebenen Benutzungsbedin-
gungen.
O: Weist darauf hin, dass der Anteil dieses Gefahrenstoffs in allen homogenen Ma-
X: Weist darauf hin, dass der Anteil dieses Gefahrenstoffs in allen homogenen Ma-
terialien dieses Teils oberhalb der Grenzwertanforderungen der Richtlinie RoHS
9
Das Symbol auf dem Produkt oder der Verpackung gibt an, dass
dieses Produkt nicht mit dem Hausmüll entsorgt werden darf. Es soll-
te bei einer Sammelstelle für das Recycling von elektrischen und
elektronischen Geräten abgegeben werden. Durch die ordnungs-
gemäße Entsorgung dieses Produkts können Sie mögliche negative
Folgen für Umwelt und Gesundheit verhindern. Nähere Informationen
zum Recycling dieses Produkts erhalten Sie bei Ihrer Stadtverwaltung,
Ihrem Entsorgungsunternehmen oder von dem Händler, von dem Sie
es erworben haben.
Das Produkt erfüllt alle relevanten Anforderungen der dafür gel-
tenden EU-Richtlinien.
Wir behalten uns das Recht vor, ohne vorherige Ankündigung Änderungen
an Text, Gestaltung und technischen Daten vorzunehmen.
Hersteller:
Mamibot Manufacturing (Shanghai) Co.,Ltd.
21st FL, No 1st, LN1040 Caoyang Rd, Shanghai, 200063. P.R.C.
Überwacht durch
Mamibot Manufacturing USA Inc.
One Commerce Center, 1201 Orange St, Wilmington, DE 19899 USA
Tel.: 001 302-428-9888 sale[email protected] www.mamibot.com
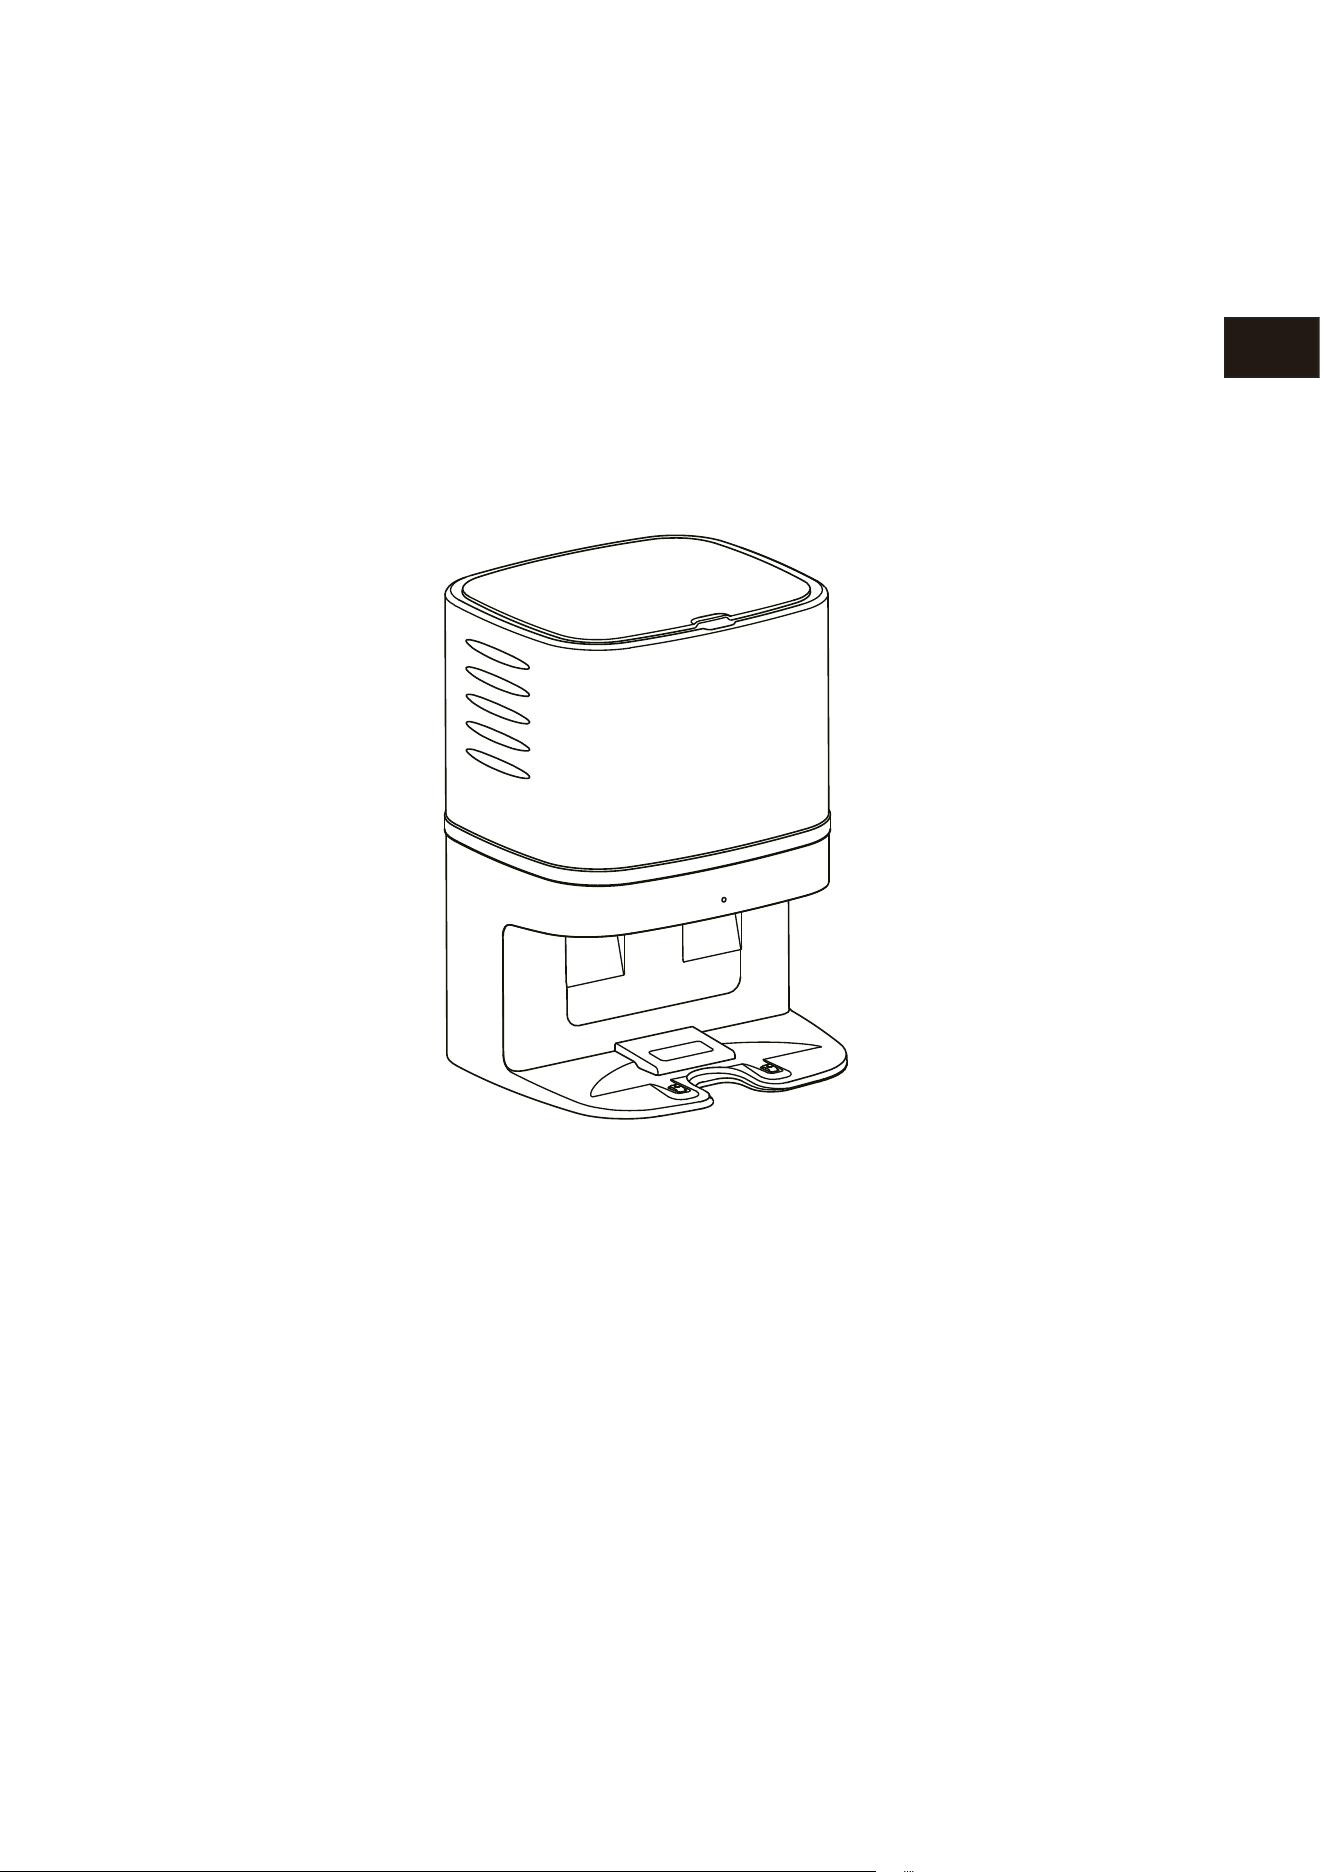
Mamibot
Collecteur de poussières – CRAFT X
Conçu pour EXVAC890 GLORY
Manuel d’utilisation
Mami
b
ot
FR
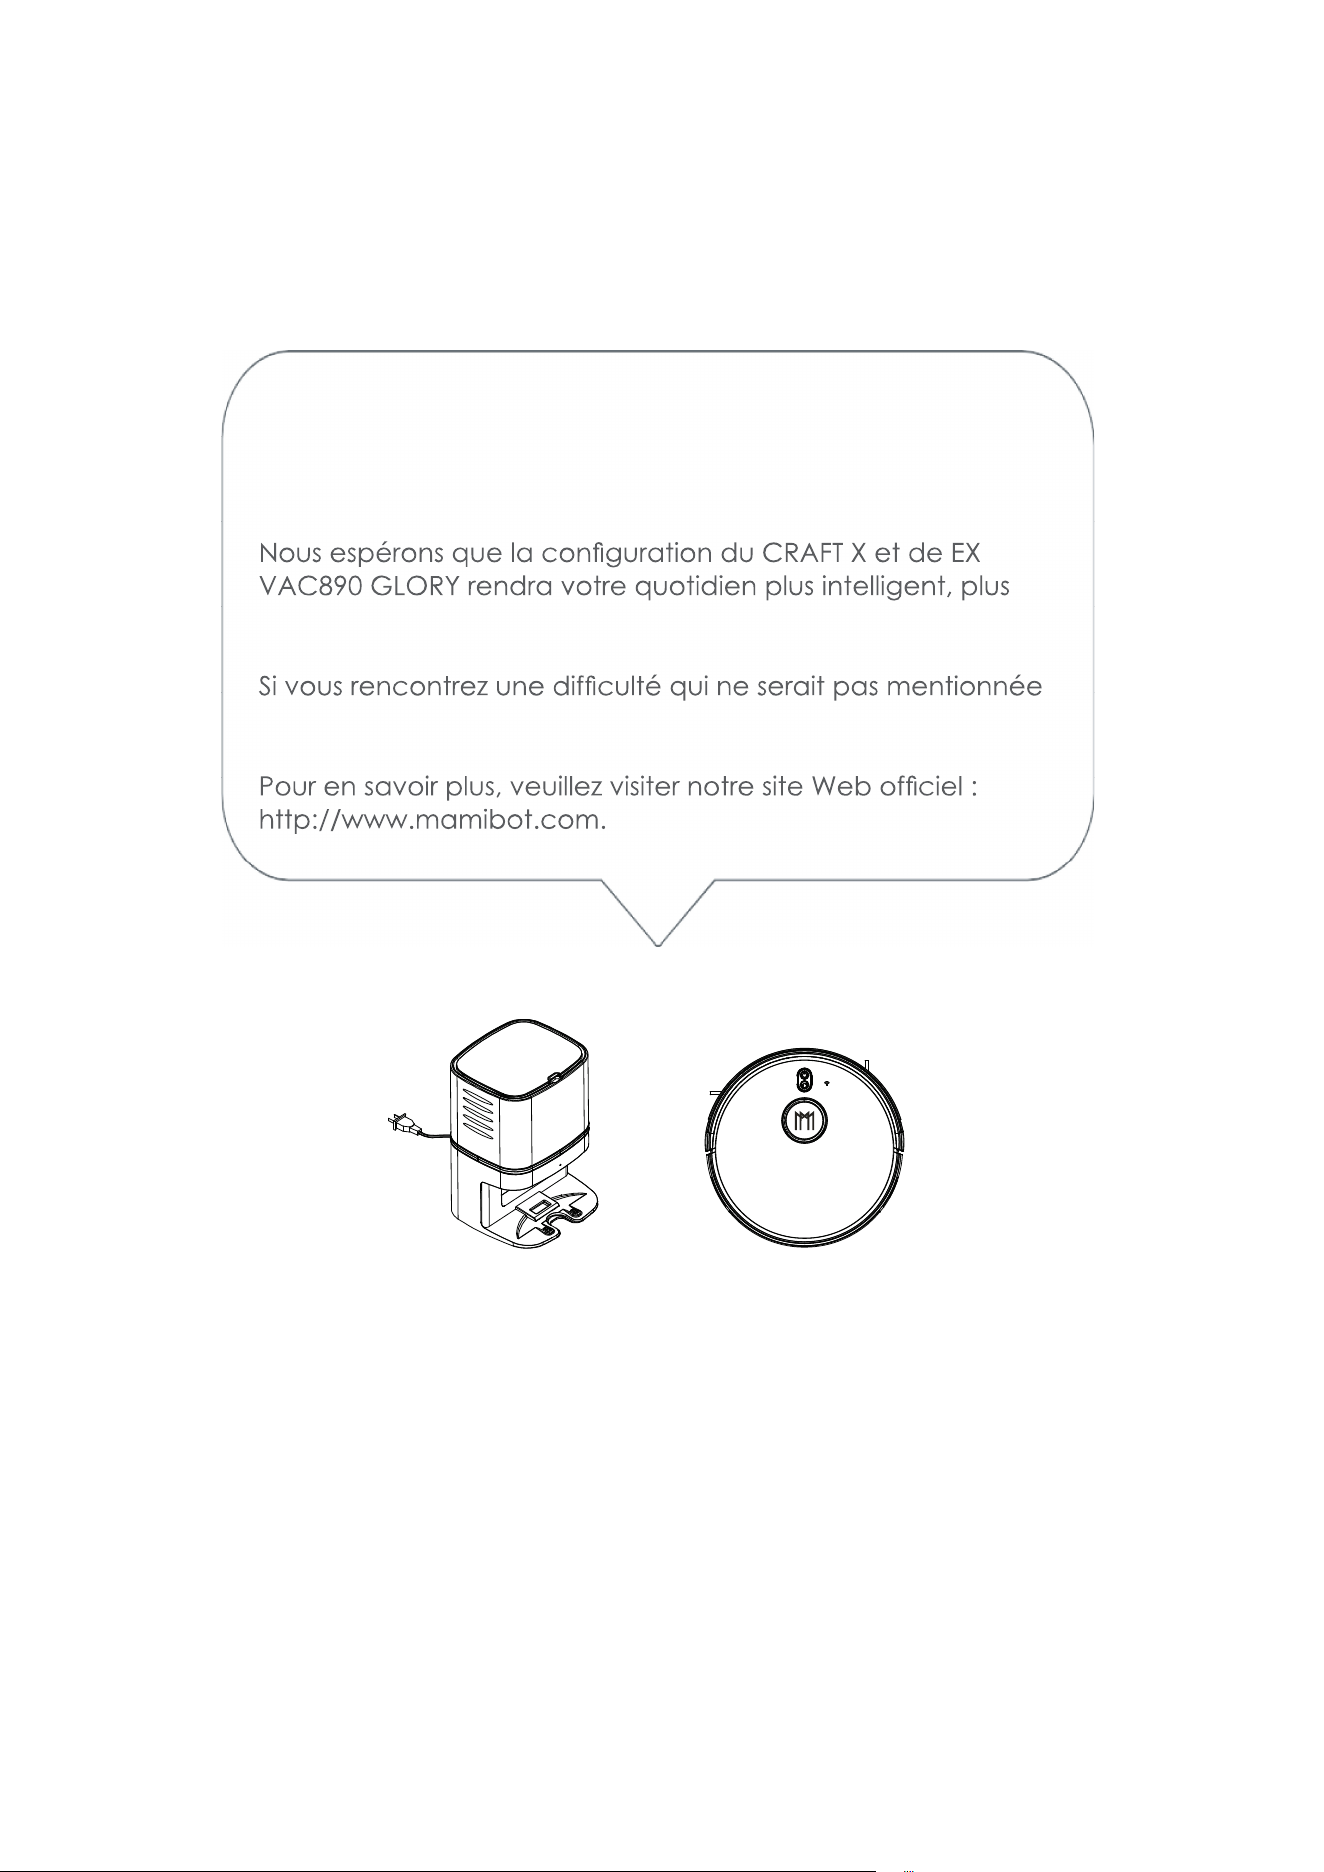
Veuillez lire attentivement ce manuel d’utilisation avant toute utilisation et con-
servez-le pour vous y référer ultérieurement.
Merci d’avoir acheté le collecteur de poussières Mamibot
CRAFT X, conçu pour EXVAC890 GLORY.
-
facile et plus pratique.
ici, veuillez contacter [email protected].
Mamibot
Ma
mi
b
o
t

Table des matières
1 Consignes de sécurité
Notes pour l’unité principale et les composants
2 Composants du CRAFT X
3 Caractéristiques
4-6 Fonctionnement
Mise en place du collecteur de poussières – CRAFT X Mise en
place du sac à poussières jetable Statut du voyant Chargement/
Aspiration
Remplacement du sac à poussières
7 Anatomie du CRAFT X
8 Nom et teneur en substances dangereuses
Recyclage du CRAFT X
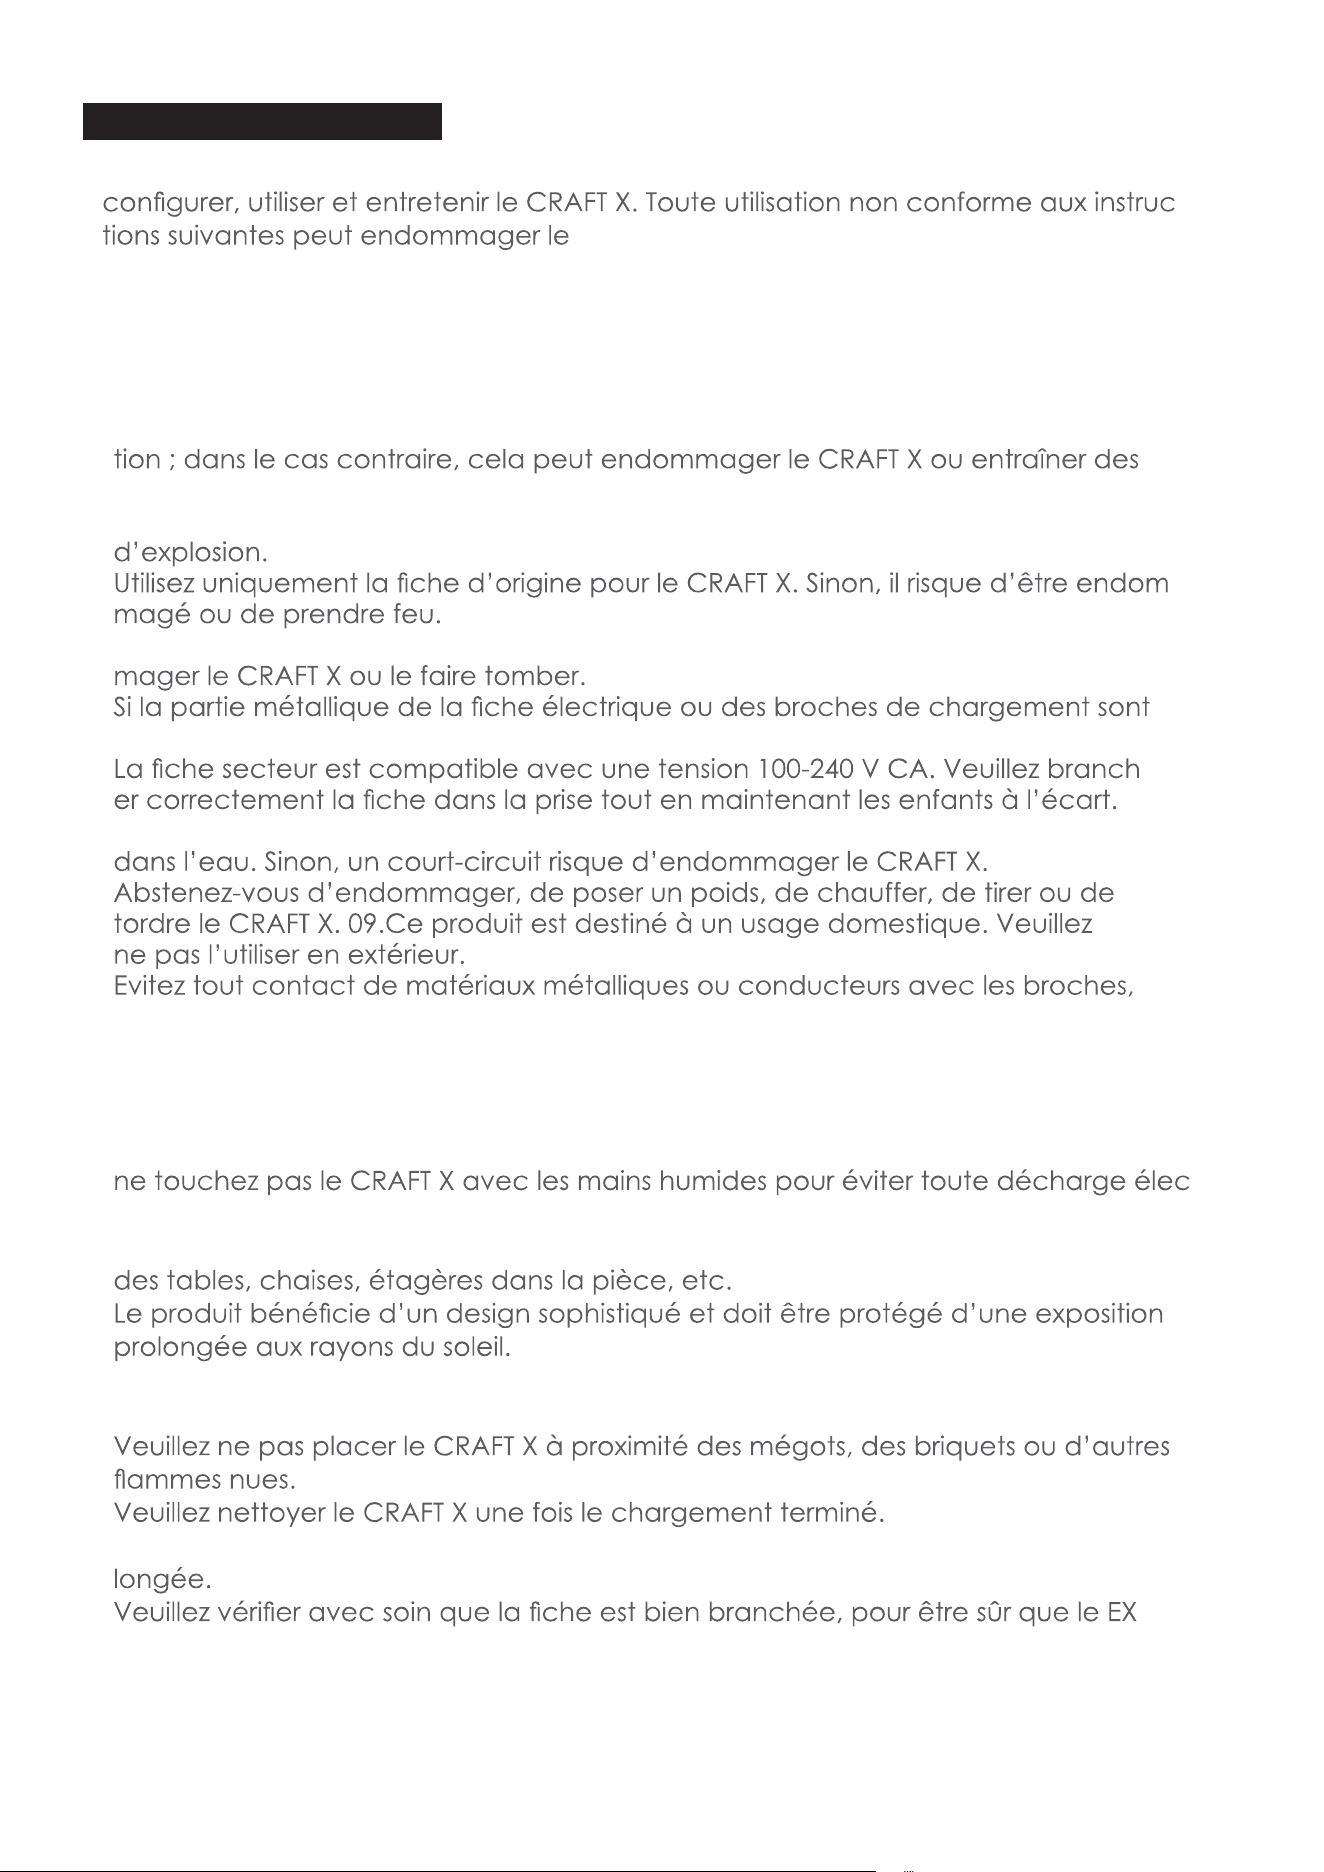
1
Consignes de sécurité
Veuillez lire toutes les instructions attentivement. Conservez-les à portée de main pour
-
CRAFT X ou causer des blessures.
Notes pour l’unité principale et les composants
Avertissement
01. Ne démontez pas, ne réparez pas et ne rééquipez pas le CRAFT X sans autorisa-
risques.
02. N’utilisez pas le produit dans un environnement présentant un risque d’incendie ou
03. -
04. Ne montez pas sur le CRAFT X et ne vous asseyez pas dessus ; cela peut endom-
05.
poussiéreuses, veuillez l’essuyer avec un chiffon sec.
06. -
07. Ne lavez pas et ne trempez pas le bloc central et les accessoires électroniques
08.
10.
sous peine de provoquer un court-circuit.
11. Ce produit n’est pas un jeu.
Attention :
01. -
trique.
02. Ne placez pas le CRAFT X à des endroits où il pourrait facilement tomber, comme sur
03.
04. Veuillez ne pas utiliser le CRAFT X dans des environnements humides, comme les salles
de bains.
05.
06.
07. Veuillez débrancher le CRAFT X si vous ne l’utilisez pas pendant une période pro-
08. -
VAC890 GLORY peut le trouver.
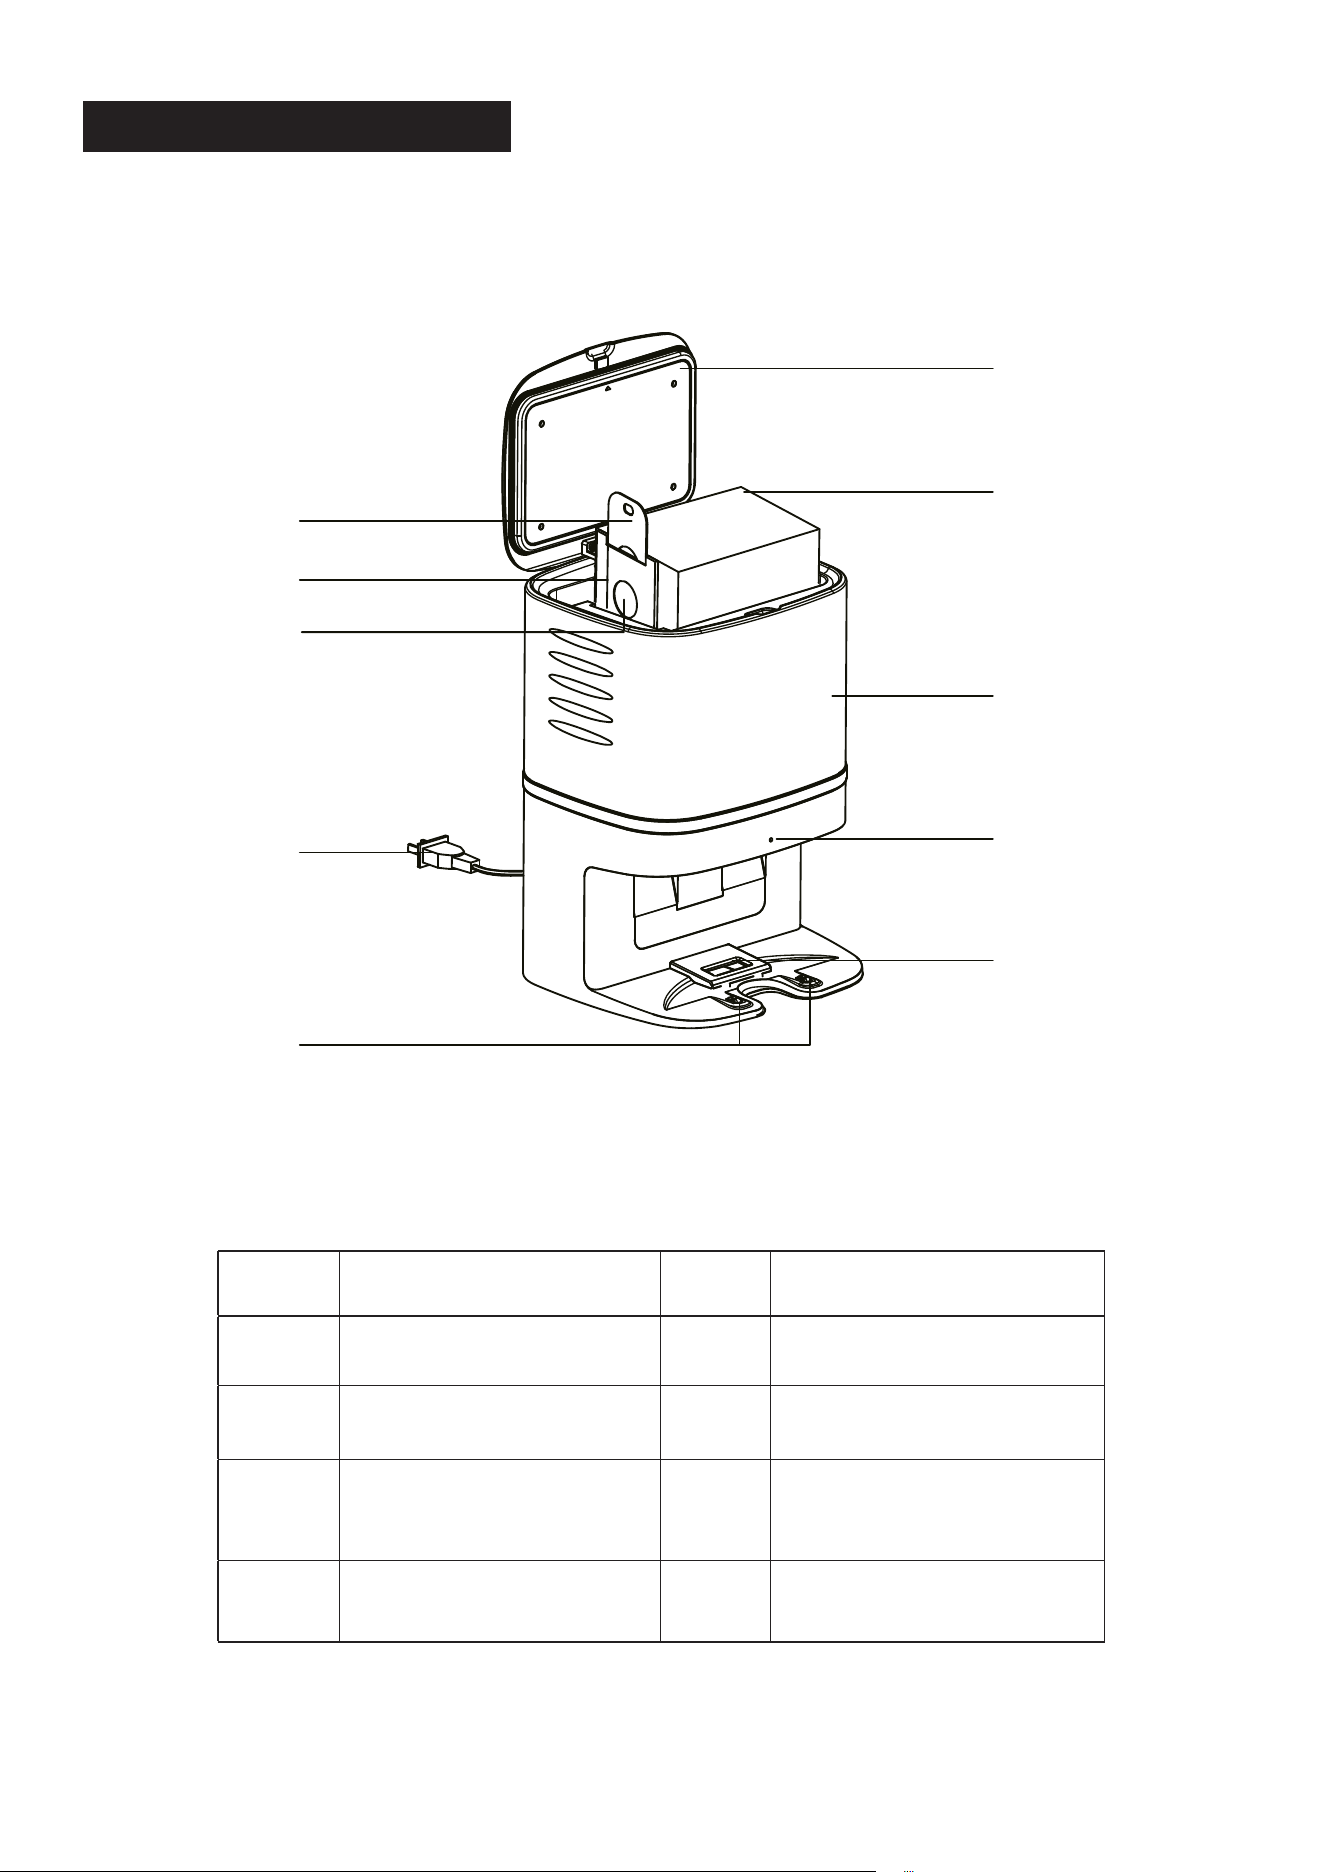
2
COMPOSANTS DU CRAFT X
1 Couvercle 6 Bloc central
2 Sac à poussières
jetable x 5 pce
7 Fiche électrique
3 Tirette du sac à pous-
sières
8 Voyant
4 Carton du sac à pous-
sières
9 Ouverture d’aspiration
de la boîte à pous-
sières
5 Ouverture d’aspiration
du sac à poussières
10 Broche de chargement
10
9
8
4
5
3
1
2
6
7
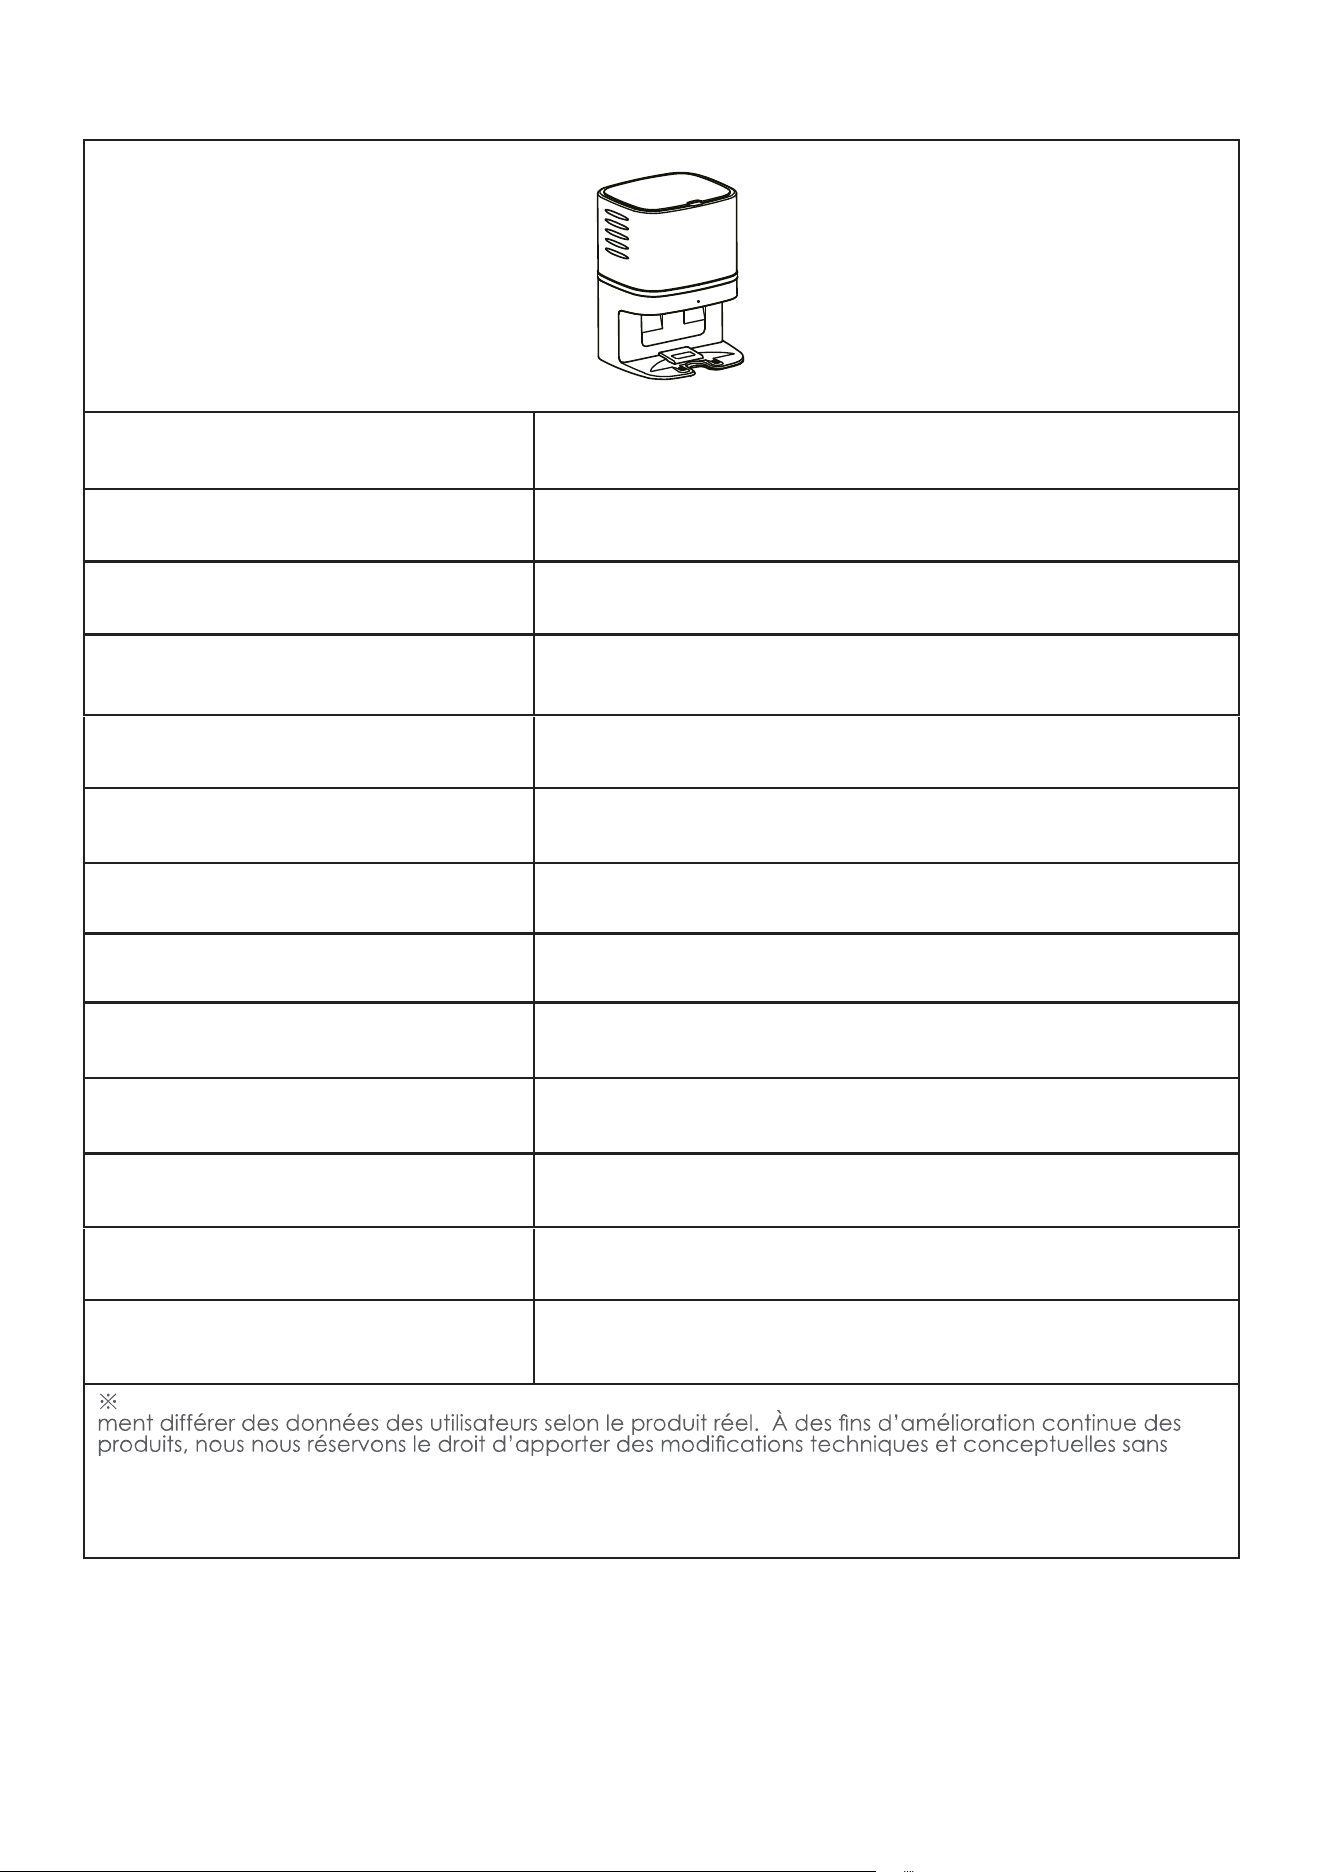
3
Modèle du produit CRAFT X
Dimensions de l’unité princi-
pale
236*246*346 mm
Poids net 3,2 kg
Tension d’entrée 220-230V5A
Tension de sortie 19 V 1 A
Puissance nominale 1050 W
Bruit en fonctionnement environ 80 dB
Puissance d’aspiration 30 kPa
Durée d’aspiration 15 s
Capacité du sac à poussières 2,8 l
Dimensions du sac à pous-
sières
170*130*130 mm
Durée de vie 600 h
Type d’appareil compatible EXVAC890 GLORY
Les données proviennent du laboratoire de Mamibot Manufacturing USA Inc. Elles peuvent légère-
préavis.
M
a
m
ibo
t
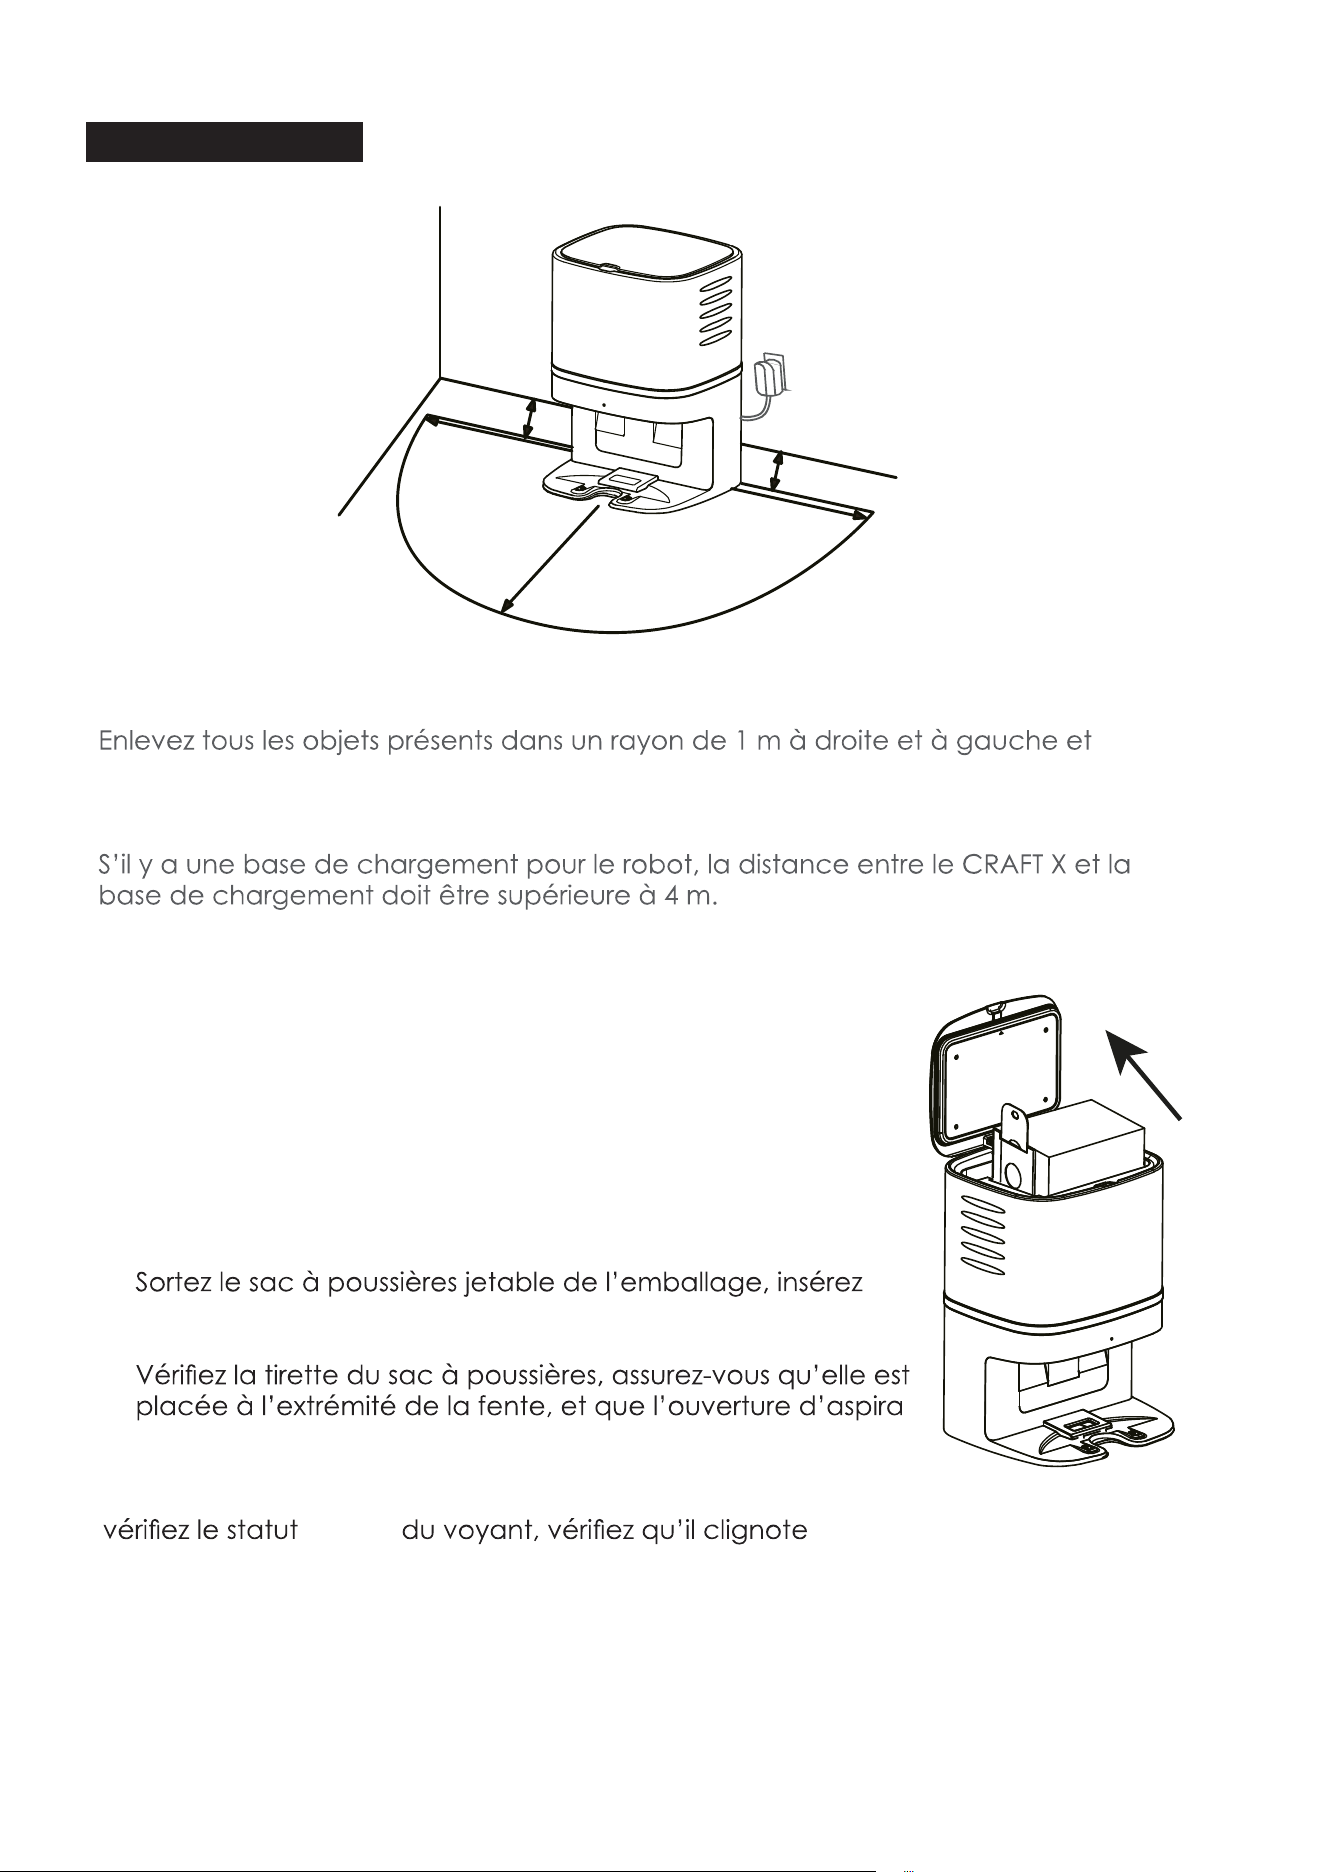
4
Fonctionnement
Mise en place du collecteur de poussières – CRAFT X
•
2 m devant le CRAFT X.
• Assurez-vous que le sac à poussières jetable est bien en place sur le CRAFT X avant
utilisation.
Mise en place du sac à poussières jetable
1). Débranchez la prise électrique, puis ouvrez le couvercle
du CRAFT X.
2).
le carton du sac à poussières dans la fente du CRAFT X,
puis poussez-le jusqu’au bout.
3).
-
tion sur le
carton est ouverte.
4). Mettez le sac à poussières en ordre et fermez le couvercle,
lentement en blanc.
1M
1
M
2M
0
.
0
5
M
0.05M
M
a
mi
b
ot
M
a
mi
b
ot
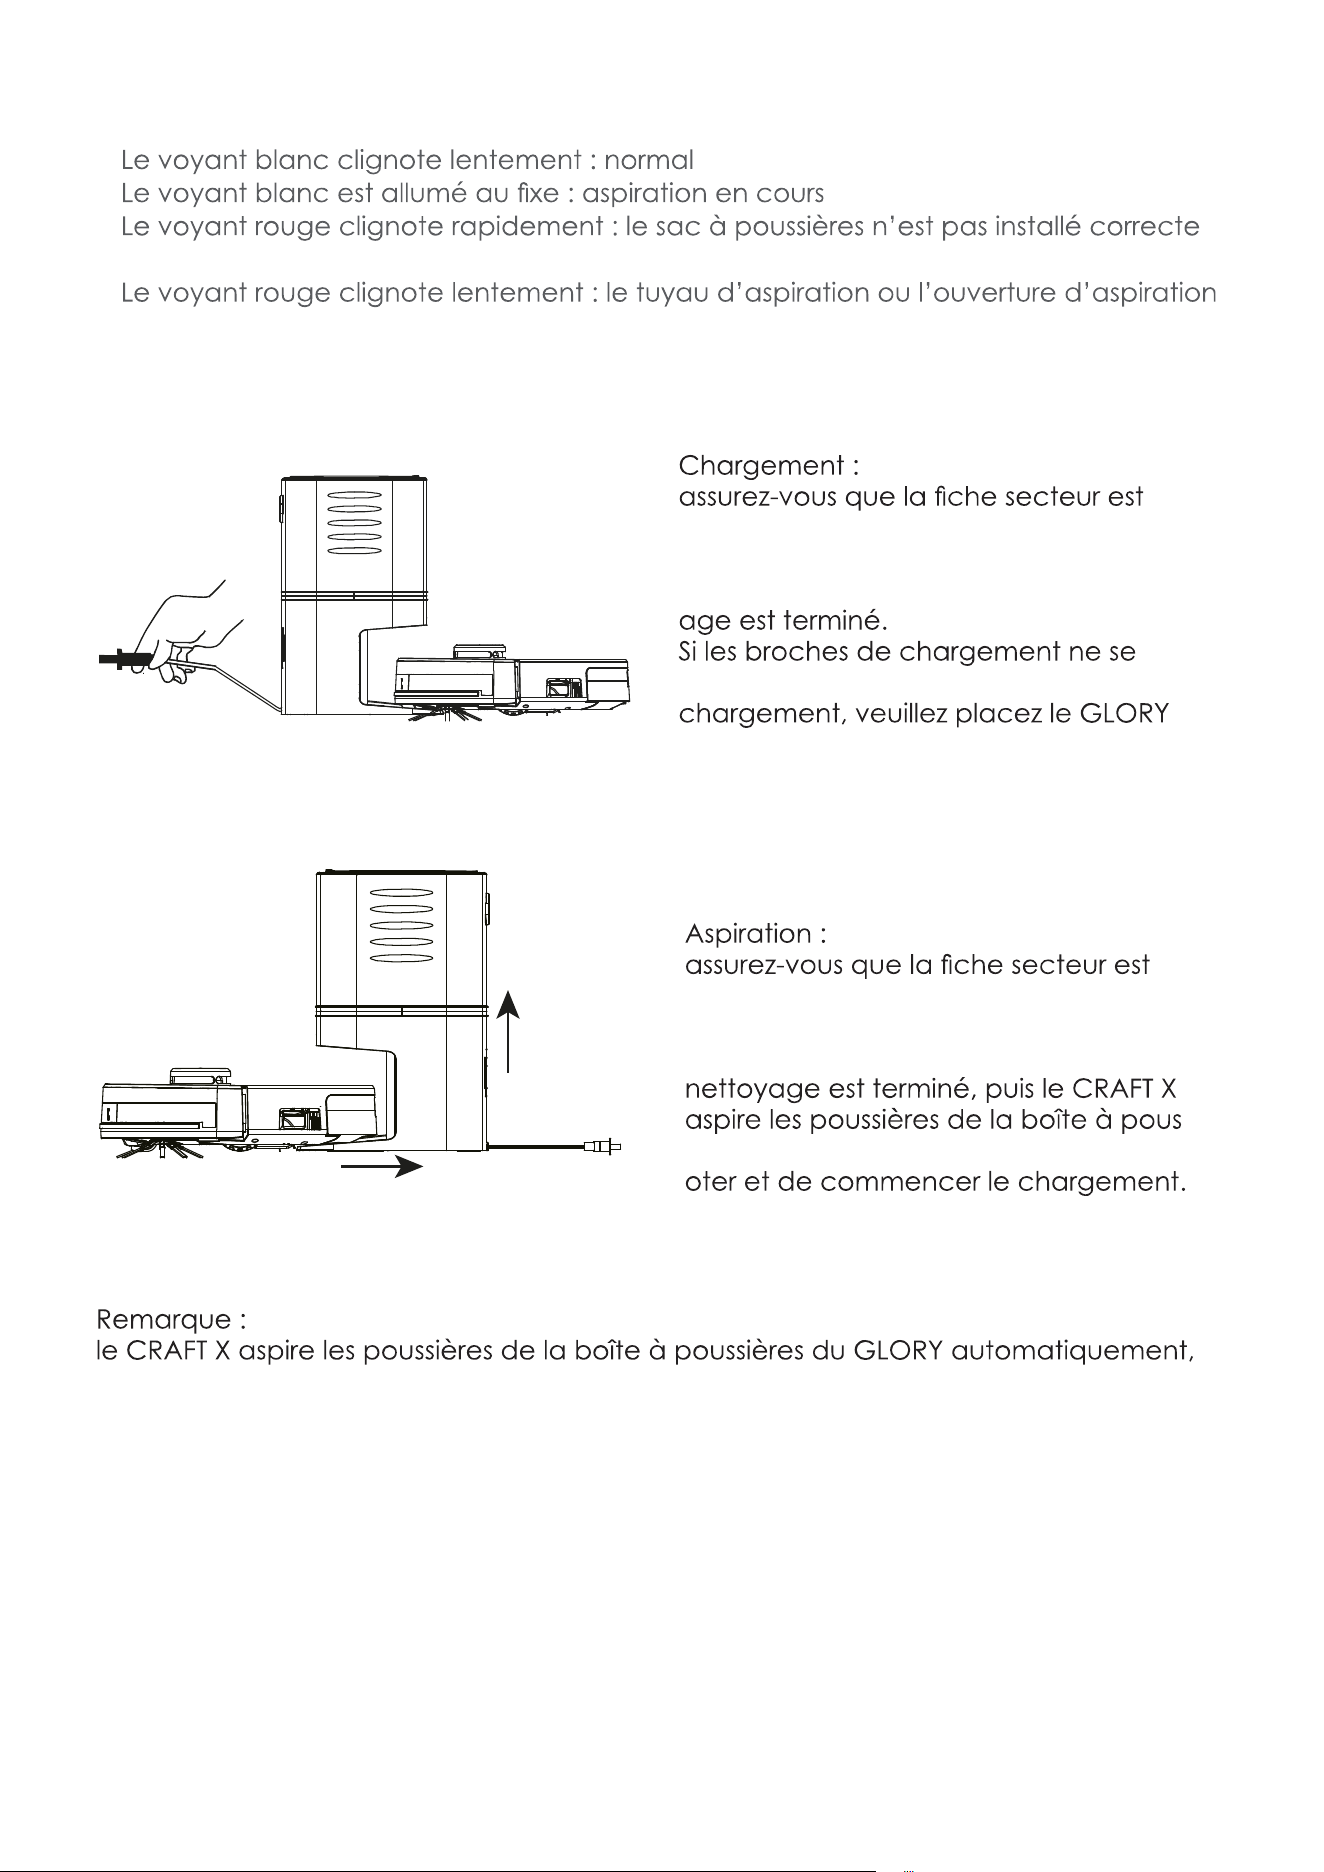
5
Statut du voyant
•
•
• -
ment
•
est bloqué(e).
Chargement/Aspiration
•
branchée correctement.
• Le GLORY cherche le CRAFT X lorsque la
batterie est faible ou dès que le nettoy-
•
connectent pas correctement lors du
manuellement sur le CRAFT X.
•
branchée correctement.
• Le GLORY cherche le CRAFT X lorsque
la batterie est faible ou dès que le
-
sières du GLORY d’abord, avant de piv-
veuillez nettoyer le sac à poussières jetable lorsque le sac à poussières est plein.
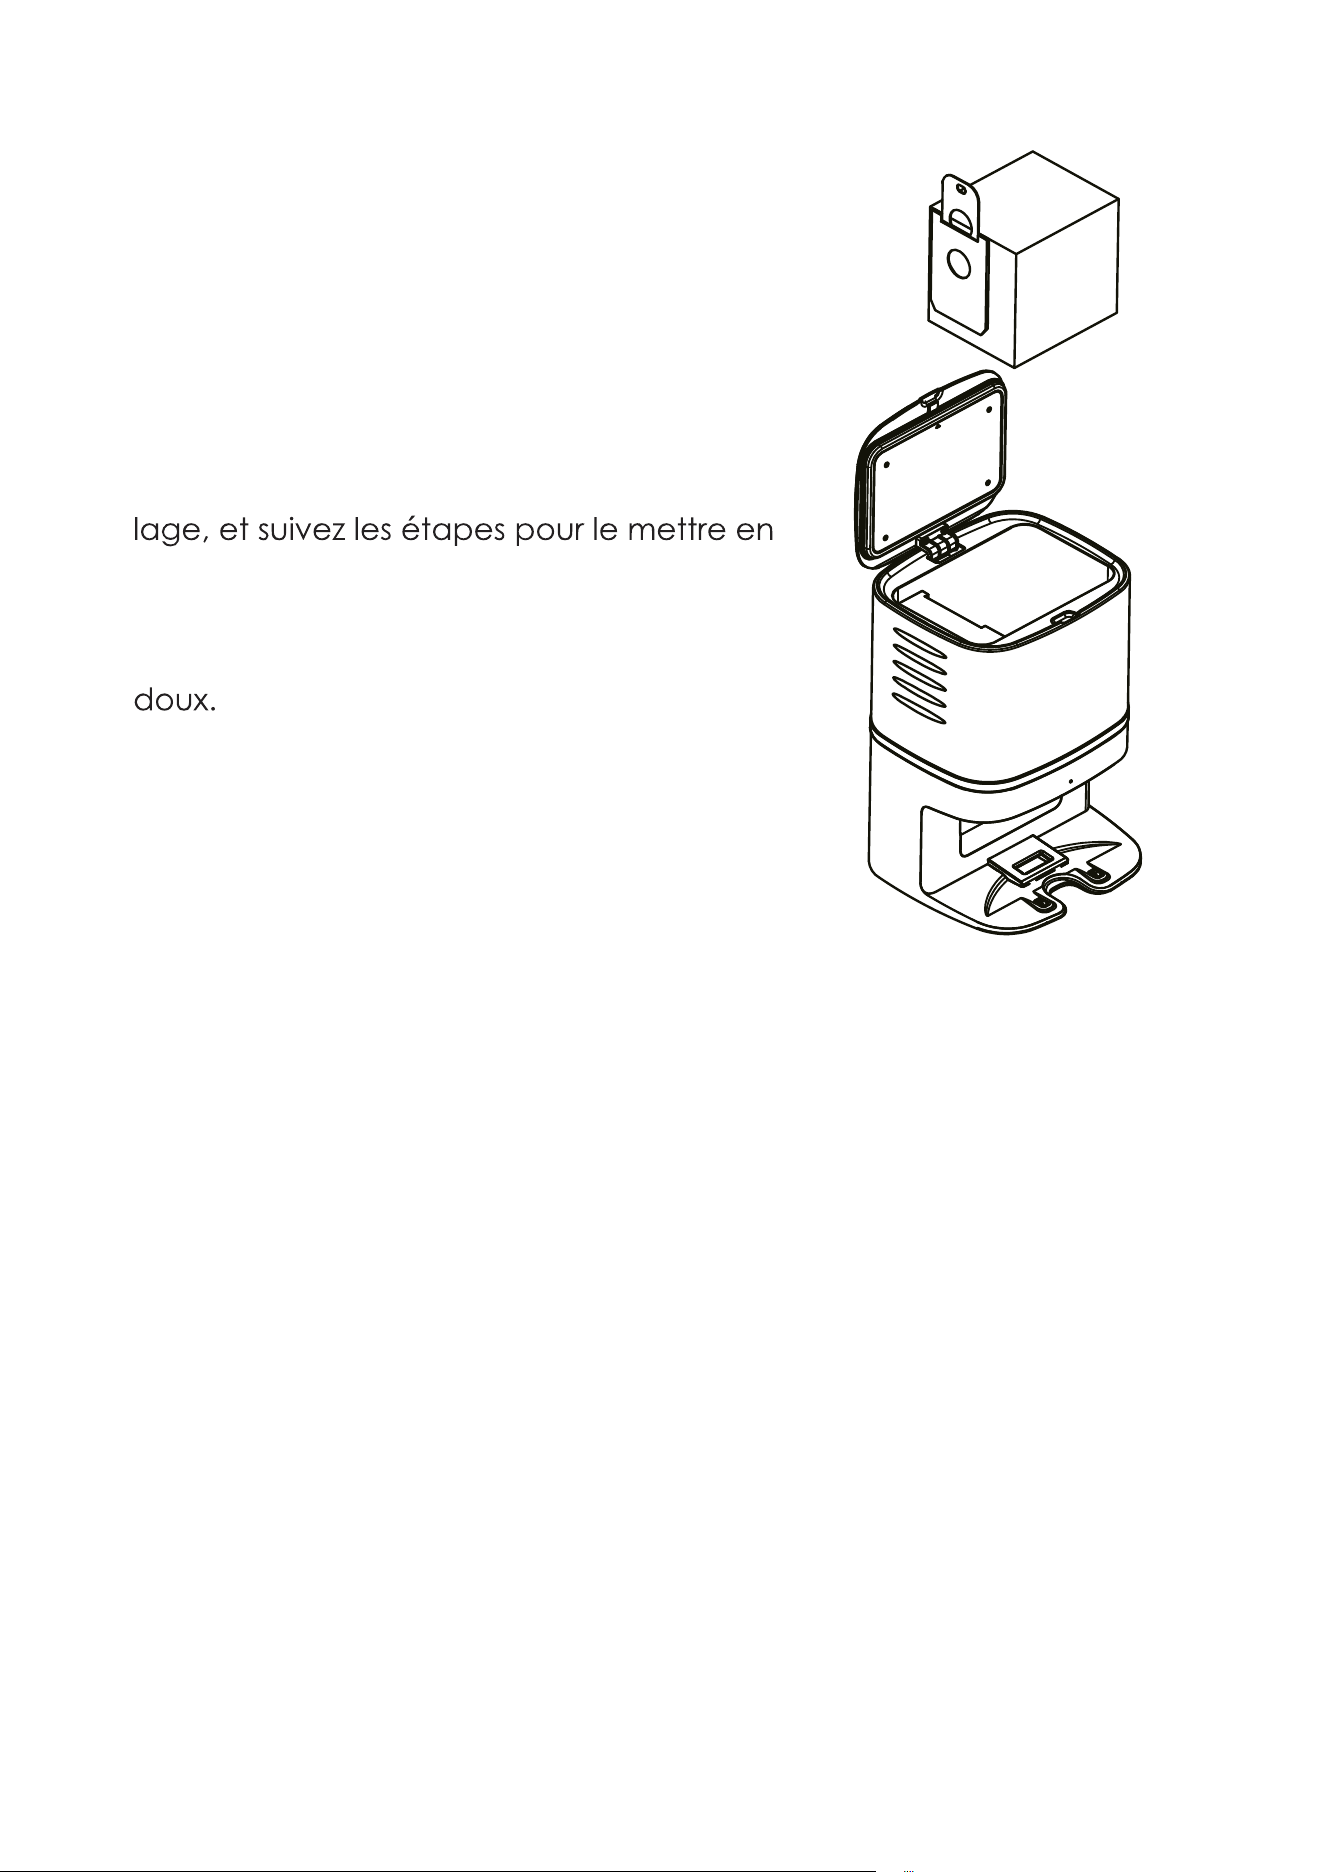
6
Remplacement du sac à poussières
1). Débranchez d’abord la prise électrique, puis
ouvrez le couvercle du CRAFT X.
2). Pincez la tirette du sac à poussières et tirez-la
vers le haut, puis jetez le sac à poussières
à la poubelle.
3). Sortez un sac à poussières neuf de l’embal
place.
4). Fermez le couvercle.
5). Nettoyez le bloc central avec un chiffon
6). Branchez la prise électrique et reprenez l’util
isation
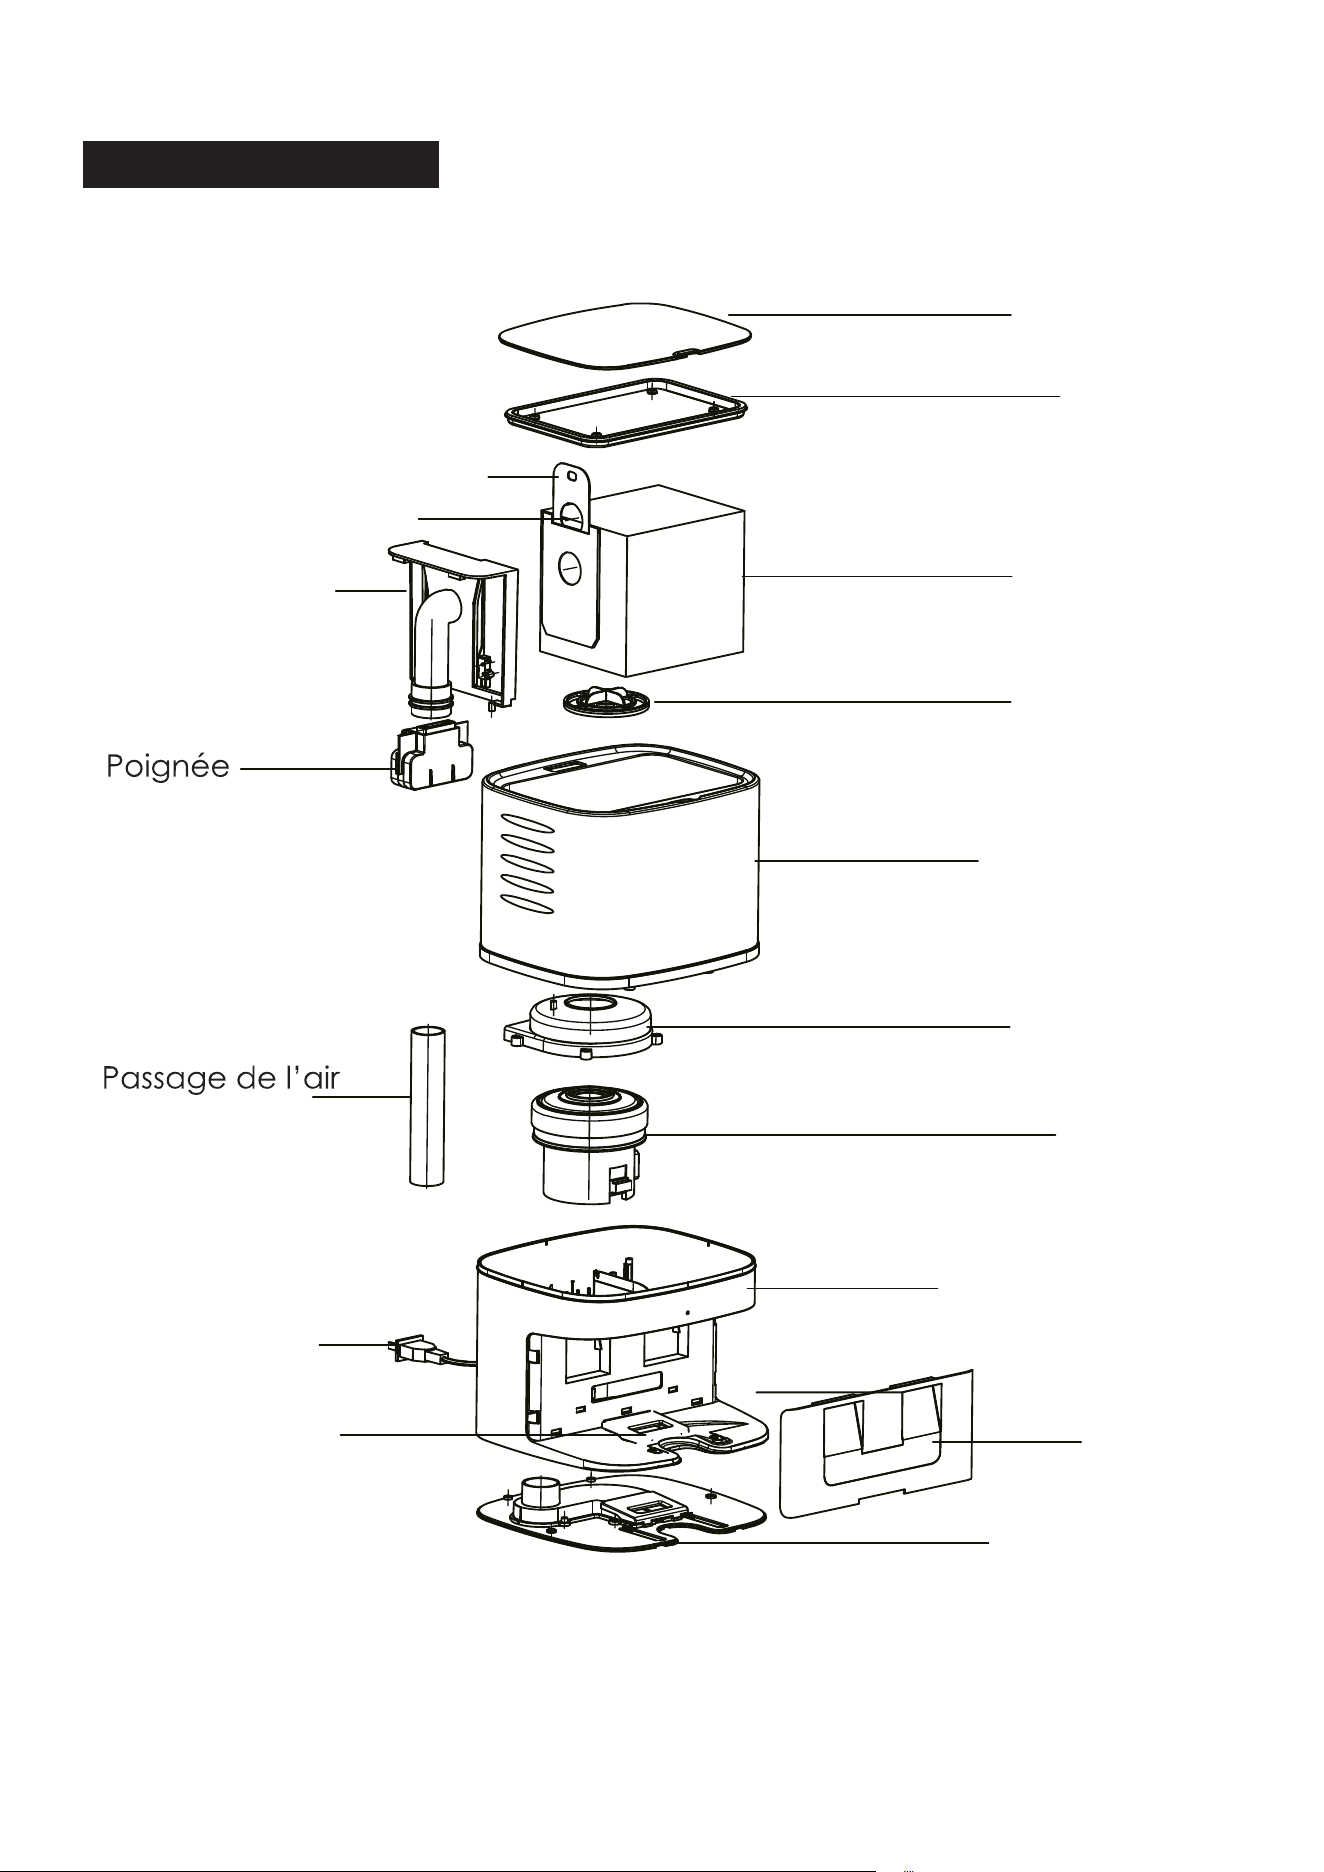
7
Anatomie du CRAFT X
Joint
Sac à poussières
Filtre
Coque
Capot du moteur
Moteur
Base
Lentille
Socle
Ouverture d’aspiration
Fiche secteur
Tuyau d’aspiration
d’air
Ouverture d’aspiration
Tirette du sac à poussières
Couvercle
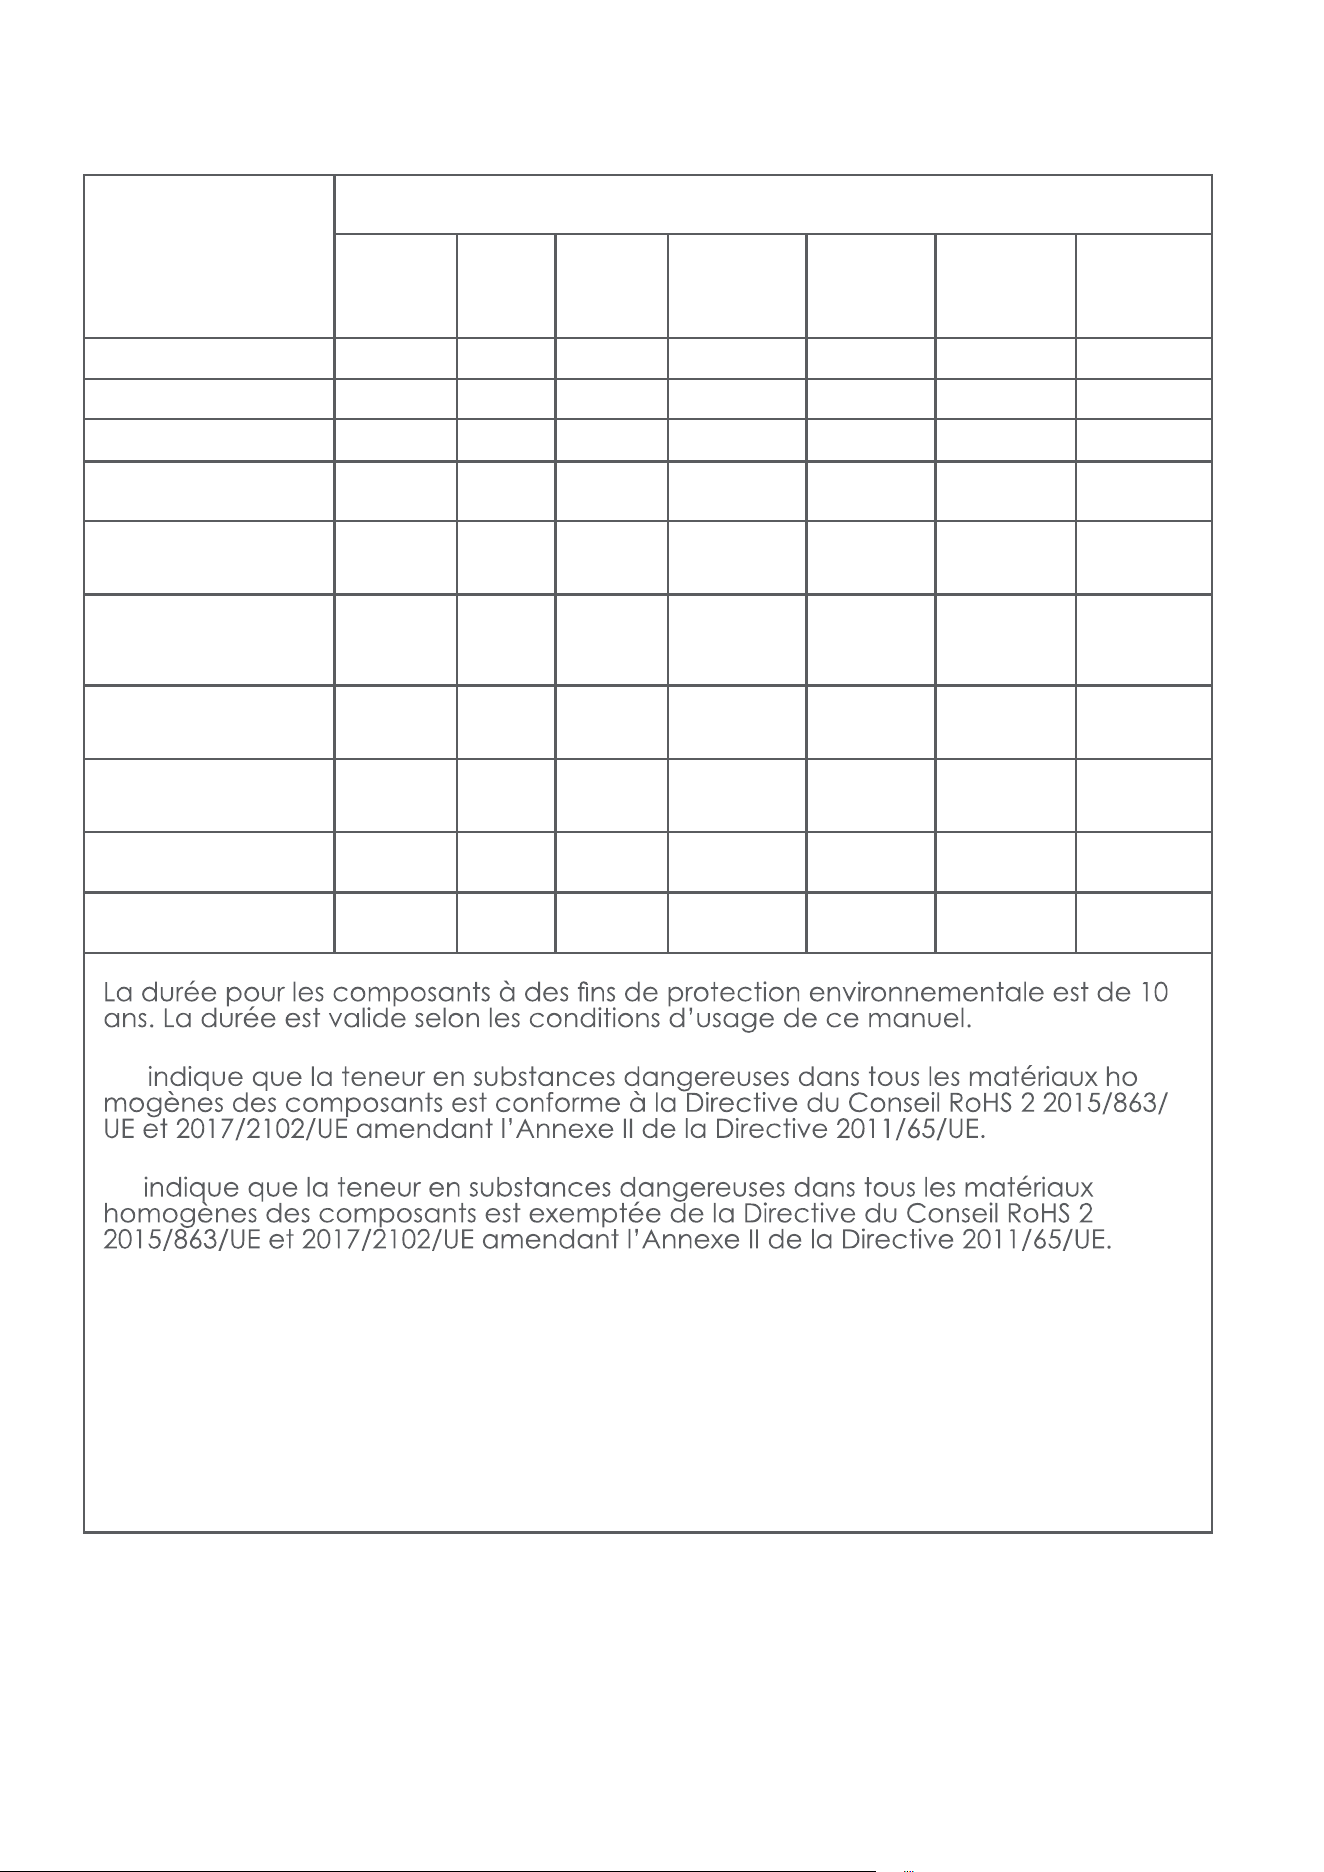
8
Composant
Teneur en substances dangereuses
Coque
plastique
CI Câbles Pièces
métal-
liques
Adapta-
teur
Com-
posants
électro-
niques
Com-
posants
en caou-
tchouc
Cadmium (Cd) O O O O O O O
Plomb (Pb) O O O X O O O
Mercure (Hg) O O O O O O O
Chrome hexavalent
(CrVI)
O O O O O O O
Biphényles poly-
bromés (PBB)
O O O O O O O
Polybro-
O O O O O O O
Phtalate de
di-(2-éthylhexyle)
(DEHP)
O O O O O O O
Phtalate de ben-
zyle et de butyle
(BBP)
O O O O O O O
Phtalate de dibu-
tyle (DBP)
O O O O O O O
Phtalate de di-
isobutyle (DIBP)
O O O O O O O
O : -
X :
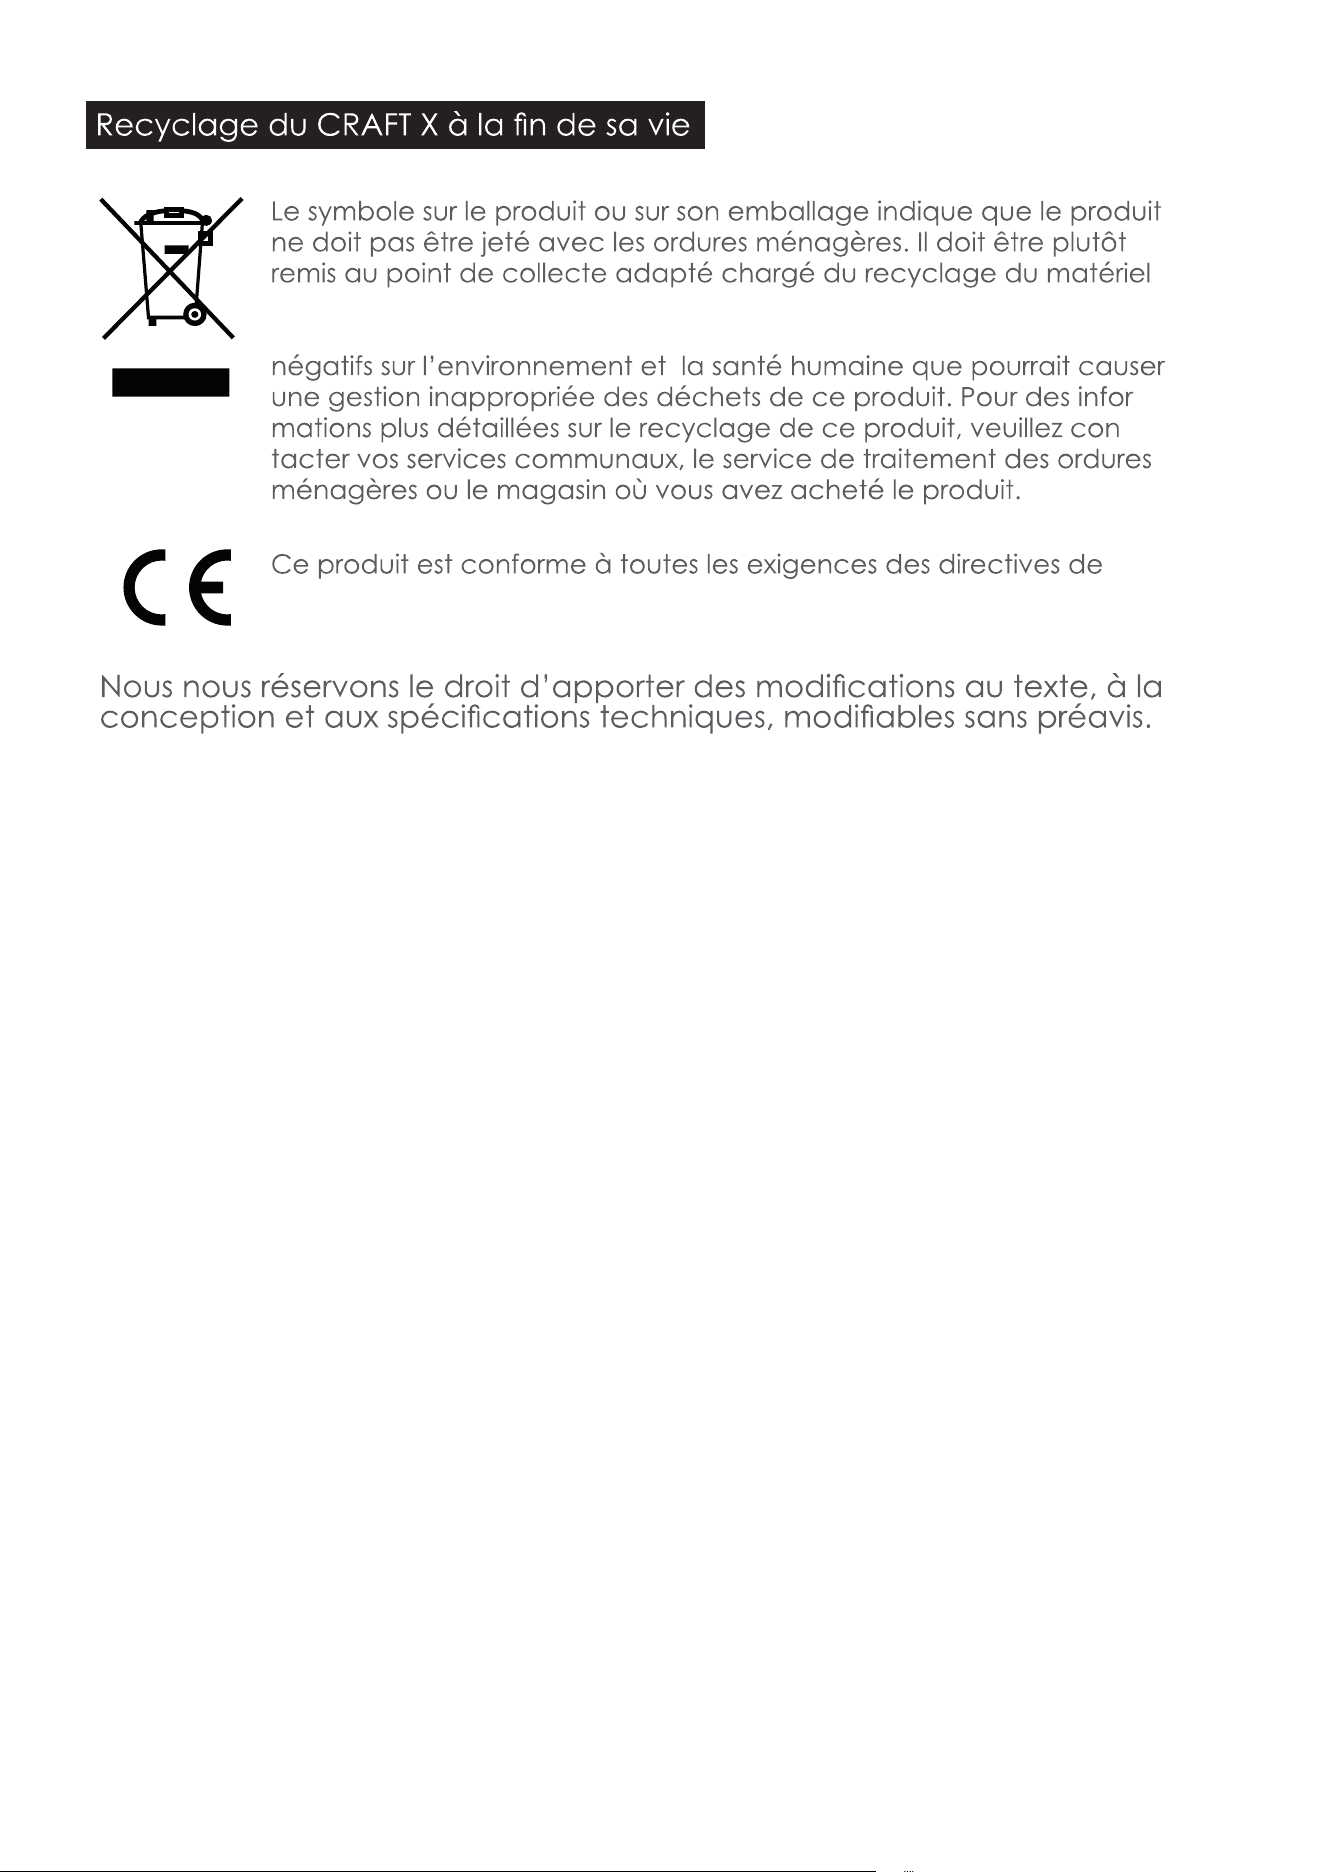
9
électrique et électronique. En vous assurant de la mise au rebut cor-
recte de ce produit, vous contribuez à éviter les potentiels impacts
-
-
l’UE applicables à ce type de produit.
Fabricant :
Mamibot Manufacturing (Shanghai) Co.,Ltd.
21st FL, No 1st, LN1040 Caoyang Rd, Shanghai, 200063. R.P.C.
Supervisé par
Mamibot Manufacturing USA Inc.
One Commerce Center, 1201 Orange St, Wilmington, DE 19899 Etats-
Unis
Tél. : 001 302-428-9888 sal[email protected] www.mamibot.com