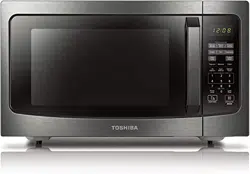
User manual Microwave Oven
SETTING UP YOUR OVEN
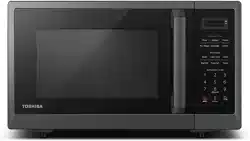
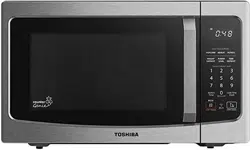
NAMES OF OVEN PARTS AND ACCESSORIES
Remove the oven and all materials from the carton and oven cavity.
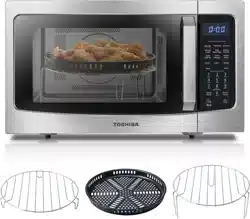
Your oven comes with the following accessories:
Glass tray 1
Turntable ring assembly 1
Instruction Manual 1
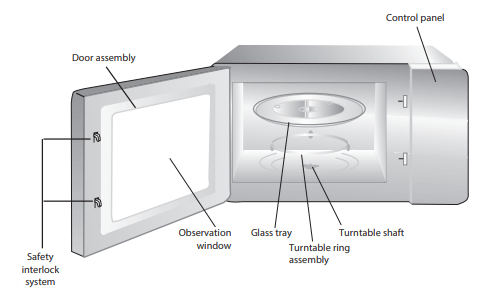
Turntable Installation
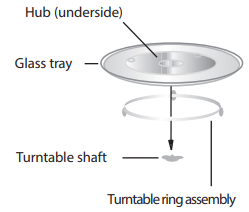
a. Never place the glass tray upside down. The glass tray should never be restricted.
b. Both glass tray and turntable ring assembly must always be used during cooking.
c. All food and containers of food are always placed on the glass tray for cooking.
d. If glass tray or turntable ring assembly cracks or breaks, contact your nearest authorized service center.
COUNTERTOP INSTALLATION
Remove all packing material and accessories. Examine the oven for any damage such as dents or broken door. Do not install if oven is damaged.
Cabinet: Remove any protective film found on the microwave oven cabinet surface. Do not remove the light brown Mica cover that is attached to the oven cavity to protect the magnetron.
INSTALLATION
1. Select a level surface that provide enough open space for the intake and/or outlet vents.
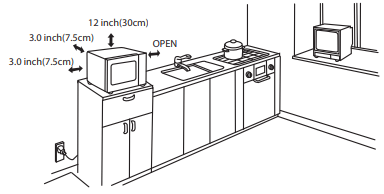
A minimum clearance of 3.0 inches (7.5cm) is required between the oven and any adjacent walls. One side must be open.
(1) Leave a minimum clearance of 12 inches (30cm) above the oven.
(2) Do not remove the legs from the bottom of the oven.
(3) Blocking the intake and/or outlet openings can damage the oven.
(4) Place the oven as far away from radios and TV as possible. Operation of microwave oven may cause interference to your radio or TV reception.
2. Plug your oven into a standard household outlet. Be sure the voltage and the frequency is the same as the voltage and the frequency on the rating label.
WARNING Do not install oven over a range cooktop or other heat-producing appliance. If installed near or over a heat source, the oven could be damaged and the warranty would be void.
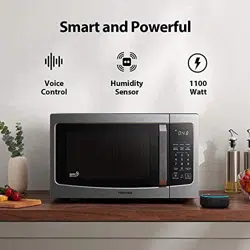
Your microwave oven can be controlled with Alexa by using any Alexa-enabled device such as Echo or Echo Dot. To control your microwave oven using Alexa, you’ll need to set up your microwave and connect to Alexa. To do so:
1. Download the latest version of the Alexa App and “MSmartLife” App from the app store or Google Play.
2. Plug the microwave oven into a power outlet that is grounded.
3. Add devices in “MSmartLife” App(Refer to MSmartLife App lnstruction)
a. Click 【+】on the APP card page. Note: Before adding a new device, make sure the microwave is powered.
b. Enter the correct WiFi password and click on the next step;
c. Select Add[microwave oven]from the device list, add this model in the selection: ML-EM34P(SS);
d. According to the operation guidelines, the user needs to perform the corresponding operation confirmation on the device, and click[the next step] after the operation is completed;
e. Waiting for connection, if the connection fails, please follow the APP guidelines for the next operation;
f. Click[finish], the device adds successfully.
4. Set up Echo with Alexa app (Refer to Alexa App lnstruction) Link MSmartLife account to Alexa.
a. Tap“Toshiba iMicrowave” in the Skills& Games,then search .Select and tap [ENABLE] to enable the Toshiba iMicrowave.
b. You will be redirected to the account link page.Type in your MSmartLife account and password ,then tap [Login] to link your MSmartLife account.
5. Control your smart devices throught Echo.
Discover devices
Echo needs to discover your smart devices before it controls them,you can Say “Alexa , discover devices” to Echo. Echo will discover devices which have already been added in the “MSmartLife ”App. you can also tap[DISCOVER] to discover the smart devices.
Control devices by voice commands.
OPERATION
You can use your microwave oven without setting it up for Alexa control.However, we highly recommend using your microwave oven with Alexa control to unlock its full potential.
1. Clock Setting
When the microwave oven is plugged into a outlet, the oven will display " 0:00 "
a. Press " COOK TIME/CLOCK ", LED will display 00:00, clock indicator will be lighted. The first hour figure will flash; ":" and the other "0" will be lighted.
b. Press the number keys and enter the correct time. For example,time is 10:12 now, please press "1,0,1,2" in turn.
c. Press " COOK TIME/CLOCK" to finish clock setting, and the clock indicator will go out. ":" will flash and the clock will be lighted.
d. If the numbers input are not within the range of 1:00--12:59, the setting will be invalid until valid numbers are input.
NOTE In the process of clock setting, if the " STOP/CANCEL " button is pressed or if there is no operation within 1 minute, the oven will go back to the former state automatically.
2. Kitchen Timer
a. Press " KITCHEN TIMER ", LED will display 00:00, clock indicator will be lighted.
b. Press the number keys and enter the correct timer.(The maximum time is 99 minutes and 99 seconds).If it exceeds the range, it does not respond to the input and at the same time beeps two hints.
c. Press " START/+30SEC. " to confirm setting, LED will display the current time by counting down. Clock indicator will flash.
d. When the kitchen time arrives, clock indicator will go out. The buzzer will ring one time.
e. At the end of cooking, the bee rings and returns to standby status.
NOTE
- Kitchen Timer is a timer.
- That is to say it poccesses the function of alarming clock.
3. Microwave cook
a. Press "COOK TIME /CLOCK "twice, LED will always bright display "00:00". microwave indicator will be lighted.
b. Press number keys to input the cooking time; the maximum cooking time is 99 minutes and 99 seconds.
c. Press " POWER LEVEL " once, LED will display "PL10". The default power is 100% power. Now you can press 0-10 number keys to adjust the power level. eleven power levels are available.

d. Press " START/+30SEC. " to start cooking. microwave indicator will flash.
e. At the end of cooking, the bee rings and returns to standby status.
Example: to cook the food with 50% microwave power for 15 minutes.
- Press "COOK TIME /CLOCK" twice."00:00" displays.
- Press "1","5","0","0" in order.
- Press "POWER LEVEL "once,then press "5" to select 50% microwave power.
- Press " START/+30SEC. " to start cooking.
NOTE In the process of cooking, if the " STOP/CANCEL " button is pressed or if there is no operation within 1 minutes, the oven will go back to the former setting automatically.
Cook by time

To cook by time, say “Alexa, microwave for X”, where X is the amount of time you’d like to cook for.
For example, to cook for 5 minutes, say “Alexa, microwave for 5 minutes.” Or, to cook for 2 minutes and 39 seconds, say “Alexa, microwave for 2 minutes and 39 seconds.”

When your microwave is in use, you can ask it to cook for additional time by saying , “Alexa, add X to the microwave,” where X is the amount of time you’d like to add. For example, to add 2 minutes to the cooking time while the microwave is already running, say “Alexa, add 2 minutes to the microwave.”
Cook by power level

By default, your microwave oven will cook at Power 10 (maximum power). To cook at a specific power, say “Alexa, microwave for X on power Y,” where X is the amount of time you’d like to cook for and Y is the power level.
For example, to cook at power 5 for 3 minutes, say “Alexa, microwave for 3 minutes on power 5.”
You can also ask your microwave oven to cook at high, medium, or low power. For example, to cook on medium power for 5 minutes, say “Alexa, microwave for 5 minutes on medium.”
4. Speedy Cooking
a. In waiting state, instant cooking at 100% power level can be started by select a cooking time from 1 to 6 minutes by pressing number pads1 to 6. Press " START/+30SEC. " to increase the cooking time; The maximum cooking time is 99 minutes and 99 seconds.
b. In waiting state, instant cooking at 100% power level with 30 seconds' cooking time can be started by pressing " START/+30SEC. ". Each press on the same button will increase cooking time by 30 seconds. The maximum cooking time is 99 minutes and 99 seconds.
c. Press " COOK TIME /CLOCK" twice and adjust cooking time,then press " START/+30SEC. " to start cooking with full microwave power.
d. At the end of cooking, the bee rings and returns to standby status.
NOTE
- Under microwave and time defrost states, press " START/+30SEC. " button to increase cooking time by 30 seconds.
- Under sensor menu cooking and weight defrost state, time cannot be added by pressing " START/+30SEC. " button.
5. Weight Defrost Function
a. Press " WEIGHT DEFROST ", LED will display "dEF1".Thawing by species indicator will be lighted.
b. Press numerical buttons to input weight to be defrosted. Input the weight ranged should be between 4~70 OZ.
c. If the weight input is not within 4~70OZ, the input will be invalid.
d. Press " START/+30SEC. " to start defrosting and LED countdown display cooking time.
e. At the end of cooking, the bee rings and returns to standby status.

To defrost a specific quantity of food, say “Alexa, defrost X pounds .” Alternatively, you can specify ounces or grams.
For example, to defrost 1 pound of food, say “Alexa, defrost 1 pound.” Your microwave oven will run using the appropriate time and power setting.
6. Time Defrost Function
a. Press " TIME DEFROST ", LED will display "dEF2".
b. Press numerical buttons to input defrost time to be defrosted. Input the time ranged is between 0:01~99:99.
c. Press " START/+30SEC. " to start defrosting. The default microwave power is PL3. The power cannot be adjusted.
d. At the end of cooking, the bee rings and returns to standby status.

To defrost food for a specific amount time, say “Alexa, defrost for X ” , where X is the amount of time you’d like to cook for.
For example, to defrost for 10 minutes and 30 seconds, say “Alexa, defrost for 10 minutes and 30 seconds.” Your microwave oven will start defrosting for 10 minutes and 30 seconds.
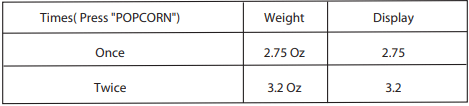
7. POPCORN
a. Press " POPCORN " repeatedly until the weight you needed appears in the display , "O z " light. For example, press " POPCORN " twice, "3.2" displays.
b. Press " START/+30SEC. " to cook, "Oz" disappears.
c. At the end of cooking, the bee rings and returns to standby status.
Popcorn

To microwave popcorn, say “Alexa, microwave X ounces of popcorn ” .Your microwave oven will determine the time to cook your popcorn appropriately.
For example, to microwave oven 2.2 ounces of popcorn, say “Alexa, microwave 2.2 ounces of popcorn .”
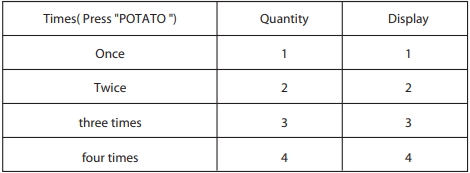
8. POTATO
a. Press " POTATO " repeatedly until the Quantity you needed appears in the display, " 1 ", " 2 ", " 3 ", " 4 ", ("2 "means 2 potatoes),When the weight of the LED display is the same as the weight of the food to be cooked, stop pressing the button.
b. Press " START/+30SEC " LED countdown display cooking time.
c. At the end of cooking, the bee rings and returns to standby status.
Things to try

Alexa: how many do you want to cook?
User: one/two/three/four (potatoes).
Alexa: ok,starting now. / starting potato.
Alexa, microwave 1/2/3/4 potato.
9 . Reheat
a. Press " Reheat " LED will display " SC-1" , " " are light.
b. Press " START/+30SEC. " to cook, LED flashing display "SC01", humidity sensing menu logo "" flashing display, waiting for sensing, countdown display remaining cooking time.
d. At the end of cooking, the bee rings and returns to standby status.

10. Multi-section cooking
At most 2 sections can be set for cooking. In multi-section cooking, if one section is defrosting, then defrosting shall be placed in the first section. When the first stage finish, the buzzer will sound twice and the next stage will begin cooking.
Example: if you want to cook with 80% microwave power for 5 minutes + 60% microwave power for 10 minutes. The cooking steps are as following.
a. Press "COOK TIME /CLOCK" twice, then press "5","0","0" to set 5 minutes.
b. Press "POWER LEVEL " once.
c. Press number button "8" to set 80% microwave power.
d. Press "COOK TIME /CLOCK" once, then press "1","0","0","0" to set 10 minutes.
e. Press "POWER LEVEL " once.
f. Then press press number button "6" to set 60% microwave power.
g. Press " START/+30SEC. " start cooking.
NOTE
- Auto menu and reheat menu cannot be set as one of the multi-section.
- When microwave cooking is the second part of multiple cooking, you must press the cooking clock.
11. INQUIRING FUNCTION
a. In cooking state, press " COOK TIME/CLOCK ", the clock will displays for three seconds. After that,the oven will turn back to the clock state.
b. In the microwave cooking state, press " POWER LEVEL " to inquire microwave power level the current microwave power will be displayed.(No microwave fire can be queried during cooking or thawing of the automatic menu, humidity induction menu). After three seconds, the oven will turn back to the previous state.
12. Lock Function for Children
a. Lock: In waiting state, press “ STOP/Cancel ” 3 seconds, buzzer will ring once, the oven will enter tee children-lock state, LED will display " ", and "
 " light.
b. children-lock state, press “ STOP/Cancel ” 3 seconds, buzzer will ring once and the oven will quits the children-lock state.
13. ECO function
a. Dump screen: In standby state, press cancel key, buzzer, screen extinguished, enter ECO mode.
b. Awakening: In ECO mode, opening the furnace door or pressing any key can awaken the display and enter the standby state; In ECO mode, the first button press is to wake up the display.
14. Mute Function
Press the number key “0” for 3 seconds, there will be a “beep”, the oven will open or close the quitly function.
NOTE
- In the sound shutdown state, all keys have no sound response.
- Including the end of the cooking note.
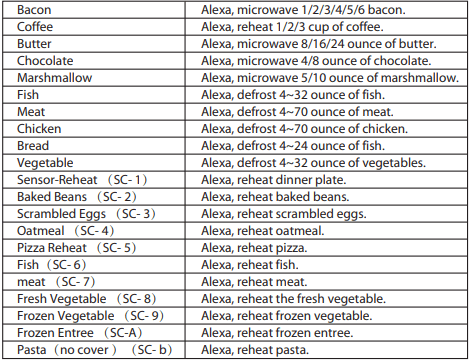
ALEXA: THINGS TO TRY
TROUBLESHOOTING
Check your problem by using the chart below and try the solutions for each problem. If the microwave oven still does not work properly, contact the nearest authorized service center.
Oven will not start
a. Electrical cord for oven is not plugged in.
a. Plug into the outlet.
b. Door is open.
b. Close the door and try again.
c. W rong operation is set.
c. Check instructions.
Arcing or sparking
a. Materials to be avoided in microwave oven were used.
a. Use microwave-safe cookware only.
b. The oven is operated when empty.
b. Do not operate with oven empty.
c. Spilled food remains in the cavity.
c. Clean cavity with wet towel.
Unevenly cooked foods
a. Materials to be avoided in microwave oven were used.
a. Use microwave-safe cookware only.
b. Food is not defrosted completely.
b. Completely defrost food.
c. Cooking time, power level is not suit ble.
c. Use correct cooking time, power level.
d. Food is not turned or stirred.
d. Turn or stir food.
Overcooked foods
Cooking time, power level is not suitable.
Use correct cooking time, power level.
Undercooked foods
a. Materials to be avoided in microwave oven were used.
a. Use microwave-safe cookware only.
b. Food is not defrosted completely.
b. Completely defrost food.
c. Oven ventilation ports are restricted.
c. Check to see that oven venti- lation ports are not restricted.
d. Cooking time, power level is not suitable.
d. Use correct cooking time, power level.
Improper defrosting
a. Materials to be avoided in microwave oven were used.
a. Use microwave-safe cookware only.
b. Cooking time, power level is not suitable.
b. Use correct cooking time, power level.
c. Food is not turned or stirred.
c. Turn or stir food.