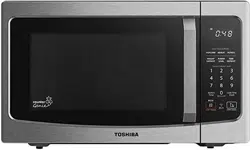
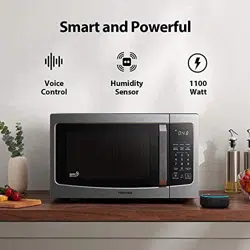
INSTRUCTION MANUAL for Microwave
PRODUCT INTRODUCTION
MATERIALS YOU CAN USE IN MICROWAVE OVEN
|
UTENSILS
|
REMARKS
|
|
Browning dish
|
Follow manufacturer’s instructions. The bottom of browning dish must be at least 3/16 inch (5mm) above the turntable. Incorrect usage may cause the turntable to break.
|
 |
|
Dinnerware
|
Microwave-safe only. Follow manufacturer’s instructions. Do not use cracked or chipped dishes.
|
|
|
Glass jars
|
Always remove lid. Use only to heat food until just warm. Most glass jars are not heat resistant and may break.
|
|
|
Glassware
|
Heat-resistant oven glassware only. Make sure there is no metallic trim. Do not use cracked or chipped dishes.
|
|
|
Oven cooking bags
|
Follow manufacturer’s instructions. Do not close with metal tie. Make slits to allow steam to escape.
|
|
|
Paper plates and cups
|
Use for short–term cooking/warming only. Do not leave oven unattended while cooking.
|
|
|
Paper towels
|
Use to cover food for reheating and absorbing fat. Use with supervision for a short-term cooking only.
|
|
|
Parchment paper
|
Use as a cover to prevent splattering or a wrap for steaming.
|
|
|
Plastic
|
Microwave-safe only. Follow the manufacturer’s instructions. Should be labeled “Microwave Safe”. Some plastic containers soften, as the food inside gets hot. “Boiling bags” and tightly closed plastic bags should be slit, pierced or vented as directed by package.
|
|
|
Plastic wrap
|
Microwave-safe only. Use to cover food during cooking to retain moisture. Do not allow plastic wrap to touch food.
|
|
|
Thermometers
|
Microwave-safe only (meat and candy thermometers).
|
|
|
Wax paper
|
Use as a cover to prevent splattering and retain moisture.
|
|
MATERIALS TO BE AVOIDED IN MICROWAVE OVEN
| UTENSILS |
REMARKS |
| Aluminum tray |
May cause arcing. Transfer food into microwave-safe dish. |
 |
| Food carton with metal handle |
May cause arcing. Transfer food into microwave-safe dish. |
|
| Metal or metaltrimmed utensils |
Metal shields the food from microwave energy. Metal trim may cause arcing. |
|
| Metal twist ties |
May cause arcing and could cause a fire in the oven. |
|
| Paper bags |
May cause a fire in the oven. |
|
| Plastic foam |
Plastic foam may melt or contaminate the liquid inside when exposed to high temperature. |
|
| Wood |
Wood will dry out when used in the microwave oven and may split or crack. |
|
SETTING UP YOUR OVEN
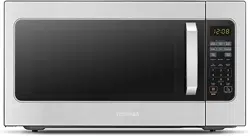
Names of Oven Parts and Accessories
Remove the oven and all materials from the carton and oven cavity. Your oven comes with the following accessories:
Glass tray 1
A Turntable ring 1
Instruction Manual 1
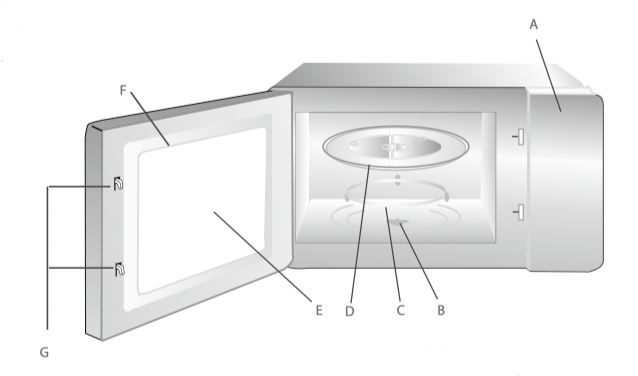
A. Control panel
B. Turntable shaft
C. Turntable ring
D. Glass tray
E. Observation window
F. Oven Door
G. Safety interlock system
TURNTABLE INSTALLATION
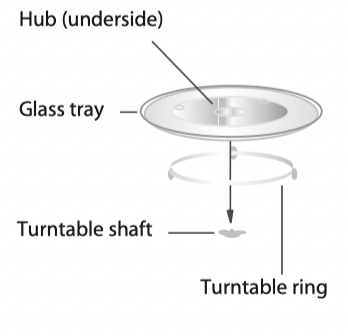
a. Never place the glass tray upside down. The glass tray should never be restricted.
b. Both glass tray and turntable ring must always be used during cooking.
c. All food and containers of food are always placed on the glass tray for cooking.
d. If glass tray or turntable ring cracks or breaks, contact the following customer assistance number: 855-204-5313.
COUNTERTOP INSTALLATION
Remove all packing material and accessories.
Examine the oven for any damage such as dents or broken door. Do not install if oven is damaged.
Cabinet: Remove any protective film found on the microwave oven cabinet surface. Do not remove the light brown Mica cover that is attached to the oven cavity to protect the magnetron.
INSTALLATION
1. Select a level surface that provide enough open space for the intake and/or outlet vents.
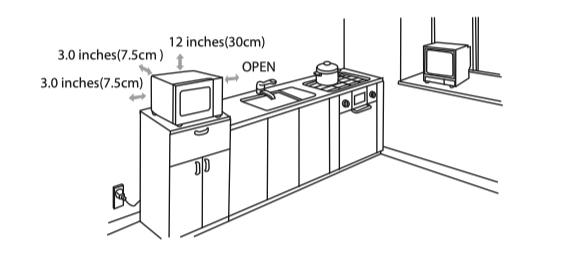
A minimum clearance of 3.0 inches (7.5cm) is required between the oven and any adjacent walls. One side must be open.
(1) Leave a minimum clearance of 12 inches (30cm) above the oven.
(2) Do not remove the legs from the bottom of the oven.
(3) Blocking the intake and/or outlet openings can damage the oven.
(4) Place the oven as far away from radios and TV a s possible.
Operation of microwave oven may cause interference to your radio or TV reception.
2. Plug your oven into a standard household outlet. Be sure the voltage and the frequency is the same as the voltage and the frenquency on the rating label.
WARNING
Do not install oven over a range cooktop or other heat-producing appliance. If installed near or over a heat source, the oven could be damaged and the warranty would be avoid.
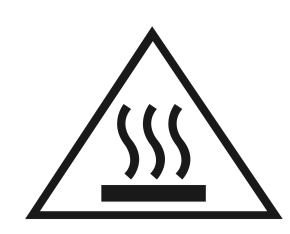
The accessible surface may be hot during operation
OPERATION
CONTROL PANEL AND FEATURES
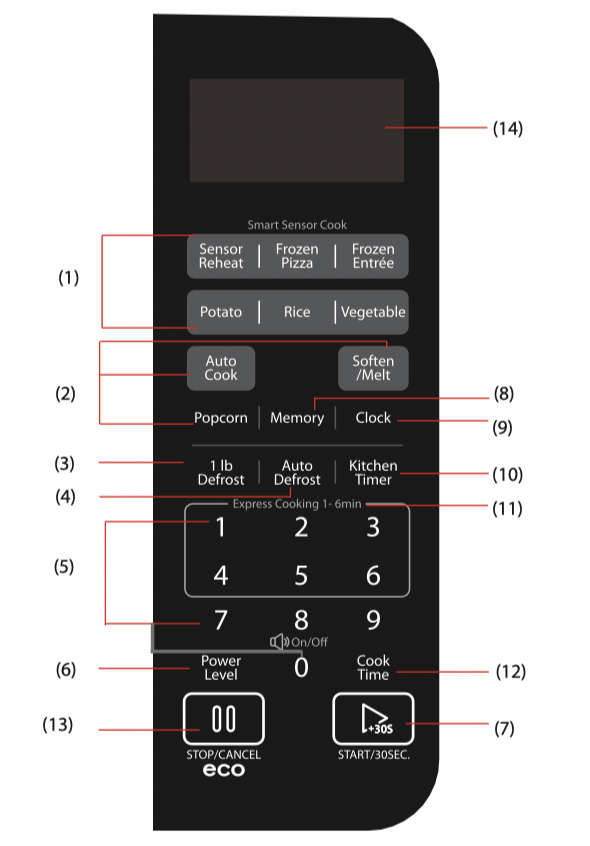
(1) Quick Touch Presets--- Sensor Menu ( Sensor Reheat, Frozen Pizza, Frozen Entrée, Potato, Rice, Vegetable )
(2) Auto Menu (Auto Cook, Soften/Melt), Popcorn
(3) Automatically defrosts one pound items
(4) Auto Defrost: Defrost time calculated by entered weight and category of item
(5) Number Pads
(6) Power Level
(7) START ADD 30 SEC
(8) Memory
(9) Clock
(10) Kitchen Timer
(11) ONE TOUCH START Pads (1- 6)
(12) Cook time
(13) STOP Cancel : Before cooking starts, press to clear all previous settings. During cooking, press once to stop oven; press twice to stop oven and clear all settings.
(14) Display Window
1. CLOCK SETTING
When the microwave oven is plugged into a outlet, "0:00" will display.
(1) Press Clock, "00:00" and "Clock" will appear in the display. The first figure will flash; ":" and other "0" will be lighted.
(2) Press the number pads and enter the current clock time. For example, if the time is now 10:12, press " 1, 0, 1, 2" in order.
(3) Press Clock to finish clock setting, ":" will flash and the numbers will appear as a clock time in the display
NOTE
(1)If the numbers entered are not within the range between 1:00 to 12:59, the setting will not be accepted until valid numbers are entered.
(2)In the process of setting clock, if the  pad is pressed or if there is no operation within 1 minute, the display will automatically return to the previous clock setting.
2. KITCHEN TIMER
(1) Press Kitchen Timer , "00:00" and "Timer" will appear in the display.
(2) Press the number pads to enter the time amount. The maximum amount of time that can be entered is 99 minutes, 99 seconds.
(3) Press to confirm setting, the timer indicator will flash, and the timer will count down.
(4) When the time amount elapses, the oven will beep 5 times. "End" will display. The time of day will display by opening the door or pressing pad.
NOTE
(1)The Kitchen Timer setting is different from the Clock setting; it is simply a timer.
(2)During the Kitchen Timer function, no cooking function can be set into operation.
(3)Kitchen Timer amount cannot be increased by pressing .
(4)Pressing will cancel the Timer countdown.
3.MICROWAVE COOK
(1) Press Cook Time , "00:00" and "Cook" will appear in the display.
(2) Press number pads to enter the cooking time; the maximum cooking time is 99 minutes and 99 seconds.
(3) Press Power Level; PL10 will flash. This is the default power level of 100%. Press Power Level several times or pads 0 through 9 to select a different power level if desired. See the POWER LEVEL table below.
(4) Press to start cooking.
Example : To cook the food with 50% microwave power for 15 minutes.
a. Press Cook Time , "00:00" displays.
b. Press "1, 5, 0, 0" in order for 15:00 to appear in the display.
c. Press Power Level , then press "5" to select 50% microwave power.
d. Press to start cooking.
NOTE
In the process of setting, if the pad is pressed or if there is no operation within 1 minute, the oven will automatically return to display the clock.
4. POWER LEVEL
Ten power levels are available.
Prior to or during cooking, press Power Level and "PL10" will display. Press Power Level pad or a number pad to select a different power level.

5.ONE TOUCH START
(1) Instant cooking at 100% power level and 1 to 6 minutes cooking time can be started by pressing number pads 1 to 6. Press to increase the cooking time by 30 seconds with each press. The maximum cooking time is 99 minutes, 99 seconds.
(2) Instant cooking at 100% power level and 30 seconds cooking time can be started by pressing . Each repeated press will increase cooking time by 30 seconds. The maximum cooking time is 99 minutes 99 seconds.
NOTE
(1)Time can also be added in 30 second increments by pressing during Microwave Cooking, Auto Menu and Sensor Menu Cooking.
(2)Time cannot be added by pressing during Weight Defrost and Kitchen Timer functions.
6.AUTO DEFROST FUNCTION
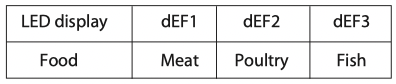
(1) Press Auto Defrost ,"dEF1" and "DEF." will appear in the display. Press the same pad repeatedly, "dEF2", "dEF3", "dEF1" will display in order.
(2) Press number pads to enter the weight to be defrosted. "Lbs" will light.
Input the weight range between 0.1 to 6.0 Lbs.
If the weight input is not between 0.1 to 6.0 Lbs, the input will be invalid. The unit will not work until valid numbers are entered.
(3) Press to start defrosting and the cooking time remaining will be displayed . "DEF."lights.
NOTE
During defrosting, the oven will beep twice to remind you to turn over the food. Open the door to pause operation. Turn over food, close the door and press to resume defrost cycle. If you do not open door to pause operation, the oven will continue the defrost cycle without interruption.
7.1 LB DEFROST
(1) Press 1lb Defrost, "1.0", "DEF." and "Lbs" will appear in the display.
(2) Press to start defrosting, "Lbs" will disappear. "DEF." will light, and the remaining defrost time will display.
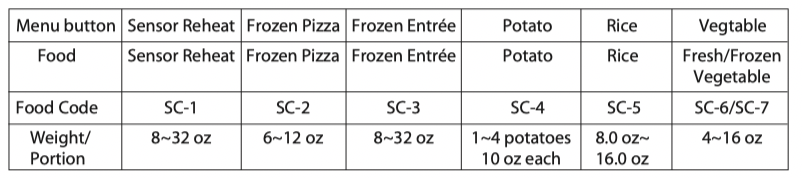
8.SENSOR MENU( Sensor Reheat, Frozen Pizza , Frozen Entrée , Potato,Rice,Vegetable)
(1) Press the pad for one of the Sensor Menu functions. An "SC-" number, "Auto" and "SENS." will appear in the display. Example: If "Rice" is pressed, "SC-5" will display.
(2) Press to start the sensor cooking process. Once the item has been sensed the remaining cooking time will display. The oven beeps 5 times when cooking is finished.
NOTE
1)For best sensor cooking results:
a. The room temperature cannot be over 95 °F (35 °C ).
b. The weight of food must be more than 4 Oz (110 g).
c. The oven cavity, glass tray and utensils must be dry.
2) During cooking:
NOTE
a. The food can be covered, but the cover or lid must be vented with a hole to allow steam to escape.
b. Wait until the cooking time is displayed and starts to count down.
Opening the door or press before the cooking time is displayed will cause an error in the sensor cooking process.
Example: Potato Sensor Pad
(1) Press Potato pad once, "SC-4", "Auto" and "SENS." will appear in the display.
(2) Press to cook.
NOTE
1) Puncture the surface of each potato several times with the times of a fork.
2) Place up to 4 potatoes on the glass turntable. Keep at least 1 inch of space between each potato.
Example: Sensor Reheat Pad
(1) After placing food into oven, press Sensor Reheat pad and "SC-1" will display.
(2) Press to cook. Oven beeps 5 times when cooking is finished.
NOTE
1) Food to be avoided in sensor reheating.
a. Bread and other dry food, such as biscuits or cake.
b. Raw or uncooked food.
c. Beverages and frozen food.
2) The food can be covered, but the cover or lid must be vented with a hole to allow steam to escape.
3) The food temperature must be at least 40 °F (5 °C) when placing it into the oven for Sensor Heat to work correctly.
4) Preparing foods for Sensor Reheat.
Casseroles - Add 2 to 3 tablespoons of liquid, covered with lid or vented plastic wrap.
Stir when time appears in the display window.
Canned foods - Empty contents into casserole dish or serving bowl, and cover with vented lid or plastic wrap. After reheating, let food stand for a few minutes.
Plate of food - Arrange food on plate; top with butter, gravy, etc. Cover with vented lid or plastic wrap. After reheating, let food stand for a few minutes.
Example: Veggie Sensor Pad
(1) Press Vegetable once , "SC-6" will display, to cook fresh vegetable. Press Vegetable2 times , "SC-7" will display, to cook frozen vegetable.
(2) Press to cook. After the cooking time displays, food can be turned over. Oven beeps 5 times when cooking is finished.
Sensor menu chart:
9.POPCORN
(a) Press Popcorn repeatedly until the number you wish appears in the display, "1.75", "3.0", "3.5" oz will display in order. And "Auto" and "Oz" will appear in the display.
(b) Press to cook. "Oz" disappears." Auto " flashes.
Oven beeps 5 times when cooking is finished.
10.AUTO COOK
(a) Press Auto Cook , "CC-1" and "Auto" will appear in the display.
(b) Press Auto Cook four more times, "CC-2, CC-3, CC-4, CC-5" will display in order.
(c) After selecting CC setting, press a number pad to select the weight or portion of food item.
(Press number pads to enter the weight of food item for CC-4.)
(d) Press to cook, "Auto" lights in display.
Oven beeps 5 times when cooking is finished.
11.SOFTEN/MELT
(a) Press Soften/Melt , "S-1" and "Auto" will display.
(b) Press Soften/Melt six more times, "S-2, S-3, S-4, S-5, S-6, S-7" will display in order.
(c) After selecting SC function, press a number pad to select the weight or portion of food item.
(d) Press to cook," Auto" lights in display.
Oven beeps 5 times when cooking is finished.
Auto Menu Chart:
|
Menu Button
|
Food
|
Display
|
Weight/portion
|
|
Custom Cook
|
Custom Cook-Bacon
|
CC-1
|
2-6 SLICES
|
|
Custom Cook-Frozen roll/Muffin-reheat
|
CC-2
|
1-6 PIECES
|
|
Custom Cook-Beverage
|
CC-3
|
1-2 CUPS
|
|
Custom Cook-Chicken Pieces
|
CC-4
|
0.5-2.0 Lbs
|
|
Custom Cook-Oatmeal(with milk)
|
CC-5
|
20/40 Oz
|
|
Soften/Melt
|
Melt-Butter/Margarine
|
S-1
|
1-3 STICKS
|
|
Melt-Chocolate
|
S-2
|
4/8 Oz
|
|
Melt-Cheese
|
S-3
|
8/16 Oz
|
|
Melt-Marshmallows
|
S-4
|
5/10 Oz
|
|
Soften-Butter
|
S-5
|
1-3 STICKS
|
|
Soften-Ice cream/Frozen juice
|
S-6
|
6/12/16 Oz
|
|
Soften-Cream cheese
|
S-7
|
3/ 8 Oz
|
12.MEMORY FUNCTION
(1) Press Memory to program and choose up to three cooking procedures. Each procedure will be indicated by 1, 2 or 3 in the display.
(2) Press Memory until your desired procedure number appears in the display.
Press to begin it. A maximum of two cooking stages can be set for each procedure.
(3) To program a procedure, follow the steps listed below. Example: Cook food at 80% Power Level for 3 minutes and 20 seconds; save as memory 2.
a. Press Memory twice; screen displays 2.
b. Press Cook Time once, then press "3","2" and "0" in order.
c. Press Power Level once, then press "8" for "PL8" to display.
d. Press Memory to save the procedure. Oven beeps once. Or press directly to start cooking.
e. To choose the procedure from the memory list, press Memory twice. Screen will display "2". Press to run procedure.
13.MULTI-STAGE COOKING
At most 2 stages can be set for cooking. If one stage is Defrost, it will automatically set to be the first stage.
NOTE
Auto Menu cannot be used in multi-stage cooking.
Example: 80% Power Level for 5 minutes followed by 60% Power Level for 10 minutes; saved as memory 3.
a. Press Memory 3 times; screen displays 3.
b. Press Cook Time once, then press "5", "0" and "0" to set first stage cook time.
c. Press Power Level once, then press "8" to choose 80% first stage cooking power.
d. Press Cook Time again, then press "1", "0", "0" and "0" to set second stage cook time.
e. Press Power Level again, then press "6" to choose 60% second stage cooking power.
f. Press to immediately start multi-stage cooking.
g. To choose the procedure from the memory list, press Memory three times. Screen will display "3"; press to run procedure.
NOTE If you do not want to save a particular multi-stage program as a procedure, do not press Favorite as the first step. Press after programming both stages.
14. INQUIRING FUNCTION
(1) When oven is cooking, press Clock for the time of day to appear for three seconds in the display.
(2) When oven is cooking, press Power Level pad for cooking power to appear for three seconds in the display.
15. LOCK FUNCTION
To lock the microwave so that it cannot be operated by children or other unintended users, press pad for 3 seconds. You will hear a long beep. "L C" will appear in the display.
To Unlock, press for 3 seconds, you will hear a long beep and "LOC" will disappear. The clock time will return to the display if the clock has been set. Otherwise, only "0:00" appears.
16. COOKING END REMINDER FUNCTION
The oven will beep five times to alert the user that cooking time has ended. "End" will display. The time of day will display by opening the door or pressing pad.
17.OTHER SPECIFICATIONS
(1) must be pressed to continue cooking if the oven door is opened during cooking.
(2) A single beep sounds to indicate that a pad is correctly pressed; if pad is not correctly pressed, no beep sounds.
18. SCREEN-OUT FUNCTION
(1) In standby, click the key twice into the black screen save electricity mode.
(2) Press any button to turn off the screen, resume the standby display, and beep once.
19. MUTE FUNCTION
Mute Function (memory after power-off):press the number key “8” for a long time, to switch the silent mode after 3 seconds, and “beep”once .
LED display on/off ,All beeps in the mute mode do not respond.
20. TURNTABLE RESET FUNCTION
When cooking finished, if the turntable is not at the initial position, it will enter the turntable reset function. At this time, the lamp, fan and turntable are working, " " will dynamic display. After the turntable has reset, the oven stops cooking and reminds cooking is finished.
(1) This function only works for one completed cooking. If pause or open the oven door during cooking, the current cooking cannot enter the turntable reset function.
(2) In waitting state, press number key "5" for 3 seconds, there will be a long "beep" and the turntable reset function is turnned off. To turn on the turn-table reset function, in waiting state press number key "5" for 3 seconds, there will be a long "beep" denoting that turntable reset function is released.
NOTE
1) Under the reset state, opening the door or button is pressed, the oven will go back to waiting state.
2) The function will be reserved after power loss
TROUBLE SHOOTING
Check your problem by using the chart below and try the solutions for each problem. If the microwave oven still does not work properly, contact the following number for customer.
|
TROUBLE
|
Possible Cause
|
Possible Remedy
|
|
Oven will not start
|
a. Electrical cord for oven is not plugged in.
b. Door is open.
c. Wrong operation is set.
|
a. Plug into the outlet.
b. Close the door and try again.
c. Check instructions
|
|
Arcing or sparking
|
a. Materials to be avoided in microwave oven were used.
b. The oven is operated when empty.
c. Spilled food remains in the cavity.
|
a. Use microwave-safe cookware only.
b. Do not operate with oven empty.
c. Clean cavity with wet towel.
|
|
Unevenly cooked foods
|
a. Materials to be avoided in microwave oven were used.
b. Food is not de frosted completely.
c. Cooking time, power level is not suitable.
d. Food is not turned or stirred.
|
a. Use microwave-safe cookware only.
b. Completely defrost food.
c. Use correct cooking time, power level.
d. Turn or stir food.
|
|
Overcooked foods
|
Cooking time, power level is not suitable.
|
Use correct cooking time, power level.
|
|
Undercooked foods
|
a. Materials to be avoided in microwave oven were used.
b. Food is not defrosted completely.
c. Oven ventilation ports are restricted.
d. Cooking time, power level is not suitable.
|
a. Use microwave-safe cookware only.
b. Completely defrost food.
c. Check to see that oven venti-lation ports are not restricted.
d. Use correct cooking time, power level
|
|
Improper defrosting
|
a. Materials to be avoided in microwa- veoven were used.
b. Cooking time, power level is not suitable.
c. Food is not turned or stirred.
|
a. Use microwave-safe cookware only.
b. Use correct cooking time, power level.
c. Turn or stir food
|
|
Sensor cooked foods not properly cooked
|
a. Cover or lid on food not vented.
b. Door opened before sensor-detected cooking time appears in display.
|
a. Cover or lid over food must contain vent hole for escaping steam.
b. Do not open door to stir or turn food before sensor-detected cooking time appears in display.
|