INSTRUCTION FOR USE
SETTING UP YOUR OVEN
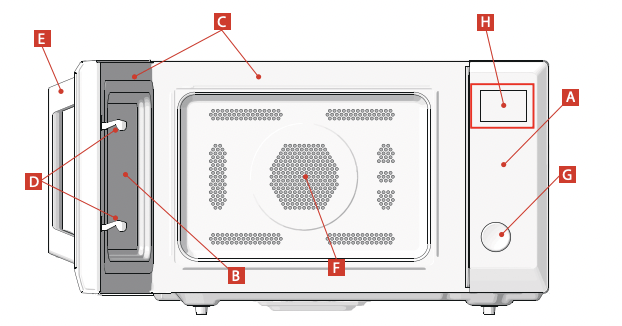
 Control panel — The pads used to operate the oven are located on the control panel.
 Observation window — Allows cooking to be viewed while keeping microwaves confinned in the oven.
 Door seals and sealing surfaces — The oven will not operate unless the door is securely closed.
 Safety interlock system — The door must be securely latched for the oven to operate.
 Door handle
 Oven cavity
 Control Knob
 LED Display
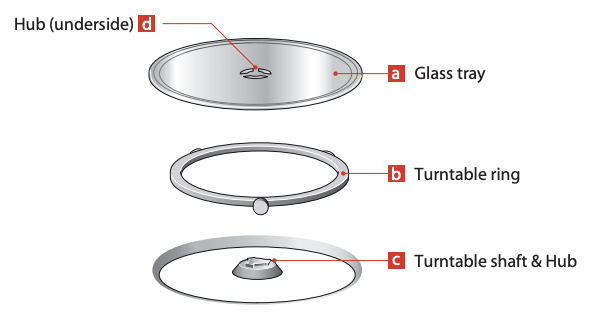
NAMES OF OVEN PARTS AND ACCESSORIES
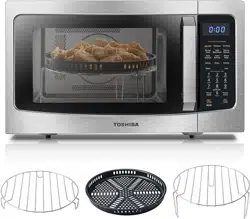
You can use the bake rack , bake tray or any other accessories that have been included with the appliance. When using the appliance in combination with the microwave mode, If you use the bake rack or the bake tray, this may create sparks, which may damage the cooking compartment. These accessories are designed especially for use in the microwave oven for convection, fast bake, fast roast or broil cooking. DO NOT USE FOR MICROWAVE ONLY COOKING. Do not substitute similar types of racks for these specially designed ones. Always use oven gloves to remove or put in accessories or ovenware.
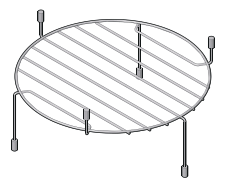
Bake Rack (Cannot be used in microwave function and must be placed on the glass turntable)
Bake Tray (Cannot be used in conjunction with microwave function and can be placed on the bake rack)
We suggest the bake rack placed on the bake tray for two-level cooking, such as layer cakes, muffins, etc. Bake tray placed on the turntable and use for roasting or broiling to allow juices to drain away from food.
CAUTION Only use the bake rack and bake tray when operating in grill or convection cooking mode. Never use in conjunction with the microwave function as this may cause arcing / sparks.
TURNTABLE INSTALLATION
Cleaning the cooking compartment and putting the turntable in place. For new installations, make sure all packaging and shipping tape has been removed from the turntable shaft. Before using the appliance to prepare food for the first time, you will need to put the turntable in place correctly. You must clean the cooking compartment and accessories.
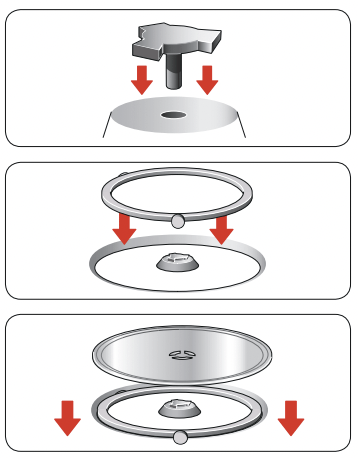
How to put the turntable in place
1. Place the roller ring  into the recess in the cooking compartment.
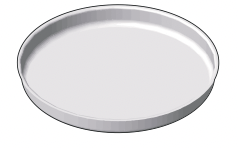
2. Place the glass tray on the turntable ring. Fit the raised, curved lines in the center of the glass tray bottom between the three spokes of the shaft. Make sure that the turntable engages in the turntable shaft
 in the centre of the cooking compartment floor. The rollers on the shaft should fit inside the turntable bottom ridge.
NOTE
- Never use the appliance without the turntable.
Make sure that it is properly engaged.
The turntable can turn clockwise or anti-clockwise.
- Never place the glass tray upside down.
The glass tray should never be restricted.
- Both glass tray and turntable ring assembly must always be used during cooking.
- All food and containers of food are always placed on the glass tray for cooking.
- If glass tray or turntable ring assembly cracks or breaks, contact your nearest authorized service center
- Never restrict the movement of the turntable.
COUNTERTOP INSTALLATION
Remove all packing material and accessories. Examine the oven for any damage such as dents or broken door. Do not install if oven is damaged.
Cabinet: Remove any protective film found on the microwave oven cabinet surface. Do not remove the light brown Mica cover that is attached to the oven cavity to protect the magnetron.
INSTALLATION
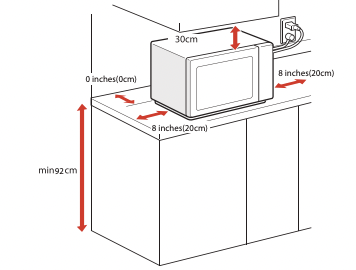
A minimum clearance of 8 inches(20cm) is required between the oven and any adjacent walls
- a. Leave a minimum clearance of 12 inches (30cm) above the oven.
- b. Do not remove the legs from the bottom of the oven.
- c. Blocking the intake and/or outlet openings can damage the oven.
- d. Place the oven as far away from radios and TV as possible. Operation of microwave oven may cause interference to your radio or TV reception.
- e. The minimum installation height is 3 ft (92 cm). ( Information is under guidance of UL Standard for Safety for Microwave Cooking Appliances, UL 923 / 42.1 /)
- f. The rear surface of the appliance shall be placed against a wall.
2. Place the oven as far away from radios and television sets as possible. Operation of microwave oven may cause interference to your radio or TV reception.
3. Plug your oven into a standard household outlet. Be sure the voltage and the frequency is the same as the voltage and the frequency on the rating label.
 Do not install oven over a range cooktop or other heat-producing appliance. If installed near or over a heat source, the oven could be damaged and the warranty would be void. The oven is designed for bench-top use only and must not be placed in a cabinet.
The accessible surface may be hot during operation.
OPERATION
Control Panel and Features
In this chapter, we will explain the displays and controls. You will also find out about the various functions of your appliance. In the control panel, you can use the various buttons and the Rotary Coding Switch to set the required function of the appliance. The current settings are shown on the display window.
NOTE Depending on the appliance model, individual details and colours may differ.
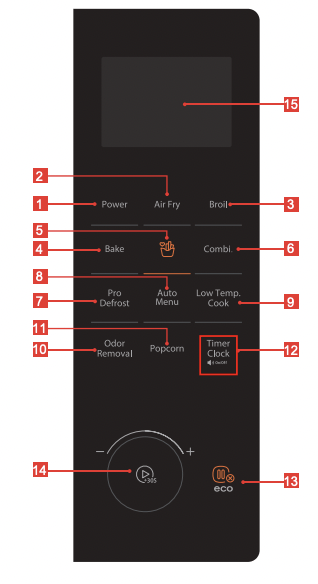
(1) Microwave
(2) Air Fry Presets
(3) Broil
(4) Bake
(5) Homefry
(6) Combination Cooking
(7) Pro Defrost
(8) Auto Menu
(9) Keep Warm
(10) Odor Removal
(11) Yummy Popcorn
(12) Timer/Clock
(13) Stop/Cancel Lock(hold down for approx. 3 secs)/ECO
(14) Rotary Coding Switch-----A rotary selector with a pressure point.
1. Turn the rotary selector clockwise and anti-clockwise to change the adjustment values shown in the display window.
2. Touch to activate Start/+30Sec (Turn on selected function or add 30Sec. )
(15) Display Window Shows the current settings of the appliance.
Menu format:
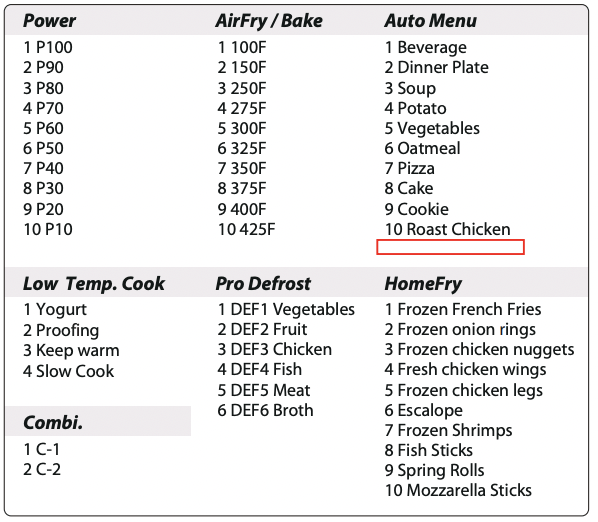
Refer to the menu label for quick references.
Heating Functions: Specials
 Microwave
Microwave heating creates the heat directly in the food. You can use the microwave to cook, heat up or defrost food quickly. To heat pre-prepared meals. To cook vegetables and �sh. The microwave can be used on its own, or in combination with a type of heating.
 Grill
Grill
The Grill function is useful for cooking thin slices of meat, steak, chops, kebabs, sausages and pieces of chicken. It is also suitable for toasting sandwiches, grilling vegetables and melting cheese on toast.
 Conventional Cooking
During Convection cooking, hot air is circulated throughout the oven cavity to brown and crisp foods quickly. The Convection function is useful for cooking, roasting and baking, similar to the cooking results of a traditional domestic oven.
 Defrost
Creates the heat directly in the food. To defrost frozen fruit, vegetables, poultry, meat, fish and baked items.
 Child Lock
You can activate this function to enable the oven use. When the Child Lock is on, the control panel is locked and no settings can be made. The oven cannot be activated accidentally. Once it activated, Child Lock sign appears on the display. You may lock the control panel to prevent the oven from being accidentally started or used by children.
 Auto Menu
Contains a list of automatic programmes.
 Timer Settings
Contains a list of clock functions.
 Ounce
Ounce
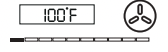
 Temperature Indicator Bar
Flashes before it reaches the temperature, and it will always be on after it reaches the temperature.
OPERATION INSTRUCTION
This oven uses modern electronic control to adjust cooking parameters to meet your needs better for cooking.
• Before operating your new microwave oven make sure you read and understand this Use and Care Guide completely. The Microwave Oven is for food preparation only. ALWAYS have food in the Microwave Oven when it is on to absorb the microwave energy. Stay near the oven while it’s in use and check cooking progress frequently so that there is no chance of overcooking food.
Follow these procedures:
Plug in the oven. Close the door. The oven display will show 0:00, Oven goes into standby mode.
1.Clock Setting
• Suppose you want to enter the correct time of day 12min 30sec.
1. Touch Timer/Clock twice. leftmost “00” flashing. 
2. Enter the correct time of day by turning the  to adjust the hour figures, The input time should be within 1--12 (12-hour).

Input “12” at this step. 
3. Touch Timer/Clock again. the minute figures will flash. 
4. Turn to adjust the minute figures. The input time should be within 0--59. Input “30” at this step.

5. Confirm with Timer/Clock.
 NOTE Your Microwave Oven can be programmed with the door open except for Start/ +30Sec and Odor Removal. If you enter an incorrect clock time, simply touch Stop/ Cancel and re-enter the the correct time of day. Electrical power supply to your Microwave Oven should not be interrupted. If this occurs during cooking, the program will be erased. The time of day will also be erased. In the process of setting the hour figures, if you do not turn rotary coding switch, it will switch to the kitchen timer function and the clock setting will be invalid.
2. Stop/Clear
Touch the STOP/CANCEL to:
- 1. Erase if you make a mistake during programming.
- 2. Cancel timer.
- 3. Stop the oven temporarily during cooking.
- 4. Return the time of day to the display.
- 5. Cancel a program during cooking, touch twice.
NOTE In the process of setting, if the ‘Stop/Cancel’ is touched or after a period of inactivity for 1 minute, the oven will revert to the former setting automatically.
3. Kitchen Timer
To set the length of an operation. To set a countdown. It will automatically monitors how long the function operates.
• Suppose you want to set timer for 5 minutes
1. Touch Timer/Clock .
2. Enter the correct time of day by turning the 

input “5” at this step 
3. Confirm with Start/+30Sec . 
NOTE
- 1. Your Microwave Oven can not be programmed during the operation of kitchen timer.
- 2. Your Microwave Oven can be pro-grammed from 5seconds to 95minutes. The kitchen time is different from 12-hour system. Kitchen Timer is countdown timer only and does not control or start any cooking modes. When the set time has elapsed, the unit will sound 5 times and the screen will return to standby or clock mode.
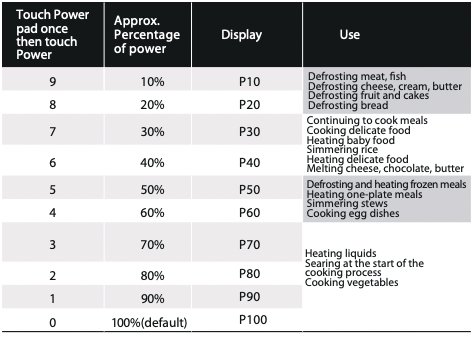
Your appliance has various operating modes which make your appliance easier to use. You can find more precise descriptions of these in the "Heating Functions: Specials" sections. The microwave function is useful for steaming, as well as the quick and convenient defrosting and reheating of foods. Using lower power levels increases the cooking time which is recommended for foods such as cheese, milk and long slow cooking of meats. There are ten preset power levels are available for Microwave cooking.
One Touch Start / Add 30 seconds
The +30S control  instant switches on the microwave oven with maximum microwave power P100(see table below), and a duration of 30 second. Simply touching the Start/+30Sec repeatedly increases the duration in cooking. In standby mode, first turn the rotary coding switch to the left to display "0:05", then right-rotate to increase cooking time, touch Start/+30Sec to start.
NOTE During Auto Menu , Low Temp. Cook Presets, Weight Defrost, Timer, Odor Removal functions, lengthen the cooking time it's not available.
4. Microwave Cooking
Follow manufacturer’s directions and the food will be cooked perfectly
• Suppose you want to cook with 80% microwave power for 5 minutes
1. Touch Power. 

2. Select desired power level by turning the or touch Power repeatedly. Input “P80” at this step.

3. Confirm with Start/+30Sec. 
4. Enter the correct time of day by turning the
Input “5” at this step. 
5. Touch Start/+30Sec.
NOTE For many heating type, the appliance specifies a default temperature or level. You can accept this value or you can use the rotate selector to change it manually. You can also use the rotate selector to scroll the menu list on the screen. In most menus, the beginning and the end of the menu are recyclable.
Cooking time may also be increased in 30 second increments by touching ‘Start/+30Sec’ repeatedly. When you touch the ‘Start/+30Sec’, the time is changed and adopted immediately.
After starting the operation, the timer countdown is highlighted.
The cooking time has elapsed
The cooking compartment stops heating. 0 min 00 s appears on the display ( Current time will display if the clock was previously set ). The temperature indicator bar goes out. To remind you that the food is ready, the buzzer will beeps 5 times until you either open the oven door or touch the Stop/Cancel pad.
5. Grill Cooking
• Suppose you want to cook with grill for 5 minutes.
1. Touch Broil. 


2. Confirm with Start/+30Sec.
3. Enter the correct time of day by turning the
Input “5” at this step.
4. Touch Start/+30Sec.
NOTE To speed cooking of such foods as chicken and hamburgers. Large items like roasts should be turned over at least once. Some food requires turning or stirring, etc., An audible signal will remind you the cooking time is halfway through.
When oven stops, in order to roast the food better, you should turn the food over, close the door, and then touch ‘Start/+30Sec’ to continue cooking. If there is no operation, the cooking process continues to run as normal. Increasing the time during the cooking process has no influence on the alarm clock.
Combination cooking
Various types of heating can be combined with the Microwave operating mode. The appliance heats up and the microwave is switched on at the same time. As a result, the food is ready in a much shorter time. The Combination function allows you to Microwave, Grill and Convection funtion in the same cooking session. You can select from two different combinations: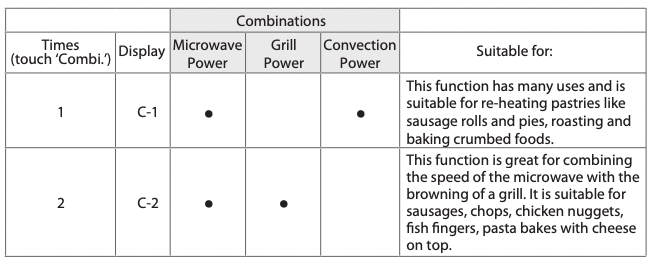
• Suppose you want to cook with combining the microwave with browning of a grill for 5 minutes.
1. Touch Combi. twice. 

2. Touch Start/+30Sec to confirm.
3. Enter the correct time of day by turning the
input “5” at this step.
4. Touch Start/+30Sec.
NOTE You can also touch ‘Combi.’ once. Set and change the Combination by turning the rotate selector until the desired setting is reached (see table above). Touch ‘Stop/Cancel’ once to pause the unit and twice to cancel the operation.
6. Convection Cooking
The convection cooking can let you cook the food as a traditional oven. Microwave is not used. It is recommended that you should preheat the oven to the appropriate temperature before placing the food in the oven. There are 10 different temperatures are available: 100ºF, 150ºF, 250ºF, 275ºF, 300ºF, 325ºF, 350ºF, 375ºF, 400ºF, 425ºF.
A. To cook with preheat
* Please do not put the food into the oven at the beginning. The oven needs to be preheated first.
1. Touch Air Fry or Bake.  or
or 
2. Select desired setting by turning the
Ex: preheat to 250ºF, input “250ºF” at this step. 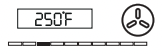
3. Touch Start/+30Sec to confirm. Touch Start/ +30Sec again to start preheating. *Twice
After several minutes, when the recommended preheating temperature arrives, Temperature Indicator Bar normal on. The temperature scale and Conventional Cooking sign will flash (Operation continues to run). Once the temperature arrives, door must be opened and then place the food in the oven. Then proceed to step 4
4. Enter the correct time of day by turning the
Ex: 30 sec input “30” at this step.
B. Without preheating function
* Placing the food in the oven.
1. Touch Air Fry or Bake. or
2. Select desired temperature by turning the
Ex: 250ºF, input “250ºF” at this step. 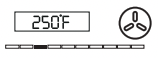
3. Touch Start/+30Sec to confirm. *Once
4. Enter the correct time of day by turning the
Ex: 30 sec input “30” at this step. 
5. Touch Start/+30Sec.
7. Home Fry Presets
1. Touch Home Fry Presets. 
2. Select desired Menu. by turning the
Ex:Frozen chicken wings, input “H04” at this step. 
3. Touch Start/+30Sec.
NOTE An audible signal will remind you the cooking time is 2/3 passes. When oven stops, in order to roast the food better, you should turn the food over, close the door, and then touch “ Start/+30Sec ” to continue cooking. If there is no operation, the cooking process continues to run as normal.
Home Fry Menu (Pre-Set Cooking temp. is 425ºF)
PRE-PROGRAMMED MENU DISPLAY
Frozen French Fries H01
Frozen onion Rings H02
Frozen chicken nuggets H03
Frozen chicken wings H04
Frozen chicken legs H05
Escalope H06
Frozen Shrimps H07
Fish Sticks H08
Spring Rolls H09
Mozzarella Sticks H10
8. Low Temp. Cook Presets
1. Touch Low Temp. Cook. 

2. Select desired Menu. by turning the
Ex: Keep warm, input “L3” at this step. 
3. Touch Start/+30Sec to confirm.
Low Temp. Cook Menu
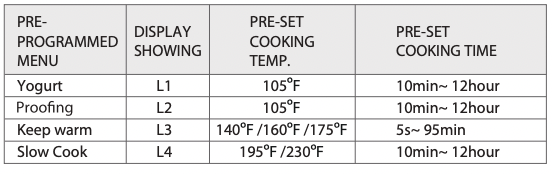
4. Select desired temperature by turning the
Ex: 160ºF, input “160ºF” at this step. 
5. Touch Start/+30Sec to confirm.
6. Enter the correct time of day by turning the
Ex: 30 sec input “30” at this step. 
7. Touch Start/+30Sec.
Cooling fan
When the oven operates, the cooling fan turns on automatically to keep the surfaces of the oven cool. After the cooking time has elapsed, the cooling fan can continue to operate until the oven cools down.
9. Mute Function
Long touch " Timer/Clock " for 3 seconds to enable or disable mute mode, and the screen will show “On” or “OFF” for 3 seconds.
10. Other Specification
- (1)
 must be touched to continue cooking if the door is opened during cooking
- (2) A single beep sounds to indicate that a pad is correctly touched. If pad is not correctly touched, no beep sounds.
11. Custom Defrost Function
- (1) Touch Pro Defrost pad, "dEF1" will appear in the display. Turn the rotate selector or touch Pro Defrost repeatedly, "dEF1" , "dEF2", "dEF3", "dEF4" , "dEF5", "dEF6", "dEF7" will display in order. Confirm with .
- (2) Use the rotate selector to enter the weight to be defrosted for ‘dEF1’ to ‘dEF6’. Input the weight range between 4 to 100 Oz.
- 3) Touch to start defrosting and the cooking time remaining will be displayed
 , "
, " " indicator will flash.
NOTE When 40% of the defrosting time passes, the oven will beep twice to remind you to turn over the food. Open the door to pause operation. Turn over food, close door and touch to resume defrost cycle. If you do not open door to pause operation, the oven will continue the defrost cycle without interruption.
12. Time Defrost
- (1) Touch Pro Defrost once, and than touch Pro Defrost repeatedly, or turn the rotate selector until "dEF7" appears on the screen. Confirm with .
- (2) Use the rotate selector to enter the time amount.
- (3) Touch to start defrosting, the remaining defrost time will display.
NOTE Power level cannot be check or change during defrosting. Touch pad to add cooking time if desired.
13. Popcorn
- (a) Touch Popcorn and turn the rotate selector until the number you wish appears in the display, "2.75", "3.2", "3.5" Oz will display in order. And "
 ", " " and "Oz" will appear in the display.
- (b) Touch to start cooking. "Oz" disappears. " " , " " flashes. and time countdown shows in the display.
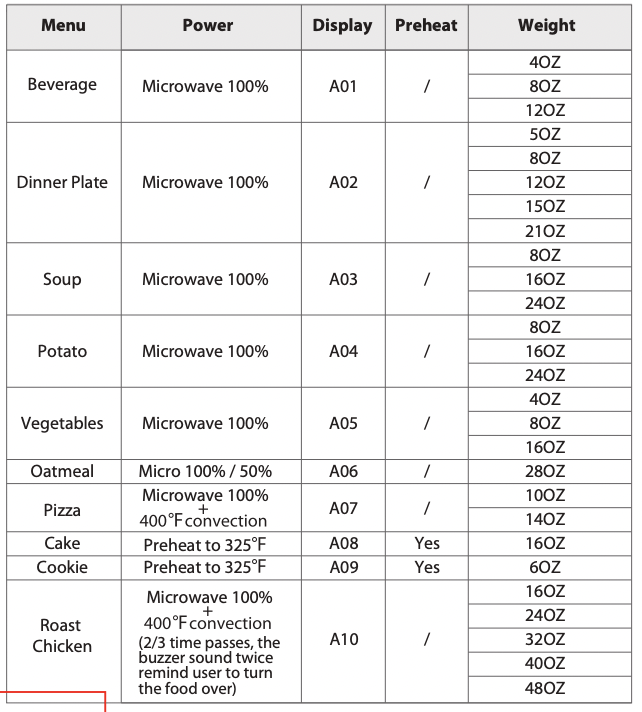
14. Auto Cook
- (a) Touch Auto Menu , "A01" and " " , " or
 or both " will appear in the display.
- (b) Turn the rotate selector, "A01" to "A10" will display in order. Refer to the Auto Menu Chart below
- (c) Confirm with . Use the rotate selector to select the weight or portion of food item.
- (d) Touch to start cooking, menu"A08" and "A09" is starting to preheat " " ," or " flashes. The time countdown shows in the display
Note:
1)Cake and Cookie menu is under convection cooking with 325℉-warm-up function, and you should preheat first, following the auto menu operation above. When the oven reaches the preheating temperature, it will stop working and sound to remind opening the door to put cake in, then simply touch " " to start cooking. display.
2) When roast chicken is selected and 2/3 of the time has passed, it will sound twice to remind you to turn over the food. You can just leave it continue. For better result, turn the food over, close the door, and then touch " " to continue cooking.
Auto Menu Chart:
15. Inquiring Function
(1) When oven is cooking, touch Timer/Clock for the time of day to appear for three seconds in the display.
(2) When oven is cooking, touch Power pad for cooking power to appear for three seconds in the display.
16. Lock Function
To lock the microwave so that it cannot be operated by children or other unintended users, touch pad for 3 seconds. You will hear a long beep. If the clock has been set, the time of day and "Lock" will appear in the display. Otherwise, only "Lock" will appear. To Unlock, touch for three seconds, you will hear a long beep and "Lock" will disappear.
17.Energy Saver Mode
- (1) In standby mode, touch the once (less than 3 seconds to avoid starting the Lock function ) to enter the Energy Saver mode. (the screen is turned off).
- (2) Above operation is the only way to start the Energy Saver mode.
- (3) In screen off, you can touch any pad or open the oven door to turn on the screen, The first touch is to turn on the screen by default, and the second touch is to execution the cooking program itself.
18. Turntable Reset Function
• When cooking finished, if the turntable is not at the initial position, it will enter the turntable reset function. At this time, the lamp, fan and turntable are working. The oven stops working when the reset is complete. Touch key without releasing, and touch Combi. within 3 seconds to turn on or off the reset function of the turntable. The screen displays ON or OFF.
NOTE
- This function only works for one completed cooking. If pause or open the door during cooking, it cannot use the reset function.
- Under the reset status, opening the door or touching will back to standby mode.
MAINTENANCE
Troubleshooting
Check your problem by using the chart below and try the solutions for each problem. If the microwave oven still does not work properly, contact the nearest authorized service center.
Oven will not start
a. Electrical cord for oven is not plugged in.
b. Door is open.
- b. Close the door and try again.
c. Wrong operation is set.
Arcing or sparking
a. Materials to be avoided in microwave oven were used.
- a. Use microwave-safe cookware only.
b. The oven is operated when empty.
- b. Do not operate with oven empty.
c. Spilled food remains in the cavity.
- c. Clean cavity with wet towel.
Unevenly cooked foods
a. Materials to be avoided in microwave oven were used.
- a. Use microwave-safe cookware only.
b. Food is not defrosted completely.
- b. Completely defrost food.
c. Cooking time, power level is not suit ble.
- c. Use correct cooking time, power level.
d. Food is not turned or stirred.
Overcooked foods
Cooking time, power level is not suitable.
- Use correct cooking time, power level.
Undercooked foods
a. Materials to be avoided in microwave oven were used.
- a. Use microwave-safe cookware only.
b. Food is not defrosted completely.
- b. Completely defrost food.
c. Oven ventilation ports are restricted.
- c. Check to see that oven ventilation ports are not restricted.
d. Cooking time, power level is not suitable.
- d. Use correct cooking time, power level.
Improper defrosting
a. Materials to be avoided in microwave oven were used.
- a. Use microwave-safe cookware only
b. Cooking time, power level is not suitable.
- b. Use correct cooking time, power level.
c. Food is not turned or stirred.