USER MANUAL Roku Smart Led Tv
Connections and setup
Main features
- wide screeen for a complete home theater experience
- Super slim LCD TV with LED backlight
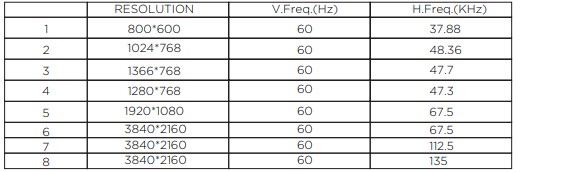
- 3840x2160 native resolution for HD performance
- Integrated ATSC TV tuner for HDTV broadcast reception
- HDMI inputs for true digital connections
Accessories
- Infrared Remote Control................................... 1
- User’s Manaul.......................................................... 1
- Battery (AAA)........................................................ 2
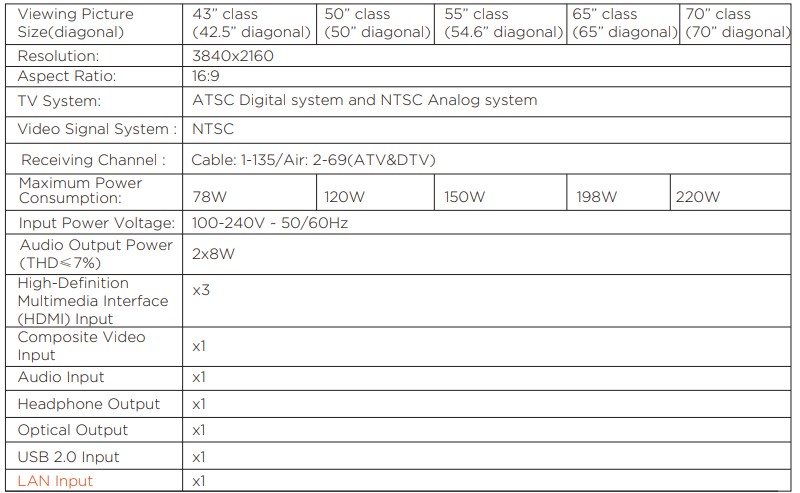
Specifications
“The product is manufactured, distributed, serviced and warranted exclusively by SHEN ZHEN MTC CO., LTD...“JVC” is the trademark of JVC KENWOOD Corporation, used by such company under license.”
INSTALLATION
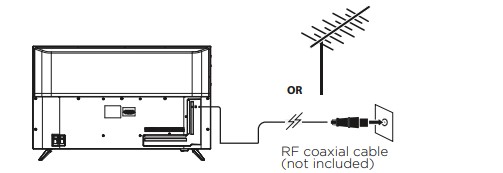
Antenna
Check to ensure that you have selected the right cables for the ports and that they are connected securely. Loose connections can affect the quality of the picture image and color. (Cables and External Equipment not included.)
Note:
Aerial connections : F connector.
Input impendance : 75Ω unbalanced.
With the tuner built-in you can connect your TV to an antenna and enjoy over-the-air entertainment.
- When the setup wizard is complete select the Antenna TV icon
 from the home screen.
- Follow the on-screen instructions.
- Whenever you want to watch antenna TV, select the Antenna icon.
Plug in and turn on TV
- Connect your power cord to the TV, then plug it into the wall outlet.
- Press the power button on your TV remote control.
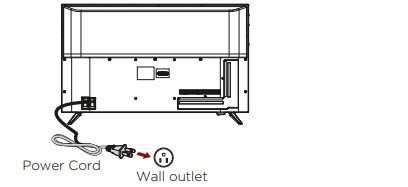
Power connection
Please note: After unpackint, allow the TV to reach ambient room temperature before connection the TV to the mains power socket.
PRESET MODE(HDMI)
CABLE
- When shipped from the factory, the Signal Type option is for the RF connector(F-type) set to the “AIR” (Over-the air antenna) mode.
Base Stand Assembly Instruction
It is recommended two people handle TV stand installation. To prevent scratch or damage to the TV screen, place the TV on a soft, flat surface.

Attach the stands to the bottom of the TV by inserting the stand into slots on the TV. Secure the stands to the TV with the supplied screws.
To attach the left and right leg that forms the stand:
- Place the legs into the bottom slots of the TV, insert and tighten the screws (found in the accessories bag) in the circled areas with the screwdriver (not provided).
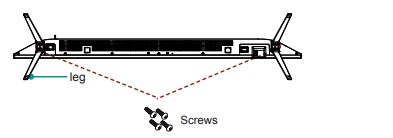
- After securing the stand, place the TV on a stable surface. The TV is ready for use now.
Note: TV can also be wall mounted. Wall mount sold separately.
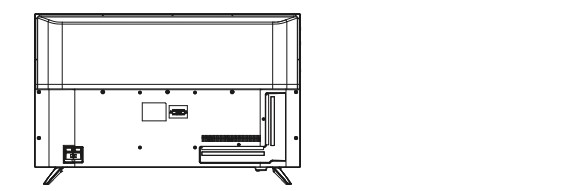
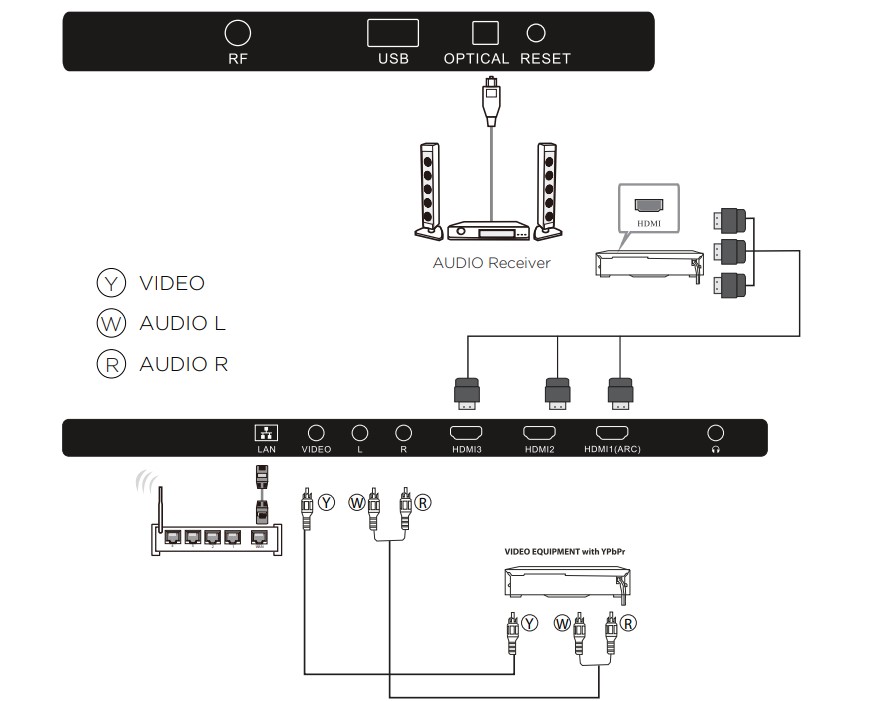
External Connection
AV Equipment
You can use the rear input terminals as follows.
Video Equipment: VCR, Multi Disc Player, DVD Player, Camcorder, Video Game, etc.
Connecting a Camcorder
The rear panel jacks on your TV make it easy to connect a camcorder to your TV. They allow you to view the camcorder tapes without using a VCR.
Each Camcorder has a different back panel configuration.When connecting a Camcorder or DVD. match the color of the connection terminal to the cable.
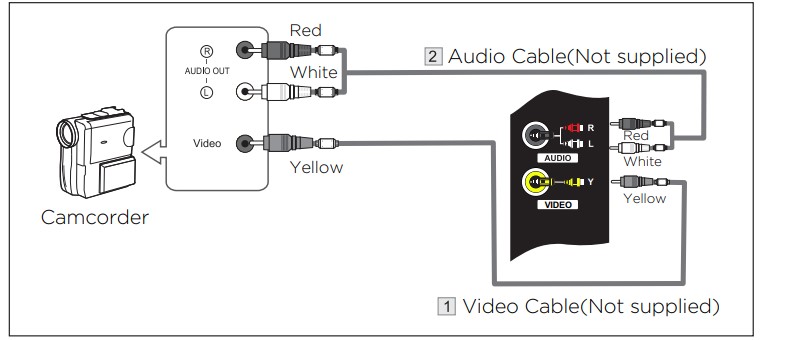
- Connect a Video Cable between the AV VIDEO in jacks on the TV and the Video out jack on the camcorder
- Connect Audio Cables between the AUDIO L and AUDIO R jacks on the TV and the AUDIO out jacks on the camcorder.
- Connect a Video Cable between the AV VIDEO in jacks on the TV and the Video out jack on the DVD
Notes:
- Whenever you connect an external device to your TV, make sure that power on the unit is turned off
- When connecting an external device, match the color of the connection terminal to the cable.
Connecting Digital Audio System
This connection can only be made if there is a HDMI Output connector on the external device.
What is HDMI? HDMI, or high-definition multimedia interface, is a next-generation interface that enables the transmission of digital audio and video signals using a single cable without compression.
Multimedia interface is a more accurate name for it especially because it allows multiple channels of digital audio.
The difference between HDMI and DVI is that the HDMI device is smaller in size, has the HDCP(High Bandwidth Digital Copy Protection) coding feature installed, and supports multi-channel digital audio.
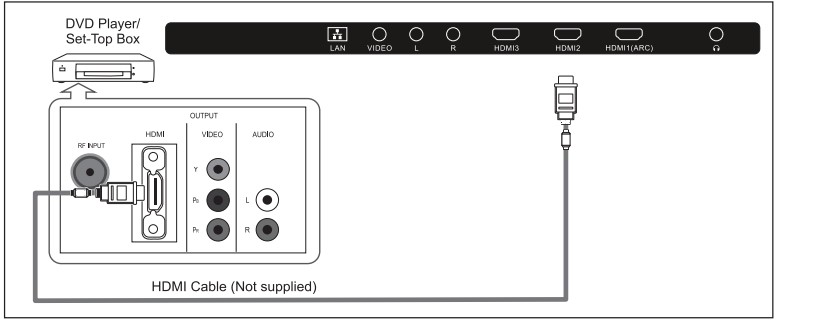
Each DVD player/STB has a different back panel configuration.
Connect an HDMI Cable between the HDMI1, HDMI2, HDMI3 connector on the TV and the HDMI connector on the DVD player/Set-Top Box.
Notes:
- Whenever you connect an external device to your TV, make sure that power on the unit is turned off.
- When connecting an external device, match the color of the connection terminal to the cable.
Connecting an antenna, cable, or satellite box
If you are using an antenna, CATV cable without a set-top box, or a cable or satellite box that has only an antenna output, connect a 75-ohm coaxial cable (not provided) from the device to the ANT/CABLE input on the TV.
Tip: If you are using an antenna with a 300 ohm twin-lead cable, you need to use a 300-to-75 ohm adapter (not provided) to adapt the twin-lead cable to a connection that is compatible with the TV‛s antenna input
Tip: If you receive your TV stations through a set top box from a cable or satellite TV provider, connect it to the TV using the best connection method available. From most to least desirable:
- HDMI® input -Digital HD and SD video
- AV input - analog SD video
- Antenna input - analog SD video using NTSC
Connecting external equipment with a composite AV video cable
If the best connection available on your device is AV or composite video output, connect it to the TV using a composite AV cable (not provided). Composite AV cables typically have three RCA-type plugs on each end, color coded as follows:
- Yellow Video
- Red Audio, right channel
- White or black Audio, left channel
Connect each plug to the corresponding connector on the device and on the TV.
Note: Select models have an AV Input that looks like a headphone jack. Use the breakout cable (included) to adapt this input to the three RCA-type plugs on your composite cable
Connecting headphones or analog sound bar to the TV
- You can connect headphones or an analog sound bar (not provided) to the TV headphone jack.
Warning: Loud noise can damage your hearing. When using headphones, use the lowest volume setting on your headphones that still lets you hear the sound.
- Select models also have an audio line out connection that is not affected by TV volume or mute settings and does not disable the TV speakers. Use this connection when you want to use your amplifier or sound bar to control the TV volume. To turn off the TV‛s built-in speakers, in the Home screen menu, navigate to Settings > Audio > TV speakers and change the setting.
Preparing for Internet connectivity
- If you want to watch streaming content and take advantage of the cool features of your Roku TV, connect it to the Internet through a wireless modem/router or a wireless access point (not provided). The TV has a built-in wireless LAN adapter.
Note: The TV supports only its internal wireless network adapter it does not support the use of a USB network adapter.
- Select 4K models have wired in addition to wireless network connectivity. To use the wired network connection, connect an RJ-45 Ethernet cable (not provided) from the jack on the back of your TV to your network router or switch. The wired connection supports both 10 Base-T and 100 Base-T Ethernet.
Guided Setup
Starting Guided Setup
- To start Guided Setup, press the POWER button on the remote to turn on your TV.
When you first turn on your TV, it will take a few seconds to get itself ready. Y notice the following things happening:
- The status indicator blinks every time the TV is busy doing something; in this case it's powering up and getting for you
- The power-on screen appears and the status indicator blinks slowly for a few more seconds. The power-on screen shows a brand logo while the TV starts up.
- After a few seconds, Guided Setup starts.
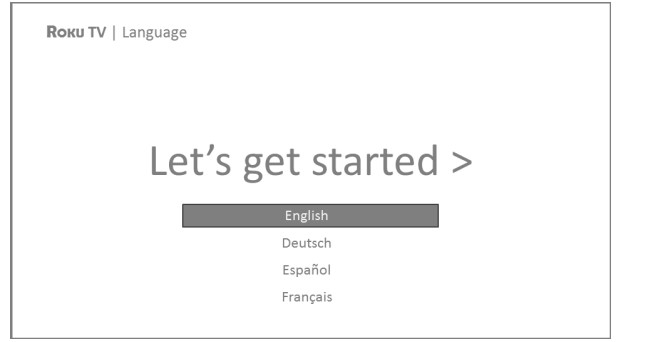
Completing Guided Setup
Follow these steps to complete Guided Setup. At this point, you should be seeing the Language screen.
- Only on models that have a Roku voice remote: A few moments after the get started screen appears, Guided Setup starts the pairing process for the voice remote. If the voice remote does not pair automatically, follow the instructions on the screen to complete the pairing process.
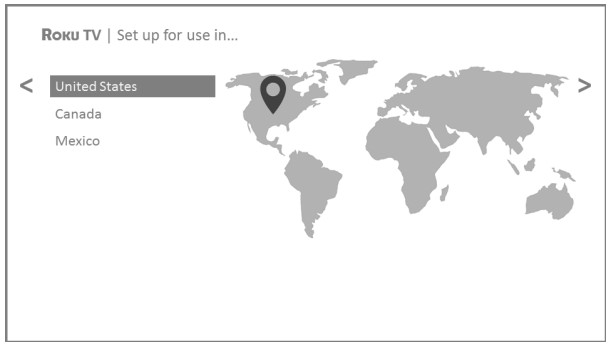
- Press the DOWN arrow on the remote to highlight your preferred language, and then press OK or the RIGHT arrow.
- Some models have a country selection screen: If you don't see this screen, skip ahead to the next step. If you see this screen, select your country.
- Press OK or the RIGHT arrow on the remote to go to the next screen:
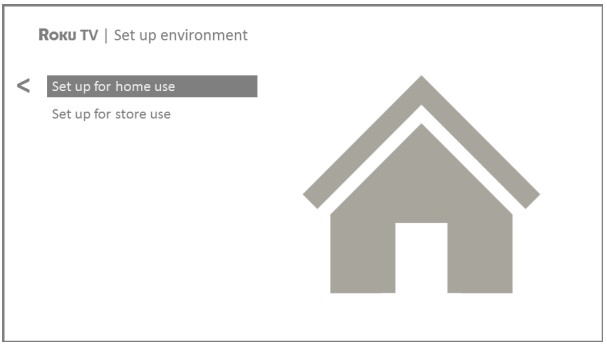
- Press OK to select Set up for home use. This is the right choice for enjoying your TV at home. It provides energy saving options as well as access to all features of the TV.
Home screen
The following illustrations show typical Home screens, which vary depending on location, connected mode, selected theme, number of TV inputs enabled, and streaming channels and apps added.
Note: A paid subscription or other payments may be required for some channel content. Channel availability is subject to change and varies by country. Not all content is available in countries or regions where Roku ® products are sold.
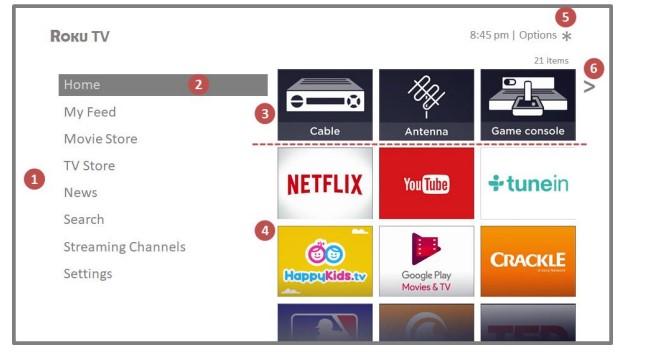
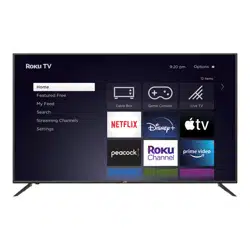
Typical connected Home screen, United States
- Home screen menu shows options available to you when you are on the Home screen.
- Highlighted option press OK on the remote to select.
- TV input tiles select an input to watch the connected device.
- Streaming channel and app tiles select a tile to go to the indicated streaming channel or application.
- Options hint press
 on the remote for options when this symbol is present.
- Next screen hint press the RIGHT arrow on the remote to see the next screen.
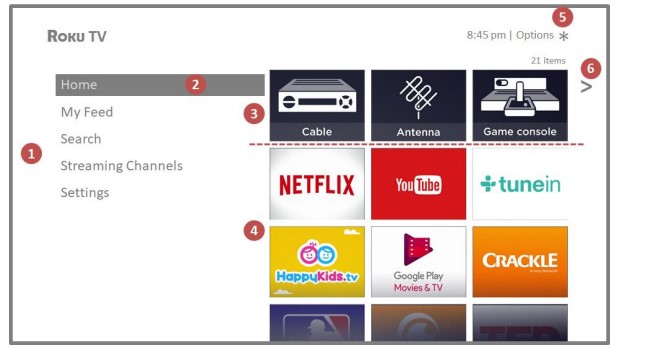
Typical connected Home screen, Canada
- Home screen menu shows options available to you when you are on the Home screen.
- Highlighted option press OK on the remote to select.
- TV input tiles select an input to watch the connected device.
- Streaming channel and app tiles select a tile to go to the indicated streaming channel or application
- Options hint press on the remote for options when this symbol is present.
- Next screen hint press the RIGHT arrow on the remote to see the next screen.
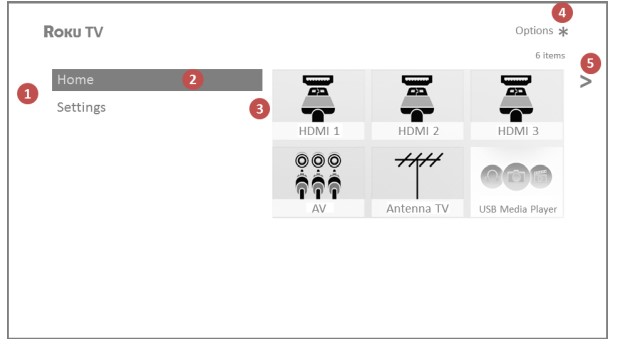
Typical non-connected Home screen
- Home screen menu shows options available to you when you are on the Home screen.
- Highlighted option press OK on the remote to select.
- TV input tiles select an input to watch the connected device.
- Options hint press on the remote for options when this symbol is present.
- Next screen hint press the RIGHT arrow on the remote to see the next screen.
Benefits of connecting
Connecting brings out your TV’s full potential!
Make any night a movie night
- Thousands of movies to choose from, across all major streaming movie channels like Netflix, Crackle, and more* . You'll never run out of something new to watch.
Get in the groove
- Stream endless hours of music from free and subscription-based channels like Deezer and TuneIn. With almost instant access to thousands of music artists, your favorite beats are just as close as your remote.
Explore your passions
- In addition to popular streaming channels like YouTube, NHL, Sky News and Google Play, your Roku TV also offers hundreds of streaming channels to fuel your passions including fitness, cooking, religion, outdoors, International programming and much more.
Enjoy FREE trials of popular channels
- Your Roku TV comes loaded with special offers, including free trials (if eligible) from popular streaming channels like Netflix, Hopster, Acorn TV, and many more. REMEMBER THAT YOU MUST CANCEL BEFORE THE FREE TRIAL ENDS TO AVOID SUBSCRIPTION FEES
What is streaming?
Streaming is viewing or listening to video or audio content that is sent over the Internet, or located on a network-connected media server or on a USB device plugged into the TV's USB port
With streaming, you can buy or rent most programs on demand, when it's convenient for you. When streaming, you can play, pause, rewind, and fast forward most of what you are watching. You can also replay the last few seconds again, or turn on closed captions.
Tip: Some content cannot be paused or skipped. For example, if you are viewing live programming or a program that is supported by ads, you might not be allowed to skip the ads
Your Roku TV lets you choose from thousands of streaming channels that offer a huge selection of entertainment:
- Thousands of movies and TV episodes
- Unlimited music, live and on-demand
- Tons of live and on-demand sports
- Commercial-free kids programming
- International programming in 22 languages
- 24x7 news and in-depth news commentary
Many streaming channels are free. Some streaming channels, like Google Play, let you purchase or rent the latest movie releases or popular TV series. Some channels such as Netflix or Acorn TV charge a monthly subscription fee and others are available at no additional cost if you subscribe to a companion service through your cable or satellite provider
If you have an existing subscription to a service like Netflix, you can just sign in with your existing user name and password.
To play streaming content, you add streaming channels to your Home screen. Use the Streaming Channels option on the Home screen menu to go to the Roku Channel Store, and then select the streaming channel you want to add. The channel remains on your Home screen unless you remove it, and you can watch it at any time
Note: A paid subscription or other payments may be required for some channels. Channel availability is subject to change and varies by country. Not all content is available in countries or regions where Roku ® products are sold.
What if I didn’t connect my TV?
What if you went through Guided Setup and chose Connect to the Internet later? No worries. Your Roku TV makes it easy to connect whenever you want. As you move around the Home screen. you'll see several places where you can start the connection process. For example:
- Now and then you'll see a message appear on the panel to the right of the Home screen offering a Connect Now option. Simply highlight and select the Connect Now option to get started
- Use the Connect and activate now option in the Settings menu. From the Home screen menu. select Settings, then Network. and then Connect and activate now.
- If you want to start over from the beginning. use the Settings menu to do a Factory reset. and then go through Guided Setup again. This time. choose your home network when prompted.