Loading ...
Loading ...
Loading ...
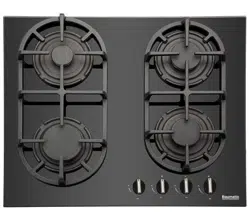
o Place the clamp (B) over the holes that match the size of the
screws. There are one set of screw holes in each corner of the
hob. Slightly tighten a screw (C) through the clamp (B) so that
the clamp is attached to the hob, but so that you can still adjust
the position of it.
o Carefully turn the hob back over and then gently lower it into the
aperture hole that you have cut out.
o On the underneath of the hob, adjust the clamps into a position
that is suitable for your worktop. Then fully tighten the screws
(C) to secure the hob into position.
Gas connection
22
nts.
This appliance must be installed by a competent
person in accordance with the current versions of
the following UK (United Kingdom) or ROI (Republic
of Ireland) Regulations and Safety Standards or
their European Norm Replaceme
Important information
o This hob is supplied to run on natural gas only and cannot be
used on any other type of gas without modification.
o Conversion for use on LPG and other gases must only be
undertaken by a qualified person. For information on the use of
other gases, please contact the Baumatic Advice Line.
o The hob must be installed by a qualified person, in accordance
with the current edition of the Gas Safety (Installation and Use)
(Amendment) Regulations and the relevant building/I.E.E.
Regulations.
o Failure to install the appliance correctly could invalidate
Baumatic’s guarantee and lead to prosecution under the
regulations quoted above.
o In the UK, GASSAFE registered installers are authorised to
undertake the installation and service work, in compliance with
the above regulations.
Loading ...
Loading ...
Loading ...