HP DESKJET 3637 All-in-One Printer
Product's Documents
Below are documents related to this product, you can read online or download:
- Owner's manual - (English) Read Online | Download pdf
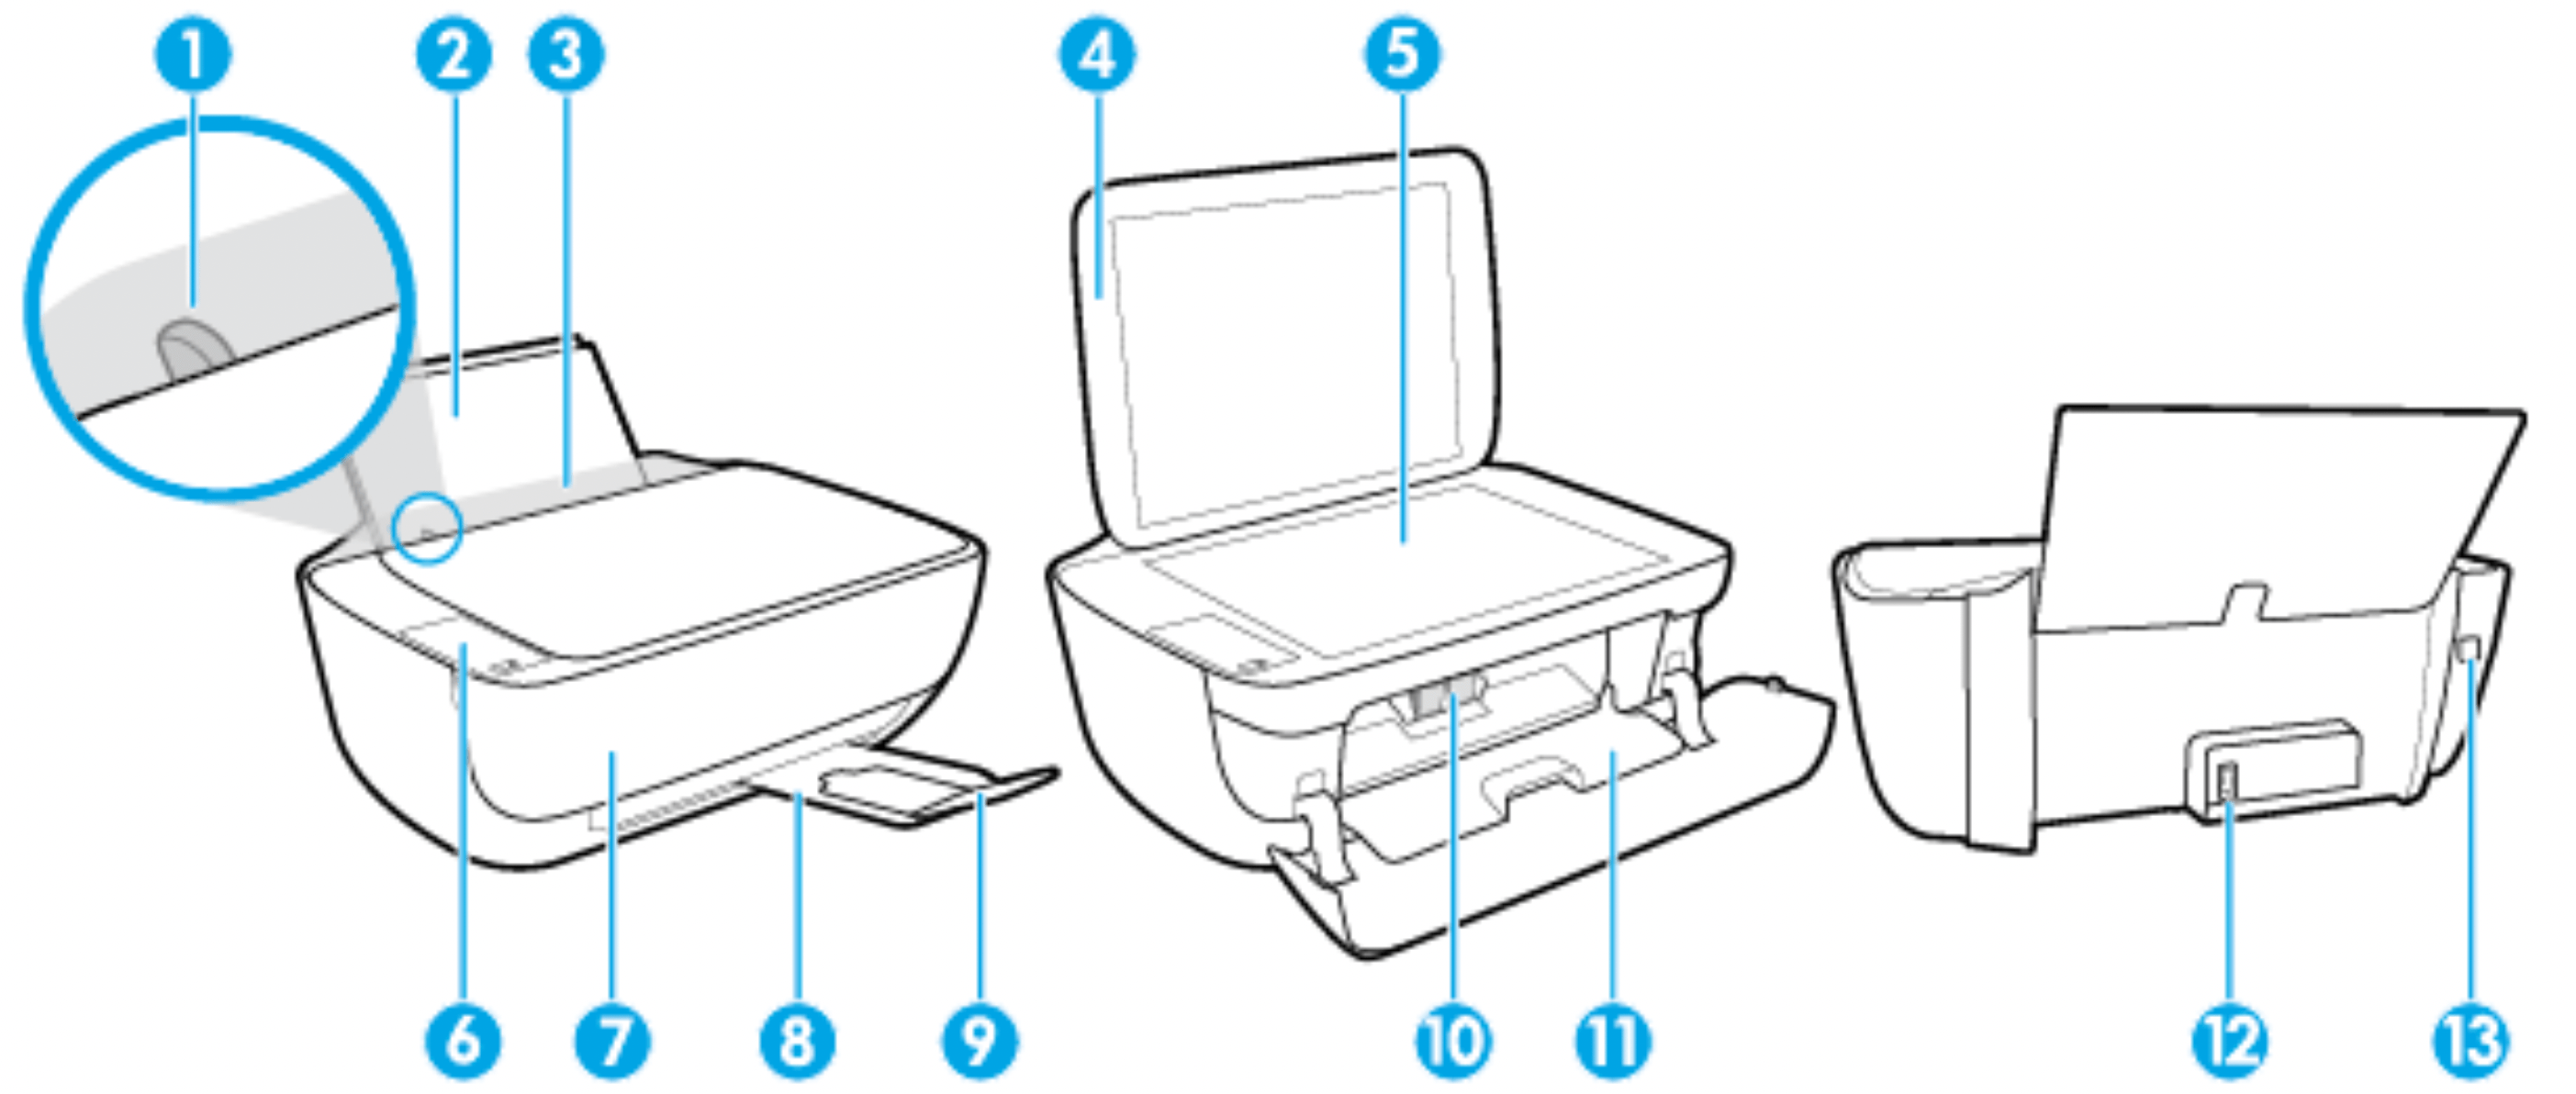
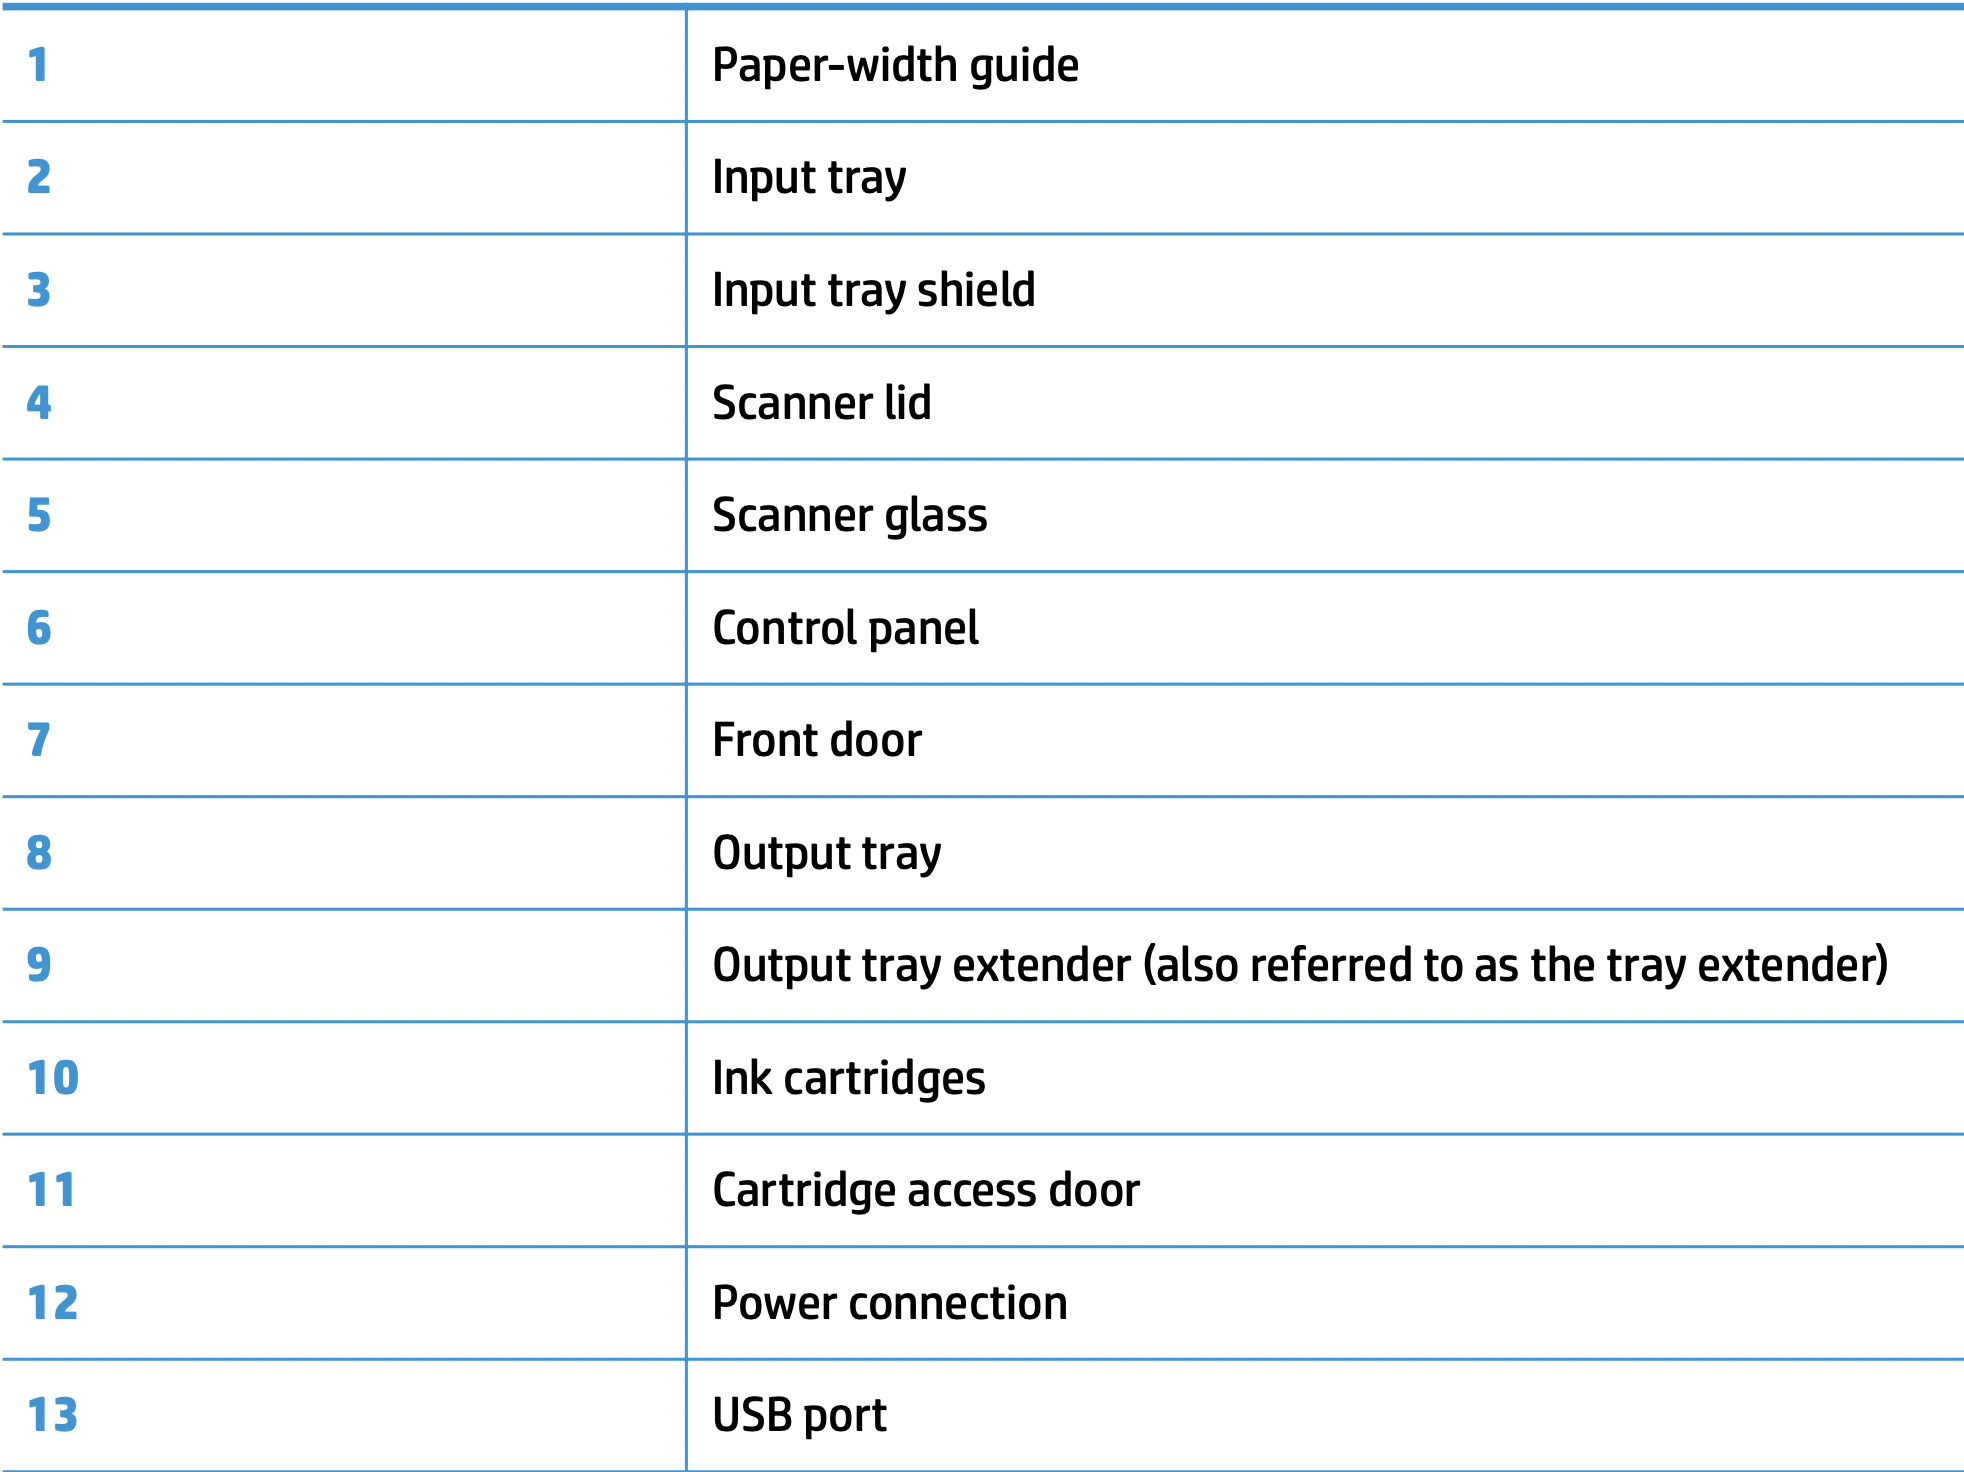
Owner's Guide Printer
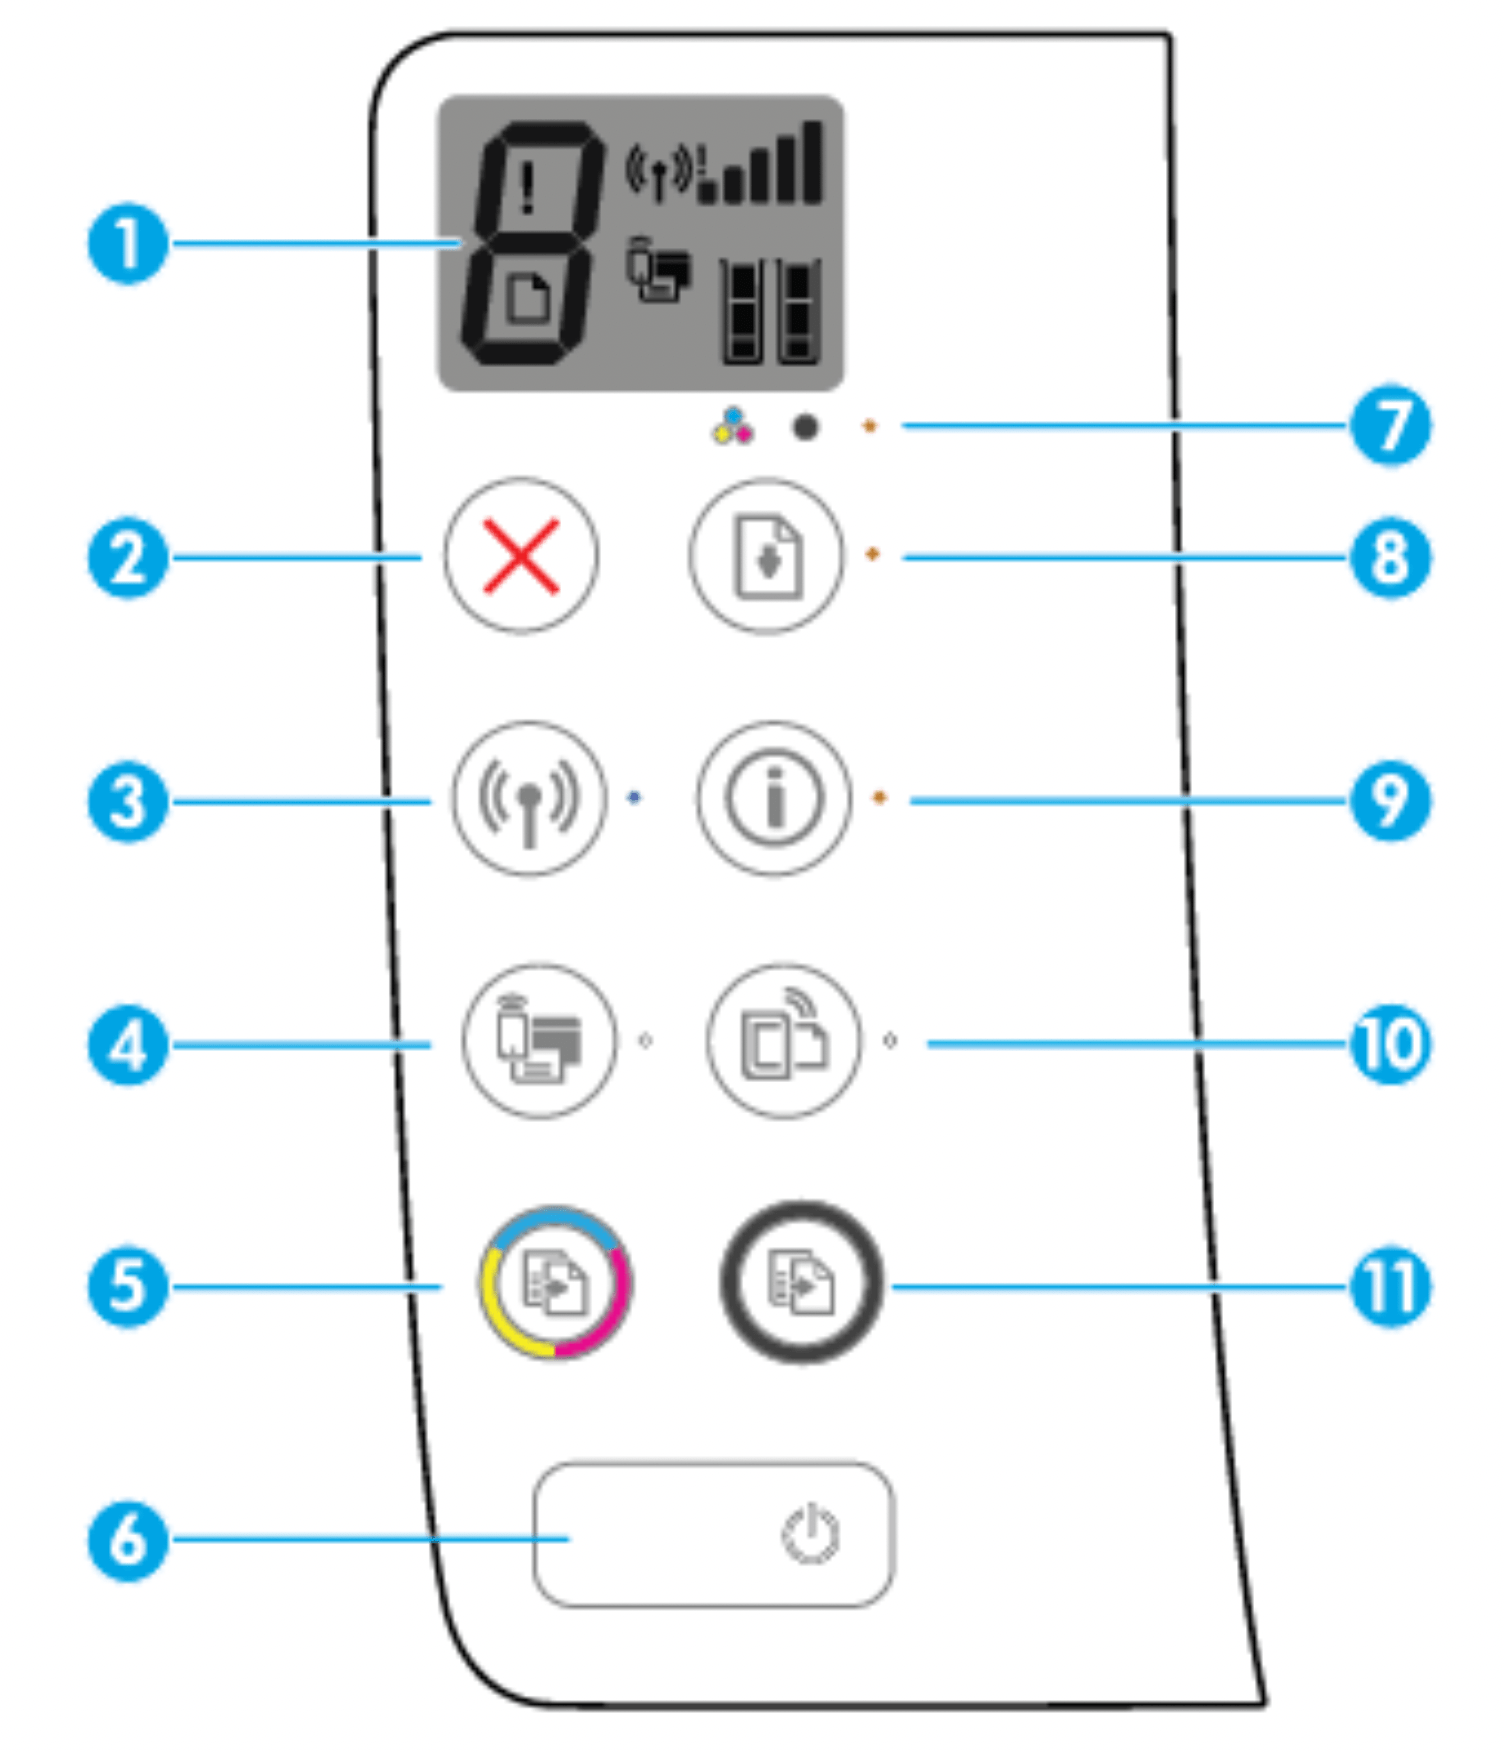
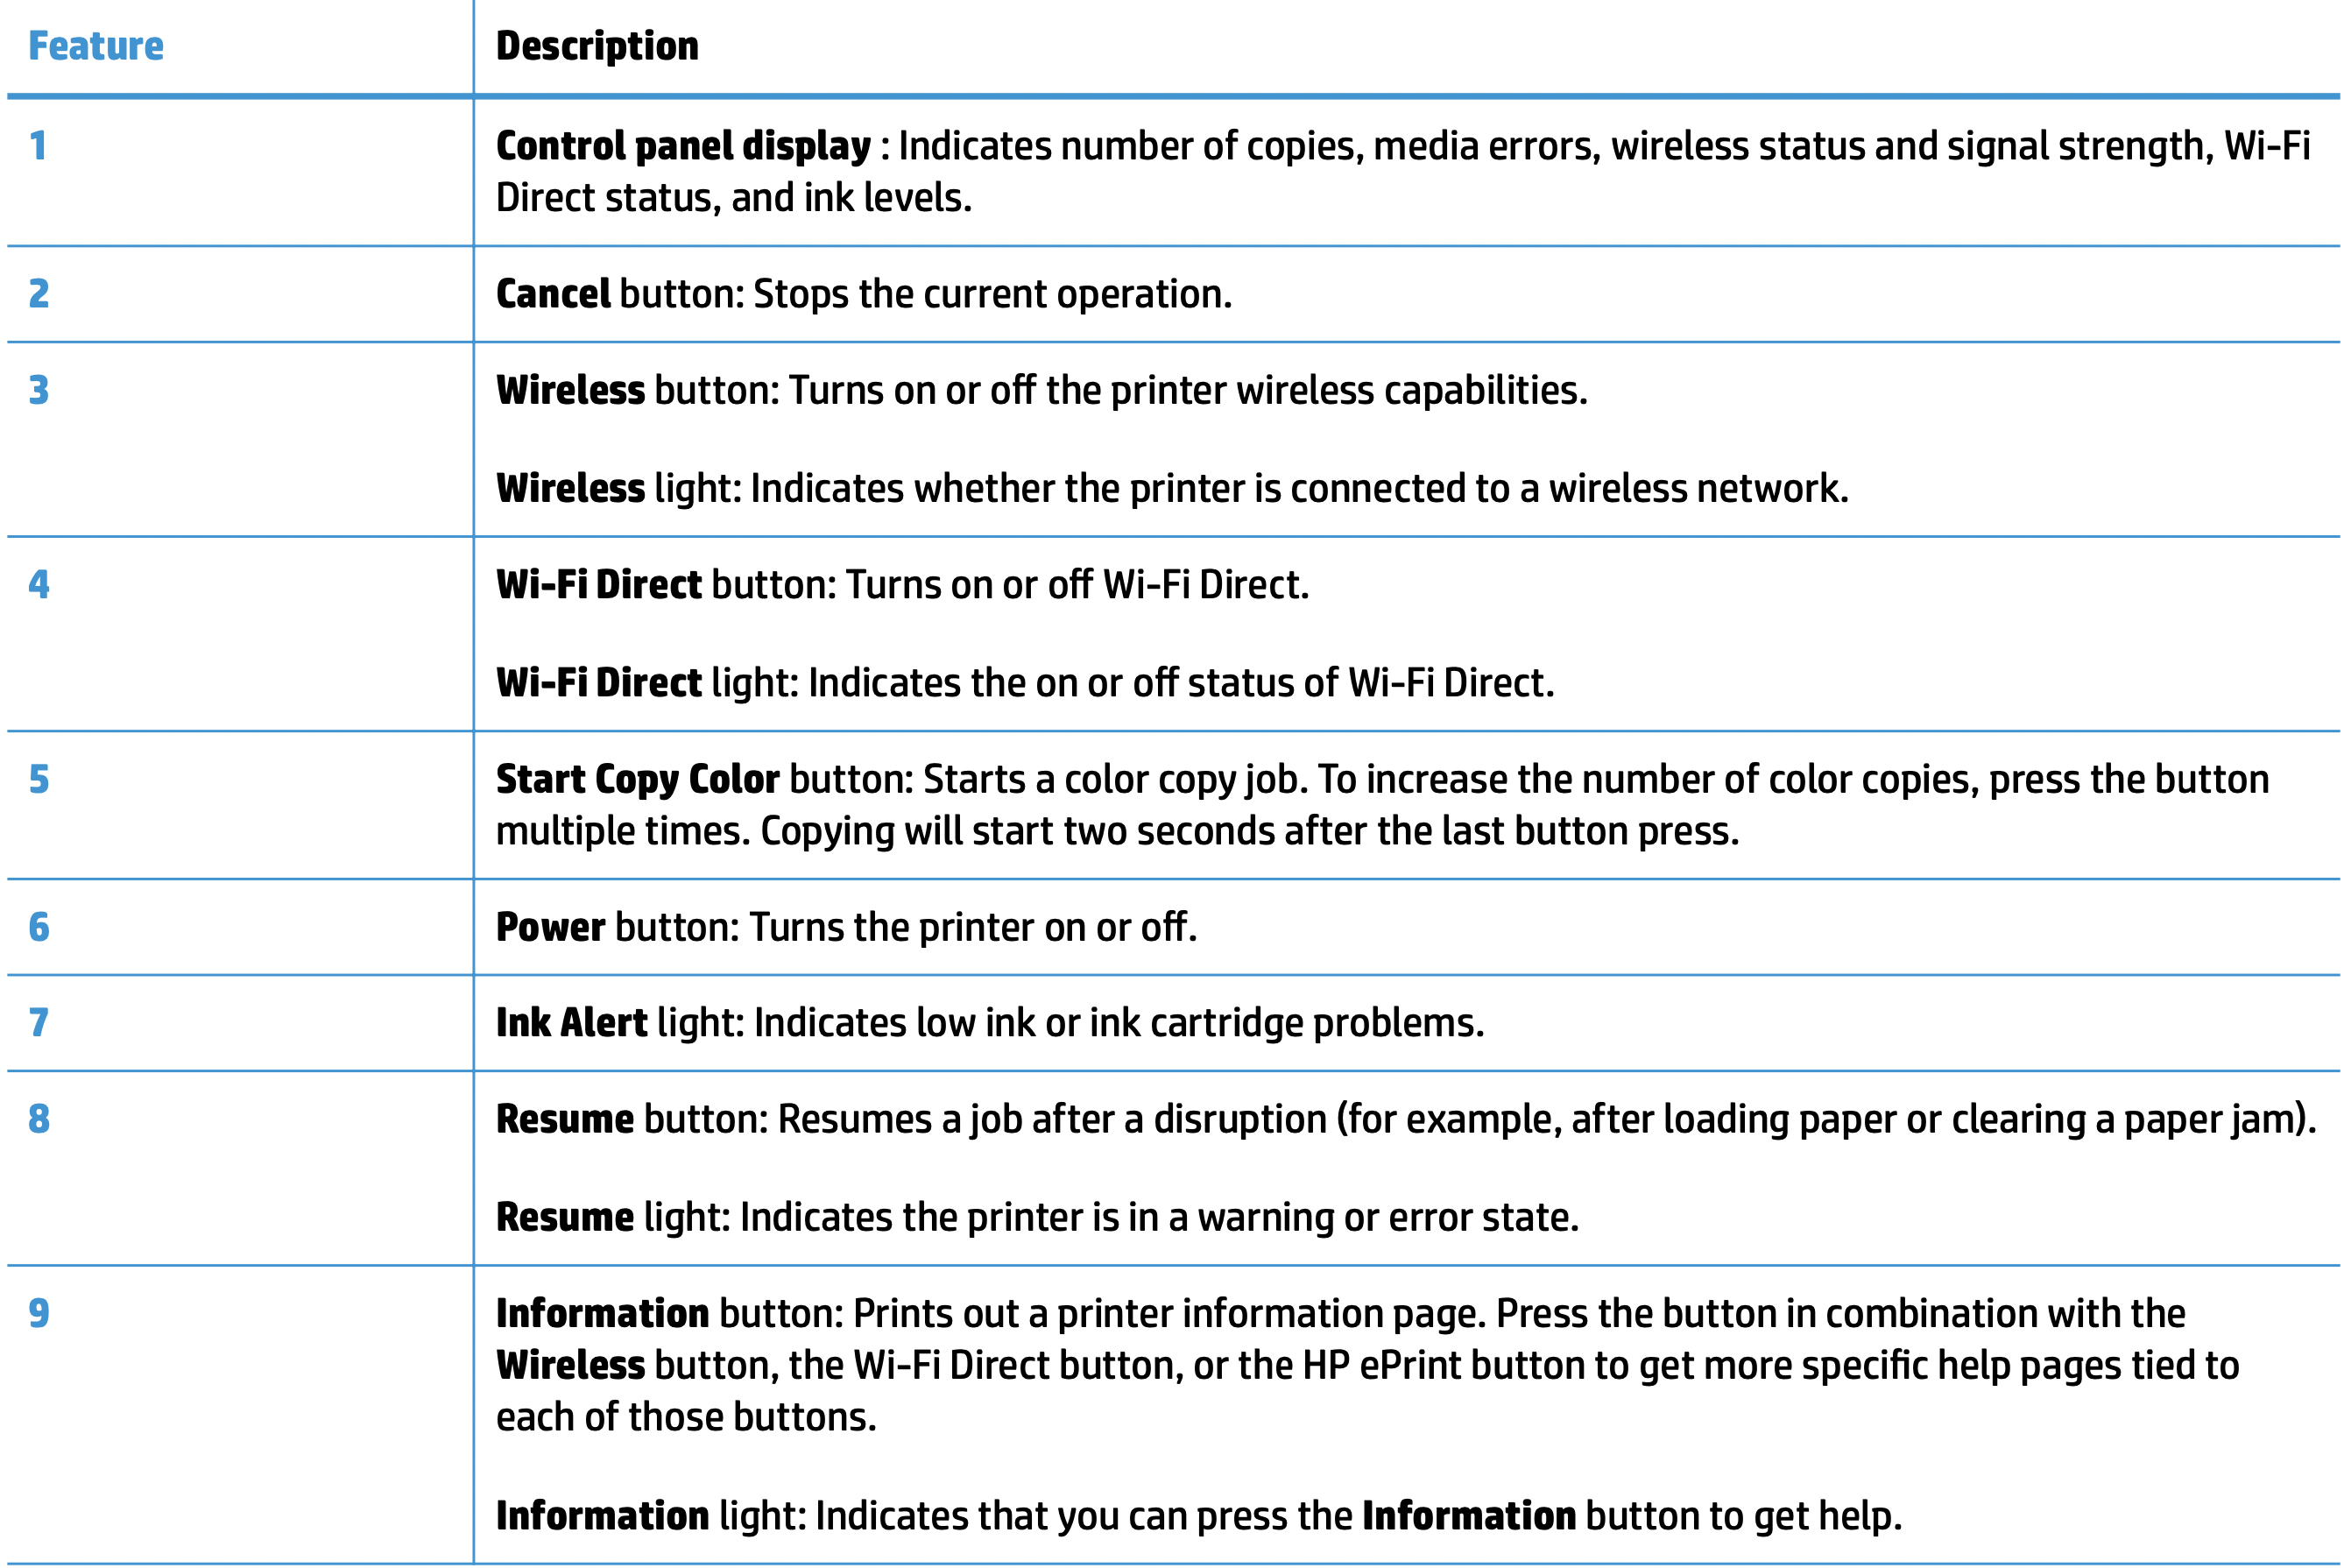
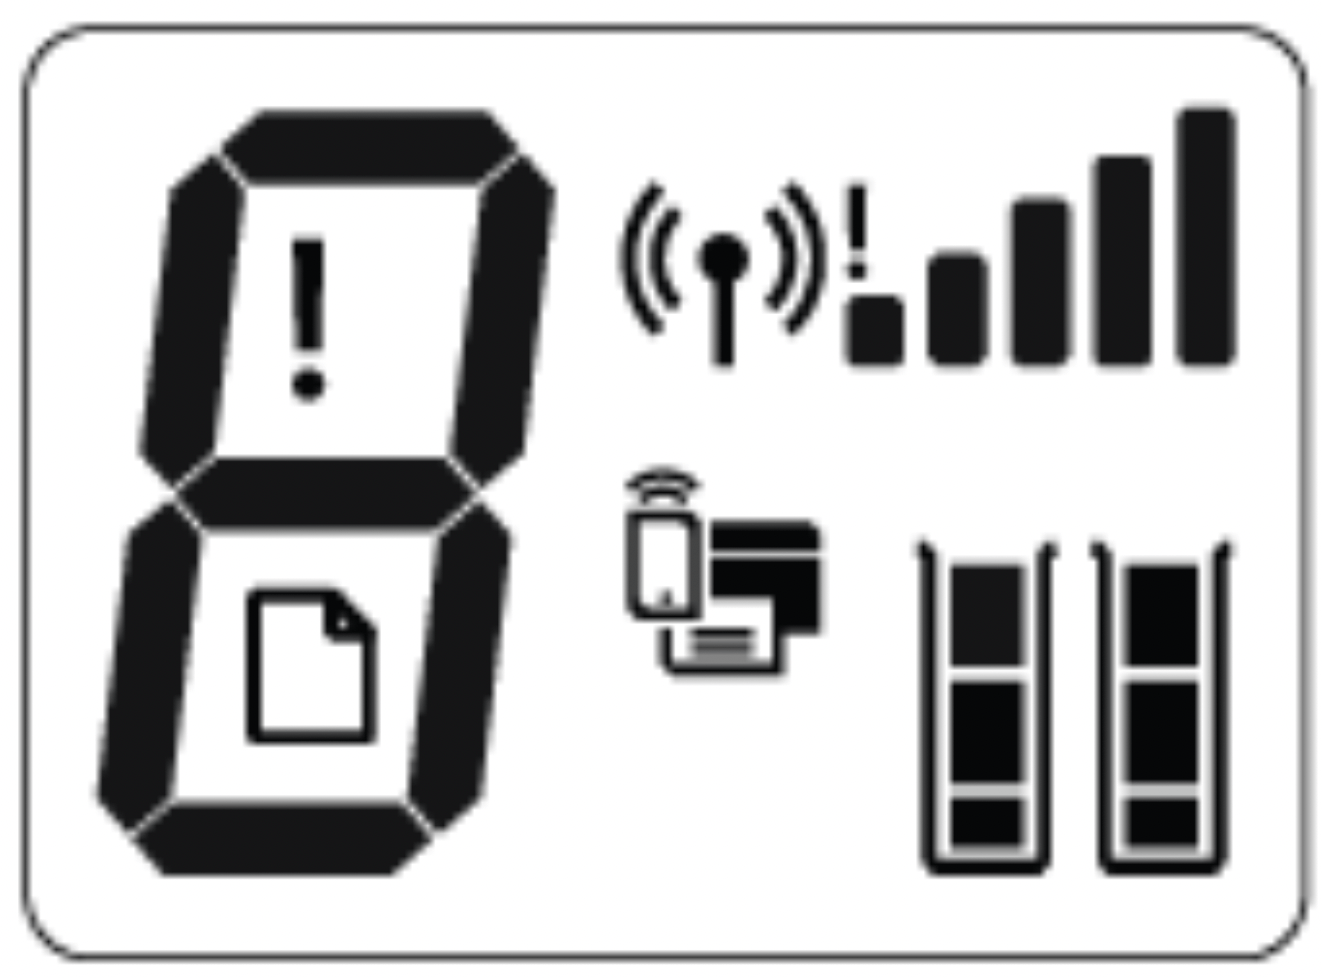
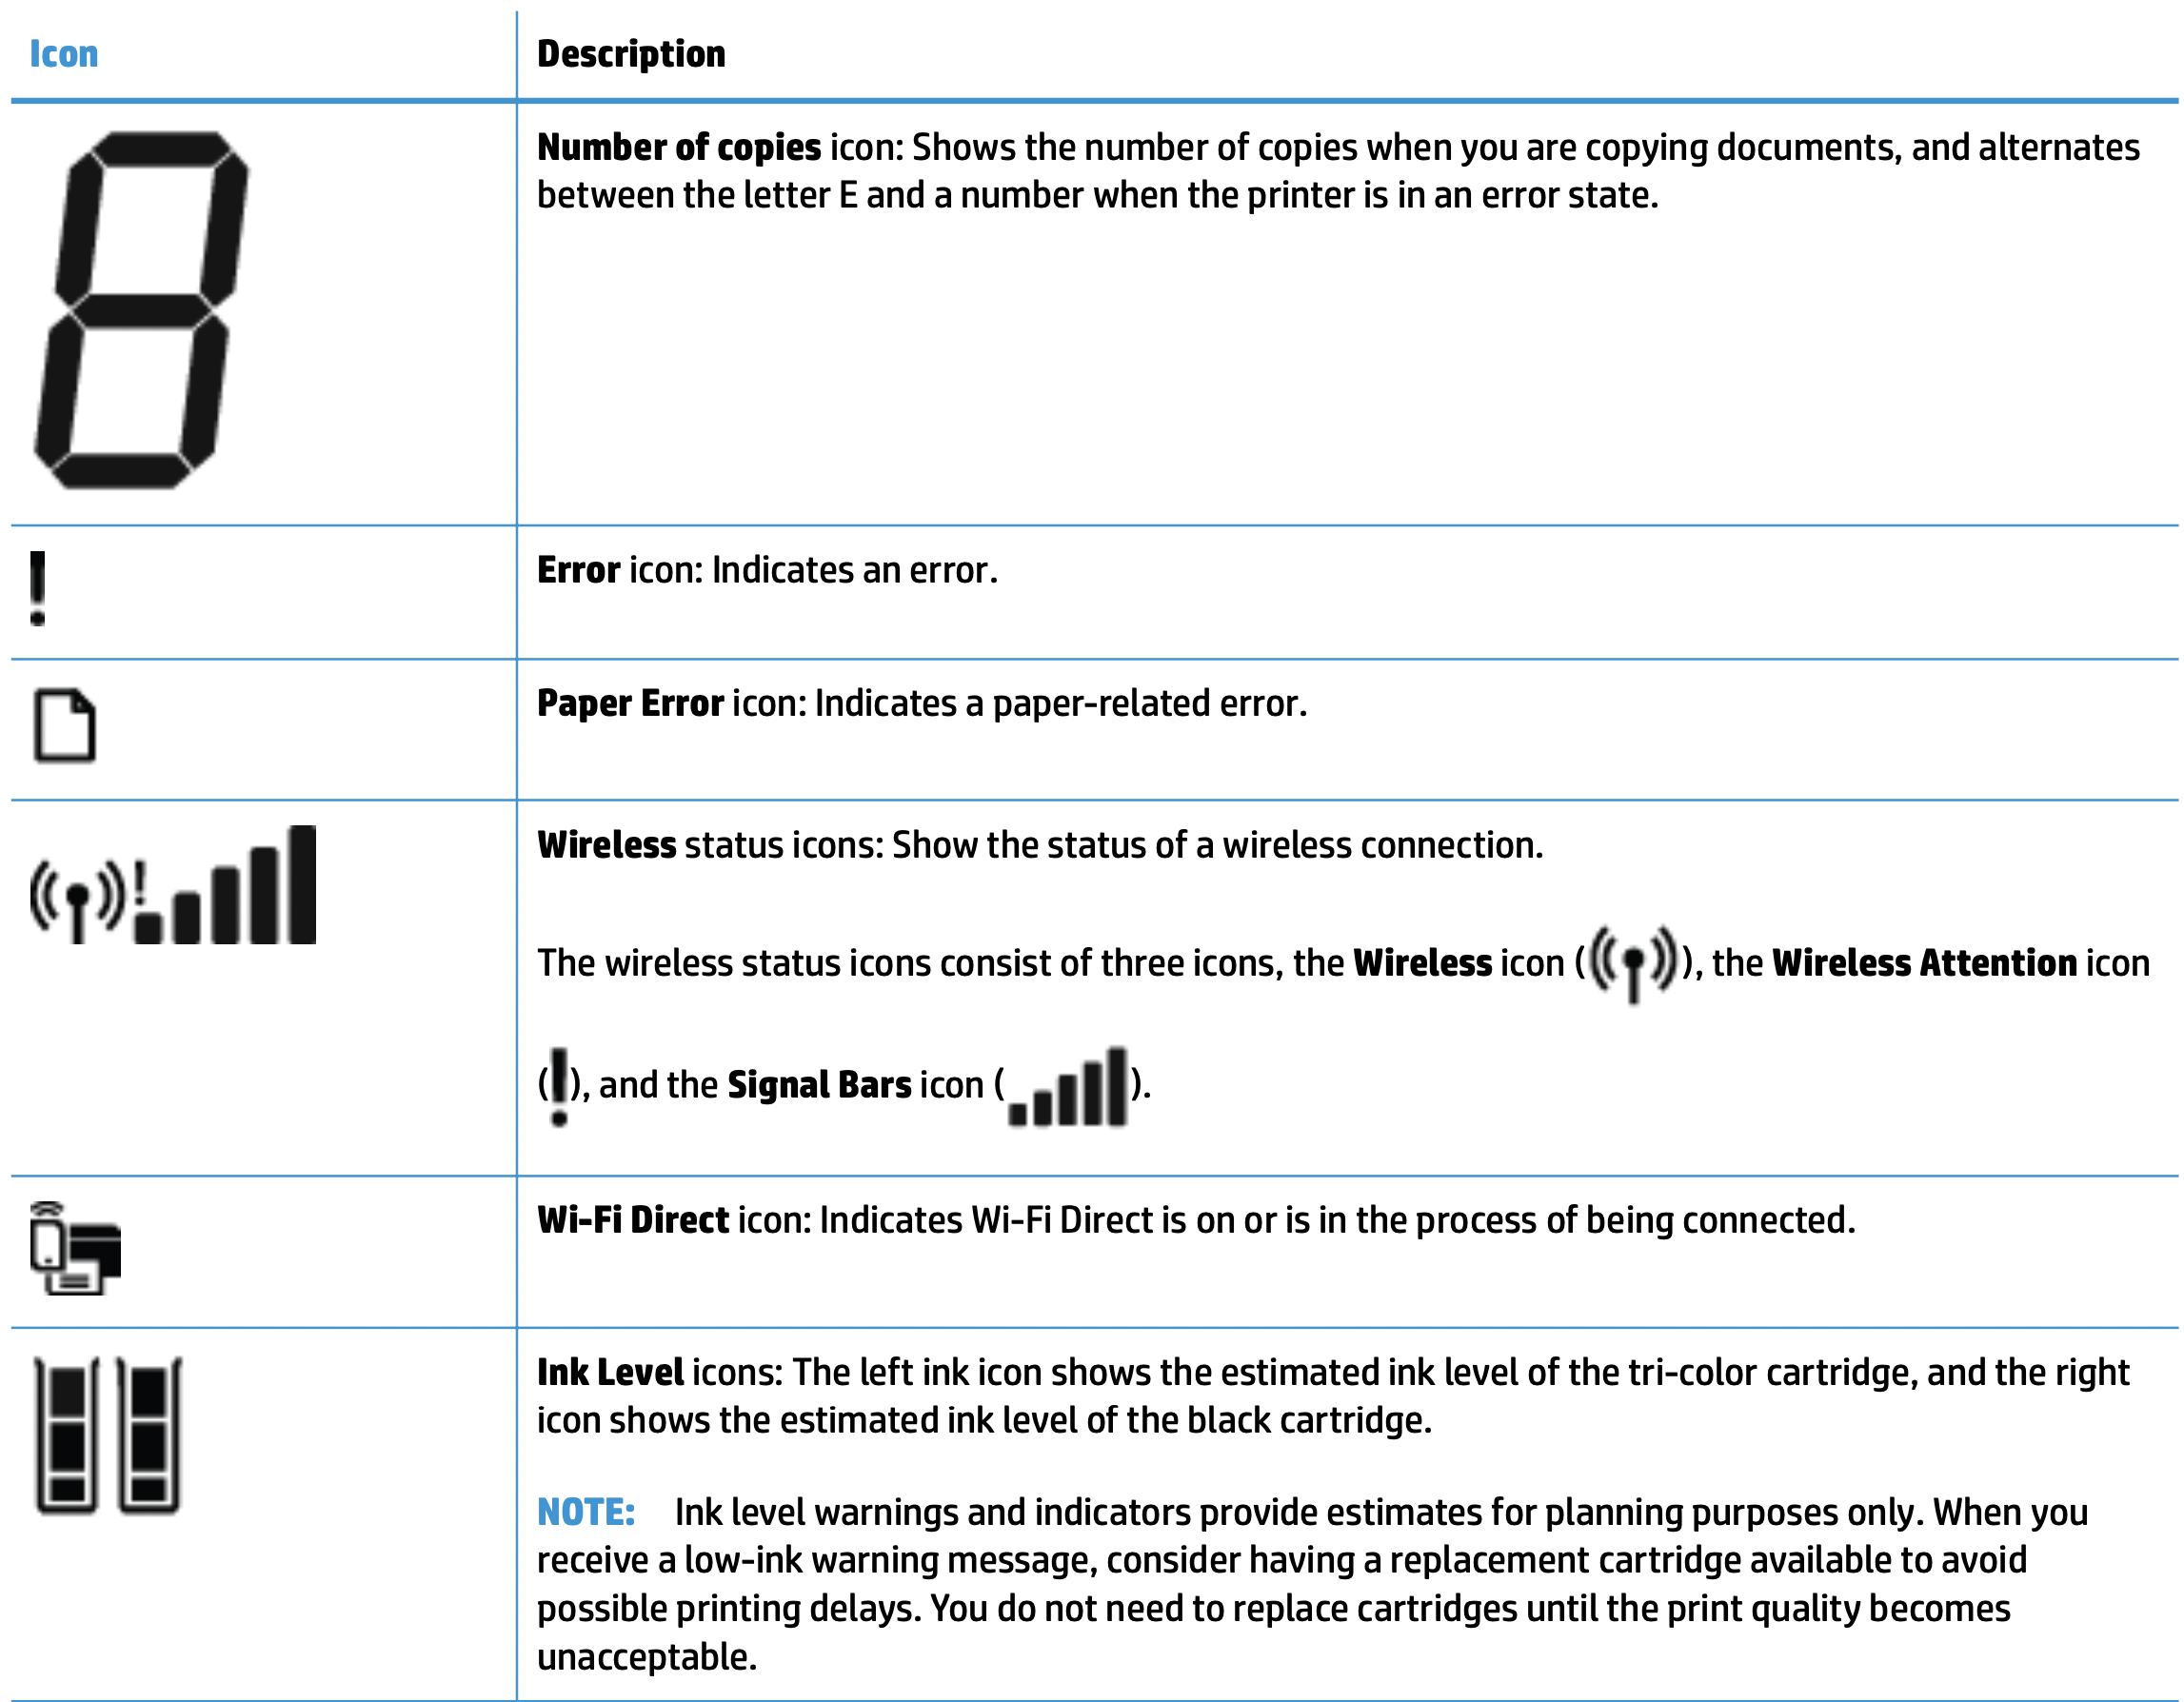
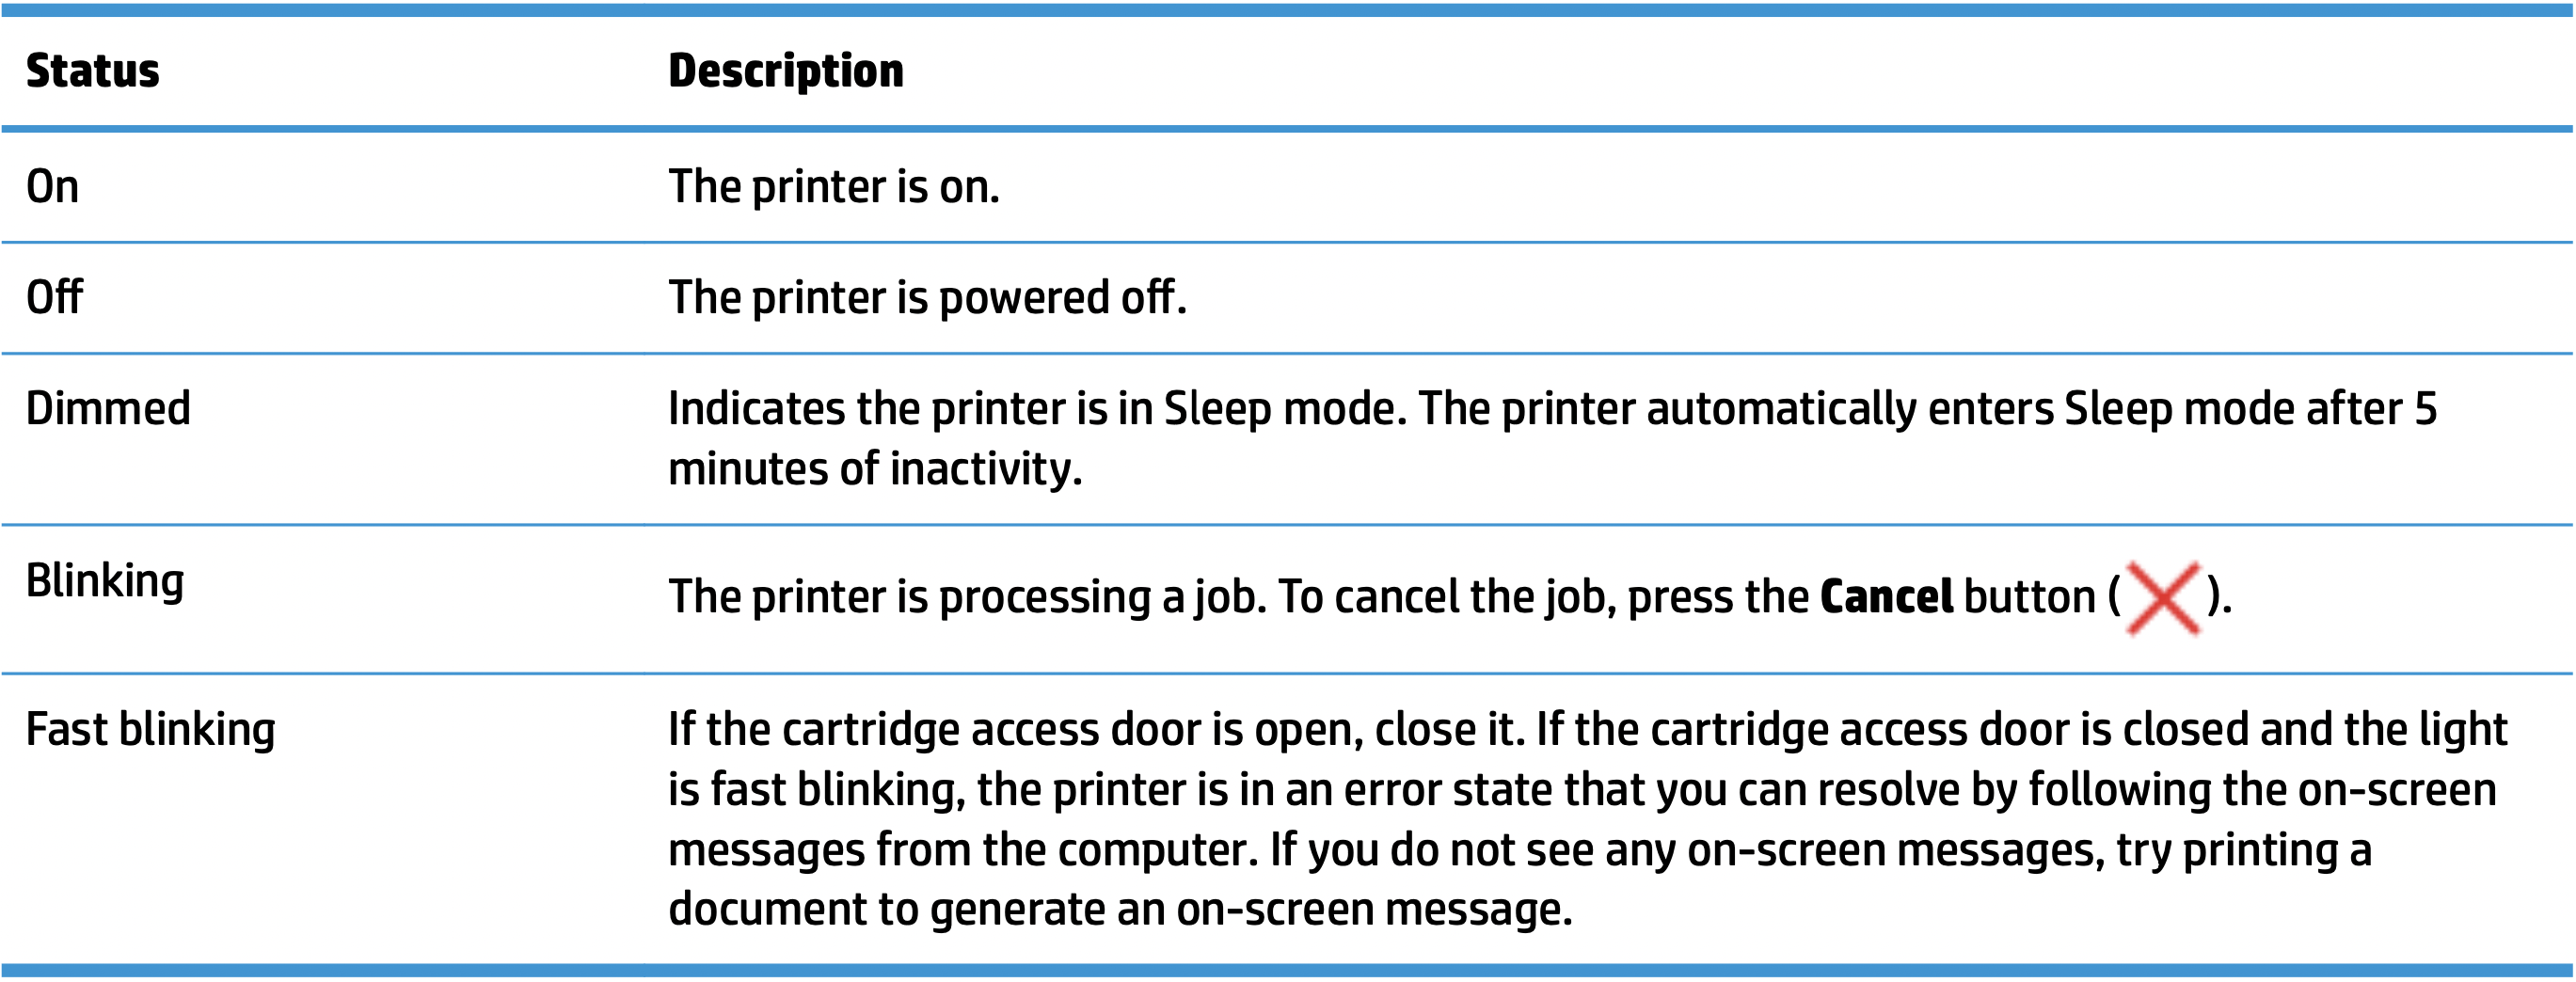
Power button light

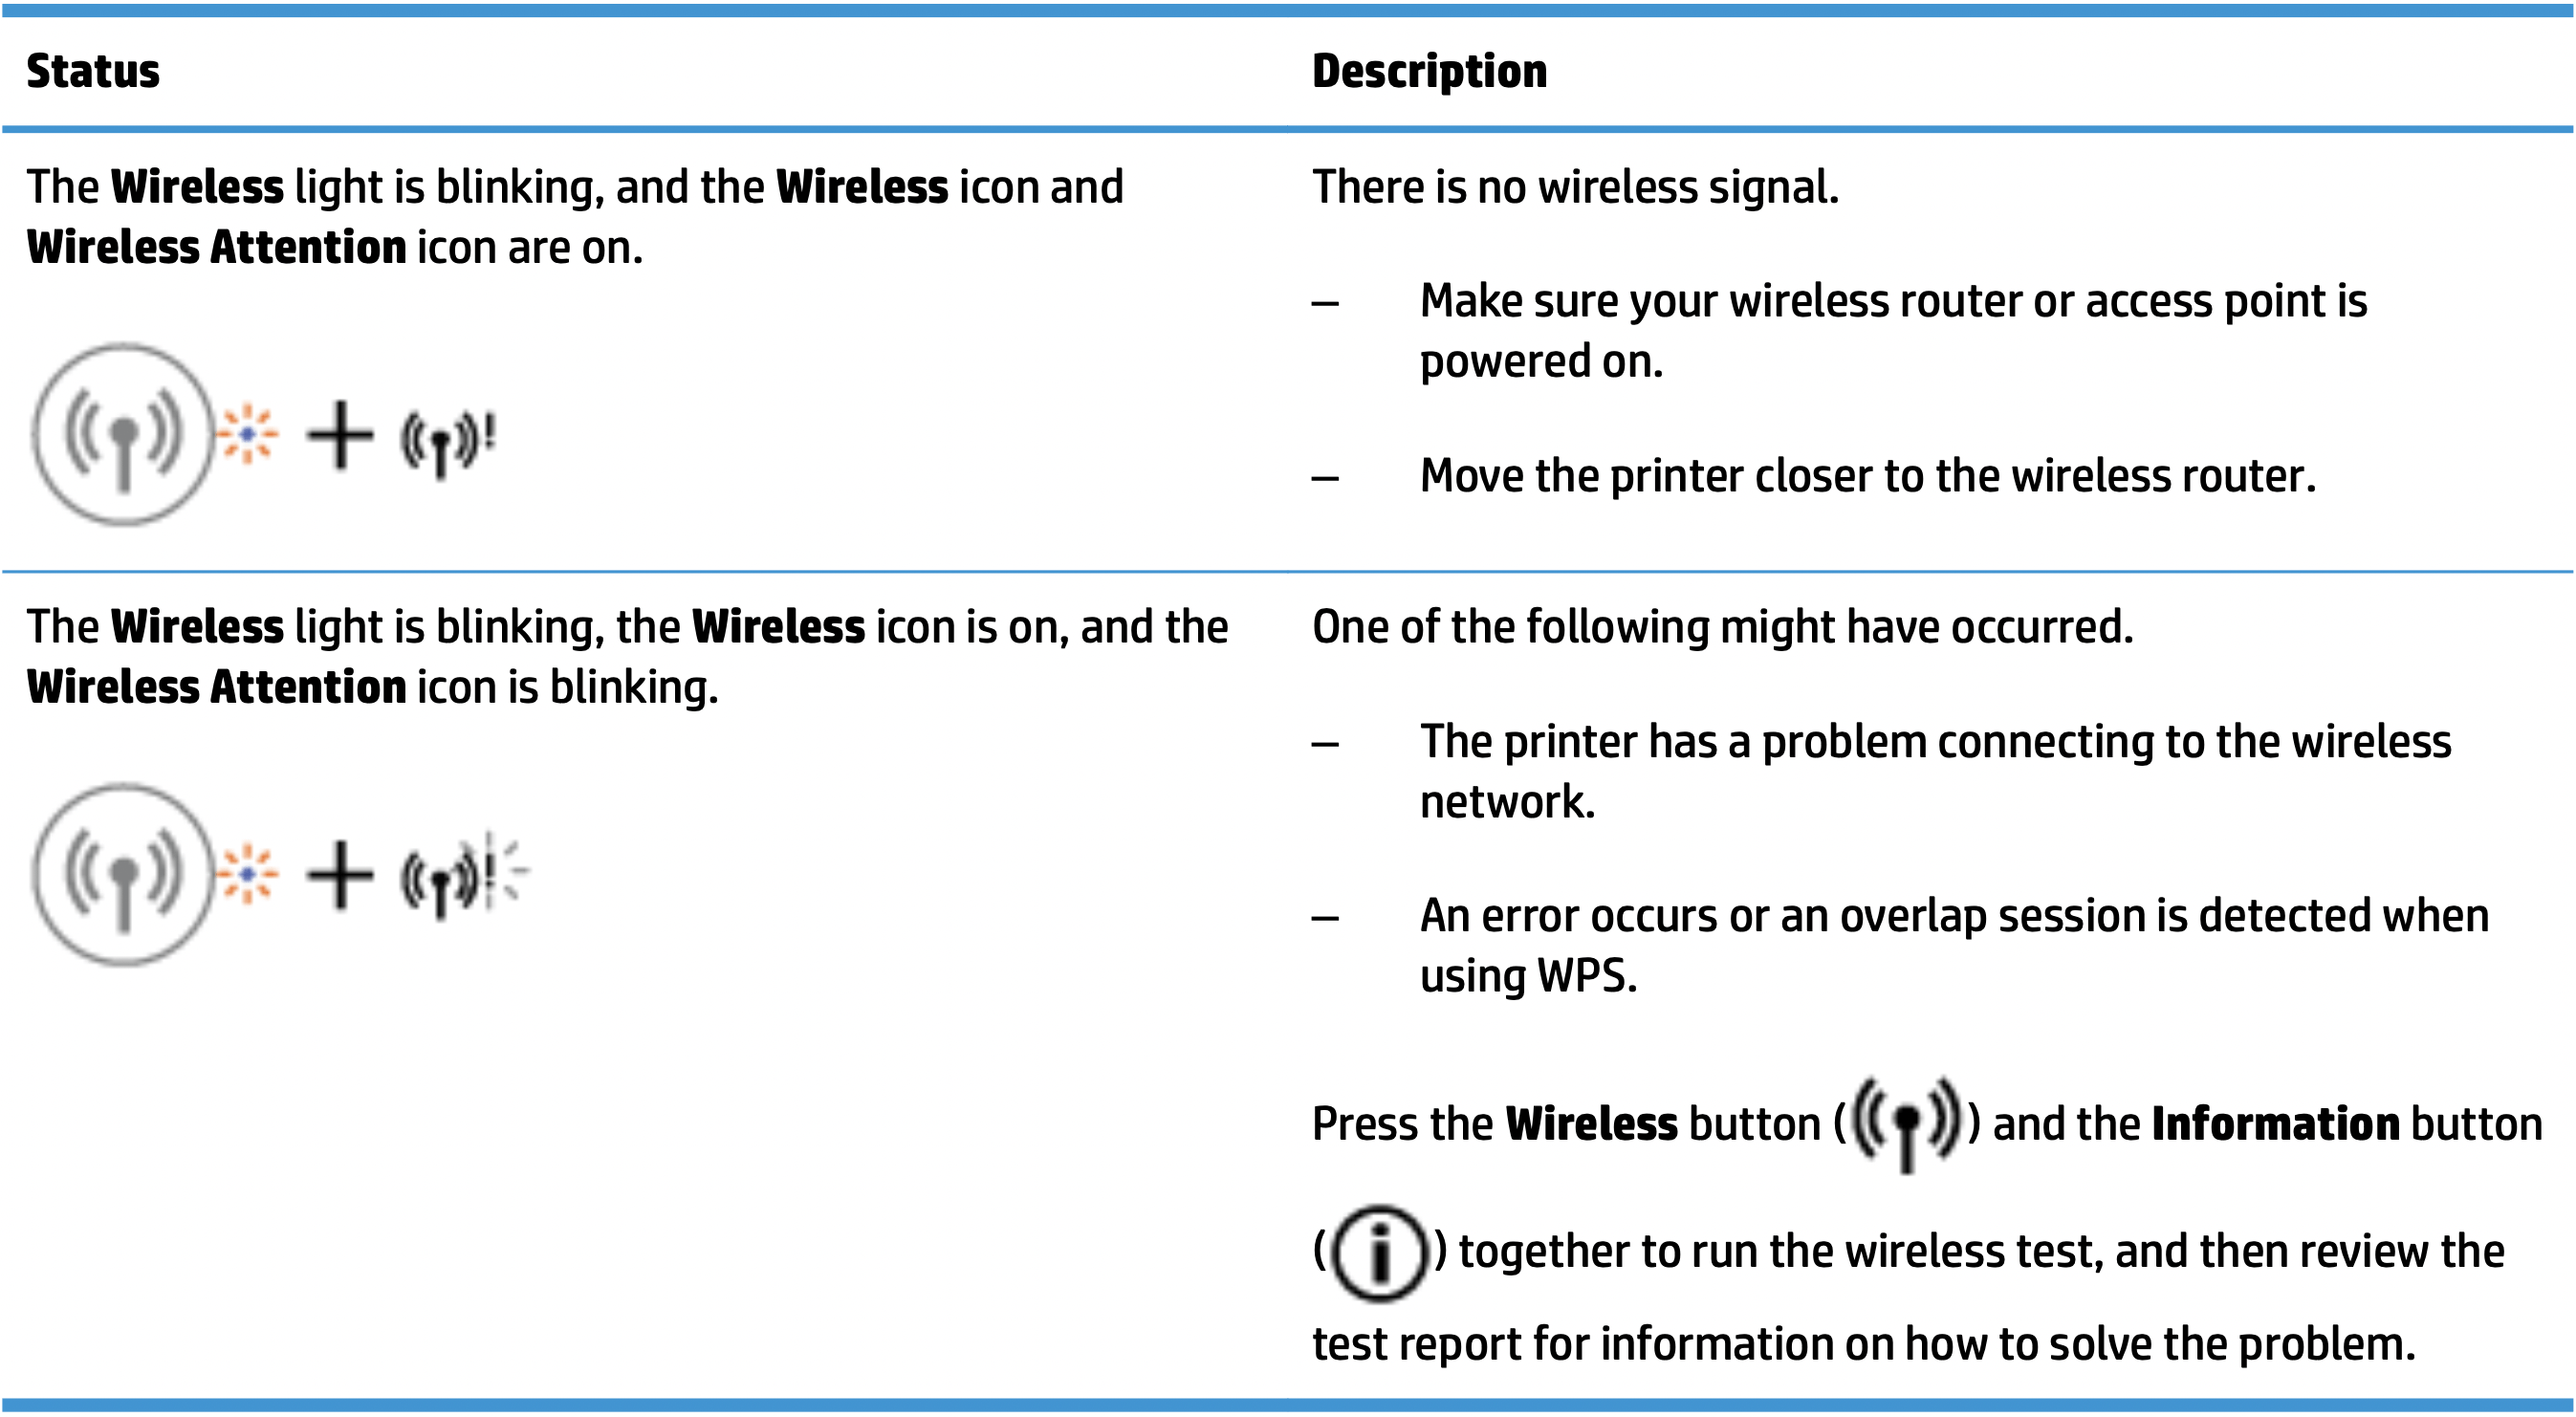
Wireless light and icons
 ) and the wireless status icons on the control panel display work together to indicate the status of a wireless connection.
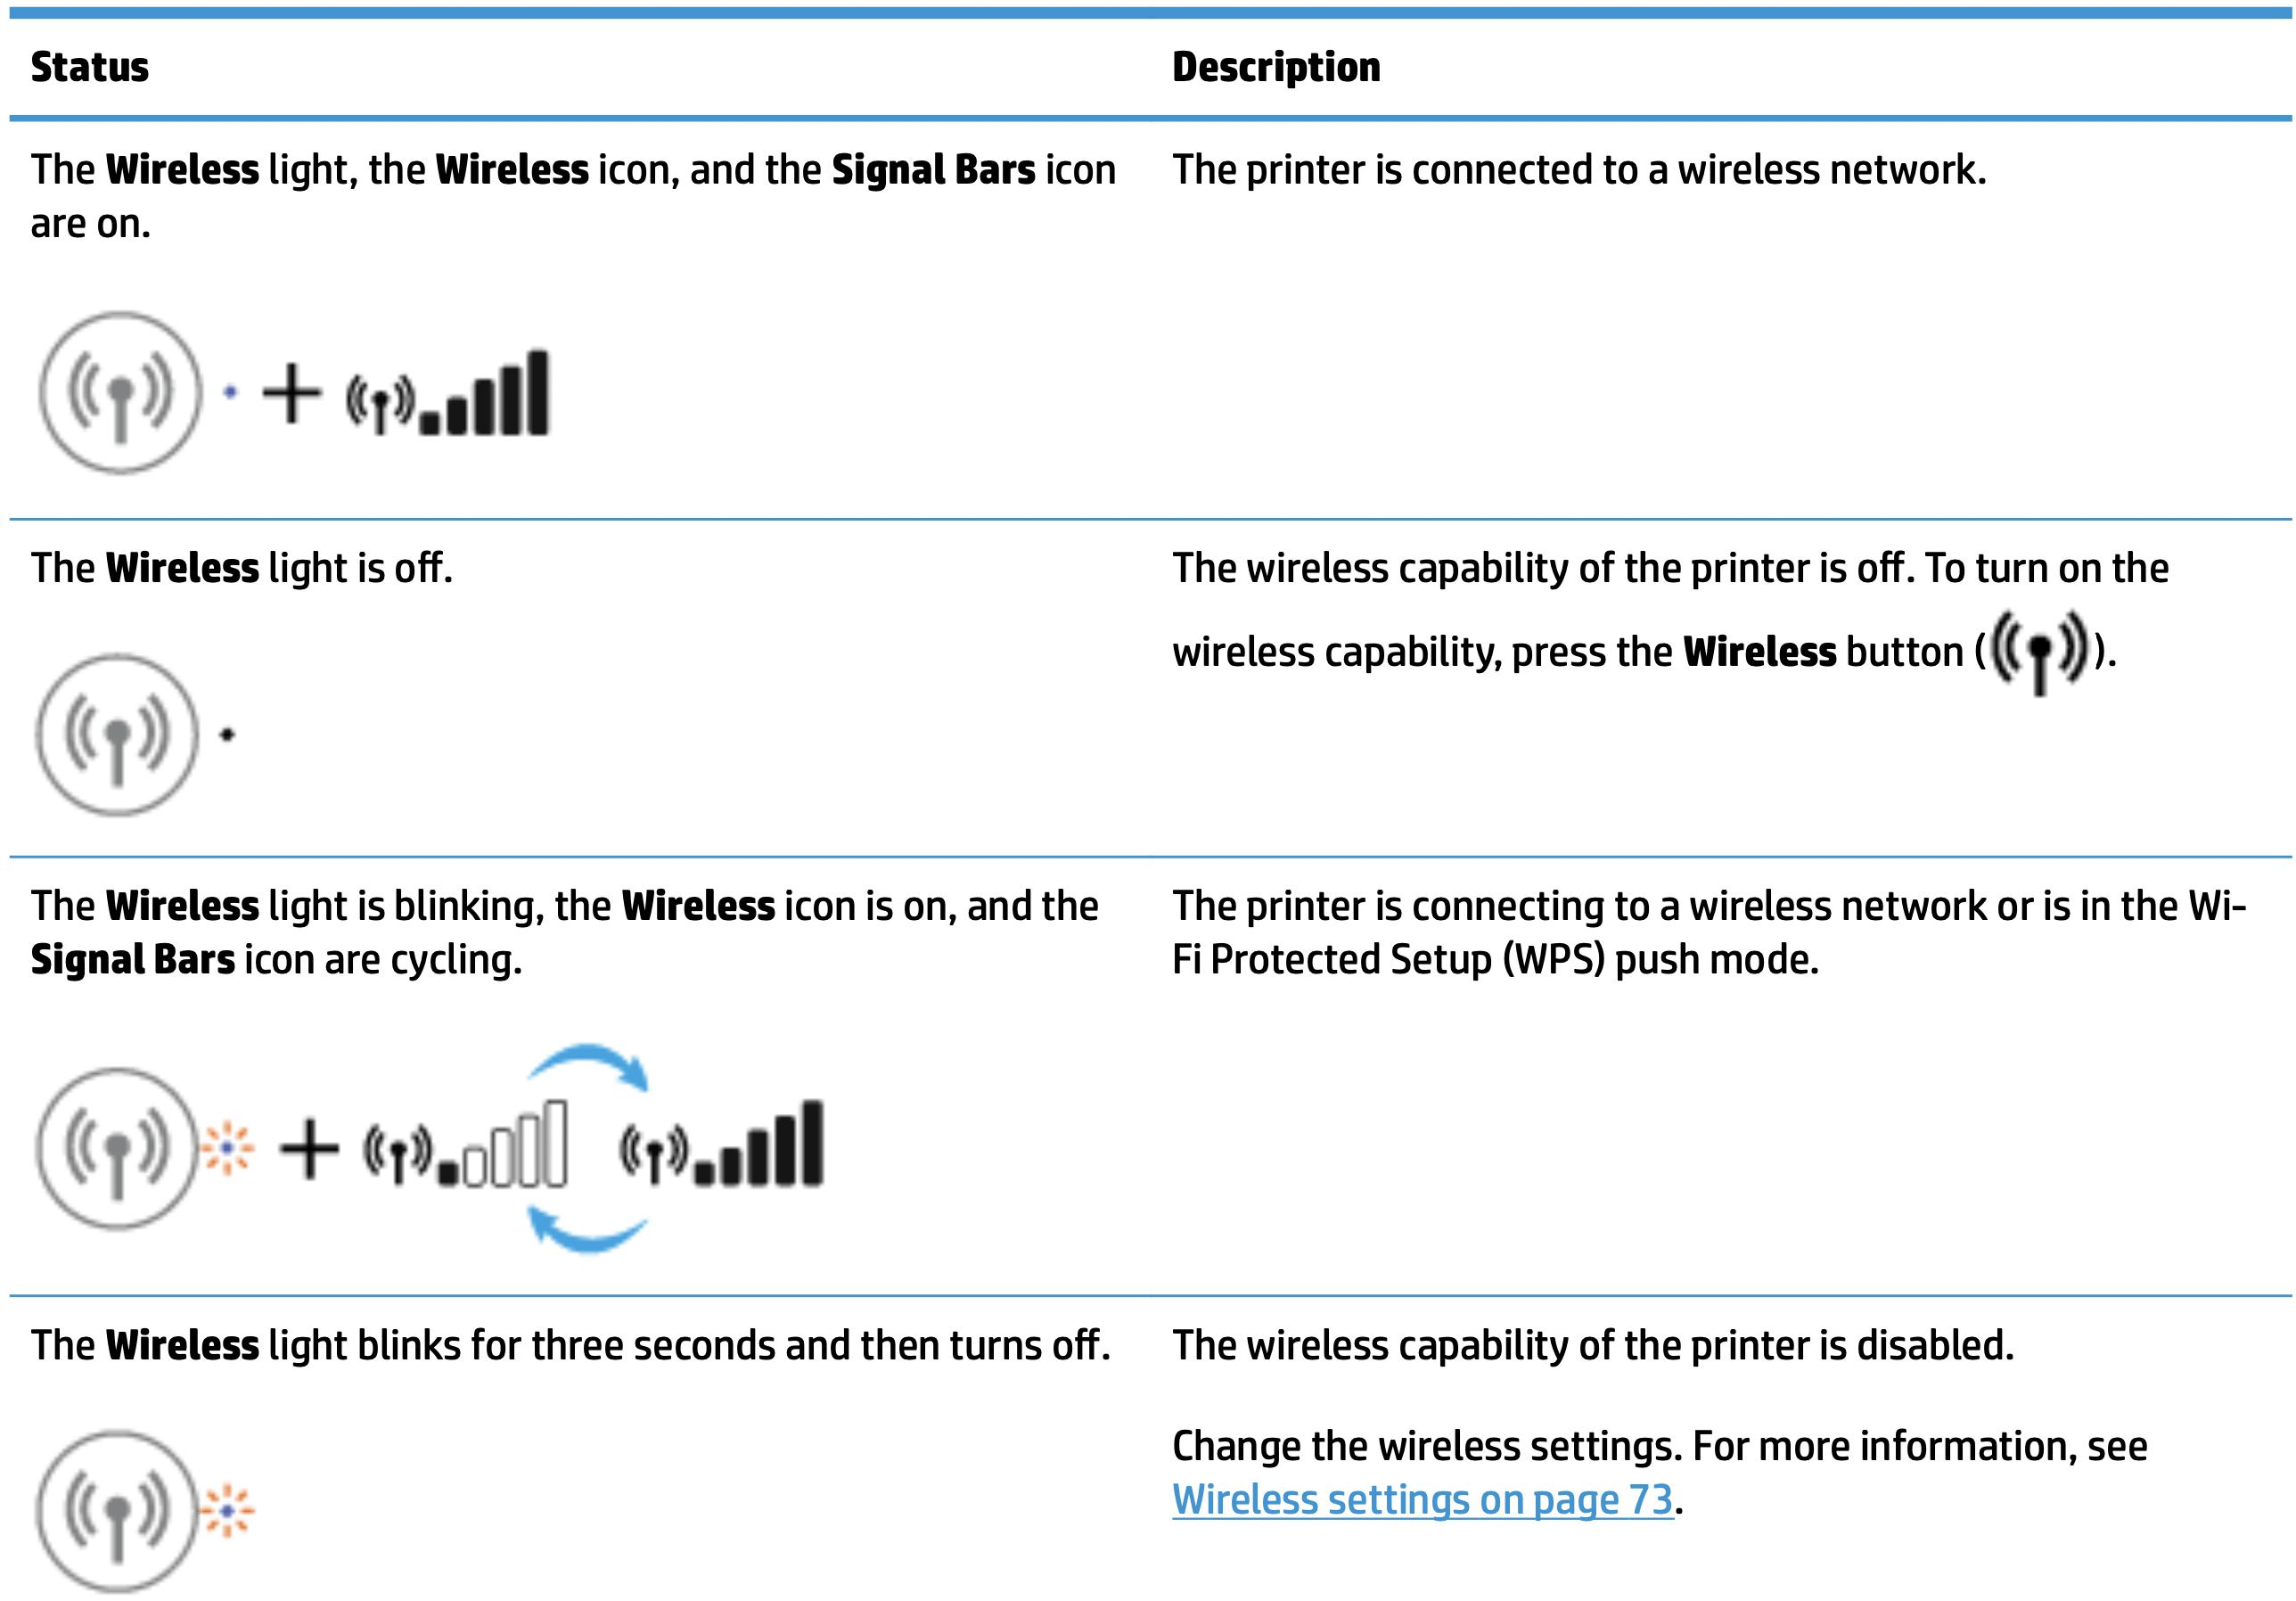
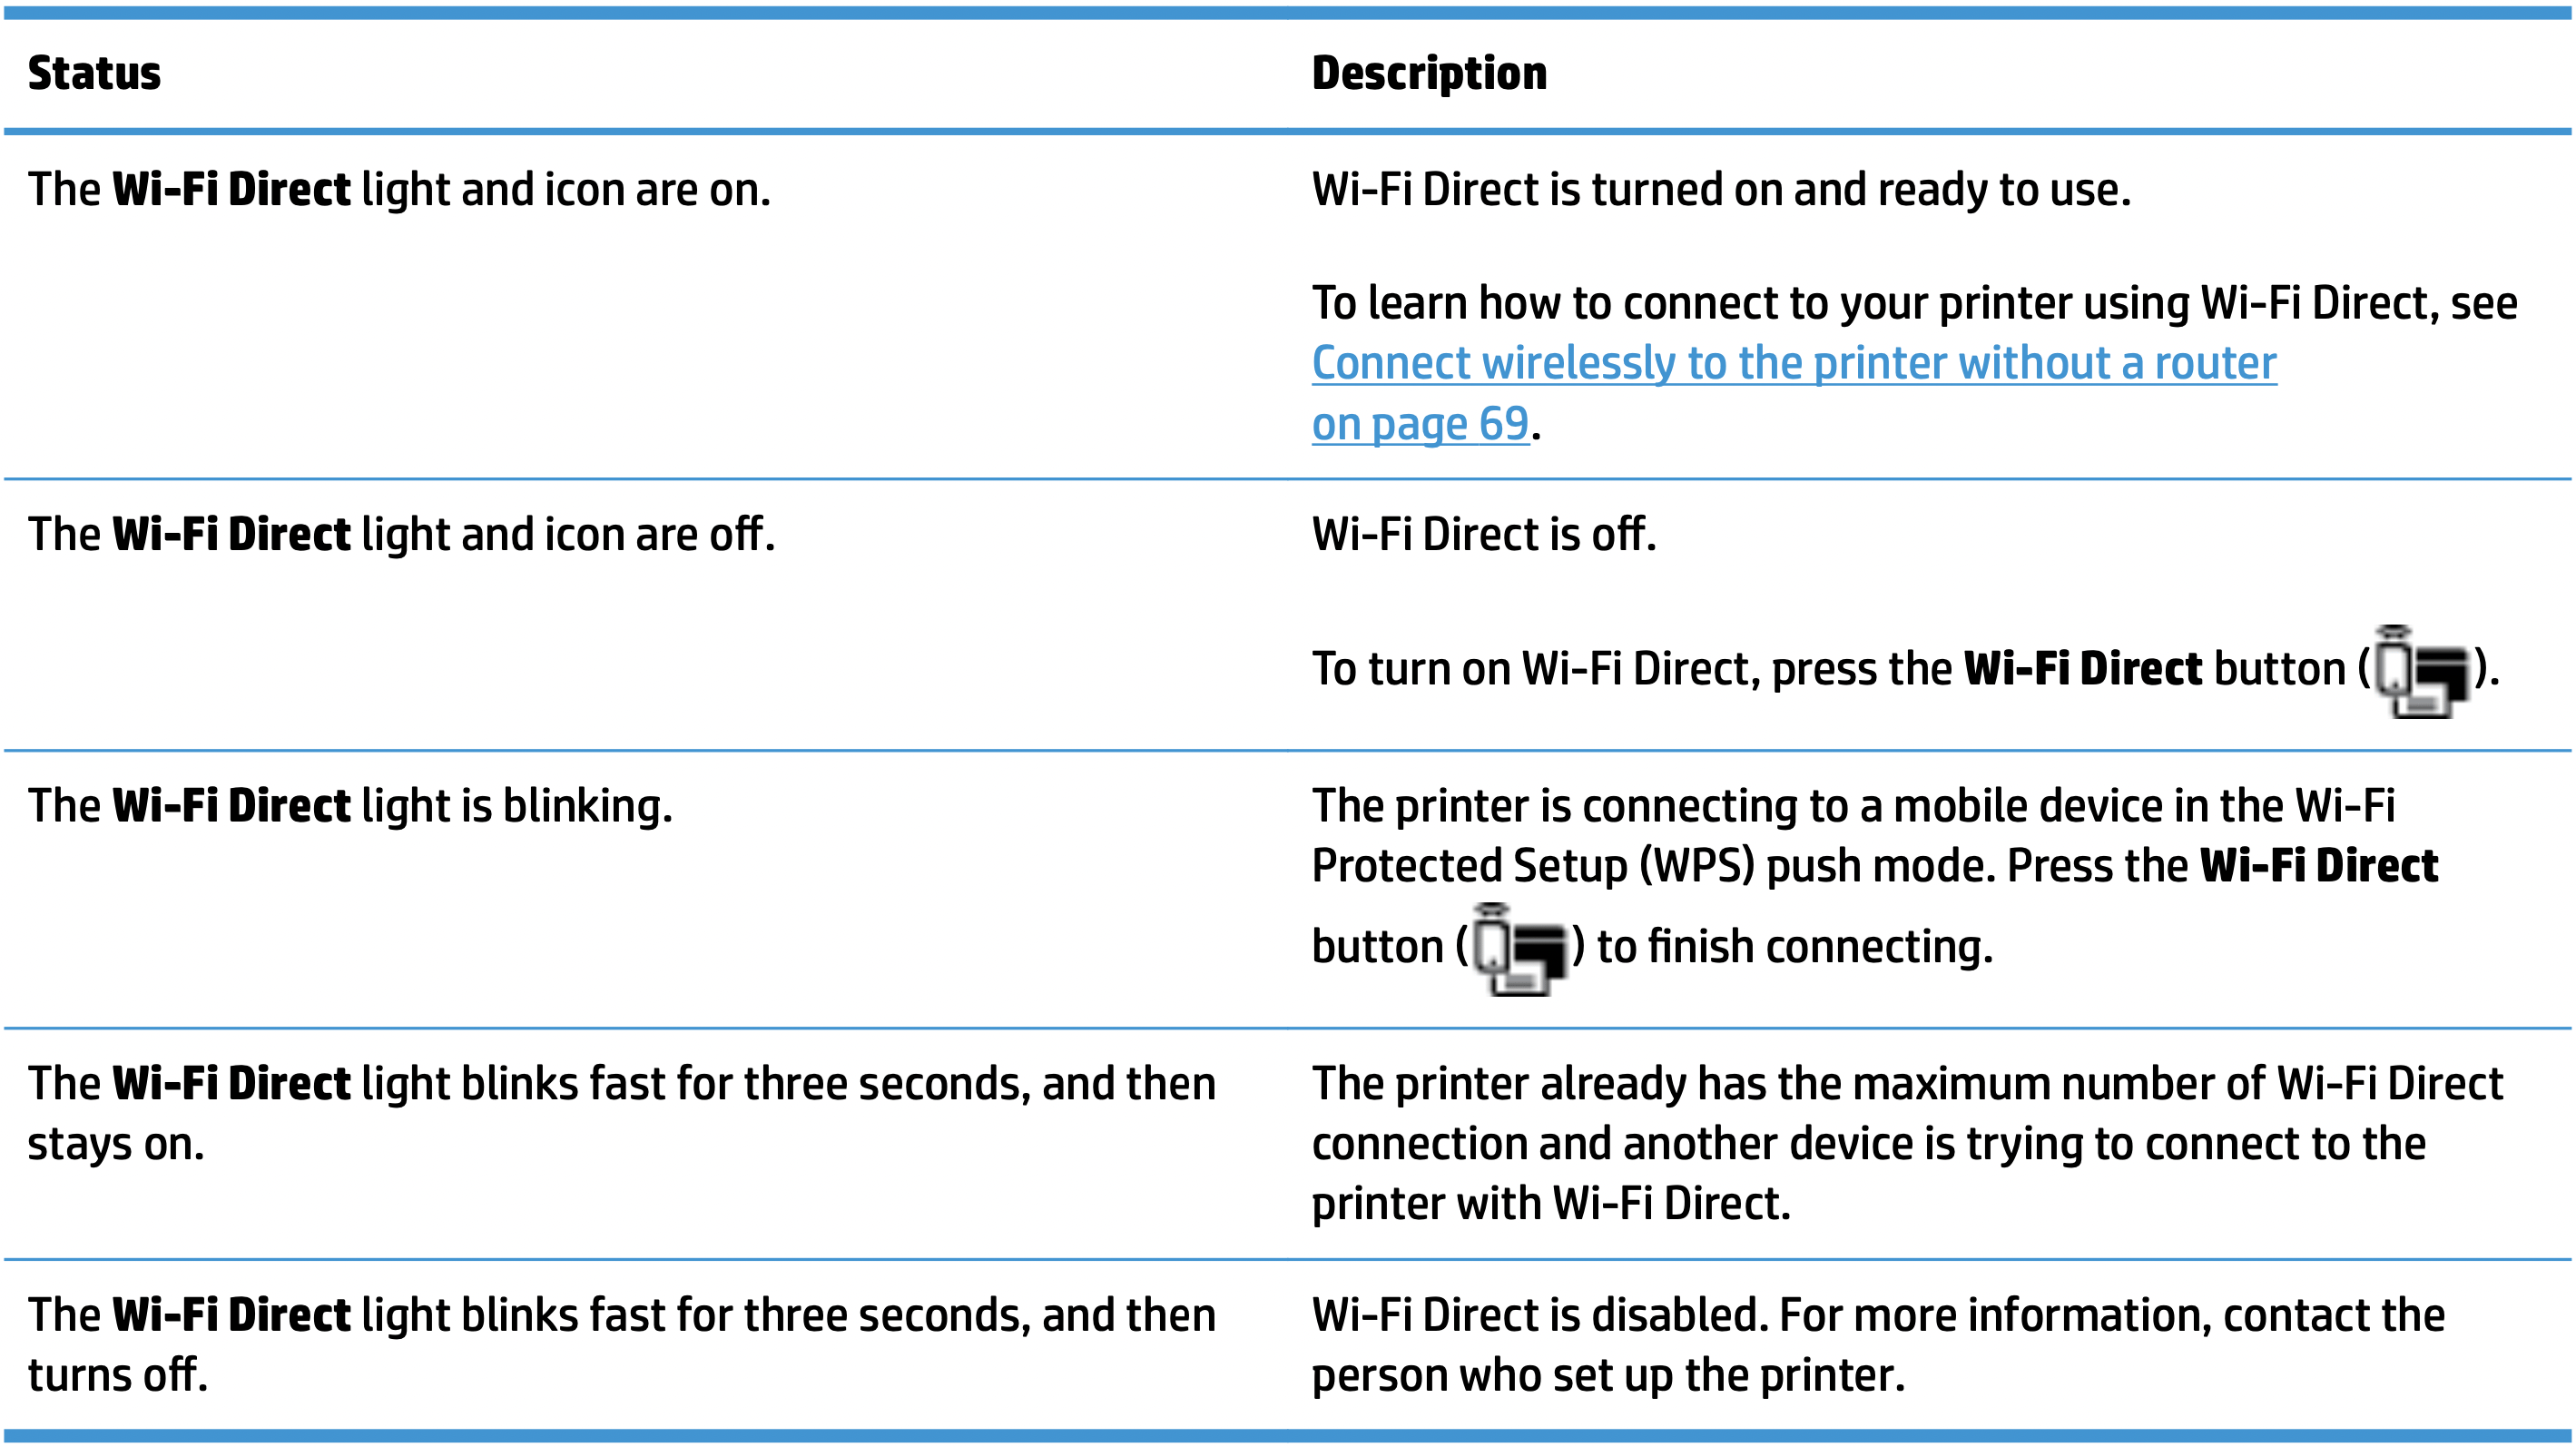
Wi-Fi Direct light and icon
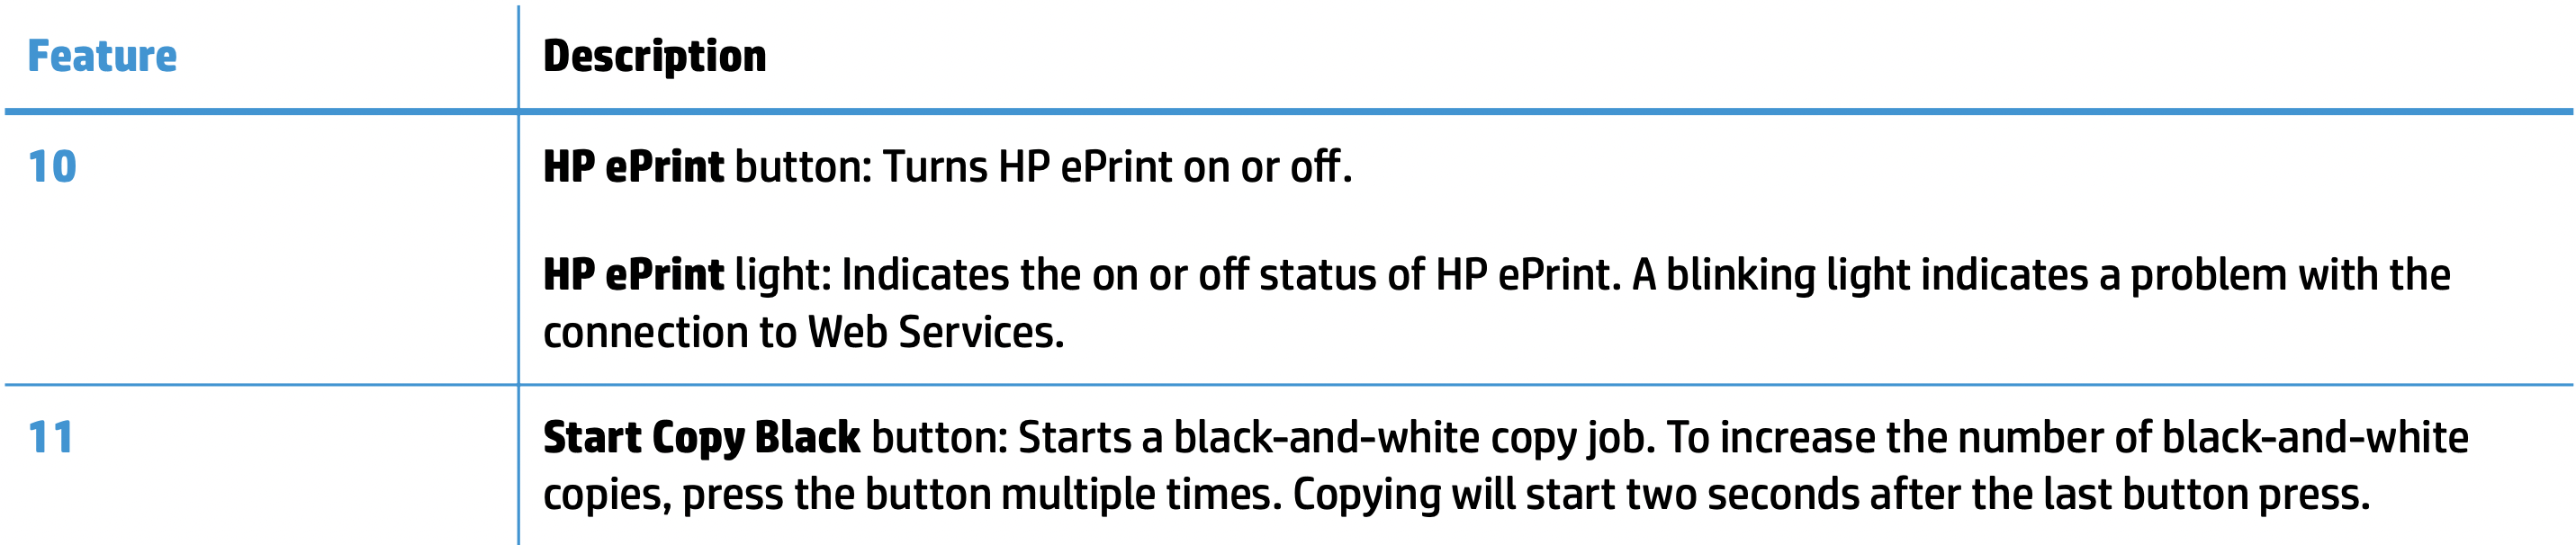
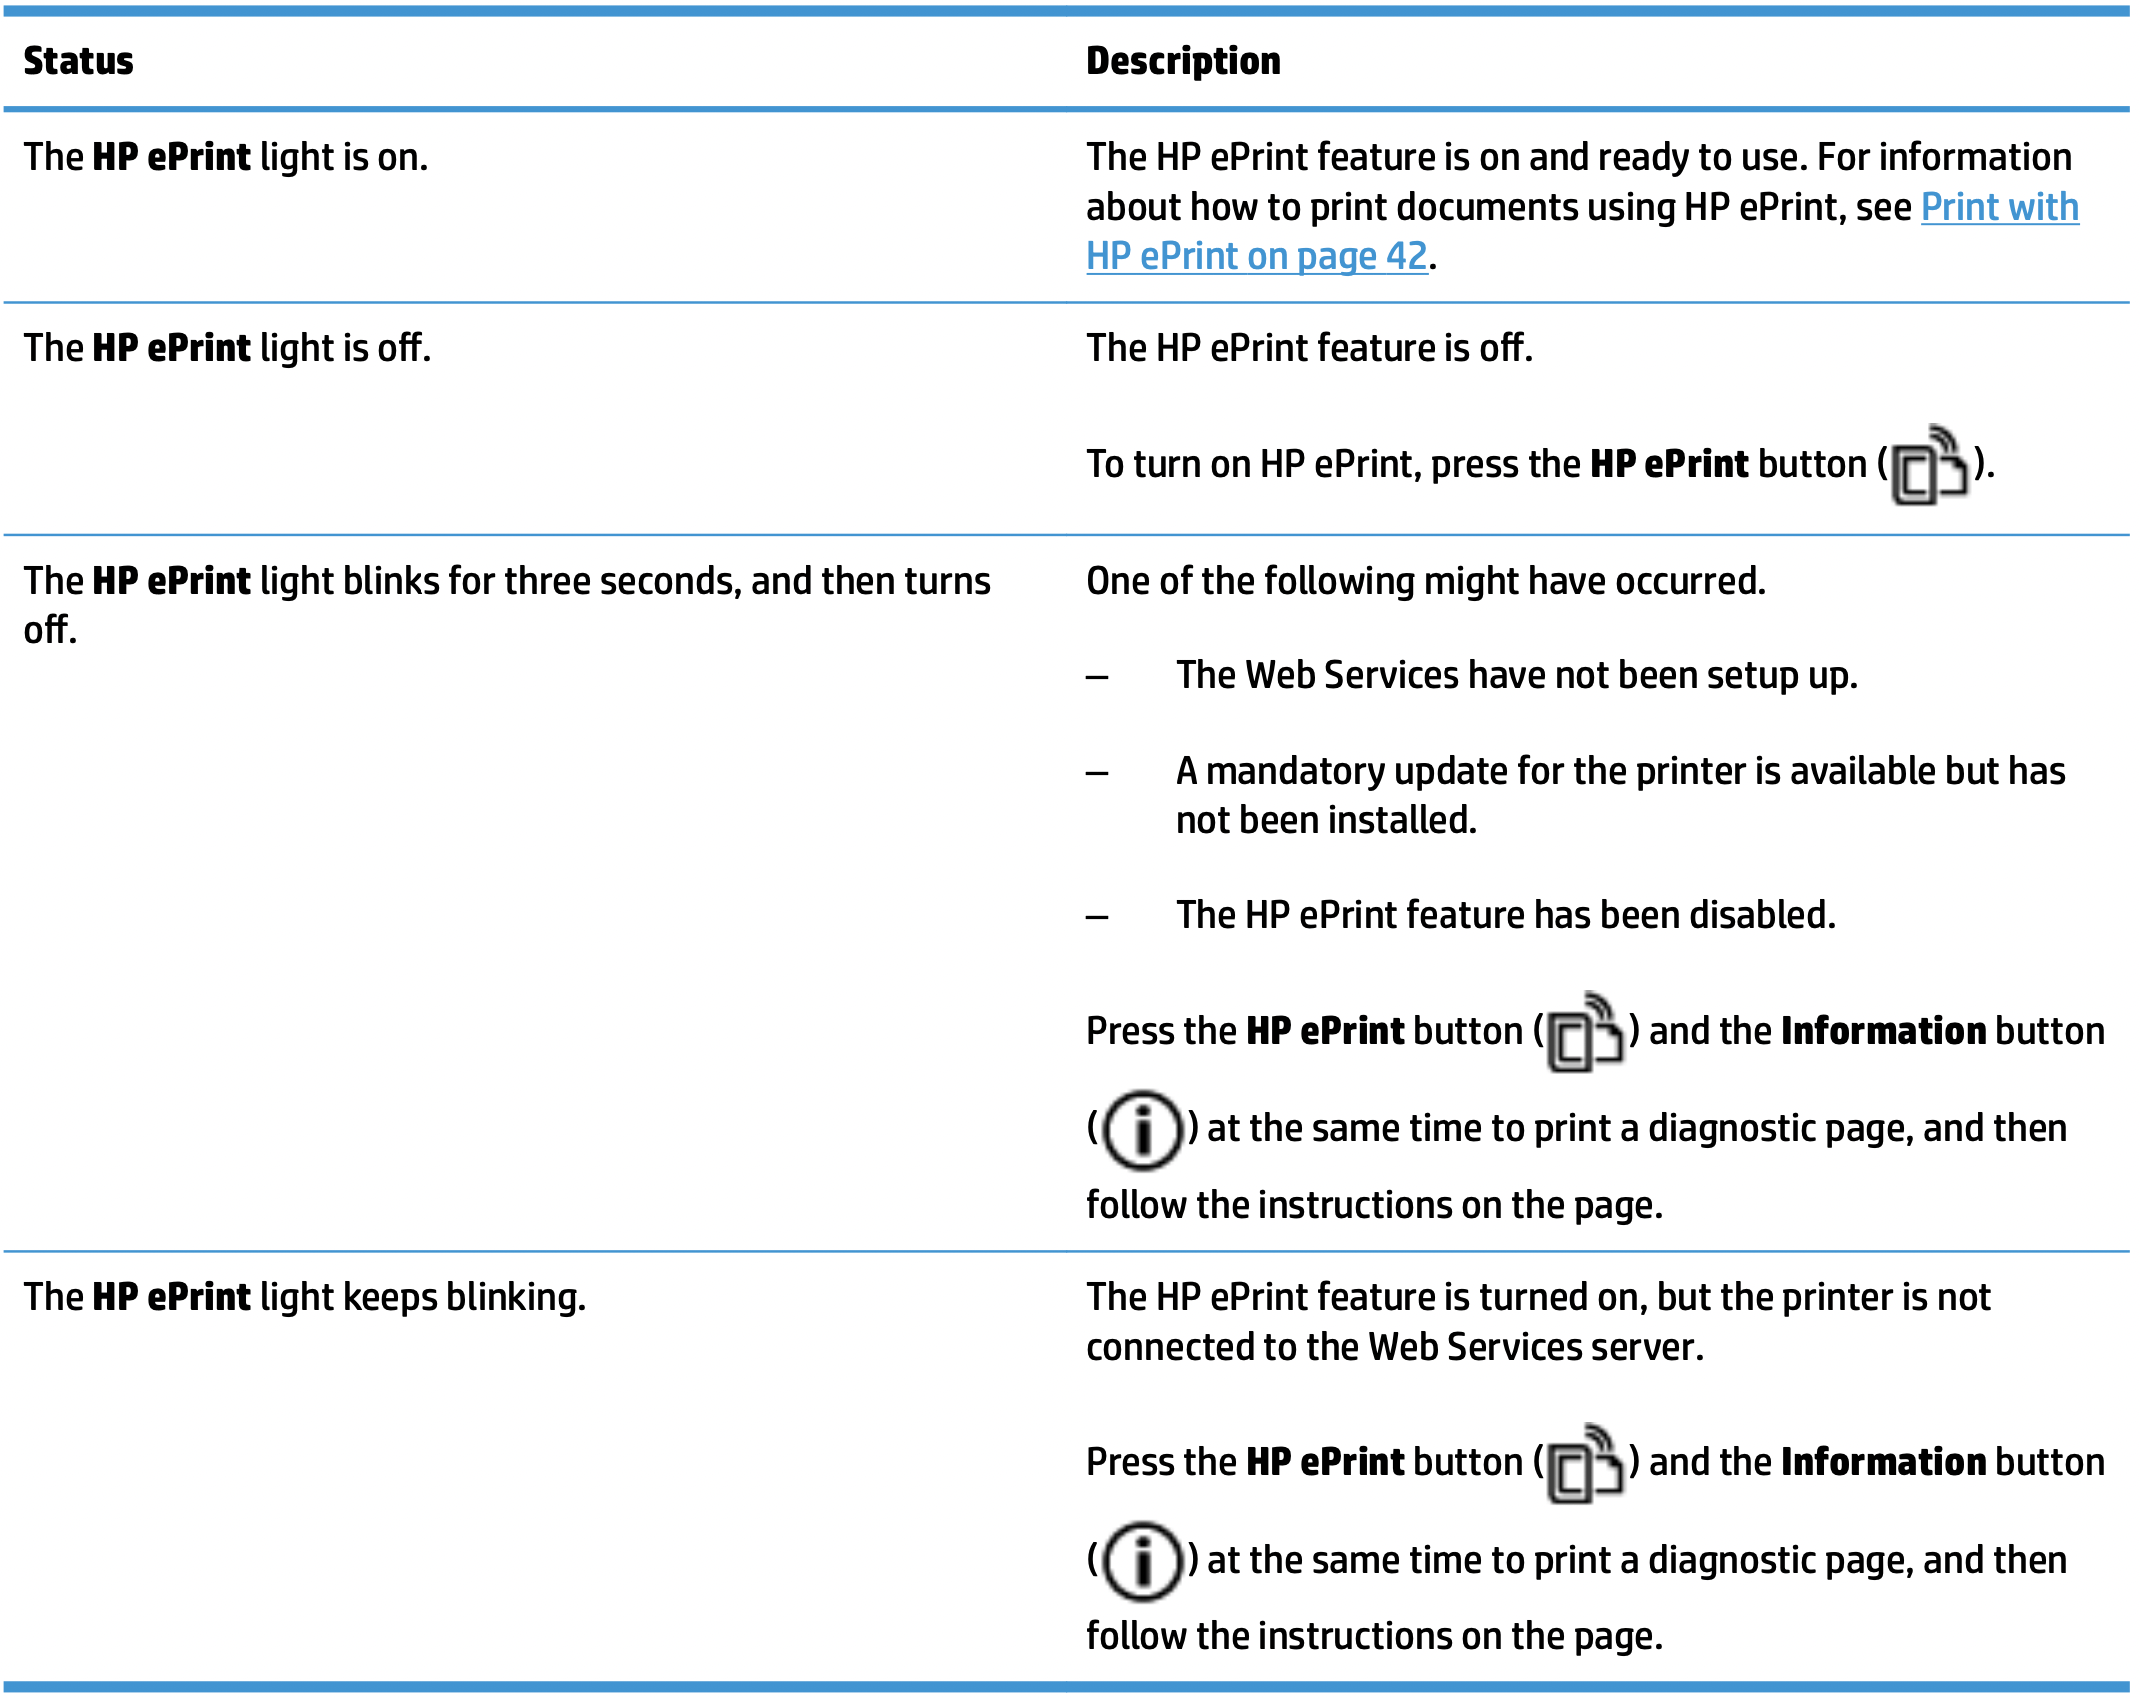
HP ePrint light

Ink Level icons and Ink Alert light

| Cause | Solution |
|---|---|
|
One of the following might have occurred.
|
|

| Cause | Solution |
|---|---|
|
One of the following might have occurred.
|
|

| Cause | Solution |
|---|---|
|
The corresponding ink cartridge is low on ink and will need to be replaced soon. |
|

| Cause | Solution |
|---|---|
| Both cartridges are low on ink and will need to be replaced soon. |
|

| Cause | Solution |
|---|---|
|
One of the following might have occurred.
|
|
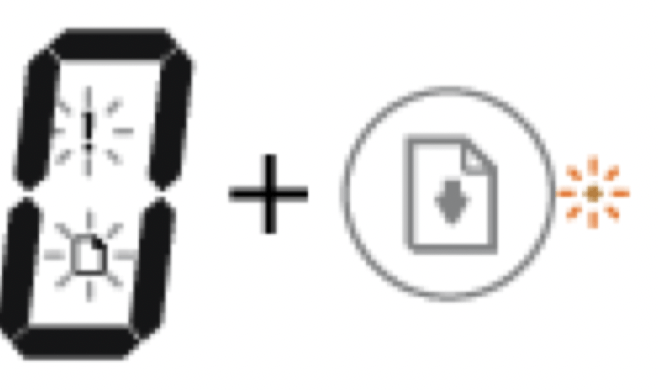
Error icon, Paper Error icon, and Resume light
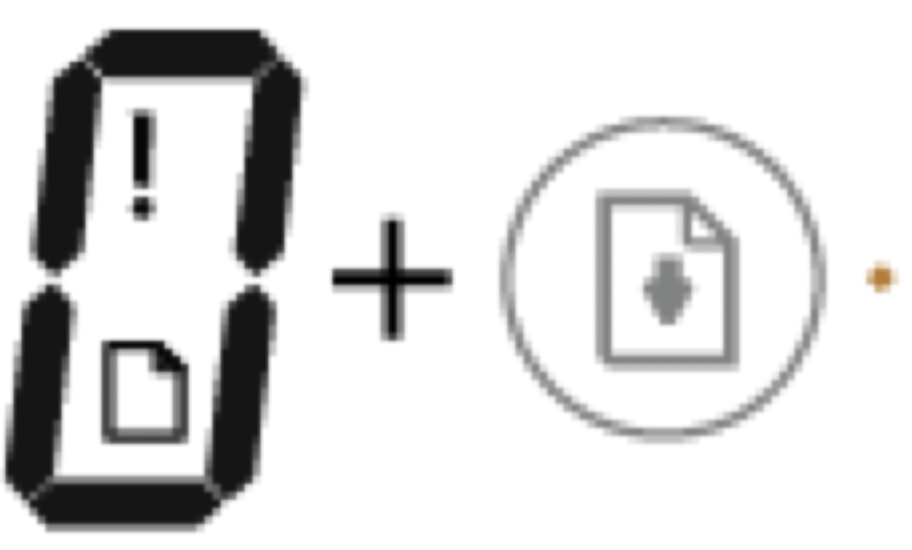
| Cause | Solution |
|---|---|
|
There is no paper in the input tray. |
|
| Cause | Solution |
|---|---|
|
The printer receives a printing job, and detects that there is no paper in the input tray. |
|
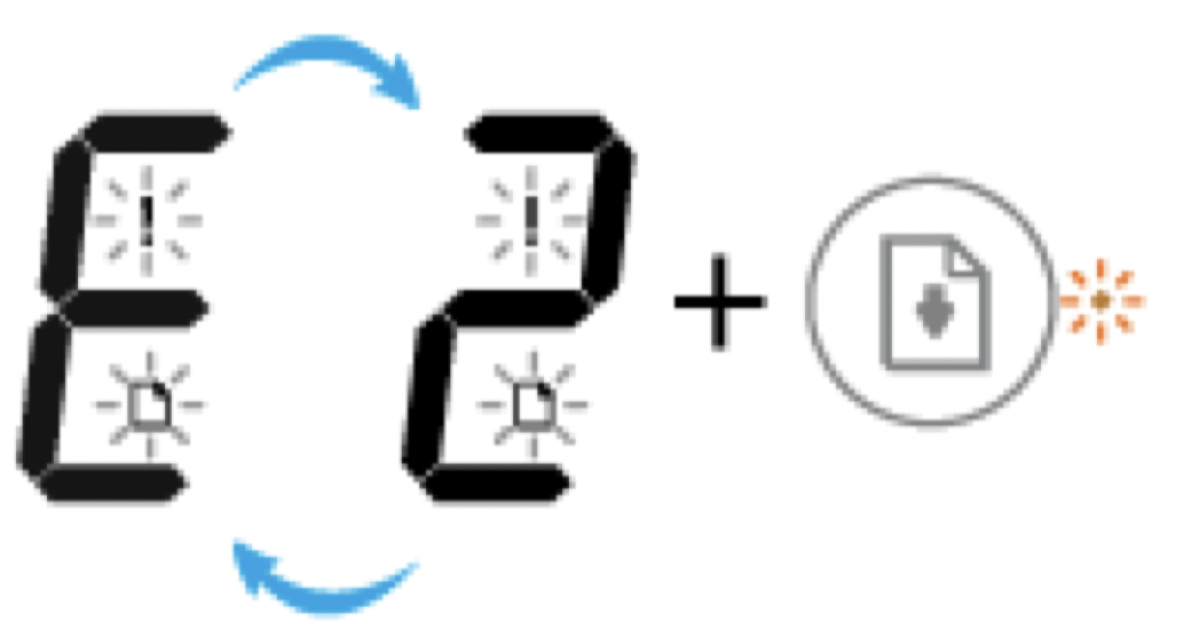
Number of copies icon
| Cause | Solution |
|---|---|
| The printer receives a printing job, starts feeding paper, and detects that the paper width for the printing job is bigger than the width of the loaded paper. |
TIP: You can change the default paper size automatically detected by the printer. For more information, see Change the default paper size detected bu printer. |
| Cause | Solution |
|---|---|
| The printer receives a single-page printing job, detects that the paper length for the printing job does not match the length of the loaded paper, and then prints out the page with errors. |
To clear the error, press any button on the control panel or wait for two minutes. To avoid the paper length mismatch problem, do one of the following before printing.
TIP: You can change the default paper size automatically detected by the printer. For more information, see Change the default paper size detected by printer. |
| Cause | Solution |
|---|---|
| The printer receives a multi-page printing job, detects that the paper length for the printing job does not match the length of the loaded paper, and then prints out the first page of the job with errors. |
TIP: You can change the default paper size automatically detected by the printer. For more information, see Change the default paper size detected by printer. |

| Cause | Solution |
|---|---|
| The carriage inside the printer has stalled. |
|
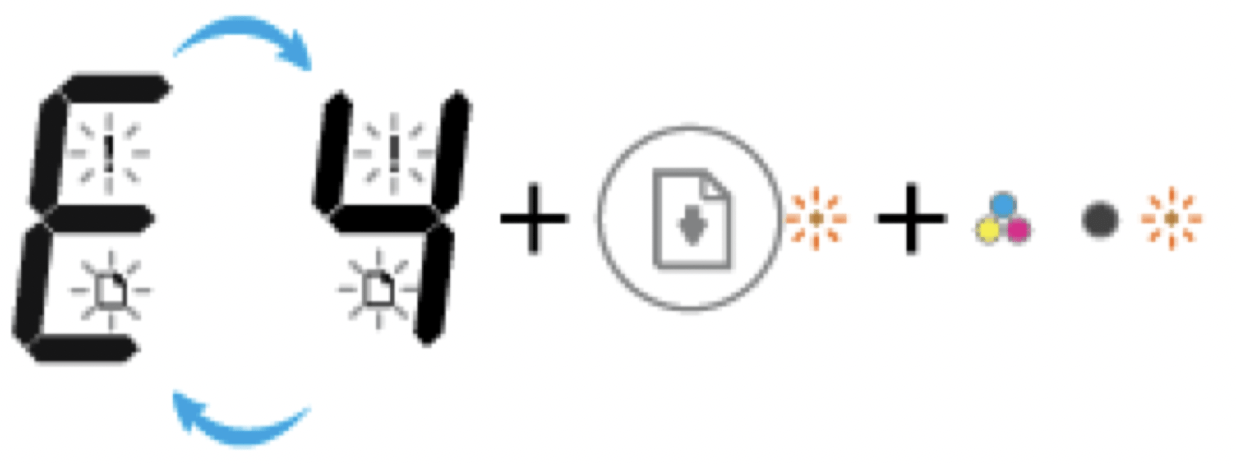
| Cause | Solution |
|---|---|
| There is a paper jam. |
|

| Cause | Solution |
|---|---|
| The scanner is not working. |
|

| Cause | Solution |
|---|---|
| The printer is in an error state. |
Reset the printer.
If the problem persists, contact HP.
|
Select a paper size to continue.
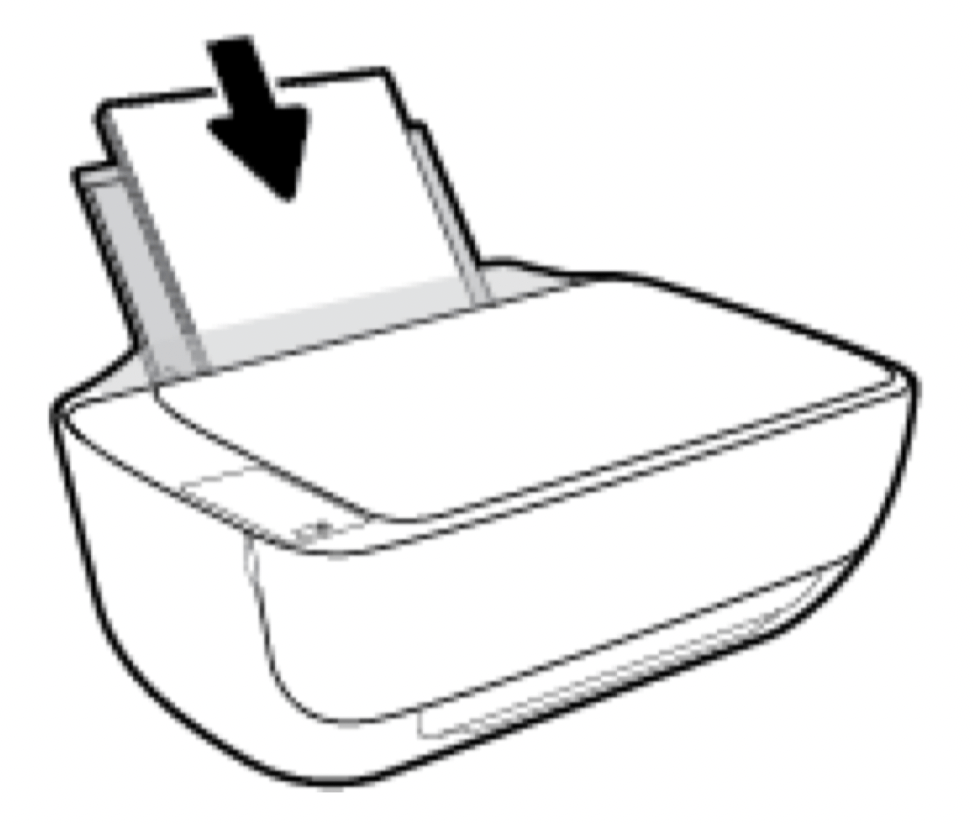
To load full-size paper
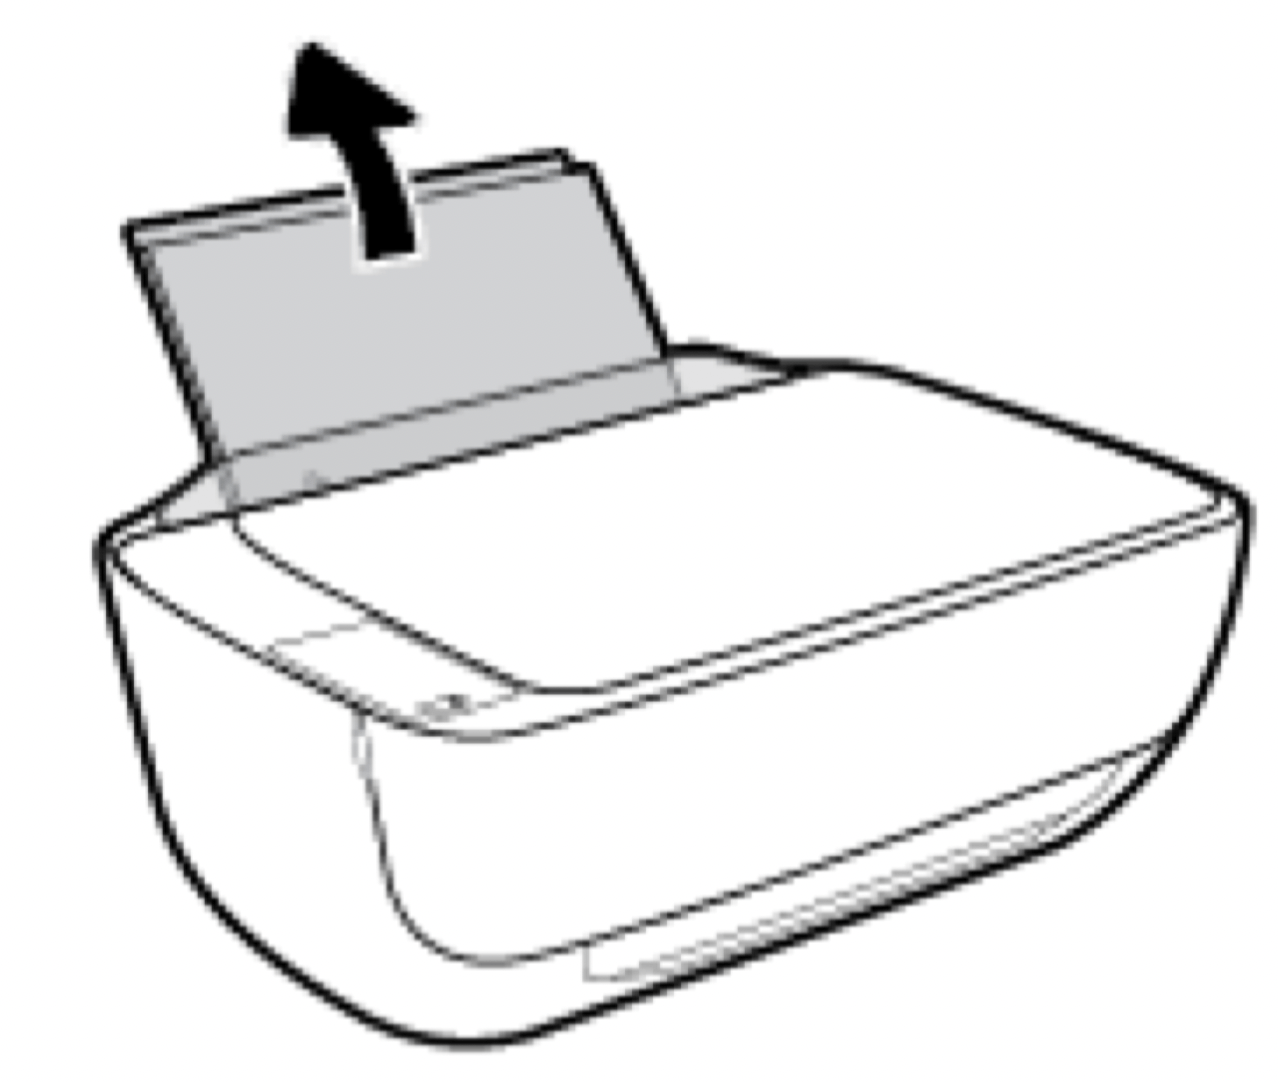
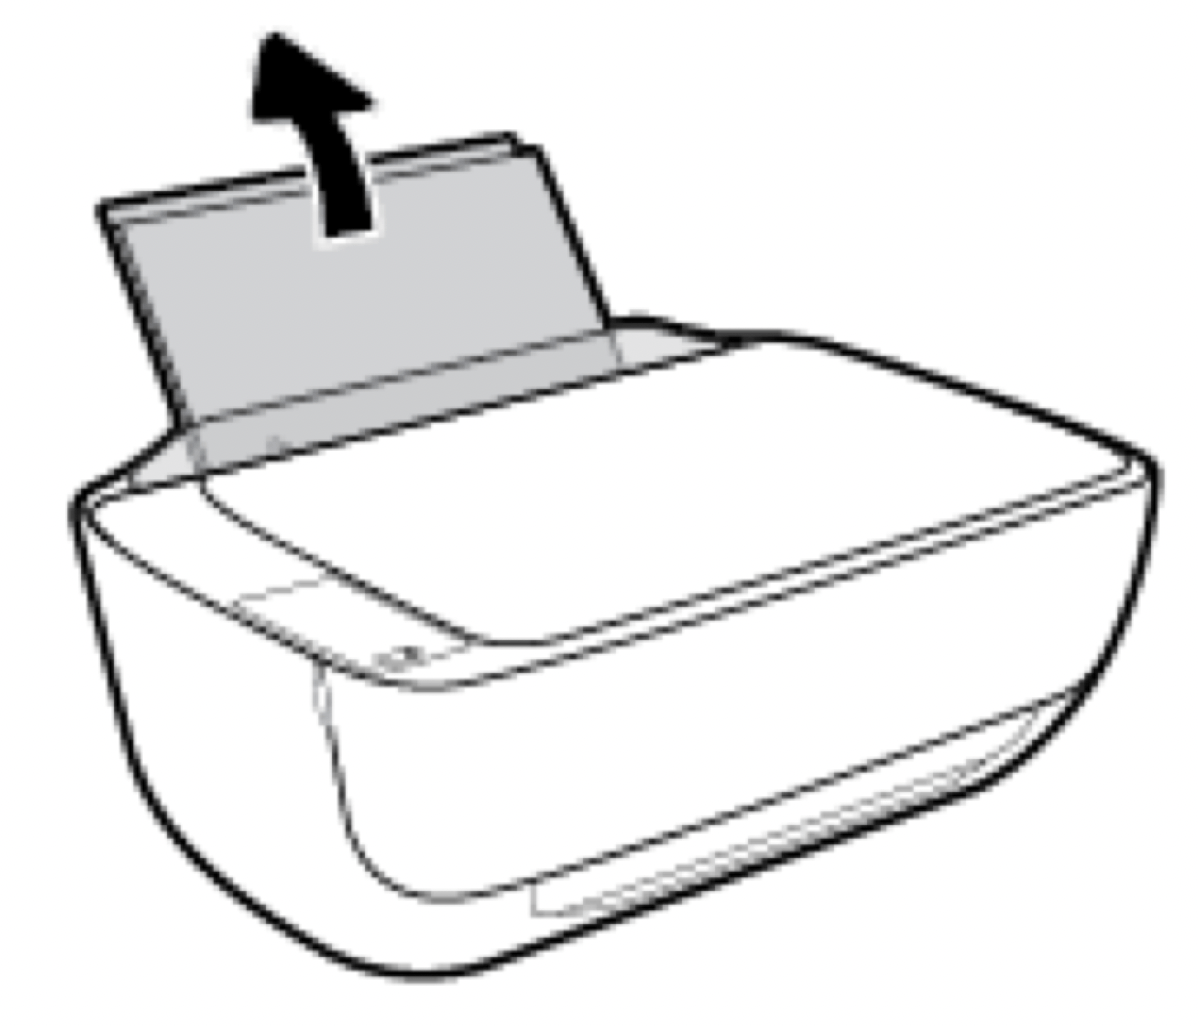
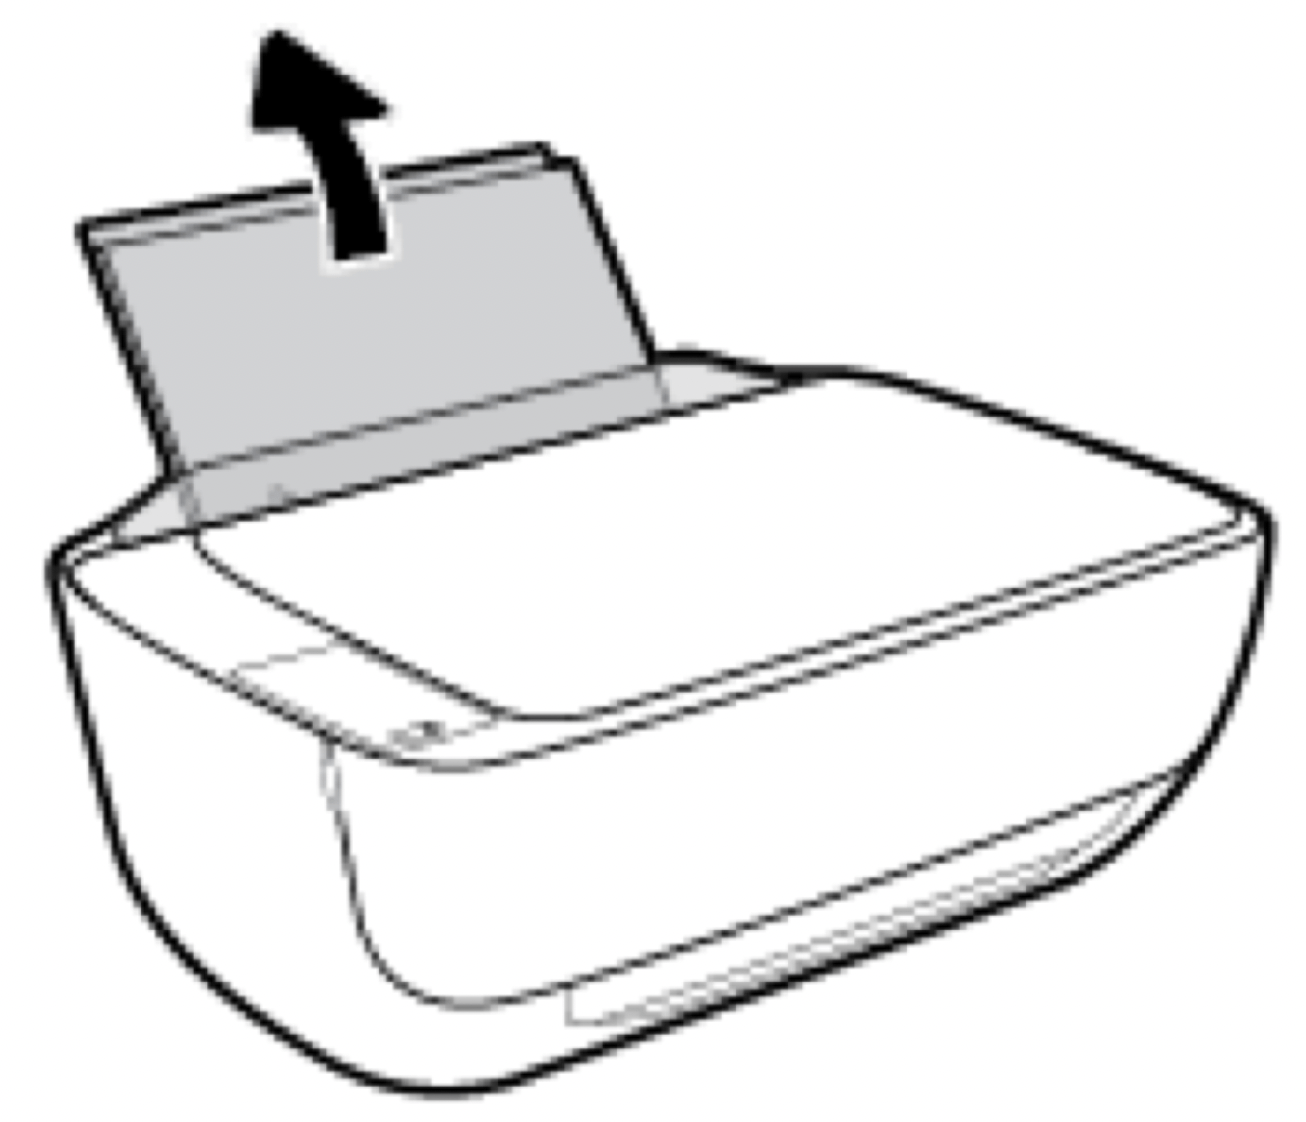
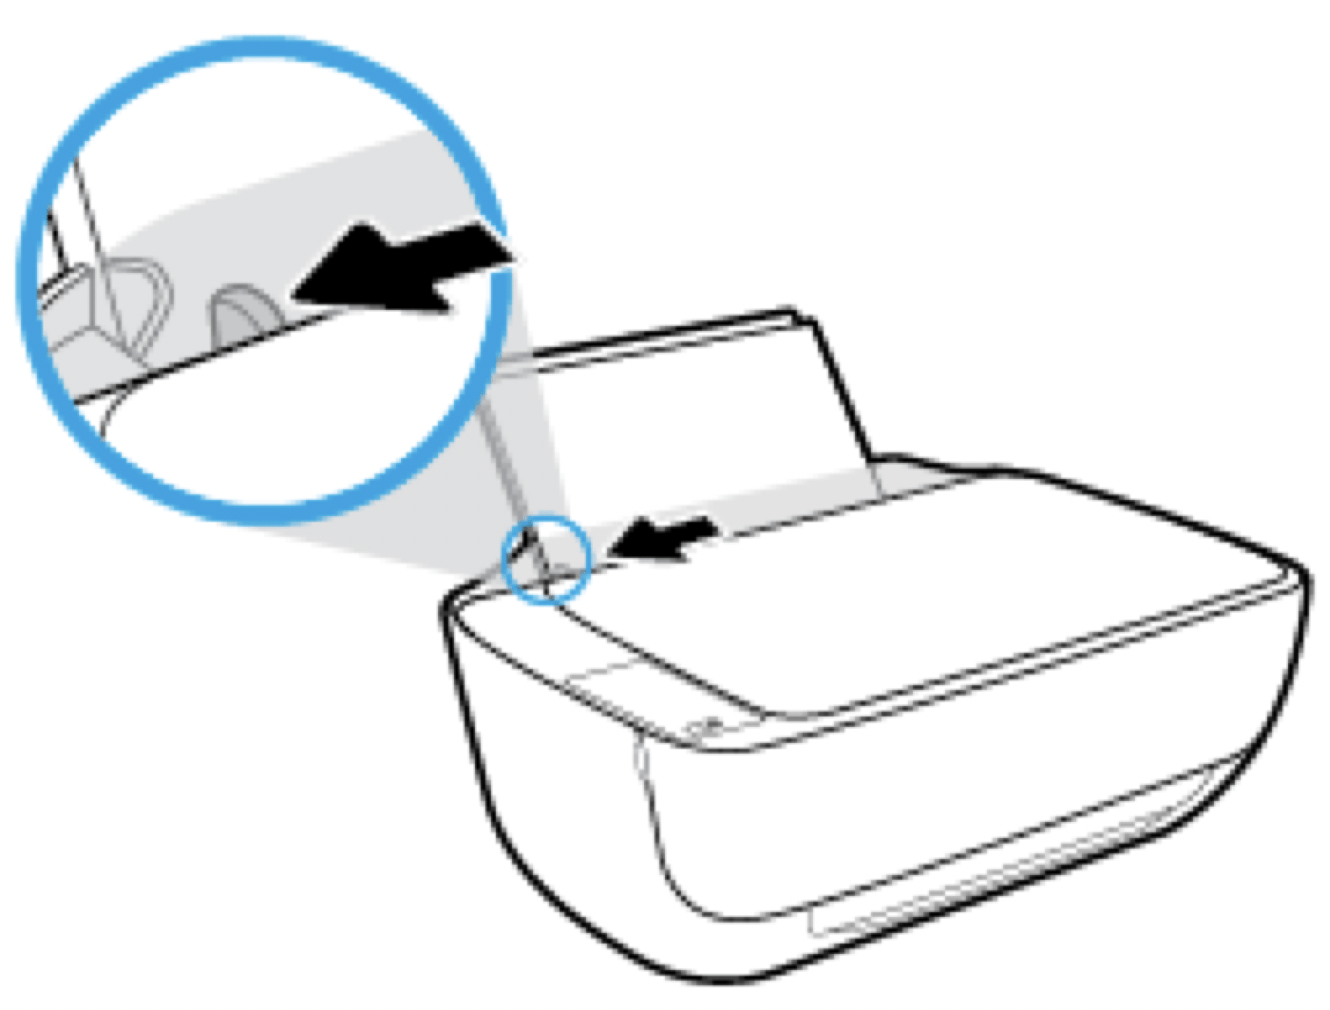
1. Raise the input tray.
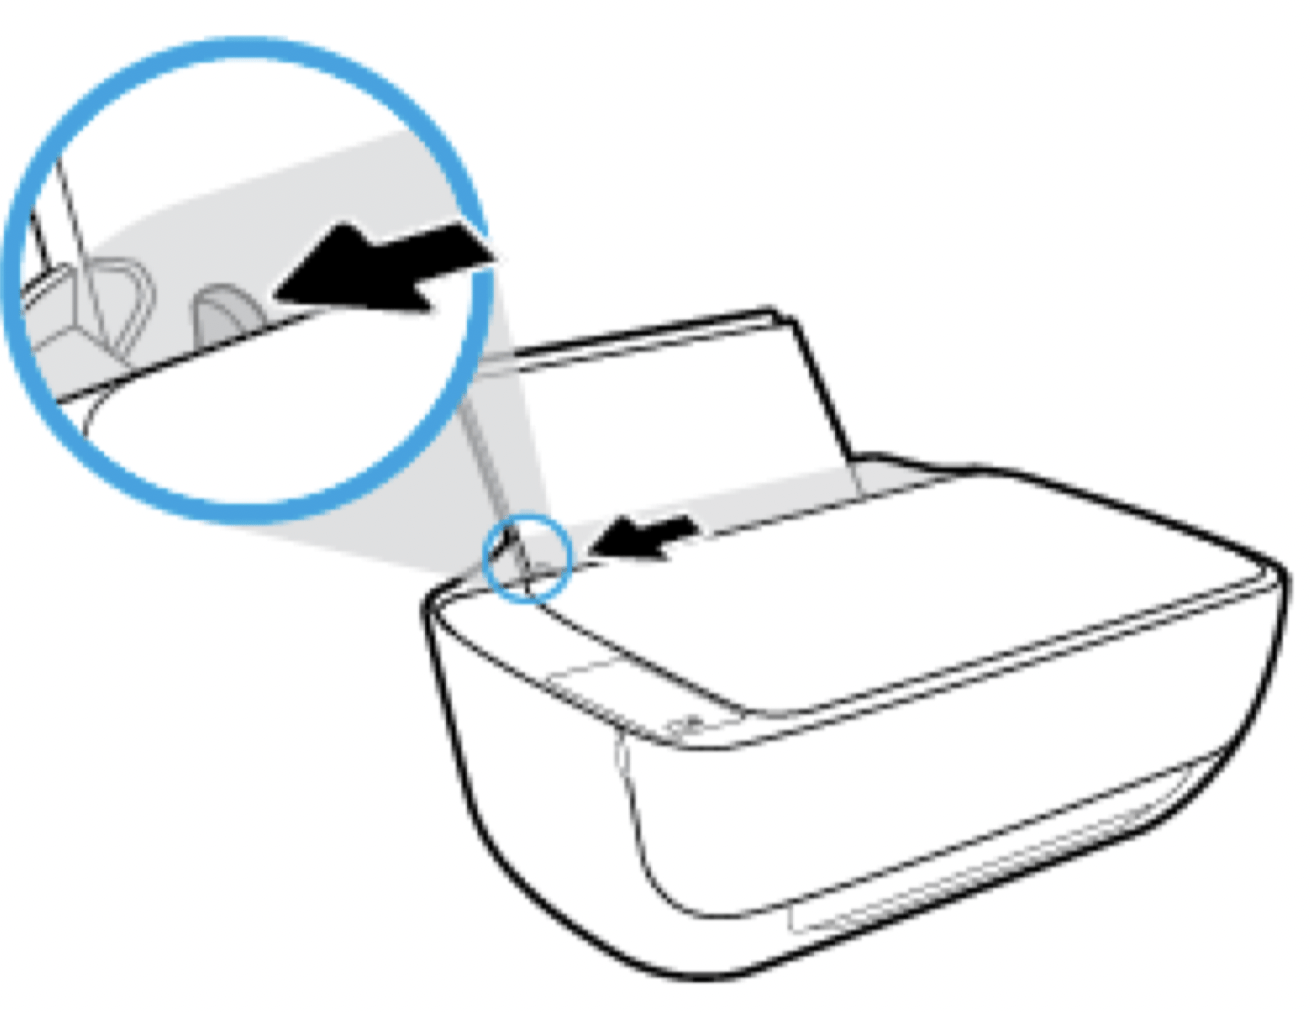
2. Slide the paper-width guide to the left.
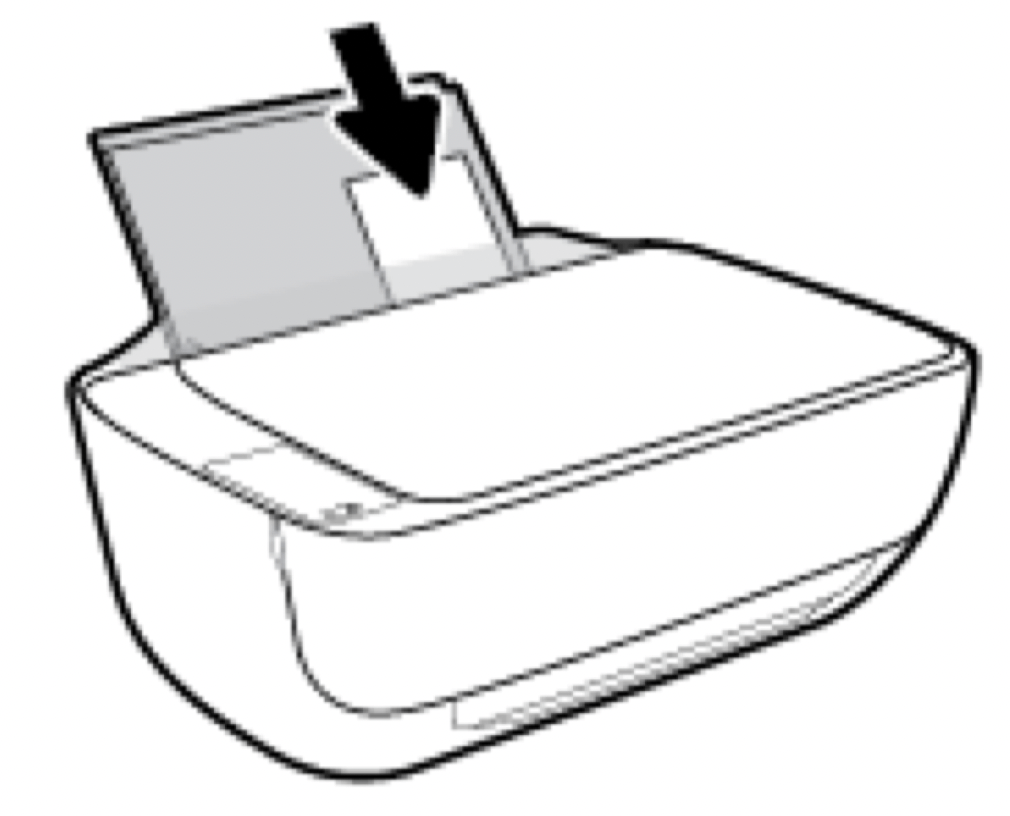
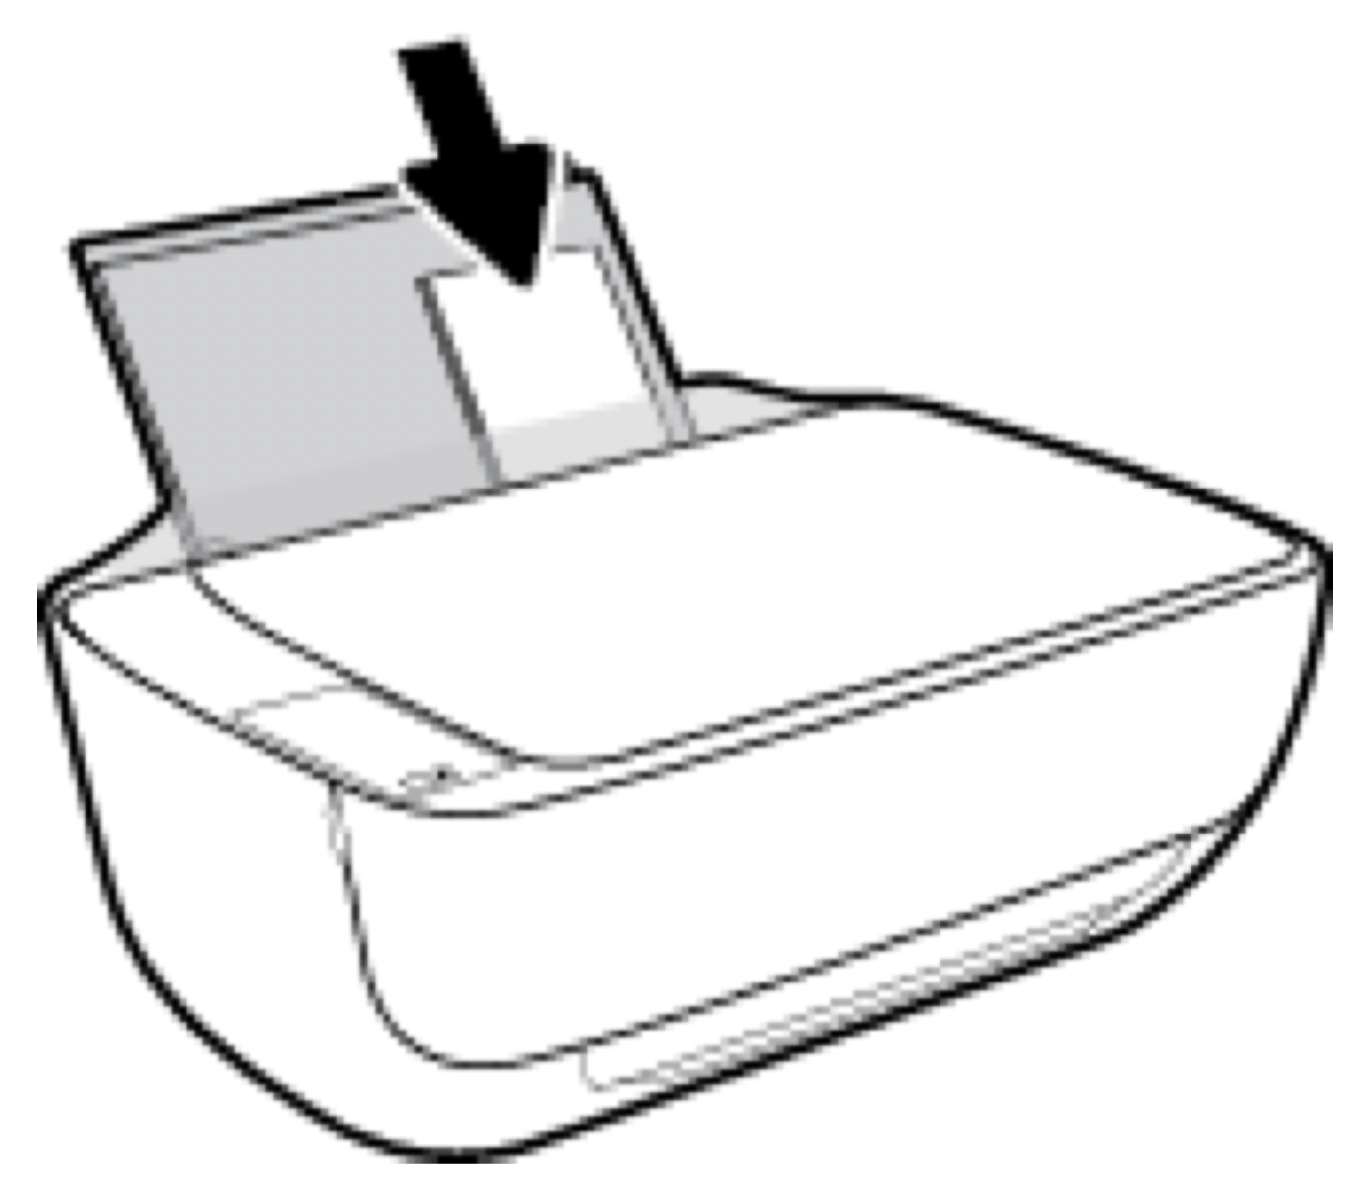
3. Insert a stack of paper into the input tray with the short edge down and the print side up, and slide the stack of paper down until it stops.
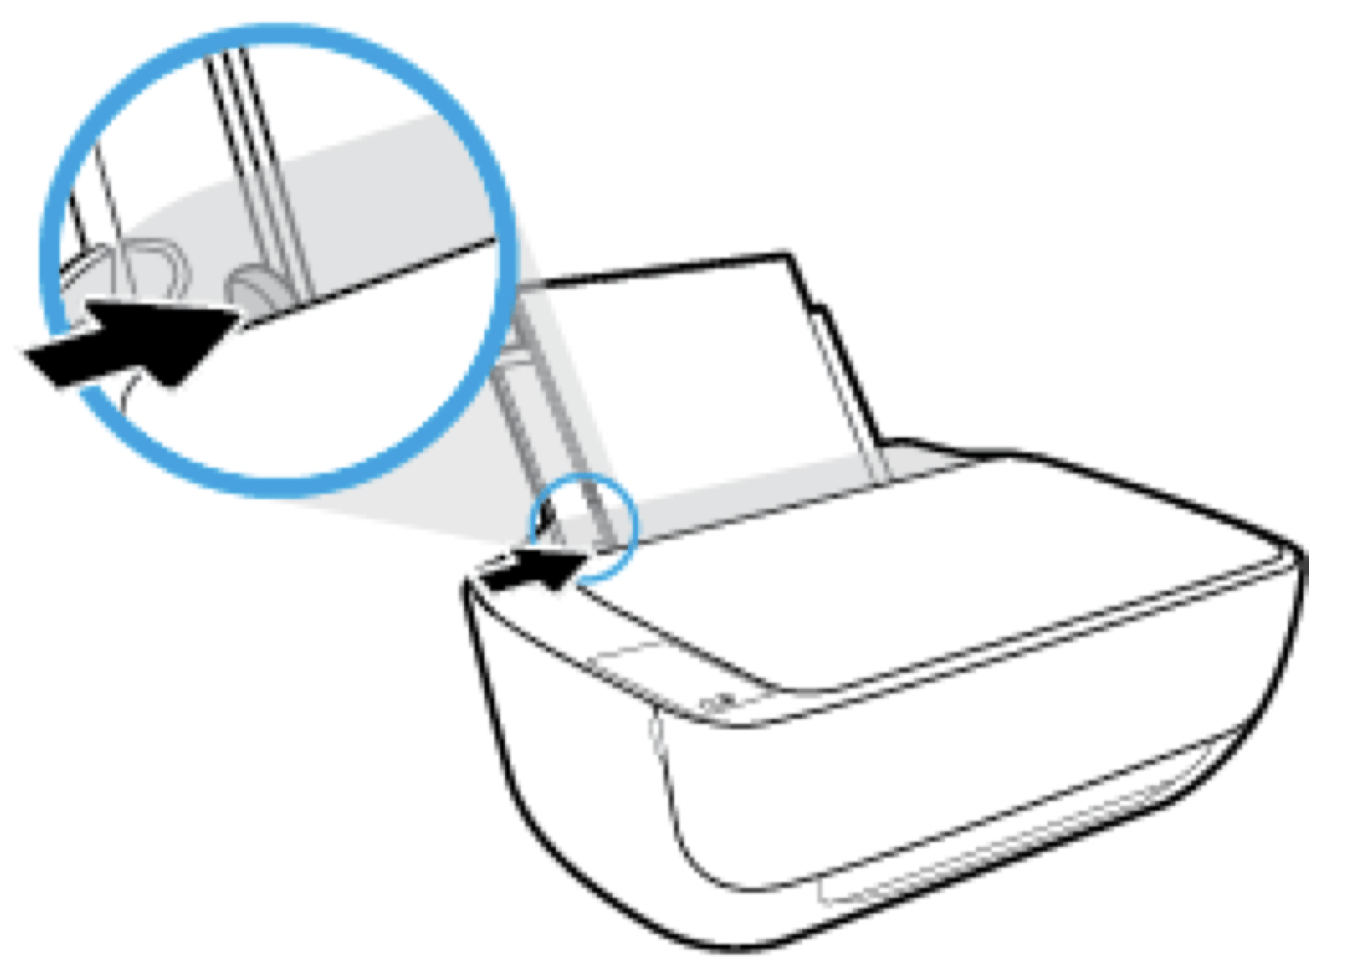
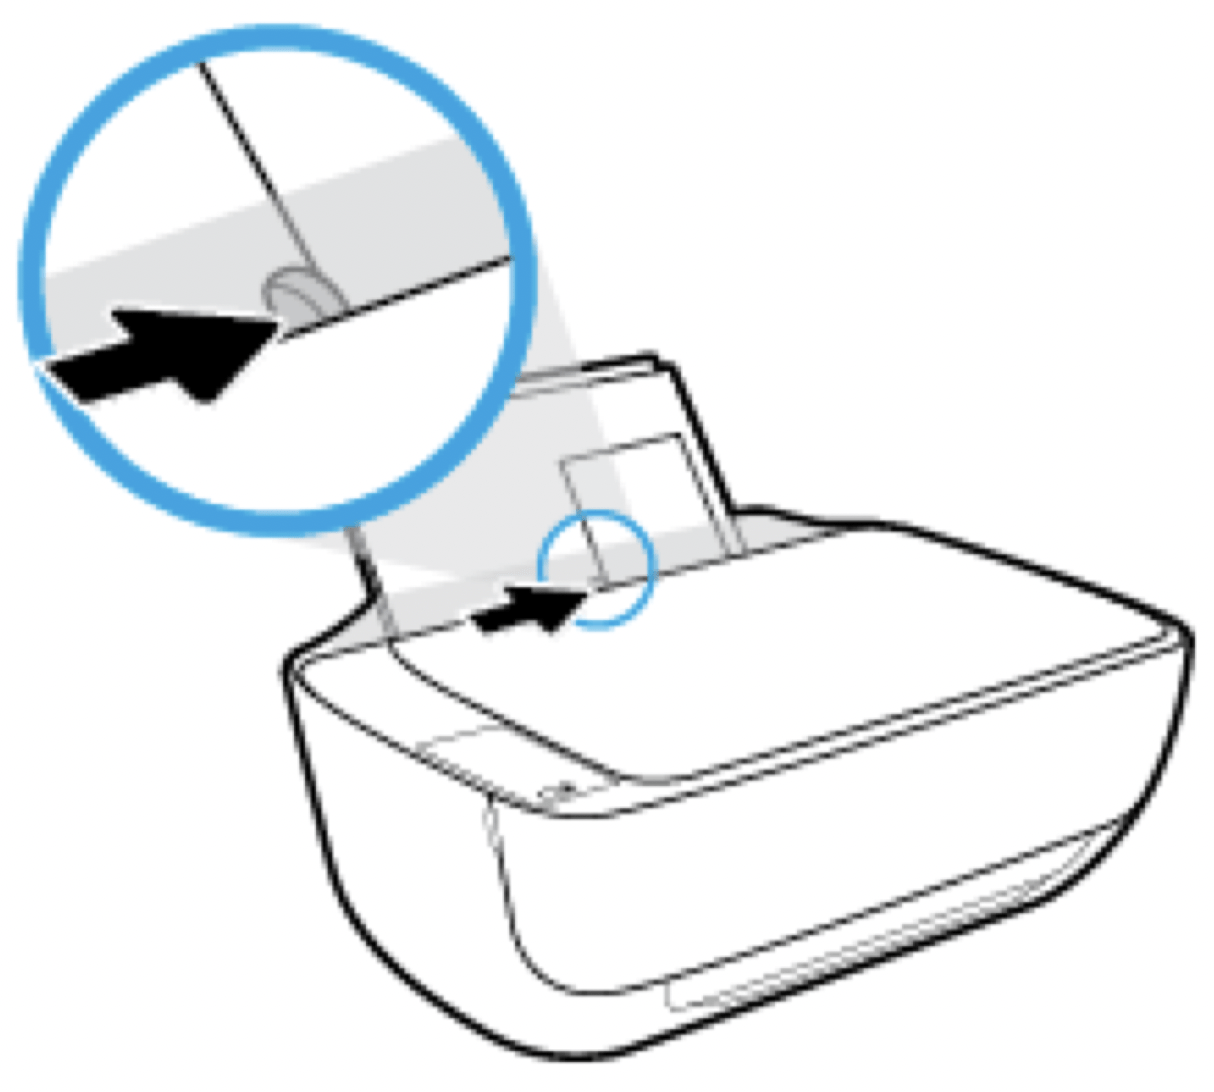
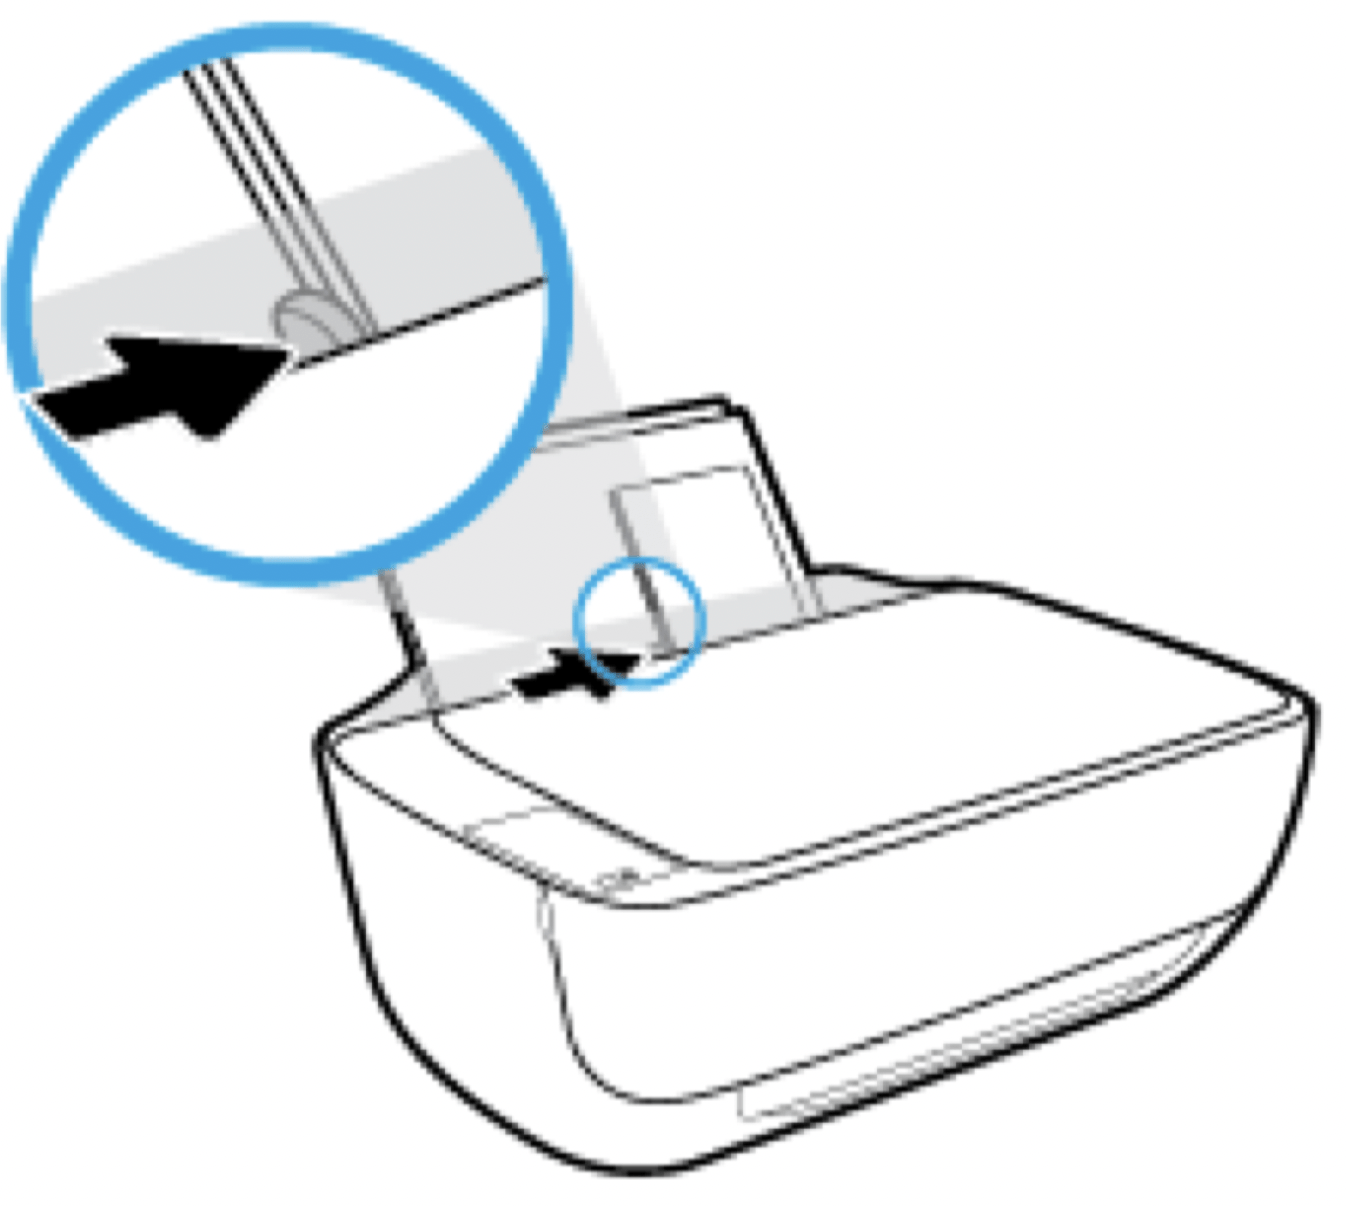
4. Slide the paper-width guide to the right until it stops at the edge of the paper.
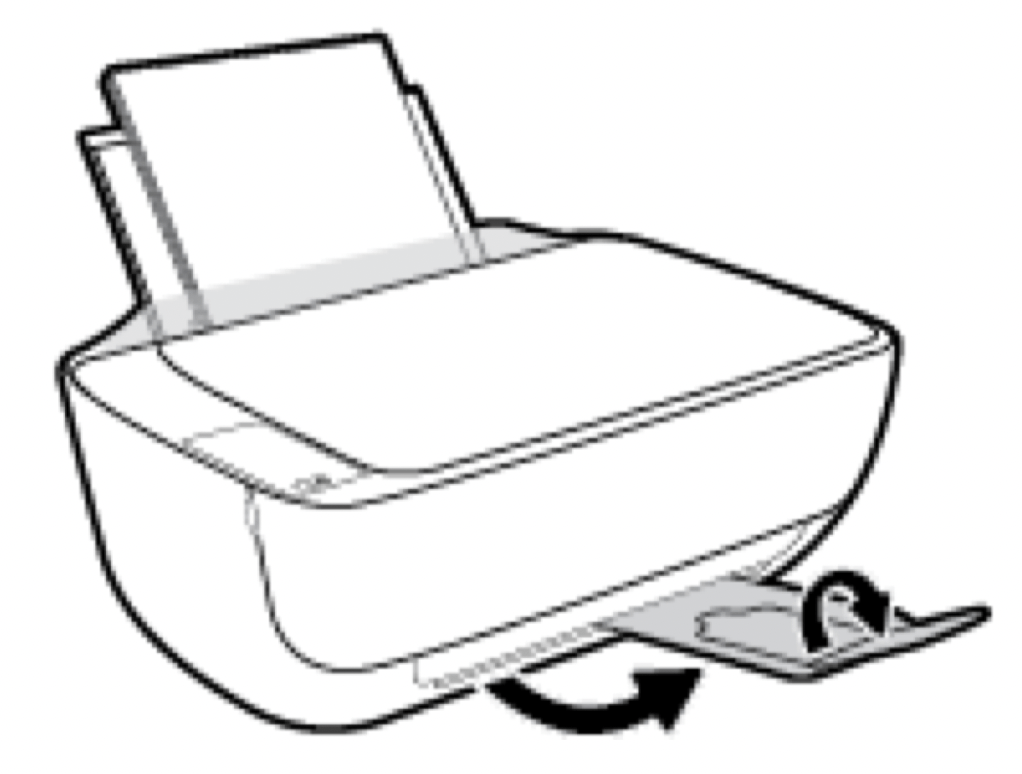
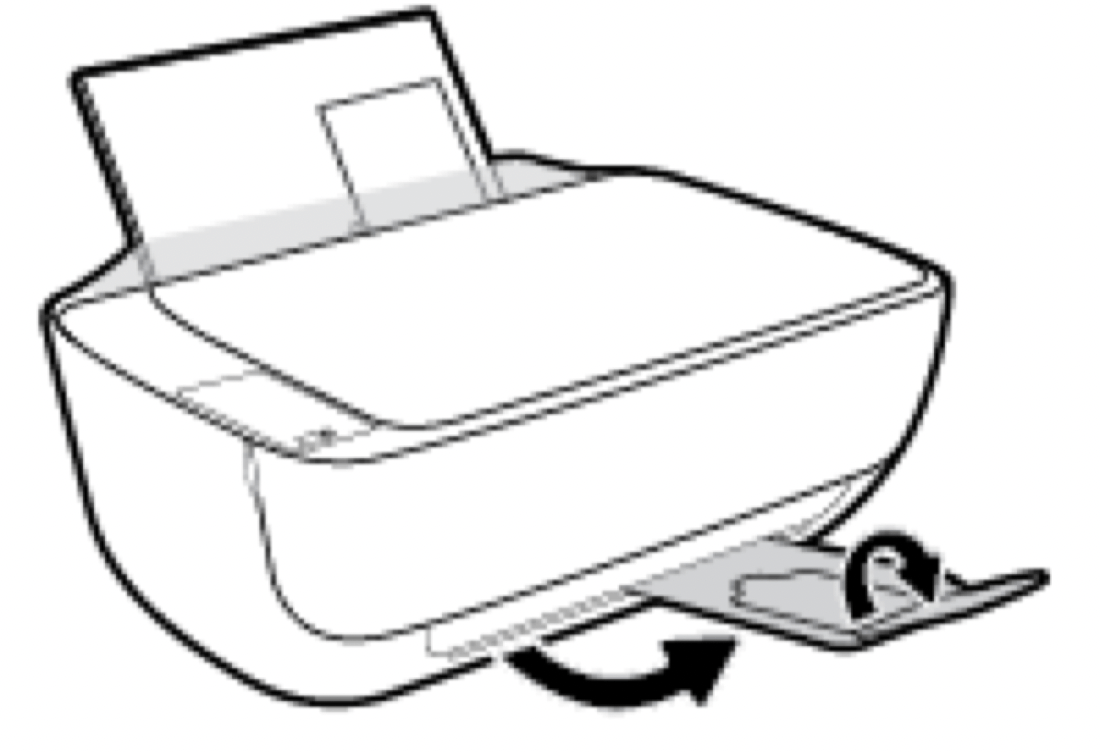
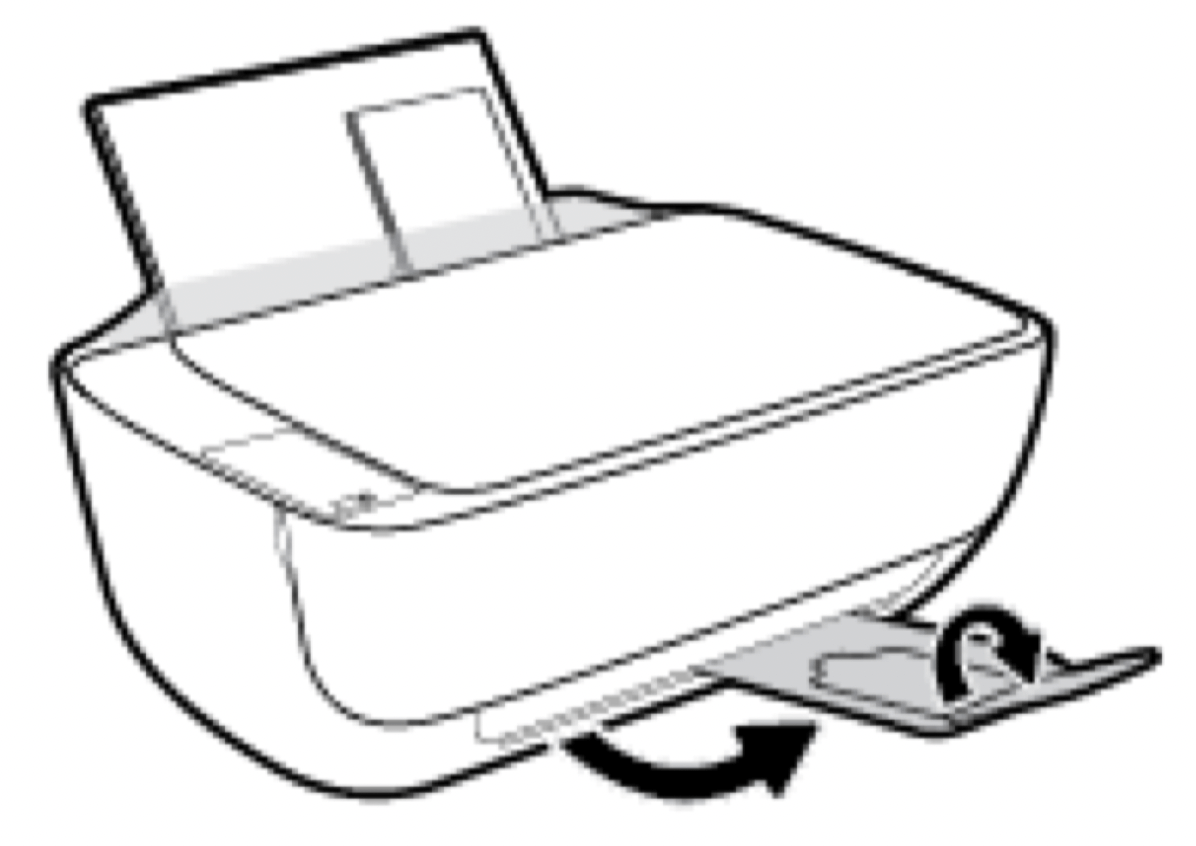
5. Pull out the output tray and the tray extender.
To load small-size paper
1. Raise the input tray.
2. Slide the paper-width guide to the left.

3. Insert a stack of photo paper into the far-right side of the input tray with the short edge down and the print side up, and slide the stack of paper down until it stops.
4. Slide the paper-width guide to the right until it stops at the edge of the paper.
5. Pull out the output tray and the tray extender.
To load envelopes
1. Raise the input tray.
2. Slide the paper-width guide to the left.
3. Insert one or more envelopes into the far-right side of the input tray and slide the stack of envelopes down until it stops.
The side to be printed on should face up. The flap should be on the left side and facing down.
4. Slide the paper-width guide to the right against the stack of envelopes until it stops.
5. Pull out the output tray and the tray extender.
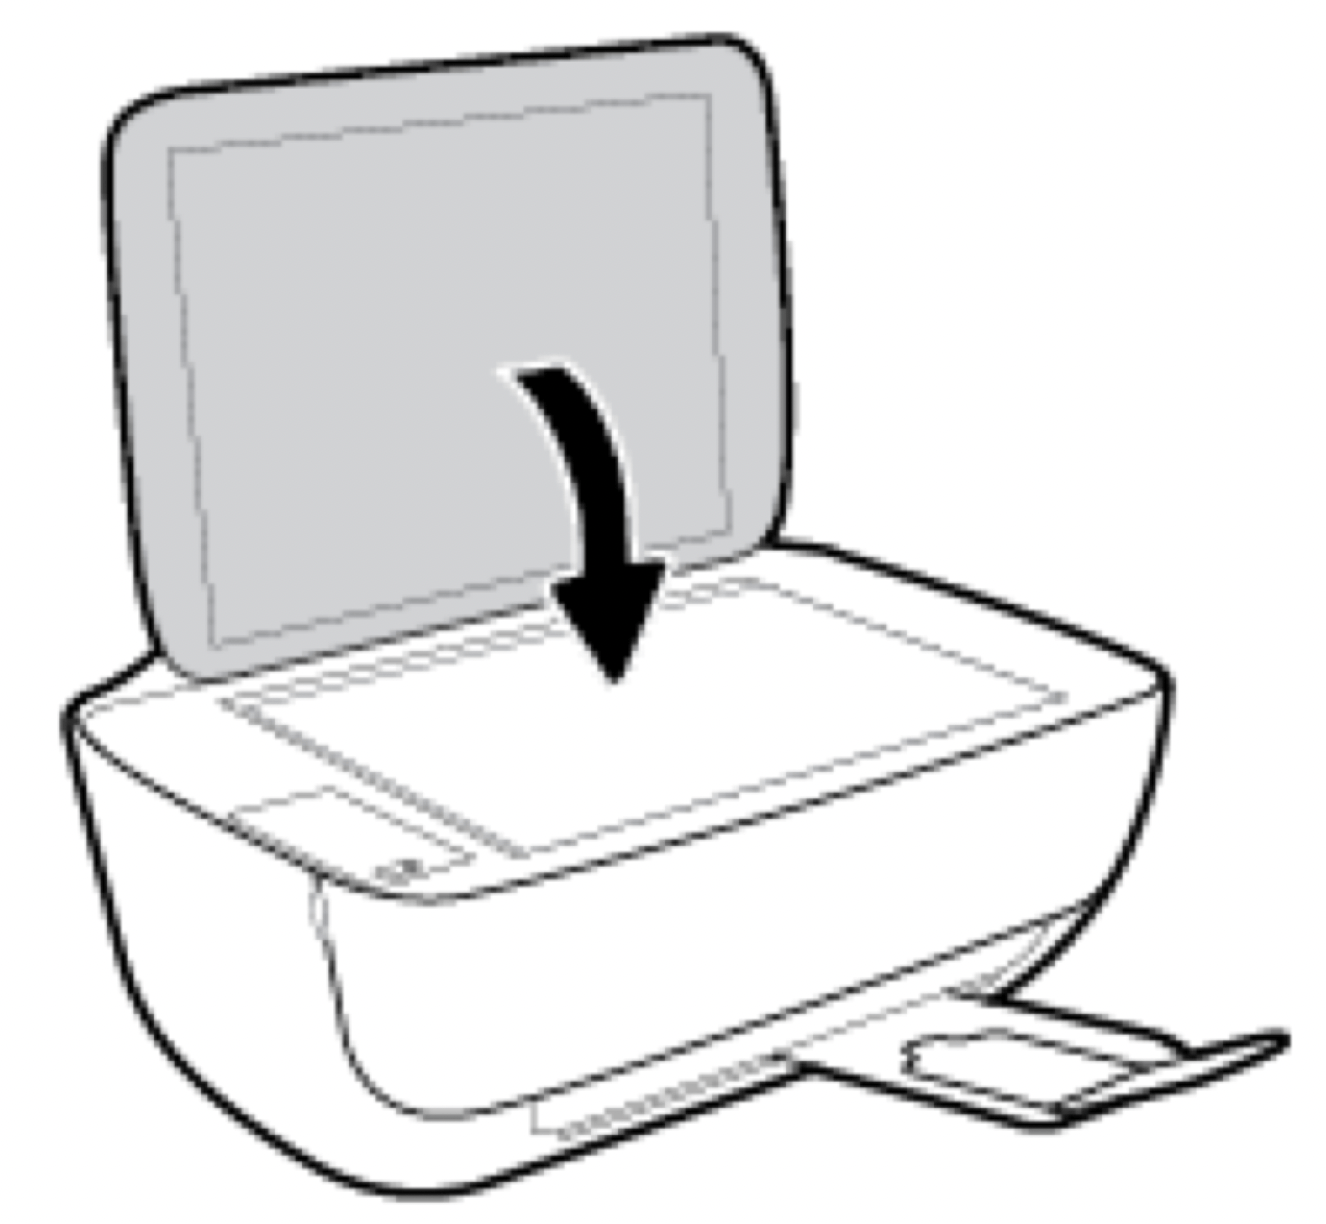
To load an original on the scanner glass
1. Lift the scanner lid.
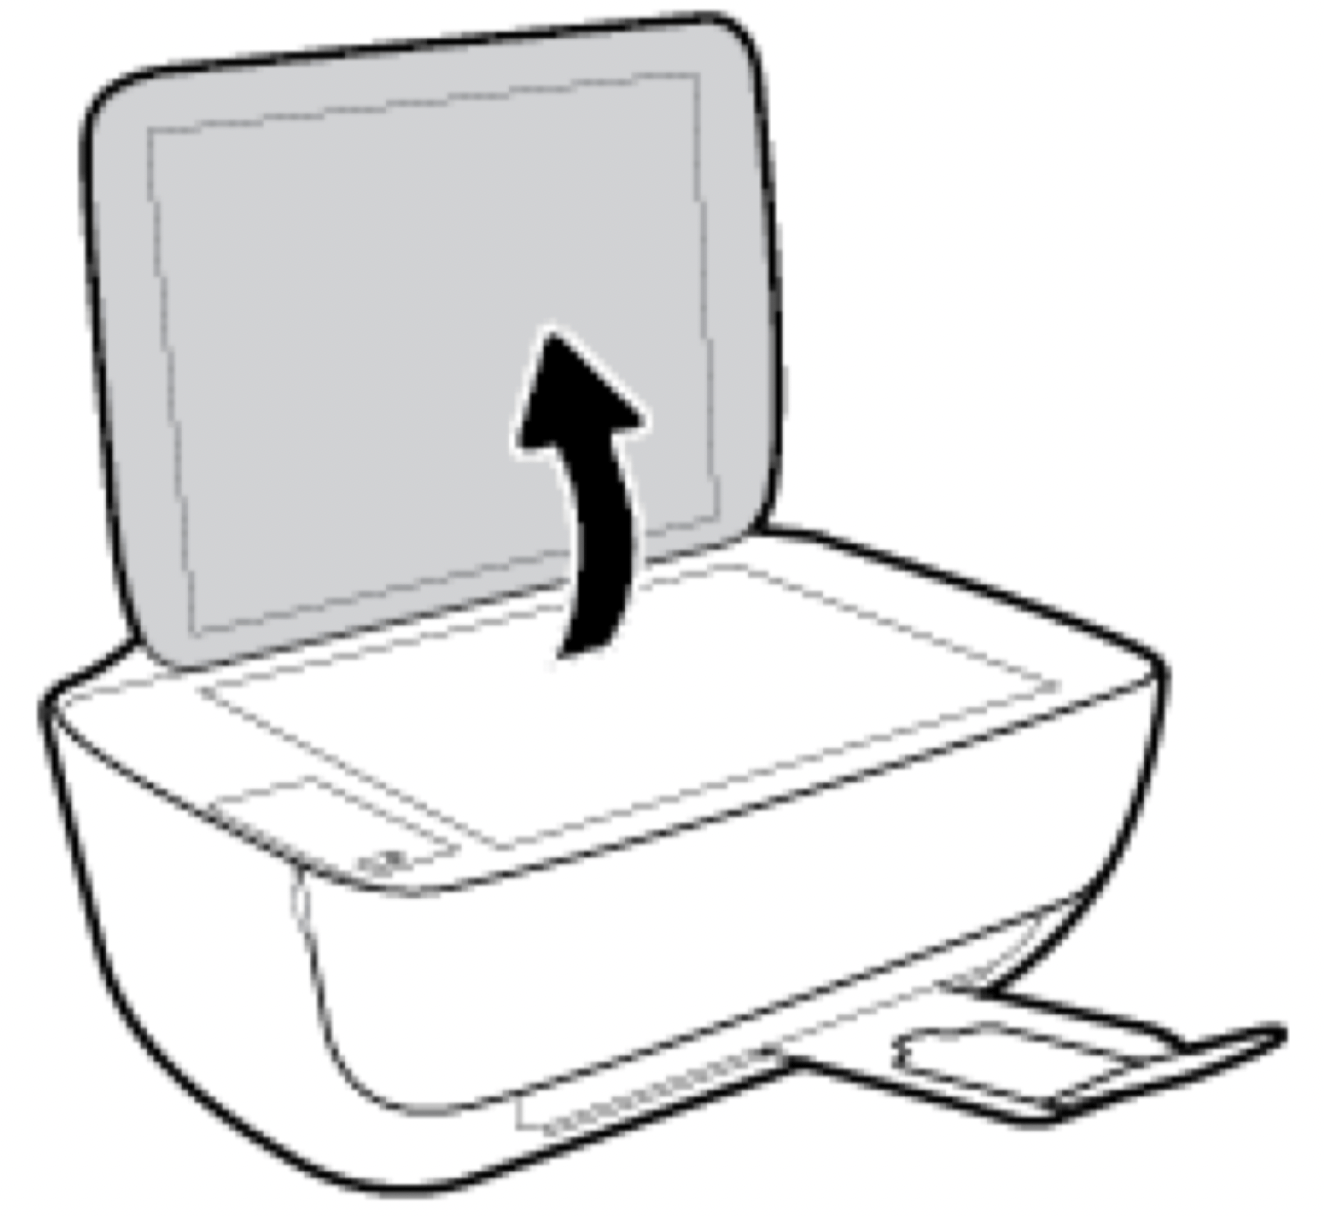
2. Load the original print-side down on the right corner of the scanner glass.

3. Close the scanner lid.
Print documents
Before printing documents, make sure you have paper loaded in the input tray and the output tray is open. For more information about loading paper, see Load media.
To print a document (Windows)
1. From your software, select Print.
2. Make sure your printer is selected.
3. Click the button that opens the Properties dialog box.
Depending on your software application, this button might be called Properties, Options, Printer Setup, Printer Properties, Printer, or Preferences.
4. Select the appropriate options.
5. Click OK to close the Properties dialog box.
6. Click Print or OK to begin printing.
To print documents (OS X)
1. From the File menu in your software, choose Print.
2. Make sure your printer is selected.
3. Specify the page properties.
If you do not see options on the Print dialog, click Show Details.
NOTE: The following options are available for a USB connected printer. Locations for the options can vary from one application to another.
NOTE: If you change the Paper Size ensure that you have loaded the correct paper.
4. Click Print.
To print on both sides of the page (Windows)
1. From your software, select Print.
2. Make sure your printer is selected.
3. Click the button that opens the Properties dialog box.
Depending on your software application, this button might be called Properties, Options, Printer Setup, Printer Properties, Printer, or Preferences.
4. Select the appropriate options.
5. On the Layout tab, select an appropriate option from the Print on Both Sides Manually drop-down list.
6. After you print the first side, follow the on-screen instructions to reload the paper with the blank side up and top of the page down, and then click Continue.
7. Click OK to print.
To print on both sides of the page (OS X)
1. From the File menu in your software, choose Print.
2. In the Print dialog, choose Paper Handling from the pop-up menu and set Page Order to Normal.
3. Set Pages to Print to Odd only.
4. Click Print.
5. After all of the odd numbered pages have printed, remove the document from the output tray.
6. Reload the document so that the end that came out of the printer is now going into the printer and the blank side of the document is facing toward the front of the printer.
7. In the Print dialog, return to the Paper Handling pop-up menu and set the page order to Normal and the pages to print to Even Only.
8. Click Print.
Print photos
Before printing photos, make sure you have photo paper loaded in the input tray and the output tray is open. For more information about loading paper, see Load media.
To print a photo on photo paper (Windows)
1. From your software, select Print.
2. Make sure your printer is selected.
3. Click the button that opens the Properties dialog box.
Depending on your software application, this button might be called Properties, Options, Printer Setup,
Printer Properties, Printer, or Preferences.
4. Select the appropriate options.
5. Click OK to return to the Properties dialog box.
6. Click OK, and then click Print or OK in the Print dialog box.
NOTE: After the printing is finished, remove unused photo paper from the input tray. Store the photo paper so it does not start to curl, which could reduce the quality of your printout.
To print a photo from the computer (OS X)
1. From the File menu in your software, choose Print.
2. Make sure your printer is selected.
3. Set the print options.
If you do not see options on the Print dialog, click Show Details.
NOTE: The following options are available for a USB connected printer. Locations for the options can vary from one application to another.
a. Choose the appropriate paper size in the Paper Size pop-up menu.
NOTE: If you change the Paper Size ensure that you have loaded the correct paper.
b. Select an Orientation.
c. From the pop-up menu, choose Paper Type/Quality, and then choose the following settings:
4. Select any other print settings you want, and then click Print.
With HP mobile printing technology, you can print from your smartphone or tablet to your printer easily.
If you are at home or office, to use the printing capabilities already on your smartphone or tablet to print:
If you want to print without accessing the network, see Connect wirelessly to the printer without a router on page 69 for more information.
If you are on the road, you can print a document by sending an email with the HP ePrint app to your HP ePrint enabled printer. See Print with HP ePrint on page 42 for more information.
Printing using Apple’s AirPrint is supported for iPad (iOS 4.2), iPhone (3GS or later), iPod touch (third generation or later), and Mac (OS X 10.7 or later).
To use AirPrint, ensure the following:
TIP: You can change the default paper size automatically detected by the printer. For more information, see Change the default paper size detected by printer on page 19.
NOTE: All documents are copied in normal quality print mode. You cannot change the print mode quality when copying.
To copy documents
 ) or the Start Copy Color button (
  ) to make a copy. Copying will start two seconds after the last button press.
TIP: You can increase the number of copies by pressing the button multiple times.
Scan to a computer
Before scanning to a computer, make sure you have already installed the HP recommended printer software. The printer and computer must be connected and turned on.
To scan a document or photo to a file (Windows)
1. Load the original print side down on the right front corner of the scanner glass.
2. Double-click the printer icon on the desktop or do one of the following to open the printer software:
3. In the printer software, click Scan a Document or Photo .
4. Select the type of scan you want and then click Scan .
NOTE: Click the More link at the top right corner of the Scan dialog to review and modify settings for any scan.
For more information, see Change scan settings (Windows) on page 51.
If Show Viewer After Scan is selected, you can make adjustments to the scanned image in the preview screen.
To scan a document or photo to email (Windows)
1. Load the original print side down on the right front corner of the scanner glass.
2. Double-click the printer icon on the desktop or do one of the following to open the printer software:
3. In the printer software, click Scan a Document or Photo .
4. Select the type of scan you want and then click Scan.
Choose Email as PDF or Email as JPEG to open your email software with the scanned file as an attachment.
NOTE: Click the More link at the top right corner of the Scan dialog to review and modify settings for any scan.
For more information, see Change scan settings (Windows) on page 51.
If Show Viewer After Scan is selected, you can make adjustments to the scanned image in the preview screen.
To scan an original from HP printer software (OS X)
1. Open HP Scan.
HP Scan is located in the Applications/Hewlett-Packard folder at the top level of the hard disk.
2. Click Scan.
3. Choose the type of scan profile you want and follow the on-screen instructions.
Webscan is a feature of the embedded web server that lets you scan photos and documents from your printer to your computer using a web browser.
This feature is available even if you did not install the printer software on your computer.
NOTE: By default, Webscan is off. You can enable this feature from the EWS.
If you are unable to open Webscan in the EWS, your network administrator might have turned it off. For more information, contact your network administrator or the person who set up your network.
To enable Webscan
To scan using Webscan
Scanning using Webscan offers basic scan options. For additional scan options or functionality, scan from the HP printer software.
Clear a paper jam
| Solve paper jam issue |
|
NOTE: The HP online troubleshooting wizards may not be available in all languages.
Read general instructions in the Help for clearing paper jams
Paper jams can occur in several locations.
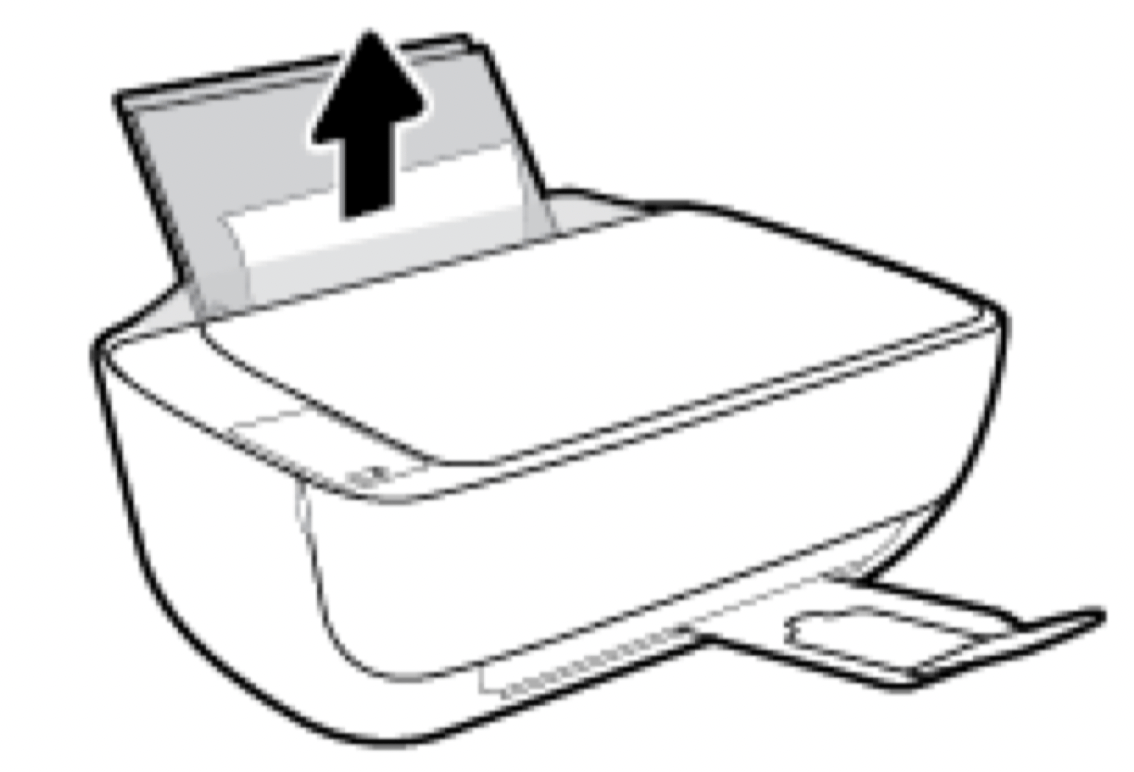
To clear a paper jam from the input tray
1. Press the Cancel button (  ) to try to clear the jam automatically. If this does not work, complete the following steps to clear the jam manually.
2. Pull the paper gently out of the input tray.
3. Make sure there is no foreign object in the paper path, and then reload paper.
NOTE: The input tray shield can prevent foreign debris from falling into the paper path and causing serious paper jams. Do not take down the input tray shield.
4. Press the Resume button (  ) on the control panel to continue the current job.
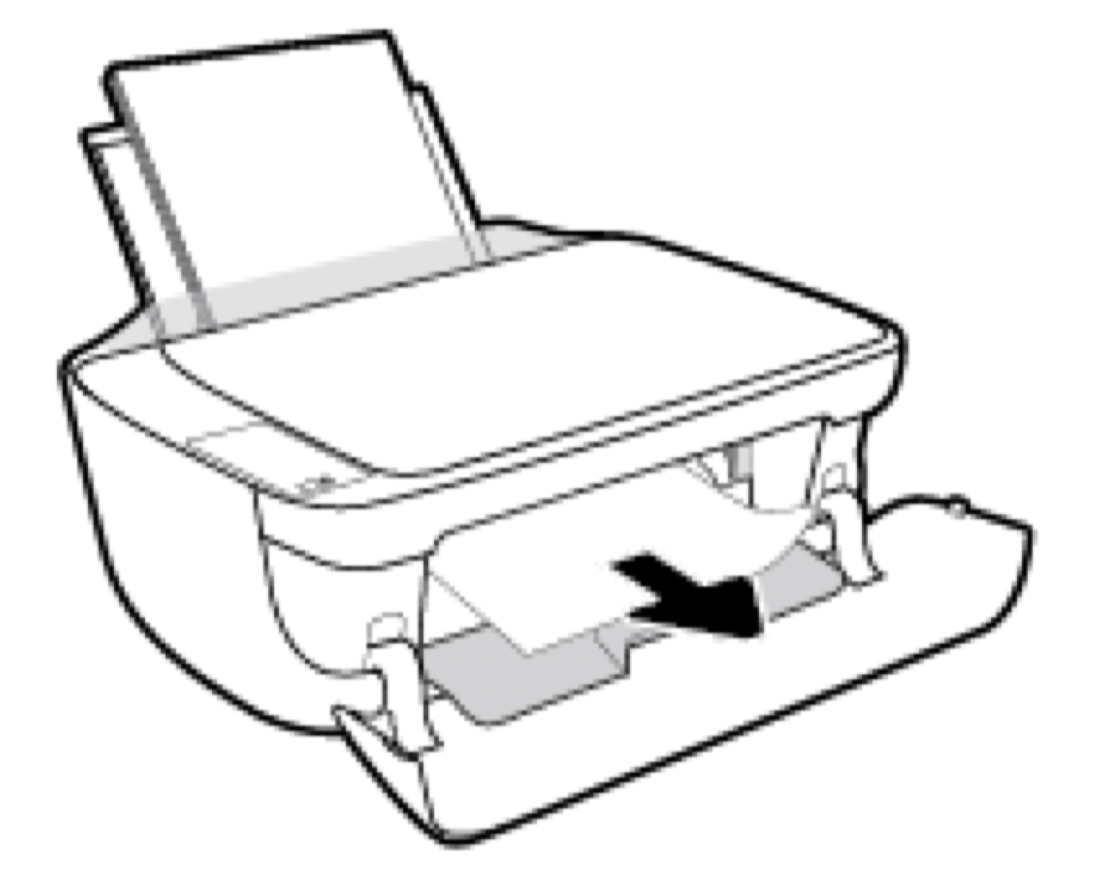
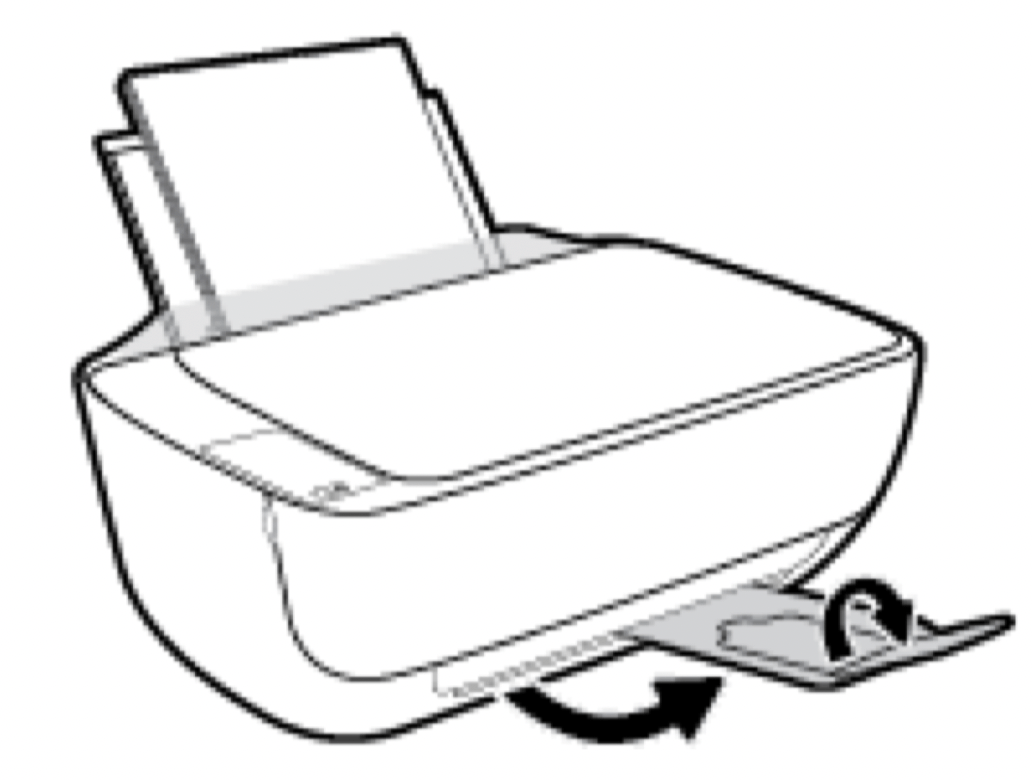
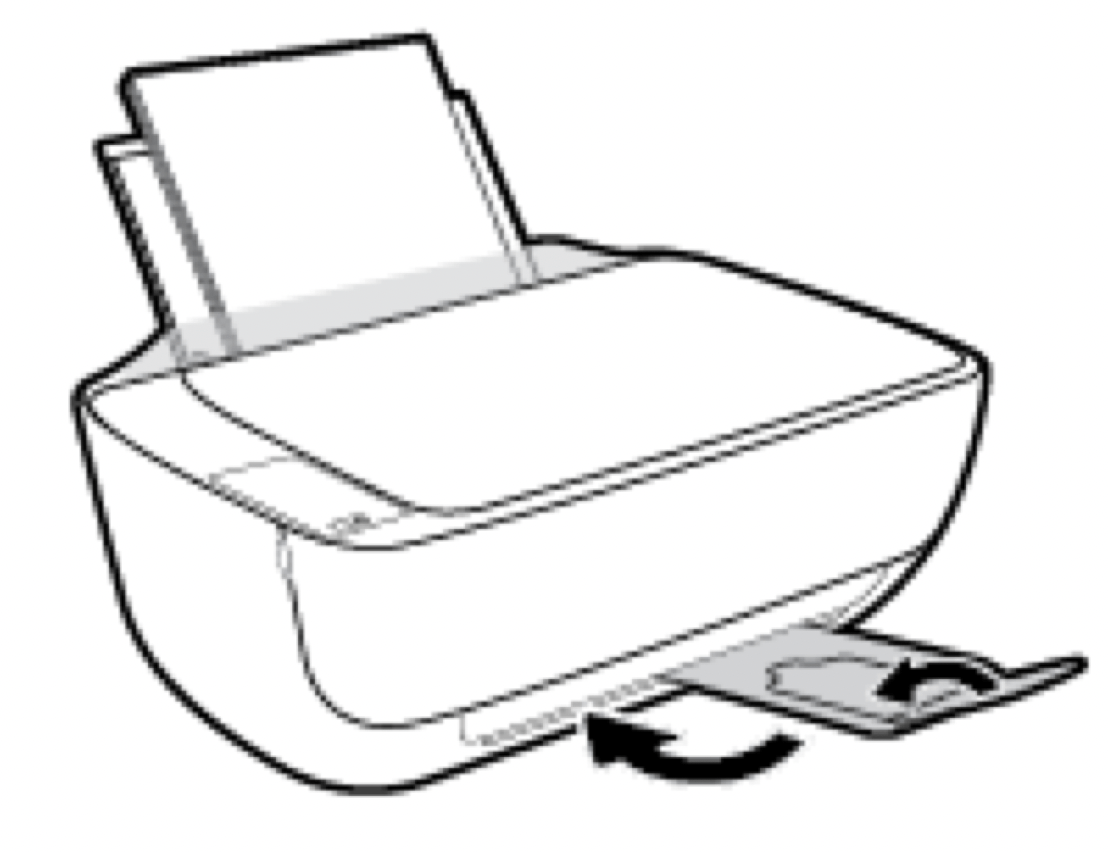
To clear a paper jam from the output tray
1. Press the Cancel button ( ) to try to clear the jam automatically. If this does not work, complete the following steps to clear the jam manually.
2. Pull the paper gently out of the output tray.
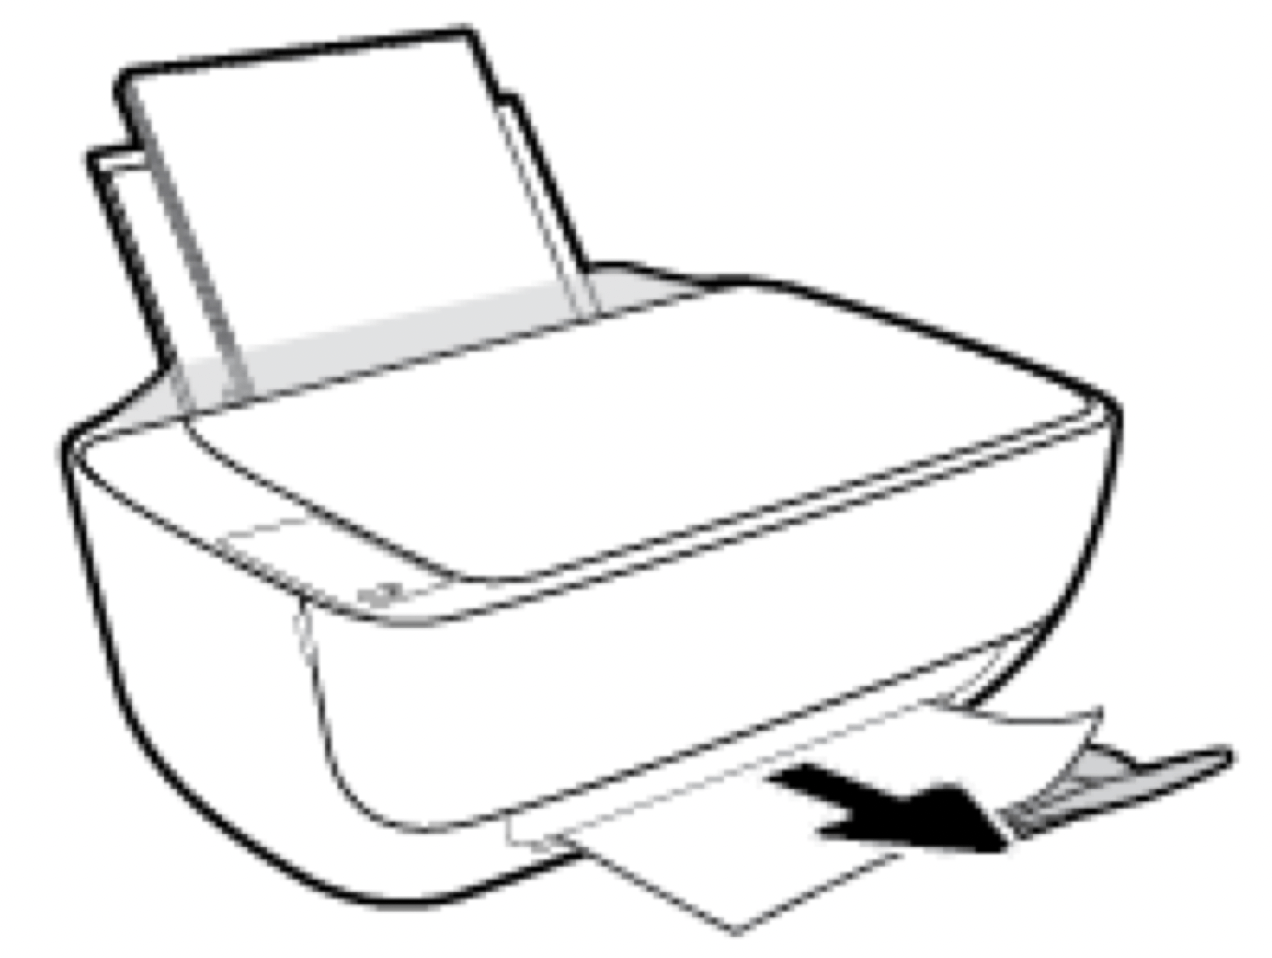
3. Press the Resume button ( ) on the control panel to continue the current job.
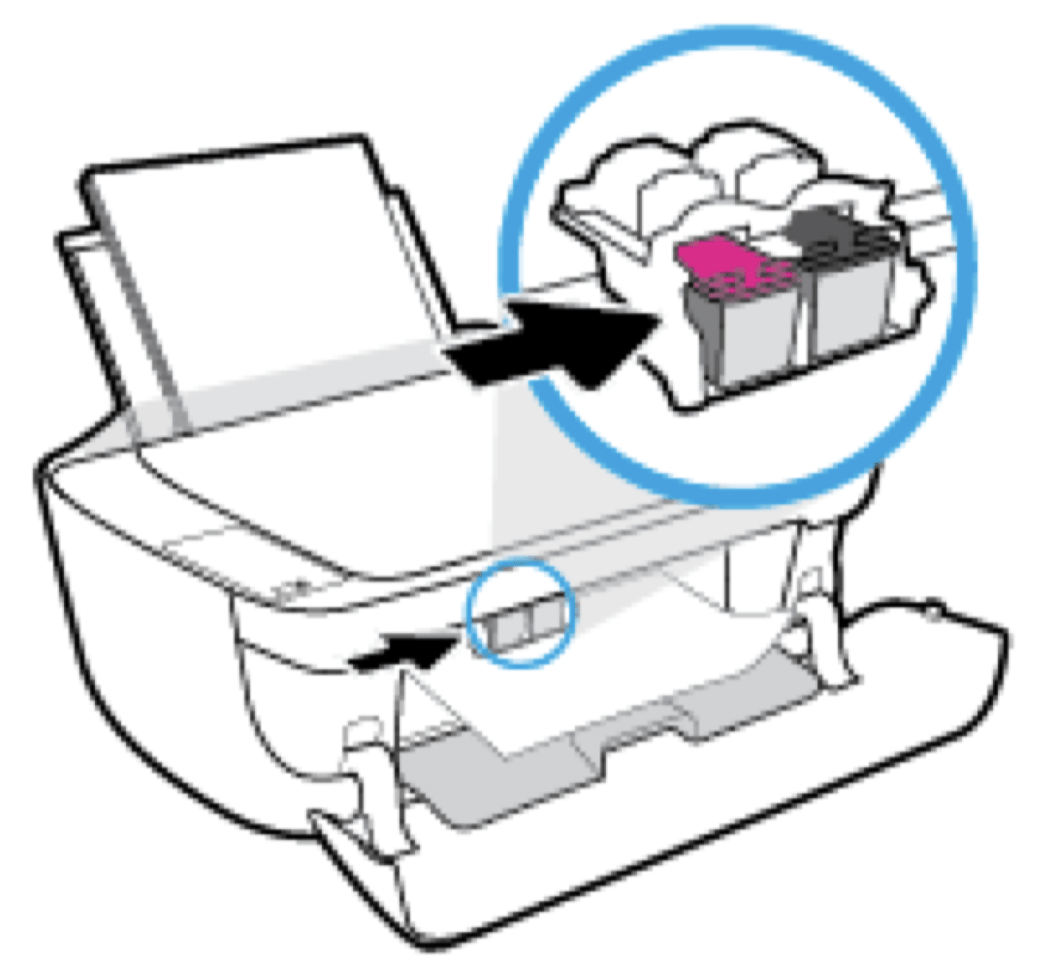
To clear a paper jam from the cartridge access area
1. Press the Cancel button ( ) to try to clear the jam automatically. If this does not work, complete the following steps to clear the jam manually.
2. Remove the jammed paper.
 ) to turn off the printer.
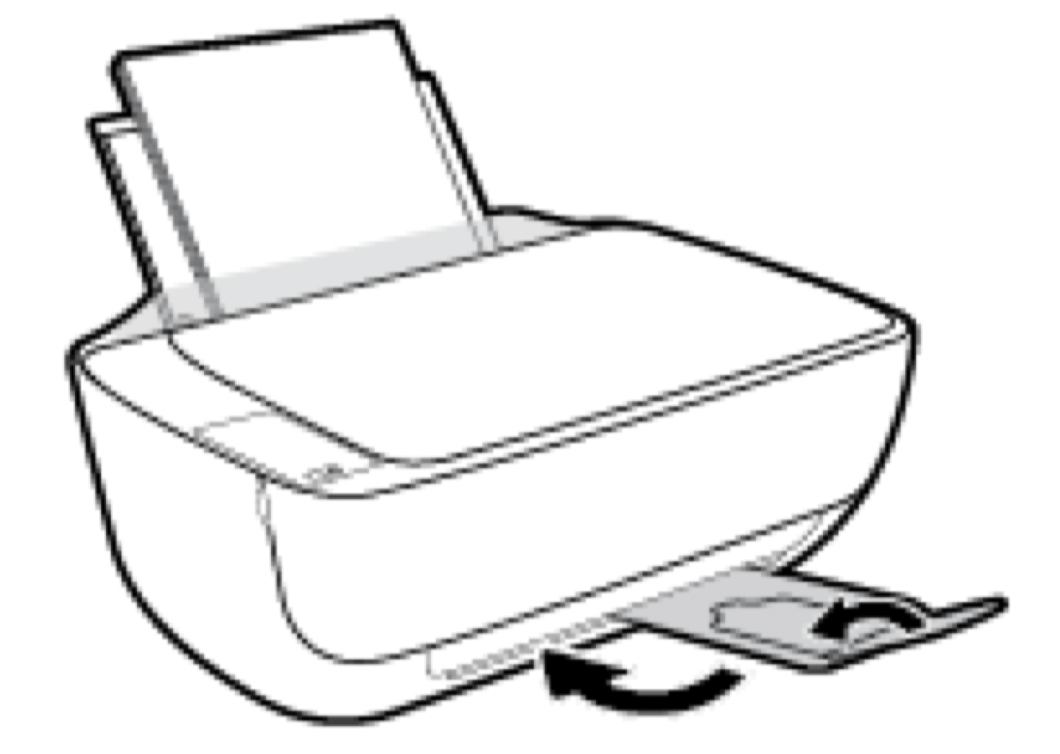
3. Press the Power button ( ) to turn on the printer.
To clear a paper jam inside of the printer
1. Press the Cancel button ( ) to try to clear the jam automatically. If this does not work, complete the following steps to clear the jam manually.
2. Press the Power button ( ) to turn off the printer.
3. Turn the printer over, locate the cleanout door on the bottom of the printer, and then pull both tabs on the cleanout door to open it.
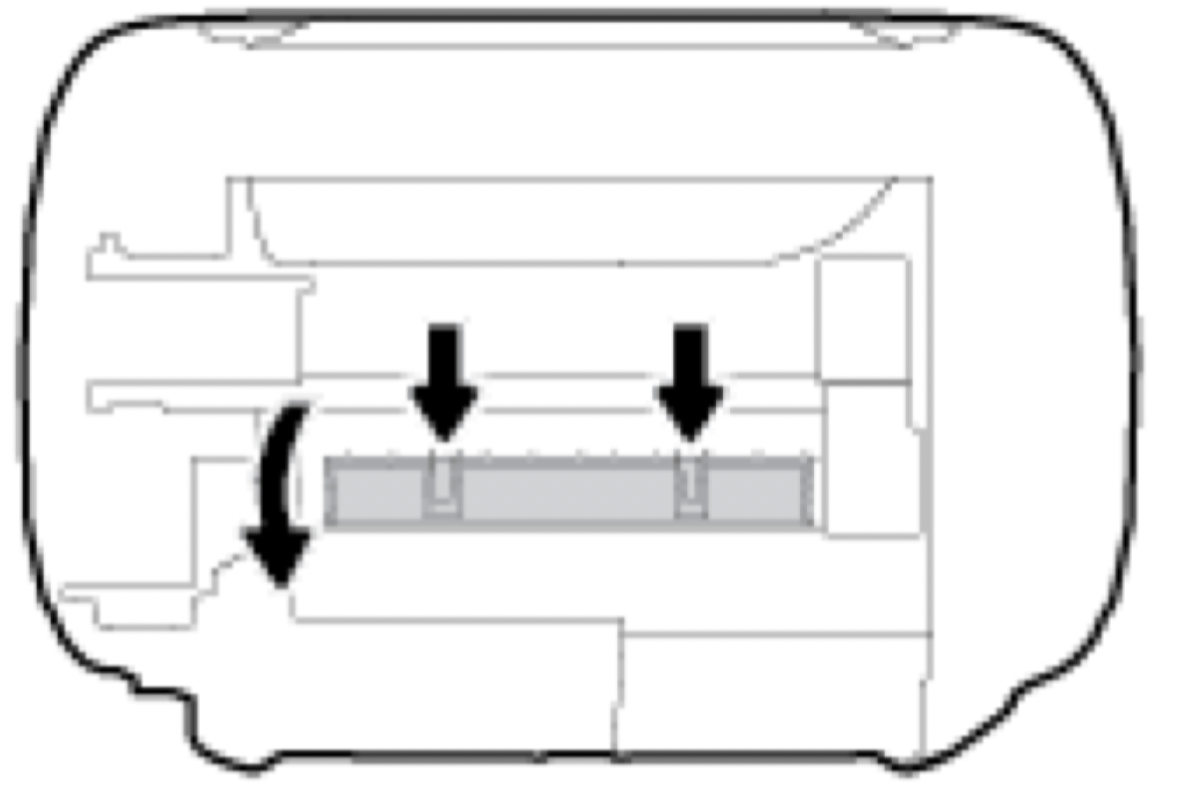
4. Remove the jammed paper.

5. Close the cleanout door. Gently push the door towards the printer until both latches snap into place.
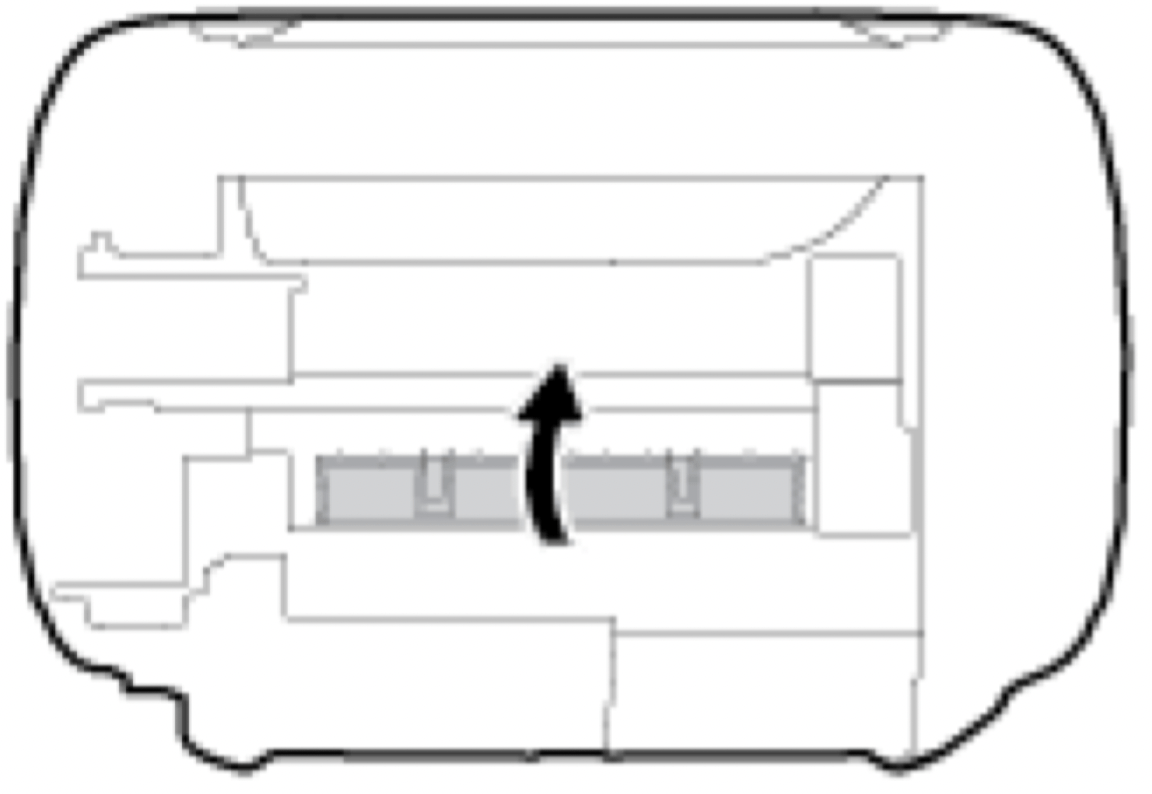
6. Turn the printer over, and then press the Power button ( ) to turn on the printer.
Clear a print carriage jam
| Resolve a print carriage jam. |
|
NOTE: The HP online troubleshooting wizards may not be available in all languages.
Read general instructions in the Help for clearing a print carriage jams
Remove any objects, such as paper, that are blocking the print carriage.
NOTE: Do not use any tools or other devices to remove jammed paper. Always use caution when removing jammed paper from inside the printer.
Learn how to avoid paper jams
To help avoid paper jams, follow these guidelines.
Solve paper-feed problems
What kind of problem are you having?
Identify whether an ink cartridge has a problem
To identify whether an ink cartridge has a problem, check the status of the Ink Alert light and the corresponding Ink Level icon. For more information, see Control panel lights and display icons status on page 7.
If you get an ink cartridge problem message from the printer software that states at least one of the cartridges has a problem, do the following to identify whether a cartridge has a problem.
1. Remove the black cartridge and then close the cartridge access door.
2. Install the black cartridge back in the printer, remove tri-color cartridge, and then close the cartridge access door.
Fix ink cartridge problems
If an error occurs after a cartridge is installed, or if a message indicates a cartridge problem, try removing the ink cartridges, verifying the protective piece of plastic tape has been removed from each ink cartridge, and then reinserting the ink cartridges. If this does not work, clean the cartridge contacts. If the problem is still not resolved, replace the ink cartridges. For information about replacing ink cartridges, see Replace ink cartridges on page 58.
To clean cartridge contacts
CAUTION: The cleaning procedure should take only a few minutes. Make sure that the ink cartridges are reinstalled in the printer as soon as possible. It is not recommended to leave the ink cartridges outside of the printer longer than 30 minutes. This could result in damage to the printhead or the ink cartridges.
1. Check that power is on.
2. Close the output tray extender, and then rotate the output tray clockwise to stow it in the printer.
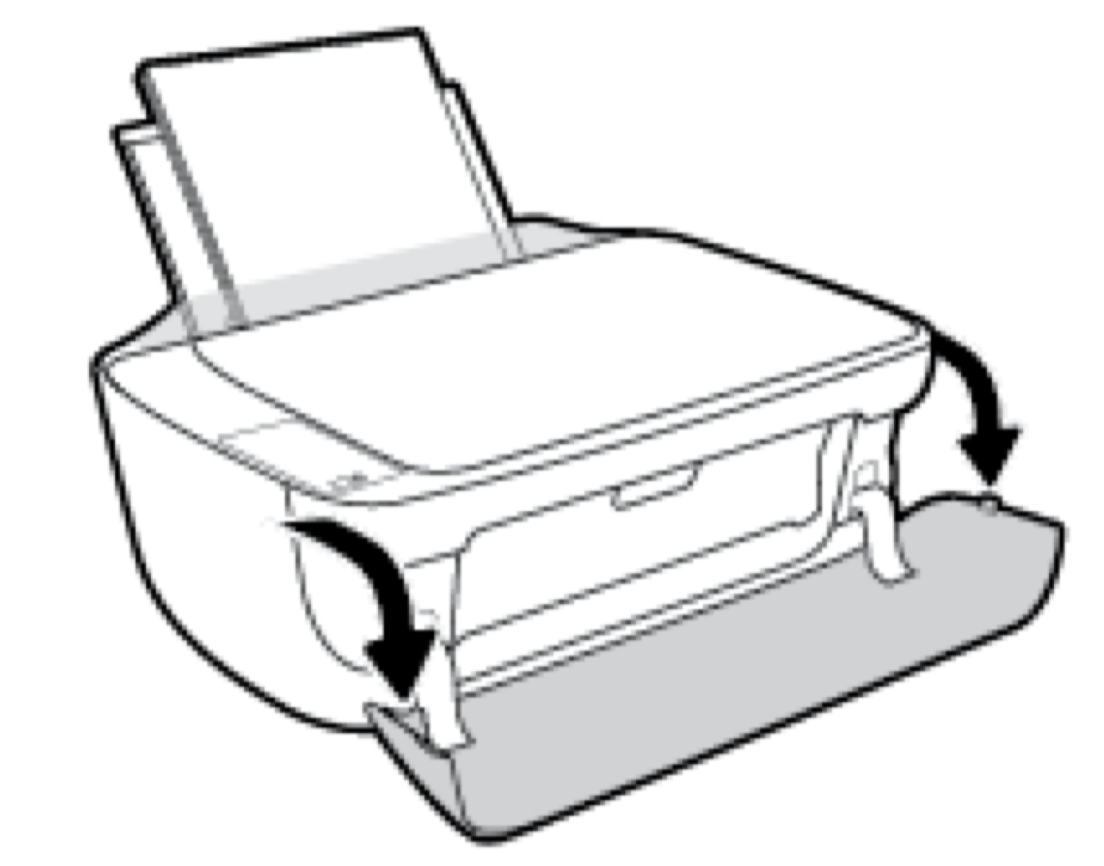
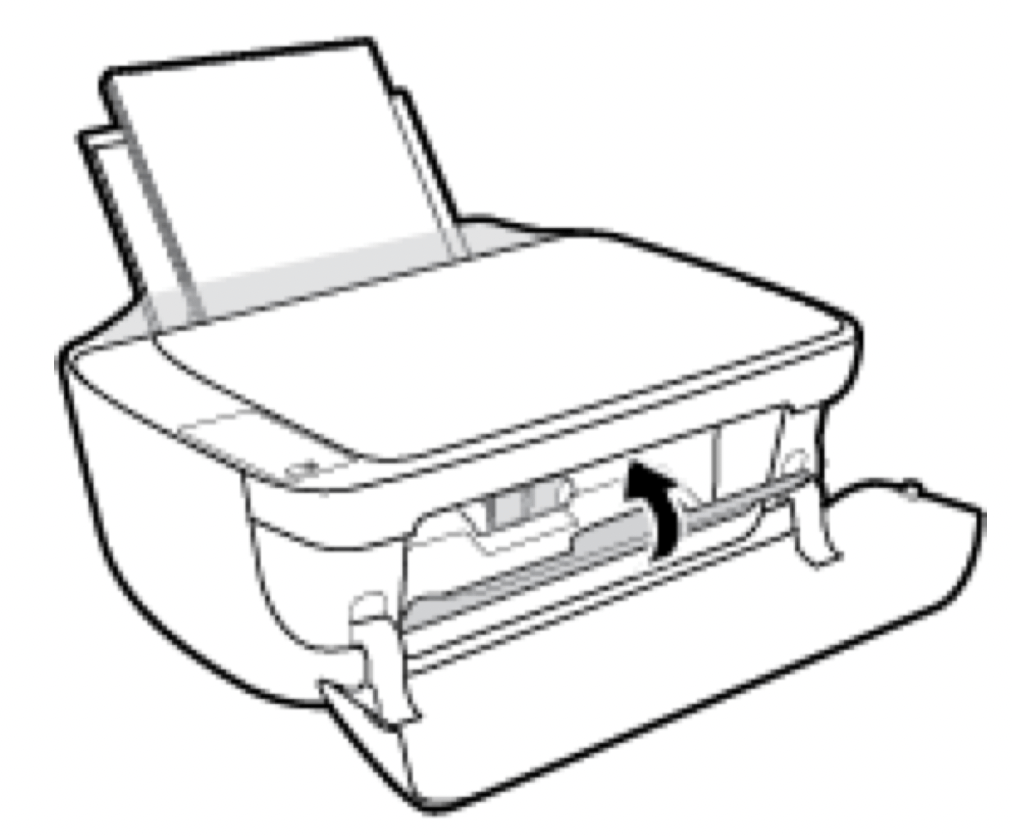
3. Open the front door of the printer.
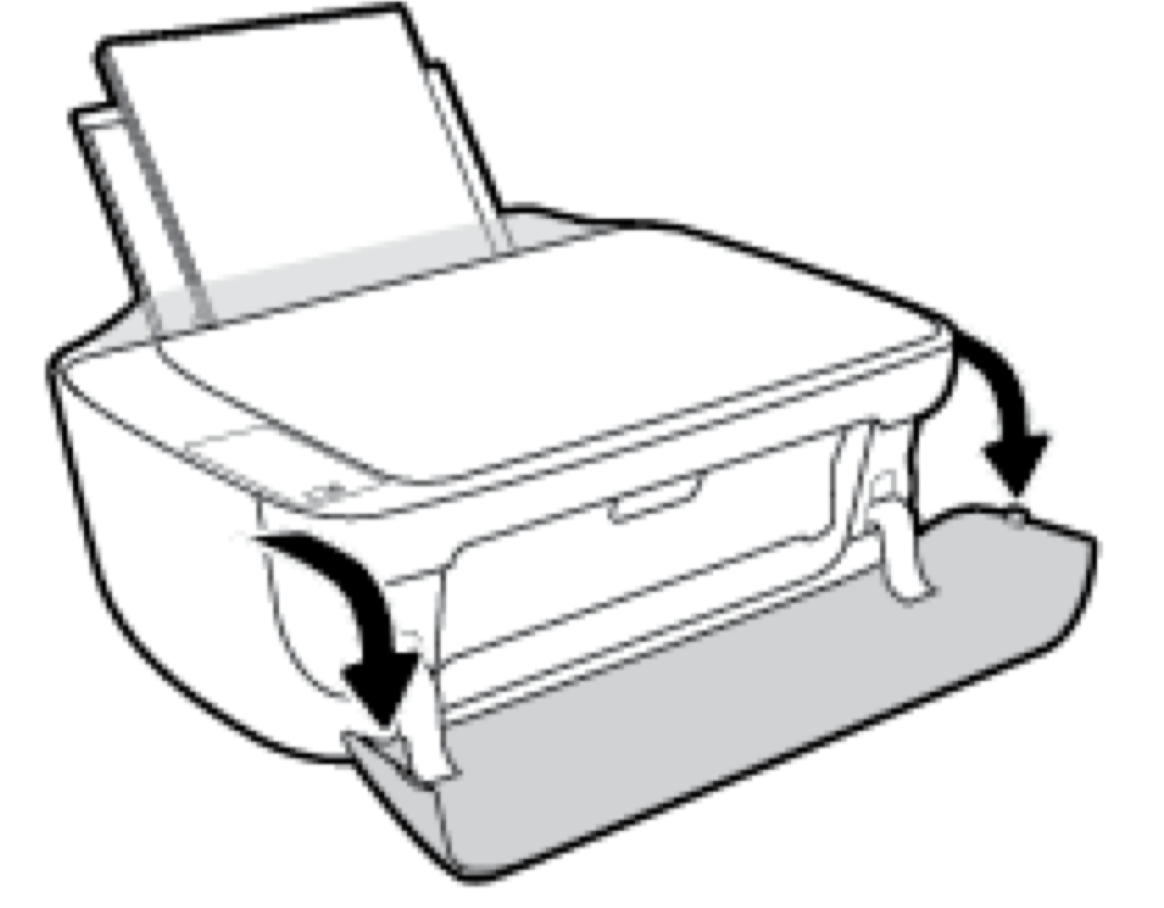
4. Open the cartridge access door and wait for the print carriage to move to the center of the printer.
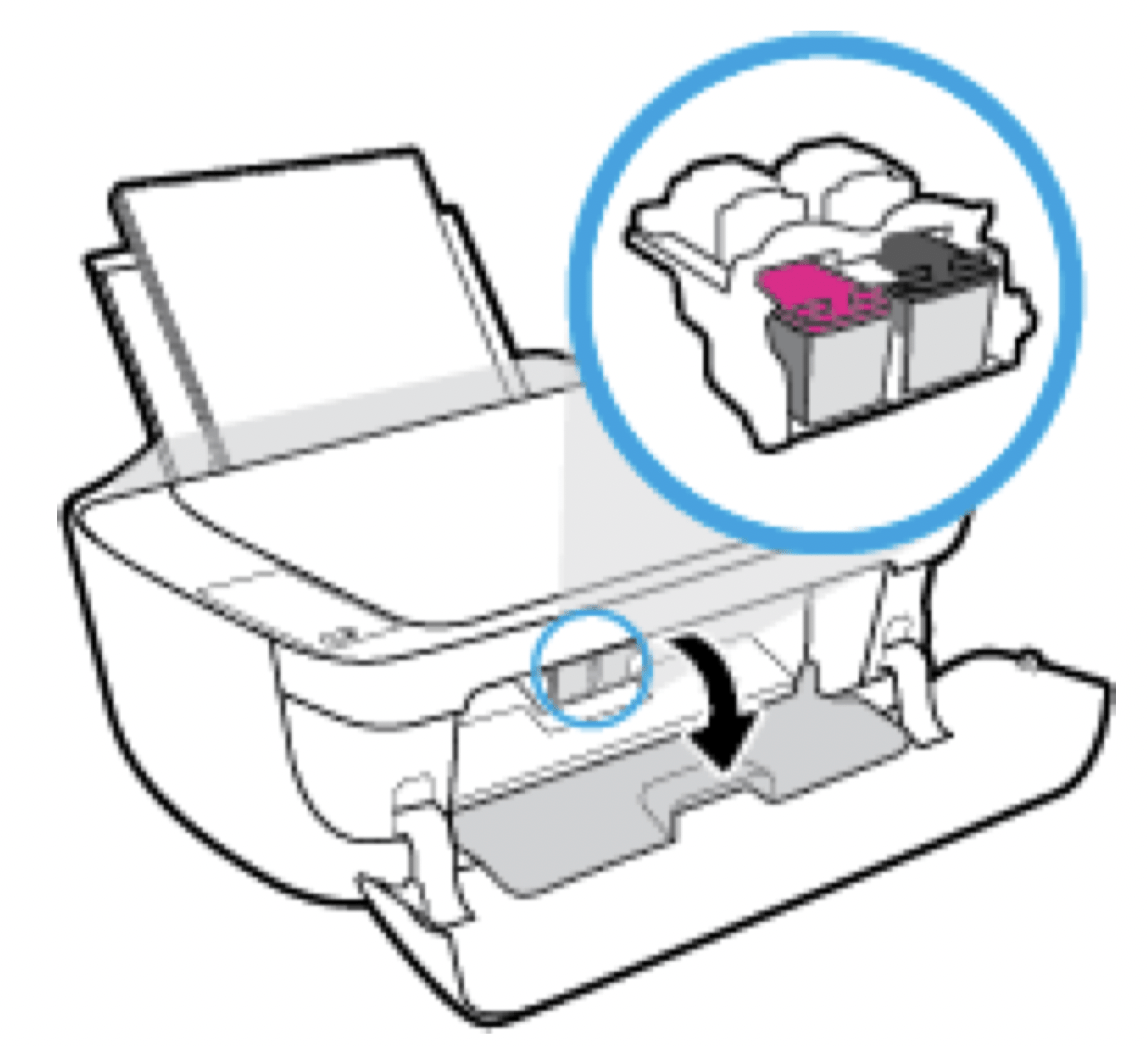
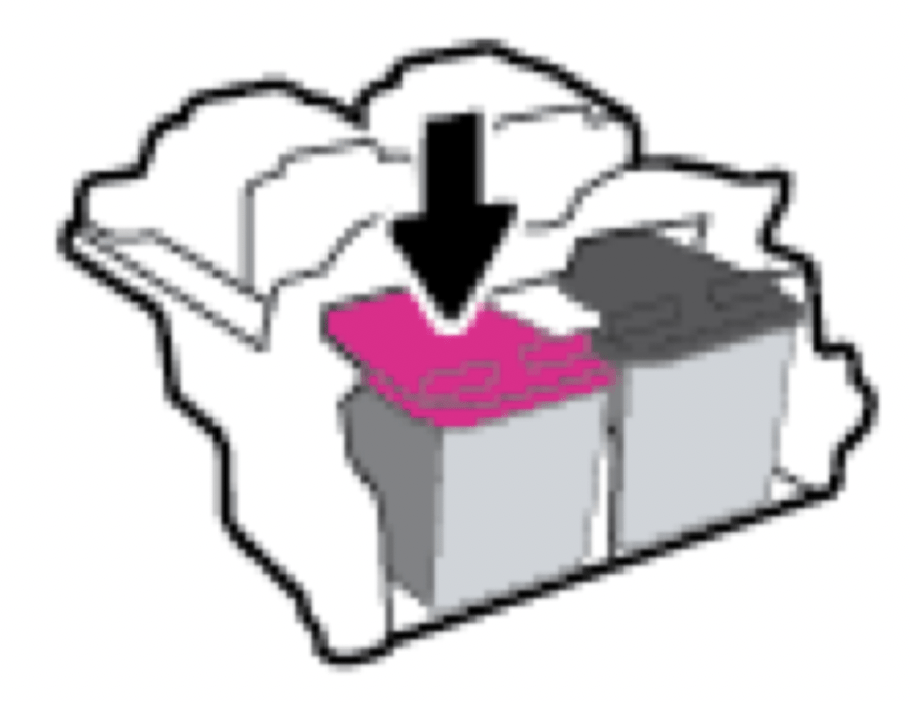
5. Remove the ink cartridge indicated in the error message.
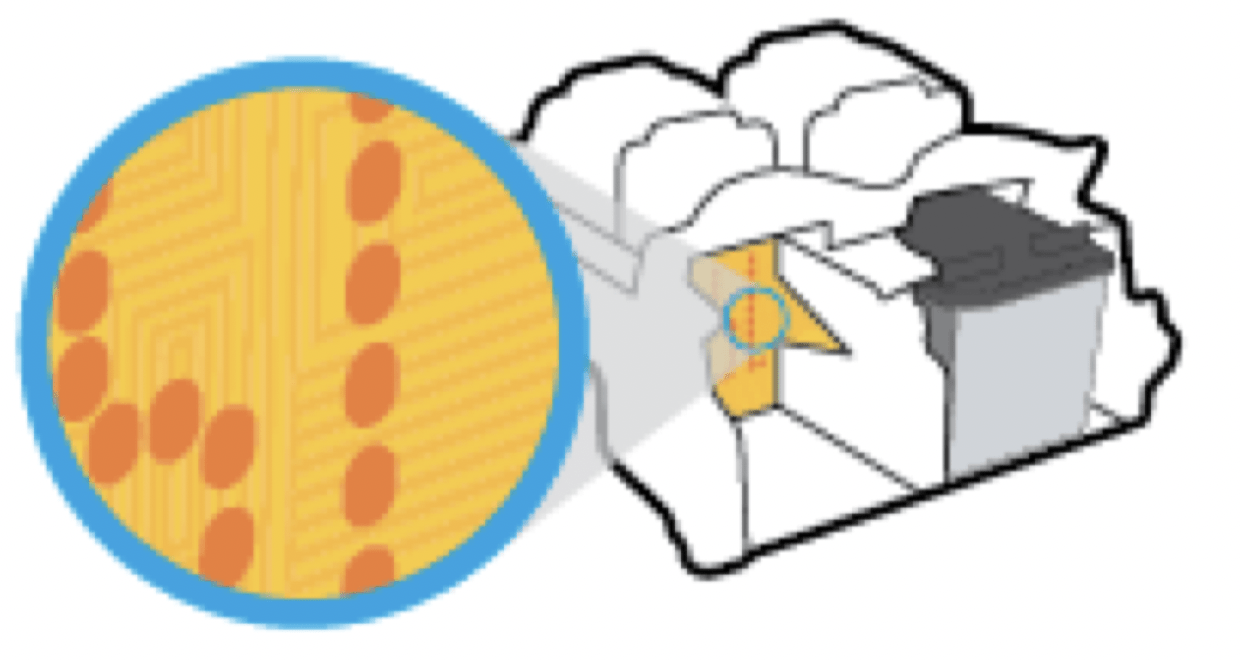
6. Clean the cartridge contacts and printer contacts.
Hold the ink cartridge by its sides with the bottom pointing up and locate the electrical contacts on the ink cartridge.
The electrical contacts are the small gold-colored dots on the ink cartridge.
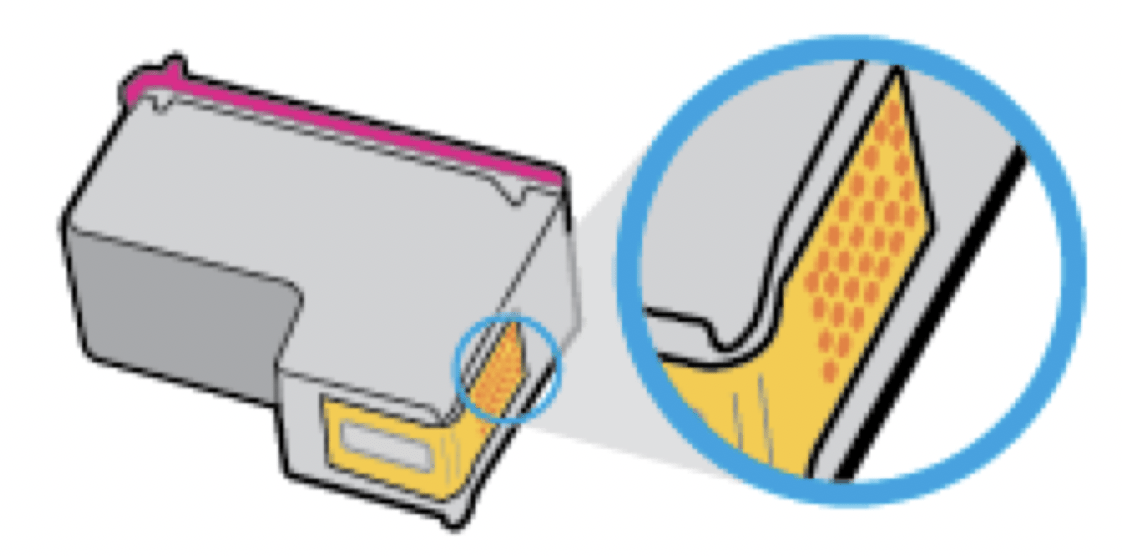
CAUTION: Be careful to wipe only the contacts, and do not smear any of the ink or other debris elsewhere on the ink cartridge.
On the inside of the printer, locate the contacts for the cartridge.
The printer contacts are the set of gold-colored bumps positioned to meet the contacts on the ink cartridge.
7. Reinstall the ink cartridge.
8. Close the cartridge access door, and then close the front door.
9. Check if the error message has gone away. If you still receive the error message, turn the printer off, and then on.
NOTE: If one ink cartridge is causing problems, you can remove it and use the single-cartridge mode to operate the printer with only one ink cartridge.
Fix ink cartridge incompatible issues
The ink cartridge is not compatible with your printer. This error can occur if you install an HP Instant Ink cartridge into a printer that has not been enrolled in the HP Instant Ink program. It can also occur if the HP Instant Ink cartridge was previously used in a different printer enrolled in the HP Instant Ink program.
Fix problems with page not printing (unable to print)
| HP Print and Scan Doctor |
The HP Print and Scan Doctor is a utility that will try to diagnose and fix the issue automatically. NOTE: This utility is only available for Windows operation system. |
| Troubleshoot problems with print jobs not printing. |
Use an HP online troubleshooting wizard Get step-by-step instructions if the printer is not responding or printing. |
NOTE: The HP Print and Scan Doctor and the HP online troubleshooting wizards may not be available in all languages.
Read general instructions in the Help for unable to print issues
To resolve print issues (Windows)
Make sure that the printer is turned on and that there is paper in the input tray. If you are still unable to print, try the following in order:
1. Check for error messages from the printer software and resolve them by following the on-screen instructions.
2. If your computer is connected to the printer with a USB cable, disconnect and reconnect the USB cable. If your computer is connected to the printer with a wireless connection, confirm that the connection is working.
3. Verify that the printer is not paused or offline.
To verify that the printer is not paused or offline
a. Depending upon your operating system, do one of the following:
b. Either double-click the icon for your printer or right-click the icon for your printer and select See what's printing to open the print queue.
c. On the Printer menu, make sure there are no check marks next to Pause Printing or Use Printer Offline.
d. If you made any changes, try to print again.
4. Verify that the printer is set as the default printer.
To verify that the printer is set as the default printer
a. Depending upon your operating system, do one of the following:
b. Make sure the correct printer is set as the default printer.
The default printer has a check mark in a black or green circle next to it.
c. If the wrong printer is set as the default printer, right-click the correct printer and select Set as Default Printer.
d. Try using your printer again.
5. Restart the print spooler.
To restart the print spooler
a. Depending upon your operating system, do one of the following:
Windows 8.1 and Windows 8
i. Point to or tap the upper-right corner of the screen to open the Charms bar, and then click the Settings icon.
ii. Click or tap Control Panel, and then click or tap System and Security.
iii. Click or tap Administrative Tools, and then double-click or double-tap Services.
iv. Right-click or touch and hold Print Spooler, and then click Properties.
v. On the General tab, next to Startup type, make sure that Automatic is selected.
vi. If the service is not already running, under Service status, click or tap Start, and then click or tap OK.
Windows 7
i. From the Windows Start menu, click Control Panel, System and Security, and then Administrative Tools.
ii. Double-click Services.
iii. Right-click the Print Spooler, and then click Properties.
iv. On the General tab, next to Startup type, make sure that Automatic is selected.
v. If the service is not already running, under Service status, click Start, and then click OK.
Windows Vista
i. From the Windows Start menu, click Control Panel, System and Maintenance, Administrative Tools.
ii. Double-click Services.
iii. Right-click the Print Spooler service, and then click Properties.
iv. On the General tab, next to Startup type, make sure that Automatic is selected.
v. If the service is not already running, under Service status, click Start, and then click OK.
Windows XP
i. From the Windows Start menu, right click My Computer.
ii. Click Manage, and then click Services and Applications.
iii. Double-click Services, and then select Print Spooler.
iv. Right-click Print Spooler, and click Restart to restart the service.
b. Make sure the correct printer is set as the default printer.
The default printer has a check mark in a black or green circle next to it.
c. If the wrong printer is set as the default printer, right-click the correct printer and select Set as Default Printer.
d. Try using your printer again.
6. Restart the computer.
7. Clear the print queue.
To clear the print queue
a. Depending upon your operating system, do one of the following:
b. Double-click the icon for your printer to open the print queue.
c. On the Printer menu, click Cancel all documents or Purge Print Document, and then click Yes to confirm.
d. If there are still documents in the queue, restart the computer and try printing again after the computer has restarted.
e. Check the print queue again to make sure it is clear, and then try to print again.
To resolve print issues (OS X)
1. Check for error messages and resolve.
2. Disconnect and reconnect the USB cable.
3. Verify that the product is not paused or offline.
To verify that the product is not paused or offline
a. In System Preferences, click Print & Fax.
b. Click the Open Print Queue button.
c. Click a print job to select it.
Use the following buttons to manage the print job:
d. If you made any changes, try to print again.
4. Restart the computer.
|
Step-by-step instructions for resolving most print quality issues. |
Troubleshoot print quality issues online |
Read general instructions in the Help for resolving print quality issues
NOTE: To protect the cartridges from drying out, always turn the printer off using the Power button, and wait until the Power button light goes out.
To improve print quality (Windows)
1. Make sure you are using original HP ink cartridges.
2. Check the printer software to make sure you have selected the appropriate paper type from the Media drop-down list and print quality from the Quality Settings drop-down list.
In the printer software, click Print & Scan and then click Set Preferences to access the print properties.
3. Check the estimated ink levels to determine if the ink cartridges are low on ink.
For more information, see Check estimated ink levels on page 56. If the ink cartridges are low on ink consider replacing them.
4. Check the paper type.
For best print quality, use high quality HP paper, or papers that adhere to the ColorLok® standard. For more information, see Paper basics on page 21.
Always make sure the paper you are printing on is flat. For best results when printing images, use HP Advanced Photo Paper.
Store specialty paper in its original packaging inside a resealable plastic bag on a flat surface in a cool, dry place. When you are ready to print, remove only the paper you plan to use immediately. When you have finished printing, return any unused photo paper to the plastic bag. This prevents the photo paper from curling.
5. Align the ink cartridges.
To align the ink cartridges
a. Load letter or A4 unused plain white paper into the input tray.
b. Open the printer software. For more information, see Open the HP printer software (Windows) on page 23.
c. In the printer software, click Print & Scan and then click Maintain Your Printer to access the printer toolbox.
The printer toolbox appears.
d. Click Align Ink Cartridges on the Device Services tab.
The printer prints an alignment page.
e. Follow the on-screen instructions to load the cartridge alignment page print side down on the scanner glass, and then click Scan to scan the alignment page.
The printer aligns the ink cartridges. Recycle or discard the cartridge alignment sheet.
6. Print a diagnostics page if the ink cartridges are not low on ink.
To print a diagnostics page
a. Load letter or A4 unused plain white paper into the input tray.
b. Open the printer software. For more information, see Open the HP printer software (Windows) on page 23.
c. In the printer software, click Print & Scan and then click Maintain Your Printer to access the printer toolbox.
d. Click Print Diagnostic Information on the Device Reports tab to print a diagnostics page.
e. Review the blue, magenta, yellow, and black boxes on the diagnostics page.
7. Clean the ink cartridges, if the diagnostic page shows steaks or missing portions of the color and black boxes.
To clean the ink cartridges
a. Load letter or A4 unused plain white paper into the input tray.
b. Open the printer software. For more information, see Open the HP printer software (Windows) on page 23.
c. In the printer software, click Print & Scan and then click Maintain Your Printer to access the Printer Toolbox.
d. Click Clean Ink Cartridges on the Device Services tab. Follow the on-screen instructions.
To improve print quality (OS X)
1. Make sure you are using original HP cartridges.
2. Make sure you have selected the appropriate paper type and print quality in the Print dialog.
3. Check the estimated ink levels to determine if the cartridges are low on ink.
Consider replacing the print cartridges if they are low on ink.
4. Check the paper type.
For best print quality, use high quality HP paper, or papers that adhere to the ColorLok® standard. For more information, see Paper basics on page 21.
Always make sure the paper you are printing on is flat. For best results when printing images, use HP Advanced Photo Paper.
Store specialty paper in its original packaging inside a resealable plastic bag on a flat surface in a cool, dry place. When you are ready to print, remove only the paper you plan to use immediately. When you have finished printing, return any unused photo paper to the plastic bag. This prevents the photo paper from curling.
5. Align the printer cartridges.
To align print cartridges from the software
a. Load Letter or A4 plain, white paper in the paper tray.
b. Open HP Utility.
NOTE: HP Utility is located in the Hewlett-Packard folder in the Applications folder at the top level of the hard disk.
c. Select the HP DeskJet 3630 series from the list of devices at the left of the window.
d. Click Align.
e. Click Align and follow the on-screen instructions.
f. Click All Settings to return to the Information and Support pane.
6. Print a test page.
To print a test page
a. Load Letter or A4 plain, white paper in the paper tray.
b. Open HP Utility.
NOTE: HP Utility is located in the Hewlett-Packard folder in the Applications folder at the top level of the hard disk.
c. Select the HP DeskJet 3630 series from the list of devices at the left of the window.
d. Click Test Page.
e. Click the Print Test Page button, and follow the on-screen instructions.
Check the test page for jagged lines in the text or streaks in the text and colored boxes. If you are seeing jagged lines, or streaks, or no ink in portions of the boxes, then automatically clean the cartridges.
7. If the diagnostic page shows steaks or missing portions of the text or colored boxes, clean the print cartridges automatically.
To automatically clean the print head
a. Load Letter or A4 plain, white paper in the paper tray.
b. Open HP Utility.
NOTE: HP Utility is located in the Hewlett-Packard folder in the Applications folder at the top level of the hard disk.
c. Select the HP DeskJet 3630 series from the list of devices at the left of the window.
d. Click Clean Printheads.
e. Click Clean, and follow the on-screen instructions.
CAUTION: Clean the print head only when necessary. Unnecessary cleaning wastes ink and shortens the life of the print head.
NOTE: If print quality still seems poor after you complete cleaning, try aligning the printer. If print quality problems persist after cleaning and aligning, contact HP support.
f. Click All Settings to return to the Information and Support pane.
| Troubleshoot copy problems. |
|
NOTE: The HP online troubleshooting wizards may not be available in all languages.
| HP Print and Scan Doctor |
The HP Print and Scan Doctor is a utility that will try to diagnose and fix the issue automatically. NOTE: This utility is only available for Windows operation system. |
| Solve scan problems |
|
NOTE: The HP Print and Scan Doctor and the HP online troubleshooting wizards may not be available in all languages.
Fix wireless connection
Choose one of the following troubleshooting options.
| HP Print and Scan Doctor |
The HP Print and Scan Doctor is a utility that will try to diagnose and fix the issue automatically. NOTE: This utility is only available for Windows operation system. |
| Use an HP online troubleshooting wizard |
|
NOTE: The HP Print and Scan Doctor and the HP online troubleshooting wizards may not be available in all languages.
Read general instructions in the Help for wireless troubleshooting
Press the Wireless button (  ) and the Information button (
  ) at the same time to print the wireless network test report and network configuration page.
Find network settings for wireless connection
Choose one of the following troubleshooting options.
| HP Print and Scan Doctor |
The HP Print and Scan Doctor is a utility that can tell you the network name (SSID) and password (network key). NOTE: This utility is only available for Windows operation system. |
|
Use an HP online troubleshooting wizard |
Learn how to find your network name (SSID) and wireless password. |
NOTE: The HP Print and Scan Doctor and the HP online troubleshooting wizards may not be available in all languages.
Fix Wi-Fi Direct connection
| Use an HP online troubleshooting wizard |
Troubleshoot your Wi-Fi Direct problem or learn how to configure Wi-Fi Direct. |
NOTE: The HP online troubleshooting wizards may not be available in all languages.
Read general instructions in the Help for Wi-Fi Direct troubleshooting
 ) to turn it on.
Convert USB connection to wireless
Choose one of the following troubleshooting options.
| HP Print and Scan Doctor |
The HP Print and Scan Doctor is a utility that will try to diagnose and fix the issue automatically. NOTE: This utility is only available for Windows operation system. |
|
Use an HP online troubleshooting wizard |
Convert a USB connection to wireless or Wi-Fi Direct. |
NOTE: The HP Print and Scan Doctor and the HP online troubleshooting wizards may not be available in all languages.
Close cartridge access door
The printer shuts down unexpectedly
NOTE: When Auto-Off is enabled, the printer will automatically turn off after 2 hours of inactivity to help reduce energy use. For more information, see Auto-Off on page 26.
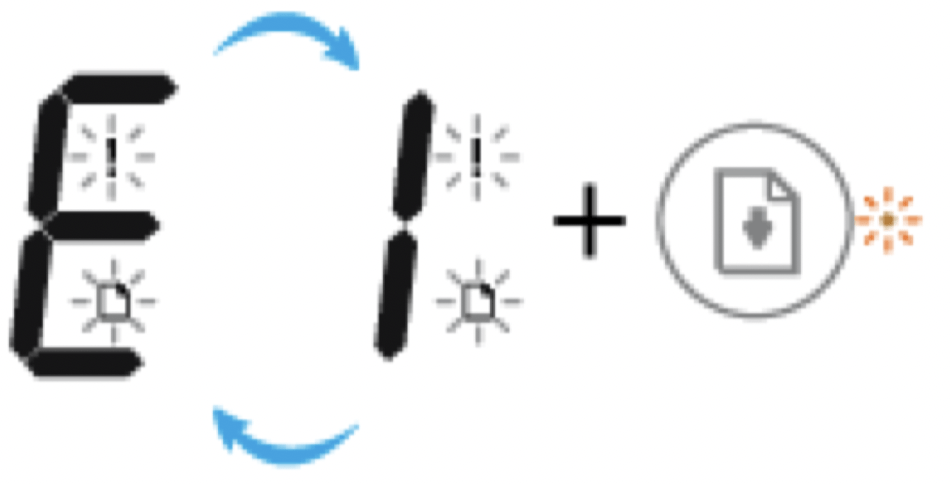
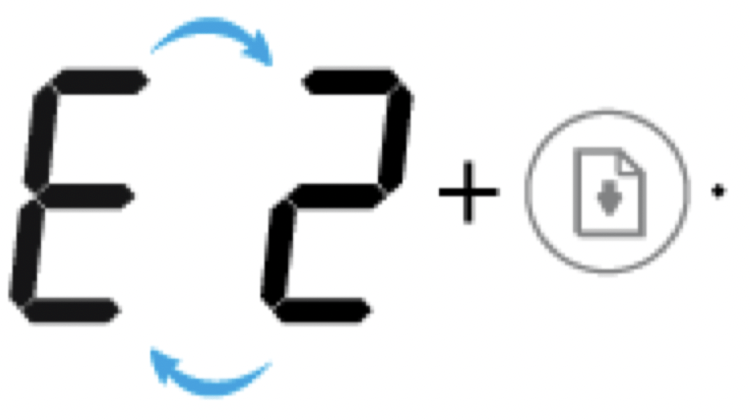
Resolve printer failure
If the Number of copies icon on the printer display is alternating between the letter E and a number, it indicates the printer is in an error state. The letter E and the number work as error codes. For example, if the Number of copies icon is alternating between the letter E and the number 4, it indicates that a paper jam has occurred.
To identify the error code and its corresponding solutions, see the information about the Number of copies icons in Control panel lights and display icons status on page 7.