Loading ...
Loading ...
Loading ...

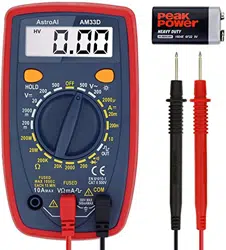
GETTING TO KNOW YOUR DEVICE
Digital LCD Display
Displays a variety of information including results from test measurements, low battery indicator,
and error display. Comes with a backlight for easier reading in dim conditions.
Data Hold Button
When taking measurements and recording results, it is often easier to use the data hold function
to freeze the data being displayed on the digital display. Even when the test leads are removed
from the measurement source, the results will continue to display to take easier notes. Press the
Data Hold Button once to lock in the results, then press it again to reset the reading a “1” will be
displayed until the probes are used to take the next reading.
Backlight Button
Use the backlight button to make the display even easier to read. Just press the backlight button
once to turn the light on; it will slowly dim until it is completely off. If you need to use the light for
longer, just press the button again while the light is dimming or after it has turned off and it will
brighten back up to full capacity again. If you need to turn off the backlight quickly, moving the
rotary switch to the OFF position will turn off the screen and backlight.
Function and Range Switch
This device is what is known as a manual ranging multimeter, meaning that the user must select
the correct range for measurement. Doing so is not difficult and doesn’t have to be intimidating.
If you know the function and range you are going to be measuring, simply turn the dial to that
range to begin. If you are unsure which range you will be testing, begin at the highest range for
that function, if the function comes back as reading zero or is bouncing between a very small
number and zero, simply move the dial to the next highest level. Continue doing this until you
have a satisfactory reading.
COM Terminal
COM is short for “Common Terminal”. This terminal is the plug on the right of the multimeter.
Whenever you are using the multimeter, the black lead is going to be plugged into this terminal.
VΩmA Terminal
This terminal is located in the middle of the multimeter and it is meant for taking most
measurements, as long as the test does not exceed 200mA. The red plug will go in this
terminal.
10A Terminal
This terminal is located on the left side of the meter, it is meant for taking measurements where
the current is over 200mA but below 10A. The red plug will go in this terminal. Be careful when
using this terminal because of the amount of energy that is being put through it. Only expose the
probes and multimeter to testing for 10 seconds at a time, and only apply this every 15 minutes.
Doing this will prevent the multimeter from overloading or overheating.
Loading ...
Loading ...
Loading ...
