Owner's Guide Vacuum Cleaner
Product overview
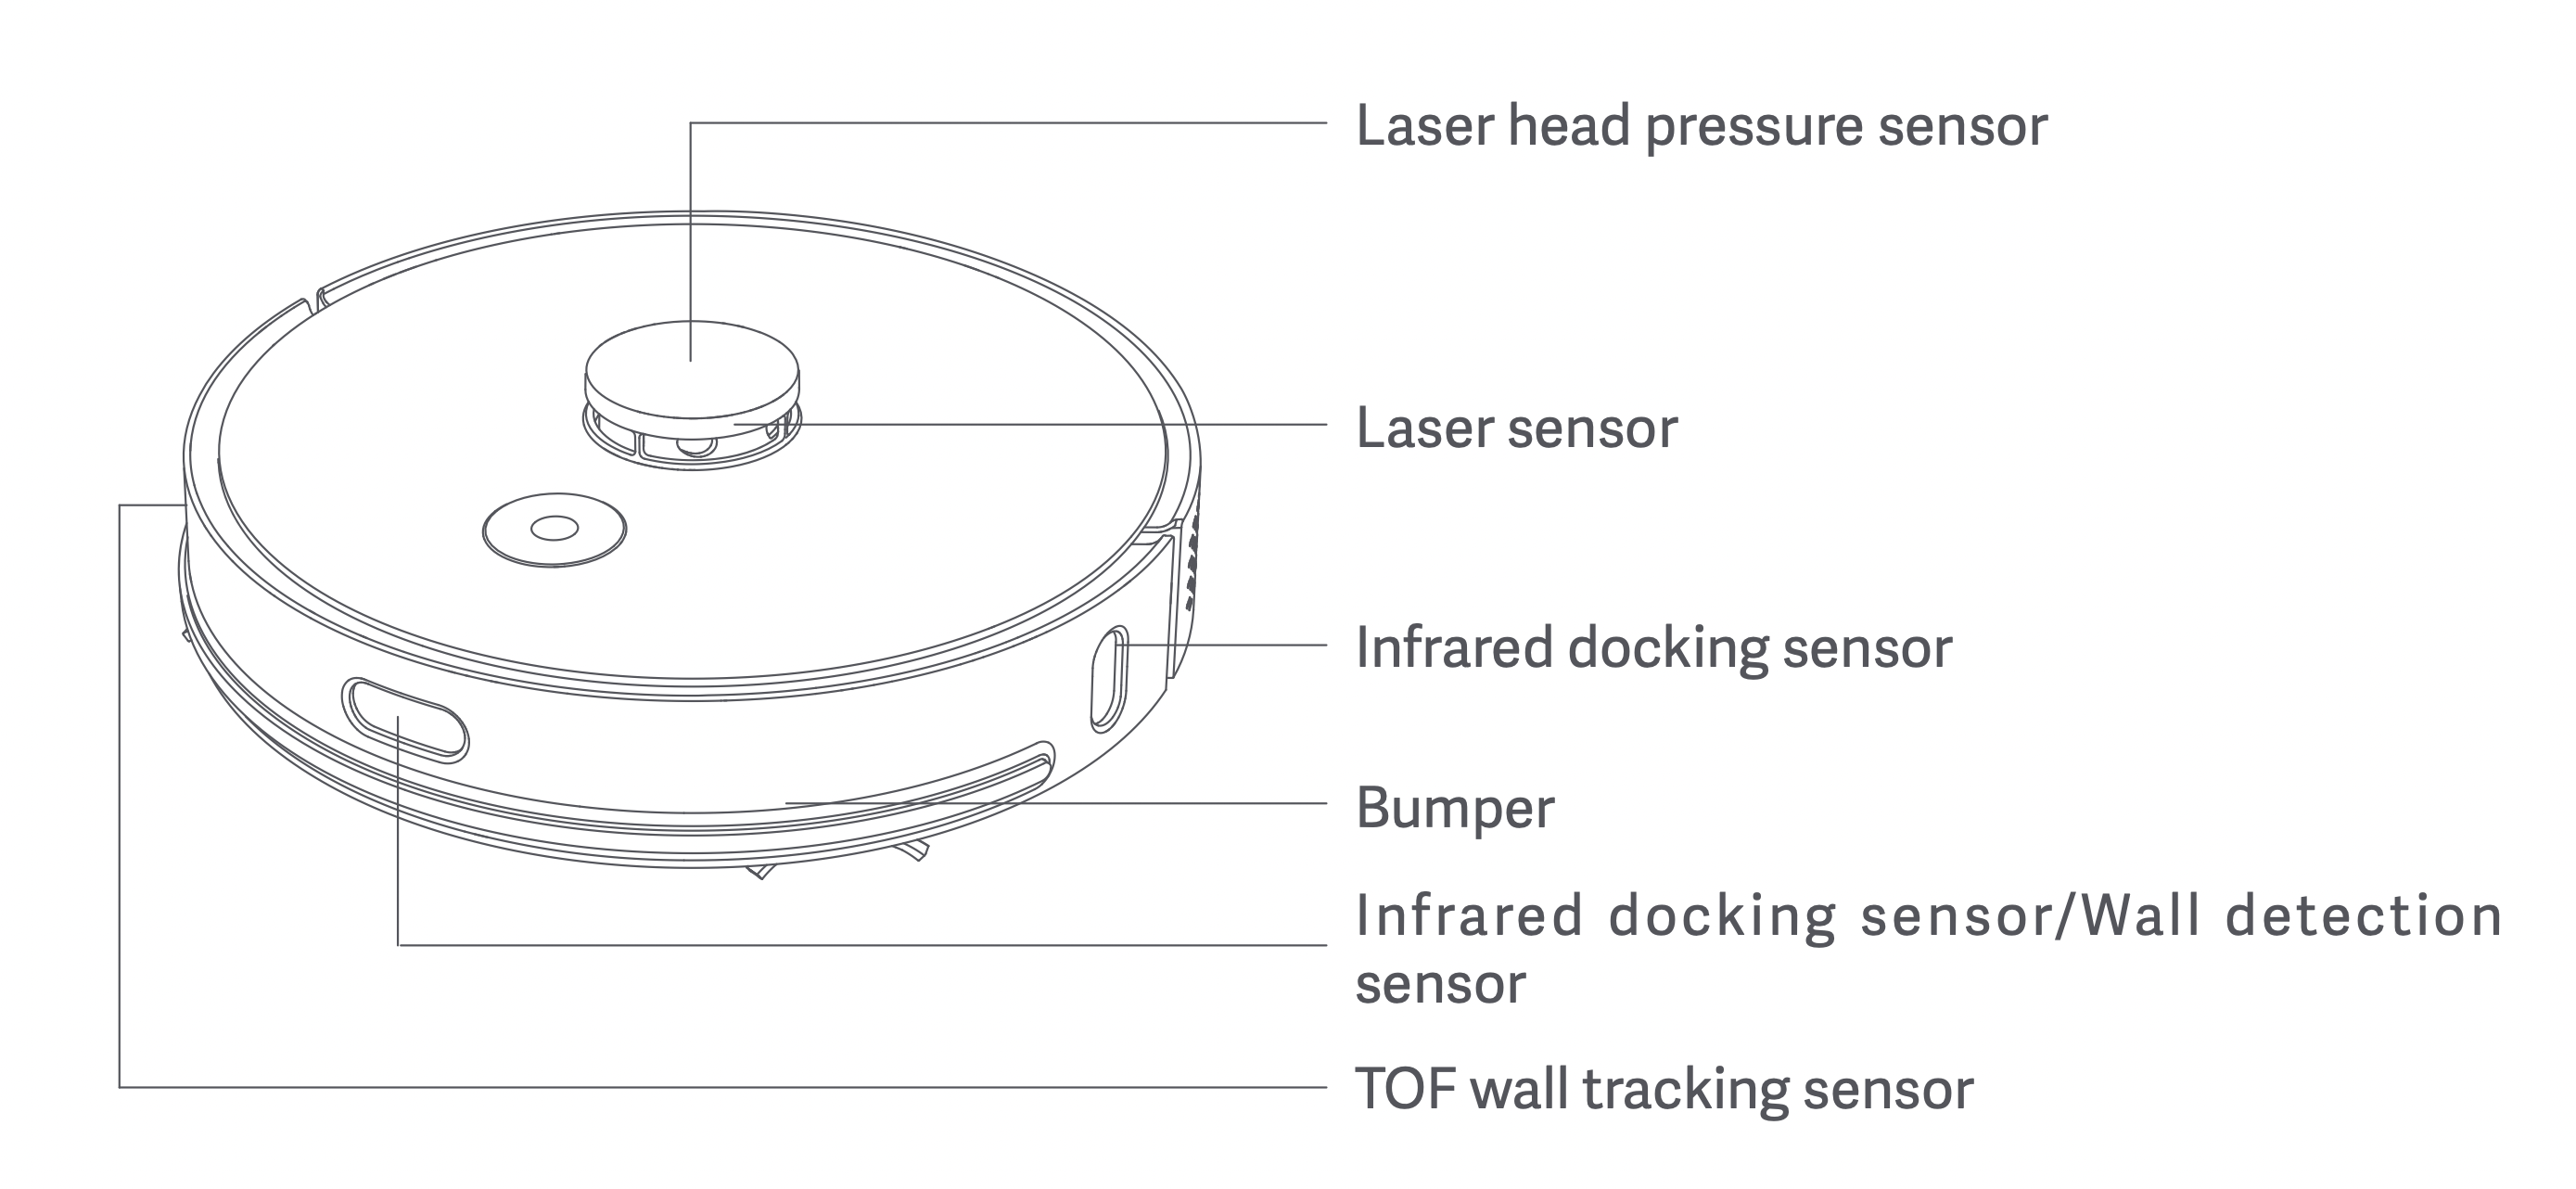
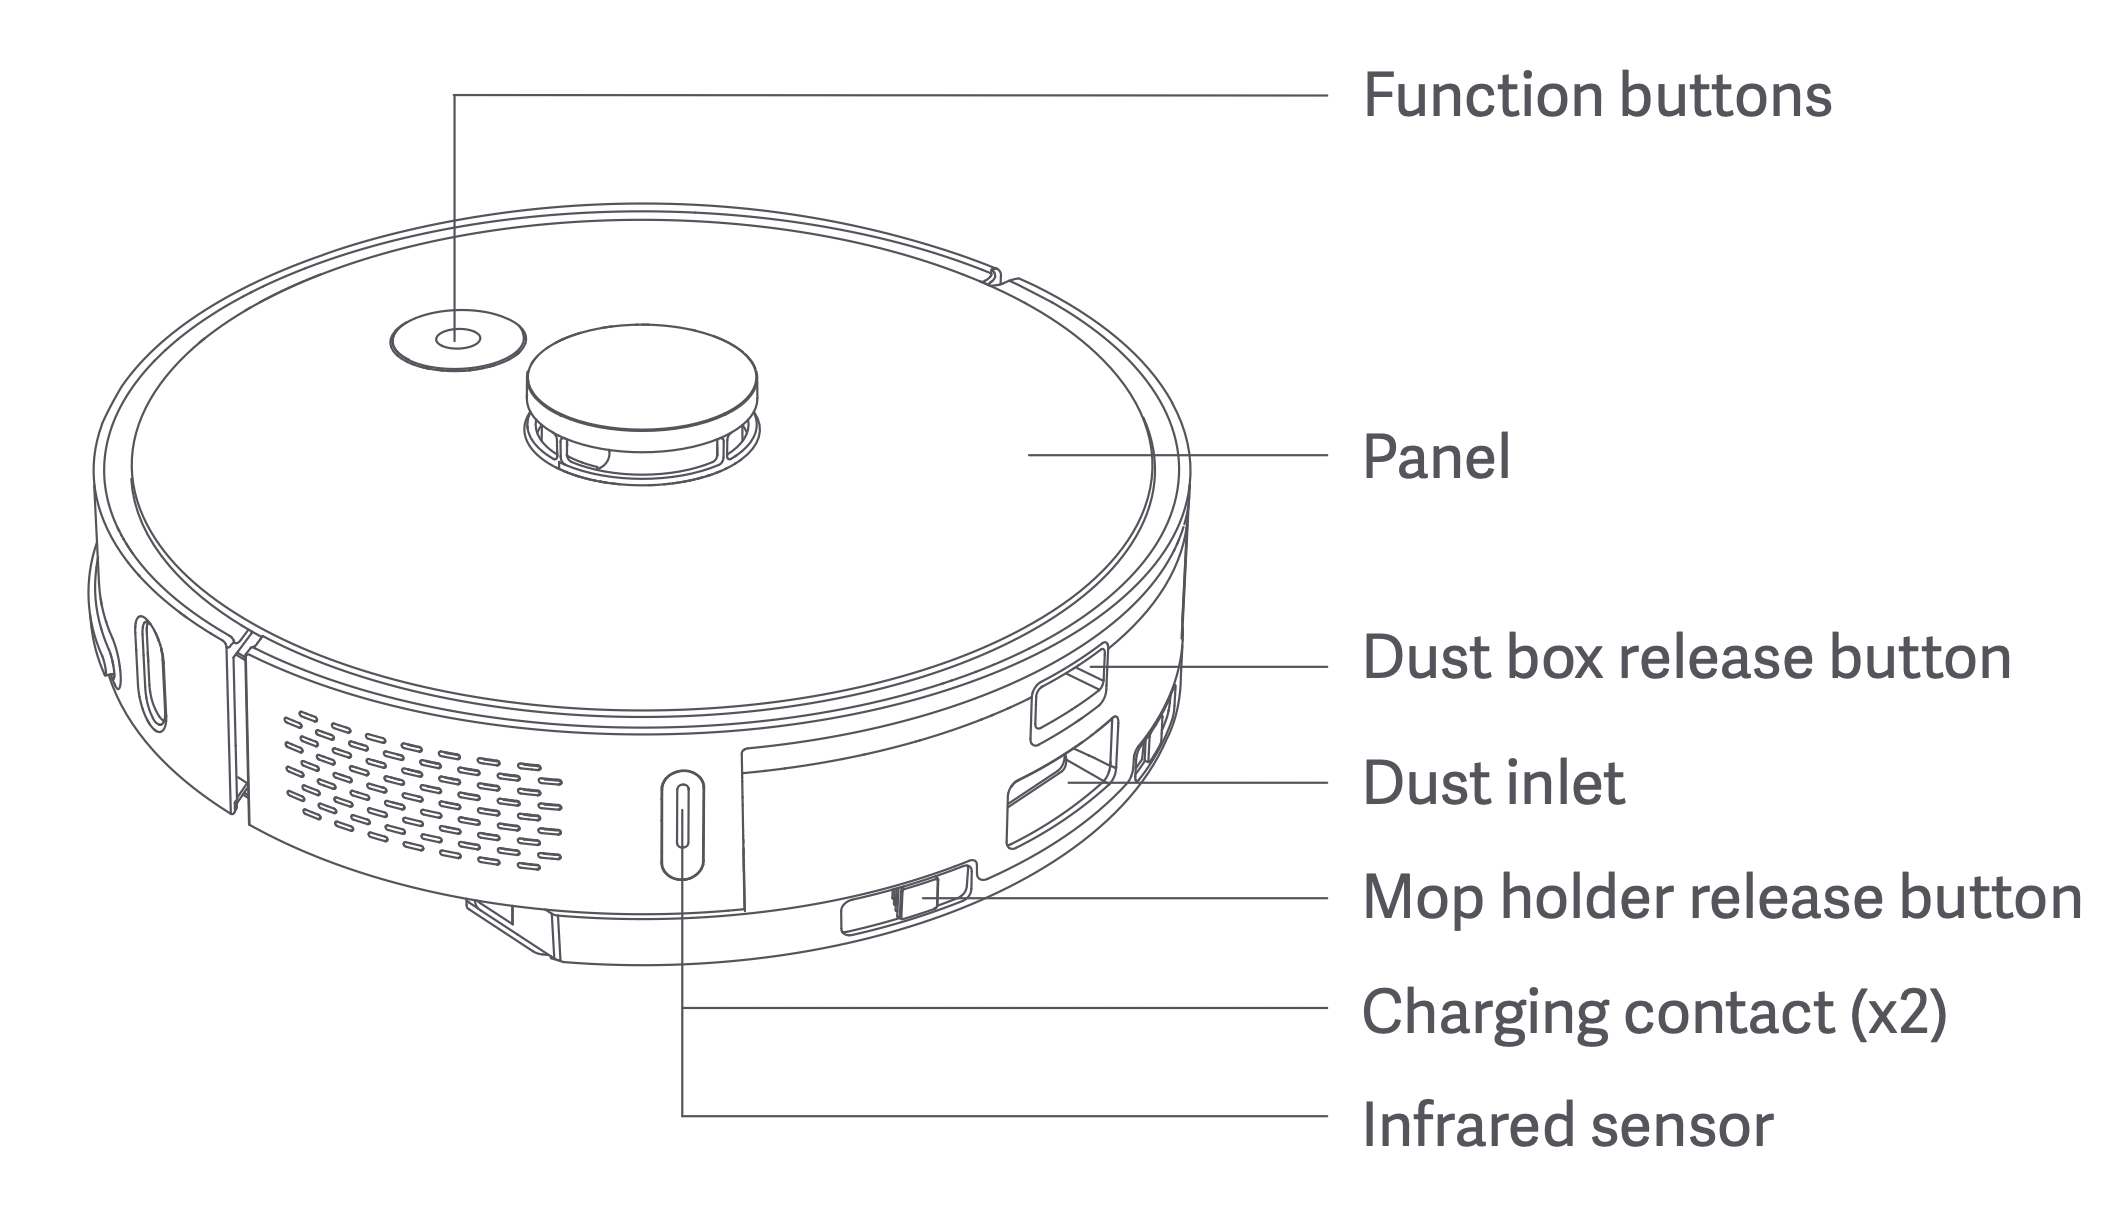
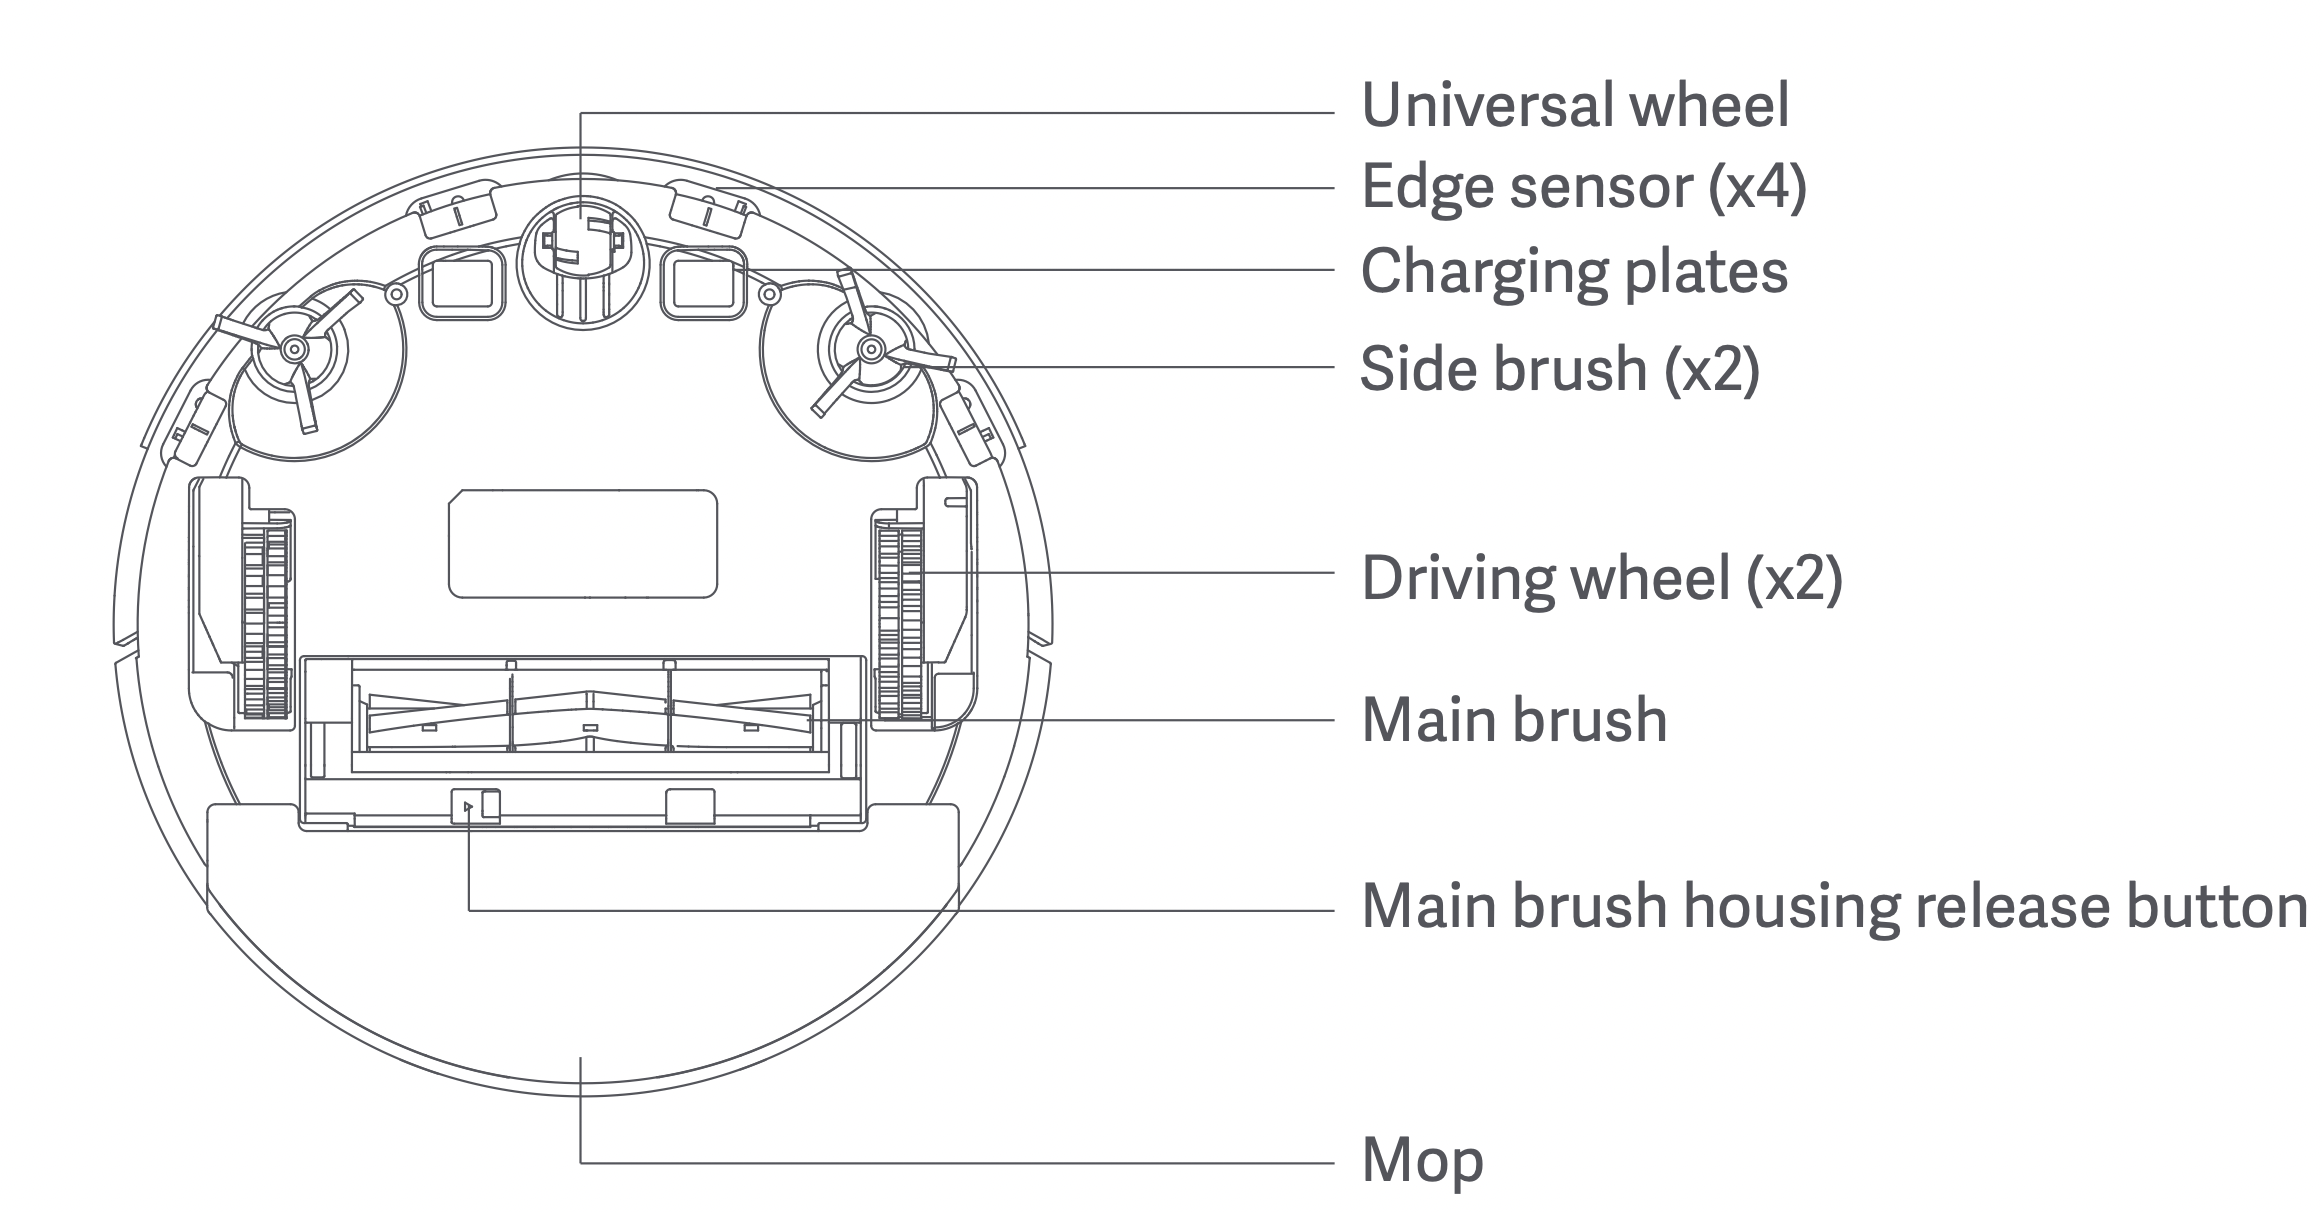
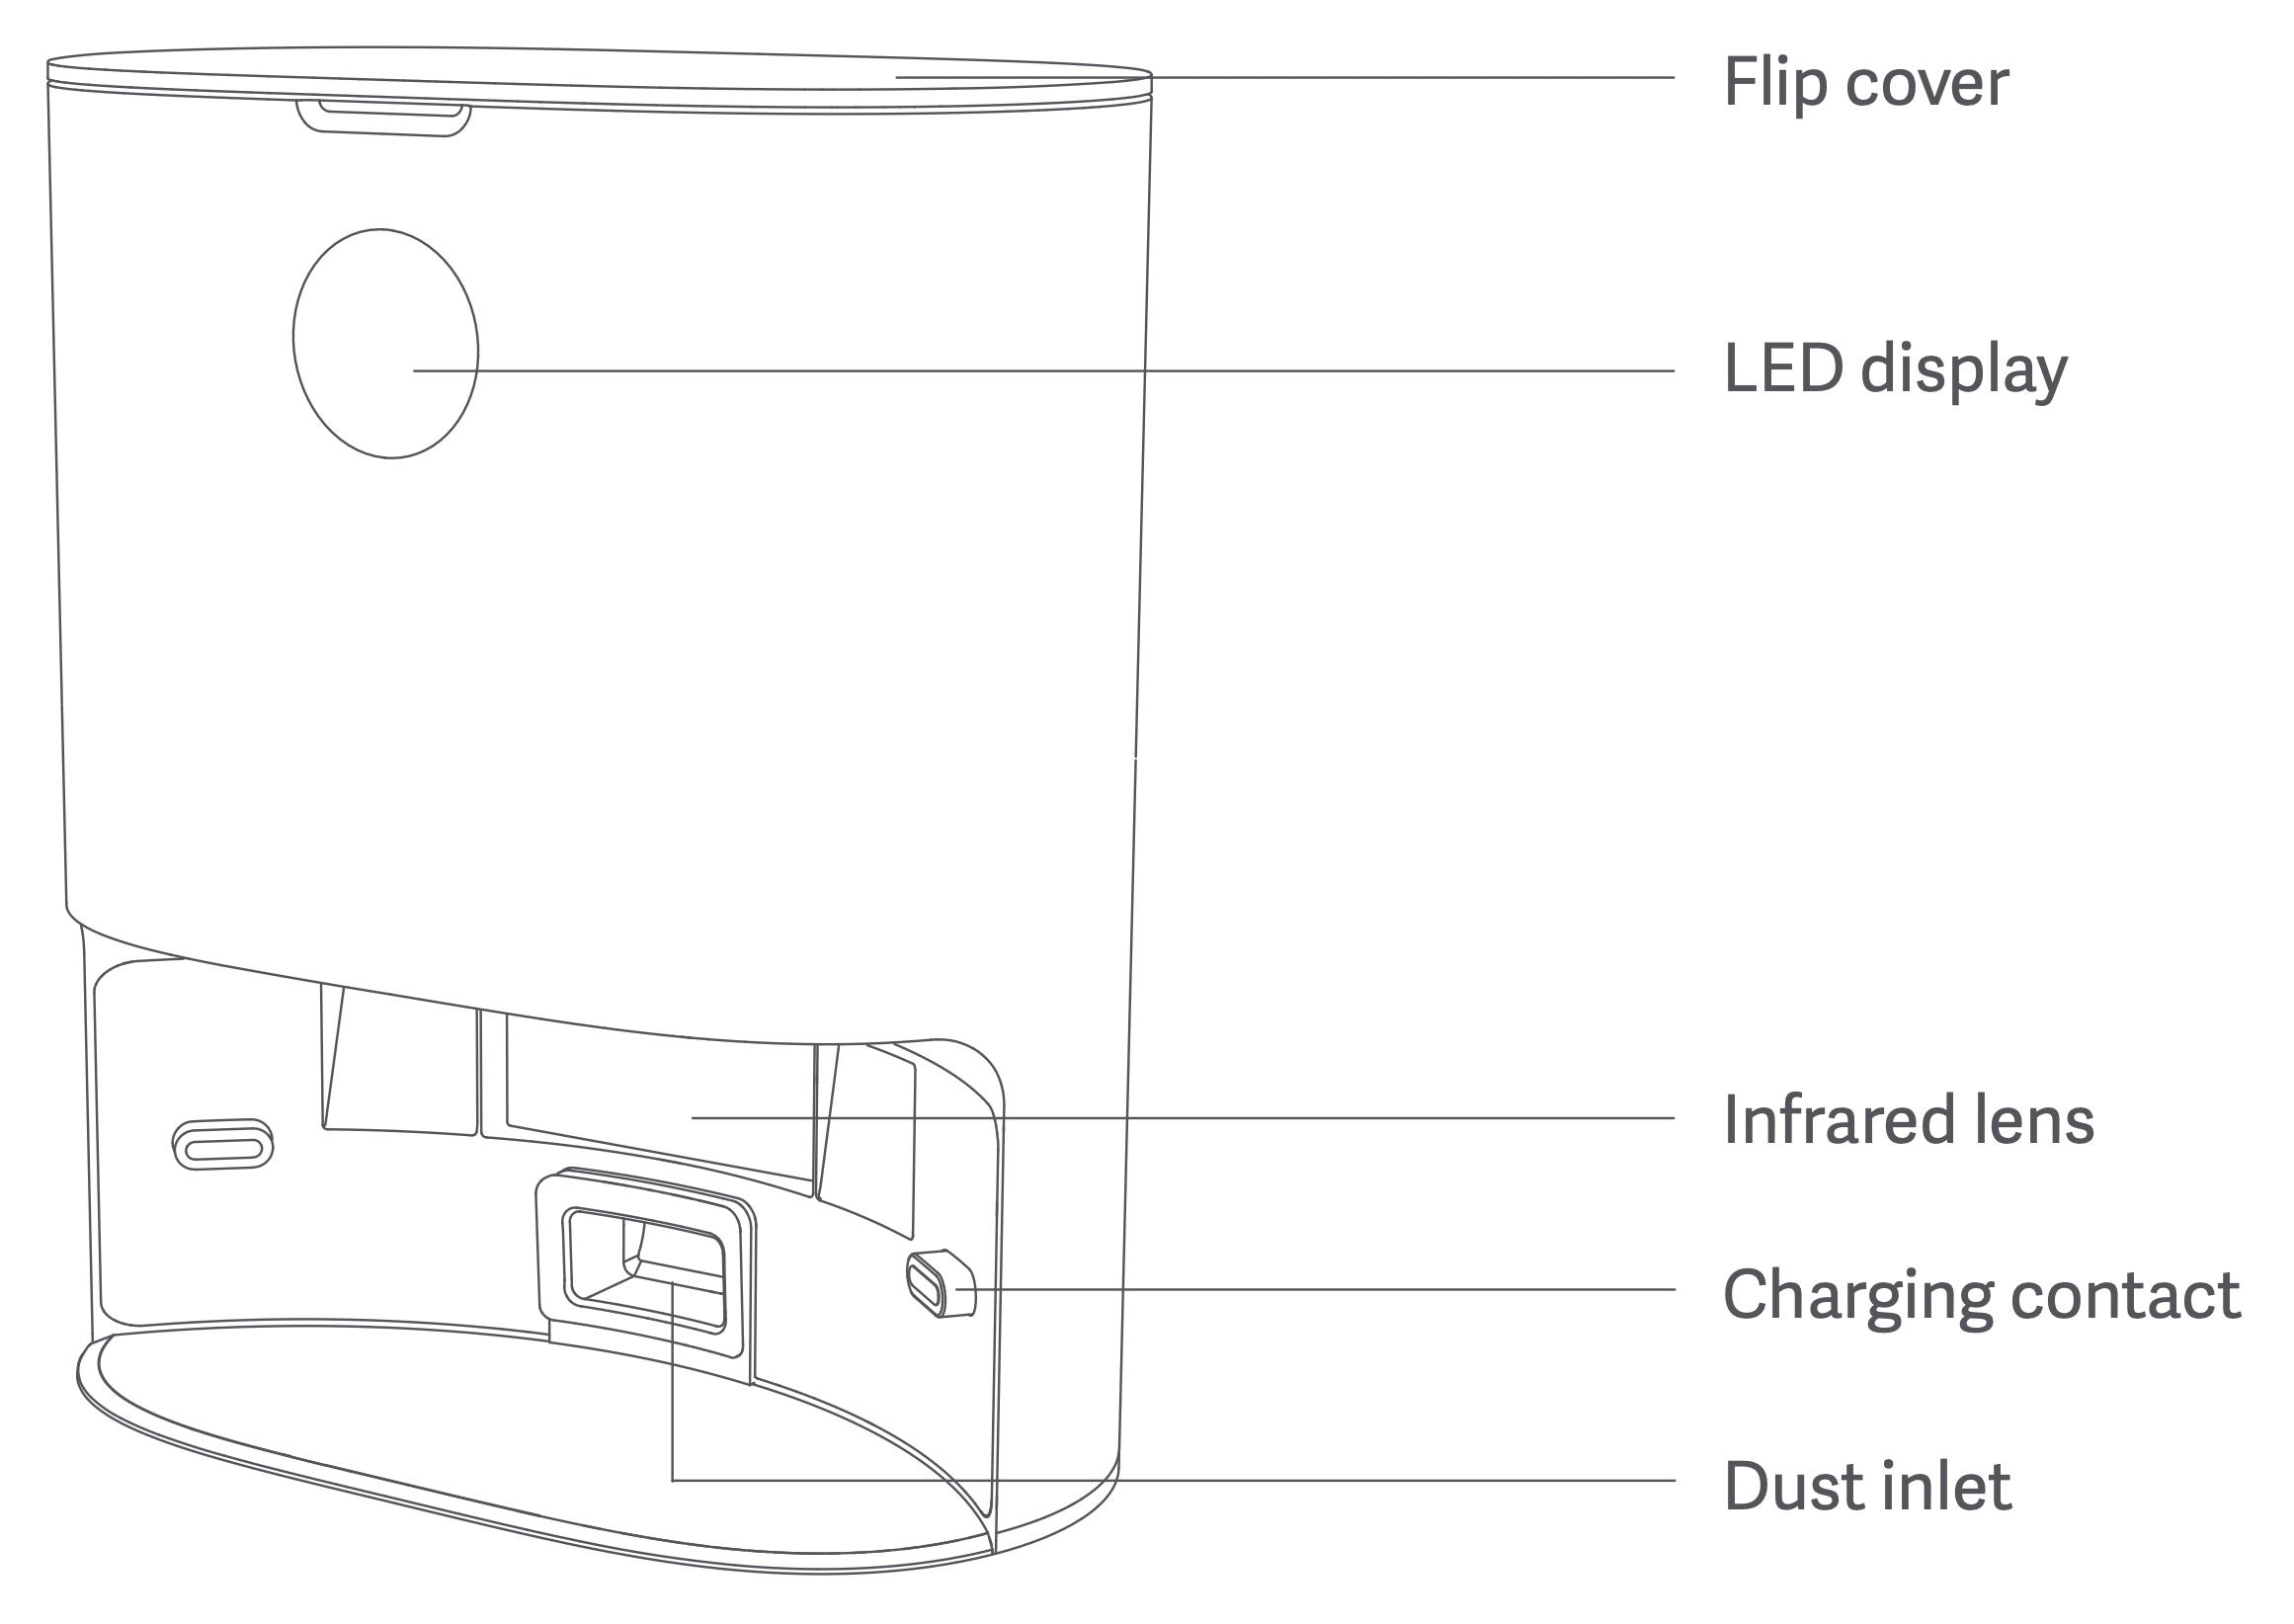
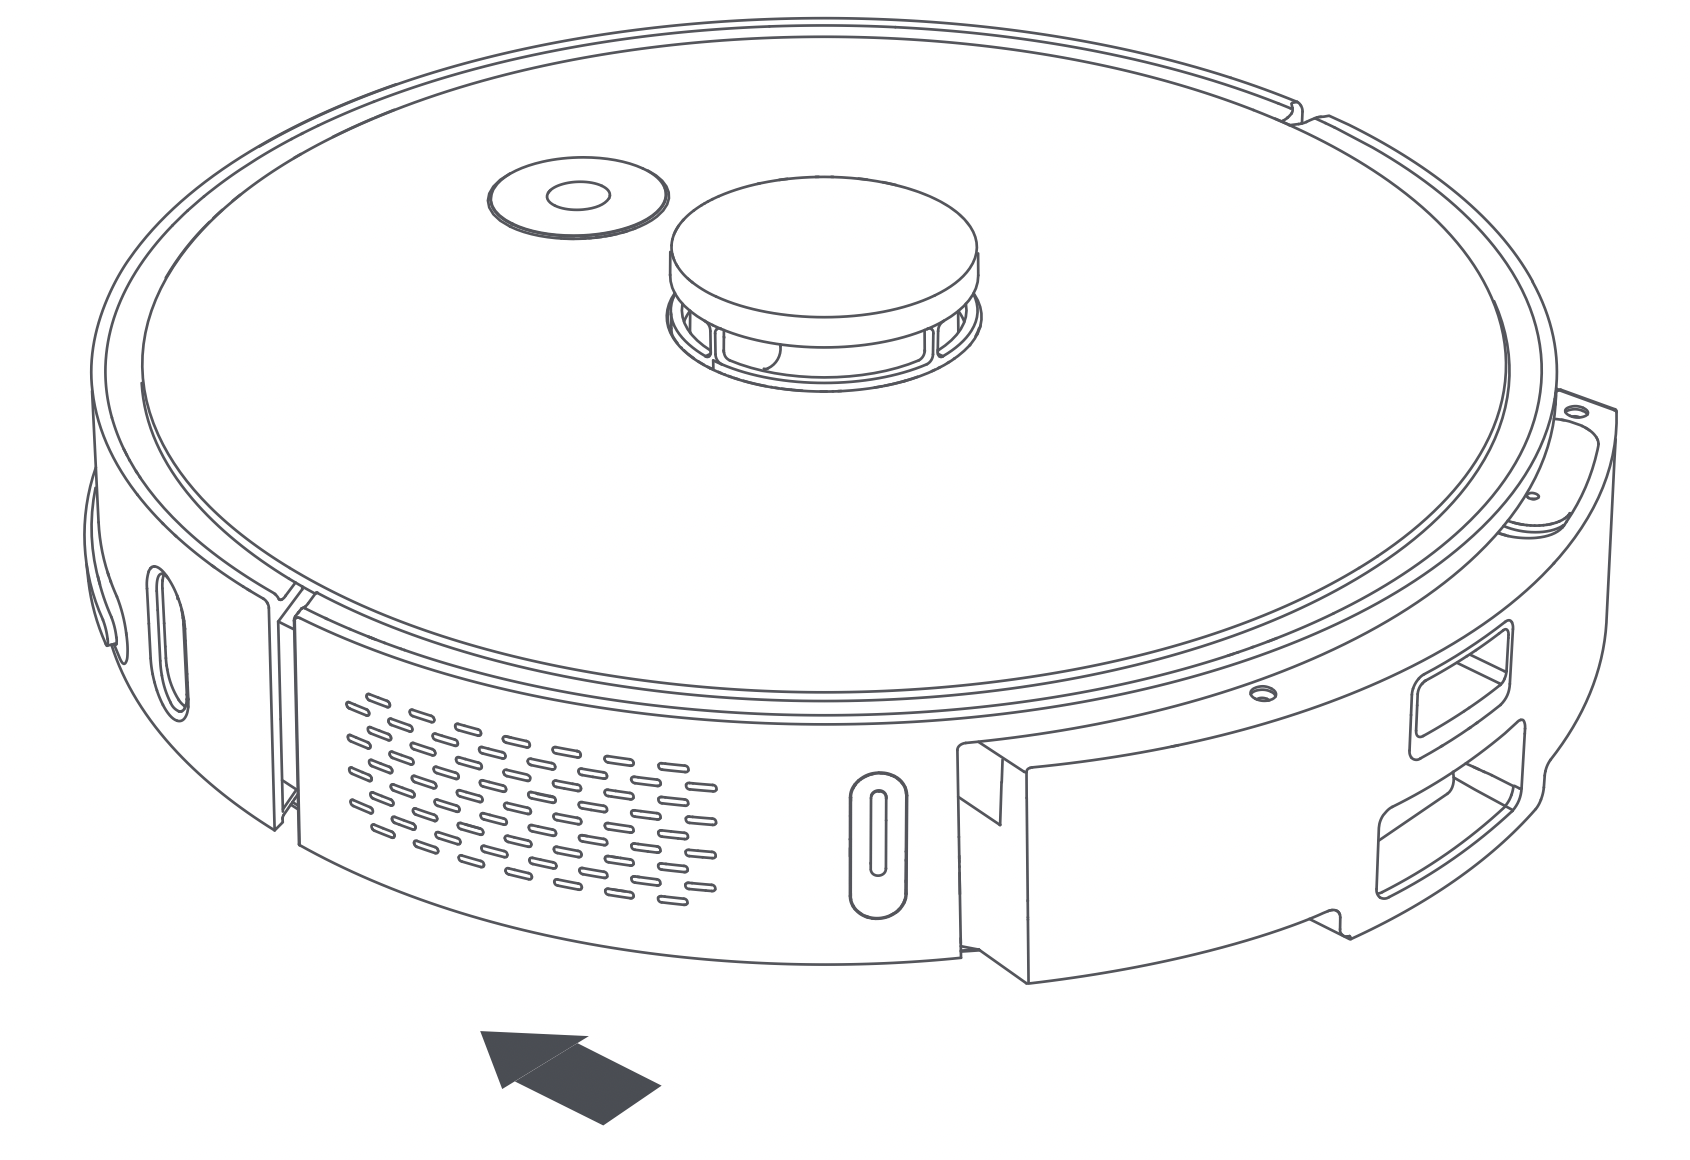
Main unit
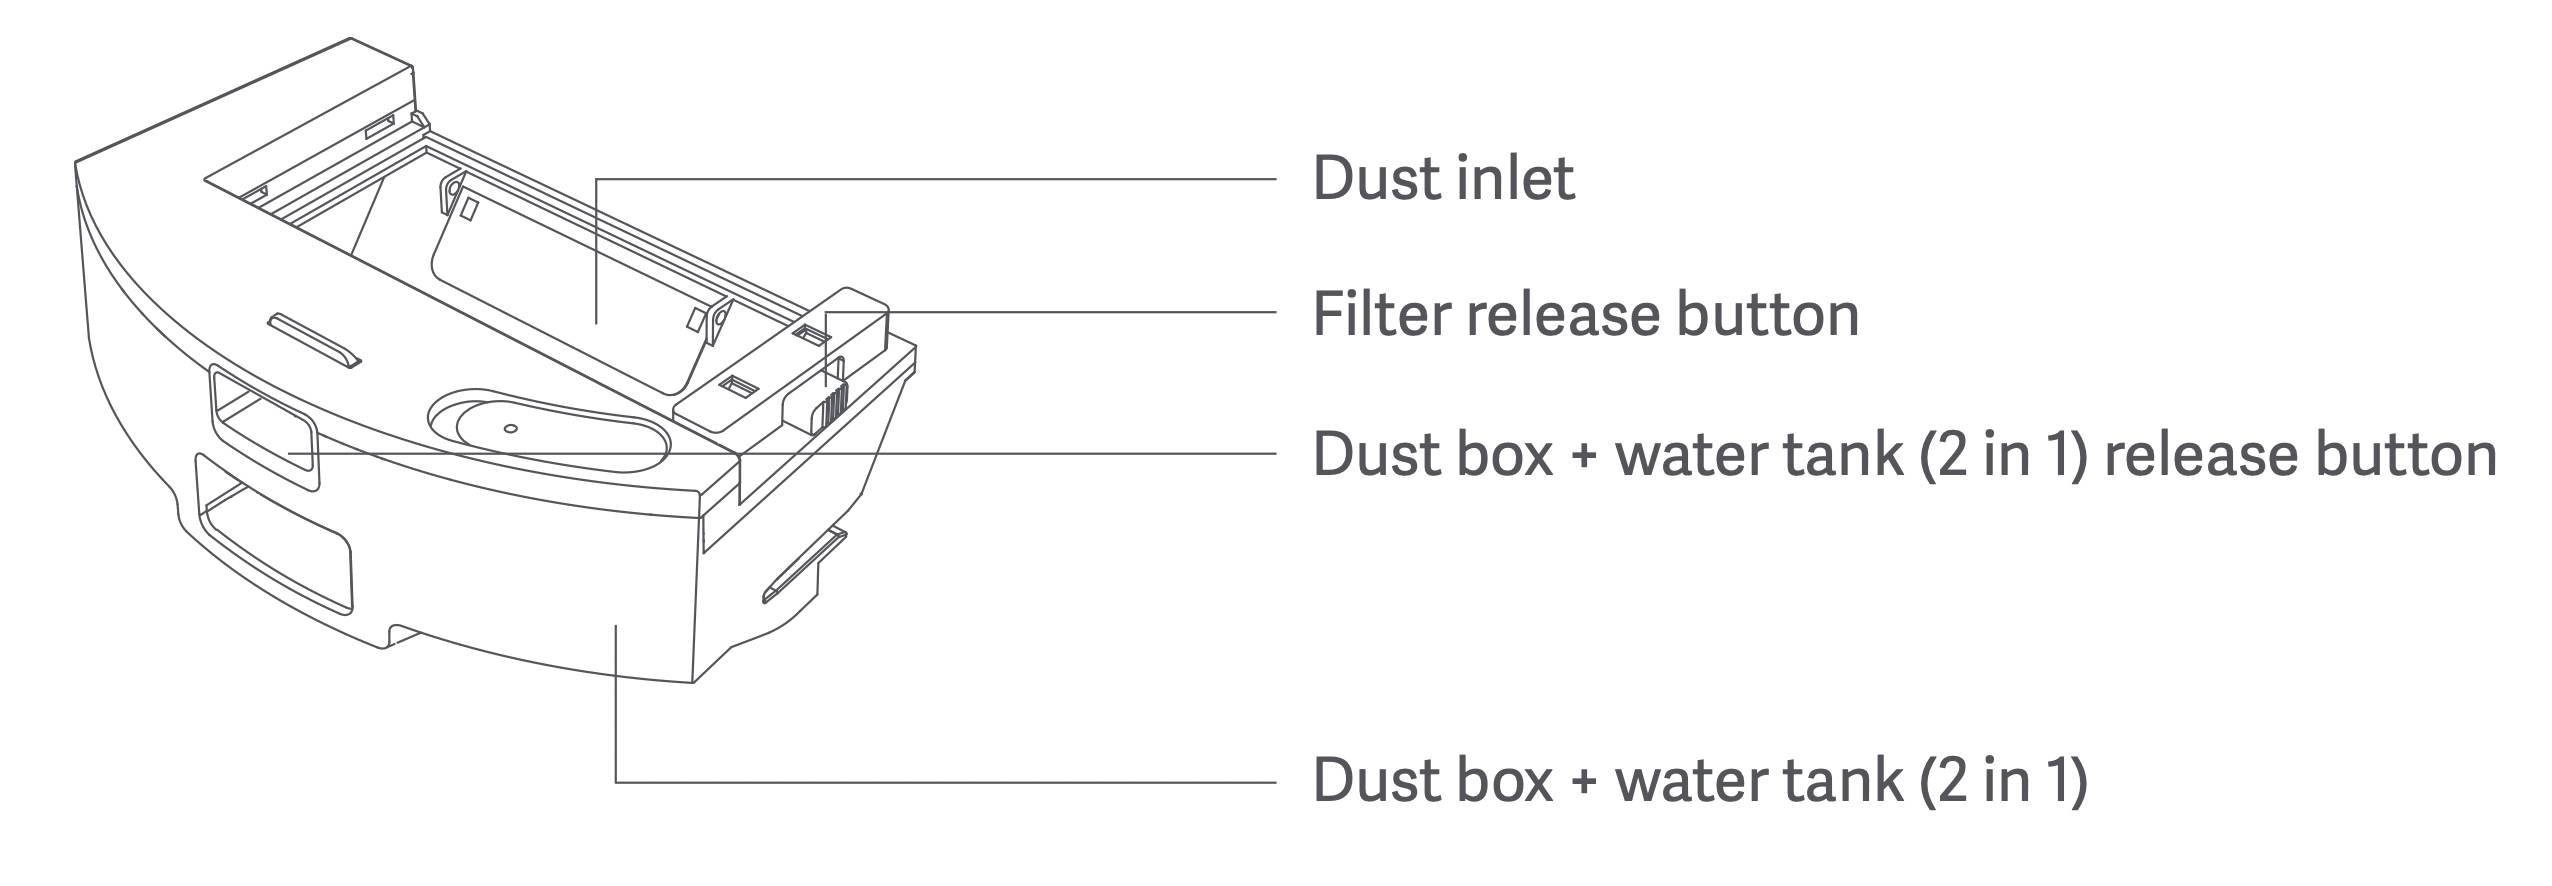
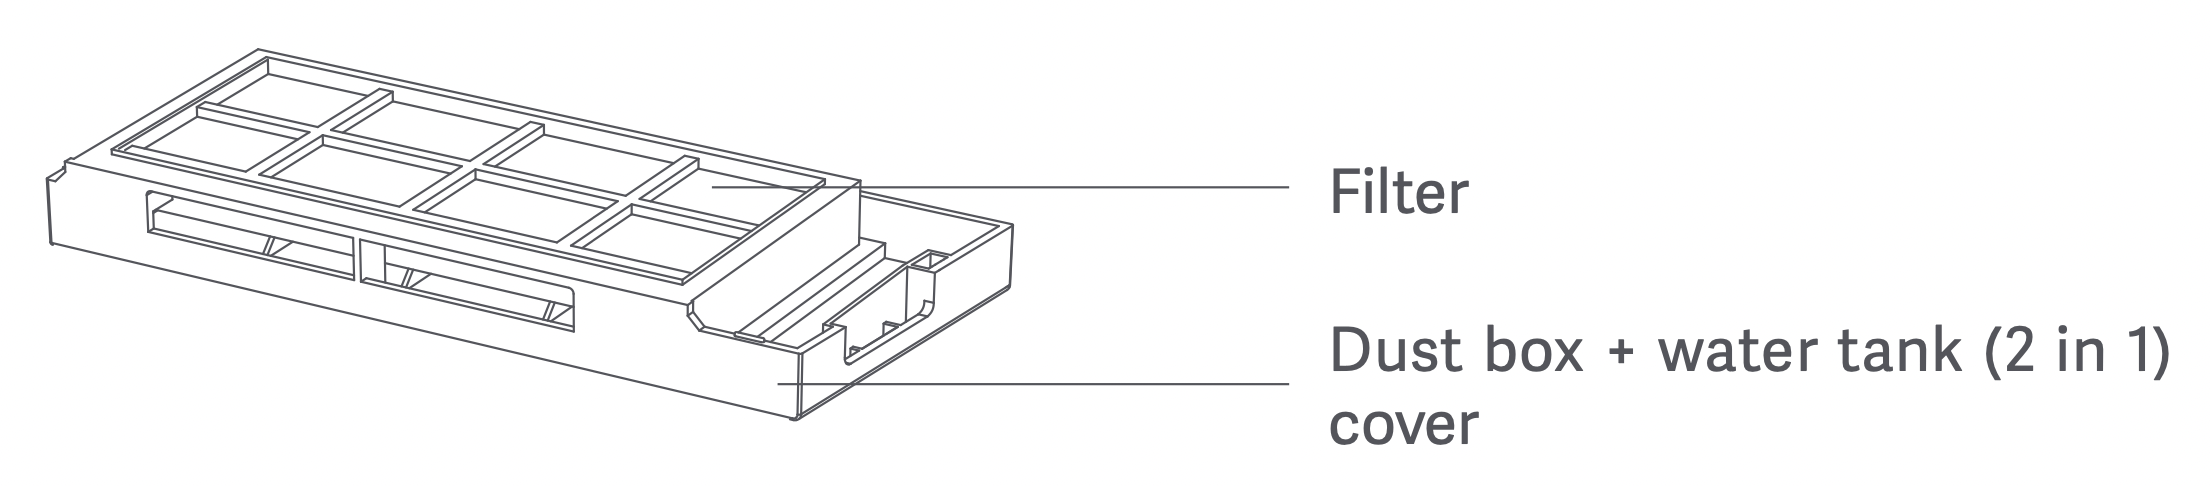
Electric water tank and mopping module

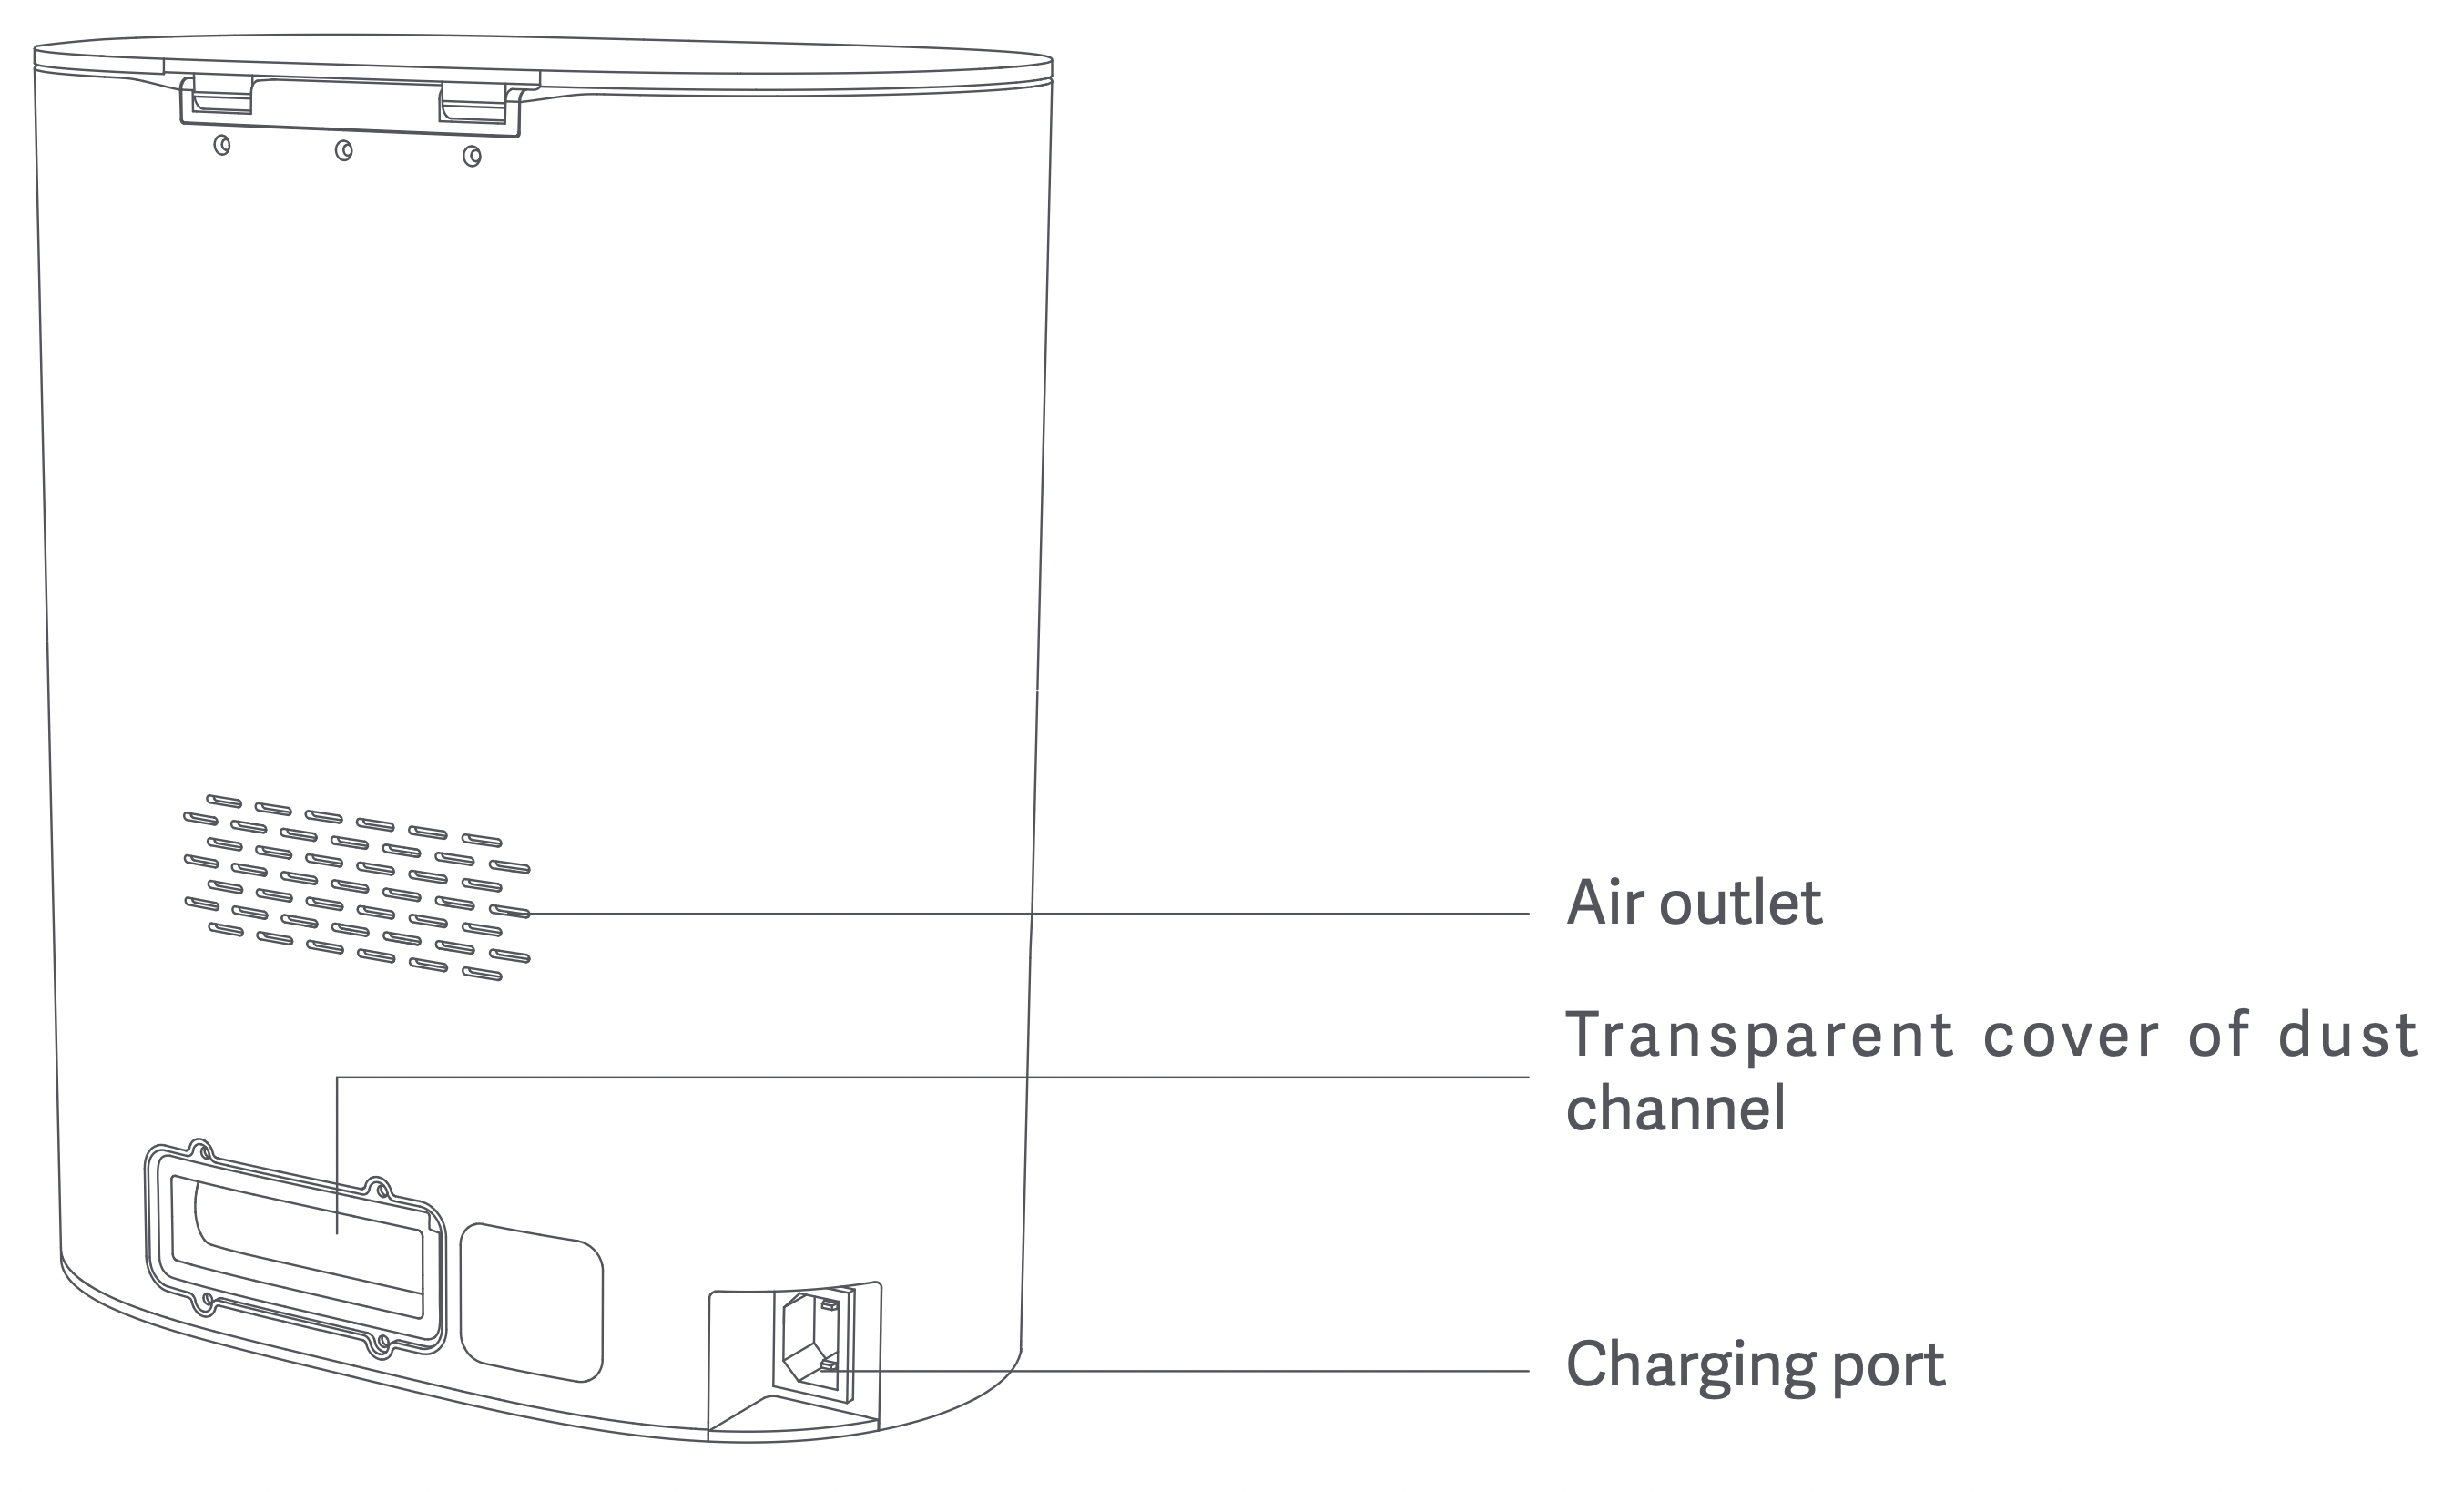
Dust collector (optional)
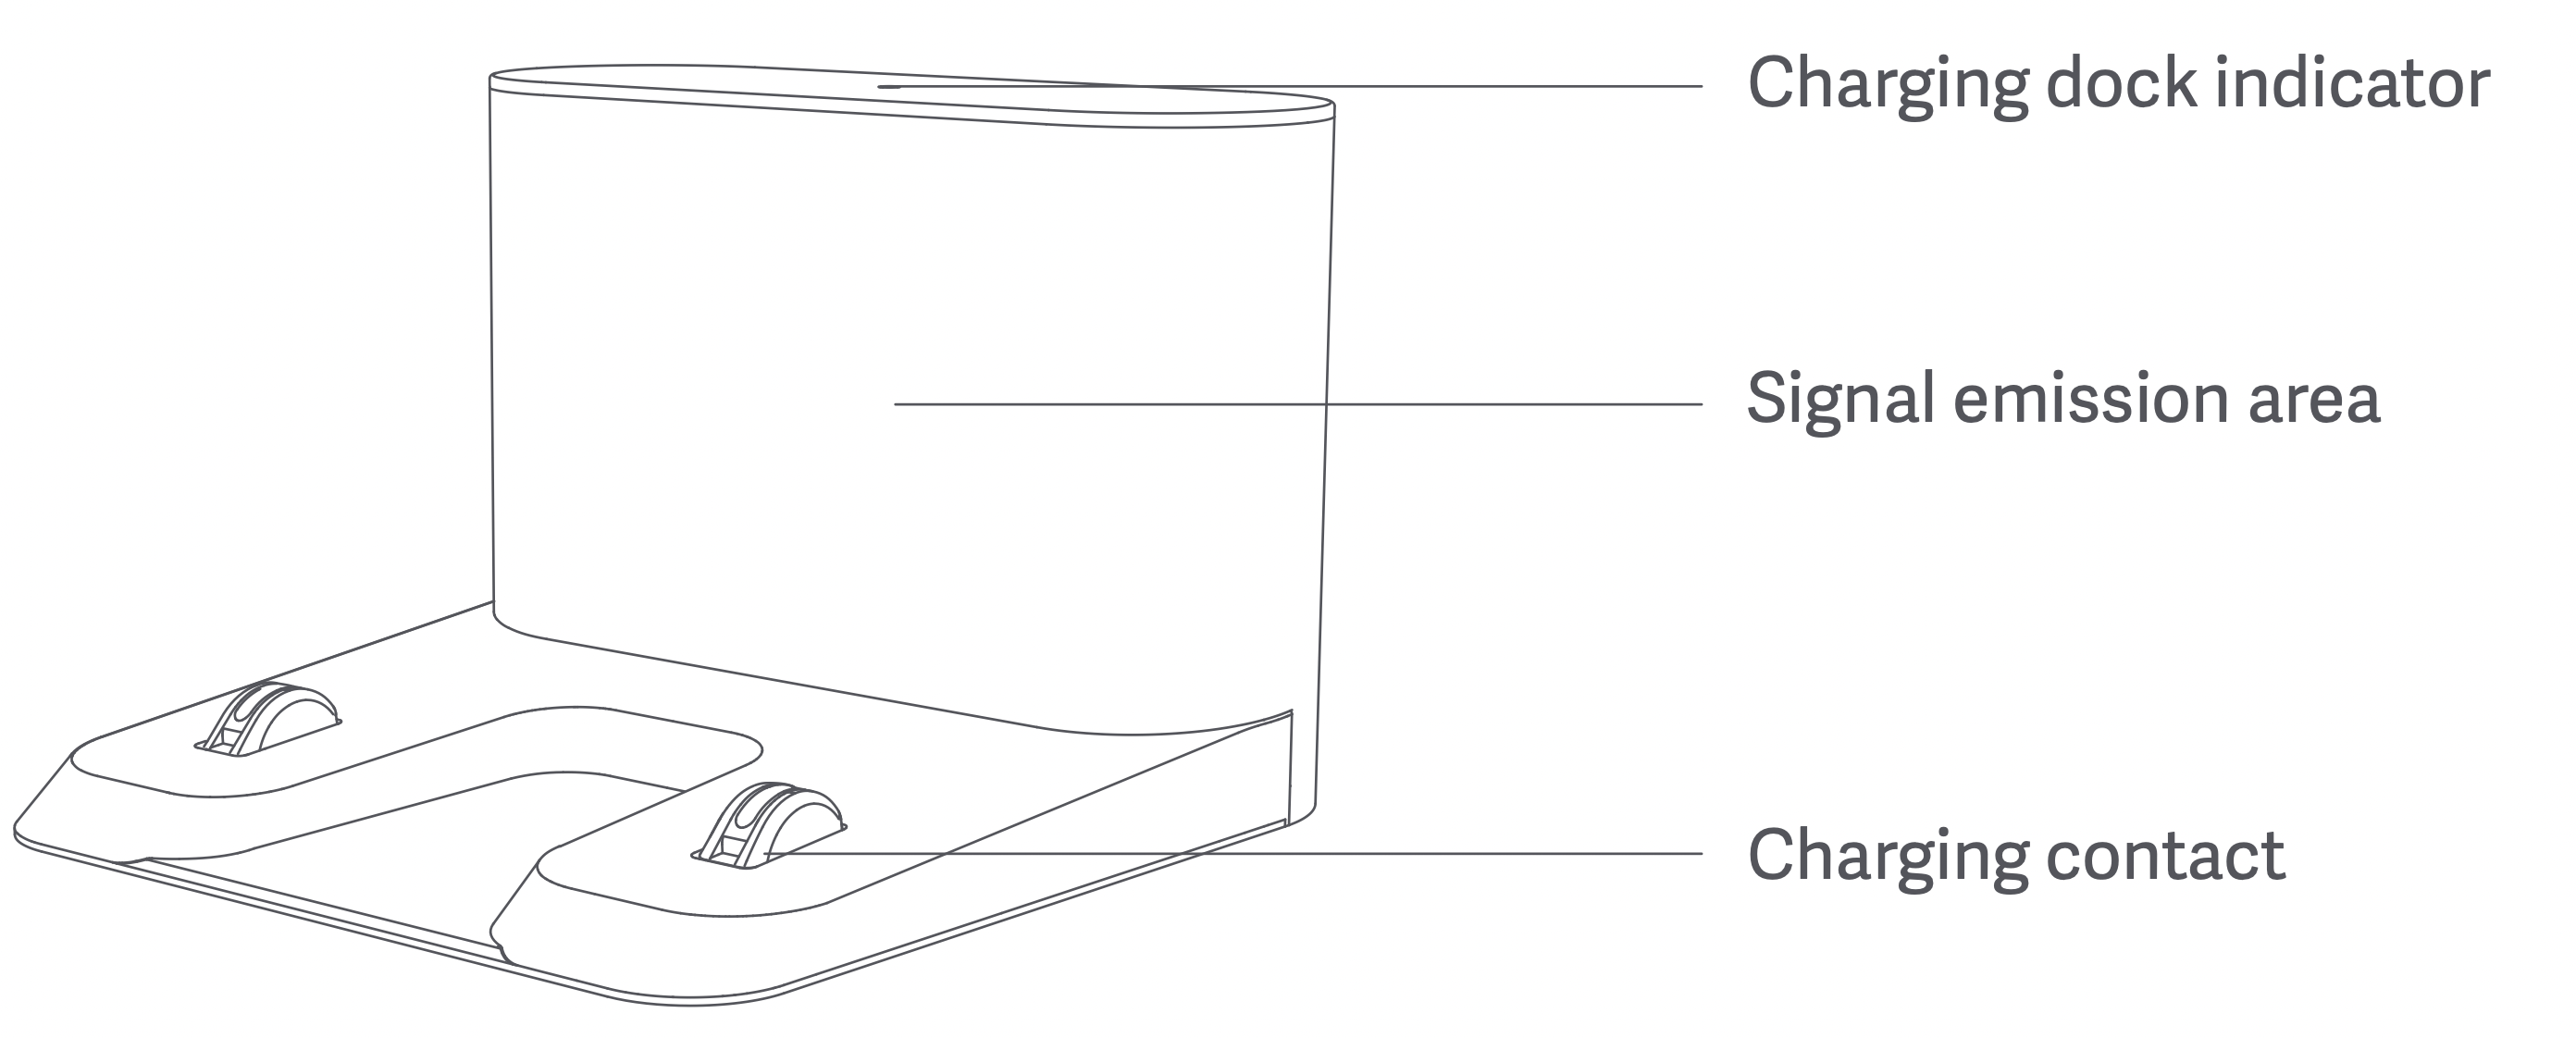
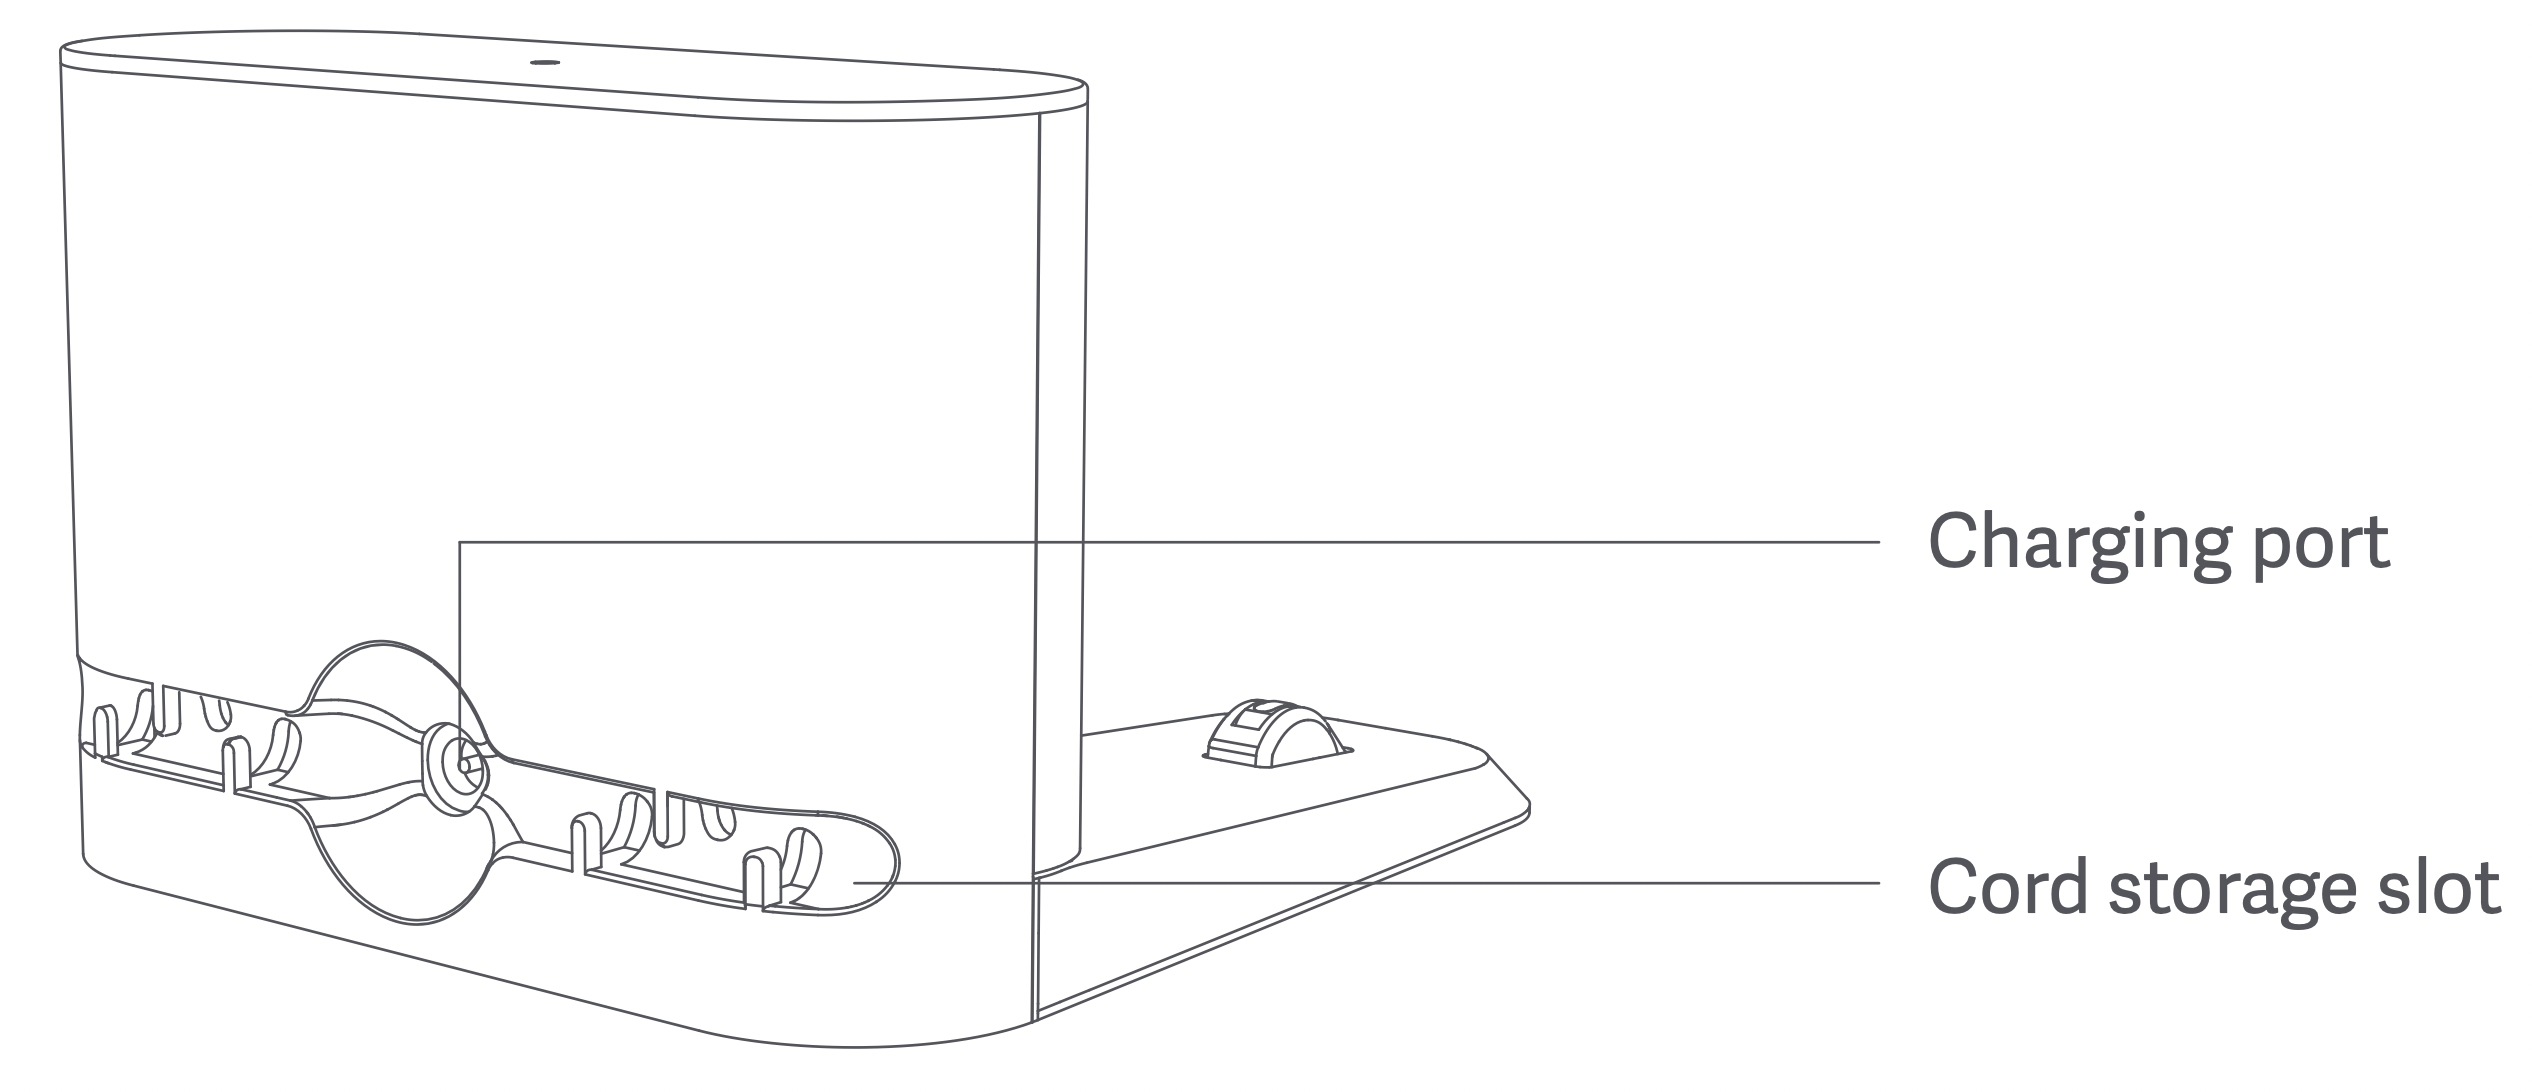
Charging dock (optional)
Installation
Installing the dust collector (optional)
Step 1: Find a suitable location to place the dust collector;
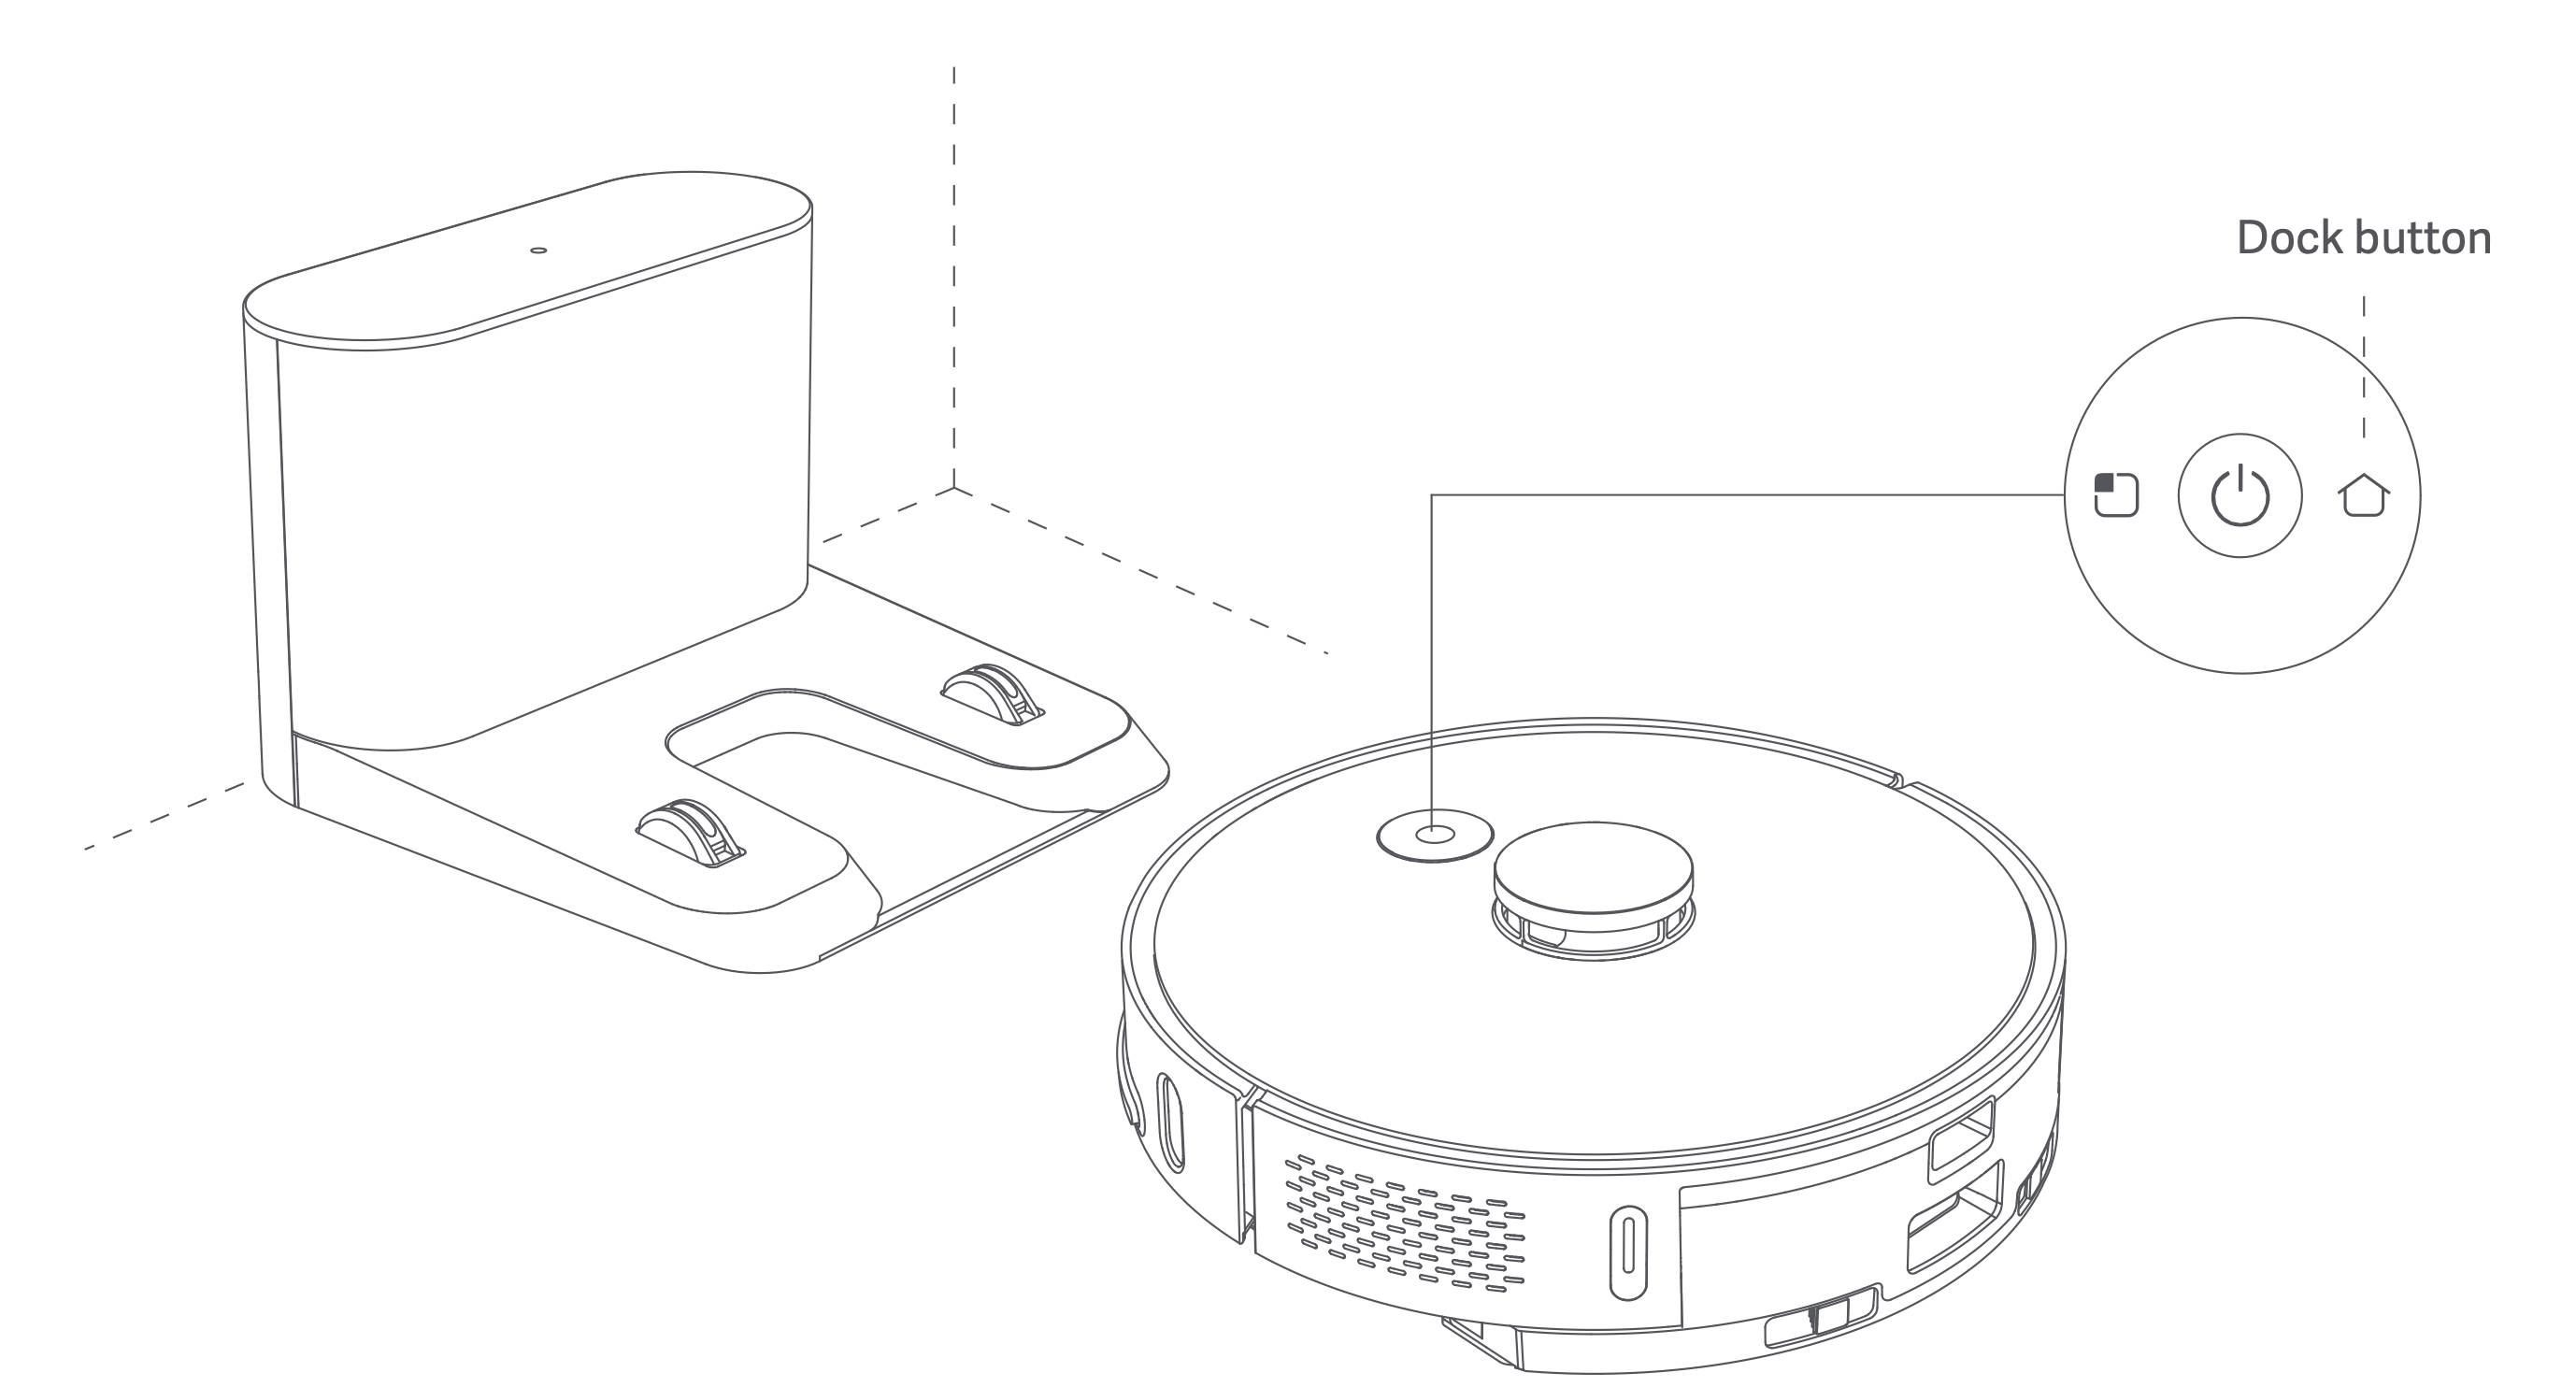
Step 2: Press and hold the Power button on the main unit to turn on the robot vacuum and mop cleaner, then press the Dock button for the robot to search for the dust collector to charge.

Caution
- When charging, do not install the mopping module to prevent water seeping from the wet mop and damaging the floor.
- Do not use this product in the room of infants and young children, keep it away from infants and young children.
- When the main unit is docked at the dust collector, do not let children or pets approach it or collide with the main unit to avoid danger.
- In order to facilitate the smooth return of the main unit to the dust collector after cleaning, it is recommended to start the appliance from the dust collector and that you do not move the dust collector during the cleaning process.
- The dust collector has dust collection and charging functions, and a new dust bag is installed before the product leaves the factory.
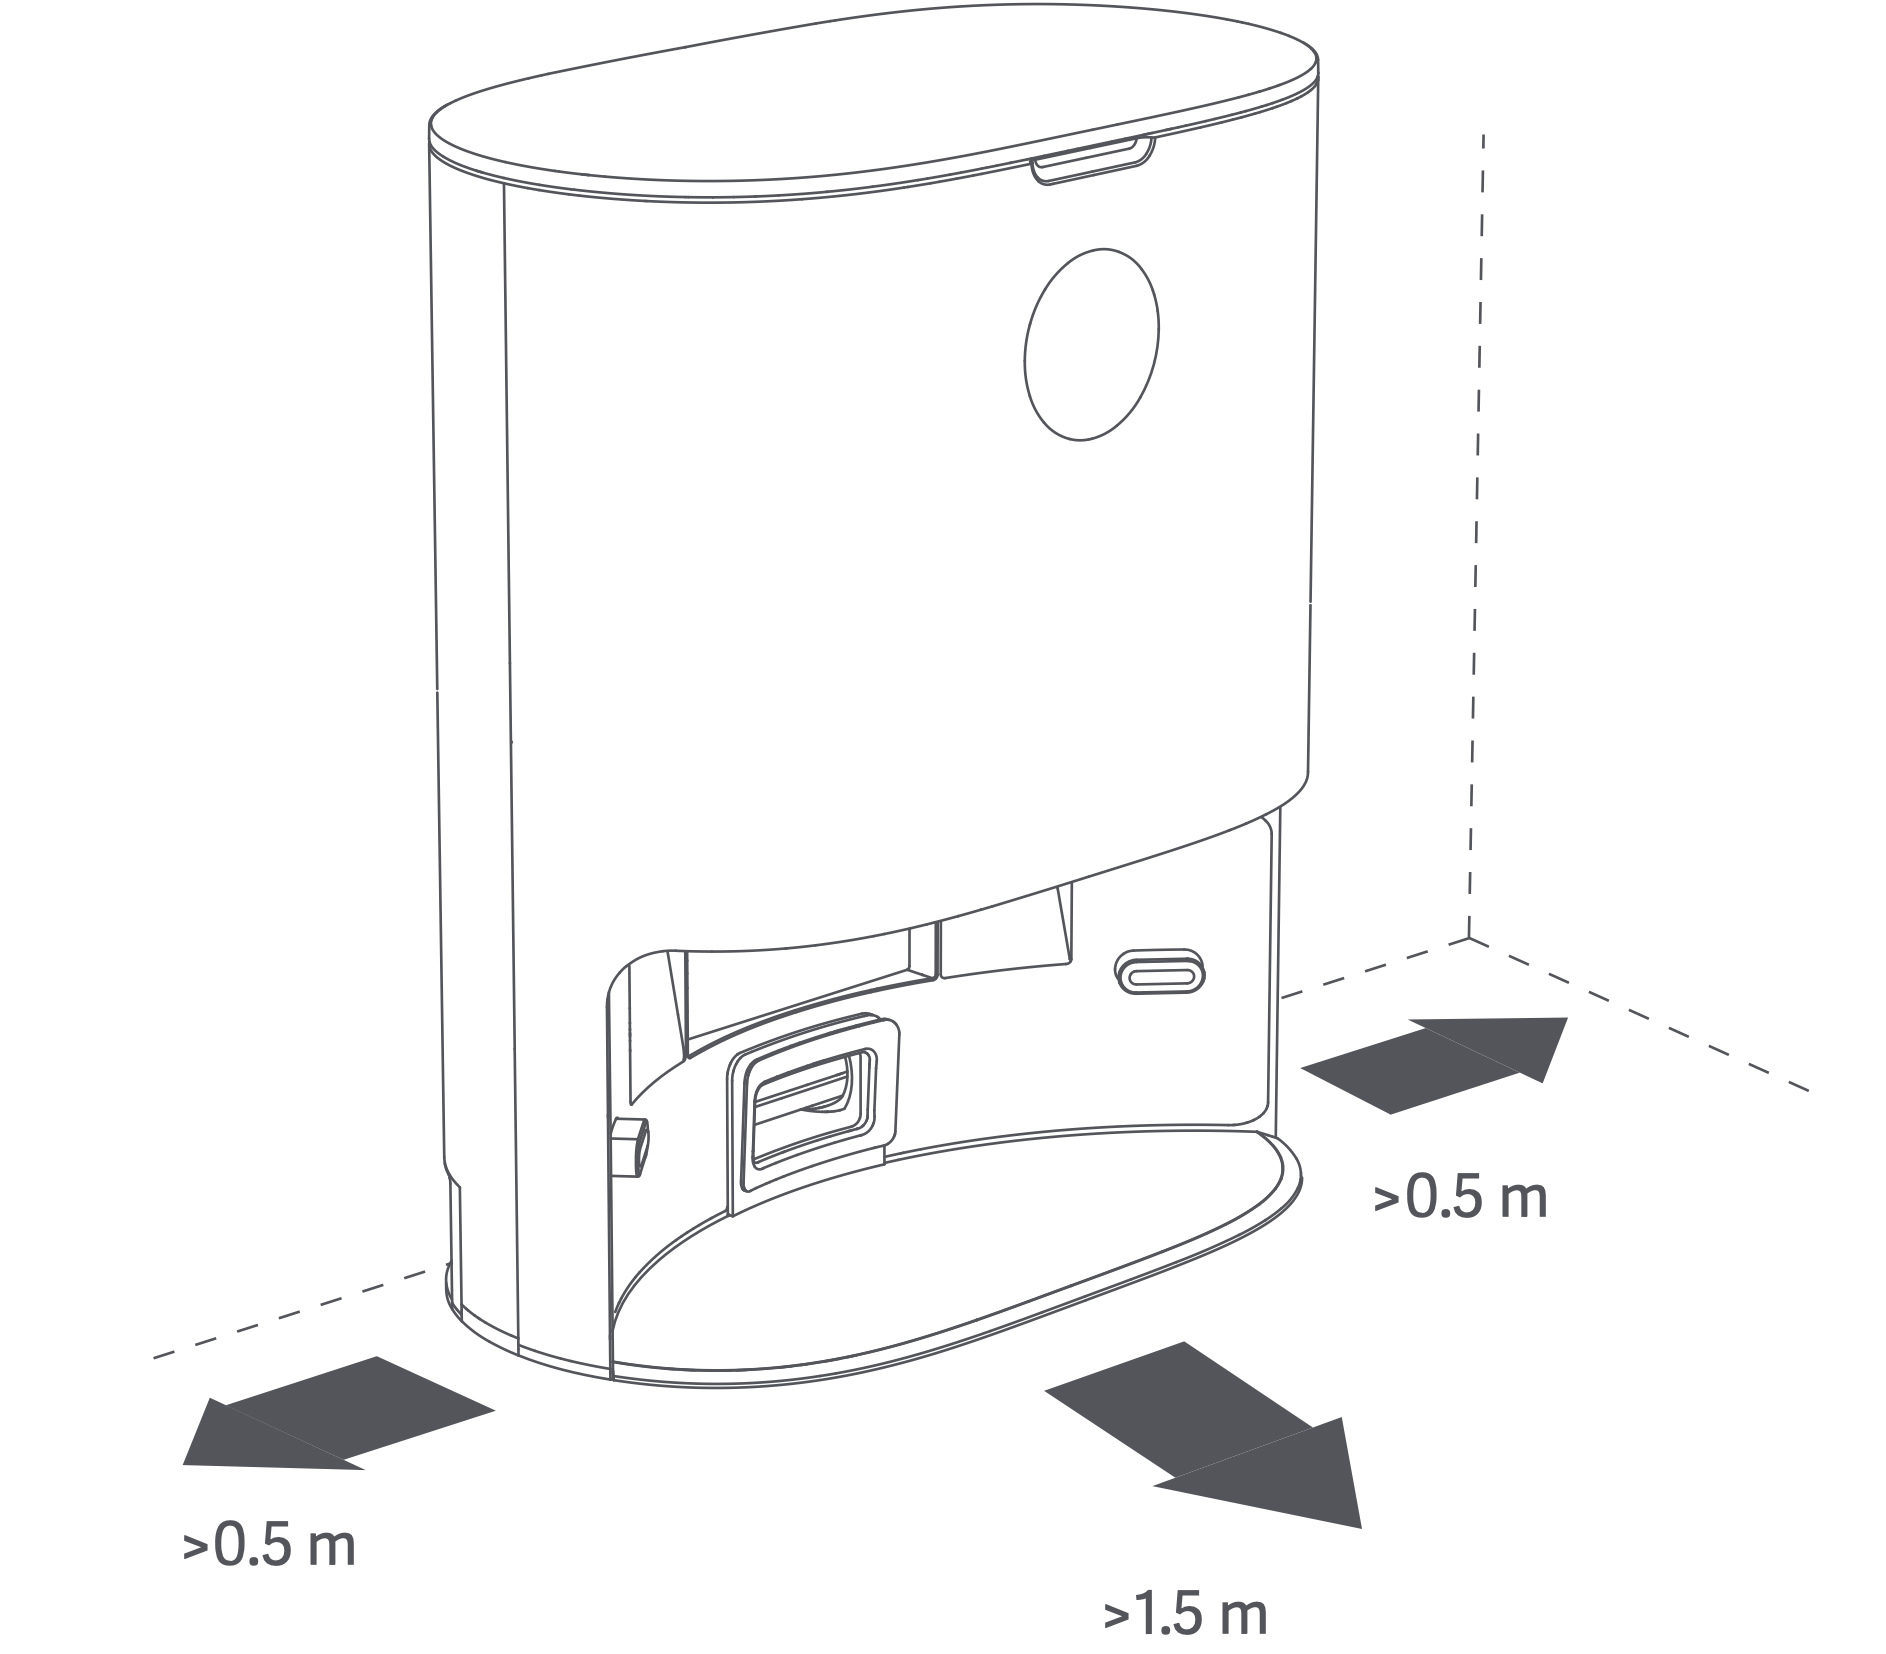
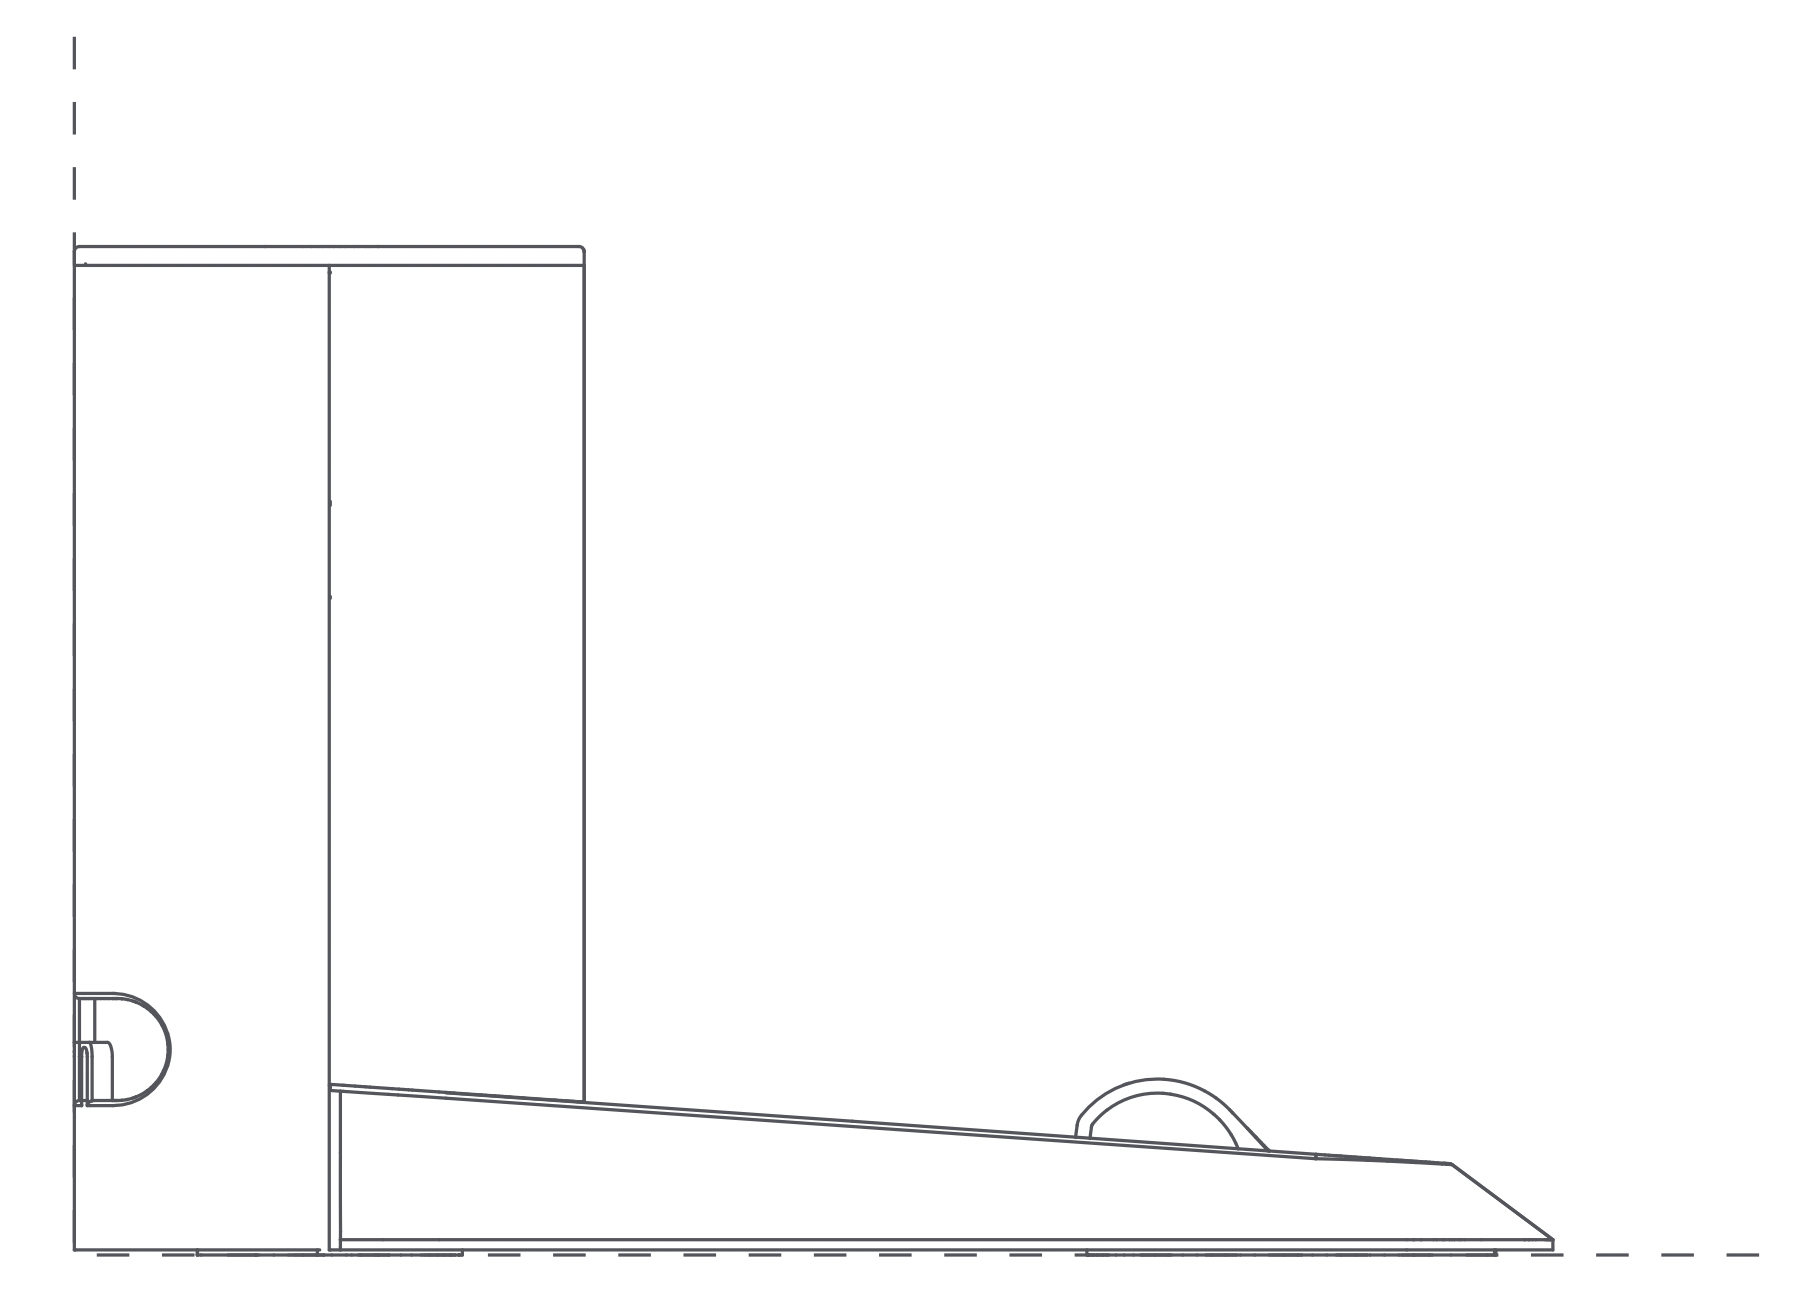
Installing the charging dock (optional)
Step 1: Find a suitable location to place the charging dock;

Step 2: Place the charging dock against the wall;
Step 3: Press and hold the Power button on the main unit to turn on the robot vacuum and mop cleaner, then press the Dock button for the robot to search for the charging dock to charge.
Caution
- When charging, do not install the mopping module to prevent water seeping from the wet mop and damaging the floor.
- Do not use this product in the room of infants and young children, keep it away from infants and young children.
- When the main unit is docked on the charging dock, do not let children or pets approach it or collide with the main unit to avoid danger.
- In order to facilitate the smooth return of the main unit to the charging dock after cleaning, it is recommended to start the appliance from the charging dock and that you do not move the charging dock during the cleaning process.
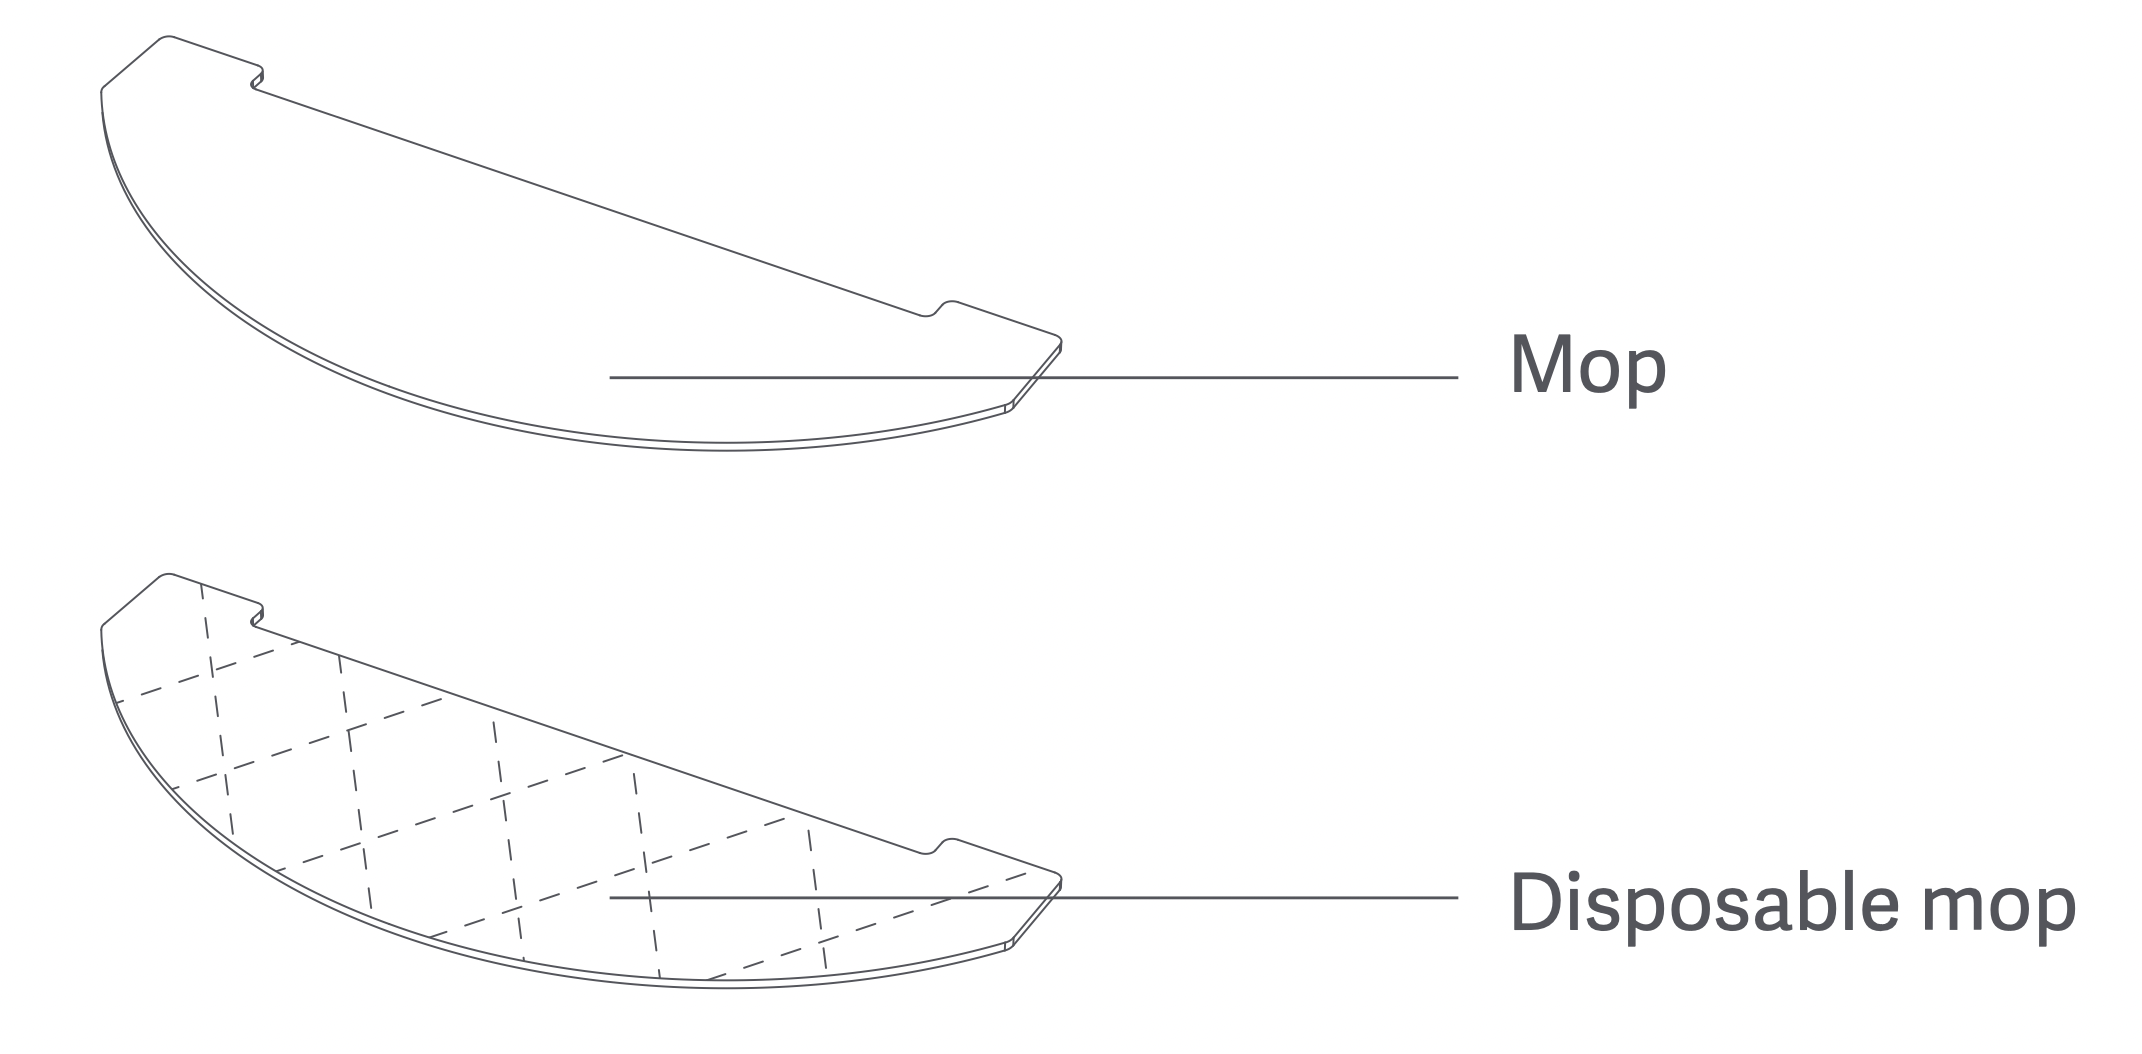
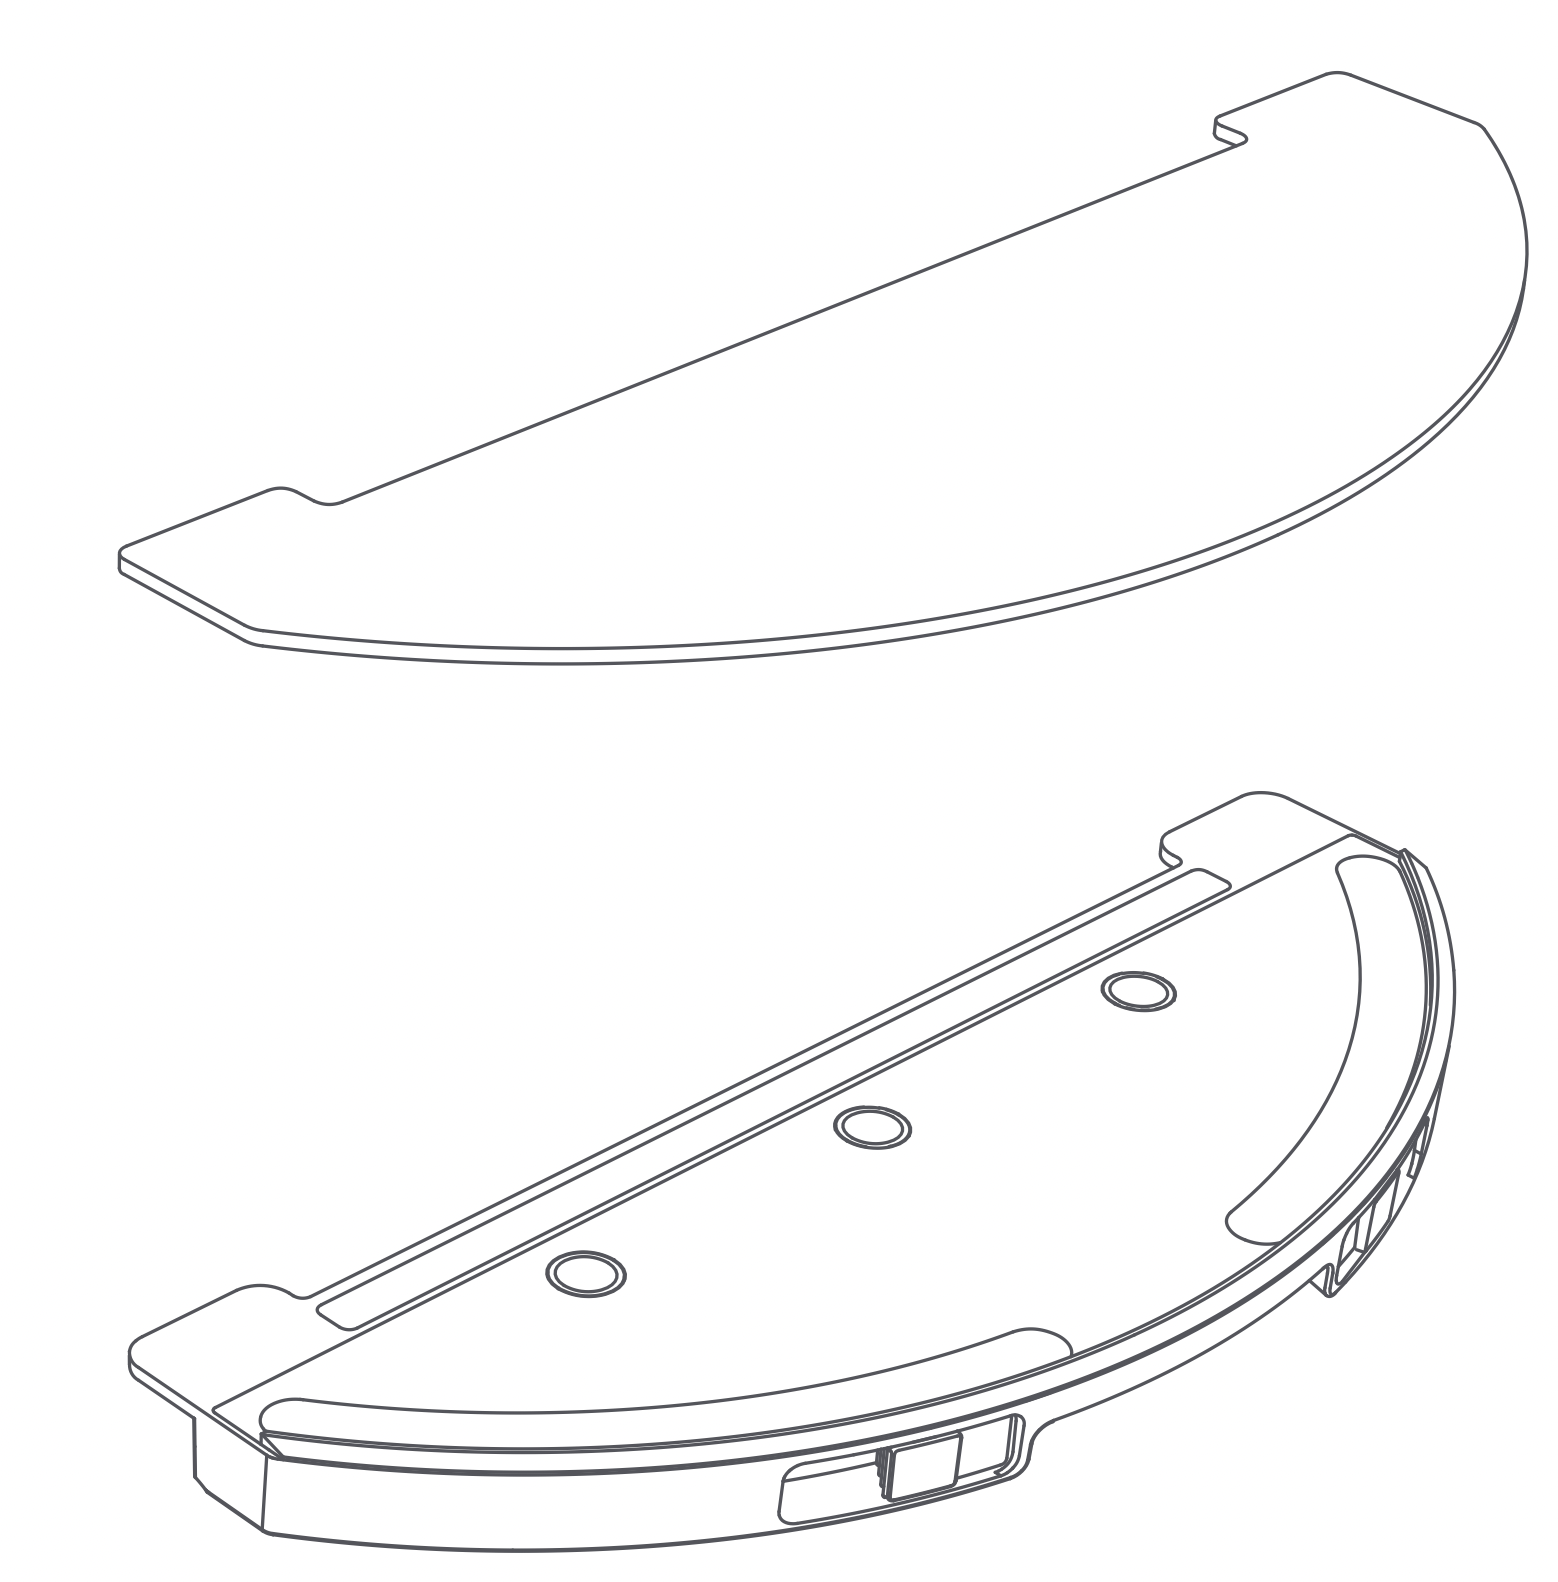
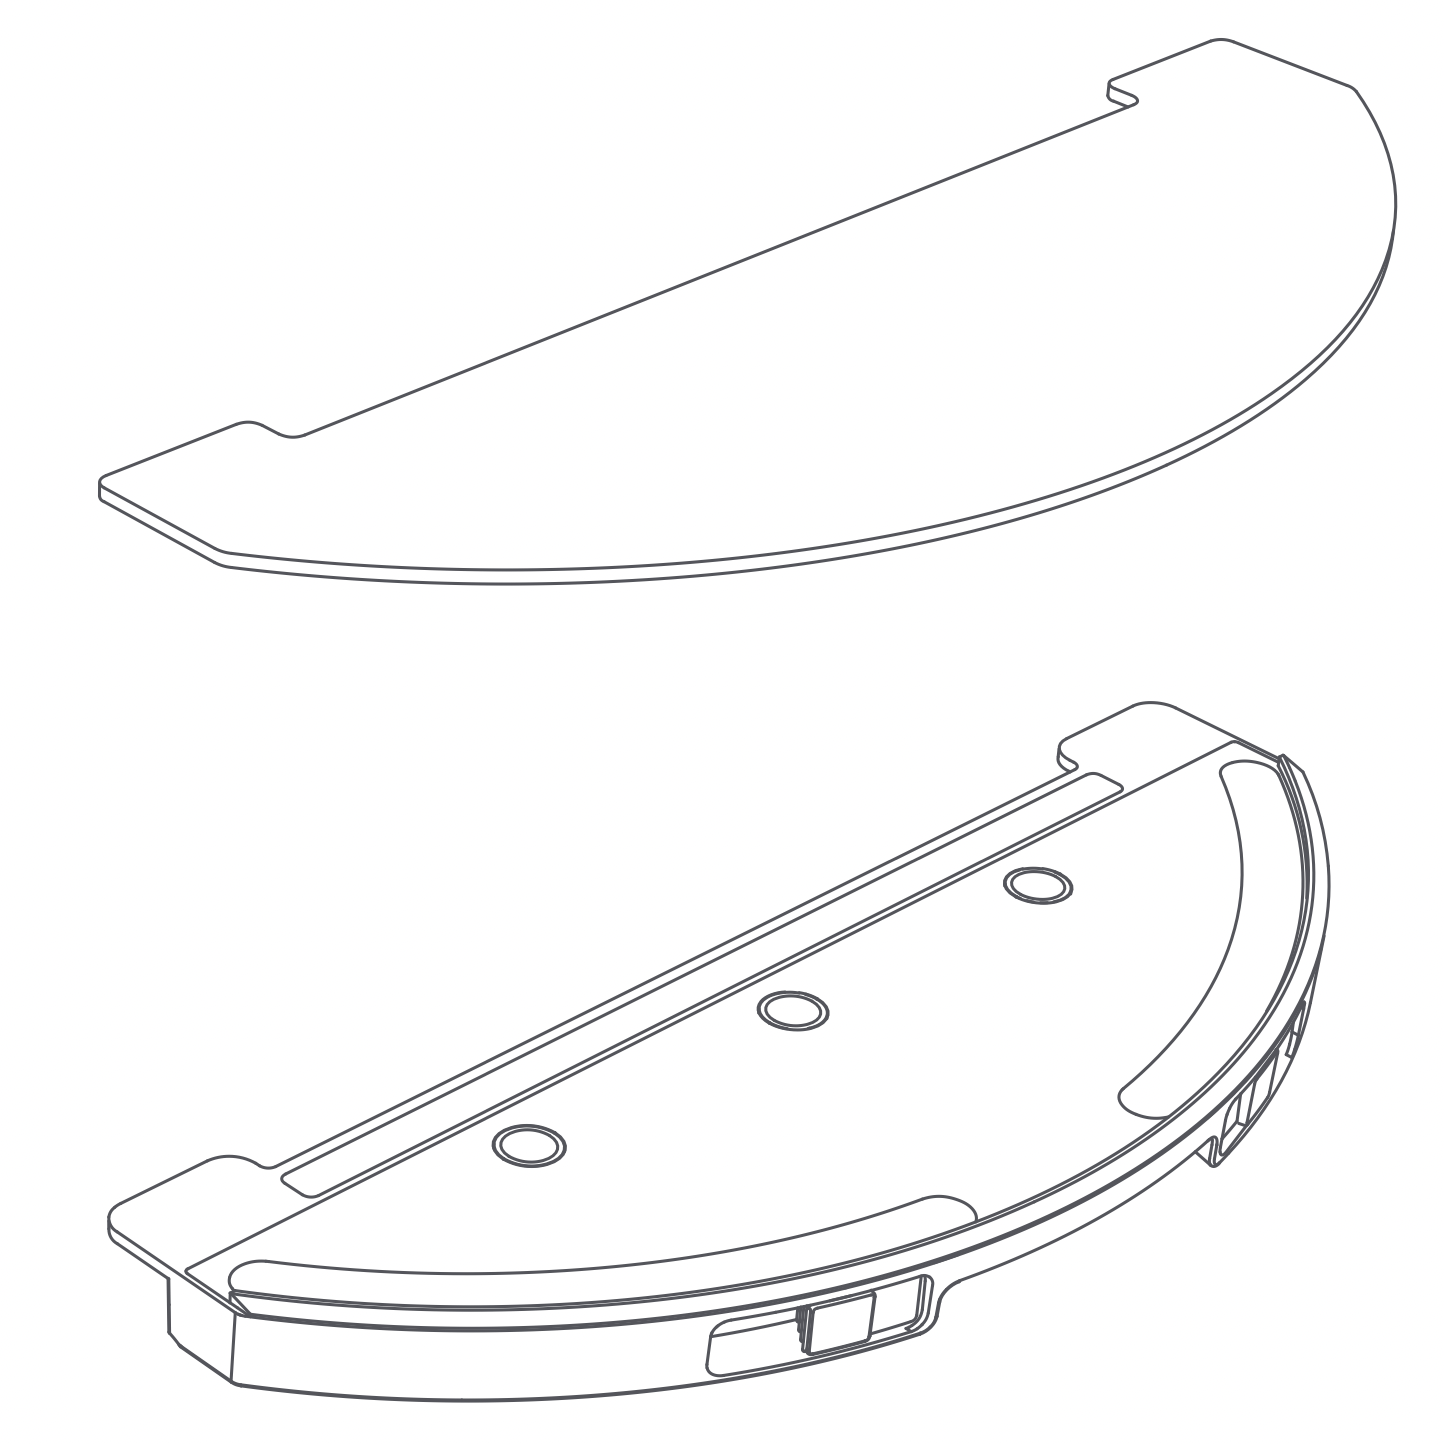
Installing the mopping module
Step 1: Attach the mop
Stick the mop on the designated area on the mop holder
Step 2: Add water to the water tank
Open the cover of the water tank, add water, and then shut the cover
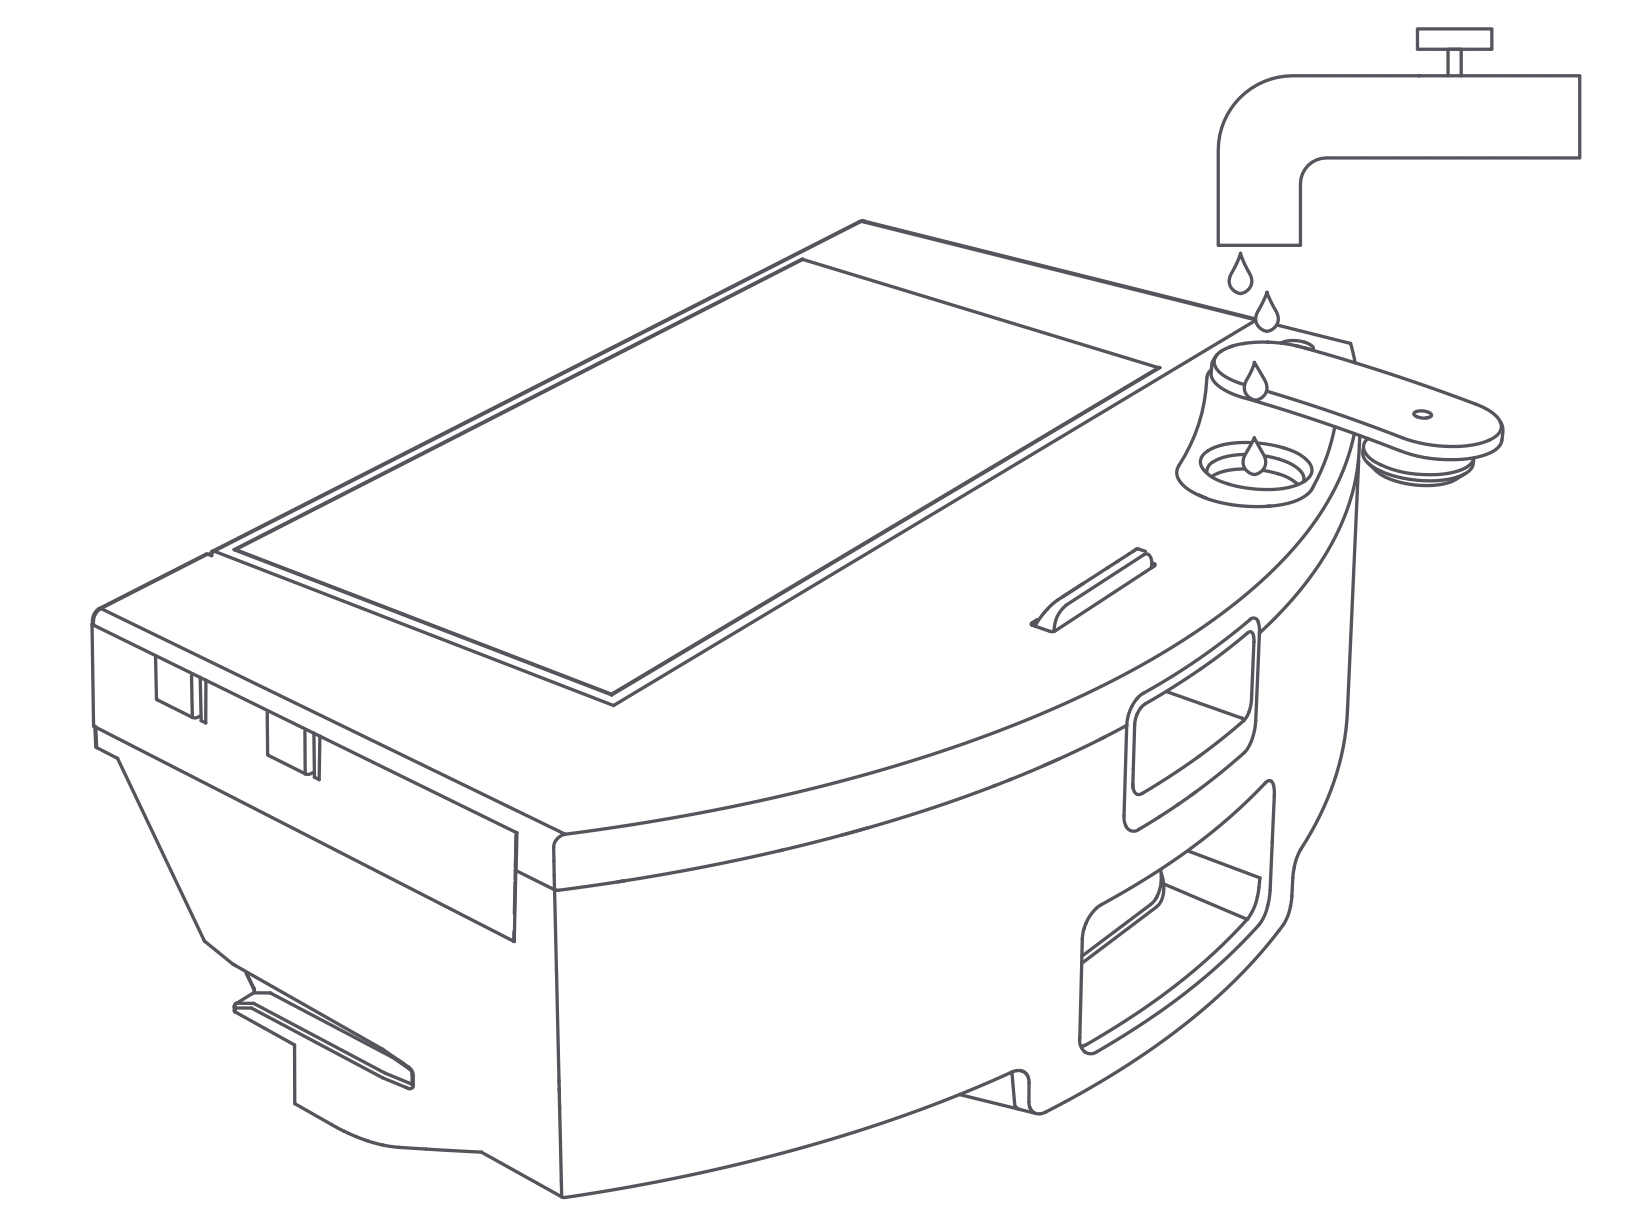
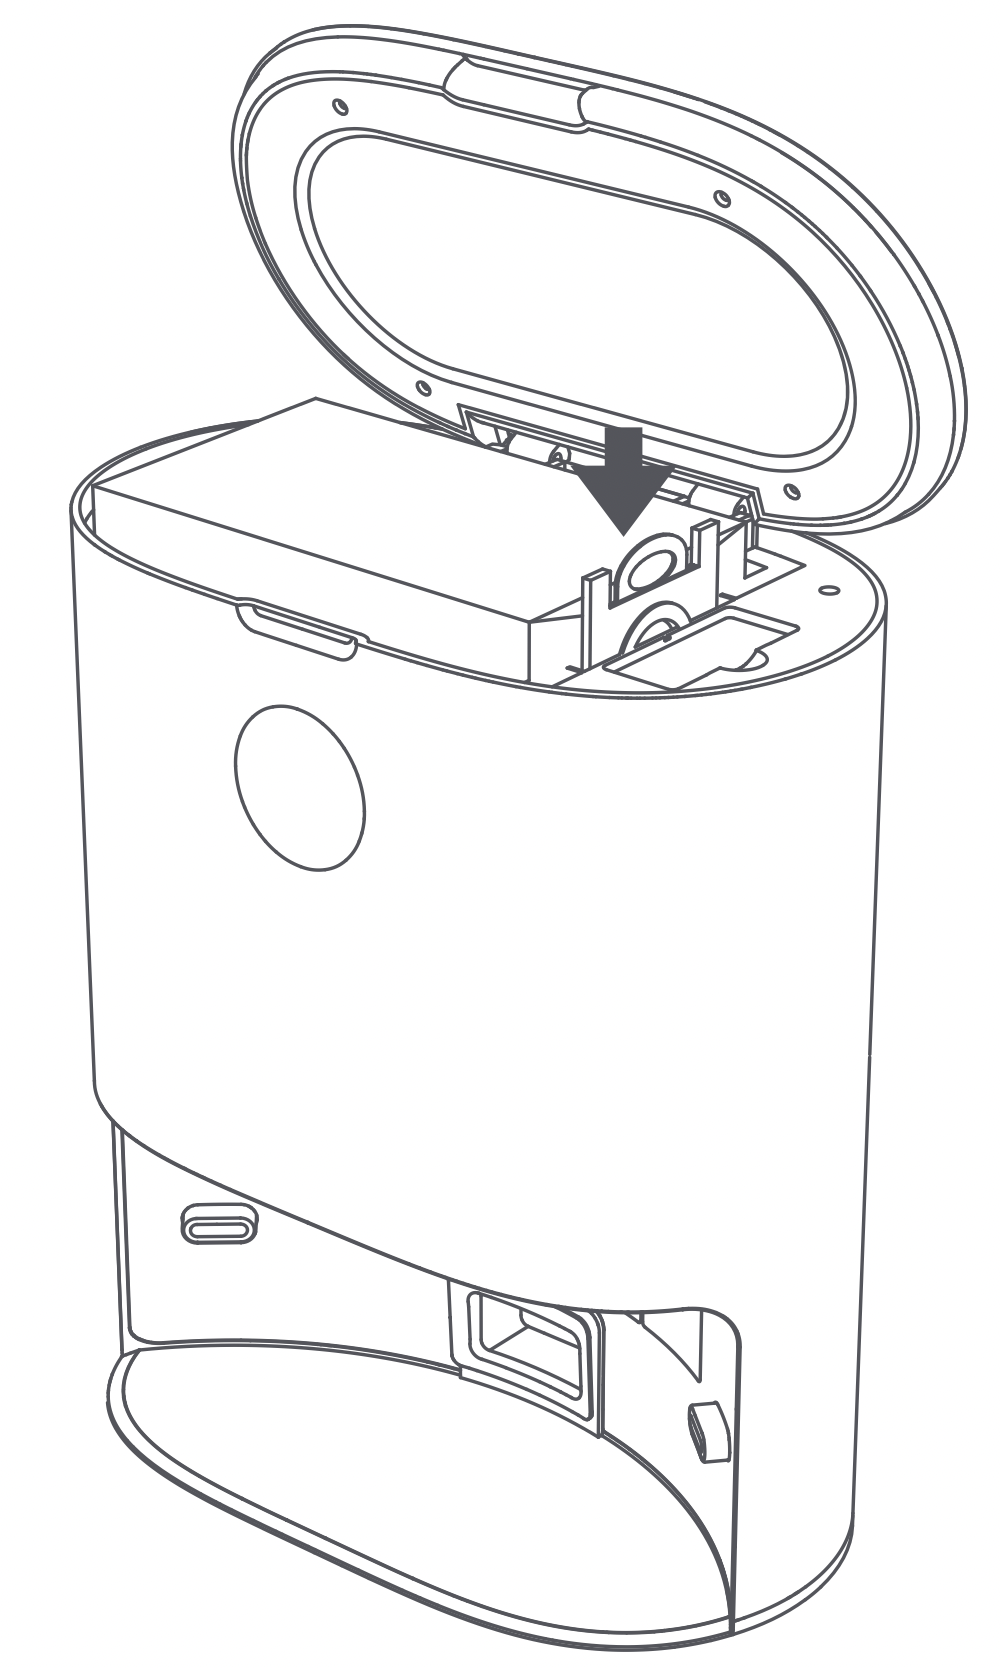
Step 3: Install the water tank
Push the electric water tank and dust box horizontally in the direction of the groove on the main unit until you hear a "click" sound.
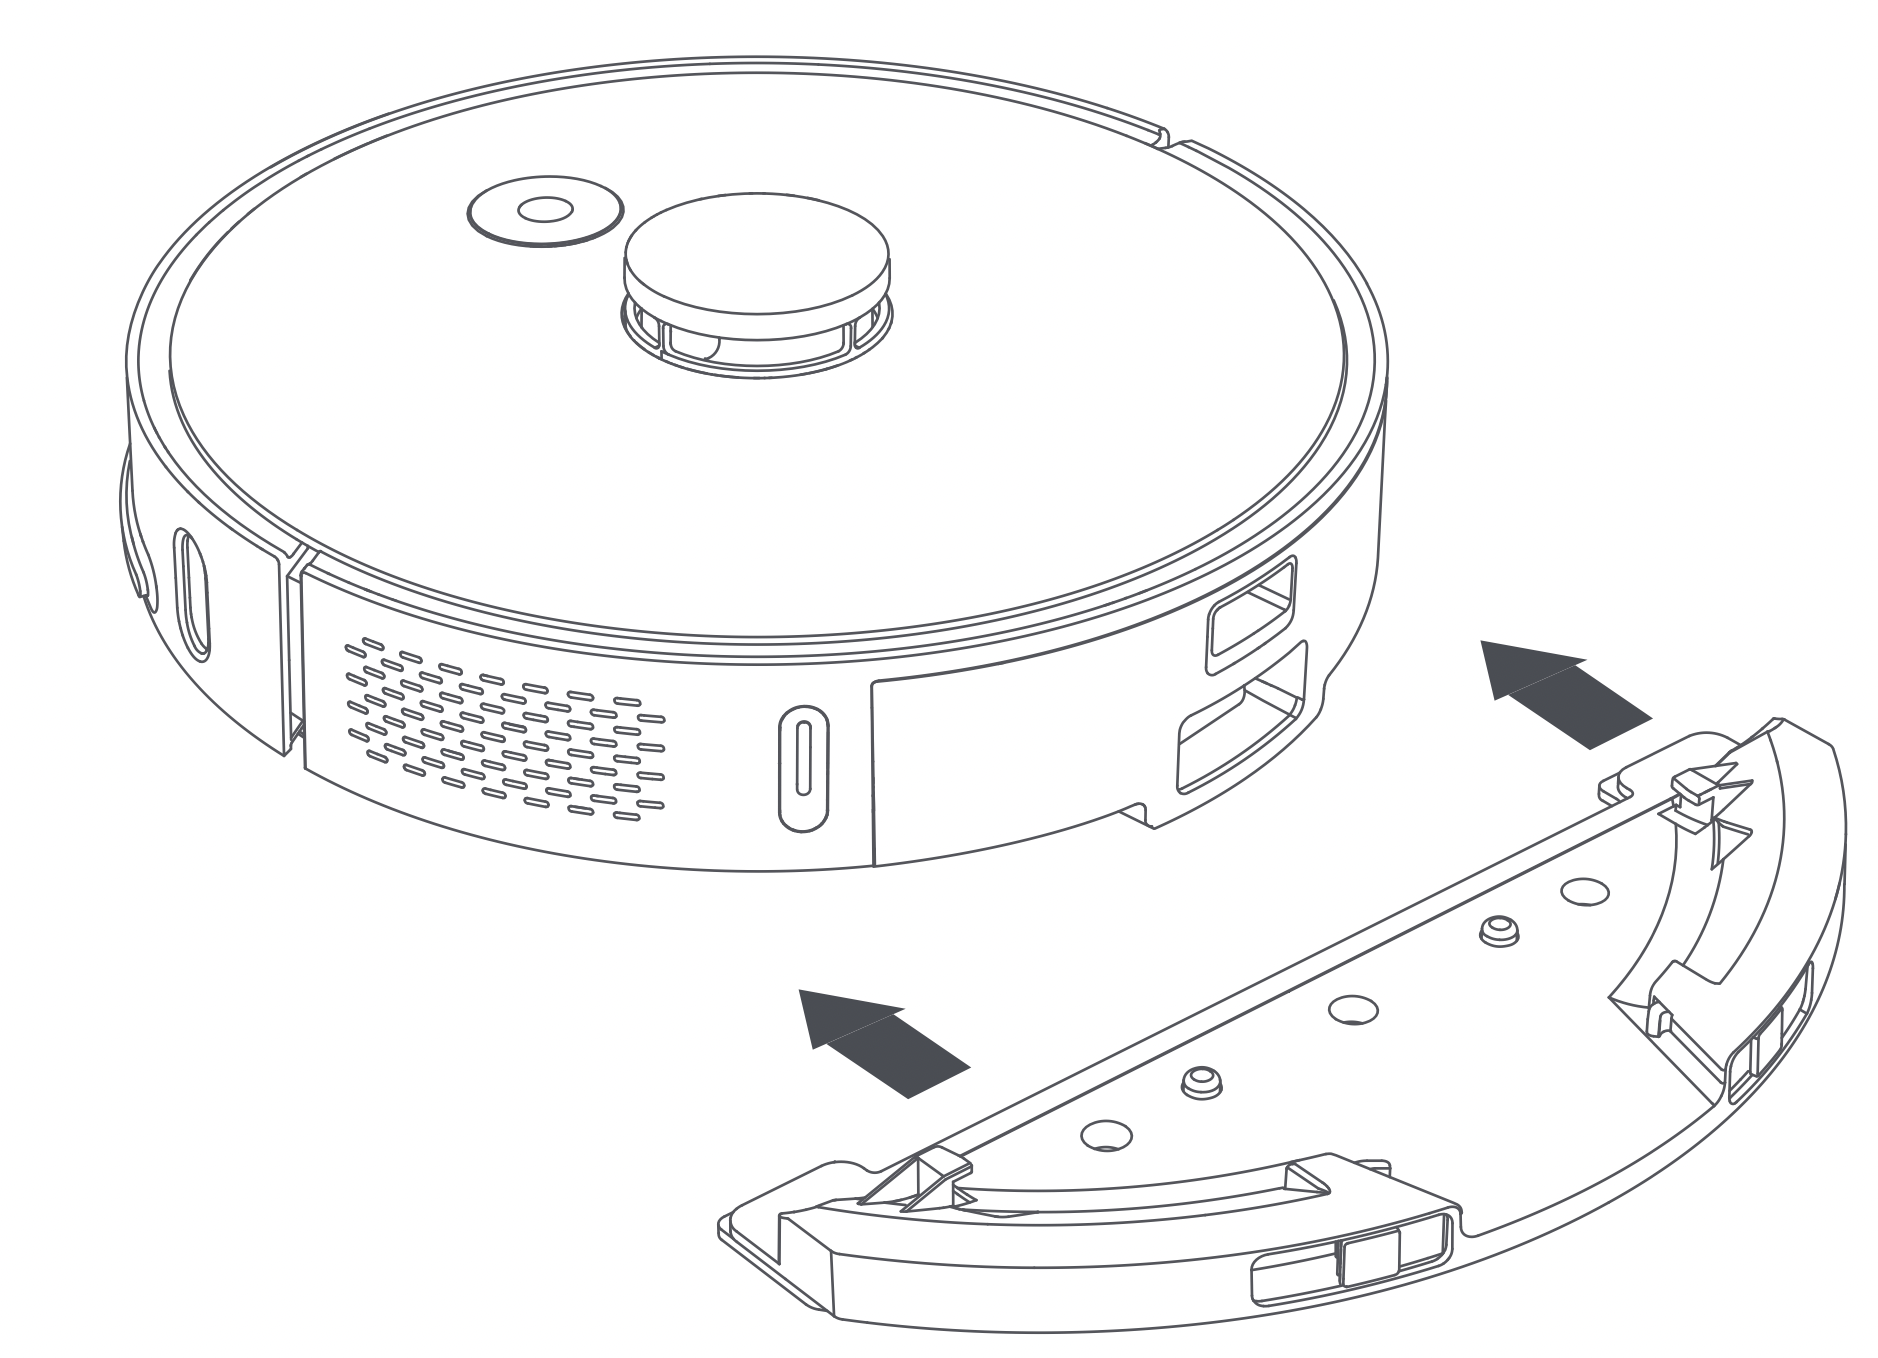
Step 4: Install the mopping module
Push the mopping module buckle in parallel along the electric water tank until you hear a "click" sound.
Caution
- Do not use the mopping function on the carpet.
- When charging or when the robot is not in use, remove the mopping module, pour out the excess water in the water tank and clean the mop to avoid mold or odor.
- It is recommended to clean the mop each time to maintain water speed and cleaning effect. Replace with a new mop if necessary.
- When charging the main unit on wooden floors, remove the mopping module in a timely manner to prevent water seeping from the mop and damaging the floor.
Use
Turning on/off and cleaning modes
- Turning on/off
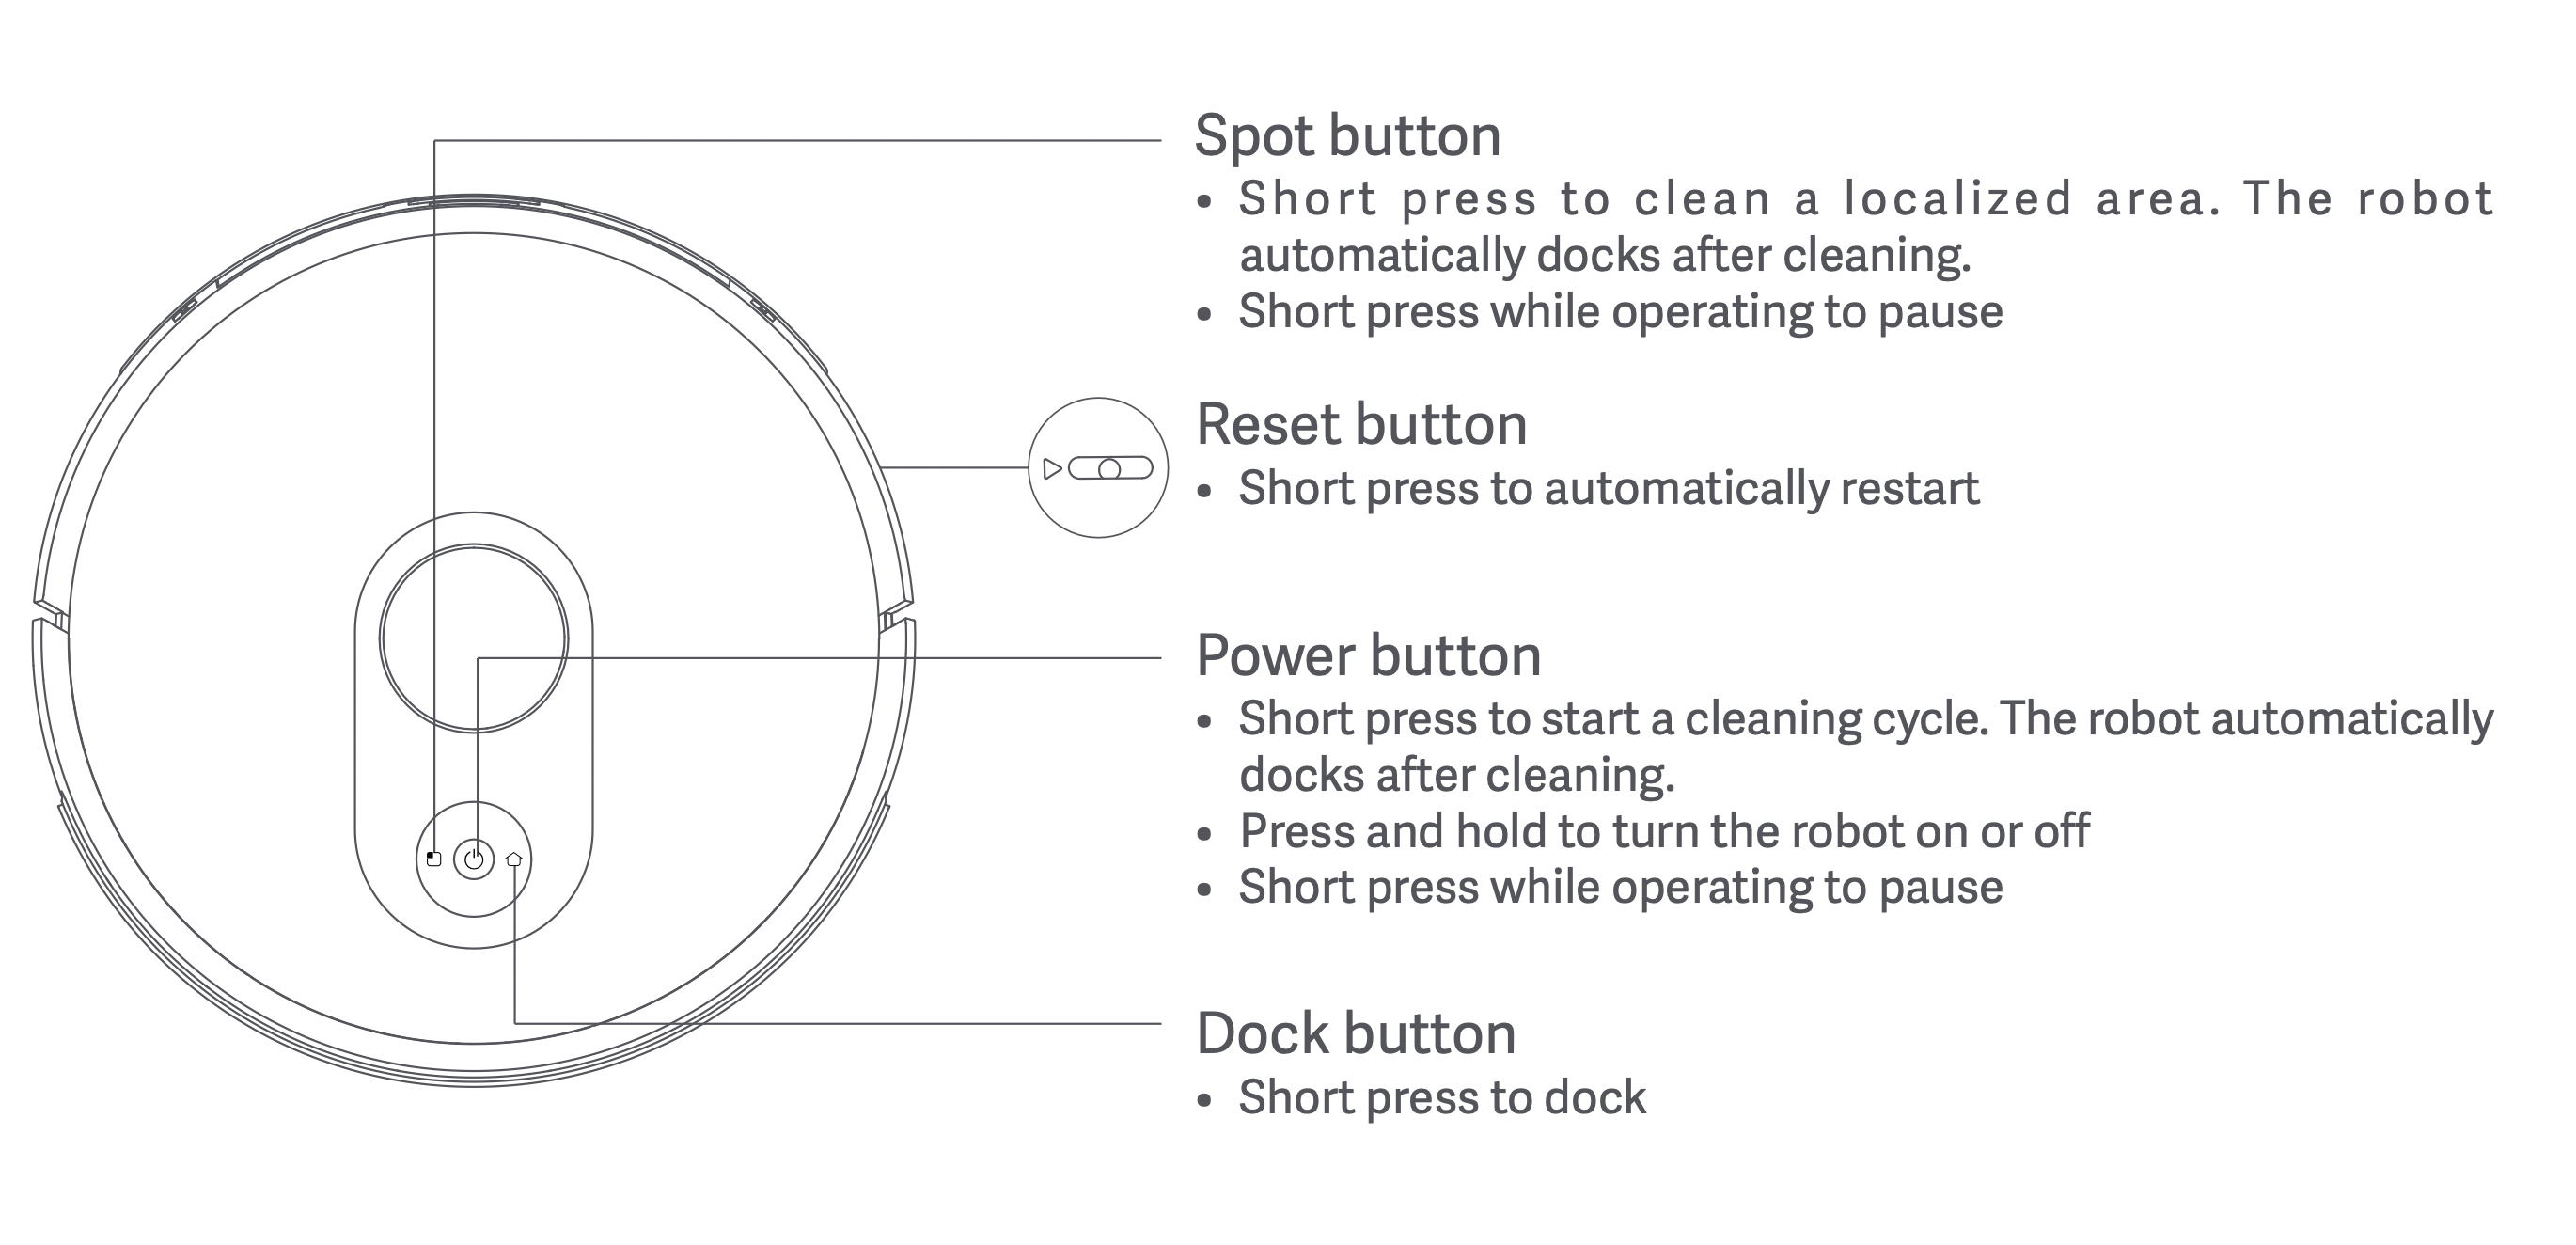
Press and hold the Power button, the Power button indicator is ON and the main unit enters Standby mode. When the main unit is in Idle mode, press and hold the Power button, the indicator slowly turns off and the cleaning cycle is done.
When the main unit is running, press any button to pause the appliance. Press the Power button again to resume the cleaning cycle.
Press the Dock button, the main unit automatically docks and the cleaning cycle will end. Press the Spot button to clean a localized area.
- Charging
When a cleaning cycle is complete, the main unit automatically docks and charges itself. If an error occurs, resolve the problem and press the Dock button after troubleshooting, the main unit automatically docks.
When the main unit is charging, the Power button indicator is always ON; when fully charged, the indicator breathes (breathe = dim and brighten at a certain rate).
If a cleaning cycle does not start from the charging dock or dust collector, the robot may fail to dock. When the cleaning cycle is complete, the main unit automatically returns to where it started. To return it to the charging dock or the dust collector, press the Dock button.
- Clean mode
After the main unit is turned on, it scans and intelligently maps out a series of areas. Then it cleans along the wall and then in small arcs until the area is complete. When the cleaning cycle is complete, the main unit automatically returns to the charging dock or the dust collector.
Press the Power button to start a cleaning cycle. The cleaning path is as shown in the figure below. Press any button to pause the cleaning.

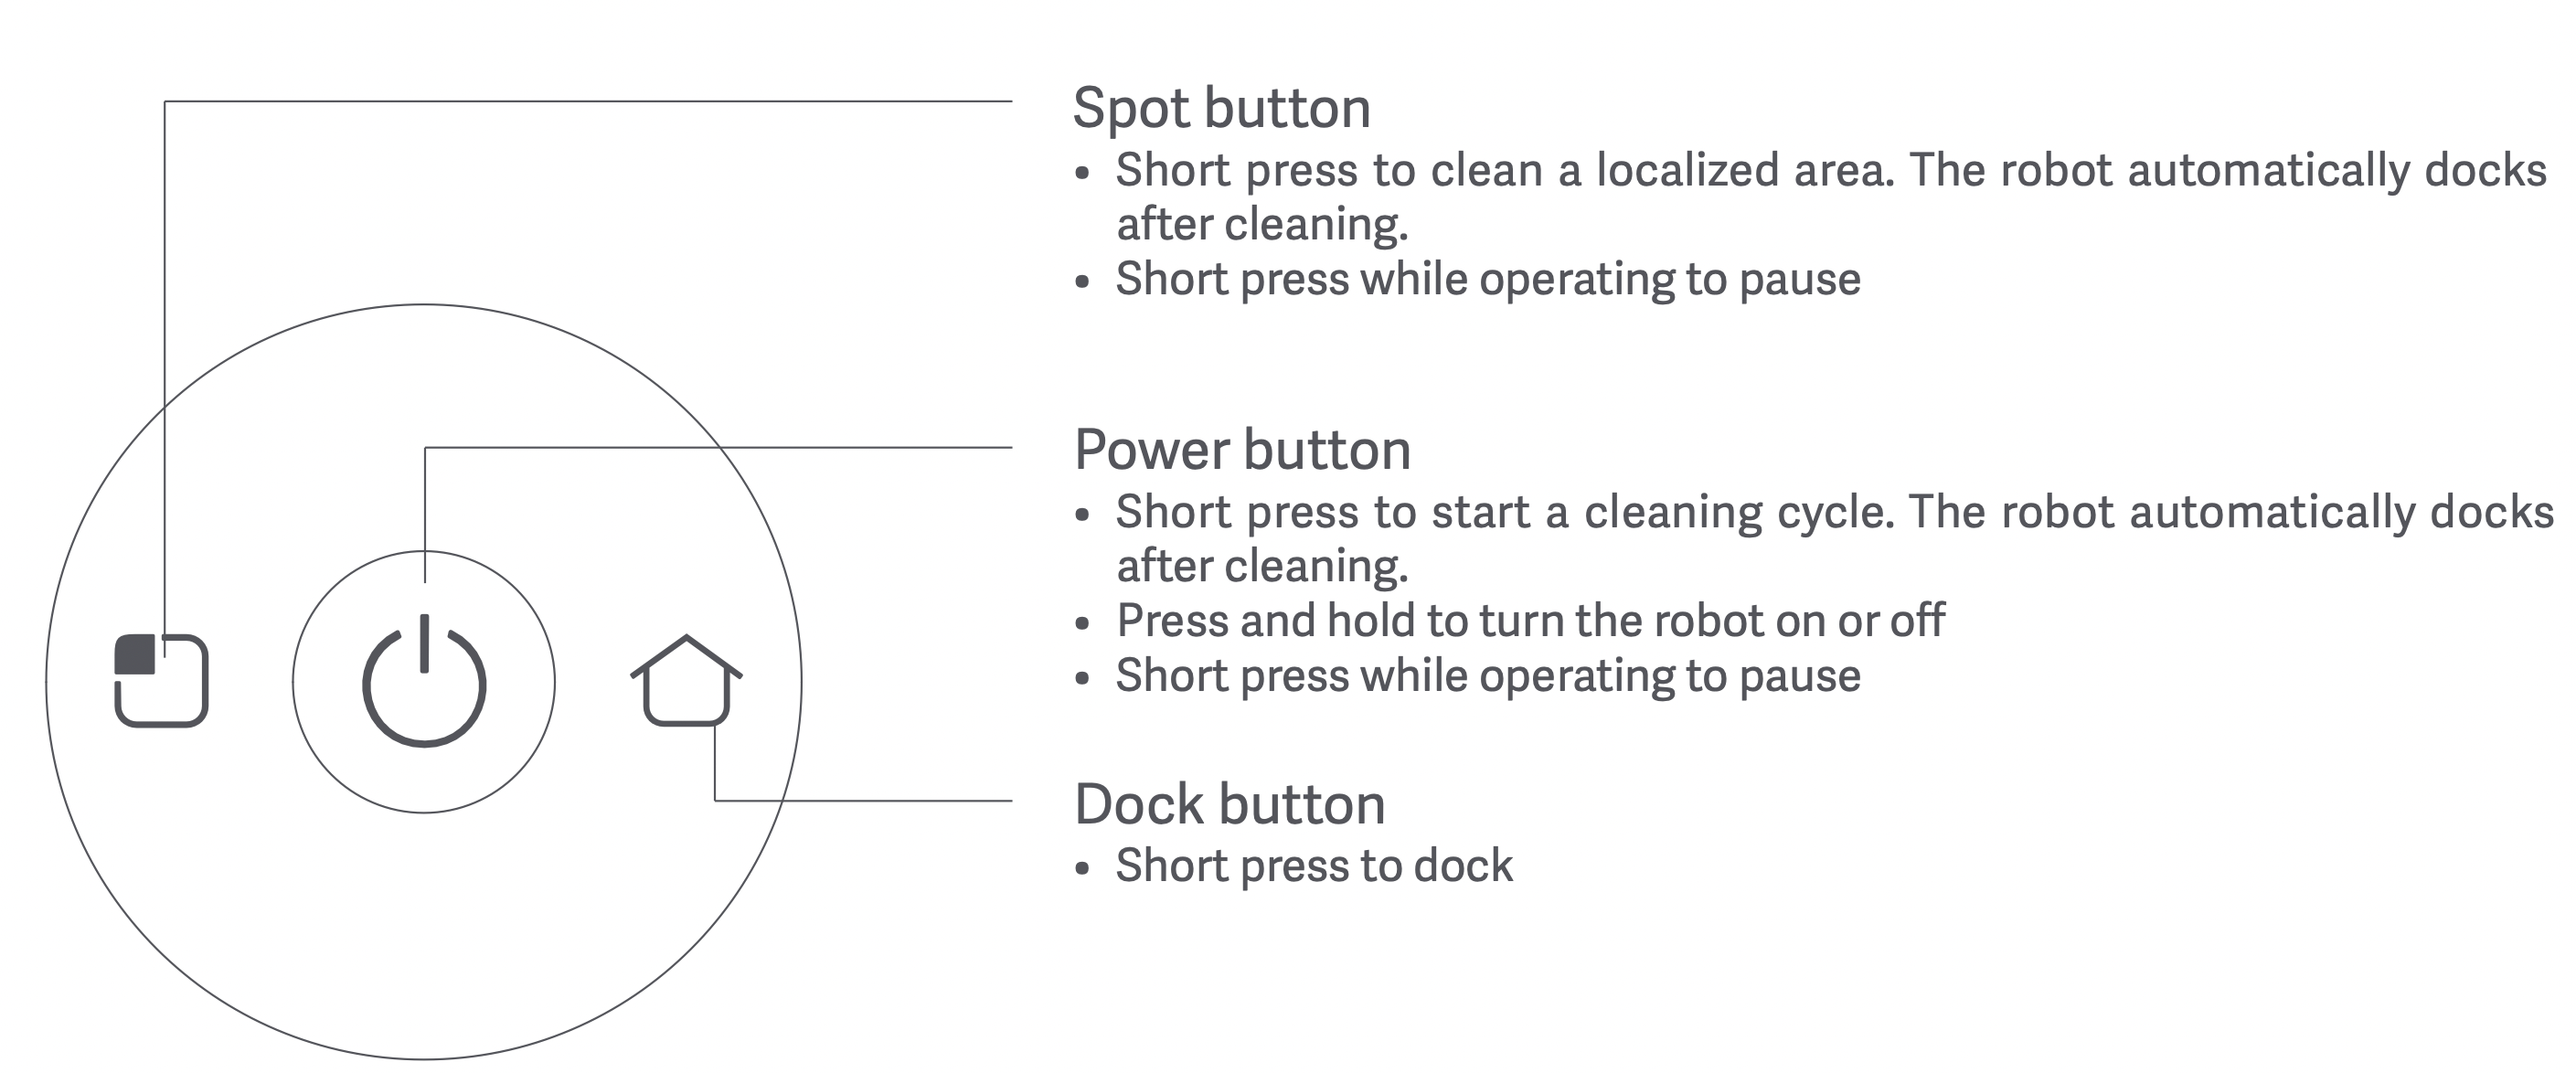
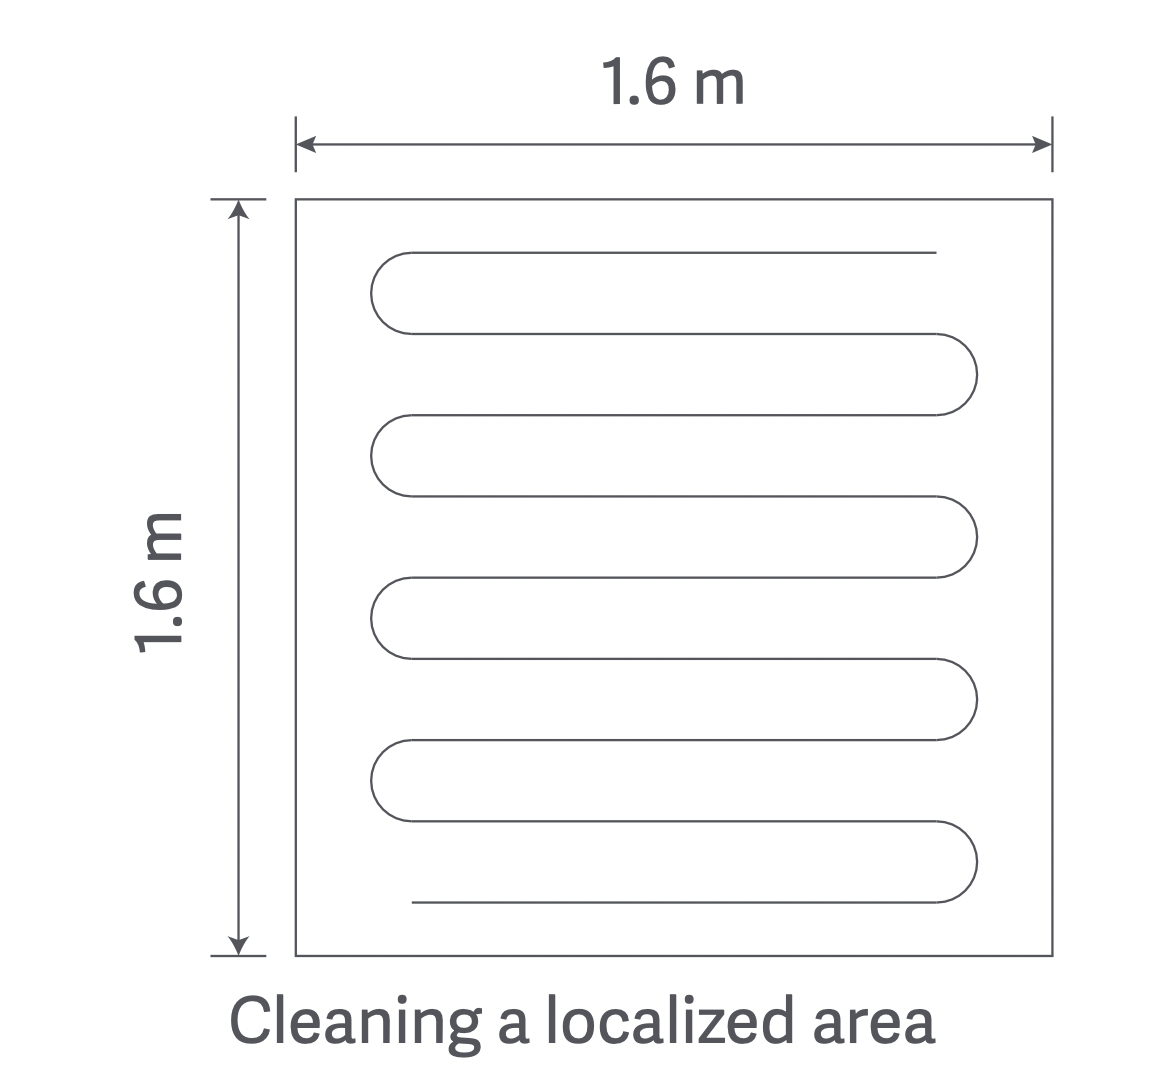
- Cleaning a localized area
When the main unit is in Standby mode or paused, press the Spot button to start cleaning a localized area. The cleaning area is a 1.6 m x 1.6 m square centered on the main unit. After cleaning, the main unit automatically docks.
- Room mode
If a room has been set in map management, select the room and press the Spot button to clean it. If not set, firstly set the room boundaries on the APP.
- Adding water or cleaning the mop while operating
In Operating mode, to add water or clean the mop, press the Power button to pause the main unit, remove the dust box + water tank (2 in 1) and the mopping module. When finished, reinstall them back, and press the Power button to resume the cleaning cycle.
- Error symptom
When an error occurs while the main unit is operating, the Power button indicator flashes quickly and a voice prompt will be heard. Refer to the “Troubleshooting” section in this manual to resolve the problem.
- Sleep mode
After 10 minutes of no operation, the main unit automatically enters Sleep mode. Press any key to wake it up.
- WiFi reset
When resetting the password or when your phone is unable to connect to the main unit for other reasons, reset the WiFi according to the instructions in “APP downloads” section of this manual.
- Automatic dust collection (only applicable to robot vacuum and mop cleaner supplied with a dust collector)
When a cleaning cycle is complete, the robot automatically returns to the dust collector for charging and dust collection.
- Reset button
When the button does not respond or cannot be turned on, please try to reset the system; after reset, the timing cleaning setting and cleaning mode setting of the host will be cleared. Set WiFi.
Caution
- It is recommended to start cleaning when the main unit is on the charging dock or the dust collector.
- When power is insufficient during cleaning, the main unit will automatically dock on the charging dock or the dust collector and charge itself. It will return to where it left off and resume cleaning after charging is completed.
- Before using the product, arrange the desks, chairs, household items, floor objects, etc. neatly, and clear power cords and small items laying on the ground to avoid the product being blocked during cleaning.
- Do not stand in front of the main unit when the appliance is running, to prevent the main unit from being unable to recognize the area to be cleaned.
- After the main unit has finished working, it is recommended not to shut it down, and to keep the main unit in the charging state so it can better carry out the next cleaning task.
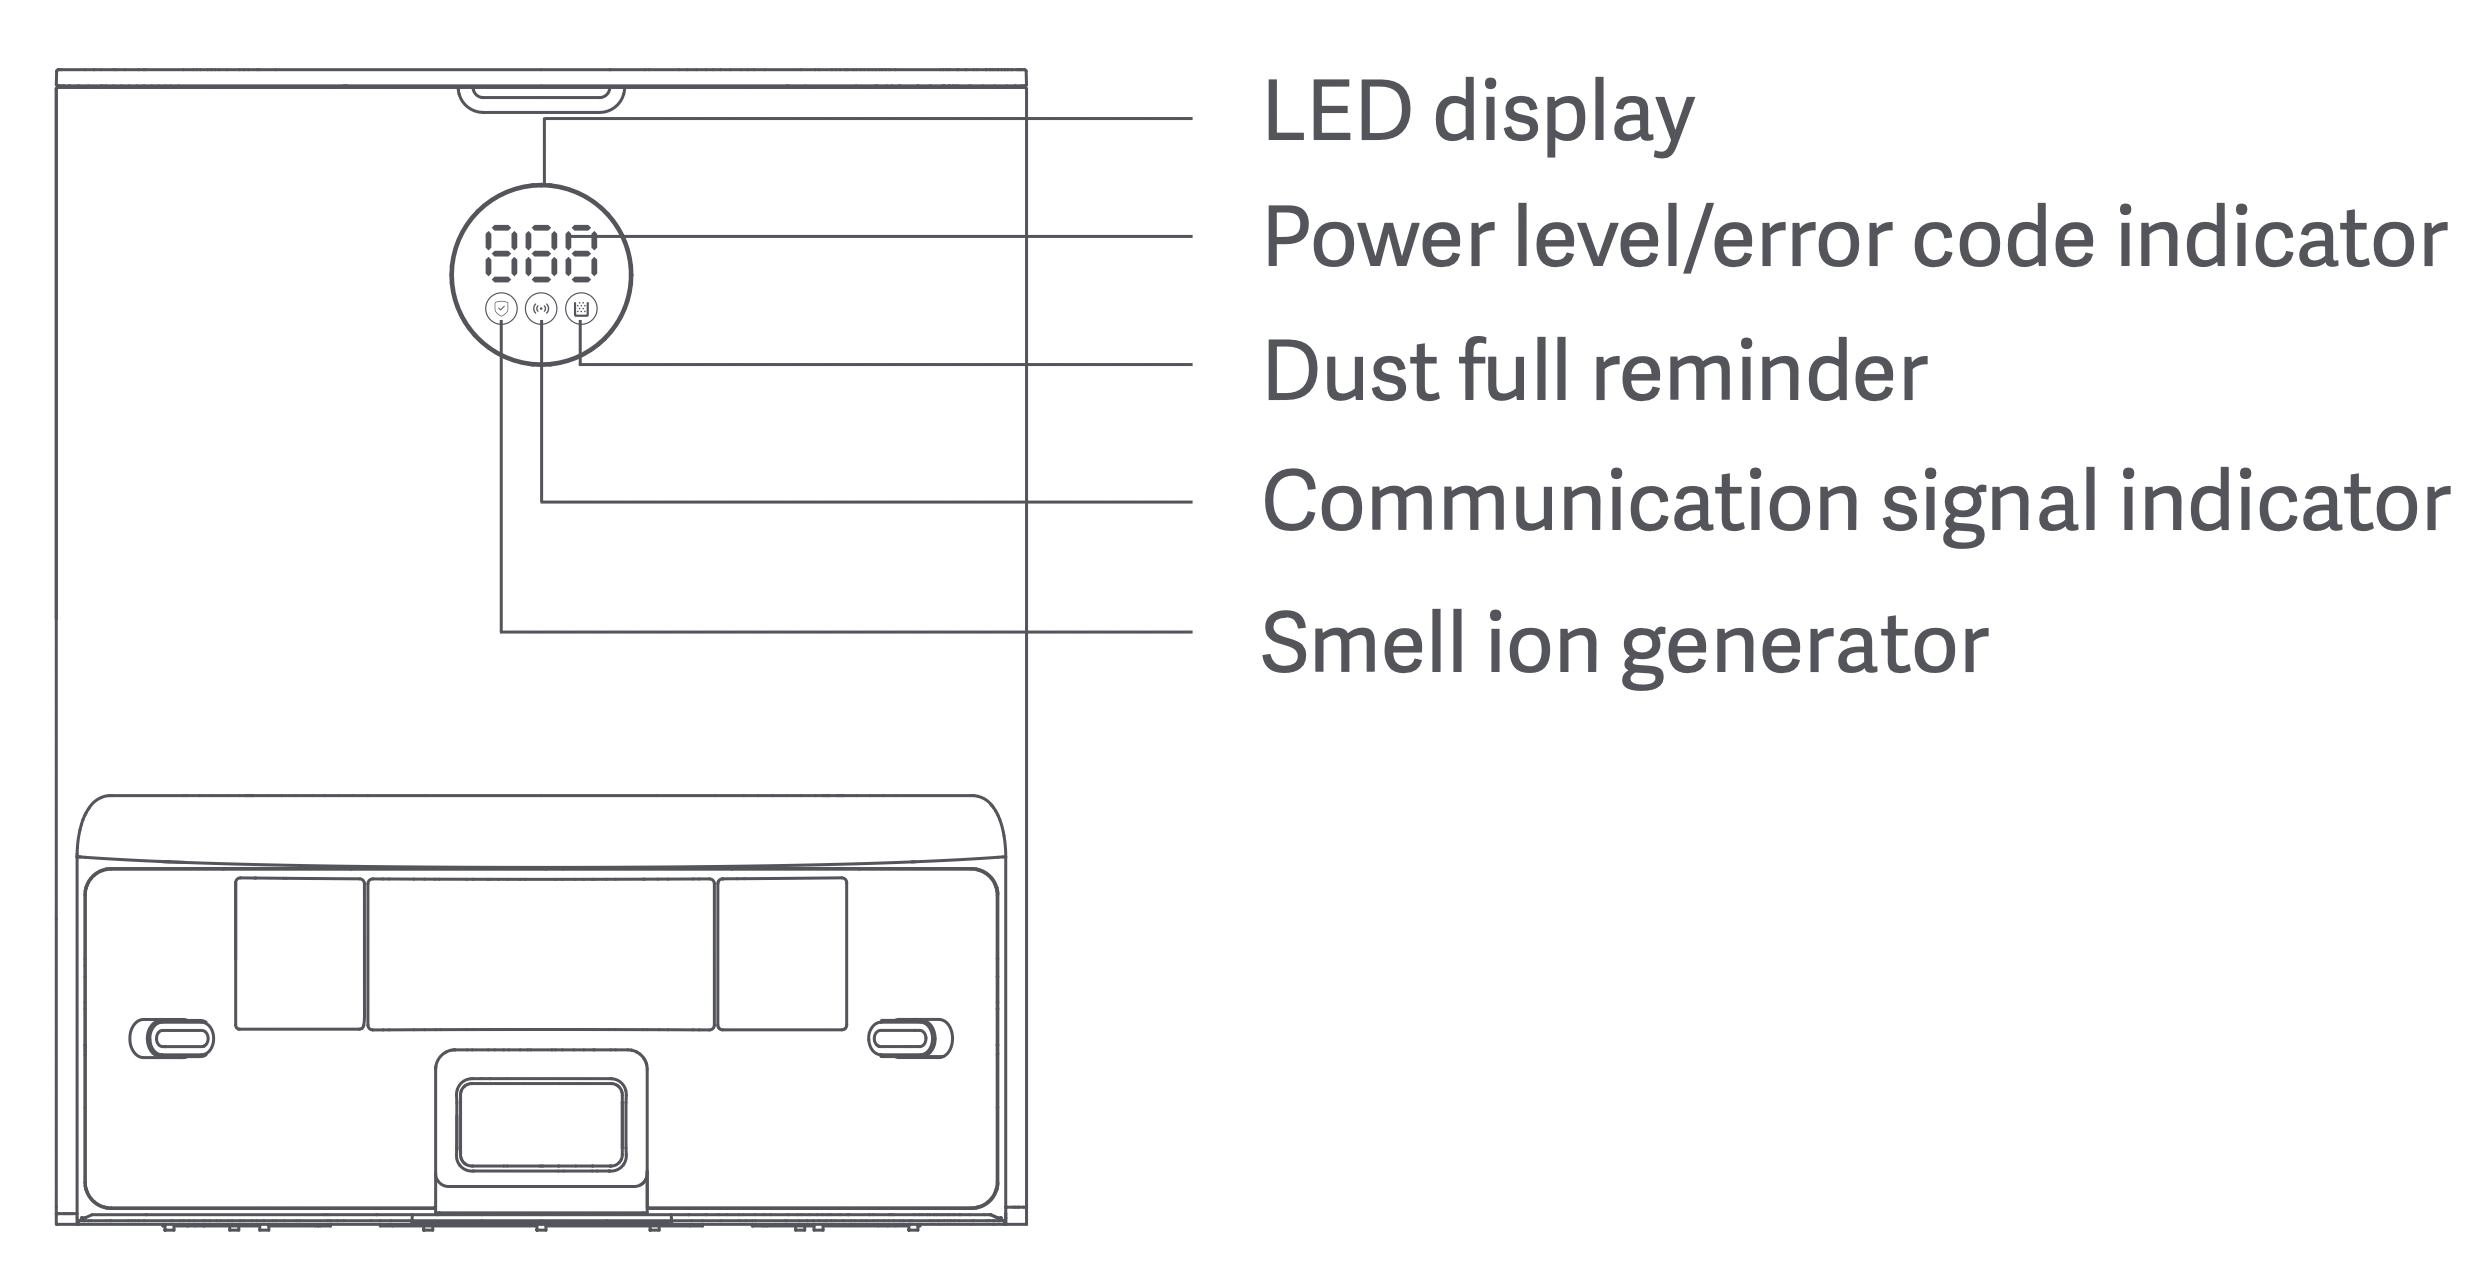
Turning on/off and operating the dust collector (optional)
Touch the LED display to turn on the dust collection function. When the dust collection function of the integrated station is normal, the outer ring indicator light shows the state of the running water light, and the smell ion generator indicator light is always on for 30 minutes and then goes out. The LED display will also display the remaining power; if the dust bag is not installed, the fault code will be displayed; in addition, the display There are also functions for reminding the work of the smell ion generator, the communication light of the dust collection station and the host, and the function of reminding that the dust is full.
Dust collector status indicator
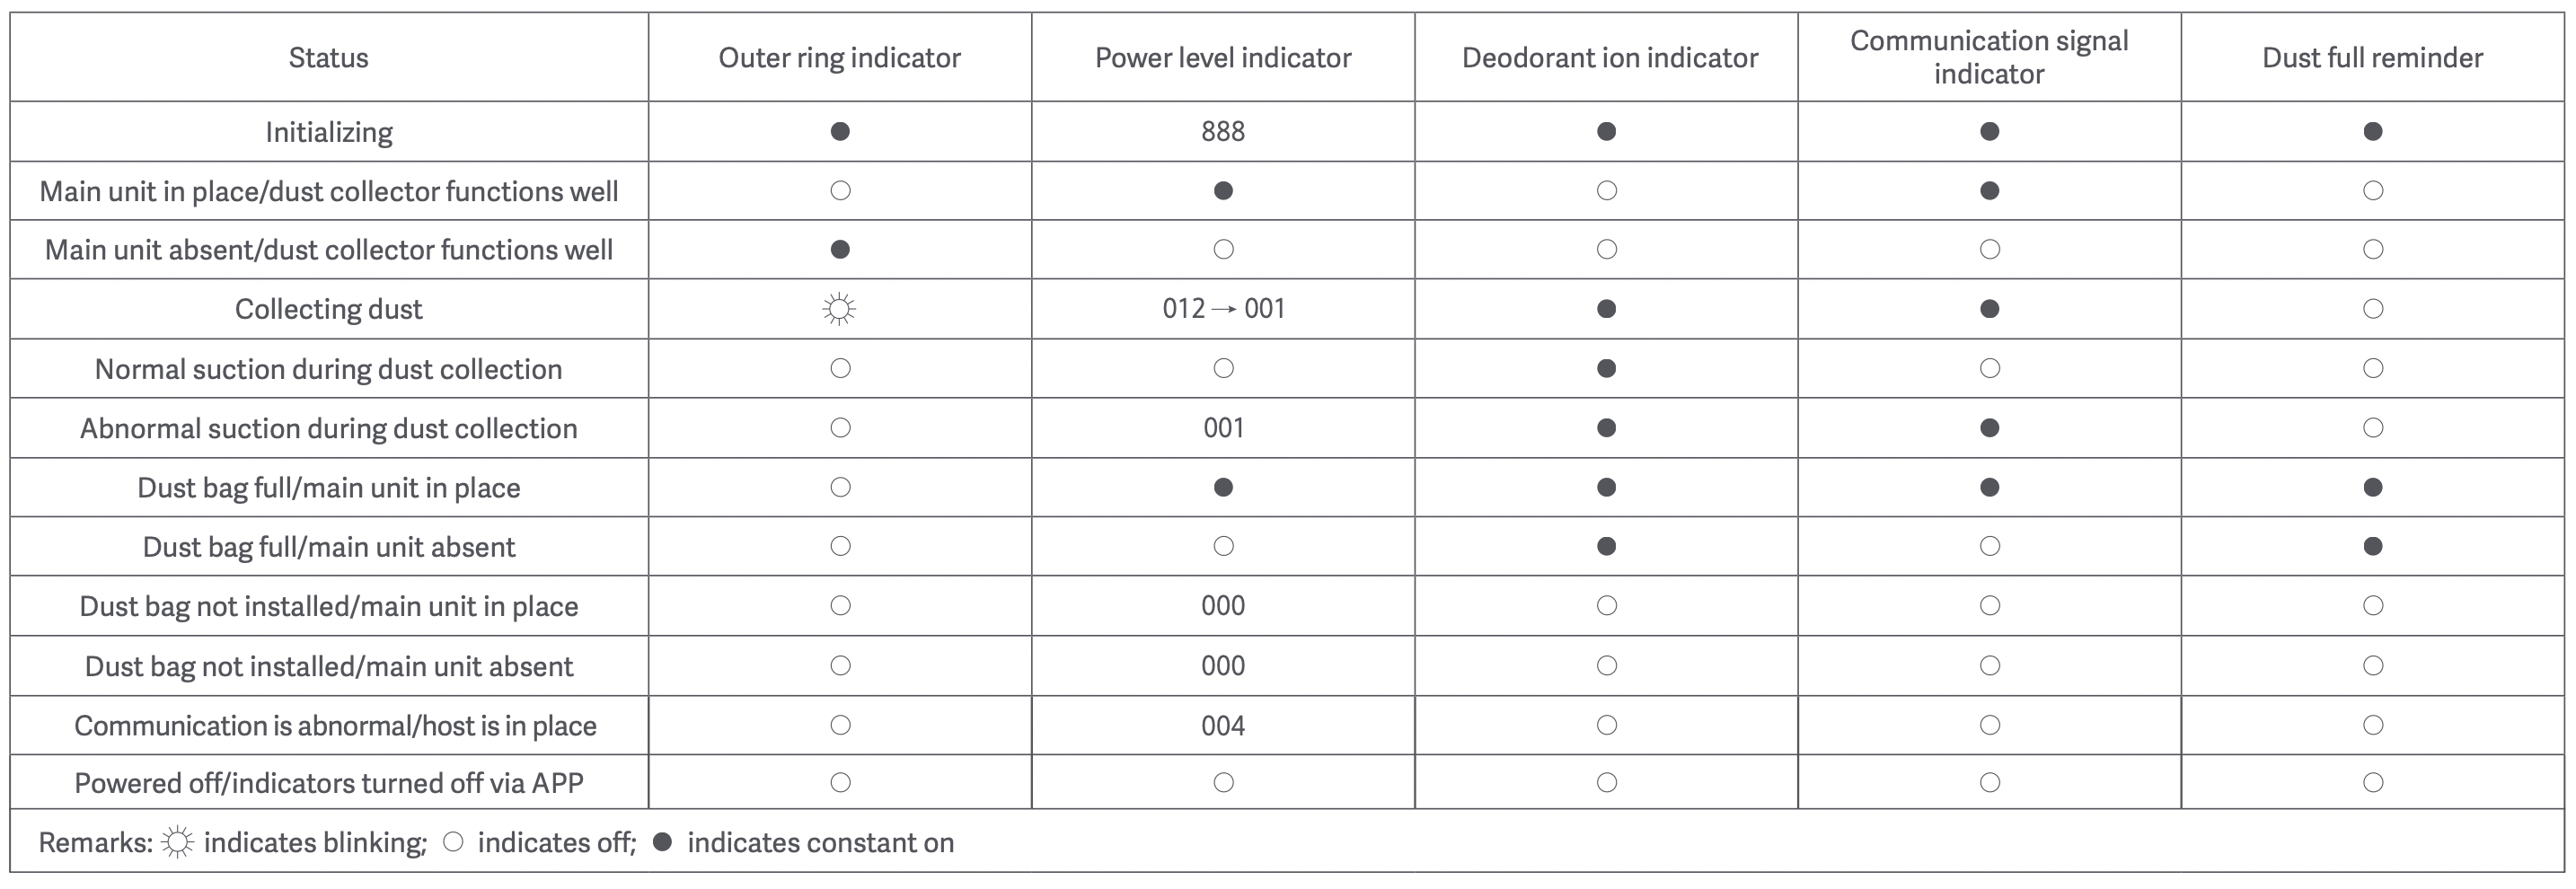
Reminder: Make sure the dust collector is connected to the power supply and the main unit is in place, so that you can start cleaning and dust collection remotely at any time through the APP.
Cleaning and maintenance
Always turn off the product before any maintenance!
Disassembling and installing the main brush
Step 1: Disassemble the main brush
Turn the robot vacuum and mop cleaner over, press the main brush cover release button to remove the main brush cover. Take out the main brush and clean it.

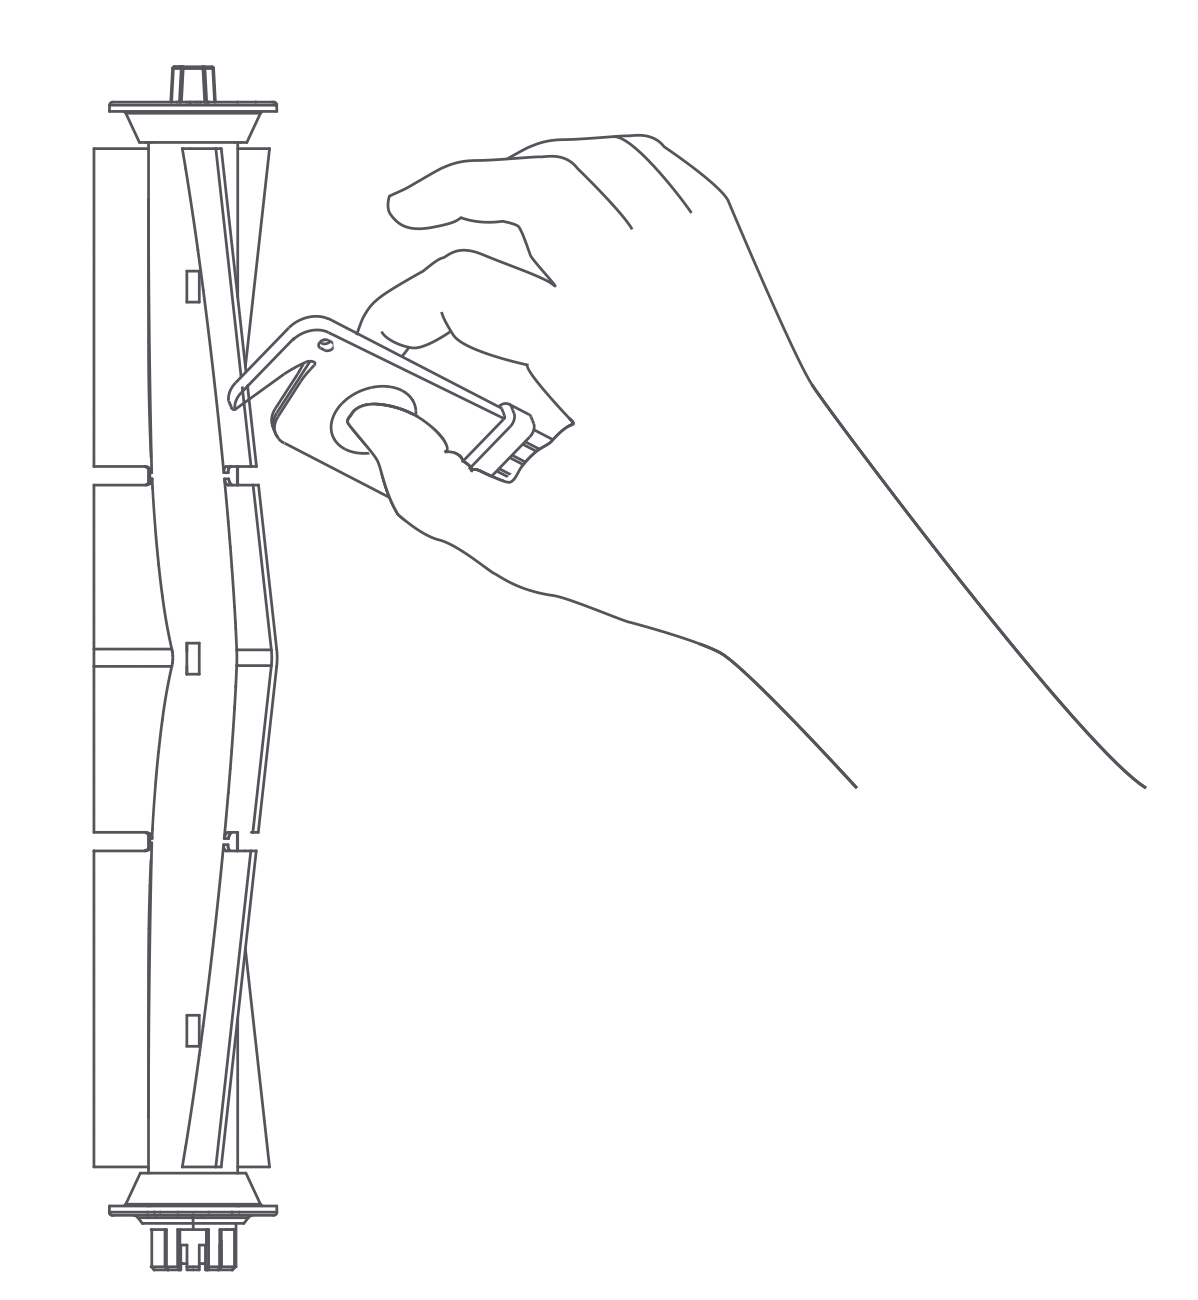
Step 2: Clean the main brush
Use the cleaning brush to pick up and cut away the hair and fibers entangled on the main brush. It is recommended to replace the main brush every 3-6 months.
Caution
- Turn off the product before replacing the main brush.
- The cleaning brush has a sharp blade, which is used to cut away entangled objects that are difficult to clean. Keep the cleaning brush away from children.
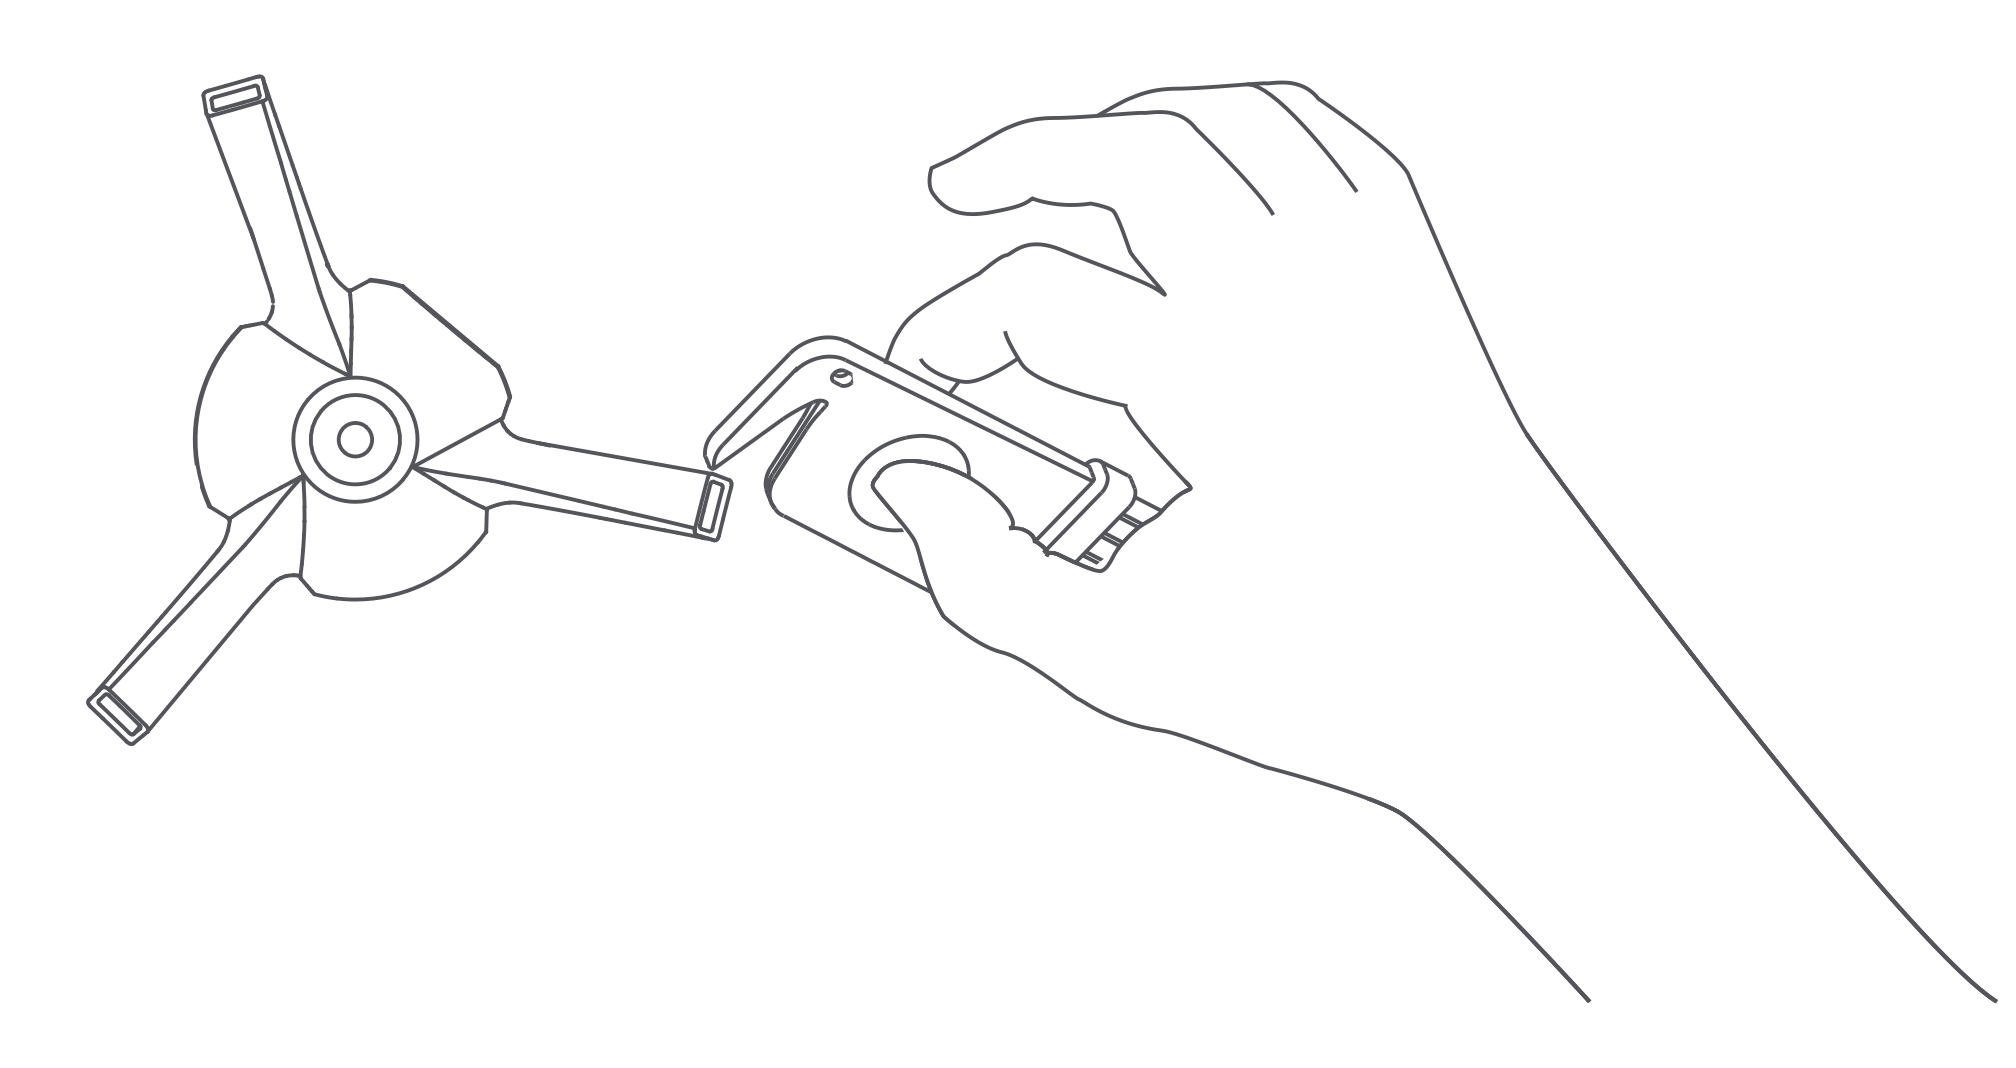
Disassembling and installing the side brush
Step 1: Disassemble the side brush
Turn the robot vacuum and mop cleaner over, remove the screw with a screwdriver, and take out the side brush.
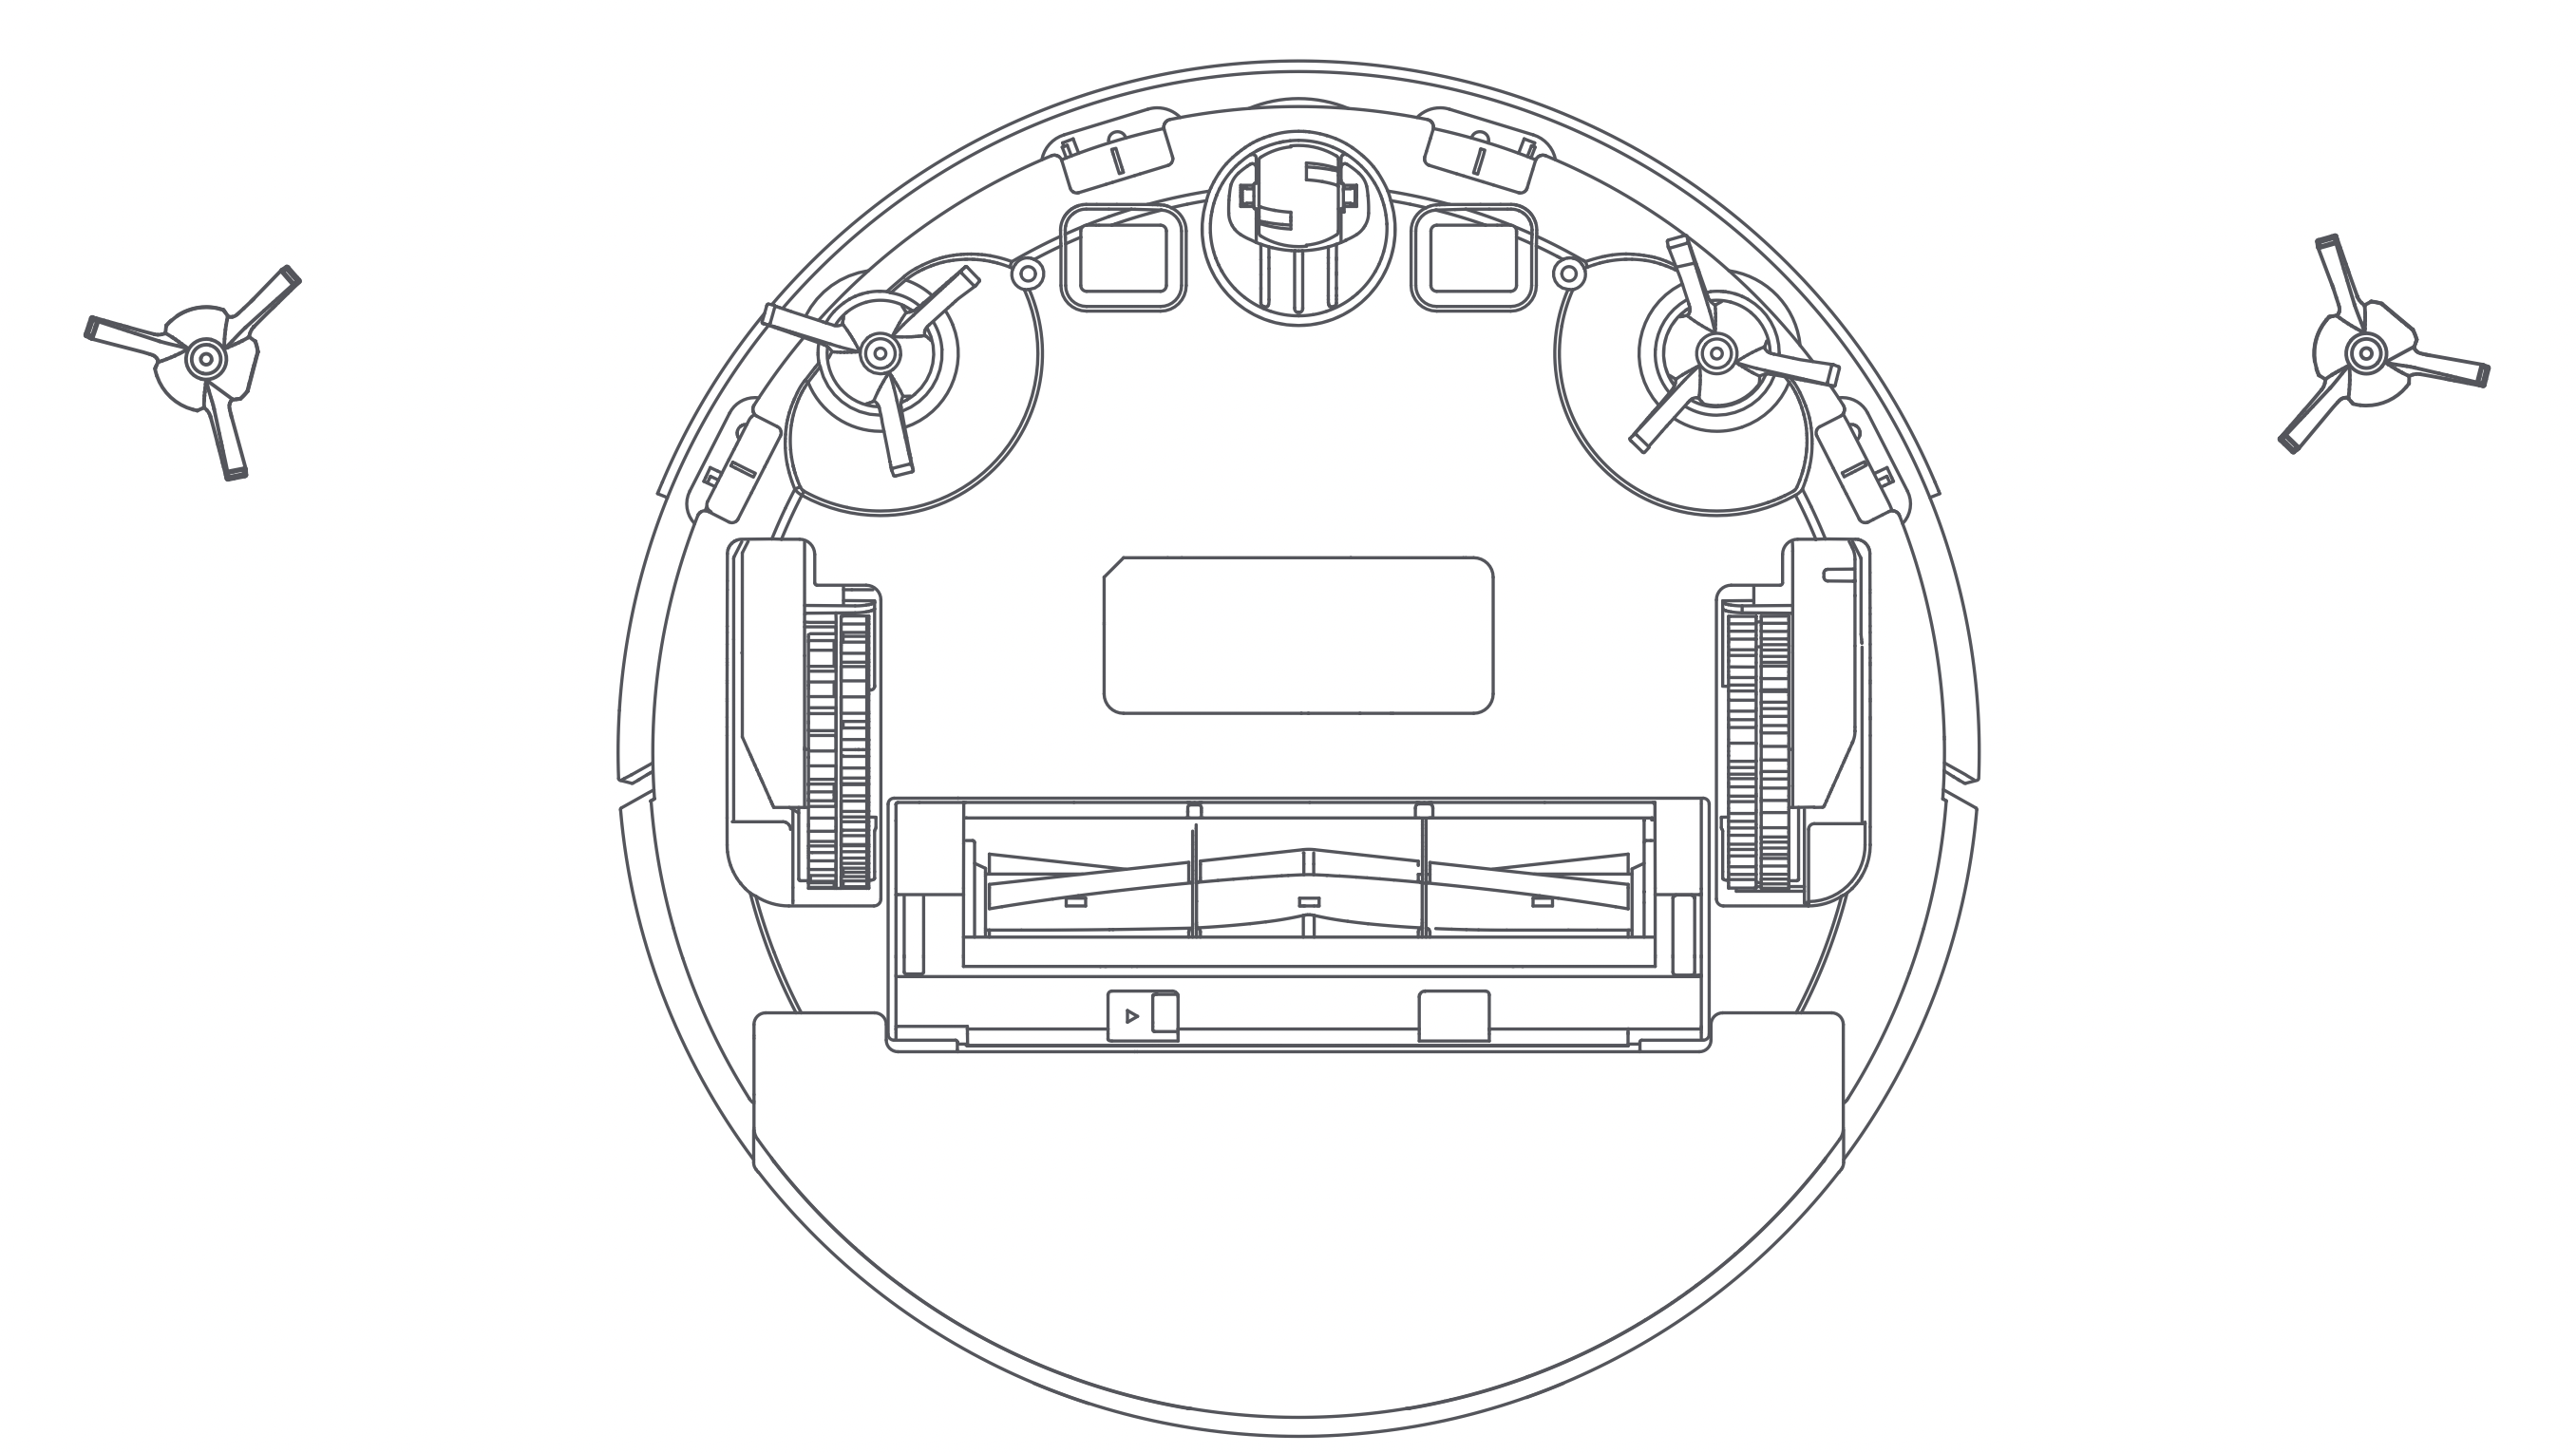
Step 2: Clean the side brush
Use the cleaning brush to pick up and cut away the hair and fibers entangled on the side brush. It is recommended to replace the side brush every 3-6 months to ensure effective cleaning.
Caution
- Only replace with a side brush supplied by ROIDMI, otherwise, it may lead to damage to the main unit.
- To avoid scratching yourself, be careful when using a screwdriver to replace the side brush.
- Install the left and right side brushes correctly onto their respective pins.
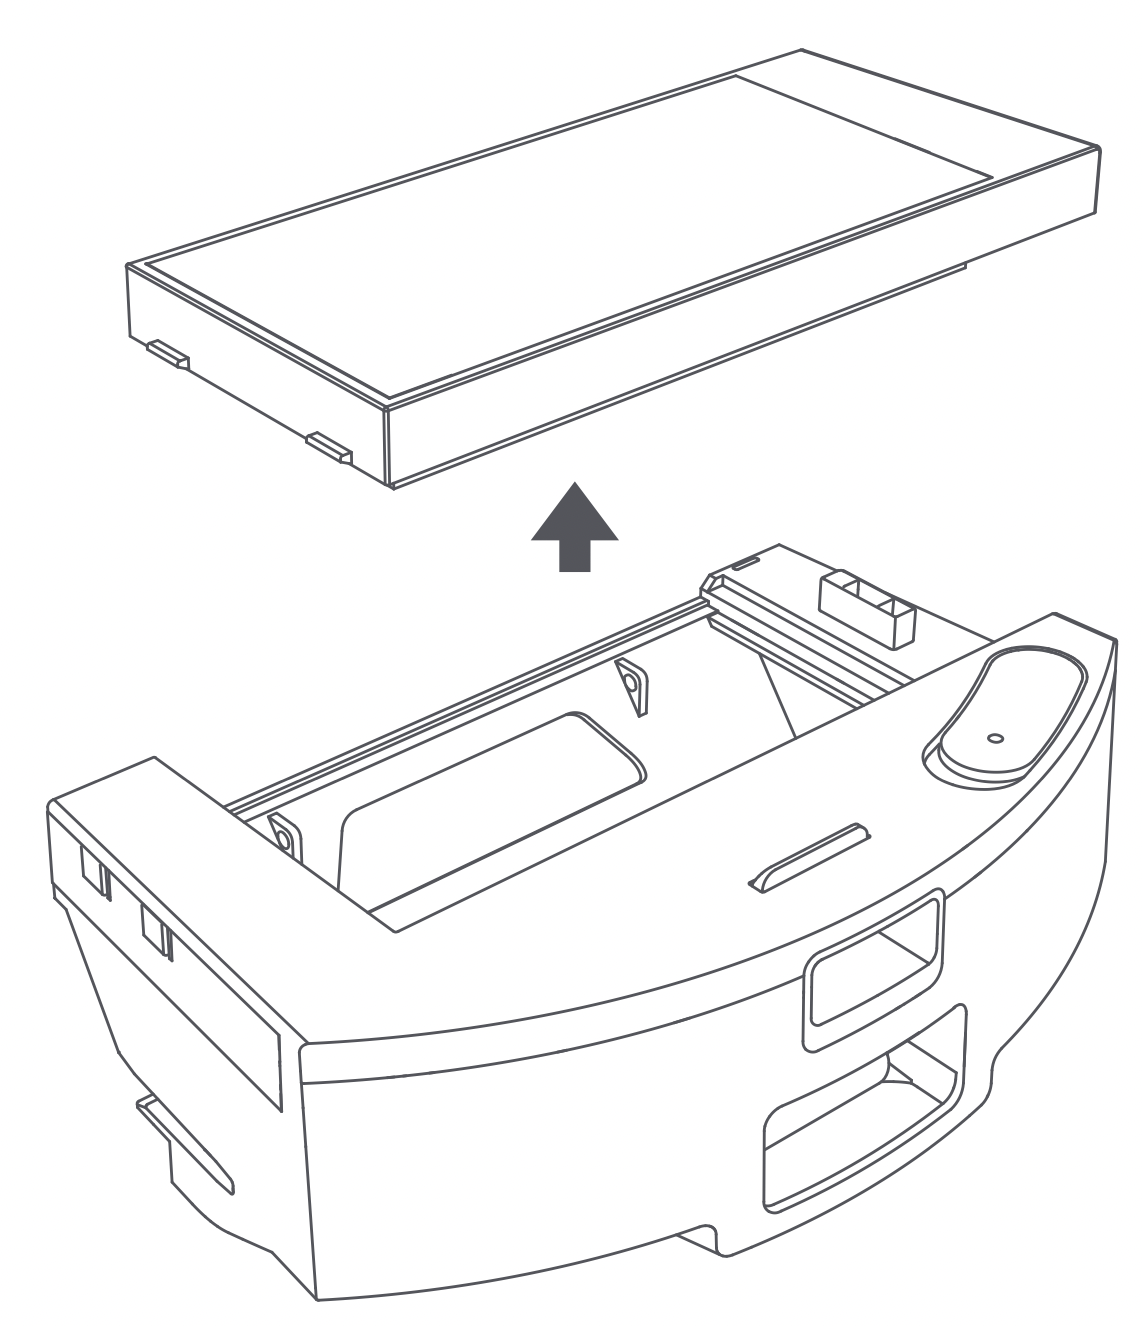
Disassembling and installing the dust box + water tank (2 in 1) and filter
Step 1: Disassemble the dust box + water tank (2 in 1)
Press the dust box + water tank (2 in 1) release button to remove the dust box + water tank (2 in 1).

Step 2: Disassemble the filter
Press the filter release button on the right of the dust box + water tank (2 in 1) to remove the filter.
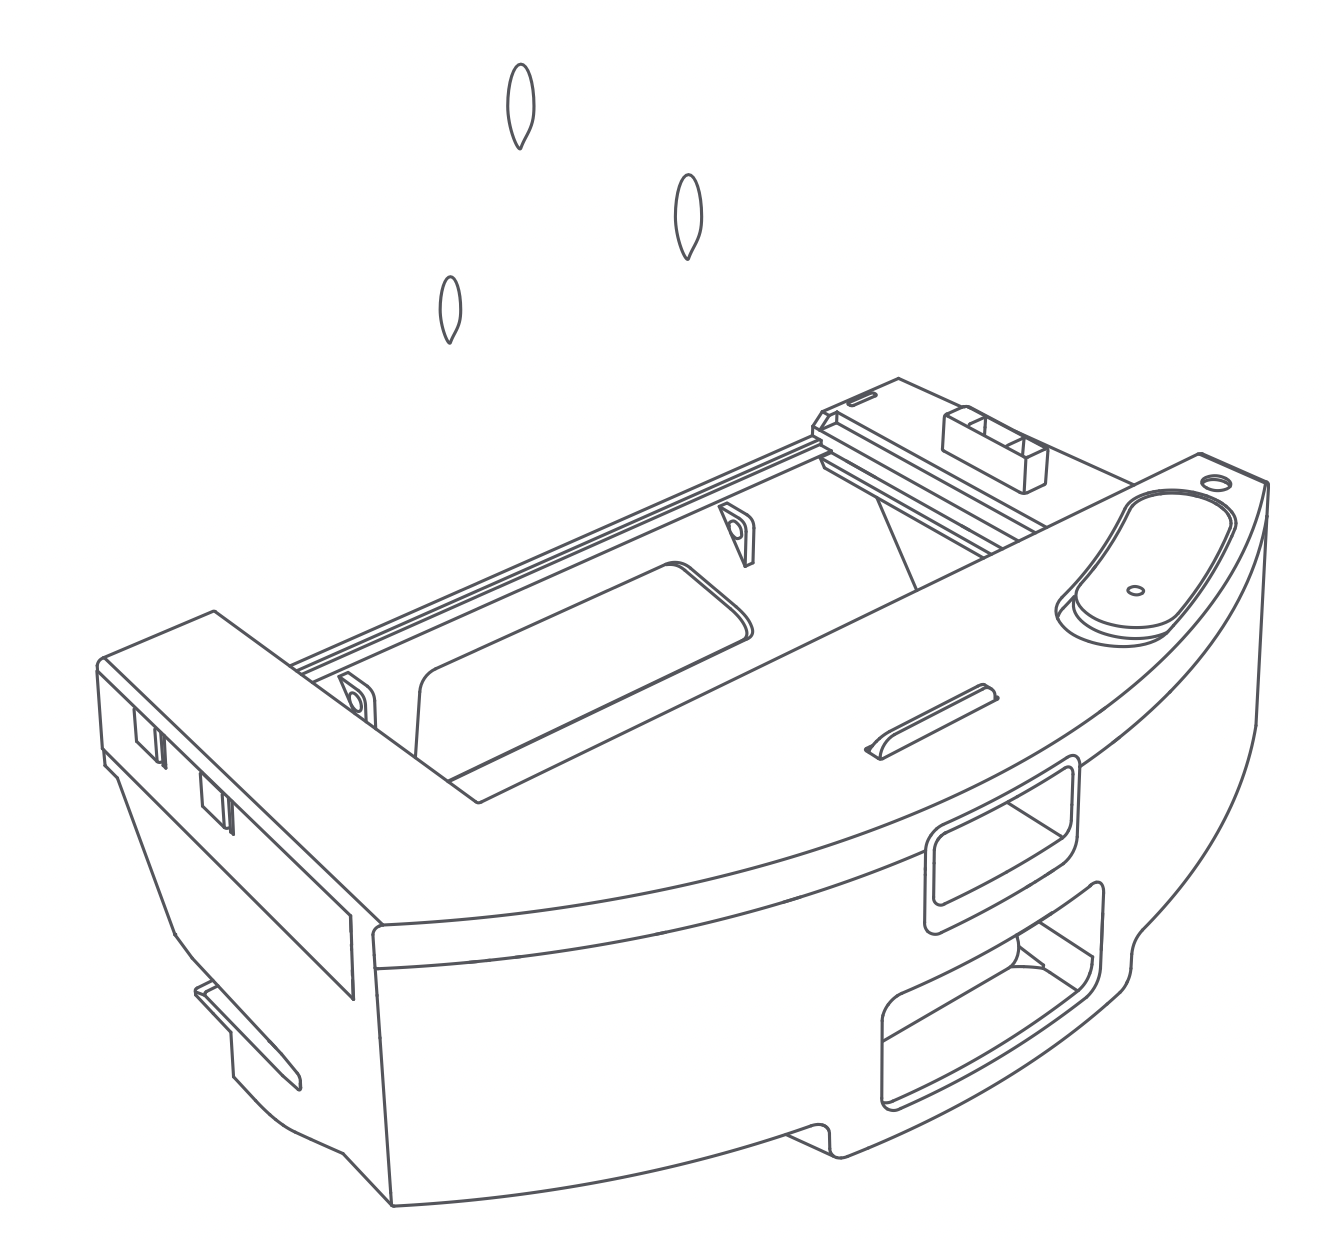
Step 3: Empty the dust box + water tank (2 in 1)
Align the dust box with the opening of a trash can and empty the dust. Use the cleaning brush to clean the dust box corners that are hard to reach.

Step 4: Clean the dust box + water tank (2 in 1)
Rinse the dust box + water tank (2 in 1) with clean water. Air-dry completely for at least 24 hours before reinstalling to prevent dust from clumping during the next use.
Disassembling and installing the mop
Step 1: Disassemble the mop
Remove the mopping module from the dust box + water thank (2 in 1), and remove the mop from the mopping module.
Step 2: Clean the mop
Rinse the mop with clean water. Air-dry completely before reinstalling to prevent dust from clumping during the next use.

Caution
- Only replace with a mop supplied by ROIDMI, otherwise, it may lead to ineffective cleaning.
- Be sure to remove and clean the mop to prevent dirty water flowing back.
- It is recommended to replace the mop every 3-6 months to ensure effective cleaning.
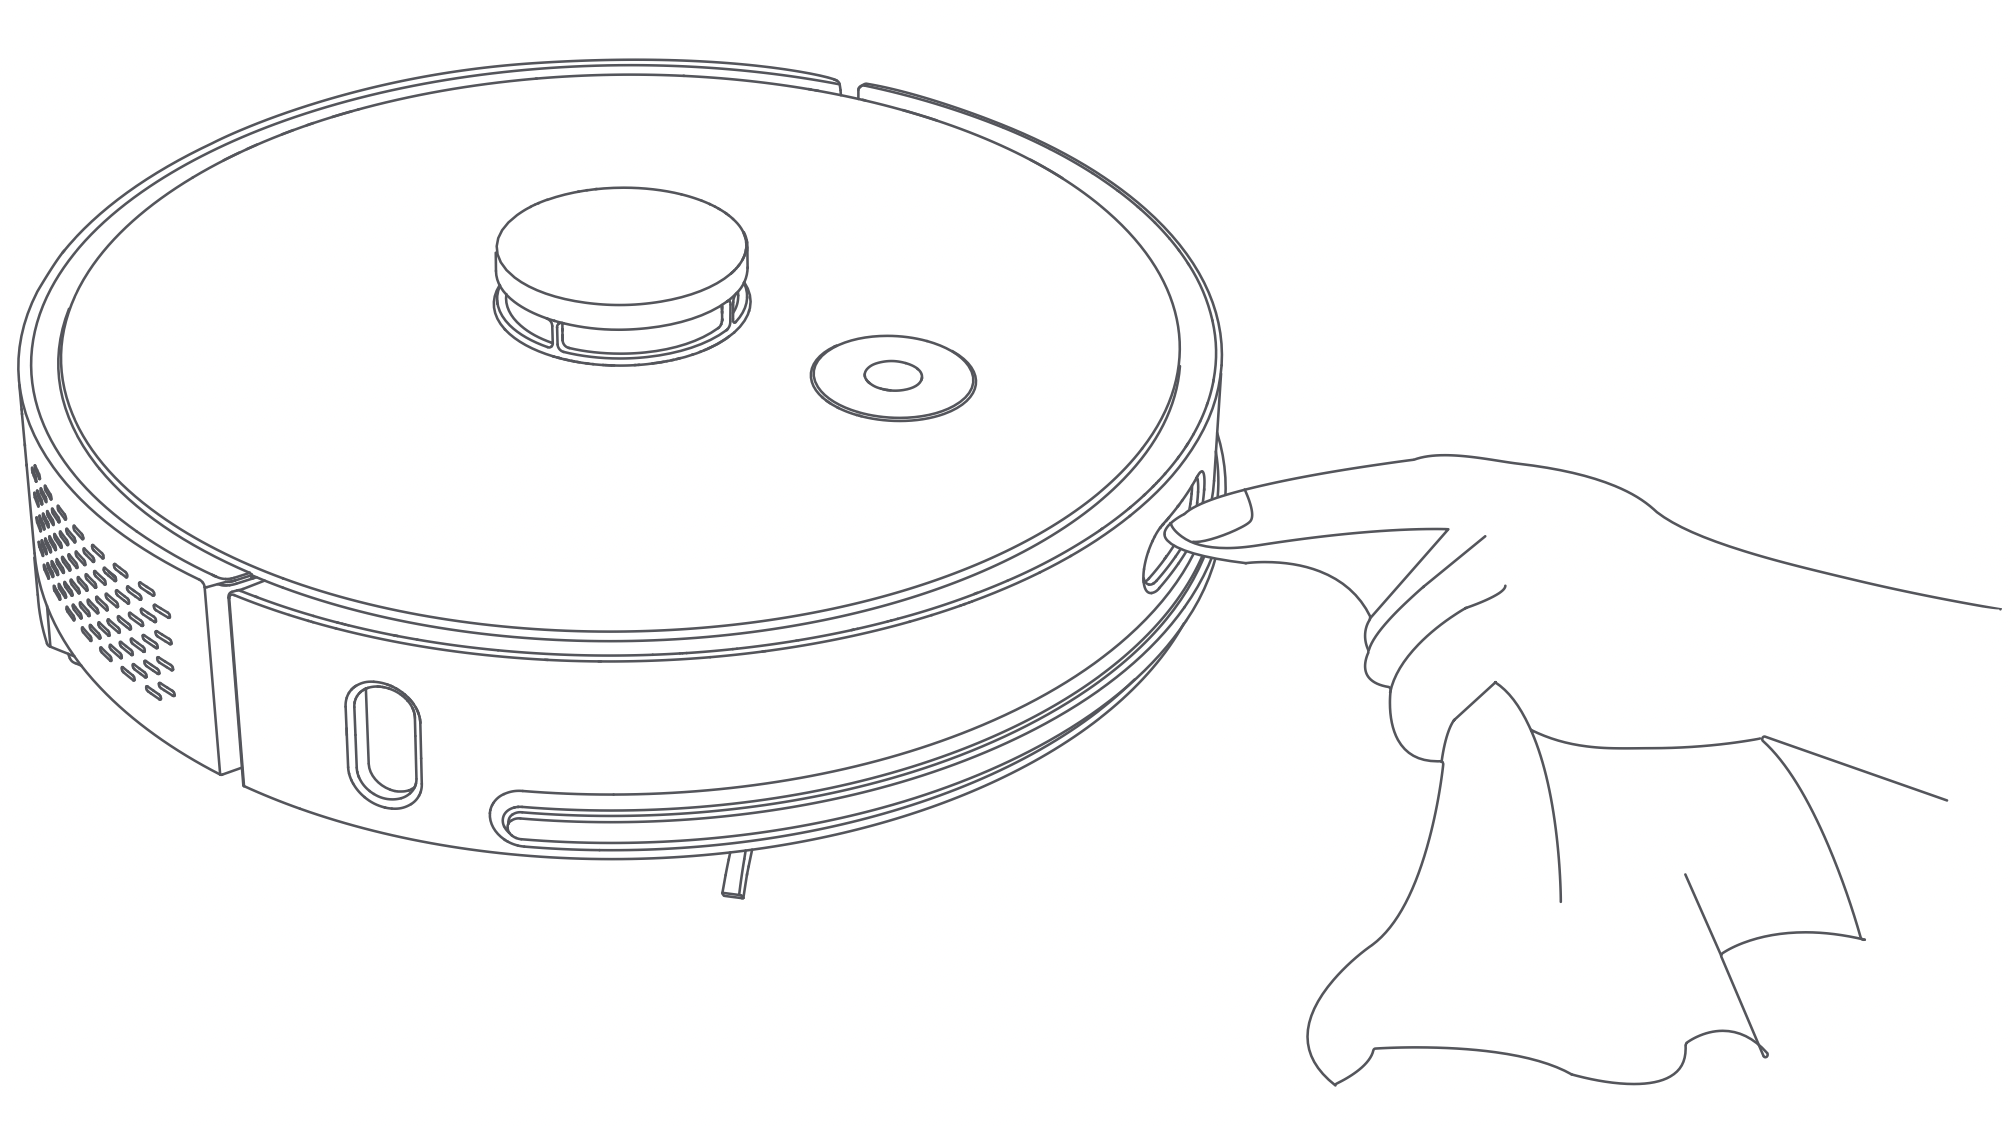
Cleaning the replacement parts
Step 1: Clean the sensors
Use a soft clean cloth to wipe and clean the charging plates on the back, the laser distance sensor on the top, the edge sensors, the infrared docking sensors and the TOF wall tracking sensor.
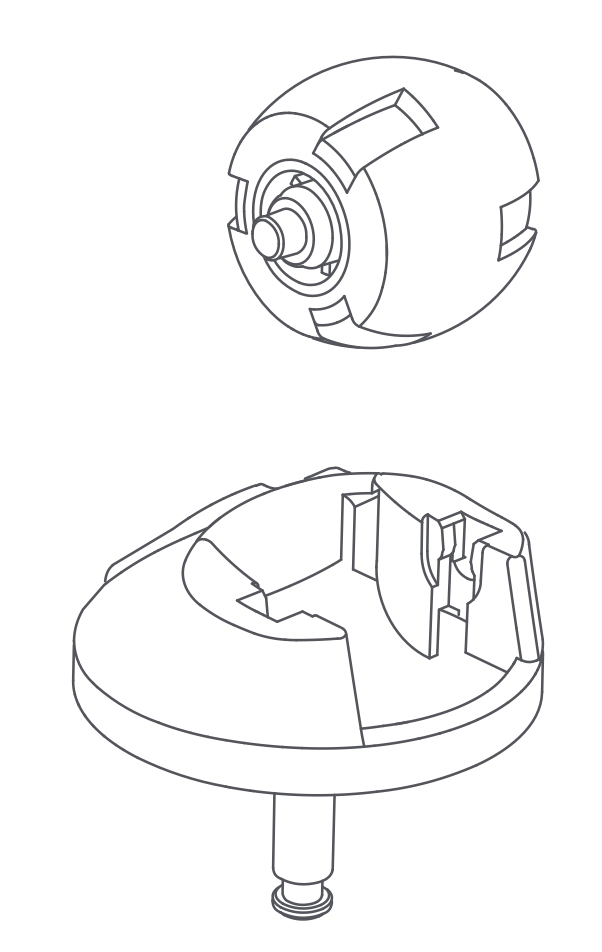
Step 2: Clean the universal wheel
Turn the robot vacuum and mop cleaner over and pull out the universal wheel, clean out the hair and dirt from the wheel and axle. Wash the universal wheel with water, air-dry completely and reinstall it.
Step 3: Clean the filter Rinse the dust box filter with clean water. Air-dry completely before reinstalling to prevent dust from clumping during the next use.
Clean the charging dock (optional)
Step 1: Clean the charging contact
Check whether there is dirt on the charging contacts. Wipe and clean the charging contacts with a soft clean cloth to keep it clean and free of debris.
Caution
- Use a dry cloth to clean the main unit’s sensors, infrared sensors and charging contacts. Do not use a wet cloth to prevent water from entering the appliance and causing damage.
- To avoid scratching yourself, be careful when using a screwdriver to replace the replacement parts.
Clean the dust collector (optional)
Step 1: Replace the dust bag
When the dust bag is full, the dust full indicator on the LED display of the dust collector becomes constant on, replace the dust bag. It is recommended to replace the dust bag every 4 weeks.
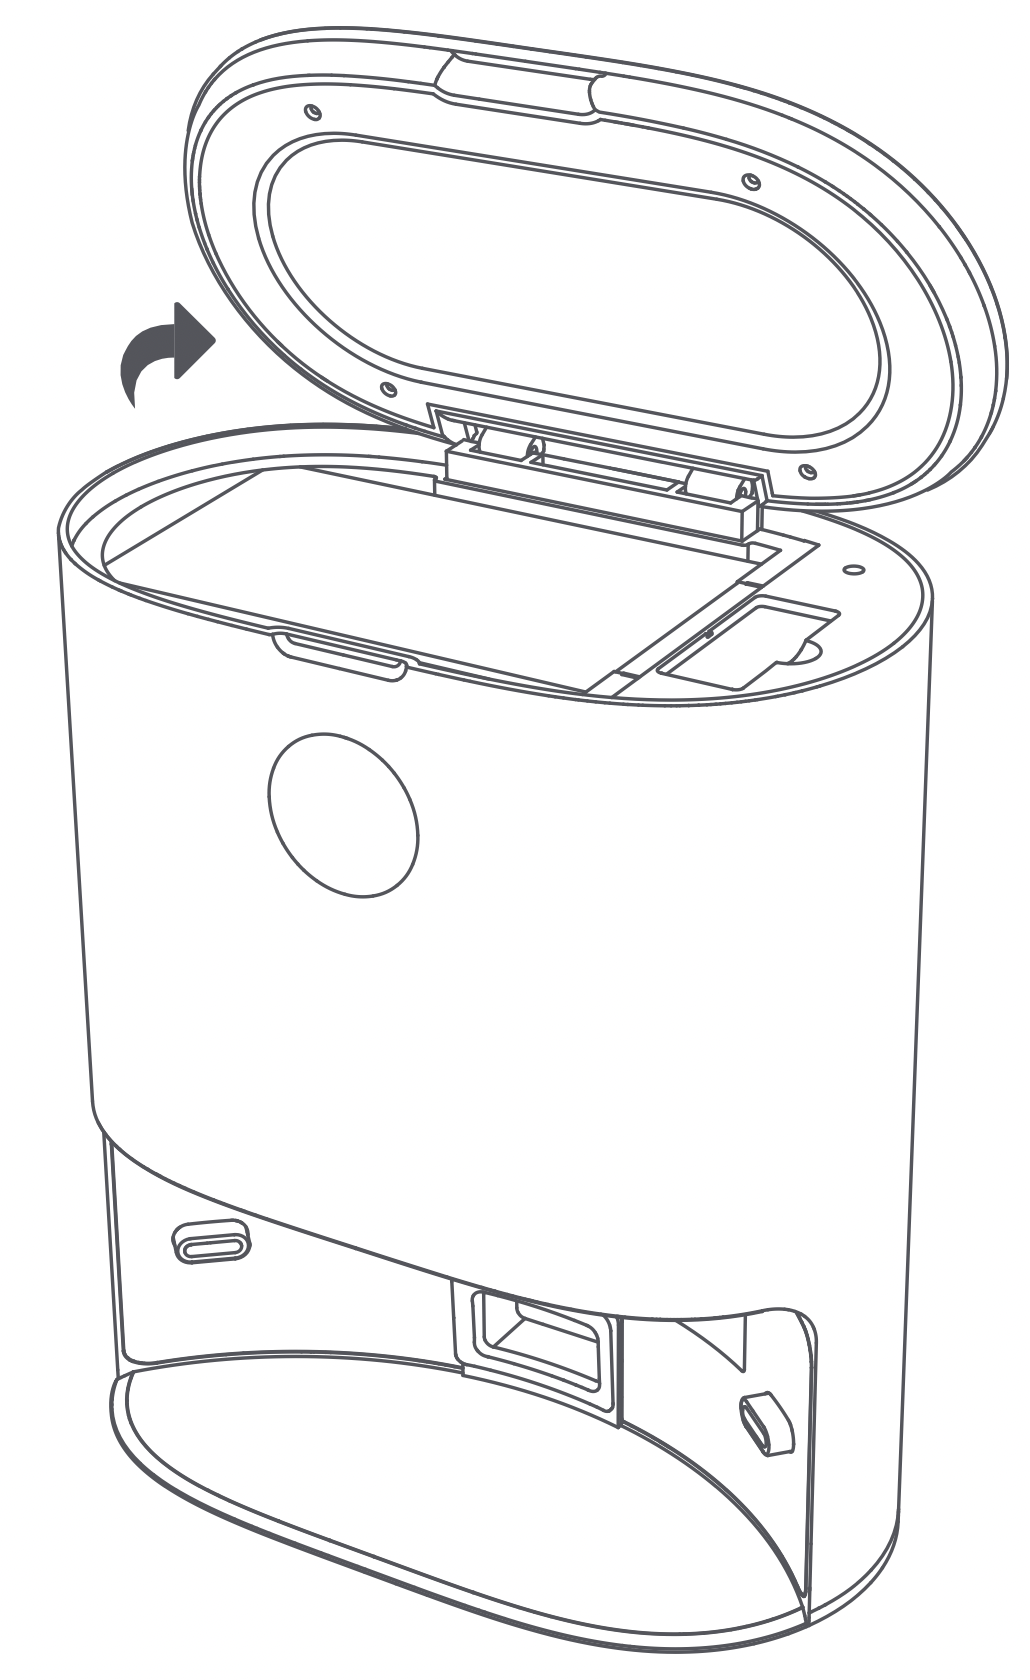
Open the cover of the dust collector
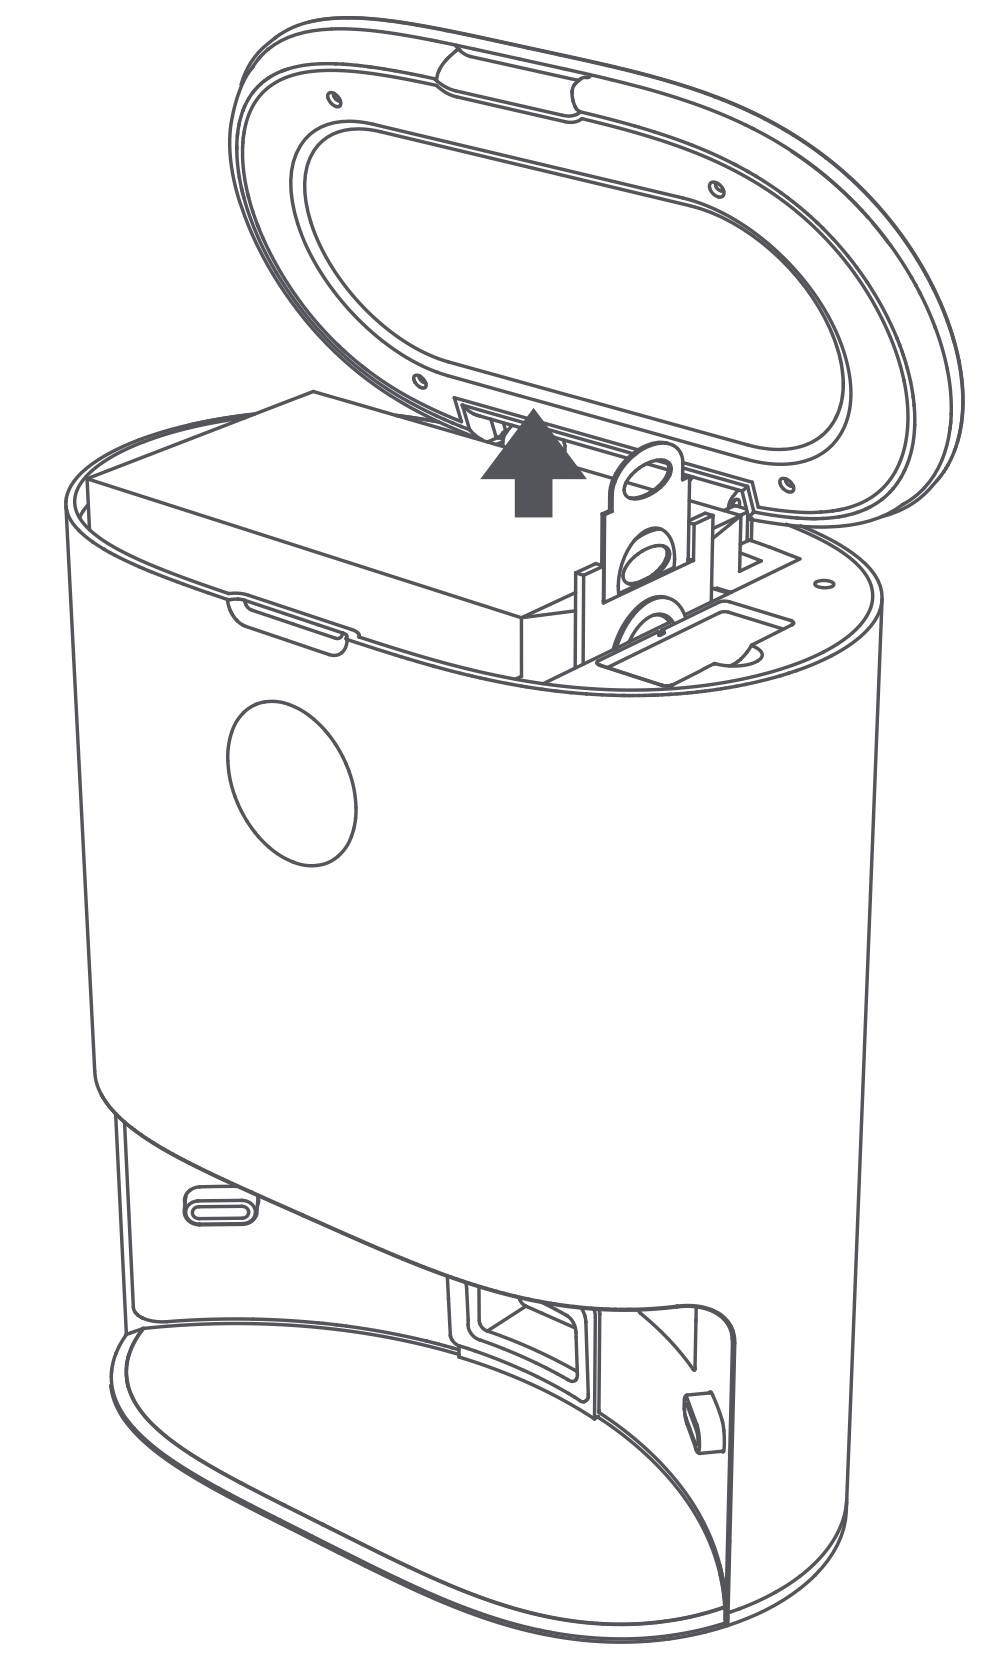
Pull the dust bag handle up to remove the dust bag
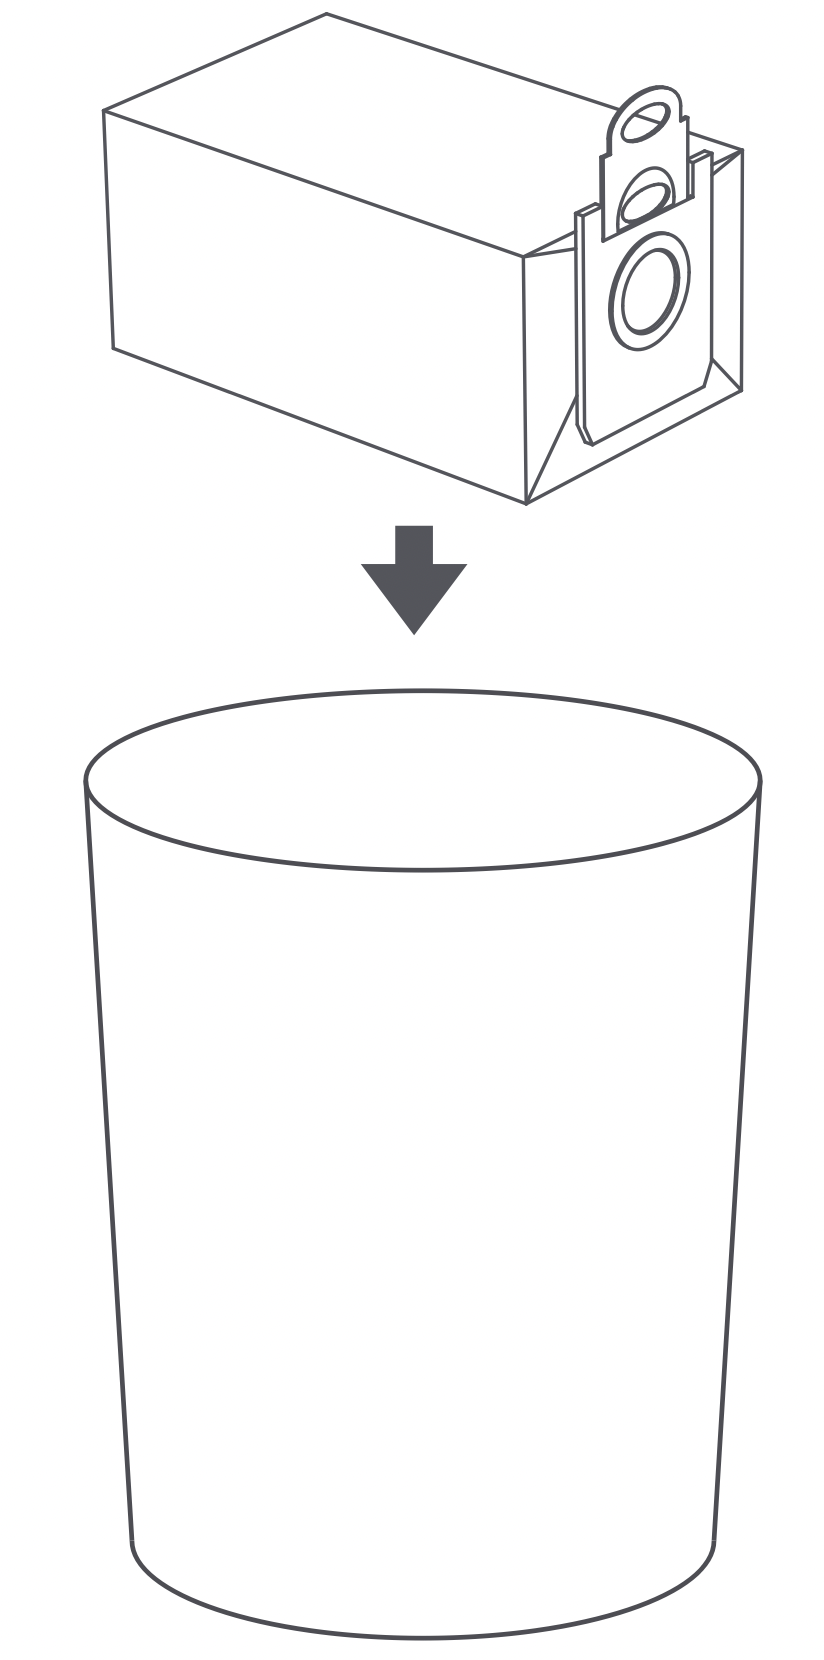
Dispose of the used dust bag
Replace with a new dust bag
Close the cover of the dust collector
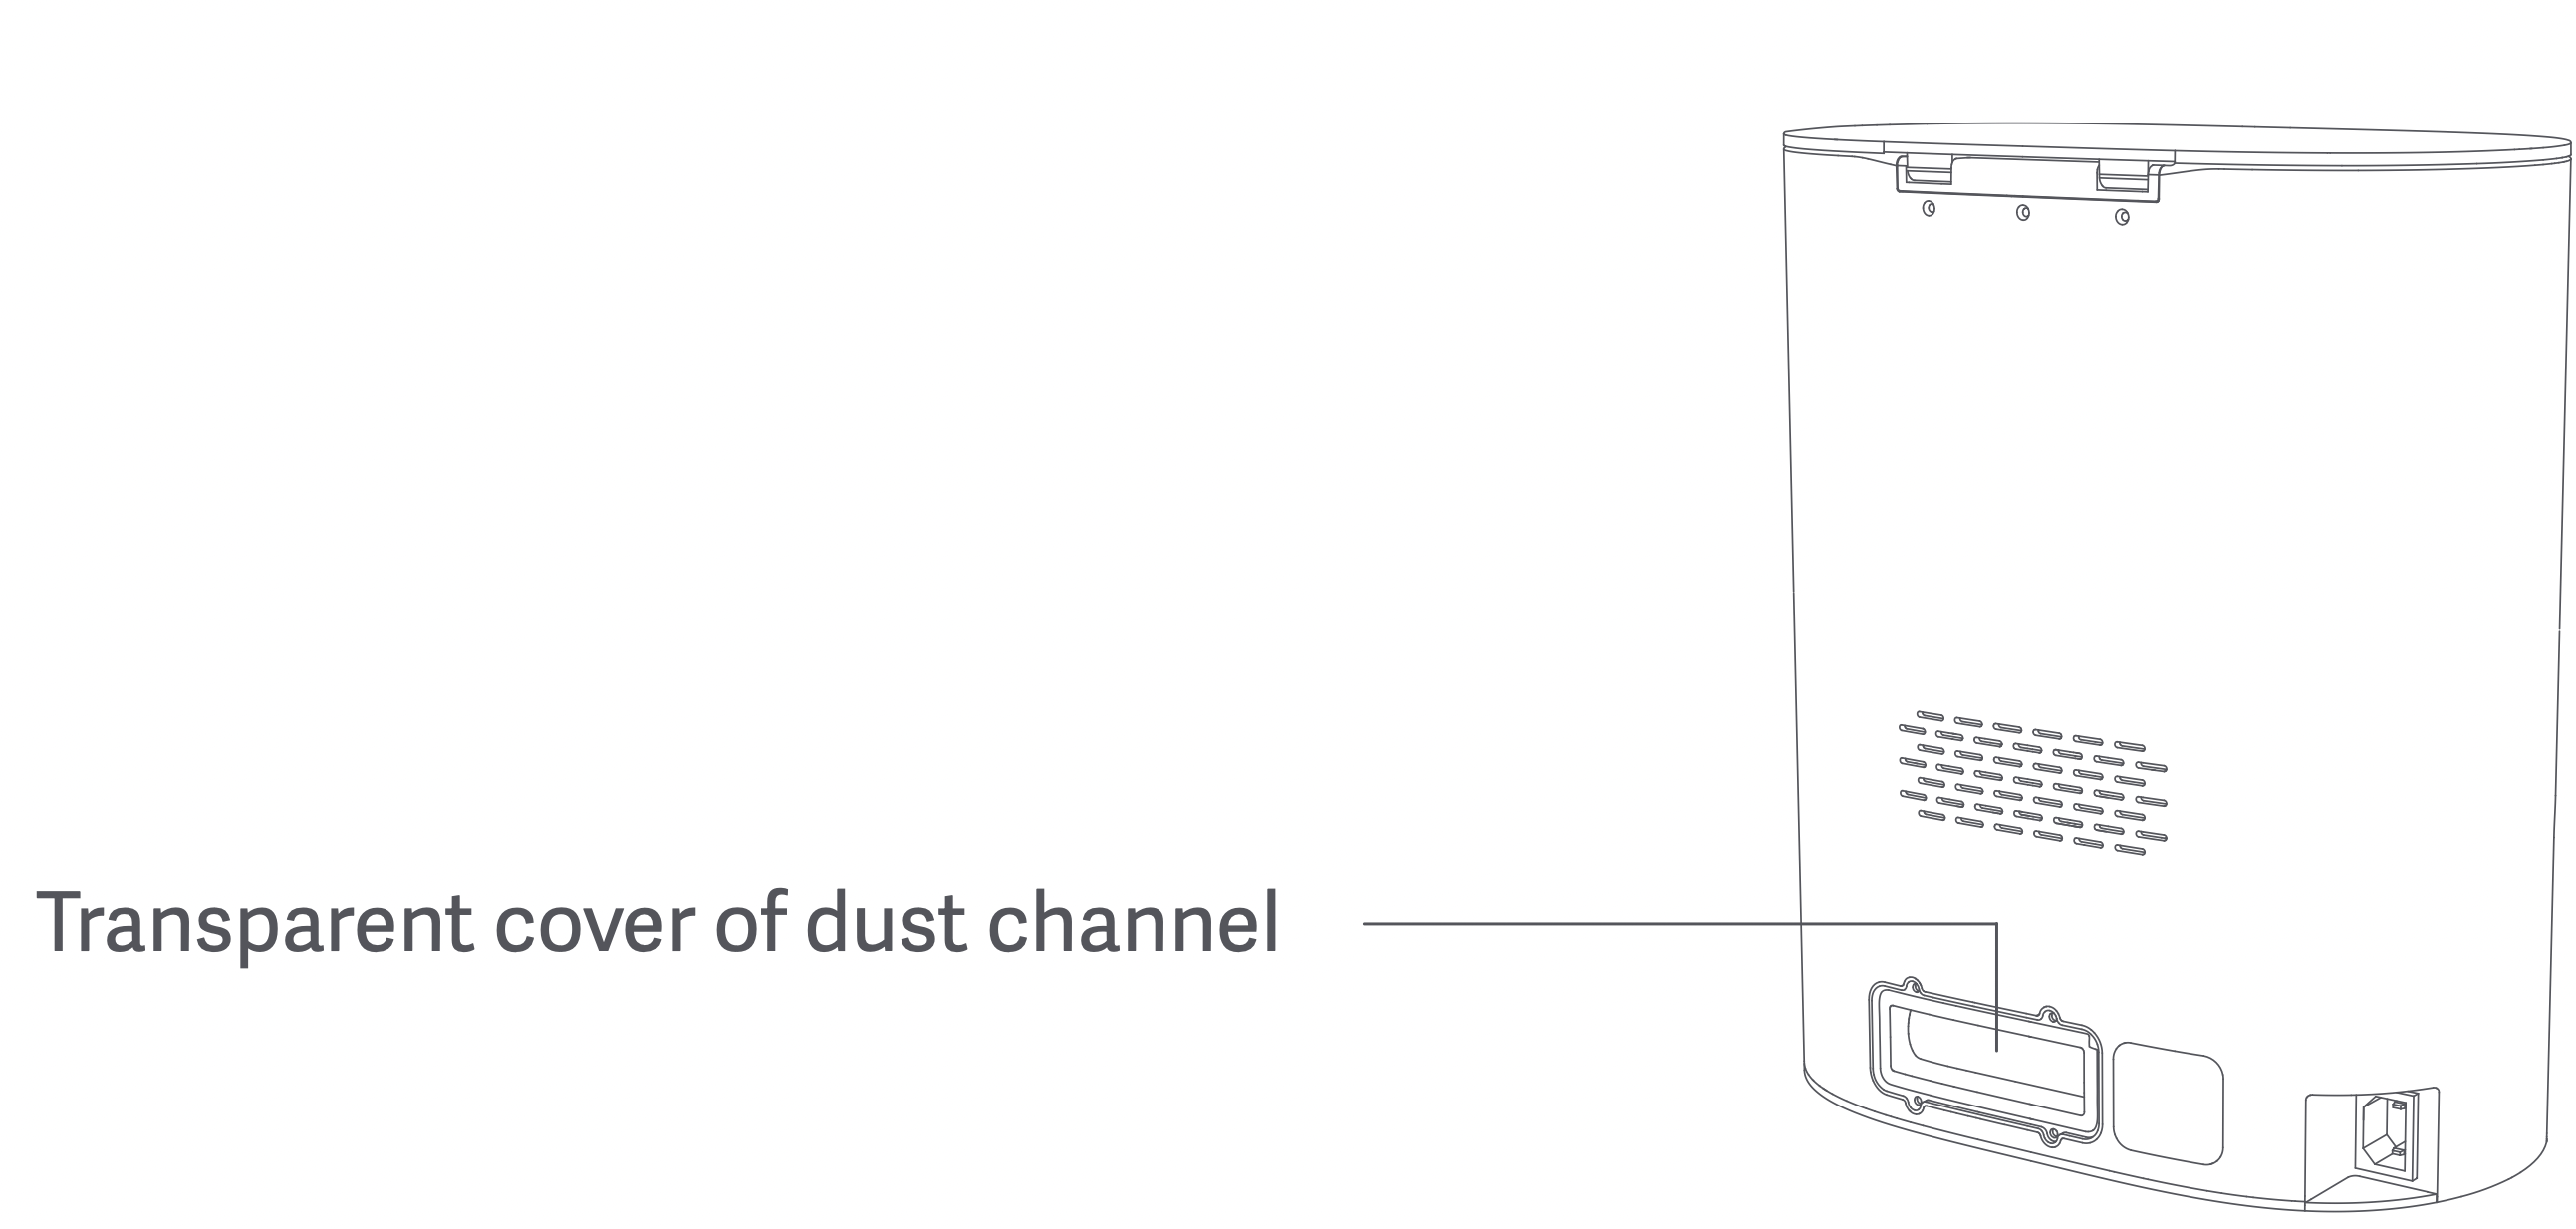
Step 2: Clean the dust channel
If the dust collector does not work while powered on and the dust bag is not full, firstly disconnect it from the power supply and check whether the dust channel is blocked. If it is blocked, use a screwdriver to open its transparent cover and clear out the obstructions.
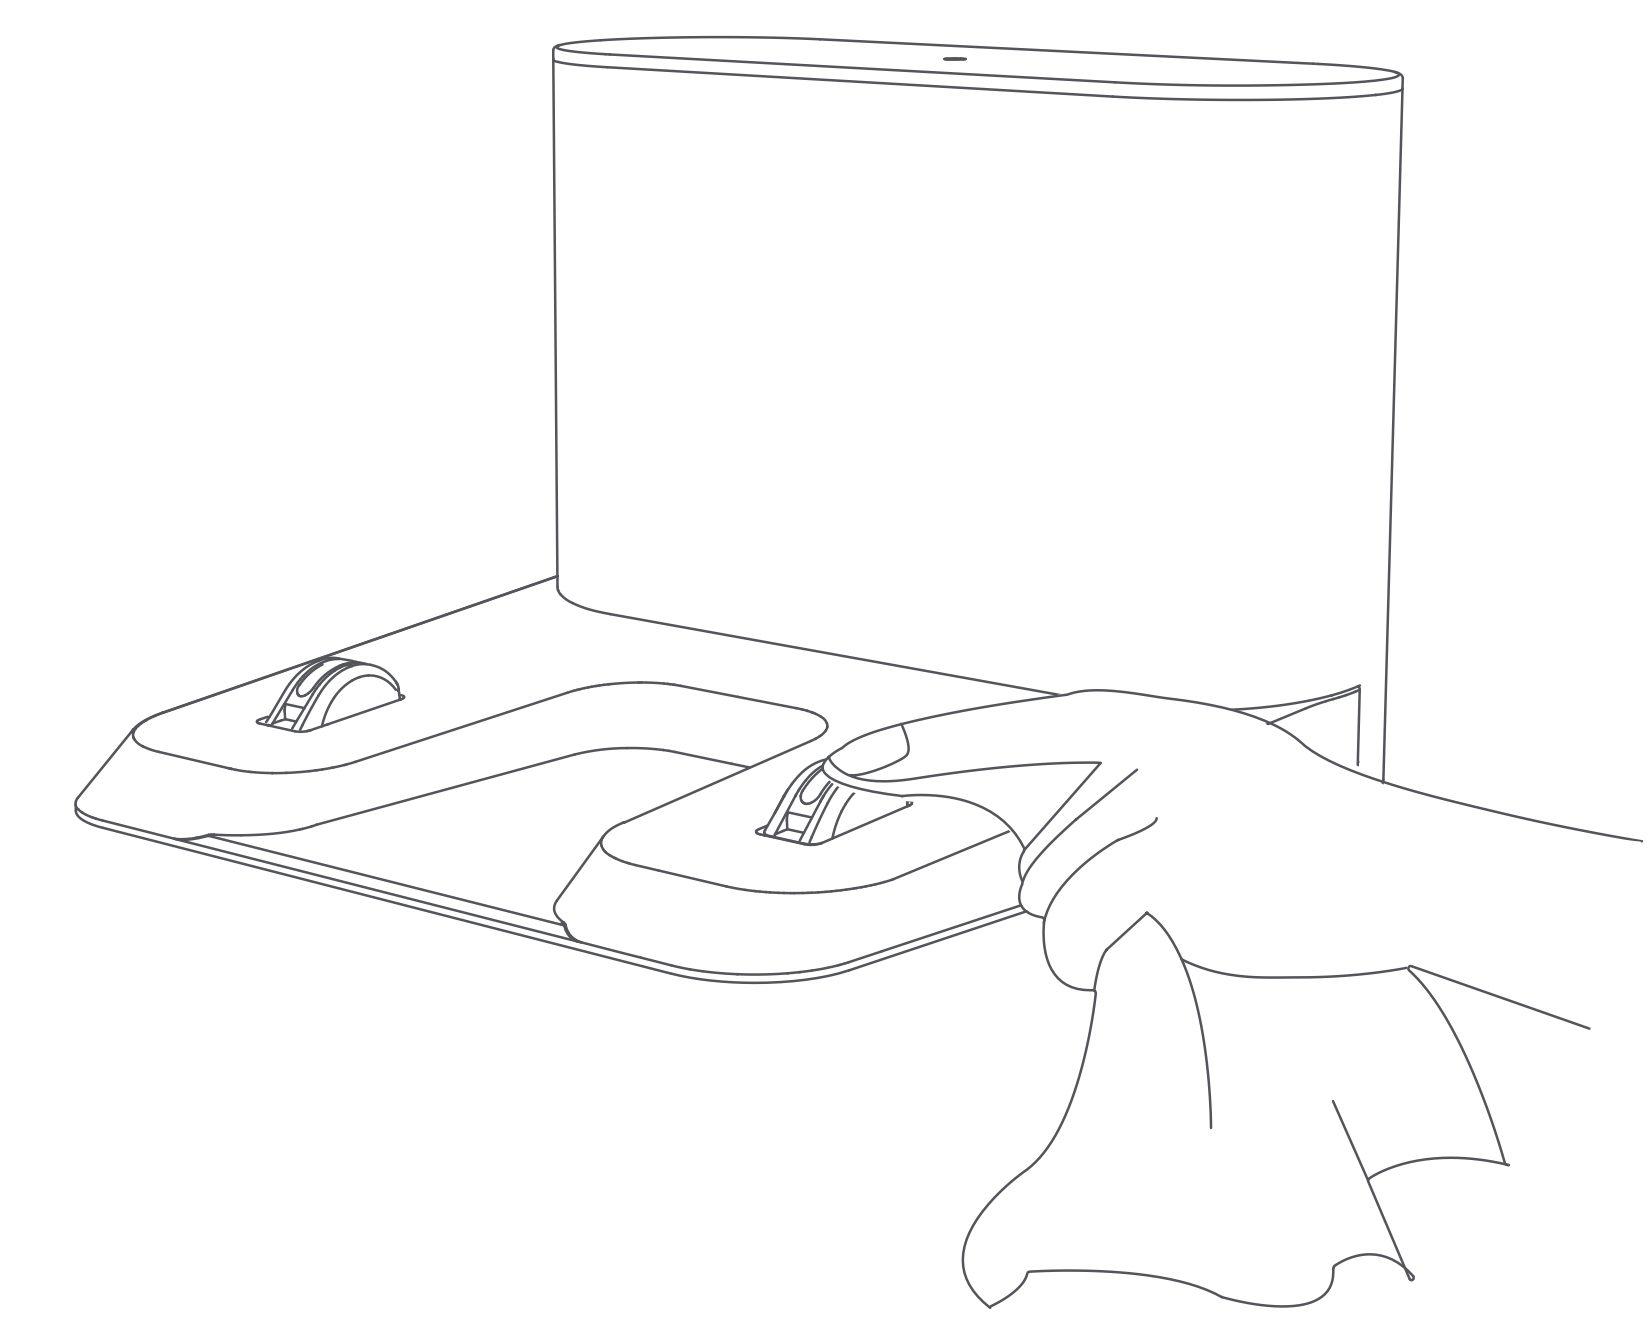
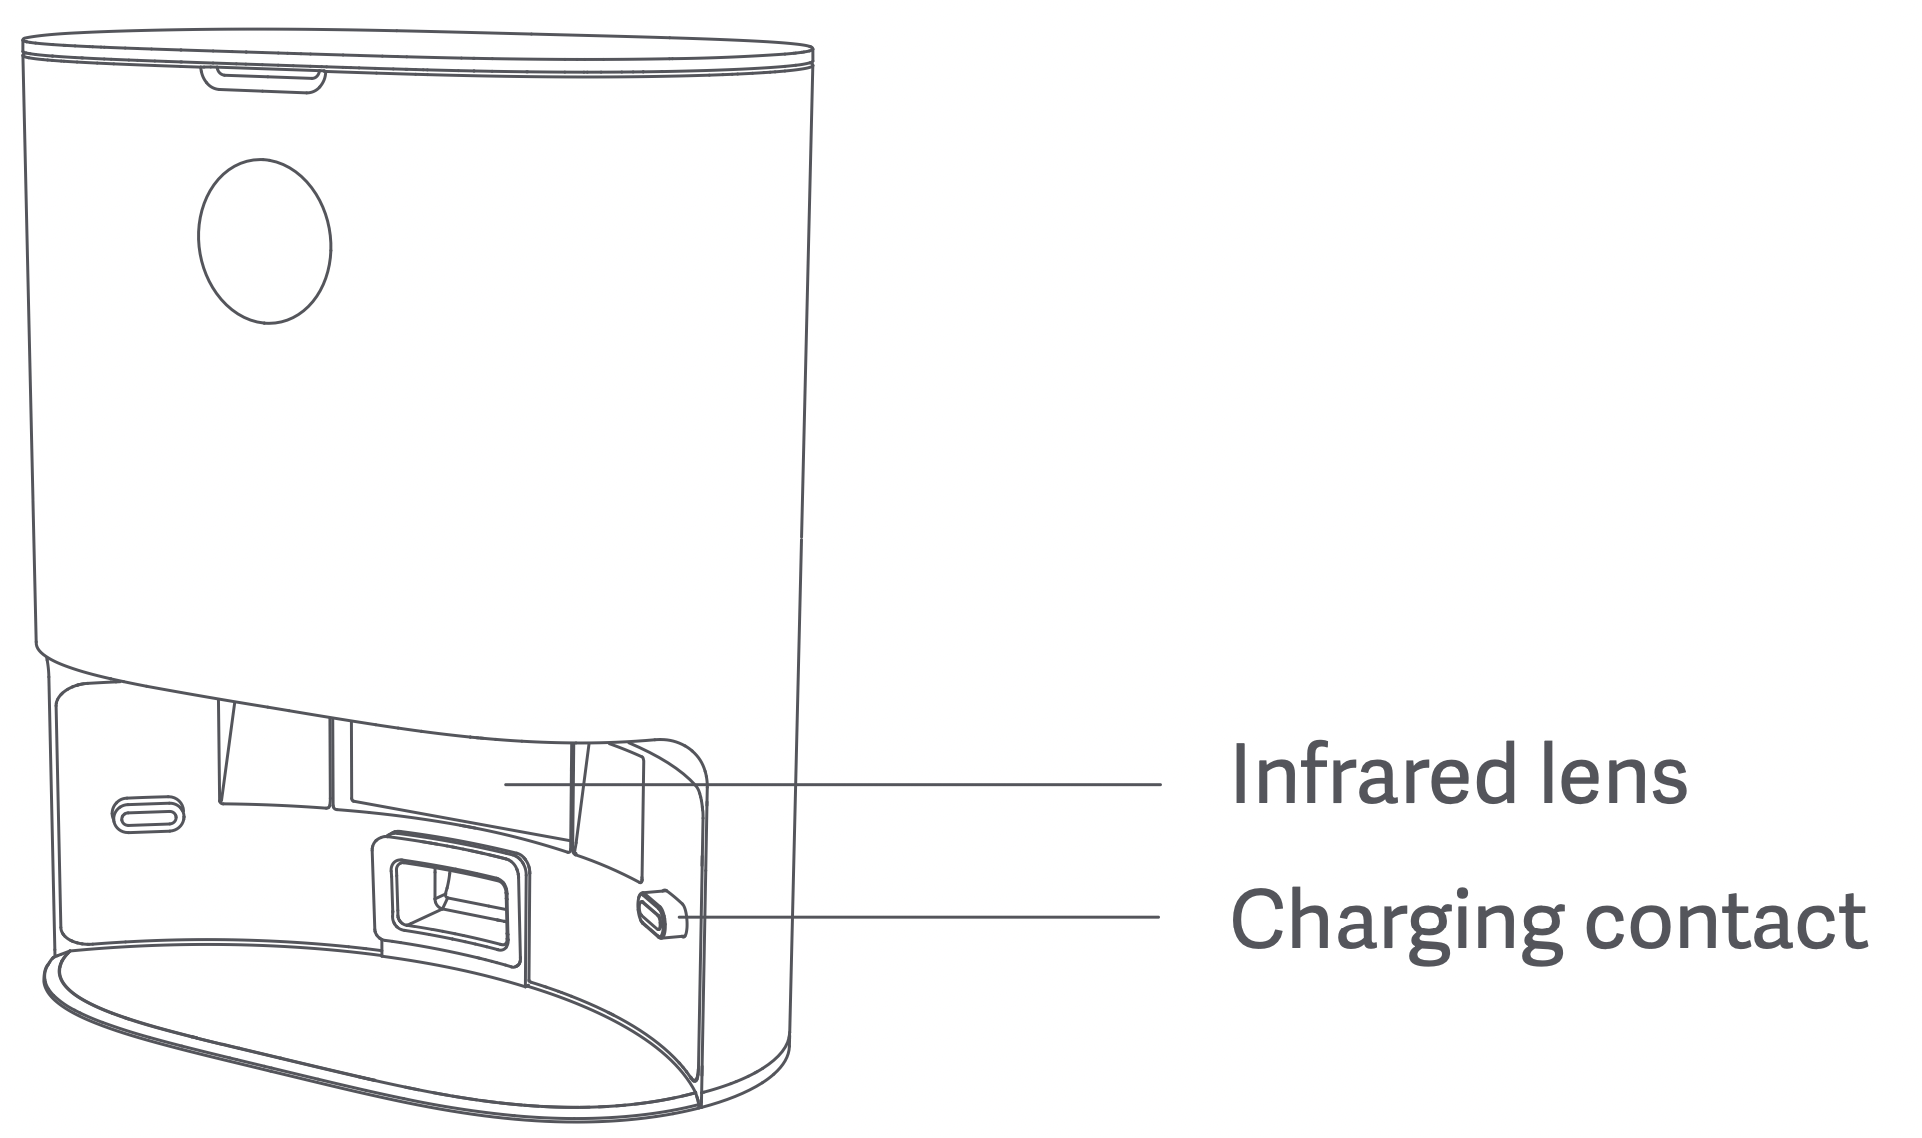
Step 3: Clean the infrared lens and charging contacts
Wipe and clean the infrared lens and charging contacts with a soft clean cloth to keep it clean and free of debris.
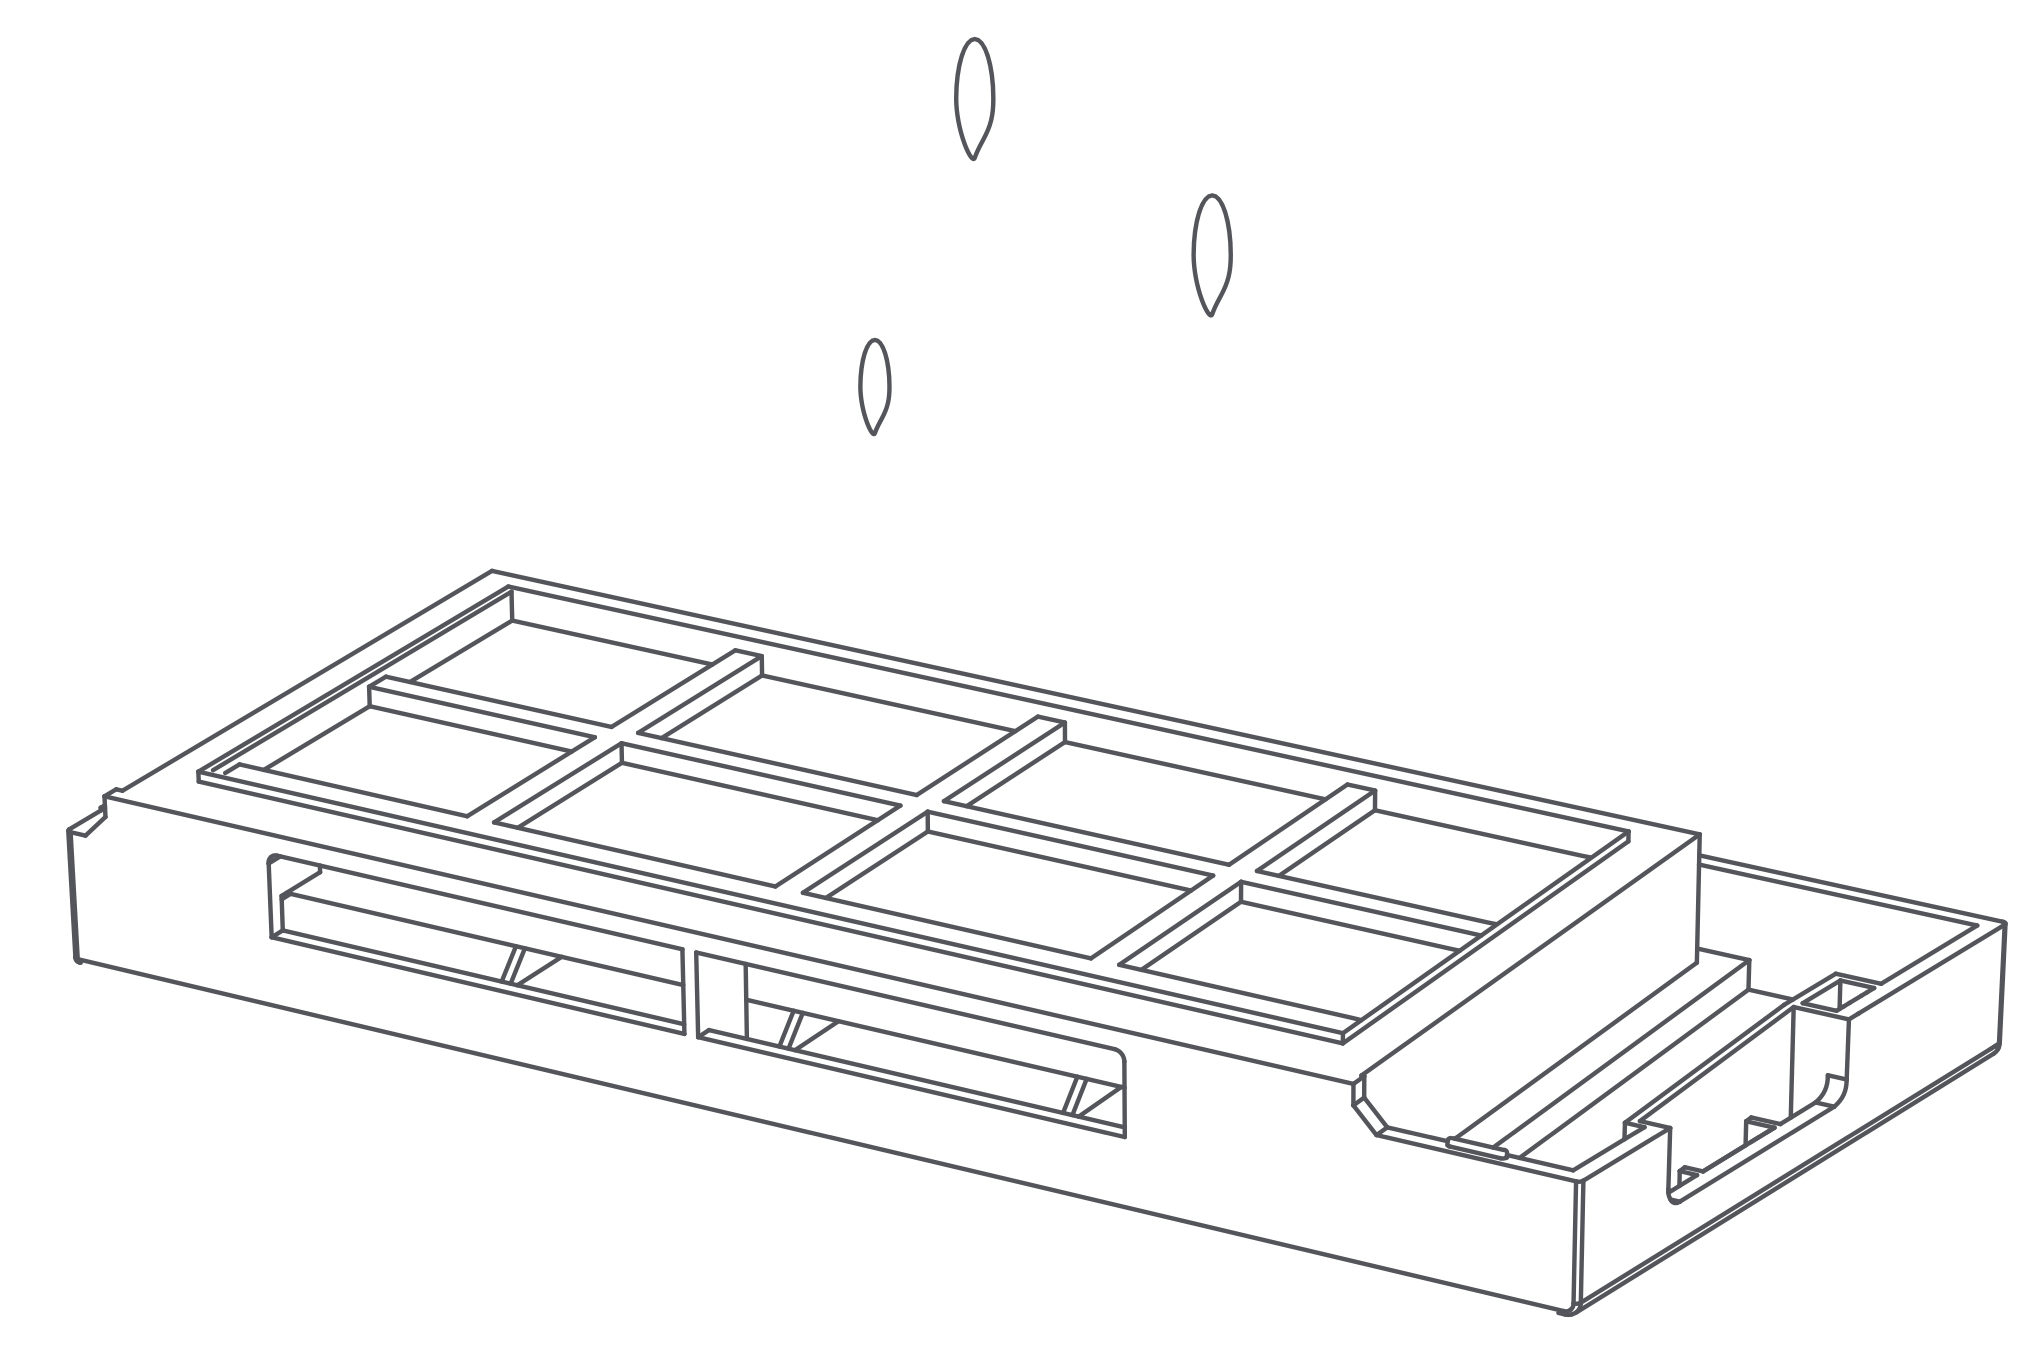
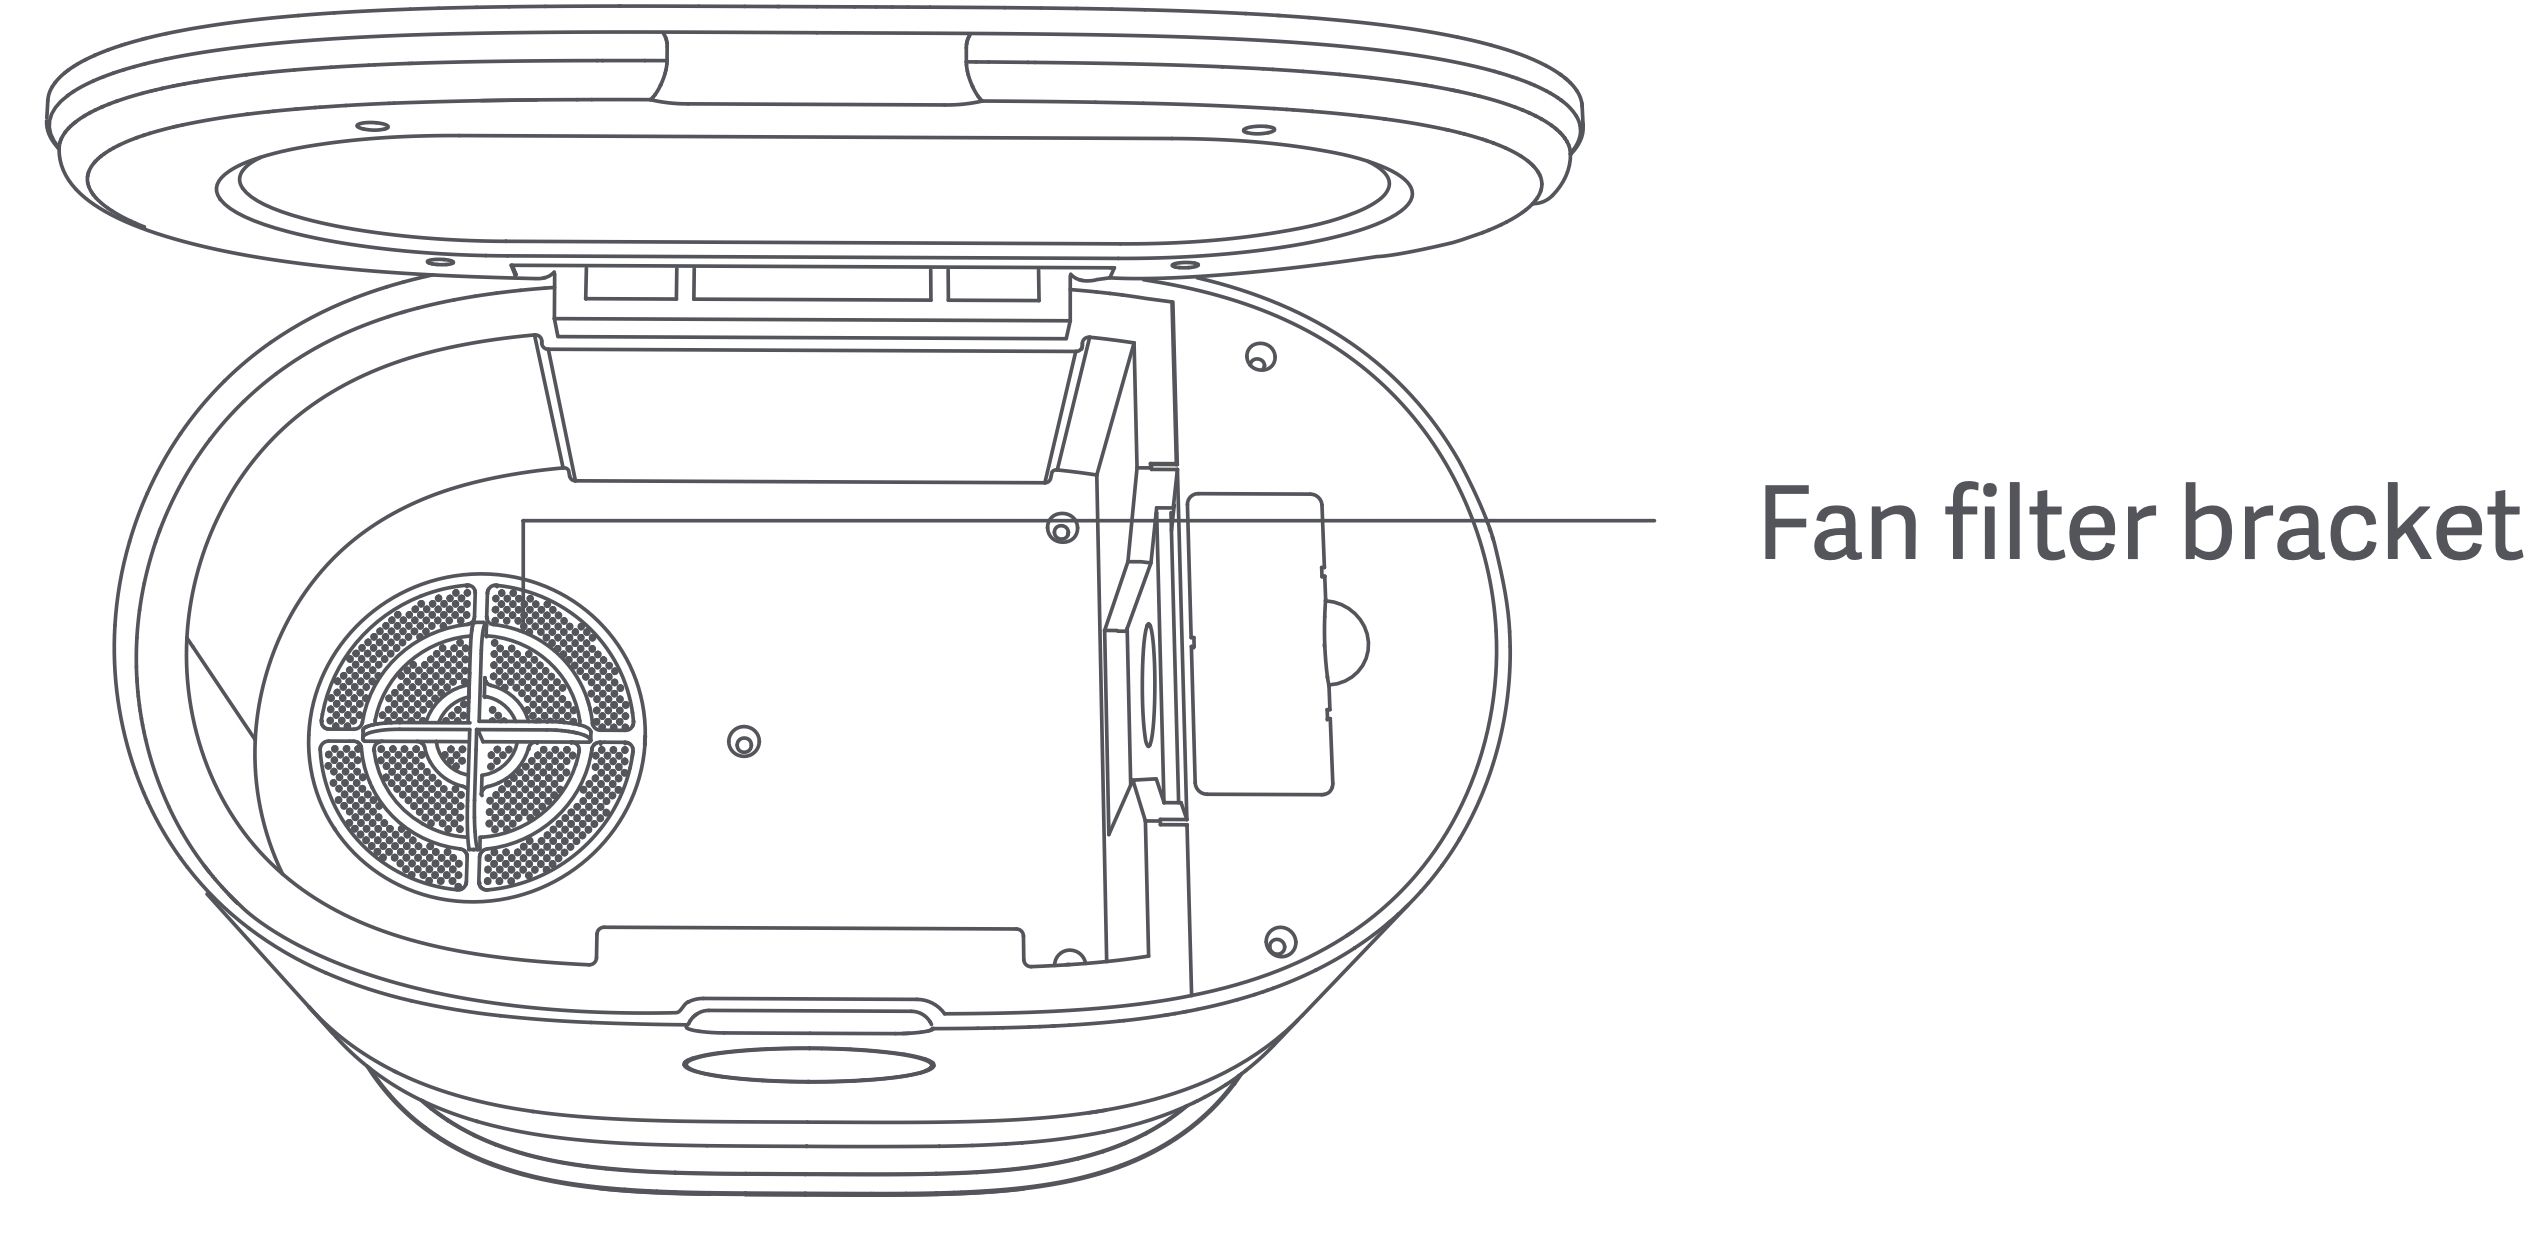
Step 4: Clean the fan filter bracket
Check whether the fan filter bracket is entangled with any foreign objects or debris. Wipe with a soft clean cloth to keep it clean and free of debris.
Caution
- Use a dry cloth to clean. Do not use a wet cloth to prevent water from entering the appliance and causing damage.
- To avoid scratching yourself, be careful when using a screwdriver to replace the replacement parts.
Troubleshooting
When an error occurs while the robot vacuum and mop cleaner is operating, the Power button indicator flashes quickly and a voice prompt will be heard. Refer to the “Troubleshooting” table below to fix the error.
| Error message |
Solution
|
|
Error 1: Check if the radar is obstructed or stuck. If it is, move the main unit to a new location and start it.
|
If the radar is obstructed or stuck, remove the obstruction or debris.
|
|
Do not use the product outdoors under sunlight or in places with strong light. Use it indoors.
|
|
If the solutions above do not work, move the main unit to a new location and start it.
|
|
If the alert continues, contact the customer service.
|
|
Error 2: Check if the bumper is stuck.
|
If the bumper is stuck, remove the debris and briskly tap the bumper several times to dislodge any debris that may be trapped underneath.
|
|
If the product is trapped because of insufficient space, move it to a new location and start it.
|
|
If the alert continues, contact the customer service.
|
|
Error 3: Wipe the edge sensor, move the main unit away from edge and start it.
|
If the main unit is suspended in the air, move it to a new location and start it.
|
|
If the edge sensor is dirty or obstructed by debris, clean the edge sensor regularly.
|
|
If the alert continues, contact the customer service.
|
|
Error 4: Check if the main brush is stuck.
|
If the main brush is entangled with wool, wires and other debris, remove the main brush and clean it.
|
|
Clean up wool, wires and other debris on the floor.
|
|
Regularly clean the main brush, as it can easily be entangled with debris.
|
|
If the alert continues, contact the customer service.
|
|
Error 5: Check if the side brushes are stuck.
|
If the side brushes are entangled with wool, wires and other debris, remove the side brushes and clean them.
|
|
Clean up wool, wires and other debris on the floor.
|
|
Regularly clean the side brushes, as they can easily be entangled with debris.
|
|
If the alert continues, contact the customer service.
|
|
Error 6: Check if the driving wheel is stuck.
|
If the driving wheel is stuck, clean it.
|
|
If the alert continues, contact the customer service.
|
|
Error 7: Reinstall the dust box + water tank (2 in 1).
|
Reinstall the dust box + water tank (2 in 1) and filter and make sure they are reinstalled properly.
|
|
If the error persists, replace the filter.
|
|
If the alert continues, contact the customer service.
|
|
Error 8: Battery is too low, please charge.
|
Battery is low, charge it before use.
|
|
Error 9: Cannot charge. Check if the main unit is correctly connected to the dust collector.
|
Use a dry clean cloth to wipe the charging contacts on the dust collector and the charging plates on the main unit.
|
|
Error 10: Battery pack temperature is too high or too low, try it again later.
|
If battery temperature is too high or too low, use the appliance when its temperature returns to normal.
|
|
Error 11: Check the wall tracking sensor.
|
If the wall tracking sensor is covered by dust, wipe and clean it.
|
|
Error 12: Place the main unit on level ground and start it.
|
If the main unit is detected to be tilted, place it on level ground and start it.
|
|
Error 13: Abnormal vacuum fan.
|
If the vacuum fan does not work properly, reset the system.
|
|
If the alert continues, contact the customer service.
|
|
Error 14: Check if the top radar cover is stuck.
|
If the top radar cover is stuck or under pressure, move the appliance to a new location and start it.
|
|
Error 15: Move the main unit away from forbidden areas and start it.
|
Move the main unit away from the virtual walls or forbidden areas and start it.
|
|
Error 16: Cannot return to the charging dock. Remove any obstacles near the charging dock.
|
Remove any obstacles that are closer than 1.5 m from the front of the charging dock.
|
|
Error 17: Dust bag is not in place.
|
Check if the dust bag is installed.
|
|
If installed, check if it reaches the bottom of the charging dock.
|
|
If the alert continues, contact the customer service.
|
|
Error 18: Dust bag is full.
|
If the dust bag is full, replace with a new one.
|
|
If the dust bag is not full, check if the dust collector’s channel is clogged. If clogged, clean the dust channel.
|
|
If the alert continues, contact the customer service.
|
|
Error 19: Clean the dust box + water tank (2 in 1) if it has not been cleaned for a long time.
|
If there is excessive dust in the dust box + water tank (2 in 1), clean it and the filter.
|
|
Error 20: Clean the filter.
|
Remove the filter and clean it.
|
Tip: Resetting the system can fix some errors.
FAQs
| Question type |
Solution
|
|
Cannot power on
|
If the battery power is insufficient, dock the main unit on the charging dock and fully charge it before next use. If the battery temperature is too low or too high, use the product at temperatures of 0-40 °C.
|
|
Cannot charge
|
Make sure both ends of the charging dock’s power cable are firmly plugged in. If poor contact is detected, clean the charging contacts on the charging dock and the charging plates on the main unit.Confirm if the charging indicator turns on.
|
|
Slow charging
|
When the product is used at extreme temperatures, to extend the battery life, the main unit will automatically reduce the charging speed. If the charging contacts are dirty, clean them with a dry cloth.
|
|
Cannot dock
|
If there are many obstacles near the charging dock, place it in a clear, open space. If the main unit is far away from the charging dock, place it near to the charging dock and try again.
|
|
Abnormal operation
|
Restart the appliance.
|
|
Abnormal noises while cleaning
|
If the main brush, side brush or driving wheel is entangled with debris, turn off the appliance and clean. If the universal wheel is dusty or jammed while cleaning, it is recommended to use a screwdriver toremove the wheel and rinse it under water.
|
|
Decreased cleaning ability or dust falls out of the main unit
|
If the dust box is full, clean the dust box. If the filter is clogged, clean the filter. If the main brush is entangled with debris, clean the main brush.
|
|
Cannot connect to WiFi
|
If WiFi function is not activated, reset WiFi and try again.
|
|
If WiFi signal is poor, place the main unit within the coverage of WiFi signal.
|
|
If WiFi connection is abnormal, reset WiFi, download the latest mobile client and try again.
|
|
If the APP does not support the current device model, follow the prompts to check the models supported.
|
|
Cannot connect to WiFi suddenly. If the router settings are incorrect, contact the customer service.
|
|
Scheduled cleaning does not start
|
Insufficient power. Scheduled cleaning will only start when the power level is greater than 15%.
|
|
Is energy consumption high if the main unit is kept on the chargingdock?
|
Keeping the main unit on the charging dock helps to keep the battery at its best performance, and the energy consumption is low.
|
|
Is it necessary to charge for 16 hours during the first three uses?
|
Lithium batteries exhibit no memory effect. You may use the appliance when the battery is full.
|
|
Mopping module discharges little or no water
|
Check whether there is sufficient water in the water tank. Adjust the water volume to Large via the APP. Make sure the mop and mop holder are installed correctly according to the instructions.
|
|
Main unit does not resume cleaning after docking for charging
|
Make sure the main unit is not in “Do Not Disturb” mode, in which the main unit does not resume cleaning. It also does not resume cleaning if it is docked by pressing the Dock button or manuallyreturned to the charging dock.
|
|
Main unit does not return to charging dock after cleaning a localizedarea or after being moved
|
After cleaning a localized area or being moved far away, the robot vacuum and mop cleaner will generate a new map. If the charging dock is far away, the main unit may not automatically dock. In thiscase, manually return the main unit back on the charging dock to charge.
|
|
Robot vacuum and mop cleaner misses spots
|
If the wall tracking sensor or edge sensor is dirty, clean them with a soft dry cloth.
|