Loading ...
Loading ...
Loading ...
9
6 7
Important: Always carry the slow cooker from the
cooking base handles. Make sure to securely grasp the
bottom portion of the handles to avoid the handles
separating or unlocking unexpectedly while carrying.
(D) Never lift the slow cooker by the lid handle. Detach
temperature probe before carrying slow cooker.
4. To unlock, push up the top part of the handles into
the open, unlocked position. Then swing the locking
wires down and around to the cooking base.
Important: When unlocking, keep your fingers out from between the top part
of the handles and the edge of the stoneware.
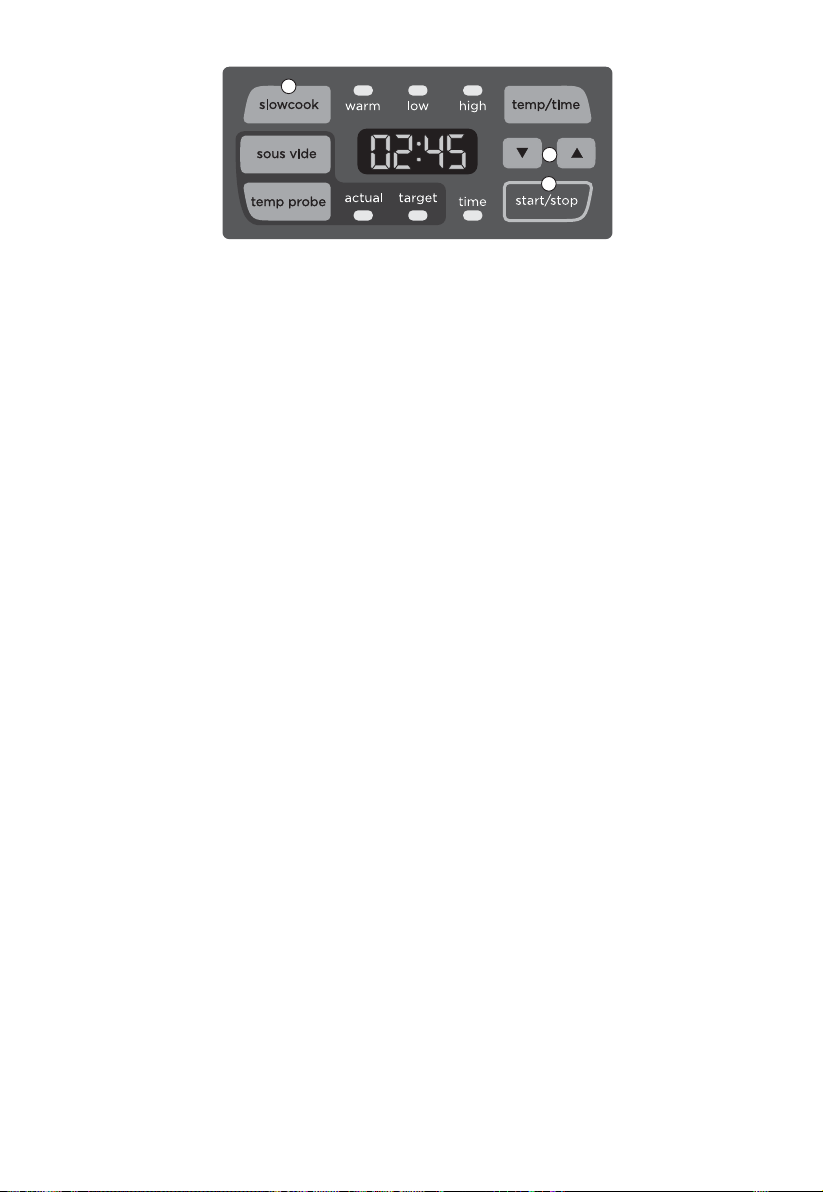
SLOW COOK FUNCTIONS
temp
4
5
3
Note: The temperatures for the Slow Cook and Keep Warm functions are fixed at
175°F for low, 190°F for high, and 140°F for (keep) warm. Do not use the temperature
probe for these functions.
1. Add ingredients to the stoneware pot and cover with glass lid.
2. Plug in the appliance. The main control display will blink “----”. This indicates
that the heat is off and the appliance is ready to be set for cooking.
3. Click the SLOWCOOK button until the light over either your choice of low or
high is on.
Note: Do not use the warm setting to cook. Only use it to keep warm cooked food
that is already hot.
Presets: The default times for slow cooking are 8 hours on low and 4 hours on high.
4. If you wish, adjust the amount of time you wish to cook by using the arrows.
The maximum time that can be set is 20 hours.
5. Press the START/STOP button to begin cooking. The numbers will stop
flashing. The “:” between the numbers will blink, indicating the unit is cooking.
Note: You may adjust the time during the cooking cycle by pressing the arrows. After
3 seconds of no buttons being pressed, the numbers will stop flashing and the new
amount of time for cooking will begin.
End of cooking cycle: When time is up, the unit will beep three times and
automatically switch to Keep Warm. The light for “warm” will go on and the numbers
will start counting up from zero (00:00) to 4 hours (04:00).
D
6. After the Keep Warm cycle has been on for 4 hours, the unit will power off and
return to the default display: “----”.
Note: Do not keep foods on the warm setting for more than 4 hours.
• Unplug the appliance when not in use and always allow the slow cooker to
completely cool before cleaning.
TEMP PROBE
temp
5
6
7
1. Add ingredients to the stoneware pot and cover with glass lid.
2. Plug in the appliance. The main control display will blink “----”. This indicates
that the heat is off and the appliance is ready to be set for cooking.
3. Insert the jack of the temp probe into the port on the
right side of the control panel. (E)
4. Lock lid and insert temperature probe into food.
There are three insertion portals in the lid. (F) If
cooking meat, insert the probe at the thickest part of
the meat, but not touching bone.
Note: While meat is cooking, the muscle fibers contract
and start to push out the probe. Check the position of the
probe tip during cooking and reposition as needed.
5. Click the TEMP PROBE button. The light below the
“target temp” will light up. This indicates that you are
setting the temperature that you want the food to be
cooked to.
6. The default temperature is set at 180°F. Adjust to
your desired temperature with the arrows.
7. Press START/STOP to begin cooking. The light for
“actual temp” will illuminate. The number display
will show the actual temperature that the probe is
sensing from within the food.
End of cooking cycle: When the internal temperature of the meat has reached the
target temperature, the unit will beep two times and automatically switch to a cycle
holding the food at the target temperature. To help you keep track of the length of
time the food has been held at that temperature, the numbers will start counting up
from zero (00:00).
E
F
A. SLOW COOKER MODE
Note: Do not use the Slow Cook functions with the temperature probe.
1.
Add ingredients to the ceramic bowl and cover with the glass lid.
2. Plug in the appliance. The main control display will blink “----”. This indicates that the
heat is off and the appliance is ready to be set for cooking.
3. Press the SLOWCOOK button until your choice of intensity is on: the indicator light
below either LOW or HIGH will glow.
Note: Do not use the warm setting to cook. Only use it to keep warm cooked food that is
already hot.
Pre-sets: The default times for slow cooking are 8 hours on low and 4 hours on high.
4.
If needed, adjust to your desired cooking time by using the arrows. The maximum
setting time is 20 hours.
5. Press the START/STOP button to begin cooking. The numbers will stop ashing. The
“:” between the numbers will blink, indicating the unit is cooking.
Note: You may adjust the time during the cooking cycle by pressing the arrows. After 3
seconds, the desired cooking time displayed on the screen will stop ashing and the cooking
cycle will continue, with the adjusted cooking time.
End of cooking cycle: When time is up, the unit will beep three times and automatically switch
to Keep Warm. The light below WARM will glow and the numbers will start counting up from
zero (00:00) to 4 hours (04:00). After the Keep Warm cycle has been on for 4 hours, the unit will
power off and return to the default display: “----”.
Caution: Do not keep foods on the warm setting for more than 4 hours.
Unplug the appliance when not in use and always allow the slow cooker to completely cool
before cleaning.
SLOW COOKER GENERAL TIPS:
• The ceramic bowl should always be filled from ½ to ¾ full, to avoid over and under
cooking.
- When only half full, check the doneness 1 to 2 hours before recommended cooking
time.
- To avoid spill overs, do not ll the slow cooker more than 3⁄4 full.
Loading ...
Loading ...
Loading ...