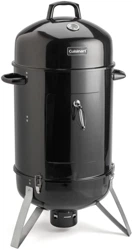
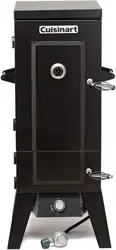
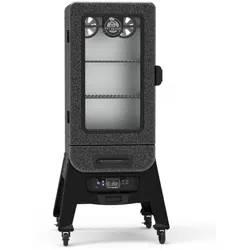
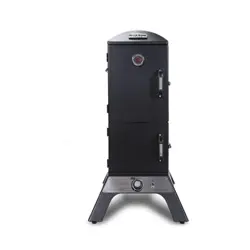
Operating Instructions for Smoker
Warnings and Safety Instructions
If these instructions are ignored, there is a possibility of a hazardous fire or explosion which could result in physical injury or property damage! It is your responsibility to assemble, operate and maintain your smoker properly.
READ ALL WARNINGS AND INSTRUCTIONS PRIOR TO ASSEMBLING AND OPERATING YOUR SMOKER
WARNINGS
- This smoker is for outdoor use only. It should NOT be used in a building, garage or any other enclosed area.
- The use of alcohol, prescription or non-prescription drugs may impair an individual’s ability to properly assemble or safely operate this smoker.
- Do not leave the smoker unattended.
- Keep children and pets away from the smoker all the times.
- Do not use the smoker in high wind.
- Do not use gasoline, kerosene or alcohol for lighting. Use only charcoal lighter fluid. Follow manufacturer’s instructions.
- Do not add charcoal lighter fluid or charcoal impregnated with charcoal lighter fluid to hot or warm charcoal.
- Do not remove ashes until all charcoal is completely burned out or completely extinguished.
- Open the lid while lighting and getting charcoal started.
- Always put charcoal on top of the charcoal grate and not directly into the bottom bowl.
- Use grill mitts or hot pads to protect hands while adjusting smoker vents.
- To extinguish coals do not use water. Close vents and lid and wait until smoker cools below 115° F (45°C).
- Handle and store hot electric starters carefully. Never use charcoal lighter fluid or charcoal impregnated with charcoal lighter fluid with an electric starter. Follow electric starter manufacturer’s instructions carefully.
- When using lighter fluid always check ash collector before lighting . Fluid can accumulate in the ash collector, resulting in a fire below the bottom bowl. Remove any fluid from ash collector prior to lighting.
- Do not attempt to move the smoker when in use. Allow the smoker to cool to 115 F°(45 C°) before moving or storing.
- Do not use the smoker unless it is COMPLETELY assembled and all parts are securely fastened and tightened. If there are any missing or damaged parts, contact customer service for a replacement.
- Do not alter the smoker in any manner.
- This smoker is not intended to be installed in or on a boat or recreational vehicle.
- Locate the smoker away from any combustible materials or construction by at least 10 feet in all directions. Never use smoker under any overhang or enclosure.
- This smoker is not intended for and should never be used as a heater.
- This smoker will be hot during and after use. Use insulated oven mitts or gloves for protection from hot surfaces or splatter from cooking liquids.
- This smoker is not intended for commercial use.
- Combustion by-products produced when using this product contain chemicals known to the state of California to cause cancer, birth defects, or other reproductive harm.
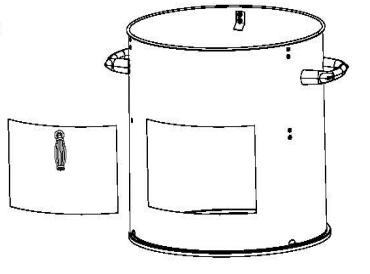
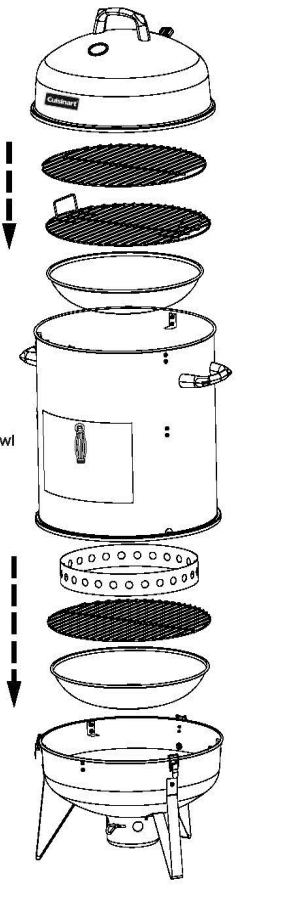
Illustrated Parts List and Exploded View
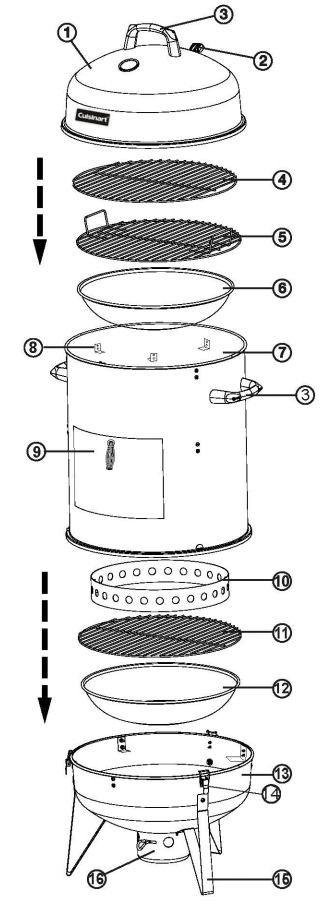
1. Lid
2. Lid Vent
3. Handle
4. Upper Cooking Grate (large)
5. Lower Cooking Grate
6. Water Bowl
7. Middle Barrel
8. Bracket
9. Door
10. Charcoal Ring
11. Charcoal Grate (small)
12. Bottom Bowl (vented)
13. Base
14. Base Latches
15. Legs
16. Bottom Vent/Ash Collector
Assembly Instructions
Step 1:

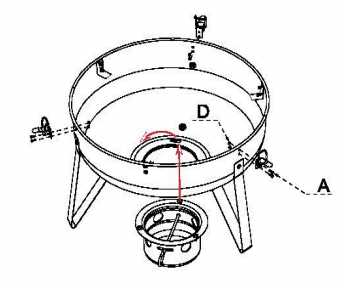
Step 2:
Attach Bottom Vent by lifting vent up to base and lining screws up with circular openings. Rotate vent to lock in place. Screw in Base Latches
Step 3:
Attach Handles to Middle Barrel. Attach upper three brackets to Middle Barrel.
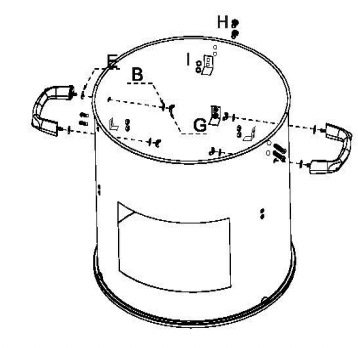
Step 4 :
Attach door by tilting it at a 45* angle with the handle facing out. Place one side of the Door through the Middle Barrel at a time in order the secure in place.
Step 5:
Attach handle to lid
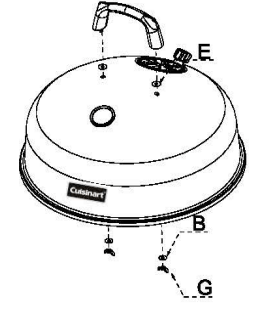
Step 6:
Assemble smoker according to diagram. Water Bowl rests on lower three brackets of Middle Barrel. Lower Cooking Grate rests on Water Bowl
Operating Your Smoker
Select a Proper Location
Once you have assembled your new smoker, find a suitable location for use.
DANGER
• Never use this outdoor smoker inside any building, garage, shed or breezeway, under an overhang or inside any boat, trailer or recreational vehicle, to prevent possible fire and to prevent the possibility of carbon monoxide poisoning or asphyxiation.
• Always place your smoker on a hard and level surface far away from combustible materials and structures.
• Do not use this smoker under overhead combustible surface or covered area ( e.g., awnings, umbrellas, porches or gazeboes). Keep all combustible surfaces at least 10 feet (3 meters) away.
• Locate the smoker away from any combustible and non-combustible material or construction by at least 10 feet (3m)
• Never store or use gasoline or other flammable or volatile substances in the vicinity of this smoker or in the vicinity of any other heat-generating appliance, because of the danger of starting a fire.
• Do not obstruct the flow of combustion and ventilation air.
Choosing your charcoal
• We recommend using charcoal briquettes or lump charcoal.
• Adding 3 or 4 lumps of dry hard wood on top of hot coals can provide added smoke flavor.
Air Vent Operation
Your smoker has two airflow control vents; a bottom vent below the bottom bowl and an air exhaust vent at the top of the lid. By adjusting the amount of vent opening, you can adjust the temperature of your smoker.
DANGER
* The vents and vent controls and the metal surfaces around them will become very hot during smoker use. Use grill mitts or hot pads to adjust vents when smoker is in use.
Lighting instructions
DANGER
• Do not use gasoline, kerosene or alcohol for lighting. Use only charcoal lighter fluid. Follow manufacturer’s instructions.
• Do not add charcoal lighter fluid or charcoal impregnated with charcoal lighter fluid to hot or warm charcoal.
• Do not overfill charcoal grate. Excess charcoal may cause a fire, or may cause damage to your smoker.
1. Read all instructions before lighting.
2. Leave middle barrel off during charcoal lighting and heat up period
3. Carefully follow all instructions accompanying charcoal lighter fluid, electric charcoal starters, and or charcoal.
4. Fully open air vents on lid and bottom vent.
5. Ensure that the charcoal grate is in the smoker, and positioned properly
6. Ensure that the bottom bowl is empty (NEVER remove hot ashes; follow ash removal instructions in section 4.6)
7. Open both vents as described in section 4.3
8. Place desired amount of charcoal onto charcoal grate. Use no more than will go above the brim of the charcoal ring. Overfilling the charcoal ring with charcoal can cause injury and damage your smoker.
ELECTRIC STARTER
• Follow electric starter manufacturer’s instructions
• Use caution when removing hot starter
CHIMNEY STARTER
1 For best results with a chimney starter, remove cooking grate and set aside.
2 Put desired amount of charcoal in chimney starter
3 Place crumpled newspaper under the starter and light, being sure to follow the starter manufacturer’s instructions
4 Carefully pour ignited coals onto charcoal tray, using mitts, gloves, eye protection, and any other protective equipment recommended by the starter manufacturer.
5 Replace cooking grate using a grilling mitt or grate lifting tool.
SELF STARTING CHARCOAL
DANGER
* Do not add charcoal lighter fluid or charcoal impregnated with charcoal lighter fluid to hot or warm charcoal.
* Arrange desired amount of charcoal and ignite following manufacturer’s instructions
LIGHTER FLUID
DANGER
• Follow all instructions on lighter fluid container.
• When using lighter fluid always check ash collector before lighting. Fluid can accumulate in the ash collector, resulting in a fire below the bottom bowl. Remove any fluid from ash collector prior to lighting.
• Do not add charcoal lighter fluid or charcoal impregnated with charcoal lighter fluid to hot or warm charcoal.
1 Place desired coals onto charcoal grate. Arrange as indicated by lighter fluid manufacturer
2 Following lighter fluid manufacturer instructions, apply lighter fluid to charcoal
3 Be sure to allow all lighter fluid to burn off prior to cooking, or noticeable flavors can be added to food
* Clean your smoker after each use. DO NOT use abrasive or flammable cleaners, as it will damage the parts of this product and may start a fire. Clean with warm soapy water.
Operating the Smoker
• Latch the middle barrel to the bottom bowl
• Place the water bowl on the latches inside the middle barrel
• Fill the water bowl to desired fullness level {recommended halfway to full)
• Place lower cooking grate on top of water bowl
• For larger foods that need extra space-place food on lower cooking grate. For ease of access or smoking smaller foods-use upper cooking grate.
• Secure lid on middle barrel
• Average smoking temperature Is approximately 225° F. Open vents to Increase smoker temperature. Close vents to decrease smoker temperature. Vents may need to be adjusted throughout smoking process.
TIPS
• The water In the smoker Is used to keep the temperature low. Check the water level every couple hours. If you notice the temperature going up In the smoker, add desired amount of water.
• We don't recommend opening the door often, but it provides access to bottom bowl charcoal/wood. chunks and lower cooking grate when necessary.
• External thermometer probes can run through the lid vent to access food in smoker.
When Finished Cooking
DANGER
- Never use water to extinguish charcoal.
- Do not remove ashes until all charcoal Is completely burned out or completely extinguished.
1. Close lid, and close both vents.
2. The charcoal will slowly cool.
3. Once charcoal is cool, slide out ash collector and dispose into a metal container.
Warranty
This warranty covers defects In parts and workmanship for a period of 3 years from the original purchase date. Any damage claim regarding the enameling must be submitted within 30 days of purchase to be covered by the warranty.
The following conditions are NOT covered by this warranty;
• Unevenness and color variations in the enamel coating.
• Damage caused by Improper assembly or disregard of the manual.
• Use of spare parts not supplied by manufacturer.
• Damage resulting from modifications or inappropriate use.
• Abuse of the smoker
• Damage caused by improper maintenance or repairs by an unauthorized person.
Limitations and exclusions:
1. This warranty applies only to the original purchaser and may not be transferred.
2. If you cannot verify the purchase date of the smoker the warranty period will begin on the date the smoker was manufactured.
3. Replacement or repair parts are warranted for the remaining period of the original part warranty.
Smoking Tips
WATER: Keeping the water bowl as full as possible will be advantageous to your smoking experience. Water will help to keep the temperature in the smoker from rising too much and make it easier to control the temperature (cold water will bring the temperature down more than hot water). And as the water evaporates and turns to steam, it will help keep food from drying out.
WOOD CHIPS/CHUNKS: Many different kinds of wood chips or chunks can be used in the smoker. Whether they are presoaked or dry, Hickory or Applewood, wood chips or wood chunks, each will give you a different smoking experience. Wood chunks will last longer than wood chips but may take longer to start smoking. The same goes for presoaked wood chips/chunks that will last longer than dry wood chips/chunks. Different flavored wood chips/ chunks will go better with different types of food. For example, some people enjoy using Applewood while smoking salmon because fruit woods have a lighter/sweeter smoky taste.
AIR VENTS: Air vents will help regulate temperature and smoke production. Adjusting air vents will lower or raise air temperature as needed. Keep in mind that the smoker’s position in relation to the wind (especially on a windy day) will affect the temperature of the smoker.
MAINTENANCE: The interior of your smoker will get a thin browned coating from the smoking process. This coating will help to seal and protect the smoker. Hot soapy water can be used to clean the cooking racks, water bowl, and base unit. Do not use abrasive materials because they will damage the finish of the smoker. If possible (when not in use), keep the smoker stored under cover or in a garage.
MISCELLANEOUS:
- Keep in mind that every time you open up your smoker, you’re letting out smoke and letting out heat. This will add time to your smoke, so only check on your food when it needs to be done.
- Smoking meats will often give them a pink color and make it seem like the food is done before it’s time. The best way to know whether or not the food is finished cooking is by using a meat thermometer.
- Use barbecue mitts or grilling tools to adjust vents, water bowl, and cooking racks.
- Each cooking rack can be used at the same time. Keep in mind that the varying amounts of food will affect the internal smoker temperature.
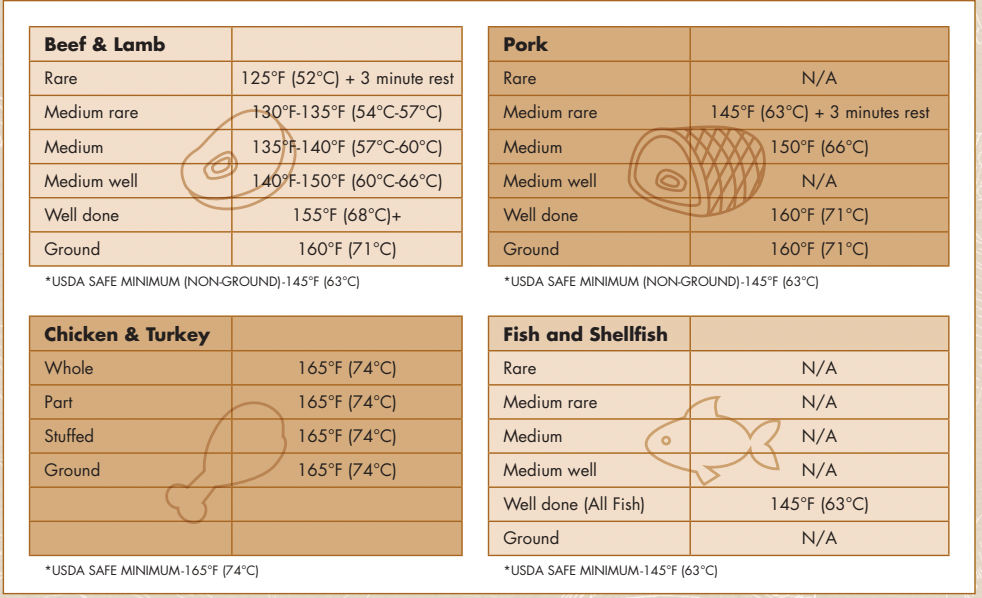
Meat Temperature Guide
Barbecue Rub
Prep Time: 10 minutes
|
Ingredients:
• ½ cup butcher salt
• 4 tablespoons coarse ground pepper
• 2 tablespoons ground coriander
• ½ cup organic brown sugar
• 4 tablespoons smoked paprika
• 4 tablespoons dried thyme
• 4 tablespoons chili powder
• 8 tablespoons ground cumin
• OPTIONAL: 2 tablespoons fine ground coffe
|
|
Directions:
Mix all of the spices thoroughly in a bowl and pour mix into Cuisinart Magnetic Spice Set (CSS-33) or other large jar for storage. When ready to use sprinkle the mixture generously on your choice of meat or fish and rub in before grilling.
|
Sweet & Spicy Barbecue Sauce
Prep Time: 10 minutes
|
Ingredients:
• 1 ½ cups brown sugar
• 1 ½ cups ketchup
• ½ cup red wine vinegar
• ½ cup water
• 2 ½ tablespoons yellow mustard
• 1 tablespoon Worcestershire sauce
• 2 teaspoons paprika
• 2 teaspoons salt
• 1 ½ teaspoons black pepper
• 2 dashes hot pepper sauce
|
|
Directions:
In a blender, combine brown sugar, ketchup, vinegar, water and Worcestershire sauce. Season with mustard, paprika, salt, pepper, and hot pepper sauce. Blend until smooth.
|
Prosciutto Wrapped Shrimp
Prep Time: 20 minutes
Cook Time: 1 hour
|
Ingredients:
• 1 lb. baby portabella mushrooms
• 8 oz. package of cream cheese (softened)
• 1 cup shredded cheese
• ¼ cup chives
• Barbecue rub
|
|
Directions:
1. Remove rack from smoker and bring to work station.
2. Fill middle bowl portion of water/wood chip tray with your choice of dry wood chips. Fill outer ring of tray with water.
3. Preheat smoker to 225°F.
4. Remove the stems from each mushroom.
5. Soak mushroom caps in bowl of water for 30 minutes to clean (Fig. 1).
6. Remove from bowl and rinse well under cold water.
7. Lay mushrooms out on paper towel or a cloth for 5 minutes to dry (Fig. 2).
8. Mix cream cheese, cheese, and chives to make filling.
9. Fill mushroom caps with filling.
10. Sprinkle barbecue rub generously on top of each stuffed mushroom.
11. Place rack in smoker and close. Let sit in smoker for approximately 1 hour.
|
Vegetables
Prep Time: 20 minutes
Cook Time: 3 hour
|
Ingredients:
• 1 green pepper
• 1 red pepper
• 1 squash
• 1 zucchini
• 8 oz. baby portabella mushrooms
• 1 onion
• Salt
• Pepper
• Olive Oil
|
|
Directions:
1. Remove rack from smoker and bring to work station.
2. Fill middle bowl portion of water/wood chip tray with your choice of wood chips. Fill outer ring of tray with water.
3. Preheat smoker to 250°F.
4. Place a large piece of aluminum foil on cooking rack.
5. Cut up vegetables into strips or 1” x 1” pieces (depending on preference) (Fig. 1).
6. Place cut up vegetables on aluminum foil on cooking rack. Curl up edges of aluminum foil to help retain juices.
7. Drizzle olive oil over vegetables and season to taste with salt and pepper.
8. Place cooking rack in smoker, close, and let sit for 3 hours.
9. After 3 hours check on vegetables for desired tenderness and remove or leave in smoker depending on preference.
|